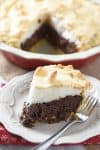
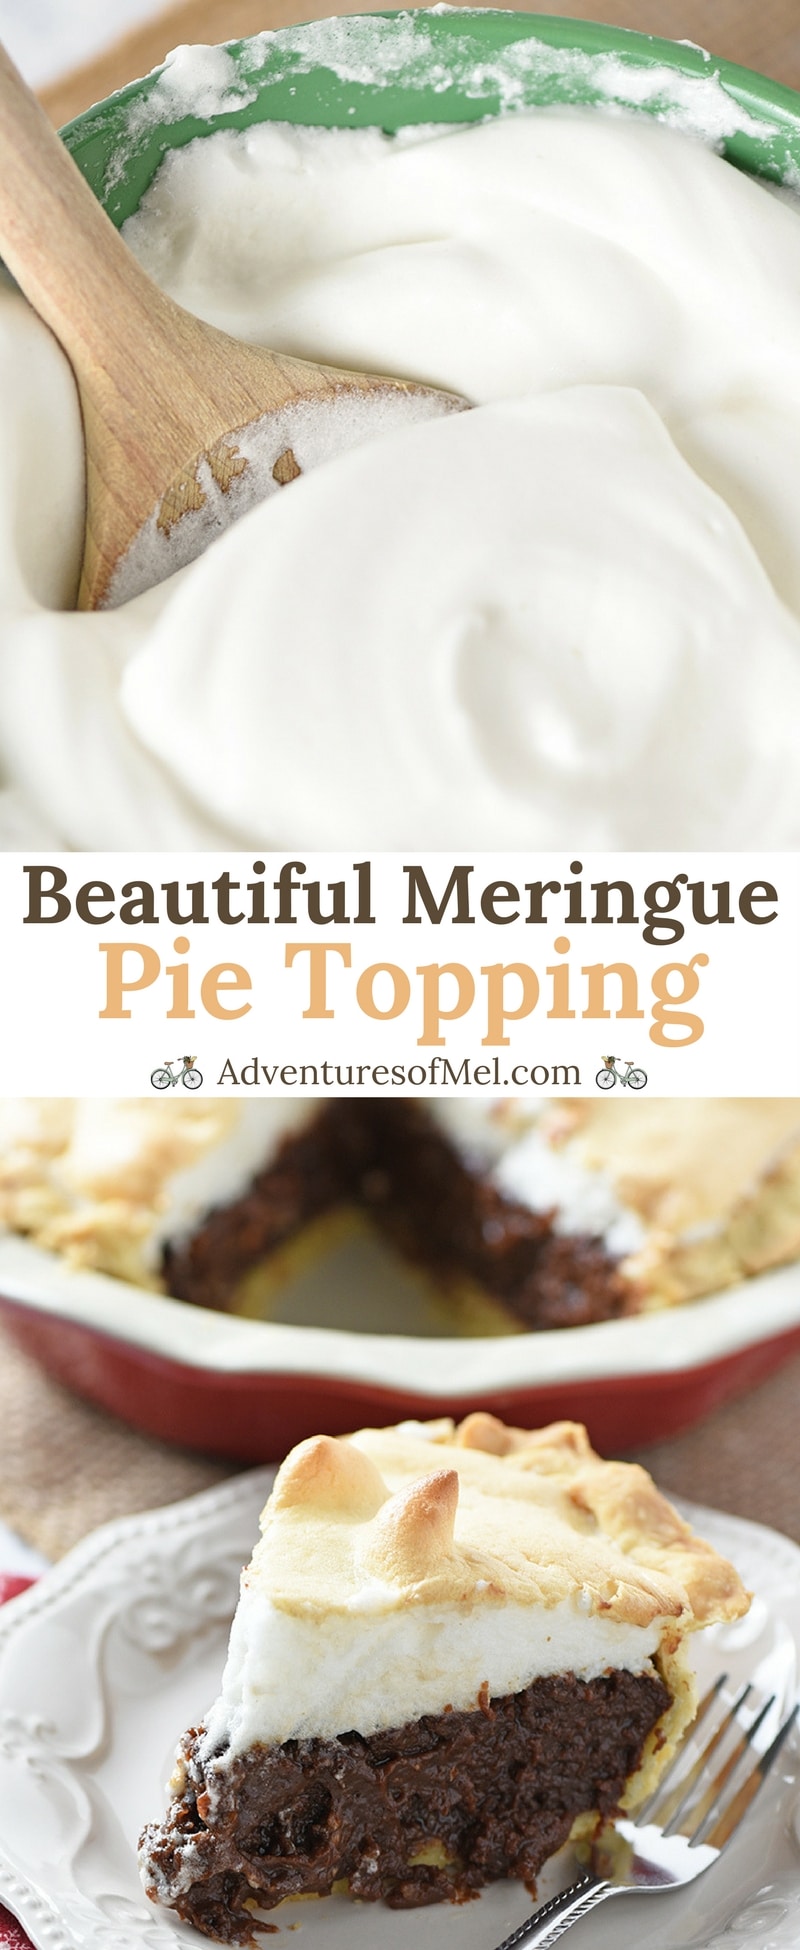
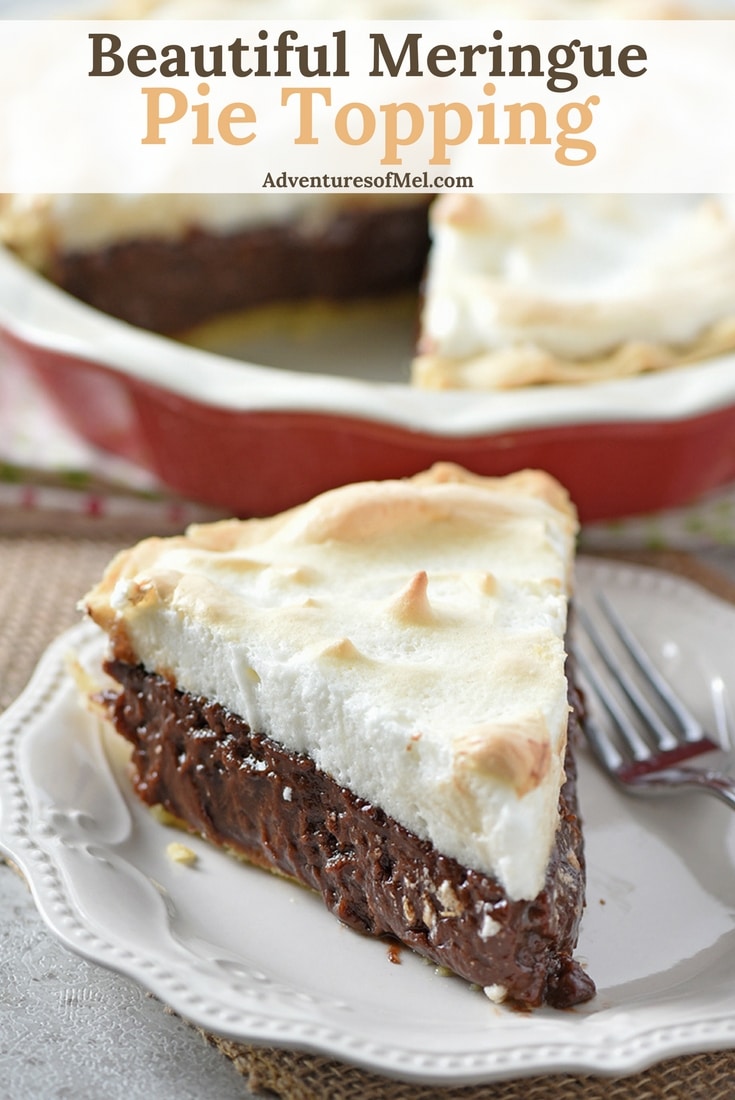
Meringue Pie Topping doesn’t have to be so intimidating. This recipe makes a beautiful meringue that’s light, fluffy, and melt-in-your-mouth scrumptious!
Meringue Pie Topping is a little bit like pie crust in that it seems intimidating; when actually, meringue for pies is so easy to make. Not to mention, this recipe only requires 4 simple ingredients.
Now this is not my recipe… It actually belonged to my grandmother, and she copied it down from a friend. I knew the friend she got this recipe from, and I imagine back to the day when they must have swapped recipes at a church potluck at our little country church.
I can actually feel the tone of Grandma’s voice as I read the recipe card, and I can tell that she was awfully excited to get this recipe. She specifically mentioned this meringue “does not weep.” She also called it beautiful.
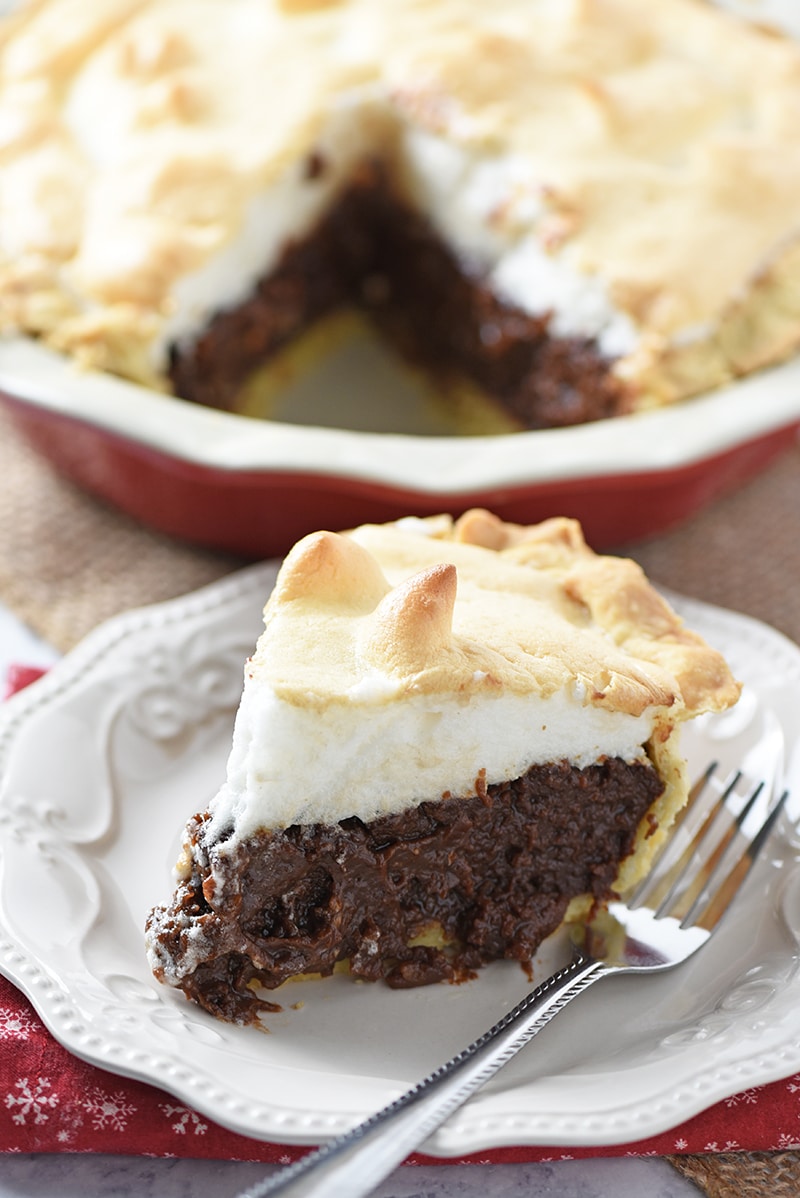
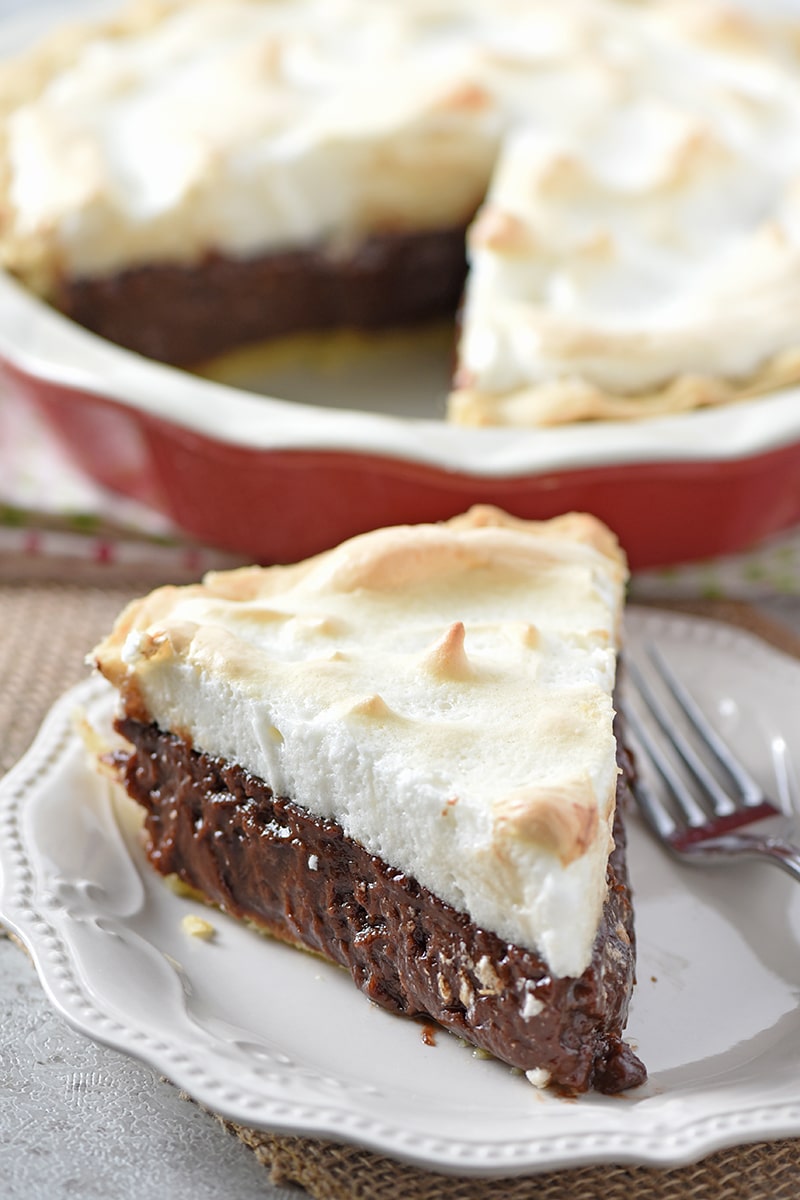
Grandma was right. This meringue doesn’t weep. And it is really beautiful, very fluffy, very light, and melt-in-your-mouth good. It pairs deliciously well with homemade chocolate meringue pie, which is the reason I needed meringue in the first place.
Tips for how to make Meringue Pie Topping
First gather your ingredients… You’ll need sugar, corn starch, water, and egg whites.
In a small saucepan, whisk together the sugar corn starch, and water.
Place the saucepan on medium heat and bring to a boil, constantly stirring the mixture.
Boil the mixture until it thickens.
Remove the saucepan from the heat, and allow the mixture to cool.
Meanwhile, separate your eggs; you’ll need 3 egg whites.
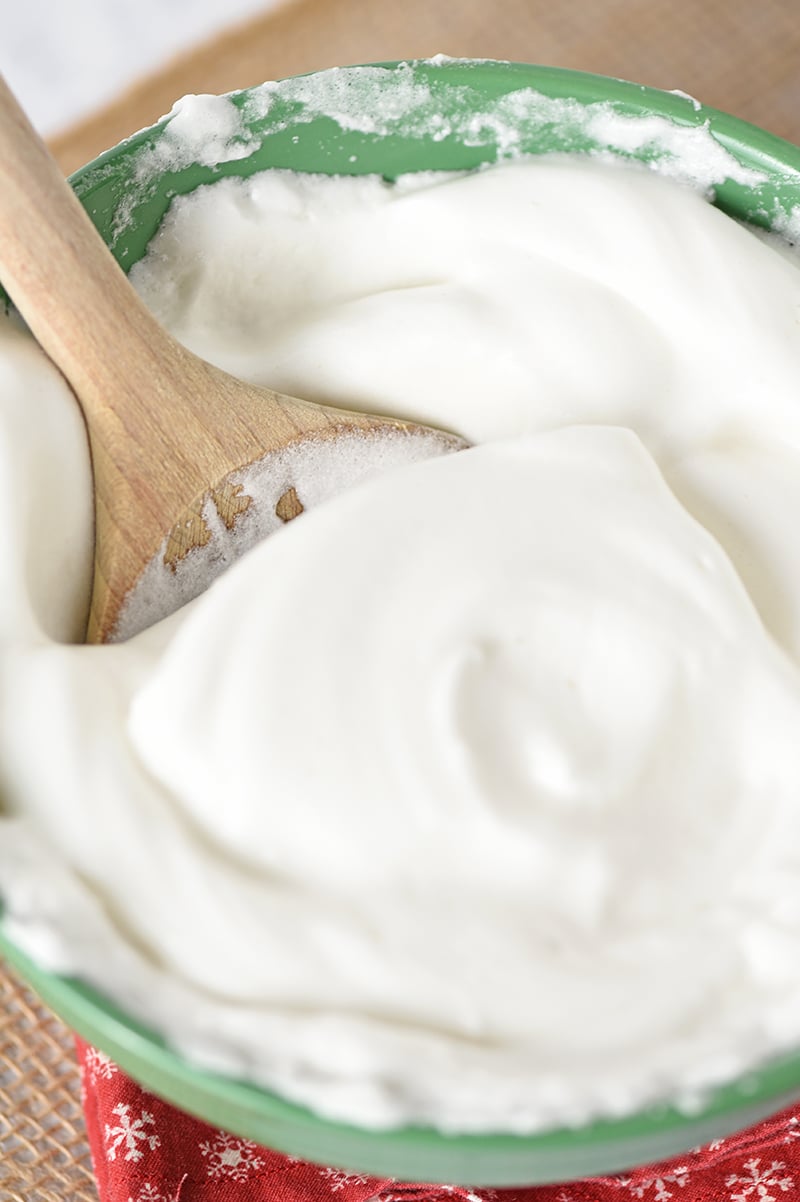
Beat those egg whites in a mixing bowl until they begin to form peaks.
Add the cooled sugar mixture to the stiffly beaten egg whites, and beat some more, until your meringue begins to form stiff peaks.
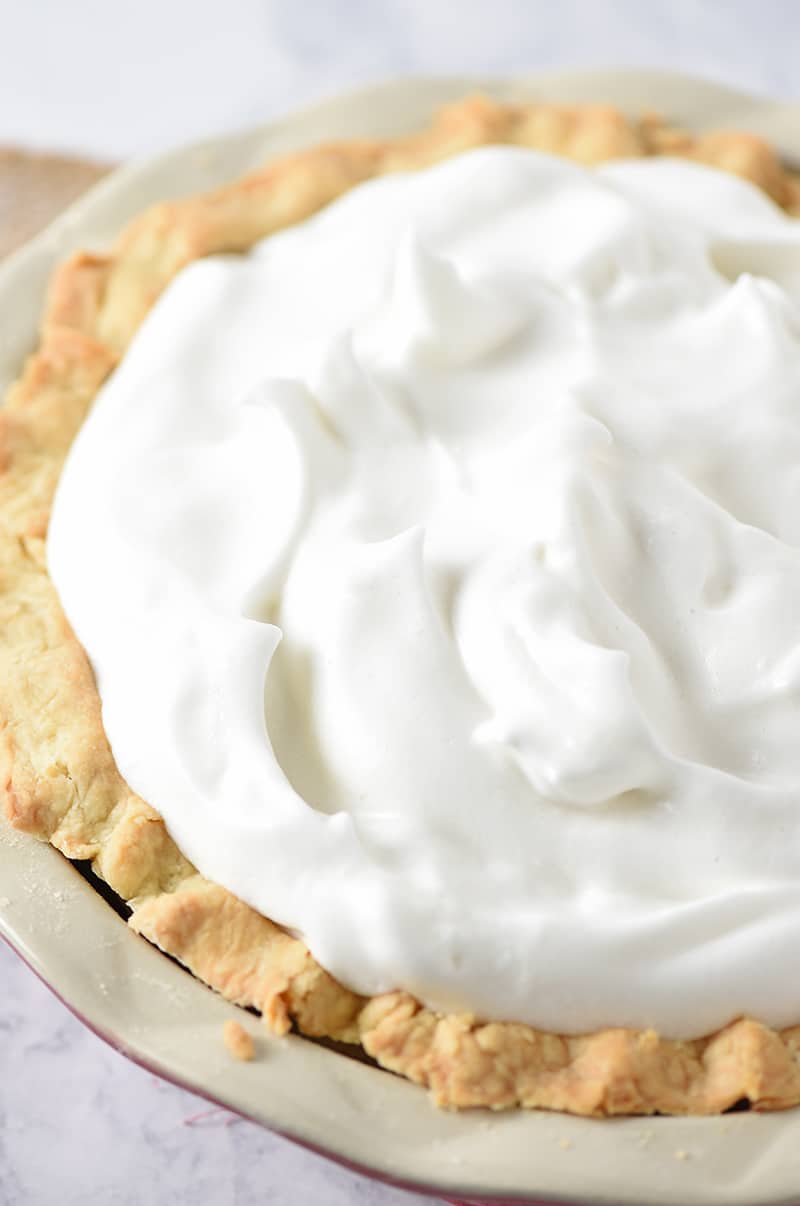
Spread the meringue all over the top of your pie, making sure to spread it all the way up to the edges of your pie.
At this point, you can form curls with a spoon if you want… I just used my spatula to kinda form a few little curls and left it with a somewhat wavy appearance.
Bake your pie for at least 15 minutes at 350°, maybe a little longer to ensure that your meringue is cooked through. It will start to turn golden.
Remove from the oven and allow to cool on a wire rack for about an hour. Then refrigerate for at least 2 to 3 hours before serving.
Small Saucepan – You’ll need this to cook your sugar mixture for the meringue. Whisk – A whisk will help you avoid any lumps in your sugar mixture. Spatula – You’ll use a spatula to both stir your sugar mixture and spread the meringue over the top of your pie. Egg Separator – This handy tool allows you to easily separate your egg yolk from the white. Hand Mixer – You’ll need a mixer to beat the eggs stiff enough for meringue. Mixing Bowl – for mixing the meringue. Wire Rack – for cooling your pie.
Print the recipe for Beautiful Meringue Pie Topping
Beautiful Meringue Pie Topping
Meringue Pie Topping doesn’t have to be so intimidating. This recipe makes a beautiful meringue that’s light, fluffy, and melt-in-your-mouth scrumptious!
6 teaspoons cane sugar
1 tablespoon corn starch
1/2 cup water
3 large egg whites
1/4 teaspoon cream of tartar (heaping)
In a small saucepan, whisk together the sugar, corn starch, and water.
Place the saucepan on medium heat and bring to a boil, constantly stirring the mixture.
Boil the mixture, constantly stirring, until it thickens.
Remove the saucepan from the heat, and allow the mixture to cool.
Meanwhile, separate your eggs; you’ll need 3 egg whites.
Beat those egg whites in a mixing bowl until they begin to form peaks.
Add the cooled sugar mixture and the cream of tartar to the stiffly beaten egg whites, and beat some more, until your meringue begins to form stiff peaks.
Spread the meringue all over the top of your pie, making sure to spread it all the way up to the edges of your pie.
At this point, you can form curls with a spoon if you want… I just used my spatula to kinda form a few little curls and left it with a somewhat wavy appearance.
Bake your pie for at least 15 minutes at 350°, maybe a little longer to ensure that your meringue is cooked through. It will start to turn golden.
Remove from the oven and allow to cool on a wire rack for about an hour. Then refrigerate for at least 2 to 3 hours before serving.
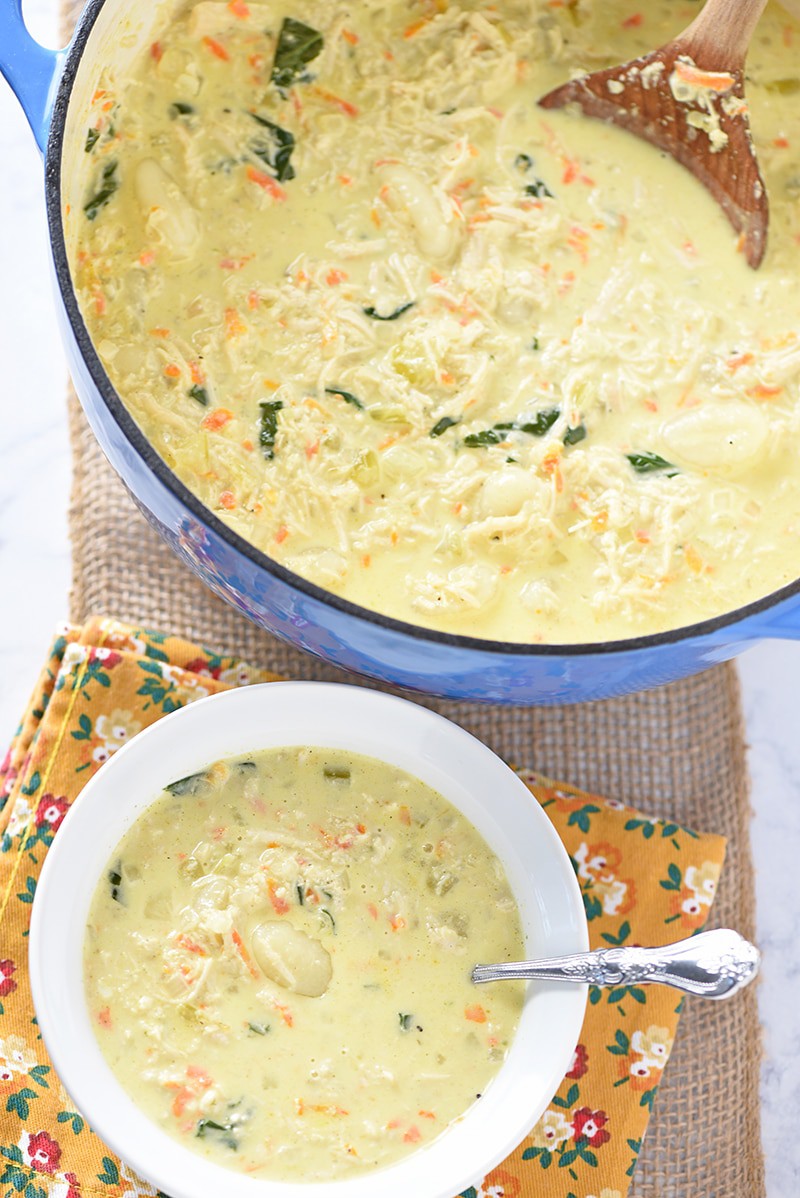
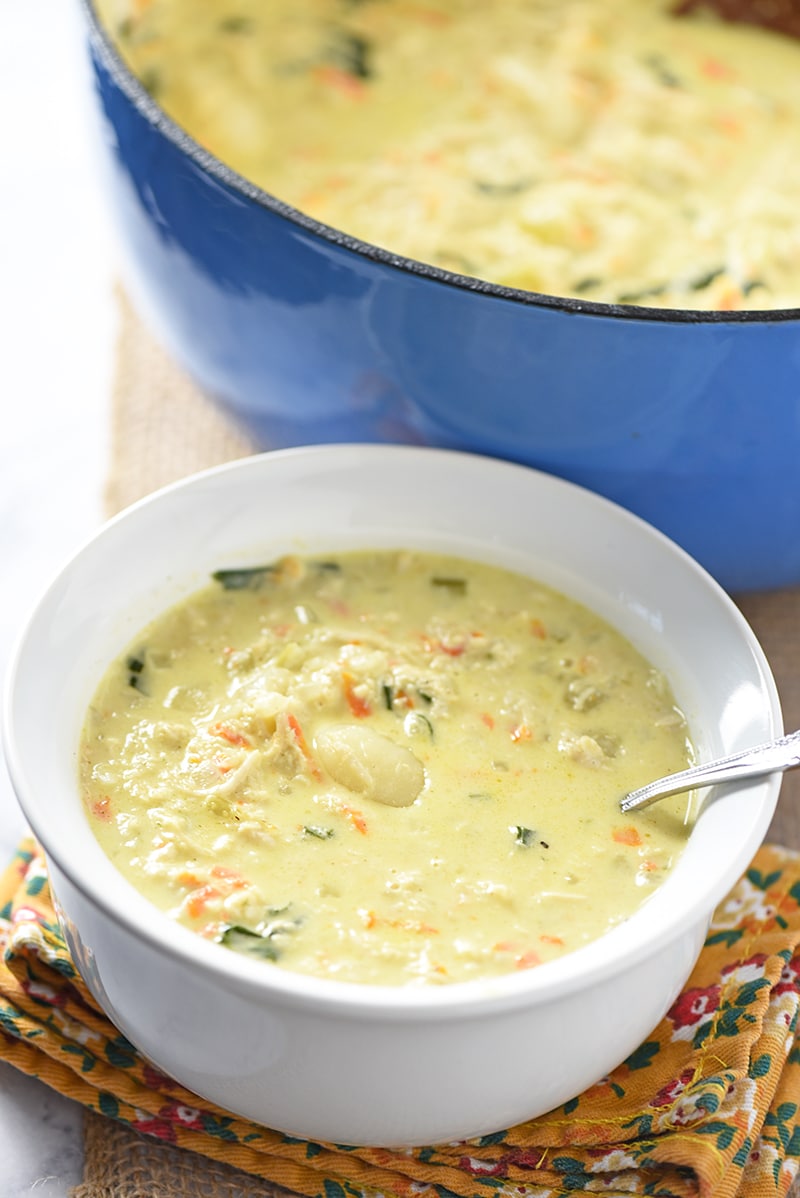
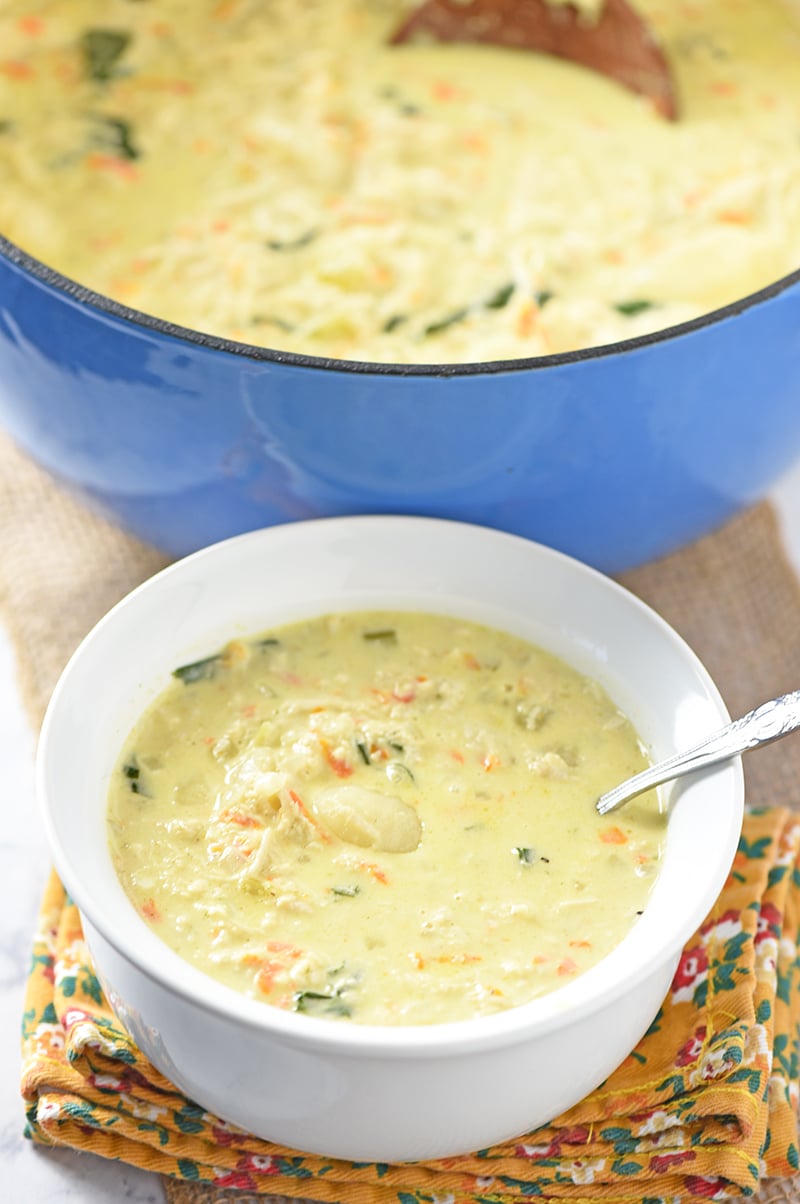
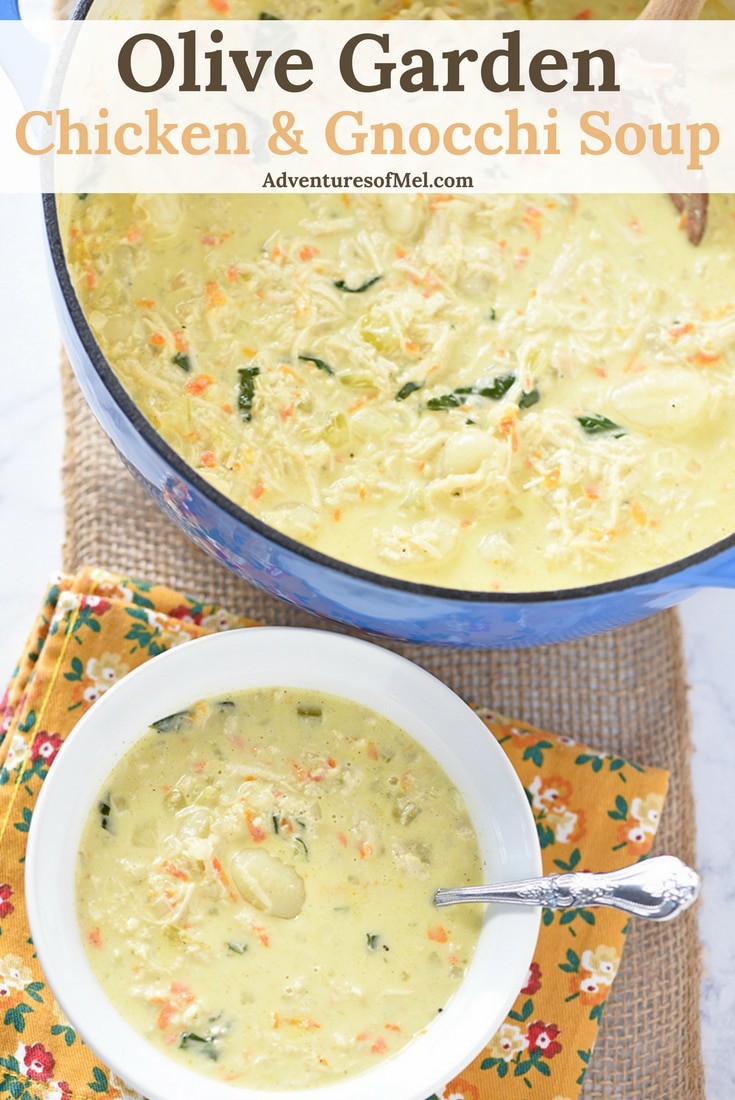
Olive Garden Chicken and Gnocchi Soup with chicken, spinach, and gnocchi. Easy copycat for the creamy restaurant soup, it makes a delicious lunch or dinner!
Olive Garden Chicken and Gnocchi Soup is hands down my favorite creamy soup. You can ask my family; pretty much every time we visit the restaurant, my “usual” has been Chicken and Gnocchi Soup, breadsticks, and salad.
It’s not a difficult soup to make at home, though. You just need a few key ingredients, and I like to add a little sage to give it even more flavor.
I think I’ve got a pretty good handle on making my own homemade version of Chicken Gnocchi Soup. Now if I could only master a recipe for Olive Garden’s breadsticks (because they are absolutely perfect for dipping in my soup).
Whether you want to warm up on a cold winter night or simply want a lunch to get excited about, this copycat recipe is for you. Let’s cook up a pot of delicious soup, shall we?
Tips for how to make Olive Garden Chicken and Gnocchi Soup
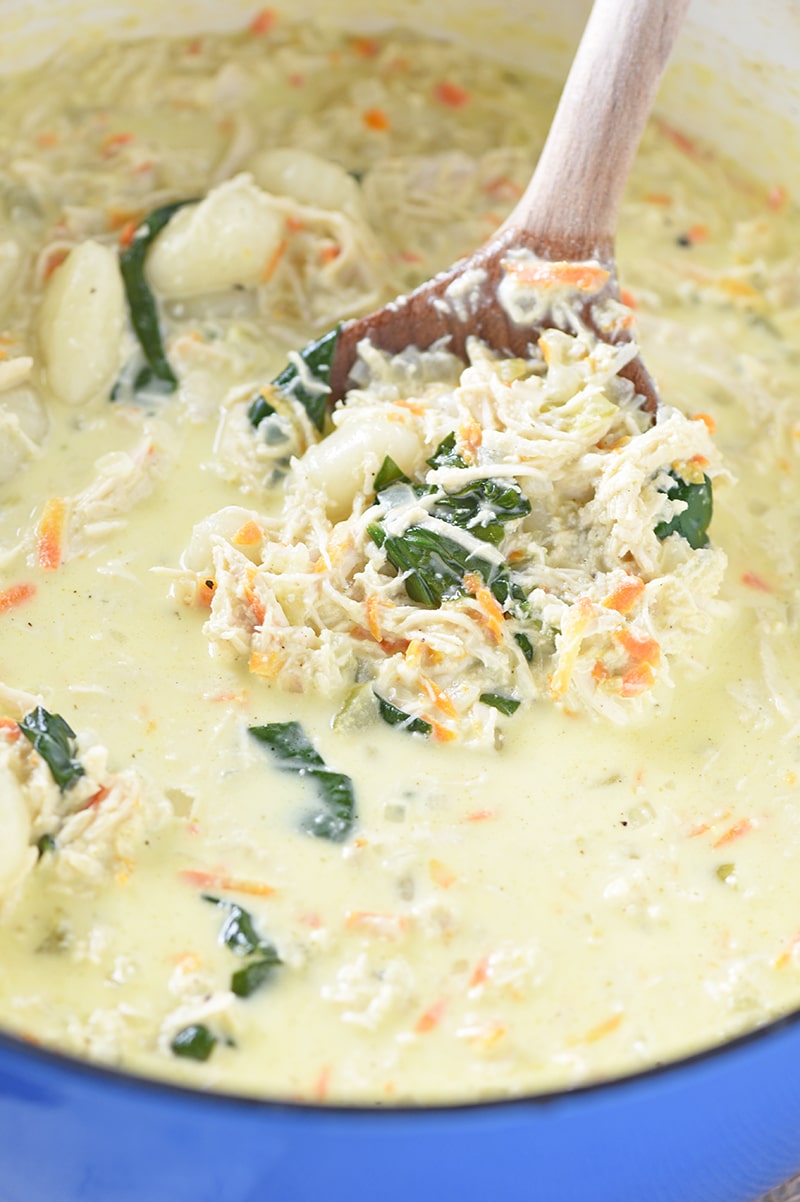
Gather your ingredients. You’ll need salted butter, a medium sized onion, celery, garlic, carrots, cooked chicken breast/s, chicken broth, heavy whipping cream, sage, gnocchi, salt, pepper, and fresh spinach.
Wash any fresh veggies you’ll be using.
Mince the onion, celery, and garlic.
Melt a tablespoon of salted butter in a Dutch oven.
Sauté the onion, celery, and garlic in the butter for about 5 minutes or until they begin to soften.
Shred the carrots and the cooked chicken breast/s (if you like more liquid in your soup, use only 1 chicken breast; if you prefer a chunkier soup with less liquid, use 2).
Add the carrots, chicken, and chicken broth to the Dutch oven, mixing well.
Bring the mixture to a boil, and let it simmer on medium heat for about 5 minutes.
Add the heavy whipping cream and sage to your soup.
Bring to a boil again, and simmer for another 5 minutes.
Add the gnocchi, salt, and pepper to the soup mixture.
Again, bring the soup to a boil, and simmer for 5 more minutes.
Add the spinach leaves to the soup, and simmer for another 2 to 3 minutes.
Serve while warm with breadsticks, baguettes, or crackers. Enjoy!
Tools you may need to make Olive Garden Chicken and Gnocchi Soup
Cutting Board and Vegetable Cleaver – I prefer an old school cutting board and knife for chopping. You’ll use these time and again to chop vegetables for recipes. 6 Quart Dutch Oven – My Dutch Oven is sort of like my spatulas. I wouldn’t want to be without it. Wooden Spoon – I’ve been eyeing this particular wooden spoon for awhile now… But again, my wooden spoons are like my spatulas; couldn’t cook without them! Salad Shooter (or Vegetable Shredder) – Perfect for shredding carrots and other veggies.
Wanna see how to make the soup? Watch our video!
Print the recipe for Olive Garden Chicken and Gnocchi Soup
Chicken and Gnocchi Soup
Olive Garden Chicken and Gnocchi Soup with chicken, spinach, and gnocchi. Easy copycat for the creamy restaurant soup, it makes a delicious lunch or dinner!
1 tablespoon salted butter
1 medium yellow onion (minced)
2 stalks celery (minced)
1 teaspoon garlic (minced)
2 medium carrots (shredded)
2 chicken breasts (cooked and shredded)
4 cups chicken broth
3 cups heavy whipping cream
1 teaspoon ground sage
16 ounces gnocchi
1 teaspoon salt
1/2 teaspoon ground black pepper
1 cup fresh spinach leaves
In a Dutch oven pan over medium heat, melt the butter.
Sauté the onion, celery, and garlic in the butter for about 5 minutes, or 'til they begin to soften.
Add the carrots, chicken, and chicken broth to the Dutch oven, stirring everything together.
Bring the mixture to a boil, and let it simmer on medium heat for about 5 minutes.
Add the heavy whipping cream and ground sage to the soup.
Bring to a boil again; then simmer over low heat for another 5 minutes.
Add the gnocchi, salt, and pepper to the soup mixture.
Again, bring the soup to a boil; then simmer over low heat for 5 more minutes.
Add the spinach leaves to the soup, and simmer for another 2 to 3 minutes.
Serve while warm with breadsticks, baguettes, or crackers.
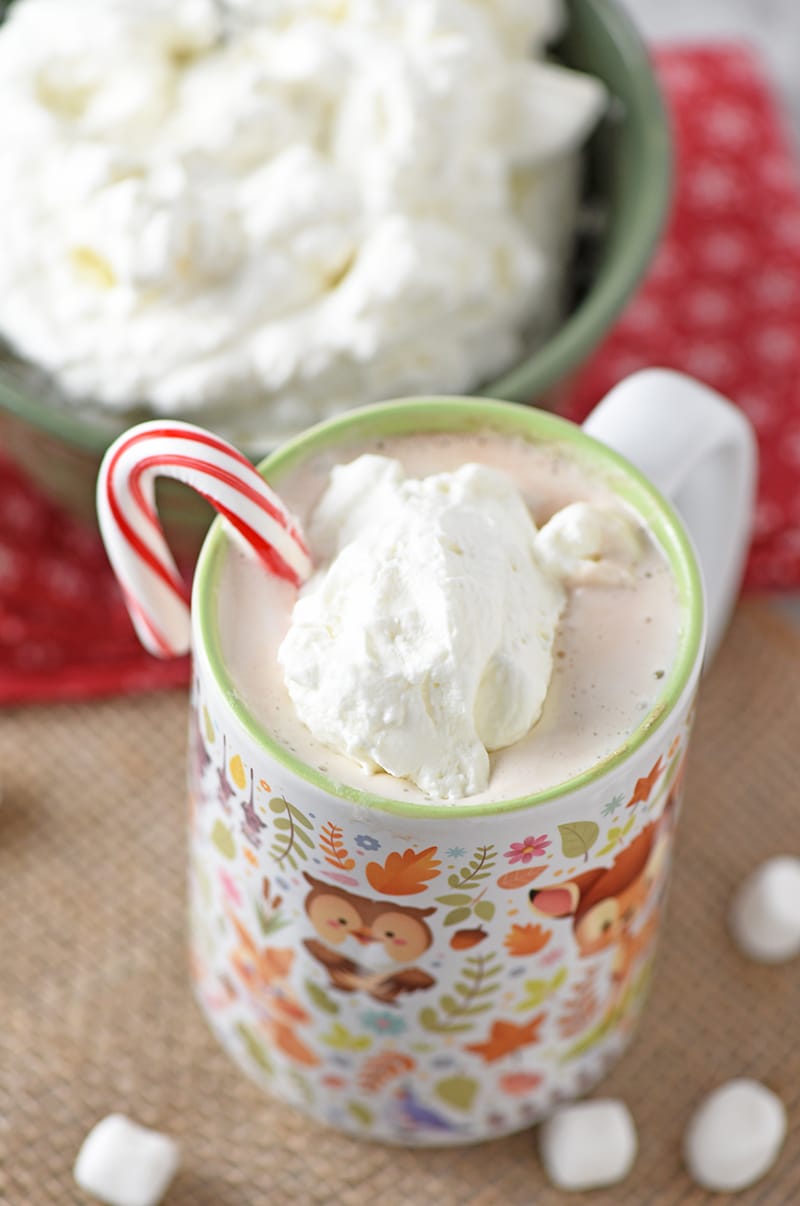
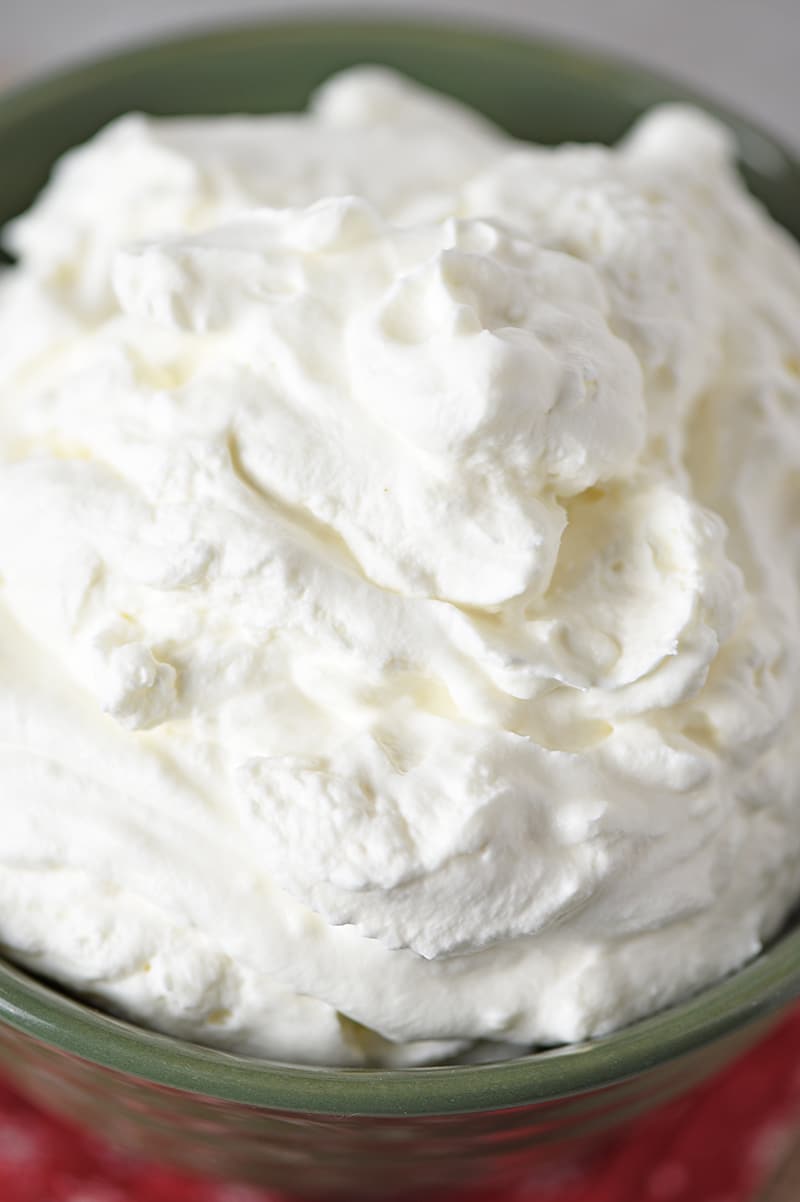
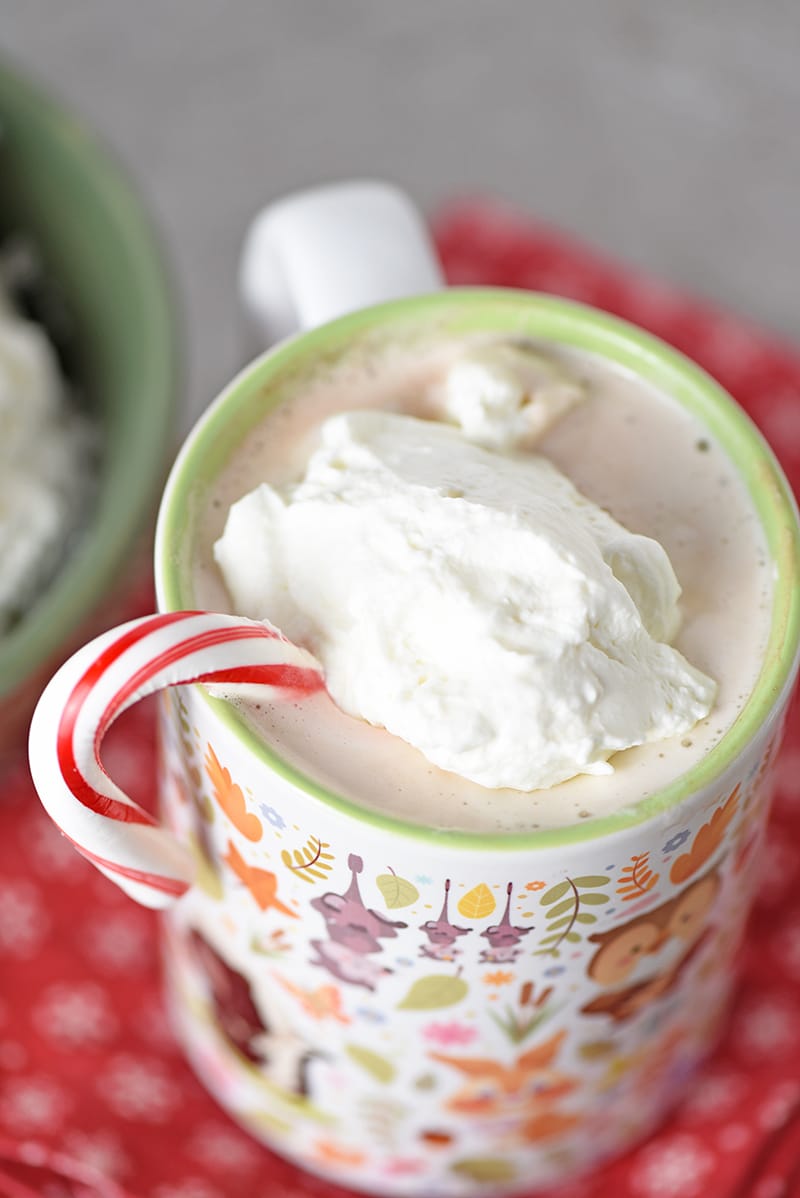
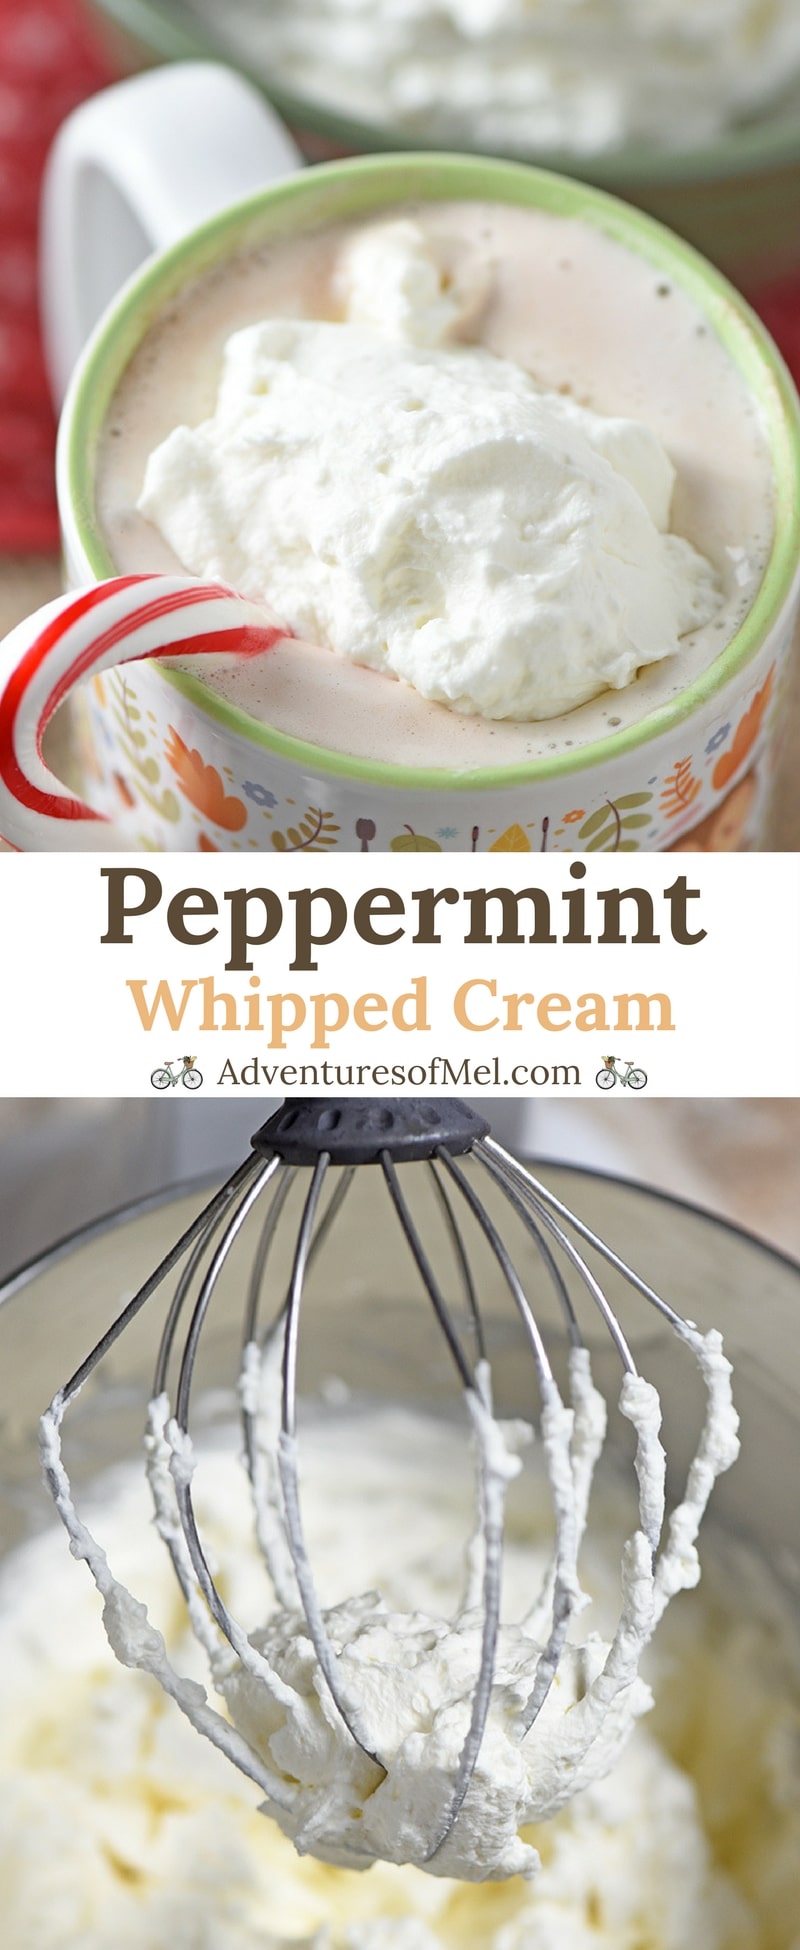
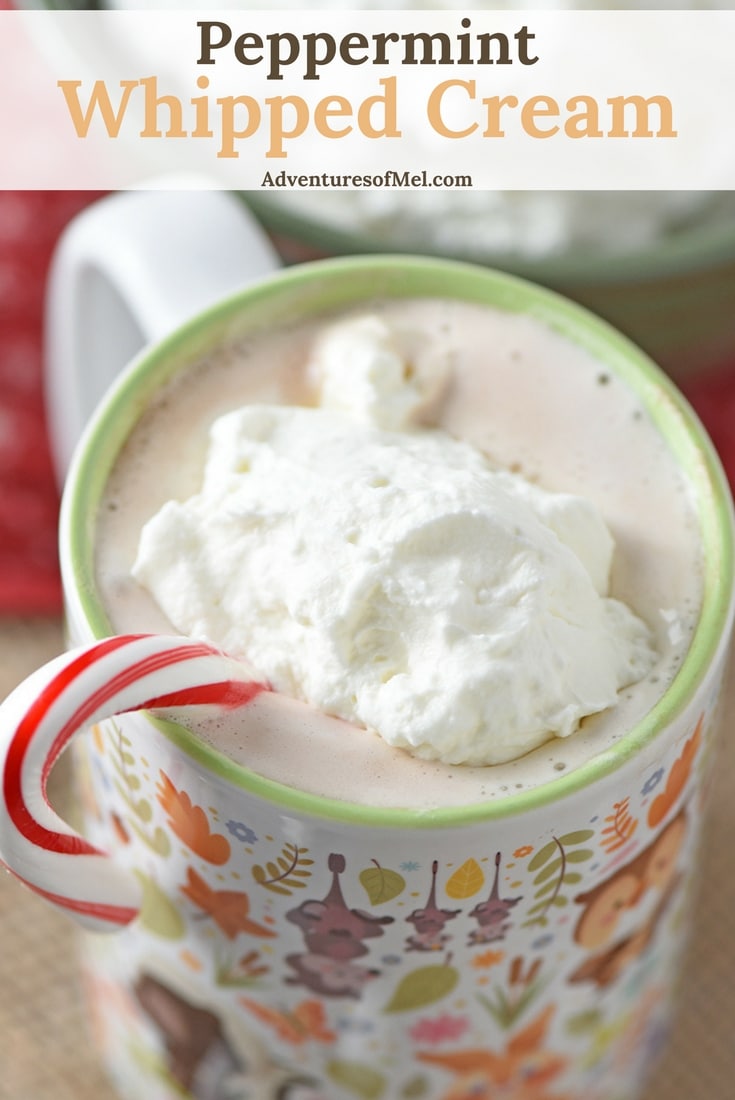
Peppermint Whipped Cream you can make in 5 minutes. Creamy delicious dessert topping or add a dollop to your hot chocolate for a minty treat!
Peppermint Whipped Cream is probably one of my favorite ways to top off a nice warm mug of creamy hot chocolate. It adds a minty flavor, as well as an even creamier texture; and it’s so delicious!
This recipe is super easy to make and only calls for 5 ingredients. You can pretty much throw everything into the mixing bowl, add a whisk to your mixer, and mix away.
Before you know it, you’ll have a minty, creamy whipped topping you can enjoy with pies, cakes, hot chocolate, and all your favorite desserts. Just add a dollop and you’re set for a really yummy sweet treat.
Add all of your ingredients to a large mixing bowl.
Use a whisk or mixer with a whisk to mix all of the ingredients together, and keep mixing until the mixture thickens to the desired consistency for whipped cream.
Note: It will thicken up really fast before you realize it. So if you’re wanting it to have a more silky appearance, just stop the whipping process sooner.
Enjoy on your favorite dessert or warm drink.
Looking for a few lovely desserts or warm drinks to enjoy with a dollop of peppermint whipped cream?
Tools you may need to make Peppermint Whipped Cream
Mixing Bowl – for mixing up all of your ingredients. Whisk or Hand Mixer or Stand Mixer – A hand mixer works great for mixing up homemade whipped cream. Spatula – Can’t live without my spatulas (as in plural).
Print the recipe for Peppermint Whipped Cream
Peppermint Whipped Cream
Peppermint Whipped Cream you can make in 5 minutes. Creamy delicious dessert topping or add a dollop to your hot chocolate for a minty treat!
2 ounces cream cheese
2 cups heavy whipping cream
1 teaspoon vanilla extract
1 teaspoon peppermint extract
1/2 cup powdered sugar
In a large mixing bowl, whip the cream cheese.
Add the heavy whipping cream, vanilla extract, peppermint extract, and powdered sugar to the cream cheese.
Use a mixer to whip together the ingredients until the mixture begins to thicken to the consistency of whipped cream. It will thicken up rather quickly, so if you're wanting it to have a thinner texture/more silky appearance, just stop the whipping process sooner.
Refrigerate until serving, and serve with your favorite desserts and drinks.
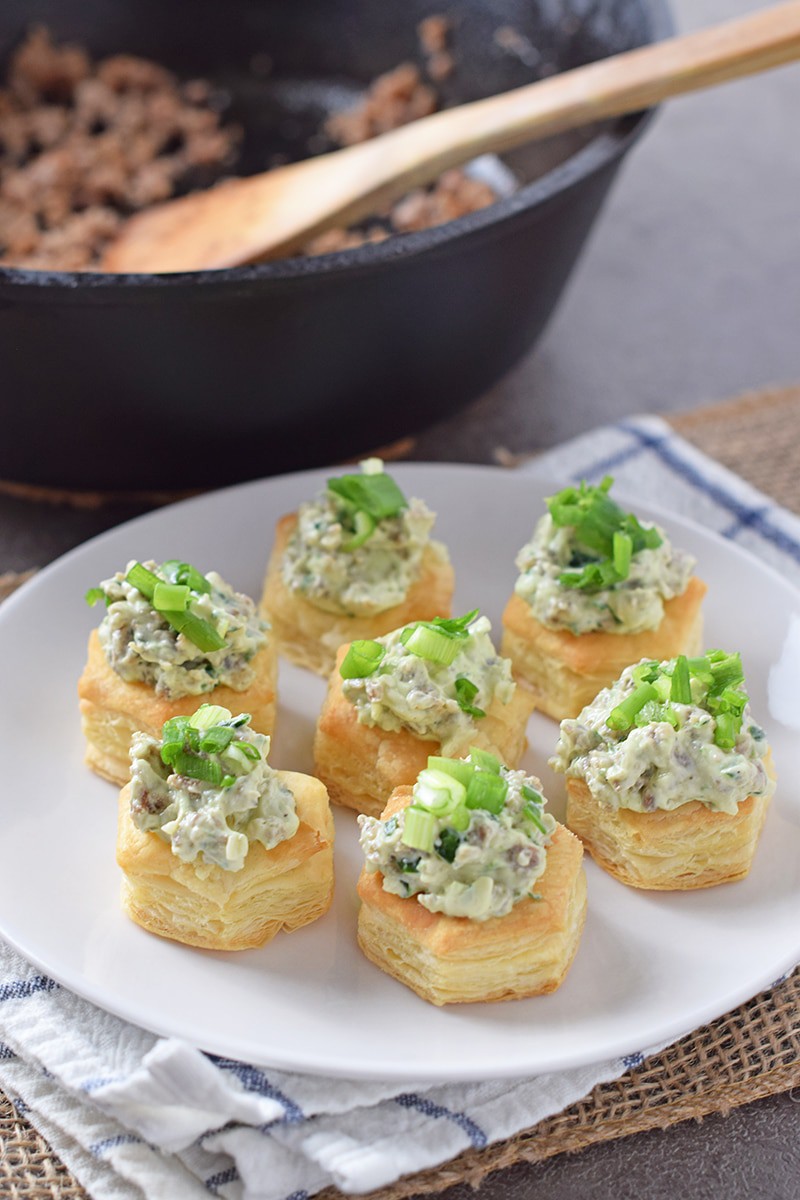
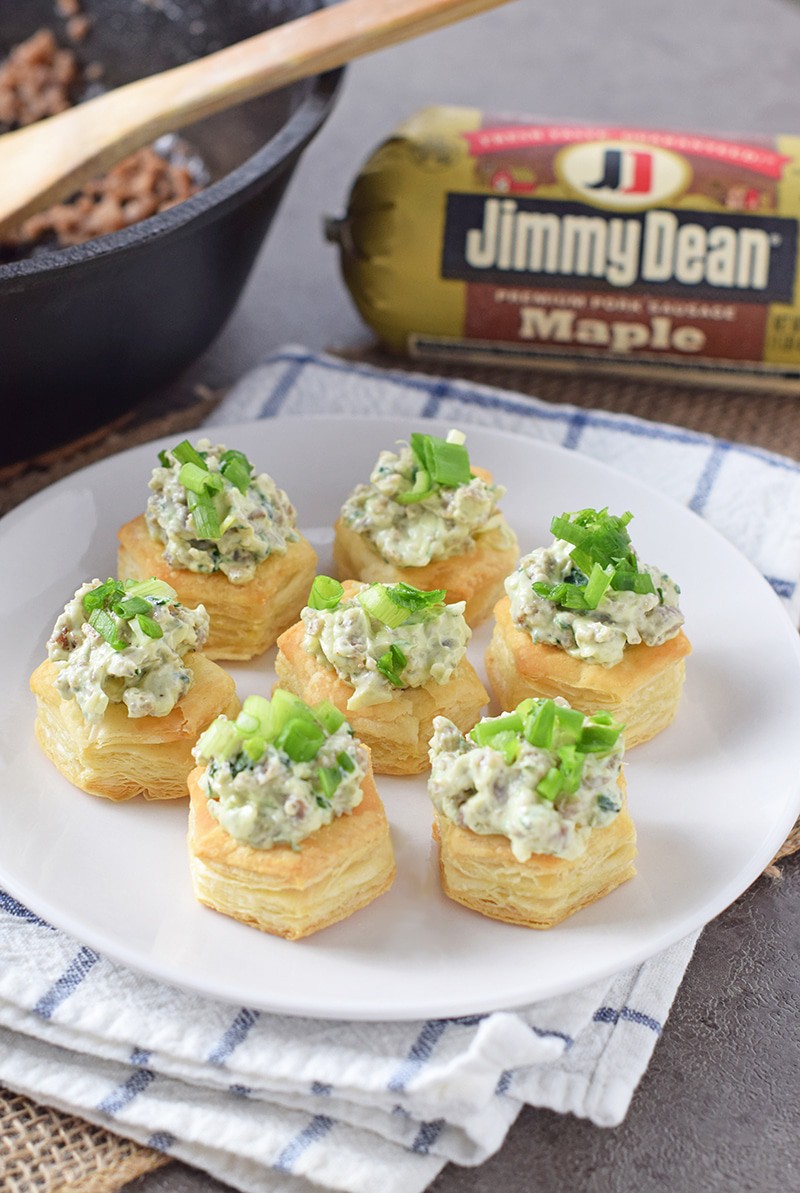
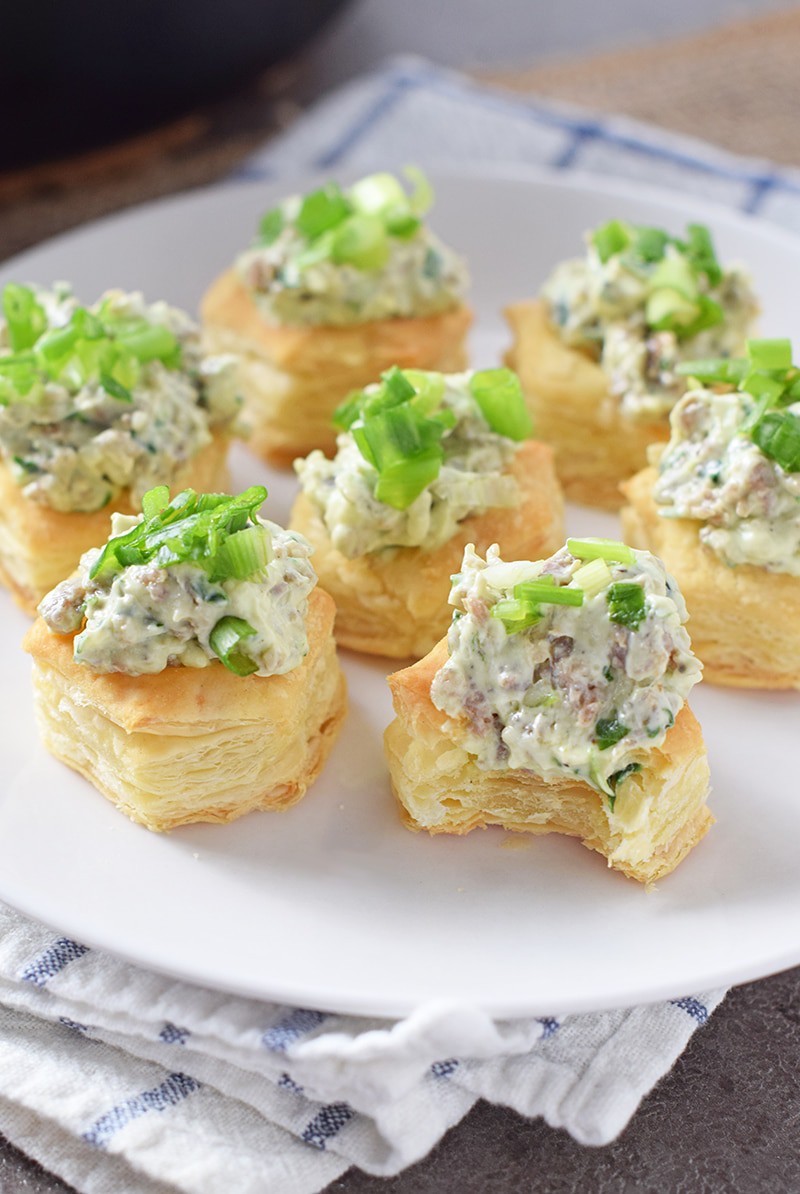
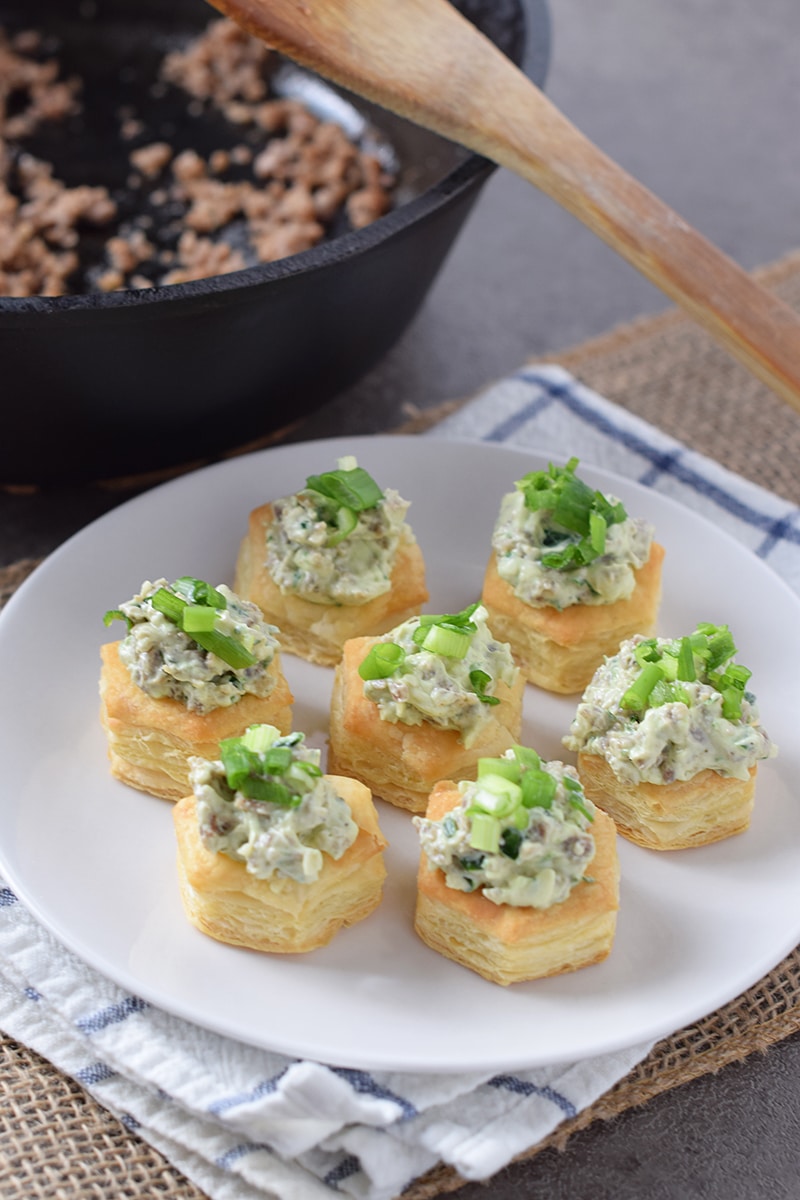
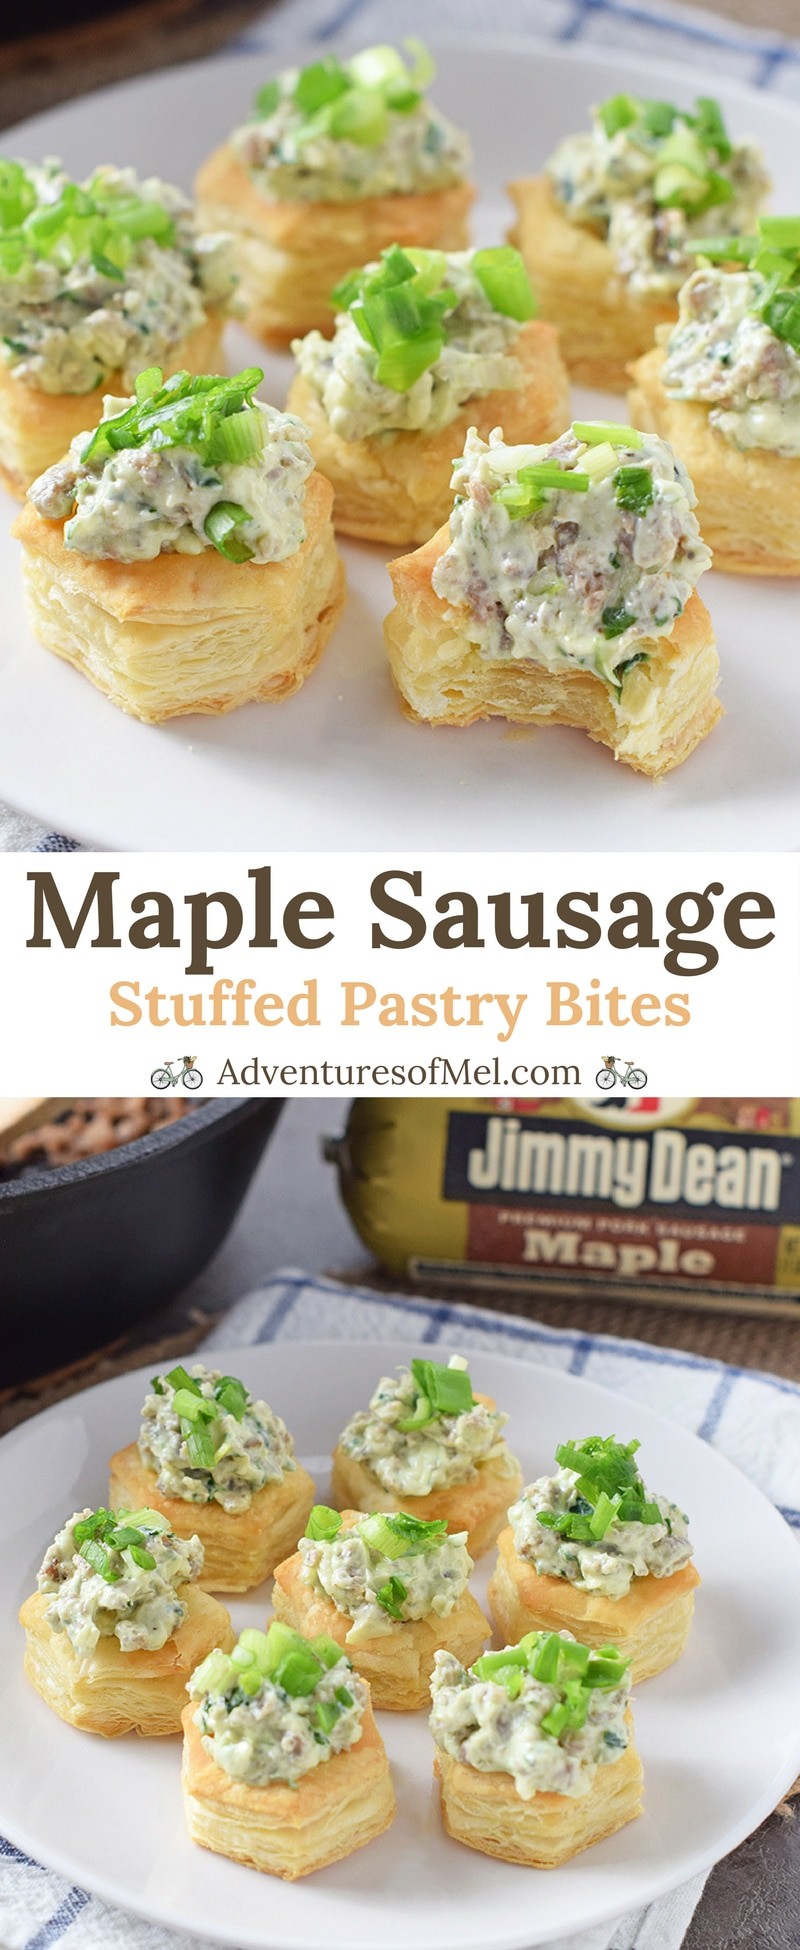
Maple Sausage Stuffed Pastry Bites – Made with cream cheese and spinach, maple sausage stuffed pastry bites are the ultimate appetizer and finger food idea for your holiday party.
Whether you’re gearing up for a holiday party or just making a few treats for family and friends, finger foods are definitely a given.
I used to love it when I’d hear that term… Finger Foods. It usually went along with one of my other favorite terms growing up… Church Potluck. Both meant all sorts of good things to eat and an enjoyable time with friends, as well.
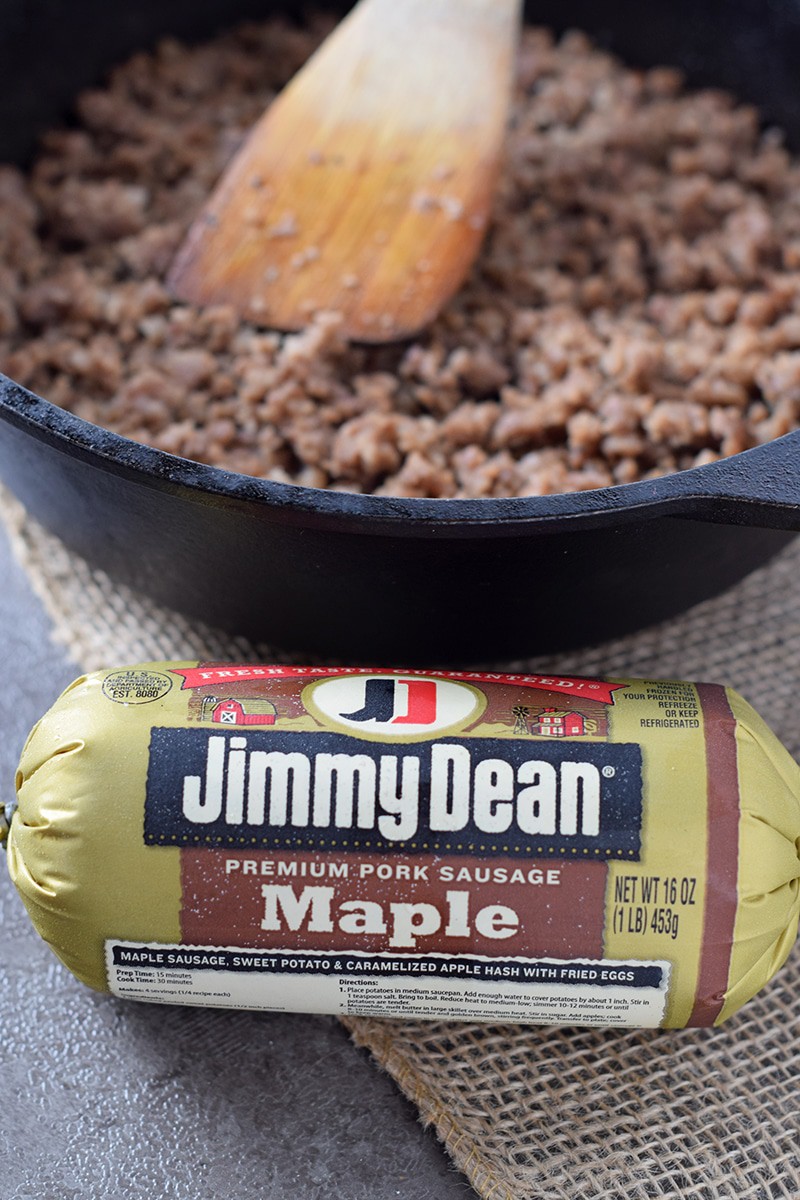
I could think of all sorts of things to do with Jimmy Dean® Pork Sausage; in fact, Jimmy Dean® Maple Sausage has been my absolute favorite kind of sausage for a really long time, mainly because of the flavor it gives to anything I choose to make with it.
Just ask my family. Breakfast Bake is one of my favorite things to make, along with delicious Biscuits and Sausage Gravy; Sausage Biscuit Sandwiches; Sausage, Egg, and Cheese Sandwiches; and so much more.
Breakfast isn’t the only way to use Jimmy Dean® Maple Sausage, though. Think appetizers, soups and stews, snacks, kid-friendly dinner ideas, and meat pies… With premium quality ingredients and delicious taste in every roll of down-home fresh pork sausage, it’s a definite go-to ingredient for all sorts of recipes and meal ideas.
For now, let’s make a super easy appetizer you can whip up in no time. All you need are a few delicious ingredients.
Looking for more appetizers? You may enjoy these easy appetizer recipes, including pinwheels, apples and cheese crackers, and bacon wrapped apples and cheese.
Tips for how to make Maple Sausage Stuffed Pastry Bites
You can find Jimmy Dean® Maple Sausage in the refrigerated meats section at Walmart. If you use Ibotta, look for the offer to purchase 2 rolls of sausage and earn $1.
Bake the puff pastry cups according to the package directions.
Meanwhile, cook the sausage in a large skillet. Drain well.
Wash and chop the spinach and green onions.
Shred the cheddar cheese.
Mix together the cream cheese, ranch dressing mix, sour cream, spinach, and cheddar.
When the sausage is fully cooked and drained, mix it into the creamy mixture.
Add a small dollop of the creamy sausage mixture into each puff pastry cup.
Top off each of the Maple Sausage Stuffed Pastry Bites with green onions.
Serve on a platter right away to all your holiday guests!
Looking for more delicious holiday appetizers or snacks?
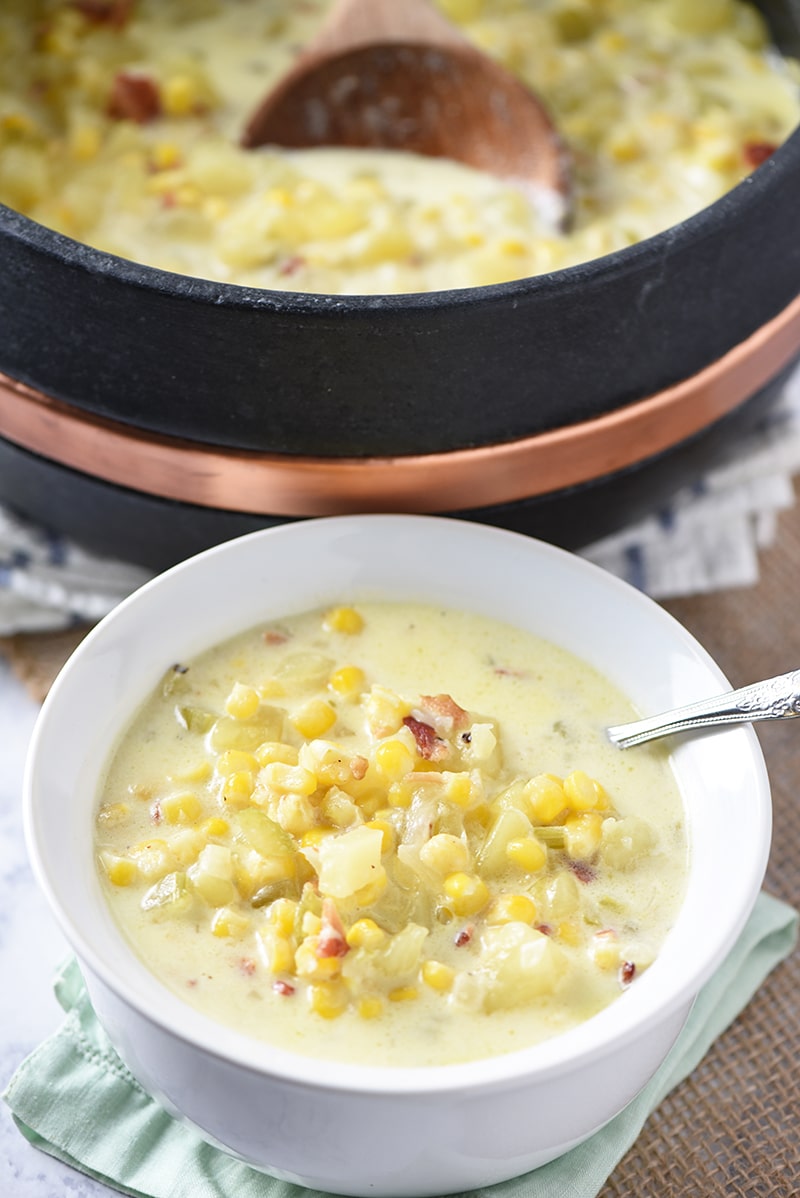
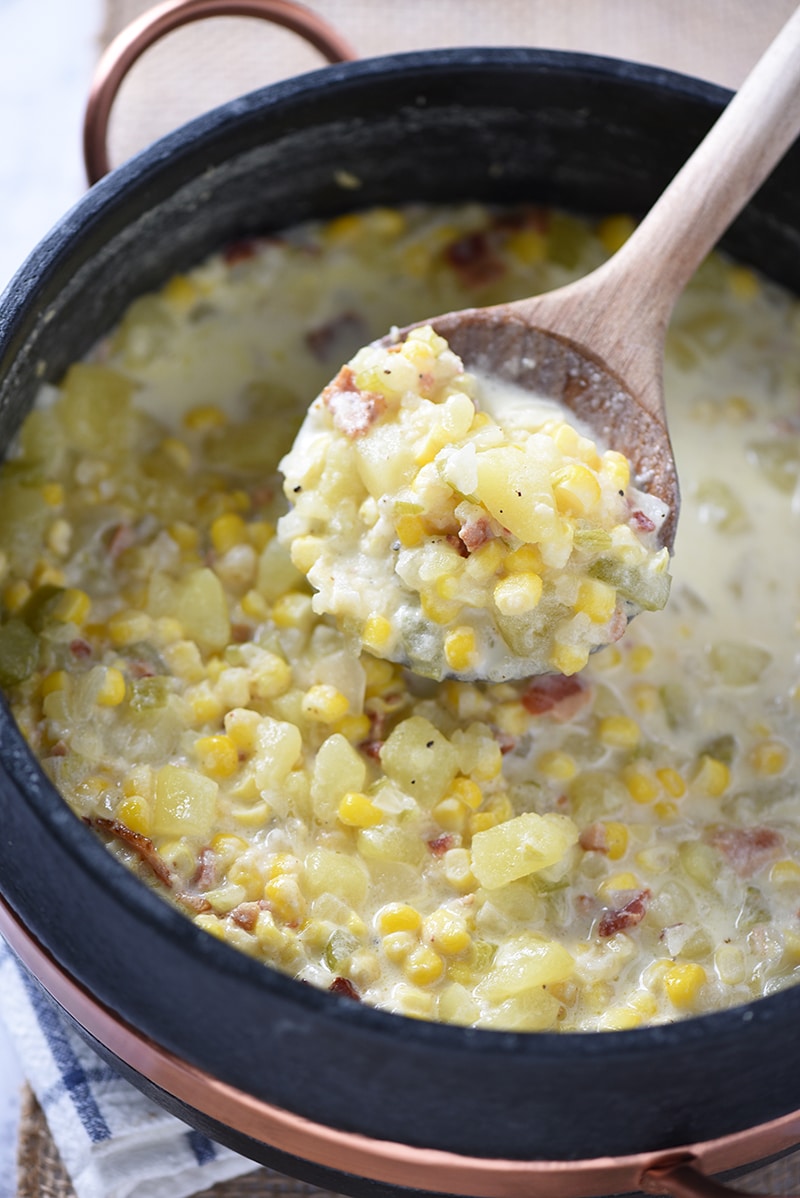
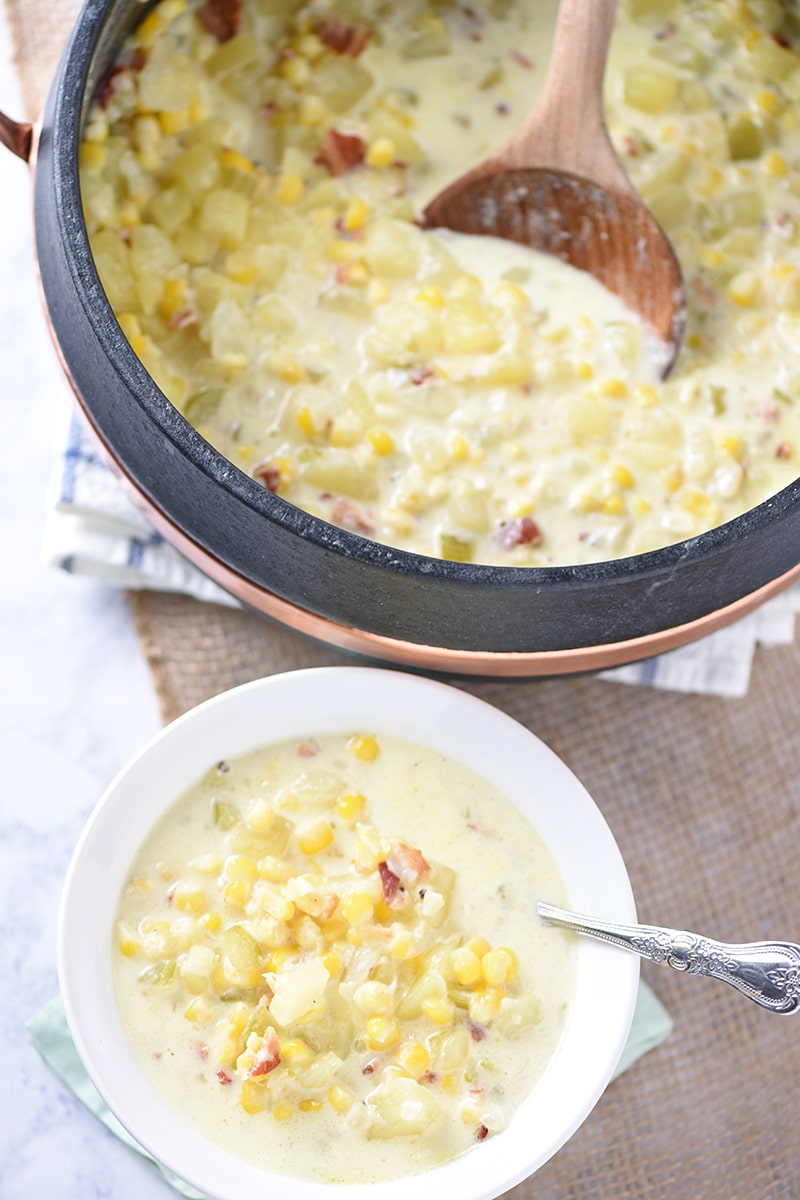
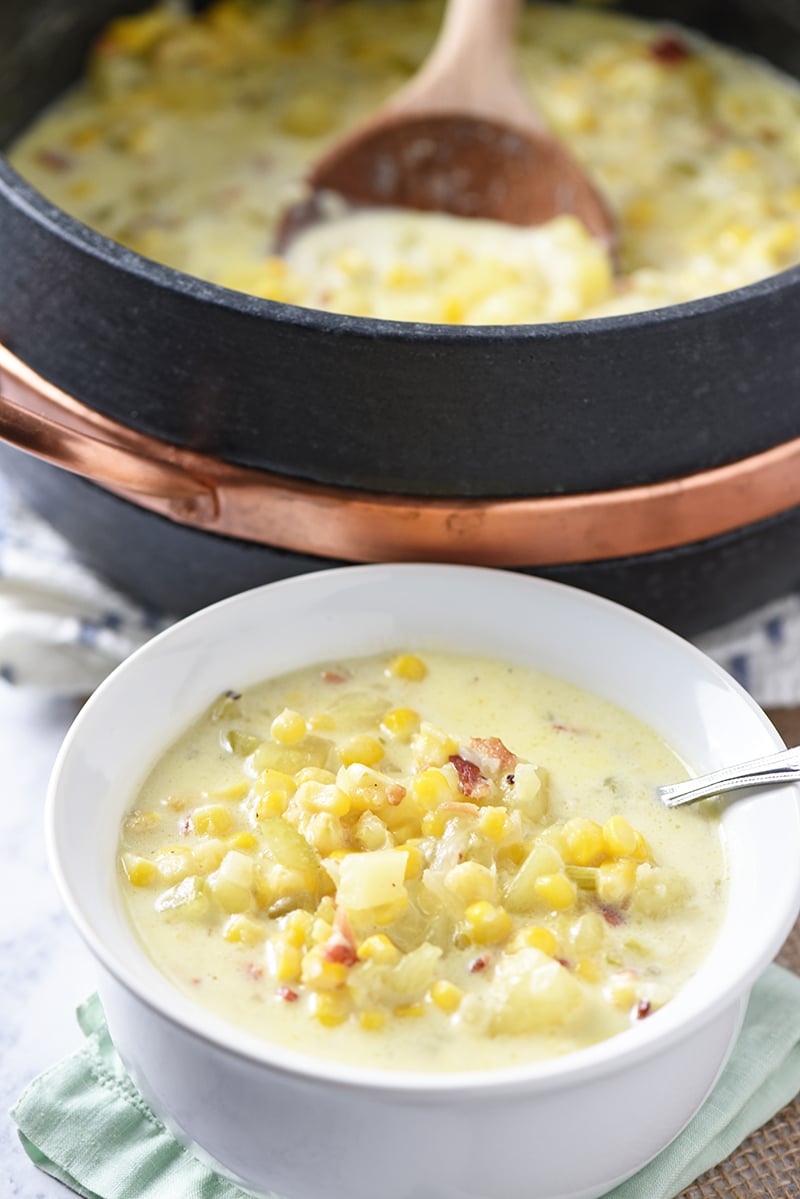
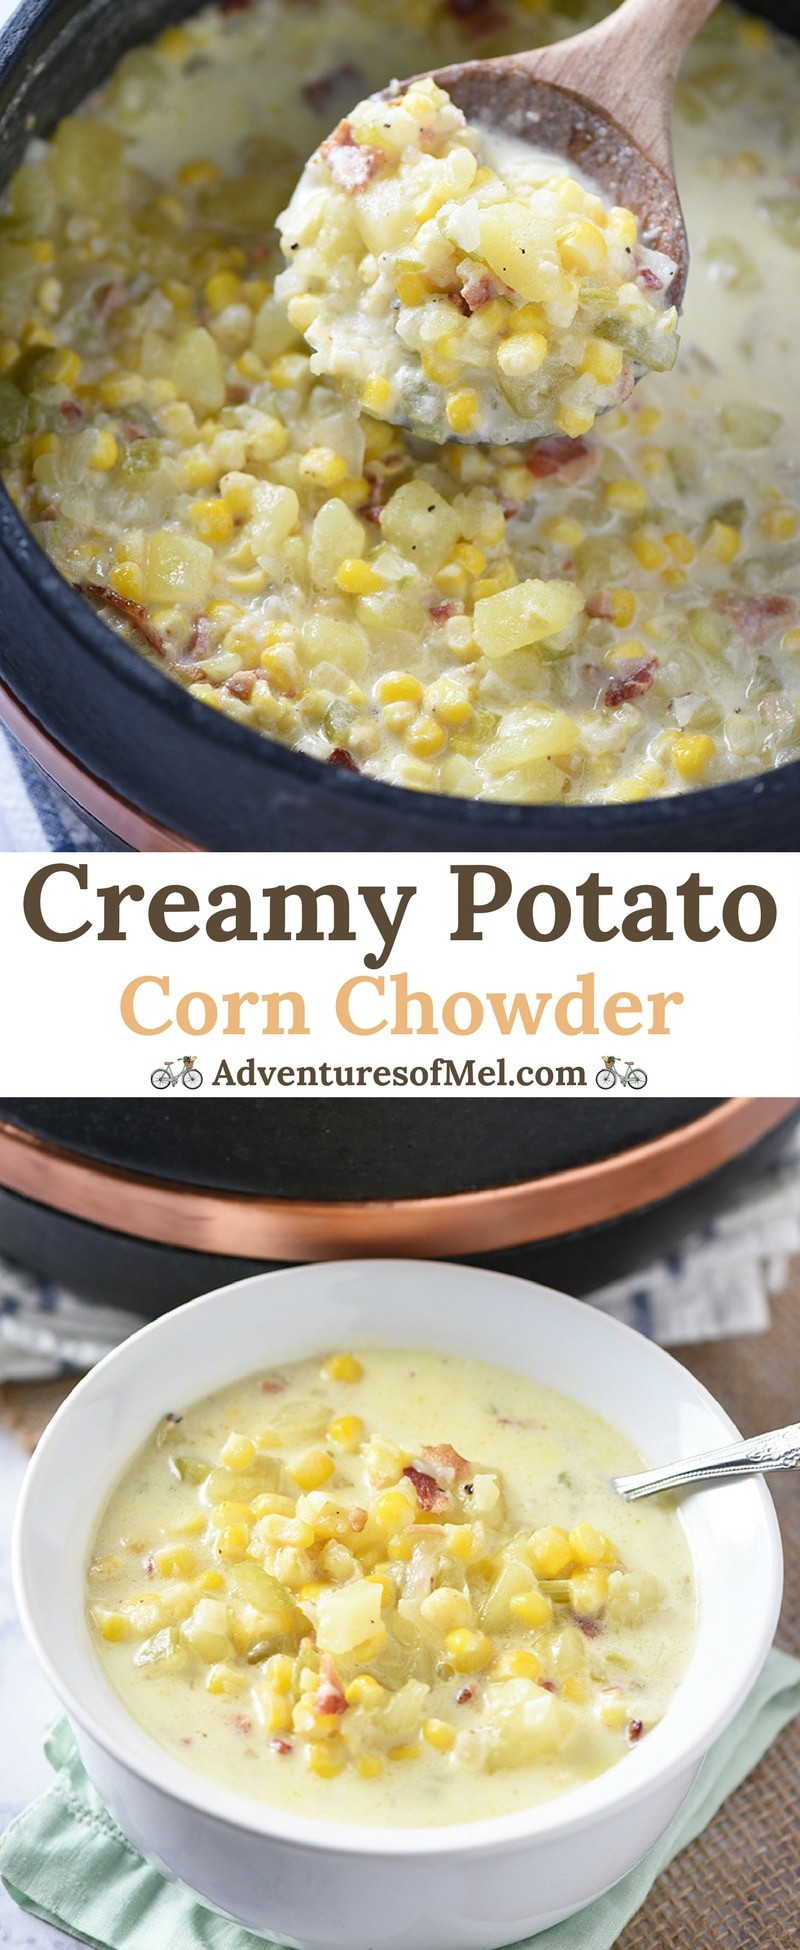
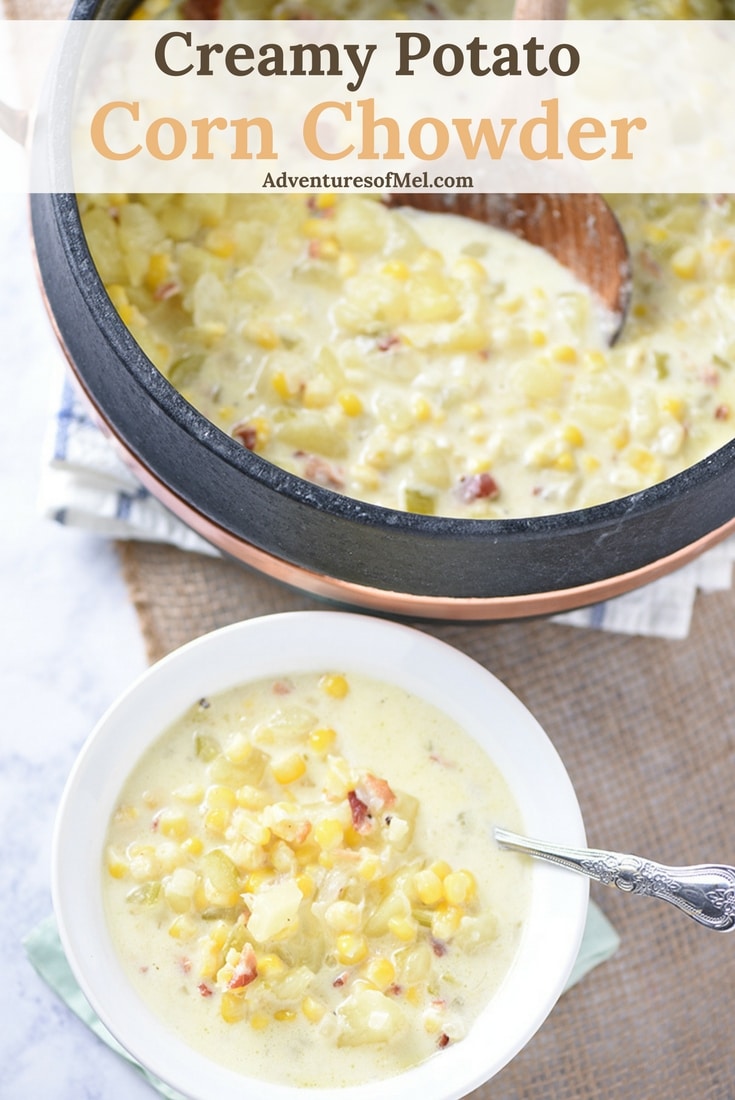
Creamy Potato Corn Chowder with bacon and cheddar is so easy to make. Hearty soup that makes a cozy weeknight meal the whole family will love!
This recipe for Creamy Potato Corn Chowder is sponsored by UncommonGoods. Corn Chowder is a hearty soup and a cozy meal to warm up with on a chilly week night. It’s oh so creamy and best served with crackers, slices of cheddar cheese, and even a homemade baguette or two if you happen to have one.
I love cooking up a big pot of stew in my UncommonGoods Soapstone Stew Pot, which would make a great gift idea for the aspiring chef in your life. Even after I remove this beautiful pot from the stove, it continues to naturally keep our soup warm, a feature I absolutely love for a non-rushed weeknight meal with my family.
Speaking of UncommonGoods, they offer all sorts of handmade, recycled, and organic products for customers. Their mission is sustainability and social responsibility in everything they do. The copper handled and belted Soapstone Stew Pot is actually handmade by a couple from Brazil, and each pot is unique.
That uniqueness of many UncommonGoods products lends to fantastic and meaningful personalized gift ideas, gift ideas for friends, and more. They even offer a more personalized gift search function called Sunny, which allows you to search based on your gift recipient’s interests.
I do love the uniqueness of this stew pot… and I especially love that you only need a few ingredients to make a delicious pot of Creamy Potato Corn Chowder.
Tips for how to make Creamy Potato Corn Chowder
Wash and chop your veggies, including potatoes, onion, and celery.
Sauté the chopped onion and celery in melted butter in a large stew pot for 3 to 4 minutes.
Stir in the chicken broth, potatoes, and frozen corn.
Simmer on medium heat until potatoes have softened, about 30 minutes or so.
Meanwhile, cook and crumble the bacon.
Also, shred the cheddar cheese.
Once the soup has simmered and potatoes have softened, stir in the heavy whipping cream, cheddar cheese, bacon, salt, and pepper.
Do a li’l taste test to make sure you have enough salt and pepper.
Bring soup to a boil, and allow it to simmer for another 15 to 20 minutes.
Serve while warm, with crackers, extra cheddar cheese, baguettes, buttermilk cornbread, etc.
This easy sugar cookie icing is made with powdered sugar and a flavorful secret ingredient. So creamy delicious, my favorite recipe for cookie decorating.
This easy sugar cookie icing is a cookie icing recipe that’s been with me since I was a little girl. While the main ingredients are butter, vanilla, powdered sugar, and heavy whipping cream, it also uses a secret ingredient.
That secret ingredient is almond extract. I can’t imagine making this icing without it.
I can usually mix this cookie icing up in minutes; and when I’m using it with my mom’s cut out sugar cookie recipe that we make every single Christmas, I’ll sometimes add a little food color for cookie decorating purposes.
Though I have been known to skip the food coloring and go with sprinkles on white icing instead… Those tiny rainbow sprinkle dots that crunch in your teeth when you bite into the cookie? I love those!
I usually make these sugar cookies the way my mom taught me when I was younger. I’ve never been that patient with a decorating bag.
So I take the easy way out and use a butter knife to spread the cookie frosting on… Then spread sprinkles all over the cookie.
Just writing up this recipe is making me wish we still had a few of those soft sugar cookies left in the cookie jar. It’s one of my favorite Christmas recipes!
I JUST WANT THE RECIPE! TAKE ME TO THE RECIPE FOR EASY SUGAR COOKIE ICING!
If you’d rather skip all of my cooking tips, important cooking info for this recipe, and similar recipe ideas – and get straight to the scrumptious sugar cookie icing recipe – just scroll down to the bottom, where you’ll find a printable recipe card.
Slowly add the powdered sugar to the mixture, mixing it in as you go.
Once everything is mixed together, the icing should be smooth and creamy, free of any lumps. It’s important to get the right consistency. You don’t want the icing to be too thick (it won’t spread well) or too thin (it’ll run right off your cookies).
At this point, you can add food color, if desired.
Have fun decorating cookies together!
CAN I FREEZE COOKIE ICING?
Yes, you can. In fact, I usually do have leftover icing, and I’ll stick it in the freezer for next time we need it.
It freezes just fine, as long as you cover it well so it doesn’t get freezer burn.
HERE ARE A FEW OF MY FAVORITE RECIPES THAT USE THIS COOKIE FROSTING:
Easy Sugar Cookie Icing, made with powdered sugar and a flavorful secret ingredient. So creamy delicious, my favorite recipe for cookie decorating.
4 tablespoons salted butter (softened)
1 teaspoon vanilla extract
1 teaspoon almond extract
1 cup heavy whipping cream
6 cups powdered sugar
Soften the butter.
In a large mixing bowl, mix together the butter, vanilla extract, and almond extract.
Add the heavy whipping cream to the mixture.
Slowly add the powdered sugar to the mixture, mixing it in as you go.
Once everything is mixed together, the icing should be smooth and creamy, free of any lumps.*
At this point, you can add food coloring, if desired.
Have fun decorating cookies together!
*It’s important to get the right consistency. You don’t want the icing to be too thick (it won’t spread well) or too thin (it’ll run right off your cookies).
How to make an easy homemade ham gravy recipe, made last minute with leftover ham drippings. This gravy makes a delicious side dish with ham, mashed potatoes, and all the fixings at your holiday or family dinner!
Homemade ham gravy (like its counterpart turkey gravy) is a staple side dish whenever we cook a ham in the oven, which is mostly on holidays like Thanksgiving, Christmas, or Easter. Family dinner and holiday dinners just wouldn’t be the same without gravy to smother over our sliced ham and mashed potatoes.
Now it’s important to remember… The main flavoring for ham gravy comes directly from the ham itself. So if you glaze your ham, like with a brown sugar glaze or something like this sweet pineapple honey baked ham, the sweet flavoring from the glazed ham will go into your gravy for ham, and the end result will be a sweet gravy.
It’s so easy to make homemade gravy, and it’s super quick too. It’s delicious and definitely worth the minimal effort.
Why You’ll Love Knowing How to Make Ham Gravy
There are a lot of reasons to love this delicious gravy recipe…
It’s an easy condiment to make, takes less than 30 minutes to make, and it’s something you can make last minute just before serving the main meal.
It takes a very minimal amount of ingredients to make gammon gravy. In fact, they’re all pretty simple, and you likely already have them on hand.
It’s a fantastic addition to your holiday dinner spread. I’ve added this ham gravy recipe with drippings to my collections of favorite Thanksgiving recipes, Christmas recipes, and Easter dinner recipes, where you’ll find all the holiday inspiration you need in one place.
Ingredients and Substitutions Notes
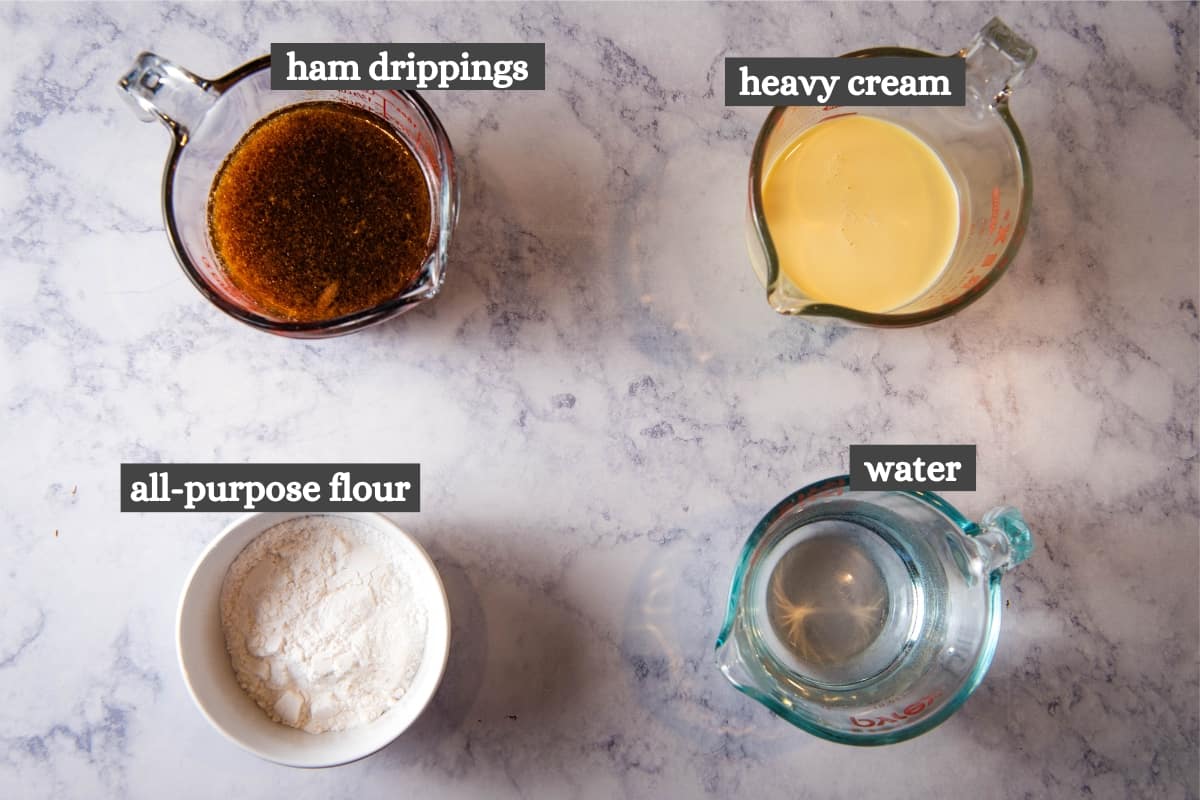
You’ll need just a handful of ingredients to make gravy for gammon (or ham). While you should have most of the ingredients on hand, you’ll likely need to purchase a ham at the grocery store, in order to have leftover ham drippings.
All-Purpose Flour – I prefer to use an unbleached all-purpose flour; you can also use a good gluten-free flour, although it’s important to note that gravy made with gluten-free flour doesn’t stay thick as long as with regular flour… In other words, it won’t store well. If you need a good gluten-free ham gravy alternative, ham gravy with cornstarch is just the thing.
Heavy Cream – You can skim heavy cream off of raw milk, or you can use store bought heavy whipping cream.
Ham Drippings – You can scoop the ham juices and pan drippings from the roasting pan after baking a spiral ham, bone-in whole ham, or boneless ham. You should have enough drippings to at least make a small batch of homemade gravy. These leftover ham drippings will likely give you all the delicious flavor you need without any extra seasoning, salt, or black pepper. If you don’t have any ham drippings, you can always use ham broth made from bouillon to make ham gravy.
Water
How to Make This Old-Fashioned Ham Gravy Recipe
Making this easy gravy for ham is actually really simple, but there are a few tips and tricks that will ensure you make a really good gravy from ham drippings.
How to Avoid Lumpy Gravy
Before we get started, here are 3 tips for preventing lumpy gravy…
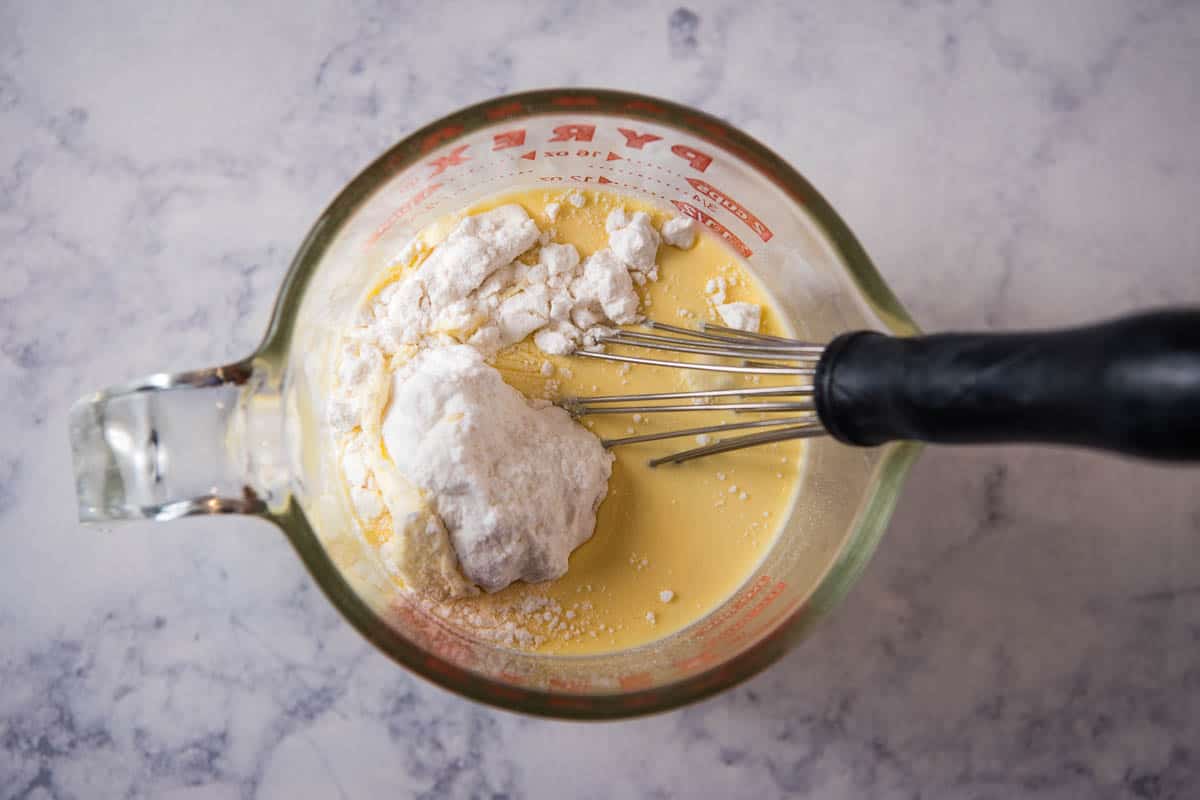
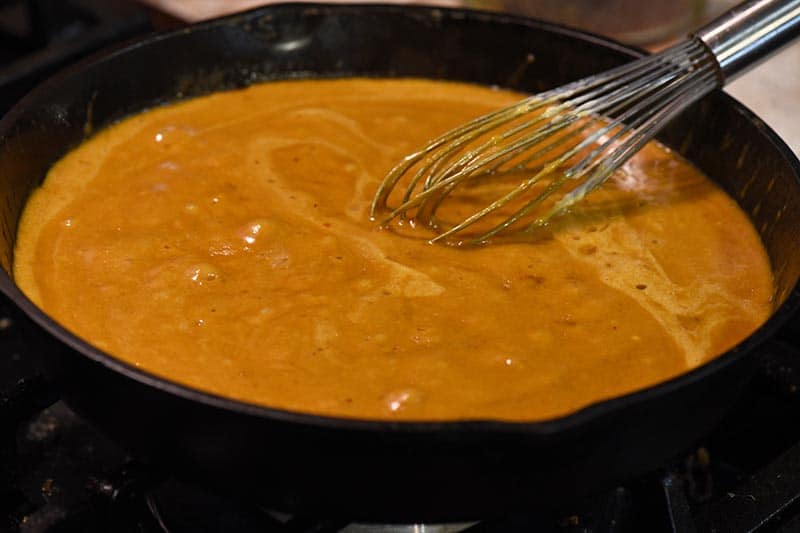
It’s important to start with a roux, and you do this by mixing together the flour and heavy whipping cream in a small mixing bowl or glass measuring cup. Whisking this together in the beginning will help prevent lumps in your gravy.
Use a whisk to stir your gravy while it’s cooking. It’s pretty much a given that you may have a few lumps, but you can minimize them by whisking the gravy.
Take your time to avoid any lumps in your gravy. To me, this right here is the secret to good gravy… Patience and being willing to take your time. Work on medium-low heat, and don’t get in a hurry, and you’ll make a good gravy.
Now Let’s Make Ham Gravy
Mix together the flour and heavy whipping cream in a small mixing bowl or glass measuring cup.
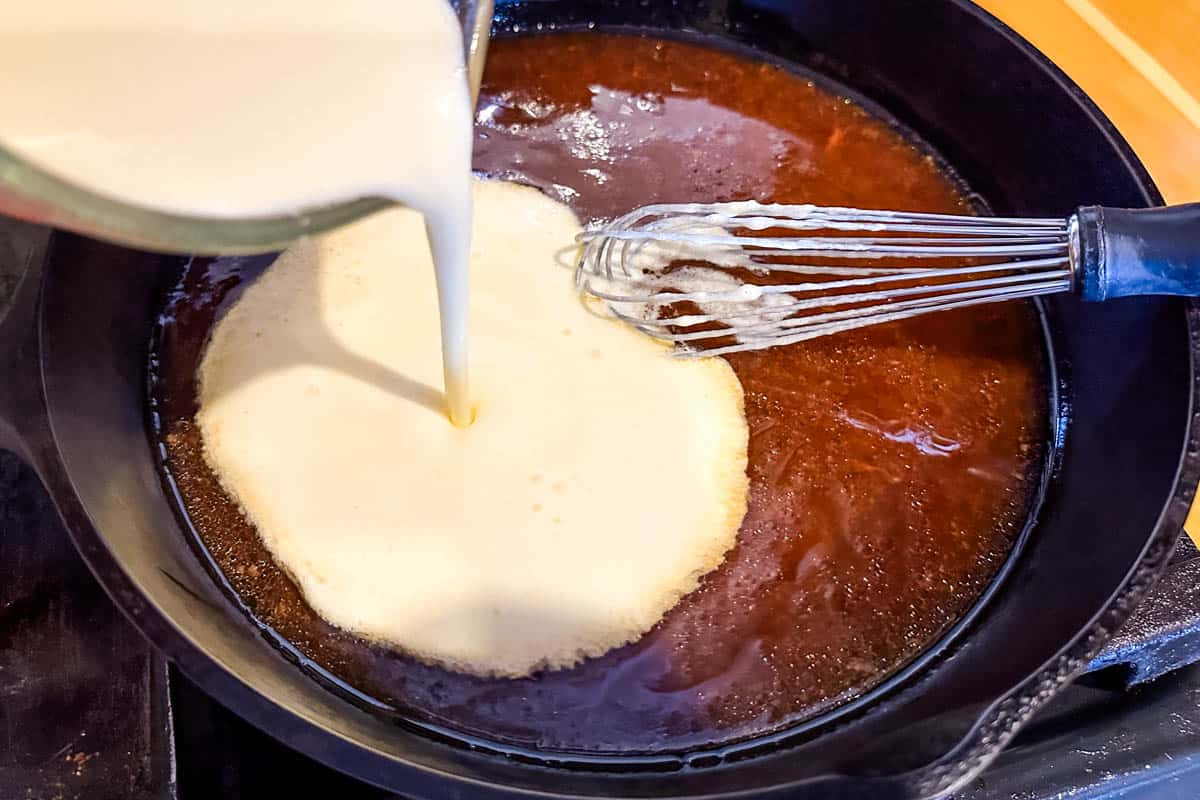
Gradually whisk together the flour/cream mixture with the pan drippings in a large saucepan or skillet on medium heat.
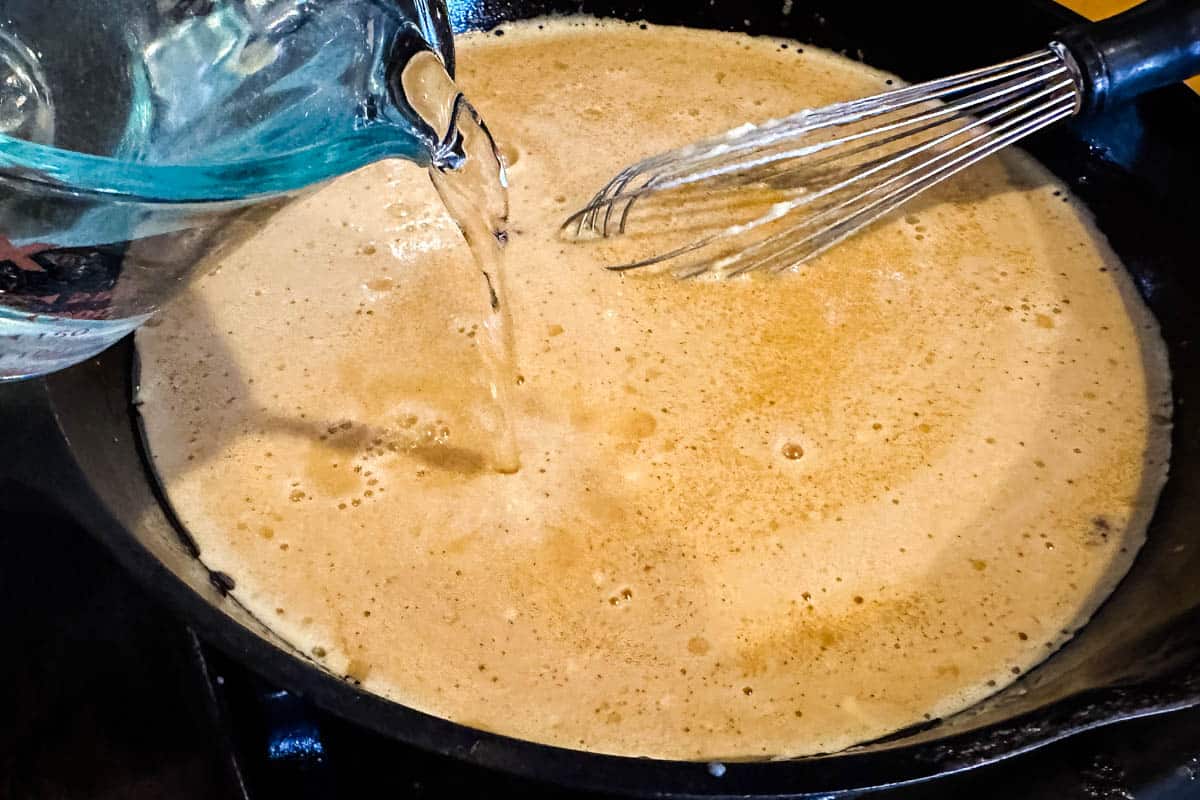
Add in the water.
Continue whisking and stirring the gravy until it begins to thicken and is ready to serve.
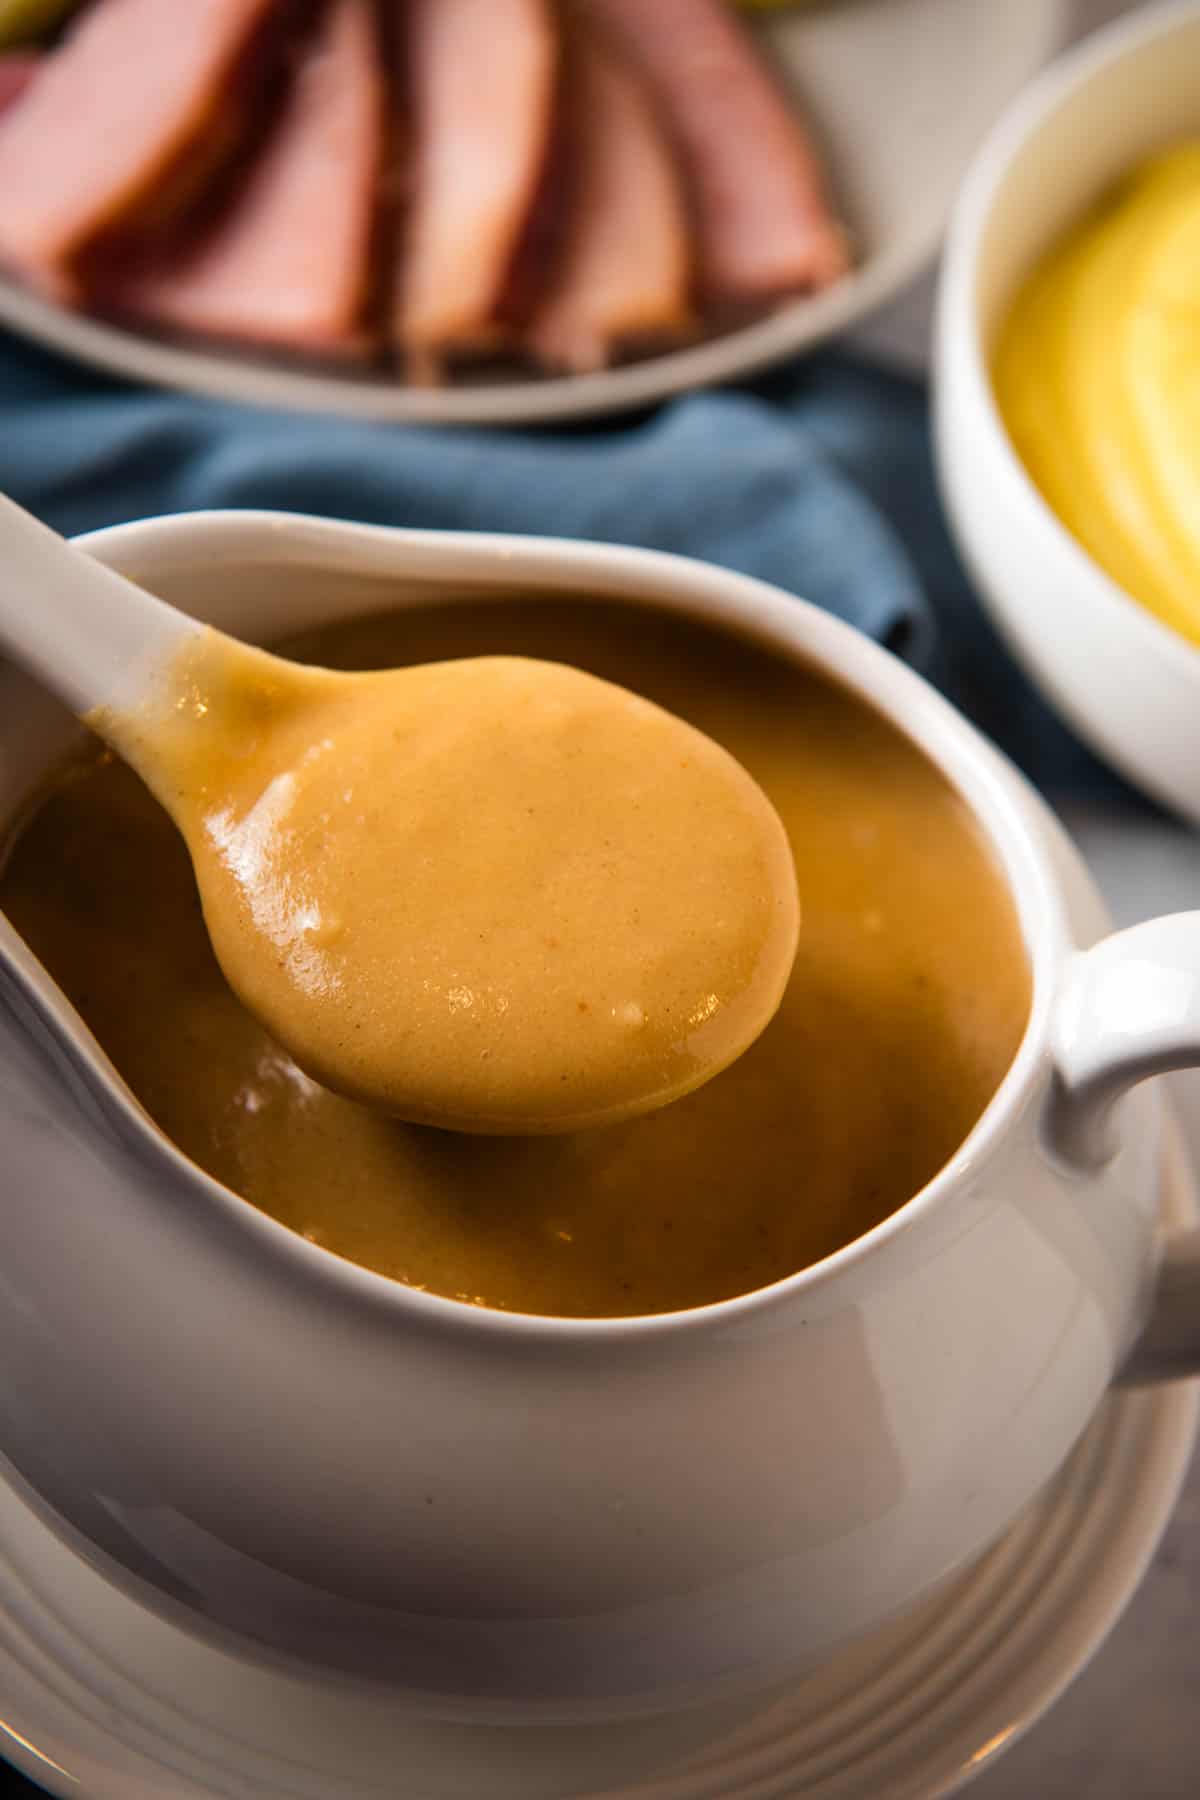
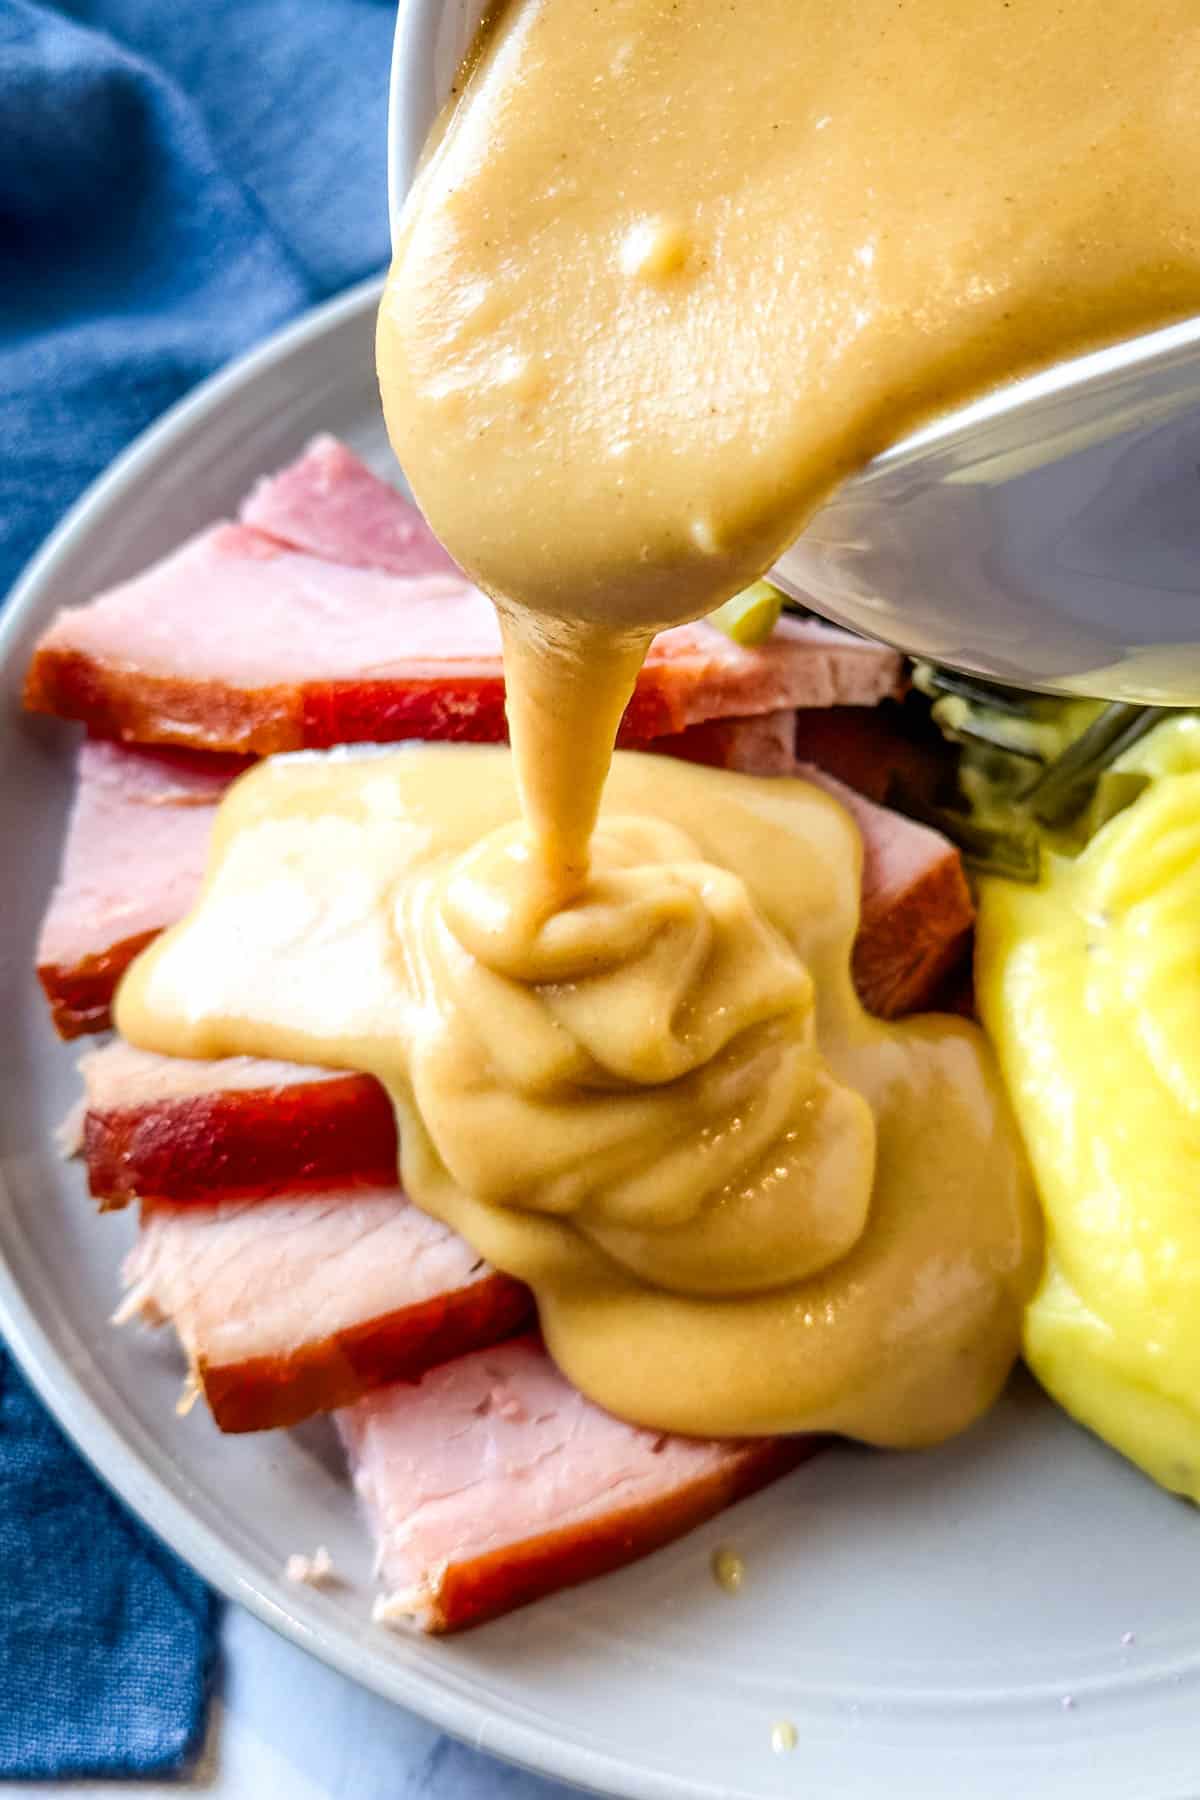
Then just pour the gravy into a gravy boat, and serve it with ham, mashed potatoes, and all the fixin’s! It will add such a rich flavor to your mashed potatoes, you’ll wish you had that ham flavor the next time you eat potatoes.
Expert Tips and Recipe FAQ’s
How much gravy should you make per person?
The answer to this will really depend on the consistency of your gravy. When we make this recipe, we usually have a lot of leftover gravy. You want to plan on about 1/3 to 1/2 cup per person, again depending on how thick your gravy is.
How do you store and reheat ham gravy?
Store leftover gravy in an airtight container in the fridge; it should keep for about 3-4 days. You can re-heat gravy by placing it in the microwave in a microwave-safe dish for a few minutes, stirring between every 30-second increments of time, ’til heated through; or put the gravy in a saucepan, and heat it up over low to medium heat on the stove, constantly stirring so it doesn’t scorch.
Can you freeze gravy?
Yes, you can. Just be sure to put it in an airtight freezer-friendly container, so it doesn’t get freezer burn. It should keep for about 4 to 6 months.
If you try this recipe, why not leave a star rating in the recipe card right below and/or a review in the comment section further down the page? I always appreciate your feedback. You can also follow me on Pinterest, Facebook, Instagram, and YouTube. And subscribe to my email list too!
Ham Gravy Recipe
How to make an easy homemade ham gravy recipe with leftover ham drippings. Delicious side dish with ham, mashed potatoes, and all the fixings!
Mixing Bowl
Large Skillet
Whisk
Wooden Spoon
Heat-Resistant Spatula
Gravy Boat
1/2 cup unbleached all-purpose flour
1 cup heavy whipping cream
2 cups ham drippings
1 cup water
Mix together the flour and heavy cream in a small mixing bowl or glass measuring cup.
Gradually whisk together the flour/cream mixture with the pan drippings in a large saucepan or skillet on medium heat.
Add in the water.
Continue whisking and stirring the gravy until it begins to thicken and is ready to serve.
Serve with ham, mashed potatoes, and all the fixin's!
*Take your time whisking in the flour mixture to avoid any lumps in your gravy. It’s pretty much a given that you may have a few lumps, but you can minimize them by starting with the roux and taking your time, whisking the gravy.
Store leftover gravy in an airtight container in the fridge; it should keep for about 3-4 days. You can re-heat gravy by placing it in the microwave in a microwave-safe dish for a few minutes, stirring between every 30-second increments of time, ’til heated through; or put the gravy in a saucepan, and heat it up over low to medium heat on the stove, constantly stirring so it doesn’t scorch.
Condiments, Sauces & Dressings, Side Dish
American
gammon gravy, gravy for gammon, gravy for ham, gravy from ham drippings, gravy recipes, ham gravy, ham gravy recipe, ham gravy recipe with drippings, homemade ham gravy, how to avoid lumpy gravy, how to make gravy, how to make ham gravy, making ham gravy
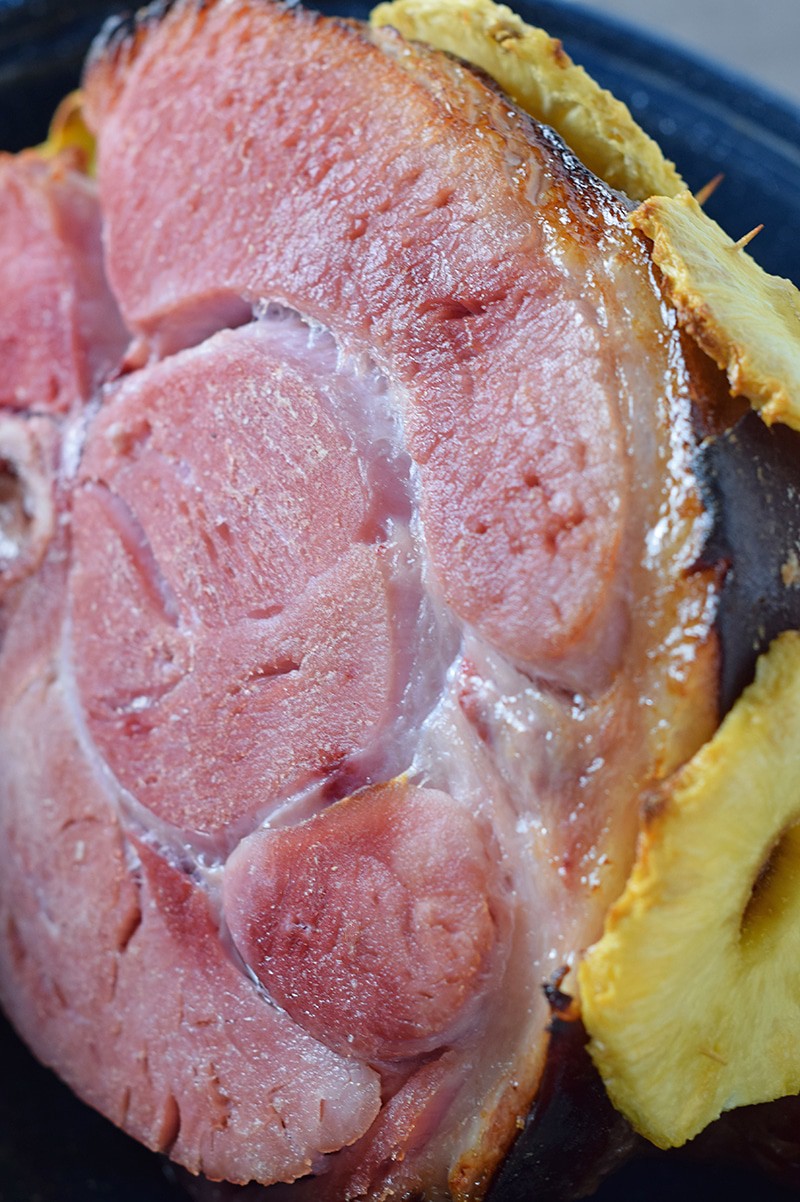
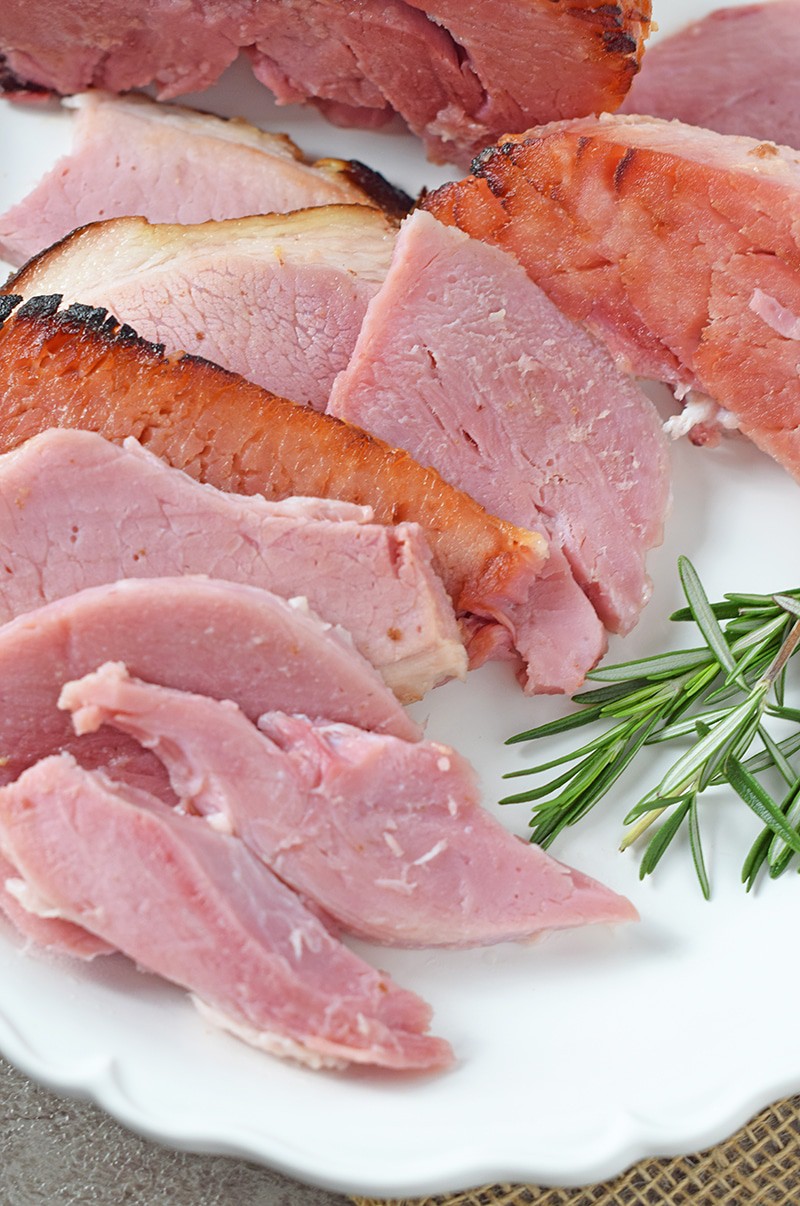
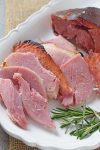
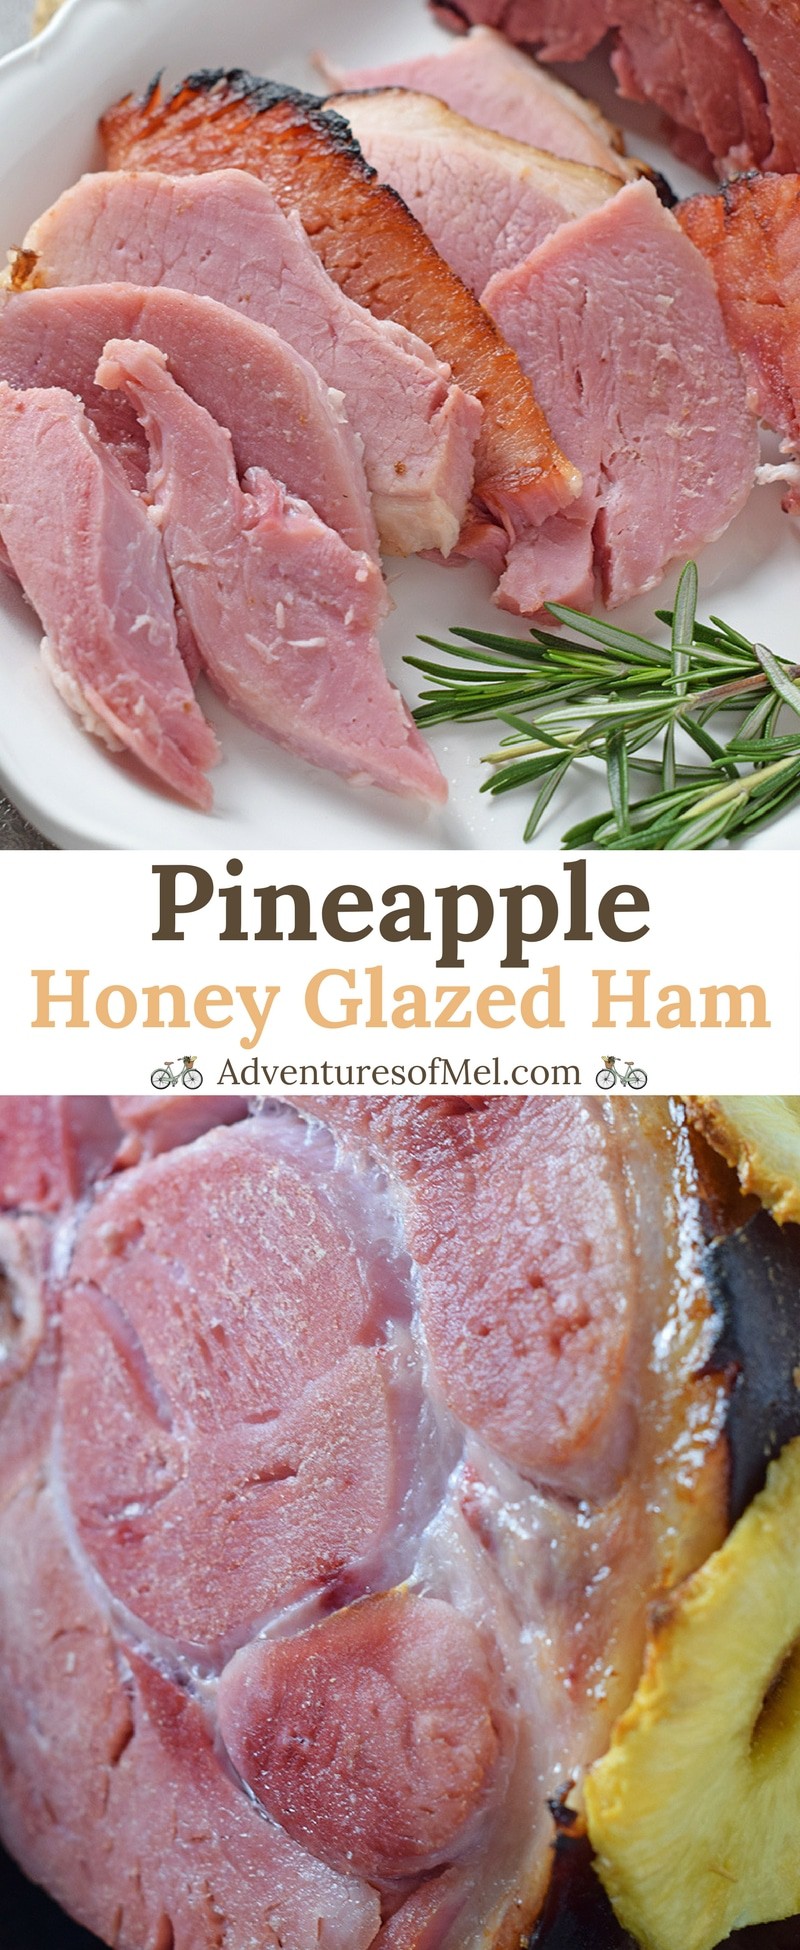
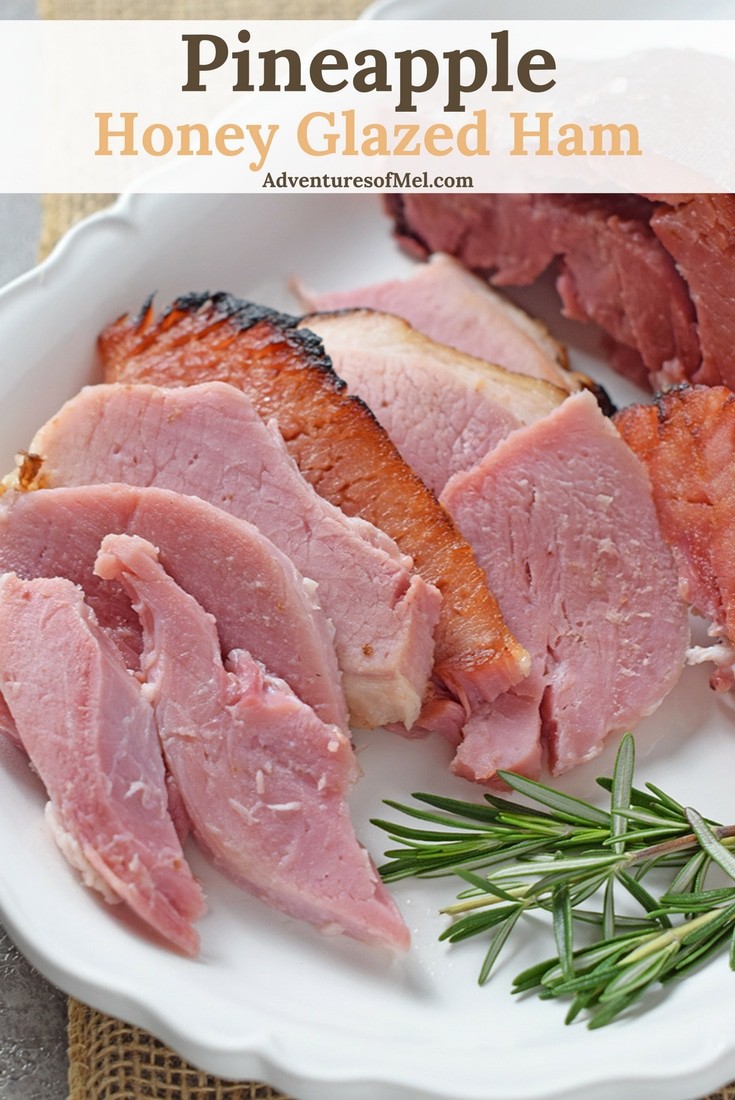
How to make a perfectly cooked, moist, delicious pineapple honey glazed ham for dinner and holiday celebrations.
Pineapple Honey Glazed Ham is a blend of sweet and salty deliciousness. Whether you’re looking for a family dinner idea or rather a main dish to add to your holiday menu, this ham is the perfect addition.
Years ago in a past life, we had a grocery store where we loved to occasionally shop. One of the treats we enjoyed from that store was shaved pineapple ham fresh from the deli.
That’s what this recipe reminds me of. The fresh pineapple purée and sliced pineapple, along with honey, give the roasted ham a slightly sweet flavor, but not too sweet.
Purée a slice or two of pineapple in a blender, just enough to make 2 tablespoons of purée.
Mix the pineapple purée with the honey, and brush it all over the ham, letting the excess glaze run off the ham and into the bottom of the roasting pan.
Using toothpicks, attach pineapple slices to the outside of the ham, at least 6 to 8 slices.
Bake the ham at 325°. Bake time will be per the weight of your ham and will differ per ham.
Once the ham has cooked through and is ready, you’ll need to slice it up before serving.
Looking for delicious side dish recipes to go with your ham?
Pineapple Honey Glazed Ham recipe. How to make a perfectly cooked, moist, delicious ham for dinner and holiday celebrations.
1 large ham
1 cup water
2 tablespoons pineapple purée
1/2 cup honey
6 to 8 pineapple slices
12 to 18 to othpicks
Pre-heat the oven to 325°.
Place a large ham in a roasting pan.
Add water to the roasting pan.
Purée a slice or two of pineapple in a blender, just enough to make 2 tablespoons of purée.
Mix the pineapple purée with the honey, and brush it all over the ham, letting the excess glaze run off the ham and into the bottom of the roasting pan.
Using toothpicks, attach pineapple slices to the outside of the ham, at least 6 to 8 slices.
Bake the ham at 325°. Bake time will be per the weight of your ham and will differ per ham.
Once the ham has cooked through and is ready, you’ll need to slice it up before serving.
Pork Recipes
American
honey glazed ham, pineapple ham, pineapple honey glazed ham
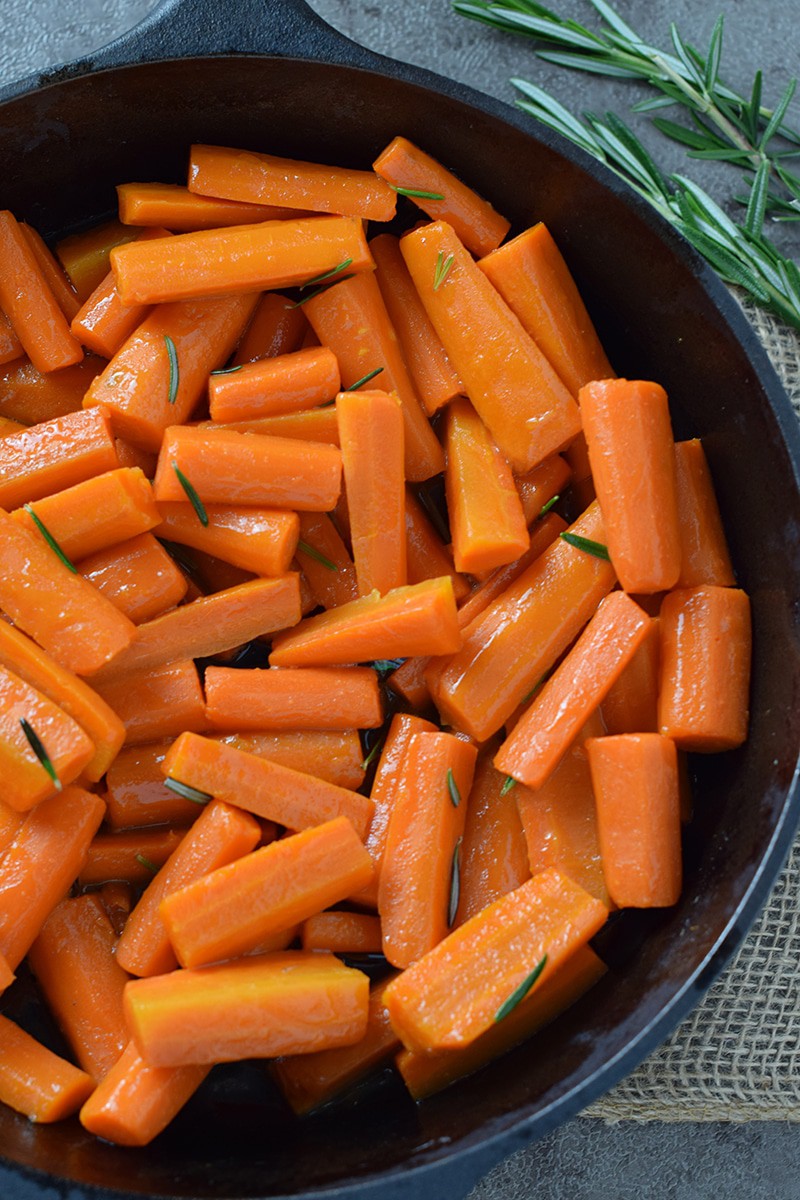
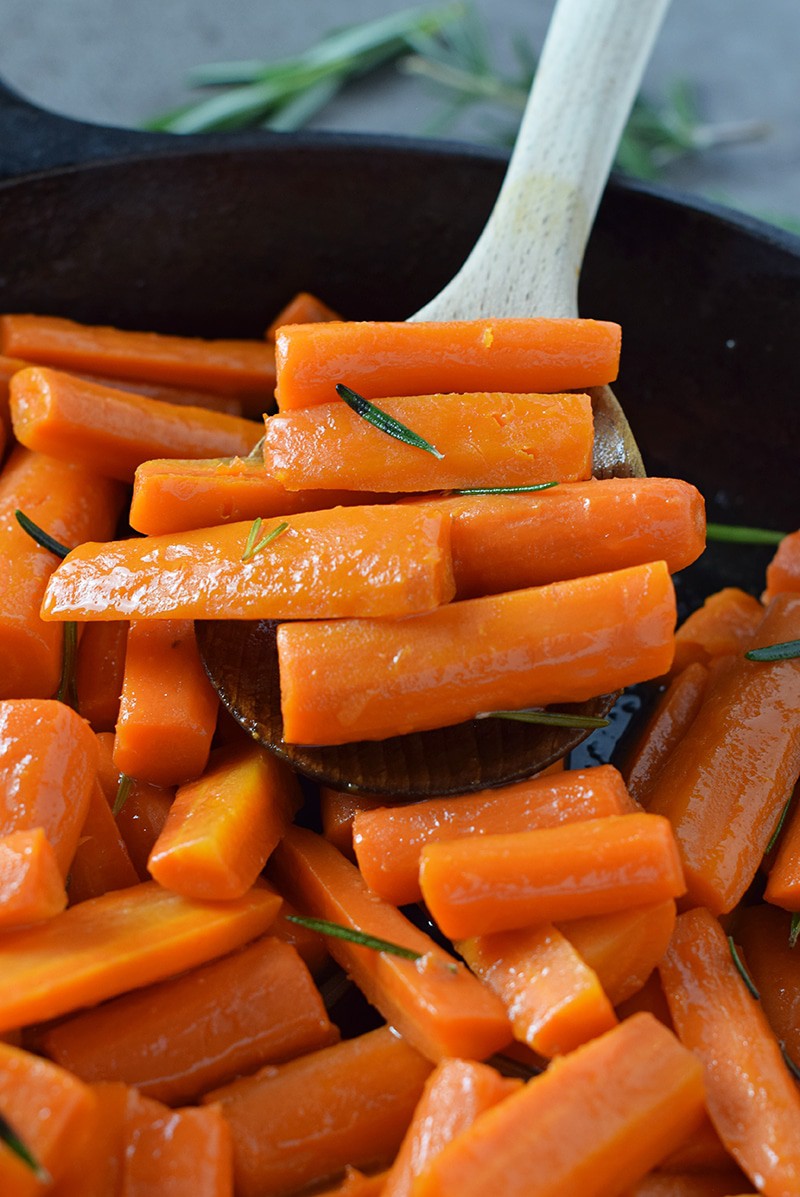
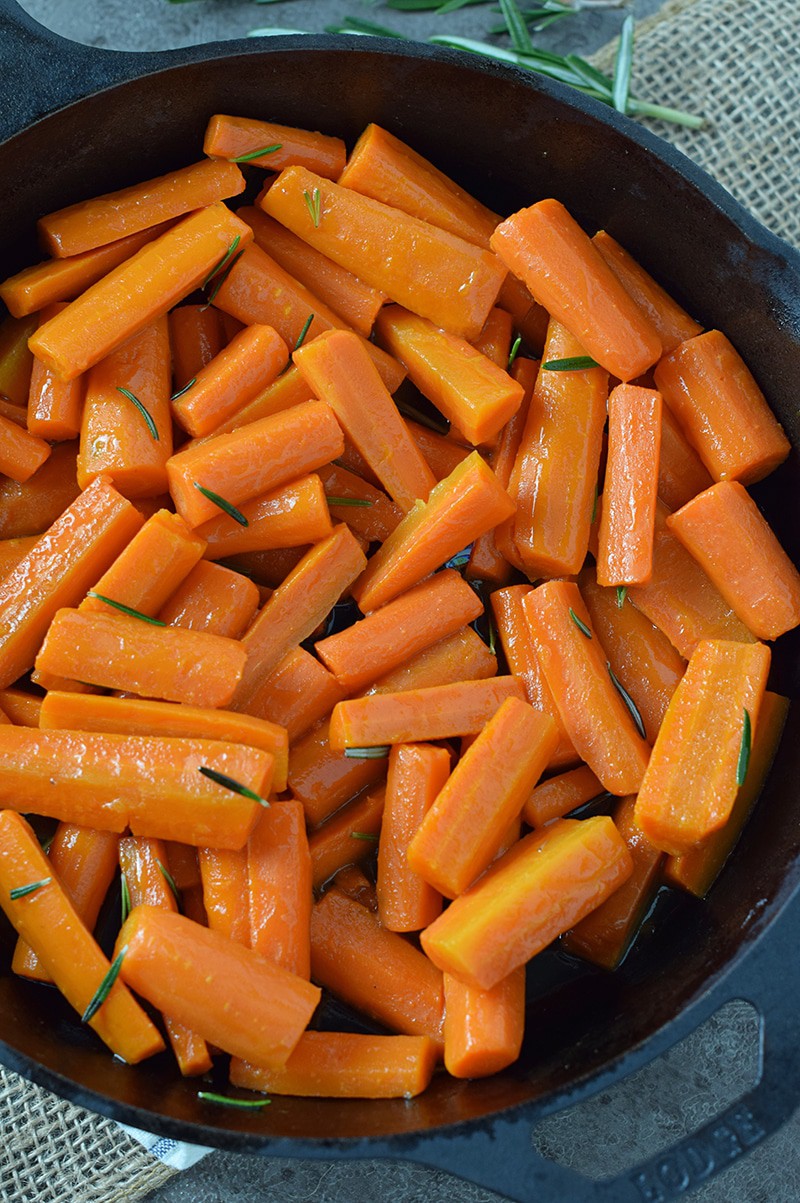
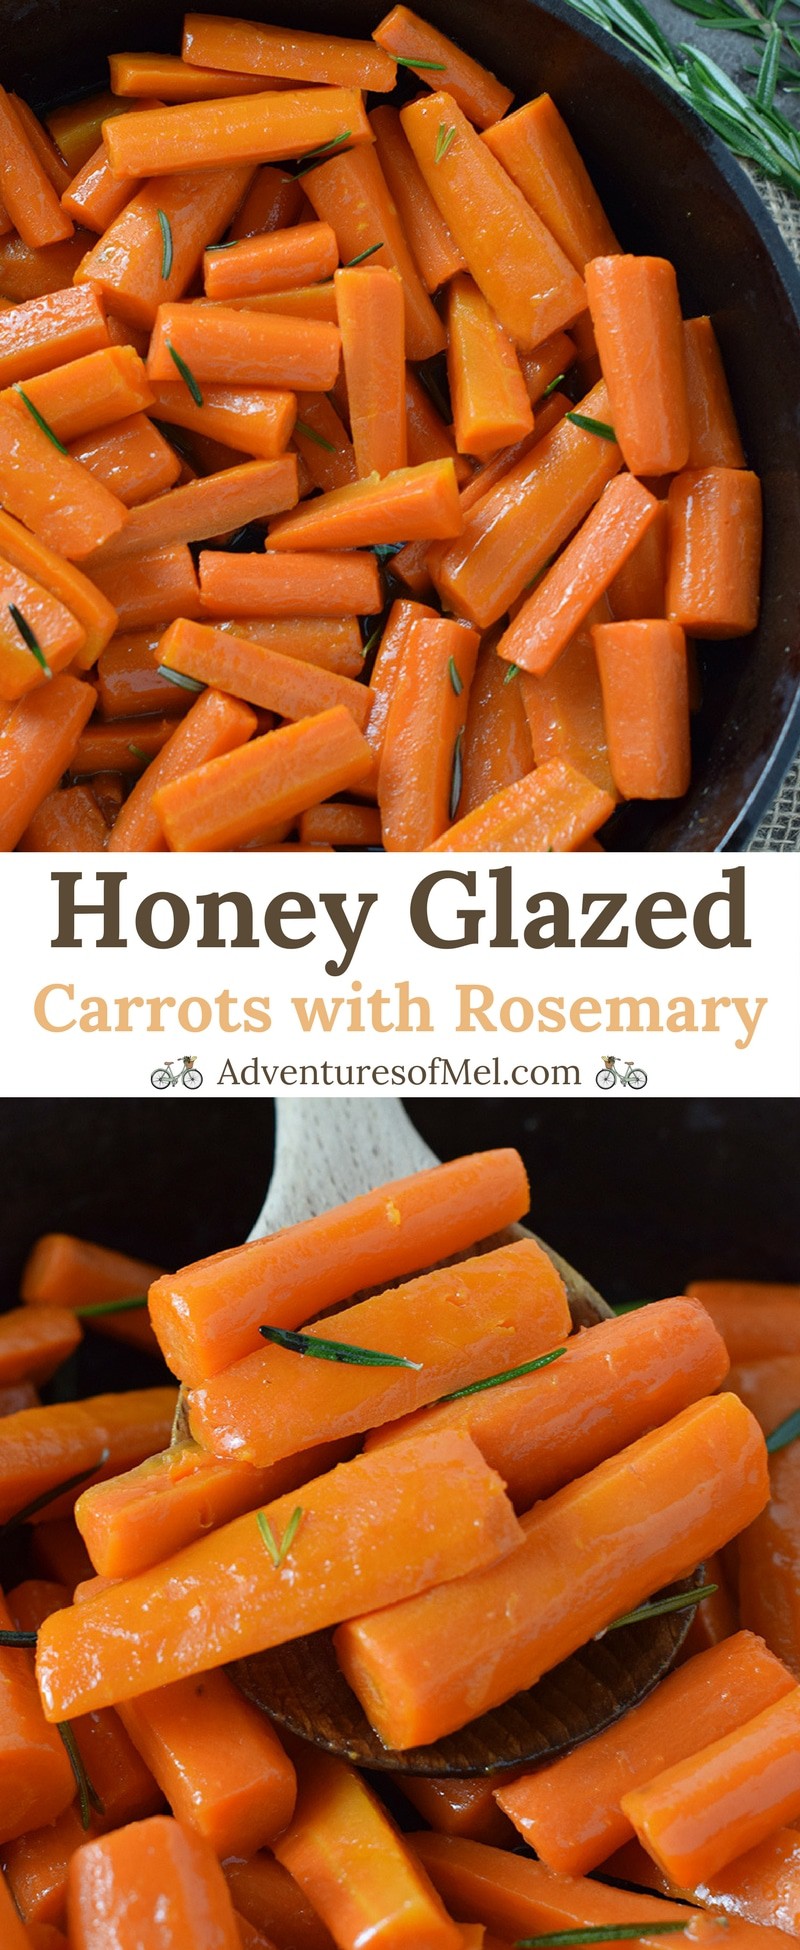
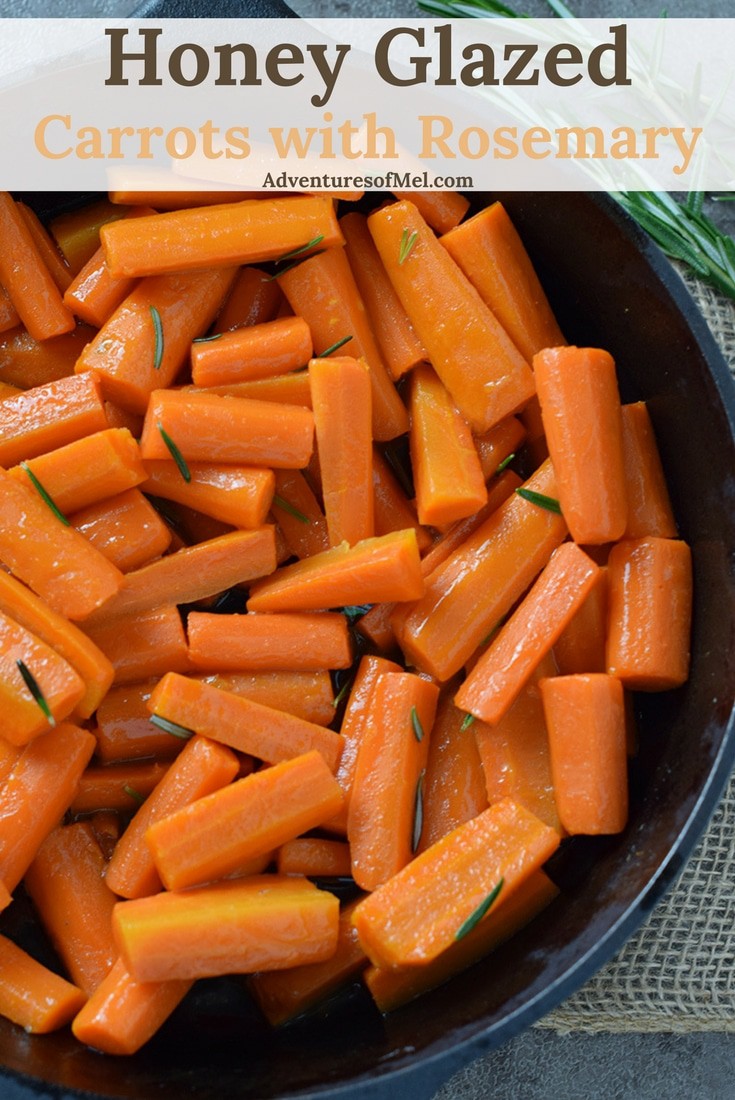
Honey Glazed Carrots, made with simple ingredients like butter, honey, and rosemary. Delicious side dish recipe, perfect for holidays or weeknight meals.
Honey Glazed Carrots are one of the easiest side dish recipes you’ll ever make for a slow cooker pot roast, CrockPot whole chicken or baked chicken legs. I love when a dish has great flavor, and I also love when a dish is beautiful. Carrots are pretty all by themselves, but when you dress them up with a little rosemary, they’re even prettier.
And my favorite thing about this recipe is it only takes 4 ingredients, one of which really could be optional. I say that because rosemary may not be to everyone’s taste, and you could certainly make this recipe without the rosemary.
Whether you’re creating an Easter menu or just making dinner for the family, Honey Glazed Carrots are a great addition to your meal… Not to mention a great way to get kids to eat their veggies. They pair really well with Roast Beef or Pork Chops.
Tips for how to make Honey Glazed Carrots with Rosemary
Kitchen Tools you may need to make Honey Glazed Carrots
Saucepot and Steamer – Handy whether you want to steam or boil the carrots. Large Skillet – You’ll need this to toss everything together on the stove. Wooden Spoon – to toss the mixture together. Serving Bowl – to serve your beautifully delicious carrots.
Print the recipe for Honey Glazed Carrots with Rosemary
Honey Glazed Carrots
Honey Glazed Carrots, made with simple ingredients like butter, honey, and rosemary. Delicious side dish recipe, perfect for holidays or weeknight meals.
2 pounds carrots
3 tablespoons salted butter
2 1/2 tablespoons raw honey
1 stalk rosemary leaves ((optional))
Wash, peel, and slice the carrots.
Steam or boil the carrots ’til softened.
Melt the butter in a large skillet.
Add the honey and carrots to the skillet, and toss together with the melted butter.
If desired, add fresh rosemary to the mixture.
Toss everything together on low heat for 3 to 5 minutes.
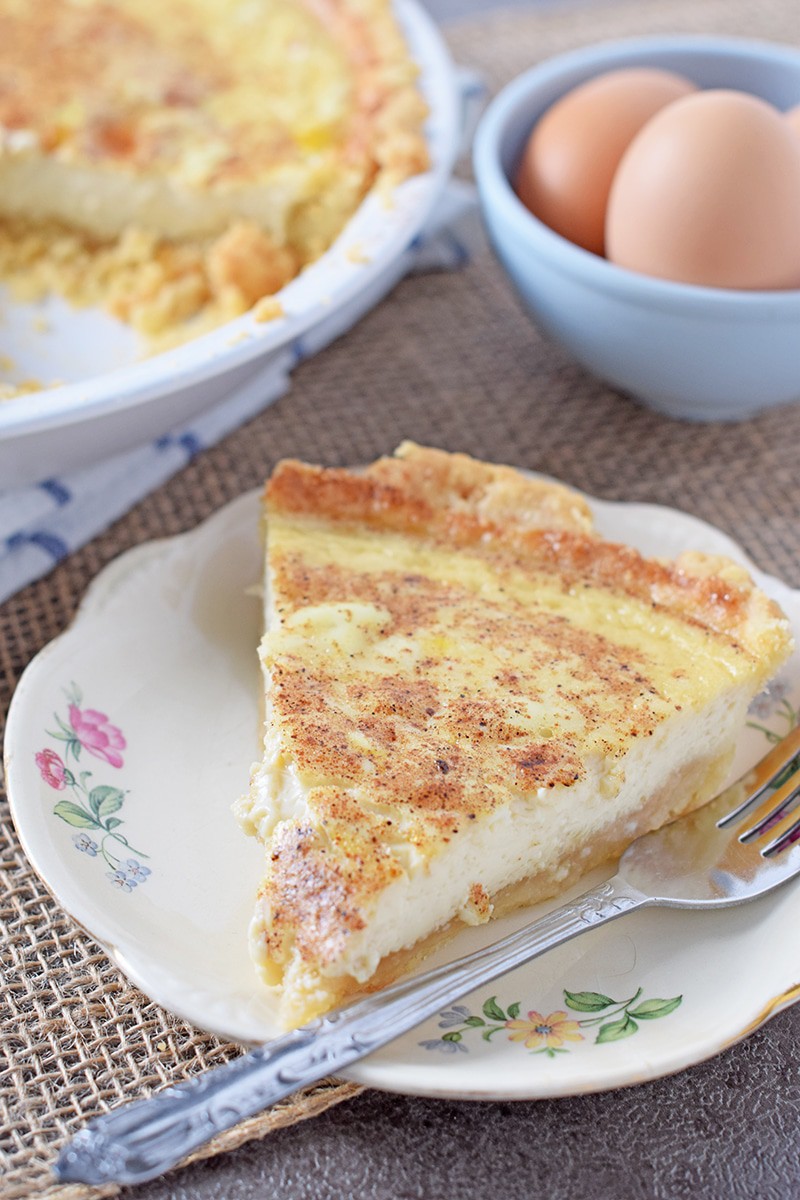
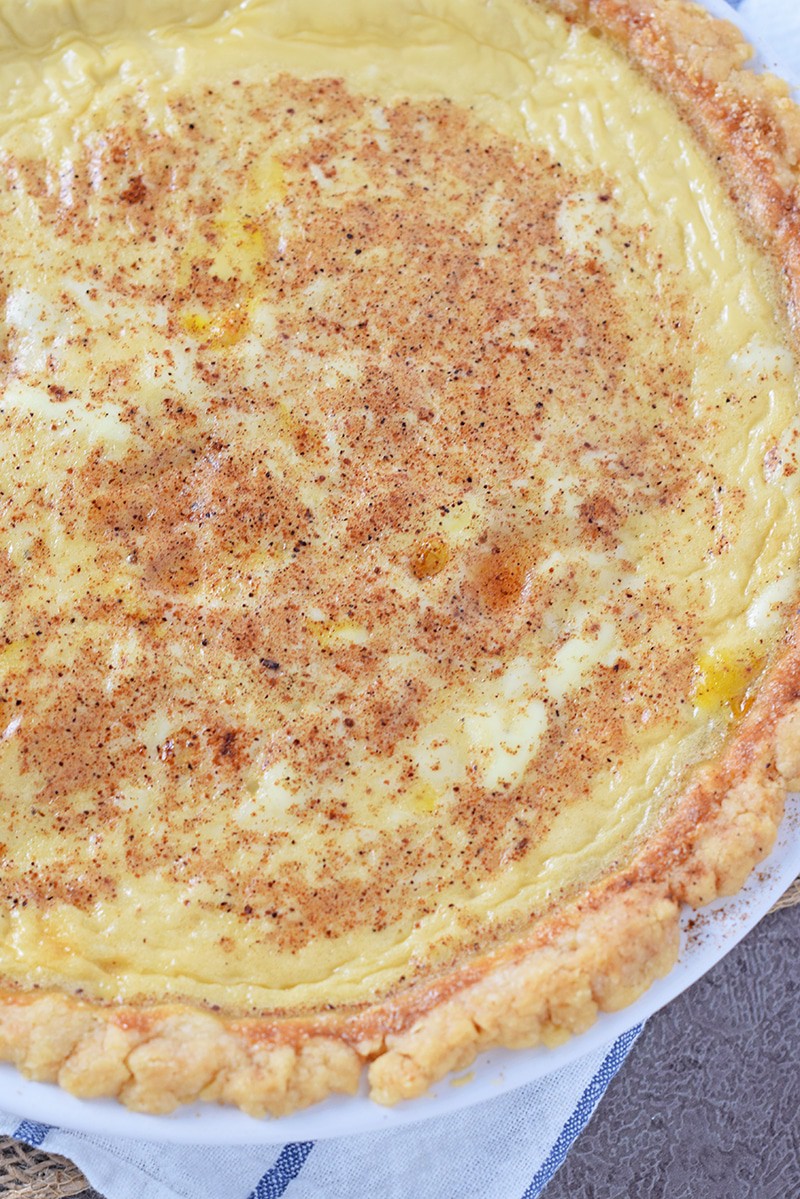
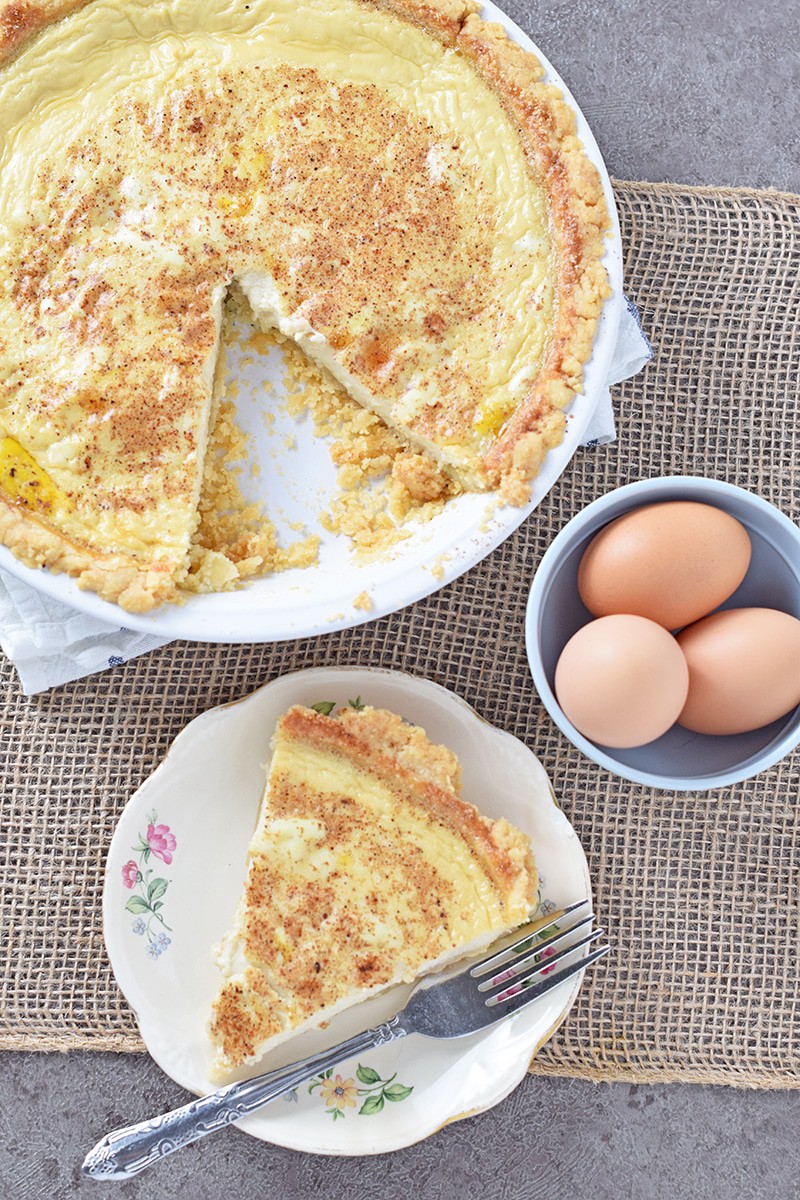
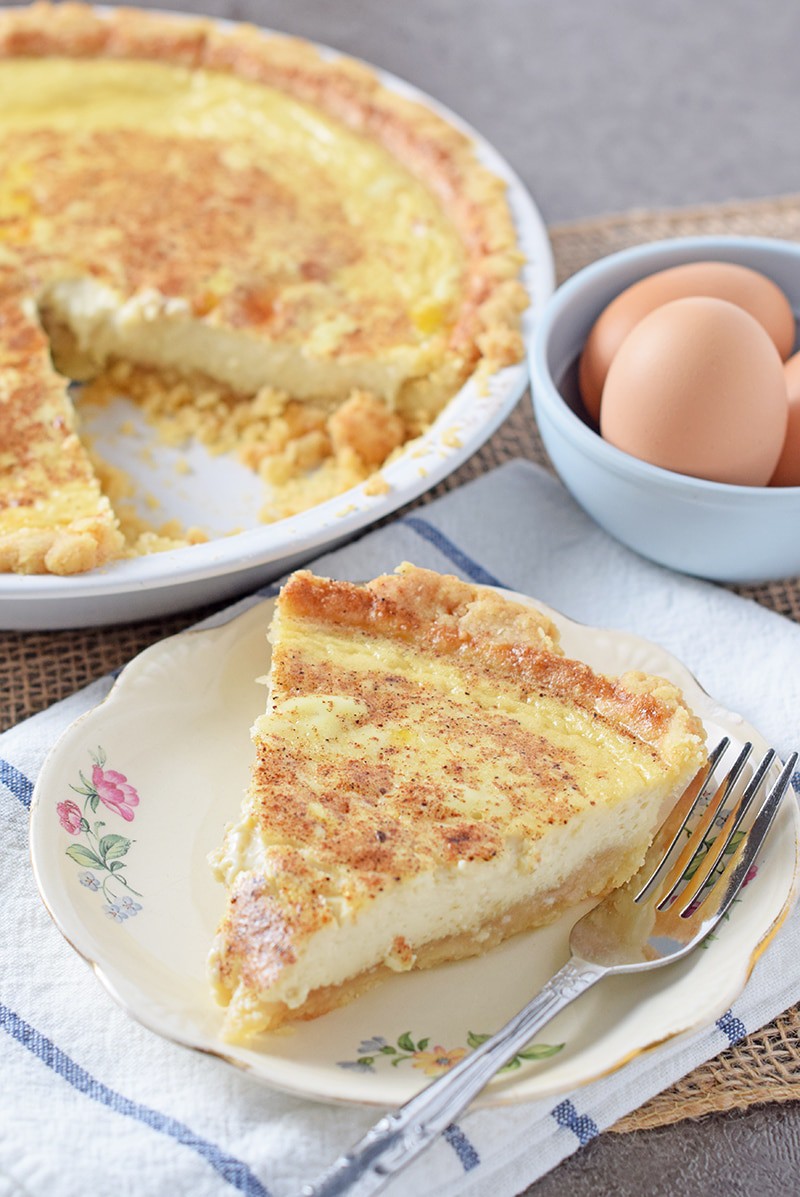
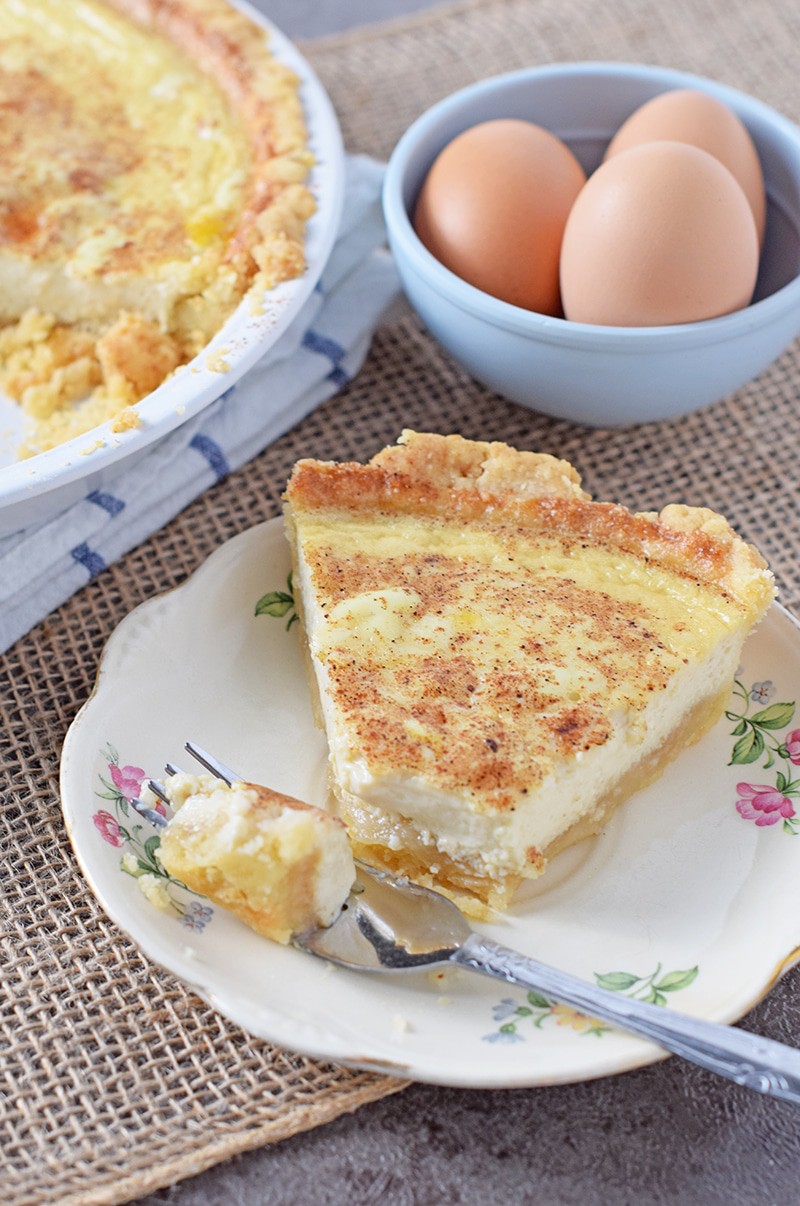
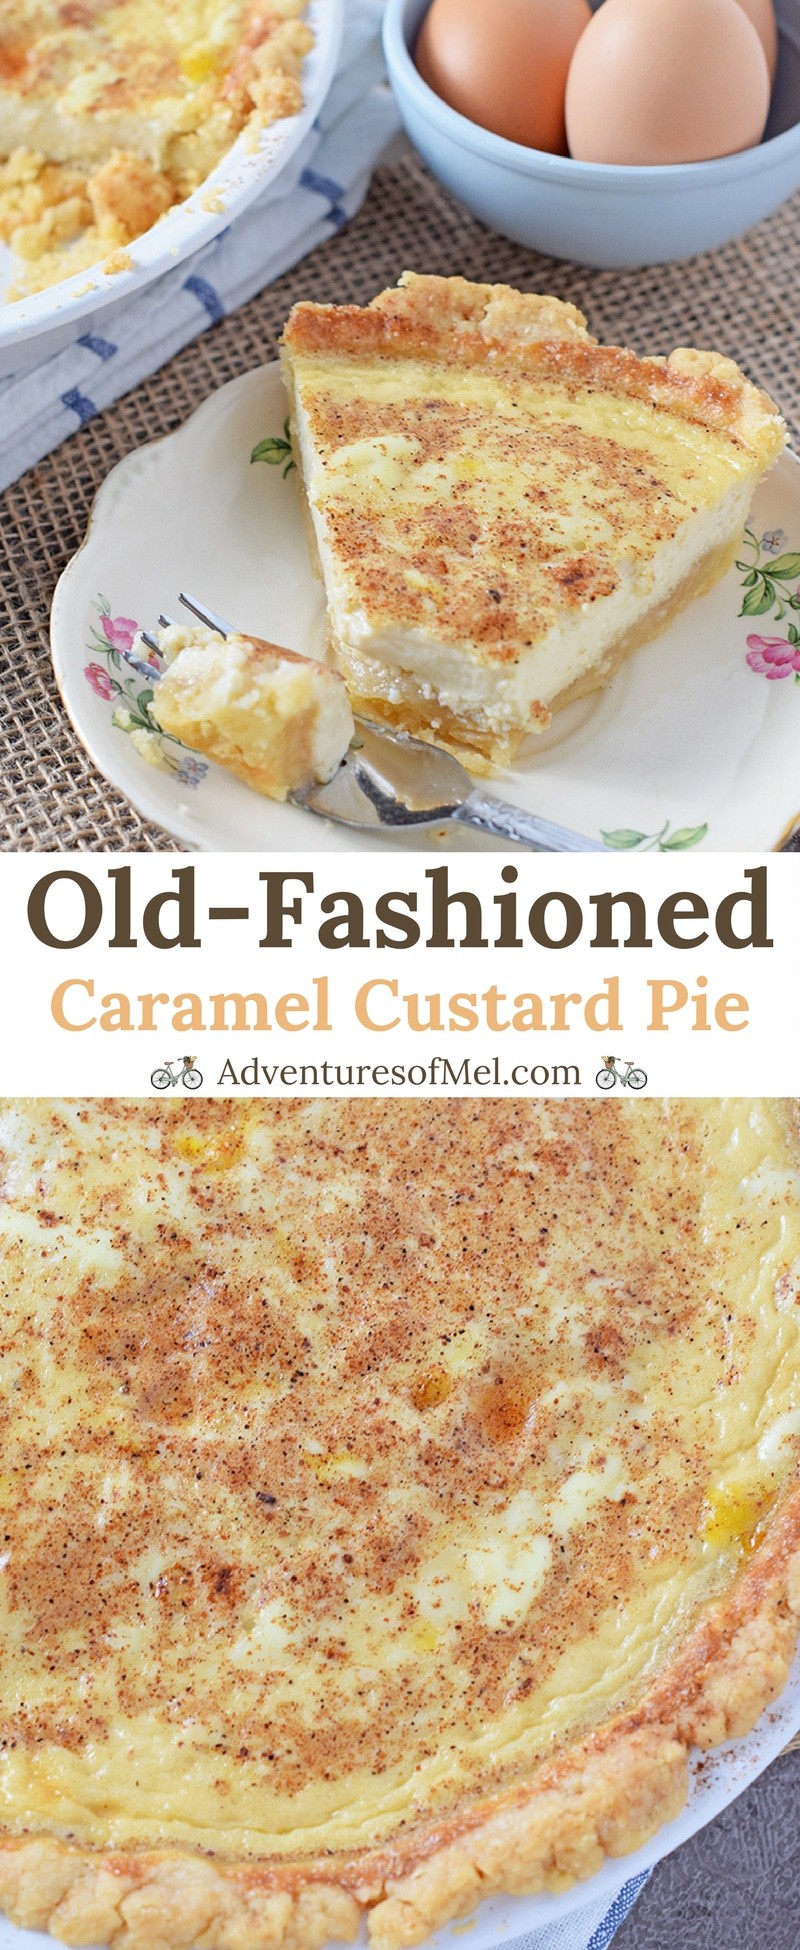
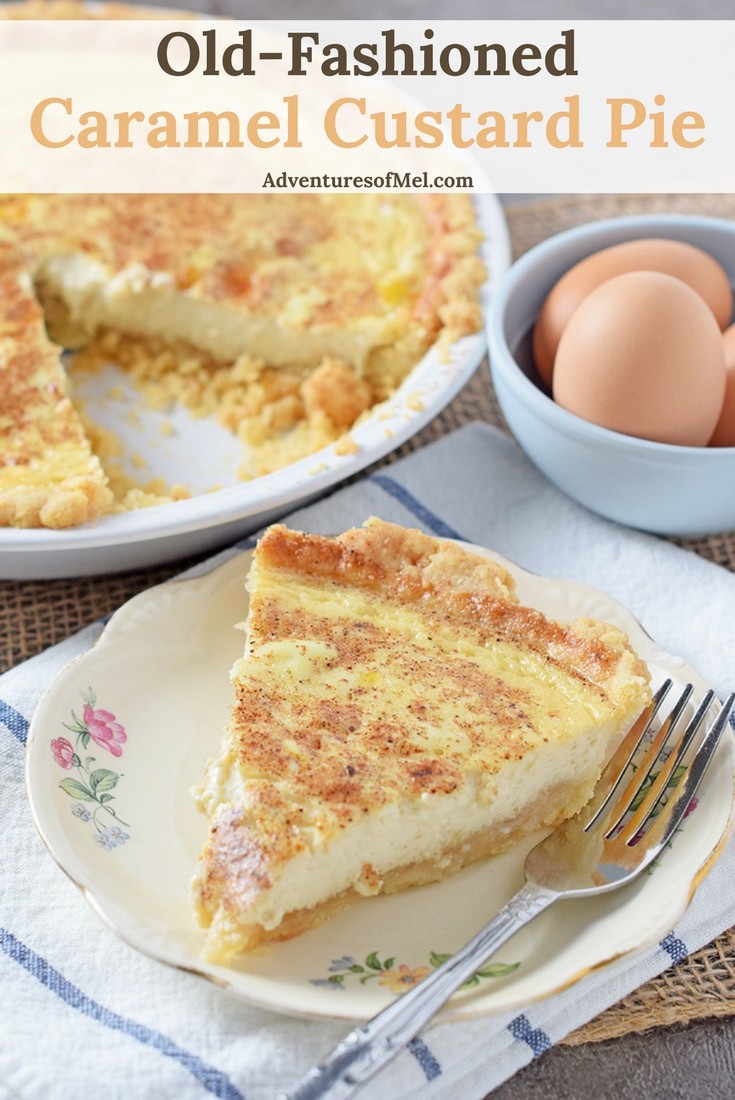
Made with an easy shortcut pie crust and a brown sugar caramel twist, this caramel custard pie is a delicious dessert and a family favorite recipe!
Caramel Custard Pie is not your ordinary custard pie. It has a caramel twist that adds an oomph to traditional custard pie, and it’s easily become another one of my family’s favorite pie recipes.
I remember my mom making custard and putting it in the oven to cook; much like pecan pie, it seemed to be one of her favorite desserts to make. Making this pie always brings back those memories of Mom in her kitchen cooking up a scrumptious dessert.
The brown sugar mixture I press into my crust gives this pie a great flavor, almost like a graham cracker crust but a different texture altogether.
While most custard pie recipes say to chill for an hour or two (and this one is delicious when it’s been chilled overnight), I enjoy this pie just as much when it’s warm from the oven. Mmmm, mmmm good.
WHERE CAN I FIND THE RECIPE FOR CARAMEL CUSTARD PIE?
If you’d rather skip all of my baking tips, important baking info for this recipe, and similar recipe ideas – and get straight to the scrumptious caramel custard pie recipe – just scroll down to the bottom, where you’ll find a printable recipe card.
Mix the brown sugar, granulated sugar, and flour together.
Then lightly press the brown sugar mixture into your crust, pressing into the bottom and sides. You may have a little bit left over.
For the filling, mix together the eggs, vanilla, caramel extract, milk, sugar, and salt. Don’t let the mixture become too frothy; just make sure it’s blended well.
Pour the egg mixture into your pie crust.
Sprinkle the top of the pie with a pinch of nutmeg.
Bake at 350° for about 45 minutes to an hour. You may want to use a pie shield to keep the edges of your pie from burning.
Insert a knife or baking tester in the center; if it comes out clean, the pie should be done.
Let the pie cool; it may sink just a bit.
Store in the refrigerator, and you may even want to chill overnight before serving. Serve alone or with whipped cream and fresh fruit. Enjoy!
Caramel Custard Pie, made with an easy shortcut pie crust and a brown sugar caramel twist. Delicious dessert and a family favorite recipe!
Crust:
2 cups all-purpose flour
2 teaspoons cane sugar
1 1/4 teaspoons salt
2/3 cup canola oil
3 tablespoons whole milk ( )
1/4 cup light brown sugar
1/4 cup cane sugar
2 teaspoons all-purpose flour
Custard Pie Filling:
3 large eggs
1 teaspoon vanilla extract
1 teaspoon caramel extract
1 3/4 cups whole milk
3 tablespoons cane sugar
1 teaspoon salt
1/2 teaspoon ground nutmeg
Pre-heat the oven to 350° F.
Crust:
Mix together 2 cups flour, 2 teaspoons cane sugar, and salt.
In a separate bowl (or glass measuring cup), whisk together the oil and milk.
Add the oil mixture to the dry ingredients, and stir together with a fork until the flour is all moistened.
Press the dough evenly into an un-greased 9-inch pie plate, covering the bottom and the sides. If you want to crimp the edges, go right ahead.
In a small mixing bowl, mix the brown sugar, 1/4 cup cane sugar, and 2 teaspoons flour together.
Then lightly press the brown sugar mixture into the crust, pressing into the bottom and sides. You may have a little bit left over.
Custard Pie Filling:
In a large mixing bowl, mix together the eggs, vanilla, caramel extract, milk, sugar, and salt. Don't let the mixture become too frothy; just make sure it's blended well.
Pour the egg mixture into your pie crust.
Sprinkle the top of the pie with the ground nutmeg.
Bake at 350° F for about 45 minutes to 1 hour. You may want to use a pie shield to keep the edges of your pie from burning. When a knife inserted in the center comes out clean, the pie should be done.
Remove the pie from the oven, and let it cool on a wire rack; it may sink just a bit.
Store the pie in the refrigerator, and you may even want to chill overnight before serving. Serve alone or with whipped cream and fresh fruit.
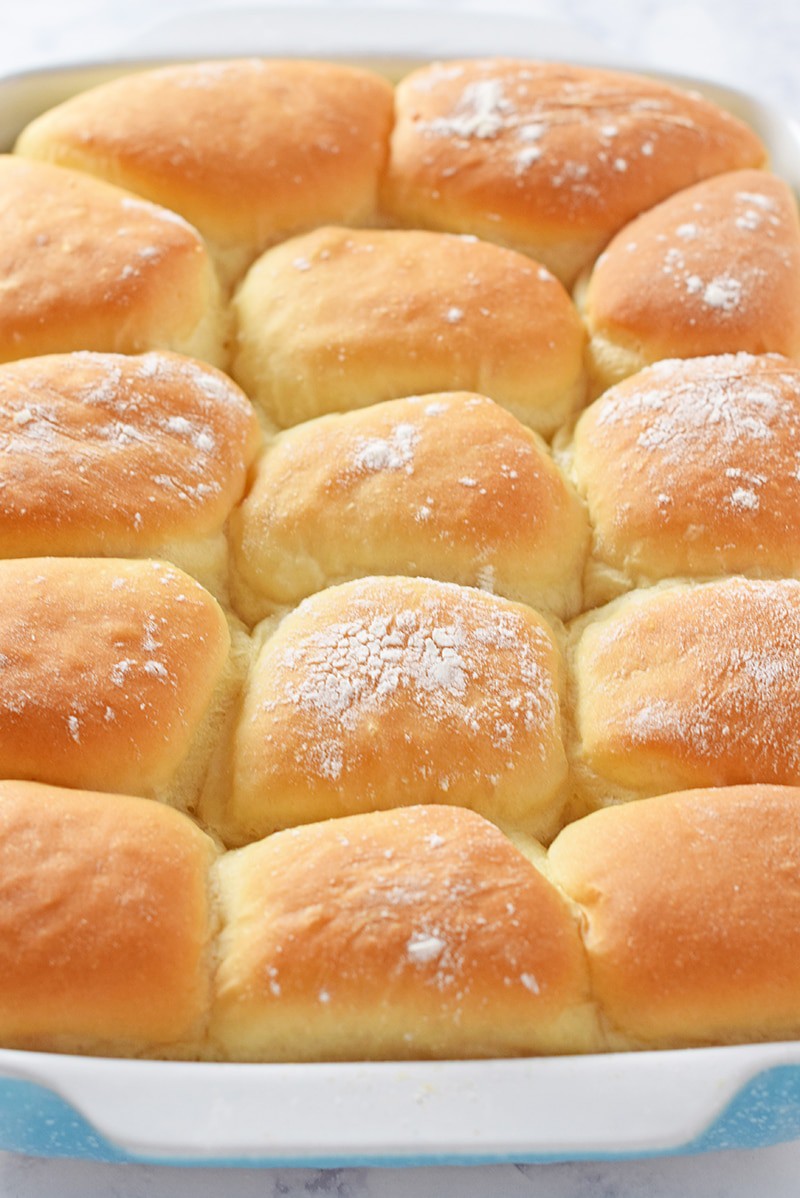
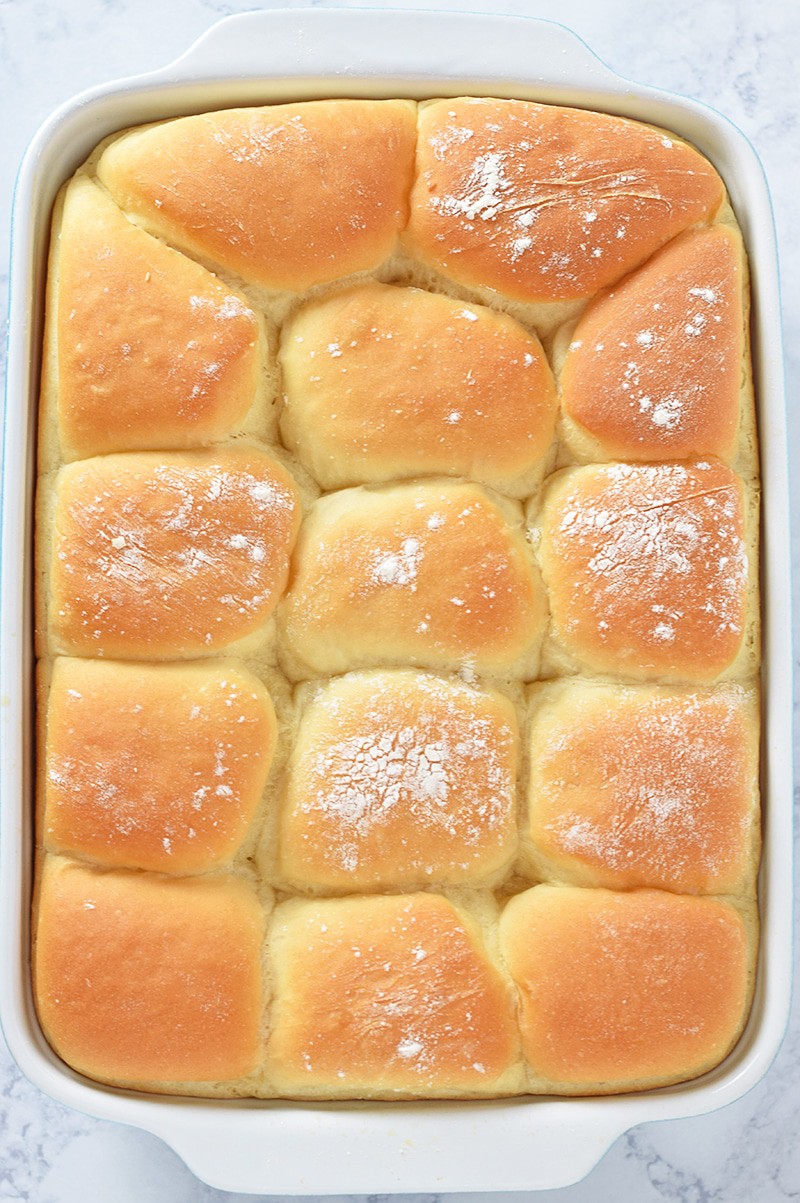
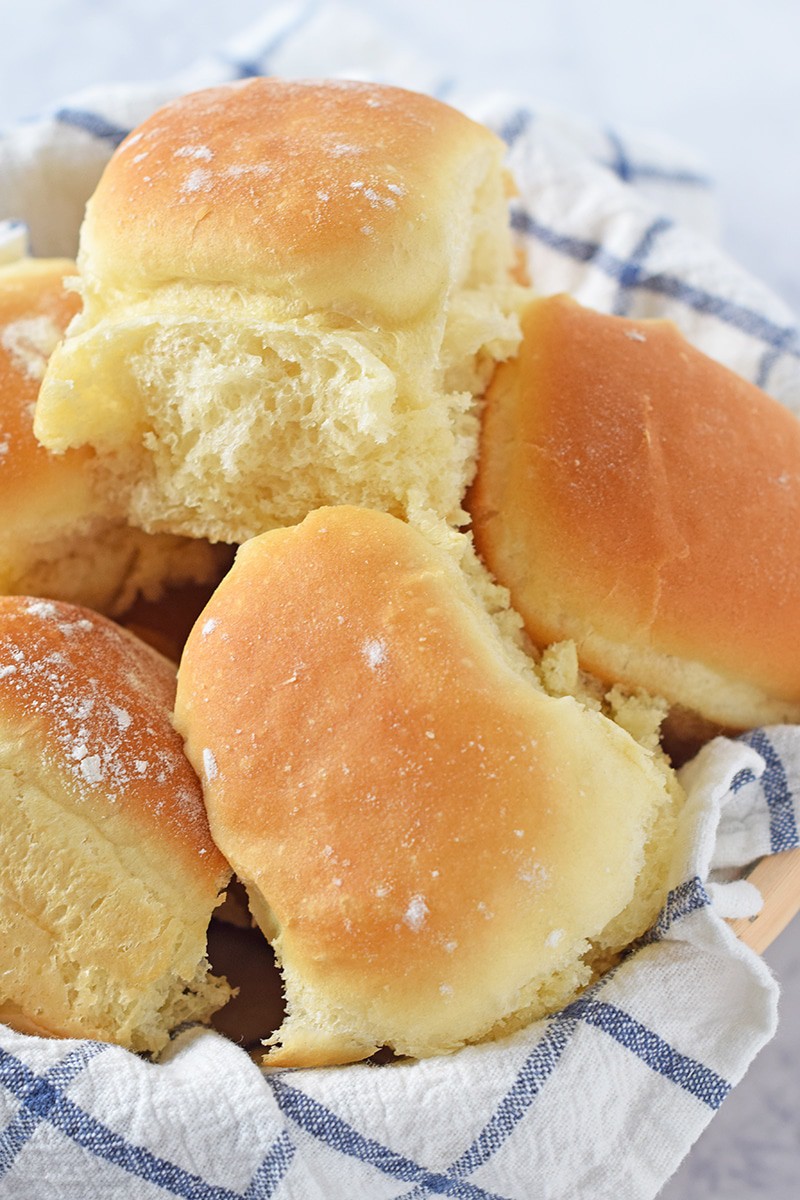
How to make Grandma’s homemade yeast rolls. Soft and buttery, these are easy yeast rolls for beginners, and a family favorite holiday dinner recipe. Enjoy fluffy dinner rolls at Thanksgiving, Christmas, and Easter!
Homemade dinner rolls are a staple for special occasions and holiday dinners in my family. My grandma made these old fashioned yeast rolls every Thanksgiving, Christmas, and Easter. Sometimes we just make them for our weekly slow cooker pork roast!
Just baking up a batch of these golden beauties brings back so many memories. I learned to make this dinner rolls recipe from my mom, just like she learned from her mom.
Why I Love Making My Grandma’s Yeast Rolls
There are loads of reasons to love Grandma’s yeast rolls…
I’m not going to say this is a quick recipe because it’s definitely not, but I will say it’s easy. While the recipe is a bit time-consuming, and you do have the added time of waiting for the dough to rise, these are easy yeast rolls for beginners to make and a great recipe to use for learning purposes.
It’s definitely a recipe I cherish and one I’m passing down to my own boys, so that Grandma’s legacy lives on. My oldest makes these rolls even better than I do; when he bakes them, they always turn out so light and fluffy.
We make this recipe for dinner rolls with all our favorite Easter recipes, Thanksgiving recipes, and Christmas recipes, and sometimes in between. We have to pace ourselves, because some of us will eat rolls with every meal when we have them around.
Ingredients and Substitutions Notes
Gather your ingredients before you get started.
Active Dry Yeast – While you can use instant yeast, I recommend using active dry yeast, which will ensure a longer rise time, and in turn, a batch of very soft, pillowy rolls. Whether you buy jars or packets of yeast, just know that 1 packet of yeast equals about 1 tablespoon.
Cane Sugar – You can also use granulated sugar
Warm Water – Not too hot, because you don’t want to kill the yeast. You want it slightly warm, so almost lukewarm.
Unsalted Butter – You can also sub shortening if you don’t have unsalted butter. My grandma actually used shortening; in fact, sometimes we would use regular shortening, and sometimes butter shortening (example: butter Crisco).
Large Eggs
All-Purpose Flour – I recommend using a really good unbleached all-purpose flour to make these rolls. You can also use a good bread flour. We’ll talk more about the differences below.
Sea Salt – I prefer using Redmond Fine Sea Salt.
How to Make Grandma’s Homemade Yeast Rolls
While there are a few steps to making dinner rolls from scratch, you’ll find the process is really pretty easy.
Activate the Yeast
Stir the yeast, sugar, and warm water in a glass measuring cup or small bowl.
Set aside in a warm place to rise. It will bubble and rise up.
Mix the Dough
While waiting for the yeast mixture to rise, cream (or mix together) the sugar and unsalted butter in a large mixing bowl.
Beat in the eggs, one at a time.
Add the bubbly yeast mixture to the butter mixture, along with an additional 1 1/2 cups warm water.
In a separate bowl, sift together the flour and salt.
Gradually add the flour in, and mix well. For this step, I like to use the dough hook on my stand mixer.
Turn the dough into a large greased bowl or stockpot, and let it rise to the top or almost to the top (it can take 2 to 3 hours to double in size). Keep the bowl or pan covered with a lightweight kitchen towel.
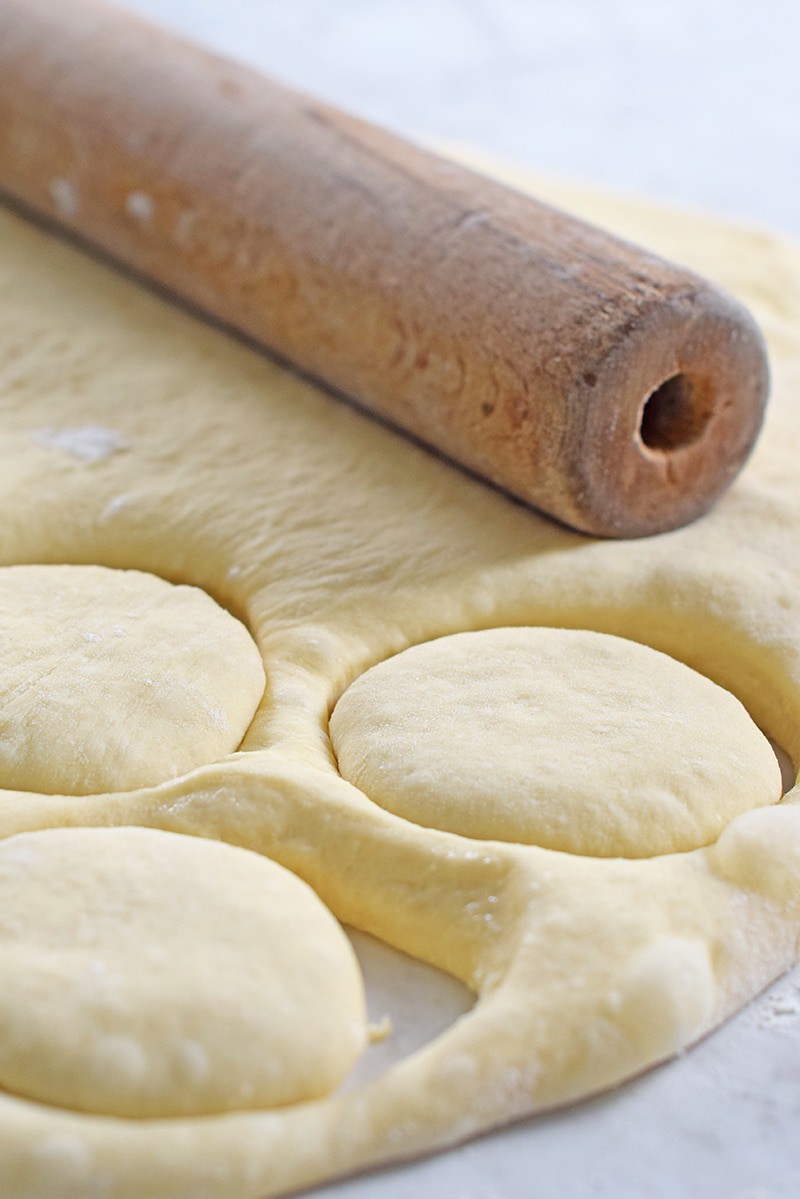
How to Shape the Dinner Rolls
Once the dough has risen, turn it out onto a floured surface. Coat generously with flour by turning and shaping. No kneading is necessary, though I still like to knead it a bit just for fun.
Roll out the dough to about a 1 to 2 inch thickness.
Then cut round rolls with a cup, glass, or biscuit cutter.
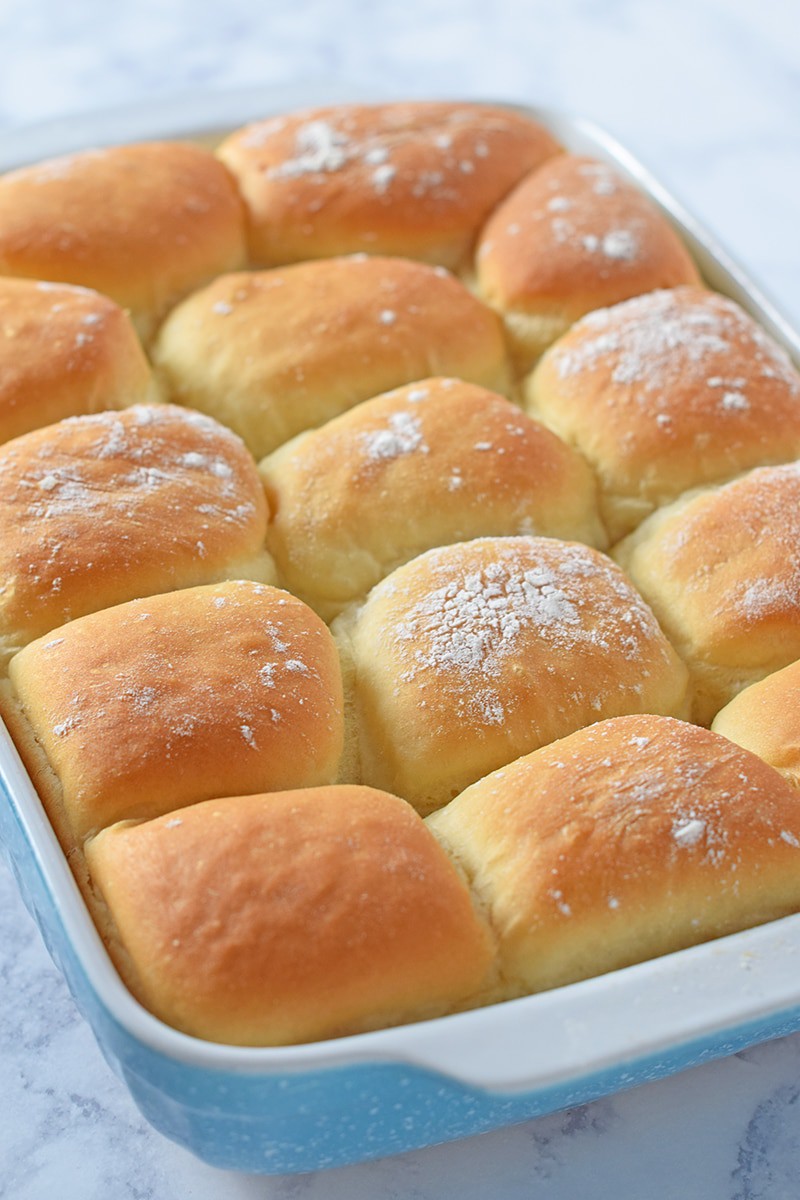
Bake the Rolls
Place the rolls, side by side against each other, in greased baking pans, and let them rise (this will probably take another 1 to 2 hours).
Bake the rolls for about 20 minutes (maybe a little longer) at 350°F. Halfway through baking, you may need to cover the rolls with foil, so they don’t brown too much before they bake through.
When they’re done baking, remove the rolls from the oven and allow them to cool.
What to Serve with Yeast Rolls
Of course, I usually can’t resist enjoying a hot roll with warm melty butter. They’re so delicious, especially since I learned how to make salted butter; homemade butter is the best!
Which is better for dinner rolls, all-purpose flour or bread flour?
We’ve used both kinds of flour, and while I’ve always used all-purpose flour, my son always uses bread flour. It’s a personal preference we both have. However, here’s the truth, so you can decide which is best for you. Bread flour contains more protein, which equals more gluten, which equals more elasticity and stretchability. It’s especially good for making actual loaves of bread, baguettes, etc. All-purpose flour will create a tighter crumb; it’s also a great choice in roll recipes that require more butter and sugar, which both make a difference in the final texture of the bread when baked. King Arthur actually has a really great article about whether bread flour really does make a difference when baking bread. I encourage you to read it if you’d like to learn more.
Why aren’t my yeast rolls light and fluffy?
Dry, dense rolls can happen when we 1) add too much flour; or 2) don’t allow enough rise time. My grandma always wanted us to sift the flour at least 7 times while baking cakes and bread. While I’ve never done that, sifting does make a difference. And allowing that rise time so your rolls get big and puffy and pillowy soft makes a huge difference in the final baked bread roll.
Why did my homemade rolls get hard?
Probably over kneading. This recipe doesn’t require any kneading at all, so there’s no need to even worry about this.
Should you brush yeast rolls before baking?
Totally up to you, but I never have with this recipe. My oldest does. He likes a shiny golden top to his bread rolls. An egg yolk will help the rolls to brown, but you really don’t need any help with these rolls browning, as the oven temp will do just fine on its own; in fact, you may have to cover with foil to avoid too much browning. Egg white will give the shine. You can even brush with melted butter after baking for added flavor and a bit of shine.
Can you freeze homemade rolls?
Yes, you can. You can either freeze the shaped unbaked rolls, covered in an airtight baking pan; then thaw before baking as usual. Or you can freeze the baked rolls in an airtight container; then thaw and warm before serving.
If you try this recipe, why not leave a star rating in the recipe card right below and/or a review in the comment section further down the page? I always appreciate your feedback. You can also follow me on Pinterest, Facebook, Instagram, and YouTube. And subscribe to my email list too!
Grandma’s Homemade Yeast Rolls
How to make Grandma's homemade yeast rolls. Soft and buttery, easy yeast rolls for beginners, a family favorite holiday dinner recipe.
Glass Measuring Cup
Mixer
Large Mixing Bowl
Sifter
Rolling Pin
Stockpot
Biscuit Cutter
Baking Pans
1 tablespoon active dry yeast
1 teaspoon cane sugar
1/2 cup warm water
2/3 cup cane sugar
3 tablespoons unsalted butter (softened)
3 large eggs
1 1/2 cups warm water
6 cups all-purpose flour
3 teaspoons sea salt
Whisk together the yeast, sugar, and warm water in a glass measuring cup or small bowl. Set aside in a warm place to rise. It will bubble and rise up.
While waiting for the yeast mixture to rise, cream (or mix together) the sugar and unsalted butter in a large mixing bowl.
Beat in the eggs, one at a time.
Add the bubbly yeast mixture to the butter mixture, along with an additional 1 1/2 cups warm water.
In a separate bowl, sift the flour and salt together.
Gradually add the flour mixture into the wet ingredients, and mix well. For this step, I like to use the dough hook on my stand mixer.
Turn the dough into a large greased bowl or stockpot, and let it rise to the top or almost to the top (it can take 2 to 3 hours to double in size). Keep the bowl or pan covered with a lightweight kitchen towel.
Once the dough has risen, turn it out onto a floured surface. Coat generously with flour by turning and shaping. No kneading is necessary, though I still like to knead it a bit just for fun.
Roll out the dough to about a 1 to 2 inch thickness.
Then cut round rolls with a cup, glass, or biscuit cutter.
Place the rolls, side by side against each other, in greased baking pans, and let them rise (this will probably take another 1 to 2 hours).
Pre-heat the oven to 350° F.
Bake the rolls for about 20 minutes (maybe a little longer) at 350°F. Halfway through baking, you may need to cover the rolls with foil, so they don't brown too much before they bake through.
When they're done baking, remove the rolls from the oven and allow them to cool. Of course, I usually can't resist enjoying a hot roll with warm melty butter. They're so delicious!
*Grandma used shortening in her rolls; I prefer to use butter instead.
Breads & Muffins
American
bread roll recipe, bread rolls, dinner roll recipe, dinner rolls, dinner rolls from scratch, dinner rolls recipe, easy yeast rolls for beginners, grandma’s homemade yeast rolls, grandma’s yeast rolls, homemade rolls, old fashioned yeast rolls, recipe for dinner rolls, yeast roll recipe, yeast rolls
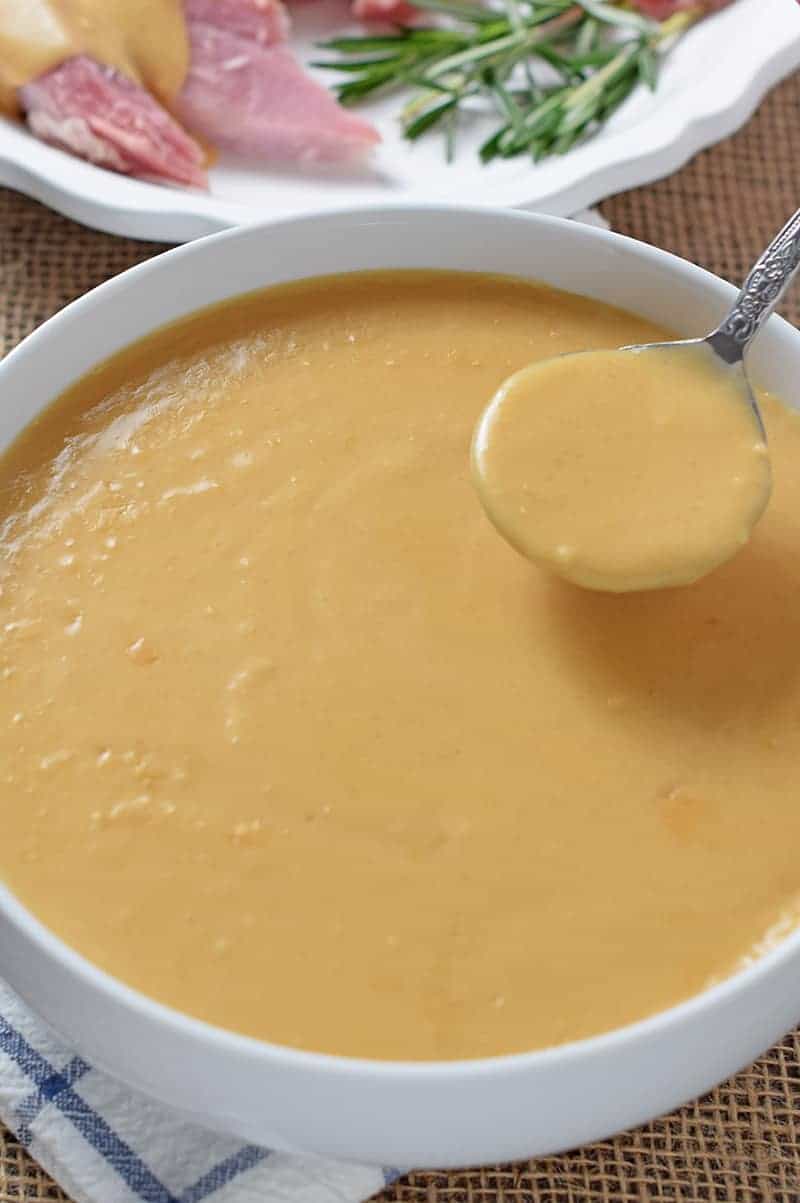
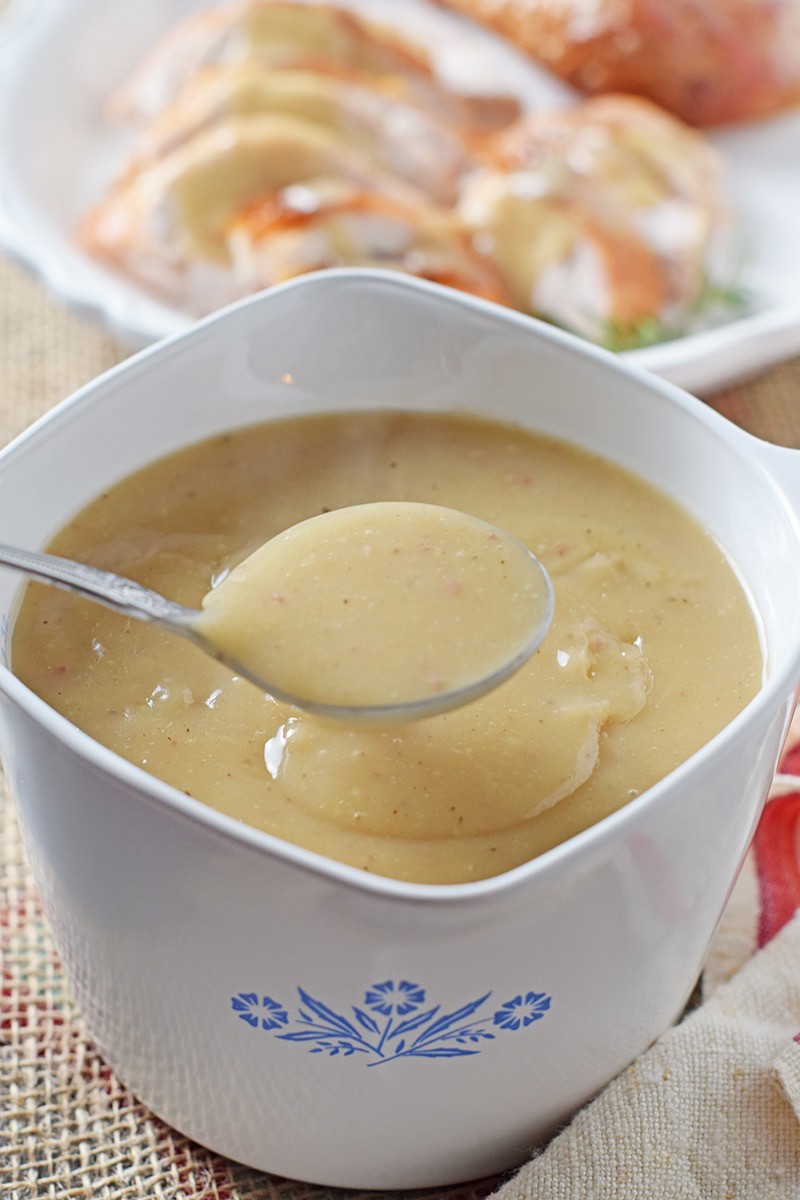
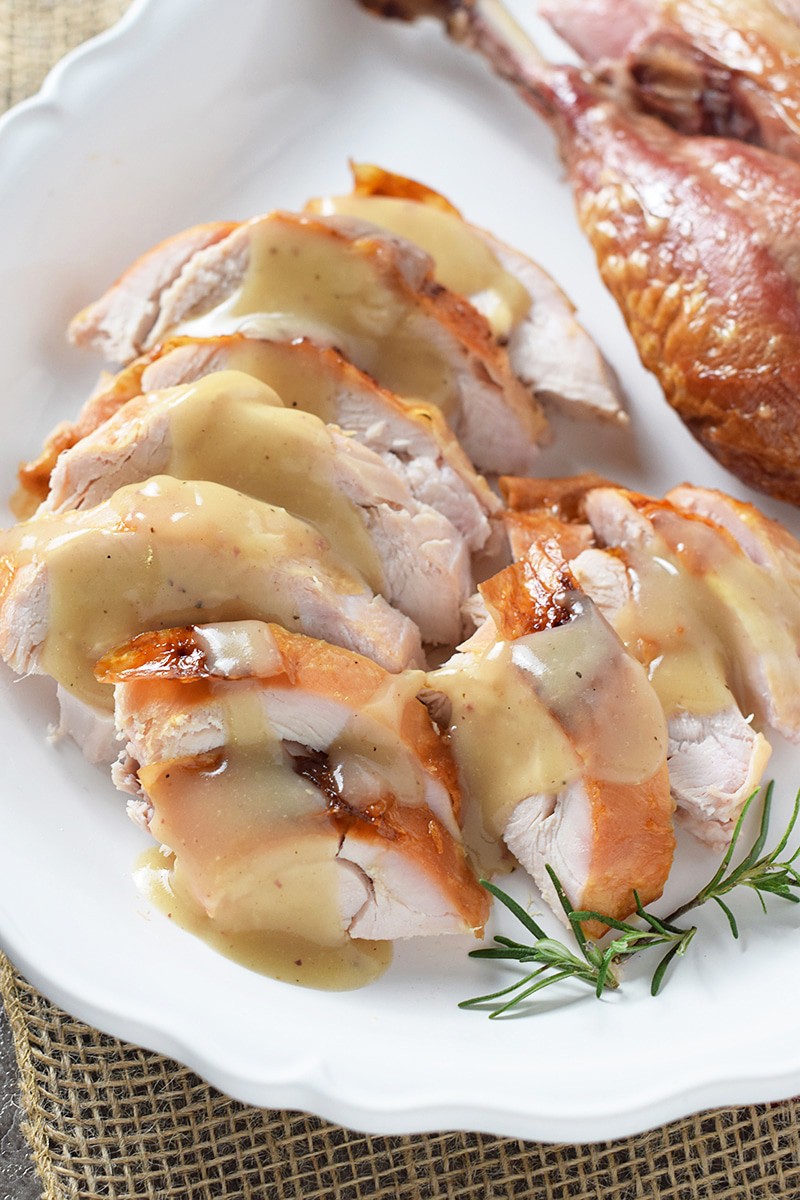
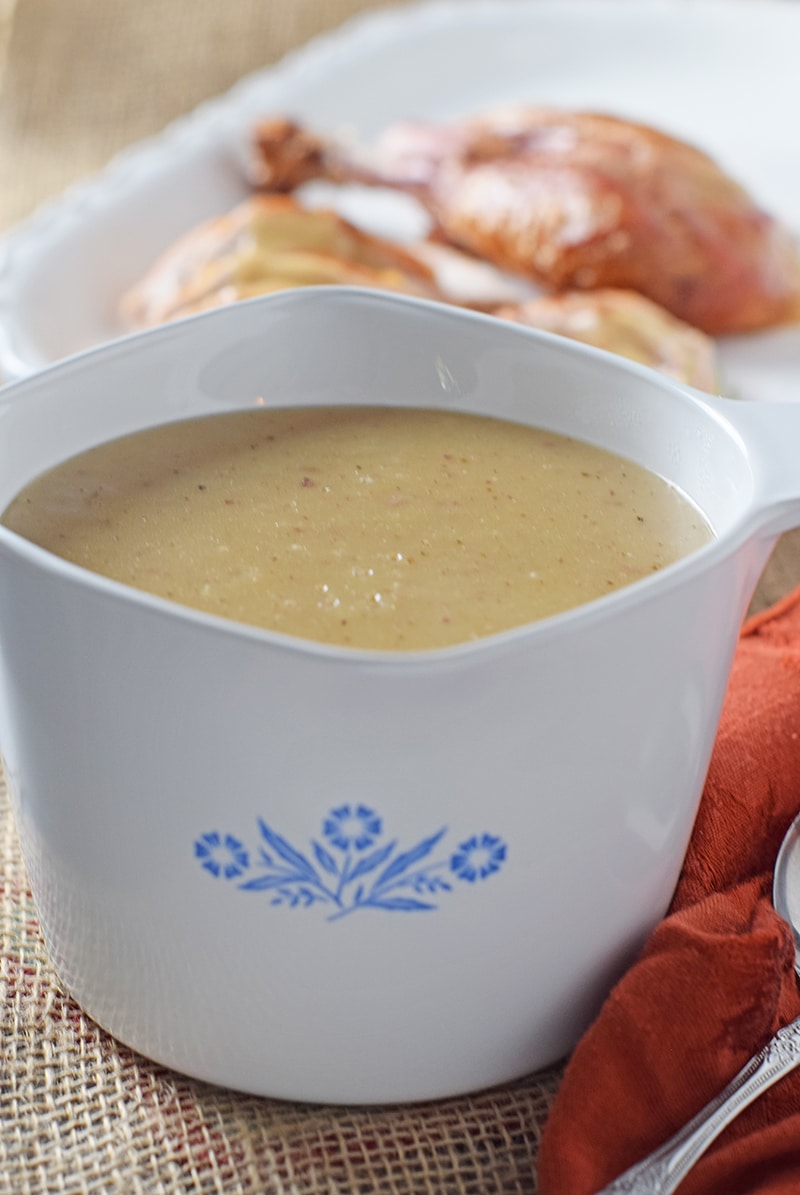
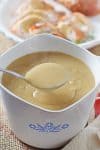
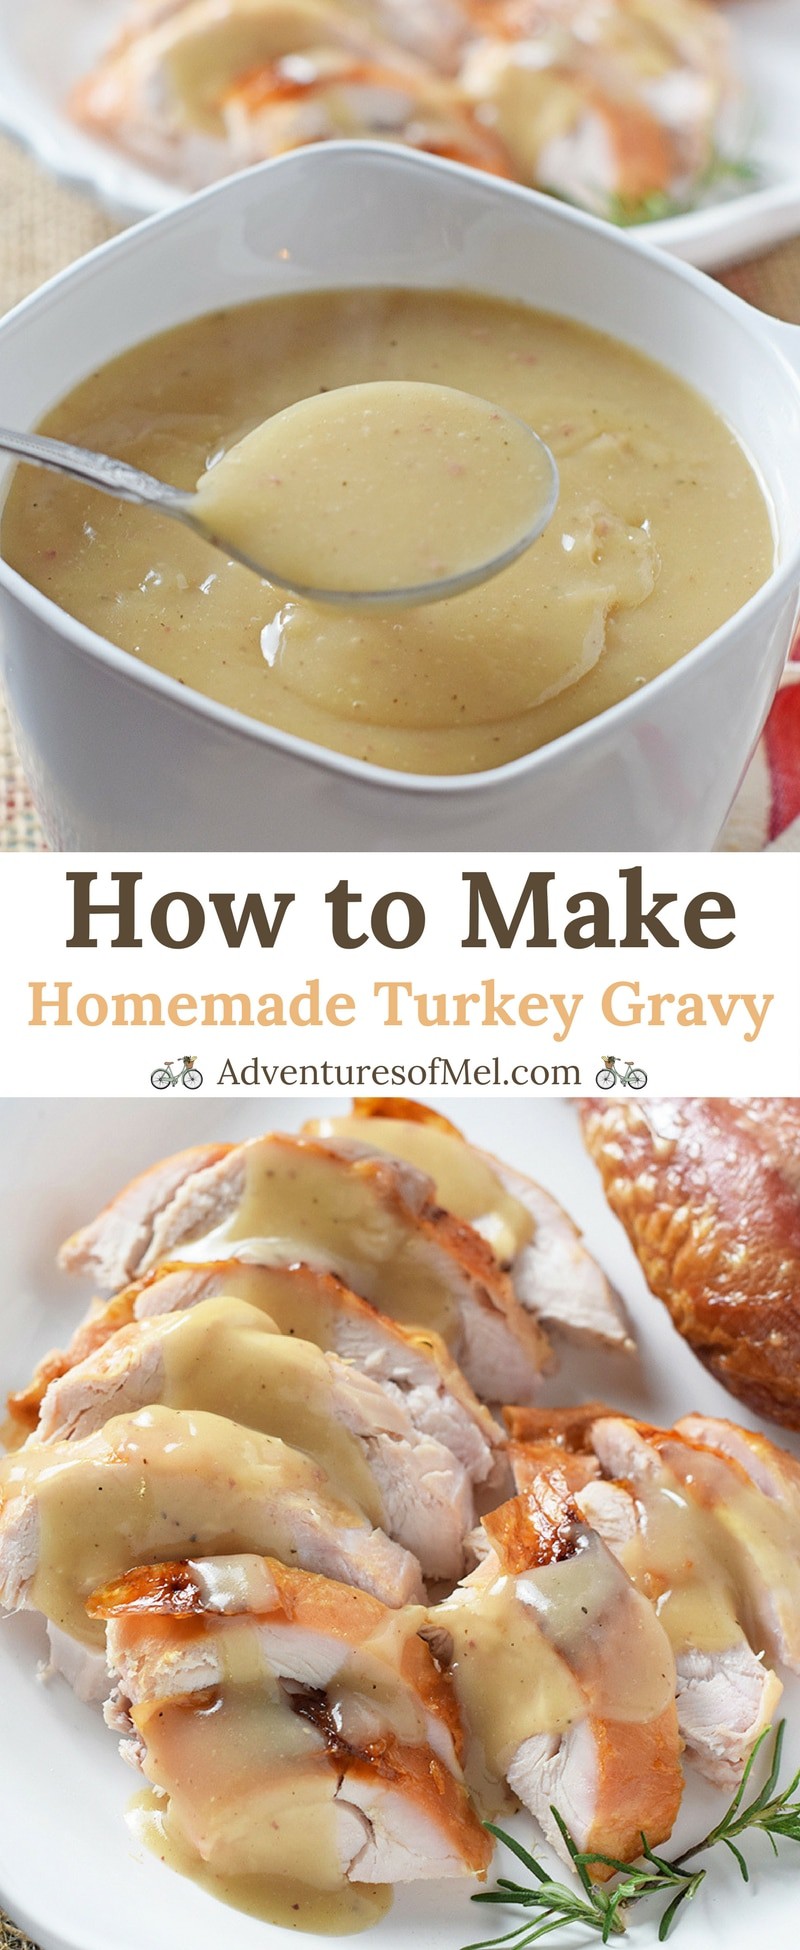
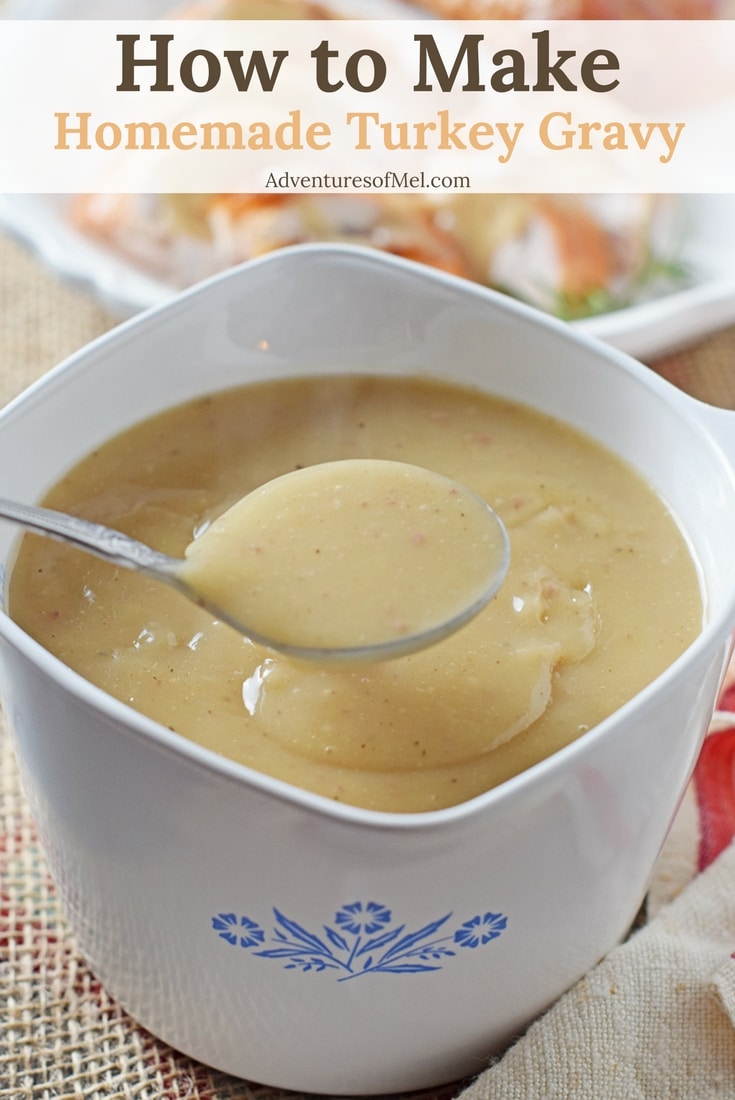
Made with leftover turkey drippings and neck broth, homemade turkey gravy is a delicious side dish with turkey, mashed potatoes, and all the fixings!
Homemade Turkey Gravy, like ham gravy at Christmas, is a staple side dish with Thanksgiving dinner. It just wouldn’t be the same without gravy to smother over our sliced turkey, stuffing, and mashed potatoes.
The main flavoring for the gravy comes directly from the turkey itself. So you’ll definitely want to keep in mind that if you brine your turkey or add a glaze of any kind, that flavoring will go into your gravy. For example, if you’re using a sweet brine, your gravy will be a little sweeter.
It really only takes a few minutes to make homemade gravy, so it’s usually the last dish we make before we all sit down to eat. But it’s delicious and definitely worth the minimal effort.
I’m definitely adding this to my favorite Thanksgiving Recipes and Christmas Recipes, where you’ll find all the Thanksgiving inspiration you need in one place.
Tips for how to make Homemade Turkey Gravy
Mix together the flour and water in a small mixing bowl.
Gradually whisk together the flour/water mixture with the neck broth and turkey drippings in a large saucepan on medium heat. Take your time to avoid any lumps in your gravy. It’s pretty much a given that you may have a few lumps, but you can minimize them by whisking the gravy.
Add salt and pepper to taste.
Continue whisking and stirring the gravy until it begins to thicken and is ready to serve.
Serve with turkey, mashed potatoes, and stuffing… The works!
Homemade Turkey Gravy, made with leftover turkey drippings and neck broth. Delicious side dish with turkey, mashed potatoes, and all the fixings!
1 cup all-purpose flour
1 cup water
1 cup neck broth
1 cup turkey drippings
Salt (to taste)
Ground black pepper (to taste)
Whisk together the flour and water in a small mixing bowl.
Gradually whisk together the flour/water mixture with the neck broth and turkey drippings in a large saucepan on medium heat.
Continue whisking and stirring the gravy until it begins to thicken and is ready to serve.
Add salt and pepper, to taste.
Serve with turkey, mashed potatoes, and stuffing.
*Take your time whisking in the flour/water mixture to avoid any lumps in your gravy. It’s a given that you’ll have a few lumps, but you can minimize them by whisking the gravy.
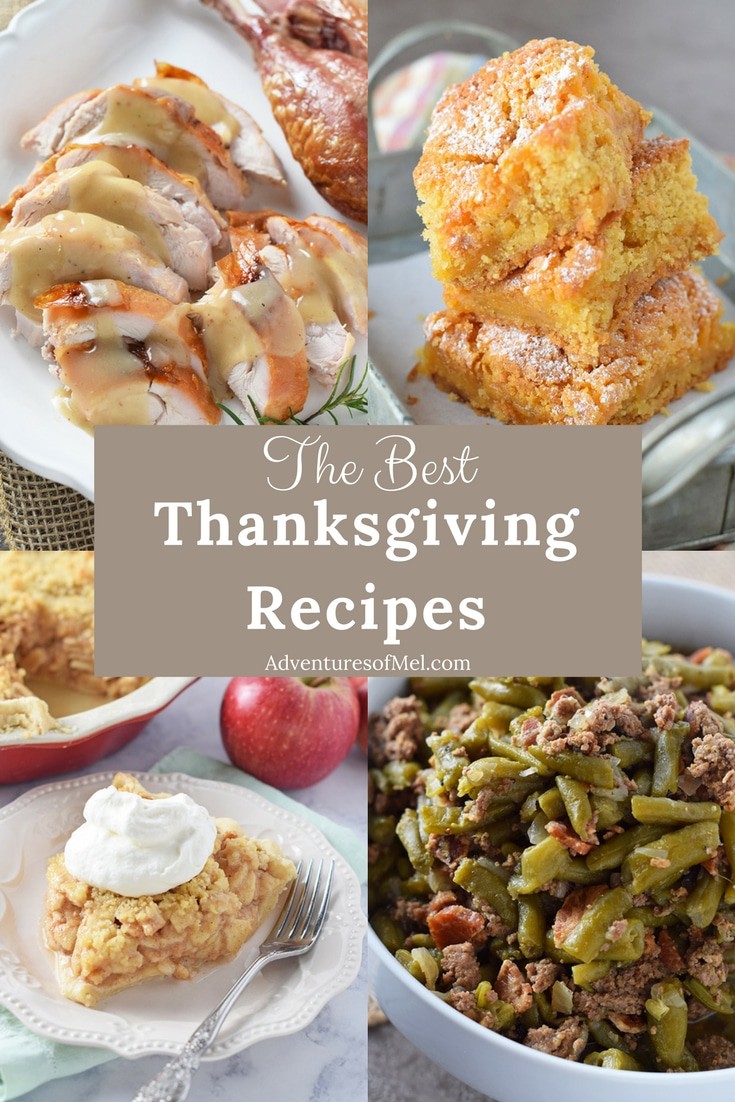
Thanksgiving recipes to add to your holiday dinner menu, including the best turkey ever, delicious side dish recipes, and scrumptious desserts!
Thanksgiving brings back so many memories for me. Many of those memories revolve around all the different foods we enjoyed together on that one special day of the year.
Of course, I love baking, so you’ll find quite a few baking recipes on this list. Who can resist dessert? All sorts of delicious desserts!
The recipes I’ve included on this list will fill your Thanksgiving menu, whether you’re cooking for your family or making a huge Thanksgiving dinner to feed a crowd.
Thanksgiving Dinner Recipes
Here is a simple compilation of my favorite Thanksgiving recipes. This list has a little bit of something for everybody.
Thanksgiving Main Dish Recipes
Here are some of my favorite Thanksgiving main dishes. These simple dishes are perfect for holiday family gatherings!
[wprm-recipe-roundup-item id=”40842″ name=”Maple Bourbon Brined Roasted Turkey” summary=”<p>How to make the most delicious, moist roasted turkey for dinner and holiday celebrations.</p>” button=”Get the Recipe”]
[wprm-recipe-roundup-item id=”42281″ name=”How to Cook a Ham in the Oven” summary=”<p>Everything you need to know about how to cook a ham in the oven. This baked spiral ham recipe with an easy, simple glaze is perfect for family dinners and holidays.</p>”]
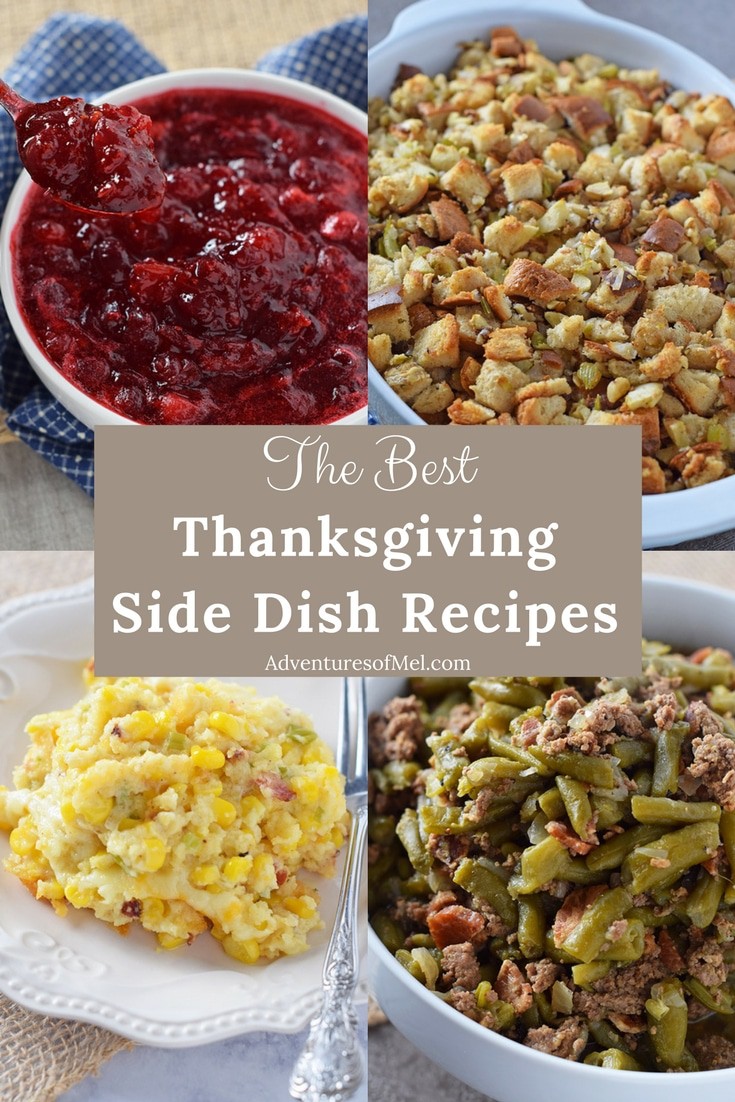
Thanksgiving Side Dish Recipes
This list of family-favorite Thanksgiving sides is a great help in planning your family dinner. These recipes will not disappoint!
[wprm-recipe-roundup-item id=”40854″ name=”How to Make Homemade Turkey Gravy” summary=”<p>How to make a delicious gravy from turkey drippings and neck broth. Easy holiday side dish in which nothing goes to waste.</p>”]
[wprm-recipe-roundup-item id=”40864″ name=”Easy Ham Gravy Recipe {How to Make with Drippings}” summary=”<p>How to make an easy homemade ham gravy recipe with leftover ham drippings. Delicious side dish with ham, mashed potatoes, and all the fixings!</p>”]
[wprm-recipe-roundup-item id=”45077″ name=”Easy Chicken Gravy without Drippings” summary=”<p>Simple recipe for how to make easy chicken gravy without drippings. How to turn broth into a delicious homemade gravy in minutes!</p>”]
[wprm-recipe-roundup-item id=”40848″ name=”Apple Walnut Bread Stuffing” summary=”<p>How to make an old-fashioned homemade bread stuffing. A classic Thanksgiving side dish that is a must at every table.</p>”]
[wprm-recipe-roundup-item id=”40395″ name=”How to Make Homemade Cranberry Sauce” summary=”<p>How to make a simple, fresh homemade cranberry sauce using 4 common ingredients. Perfect for the holiday season.</p>”]
[wprm-recipe-roundup-item id=”40882″ name=”Creamy Mashed Potatoes” summary=”<p>How to make creamy mashed potatoes with yellow potatoes, cream, and butter. A classic side dish perfect for a holiday meal.</p>”]
[wprm-recipe-roundup-item id=”43826″ name=”Southern Sweet Potato Casserole with Marshmallows” summary=”<p>How to make the best southern sweet potato casserole with marshmallows and pecans. Classic Thanksgiving side dish you can easily make ahead.</p>”]
[wprm-recipe-roundup-item id=”40426″ name=”Hash Brown Casserole with Corn Flakes” summary=”<p>This traditional potluck recipe is the perfect candidate for any holiday side dish. Cheesy hash brown casserole with Corn Flakes is an easy make-ahead recipe that won't disappoint.</p>”]
[wprm-recipe-roundup-item id=”43872″ name=”Cheesy CrockPot Funeral Potatoes” summary=”<p>How to make cheesy CrockPot funeral potatoes. Easy slow cooker hashbrown casserole, a family favorite side dish, breakfast, or brunch recipe.</p>”]
[wprm-recipe-roundup-item id=”42925″ name=”How to Make Scalloped Potatoes and Ham” summary=”<p>How to make good old scalloped potatoes and ham in a creamy sauce, baked in the oven. This old-fashioned recipe truly deserves a reservation for your dinner table.</p>”]
[wprm-recipe-roundup-item id=”64043″ name=”Homemade Green Bean Casserole” summary=”<p>How to make the best homemade green bean casserole from scratch. Quick and easy holiday side dish recipe that can feed a crowd!</p>” button=”Get the Recipe”]
[wprm-recipe-roundup-item id=”40850″ name=”Instant Pot Southern Green Beans” summary=”<p>How to make the best pot of tender green beans with just bacon, onion, and ground beef. Perfect holiday side dish that everybody will love.</p>”]
[wprm-recipe-roundup-item id=”40860″ name=”Honey Glazed Carrots with Rosemary” summary=”<p>Honey glazed carrots are one of the easiest recipes a person can make. This dish is simply divine, and it makes a fantastic side dish for any weeknight meal or holiday event.</p>”]
[wprm-recipe-roundup-item id=”40220″ name=”Jiffy Corn Casserole with Cream Cheese and Bacon” summary=”<p>Jiffy corn casserole is a simple and easy make-ahead recipe, a cheesy and delicious side dish just begging to feed a crowd.</p>”]
[wprm-recipe-roundup-item id=”43911″ name=”Creamy Cheesy CrockPot Corn Casserole” summary=”<p>Throw together CrockPot corn casserole with cream cheese and Jiffy mix. Easy side dish recipe for a crowd. Make ahead for Thanksgiving and Easter.</p>”]
[wprm-recipe-roundup-item link=”https://flouronmyfingers.com/mandarin-orange-jello-salad/” name=”Easy Mandarin Orange Jello Salad” summary=”<p>How to make a quick and easy mandarin orange jello salad with just cottage cheese, pineapple, and Cool Whip. A delicious holiday fluff dessert recipe that the kids will love.</p>” image=”43798″]
[wprm-recipe-roundup-item id=”42821″ name=”Quick and Easy Ambrosia Fruit Salad” summary=”<p>How to make a simple ambrosia salad, the southern classic that every holiday dinner needs.</p>”]
[wprm-recipe-roundup-item id=”40838″ name=”Easy Broccoli Salad with Bacon and Cauliflower” summary=”<p>Good old broccoli salad, with bacon, cauliflower, sunflower seeds, and peas. This old-fashioned Thanksgiving staple is a great option for just about any meal.</p>”]
[wprm-recipe-roundup-item id=”40720″ name=”Layered Salad Recipe” summary=”<p>How to make the best layered salad- with whatever layers you want. This versatile recipe is so good that even the kids will love it!</p>”]
[wprm-recipe-roundup-item link=”https://flouronmyfingers.com/butterhorn-rolls/” name=”How to Make Homemade Butterhorn Rolls” summary=”<p>Bake a batch of these wonderful butterhorn dinner rolls and you won't be disappointed. These soft, buttery crescent rolls will be a hit at Thanksgiving dinner!</p>” image=”57122″]
[wprm-recipe-roundup-item id=”40856″ name=”Grandma’s Homemade Yeast Rolls” summary=”<p>Serve these delicious homemade dinner rolls hot out of the oven, just like Grandma did. This easy, time-tested recipe makes for a great dinner or holiday side.</p>”]
[wprm-recipe-roundup-item id=”40820″ name=”Easy Homemade Biscuits from Scratch” summary=”<p>The best homemade biscuits using only 5 ingredients. They make for a quick and easy breakfast or dinner.</p>”]
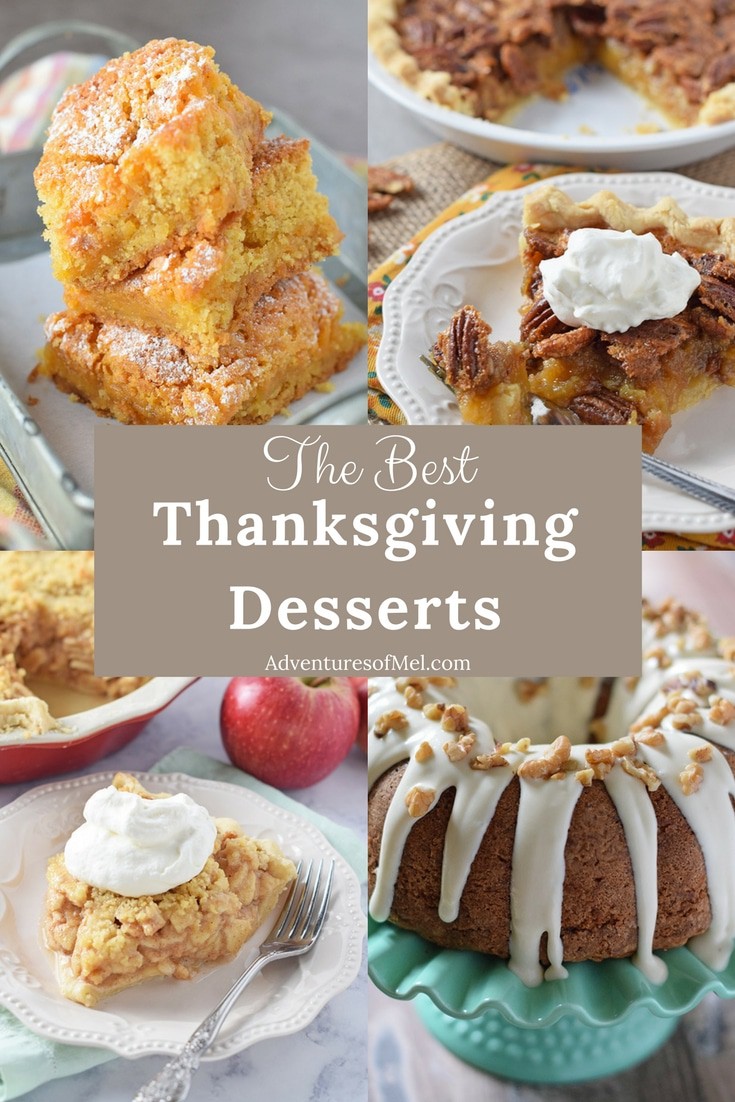
Thanksgiving Dessert Recipes
Be sure to give these delicious Thanksgiving desserts a try. These easy recipes are bound for the dessert table.
[wprm-recipe-roundup-item id=”40852″ name=”Simple and Easy Classic Pecan Pie Recipe” summary=”<p>How to make an easy, old-fashioned southern classic. This pecan pie is sure to be a hit at your Thanksgiving dinner.</p>”]
[wprm-recipe-roundup-item id=”40858″ name=”Caramel Custard Pie” summary=”<p>Made with an easy shortcut pie crust and a brown sugar caramel twist, caramel custard pie is by far one of my family's favorite recipes.</p>”]
[wprm-recipe-roundup-item id=”40844″ name=”Easy Shortcut No-Roll Pie Crust” summary=”<p>This delicious no-roll shortcut pie crust is the easiest pie crust you'll ever make, perfect for fruit pies, custard pie, and more.</p>”]
[wprm-recipe-roundup-item id=”40824″ summary=”<p>How to make the best no-fail pie crust with only butter and 3 simple ingredients. This pastry is perfect for both sweet and savory recipes.</p>”]
[wprm-recipe-roundup-item id=”40984″ name=”Pecan Nut Pie Crust Recipe” summary=”<p>How to make a delicious no fail, no roll, pecan nut pie crust that's perfect for any homemade pie or no bake dessert.</p>”]
[wprm-recipe-roundup-item id=”40816″ name=”Quick and Easy Homemade Whipped Cream” summary=”<p>This creamy, delicious topping is easily made with only 4 ingredients and 5 minutes of your time. Put homemade whipped cream on all of your favorite desserts.</p>”]
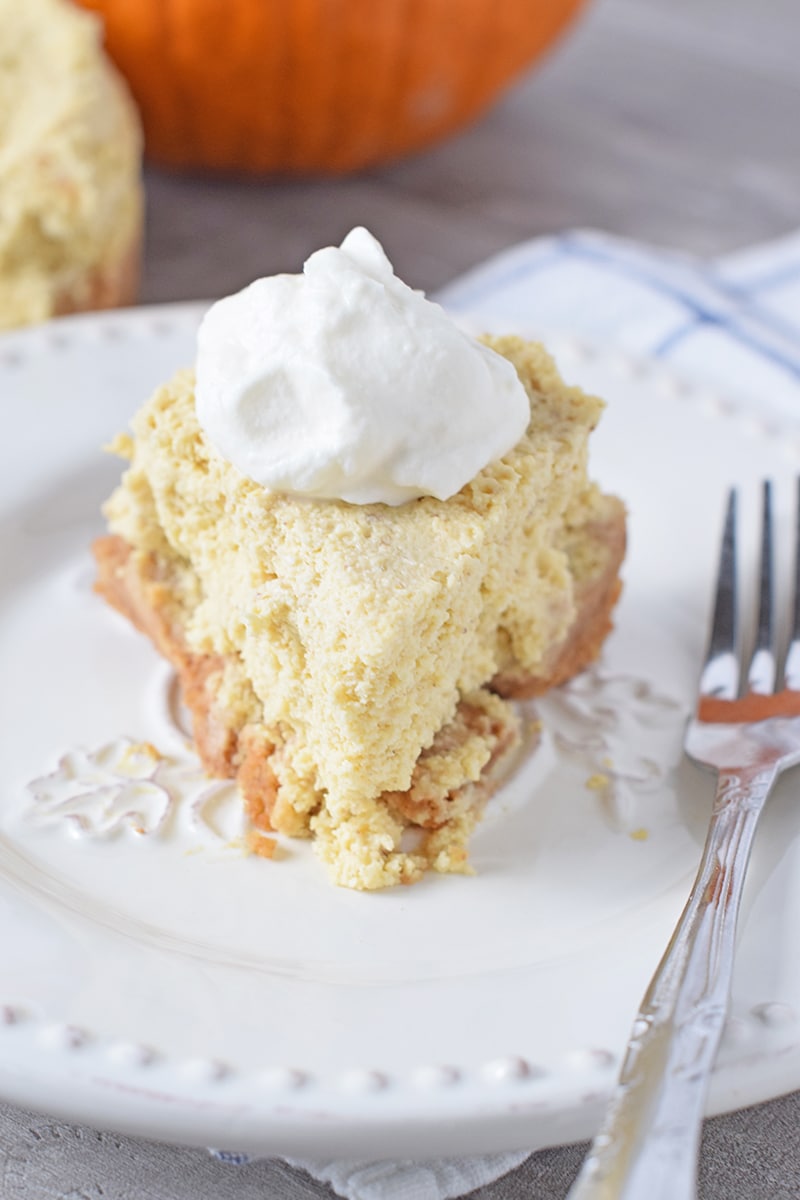
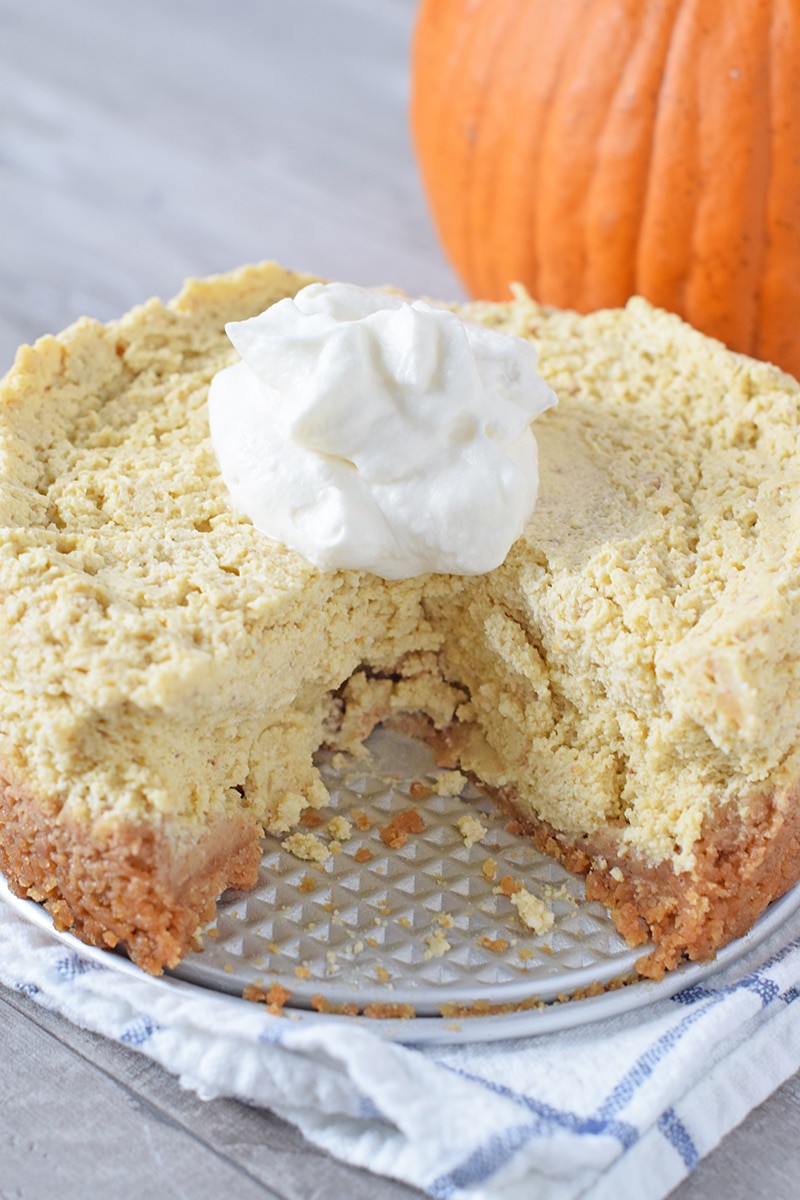
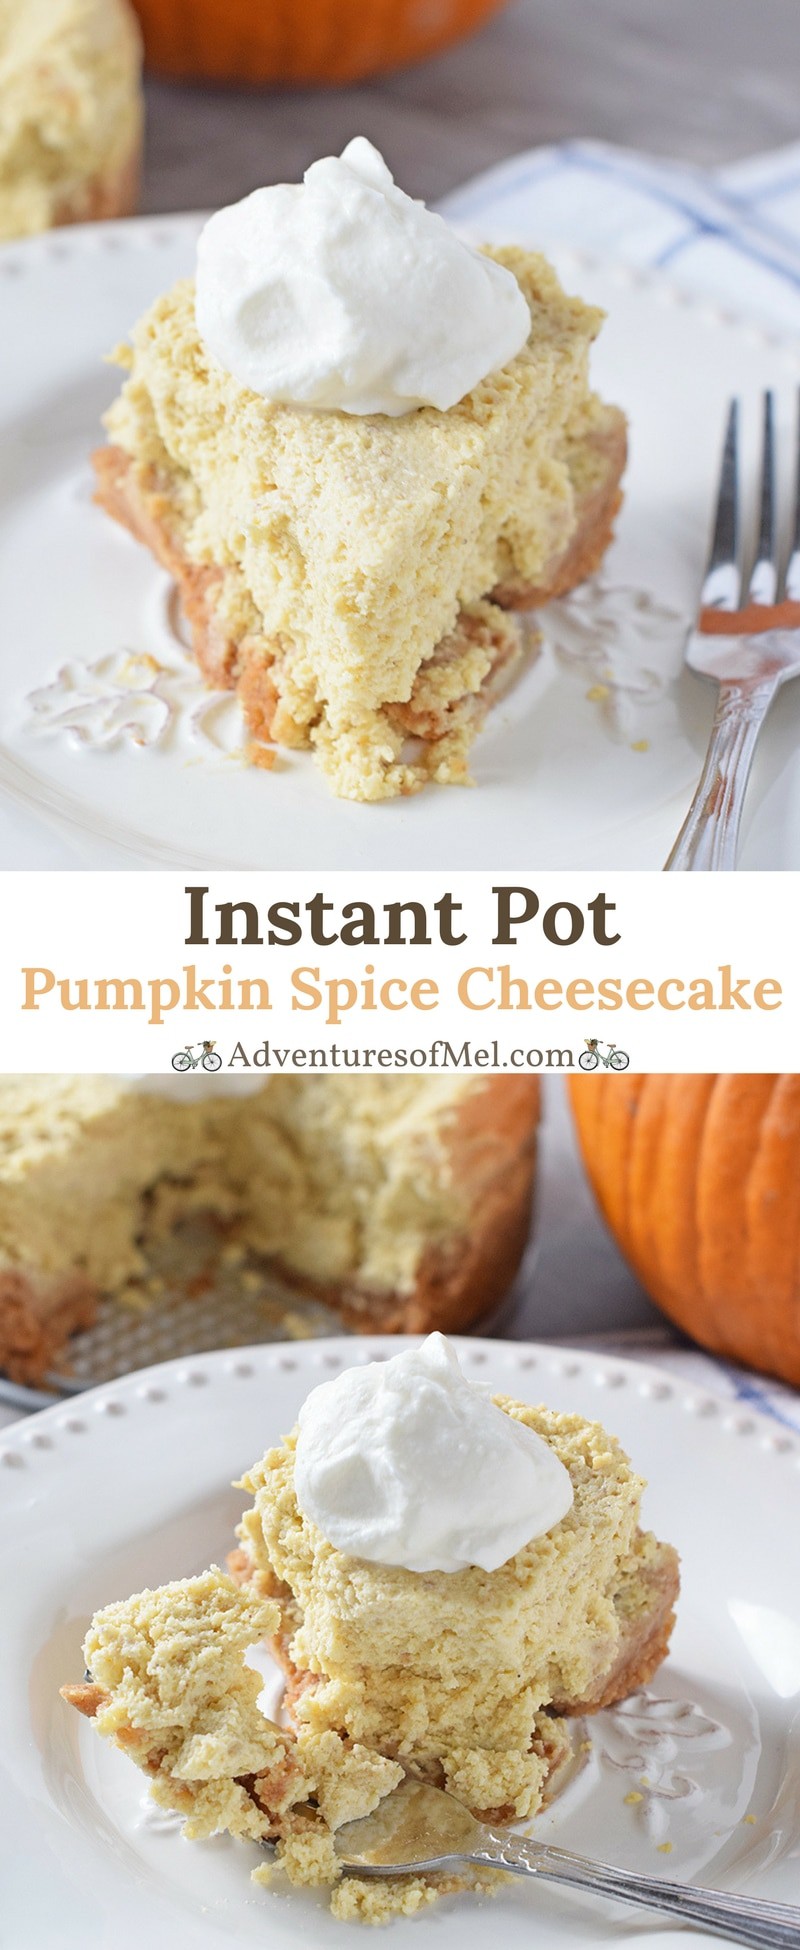
[wprm-recipe-roundup-item id=”40840″ summary=”<p>How to make an easy fall and holiday pumpkin spice cheesecake with a rich graham cracker crust. This Instant Pot recipe is full of delicious fall flavors.</p>”]
[wprm-recipe-roundup-item id=”41006″ name=”Creamy No Bake Pumpkin Dessert” summary=”<p>How to make a creamy no bake pumpkin dessert layered with cream cheese filling and a pecan nut pie crust. This delicious and simple dessert will be gone before you know it!</p>”]
[wprm-recipe-roundup-item id=”40836″ name=”Dutch Apple Crumb Pie with Streusel Topping” summary=”<p>How to make an easy Dutch apple crumb pie with a sweet streusel crumble topping over a cinnamon spiced apple filling. This recipe is a well-used family favorite.</p>”]
[wprm-recipe-roundup-item id=”43360″ name=”Easy Apple Crumble without Oats” summary=”<p>How to make a delicious apple crumble without oats, from Grandma's recipe box. This easy, time-tested recipe is a must at any Thanksgiving dinner.</p>”]
[wprm-recipe-roundup-item id=”40830″ name=”How to Make Homemade Pumpkin Purée” summary=”<p>Learn how to roast pie pumpkins for your own homemade pumpkin puree, perfect for all of your favorite pumpkin recipes and desserts.</p>”]
[wprm-recipe-roundup-item id=”40832″ name=”Grandma’s Old-Fashioned Pumpkin Pie from Scratch” summary=”<p>Learn how to make this classic holiday dessert from scratch, straight from Grandma's recipe box. This pumpkin pie is sure to be the star of the show.</p>”]
[wprm-recipe-roundup-item id=”40822″ name=”Pumpkin Gooey Butter Cake” summary=”<p>Take gooey butter cake to a whole new level with this yummy pumpkin dessert, filled with ooey gooey, buttery, cream cheese goodness. This easy St. Louis classic is sure to please the guests.</p>”]
[wprm-recipe-roundup-item id=”40812″ summary=”<p>This scrumptious apple bundt cake is perfect for your holiday dinner, complete with apples, walnuts, and a caramel cream cheese glaze.</p>”]
[wprm-recipe-roundup-item id=”41048″ name=”The Most Scrumptious Pumpkin Roll Ever” summary=”<p>Learn how to make the best pumpkin roll with a yummy caramel cream cheese filling. This is an easy, time-tested Thanksgiving dessert recipe that's sure to be a family favorite!</p>”]
[wprm-recipe-roundup-item id=”40768″ name=”Southern Sweet Potato Pie” summary=”<p>How to make a good, old-fashioned southern sweet potato pie straight from Grandma's recipe box. This simple recipe is sure to be a hit!</p>”]
[wprm-recipe-roundup-item id=”40682″ summary=”<p>This easy pumpkin spice pear cake is the perfect holiday dessert that's full of rich fall flavor. It will not disappoint!</p>”]
[wprm-recipe-roundup-item id=”40990″ summary=”<p>This quick and easy pumpkin spice sugar cookies recipe is perfect for any holiday dessert, a great recipe to get the kids involved!</p>”]
Leftover Turkey Recipes
With every holiday dinner, leftovers are inevitable. Fortunately, all is not a loss, and these recipes are a great way to use up all of that leftover turkey so that nothing goes to waste.
[wprm-recipe-roundup-item id=”41056″ summary=”<p>This turkey stuffing crescent rolls recipe is an easy solution to your Thanksgiving leftovers. It's a simple and easy finger food for holiday parties!</p>”]
[wprm-recipe-roundup-item id=”40692″ name=”Turkey Enchilada Skillet Casserole Recipe” summary=”<p>How to make the best turkey enchilada skillet casserole, a great way to use up Thanksgiving leftovers. This recipe is a family-favorite.</p>”]
[wprm-recipe-roundup-item id=”41699″ name=”Cheesy Leftover Turkey Casserole with Pasta” summary=”<p>This turkey casserole with pasta is an easy recipe requiring only egg noodles and turkey leftovers. Turkey tetrazzini is so creamy and delicious!</p>”]
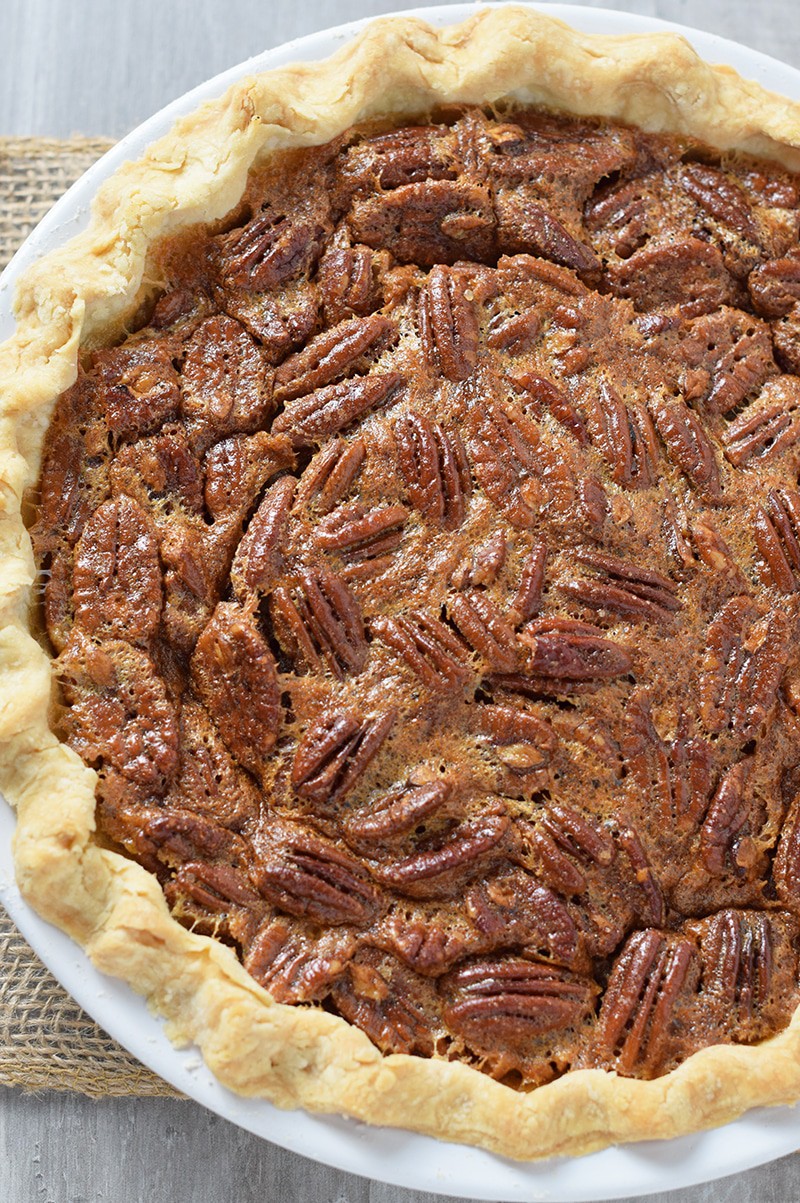
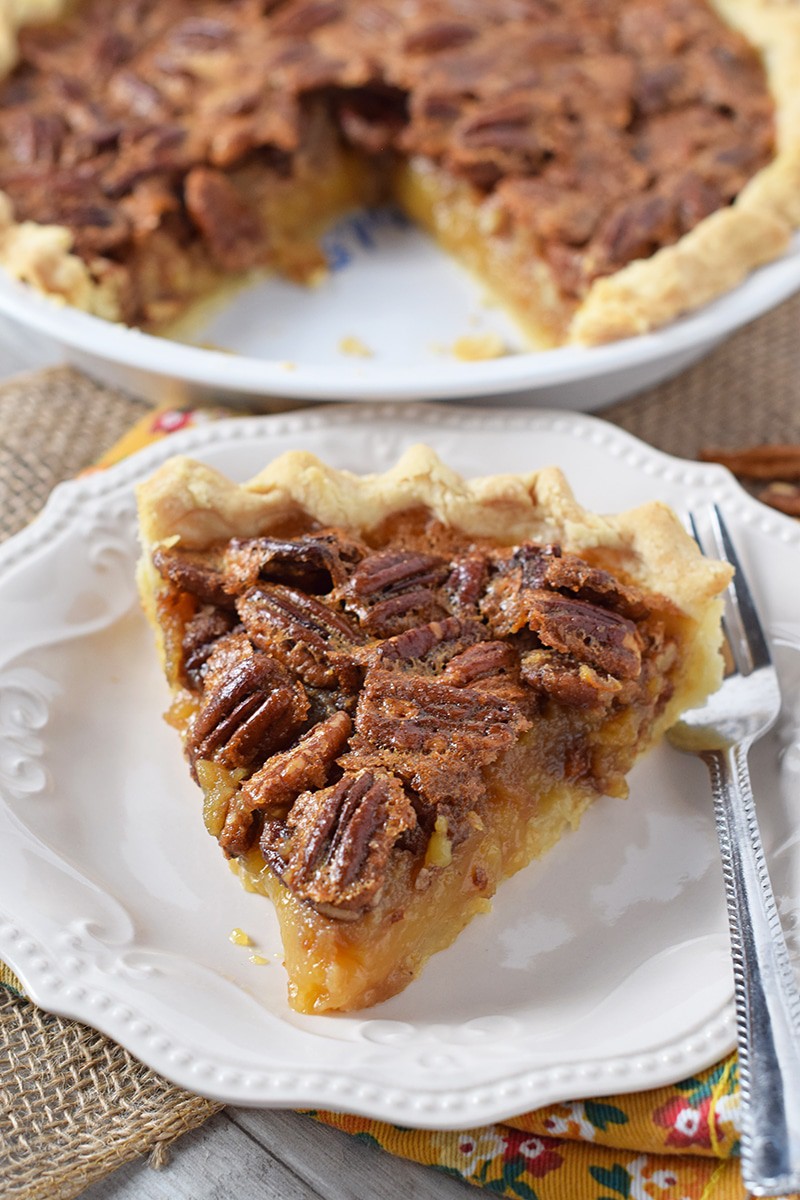
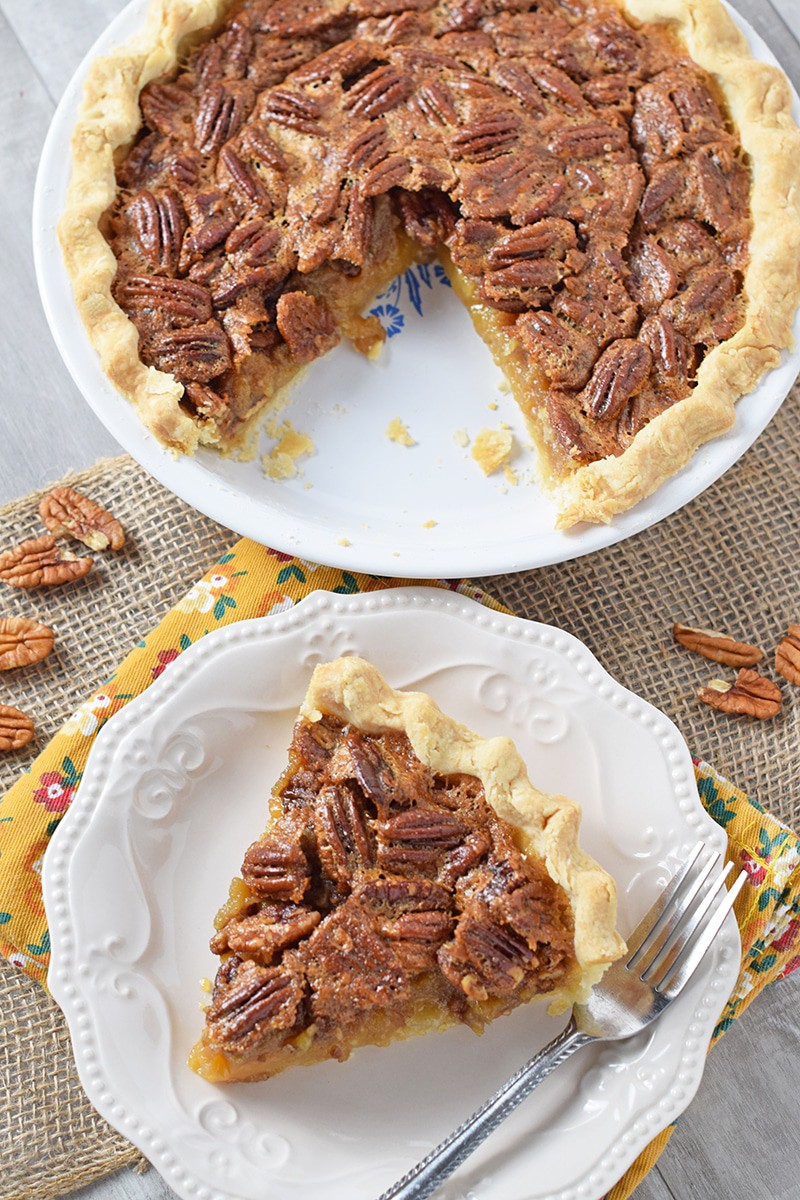
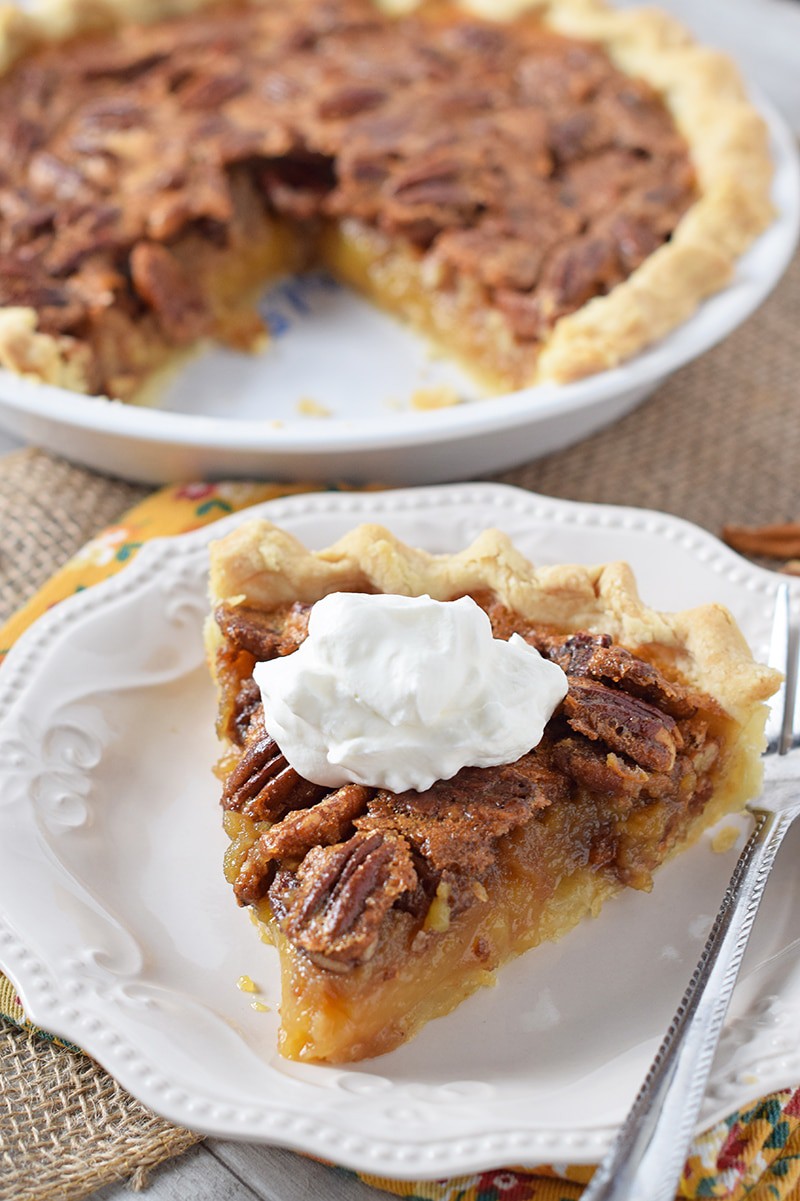
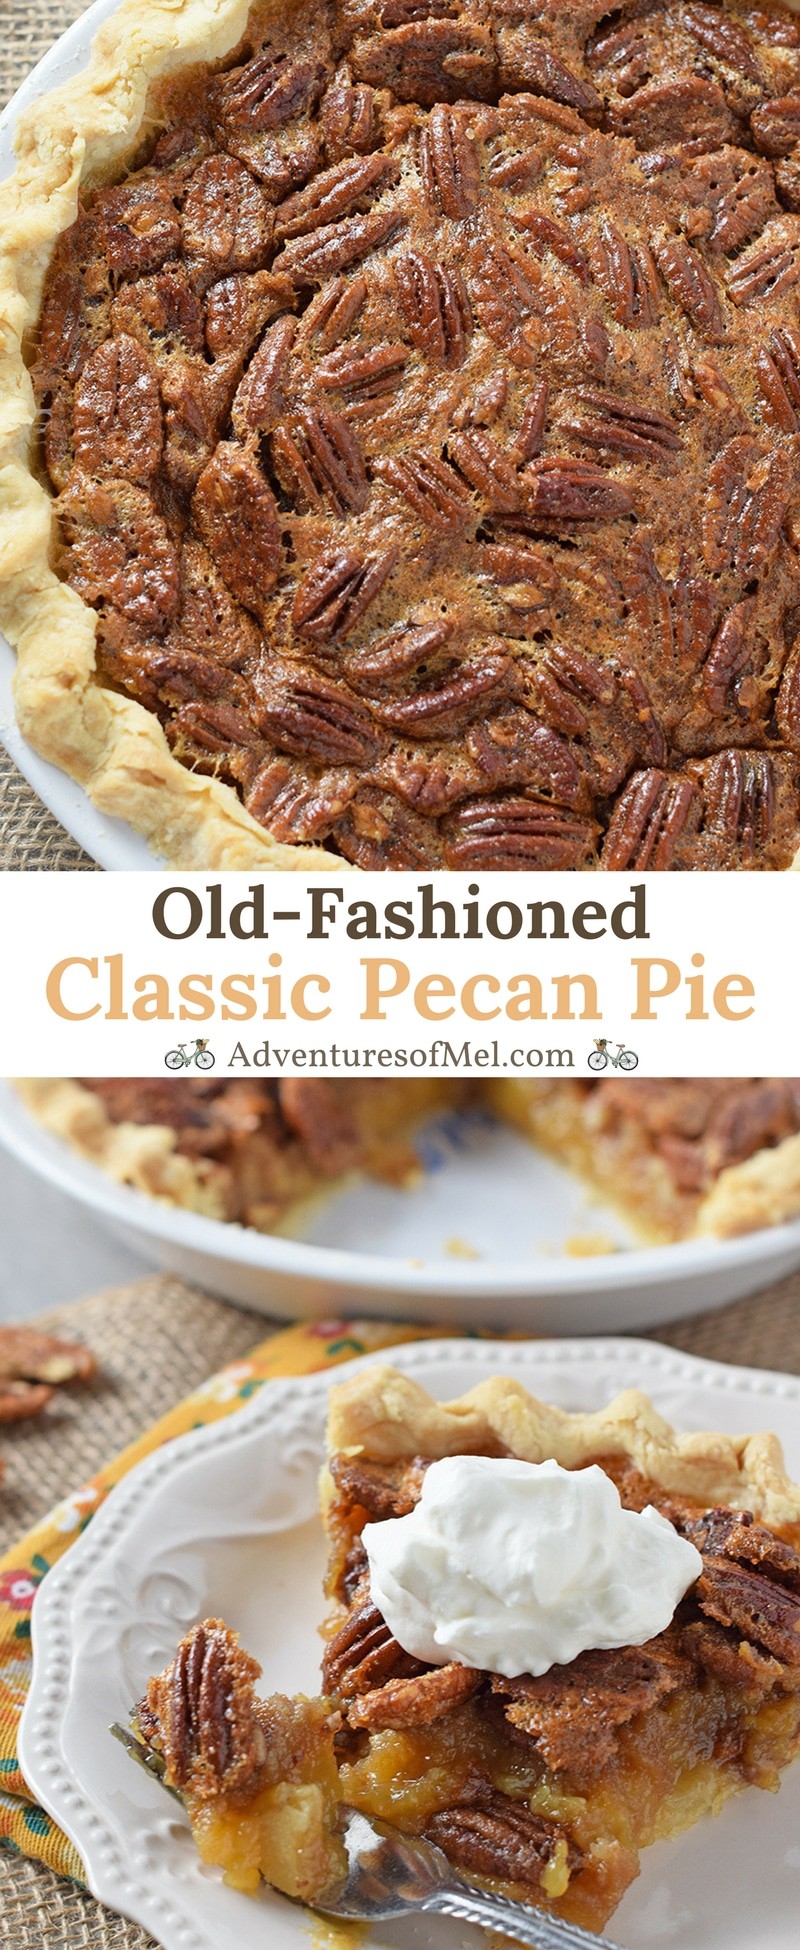
How to make the best classic pecan pie recipe. Easy, old-fashioned, southern dessert with a gooey filling and homemade crust. Perfect for Thanksgiving!
Southern pecan pie has become one of my favorite desserts this time of year. Like our favorite apple crumb pie, it’s always on the dessert table at Thanksgiving; and it’s usually a safe bet that my mom will have one sitting on her kitchen counter at different times throughout the year.
It’s funny, ’cause when I was younger, I didn’t like your typical, classic pecan pie at all (or maybe I just thought I didn’t). But I’ve really grown to love it over the last few years.
I don’t know which is my favorite, the crunchy pecans that float to the top or the delicious sweet, somewhat salty pie filling that gives pecan pie its unique flavor. Mmmm, it’s just so good!
Also, pecan pie is so easy to make; it’s not one bit complicated. Make a crust, mix up the filling, pour it into the crust, and presto… It’s ready to bake.
If you’d rather skip all of my baking tips, important info for this recipe, and similar recipe ideas – and get straight to the recipe – just scroll down to the bottom, where you’ll find a printable recipe card.
[mv_video doNotAutoplayNorOptimizePlacement=”false” jsonLd=”true” key=”vpa11rc7pjskijhutgjq” thumbnail=”https://mediavine-res.cloudinary.com/v1574708167/xvtk46coqm9ktpxlh640.jpg” title=”Simple and Easy Classic Pecan Pie Recipe” volume=”100″]
Then just pour the pie filling into your unbaked pie crust. Bake the pie according to the instructions in the recipe card below. Learn how to prevent pie crust from burning.
Serve with a creamy delicious dollop of whipped cream!
BAKING TIPS FOR SOUTHERN PECAN PIE
You may want to use a pie shield or a strip of aluminum foil to keep the edges of your pie crust from getting too dark or burning.
When your pie is fully cooked through, remove it from the oven and cool on a wire rack.
HOW TO TELL WHEN PECAN PIE IS DONE
You can use a toothpick, table knife, or cake tester to see if your pie is done, but being that this is more of a custard pie, you may still see a slight bit of residue on your tester.
You can also check the internal temperature with a cooking thermometer. It should be at least 200° F.
When you go to take it out of the oven, your pie should be fairly firm. If it’s more than slightly jiggly, it needs more time in the oven.
It’s a delicate balance between under-baking and over-baking when it comes to pecan pie. On the other hand, you don’t want it to be uncooked in the middle; on the other hand, you don’t want it to crack and be too dry.
If you love this recipe as much as I do, please write a 5 star review, and help me share the recipe on Facebook and Pinterest! If you make the recipe, be sure to share that you tried it on Pinterest. I love when readers share feedback!
How to make the best classic pecan pie recipe. Easy, old-fashioned, southern dessert with a gooey filling and homemade crust. Perfect for Thanksgiving!
1 pie crust
3 tablespoons salted butter (softened)
1 cup cane sugar
3 large eggs
1/2 cup dark corn syrup
1 teaspoon vanilla extract
1 1/2 cups pecans (halved or sliced)
Chill the pie crust, rolled out and prepared in a 9-inch pie plate, 'til you're ready to add the filling.
Pre-heat the oven to 450° F.
In a large mixing bowl, cream (or mix) together the butter and sugar.
In a separate smaller bowl, lightly beat the eggs together.
Then mix the eggs into the butter/sugar mixture.
Add the dark corn syrup and vanilla to the mixture, mixing well.
Stir in the pecans by hand.
Pour the pie filling into the unbaked pie crust.
Bake the pie at 450° F for about 10 minutes. Then reduce the heat to 350° F, and bake an additional 30 minutes.
When the pie is fully cooked through, remove it from the oven and cool on a wire rack.
Serve each slice with a creamy delicious dollop of whipped cream.
*You can make a more traditional roll-out pie crust (link in the ingredients above) or an easier shortcut no-roll pie crust.
9. You may want to use a pie shield or a strip of aluminum foil to keep the edges of your pie crust from getting too dark or burning.
10. You can use a toothpick, table knife, or cake tester to see if your pie is done, but being that this is more of a custard pie, you may still see a slight bit of residue on your tester. You can also check the internal temperature with a cooking thermometer. It should be at least 200° F. When you go to take it out of the oven, your pie should be fairly firm. If it’s more than slightly jiggly, it needs more time in the oven. It’s a delicate balance between under-baking and over-baking when it comes to pecan pie. On one hand, you don’t want it to be uncooked in the middle; on the other hand, you don’t want it to crack and be too dry.
Desserts, Pies & Pastries
American
classic pecan pie, classic pecan pie recipe, how to make pecan pie, pecan pie, pecan pie recipe, southern pecan pie
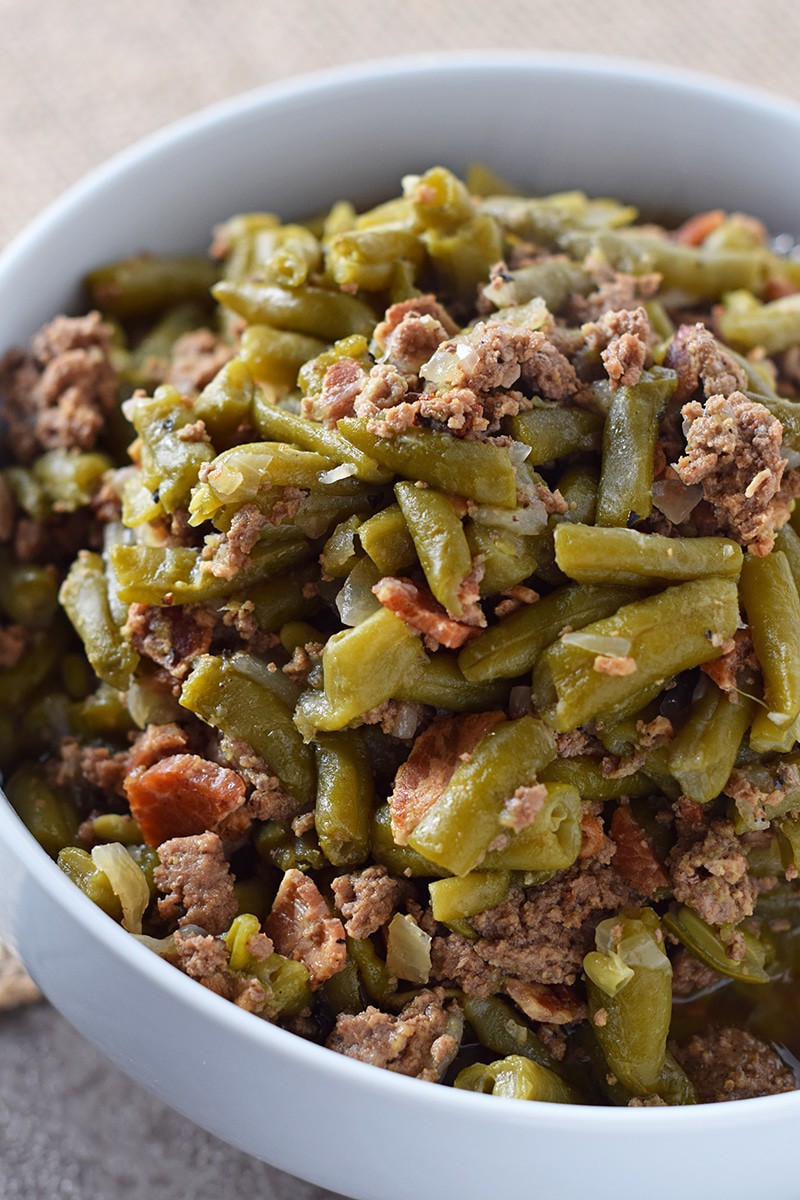
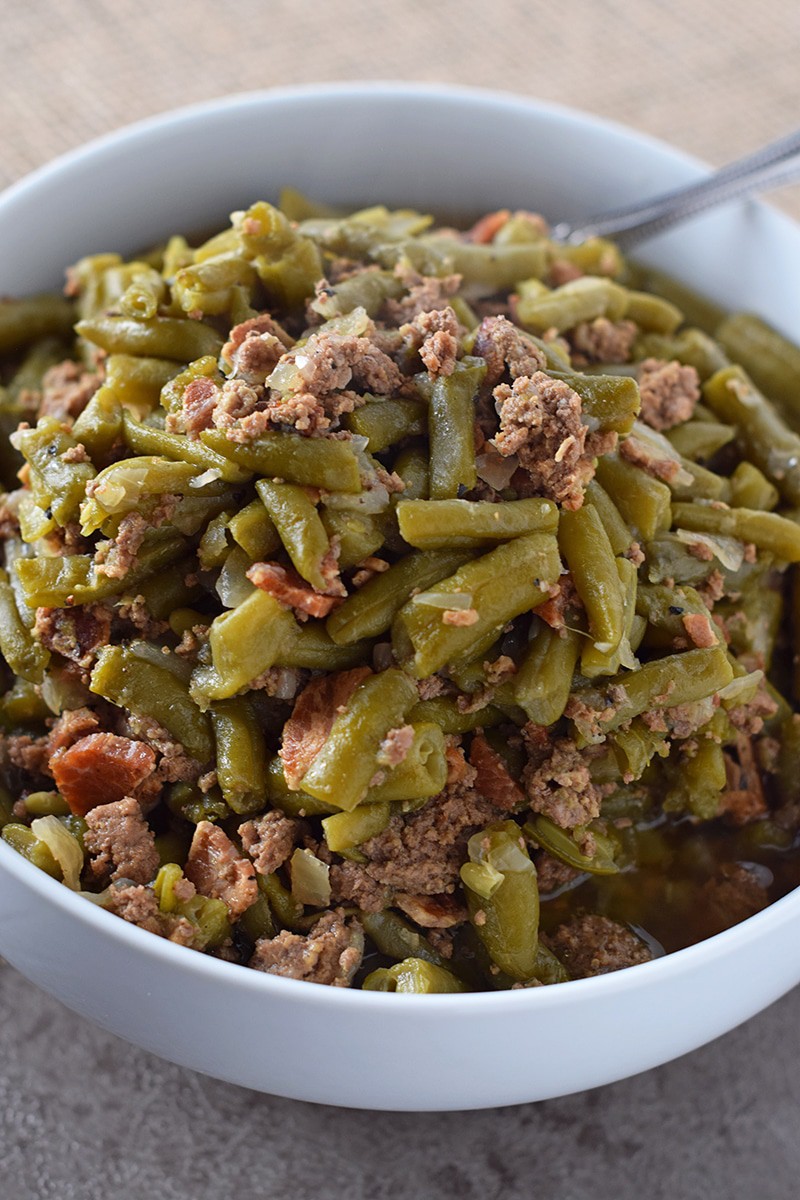
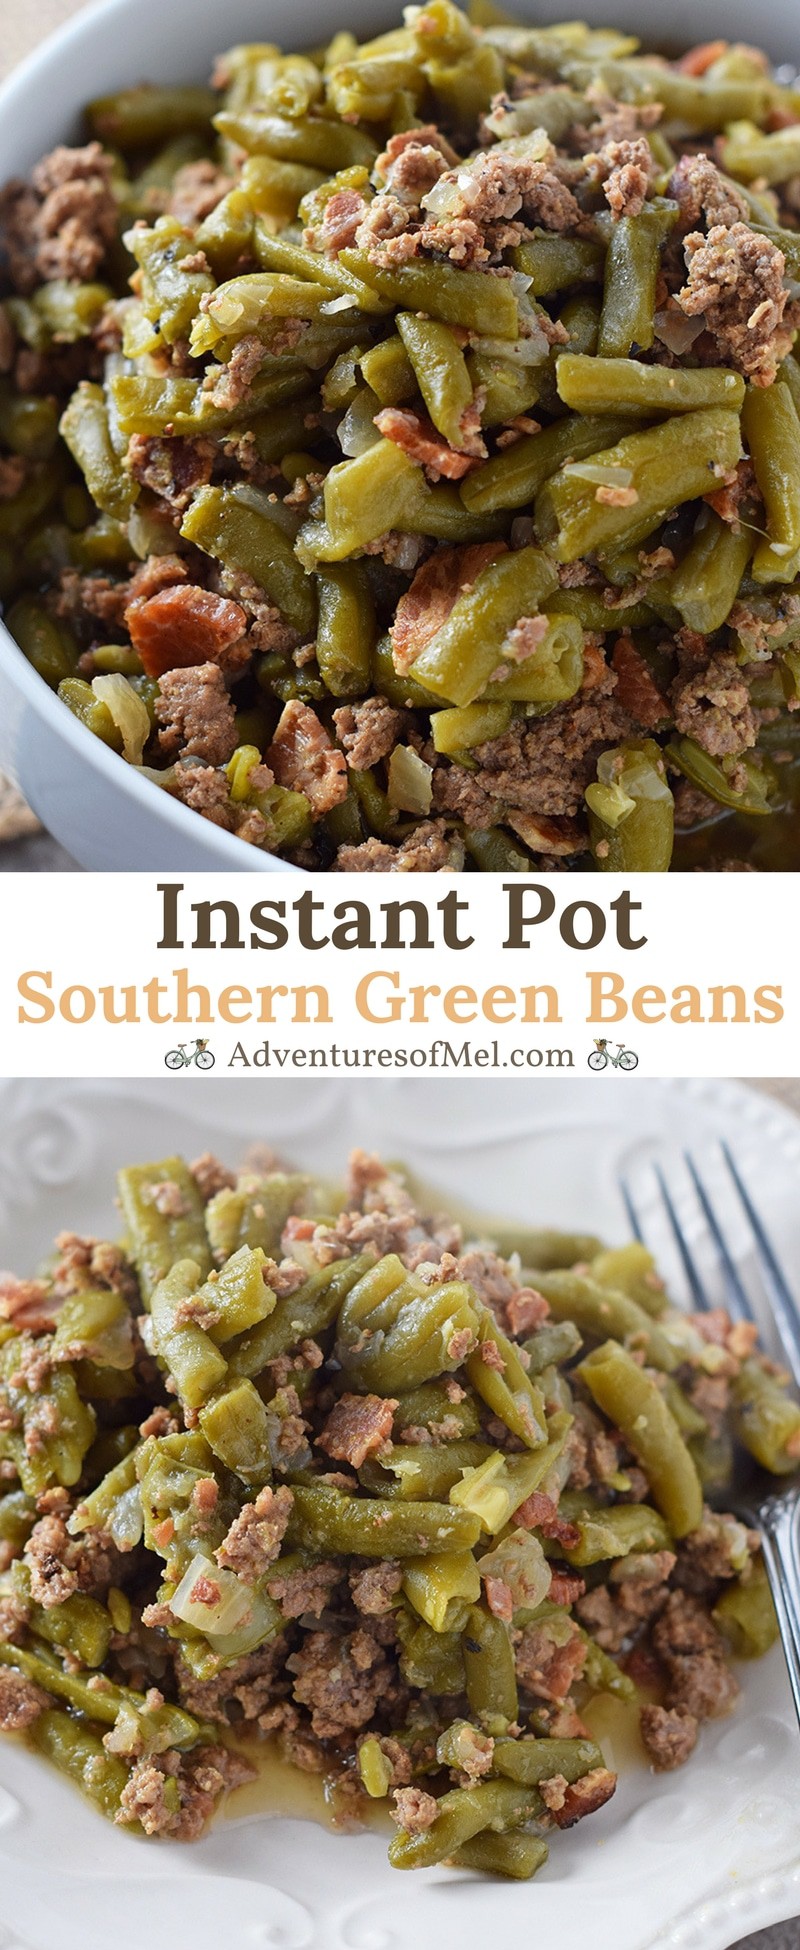
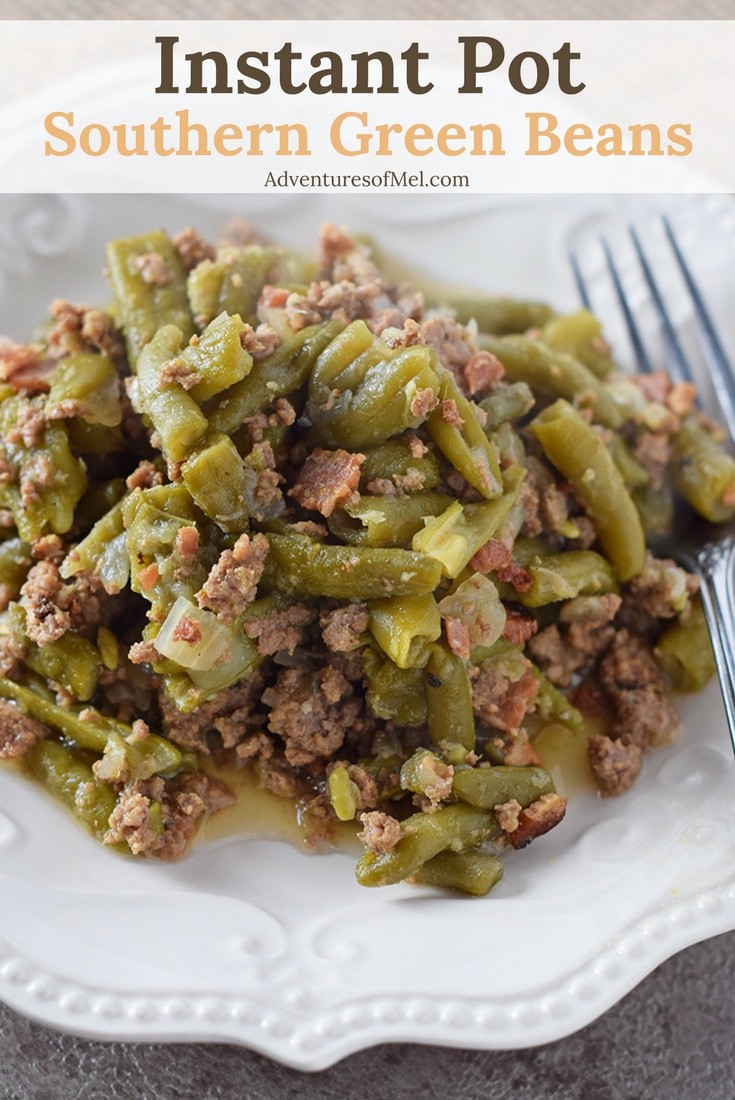
Southern Green Beans, made with bacon, onion, and ground beef in the Instant Pot. Delicious side dish recipe, perfect for holidays or weeknight meals.
Southern Green Beans are the most flavorful green beans you’ll ever enjoy. With bacon, onion, and ground beef, the flavors are incredible. Pressure cooked in the Instant Pot, they’re so tender and delicious, not to mention easy to make. And they pair really well with a Crock Pot pork roast or even baked chicken drums!
They’re reminiscent of the green beans my grandma used to make for every single holiday get together. Also, the fact that I live in Arkansas… That warrants a Southern recipe or two, right? I think so.
This recipe really only uses 6 ingredients, so it’s a pretty simple recipe. The most work is cooking up the bacon and ground beef beforehand. Otherwise, just throw all the ingredients in the Instant Pot, give them a stir, pop the lid on, and cook.
Meaning you can throw it all together and walk away and focus on doing something else (like play a quick game with the kids or keep the laundry going).
Tips for how to make Instant Pot Southern Green Beans
Chop a medium sized onion.
Cook ground beef and onion together in a large skillet.
Meanwhile, also cook bacon in another large skillet.
When ground beef/onion mixture is done, drain well.
Crumble bacon.
Add frozen green beans, ground beef/onion mixture, crumbled bacon, salt, pepper, and water to the Instant Pot.
Give it all a good stir.
Place lid on the Instant Pot.
Cook on Manual for 25 minutes. Allow the Instant Pot to naturally release.
Serve while warm. We’ve eaten this as both a side dish and a main dish. So good!
Tools you may need to make Instant Pot Southern Green Beans
Cutting Board and Knife – for chopping the onions and crumbling the bacon. Large Skillet – You’ll need to cook both the ground beef and the bacon. Wood Spatula – Use for cooking the ground beef. Instant Pot – We have the 6-Quart Instant Pot, without the yogurt function. We love it. Serving Bowl – This will allow for easier (and prettier) serving than just from the Instant Pot.
Print the recipe for Instant Pot Southern Green Beans
Instant Pot Southern Green Beans
Southern Green Beans, made with bacon, onion, and ground beef in the Instant Pot. Delicious side dish recipe, perfect for holidays or weeknight meals.
Large Skillet
Instant Pot
1 tablespoon olive oil
1 medium onion (minced)
1 pound ground beef
36 ounces frozen green beans
6 slices bacon (cooked and crumbled)
1 teaspoon salt
1 teaspoon ground black pepper
1 cup water
Add the olive oil to a large skillet over medium heat.
Stir the minced onion into the olive oil and sauté 'til the onion is translucent, about 3-5 minutes.
Mix the ground beef together with the onion in the skillet and cook.
When the ground beef mixture is done, drain well.
Add the ground beef mixture, frozen green beans, crumbled bacon, salt, pepper, and water to the Instant Pot.
Give it all a good stir.
Place the lid on the Instant Pot, set the vent to "Sealed," and cook on Manual (or Pressure Cook) for 15 minutes. Allow the Instant Pot to naturally release.
Serve while warm and enjoy!
Side Dish
American
green beans, Instant Pot green beans, southern green beans
Wanna save this recipe for later? Go ahead and Pin it!
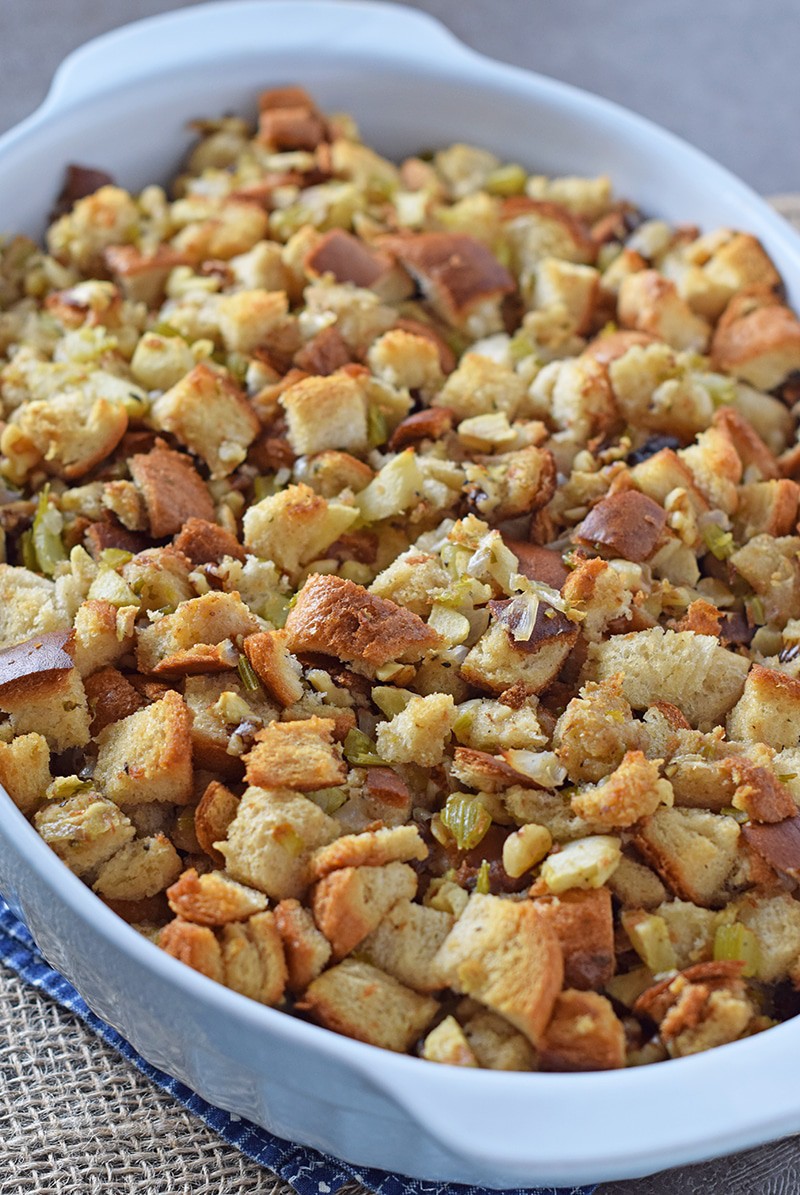
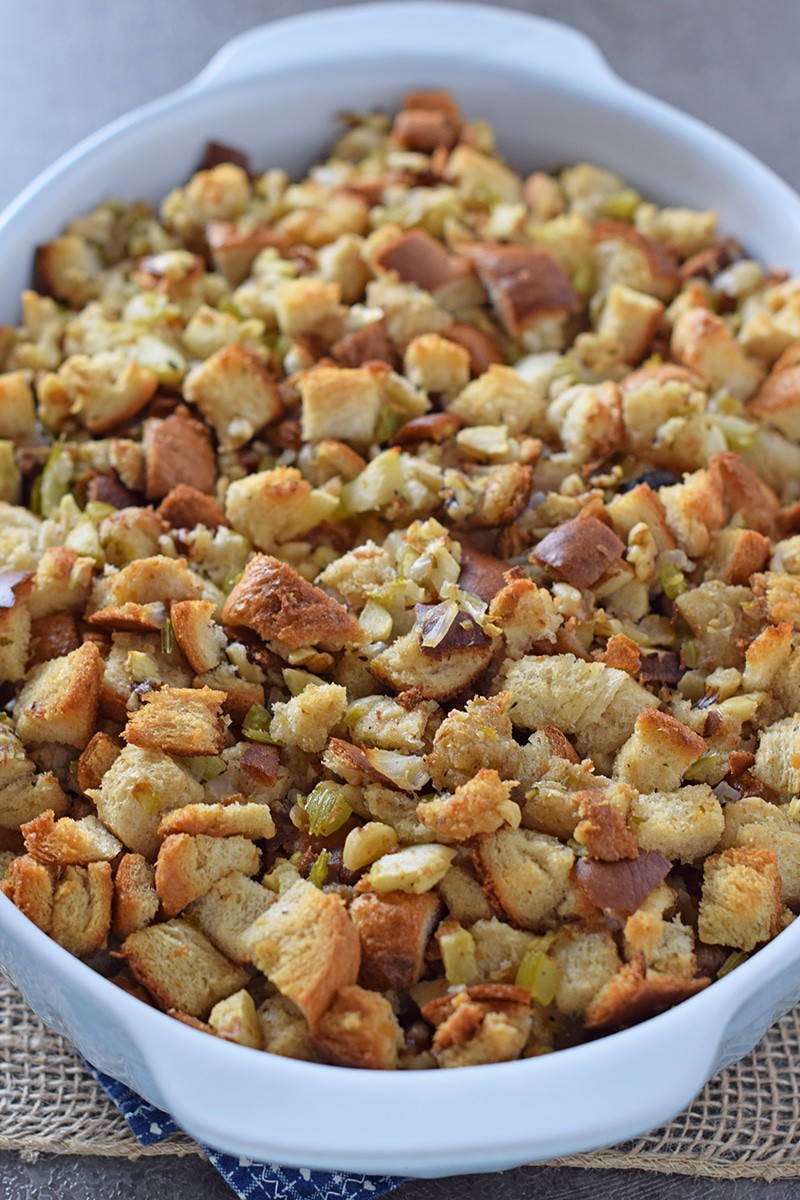
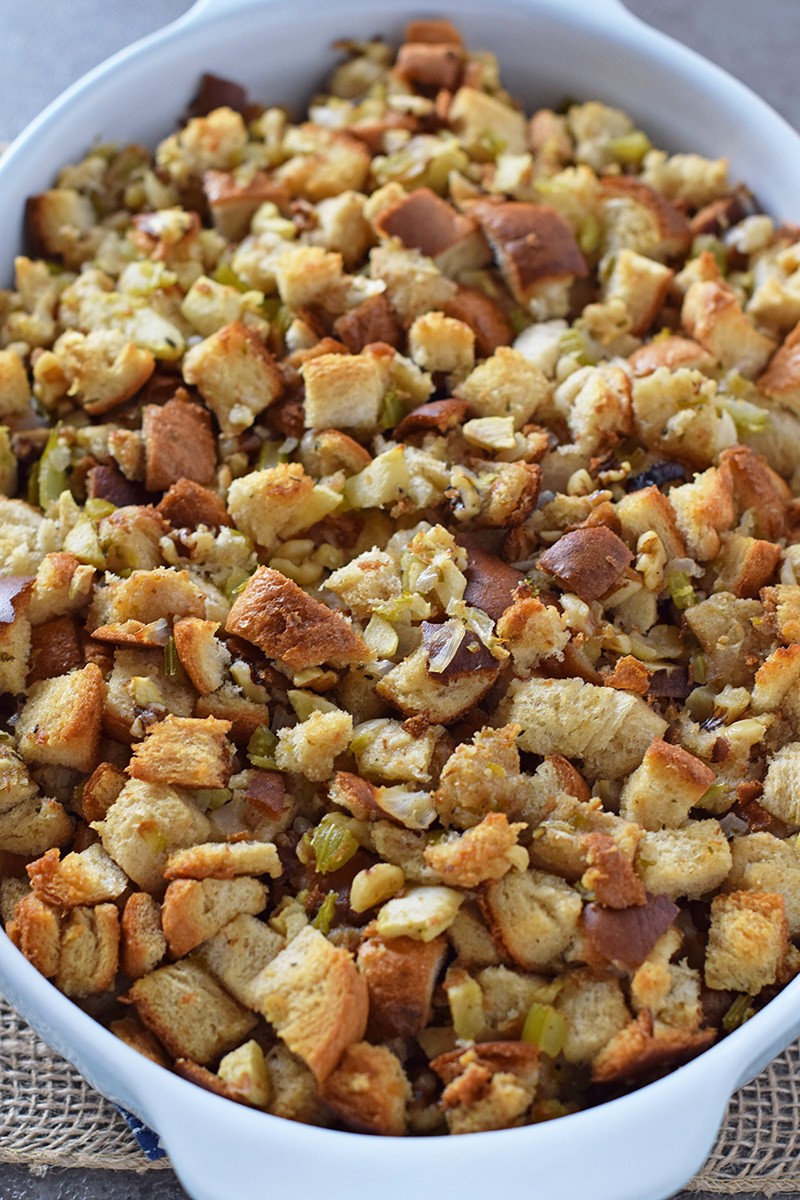
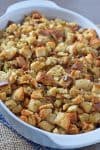
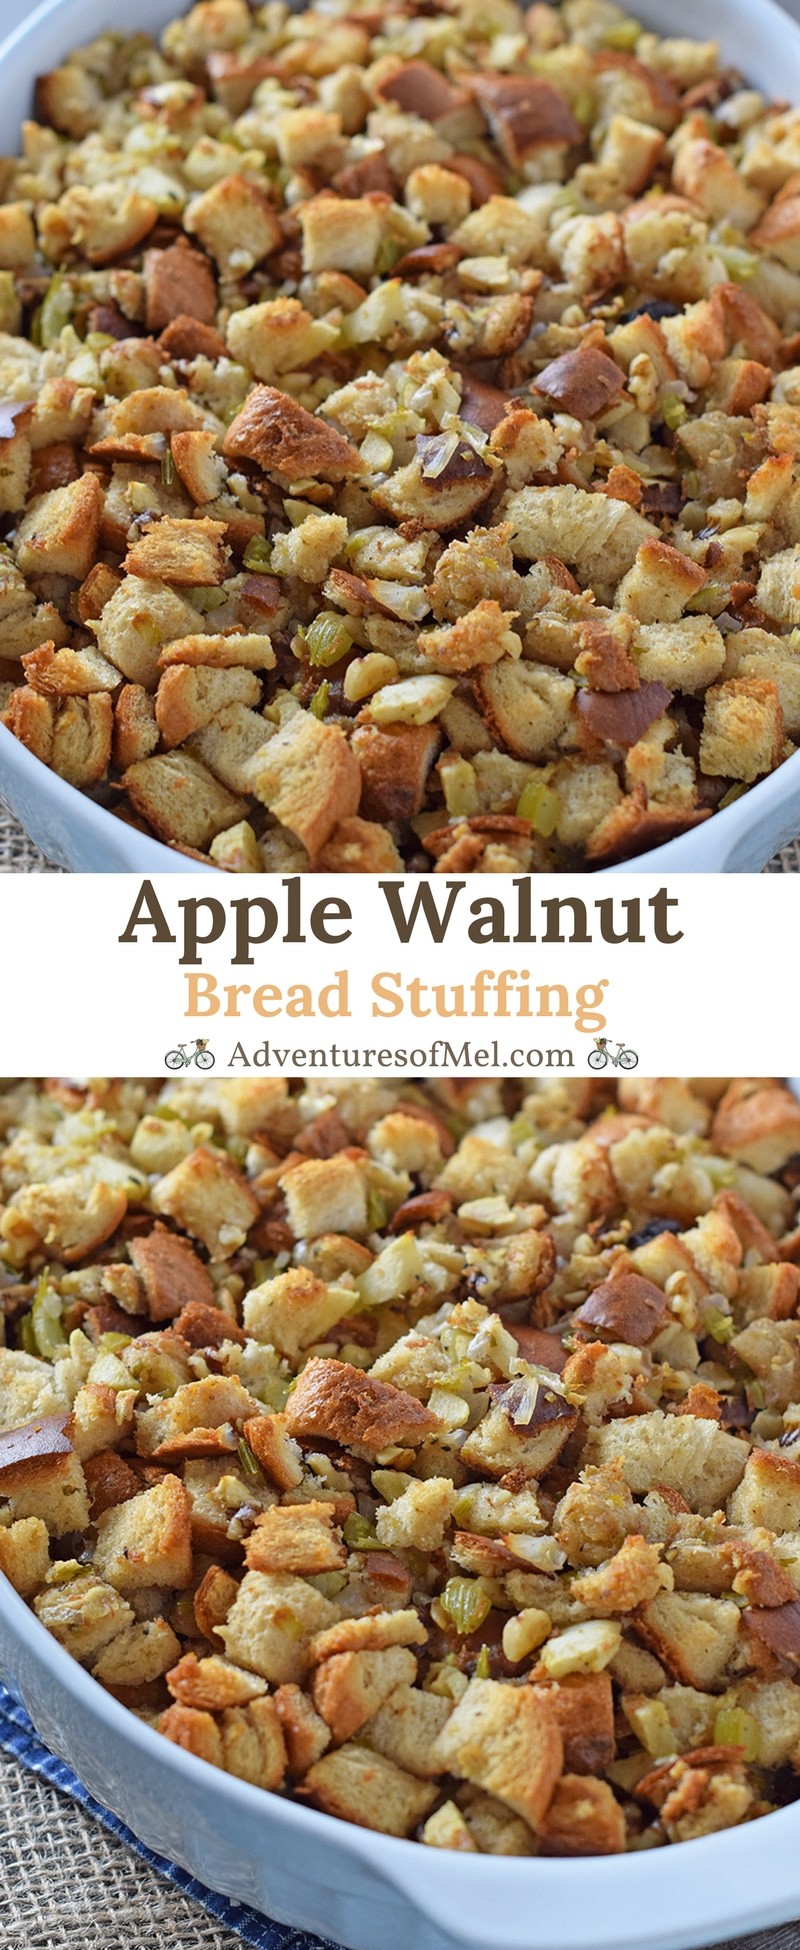
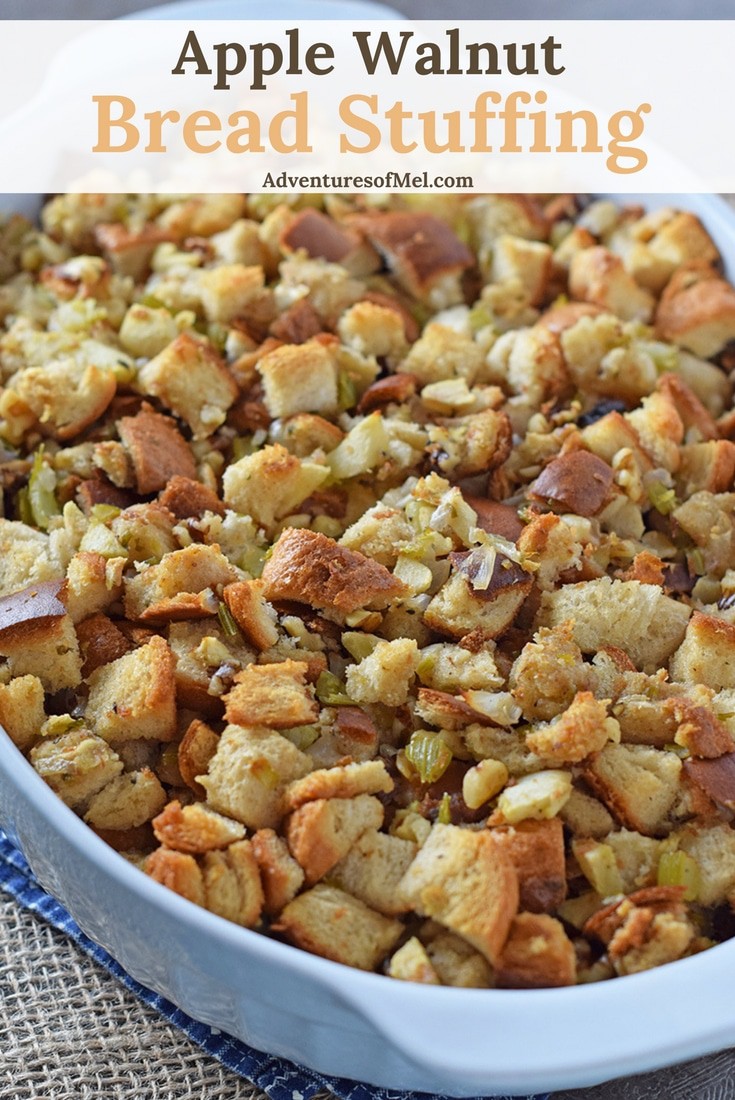
Apple Walnut Bread Stuffing – An easy, traditional, old-fashioned, homemade stuffing recipe. Simple ingredients in a delicious Thanksgiving side everyone will love!
Apple Walnut Bread Stuffing will most definitely be on our Thanksgiving (and maybe even Christmas) table this year. This is the first stuffing I’ve ever made, and it came together in a most delicious way! And you don’t have to make it for the holidays; It also pairs really well with our weekly slow cooker pork roast!
While I grew up on both bread “dressing” (as my grandma called it… It was “dressing”) and my mom’s cornbread stuffing, Dan grew up eating bread stuffing. It’s his favorite kind of stuffing. So, I really wanted to try and create something similar to what he was used to.
The ingredients for this are really simple, but it really is so flavorful… The most expensive ingredient will likely be the walnuts. Thankfully, you don’t need a lot of them.
And stuffing is really not that hard to make. I don’t know why I thought it was going to be a long, drawn-out, complicated process. Because it’s totally not.
Apple Walnut Bread Stuffing, an easy, traditional, old-fashioned, homemade recipe. Simple ingredients in a delicious Thanksgiving side everyone will love!
1 loaf bread
3 stalks celery (chopped)
1/2 large onion (minced)
1 cup apples (chopped)
8 tablespoons salted butter
1 teaspoon ground sage
1 teaspoon parsley
1/2 teaspoon salt
1/2 teaspoon ground black pepper
1 cup chopped walnuts
Pre-heat the oven to 350° F.
Cube 1 whole loaf of bread and set aside.
Melt the butter in a skillet.
Sauté the celery, onion, and apples in the butter for about 5 minutes.
Mix the sautéed mixture with the cubed bread in a large bowl, making sure all of the bread is moistened.
Add sage, parsley, salt, and pepper to the mixture. Stir well.
Finally, add the walnuts to the mixture and mix well.
Spray a large 9×13 casserole dish with cooking spray.
Add the stuffing mixture to the dish.
Bake uncovered at 350° F for about 20 minutes.
Cover with foil and bake an additional 15 minutes.
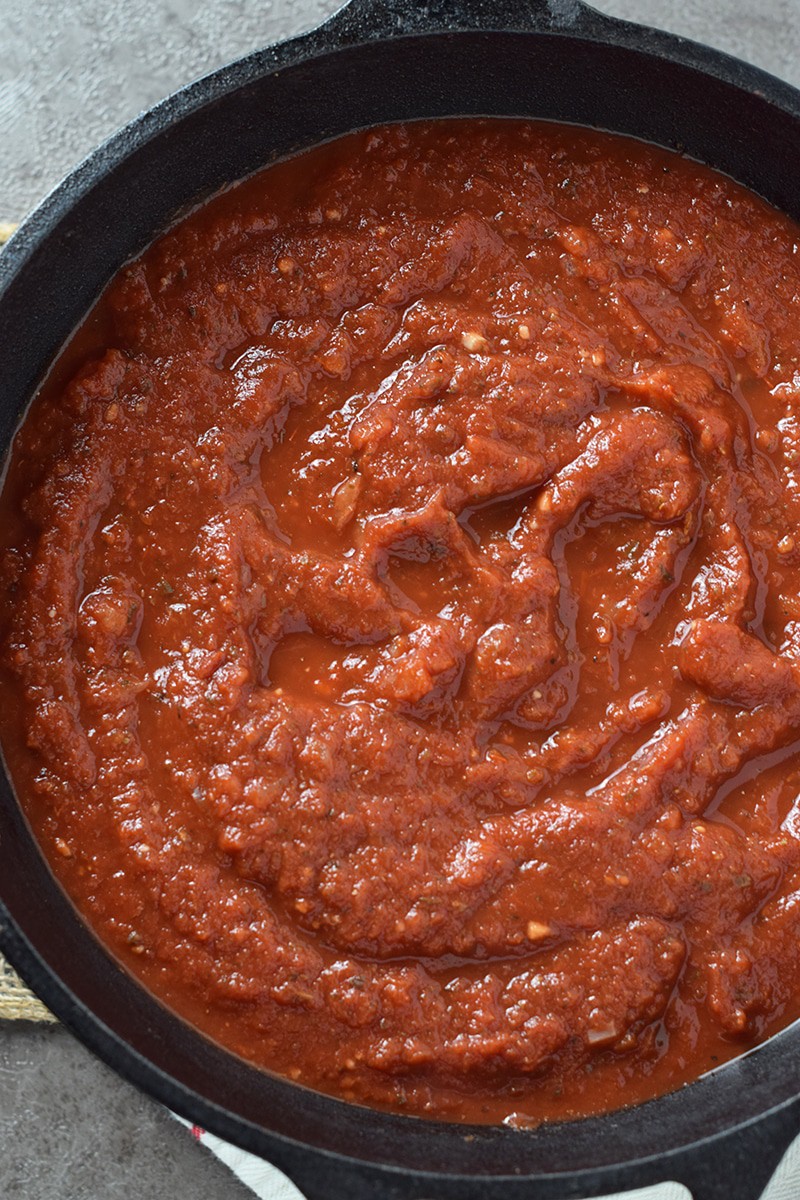
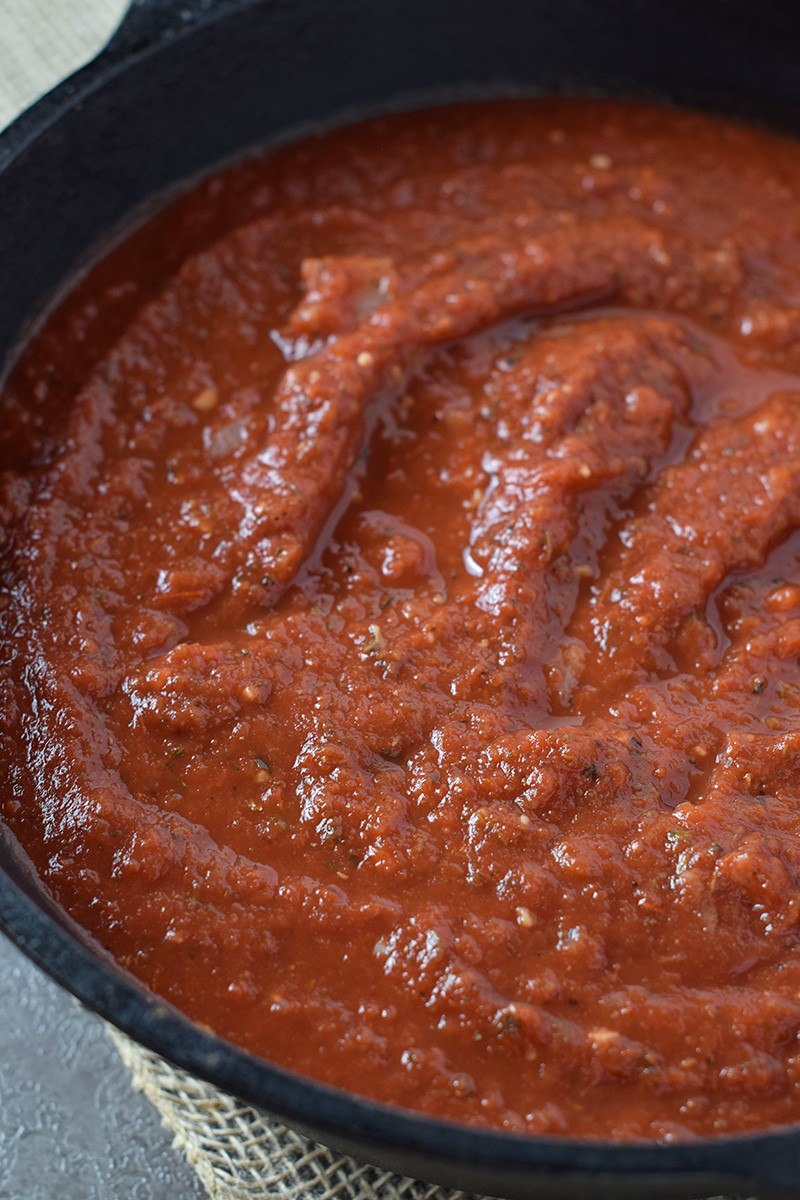
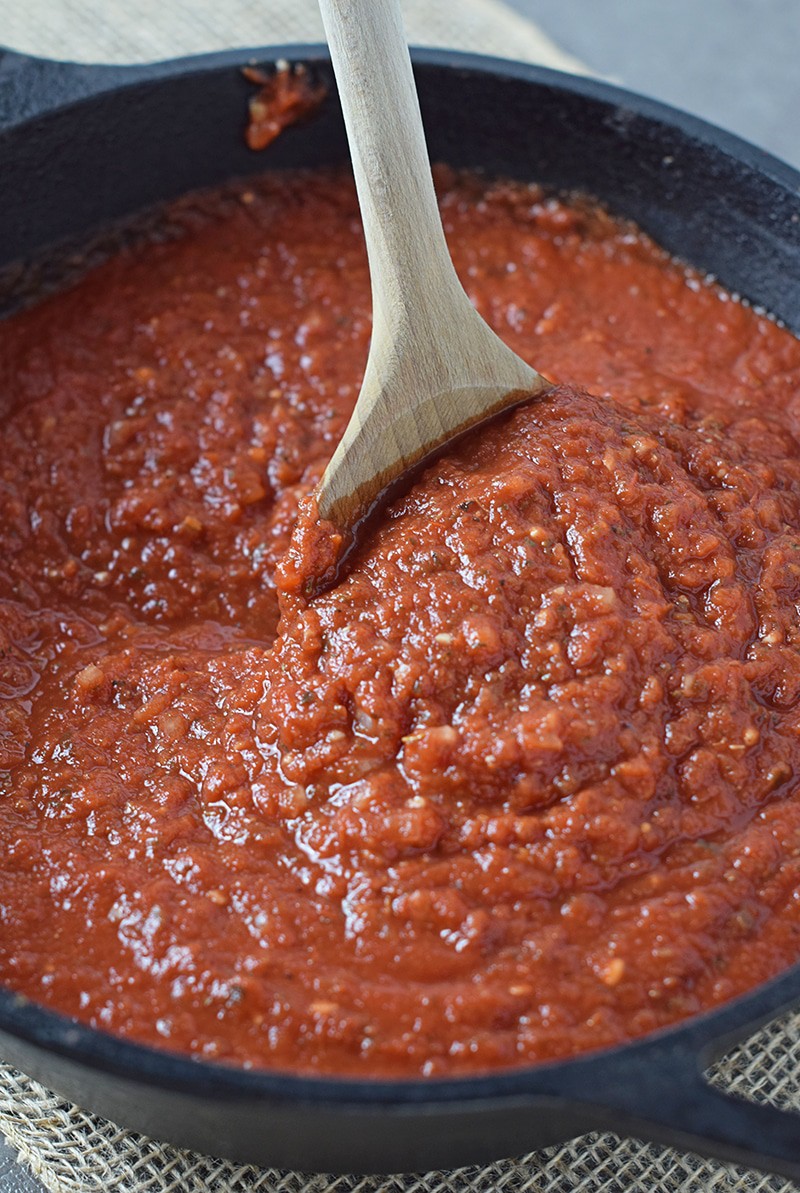
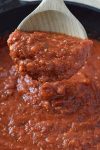
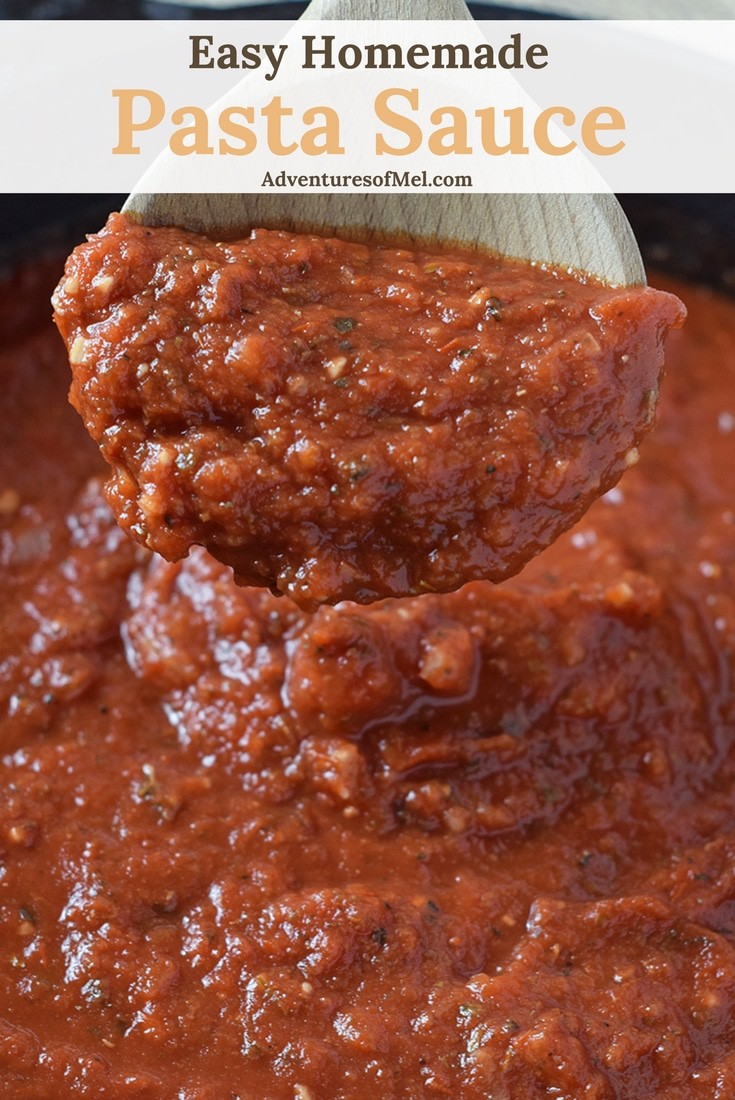
Homemade Pasta Sauce for spaghetti, lasagna, and other favorite pasta dishes. Simple ingredients and delicious flavor, good with meat or go meatless!
Homemade Pasta Sauce is so simple and easy to make. We started making this particular sauce over the last year or so. Occasionally, we’ll have it with real pasta; other times we’ll have it with squash or zucchini pasta.
While I love ground beef, Italian sausage, or meatballs in my sauce, this sauce is also really good as a meatless sauce. So if you prefer a hearty sauce without meat, this is the sauce for you.
The recipe makes enough for a large pan of lasagna or a couple meals of spaghetti, just to give you an idea of how many servings it makes. You can freeze any leftover sauce, as well, making for a quick weeknight meal when you’re not sure what to make for dinner.
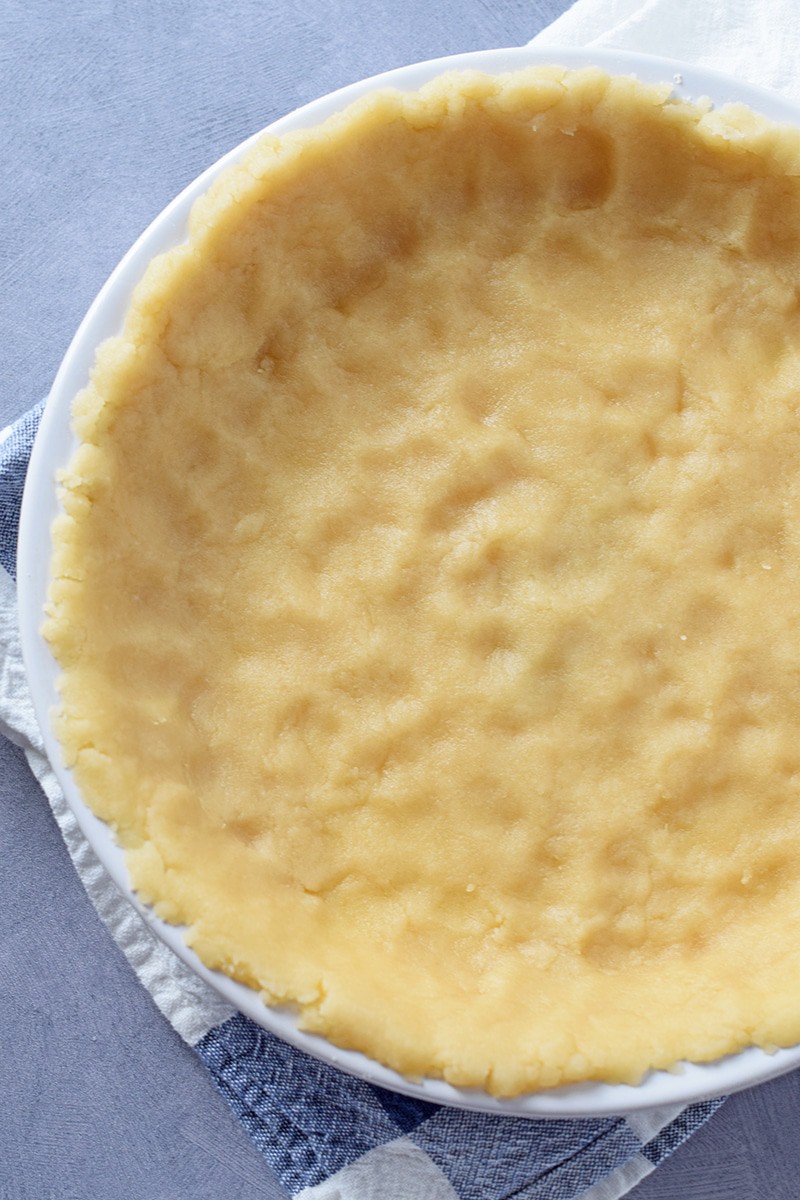
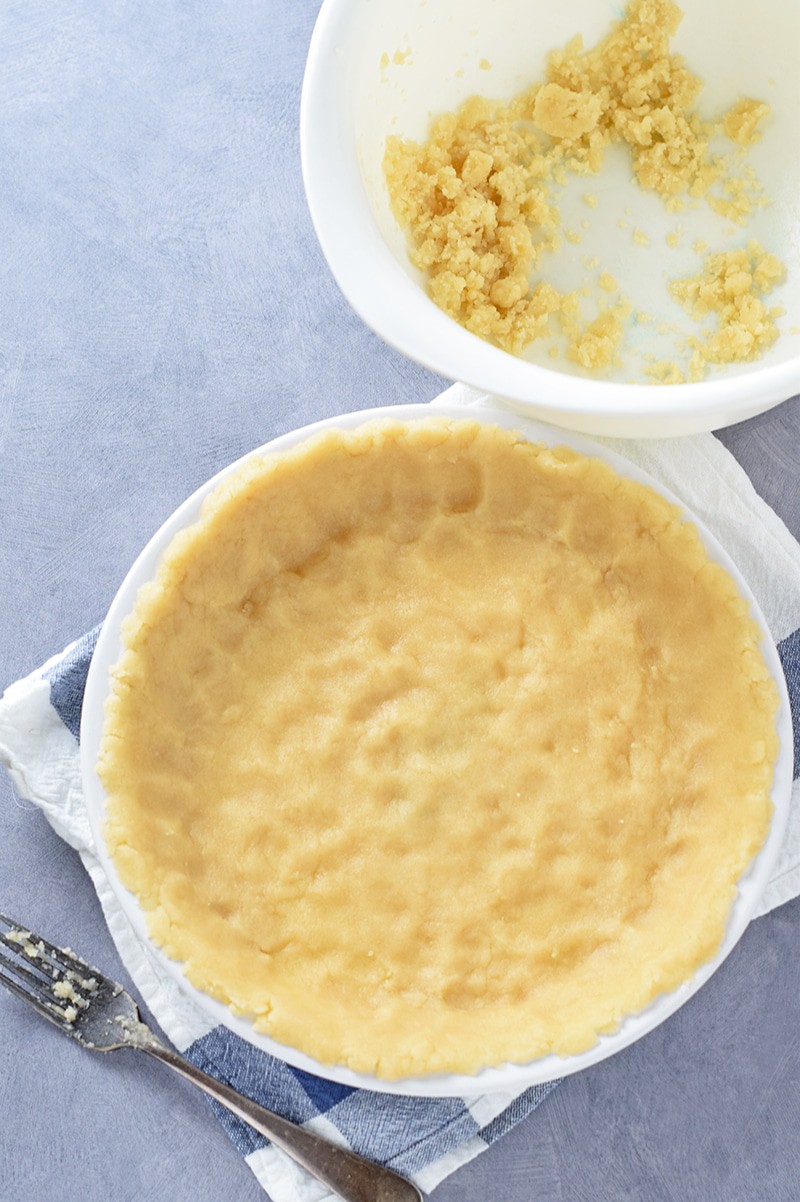
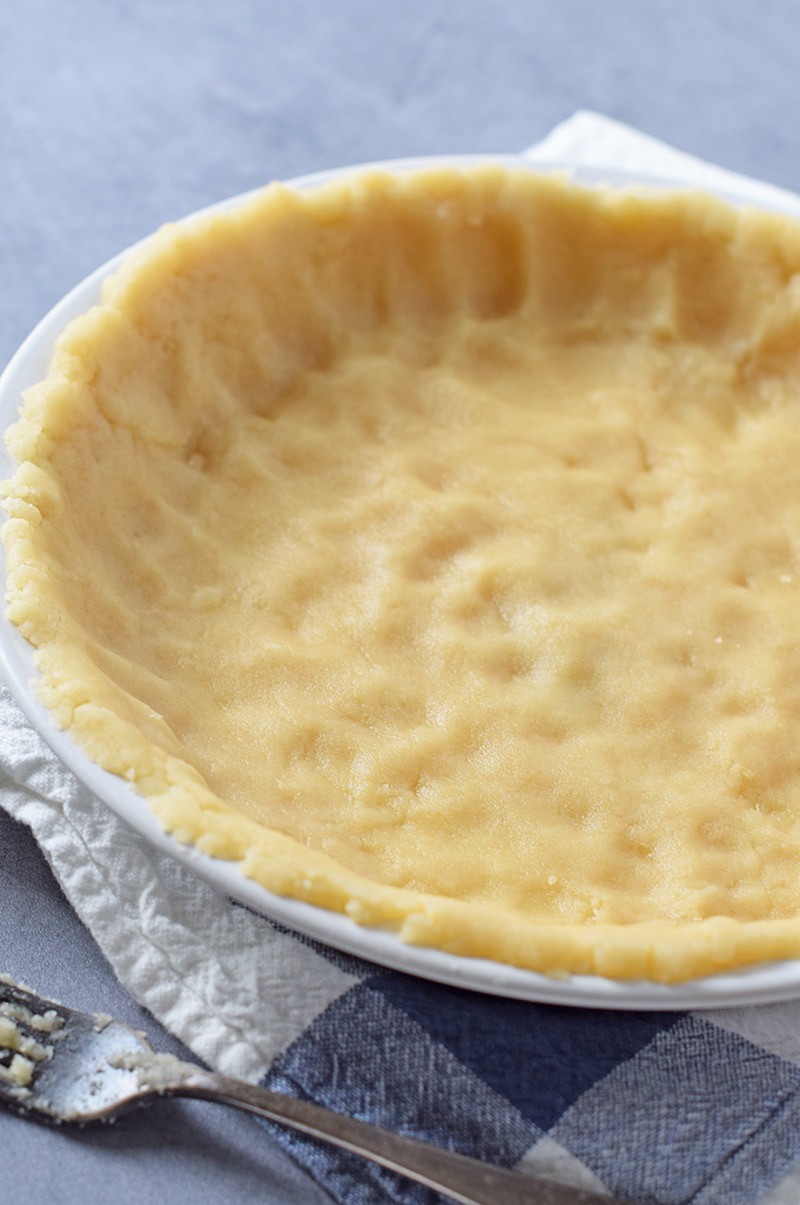
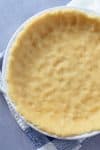
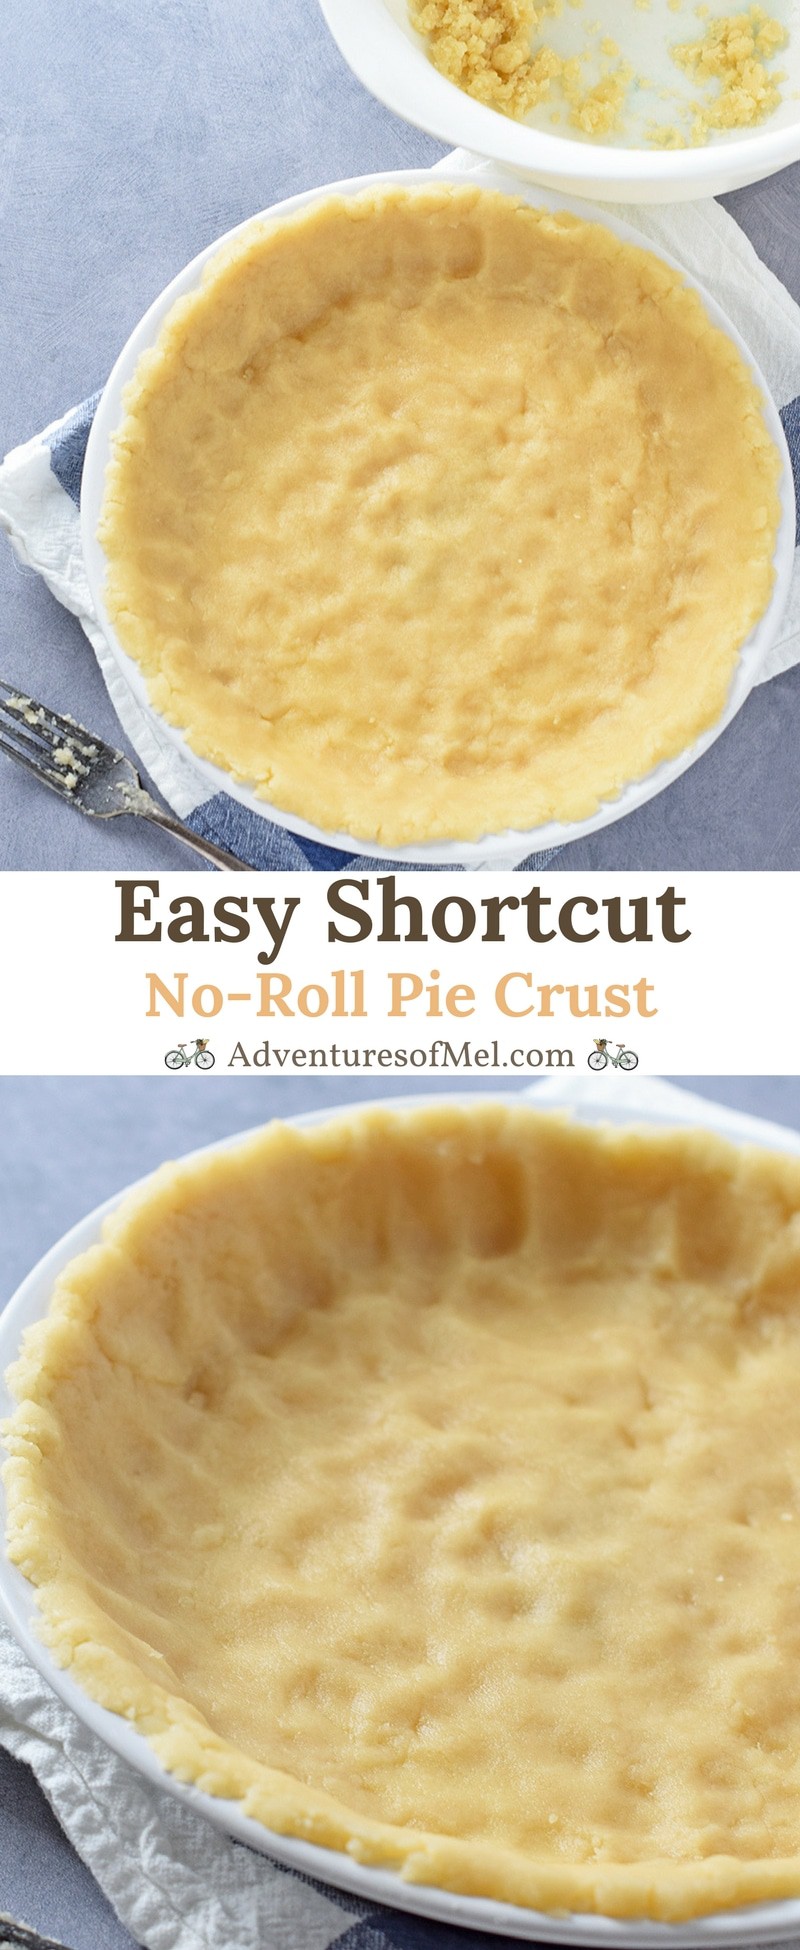
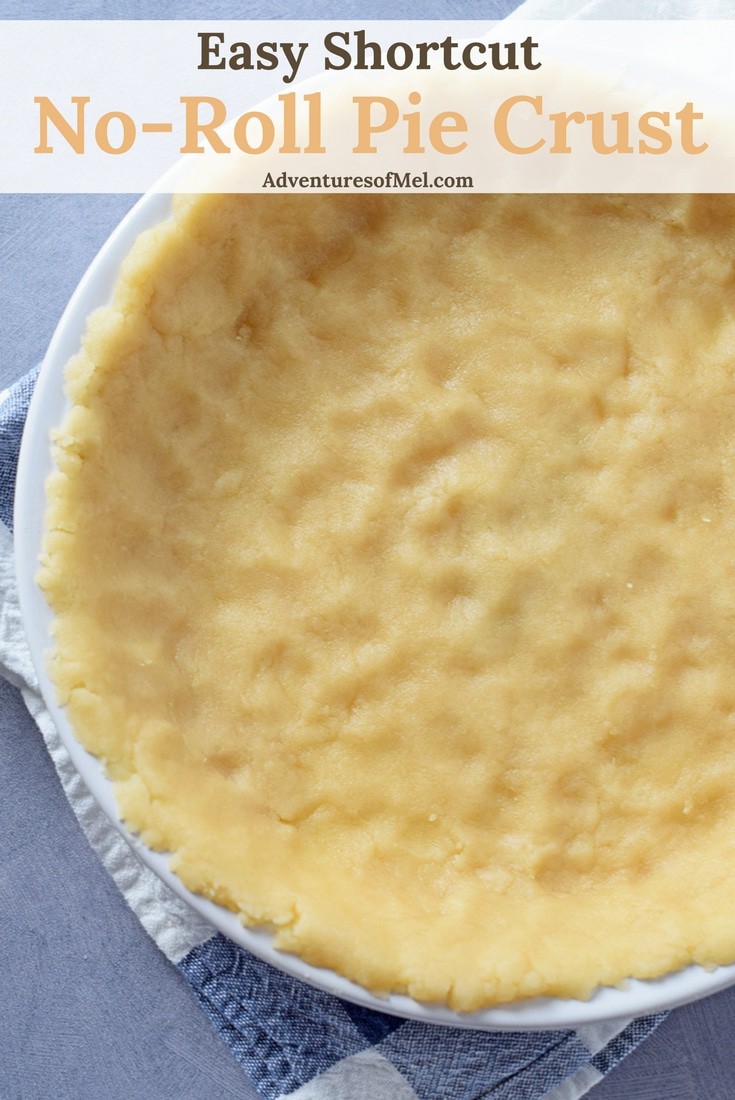
No-Roll Pie Crust recipe perfect for fruit pies, custard pie, and more. Made with oil, mix and press into a pie plate for a delicious homemade crust.
No Roll Pie Crust… Now that’s my kind of crust. This particular crust is perfect for fruit cobblers, but I also like it for all sorts of pie.
This is another pie crust straight out of Grandma’s recipe box. I haven’t really changed a thing.
It’s an oil-based crust, so the texture is somewhat different. I would say it almost melts in your mouth, and it definitely has a flakiness about it.
What I really love about it, is that it’s really a no-fail pie crust. Anyone can make it. There’s no rolling or fluting required. Just mix it up and press it into a pie plate. And presto! You’ve got a pretty tasty pie crust. Game changer!
Tips for how to make an Easy Shortcut No-Roll Pie Crust
Mix together the flour, sugar, and salt.
In a separate bowl (or glass measuring cup), whip together the oil and milk with a fork.
Add the oil mixture to the dry ingredients, and stir together with a fork until the flour is all moistened.
If you’re making a fruit cobbler, save back about a third of the mixture to crumble on top of the pie.
Press the remaining dough evenly in a pie plate, covering the bottom and the sides.
If you want to crimp the edges, go right ahead. But there’s no need if you don’t want to.
And that’s it, your no-roll pie crust is ready for filling. Bake according to the instructions for whatever type of pie or cobbler you’re making. Before baking, you may want to learn how to keep a pie crust from burning.
Want to make a pie with this crust? Here are a few scrumptious ideas.
Glass Measuring Cup – I use mine all the time, not just for measuring, but also for mixing up small quantity recipes.
Glass Pie Plates – This pie plate is my old faithful pie plate. I’ve had it forever, probably since we got married. Mine actually has the fluted edge sorta built in too, so you can press it in and get somewhat of a decorative edge without a lot of handiwork on your part.
Print the recipe for an Easy Shortcut No-Roll Pie Crust
Easy No-Roll Pie Crust
No-roll pie crust recipe perfect for fruit pies, custard pie, and more. Made with oil, mix and press into a pie plate for a delicious homemade crust.
2 cups all-purpose flour
2 teaspoons cane sugar
1 1/4 teaspoon salt
2/3 cup canola oil
3 tablespoons whole milk
Pre-heat the oven to 350° F.
In a large mixing bowl, whisk together the flour, sugar, and salt.
In a separate bowl (or glass measuring cup), whisk together the oil and milk.
Add the oil mixture to the dry ingredients, and stir together with a fork until the flour is all moistened.
Press the dough evenly in an un-greased pie plate, covering the bottom and sides. If you're making a fruit cobbler, save back about a third of the mixture to crumble on top of the cobbler.
If you want to crimp the edges, go right ahead.
Bake at 350° F for about 20 minutes, or until the crust begins to turn a golden brown.
Let the crust cool before adding any filling.
If you are making this crust with a recipe where you bake the crust with the filling, just bake it according to the instructions for that particular recipe.
Desserts, Pies & Pastries
American
easy pie crust, no-roll pie crust, pie crust, pie crust recipe, press-in pie crust
Can’t wait to make this crust recipe? Pin it for later!
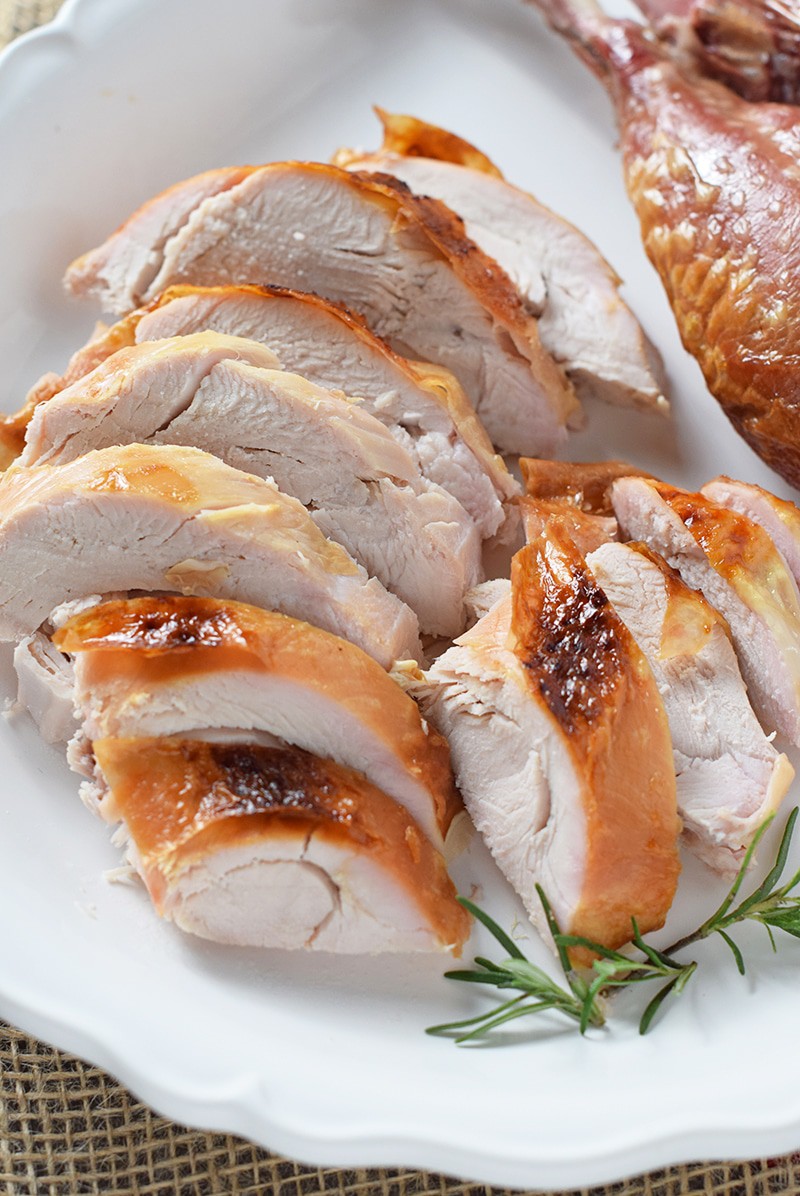
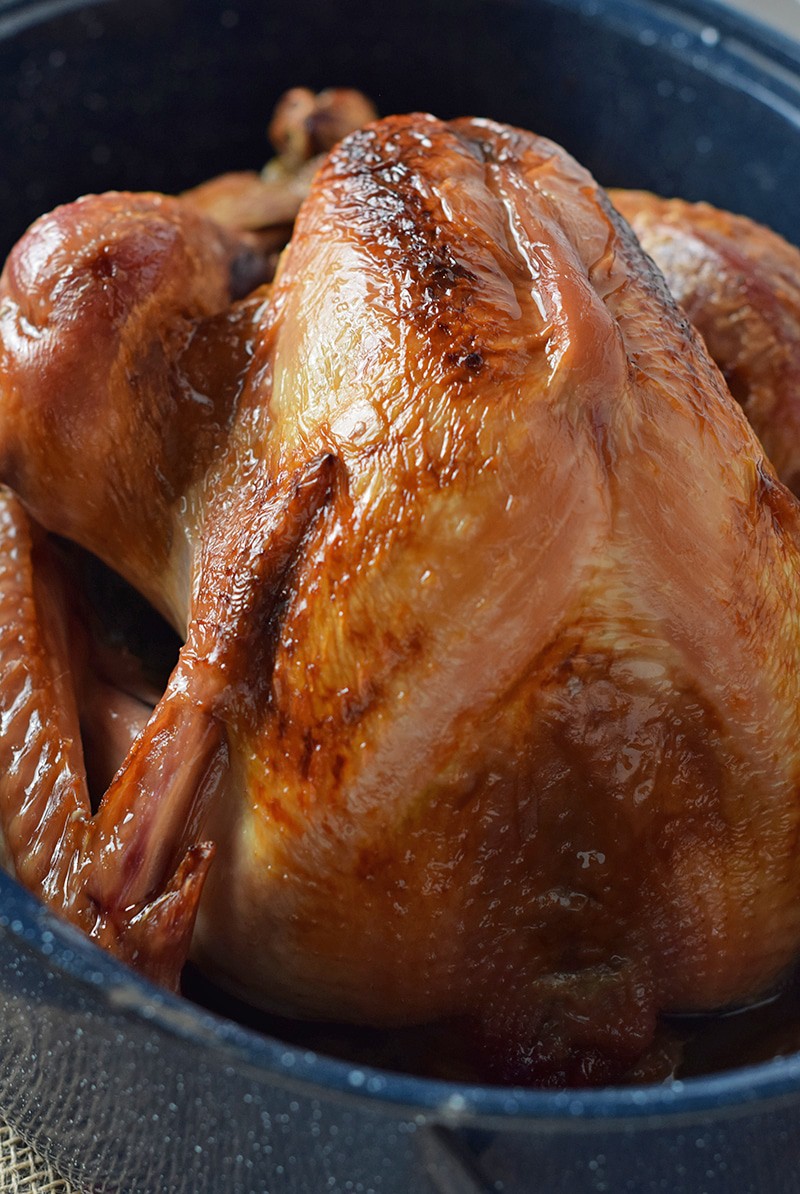
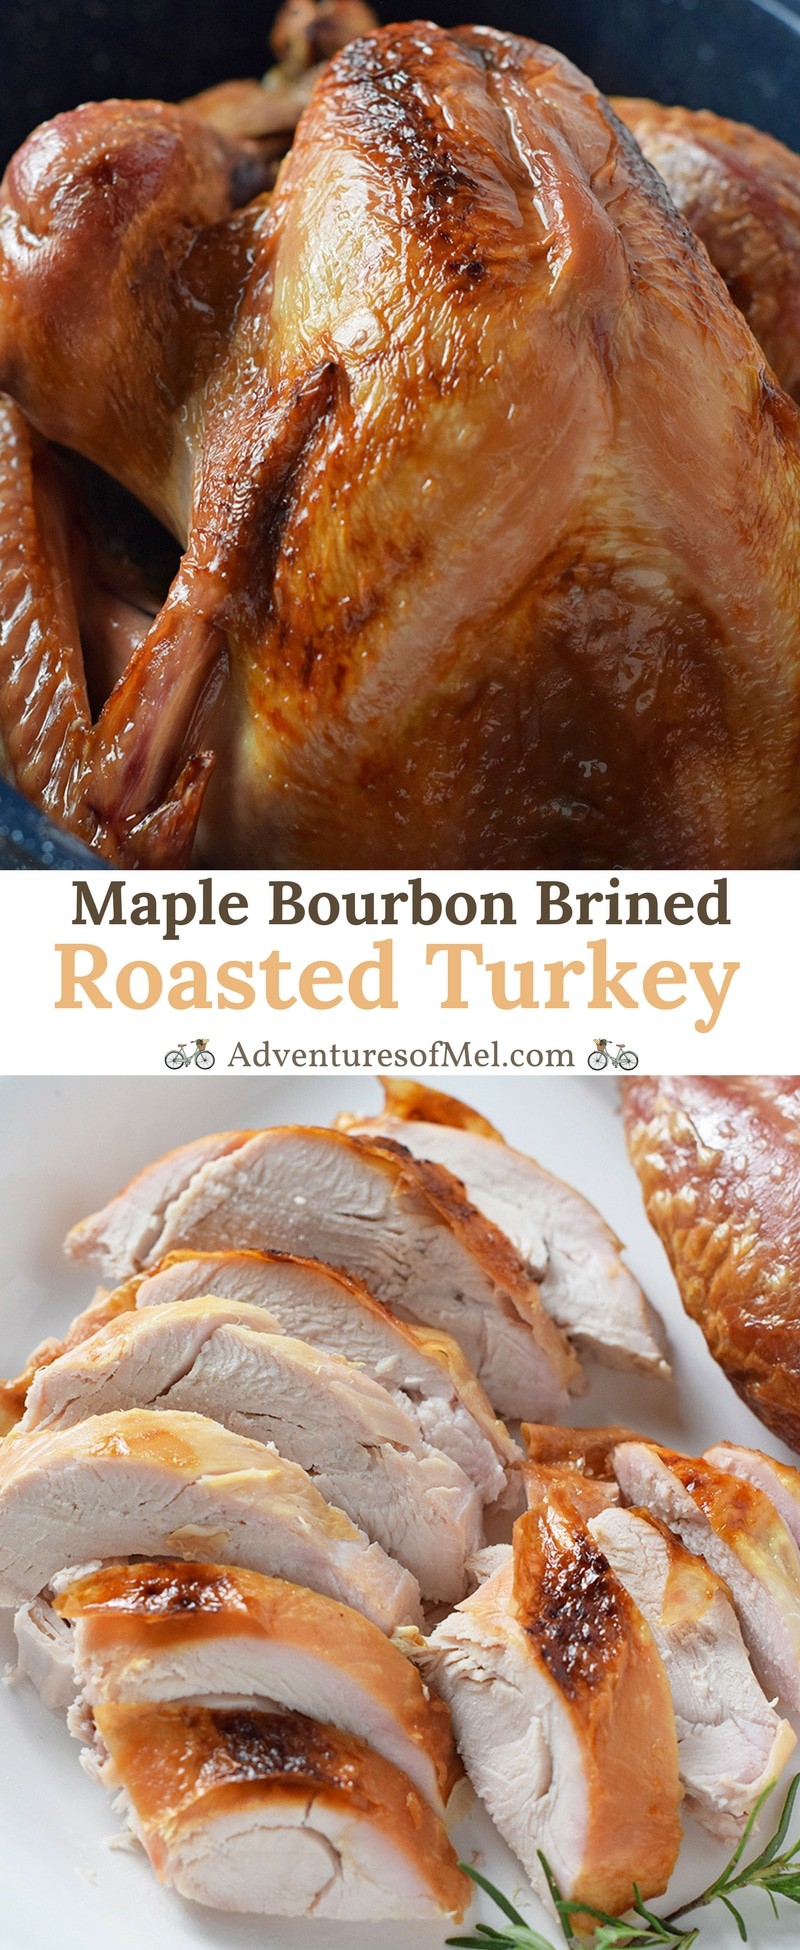
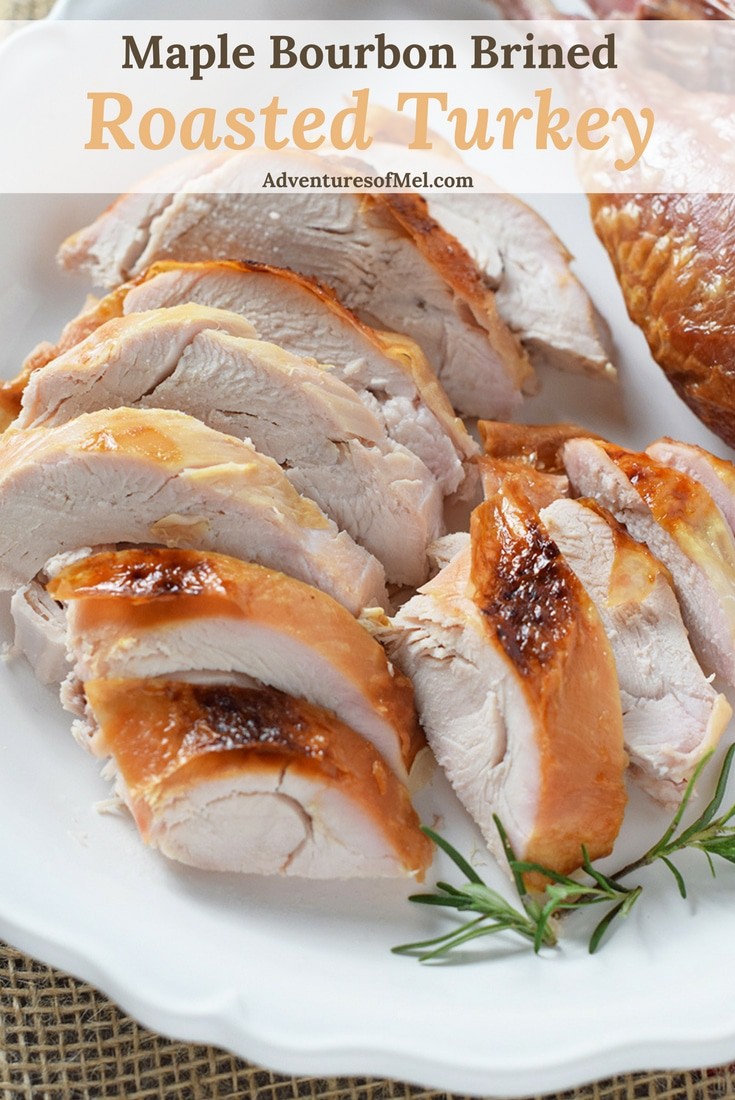
How to make a perfectly cooked, moist, delicious maple bourbon brined roasted turkey for dinner and holiday celebrations.
Maple Bourbon Brined Roasted Turkey is hands down the best turkey I’ve ever had. Better than deep fried even. It’s so moist and packed full of delicious flavor. And it’s definitely going on my list of favorite Thanksgiving Recipes and Christmas Recipes, along with my favorite slow cooker pork roast.
My husband Dan is the guru behind this recipe. He showed me how to make it for the purposes of this recipe (and Thanksgiving, which is right around the corner).
Brining a turkey isn’t difficult at all… Basically, if you have a food grade bucket and a few ingredients, you’re in business. I could see myself doing this to roast chicken too because it’s just so delicious!
One of my favorite things about cooking a turkey is the leftovers it gives. Enough to make this wonderfully cheesy turkey casserole with pasta.
Tips for how to make Maple Bourbon Brined Roasted Turkey
Prepare the turkey by removing the neck, gizzards, etc. Rinse with water.
To a food grade 5 gallon bucket, add hot water, onion, garlic, the peel of an orange, brown sugar, real maple syrup, bourbon, peppercorns, whole cloves, melted butter, kosher salt, ground sage, poultry seasoning, bay leaves, and ice. Stir well.
Place the turkey down in the mixture.
Cover the bucket with a lid and place in the refrigerator for 12-24 hours or longer. If you don’t have enough fridge room, you could pack the bucket with ice.
Once it’s brined, remove the turkey from the bucket and rinse with cold water, inside and out.
Rub the turkey with a thin coat of real maple syrup.
Place in a roasting pan, uncovered, for roasting.
Roast at 350° until the internal temperature is at 165° or higher. Base your cooking time on the size of your turkey; for example, we cooked a smaller turkey in about 3 hours. Cooking time will differ per turkey.
Print the recipe for Maple Bourbon Brined Roasted Turkey
Maple Bourbon Roasted Turkey
How to make a perfectly cooked, moist, delicious, maple bourbon roasted turkey for dinner and holiday celebrations. Perfect recipe for Thanksgiving dinner!
15 pounds turkey
1 1/2 gallons hot water
1 large yellow onion (chopped)
2 cloves garlic (minced)
1 whole orange peel
1/2 cup light brown sugar
1 1/8 cups maple syrup
3/4 cup bourbon
2 tablespoons black peppercorns
1 tablespoon whole cloves
1 cup unsalted butter (melted)
3/4 cup kosher salt
1 tablespoon ground sage
1/4 cup poultry seasoning
4 bay leaves (crumbled)
4 pounds ice
Prepare the turkey by removing the neck, gizzards, etc, and rinse with water.
To a food grade 5 gallon bucket, add the hot water, onion, garlic, orange peel, brown sugar, 1 cup of maple syrup, bourbon, peppercorns, whole cloves, melted butter, kosher salt, ground sage, poultry seasoning, bay leaves, and ice. Stir well.
Place the turkey down in the mixture.
Cover the bucket with a lid and place in the refrigerator for 12-24 hours or longer. If you don't have enough fridge room, you can pack the bucket with ice.
Once it’s brined, remove the turkey from the bucket and rinse with cold water, inside and out.
Rub the turkey with a thin coat of real maple syrup (the extra 1/8 cup).
Place the turkey in a roasting pan, uncovered, for roasting.
Roast at 350° F until the internal temperature of your turkey is 165° F or higher. Base your cook time on the size of your turkey; cook time will differ per turkey.
Instant Pot pumpkin spice cheesecake is an easy fall and holiday dessert recipe with a graham cracker crust, full of delicious fall flavors.
Pumpkin Cheesecake is one of those “to die for” desserts… Dessert that makes the taste buds tingle and satisfies those cravings for creamy delicious cheesecake.
When you add pumpkin spice and all the flavors of fall to my favorite dessert… Well, I may just swoon.
When I first tried creating this recipe, my first attempt was somewhat of a fail. It turned out more like pumpkin spice pudding than pumpkin spice cheesecake. But I didn’t give up, and my second attempt won.
The fact that it’s made in the Instant Pot just adds an element of fun to the recipe. I LOVE cooking with my Instant Pot because the possibilities are truly endless.
Tips for Making Pumpkin Spice Cheesecake in the Instant Pot
This recipe creates enough filling for 2 smaller cheesecakes. If you have a larger Instant Pot (ours is smaller, a 6-quart), you could make 1 larger cheesecake with a larger graham cracker crust with this recipe.
Crush the graham crackers, using a Ziploc bag and a rolling pin.
Mix the graham crackers together with melted butter.
Spray your springform pan with cooking spray; then press the mixture into the pan. Place in the freezer ’til you’re ready to add the filling.
Mix together softened cream cheese, sugar, and brown sugar with a mixer.
Add vanilla and almond extract, mixing well.
Crack 1 whole egg and 1 egg yolk into the mixture.
Add pumpkin puree, along with sour cream, mixing well.
Finally, mix in a tablespoon of flour and the salt.
Pour the cheesecake filling into your crust.
Add 1 1/2 cups water to the bottom of your pressure cooker.
Cover the cheesecake pan with foil, and place the pan inside your Instant Pot.
Set to Manual and cook for 30 minutes.
When the Instant Pot is done and it’s naturally released, remove the cheesecake, keep covered, and place in the fridge for a few hours (or even overnight). Let it chill thoroughly.
Then it’s ready to serve. I suggest serving it with a li’l whipped cream.
Want to see how to make Pumpkin Spice Cheesecake in the Instant Pot? Watch the video!
If you try this recipe, why not leave a star rating in the recipe card right below and/or a review in the comment section further down the page? I always appreciate your feedback. You can also follow me on Pinterest, Facebook, Instagram, and YouTube. And subscribe to my email list too!
Instant Pot Pumpkin Spice Cheesecake
Pumpkin Spice Cheesecake, made in the Instant Pot. Easy fall and holiday dessert recipe with a graham cracker crust, full of delicious fall flavors.
8 graham crackers
5 tablespoons salted butter (melted)
16 ounces cream cheese
1/4 cup cane sugar
1/4 cup light brown sugar
1 teaspoon vanilla extract
1/8 teaspoon almond extract
1 large egg
1 large egg yolk
1/2 cup pumpkin puree
2 tablespoons sour cream
1/4 teaspoon ground cinnamon
1/8 teaspoon ground ginger
1/8 teaspoon ground cloves
1/8 teaspoon ground nutmeg
1 tablespoon all-purpose flour
1/4 teaspoon salt
Crush the graham crackers, using a Ziploc bag and a rolling pin.
Mix the graham crackers together with the melted butter.
Spray your springform pan with cooking spray; then press the mixture into the pan. Place in the freezer ’til you’re ready to add the filling.
Mix together the softened cream cheese, sugar, and brown sugar with a mixer.
Add the vanilla and almond extract, mixing well.
Add 1 whole egg and 1 egg yolk to the mixture.
Add pumpkin puree, along with sour cream, mixing well.
Mix in the spices, including the cinnamon, ginger, cloves, and nutmeg.
Finally, mix in a tablespoon of flour and the salt.
Pour the cheesecake filling into your crust.
Add 1 1/2 cups water to the bottom of your pressure cooker.
Cover the cheesecake pan with foil, and place the pan inside your Instant Pot.
Set to Manual and cook for 30 minutes.
When the Instant Pot is done and it's naturally released, allow it to cool completely.
Then cover the cheesecake and place it in the fridge to chill for at least 6 hours, or overnight.
Slice and serve. I suggest serving it with a li'l whipped cream on top.
*This recipe creates enough filling for 2 smaller cheesecakes. If you have a larger Instant Pot (ours is smaller, a 6-quart), you could make 1 larger cheesecake with this recipe; just add a few more graham crackers and a little more butter to the crust mixture.
Desserts
American
instant pot cheesecake, instant pot pumpkin cheesecake, pumpkin cheesecake, pumpkin spice cheesecake