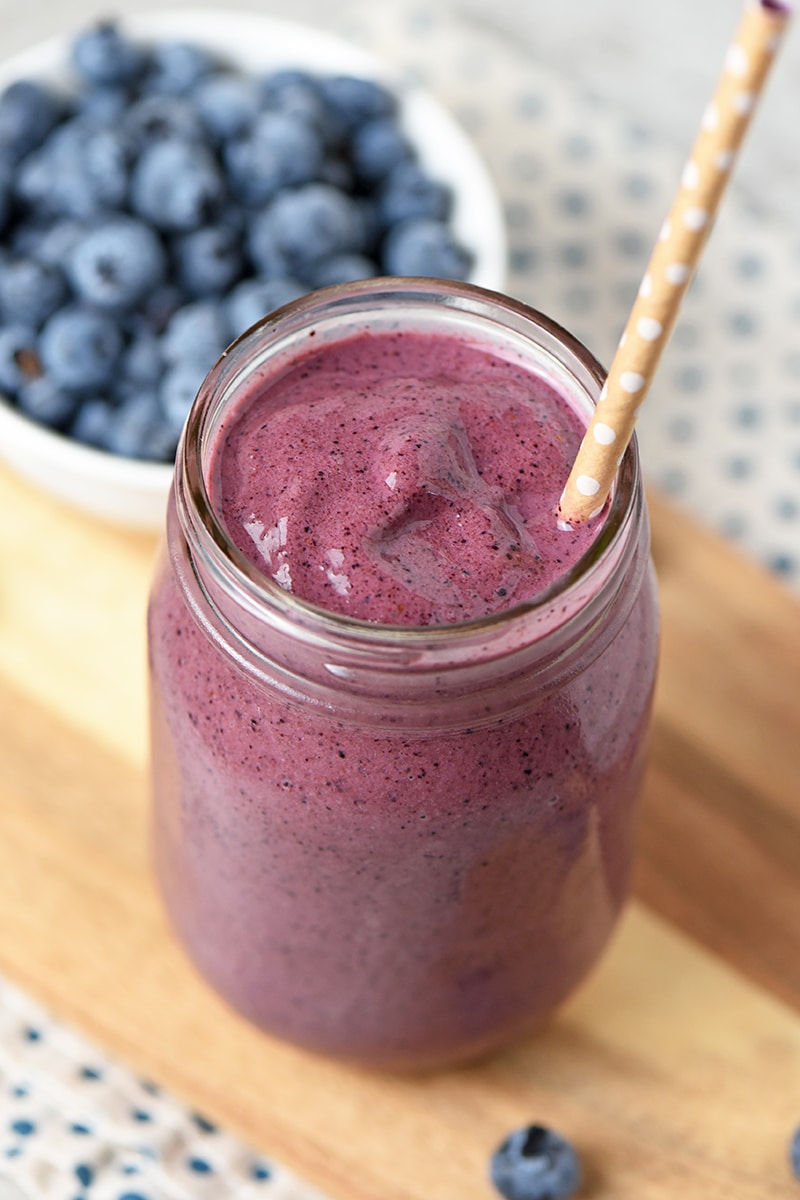
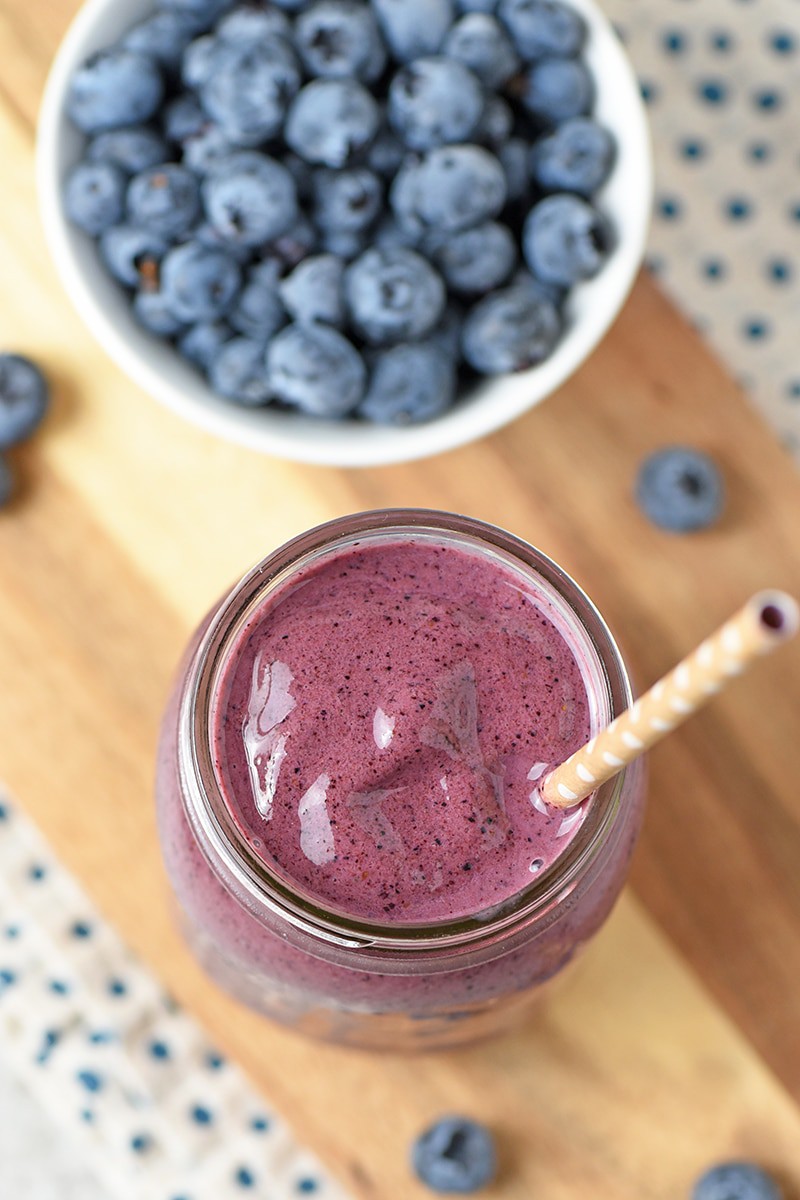
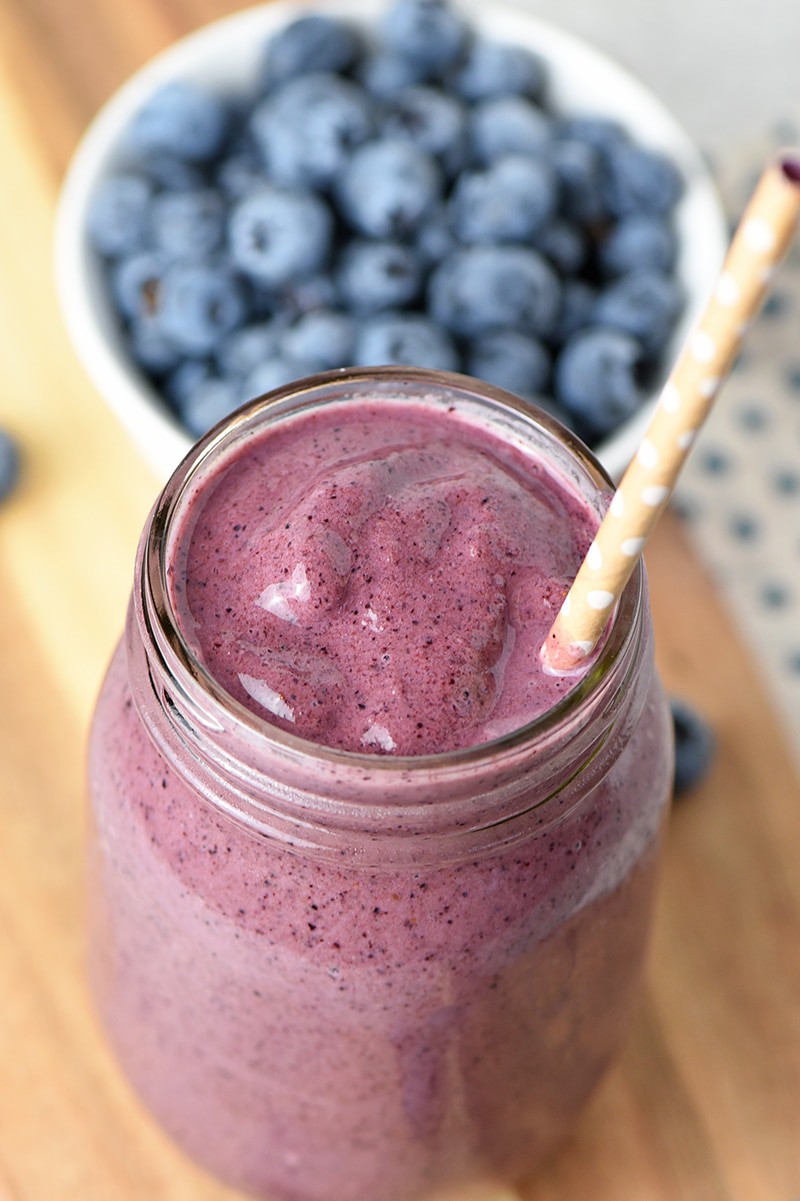
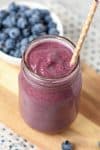
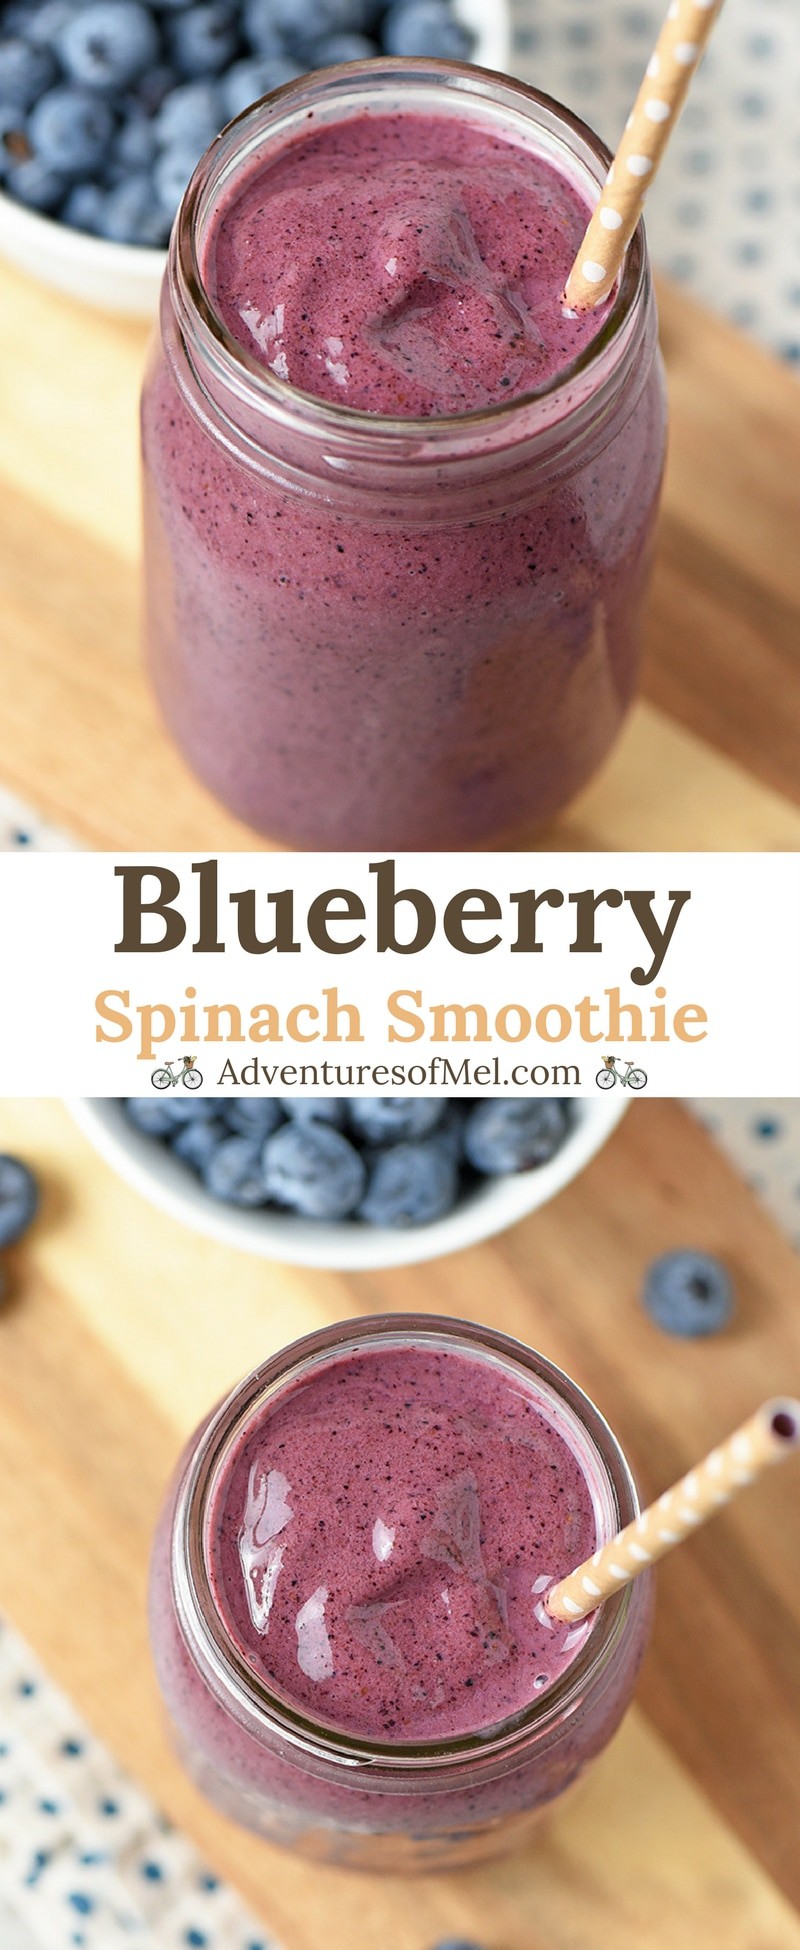
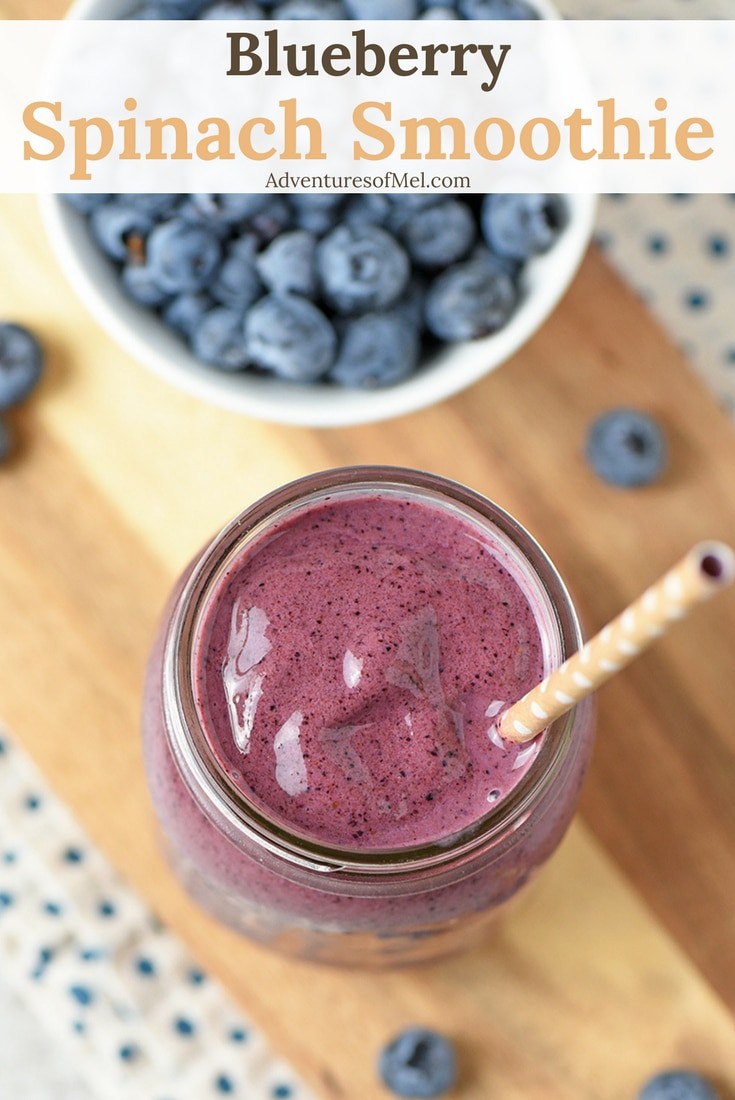
Blueberry Spinach Smoothie recipe that’s healthy, quick, and an easy to make snack. Made with fresh spinach, plain Greek yogurt, and honey, also a tasty addition to mornings.
Blueberry Spinach Smoothie snacks are not only easy to make, they’re also full of nutrition. I love a smoothie during that afternoon witching hour when I’m starting to crave something sweet.
This particular smoothie has a few hidden ingredients, like spinach, a banana, Greek yogurt, milk, and honey. My boys didn’t quite know what to think when they found out there was spinach in their smoothies.
You can use fresh or frozen blueberries, totally up to you. I used frozen because cheaper.
I do add the banana and tablespoon of honey to sweeten the smoothie just a bit; however, it’s not overly sweet. The banana and honey really work together to give just the right amount of sweetness but not too much.
The Greek yogurt gives the smoothie more of a creamy factor. You could probably leave it out if you don’t want that tangy yogurt taste… I make smoothies both with and without yogurt, depending on what’s in my fridge at any given time.
Tips for how to make a Blueberry Spinach Smoothie:
Gather your ingredients… You’ll need fresh or frozen blueberries, fresh spinach leaves, a banana, plain Greek yogurt, milk, raw honey, and ice.
If you’re using fresh blueberries, wash your berries. If you’re using frozen blueberries, there’s no prep needed.
Also wash the spinach.
Add your blueberries, spinach leaves, peeled banana, yogurt, milk, and honey to a large blender.
Pulse until everything is mixed well.
Add the ice to the mixture, and pulse again until you reach the desired consistency. If your blender has a smoothie setting, you can use that.
This recipe yields about 2 to 4 smoothies, depending on the size smoothie you prefer. We like them on the smaller side, so my 3 boys and I can usually split the recipe between us.
Alternative options or add-ins for your smoothie:
If you don’t want regular milk… You can use whatever kind of milk you prefer, whether it’s almond milk, soy milk, whatever you choose.
Add a handful of strawberries for an extra berry kick.
Kitchen tools you may need to make a Blueberry Smoothie:
Fruit Wash Bowl – Handy for washing fruits and vegetables. Blender – You’ll need a blender that has the strength to blend up ice in a smoothie. Cups or Jars with Straws – for serving.
Print the recipe for Blueberry Spinach Smoothie
Blueberry Spinach Smoothie
Blueberry Spinach Smoothie recipe that’s healthy, quick, and an easy to make snack. Made with fresh spinach, plain Greek yogurt, and honey, also a tasty addition to mornings.
2 cups fresh or frozen blueberries
1 cup fresh spinach leaves
1 banana
1/2 cup plain Greek yogurt
1/2 cup whole milk
1 tablespoon raw honey
1 1/2 cups ice
If you’re using fresh blueberries, wash your berries. If you’re using frozen blueberries, there’s no prep needed.
Also wash the spinach.
Add your blueberries, spinach leaves, peeled banana, yogurt, milk, and honey to a large blender.
Pulse until everything is mixed well.
Add the ice to the mixture, and pulse again until you reach the desired consistency. If your blender has a smoothie setting, you can use that.
Pour into cups or jars and serve with straws.
This recipe yields about 2 to 4 smoothies, depending on the size smoothie you prefer. We like them on the smaller side, so my 3 boys and I can usually split the recipe between us.
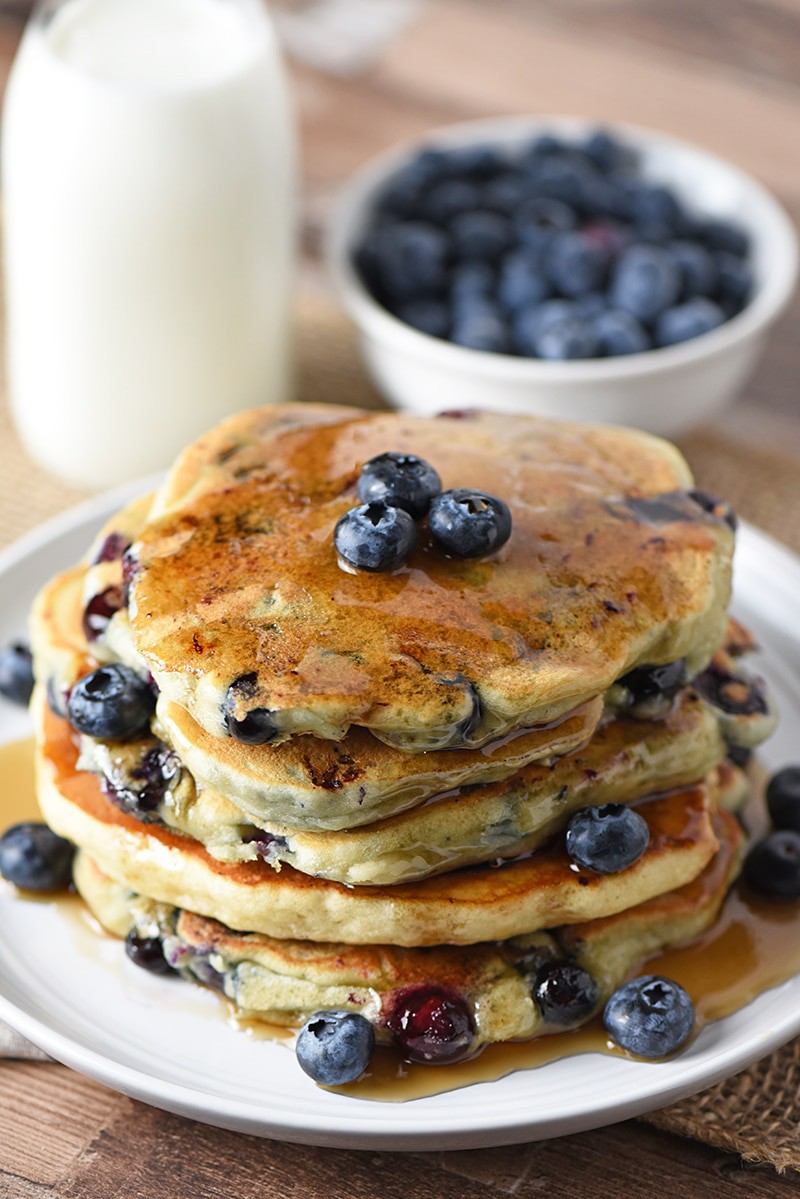
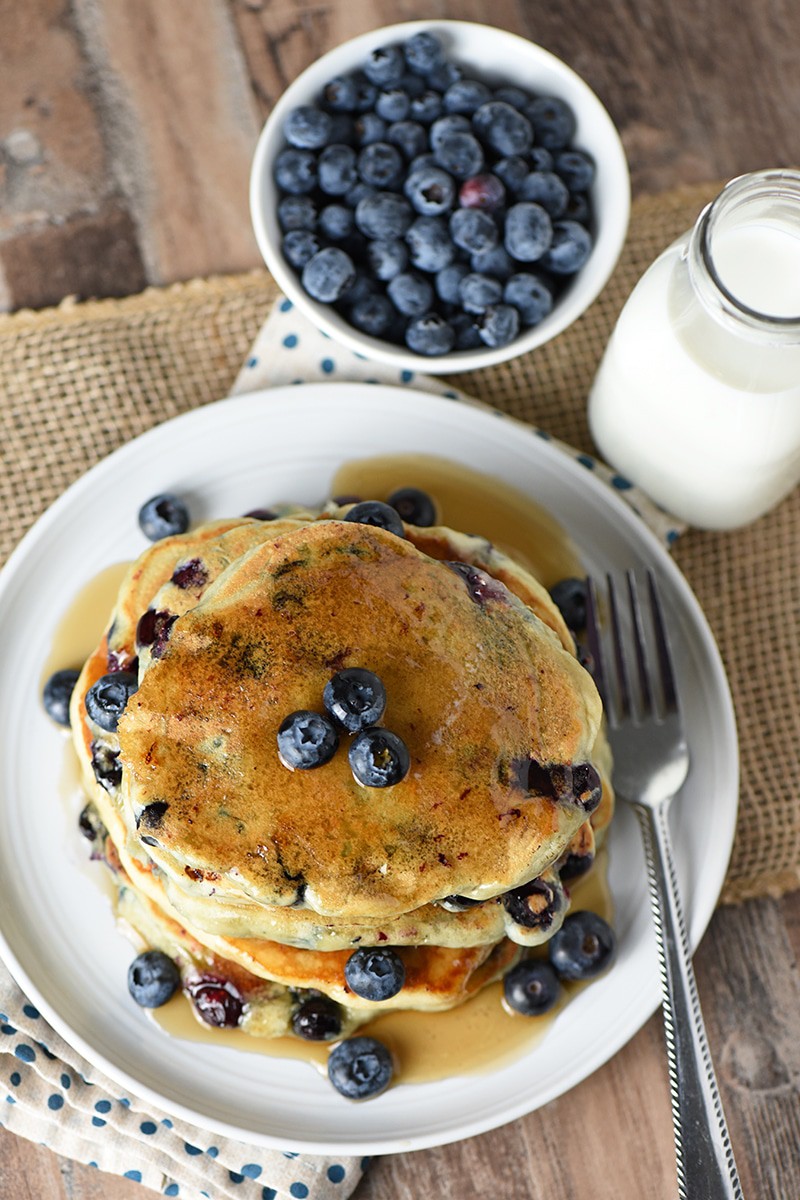
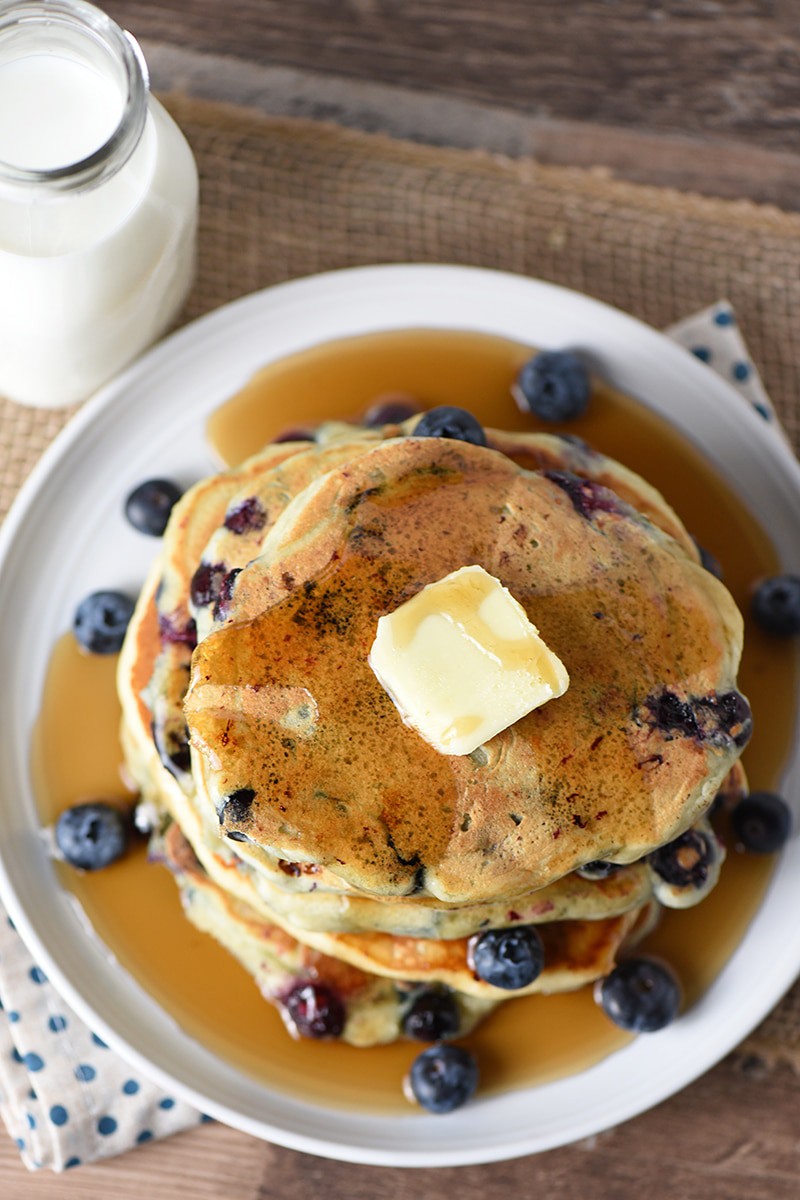
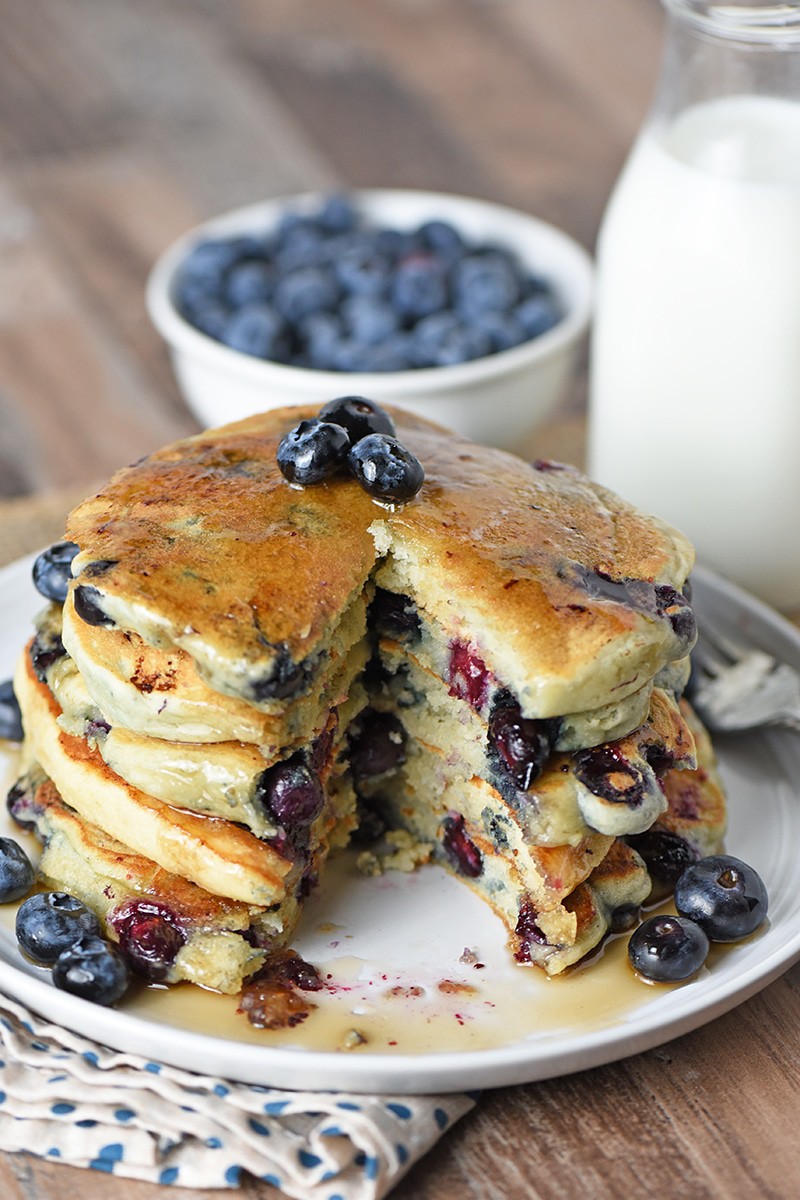
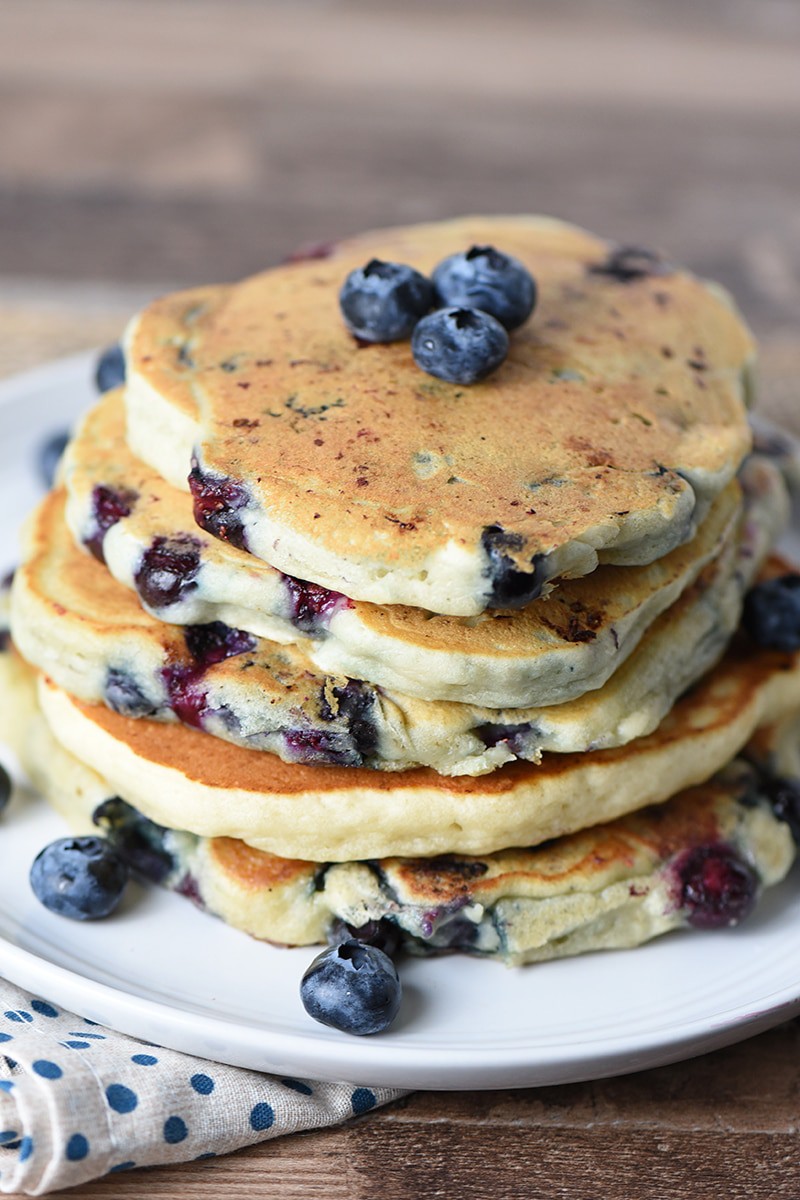
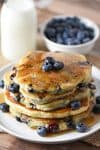
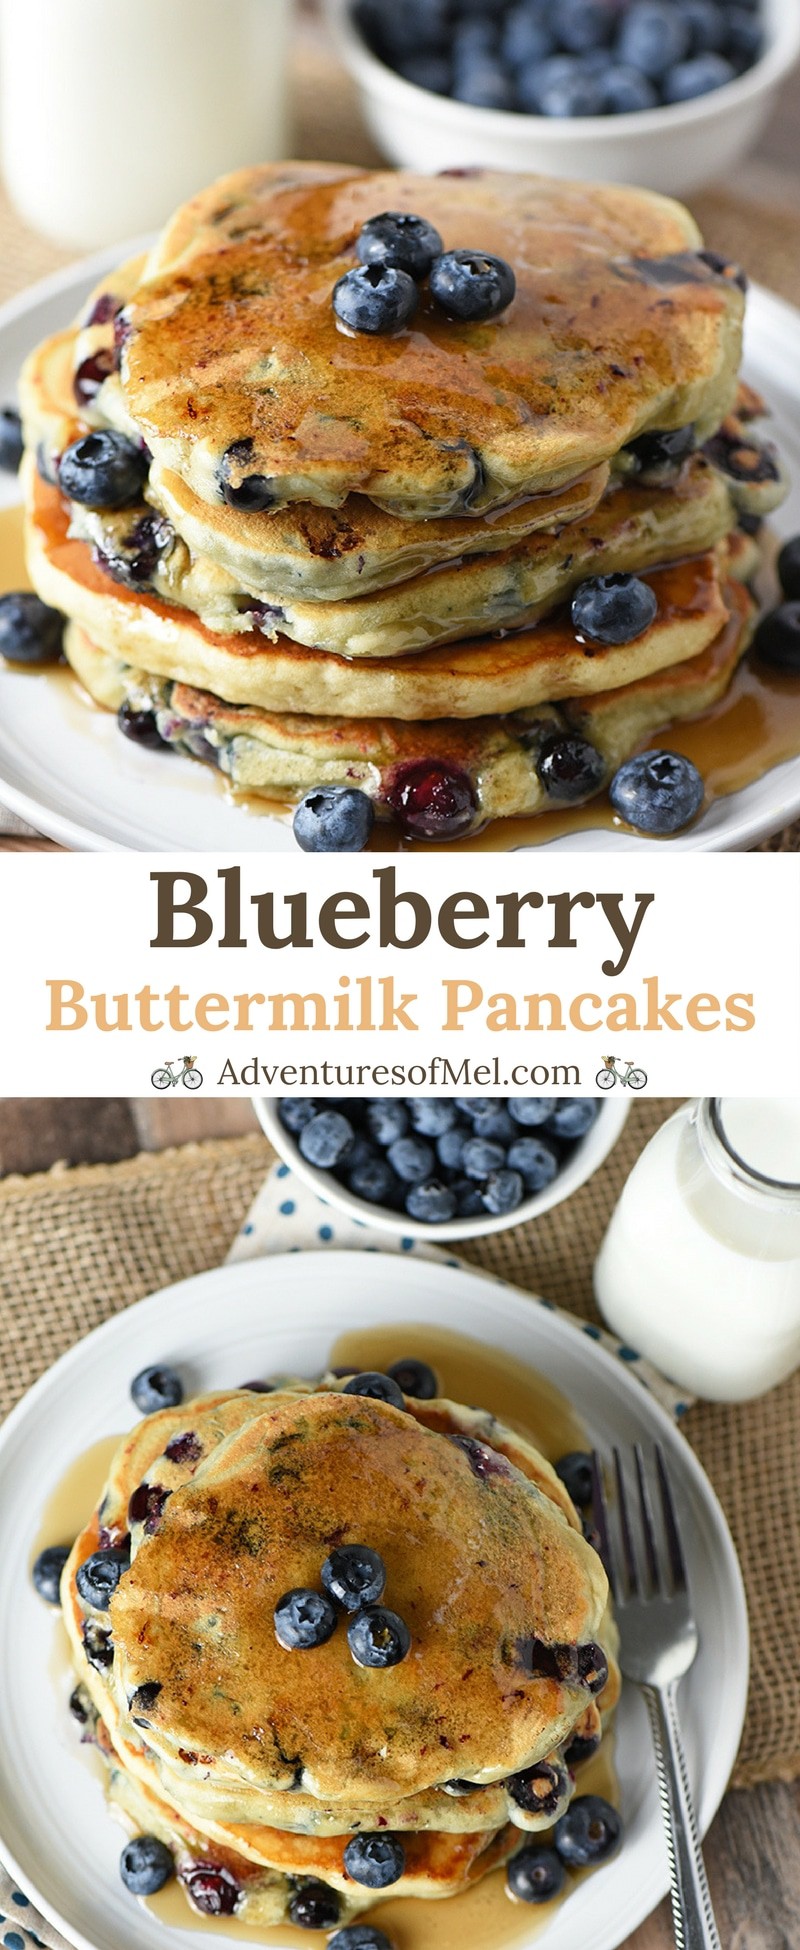
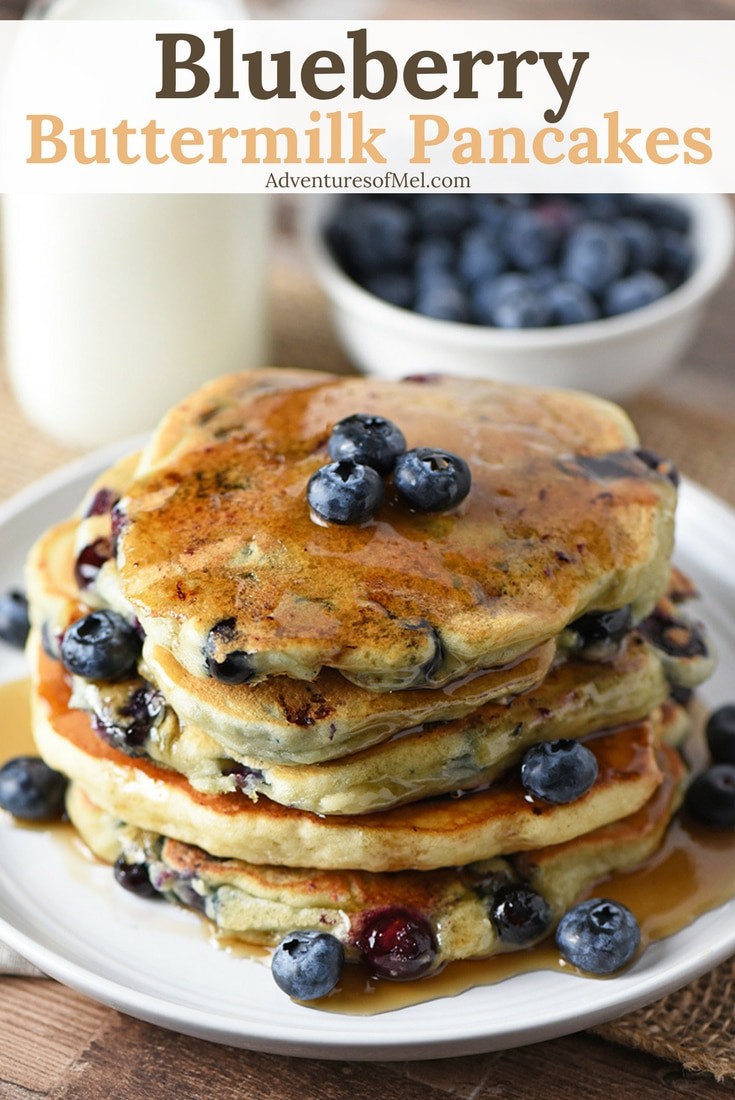
Blueberry Buttermilk Pancakes from scratch are so easy to make with this simple recipe. My boys love it when we have fluffy pancakes for breakfast, especially when they’re filled with sweet, juicy blueberries.
Fluffy pancakes filled with sweet, juicy blueberries and covered over with a light layer of maple syrup or a sprinkling of powdered sugar on top… Well, that’s pure pancake perfection.
This recipe is easy to make and calls for simple ingredients you probably already have in your kitchen. Instead of eggs, I use unsweetened applesauce; and if you don’t have buttermilk, you can always sour your milk with about a tablespoon of vinegar (either distilled white or apple cider).
I like to make pancakes on our electric griddle or cast iron griddle, just depends on the day. Either way you choose to cook up a batch of these pancakes, may they be a delicious start to your day!
Our oldest son has actually taken over pancake duty, the more he’s learned how to cook. I love it when he gets a craving for pancakes because that usually means he’s in the kitchen cooking up a batch to go with our regular breakfast of bacon and eggs.
Pancake Turner – I recommend a spatula with a wide base for flipping pancakes.
Print the recipe for Blueberry Buttermilk Pancakes
Blueberry Buttermilk Pancakes
Blueberry Buttermilk Pancakes from scratch are so easy to make with this simple recipe. My boys love it when we have fluffy pancakes for breakfast, especially when they’re filled with sweet, juicy blueberries.
Large Mixing Bowl
Whisk
Griddle
1 1/4 cups all-purpose flour
1/2 teaspoon baking soda
2 teaspoons baking powder
3/4 teaspoon salt
2 tablespoons cane sugar
1/4 cup unsweetened applesauce
3/4 cup buttermilk
3 tablespoons canola oil
1 cup blueberries
In a large mixing bowl, whisk together the dry ingredients, including the flour, baking soda, baking powder, salt, and sugar.
Make a well in the center of the mixture.
Add the applesauce, buttermilk, and canola oil to the well.
Stir everything together just until moistened. The batter will be quite thick.
Gently fold in the blueberries with a large spoon.
Set the griddle on low to medium heat, and lightly spray it with cooking spray.
Spoon the pancake batter onto the hot griddle, adding enough to make your preferred size pancake.
Cook the pancakes 'til the tops are covered in bubbles, and the bottom edges have turned slightly crispy and golden brown in color.
Flip the pancakes and cook the other side. Cook well, until each pancake is a nice golden brown and cooked through.
Serve with butter and warm maple syrup, warm blueberry syrup, or powdered sugar.
Breakfast & Brunch, Main Course
American
blueberry buttermilk pancakes, blueberry pancakes
Pin this scrumptious recipe to save it for breakfast this weekend!
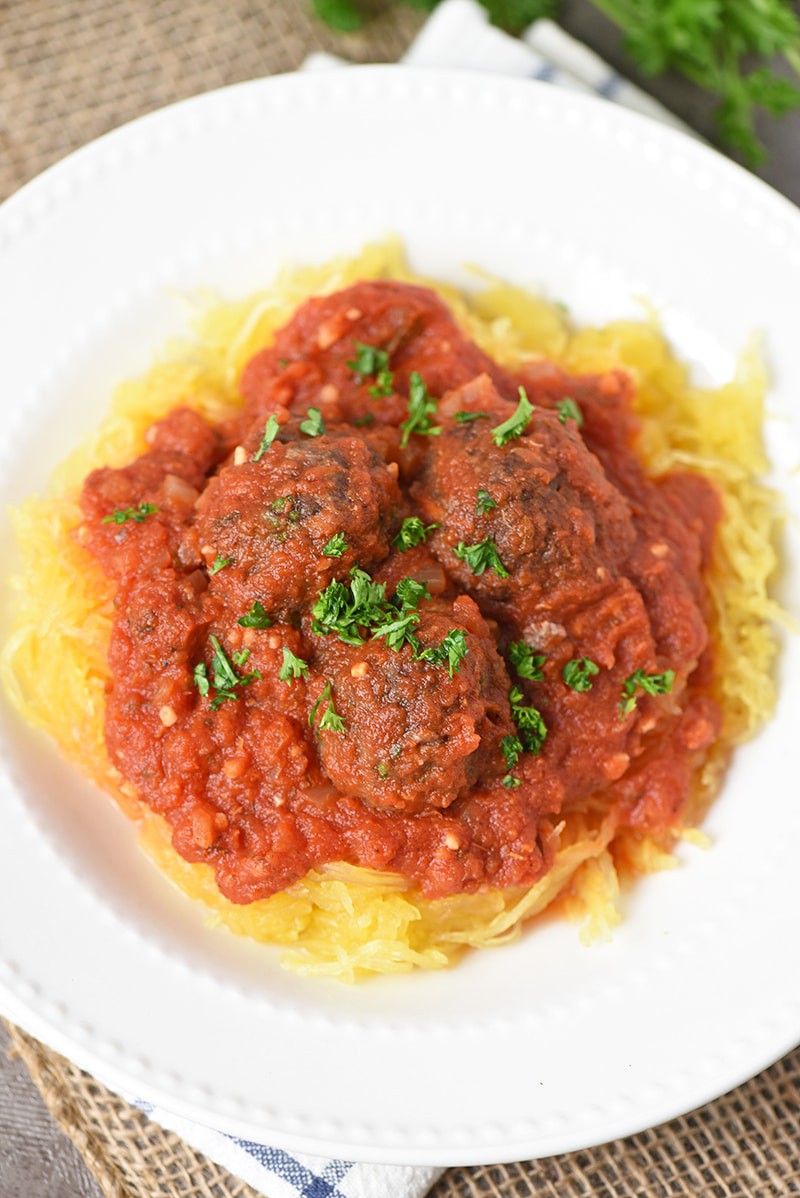
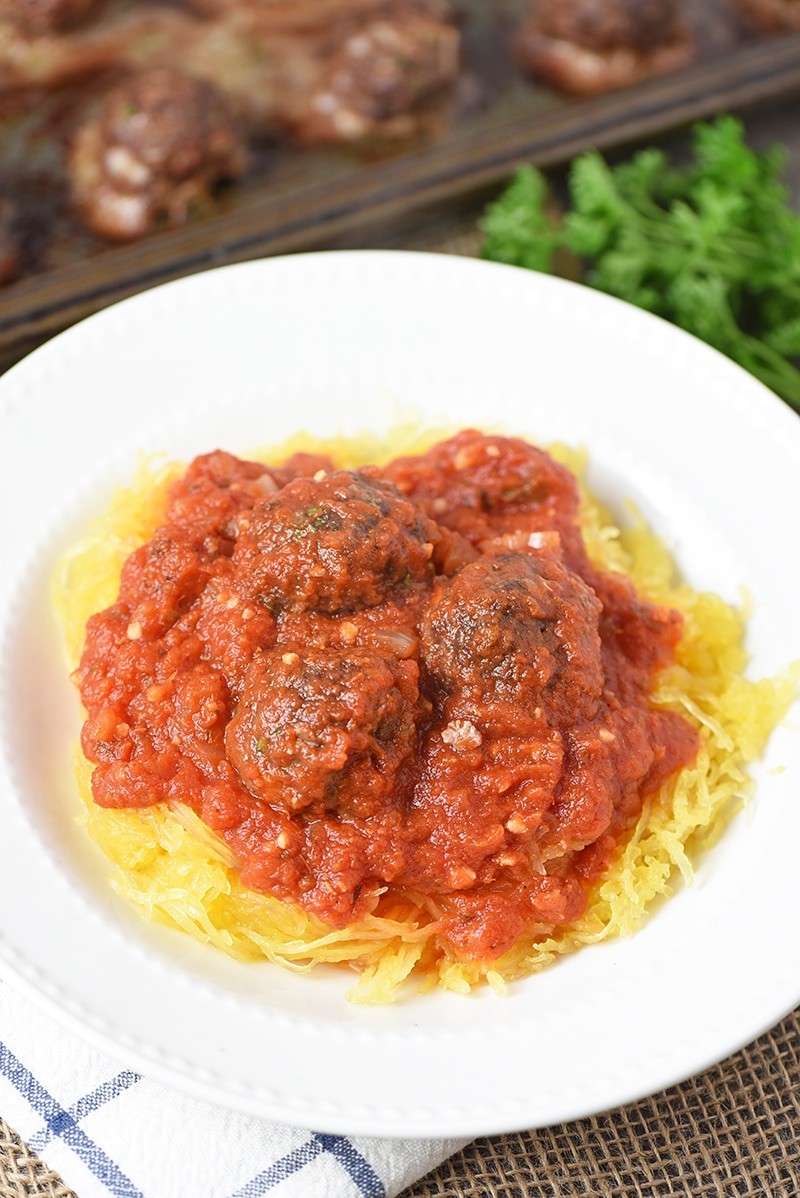
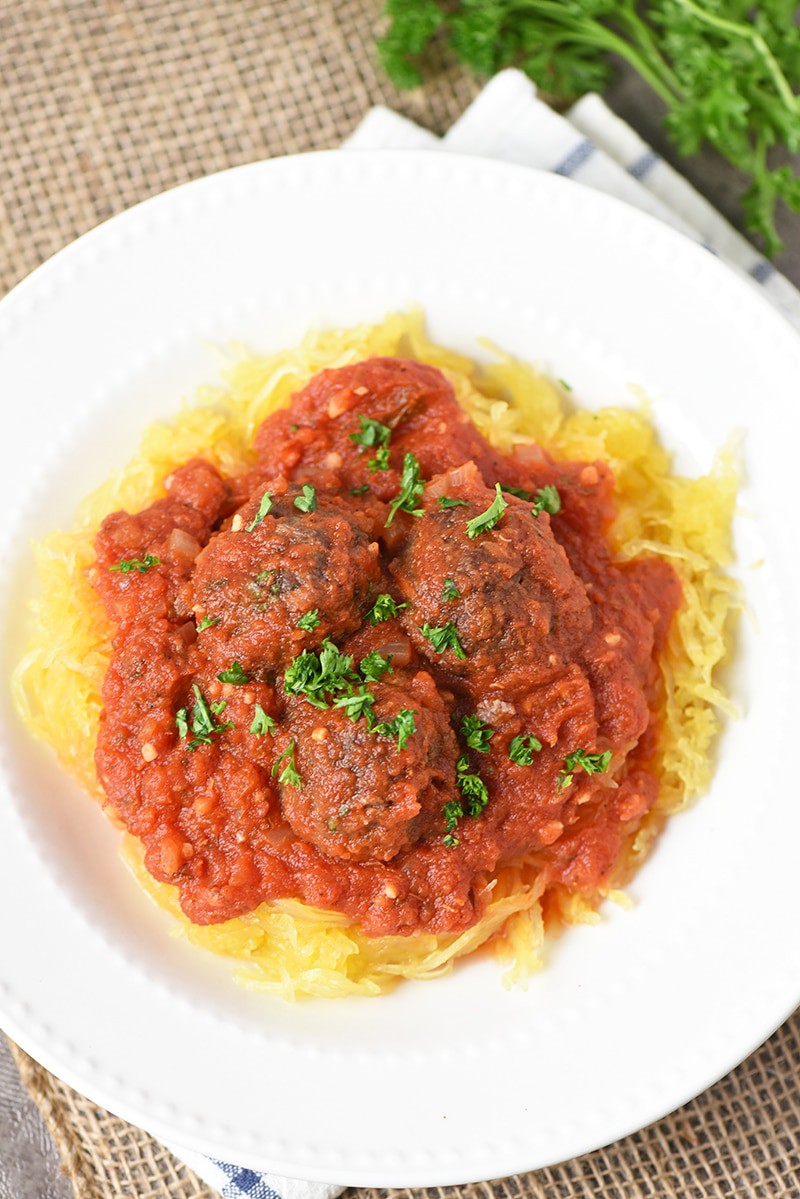
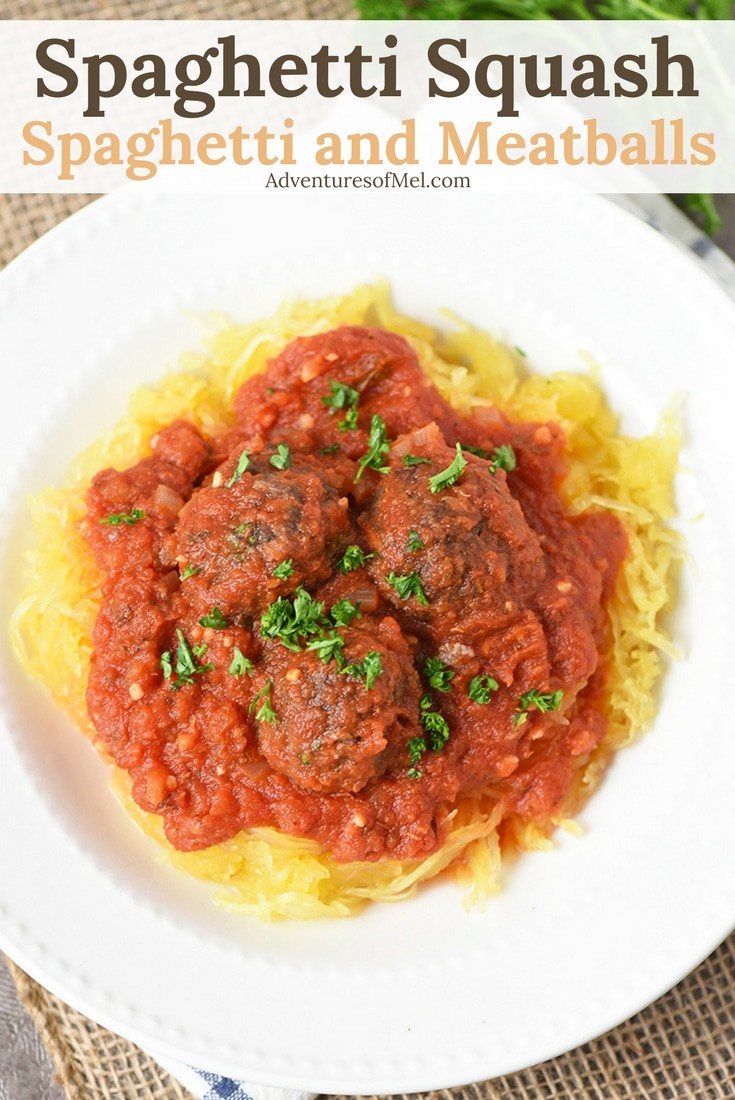
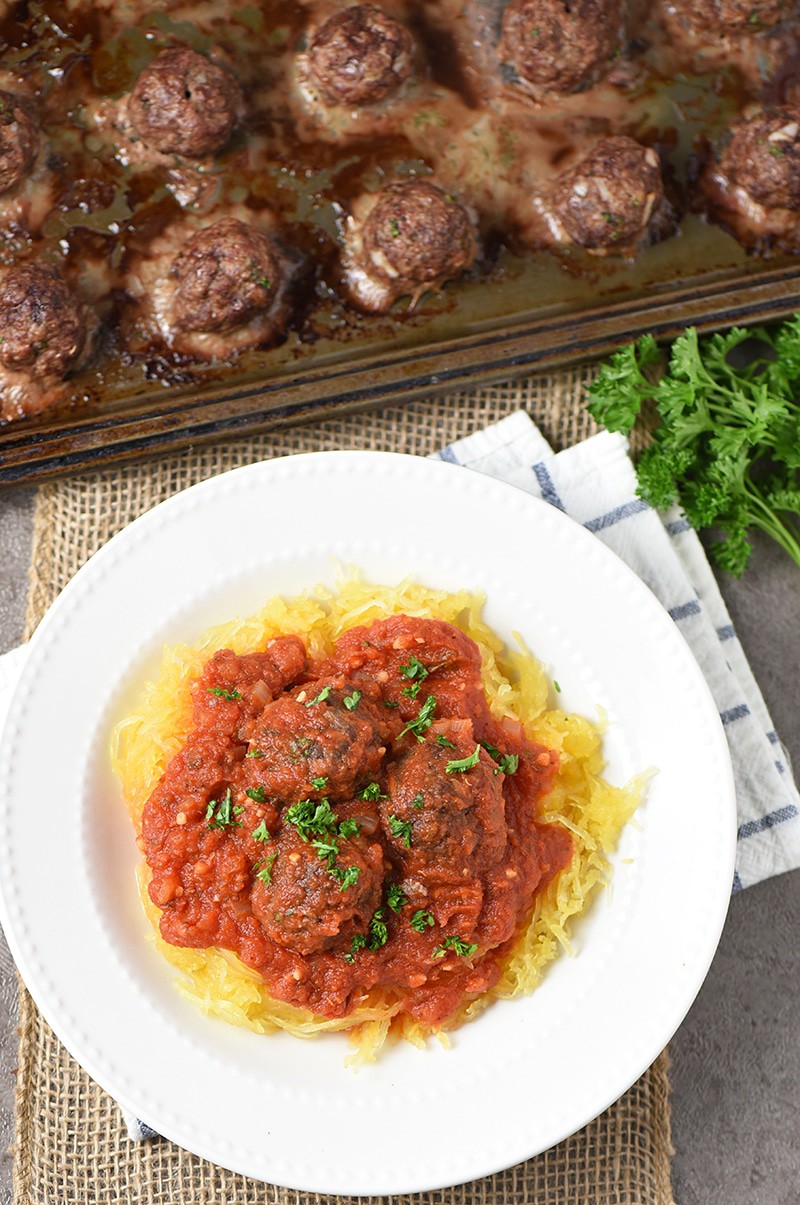
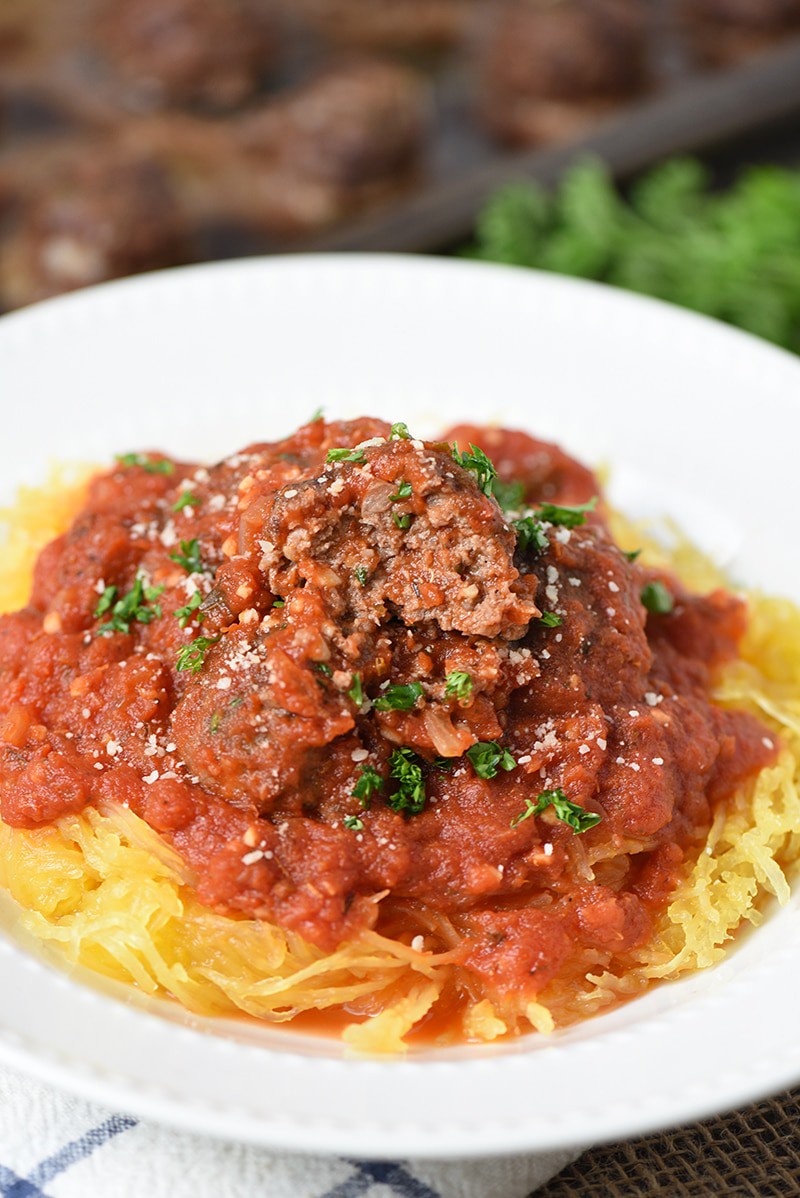
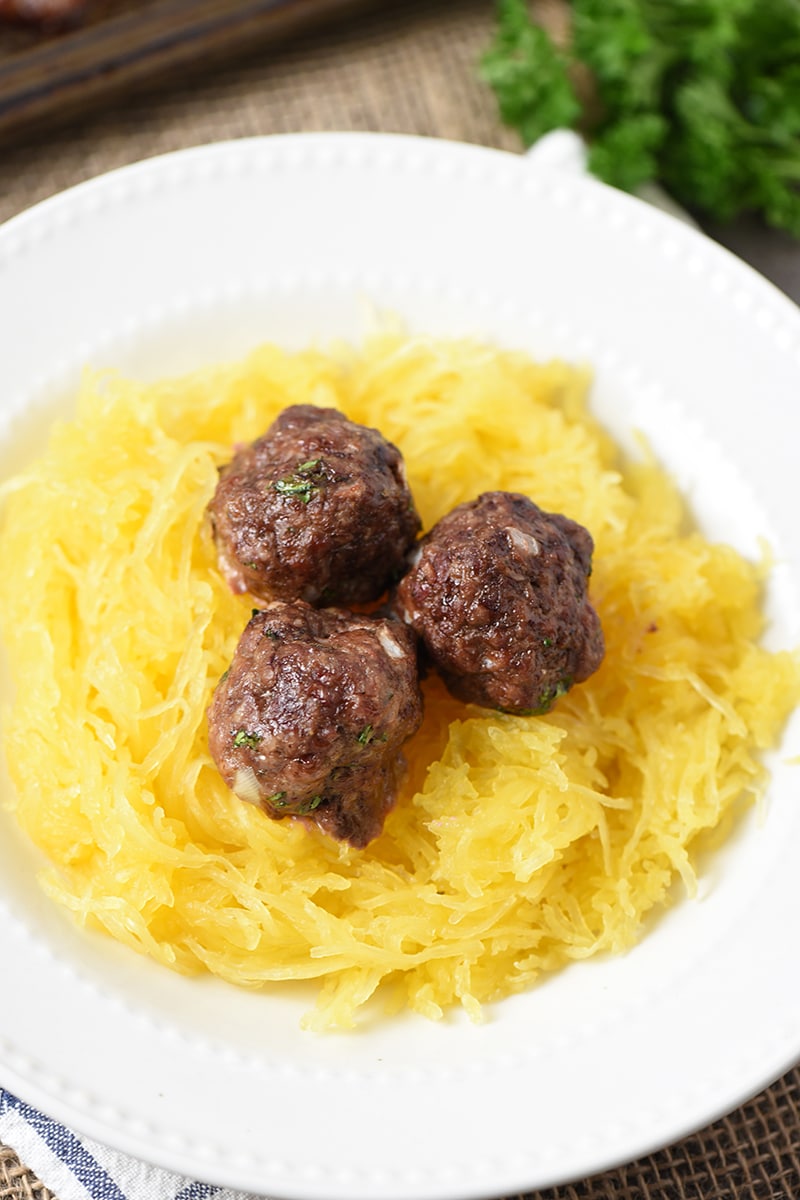
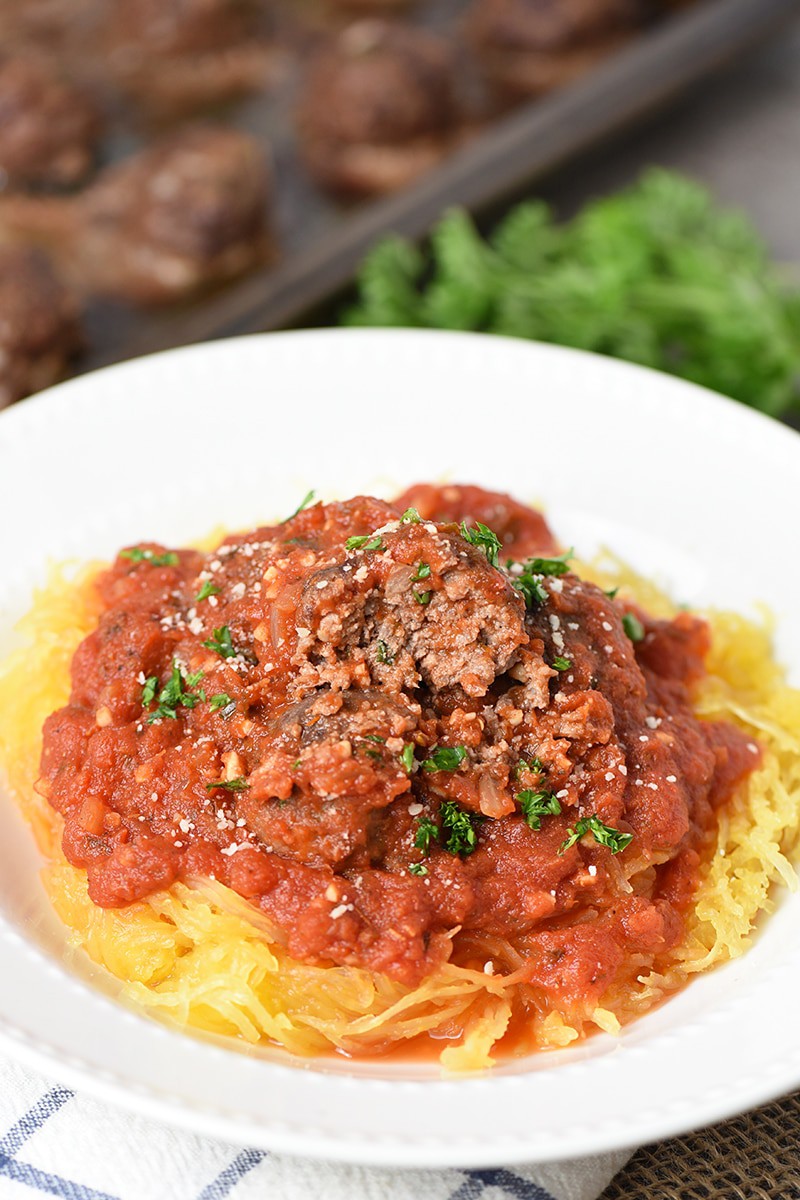
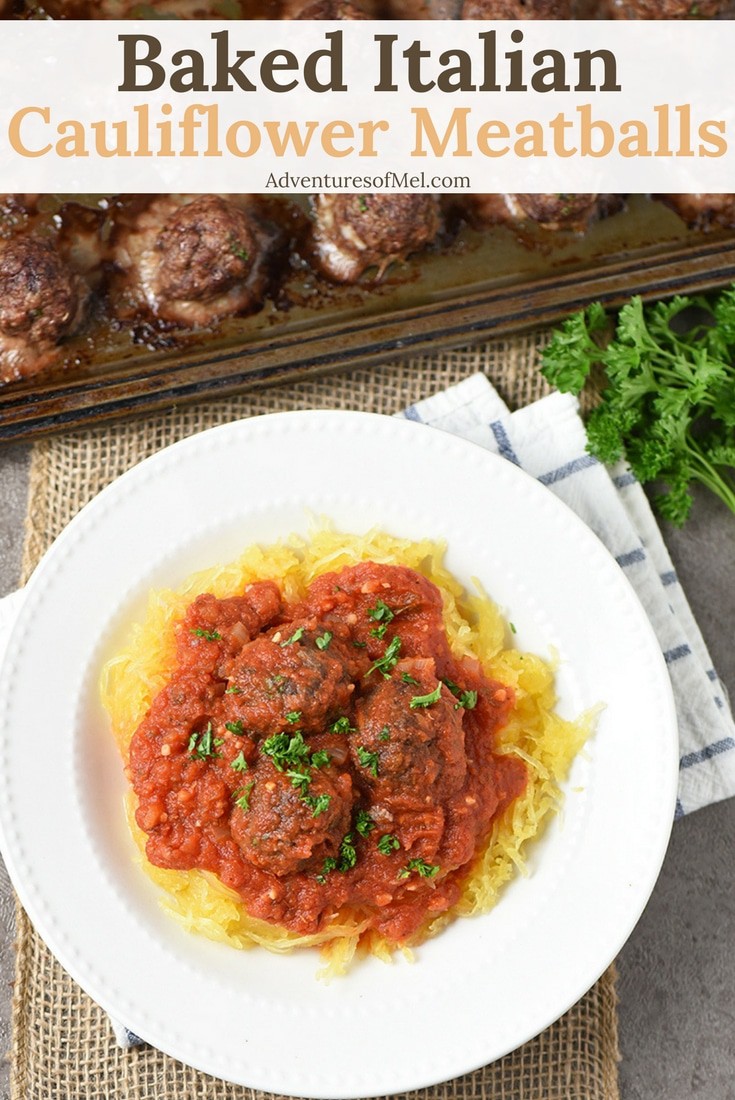
Spaghetti Squash Spaghetti and Meatballs recipe, made with spaghetti squash instead of pasta, an easy homemade pasta sauce, and low carb meatballs packed with a hidden veggie. It’s a healthy meal my family can’t wait to eat for dinner.
Spaghetti Squash Spaghetti is one of my family’s favorite meals, even though it’s packed with squash instead of pasta and served with either a meaty sauce or low carb cauliflower meatballs.
I’ve become quite accustomed to the flavor and texture of spaghetti squash, and I’d choose it over pasta any day.
This particular spaghetti dinner pairs perfectly well with a batch of hot dog bun breadsticks too.
You’d think that making pasta with squash would be this long, drawn-out process. But it’s not. In fact, spaghetti squash is so easy to cook and use for so many different noodle dishes.
Tips for how to make Spaghetti Squash Spaghetti and Meatballs
Place the spaghetti squash, face down, in your Instant Pot, along with a cup of water.
Put the lid on your Instant Pot. Hit ‘Pressure Cook’ and set for 6 to 8 minutes. (If you don’t have an Instant Pot, you can bake the spaghetti squash instead.)
Meanwhile, prepare the sauce and the meatballs, according to recipe instructions.
Once the squash has fully cooked and your Instant Pot has naturally released, place the cooked spaghetti squash on a cutting board, and pull out all the squash. It’ll come out in long strands, sorta like spaghetti.
Serve while warm, with sauce and meatballs on top, for a delicious family meal.
It’s such a simple and easy recipe; I feel like everyone knows how to make spaghetti. But not everyone knows how to make spaghetti with squash instead of pasta.
Of course, it’s also really delicious, and it’s not a heavy meal. This kind of spaghetti fills you up but not so much that you have that too-full feeling in the pit of your stomach. And it’s a great way to add extra nutrients into a meal your kids will truly enjoy.
Kitchen tools you may need to make Spaghetti Squash Spaghetti:
Cutting Board and Vegetable Cleaver – Perfect for prepping all your ingredients. Instant Pot – We use our Instant Pot several times a week, if not every day, and it makes cooking the spaghetti squash a breeze. Large Serving Bowl – for serving the spaghetti squash. Spaghetti Server – This makes plating spaghetti so much easier.
Want to see how to make the recipe? Watch our video!
Print the recipe for Spaghetti Squash Spaghetti and Meatballs:
Spaghetti Squash Spaghetti and Meatballs
Spaghetti Squash Spaghetti and Meatballs recipe, made with spaghetti squash instead of pasta, an easy homemade pasta sauce, and low carb meatballs packed with a hidden veggie. It’s a healthy meal my family can’t wait to eat for dinner.
1 spaghetti squash
1 cup water
1 batch Easy Homemade Pasta Sauce
1 batch Baked Italian Cauliflower Meatballs
Wash your spaghetti squash, and cut it in half.
Remove the seeds.
Place the spaghetti squash, face down, in your Instant Pot, along with a cup of water.
Put the lid on your Instant Pot. Hit ‘Pressure Cook’ and set for 6 to 8 minutes. (If you don’t have an Instant Pot, you can bake the spaghetti squash instead.)
Meanwhile, prepare the sauce and the meatballs, according to recipe instructions.
Once the squash has fully cooked and your Instant Pot has naturally released, place the cooked spaghetti squash on a cutting board, and pull out all the squash. It’ll come out in long strands, sorta like spaghetti.
Place the spaghetti squash spaghetti in a large serving bowl.
Serve while warm, with sauce and meatballs on top, for a delicious family meal.
Pasta
Italian
spaghetti and meatballs, spaghetti squash spaghetti, spaghetti squash spaghetti and meatballs
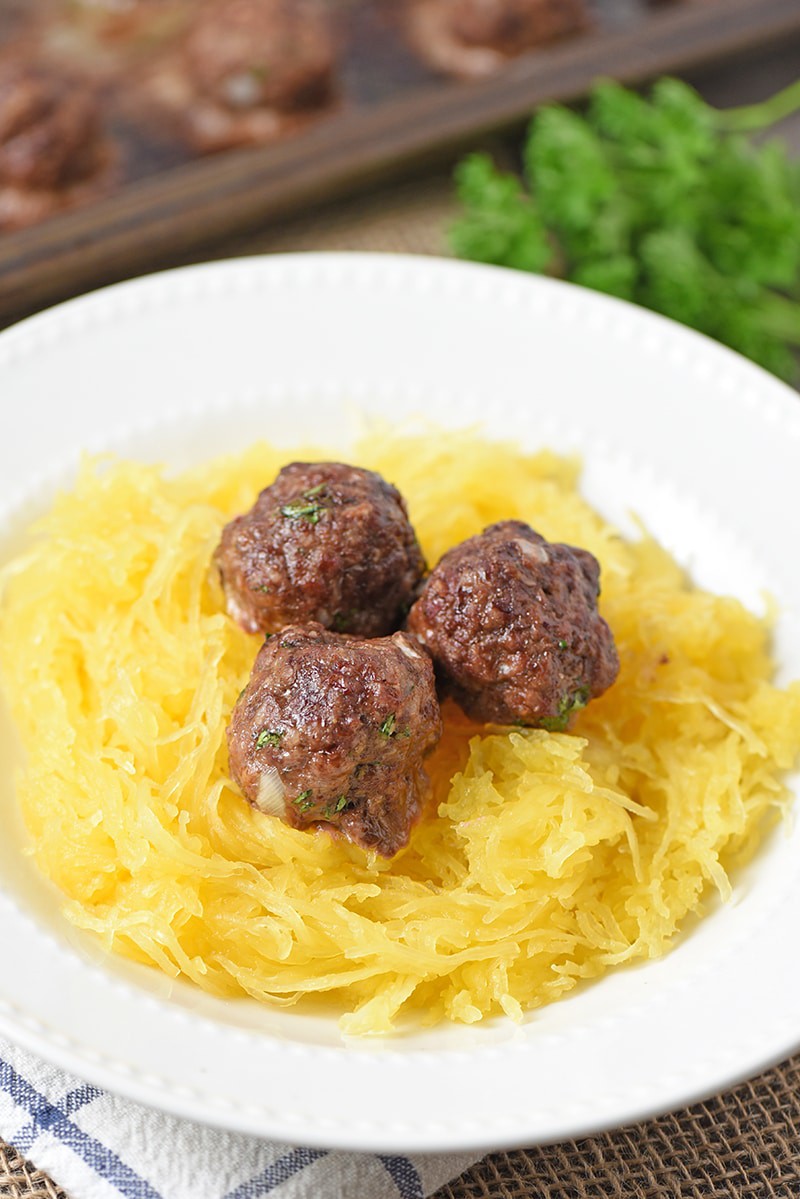
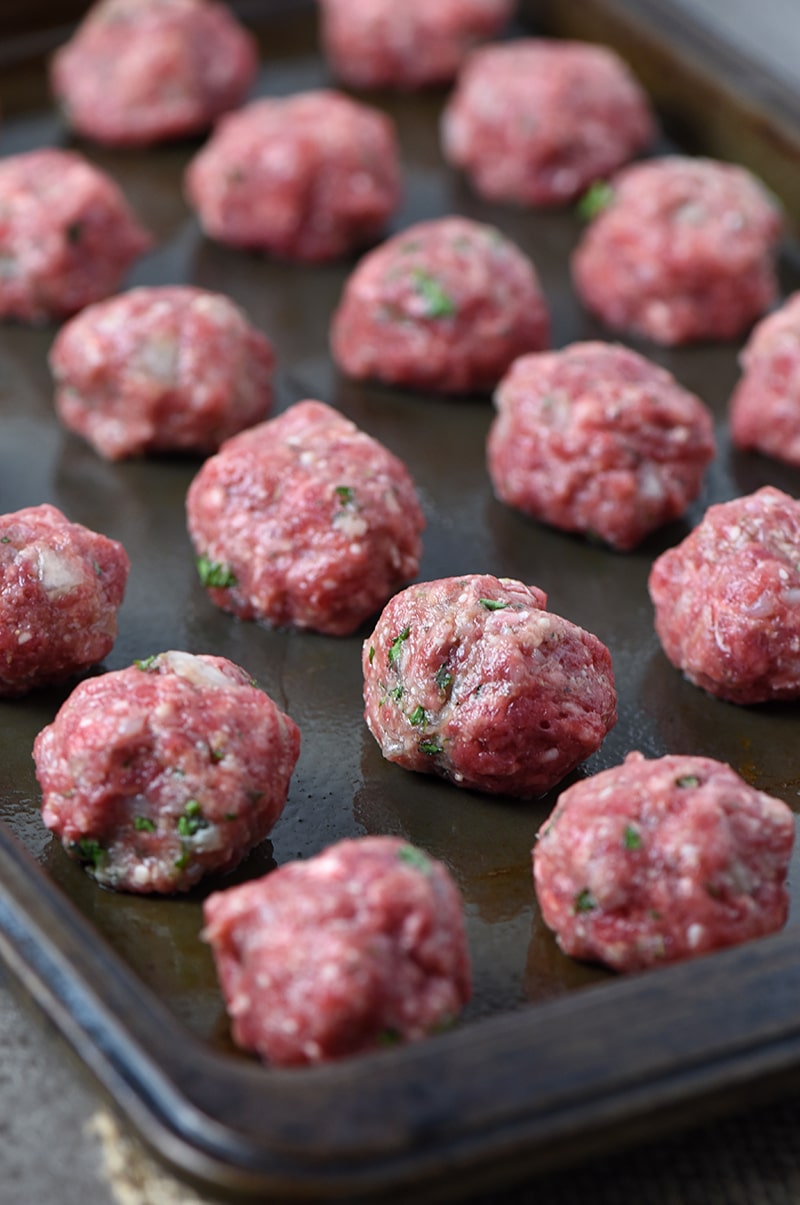
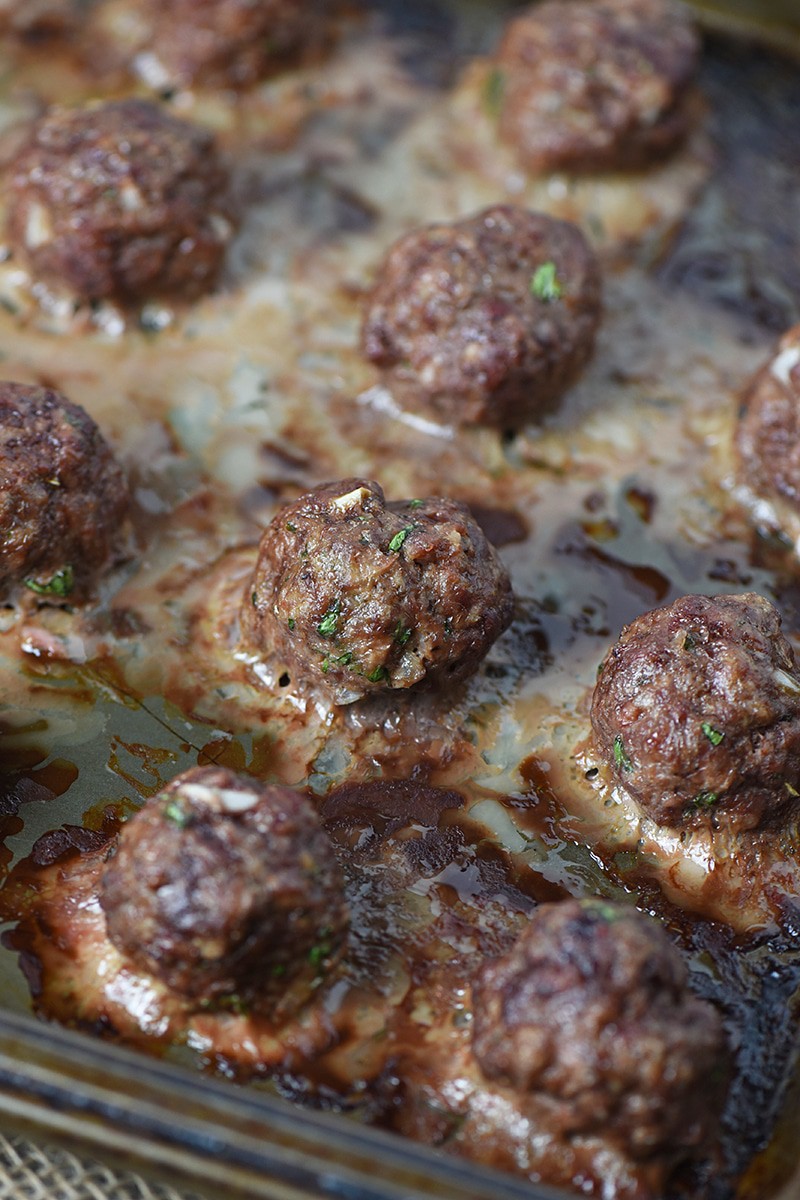
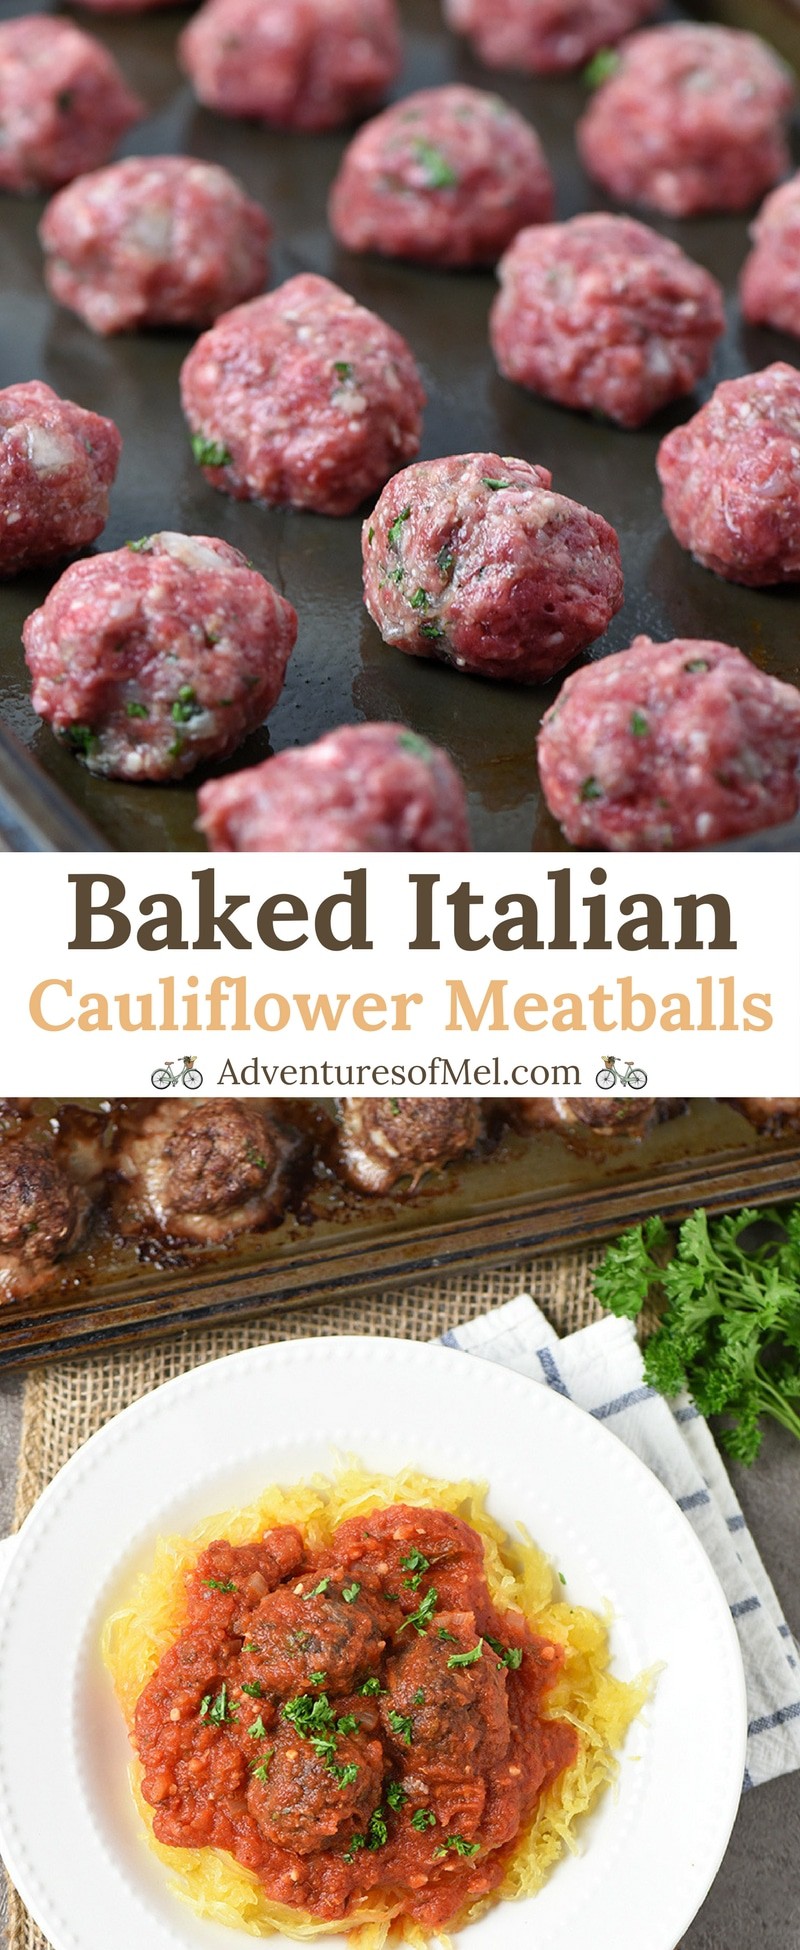
Baked Italian Cauliflower Meatballs, made with lean ground beef, cauliflower rice, parmesan cheese, herbs, and seasonings. Healthy and delicious recipe your family will love!
Baked Italian Cauliflower Meatballs are delicious in spaghetti and as party appetizers. They’re another one of my experiments, but this time an experiment gone totally right.
Making dinner healthier has been a priority; bread crumbs in meatballs doesn’t necessarily add up to healthier, especially when you’re watching carb counts.
However, cauliflower makes an excellent substitute for bread crumbs in Italian style meatballs, as well as in my low carb meatloaf recipe.
Cauliflower makes a moist meatball, but not so moist that you even realize there’s cauliflower in there. It’s like having your vegetables and eating them too. Hidden veggies are fun, aren’t they?
Serve them up with a homemade pasta sauce and spaghetti, and you’re all set for a delicious dinner with your family.
Tips for How to Make Baked Italian Cauliflower Meatballs:
Gather your ingredients… You’ll need lean ground beef, eggs, onion, steamed cauliflower, parmesan cheese, oregano, basil, fresh parsley, sea salt, and ground black pepper.
At this point, you can keep stirring with a large fork; or get your hands into the mixture and mix it all together really well.
Take small amounts of the meat mixture and roll into meatballs, about 1 to 2 inches in diameter. You can also use a scoop for this.
Place all the meatballs on your cookie sheet.
Bake at 350° for about 35 minutes or until they’re entirely cooked through and up to temperature.
Serve with spaghetti, as an appetizer, etc.
Meatballs really aren’t that complicated to make. They require a bit of patience as you take the time to roll each of them up, but they’re totally worth it.
The ingredients are simple. The process is simple. And you end up with delicious meatballs packed full of flavor.
Want to see how to make the recipe? Watch our video!
Print the Recipe for Baked Italian Cauliflower Meatballs
Baked Italian Cauliflower Meatballs
Baked Italian Cauliflower Meatballs, made with lean ground beef, cauliflower rice, parmesan cheese, herbs, and seasonings. Healthy and delicious recipe your family will love!
2 pounds lean ground beef
2 eggs
1/2 small onion
1 cup cauliflower rice
1/4 cup parmesan cheese
1/2 teaspoon oregano
1/2 teaspoon basil
2 tablespoons fresh parsley
1 teaspoon sea salt
1/2 teaspoon ground black pepper
Pre-heat the oven to 350° and spray your cookie sheet/baking pan with cooking spray.
In a mixing bowl, mix together the lean ground beef and eggs.
Mince or chop the onion, and stir it into your beef mixture.
Mince the already steamed cauliflower into cauliflower rice (you can also use a food processor or blender to do this).
Add the cauliflower rice and parmesan cheese to the meat mixture.
Next mix in all of your herbs and seasonings, including the oregano, basil, fresh minced parsley, sea salt, and ground black pepper.
At this point, you can keep stirring with a large fork; or get your hands into the mixture and mix it all together really well.
Take small amounts of the meat mixture and roll into meatballs, about 1 to 2 inches in diameter. You can also use a scoop for this.
Place all the meatballs on your cookie sheet.
Bake at 350° for about 35 minutes or until they’re entirely cooked through and up to temperature.
Serve with spaghetti, as an appetizer, etc.
Appetizers
Italian
baked Italian cauliflower meatballs, baked meatballs, cauliflower meatballs, Italian cauliflower meatballs
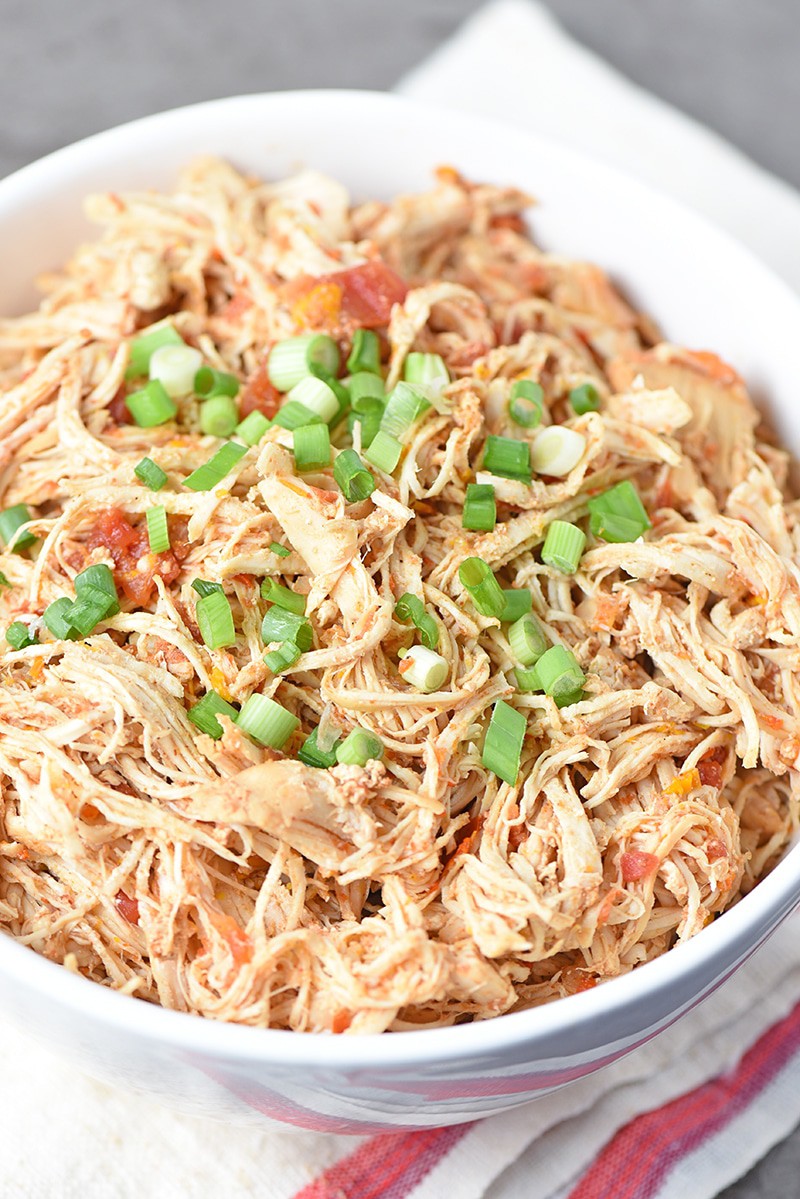
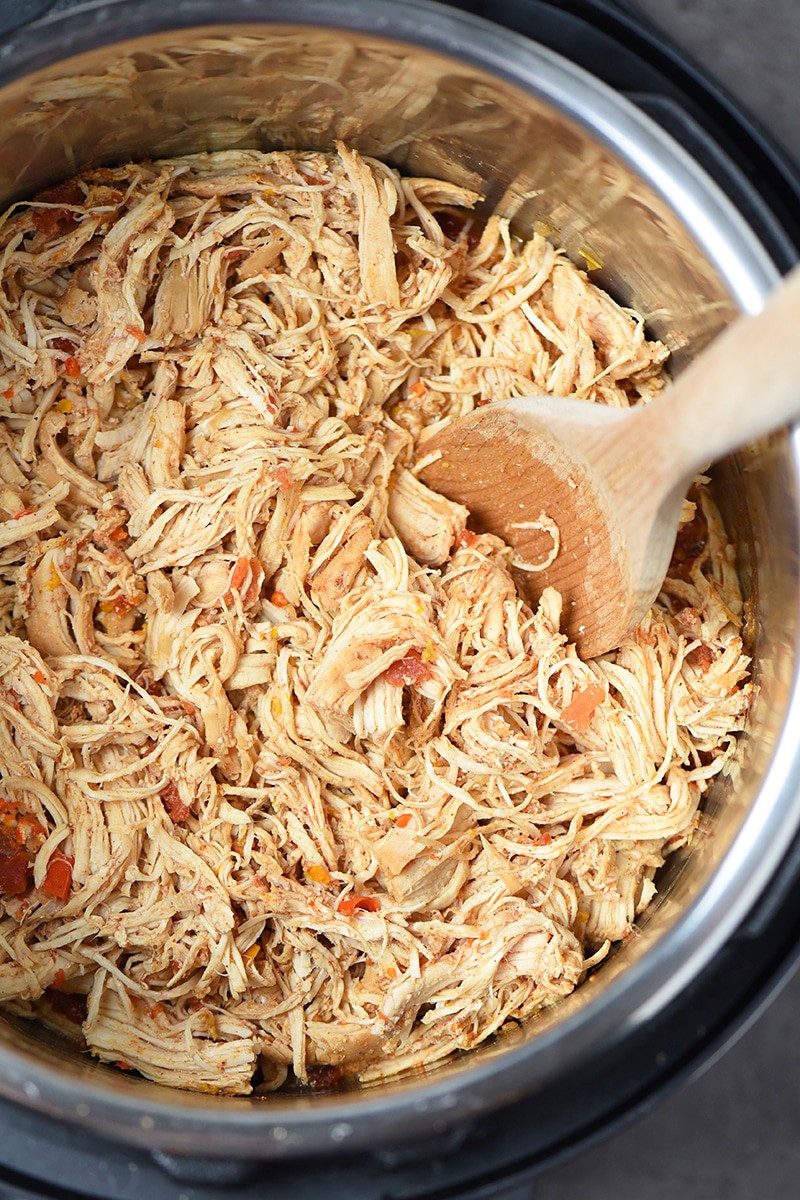
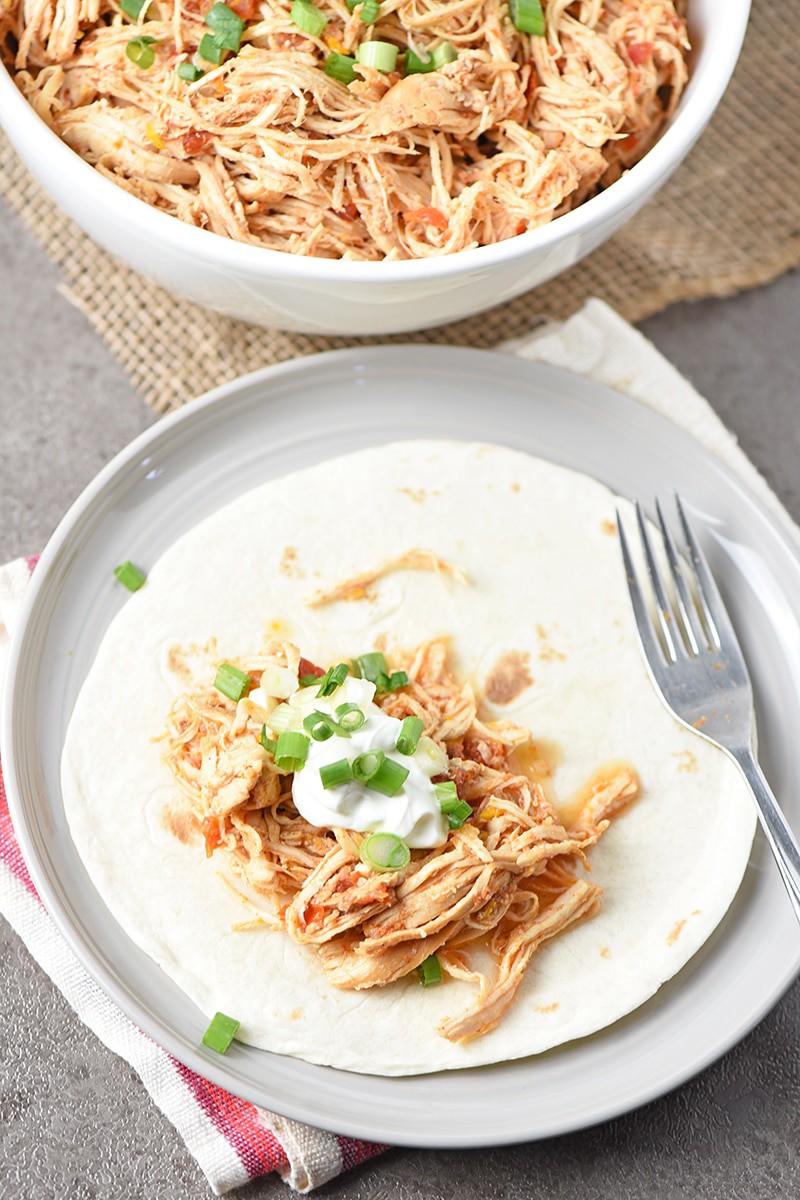
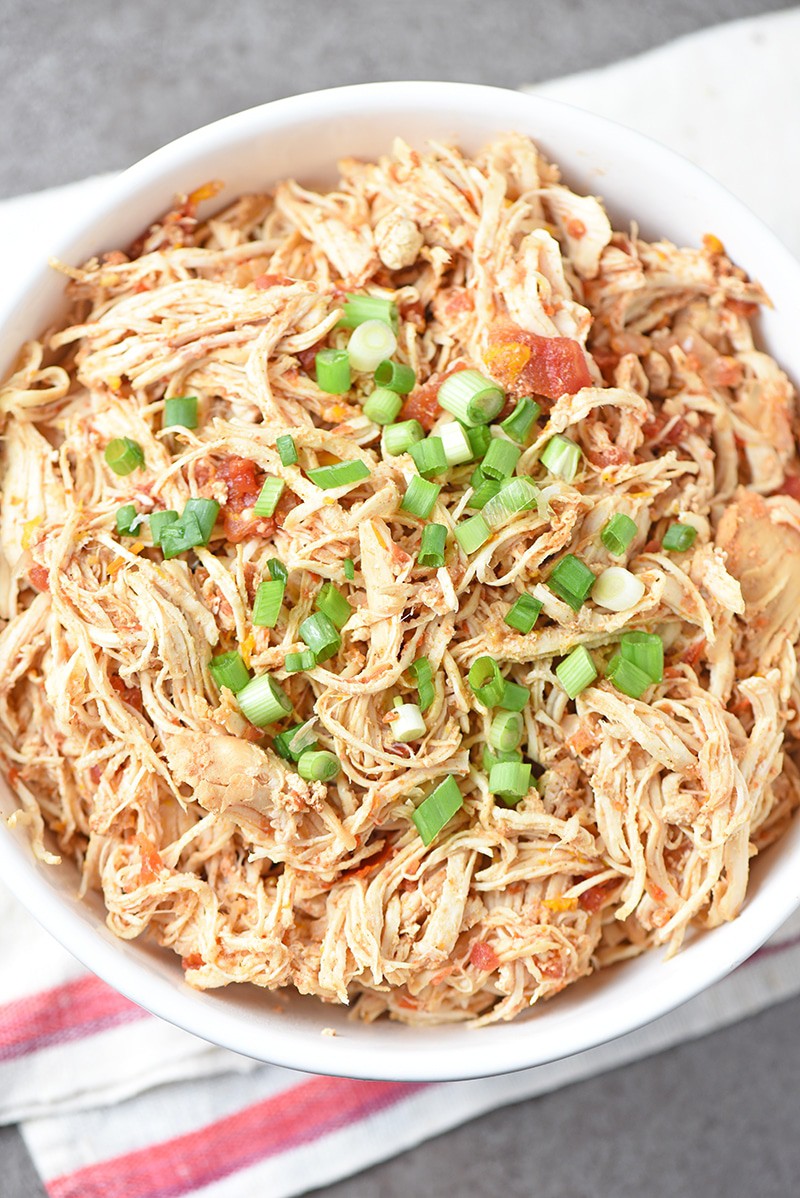
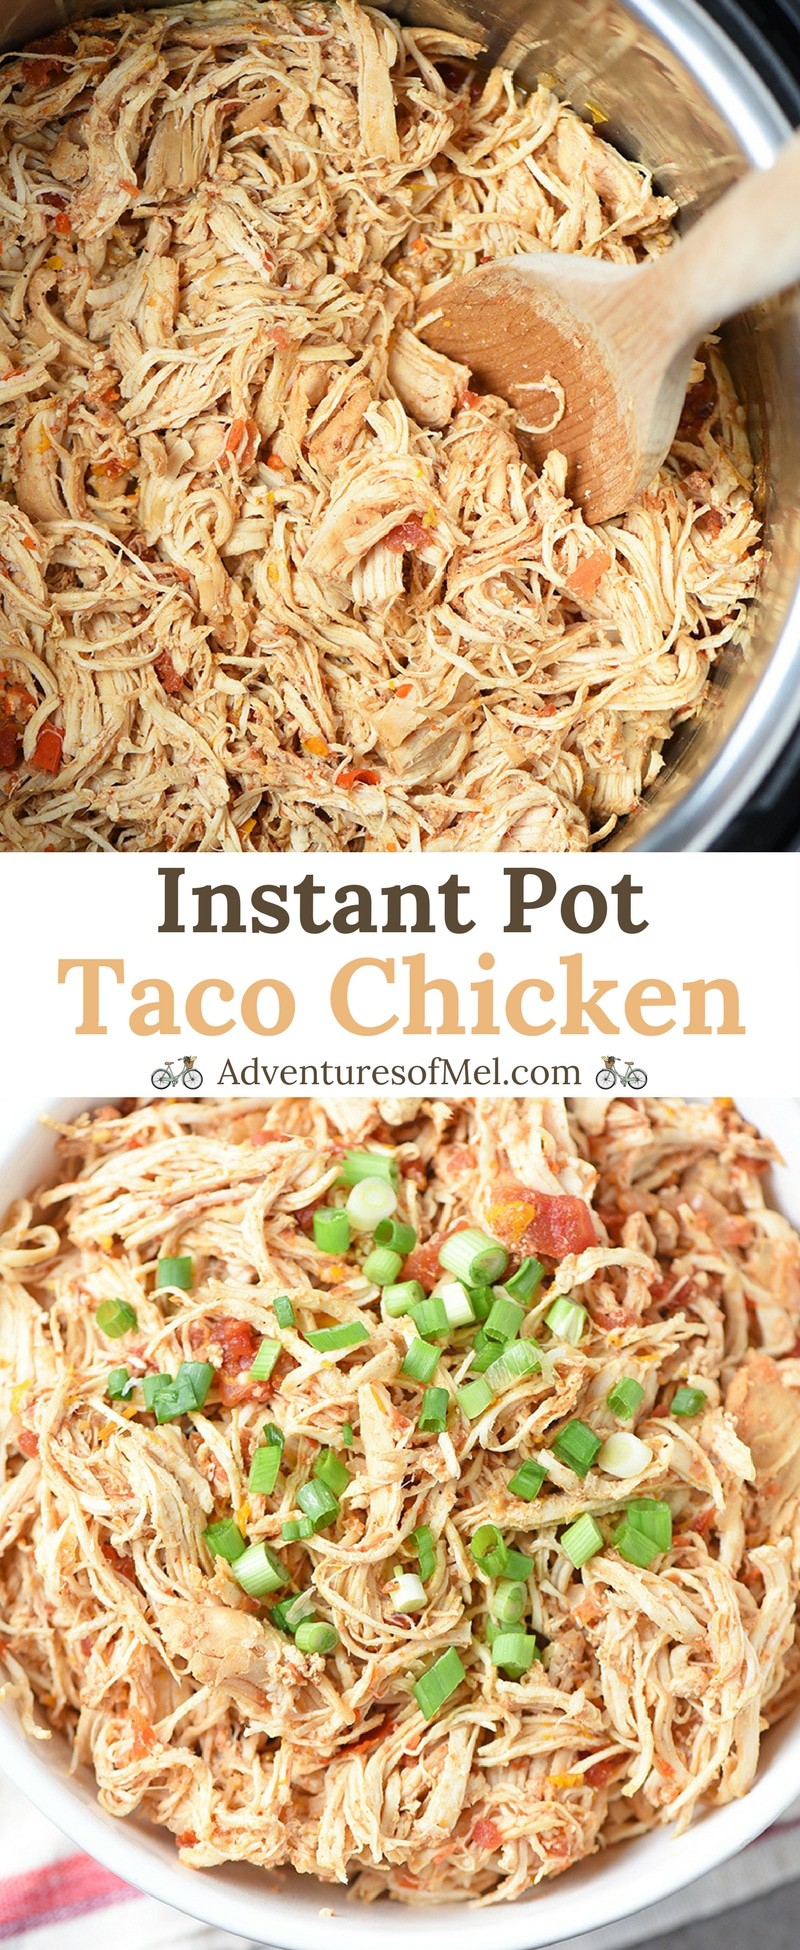
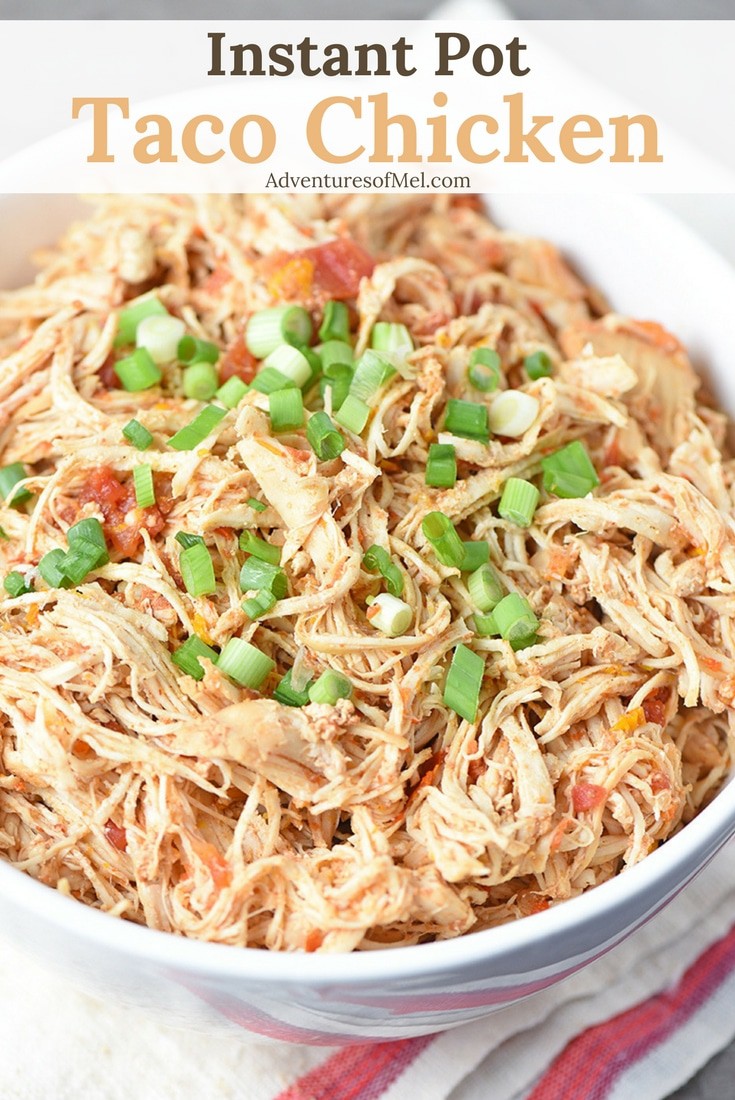
Instant Pot taco chicken is homemade taco filling with spices and seasonings, fresh pepper and onion, and other flavorful ingredients. Easy to make recipe you can use for tacos, enchiladas, and more.
Instant Pot Taco Chicken is one recipe you can easily make ahead and freeze for later. We love making tacos and enchiladas with it.
We’ve made our taco chicken with salsa and picante sauce in the past. A healthier lifestyle has made me re-think a lot of our old ways, though, especially the ingredients that we use. The fresher and simpler our ingredients, the better.
The instructions for this recipe are pretty simple too. You’ll basically throw everything together in the Instant Pot, cook, and shred right there in the pot, making it a one pot dish.
Learn how to quickly use your Instant Pot with our Instant Pot Quick Start Guide, filled with practical tips, Instant Pot recipes, accessory ideas, and more!
Kitchen tools you may need to make Instant Pot Taco Chicken
Instant Pot – Our Instant Pot has come in handy for so many things; it’s one of the most versatile kitchen appliances we’ve ever owned. And it makes the most tender, delicious, homemade taco chicken.
Cutting Board – We use our cutting boards (notice plural) every single day.
Wooden Spoon – for stirring up the chicken when it’s all shredded and ready to serve.
Print the recipe for Instant Pot Taco Chicken
Instant Pot Taco Chicken
Instant Pot Taco Chicken, homemade with spices and seasonings, fresh pepper and onion, and other flavorful ingredients. Easy to make recipe you can use for tacos, enchiladas, and more.
1 1/2 cups water
4 large chicken breasts
2 cloves garlic
1 teaspoon lemon juice
1 tablespoon chili powder
1 teaspoon salt
1/2 teaspoon ground black pepper
5 mini or 1 large bell pepper
1/2 large onion
1 can (14.5 ounces petite diced tomatoes)
Add water to the Instant Pot.
Place chicken breasts in the Instant Pot.
Keep in mind as you add ingredients, there’s no need to stir.
Mince the garlic, and add it in with the chicken.
Add the lemon juice, chili powder, salt, and black pepper.
Wash and chop or mince the peppers and onion. Add them in with the chicken.
Finally, add a can of petite diced tomatoes.
There’s no need to stir or mix together ingredients. Just place the lid on the Instant Pot.
Press the Pressure Cook button and set for 1 hour.
Allow the pressure valve to naturally release.
Once the chicken is done, open up the Instant Pot and shred the chicken with 2 forks. It’ll be so tender, it will easily shred right in the pot.
Finally, give the chicken a good stirring, mixing it up with all the ingredients.
Serve or enjoy in tacos, enchiladas, nachos, quesadillas, burritos, salad, soup, etc.
Instant Pot Recipes
Tex-Mex
instant pot chicken, Instant Pot recipes, instant pot taco chicken, taco chicken
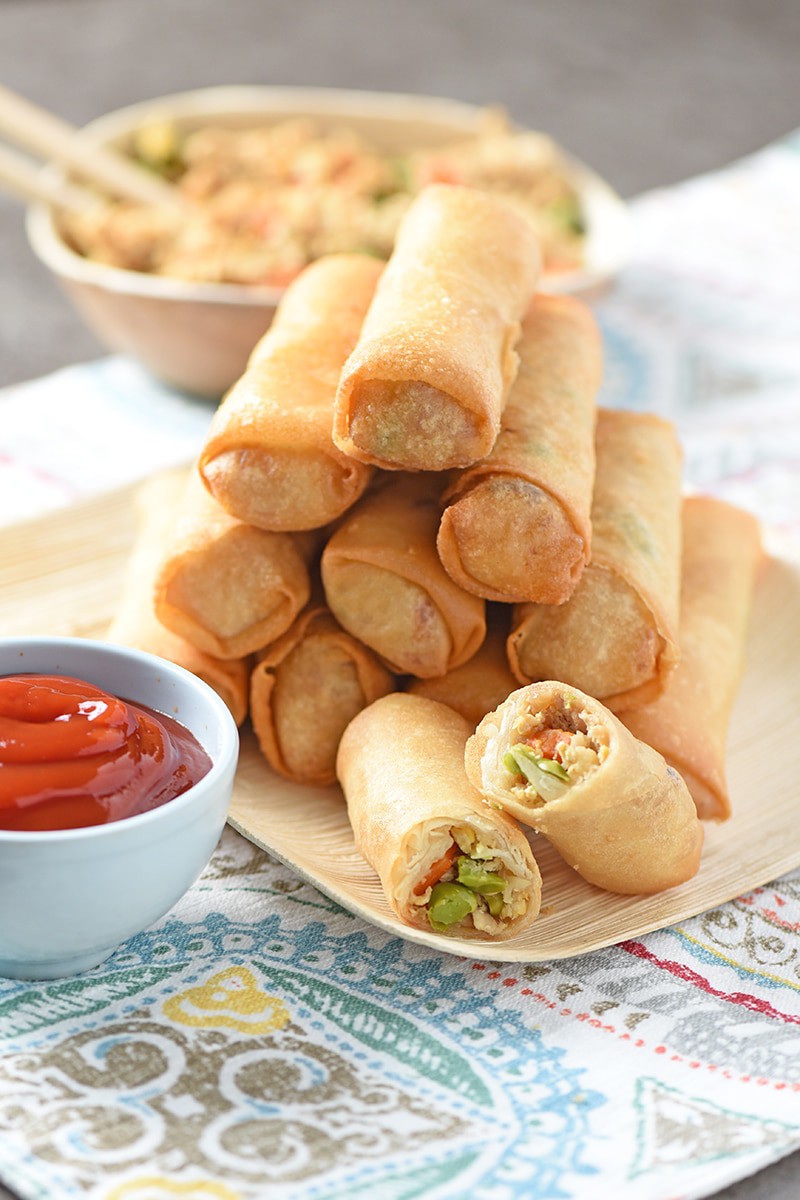
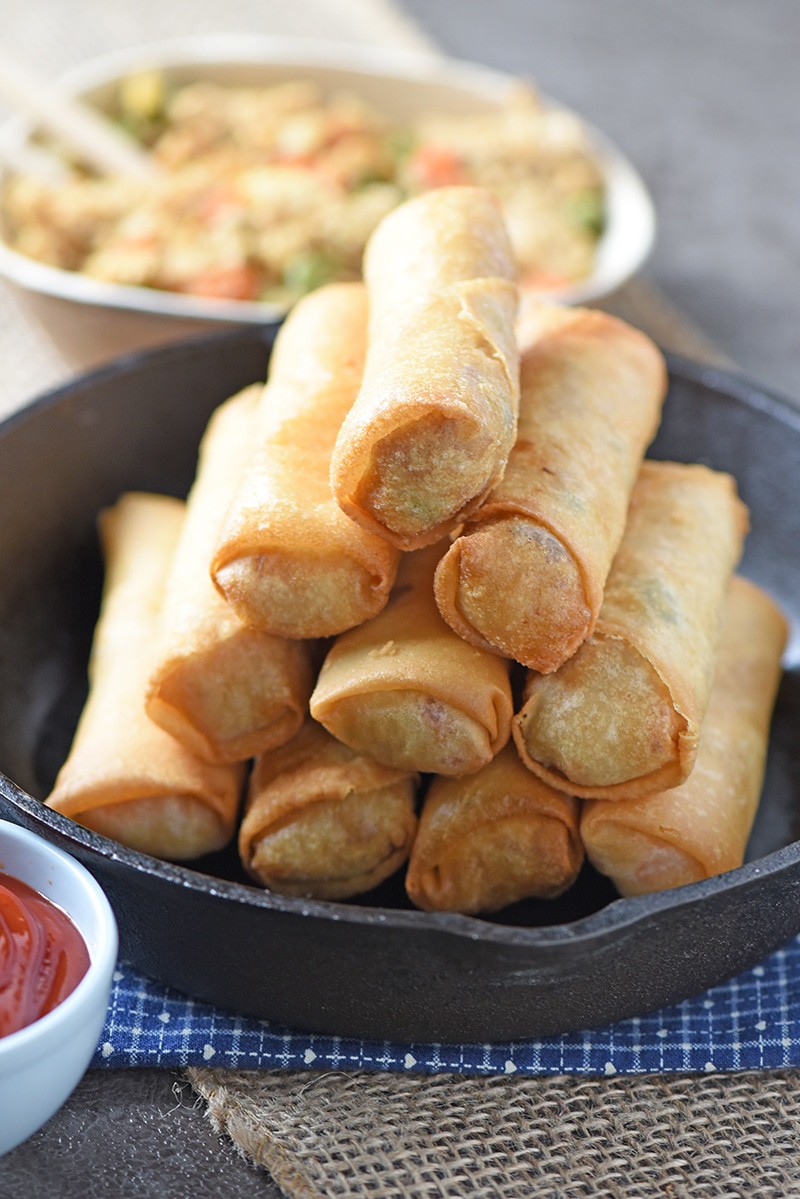
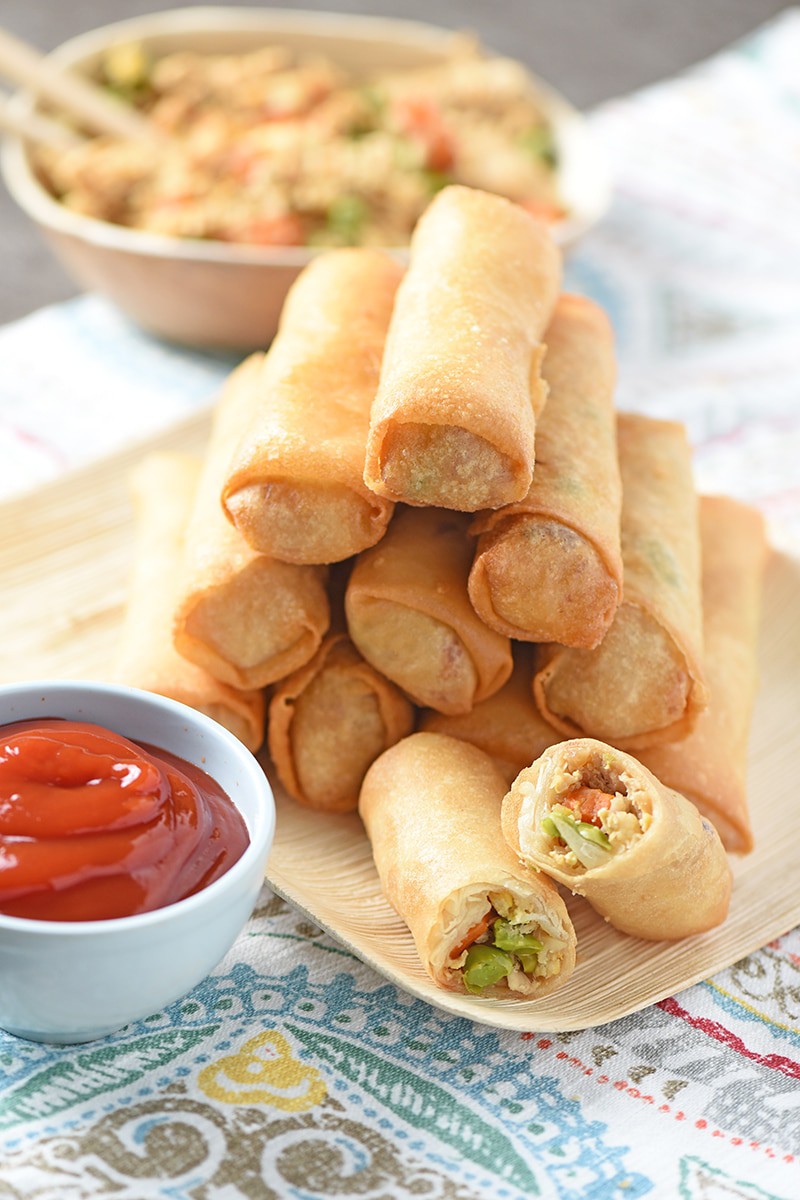
I’ve always wanted to try making homemade rice paper spring rolls, fried to perfection (versus soggy egg rolls); I love the spring rolls they make at our favorite Thai place.
For some reason, the wraps we used in the past just didn’t create the kind of flaky, crispy texture we were trying to achieve.
But then we found a local Asian market that sells a pack of Spring Roll Pastry that makes perfectly flaky, crispy fried rice paper rolls. We had to hunt for them and finally found them in a deep freezer they keep in the store. Game on.
And I’m just going to address the elephant in the room and come right out and say it… Frying these is a must to get that flaky texture. It really is. Baking just isn’t the same.
When you’re filling the insides with delicious cauliflower chicken fried rice, it’s no surprise that these little appetizers, sides or snacks (however you choose to enjoy them) disappear quickly.
How to Make Fried Rice Spring Rolls
First things first… Gather your ingredients. You’ll need a batch of chicken fried rice (or cauliflower chicken fried rice), 1 pack spring roll pastry, all-purpose flour, water, and canola oil.
Mix up a sort of paste with the flour and water; you’ll use this to seal the spring rolls as you wrap each one.
Prepare the spring roll wraps according to the package directions; for us, this just meant separating each wrap and placing them all in a loose pile.
Spoon about 2 tablespoons of chicken fried rice into the corner of the wrap.
Fold that corner over the mixture, folding the left and right sides in to form a more rectangular shape. Then roll the wrap to where it’s wrapped pretty tightly but not tight enough to tear.
Dab a bit of your flour paste mixture to the tip of the wrap and finish wrapping tightly (but again, not tight enough to tear).
Repeat the above steps for each spring roll wrap.
You can use a pre-heated deep fryer, air fryer, or a large skillet with at least 1/2 inch of canola oil to fry the spring rolls.
Fry the spring rolls until each one is golden brown.
Remove and drain before serving. Tip: A new (clean) brown paper lunch bag works great for draining; you can also place a few paper towels on a plate and put your spring rolls on the towels to drain.
Kitchen tools you may need to make Chicken Fried Rice Spring Rolls
Cutting Board or Work Surface – We use our cutting boards (notice plural) every single day, and our work surface is usually our old postal table island.
If you try this recipe, why not leave a star rating in the recipe card right below and/or a review in the comment section further down the page? I always appreciate your feedback. You can also follow me on Pinterest, Facebook, Instagram, and YouTube. And subscribe to my email list too!
Chicken Fried Rice Spring Rolls
Fried rice spring rolls are fried to perfection, so crispy, flaky, and delicious. Fill them with chicken fried rice. Super easy recipe for your favorite takeout side.
5 cups Chicken Fried Rice
1 pack Spring Roll Pastry
2 tablespoons all-purpose flour
3 tablespoons water
Mix up a sort of paste with the flour and water; you’ll use this to seal the spring rolls as you wrap each one.
Prepare the spring roll wraps according to the package directions; for us, this just meant separating each wrap and placing them all in a loose pile.
Lay out a wrap on your cutting board or work surface.
Spoon about 2 tablespoons of chicken fried rice into the corner of the wrap.
Fold that corner over the mixture, folding the left and right sides in to form a more rectangular shape. Then roll the wrap to where it’s wrapped pretty tightly but not tight enough to tear.
Dab a bit of your flour paste mixture to the tip of the wrap and finish wrapping tightly (but again, not tight enough to tear).
Repeat the above steps for each spring roll wrap.
You can use a pre-heated deep fryer, air fryer, or a pan with at least 1/2 inch of canola oil to fry the spring rolls.
Fry the spring rolls until each one is golden brown.
Remove and drain before serving. Tip: A new (clean) brown paper lunch bag works great for draining; you can also place a few paper towels on a plate and put your spring rolls on the towels to drain.
Serve while warm with your favorite sauce.
Appetizers
Asian
chicken fried rice spring rolls, chicken spring rolls, fried spring rolls, spring rolls
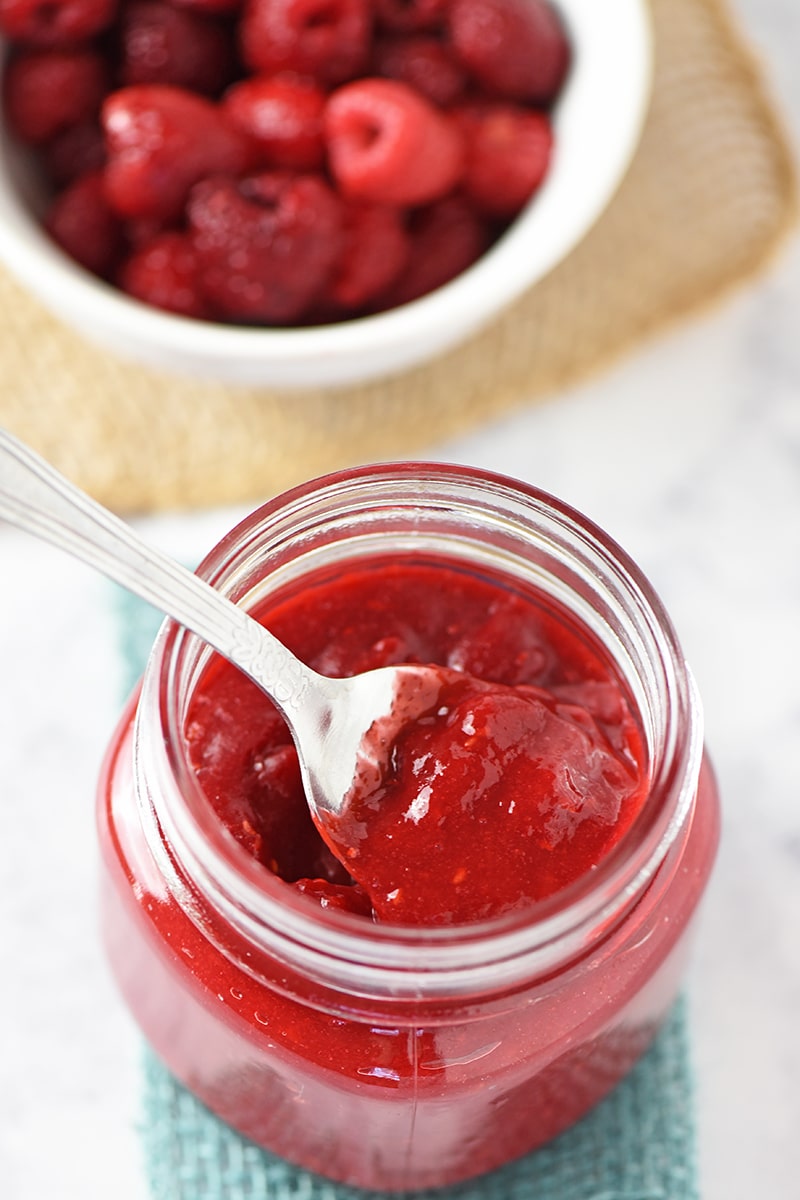
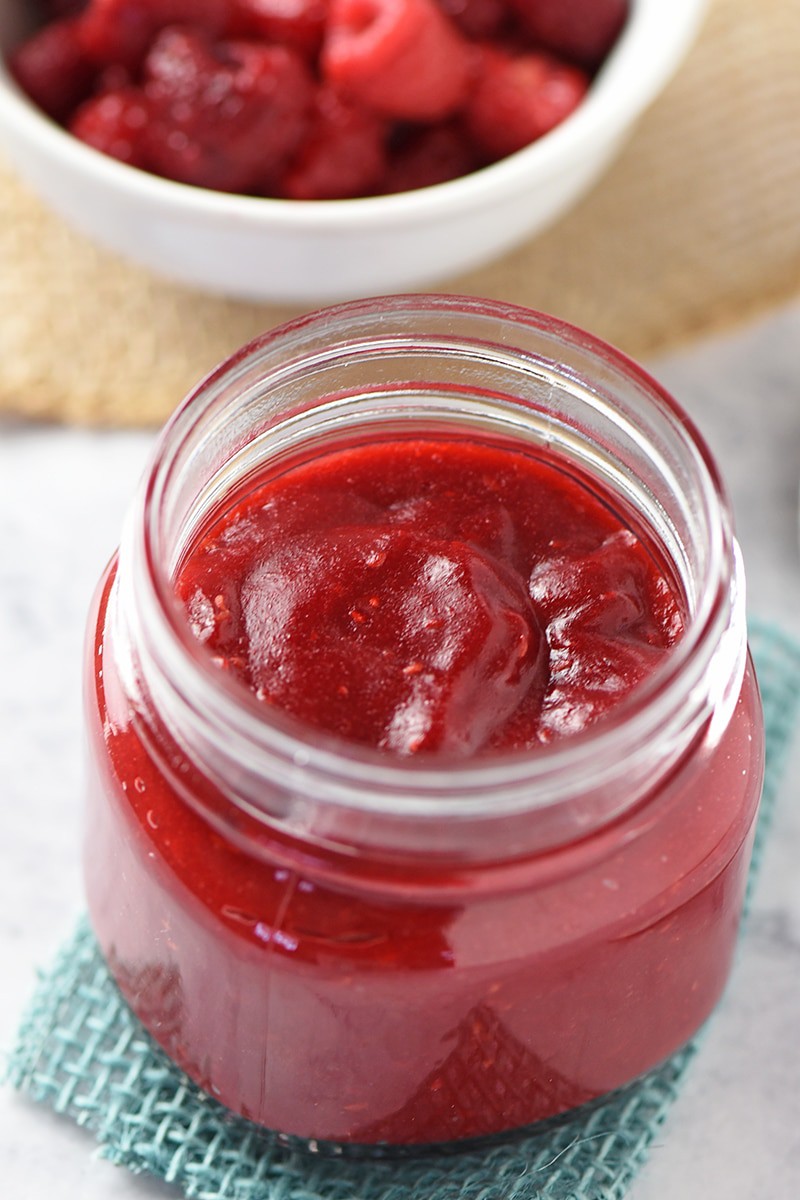
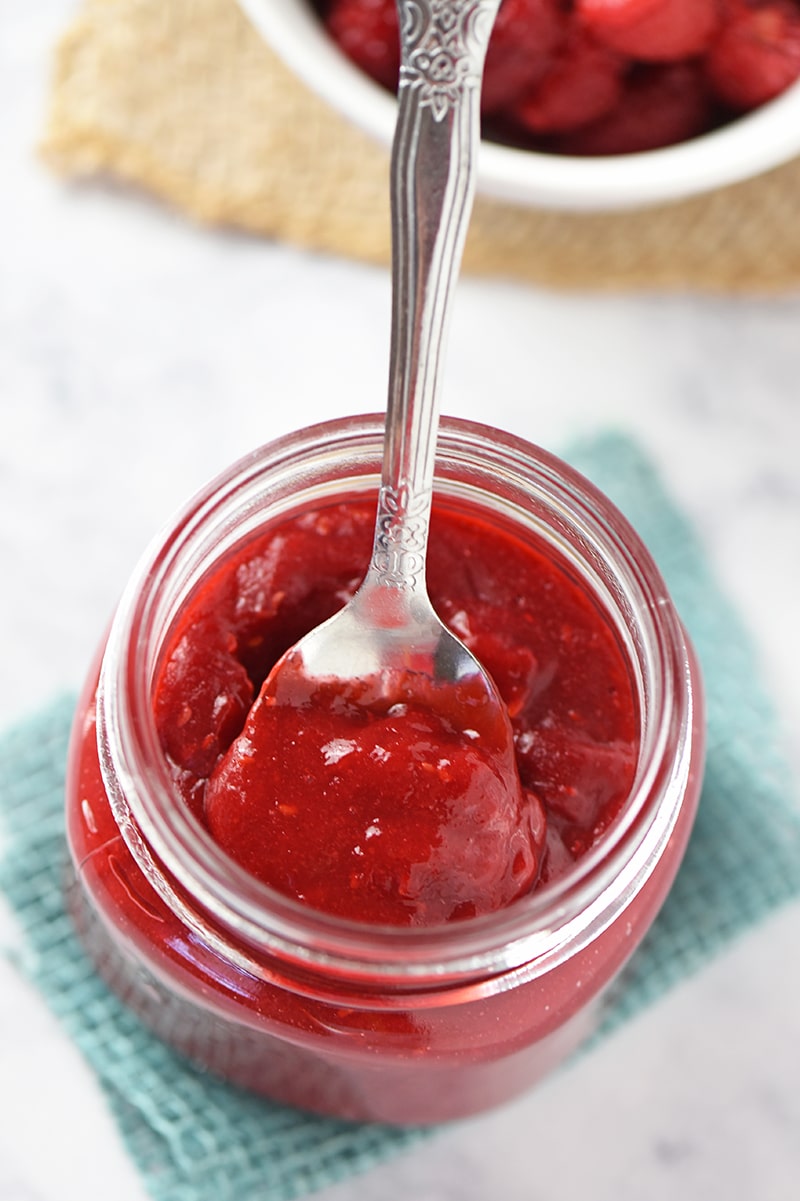
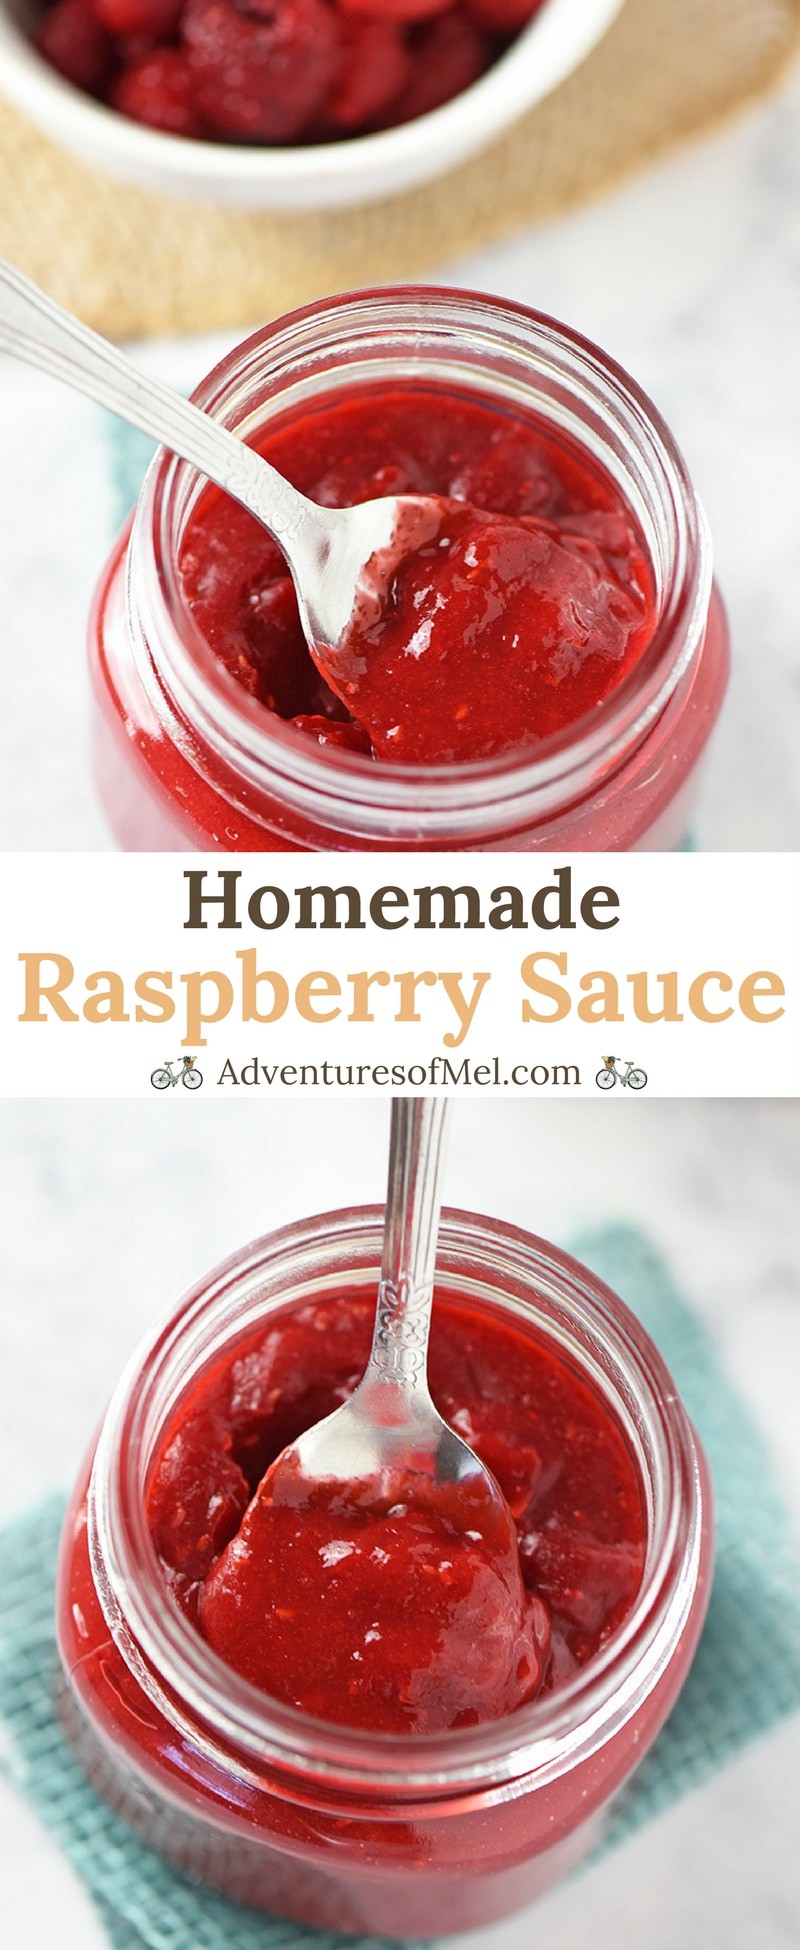
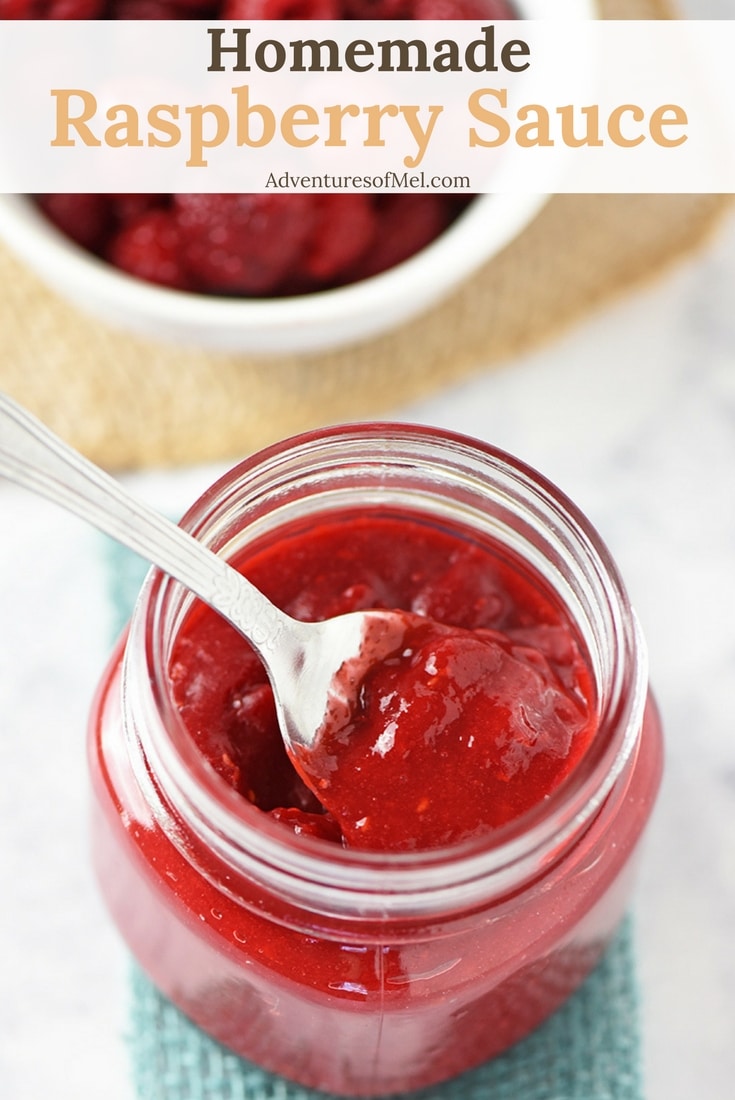
Homemade Raspberry Sauce, made with fresh or frozen raspberries, is delicious and easy to make. It’s the perfect sauce for cheesecake, pancakes, waffles, ice cream, and other desserts.
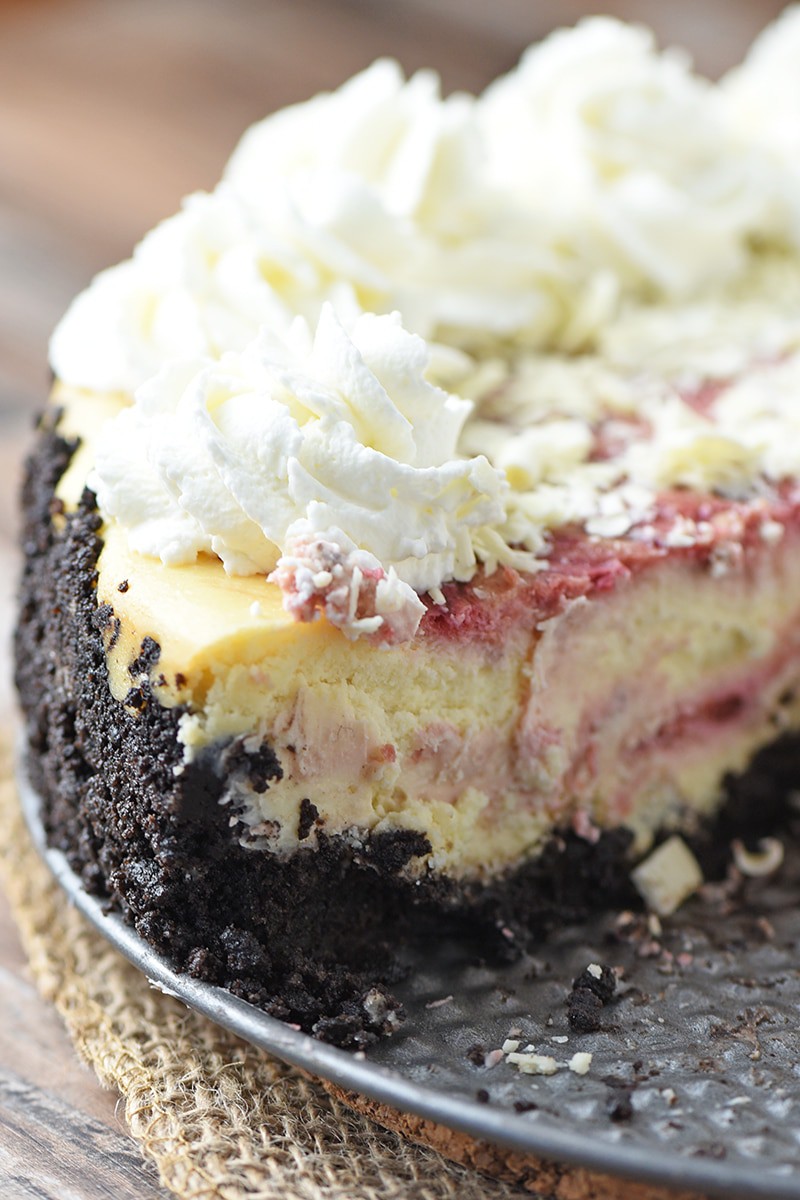
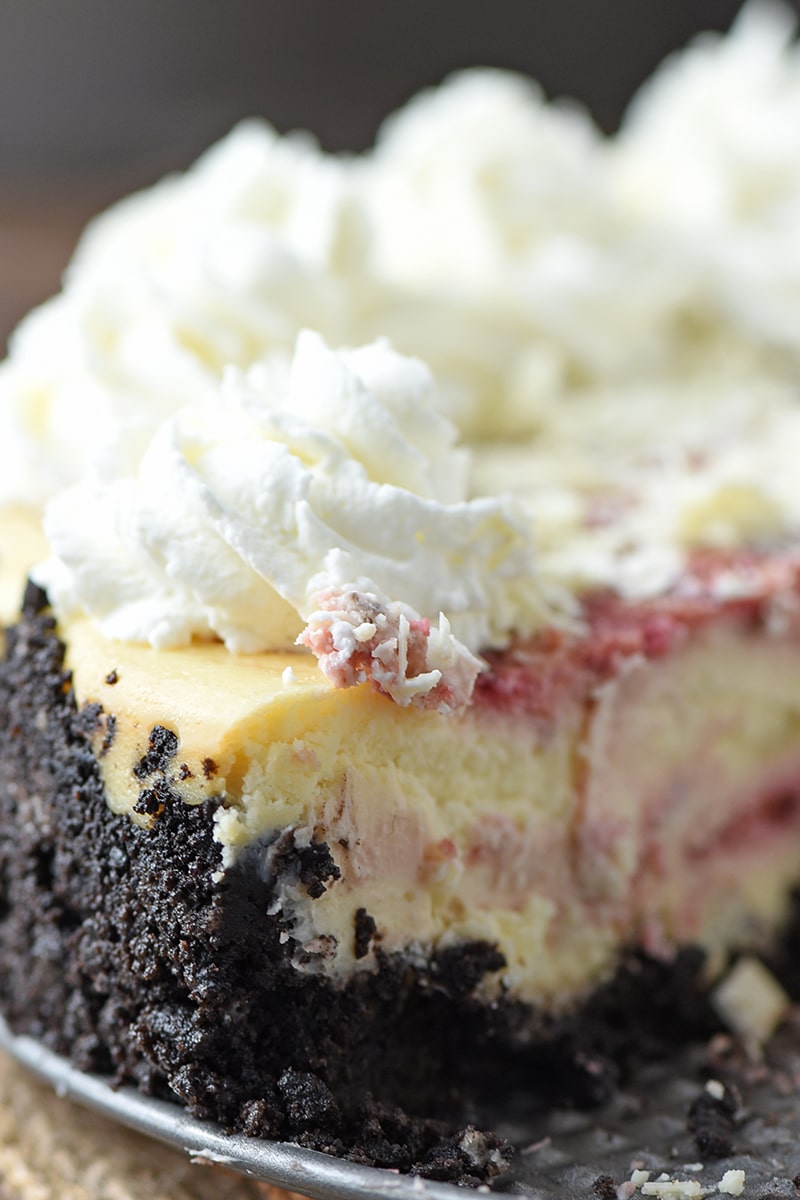
Homemade Raspberry Sauce is an easy recipe I came up with for my Olive Garden White Chocolate Raspberry Cheesecake (remember that cheesecake recipe I mentioned working on?). When you think about it, basic fruit sauce is actually pretty simple to make.
You only need a few basic ingredients, including the fruit you choose to use in your sauce, in this case, raspberries. You can use fresh or frozen berries; it really doesn’t matter. I did use frozen, though, mainly because they are a lot cheaper.
Even with straining the sauce to remove most of the seeds, there really is nothing complicated about making raspberry sauce. And it’s delicious on so many things.
You can spoon raspberry sauce onto cheesecake, pancakes, ice cream, especially with this Fruity Pebbles ice cream recipe… Zeke and I even enjoyed a peanut butter and jelly sandwich with this sauce instead of jelly.
Also, it’s not too sweet. I let the berries flavor the sauce and only added in 2 tablespoons of pure cane sugar. I got to thinking afterward, I could’ve even replaced that sugar with honey.
Either way you make it, with sugar or with honey, it’s sure to be a delicious addition to breakfast, brunch, or dessert.
Tips for how to make Homemade Raspberry Sauce
First of all, gather your ingredients… You’ll need raspberries (fresh or frozen), water, lemon juice, pure cane sugar, and corn starch.
If you’re using frozen berries, allow them to thaw first. I actually microwaved mine on defrost.
Strain the raspberries to remove most, if not all, of the seeds. I just used a simple mesh strainer.
Mix together the water, lemon juice, sugar, and puréed raspberries in a small saucepan.
Before heating, whisk the corn starch into the mixture. Whisking will ensure a lump-free sauce.
Bring to a boil on low to medium heat and simmer for about 3 minutes, or until your sauce has the desired thickness.
You can pour or spoon this delicious raspberry sauce on heart pancakes, waffles, ice cream, etc. I actually swirled most of mine into my cheesecake batter.
Kitchen tools you may need to make Homemade Raspberry Sauce
Lemon Juicer – I tend to buy lemon juice from the freezer section at my grocery store, but this may come in handy if you want to juice your own lemons for more than just this recipe.
Blender – You’ll need a way to puree the berries. You can also use a potato masher if you don’t have a blender.
Mesh Strainer – This will allow you to remove the seeds from the berries.
Heat-Resistant Spatula – I love my spatulas and use them for scraping the sides of the pan and easily keeping my sauce stirred.
Print the recipe for Homemade Raspberry Sauce
Homemade Raspberry Sauce
Homemade Raspberry Sauce, made with fresh or frozen raspberries, is delicious and easy to make. It’s the perfect sauce for cheesecake, pancakes, waffles, ice cream, and other desserts.
1 pound frozen raspberries (thawed)
2 tablespoons water
1/2 teaspoon lemon juice
2 tablespoons pure cane sugar
1 tablespoon corn starch
If you’re using frozen berries, allow them to thaw first. I actually microwaved mine on defrost.
Purée the raspberries using a blender or potato masher.
Strain the raspberries to remove most, if not all, of the seeds. I just used a simple mesh strainer.
Mix together the water, lemon juice, sugar, and puréed raspberries in a small saucepan.
Before heating, whisk the corn starch into the mixture. Whisking will ensure a lump-free sauce.
Bring to a boil on low to medium heat and simmer for about 3 minutes, or until your sauce has the desired thickness.
You can pour or spoon this delicious raspberry sauce on pancakes, waffles, ice cream, etc. I actually swirled most of mine into my cheesecake batter.
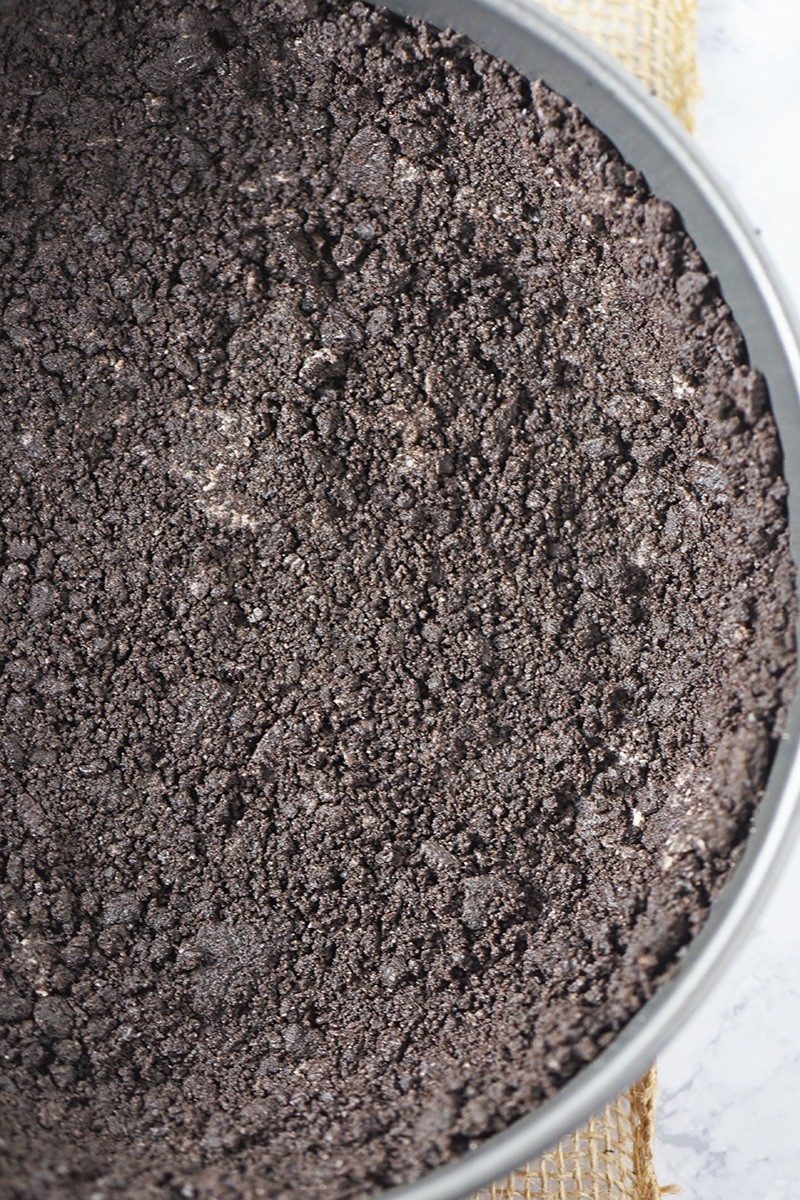
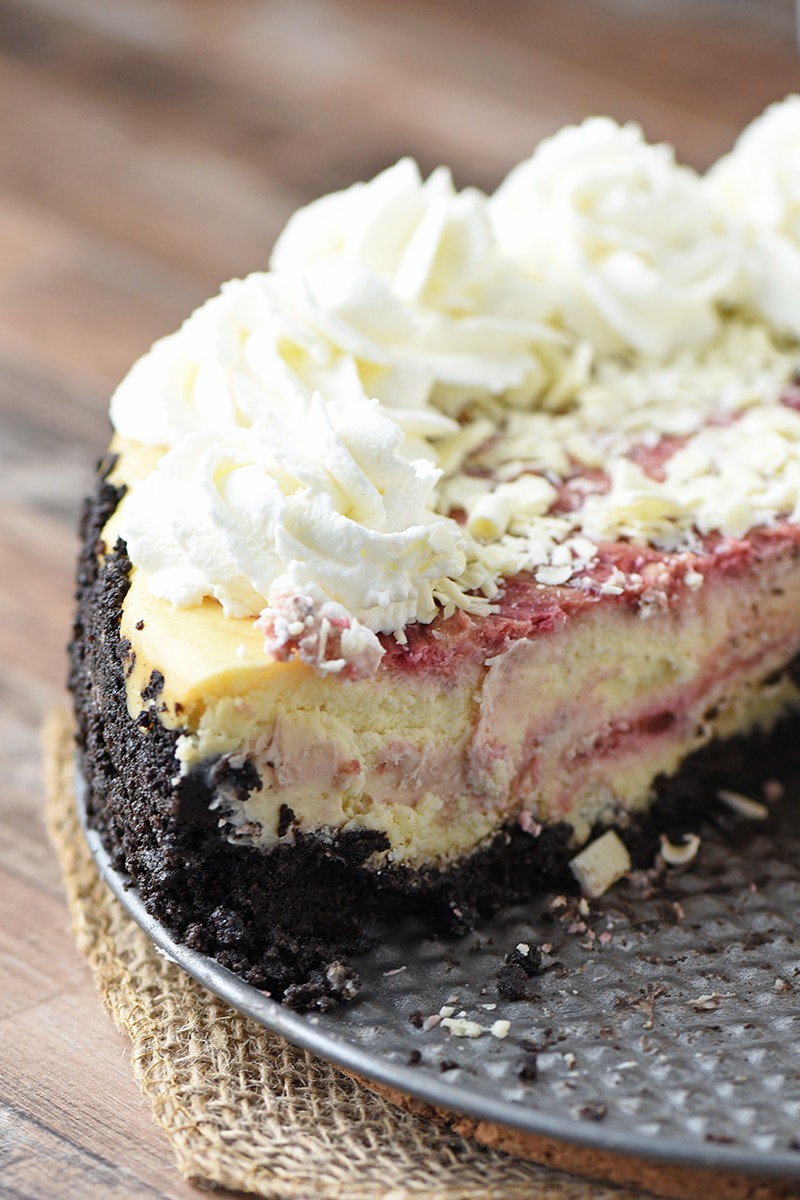
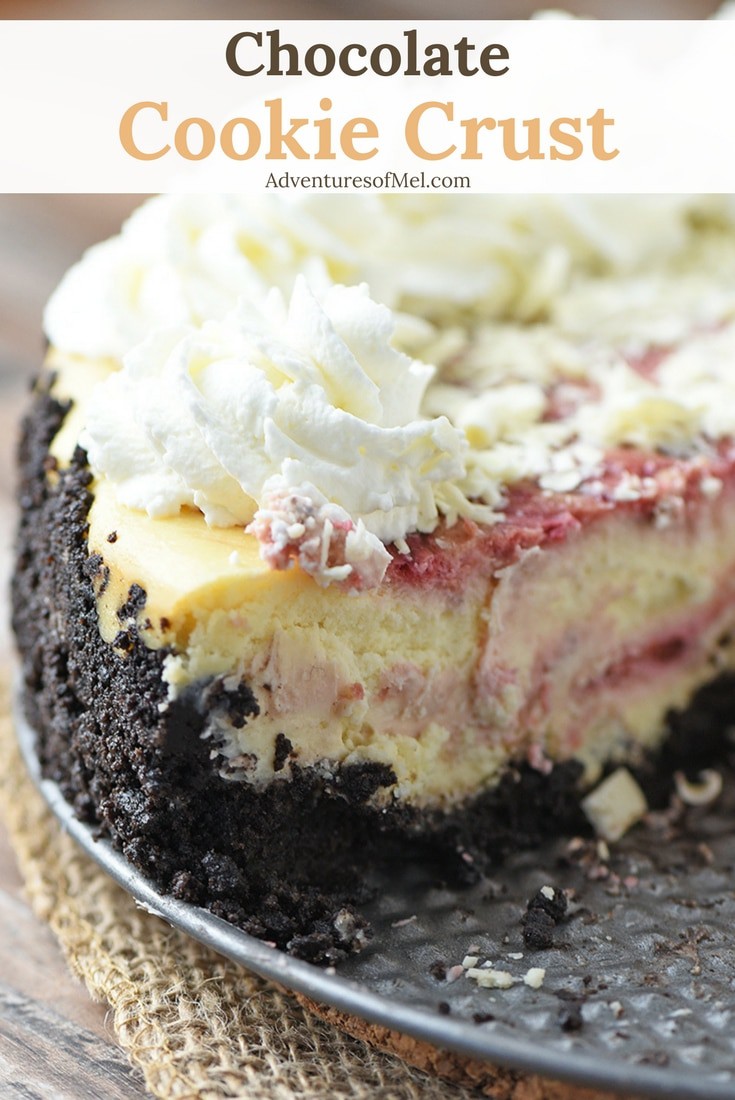
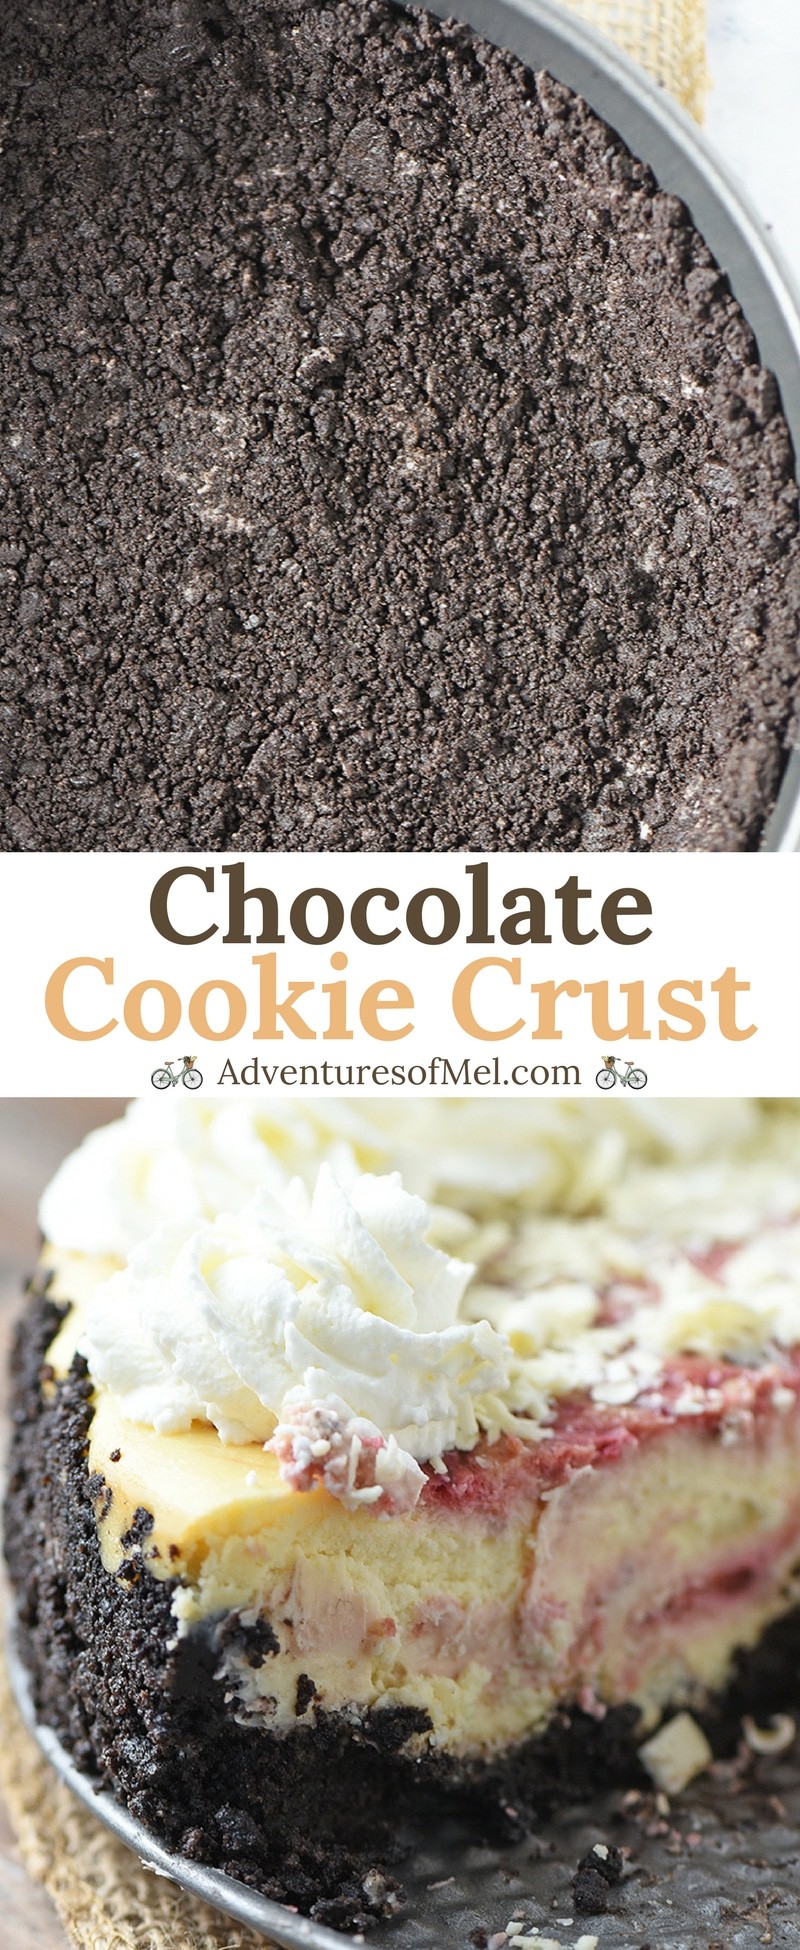
Chocolate Cookie Crust, made with Oreo Cookies and butter, is the perfect base for pie, cheesecake, and other simple desserts. It’s a quick and easy sweet treat recipe!
Chocolate Cookie Crust is the perfect base for so many desserts, especially my favorite copycat recipe, Olive Garden White Chocolate Raspberry Cheesecake. Made with only 2 ingredients, this crust is also a very simple recipe.
You can use any chocolate wafer cookie to make this crust. However, I prefer Oreos, mainly because they’re easy to find at the store and pretty much the texture and taste that I want for my crust.
The funny thing is, I couldn’t really find any other chocolate wafer cookies at all. There were chocolate graham crackers, but that’s just not the same as a chocolate cookie. So, Oreos it is.
I also choose to make this crust without all the cream filling in the Oreos. A little bit of icing still clings to the cookies, but for the most part, this crust is all cookies.
It’s easy to make, requires no rolling, and it tastes really good, especially with raspberry swirl cheesecake.
Kitchen tools you may need to make a Chocolate Cookie Crust
Baking Pan – In this case, I used a 9-inch springform pan, since I was making a cheesecake. Gallon Ziploc Bags – This makes it easy to crush the cookies with less mess. Rolling Pin, Blender, or Food Processor – to crush the cookies. Large Mixing Bowl – You’ll need a bowl for mixing the crushed cookies and melted butter together.
Print the recipe for this scrumptious Chocolate Cookie Crust
Chocolate Cookie Crust
Chocolate Cookie Crust, made with Oreo Cookies and butter, is the perfect base for pie, cheesecake, and other simple desserts. It’s a quick and easy sweet treat recipe!
3 dozen Oreos (family size pack without cream)
8 tablespoons salted butter (melted)
Pre-heat the oven to 350°.
Spray your pan with cooking spray.
Remove the cream from all of your Oreo Cookies.
Place each de-creamed cookie in a gallon-sized Ziploc bag.
Seal the bag, making sure to get all the air out, and crush the cookies with a rolling pin (or you can crush them up in a blender/food processor).
Melt the butter.
Add the crushed Oreos and the melted butter to a large mixing bowl, and stir together well.
Press the cookie mixture into your pan, covering the bottom and up the sides of the pan.
Bake at 350° for about 10 minutes.
Allow the crust to cool, and fill with whatever type of cake, pie, or dessert you are making, following the instructions for that specific dessert.
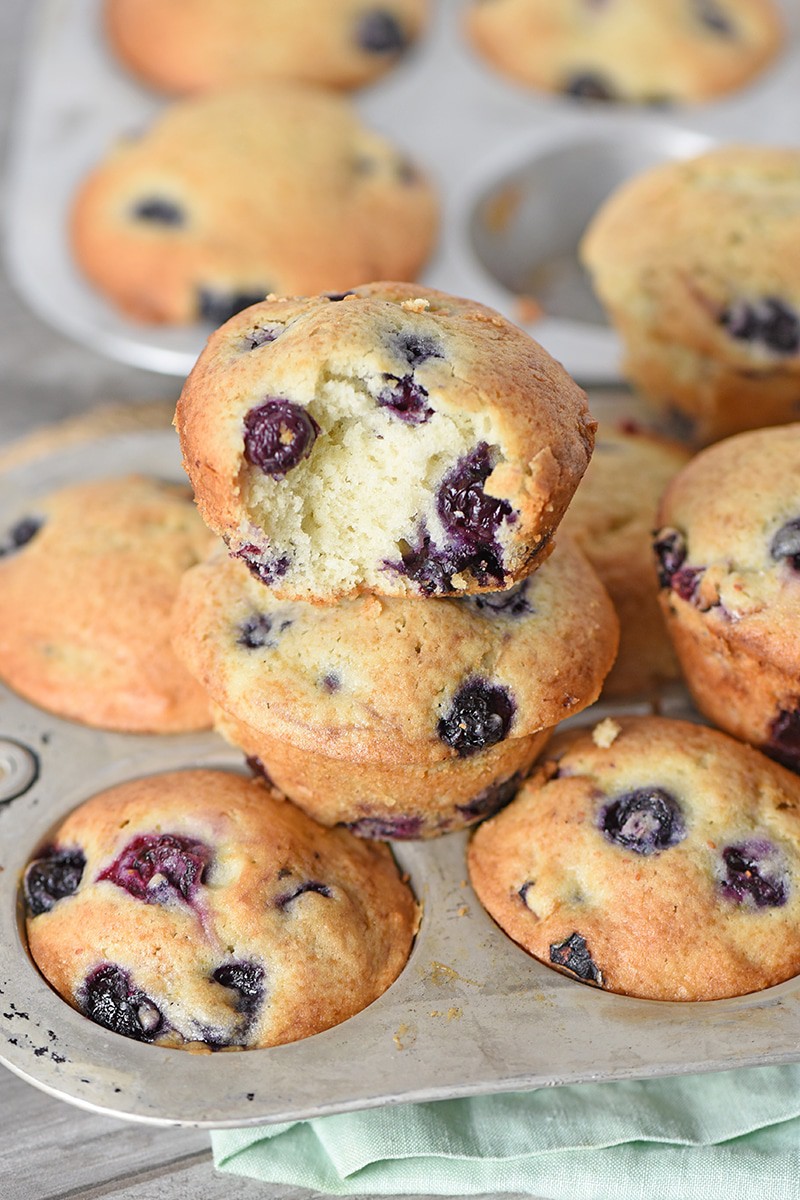
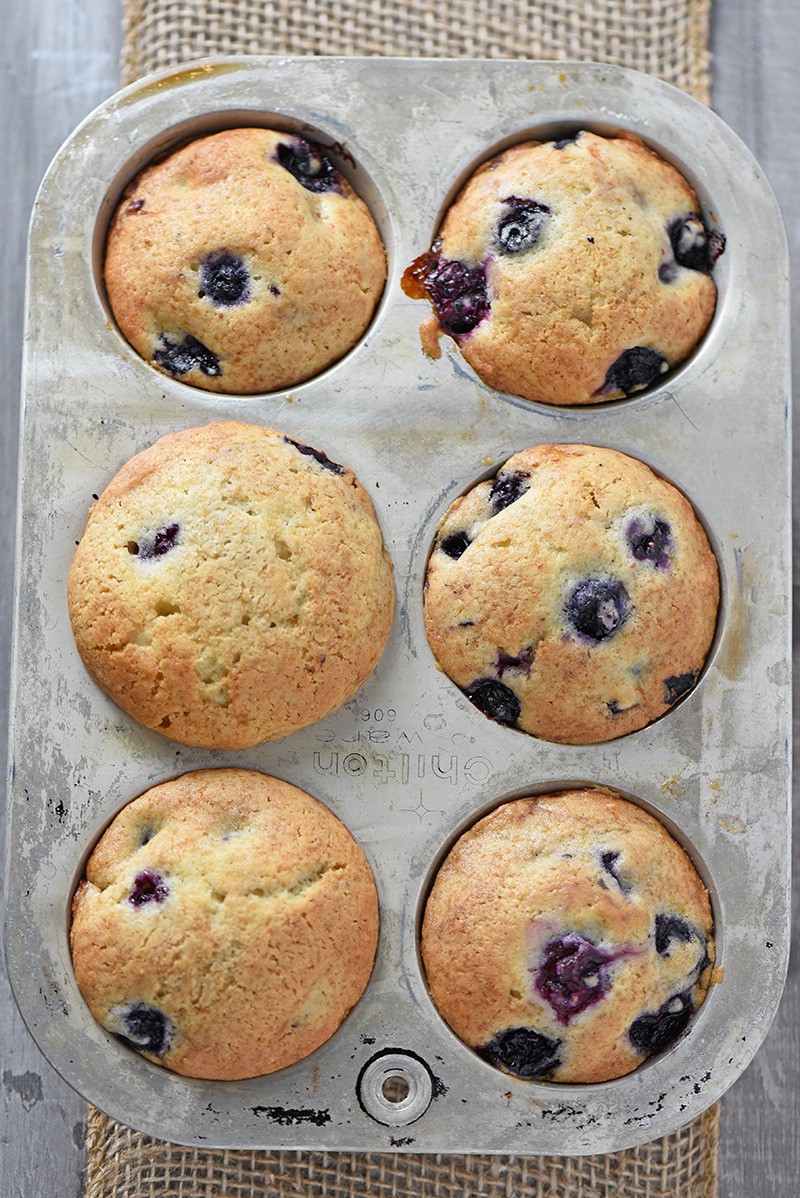
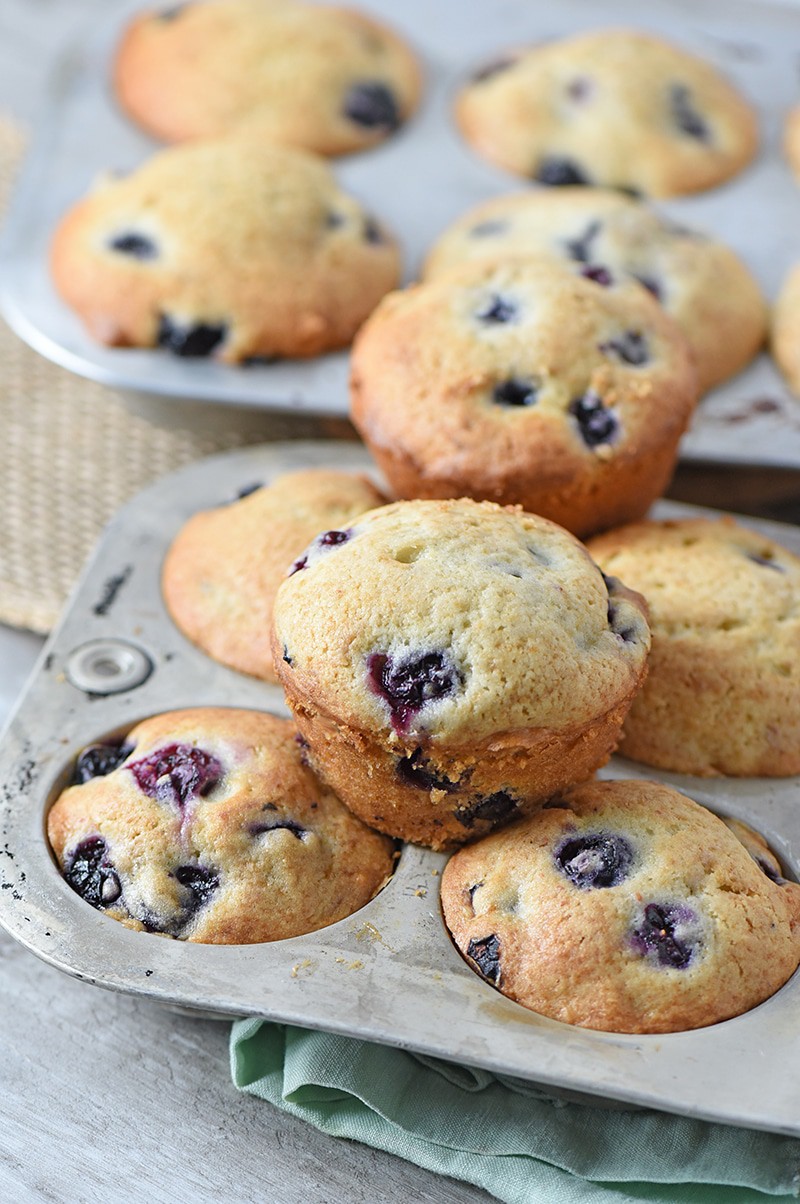
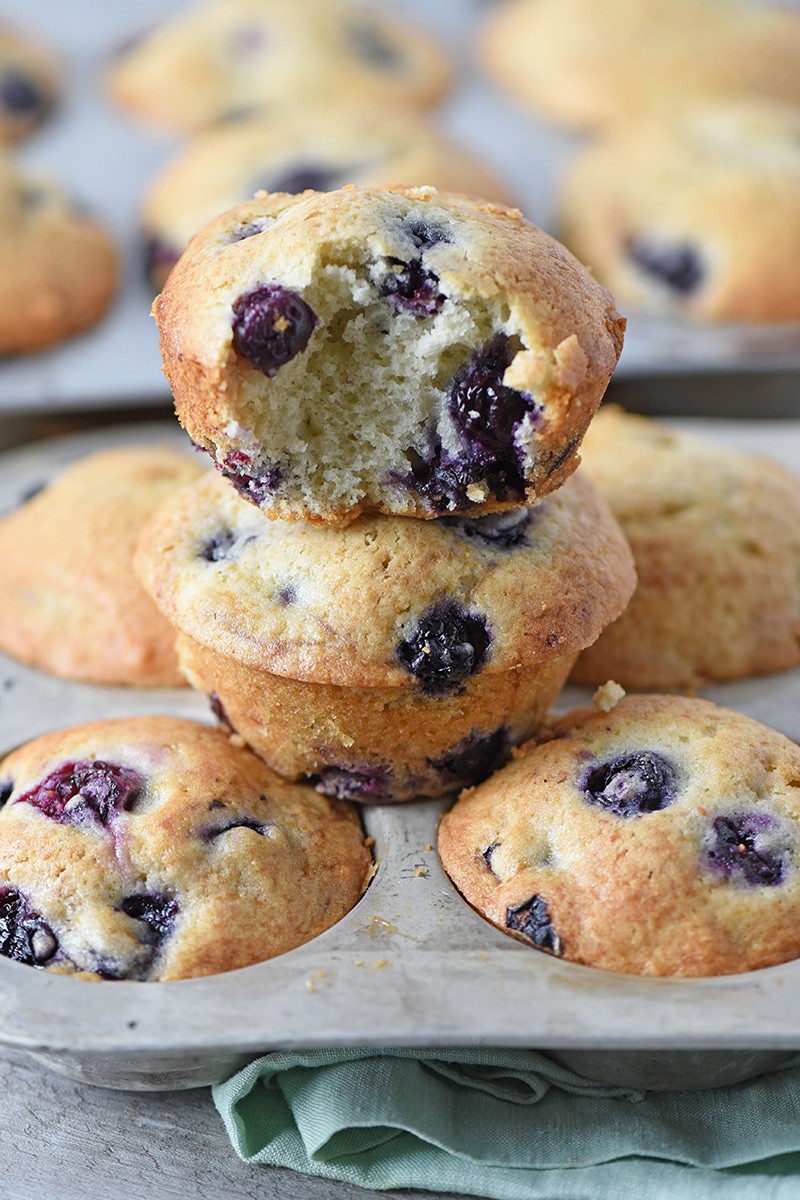
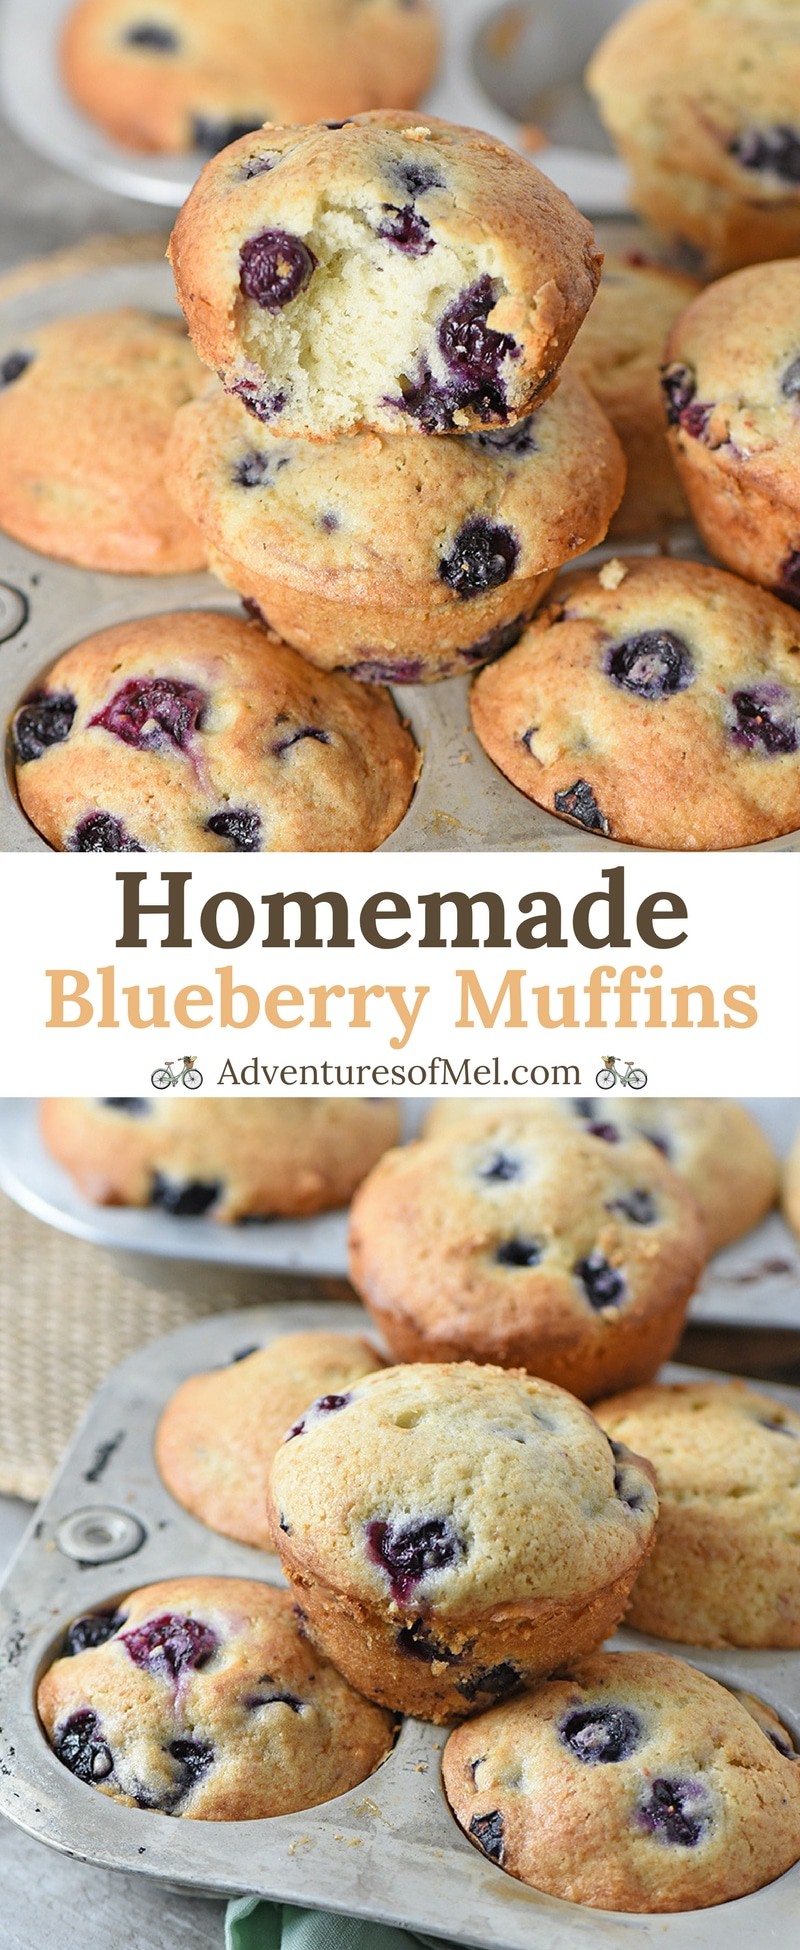
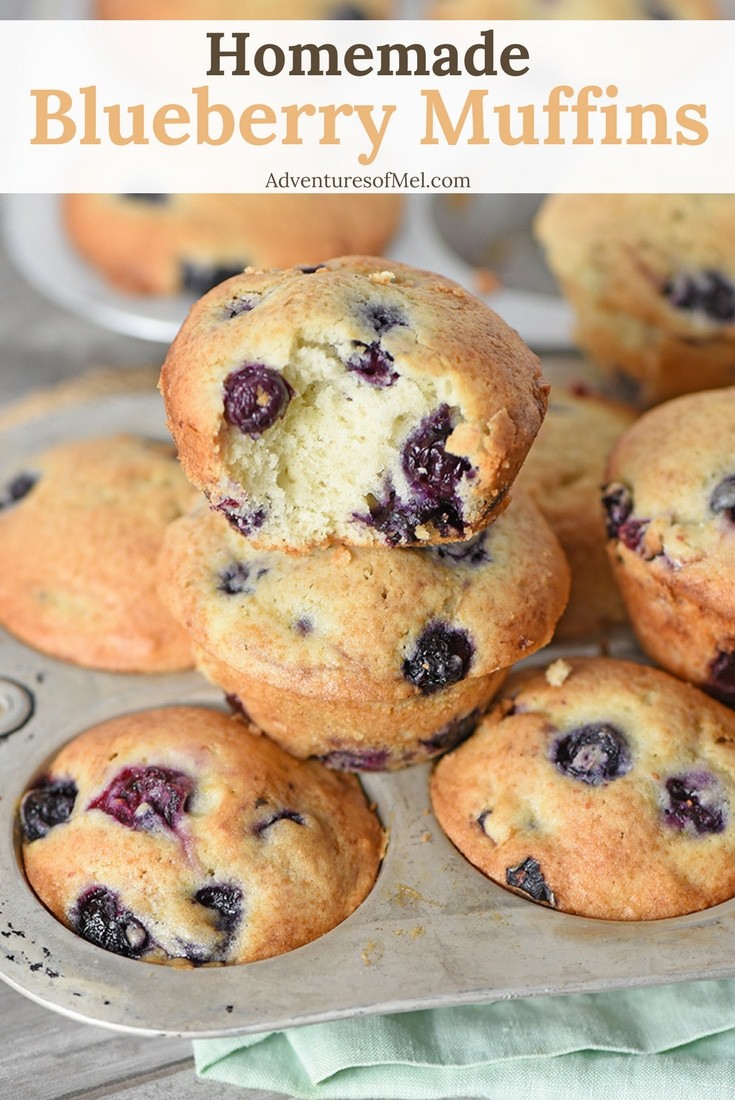
Homemade Blueberry Muffins from scratch are a breakfast sweet treat my boys really enjoy. Made with simple ingredients like butter, sour cream, and blueberries, this recipe is quick and easy to make. And the muffins are moist and delicious!
Homemade Blueberry Muffins are a rare breakfast sweet treat in our home, but when I do make them, my boys really enjoy them. Usually I’ll surprise the kids with a batch of muffins, like strawberry blackberry muffins, or banana bread on one of those (also) rare, non-busy weekends.
This blueberry muffin recipe is really quick and easy to make. I like to use simple ingredients, so I usually always have what I need on hand.
I also like that these muffins aren’t too sweet. They’re still sweet enough for a breakfast or brunch time treat, but they’re not so sweet that our bellies are heavy after we eat one.
Now what I really need is a new muffin pan after making these, only to realize that my muffin pan was flaking off onto my muffins. Thank goodness for Grandma’s old vintage muffin pans that I still have stowed away in my cabinet.
Maybe I’ll just stick with her old muffin pans because they saved the day and made some really pretty muffins.
Kitchen tools you may need to make Homemade Blueberry Muffins
Muffin Pan – I’m kinda eyeing this particular cast iron muffin pan, since mine has gone to muffin tin heaven. Mixer or Hand Mixer – Your mixer will be your best friend if you love to bake. Large Mixing Bowl – If you’re not using a mixer, you’ll need a large mixing bowl for mixing up the dough. Measuring Spoons and Cups – for measuring out your ingredients. Batter Dispenser – Makes filling the muffin cups a little bit easier. Cupcake Liners – These help create less mess and no need to grease the pan if you use a liner.
Print the recipe for Homemade Blueberry Muffins
Homemade Blueberry Muffins
Homemade Blueberry Muffins from scratch are a breakfast sweet treat my boys really enjoy. Made with simple ingredients like butter, sour cream, and blueberries, this recipe is quick and easy to make. And the muffins are moist and delicious!
3/4 cup unsalted butter
1 1/2 cups pure cane sugar
3 eggs
1/2 cup milk
1/4 cup sour cream
1 tablespoon baking powder
1 teaspoon salt
3 cups unbleached all-purpose flour
2 cups blueberries
Pre-heat the oven to 375°.
Prepare your muffin pan by greasing each cup or adding a cupcake liner to each one.
Cream (or mix) together the butter and sugar in a large mixing bowl until the mixture is light and fluffy.
Beat the eggs into the mixture.
Blend in the milk and sour cream.
Stir in the baking powder and salt with the flour, mixing well.
Fold the blueberries into your dough.
Scoop the dough into the muffin cups, filling each cup 3/4 of the way full.
Bake at 375° for 25 to 30 minutes, or until the muffins turn a nice golden hue.
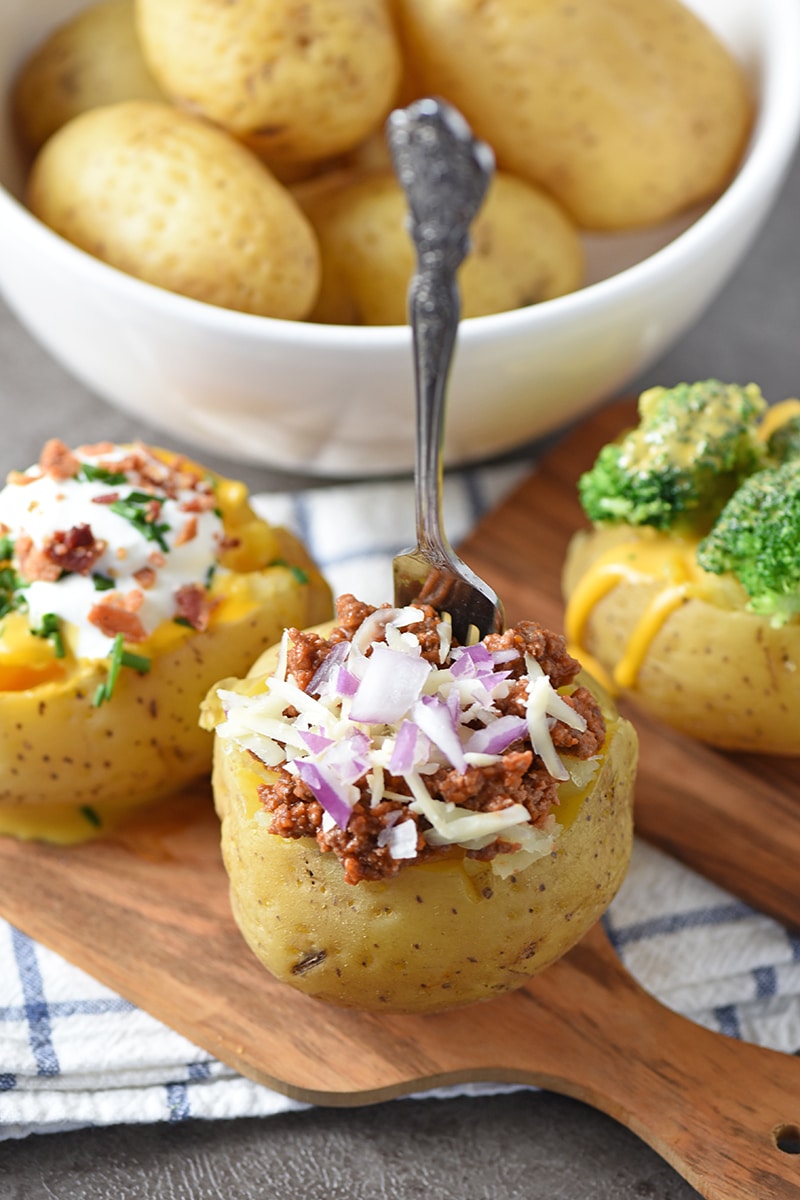
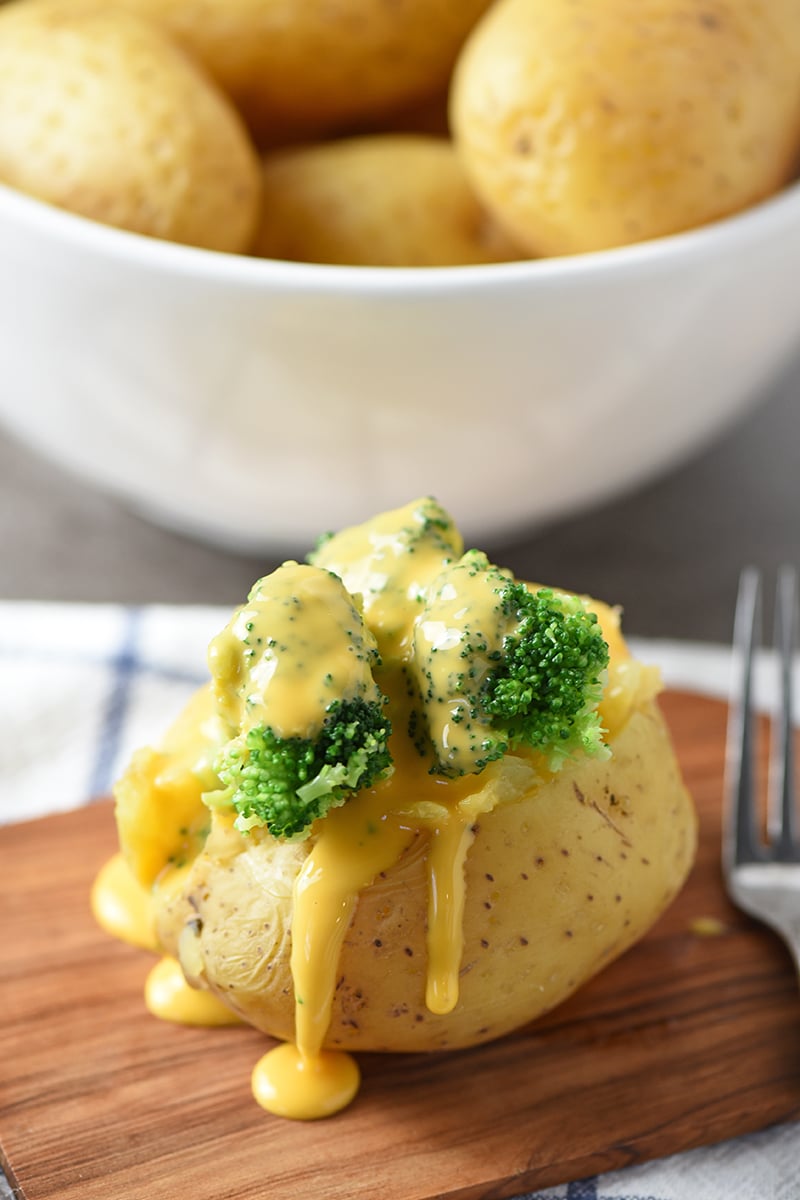
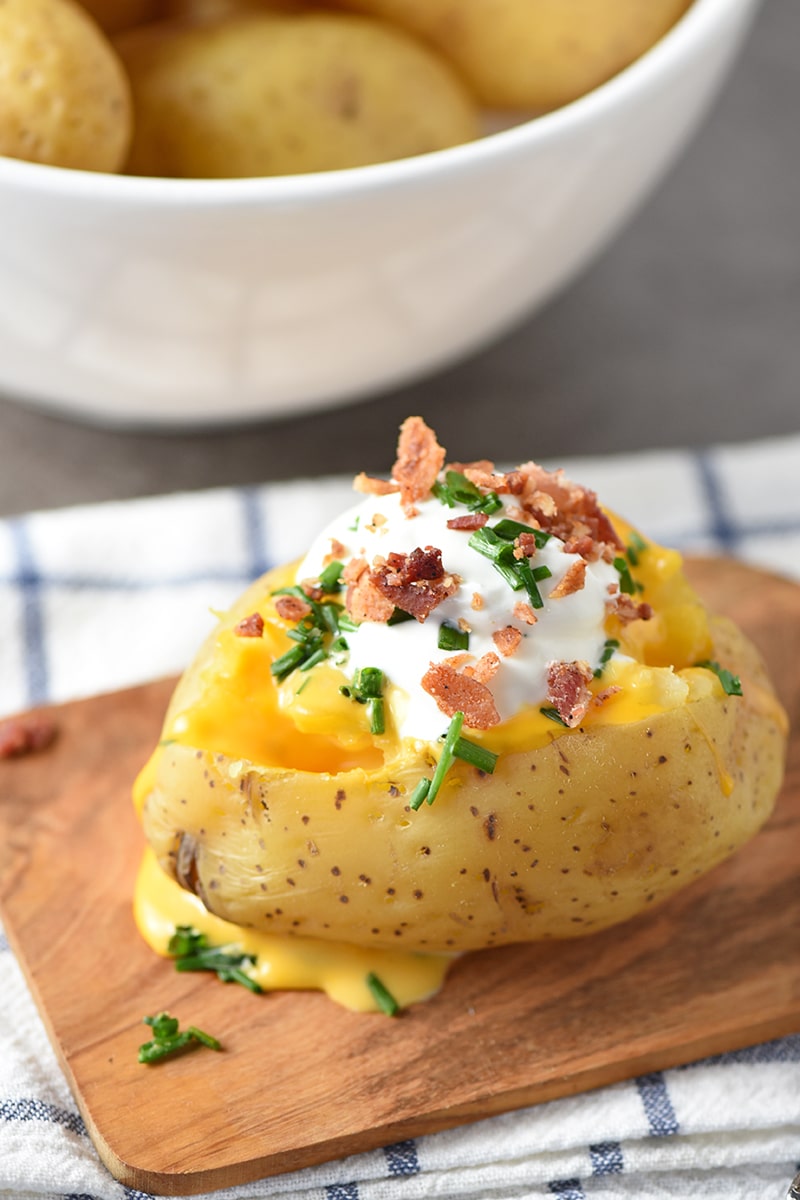
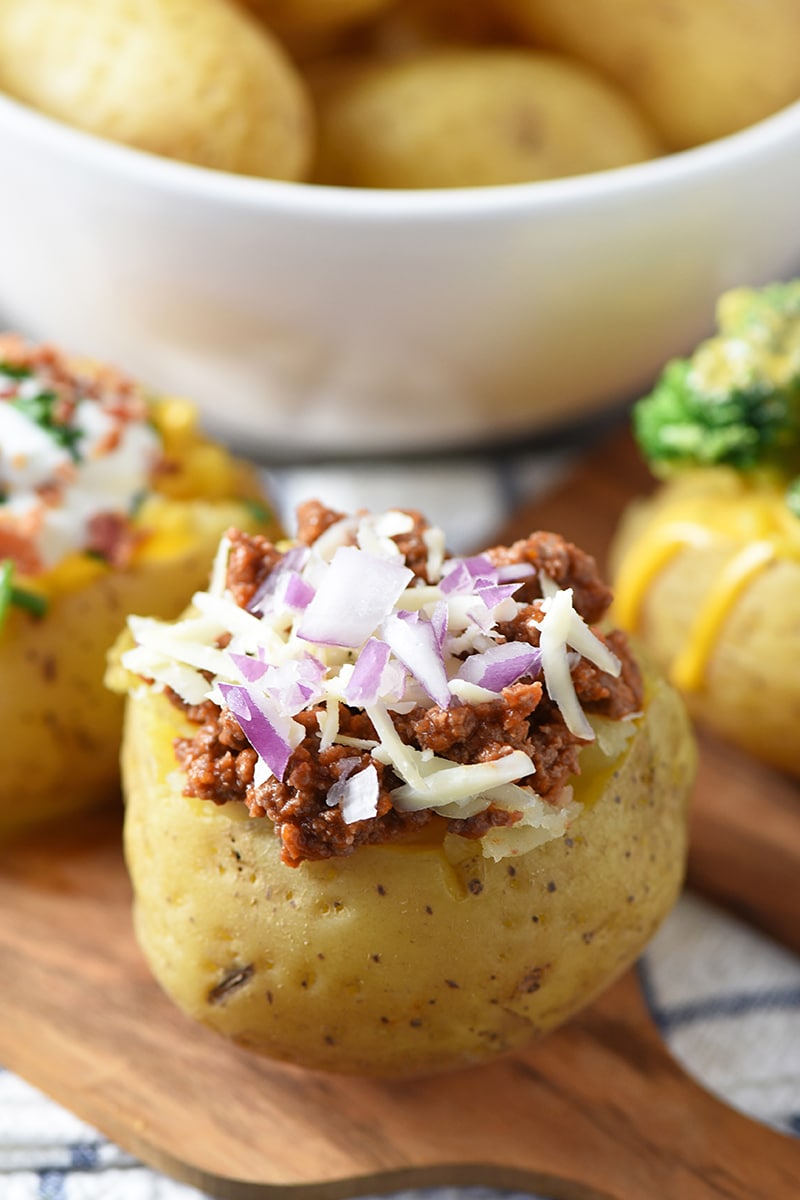
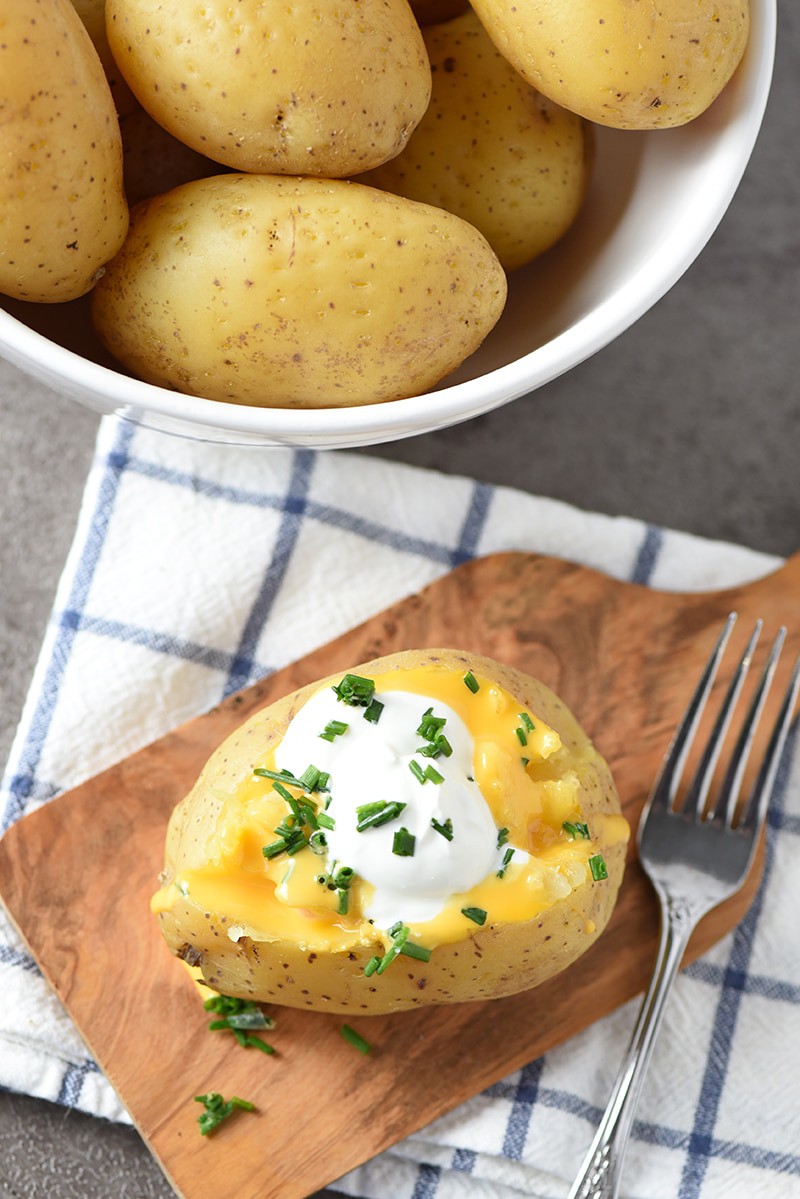
Set up the ultimate baked potato bar loaded with all the best toppings. Easy baked potato buffet ideas for a crowd, party, wedding, or special occasion. Complete with set up ideas and toppings list!
Wanna make it mashed instead? Check out the ultimate mashed potato bar loaded with crowd favorite potato toppings.
Baked potato bar ideas include so much deliciousness, they almost can’t fit into just one recipe. With all the variety, there’s truly something for everyone on this crowd pleasing buffet, and it will be the best part of everyone’s day.
Whether you’re getting together with friends for game night or hosting a large family dinner, a loaded potato bar with all kinds of wonderful potato toppings is a great way to feed and entertain your guests.
Church potluck coming up? Set up a small charcuterie board with lots of toppings, and keep baked potatoes warm in an Instant Pot or slow cooker.
A baked potato bar wedding buffet will definitely be a fun way to feed everyone and a favorite with guests.
What better occasion than game day? Your football party guests will love a loaded potato bar.
Just for the heck of it, plan a baked potato bar night with just your family, and watch movies or play board games together.
If you build it, they will come… It’s just a matter of cooking the potatoes and prepping all the toppings for your guests to choose from. Or better yet, with large gatherings, have each guest bring their favorite topping!
How to Make Baked Potatoes
You’ll need to decide what kind of potatoes you want to use and how best to cook them before setting up a potato bar.
Ingredients and Substitutions Notes
Potatoes – I prefer to use yellow potatoes, as they make a good baked potato. You can also use russet potatoes. If you’d rather use sweet potatoes over regular potatoes, you can make Instant Pot sweet potatoes.
How to Cook Baked Potatoes
There are a few ways you can bake potatoes. My favorite way is the microwave; however, if you’re feeding a crowd, you may want to go with either the oven, the grill, CrockPot, or Instant Pot baked potatoes.
Microwave
Wash and scrub the potatoes. Poke a few holes in each potato with a fork. Put them on a microwave-safe plate, and cook on high for 5 minutes; then flip and cook another 5 minutes. (Keep in mind, cook times may vary, depending on different microwaves.) Allow the potatoes to cool for a few minutes before handling.
Oven
Wash and scrub the potatoes. Poke a few holes in each potato with a fork. Line a baking sheet with aluminum foil; then on the sheet pan, rub potatoes down with olive oil and sprinkle with sea salt or kosher salt. Place on the baking sheet, and bake at 400° F for at least 1 hour, possibly a few minute longer. (You can also wrap the potatoes in foil and place them directly on the oven rack to bake.) You’ll know the potatoes are done when they can easily be pierced with a fork or knife.
Grill
Wash and scrub the potatoes. Heat the grill to 350° F. Rub potatoes down with olive oil, and sprinkle with sea salt or kosher salt. Then wrap each potato in aluminum foil, poke a few holes in the foil and potatoes, and place on the grill to cook for probably about an hour. You’ll know the potatoes are done when they can easily be pierced with a fork or knife.
Air Fryer
Pre-heat the air fryer to 400° F. Wash and scrub the potatoes. Poke a few holes in each potato with a fork. Rub each potato down with olive oil, and sprinkle with sea salt. Cook the potatoes in the pre-heated air fryer for about 45 minutes, maybe a little more, ’til the potatoes are soft and tender when poked with a fork or knife.
CrockPot or Slow Cooker
Wash and scrub the potatoes. Poke a few holes in each potato with a fork. Rub each potato down with olive oil, and sprinkle with sea salt. Then wrap each potato in aluminu foil, and place in the slow cooker. Cook on low for 6-7 hours, or on high for 4-5 hours. Potatoes are done when they can easily be pierced with a fork or knife.
Instant Pot
Wash and scrub the potatoes. Poke a few holes in each potato with a fork. Place all the potatoes in a steamer basket down in the Instant Pot. Add 1 1/2 cups of water to the Instant Pot. Place the lid on the Instant Pot, set the valve to seal, press Manual or Pressure Cook, and set to 8 minutes. Allow the Instant Pot to naturally release when done.
Learn how to quickly use your Instant Pot with our Instant Pot Quick Start Guide, filled with practical tips, Instant Pot recipes, accessory ideas, and more!
How to Set up or Assemble the Ultimate Baked Potato Bar
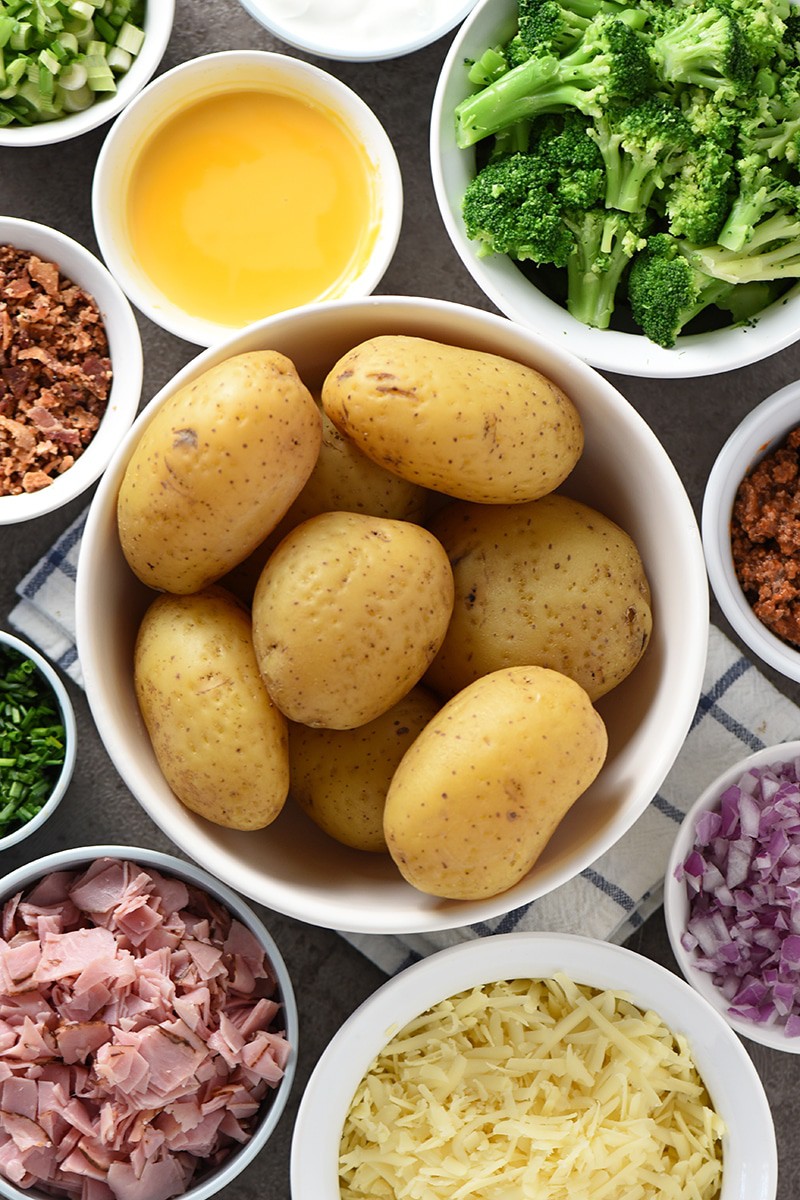
Gather the ingredients for your potato bar… You’ll need baked potatoes and baked potato bar toppings. Your main work will be cooking the potatoes and prepping any toppings for your guests to choose from.
Baked Potato Bar Ideas and Expert Tips
Prep the toppings, adding each topping to a separate dish or compartment for serving. Prepping may involve cooking, re-heating, or simply chopping.
Set everything out buffet style, so your guests can create their very own delicious baked potato creations.
If you’re hosting a smaller gathering, try using a large charcuterie board with small bowls for a variety of toppings all around a large bowl full of baked potatoes.
If you’re wondering how to keep the baked potatoes warm without warmers, you can create a CrockPot baked potato bar or Instant Pot baked potato bar.
Loaded Baked Potato Bar Toppings List:
Here’s a whole slew of different toppings you can add to your potato buffet…
The sky’s the limit on ideas for a baked potato buffet because there are so many toppings you can add to this list. But this is a great start.
Recipe FAQ’s
What potatoes are best for a baked potato bar?
While I do prefer yellow potatoes or Yukon Gold potatoes, you can use any kind of potatoes you prefer, including Russet potatoes, red potatoes, even purple potatoes if you can find them. Though I will say that yellow or russets make the best baked potatoes.
Can you make baked potatoes and toppings ahead of time?
While you can make the toppings 1-2 days ahead of time, it’s best to cook the potatoes the day of. Baked potatoes are best when eaten soon after cooking. As for the toppings, you’ll just need to store them in airtight containers in the fridge.
How can you keep baked potatoes warm while at a party?
You can either use a buffet server and food warmer. Or you can keep the potatoes in a Crock Pot or Instant Pot on the “Keep Warm” setting.
If you try this recipe, why not leave a star rating in the recipe card right below and/or a review in the comment section further down the page? I always appreciate your feedback. You can also follow me on Pinterest, Facebook, Instagram, and YouTube. And subscribe to my email list too!
Ultimate Baked Potato Bar
Set up the ultimate baked potato bar loaded with the best toppings. Easy buffet ideas for a crowd, party, wedding, or special occasion.
Instant Pot
Cutting Board
Vegetable Cleaver
Buffet Server and Food Warmer
Serving Bowls
Sectioned Serving Tray
12 large baked potatoes
Baked Potato Bar Toppings:
1 1/2 cups salted butter
1/4 cup salt
1/4 cup ground black pepper
1 1/2 cups sour cream
3 cups cheese sauce
12 ounces extra sharp cheddar cheese (*shredded)
2 cups red onion (minced)
2 cups green onion (chopped)
2 cups chives (chopped)
6 cups broccoli (cooked)
6 cups chili
6 cups sloppy joe meat
1 1/2 cups bacon (cooked and crumbled)
4 1/2 cups ham (chopped)
Choose and prep your toppings*, adding each topping to a separate dish or compartment for serving. Prepping may involve cooking, re-heating, or simply chopping.
Set everything out buffet style, so your guests can create their very own delicious baked potato creations.
* You can use any kind of shredded cheese you prefer. I recommend Extra Sharp Cheddar, Colby Jack, Monterey Jack, Pepper Jack, Smoked Cheddar, Mozzarella, goat cheese, etc.
*More mashed potato bar topping ideas include cooked cauliflower, chili, beef taco meat, taco chicken with black beans, pulled pork, rotisserie chicken, sausage, ground beef, steak, bacon bits, cubed pepperoni, BBQ sauce, Ranch dressing, pizza sauce, turkey gravy, ham gravy, ham gravy with cornstarch, chicken stock gravy, tomatoes, guacamole, salsa, jalapeños, fire roasted green chiles, corn, peas, etc.
*You may need warmers to keep the baked potatoes warm; you can also use a slow cooker or Crock pot, or an Instant Pot. Otherwise, you may use a serving platter or serving bowls for toppings.
Side Dish
American
baked potato bar, baked potato bar ideas, baked potato bar toppings, baked potato buffet, loaded baked potato bar, loaded potato bar, mashed potato bar ideas, mashed potato bar toppings, potato bar ideas, potato bar toppings, ultimate baked potato bar
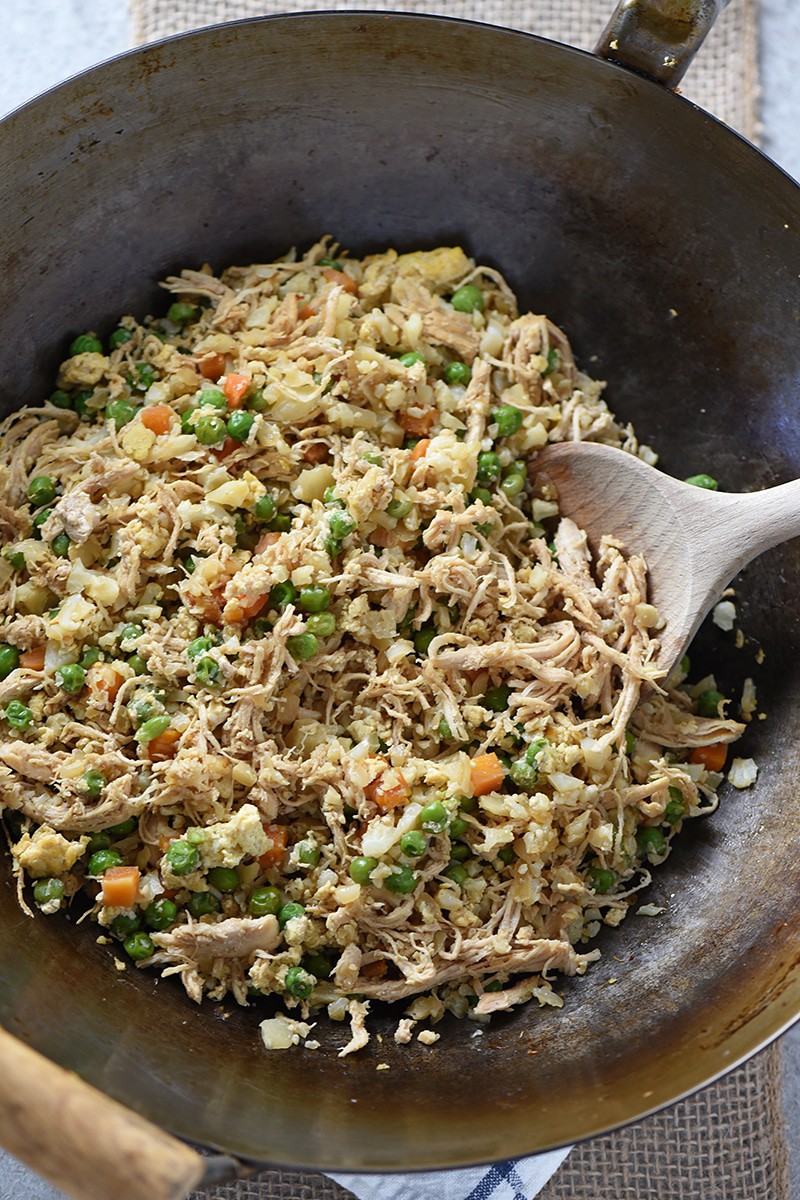
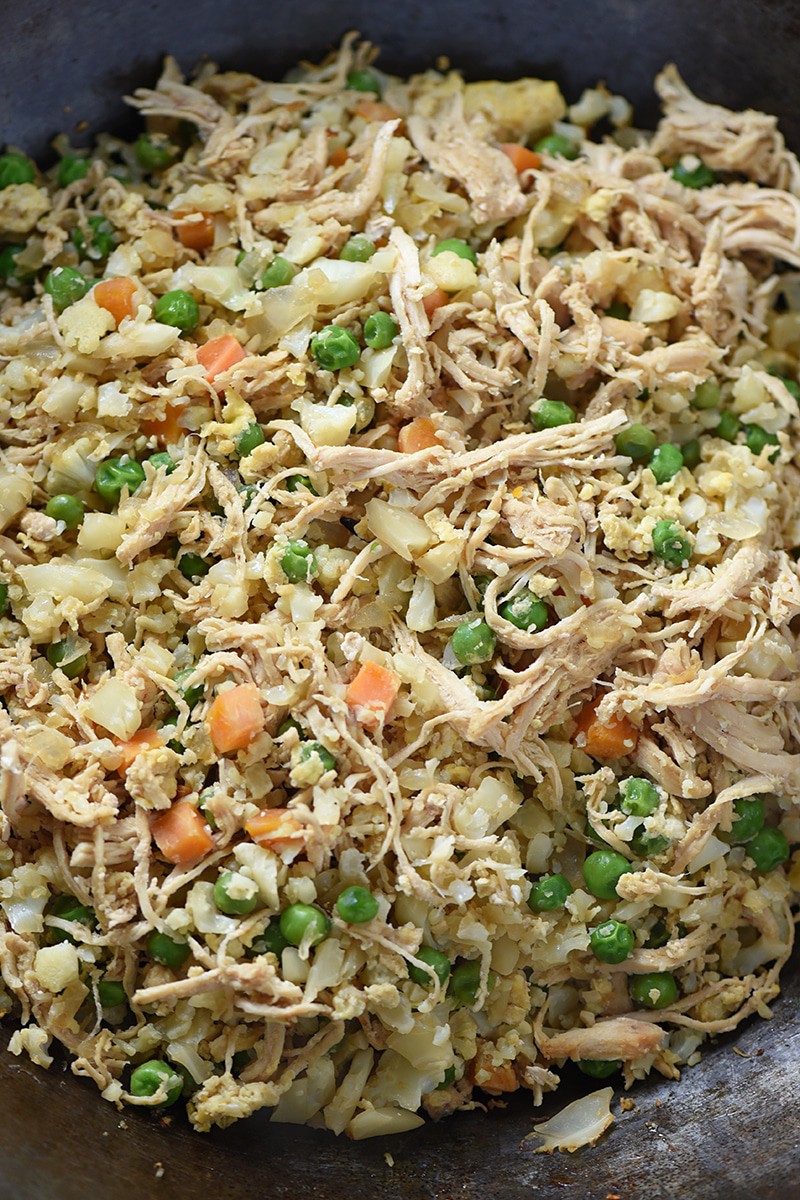
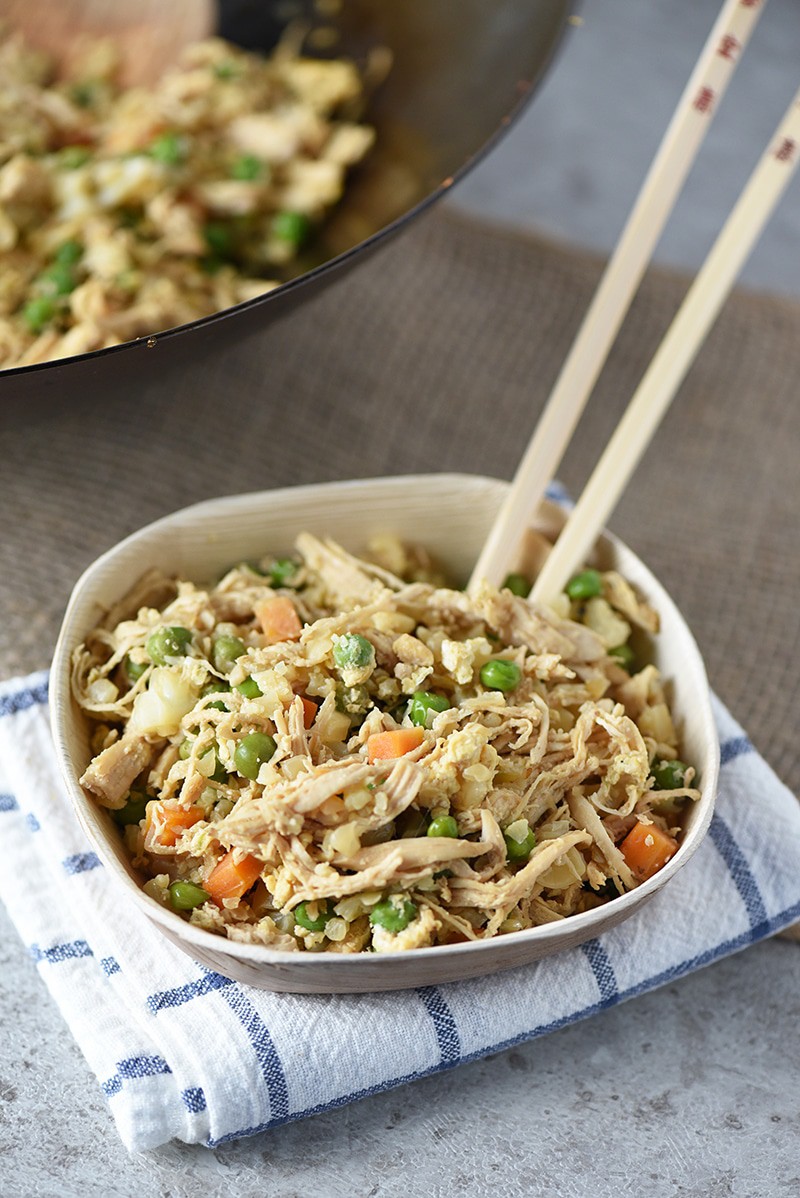
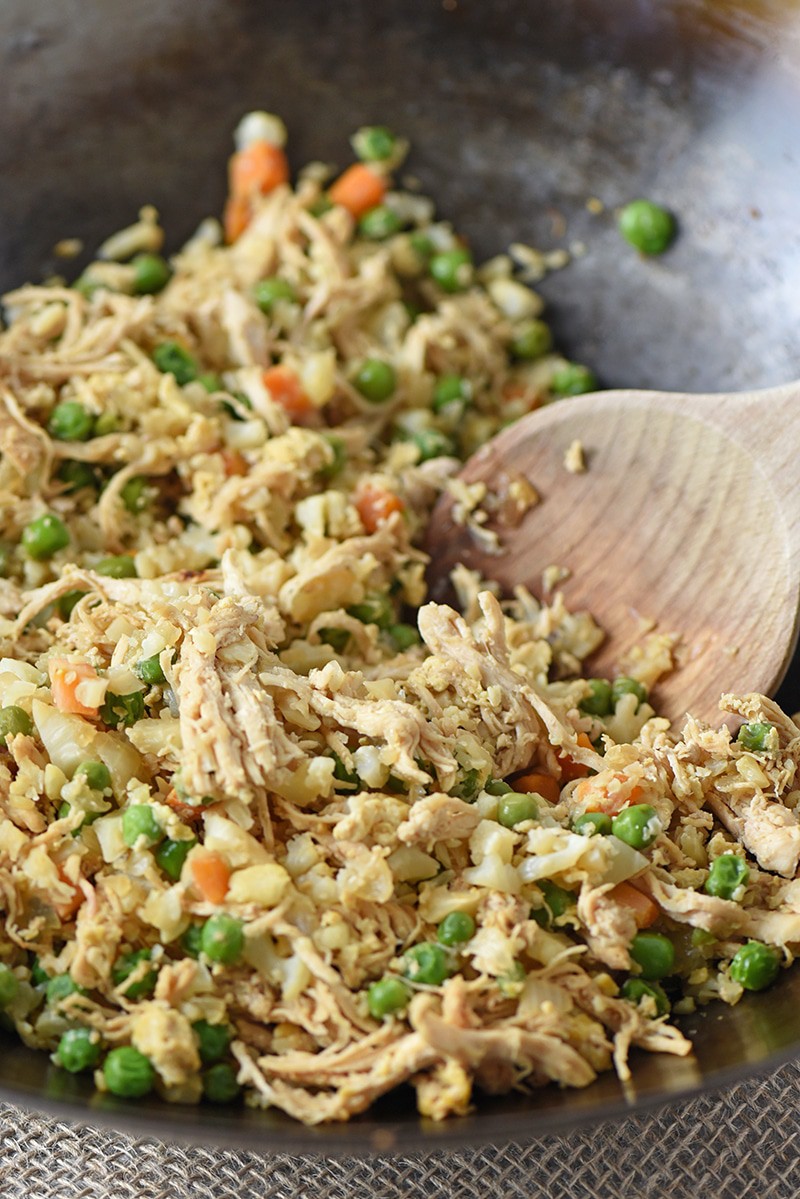
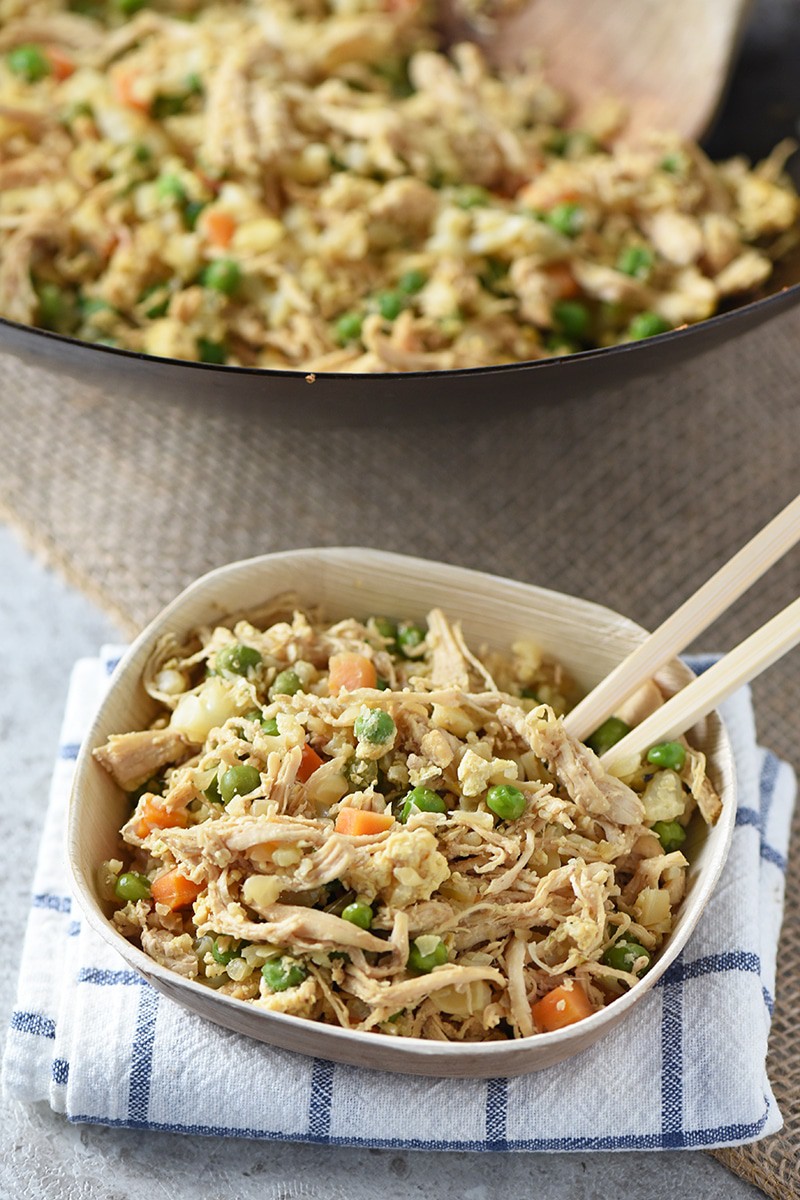
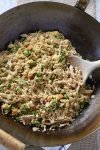
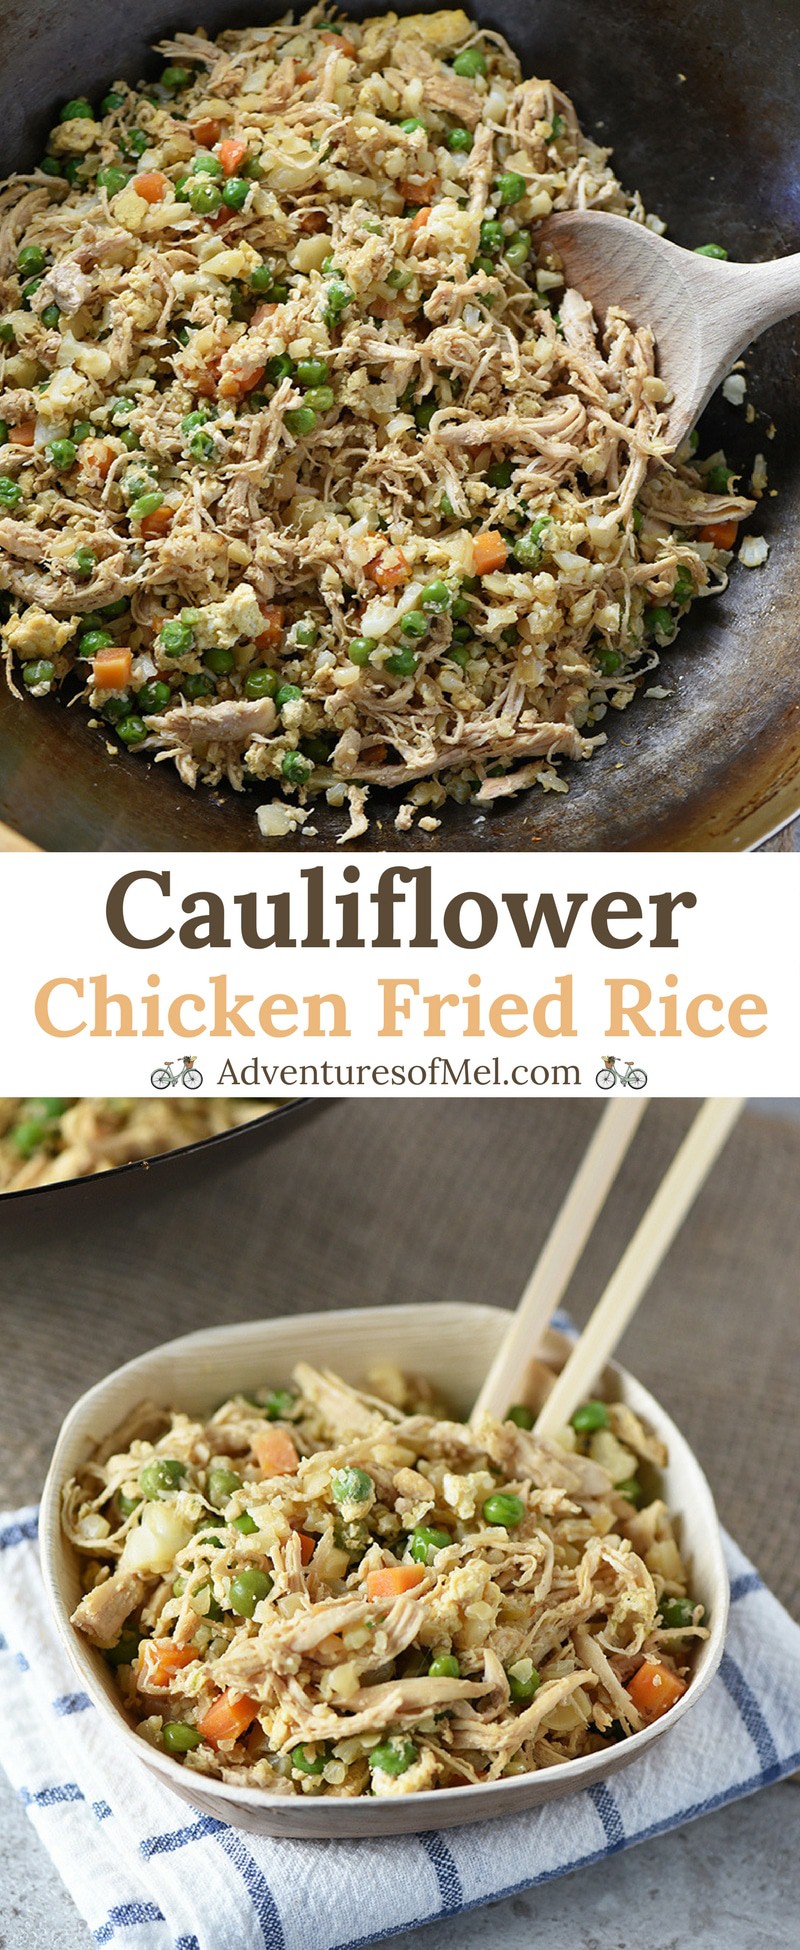
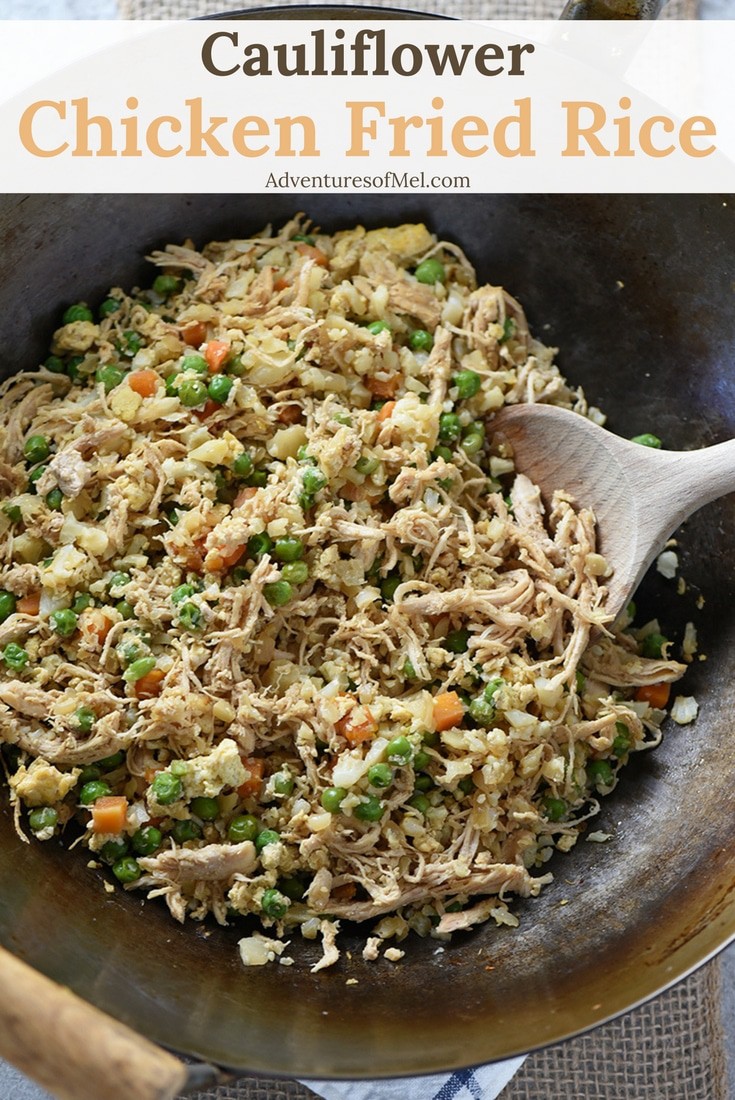
Cauliflower Chicken Fried Rice – A healthier version of your favorite takeout food. Cauliflower chicken fried rice is made with riced cauliflower, chicken, eggs, and veggies,. It’s a delicious dinner idea the whole family will love!
I feel like Chicken Fried Rice gives the appearance of being a hard dish to master. But really, it’s not that difficult to make; in fact, it’s probably one of the quicker meals you can throw together.
The key is to have all of your veggies and ingredients ready to go, because this recipe moves fast once you start cooking.
While we love Chicken Fried Rice, we’ve had to come up with creative and healthy solutions for a lot of our favorite dishes. Cauliflower is a very worthy substitute for rice, especially when you mince it up really small.
It works quite deliciously, in fact. And it really isn’t much more work than cooking up a pot of rice would be.
If you’re looking for a lower carb option for your favorite takeout dish, Cauliflower Chicken Fried Rice may be just the ticket. And just in case you’d rather have rice, we also have a regular chicken fried rice in a wok recipe you may enjoy.
Tips for how to make Cauliflower Chicken Fried Rice
Gather and prep all of your ingredients first and have them ready to go… You’ll need cauliflower, onion, garlic, chicken that’s already been cooked, frozen peas and carrots, eggs, sesame oil, and soy sauce.
Want to see how to make this recipe? Watch our cooking show!
Kitchen tools you may need to make Cauliflower Chicken Fried Rice
Large Pan or Wok – Dan purchased this wok for us a couple years ago, and we’ve used it time and time again. It’s wonderful for cooking up Cauliflower Chicken Fried Rice.
Wok Spatula – This comes in really handy for stirring and scraping the wok as you toss the cauliflower rice while cooking.
Print the recipe for Cauliflower Chicken Fried Rice
Cauliflower Chicken Fried Rice
Cauliflower Chicken Fried Rice is a healthier version of your favorite takeout food. Made with riced cauliflower, chicken, eggs, and veggies, it’s a delicious dinner idea the whole family will love!
3 cups finely minced cauliflower
1 large onion
2 cloves garlic
1/2 pound cooked and shredded chicken
3 tablespoons sesame oil
1 cup frozen peas and carrots
2 eggs (beaten)
1/4 cup soy sauce
Gather and prep all of your ingredients first and have them ready to go.
Wash and finely mince the cauliflower.
Chop the onion and garlic.
Shred the already cooked chicken.
Heat the sesame oil in a large skillet or wok on medium heat.
Stir the onion and garlic into the oil; sauté ’til they soften.
Add the peas and carrots, and continue to sauté, ’til they become tender.
Make a well in the center of the onion mixture, and add the eggs, scrambling them.
Stir everything together well, keeping the wok on medium heat.
Add the shredded chicken, as well as the cauliflower, to the wok, stirring well.
Add the soy sauce and continue to stir.
Place the lid on your wok and let the mixture steam or cook for 3 to 5 minutes.
When everything is heated thoroughly, it’s ready to serve.
Instant Pot Baked Potatoes are so easy to make, pressure cooked in less than 10 minutes. Tender and delicious, they’re a family favorite dinner side.
Instant Pot Baked Potatoes are pressure cooked to perfection. Plus, like my Instant Pot sweet potato recipe, they’re super easy to make which makes them a win win in my book.
We pretty much have potatoes on hand all the time. My boys sometimes love to eat a baked potato with their lunch; and less often now, we’ll enjoy mashed potatoes or baked potatoes with our Instant Pot whole chicken dinner.
And if you haven’t figured it out by now, we absolutely love our Instant Pot. I think it’s safe to say it’s reached the heights of being one of those small appliances I wouldn’t want to live without.
If you’re an Instant Pot fanatic (like us), you’re going to love this hack of a recipe. If you have an Instant Pot and you haven’t opened it up yet, it’s time; in fact, you can use our Instant Pot Quick Start Guide to get you going. And if you’re just not sure about these newfangled contraptions… Well, you’ll definitely be sure after you taste these delicious baked spuds.
Tips for how to make Instant Pot Baked Potatoes
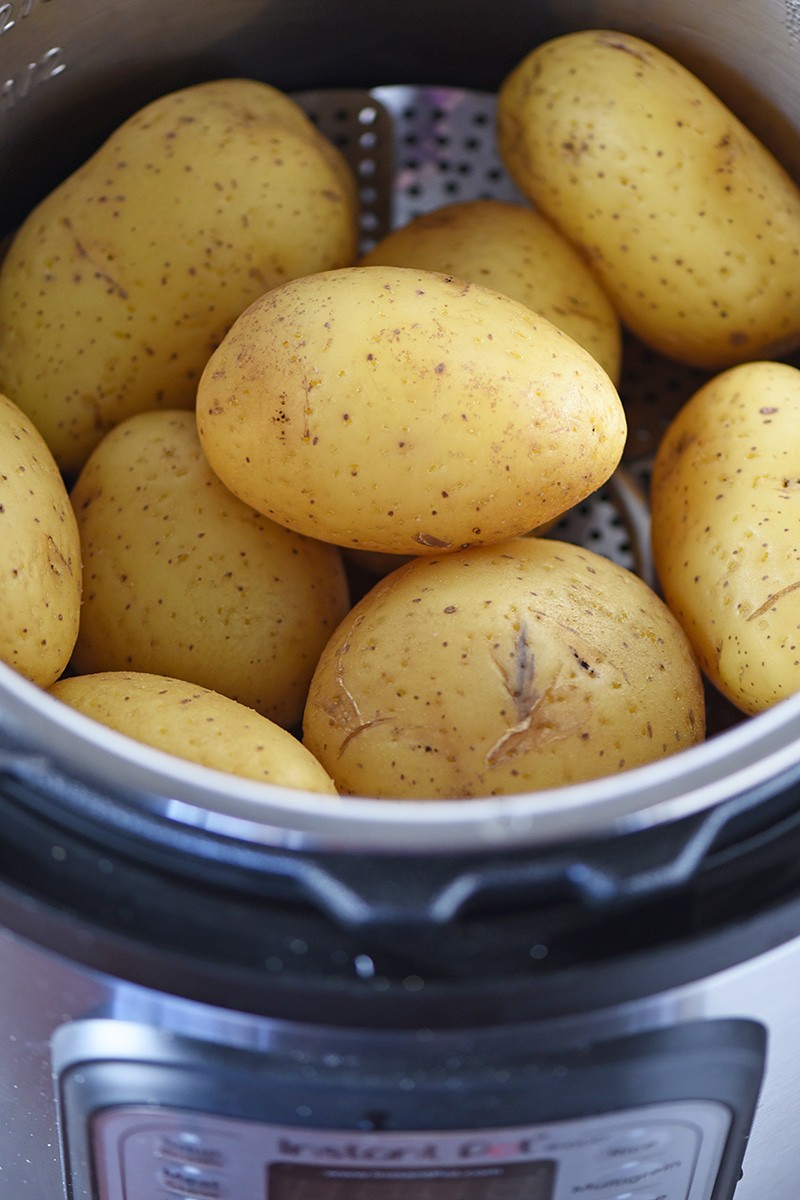
First of all, you’ll need to gather your ingredients and supplies. You’ll need your Instant Pot (with a vegetable steamer basket if you have one), a handful of potatoes, and water. Yep, that’s it, easy peasy.
Pick out 8 to 10 medium sized potatoes that would make good baked potatoes. They don’t have to be large, but you probably don’t want them to be too small either.
Wash the potatoes well.
Then take a fork and prick each potato all over. This keeps your potatoes from bursting while cooking.
If you have a vegetable steamer basket, place it in your Instant Pot. This will keep your potatoes from getting overly moist from sitting in water while they’re cooking.
Place all the potatoes in the steamer basket.
Add water to the Instant Pot.
Place the lid on your Instant Pot, and hit Manual (or Pressure Cook); set the time to 8 minutes.
Let it naturally release when done.
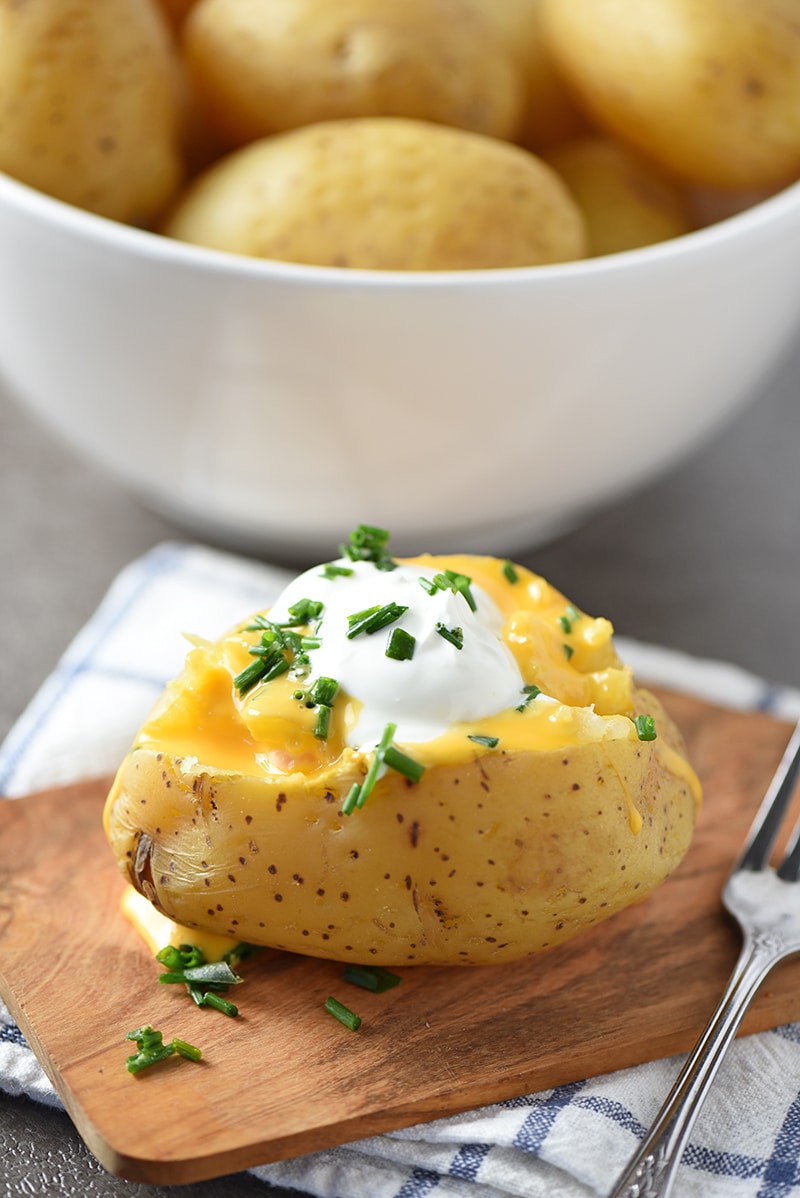
Serve while warm with all the fixings that go along with baked potatoes… Butter, sour cream, cheese, crumbled bacon, chives, etc.
Learn how to quickly use your Instant Pot with our Instant Pot Quick Start Guide, filled with practical tips, Instant Pot recipes, accessory ideas, and more!
Kitchen tools you may need to make Instant Pot Baked Potatoes
Instant Pot – We use our Instant Pot just about every day for all sorts of things. It’s so versatile and handy and makes the perfect baked potatoes.
Vegetable Steamer Basket – This will keep your potatoes from getting overly moist from sitting in water while they’re cooking.
Instant Pot Baked Potatoes are so easy to make, pressure cooked in less than 10 minutes. Tender and delicious, a family favorite dinner side.
8 to 10 medium yellow potatoes
1 1/2 cups water
Any dressings you want (salt, pepper, butter, cheese sauce, sour cream, chives, etc.)
Pick out 8 to 10 medium potatoes that would make good baked potatoes. They don’t have to be large, but you probably don’t want them to be too small either. We prefer yellow potatoes.
Wash the potatoes well.
Then take a fork and prick each potato all over. This keeps your potatoes from bursting while cooking.
If you have a steamer basket, place it in your Instant Pot. This will keep your potatoes from getting overly moist from sitting in water.
Place all the potatoes in the steamer basket.
Add water to the Instant Pot.
Place the lid on your Instant Pot, and hit Manual (or Pressure Cook); set the time to 8 minutes.
Let it naturally release when done.
Serve while warm with all the fixings that go along with baked potatoes… Butter, sour cream, cheese, bacon bits, etc.
Instant Pot Recipes
American
baked potatoes, instant pot baked potatoes, pressure cooker baked potatoes
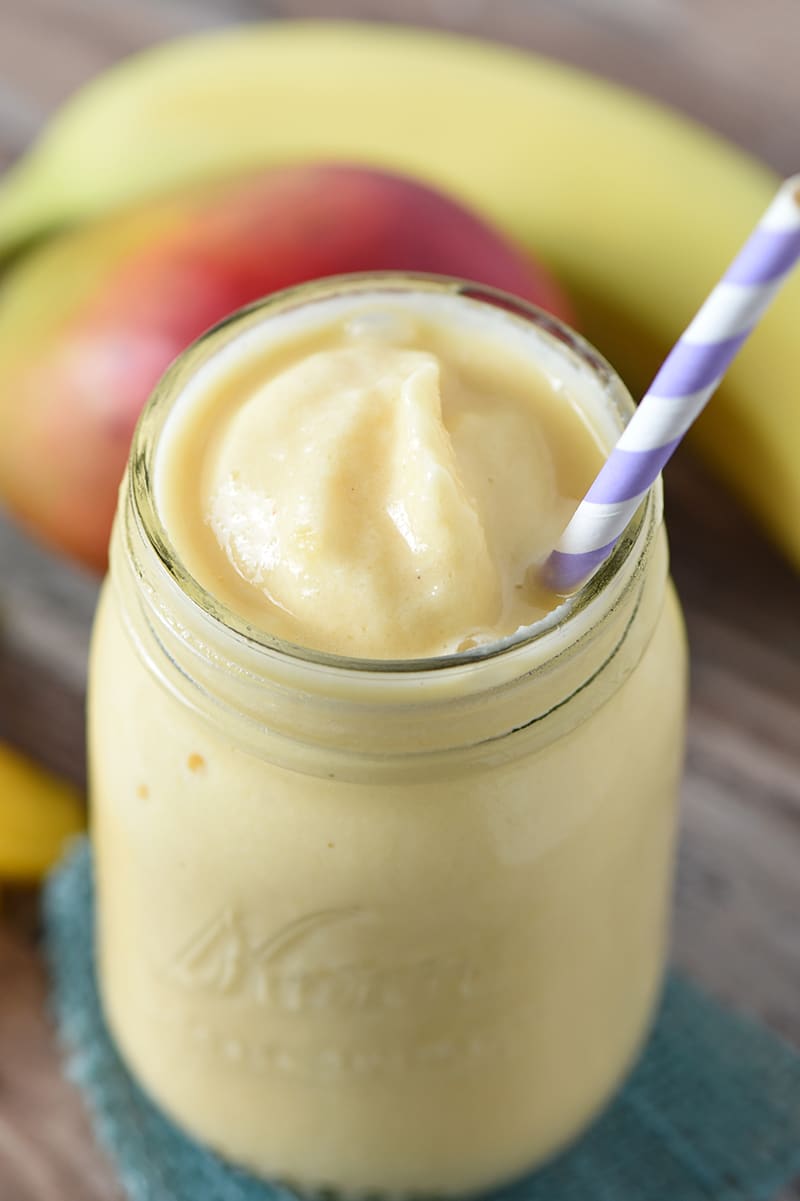
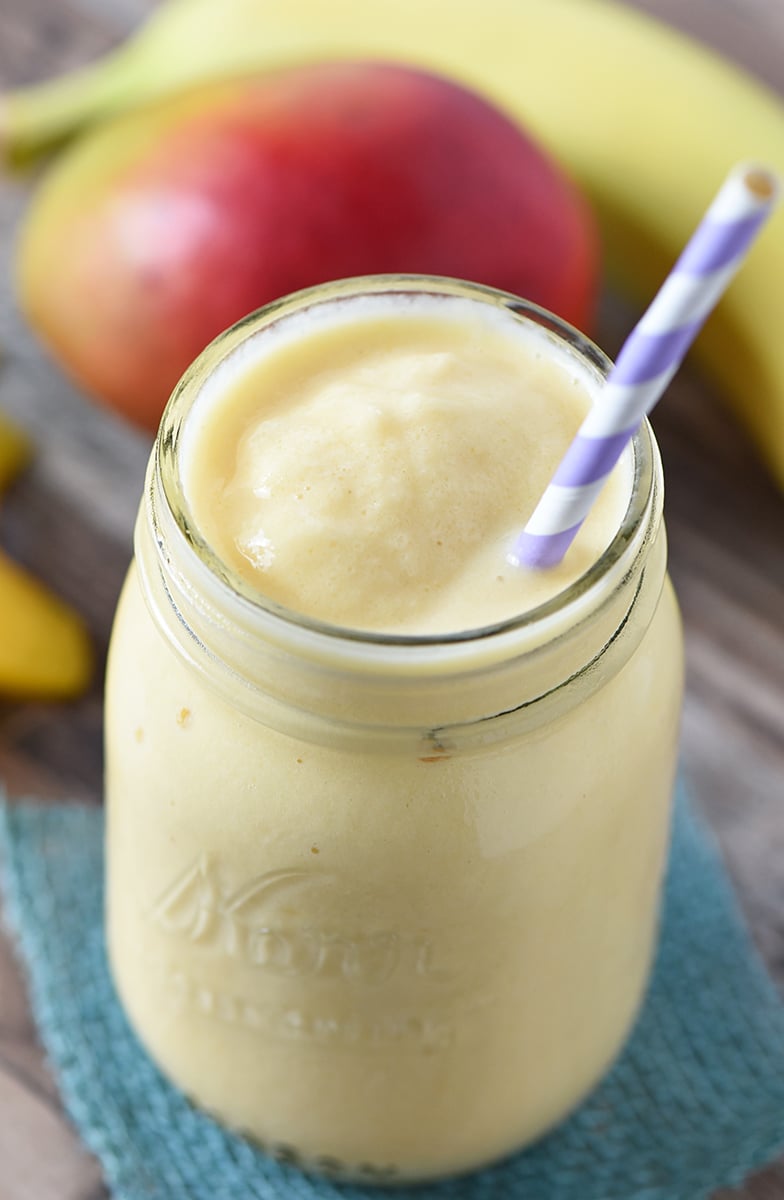
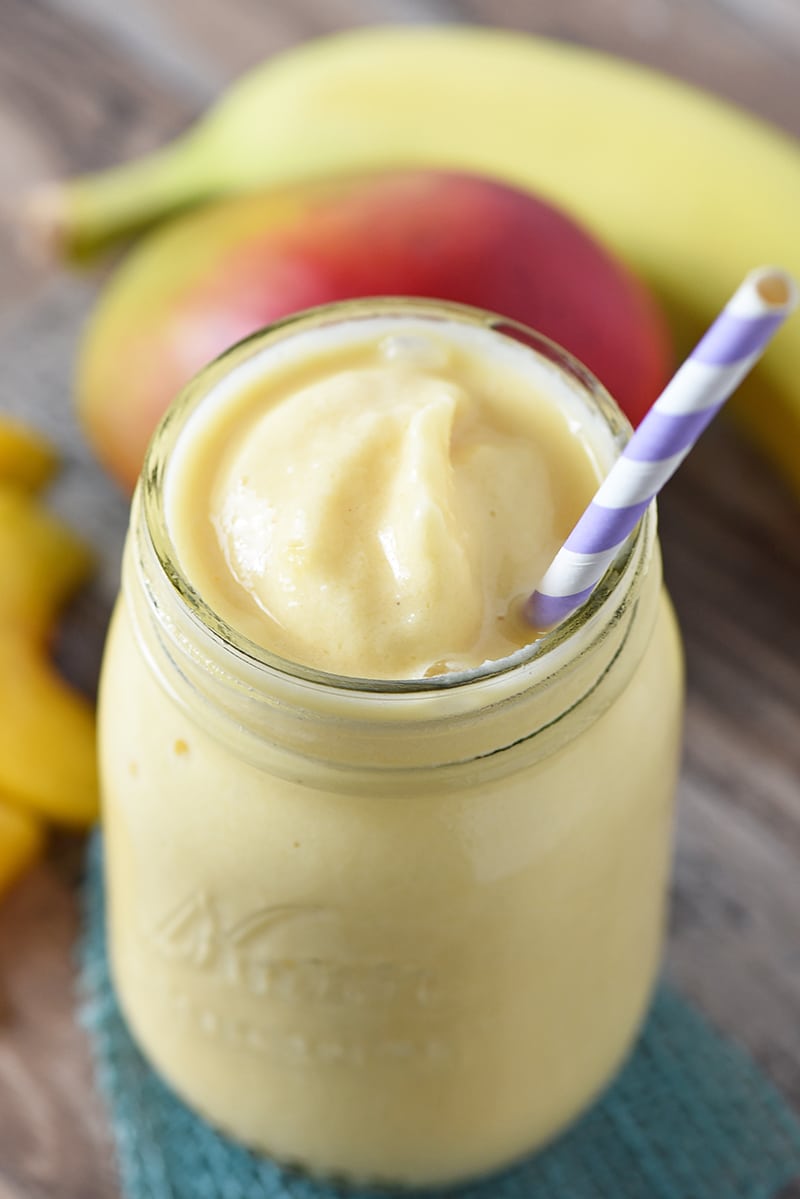
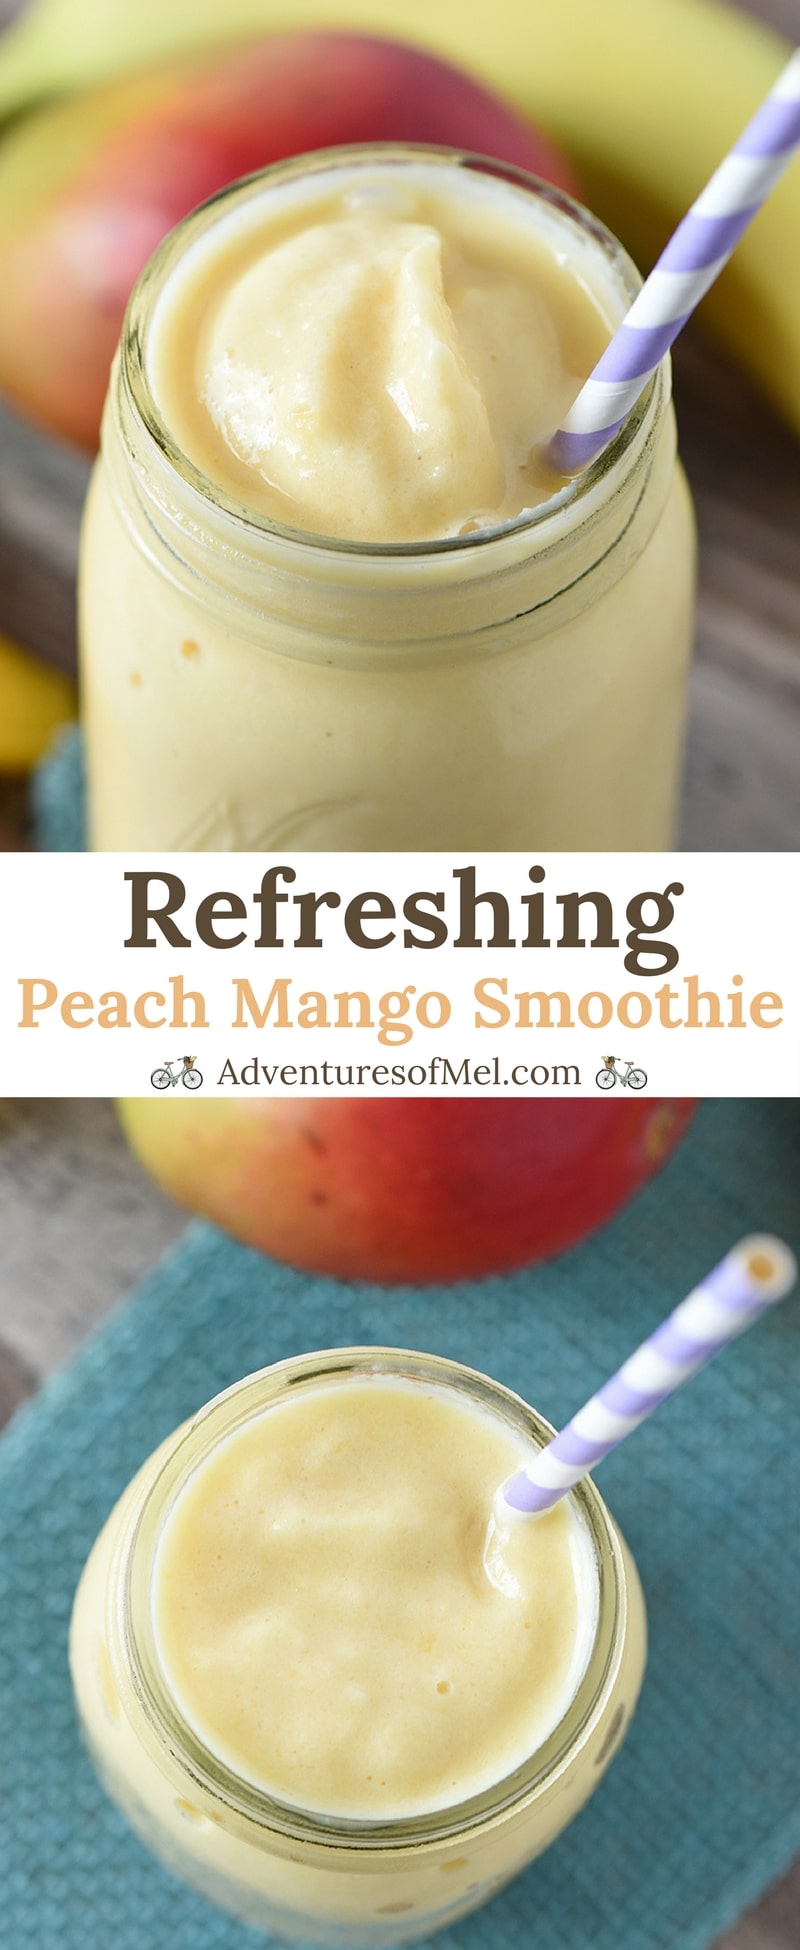
Peach Mango Smoothie recipe that’s healthy, quick, and an easy to make snack. Made with 1 banana and a dash of honey, also a tasty addition to mornings.
Peach Mango Smoothie snacks are so easy to make for myself and the boys. A smoothie is a great way to give us all a boost of fruit in our diet and also very refreshing.
On rare occasions, I’ll mix up a smoothie to go with our breakfast or lunch. Most of the time, though, it’s in that late afternoon timeframe when I’m craving something sweet but don’t want to give in to my sweet tooth and eat something useless… That’s usually the time I bring out the ole blender and mix up a frozen treat that’s healthy too.
I do add a banana and a tablespoon of honey to sweeten the smoothie just a bit; however, it’s not overly sweet. The banana and honey really work together to give just the right amount of sweetness but not too much.
You can use fresh or frozen mangoes and peaches, totally up to you. I’ve used both and the smoothies turn out just as good either way I make them.
This particular recipe makes enough smoothies for me and all 3 of my boys, even Dan sometimes if he happens to want one. So, you’ll get enough for 4 to 5 people out of this recipe.
Tips for how to make a delicious Peach Mango Smoothie
Gather your ingredients first… You’ll need mangoes (fresh or frozen), frozen peaches, a banana, milk, ice, and honey.
If you’re using fresh mangoes, wash, peel, pit, and chop your mangoes. If you’re using chopped frozen mangoes, there’s no prep needed.
Add your mangoes, frozen peach slices, peeled banana, milk, and honey to a large blender.
Pulse until everything is mixed well. You may need just a little extra milk to get everything blended well.
Add the ice to the mixture, and pulse again until you reach the desired consistency. If your blender has a smoothie setting, you can use that.
Add a handful of spinach for a healthy dose of green. You’ll never know it’s there, though you may need to add just a little extra milk with it.
Speaking of milk, if you don’t want regular milk… You can use whatever kind of milk you prefer, whether it’s almond milk, soy milk, whatever you choose.
Kitchen tools you may need to make a Peach Mango Smoothie
Cutting Board – If you’re using fresh mangoes, you’ll need a cutting board for prep. Mango Slicer, Peeler, and Pit Remover Tool – How handy is this for prepping fresh mangoes?! Kinda wishing I’d had this when I prepped this recipe. Blender – You’ll need a blender that has the strength to blend up ice in a smoothie. Cups or Jars with Straws – for serving.
Print the recipe to make your own Peach Mango Smoothie
Peach Mango Smoothie
Peach Mango Smoothie recipe that’s healthy, quick, and an easy to make snack. Made with 1 banana and a dash of honey, also a tasty addition to mornings.
2 fresh mangoes or 2 cups frozen mangoes
1 16- ounce package frozen peaches
1 banana (peeled)
1 cup milk
1 tablespoon honey
1 1/2 cups ice
If you’re using fresh mangoes, wash, peel, pit, and chop your mangoes. If you’re using chopped frozen mangoes, there’s no prep needed.
Add your mangoes, frozen peach slices, peeled banana, milk, and honey to a large blender.
Pulse until everything is mixed well. You may need just a little extra milk to get everything blended well.
Add the ice to the mixture, and pulse again until you reach the desired consistency. If your blender has a smoothie setting, you can use that.
Pour into cups or small jars and serve with straws.
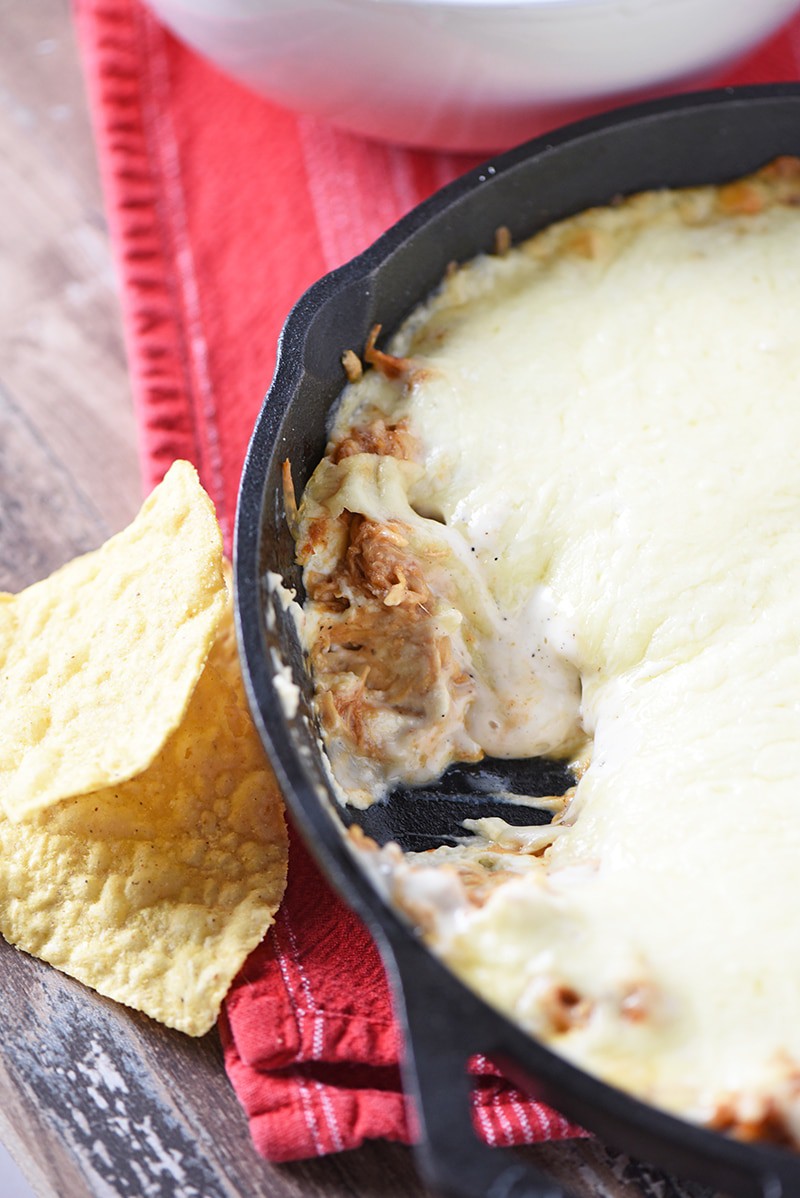
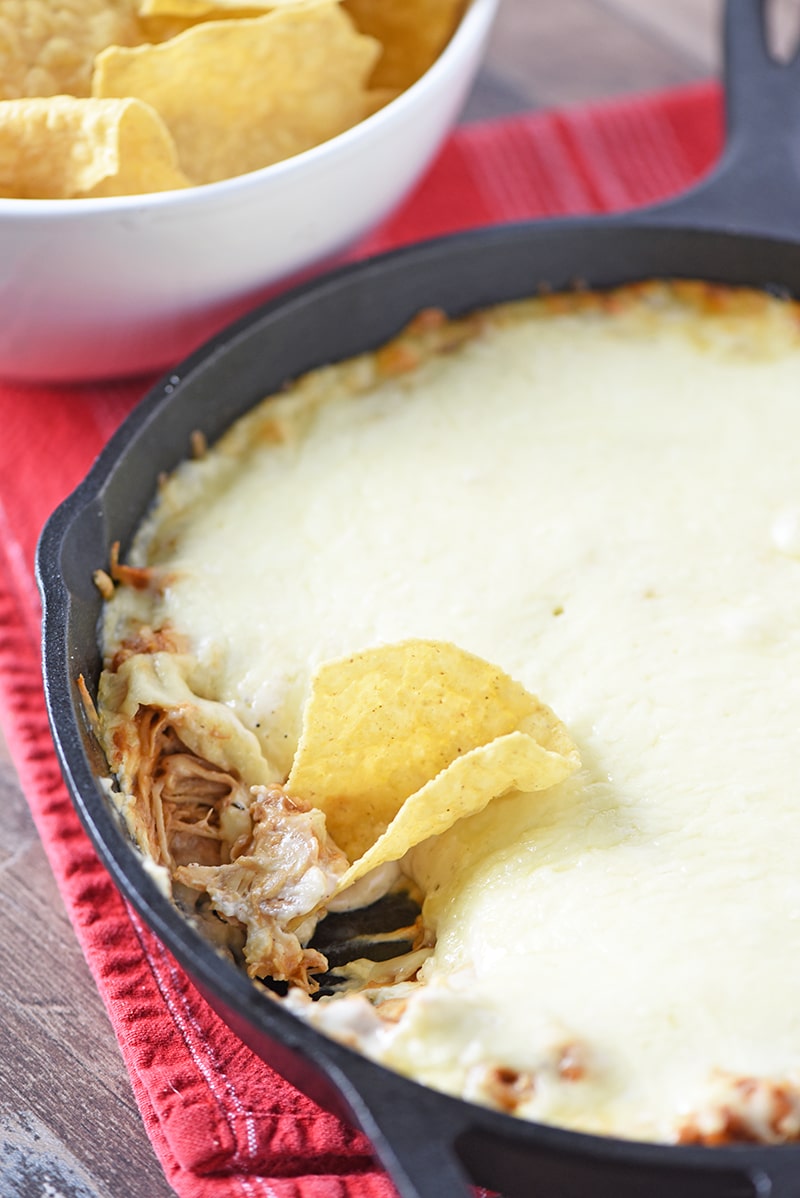
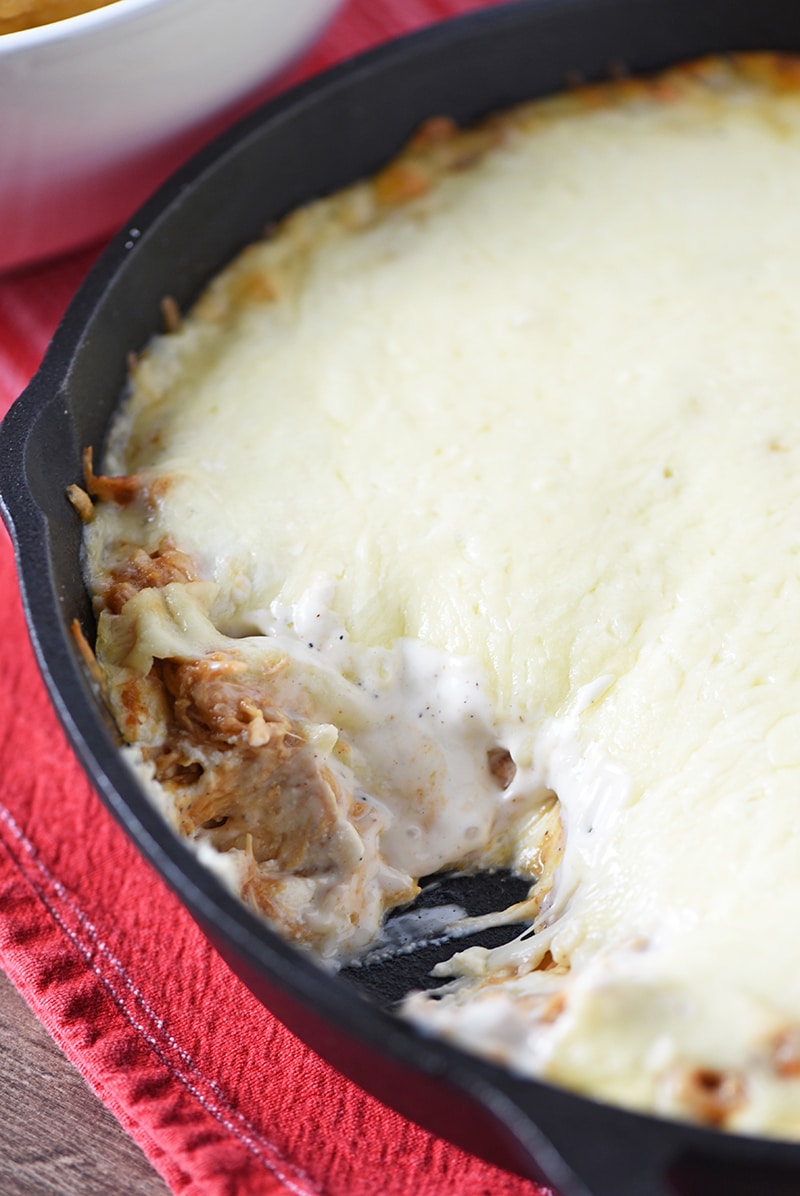
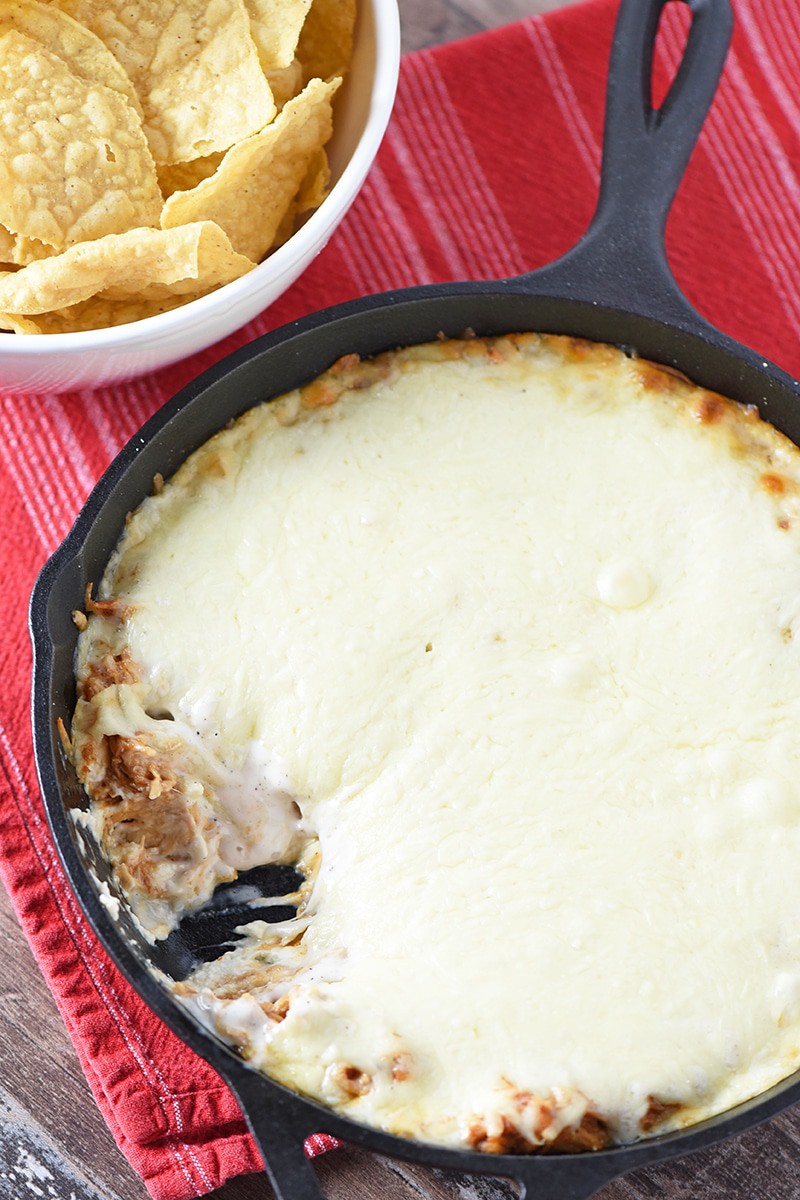
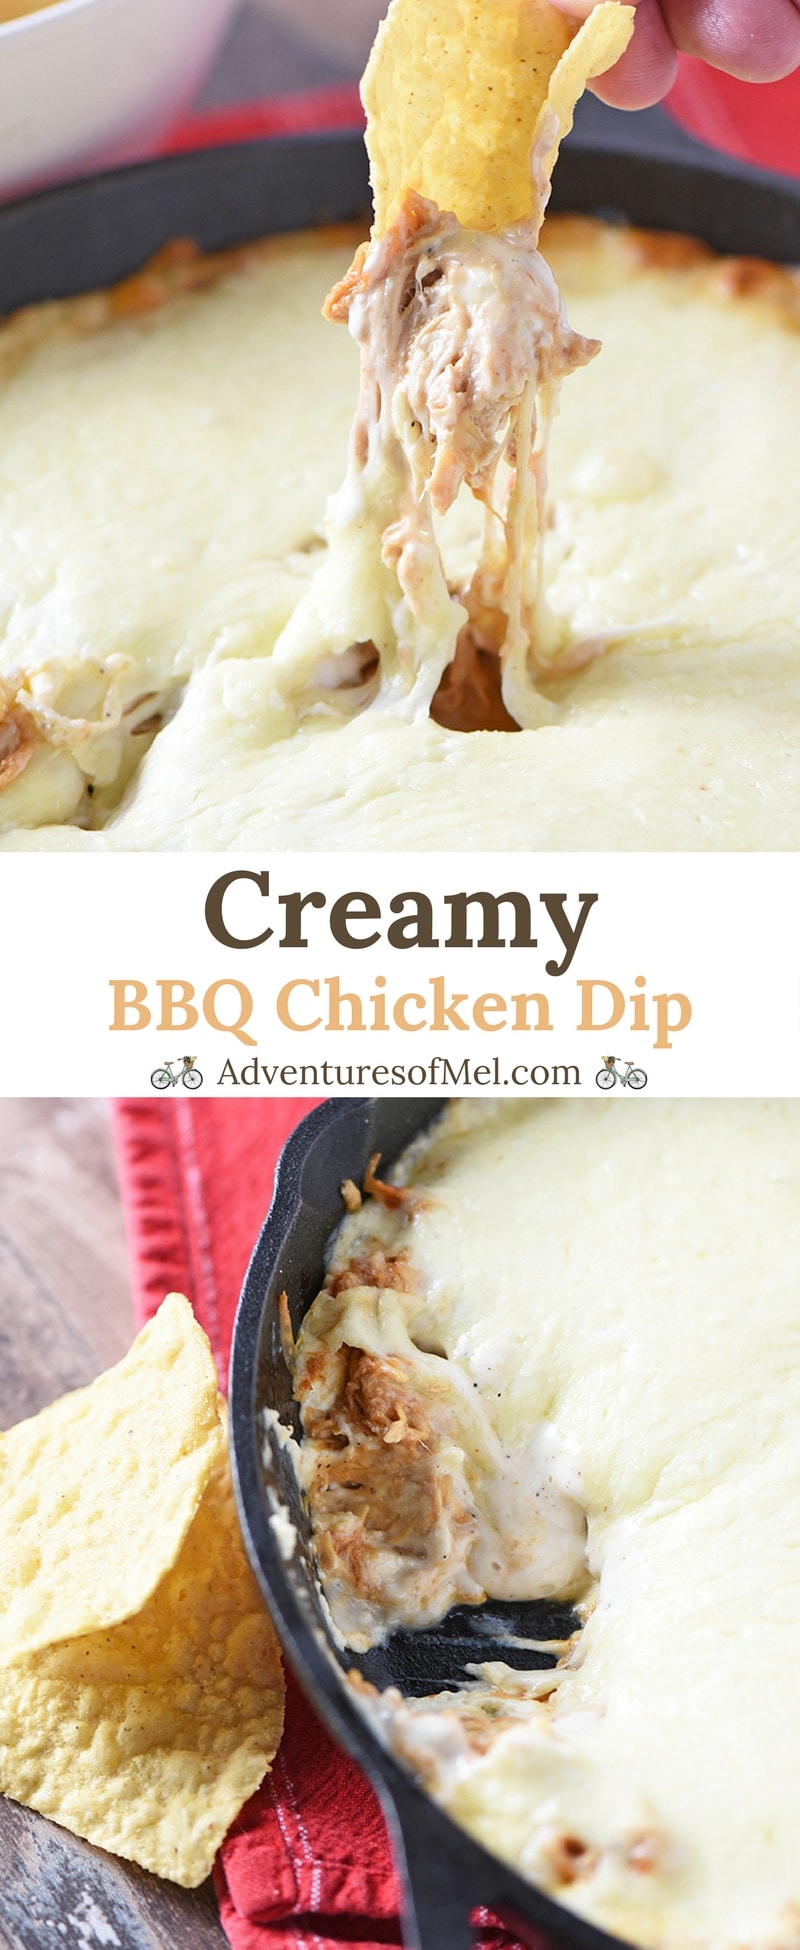
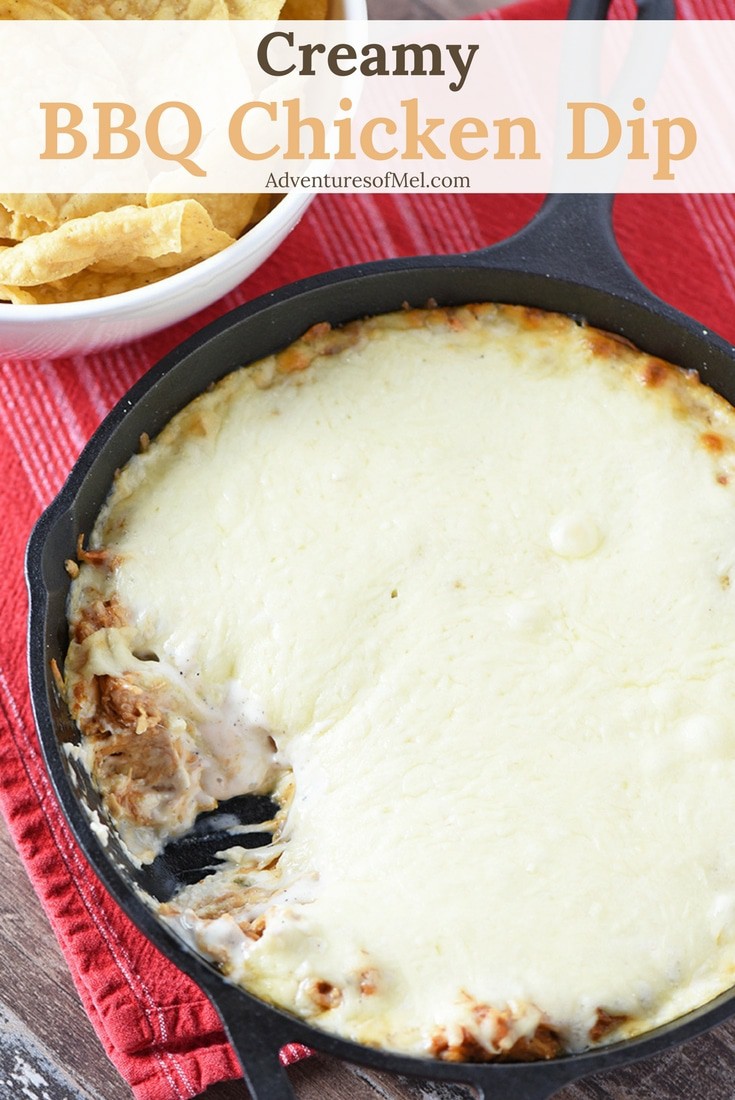
BBQ Chicken Dip, made with cream cheese, is an easy appetizer recipe. Pair it with tortilla chips for a delicious snack your friends and family will love!
BBQ Chicken Dip is one of my family’s favorite snacks for holidays, movie night, Game Day, and more. It makes a great party appetizer too and disappears rather quickly. It pairs well alongside chili cheese fries.
There’s just something about cream cheese, BBQ sauce, and Ranch dressing mixed together. The ingredients come together to form a layered dip that’s absolutely delicious and pairs well with crackers, tortilla chips, even raw veggies.
While you can make this in a pie plate, cutting the ingredients by half (and we’ve done this plenty of times), you can also make it, as is, in a 13×9 inch pan… I prefer to layer the ingredients, as listed, in about a 10-inch iron skillet.
It’s a little thicker this way, which is how I prefer this dip to be, with a good, solid layer of cream cheese on the bottom.
If your chicken is already cooked, you can mix this dip up in about 10 minutes. Pop it in the oven for about 20 minutes, and you’re all set.
First of all, gather your ingredients… You’ll need about a pound of cooked chicken. We sometimes use leftovers from an Instant Pot whole chicken. Then you’ll need cream cheese, BBQ sauce, Ranch dressing, and Mozzarella cheese.
Mixing Bowl – I love my mixing bowl with a handle for mixing up the chicken with the BBQ sauce.
Spatula – I use a spatula with just about every recipe I make.
Print the recipe for Creamy BBQ Chicken Dip
Creamy BBQ Chicken Dip
BBQ Chicken Dip, made with cream cheese, is an easy appetizer recipe. Pair it with tortilla chips for a delicious snack your friends and family will love!
2 8- ounce packages cream cheese (softened)
1 pound chicken (cooked & shredded)
1 cup BBQ sauce
2/3 cup Ranch dressing
8 ounces grated mozzarella
Pre-heat the oven to 350°F.
Shred the cooked chicken with forks.
Spread the cream cheese on the bottom of an iron skillet (or deep dish pie plate, etc.).
In a separate mixing bowl, mix the BBQ sauce with the shredded chicken.
Spread the BBQ chicken mixture on top of the cream cheese.
Pour the Ranch dressing on top of the BBQ chicken mixture.
Sprinkle the entire skillet with grated Mozzarella cheese.
Bake for about 20 minutes at 350°F, or until the cheese melts and is bubbly.
Serve warm with tortilla chips, crackers, raw vegetables, or whatever snack food you prefer.
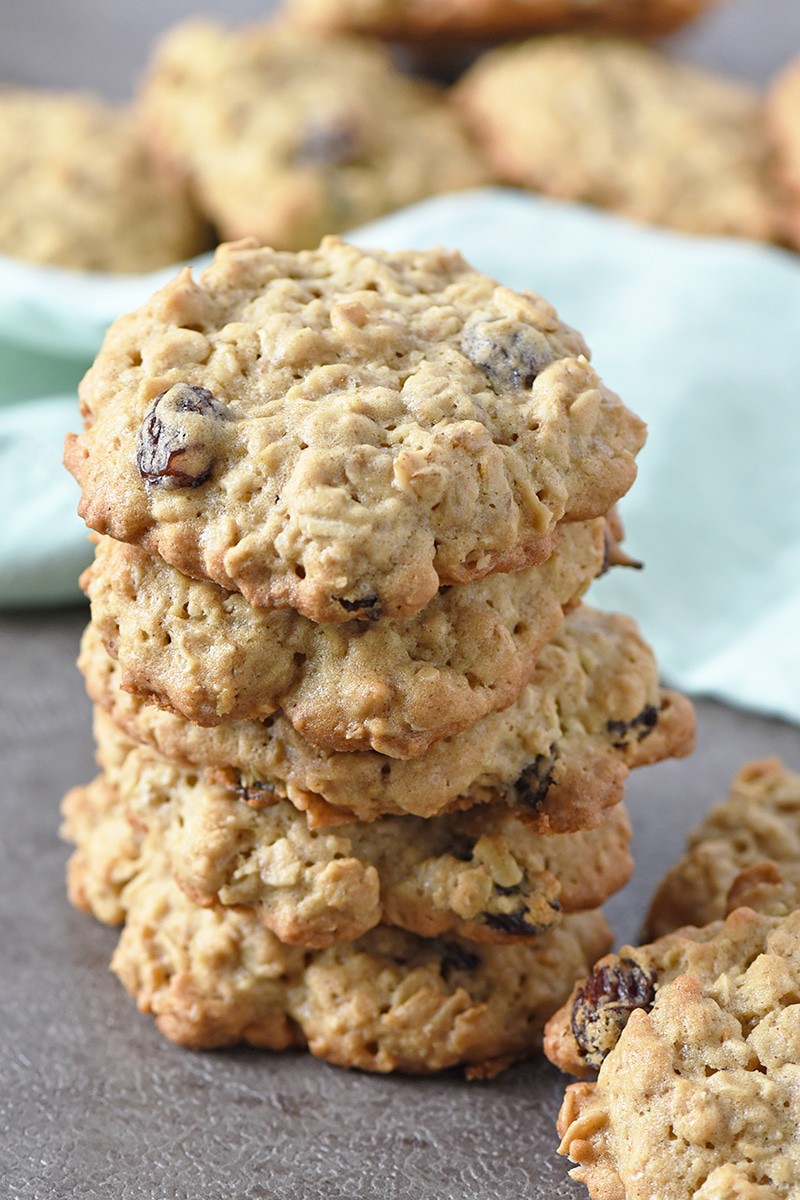
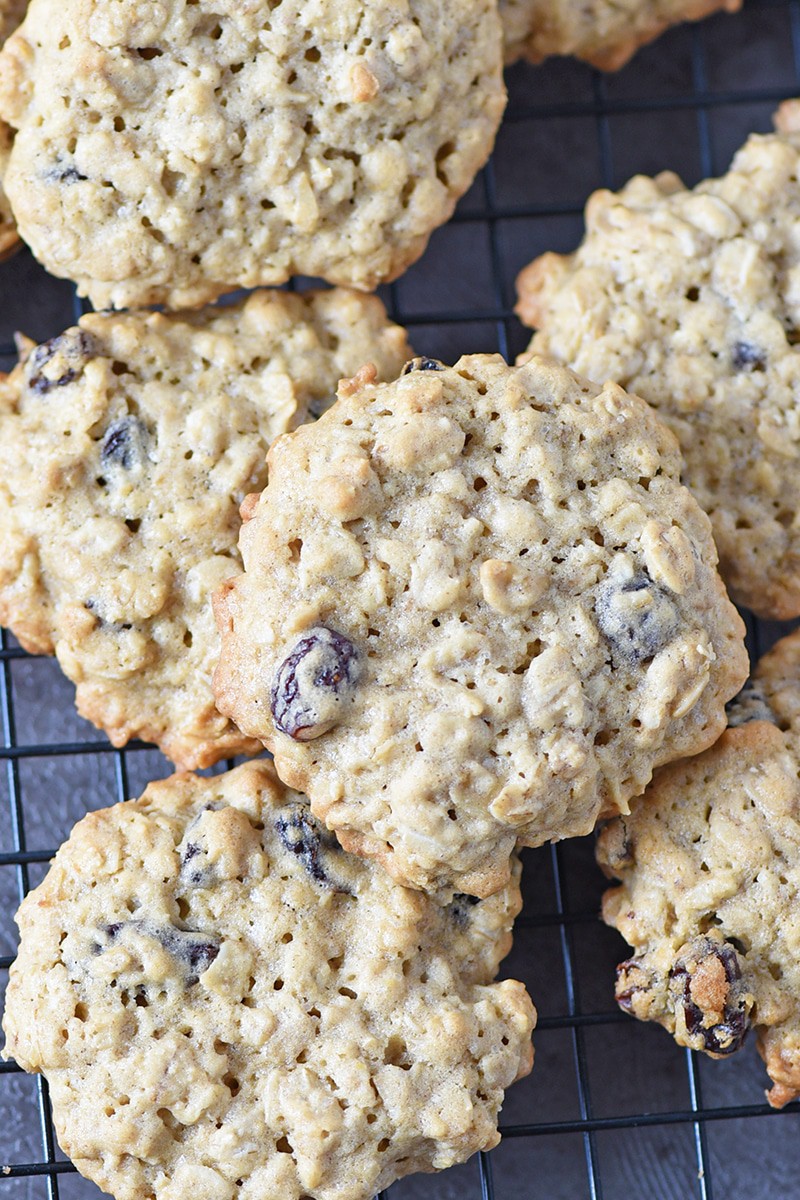
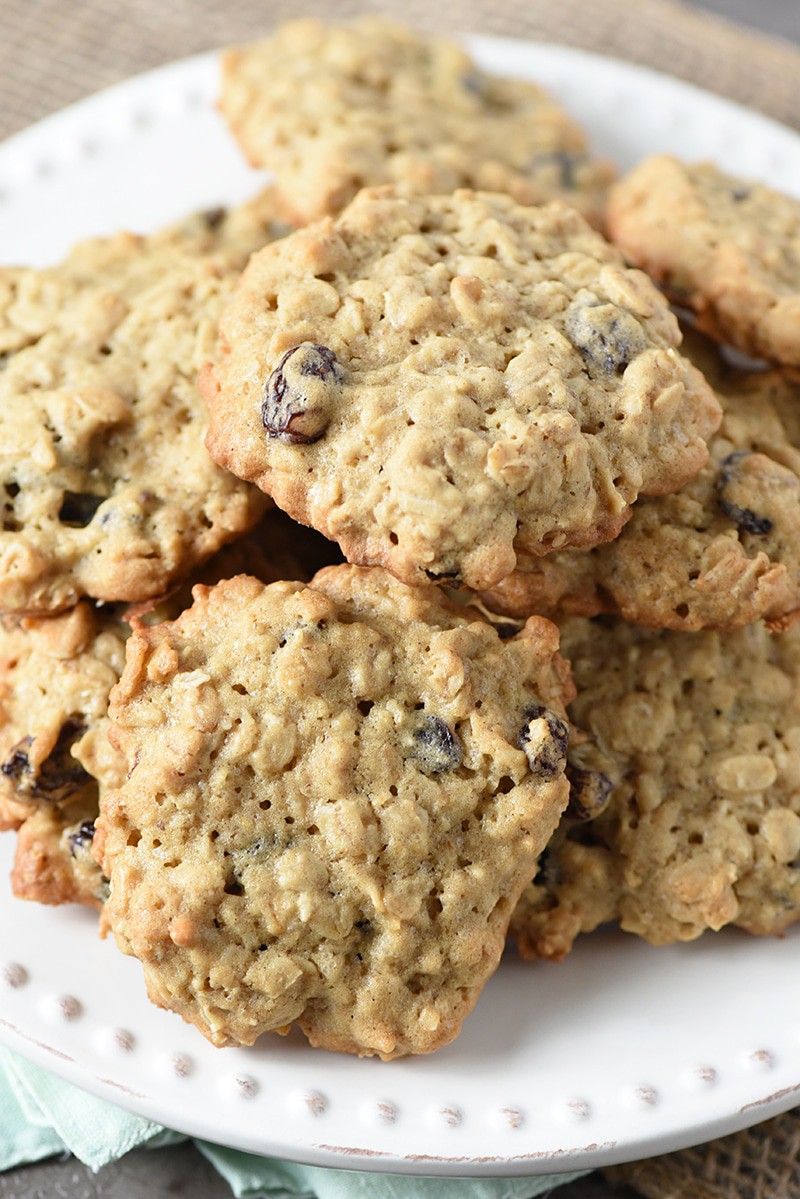
I really do love the oatmeal, cinnamon, and raisins in this cookie; the flavors meld together to form a delicious cookie.
This recipe is actually adapted from an oatmeal cookie my grandma used to make. While I’ve made a few changes, like using butter instead of shortening, adding less sugar, and a few other ingredient changes… They’re still very reminiscent of her delicious Oatmeal Raisin Cookies.
This recipe can be mixed up with a mixer, but when you get to the point where you’re adding in the oatmeal and the raisins, it may be easier to mix by hand. The dough gets quite stiff and can sometimes climb up the mixing paddle (at least on my mixer).
Whether you’re making these for a potluck, get together, or just to share with your family, they’re fun to make and equally fun to eat, especially with a tall glass of ice cold milk. Let’s do some baking, shall we?
Tips for how to make Oatmeal Raisin Cookies
Before you get started, gather your ingredients… You’ll need brown sugar, pure cane sugar, unsalted butter, eggs, vanilla extract, milk, vinegar, all-purpose flour, salt, baking soda, ground cinnamon, old fashioned oats, and raisins.
Begin by making the sour milk… Add the vinegar to the milk to sour it, and set it aside to rest while you start mixing the dough.
Sifter – for sifting the dry ingredients together.
Cookie Scoop – I wasn’t sold on my cookie scoop at first; Dan wanted me to use it, but I was used to just using a spoon and my fingers. But he was right… It saves dough, makes a smaller cookie, and lends to a rounder cookie.
Cookie Sheet – Mine comes in handy for so many things, including baking cookies.
Cookie Spatula – for removing the hot cookies from the cookie sheet.
Wire Rack – This allows the cookies to rest and cool before you put them in the cookie jar.
Print the recipe for Oatmeal Raisin Cookies
Oatmeal Raisin Cookies
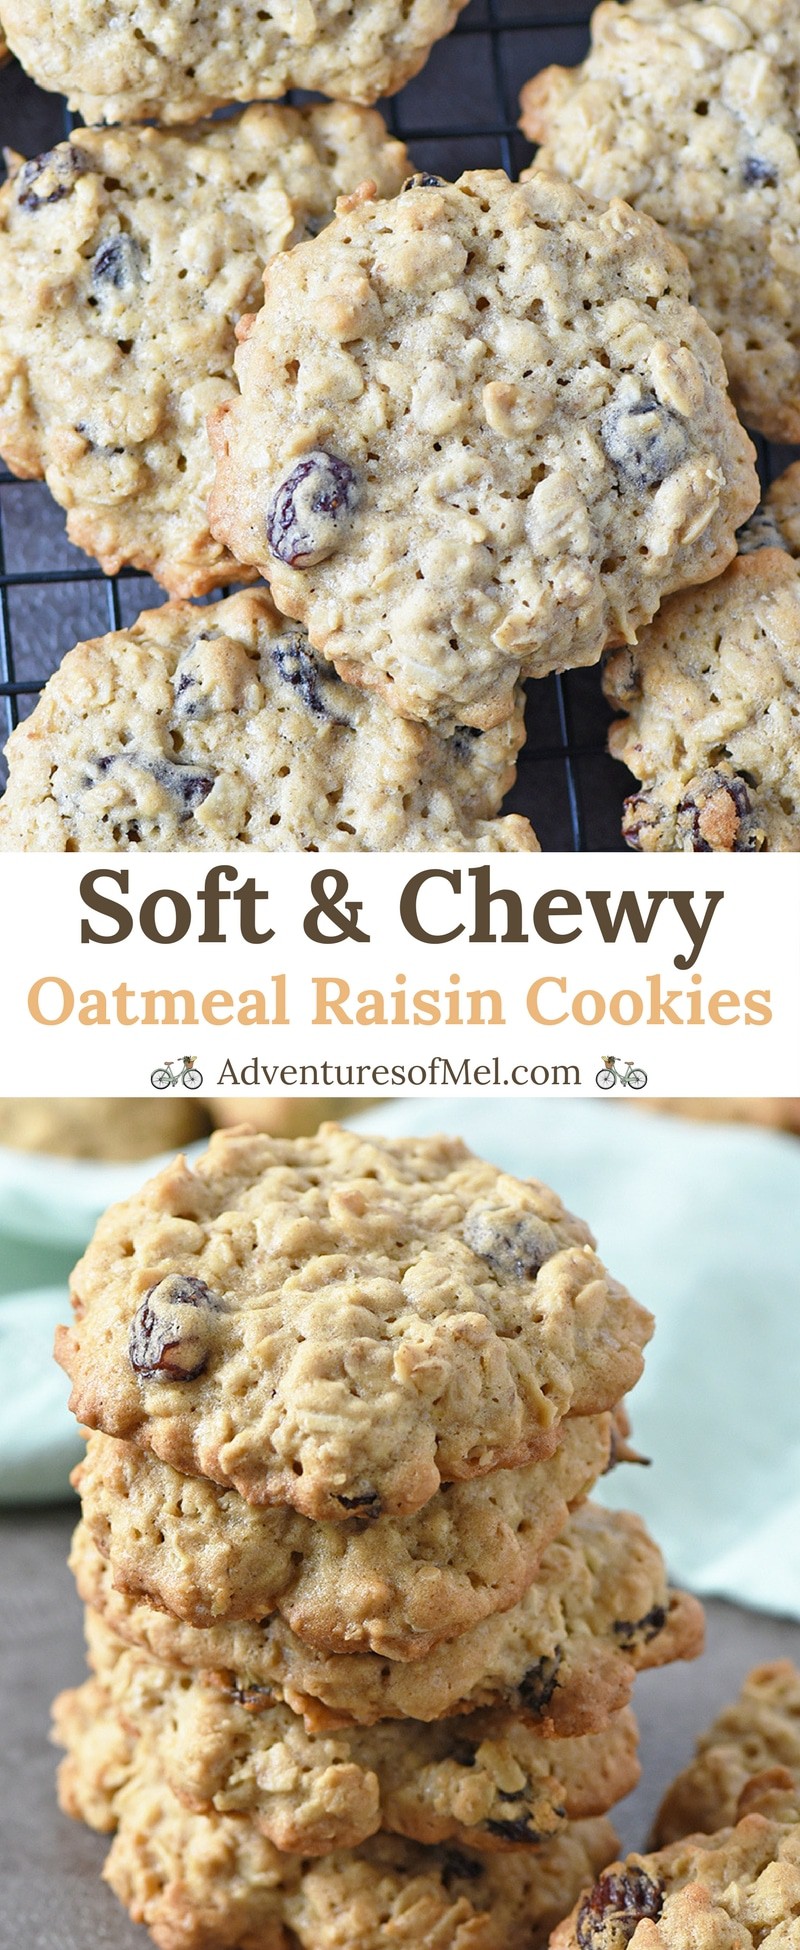
Oatmeal Raisin Cookies, made with brown sugar, cinnamon, and oatmeal, have a crispy outer edge and a soft, chewy middle. Delicious cookie recipe!
1/2 tablespoon vinegar
1/4 cup milk
3/4 cup brown sugar
3/4 cup pure cane sugar
2 sticks unsalted butter
2 eggs
1 teaspoon vanilla extract
1/2 teaspoon baking soda
2 cups all-purpose flour
1 teaspoon salt
1 teaspoon ground cinnamon
4 cups old fashioned oats
1 cup raisins
Begin by making the sour milk… Add the vinegar to the milk to sour it, and set it aside to rest while you start mixing the dough.
Pre-heat the oven to 350°F.
Cream (mix) together the brown sugar, pure cane sugar, and softened butter.
Add the eggs and vanilla extract to your mixture, and mix well.
Stir the baking soda into your sour milk and set aside.
Sift together the dry ingredients, including the all-purpose flour, salt, and ground cinnamon.
Mix the dry ingredients into the creamed mixture, alternating with the sour milk.
Add the oatmeal and raisins, mixing them in well (this is where you may need to mix by hand).
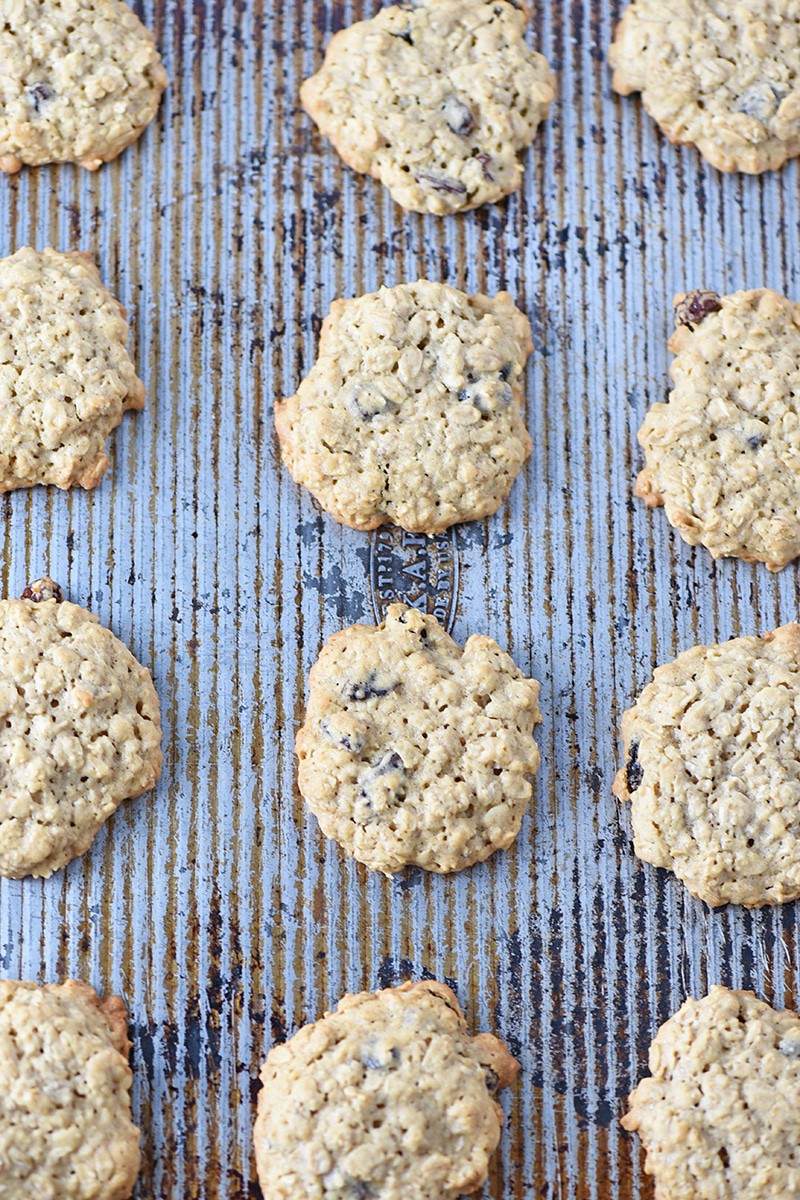
Using a cookie scoop, drop cookies onto your cookie sheet, pressing/patting the cookies somewhat flat with your fingers.
Bake for 12 to 15 minutes, or until the cookies turn a nice golden hue.
When you remove each batch from the oven, remove the cookies from the cookie sheet and allow them to cool on a wire rack.
Bacon Cheddar BBQ Ranch Dip is a tasty appetizer your guests will love. Pair with your favorite snacks, like chips, crackers, and raw vegetables!
Bacon Cheddar BBQ Ranch Dip is a yummy dip my family loves to make and eat with raw carrots, celery, and the occasional snack cracker. In fact, I just bought a new box of nutty crackers to snack on.
My guys and I have this tradition of making our favorite easy appetizer recipes and snacks at certain times of the year, like New Year’s Eve and even for that big game that everyone watches around the beginning of February (the game that shall not be named). Sometimes we even make chili cheese fries!
While I’ll admit that football is not my family’s thing, it certainly is a big deal for a LOT of our friends and extended family. After all, we do happen to live in Razorback country, where you can’t help but feel the excitement when football season makes its grand debut.
While we prefer the commercials to the actual game (admit it, there are some pretty great commercials out there), we do love us some Game Day food.
Any kind of dip for crackers, veggies, or tortilla chips rates high on our list of favorite Game Day snacks and appetizers. When it happens to involve bacon, cheddar, BBQ, and Ranch… Well, we’ve created the perfect snack recipe.
And since it makes a delicious party appetizer, I’m definitely adding this recipe to my list of favorite Christmas recipes.
How to make bacon cheddar BBQ Ranch dip
First things first, gather your ingredients… You’ll need cream cheese, your favorite BBQ sauce, Ranch dressing, cheddar cheese, Colby Jack cheese, and crumbled bacon you’ve already cooked.
Mix together the cream cheese, BBQ sauce, and Ranch dressing.
Shred the cheeses and add them to the mixture, mixing together well.
Add the crumbled bacon, setting a small handful aside to embellish the dip.
Add the dip to a serving bowl, embellishing the top with the rest of the crumbled bacon.
Keep chilled ’til serving time.
Serve with whatever snack your heart desires. It’s delicious with snack crackers, vegetables, and chips (including tortilla chips).
If you try this recipe, why not leave a star rating in the recipe card right below and/or a review in the comment section further down the page? I always appreciate your feedback. You can also follow me on Pinterest, Facebook, Instagram, and YouTube. And subscribe to my email list too!
Bacon Cheddar BBQ Ranch Dip
Bacon Cheddar BBQ Ranch Dip is a tasty appetizer your guests will love. Pair with your favorite snacks, like chips, crackers, and raw vegetables!
16 ounces cream cheese
1/2 cup bbq sauce
1/4 cup Ranch dressing
1/2 cup extra sharp cheddar cheese
1/2 cup Colby Jack cheese
6 slices bacon (cooked and crumbled)
Mix together the cream cheese, BBQ sauce, and Ranch dressing.
Shred the cheeses and add them to the mixture, mixing together well.
Add the crumbled bacon, leaving a small handful to embellish the dip.
Add the dip to a serving bowl, embellishing the top with the rest of the crumbled bacon.
Keep chilled 'til serving time.
Serve with whatever snack your heart desires. It's delicious with snack crackers, vegetables, and chips (including tortilla chips).
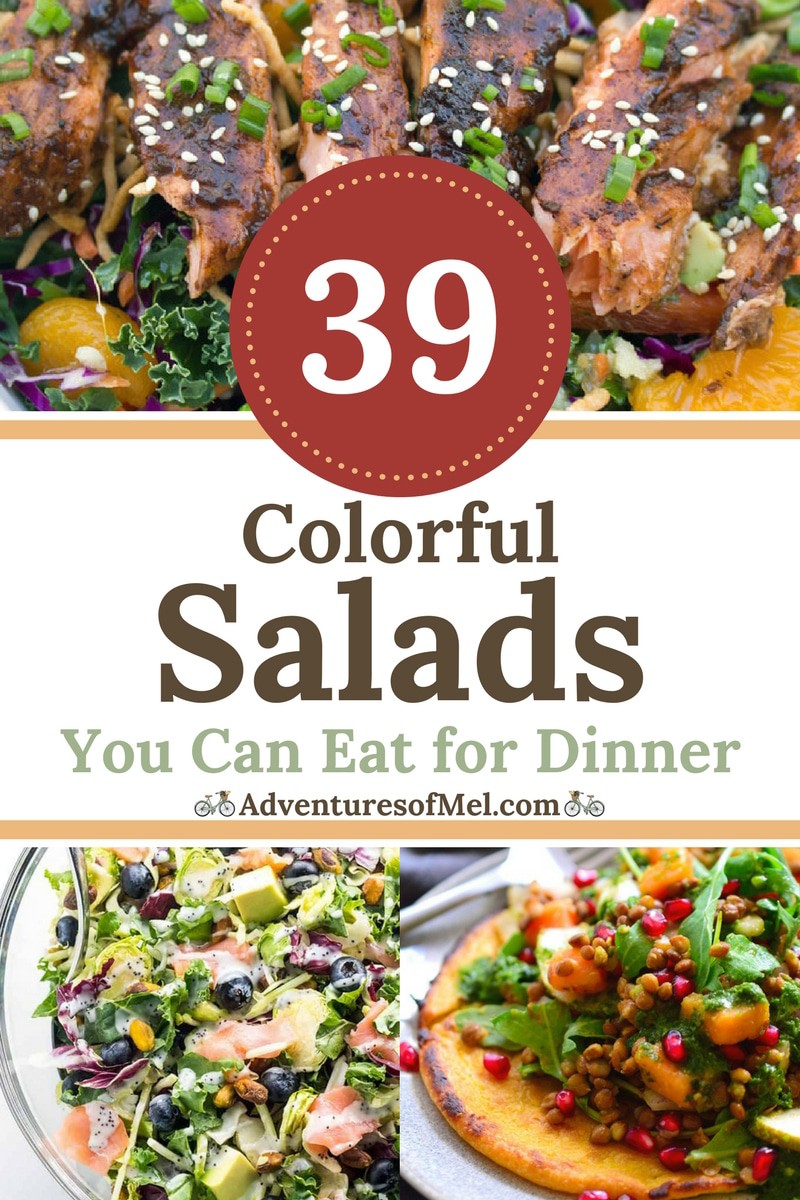
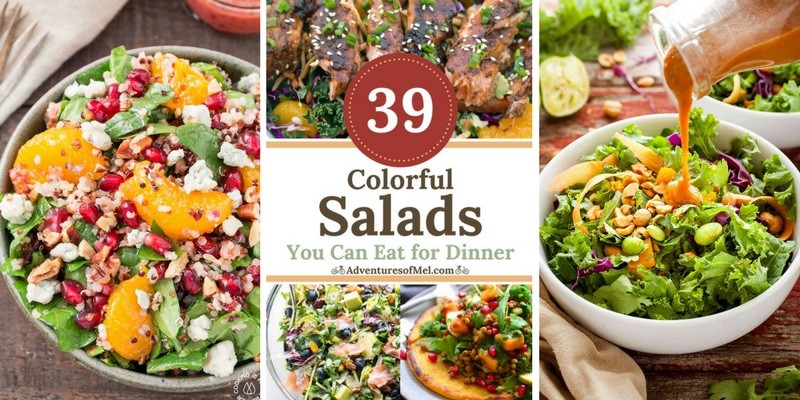
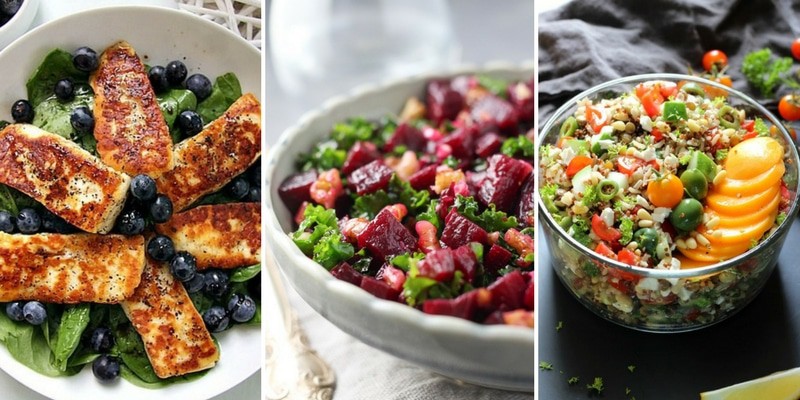
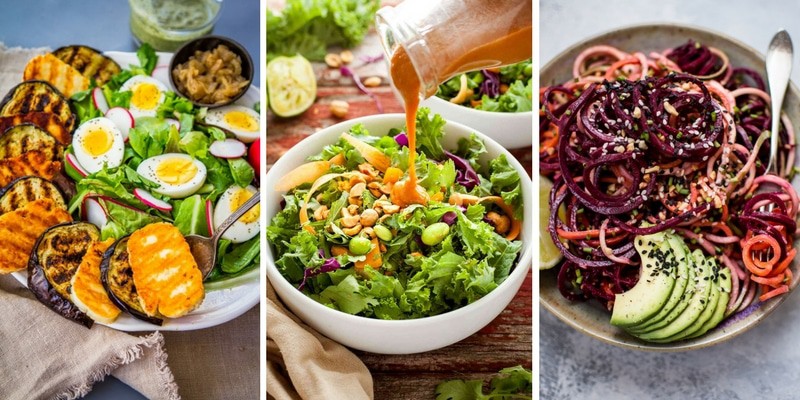
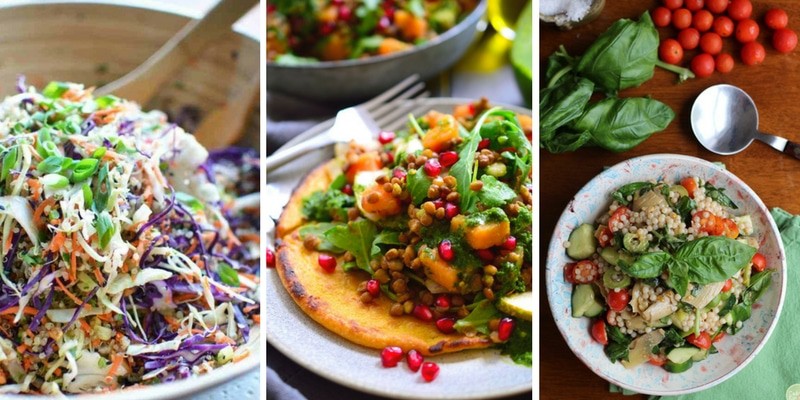
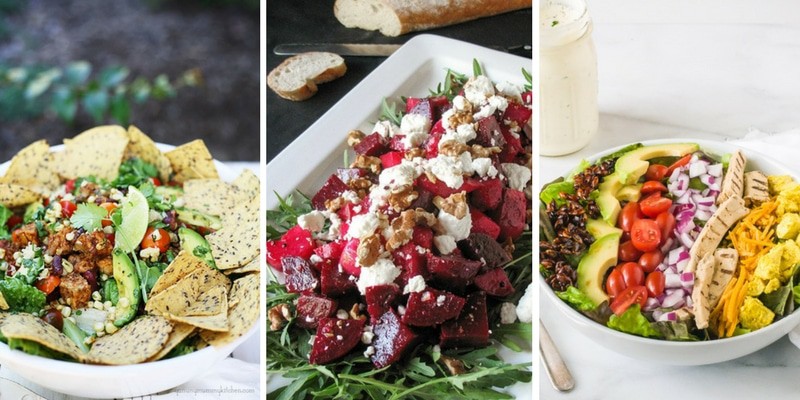
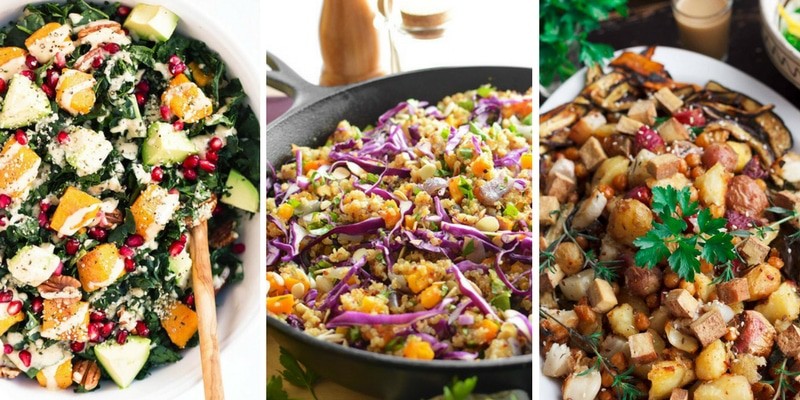
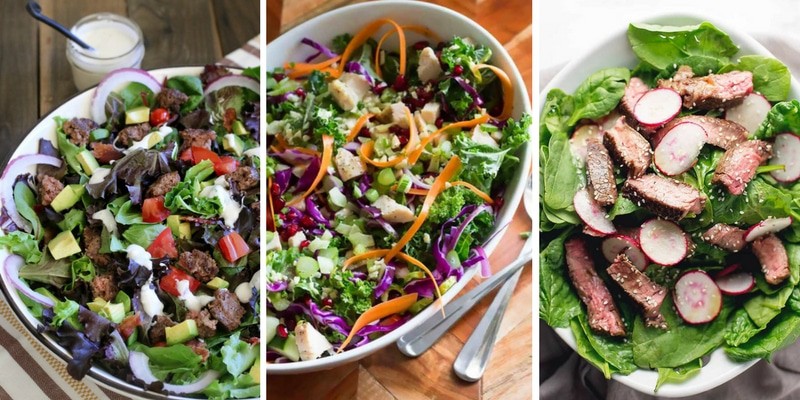
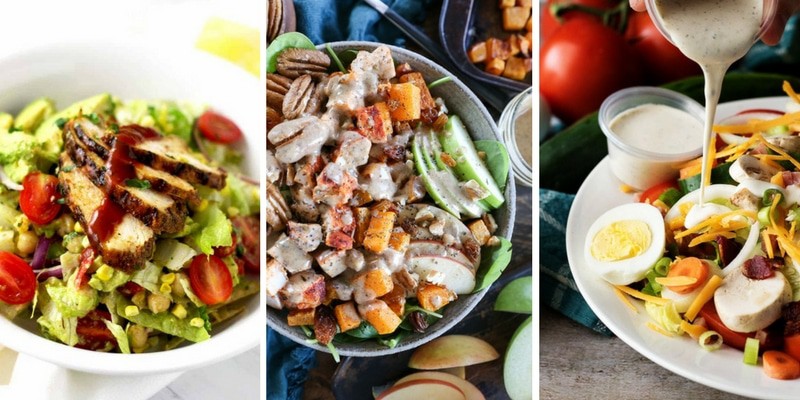
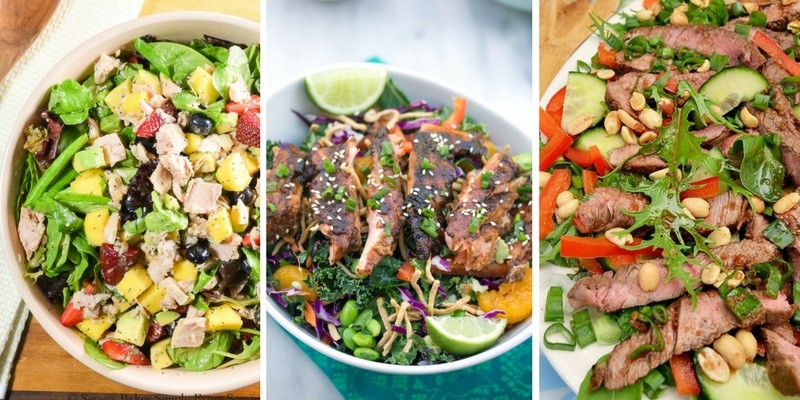
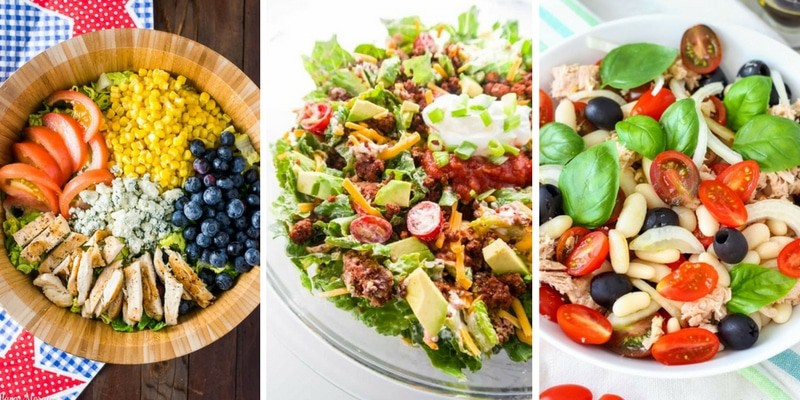
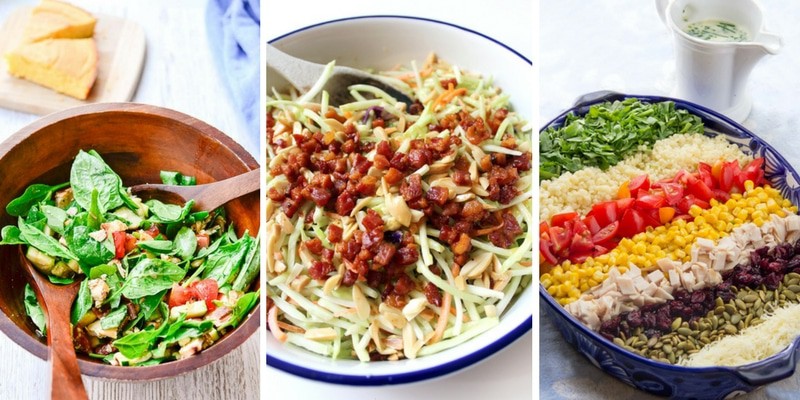
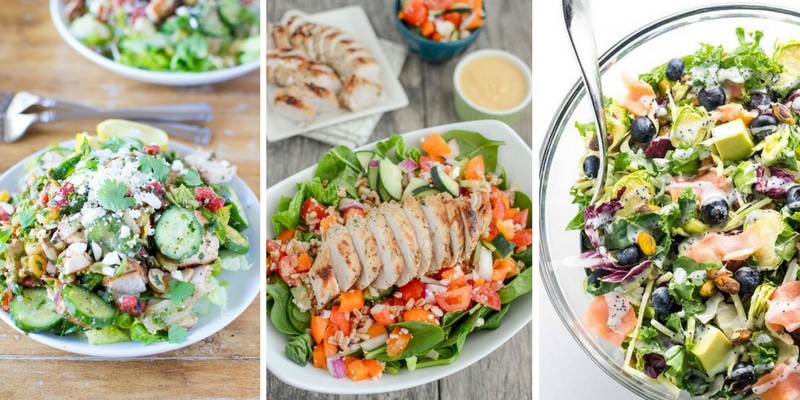
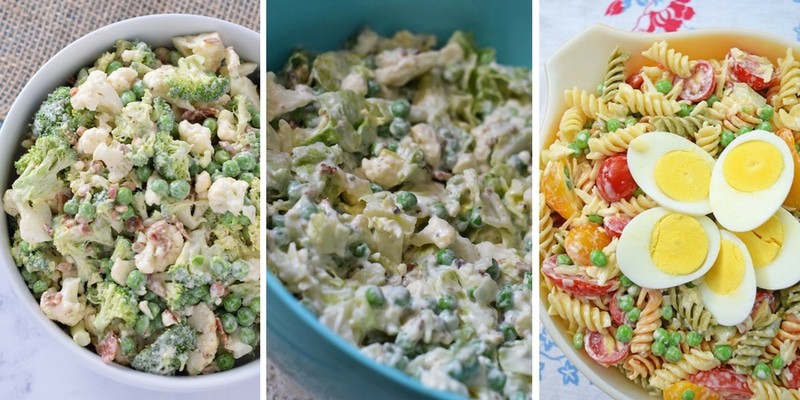
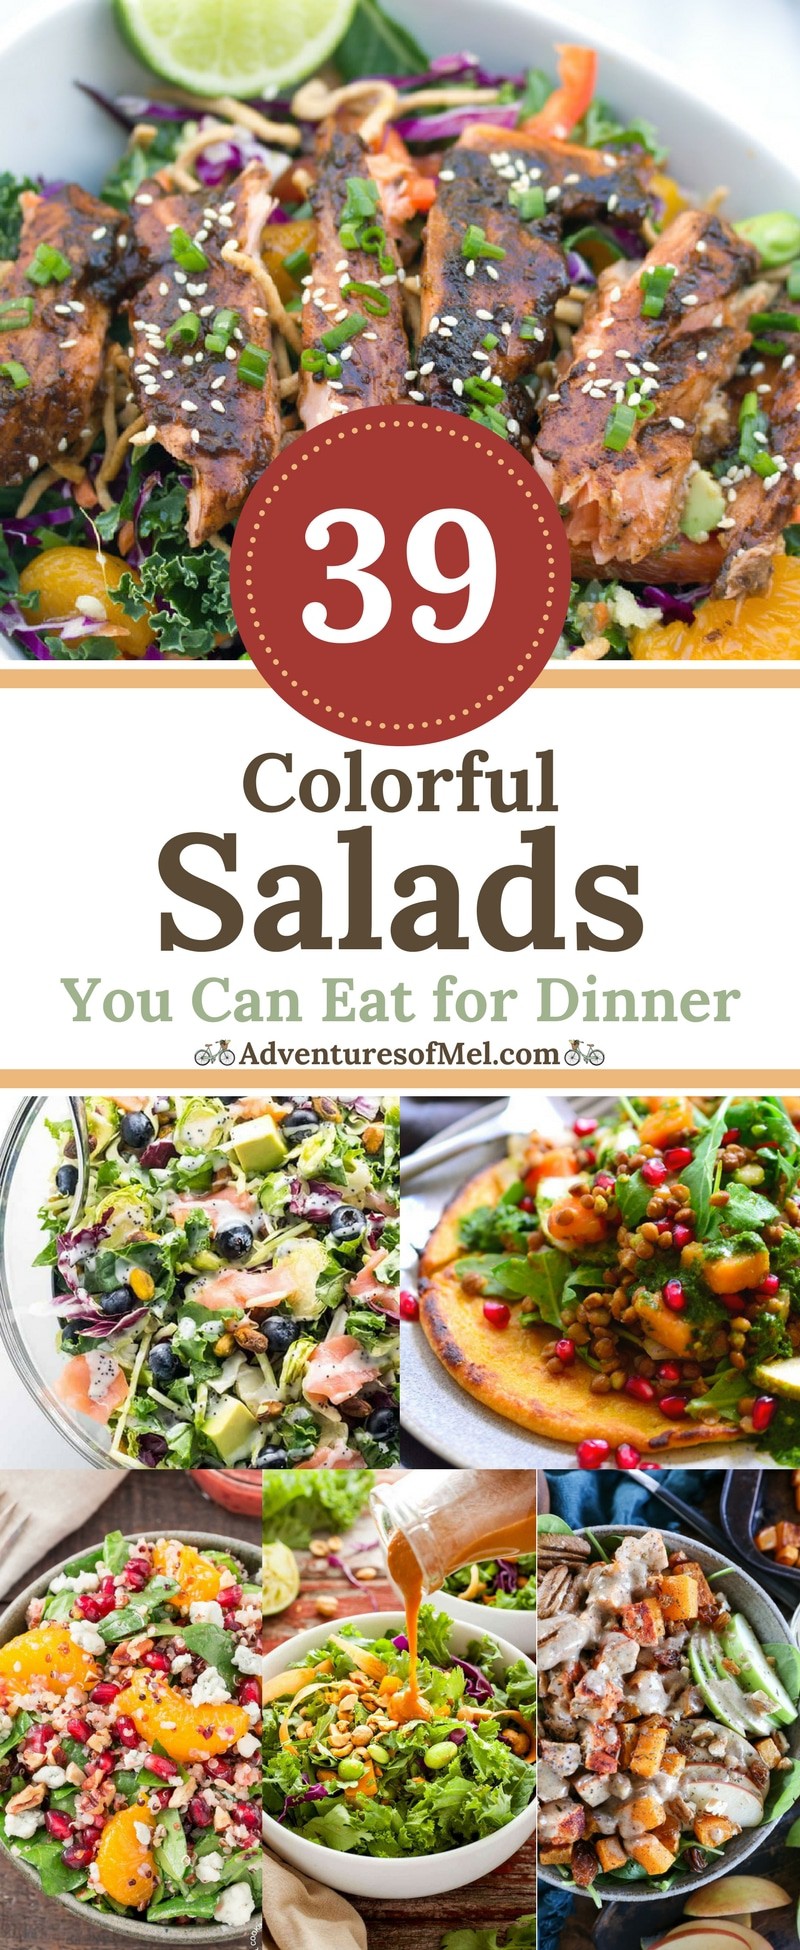
Colorful Salads You Can Eat for Dinner with loads of vegetables, some with meat, and a few meatless ideas! Loads of ideas for delicious weeknight meals!
Colorful Salads can make delicious weeknight meals, especially if they’re packed with vegetables and offer a little protein too. You can pair a good salad deliciously well with a bowl of Instant Pot potato soup, salmon patties, a low carb meatloaf, or fish fillets.
I find myself sometimes just wanting a lighter meal, especially in the evenings after a really long day. And a good salad, like chicken egg salad, is just the thing when a heavier dinner feels like too much.
Even our kids love salad, and I feel like we’re pretty lucky that they do. Personally, I love a good Cobb Salad with chicken and a little bit of BBQ sauce with Ranch dressing drizzled on for extra flavor.
Below you’ll find 39 colorful salad ideas you can implement into your weekly menu plan. Whether you’re packing a lunch or cooking up dinner, maybe think about adding a hearty salad to your meal plan.
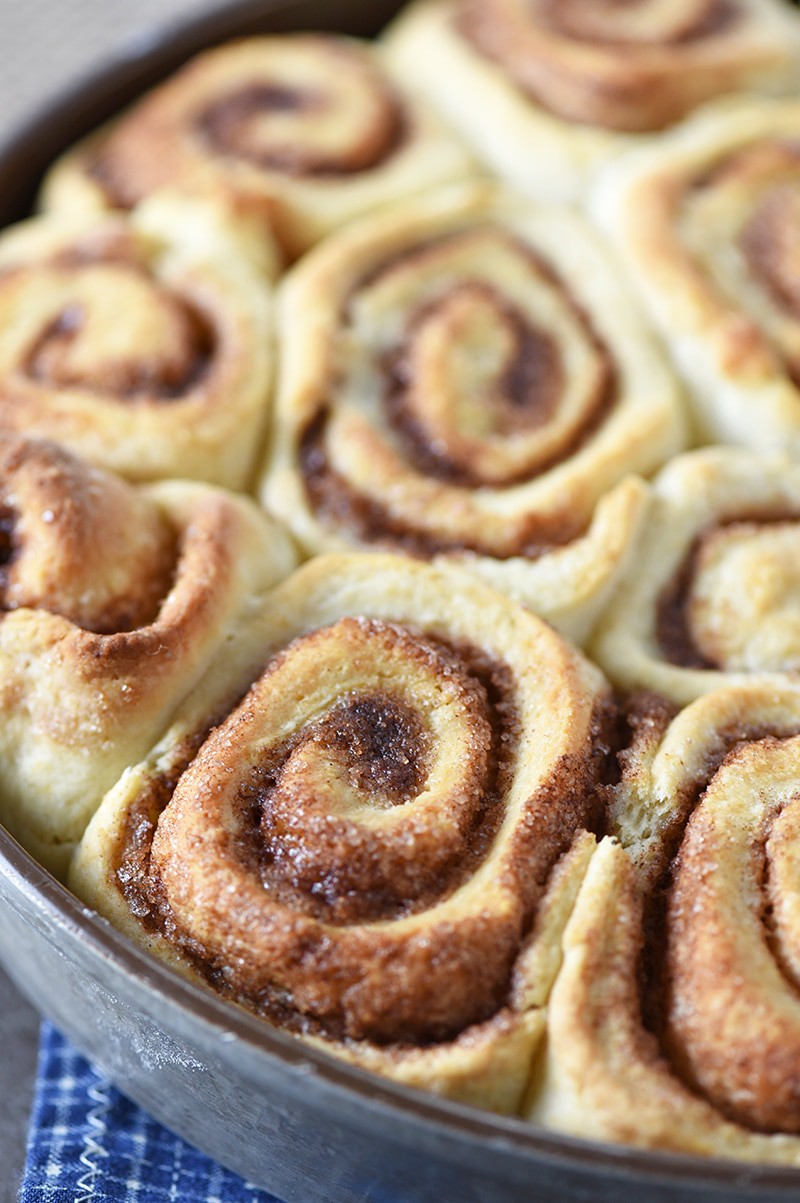
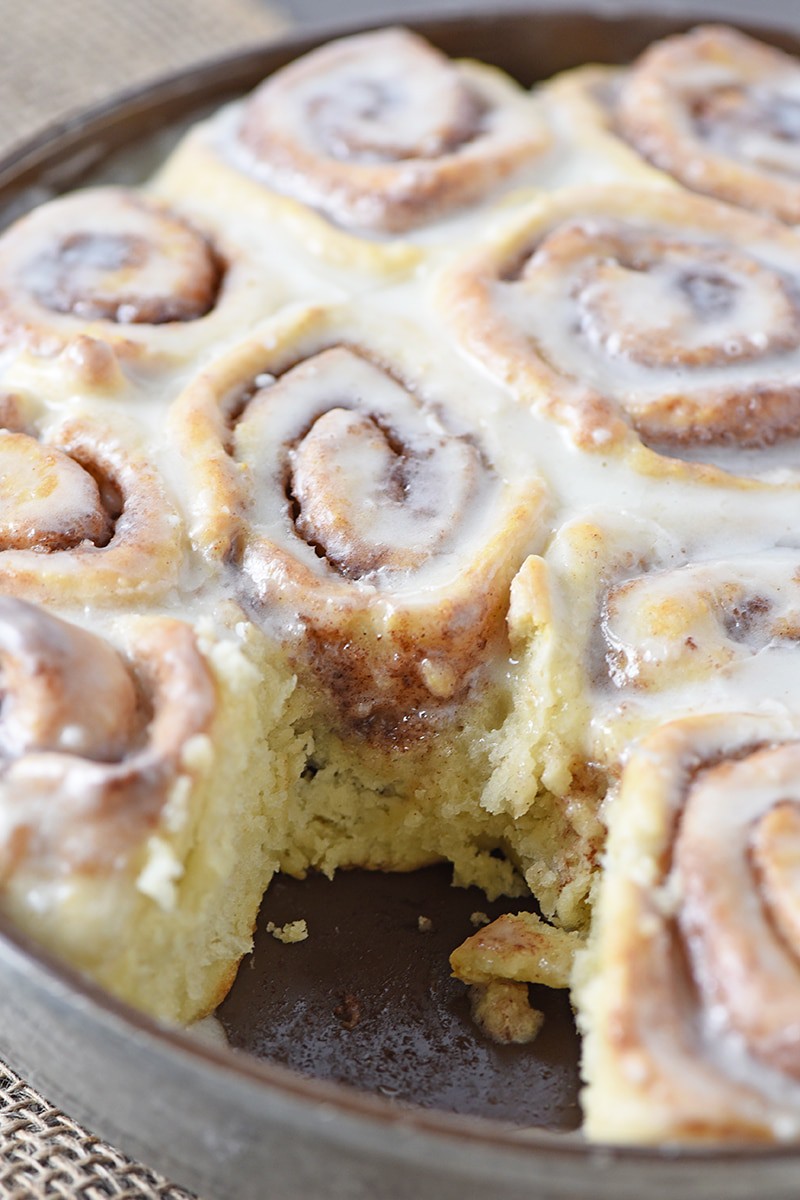
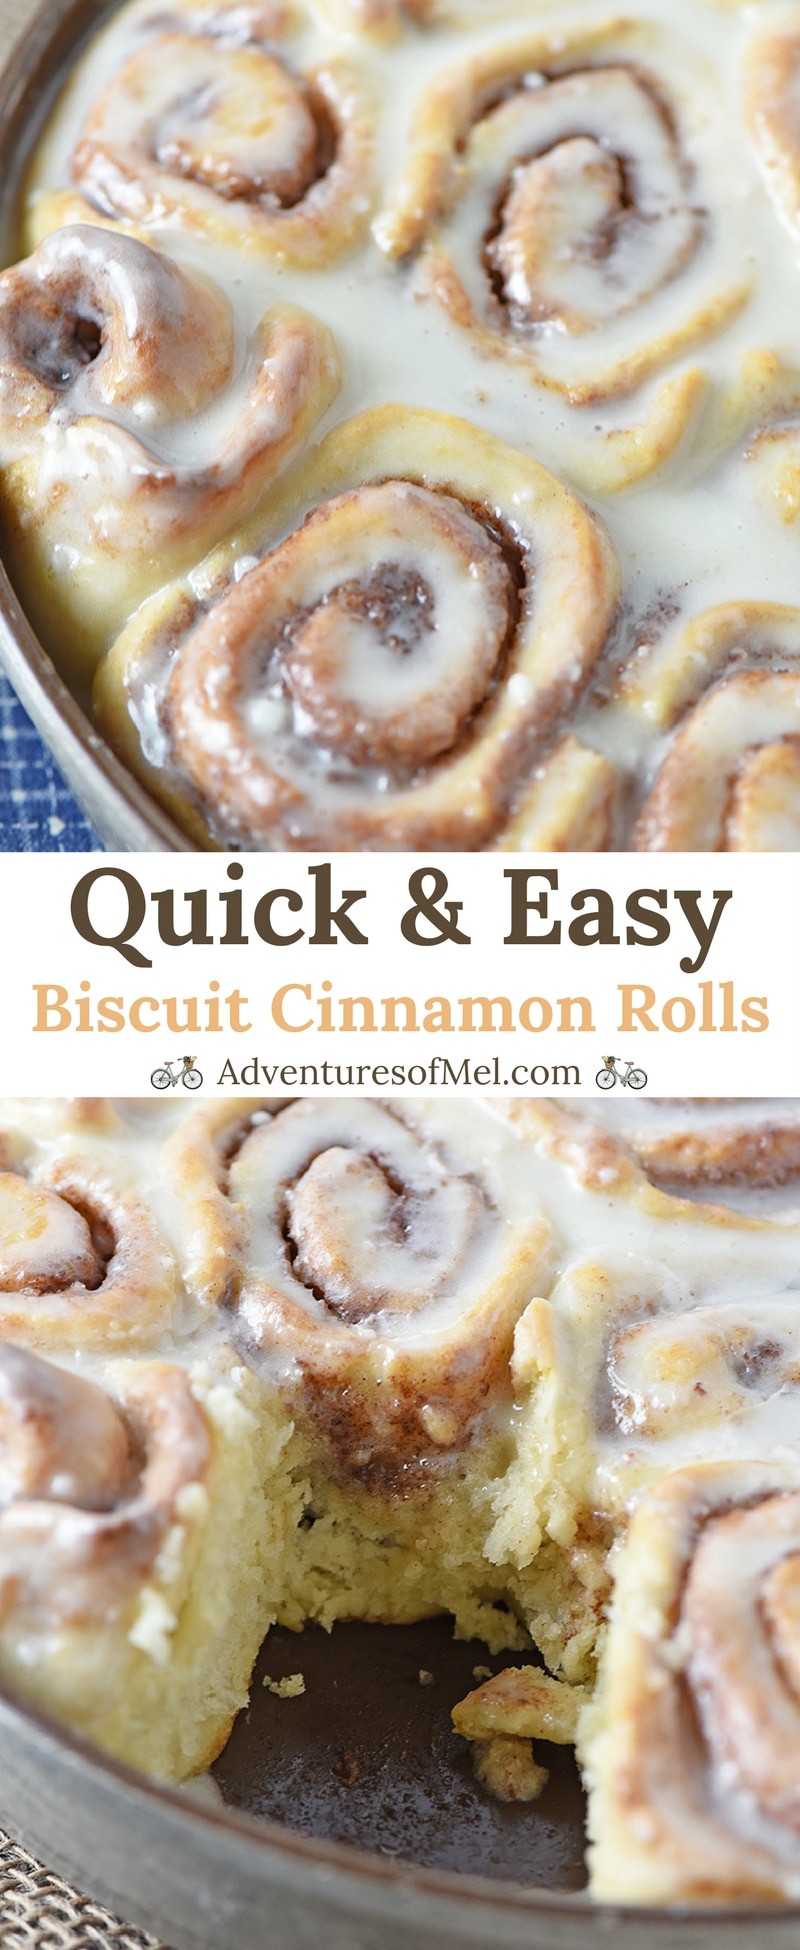
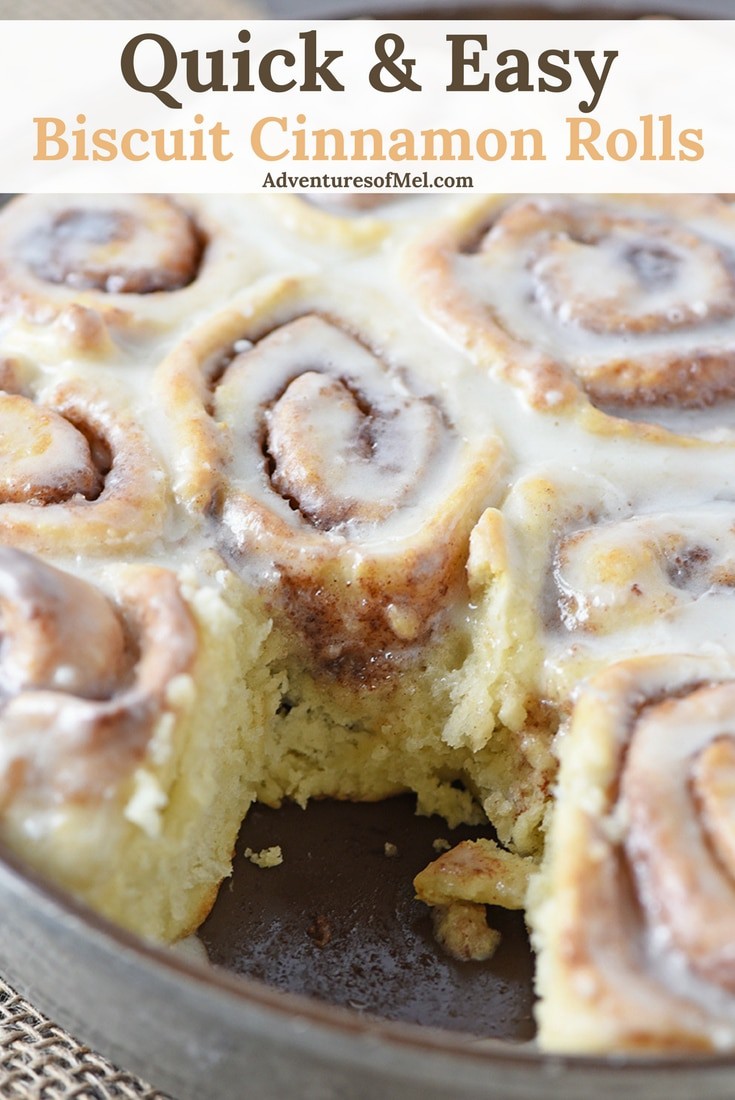
Biscuit Cinnamon Rolls are quick, easy to make, and no rise too! Deliciously sweet and irresistible, ooey gooey, homemade breakfast treats.
Biscuit Cinnamon Rolls are a quick and easy version of cinnamon rolls, especially given the fact that they require no yeast and no rise time. In some ways, I like these yummy treats even more than traditional cinnamon rolls made with yeast.
While you still have to roll them out, it doesn’t seem like quite as much work. And they’re still fluffy. They’re so fluffy and so ooey gooey. They’re perfect for when you’re craving traditional cinnamon rolls but don’t feel like going to all the work and dealing with all the wait time.
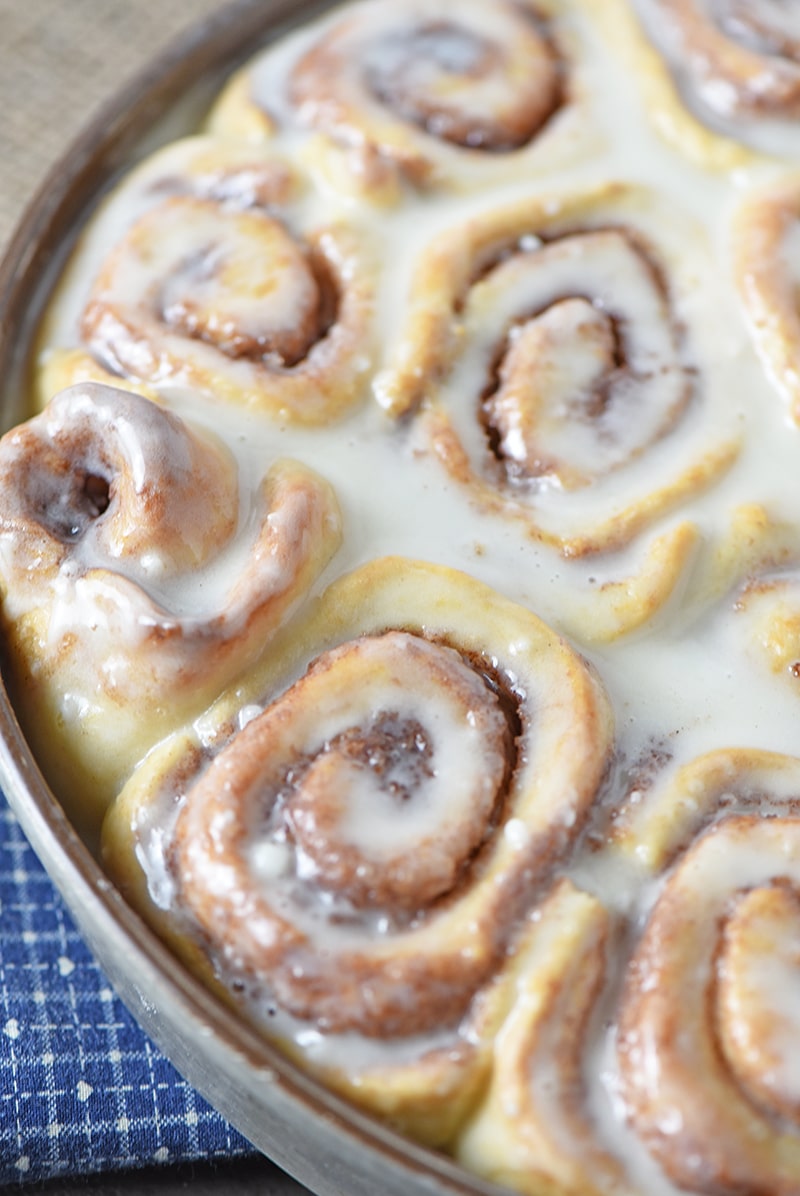
While I didn’t add raisins to this batch, you can totally add raisins to yours. When they’re warm right out of the oven is when you’ll want to spoon on the powdered sugar icing, which gives them even more of a gooey texture.
These cinnamon rolls make a perfect holiday breakfast treat… In fact, I’ve already planned to make these again Christmas morning. And I’m definitely adding this recipe to my list of The Best Christmas Recipes for Your Holiday Celebrations.
Once you have your dough mixed up, sprinkle a handful of flour on a clean surface. Take your dough and knead a bit of flour into it, shaping it with your hands.
Use a rolling pin to roll the dough out to about a 1-inch thickness.
Sprinkle the cinnamon sugar mixture all over the dough, giving the dough an even covering.
If you want raisins, sprinkle them all over the dough, as well.
Somewhat tightly, roll the dough into a long, thick roll. Slice into approximately 1-inch wide pieces.
Place the cinnamon rolls, face up, into a greased pan.
Bake the cinnamon rolls at 425° for about 20 minutes or until the tops begin to turn a warm golden hue.
While the cinnamon rolls are baking, mix up a simple powdered sugar icing. You can use my Easy Sugar Cookie Icing, but I do recommend cutting the ingredients down because you don’t need near as much icing as the recipe will make… I’d suggest cutting it down to 1/4 of what it calls for and leave out the almond extract. Note: You want the icing to be thin enough to brush onto the cinnamon rolls, so alternate powdered sugar and heavy whipping cream until you achieve your desired consistency.
Once the cinnamon rolls are baked, remove them from the oven, and let them cool for about 5 minutes.
Brush or spoon the icing onto the tops of the cinnamon rolls. Serve and enjoy!
Alternative options for Biscuit Cinnamon Rolls
Raisins are optional, so add them if you want; or leave them out if you don’t.
You could add crumbled pecans or walnuts to the dough when you sprinkle on the cinnamon/sugar mixture.
You can substitute a little bit of brown sugar for some of the regular sugar in the cinnamon/sugar mixture you sprinkle onto the dough.
Use fruit jam or even something like Nutella in place of the butter and cinnamon/sugar mixture. I haven’t tried this, but I kinda bet it would be good.
Mix up more of a cream cheese frosting, like this Caramel Cream Cheese Glaze, instead of a powdered sugar icing.
If you try any of these alternative options, let me know how they turned out by leaving me a comment below. I’d love to hear from you!
Kitchen tools you may need to make Easy Biscuit Cinnamon Rolls
Mixing Bowl – My handled bowl is probably my favorite bowl to use; I use it all the time, especially when mixing up biscuits or pie crust. Pastry Blender – This helps to really cut in the butter with the dry ingredients when you’re mixing up the biscuit dough. Rolling Pin – I use my rolling pin anytime I make dinner rolls, biscuits, pie crust, etc. Cereal-Sized Bowl – A cereal-sized bowl is the perfect size for mixing up a small batch of icing. Pastry Brush – You can either brush the icing on or spoon it on. A brush helps you to spread the icing over the cinnamon roll. Plastic Spatula – Works so well for slicing the dough into cinnamon rolls, and then separating the cinnamon rolls when serving. Round Cake Pan – I used a 9-inch round cake pan for this batch, and it’s the perfect size.
Want to see how to make Biscuit Cinnamon Rolls? Watch our video!
Print the recipe for Easy Biscuit Cinnamon Rolls
Biscuit Cinnamon Rolls
Biscuit Cinnamon Rolls are quick, easy to make, and no rise too! Deliciously sweet and irresistible, ooey gooey, homemade breakfast treats.
Biscuit Cinnamon Rolls:
1 cups all-purpose flour
1 tablespoon baking powder
1 teaspoon salt
1/3 cup unsalted butter
1 cup whole milk
1/3 cup cane sugar
2 teaspoons ground cinnamon
3 tablespoons salted butter (melted)
1/4 cup raisins (optional)
Icing:
2 tablespoons salted butter (softened)
1/2 teaspoon vanilla extract
1/2 cup whole milk
2 1/2 cups powdered sugar
Pre-heat the oven to 425° F, and grease a 9-inch round cake pan with cooking spray.
Whisk together the flour, baking powder, and salt.
Using a pastry blender, cut the unsalted butter into the flour mixture, 'til it makes fine crumbles.
Make a well in the center of the mixture, and add the milk. Mix together well.
Sprinkle a handful of all-purpose flour on a clean surface. Knead the biscuit dough into the flour, shaping it with your hands. Using a rolling pin, roll the dough out to about a 1-inch thickness.
In a small bowl, mix together the sugar and cinnamon.
Brush the melted butter all over the rolled out dough.
Sprinkle the cinnamon sugar mixture all over the dough, giving the dough an even covering.
If you want raisins, sprinkle them all over the dough, as well.
Somewhat tightly, roll the dough into a long, thick roll.
Then slice it into approximately 1-inch wide pieces.
Place the cinnamon rolls, face up, into the prepared pan.
Bake the cinnamon rolls at 425° F for about 20 minutes, or 'til the tops begin to turn a warm golden hue.
To make the icing, mix together the softened butter and vanilla extract in a large mixing bowl.
Add the milk to the mixture.
Then slowly mix in the powdered sugar. You want the icing to be thin enough to brush onto the cinnamon rolls.
Once the cinnamon rolls are baked, remove them from the oven, and let them cool for about 5 minutes. Keep the rolls in the pan.
Brush the icing onto the tops of the cinnamon rolls, and serve them immediately.
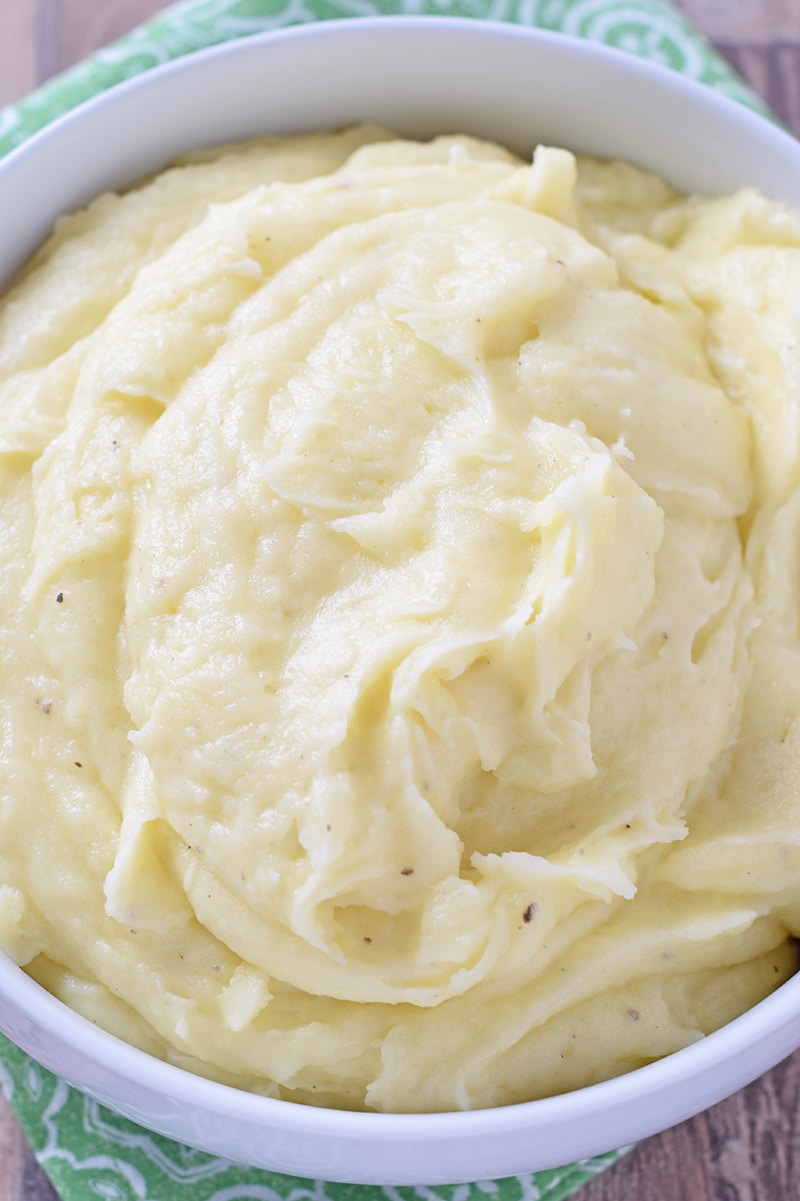
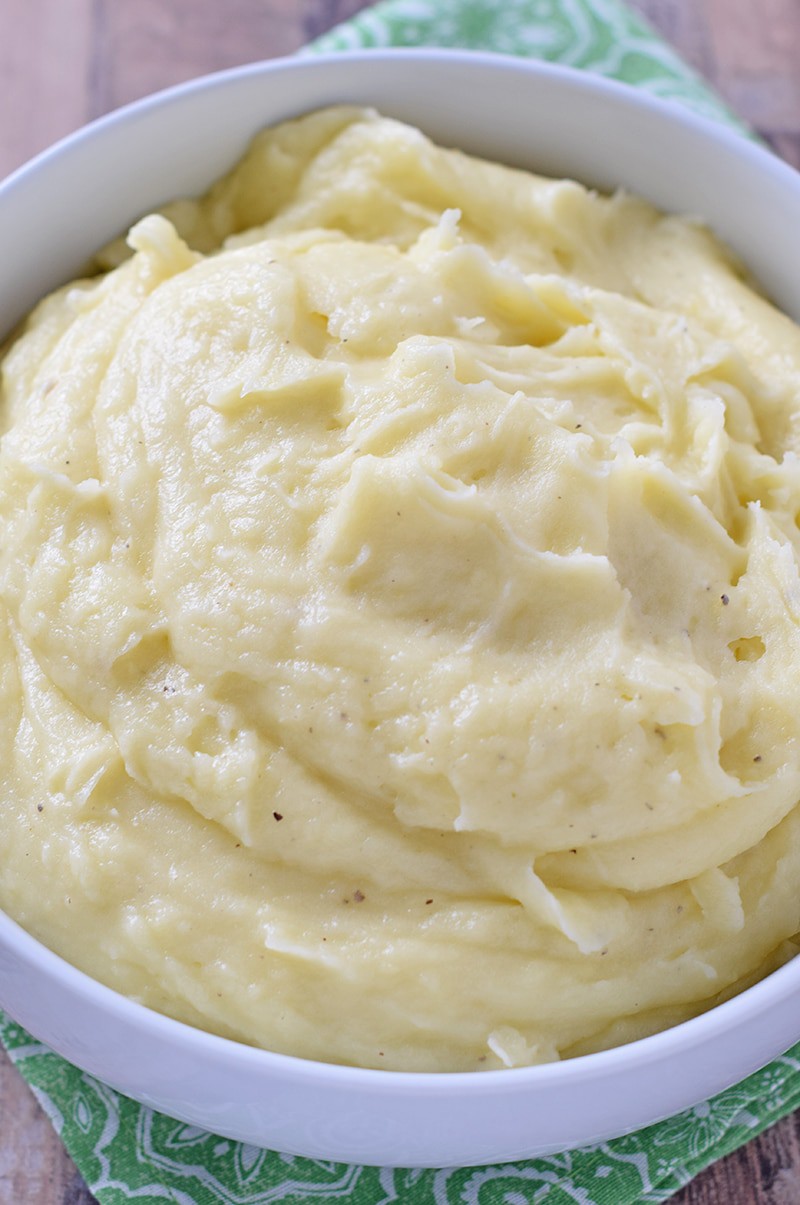
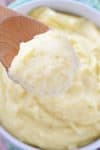
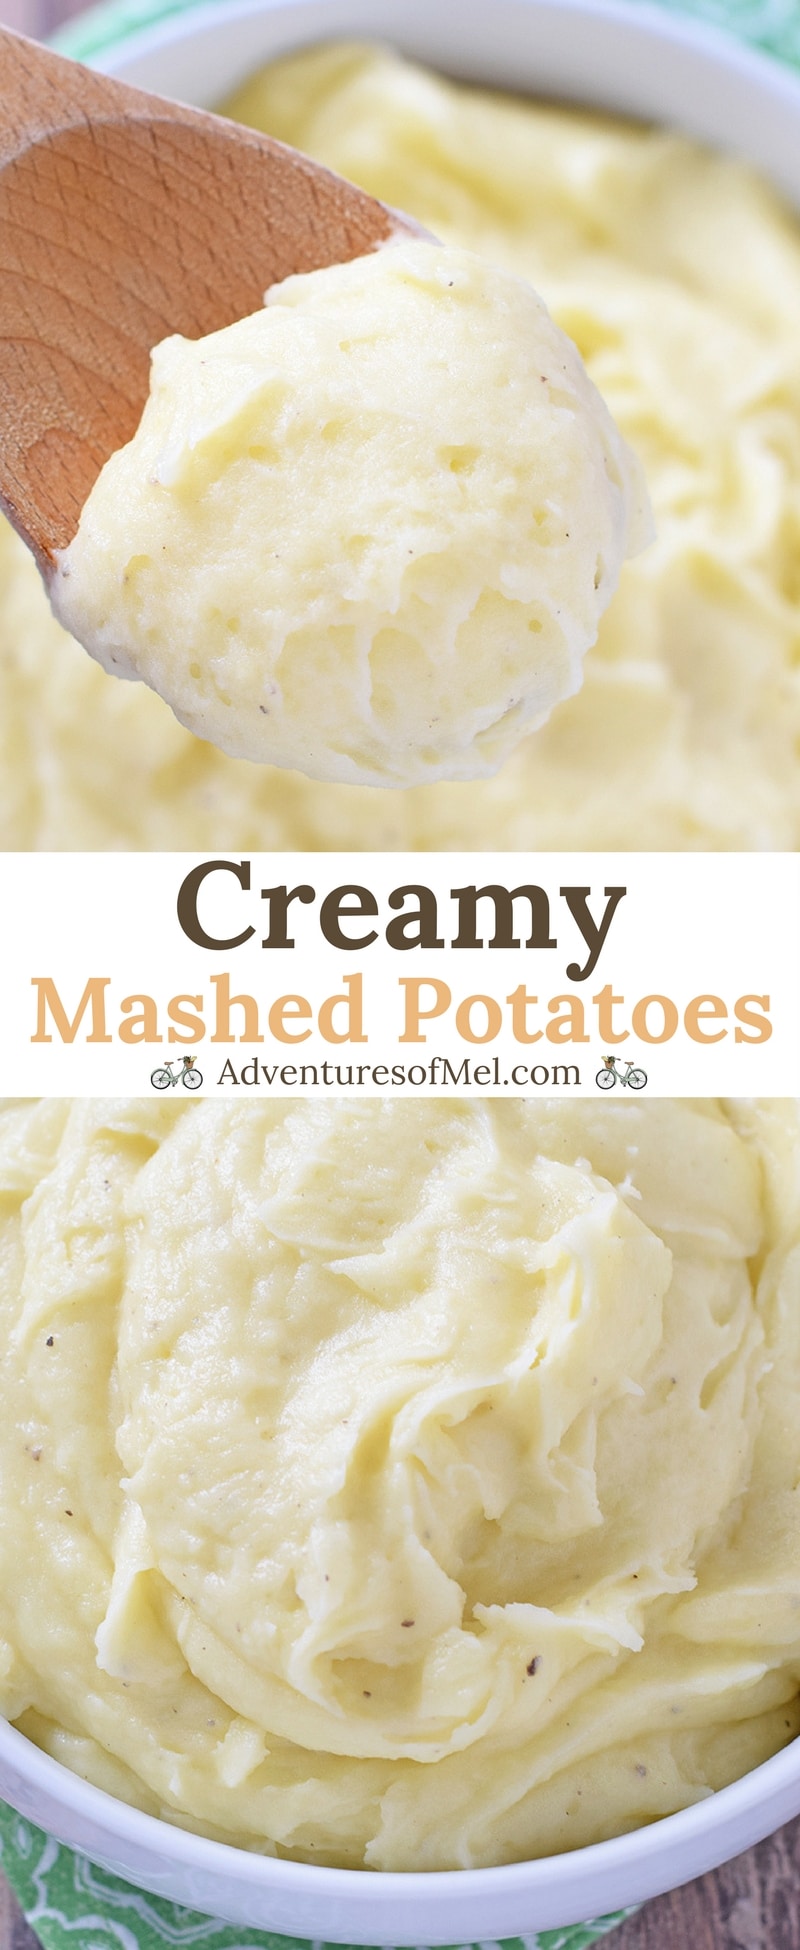
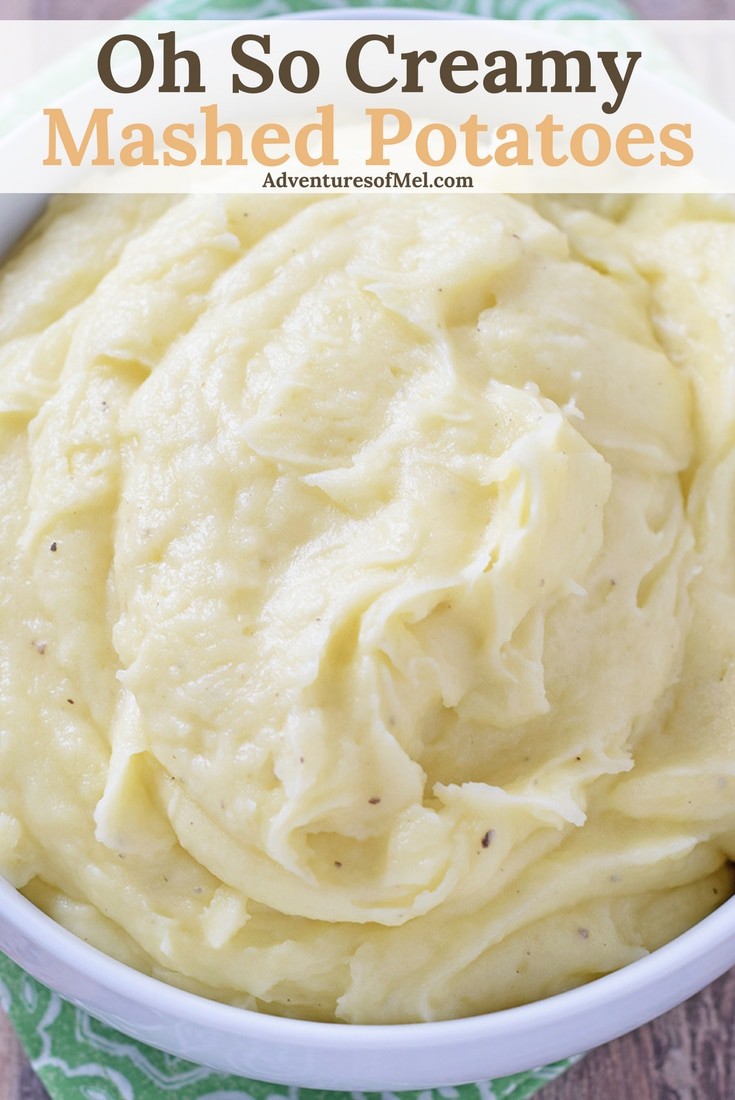
Make creamy mashed potatoes with yellow potatoes, cream, and butter. Delicious side dish recipe perfect for weeknight meals and holiday dinners.
Creamy Mashed Potatoes with gravy is the quintessential side for every holiday dinner and even some weeknight meals, like my family favorite easy meatloaf recipe with oats, slow cooker whole chicken and Crock Pot pork roast. We used to eat potatoes a lot more than we do now; but we still have our favorite mashed potatoes recipe that’s pretty basic but oh so creamy delicious.
Only 5 ingredients… That’s all it takes to make these simple potatoes. You know how we like to keep it simple. And if you know how to make gravy with cornstarch, you can have any flavor gravy you want!
Now I do suggest being picky about which potatoes you use. And maybe this topic is for another post at another time.
But our favorite type of potato for the most flavorful mashed potatoes is the yellow potato or Yukon Gold. We like red potatoes too, but I find myself going for the gold whenever we buy potatoes.
Gather your ingredients… You’ll need yellow potatoes, salted butter, heavy whipping cream, salt, and pepper.
Wash, peel, and chop the potatoes.
Cook the potatoes until they’re soft enough to easily jab with a fork. We usually cook ours by boiling them on the stove in a medium to large saucepan for about 30 minutes, but sometimes we use our Instant Pot.
Drain the water off your boiled potatoes, leaving your potatoes in the saucepan.
Add the butter and heavy whipping cream to the potatoes.
Use a hand mixer to whip the potatoes, adding salt and pepper to taste. You can also use a potato masher if you don’t have a hand mixer; your potatoes may just be a little bit chunky.
Strainer – You’ll need this to drain the potatoes.
Hand Mixer or Potato Masher – A hand mixer will enable you to get smooth, creamy mashed potatoes; a potato masher will allow you to mash the potatoes, but they’ll have a chunkier texture.
Print the recipe for Creamy Mashed Potatoes
Creamy Mashed Potatoes
Creamy Mashed Potatoes made with yellow potatoes, cream, and butter. Delicious side dish recipe perfect for weeknight meals and holiday dinners.
8 potatoes (medium size)
6 tablespoons salted butter
2 tablespoons heavy whipping cream
1 teaspoon salt (to taste)
1 teaspoon ground black pepper (to taste)
Wash, peel, and chop the potatoes.
Boil the potatoes in a large saucepan on the stove, until they're soft enough to easily jab with a fork, about 20-30 minutes.
Drain the water off the boiled potatoes, and leave them in the saucepan.
Add the butter and heavy whipping cream to the potatoes.
Use a hand mixer to whip the potatoes, adding salt and pepper to taste. You can also use a potato masher if you don’t have a hand mixer; your potatoes may just be a little bit chunky.
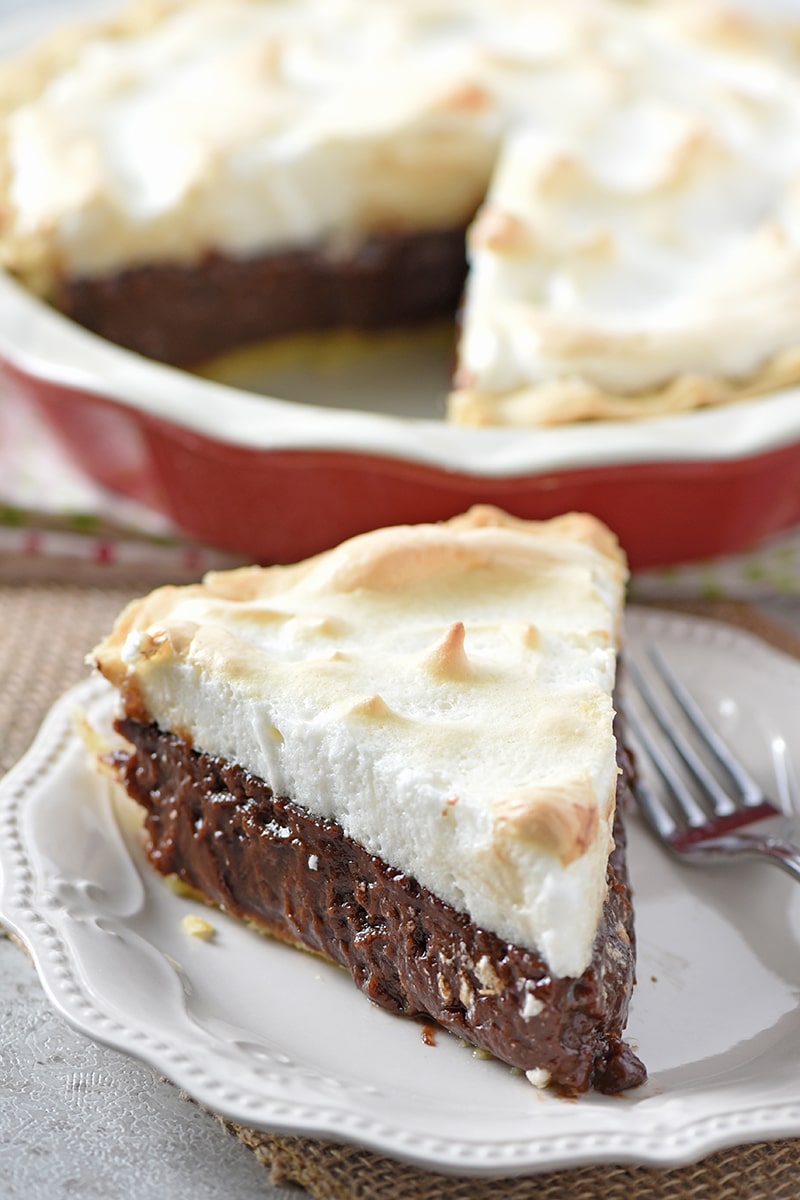
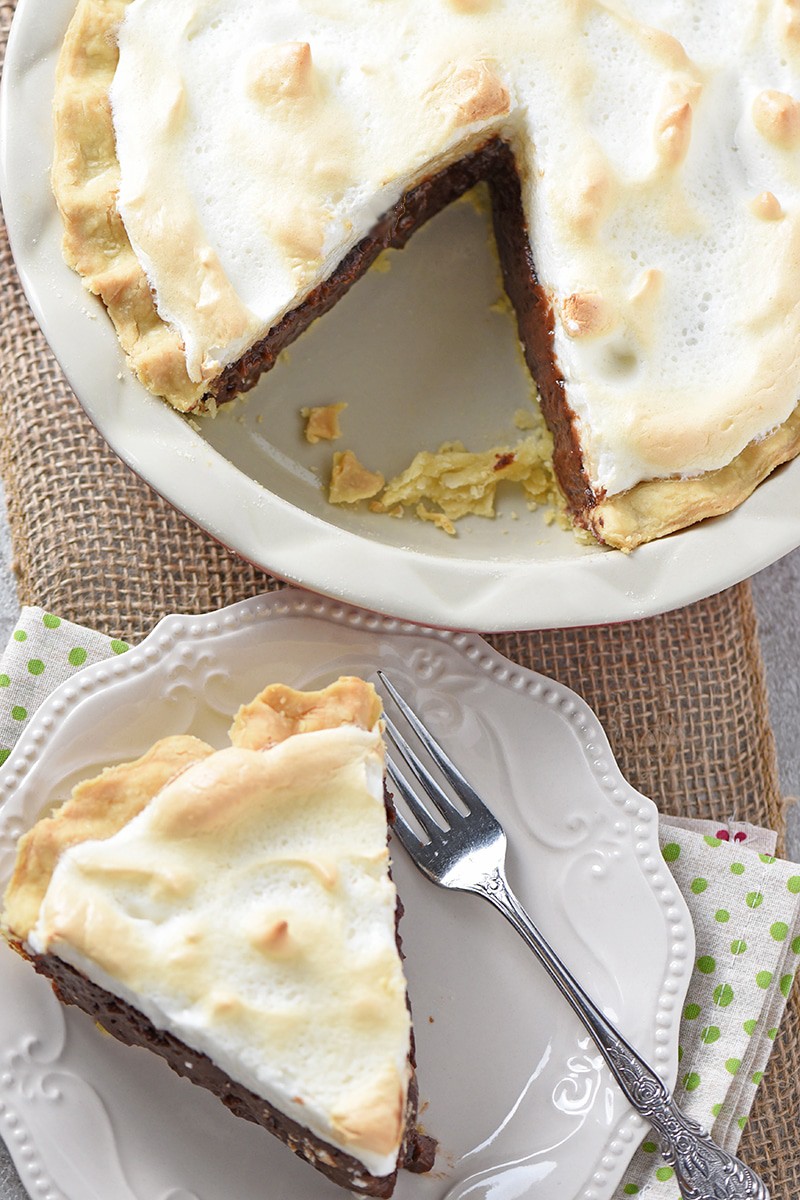
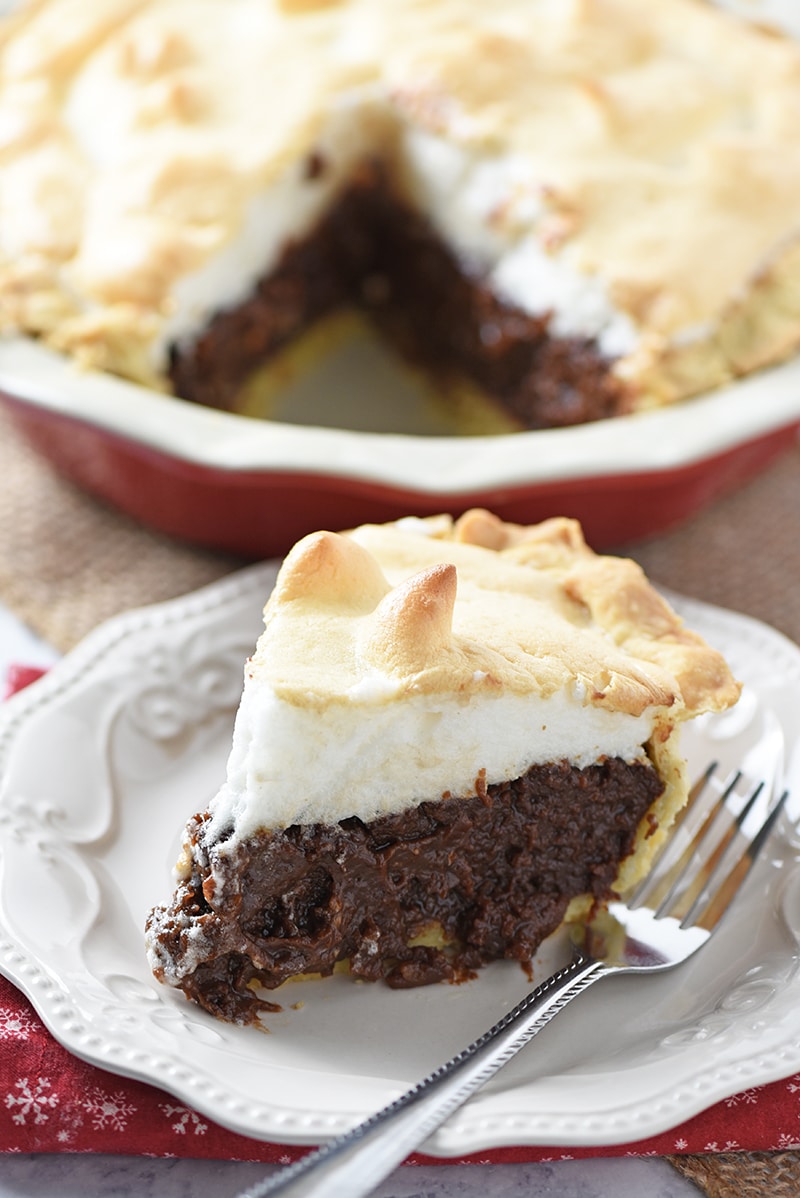
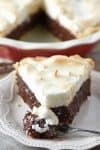
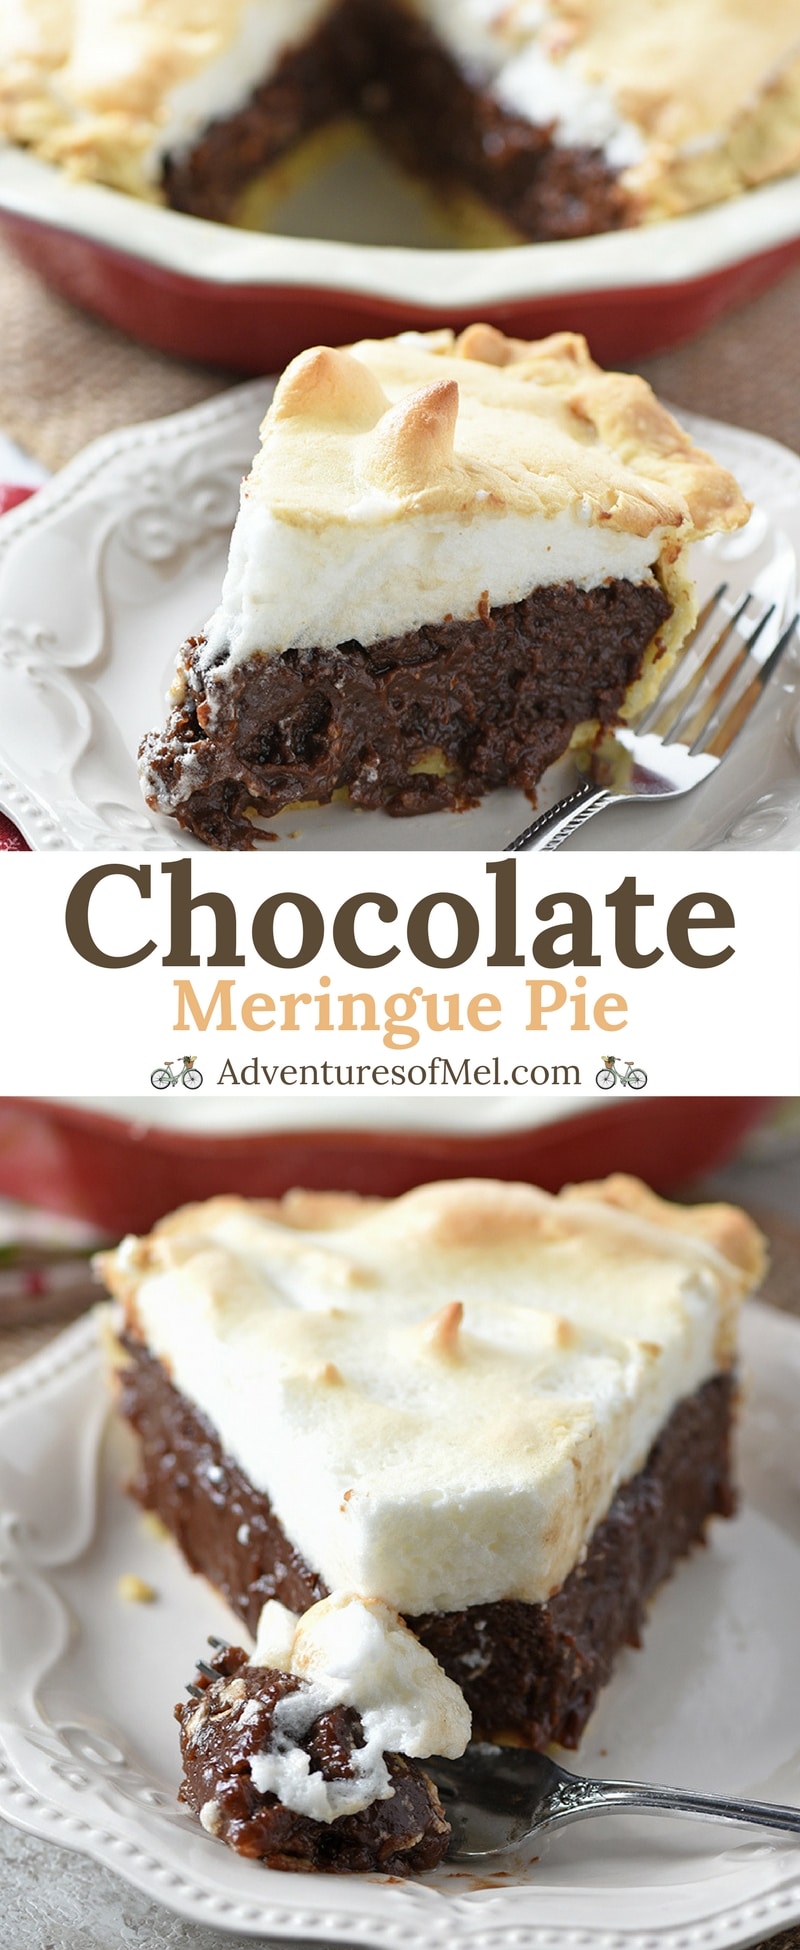
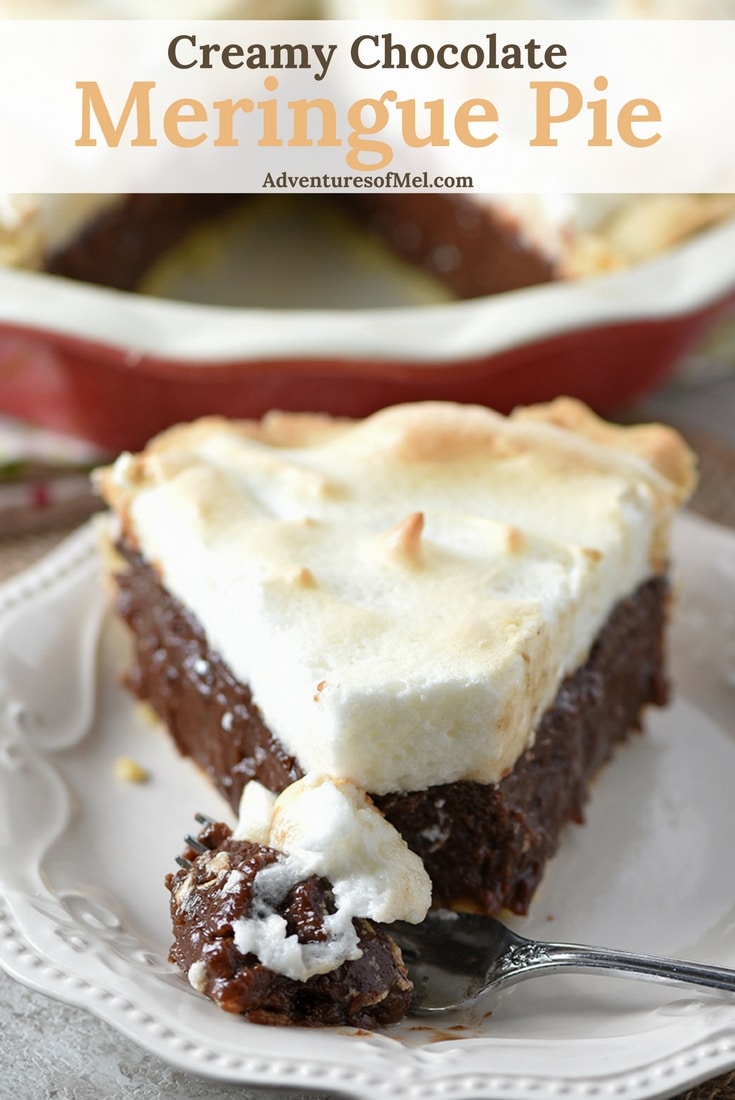
Chocolate Meringue Pie with a rich, creamy filling and fluffy homemade meringue. Delicious dessert recipe perfect for your inner chocolate lover!
Chocolate Meringue Pie has always been one of my favorite desserts. Maybe it’s my chocoholic tendencies, or maybe it’s the rich creamy filling that knocks me for a loop.
And it’s not just any chocolate pie that will do either, because there’s a difference. It has to have that old-fashioned, rich, chocolatey flavor, like the flavor of a good, old-fashioned, cooked chocolate pudding.
There is a bit of stovetop prep involved in this recipe, and I’ll be honest… Waiting for something to boil while constantly stirring is not my cup of tea. But it’s so worth it! And it really doesn’t take that long, especially if you’ve got some great music playing in the background (so you can sing as you stir).
While a chocolate pie can seem a bit intimidating, don’t let it scare you off from creating this beauty of a treat. Both your taste buds and your family will thank you for making this oh so scrumptious dessert.
In a medium to large (somewhat deeper) saucepan, mix together the sugar, corn starch, and salt.
Separate your egg yolks out (but save back 3 of your whites for the meringue pie topping).
Beat the egg yolks.
Beat together the egg yolks and heavy whipping cream.
Add the egg/cream mixture to the sugar mixture in your saucepan, and whisk everything together well.
Bring this mixture to a boil over medium heat, constantly stirring so the mixture doesn’t scorch.
Once it comes to a boil, reduce the heat just a bit, and let it boil for maybe half a minute, constantly stirring.
Note: You don’t want to boil it too long because if you do, an oil will start to form and separate from your mixture. If this happens, don’t despair; it’s totally fixable. Just pour as much of the oil off as possible without losing your filling, and your pie filling will be right as rain… No need to make a whole new filling.)
Remove the mixture from the heat.
Immediately whisk in the butter, vanilla, and cocoa powder. Mix well.
Pour the pie filling into your prepared and baked pie crust. You may also want to learn how to keep pie crust from burning before baking.
Top with meringue and bake at 350° for about 15 minutes, maybe a little longer until the meringue begins to turn a warm golden color.
Remove the pie from the oven, and cool for 1 hour, preferably on a wire rack.
Then refrigerate for at least a couple of hours before serving. Also keep any leftover pie refrigerated.
Medium to Large Saucepan – You’ll need a saucepan to mix together and cook your pie filling. Egg Separator – This handy tool allows you to easily separate your egg yolk from the white. Whisk – A whisk will help you avoid any lumps in your filling. Spatula – You’ll use a spatula to stir your pie filling and spread it in your pie crust. Wire Rack – for cooling your pie. Glass Measuring Cup – for measuring out liquids. Pie Plate – Can’t bake a pie without this. Pie Shield or Aluminum Foil – to keep the edges of your crust from burning. Pie Server – for serving your pie.
Print the recipe for Chocolate Meringue Pie
Chocolate Meringue Pie
Chocolate Meringue Pie with a rich, creamy filling and fluffy homemade meringue. Delicious dessert recipe perfect for your inner chocolate lover!
1 single pie crust
4 egg yolks (beaten)
1 1/4 cups sugar
1/3 cup corn starch
1/2 teaspoon salt
3 cups heavy whipping cream
1 tablespoon salted butter
1 teaspoon vanilla extract
6 tablespoons cocoa powder
1 meringue pie topping
Make and bake a traditional roll-out pie crust, an easy shortcut no-roll pie crust, or a pecan nut pie crust.
Pre-heat the oven to 350°.
In a large (somewhat deeper) saucepan, mix together the sugar, corn starch, and salt.
Separate your egg yolks out (but save back 3 of your whites for the meringue pie topping).
Beat the egg yolks.
Beat together the egg yolks and heavy whipping cream.
Add the egg/cream mixture to the sugar mixture in your saucepan, and whisk everything together well.
Bring this mixture to a boil over medium heat, constantly stirring so the mixture doesn’t scorch.
Once it comes to a boil, reduce the heat just a bit, and let it boil for maybe half a minute, constantly stirring.
Note: You don’t want to boil it too long because if you do, an oil will form and start to separate from your mixture. If this happens, don’t despair; it’s totally fixable. Just pour as much of the oil off as much as possible without losing your filling, and your pie filling will be right as rain… No need to make a whole new filling.)
Remove the mixture from the heat.
Immediately whisk in the butter, vanilla, and cocoa powder. Mix well.
Pour the pie filling into your prepared and baked pie crust.
Top with meringue and bake at 350° for about 15 minutes, maybe a little longer, or until the meringue begins to turn a warm golden color.
Remove the pie from the oven, and cool for 1 hour, preferably on a wire rack.
Then refrigerate for at least a couple of hours before serving. Also keep any leftover pie refrigerated.