How to make a no fail, pecan nut, no roll pie crust that’s easy, homemade, and delicious. It’s the perfect recipe for any pie or no bake dessert.
Whether you’re making a no bake dessert or pie, this pecan nut pie crust is a delicious foundation for your dessert. Of course, if you’d rather have a crust without nuts, you might want to try this more traditional pie crust recipe with butter or this easy no roll pie crust.
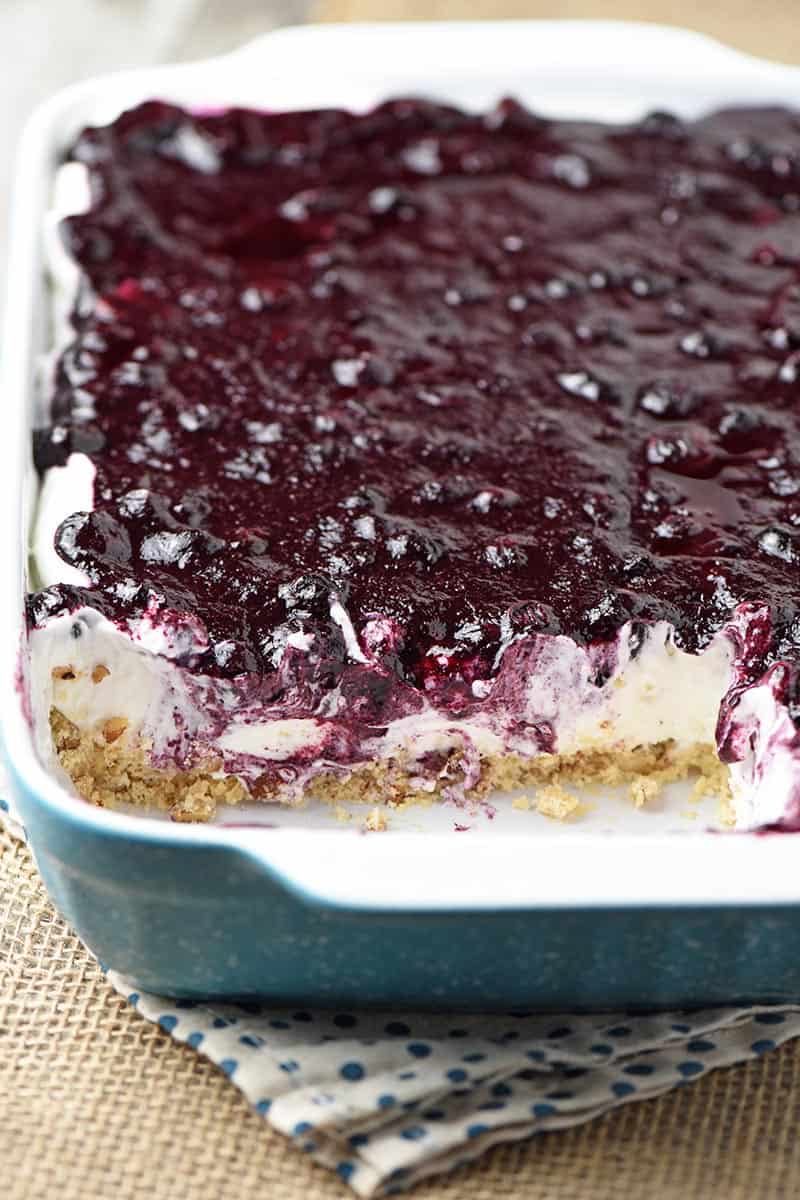
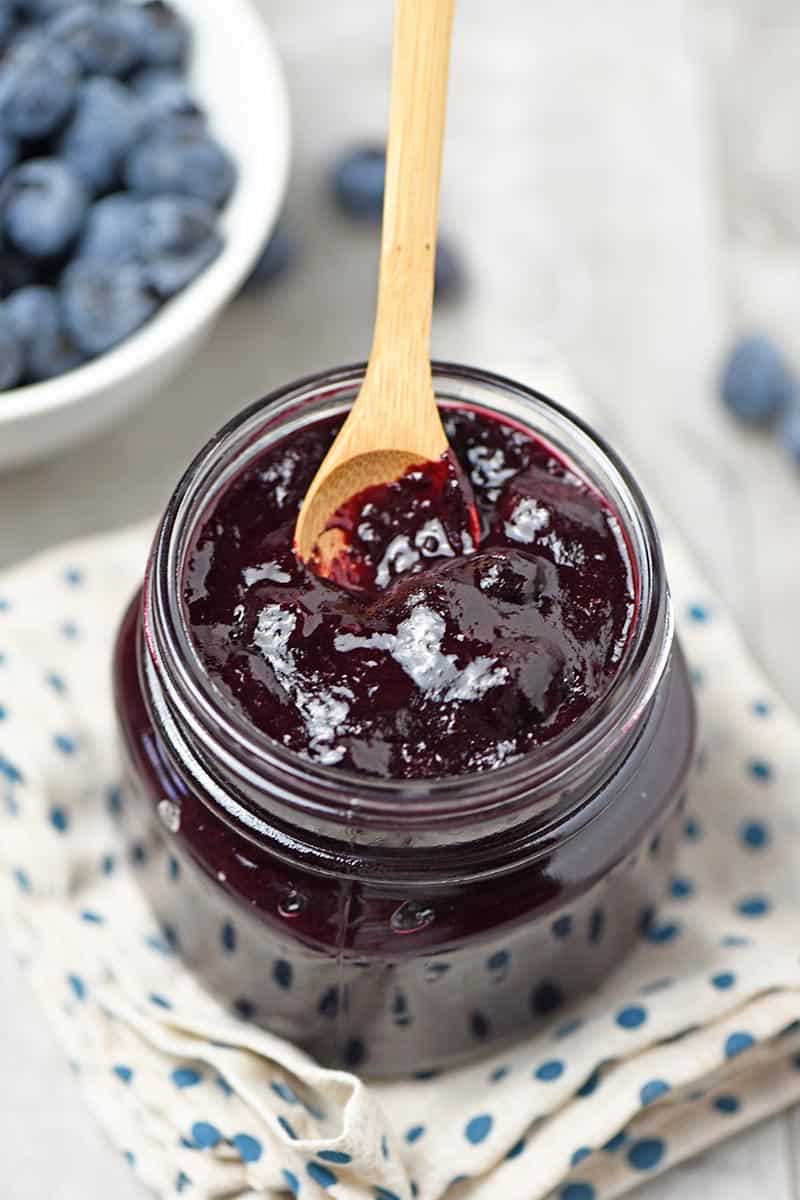
This is actually my favorite pie crust recipe for a blueberry delight with pecan crust. My mom used this crust for her famous cherry crunch, and it pairs fabulously well with that sweet cream cheese filling.
There are only 3 ingredients in this nutty pie crust, yet it gives your favorite desserts an amazing sweet and salty flavor. It’s so yummy!
Making this buttery pie crust is so simple and easy and requires just a few minutes of bake time.
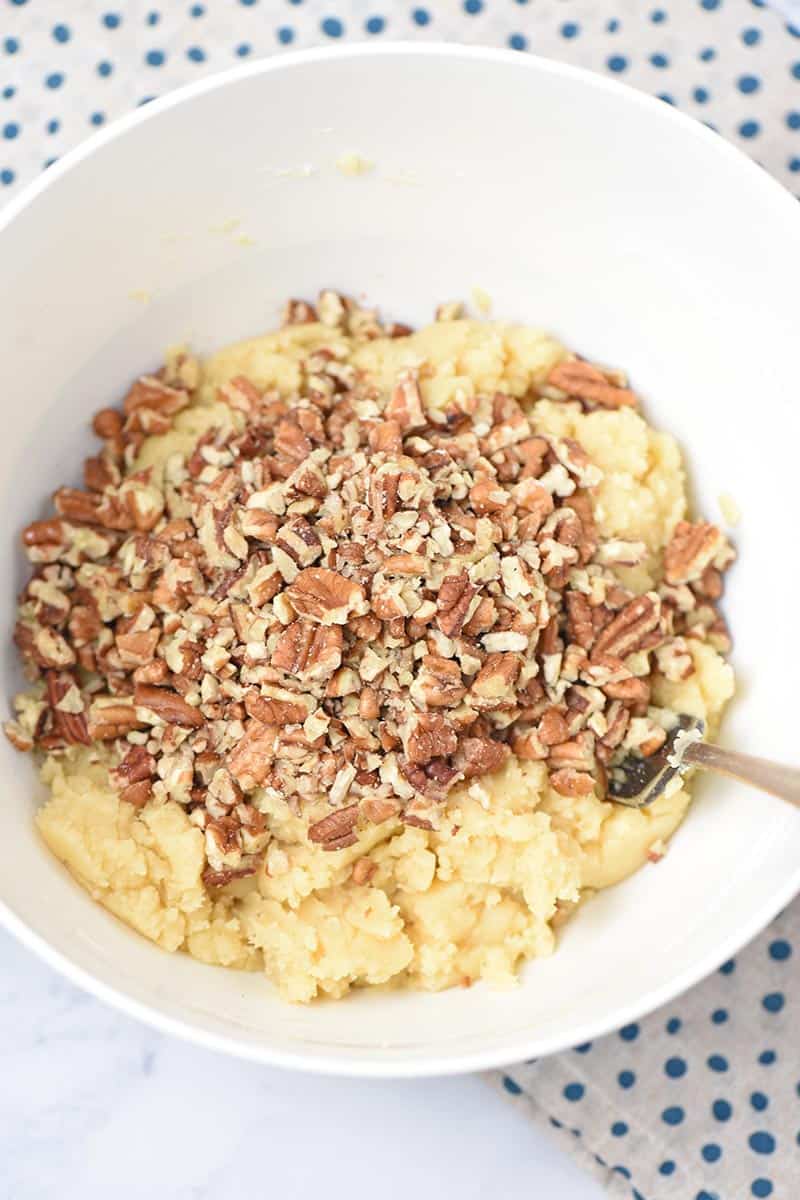
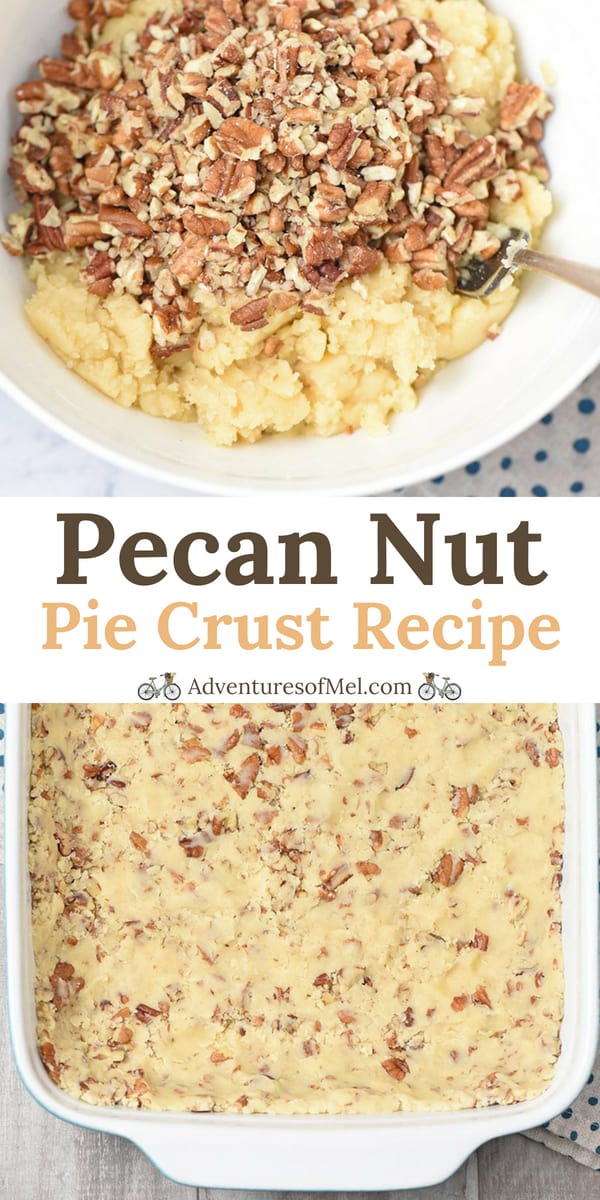
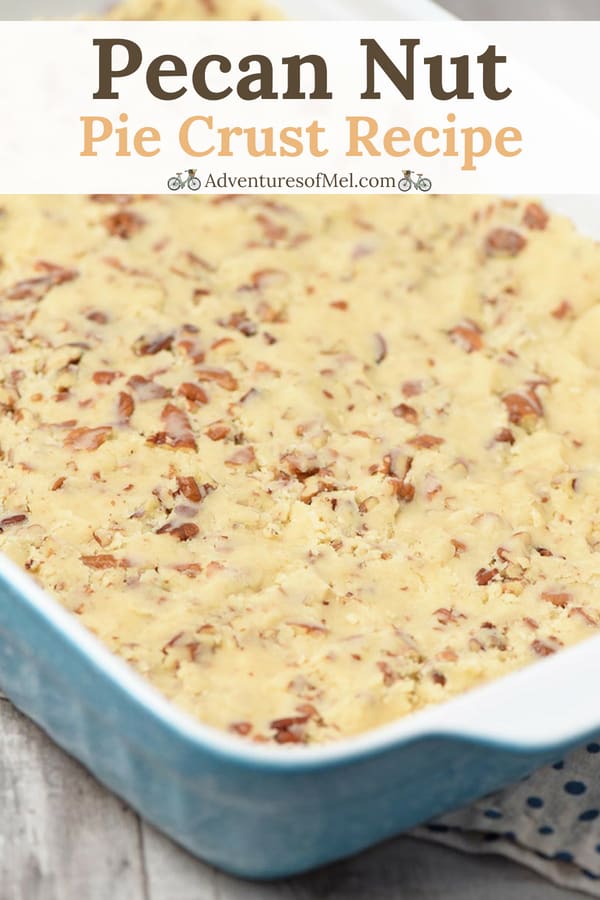
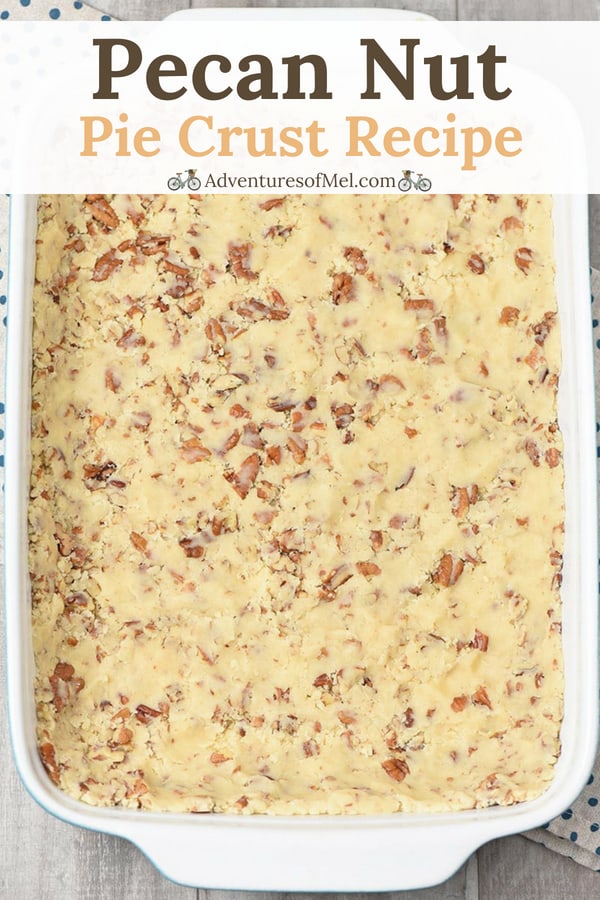
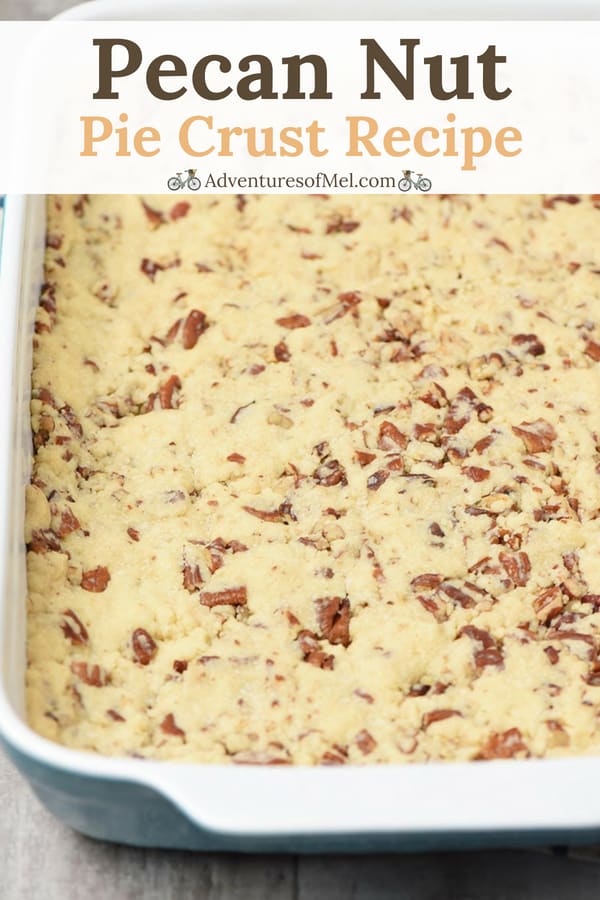
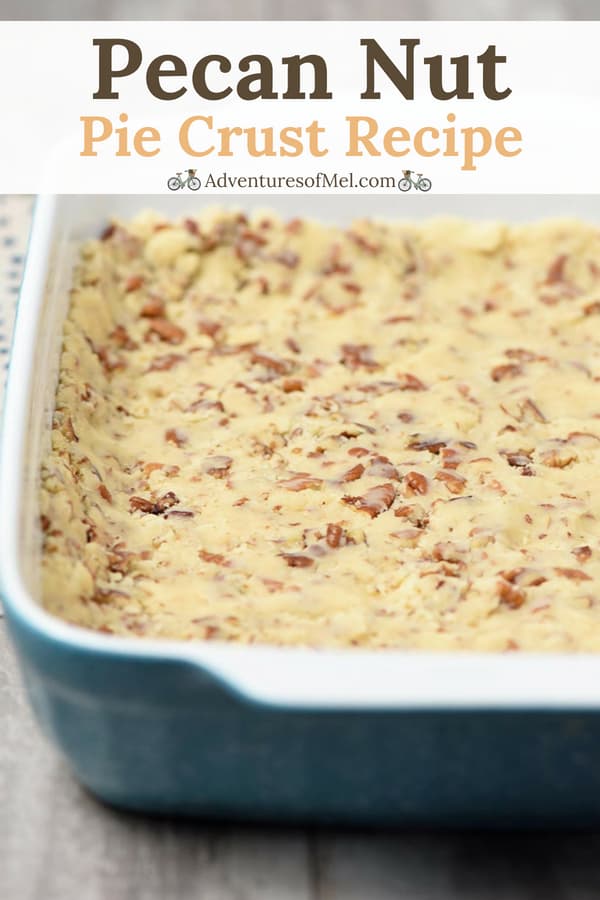
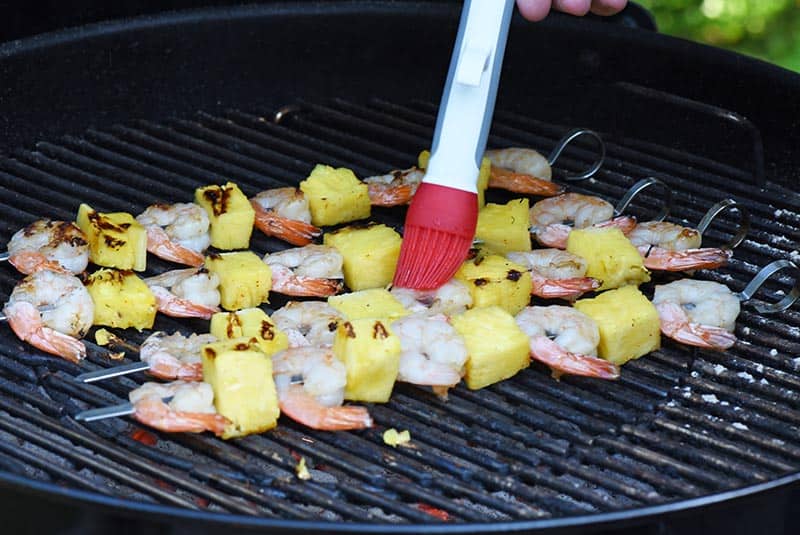
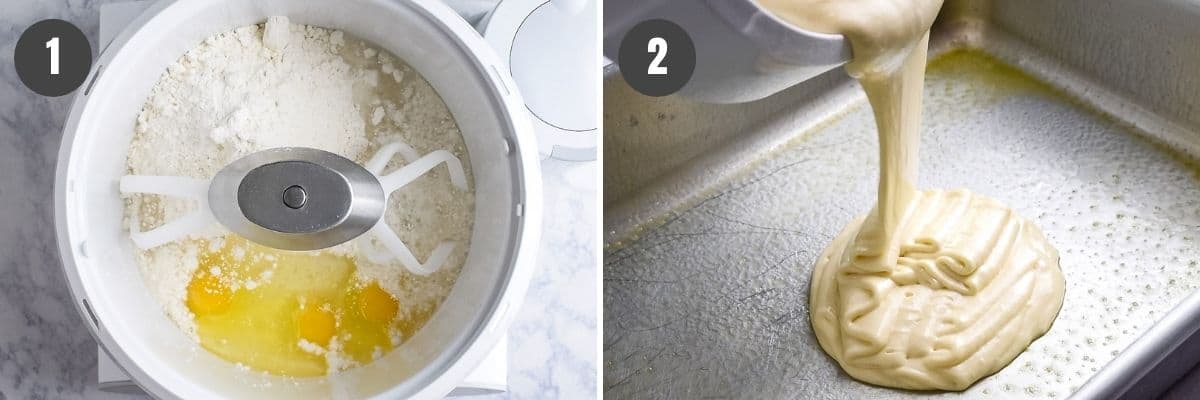
First, melt the butter. Then mix together the melted butter and flour, forming a dough.
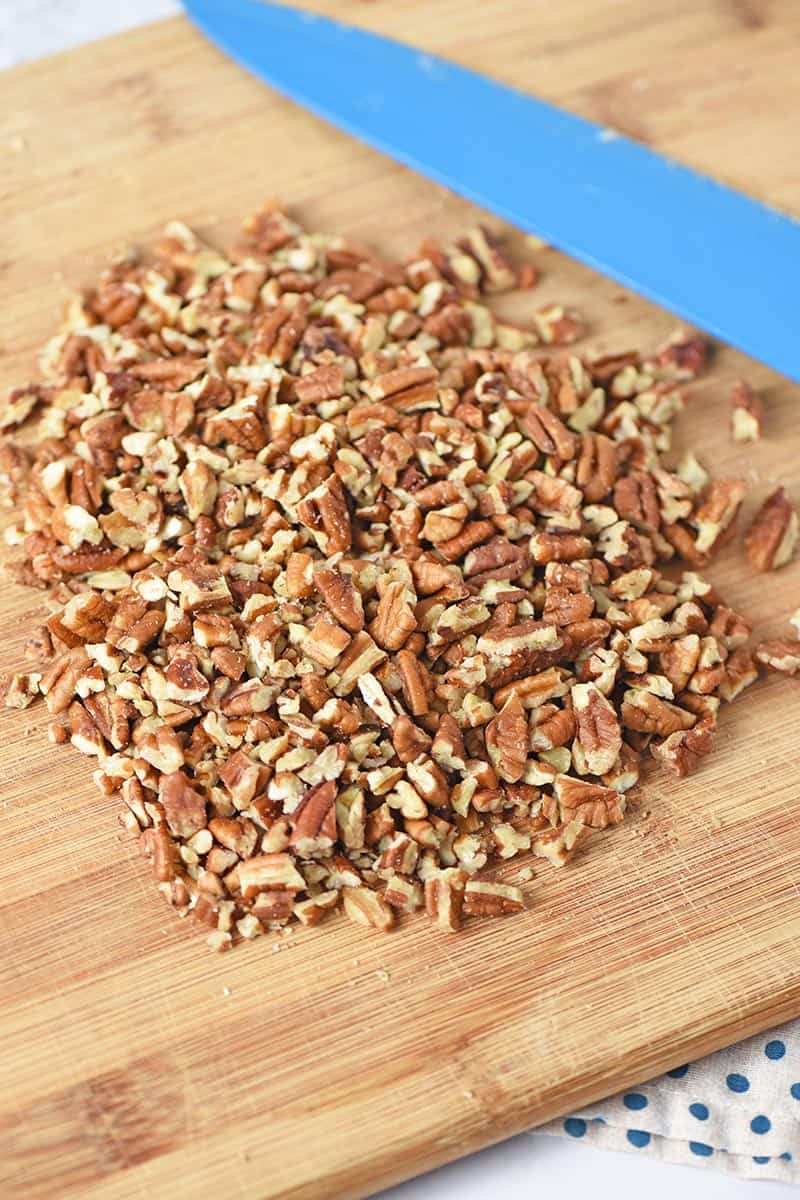
If your pecans aren’t chopped, finely chop them.
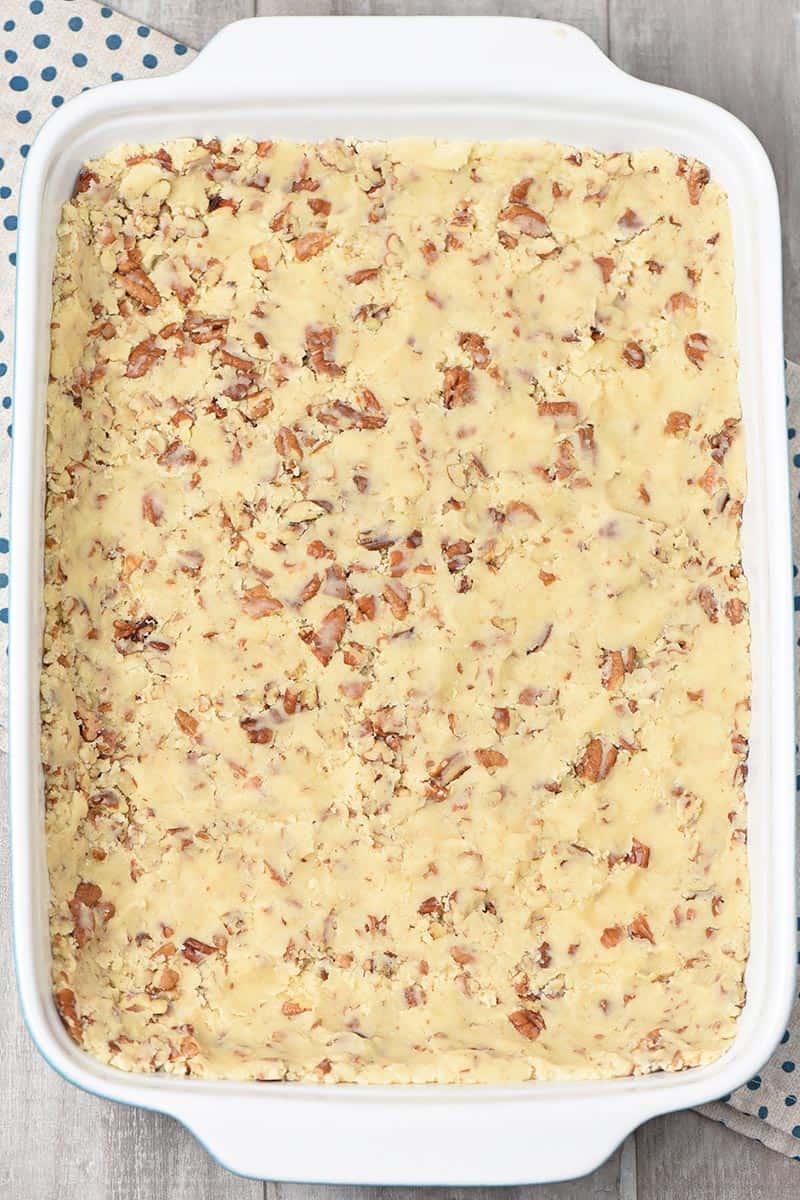
Stir in the chopped pecans until they’re all mixed in.
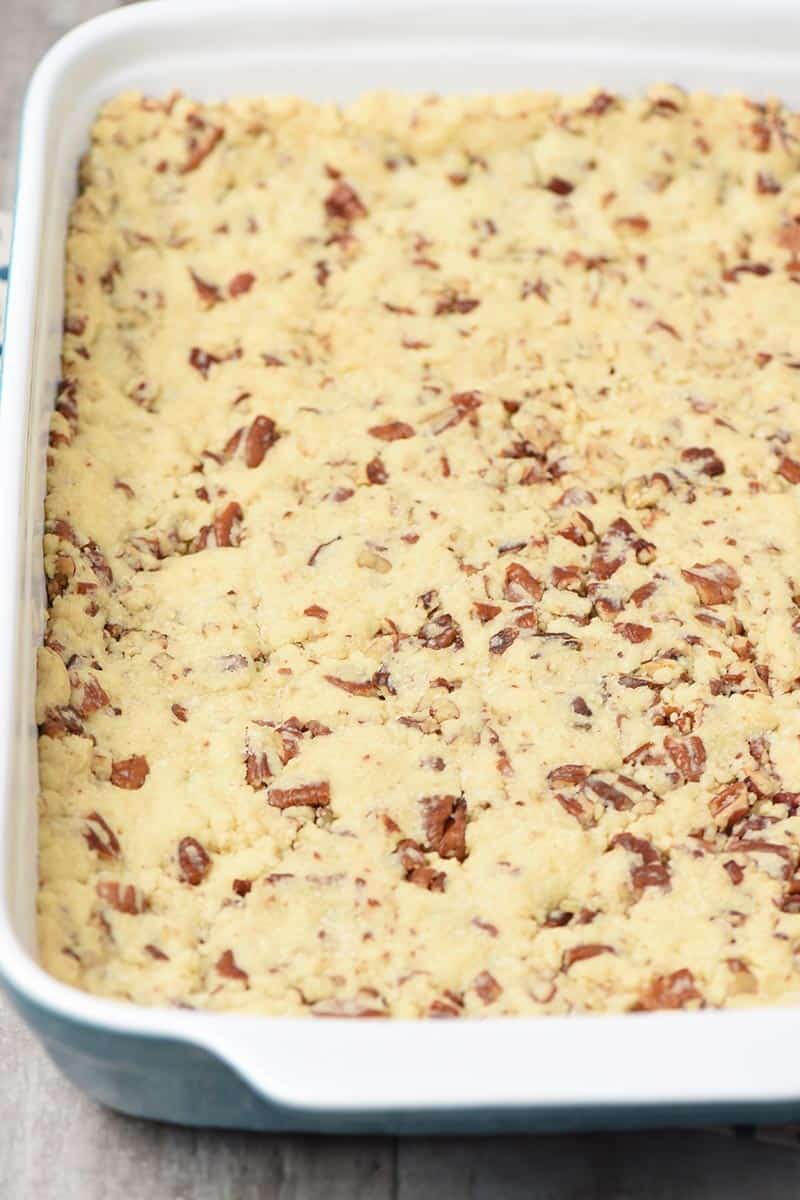
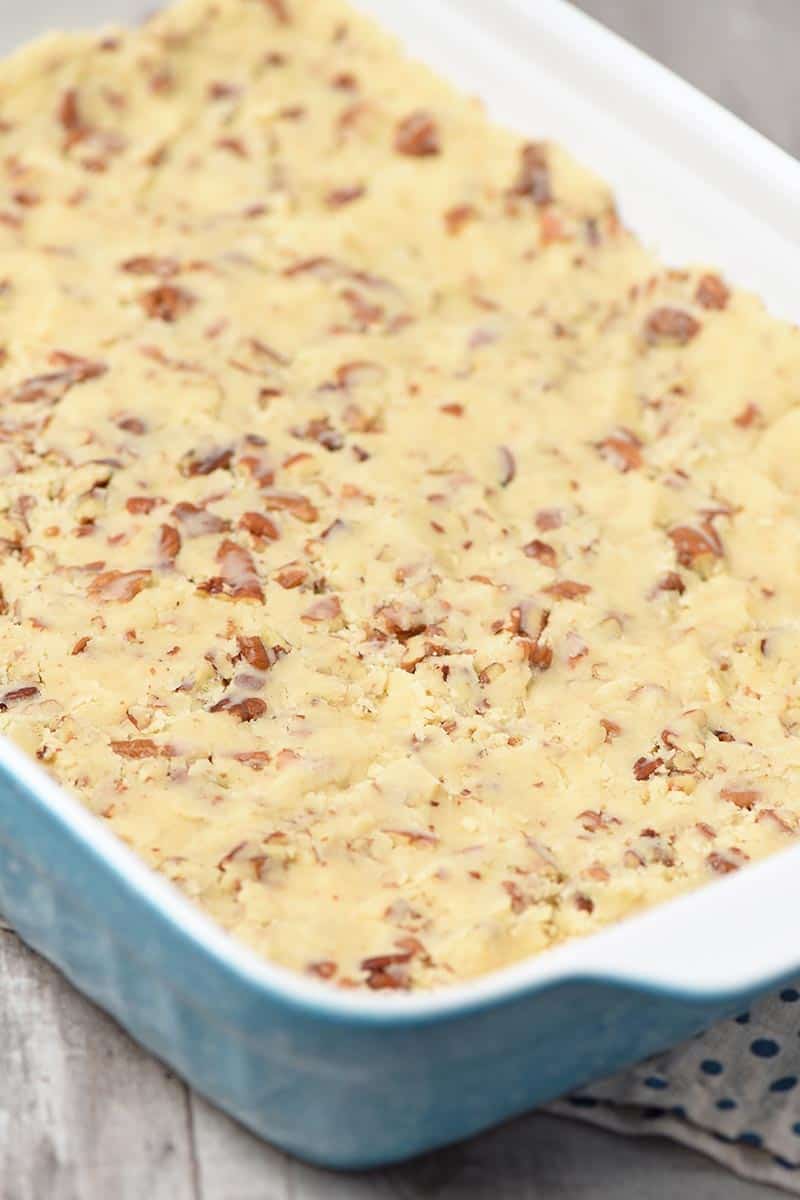
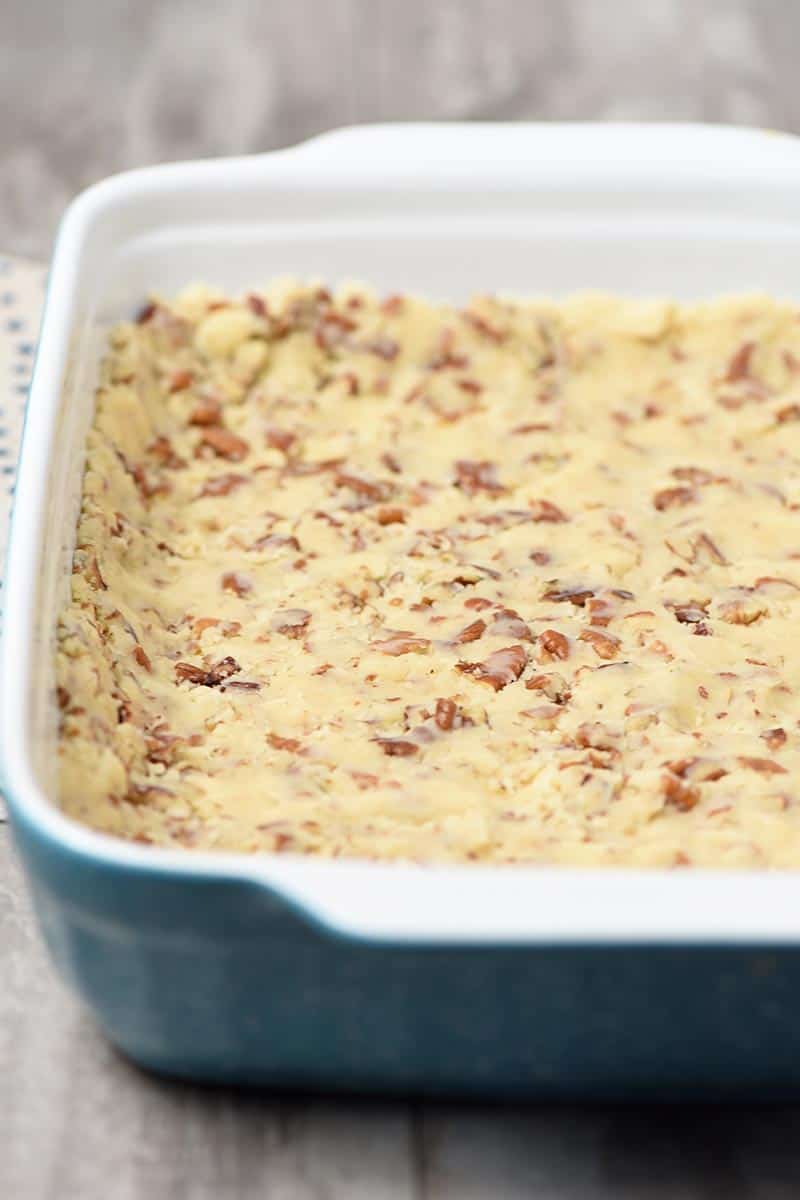
It’s a press in pie crust, so just press the dough into a 13″x9″ baking dish.
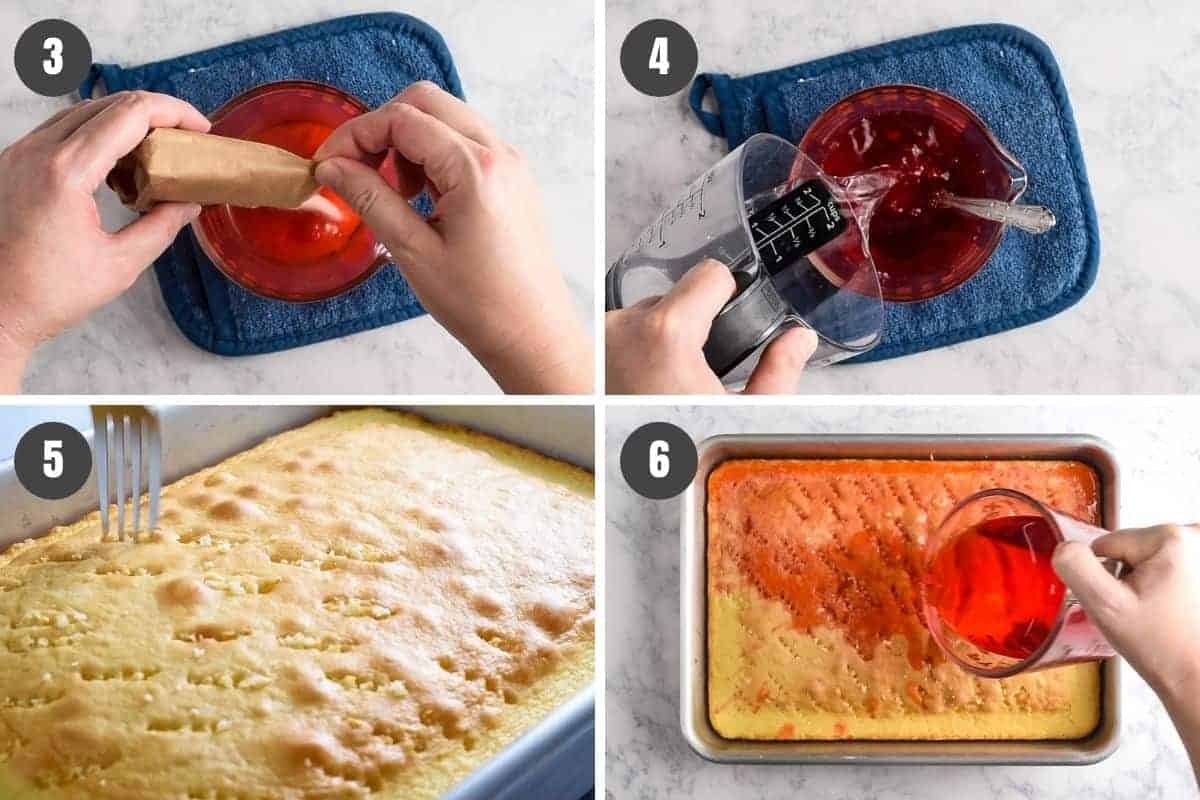
Bake at 350° for about 20 minutes, or until the edges of the crust begin to turn a nice golden brown (baking times can vary).
Let the crust cool before adding any filling.
Now if you’re making this crust with a regular pie where you bake the crust with the pie filling, you’ll bake it according to the recipe instructions for that particular pie.
Alternative ingredient options:
While this recipe only has 3 ingredients, there are a few things you can do to switch it up.
Instead of pecans, consider using walnuts, black walnuts (if you like the flavor of black walnuts), or even almonds.
Don’t you love how easy this pie crust is? It doesn’t even require you to roll out the dough.
Mix it up press it in your baking dish, and bake it. Then it’s ready for your favorite dessert. You can even pair this crust with all your favorite Thanksgiving recipes and Christmas recipes!
Pies and desserts that pair well with this pecan nut crust:
Tools you may need to make this pie crust from scratch:
13″x9″ Baking Dish – You’ll need this size baking dish for this recipe. I find myself using this size for so many recipes, not just desserts. If you want to make a smaller dessert, just split the recipe in half and use a smaller dish.
Mixing Bowl – You’ll need a medium sized mixing bowl to mix up this crust.
Pecan Nut Pie Crust
How to make a no fail, pecan nut, no roll pie crust that's easy, homemade, and delicious. It's the perfect recipe for any pie or no bake dessert.
12 tablespoons salted butter (melted)
1 1/2 cups all-purpose flour
1 cup chopped pecans
Pre-heat the oven to 350° F.
Mix together the melted butter and flour, forming a dough.
Stir in the chopped pecans.
Press the crust into an un-greased 9×13 baking dish.
Bake at 350° F for about 20 minutes, or until the crust begins to turn a golden brown.
Let the crust cool before adding any filling.
If you are making this crust with a recipe where you bake the crust with the filling, just bake it according to the instructions for that particular recipe.
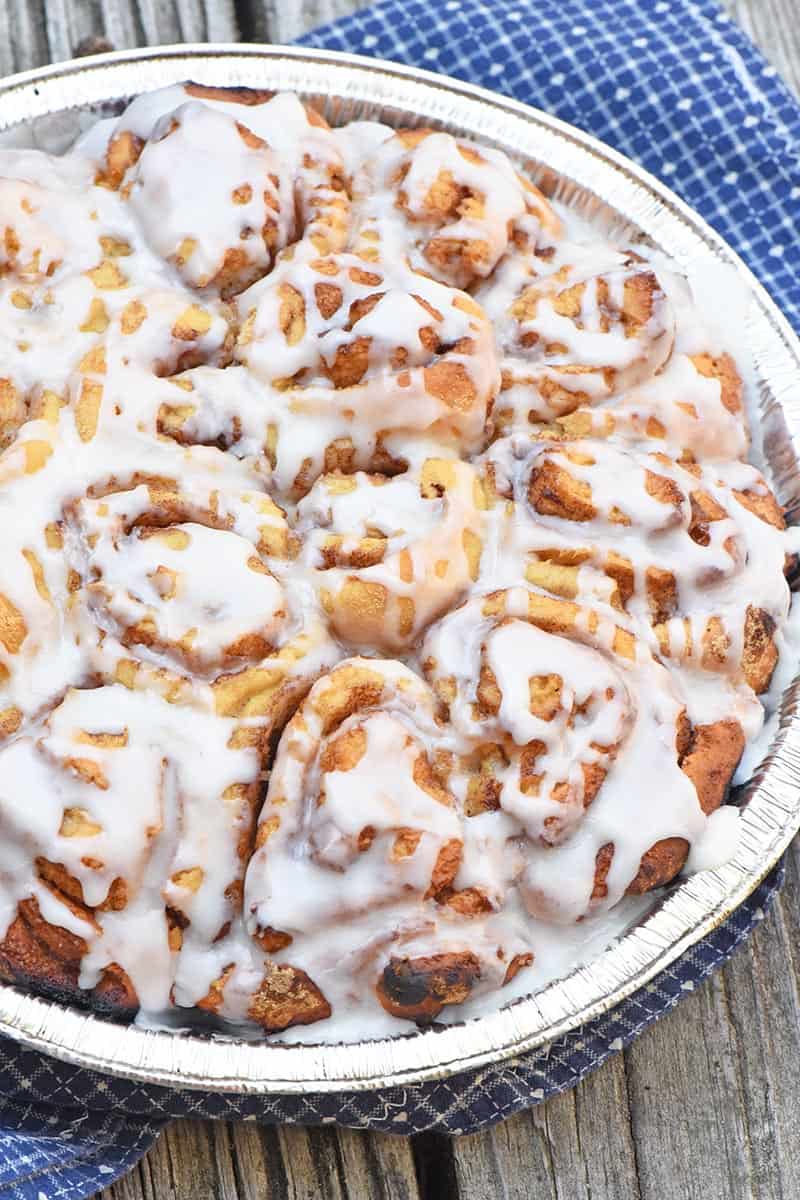
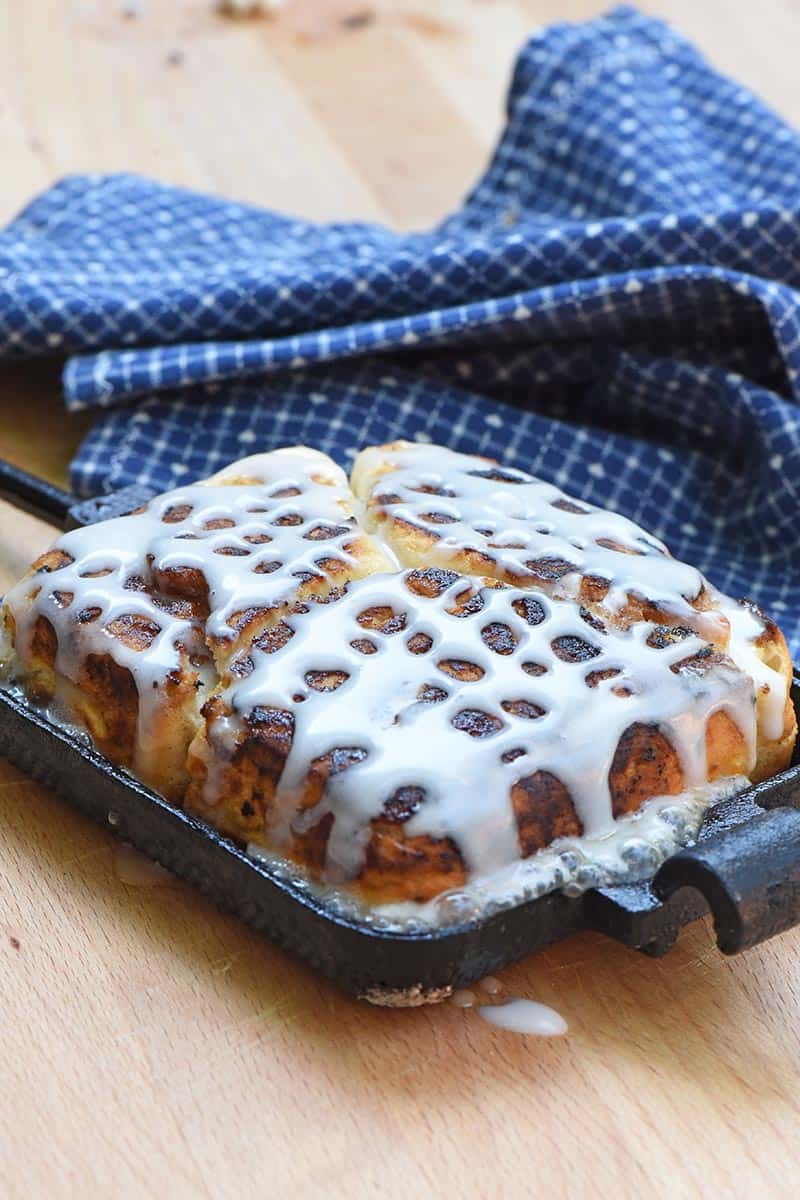
Here are two ways to make campfire cinnamon rolls, in a Dutch oven or pie iron, over the campfire or on the grill. This ooey gooey, delicious camping recipe makes an easy breakfast you can make ahead and cook outdoors! It’s perfect for the whole family; kids can help too!
People ask what we eat when we’re camping, and we pretty much eat anything we’d eat at home; in fact, here are some of our most popular camping recipes. We even make cherry cobbler over the campfire! Of course, we try to keep meals simple and easy; and these camping cinnamon rolls are no exception.
If you’re like me and love a good visual, you’ll find a video further below that’ll walk you thru the steps for how to make this easy campfire cinnamon rolls recipe on your next camping trip.
Why You’ll Love These Camping Breakfast Desserts
You can mix up a batch of campfire cinnamon rolls (and the icing for them) ahead of time and take it all with you in the cooler. I’ll have some easy storage tips for you below.
Just like drop biscuits, you can cook camp cinnamon rolls over a grill or a campfire in the fire pit.
Make Dutch oven cinnamon rolls or pie iron cinnamon rolls, or both; the choice is up to you!
While we’ve taken canned cinnamon rolls camping with us, I’m just not a huge fan of store-bought cinnamon rolls. This is such an easy recipe; and even though this is a biscuit mix or Bisquick recipe, they taste so good, and our boys absolutely love it when we make fun camping desserts (like these toasted skillet s’mores). Your kids will love them too.
Gather a few simple ingredients to make this cinnamon roll recipe…
Biscuit Mix – You can use whatever brand biscuit mix you like; I prefer to use a buttermilk baking mix for this recipe, mainly because of the purpose the buttermilk serves in helping with leavening, or the rise of the biscuits.
Whole Milk – You can also use 2% or skim milk, if you don’t have whole milk.
Salted Butter – This will need to be melted. Be sure to use salted, as this adds to the flavor.
I recommend mixing these up at home and then packing them in a cooler for cooking later over the campfire (or grill). If you can’t use a campfire or grill, because there have been many times we were in that exact situation, you can cook them in a Dutch oven on your camp stove.
How to Mix and Roll the Dough
In a large mixing bowl, mix the biscuit mix and milk together until you have a nice sticky dough.
In a separate smaller bowl, mix together the cinnamon and sugar.
Spread a little flour out on a clean surface, and knead your dough just enough so it’s not sticky anymore.
On the lightly floured surface, roll out the dough to about 1/4 inch thickness.
Brush on the melted butter; then sprinkle it with the cinnamon sugar mixture.
Roll the dough tightly into a log. Then cut it into 1-inch slices.
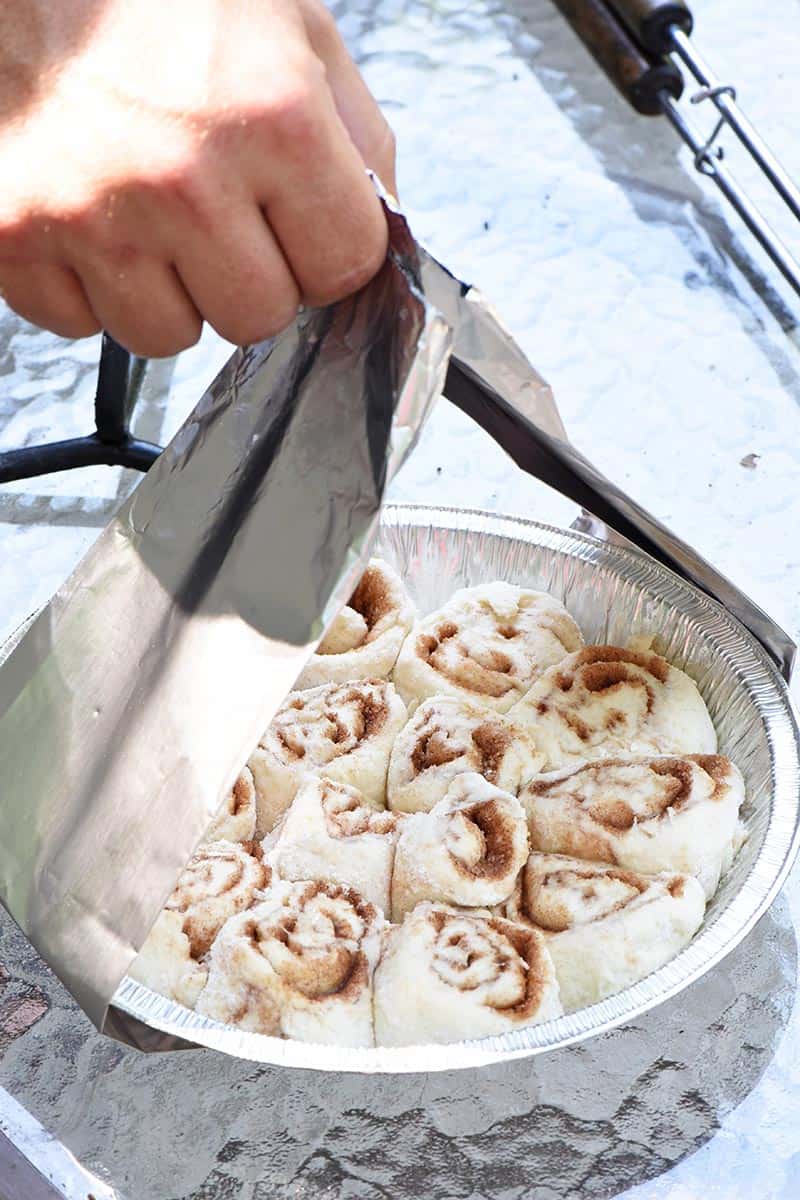
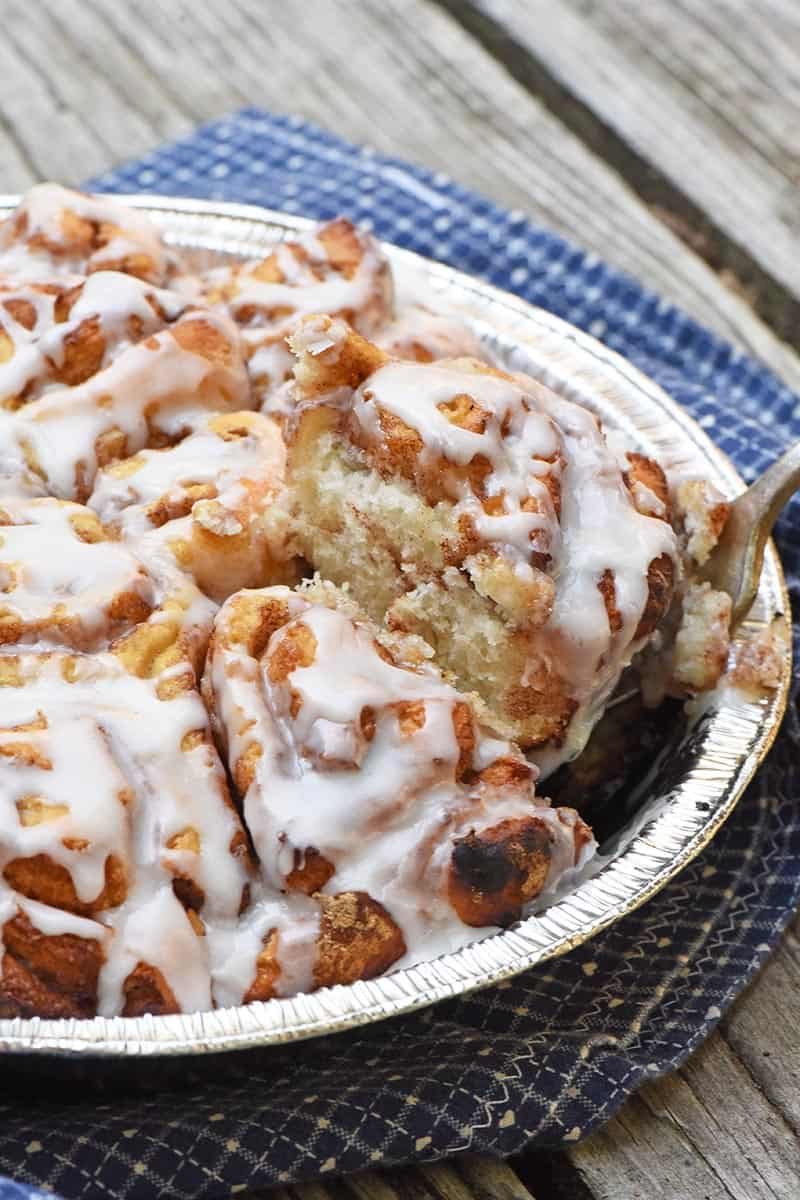
Place each slice upright in a foil pie plate, in a single layer. Once the pie plate is full, just cover with plastic wrap, and then place the whole pie plate down in a plastic gallon bag, seal it, and place it in your cooler.
Now if you want frosted cinnamon rolls, you gotta mix up the icing quick.
How to Make Powdered Sugar Icing for Camp Cinnamon Rolls
You can use this easy sugar cookie icing, but you may want to cut it down because you won’t need that much.
In a mixing bowl, mix together the softened butter, vanilla extract, and almond extract.
Add the milk to the mixture.
Slowly add the powdered sugar to the mixture, mixing it in as you go.
Once everything is mixed together, the icing should be smooth and creamy, free of any lumps.
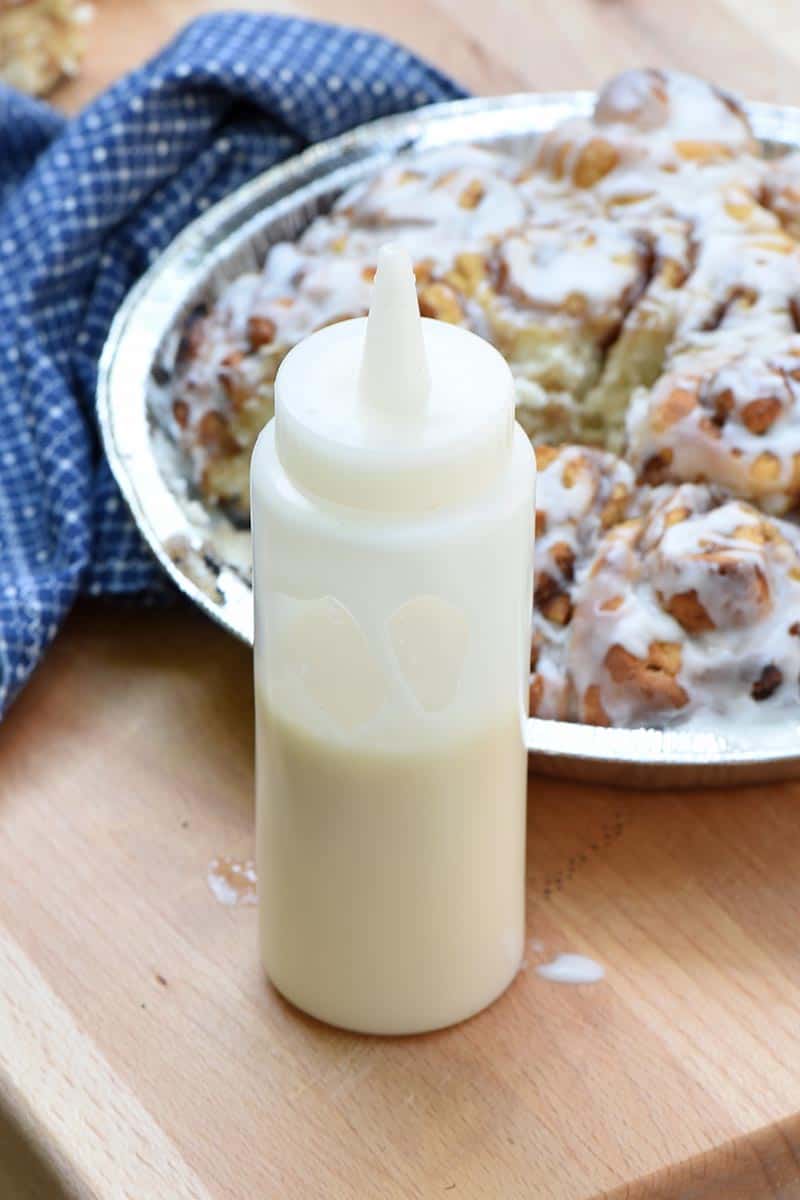
Once the icing is made, store it in a simple squeeze bottle with a lid and tip cover, and put it in the cooler. This makes it easy to both store in your cooler and then squeeze right on your cinnamon rolls after they’ve cooked. No mess, no fuss; it’s so simple and easy!
2 Ways to Bake Cinnamon Rolls Outdoors
You’ll need one of two things… A Dutch oven and/or a pie iron. Pie irons are fun because then everyone can cook their own, and kids love being able to make their own.
1. Dutch Oven Cinnamon Rolls
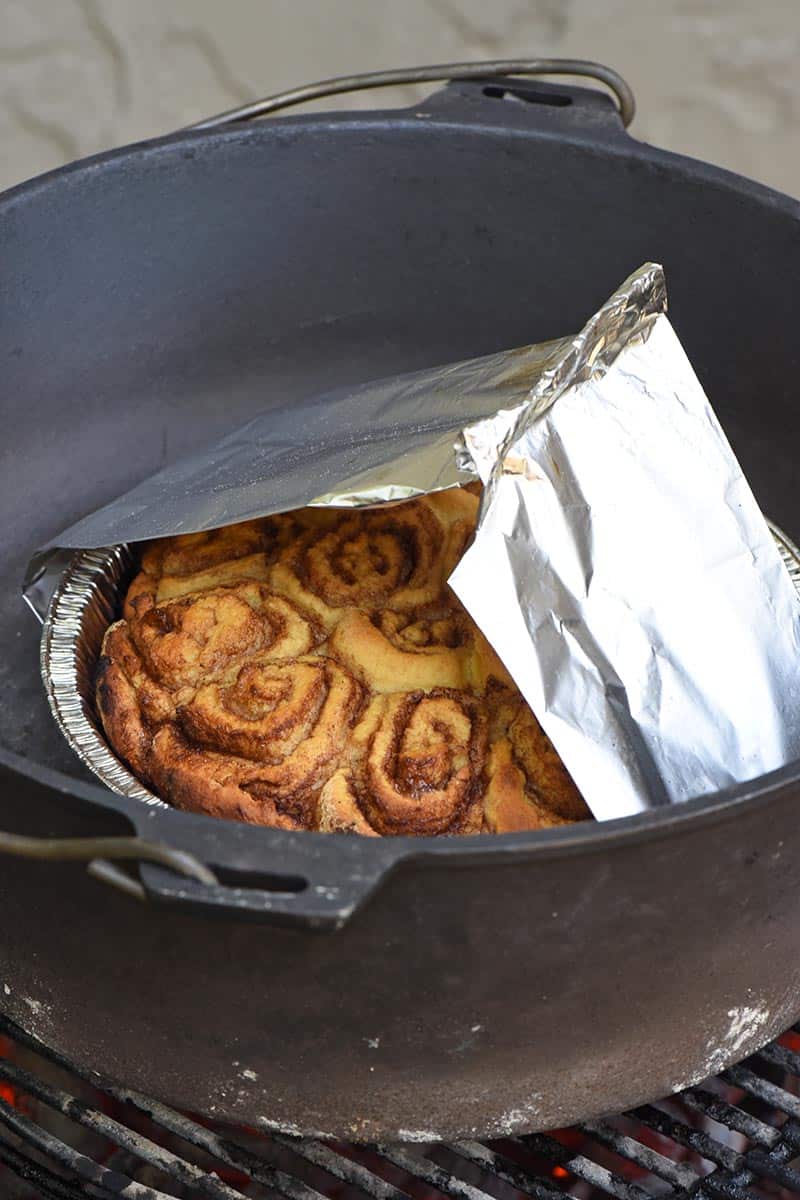
For Dutch oven cinnamon rolls, make a sling with aluminum foil.
Place your uncovered foil pie plate down into the Dutch oven using the sling. We like to put a few canning jar rings in the bottom of our Dutch oven, so the pie plate isn’t sitting directly on the bottom of the Dutch oven; this helps prevent the bottoms of the cinnamon rolls from burning.
Place the Dutch oven over the hot coals of a campfire; or place campfire-approved cooking grate above the hot coals in a grill, and place the Dutch oven on the grate. Then let the rolls cook for probably 10 minutes or a little more, ’til they’re golden brown and done. If you want to cook directly over the campfire, you can use a tripod, so your Dutch oven can sit up off the large flames, and the bottoms of your cinnamon rolls won’t burn. However you cook them, just check them frequently to make sure they don’t burn.
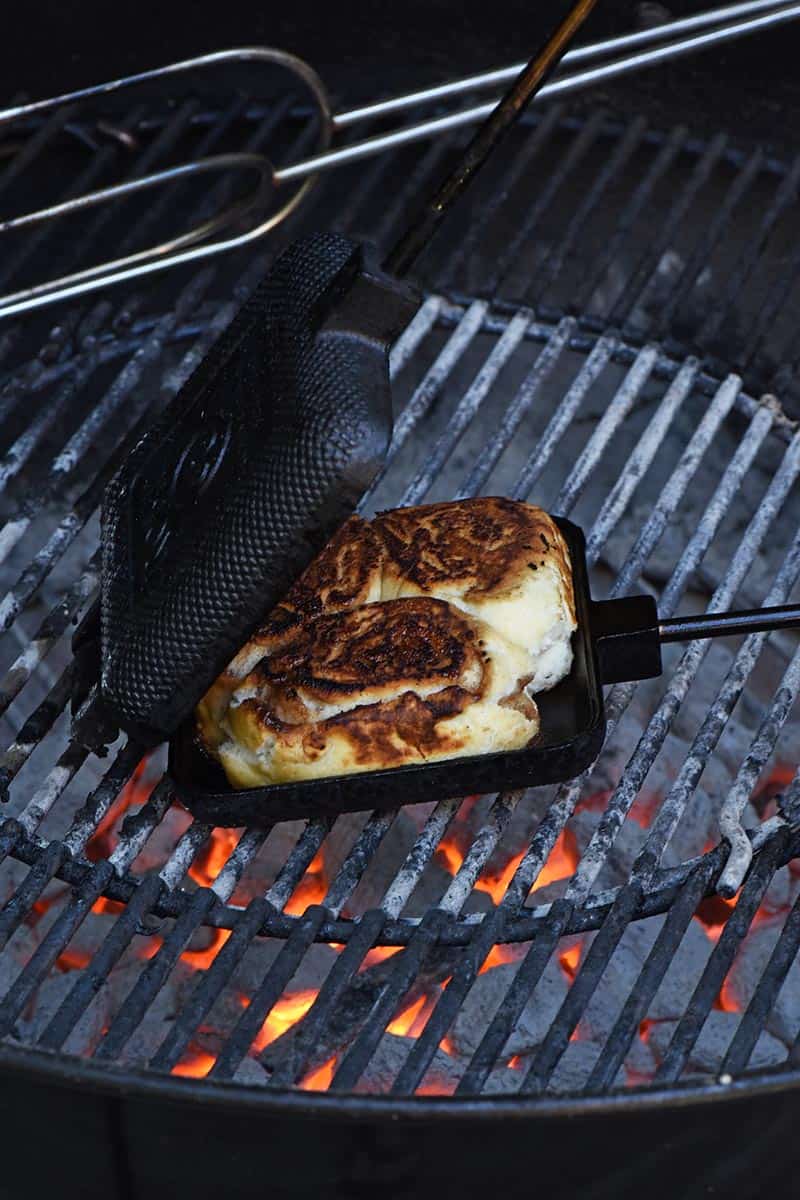
2. Pie Iron Cinnamon Rolls
Spray the inside of a pie iron with cooking spray.
Place 2 or more cinnamon rolls inside, close it up, and hold it over the grill or fire, rotating every 30-60 seconds.
Cook the cinnamon rolls for around 10 minutes, or ’til they’re golden brown and done. Just check them frequently to make sure they don’t burn.
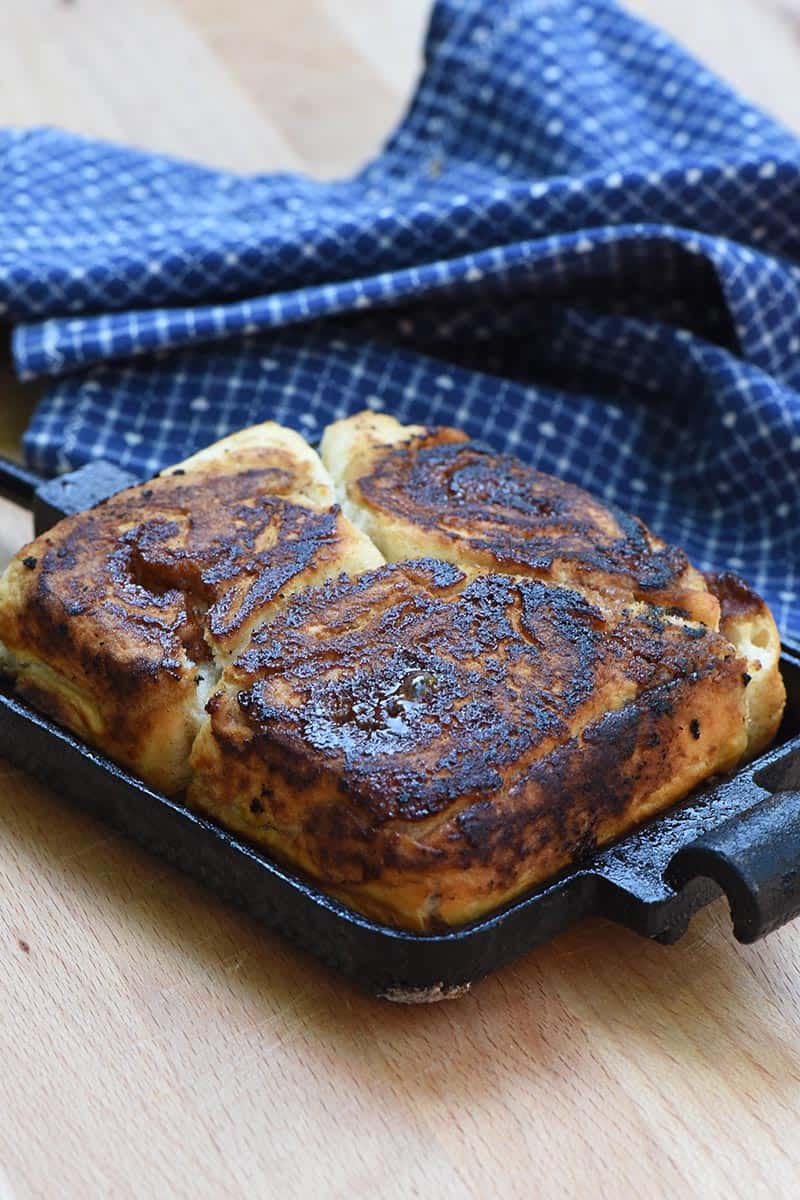
Now Drizzle the Icing
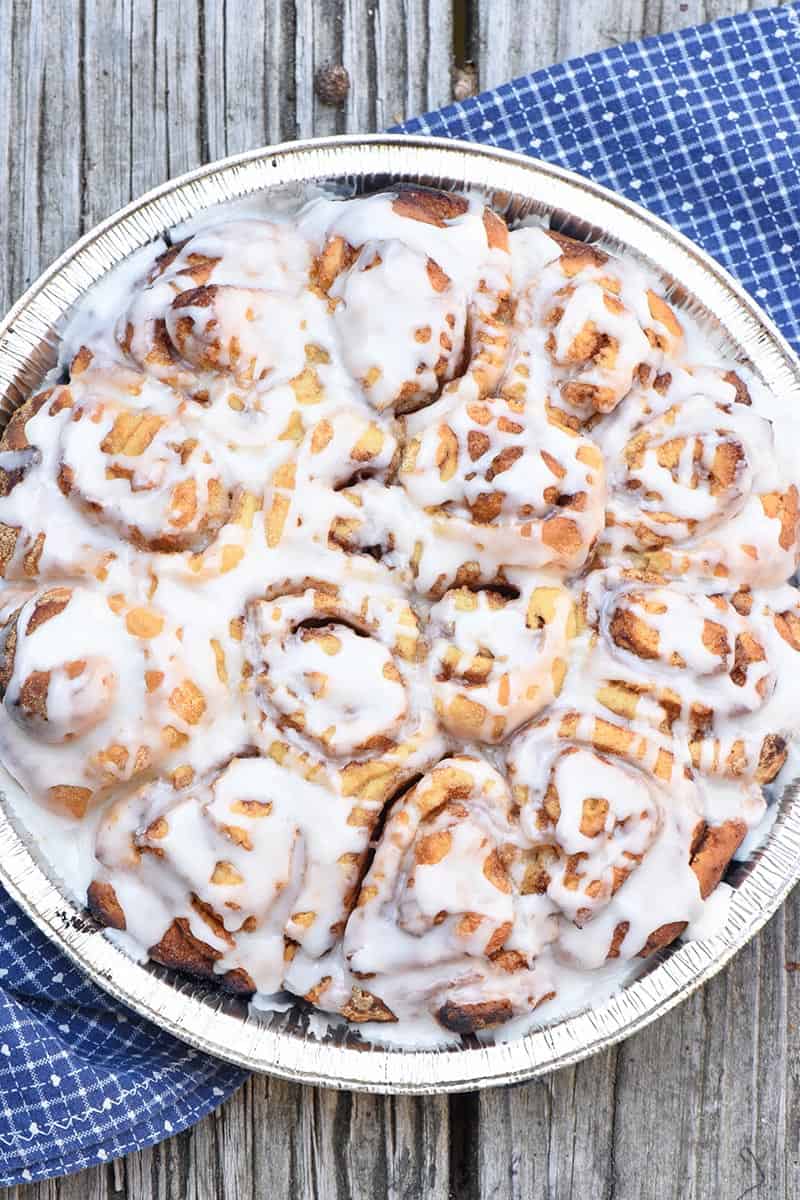
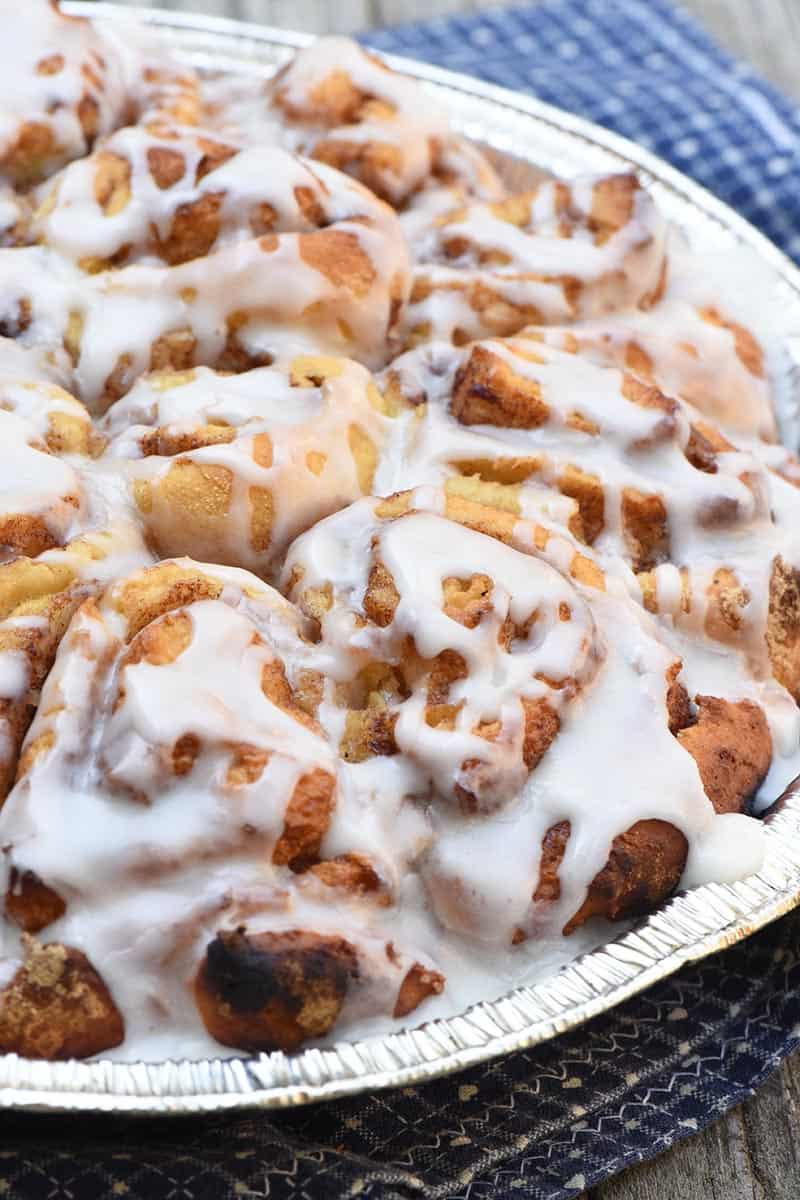
When your campfire cinnamon rolls are done, just squeeze on the icing, and they’re ready to eat! Yum!
Camping cinnamon rolls are easy and fun to make for the whole family! I love that I can make them ahead in just a few minutes and pack them in the cooler for a fun surprise treat at breakfast.
Expert Tips and Recipe FAQ’s
What’s the difference between cinnamon rolls and cinnamon buns?
There are a few differences between the two. Cinnamon buns usually have both brown sugar and nuts added; the brown sugar gives them a much sweeter flavor. They also don’t usually have icing; they’re usually sticky and served as is without any icing on top.
Can you cook these in a skillet, on the stove, or on a roasting stick?
Sure! As long as you have a lid for the skillet, you can cook campfire cinnamon rolls over the coals for the same amount of time. You can also cook cinnamon rolls on the stove in a skillet or on a griddle; just be sure to flip the cinnamon rolls, so each part of the roll cooks through and is golden brown when done. As for roasting on a stick, you can also keep the rolls whole or untwist the rolls and place the rolls or dough on long roasting sticks; then hold the rolls or delicious campfire cinnamon roll-ups over the campfire to cook, kinda like you would if you were roasting marshmallows or hot dogs. Just keep in mind they might not be as moist, and you may lose some of that gooey filling.
What’s the best way to keep from burning the bottom of cinnamon rolls?
Like I mentioned above, putting canning jar rings in the bottom of the Dutch oven, then setting the foil pan full of cinnamon rolls on those jar rings, helps to prevent burning. You can also place each individual roll in an orange peel, from a hollowed-out orange, in the pan; this not only helps prevent burning, it also gives a slight orange flavor to the rolls, which pairs really well with cinnamon. Then also, keeping the pan off the open flame and to the side over hot coals instead will also help to prevent burnt rolls.
How should you store leftovers?
Definitely put any leftovers in an airtight container or sealed bag in the cooler. If you use a foil pan, you can even cover that foil pan, bag it, and put it in the cooler.
More Camping Recipes:
If you love these camp cinnamon rolls, you’ll love our other camping recipes you can enjoy in the great outdoors…
If you try this recipe, why not leave a star rating in the recipe card right below and/or a review in the comment section further down the page? I always appreciate your feedback. You can also follow me on Pinterest, Facebook, Instagram, and YouTube. And subscribe to my email list too!
Campfire Cinnamon Rolls
Here are two ways to make campfire cinnamon rolls, in a Dutch oven or pie iron, over the campfire or on the grill. This ooey gooey, delicious camping recipe makes an easy breakfast you can make ahead and cook outdoors! It's perfect for the whole family; kids can help too!
Large Mixing Bowl
Rolling Pin
Pastry Brush
Foil Pie Plate
Camping Dutch Oven
Pie Iron
Squeeze Bottle
Rolls:
3 cups biscuit mix
1 cup whole milk
1 tablespoon salted butter (melted)
2 teaspoons ground cinnamon
1/4 cup cane sugar
Icing:
1 tablespoons salted butter (softened)
1/4 teaspoon vanilla extract
1/4 teaspoon almond extract
1/4 cup whole milk
1 1/2 cups powdered sugar
Mix and Roll the Dough:
In a large bowl, mix the biscuit mix and milk together until you have a nice sticky dough.
In a separate smaller bowl, mix together the cinnamon and sugar, and set aside.
Spread a little flour or biscuit mix out on a clean surface, and knead your dough just enough so it's not sticky anymore.
Roll out the dough to about 1/4 inch thickness.
Brush the melted butter onto the dough; then sprinkle it with the cinnamon sugar mixture.
Roll the dough tightly into a log. Then cut it into 1-inch slices.
Place each slice upright in a foil pie plate.
Once the pie plate is full, cover it with plastic wrap; then place the whole pie plate down in a plastic gallon bag, seal it, and place it in your cooler.
Make Powdered Sugar Icing:
In a mixing bowl, mix together the softened butter, vanilla extract, and almond extract.
Add the milk to the mixture.
Slowly add the powdered sugar to the mixture, mixing it in as you go.
Once everything is mixed together, the icing should be smooth and creamy, free of any lumps.
Once the icing is made, store it in a simple squeeze bottle with a lid and tip cover, and put it in the cooler.
How to Bake Dutch Oven Cinnamon Rolls:
For Dutch oven cinnamon rolls, make a sling with aluminum foil.
Place your uncovered foil pie plate down into the Dutch oven using the sling. We like to put a few jar rings in the bottom of our Dutch oven, so the pie plate isn't sitting directly on the bottom of the Dutch oven.
Let the rolls cook over the coals of a campfire, or on the grate above the coals in the grill, for probably 10 minutes or a little more, 'til they're golden brown and done. If you want to cook directly over the campfire, you can use a tripod, so your Dutch oven can sit up off the fire, and the bottoms of your cinnamon rolls won't burn. However you cook them, just check them frequently to make sure they don't burn.
How to Bake Pie Iron Cinnamon Rolls:
Spray the inside of a pie iron with cooking spray.
Place 2 or more cinnamon rolls inside, close it up, and hold it over the grill or fire, rotating every 30-60 seconds.
Cook the cinnamon rolls for around 10 minutes, or 'til they're golden brown and done. Just check them frequently to make sure they don't burn.
When your campfire cinnamon rolls are done, just squeeze on the icing, and they're ready to eat! Yum!
I recommend mixing these up at home and then packing them in the cooler for cooking over the campfire (or grill). If you can’t use a campfire or grill, because there have been many times we were in that exact situation, you can cook them in a Dutch oven on your camp stove.
Definitely put any leftovers in an airtight container or sealed bag in the cooler. If you use a foil pan, you can even cover that foil pan, bag it, and put it in the cooler.
Breakfast & Brunch, Dessert
American
campfire cinnamon rolls, camping cinnamon rolls, Dutch oven cinnamon rolls, pie iron cinnamon rolls
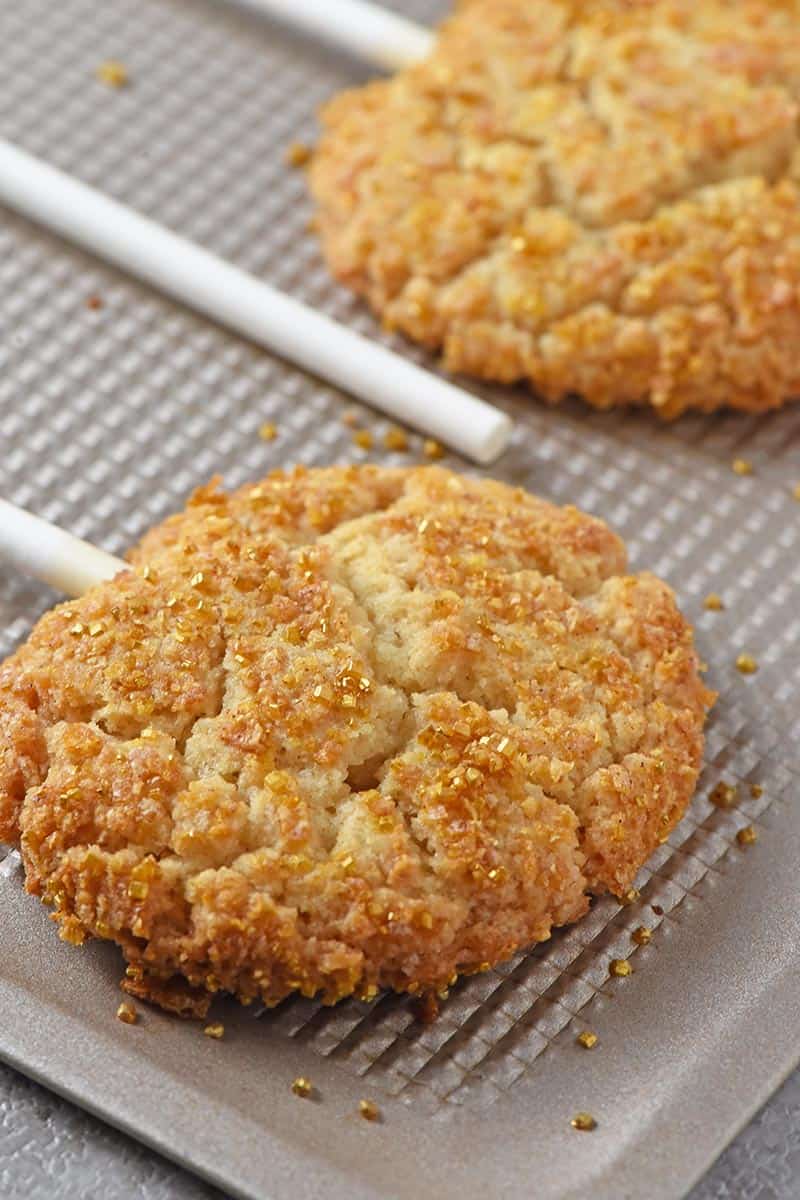
Fellow book lovers unite with Golden Snitch cookies, the perfect fun dessert for your next Harry Potter themed party!
If you love the Harry Potter books and movies, you’re going to love this creative recipe for Golden Snitch cookie pops. Even my oldest child, who doesn’t eat a lot of sweets, absolutely loved these homemade snickerdoodle pops.
While they do take a little time, like our favorite chocolate sandwich cookies and peanut butter cookies, they’re actually really easy to make. It’s as simple as mixing up your favorite recipe for snickerdoodle cookies, then decorating them to look like the Golden Snitch.
I used just a smidge of cinnamon in the cookie dough but instead of rolling the cookies in a cinnamon/sugar mixture, I rolled them in cereal. Then I rolled them in golden sugar crystals.
It gave just the right amount of cinnamon flavor and golden sparkle. The cookies even cracked just a little bit to give that worn appearance the Golden Snitch seems to have.
Below you’ll find the printable recipe and a video tutorial, and I’ll share where you can find the printable wings I used for these scrumptiously magical cookie pops.
Salted butter and unsalted butter – I prefer the texture that real butter gives over margarine.
Pure cane sugar – You can also use granulated sugar, but I prefer to use unrefined cane sugar.
Unbleached all-purpose flour – You can make these gluten-free, as well, by using a gluten-free flour (and making sure all your other ingredients are gluten-free).
Cereal – I use Cinnamon Frosted Flakes for this recipe; you can use just about any type of cinnamon flavored cereal, for example, Cinnamon Life or Cinnamon Toast Crunch.
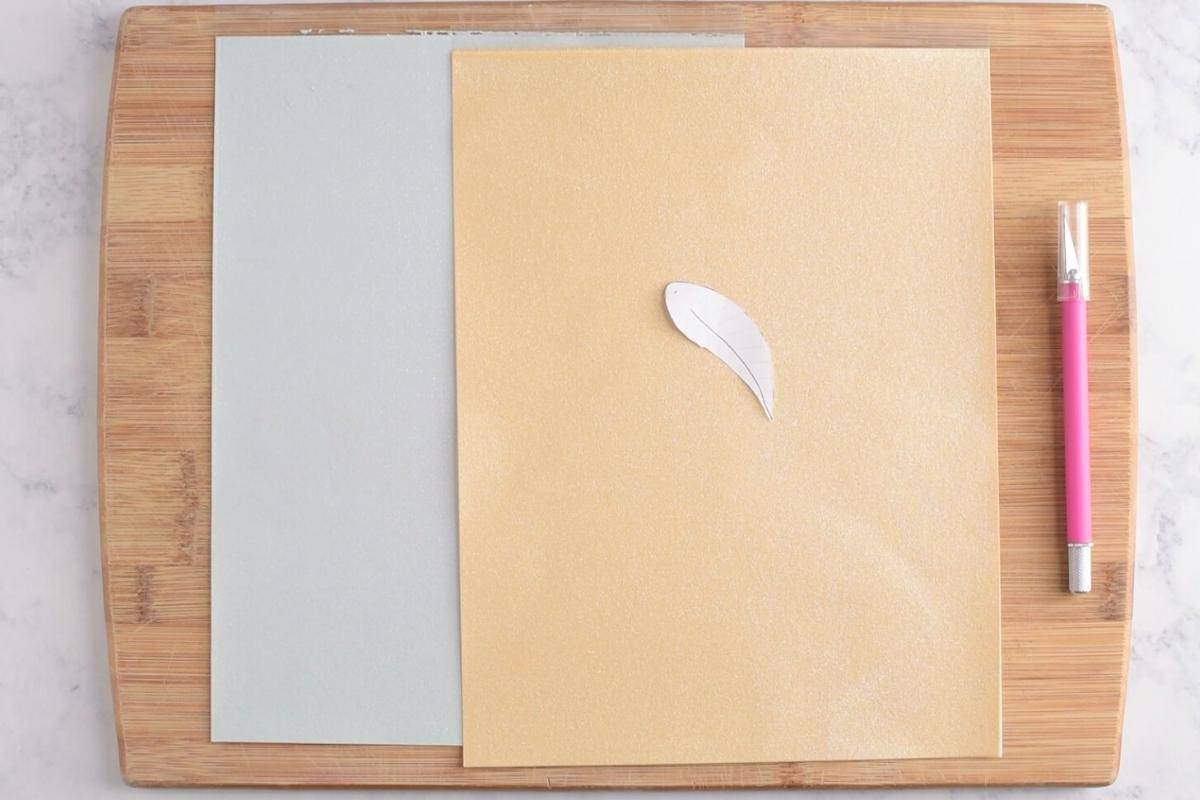
Gold colored sugar crystals – I found these at the craft store.
Sugar paper – to make the wings.
How to mix up this snickerdoodle cookie recipe:
First things first, pre heat your oven to 400°.
Then you’ll start mixing together ingredients…
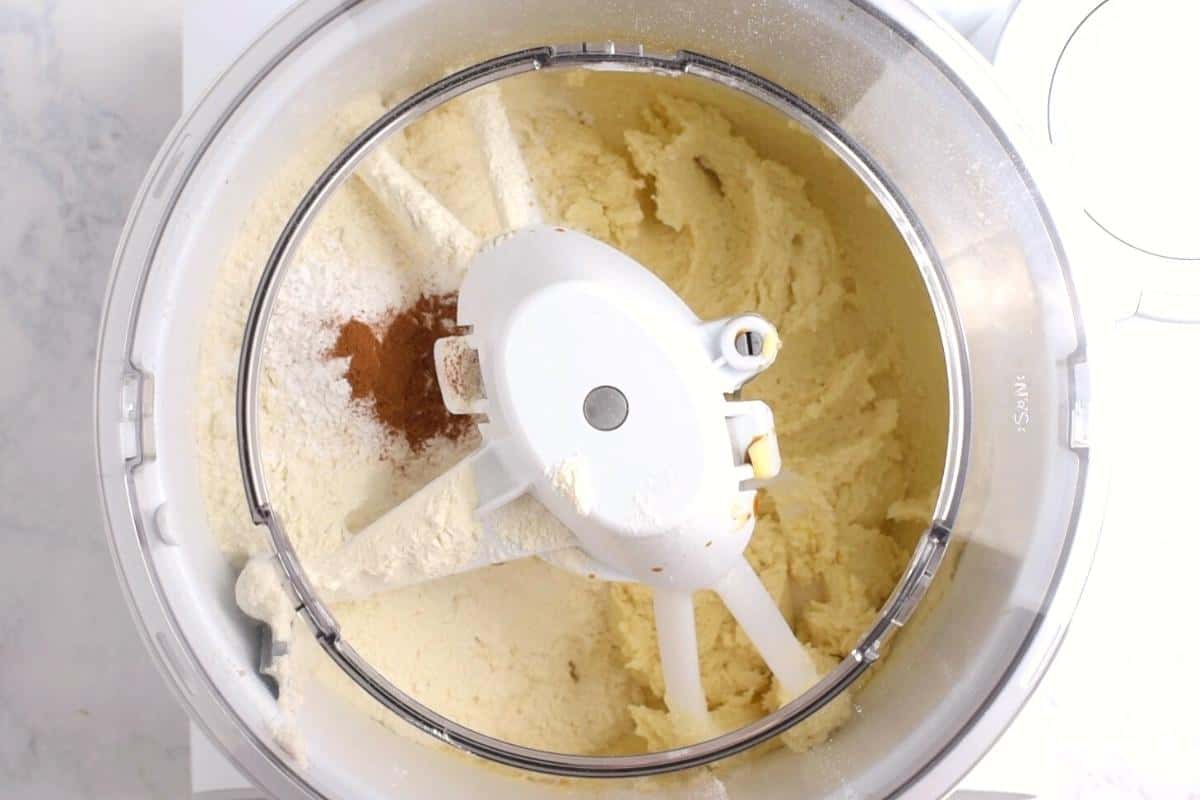
Start by creaming (or mixing together) the butter, sugar, and eggs.
Blend in the dry ingredients, including the flour, cream of tartar, baking soda, salt, and cinnamon.
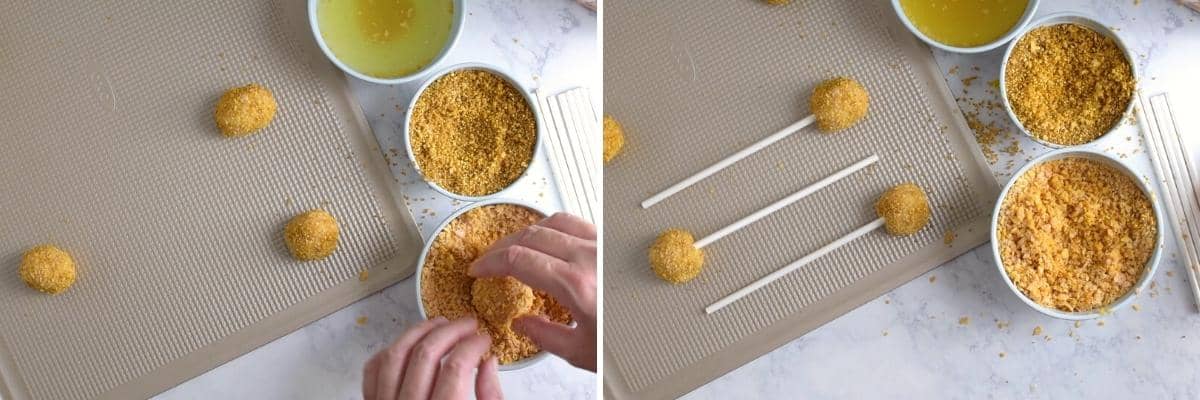
Crush whatever cereal you decide to use… We put ours in a plastic baggie and crushed it with a rolling pin. Once it’s crushed, put it in a bowl.
Add a little bit of water to a separate bowl, and add the golden colored sugar crystals to yet another separate bowl. Shape the dough by rounded teaspoonfuls into balls. Then roll the balls first in the water to moisten them up just a bit. Next, roll them in the cereal, patting the crushed flakes into the surface of the cookie ball. Finally, roll each cookie ball in the golden sugar crystals, again patting the sugar crystals into the surface of the cookie ball.
Place each cookie ball on an un-greased cookie sheet. Then stick a cookie/cake pop stick into each one.
Bake the cookie pops for 12 to 14 minutes. The cookies will flatten out somewhat but still stay in a fluffy, rounded shape.
Once the cookies have baked, allow them to cool.
How to decorate Golden Snitch cookies
First Cut out the Wings
Use this Golden Snitch wing template to cut wings out of the sugar paper. You’ll want 2 wings for each cookie pop. How to do this…
Print the wing out on a printer; then cut it out using a craft knife.
Place the paper wing on your sugar paper (on a cutting board), and cut the wings out with your craft knife. Make sure to position your paper wing while cutting so you have one for each side of your cookie pop.
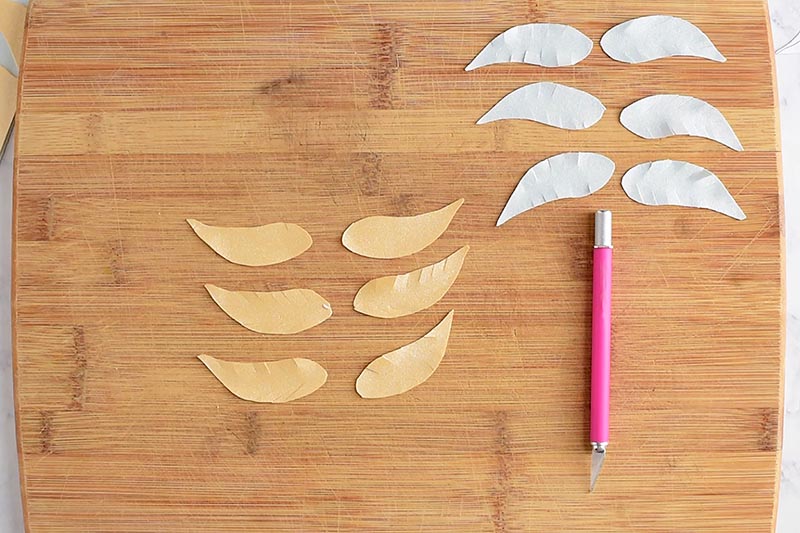
Once you have all your wings cut out, peel the backing off each one.
Then add slits for feathering in each wing (see my video in the recipe card below if this seems confusing).
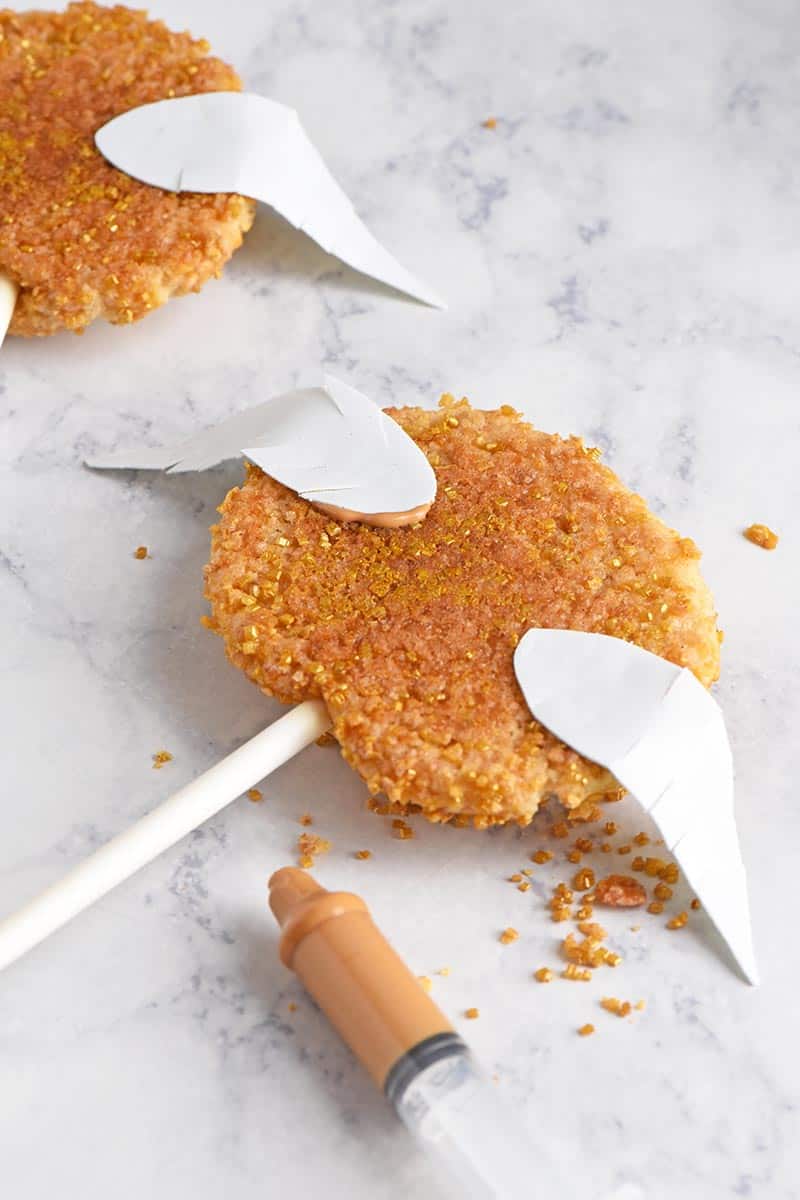
Then Attach the Wings with Candy Melts
Once all of your wings are cut out, melt your candy melts according to package directions.
Then you’ll add just a couple drops of melted candy on both sides of your cookie, and press the wings in place.
At this point, it’s important to let the candy harden so the wings will stay in place. This will take anywhere from 10 to 20 minutes.
And that’s it! Now you have Golden Snitch Snickerdoodle Cookie Pops to share with your kids, ready to munch on while they read their favorite book.
Fellow book lovers unite with Golden Snitch cookies, the perfect dessert for your next Harry Potter themed party!
1/2 cup salted butter
1/2 cup unsalted butter
1 1/2 cups sugar
1 teaspoon vanilla extract
1 large egg
2 3/4 cups all-purpose flour
2 teaspoons cream of tartar
1 teaspoon baking soda
1/4 teaspoon salt
1/4 teaspoon ground cinnamon
1 cup water
2 cups cinnamon Frosted Flakes* (crushed)
1/3 cup gold sugar crystals
1/2 cup salted caramel candy melts (melted)
1 piece sugar paper
Pre-heat the oven to 400°.
Mix together the softened butter and sugar.
Then add in the egg, mixing well.
Mix together the dry ingredients, including the flour, cream of tartar, baking soda, salt, and cinnamon.
Add the dry ingredients to the wet ingredients, mixing well.
Crush the cereal you decide to use… You can put it in a plastic baggie and crush with a rolling pin. Once it's crushed, put it in a bowl.
Also, add the water to a separate bowl; and add the golden colored sugar crystals to another separate bowl.
Shape the dough by rounded teaspoonfuls into balls.
First roll the dough balls in the water to moisten them up just a bit. Next roll them in the cereal, patting the crushed flakes into the surface of the cookie ball. And finally, roll in the golden sugar crystals, again patting the sugar crystals into the surface of the cookie ball.
Place each cookie ball on an ungreased cookie sheet. Then stick a cookie/cake pop stick into each one.
Bake the cookie pops at 400° for 12 to 14 minutes (oven times may vary). The cookies will flatten out somewhat but still stay in a fluffy, rounded shape.
Once the cookies have baked, allow them to cool.
Meanwhile, use a Golden Snitch wing template to cut wings out of the sugar paper. You'll want 2 wings for each cookie pop. Make sure to position your paper wing while cutting so you have one for each side of your cookie pop.
Once you have all your wings cut out, peel the backing off each one.
Then add slits for feathering in each wing (see the video if this seems confusing).
Once all of your wings are cut out, melt your candy melts according to package directions.
Add just a couple drops of melted candy on both sides of your cookie, and press the wings in place. An easy way to do this is to use an old medicine dropper.
At this point, it's important to let the candy harden, so the wings will stay in place. This will take anywhere from 10 to 20 minutes.
And that's it! Now you have Golden Snitch Snickerdoodle Cookie Pops, ready for your kids to munch on while they read their favorite book.
*I use Cinnamon Frosted Flakes for this recipe; you can use just about any type of cinnamon flavored cereal, for example, Cinnamon Life or Cinnamon Toast Crunch.
Desserts
American
Golden Snitch cookie pops, Golden Snitch cookies, Golden Snitch snickerdoodles
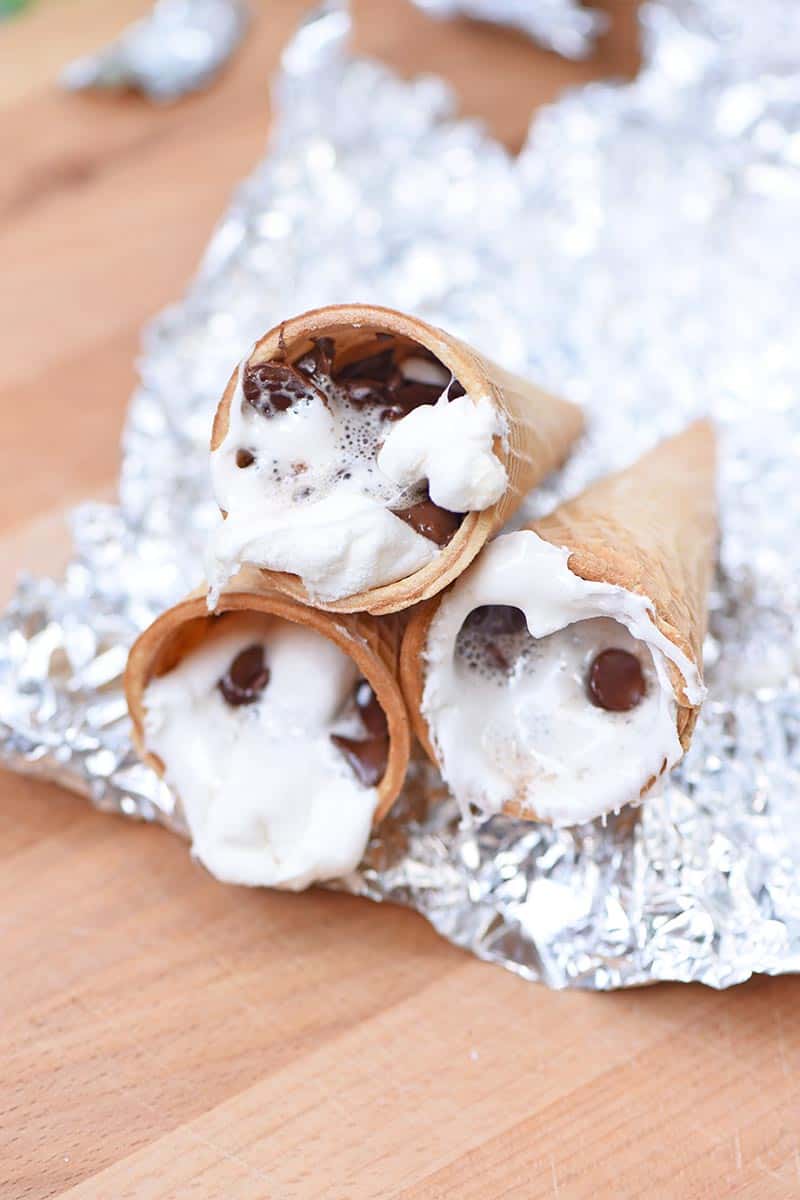
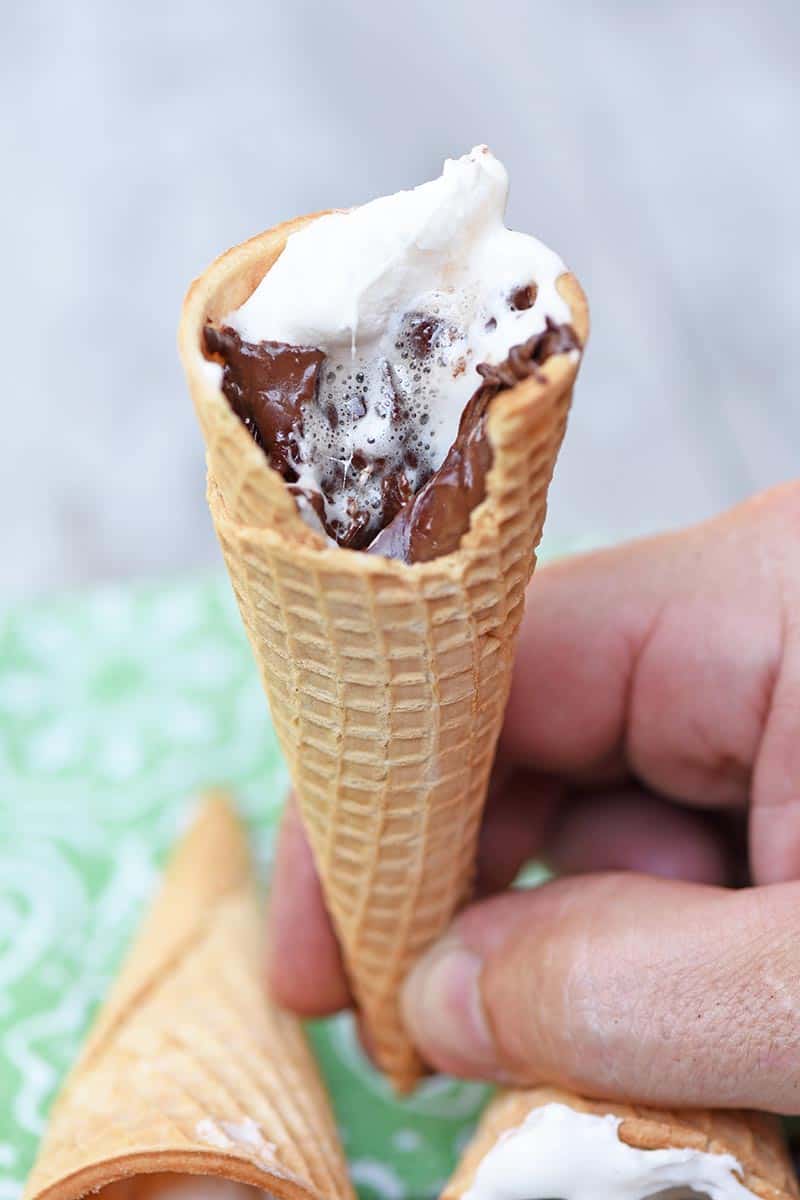
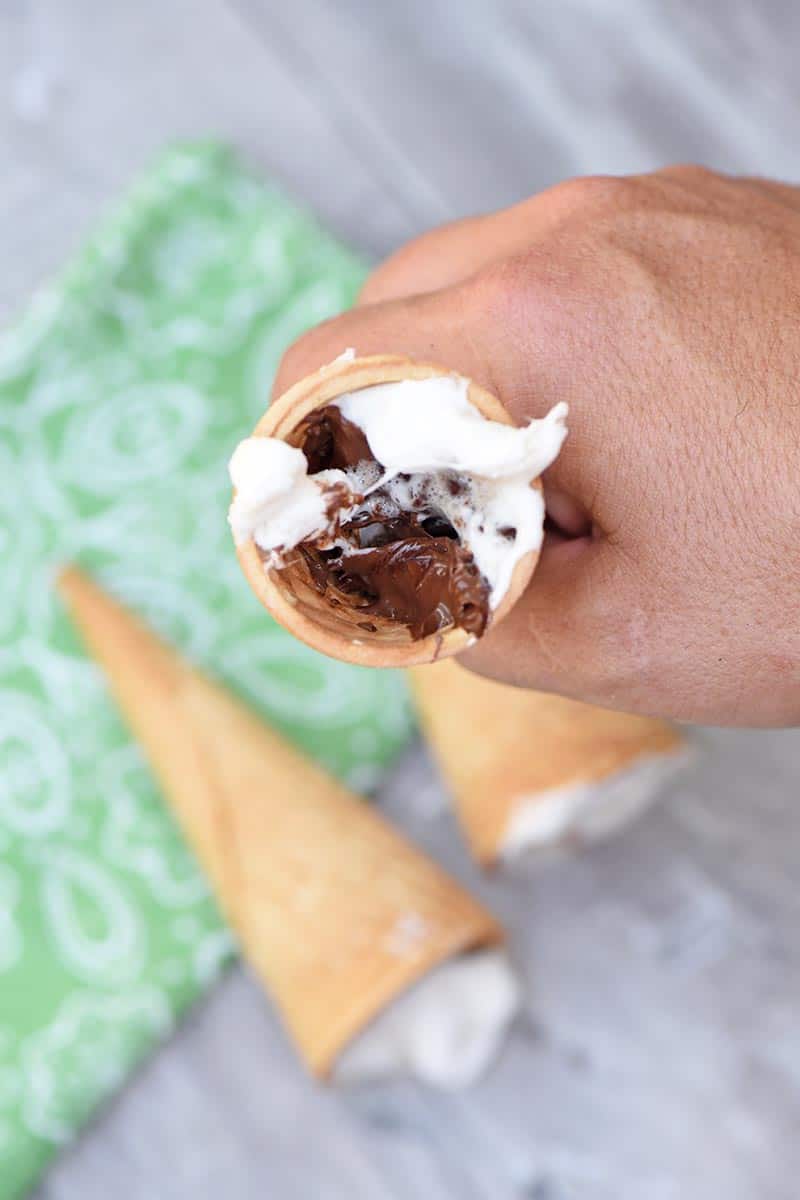
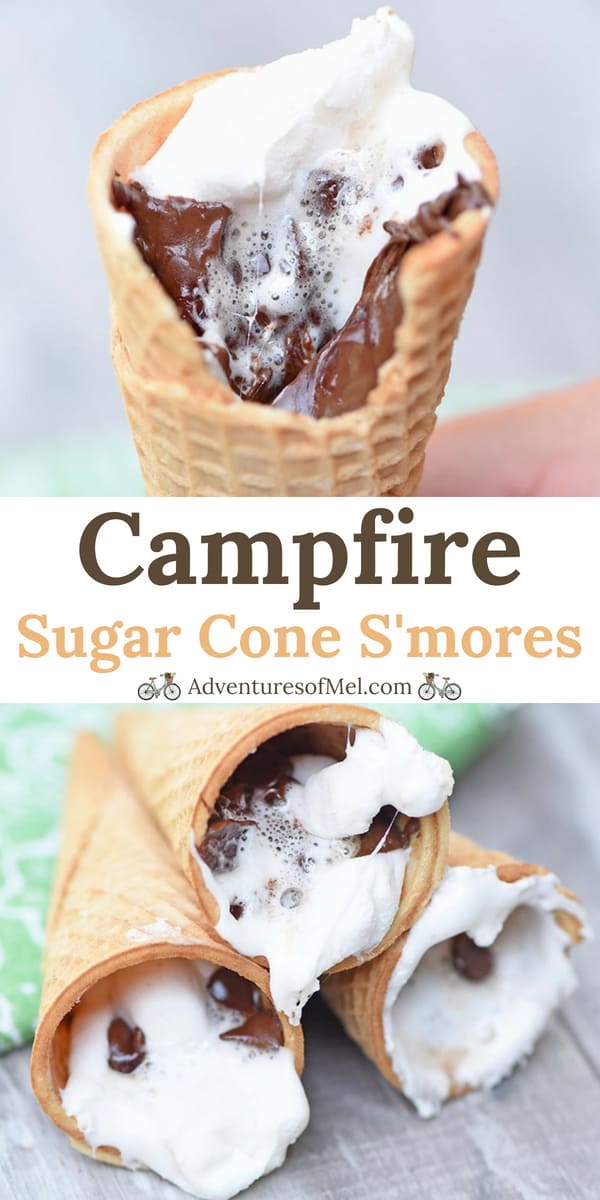
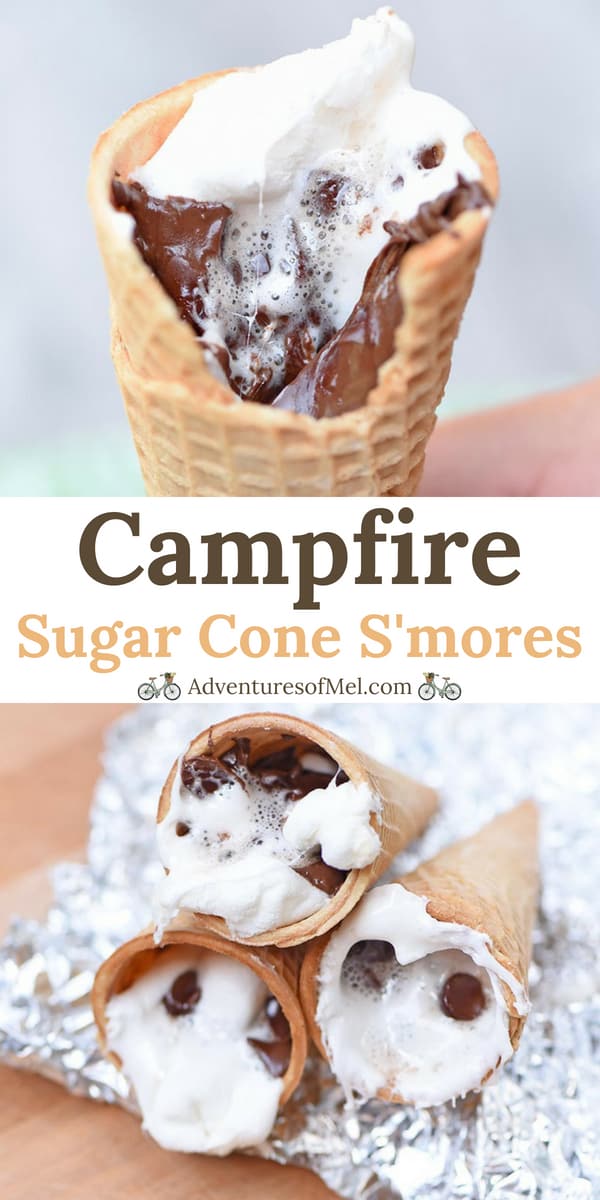
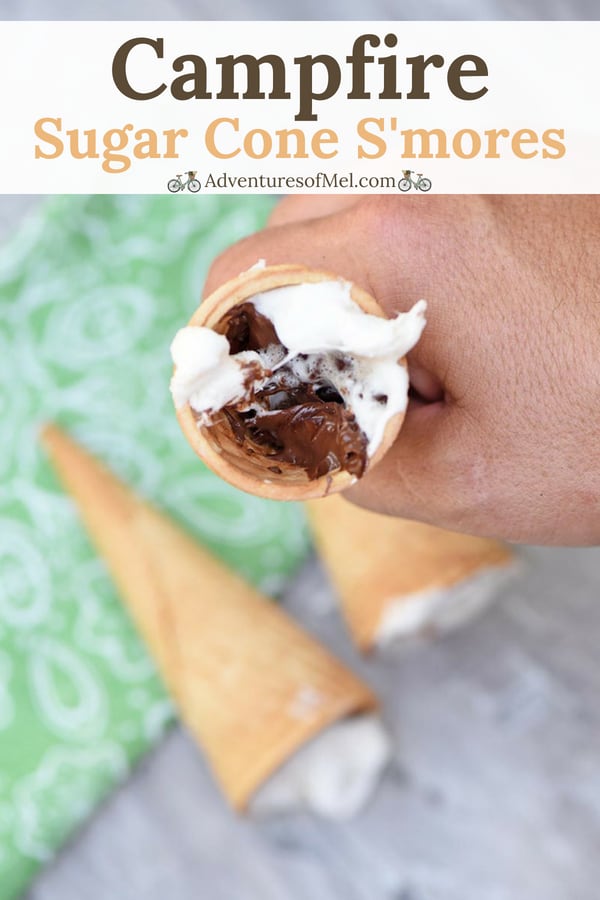
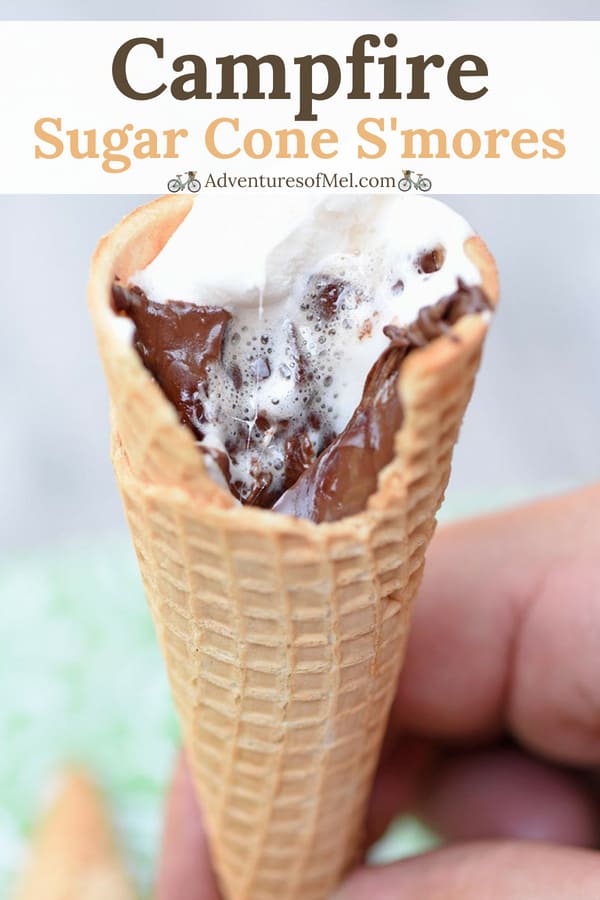
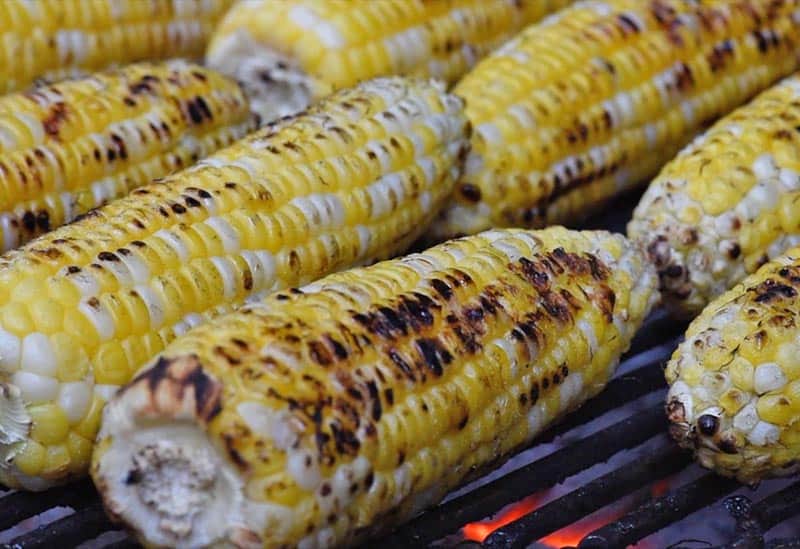
How to make yummy campfire sugar cone s’mores. All you need are ice cream cones, chocolate chips, and mini marshmallows for this easy camping recipe!
Every time we go camping, I always pack ingredients for s’mores. While graham crackers, chocolate, and mini marshmallows are always in our snack box, I have a feeling campfire cones will be too.
Ice cream cone s’mores and banana boats s’mores are the easiest things I’ve ever made. The trick is to pack them as full of chocolate chips and marshmallows as you possibly can.
You can use any kind of chocolate you want, but Ghirardelli chocolate chips are the best and my absolute favorite for making s’mores, chocolate chip cookies, and more. They really do make the best s’mores with kids.
Instead of sugar cones, you can also make waffle cone s’mores with waffle cones. I know my kids love this because the cones are slightly bigger than a regular sugar cone.
What I really love about s’mores cones is there’s less mess. Everything squishes down in the cone, you warm it up over the fire or the grill, and then eat it like an ice cream cone.
Also, did you know there is a National S’mores Day? Sure enough, every August 10th, you have an especially good reason to make these lovelies.
WHERE CAN I FIND THE ACTUAL RECIPE CARD?
If you’d rather skip all of my s’mores making tips, important cooking info for this recipe, and similar recipe ideas – and get straight to the sugar cone s’mores recipe – just scroll down to the bottom, where you’ll find a printable recipe card.
INGREDIENTS YOU’LL NEED FOR S’MORES CONES:
Chocolate chips – My favorite are Ghirardelli Semi-Sweet Chocolate Chips.
Aluminum Foil – You’ll need to wrap your cones in foil before cooking.
Tongs – A good pair of tongs will save your fingers.
HOW TO MAKE ICE CREAM CONE S’MORES
First things first, you’ll need either a campfire or a heated grill. Before you start filling the cones, either get a fire going or heat up the grill.
Then you’re ready to assemble your sugar cone s’mores…
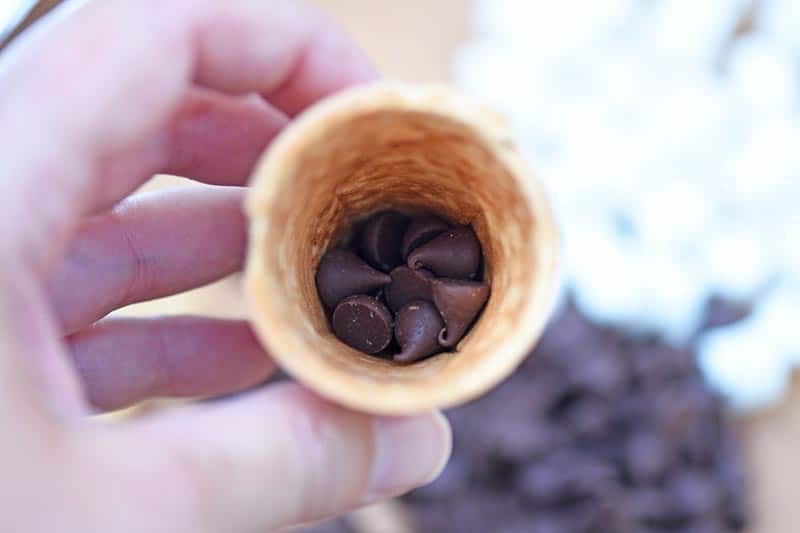
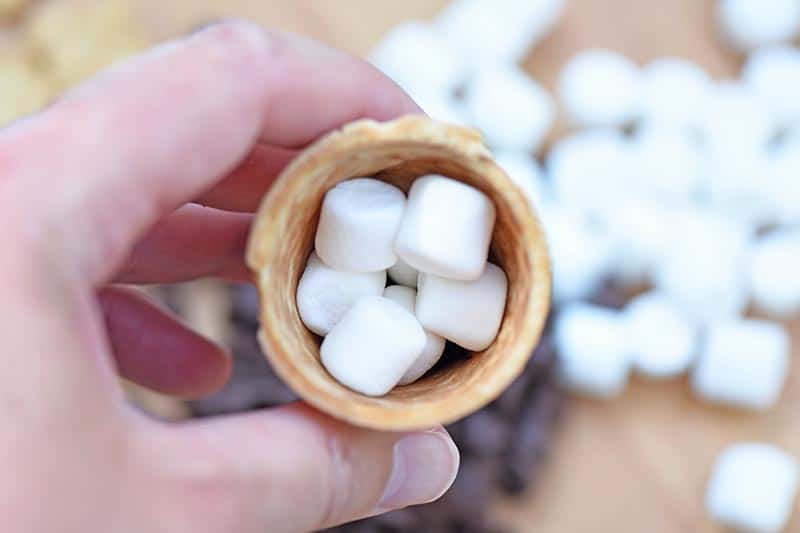
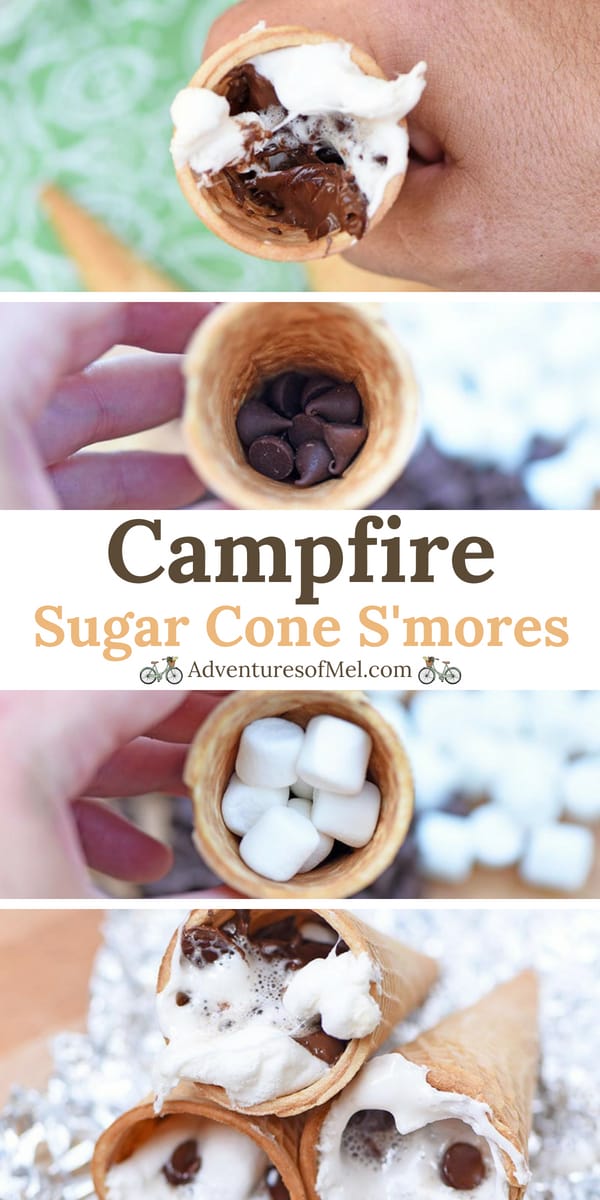
Layer chocolate chips in the bottom of a sugar cone.
Alternate layering mini marshmallows with chocolate chips in a few layers until your ice cream cone is full.
Squish and fill each cone as full as possible.
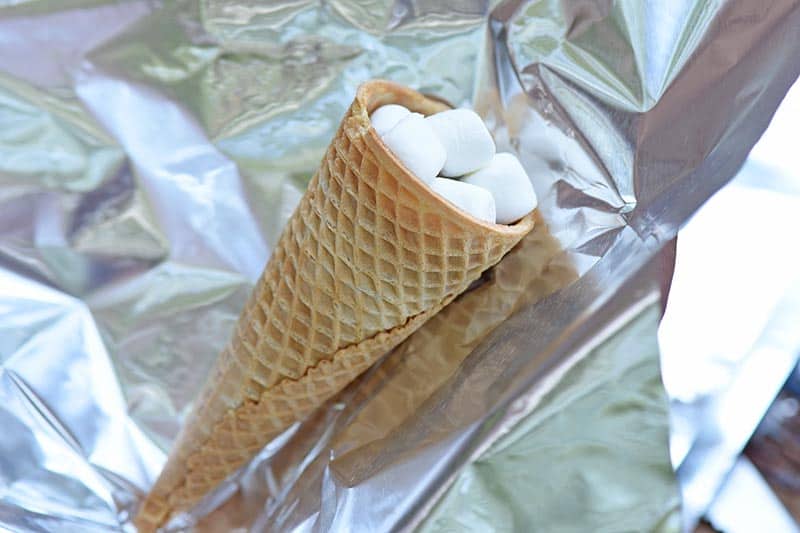
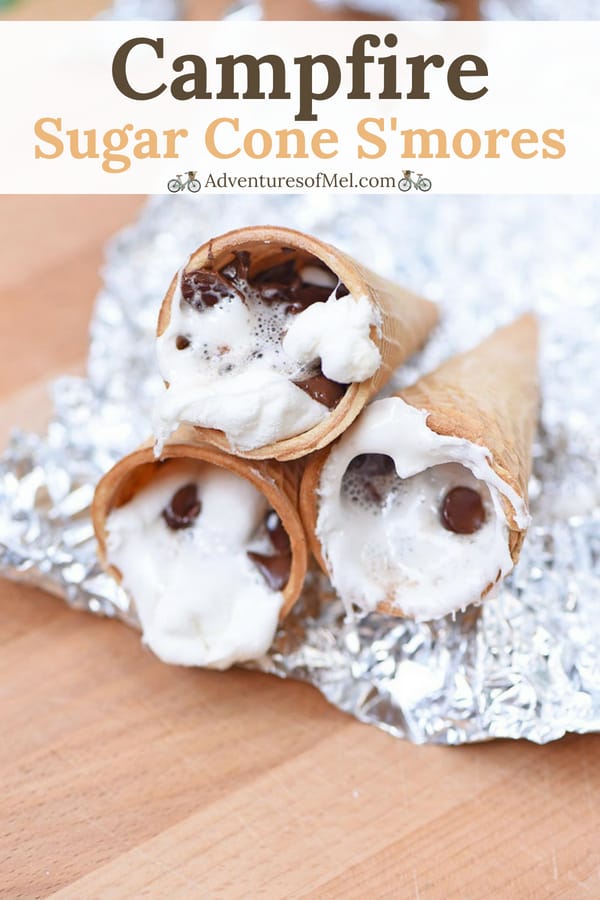
Wrap each sugar cone s’more in aluminum foil. Make sure it’s completely covered.
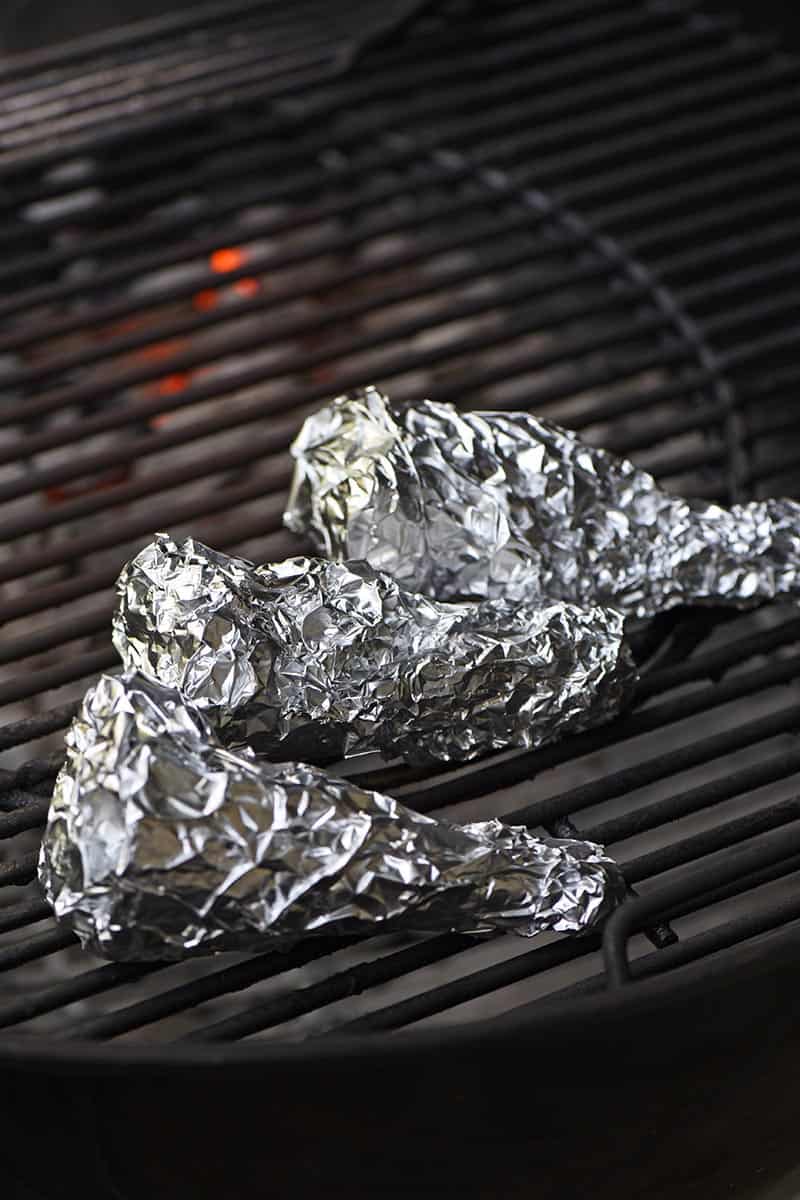
Add the wrapped cones to a warm grill, or place over the fire (try to keep it somewhat above the fire, maybe using a tripod with a Dutch oven). If you want to put it directly in the fire, try to put it over hot coals rather than over open flame.
Allow the s’mores to cook for about 5 to 10 minutes.
Using a pair of tongs, remove each s’more from the fire or grill, and carefully unwrap the foil; be careful, it’s hot! Watch the marshmallow, especially, as you unwrap, so you don’t get burnt.
Allow it to cool for a few minutes; then dig in and enjoy!
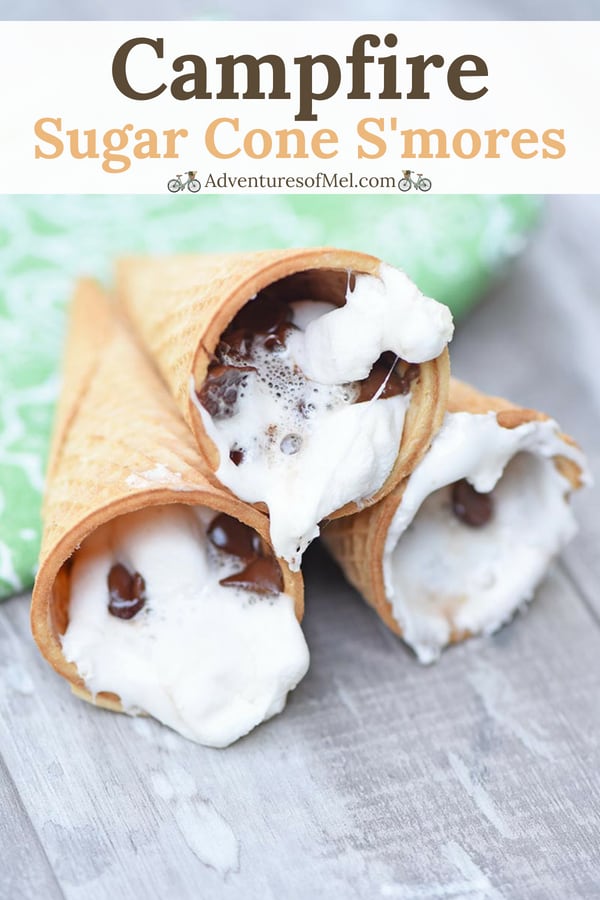
S’more campfire cones are so yummy! Everything’s layered just so, and it all melts together into one chocolaty, gooey, delicious dessert with a crunch.
ALTERNATIVE INGREDIENT OPTIONS
When it comes to what you layer inside your cone s’mores, there is no end to the possibilities. Let your imagination get to work.
Here are a few ideas to get you started…
Before you ever start to layer the chocolate and marshmallows, line your cone with peanut butter or marshmallow cream. Sometimes you can even find flavored marshmallow creams like strawberry marshmallow cream.
Add in peanuts or crushed up almonds for a little extra crunch.
Add fresh fruit like sliced bananas or chunks of strawberries.
CAN I MAKE THESE S’MORES AT HOME?
Yes, you absolutely can make these in both the microwave or the oven.
MICROWAVE ICE CREAM CONE S’MORES:
Layer all the ingredients, just as above, inside the cone.
Do NOT use aluminum foil in the microwave. Instead lay the cone on a microwave-safe dish, and cook in 15-second intervals ’til everything is almost melted inside the cone.
Allow your s’more to cool for a few minutes, and then it’ll be ready to serve. Be careful because it will be hot!
OVEN ICE CREAM CONE S’MORES:
Again, layer all the ingredients, just as above, inside the cone.
This time you can use aluminum foil. So, wrap each filled sugar cone in aluminum foil. Make sure it’s completely covered.
Add the wrapped cones to a cookie sheet or straight onto the oven rack, and cook at 350° F for about 5-10 minutes.
Using a pair of tongs, remove each s’more from the oven, and carefully unwrap the foil; be careful, it’s hot! Watch the marshmallow, especially, as you unwrap, so you don’t get burnt.
Allow it to cool for a few minutes; then dig in and enjoy!
Sugar cone s’mores are so fun and so easy to make. Your kids will LOVE making these fun desserts while camping, while indoors on a rainy day, or while enjoying a backyard campfire or cookout.
How to make yummy campfire s’mores in an ice cream cone. All you need are sugar cones, chocolate chips, and mini marshmallows for this easy camping recipe!
1 cup chocolate chips
1 cup mini marshmallows
4 whole ice cream cones ((sugar cones or waffle cones))
Start a campfire or heat up the grill.
Layer chocolate chips and mini marshmallows in the sugar cones, adding a few layers until your cones are as full as possible.
Wrap your sugar cone s’mores separately in aluminum foil. Make sure each one is completely covered.
Add your s’mores to a warm grill, or place them over the fire*.
Allow the s’mores to cook for about 5 to 10 minutes.
Using a pair of tongs, remove your s’mores from the fire or grill, and carefully unwrap the foil; be careful, it’s hot! Watch the marshmallow, especially, as you unwrap the foil, so you don’t get burnt.
You can let it cool for a few minutes, then dig in and enjoy!
*Try to keep your s’mores somewhat above the fire, maybe using a tripod with a Dutch oven. If you want to put them directly in the fire, try to put them on hot coals rather than open flame.
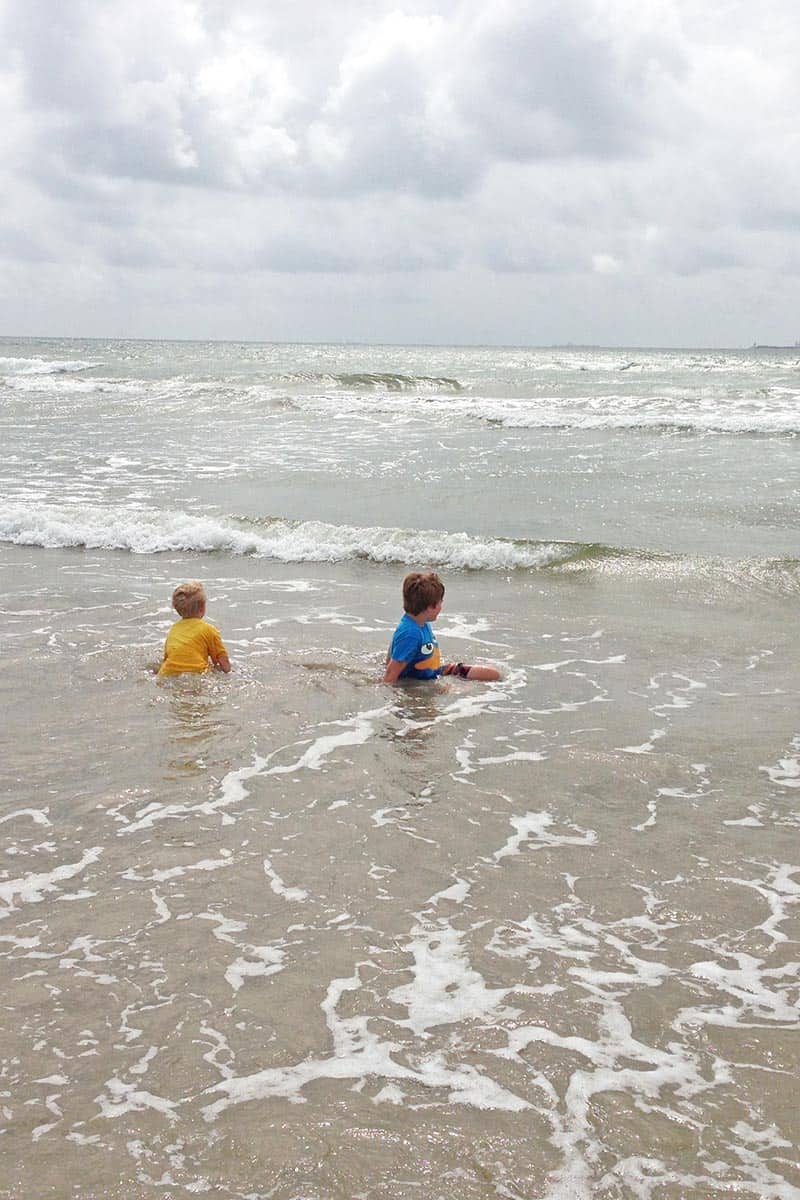
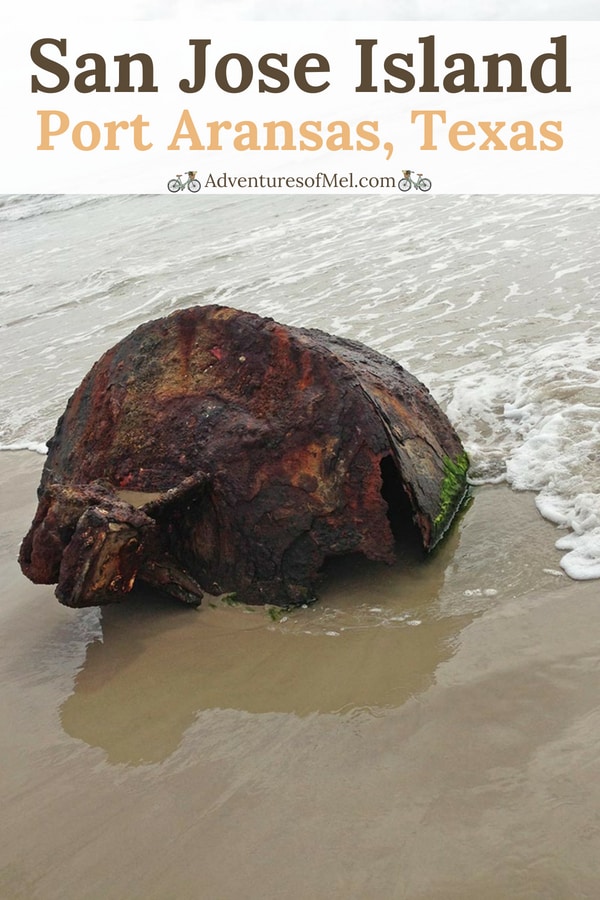
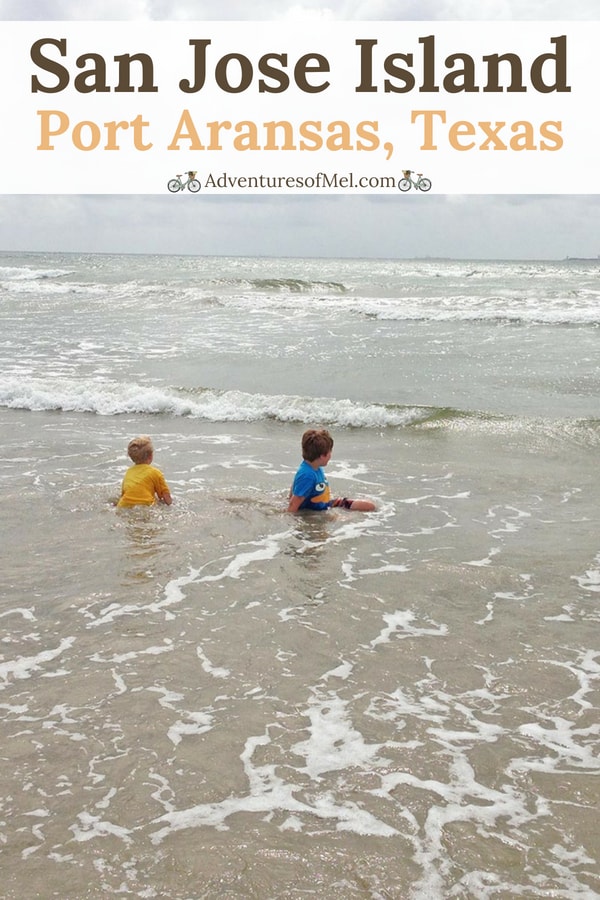
San Jose Island in Port Aransas is an uninhabited island you can only travel to by ferry. Explore the island, play on the beach, and collect sand dollars!
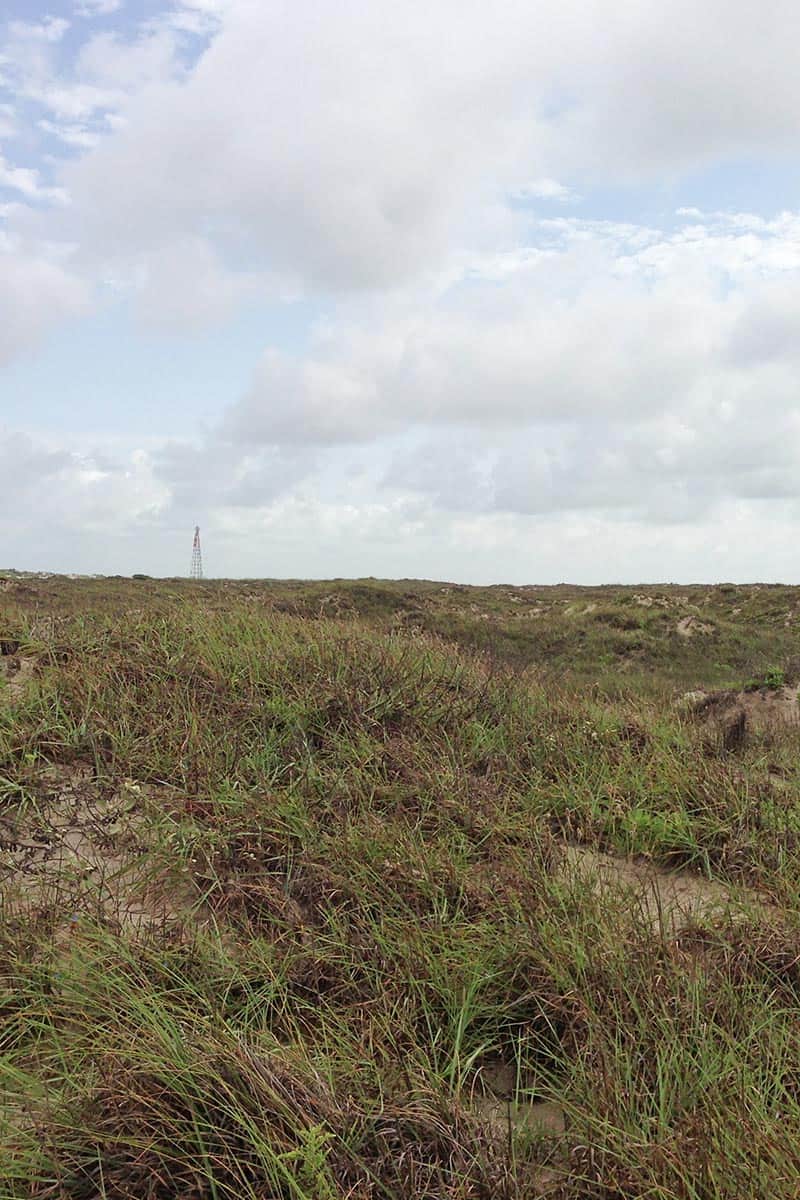
While doing a little research before we traveled to Port Aransas Beach a few years ago, I came upon an island everyone said was a must see place. San Jose Island, or Saint Joe’s Island, is a wild uninhabited piece of coastline on the Texas Gulf Coast.
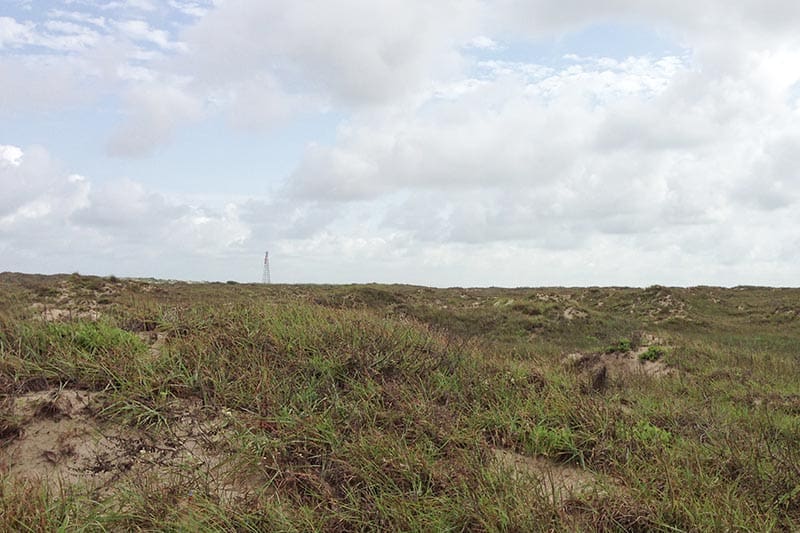
San Jose Island, Texas, is a beautiful natural island; it’s privately owned, free of vehicles, about 2 miles wide at its widest point, and about 21 miles long. There are no shelters of any kind, but you may see the occasional cow roaming about.
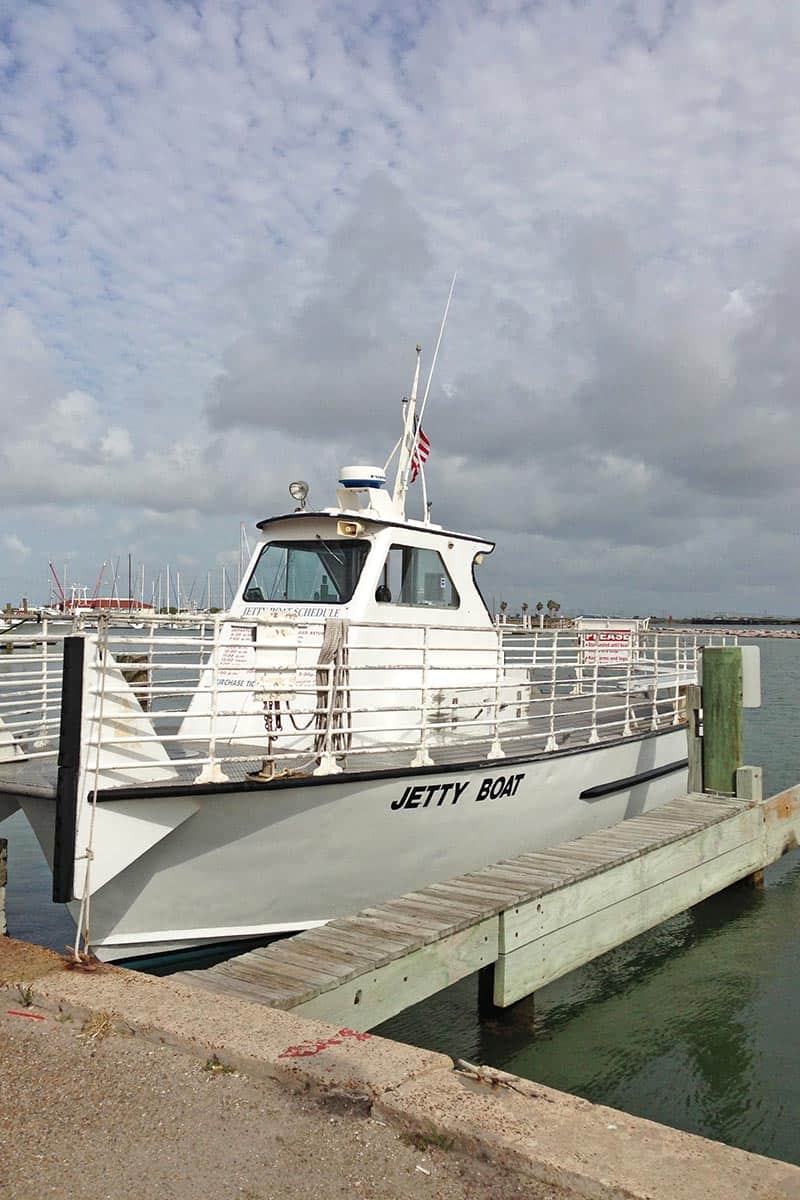
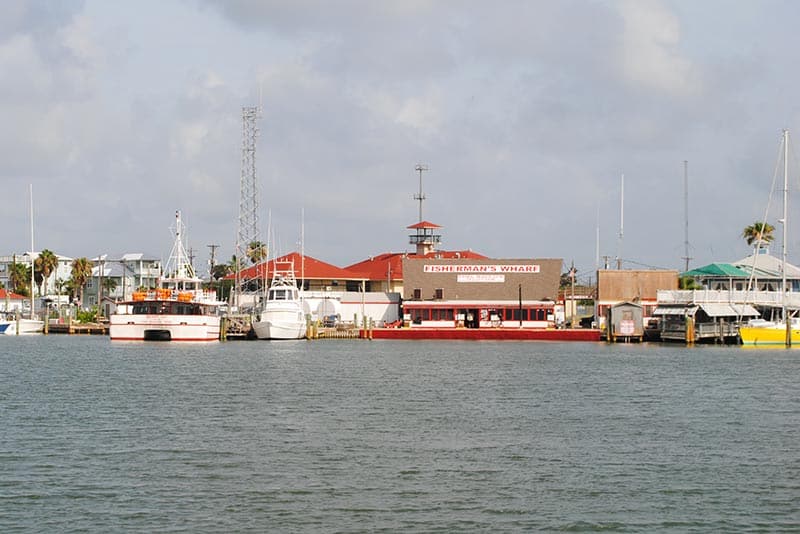
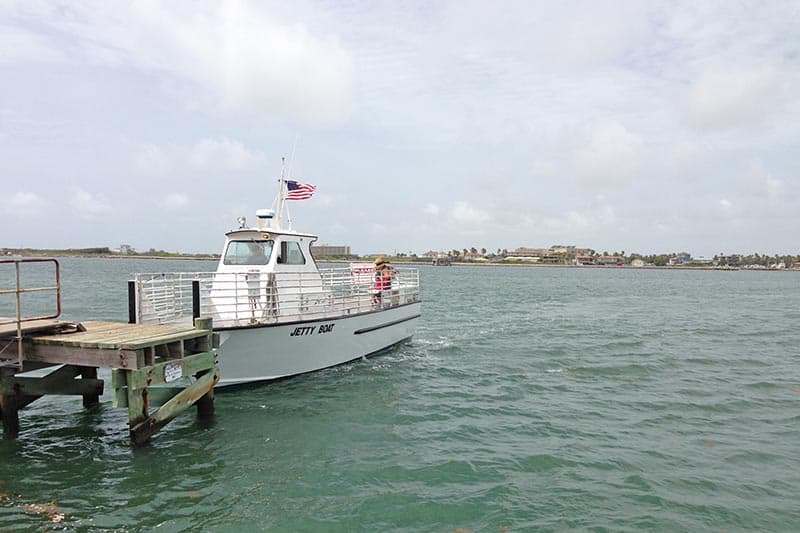
The only way to get to the island is to take the Jetty Boat from Fisherman’s Wharf, Port Aransas.
It’s one of our favorite things to do in Port Aransas besides hanging out on beautiful Port Aransas beaches, and believe me, there are a LOT of fun things to do and explore in this amazing Texas beach town.
I know things may have changed since we were there, especially after Hurricane Harvey; but I’m anxious to go back and explore some more.
Getting to San Jose Island by the Jetty Boat
We decided to spend half a day on the island and explore, play in the ocean, and just like on Sanibel Island, hunt for sand dollars and sea shells. We bought our tickets at Fisherman’s Wharf.
There were a few people making the short journey with us. You can actually see the island from Port Aransas; it’s only a 5 minute ride.
Exploring Saint Joe’s Island in Port A
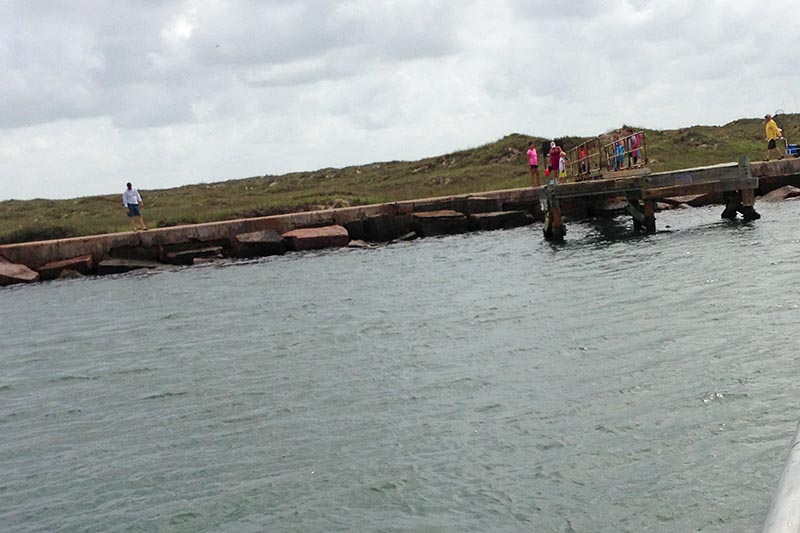
When we arrived, there were a handful of people waiting to take the Jetty Boat back to Port A.
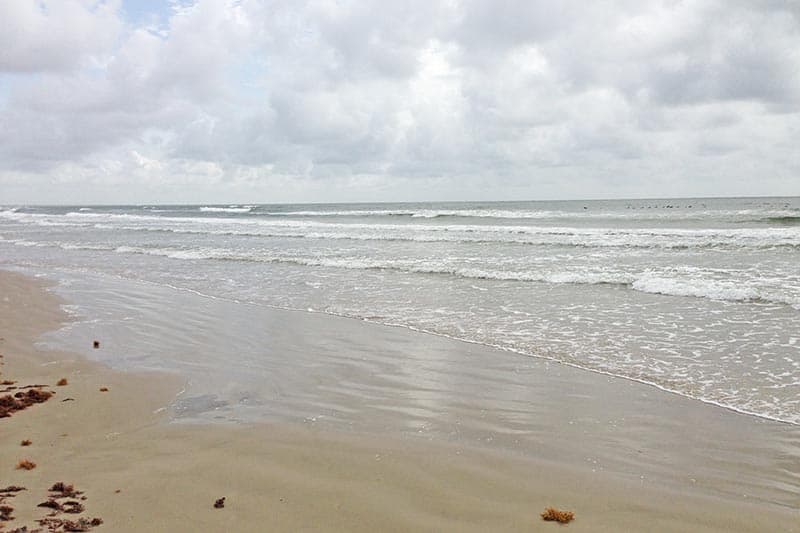
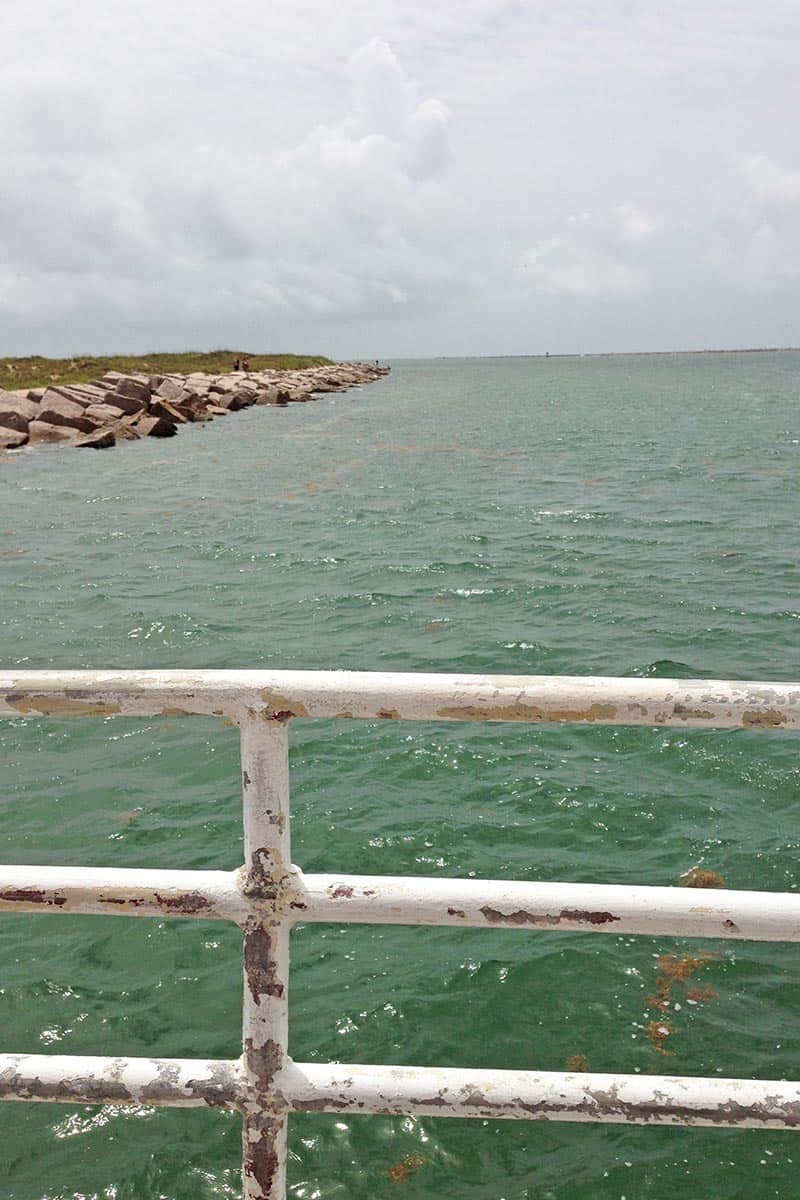
We walked along the edge of the water until we came to the Gulf side of the island and then were able to walk along the shoreline.
The shoreline itself was absolutely beautiful, and the water was as warm as bath water.
While visitors are restricted to the beach, I will say that if you’re going to explore past the line of seaweed on the upper edge of the shore, I recommend wearing shoes or flip flops; don’t go barefoot. Trash and other objects tend to wash up from the ocean.
We settled in a spot with our towels and things we’d brought over to the island with us. We were mesmerized and walked and walked along the shoreline.
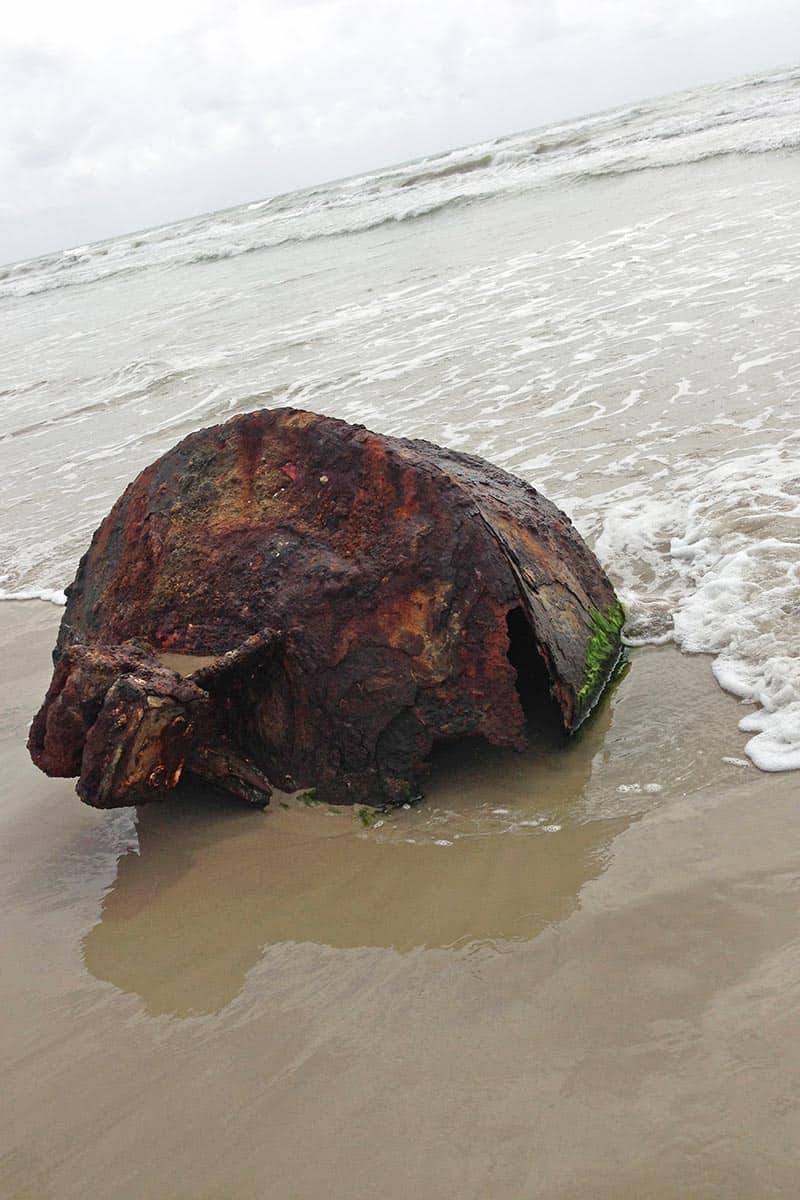
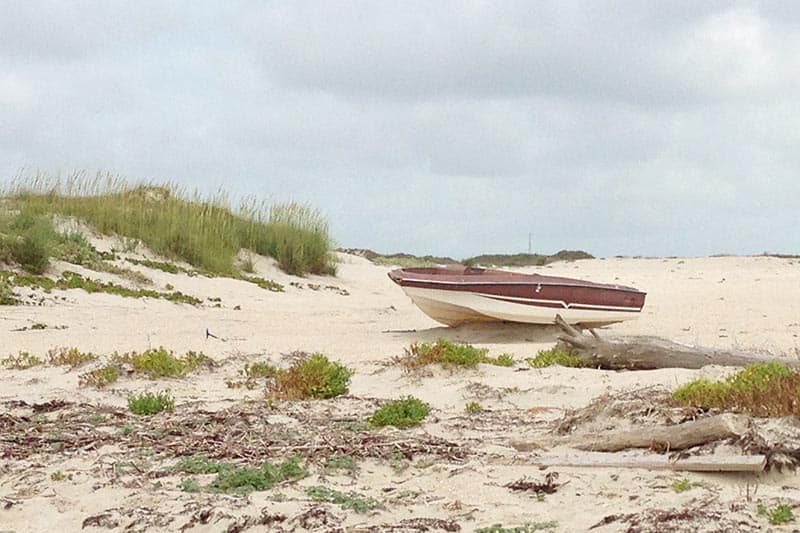
Photo Opps and Treasures on San Jose Island
There were so many beautiful photo opps, from this washed up buoy…
To an old boat that looked like it’d seen better days…
To the waves rolling in from the Gulf of Mexico.
It was a cloudy day, but even so, the ocean was gorgeous and warm.
Closer to the harbor end of the island, ships sailed in and out, dolphins swimming right in front of or beside them. There was a lot of traffic in and out of the harbor.
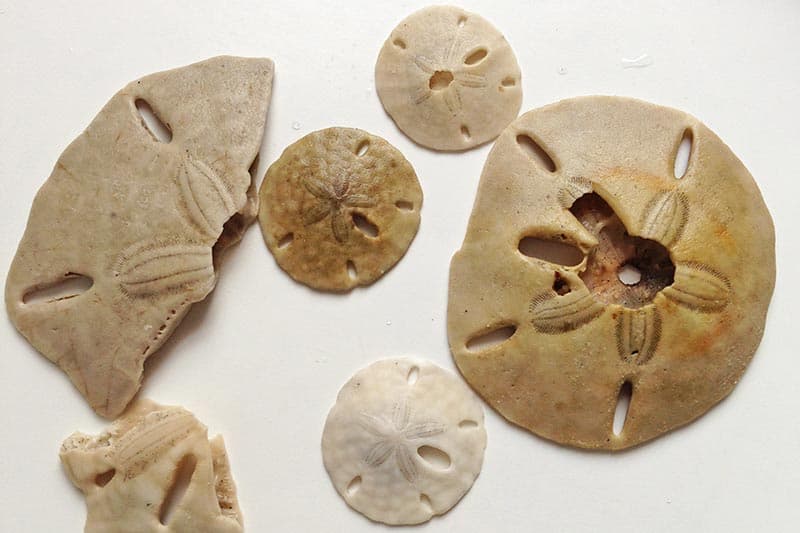
Walking up and along the shoreline, we found quite a few sand dollars and smaller sea shells; Jacob got so excited with every sand dollar we found. They were really small and cute; we’d find broken pieces of larger sand dollars too.
I love raising explorers; I hope my boys stay that way their entire lives.
Our visit to the island was so relaxing and quiet; there were not a lot of other people, and the people that were there were enjoying the solitude of the Texas Gulf Coast just as much as we were.
Eventually, we caught the Jetty Boat back to Port A.
Reluctant to leave, we made a vow to return again soon.
Though next time, we’ll stay even longer and explore even farther.
Things to know before you go to San Jose Island, Texas:
There are a few things you should know before you plan a trip to San Jose Island in Port Aransas.
You can catch a boat to the island via Fisherman’s Wharf in Port Aransas. Tickets are $12 for adults, $6 for kids.
There are daily departure times, as well as return times, to choose from when planning your visit. Once you are on the island, you’ll be there for at least 2 hours before the ferry returns to pick you up; but you can stay longer.
Activities on San Jose Island include spectacular birding, fishing, crabbing, hunting for sea shells and sand dollars, and of course, the beach.
The island is privately owned and needs to be respected as such; visitors are not permitted above the vegetation line, meaning you must stay on the beach.
Fisherman’s Wharf offers pull carts you can rent to carry your stuff over to the island with you.
There are no bathrooms on the island, so plan accordingly.
Pack food and drinks (including water bottles) with you in a small cooler, along with everything you’ll need… Again, there are no shelters or facilities of any kind on the island.
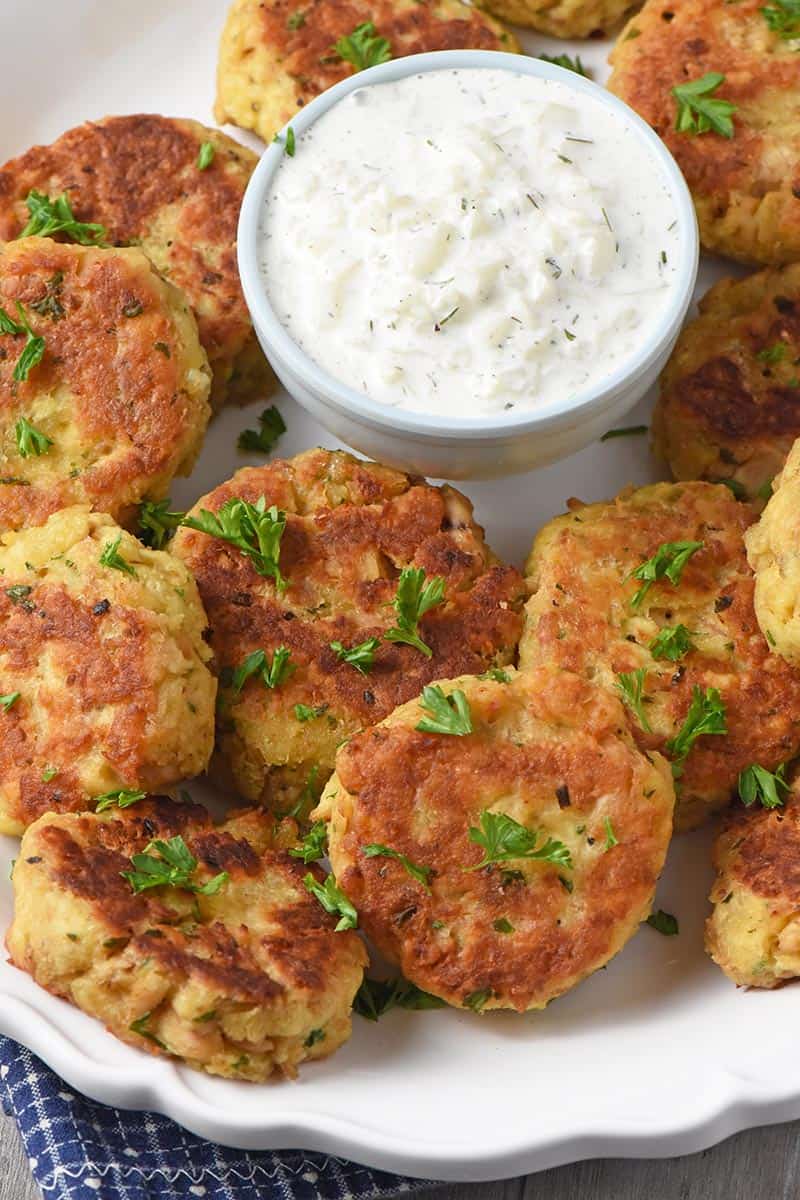
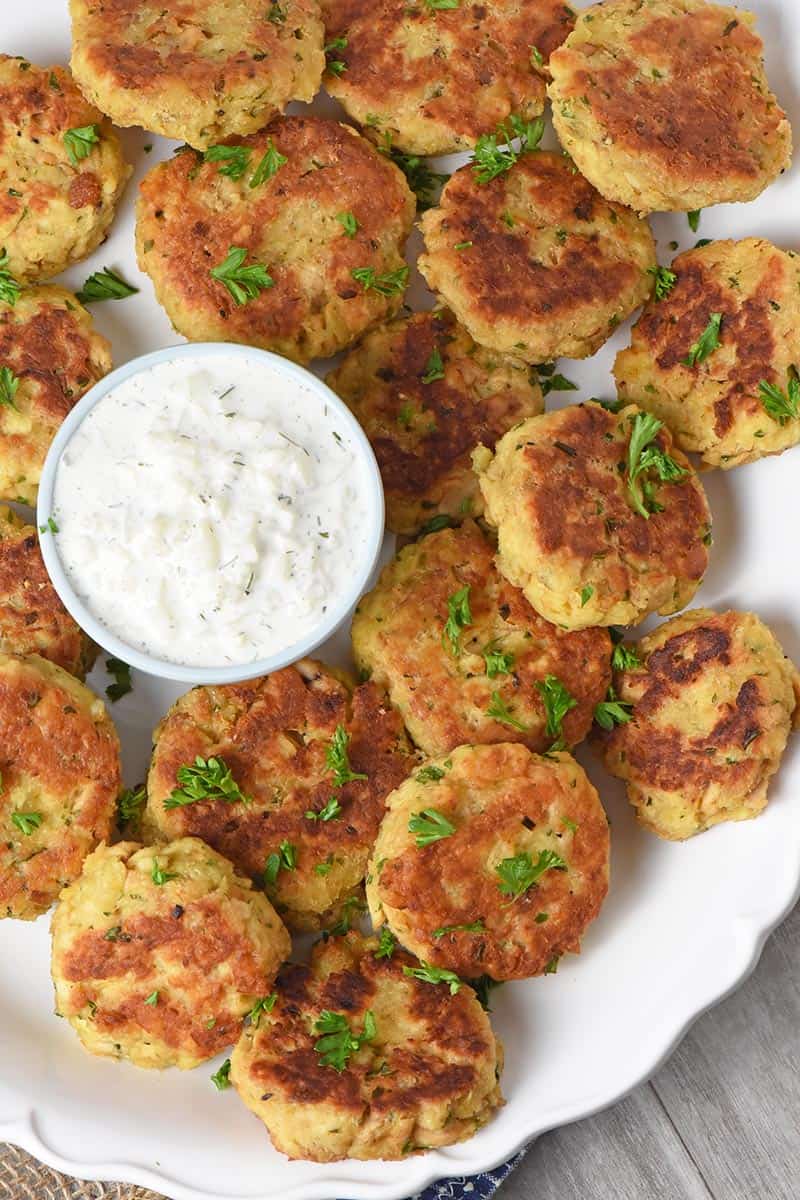
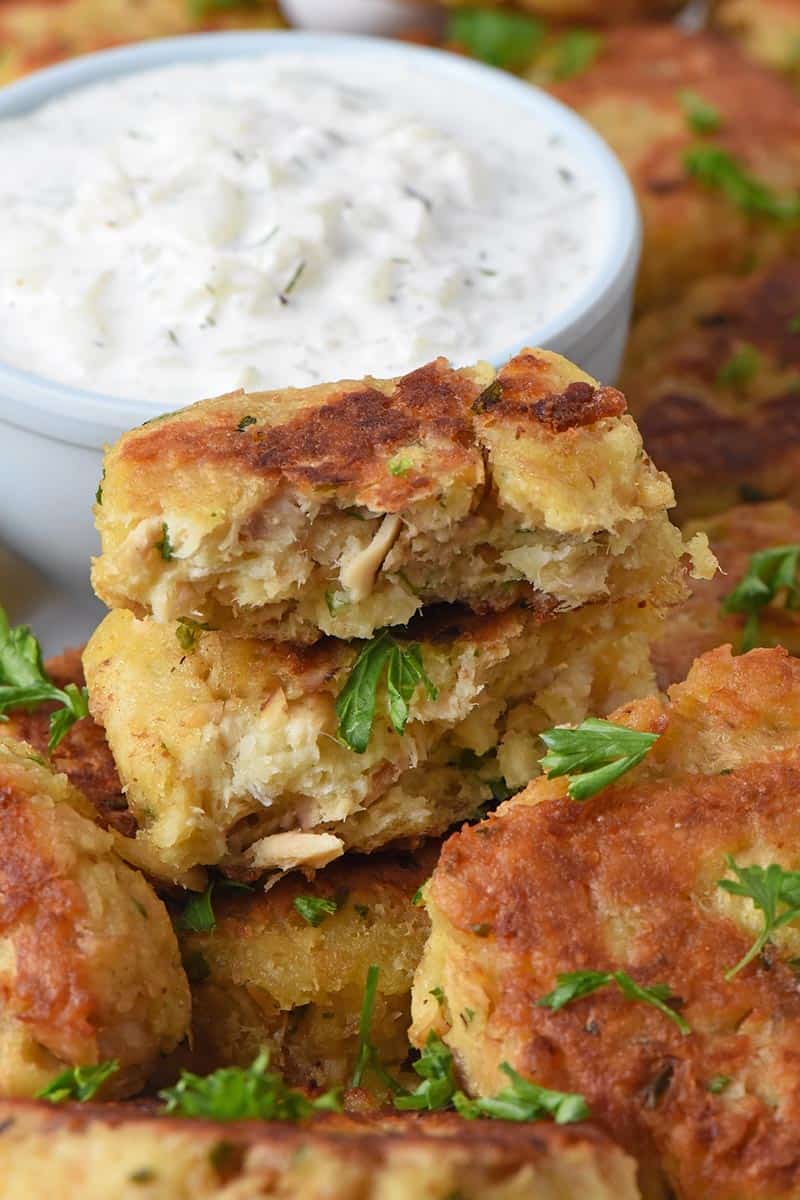
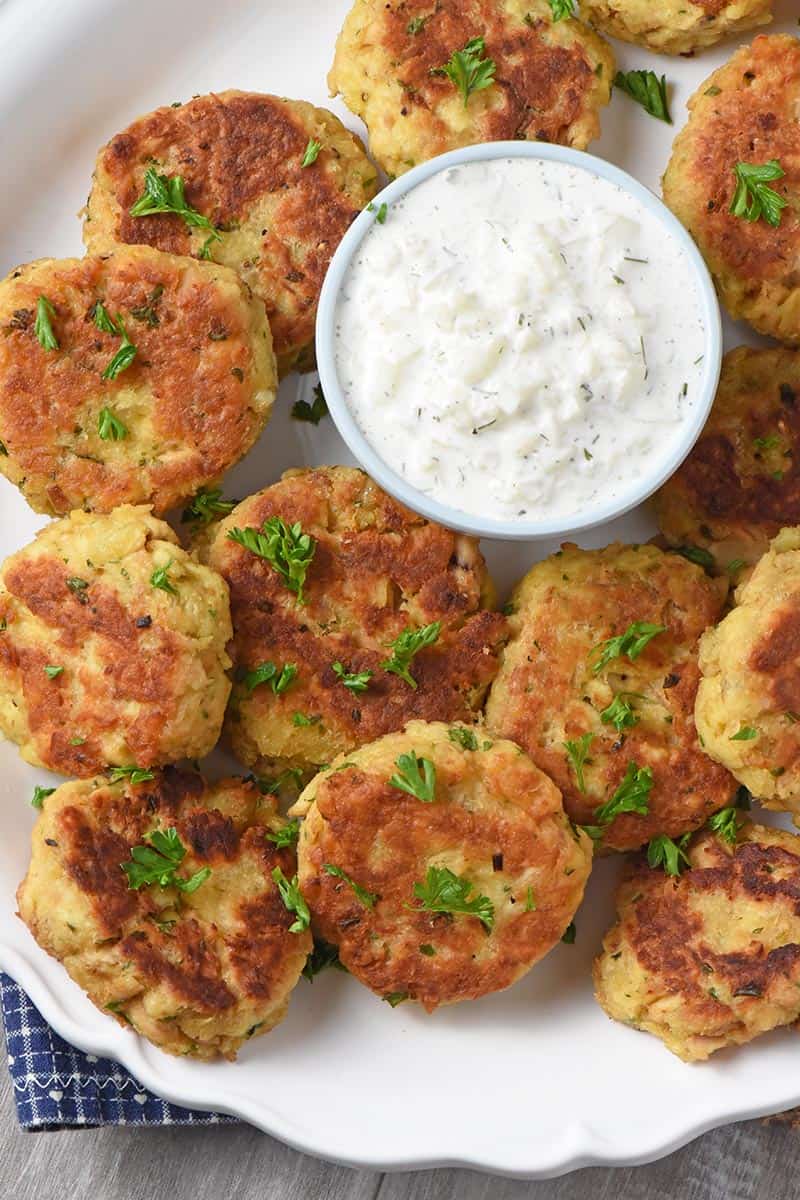
Simple and easy salmon patties, made with crackers. Delicious with tzatziki sauce and perfect for dinner or served as an appetizer.
My mom used to make the best salmon patties when I was growing up; my dad did a lot of deep sea fishing, so a lot of times, she’d make them with home canned salmon.
While my salmon cakes can probably never live up to hers, I still enjoy making them for dinner, especially when we make tzatziki sauce to go with them.
I’ll keep perfecting my salmon patties recipe, and hopefully, some day I’ll come close to Mom’s.
You can find a printable recipe below.
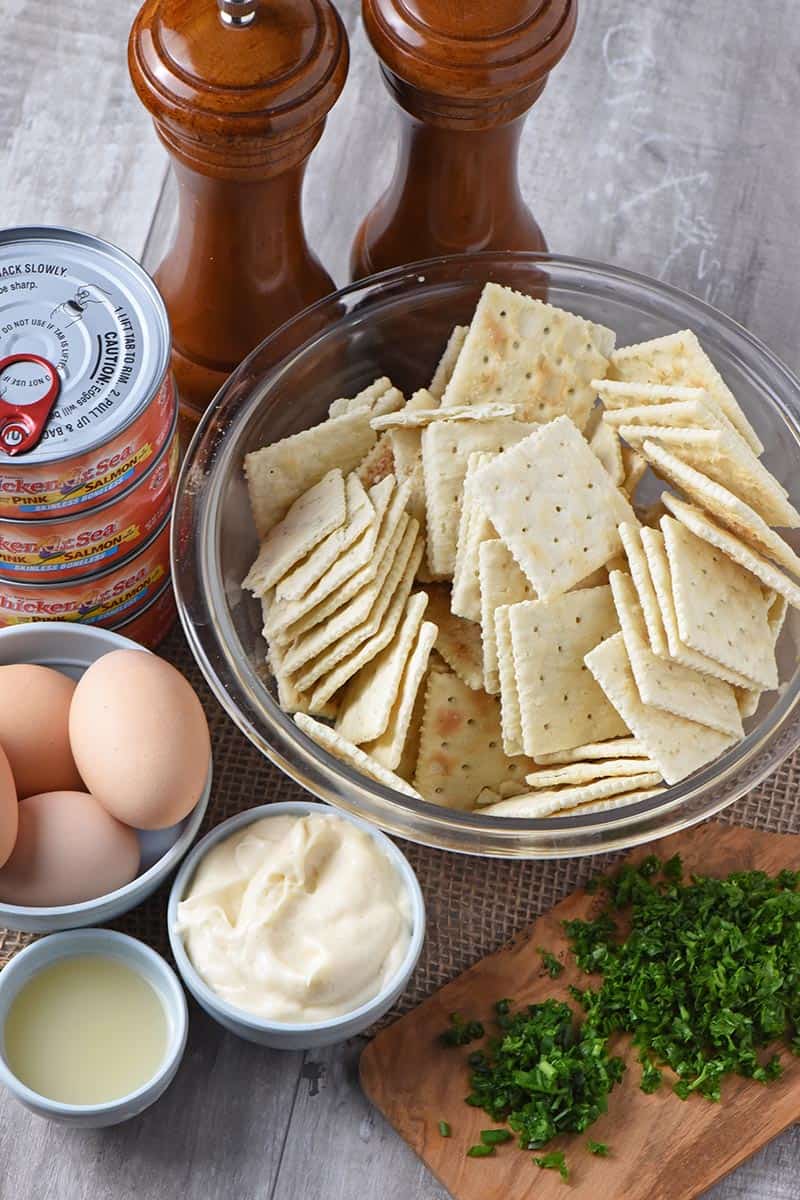
Ingredients you need to make this recipe for salmon patties:
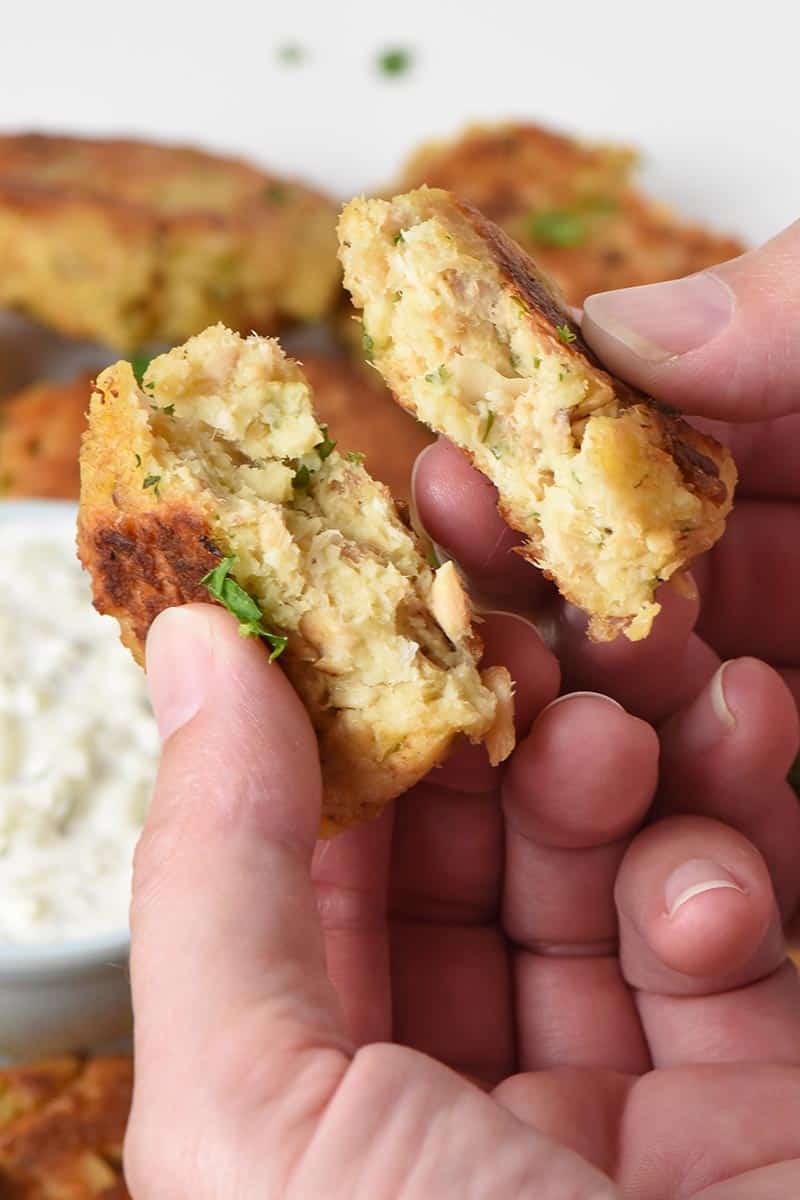
The first thing you’ll want to do if you’re using canned salmon, is to drain and rinse the salmon. Then add it to a large mixing bowl.
Add the eggs and lemon juice to the salmon, and give it a good stir.
Crush the Saltine crackers in a plastic baggie, using a rolling pin. Then add the crackers to your salmon mixture.
Next, mix in the Miracle Whip.
Then add the salt, pepper, chives, and chopped fresh parsley. The mixture should be just right for forming 1 to 2 dozen salmon patties, depending on the size you make them.
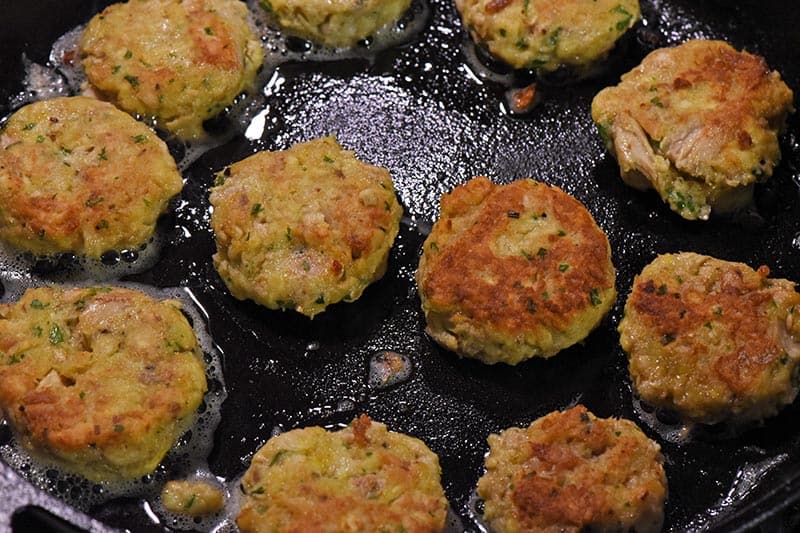
Add a dash of olive oil or a couple tablespoons of butter to a skillet and begin to warm.
Grab about 1 to 2 tablespoons of the mixture and begin forming a patty. Repeat and continue until all of the mixture has been formed into patties.
Add the patties to your skillet (or griddle) and fry each side until the patties have turned a golden brown color and have a crispy texture.
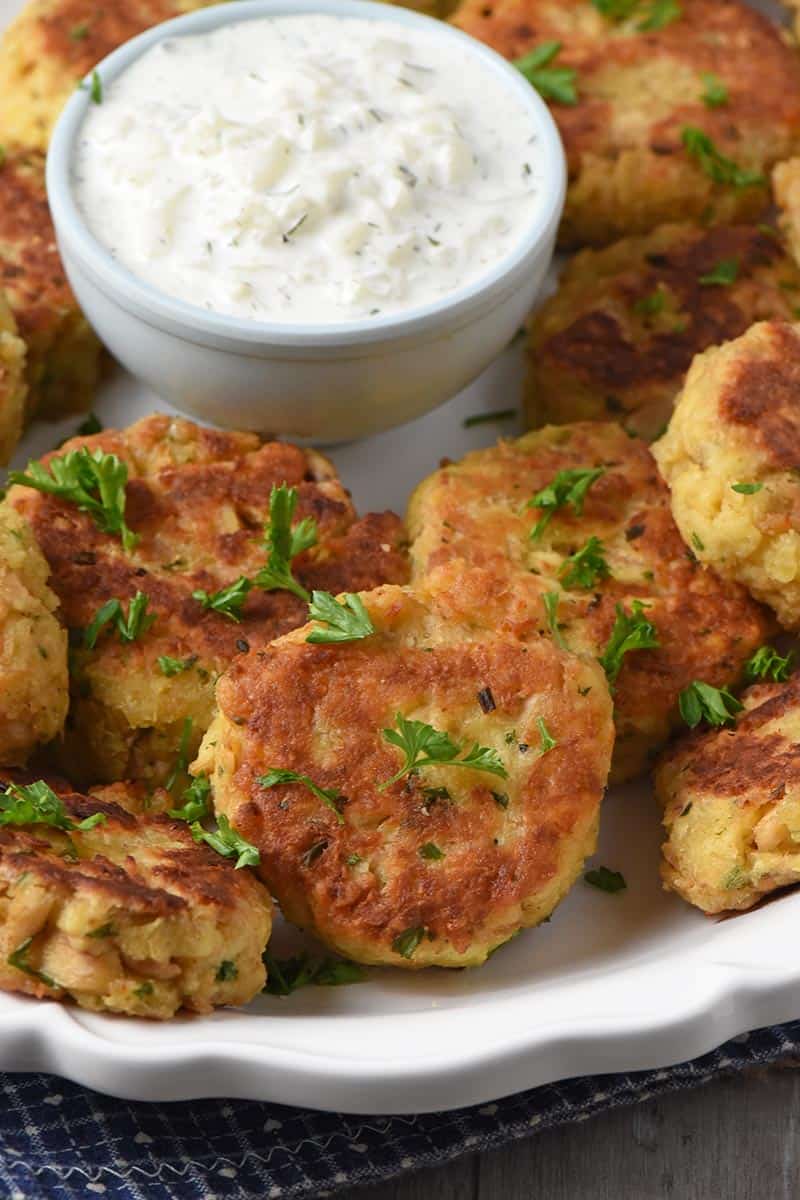
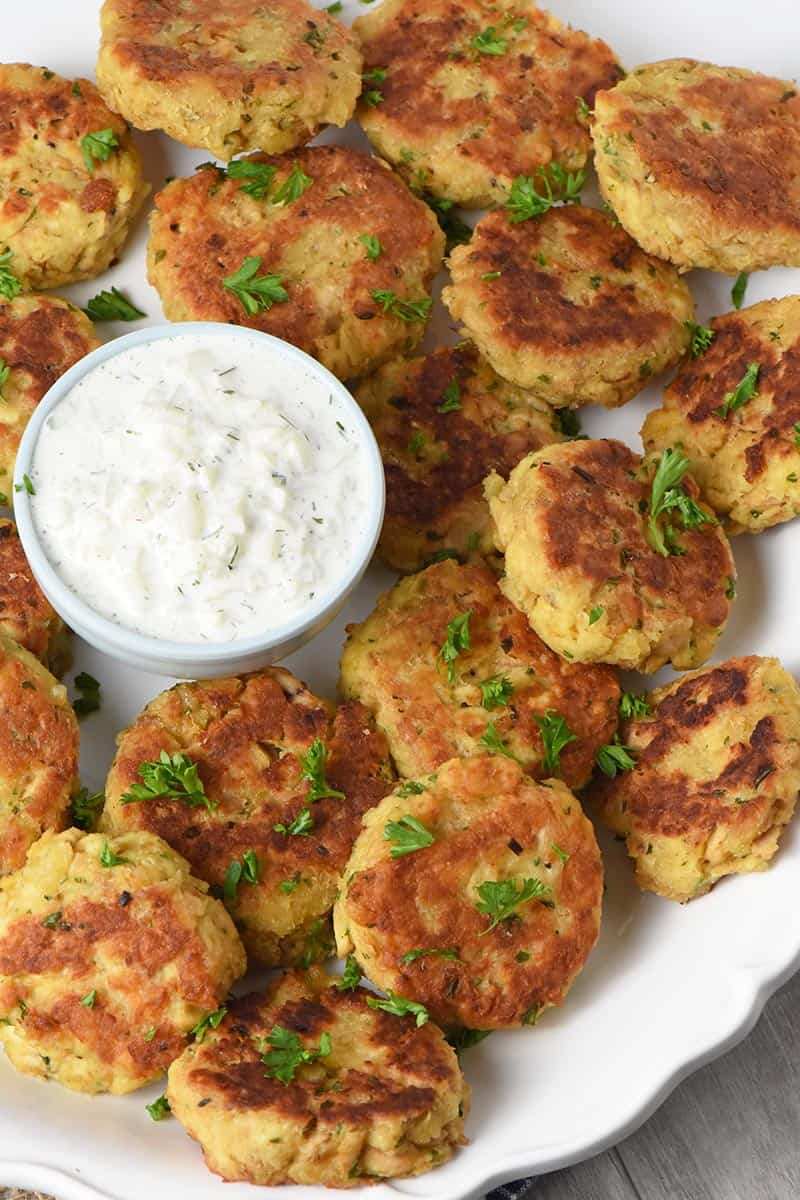
When they are cooked through, remove them from the skillet and serve while warm.
If you have leftovers, they’re just as good the next day.
What to serve with salmon patties
Salmon cakes are delicious when served with pasta, rice, vegetables, and more. We enjoy pairing them with a salmon patties sauce like tzatziki sauce, as well as spaghetti squash alfredo (minus the chicken).
Kitchen tools you may need to make salmon patties:
Strainer – This makes it easy to drain and rinse the salmon. Mixing bowl – You’ll need a large mixing bowl to mix up the salmon patties recipe. Rolling Pin – Makes it easy to crush up the Saltines. Skillet or Griddle – You’ll need a way to fry the salmon patties. Flipper or Turner – for turning the patties in the skillet.
Delicious Salmon Patties Recipe
Simple and easy salmon patties, made with crackers. Delicious with tzatziki sauce and perfect for dinner or served as an appetizer.
20 ounces canned salmon (boneless and skinless)
4 whole eggs
2 tablespoons lemon juice
64 whole Saltine crackers ((about 2 sleeves))
1/2 cup Miracle Whip
1 teaspoon salt
1 teaspoon black pepper
1 tablespoon fresh chives (chopped)
3 tablespoons fresh parsley (chopped)
2 tablespoons olive oil (or salted butter)
Drain and rinse the salmon. Then add it to a large mixing bowl.
Add the eggs and lemon juice to the salmon, and give it a good stir.
Crush the Saltine crackers in a plastic baggie, using a rolling pin.
Add the crackers to your salmon mixture.
Next, mix in the Miracle Whip.
Then add the salt, pepper, chives, and fresh parsley. Mix everything together well.
Add a dash of olive oil or a couple tablespoons of butter to a skillet and begin to warm.
Grab about 1 to 2 tablespoons of the mixture and begin forming a patty. Repeat and continue until all of the mixture has been formed into patties.
Add the patties to your skillet (or griddle) and fry each side on low to medium heat until the patties have turned a golden brown color and have a crispy texture.
When they are cooked through, remove them from the skillet, allow to drain, and serve while warm.
They pair deliciously well with this homemade tzatziki sauce.
You can use canned salmon or fresh salmon, totally up to you.
You can also substitute dried chives or parsley for fresh.
If you have leftovers, these salmon patties are just as good the next day.
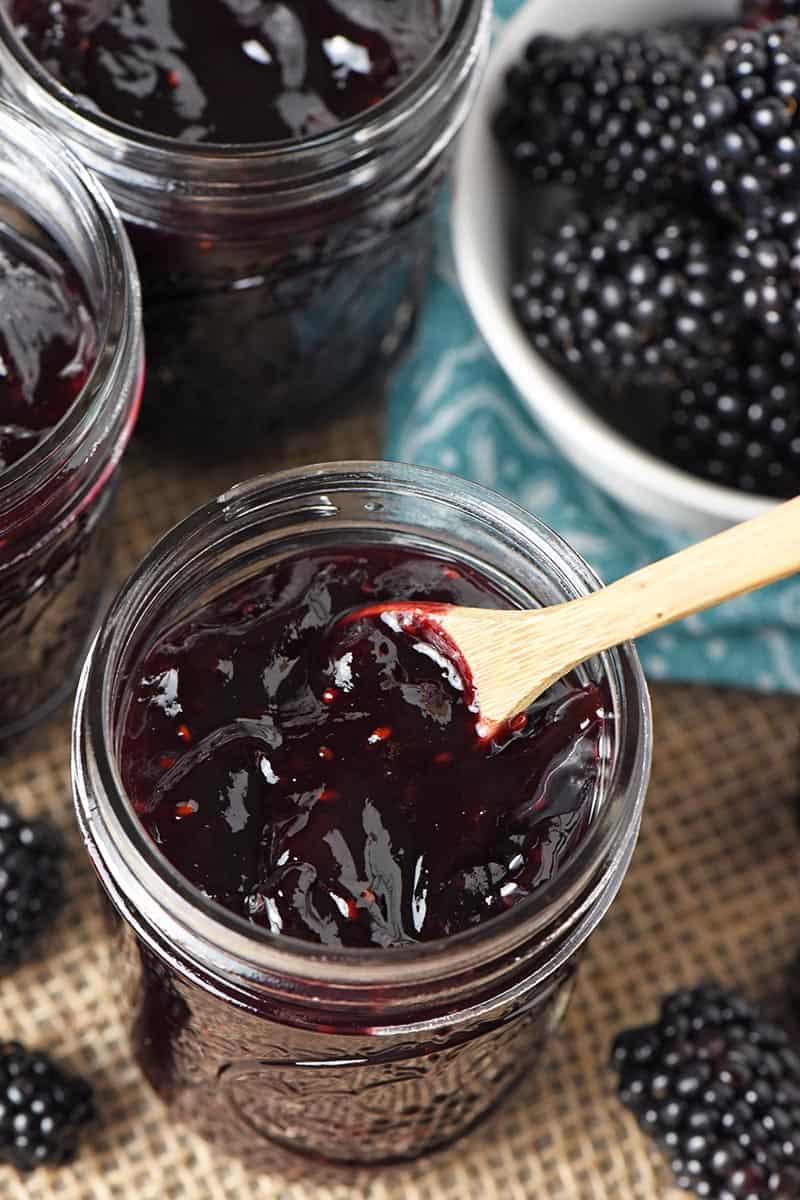
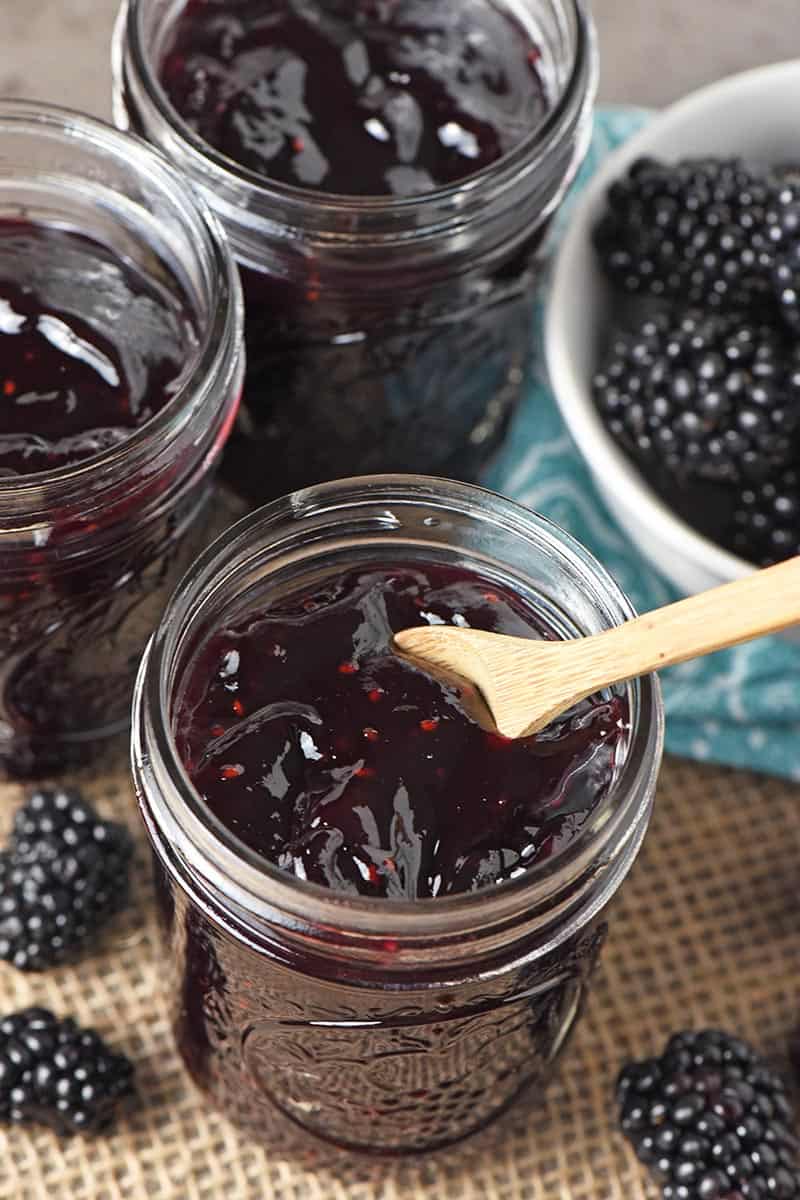
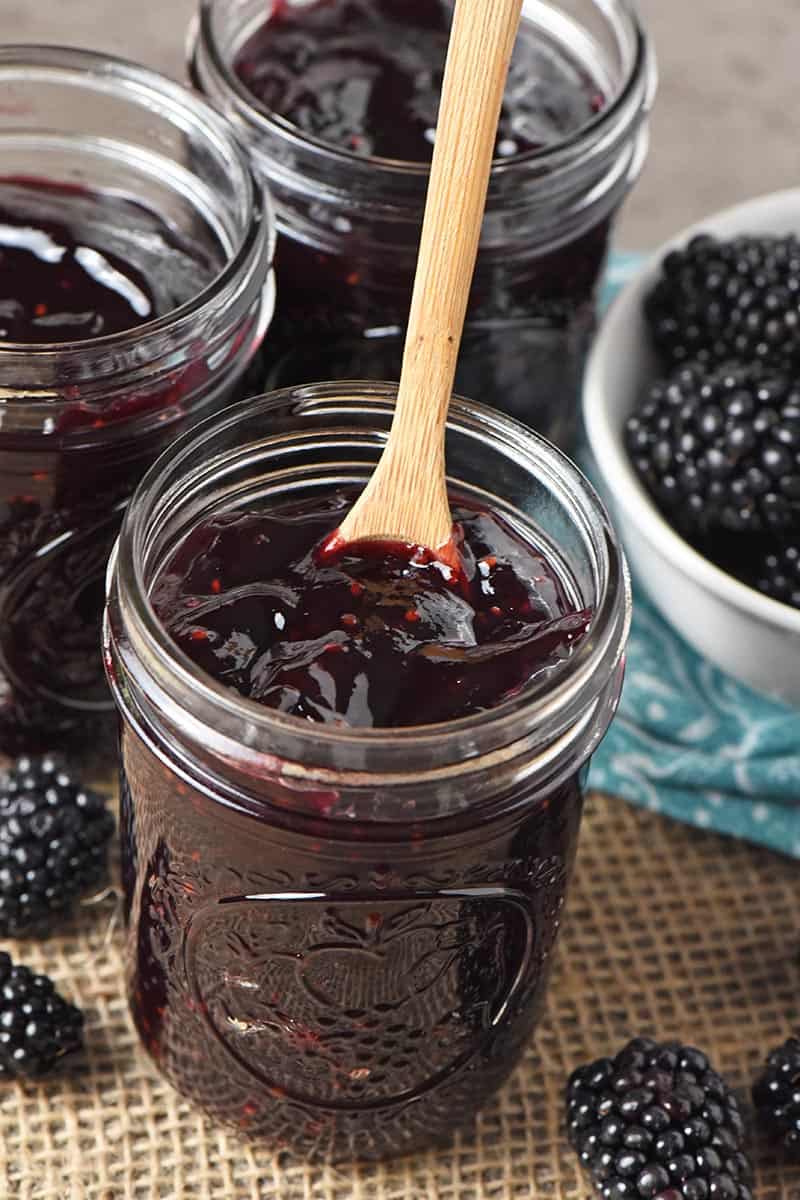
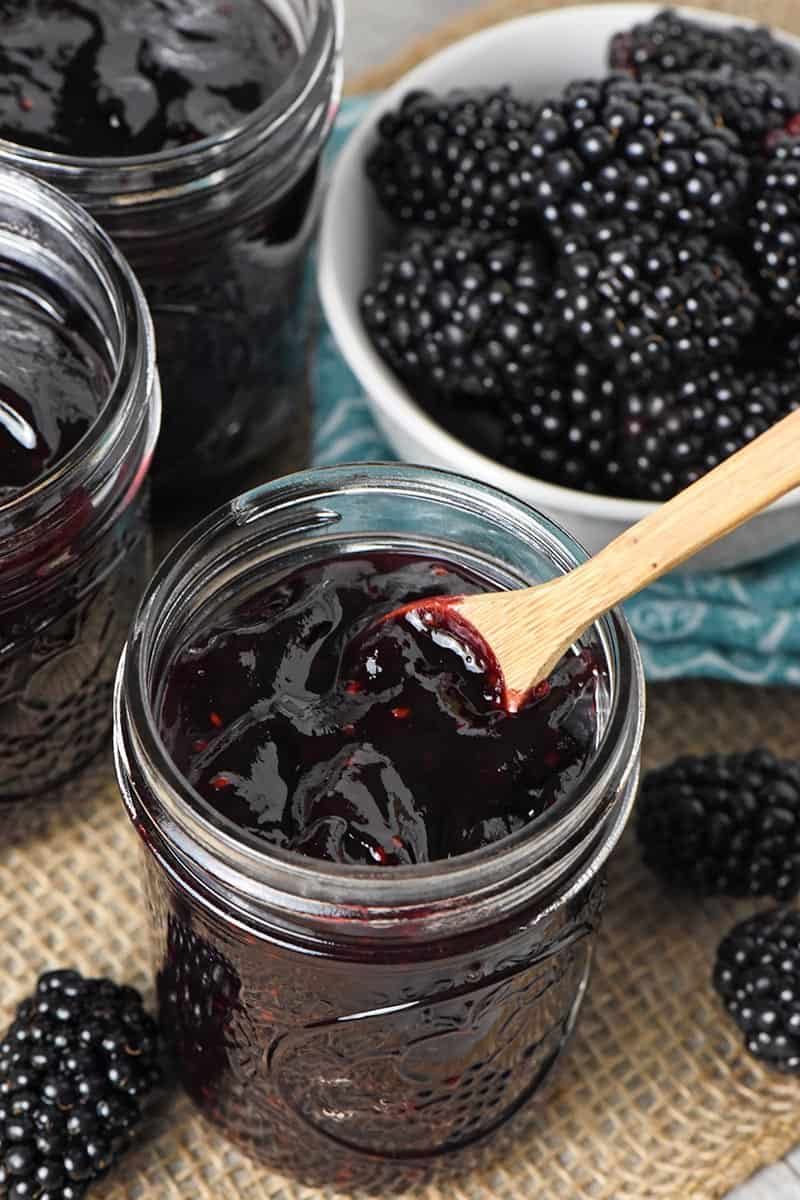
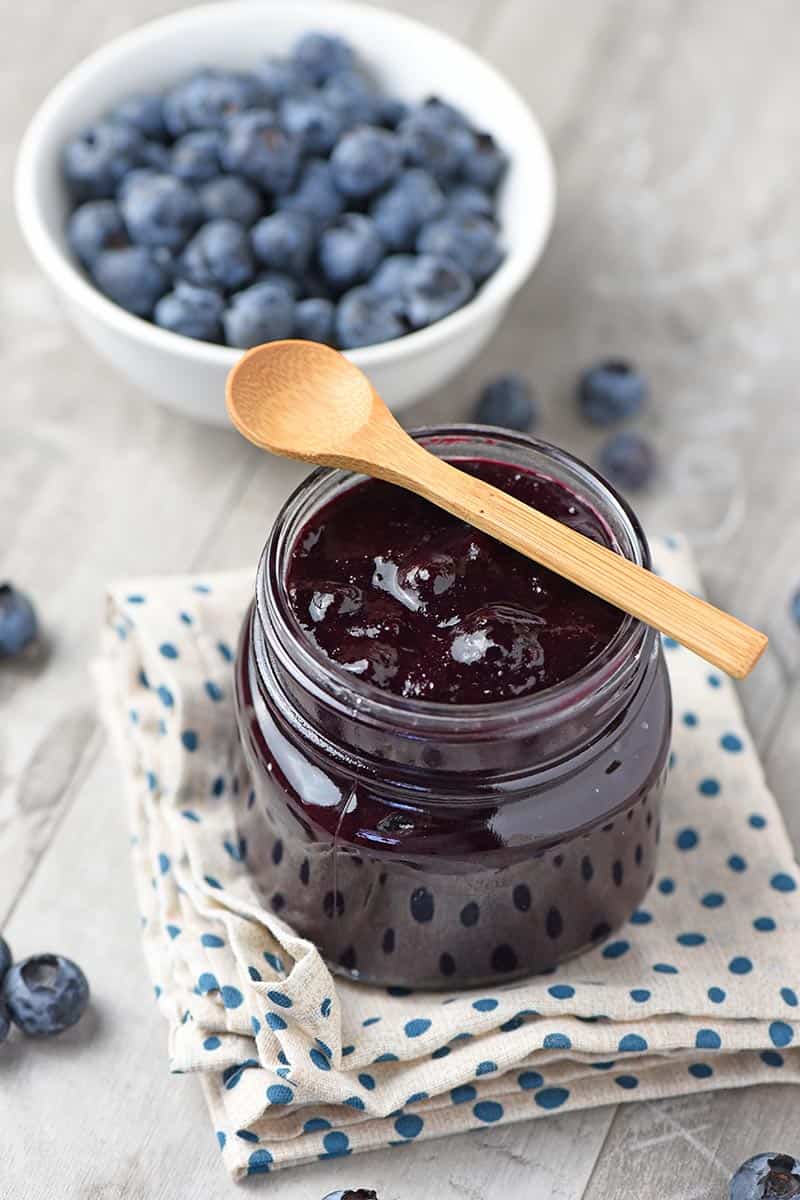
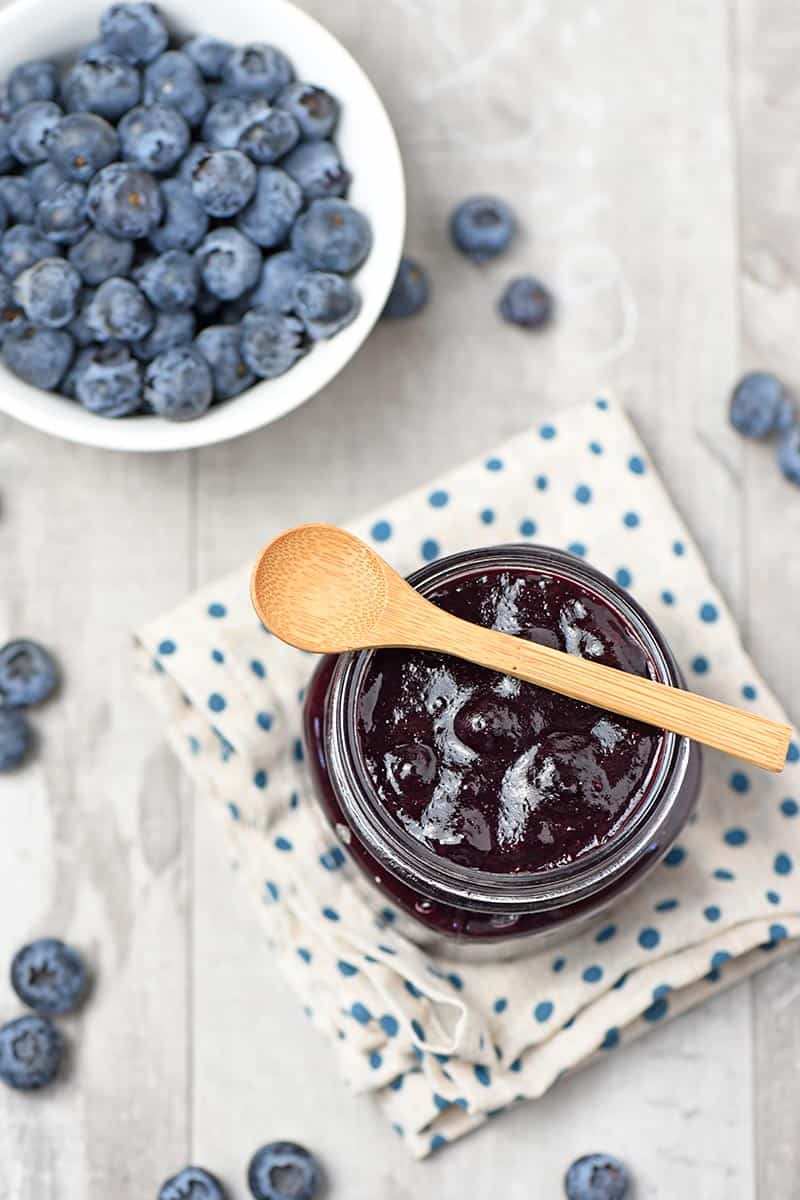
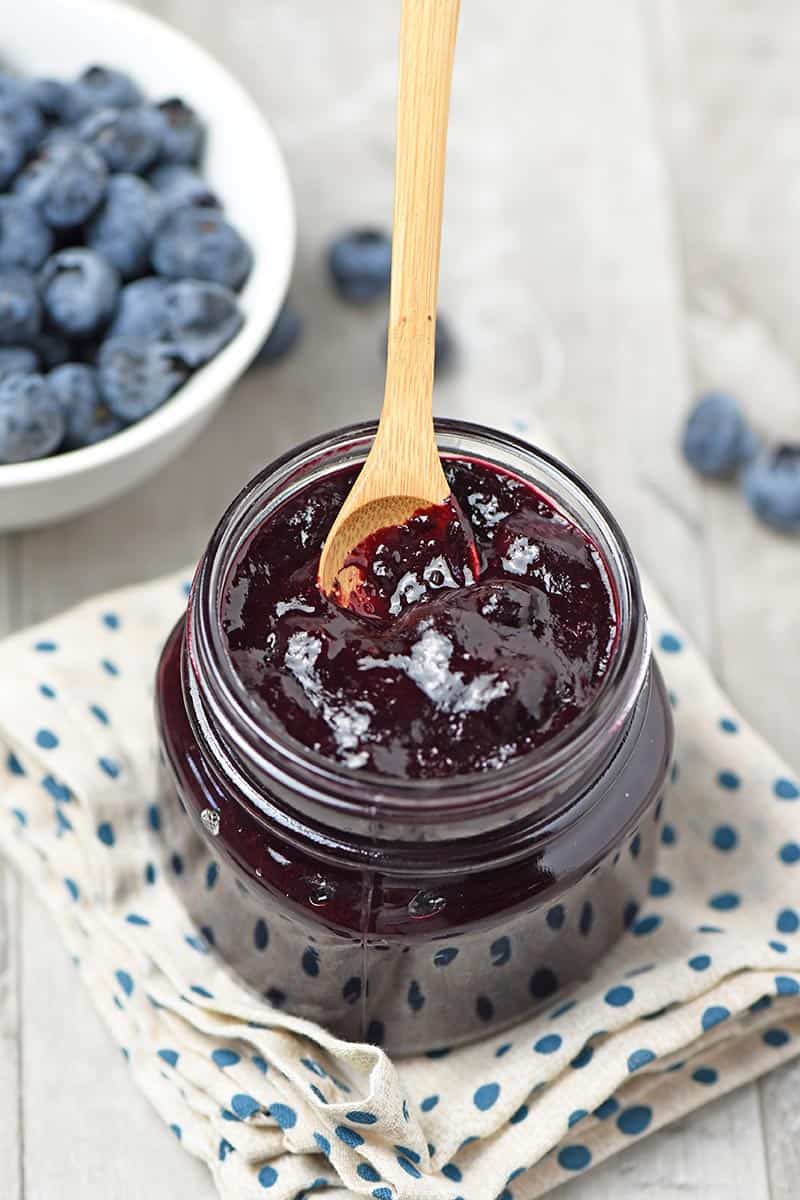
How to make my grandma’s old-fashioned blackberry jam recipe without pectin. It’s perfect for freezing or canning. Delicious and easy batch with just 3 ingredients, including blackberries and sugar!
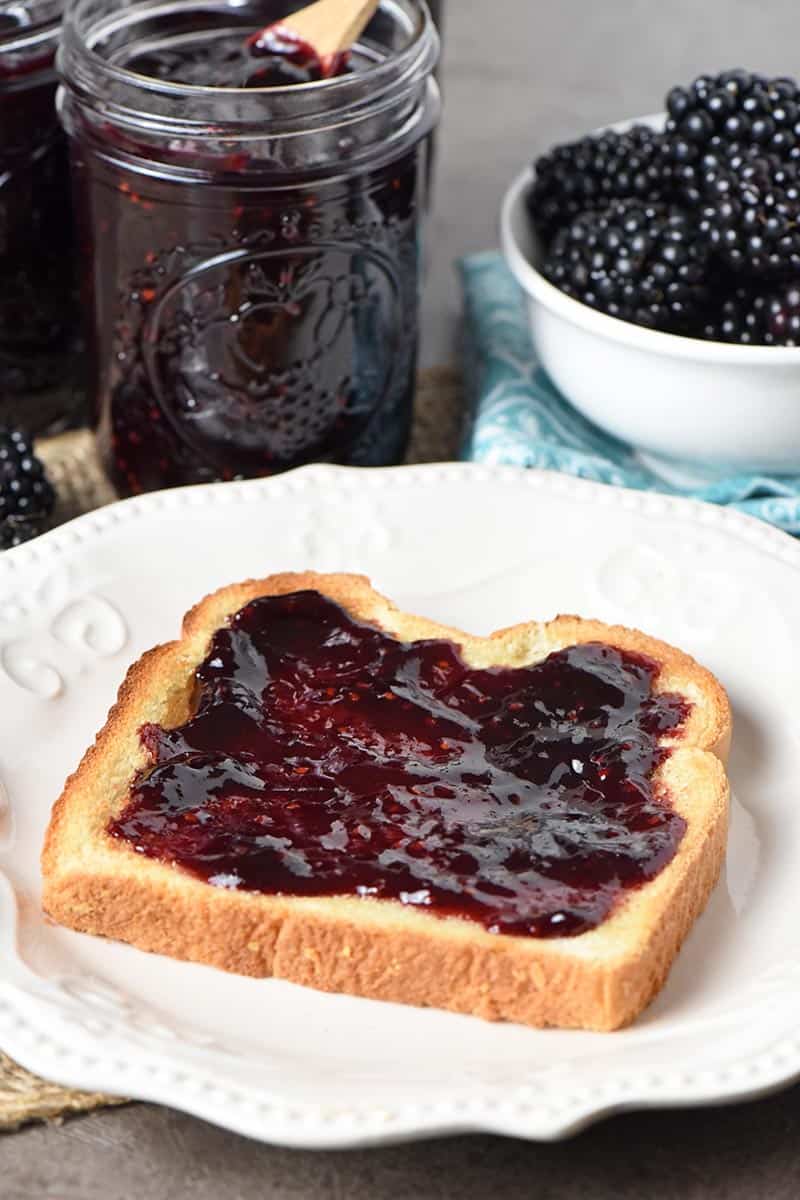
Blackberry jam is one of our favorite homemade jams to make and eat; my boys love jam with breakfast. While my favorite strawberry jam recipe uses pectin, this is a recipe for blackberry jam without pectin.
Actually, while blackberries can be expensive, I think it actually saves money to make homemade jam versus buying store bought. The healthier store bought jams without high fructose corn syrup are usually very pricey.
That and you only get 1 jar of jam for that expensive price tag vs. a whole batch of jam out of a relatively small batch of blackberries. When I make this blackberry jam recipe no pectin, I usually get 8 to 10 half pint jars. That’s a lot of blackberry jam for my buck.
Why You’ll Love This Recipe
You can use fresh or frozen blackberries for this recipe. While picking blackberries would be more ideal and probably more affordable (especially if you have your own bushes), frozen berries work just fine.
This recipe is actually adapted from my grandma’s recipe for strawberry preserves. I changed the ingredients and the instructions just a bit, but basically, it’s Grandma’s recipe, minus a few steps. And Grandma’s jam was always good.
It’s easy to make.
It’s a very simple recipe with only 3 ingredients, including blackberries, sugar, and lemon juice. That’s it!
You don’t need pectin, which brings me to my next point…
What Is Pectin and Why Make Blackberry Jam without It?
Pectin is a natural starch that’s naturally present in fruits and berries, some more so than others. When pectin is heated, it helps to helps to thicken jam and give it that jelly like texture.
Rather than use store bought pectin, which is heavily processed, this recipe allows you to use that natural pectin by cooking the berries down in a step-by-step process, that together with a resting time, allows the natural pectin already in the berries to thicken the jam.
Apples are another really great source of pectin, which is one reason I also love to make apple jelly without pectin.
Ingredients and Substitutions Notes:
When I found Grandma’s recipe, I was curious about the difference between blackberry jam and blackberry preserves. How Stuff Works explains the difference really well.
Fresh Blackberries – While you can use thawed frozen berries, fresh blackberries give the best results with this blackberry jam no pectin. If you don’t have your own blackberry bushes, you can usually find them at local farmers’ markets; or you might even have a local u-pick patch where you can go pick berries. My mom and I used to actually drive dirt roads in our area, scouting out blackberry bushes, when I was a kid; it was a great way to pick a couple buckets of free and otherwise unpicked blackberries for jams and eating.
Cane Sugar – You can also use granulated sugar. If you want to make this with an alternative sugar, you can try using things like Splenda, Monk Fruit, or Truvia; however, keep in mind that amounts may vary per the substitution amount and instructions for the particular sweetener you choose.
Lemon Juice – This is especially needed if you plan on canning the jam you make. To avoid bacteria, it’s best to use a commercially bottled lemon juice; I prefer to use this lemon juice when I can’t use fresh.
How to Make Blackberry Jam without Pectin
Before you get started, you’ll need to prep your jars, as well as the lids and bands. Make sure everything is clean and dry.
Also, be sure to wash the blackberries beforehand, especially if you’re using fresh berries.
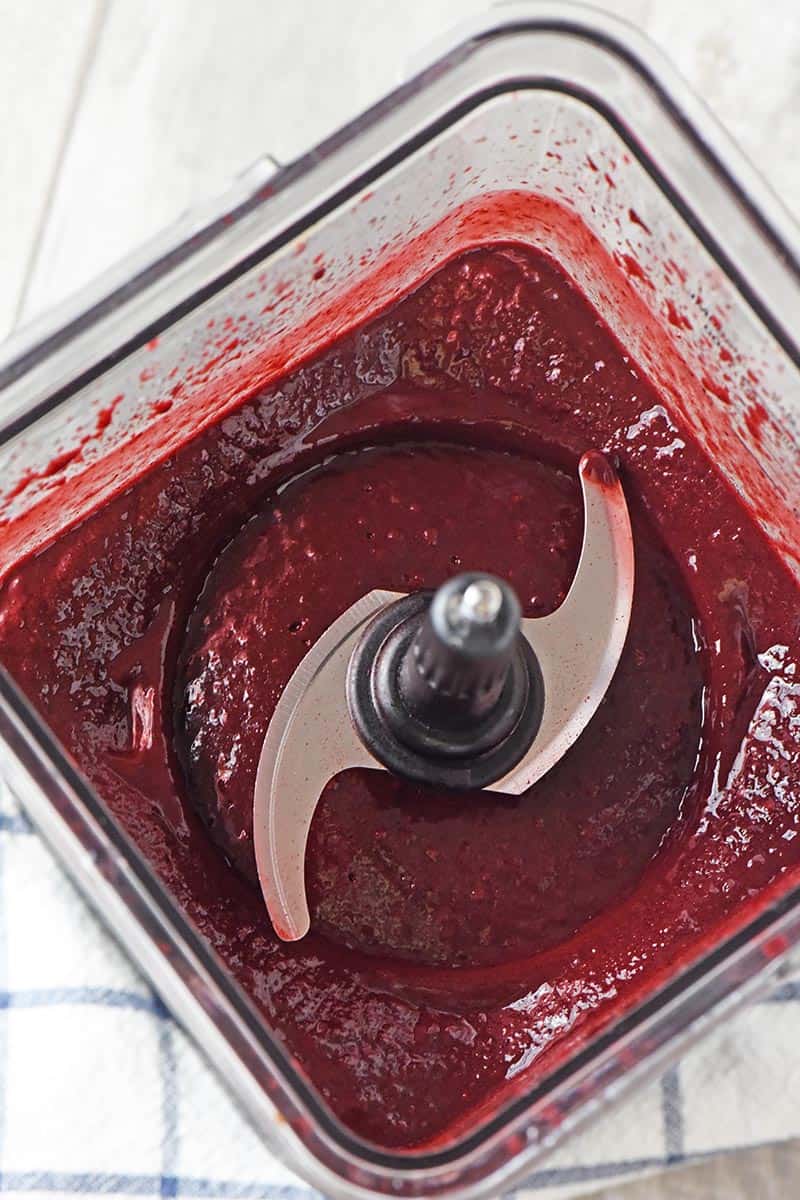
Crush and Prepare the Blackberries
You can make the choice of whether to crush the berries with a potato masher, leaving a few chunks in the finished jam; or you can actually purée the blackberries using a blender or food processor.
While normally I like to leave a few chunks in my jam, this time I decided to purée the berries in my blender for 2-3 minutes.
Note: If you’re using frozen berries, you may want to let them thaw for just a bit before you try to purée them.
How to Cook Blackberry Jam without Pectin
In a larger stock pot, mix together the crushed blackberries, sugar, and lemon juice.
Heat on low to medium heat, and bring the mixture to a boil, stirring constantly so it doesn’t scorch.
Boil the mixture for a good 20 to 24 minutes, stirring constantly with a spatula. The sugar should all dissolve in the boiling process.
Remove the mixture from the heat, and let it set a few minutes.
If you have any foam on top, you’ll want to skim that off; my foam all dissipated in the cooking process, so this step wasn’t needed.
Now a note: Your jam will seem more like syrup at this point. Please don’t be discouraged, because it’s a bit like magic from here on.
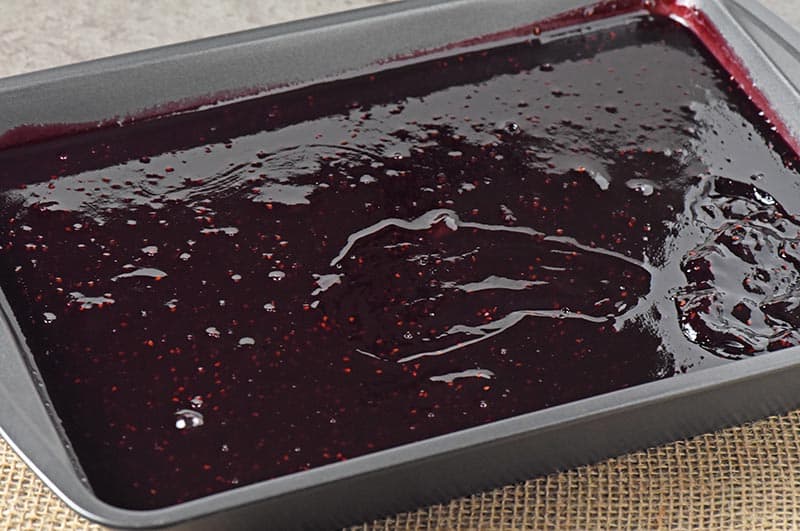
Allow the Jam to Rest and Thicken
Pour the mixture into a 9×13 cake pan, and let it stand until it cools, 3+ hours. Grandma suggests 12 hours, but I let mine sit for probably around 6-ish hours, and it was ready.
As it cools, it will begin to set and jell. Before you know it, you have the thick consistency of jam; it feels like magic, but it’s actually a combination of the natural pectin in the berries and the cooling process that does the work of thickening or setting the jam.
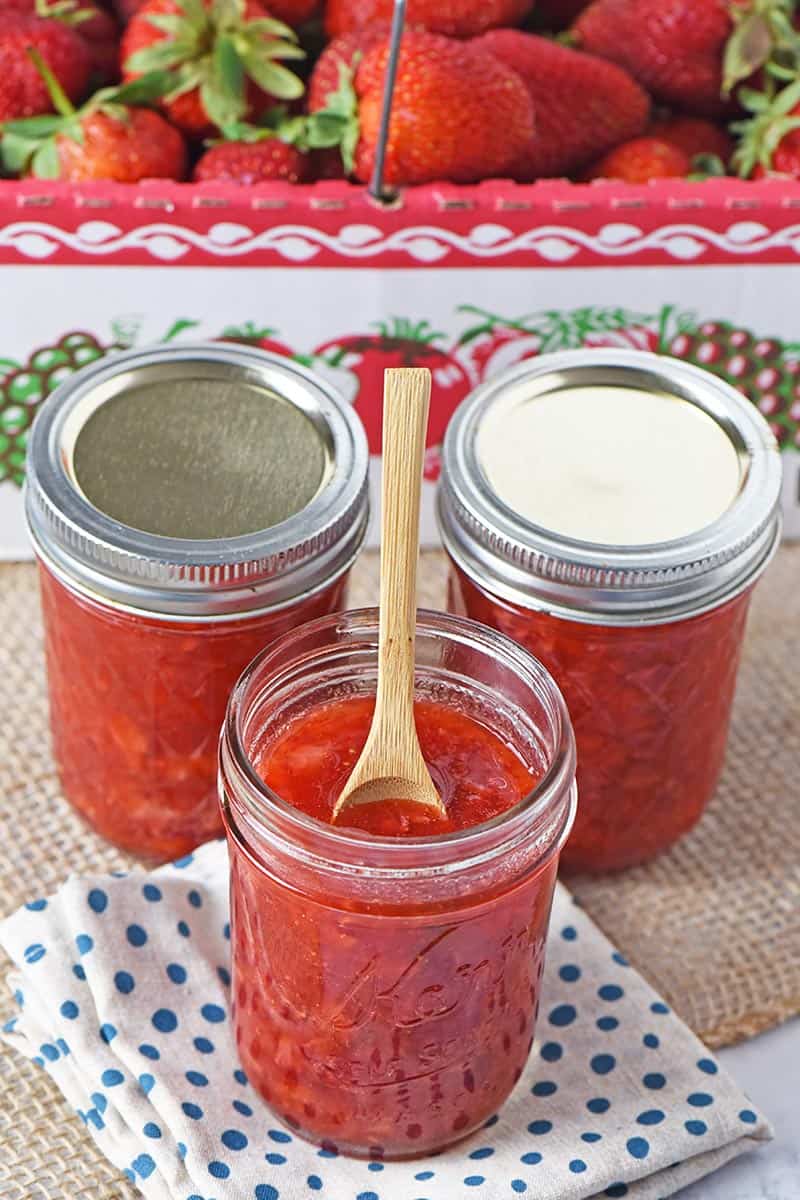
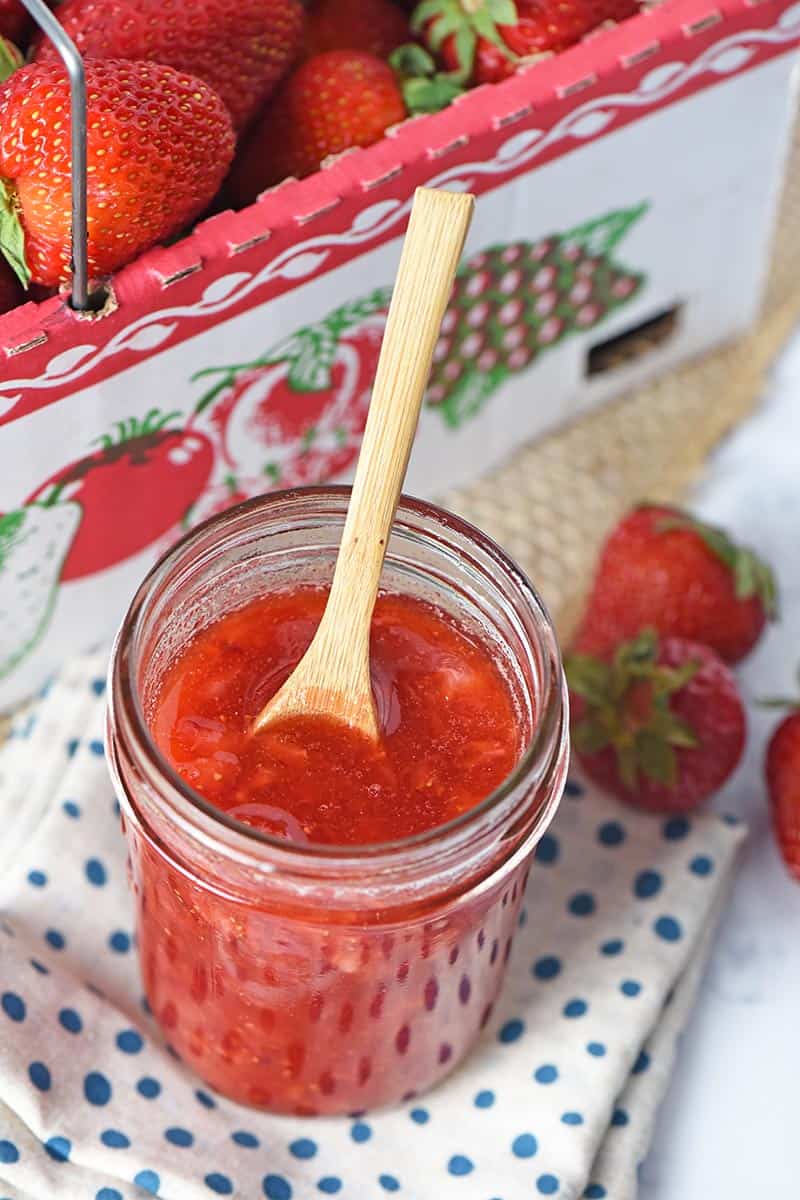
Sometimes I’ve canned it, because it will keep even longer in the pantry, up to a year. Sometimes I make it into blackberry freezer jam just because it’s easier. It will keep for 3-6 months in the freezer.
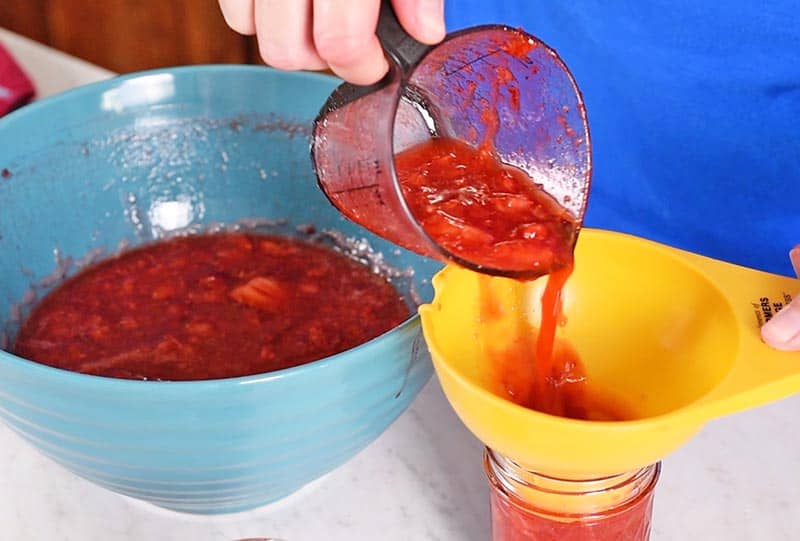
Canning Blackberry Jam
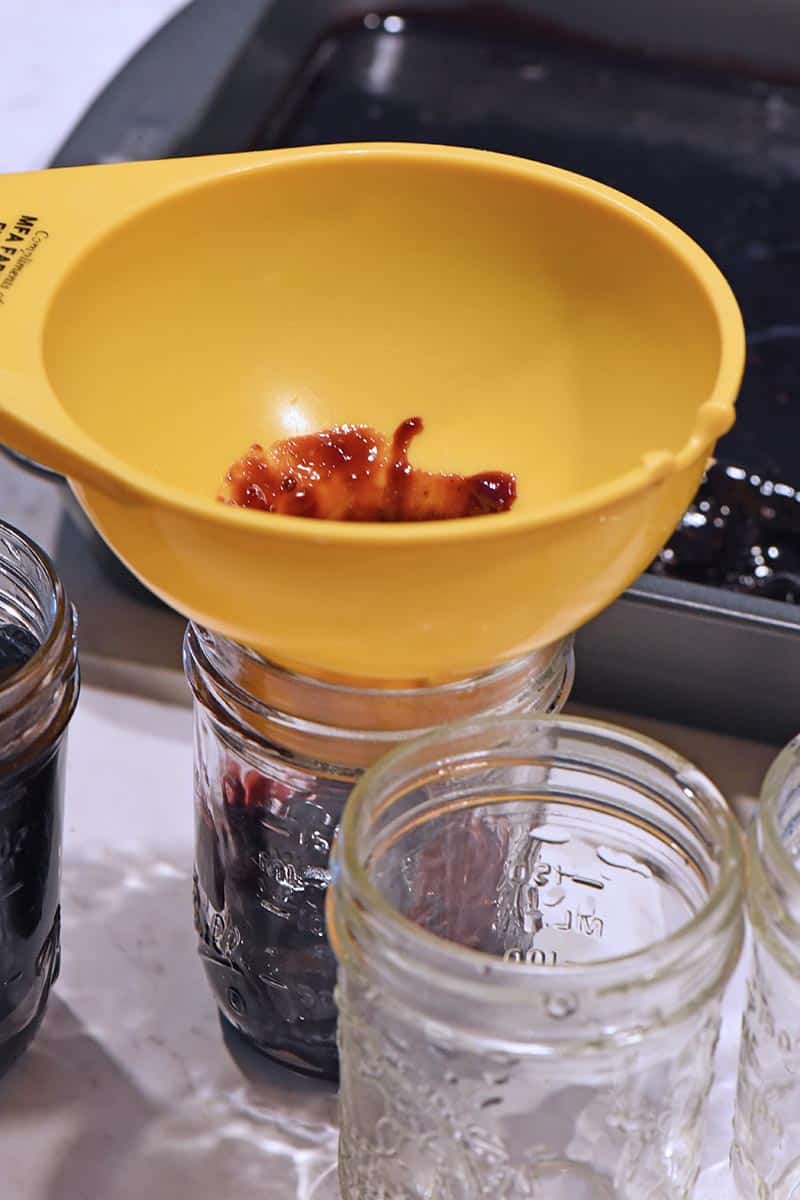
Wash half-pint jars and lids in hot soapy water, rinse, and keep warm. We like to place ours on a baking sheet in a lower temp oven to stay hot.
Using a jar funnel, ladle or pour the jam into the hot jars. Be sure to leave about a 1/2-inch gap at the top of each jar.
Wipe the rim of each jar with a wet towel or rag, place the lid on, and tighten the band.
Then place the hot jars down in a boiling hot water bath canner with 1-2 inches of water over the jars, and process those jars in the hot water bath for about 10 minutes.
Remove the jars from the oven, and allow them to rest for at least 24 hours, but be sure to check every lid to make sure it’s sealed shortly after canning.
Before moving to the pantry, remove the bands and write what it is and the year on the lid, so you know when you made it. There are plenty of options for pretty jar labels for jam, and you can even turn your home canned blackberry jam into holiday gifts or hostess gifts.
Freezing Blackberry Jam
Using a jar funnel, ladle or pour the jam into the clean jars. Be sure to leave about a 1/2-inch gap at the top of each jar to allow for expansion in the freezer.
Wipe the top of each jar with a wet towel or rag, place the lid on, and tighten the band.
Before you put your jam in the freezer, be sure to write what it is and the year on the lid, so you know when you made it.
Do you need to remove the seeds from blackberries for jam?
If you want a smoother consistency and texture to your jam, then yes, you can remove the seeds using a food mill; or you can strain out the seeds while pouring the cooked jam into the cake pan. However, you don’t need to remove the seeds in order to make this easy blackberry jam. In fact, the seeds actually contain natural pectin.
Can I use frozen blackberries?
While fresh are better, yes, you can use frozen blackberries. Just be sure to thaw them ahead of time, so they don’t add unnecessary liquid to the mixture.
More Jam, Jelly, and Sauce Recipes You May Enjoy:
If you love this no pectin blackberry jam, you’ll love these delicious fruit spreads too…
If you try this recipe, why not leave a star rating in the recipe card right below and/or a review in the comment section further down the page? I always appreciate your feedback. You can also follow me on Pinterest, Facebook, Instagram, and YouTube. And subscribe to my email list too!
Blackberry Jam Recipe without Pectin
How to make Grandma's old-fashioned blackberry jam recipe without pectin. Perfect for freezing or canning. Easy batch with just 3 ingredients!
Blender
Stock Pot
9×13 Cake Pan
Half Pint Jelly Jars with Lids and Bands
Jar Funnel
Hot Water Bath Canner
Dissolvable Canning Jar Labels
6 cups crushed blackberries
6 cups cane sugar
2 tablespoons lemon juice
Prep your jars, as well as the lids and bands. Make sure everything is clean and dry.
Wash and rinse your berries, especially if they’re fresh berries. Pat dry.
Purée or crush the berries, using a blender, potato masher, or food processor, for 2 to 3 minutes.
In a stock pot, mix together the crushed blackberries, sugar, and lemon juice.
Heat the mixture on low to medium heat, and bring it to a boil, stirring constantly with a spatula, so it doesn’t scorch.
Boil the mixture for a good 20 to 24 minutes, stirring constantly. The sugar should all dissolve in the boiling process.
Remove the mixture from the heat, and let it set a few minutes.
If you have any foam on top, you’ll want to skim that off; this may or may not be necessary.
Note: Your jam will seem more like syrup at this point. Please don't be discouraged, because it works a little bit like magic from here on.
Pour the mixture into a 9×13 cake pan, and let it stand until it cools, 3+ hours. As it cools, it will begin to set and jell. Before you know it, you'll have the thick consistency of jam; it feels like magic, but it's actually a combination of the natural pectin in the berries and the cooling process that does the work of thickening or setting the jam.
Canning Blackberry Jam:
Wash half-pint jars and lids in hot soapy water, rinse, and keep warm. We like to place ours on a baking sheet in a lower temp oven to stay hot.
Using a jar funnel, ladle or pour the jam into the hot jars. Be sure to leave about a 1/2-inch gap at the top of each jar.
Wipe the rim of each jar with a wet towel or rag, place the lid on, and tighten the band.
Then place the hot jars down in a boiling hot water bath canner with 1-2 inches of water over the jars, and process those jars in the hot water bath for about 10 minutes.
Remove the jars from the oven, and allow them to rest for at least 24 hours, but be sure to check every lid to make sure it's sealed shortly after canning.
Before moving to the pantry, remove the bands and write what it is and the year on the lid, so you know when you made it.
Freezing Blackberry Jam:
Using a jar funnel, ladle or pour the jam into the clean jars. Be sure to leave about a 1/2-inch gap at the top of each jar to allow for expansion in the freezer.
Wipe the top of each jar with a wet towel or rag, place the lid on, and tighten the band.
Before you put your jam in the freezer, be sure to write what it is and the year on the lid, so you know when you made it.
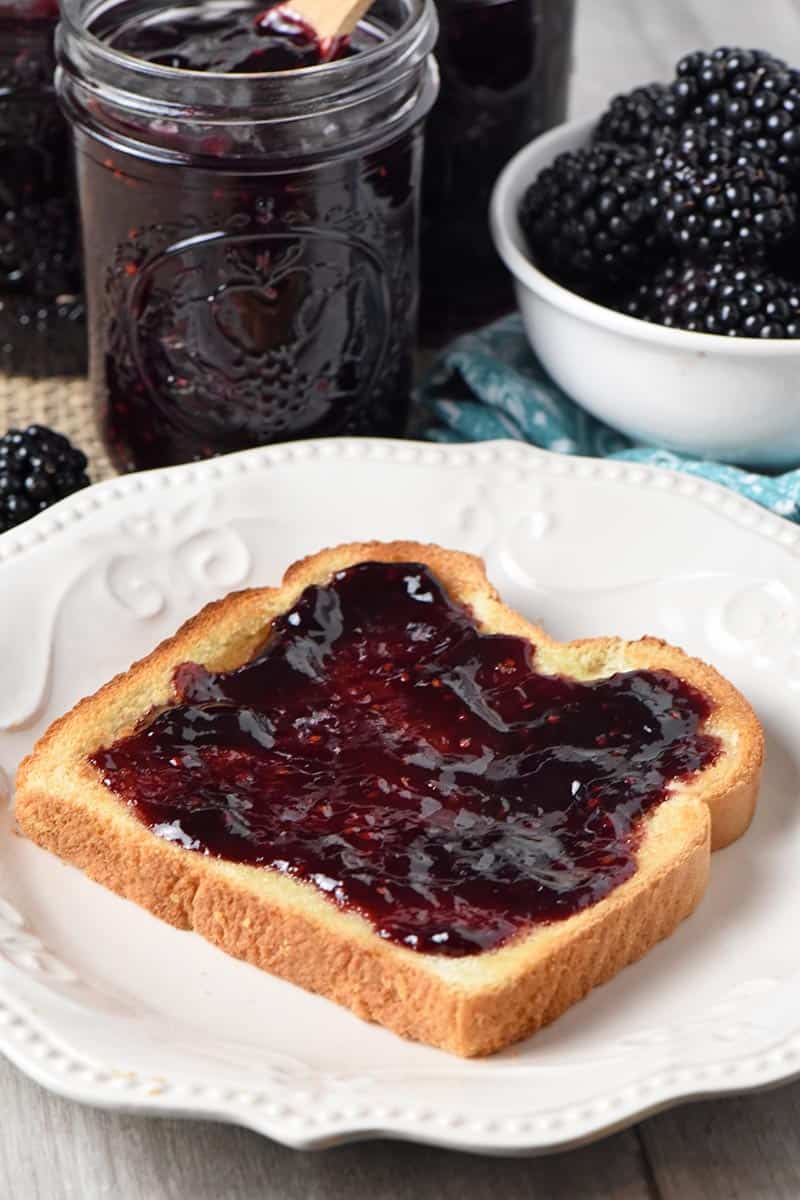
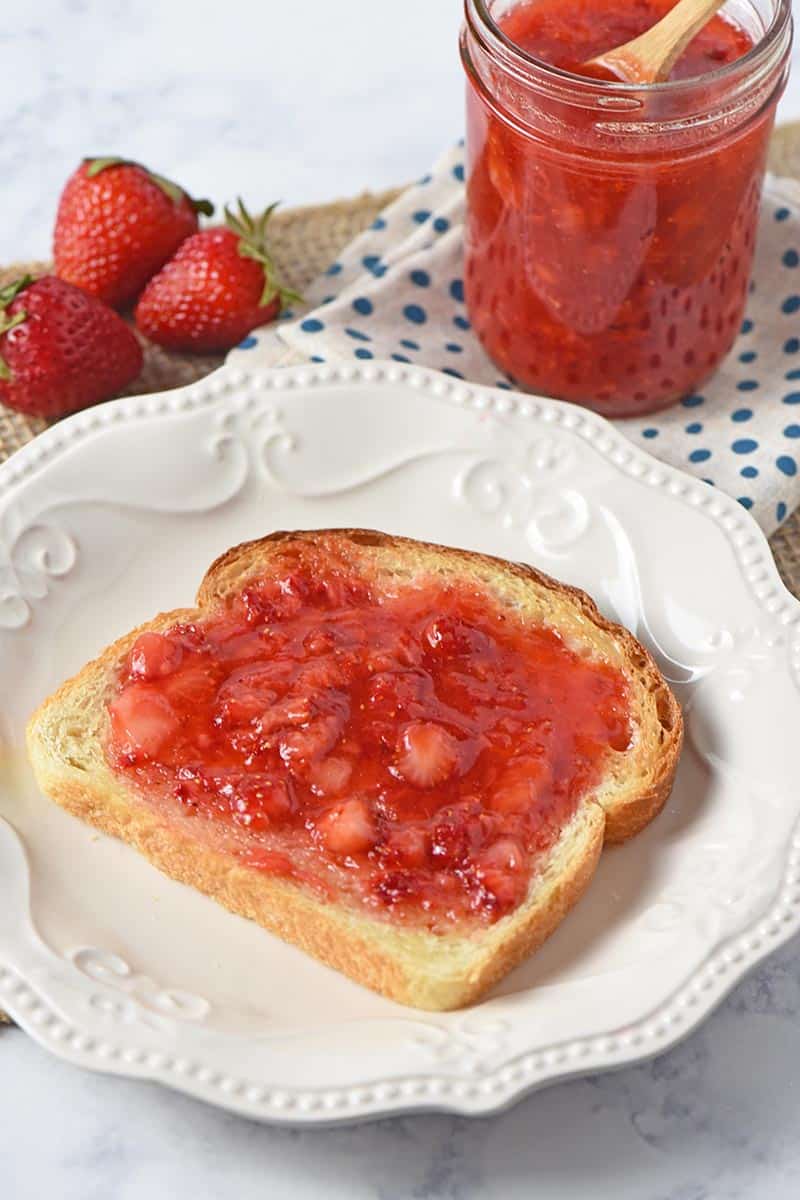
Serve the jam on toast, biscuits, ice cream, etc.
While fresh are better, you can use frozen blackberries. Just be sure to thaw them ahead of time, so they don’t add unnecessary liquid to the mixture and they’re easier to crush.
jams and jellies
American
blackberry jam, blackberry jam no pectin, blackberry jam recipe no pectin, blackberry jam recipe without pectin, blackberry jam without pectin, no pectin blackberry jam, old fashioned blackberry jam, recipe for blackberry jam without pectin
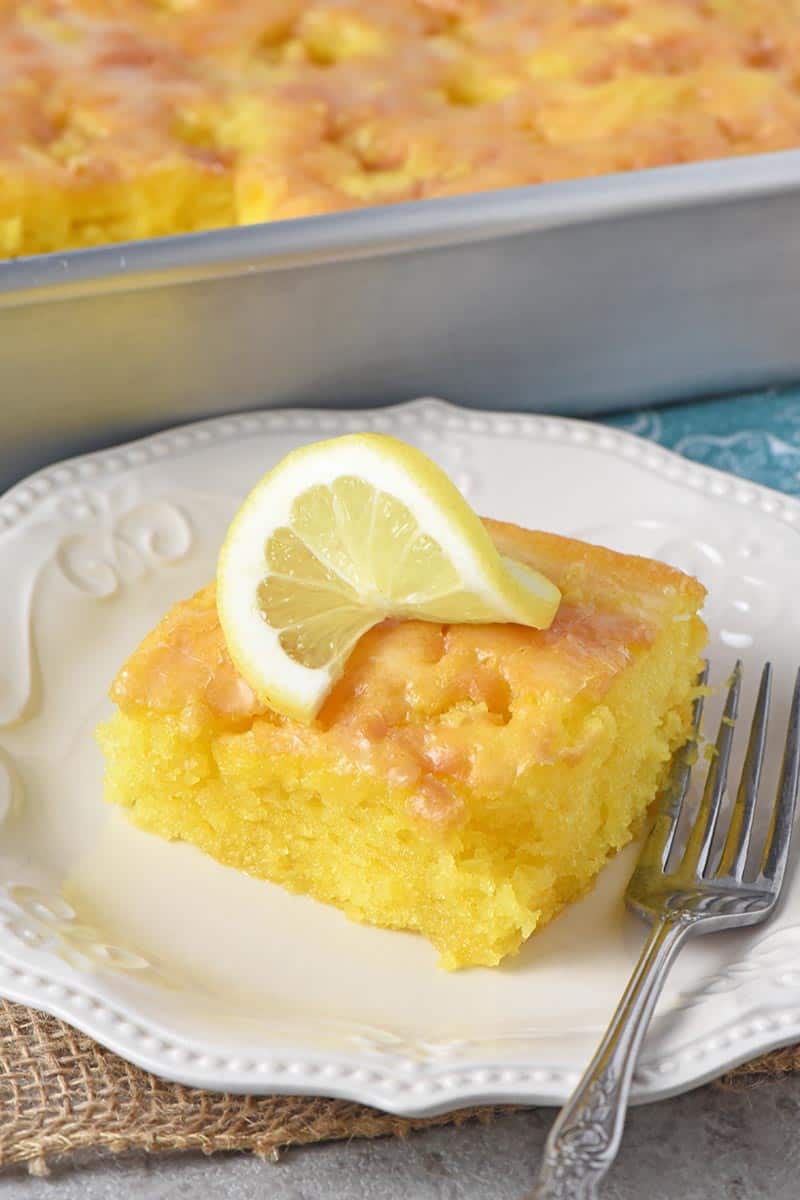
Let’s make Grandma’s favorite lemon poke cake with lemon glaze, using a cake mix. This easy recipe makes a fluffy cake with a simple lemony icing drizzled on top. It’s a luscious lemony dessert everyone will love.
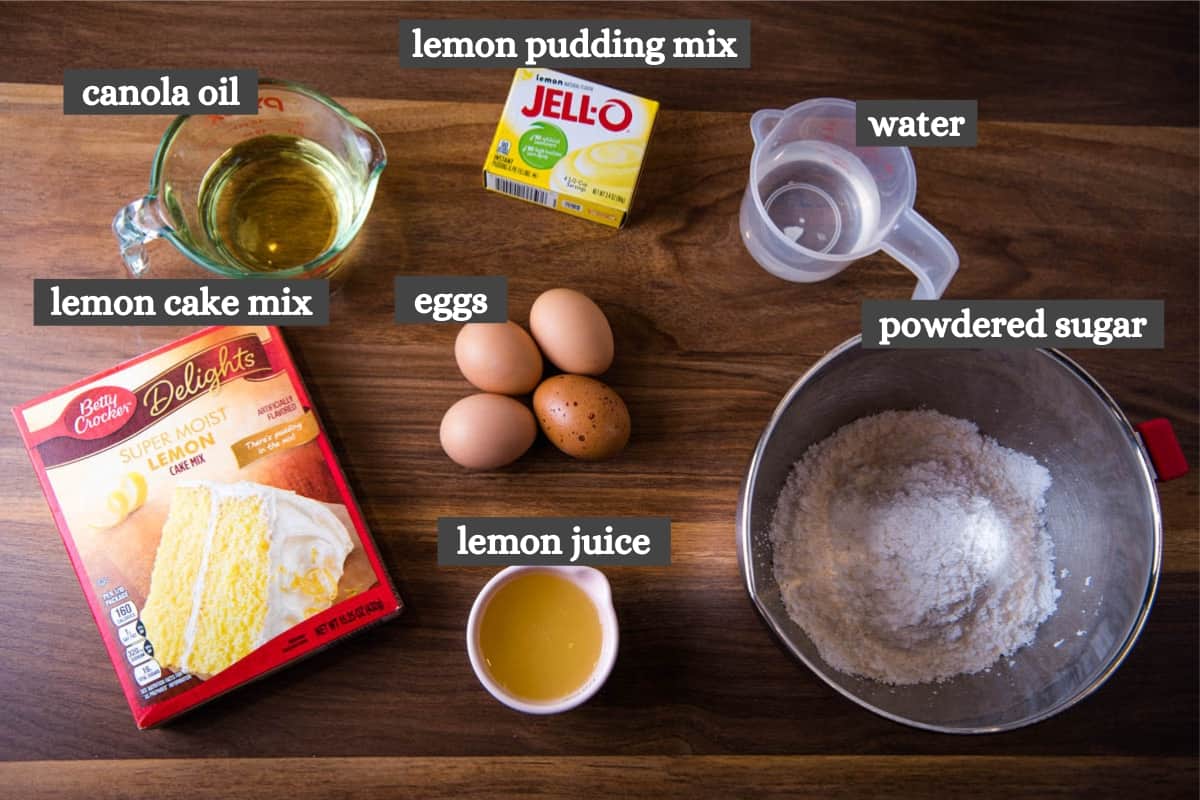
Lemon Instant Pudding Mix – Since you’re adding this mix in with the cake mix to make the cake batter, you really need an instant pudding mix versus cook ‘n’ serve. You’re not actually making the pudding.
Lemon Juice – While you can squeeze fresh juice from a lemon, I prefer to use Minute Maid lemon juice, which you can find in the freezer section of your grocery store. Or if you have it on hand, you can use frozen lemonade concentrate; my grandma used this quite a few times when making the glaze for this cake.
How to Make Lemon Poke Cake
Before getting started mixing up the batter, pre-heat your oven to 350° F and grease a 9×13 cake pan.
Mix up the Cake Batter…
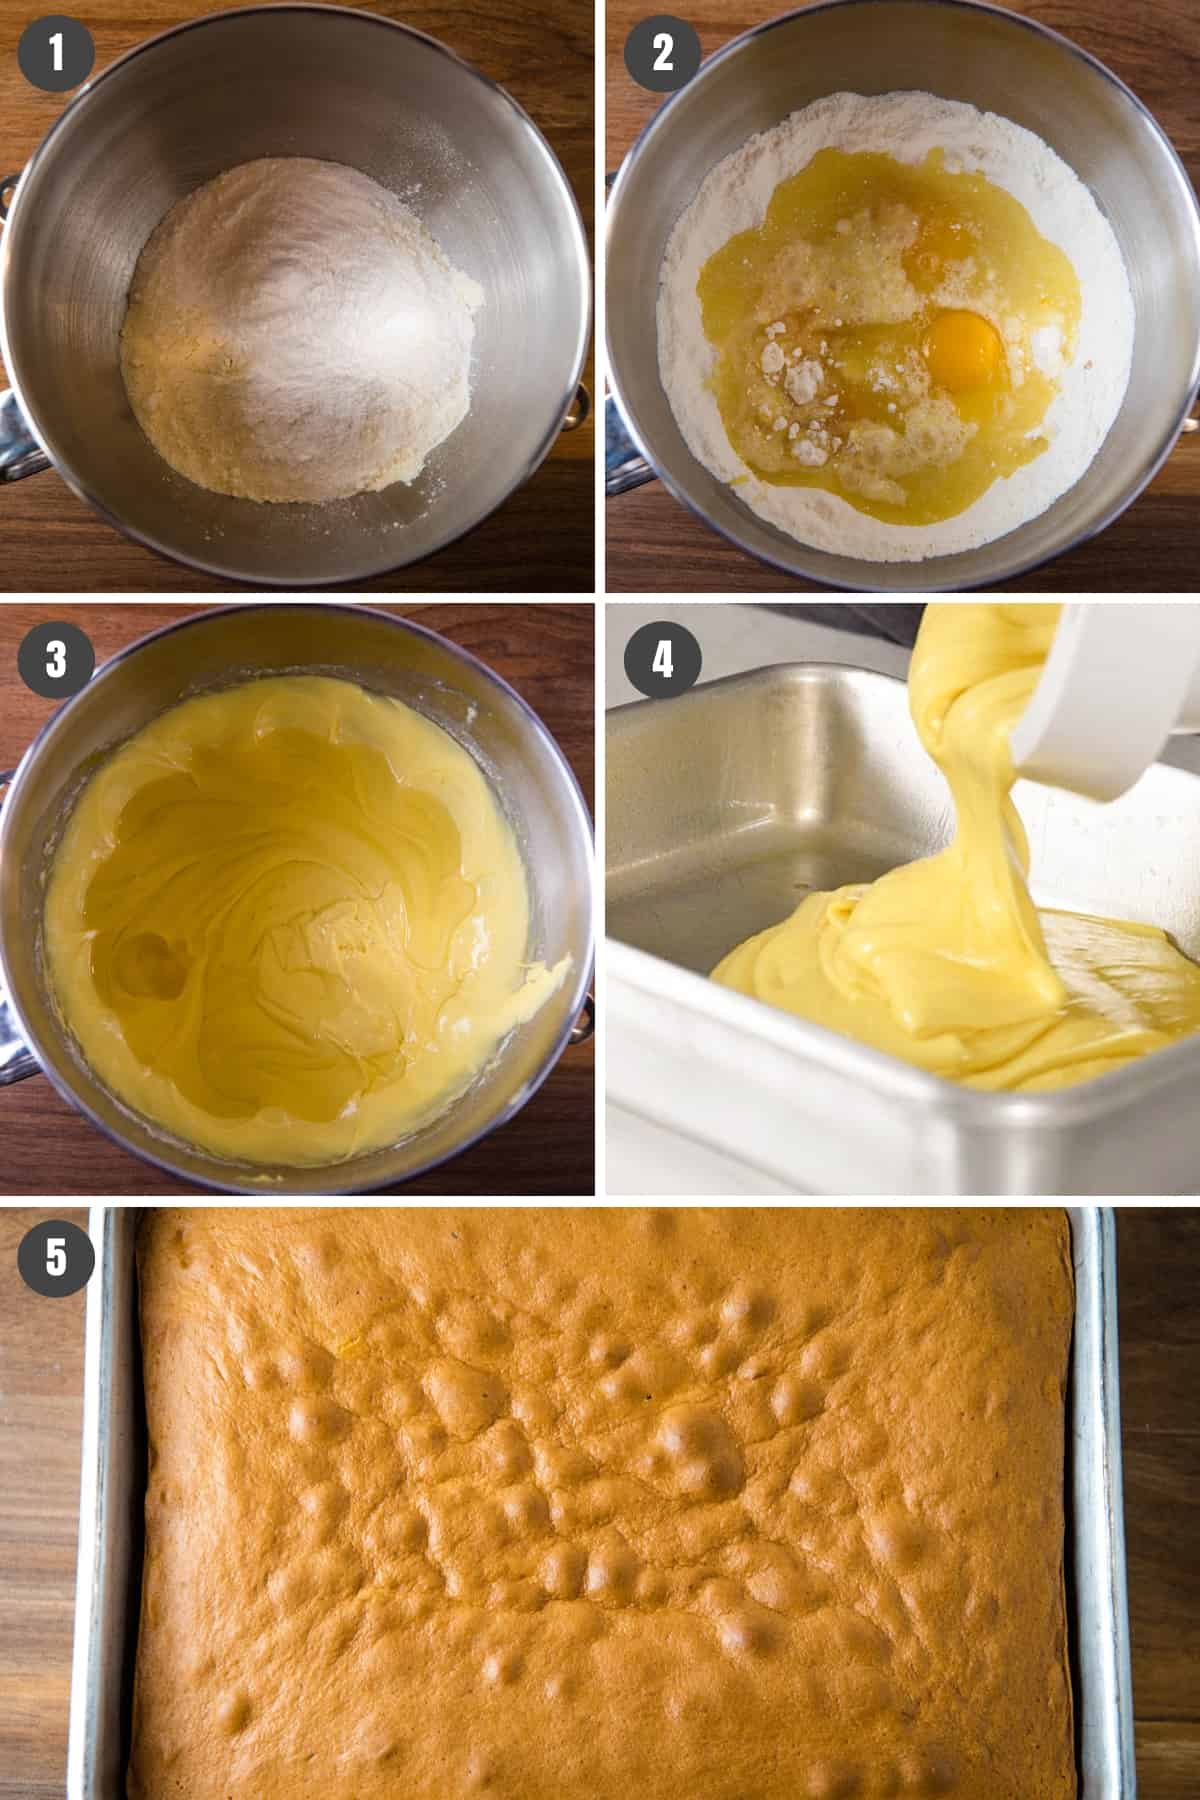
First mix together the cake mix and the instant pudding mix.
Add in the eggs and water, beating everything together for about 2 minutes.
Add the canola oil; then beat for another 2 minutes.
Place it in the oven and bake at 350° F for 30 to 40 minutes, or until a toothpick or cake tester comes out clean.
Then Make the Lemon Glaze…
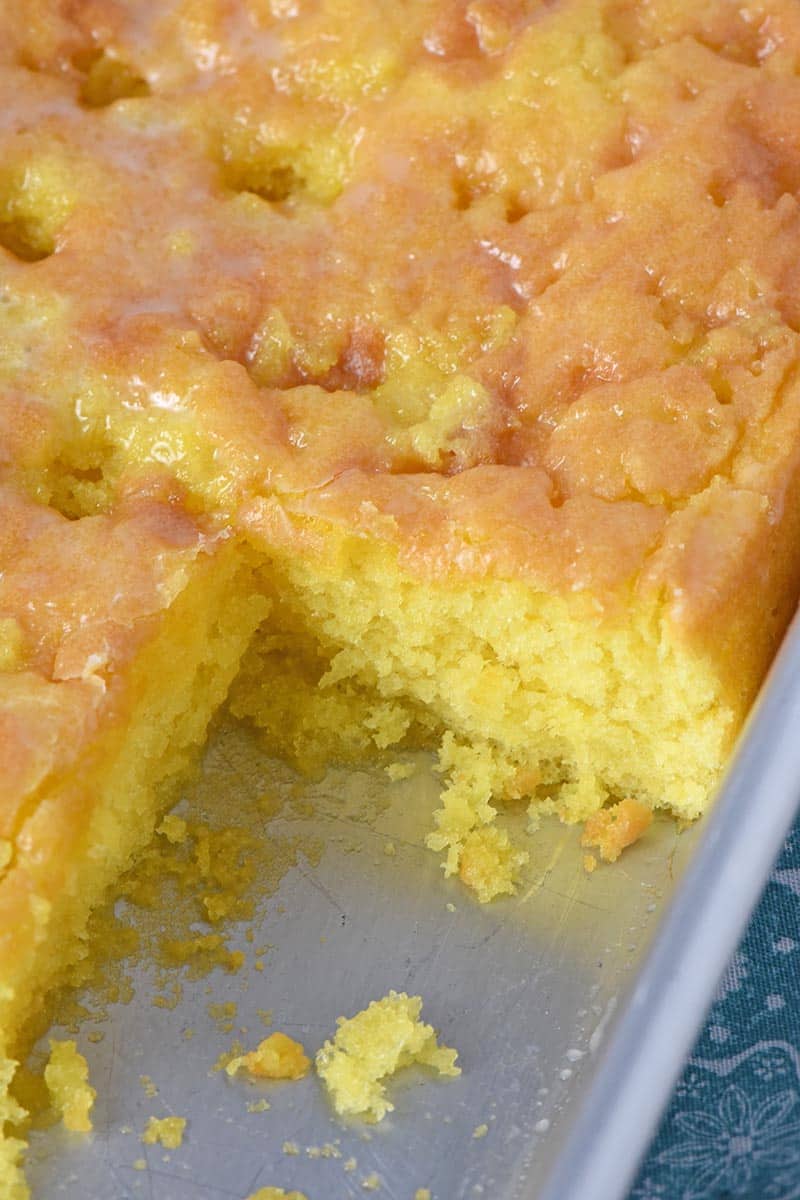
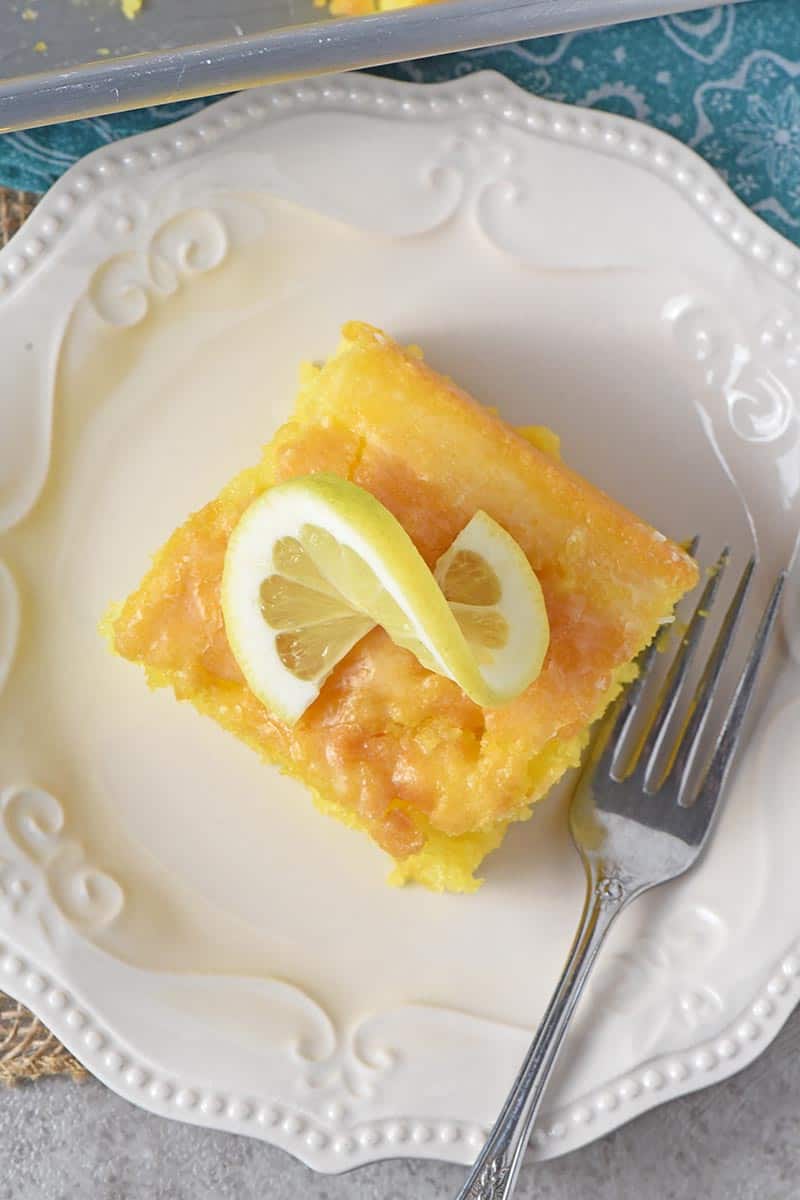
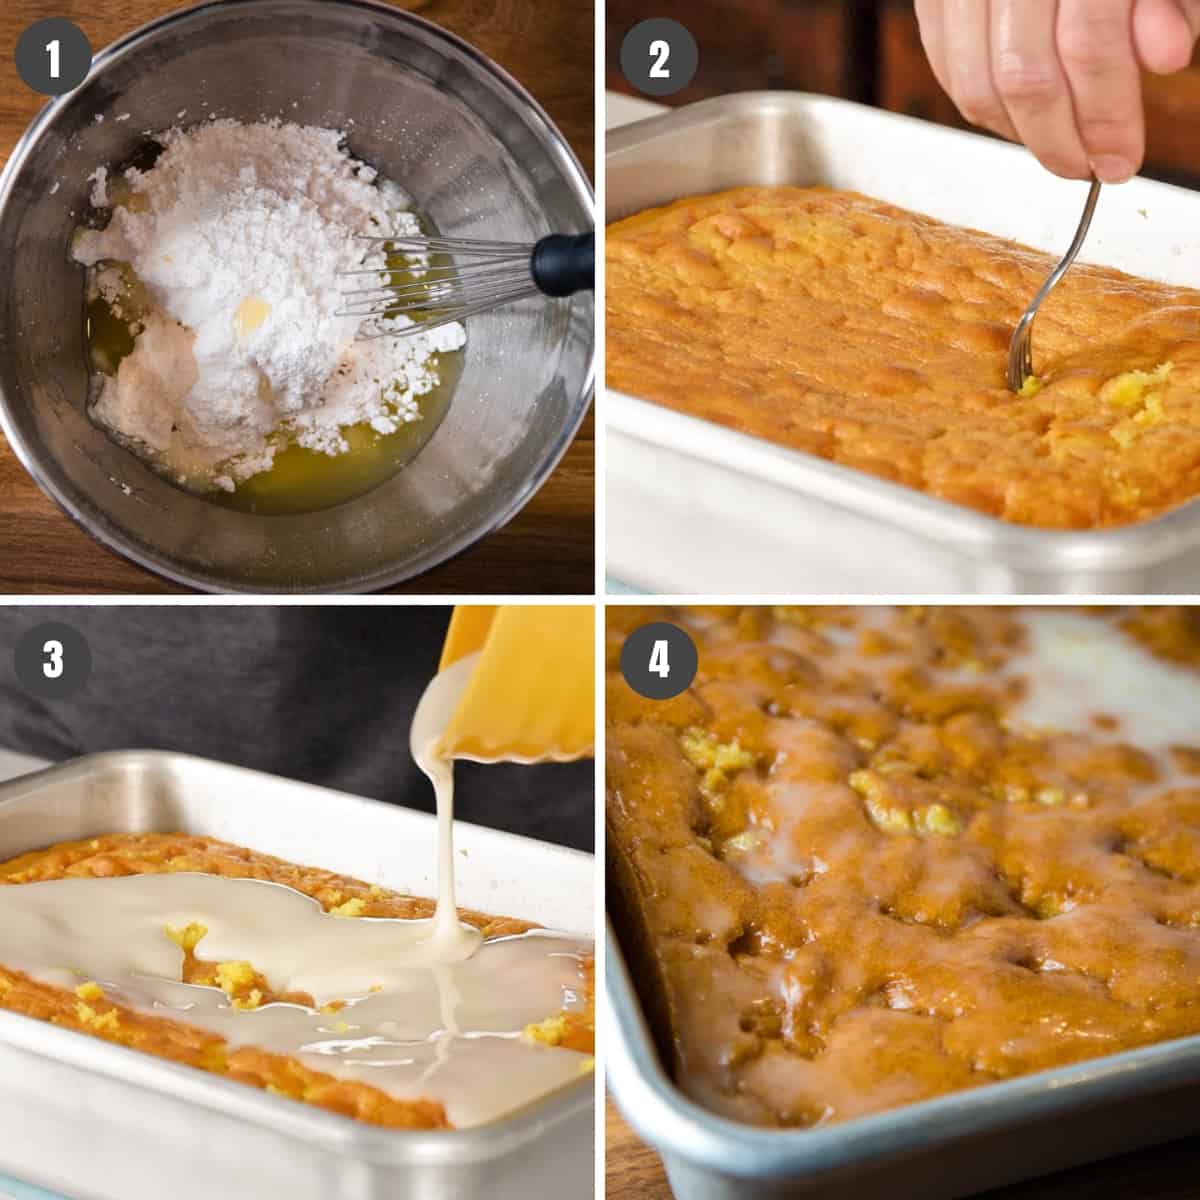
In a medium bowl, mix together the powdered sugar and lemon juice, which will create a really thin glaze.
When the cake is done and while it’s still hot, poke it all over with a fork.
Then pour or spoon on the glaze and spread it evenly over the cake.
The glaze will soak down into the cake, creating a really moist texture to the cake and a slightly crunchy top layer. It’s so good!
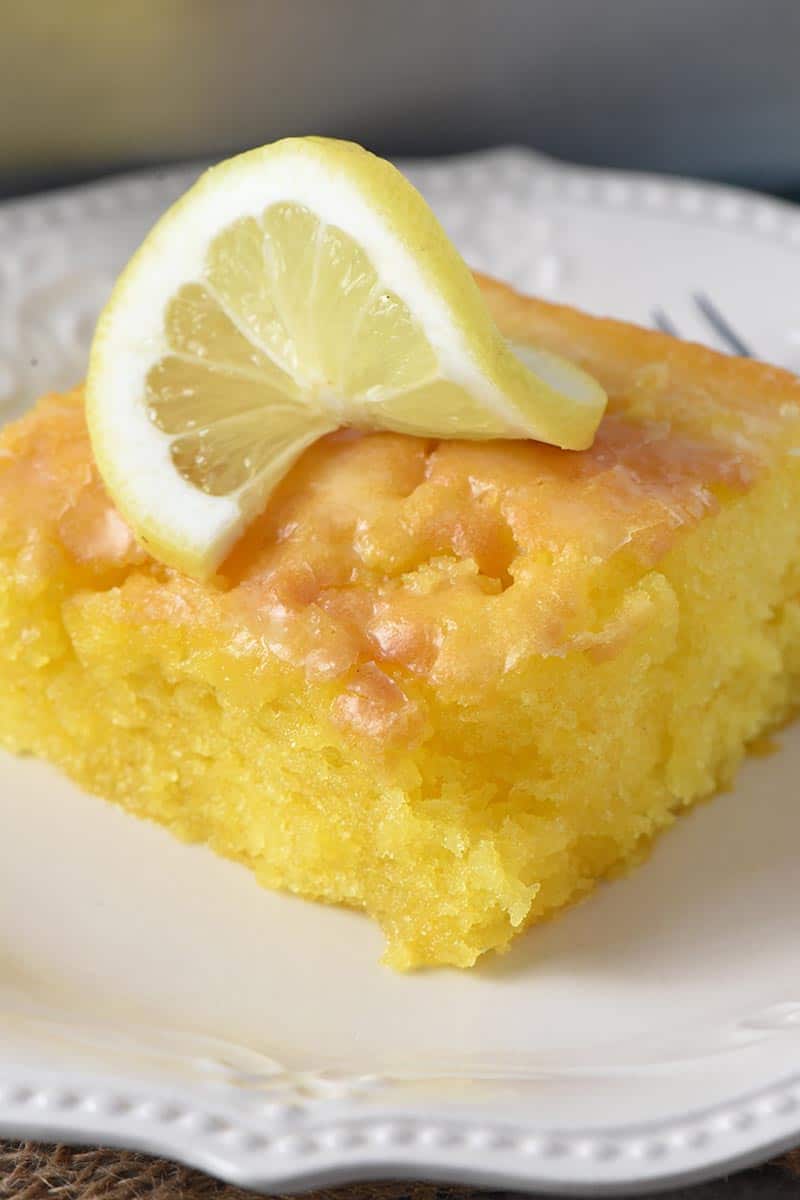
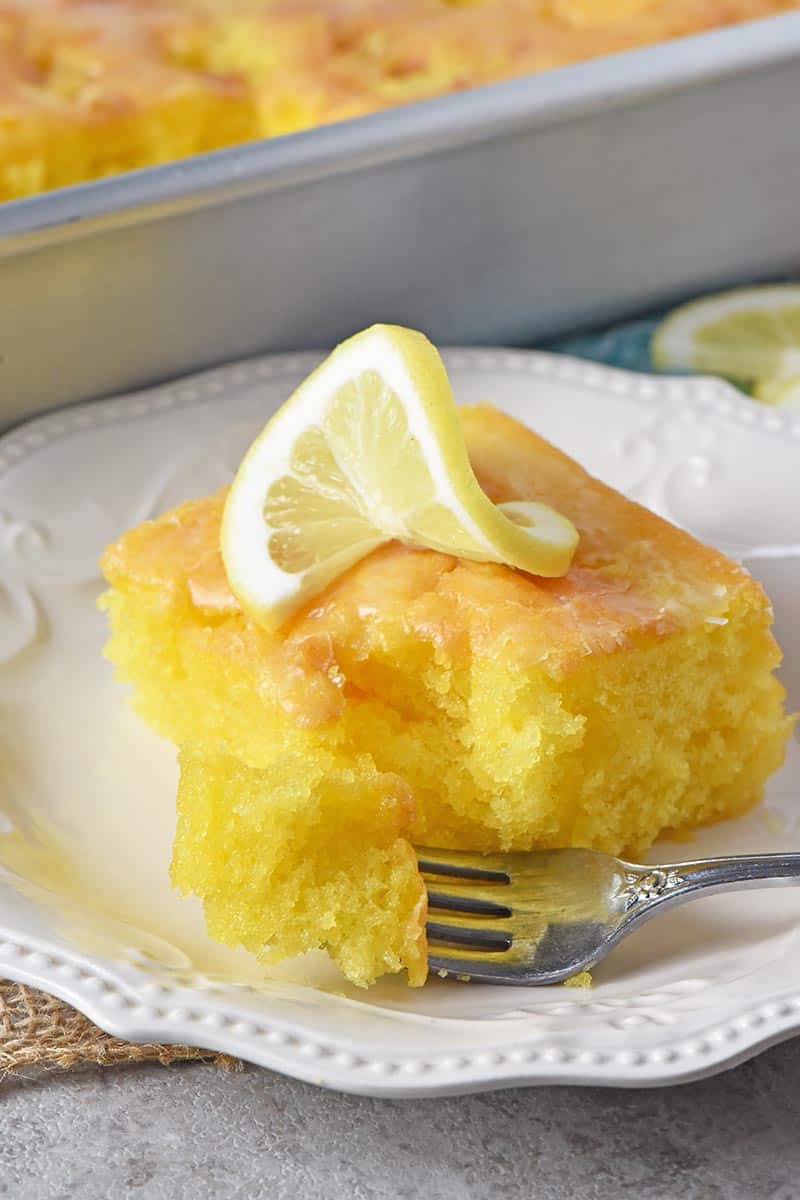
And at this point, it’s ready to slice, serve, and satisfy those cravings for all the lemon flavor this cake has to offer.
Expert Tips and Recipe FAQ’s
What happens if you add lemon juice to the cake mix?
You’ll just have an even more lemony cake. It will be really citrusy. I find that the cake mix is usually lemony enough without added juice.
What is the best way to poke holes in a poke cake?
If you’re just pouring a thin glaze, as in the case of this cake, a fork is generally sufficient. Just use the fork to poke holes all over the top of the cake, and the glaze will drizzle down into the baked cake, making it really moist and delicious. However, if you’re adding a thicker liquid, like pudding, you may want to use the handle of a wooden spoon to poke the holes; that allows more room for the pudding to soak down into the cake.
How should I store lemon poke cake?
It should be fine on the counter for 2-3 days. It will keep longer, though, if stored in the refrigerator.
Can I freeze it?
Yes, you can. Just be sure to store it in an airtight container so it doesn’t get freezer burn. If freezing it in the cake pan, I’d add a layer of plastic wrap underneath the lid as an extra measure to guard against freezer burn. It should keep up to 3 months in the freezer.
More Easy Cake Recipes:
If you love this easy lemon cake, you’ll love these cakes too…
If you try this recipe, why not leave a star rating in the recipe card right below and/or a review in the comment section further down the page? I always appreciate your feedback. You can also follow me on Pinterest, Facebook, Instagram, and YouTube. And subscribe to my email list too!
Lemon Poke Cake with Lemon Glaze
How to make Grandma's lemon poke cake with lemon glaze, using a cake mix. Fluffy cake recipe with a simple lemony icing drizzled on top.
Mixer
9×13 Cake Pan
Baking Spatula
Cake Tester
Mixing Bowl
Cake:
15.25 ounce lemon cake mix
3.4 ounces lemon instant pudding mix
4 large eggs
3/4 cup water
3/4 cup canola oil
Glaze:
2 cups powdered sugar
6 tablespoons lemon juice*
Cake:
Pre-heat the oven to 350°.
Mix together the cake mix and the instant pudding mix.
Then add in the eggs and water, beating everything together for about 2 minutes.
Add the canola oil; then beat for another 2 minutes.
Pour the cake batter into a rectangular 13"x9" cake pan, and smooth it out evenly in the pan with a spatula.
Place it in the oven and bake at 350° F for 30 to 40 minutes, or until a toothpick or cake tester comes out clean.
Lemon Glaze:
In a medium bowl, mix together the powdered sugar and lemon juice, which will create a really thin glaze.
When the cake is done and while it’s still hot, poke it all over with a fork.
Then pour or spoon on the glaze and spread it evenly over the cake. The glaze will soak down into the cake, creating a really moist texture to the cake and a slightly crunchy top layer. It's so good!
Now it's ready to serve and enjoy!
*You can substitute 4 ounces of frozen lemonade concentrate for the lemon juice.
How should I store lemon cake? It should be fine on the counter for 2-3 days. It will keep longer, though, if stored in the refrigerator.
Can I freeze it? Yes, you can. Just be sure to store it in an airtight container so it doesn’t get freezer burn. If freezing it in the cake pan, I’d add a layer of plastic wrap underneath the lid as an extra measure to guard against freezer burn. It should keep up to 3 months in the freezer.
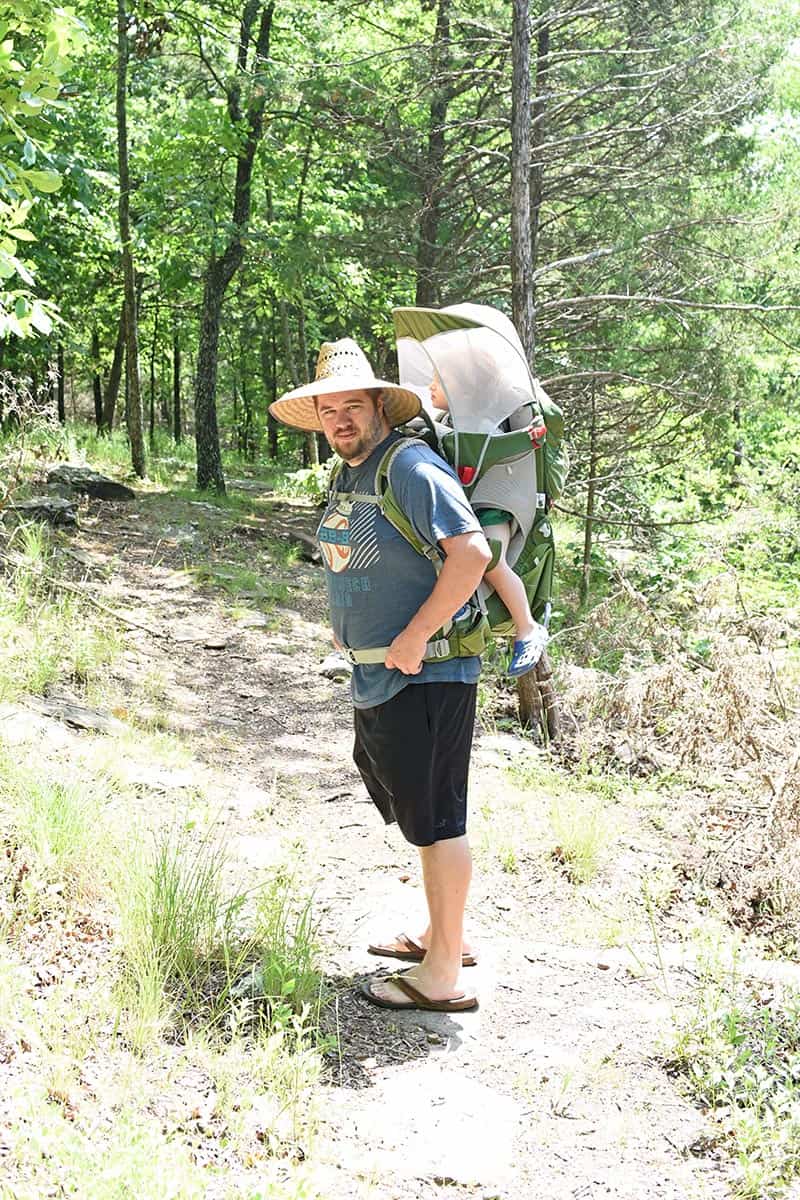
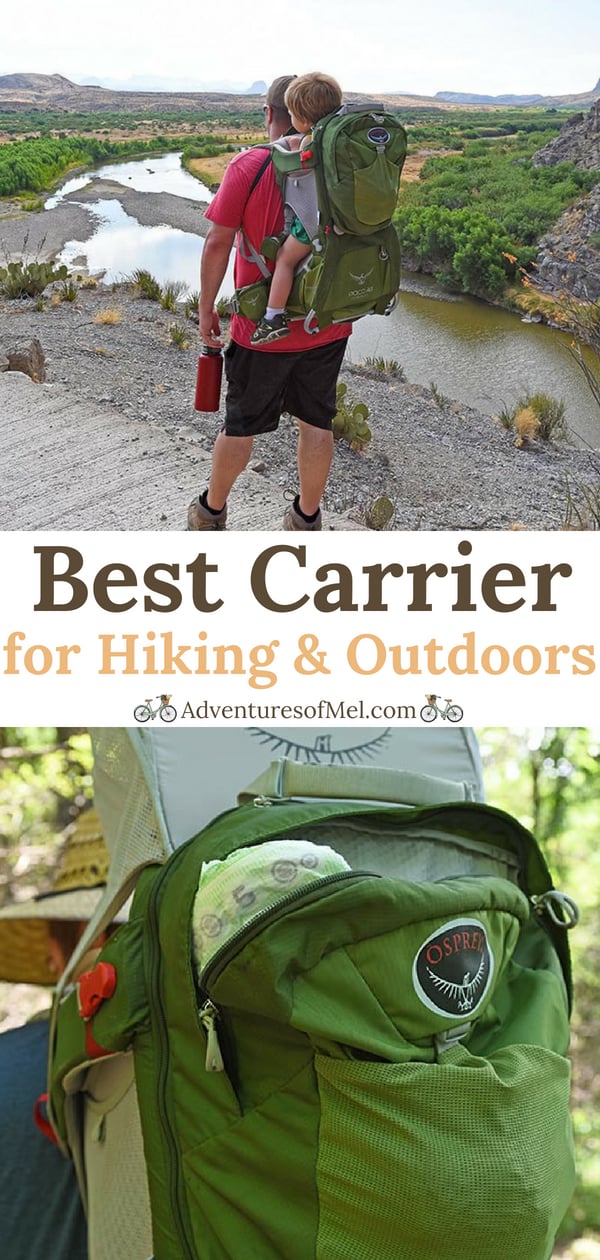
Before Zeke was born, we knew we needed a baby carrier that would stand up to all of our outdoor adventures. Of course, we also wanted it to be comfortable, lightweight, and easy to carry; and we wanted it to grow with him.
After a lot of research, we decided on the Osprey Poco AG Premium Child Carrier. It’s been the best purchase we could have ever made and the ONE baby product we’ve used over and over and over again.
How we use our Osprey baby carrier backpack
The Osprey carrier is actually quite versatile, and we’ve used it in many different ways for many different things. While it’s mostly meant for hiking, we’ve also used it in other ways…
Eating on the trail or while traveling – it makes a phenomenal baby seat and keeps Zeke safe when we don’t necessarily want him running around, even more so when he was really little.
Riding burros to Boquillas – Zeke rode on Dan’s back.
Working outside in the yard and garden – Dan and I both would take Zeke outside in the carrier before he was able to walk.
While we haven’t used it in the airport, it’d be a great way to navigate the airport, especially when your child is really little.
The carrier has an anti-gravity (AG) suspension system. It has aluminum stays that provide stability both while carrying and while sitting on the ground.
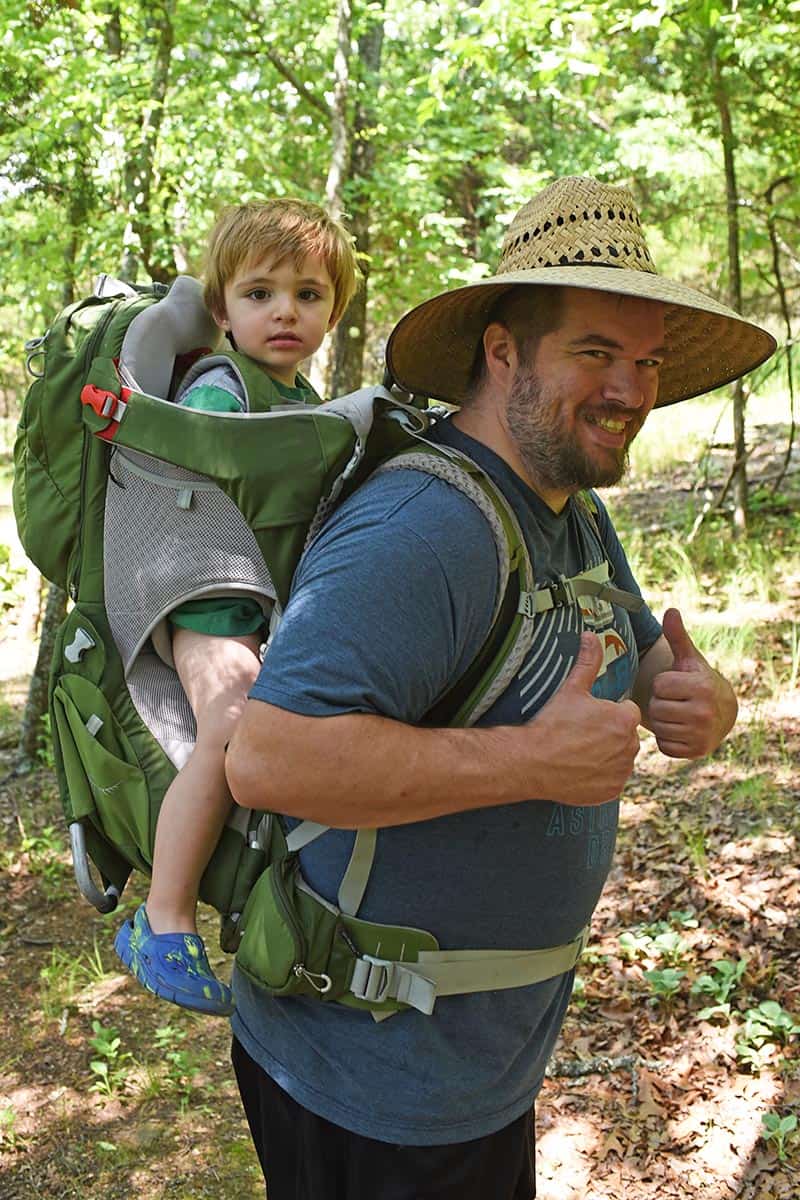
I love that the child seat has padding, a drool pad, and a softer fleece lining. We can strap Zeke in with the safety harness, and his feet can either dangle down, which he seems to prefer, or be secured in the provided adjustable foot straps.
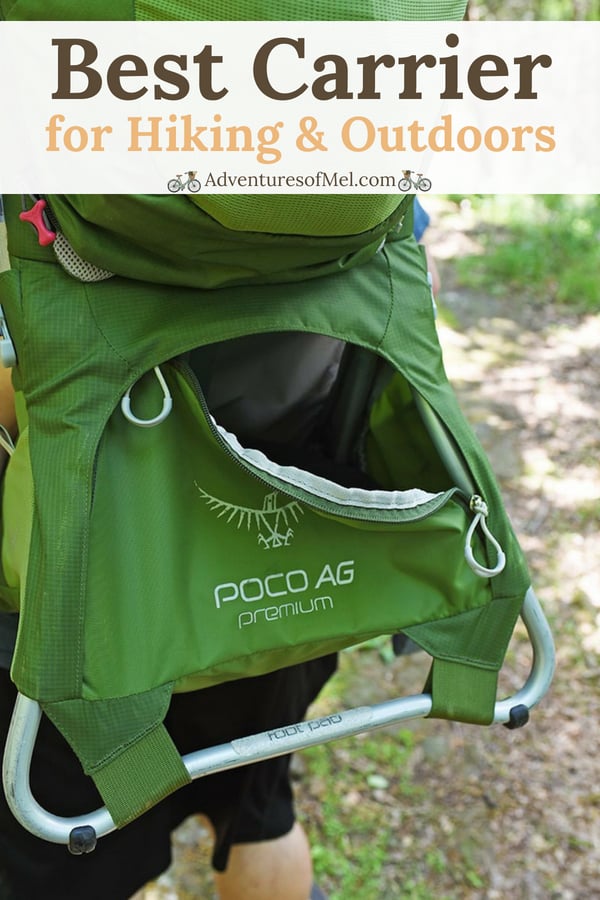
Some of our favorite features of the Osprey Poco AG Premium:
Comfort for Zeke – It’s comfortable for Zeke; he’s loved it since he was a baby. He absolutely loves being in his pack when we’re out exploring.
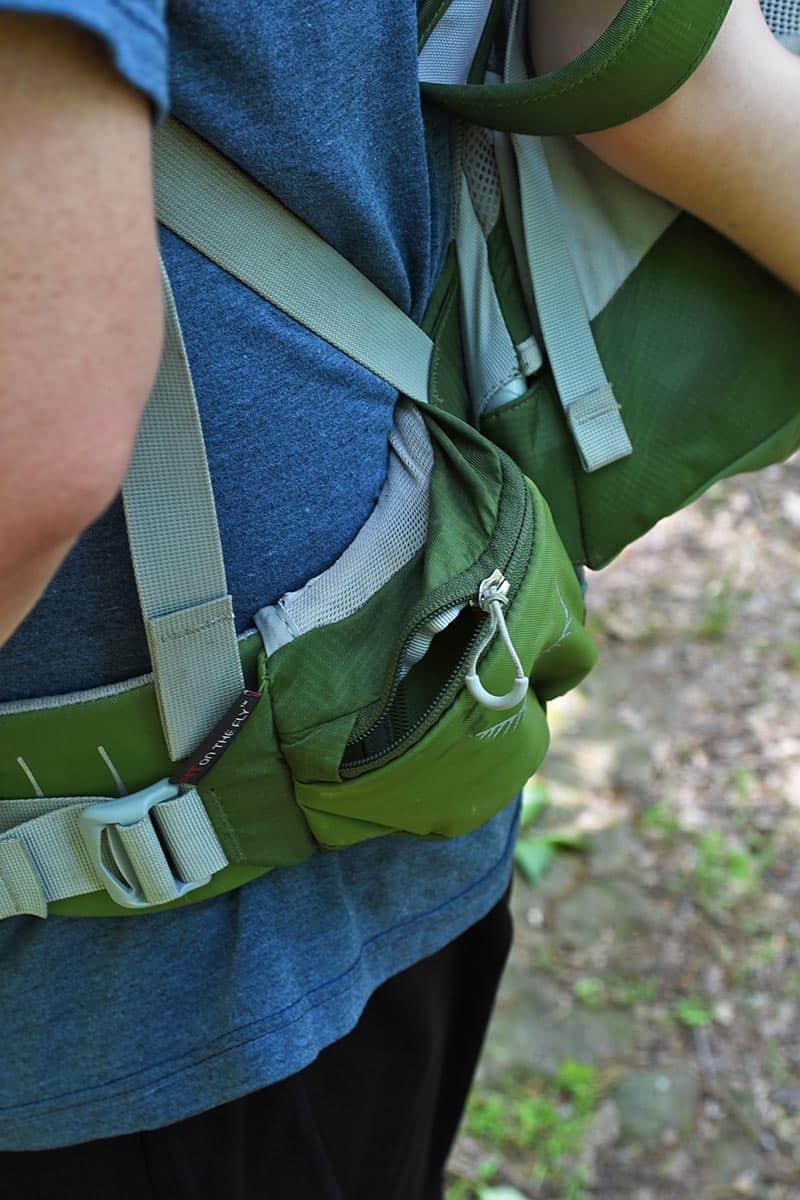
Comfort for Us – It has a Fit-on-the-Fly hipbelt we can easily adjust to fit whoever is carrying. It also has an adjustable sternum strap. The mesh shoulder harness and backpanel give ventilation.
Sunshade – If it’s extremely sunny and hot, we can pull out the sunshade to give Zeke a little shade. As he’s gotten bigger, he doesn’t love the shade so much; he likes to be out in the open. But when he was little, it was a lifesaver.
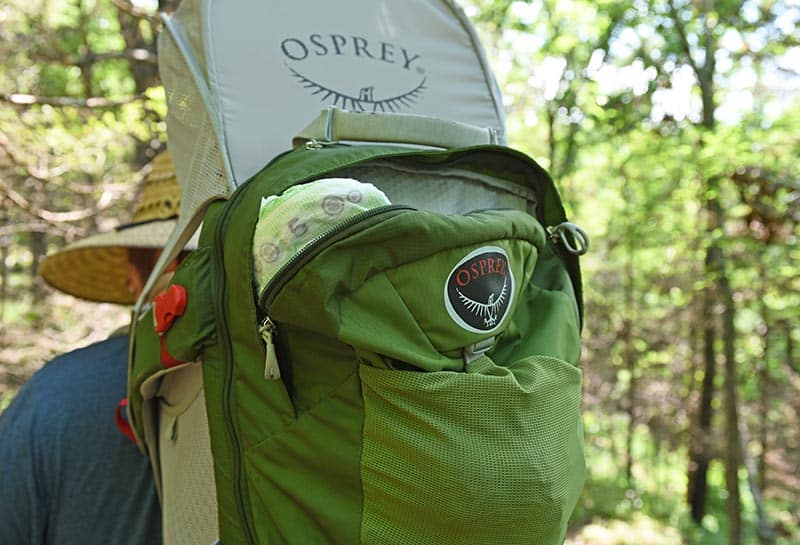
Storage – There’s a small, removable backpack built into the carrier, as well as a larger bottom storage area. There are also various little pockets, like the hipbelt pockets. We carry things like sunscreen, snacks, diapers, and more. We’ve even stuffed a jacket or two in the pack.
Water Reservoir Storage – There’s a sleeve for a water reservoir, so no need to carry a water bottle if you don’t want to.
Grab Handles – The grab handles make it easy to grab and throw in the car or carry wherever you need it.
Stores well – The carrier itself folds up and stays put, taking up a smaller footprint wherever you need to store it.
Specs of the Poco AG Premium baby carrier backpack/toddler carrier backpack:
Max load, including child, pack, and gear – 48.5 pounds (all 3 carriers).
Weight of the Premium pack is 8.31 pounds; Plus is 7.67 pounds; and Poco AG is 6.9 pounds.
2,380 cubic inches of carrying capacity in the Premium; 1,587 cubic inches in the Plus; and 1,220 cubic inches in the Poco AG.
Extra accessories you may want to consider:
You can buy both a rain cover (perfect for hiking in the mountains where conditions are unpredictable) and a travel cover or carrying case for the Osprey. The travel cover is especially useful for air travel.
Looking for more outdoor gear for kids recommendations?
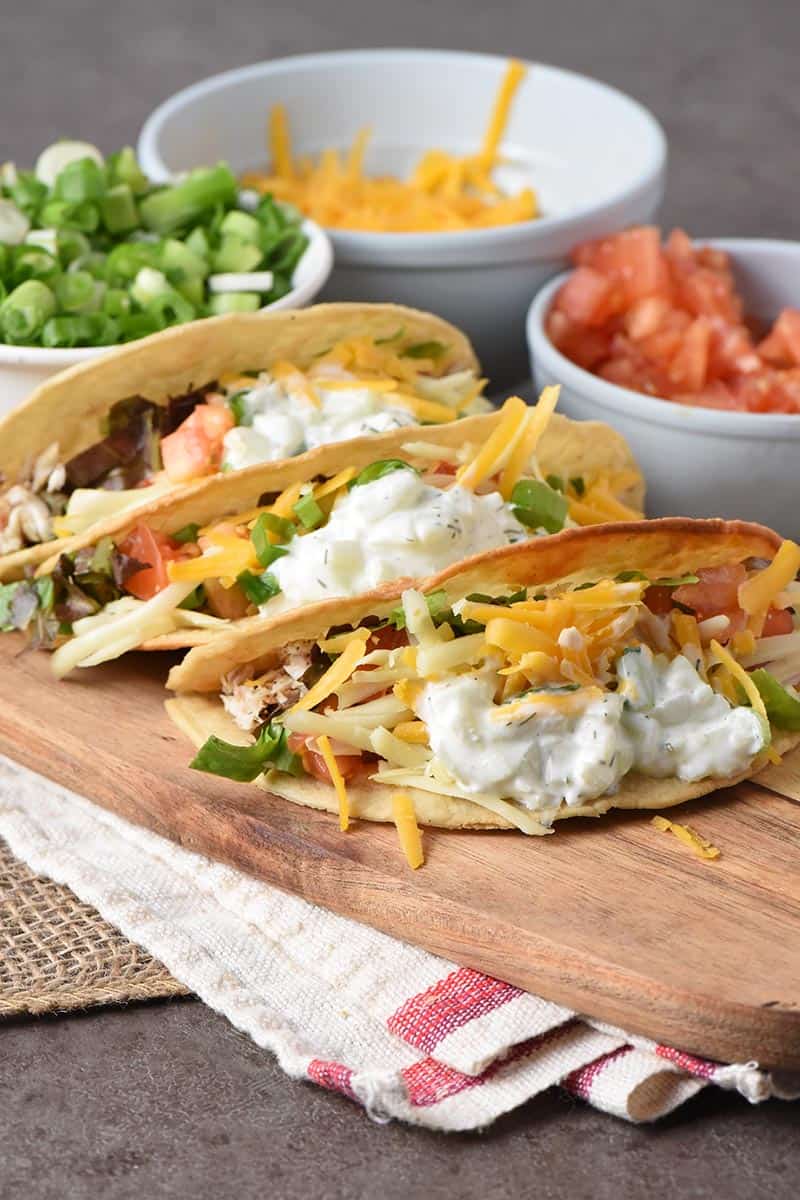
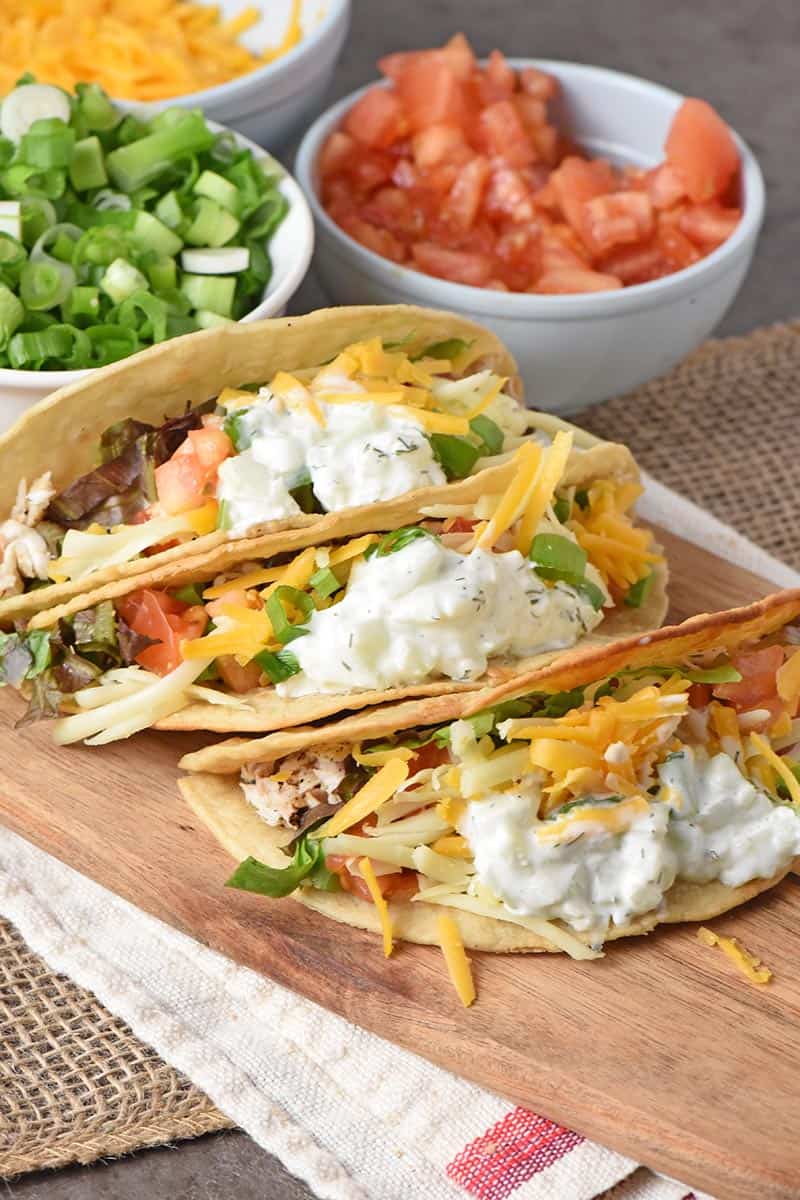
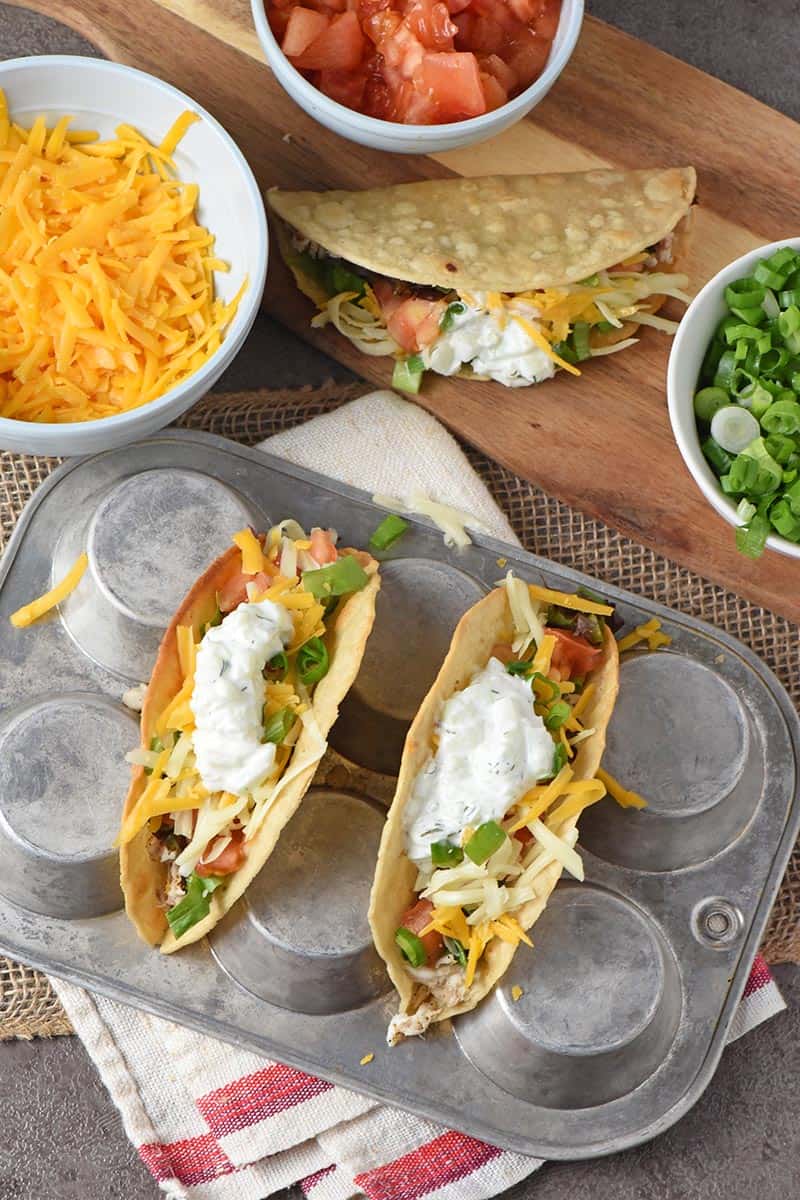
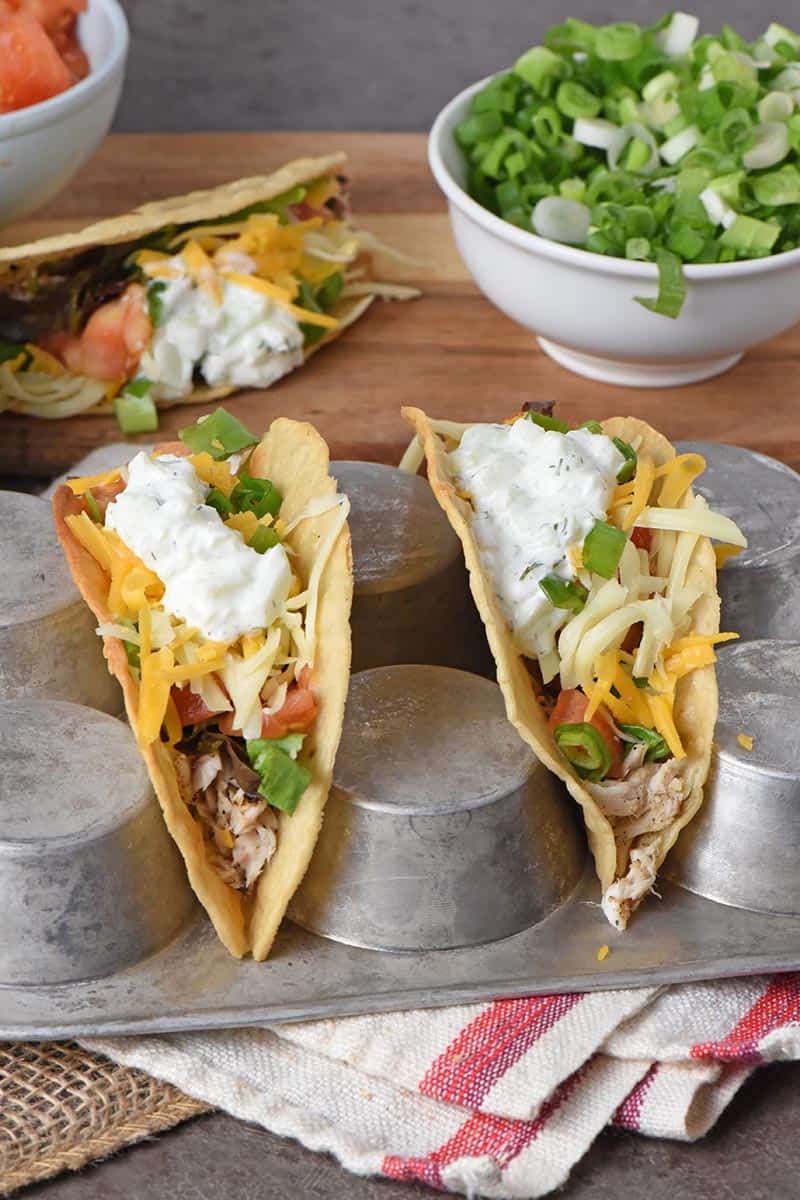
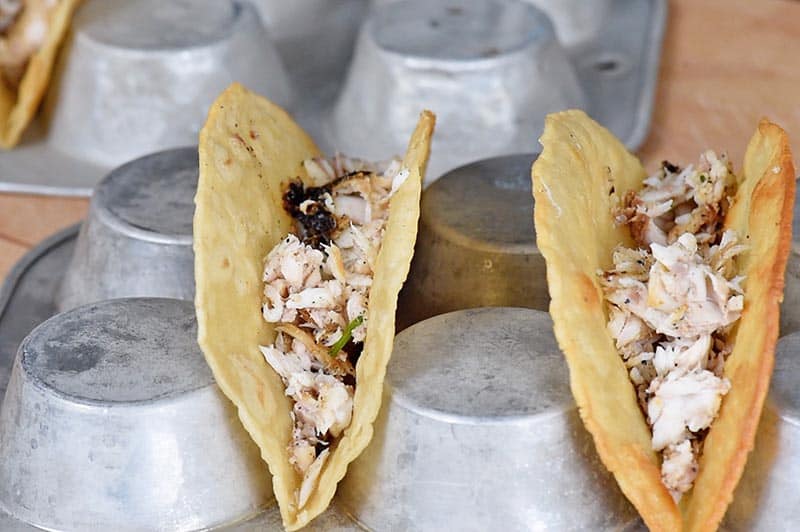
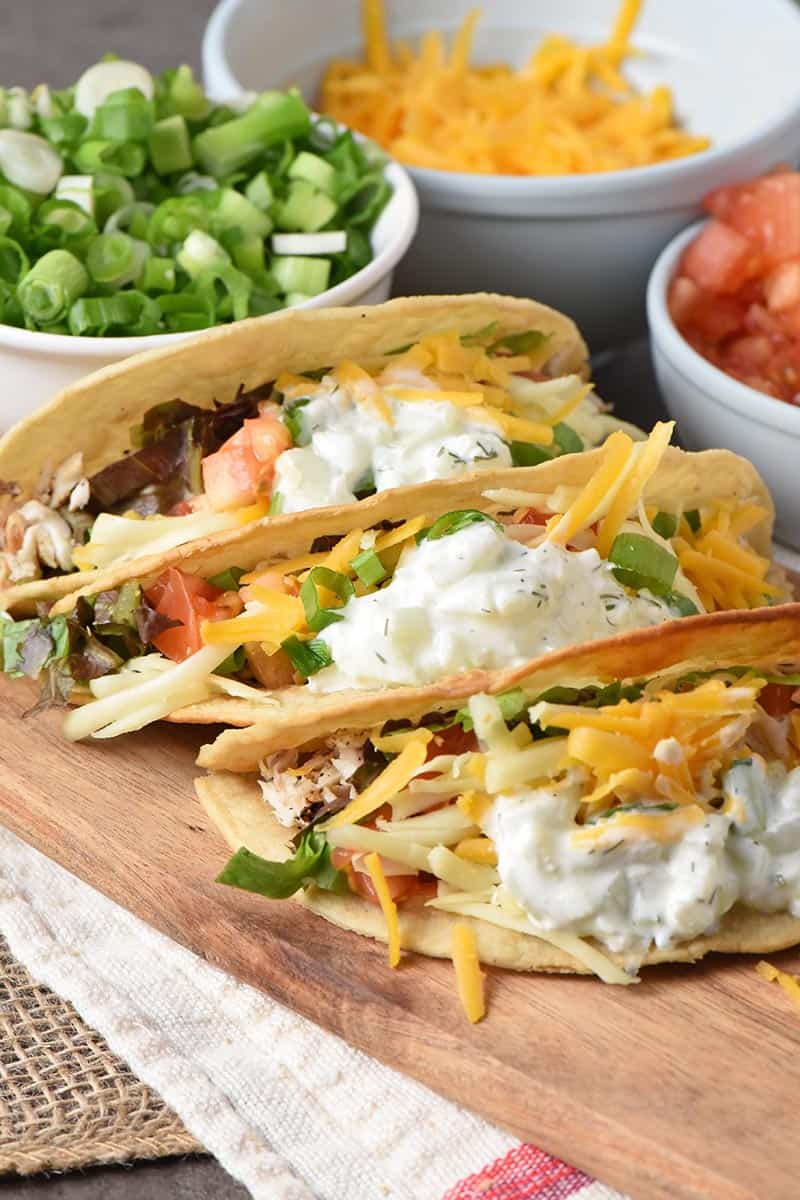
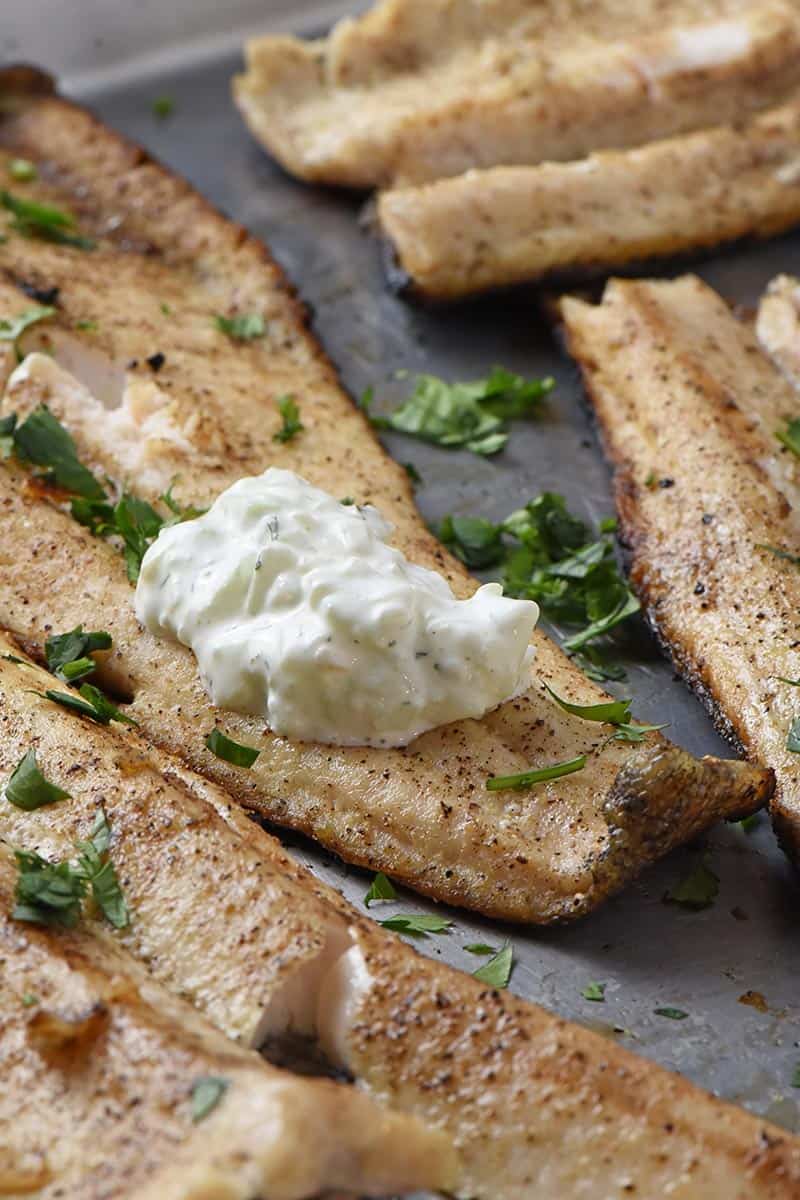
Fish Tacos – Easy, simple, delicious, crispy fish tacos recipe with a low carb tzatziki fish taco sauce. Perfect dinner idea for Taco Tuesday!
Tacos = life. Do you agree? If you said yes, you’re going to love this recipe for the most deliciously crispy fish tacos with the most deliciously creamy tzatziki fish taco sauce ever!
We grilled trout fillets to use in our tacos. However, you can use any white, flaky fish you want for this fish tacos recipe. Sometimes we just make salmon in the Instant Pot if we don’t have time to fire up the grill!
You can also cook the fish however you choose, though grilling is definitely my favorite way to eat fish. Except, of course, when we make salmon into the most delicious salmon patties; they are definitely a family favorite. And my boys love pan fried crappie after a good fishing trip!
I’ll share a few alternative options for how to cook fish below.
Once you’ve chosen the fish you want to use, you’ll need to cook it. We highly recommend grilling on a charcoal grill or gas grill to give your fish a smoky, slightly blackened flavor.
But if you don’t want to grill or don’t have access to a grill, you can certainly bake the fish or even fry the fish. I’m pretty sure you can even cook fish in your Instant Pot, though you’d definitely want to check pressure cooking times and settings.
Gather your ingredients for this fish tacos recipe:
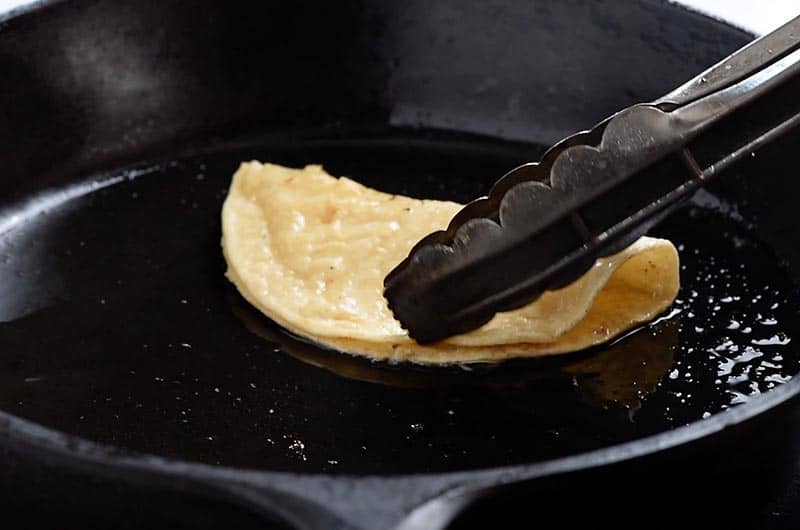
To make your own crispy taco shells (they remind me of a Taco Bell Chalupa shell)…
Heat about a tablespoon of bacon grease in a skillet; let it melt and heat up.
Add a corn tortilla to the skillet, letting it cook on one side.
Use tongs to turn the tortilla and let the other side cook.
Finally, remove the tortilla from the skillet and let drain on a paper towel or paper bag for maybe 30 seconds or so.
Fold into a taco shape and place in either a taco holder or the bottom side of a muffin pan.
And that’s it, you’ve made your own taco shells. They’re so good!
Tips for how to make grilled fish tacos:
First, grill the fish; or cook it however you choose.
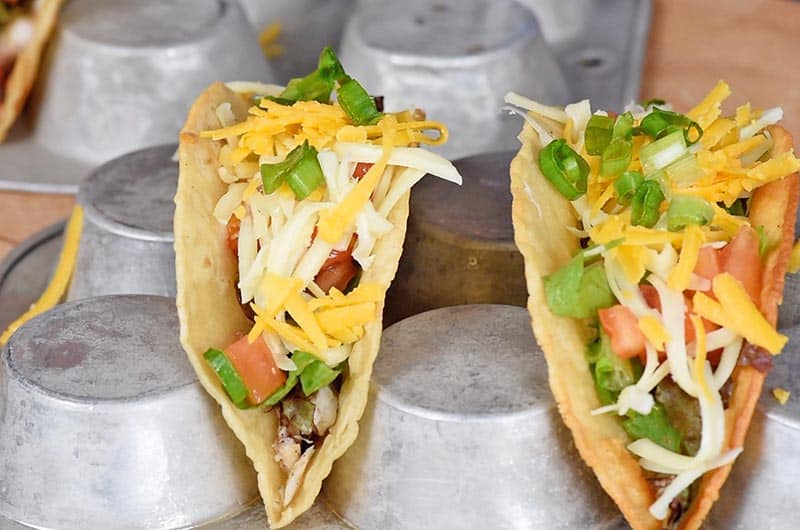
Prep all your fresh ingredients. Wash and chop the lettuce, tomatoes, and green onions. Also, shred the cheese.
Fry up a batch of corn tortillas to form taco shells. You can use bacon grease or oil.
Once the fish is fully cooked, taco shells are done, and fresh ingredients are prepped, you’re ready to start the process of layering.
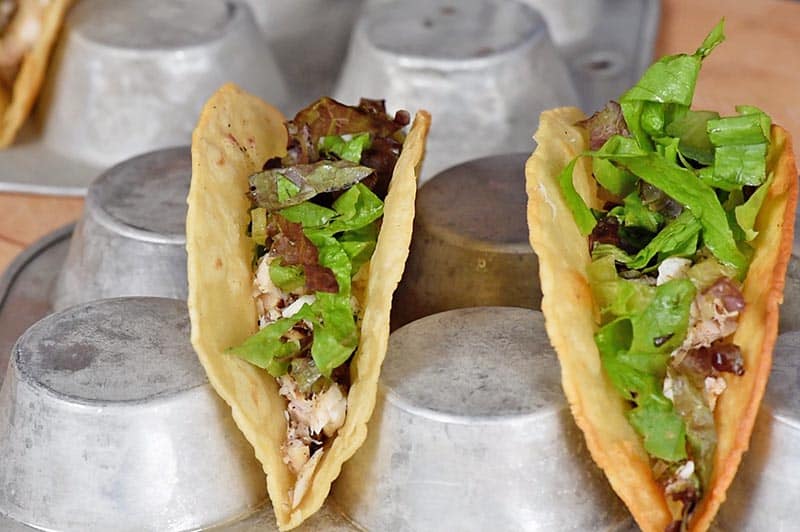
You can layer ingredients in any order you want (I layer them a bit differently in the video and photos from what I describe here), but I prefer to add the fish into the taco shell first, then the cheese (it gets all melty on the warm meat), and go from there.
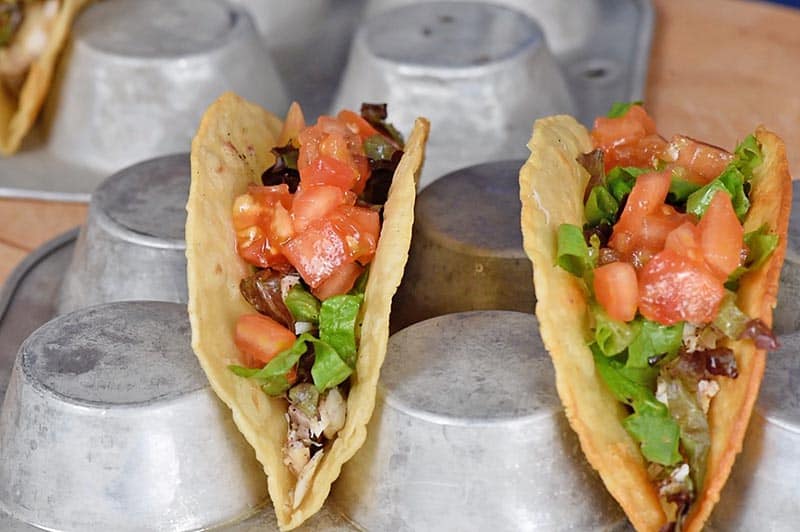
Add a layer of lettuce.
Then add a layer of tomatoes.
Now add the cheese, green onions, and whatever else your heart desires.
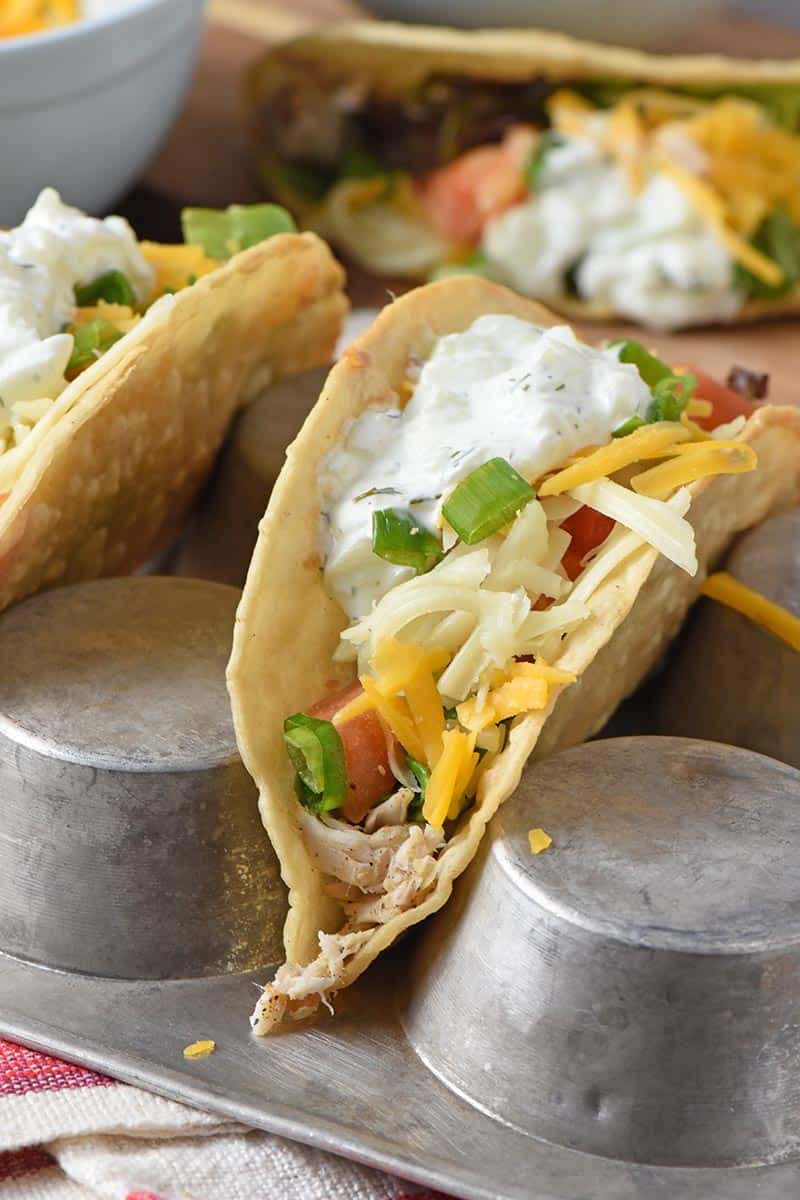
Don’t forget a dollop of tzatziki sauce (though I love adding a good layer of fish taco sauce or sour cream before I even add the meat; that way I have the sauce in every single bite).
And that’s it. Tacos are the easiest thing to make on a busy weeknight!
Grilling Spatula – for turning the fish and carefully removing it from the grill.
Iron Skillet – We’re avid users of cast iron cookware. We even take our favorite iron skillet camping with us.
Tongs – They’ll be needed for flipping the corn tortillas in the skillet.
Taco Holder – Ok, so you don’t technically NEED this, but it sure does come in handy. I just use the bottom side of my muffin pan.
Cutting Board and Knife – You’ll use this for way more than just one recipe. We use ours just about every time we step foot in the kitchen.
Easy Fish Tacos with a Tzatziki Fish Taco Sauce
Easy, simple, delicious, crispy fish tacos recipe with a low carb tzatziki fish taco sauce. Perfect dinner idea for Taco Tuesday!
2 pounds fish fillets (grilled or cooked)
12 whole corn tortillas
3 tablespoons bacon grease
1/2 head lettuce
6 whole Roma tomatoes (chopped)
4 ounces Monterey Jack cheese (shredded)
4 ounces cheddar cheese (shredded)
6 whole green onions (chopped)
1/4 cup cilantro (optional)
1/2 cup tzatziki sauce
First, grill the fish fillets; or cook it however you choose.
Prep all your fresh ingredients. Wash and chop the lettuce, tomatoes, and green onions. Also, shred the cheese.
Fry up a batch of corn tortillas to form taco shells. You can use bacon grease or canola oil.
Once the fish is fully cooked, taco shells are done, and fresh ingredients are prepped, you’re ready to start the process of layering. You can layer ingredients in any order you want.
Add the fish into the taco shell first, then the cheese.
Layer lettuce, a layer of tomatoes, green onions, and whatever else your heart desires.
Add a dollop of tzatziki sauce or sour cream to top them off.
And you can also substitute sour cream for the tzatziki sauce.
When it comes to layering, I actually really love layering starting with the sauce first (so there’s sauce in every bite), then the fish, the cheese so it gets a little melty on the hot meat, then all the rest of the layers.
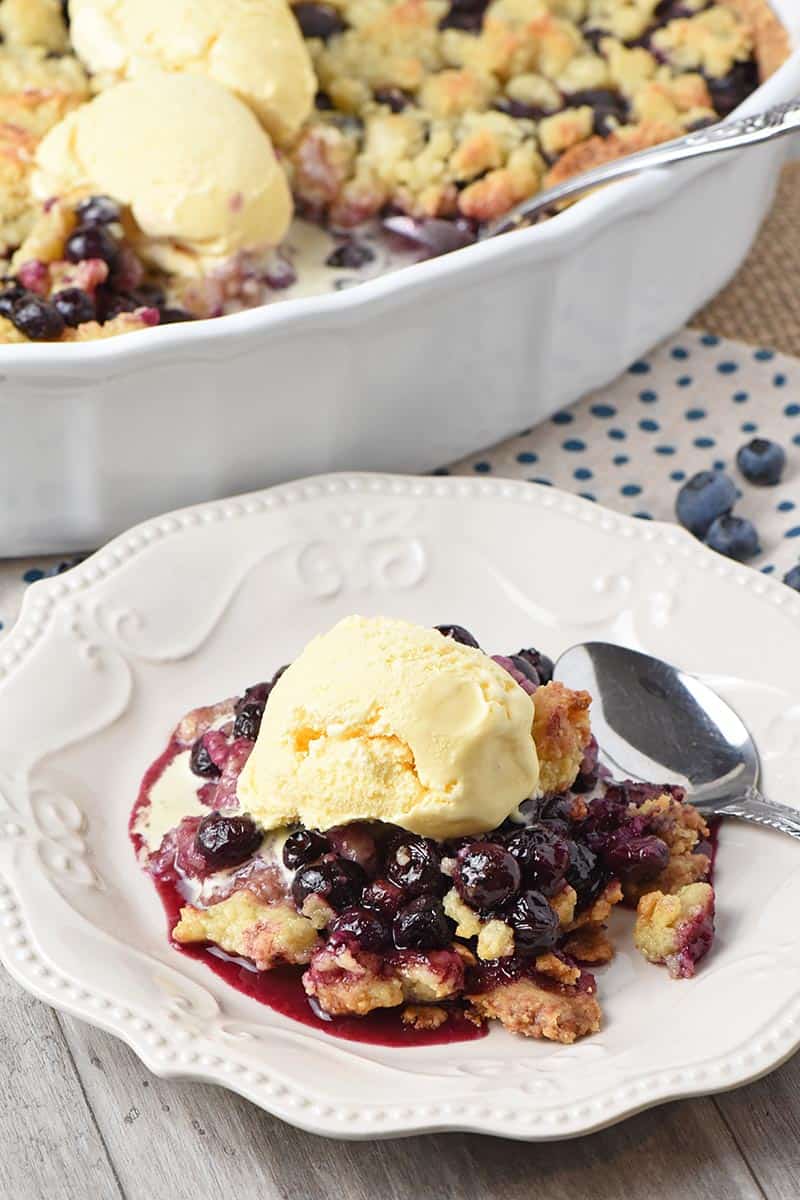
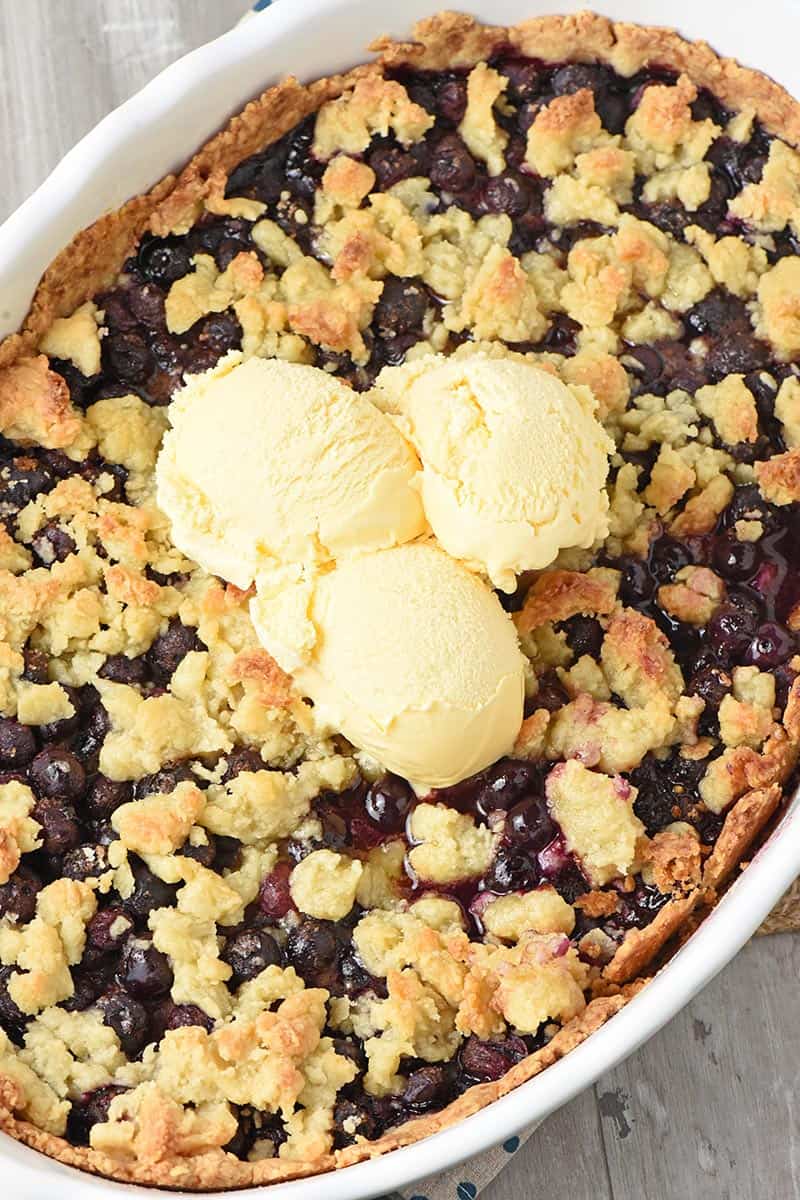
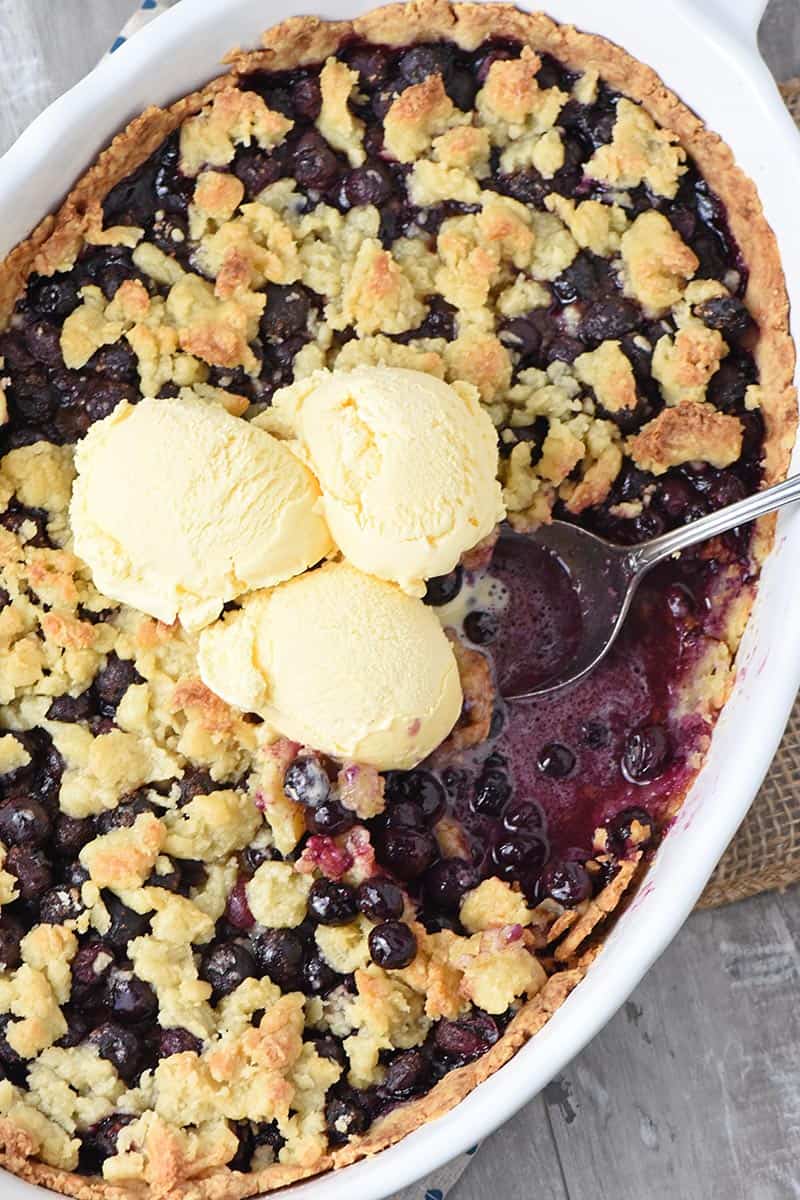
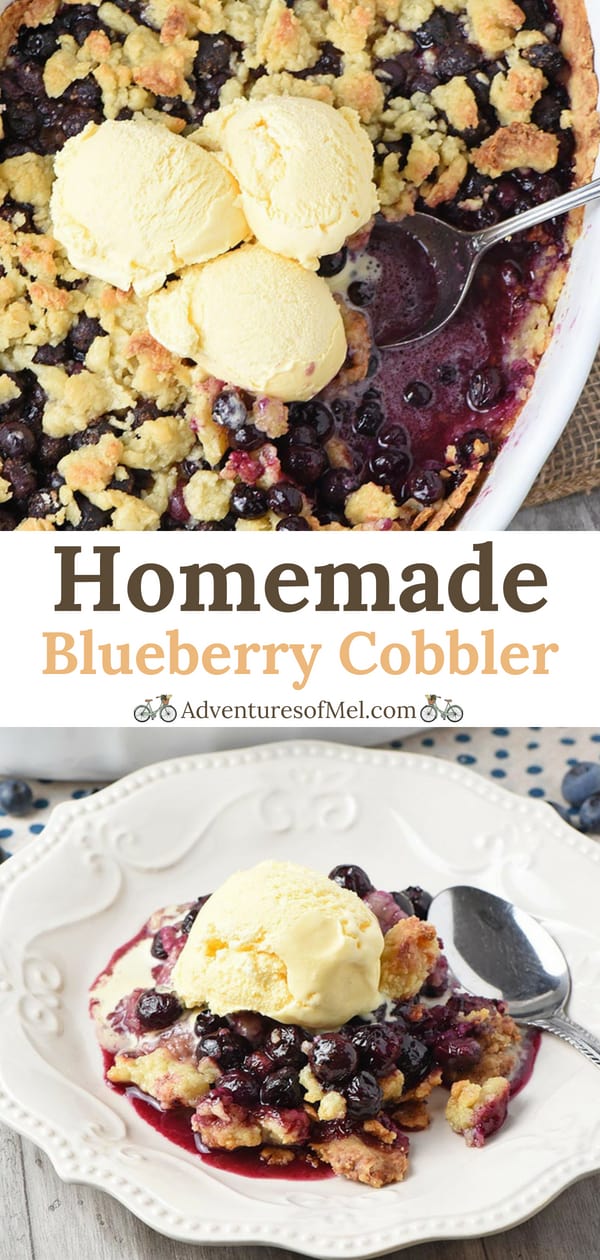
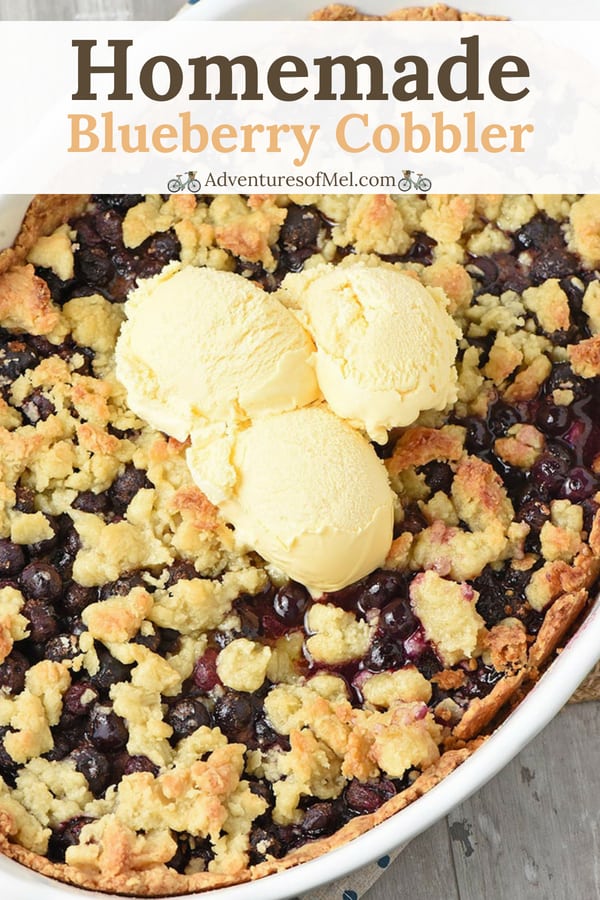
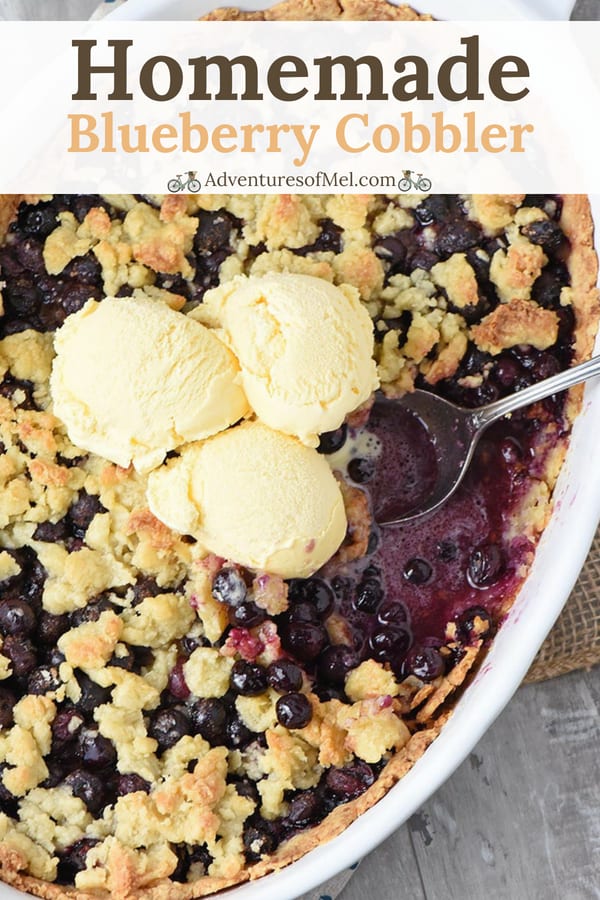
Homemade blueberry cobbler is a family favorite dessert. Made from scratch using fresh blueberries, it’s a super easy recipe you can make in a pinch!
Fruit cobbler is definitely one of my favorite desserts to make, besides chocolate chip cookies, when I’m in a pinch and need something quick. We love cobbler so much that I even make a delicious Dutch oven cherry cobbler when we’re out camping!
I make peach cobbler every year, and this year after picking blueberries, I decided to switch up our recipe to make a scrumptious blueberry cobbler.
This blueberry cobbler recipe is so easy; and it uses really simple ingredients. Once it’s mixed up, just let your oven do the rest.
Being that it’s made with blueberries, the only prep you have to do to the berries is wash them and dry them. No stemming, slicing, or anything else.
Tips for how to make this recipe for blueberry cobbler:
Preheat the oven to 425°. Then bring it down to 375°.
To mix the crust, combine the dry ingredients, including the flour, sugar, and salt; then set the mixture aside.
Combine the softened unsalted butter and whole milk in a smaller bowl or glass measuring cup. Then add the liquid ingredients to the dry ingredients, stirring with a fork.
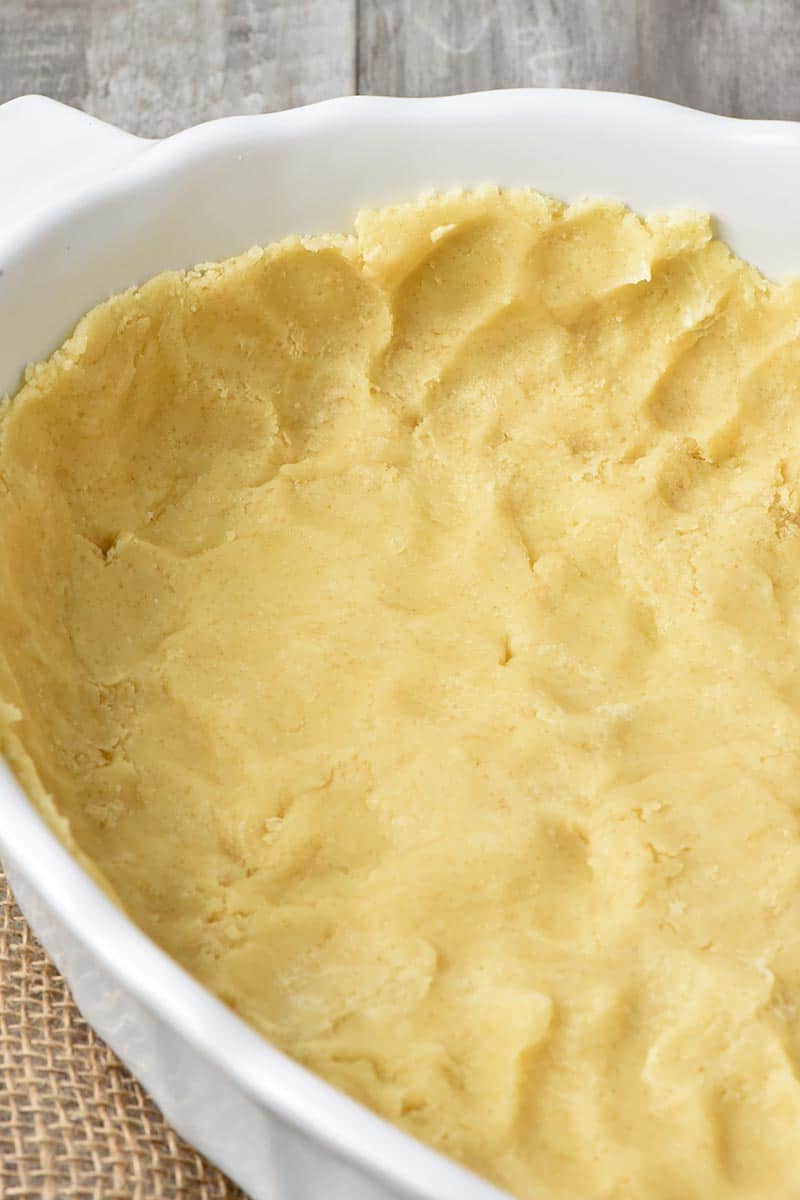
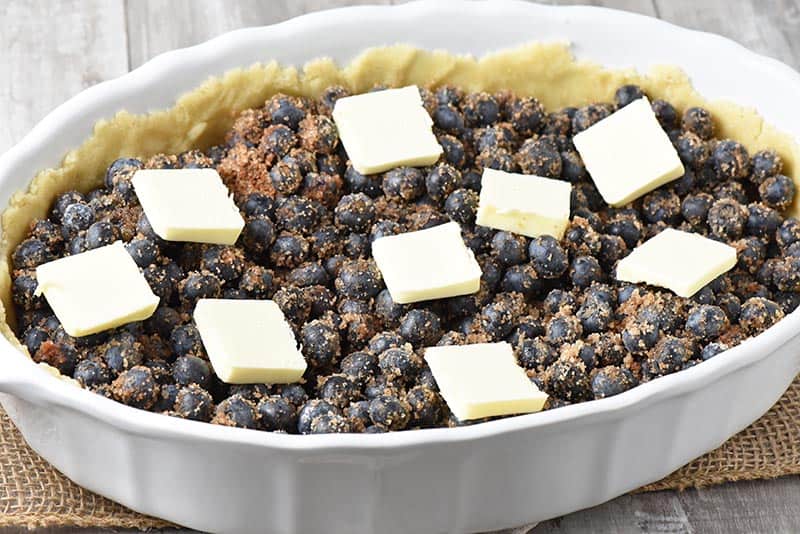
Set aside about 1/4 of the dough for your cobbler topping. Press the rest of the dough into an oval baking dish or large cast iron skillet; press the dough up the sides until the crust covers the dish or skillet.
Wash and pat dry the blueberries. Place them in a medium to large sized mixing bowl; I love my handled bowl for this.
Add in the sugar, salt, corn starch, and cinnamon. Mix well.
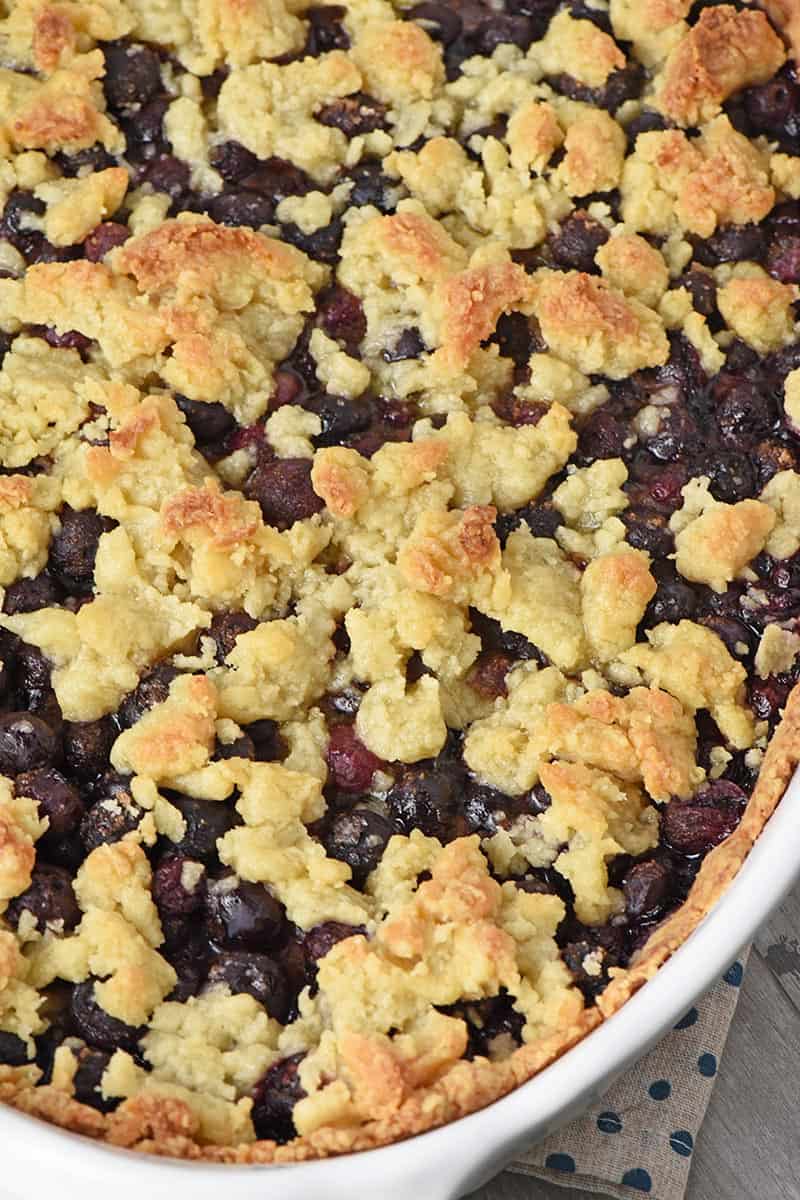
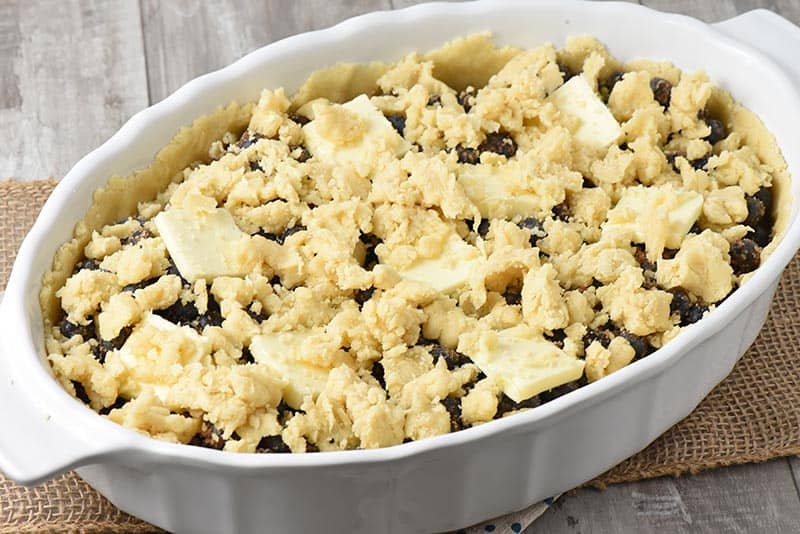
Pour the blueberry mixture into the crust, and top with slices of salted butter. Finally, crumble your saved crust topping over the blueberry mixture.
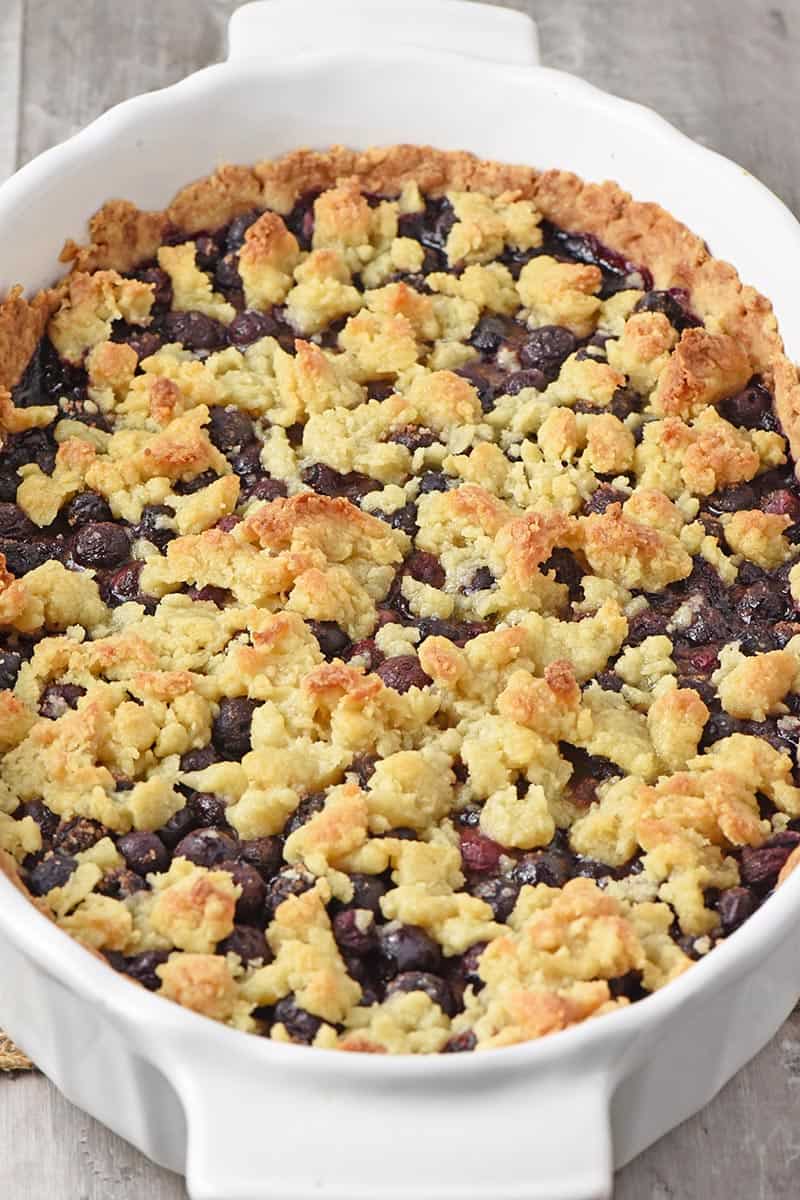
Bake for 40 minutes to 1 hour, until the crust turns a golden brown.
Homemade blueberry cobbler is a family favorite dessert. Made from scratch using fresh blueberries, it’s a super easy recipe you can make in a pinch!
Crust:
2 cups unbleached all-purpose flour
3 tablespoons pure cane sugar
1/2 teaspoon salt
3/4 cup unsalted butter
5 tablespoons whole milk
Filling:
5 cups blueberries
2/3 cup pure cane sugar
1 teaspoon salt
1/2 tablespoon corn starch
1/4 cup salted butter
1/2 teaspoon cinnamon
Preheat the oven to 425°. Then bring it down to 375°.
To mix the crust, combine the dry ingredients, including the flour, sugar, and salt; then set the mixture aside.
Combine the softened unsalted butter and whole milk in a smaller bowl.
Then add the liquid ingredients to the dry ingredients, stirring with a fork.
Set aside about 1/4 of the dough for your cobbler topping.
Press the rest of the dough into an oval baking dish or large cast iron skillet; press the dough up the sides until the crust covers the dish or skillet.
Wash and pat dry the blueberries.
Place the blueberries in a medium to large sized mixing bowl; I love my handled bowl for this.
Add in the sugar, salt, corn starch, and cinnamon. Mix well.
Pour the blueberry mixture into the crust, and top with slices of salted butter.
Crumble the saved crust topping over the blueberry mixture.
Bake for 40 minutes to 1 hour, until the crust turns a golden brown.
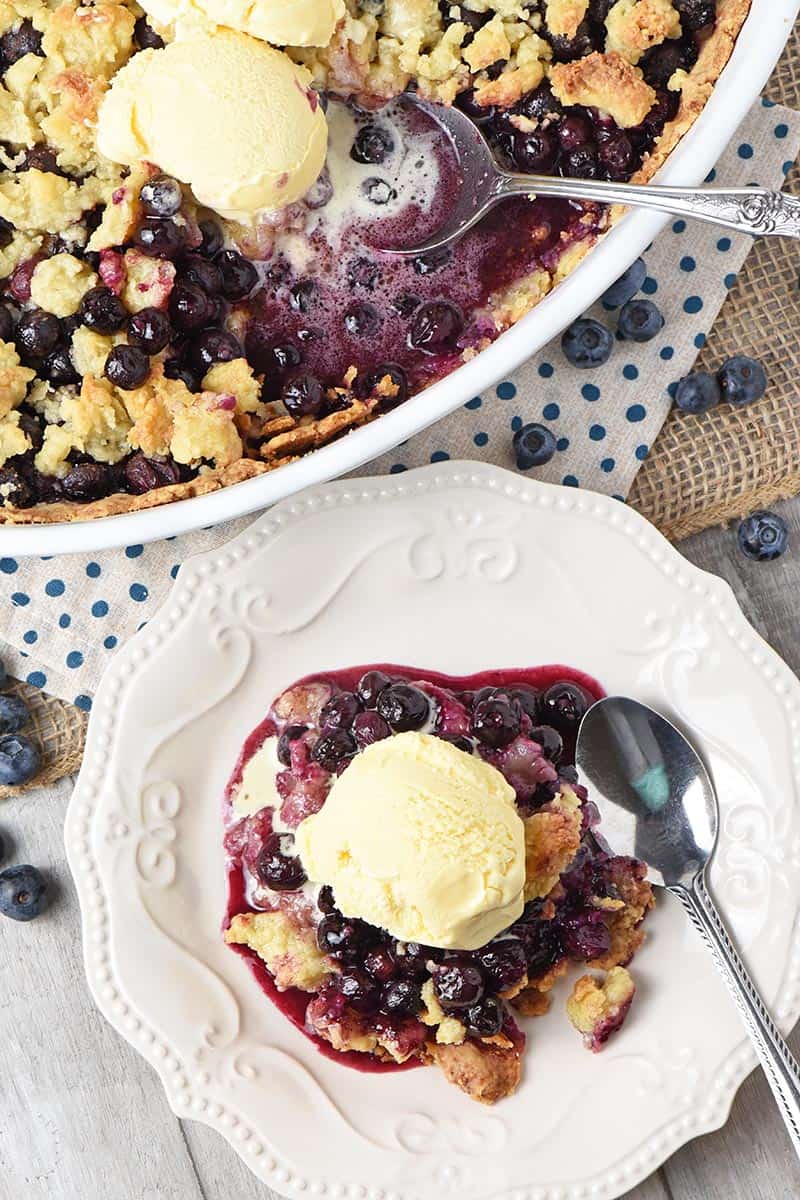
Serve with a scoop of vanilla ice cream and enjoy! It’s so yummy!
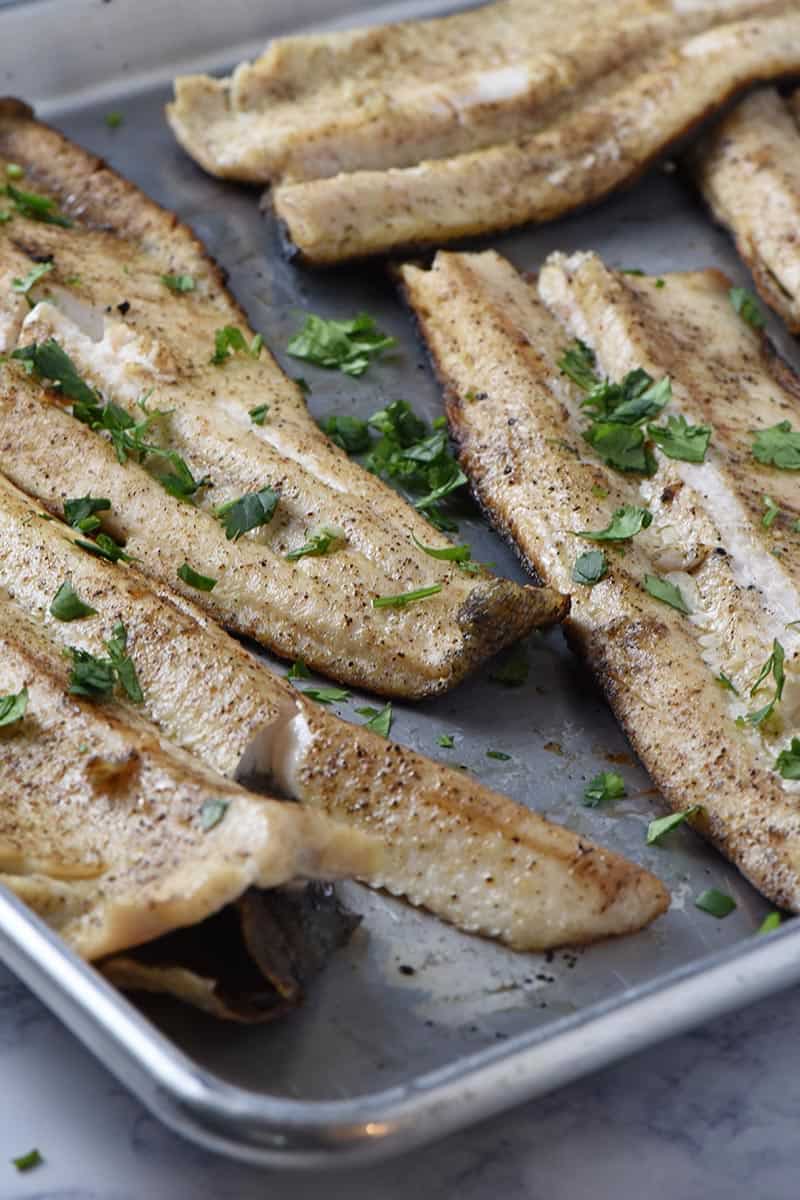
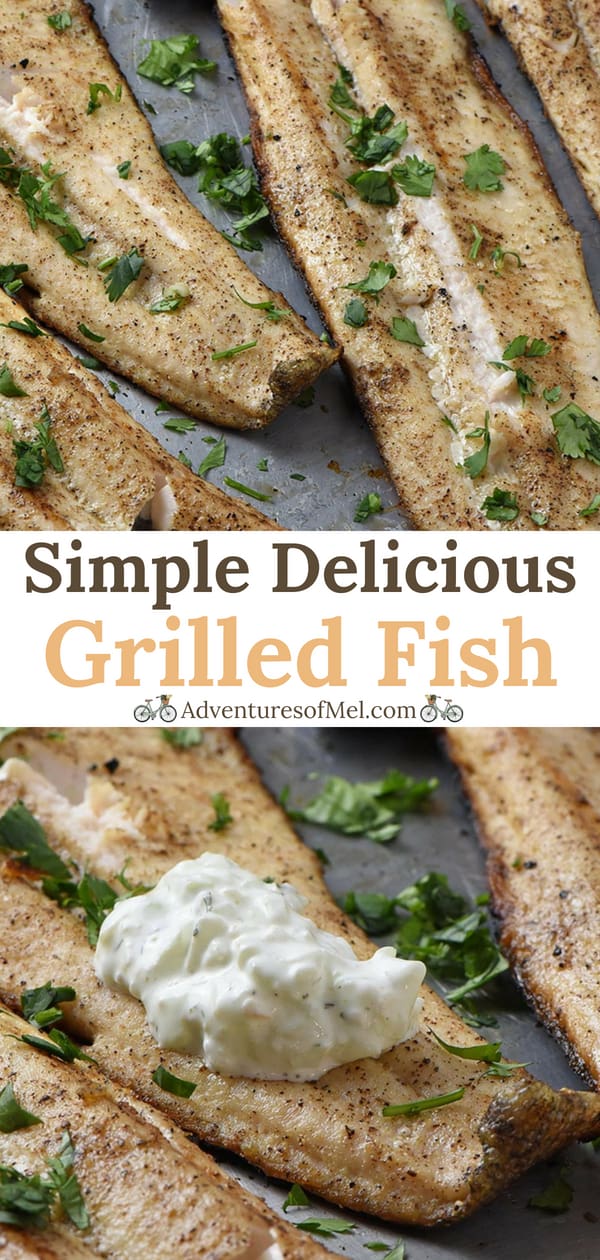
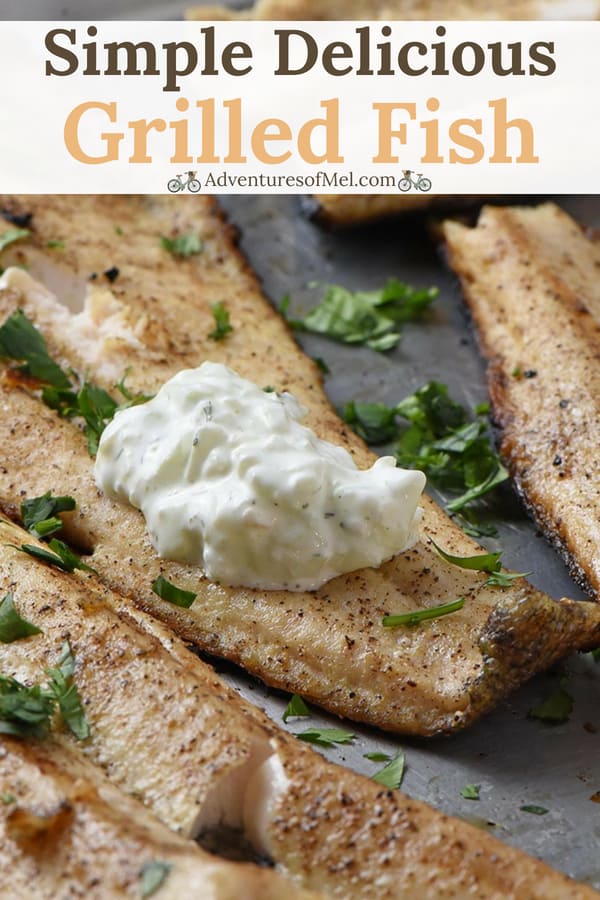
This grilled fish fillets recipe adds a whole new level of deliciousness to dinner. Healthy, delicious, lightly seasoned fish fillets on the grill.
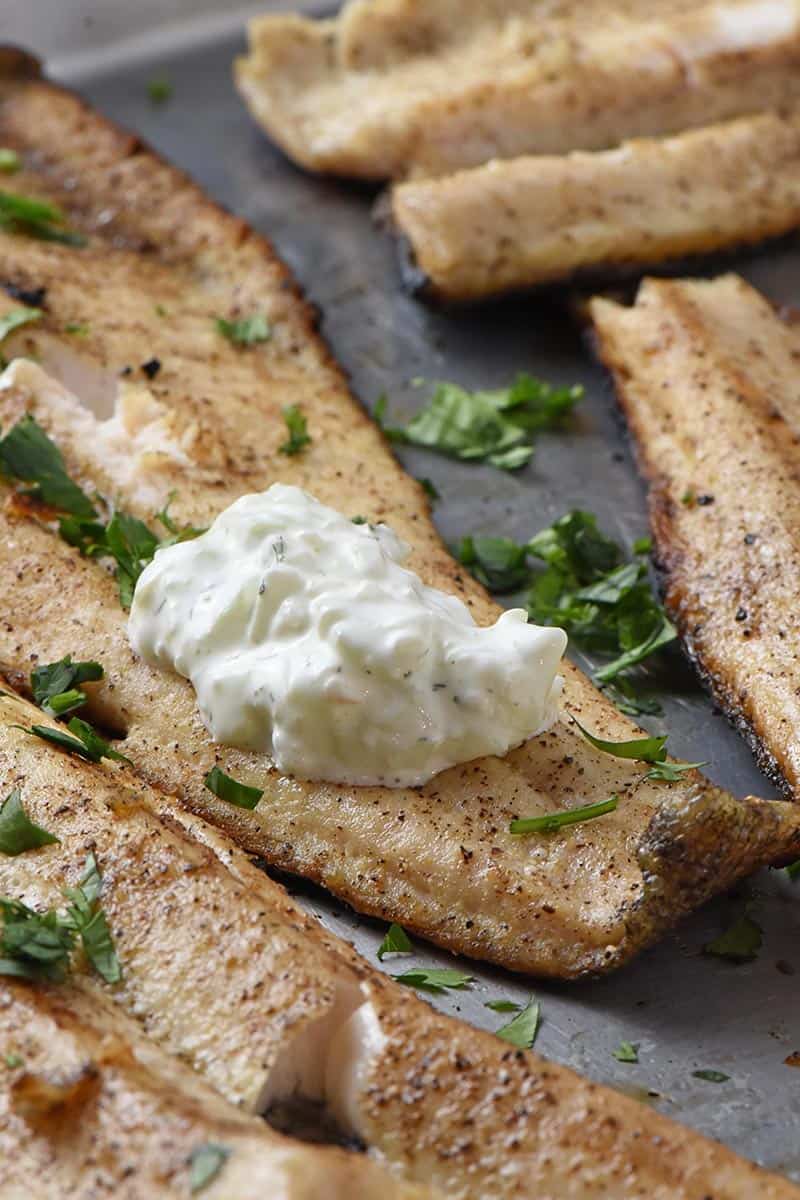
While I haven’t always been a big fish eater, I do love fishing with my boys. And I do appreciate the mild flavor of fried crappie! With our busy schedule, we usually make Instant Pot salmon, but I recently learned that I actually really love fish fillets that are cooked on the grill, especially paired with our favorite tzatziki sauce, this salsa recipe with fruit, or this peach and mango salsa.
Fish has so many health benefits, and we are trying to incorporate more of it into our family meals with recipes like our favorite salmon patties. I think in the past maybe we’ve gone with the wrong kinds of fish (that fishy taste), or we’ve cooked it incorrectly.
After grilling this last batch of trout fillets, I can honestly say I loved them. They were so easy to make, just lightly seasoned, and everyone ate them up; in fact, we used them to make the most delicious fish tacos, which goes really well with homemade pork fried rice!
I mentioned the health benefits; are you aware of the following?
Fish is filled with omega-3 fatty acids and vitamins like Vitamin D, a vitamin that many of us are lacking these days. Just the omega-3’s alone are worth adding a good amount of fish to your weekly menu. We’re talking heart and brain health.
Fish has lots of calcium.
It’s also rich in minerals.
Fish contains essentially a “Caf-Pow” of protein (clearly, I’ve watched way too much NCIS).
Those are just a few of the many benefits of adding more fish in our diets. So, let’s get to the grilling of these amazing fillets, so you can start enjoying the benefits of fish.
Ingredients needed to grill trout fillets or any white, flaky fish fillets:
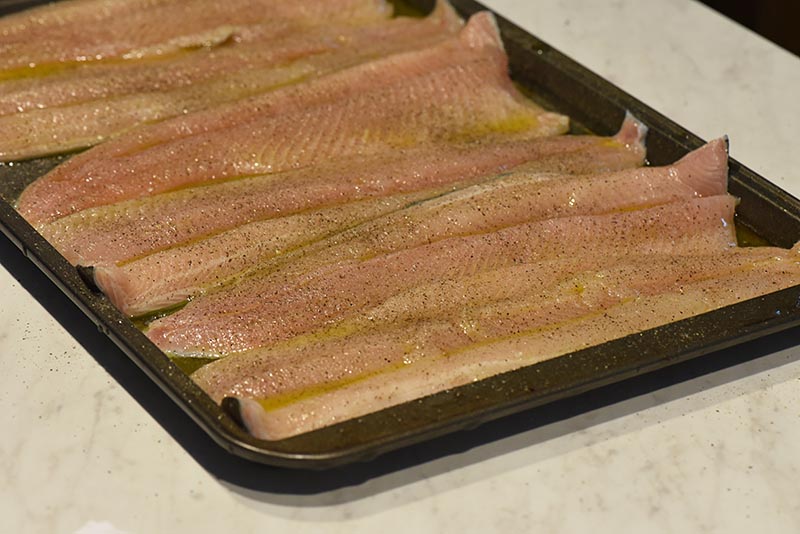
Add the olive oil to a large bowl, and coat the fish in the oil.
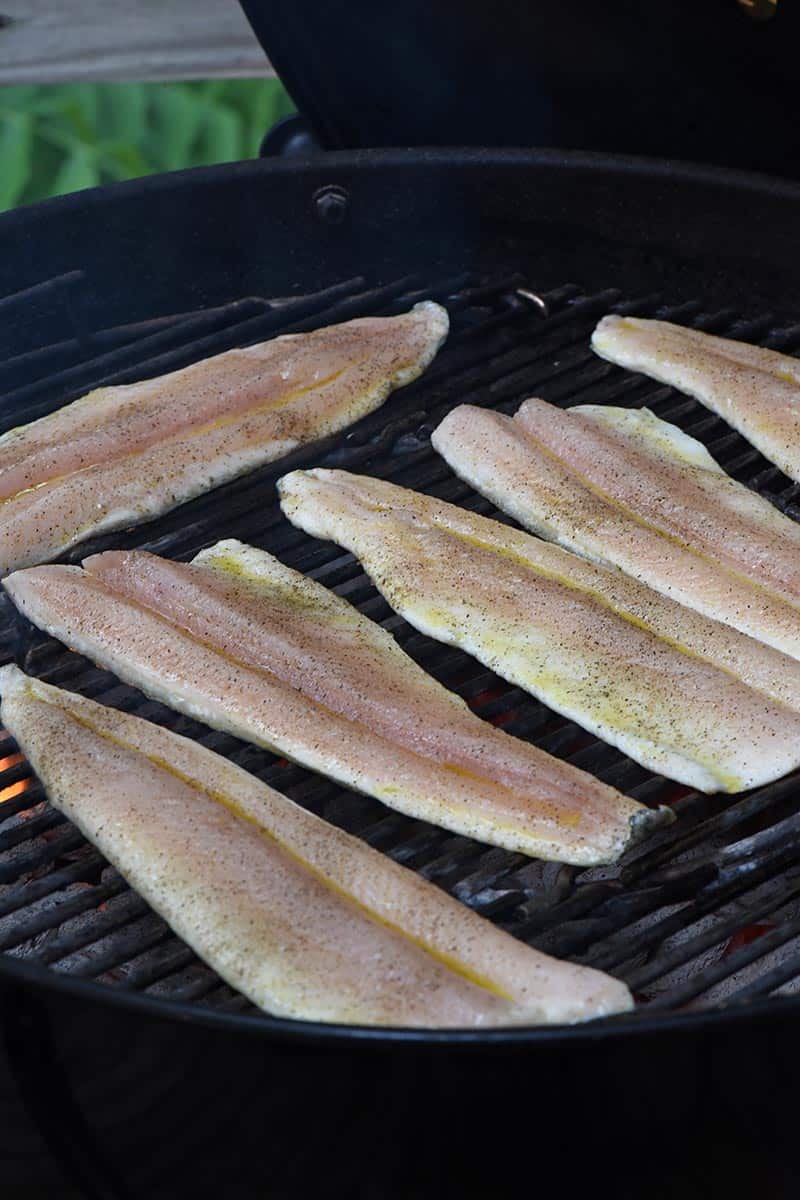
Place each fillet on a baking sheet. Season the fish fillets with salt and pepper.
Place each of the fish fillets on the already heated grill. You can also use a plank, but there is definitely an art to grilling with a plank, so this recipe is focusing on adding the fillets straight onto the grill.
Grill fish on high for 10 to 12 minutes, turning for the last 1 to 2 minutes.
Kitchen tools you may need to make this grilled fish fillets recipe:
Charcoal Grill or Gas Grill – We love using our charcoal grill. Large Bowl – for coating the fillets with olive oil. Baking Sheet – for seasoning the fish fillets. Grilling Spatula – for turning the fish and carefully removing it from the grill. Fish Oven Mitts – You may or may not need oven mitts for grilling, but aren’t these fun?!
Simple and Delicious Grilled Fish Fillets
This grilled fish fillets recipe adds a whole new level of deliciousness to dinner. Healthy, delicious, lightly seasoned fish fillets on the grill.
2 pounds fish
2 tablespoons olive oil
2 teaspoons salt
2 teaspoons black pepper
Heat up the grill while you prepare the fish.
Rinse and pat the fish fillets dry.
Add the olive oil to a large bowl, and coat the fish in the oil.
Place each fillet on a baking sheet.
Season the fish fillets with salt and pepper.
Place each of the fish fillets directly onto the already heated grill.
Grill fish on high for 10 to 12 minutes, turning for the last 1 to 2 minutes.
Use a grilling spatula to carefully get under the whole fillet and pick it up off the grill.
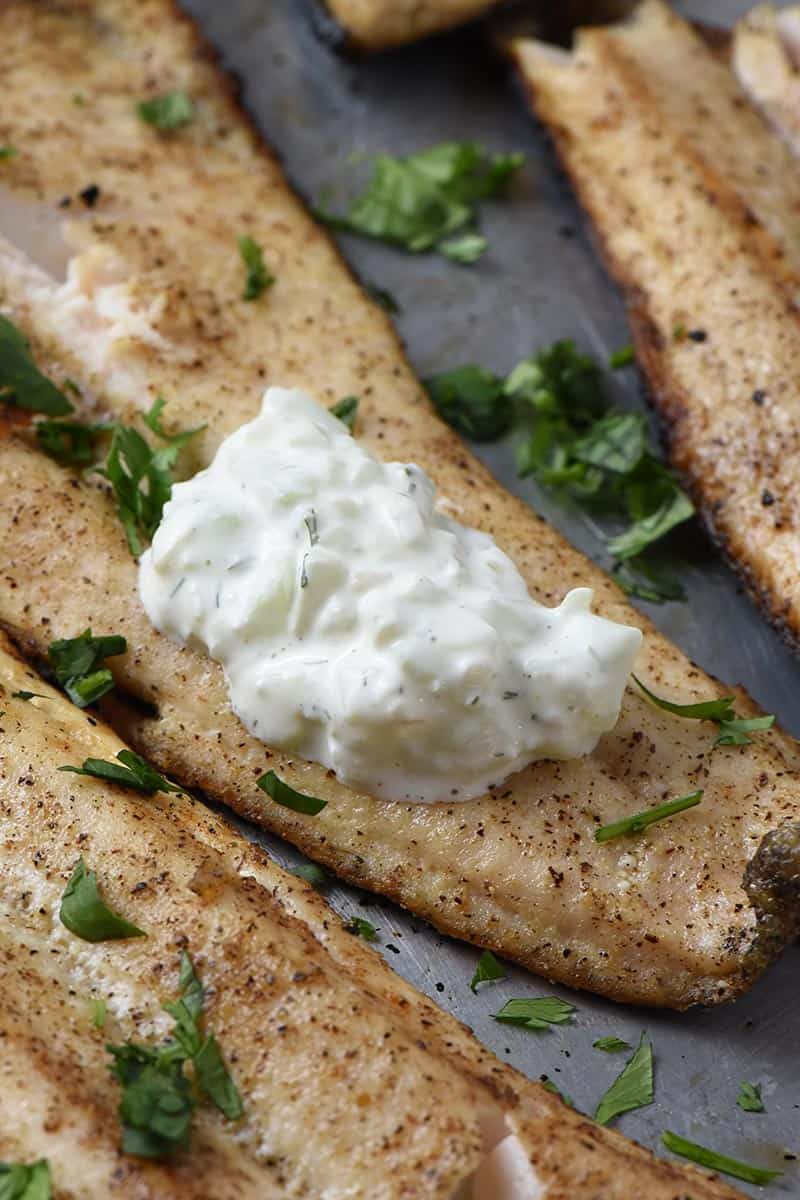
Serve immediately with tzatziki sauce and your favorite sides.
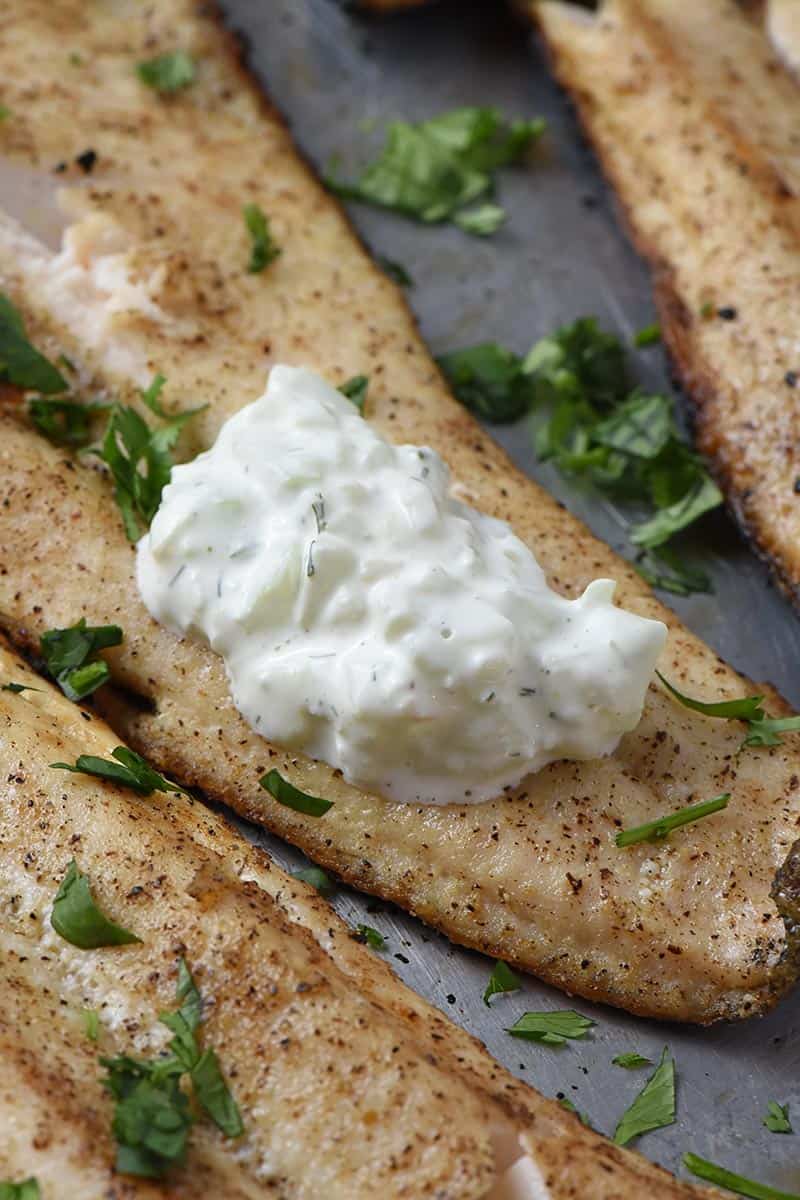
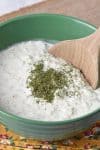
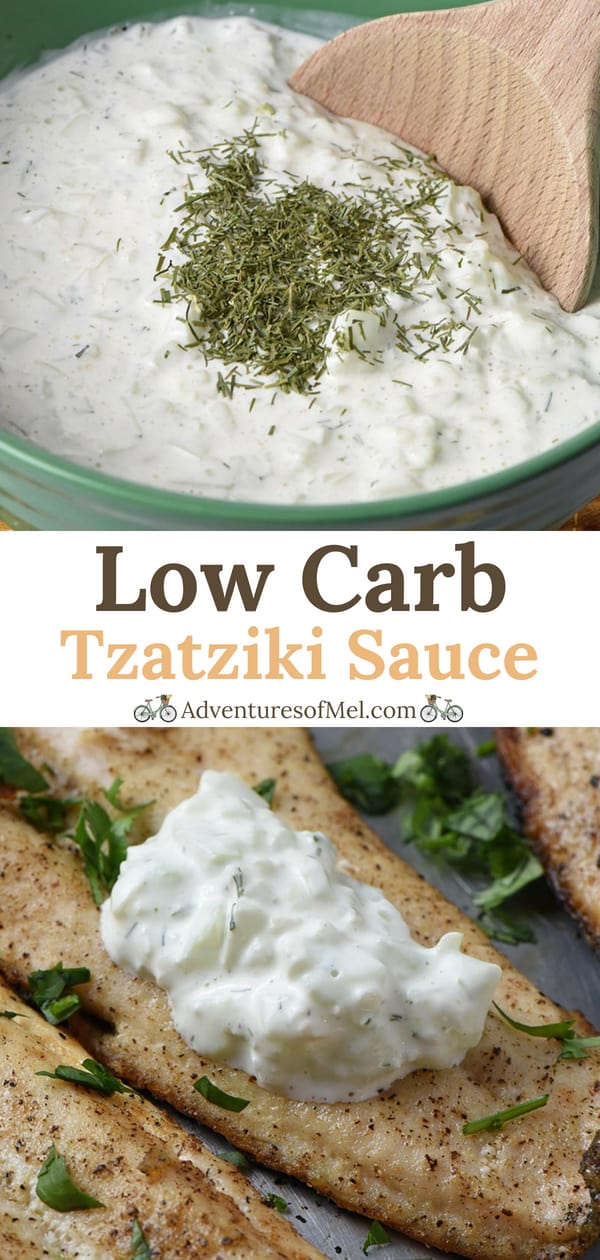
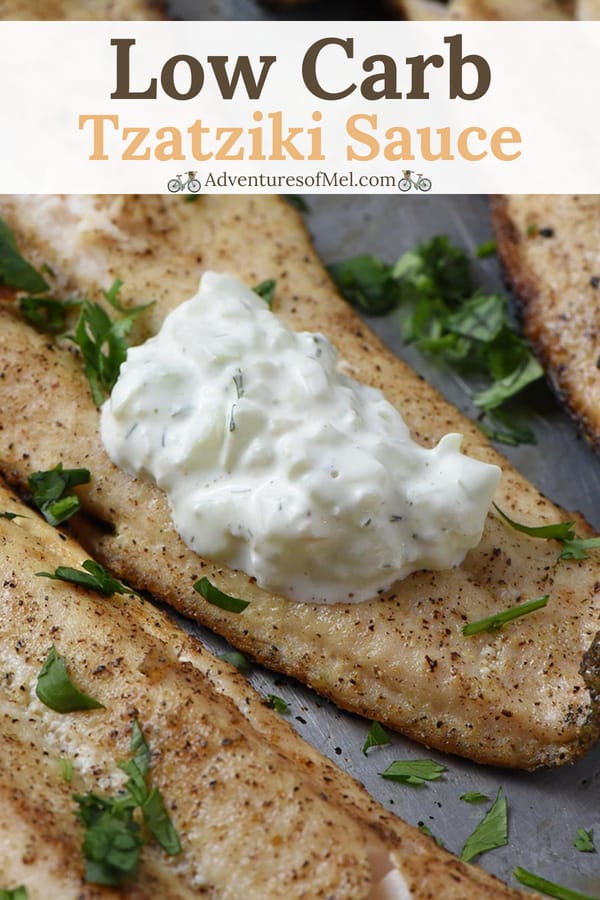
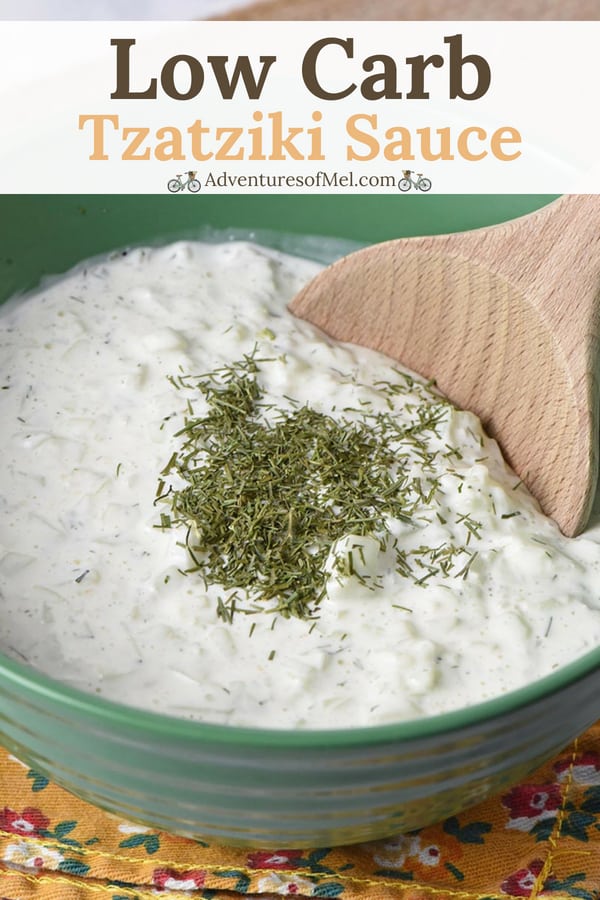
How to make a low carb homemade tzatziki sauce with sour cream. Quick and easy recipe, it’s delicious on grilled fish, in gyros, and more!
There are times that a good sauce brings out all the flavors in your favorite foods. Grilled fish fillets, salmon patties, and fish tacos with tzatziki sauce are the perfect examples of pairing and melding flavors together.
I had never had gyros or tzatziki sauce until after I married Dan. My first time eating a gyro was shortly after we married, when we went to the New York State Fair; it was delicious.
Since then, we’ve made this sauce to go with some of our favorite dishes. Made with sour cream and mayo instead of Greek yogurt, it’s a low carb recipe alternative.
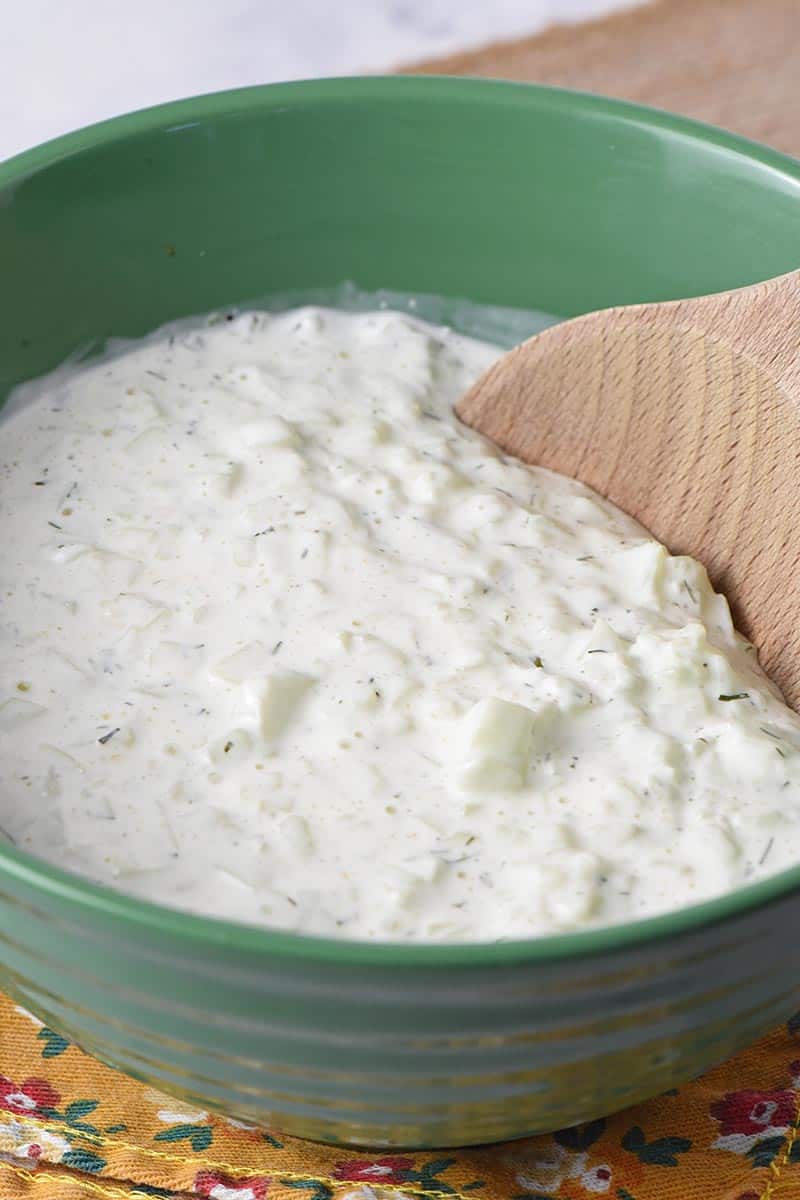
It’s simple, quick, and easy to make. And most of the ingredients you probably already have, besides maybe the cucumber; but don’t leave out the cucumber because it’s a must.
Ingredients you need to make tzatziki sauce:
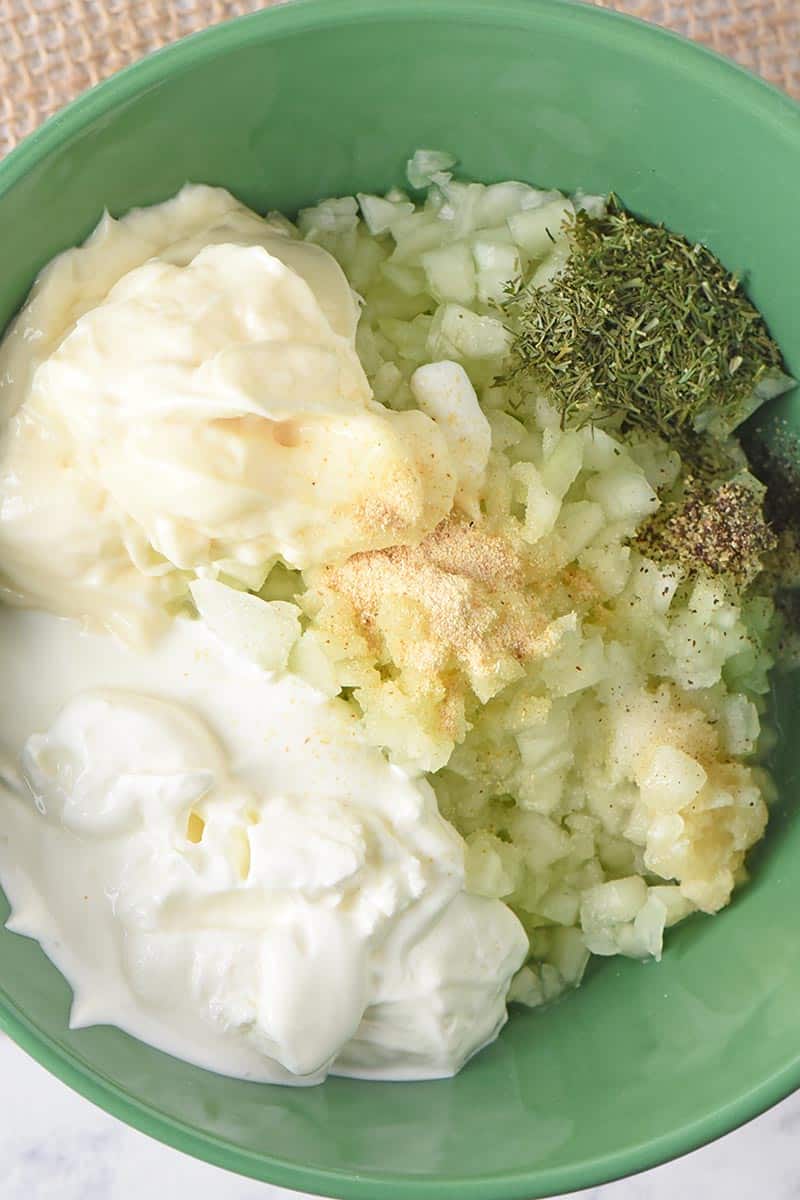
Gather your ingredients. You’ll need the following:
How to make a low carb homemade tzatziki sauce with sour cream. Quick and easy recipe, it’s delicious on grilled fish, in gyros, and more!
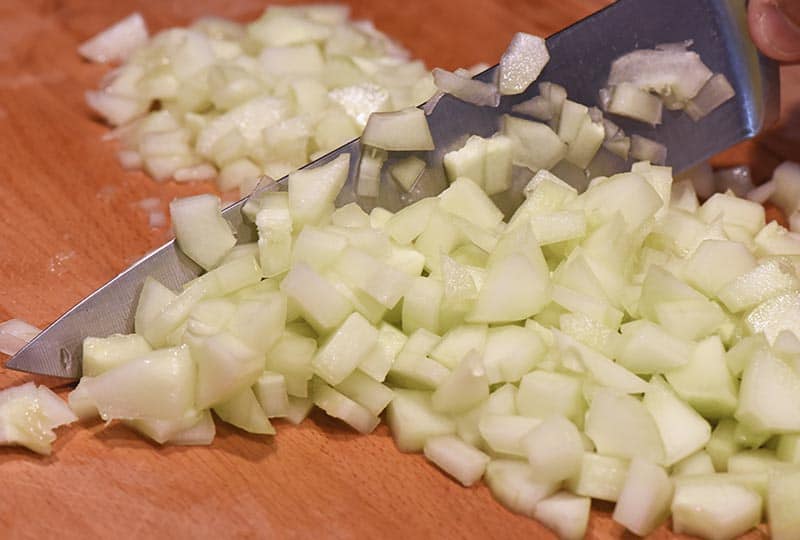
1 large cucumber (peeled, de-seeded, and minced)
1/3 cup sour cream (heaping)
1/4 cup mayonnaise
1/2 teaspoon lemon juice
1 teaspoon garlic (crushed)
1/2 teaspoon garlic powder
1/2 teaspoon dill weed
1/2 teaspoon salt
1/4 teaspoon black pepper
First wash the cucumber. Then peel, de-seed, mince it, and set it aside.
In a medium sized mixing bowl, mix together the sour cream, mayo, and lemon juice.
Add in the crushed garlic, garlic powder, dill, salt, and pepper. Stir together.
Finally, add in the cucumber, mixing everything together well.
And that’s it! You’re ready to serve it with your favorite dish; it can be used as both a sauce and a dip. It pairs deliciously well with grilled fish fillets, fish tacos, salmon patties, gyros, and fresh veggies.
If you’re not yet ready to serve the sauce, just cover and chill it in the fridge.
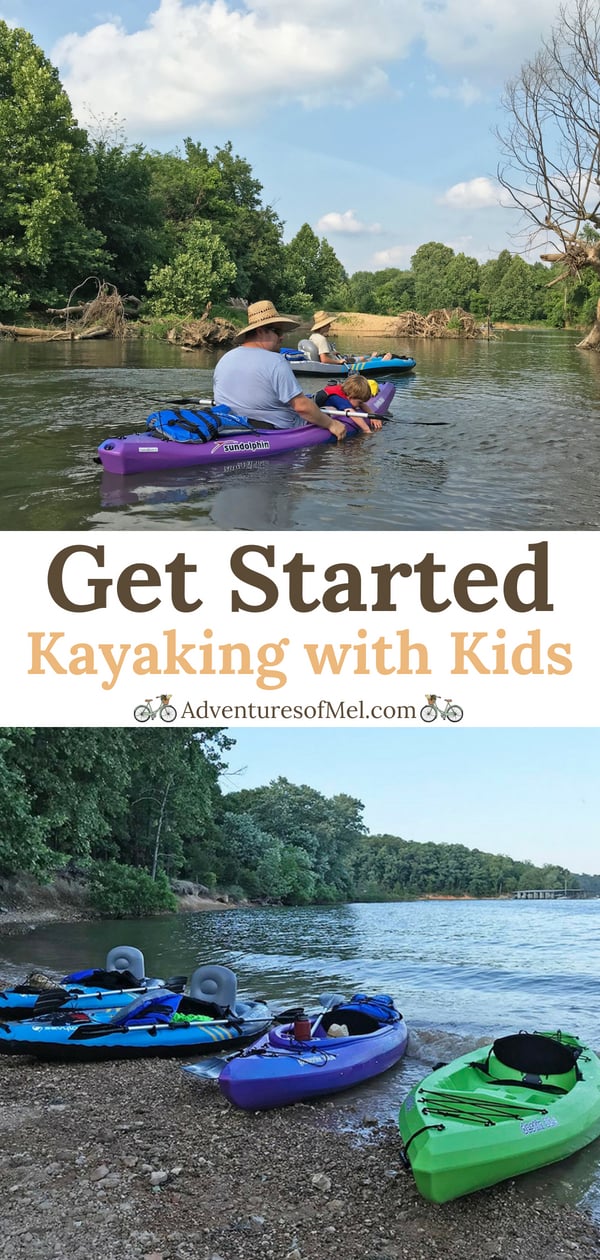
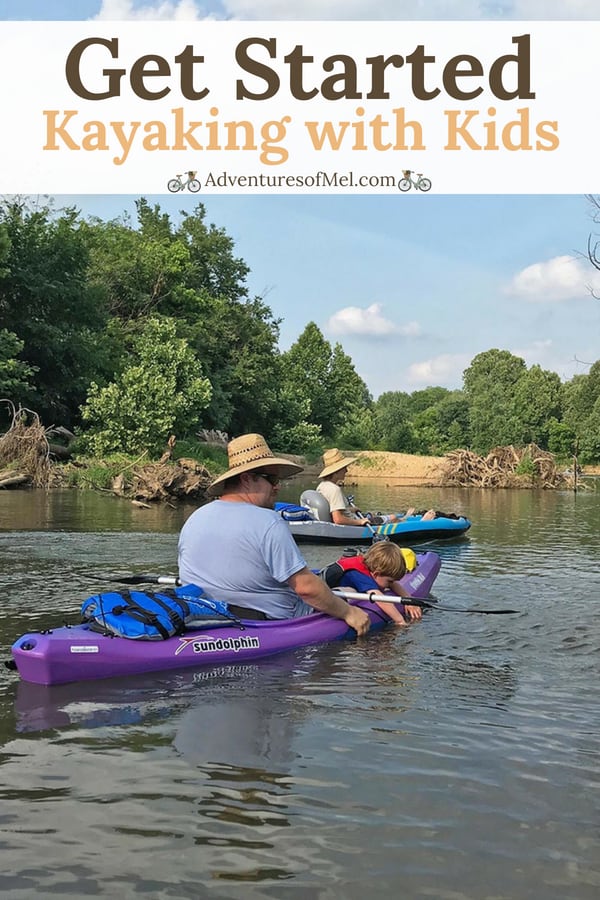
Kayaking with kids is an enjoyable family adventure that’s great for body and soul. Tips for beginners, including gear and where to get out on the water.
For years, we chatted back and forth about how much we wanted to go kayaking, but then this or that would come up, and the thought would float away.
But kayaking is something we can enjoy when we head back to Big Bend, on a mountain lake in Colorado, on the Gulf Coast waters, on the Jacks Fork River and the Current River in my home state of Missouri, and right here at home in the heart of the Ozarks where lakes and rivers abound, including Beaver Lake and the Buffalo National River.
Everything changed over the course of the past two months as we decided to finally take the leap and just do it.
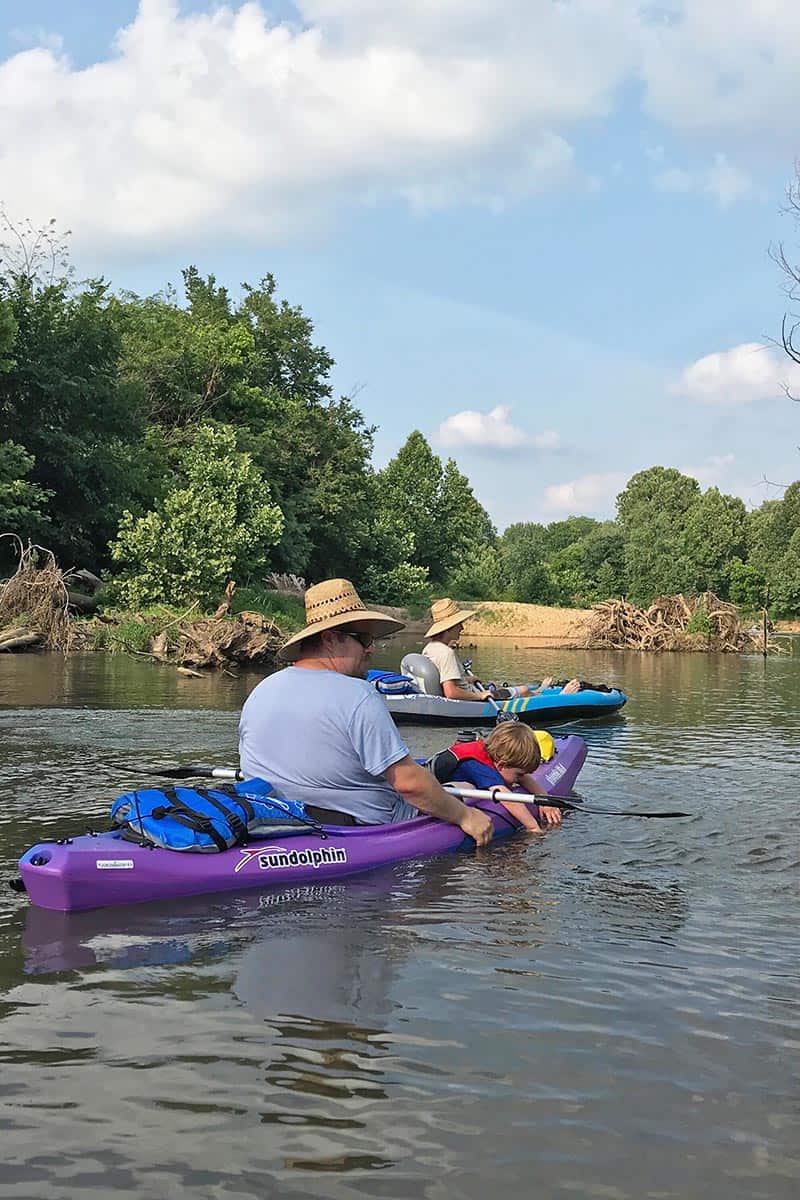
Before we purchased our kayaks, we did a lot of research about kayaking with kids. We really wanted to experience this new adventure together, as a family; but above all, we needed to make sure everyone would be safe, especially our toddler.
After my initial freak out our first time out (I have a fear of deep dark water, but I’ll write more about that later), I felt myself begin to relax, surrounded by nature. We went again the next day and again the day after that.
I think it’s safe to say, from youngest to oldest, we’re all falling in love with the sport of kayaking. It’s another avenue to nature; and it’s another opportunity, in addition to dispersed camping, to find hidden away places we might not otherwise get to experience.
There are some things we did in the beginning, though, to really get a handle on kayaking with our boys. We wanted them to feel safe and capable before we took them out on open water.
Watch our video to see what it’s like kayaking with kids!
Tips for getting started kayaking with kids
1. Pick out kayaks and paddles. One is just as important as the other.
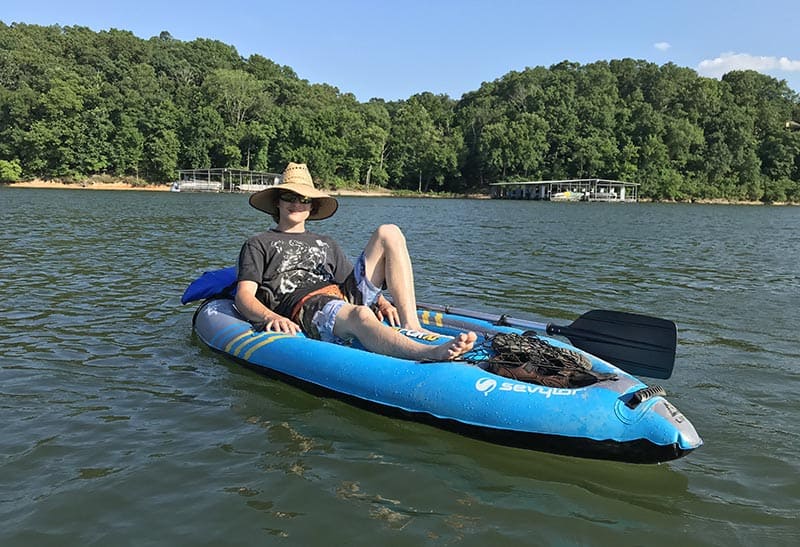
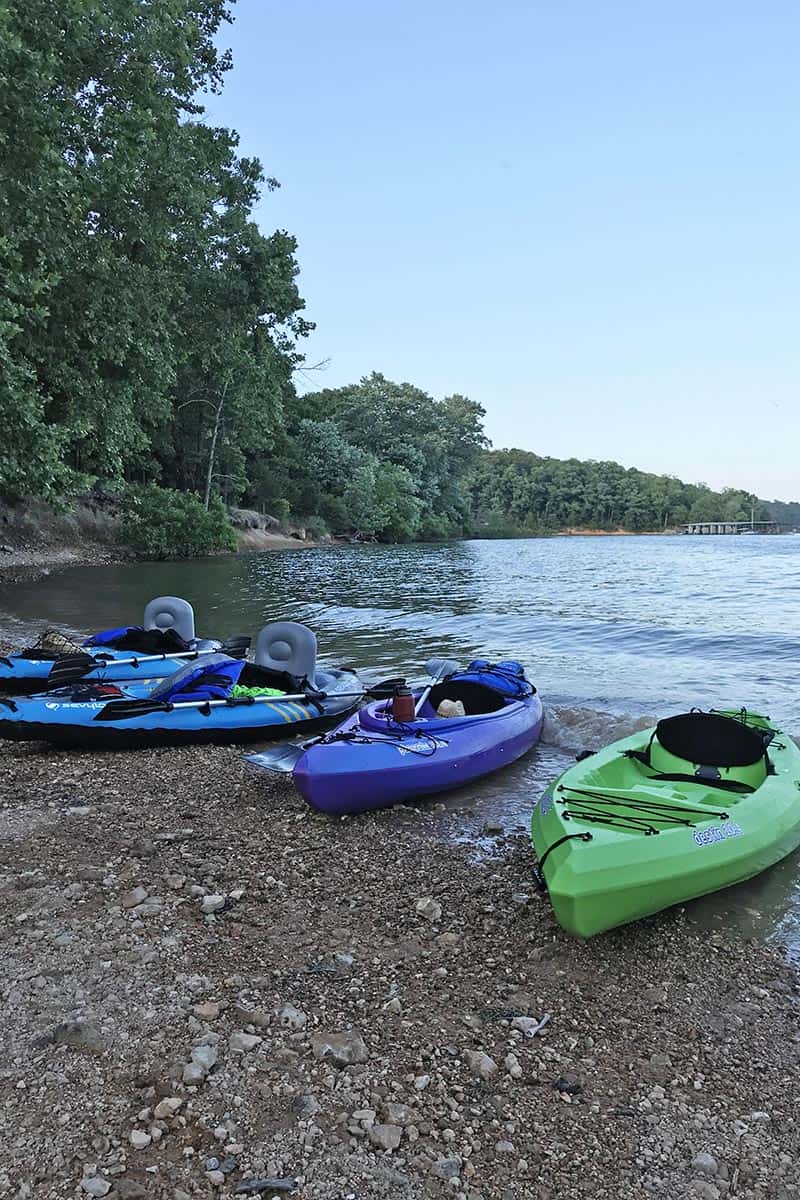
In the beginning, we thought about renting versus buying. However, with the empty cost of a rental, we decided to just go ahead and get our own. We ordered inflatable kayaks and bought a hardshell for Dan, so Zeke could ride more safely with him.
While inflatables definitely have their place, we pretty much knew our second to third day out, we needed more than just an inflatable. While the boys loved their inflatable kayaks, we felt in order to really explore some of the places we want to go (and the boys really want to do some fishing off their kayaks), we needed hardshell kayaks.
My advice to you: Pick the kayak and paddle that will work for each person in your family. Make sure if you have a toddler, you purchase a kayak with plenty of room for him/her to ride with you.
Go to the store and actually sit in both the sit in and sit on top kayaks; research the stability and read reviews. Try out paddles too because paddles are extremely important, though some kayaks do come with them.
Note: Make sure your kayak has a place to hold the paddle… Pretty important when you’re out on the water and need to be hands free.
Inflatables are a really affordable way to start out and get a feel for whether or not you and your kids even like kayaking. But if you’re wanting to explore various places, are wanting to fish off your kayak, or want the safety net of a hardshell for younger kids, pick the hardshell.
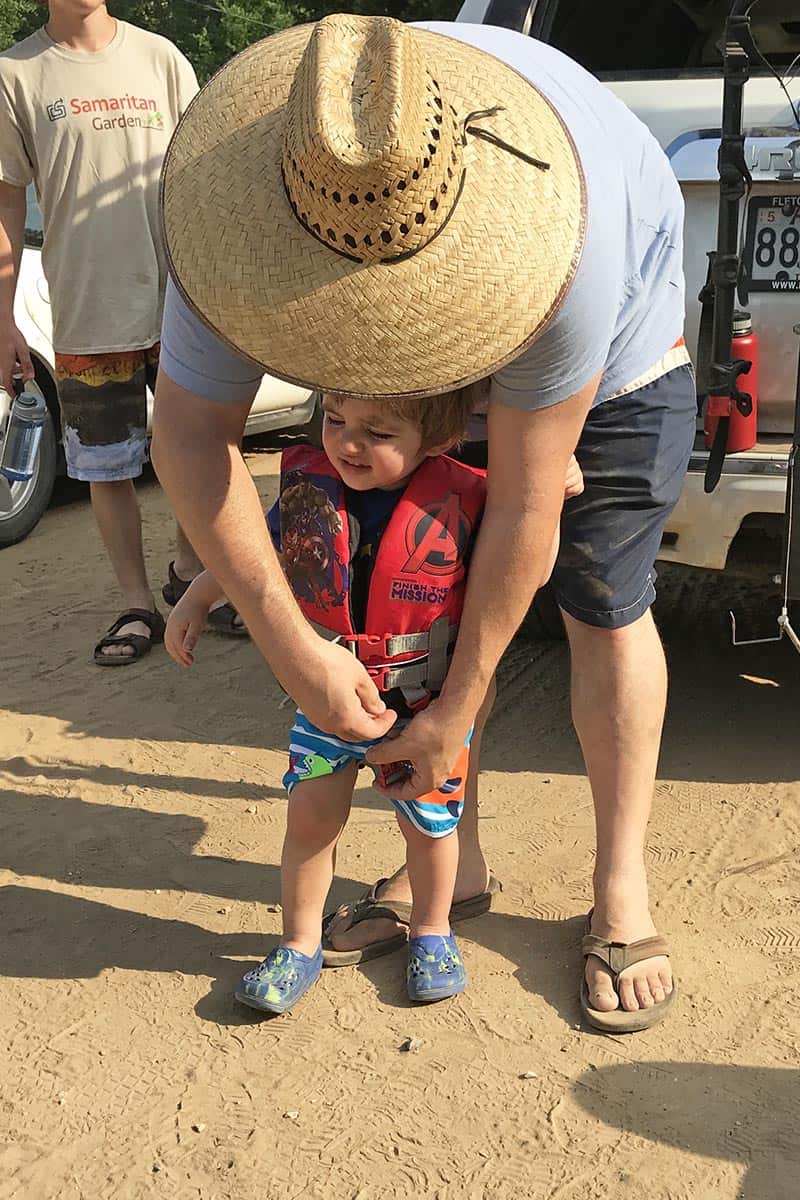
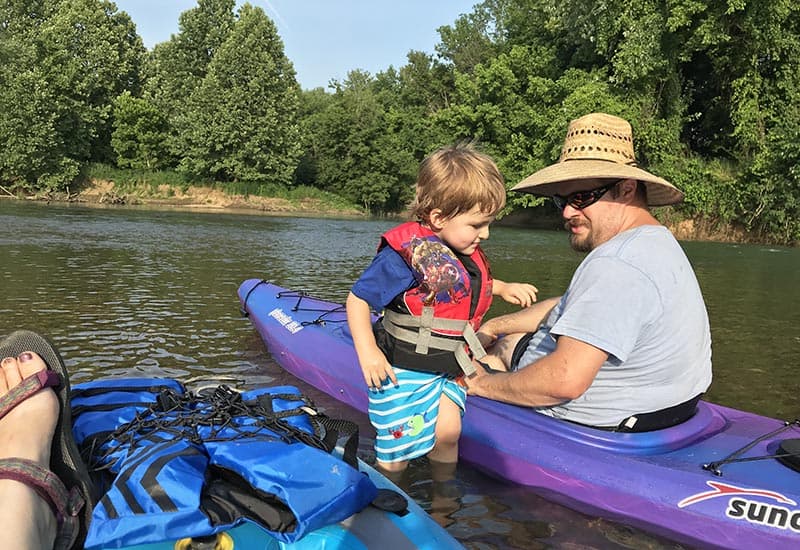
2. Every person needs a life jacket.
Everyone needs a life jacket, regardless of whether or not you wear it. Here in Arkansas, the law is that anyone 12 and under must be in a life jacket.
You can purchase life jackets by size or by weight. They usually range in price from $10 on up.
While Dan and I and even Jacob strap our life jackets within reach onto our kayaks, our younger kids are always in a life jacket when we go out. But we all have one because you just never know; anything can happen.
3. Start out in the pool.
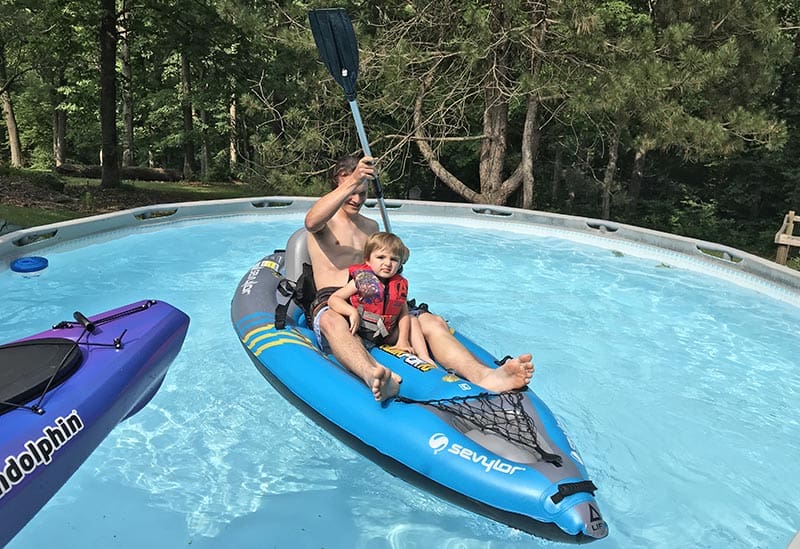
I’m sure our neighbors thought we had finally lost our ever lovin’ minds, but we put the kayaks in the pool and started out there. If you have access to a pool that will allow it, a pool is a great place to get your bearings on a kayak.
While kayaking isn’t hard at all, this step gives everyone a feel for being on the water in a kayak. It may even put your mind at ease, giving everyone a feel for the stability of their kayaks and a chance to learn how to paddle.
Learning how to paddle is key; if you or your kids don’t know how to paddle correctly, you’ll get nowhere fast and could even have an accident. Give everyone an opportunity to practice in a safer environment.
This will also give you a chance to talk about the do’s and don’ts of kayaking together, and practice safety on the water.
4. Move up to an area of calmer water (like a pond or lake).
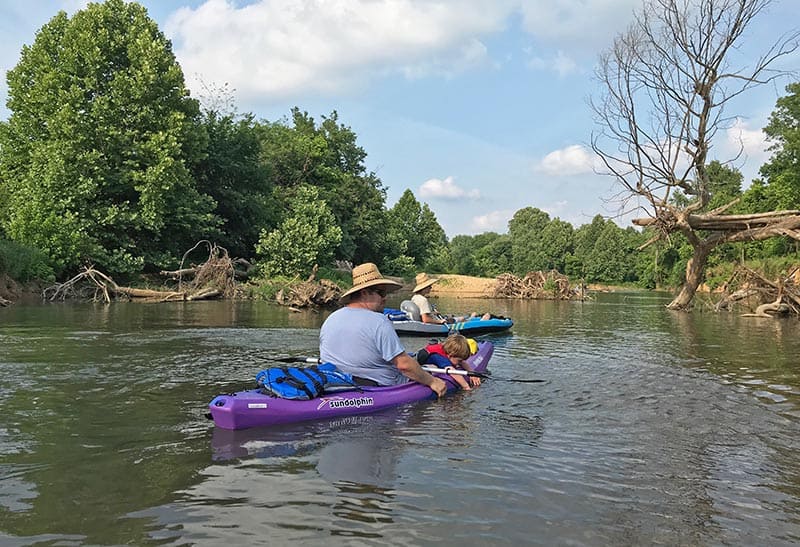
Stupidly, we went to the river for our first time out on actual open water. Not a good idea.
On a river, you deal with currents and loads of trees. While you have a little current on a lake and some trees, as well, it’s nothing like it is on a river.
Start out on a calmer, hopefully less crowded lake or pond. If your lake is like ours (Beaver Lake), large and pretty busy with happy boaters, find a cove where the water’s a little more calm, quiet, and peaceful. The more peaceful the locale, the better off you’ll be your first time out.
This is yet another great opportunity to learn how to paddle. And if there are boats, it gives everyone a chance to learn how to handle the wake from a boat, which can feel like the waves of an ocean, depending on the boat.
5. Take short kayaking trips.
Those first few trips, keep them short and sweet. Kids don’t always have a huge attention span, especially the younger they are.
Give them a chance to explore, but don’t plan to stay out too long. Maybe give them opportunity to get out near the shoreline and swim a little if it’s safe to do so.
Gradually increase your time on the water. Over time, your trips will get longer and longer, until you may eventually be packing dinner to eat on the water while you watch the sun set.
6. Pack the gear you need for everyone.
Before headed out kayaking with kids, you may need to pack a few things…
While water isn’t usually a huge deal with the hardshell kayaks, it can be a problem; maybe think about getting a bilge pump to pump water out if needed. Ours was a life saver with the inflatables.
Also, you’re going to want pictures. Maybe think about a soft case or a hard case for your phone, so you can still get all the photos and videos you want of your family’s many adventures out on the water.
Find a kayak, explore your world
While kayaking is an initial investment with the purchase of kayaks and life jackets, once you have the gear, it’s really an affordable activity your whole family can enjoy. There’s no need to buy gas (other than to drive to your nearest body of water).
The places you can go in a kayak are limitless. If you’re talking about kayaking with kids, stop talking about it and just do it. You may find yourself falling in love with yet another way to connect with your family in the great outdoors.
Mexican Corn on the Cob with Bacon – How to transform grilled corn on the cob into Mexican corn, with a tasty addition of bacon sprinkled on top. Delicious, flavorful side dish recipe!
Trust me when I say, this is such a delicious recipe. I know what you’re thinking, though.
Ew, mayo and butter on corn? No way! Oh yes way.
Just give it a chance, because the combination of ingredients in this Mexican street corn recipe make a very flavorful, crispy, tasty ear of corn. Just one bite, and those ears will fly off the table.
All you need are a few ingredients to make this amazing Mexican corn recipe. And if you’d rather have it in casserole form, you can make Mexican Corn Casserole.
[mv_video doNotAutoplayNorOptimizePlacement=”false” doNotOptimizePlacement=”false” jsonLd=”true” key=”uozfsoew8h07siilbbas” thumbnail=”https://mediavine-res.cloudinary.com/video/upload/uozfsoew8h07siilbbas.jpg” title=”Mexican Corn on the Cob with Bacon” volume=”100″]
Tips for how to make delicious Mexican corn on the cob:
Once you’ve gathered all your ingredients, your first step is to get the grill going. You can use any type of grill, either a charcoal grill or gas grill; we prefer charcoal, mainly for the taste it gives the food.
Shuck and wash the corn. Then grill the corn until it’s done and slightly charred; as you grill it, make sure you stay with it and turn it often with a good pair of grilling tongs.
Once the corn is cooked to perfection, take it off the grill and put it on a baking sheet.
Generously butter each ear of corn.
Use a basting brush to brush a generous helping of mayo onto each ear of corn, turning the ear to make sure it’s coated well all the way around.
Sprinkle chili powder on every ear, again turning to sprinkle all the way around each ear.
Crumble Feta cheese on top of each ear of corn.
Sprinkle all the corn with a good helping of chopped up cilantro.
Crumble real bacon on top of each ear… Because bacon makes everything better, right?
Finally, cut your limes into wedges, and give a good squeeze of lime juice over everything. This will give the flavors just a hint of citrus kick.
How to transform grilled corn on the cob into Mexican corn, with a tasty addition of bacon sprinkled on top. Delicious, flavorful side dish recipe!
8 ears corn on the cob
8 tablespoons salted butter
3/4 cup mayonnaise
1 tablespoon chili powder
4 ounces Feta cheese (crumbled)
3 tablespoons cilantro (chopped)
4 slices bacon (cooked and crumbled)
1 whole lime
Start up the grill first. You can use any type of grill, either a charcoal grill or gas grill; we prefer charcoal, mainly for the taste it gives the food.
Shuck and wash the corn.
Grill the corn until it’s done and slightly charred; as you grill it, make sure you stay with it and turn it often with a good pair of grilling tongs.
Once the corn is cooked to perfection, take it off the grill and put it on a baking sheet.
Generously butter each ear of corn.
Use a basting brush to brush a generous helping of mayo onto each ear of corn, turning the ear to make sure it’s coated well all the way around.
Sprinkle chili powder on every ear, again turning to sprinkle all the way around each ear.
Crumble Feta cheese on top of each ear of corn.
Sprinkle all the corn with a good helping of chopped up cilantro.
Crumble real bacon on top of each ear.
Finally, cut your limes into wedges, and give a good squeeze of lime juice over everything.
And that’s it. You’re ready to eat! This corn pairs really well with pork chops, burgers, Chicago hot dogs, and shrimp kabobs!
Learn how to make an easy homemade blueberry filling for pies and desserts. This is a small batch recipe using fresh or frozen berries! You can make enough for one dessert, or double the recipe and freeze it!
Blueberries are quite possibly my favorite snacking berries; they’re full of antioxidants and they’re just plain delicious. Pie happens to be a family favorite too.
‘Cause you know… Homemade is so much better. This stove top blueberry pie filling is so much better than store bought cans. It just is.
Making your own blueberry filling for pie really isn’t difficult. It requires a little stove time with constant stirring, but really it isn’t bad at all; believe me, I’d tell you if it were, because I’m not a fan of standing in front of a stove for long periods of time.
You only need a few ingredients, and besides the blueberries, you should already have everything else in your kitchen cabinets. What you’ll love about this recipe is it’s small batch (so no canning required), and you can use it for all sorts of desserts.
Why Make Homemade Fruit Filling?
That’s a very good question, and one with a few answers…
Homemade is always better, in my opinion. First of all, you have control over the type of ingredients you use, and you also have control of how much of those ingredients goes in to your filling. You have the power to make it the way you want it, and it’s not going to be pumped full of preservatives to keep it fresh.
Personally, I prefer the taste of homemade versus store bought canned filling, especially when it’s made with fresh berries. Nothing beats that fresh blueberry flavor. Even good frozen blueberries give amazing flavor compared to canned.
It’s so quick and easy to make, and the best part is it only needs 5 ingredients. That’s it!
Ingredient Notes for Blueberry Filling:
Blueberries – You can use fresh or frozen blueberries; just be sure to thaw and dry the berries if using frozen, so you’re not adding unnecessary moisture to your filling.
Corn starch – This is used to thicken the pie filling.
Lemon juice – I prefer to either juice a lemon, or use Minute Maid lemon juice, which you can usually find in the freezer section of any grocery store.
Pure cane sugar – You can also use granulated sugar, but I prefer to use unrefined pure cane sugar.
Cinnamon – This adds a spicy hint to the filling… Don’t worry, not so spicy that it’s weird, just enough that it enhances the flavor of the blueberries.
How to Make Blueberry Pie Filling
First I find it’s easier if you gather your ingredients together, so everything is ready to go.
Make the blueberry purée using a blender. I recommend a blender in this case because the skins on blueberries can be hard to break down with a potato masher.
Whisk together the water and corn starch first, ensuring there are little to no lumps.
Then combine the water/corn starch mixture together with the lemon juice and sugar in a medium saucepan on medium heat.
Add the puréed blueberries and whole blueberries to the mixture in the pan.
Cook the entire mixture for about 10 to 15 minutes, stirring constantly until the mixture begins to thicken.
Remove from the heat and add to an already cooked pie crust. Or if you’re adding the pie filling to a chilled dessert, allow the filling to cool before doing so.
Yes, you can. As mentioned above, just be sure to thaw and dry the berries well before using, so you don’t add unnecessary moisture to the filling.
How do you store it?
You’ll definitely want to keep it in the fridge, and it should keep for 4-5 days. After that, you’ll want to freeze it if not able to use it, which brings me to the next question…
Can you freeze it?
Yes, you can. If freezing it, just be sure to put it in an airtight container so it doesn’t get freezer burn. It should keep for up to 3 months in the freezer. I don’t recommend canning this pie filling because it used cornstarch, and cornstarch is not safe for canning; instead you’d want to use Clear-Jel as a thickener, so it’s safe for canning.
How long should I cook it if I put it in a pie?
Make this filling, per the recipe instructions. Then follow the instructions for whichever pie you’re using as to how long to bake it in the crust.
If you try this recipe, why not leave a star rating in the recipe card right below and/or a review in the comment section further down the page? I always appreciate your feedback. You can also follow me on Pinterest, Facebook, Instagram, and YouTube. And subscribe to my email list too!
Small Batch Blueberry Filling
How to make an easy homemade blueberry filling for pies and desserts. Small batch recipe using fresh or frozen berries!
Blender
Medium Saucepan
Whisk
Heat-Resistant Spatula
2 cups blueberry purée
2 cups blueberries* (fresh or frozen)
2 tablespoons water
1 tablespoon corn starch
1/2 teaspoon lemon juice
2 tablespoons sugar
1/4 teaspoon ground cinnamon
Make the blueberry purée using a blender.
Whisk together the water and corn starch first, ensuring there are little to no lumps.
Then mix the water/corn starch mixture together with the lemon juice and sugar in a medium saucepan on medium heat.
Add the puréed blueberries and whole blueberries to the mixture.
Cook the entire mixture for about 10 to 15 minutes, stirring constantly until the mixture begins to thicken.
Remove from the heat and add to an already cooked pie crust. Or if you’re adding the pie filling to a chilled dessert, allow the filling to cool before doing so.
*If using frozen berries, just be sure to thaw and dry the berries well before using, so you don’t add unnecessary moisture to the filling.
How do you store it? You’ll definitely want to keep it in the fridge, and it should keep for 4-5 days. After that, you’ll want to freeze it if not able to use it, which brings me to the next question…
Can you freeze it? Yes, you can. If freezing it, just be sure to put it in an airtight container so it doesn’t get freezer burn. It should keep for up to 3 months in the freezer. I don’t recommend canning this pie filling because it used cornstarch, and cornstarch is not safe for canning; instead you’d want to use Clear-Jel as a thickener, so it’s safe for canning.
Pies & Pastries
American
blueberry filling, blueberry filling recipe, blueberry pie filling, blueberry pie filling recipe, small batch blueberry pie filling
How to make freezer jam in minutes with a quick and easy, no-cook strawberry jam recipe that uses simple ingredients. Why buy store bought when you can make your own delicious jam filled with delicious berry chunks?
Mmmm, one of the main reasons I love spring is because it’s the beginning of a long and hopefully very productive berry season, starting with strawberries. Our favorite strawberry pie and strawberry jam recipe in mind, we go strawberry picking every May, filled with the notion of making plenty of freezer jam to last the whole year long.
Of course, after strawberries come blueberries, then blackberries, then peaches, then apples… And I know peaches and apples aren’t berries; but peach jam is delicious, this blackberry jam recipe without pectin is amazing, apple jelly from juice is so easy to make, and apple butter is another one of our favorites.
The last few years we’ve used a different brand of pectin than what we used before.
I really like using Ball RealFruit Instant Pectin because it calls for way less sugar, and I also love that I don’t have to cook a thing.
Simply mix the ingredients together, and you’ve got a whole batch of jam. Don’t worry, I’ll walk you through the whole thing… It’s quick, painless, and so easy.
Your reward at the end will be about 8 jelly jars full of the most delicious no cook strawberry freezer jam ever. Let’s make some jam, shall we?
Tips for how to prep strawberries for this strawberry jam recipe:
You’ll likely need 3 to 4 quarts of berries for 8 jars of jam. Here’s how to get them ready…
First, wash and dry the berries. I like to soak mine in a vinegar water solution for 5 to 10 minutes, then rinse well.
Once your bowl is full, crush the berries with a potato masher; or you can puree them with a blender.
When you’re done, you’ll be ready to mix up a quick batch of freezer jam.
Tips for how to make strawberry jam, the quick and easy way:
According to the Pectin Calculator, this recipe should really only make 6 jars of jam. I consistently get 8 jelly jars and call it a win.
First of all, prep your jars, as well as the lids and bands. Make sure everything is clean and dry.
You’ll need to stir together the sugar and pectin in a large mixing bowl.
Then add the crushed berries to your sugar/pectin mixture; stir together for a good 3 to 4 minutes, just to make sure everything’s dissolved and mixed up well.
Using a jar funnel, pour the jam into each prepared jar… You can use a ladle, or I like to use a really small liquid measuring cup to dip and pour. It makes the process so easy and less messy.
Be sure to leave about a 1/2-inch gap at the top of each jar to allow for expansion in the freezer. Wipe the top of each jar with a wet towel or rag, place the lid on, and tighten the band.
Let the jars stand for about 30 minutes, then either refrigerate or freeze. Ball says the jam keeps up to 3 weeks in the refrigerator and up to 1 year in the freezer.
Before you put your jam in the freezer, be sure to write what it is and the year on the lid, so you know when you made it.
8-ounce Jelly Jars – You can use smaller jars or even pint jars. I’ve found these jelly jars are just the right size for us with the amount of jam we eat in a 3-week period. If you already have jars, you may need new lids or a pack of lids and bands.
Jar Funnel – This helps to pour the jam into the jars without making a huge mess.
Sharpie or Jar Labels – so you can label your jars and know what it is and when you made this batch of freezer jam.
Quick and Easy Strawberry Jam Recipe
How to make freezer jam in minutes with a quick and easy, no-cook strawberry jam recipe that uses simple ingredients. Why buy store bought when you can make your own delicious jam filled with delicious berry chunks?
5 cups crushed strawberries
6 tablespoons Ball RealFruit Instant Pectin
2 cups pure cane sugar
Wash the strawberries.
Pat the berries dry with a towel.
Stem the berries.
Slice the berries in half, lengthwise.
Once your bowl is full, crush the berries with a potato masher; or you can puree them with a blender.
Prep your jars, as well as the lids and bands. Make sure everything is clean and dry.
Stir together the sugar and pectin in a large mixing bowl.
Add the crushed berries to your sugar/pectin mixture; stir together for a good 3 to 4 minutes, just to make sure everything’s dissolved and mixed up well.
Using a jar funnel and either a ladle or small liquid measuring cup, pour the jam into each prepared jar. Be sure to leave about a 1/2-inch gap at the top of each jar to allow expansion in the freezer.
Let the jars stand for about 30 minutes, then either refrigerate or freeze. Ball says the jam keeps up to 3 weeks in the refrigerator and up to 1 year in the freezer.
This is your complete guide to Big Bend primitive camping, in a National Park full of adventure, rugged beauty, solitude, and spectacular starry skies beyond anything you’ve ever imagined or seen.
A beautiful, rugged, and unforgiving place, Big Bend camping is some of the best camping known to man. With over 801,000 acres, there’s plenty of room for dispersed camping in Big Bend National Park.
While the park is quite rugged and desolate in some places, we found it to be a beautiful paradise away from the rat race of life. And while Big Bend is a fairly popular spring break destination, I’d still add it to my list of amazing spring break road trip ideas.
The only thing is, per Lockcuff family habit, we really didn’t do a whole lot of planning before we went. I take that back… I did make sure to pack our passports because we planned to visit Boquillas, Mexico, while there.
So on the way to this southern point in Texas, I started looking for the best primitive roadside campsites Big Bend has to offer. I quickly found out we really should’ve done our research beforehand.
While Big Bend does have 3 developed campgrounds, backcountry camping in primitive roadside campsites was our first choice. Since we visited in May when it’s extremely hot (true Lockcuff fashion), we had no problem reserving one of the Big Bend National Park campsites.
Which brings me to my next point… Big Bend National Park camping reservations, in person, are a must.You HAVE to reserve your site and purchase a backcountry permitin person during visitor center hours, up to 24 hours in advance. It’s not like your typical dispersed camping experience where you just go out and pick a site; you have to actually pick a site when you get your permit.
So, take it from me… This means even if you arrive at 5:15, and the visitor center closes at 5, you’re out of luck until the next day. Also, cooler times of the year are when campsites really fill up; so you want to arrive early on to reserve a site.
The park has links to each campsite with photos. It was enough for us to just read descriptions, look through photos, kinda research the roads campsites are on, and pick a site that resonated with us.
Looking for more camping options in the USA? Check out how we find the best free places to camp.
What Big Bend Camping Is Really Like
It wasn’t hard for us to pick a site. We knew we wanted solitude and a beautiful view.
Backcountry camping in Big Bend is available for backpackers. Dispersed or primitive roadside campsites are available on what they call “improved dirt roads” and “primitive dirt roads.” Primitive dirt roads require a high-clearance 4-wheel-drive vehicle. The road may get quite rocky, even sandy; and rain can make them impassable.
Of course, we decided on a primitive dirt roadside site, and we set off for Glenn Springs Road, which eventually comes to Juniper Canyon Road. Just to give you an idea of how long it took us to get to our site… From the paved road, we had about a little over an hour’s ride on dirt road out to our campsite at Robbers Roost Big Bend.
While it was a really long, really bumpy ride, the views were worth every single jolt. Of course, a thunderstorm hit on our first night out; but as that thunderstorm passed, we were hit with the most beautiful sunset over the mountains and a very surreal lighting like I’d never seen in my life.
It was so surreal and with storms all around us, it were as if God cleared the clouds over our tent and allowed us a glimpse of His majesty. I’ve never experienced anything so beautiful in all my life.
Primitive Roadside Campsites in Big Bend
Robber’s Roost is way out in the desert, with no one else around for miles. However, the site is really well developed with adequate parking, enough room for 3 tents, and a bear box to store food and anything else with a scent.
It provides amazing views of the Chisos Mountains, beautiful sunrise mornings, gorgeous sunset nights, colorful views of the Texas and Mexico desert, a stargazer’s paradise, amazing sleep, and peaceful desert sounds in those early morning hours.
Every part of me longs to be back in that beautiful desert atmosphere.
Can I Boondock or Camp in a Tent?
While boondocking isn’t allowed in Big Bend, per park rules, roadside camping (with a permit) is allowed, and you can camp in your car or in a tent.
Big Bend offers 64 campsites on backcountry roads, most of them requiring high-clearance 4WD vehicles to reach them. Only a few of these sites can accommodate large RV’s or camping trailers.
Each campsite has rules regarding vehicle length and capacity limits.
How to Reserve or Book a Big Bend Campsite
Online reservations are available online, up to 6 months in advance, for the 34 most popular campsites thru recreation.gov.
Reservations for the remaining 30 primitive roadside campsites can only be attained in person at the Panther Junction Visitor Center, daily from 8:30am to 5:00pm, and the Chisos Basin Visitor Center, daily from 8:30am to 4:00pm. Reservations must now be made 24 hours in advance of your first night’s stay.
Before you head out, follow park regulations and get the required permit. Even though the permit isn’t used to check on your safety, it allows rangers to talk with you, to get an idea of what sites will work for the type of vehicle you’re driving, and make sure you know what you’re getting yourself into, as well as warn you of the dangers.
They use the permits to track how many people use the primitive campsites, as well. And if you get caught without a permit? Not good.
Permits are only $12, and when you get yours, you can extend it out as long as 14 days.
Safety Tips for Big Bend Backcountry Camping
I wish we had a picture of the park sign we saw that read something like, “Please call your family and tell them you don’t have cell phone service so they’re not calling and reporting you missing.” Apparently, this happens a lot at Big Bend.
In all seriousness, it can be a very desolate place, and we learned a few lessons while trekking Big Bend even for the short time we were there this trip.
Here are a few safety tips, as well as tips for how to prepare for your Big Bend adventure…
Tell people when and where you are going and plan on checking in, so they can report you missing if they don’t hear from you; otherwise, the rangers will not know to look for you unless someone calls. Certain visitor centers have Wi-Fi, and there is cell service in some areas of the park, just likely not where you’ll be camping. Stay in touch with your loved ones.
Stay connected by carrying a radio so you can attempt to call someone if you need help.
Carry at least a gallon of water per person, per day, for however long you’ll be there, extra if you plan to use a portable shower for camping. Even if you plan to drive out the next day, carry extra because you never know what will happen, and you need water in order to survive. We consistently reached over 100 degree temps while there.
Carry extra fuel. Gas stations are few and far between.
Carry a map of the park with you at all times.
Carry plenty of spare tires. We have 4. Even the ranger mentioned this to Dan; when Dan said we had 4, he said, “You’ve been down that road, huh?” Yes, we have, 10,000 feet up on a mountainside in Colorado in the dark, and it was not fun.
Wear sunscreen. Even if you don’t plan to be out in the sun long, wear it anyway. Also, wear proper clothing and shoes, especially shoes. There are rattlesnakes, scorpions, etc. Protect yourself and your little ones. Also, a hat goes a long way for shade, because there will be no shade, no shade at all, besides the occasional rock or boulder.
Plan strenuous activities, like hiking in Santa Elena Canyon and other places, for early in the mornings or in the evenings when it’s cooler; be sure to pack a good hiking carrier for little ones.
Cactus is everywhere; it is a desert environment. While it’s beautiful, it can also be quite attractive to little ones. Zeke found out the hard way that cactus hurts. Watch your kids closely, especially if you’re in the middle of nowhere and a long way from cell service or help.
Stay low during a thunderstorm. Also, keep things tied down well. Keep all loose items stored when you’re not at the campsite; strong winds can come up quickly in the desert.
Campfires are banned. Even charcoal grills were not allowed while we were there. It’s so dry, and all it takes is one spark.
Keep food put away and closed up; bear boxes are provided because bears and javelinas are pretty prevalent in the park.
Plan for the most beautiful starry nights you’ve ever seen in your life. Whether it’s camera equipment you want to bring along to capture those night time images, or a map of the constellations, make sure you’re prepared for night time skies in Big Bend.
Pack it in, pack it out, including all trash. Leave no trace.
Gas is available at Panther Junction and Rio Grande Village. Diesel and limited groceries are also available at Panther Junction; and you can find propane at Rio Grande Village.
As for more supplies, you can find convenience stores at Rio Grande Village, the Chisos Basin, and at Castolon. They carry basic supplies like camping supplies, some groceries, and souvenirs too.
What’s the Best Time of Year to Visit Big Bend?
It really depends on the reason for your visit. For example, if you’re floating the river, you may want to visit in the summer months when the weather is hot hot hot.
If it’s hiking and land adventure you’re after, fall, winter, or early spring may be a good time. March can be crowded with spring break travelers, but the temperatures are just about right with warmth thru the day and cooler temps at night. Early spring also brings wildflowers to the park, so that is something to think about when planning your trip.
Keep in mind winter in the park brings freezing temps at night; and holidays can get quite crowded, about like spring break.
We can’t wait to go camping in Big Bend National Park again, likely in the cooler weather of spring or fall. We fell in love with this beautiful, wild, rugged park and everything it has to offer.
It’s one of those national parks you can spend days and weeks exploring and still not see everything there is to see. Next time maybe we’ll go kayaking on the Rio Grande.
If it’s not camping you want but lodging instead, Park Ranger John has all the details on Big Bend Lodging.
Can You Bring Pets to Big Bend?
Big Bend has a lot of rules and regulations around pets in the park. While they can come in the park, they can’t be on any trails; in fact, they can only go where your car can go.
There are no kennel services in the park either. So it stands to reason that it’s probably better not to bring pets into the park, unless you’re camping in a campground and they’d be safe to stay in the camper.
Video of our Camping Adventure at Robbers Roost Big Bend
Easy recipe for grilled shrimp kabobs marinated with the most delicious, two ingredient, maple bourbon grilled shrimp marinade, then skewered with pineapple chunks and thrown on the grill.
We’ve been a huge fan of the flavor that maple syrup and bourbon give together, especially since we shared the recipe for our Maple Bourbon Brined Turkey. We had to give a similar (but much simpler) glaze a try with our grilled shrimp kabobs.
Shrimp is so easy to make, I don’t know why we haven’t shared more easy shrimp recipes. But get ready because I have a feeling we’ll be sharing more in the near future.
I’m not quite sure how to describe the flavor that maple and bourbon give together. It’s slightly sweet, slightly tangy. These grilled shrimp kabobs are juicy and flavorful, just like my garlic parmesan chicken skewers.
Our grilled shrimp marinade is as simple and easy as 2 ingredients. And just in case you’re wondering where to buy shrimp if you don’t live near a coast… We bought frozen, already cooked shrimp at Aldi, $4.99 for a 12-ounce bag.
How to make a simple grilled shrimp marinade:
You’ll need 2 ingredients for this simple marinade recipe… Real maple syrup (make sure it’s real) and bourbon. If you’re not sure where to buy bourbon, Saucey will deliver it right to your home.
Mix the maple syrup and bourbon together in a bowl.
Then pour into a gallon-sized bag with your shrimp (about two 12-ounce bags of already cooked shrimp).
Seal the bag and allow the shrimp to soak in the mixture for 20 to 25 minutes in the refrigerator.
Gather the rest of your ingredients… You’ll need the marinated shrimp, fresh pineapple chunks, and optional cayenne pepper.
Take your skewers and alternate adding the marinated shrimp and pineapple chunks to each skewer.
Once your skewers are filled with shrimp and fresh pineapple chunks, place them on the already heated grill.
Sprinkle a bit of cayenne pepper on the kabobs… This step is optional but adds a little spicy taste.
Brush a bit of the marinade on when the shrimp kabobs begin to cook, and grill on high for 5 to 7 minutes per side.
And that’s really all there is to this grilled shrimp recipe. Easy peasy! I like to top mine off with a fresh batch of sweet fruit salsa, or sometimes peach and mango salsa!
Mixing Bowl – A medium sized bowl will come in handy for mixing the maple syrup and bourbon together before pouring it over the shrimp in a gallon-sized bag. Charcoal Grill or Gas Grill – We love using our charcoal grill. Skewers – You’ll need skewers to make kabobs; we have metal skewers similar to this, and they’re so easy to use. Grilling Tongs – You’ll need tongs to turn the shrimp kabobs on the grill. Basting Brush – to brush on the maple bourbon grilled shrimp marinade.
Maple Bourbon Marinated Grilled Shrimp Kabobs
Easy recipe for grilled shrimp kabobs marinated with the most delicious, two ingredient, maple bourbon grilled shrimp marinade, then skewered with pineapple chunks and thrown on the grill.
1/4 cup real maple syrup
1/4 cup bourbon
24 ounces frozen cooked shrimp (thawed)
1 whole pineapple (cut into chunks)
1 teaspoon cayenne pepper
Mix the maple syrup and bourbon together in a bowl.
Then pour the mixture into a gallon-sized bag with the thawed shrimp.
Seal the bag and allow the shrimp to soak in the mixture for 20 to 25 minutes in the refrigerator.
Meanwhile, heat up the grill; we prefer using a charcoal grill, but you can use any type of grill.
Take your skewers and alternate adding the marinated shrimp and pineapple chunks to each skewer.
Once your skewers are filled with shrimp and fresh pineapple chunks, place them on the already heated grill.
Sprinkle a bit of cayenne pepper on the kabobs… This step is optional but adds a little spicy taste.
Brush a bit of the marinade on when the shrimp kabobs begin to cook, and grill on high for 5 to 7 minutes per side. The shrimp and pineapple will start to blacken up just a bit.
Once the shrimp are cooked through, remove from the grill and serve immediately with your favorite sauce.
Celebrate the 4th of July with a patriotic flag cake made from a box mix and strawberry Jello. This poke cake, topped with whipped cream and fresh berries, is such a refreshing dessert and so easy to make!
I just love how refreshing this cake really is. It’s the perfect dessert for summertime!
Why Make This Recipe?
I think you’ll love this 4th of July cake because it’s…
Quick and easy to make – In fact, you can mix it up in just minutes, and it’s topped with a simple whipped cream topping.
Light and fluffy – Because it’s a Jello cake made with a cake mix, it’s always so soft and fluffy, so it’s not a heavy dessert.
Perfect for summer – Jello cake is so refreshing in the summertime, mainly because it’s chilled and filled with all that strawberry Jello goodness.
Easy to decorate – What easier way to decorate an American flag cake than with fresh blueberries and strawberries? There’s hardly any work involved.
Budget-friendly – You can make this festive dessert for less than $15.
[mv_video jsonLd=”true” key=”sadsbfvnwjxsmhwplmkk” ratio=”16:9″ thumbnail=”https://mediavine-res.cloudinary.com/v1527008225/ckk4alacd4qkaezk2ykz.jpg” title=”Strawberry Jello Cake Flag Cake”]
Ingredient Notes
Most of the ingredients you need are simple, and you may even have them already in your pantry. Fresh berries are the only thing you may have trouble finding during certain times of the year.
Cake mix – You can use any vanilla flavor cake mix, but I really like the flavor that French vanilla adds. You can also use a gluten-free cake mix.
Fresh berries – You can substitute fresh raspberries for strawberries. I suppose you could also sub in blackberries for blueberries.
How to Make a Flag Cake
Gather your ingredients, and prep anything that needs prepped. For example, wash and dry the berries.
Mix together the cake mix, water, canola oil, and eggs, and mix it according to package directions.
Then pour the cake batter into a greased 9×13 cake pan, and bake according to package directions.
After baking, allow the cake to cool for about 15 to 20 minutes; and meanwhile, mix the Jello mix with boiling water.
Then add in cold water, continuing to mix well, ’til the Jello mix is fully dissolved.
Poke the top of your cake all over with a fork, creating small holes all over the top of the cake.
Slowly pour the Jello mixture over the entire cake, and allow the cake to finish cooling.
Using a spatula, spread whipped cream evenly over the entire cake.
Add 5 or more rows of blueberries to the top left corner of the cake.
Stem and slice the strawberries length wise; then add rows of strawberries to create the red stripes for your cake. I had enough room to add 4 rows of strawberries to my cake.
When you’re done decorating, cover and chill your Fourth of July cake for 3 to 4 hours before serving.
Expert Tips and Recipe FAQ’s
Careful when spreading the whipped cream on top of the cake. Some cake mix cakes are so light and fluffy, the top will easily crumble and spread with the whipped cream.
How long will Jello cake keep?
It should keep for 2 to 3 days, but you’ll need to cover it and keep it in the refrigerator when not serving.
Can I use other flavors of cake mix?
Yes, you can! You can easily make this dessert just as good with a chocolate cake mix, funfetti cake mix (sprinkles are especially fun for the 4th of July), yellow butter cake, strawberry cake, etc.
If you try this recipe, why not leave a star rating in the recipe card right below and/or a review in the comment section further down the page? I always appreciate your feedback. You can also follow me on Pinterest, Facebook, Instagram, and YouTube. And subscribe to my email list too!
Easy Strawberry Jello Flag Cake
Celebrate the 4th of July with a patriotic flag cake made from a box mix and strawberry Jello. This poke cake, topped with whipped cream and fresh berries, is such a refreshing dessert and so easy to make!
16.5 ounces vanilla cake mix
1 cup water
3 large eggs
1/3 cup canola oil
1 cup boiling water
3 ounces strawberry Jello mix
1/2 cup cold water
8 ounces whipped cream
1 pint blueberries
1 1/2 quarts strawberries
Gather ingredients, and prep berries by washing and drying.
Mix together the cake mix, water, canola oil, and eggs, and mix it according to package directions.
Then pour the cake batter into a greased 9×13 cake pan, and bake according to package directions.
After baking, allow the cake to cool for about 15 to 20 minutes.
Meanwhile, mix the Jello mix with boiling water.
Then add the cold water, continuing to mix well, ’til the Jello mix is fully dissolved.
Poke the top of your cake all over with a fork, creating small holes all over the top of the cake.
Slowly pour the Jello mixture over the entire cake, and allow the cake to finish cooling.
Using a spatula, spread whipped cream evenly over the entire cake.
Add 5 or more rows of blueberries to the top left corner of the cake.
Stem and slice the strawberries length wise; then add rows of strawberries to create the red stripes for your cake. I had enough room to add 4 rows of strawberries to my cake.
When you’re done decorating, cover and chill your Fourth of July cake for 3 to 4 hours before serving.
Gluten-Free –
You can use a gluten-free cake mix in place of a regular cake mix; just keep in mind cake batter ingredients may vary, depending on the cake mix you use.
Careful when spreading the whipped cream on top of the cake –
Some cake mix cakes are so light and fluffy, the top will easily crumble and spread with the whipped cream. Go easy with the spatula.
Storage –
Jello cake should keep for 2 to 3 days, but you’ll need to cover it and keep it in the refrigerator when not serving.
4th of July
American
4th of July cake, American flag cake, flag cake, flag cake recipe, Fourth of July cake, Jello flag cake, July 4th dessert