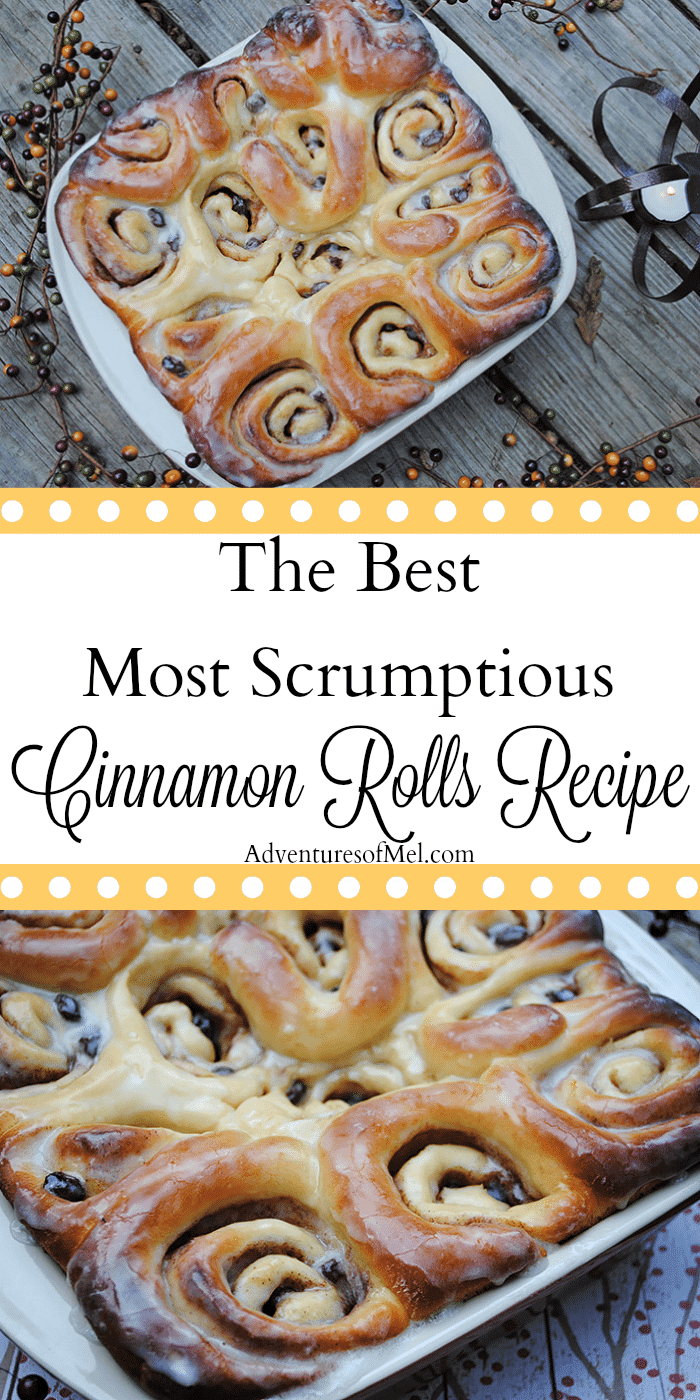
Don’t you just love berry season? It seems like it came early this year here in our little corner of Arkansas.
Every year around this time I have to make all the things with delicious fresh-picked strawberries, including strawberry cream pie, strawberry freezer jam, strawberry delight, and strawberry shortcake. And fresh strawberries make the ultimate mini fruit pizzas! Because who doesn’t love a good old-fashioned strawberry shortcake, especially when it involves Grandma’s biscuits?
And of course, the star of the show… Red, juicy strawberries.
Speaking of Grandma’s Biscuits…
For as long as I can remember, Grandma kept a slip of paper taped to the inside of her cabinet door. That slip of paper held her favorite biscuit recipe, handwritten in her own handwriting. My mom now has that same slip of paper taped to the inside of her cabinet door. And I’m considering writing out the recipe and taping it to the inside of our cabinet.
We love making these biscuits. They can be rolled out or dropped. For this particular recipe, I actually grabbed spoonfuls and shaped them by hand, so they were more like drop biscuits. I also added in a teaspoon of sugar just to add a li’l sweetness to the recipe since I planned to use them for strawberry shortcake.
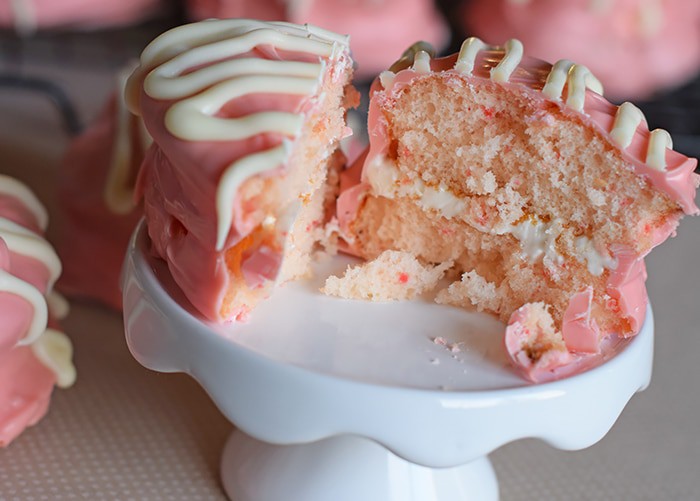
Gobs of Creamy Whipped Cream
Before I actually created this recipe, I had this idea to add cream cheese to the homemade whipped cream I planned to make. Dan wasn’t sure it would work; frankly, I wasn’t either. But like I’ve said before, cream cheese is one of my favorite ingredients. Ever.
Well, it worked. The whipped cream is so creamy and flavorful. It definitely adds a special touch to the shortcake.
Print the Recipe for Old-Fashioned Strawberry Shortcake with Grandma’s Biscuits
Below is the printable recipe for this scrumptious old-fashioned strawberry shortcake using Grandma’s biscuits. Enjoy!
Old-Fashioned Strawberry Shortcake with Grandma’s Biscuits
Strawberry Shortcake made with a cream cheese whipped cream, Grandma's biscuits, and juicy red strawberries! Print the recipe for Old-Fashioned Strawberry Shortcake with Grandma's Biscuits.
Biscuits –
2 cups all-purpose flour
3 teaspoons baking powder
1/2 teaspoon salt
1 teaspoon sugar
1/3 cup unsalted butter
3/4 cup milk
Whipped Cream –
2 ounces cream cheese
2 cups heavy whipping cream
1 teaspoon vanilla extract
1/2 cup powdered sugar
Strawberries (washed and sliced)
For the biscuits, mix together flour, baking powder, salt, and sugar in a medium bowl.
Use a pastry blender to blend flour mixture together with cold sliced butter. Continue until mixture is well blended.
Add milk to mixture, and mix well. You should be left with a somewhat sticky but still manageable dough.
Grab spoonfuls of dough and shape into biscuits about 3/4 inch thick. Place on ungreased cookie sheet.
Bake at 425° for about 15-20 minutes, or until tops are beginning to turn golden.
Meanwhile, wash strawberries.
Mix together cream cheese, heavy whipping cream, vanilla, and powdered sugar to form a whipped cream.
Once the biscuits have cooled, slice a biscuit in half.
Place bottom half of biscuit on plate. Add a layer of sliced strawberries, followed by a generous layer of whipped cream, then another layer of sliced strawberries. Top with the top half of the biscuit.
Add a small dollop of whipped cream to the top, followed by a whole strawberry.
Serve and enjoy!
Desserts
American
old-fashioned strawberry shortcake, strawberry shortcake, strawberry shortcake with biscuits
Learn how to make easy and adorable bunny tail cupcakes with chocolate cupcakes, frosting, and mini marshmallows. This is a fun Easter dessert kids will love to help make!
Easter will soon be here, and these little bunny cupcakes are so easy and fun, you’ll want to add them to your traditional Easter dinner menu.
Why You’ll Love This Easter Dessert
This is a fun dessert for kids and young at heart.
Perfect recipe for toddlers and working on fine motor skills… Placing the marshmallows on the cupcakes will keep them entertained and busy for at least a little bit.
You can make regular sized cupcakes or mini cupcakes. Mini bunny tail cupcake bites are the perfect size dessert if you’re trying to watch what you eat but still want a bit of a sweet treat.
They involve chocolate, so that’s a win win dessert right there. Of course, you can make the cupcakes any flavor you like.
Ingredients and Substitutions Notes:
You’ll need a few ingredients to make this recipe…
Butter and Oil – I like to use salted butter and canola oil for this recipe.
Unsweetened Cocoa Powder – I prefer Hershey’s Cocoa Powder, but you can use any brand you like.
Large Eggs
Baking Soda
Buttermilk – You can use a buttermilk mix, straight buttermilk from the store, or just sour regular milk by adding a tablespoon of vinegar to the measuring cup, then measure out the milk to the line for the amount you need.
Another option is to use a cake mix. I’m all for easy, so I totally get it, plus you can make any flavor you want.
If you decide to make mini cupcakes, you’ll definitely need a mini muffin pan.
Before you get starting mixing up the cupcake batter, pre-heat the oven to 350° F, and line your muffin pan/s with cupcake liners.
Mix and Bake the Cupcakes
In a large mixing bowl, whisk together the sugar, flour, and cocoa powder.
In a medium saucepan, bring the butter, oil, and water to a boil.
Then remove the mixture from the heat, and mix together with the flour mixture.
In a separate bowl, dissolve the baking soda in the buttermilk by whisking together for a minute or so.
Then beat the eggs in with that buttermilk mixture.
Add the egg mixture and vanilla extract to the flour mixture in the mixing bowl, and mix well.
Pour the cupcake batter into the prepared muffin pan/s, and bake at 350° for about 15-20 minutes, or until a toothpick inserted in the center of a cupcake comes out clean.
Let the cupcakes cool in the pan for about 10 minutes before removing to a wire rack to cool completely.
Make the Frosting
While your cupcakes are baking, mix up the frosting.
In a medium mixing bowl, whisk together the powdered sugar and cocoa powder. Set aside.
In a medium saucepan, melt the butter into the buttermilk, but do not boil. Remove from the heat when all the butter has melted.
Then beat in the powdered sugar mixture ’til you have a spreadable consistency for frosting.
Whisk in the vanilla extract, and it’s ready to go.
How to Decorate Bunny Tail Cupcakes
Once your cupcakes have baked and cooled, frost to whatever thickness you prefer.
Then apply a thin layer of marshmallow cream; it’s ok if the marshmallow cream mixes just a bit with the chocolate frosting. This mixture will allow the mini marshmallows to really adhere to the top of the cupcake without sliding off.
Slice or tear each mini marshmallow in half.
Place the marshmallows all over the top of each frosted cupcake, adding more marshmallow halves ’til the top of each cupcake is covered, resembling a fluffy bunny tail.
And that’s it. They are so cute and perfect for the Easter holiday with family and friends.
Expert Tips and Recipe FAQ’s
How should I store bunny tail cupcakes?
If you have leftovers, store them in an airtight container in the fridge. They’ll keep better in the fridge, though they’ll likely only last about 3-4 days before going stale.
Do I have to frost the cupcakes?
No, you don’t. You can just use marshmallow cream if you want. However, you do need marshmallow cream, no matter what, to help the marshmallows stick to the cupcake tops; I’ve found it works the best to keep them from sliding off.
If you try this recipe, why not leave a star rating in the recipe card right below and/or a review in the comment section further down the page? I always appreciate your feedback. You can also follow me on Pinterest, Facebook, Instagram, and YouTube. And subscribe to my email list too!
Bunny Tail Cupcakes
How to make easy, adorable bunny tail cupcakes with chocolate cupcakes, frosting, and mini marshmallows. Fun Easter dessert kids will love!
Muffin Tins
Cupcake Liners
Cupcakes:
2 cups cane sugar
2 cups all-purpose flour
1/4 cup unsweetened cocoa powder
1/2 cup salted butter
1/2 cup canola oil
1 cup water
1 1/2 teaspoons baking soda
1/2 cup buttermilk
2 large eggs
1 teaspoon vanilla extract
Frosting:
5 1/2 to 6 cups powdered sugar
1/4 cup unsweetened cocoa powder
8 tablespoons salted butter (softened)
1/2 cup buttermilk
1 teaspoon vanilla extract
1 cup marshmallow cream
4 cups mini marshmallows
Mix and Bake the Cupcakes:
Pre-heat the oven to 350° F, and line muffin tin/s with cupcake liners.
In a large mixing bowl, whisk together the sugar, flour, and cocoa powder.
In a medium saucepan, bring the butter, oil, and water to a boil.
Then remove the mixture from the heat, and mix together with the flour mixture.
In a separate bowl, dissolve the baking soda in the buttermilk by whisking together for a minute or so.
Then beat the eggs in with that buttermilk mixture.
Add the egg mixture and vanilla extract to the flour mixture in the mixing bowl, and mix well.
Pour the cupcake batter into the prepared muffin pan/s, and bake at 350° for about 15-20 minutes, or until a toothpick inserted in the center of a cupcake comes out clean.
Let the cupcakes cool in the pan for about 10 minutes before removing to a wire rack to cool completely.
Make the Frosting:
In a medium mixing bowl, whisk together the powdered sugar and cocoa powder. Set aside.
In a medium saucepan, melt the butter into the buttermilk, but do not boil. Remove from the heat when all the butter has melted.
Then beat in the powdered sugar mixture 'til you have a spreadable consistency for frosting.
Whisk in the vanilla extract, and it's ready to go.
How to Decorate Bunny Tail Cupcakes:
Once your cupcakes have baked and cooled, frost to whatever thickness you prefer.
Then apply a thin layer of marshmallow cream; it's ok if the marshmallow cream mixes just a bit with the chocolate frosting. This mixture will allow the mini marshmallows to really adhere to the top of the cupcake without sliding off.
Slice or tear each mini marshmallow in half.
Place the marshmallows all over the top of each frosted cupcake, adding more marshmallow halves 'til the top of each cupcake is covered, resembling a fluffy bunny tail.
*You can also make mini cupcakes by using a mini muffin pan.
If you have leftovers, store them in an airtight container in the fridge. They’ll keep better in the fridge, though they’ll likely only last about 3-4 days before going stale.
Learn how to make bacon Ranch deviled eggs with a handful of simple ingredients. These yummy finger foods are perfect for an Easter or holiday appetizer. This recipe is easy to make, and it makes enough to feed a crowd.
Eggs, eggs, and more eggs… Thanks to our chickens, we have plenty of eggs right now, something I’m over the moon about because that’s one thing I don’t have to buy at the grocery store.
Easter Sunday is right around the corner, so what better way to use them than by making a big batch of delicious Ranch deviled eggs with bacon to go with your traditional Easter dinner? Yum!
Random Fun Fact: Did you know some people call deviled eggs angel eggs? Essentially the same thing, but I just thought that was interesting.
Why You’ll Love This Recipe
They’re quick and easy to make, perfect for a last minute appetizer.
You can make Ranch deviled eggs with bacon or without bacon… Of course, I’m of the mind that bacon makes everything better.
This recipe makes enough to feed a group of people, so it’s perfect for family dinner, holiday parties, etc.
Simple ingredients… This means everything, especially with the costs of groceries these days.
Even if you don’t necessarily have a get together to make them for, they make great snacks.
Ingredients and Substitutions Notes
You only need a handful of ingredients to make Ranch bacon deviled eggs…
Hardboiled Eggs – You can boil these ahead of time, so they’re ready.
Buttermilk Ranch Mix – I prefer to use Hidden Valley Buttermilk Ranch mix to make Hidden Valley Ranch deviled eggs. It’s easy and convenient.
Condiments – You’ll need both mayonnaise and mustard. While mayo makes a lower carb version of these eggs, I’ve also used a dressing like Miracle Whip; but keep in mind, you may not need as much salt if doing so.
Dill Pickles – Just mince them up.
Bacon – I prefer to cook our bacon with breakfast and save it back in the fridge for use later; but you can also use precooked bacon and just pop it in the microwave when ready. Regardless which bacon you choose, it will need to be cooked and crumbled.
How to Make Bacon Ranch Deviled Eggs
Prep work mainly involves boiling the eggs ahead of time and allowing them to cool. You can also cook the bacon and crumble it.
How to Make and Fill Deviled Eggs
Peel and slice each hardboiled egg in half, removing the yolks and placing them in a large mixing bowl. Set the whites aside on a platter.
Add the Ranch mix, mayonnaise, mustard, and minced Dill pickles to the egg yolks, and mix together well.
Fill each egg white half with a spoonful of the yolk mixture.*
Cover and refrigerate the eggs for 1-2 hours.
When ready to serve, crumble the bacon on top of each deviled egg.
And that’s it! They’re ready to serve.
Expert Tips and Recipe FAQ’s
When is the best time to make bacon Ranch deviled eggs, the day before or the day of?
Personally, I’d rather eat deviled eggs the day of, but with maybe 2-3 hours to chill in the fridge. However, you can make them the day before, and they’ll be just fine. Now, if you are making them the day before, I do recommend crumbling freshly cooked bacon on the day of; if you add bacon the day before, it can get kinda chewy and tough from sitting in the fridge.
How should you store deviled eggs?
Definitely store them in an airtight deviled egg container with a lid, and in the refrigerator. You can also put them on a platter and cover it tightly with plastic wrap.
Can you freeze deviled eggs?
While you can freeze the yolk mixture, it’s best to not freeze the egg whites because they’ll become quite rubbery in texture.
If you try this recipe, why not leave a star rating in the recipe card right below and/or a review in the comment section further down the page? I always appreciate your feedback. You can also follow me on Pinterest, Facebook, Instagram, and YouTube. And subscribe to my email list too!
Bacon Ranch Deviled Eggs
How to make bacon Ranch deviled eggs, perfect for an Easter or holiday appetizer. Easy to make, this recipe makes enough to feed a crowd.
Deviled Egg Container with Lid
24 large hardboiled eggs
2 teaspoons buttermilk Ranch mix
1 cup mayonnaise
1 teaspoon mustard
1/4 cup Dill pickles (minced)
4 slices bacon (cooked and crumbled)
Peel and slice each hardboiled egg in half, removing the yolks and placing them in a large mixing bowl. Set the whites aside on a platter.
Add the Ranch mix, mayonnaise, mustard, and minced Dill pickles to the egg yolks, and mix together well.
Fill each egg white half with a spoonful of the yolk mixture.*
Cover and refrigerate the eggs for 1-2 hours.
When ready to serve, crumble the bacon on top of each deviled egg. Then serve.
*You can fill the eggs 3 ways…
Use a spoon to add the yolk mixture to the whites.
Snip the corner of a Ziploc bag with scissors, fill the bag with yolk mixture, and pipe the filling into the whites.
Or you can use a cake tip and pastry bag filled with the yolk mixture to pipe the yolk mixture into the whites.
When is the best time to make bacon Ranch deviled eggs, the day before or the day of? Personally, I’d rather eat deviled eggs the day of, but with maybe 2-3 hours to chill in the fridge. However, you can make them the day before, and they’ll be just fine. Now, if you are making them the day before, I do recommend crumbling freshly cooked bacon on the day of; if you add bacon the day before, it can get kinda chewy and tough from sitting in the fridge.
How should you store deviled eggs? Definitely store them in an airtight container with a lid, and in the refrigerator. You can also put them on a platter and cover it tightly with plastic wrap.
Chili and cornbread together is one of my all-time favorite meals; in fact, the whole family loves it. Of course, easy Instant Pot chili is even better because it makes dinner prep that much simpler.
Back in the day we used to make a vegetarian chili using soy crumbles. I’m not sure what I was thinking. My guys really didn’t like soy crumbles, but I’d “heard” they were healthier.
I’ve since come to find out that soy is really not that good for you, especially when you have thyroid issues (as I do). And to be quite honest, we love our meat.
We eat more of a low carb, high fat diet these days (most of the time… some of us still get a few carbs in). And ground beef is now a healthy addition to our Instant Pot chili.
We’ve been making this chili for awhile. I personally love a nice skillet cornbread with this chili.
And we’ve been known to serve it with tortilla chips if we don’t have cornbread.
But for the most part, we enjoy it with a dollop of sour cream and a bit of shredded cheddar. Sometimes I even use this chili to make the best loaded chili cheese fries.
If you love a warm bowl of chili, you’ll love this recipe. It’ll warm your heart and soul like no other. Below is the printable recipe. Enjoy!
This chili also makes a tasty addition to your next Baked Potato Bar. And it would make and excellent chili dip.
Learn how to quickly use your Instant Pot with our Instant Pot Quick Start Guide, filled with practical tips, Instant Pot recipes, accessory ideas, and more!
Print the Recipe for Easy Instant Pot Chili
Easy Instant Pot Chili
Chilly nights call for a nice hot bowl of homemade Instant Pot chili to warm your heart and soul. Best served with cornbread and a dollop of sour cream.
Instant Pot
1 tablespoon salted butter
1 medium yellow onion (minced)
1 pound ground beef
32 ounces chili beans
14.5 ounces diced tomatoes
16 ounces tomato sauce
1 tablespoon molasses
3 tablespoons chili powder
Using the Sauté function on the Instant Pot, melt the butter right in the pot.
Then sauté the onion in the butter, 'til it starts to soften.
Stir the ground beef in with the onion, cooking 'til the meat is browned.
Add in the chili beans, diced tomatoes, tomato sauce, molasses, and chili powder, stirring everything together.
Put the cover on your Instant Pot, seal the vent, and set it to cook for about 10 minutes.
Once it's cooked, let it naturally release pressure.
Serve with sour cream, shredded cheese, and whatever else your heart desires.
main dish, Soups & Stews
American
chili, chili recipe, easy chili recipe, easy Instant Pot chili, Instant Pot chili
Once in a great while, you travel somewhere that instantly changes your life. And you can feel that change from the moment you set foot in that place. Marble, Colorado, along with Crystal Mill, is one of those places for us. From the moment we entered that small mountain town in the wilds of Colorado, we knew we would never be the same. We fell in love with the mountains, the culture, and everything about it.
Marble, Colorado, is a small mountain town that sits on the edge of the Maroon Bells/Snowmass and Ragged Wilderness areas. Its beauty is unmatched, and its history is filled with stories of unsung heroes and creepy characters.
There are so many reasons to visit Marble, but let me just start with a few of our favorites…
5 Reasons to Visit Beautiful Marble, Colorado
1. Marble is home to the Yule Marble Quarry. You can even take a piece of marble home with you. I have a piece that sits on my desk so I’m reminded of my favorite place every single day of my life. And an interesting fact… Stone from Yule Marble Quarry was used for the Tomb of the Unknown Soldier in Arlington National Cemetery.
2. Marble is beautiful and peaceful and full of outdoor adventures. We camped all around the area for almost an entire week; there are plenty of nearby opportunities for dispersed camping. A part of the Maroon Bells/Snowmass and Ragged Wilderness areas, you can just imagine how beautiful Marble really is. The mountains are unbelievably beautiful. The town is a peaceful spot to settle down for a nice relaxing vacation. They even have a lodge overlooking a gorgeous mountain lake. You’ll find all sorts of activities, including fishing, canoeing, kayaking, mountain biking, and more.
3. Crystal Mill, Lead King Basin, and Devils Punch Bowl. Take a Jeep tour to Crystal Mill or drive to Crystal Mill on a one lane 4WD road yourself, and explore the area. Crystal Mill and the semi ghost town of Crystal City will forever remain one of my favorite spots in all of Colorado. A guided Jeep tour will not only let you enjoy the scenery, but you’ll hear stories all along the way with bits and pieces of the area’s history. And once you get to Crystal City, you have the opportunity to meet a local author who is full of even more knowledge and stories about the area.Back roads lead to beautiful destinations, and in this case, breathtaking destinations.
4. The people are amazing. In all of our travels, we’ve never met more friendly and helpful people. Our first night there, a local invited us to camp out in his front yard. Granted, he may have been a bit tipsy; but that friendly, helpful nature seemed to be the Marble way. Not uppity in any sense of the word, the town had some of the most down-to-earth friendliest people we’ve ever met. And they had plenty of stories to share and tell.
5. The best BBQ you’ll ever eat. We ate in town, more than once, at Slow Groovin’ BBQ. From their Hillbilly Nachos to their homemade pie, Slow Groovin’ was an amazing place to eat. In fact, our kids have begged to go back just for the bbq.
Are You Ready to Visit Marble?
I’m ready for summer and so ready for a trip back to Marble… Have you ever been?
Last Christmas Dan and the boys got me a gift certificate to one of my favorite antique stores. I pretty much knew right away what I wanted to get with it. I’d been wanting to build suitcase shelves for quite awhile, so it only made sense to use part of it for an old suitcase. We already had the suitcase cabinet, and we had the suitcase table. We definitely needed shelves. Off on the hunt I went.
It was in the very back of the antique store that I found a booth filled to the gills with vintage suitcases. There were several on a table, underneath the table, under a bird cage, stacked on top of one another, everywhere. I dug and dug until I found what felt like just the right fit for my project. The entire suitcase had a certain charm to it, from the clasps on the front to the hinges on the back. And the color was neutral but absolutely beautiful. It was a bit roughed up, a part of its character that only adds more charm, in my opinion.
I brought it home, and we got to work, ready to build suitcase shelves that would add even more character and charm to our living area.
Supplies You’ll Need to Build Suitcase Shelves
You’ll need a few supplies for this DIY project, including the following:
1 old suitcase, preferably a level design
Wood
Tape measure
Sharpie or carpenter’s pencil
Saw (Sawzall, table saw, hand saw, miter saw)
Cutoff tool or grinder
Vacuum cleaner
Screw gun (or screwdriver) and screws
How to Build Suitcase Shelves
First you’ll want to clean out your suitcase, removing any unnecessary fabric or metal pieces/framework.
Measure and cut your suitcase in half in the direction you desire. We intended to use both the top half and the bottom half of the suitcase as shelves. So, we cut right down the middle using a Sawzall.
Measurements of the wood you plan to use are case by case, since suitcases vary in size, and it will depend what size your suitcase is. Cut pieces of wood, using a table saw or hand saw, to screw to the inside of the suitcase to hold the suitcase halves together. Otherwise, each part will want to flop open.
Build your shelf framework. This is the piece of wood you’ll place on the wall with 3 perpendicular pieces of wood jutting into the suitcase.
To place your suitcase shelves on the wall, attach the framework to the wall. Slide your suitcase half on, and screw the suitcase to the framework from the top down.
You can watch this video to see the entire process, from start to finish.
Finally, you’re ready to decorate your vintage shelves however your heart desires. It’s such an easy DIY project, and they add so much vintage flair to a living area.
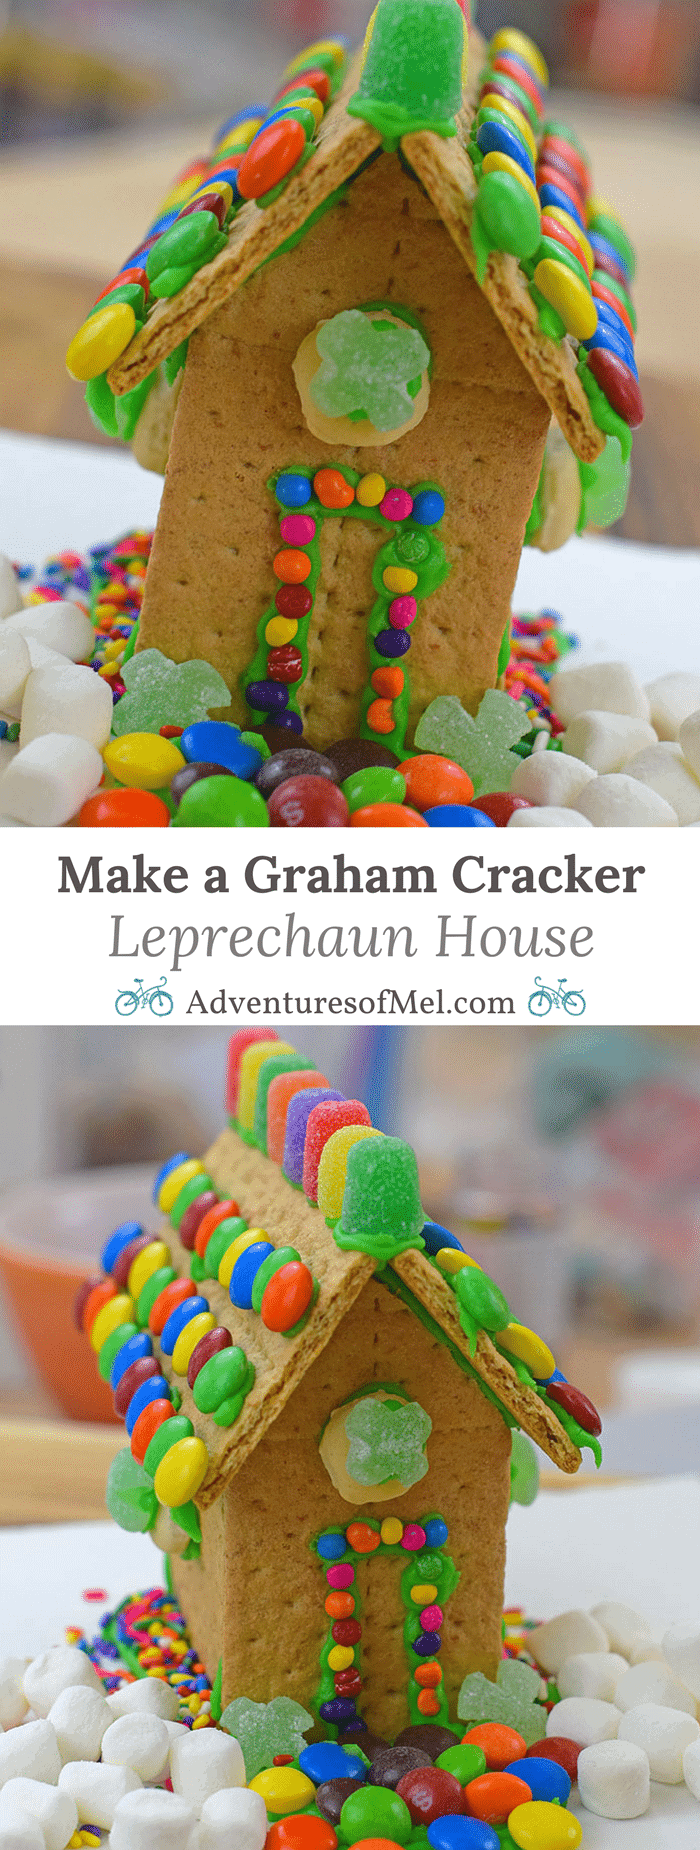
With St. Patrick’s Day just around the corner, I’ve got a fun project kids will adore. It’s pretty much a spinoff of a favorite Christmas classic, but geared toward St. Patrick’s Day and the luck of the Irish. Instead of gingerbread, though, it’s a graham cracker leprechaun house.
I remember when I was a little girl, and my mom and I watched Disney’s classic, Darby O’Gill and the Little People. Remember that movie? Leprechauns and all the legend surrounding them just fascinated me as a kid. This would be the perfect movie to watch as you create your very own leprechaun house.
Before you get started making your own graham cracker leprechaun house, you’ll need a few supplies.
Supplies You’ll Need for a Graham Cracker Leprechaun House
Cake board or small white cardboard squares for house to rest on
Scissors
Box of graham crackers
Decorating Icing – I used Wilton Green Decorating Icing.
Spice Drops or gum drop candies
Skittles
M&M’s
Mini crackers
Small green gummy candies
Rainbow sprinkles and decorating candies
How to Construct Your Own Graham Cracker Leprechaun House
Your first step is to prep your cake board. You can cut it into smaller squares or use a smaller piece of cardboard wrapped in white freezer paper.
Next assemble your leprechaun house using graham crackers and Decorating Icing. Now here’s where it was a bit tricky for me in the beginning. Everything I’d read said to use Royal Icing, but I’m just going to be real here… I tried that, and it was horrible. It was horrible! A disaster of epic proportions. I’d bought a box kit, and I’m not sure what happened with it, but it just wasn’t for me. I think it had more to do with me than the icing; I just didn’t have the patience for it. But I was lucky that I actually had backup in the form of Wilton Decorating Icing. It worked great! And there was no mixing or hassle with it.
To construct your graham cracker house, I recommend following this wonderful tutorial from Happiness is Homemade. Just be sure you have plenty of graham crackers on hand.
Decorate Your Graham Cracker Leprechaun House
Once your house is constructed and has had a chance to meld together enough that it’s not going anywhere, it’s time for the fun part… Decorating! This is where all your candies and sprinkles come in.
There really is no set way to decorate a leprechaun house. But I do recommend LOADS of rainbow colors, in the form of spice drops (or gum drop candies), M&M’s, Skittles, sprinkles, and more. Use your Decorating Icing to attach everything to your house.
You can use mini crackers as windows. I found small green apple gummies that I actually cut with scissors to hopefully look more like 4-leaf clovers.
You can create a door with icing and sprinkles. Skittles make a wonderful rainbow path through clouds of mini marshmallows. Just be creative and have fun with it! The decorating is especially fun for kids, though they may eat more than they decorate, fair warning.
Happy decorating your very own graham cracker leprechaun house this St. Patrick’s Day!
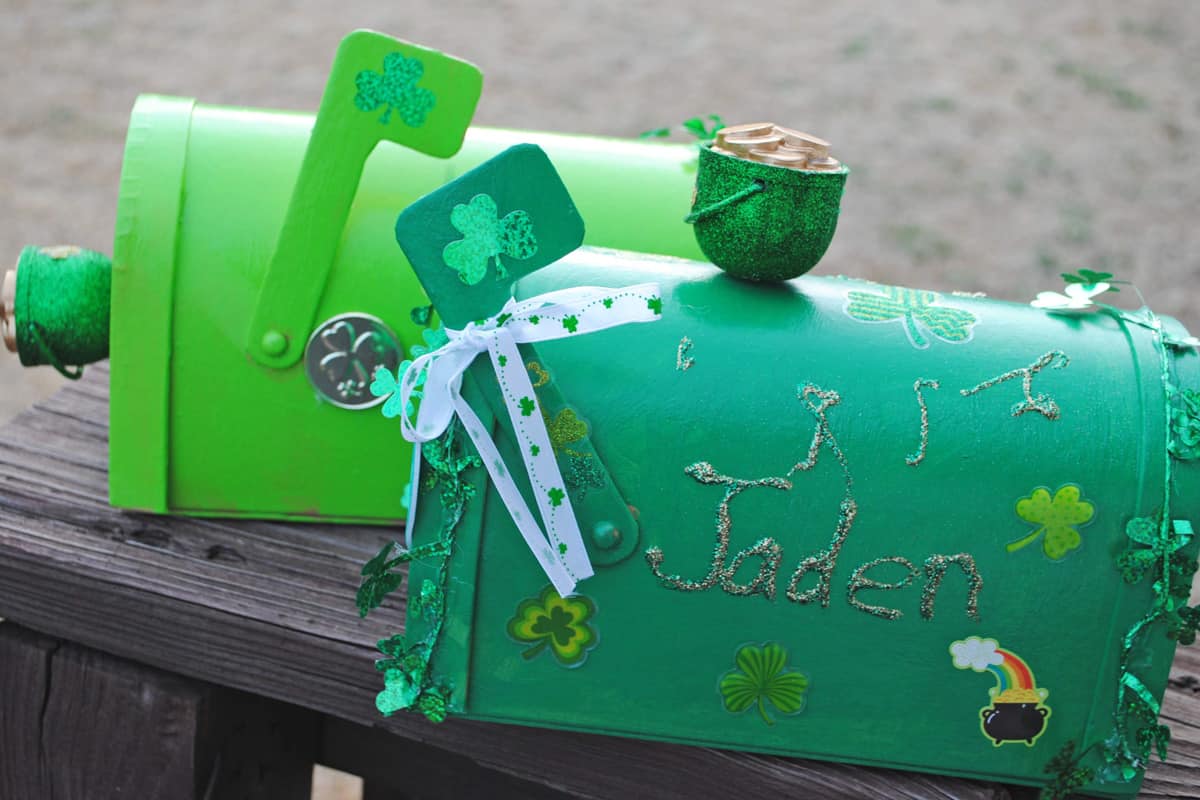
Less than a month ’til St. Patrick’s Day! A few years back, the boys and I made what we like to call Leprechaun Boxes.
Originally, we wanted to create a special box for the “leprechauns” (Mom & Dad) to leave fun treats and things on the eve of St. Patrick’s Day. I’d heard of the idea a few years ago, and that year, we decided to have some fun with it.
It turned out to be a really fun craft project, and it inspired my boys to get creative. Hopefully, it will inspire you and your kids to dig out the craft supplies and get crafting too!
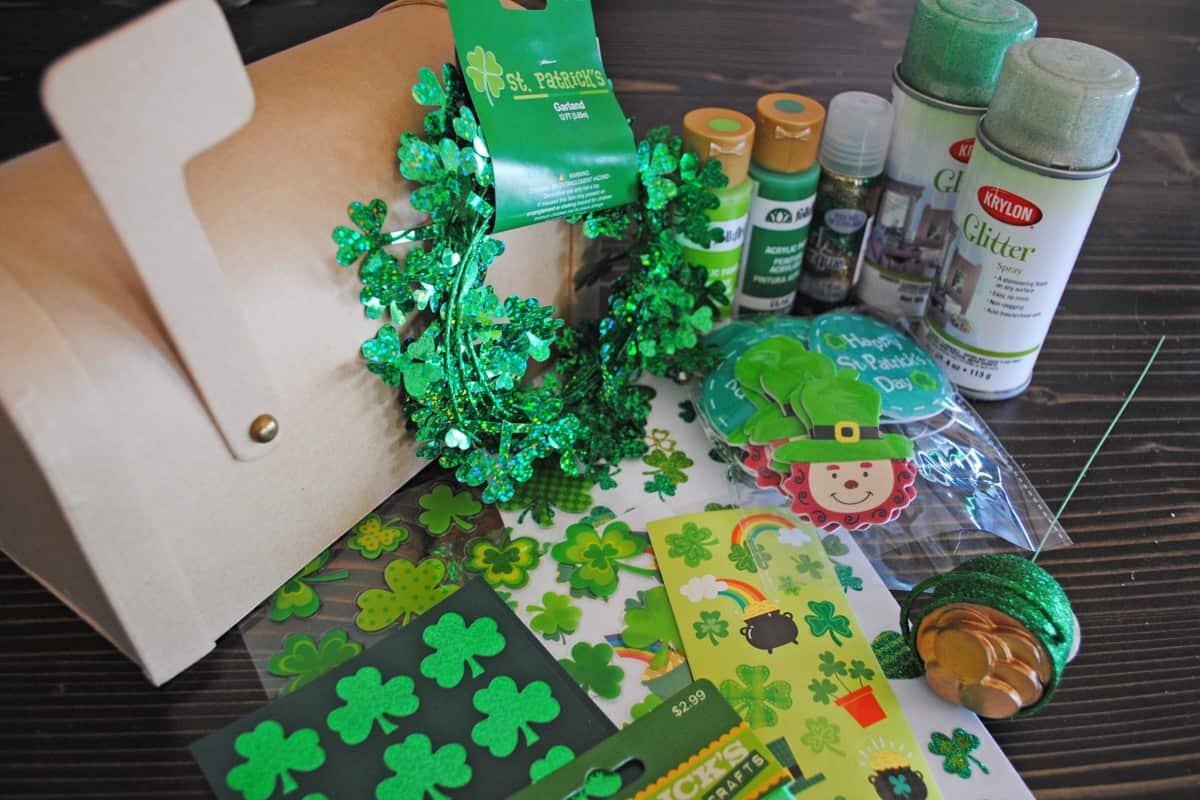
Supplies You’ll Need to Make Your Own Leprechaun Boxes
First things first, you’ll need to gather a few supplies…
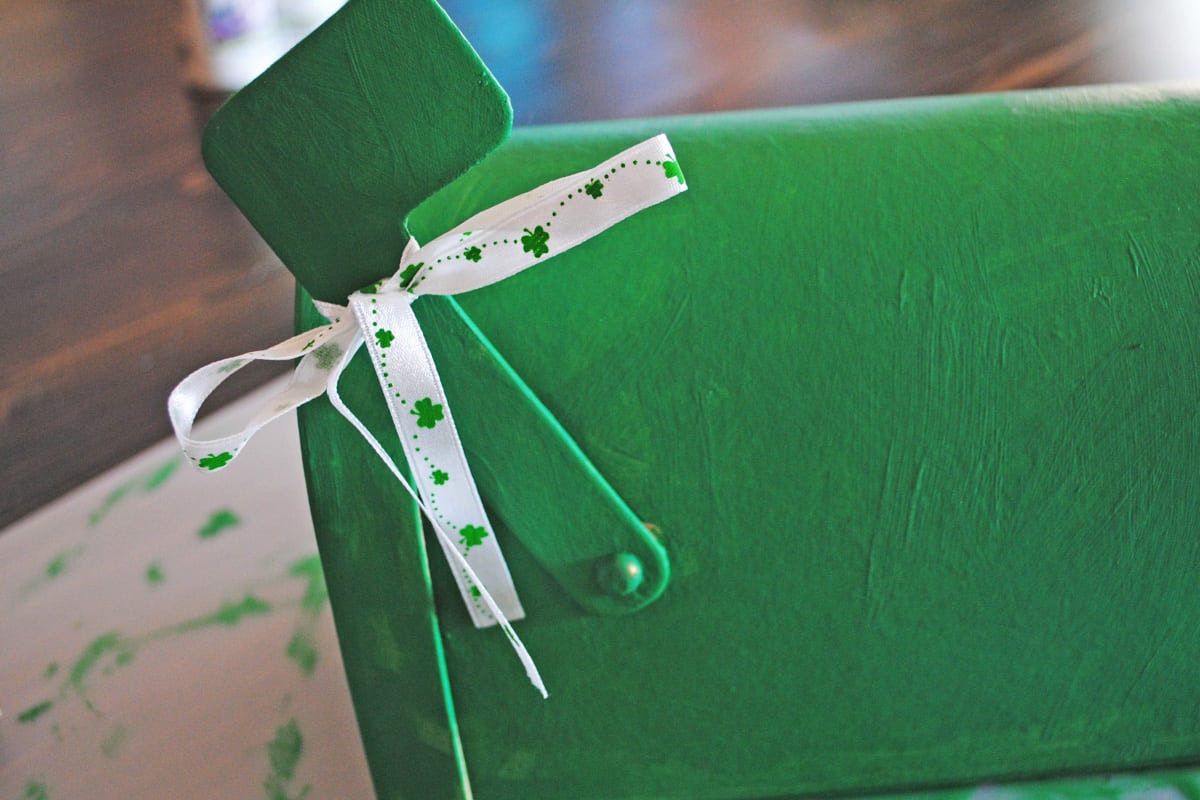
Add decorative touches, like ribbon around the mailbox flag.
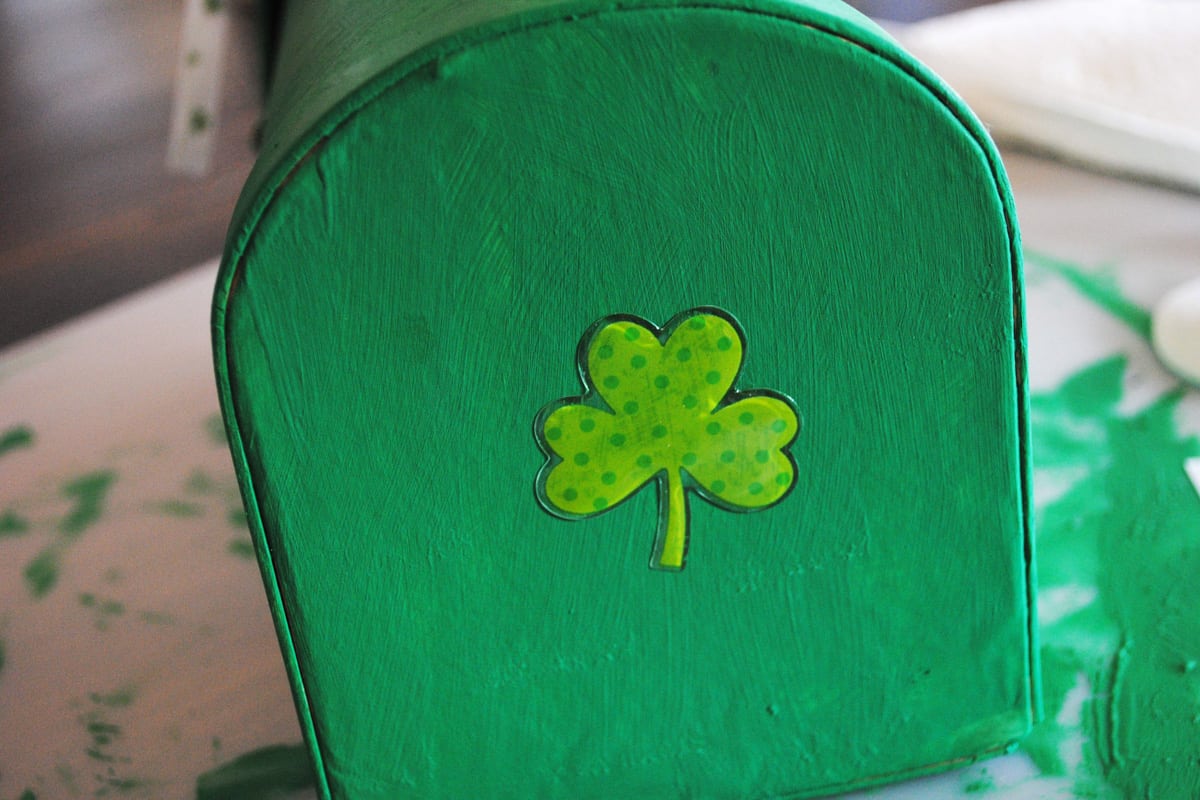
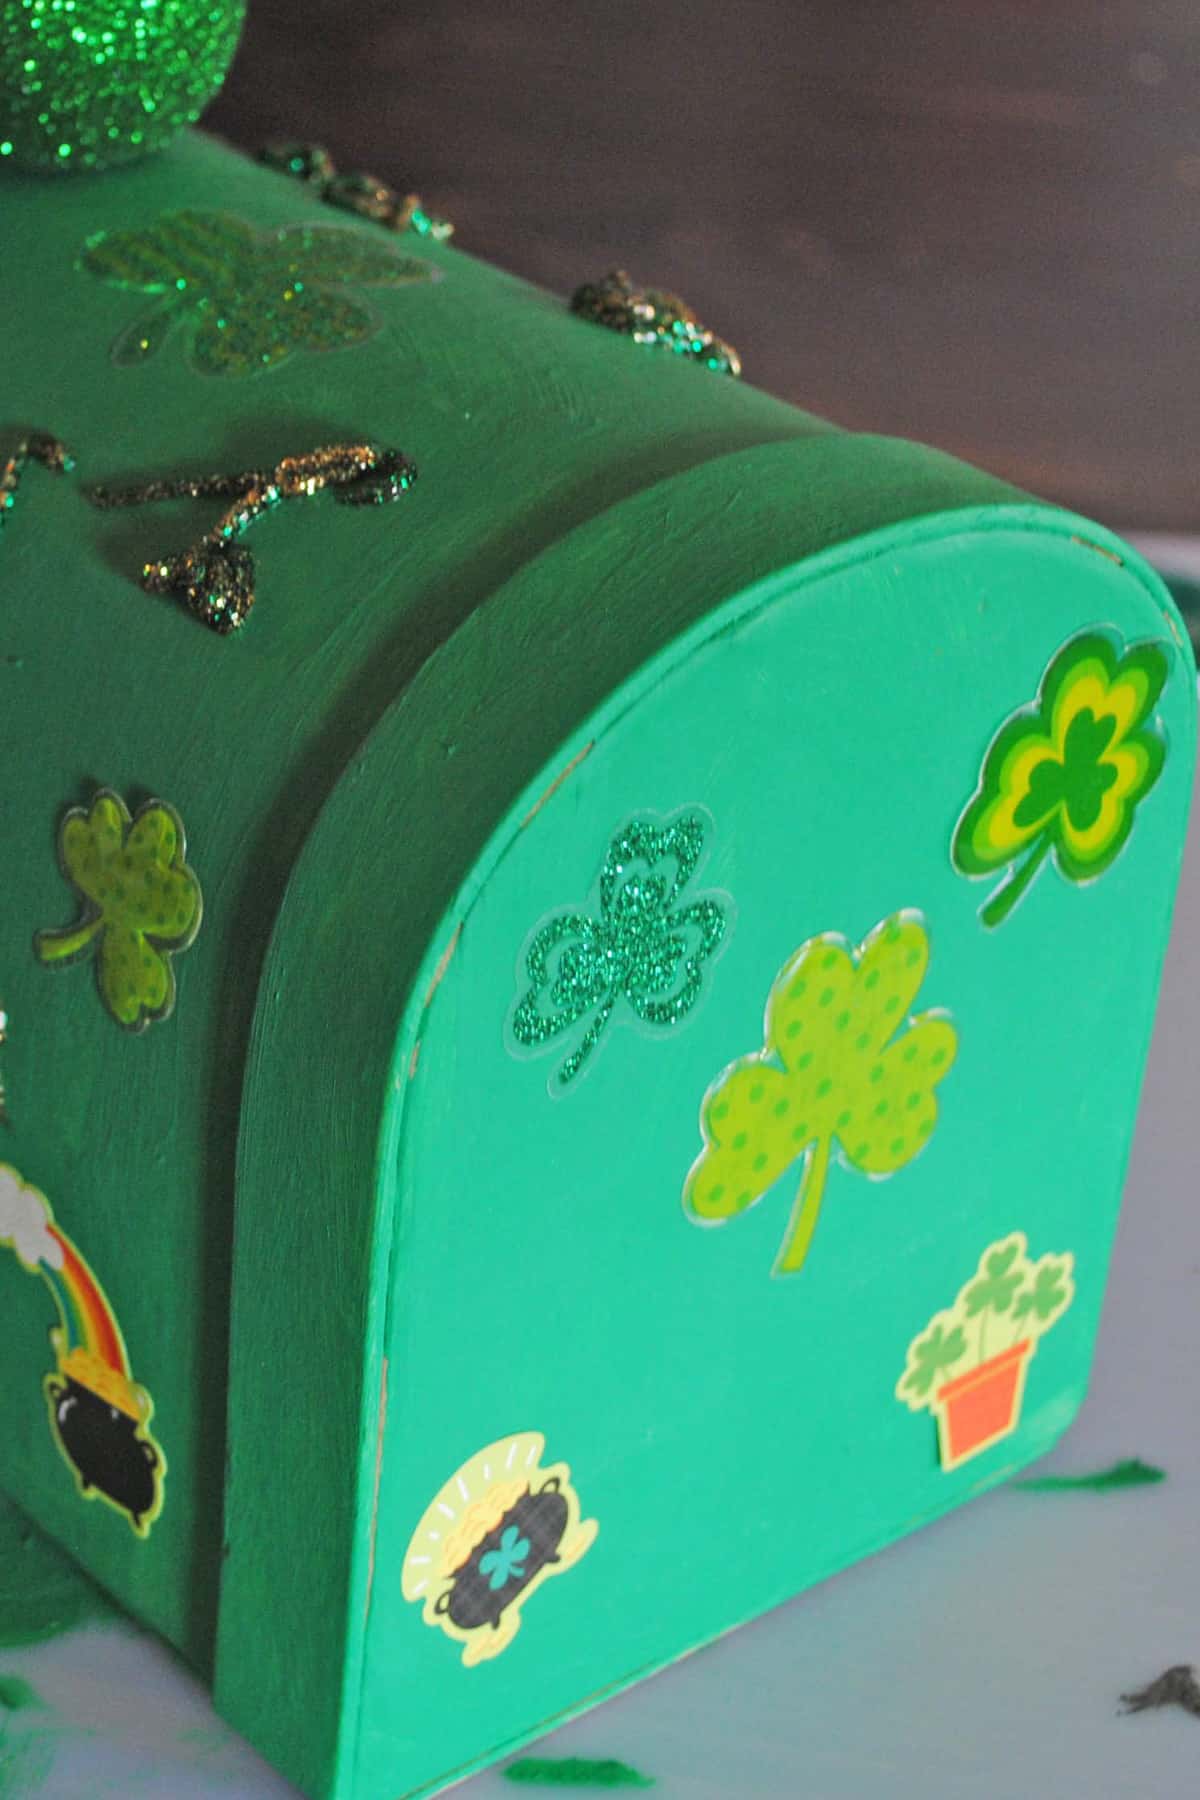
Stickers are one of the best ways to decorate your box. You can put them anywhere and everywhere; there are no rules. You can even put them inside.
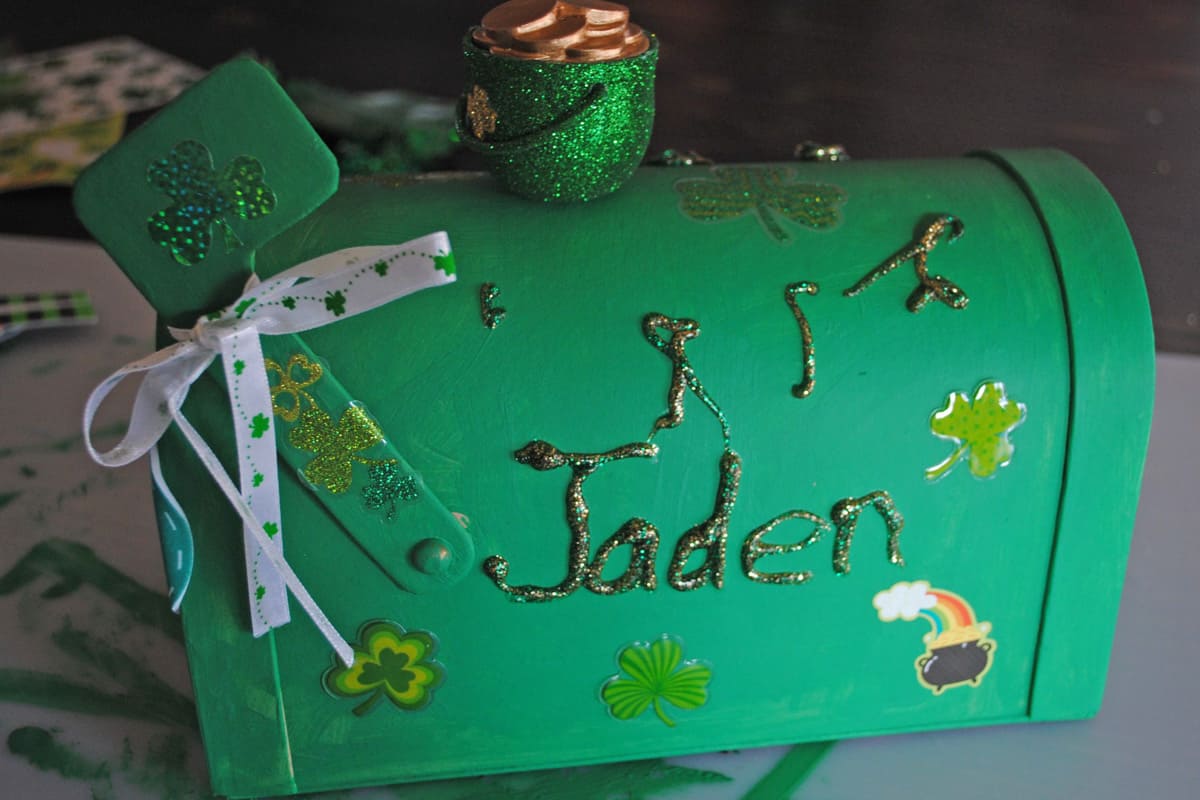
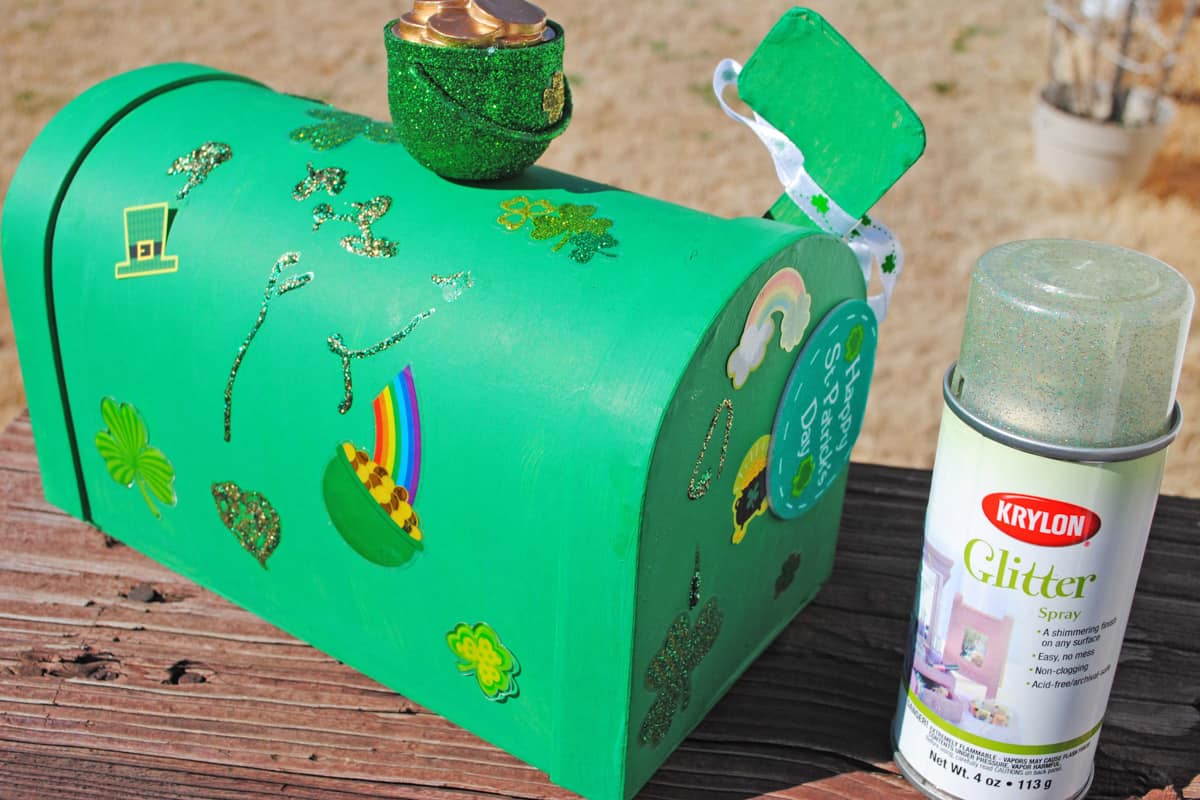
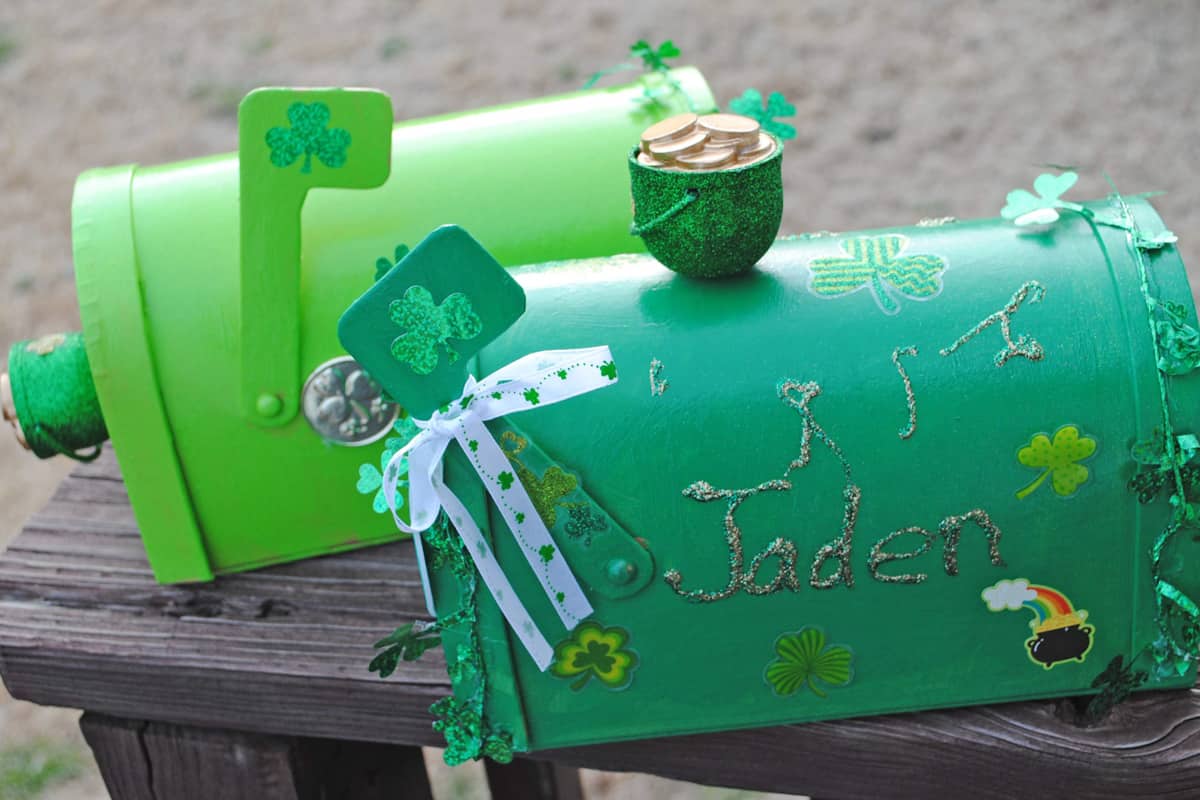
Get creative with different pieces of decor. I’d found these cute pot of gold decorations, so we cut the stem off and hot glued the pot into a small hole poked in the top of his box. Jacob actually made his pot of gold into the handle for the mailbox lid. It turned out so cute.
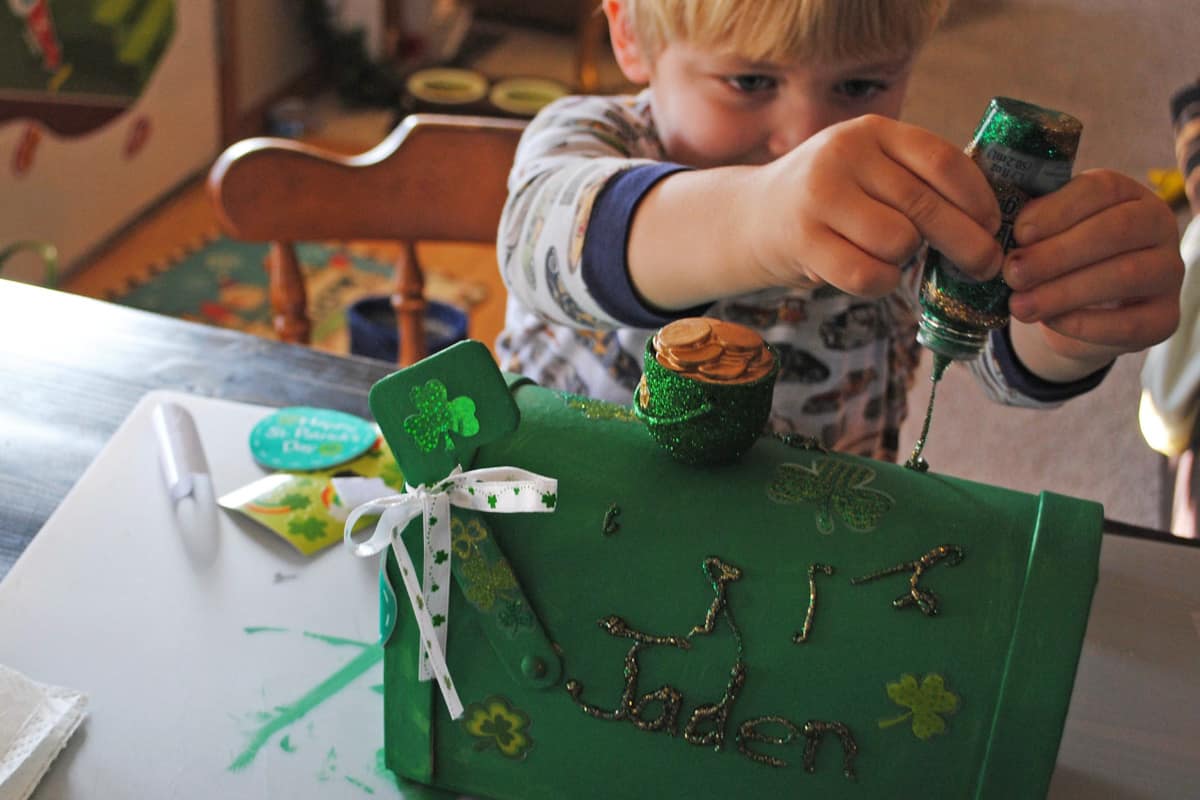
Using the glitter glue, your child can also add their name to the box.
When all is said and done with decorating, you can finish off the boxes with a bit of glitter spray to make them shine.
You can trim with garland, as well.
I think it’s safe to say that Jaden had the most fun with the green and gold glitter glue, adding it in little spots all over his mailbox.
Now you’re ready for the leprechauns, though Jaden very matter-of-factly told me he knows Daddy and I are the leprechauns. Hmmm… Smart kid. Hey, it’s just a fun thing we do to celebrate St. Patty’s Day.
Do you have any special St. Patrick’s Day traditions? Have you made any St. Patty’s Day crafts or treats lately?
St. Patrick’s Day Leprechaun Boxes for Kids
Start a fun St. Patrick’s Day tradition, and decorate Leprechaun Boxes with your kids. Fun St. Patty's Day craft kids will absolutely love!
pair of scissors
2 paper mache mailboxes
1 bottle craft paint (green)
2 sponge paint brushes
2-3 sheets St. Patrick's Day stickers
1 shamrock garland
1 St. Patrick's Day ribbon
2 bottles glitter glue (green and gold)
1 can glitter spray (any color)
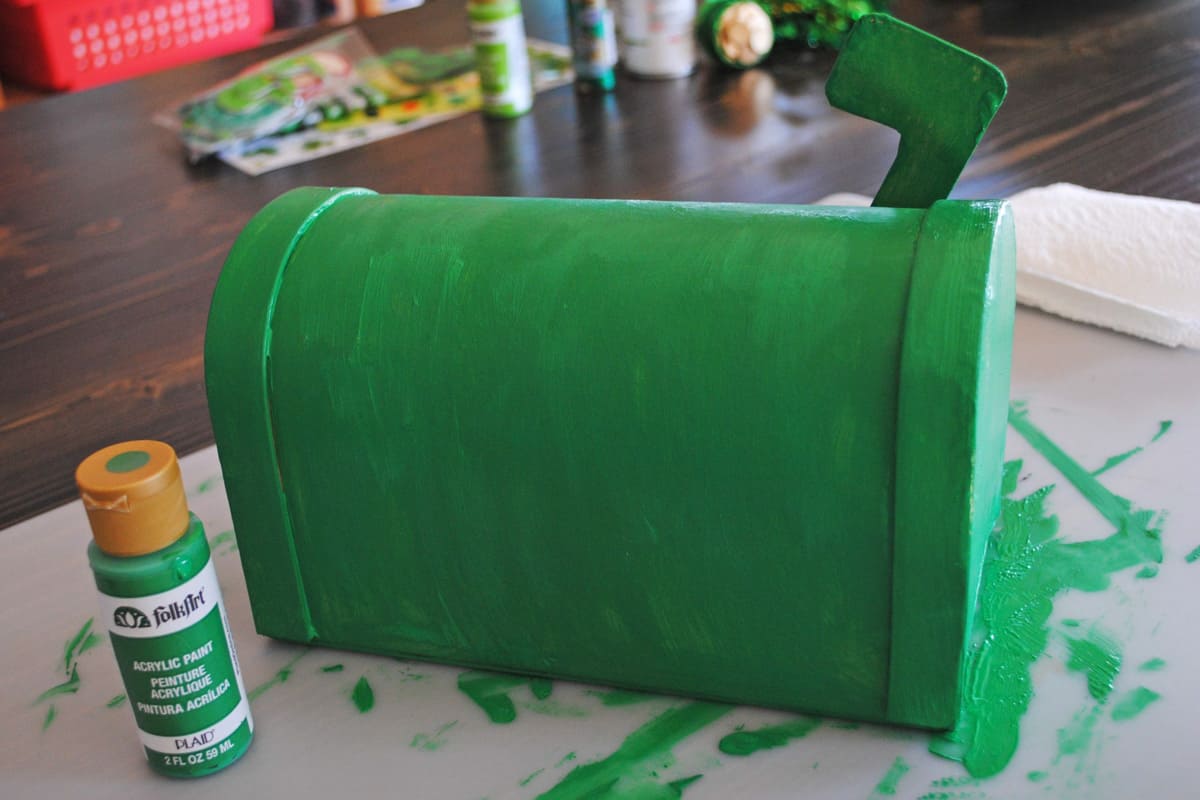
First paint your box/es.
Add decorative touches, like ribbon around the mailbox flag.
Stickers are one of the best ways to decorate your box. You can put them anywhere and everywhere; there are no rules. You can even put them inside.
Get creative with different pieces of decor. I'd found these cute pot of gold decorations, so we cut the stem off and hot glued the pot into a small hole poked in the top of his box. Jacob actually made his pot of gold into the handle for the mailbox lid. It turned out so cute.
Using the glitter glue, your child can also add their name to the box.
When all is said and done with decorating, you can finish off the boxes with a bit of glitter spray to make them shine.
You can trim with garland, as well.
And that's it. Now you're ready for the leprechauns!
leprechaun boxes, st. patrick’s day leprechaun boxes
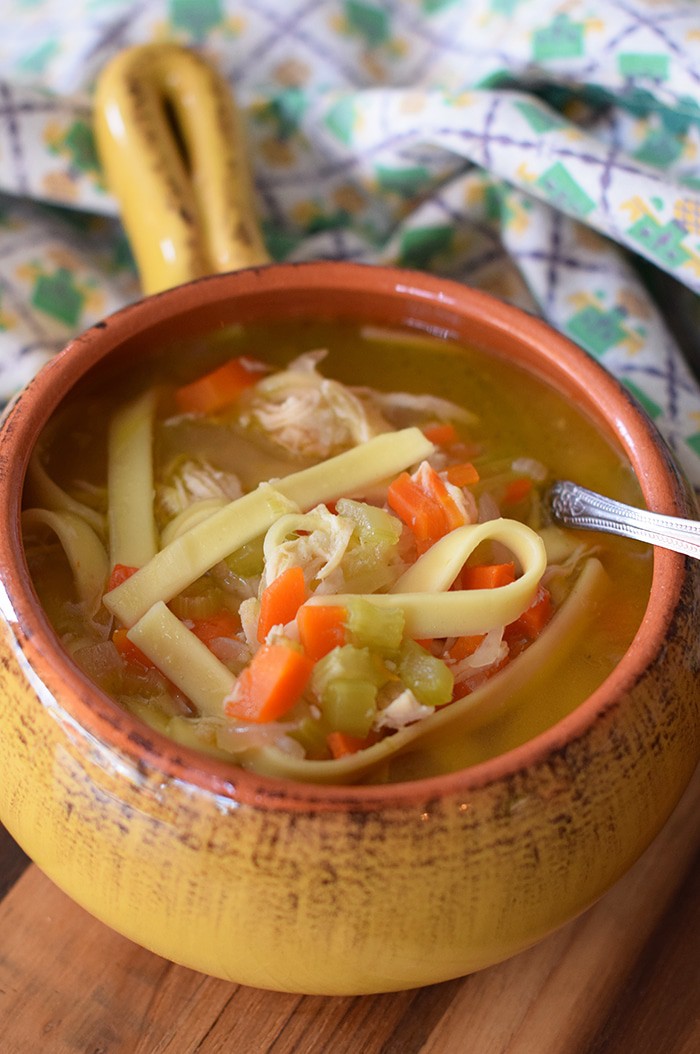
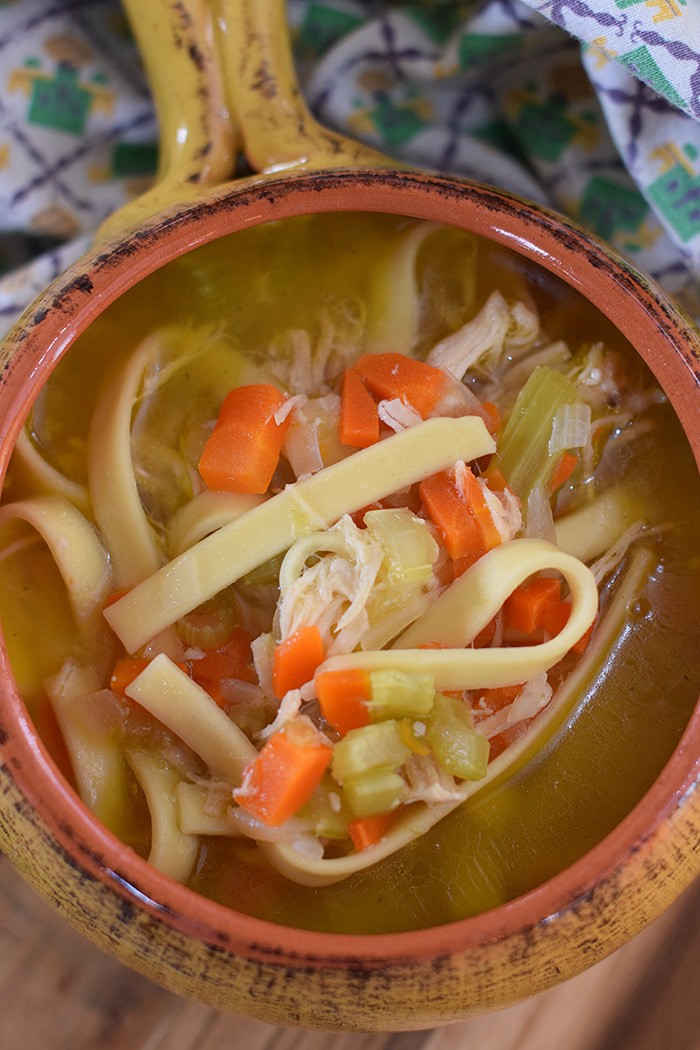
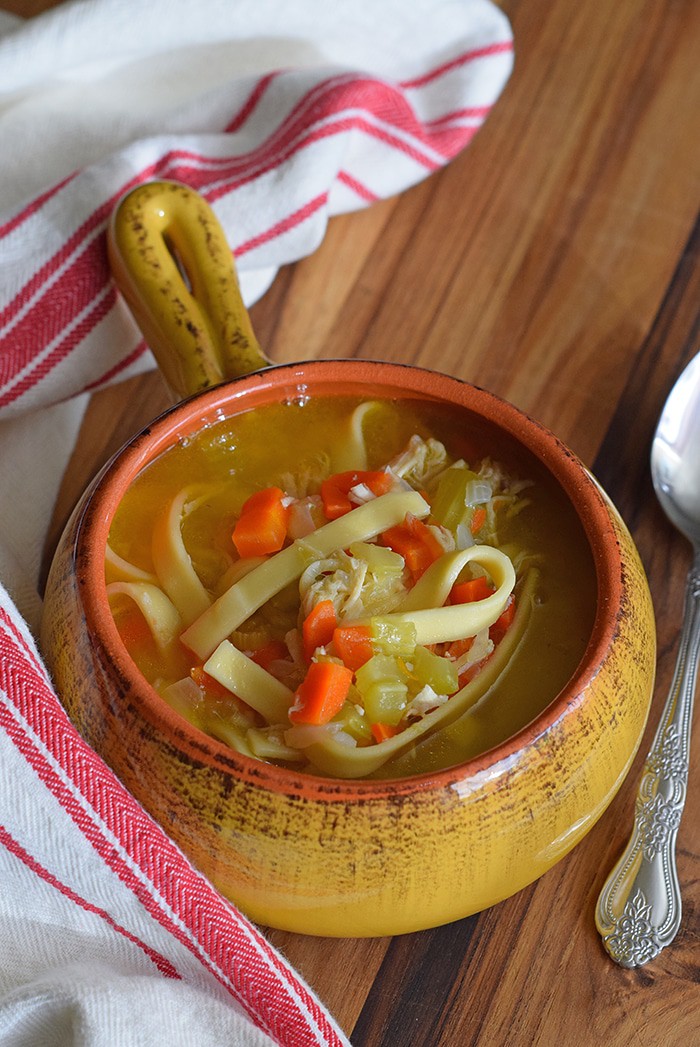
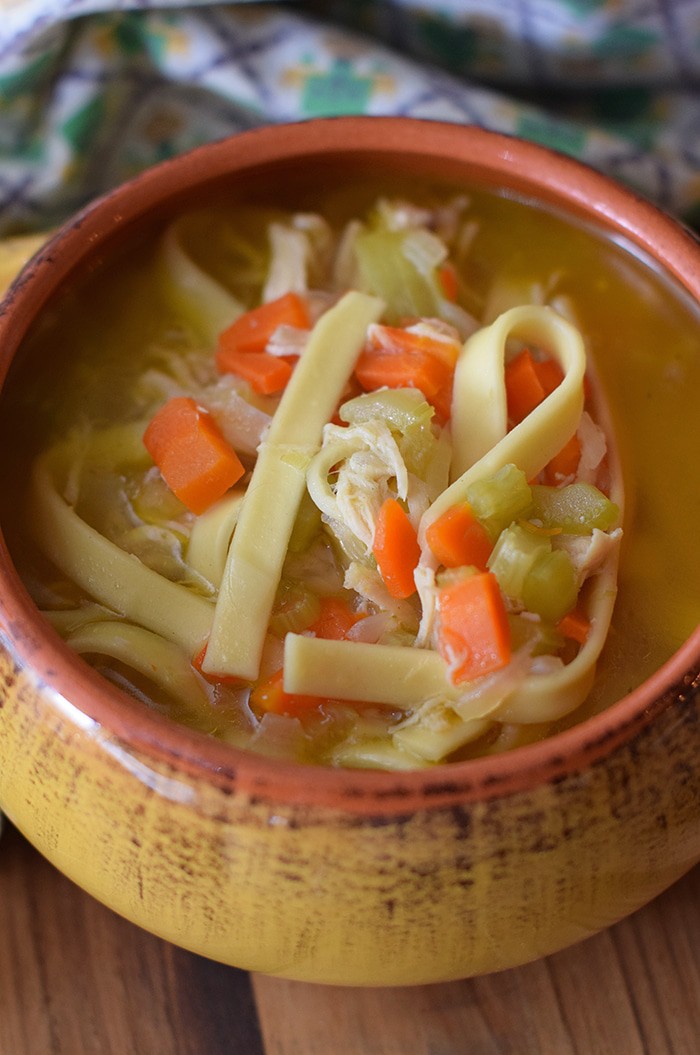
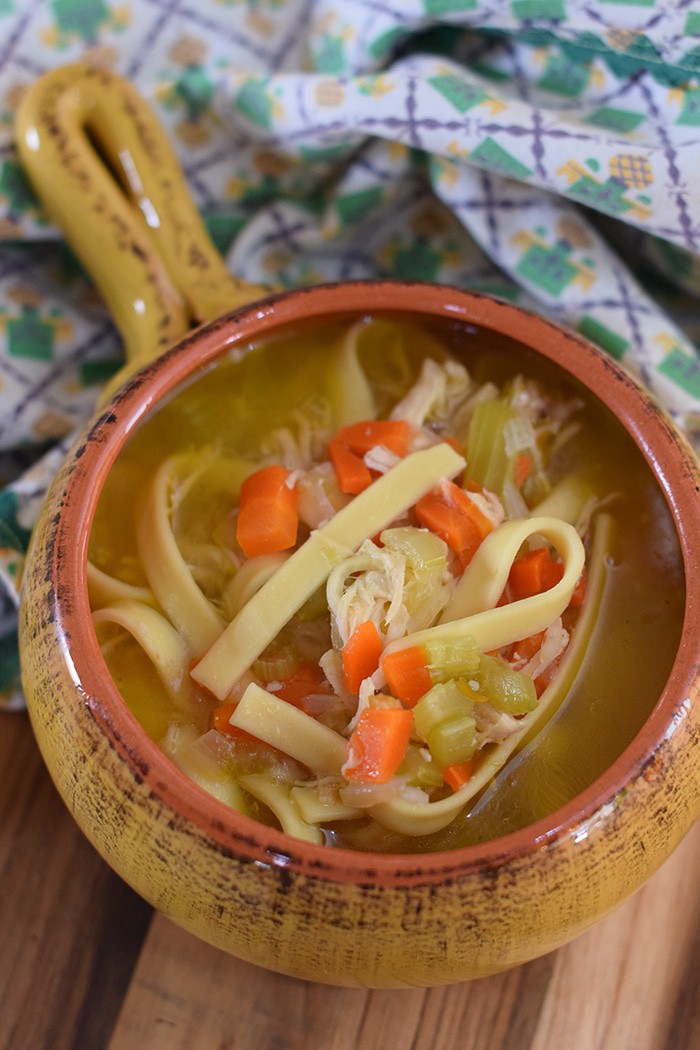
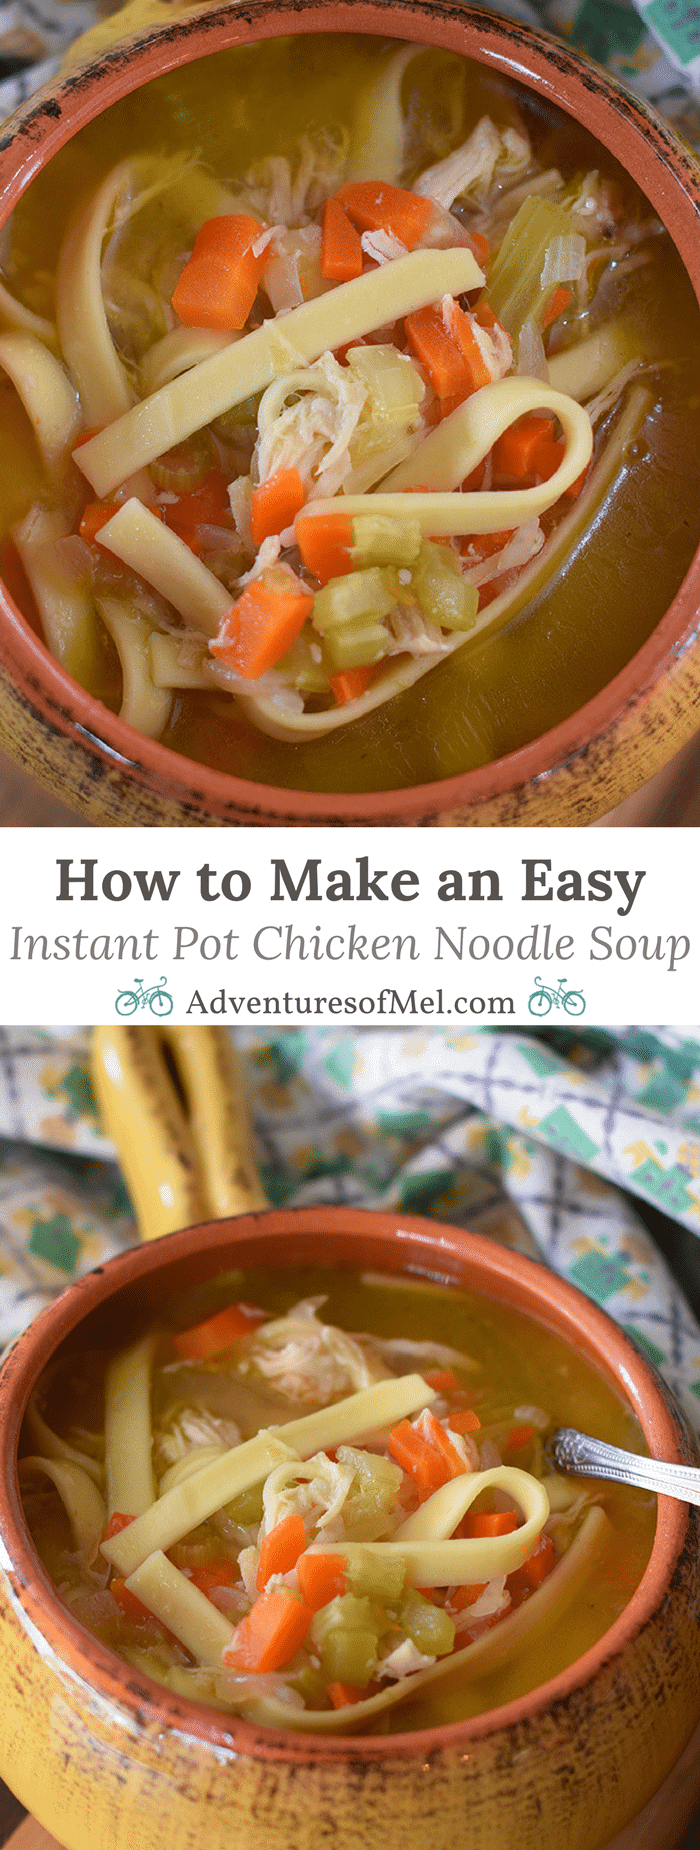
Cold and flu season has descended upon us like a million bats out of you know where. Our oldest has the flu as I write this, which means it’s time for a little TLC with homemade Instant Pot chicken noodle soup.
I don’t know if it’s because it’s chicken noodle soup or because it’s made in the Instant Pot. But I do know that it’s become one of my favorite soups, especially this time of year.
What Is It About Soup?
There’s just something about chicken soup when you’re sick. It’s soothing, it’s delicious, it’s piping hot, and it’s full of good wholesome nutrition.
We prefer to make it homemade. We used to stock up on cans of chicken noodle soup every fall, but then we started making more homemade soups because canned got to be so expensive.
When we tried canned again for a quick meal, it just didn’t taste good anymore. Our taste buds had gotten accustomed to home cooked soup right from our very own kitchen.
You might think homemade is time-consuming and difficult to make. But not so, especially when you make it in the Instant Pot (or even a good old-fashioned slow cooker).
There are a few veggies to chop for this soup, but you can chop them ahead of time to save you even more time and energy. And you could always make a batch of this soup and freeze it for when you need it.
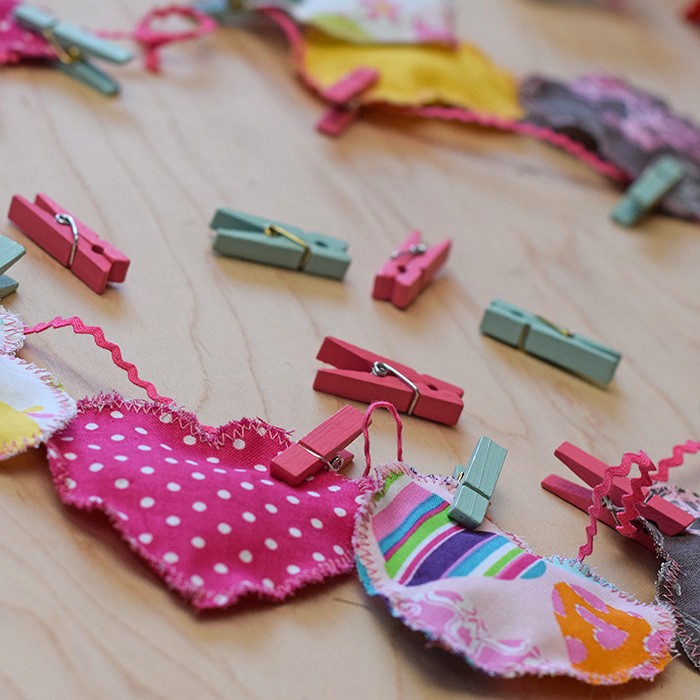
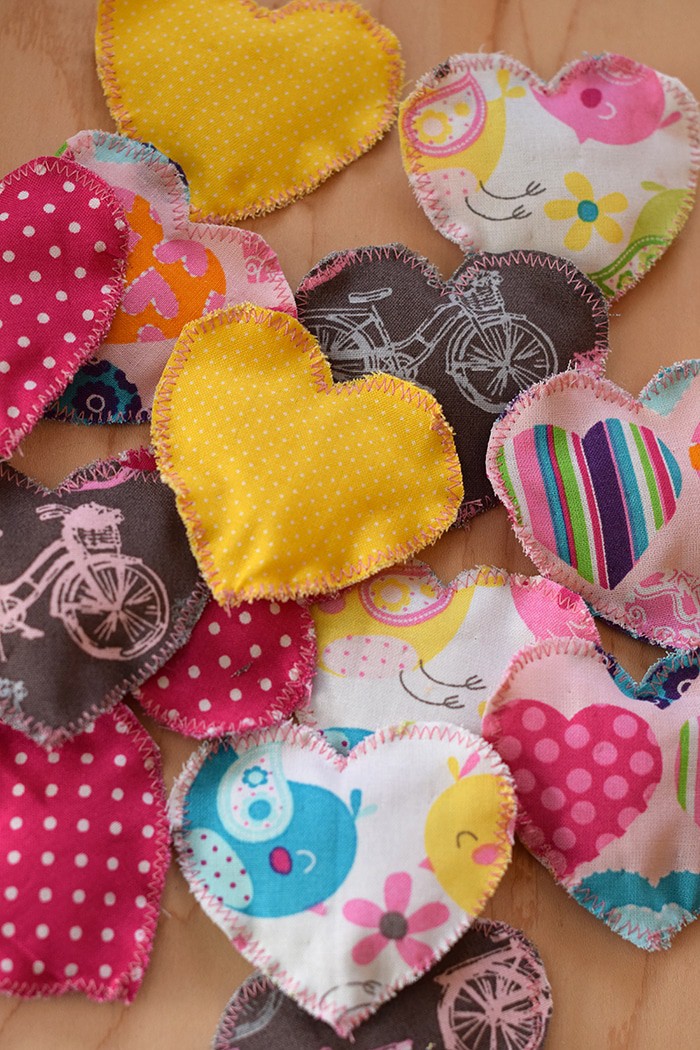
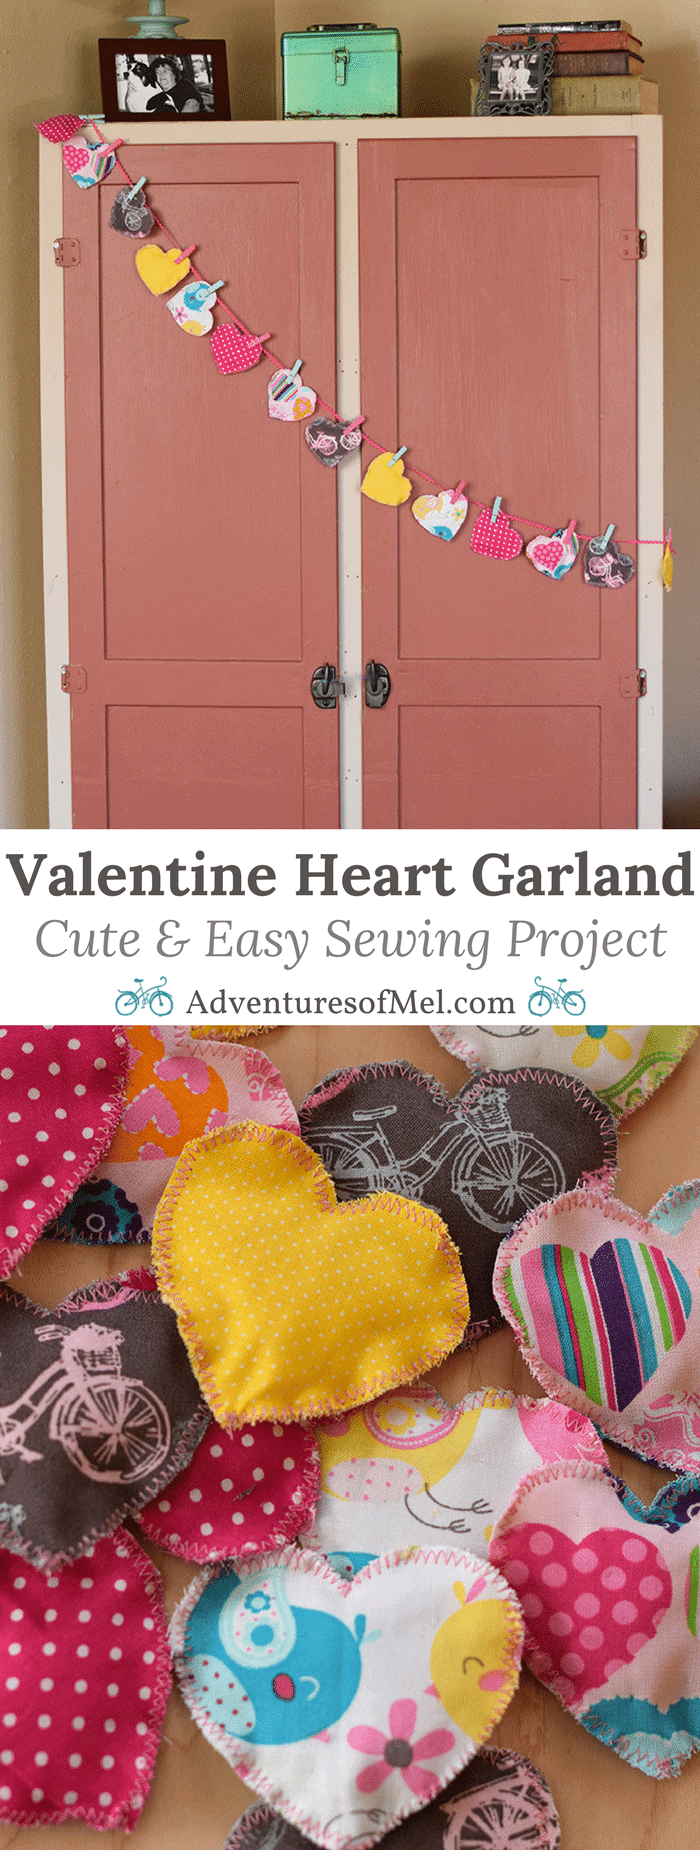
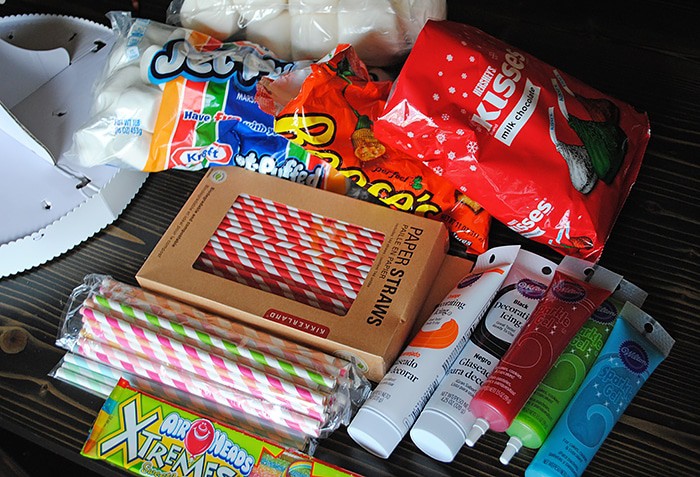
I’ve had it in my mind to make a heart garland for quite some time, especially after making Valentine marshmallow pops. I knew I wanted to sew the hearts together, but I hadn’t had my sewing machine out for a long time, so I felt a little green behind the pedal.
As I started working on this sewing project, I realized how much I’d missed sewing. The thing with this project is… Don’t let a little sewing scare you off. This Valentine’s Day heart garland is super easy to make. You can make it as big or as small as you prefer.
You can even sew it by hand if you don’t have a machine; it will just require a different stitch by hand.
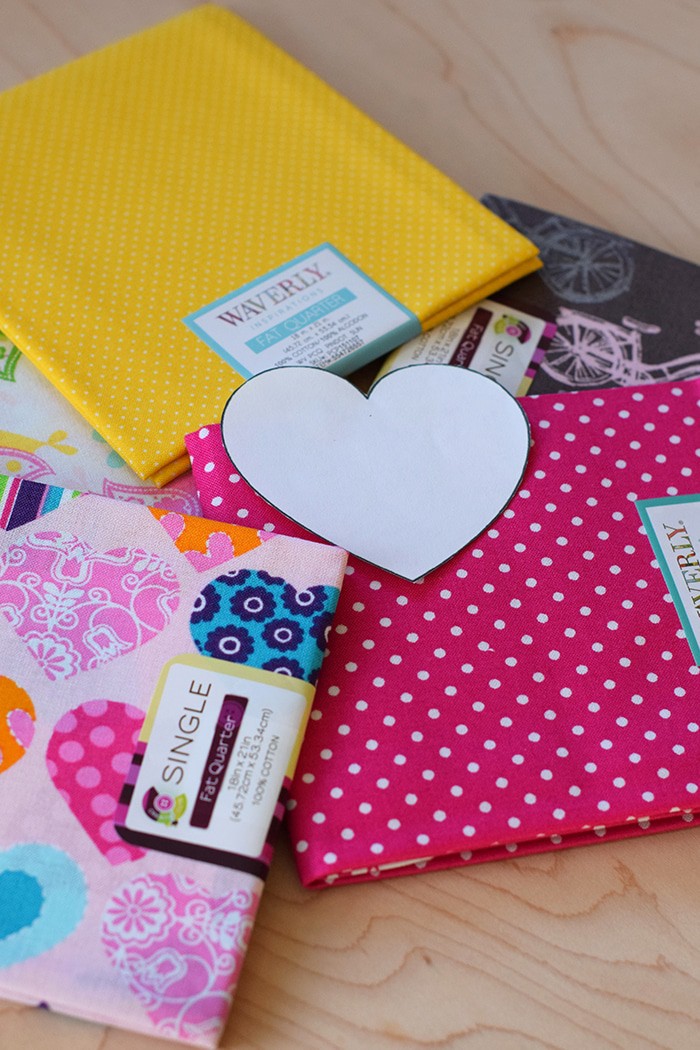
Supplies You’ll Need for a Valentine’s Day Heart Garland
Mini clothespins – I found pink and mint colored clothespins in the scrapbook section at Hobby Lobby.
Sewing machine – If you don’t have one, you can always sew by hand.
How to Create Heart Shapes for a Garland
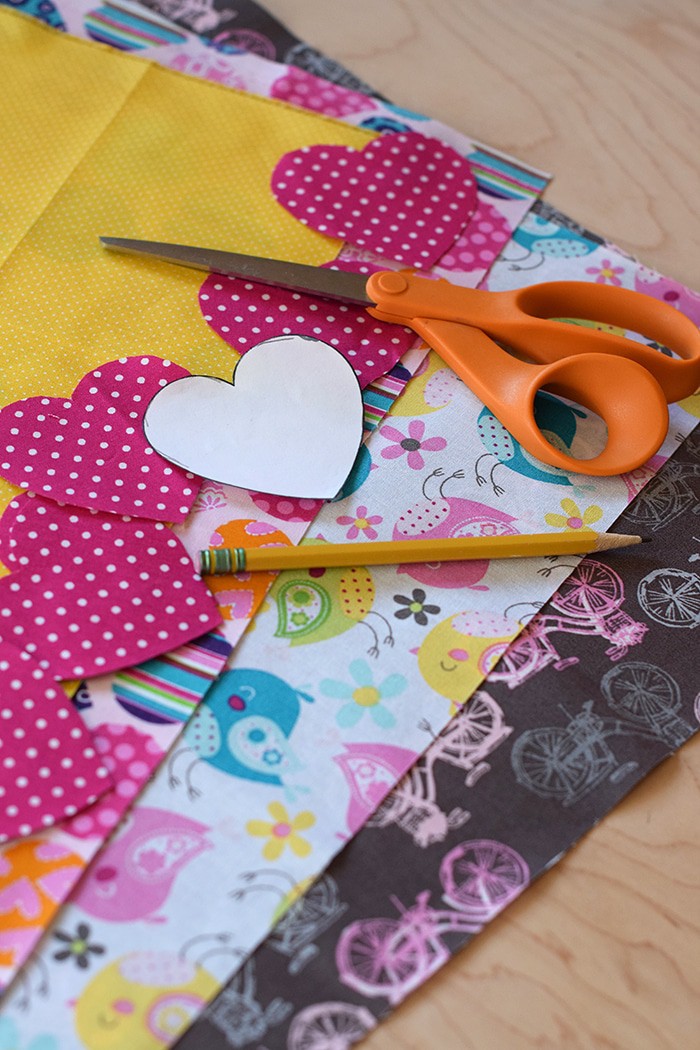
Print the heart image you’ve chosen to use. I wanted a smaller heart shape for my garland. Cut the image out.
You may want to wash and iron the fabric you’ve chosen to use. Lay your fabric out on a flat surface, and place the heart image on the fabric. Draw around it with a pencil, and cut out each fabric heart.Repeat this step for as many hearts as you plan to use on your garland. You’ll need 2 fabric cutouts for every heart. For example, I cut out 32 heart shapes to make 16 hearts.
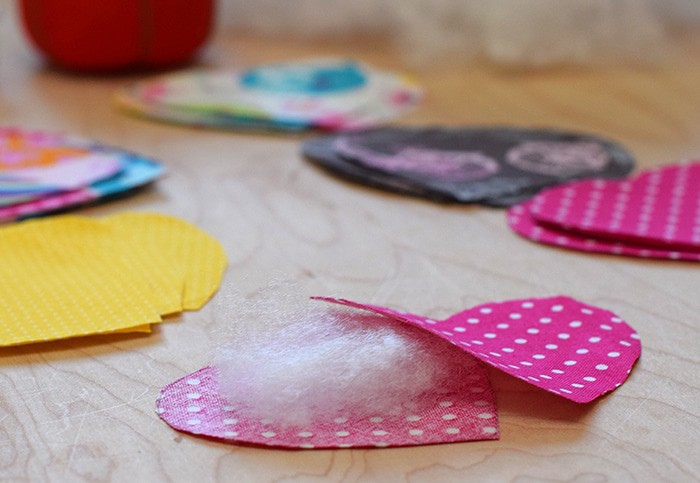
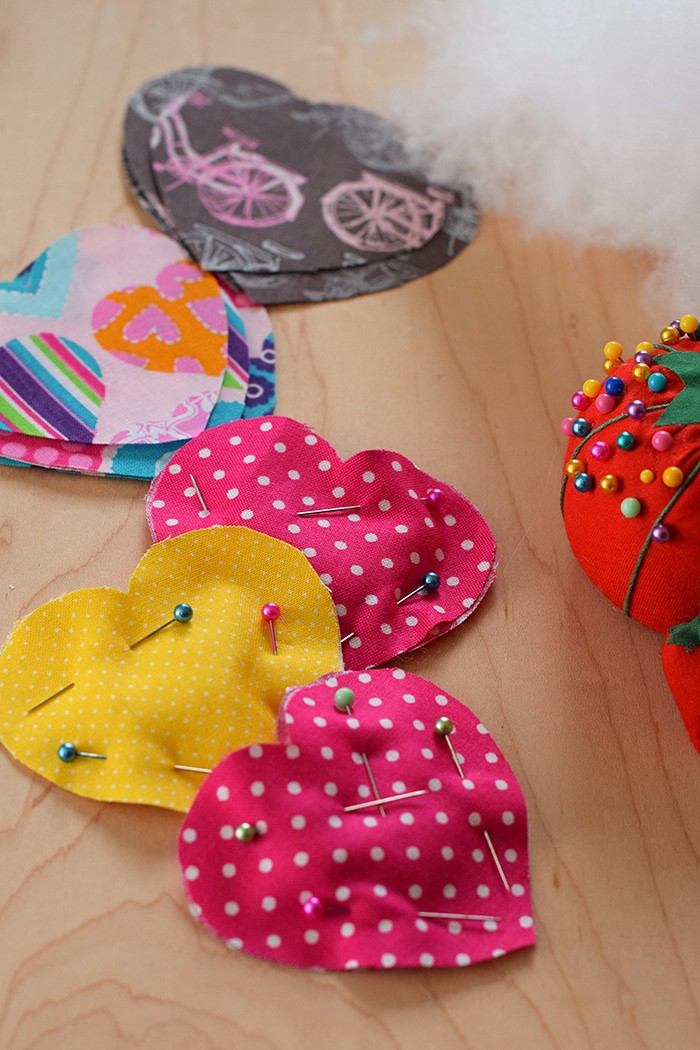
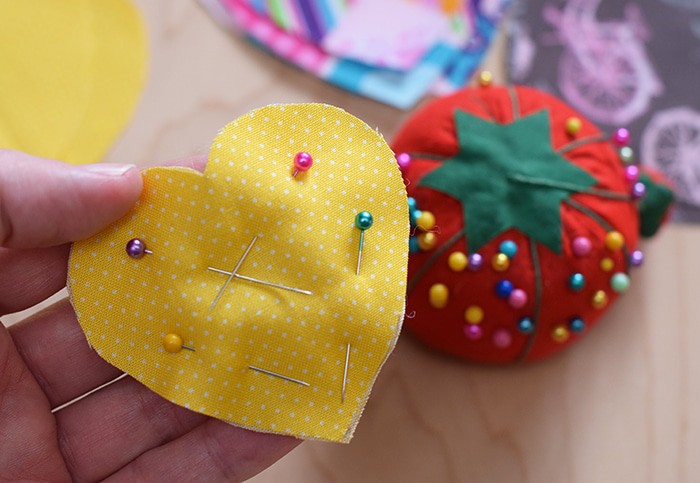
Once all your hearts are cut out, you’ll need to put your hearts together with stuffing and pins. Place fabric heart on table with the wrong side of the fabric facing up. Add just a bit of pillow stuffing, and cover over with another heart, this time with the right side of the fabric facing up. Pin the two hearts together with the stuffing in between. Repeat these steps for every heart.
How to Sew the Hearts Together and Create a Valentine’s Day Heart Garland
Prep your sewing machine with the color thread you plan to use. I used a contrasting pink thread for all my shapes. A little history behind the thread… I have a whole box full of thread that once belonged to my grandma. This particular spool full of pink thread still had a green Walmart price sticker on it, so that tells you how old that thread really is. Grandma loved to sew.
Now where were we? You’ll be using a zig-zag stitch.
Stitch around the outside edge of each heart with a zig-zag stitch, being careful to stay close to or right on the edge. Remove the pins as you sew.
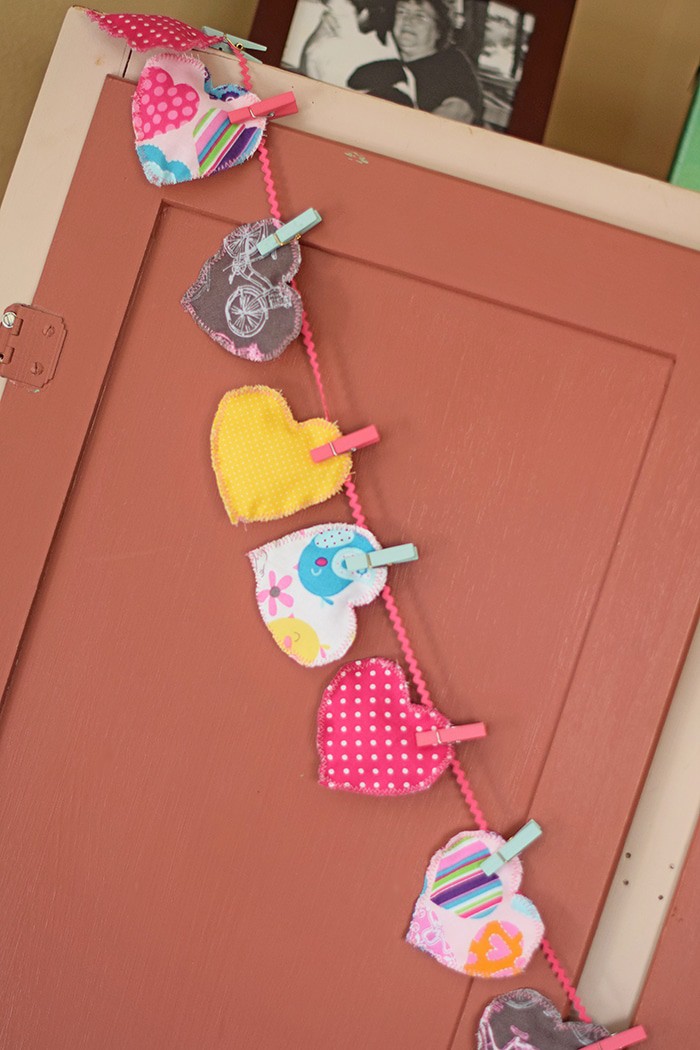
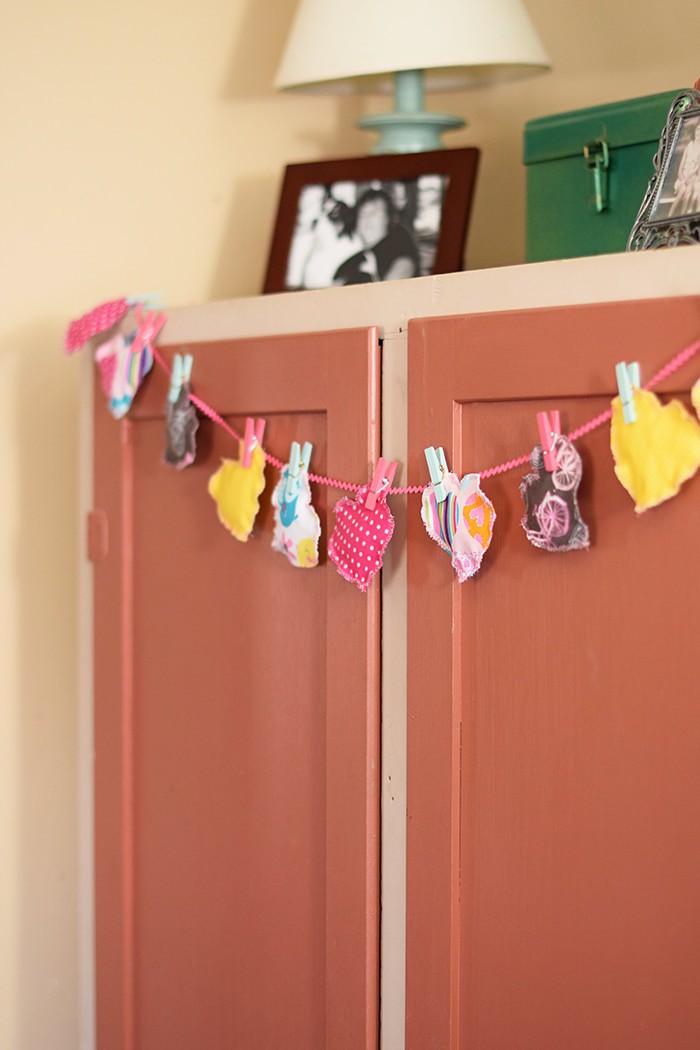
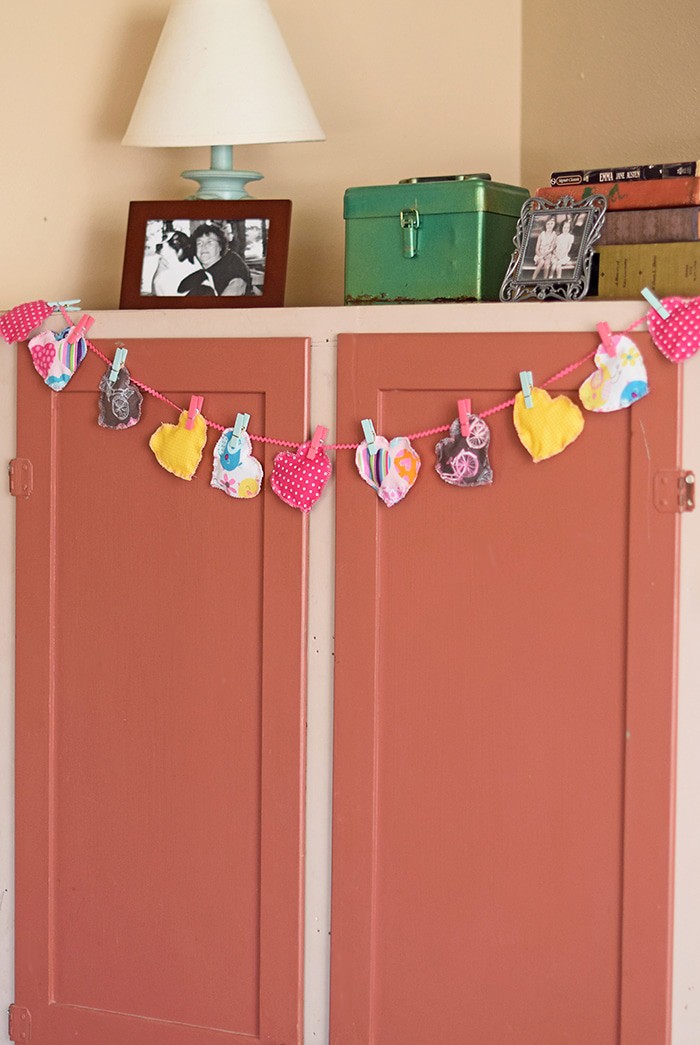
Once you’ve sewn all the hearts, cut a long piece of rick rack to use as your garland. The length will depend on how many hearts you’ve chosen to use.
Add each heart to the rick rack, using mini clothespins. You can place your hearts straight on or give them a little tilt for even more charm.
Form a knotted loop at each end of the garland, which you can use to hang it up wherever you choose.
And there you have it… A super cute Valentine’s Day garland or bunting you can re-use year after year!
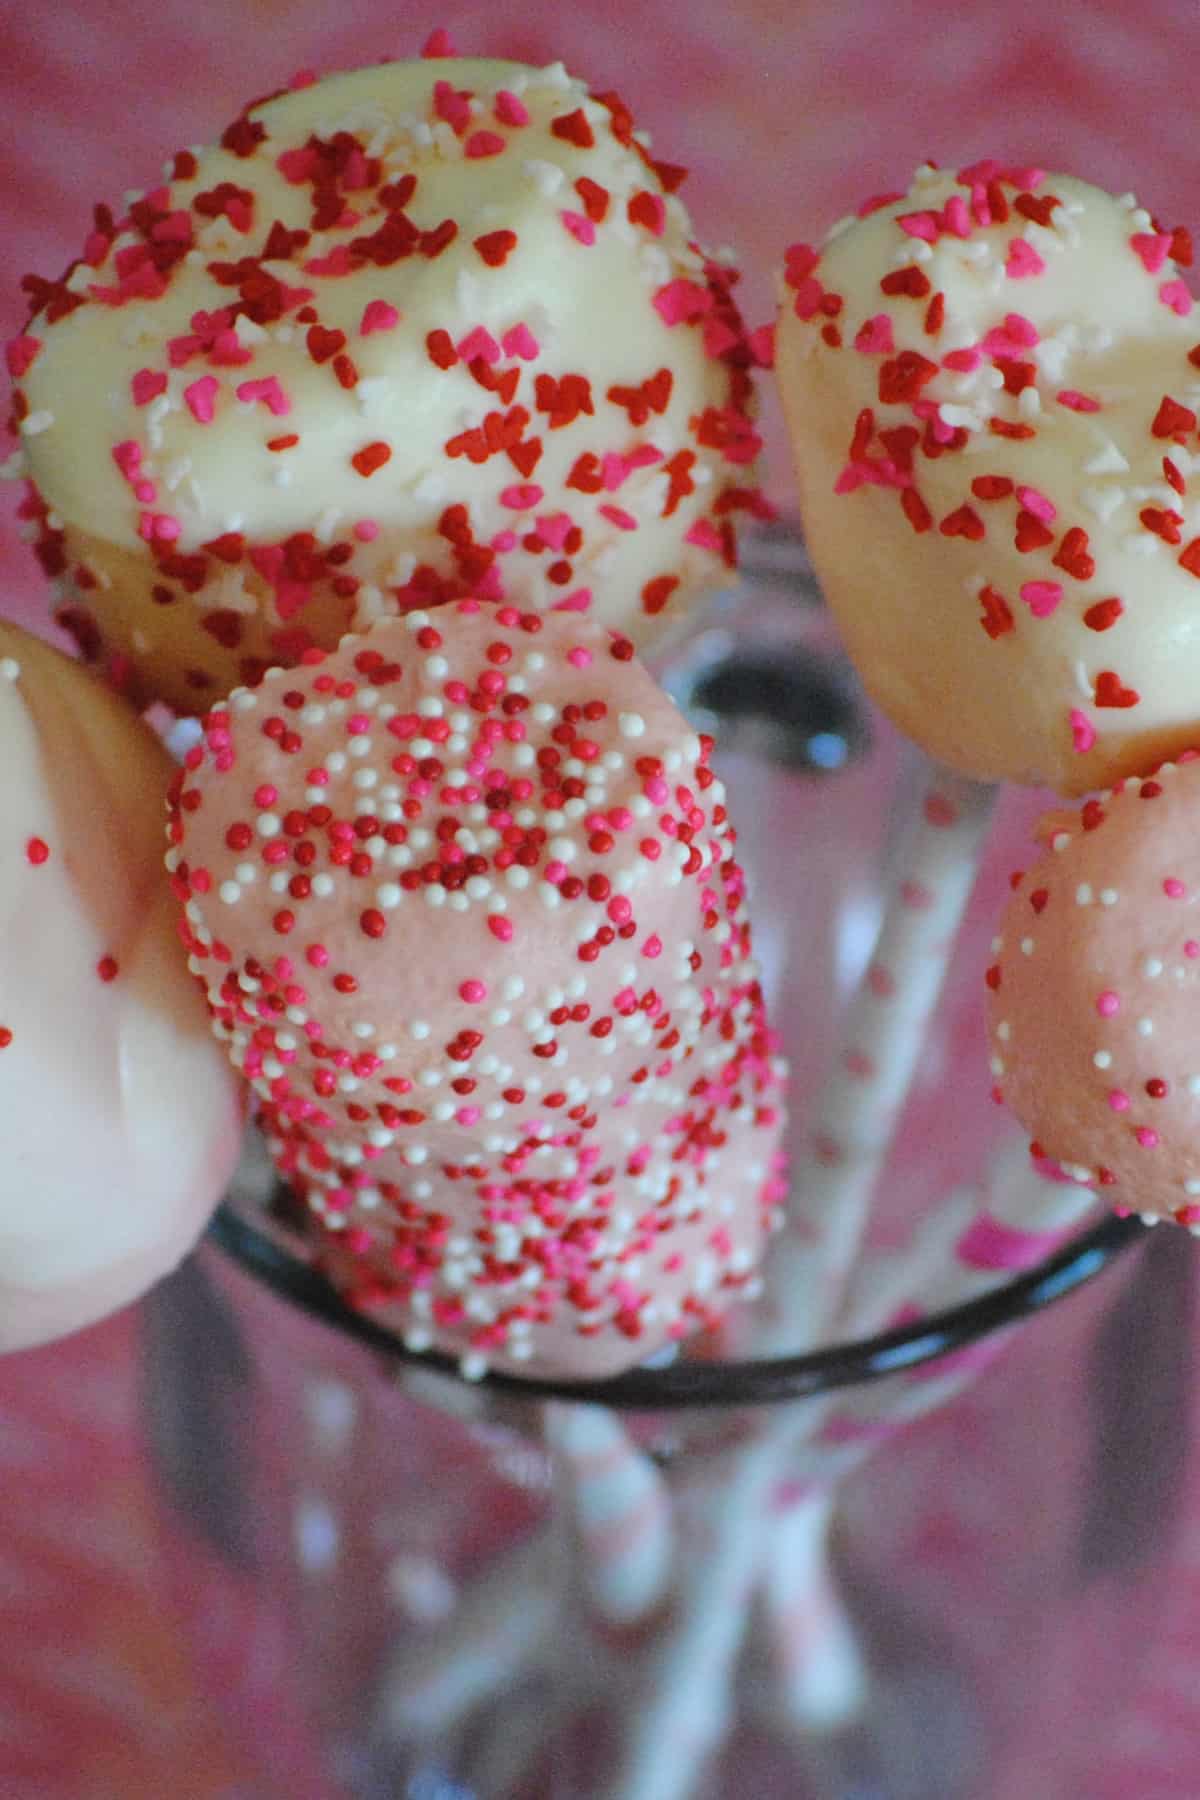
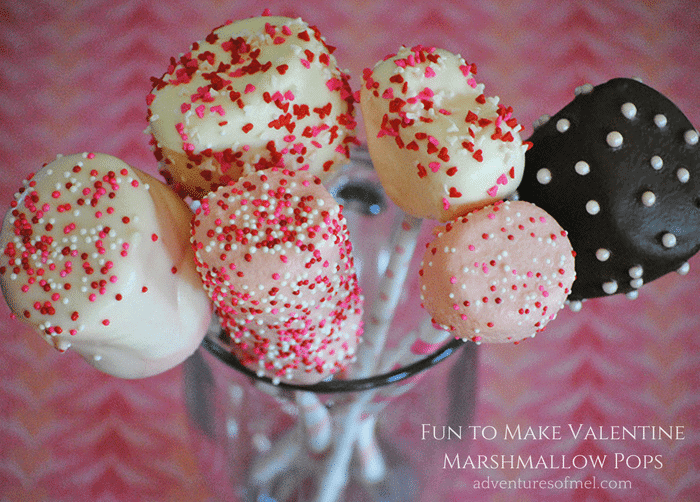
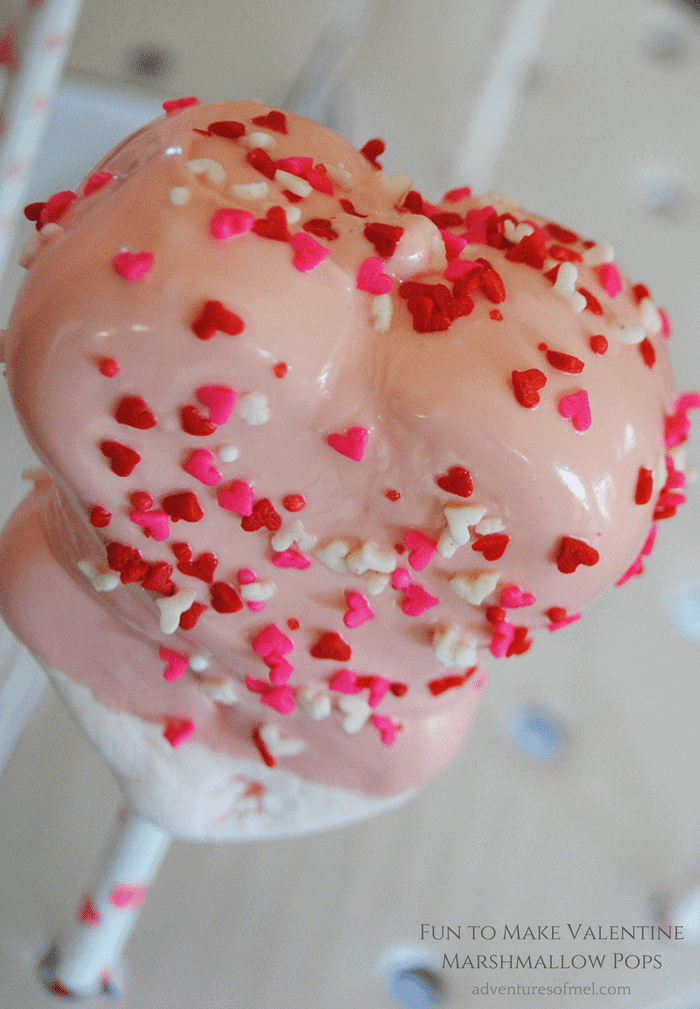
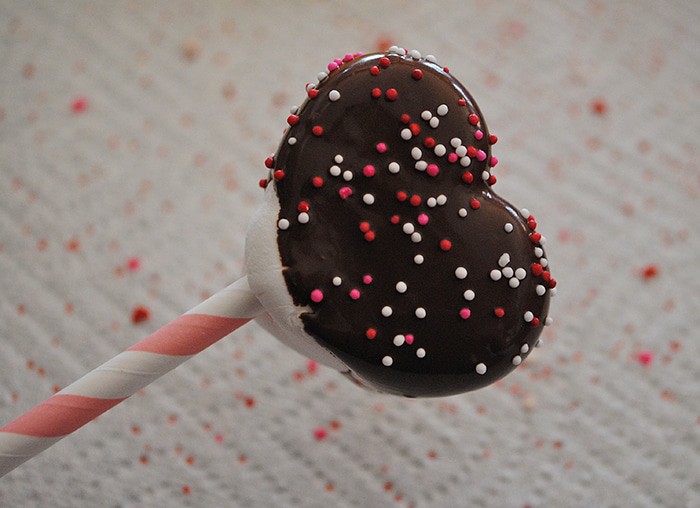
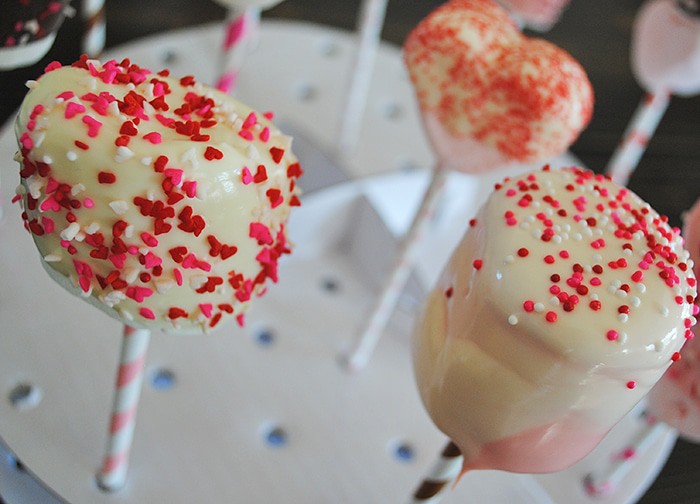
Use candy melts and marshmallows to make easy Valentine marshmallow pops. A kid-friendly Valentine’s Day recipe, they make perfect party treats with oodles of decorating ideas.
If you’re still looking for a fun treat to make with your kids this Valentine’s Day, Valentines marshmallows are something both you and your kids will love. Awhile ago, I shared my recipe for cherry chip cake pops…. Valentine marshmallow pops are a slightly easier treat and oh so fun and kid-friendly to make.
Ingredient Notes:
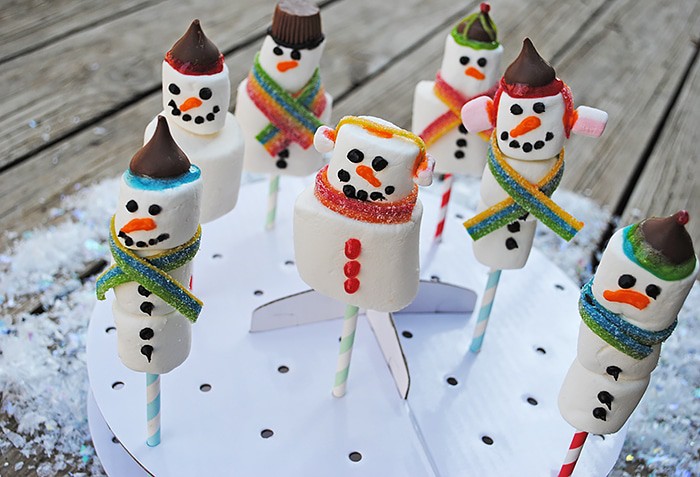
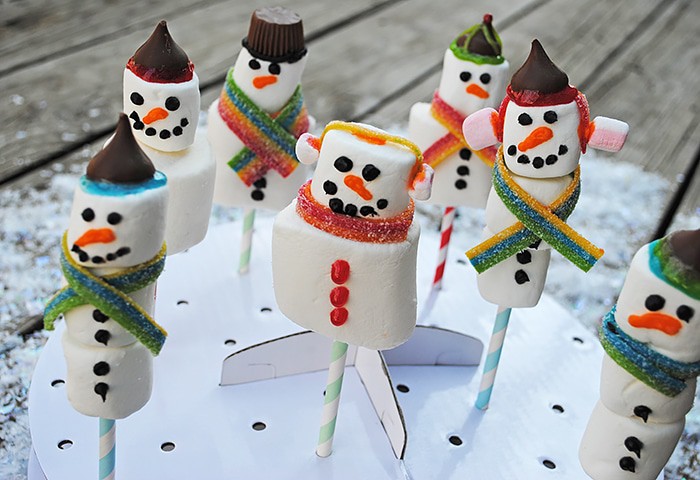
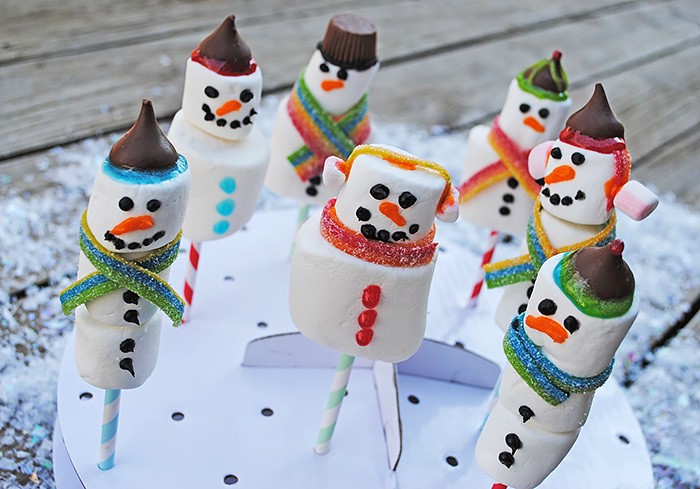
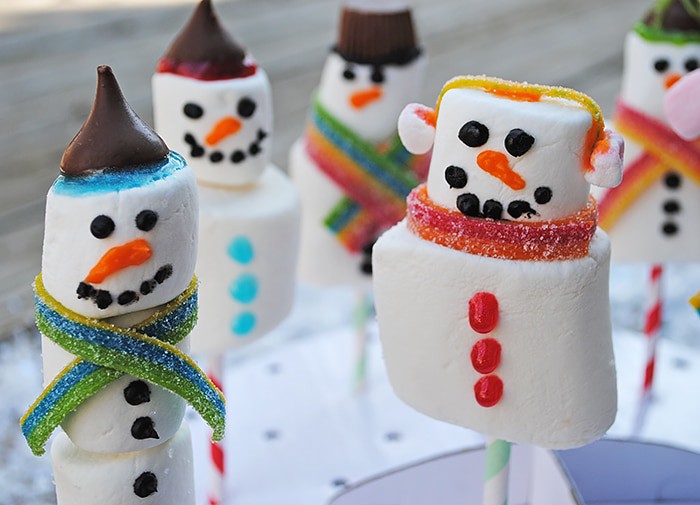
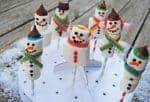
Snowman marshmallow pops are another fun marshmallow dessert for kids, especially during the wintertime.
Paper Towel for Work Space – This will catch all the extra sprinkles and drips from the melted candy melts. It definitely makes cleanup a LOT easier afterward.
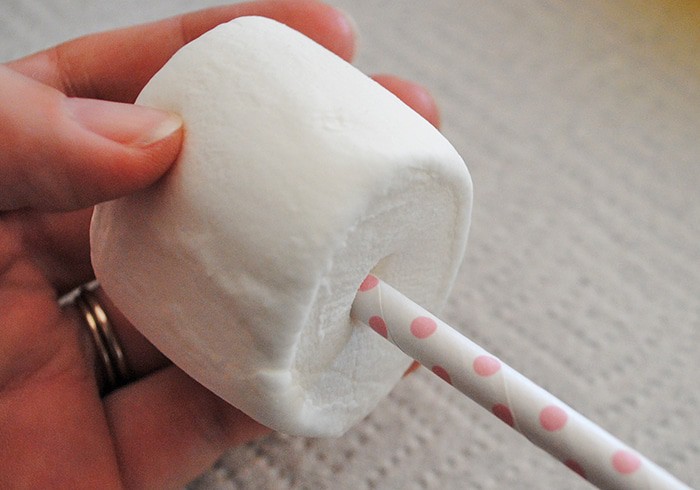
The first step is to place marshmallows on the paper straws. Insert the paper straws into the center of your marshmallows, letting the straw act as a lollipop stick.
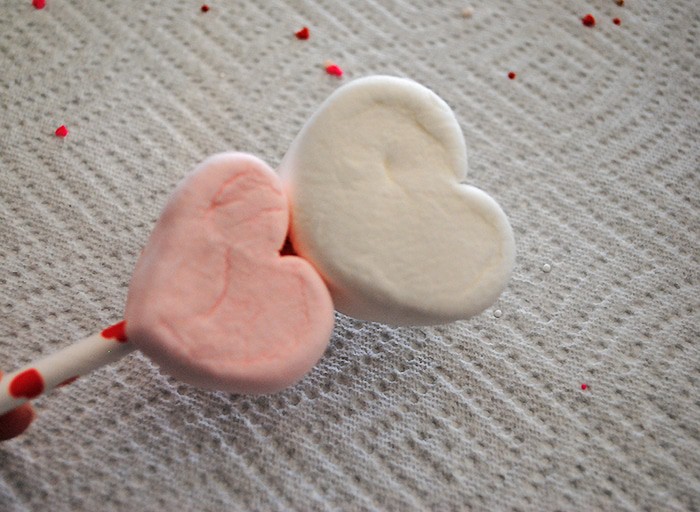
Be creative and make different designs, like doubling up heart shaped marshmallows on one stick.
How to Melt the Candy Melts and Chocolate for Dipping
Depending on the dipping candy you decide to use, you can melt it a couple different ways:
Melt using a double boiler on the stove – This is basically a pan inside of another pan with boiling water in the bottom pan. It allows for more even melting without burning, and it also keeps chocolate warm for dipping. If you’re wanting to use different colors, this may not be the easiest way to melt the candy melts. So instead…
Melt it in the microwave – This is usually the route I go. Just follow the package instructions for melting. Usually, you heat and stir in 15-second intervals until the candy is melted and smooth enough for dipping.
One Important Tip: Depending on the type of chocolate you use, some people like to add shortening or paraffin wax to their chocolate as it melts. This allows for a thinner coat and stretches the chocolate a little further. If you use a good quality chocolate, you likely won’t need this step.
Dip and Decorate Marshmallows
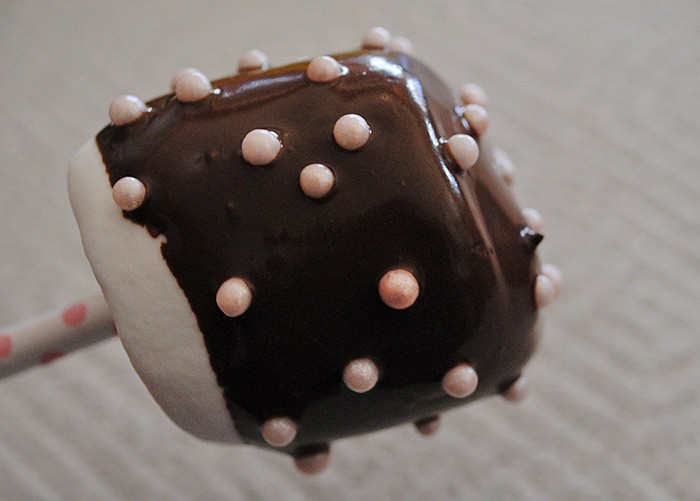
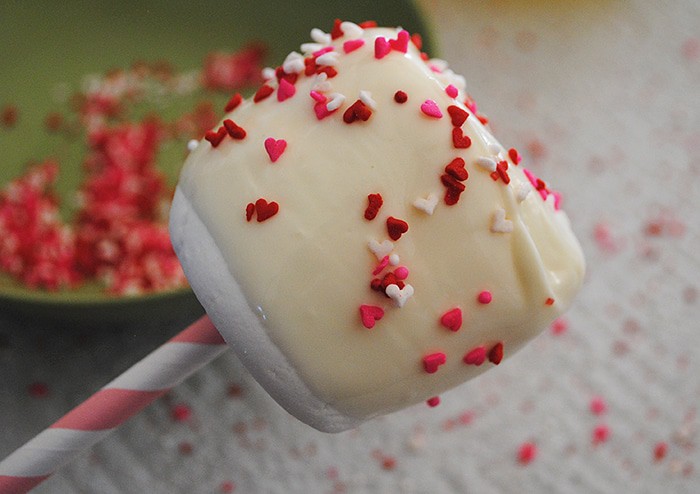
Dip the marshmallows in the melted candy melts, letting excess candy drip back into the bowl.
Now you’re ready to immediately grab the sprinkles and decorate before the candy coating hardens. You can create polka dots all over the marshmallows with candy beads and shake little sprinkles or hearts all over. Maybe even sprinkle a little candy sugar on top. Just be creative and let your kids do their thing; you never know what they’ll come up with.
Place the Valentine marshmallows in the marshmallow pop holder, and let the candy coating set.
There’s nothing like festive Valentine dipped marshmallows to wish someone a very Happy Valentine’s Day.
Expert Tips and Recipe FAQ’s
Can I make these ahead of time?
Yes, you can, though it’d probably be best to make them only 1-2 days in advance, so they don’t get stale.
How should I store marshmallow pops?
They should be stored in an airtight container in a slightly cooler environment. Not chilled in the fridge, but you want them to keep their shape and the candy to not melt… So you don’t want them next to a stove or oven.
If you try this recipe, why not leave a star rating in the recipe card right below and/or a review in the comment section further down the page? I always appreciate your feedback. You can also follow me on Pinterest, Facebook, Instagram, and YouTube. And subscribe to my email list too!
Valentine Marshmallow Pops
Use candy melts and marshmallows to make easy Valentine marshmallow pops. They make perfect kid-friendly Valentine's Day party treats.
Wilton Cake Pops Decorating Stand
Valentine Paper Straws
Paper Towels
12 ounces marshmallows
12 ounces candy melts
1/2 cup Valentine sprinkles
Insert the paper straws into the center of your marshmallows, letting the straw act as a lollipop stick.
Be creative and make different designs, like doubling up heart shaped marshmallows on one stick.
How to Melt the Candy Melts and Chocolate for Dipping
Depending on the dipping candy you decide to use, you can melt it a couple different ways… Melt using a double boiler on the stove – This is basically a pan inside of another pan with boiling water in the bottom pan. It allows for more even melting without burning, and it also keeps chocolate warm for dipping. If you're wanting to use different colors, this may not be the easiest way to melt the candy melts. So instead…
Melt it in the microwave – This is usually the route I go. Just follow the package instructions for melting. Usually, you heat and stir in 15-second intervals until the candy is melted and smooth enough for dipping.
Dip and Decorate Marshmallows
Dip the marshmallows in the melted candy melts, letting excess candy drip back into the bowl.
Immediately grab the sprinkles and decorate before the candy coating hardens. You can create polka dots all over the marshmallows with candy beads and shake little sprinkles or hearts all over. Maybe even sprinkle a little candy sugar on top.
Place the Valentine marshmallows in the marshmallow pop holder, and let the candy coating set.
Then they're ready to serve and enjoy!
One Important Melting Tip: Depending on the type of chocolate you use, some people like to add shortening or paraffin wax to their chocolate as it melts. This allows for a thinner coat and stretches the chocolate a little further. If you use a good quality chocolate, you likely won’t need this step.
Can I make these ahead of time?
Yes, you can, though it’d probably be best to make them only 1-2 days in advance, so they don’t get stale.
How should I store marshmallow pops?
They should be stored in an airtight container in a slightly cooler environment. Not chilled in the fridge, but you want them to keep their shape and the candy to not melt… So you don’t want them next to a stove or oven.
Desserts
American
how to make Valentine marshmallow pops, Valentine dipped marshmallows, Valentine marshmallow fun pops, Valentine marshmallow pops, Valentine marshmallow pops recipe, Valentine marshmallows, Valentine’s Day marshmallows, Valentines marshmallows
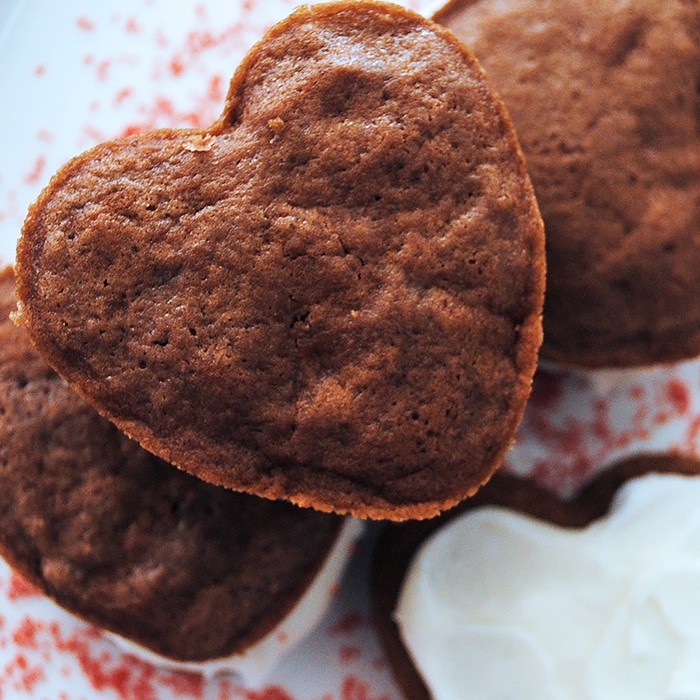
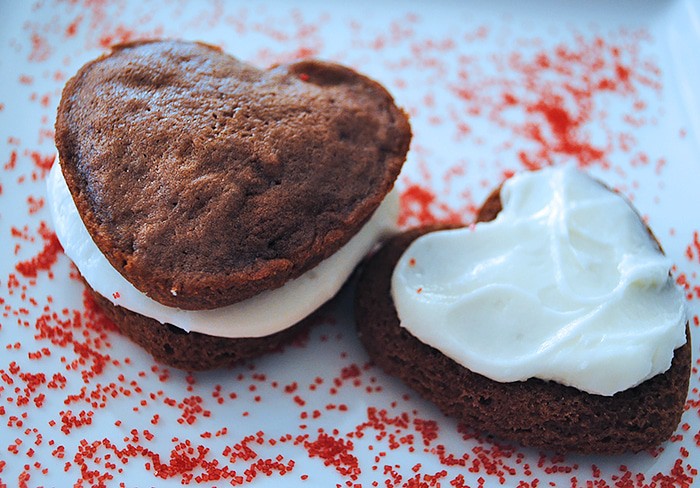
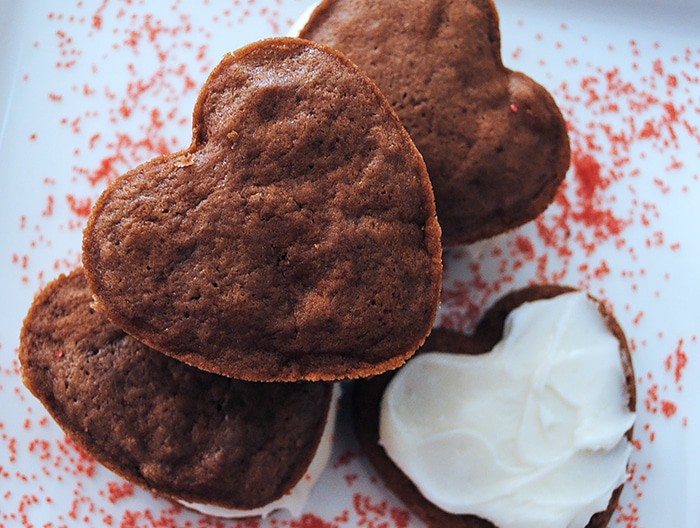
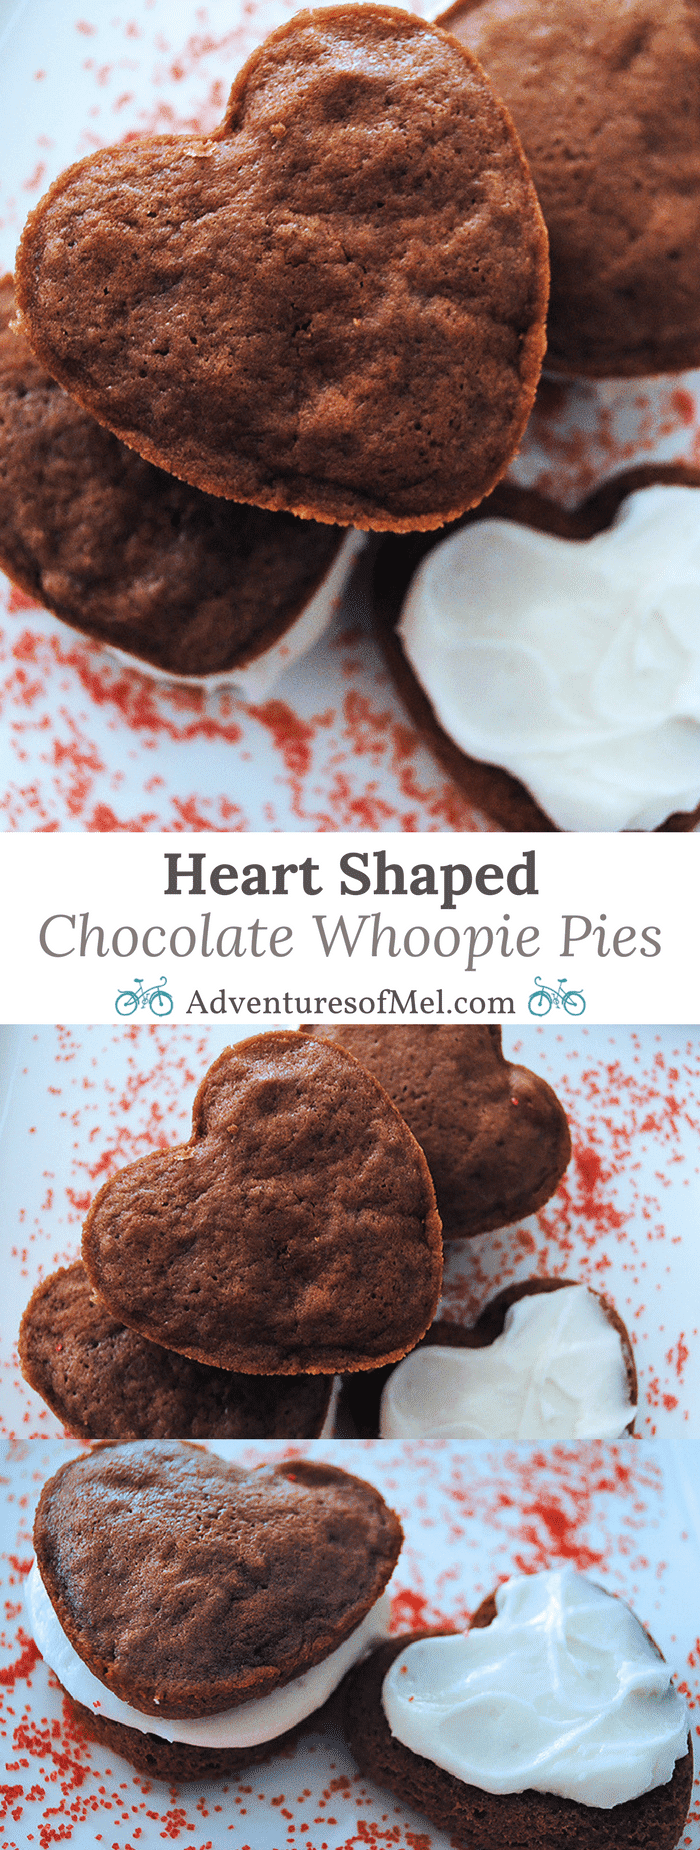
Remember when you were a kid and Valentine’s Day meant school parties with homemade Valentine boxes, gobs of Valentines, and yummy heart shaped treats like heart shaped chocolate whoopie pies?
With the holiday of love and hearts and sprinkled cupcakes just around the corner, Heart Shaped Chocolate Whoopie Pies are a most scrumptious treat, as are heart shaped chocolate chip pancakes.
We didn’t really call them whoopie pies. Ever. I’m not sure why.
But that’s really what they are. Only our icing is more of a creamy sugar cookie icing made with powdered sugar.
I think original whoopie pies have a sort of marshmallow cream icing. Either way, they’re one of my favorite cookies.
Grandma would mix these up and pop them in the oven. When they came out, the entire kitchen smelled like chocolate.
We’d smooth a bit of icing on one cookie and sandwich them together.
To this day, they’re still a family favorite. Her recipe lives on.
How to Make Heart Shaped Chocolate Whoopie Pies
Below is the printable recipe.
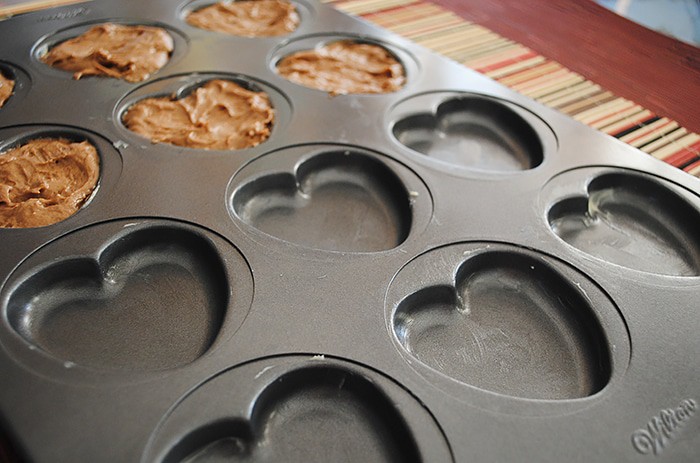
You can make these round or heart shaped. To get the heart shape, I used a Wilton heart shaped whoopie pie pan.
If you don’t want to buy the pan, I imagine you could use a heart shaped cookie cutter to form each shape with dough. Just be sure to remove the cookie cutter before baking.
This is the most scrumptious cookie… If I could call it the king of cookies (besides my favorite chocolate chip cookies), I totally would. Enjoy!
Chocolate sandwich cookies are a favorite family recipe passed down from generation to generation. Whether you call them sandwich cookies or whoopie pies, Heart Shaped Chocolate Whoopie Pies really do make a yummy Valentine's Day treat.
Cookie Dough:
1 cup unsalted butter (softened)
2 cups cane sugar
2 large eggs
1 teaspoon vanilla extract
3 3/4 cups all-purpose flour
2 teaspoons baking powder
6 tablespoons unsweetened cocoa powder
1 teaspoon salt
1 cup whole milk
Icing:
2 tablespoons salted butter (softened)
1/2 teaspoon vanilla extract
1/2 teaspoon almond extract
1/2 cup whole milk
3 cups powdered sugar
Cookies:
Pre-heat the oven to 350° F.
Cream (or mix) the butter and sugar together.
Then add the eggs and vanilla, mixing well.
Whisk or sift together the flour, baking powder, cocoa powder, and salt.
Mix the dry ingredients into the creamed mixture alternately with the milk, beginning and ending with the dry ingredients. If the batter is too thin, you may need to add just a bit more flour.
Spray the whoopie pie pan with cooking spray. Drop 1-2 teaspoonfuls of cookie dough into each heart and smooth out.
Bake at 350° F for about 10 to 12 minutes.
Remove the cookies from the cookie sheet and place on a wire rack to cool.
Icing:
In a large mixing bowl, mix together the softened butter, vanilla extract, and almond extract.
Add the milk to the mixture.
Slowly add the powdered sugar to the mixture, mixing it in as you go. You want a good consistency, not too runny or the cookies will slide apart; you want the icing thick enough to stay on the cookie but not so thick that it breaks the cookies apart when trying to spread it. Once everything is mixed together, the icing should be smooth and creamy, free of any lumps.
After the cookies have cooled, sandwich them together with the icing.
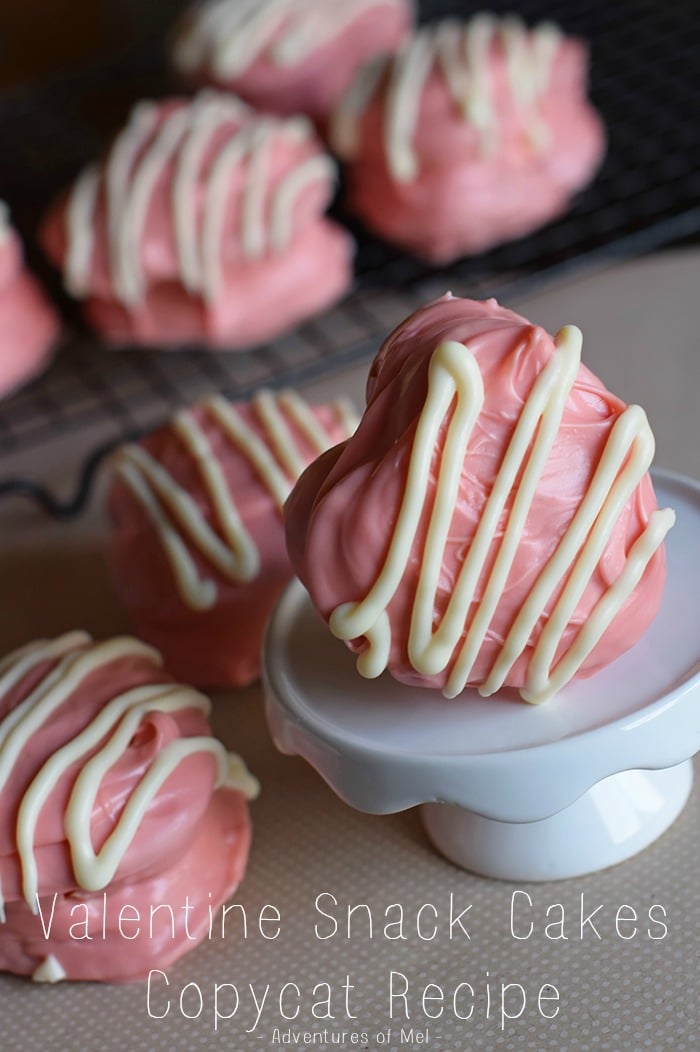
Learn how to make a copycat version of sweet Little Debbie Valentine snack cakes. Heart shaped cakes are layered with a vanilla white creme filling inside and covered with a pink shell on the outside. They’re the perfect treat for a Valentine’s Day party!
Little Debbie Valentine Cakes… Who doesn’t love these scrumptious little cakes covered in a sweet pink shell?
Along with Christmas Tree Cakes, these heart snack cakes are one of my favorite Little Debbie treats. I say treat because they are an every once in a while treat, something to look forward to.
That being said, my boys have been trying to get me to try making more than a few Little Debbie copycat recipes for not just one but a few of our favorite Little Debbie treats. Since Valentine’s Day is right around the corner, what better time to try making Little Debbie Be My Valentine Snack Cakes than now?
Cake Mix – While I prefer to use cherry chip cake mix because it gives a slightly pink tone to the cakes and I love the flavor of cherry chip, you can use any flavor you want. White cake mix or strawberry cake mix are a couple of yummy options that come to mind. You can even make Little Debbie Valentine chocolate cakes; use a chocolate cake mix or use this homemade chocolate cupcakes recipe for a moist chocolate snack cake.
Cream Cheese – I recommend using full fat cream cheese vs. low fat.
Butter – Use real salted butter rather than margarine; margarine will change the texture and outcome of your cakes.
Marshmallow Fluff – You can use any marshmallow cream, but I love actual Fluff brand. Holy cow, the creamy factor that Marshmallow Fluff adds to frosting is ah-mazing.
Candy Melts – If making pink Valentine’s Day Little Debbie cakes, you’ll want pink and white candy melts… Pink for the coating, white for the little decorative dribbles on top.
How to Make Little Debbie Valentine Snack Cakes
I had to think about this recipe for quite a while before attempting to make it; if you think of it like cupcakes, it’s really pretty simple to make.
First, Make Heart Shaped Cakes:
Mix the cake mix according to the package directions.
Spray a heart shaped mini cakes pan with cooking spray. Then fill the heart shapes in the pan with batter, about 2/3 of the way full.
Bake according to package directions for cupcakes, or until a toothpick inserted in the center of the cakes comes out clean.
Remove the cakes from the pan and let cool on a wire rack.
Next Mix the Filling:
Mix together the cream cheese, butter, and vanilla.
Add the powdered sugar, mixing well.
Then add in Marshmallow Fluff, making sure all the ingredients are mixed.
Once the cakes have cooled, slice them in half horizontally, add a layer of creme, and sandwich them back together.
Now Coat the Snack Cakes:
Melt the pink candy melts, according to package directions. Note: It can be difficult to shake excess candy coating off the cakes as you’re dipping and rolling, and the coating may need to be just a bit thinner; it may help to add a tablespoon of shortening to it during the melting process.
Gently dip (or roll) the cake sandwiches, one at a time, in the melted candy coating.
Set each dipped cake on wax paper. You may need to spoon a bit of candy coating on top of each cake once you’ve set it on the wax paper.
Once all the heart cakes have been coated, allow them to chill in the refrigerator until the coating has hardened.
Then melt the white candy melts, according to package directions.
Drizzle over the top of each cake in whatever pattern you desire. I used a bottle with a cake tip for this step.
Again, allow to chill until the candy coating has fully hardened.
These sweet little snack cakes were a hit with my boys, which is really what mattered. The cakes were gone in no time.
If you try this recipe, why not leave a star rating in the recipe card right below and/or a review in the comment section further down the page? I always appreciate your feedback. You can also follow me on Pinterest, Facebook, Instagram, and YouTube. And subscribe to my email list too!
Little Debbie Valentine Snack Cakes
How to make a copycat version of Little Debbie Valentine snack cakes, pink heart shaped cakes layered with a vanilla white creme filling.
Heart Shaped Muffin Pan
Cake –
15.25 ounces Cherry Chip cake mix
1 cup water
1/2 cup canola oil
3 large eggs
Filling –
8 ounces cream cheese (softened)
3 tablespoons salted butter (softened)
1/4 teaspoon vanilla extract
2 cups powdered sugar
1/3 cup Marshmallow Fluff
Coating –
12 ounces pink candy melts
12 ounces white candy melts
Cake –
Mix the cake mix according to the package directions.
Spray the pan with cooking spray. Then fill the heart shapes in the pan with batter, about 2/3 of the way full.
Bake according to package directions for cupcakes, or until a toothpick inserted in the center of the cakes comes out clean.
Remove the cakes from the pan and let cool on a wire rack.
Filling-
Mix together the cream cheese, butter, and vanilla.
Add the powdered sugar, mixing well.
Then add in Marshmallow Fluff, making sure all the ingredients are mixed.
Once the cakes have cooled, slice them in half horizontally, add a layer of creme, and sandwich them back together.
Coating –
Melt the pink candy melts, according to package directions. See Notes below.
Gently dip (or roll) the cake sandwiches, one at a time, in the melted candy coating.
Set each dipped cake on wax paper. You may need to spoon a bit of candy coating on top of each cake once you've set it on the wax paper.
Once all the heart cakes have been coated, allow them to chill in the refrigerator until the coating has hardened.
Then melt the white candy melts, according to package directions.
Drizzle over the top of each cake in whatever pattern you desire. I used a bottle with a cake tip for this step.
Again, allow to chill until the candy coating has fully hardened.
Store the pink heart snack cakes in the refrigerator until ready to serve.
It can be difficult to shake excess candy coating off the cakes as you’re dipping and rolling, and the coating may need to be just a bit thinner; it may help to add a tablespoon of shortening to it during the melting process.
Desserts
American
Be My Valentine snack cakes, heart snack cakes, Little Debbie copycat recipe, Little Debbie heart cakes, Little Debbie Valentine cakes, Little Debbie Valentine heart cakes, Little Debbie Valentine snack cakes, Valentine snack cakes, Valentine’s Day Little Debbie cakes
When I was about 12, we went from living in the city to living “in the country.” We lived on a farm in a charming old 2-story farmhouse.
My room had no heat or insulation (though I did have a very comfy electric blanket to keep me warm). So on really cold winter days, I’d spend my time in the kitchen; that’s how I developed my love for baking.
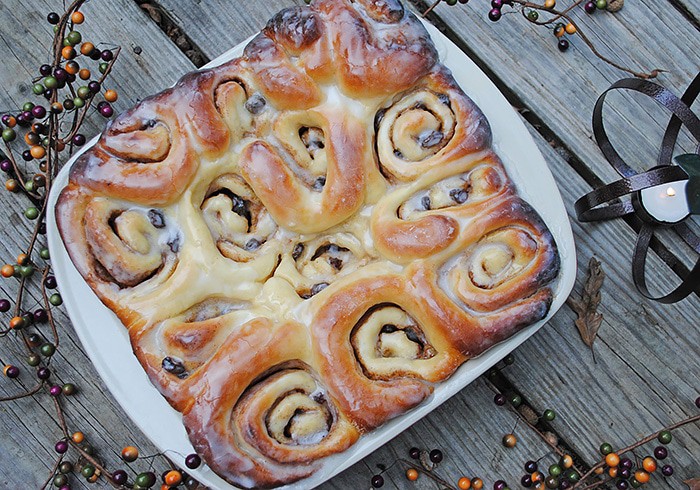
I remember many a time rolling out dough for my mom and grandma’s cinnamon rolls recipe.
Family Recipes Are the Best
My mom taught me how to make these cinnamon rolls. Every time I make a batch, I re-live those days in the old farmhouse.
I loved rolling them out on the old pull-out wooden cutting board in our farmhouse kitchen, filling them up with cinnamon, sugar, and raisins. Raisins are very important; the more the merrier, according to my dad (and me).
Then I’d carefully roll up the dough and slice rolls.
Cozy up with the best most scrumptious cinnamon rolls recipe ever! Homemade cinnamon rolls make the perfect breakfast treat, especially on a cold day when it's nice and warm inside.
Dough:
1 tablespoon active dry yeast
1 teaspoon cane sugar
1/2 cup warm water
2/3 cup cane sugar
3 tablespoons unsalted butter (softened)
3 large eggs
1 1/2 cups warm water
6 cups all-purpose flour
3 teaspoons salt
Cinnamon Sugar Filling:
6 tablespoons salted butter (melted)
3 teaspoons ground cinnamon
1 cup cane sugar
3/4 cup raisins
Icing:
4 tablespoons salted butter (softened)
1 teaspoon vanilla extract
1 cup whole milk
5 cups powdered sugar
In a small mixing bowl, whisk together the yeast, 1 teaspoon sugar, and 1/2 cup warm water. Set aside in a warm place, where it will bubble and rise.
Cream (or mix) together 2/3 cup sugar with the softened butter in a large mixing bowl.
Beat in the eggs, one at a time.
Add the yeast mixture to the butter mixture, along with an additional 1 1/2 cups warm water.
Sift the flour and salt together in a separate large bowl.
Gradually add the flour mixture into the wet ingredients, and mix well. For this step, I like to use the dough hook on my stand mixer.
Turn the dough into a large greased bowl or stockpot, and let it rise to the top or almost to the top (may take 2 to 3 hours). Keep the bowl or pan covered.
Once the dough has risen, grease a 9×13 baking dish and an 8×8 baking dish.
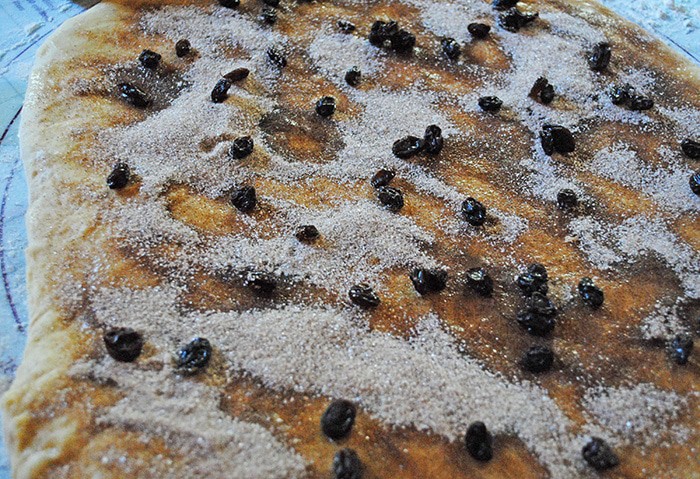
Turn the dough out onto a floured surface. Coat generously with flour by turning and shaping. No kneading is necessary. Roll the dough out to the desired thickness, about 1/2 inch or more.
Brush the melted butter onto the dough.
In a small bowl, whisk together the cinnamon and sugar.
Sprinkle the cinnamon/sugar mixture all over the buttered dough, and sprinkle on the raisins.
Somewhat tightly, roll the dough into a long, thick roll.
Then slice it into approximately 1-inch wide pieces.
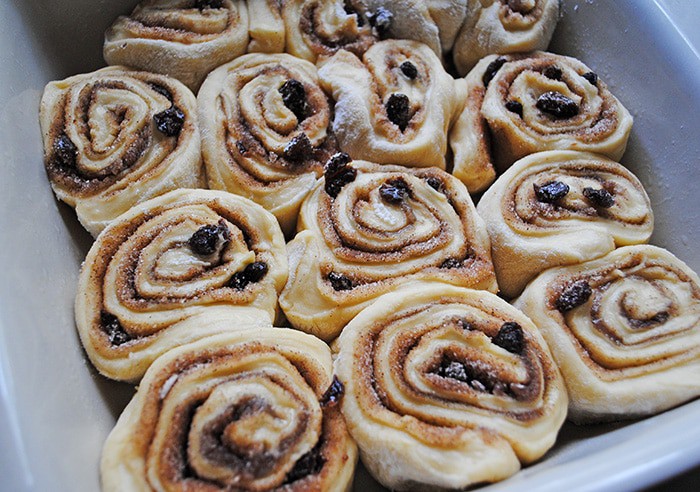
Place the cinnamon rolls, face up, into the greased pans, and let the rolls rise for 2-3 hours.
Once the rolls have risen, pre-heat the oven to 350° F.
Bake the rolls at 350° F for about 10 to 15 minutes; then cover with foil, and bake an additional 10 to 15 minutes. This allows the middle to cook thru without burning the tops.
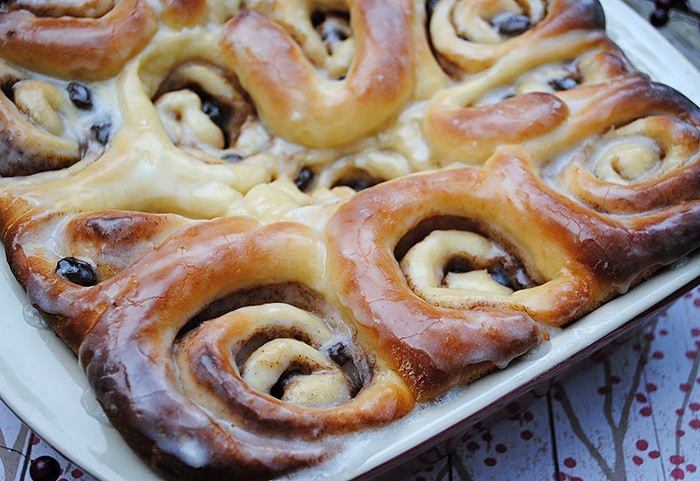
To make the icing, mix together the softened butter and vanilla extract in a large mixing bowl.
Add the milk to the mixture.
Then slowly mix in the powdered sugar. You want the icing to be thin enough to brush onto the cinnamon rolls.
Once the cinnamon rolls are baked, remove them from the oven, and let them cool for about 5 minutes. Keep the rolls in the pan.
Brush the icing onto the tops of the cinnamon rolls, and serve them immediately.
*Sometimes before adding the cinnamon sugar mixture, I’ll save back a little less than half the dough to make regular bread rolls.
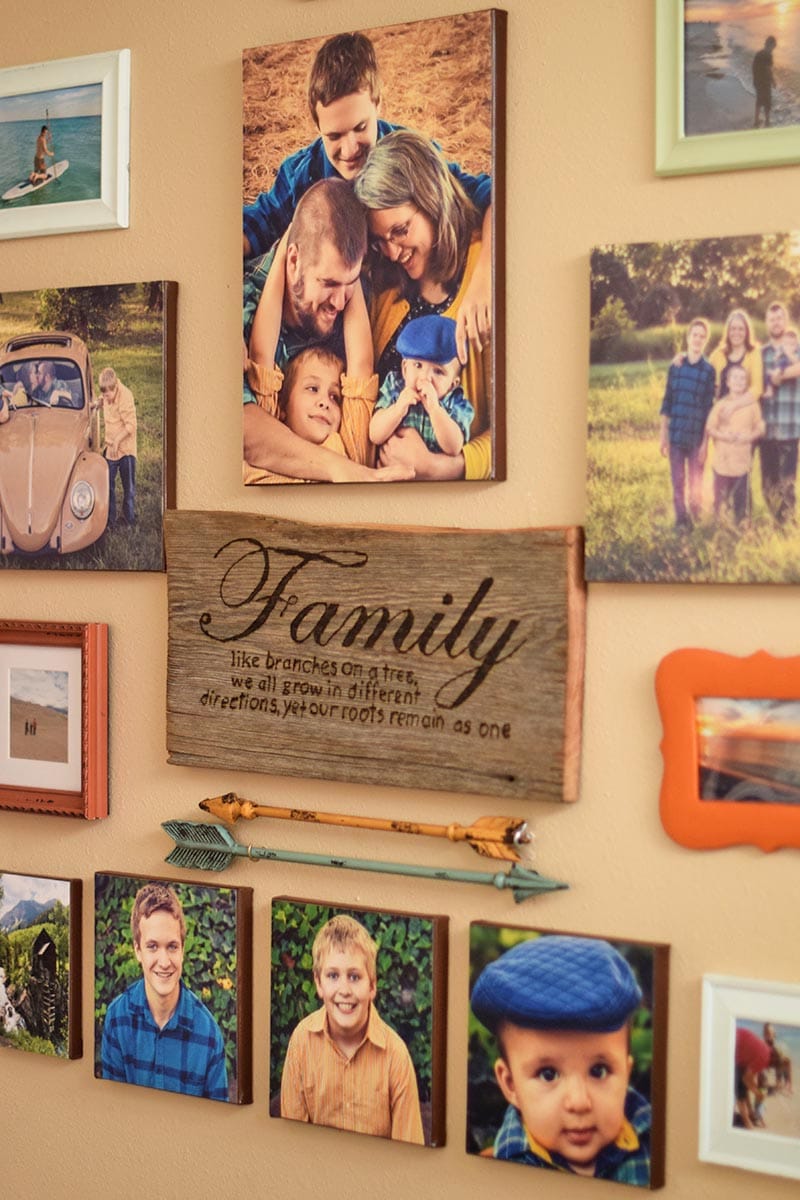
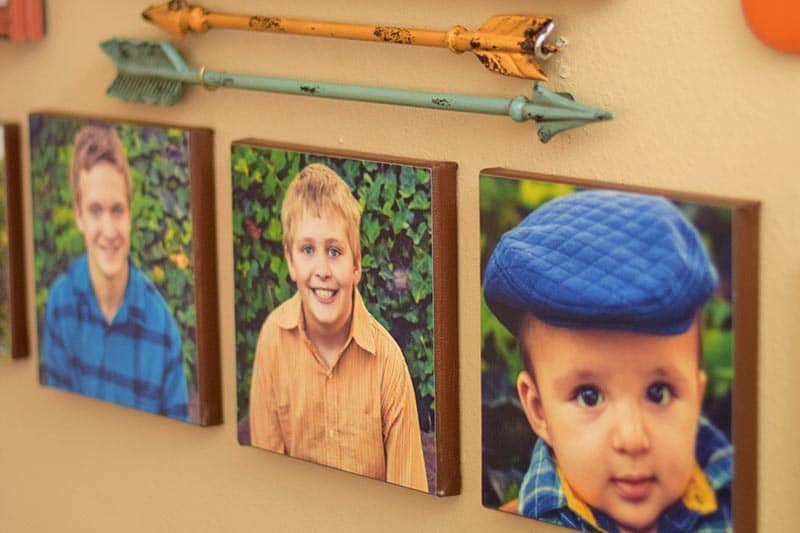
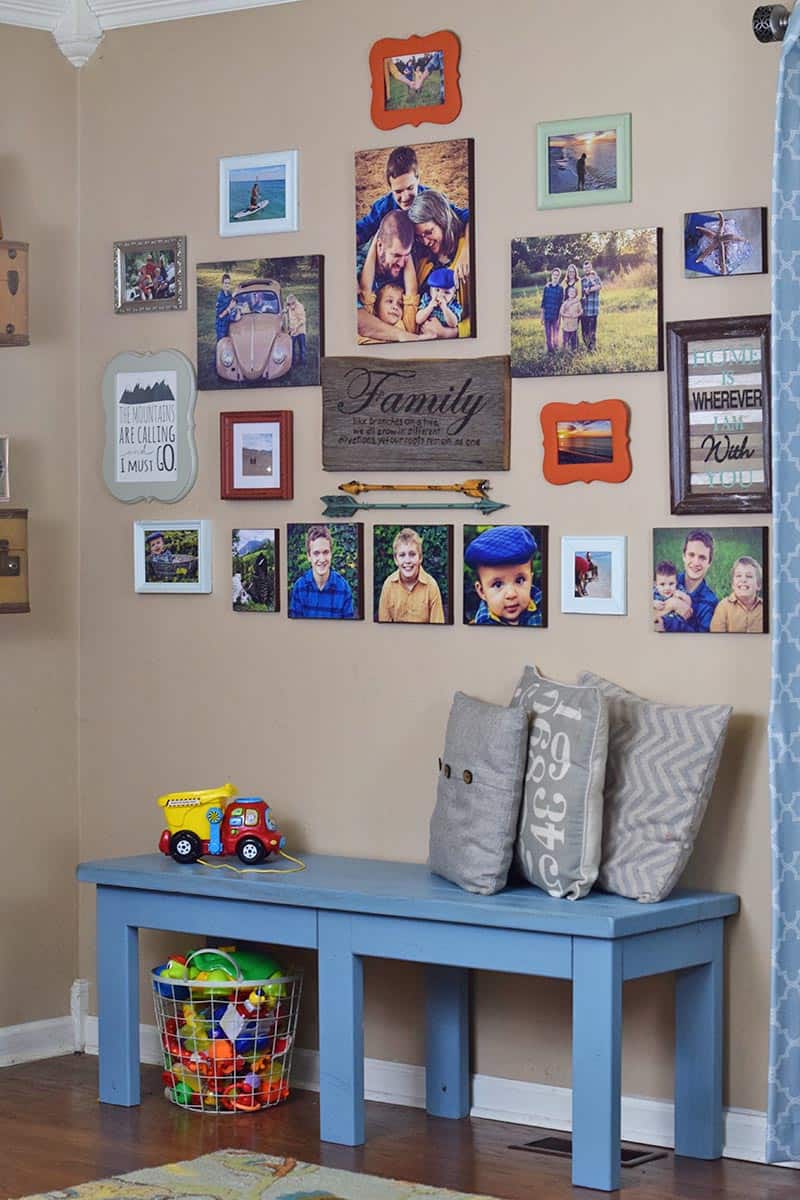
How to transfer family pictures and travel photographs to a DIY photo canvas, using Mod Podge and acrylic paint. Cheap, simple, and creative!
A few months after Zeke was born, we had family photos taken. Shortly after, I decided I wanted to learn how to make a DIY photo canvas and create a gallery wall in our living room.
I started to price canvas prints, and wowsers, the price for even a small print was shocking.
So I thought to myself, “How can I make my own photo transfer to canvas?” And I started looking for DIY canvas print tutorials.
That’s when I found the Youtube video below. Y’all, I would totally have made a video for this (because I’m loving video production), but why re-invent the wheel when this perfectly beautiful tutorial is already out there?
I’m just gonna share the steps for how to make your own canvas, and then embed the video below for all my visual readers and to give credit where credit is due.
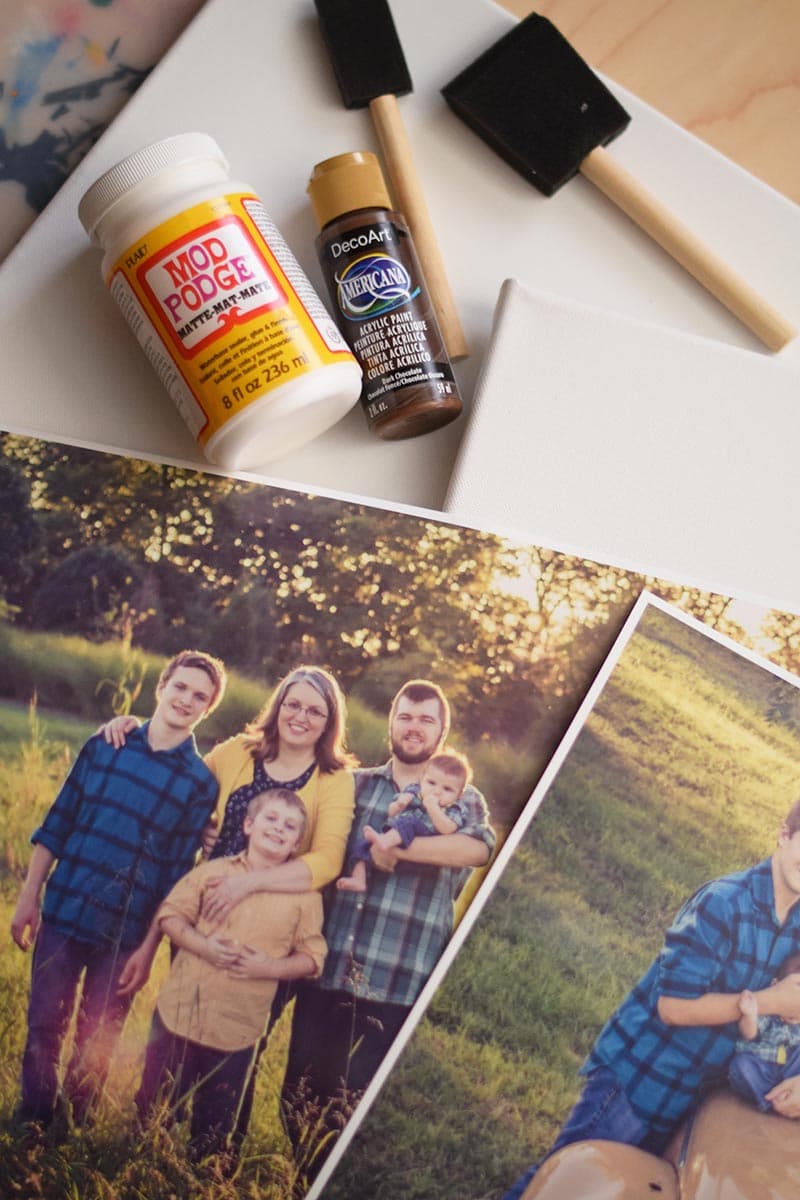
Photo Prints – in whatever sizes you want to use on your wall… I ordered photo prints through Snapfish. They have photo printing services for small, medium, and large photo sizes.
Canvases to fit those prints – I picked mine up at Hobby Lobby while they were 50% off and bought a few of the cheaper multi-packs, as well.
Now it’s time to have some fun. This is truly such an easy project, I don’t know why I haven’t done this before now.
Mod Podge really works great for so many different projects, especially DIY canvas prints.
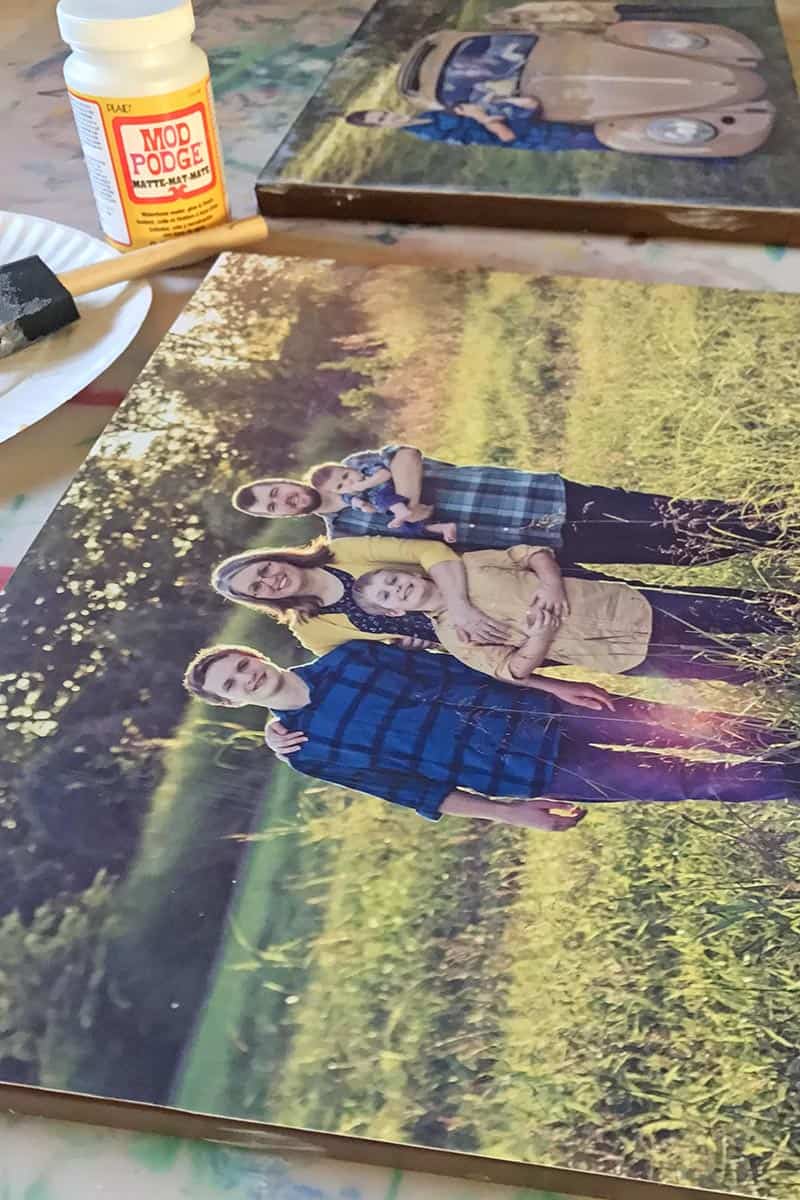
I decided to create a few different photo canvases, some with family photos and some with travel photos and family adventures.
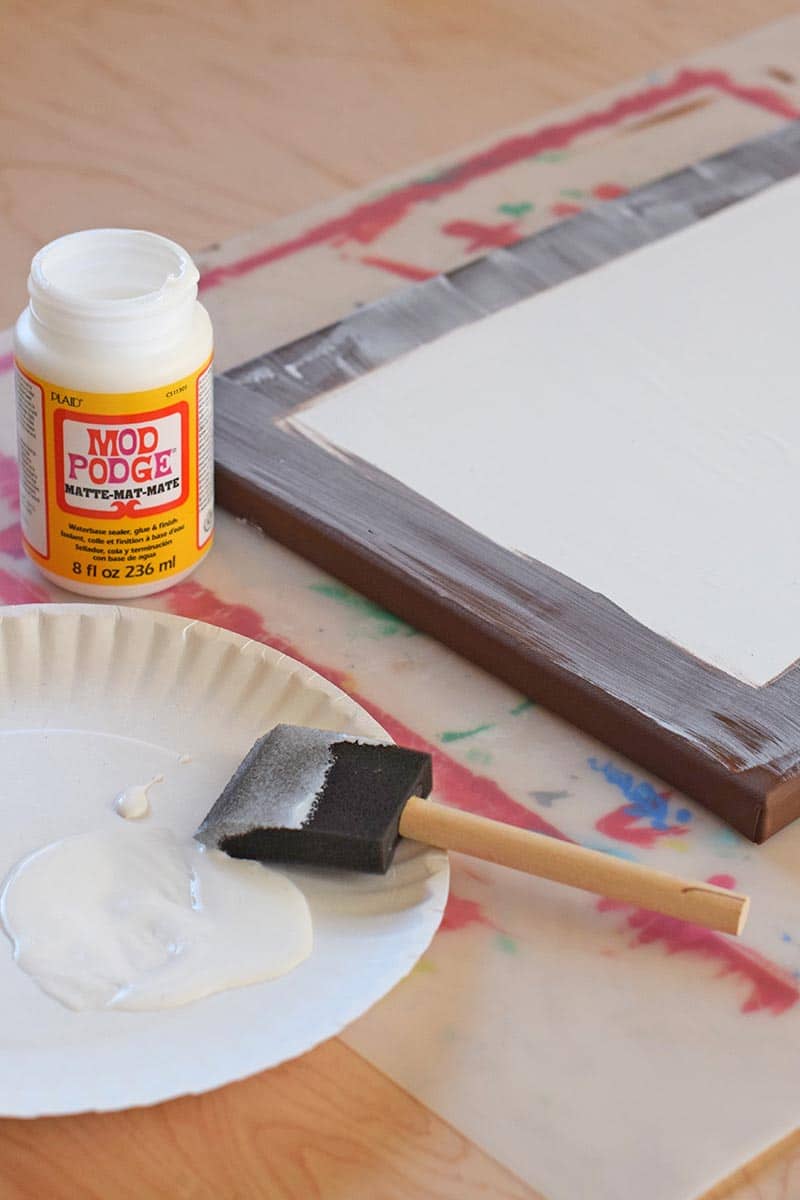
Prep Your Canvas
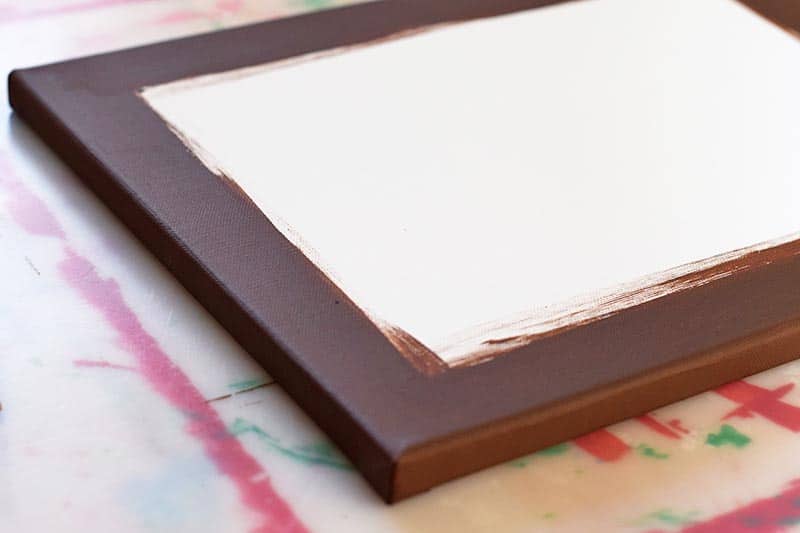
The first step, since it’s a step that requires time to dry, is to paint the edges of your canvas.
With a foam brush, paint the edge of the canvas, overlapping all around the top, as well as the sides, the bottom, and just over the front and back. It’ll take about 2 to 3 coats of paint to get a good amount of coverage.
Time Saver Tip: Set out 2 to 4 canvases, paint them, and then start the process all over again even if the paint is still a little damp (because I’m impatient like that).
Allow your paint to get good and dry before attempting to apply your photos.
Prep Your Photo Prints
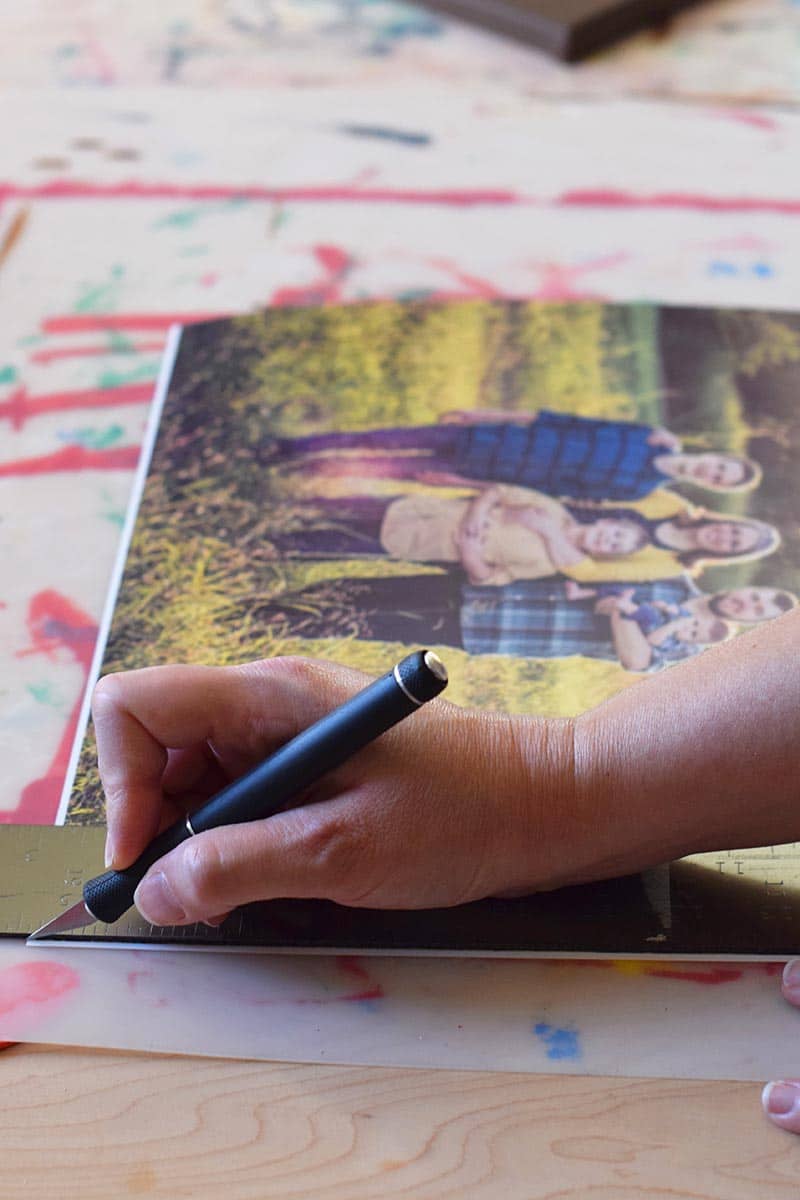
While you’re waiting, trim any white edges off of your photo prints. You may even need to size them up to the canvas and make sure you don’t need to do any extra trimming.
What Kind of Paper Should I Use to Print My Photos?
If you’re printing the photos yourself, you may be wondering what kind of paper to use. I’ve actually gotten this question from readers.
Should you decide not to have them printed, but you want to print them at home, use a matte photo paper.
Photo paper will be strong enough to withstand all of the Mod Podge you’re going to brush onto the photo. Regular paper may snag or tear and just isn’t strong enough for this kind of project.
How to Mod Podge Photo to Canvas
The process of actually Mod Podging photo canvases takes a few steps…
After your paint is dry, apply a good layer of Mod Podge to the front of your canvas. Make sure you’re using Matte Finish Mod Podge.
Then place the photo on the canvas, maneuvering it into place, making sure the edge of the photo lines up with the edge of the canvas.
Once the photo is placed correctly, flip the canvas over and rub your hands all along the back side of the canvas inside the frame. This will work out any bubbles and ensure that the photo adheres well to the canvas.
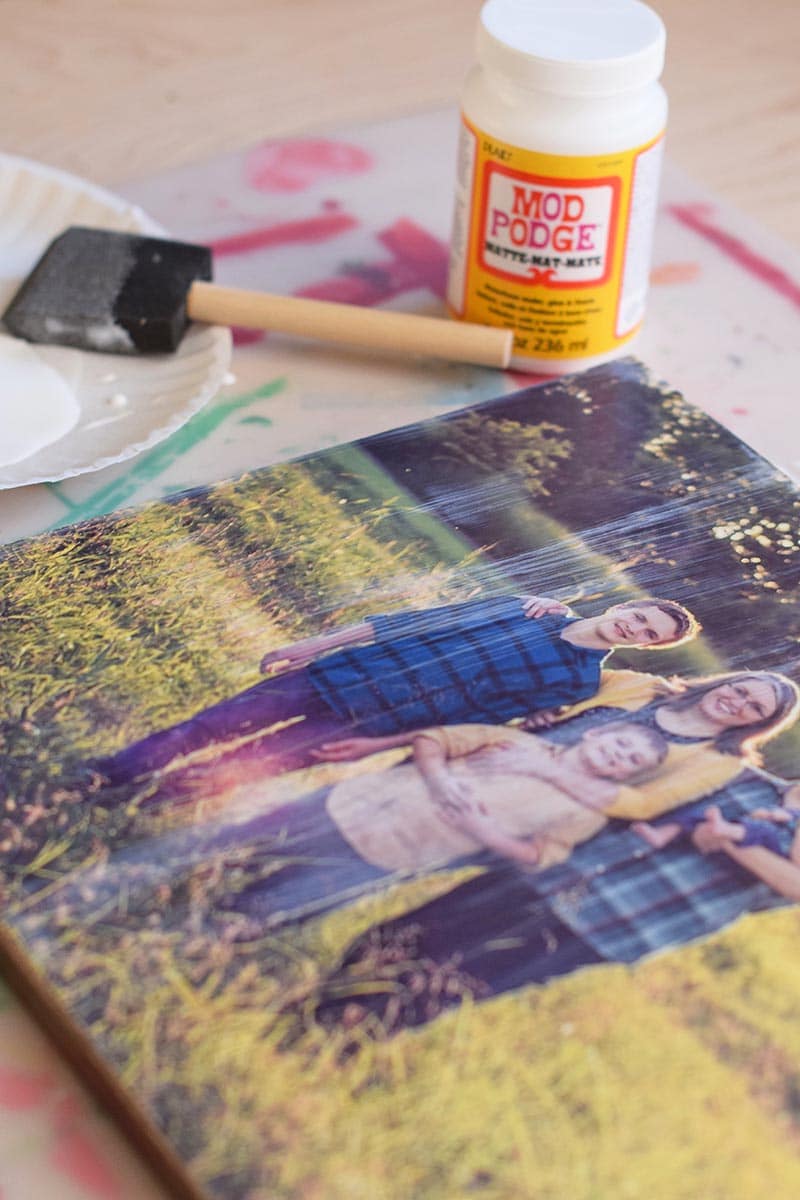
Finally, flip your canvas back over and apply another good layer of Mod Podge to the photo and the sides of the canvas. This will not only seal the photo and protect it, but it will also provide a really nice matte texture to your photo canvas.
Allow your Mod Podge to dry completely before touching the canvas; otherwise you’ll end up with smudges or fingerprints on your otherwise beautiful photos.
Mod Podge Tip: While I used up and down strokes, you can go any direction with your brush. The Mod Podge will dry clear.
Watch How to Make a DIY Canvas Print
Here is the video I mentioned above… Watch and behold the magic of Mod Podge on a DIY photo canvas!
Time to Decorate!
And that’s it… Wasn’t that so simple and easy? That’s really all there is to it!
Now you’re ready to decorate with your own beautiful photo canvases. They add a really beautiful touch to any room and make a wonderful gallery wall.
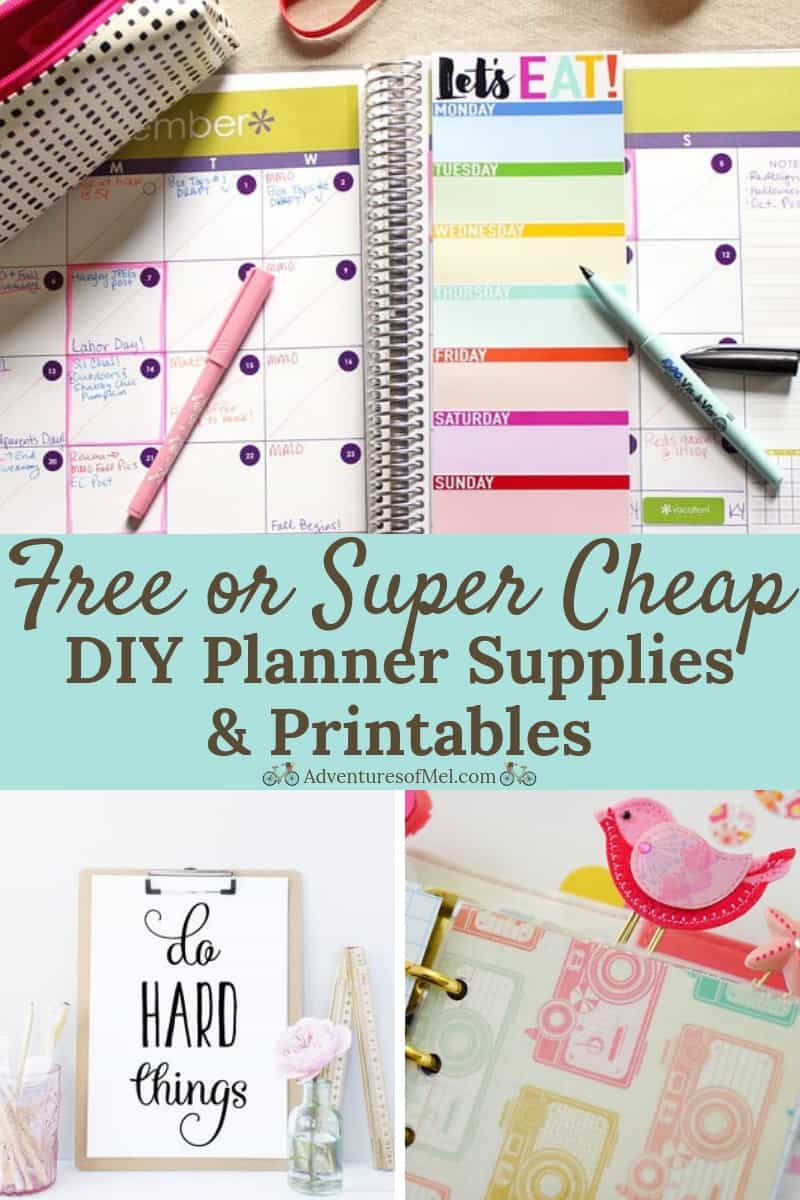
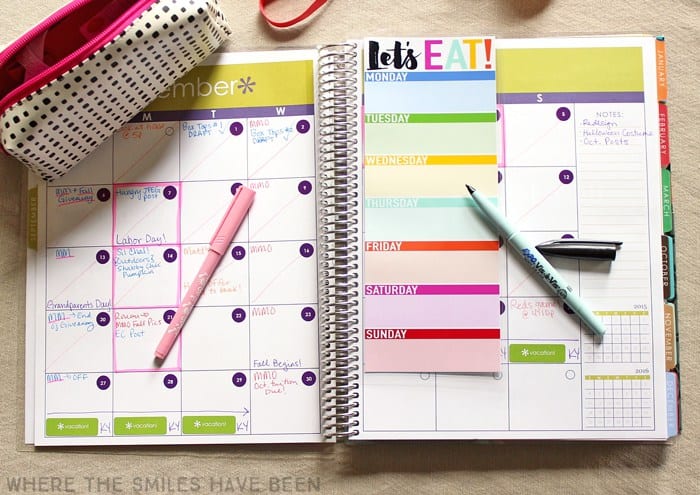
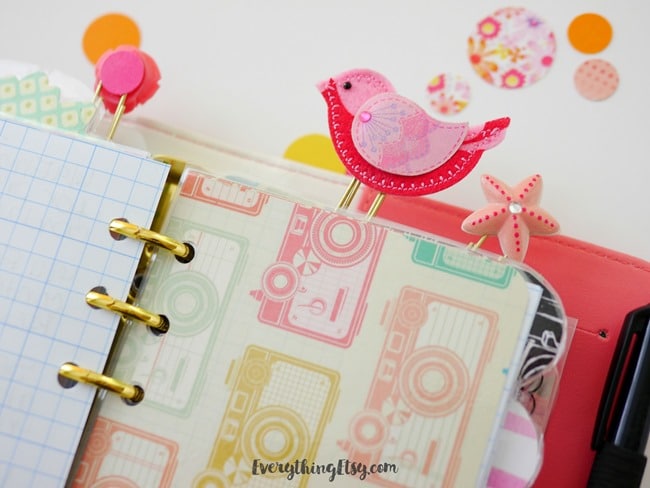
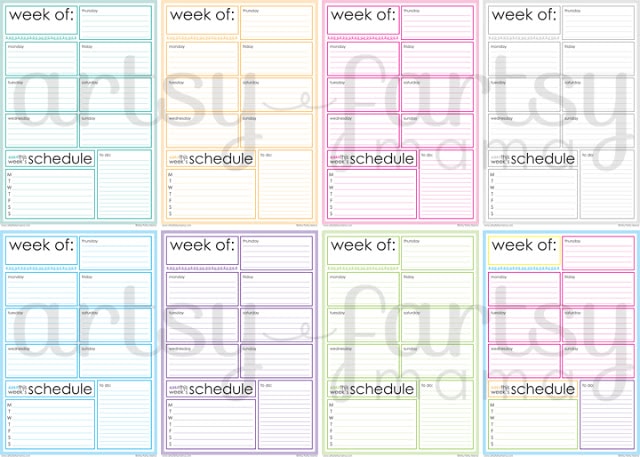
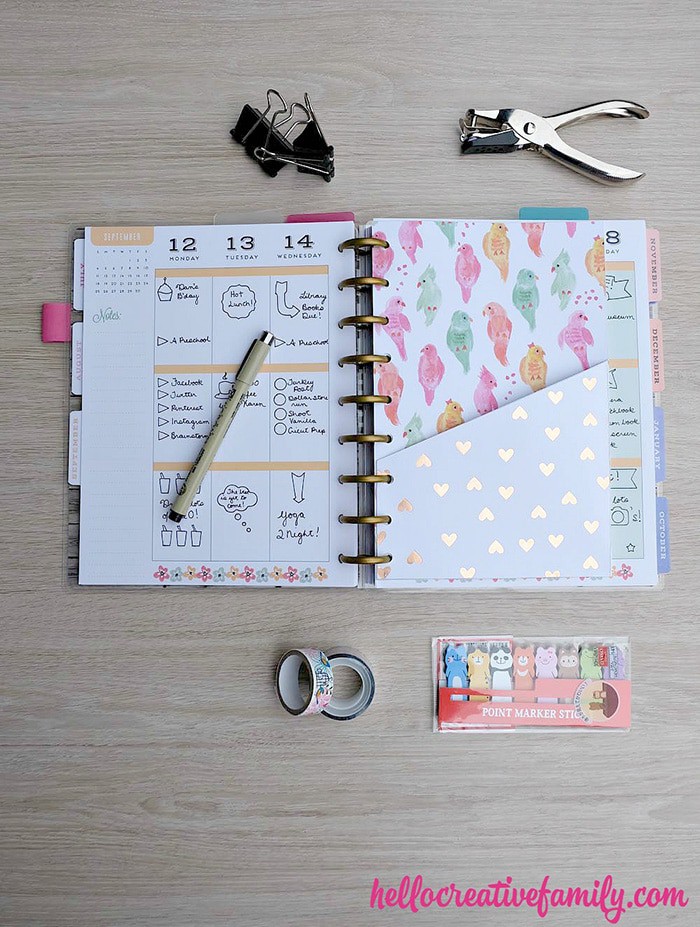
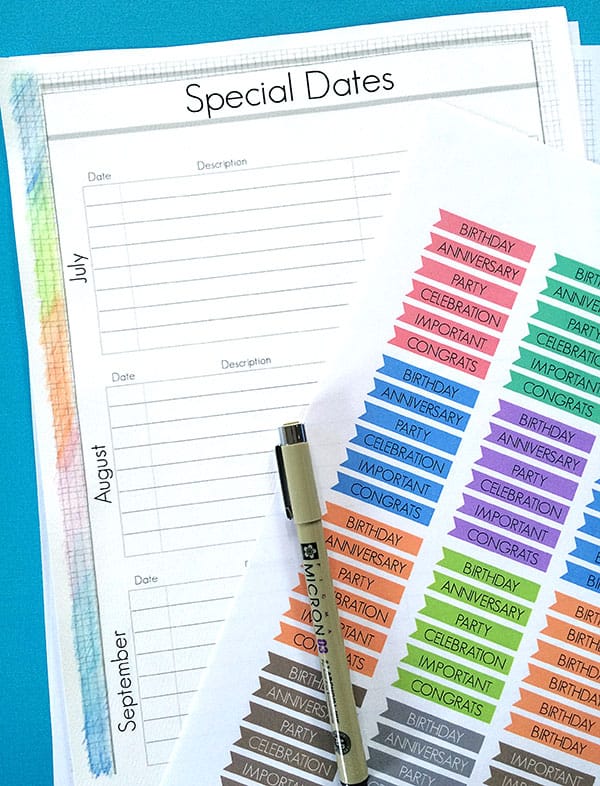
Planner Supplies and Printables – Creative supplies, including accessories like to do lists, paper clips, dividers, planner stickers, weekly planners, and more! I love my Happy Planner; my semi-obsession led me to compile a list with all sorts of cheap, pretty planner ideas!
Planner supplies and printables are so much fun to look for on the internet. I’ve found that Pinterest and Instagram are both a planner lover’s paradise when it comes to ideas and accessories.
Where would I be without my planner organizer? I’ve always used a paper planner, but I’ve had a hard time finding one that truly fits my life.
I think I’ve finally found a great fit and a planner design I love with the Happy Planner from Me & My Big Ideas. I absolutely love it.
My love and semi-obsession with it got me looking for free or DIY planner supplies and printables. Who doesn’t love a good printable, especially when it provides a nice addition to your planner notebook?
WHAT I LOVE ABOUT MY HAPPY PLANNER
What I love about the Happy Planner is that I can take pages out and add pages in if I want. It’s also a planner full of positivity, which is something I desperately need in my life.
Truth be told, I tend to be a glass half empty person, and I’m working on changing that. So the visual reminders each and every day really brighten up my day, my thinking, and my outlook on life in general.
I also love that I can pick up my Happy Planner at Hobby Lobby with a 40% off coupon. And while I love Happy Planner accessories, I also love when I can find free stuff for my planner.
I EVEN CREATED A VIDEO SHOWING HOW I USE MY PLANNER NOTEBOOK
You can click below to watch the video, where I share how I use my planner to my full advantage when planning out my days and weeks.
While I also use online programs like Airtable, Google Docs, Google Calendar, and Trello, I’m constantly referring to my traditional paper planner. It just works for me!
9 FREE OR SUPER CHEAP DIY PLANNER SUPPLIES AND PRINTABLES
I searched around and came up with quite a few handy dandy supplies for your planner, my planner, ALL the planners. Ready to have a li’l fun?
Super easy appetizers anyone can make, perfect for your holiday party. This list of 30+ recipes includes finger food appetizers, quick and easy dips, and more. Who doesn’t love the bite-sized deliciousness of a simple appetizer?
The holidays mean loads of holiday parties and events with loads of finger foods. It’s a great time to have an arsenal of easy appetizer recipes, like leftover ham and stuffing crescent rolls, you can turn to when you need something quick and easy.
This list of simple appetizers is a list of recipes that aren’t just easy; they’re really delicious too.
In fact, sometimes we make finger foods and appetizers just because we want to, no party plans in sight. Did I mention they’re great for game day too?
When it comes to easy party foods and finger foods, you want to keep it as simple as possible but still make sure it tastes good. Keep it simple with as few ingredients as possible, and hopefully ingredients you already have on hand.
Great options for simple appetizers and good finger foods include…
When planning easy apps for a crowd, there are 4 things you need to think about.
1. Timing
What appetizers can sit out, which ones can you make ahead, can you freeze any ahead of time, and are there appetizers that need to be made last minute right before the party or event? Figuring out the timing of making all the appetizers will help you plan an appetizer menu that works for you, not against you. It’ll also help you know how to give people tasks when they ask how they can help.
2. Serving
How much of each appetizer do you need to make? How many people will be in attendance, and how much will you need per person? Think serving sizes; also think about making extra on the most popular appetizers people love the most.
Once you figure out how many and how much, you’ll need to think about serving dishes, platters, bowls, and such. Also plates, napkins, and utensils needed.
3. Dietary Restrictions
Yeah, dietary restrictions can be a major bummer, but think about your guests who are living with those food restrictions… Even more of a bummer for them if there’s nothing they can eat. Ask your guests if they have any restrictions, and try to plan a few appetizers or snacks they can enjoy, as well. Think about vegetarian, vegan, gluten-free, dairy-free, etc.
4. Can You Turn the Party into an Appetizer Potluck?
Instead of doing all the work yourself, ask everyone to bring their favorite snacks, dips, and finger foods. Talk about cheap easy appetizers… Less work for you and everyone involved, and everyone gets to graze on their favorites. It’s a win-win!
Finger Food Appetizers
Super simple bites and foods you can eat with your fingers… Sometimes I’d rather have the appetizers over the main meal. Your guests will feel the same with this delicious array.
[wprm-recipe-roundup-item link=”https://staging.adventuresofmel.com/dill-pickle-ham-roll-ups/” newtab=”0″ name=”1. Dill Pickle Ham Roll Ups” summary=”<p>Whip up a batch of dill pickle ham roll ups in 10 minutes or less. These easy to make pinwheels make perfect snacks and party appetizers.</p>” image=”56265″]
[wprm-recipe-roundup-item link=”https://staging.adventuresofmel.com/apple-cheese-and-crackers/” newtab=”0″ name=”2. Apple Cheese and Crackers” summary=”<p>Top crackers with apple slices and cheddar to make apple cheese and crackers, an easy snack and basic appetizer idea grown-ups and kids will love!</p>” button=”Get the Recipe” image=”56342″]
[wprm-recipe-roundup-item link=”https://staging.adventuresofmel.com/bacon-wrapped-apples-with-cheese/” newtab=”0″ name=”3. Bacon Wrapped Apples with Cheese” summary=”<p>All you need are 4 ingredients to make bacon wrapped apples with cheese. Insanely delicious, easy appetizer recipe, perfect for a party.</p>” button=”Get the Recipe” image=”56195″]
[wprm-recipe-roundup-item link=”https://theforkedspoon.com/bacon-wrapped-shrimp/” name=”4. Bacon Wrapped Shrimp” summary=”<p>Delicious bite-sized bacon wrapped shrimp are the best quick and easy appetizer, perfect for game day, holidays, and special occasions. Made with juicy shrimp wrapped in crispy bacon, then brushed with a sweet and spicy honey Cajun glaze.</p>” button=”Get the Recipe” image=”56435″]
[wprm-recipe-roundup-item link=”https://nibbleanddine.com/smoked-salmon-canapes/” name=”5. Smoked Salmon Canapés” summary=”<p>Smoked salmon canapés are a quick, easy, and elegant appetizer with only 8 ingredients; and you can make them in about 15 minutes! </p>” button=”Get the Recipe” image=”56436″]
[wprm-recipe-roundup-item link=”https://staging.adventuresofmel.com/maple-bourbon-grilled-shrimp-kabobs/” newtab=”0″ name=”6. Maple Bourbon Shrimp Skewers” summary=”<p>Easy recipe for grilled shrimp kabobs marinated with the most delicious, two ingredient, maple bourbon grilled shrimp marinade, then skewered with pineapple chunks and thrown on the grill.</p>” button=”Get the Recipe” image=”34952″]
[wprm-recipe-roundup-item link=”https://staging.adventuresofmel.com/maple-sausage-stuffed-pastry-bites/” newtab=”0″ name=”7. Maple Sausage Stuffed Pastry Bites” summary=”<p>Maple sausage stuffed pastry bites, made with cream cheese and spinach, are the ultimate appetizer and finger food idea for your holiday party.</p>” button=”Get the Recipe” image=”32369″]
[wprm-recipe-roundup-item link=”https://staging.adventuresofmel.com/appetizer-recipe-taco-bites/” newtab=”0″ name=”8. Taco Bites” summary=”<p>Little taco bites snacks are super easy to make, and they contain fresh ingredients, like tomatoes, lettuce, and shredded cheese.</p>” button=”Get the Recipe” image=”21975″]
[wprm-recipe-roundup-item link=”https://staging.adventuresofmel.com/chicken-dip-pinwheels-appetizer/” newtab=”0″ name=”9. Chicken Dip Pinwheels” summary=”<p>Chicken dip pinwheels may be bite-sized, but they pack a delicious, flavor-filled punch. Add a little lettuce for a bit of green, and you've got an appetizer your guests will love.</p>” button=”Get the Recipe” image=”24801″]
[wprm-recipe-roundup-item link=”https://confessionsofparenting.com/cranberry-brie-bites/” name=”10. 15 Minute Cranberry Brie Bites” summary=”<p>Cranberry brie bites are the perfect addition to your next holiday party! With a beautiful cranberry sauce over melted brie in Filo shells, these simple cranberry appetizers are so easy to prep, but look like you slaved all day in the kitchen!</p>” button=”Get the Recipe” image=”56422″]
[wprm-recipe-roundup-item link=”https://budgetdelicious.com/buffalo-chicken-meatballs/” name=”11. Buffalo Chicken Meatballs” summary=”<p>Enjoy the great taste of Buffalo wings in convenient meatball form!</p>” button=”Get the Recipe” image=”56423″]
[wprm-recipe-roundup-item link=”https://xoxobella.com/homemade-mini-pizza-bagel-bites/” name=”12. Homemade Mini Pizza Bagel Bites” summary=”<p>Once you know how to make bagel bites, you'll want to rustle up this bite size pizza snack all the time. Homemade mini pizza bagel bites are a great lunch, snack or appetizer. Give these easy DIY pizza bagels a try!</p>” button=”Get the Recipe” image=”56424″]
[wprm-recipe-roundup-item link=”https://www.wholesomeyum.com/recipes/crispy-bacon-wrapped-asparagus/” name=”13. Bacon Wrapped Asparagus” summary=”<p>This oven baked bacon wrapped asparagus recipe includes tips to make it extra crispy, and it takes less than 30 minutes to make!</p>” button=”Get the Recipe” image=”56425″]
[wprm-recipe-roundup-item link=”https://staging.adventuresofmel.com/leftover-ham-and-stuffing-crescent-rolls/” newtab=”0″ name=”14. Leftover Ham and Stuffing Crescent Rolls” summary=”<p>Easy appetizer recipe with leftover ham, stuffing, and crescent rolls. Simple and delicious finger foods, perfect for party snacks or lunch with the kids!</p>” button=”Get the Recipe” image=”38063″]
[wprm-recipe-roundup-item link=”https://crazyadventuresinparenting.com/2015/10/spinach-balls-great-for-football-entertaining.html” name=”15. Easy Spinach Balls” summary=”<p>Get ready for this delectable spinach balls recipe which can be made gluten-free or no-carb, easy peasy.</p>” button=”Get the Recipe” image=”56427″]
[wprm-recipe-roundup-item link=”https://blackberrybabe.com/2021/06/16/puff-pastry-wrapped-asparagus/” name=”16. Cheesy Puff Pastry Wrapped Asparagus” summary=”<p>Cheesy puff pastry wrapped asparagus is a wonderful side dish or great appetizer! This tasty recipe uses just 6 ingredients, including fresh asparagus.</p>” button=”Get the Recipe” image=”56428″]
[wprm-recipe-roundup-item link=”https://eatpicks.com/ham-roll-ups/” name=”17. Easy Ham Roll Ups” summary=”<p>This easy ham roll ups recipe is perfect for your next appetizer or snack set up. With only 3 ingredients of sliced ham, cream cheese, and green onion, you can serve retro ham pinwheels for any party or holiday table!</p>” button=”Get the Recipe” image=”56429″]
[wprm-recipe-roundup-item link=”https://inspiredbycharm.com/brie-fig-and-prosciutto-crostini/” name=”18. Brie, Fig, and Prosciutto Crostini” summary=”<p>Inspired by a charcuterie, the wonderful flavors of this brie, fig, and prosciutto crostini will delight you and your guests, whether you’re hosting a large gathering or an intimate dinner.</p>” button=”Get the Recipe” image=”56430″]
[wprm-recipe-roundup-item link=”https://www.simplystacie.net/air-fryer-crab-rangoon/” name=”19. Air Fryer Crab Rangoon” summary=”<p>Air fryer crab rangoon is a quick and easy appetizer that's ready to eat in less than 20 minutes. The wonton is crispy on the outside with creamy crab filling on the inside. Perfect for parties or game day gatherings.</p>” button=”Get the Recipe” image=”56432″]
[wprm-recipe-roundup-item link=”https://www.wholesomeyum.com/bacon-wrapped-dates/” name=”20. Bacon Wrapped Dates with Goat Cheese” summary=”<p>Bacon wrapped dates with goat cheese make a classic appetizer! Just 4 Ingredients to make this EASY bacon wrapped stuffed dates recipe.</p>” button=”Get the Recipe” image=”56433″]
[wprm-recipe-roundup-item link=”https://recipesfromapantry.com/corn-ribs-air-fryer/” name=”21. Corn Ribs Air Fryer Style” summary=”<p>Making corn ribs air fryer style is a fun twist on traditional corn on the cob. This infamous recipe really is the perfect appetizer, party food, snack, or side dish.</p>” button=”Get the Recipe” image=”56434″]
[wprm-recipe-roundup-item link=”https://thegirlinspired.com/charcuterie-cups/” name=”22. Charcuterie Cups” summary=”<p>Charcuterie cups provide a creative twist to the everyday charcuterie board! Load clear plastic cups with assorted snacks of choice for a decorative and fun hand-held party appetizer.</p>” button=”Get the Recipe” image=”56482″]
Easy Party Dips
Don’t you just love a good dip? Family and friends will love these hot and cold dips that pair so well with tortilla chips, crackers, potato chips, fresh raw veggies, and more.
[wprm-recipe-roundup-item link=”https://staging.adventuresofmel.com/easy-chili-cheese-dip/” newtab=”0″ name=”23. Easy Chili Cheese Dip” summary=”<p>How to make amazing chili cheese dip with cream cheese in the microwave, oven, or CrockPot. Easy, homemade, crowd favorite appetizer recipe!</p>” button=”Get the Recipe” image=”44118″]
[wprm-recipe-roundup-item link=”https://staging.adventuresofmel.com/bbq-chicken-dip/” newtab=”0″ name=”24. Creamy BBQ Chicken Dip” summary=”<p>BBQ Chicken Dip, made with cream cheese, is an easy appetizer recipe. Pair it with tortilla chips for a delicious snack your friends and family will love!</p>” button=”Get the Recipe” image=”33009″]
[wprm-recipe-roundup-item link=”https://staging.adventuresofmel.com/game-day-recipe-bacon-cheddar-bbq-ranch-dip/” newtab=”0″ name=”25. Bacon Cheddar BBQ Ranch Dip” summary=”<p>Bacon cheddar bbq ranch dip is a tasty appetizer your guests will love. Pair with your favorite snacks, like chips, crackers, and raw vegetables!</p>” button=”Get the Recipe” image=”51736″]
[wprm-recipe-roundup-item link=”https://staging.adventuresofmel.com/snowman-pimento-cheese-ball-recipe/” newtab=”0″ name=”26. Snowman Pimento Cheese Ball” summary=”<p>Festive snowman pimento cheese ball you can serve with crackers, pretzels, or a fresh veggie tray. Perfect for a Christmas party!</p>” button=”Get the Recipe” image=”21525″]
[wprm-recipe-roundup-item link=”https://www.saltysidedish.com/fiesta-corn-dip-with-rotel/” name=”27. Fiesta Corn Dip with Rotel” summary=”<p>Fiesta corn dip recipe with whole kernels of corn, green onions, and loads of cheddar cheese makes the perfect easy and cold large party dip. It's a no fail Mexican party dip that every one is sure to love!</p>” button=”Get the Recipe” image=”56483″]
[wprm-recipe-roundup-item link=”https://julieblanner.com/creamy-spinach-dip-recipe/” name=”28. Spinach Dip with Cream Cheese” summary=”<p>Creamy spinach dip with cream cheese is quick and easy to prepare, making it a great last minute appetizer that feels anything but last minute.</p>” button=”Get the Recipe” image=”56484″]
[wprm-recipe-roundup-item link=”https://unsophisticook.com/chips-and-dip/” name=”29. Copycat Lawson’s Potato Chip Dip” summary=”<p>If you're a chips and dip junkie, you're going to love this out-of-this-world easy chip dip… AND it doubles as a delicious veggie dip!</p>” button=”Get the Recipe” image=”56485″]
[wprm-recipe-roundup-item link=”https://www.westviamidwest.com/5-minute-crack-dip/” name=”30. 5 Minute Crack Dip” summary=”<p>This 5 minute crack dip comes together in 5 minutes and is perfect for serving with crackers. Ideal for holiday party appetizers, game day snacking, or just to serve with cocktails!</p>” button=”Get the Recipe” image=”56486″]
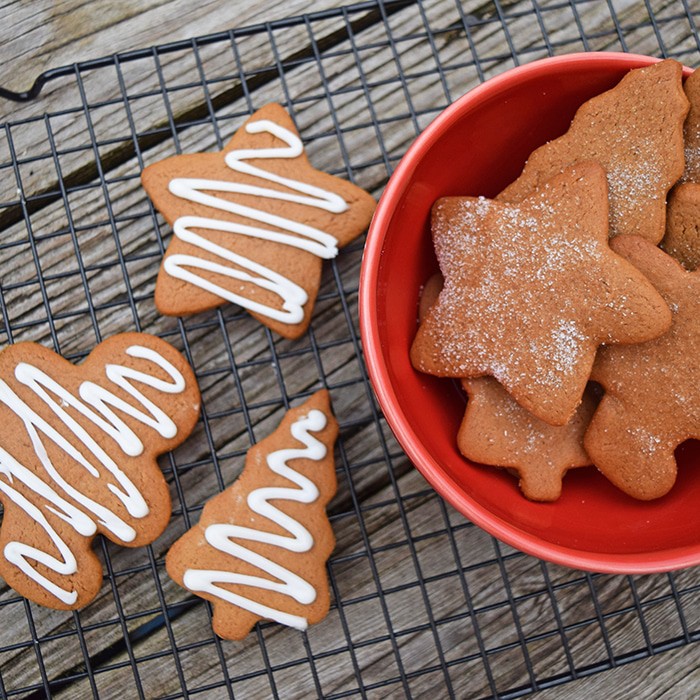
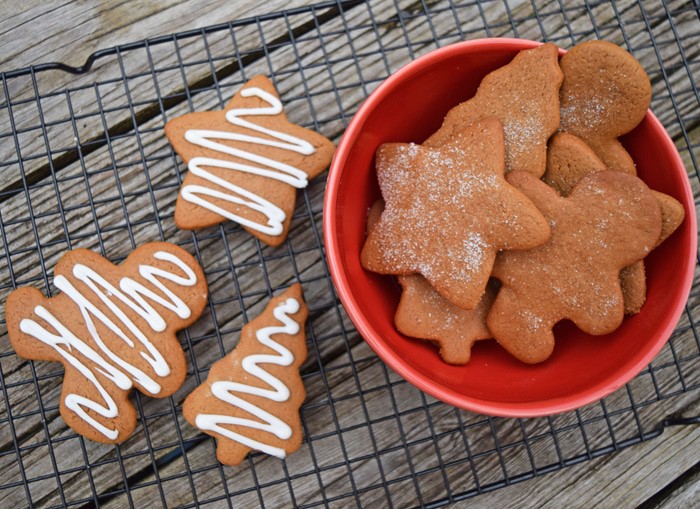
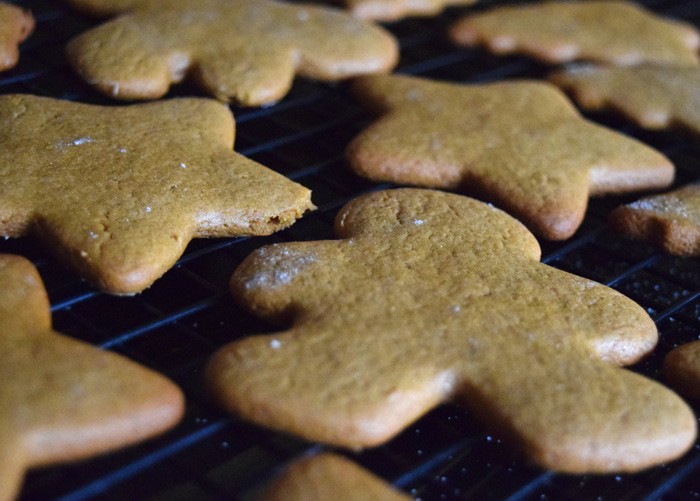
But we hardly ever make gingerbread cookies. I’ve made them before, but they’ve always been either a really difficult recipe or frankly, just haven’t tasted that great.
Not so with this recipe. These cookies are slightly chewy with a somewhat crunchy edge. You are going to love it!
These chewy gingerbread cookies have disappeared from our cookie jar rather quickly. In fact, I’ve considered making another batch.
We actually have all sorts of things planned for this week (or rather, I have a few surprises up my sleeve).
The week before Christmas we usually do a little Christmas school, where instead of hitting the books, we do fun Christmas-y things, like make all sorts of goodies, start a Christmas puzzle, put together a gingerbread house, read Christmas books, go shopping for any last minute gifts, go see Christmas lights, and just spend time together.
Baking together is one of our favorite things.
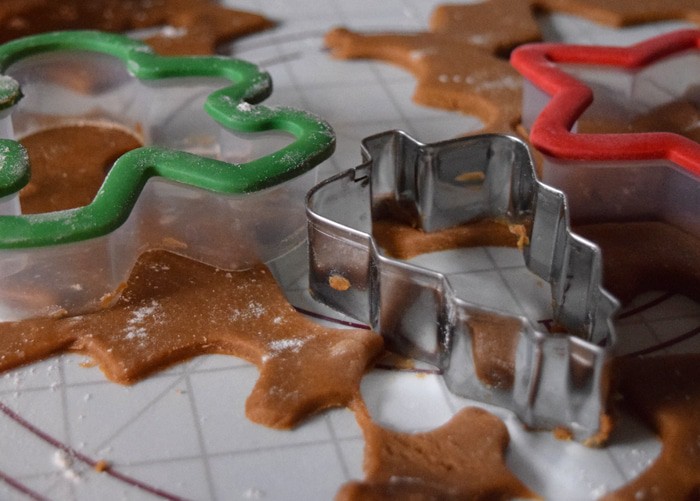
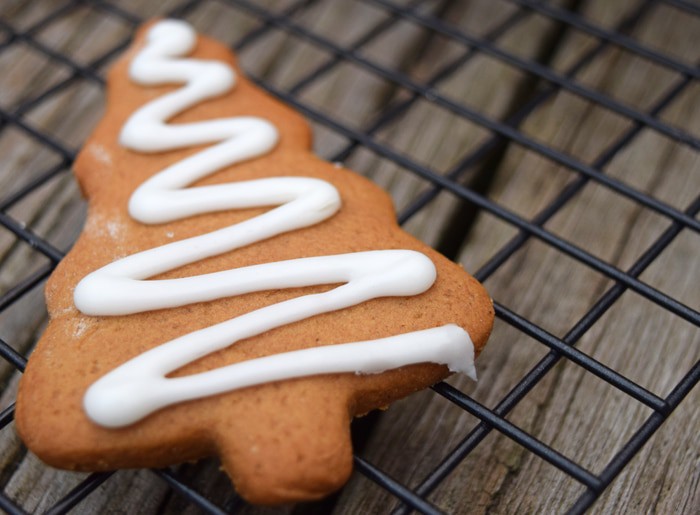
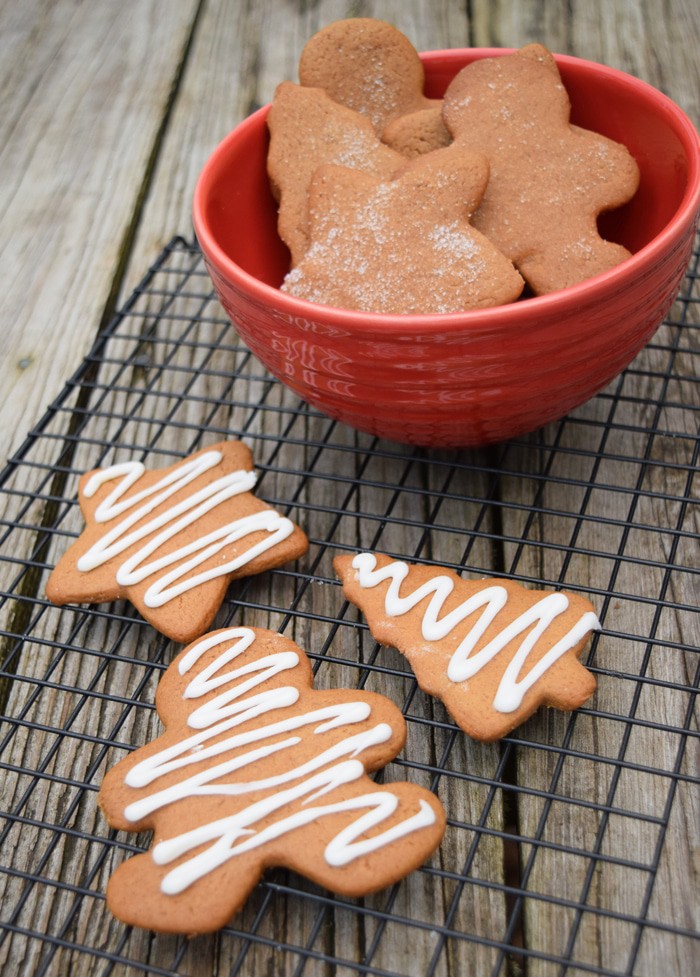
With this recipe, we chose to make Christmas trees, gingerbread men, and stars.
Creating recipes like this gives opportunity to teach kids a few cooking skills… For instance, they can learn how to roll out dough. Warning: They may even fight over who gets to roll the dough.
They can also cut out the cookies and put them on the cookie sheet. My boys love to actually decorate cookies with Easy Sugar Cookie Icing, though I’m not sure how much decorating gets done vs. eating.
Below you’ll find the printable recipe. This gingerbread cookie recipe is adapted from the Gingerbread Boys recipe in the old 1969 version of Betty Crocker’s Cookbook. Don’t you just love vintage cookbooks? Within the pages are treasures to be found.
I tweaked and added a few things to give the recipe my own touch. Also, just a helpful note, the cookies are even better the next day. I hope you enjoy!
Chewy Gingerbread Cookies
Grab the ingredients, a few decorations, and your family, and make Chewy Gingerbread Cookies together. They're scrumptious classic holiday treats inspired by a vintage cookbook.
Cookie Dough:
1/2 cup unsalted butter (softened)
1/4 cup cane sugar
1/4 cup dark brown sugar
1/2 cup molasses
1/4 cup whole milk
1/2 teaspoon lemon juice
2 1/2 cups all-purpose flour
1/2 teaspoon baking soda
1/2 teaspoon salt
3/4 teaspoon ground ginger
1/4 teaspoon ground nutmeg
1/4 teaspoon ground cinnamon
1/8 teaspoon ground allspice
Cookie Icing:
4 tablespoons salted butter (softened)
1 teaspoon vanilla extract
1 cup whole milk
6 cups powdered sugar
Gingerbread Cookies:
In a large mixing bowl, cream or mix together the softened unsalted butter, sugar, and dark brown sugar.
Add the molasses, milk, and lemon juice, mixing well.
In a separate large bowl, sift together the flour, baking soda, salt, ginger, nutmeg, cinnamon, and allspice.
Mix the dry ingredients into the creamed mixture, mixing well.
Cover the dough, and chill in the refrigerator for about 4 hours.
Pre-heat the oven to 375° F.
Turn the dough out onto a floured surface, coating the dough with flour and kneading it until it's less sticky and more pliable.
Then roll the dough out to about 1/4 inch thickness.
Cut out cookies with floured Christmas cookie cutters.
Place the cookies on an un-greased cookie sheet, and bake at 375° F for about 10 minutes, or until the cookies are set.
Place the cookies on a wire rack to cool completely before decorating.
Cookie Icing:
In a large mixing bowl, mix together the softened salted butter and vanilla extract.
Add the milk to the mixture.
Slowly add the powdered sugar to the mixture, mixing it in as you go; the finished icing should be smooth, creamy, and spreadable.
Decorate the gingerbread cookies with icing, sprinkles, and nonpareils.
Christmas, Desserts
American
chewy gingerbread cookies, gingerbread cookies, homemade gingerbread cookies
Christmas always gets me in a crafty mood, and more times than not it inspires me to make something for or with my boys. My middle child especially loves to craft and create, and these Snowman Marshmallow Pops, inspired by both Pinterest and winter, are definitely something we have to make during the holiday season.
Want to make them with your kids? You just need to gather a few supplies.
Supplies You’ll Need to Make Snowman Marshmallow Pops
Honestly, just let your imagination be your guide when gathering supplies. There are a few basics that you’ll want to have on hand, but as far as candy and the rest of your “sweet” decorations go, let your kids have fun with it and decide what to use.
Supplies and Ingredients You’ll Need
Jumbo marshmallows
Regular sized marshmallows
Mini marshmallows
Paper straws or cake pop sticks Wilton Decorating icing in your favorite colors
Round cake tips w/ couplers
Reese’s Mini Peanut Butter Cups
Hershey’s Kisses (Hugs would work great too) Airheads Xtremes Sour Belts Cake Pop Decorating Stand (Wilton has a basic cardboard stand that is affordable and works great)
How to Make Snowman Marshmallow Pops
Once you’ve gathered all your supplies, it’s time to get creative. You can use a mix of different sized marshmallows to create your snowmen. I made some triple stack and some more roly-poly.
Trim the snowmen to your heart’s desire; the sky really is the limit once you get going because it’s really quite relaxing and fun. Place a Hershey Kiss on the top of the snowman to create a sort of stocking cap. Or you can use a Reese’s Mini to create more of a traditional “Frosty” hat.
Use mini marshmallows, a little icing, and smaller lengths of the Airheads candy to create earmuffs, or as my kids called them, “Awesome headphones.”
Also, use the Airheads belts to create scarves. Then decorate the snowmen with the Decorating Icing, forming carrot noses, eyes, smiles, and buttons.
This might be a fun activity for holiday parties and family get-togethers. Create a decorating table, and let all the kids create their own snowman treats.
If you try this recipe, why not leave a star rating in the recipe card right below and/or a review in the comment section further down the page? I always appreciate your feedback. You can also follow me on Pinterest, Facebook, Instagram, and YouTube. And subscribe to my email list too!
What candies and decorations would you use for your own Snowman Marshmallow Pops?
Snowman Marshmallow Pops
Use marshmallows of all sizes to make yummy snowman marshmallow pops. They're a scrumptious Christmas craft or holiday party idea, and kids love decorating these festive treats.
Cake Pop Sticks
Round Cake Tips
Cake Tip Couplers
Cake Pop Decorating Stand
16 jumbo marshmallows
16 marshmallows
Decorating Icing ((variety of colors))
16 Hershey Kisses ((or Hugs))
16 Mini Peanut Butter Cups
64 mini marshmallows
Airheads Xtremes Sour Belts
Place marshmallows on cake pop sticks; use a variety of large and jumbo marshmallows. You can make some triple stack, some with a jumbo body and large head, and so on.
To give the snowman a hat, use a Hershey Kiss or Mini Peanut Butter Cup, attaching either one with a dab of Decorating Icing.
To create earmuffs, cut smaller lengths of Airheads Sour Belts, long enough to drape over the snowman's head; dab Decorating Icing on 2 mini marshmallows, and attach 1 to each end of a shortened Sour Belt. Then place the earmuffs on the snowman.
Use the Airheads Sour Belts to create scarves around your snowman's neck.
Use Decorating Icing to decorate each snowman, forming carrot noses, eyes, smiles, and buttons.
This might be a fun activity for holiday parties and family get-togethers. Create a decorating table, and let all the kids create their own snowman treats.
Certain scents have always brought Christmas memories to my mind. Memories have stirred with the scents of cinnamon, clove, peppermint, and more.
Since I love using my essential oils, it only made sense to somehow incorporate them into our Christmas tree by making clay diffuser ornaments.
I had all the supplies I needed on hand, and you may too.
Supplies You’ll Need for Clay Diffuser Ornaments
Here’s what you’ll need… Let’s gather supplies.
Air-Dry Clay
Cutting board (with parchment paper) or craft mat
Rolling pin
Christmas cookie cutters
Decorative acrylic stamps
Stamp block/s
Small cup of water
Pencil
Scissors
Ribbon
Instructions for DIY Clay Diffuser Ornaments
Cover a cutting board with parchment paper to protect the surface of your board, or just use a craft mat, whichever you prefer.
I had originally planned to use white clay, but the only unopened clay I had that wasn’t dried out was the Terracotta color. And actually, I ended up liking the Terracotta color even more because when all was said and done, the ornaments reminded me of cinnamon ornaments.
Roll out the clay to about 1/4 to 1/2 inch thickness. Tip: If it’s too thick, the ornaments will be extra heavy on your tree.
Once your clay is rolled out, begin cutting out shapes with the cookie cutters.
Now comes the fun of decorating your ornaments. Attach acrylic stamps to your stamp blocks and leave impressions on each ornament.
I added snowflake borders, snowflake stripes, a berry branch, a kind of snowflake star, and more.
Just have fun with it! The best part about using this type of clay is if you mess up, it’s pretty easy to smooth over the design and try again.
Just keep a little water on hand, so you can dip your fingers in it before smoothing out a design.
When you’re done decorating, use a pencil to create a hole in the top of your ornament, in order to insert a ribbon for hanging. Then let the ornaments dry for 24-48 hours.
Finish Your Ornaments
Cut a piece of ribbon, about 4-6 inches in length. Poke the ribbon through each ornament hole, using a pencil or other sharp object to help get it through the hole.
Tie the ribbon in a double knot for hanging.
Now you can pick your favorite scents of essential oils, and add a few drops to your ornaments.
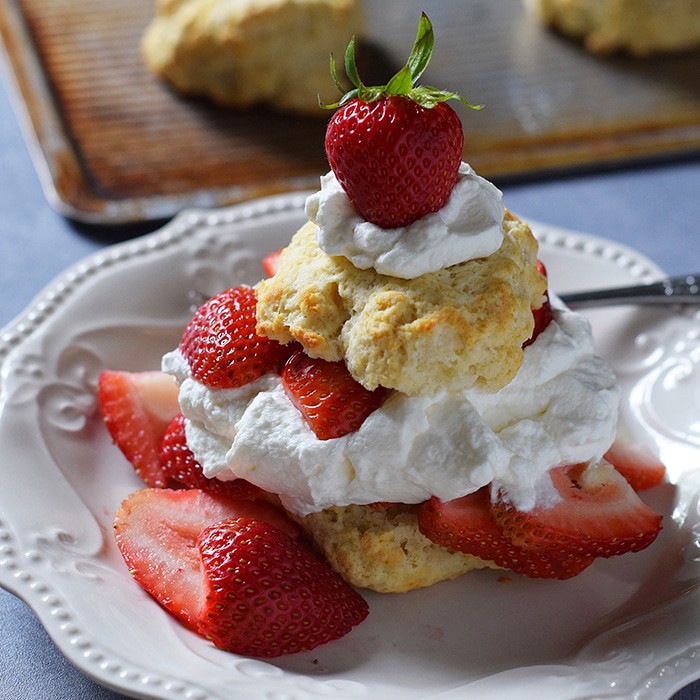
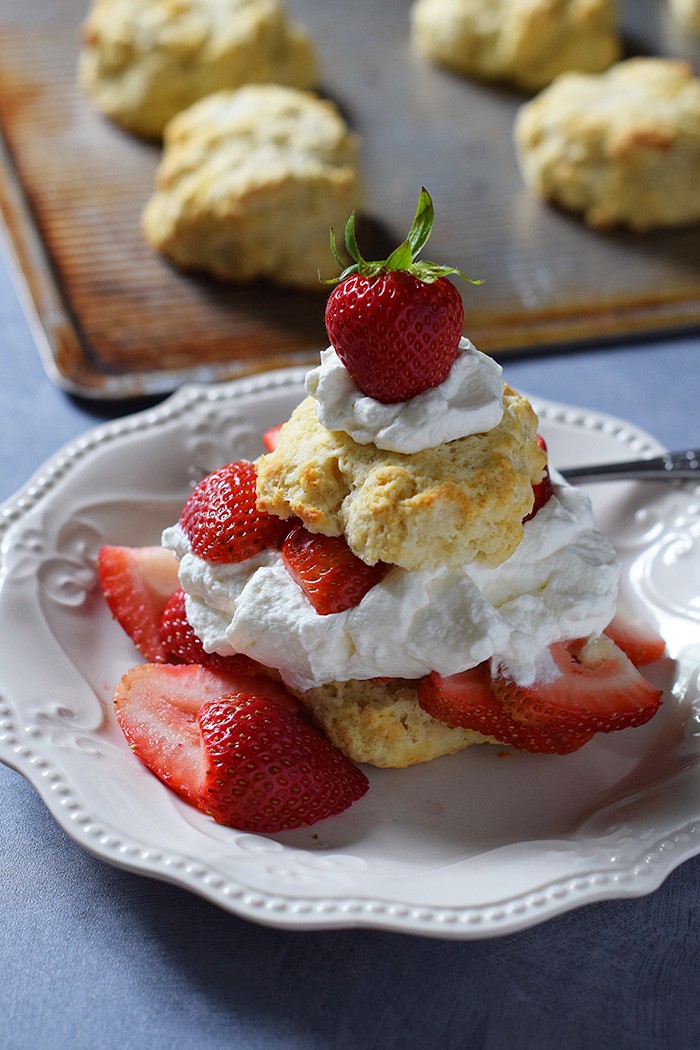
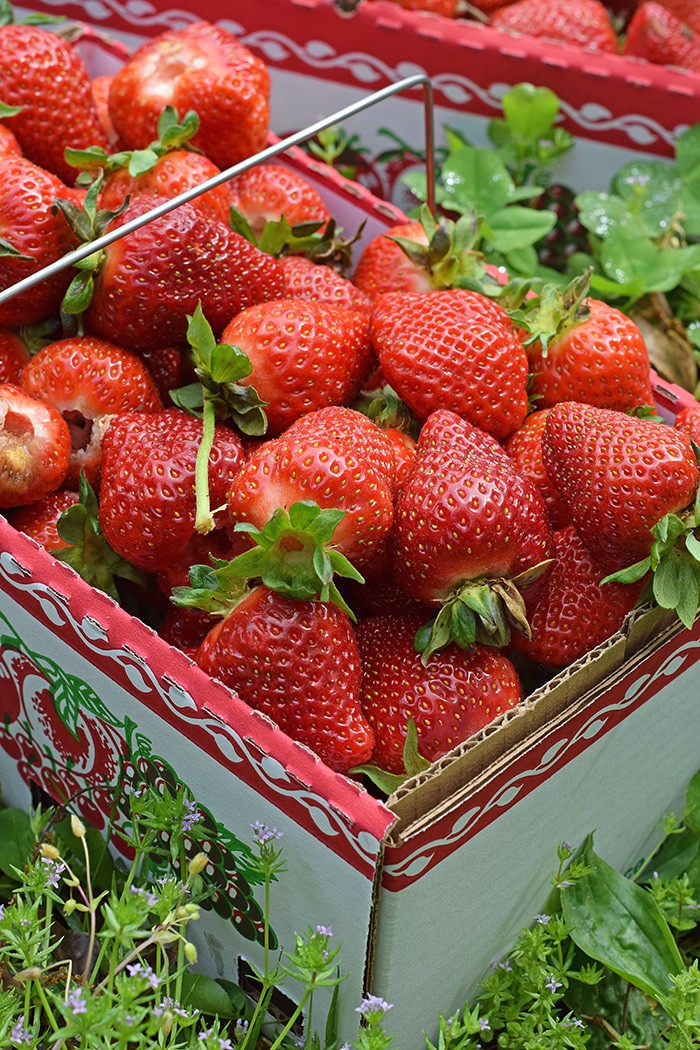

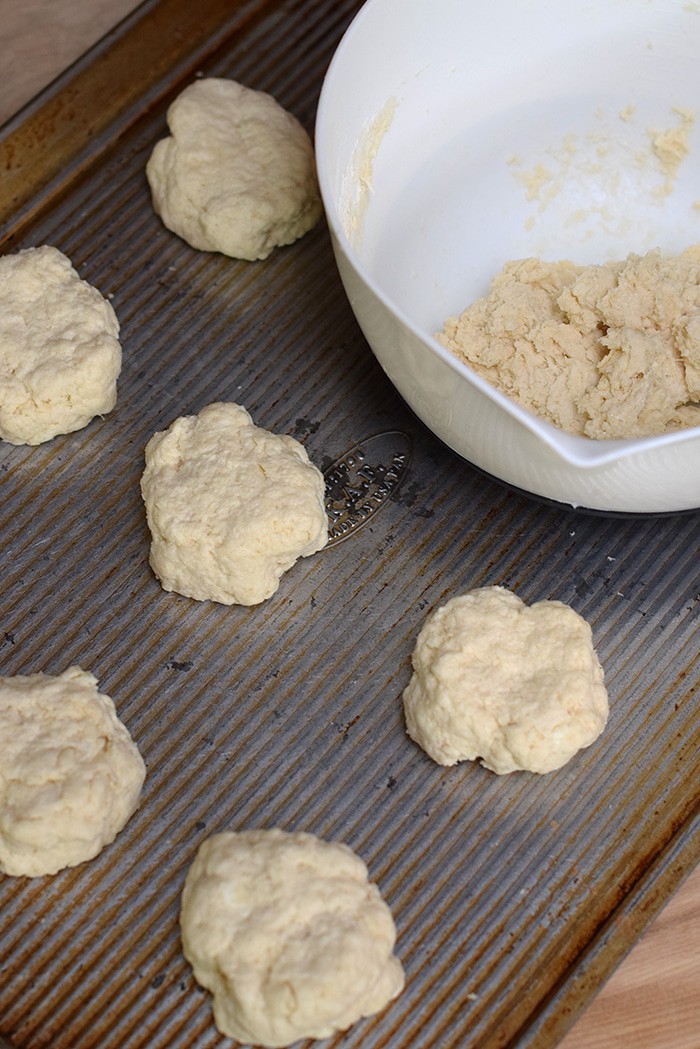
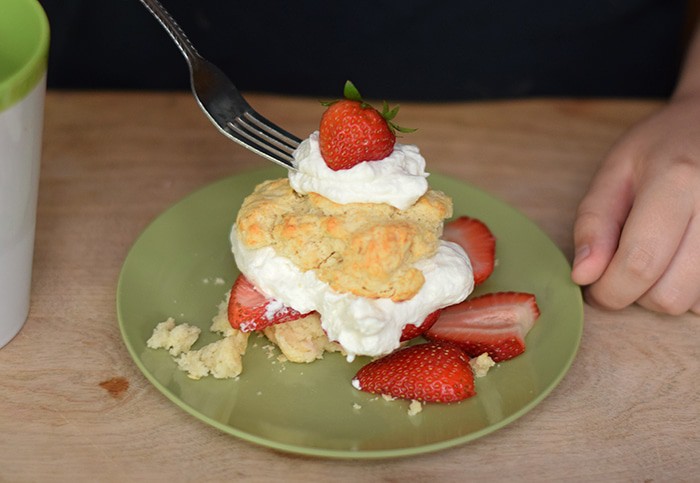
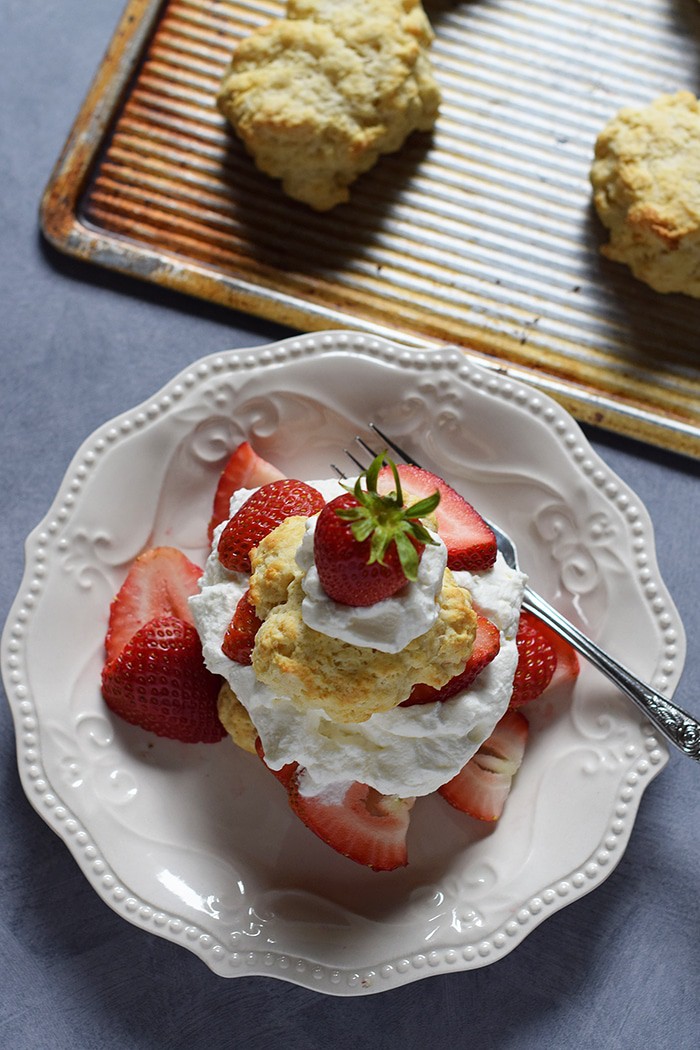
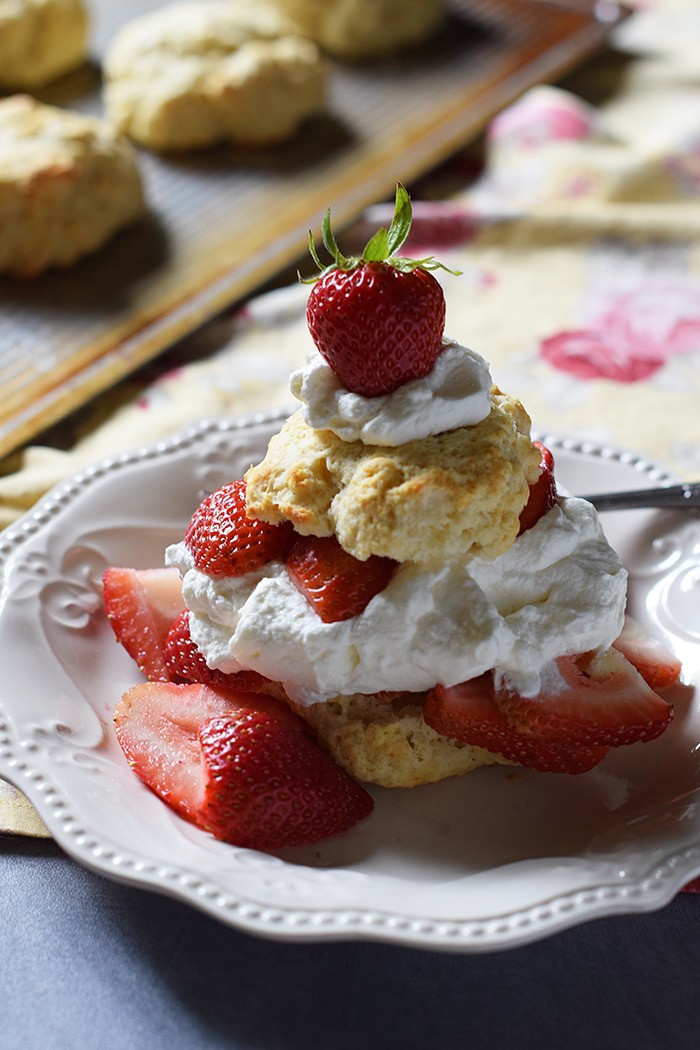
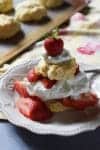
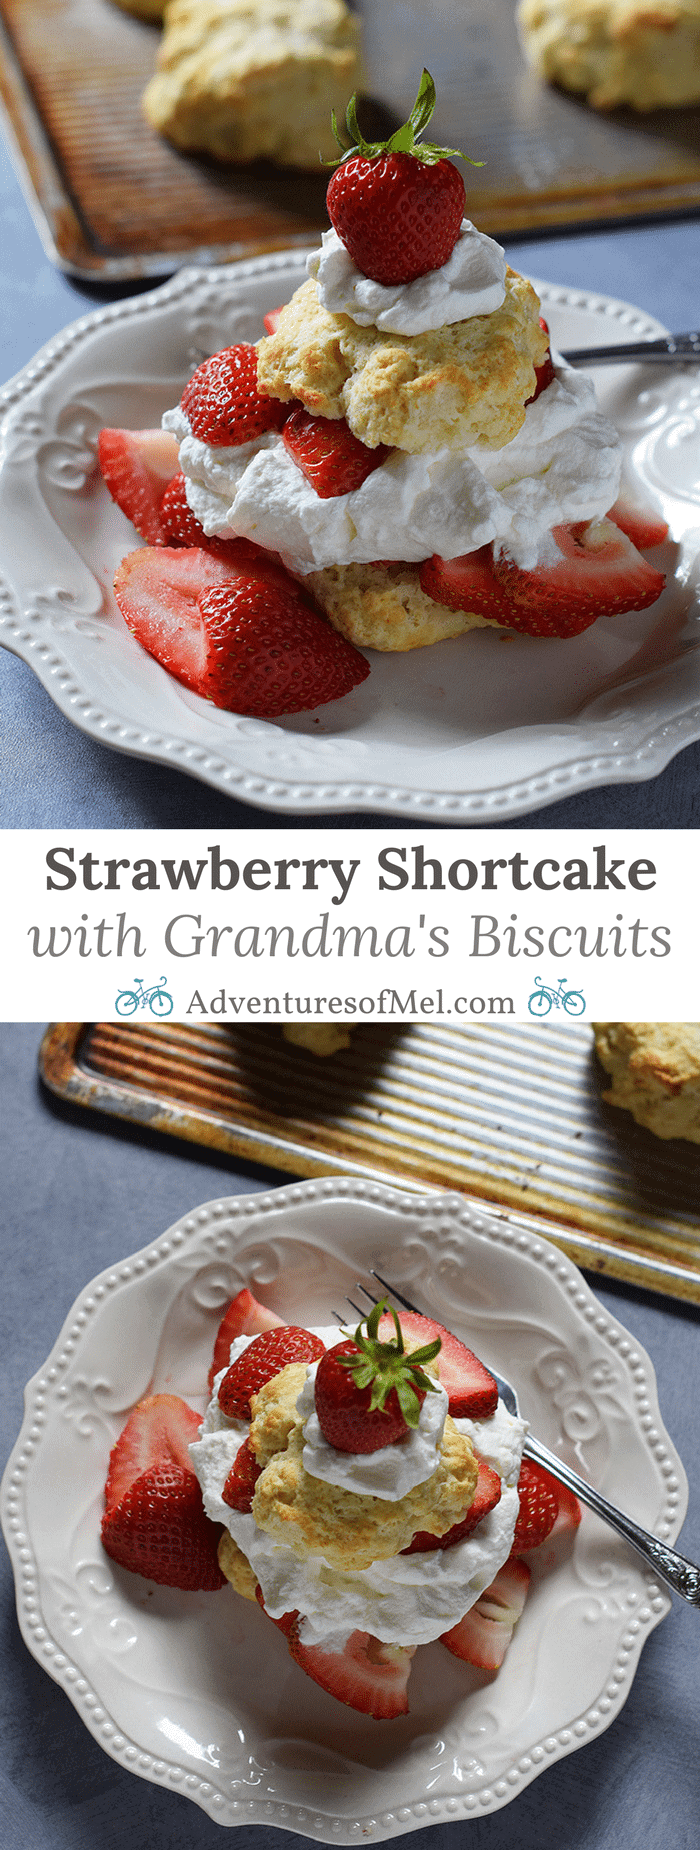
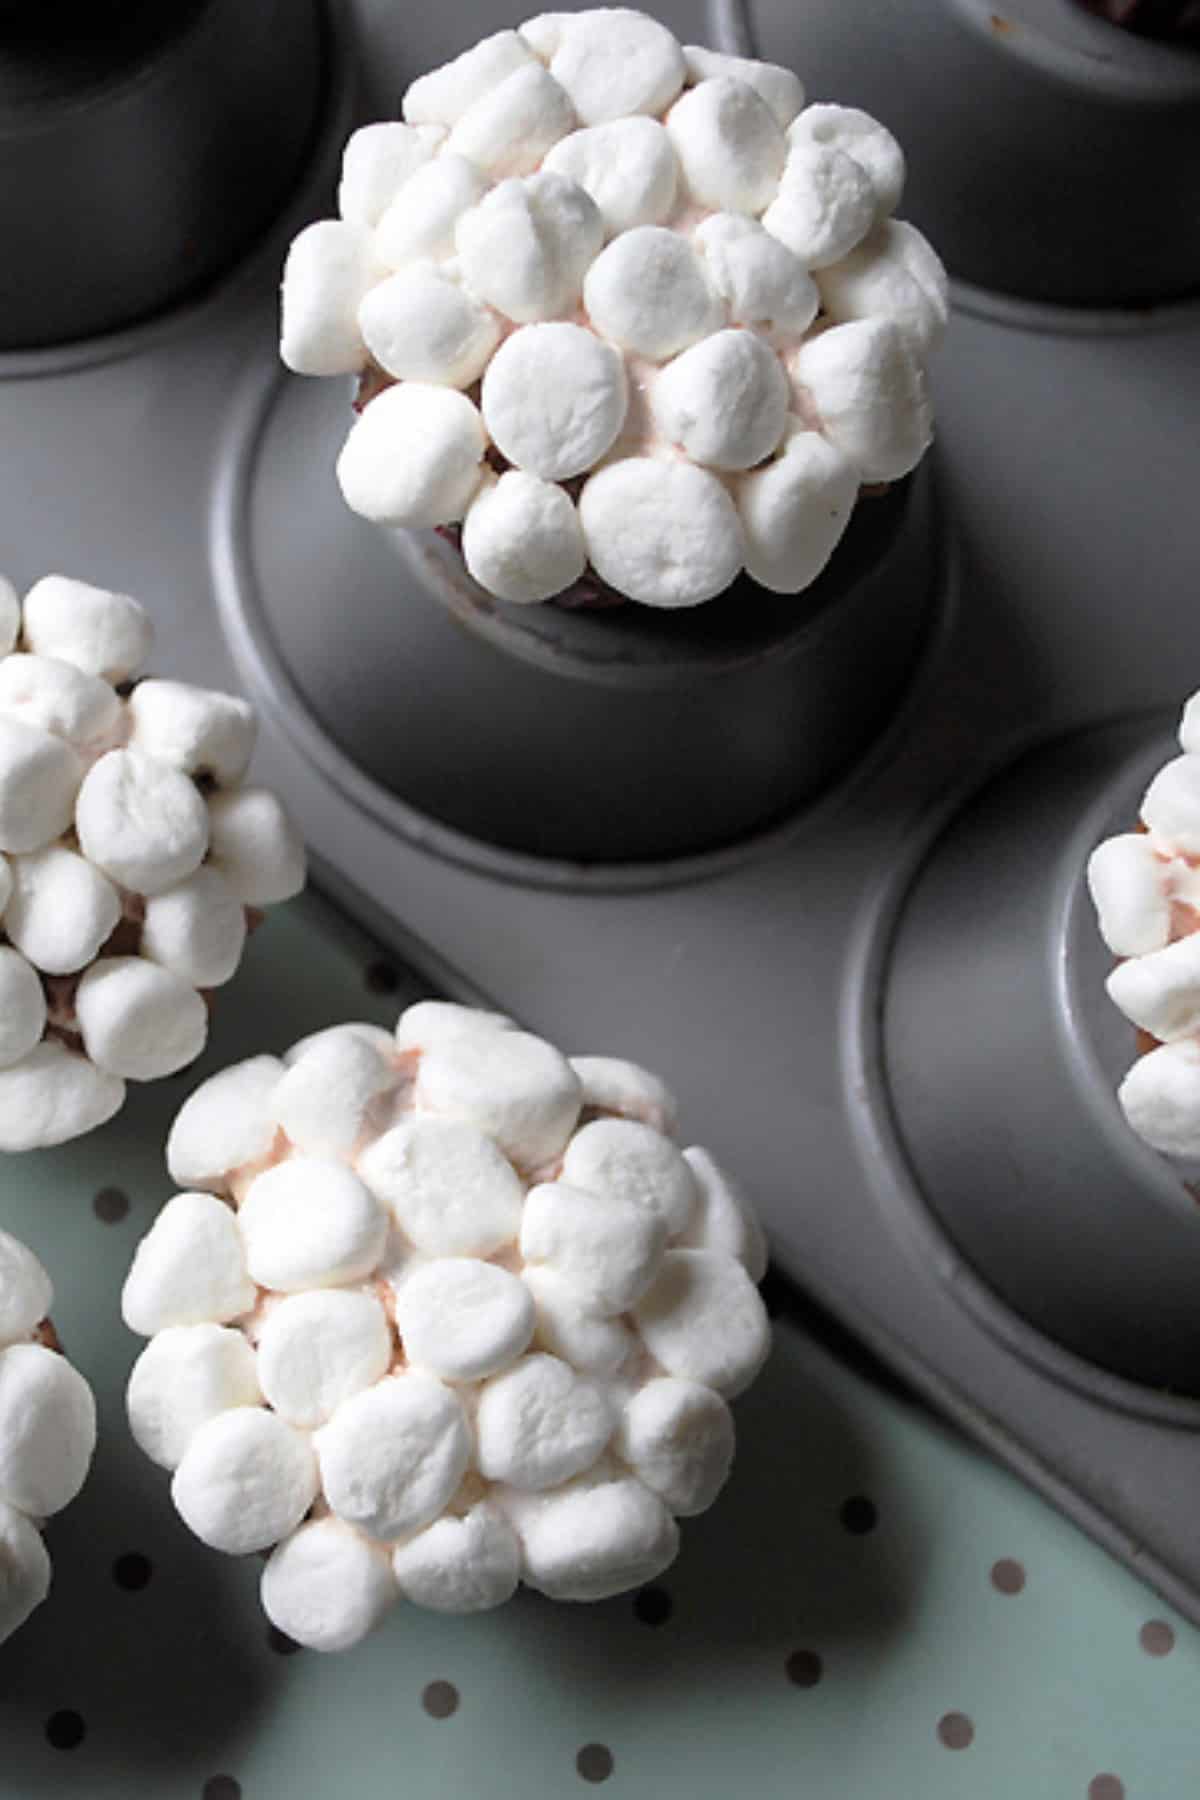
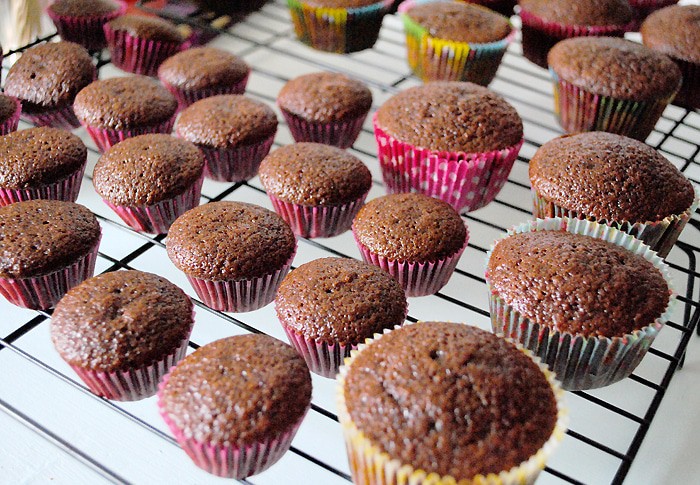

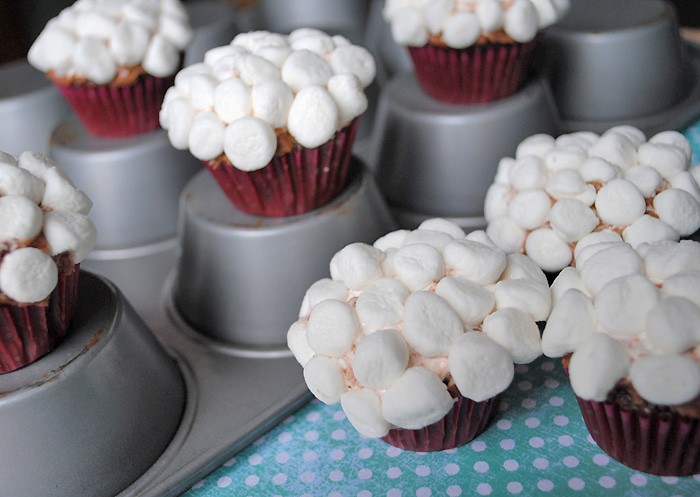
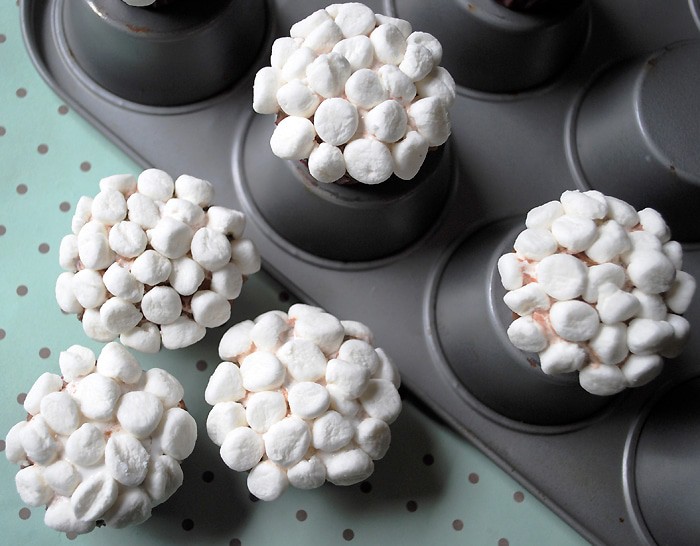
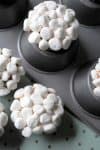
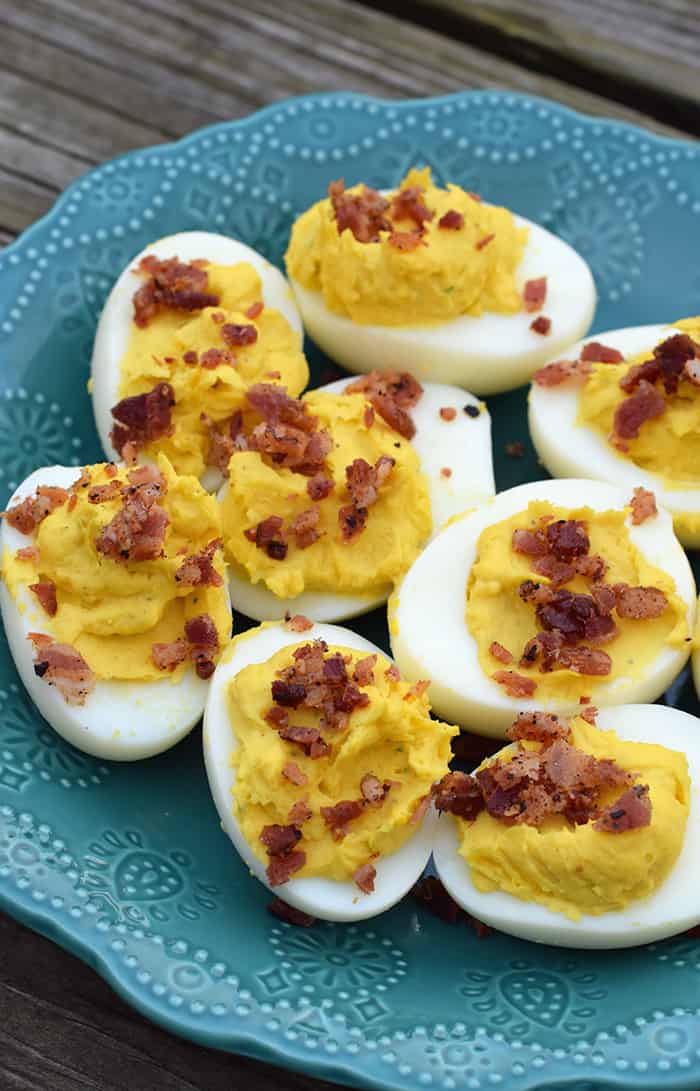
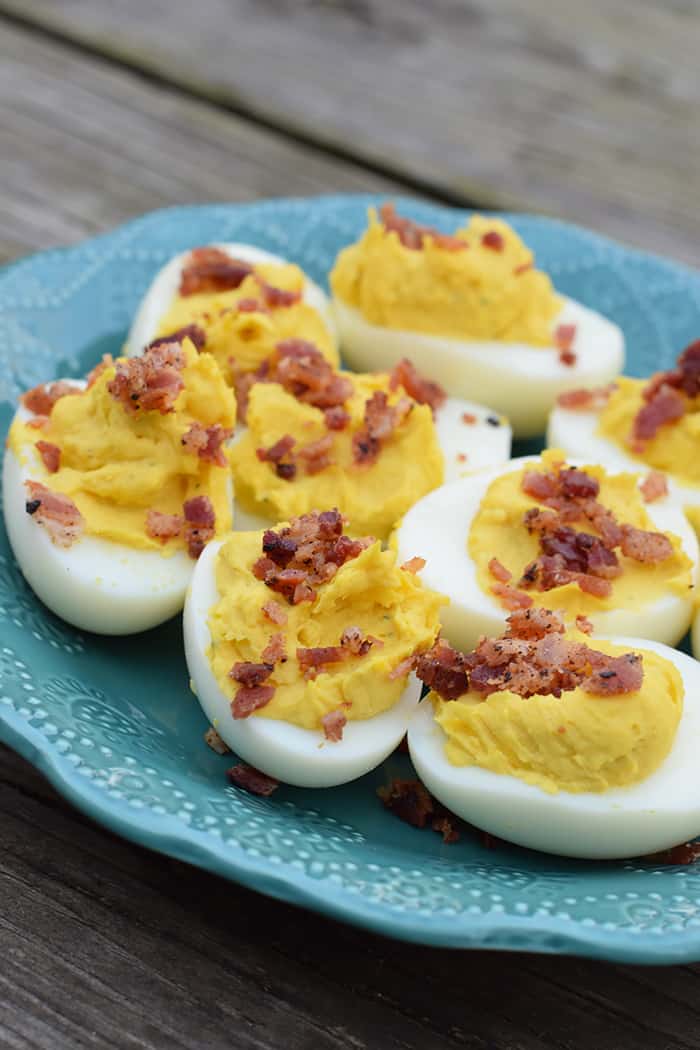

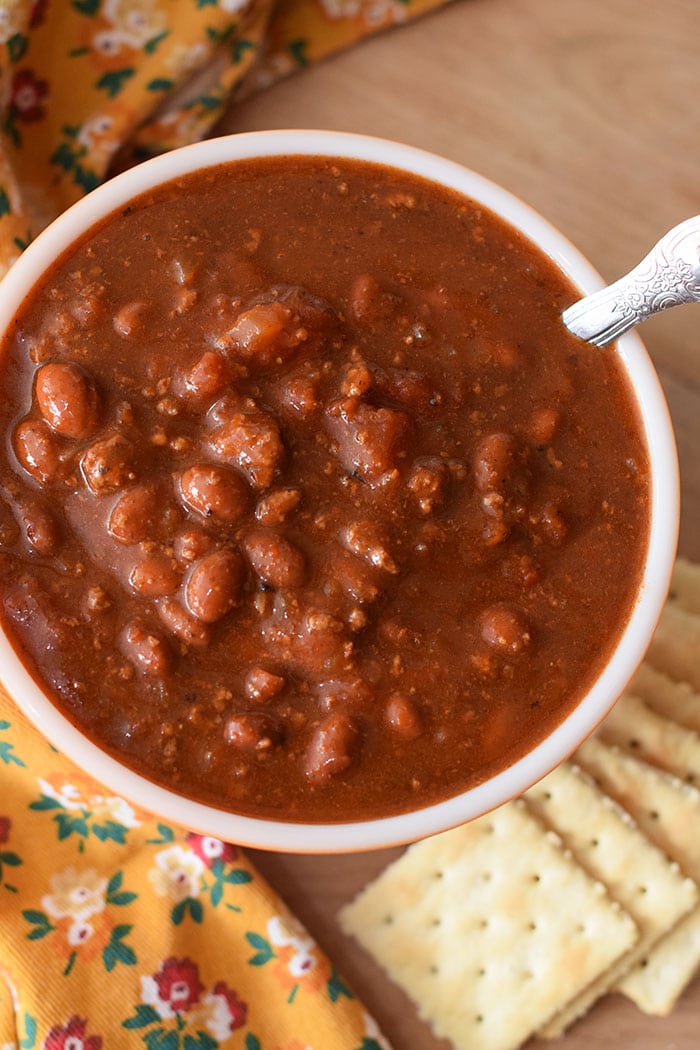
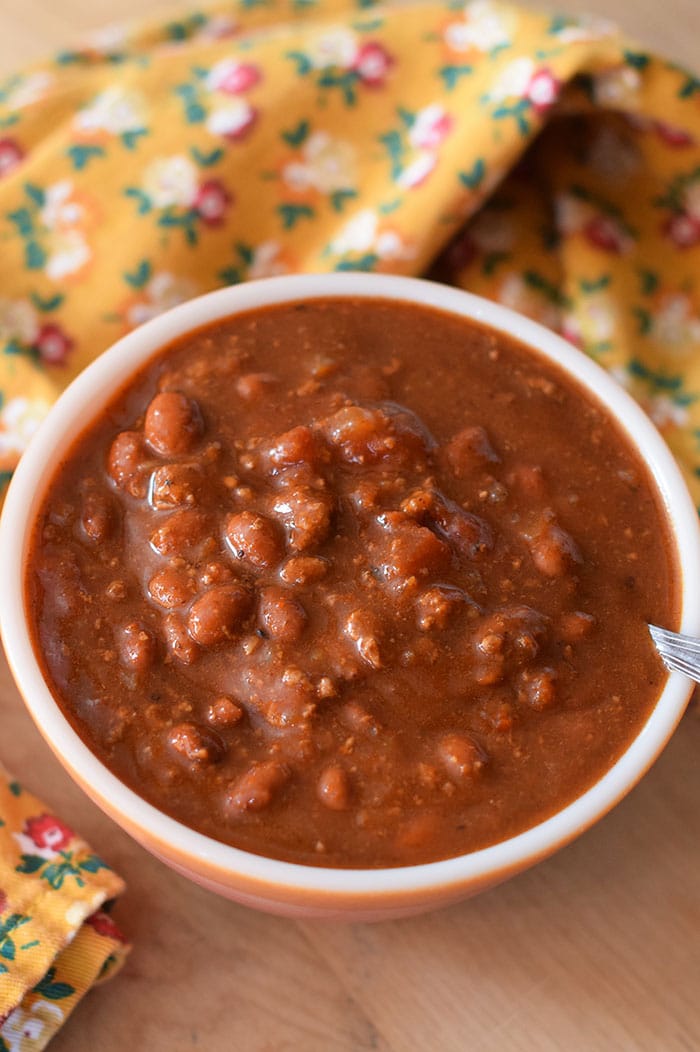
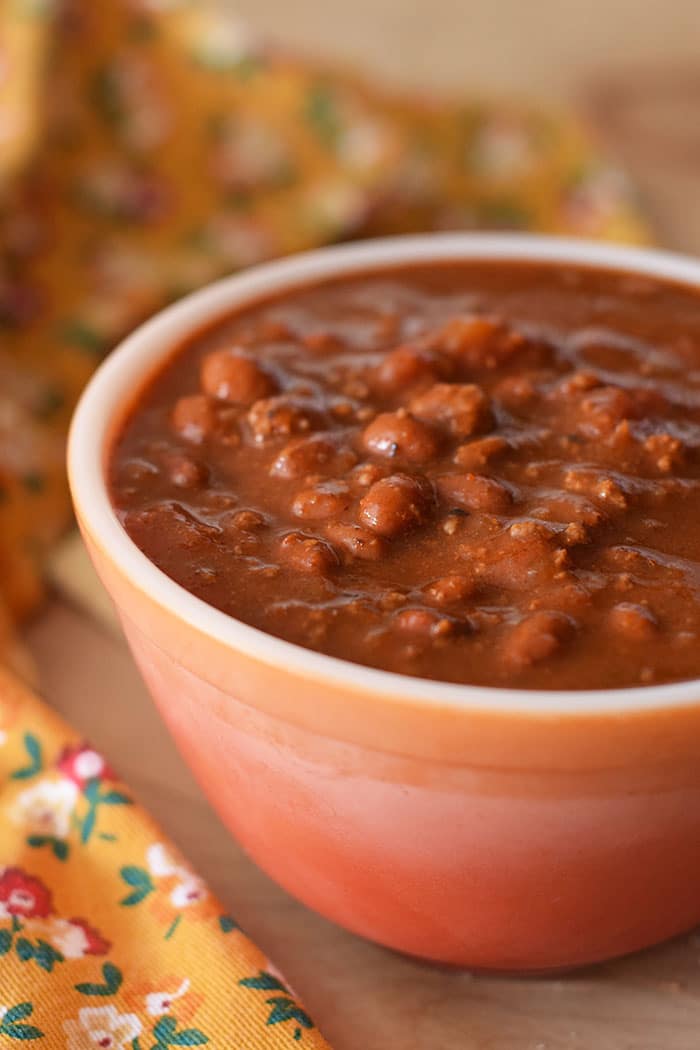
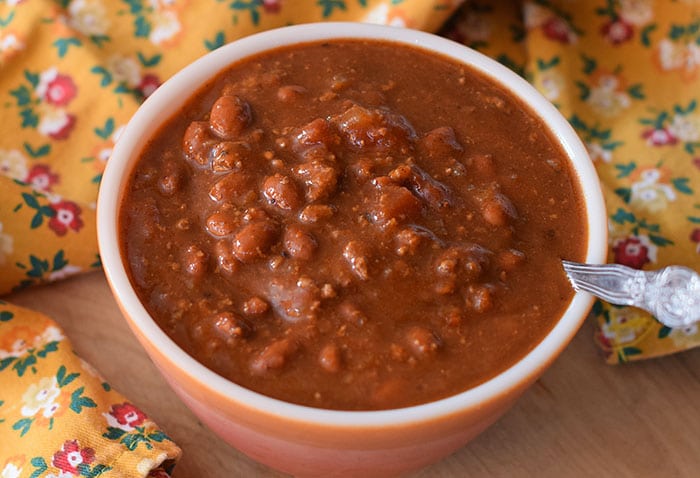


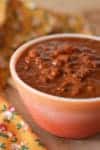

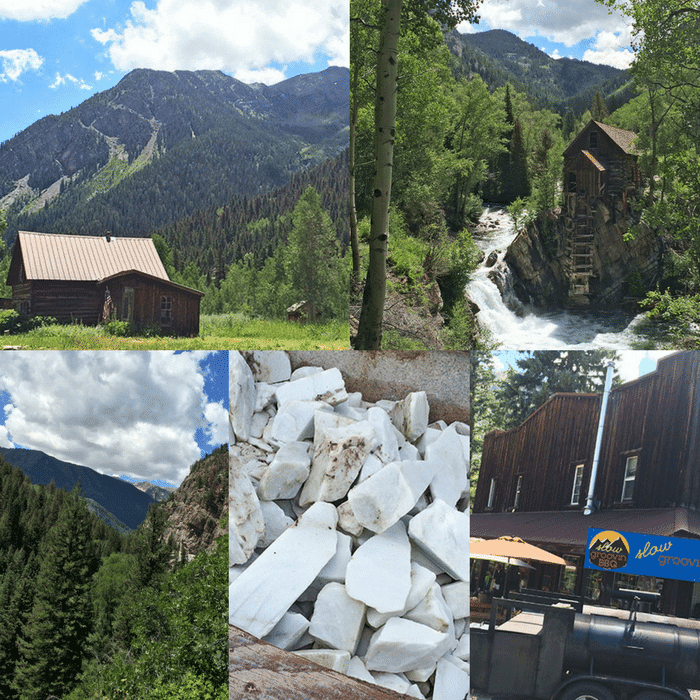

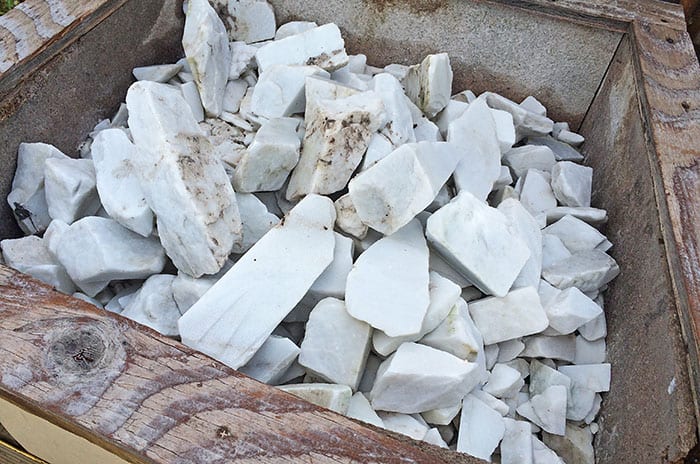


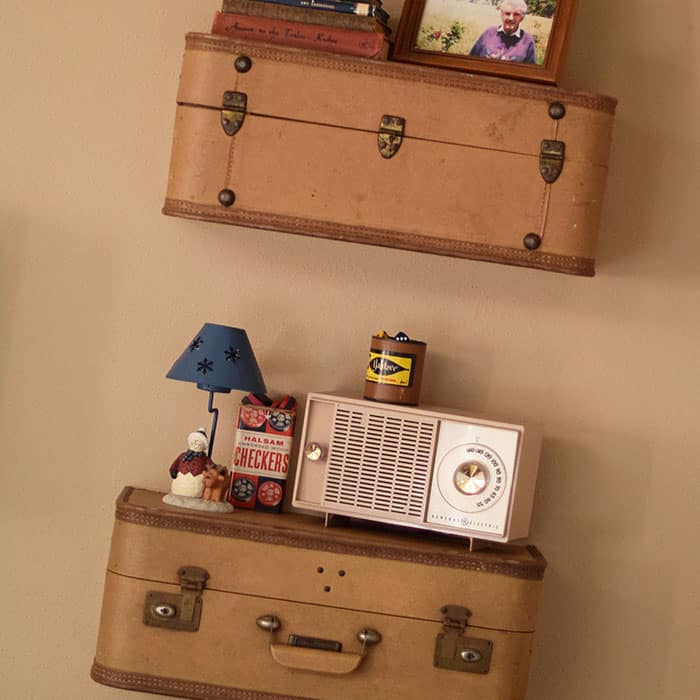
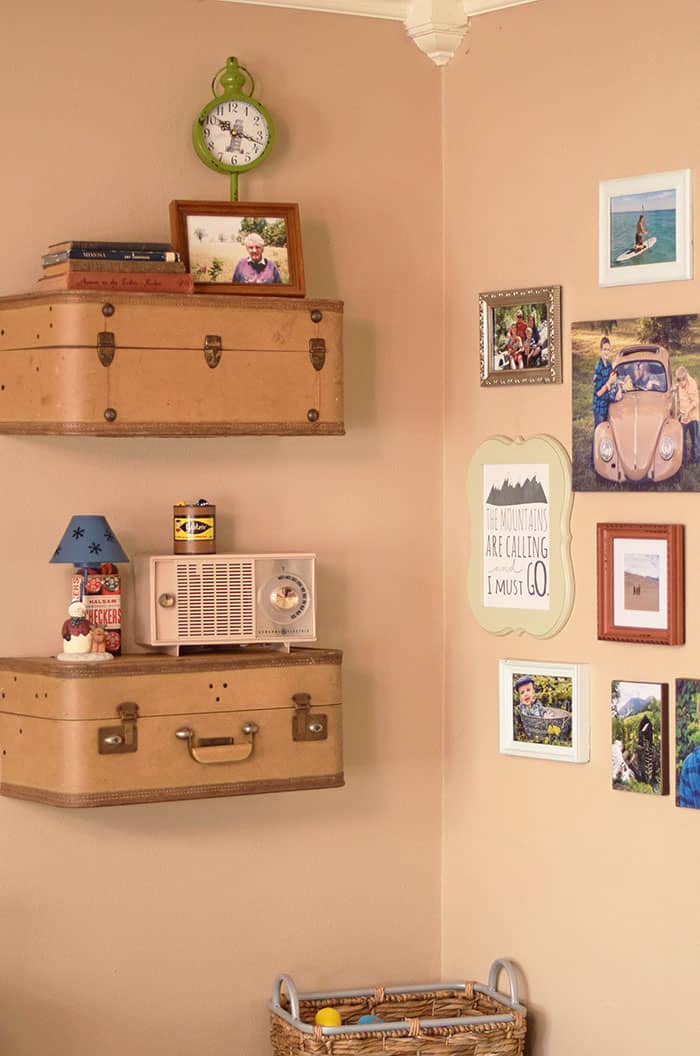
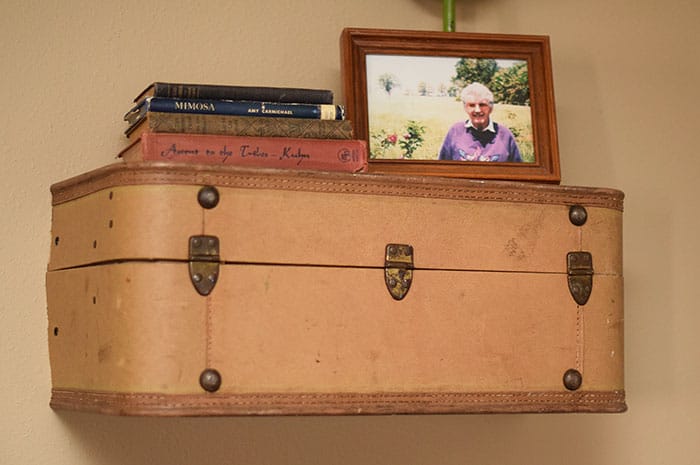 And the color was neutral but absolutely beautiful. It was a bit roughed up, a part of its character that only adds more charm, in my opinion.
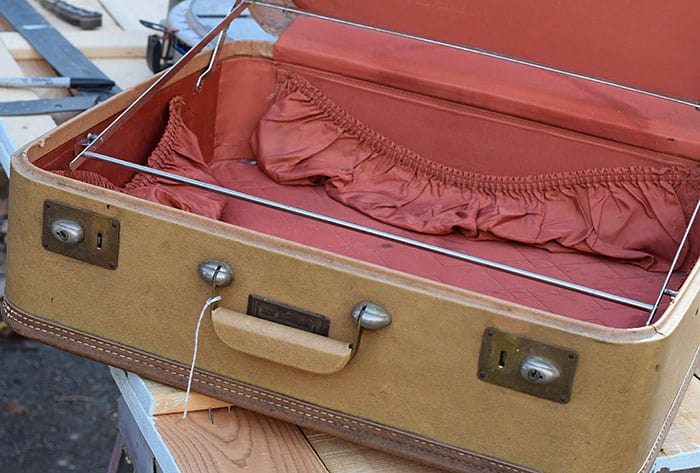
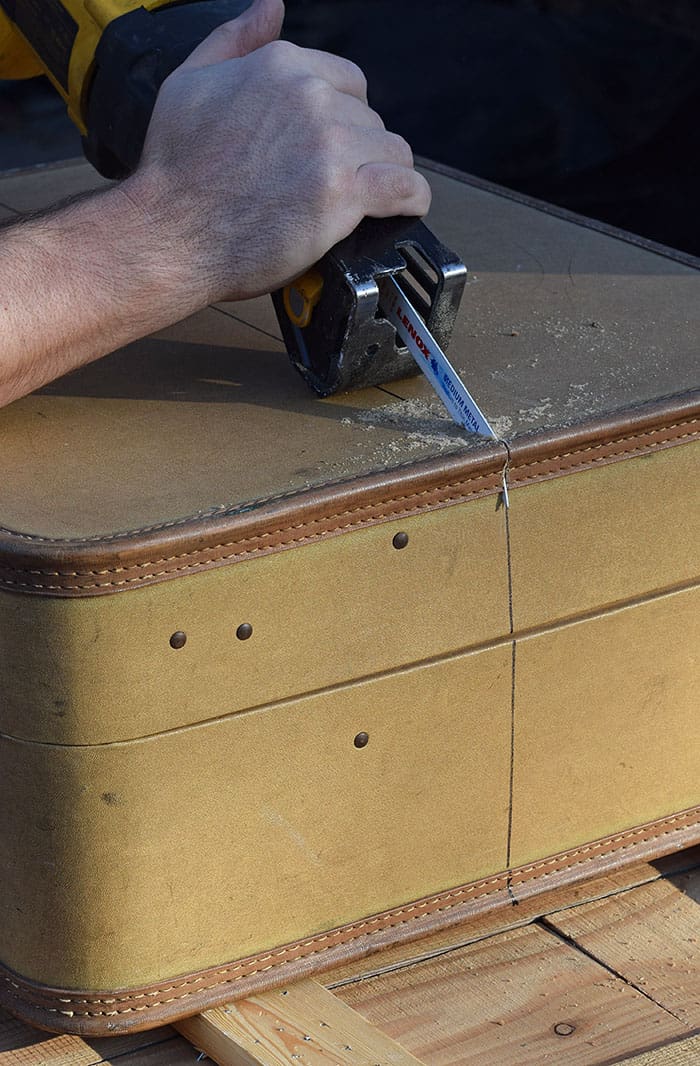 We intended to use both the top half and the bottom half of the suitcase as shelves. So, we cut right down the middle using a Sawzall.
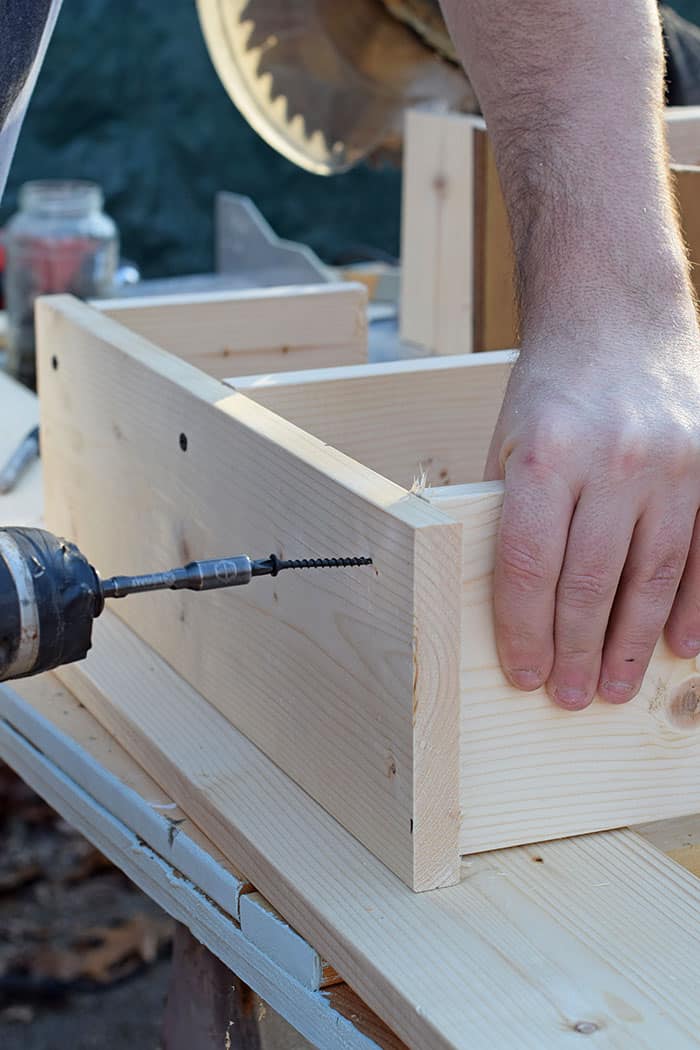 This is the piece of wood you’ll place on the wall with 3 perpendicular pieces of wood jutting into the suitcase.
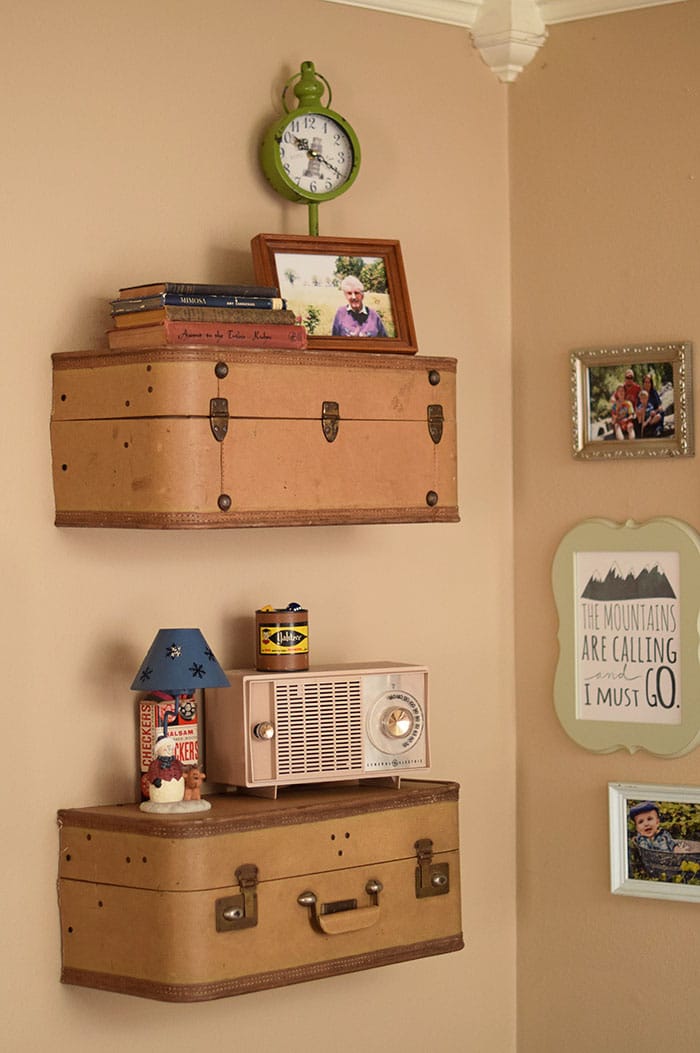
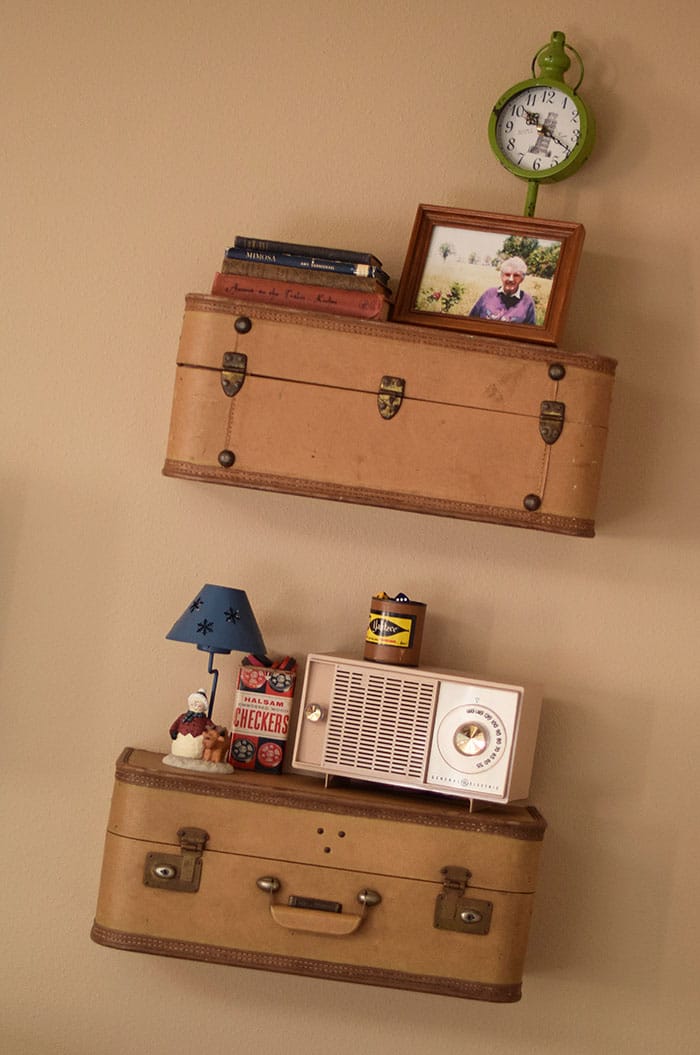 It’s such an easy DIY project, and they add so much vintage flair to a living area.
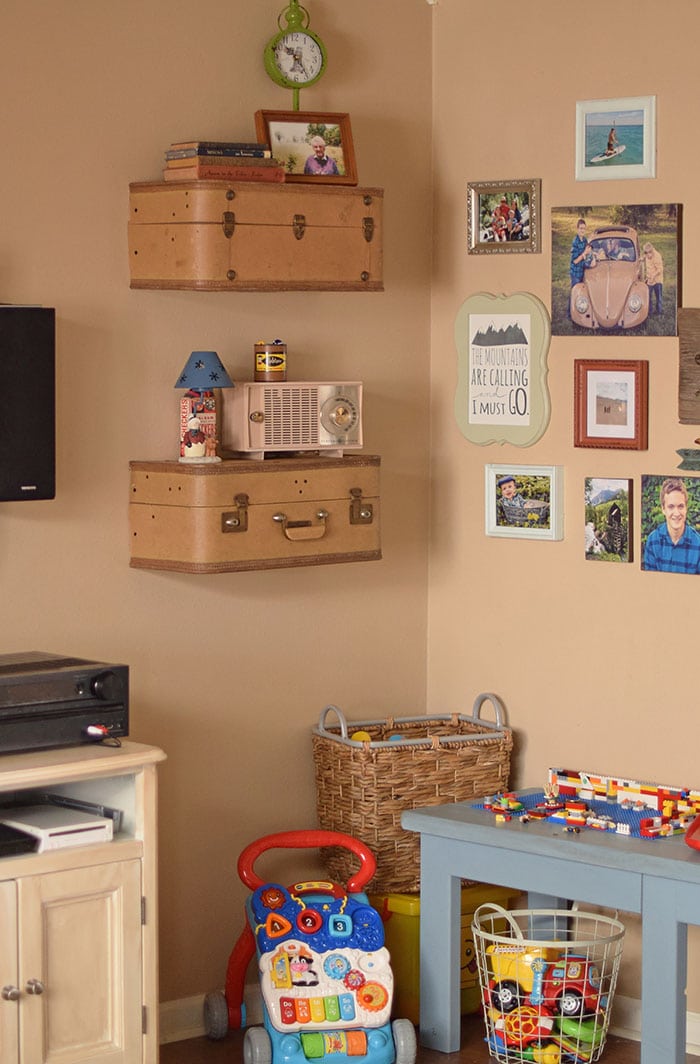
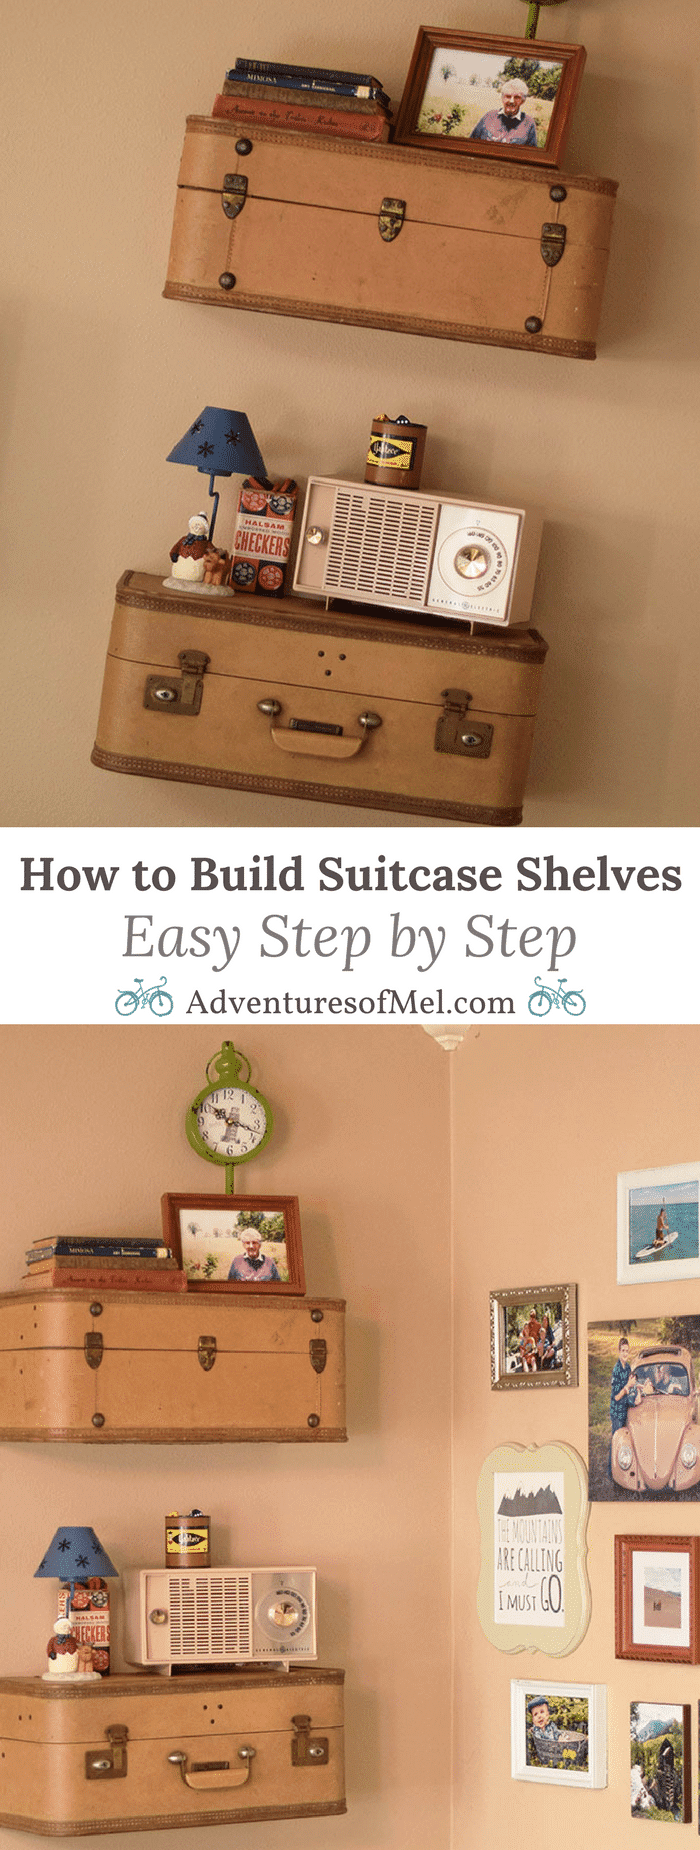
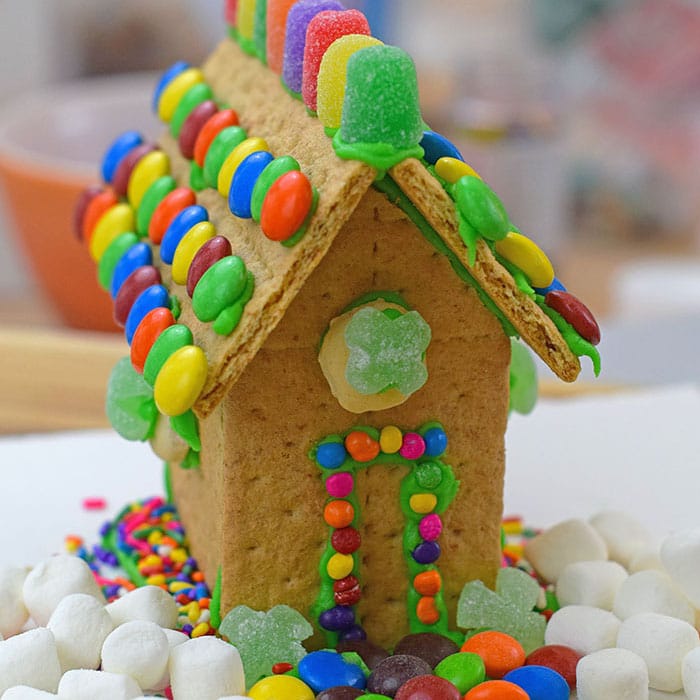
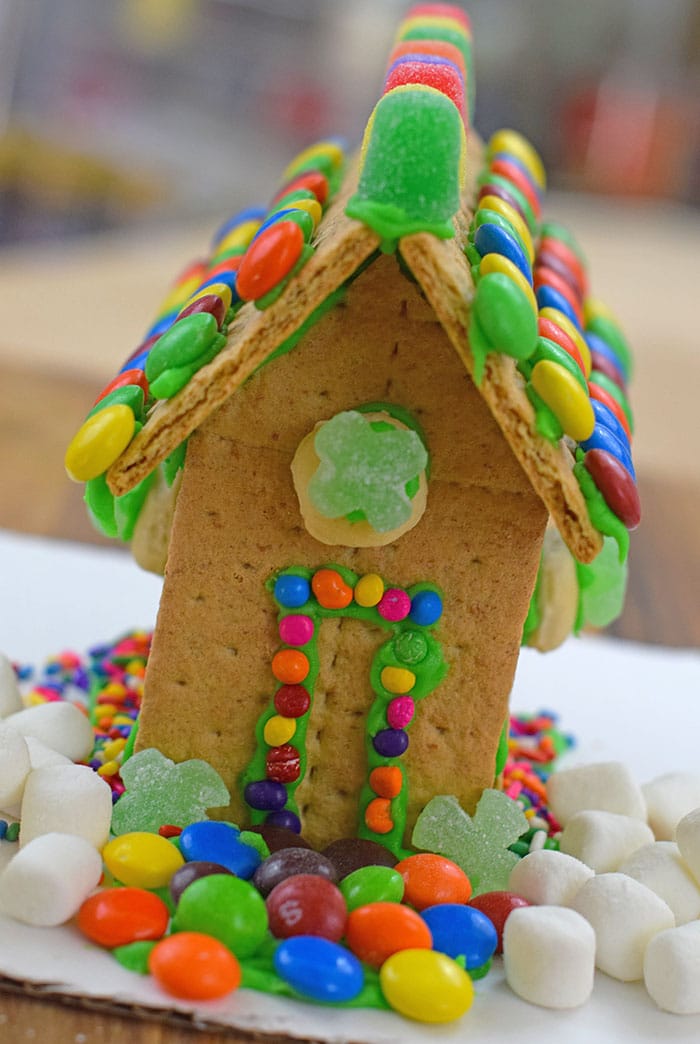
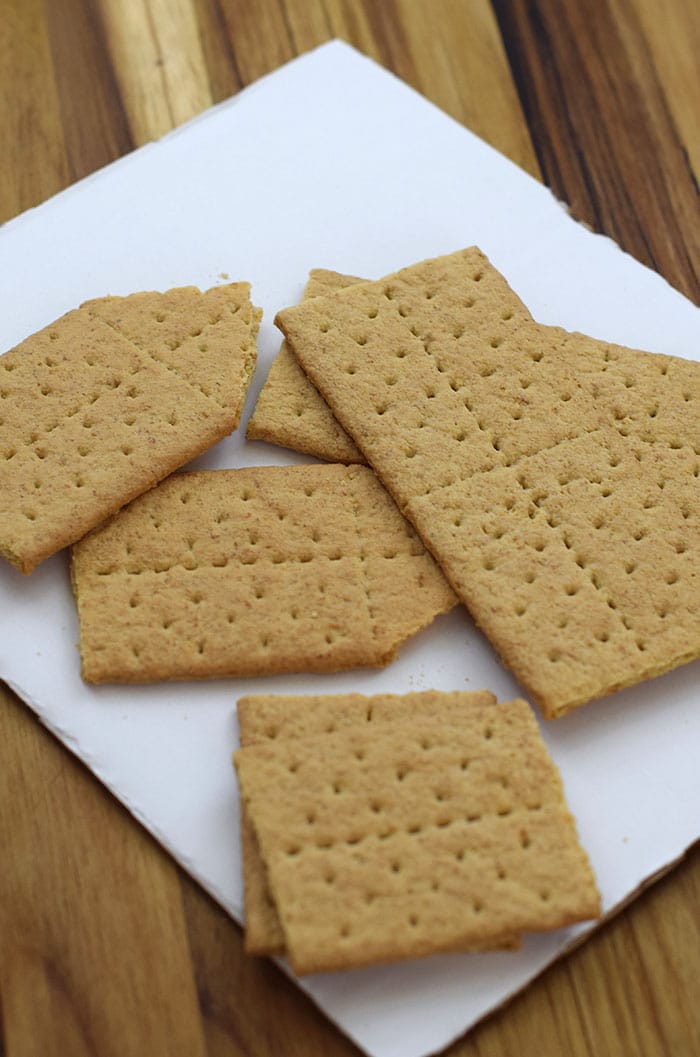 Next assemble your leprechaun house using graham crackers and Decorating Icing.
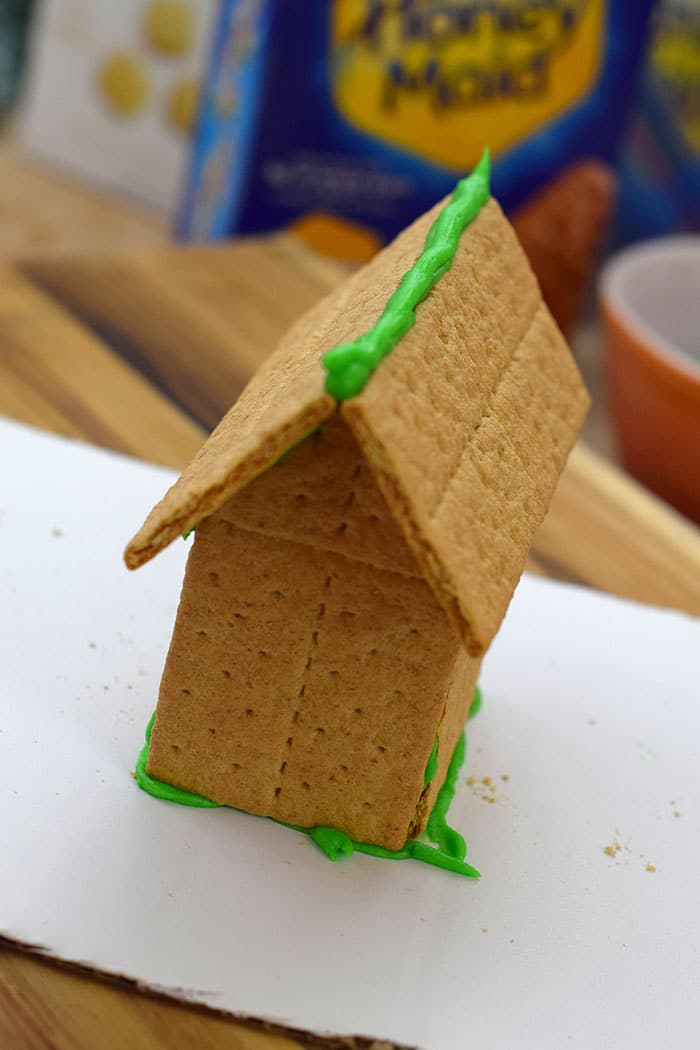 Now here’s where it was a bit tricky for me in the beginning. Everything I’d read said to use Royal Icing, but I’m just going to be real here… I tried that, and it was horrible. It was horrible! A disaster of epic proportions. I’d bought a box kit, and I’m not sure what happened with it, but it just wasn’t for me. I think it had more to do with me than the icing; I just didn’t have the patience for it. But I was lucky that I actually had backup in the form of Wilton Decorating Icing. It worked great! And there was no mixing or hassle with it.
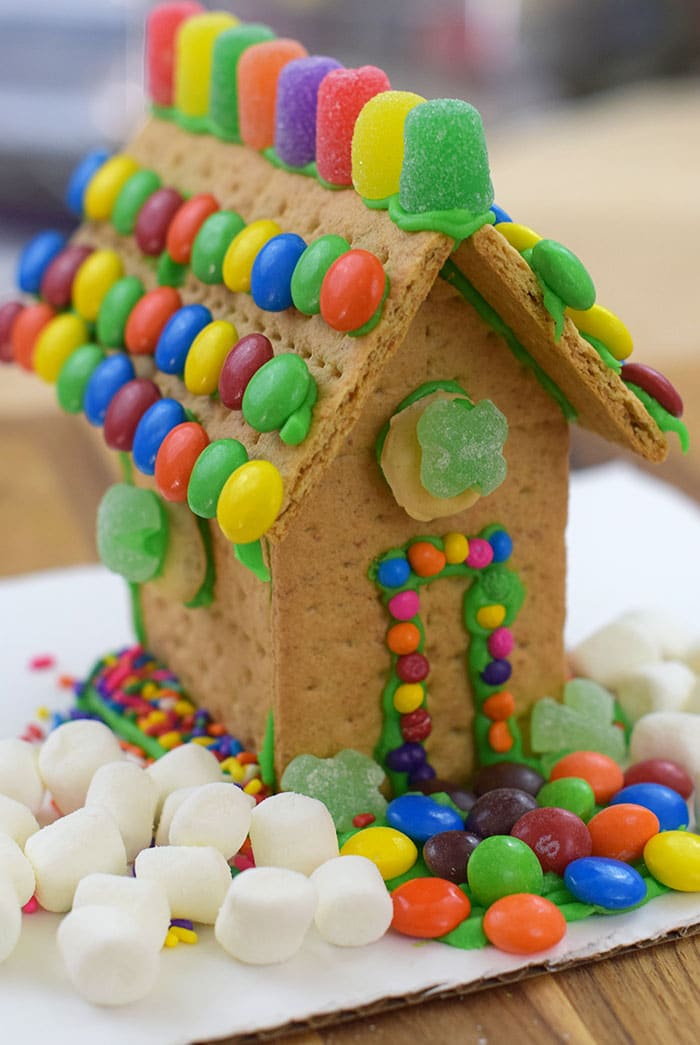 Once your house is constructed and has had a chance to meld together enough that it’s not going anywhere, it’s time for the fun part… Decorating! This is where all your candies and sprinkles come in.
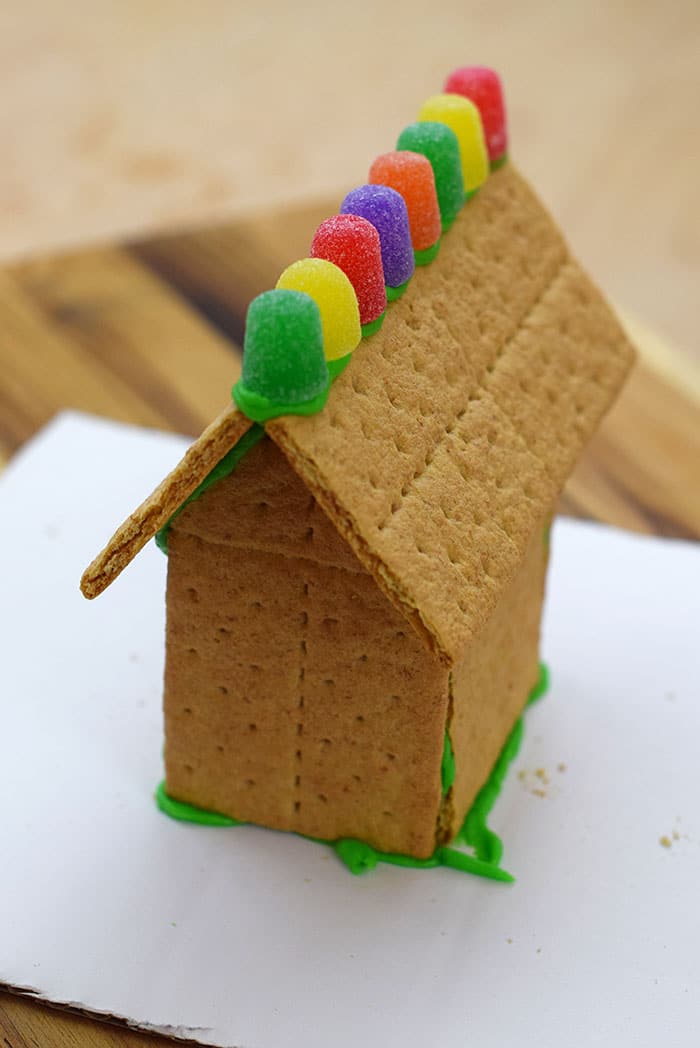 There really is no set way to decorate a leprechaun house.
 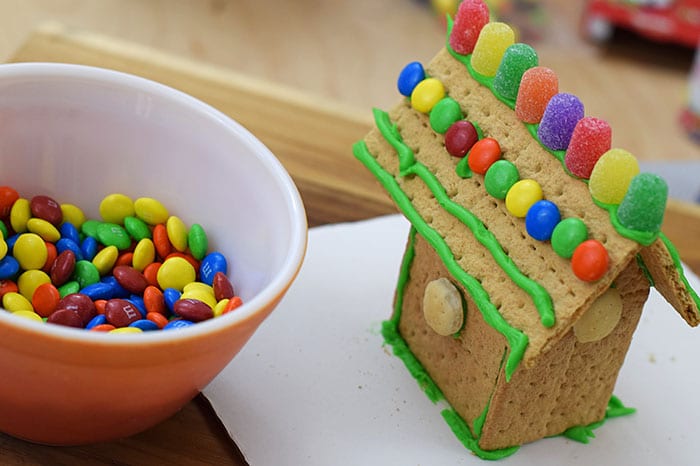 But I do recommend LOADS of rainbow colors, in the form of spice drops (or gum drop candies), M&M’s, Skittles, sprinkles, and more.
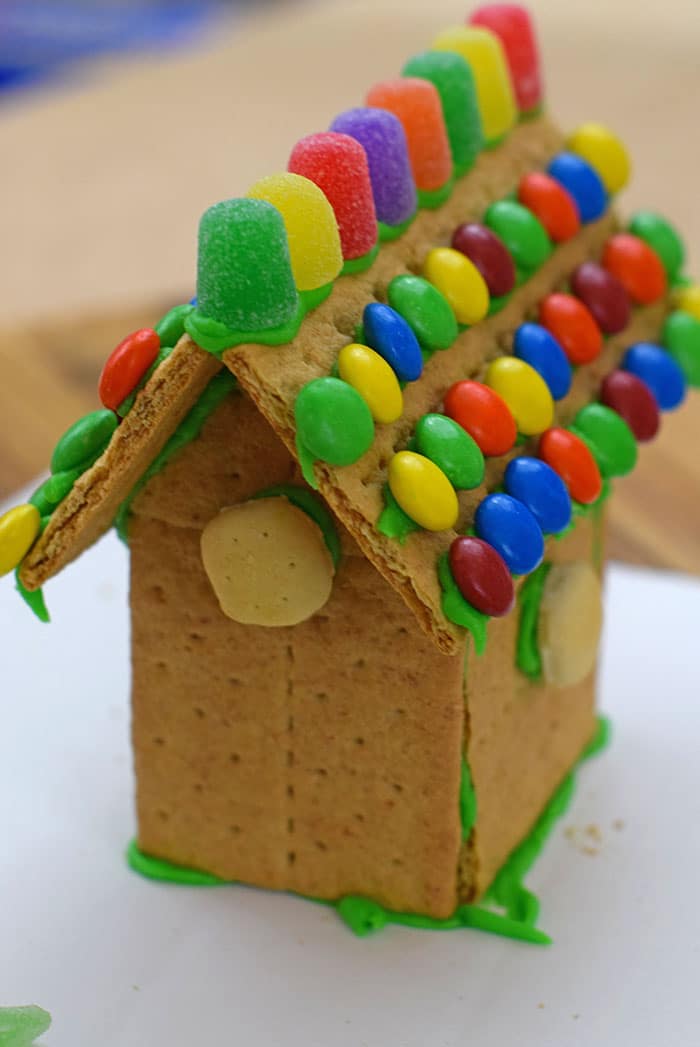 Use your Decorating Icing to attach everything to your house.
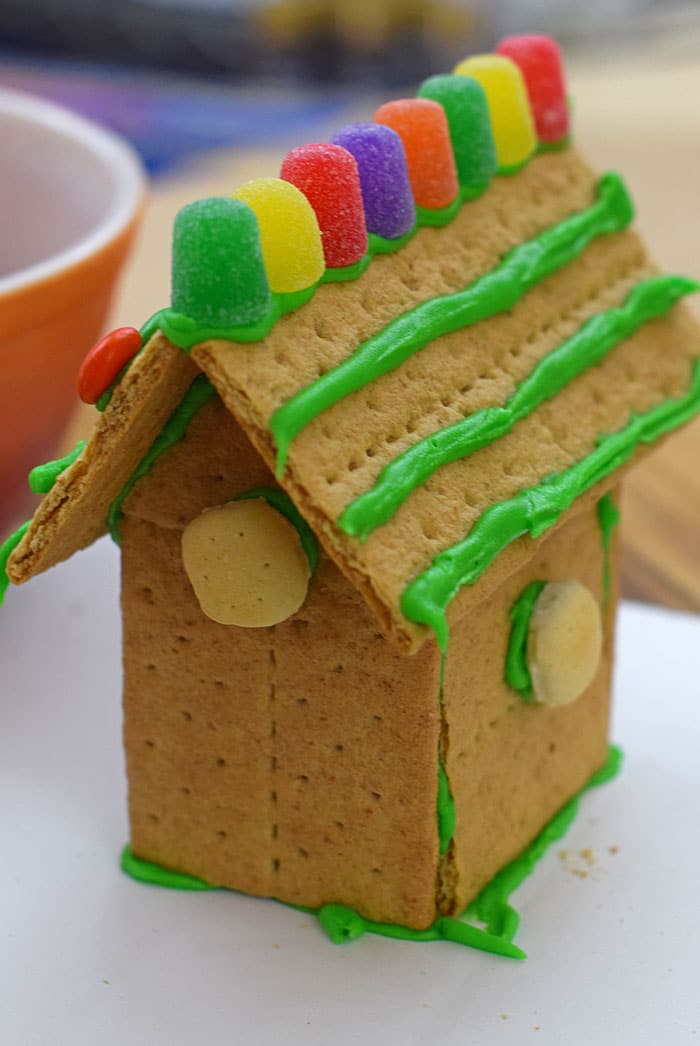
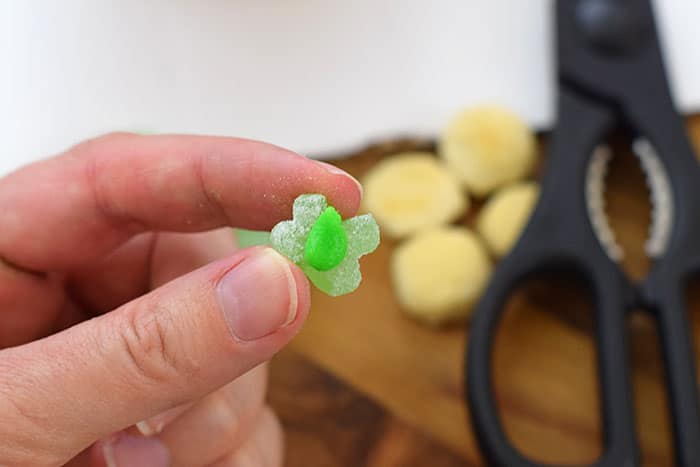 I found small green apple gummies that I actually cut with scissors to hopefully look more like 4-leaf clovers.
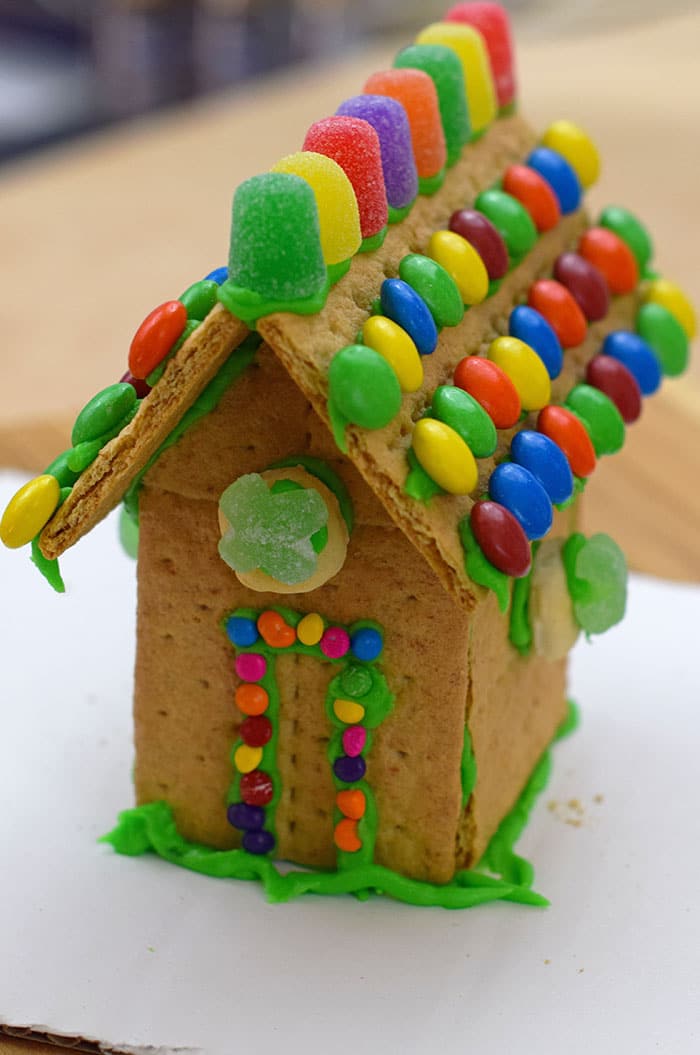
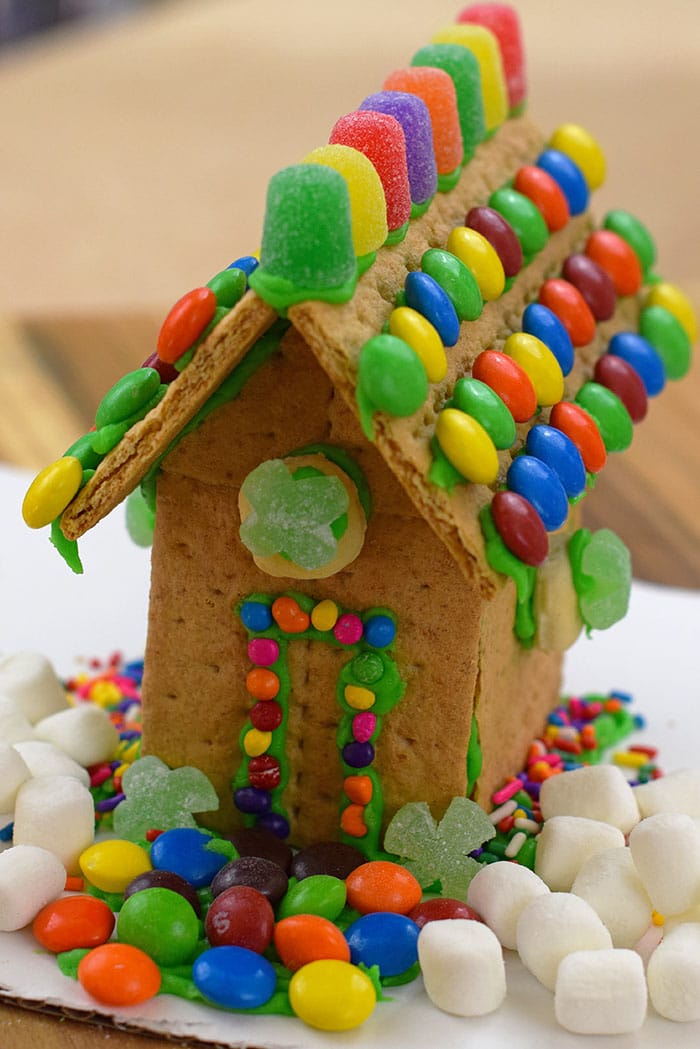 Skittles make a wonderful rainbow path through clouds of mini marshmallows.
 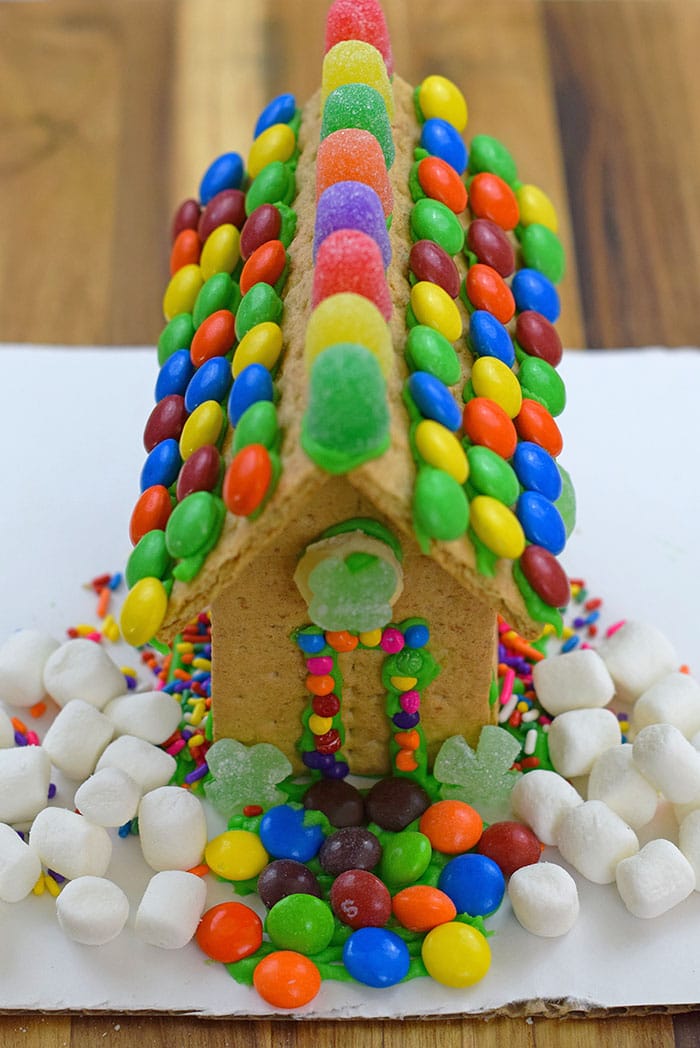 Just be creative and have fun with it! The decorating is especially fun for kids, though they may eat more than they decorate, fair warning.
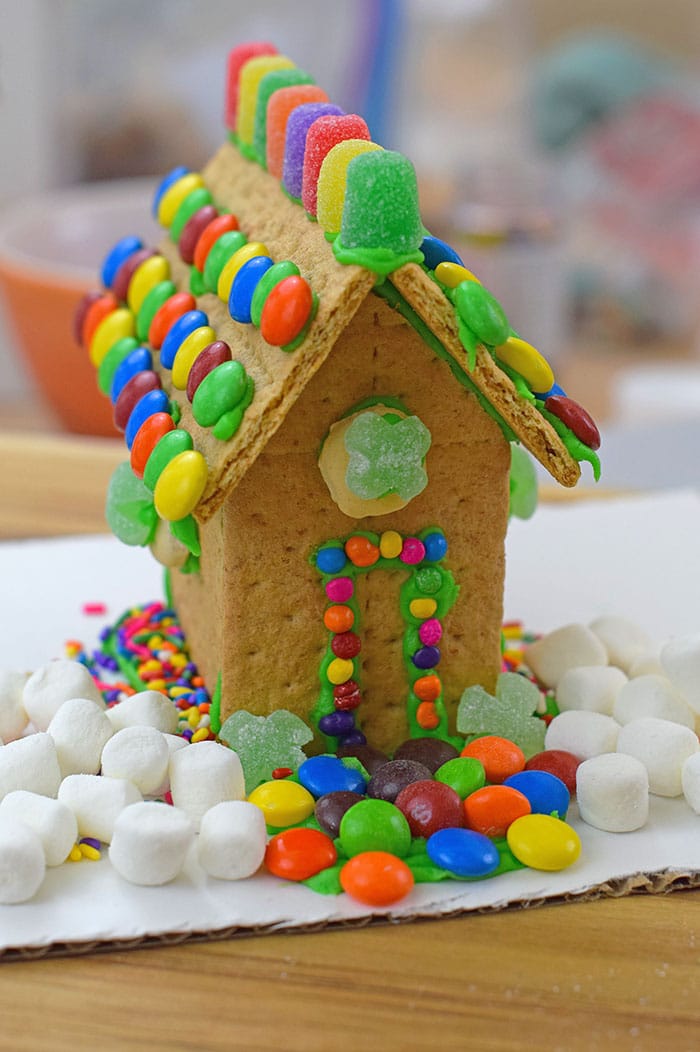 Happy decorating your very own graham cracker leprechaun house this