Christmas just wouldn’t be the same without my family’s traditional recipes, especially when it comes to classic Christmas cookies. I’m thinking of my mom’s Christmas sugar cookies, my favorite thumbprint cookies, and more.
Holiday cookies bring a touch of cozy to the season. There are so many delicious holiday recipes.
The Internet makes it really easy to swap recipes back and forth with people near and far. I love that, don’t you?!
As we embark upon the Christmas holiday, I hope you are enjoying every moment. Nothing says Christmas like tried and true, stand the test of time, traditional, classic Christmas cookies.
Below you’ll find a collection of 30 Classic Christmas Cookies to inspire your holiday season. Enjoy and Happy Baking!
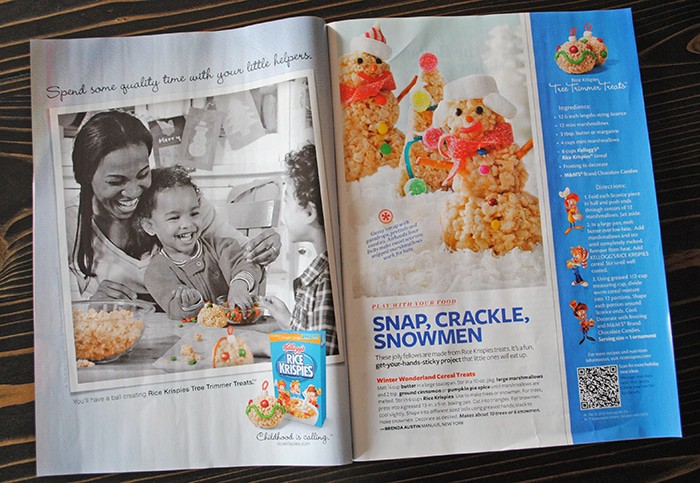
One of my favorite magazines and one I’ve actually been subscribed to for awhile is Taste of Home. They always have the most down-to-earth, delicious recipes with beautiful photos that make my mouth water.
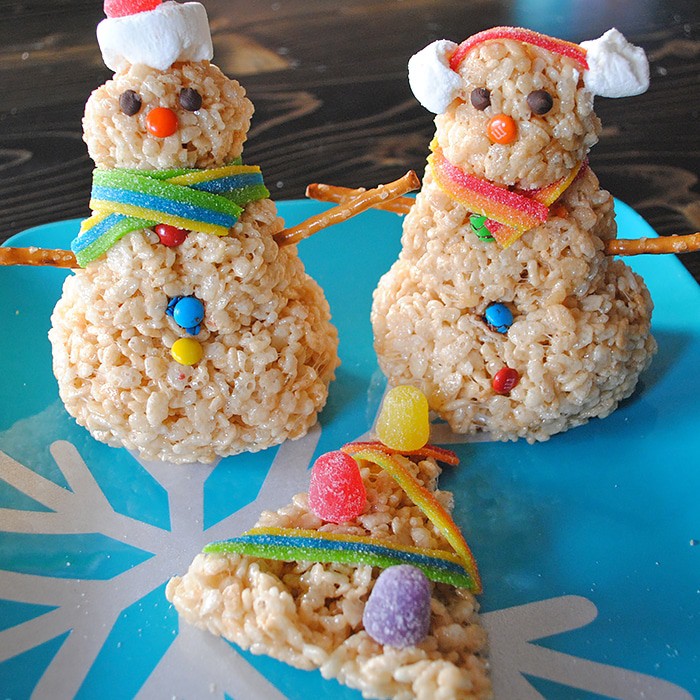
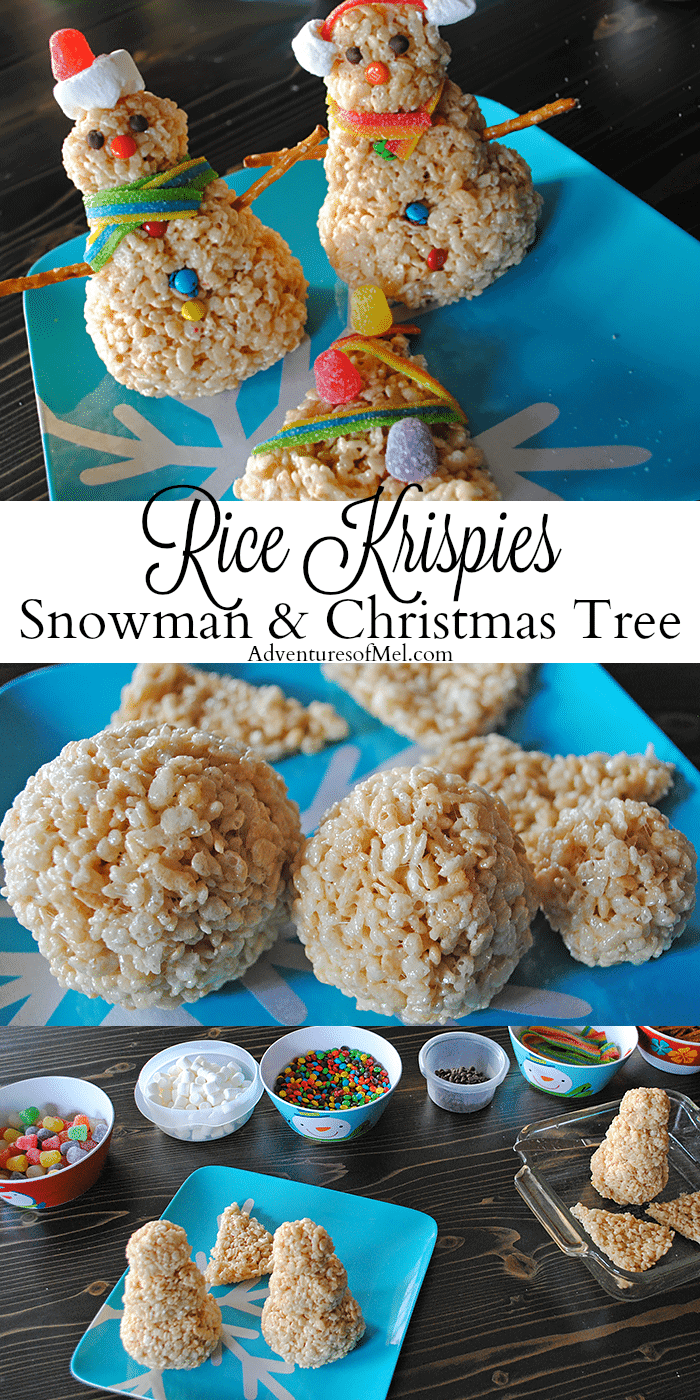
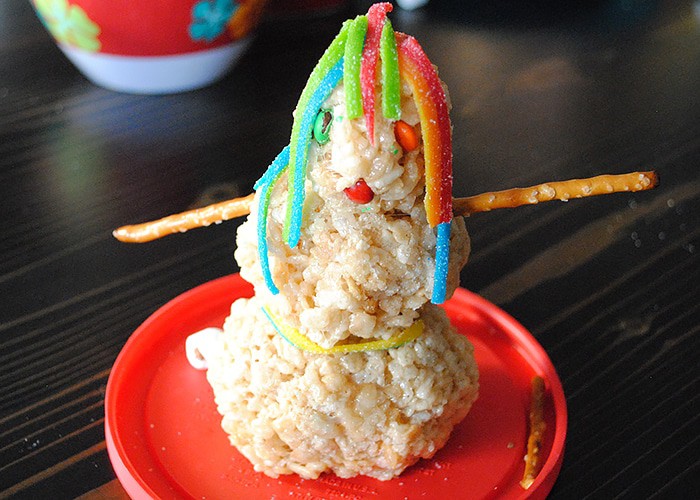
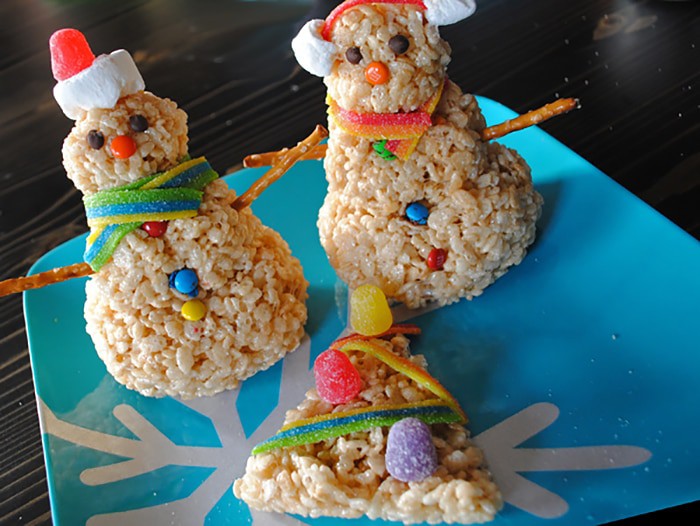
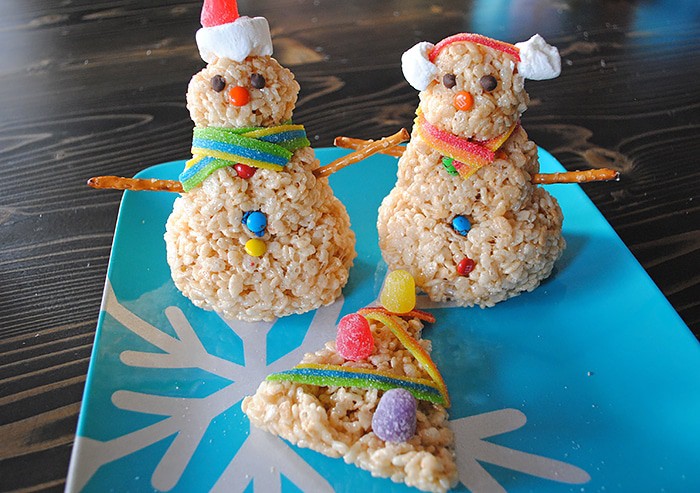
While browsing through an old issue awhile ago, I noticed a Rice Krispies ad with a recipe for Snap, Crackle, Snowmen from another reader.
While we didn’t follow the recipe to a T, we tried making these together and ended up having a LOT of fun. They are the perfect holiday project for kids. They’re definitely going on my list of The Best Christmas Recipes for Your Holiday Celebrations.
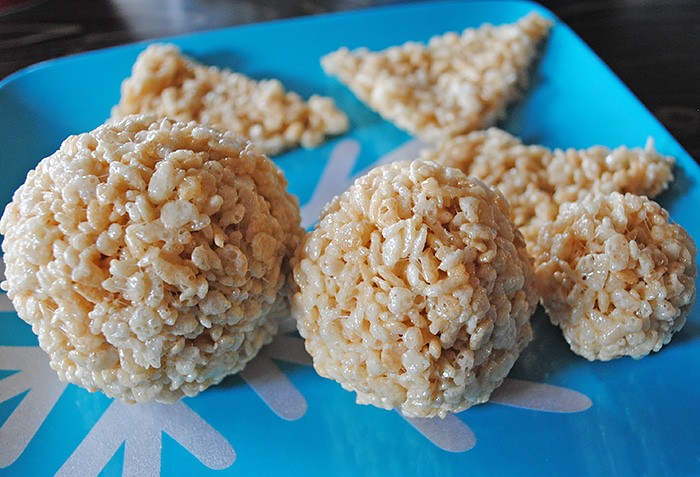
Make Rice Krispies Treats
First, gather your ingredients. You’ll need Rice Krispies, marshmallows, butter, and plenty of candy embellishments.
Mix up the Rice Krispies Treats as usual. We did double the recipe, so we’d have enough treats for all of us to share in the fun.
Let the Rice Krispies cool just slightly but not too much.Then begin to form snowmen.
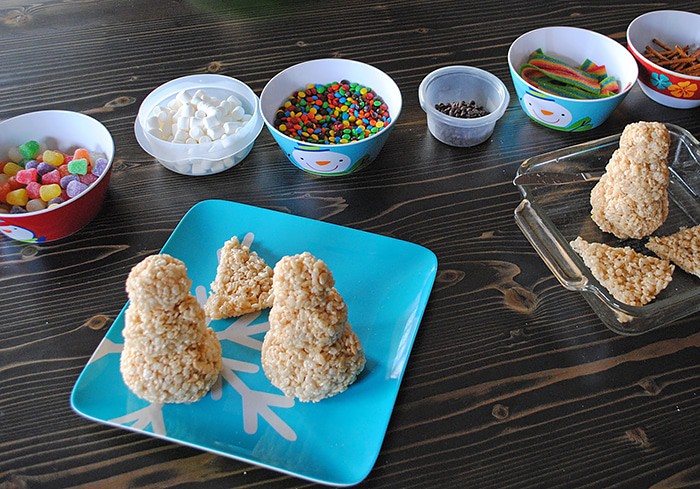
Rice Krispies Snowman
To make a snowman, form round treats for the head, middle, and base of the snowman; then put them together. The more the Rice Krispies cool, though, the harder it is to get them to form and stick; so, you definitely don’t want to wait long at all.
Decorate Your Rice Krispies Snowman
Lay out all your decorating treats in a candy bar of sorts.
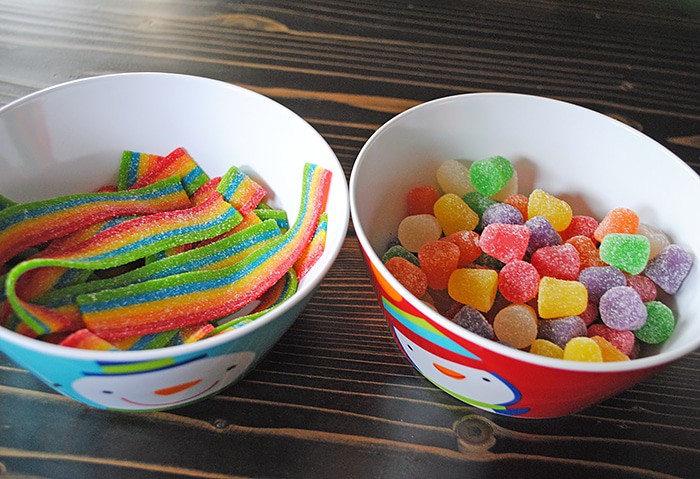
We used spice drops, mini marshmallows, mini M&M’s, mini chocolate chips, sour strips, and mini pretzel sticks. Use the candies in creative ways to decorate your snowmen.
The boys had a blast decorating and came up with some pretty interesting characters.Jacob ended up with a chicken.
Jaden, well, I’m not sure what his was, but he was being silly, as usual.
He’s the comedian in the house; we’re always saying how he’s going to be a comedian when he grows up because he constantly makes everyone laugh.
Even Dan got in on the fun, even though he changed his snowman from a beach snowman to…. Well, I’m not sure.
The most important thing is we had fun.
These holiday treats are all hands on and are the perfect activity for a chilly afternoon during the holidays. They also make a great Advent activity.
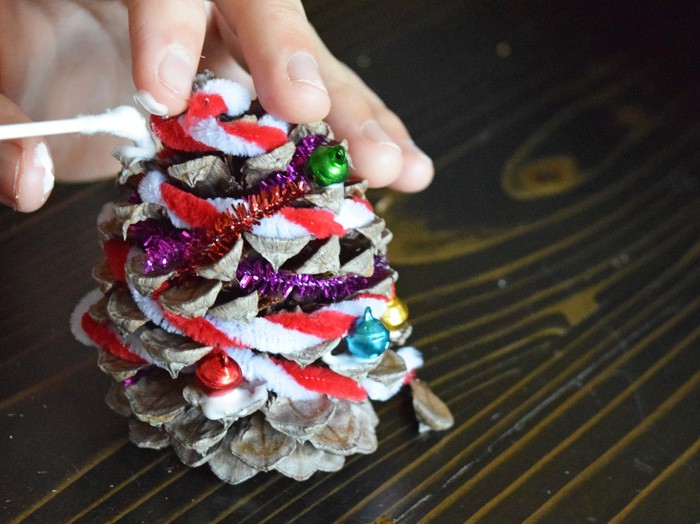
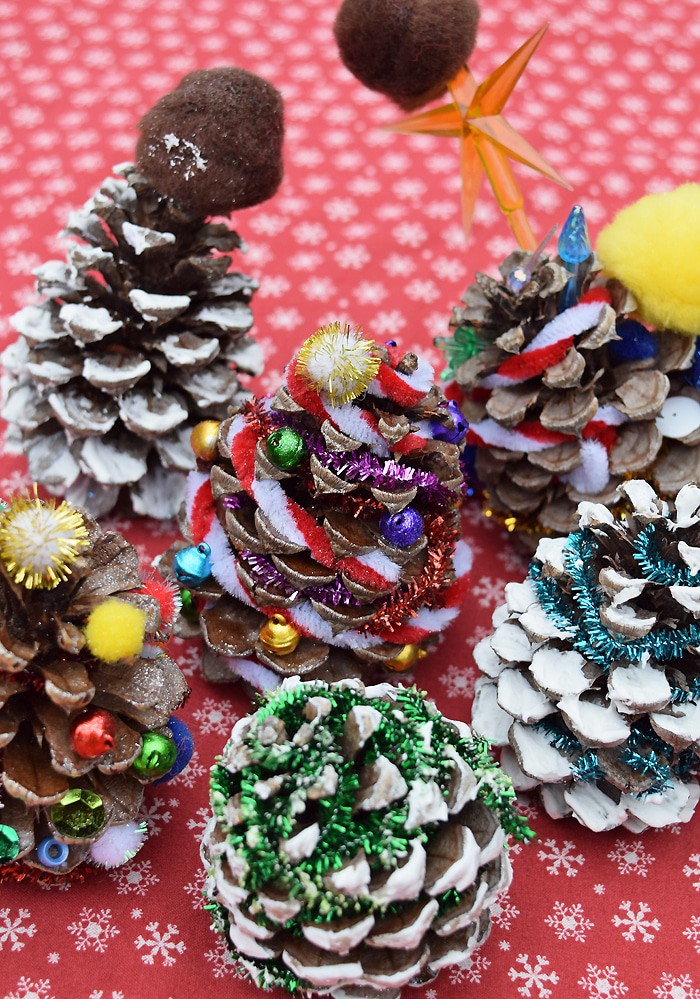
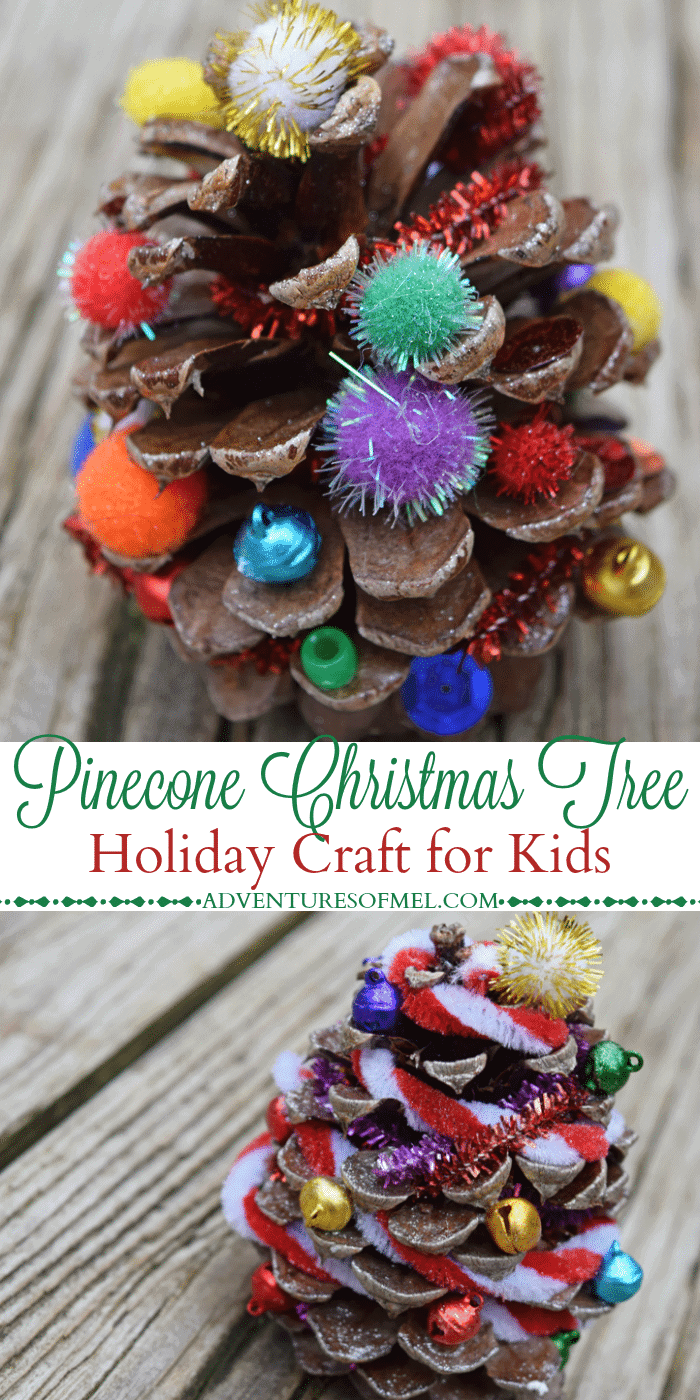
Pinecones from Colorado come in handy when you’re crafting at Christmas time. When I was in elementary school, I remember our art teacher bringing in these giant pinecones for us to decorate as Christmas trees. It was so much fun!
In fact, I’ve told my boys that if my mom still has that pinecone Christmas tree, I’ll show it to them when we visit next. It’s a fun holiday craft for kids that will really let their creativity shine.
The best part is you only need a few supplies, and most of them, you may already have stuffed in a craft drawer somewhere. Don’t just let the kids craft this one; you get in on the fun too. I sure did!
Supplies You’ll Need to Decorate a Pinecone Christmas Tree
Pinecones (and don’t worry, they don’t have to be huge)
Glue (we used Elmer’s Craft Bond with Dixie cups and Q-tips, tip below)
Pom poms, sequins, beads, tiny bells, and other embellishments
Instructions for Creating a Pinecone Christmas Tree
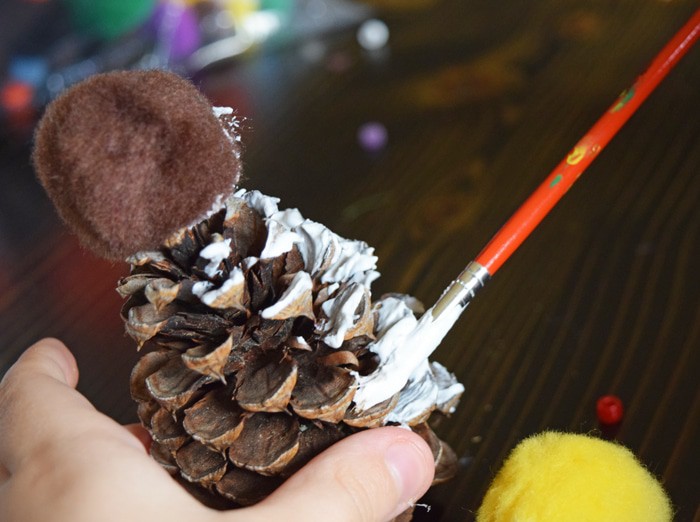
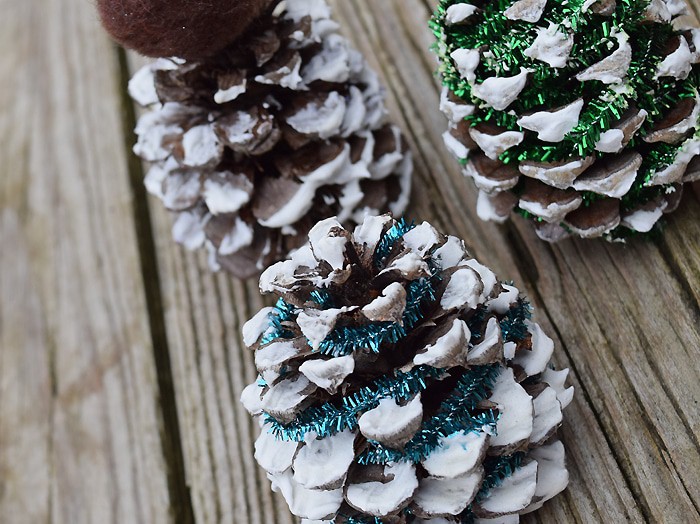
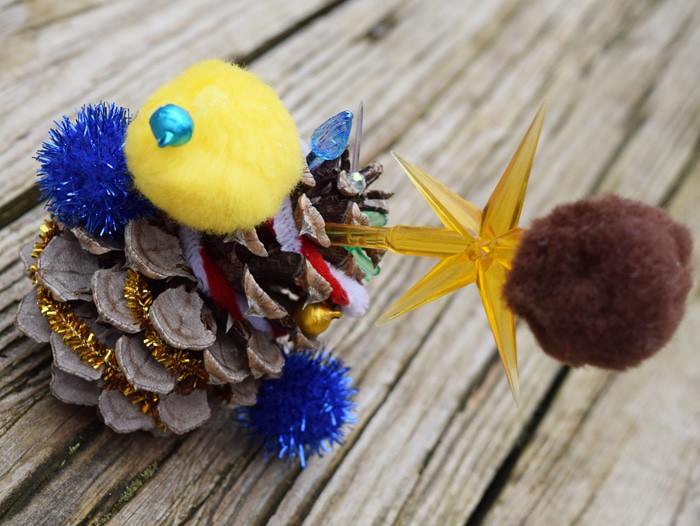
Clean off your pinecones, making sure they’re clear of any dirt or li’l critters… Hey, you never know. Start by wrapping pipe cleaners around and through the pinecone, acting as a tinsel of sorts. The next step is the best, and here’s a tip if you’re working with younger kids. I read this somewhere years ago. Get a few Dixie cups, pour a little glue in, and use Q-tips to apply the glue for all your embellishments. So much easier and less mess! This is the best part. You can apply all sorts of embellishments, as many as your heart desires.
Finally, finish off your Christmas tree by using a small paint brush to apply Glitter Snow, or spray on some Glitter Dust.
This may require a 24 hour drying process, so just be aware…this is your last step.
Finally, stand back and admire your creation. We had a lot of fun with this, Jaden especially. One of his trees was quite unique. Jacob, of course, had to make it into a competition; he does that with most things these days. Now we have something to pull out of our Christmas boxes every year and remember the good times we’ve had. Christmas school rocks!
Watch and make the craft right along with me!
Want to save this craft for later? Pin it to your Christmas boards!
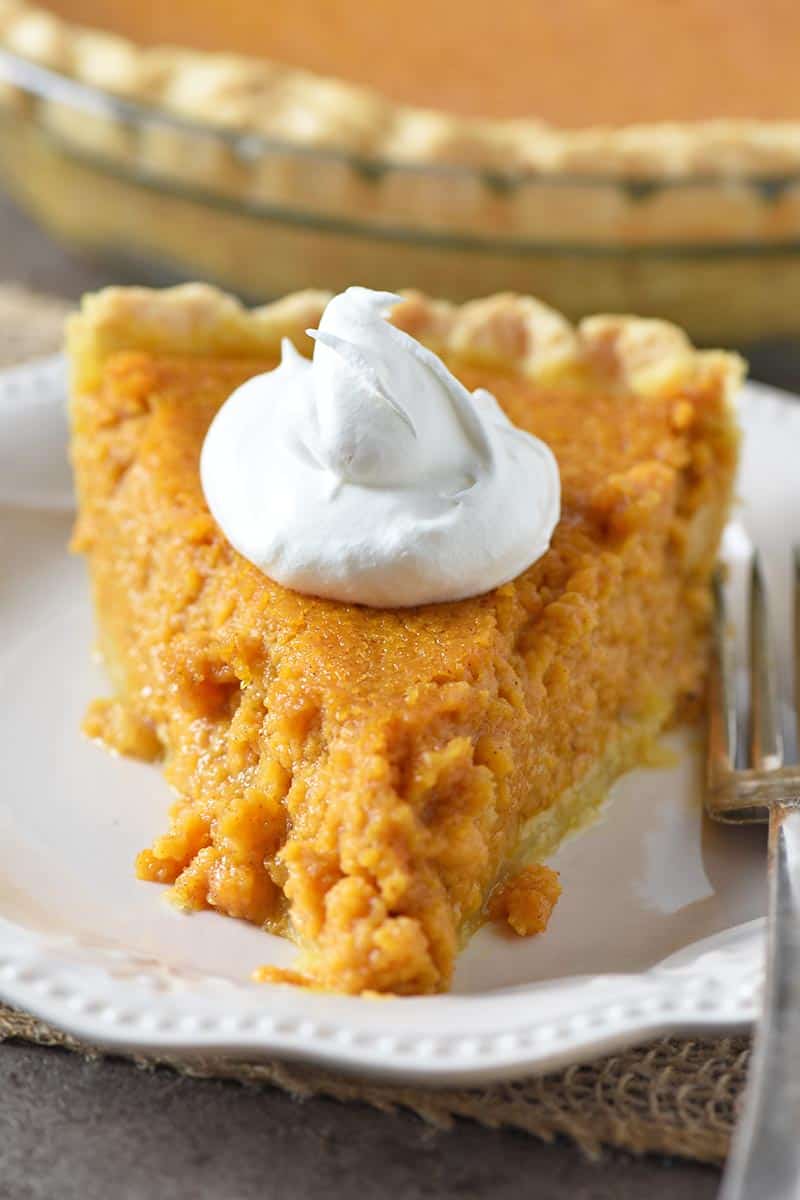
How to make southern sweet potato pie from Grandma’s recipe box. Simple and easy, old-fashioned, family favorite Thanksgiving dessert from scratch.
This delicious southern sweet potato pie recipe is one I’m sharing from my grandmother’s recipe box (though I’ve tweaked it just a bit). The recipe card actually has my Aunt Jennie’s name written at the top, along with a date from 1980.
As a little girl, we would often visit family in Texas, including my Great Aunt Jennie. Aunt Jennie was one of a kind, and it was always fun going to see her.
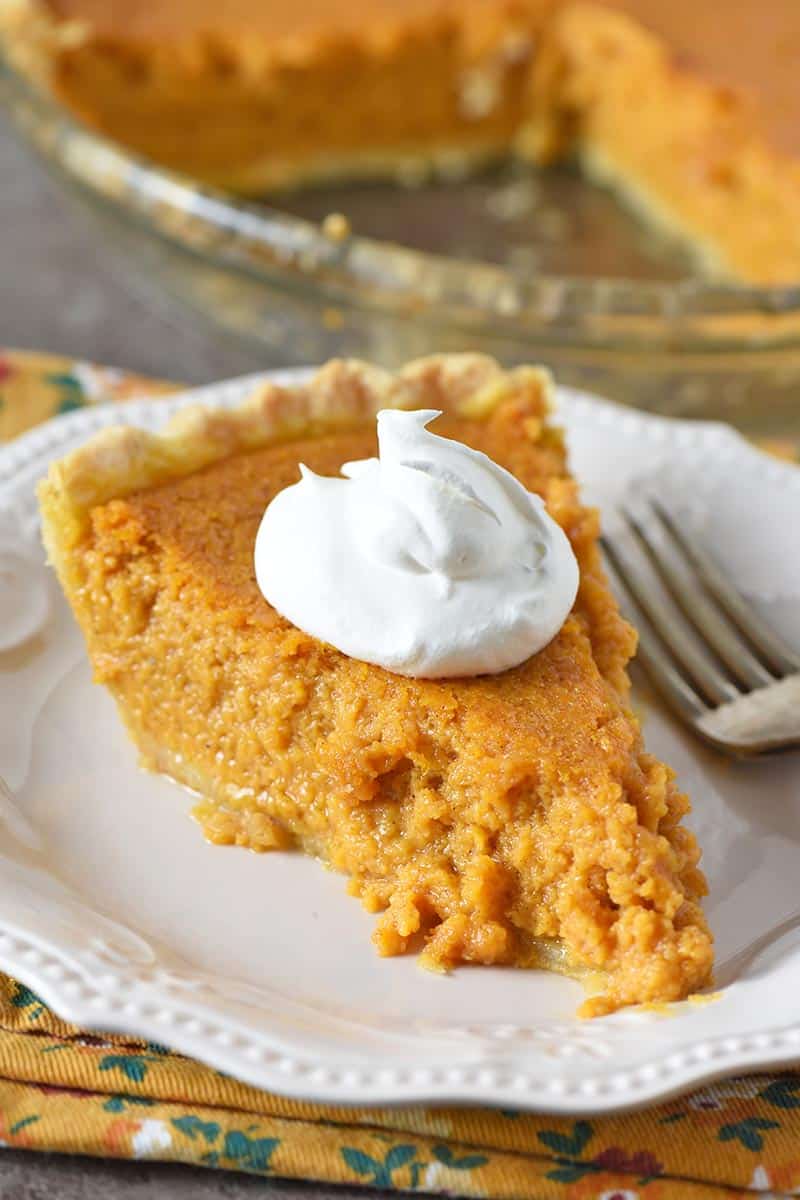
Add a dollop of whipped cream on top, and you’ve got a very yummy holiday dessert.
This southern style sweet potato pie is super easy to make, and it doesn’t require a ton of ingredients. But unless you’re using canned sweet potato, be sure to cook your sweet potatoes beforehand and have them ready to go; I prefer to cook my sweet potatoes in the Instant Pot.
If you’d rather skip all of my baking tips, important info for this recipe, and similar recipe ideas – and get straight to the recipe – just scroll down to the bottom, where you’ll find a printable recipe card with a longer how to video.
[mv_video doNotAutoplayNorOptimizePlacement=”false” jsonLd=”true” key=”thwa2qs4gar1afkxwkat” sticky=”false” thumbnail=”https://mediavine-res.cloudinary.com/v1574196027/hyh4dexiffyqoyhsqwz2.jpg” title=”How to Make Southern Sweet Potato Pie” volume=”100″]
DOES SWEET POTATO PIE TASTE LIKE PUMPKIN PIE?
Sweet potato pie is basically a sweet potato custard pie. So, yes, it’s a lot like your classic old-fashioned pumpkin pie, only it’s made with sweet potatoes.
It has the same look, a similar taste (personally, I think it’s better than pumpkin pie), and a very similar texture.
Coffee Maker with Coffee – Some of my favorite memories are dessert with my grandmother. She always loved a hot cup of coffee with her pie.
HOW TO PREP FRESH SWEET POTATOES FOR PIE
You can either boil, pressure cook, or bake the sweet potatoes.
If you decide to boil or pressure cook the sweet potatoes, you’ll need to wash and peel them before you cook them. If you decide to bake them, you can bake them in the skins, and then remove the skins after they’ve cooled.
Then just purée the sweet potatoes in a blender or with an immersion blender to get them ready for pie. You’ll want a smooth, creamy texture to your sweet potato purée.
To make the whole process easier, I usually just pressure cook the sweet potatoes in my Instant Pot, then peel them and mash them up, right in the pot, with my immersion blender.
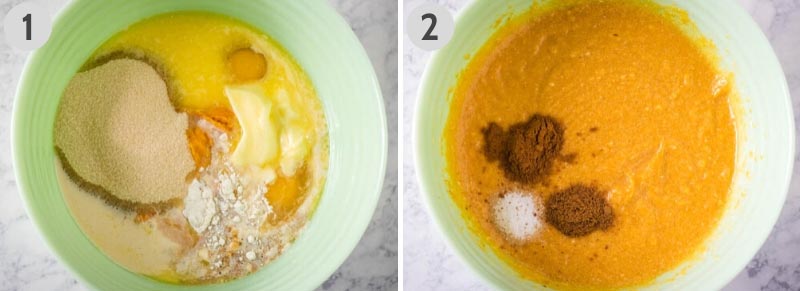
HOW TO MAKE SOUTHERN SWEET POTATO PIE
Before you get started, just make sure you’ve got your mashed sweet potatoes and an unbaked pie crust ready to go. Let’s talk about the crust and the filling…
MAKING THE PIE CRUST:
If you prefer a traditional roll-out crust, this pie crust is the way to go. If you want to keep it easy, try making this easy no-roll pie crust.
Add in the salt, cinnamon, and nutmeg, whipping the mixture until it’s blended well. You may need to scrape the sides of your mixing bowl and mix again.
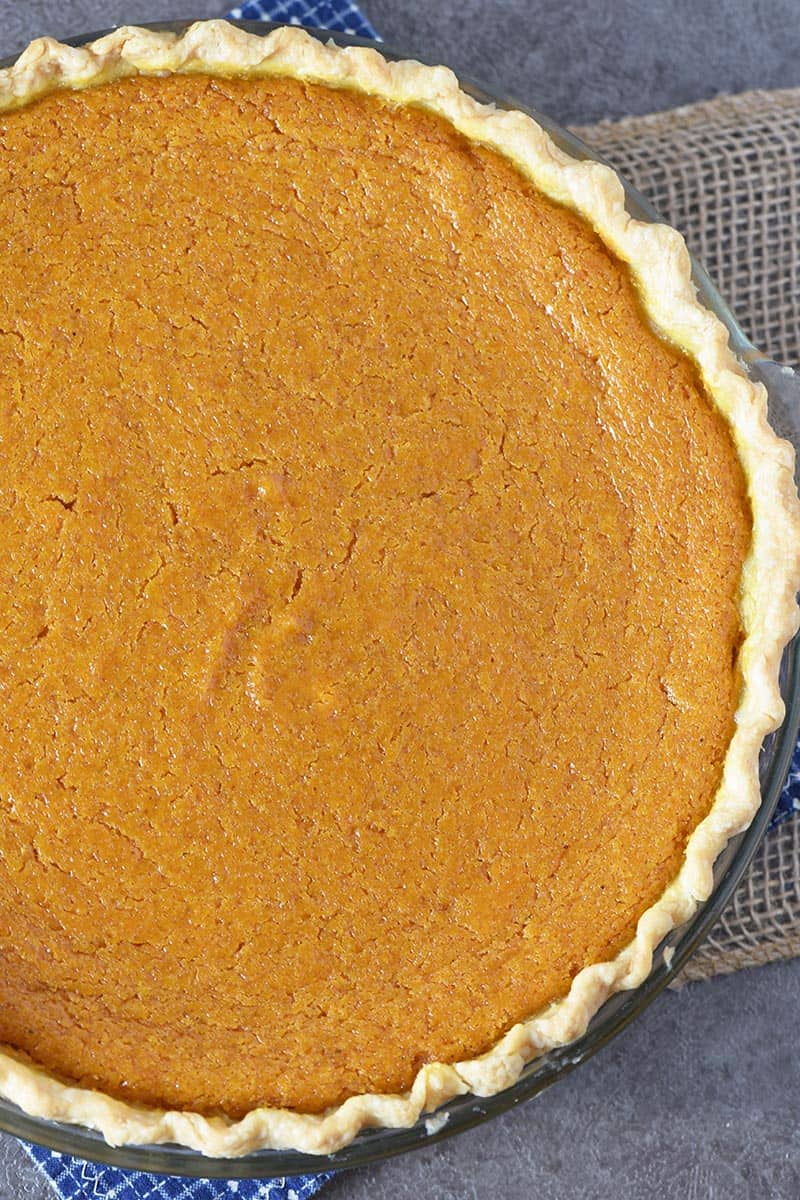
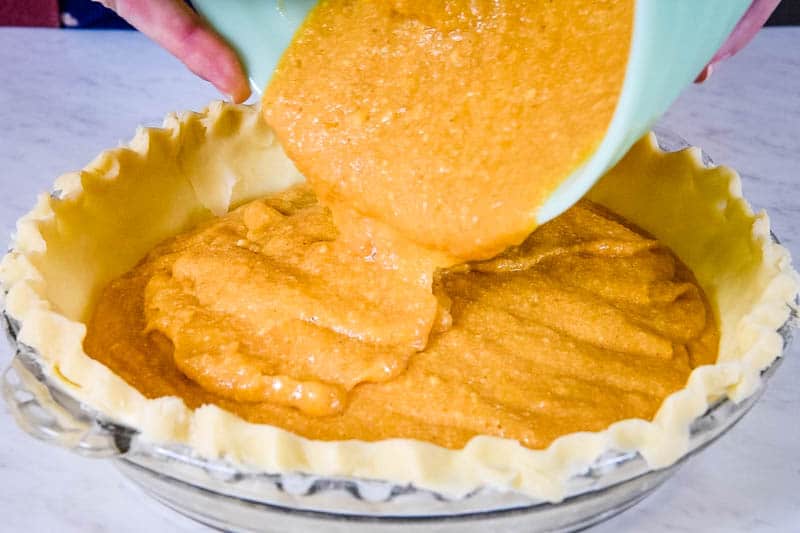
Then just pour the batter into your prepared, unbaked pie shell.
Bake according to the instructions in the recipe card below. Then allow the pie to cool on a wire rack.
Once your pie has cooled, I recommend chilling it overnight in the refrigerator before slicing into it. This is one pie that just gets better and better the next day and the day after that.
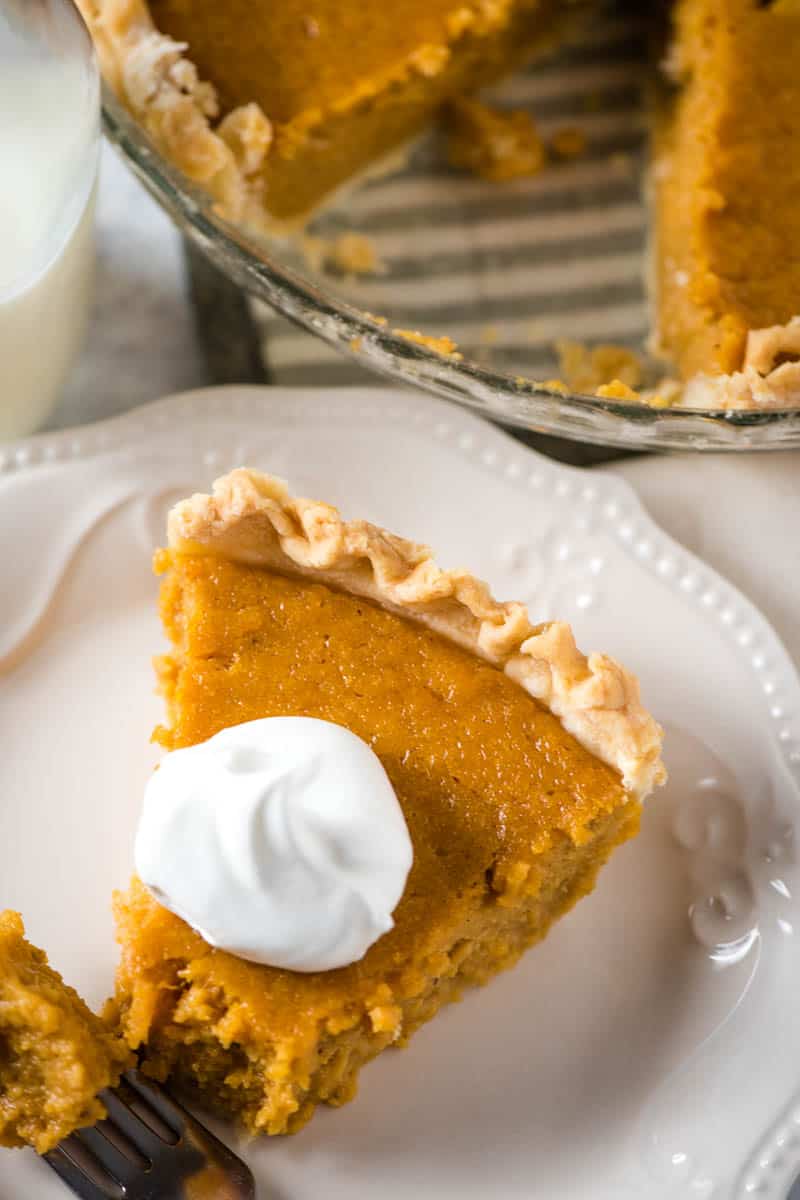
Once it’s chilled, you can slice it, add a dollop of whipped cream, and you’re all set to enjoy every bite, along with a glass of milk or a cup of coffee. Nothing like coffee to bring all the flavors full circle!
CAN I USE CANNED SWEET POTATO TO MAKE THIS PIE?
Yes, you can use canned sweet potato, which is certainly easier to do.
Though I still prefer to use fresh sweet potatoes for the flavor. They just require a little more prep work.
IS SOUTHERN STYLE SWEET POTATO PIE GLUTEN-FREE?
You can absolutely make it gluten-free by substituting a good cup for cup gluten-free flour for the all-purpose flour. And then also make the pie crust with gluten-free flour.
Also, be sure to check labels on any of the above ingredients, just to be safe, especially the spices you use.
HOW TO TELL WHEN SWEET POTATO PIE IS DONE
You can use a toothpick, table knife, or cake tester to see if your pie is done, but being that this is more of a sweet potato custard pie, you may still see a bit of residue on your tester. So this may not be an accurate way of telling whether or not it’s done.
When you go to take it out of the oven, your pie should still be a little bit jiggly. If it’s more than just a little jiggly, it needs more time in the oven.
It’s a delicate balance between under-baking and over-baking when it comes to custard pie. On one hand, you don’t want it to be uncooked in the middle; on the other hand, you don’t want it to crack and be too dry.
The pie will continue to cook even when you take it out of the oven. As it cools, it will firm up; placing it in the fridge after cooling will help even more.
Yes, you can freeze sweet potato pie. Just make sure it’s covered well so it doesn’t get freezer burn.
You may also want to make it in a pie dish you don’t plan to use again before you take the pie out of the freezer; or use a disposable aluminum pie plate.
The Kitchn has a great tutorial on how to freeze pumpkin pie with all sorts of helpful tips that would work just as well for sweet potato pie.
GET THE PRINTABLE SWEET POTATO PIE RECIPE
If you love this recipe as much as I do, please write a 5 star review, and help me share the recipe on Facebook and Pinterest! If you make the recipe, be sure to share that you tried it on Pinterest. I love when readers share feedback!
How to make southern sweet potato pie from Grandma's recipe box. Simple and easy, old-fashioned, family favorite Thanksgiving dessert from scratch.
2 cups sweet potato purée
2 large eggs
1/2 tablespoon all-purpose flour
1 cup cane sugar
1/2 cup salted butter (softened)
3/4 cup evaporated milk
1 teaspoon vanilla extract
1 teaspoon salt
1 teaspoon ground cinnamon
1/2 teaspoon ground nutmeg
1 single pie crust (unbaked)
Using a mixer, mix together the sweet potato purée, eggs, flour, sugar, butter, evaporated milk, and vanilla extract.
Add in the salt, cinnamon, and nutmeg, whipping the mixture until it’s blended well. You may need to scrape the sides of your mixing bowl and mix again.
Pour the mixture into your prepared and unbaked pie crust.
Bake the pie at 350° F for about 1 hour, or until it’s firm.
Allow the pie to cool on a wire rack.
Once your pie has cooled, I recommend chilling it overnight in the refrigerator before slicing it. This is one pie that just gets better and better the next day and the day after that.
Once it’s chilled, you can slice it, add a dollop of whipped cream, and serve.
*You can use canned sweet potato if you want. Though I still prefer to use fresh sweet potatoes for the flavor. They just require a little more prep work. You can either boil, pressure cook, or bake the sweet potatoes. To make the whole process easier, I usually make Instant Pot sweet potatoes, then peel them and mash them up, right in the pot, with my immersion blender.
**You can make this pie gluten-free by substituting a good cup for cup gluten-free flour for the all-purpose flour. And then also make the pie crust with gluten-free flour. Also, be sure to check labels on any of the above ingredients, just to be safe, especially the spices you use.
5. When you go to take it out of the oven, your pie should still be a little bit jiggly. If it’s more than just a little jiggly, it needs more time in the oven. It’s a delicate balance between under-baking and over-baking when it comes to custard pie. On one hand, you don’t want it to be uncooked in the middle; on the other hand, you don’t want it to crack and be too dry. The pie will continue to cook even when you take it out of the oven. As it cools, it will firm up; and placing it in the fridge after cooling will help even more.
Can you freeze sweet potato pie?
Yes, you can freeze sweet potato pie. Just make sure it’s covered well so it doesn’t get freezer burn.
Desserts, Pies & Pastries
American
5 star sweet potato pie recipe, canned sweet potato pie, how to make southern sweet potato pie, old fashioned sweet potato pie, southern style sweet potato pie, southern sweet potato pie recipe, sweet potato custard pie, sweet potato pie recipe
Lately, I feel like we’re run ragged; we’re constantly on-the-go between doctor’s appointments, activities, homeschool co-op, and other everyday adventures. With our eating habits in even more of a changing state, I’ve really been trying to up our snack game, so we have healthier things to snack on, like trail mix, readily available.
I’ve found that through the week, if it’s not easy(ish), we just won’t take the time. So, it’s important to set the stage over the weekend for healthier eating habits by prepping certain foods and snacks. With all the outdoor activities our family enjoys, trail mix is a definite win in the snack cabinet.
This trail mix pairs perfectly with so many of the outdoor activities we love to do, like camping, hiking, fishing, and kayaking.
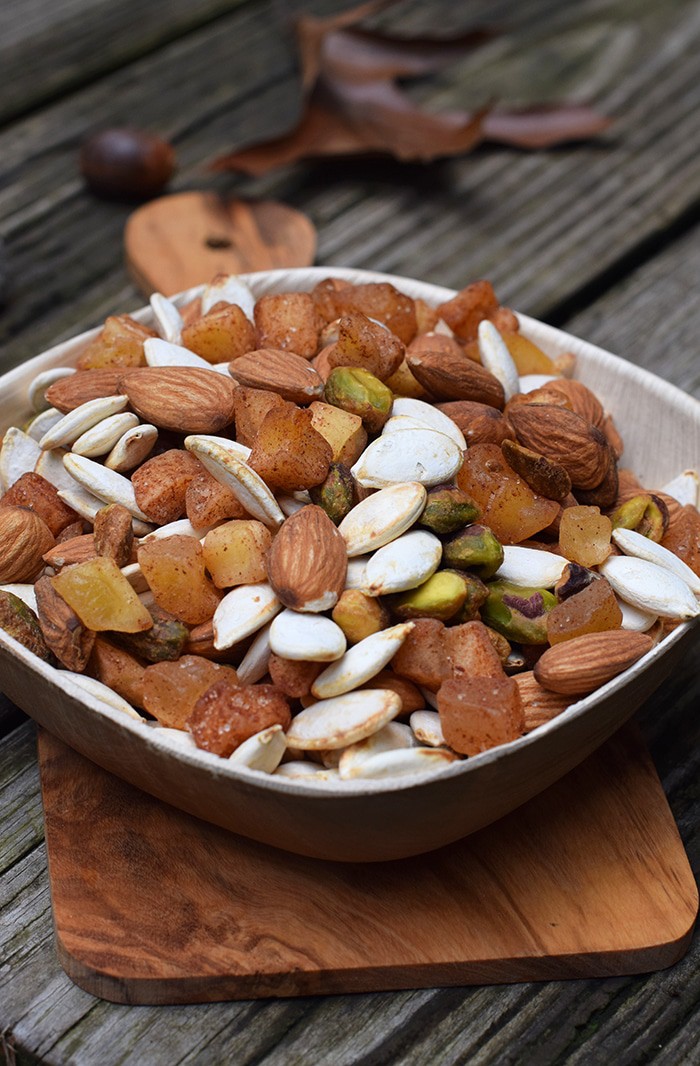
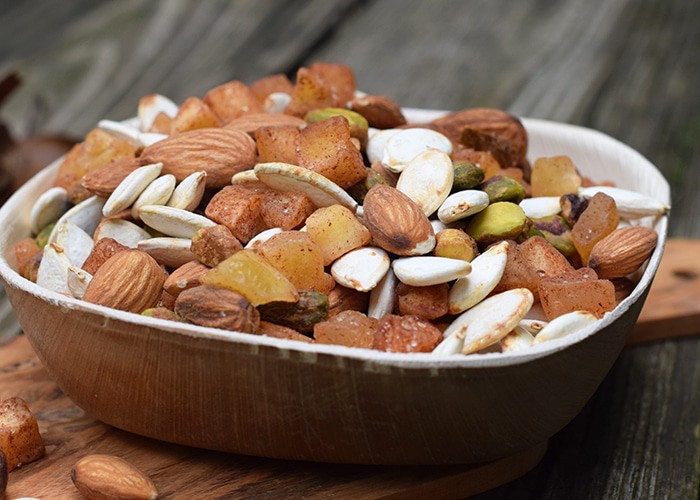
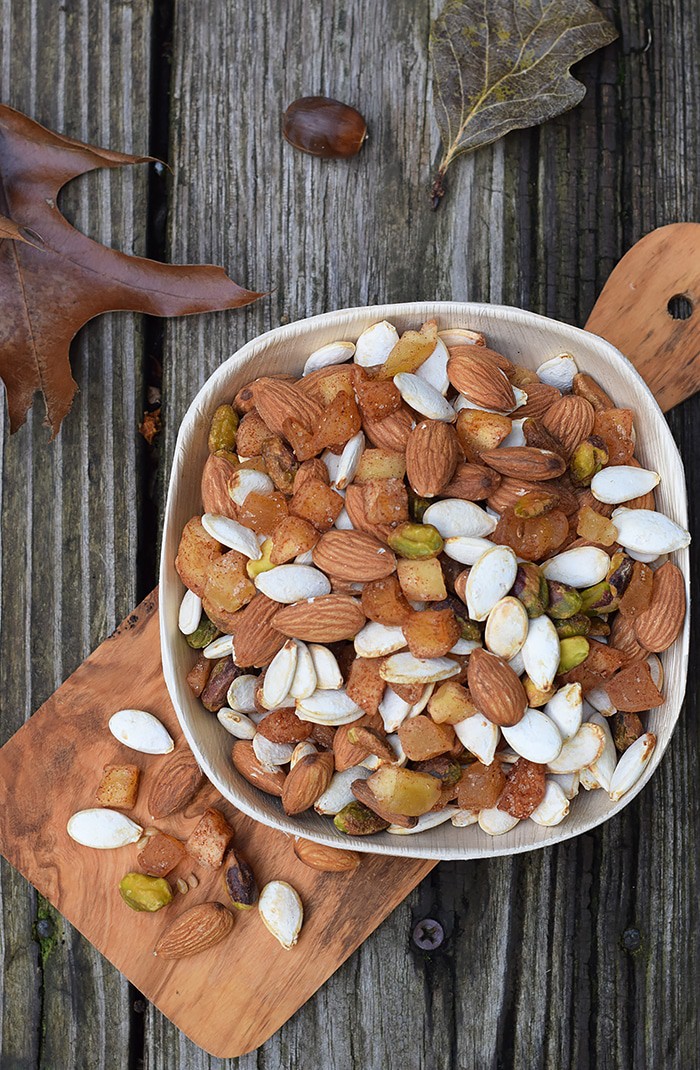
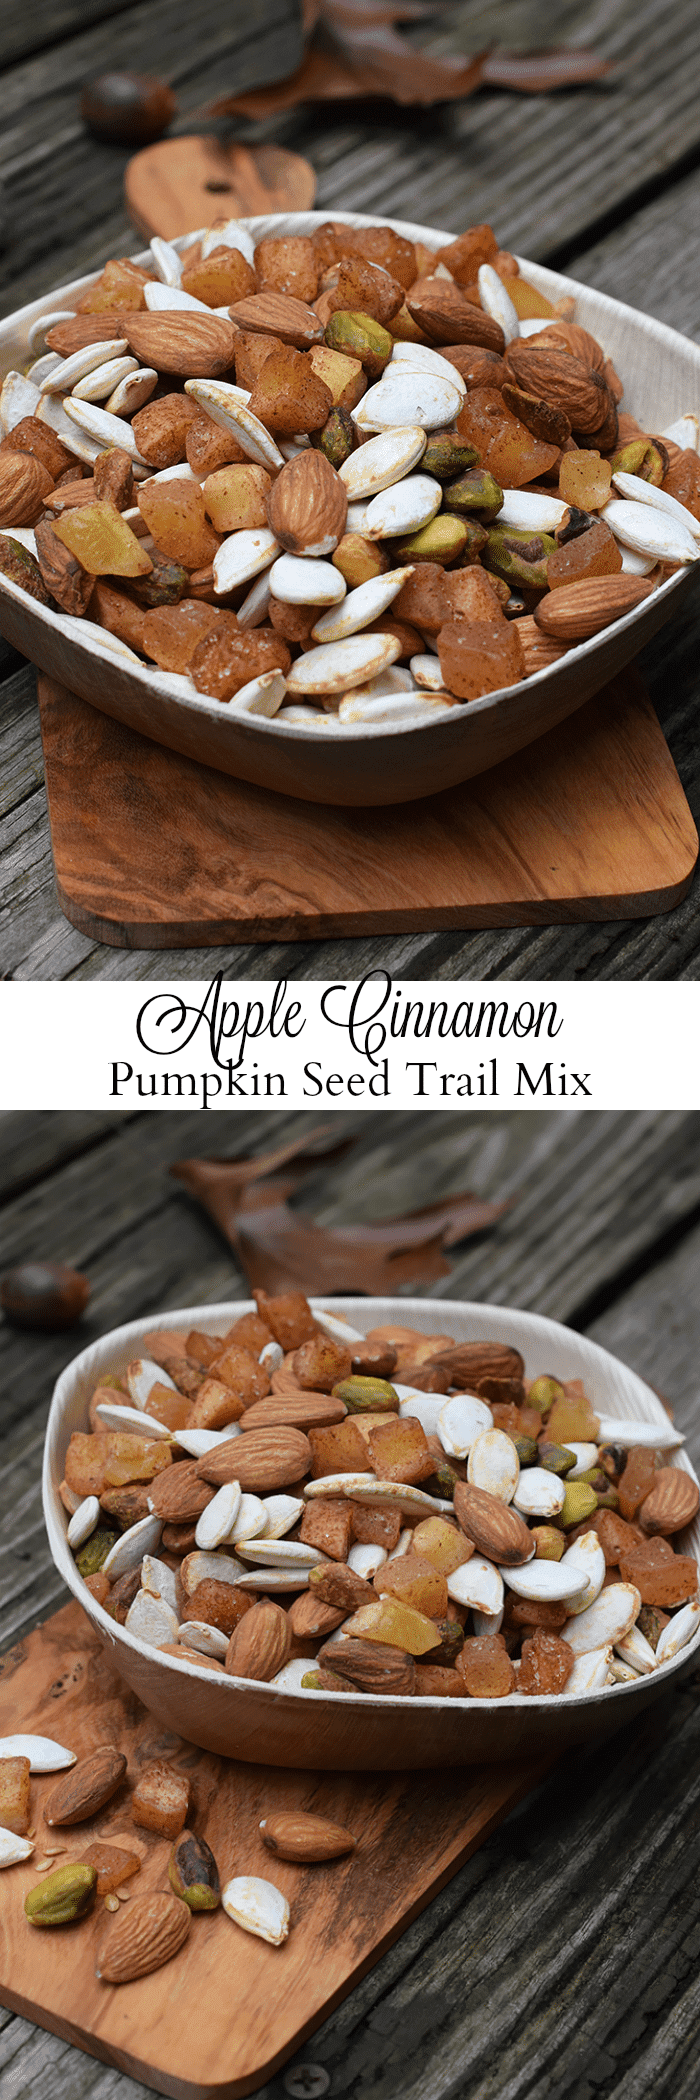
I’ve found myself craving certain autumn flavors, things like pumpkin and all the apple recipes with the flavors of apple cinnamon. It was only natural to create a trail mix with a slight hint of fall.
This trail mix is full of yummy, energy boosting bites and it’s great because we can all enjoy it, including Dan who’s gone completely low carb, no sugar with his food choices. He may wanna leave the apple cinnamon bites alone (and maybe even the pistachios… Who knew they had a tad bit of sugar?), but the almonds, flaxseed, and pumpkin seeds are fair game.
Below is the printable recipe. Enjoy and let me know if you decide to make it!
Apple Cinnamon Pumpkin Seed Trail Mix for On-the-Go
Apple Cinnamon Pumpkin Seed Trail Mix is full of yummy, energy-boosting bites with a slight taste of fall, in case you’re craving autumn flavors. It’s an easy snack recipe you can prep ahead of time and grab on-the-go.
1 1/2 cups roasted pumpkin seeds
1 cup shelled pistachios
1 1/2 cups whole almonds
1/2 cup Golden Flaxseed
1 1/2 cups Apple Cinnamon Bites (these are dried fruit bites I found in our local produce section)
Mix all ingredients together, and store in a re-sealable bag or tightly closed container.
The last few weeks have brought a lot of “lemons” into our lives. You know the old saying, “When life hands you lemons, make lemonade.” If taking charge and grabbing life by the horns entails making lemonade, then I guess that’s where we’re at right now. This recipe for granola bars comes from a desire to provide my guys with more “healthy” to snack on. It was born from all the lemons life’s thrown our way here lately.
Healthy doesn’t have to equal expensive or difficult either. In fact, this recipe is probably going to be a favorite for years to come. I can’t believe I hadn’t made my own granola bars sooner. It’s so easy, and I know every single ingredient that’s in these little buggers.
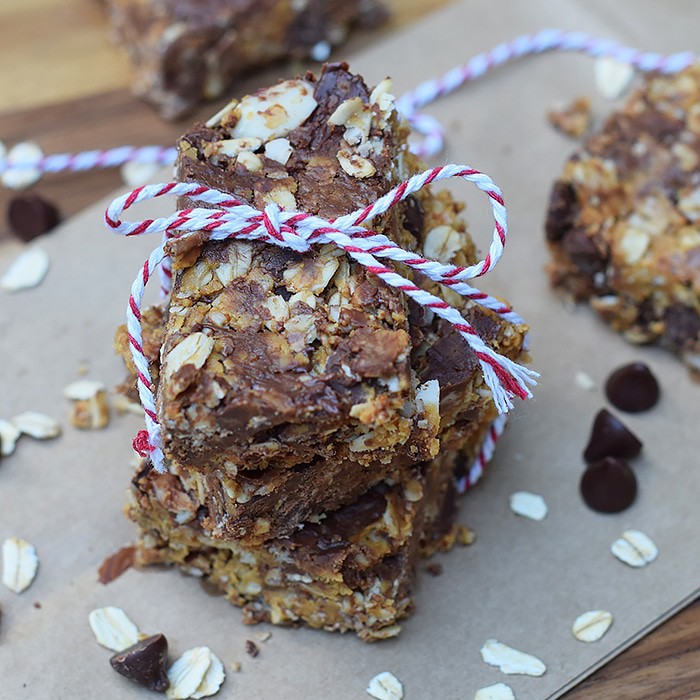
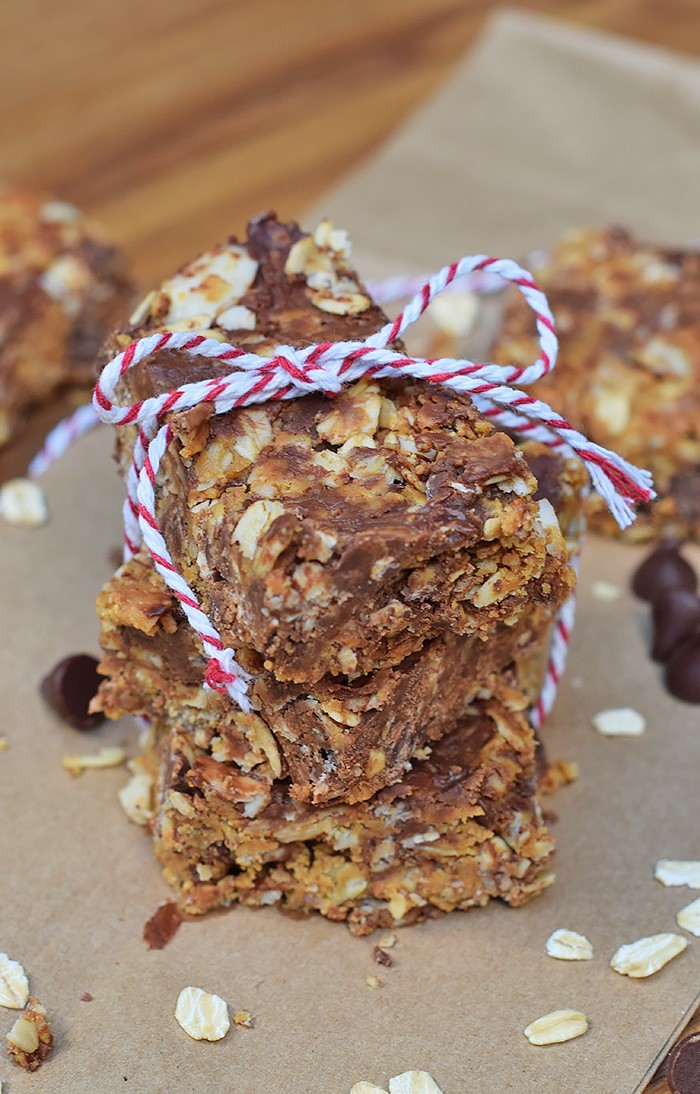
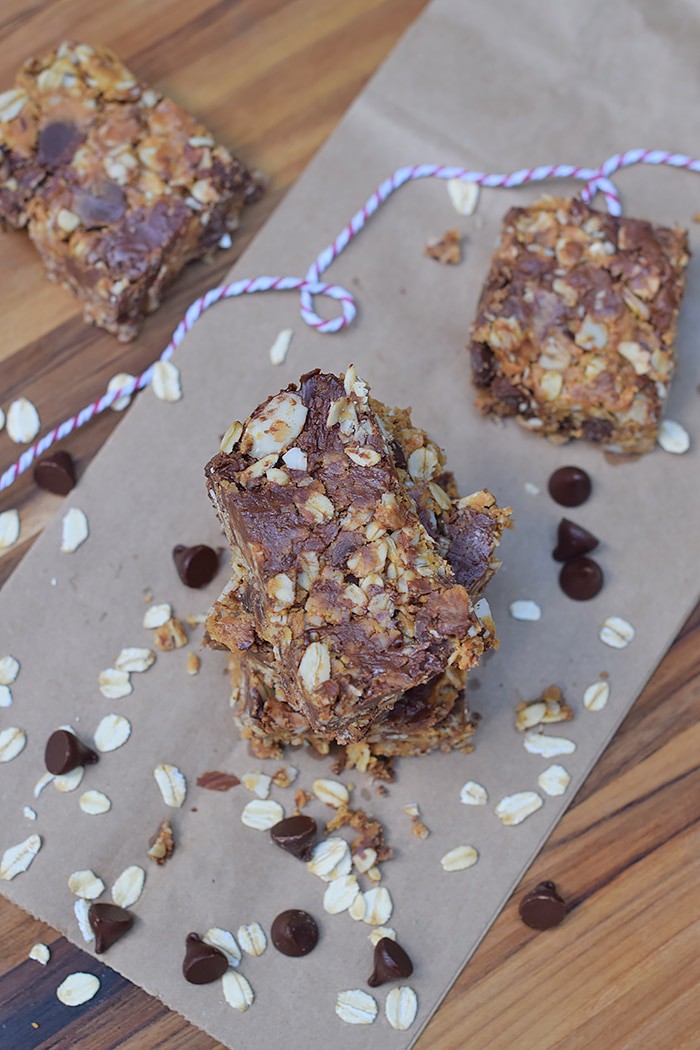
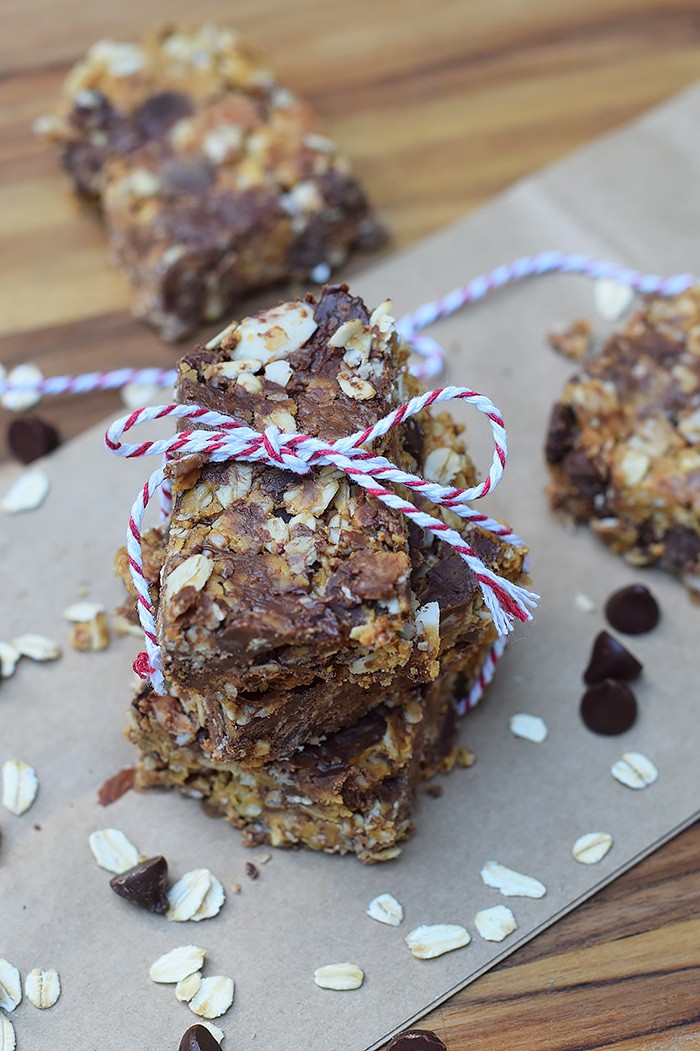
From natural peanut butter to a li’l bit of honey, flaxseed meal, almonds, oats, and dark chocolate chips, they are one scrumptious snack filled with both protein and a li’l fiber.
They even satisfy the sweet tooth but definitely not in a too-sweet way.
Healthy doesn’t equal expensive or difficult. No-Bake Nut Butter and Chocolate Granola Bars are healthy snacks, filled with ingredients you may already have in your kitchen. Grab the easy recipe for these scrumptious treats!
1 cup natural peanut butter (or another nut butter)
1/4 cup honey
2 tablespoons flaxseed meal
1/3 cup sliced almonds
1 1/3 cups old-fashioned oats
6 ounces semi-sweet dark chocolate chips
Add peanut butter and honey to medium-sized saucepan and warm on stove, mixing together ’til creamy.
Remove from heat, and right away, stir in flaxseed meal, sliced almonds, oats, and chocolate chips. The chocolate chips may melt a bit, but they really give the bars a nice, chocolatey texture.
Last year about this time when I found out I was pregnant with Zeke, I knew that I may potentially be done with ever dyeing my hair again. I considered dyeing it with an ammonia-free dye after my first trimester when they say it’s safe to do so, but I just couldn’t bring myself to do it. I think I was tired… tired of dyeing it, tired of the fumes, tired of it fading within such a short time. To put it simply, I was over it. I started to question then whether or not I should grow out the gray.
A little back story on the gray…
My first gray hair showed up when I was 16. It held back, for the most part, until I reached my early 30’s when I started dyeing. The dye would last only a few weeks; then the gray was back with a vengeance. For awhile, I had this skunk stripe goin’ on; I’d sometimes try to cover it up with my eyeliner pencil (works like a charm, by the way), and every so often, I’d dye it again. At one point, I had a hairstylist tell me that if I continued dyeing it at home, my hair would eventually be the texture of a horse’s mane. Call me vain, but I didn’t care at the time… All I knew was that I didn’t want a head full of gray.
Eventually while expecting Zeke, the gray grew out long enough that it was no longer just a few roots showing. It was literally taking over my world.
I felt like the gray made me look tired and old. Ironically, that’s when the compliments started to come. A friend told me the silvery color was beautiful, which was when I realized that it was quite silvery vs. a duller gray. Then my dad (who normally teased me about my gray hair) came along and shared my grandma’s story with me and how she had a head full of white hair at my age (38). It’s a true family trait, written in my DNA. And then there was Dan, who encouraged me time and again to keep the gray, telling me over and over how much he loved my silvery hair.
The wheels in my silver streaked head began to turn, and I began to think that maybe I was looking at this all wrong.
I still hadn’t made a decision when I decided that I’d just find a good hairstylist and have her help me. And by help, I meant HELP! What do I do with this mess? I hadn’t had a haircut in over a year, bless her heart. The day before my appointment, I was really trying to make up my mind… Do I dye it? Do I grow out the gray? Should I cut it short? What should I do? Laugh if you will, but it was a really serious thing for me to grow out the gray at this “young” an age.
It’s a beautiful sisterhood thing, this whole grow out the gray process…
And that’s when I found a whole sisterhood of silver sisters. One of the first sites I came upon was How Bourgeois. First of all, I was drawn in by her photo (she had a full head of gorgeous platinum hair); but then I began to read her posts about her own experience growing out the gray. As I Googled some more and read some more, I became more and more encouraged. Silver hair really is a beautiful thing, especially when it involves a person learning to accept and embrace themselves the way they are and the way God’s made them, even if that plan involves the gift of getting your first gray hair at the ripe old age of 16.
I knew it was time to let my gray do its thing. It was time to embrace who I am, gray hair and all. It was more a heart thing than anything, this decision of mine.
The next day as I went to my salon appointment, I had to stop in and ask directions. The receptionist there, out of nowhere, just went on and on about how beautiful my silver streaks were. I hadn’t even had it cut yet. And when I finally reached the salon and told my stylist that I wasn’t going to be dyeing, she completely agreed with me, telling me that my gray was a silvery color that looked good with my face and complexion. I ’bout fell out of my chair when she said that. I’d NEVER had a stylist tell me to keep the gray; they’d ALWAYS tried to get me to dye it. She cut my hair in a style that works for me for awhile (just while I let the gray grow out) and encouraged me to keep going, that it’d only be a couple more cuts and we’d have it all grown out.
I’ve always believed that God cares about even the tiniest of things in our lives, but that day I went to the salon, it was almost as if He were speaking directly to me through those women and confirming that I’d made the right choice, that He cared about this tiny decision of mine.
A little encouragement for anyone else who might be considering or going thru the same “grow out the gray” process…
I’ve had a few friends reach out with their own stories of dyeing for years and their fears of going gray. When it’s time to let go, you’ll know. Don’t let fear stop you from being who you are, both inside and out. You’re NOT ugly, old, and tired just because of a few gray hairs. If anything, you’re on trend (did you know gray hair was trendy?). You’ve earned every single one of those gray hairs. I like to think with gray hair comes wisdom. If it’s a family trait, embrace and carry that trait with pride.
When it’s time, you’ll have a peace about it, you’ll accept it, and you won’t look back.
And a HUGE plus? You’ll never have to dye again, meaning you’ll likely save a ton of money.
My mission now: To tame these wiry grays and make them softer than ever. Stay tuned for more grow out the gray adventures!
If you’ve been thinking about jumping ship on dyeing, you’ve got this! Email me or leave me a comment. I’d love to encourage you on your journey to growing out your gray.
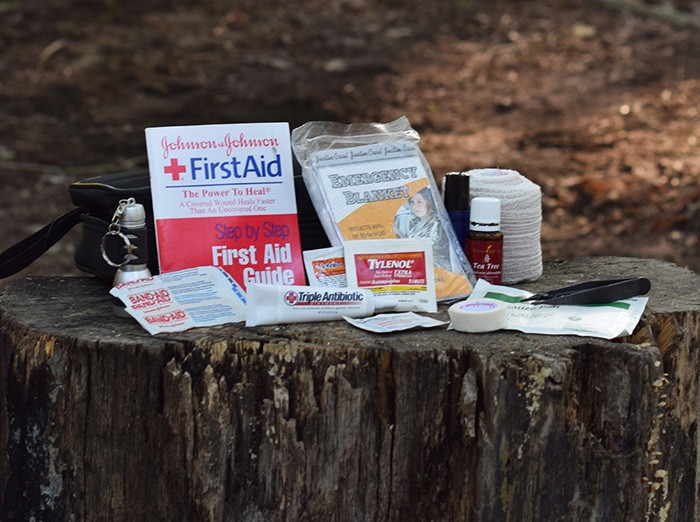
Whenever we travel, and especially when we go camping, kayaking, or hiking together, we always carry a first aid kit with us. It stays in our vehicle 24/7, even for short day trips, like when we go fishing.
I also keep a stash of first aid supplies in our working pantry in our home.
I started carrying one with us because when Jacob and Jaden were little, there were numerous times they’d need a Band-Aid, and I wouldn’t have one. So, I solved that problem by packing a comprehensive first aid kit that would hopefully get us through any mini catastrophe.
Trust me… With boys (just kids in general), there WILL BE lots of mini catastrophes. It’s come in handy more times than I can even say.
We were given a kit years ago, so I’ve kept a few of the supplies that were in it and added to it over the years. You can buy a first aid kit, or you can put together your own kit. All you need is some sort of container, a small box, or zippered pouch. A zippered lunch box, with a handy dandy handle, is an easy solution.
What to Pack in Your First Aid Kit
If you keep the usual first aid supplies on hand, it’s pretty easy to pack your own kit; it also gives you an opportunity to add in extra things that a regular first aid kit may not have. Here’s a checklist of what to pack in your first aid kit…
Wounds and Injuries
When it comes to bandages and Band-Aids, be sure to pack multiples.
Bandages and Band-Aids (various sizes and types)
Butterfly adhesives
Gauze and/or gauze pads
Compress bandages/dressings
Bandaging tape
Scissors
Elastic bandages with clips
Cold compress – If you’re carrying ice in a cooler, you could take a few resealable plastic bags for ice and use as a homemade cold compress, along with a wash rag.
Did I miss anything? What else would you add to a first aid kit for camping or family adventures?
Disclaimer: Everything I share about essential oils on Adventures of Mel is based on personal experience and has not been approved by the FDA. Please do your own research, and never use essential oils in a way that would make you uncomfortable. Also, take special caution for those pregnant or nursing, as well as infants and children. Read the full disclaimer.
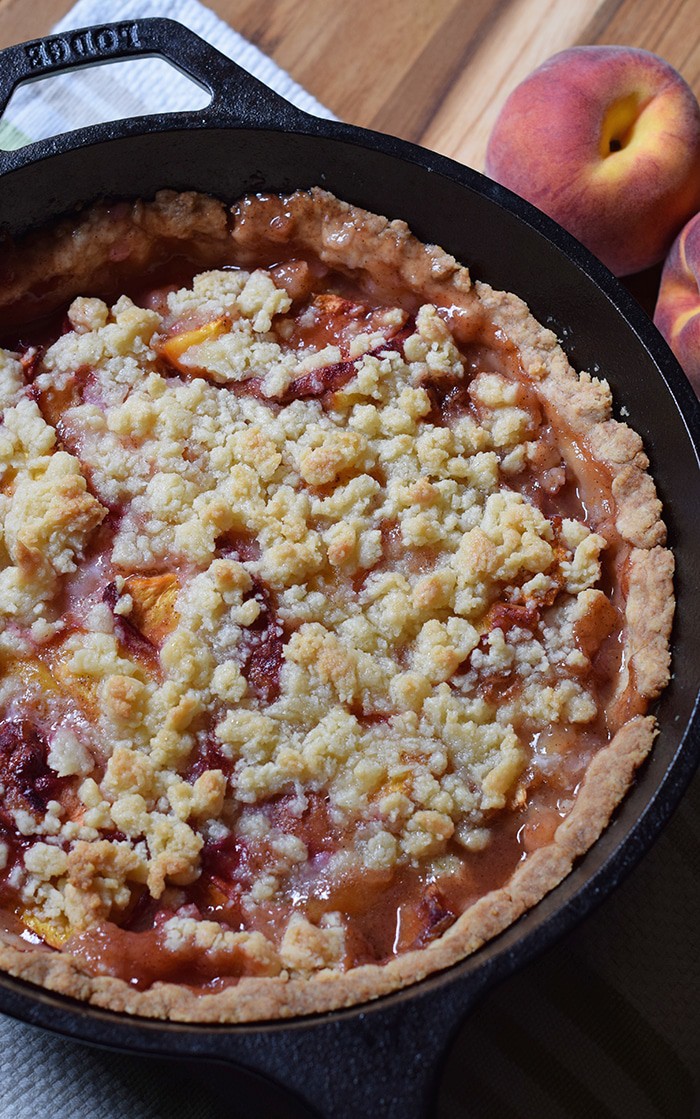
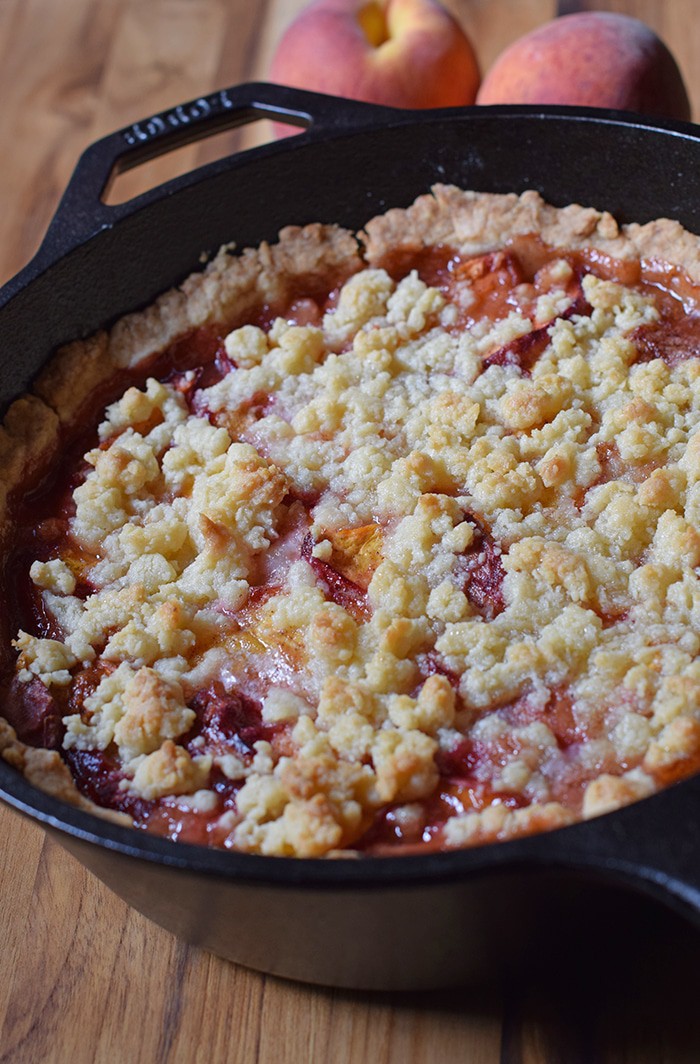
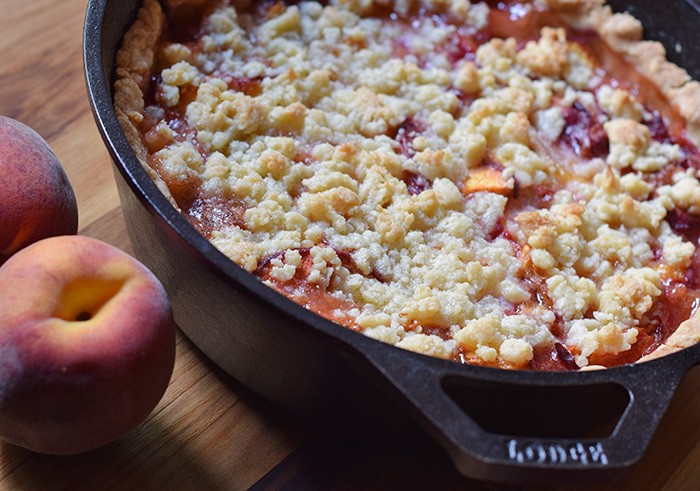
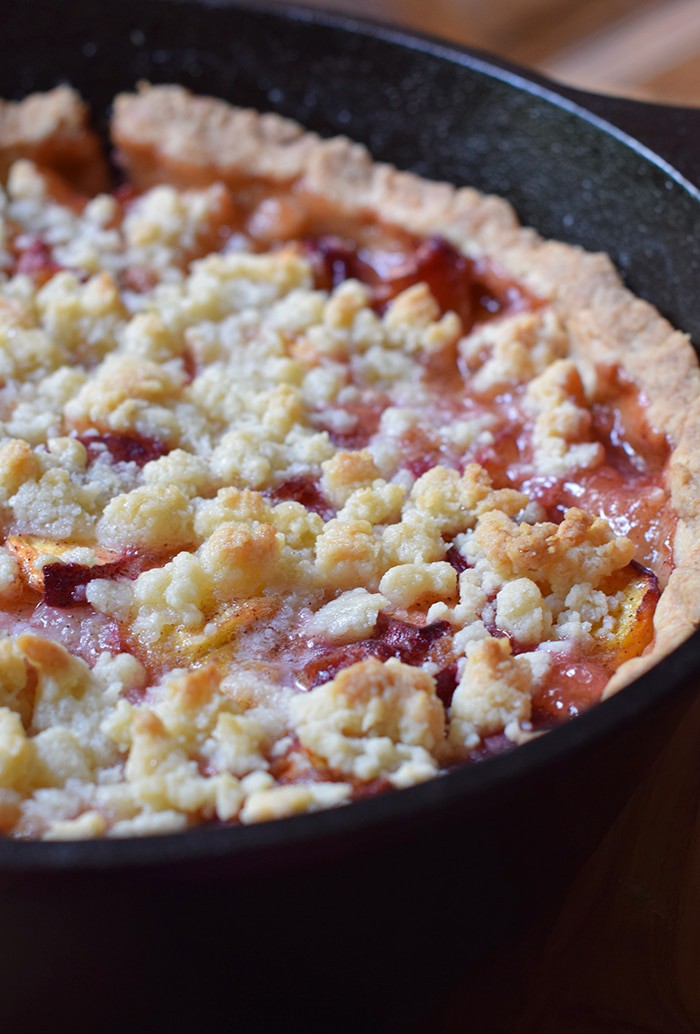
Every time I make this cobbler, it just seems to get better and better. When I made this particular one to share as a recipe, I kid you not, my guys pretty much devoured it in a day.
I really do need to be more strategic about when I make this and make it when we’re about to have company, so we don’t eat it all ourselves. I did get a little bit… just a li’l.
And I must say that you can’t have peach cobbler without a scoop of vanilla ice cream. It just wouldn’t be the same.
So, if you plan to make this, get to the store and get yourself a carton of ice cream to go with it; or better yet, make homemade vanilla ice cream.
Peach cobbler is probably the easiest recipe, besides chocolate chip cookies, you could ever make. Ingredients are simple and the crust is a press-in crust, my favorite type of pie crust.
The more tedious part is peeling and slicing the peaches, but even that isn’t bad. Fair warning, though… If you don’t watch it, you may not have as many peaches in your cobbler as you first started out with… They’re hard to resist.
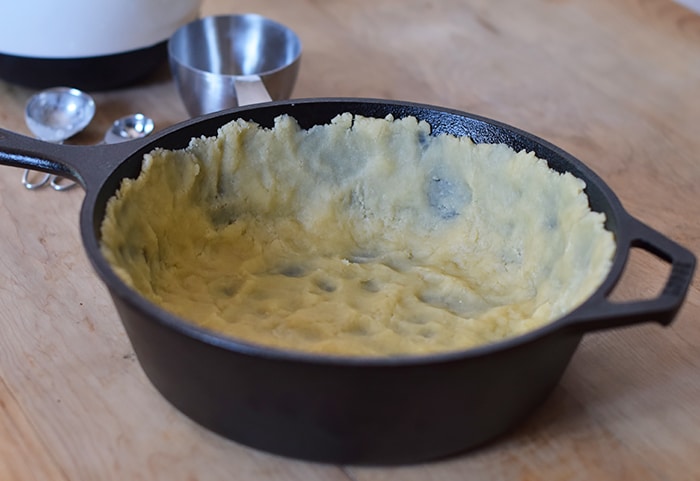
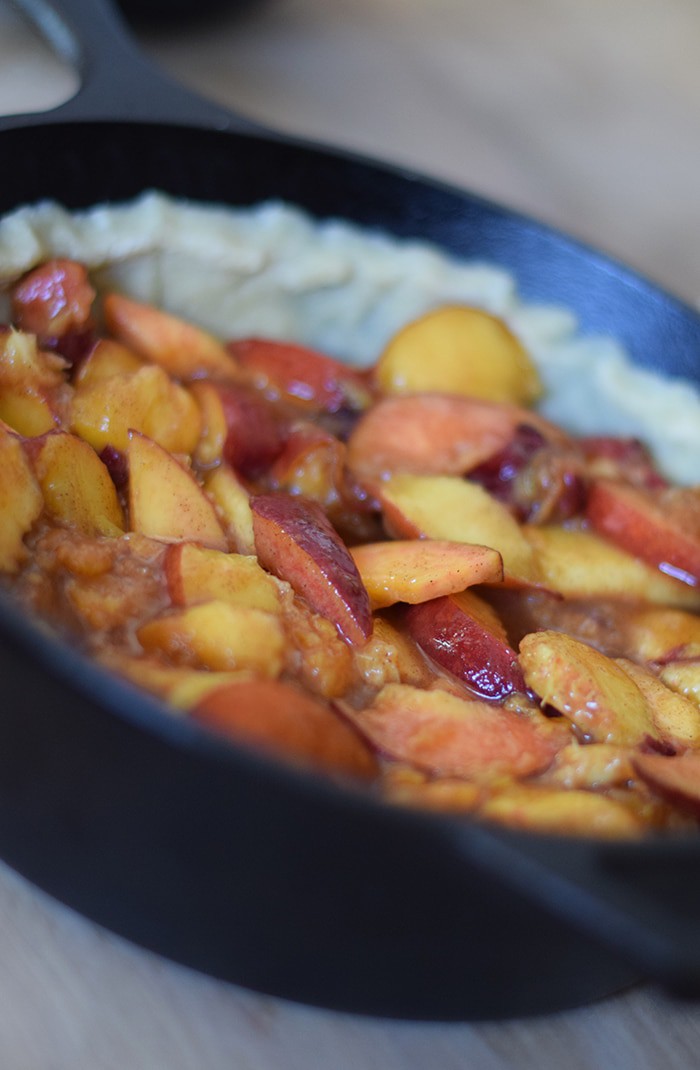
You can use a regular baking dish. I’ve made this in a round glass casserole dish for years, but while I was pregnant and more prone to anemia, we really started using more cast iron for cooking. So, I decided to give Dan’s favorite skillet a try.
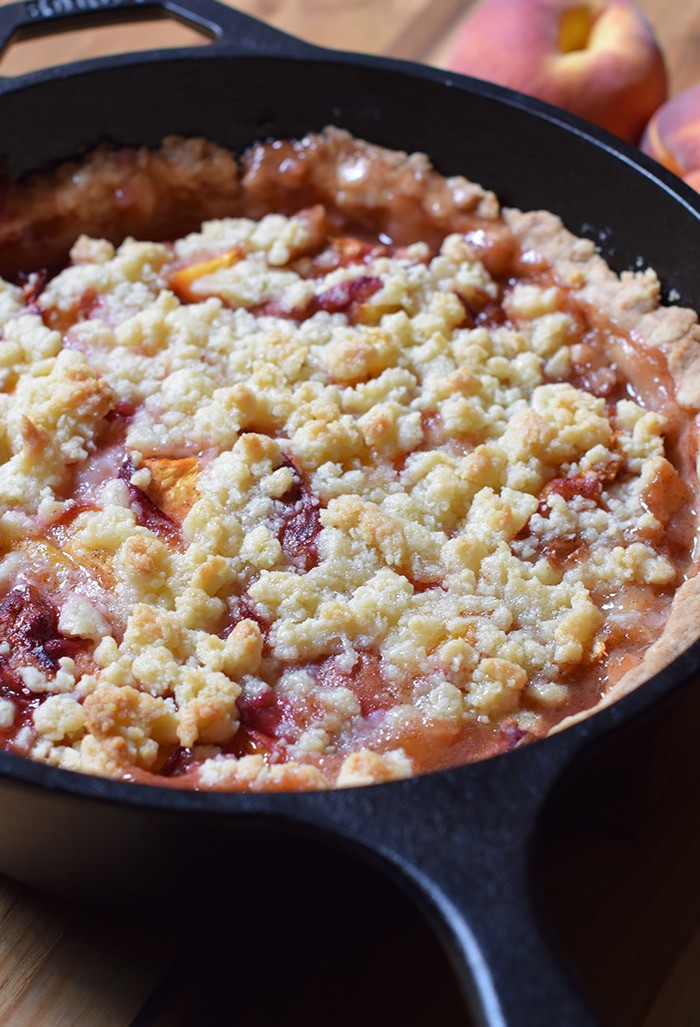
A cast iron skillet makes a super delicious cobbler.
Below is a printable recipe. If you decide to make it, you’ll have to let me know how long it lasted in your house. Enjoy!
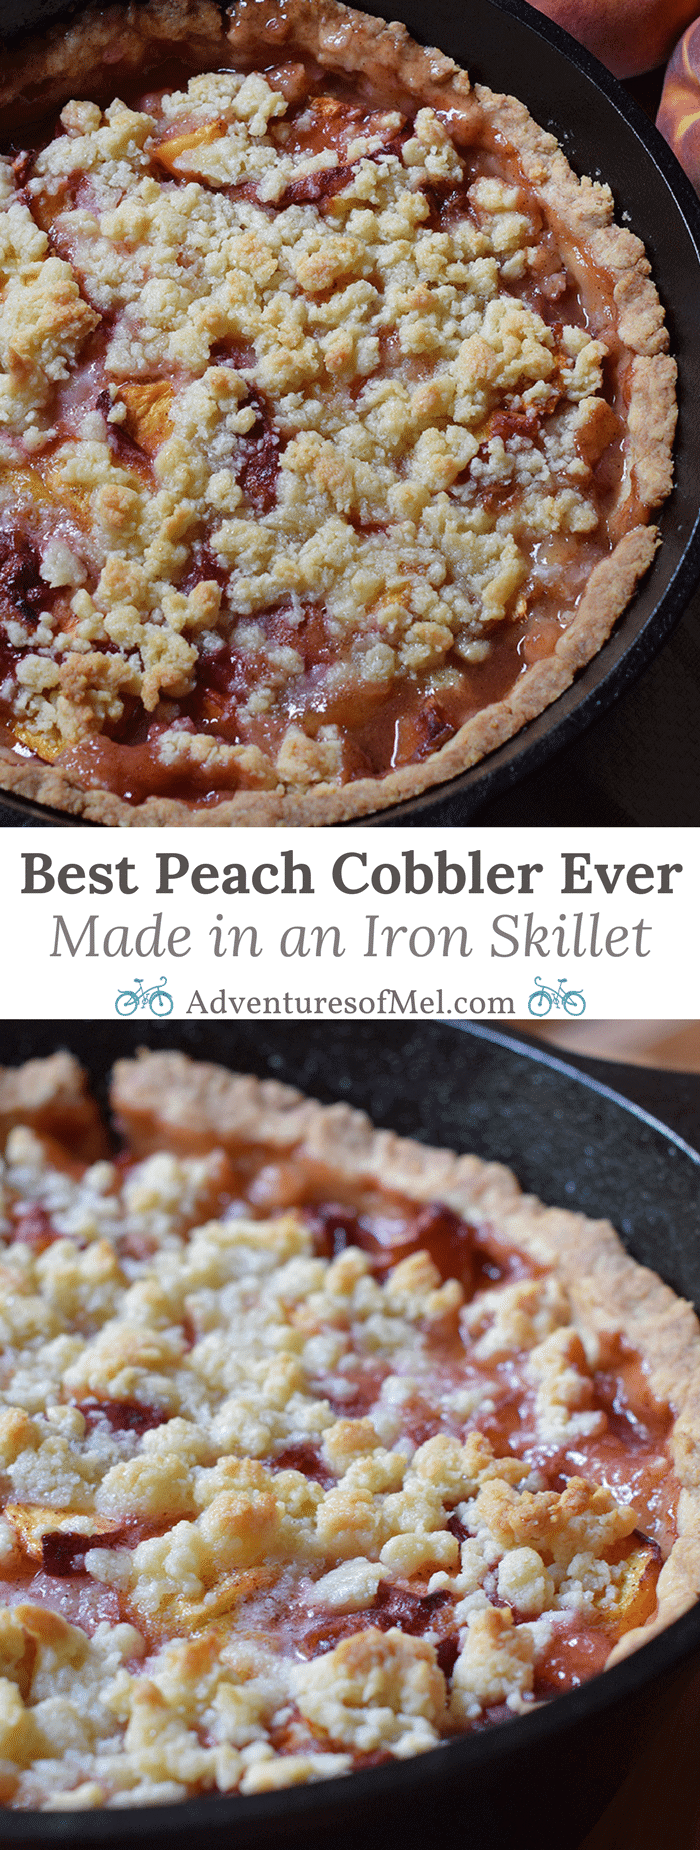
The Best Peach Cobbler Ever, Made in a Cast Iron Skillet
Peach cobbler is probably the easiest dessert recipe you could ever make. Ingredients are simple, with a press-in crust! Bake it up in your favorite cast iron skillet, serve with vanilla ice cream, and watch it disappear.
Crust:
2 cups flour
3-4 tbsp. sugar
1/2 tsp. salt
3/4 cup unsalted butter (softened)
3-4 tbsp. milk
Filling:
8-12 peaches
1/2-2/3 cup sugar
Pinch of salt
1/2 tbsp. corn starch
1/4 cup salted butter
1/2 tbsp. cinnamon
Preheat oven to 425 degrees. Bring down to 375 degrees.
For the crust, combine dry ingredients and set aside.
Combine softened butter and milk in smaller bowl.
Add to dry ingredients, stirring with a fork.
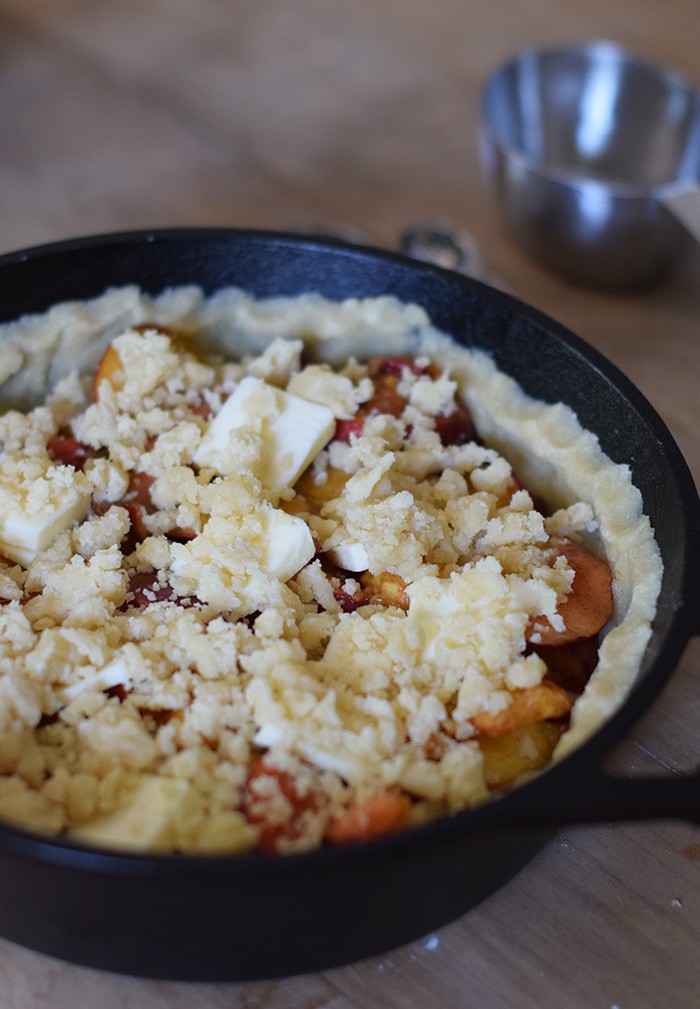
Set aside 1/4 of dough for topping.
Press the rest of the dough into a baking dish or large cast iron skillet. Press up the sides until the crust covers the dish or skillet.
Wash, peel, and slice peaches.
Add in sugar, salt, corn starch, and cinnamon. Mix well.
Pour peach mixture into crust, and top with sliced butter.
Finally, crumble your saved crust topping over the peach mixture.
Bake for 40 minutes to 1 hour, until crust is golden brown.
Serve with a scoop of vanilla ice cream and enjoy!
Pies & Pastries
American
best peach cobbler, cast iron peach cobbler, peach cobbler, skillet peach cobbler
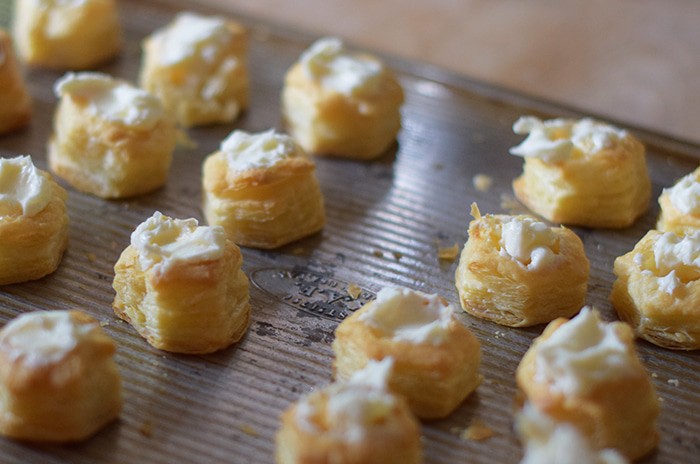
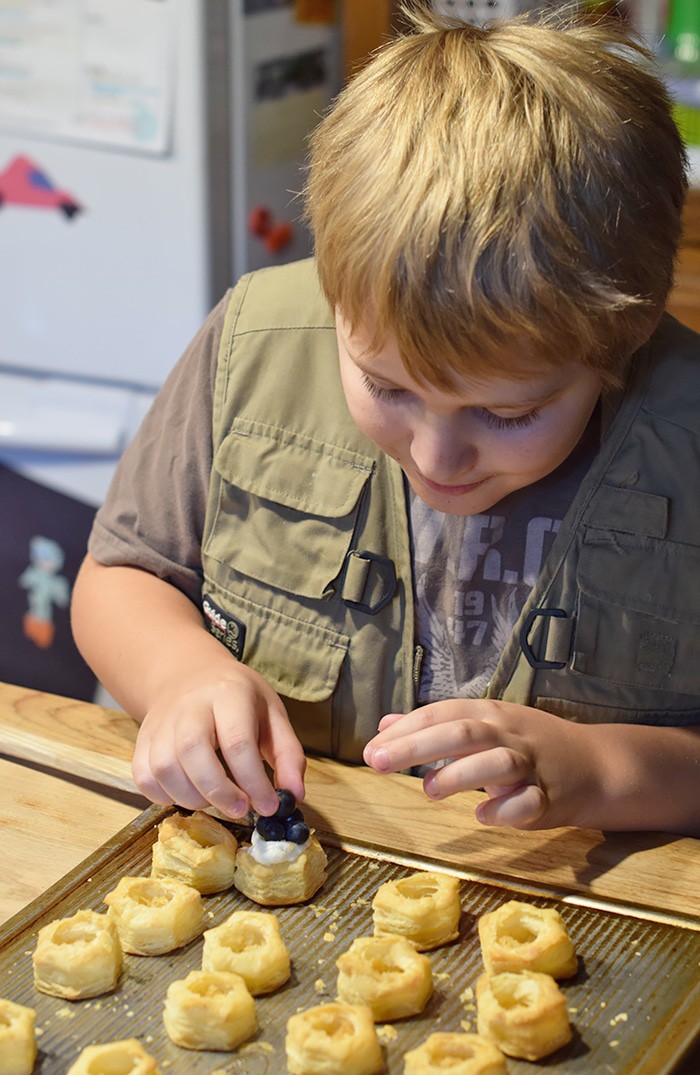
Lately I’ve felt the need to do more with my Jaden to both spend more time with him and keep him busy through the day. Since Baby Zeke was born, we’ve been pretty consumed with everything baby. If I let Jaden, he would stay on electronics or watch tv all day long. Sure, he loves to go outside, go swimming, and play with his army men; but he can get sucked into electronics like nobody’s business. This week we’ve made a couple of treats together, including these yummy Fruit Pizza Bites. Made with Puff Pastry Cups, they’re the perfect summery bite-sized treat, and they’re so easy to make.
Fruit Pizza is one of my kids’ favorite desserts, especially Jacob. He usually asks for it every birthday. These bite-sized fruit pizzas are a spin-off of our favorite dessert, made with berries. They’re perfectly kid-friendly to make, and you can whip up a batch in hardly any time at all.
Baking the Puff Pastry Cups according to package directions is your first step. When they come out of the oven, use the tip of a wooden spoon to smash down the middle of each cup. Once they’ve cooled, add a tiny dollop of the cream cheese mixture. Then top with a berry… …or in true Jaden fashion, a pyramid of berries. Yum! That’s all there is to it. They’re so fun to make and eat.
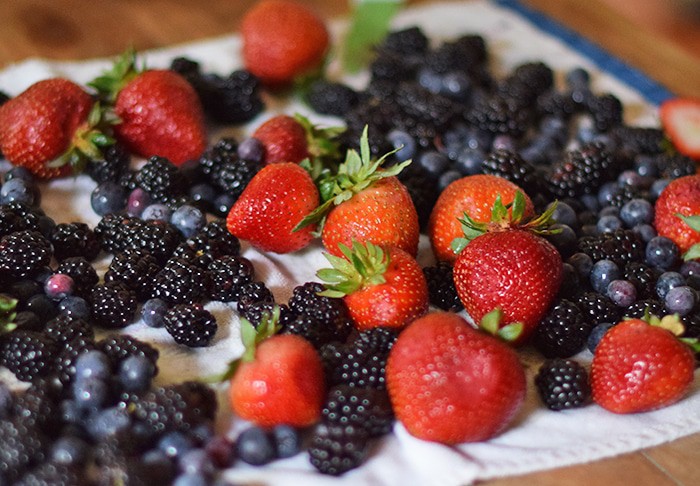
Fruit Pizza Bites, made with strawberries, blueberries, and blackberries, is a spin-off made with Puff Pastry Cups, and it’s so kid-friendly to make, perfect for summer. Grab the printable recipe!
1 box Puff Pastry Cups
1 8 oz. box cream cheese
1/2 cup powdered sugar
Strawberries
Blueberries
Blackberries
Bake the Puff Pastry Cups according to package directions.
When they come out of the oven, use the tip of a wooden spoon to smash down the middle of each cup.
Once they’ve cooled, add a tiny dollop of the cream cheese mixture to the center of each Puff Pastry Cup.
Wash all berries.
Prep strawberries by stemming and slicing.
Top each cup with a berry, or if desired, a pyramid of berries.
Serve and enjoy!
Desserts
American
fruit pizza, fruit pizza bites, puff pastry recipes
How do you keep your kids busy and active? Share your best tips in the comments below!
Can’t make them just yet? Pin the recipe for later!
Do you have a mosquito problem where you live? We have a ton of mosquitoes.
Between the woods and the creek in the woods, along with various things sitting outside that collect water, we tend to have a lot of mosquitoes. It’s almost impossible to sit outside on a warm summer evening without getting eaten alive.
And this year, we’ve had a few ticks. For the most part, our chickens really help to keep the tick population to a minimum, but we still have a few.
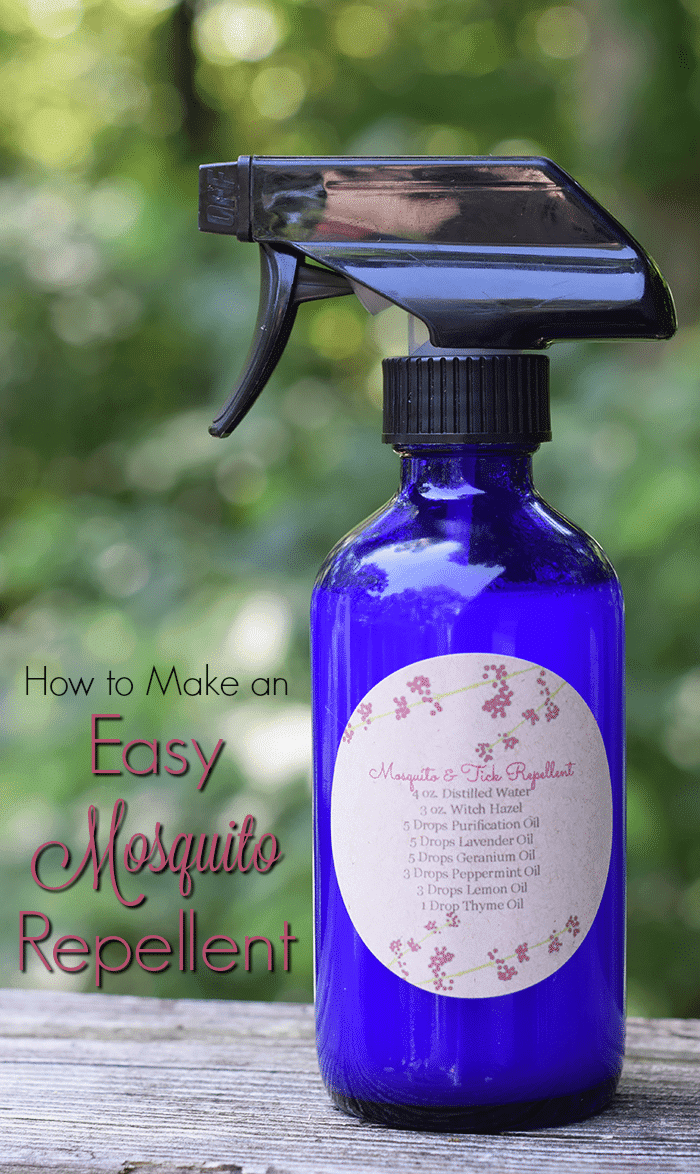
A mosquito and tick repellent is a must if we’re headed outside, especially in the evenings.
Last summer I came up with a homemade mosquito repellent. When we used it, we still noticed mosquitoes landing on our arms and legs, though they wouldn’t bite; they’d just land, then fly away.
While that spray worked ok, we noticed that we had to keep spraying it on for it to work; I’ve since researched and found that adding in a bit of vegetable glycerin would probably help the spray to last longer, but I’m not trying that just yet.
This year, I think I’ve perfected my recipe, though I may still add in that vegetable glycerin… We’ll see.
I’ve added a few other things, and when I tested it by going outside to stand by our fire pit (which can be a dangerous thing to do on a summer evening, especially right around dusk), I didn’t have one single mosquito land on me.
I went even further and went out to sit on our porch swing… Not one mosquito made its presence known on my skin. Woohoo! I think we have a winner.
I’ll keep testing and update here if needed, but I’m really excited to have a bug repellent that I don’t have to worry about putting on our skin. It smells great too because of the essential oils I added.
Below you’ll find the printable recipe.
Per FDA regulations, I will say that the use of essential oils is entire optional, but I love the oils I chose to use and wouldn’t want to make my spray without them.
So, here you go! Let me know what you think if you make it and try it. I’d love to get your feedback on how the spray worked for you.
Easy Mosquito and Tick Repellent
We have so many mosquitoes the minute we step into our backyard. I’m so excited to finally have a homemade DIY mosquito and tick repellent spray that actually works, and it smells great too!
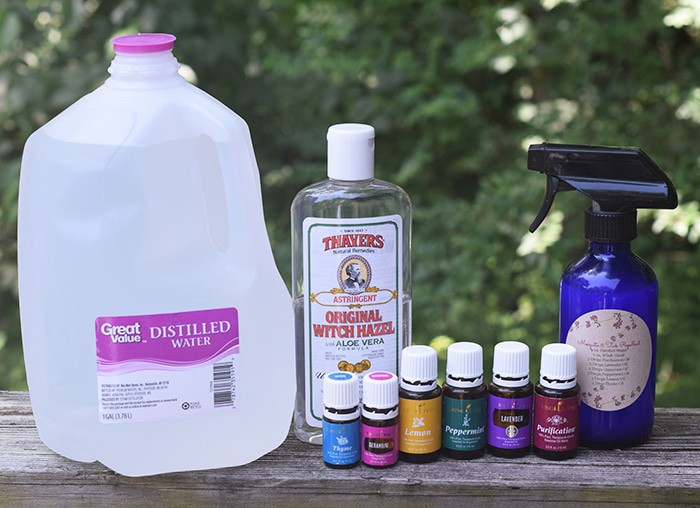
8 ounce spray bottle
4 ounces distilled water
3 ounces Witch Hazel
5 drops Purification essential oil
5 drops Lavender essential oil
5 drops Geranium essential oil
3 drops Peppermint essential oil
3 drops Lemon essential oil
1 drop Thyme essential oil
Mix all ingredients in an 8 oz. spray bottle.
Spray on exposed skin when headed outdoors!
Disclaimer: Everything I share about essential oils on Adventures of Mel is based on personal experience and has not been approved by the FDA. Please do your own research, and never use essential oils in a way that would make you uncomfortable. Also, take special caution for those pregnant or nursing, as well as children. Read the full disclaimer.
What do you use for bug repellent? What’s your favorite way to keep those pesky mosquitoes at bay?
Disclaimer: Everything I share about essential oils on Adventures of Mel is based on personal experience and has not been approved by the FDA. Please do your own research, and never use essential oils in a way that would make you uncomfortable. Also, take special caution for those pregnant or nursing, as well as children. Read the full disclaimer.
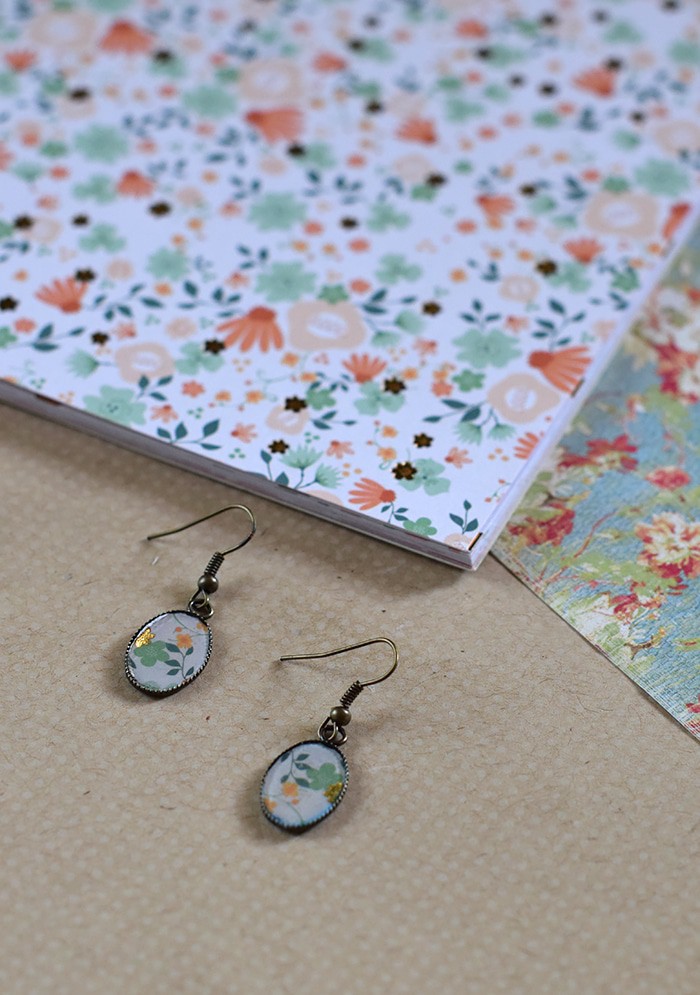
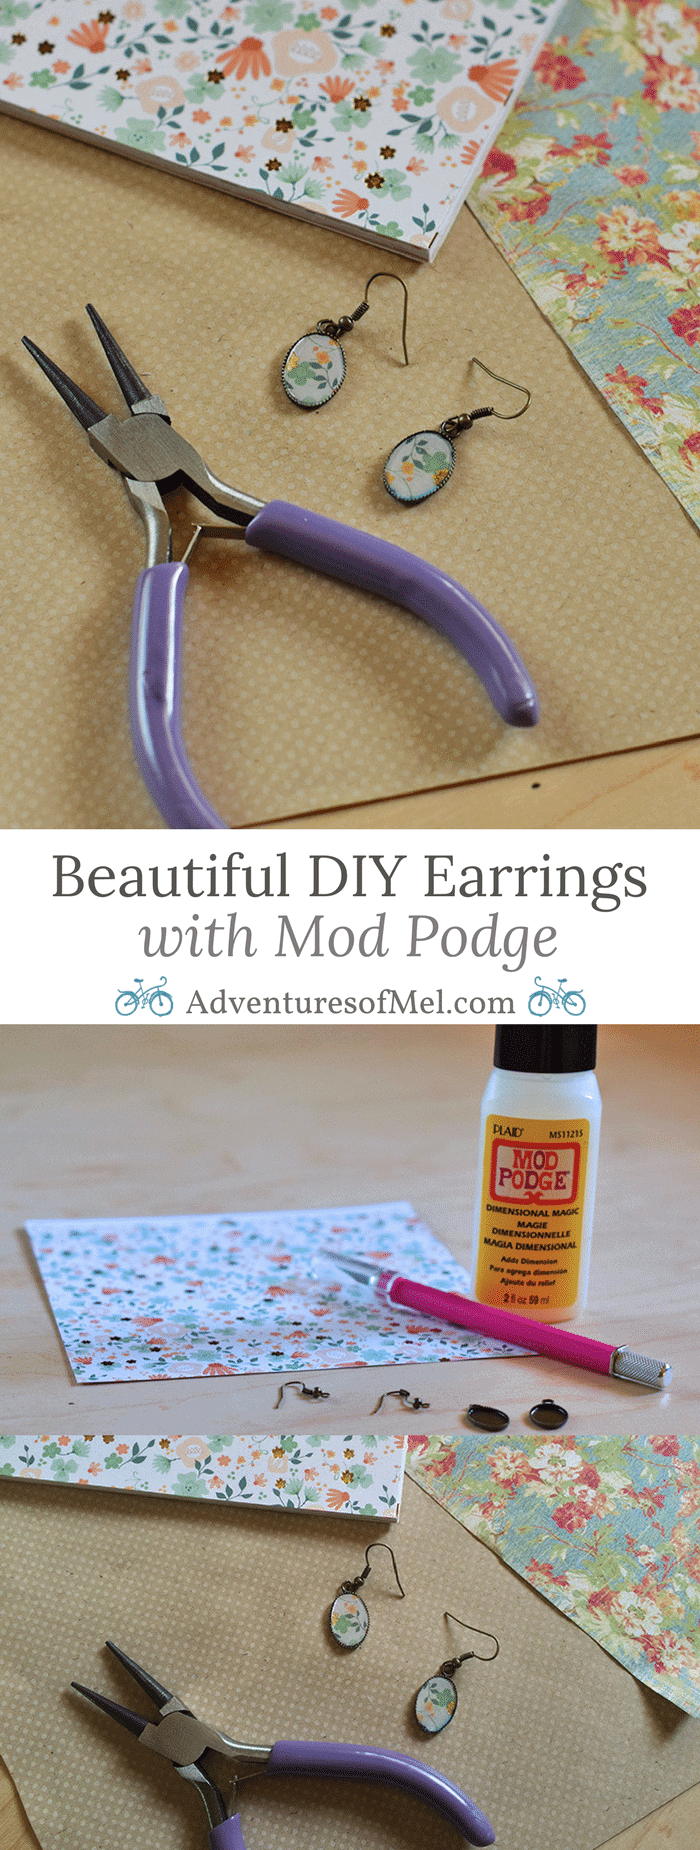
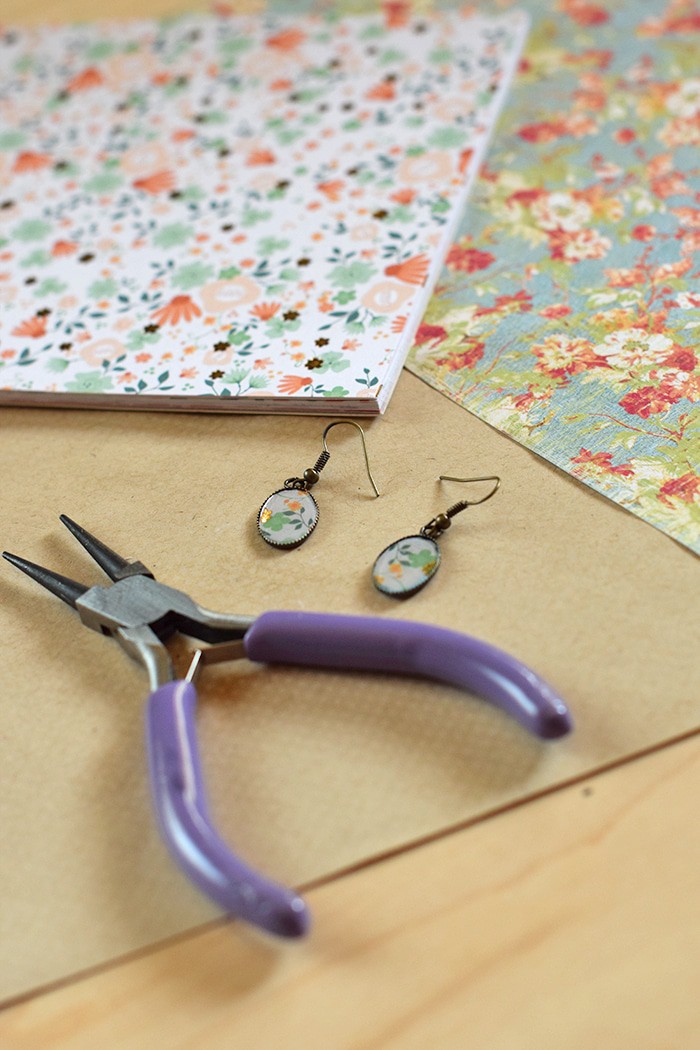
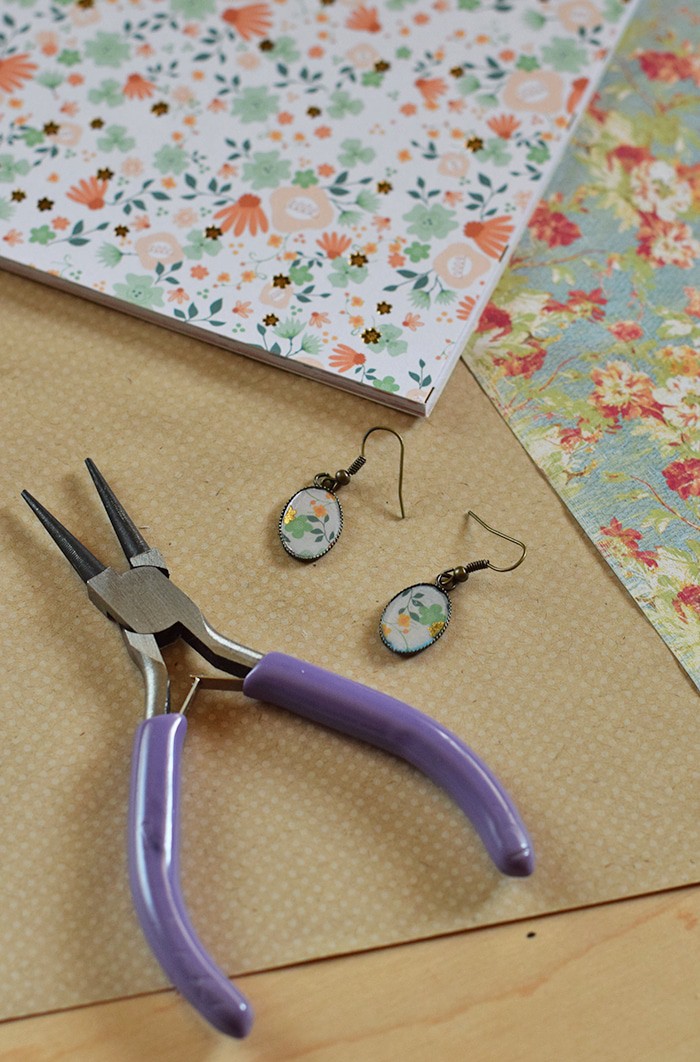
Love Mod Podge crafts? Me too! Mod Podge is one of my favorite crafting mediums because there are so many things you can do with it; for instance, you can create things like handmade jewelry, photo gifts, special keepsakes, furniture makeovers… The possibilities are endless. If you love jewelry but haven’t tried making your own yet, I have an easy tutorial that will have you making all sorts of beautiful earrings. It really is that easy.
These little earrings only require a few supplies. They’re actually really affordable to make, and you could make several pair, depending on how many designs you want.
Supplies Needed for DIY Mod Podge Earrings
Scrapbook paper
Craft knife
Cutting mat
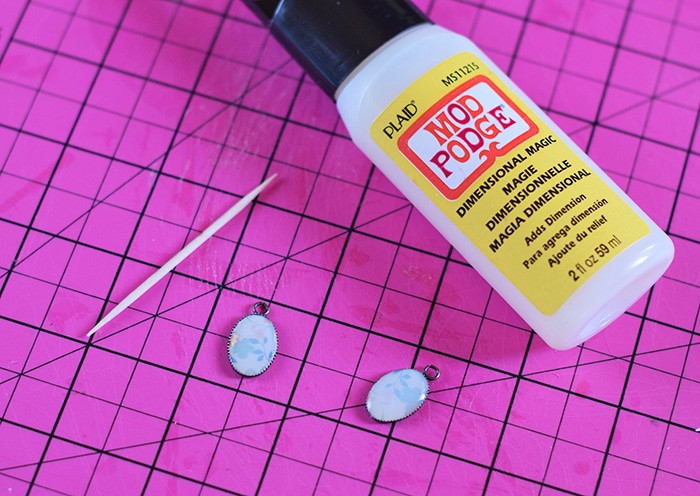
Mod Podge Dimensional Magic
2 Earring pendants
2 flat fishhook earwires
2 round jump rings (optional)
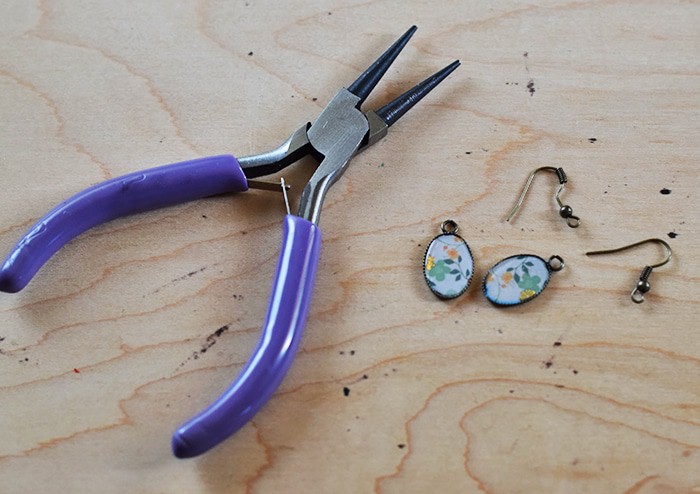
Round-nose pliers
Instructions for Making Earrings
The first step is to pick out the scrapbook paper design you want. I stuck with a smaller, colorful, floral pattern for this particular pair, allowing for more design flair in the earrings.
Cut paper to pendant shape with a craft knife. This is the most tedious step because it may require more trimming and shaping to fit the paper inside the pendant.
Fit paper inside each pendant.
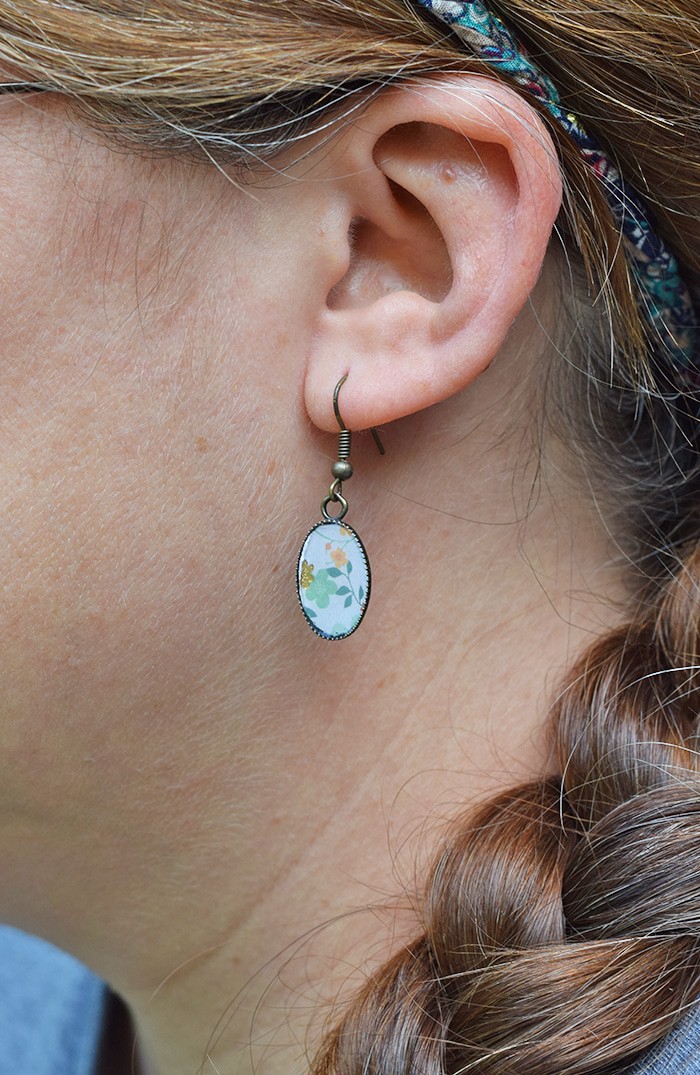
Dimensional Magic allows you to finish the earrings with a clear raised finish. Fill in the surface of each earring pendant with Mod Podge Dimensional Magic, making sure it goes to the edges of your earrings, also removing bubbles with a toothpick. It’s important to remove any bubbles you may have; otherwise, they’ll show up even after the Mod Podge has dried. You’ll want to allow about 3 hours for this to dry. When first applied, it will look milky, but it’ll clear as it dries.
After your jewelry has dried well, then you can add the necessary hardware, using the round-nose pliers. Hardware includes jump rings (if you prefer them) and flat fishhook earwires. I didn’t add jump rings to this pair because I didn’t feel they needed them, but it’s totally up to you.
And that’s it! Making your own earrings is super duper easy and quite addictive. They make great gifts too; I’m sure we all know a birthday girl, a graduate, a friend, sister, mom, teacher who would love a gift like this. Happy crafting!
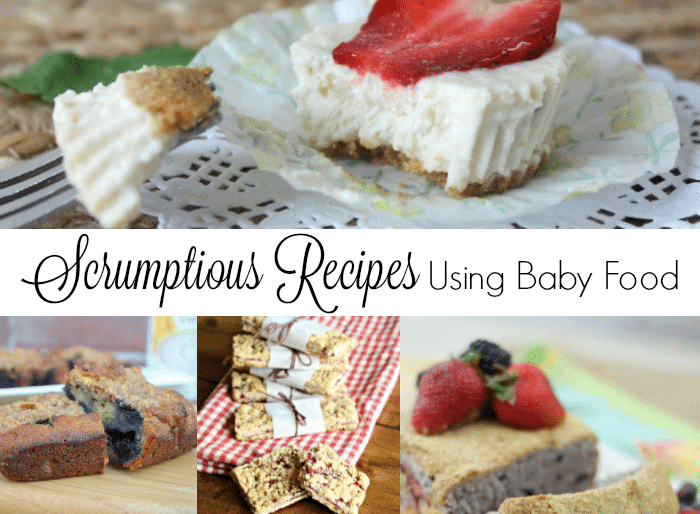
Who would have thought that leftover baby food would make a fantastic ingredient for all sorts of scrumptious recipes? I know I didn’t, back when my older boys graduated to regular food from baby cereal and baby food. It just wasn’t something I’d ever really thought about.
Going through a few rough patches in our life together has really given us a desire to not waste anything… I won’t say we never waste anything, but we’re a lot more mindful of it and it stings when something is wasted.
Now that we’re about to have another baby, I’ve stocked up on a few things, and some of those things I’m already using in scrumptious recipes we can enjoy now.
The ideas are endless. There are so many ways you can use baby oatmeal, from adding it to smoothies, breads, cookies, meatballs… No chucking that box of baby cereal when baby’s done with it. Instead, I’ll find delicious ways to add that nutrition to different recipes we create, whether for meal time, snacks, or dessert.
Below are several ideas for using Gerber baby food and baby cereal in different recipes. I can’t wait to try a lot of these myself.
Scrumptious Recipes Using Baby Food or Baby Cereal
For more recipes and ideas for using leftover baby food, be sure to follow the #CookingwithGerber hashtag on Twitter, Facebook, Instagram, and other forms of social media.
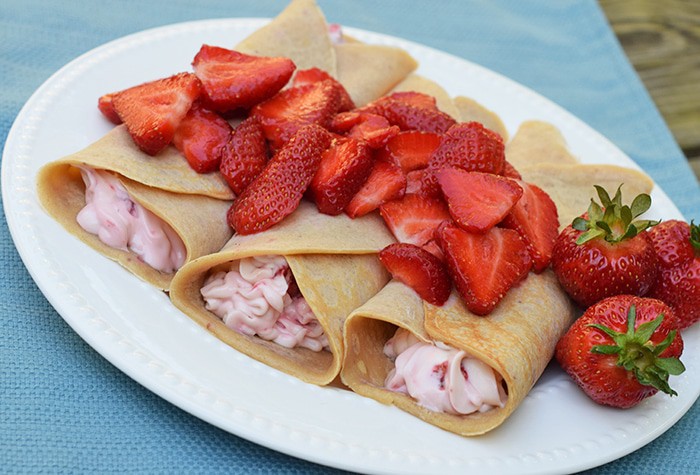
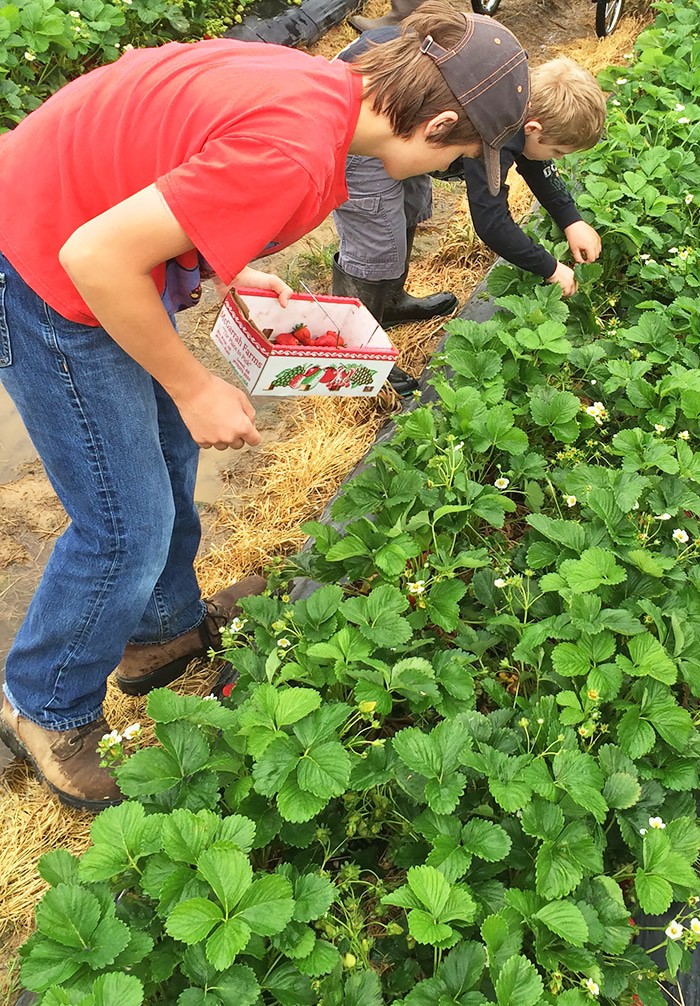
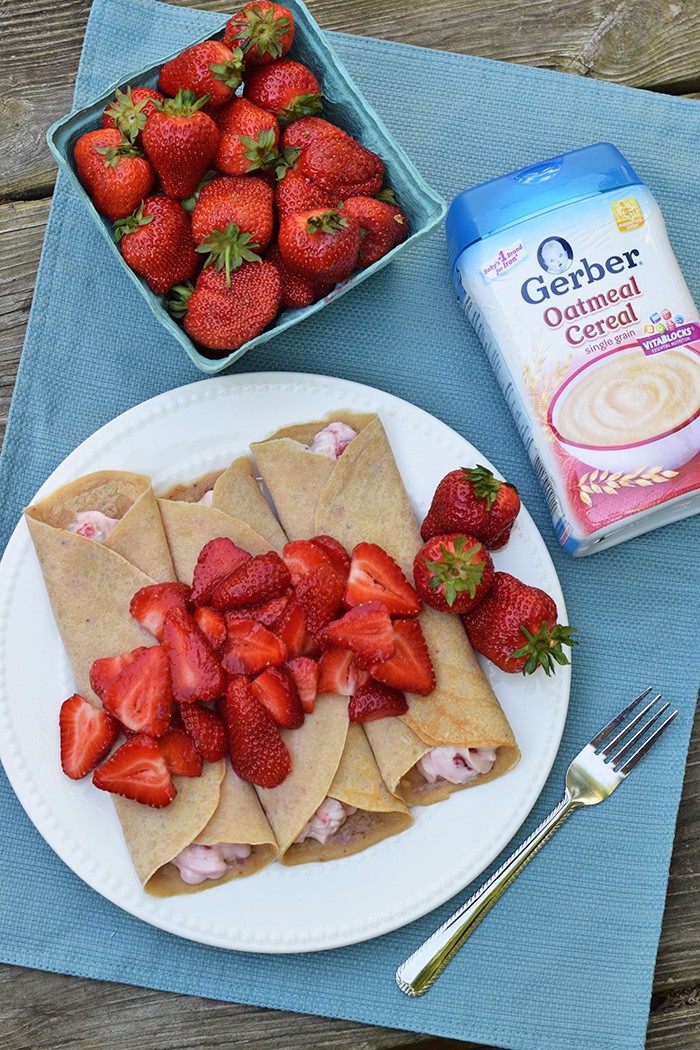
Do you enjoy crepes but, like me, have never made them? Don’t let that stop you. When it comes to crepes, I’m not gonna lie… I’d never made them before this recipe came to fruition in the ongoing list of ideas going through my head at any given time. But I have to say, I believe I’m sold on making crepes. They’re so easy to make and scrumptious too. I love that they can be made savory or sweet, meaning every person in my family is happy. What originally inspired these crepes was Gerber Oatmeal Cereal. Yet another inspiration point for these particular crepes was the fact that strawberries are ripening across Northwest Arkansas, and my boys wanted to go pick berries. Berries, oatmeal, my desire for a new recipe… You get the picture.
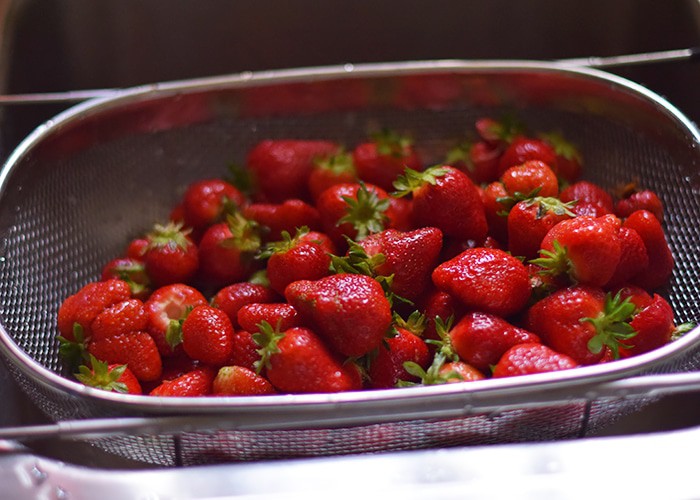
I normally love berry picking every year, but this year my 9 month pregnant belly is kinda hindering me in some ways, including bending over to pick a whole flat of berries. But that didn’t stop us from going and letting the boys pick ’til they had a crate full of red, juicy berries that looked oh so good. It didn’t take them long because the berries were in abundance and absolutely beautiful. I couldn’t resist picking a few myself.
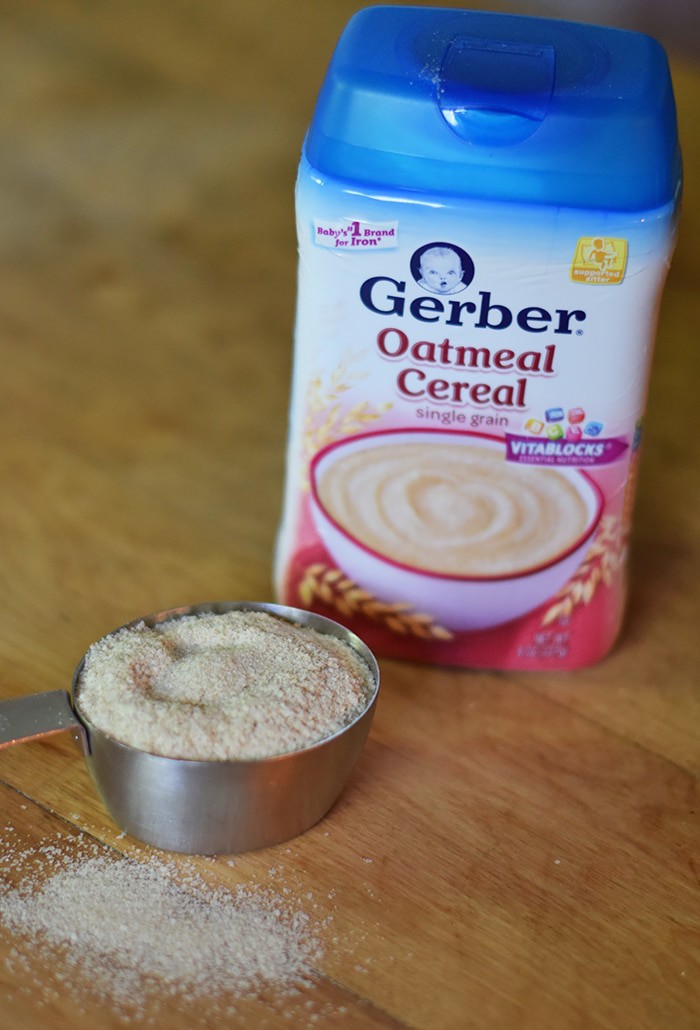
Now, as for Gerber Oatmeal Cereal Single-Grain (because that’s what I used in this recipe)… My boys were all excited when they came in the kitchen and they asked me what I was making. Then my oldest saw the baby cereal sitting on the table. He was a bit skeptical… “Baby food in crepes?” Once he tried a bite, though, I’ll tell you, his skepticism didn’t keep him from eating and enjoying every bite of scrumptious strawberry crepe. Our first ever batch of homemade crepes was a hit!
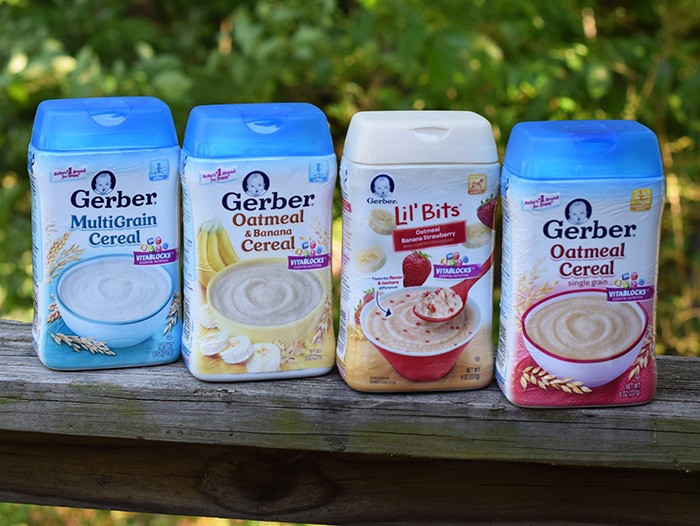
I love the fact that not only can I keep this cereal stocked in my cabinet for this third baby boy that’s about to make his way into our family, but I can cook other things with said cereal, as well. We used baby cereal with both Jacob and Jaden, and I plan to use it again with this one; it was a great way of introducing them to solid foods, not to mention satisfying their hungry little bellies. If you have leftover baby cereal, it’s a great way to add nutrients (like iron, B vitamins, Vitamin E, Vitamin C, zinc, and calcium) to different recipes, including desserts or sweet treats. I’m looking forward to making my next batch of muffins and subbing in a bit of nutrient rich cereal for part of the flour. You’ll find 4 different kinds of Gerber cereal that make great recipe substitutions at Walmart… MultiGrain Cereal, Oatmeal & Banana Cereal, Lil’ Bits Oatmeal Banana Strawberry, and Oatmeal Cereal Single-Grain.
Back to the crepes…
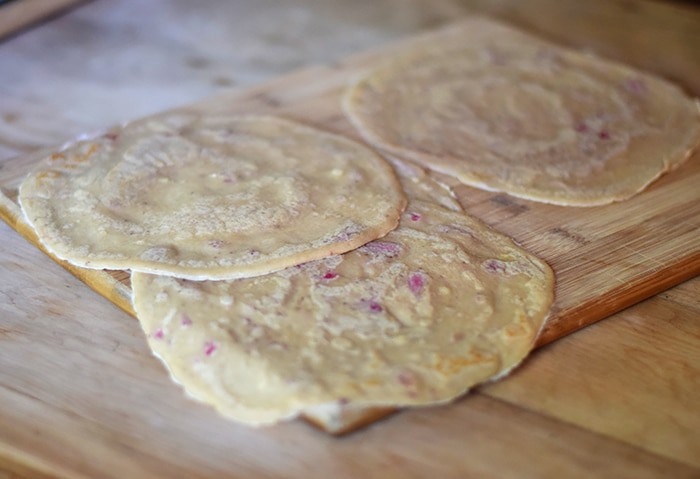
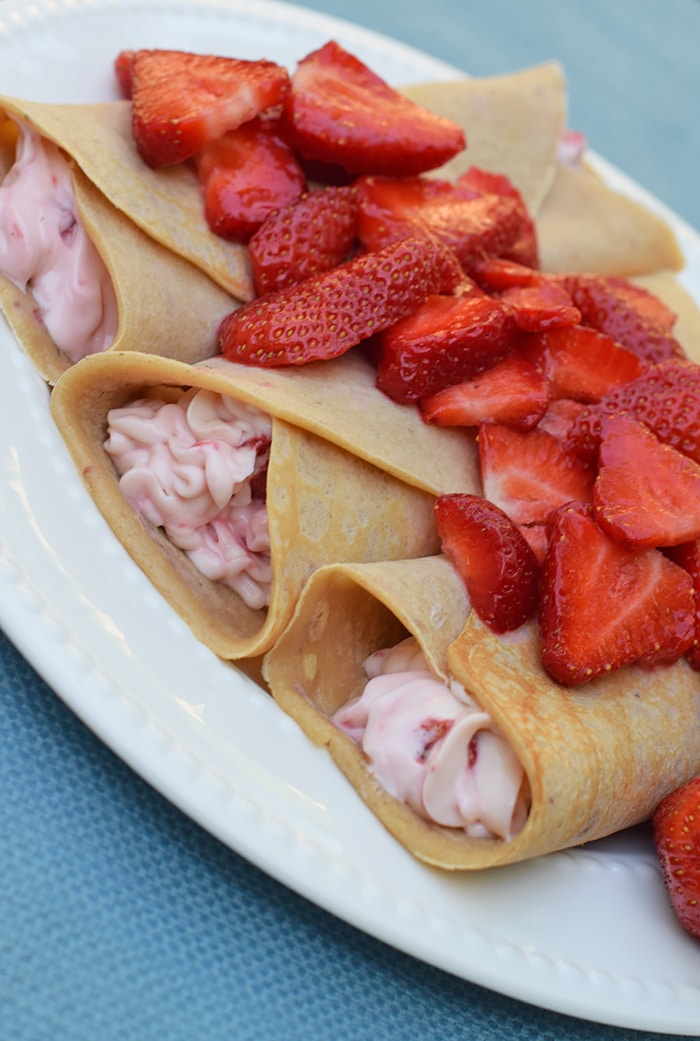
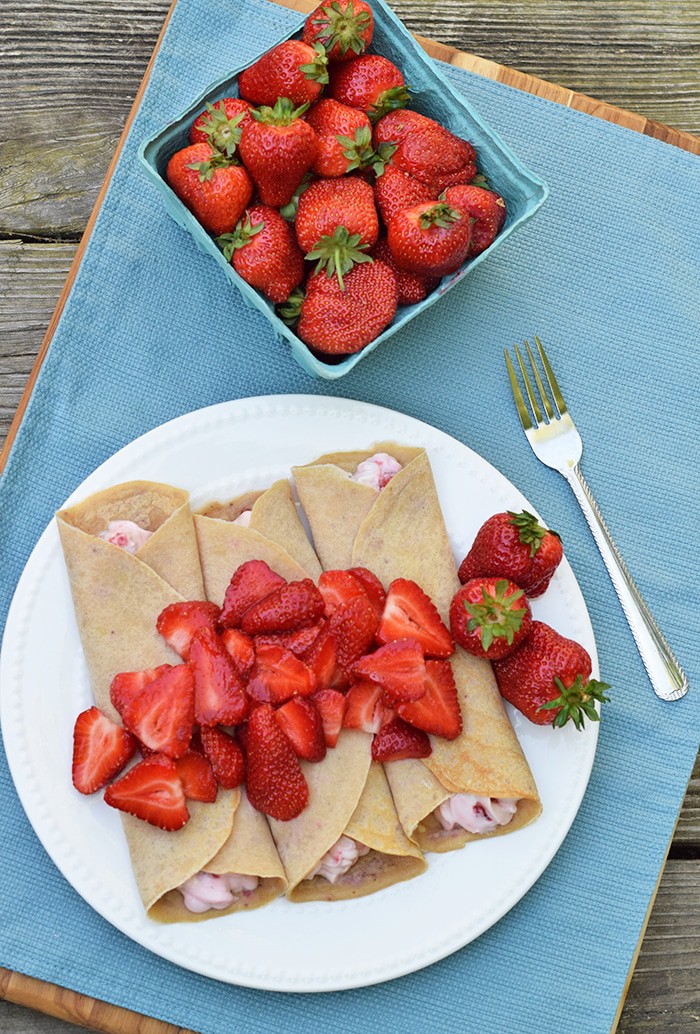
This crepe recipe is similar to a pancake recipe, only it uses a slightly thinner batter, that and there’s no baking powder or baking soda. That way the crepes can really spread out in the pan without puffing up into pancake form. I added crushed strawberries to the crepe batter itself, and I also added chopped strawberries to the cream filling.
Mix your batter. Then cook each crepe on a griddle, spreading each crepe out with a spoon, so it’s nice and thin. They don’t take long to cook; once they’re fully cooked, you can lay them out on a cutting board to cool. Once cooled, you can either stack them or fill with the cream filling and fold the sides over on top of each other.
Below you’ll find the printable recipe with full instructions. Enjoy!
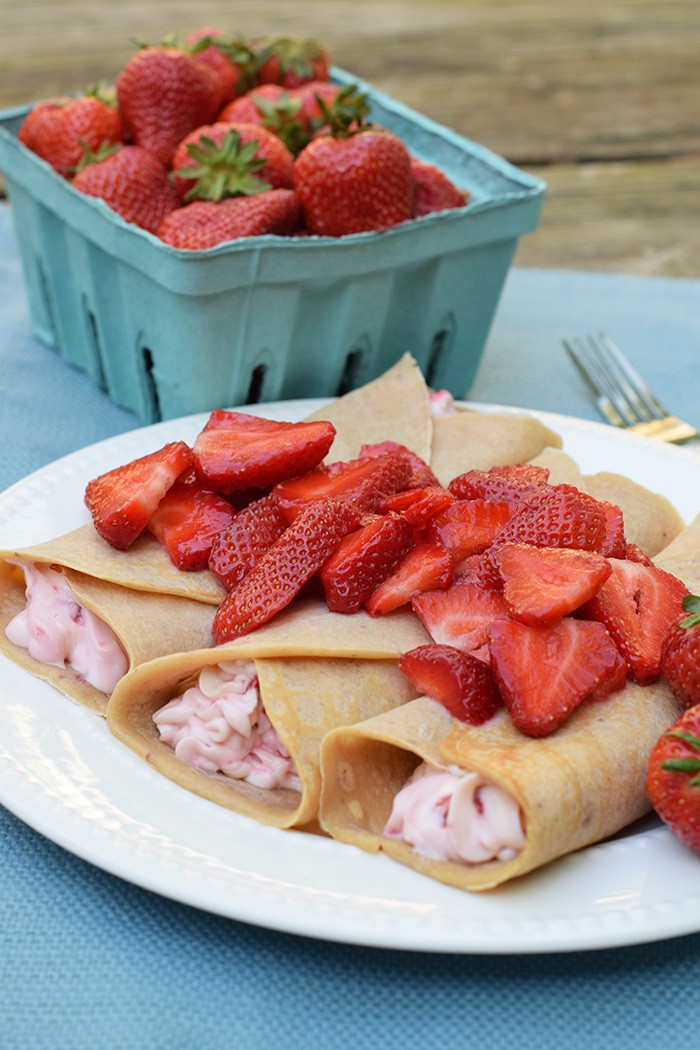
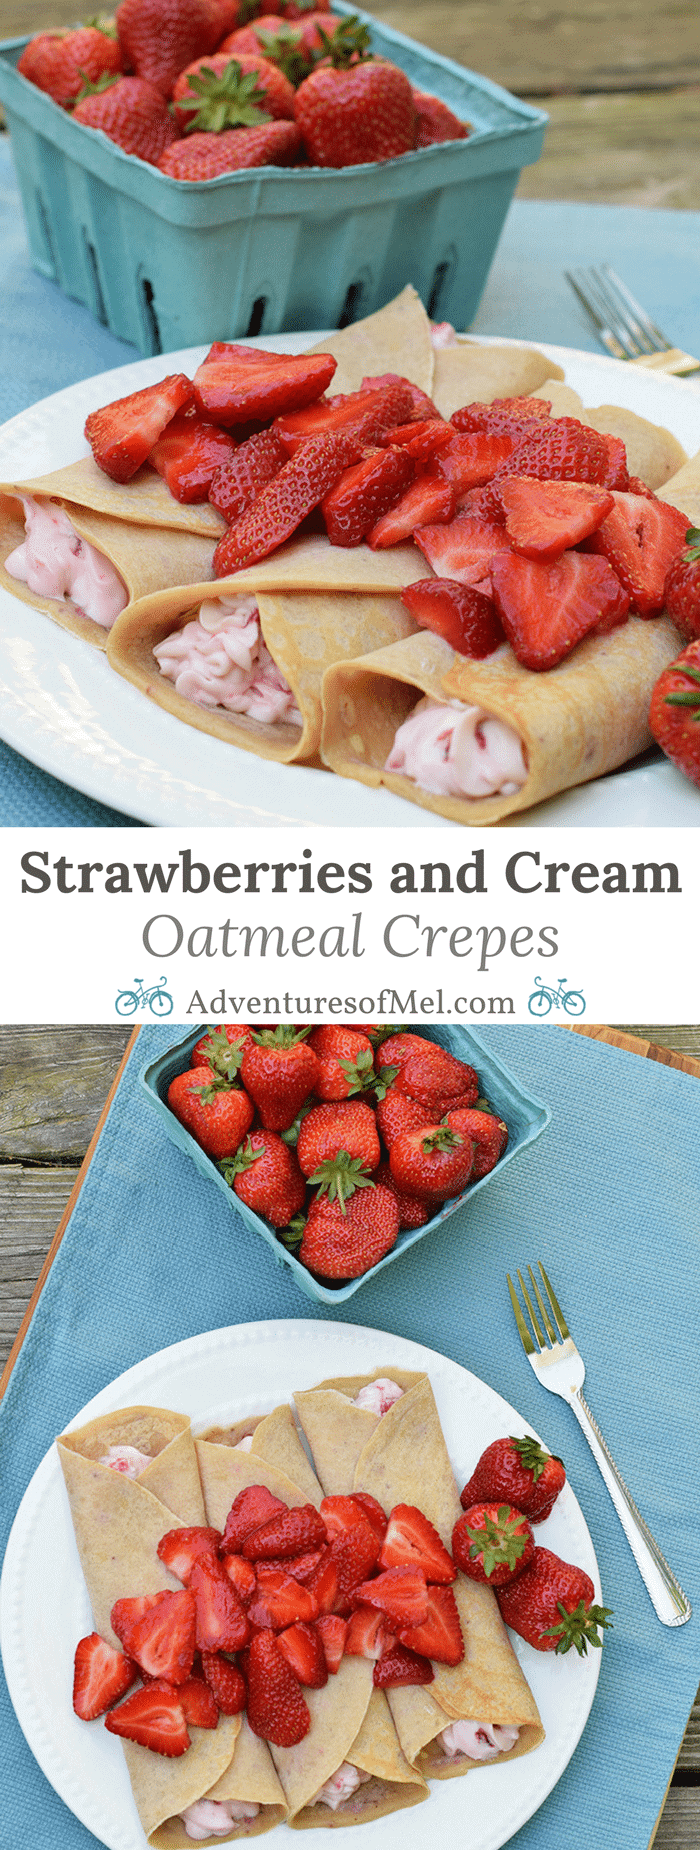
Sweet and Savory Strawberries and Cream Oatmeal Crepes
Homemade Sweet and Savory Strawberries and Cream Oatmeal Crepes, made with baby cereal, are so simple and easy to make, scrumptious too! Print the recipe for this breakfast and brunch favorite.
Crepes:
1 cup all-purpose flour
1/2 cup Gerber Oatmeal Cereal Single-Grain
3/4 tsp. salt
2 eggs
1 cup milk
2 tbsp. butter (melted)
1/3 cup strawberries (washed and crushed)
Extra strawberries for garnish
Cream Filling:
1 pkg. cream cheese
3/4 cup powdered sugar
1/2 tbsp. milk
3/4 cup strawberries (washed and chopped)
Stir together flour, oatmeal, and salt in medium-sized bowl.
Make well in center of dry ingredients, and add in eggs, milk, and butter, mixing well.
Mix in crushed strawberries.
Heat griddle on medium to medium-low heat.
Spoon batter onto griddle, spreading in a circular motion ’til spread fairly thin.
Cook ’til crepe starts to set well, then flip and cook other side (probably 1-2 minutes per side).
Cool on cutting board.
While crepes are cooling, mix together cream filling ingredients.
Spoon cream filling onto middle of each crepe, and fold sides over on top of each other.
Place crepes on plates to serve, and add extra strawberries on top for garnish.
Serve and enjoy!
Pancakes, Waffles, & French Toast
American
oatmeal crepes, strawberries and cream crepes, strawberry crepes
Can’t make the crepes just yet? Go ahead and Pin them for later! They’ll be waiting when you’re ready. Also, note that you can follow the hashtag #CookingwithGerber on social media for even more ideas, recipes, and inspiration surrounding Gerber Cereal.
Squirrels… They have officially become my nemesis over the last year and a half.
When we first moved here, we were fairly lucky in that pests hadn’t discovered our garden. Last year, however, was a different story.
We would find a squirrel sitting contentedly and almost mockingly on the corner of our deck railing, munching happily on an almost ripened tomato he’d just plucked from our plants. That or they’d leave traces of half eaten tomatoes and berries along their trail of destruction.
This year before we ever even started our garden, in fact while we were still starting seeds indoors before the growing season, we came up with a plan to put a stop to it.
Ornery little buggers! Squirrels are no longer cute in my eyes. And our cat, well… he’s just pure laziness these days and couldn’t give a hoot. Good thing he’s cute!
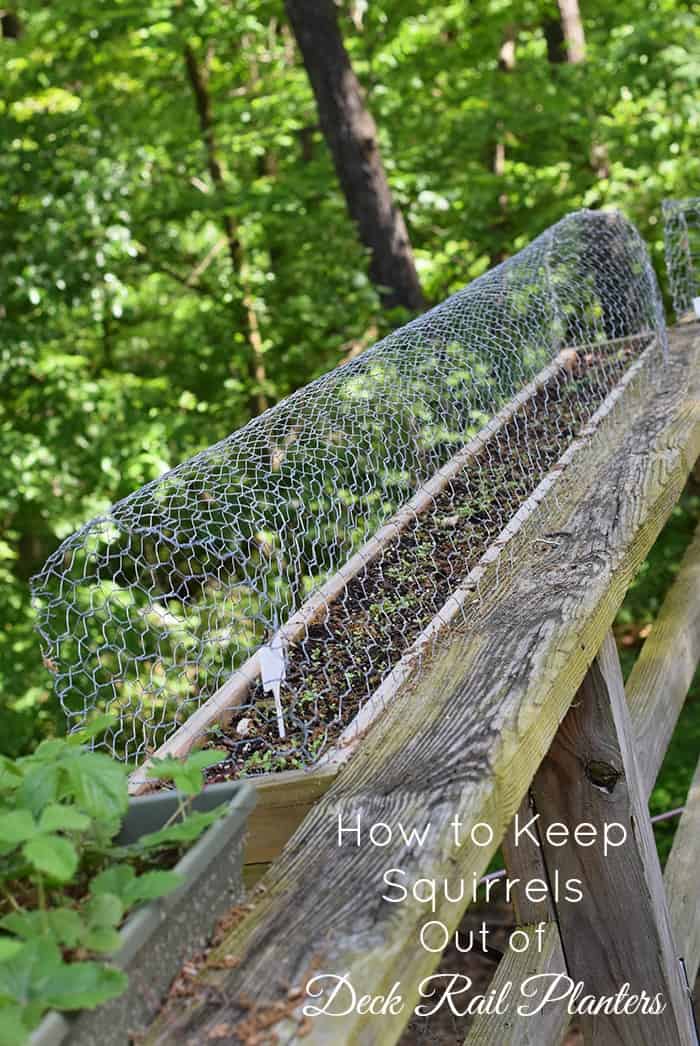
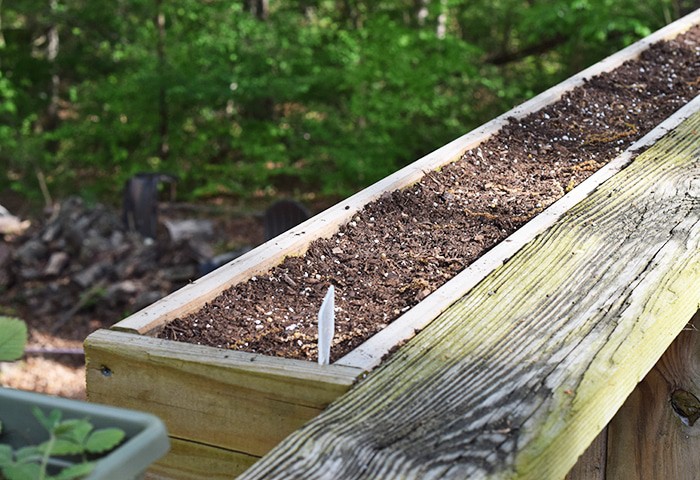
Anyway, we had to come up with a solution to keep squirrels out of our deck rail planters where we are planting lettuce, spinach, and have a few strawberry plants. We’ve already found where they dug up our spinach seeds before we could get the squirrel-proofing done. I kinda feel like I’m in an old 80’s hit comedy with these critters!
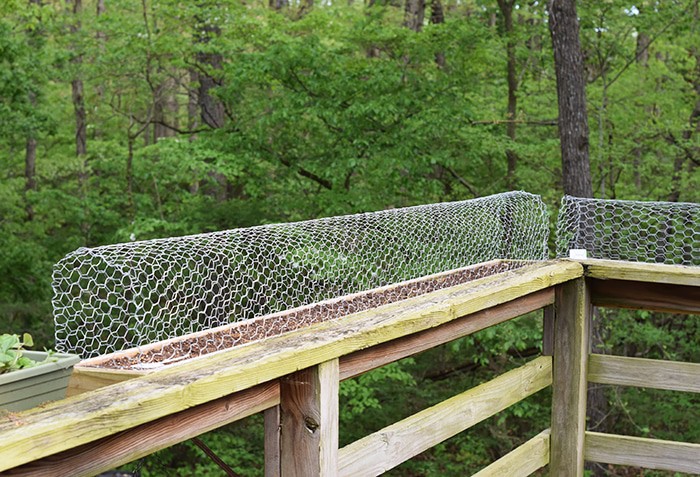
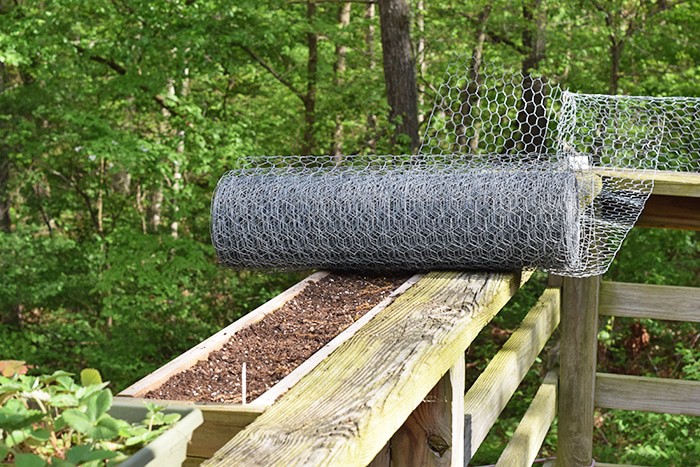
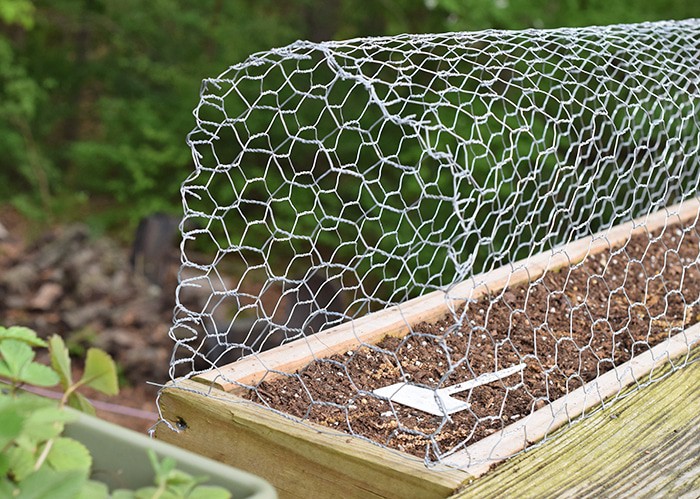
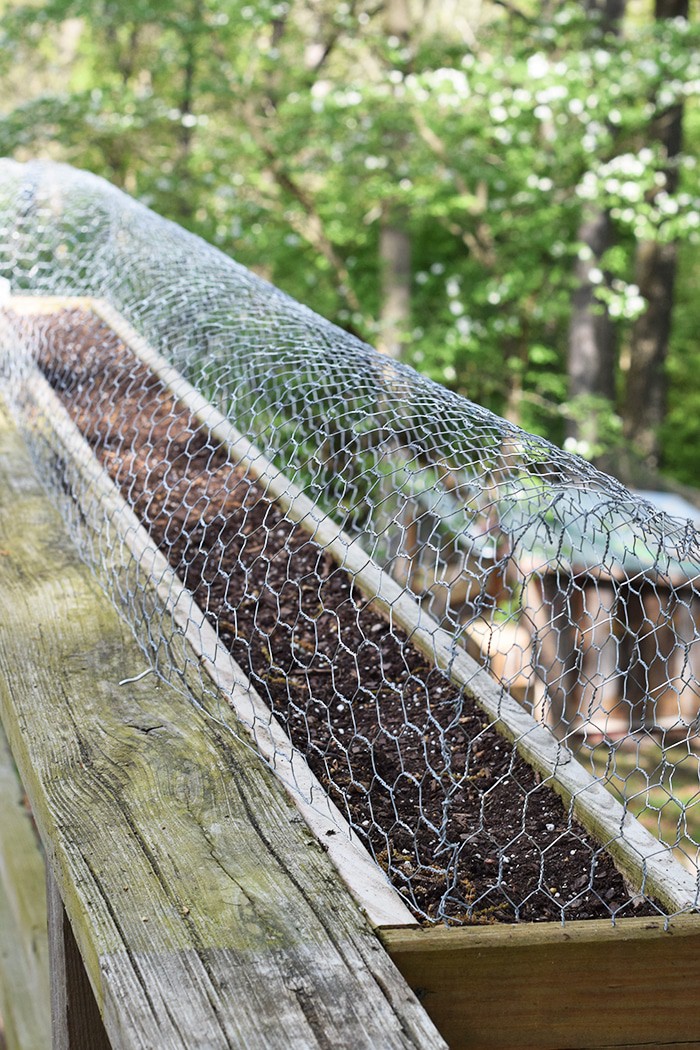
We’ve read all sorts of solutions, including using wolf (or other predator) pee, which we may be desperate enough to try around our front garden beds and pots. But for deck rail planters, chicken wire makes a great cage of sorts to keep squirrels out. I swear, as we built these, we could hear them angrily chattering from their perch in the trees overhead. I won’t share how Dan answered them back…
Supplies You Need
Chicken wire
Wire cutters
Staple gun
Staples
Pliers
Hooks
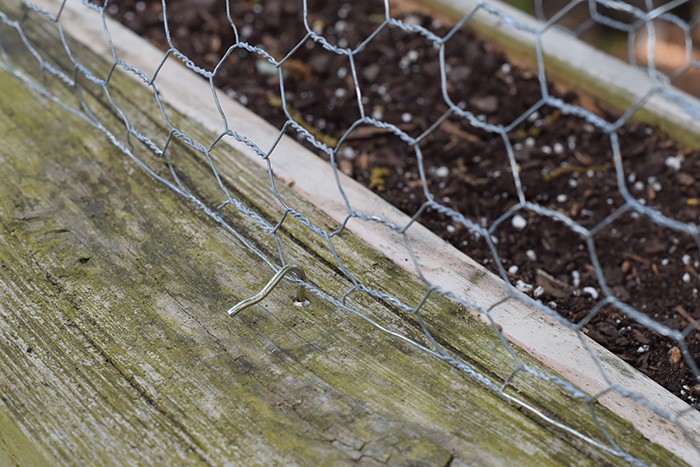
Instructions for Keeping Squirrels Out of Deck Rail Planters
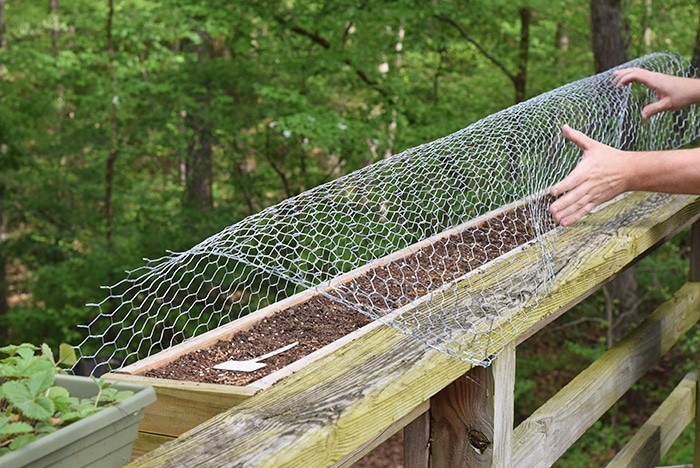
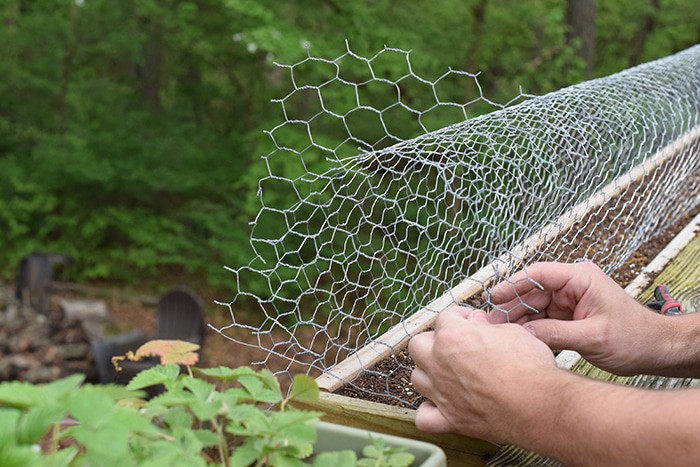
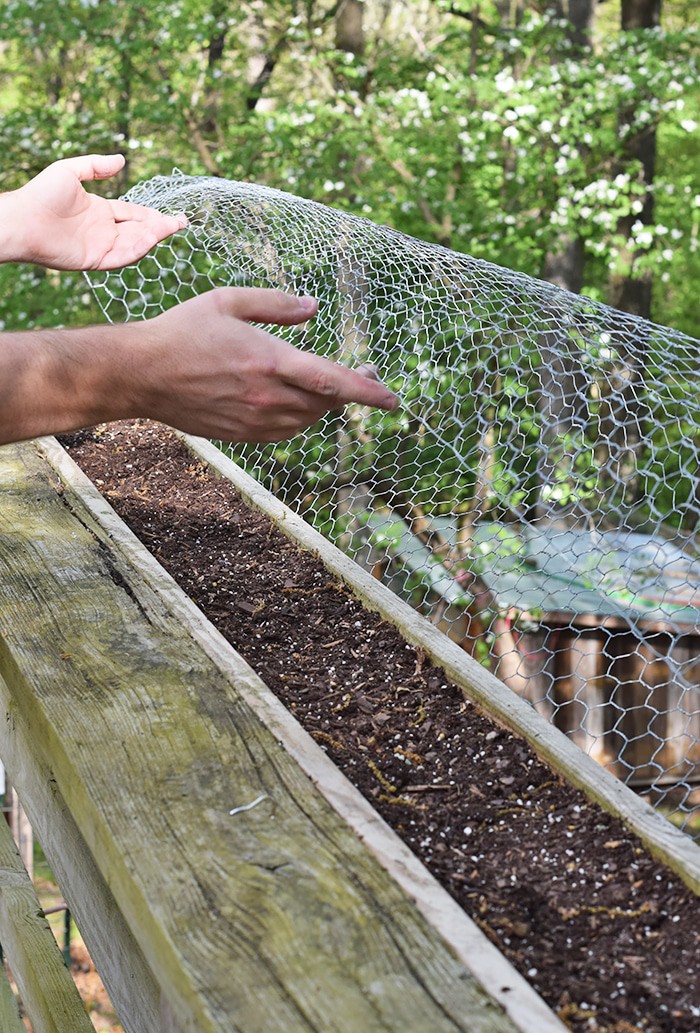
Roll out the chicken wire and cut to the length needed for your planter. Form it into a tunnel, and staple it to the outside edge of your deck rail planter.
Cut another piece of fencing to match the shape of the tunnel end, and wire to the end, snipping extra wire off when done.
Place hooks in deck rail to fasten squirrel guard/tunnel down to railing. This way you can open it up when you need to work with your plants or harvest.
And that’s pretty much it! You now have a way to keep those pesky critters out of your deck planters. It’s so simple, it’s not even funny. So simple, the squirrels in your neck of the woods will probably be telling you off as you make it.
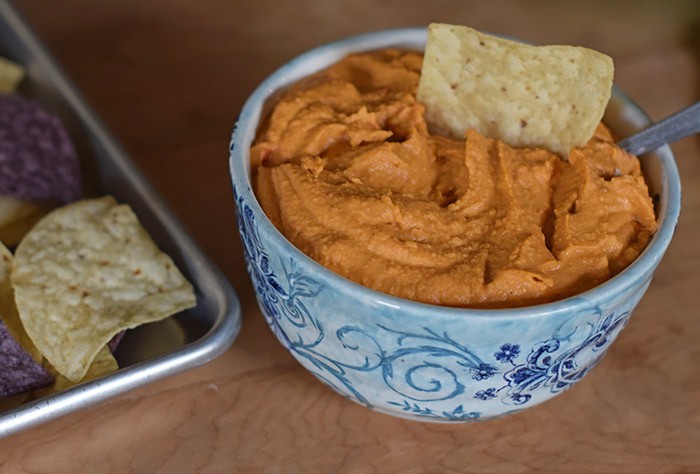
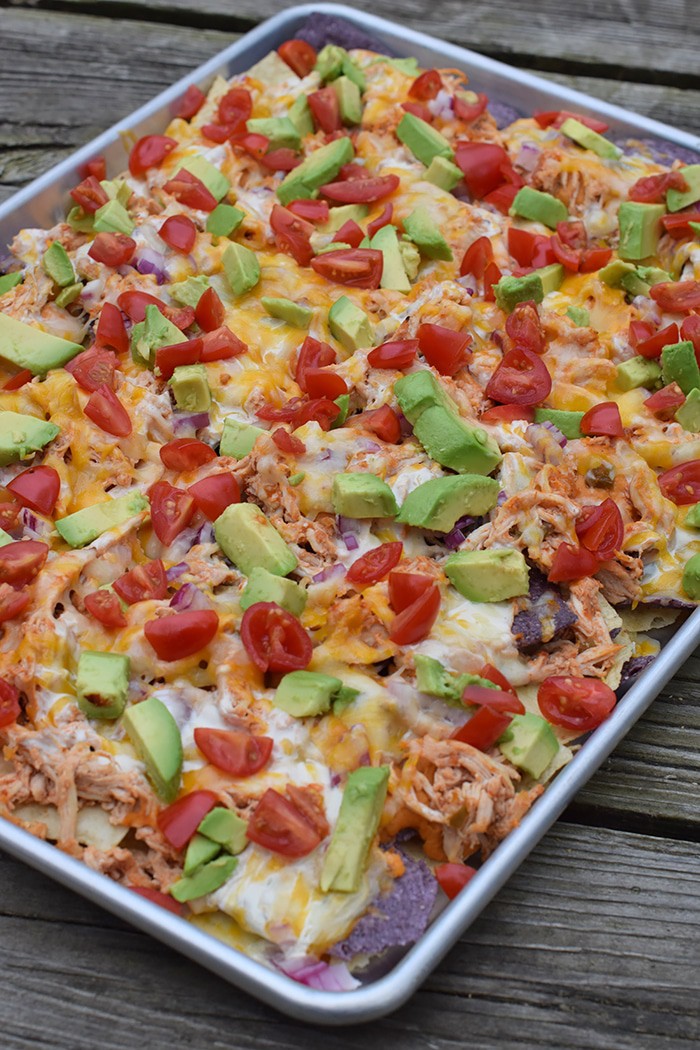
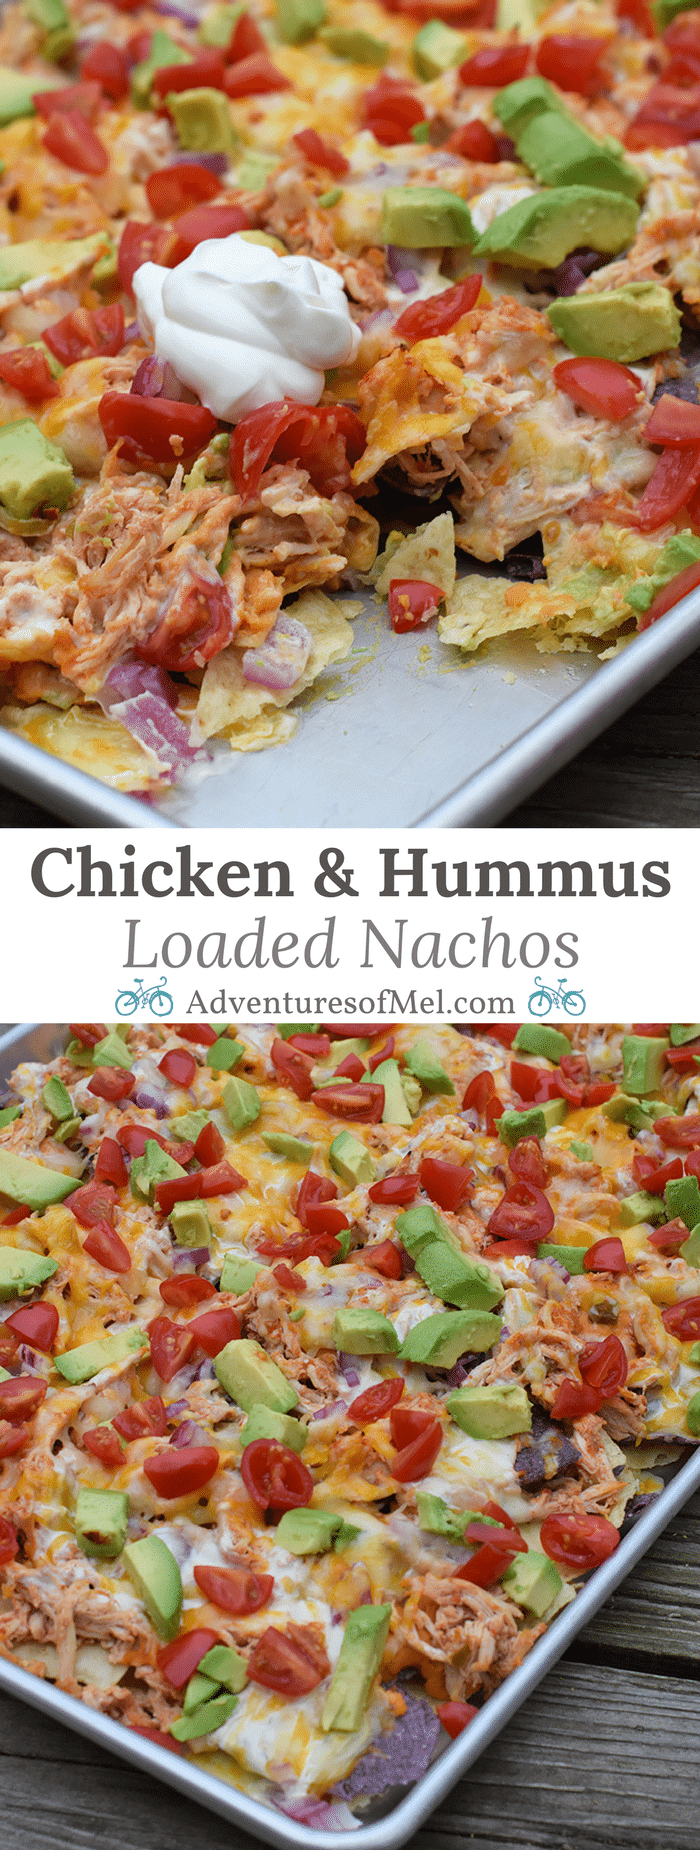
Usually, when we’re going out to eat, we’re going for Mexican. Loaded nachos are a favorite all ’round, as is a nice snack of roasted red pepper hummus.
I’ve got a delicious recipe for you that will make you re-think ever using refried beans again.
Want a camping version of these chicken nachos? Try our campfire nachos recipe!
We had a crazy busy week last week. We had a week filled with doctor’s appointments, a midwife appointment, minor surgery for Dan, and more, not to mention homeschooling and work.
We’re trying to get as much done and meet as many commitments as we possibly can before this baby boy arrives. But by the time the end of the week arrived, we were all beat and needed something super easy to snack on, not to mention something fairly easy to eat for dinner.
As I mentioned, we love roasted red pepper hummus.
We’ll eat it with crackers, tortilla chips, pita bread… It’s a favorite snack around here but also tends to be a bit pricey, meaning we don’t always keep it on hand.
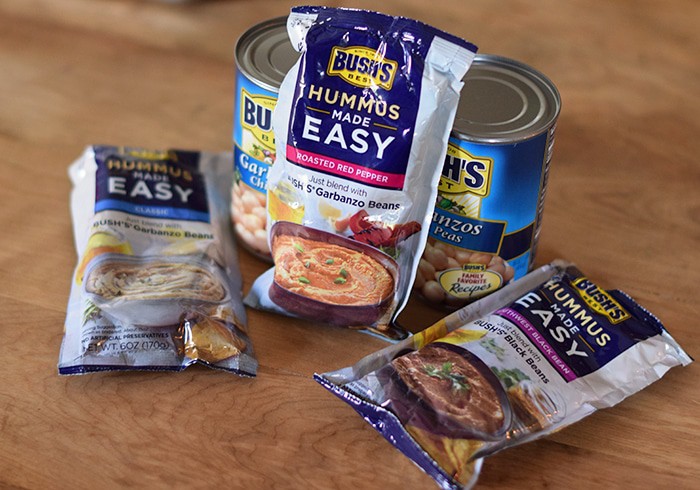
But that has changed since we’ve been introduced to Bush’s Hummus Made Easy. Available at Walmart in 3 delicious flavors (Classic, Roasted Red Pepper, and Southwest Black Bean), it’s also friendly to our budget.
Not only that, but it’s easily made in literally seconds, I kid you not.
All you need is a can of beans, the pouch of hummus, and a food processor or blender (I used my Ninja).
We chose to use Bush’s Garbanzos (or Chick Peas), which happened to be conveniently located right next to the Hummus Made Easy pouches in the store, to mix up a batch of Roasted Red Pepper Hummus Made Easy.
And you know what? In my opinion, it tastes better than the stuff that’s already pre-mixed and packaged in the deli. And it’s cheaper! Win win!
On top of that, it has no artificial preservatives, and it’s made with real ingredients like olive oil, tahini, roasted red bell peppers, and spices.
Even more importantly, it meets my official taste tester’s seal of approval.
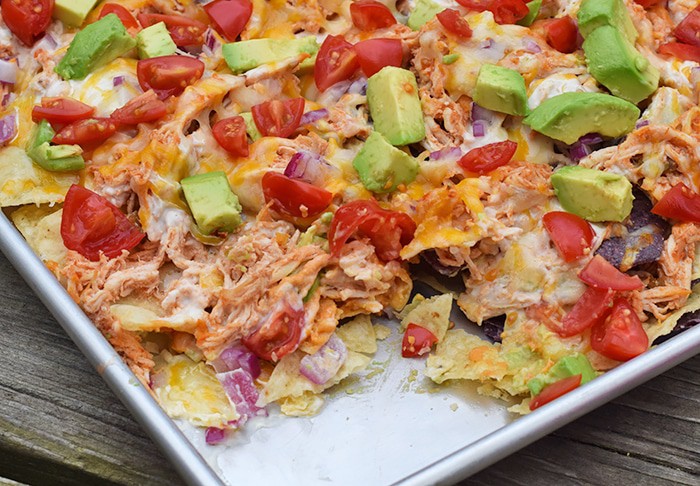
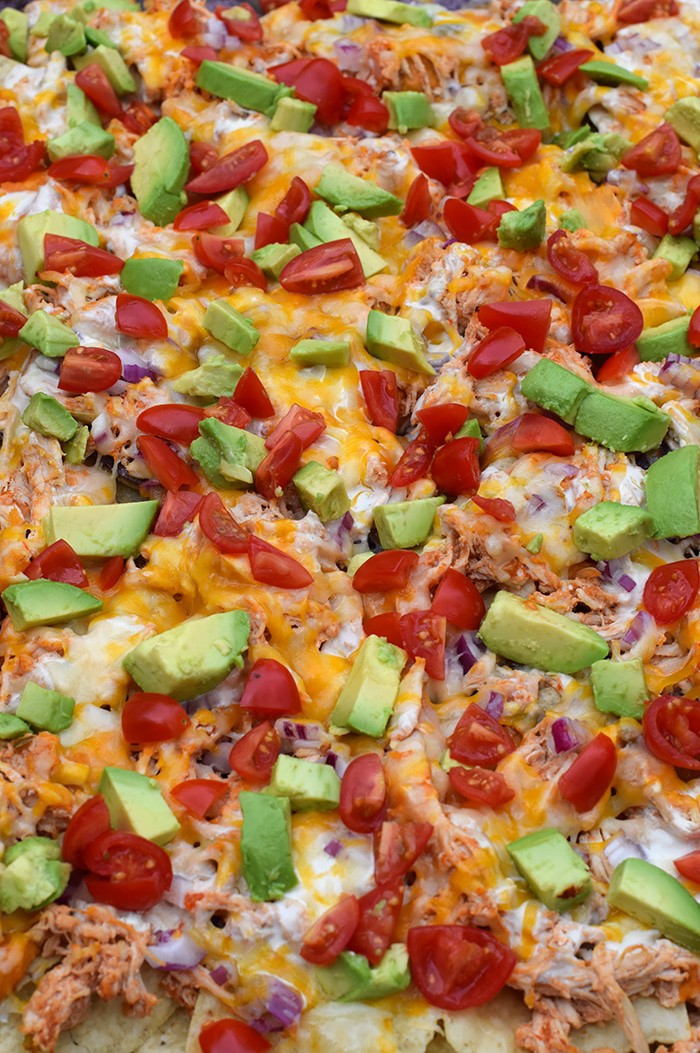
I really like how versatile it is. There are a ton of recipes on the Hummus Made Easy site, and when I saw a recipe for a 7 layer dip and perused Pinterest just a bit for even more inspiration, I knew I wanted to make some sort of nachos, leading me to the idea of Loaded Nachos, only without refried beans and made with hummus instead.
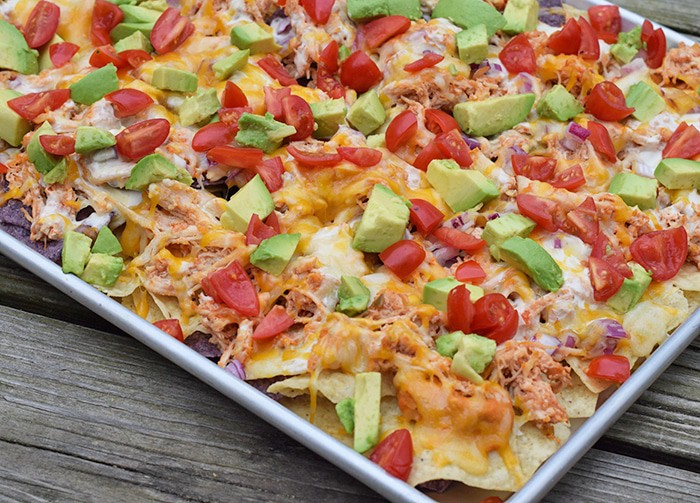
Honestly, these nachos are all about the layering. You have a layer of tortilla chips, dollops of hummus…
… then a layer of delicious Instant Pot Taco Chicken, white queso, a bit of lime juice and red onion, cheese, tomatoes, and avocado. Mmmm…
That layer of Roasted Red Pepper Hummus Made Easy makes all the difference in the world. It adds a flavor that you just can’t get otherwise.
These nachos were the most flavorful nachos I’ve ever made; they were far from your typical, boring nachos.
Just thinking about it is making me crave them all over again. Pregnancy cravings are no joke.
Looking for more delicious appetizer and snack recipes?
Make the most flavorful loaded nachos with chicken and roasted red pepper hummus, along with other favorite ingredients like cheese, tomatoes, avocado, and more.
Blue and white tortilla chips
1 pouch Bush’s Roasted Red Pepper Hummus Made Easy
1 can Bush’s Garbanzos
2 chicken breasts (cooked and shredded)
1/2 cup Picante
1 lime (just a squeeze of juice)
1/2 cup white queso
1/2 medium red onion (minced)
4 oz. cheddar (shredded)
4 oz. Colby Jack (shredded)
Tomatoes
Avocado
Sour cream
Mix Bush’s Hummus Made Easy and Garbanzos, according to package directions.
Layer a generous amount of blue and white tortilla chips on bottom of sheet pan.
Add dollops of hummus around on top of tortilla chips.
Mix cooked, shredded chicken with Picante and spread around on top as a third layer.
Squeeze lime juice all around on chicken.
Spoon white queso all around on nachos.
Scatter minced red onion as yet another layer.
Add shredded cheeses, spreading evenly across nachos.
Bake at 325° for about 10 minutes, maybe a little longer if cheese isn’t melted.
Remove from oven and add your favorite toppings, like tomatoes, avocado, sour cream, and salsa.
Serve and enjoy!
Note: These nachos can also be refrigerated and later warmed back up in the oven; if warmed in the oven, it brings the crunchiness of the nachos right back. Yum!
Can’t make the nachos just yet? Go ahead and pin them for later! They’ll be waiting when the craving hits.
Also, note that you can follow the hashtag #HummusMadeEasy on social media for even more ideas, recipes, and inspiration surrounding Bush’s Hummus Made Easy.
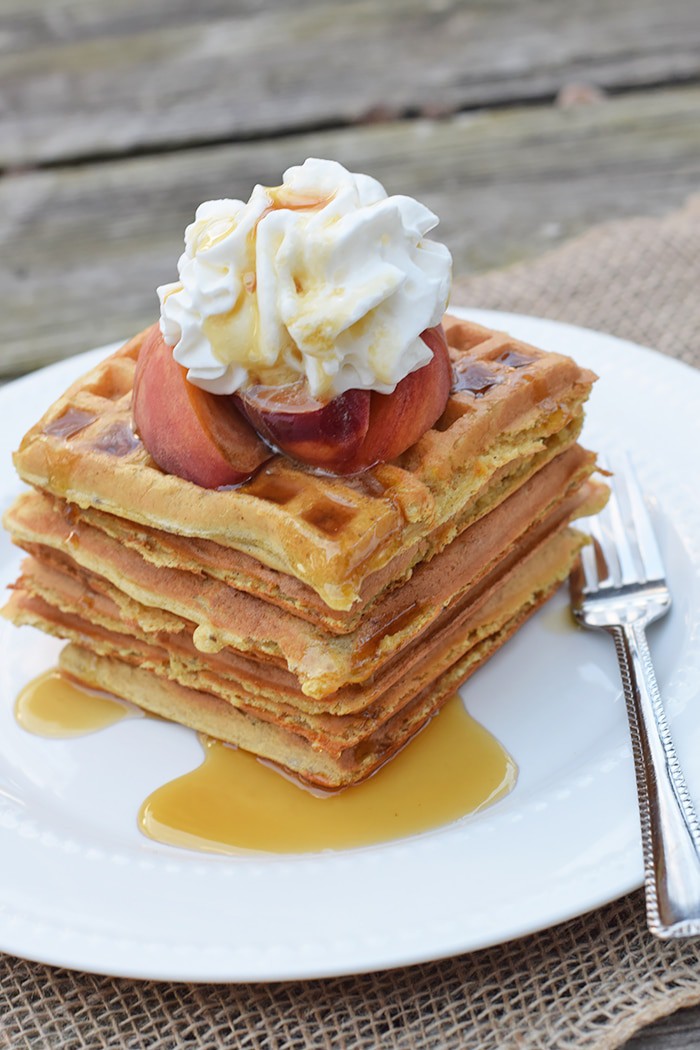
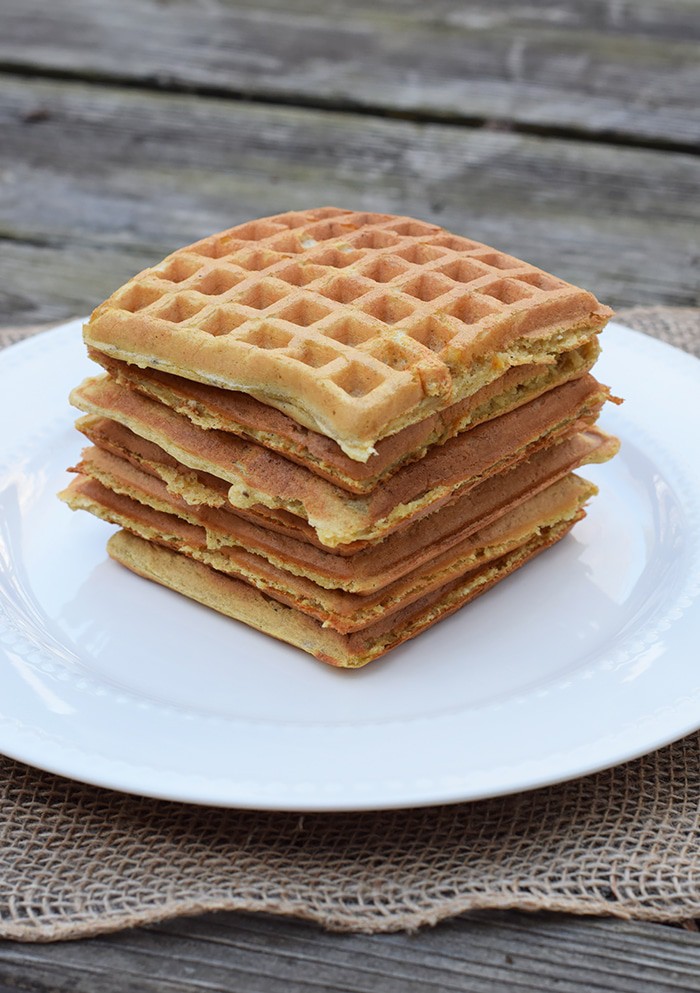
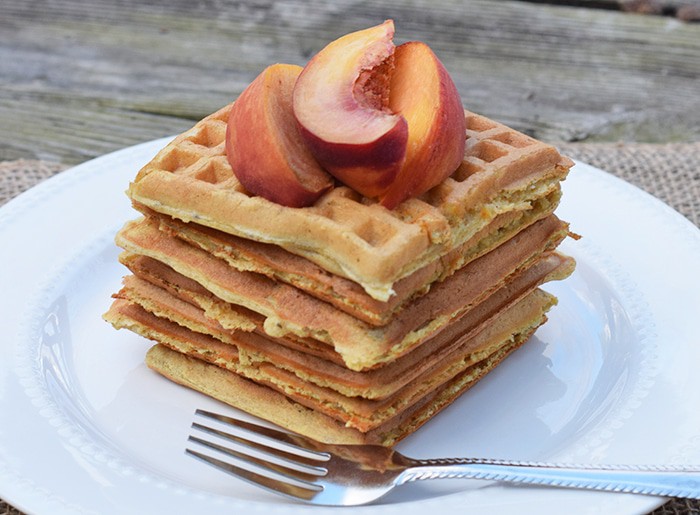
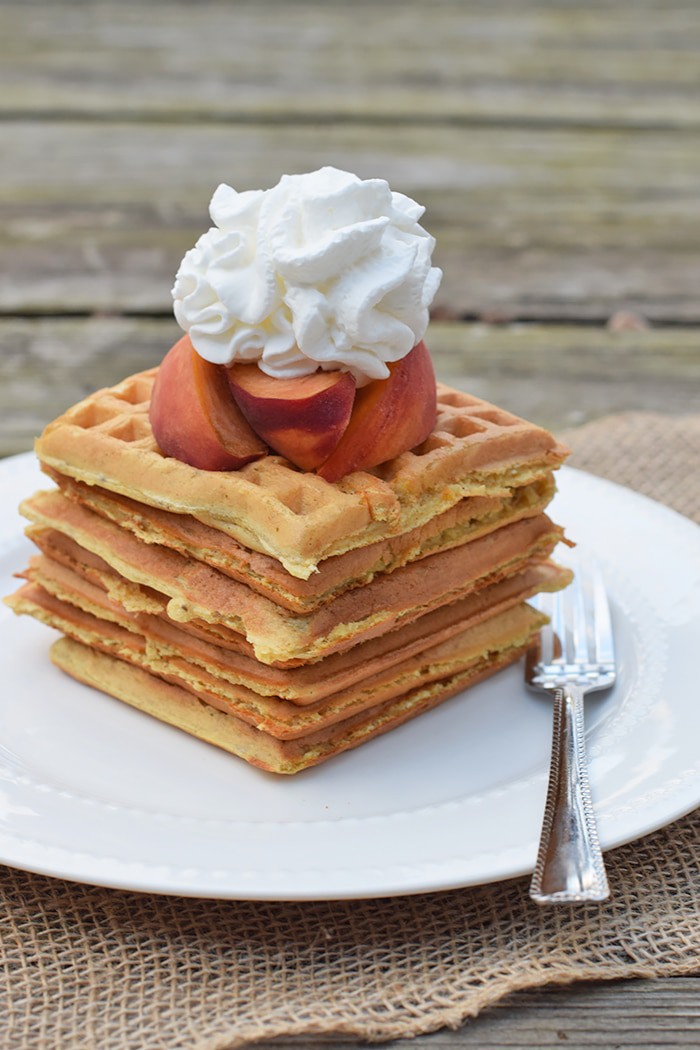
Waffles for dinner… That’s what we had one night last week when I got this harebrained idea to make peaches ‘n’ cream waffles. And I have to say, they were pretty scrumptious. With peaches in the batter and peaches sliced on top, they had a light peachy taste with a hint of cinnamon for good measure.
These waffles are super easy to make. All you need are the ingredients and a waffle iron. If you don’t have a waffle iron, you could even make these into pancakes. They’d work whichever way you like.
We topped ours off with a few sliced peaches. Then we added a li’l whipped cream and a smidge of real maple syrup. Served with a bit of bacon to add a little protein to our meal, it was one of those super fun breakfast for dinner nights.
Below you’ll find the printable recipe. Enjoy!
Homemade Peaches and Cream Waffles
With peaches in the batter and peaches sliced on top, peaches and cream waffles have a light peachy taste with a hint of cinnamon for good measure.
1 1/2 cups all-purpose flour
1/2 tsp. baking soda
2 tsp. baking powder
3/4 tsp. salt
2 tbsp. granulated sugar
1 egg
3/4 cup buttermilk (or milk soured with about 1 tbsp. vinegar)
3 tbsp. canola oil
Dash of cinnamon
2 peaches (pureed)
Extra peaches (whipped cream, and real maple syrup for serving)
Sift and stir together dry ingredients in bowl; then make a well in center of mixture.
Add egg, buttermilk, and oil to well in dry ingredients, stirring just until moistened.
Wash, slice, and puree peaches, peeling and all. Add to mixture, mixing well.
Lightly spray waffle maker with cooking spray if needed, and heat to a moderate temperature.
Cook waffles until they reach a nice golden color, are cooked through, and edges are slightly crispy.
Serve with butter, real maple syrup, peaches, and whipped cream. Enjoy!
Ah, spring cleaning… I can’t even tell you how good it feels to purge the clutter and clean out even just one room.
Though lately, I’ve gotten three whole rooms cleaned up, including three closets. One of those rooms I’ve been working on for about 3 weeks, amidst hobbling along in my 7th month of pregnancy, has been our guest room/playroom.
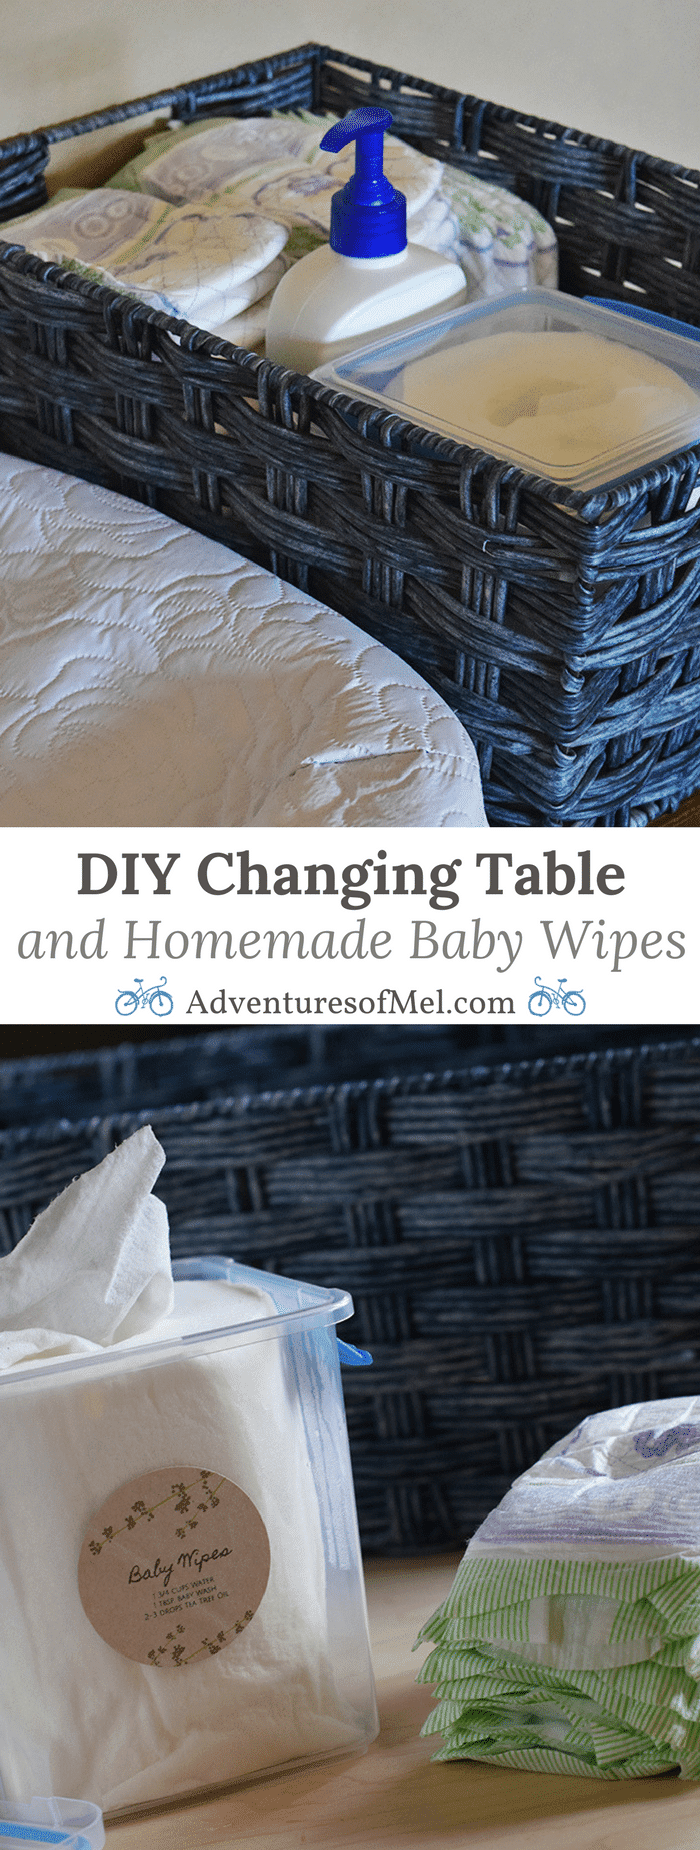
It was more play/storage/complete cluttered chaos than anything. But today, I’m going to show you how I tamed the clutter and started the transition to a baby’s room by creating a DIY changing table area.
Oh, and you will definitely want to grab my recipe for homemade baby wipes below.
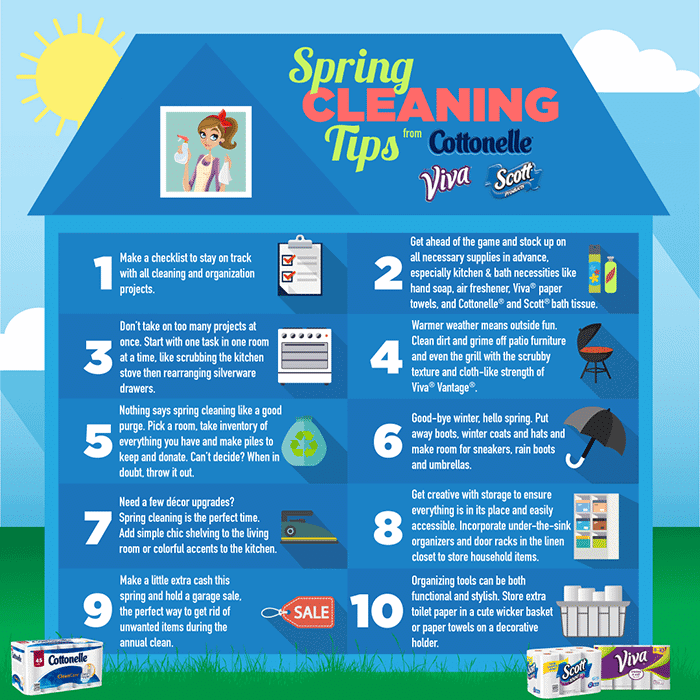
5 Tips for Adding Joy to Spring Cleaning and Organizing
First of all, I feel the need to share a few tips for making that overwhelming, cluttered up room, together with “dangerous” closet area, more fun to clean because I know how you’re feeling about your own room of doom. I get it, I really do. When you finally start to clean, here are 5 tips for making the process more FUN and JOYFUL!
Before I ever start cleaning a room, I like to go in, clear a place to sit, and envision what I want that room to be, how I want it to look, how I want that room to really function. And functional is so important when cleaning out and organizing; it’s important to think about how you can make your life or the room occupant’s life easier and better, along with making the room much more functional.
Put on your favorite music. Myself, I have my favorite online radio stations, something that will really get me out of the over-cluttered mental zone and into the spring cleaning/nesting zone where I really start to move (and sometimes sing along to my favorite tunes).
Keep 2 bags/boxes on hand… one for trash and one for donations. Nothing brings more joy than making the decision to get rid of something that’s no longer used or needed.
Start with just one surface. I promise, as soon as you’ve cleared that surface, you’ll get your groove on, and it may even become addictive, leading you to clean more and more surfaces ’til the room is a whole different space.
Incorporate little things to help add pops of color and personality to the room. I’m not talking expensive items… I’m talking things like wire or wicker baskets for decorative storage, your kids’ artwork on the wall, colorful containers, maybe a couple plants, or whatever your heart desires.
Here are a few more handy spring cleaning tips…
Creating a DIY Changing Table
Creating a DIY changing table involves only a minimal number of supplies. You’ll need the following:
A dresser
1 changing pad (cover optional)
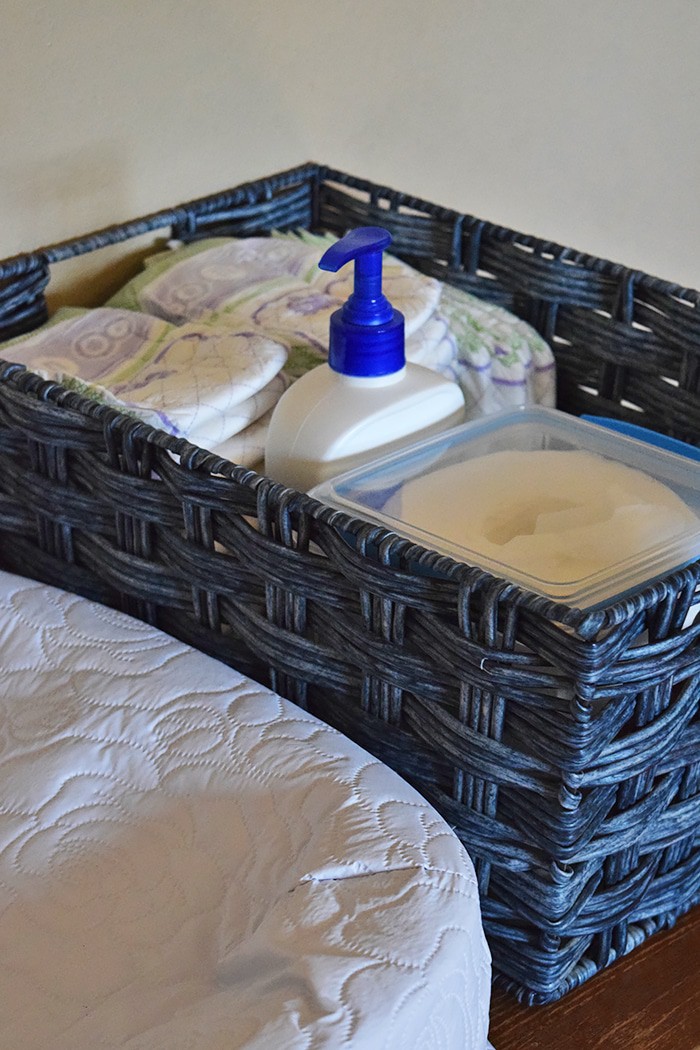
Basket
Diapers
Homemade Baby Wipes (recipe below)
Baby Lotion
Hamper
Whatever else your heart desires
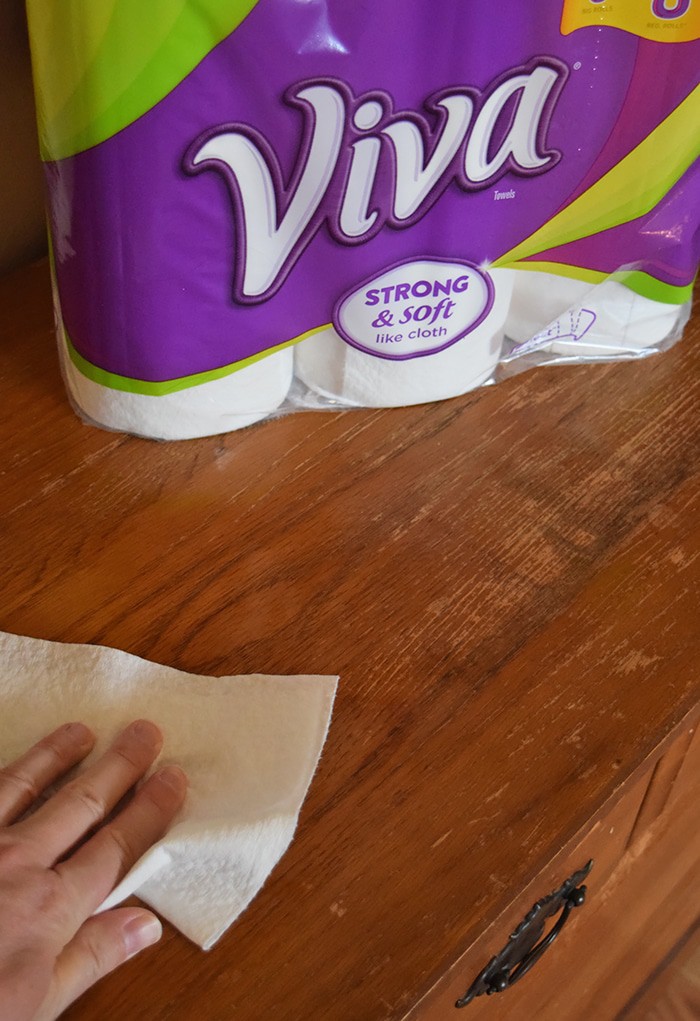
We’ve had an old wooden dresser through both of our boys, so it made sense to transition it over to our new baby boy. Of course, it was quite dusty and needed a good cleanup, as did our crib. That’s where Viva® Towels come to save the day, along with your favorite wood cleaner or polish. I originally wanted to paint the old dresser, but all my guys kinda pitched a fit over that… apparently, they have memories with every little scratch and dent. So, we’re keeping the vintage wood look, for now.
Transforming the dresser top into a changing table is so easy, it’s not even funny. Once the surface has been thoroughly cleaned, add a changing pad, which you should be able to attach to the top of the dresser (follow the instructions for your particular changing pad). Then on the other end of the dresser, add a basket filled with all the diaper changing necessities you’ll need like diapers, wipes, lotion, butt paste, etc. Of course, don’t forget the diaper pail.
Having a changing spot on the top of a dresser is so convenient because the baby’s clothes are right there in the drawers if and when you need them. Handy dandy.
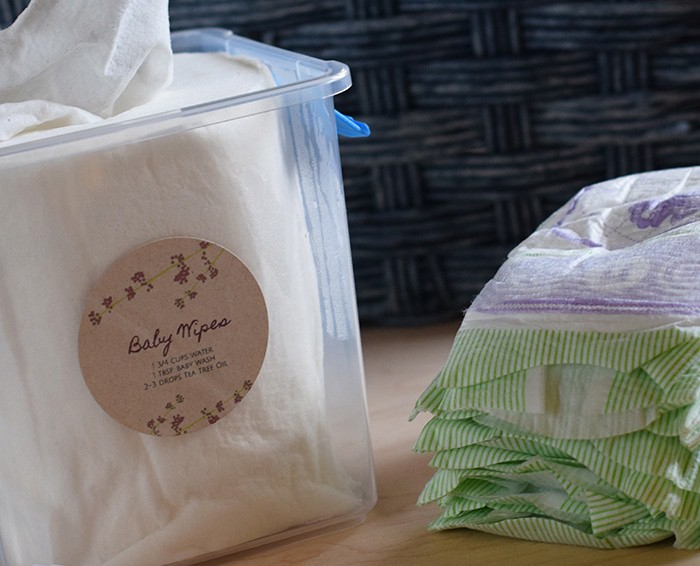
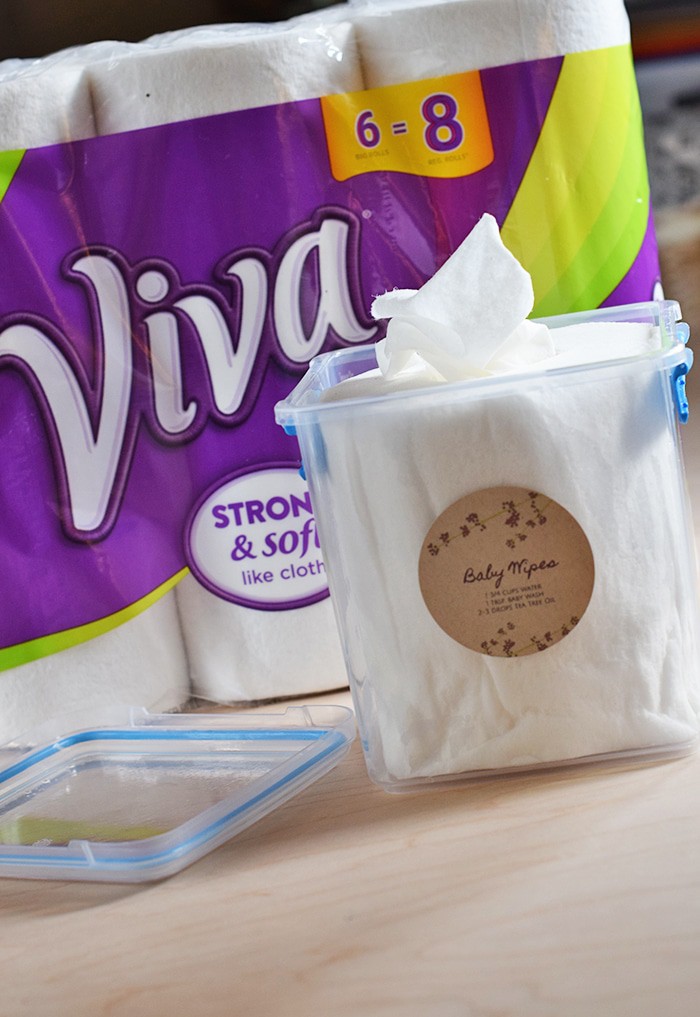
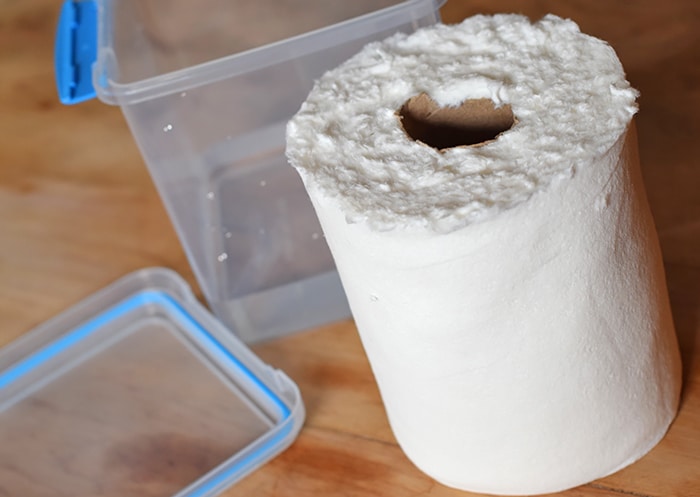
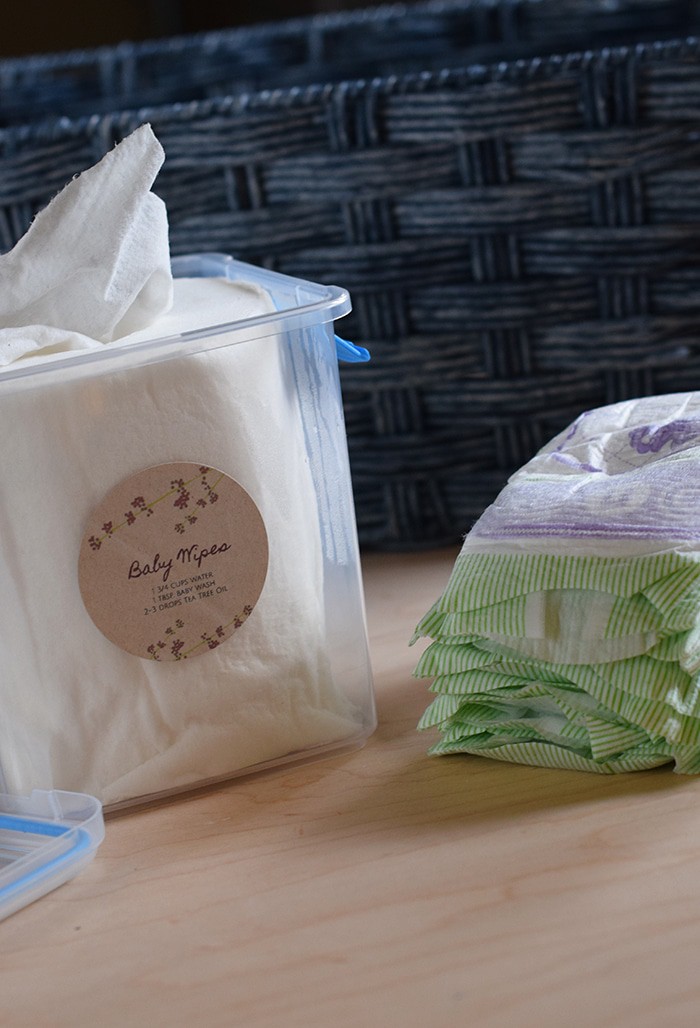
Homemade Baby Wipes Recipe
We’ve made our own baby wipes since our oldest (13 years) was born. They’ve definitely served us well. And I do not mince words when I highly recommend Viva® Towels for said baby wipes. The reason I prefer Viva® Towels is because they’re very soft and smooth, but at the same time, they’re very strong and durable (like cloth) for using as wipes. I even make my own household cleaning wipes with them.
To make the wipes, you cut a roll of towels in half. Then fill a sealable container with the ingredients listed, and add the roll of paper towels, cut side down, to the container. Place the lid on top and turn upside down so all of the liquid can soak into the roll.
Below is the printable recipe.
Homemade Baby Wipes
Homemade baby wipes are so easy to make. Just a few ingredients, paper towels, and a container to hold your wipes is all you need for this super easy DIY.
1 knife
1 container with lid
1 3/4 cups water
1 tablespoon baby wash
3 drops Tea Tree essential oil
Cut a roll of Viva® Towels in half.
Add all ingredients to sealable container, mixing well.
Add roll of paper towels, cut side down, to liquid in container.
Secure lid in place, and turn container upside down, allowing all liquid to soak into towels.
When towel roll is fully soaked, remove cardboard tube and use towels as baby wipes.
Homestead
homemade baby wipes
Nesting, Spring Cleaning, and Stocking Up
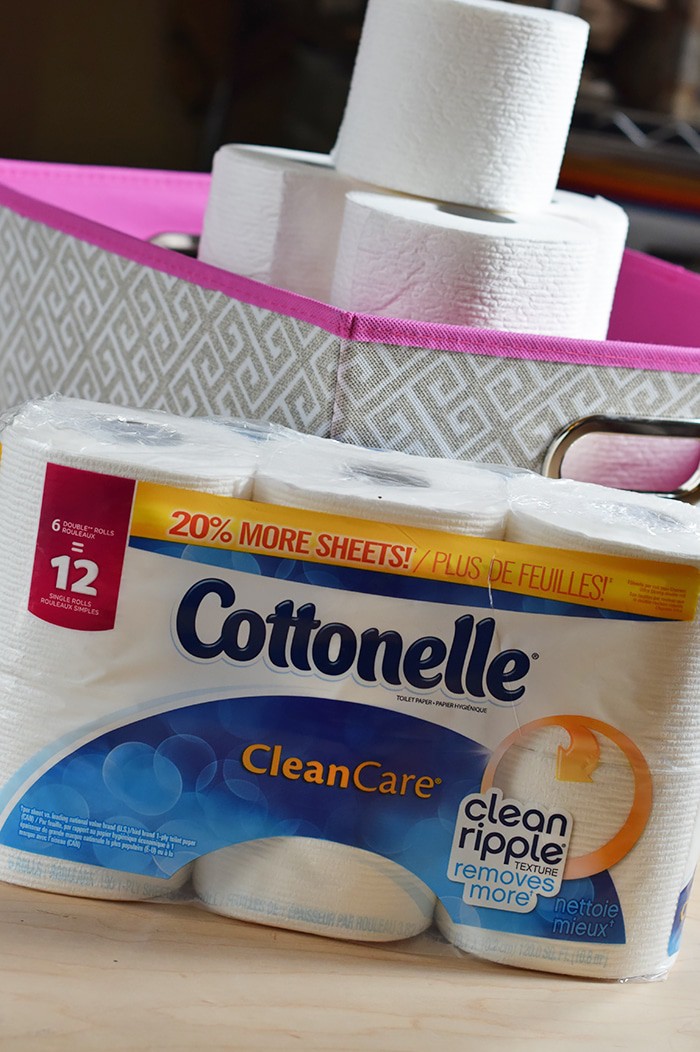
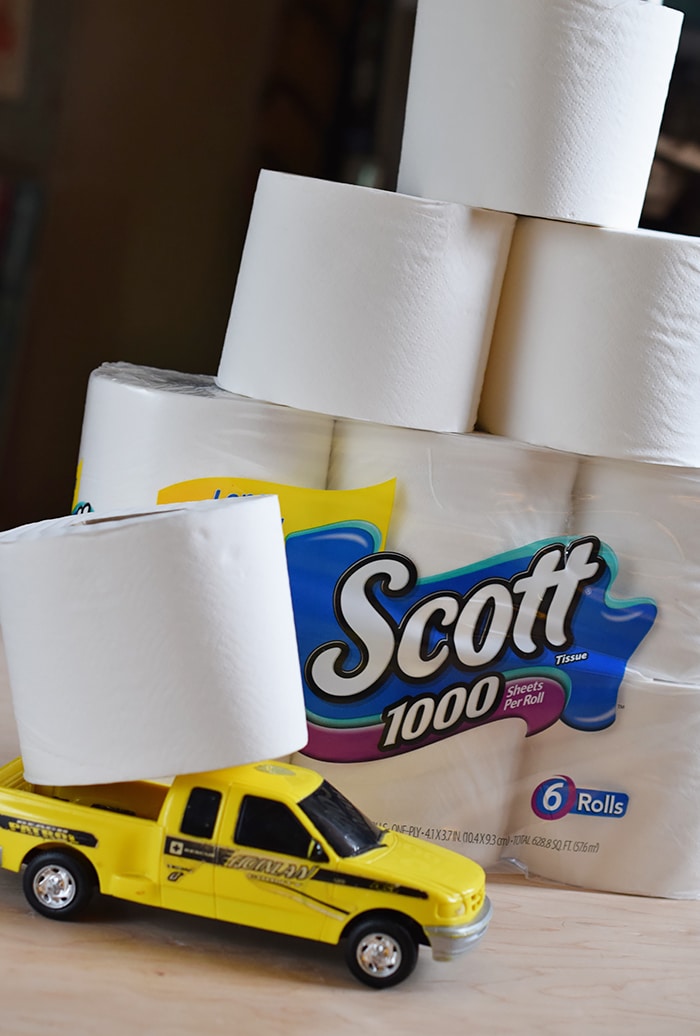
Of course, it’s not only baby I need to prepare for. I’m working at giving the whole house a good cleaning, as well as stocking both our bathroom and the boys’ bathroom with a good supply of the basic necessities, one of those necessities being toilet paper. I’ve stocked our bathroom with Cottonelle®, which has that CleanRipple texture for getting a good, clean bum. My boys prefer Scott® 1000, which I have to say lasts them a REALLY long time.
And for cleaning… Viva® Vantage paper towels have more of a scrubby texture, making them great for cleaning household appliances and outdoor items… Viva® Towels have a softer texture, which makes them great for cleaning up furniture and baseboards, or even making baby wipes.
All the above products, including Viva® Towels, Cottonelle®, and Scott® 1000 can be found at Walmart.
And now I’m off to clean and nest a bit more… I think the kitchen could use a little cleaning. Look out, here I come!
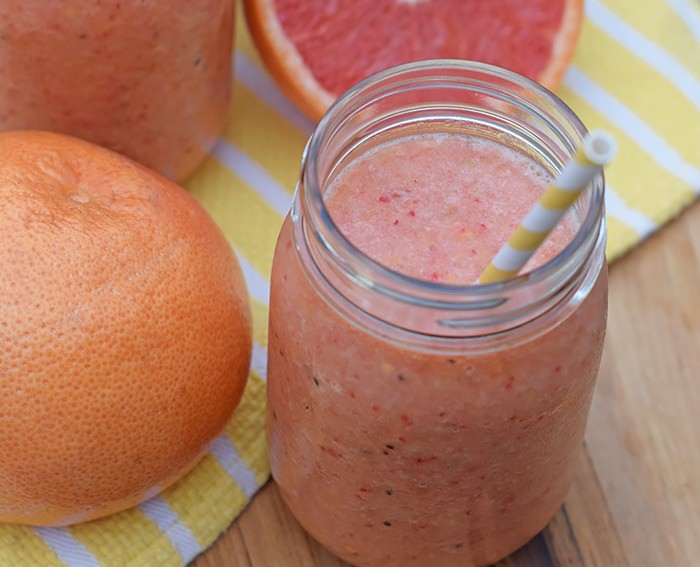
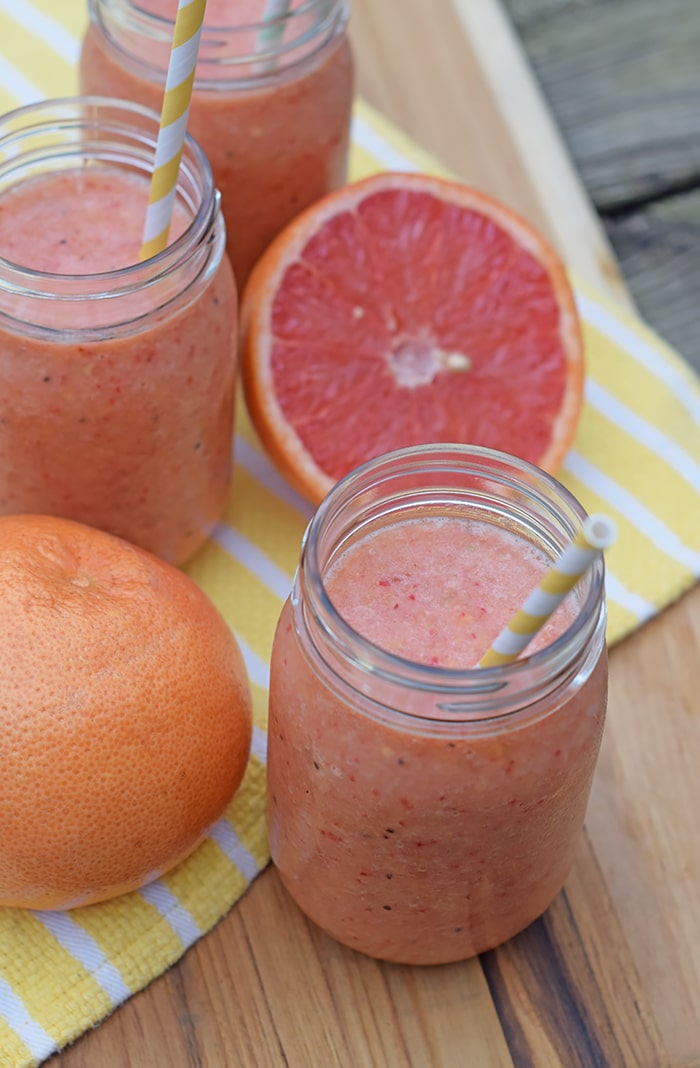
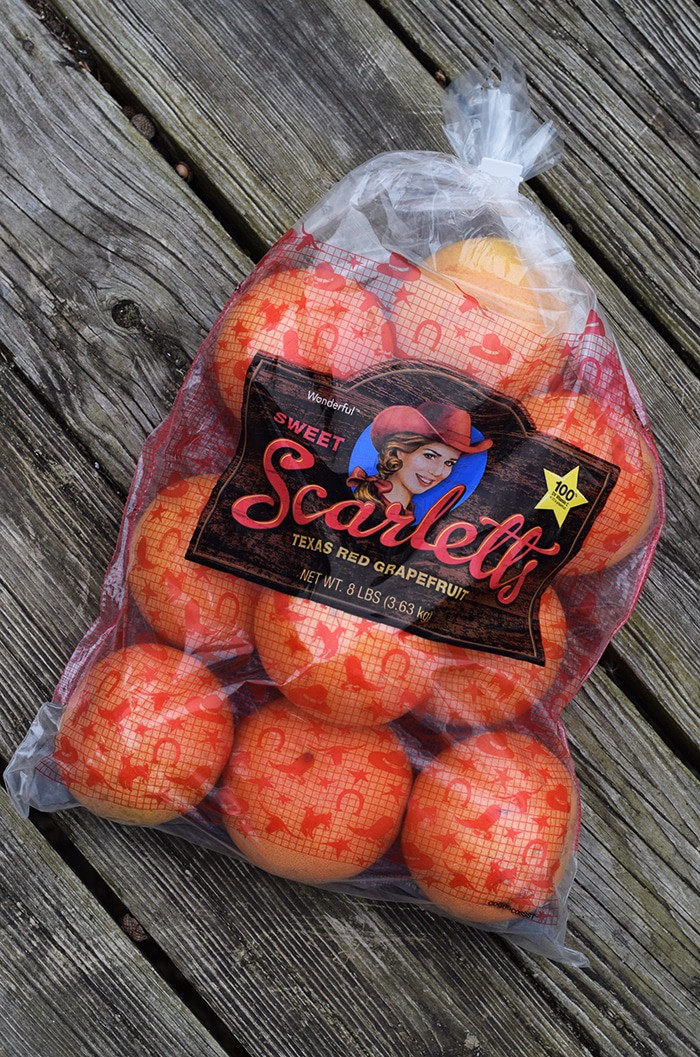
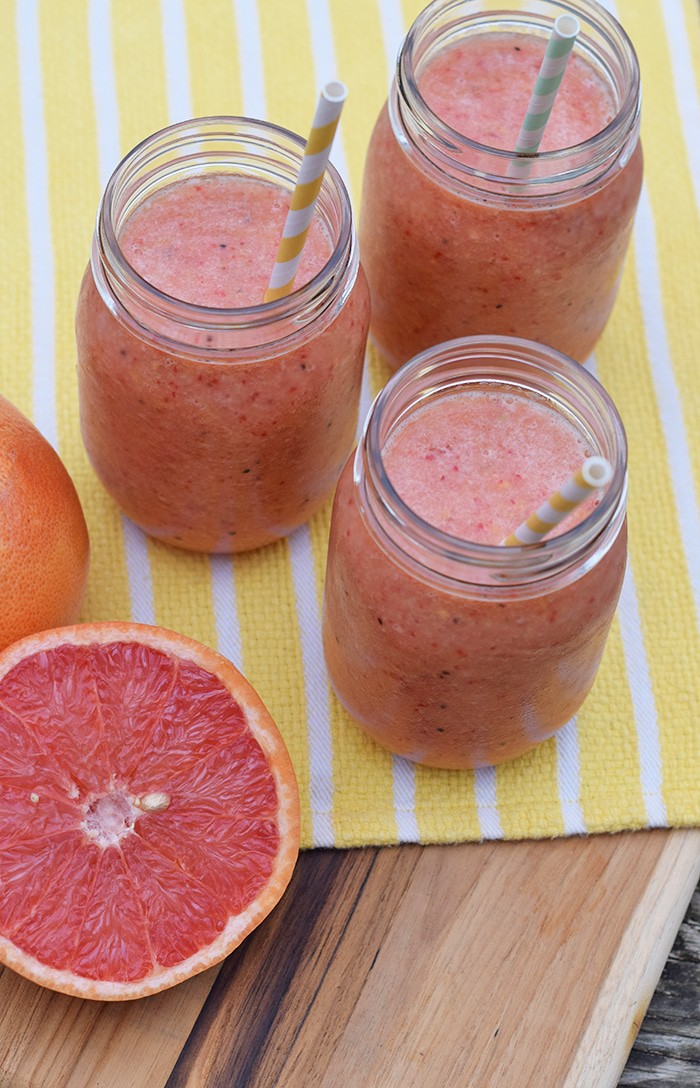
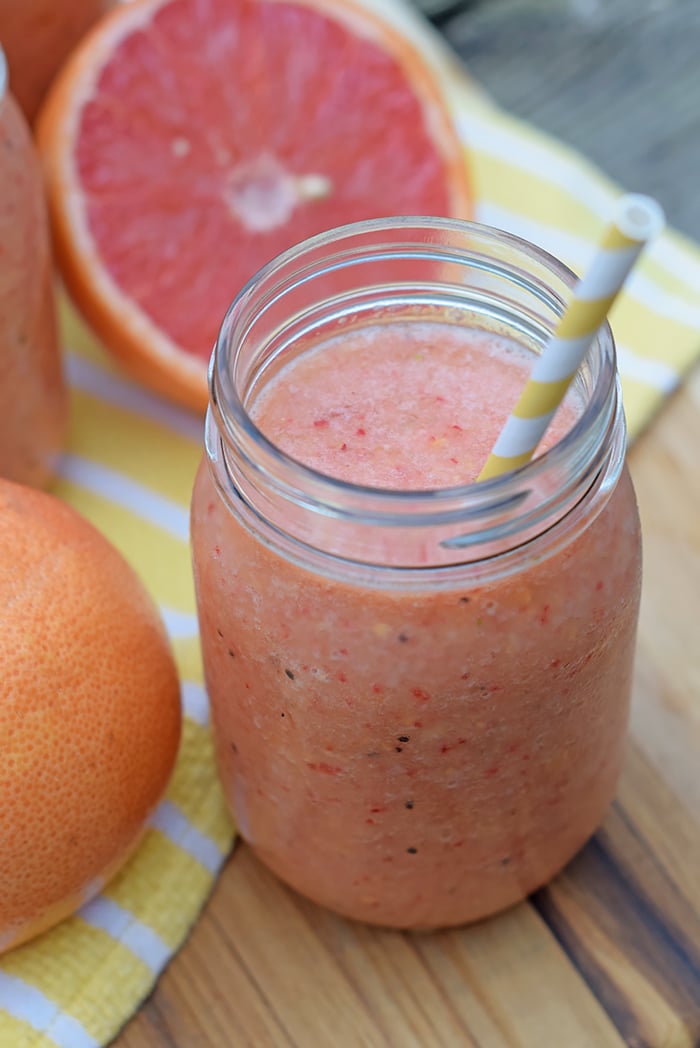
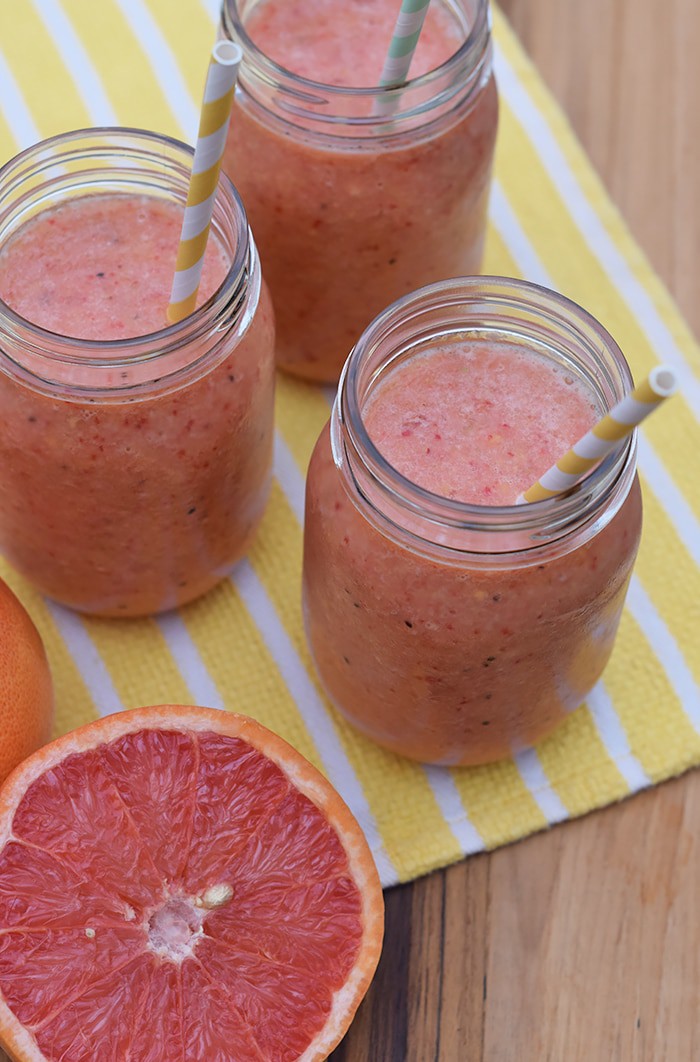
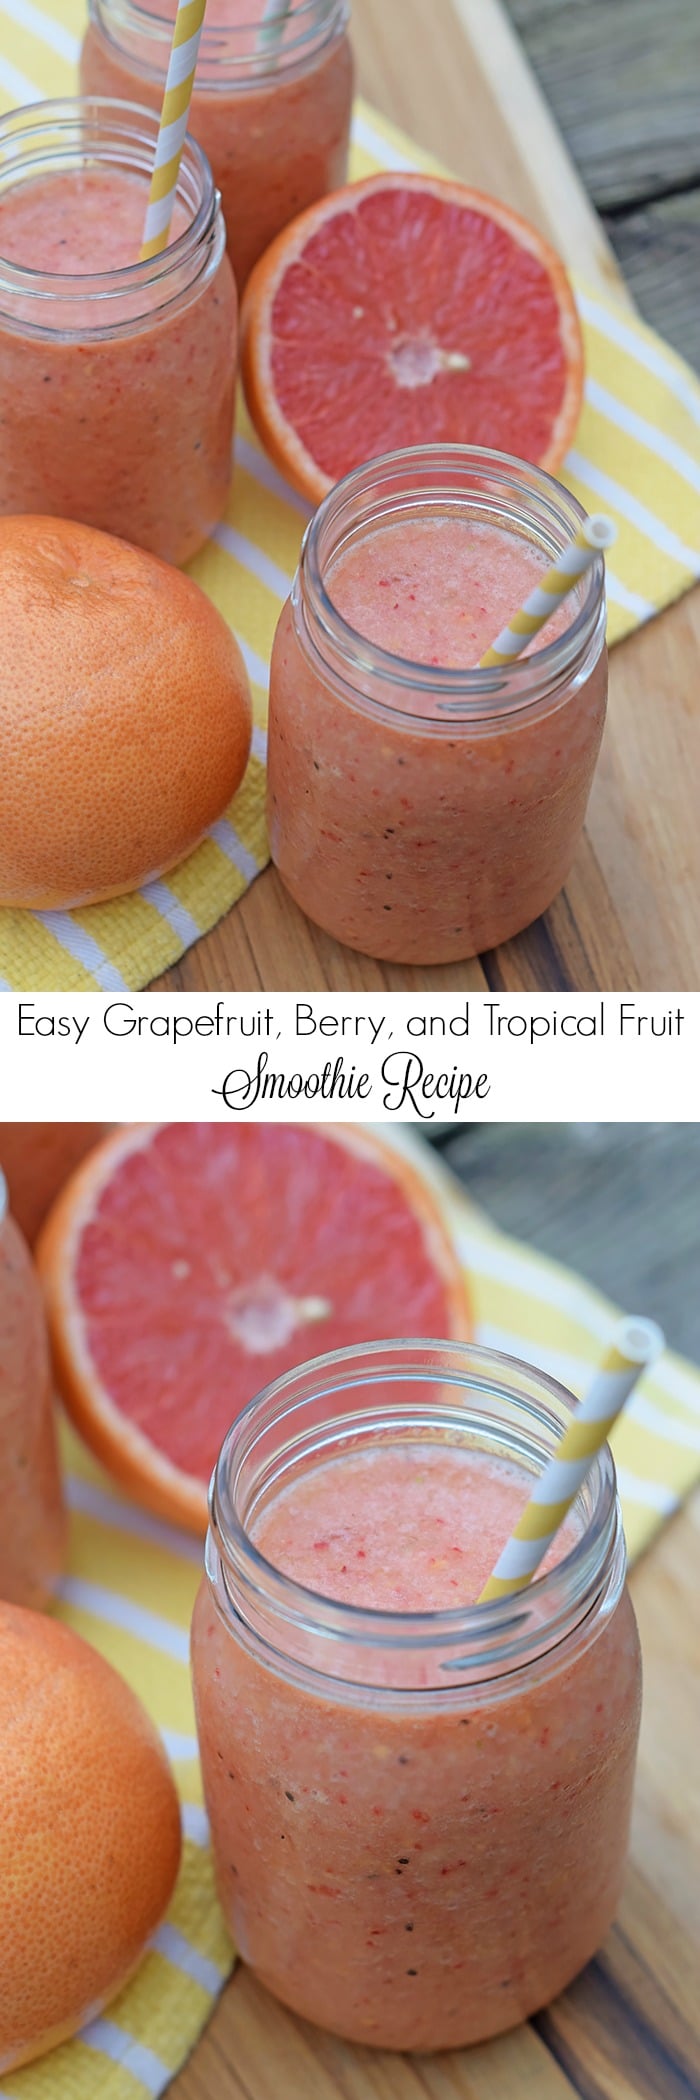
Mmmm, there is nothing like a sweet, red, juicy grapefruit. Throw that together in a blender full of other tropical fruits and berries, and you’ve got a fruit smoothie that is out of this world delicious, not to mention refreshing. If you’ve never tried grapefruit in a smoothie, you are so missing out. But no more, because today I’ve got the perfect recipe for you. It’s so easy and simple and has NO added sugar. The natural fruit itself, including Sweet Scarletts Texas Red Grapefruit, is the sweetness in this smoothie.
Ever since I was a little girl, I’ve loved a good grapefruit. In fact, just looking at a grapefruit brings back really fond memories for me. My dad was an over-the-road truck driver, and sometimes he’d be out for a month at a time. But when he’d return, he ‘d always come home bearing gifts. At certain times of the year, after going through the great state of Texas, he’d bring home huge boxes of grapefruit. We’d store them in our uninsulated cold stairwell that led up to the second story of our old farmhouse. Then every morning (or even of a night) we’d grab a grapefruit and one of the only grapefruit spoons we owned, split the grapefruit open to reveal red, juicy fruit inside, and enjoy to our hearts’ content. We’d eat every bite of the fruit inside, then squeeze out all the juice and drink it down. Not a drop was left when we were finished. My dad loved adding a dash of salt to his grapefruit, a habit he’s passed on to my boys; myself, I love them just the way they are.
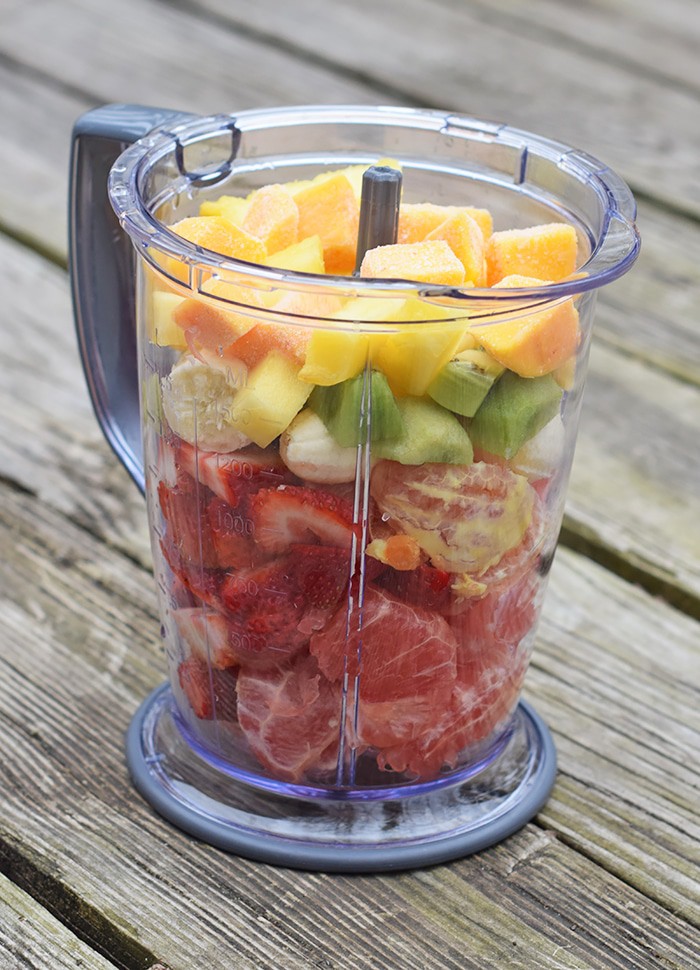
For this particular smoothie recipe, all you need is a bunch of fruit, including Sweet Scarletts Grapefruit, and ice cubes. That’s it! No sugar, no extra stuff. Wash, peel, and chunk the fruit into a blender.Then blend until you have a nice, smooth puree. Add the ice cubes and blend again. You’re left with a bright pink smoothie that my guys couldn’t get enough of…
It’s nature’s sweetness at its finest and simplest. It’s healthy too, a good source of vitamin C and fiber. And it’s so yummy!
Looking for more smoothie or frozen drink recipes?
Easy Grapefruit, Berry, and Tropical Fruit Smoothie Recipe
Throw a sweet, red, juicy grapefruit together with a blender full of other tropical fruits and berries, and you’ve got a fruit smoothie that is out of this world delicious, not to mention refreshing.
1 Sweet Scarletts Grapefruit
8-10 strawberries
1 orange
2 bananas
2 kiwi
1 cup pineapple chunks (fresh or frozen)
3/4 cup mango chunks (fresh or frozen)
2 cups ice cubes
Wash all fresh fruit; I like to soak mine in a vinegar/water bath for about 10 minutes.
Peel grapefruit, orange, bananas, kiwi, pineapple, and mango.
Stem strawberries.
Chunk fruit up into blender.
Blend until mixture is a nice, smooth puree.
Add ice cubes and blend until mixture is well combined.
Pour into jars or glasses, add straws, and serve immediately.
Enjoy!
Drinks
American
grapefruit smoothie, tropical fruit smoothie
Try Sweet Scarletts, the sweetest Texas red grapefruit. Check out the Sweet Scarletts Facebook page for more from the reddest, sweetest, and best grapefruit you’ve ever tasted.
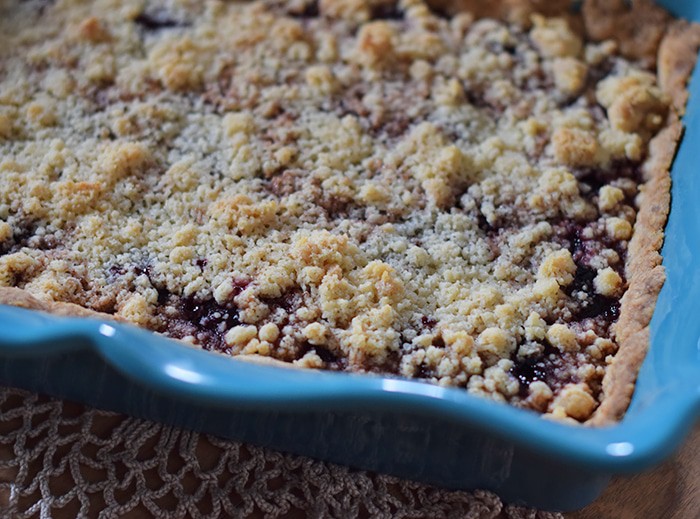
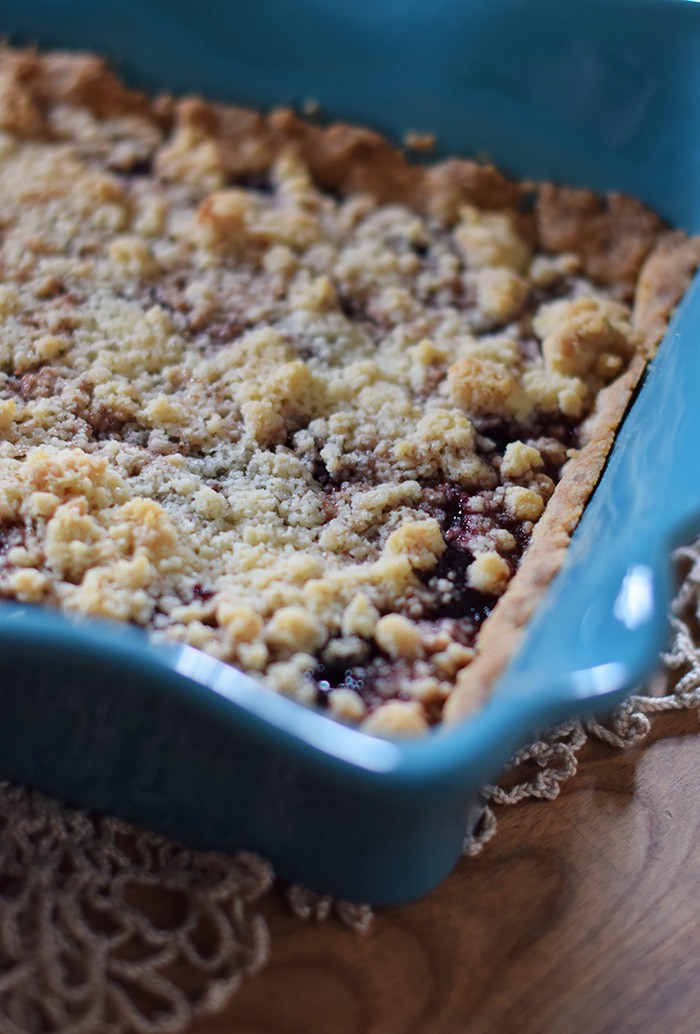
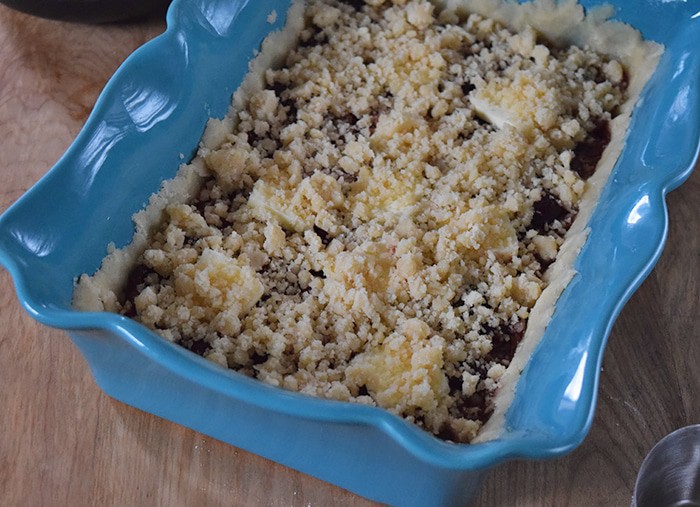
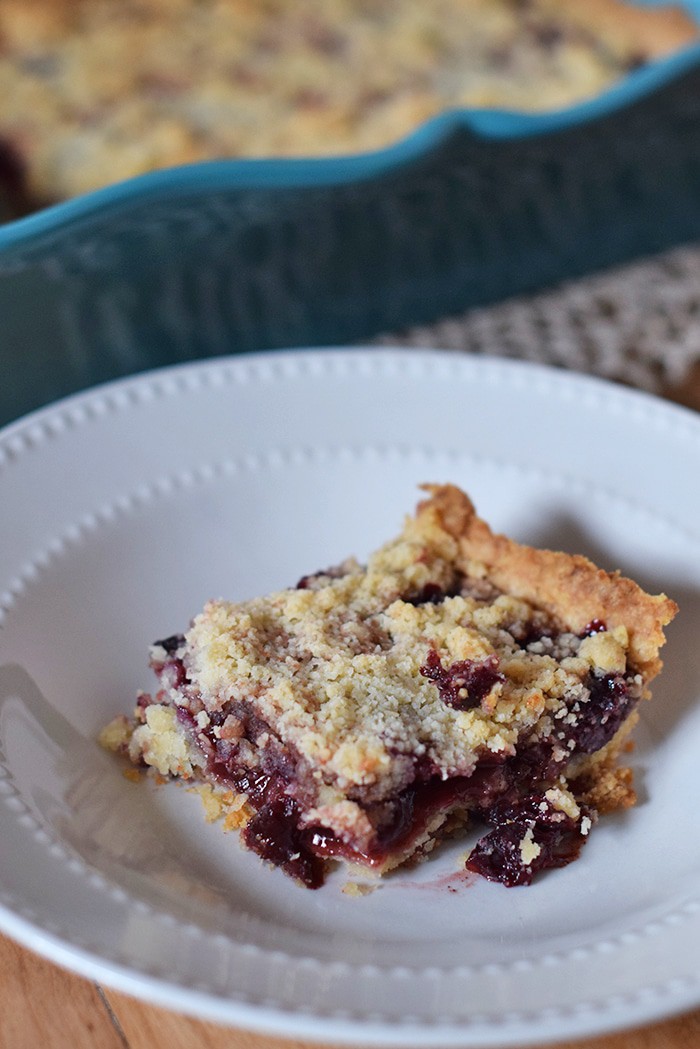
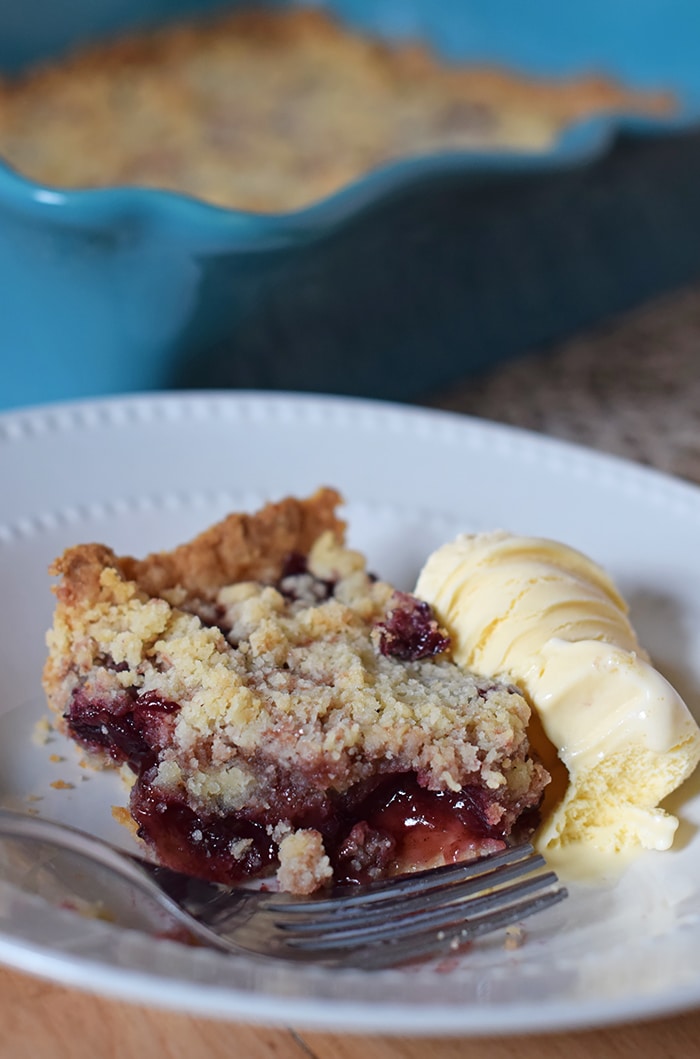
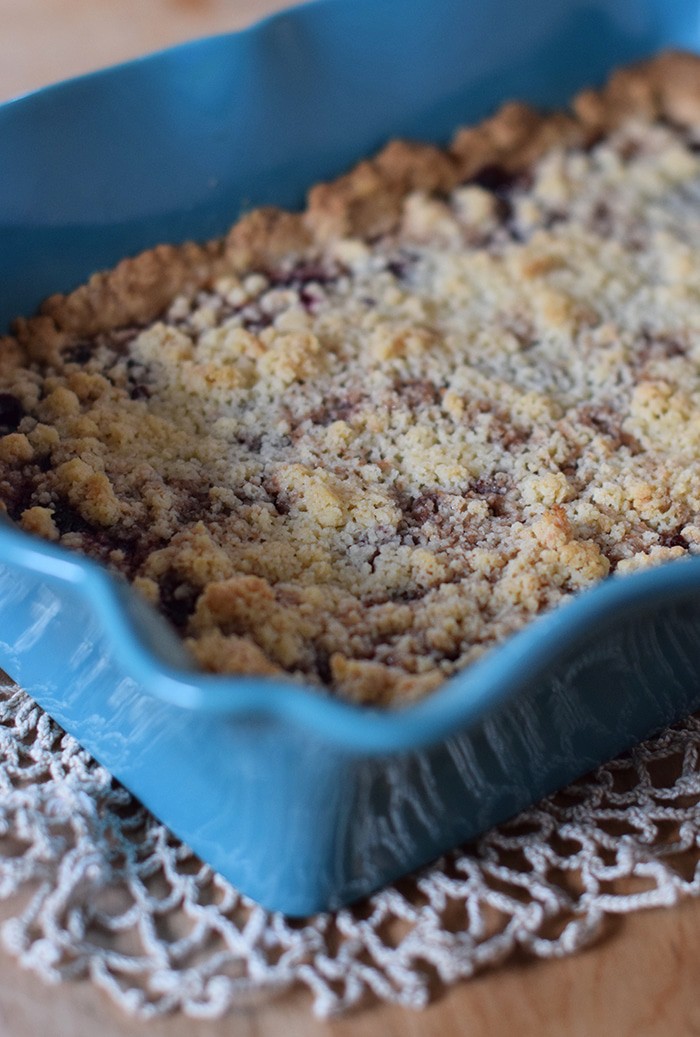
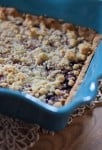
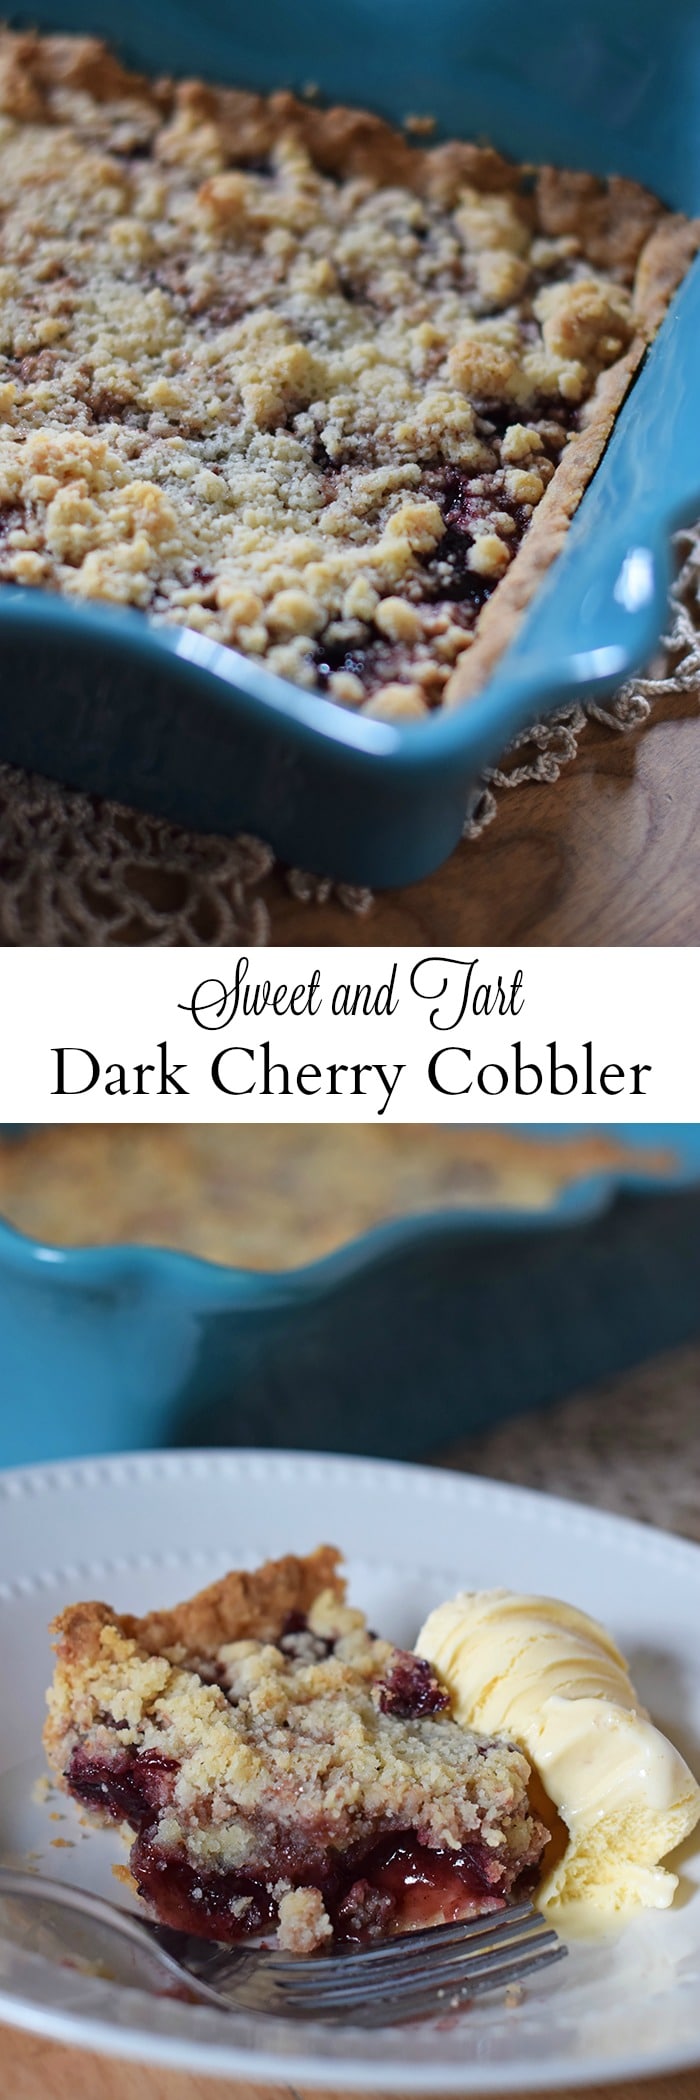
With February being national cherry month, I thought it the perfect time to celebrate with a homemade fruit cobbler. I make a killer campfire cherry cobbler when we’re out camping, but it’s been a long time since I’ve made a cherry cobbler at home. This recipe is very similar to my homemade peach cobbler and homemade blueberry cobbler recipes.
How to Make a Dark Cherry Cobbler
Making a fruit cobbler is really not as hard as it sounds; in fact, a cobbler is probably the easiest type of pie/pastry you could ever endeavor to make. It’s perfect for a beginning baker, and kids might like to get involved, as well.
The crust comes first. You mix up the ingredients for the crust, per the recipe below. Then save back about 1/4 of the dough to use as topping. Press the rest of the crust into a baking dish. Personally, I love ceramic bakeware, and just a hint… Wayfair has an excellent selection of bakeware. You can also use an oven-friendly glass baking dish or a pie plate. The choice is totally up to you. But press that crust all along the bottom of your dish and up the sides just a bit, enough to hold the cobbler filling.
Next, you’ll mix up the filling, per the recipe below. You can use fresh cherries or frozen; I used frozen organic dark sweet cherries since fresh are a bit out of season in our neck of the woods right now.
Once you’ve poured your filling into the crust, just crumble the rest of the crust that you saved back on top of your cobbler and bake! It’s as simple as that.
We love our cobbler with a scoop or two of vanilla ice cream. The cream just adds even more flavor to the fruity cobbler. It’s so delicious!


 I didn’t add jump rings to this pair because I didn’t feel they needed them, but it’s totally up to you.
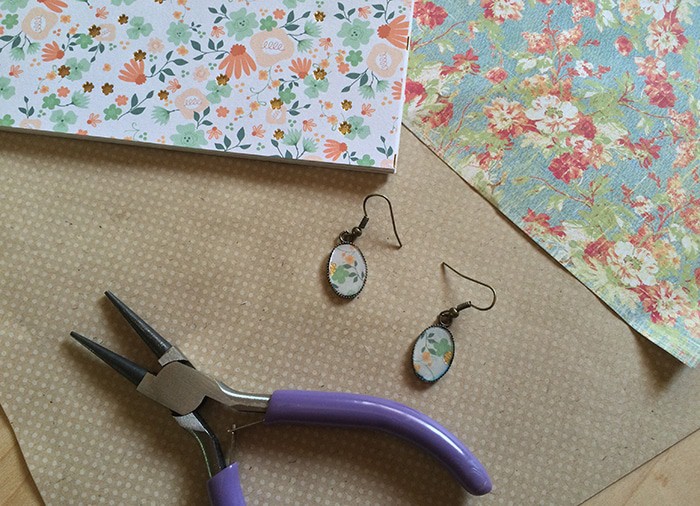
 They make great gifts too; I’m sure we all know a birthday girl, a graduate, a friend, sister, mom, teacher who would love a gift like this. Happy crafting!