Category: Holiday Favorites

  • Twix Bar Mummy Halloween Brownies

    Twix Bar Mummy Halloween Brownies

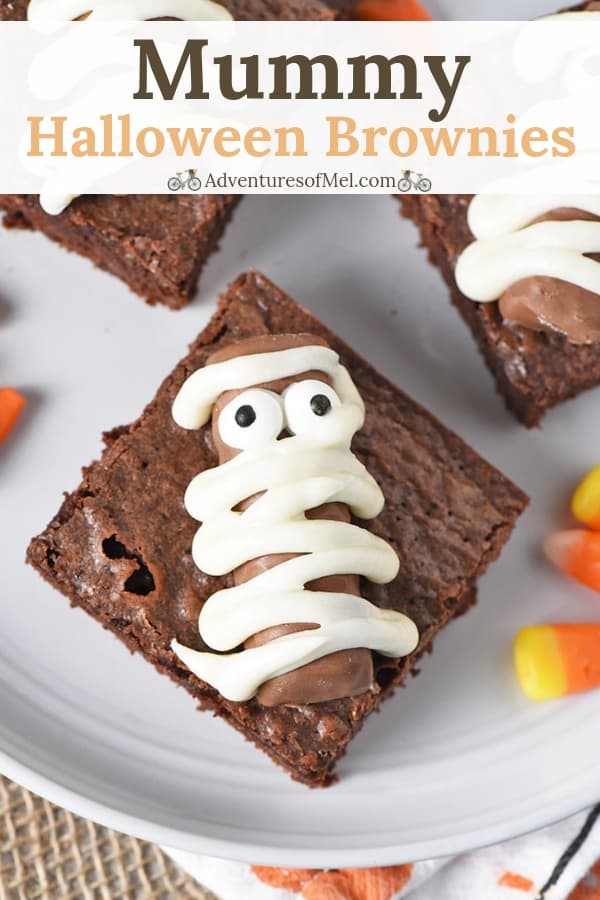
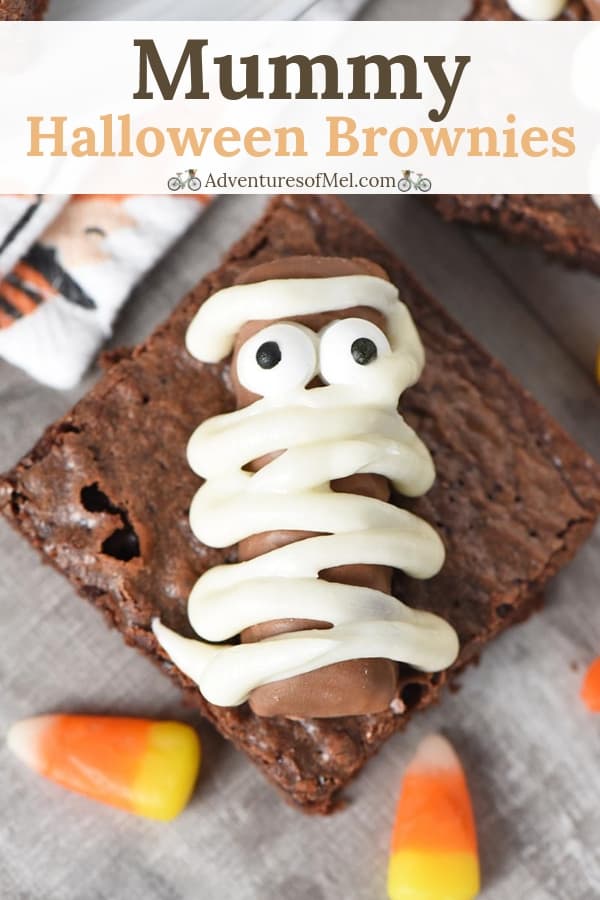
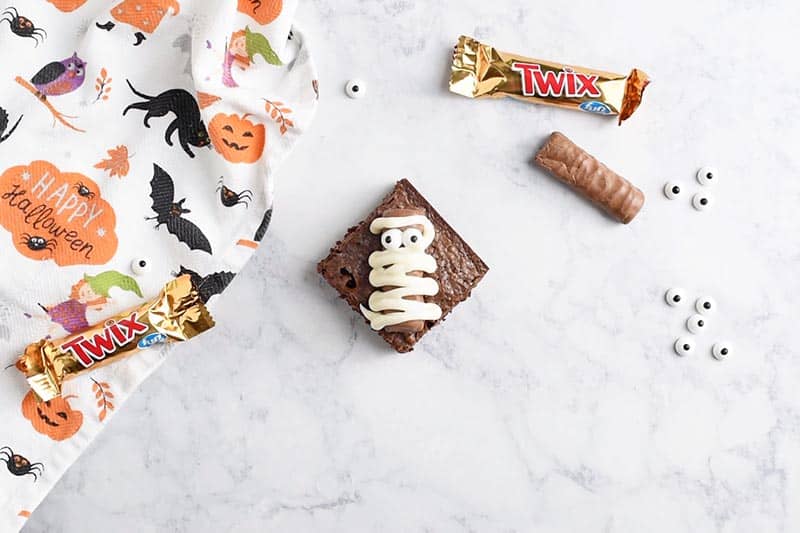
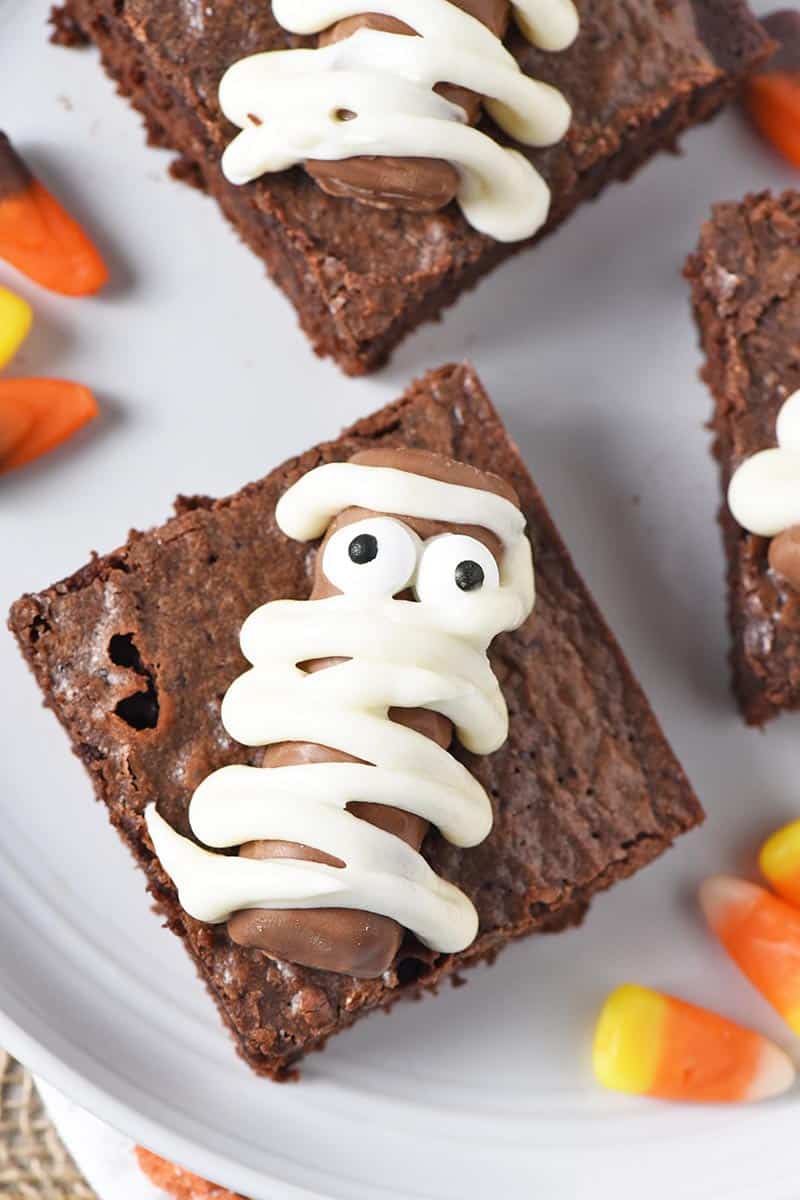
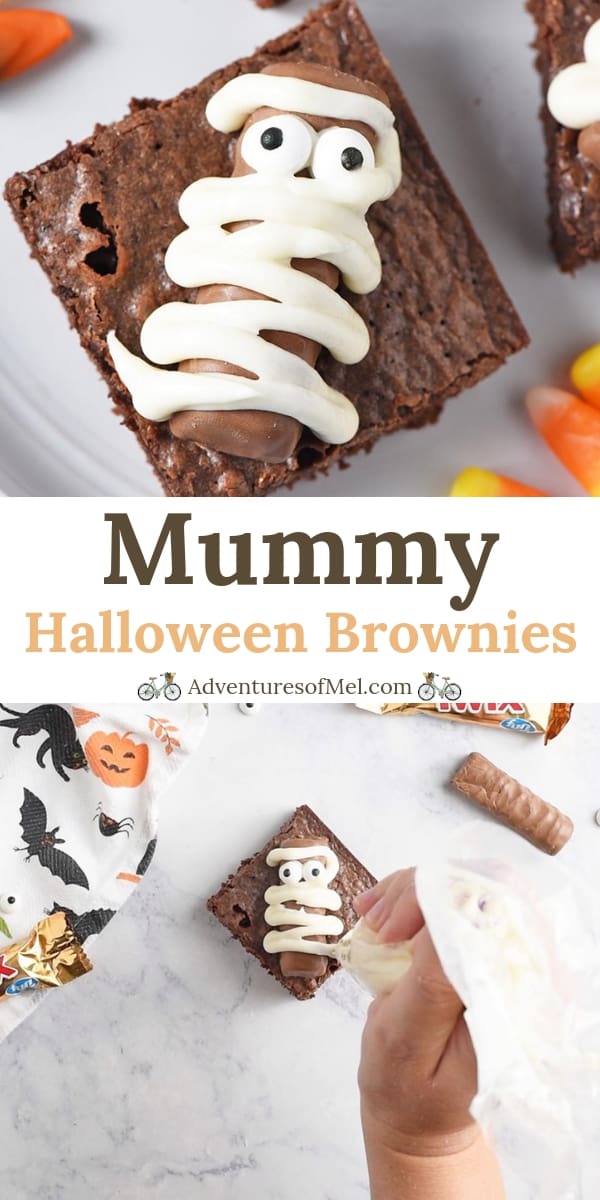
    Twix Bar Mummy Brownies are quick and easy Halloween treats anyone can make! So cute and fun for kids, they’re the perfect Halloween desserts!

    Halloween is just around the corner, believe it or not. And these Halloween brownies topped with cute little Twix bar mummies, are a super easy treat you can whip up in no time.

    mummy halloween brownies made with Fun Size Twix bars on a plate with candy corn

    I don’t know about you, but I don’t like a really long, drawn out process when it comes to fun little Halloween treats for kids. I’m not a HUGE fan of pastry bags, even though I’ve created quite a few detailed treats with them since I became a mom.

    Halloween treats made with Twix bar mummy Halloween brownies

    But I’ll tell you, this is one super easy Halloween recipe, even uses a brownie mix. And while I use a homemade sugar cookie icing, you can totally buy decorating icing already made and ready to go.

    Below you’ll find a few tips, things I learned along the way, so hopefully, making these Halloween desserts can be seamless and enjoyable for you. This is a great opportunity to get your kids in the kitchen with you too.

    More Halloween treats you will love: Frankenstein BrowniesGhost Halloween BrowniesGraveyard Brownies, and Pumpkin Patch Halloween Brownies.

    icing wrapped mummy Twix bar decorated Halloween brownies

    WHAT KIND OF BROWNIE MIX SHOULD I USE?

    Ok, here’s the first tip because live and learn. You want a brownie that’s going to be easy to slice and pull out of the pan, nothing too messy or gooey.

    My first batch of brownies turned out a really ooey gooey brownie; I didn’t realize they’d be that gooey. They could hardly be scraped off the bottom of the pan.

    brownie mix brownies for easy Halloween brownies or easy Halloween treats in baking dish

    I recommend using cake-like or chewy brownies (preferably chewy) that won’t be so gooey and will easily come out of the pan.

    This brownie mix worked wonderfully for our mummy brownies.

    TIPS FOR HOW TO MAKE THESE SCRUMPTIOUS HALLOWEEN TREATS

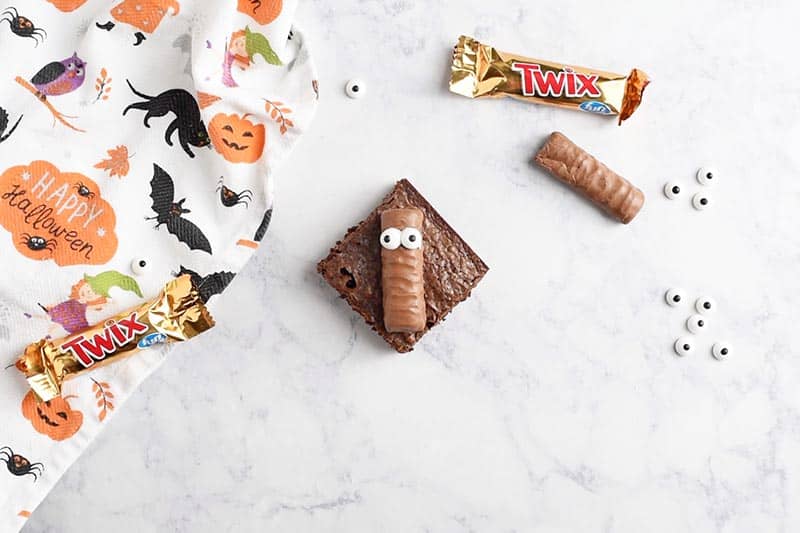
    You’ll need just a handful of things to make mummy Halloween brownies, including already baked and cooled brownies, Fun Size Twix bars, sugar cookie icing, and candy eyeballs.

    ingredients to make cute Halloween treats, Twix bar mummy Halloween brownies

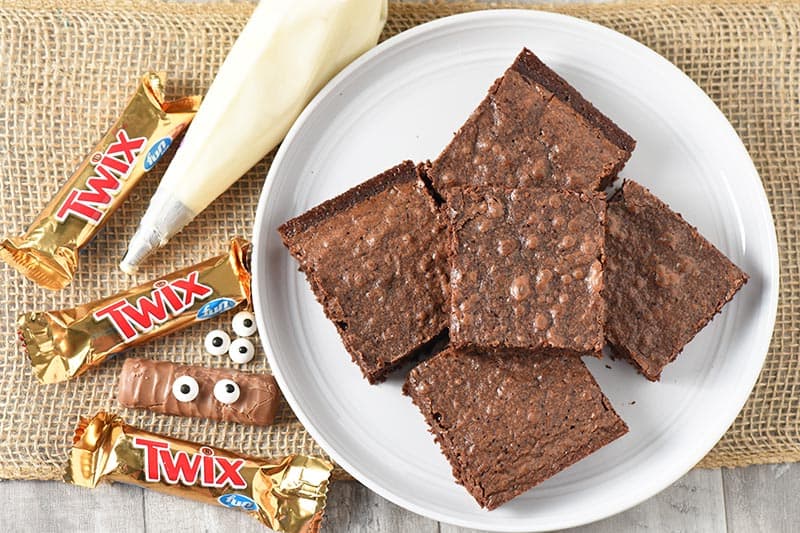
    Slice your brownies into squares or as close to square shaped brownies as you can.

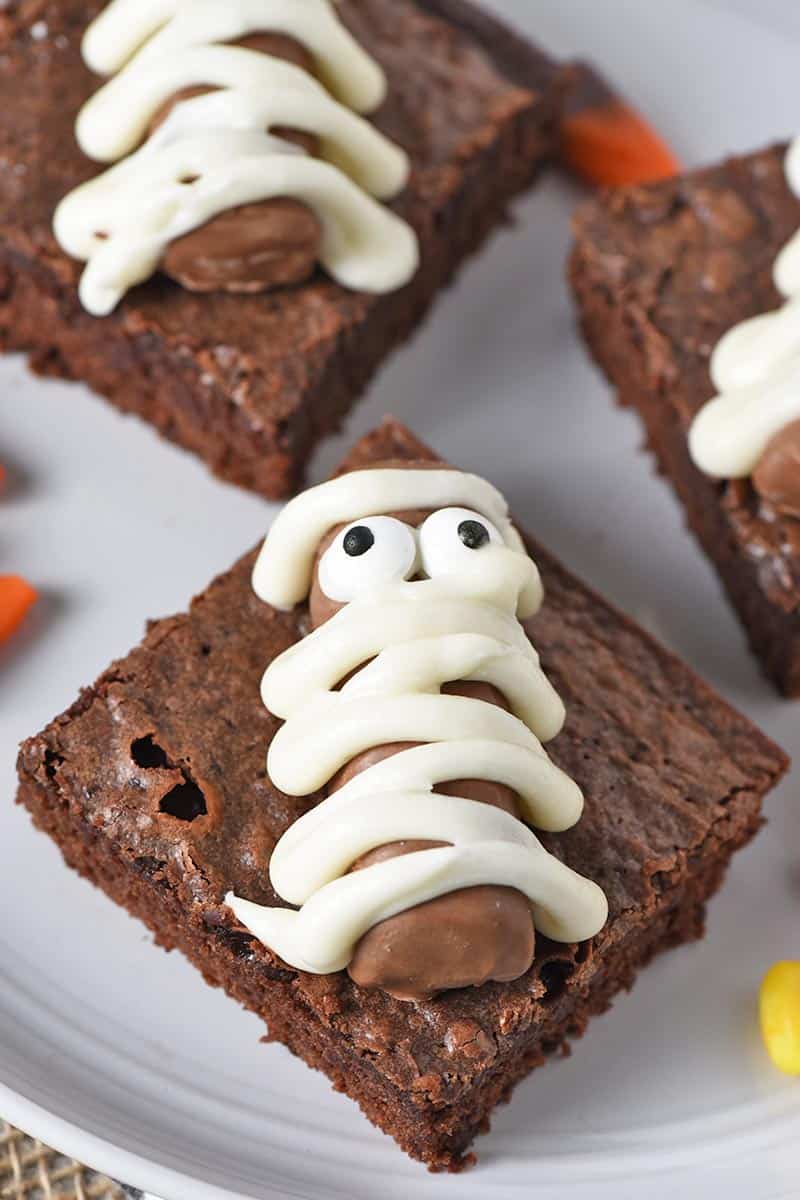
    To decorate brownies as mummies, follow these steps:

    adding icing to back of Twix bar for mummy Halloween brownies
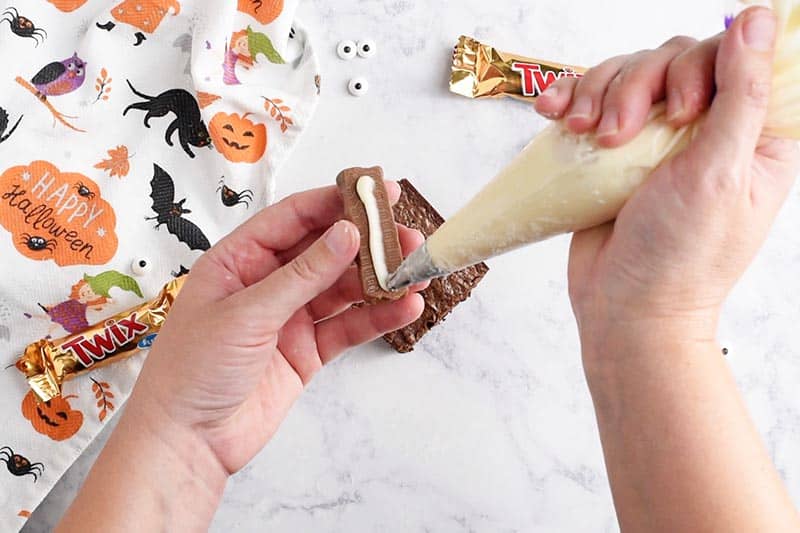
    • Using Wilton Round Tip 10 (or the closest off brand cake tip) and a small pastry bag, “glue” a Twix bar to the top of the brownie with the sugar cookie icing.
    • Next “glue” the candy eyeballs toward the top of your Twix bar.
    add candy eyeballs to Twix bar for mummy Halloween brownies
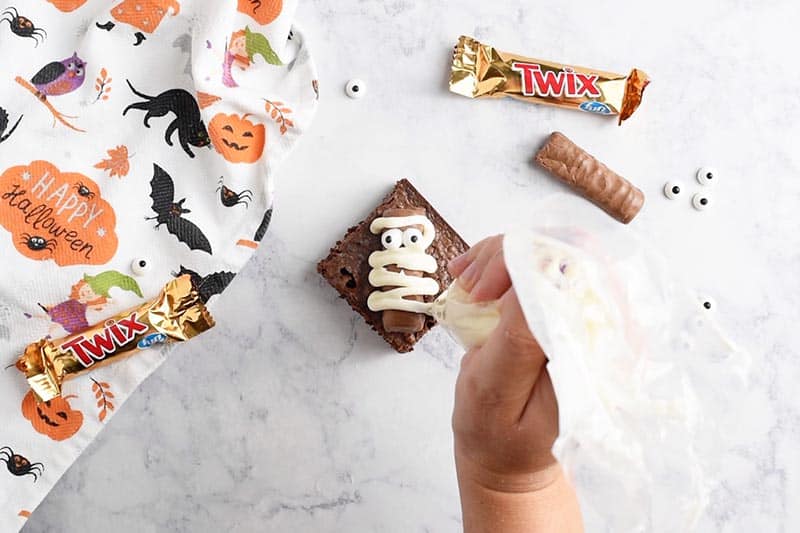
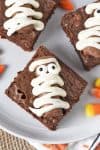
    • Wrap it up (see what I did there?) by zig-zagging white icing across the top of  your Twix bar.

    When you add the mummy wrap (or icing), try not to cover up the eyes. Although if you happen to go across one of the eyeballs, it’s totally fine… It’ll probably look even more like a real mummy.

    wrapping mummy with icing from pastry bag on halloween brownies

    WHAT IF I DON’T HAVE CAKE TIPS AND PASTRY BAGS?

    No worries! You really don’t have to have the cake tip I mentioned above or the pastry bag. You can get creative with what you have.

    If you have sandwich bags, snip the corner of a sandwich bag, fill the bag with icing, and swirl away. Works like a charm!

    You can also create a DIY pastry bag using parchment paper or wax paper.

    Or you can just use ready made icing that comes with a convenient tip for decorating, making the process even easier.

    easy Halloween treats, Mummy Haloween Brownies made with Twix bars

    WHAT IF I DON’T HAVE TWIX BARS?

    If you don’t have Twix bars, just create the top of your brownie to look like a mummy.

    Simply add the candy eyeballs and icing to the top of your brownie instead of on the candy bars.

    And if you can’t find candy eyeballs, you can always use M&M’s, M&M’s Minis, or chocolate chips.

    Get creative and just have fun!

    mummy Halloween brownies with candy corn

    MORE HALLOWEEN TREATS AND RECIPES YOU CAN MAKE:

    More easy last minute ideas –>> 20+ Halloween treats – including Halloween brownies, party punch, cookies, no bake desserts, treats on a stick, Halloween cupcakes, and more!

    KITCHEN TOOLS YOU’LL NEED TO MAKE MUMMY HALLOWEEN BROWNIES

    Mixer

    Brownie Pan or Cake Pan

    Pastry Bags (or Sandwich Bags)

    Wilton Tip 10

    TWIX BAR MUMMY HALLOWEEN BROWNIES RECIPE

    If you love this mummy Halloween brownies recipe as much as I do, please write a 5 star review, and help me share the recipe on Facebook and Pinterest! If you make the recipe, be sure to share that you tried it on Pinterest. I love when readers share feedback!

    Twix Bars Mummy Halloween Brownies Halloween Treats Recipe

    CONNECT WITH ADVENTURES OF MEL!

    Be sure to follow me on social, so you never miss a post!

    Facebook | Pinterest | YouTube | Instagram | Twitter

    Sign up to receive my newsletter, filled with delicious recipes and outdoor travel adventures, in your inbox:

    FREE EMAIL SUBSCRIPTION

    Click on the video below to see how easy it is to make mummy brownies for Halloween!

    Twix Bar Mummy Brownies

    Twix bar mummy brownies are quick and easy Halloween treats anyone can make! So cute and fun for kids, and you only need 4 ingredients!

    • 15 brownies (baked and cooled)
    • 2 cups white decorating icing
    • 20 Fun Size Twix bars
    • 40 candy eyeballs
    1. Slice the brownies into squares.

    2. Using the white decorating icing, "glue" a Twix bar to the top of each brownie with the icing.

    3. Next, using the white decorating icing, "glue" the candy eyeballs toward the top of the Twix bar.

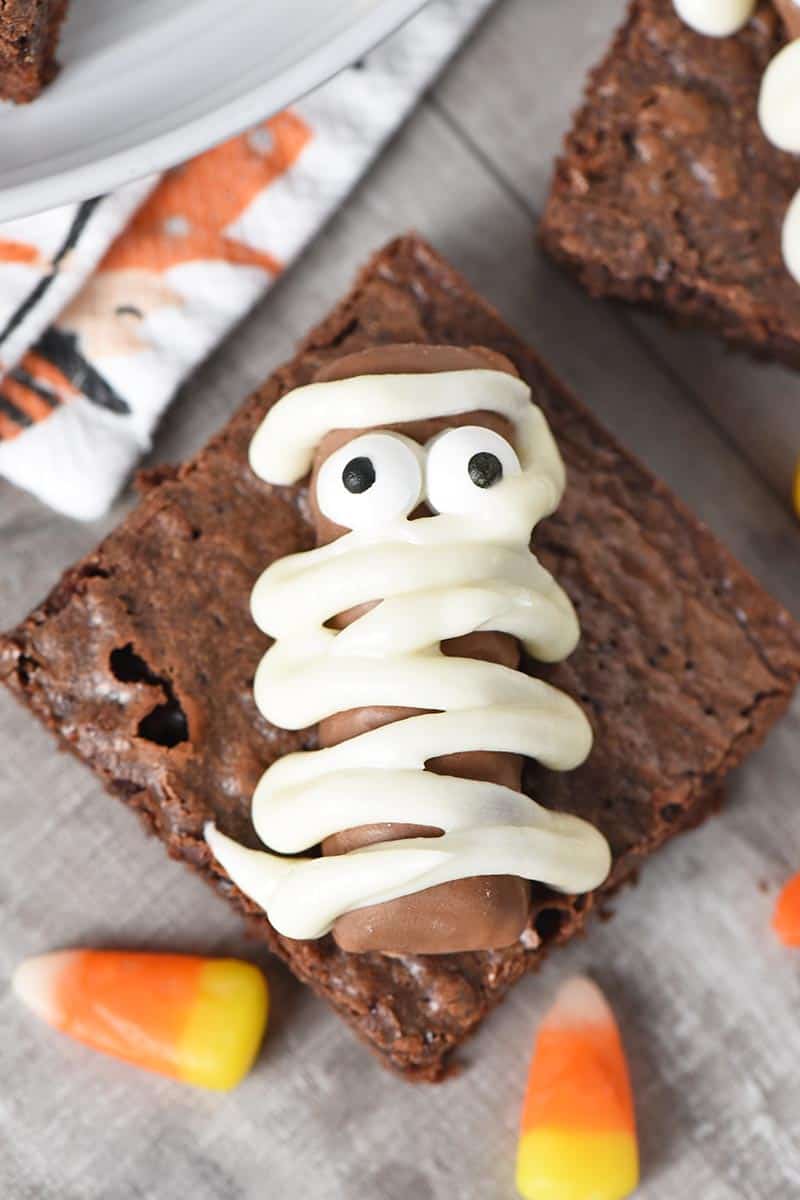
    4. Zig-zag white icing across the top of the Twix bar, doing your best not to cover up the eyes.

    5. That's it! Your spooky mummy treats are ready to serve.

    *If you don’t want to buy icing, you can also make homemade cookie icing; then use a pastry bag and round tip to decorate. If you’re using homemade icing and you don’t have pastry bags or tips, you can use a sandwich bag instead. Just snip the corner of a sandwich bag, fill the bag with icing, and swirl away.

    Desserts, Halloween
    American
    brownie mix, Halloween brownies, halloween desserts, Halloween treats, mummy brownies, Twix bar mummy
    Easy Halloween Brownies with Twix Bar Mummies
    easy Halloween treats, Twix bar mummy Halloween brownies
  • Mexican Corn Casserole with Bacon

    Mexican Corn Casserole with Bacon

    Mexican Corn Casserole with Bacon – How to make the most delicious Mexican corn casserole recipe with Jiffy cornbread, green chiles, cream cheese, and bacon. The best holiday comfort food!

    My boys are serious about their sides. When it comes to Thanksgiving sides, they have their absolute favorites, one of which is now this Mexican corn casserole with a Tex-Mex twist.

    wooden spoon dishing up Mexican corn casserole from white casserole dish

    I mean, I do have to admit, corn casserole is the perfect side to go with turkey, ham, stuffing, the works. Of course, on any ordinary day, I love to pair this creamy casserole with a good burger.

    The fact this Mexican street corn casserole has bacon? Well, bacon just makes everything better, right?

    Mexican corn casserole, made like Mexican street corn, in white casserole dish

    I’m going to out on a limb here and tell you that while I thought it would be impossible to beat our favorite Jiffy corn casserole recipe… I actually love this Mexican cornbread casserole even more. Like Mexican Corn, it’s full of Tex-Mex flavor, and I am a sucker for Tex-Mex.

    Wanna make corn casserole in your slow cooker? This slow cooker corn casserole is ah-mazing!

    If you love a good Tex-Mex comfort food recipe, you may enjoy Mexicali meat pie too.

    My family also loves this easy green bean casserole recipe!

    I JUST WANT THE RECIPE! TAKE ME TO THE RECIPE FOR MEXICAN CORN CASSEROLE WITH BACON!

    If you’d rather skip all of my cooking tips, important cooking info for this recipe, and similar recipe ideas – and get straight to the delicious Mexican corn casserole recipe – just scroll down to the bottom, where you’ll find a printable recipe card.

    Mexican corn casserole in white baking dish, made with similar ingredients to Mexican corn on the cob

    WHY SHOULD I USE JIFFY CORNBREAD MIX IN CORN CASSEROLE?

    We use just half of a JIFFY Corn Muffin Mix in our casserole. Just mix it in with the rest of the ingredients.

    Using just half the mix gives stability but not so much that the casserole is more like a cornbread than an actual casserole.

    Instead the cornmeal gives the casserole a little bit of breading, just enough to keep it very moist and creamy but also have enough substance to bake well.

    It also adds just a hint of sweetness, bringing out the flavor of all the ingredients.

    wooden spoon in Mexican corn casserole with cilantro on top

    IS CORN CASSEROLE THE SAME AS CORN PUDDING?

    I guess this could be considered to be the same as corn pudding. You’re basically mixing a bunch of ingredients together to create a creamy side dish.

    And the casserole isn’t fully stable, like a slice of cornbread would be. It requires you to spoon it onto your plate, no eating with your hands here!

    Mexican corn casserole dished out on white Pioneer Woman plate

    DO I HAVE TO USE CILANTRO IN THIS BAKED CORN CASSEROLE?

    No, you do not. Cilantro is totally optional.

    In fact, I leave cilantro out, mainly because Dan doesn’t care for the taste. While it’s grown on me, I’m not a HUGE fan of cilantro either.

    WHAT IS COTIJA CHEESE AND WHERE CAN I FIND IT?

    Did you know there is a website completely dedicated to cheese, all kinds of cheese?

    According to Cheese.com, Cotija cheese “is a Hispanic-style cheese named after the town of Cotija in the Mexican state of Michoacán. It’s also made mostly from cow’s milk.

    It does crumble, so it kind of resembles feta cheese in that way; but in taste, it’s got a LOT more flavor, in my opinion. Since it has zero carbs, Dan likes to eat it on a lot of foods, including salads.

    This cheese also doesn’t melt, so it’ll make your casserole look as though you’ve sprinkled parmesan on top.

    Mexican corn casserole with Cotija cheese crumbled on top

    And I’ll warn you… While cooking and after you remove your casserole, the cheese can smell a bit like vomit; there, I said it. Do me a solid, though, and just take one bite of this delicious casserole. I promise, you won’t be disappointed.

    You can usually find Cotija cheese in the cheese or deli section of your store; our Walmart had it with all of the Hispanic cheeses, next to the Queso Fresco cheese. It’s a small, round, white block of cheese.

    CAN I FREEZE MEXICAN STREET CORN CASSEROLE?

    While I haven’t had the need to freeze it, I don’t see why you couldn’t freeze it, and I wouldn’t hesitate to do so.

    serving Mexican corn casserole with a wooden spoon out of a white baking pan

    The ingredients used in this casserole are all conducive to freezing. Just cover it well, so it doesn’t get freezer burnt.

    TIPS FOR HOW TO MAKE MEXICAN CORN CASSEROLE WITH BACON

    Looking ahead, you’ll want to cook the bacon. You’ll also need to chop up the green onions and shred the cheddar cheese.

    The steps to this recipe are really simple and easy…

    Mix cream cheese, whipping cream, mayo, and sugar together for Mexican Corn Casserole
    • Mix together the cream cheese, mayo, heavy whipping cream, butter, sugar, and sour cream in a medium saucepan, and allow to cook on low heat until the cream cheese has melted. Stir constantly so the mixture doesn’t scorch.
    • In a large mixing bowl, mix together the creamy mixture, crumbled bacon, green onions, green chilies, frozen corn, half the JIFFY Corn Muffin mix, chili powder, salt, pepper, and shredded cheddar.
    ingredients for baked Mexican corn casserole in mixing bowl
    • Pour the entire corn casserole mixture into a greased 9″x13″ baking pan.
    • Then let the oven work its magic for about an hour.
    • When it’s all baked and ready to go, you can crumble Cotija cheese on top and let it bake an additional 10 minutes or so.

    And that’s it! Easy peasy, so simple, yet so delicious!

    easy Mexican corn casserole in a white baking dish with cilantro

    WHAT CAN I PAIR WITH MEXICAN CORN CASSEROLE?

    While it makes a delicious holiday side with both turkey and ham at Thanksgiving and Christmas, it also pairs really well with a good burger and the following main dishes:

    Chicago Hot Dog

    Sweet Chili Instant Pot Baby Back Ribs

    Maple Pork Chops with Apples and Onions

    IF YOU LOVE THIS MEXICAN CORN CASSEROLE RECIPE, TRY SOME OF OUR OTHER CORN FAVORITES:

    Mexican Corn on the Cob with Bacon

    Grilled Corn in the Husk with Honey Butter

    Instant Pot Corn on the Cob

    Creamy Potato Corn Chowder

    KITCHEN TOOLS YOU’LL NEED TO MAKE MEXICAN CORN CASSEROLE:

    Cutting Board and Knife – for mincing the green onions and crumbling the bacon.

    Cheese Grater – Use to grate cheddar cheese for your casserole.

    Saucepan – You’ll need a medium-sized saucepan to cook up the cream cheese mixture.

    Heat Resistant Spatula – Works well for stirring and scraping the sides of the pan.

    Large Mixing Bowl – Use to mix all of the ingredients together.

    Casserole Dish – Use to bake the Mexican corn casserole.

    MEXICAN CORN CASSEROLE RECIPE

    If you love this Mexican corn casserole recipe as much as I do, please write a 5 star review, and help me share the recipe on Facebook and Pinterest!

    Mexican Corn Casserole with Bacon Recipe

    CONNECT WITH ADVENTURES OF MEL!

    Be sure to follow me on social, so you never miss a post!

    Facebook | Pinterest | YouTube | Instagram | Twitter

    Sign up to receive my newsletter, filled with delicious recipes and outdoor travel adventures, in your inbox:

    FREE EMAIL SUBSCRIPTION

    Mexican Corn Casserole with Bacon

    How to make the most delicious Mexican corn casserole recipe with Jiffy cornbread, green chiles, cream cheese, and bacon. The best holiday comfort food!

    • 6 slices bacon
    • 3 whole green onions (minced)
    • 4 ounces cream cheese
    • 1/2 cup mayo
    • 1 cup heavy whipping cream
    • 4 tablespoons salted butter
    • 1 teaspoon pure cane sugar
    • 1 tablespoon sour cream
    • 4 ounces green chiles (chopped)
    • 1 tablespoon chili powder
    • 32 ounces frozen corn
    • 1/2 box JIFFY Corn Muffin Mix
    • 1/2 cup cheddar cheese (shredded)
    • 1 teaspoon salt
    • 1/2 teaspoon black pepper
    • 4 ounces Cotija cheese
    • 3 tablespoons cilantro (optional)
    1. Pre-heat the oven to 325°.
    2. Cook the bacon and set it aside.
    3. Mince the green onions, shred the cheddar cheese, and set both aside.
    4. In a medium saucepan, add the cream cheese, mayo, heavy whipping cream, salted butter, sugar, and sour cream.
    5. Cook the mixture on low heat until the cream cheese is fully melted. Constantly stir to keep the mixture from scorching.
    6. In a large mixing bowl, mix together the cream cheese mixture, crumbled bacon, green onions, green chiles, chili powder, frozen corn, 1/2 the box of JIFFY Corn Muffin Mix, shredded cheddar, salt, and pepper.
    7. Spray a 9"x13" baking dish with cooking spray.
    8. Pour the casserole mixture into the baking dish, making sure it’s evenly spread throughout the pan.
    9. Bake at 325° for about 55 minutes or until the mixture is set.
    10. Add crumbled Cotija cheese* to the top of the casserole, and bake an additional 10 minutes.
    11. Sprinkle with cilantro, if desired.**
    12. Serve while warm and enjoy!

    *Cotija cheese is a small, round, white block of cheese; you can usually find it next to the Queso Fresco and other Hispanic-style cheeses at your grocery store.

    **Cilantro is totally optional. Some readers love it, and some don’t… I chose not to use it, since some in my family don’t care for it either.

    Mexican corn casserole pairs deliciously well with a good burger, a Chicago Hot Dog, Sweet Chili Instant Pot Baby Back Ribs, and Maple Pork Chops with Apples and Onions, just to give you a few dinner ideas!

    Side Dish
    American
    Mexican corn casserole, Mexican street corn
    easy Mexican corn casserole recipe with bacon
  • Pumpkin Spice Sugar Cookies

    Pumpkin Spice Sugar Cookies

    Make a batch of soft pumpkin spice sugar cookies, perfect for a cozy fall dessert. You can roll cookie dough in sugar before baking or spread with frosting after baking. Delectable autumn cookie recipe everyone will love!

    Fall is in the air, and so is pumpkin spice. Along with my favorite pumpkin gooey butter cake, these soft pumpkin sugar cookies are a scrumptious way to welcome fall.

    stack of soft pumpkin spice sugar cookies, made from scratch, on wood countertop with burlap cloth

    We make a lot of pumpkin recipes around here, so easy pumpkin sugar cookies fit right in.

    Why You’ll Love These Cookies

    • Pumpkin spice sugar cookies are soft and delicious.
    • You have options if you don’t have pumpkin on hand; we’ll talk more about this in the ingredients notes below, but you can use canned pumpkin, homemade mashed pumpkin, or even various types of squash.
    • Enjoy these soft pumpkin sugar cookies with frosting or without. If you don’t want to frost them, just do like I do, and roll the dough balls in sugar before baking. Easy peasy and still just as good.
    • This pumpkin sugar cookie recipe is great for fall, Halloween, and Thanksgiving. Bake a batch for potlucks, parties, or bake sales.

    Ingredients and Substitutions Notes

    Gather up a few ingredients, most of which you probably already have on hand.

    • Unsalted Butter – You can use salted butter too; just keep in mind you may not need to add quite as much salt. Unsalted butter allows you to control the amount of salt that goes into the cookies. You’ll need to be sure to soften the butter before mixing.
    • Cane Sugar – You can also use granulated sugar. Just be sure to use the appropriate amount of sugar as specified by the recipe, because extra sugar can make your cookies spread and flatten, as well as be really sweet with a super chewy texture.
    • Light Brown Sugar – Brown sugar helps give a cookie its texture and flavor. In the case of fall flavors, brown sugar is where it’s at when you’re trying to get those yummy fall flavors into a recipe.
    • Egg – You’ll need a large egg.
    • Vanilla Extract
    • Pumpkin – While I make the cookies with canned pumpkin, you can also make your own homemade pumpkin puree. A lot of times, I will also substitute other types of squash if I don’t have pumpkin, especially when I make my grandma’s pumpkin pie recipe.
    • All-Purpose Flour – I prefer to use an unbleached all-purpose flour. And if you want to make gluten-free cookies, use a good gluten-free flour.
    • Cream of Tartar – If you don’t have cream of tartar, you can substitute lemon juice or white vinegar; for every 1/2 teaspoon cream of tartar, you’ll need 1 teaspoon lemon juice or white vinegar.
    • Baking Soda
    • Sea Salt – I recommend and use Redmond Fine Sea Salt.
    • Pumpkin Pie Spice – You can buy this at the store, or make homemade pumpkin pie spice with individual spices and use that.

    How to Make Pumpkin Spice Sugar Cookies

    Before you mix up the cookie dough, be sure to pre-heat your oven to 375° F.

    Mix up the Dough

    1. Cream or mix together the softened butter, cane sugar, and light brown sugar.
    2. Then mix both the egg and vanilla extract into the creamed mixture.
    3. Next add in the pumpkin puree, and mix everything together well.
    4. In a separate bowl, whisk together the flour, cream of tartar, baking soda, salt, and pumpkin pie spice.
    5. Then stir the dry ingredients into the creamed mixture, and mix really well, being sure to scrape the sides of your bowl.
    mixing pumpkin sugar cookie dough in white mixer

    Bake the Cookies

    1. Using a cookie scoop, scoop 1-inch balls of dough onto an ungreased cookie sheet.
    scoops of pumpkin sugar cookie dough on ungreased OXO cookie sheet
    1. Press each cookie with the bottom of a glass coated in pure cane sugar. If you want to frost the cookies, you can omit the sugar.
    flattening soft pumpkin sugar cookies with the bottom of a glass coated in cane sugar on cookie sheet
    1. Bake the flattened cookies at 375° F for about 12 minutes, or ’til the edges of the cookies begin to turn a nice golden brown.
    flattened pumpkin sugar cookies with sugar on top, ready to bake on ungreased baking sheet
    1. Remove the baked cookies from the cookie sheet, and place them on a wire rack to cool before serving. If you want to ice the cookies, just spread your favorite icing on the top of each cooled cookie.
    homemade pumpkin spice sugar cookies on a white plate with cookie sheet full of cookies

    Expert Tips and Recipe FAQ’s

    Do you have to chill the cookie dough?

    No, but you can if you want a cookie that’s a bit more chewy in texture. If you choose to chill the dough, put it in the fridge for about 1-2 hours before baking.

    Can you freeze pumpkin spice sugar cookies?

    Yes, and actually, you can freeze the dough itself, the dough balls once you’ve scooped with a cookie scoop, or the unfrosted cookies. However you plan to freeze them, be sure to store in an airtight container so they don’t get freezer burn.

    How do you store pumpkin sugar cookies?

    If they’re unfrosted, just keep them in an airtight container on the counter. If you do frost them, you’ll need to store them in an airtight container in the fridge, since the frosting will likely have either cream cheese or milk in the ingredients.

    Additional Ingredients or Recipe Options

    There are a few ways you can add to this pumpkin sugar cookie recipe…

    • Coat the cookies in a cinnamon sugar mixture, rather than just sugar.
    • We talked about this a little bit above, but just like with my regular sugar cookies, instead of coating the cookies in sugar, you can actually frost these cookies with an easy sugar cookie icing or a cream cheese frosting.
    • If you want to make the icing even more fun and flavorful, you can add maybe 1/2 teaspoon of caramel extract or maple extract. Mmmm, can you imagine? Yum!
    • Add chopped walnuts or pecans to your cookie dough before baking.
    • Dust the top of your freshly baked, warm out of the oven, pumpkin sugar cookies with a light sprinkling of powdered sugar.
    plate full of yummy pumpkin sugar cookies made from scratch

    More Pumpkin Spice Recipes:

    You’ll find even more pumpkin recipes on my list of family favorite Thanksgiving recipes!

    If you try this recipe, why not leave a star rating in the recipe card right below and/or a review in the comment section further down the page? I always appreciate your feedback. You can also follow me on Pinterest, Facebook, Instagram, and YouTube. And subscribe to my email list too!

    Pumpkin Spice Sugar Cookies

    Make a batch of soft pumpkin spice sugar cookies, perfect for a cozy fall dessert. Can be rolled in sugar or frosted. Delectable recipe!

    • Mixer
    • Cookie Scoop
    • Cookie Sheet
    • Cookie Spatula
    • Wire Rack
    • 1 cup unsalted butter (softened)
    • 3/4 cup cane sugar
    • 3/4 cup light brown sugar
    • 1 large egg
    • 2 teaspoons vanilla extract
    • 1/2 cup pumpkin
    • 3 cups all-purpose flour
    • 1 teaspoon cream of tartar
    • 1/2 teaspoon baking soda
    • 1 teaspoon sea salt
    • 1 teaspoon pumpkin pie spice
    1. Pre-heat the oven to 375° F.

    2. Cream or mix together the butter, cane sugar, and light brown sugar. 

    3. Then mix both the egg and vanilla extract into the creamed mixture.
    4. Next add in the pumpkin, and mix everything together well.

    5. In a separate bowl, whisk together the flour, cream of tartar, baking soda, salt, and pumpkin pie spice.

    6. Stir the dry ingredients into the creamed mixture, and mix really well, being sure to scrape the sides of your bowl. 
    7. Using a cookie scoop, scoop 1-inch balls of dough onto an ungreased cookie sheet. 
    8. Press each cookie with the bottom of a glass coated in cane sugar. If you want to frost the cookies, you can omit the sugar.

    9. Bake at 375° F for about 12 minutes, or until the edges of the cookies begin to turn a nice golden brown.

    10. Remove the baked cookies from the cookie sheet, and place them on a wire rack to cool. If you want to frost the cookies, just spread your favorite frosting on the top of each cooled cookie.

    You can use either canned or homemade pumpkin purée to make these cookies.

    If the cookies are unfrosted, just store them in an airtight container on the counter. If you do frost them, you’ll need to store them in an airtight container in the fridge, since the frosting will likely have either cream cheese or milk in the ingredients.

    Cookies & Bars, Desserts
    American
    pumpkin cookies, pumpkin spice, pumpkin sugar cookies
  • Easy Strawberry Jello Flag Cake

    Easy Strawberry Jello Flag Cake

    Celebrate the 4th of July with a patriotic flag cake made from a box mix and strawberry Jello. This poke cake, topped with whipped cream and fresh berries, is such a refreshing dessert and so easy to make!

    Like my red white and blue poke cake and red white and blue cupcakes, this is a semi-homemade recipe. Meaning that, instead of making a homemade cake, you can use a cake mix.

    American flag cake in metal cake pan

    I just love how refreshing this cake really is. It’s the perfect dessert for summertime!

    Why Make This Recipe?

    I think you’ll love this 4th of July cake because it’s…

    • Quick and easy to make – In fact, you can mix it up in just minutes, and it’s topped with a simple whipped cream topping.
    • Light and fluffy – Because it’s a Jello cake made with a cake mix, it’s always so soft and fluffy, so it’s not a heavy dessert.
    • Perfect for summer – Jello cake is so refreshing in the summertime, mainly because it’s chilled and filled with all that strawberry Jello goodness.
    • Easy to decorate – What easier way to decorate an American flag cake than with fresh blueberries and strawberries? There’s hardly any work involved.
    • Budget-friendly – You can make this festive dessert for less than $15.
    [mv_video jsonLd=”true” key=”sadsbfvnwjxsmhwplmkk” ratio=”16:9″ thumbnail=”https://mediavine-res.cloudinary.com/v1527008225/ckk4alacd4qkaezk2ykz.jpg” title=”Strawberry Jello Cake Flag Cake”]

    Ingredient Notes

    Most of the ingredients you need are simple, and you may even have them already in your pantry. Fresh berries are the only thing you may have trouble finding during certain times of the year.

    American flag cake ingredients on white marble countertop

    How to Make a Flag Cake

    Gather your ingredients, and prep anything that needs prepped. For example, wash and dry the berries.

    1. Mix together the cake mix, water, canola oil, and eggs, and mix it according to package directions.
    2. Then pour the cake batter into a greased 9×13 cake pan, and bake according to package directions.
    mixing ingredients for cake batter in mixer and pouring batter into greased cake pan
    1. After baking, allow the cake to cool for about 15 to 20 minutes; and meanwhile, mix the Jello mix with boiling water.
    2. Then add in cold water, continuing to mix well, ’til the Jello mix is fully dissolved.
    3. Poke the top of your cake all over with a fork, creating small holes all over the top of the cake.
    4. Slowly pour the Jello mixture over the entire cake, and allow the cake to finish cooling.
    mixing strawberry Jello with water in glass measuring cup, poking holes on top of vanilla cake, and pouring Jello onto cake
    1. Using a spatula, spread whipped cream evenly over the entire cake.
    2. Add 5 or more rows of blueberries to the top left corner of the cake. 
    3. Stem and slice the strawberries length wise; then add rows of strawberries to create the red stripes for your cake. I had enough room to add 4 rows of strawberries to my cake.
    decorating American flag cake with whipped cream, blueberries, and strawberries

    When you’re done decorating, cover and chill your Fourth of July cake for 3 to 4 hours before serving.

    Expert Tips and Recipe FAQ’s

    • Careful when spreading the whipped cream on top of the cake. Some cake mix cakes are so light and fluffy, the top will easily crumble and spread with the whipped cream.
    How long will Jello cake keep?

    It should keep for 2 to 3 days, but you’ll need to cover it and keep it in the refrigerator when not serving.

    Can I use other flavors of cake mix?

    Yes, you can! You can easily make this dessert just as good with a chocolate cake mix, funfetti cake mix (sprinkles are especially fun for the 4th of July), yellow butter cake, strawberry cake, etc.

    If you try this recipe, why not leave a star rating in the recipe card right below and/or a review in the comment section further down the page? I always appreciate your feedback. You can also follow me on Pinterest, Facebook, Instagram, and YouTube. And subscribe to my email list too!

    Easy Strawberry Jello Flag Cake

    Celebrate the 4th of July with a patriotic flag cake made from a box mix and strawberry Jello. This poke cake, topped with whipped cream and fresh berries, is such a refreshing dessert and so easy to make!

    • 16.5 ounces vanilla cake mix
    • 1 cup water
    • 3 large eggs
    • 1/3 cup canola oil
    • 1 cup boiling water
    • 3 ounces strawberry Jello mix
    • 1/2 cup cold water
    • 8 ounces whipped cream
    • 1 pint blueberries
    • 1 1/2 quarts strawberries
    1. Gather ingredients, and prep berries by washing and drying.
    2. Mix together the cake mix, water, canola oil, and eggs, and mix it according to package directions.
    3. Then pour the cake batter into a greased 9×13 cake pan, and bake according to package directions.
    4. After baking, allow the cake to cool for about 15 to 20 minutes.
    5. Meanwhile, mix the Jello mix with boiling water.
    6. Then add the cold water, continuing to mix well, ’til the Jello mix is fully dissolved.
    7. Poke the top of your cake all over with a fork, creating small holes all over the top of the cake.
    8. Slowly pour the Jello mixture over the entire cake, and allow the cake to finish cooling.
    9. Using a spatula, spread whipped cream evenly over the entire cake.
    10. Add 5 or more rows of blueberries to the top left corner of the cake.
    11. Stem and slice the strawberries length wise; then add rows of strawberries to create the red stripes for your cake. I had enough room to add 4 rows of strawberries to my cake.
    12. When you’re done decorating, cover and chill your Fourth of July cake for 3 to 4 hours before serving.

    Gluten-Free –

    You can use a gluten-free cake mix in place of a regular cake mix; just keep in mind cake batter ingredients may vary, depending on the cake mix you use.

    Careful when spreading the whipped cream on top of the cake –

    Some cake mix cakes are so light and fluffy, the top will easily crumble and spread with the whipped cream. Go easy with the spatula.

    Storage –

    Jello cake should keep for 2 to 3 days, but you’ll need to cover it and keep it in the refrigerator when not serving.

    4th of July
    American
    4th of July cake, American flag cake, flag cake, flag cake recipe, Fourth of July cake, Jello flag cake, July 4th dessert
  • Best Ever Carrot Cake Sheet Cake

    Best Ever Carrot Cake Sheet Cake

    Best Ever Carrot Cake Sheet Cake is easy to make, moist, and delicious. It’s one of my favorite desserts, especially paired with a cream cheese frosting that’s simply to die for. Homemade carrot sheet cake recipe you can feed a crowd.

    Bite of the best ever carrot cake sheet cake on a fork on white plate

    Is there anything better than a carrot sheet cake lathered with a sweet and tangy cream cheese frosting? Nope. There’s nothing better than my best ever carrot cake sheet cake. Mmmm, it really is that good.

    My original thought was to make this recipe into a traditional layer cake because it’s carrot cake, right? But when I got to thinking about it, I decided I wanted to give you a truly easy carrot cake recipe that’s super simple to make.

    Plus a sheet cake feeds a crowd. It’s something you can cut into squares and feed a large group of people, perfect for Easter and summer get togethers.

    And don’t be intimidated by the thought of making carrot cake from scratch. It’s not difficult at all, especially if you have a salad shooter for shredding up your carrots.

    [mv_video doNotAutoplayNorOptimizePlacement=”false” jsonLd=”true” key=”pnjy7xfoyxiernbxrrzc” sticky=”false” thumbnail=”https://mediavine-res.cloudinary.com/v1521734081/p2wgb2fwz8tsfm1ubiaf.jpg” title=”Best Ever Carrot Cake Sheet Cake” volume=”100″]

    While I decided to put pecans in our carrot cake, you can totally decide whether or not you want them in yours. I know a lot of people don’t like nuts, and that’s ok. With or without, it’ll still be delicious either way you go.

    Slice of carrot sheet cake with cream cheese frosting and pecans on a spatula

    If you love cake, you may also enjoy my yellow cake with chocolate buttercream frosting.

    Tips for how to make this carrot cake recipe:

    You’ll need a few ingredients… Unsalted butter, pure cane sugar, eggs, vanilla extract, caramel extract, unbleached all-purpose flour, baking soda, baking powder, salt, cinnamon, carrots, and chopped pecans.

    1. Pre-heat your oven to 375°.
    2. Melt the butter, and cream (mix) together with the sugar.
    3. Add the eggs, vanilla extract, and caramel extract into your butter mixture, and mix well.
    4. Sift together your dry ingredients, including the flour, baking soda, baking powder, salt, and cinnamon.
    5. Add the dry ingredients to the wet ingredients, and mix well for 2 to 3 minutes.
    6. Add the shredded carrots and pecans (again, nuts are optional) to your mixture, and continue to mix well until everything is blended together.
    7. Pour and spread the cake batter into a large sheet cake pan.
    8. Bake at 375° for 25 to 30 minutes, or until a toothpick/cake tester comes out clean.
    9. Remove the cake from the oven, and allow it to cool right in the pan.
    10. Meanwhile, mix up your frosting. I highly recommend using a cream cheese frosting.
    11. Once the cake has cooled, spread the frosting all over the top of the cake.
    12. Optional step: Sprinkle chopped pecans or walnuts all over the top of the frosting.
    13. Cut into slices and serve.

    I recommend storing the frosted cake in the refrigerator, since it’s covered in a cream cheese frosting.

    slice of the best ever carrot cake with a swirl of cream cheese frosting on top

    Variations for your carrot sheet cake:

    Use shredded zucchini instead of, or in addition to, carrots. Just cut the amount of carrots down for however much zucchini you decide to use.

    You can even add in 1/2 teaspoon or so of allspice, nutmeg, or your favorite spice to give the cake a more spice-filled taste.

    Instead of pecans, you can use walnuts or any other type of nut you think may be good.

    carrot cake from scratch in a sheet pan with cream cheese frosting and pecans on top

    More cake recipes you may enjoy:

    Pineapple Sunshine Cake

    Peanut Butter Chocolate Cake

    Apple Bundt Cake

    Pumpkin Pear Spice Cake

    Lemon Cake

    easy carrot cake recipe sliced on a spatula in a sheet pan

    Kitchen tools you may need to make carrot cake from scratch:

    Mixer – I love using my Bosch mixer for mixing up cake batter.

    Sifter – I never make a cake without sifting, the result of training by my mom and grandmas.

    Salad Shooter – This kitchen tool makes it so much easier to shred the carrots.

    Sheet Cake Pan – You’ll need a large pan that makes a thinner cake.

    Cake Tester – This will help you see if your cake is done after baking.

    Spatula/Server – Slice and serve your cake with a square spatula.

    Best Ever Carrot Cake Sheet Cake

    Best Ever Carrot Cake Sheet Cake is easy to make, moist, and delicious. It’s one of my favorite desserts, especially paired with a cream cheese frosting that’s simply to die for. Homemade carrot sheet cake recipe you can feed a crowd.

    • 1 cup unsalted butter
    • 2 cups pure cane sugar
    • 4 eggs
    • 2 teaspoons vanilla extract
    • 1/2 teaspoon caramel extract
    • 2 cups unbleached all-purpose flour
    • 2 teaspoons baking soda
    • 1 teaspoon baking powder
    • 1 teaspoon salt
    • 2 teaspoons cinnamon
    • 2 1/2 cups shredded carrots
    • 1 1/2 cups chopped pecans
    • 2 cups cream cheese frosting
    1. Pre-heat your oven to 375°.
    2. Melt the butter, and cream (mix) together with the sugar. 
    3. Add the eggs, vanilla extract, and caramel extract into your butter mixture, and mix well.
    4. Sift together your dry ingredients, including the flour, baking soda, baking powder, salt, and cinnamon.
    5. Add the dry ingredients to the wet ingredients, and mix well for 2 to 3 minutes.
    6. Add the shredded carrots and pecans (nuts are optional) to your mixture, and continue to mix well until everything is blended together.
    7. Pour and spread the cake batter into a large sheet cake pan.
    8. Bake at 375° for 25 to 30 minutes, or until a toothpick/cake tester comes out clean.
    9. Remove the cake from the oven, and allow it to cool right in the pan.
    10. Meanwhile, mix up your frosting. I highly recommend using a cream cheese frosting.
    11. Once the cake has cooled, spread the frosting all over the top of the cake.
    12. Optional step: Sprinkle chopped pecans all over the top of the frosting.
    13. Cut into slices and serve.
    Cakes & Cupcakes
    American
    carrot cake, carrot cake sheet cake, carrot sheet cake
    Best Ever Carrot Cake Sheet Cake Recipe
    Slice of the best ever carrot cake sheet cake on a white plate with a bite on a fork
  • Easy Biscuit Cinnamon Rolls

    Easy Biscuit Cinnamon Rolls

    Biscuit Cinnamon Rolls are quick, easy to make, and no rise too! Deliciously sweet and irresistible, ooey gooey, homemade breakfast treats.

    Biscuit Cinnamon Rolls are a quick and easy version of cinnamon rolls, especially given the fact that they require no yeast and no rise time. In some ways, I like these yummy treats even more than traditional cinnamon rolls made with yeast.

    Biscuit Cinnamon Rolls are so easy to make; they’re a delicious alternative to traditional cinnamon rolls, and they’re no rise! Sweet breakfast treat perfect for the holidays or anytime!

    While you still have to roll them out, it doesn’t seem like quite as much work. And they’re still fluffy. They’re so fluffy and so ooey gooey. They’re perfect for when you’re craving traditional cinnamon rolls but don’t feel like going to all the work and dealing with all the wait time.

    While I didn’t add raisins to this batch, you can totally add raisins to yours. When they’re warm right out of the oven is when you’ll want to spoon on the powdered sugar icing, which gives them even more of a gooey texture.

    How to make the most scrumptious Biscuit Cinnamon Rolls, perfect for a breakfast treat or even for dessert. No rise, no wait time, no yeast. And they’re still so fluffy!

    These cinnamon rolls make a perfect holiday breakfast treat… In fact, I’ve already planned to make these again Christmas morning. And I’m definitely adding this recipe to my list of The Best Christmas Recipes for Your Holiday Celebrations.

    Tips for how to make Easy Biscuit Cinnamon Rolls

    • First, you’ll need to gather your ingredients… You’ll need all-purpose flour, baking powder, salt, unsalted butter, milk, sugar, ground cinnamon, salted butter, and possibly raisins. For the icing, you’ll need salted butter, vanilla extract, heavy whipping cream, and powdered sugar.
    • Pre-heat the oven to 425°.
    • Mix up the dough for my Easy Homemade Biscuits, or you can mix up the dough from our Campfire Cinnamon Rolls.
    • Once you have your dough mixed up, sprinkle a handful of flour on a clean surface. Take your dough and knead a bit of flour into it, shaping it with your hands.
    • Use a rolling pin to roll the dough out to about a 1-inch thickness.
    • In a cereal-sized bowl, mix together the sugar and cinnamon.
    • Melt the salted butter.
    • Brush the butter onto your rolled out dough.
    • Sprinkle the cinnamon sugar mixture all over the dough, giving the dough an even covering.
    • If you want raisins, sprinkle them all over the dough, as well.
    • Somewhat tightly, roll the dough into a long, thick roll. Slice into approximately 1-inch wide pieces.
    • Place the cinnamon rolls, face up, into a greased pan.
    • Bake the cinnamon rolls at 425° for about 20 minutes or until the tops begin to turn a warm golden hue.
    • While the cinnamon rolls are baking, mix up a simple powdered sugar icing. You can use my Easy Sugar Cookie Icing, but I do recommend cutting the ingredients down because you don’t need near as much icing as the recipe will make… I’d suggest cutting it down to 1/4 of what it calls for and leave out the almond extract. Note: You want the icing to be thin enough to brush onto the cinnamon rolls, so alternate powdered sugar and heavy whipping cream until you achieve your desired consistency.
    • Once the cinnamon rolls are baked, remove them from the oven, and let them cool for about 5 minutes.
    • Brush or spoon the icing onto the tops of the cinnamon rolls. Serve and enjoy!
    Brush a simple powdered sugar icing onto the tops of warm Biscuit Cinnamon Rolls for a warm, ooey gooey, homemade breakfast treat your family or guests will love.

    Alternative options for Biscuit Cinnamon Rolls

    • Raisins are optional, so add them if you want; or leave them out if you don’t.
    • You could add crumbled pecans or walnuts to the dough when you sprinkle on the cinnamon/sugar mixture.
    • You can substitute a little bit of brown sugar for some of the regular sugar in the cinnamon/sugar mixture you sprinkle onto the dough.
    • Use fruit jam or even something like Nutella in place of the butter and cinnamon/sugar mixture. I haven’t tried this, but I kinda bet it would be good.
    • Mix up more of a cream cheese frosting, like this Caramel Cream Cheese Glaze, instead of a powdered sugar icing.

    If you try any of these alternative options, let me know how they turned out by leaving me a comment below. I’d love to hear from you!

    Ooey gooey, homemade Biscuit Cinnamon rolls are so easy to make. They’re delicious too. This recipe is my go to when I’m craving cinnamon rolls but don’t want all the hassle of a traditional recipe.

    Looking for more sweet breakfast treats?

    Kitchen tools you may need to make Easy Biscuit Cinnamon Rolls

    Mixing Bowl – My handled bowl is probably my favorite bowl to use; I use it all the time, especially when mixing up biscuits or pie crust.
    Pastry Blender – This helps to really cut in the butter with the dry ingredients when you’re mixing up the biscuit dough.
    Rolling Pin – I use my rolling pin anytime I make dinner rolls, biscuits, pie crust, etc.
    Cereal-Sized Bowl – A cereal-sized bowl is the perfect size for mixing up a small batch of icing.
    Pastry Brush – You can either brush the icing on or spoon it on. A brush helps you to spread the icing over the cinnamon roll.
    Plastic Spatula – Works so well for slicing the dough into cinnamon rolls, and then separating the cinnamon rolls when serving.
    Round Cake Pan – I used a 9-inch round cake pan for this batch, and it’s the perfect size.

    Irresistible, ooey gooey Biscuit Cinnamon Rolls that are just as fluffy as traditional cinnamon rolls. No rise, no yeast, no wait time, and they’re so delicious!

    Want to see how to make Biscuit Cinnamon Rolls? Watch our video!

    Biscuit Cinnamon Rolls

    Biscuit Cinnamon Rolls are quick, easy to make, and no rise too! Deliciously sweet and irresistible, ooey gooey, homemade breakfast treats.

    Biscuit Cinnamon Rolls:

    • 1 cups all-purpose flour
    • 1 tablespoon baking powder
    • 1 teaspoon salt
    • 1/3 cup unsalted butter
    • 1 cup whole milk
    • 1/3 cup cane sugar
    • 2 teaspoons ground cinnamon
    • 3 tablespoons salted butter (melted)
    • 1/4 cup raisins (optional)

    Icing:

    • 2 tablespoons salted butter (softened)
    • 1/2 teaspoon vanilla extract
    • 1/2 cup whole milk
    • 2 1/2 cups powdered sugar
    1. Pre-heat the oven to 425° F, and grease a 9-inch round cake pan with cooking spray.

    2. Whisk together the flour, baking powder, and salt.

    3. Using a pastry blender, cut the unsalted butter into the flour mixture, 'til it makes fine crumbles.

    4. Make a well in the center of the mixture, and add the milk. Mix together well.

    5. Sprinkle a handful of all-purpose flour on a clean surface. Knead the biscuit dough into the flour, shaping it with your hands. Using a rolling pin, roll the dough out to about a 1-inch thickness.

    6. In a small bowl, mix together the sugar and cinnamon.

    7. Brush the melted butter all over the rolled out dough.

    8. Sprinkle the cinnamon sugar mixture all over the dough, giving the dough an even covering.
    9. If you want raisins, sprinkle them all over the dough, as well.
    10. Somewhat tightly, roll the dough into a long, thick roll.

    11. Then slice it into approximately 1-inch wide pieces.

    12. Place the cinnamon rolls, face up, into the prepared pan.

    13. Bake the cinnamon rolls at 425° F for about 20 minutes, or 'til the tops begin to turn a warm golden hue.

    14. To make the icing, mix together the softened butter and vanilla extract in a large mixing bowl.

    15. Add the milk to the mixture.

    16. Then slowly mix in the powdered sugar. You want the icing to be thin enough to brush onto the cinnamon rolls.

    17. Once the cinnamon rolls are baked, remove them from the oven, and let them cool for about 5 minutes. Keep the rolls in the pan.

    18. Brush the icing onto the tops of the cinnamon rolls, and serve them immediately.


    Breads & Muffins, Breakfast & Brunch
    American
    biscuit cinnamon rolls, easy biscuit cinnamon rolls

    Pin this recipe to save it for later!

    Biscuit Cinnamon Rolls are quick, easy to make, and no rise too! Deliciously sweet and irresistible, ooey gooey, homemade breakfast treats.
    Biscuit Cinnamon Rolls that are quick, easy to make, and no rise. So fluffy and ooey gooey, a sweet breakfast treat your family and guests will love!
  • Creamy Mashed Potatoes

    Creamy Mashed Potatoes

    Make creamy mashed potatoes with yellow potatoes, cream, and butter. Delicious side dish recipe perfect for weeknight meals and holiday dinners.

    Creamy Mashed Potatoes with gravy is the quintessential side for every holiday dinner and even some weeknight meals, like my family favorite easy meatloaf recipe with oats, slow cooker whole chicken and Crock Pot pork roast. We used to eat potatoes a lot more than we do now; but we still have our favorite mashed potatoes recipe that’s pretty basic but oh so creamy delicious.

    Creamy Mashed Potatoes are a delicious side with weeknight meals or special holiday dinners. They’re the quintessential side dish recipe to pair with turkey, ham, roast, chicken, and all the fixings!

    Only 5 ingredients… That’s all it takes to make these simple potatoes. You know how we like to keep it simple. And if you know how to make gravy with cornstarch, you can have any flavor gravy you want!

    Now I do suggest being picky about which potatoes you use. And maybe this topic is for another post at another time.

    But our favorite type of potato for the most flavorful mashed potatoes is the yellow potato or Yukon Gold. We like red potatoes too, but I find myself going for the gold whenever we buy potatoes.

    Whether you’re cooking an Instant Pot whole chicken, Instant Pot salmon, oven-baked chicken legs, meat loaf muffins, or putting together a holiday meal, Creamy Mashed Potatoes are the one side dish you’ll definitely want to make sure is on the table. You can even set up a fun mashed potato bar to go with your celebration!

    If you enjoy potatoes, you may also enjoy our Instant Pot Baked Potatoes, our copycat version of the KFC mashed potato bowl, and scalloped potatoes with cheese recipes!

    Tips for how to make Creamy Mashed Potatoes

    1. Gather your ingredients… You’ll need yellow potatoes, salted butter, heavy whipping cream, salt, and pepper.
    2. Wash, peel, and chop the potatoes.
    3. Cook the potatoes until they’re soft enough to easily jab with a fork. We usually cook ours by boiling them on the stove in a medium to large saucepan for about 30 minutes, but sometimes we use our Instant Pot.
    4. Drain the water off your boiled potatoes, leaving your potatoes in the saucepan.
    5. Add the butter and heavy whipping cream to the potatoes.
    6. Use a hand mixer to whip the potatoes, adding salt and pepper to taste. You can also use a potato masher if you don’t have a hand mixer; your potatoes may just be a little bit chunky.
    7. Once they’re all whipped up, they’re ready to serve. They taste so good with a spoonful of homemade chicken gravy, this ham gravy recipe, or turkey gravy. And they make the best sloppy joe casserole with mashed potatoes too.
    How to make the best Creamy Mashed Potatoes ever! Made with yellow potatoes, cream, and butter, they’ve got the best flavor and make the perfect side dish, whether you’re cooking dinner for your family or a special occasion.

    Looking for more potato recipes?

    Instant Pot Baked Potatoes

    The Ultimate Mashed Potato Bar

    The Ultimate Baked Potato Bar

    Hashbrown Casserole Recipe

    Slow Cooker Green Beans, Potatoes, and Sausages

    Steak Cut Fries

    Looking for more delicious side dish recipes?

    Instant Pot Southern Green Beans

    Easy Green Bean Casserole Recipe

    Instant Pot Corn on the Cob

    Creamy Bacon Corn Casserole

    Apple Walnut Bread Stuffing

    Fresh Cranberry Sauce with Orange

    Honey Glazed Carrots with Rosemary

    You may also want to check out my list of The Best Thanksgiving Recipes for Your Holiday Menu and The Best Christmas Recipes for Your Holiday Celebrations for plenty more inspiration. If you’re planning for Easter, here are over 50 Easter dinner menu ideas.

    Kitchen Tools you may need to make Creamy Mashed Potatoes

    Vegetable Peeler or Paring Knife – I prefer to use a knife, but my guys prefer a veggie peeler for peeling potatoes.

    Vegetable Knife – to chop the potatoes.

    Saucepan with Lid – for boiling the potatoes.

    Strainer – You’ll need this to drain the potatoes.

    Hand Mixer or Potato Masher – A hand mixer will enable you to get smooth, creamy mashed potatoes; a potato masher will allow you to mash the potatoes, but they’ll have a chunkier texture.

    The best mashed potatoes ever are Creamy Mashed Potatoes, made with just 5 simple ingredients. Simple equals delicious with this yummy side dish recipe, perfect for dinner or your holiday family get together.

    Print the recipe for Creamy Mashed Potatoes

    Creamy Mashed Potatoes

    Creamy Mashed Potatoes made with yellow potatoes, cream, and butter. Delicious side dish recipe perfect for weeknight meals and holiday dinners.

    • 8 potatoes (medium size)
    • 6 tablespoons salted butter
    • 2 tablespoons heavy whipping cream
    • 1 teaspoon salt (to taste)
    • 1 teaspoon ground black pepper (to taste)
    1. Wash, peel, and chop the potatoes.
    2. Boil the potatoes in a large saucepan on the stove, until they're soft enough to easily jab with a fork, about 20-30 minutes.

    3. Drain the water off the boiled potatoes, and leave them in the saucepan.

    4. Add the butter and heavy whipping cream to the potatoes.
    5. Use a hand mixer to whip the potatoes, adding salt and pepper to taste. You can also use a potato masher if you don’t have a hand mixer; your potatoes may just be a little bit chunky.
    6. Once they're whipped, they're ready to serve. 

    Side Dish
    American
    creamy mashed potatoes, mashed potatoes

    Pin this recipe to save it for later!

    Creamy Mashed Potatoes made with yellow potatoes, cream, and butter. Delicious side dish recipe perfect for weeknight meals and holiday dinners.
    Best recipe for Creamy Mashed Potatoes. Easy and simple, just 5 ingredients whipped together to make a delicious side dish for your family meal or holiday dinner!
  • Peppermint Whipped Cream

    Peppermint Whipped Cream

    Peppermint Whipped Cream you can make in 5 minutes. Creamy delicious dessert topping or add a dollop to your hot chocolate for a minty treat!

    Peppermint Whipped Cream is probably one of my favorite ways to top off a nice warm mug of creamy hot chocolate. It adds a minty flavor, as well as an even creamier texture; and it’s so delicious!

    Peppermint Whipped Cream is so easy to make. Perfect topping for your favorite desserts, and I love adding a dollop to my hot chocolate. So deliciously creamy!

    This recipe is super easy to make and only calls for 5 ingredients. You can pretty much throw everything into the mixing bowl, add a whisk to your mixer, and mix away.

    How to make homemade Peppermint Whipped Cream for a minty dessert and hot chocolate topping. Adds a whole new meaning to the word creamy on all your favorite holiday desserts!

    Before you know it, you’ll have a minty, creamy whipped topping you can enjoy with pies, cakes, hot chocolate, and all your favorite desserts. Just add a dollop and you’re set for a really yummy sweet treat.

    Tips for how to make Peppermint Whipped Cream

    • Gather your ingredients… You’ll need cream cheese, heavy whipping cream, vanilla extract, peppermint extract, and powdered sugar.
    • Add all of your ingredients to a large mixing bowl.
    • Use a whisk or mixer with a whisk to mix all of the ingredients together, and keep mixing until the mixture thickens to the desired consistency for whipped cream.
    • Note: It will thicken up really fast before you realize it. So if you’re wanting it to have a more silky appearance, just stop the whipping process sooner.
    • Enjoy on your favorite dessert or warm drink.
    Peppermint Whipped Cream is one of my favorite dessert toppings on both pie and hot chocolate. Easy recipe you can make in about 5 minutes!

    Looking for a few lovely desserts or warm drinks to enjoy with a dollop of peppermint whipped cream?

    You may also enjoy my Quick and Easy Homemade Whipped Cream (original flavor) or Meringue Pie Topping.

    Mix up a bowl of Peppermint Whipped Cream. Only 5 ingredients and a super easy recipe you can make in 5 minutes. Turns any dessert or drink into a minty delicious treat!

    I’m definitely adding this easy peppermint whipped cream recipe to my list of The Best Christmas Recipes for Your Holiday Celebrations.

    Tools you may need to make Peppermint Whipped Cream

    Mixing Bowl – for mixing up all of your ingredients.
    Whisk or Hand Mixer or Stand Mixer – A hand mixer works great for mixing up homemade whipped cream.
    Spatula – Can’t live without my spatulas (as in plural).

    Peppermint Whipped Cream you can whip up in about 5 minutes. Makes a minty delicious topping for hot chocolate, pie, and all your favorite holiday desserts!

    Print the recipe for Peppermint Whipped Cream

    Peppermint Whipped Cream

    Peppermint Whipped Cream you can make in 5 minutes. Creamy delicious dessert topping or add a dollop to your hot chocolate for a minty treat!

    • 2 ounces cream cheese
    • 2 cups heavy whipping cream
    • 1 teaspoon vanilla extract
    • 1 teaspoon peppermint extract
    • 1/2 cup powdered sugar
    1. In a large mixing bowl, whip the cream cheese.

    2. Add the heavy whipping cream, vanilla extract, peppermint extract, and powdered sugar to the cream cheese.

    3. Use a mixer to whip together the ingredients until the mixture begins to thicken to the consistency of whipped cream. It will thicken up rather quickly, so if you're wanting it to have a thinner texture/more silky appearance, just stop the whipping process sooner.

    4. Refrigerate until serving, and serve with your favorite desserts and drinks.

    Desserts
    American
    peppermint whipped cream, peppermint whipped topping

    Pin this recipe to save it for later!

    Peppermint Whipped Cream you can make in 5 minutes. Creamy delicious dessert topping or add a dollop to your hot chocolate for a minty treat!
    Peppermint Whipped Cream you can easily make in 5 minutes. Creamy dessert and sweet treat topping or add a dollop to your hot chocolate for a minty delicious treat!
  • Easy Sugar Cookie Icing

    Easy Sugar Cookie Icing

    This easy sugar cookie icing is made with powdered sugar and a flavorful secret ingredient. So creamy delicious, my favorite recipe for cookie decorating.

    This easy sugar cookie icing is a cookie icing recipe that’s been with me since I was a little girl. While the main ingredients are butter, vanilla, powdered sugar, and heavy whipping cream, it also uses a secret ingredient.

    Easy Sugar Cookie Icing, using only 5 ingredients. This is my favorite cookie icing, it’s so creamy delicious and perfect for decorating Christmas cookies!

    That secret ingredient is almond extract. I can’t imagine making this icing without it.

    In fact, I also use almond extract in my favorite buttercream frosting recipe and my chocolate buttercream frosting. Just the right amount gives icing a scrumptious flavor kick.

    I can usually mix this cookie icing up in minutes; and when I’m using it with my mom’s cut out sugar cookie recipe that we make every single Christmas, I’ll sometimes add a little food color for cookie decorating purposes.

    Though I have been known to skip the food coloring and go with sprinkles on white icing instead… Those tiny rainbow sprinkle dots that crunch in your teeth when you bite into the cookie? I love those!

    I usually make these sugar cookies the way my mom taught me when I was younger. I’ve never been that patient with a decorating bag.

    So I take the easy way out and use a butter knife to spread the cookie frosting on… Then spread sprinkles all over the cookie.

    Just writing up this recipe is making me wish we still had a few of those soft sugar cookies left in the cookie jar. It’s one of my favorite Christmas recipes!

    If you’d rather skip all of my cooking tips, important cooking info for this recipe, and similar recipe ideas – and get straight to the scrumptious sugar cookie icing recipe – just scroll down to the bottom, where you’ll find a printable recipe card.

    How to make the creamiest dreamiest Easy Sugar Cookie Icing. My mom taught me how to make this icing, and I’ve made it every Christmas since I was a little girl.
    • First, soften the butter.
    • In a large mixing bowl, mix together the butter, vanilla extract, and almond extract.
    • Add the heavy whipping cream to the mixture.
    • Slowly add the powdered sugar to the mixture, mixing it in as you go.
    • Once everything is mixed together, the icing should be smooth and creamy, free of any lumps. It’s important to get the right consistency. You don’t want the icing to be too thick (it won’t spread well) or too thin (it’ll run right off your cookies).
    • At this point, you can add food color, if desired.
    • Have fun decorating cookies together!

    This Easy Sugar Cookie Icing is the perfect recipe for decorating holiday cookies. It’s packed with scrumptious flavor and so creamy.

    Yes, you can. In fact, I usually do have leftover icing, and I’ll stick it in the freezer for next time we need it.

    It freezes just fine, as long as you cover it well so it doesn’t get freezer burn.

    Make an Easy Sugar Cookie Icing to decorate cutout sugar cookies. This icing is my favorite recipe, made with powdered sugar and a secret ingredient for extra flavor!

    Large Mixing Bowl – You’ll need a large bowl to mix up your icing, and you’ll use it for so much more.

    Hand Mixer – A hand mixer comes in so handy for so many things, especially mixing up cookie icing.

    Spatula – Because I’m never without my spatula.

    Food Color – Allows you to make a few different colors, especially for Christmas cookies.

    8 ounce Bowls – These would be perfect for separating your icing to make different colors.

    Cookie Decorating Kit – Just in case you want to add more detail to your cookies.

    Easy Sugar Cookie Icing that’s creamy, perfectly spreadable, and absolutely delicious. Perfect for Christmas cutout sugar cookies.

    If you love this cookie icing recipe as much as I do, please write a 5 star review, and help me share the recipe on Facebook and Pinterest!

    Easy Sugar Cookie Icing, made with powdered sugar and a flavorful secret ingredient. So creamy delicious, my favorite recipe for cookie decorating.

    CONNECT WITH ADVENTURES OF MEL!

    Be sure to follow me on social, so you never miss a post!

    Facebook | Pinterest | YouTube | Instagram | Twitter

    Sign up to receive my newsletter, filled with delicious recipes and outdoor travel adventures, in your inbox:

    FREE EMAIL SUBSCRIPTION

    Easy Sugar Cookie Icing

    Easy Sugar Cookie Icing, made with powdered sugar and a flavorful secret ingredient. So creamy delicious, my favorite recipe for cookie decorating.

    • 4 tablespoons salted butter (softened)
    • 1 teaspoon vanilla extract
    • 1 teaspoon almond extract
    • 1 cup heavy whipping cream
    • 6 cups powdered sugar
    1. Soften the butter. 
    2. In a large mixing bowl, mix together the butter, vanilla extract, and almond extract. 
    3. Add the heavy whipping cream to the mixture.
    4. Slowly add the powdered sugar to the mixture, mixing it in as you go.
    5. Once everything is mixed together, the icing should be smooth and creamy, free of any lumps.*
    6. At this point, you can add food coloring, if desired.
    7. Have fun decorating cookies together!

    *It’s important to get the right consistency. You don’t want the icing to be too thick (it won’t spread well) or too thin (it’ll run right off your cookies).

    Cookies & Bars
    American
    Christmas cookie icing, cookie decorating, cookie icing, cookie icing recipe, sugar cookie frosting, sugar cookie icing, sugar cookie icing recipe
  • Easy Ham Gravy Recipe {How to Make with Drippings}

    Easy Ham Gravy Recipe {How to Make with Drippings}

    How to make an easy homemade ham gravy recipe, made last minute with leftover ham drippings. This gravy makes a delicious side dish with ham, mashed potatoes, and all the fixings at your holiday or family dinner!

    Homemade ham gravy (like its counterpart turkey gravy) is a staple side dish whenever we cook a ham in the oven, which is mostly on holidays like Thanksgiving, Christmas, or Easter. Family dinner and holiday dinners just wouldn’t be the same without gravy to smother over our sliced ham and mashed potatoes.

    homemade ham gravy recipe in white serving bowl with spoon

    Now it’s important to remember… The main flavoring for ham gravy comes directly from the ham itself. So if you glaze your ham, like with a brown sugar glaze or something like this sweet pineapple honey baked ham, the sweet flavoring from the glazed ham will go into your gravy for ham, and the end result will be a sweet gravy.

    It’s so easy to make homemade gravy, and it’s super quick too. It’s delicious and definitely worth the minimal effort.

    ham gravy on mashed potatoes served with ham and green beans on white plate

    Why You’ll Love Knowing How to Make Ham Gravy

    There are a lot of reasons to love this delicious gravy recipe…

    • It’s an easy condiment to make, takes less than 30 minutes to make, and it’s something you can make last minute just before serving the main meal.
    • It takes a very minimal amount of ingredients to make gammon gravy. In fact, they’re all pretty simple, and you likely already have them on hand.
    • It’s a delicious ham gravy!
    • Ham gravy is so versatile and can be used in so many delicious ways. Not only does it complement a ham dinner, but it makes a very tasty addition to your next baked potato bar or mashed potato bar, as well as a tasty dip for leftover ham crescent rolls. And you can use it in place of brown gravy or chicken gravy in a mashed potato bowl.
    • It’s a fantastic addition to your holiday dinner spread. I’ve added this ham gravy recipe with drippings to my collections of favorite Thanksgiving recipesChristmas recipes, and Easter dinner recipes, where you’ll find all the holiday inspiration you need in one place.
    ham gravy ingredients on white marble countertop

    Ingredients and Substitutions Notes

    You’ll need just a handful of ingredients to make gravy for gammon (or ham). While you should have most of the ingredients on hand, you’ll likely need to purchase a ham at the grocery store, in order to have leftover ham drippings.

    • All-Purpose Flour – I prefer to use an unbleached all-purpose flour; you can also use a good gluten-free flour, although it’s important to note that gravy made with gluten-free flour doesn’t stay thick as long as with regular flour… In other words, it won’t store well. If you need a good gluten-free ham gravy alternative, ham gravy with cornstarch is just the thing.
    • Heavy Cream – You can skim heavy cream off of raw milk, or you can use store bought heavy whipping cream.
    • Ham Drippings – You can scoop the ham juices and pan drippings from the roasting pan after baking a spiral ham, bone-in whole ham, or boneless ham. You should have enough drippings to at least make a small batch of homemade gravy. These leftover ham drippings will likely give you all the delicious flavor you need without any extra seasoning, salt, or black pepper. If you don’t have any ham drippings, you can always use ham broth made from bouillon to make ham gravy.
    • Water

    How to Make This Old-Fashioned Ham Gravy Recipe

    Making this easy gravy for ham is actually really simple, but there are a few tips and tricks that will ensure you make a really good gravy from ham drippings.

    How to Avoid Lumpy Gravy

    Before we get started, here are 3 tips for preventing lumpy gravy…

    • It’s important to start with a roux, and you do this by mixing together the flour and heavy whipping cream in a small mixing bowl or glass measuring cup. Whisking this together in the beginning will help prevent lumps in your gravy.
    • Use a whisk to stir your gravy while it’s cooking. It’s pretty much a given that you may have a few lumps, but you can minimize them by whisking the gravy.
    • Take your time to avoid any lumps in your gravy. To me, this right here is the secret to good gravy… Patience and being willing to take your time. Work on medium-low heat, and don’t get in a hurry, and you’ll make a good gravy.

    Now Let’s Make Ham Gravy

    1. Mix together the flour and heavy whipping cream in a small mixing bowl or glass measuring cup.
    making ham gravy roux in glass measuring cup with whisk
    1. Gradually whisk together the flour/cream mixture with the pan drippings in a large saucepan or skillet on medium heat.
    how to make ham gravy with roux and ham drippings in cast iron skillet
    1. Add in the water.
    whisking water into gravy for ham in cast iron skillet
    1. Continue whisking and stirring the gravy until it begins to thicken and is ready to serve.
    simmering ham gravy recipe with drippings and whisking it until it thickens in cast iron skillet

    Then just pour the gravy into a gravy boat, and serve it with ham, mashed potatoes, and all the fixin’s! It will add such a rich flavor to your mashed potatoes, you’ll wish you had that ham flavor the next time you eat potatoes.

    spoonful of homemade ham gravy over white gravy boat full of ham gravy

    Expert Tips and Recipe FAQ’s

    How much gravy should you make per person?

    The answer to this will really depend on the consistency of your gravy. When we make this recipe, we usually have a lot of leftover gravy. You want to plan on about 1/3 to 1/2 cup per person, again depending on how thick your gravy is.

    How do you store and reheat ham gravy?

    Store leftover gravy in an airtight container in the fridge; it should keep for about 3-4 days. You can re-heat gravy by placing it in the microwave in a microwave-safe dish for a few minutes, stirring between every 30-second increments of time, ’til heated through; or put the gravy in a saucepan, and heat it up over low to medium heat on the stove, constantly stirring so it doesn’t scorch.

    Can you freeze gravy?

    Yes, you can. Just be sure to put it in an airtight freezer-friendly container, so it doesn’t get freezer burn. It should keep for about 4 to 6 months.

    pouring homemade ham gravy from white gravy boat, pouring over home cooked ham

    More Side Dish Recipes to Serve with Ham Dinner

    Whenever we make a ham dinner or turkey dinner, we usually serve it with sides like Instant Pot southern green beans, honey glazed carrots, or Jiffy corn casserole. Of course, homemade cranberry sauce is a must at Thanksgiving and Christmas.

    If it’s more gravy recipes you’re looking for, Moscato Mom has a delicious recipe for slow cooker short ribs with gravy (also a keto recipe). And 918 Plate has a very yummy recipe for jumbo drop biscuits with brown butter gravy.

    If you try this recipe, why not leave a star rating in the recipe card right below and/or a review in the comment section further down the page? I always appreciate your feedback. You can also follow me on Pinterest, Facebook, Instagram, and YouTube. And subscribe to my email list too!

    Ham Gravy Recipe

    How to make an easy homemade ham gravy recipe with leftover ham drippings. Delicious side dish with ham, mashed potatoes, and all the fixings!

    • Mixing Bowl
    • Large Skillet
    • Whisk
    • Wooden Spoon
    • Heat-Resistant Spatula
    • Gravy Boat
    • 1/2 cup unbleached all-purpose flour
    • 1 cup heavy whipping cream
    • 2 cups ham drippings
    • 1 cup water
    1. Mix together the flour and heavy cream in a small mixing bowl or glass measuring cup.

    2. Gradually whisk together the flour/cream mixture with the pan drippings in a large saucepan or skillet on medium heat.

    3. Add in the water.
    4. Continue whisking and stirring the gravy until it begins to thicken and is ready to serve.
    5. Serve with ham, mashed potatoes, and all the fixin's!

    *Take your time whisking in the flour mixture to avoid any lumps in your gravy. It’s pretty much a given that you may have a few lumps, but you can minimize them by starting with the roux and taking your time, whisking the gravy.

    Store leftover gravy in an airtight container in the fridge; it should keep for about 3-4 days. You can re-heat gravy by placing it in the microwave in a microwave-safe dish for a few minutes, stirring between every 30-second increments of time, ’til heated through; or put the gravy in a saucepan, and heat it up over low to medium heat on the stove, constantly stirring so it doesn’t scorch.

    Condiments, Sauces & Dressings, Side Dish
    American
    gammon gravy, gravy for gammon, gravy for ham, gravy from ham drippings, gravy recipes, ham gravy, ham gravy recipe, ham gravy recipe with drippings, homemade ham gravy, how to avoid lumpy gravy, how to make gravy, how to make ham gravy, making ham gravy
  • Pineapple Honey Glazed Ham

    Pineapple Honey Glazed Ham

    How to make a perfectly cooked, moist, delicious pineapple honey glazed ham for dinner and holiday celebrations.

    Pineapple Honey Glazed Ham is a blend of sweet and salty deliciousness. Whether you’re looking for a family dinner idea or rather a main dish to add to your holiday menu, this ham is the perfect addition.

    Pineapple Honey Glazed Ham, perfect for a weeknight meal or a holiday celebration. Delicious sweet and salty recipe.

    Years ago in a past life, we had a grocery store where we loved to occasionally shop. One of the treats we enjoyed from that store was shaved pineapple ham fresh from the deli.

    That’s what this recipe reminds me of. The fresh pineapple purée and sliced pineapple, along with honey, give the roasted ham a slightly sweet flavor, but not too sweet.

    And it’s pretty simple and easy to make… Just be sure to have plenty of toothpicks on hand. I’m definitely adding this recipe to my lists of traditional Easter dinner recipes and favorite Christmas recipes.

    Don’t forget to make this ham gravy recipe to pour over your baked ham and mashed potatoes. If you need a gluten-free option, this gluten-free ham gravy is pretty delicious.

    Pineapple Honey Glazed Ham is a blend of sweet and salty deliciousness. It’s perfect for Christmas or Easter dinner, and the leftovers make an amazing ham sandwich.

    You can make all sorts of delicious recipes with leftover ham, including these delicious leftover ham crescent rolls, scalloped potatoes and ham casserole, and ham and cheese egg muffins.

    Tips for how to make a Pineapple Honey Glazed Ham

    • Pre-heat the oven to 325°.
    • Place a large ham in a roasting pan.
    • Add water to the roasting pan.
    • Purée a slice or two of pineapple in a blender, just enough to make 2 tablespoons of purée.
    • Mix the pineapple purée with the honey, and brush it all over the ham, letting the excess glaze run off the ham and into the bottom of the roasting pan.
    • Using toothpicks, attach pineapple slices to the outside of the ham, at least 6 to 8 slices.
    • Bake the ham at 325°. Bake time will be per the weight of your ham and will differ per ham.
    • Once the ham has cooked through and is ready, you’ll need to slice it up before serving.

    Looking for delicious side dish recipes to go with your ham?

    Honey Glazed Carrots with Rosemary

    Instant Pot Southern Green Beans

    Jiffy Corn Pudding

    Apple Walnut Bread Stuffing

    Cranberry and Orange Sauce

    Easy Broccoli Salad with Bacon and Cauliflower

    Homemade Bread Rolls

    Easy Homemade Biscuits from Scratch

    Maybe you’d rather have turkey or pork for dinner? You’ll love our Maple Bourbon Brined Roasted Turkey, roasted pork tenderloin, oven roasted pork roast, and our Maple Pork Chops with Apples and Onions.

    Whether you're looking for a family dinner idea or rather a main dish to add to your holiday menu, Pineapple Honey Glazed Ham is the perfect addition.

    Tools you may need to roast a Pineapple Honey Glazed Ham

    Roasting Pan – for roasting the ham.

    Blender – for making pineapple purée.

    Basting Brush – to glaze the ham.

    Toothpicks – to help you attach the pineapple slices to the ham.

    Meat Thermometer – This will help you know what the internal temperature of the ham is. We use ours all the time.

    Grill Armor Oven Gloves – We’ve mentioned these in a few of our live videos; I love using these.

    Carving Set – to carve the turkey before serving.

    Serving Platter – for serving.

    Print the recipe for Pineapple Honey Glazed Ham

    Pineapple Honey Glazed Ham

    Pineapple Honey Glazed Ham recipe. How to make a perfectly cooked, moist, delicious ham for dinner and holiday celebrations.

    • 1 large ham
    • 1 cup water
    • 2 tablespoons pineapple purée
    • 1/2 cup honey
    • 6 to 8 pineapple slices
    • 12 to 18 to othpicks
    1. Pre-heat the oven to 325°. 
    2. Place a large ham in a roasting pan.
    3. Add water to the roasting pan.
    4. Purée a slice or two of pineapple in a blender, just enough to make 2 tablespoons of purée.
    5. Mix the pineapple purée with the honey, and brush it all over the ham, letting the excess glaze run off the ham and into the bottom of the roasting pan.
    6. Using toothpicks, attach pineapple slices to the outside of the ham, at least 6 to 8 slices.
    7. Bake the ham at 325°. Bake time will be per the weight of your ham and will differ per ham.
    8. Once the ham has cooked through and is ready, you’ll need to slice it up before serving.


    Pork Recipes
    American
    honey glazed ham, pineapple ham, pineapple honey glazed ham

    Save this recipe. Pin it for later!

    Pineapple Honey Glazed Ham recipe. How to make a perfectly cooked, moist, delicious ham for dinner and holiday celebrations.
    How to make a perfectly roasted, moist, delicious Pineapple Honey Glazed Ham for weeknight meals or holiday celebrations. Family favorite recipe!
  • Honey Glazed Carrots with Rosemary

    Honey Glazed Carrots with Rosemary

    Honey Glazed Carrots, made with simple ingredients like butter, honey, and rosemary. Delicious side dish recipe, perfect for holidays or weeknight meals.

    Honey Glazed Carrots are one of the easiest side dish recipes you’ll ever make for a slow cooker pot roast, CrockPot whole chicken or baked chicken legs. I love when a dish has great flavor, and I also love when a dish is beautiful. Carrots are pretty all by themselves, but when you dress them up with a little rosemary, they’re even prettier.

    Honey Glazed Carrots, made with 4 simple ingredients. Delicious side dish recipe you can add to your holiday or weeknight menu.

    And my favorite thing about this recipe is it only takes 4 ingredients, one of which really could be optional. I say that because rosemary may not be to everyone’s taste, and you could certainly make this recipe without the rosemary.

    Honey Glazed Carrots pair really well with Roast Beef or Pork Chops for a delicious weeknight meal. Not to mention, they’re a great way to get kids to eat their veggies.

    Whether you’re creating an Easter menu or just making dinner for the family, Honey Glazed Carrots are a great addition to your meal… Not to mention a great way to get kids to eat their veggies. They pair really well with Roast Beef or Pork Chops.

    Tips for how to make Honey Glazed Carrots with Rosemary

    • Wash, peel, and slice the carrots.
    • Steam or boil the carrots ’til they soften.
    • Melt the butter in a large skillet.
    • Add the honey and carrots to the skillet, and toss together with the melted butter.
    • If desired, add fresh rosemary to the mixture.
    • Toss together on low heat for 3 to 5 minutes.
    • Serve while warm.
    How to make the easiest side dish recipe ever, Honey Glazed Carrots with Rosemary. Perfect for both holiday and weeknight meals.

    It really is such a simple and easy recipe.

    Looking for more side dish recipes to go with your meal?

    You may also want to check out my list of The Best Thanksgiving Recipes for Your Holiday Menu and The Best Christmas Recipes for Your Holiday Celebrations for plenty more inspiration.

    Kitchen Tools you may need to make Honey Glazed Carrots

    Saucepot and Steamer – Handy whether you want to steam or boil the carrots.
    Large Skillet – You’ll need this to toss everything together on the stove.
    Wooden Spoon – to toss the mixture together.
    Serving Bowl – to serve your beautifully delicious carrots.

    Make a delicious side dish the whole family will love, Honey Glazed Carrots. Just 4 simple ingredients, and they’re so easy to make, perfect for dinner.

    Honey Glazed Carrots

    Honey Glazed Carrots, made with simple ingredients like butter, honey, and rosemary. Delicious side dish recipe, perfect for holidays or weeknight meals.

    • 2 pounds carrots
    • 3 tablespoons salted butter
    • 2 1/2 tablespoons raw honey
    • 1 stalk rosemary leaves ((optional))
    1. Wash, peel, and slice the carrots.

    2. Steam or boil the carrots ’til softened.
    3. Melt the butter in a large skillet.
    4. Add the honey and carrots to the skillet, and toss together with the melted butter.
    5. If desired, add fresh rosemary to the mixture.
    6. Toss everything together on low heat for 3 to 5 minutes.

    7. Serve while warm.
    Side Dish
    American
    honey glazed carrots, rosemary carrots

    Save this recipe and Pin it for later!

    Honey Glazed Carrots, made with simple ingredients like butter, honey, and rosemary. Delicious side dish recipe, perfect for holidays or weeknight meals.
    Whether holiday meals or weeknight dinners, Honey Glazed Carrots make a kid-friendly side dish the whole family will love. Simple and easy recipe.
  • Caramel Custard Pie

    Caramel Custard Pie

    Made with an easy shortcut pie crust and a brown sugar caramel twist, this caramel custard pie is a delicious dessert and a family favorite recipe!

    Caramel Custard Pie is not your ordinary custard pie. It has a caramel twist that adds an oomph to traditional custard pie, and it’s easily become another one of my family’s favorite pie recipes.

    Caramel Custard Pie, an easy dessert made with a shortcut no-roll pie crust and a caramel twist. Old-fashioned family favorite sweet treat recipe!

    I remember my mom making custard and putting it in the oven to cook; much like pecan pie, it seemed to be one of her favorite desserts to make. Making this pie always brings back those memories of Mom in her kitchen cooking up a scrumptious dessert.

    The brown sugar mixture I press into my crust gives this pie a great flavor, almost like a graham cracker crust but a different texture altogether.

    While most custard pie recipes say to chill for an hour or two (and this one is delicious when it’s been chilled overnight), I enjoy this pie just as much when it’s warm from the oven. Mmmm, mmmm good.

    There’s nothing quite like Caramel Custard Pie, warm from the oven. Dreamy creamy egg-based dessert recipe with a brown sugar caramel twist.

    If you’re looking for more holiday recipes, you’ll find a whole slew of them on my lists of Thanksgiving Recipes and Christmas Recipes.

    WHERE CAN I FIND THE RECIPE FOR CARAMEL CUSTARD PIE?

    If you’d rather skip all of my baking tips, important baking info for this recipe, and similar recipe ideas – and get straight to the scrumptious caramel custard pie recipe – just scroll down to the bottom, where you’ll find a printable recipe card.

    TIPS FOR HOW TO MAKE A CARAMEL CUSTARD PIE

    • Pre-heat the oven to 350°.
    • Make this Easy Shortcut No-Roll Pie Crust, and press it into your pie plate. If you prefer a more traditional roll-out crust, you may enjoy this crust.
    • Mix the brown sugar, granulated sugar, and flour together.
    • Then lightly press the brown sugar mixture into your crust, pressing into the bottom and sides. You may have a little bit left over.
    • For the filling, mix together the eggs, vanilla, caramel extract, milk, sugar, and salt. Don’t let the mixture become too frothy; just make sure it’s blended well.
    • Pour the egg mixture into your pie crust.
    • Sprinkle the top of the pie with a pinch of nutmeg.
    • Bake at 350° for about 45 minutes to an hour. You may want to use a pie shield to keep the edges of your pie from burning.
    • Insert a knife or baking tester in the center; if it comes out clean, the pie should be done.
    • Let the pie cool; it may sink just a bit.
    • Store in the refrigerator, and you may even want to chill overnight before serving. Serve alone or with whipped cream and fresh fruit. Enjoy!
    How to make an old-fashioned dessert, Caramel Custard Pie, perfect for your holiday dessert table. Family favorite recipe with a brown sugar caramel twist.

    LOOKING FOR MORE DELICIOUS PIE RECIPES?

    Apple Crumb Pie

    Classic Pumpkin Pie from Scratch

    Sweet Potato Pie

    Chocolate Meringue Pie

    Traditional dessert recipe, Caramel Custard Pie, perfect for the holiday dessert table or an everyday sweet treat. So delicious!

    KITCHEN TOOLS YOU’LL NEED TO MAKE CUSTARD PIE

    Mixing Bowl – Handy for mixing up the pie crust and even the pie filling if you’re using a hand mixer.

    Stand Mixer or Hand Mixer – My mixer is the one small kitchen appliance I wouldn’t want to live without. I love it and use it all the time.

    Glass Measuring Cup – for measuring out liquids.

    Pie Plate – Can’t bake a pie without this.

    Pie Shield or Aluminum Foil – to keep the edges of your crust from burning. Here’s a guide on how to prevent pie crust from burning.

    Baking Tester – Check whether your pie (or cake) is done.

    Wire Rack – for cooling the pie.

    Pie Server – for serving your pie.

    It’s hard to stop at just one bite of this delicious Caramel Custard Pie, yet another one of my family’s favorite dessert recipes, especially during the holiday season.

    CARAMEL CUSTARD PIE RECIPE

    If you love this custard pie recipe as much as I do, please write a 5 star review, and help me share the recipe on Facebook and Pinterest!

    Caramel Custard Pie, made with an easy shortcut pie crust and a brown sugar caramel twist. Delicious dessert and a family favorite recipe!

    CONNECT WITH ADVENTURES OF MEL!

    Be sure to follow me on social, so you never miss a post!

    Facebook | Pinterest | YouTube | Instagram | Twitter

    Sign up to receive my newsletter, filled with delicious recipes and outdoor travel adventures, in your inbox:

    FREE EMAIL SUBSCRIPTION

    Caramel Custard Pie

    Caramel Custard Pie, made with an easy shortcut pie crust and a brown sugar caramel twist. Delicious dessert and a family favorite recipe!

    Crust:

    • 2 cups all-purpose flour
    • 2 teaspoons cane sugar
    • 1 1/4 teaspoons salt
    • 2/3 cup canola oil
    • 3 tablespoons whole milk ( )
    • 1/4 cup light brown sugar
    • 1/4 cup cane sugar
    • 2 teaspoons all-purpose flour

    Custard Pie Filling:

    • 3 large eggs
    • 1 teaspoon vanilla extract
    • 1 teaspoon caramel extract
    • 1 3/4 cups whole milk
    • 3 tablespoons cane sugar
    • 1 teaspoon salt
    • 1/2 teaspoon ground nutmeg
    1. Pre-heat the oven to 350° F.

    Crust:

    1. Mix together 2 cups flour, 2 teaspoons cane sugar, and salt. 

    2. In a separate bowl (or glass measuring cup), whisk together the oil and milk.

    3. Add the oil mixture to the dry ingredients, and stir together with a fork until the flour is all moistened.

    4. Press the dough evenly into an un-greased 9-inch pie plate, covering the bottom and the sides. If you want to crimp the edges, go right ahead.

    5. In a small mixing bowl, mix the brown sugar, 1/4 cup cane sugar, and 2 teaspoons flour together.

    6. Then lightly press the brown sugar mixture into the crust, pressing into the bottom and sides. You may have a little bit left over.

    Custard Pie Filling:

    1. In a large mixing bowl, mix together the eggs, vanilla, caramel extract, milk, sugar, and salt. Don't let the mixture become too frothy; just make sure it's blended well.

    2. Pour the egg mixture into your pie crust.
    3. Sprinkle the top of the pie with the ground nutmeg.

    4. Bake at 350° F for about 45 minutes to 1 hour. You may want to use a pie shield to keep the edges of your pie from burning. When a knife inserted in the center comes out clean, the pie should be done.

    5. Remove the pie from the oven, and let it cool on a wire rack; it may sink just a bit.

    6. Store the pie in the refrigerator, and you may even want to chill overnight before serving. Serve alone or with whipped cream and fresh fruit.

    Desserts, Pies & Pastries
    American
    caramel custard pie, custard pie, pie, pie recipe
    How to make a Caramel Custard Pie with an easy shortcut pie crust and a brown sugar caramel twist. Delicious dessert and a family favorite recipe!
  • Grandma’s Homemade Yeast Rolls

    Grandma’s Homemade Yeast Rolls

    How to make Grandma’s homemade yeast rolls. Soft and buttery, these are easy yeast rolls for beginners, and a family favorite holiday dinner recipe. Enjoy fluffy dinner rolls at Thanksgiving, Christmas, and Easter!

    Homemade dinner rolls are a staple for special occasions and holiday dinners in my family. My grandma made these old fashioned yeast rolls every Thanksgiving, Christmas, and Easter. Sometimes we just make them for our weekly slow cooker pork roast!

    grandma's homemade yeast rolls, pillowy soft, in blue baking dish

    Just baking up a batch of these golden beauties brings back so many memories. I learned to make this dinner rolls recipe from my mom, just like she learned from her mom.

    Why I Love Making My Grandma’s Yeast Rolls

    There are loads of reasons to love Grandma’s yeast rolls…

    • I’m not going to say this is a quick recipe because it’s definitely not, but I will say it’s easy. While the recipe is a bit time-consuming, and you do have the added time of waiting for the dough to rise, these are easy yeast rolls for beginners to make and a great recipe to use for learning purposes.
    • It’s definitely a recipe I cherish and one I’m passing down to my own boys, so that Grandma’s legacy lives on. My oldest makes these rolls even better than I do; when he bakes them, they always turn out so light and fluffy.
    • We make this recipe for dinner rolls with all our favorite Easter recipes, Thanksgiving recipes, and Christmas recipes, and sometimes in between. We have to pace ourselves, because some of us will eat rolls with every meal when we have them around.
    soft baked old fashioned yeast rolls in baking dish

    Ingredients and Substitutions Notes

    Gather your ingredients before you get started.

    • Active Dry Yeast – While you can use instant yeast, I recommend using active dry yeast, which will ensure a longer rise time, and in turn, a batch of very soft, pillowy rolls. Whether you buy jars or packets of yeast, just know that 1 packet of yeast equals about 1 tablespoon.
    • Cane Sugar – You can also use granulated sugar
    • Warm Water – Not too hot, because you don’t want to kill the yeast. You want it slightly warm, so almost lukewarm.
    • Unsalted Butter – You can also sub shortening if you don’t have unsalted butter. My grandma actually used shortening; in fact, sometimes we would use regular shortening, and sometimes butter shortening (example: butter Crisco).
    • Large Eggs
    • All-Purpose Flour – I recommend using a really good unbleached all-purpose flour to make these rolls. You can also use a good bread flour. We’ll talk more about the differences below.
    • Sea Salt – I prefer using Redmond Fine Sea Salt.

    How to Make Grandma’s Homemade Yeast Rolls

    While there are a few steps to making dinner rolls from scratch, you’ll find the process is really pretty easy.

    Activate the Yeast

    1. Stir the yeast, sugar, and warm water in a glass measuring cup or small bowl.
    2. Set aside in a warm place to rise. It will bubble and rise up.

    Mix the Dough

    1. While waiting for the yeast mixture to rise, cream (or mix together) the sugar and unsalted butter in a large mixing bowl.
    2. Beat in the eggs, one at a time.
    3. Add the bubbly yeast mixture to the butter mixture, along with an additional 1 1/2 cups warm water.
    4. In a separate bowl, sift together the flour and salt.
    5. Gradually add the flour in, and mix well. For this step, I like to use the dough hook on my stand mixer.
    6. Turn the dough into a large greased bowl or stockpot, and let it rise to the top or almost to the top (it can take 2 to 3 hours to double in size). Keep the bowl or pan covered with a lightweight kitchen towel.

    How to Shape the Dinner Rolls

    1. Once the dough has risen, turn it out onto a floured surface. Coat generously with flour by turning and shaping. No kneading is necessary, though I still like to knead it a bit just for fun.
    2. Roll out the dough to about a 1 to 2 inch thickness.
    3. Then cut round rolls with a cup, glass, or biscuit cutter.
    rolling out dough for homemade dinner rolls recipe, easy yeast rolls for beginners, with wooden rolling pin

    Bake the Rolls

    1. Place the rolls, side by side against each other, in greased baking pans, and let them rise (this will probably take another 1 to 2 hours).
    2. Bake the rolls for about 20 minutes (maybe a little longer) at 350°F. Halfway through baking, you may need to cover the rolls with foil, so they don’t brown too much before they bake through.
    3. When they’re done baking, remove the rolls from the oven and allow them to cool.

    What to Serve with Yeast Rolls

    Of course, I usually can’t resist enjoying a hot roll with warm melty butter. They’re so delicious, especially since I learned how to make salted butter; homemade butter is the best!

    Serve your delicious bread rolls with strawberry jam, apple butter, blackberry jam, or just plain butter. Better yet, dip your rolls in a bowl of delicious Instant Pot potato soup. Grandma’s rolls also make delicious steak and cheese sliders.

    homemade dinner rolls from scratch in a bread roll basket with white and blue checked flour sack towel

    Expert Tips and Recipe FAQ’s

    Which is better for dinner rolls, all-purpose flour or bread flour?

    We’ve used both kinds of flour, and while I’ve always used all-purpose flour, my son always uses bread flour. It’s a personal preference we both have. However, here’s the truth, so you can decide which is best for you. Bread flour contains more protein, which equals more gluten, which equals more elasticity and stretchability. It’s especially good for making actual loaves of bread, baguettes, etc. All-purpose flour will create a tighter crumb; it’s also a great choice in roll recipes that require more butter and sugar, which both make a difference in the final texture of the bread when baked. King Arthur actually has a really great article about whether bread flour really does make a difference when baking bread. I encourage you to read it if you’d like to learn more.

    Why aren’t my yeast rolls light and fluffy?

    Dry, dense rolls can happen when we 1) add too much flour; or 2) don’t allow enough rise time. My grandma always wanted us to sift the flour at least 7 times while baking cakes and bread. While I’ve never done that, sifting does make a difference. And allowing that rise time so your rolls get big and puffy and pillowy soft makes a huge difference in the final baked bread roll.

    Why did my homemade rolls get hard?

    Probably over kneading. This recipe doesn’t require any kneading at all, so there’s no need to even worry about this.

    Should you brush yeast rolls before baking?

    Totally up to you, but I never have with this recipe. My oldest does. He likes a shiny golden top to his bread rolls. An egg yolk will help the rolls to brown, but you really don’t need any help with these rolls browning, as the oven temp will do just fine on its own; in fact, you may have to cover with foil to avoid too much browning. Egg white will give the shine. You can even brush with melted butter after baking for added flavor and a bit of shine.

    Can you freeze homemade rolls?

    Yes, you can. You can either freeze the shaped unbaked rolls, covered in an airtight baking pan; then thaw before baking as usual. Or you can freeze the baked rolls in an airtight container; then thaw and warm before serving.

    grandma's yeast rolls, puffy and pillowy bread rolls, in a blue baking dish

    More Bread Recipes:

    If you try this recipe, why not leave a star rating in the recipe card right below and/or a review in the comment section further down the page? I always appreciate your feedback. You can also follow me on Pinterest, Facebook, Instagram, and YouTube. And subscribe to my email list too!

    Grandma’s Homemade Yeast Rolls

    How to make Grandma's homemade yeast rolls. Soft and buttery, easy yeast rolls for beginners, a family favorite holiday dinner recipe.

    • Glass Measuring Cup
    • Mixer
    • Large Mixing Bowl
    • Sifter
    • Rolling Pin
    • Stockpot
    • Biscuit Cutter
    • Baking Pans
    • 1 tablespoon active dry yeast
    • 1 teaspoon cane sugar
    • 1/2 cup warm water
    • 2/3 cup cane sugar
    • 3 tablespoons unsalted butter (softened)
    • 3 large eggs
    • 1 1/2 cups warm water
    • 6 cups all-purpose flour
    • 3 teaspoons sea salt
    1. Whisk together the yeast, sugar, and warm water in a glass measuring cup or small bowl. Set aside in a warm place to rise. It will bubble and rise up.

    2. While waiting for the yeast mixture to rise, cream (or mix together) the sugar and unsalted butter in a large mixing bowl.

    3. Beat in the eggs, one at a time.
    4. Add the bubbly yeast mixture to the butter mixture, along with an additional 1 1/2 cups warm water.

    5. In a separate bowl, sift the flour and salt together.

    6. Gradually add the flour mixture into the wet ingredients, and mix well. For this step, I like to use the dough hook on my stand mixer.

    7. Turn the dough into a large greased bowl or stockpot, and let it rise to the top or almost to the top (it can take 2 to 3 hours to double in size). Keep the bowl or pan covered with a lightweight kitchen towel.

    8. Once the dough has risen, turn it out onto a floured surface. Coat generously with flour by turning and shaping. No kneading is necessary, though I still like to knead it a bit just for fun.
    9. Roll out the dough to about a 1 to 2 inch thickness.

    10. Then cut round rolls with a cup, glass, or biscuit cutter.

    11. Place the rolls, side by side against each other, in greased baking pans, and let them rise (this will probably take another 1 to 2 hours).

    12. Pre-heat the oven to 350° F.

    13. Bake the rolls for about 20 minutes (maybe a little longer) at 350°F. Halfway through baking, you may need to cover the rolls with foil, so they don't brown too much before they bake through.

    14. When they're done baking, remove the rolls from the oven and allow them to cool. Of course, I usually can't resist enjoying a hot roll with warm melty butter. They're so delicious!

    *Grandma used shortening in her rolls; I prefer to use butter instead.

    Breads & Muffins
    American
    bread roll recipe, bread rolls, dinner roll recipe, dinner rolls, dinner rolls from scratch, dinner rolls recipe, easy yeast rolls for beginners, grandma’s homemade yeast rolls, grandma’s yeast rolls, homemade rolls, old fashioned yeast rolls, recipe for dinner rolls, yeast roll recipe, yeast rolls
  • How to Make Homemade Turkey Gravy

    How to Make Homemade Turkey Gravy

    Made with leftover turkey drippings and neck broth, homemade turkey gravy is a delicious side dish with turkey, mashed potatoes, and all the fixings!

    Homemade Turkey Gravy, like ham gravy at Christmas, is a staple side dish with Thanksgiving dinner. It just wouldn’t be the same without gravy to smother over our sliced turkey, stuffing, and mashed potatoes.

    How to make homemade turkey gravy to go along with your Thanksgiving and holiday dinner. Mashed potatoes just wouldn’t be the same without this delicious side dish.

    The main flavoring for the gravy comes directly from the turkey itself. So you’ll definitely want to keep in mind that if you brine your turkey or add a glaze of any kind, that flavoring will go into your gravy. For example, if you’re using a sweet brine, your gravy will be a little sweeter.

    It really only takes a few minutes to make homemade gravy, so it’s usually the last dish we make before we all sit down to eat. But it’s delicious and definitely worth the minimal effort.

    I’m definitely adding this to my favorite Thanksgiving Recipes and Christmas Recipes, where you’ll find all the Thanksgiving inspiration you need in one place.

    Use turkey drippings to make a delicious Homemade Turkey Gravy. Takes about 20 minutes to make, definitely worth the minimal effort. Perfect over turkey and mashed potatoes!

    Tips for how to make Homemade Turkey Gravy

    • Mix together the flour and water in a small mixing bowl.
    • Gradually whisk together the flour/water mixture with the neck broth and turkey drippings in a large saucepan on medium heat. Take your time to avoid any lumps in your gravy. It’s pretty much a given that you may have a few lumps, but you can minimize them by whisking the gravy.
    • Add salt and pepper to taste.
    • Continue whisking and stirring the gravy until it begins to thicken and is ready to serve.
    • Serve with turkey, mashed potatoes, and stuffing… The works!
    Use leftover turkey drippings to make a quick batch of Homemade Turkey Gravy to go with your holiday dinner. Delicious side dish recipe!

    Turkey gravy, like chicken gravy from bouillon and this ham gravy recipe, is great for dipping too, especially for dipping Leftover Turkey Stuffing Crescent Rolls. And you can use it in place of brown gravy in a mashed potato bowl.

    Looking for more Thanksgiving sides to add to your dinner menu?

    Homemade Cranberry Sauce

    Instant Pot Southern Green Beans

    Creamy Bacon Corn Casserole

    Apple Walnut Bread Stuffing

    Broccoli Salad with Bacon and Cauliflower

    And just in case you’re still looking for a turkey recipe, Maple Bourbon Brined Roasted Turkey is so good!

    Turkey Gravy also makes a very tasty addition to your next Baked Potato Bar.

    Tools you may need to make Homemade Turkey Gravy

    Mixing Bowl – for mixing together the flour and water.

    Large Saucepan – You’ll make the gravy in a saucepan on the stove. This recipe feeds a crowd, so you’ll need a larger pan.

    Whisk – Helps to minimize lumps in your gravy.

    Wooden Spoon – There’s nothing quite like a wooden spoon for stirring.

    Heat Resistant Spatula – Works well for stirring and scraping the sides of the pan.

    Gravy Boat – for serving.

    Print the recipe for Homemade Turkey Gravy

    Homemade Turkey Gravy

    Homemade Turkey Gravy, made with leftover turkey drippings and neck broth. Delicious side dish with turkey, mashed potatoes, and all the fixings!

    • 1 cup all-purpose flour
    • 1 cup water
    • 1 cup neck broth
    • 1 cup turkey drippings
    • Salt (to taste)
    • Ground black pepper (to taste)
    1. Whisk together the flour and water in a small mixing bowl.

    2. Gradually whisk together the flour/water mixture with the neck broth and turkey drippings in a large saucepan on medium heat.

    3. Continue whisking and stirring the gravy until it begins to thicken and is ready to serve.
    4. Add salt and pepper, to taste.
    5. Serve with turkey, mashed potatoes, and stuffing.

    *Take your time whisking in the flour/water mixture to avoid any lumps in your gravy. It’s a given that you’ll have a few lumps, but you can minimize them by whisking the gravy.

    Side Dish
    American
    homemade turkey gravy, turkey gravy

    Pin this recipe for later!

    Homemade Turkey Gravy, made with leftover turkey drippings and neck broth. Delicious side dish with turkey, mashed potatoes, and all the fixings!
    Homemade Turkey Gravy, made with leftover turkey drippings. Delicious side dish for holiday or weeknight meals. Must have with turkey, mashed potatoes, stuffing, and all the fixings!
  • Simple and Easy Classic Pecan Pie Recipe

    Simple and Easy Classic Pecan Pie Recipe

    How to make the best classic pecan pie recipe. Easy, old-fashioned, southern dessert with a gooey filling and homemade crust. Perfect for Thanksgiving!

    Southern pecan pie has become one of my favorite desserts this time of year. Like our favorite apple crumb pie, it’s always on the dessert table at Thanksgiving; and it’s usually a safe bet that my mom will have one sitting on her kitchen counter at different times throughout the year.

    whole southern pecan pie, baked in white pie plate, sitting on wood countertop

    It’s funny, ’cause when I was younger, I didn’t like your typical, classic pecan pie at all (or maybe I just thought I didn’t). But I’ve really grown to love it over the last few years.

    I don’t know which is my favorite, the crunchy pecans that float to the top or the delicious sweet, somewhat salty pie filling that gives pecan pie its unique flavor. Mmmm, it’s just so good!

    Also, pecan pie is so easy to make; it’s not one bit complicated. Make a crust, mix up the filling, pour it into the crust, and presto… It’s ready to bake.

    If you’re looking for more holiday recipes, you’ll find a whole slew of them on my lists of Thanksgiving Recipes  and Christmas Recipes.

    slice of classic pecan pie on white plate with fork

    WHERE CAN I FIND THE ACTUAL RECIPE CARD?

    If you’d rather skip all of my baking tips, important info for this recipe, and similar recipe ideas – and get straight to the recipe – just scroll down to the bottom, where you’ll find a printable recipe card.

    [mv_video doNotAutoplayNorOptimizePlacement=”false” jsonLd=”true” key=”vpa11rc7pjskijhutgjq” thumbnail=”https://mediavine-res.cloudinary.com/v1574708167/xvtk46coqm9ktpxlh640.jpg” title=”Simple and Easy Classic Pecan Pie Recipe” volume=”100″]

    INGREDIENTS YOU’LL NEED:

    Keep in mind, all of the ingredient amounts you’ll need are in the printable recipe card below.

    KITCHEN TOOLS AND EQUIPMENT YOU’LL NEED:

    Stand Mixer or Hand Mixer with Mixing Bowl

    Glass Measuring Cup – for measuring out liquids.

    Pie Plate 

    Pie Shield or Aluminum Foil – to keep the edges of your crust from burning.

    Baking Tester – Check whether your pie (or cake) is done.

    Wire Rack – for cooling the pie.

    Pie Server

    Coffee Maker with Coffee – Some of my favorite memories are dessert with my grandmother. She always loved a hot cup of coffee with her pie.

    Whole pecan pie in Corningware pie plate with slice of pie on white plate with fork

    HOW TO MAKE PECAN PIE

    First things first, mix up a pie crust…

    MAKING THE PIE CRUST:

    You can make a more traditional roll-out pie crust or an easier shortcut no-roll pie crust. Chill the pie crust ’til you’re ready to pour in the filling.

    MAKING PECAN PIE FILLING:

    1. Using a mixer, cream together the butter and sugar. And by cream, I mean mix together really well until it becomes a creamy mixture.
    2. Lightly beat the eggs together. Then mix them into the butter/sugar mixture.
    3. Add dark corn syrup and vanilla to the mixture, mixing well.
    4. Then stir in the pecans by hand.

    Then just pour the pie filling into your unbaked pie crust. Bake the pie according to the instructions in the recipe card below. Learn how to prevent pie crust from burning.

    Serve with a creamy delicious dollop of whipped cream!

    slice of classic pecan pie with whipped cream on white plate with fork

    BAKING TIPS FOR SOUTHERN PECAN PIE

    • You may want to use a pie shield or a strip of aluminum foil to keep the edges of your pie crust from getting too dark or burning.
    • When your pie is fully cooked through, remove it from the oven and cool on a wire rack.

    HOW TO TELL WHEN PECAN PIE IS DONE

    You can use a toothpick, table knife, or cake tester to see if your pie is done, but being that this is more of a custard pie, you may still see a slight bit of residue on your tester.

    You can also check the internal temperature with a cooking thermometer. It should be at least 200° F.

    When you go to take it out of the oven, your pie should be fairly firm. If it’s more than slightly jiggly, it needs more time in the oven.

    It’s a delicate balance between under-baking and over-baking when it comes to pecan pie. On the other hand, you don’t want it to be uncooked in the middle; on the other hand, you don’t want it to crack and be too dry.

    MORE PIE RECIPES YOU MAY ENJOY:

    Bite of old-fashioned pecan pie on fork on white plate

    GET THE PRINTABLE RECIPE

    If you love this recipe as much as I do, please write a 5 star review, and help me share the recipe on Facebook and Pinterest! If you make the recipe, be sure to share that you tried it on Pinterest. I love when readers share feedback!

    old-fashioned classic pecan pie recipe

    CRAVING MORE DELICIOUS RECIPES? Subscribe to my newsletter, and follow along on PinterestFacebookYouTube, and Instagram for all the latest updates!

    Classic Pecan Pie

    How to make the best classic pecan pie recipe. Easy, old-fashioned, southern dessert with a gooey filling and homemade crust. Perfect for Thanksgiving!

    • 1 pie crust
    • 3 tablespoons salted butter (softened)
    • 1 cup cane sugar
    • 3 large eggs
    • 1/2 cup dark corn syrup
    • 1 teaspoon vanilla extract
    • 1 1/2 cups pecans (halved or sliced)
    1. Chill the pie crust, rolled out and prepared in a 9-inch pie plate, 'til you're ready to add the filling.

    2. Pre-heat the oven to 450° F.

    3. In a large mixing bowl, cream (or mix) together the butter and sugar.

    4. In a separate smaller bowl, lightly beat the eggs together.

    5. Then mix the eggs into the butter/sugar mixture.

    6. Add the dark corn syrup and vanilla to the mixture, mixing well.

    7. Stir in the pecans by hand.
    8. Pour the pie filling into the unbaked pie crust.

    9. Bake the pie at 450° F for about 10 minutes. Then reduce the heat to 350° F, and bake an additional 30 minutes.

    10. When the pie is fully cooked through, remove it from the oven and cool on a wire rack.

    11. Serve each slice with a creamy delicious dollop of whipped cream.

    *You can make a more traditional roll-out pie crust (link in the ingredients above) or an easier shortcut no-roll pie crust.

    9. You may want to use a pie shield or a strip of aluminum foil to keep the edges of your pie crust from getting too dark or burning.

    10. You can use a toothpick, table knife, or cake tester to see if your pie is done, but being that this is more of a custard pie, you may still see a slight bit of residue on your tester. You can also check the internal temperature with a cooking thermometer. It should be at least 200° F. When you go to take it out of the oven, your pie should be fairly firm. If it’s more than slightly jiggly, it needs more time in the oven. It’s a delicate balance between under-baking and over-baking when it comes to pecan pie. On one hand, you don’t want it to be uncooked in the middle; on the other hand, you don’t want it to crack and be too dry.

    Desserts, Pies & Pastries
    American
    classic pecan pie, classic pecan pie recipe, how to make pecan pie, pecan pie, pecan pie recipe, southern pecan pie
  • Instant Pot Southern Green Beans

    Instant Pot Southern Green Beans

    Southern Green Beans, made with bacon, onion, and ground beef in the Instant Pot. Delicious side dish recipe, perfect for holidays or weeknight meals.

    Southern Green Beans are the most flavorful green beans you’ll ever enjoy. With bacon, onion, and ground beef, the flavors are incredible. Pressure cooked in the Instant Pot, they’re so tender and delicious, not to mention easy to make. And they pair really well with a Crock Pot pork roast or even baked chicken drums!

    Southern Green Beans, made with bacon, onion, and ground beef in the Instant Pot. Delicious side dish recipe, perfect for holidays or weeknight meals.

    They’re reminiscent of the green beans my grandma used to make for every single holiday get together. Also, the fact that I live in Arkansas… That warrants a Southern recipe or two, right? I think so.

    This recipe really only uses 6 ingredients, so it’s a pretty simple recipe. The most work is cooking up the bacon and ground beef beforehand. Otherwise, just throw all the ingredients in the Instant Pot, give them a stir, pop the lid on, and cook.

    Serve up a helping of Instant Pot Southern Green Beans for Thanksgiving or a weeknight meal. Incredible flavor, cooked with bacon and ground beef. So delicious!

    Meaning you can throw it all together and walk away and focus on doing something else (like play a quick game with the kids or keep the laundry going). 

    Tips for how to make Instant Pot Southern Green Beans

    • Chop a medium sized onion.
    • Cook ground beef and onion together in a large skillet.
    • Meanwhile, also cook bacon in another large skillet.
    • When ground beef/onion mixture is done, drain well.
    • Crumble bacon.
    • Add frozen green beans, ground beef/onion mixture, crumbled bacon, salt, pepper, and water to the Instant Pot.
    • Give it all a good stir.
    • Place lid on the Instant Pot.
    • Cook on Manual for 25 minutes. Allow the Instant Pot to naturally release.
    • Serve while warm. We’ve eaten this as both a side dish and a main dish. So good!
    How to make the most delicious Southern Green Beans in the Instant Pot. Full of flavor and cooked with bacon.

    More side dish recipes you may enjoy…

    You may also want to check out my list of The Best Thanksgiving Recipes for Your Holiday Menu and The Best Christmas Recipes for Your Holiday Celebrations for plenty more inspiration. And if you’re wondering what to make for Easter dinner, I’ve gotcha covered.

    Tools you may need to make Instant Pot Southern Green Beans

    Cutting Board and Knife – for chopping the onions and crumbling the bacon.
    Large Skillet – You’ll need to cook both the ground beef and the bacon.
    Wood Spatula – Use for cooking the ground beef.
    Instant Pot – We have the 6-Quart Instant Pot, without the yogurt function. We love it.
    Serving Bowl – This will allow for easier (and prettier) serving than just from the Instant Pot.

    Make Southern Green Beans in the Instant Pot. Pressure cooked to perfection. Bacon, onion, and ground beef give added flavor for a delicious side dish recipe everyone will love!

    Instant Pot Southern Green Beans

    Southern Green Beans, made with bacon, onion, and ground beef in the Instant Pot. Delicious side dish recipe, perfect for holidays or weeknight meals.

    • Large Skillet
    • Instant Pot
    • 1 tablespoon olive oil
    • 1 medium onion (minced)
    • 1 pound ground beef
    • 36 ounces frozen green beans
    • 6 slices bacon (cooked and crumbled)
    • 1 teaspoon salt
    • 1 teaspoon ground black pepper
    • 1 cup water
    1. Add the olive oil to a large skillet over medium heat.

    2. Stir the minced onion into the olive oil and sauté 'til the onion is translucent, about 3-5 minutes.

    3. Mix the ground beef together with the onion in the skillet and cook.

    4. When the ground beef mixture is done, drain well.

    5. Add the ground beef mixture, frozen green beans, crumbled bacon, salt, pepper, and water to the Instant Pot.

    6. Give it all a good stir.

    7. Place the lid on the Instant Pot, set the vent to "Sealed," and cook on Manual (or Pressure Cook) for 15 minutes. Allow the Instant Pot to naturally release.

    8. Serve while warm and enjoy!
    Side Dish
    American
    green beans, Instant Pot green beans, southern green beans

    Wanna save this recipe for later? Go ahead and Pin it!

    Southern Green Beans, made with bacon, onion, and ground beef in the Instant Pot. Delicious side dish recipe, perfect for holidays or weeknight meals.
    Southern Green Beans, made in the Instant Pot. Incredible flavor, made with bacon, onion, and ground beef. Delicious recipe, perfect for holidays or dinner.
  • Apple Walnut Bread Stuffing

    Apple Walnut Bread Stuffing

    Apple Walnut Bread Stuffing – An easy, traditional, old-fashioned, homemade stuffing recipe. Simple ingredients in a delicious Thanksgiving side everyone will love!

    Apple Walnut Bread Stuffing will most definitely be on our Thanksgiving (and maybe even Christmas) table this year. This is the first stuffing I’ve ever made, and it came together in a most delicious way! And you don’t have to make it for the holidays; It also pairs really well with our weekly slow cooker pork roast!

    How to make Apple Walnut Bread Stuffing with simple, delicious ingredients. Perfect Thanksgiving side dish the whole family will love. Easy recipe!

    While I grew up on both bread “dressing” (as my grandma called it… It was “dressing”) and my mom’s cornbread stuffing, Dan grew up eating bread stuffing. It’s his favorite kind of stuffing. So, I really wanted to try and create something similar to what he was used to.

    The ingredients for this are really simple, but it really is so flavorful… The most expensive ingredient will likely be the walnuts. Thankfully, you don’t need a lot of them.

    And stuffing is really not that hard to make. I don’t know why I thought it was going to be a long, drawn-out, complicated process. Because it’s totally not.

    Make a classic Thanksgiving side dish with this old-fashioned homemade recipe for Apple Walnut Bread Stuffing. Delicious stuffing recipe that’s also easy to make!

    And if you have leftover stuffing, you can totally make these delicious leftover turkey stuffing crescent roll appetizers and leftover ham and stuffing crescent rolls for your holiday party!

    Tips for how to make Apple Walnut Bread Stuffing

    1. Pre-heat the oven to 350°.
    2. Cube 1 whole loaf of bread and set aside.
    3. Wash the celery and apples.
    4. Chop the celery, onion, and apples.
    5. Melt the butter in a skillet.
    6. Sauté the celery, onion, and apples in the butter for about 5 minutes.
    7. Mix the sautéed mixture with the cubed bread in a large bowl, making sure all of the bread is moistened.
    8. Add sage, parsley, salt, and pepper to the mixture. Stir well.
    9. Finally, add the walnuts to the mixture and mix well.
    10. Spray a large casserole dish, preferably a 13″x9″ dish with cooking spray.
    11. Add the stuffing mixture to the dish.
    12. Bake uncovered for about 20 minutes.
    13. Cover with foil and bake an additional 15 minutes.
    14. Remove from the oven, and serve while warm.

    It pairs deliciously well with Maple Bourbon Brined Roasted Turkey or a Pineapple Honey Glazed Ham.

    Easy recipe for Apple Walnut Bread Stuffing, classic, delicious, homemade side dish recipe for your Thanksgiving table.

    Looking for more Thanksgiving side dish recipes?

    Cranberry Sauce Recipe

    Green Beans Casserole

    Creamy Bacon Corn Casserole

    Easy Broccoli Salad with Bacon and Cauliflower

    Creamy Mashed Potatoes

    Homemade Ham Gravy

    Homemade Turkey Gravy

    Instant Pot Southern Green Beans

    Grandma’s Homemade Dinner Rolls

    Honey Glazed Carrots with Rosemary

    You’ll find plenty more inspiration on my lists of favorite Thanksgiving Recipes and Christmas Recipes, as well as our favorite apple recipes!

    Tools you may need to make Apple Walnut Bread Stuffing

    Cutting Board – for cubing the bread.

    Bread Knife – for cubing the bread.

    Iron Skillet – for sautéing the vegetables.

    Wood Spatula – for sautéing the vegetables.

    Large Mixing Bowl – for mixing up the stuffing.

    Herbs – You’ll need sage and parsley.

    Walnuts – to add into the stuffing mixture.

    Casserole Dish – for baking the stuffing.

    Aluminum Foil – for covering while baking.

    Apple Walnut Stuffing

    Apple Walnut Bread Stuffing, an easy, traditional, old-fashioned, homemade recipe. Simple ingredients in a delicious Thanksgiving side everyone will love!

    • 1 loaf bread
    • 3 stalks celery (chopped)
    • 1/2 large onion (minced)
    • 1 cup apples (chopped)
    • 8 tablespoons salted butter
    • 1 teaspoon ground sage
    • 1 teaspoon parsley
    • 1/2 teaspoon salt
    • 1/2 teaspoon ground black pepper
    • 1 cup chopped walnuts
    1. Pre-heat the oven to 350° F.

    2. Cube 1 whole loaf of bread and set aside.
    3. Melt the butter in a skillet.
    4. Sauté the celery, onion, and apples in the butter for about 5 minutes.
    5. Mix the sautéed mixture with the cubed bread in a large bowl, making sure all of the bread is moistened.
    6. Add sage, parsley, salt, and pepper to the mixture. Stir well.
    7. Finally, add the walnuts to the mixture and mix well.
    8. Spray a large 9×13 casserole dish with cooking spray.

    9. Add the stuffing mixture to the dish.
    10. Bake uncovered at 350° F for about 20 minutes.

    11. Cover with foil and bake an additional 15 minutes.
    12. Remove from the oven, and serve while warm.


    Side Dish
    American
    apple walnut bread stuffing, bread stuffing, dressing, Thanksgiving dressing, Thanksgiving stuffing

    Planning your Thanksgiving menu? Pin this recipe to save it!

    Apple Walnut Bread Stuffing, an easy, traditional, old-fashioned, homemade recipe. Simple ingredients in a delicious Thanksgiving side everyone will love!
    Classic Thanksgiving side dish recipe, Apple Walnut Bread Stuffing. So delicious and easy to make. So not as complicated as I thought!
  • Maple Bourbon Brined Roasted Turkey

    Maple Bourbon Brined Roasted Turkey

    How to make a perfectly cooked, moist, delicious maple bourbon brined roasted turkey for dinner and holiday celebrations.

    Maple Bourbon Brined Roasted Turkey is hands down the best turkey I’ve ever had. Better than deep fried even. It’s so moist and packed full of delicious flavor. And it’s definitely going on my list of favorite Thanksgiving Recipes and Christmas Recipes, along with my favorite slow cooker pork roast.

    How to make a perfectly cooked, moist, delicious Maple Bourbon Brined Roasted Turkey. My favorite turkey recipe ever.

    My husband Dan is the guru behind this recipe. He showed me how to make it for the purposes of this recipe (and Thanksgiving, which is right around the corner).

    Brining a turkey isn’t difficult at all… Basically, if you have a food grade bucket and a few ingredients, you’re in business. I could see myself doing this to roast chicken too because it’s just so delicious!

    One of my favorite things about cooking a turkey is the leftovers it gives. Enough to make this wonderfully cheesy turkey casserole with pasta.

    The best turkey for both weeknight meals and holiday dinners. Maple Bourbon Brined Roasted Turkey is so moist and delicious.

    Tips for how to make Maple Bourbon Brined Roasted Turkey

    • Prepare the turkey by removing the neck, gizzards, etc. Rinse with water.
    • To a food grade 5 gallon bucket, add hot water, onion, garlic, the peel of an orange, brown sugar, real maple syrup, bourbon, peppercorns, whole cloves, melted butter, kosher salt, ground sage, poultry seasoning, bay leaves, and ice. Stir well.
    • Place the turkey down in the mixture.
    • Cover the bucket with a lid and place in the refrigerator for 12-24 hours or longer. If you don’t have enough fridge room, you could pack the bucket with ice.
    • Once it’s brined, remove the turkey from the bucket and rinse with cold water, inside and out.
    • Rub the turkey with a thin coat of real maple syrup.
    • Place in a roasting pan, uncovered, for roasting.
    • Roast at 350° until the internal temperature is at 165° or higher. Base your cooking time on the size of your turkey; for example, we cooked a smaller turkey in about 3 hours. Cooking time will differ per turkey.
    • Once the turkey is done, remove from the oven.
    • Carve the turkey and serve it up with homemade turkey gravy!
    How to brine and roast a deliciously moist turkey that’s perfect for family meals and holiday dinners like Thanksgiving. Maple Bourbon Brined Roasted Turkey is so full of flavor!

    Leftover turkey makes the most delicious appetizers too, like these Leftover Turkey Stuffing Crescent Rolls. Yum!

    Looking for side dish recipes to go with your turkey?

    Apple Walnut Bread Stuffing

    Homemade Cranberry Relish

    Homemade Turkey Gravy

    Instant Pot Southern Green Beans

    Cheesy Corn Casserole

    Green Beans Casserole

    Honey Glazed Carrots with Rosemary

    Maybe you’d rather have ham or pork chops for dinner? You’ll love our Pineapple Honey Glazed Ham and our Maple Pork Chops with Apples and Onions.

    Tools you may need to brine and roast a turkey

    Food Grade Bucket with Gamma Seal Lid – Perfect for brining a turkey.

    Real Maple Syrup – You’ll need this for both the brine and a rub. Of course, it’s delicious on pancakes too.
    Brine Ingredients – You’ll need PeppercornsWhole Cloves, Ground SagePoultry Seasoning, and Bay Leaves.

    Roasting Pan – for roasting the turkey.

    Meat Thermometer – This will help you know what the internal temperature of the turkey is. We use ours all the time.

    Grill Armor Oven Gloves – We’ve mentioned these in a few of our live videos; I love using these.

    Carving Set – to carve the turkey before serving.

    Serving Platter – for serving.

    Maple Bourbon Roasted Turkey

    How to make a perfectly cooked, moist, delicious, maple bourbon roasted turkey for dinner and holiday celebrations. Perfect recipe for Thanksgiving dinner!

    • 15 pounds turkey
    • 1 1/2 gallons hot water
    • 1 large yellow onion (chopped)
    • 2 cloves garlic (minced)
    • 1 whole orange peel
    • 1/2 cup light brown sugar
    • 1 1/8 cups maple syrup
    • 3/4 cup bourbon
    • 2 tablespoons black peppercorns
    • 1 tablespoon whole cloves
    • 1 cup unsalted butter (melted)
    • 3/4 cup kosher salt
    • 1 tablespoon ground sage
    • 1/4 cup poultry seasoning
    • 4 bay leaves (crumbled)
    • 4 pounds ice
    1. Prepare the turkey by removing the neck, gizzards, etc, and rinse with water.

    2. To a food grade 5 gallon bucket, add the hot water, onion, garlic, orange peel, brown sugar, 1 cup of maple syrup, bourbon, peppercorns, whole cloves, melted butter, kosher salt, ground sage, poultry seasoning, bay leaves, and ice. Stir well.

    3. Place the turkey down in the mixture.
    4. Cover the bucket with a lid and place in the refrigerator for 12-24 hours or longer. If you don't have enough fridge room, you can pack the bucket with ice.

    5. Once it’s brined, remove the turkey from the bucket and rinse with cold water, inside and out.
    6. Rub the turkey with a thin coat of real maple syrup (the extra 1/8 cup).

    7. Place the turkey in a roasting pan, uncovered, for roasting.
    8. Roast at 350° F until the internal temperature of your turkey is 165° F or higher. Base your cook time on the size of your turkey; cook time will differ per turkey.

    9. Once the turkey is done, remove from the oven.
    10. Carve the turkey and serve! 

    Recipe adapted from Traeger.

    dinner, main dish, Poultry & Chicken Recipes
    American
    brined roasted turkey, brined turkey, maple bourbon brined turkey, roasted turkey, Thanksgiving turkey

    Saving this recipe for your Thanksgiving or holiday menu? Pin it for later!

    Maple Bourbon Brined Roasted Turkey recipe. How to make a perfectly cooked, moist, delicious turkey for dinner and holiday celebrations.
    How to make the most delicious moist turkey you’ve ever had… Maple Bourbon Brined Roasted Turkey. Hands down my favorite turkey recipe.
  • Instant Pot Pumpkin Spice Cheesecake

    Instant Pot Pumpkin Spice Cheesecake

    Instant Pot pumpkin spice cheesecake is an easy fall and holiday dessert recipe with a graham cracker crust, full of delicious fall flavors.

    Pumpkin Cheesecake is one of those “to die for” desserts… Dessert that makes the taste buds tingle and satisfies those cravings for creamy delicious cheesecake.

    How to make Instant Pot Pumpkin Spice Cheesecake. Delicious fall and holiday dessert recipe with a buttery graham cracker crust.

    I am a cheesecake fangirl. If I get to choose a dessert when we’re out to eat and cheesecake is on the menu, you can bet I’m ordering cheesecake. My favorite is white chocolate raspberry cheesecake, and I love strawberry swirl cheesecake too.

    When you add pumpkin spice and all the flavors of fall to my favorite dessert… Well, I may just swoon.

    When I first tried creating this recipe, my first attempt was somewhat of a fail. It turned out more like pumpkin spice pudding than pumpkin spice cheesecake. But I didn’t give up, and my second attempt won.

    Perfect for the Thanksgiving dessert table, Instant Pot Pumpkin Spice Cheesecake is oh so delicious. So creamy and super easy to make!

    The fact that it’s made in the Instant Pot just adds an element of fun to the recipe. I LOVE cooking with my Instant Pot because the possibilities are truly endless.

    Tips for Making Pumpkin Spice Cheesecake in the Instant Pot

    This recipe creates enough filling for 2 smaller cheesecakes. If you have a larger Instant Pot (ours is smaller, a 6-quart), you could make 1 larger cheesecake with a larger graham cracker crust with this recipe.

    1. Crush the graham crackers, using a Ziploc bag and a rolling pin.
    2. Mix the graham crackers together with melted butter.
    3. Spray your springform pan with cooking spray; then press the mixture into the pan. Place in the freezer ’til you’re ready to add the filling.
    4. Mix together softened cream cheese, sugar, and brown sugar with a mixer.
    5. Add vanilla and almond extract, mixing well.
    6. Crack 1 whole egg and 1 egg yolk into the mixture.
    7. Add pumpkin puree, along with sour cream, mixing well.
    8. Make your own pumpkin pie spice, including cinnamon, ginger, cloves, and nutmeg.
    9. Finally, mix in a tablespoon of flour and the salt.
    10. Pour the cheesecake filling into your crust.
    11. Add 1 1/2 cups water to the bottom of your pressure cooker.
    12. Cover the cheesecake pan with foil, and place the pan inside your Instant Pot.
    13. Set to Manual and cook for 30 minutes.
    14. When the Instant Pot is done and it’s naturally released, remove the cheesecake, keep covered, and place in the fridge for a few hours (or even overnight). Let it chill thoroughly.
    15. Then it’s ready to serve. I suggest serving it with a li’l whipped cream.
    Easy recipe for Instant Pot Pumpkin Spice Cheesecake, a deliciously creamy fall and holiday dessert with all the flavors of fall.

    Looking for more pumpkin recipes?

    Tools you may need to make Instant Pot Pumpkin Spice Cheesecake

    Instant Pot We have the 6-quart pot (without the yogurt function).

    Rolling Pin for crushing the graham crackers.

    6-Inch Springform Pan This size will easily fit down into the Instant Pot.

    KitchenAid Stand Mixer – I use mine for pretty much everything I bake.

    Vanilla Extract and Almond Extract for added flavor in the cheesecake

    Spices – You’ll need CinnamonGingerCloves, and Nutmeg.

    Want to see how to make Pumpkin Spice Cheesecake in the Instant Pot? Watch the video!

    If you try this recipe, why not leave a star rating in the recipe card right below and/or a review in the comment section further down the page? I always appreciate your feedback. You can also follow me on Pinterest, Facebook, Instagram, and YouTube. And subscribe to my email list too!

    Instant Pot Pumpkin Spice Cheesecake

    Pumpkin Spice Cheesecake, made in the Instant Pot. Easy fall and holiday dessert recipe with a graham cracker crust, full of delicious fall flavors.

    • 8 graham crackers
    • 5 tablespoons salted butter (melted)
    • 16 ounces cream cheese
    • 1/4 cup cane sugar
    • 1/4 cup light brown sugar
    • 1 teaspoon vanilla extract
    • 1/8 teaspoon almond extract
    • 1 large egg
    • 1 large egg yolk
    • 1/2 cup pumpkin puree
    • 2 tablespoons sour cream
    • 1/4 teaspoon ground cinnamon
    • 1/8 teaspoon ground ginger
    • 1/8 teaspoon ground cloves
    • 1/8 teaspoon ground nutmeg
    • 1 tablespoon all-purpose flour
    • 1/4 teaspoon salt
    1. Crush the graham crackers, using a Ziploc bag and a rolling pin.
    2. Mix the graham crackers together with the melted butter.
    3. Spray your springform pan with cooking spray; then press the mixture into the pan. Place in the freezer ’til you’re ready to add the filling.
    4. Mix together the softened cream cheese, sugar, and brown sugar with a mixer. 
    5. Add the vanilla and almond extract, mixing well. 

    6. Add 1 whole egg and 1 egg yolk to the mixture. 
    7. Add pumpkin puree, along with sour cream, mixing well. 
    8. Mix in the spices, including the cinnamon, ginger, cloves, and nutmeg.

    9. Finally, mix in a tablespoon of flour and the salt.
    10. Pour the cheesecake filling into your crust.
    11. Add 1 1/2 cups water to the bottom of your pressure cooker.
    12. Cover the cheesecake pan with foil, and place the pan inside your Instant Pot.
    13. Set to Manual and cook for 30 minutes.
    14. When the Instant Pot is done and it's naturally released, allow it to cool completely.

    15. Then cover the cheesecake and place it in the fridge to chill for at least 6 hours, or overnight.

    16. Slice and serve. I suggest serving it with a li'l whipped cream on top.

    *This recipe creates enough filling for 2 smaller cheesecakes. If you have a larger Instant Pot (ours is smaller, a 6-quart), you could make 1 larger cheesecake with this recipe; just add a few more graham crackers and a little more butter to the crust mixture.

    Desserts
    American
    instant pot cheesecake, instant pot pumpkin cheesecake, pumpkin cheesecake, pumpkin spice cheesecake

    More Cheesecake Recipes You May Enjoy:

    Olive Garden White Chocolate Raspberry Cheesecake

    Strawberry Miracle Cheesecake

    Can’t wait to make this easy recipe? Pin it to save it!

    Pumpkin Spice Cheesecake, made in the Instant Pot. Easy fall and holiday dessert recipe with a graham cracker crust, full of delicious fall flavors.
    I just love Instant Pot Pumpkin Spice Cheesecake. Fall and holiday dessert recipe, easy to make, buttery graham cracker crust, filled with delicious fall flavors!