Category: Holiday Favorites

  • Christmas Tree Rice Krispie Treats

    Christmas Tree Rice Krispie Treats

    Fun and simple holiday recipe for kids! How to make Christmas tree Rice Krispie treats with a cookie cutter, gooey marshmallow treats, and candy.

    Rice Krispie squares are such a simple, classic dessert. They’re the quintessential kid-friendly dessert.

    decorated Christmas tree Rice Krispie treats on white marble countertop with candies and holiday kitchen towel

    They’re also really easy to decorate and reinvent every time a holiday or special event rolls around. I mean, how cute are these snowman Rice Krispie treats, these festive Fruity Pebbles Christmas treats, and heart shaped Rice Krispie treats?

    You only need 5 ingredients to make ordinary Rice Krispie treats. If you’re decorating and making special rice crispy treat shapes, you may need a few more decorative ingredients like icing, marshmallow cream, and candy.

    Rice Krispie Christmas trees decorated with marshmallow fluff and colorful candies

    Christmas tree Rice Krispies treats are super easy to make, and they’re a festive addition to the holiday dessert table.

    WHERE CAN I FIND THE RECIPE FOR CHRISTMAS TREE RICE KRISPIE TREATS?

    If you’d rather skip all of my cooking tips, important cooking info for this recipe, and similar recipe ideas – and get straight to the Christmas Tree Rice Krispie treats recipe – just scroll down to the bottom, where you’ll find a printable recipe card.

    HOW DO I MAKE RICE KRISPIE TREATS?

    You can follow this Rice Krispie Treats recipe to make a full pan of Rice Krispie treats.

    I usually fill a 9″x13″ pan with this recipe. Sometimes I’ll use a regular cake pan, but if I know I’m cutting out shapes, I’ll use my more shallow brownie pan.

    HOW TO MAKE RICE KRISPIE CHRISTMAS TREES

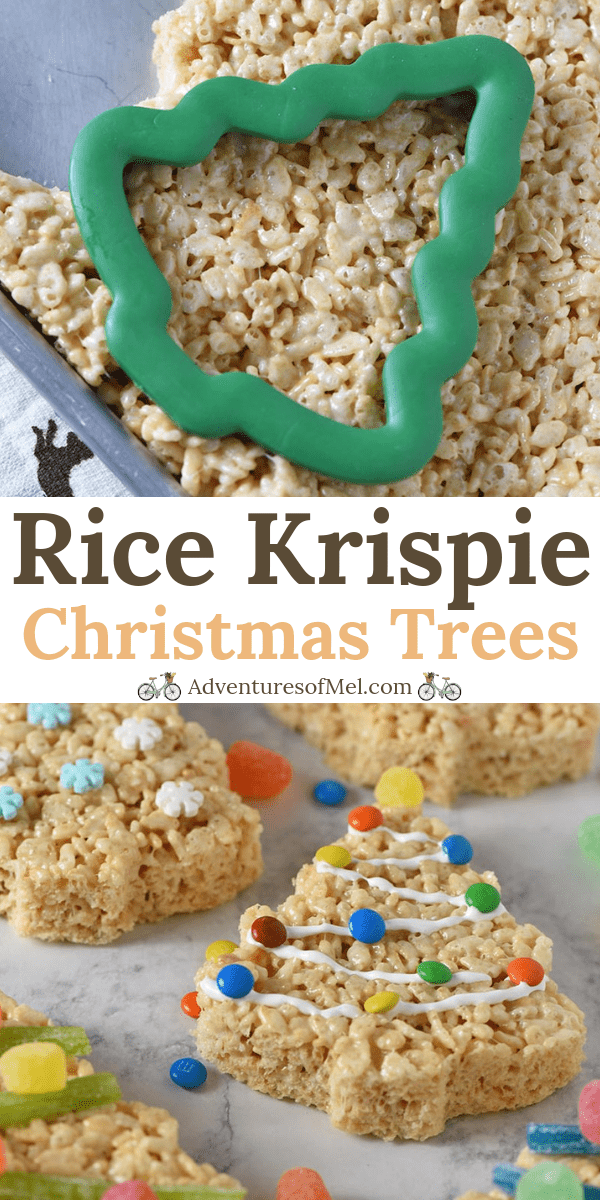
    Once you’ve spread your Rice Krispies treats mixture in your pan, you can go ahead and start cutting out Christmas tree shapes with a Christmas tree cookie cutter.

    cutting out Christmas tree rice crispy treats with a cookie cutter

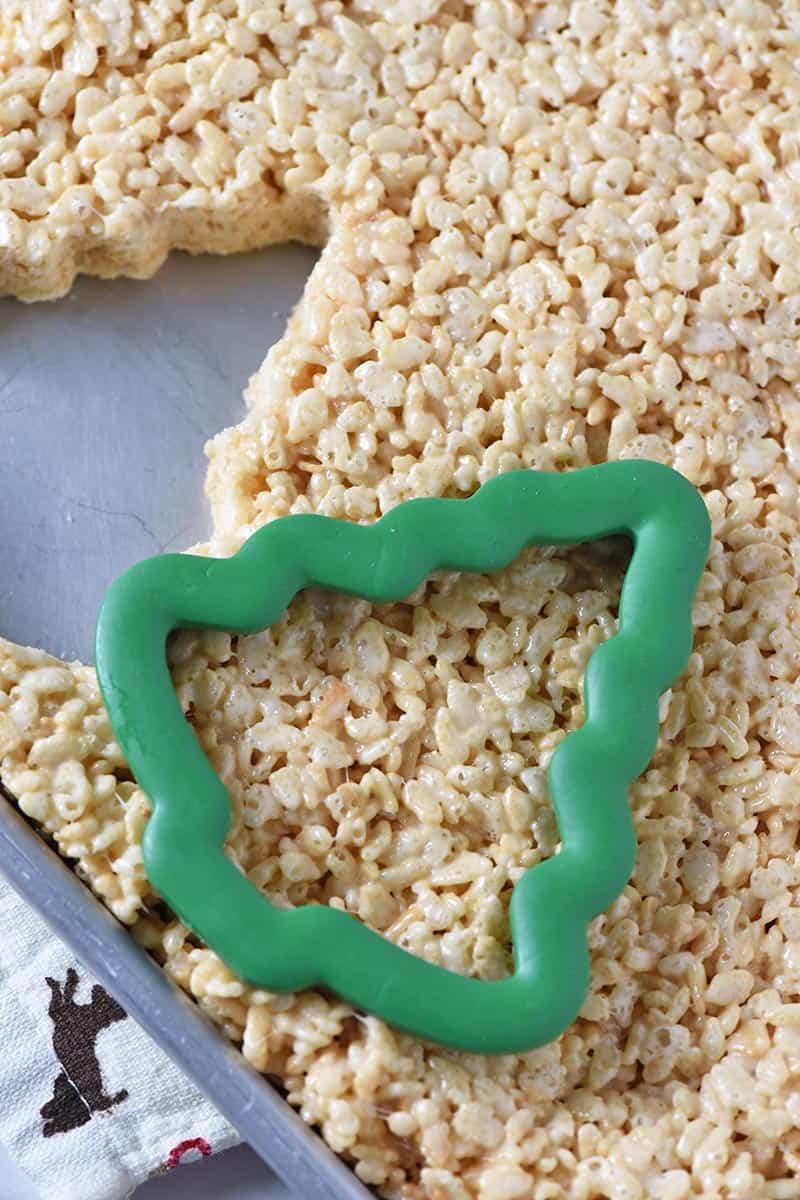
    Be careful because the treats will still be quite hot, so just take your time. Cutting out the Christmas trees will help them to cool more quickly, though.

    WHAT SHOULD I USE TO DECORATE MY CHRISTMAS TREES?

    First you’ll want to gather a few ingredients together, different candies and decorating icing.

    And here is where I improvised… I had no icing on hand, and I didn’t really feel like making my usual favorite sugar cookie icing either. I looked around me, and happened to look over inside a cabinet, and what did I see?

    A jar of Marshmallow Fluff… That’s right… Instead of using icing, I used Marshmallow Fluff, and it worked like a charm. I highly recommend it.

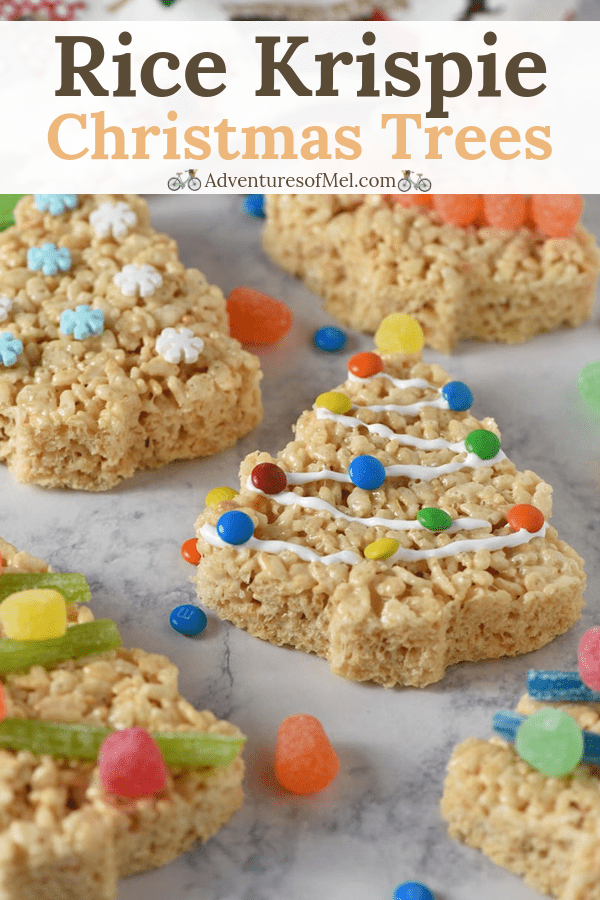
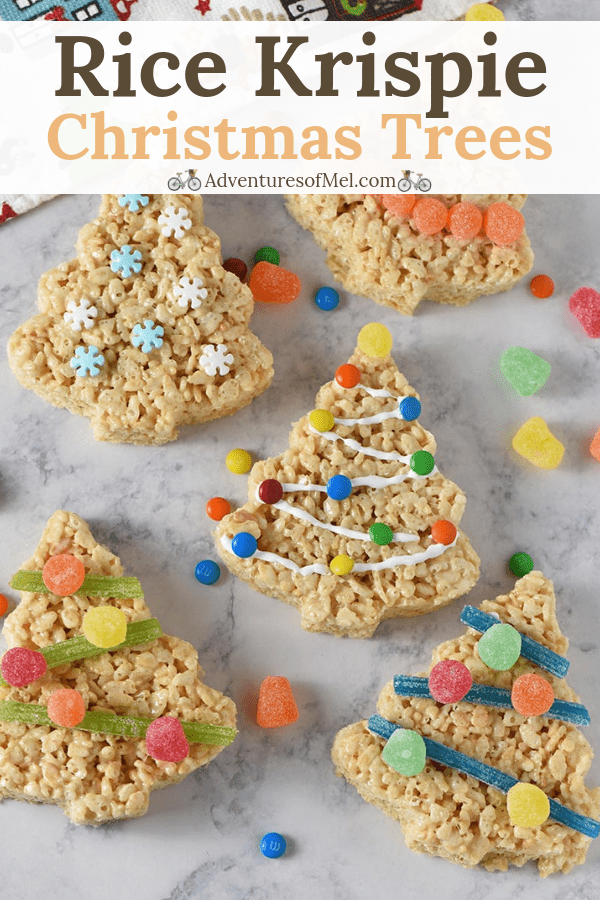
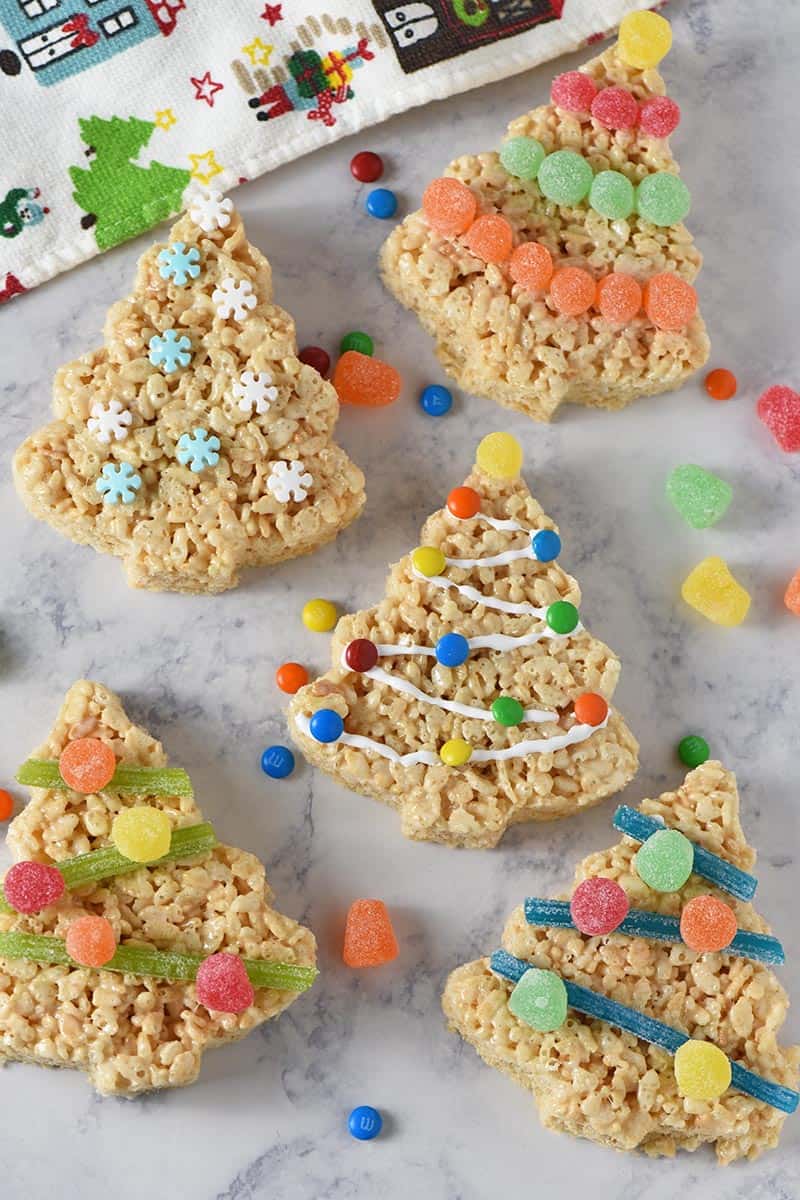
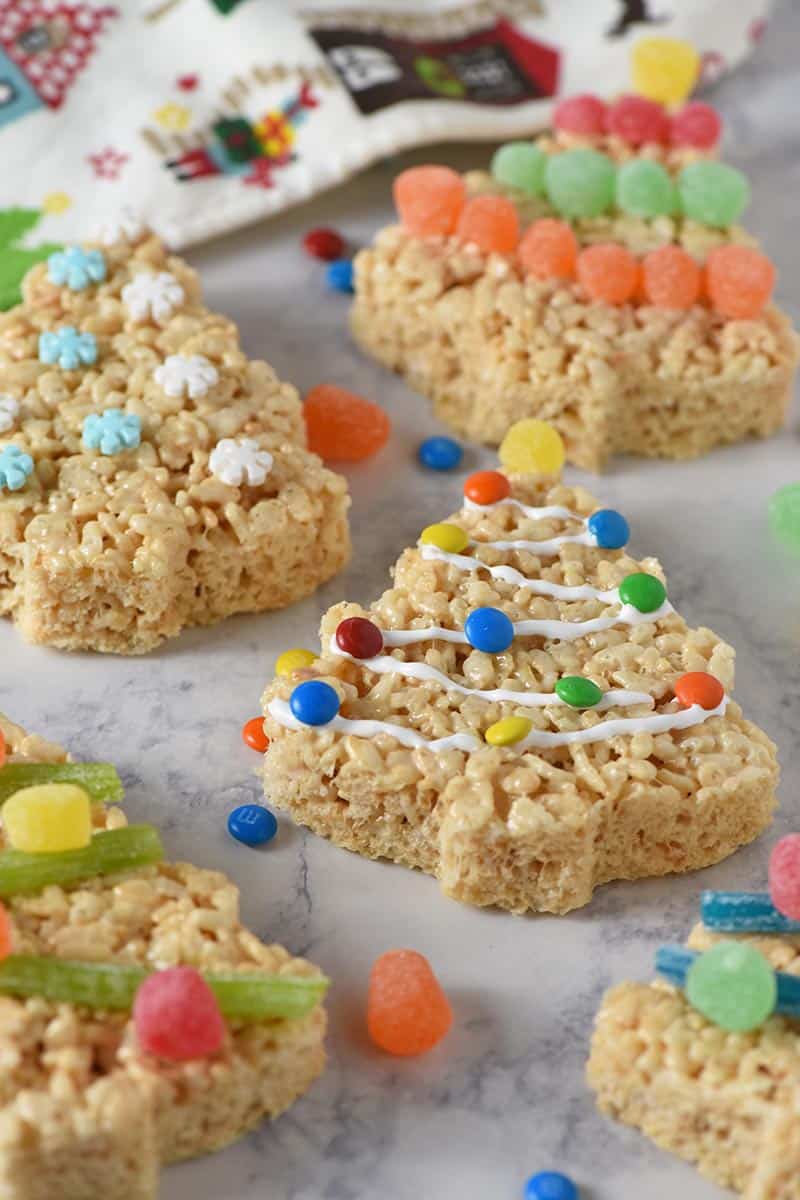
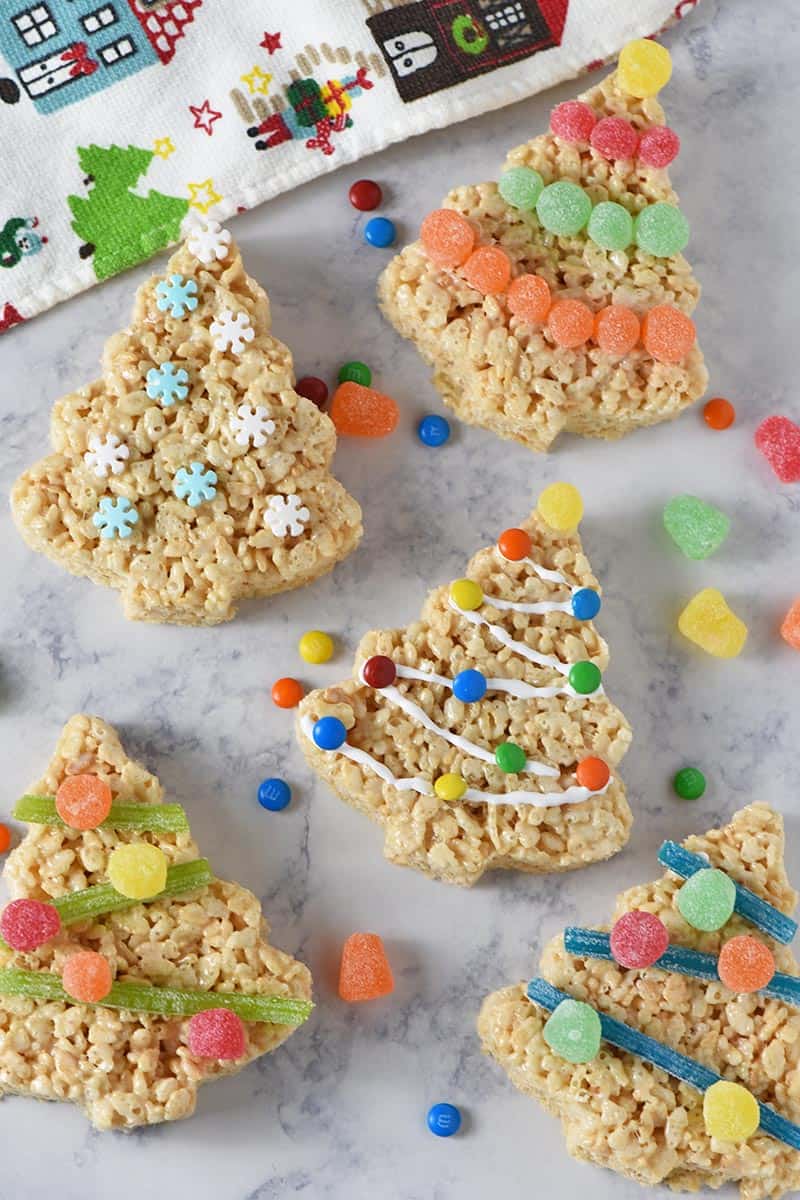
    Other ingredients you may want to gather are M&M’s Minis, spice drops, sour straws, and Christmas sprinkles.

    TIPS FOR HOW TO DECORATE CHRISTMAS TREE MARSHMALLOW TREATS

    You can decorate these treats however you want. It’s a really fun thing to do with your kids too. Give them a buffet to work from, and watch their creative forces at work.

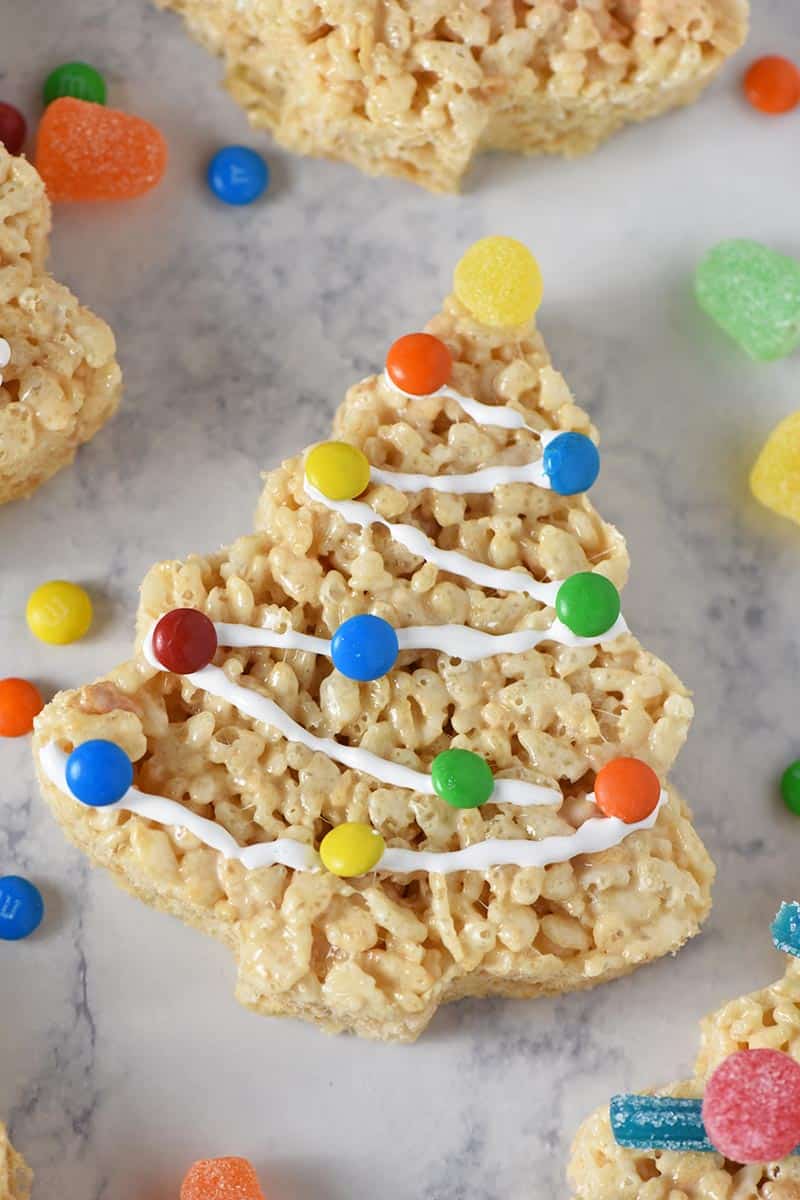
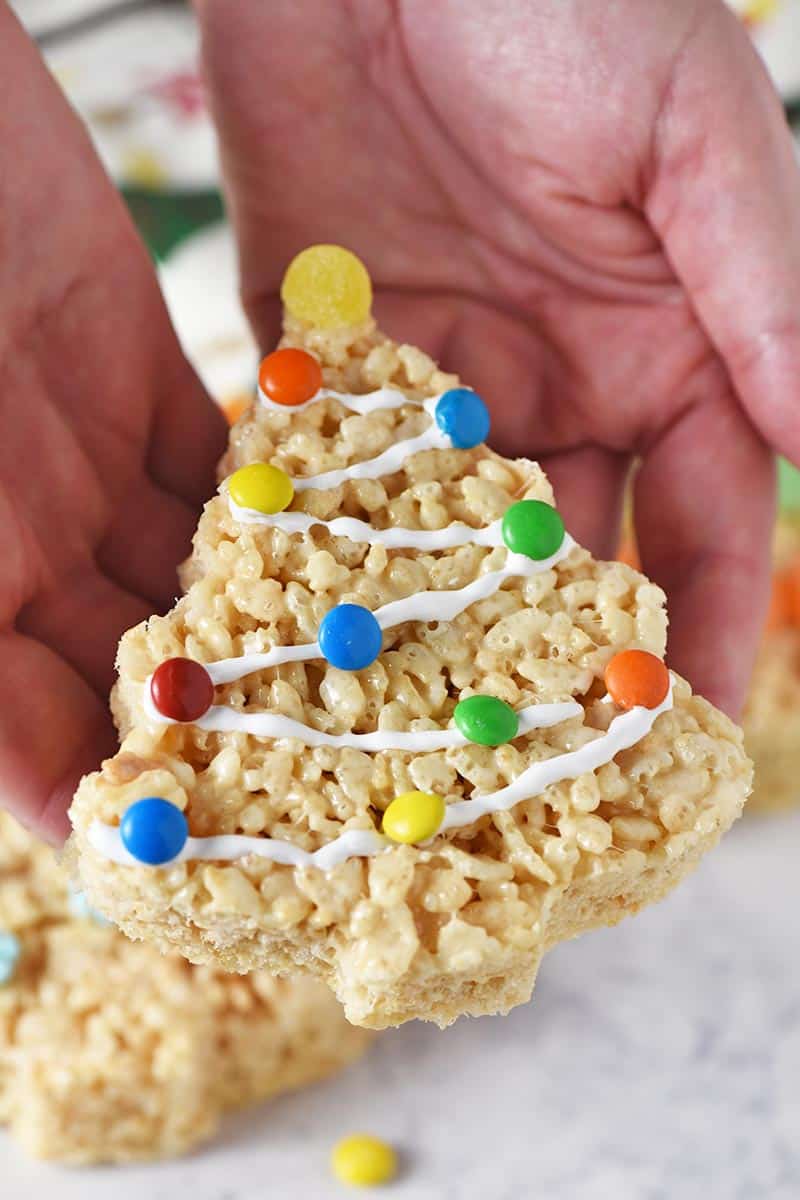
    You can pipe a bit of marshmallow fluff on as tinsel, then place M&M’s Minis on the fluff as ornaments. The fluff will hold the candy in place.

    M&M's Minis and Marshmallow Fluff decorating a Christmas tree Rice Krispie treat on white marble countertop

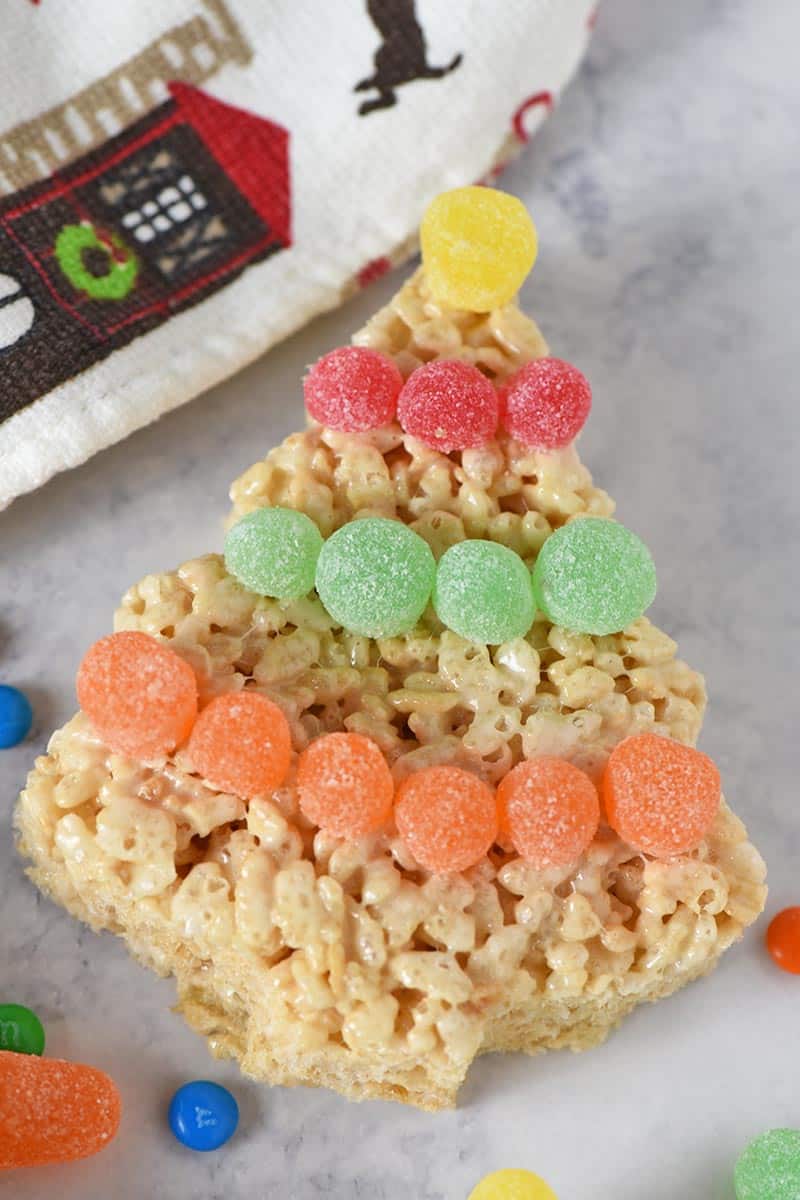
    Cut spice drops in half, which will give you a super sticky end to work with. Press that sticky end onto the Christmas tree and form a sort of spice drop tinsel (and even a star).

    spice drop tinsel on Christmas tree Rice Krispie treats

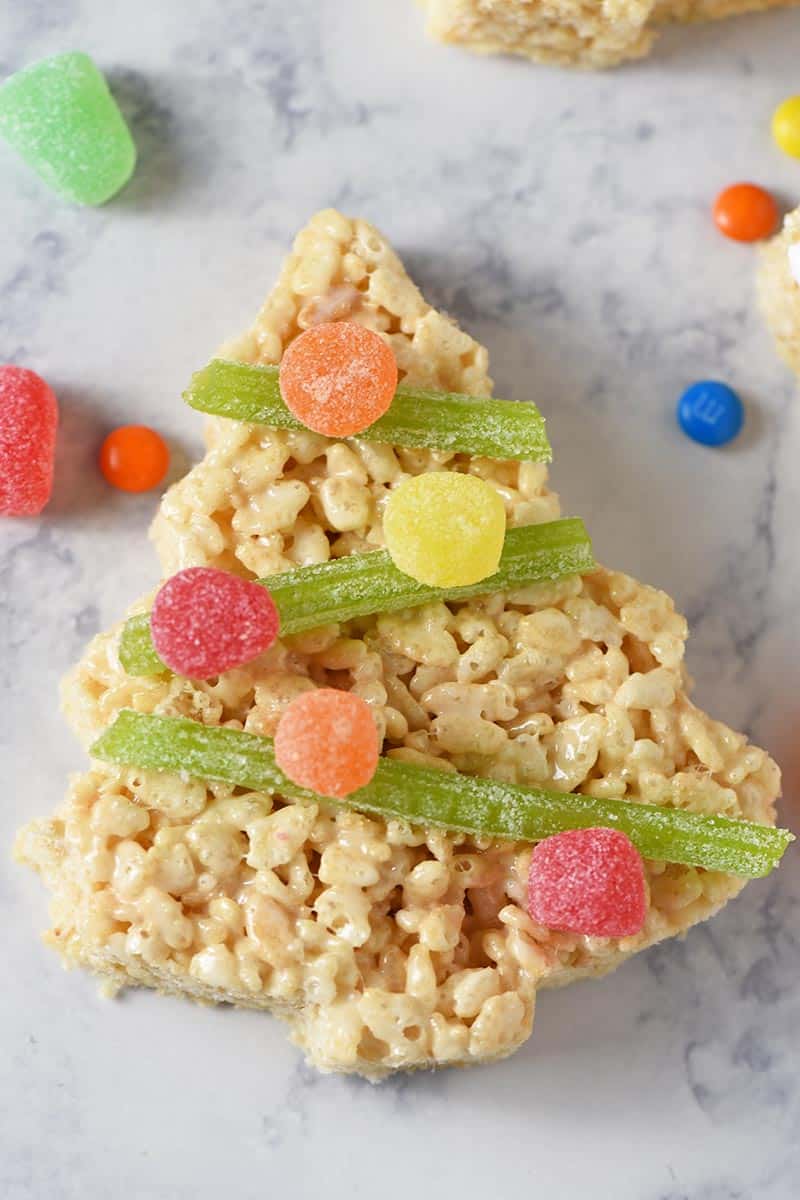
    Sour straws are really sticky, so you can stick pieces of sour straws onto your trees as tinsel.

    sour straws used as tinsel with spice drop ornaments on Rice Krispie Christmas trees

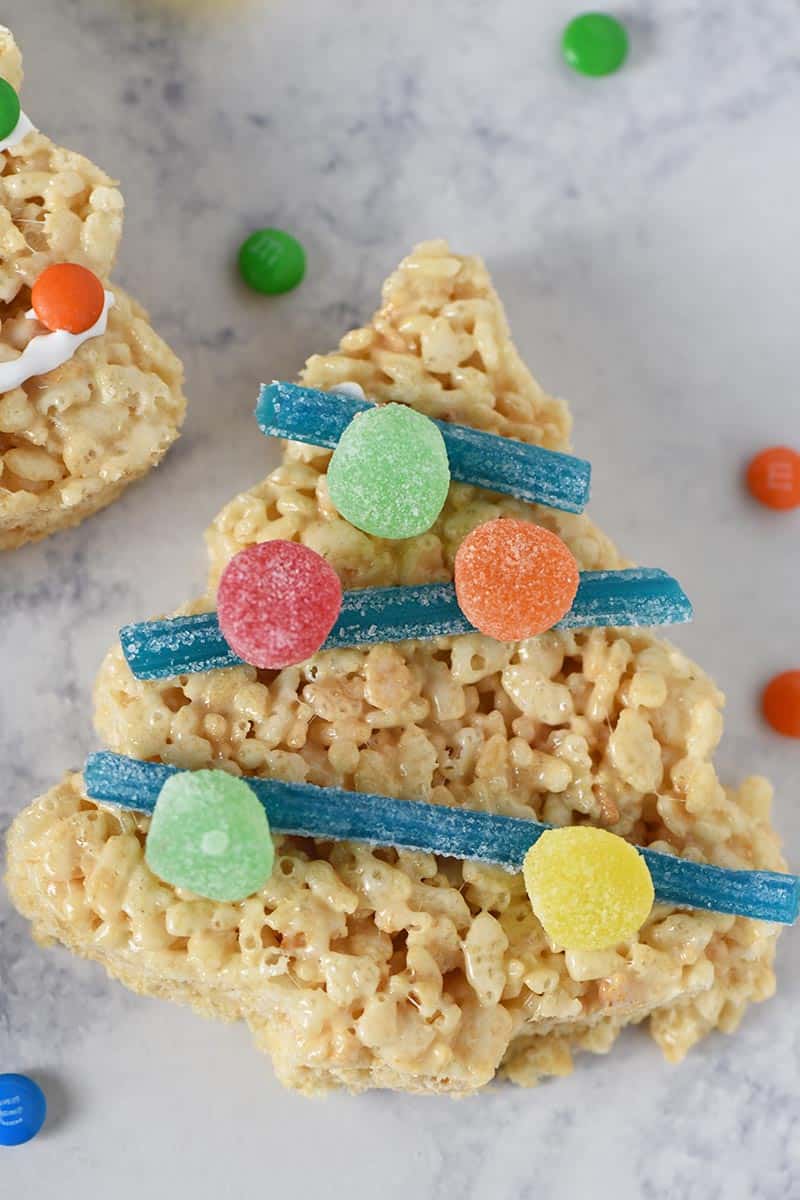
    Then add sliced spice drops as ornaments.

    spice drops and sour twist candy decorating Christmas tree Rice Krispie treats

    Use Marshmallow Fluff to hold special sprinkles on the tree… I love these little snowflake sprinkles.

    snowflake sprinkles on Christmas tree Rice Krispie treats

    Marshmallow Fluff will pretty much hold anything on your cutout Rice Krispie trees that just won’t stick. It’s amazing stuff and works so much better than decorating icing, in my humble opinion.

    holding decorated Christmas tree Rice Krispie treats

    LOOKING FOR MORE NO BAKE CHRISTMAS TREATS?

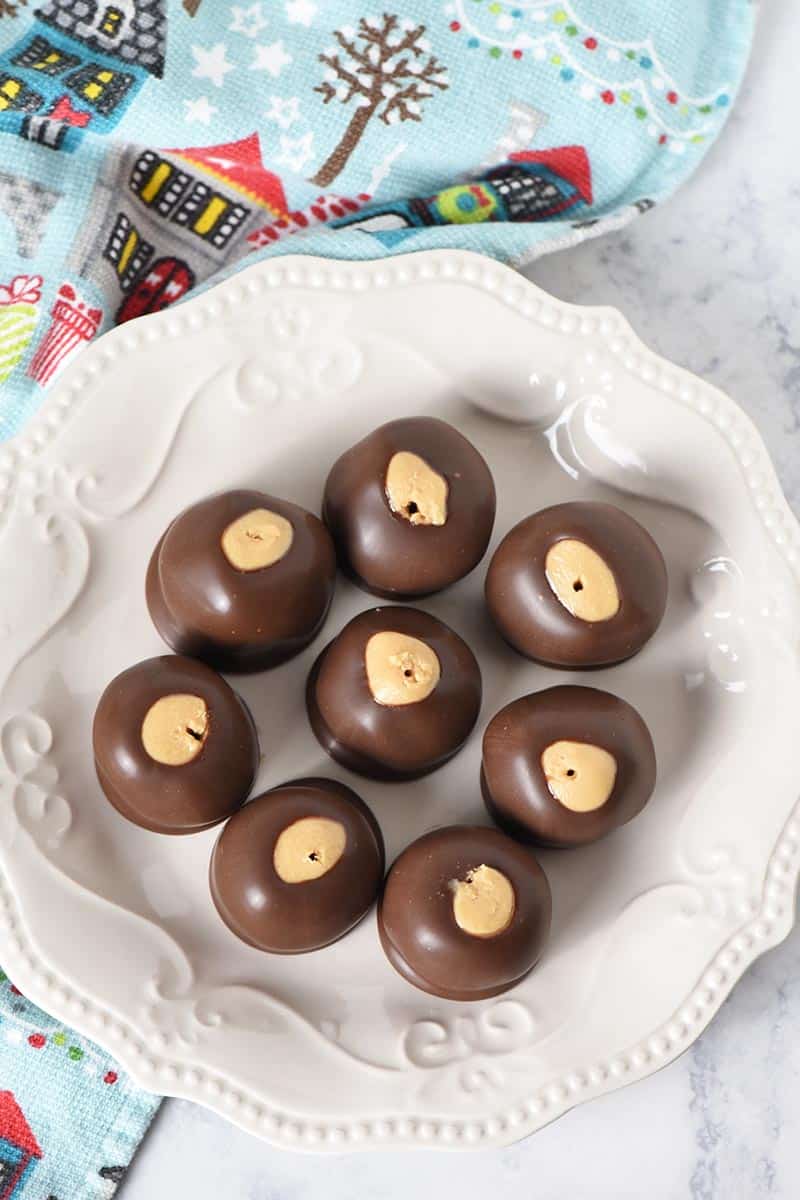
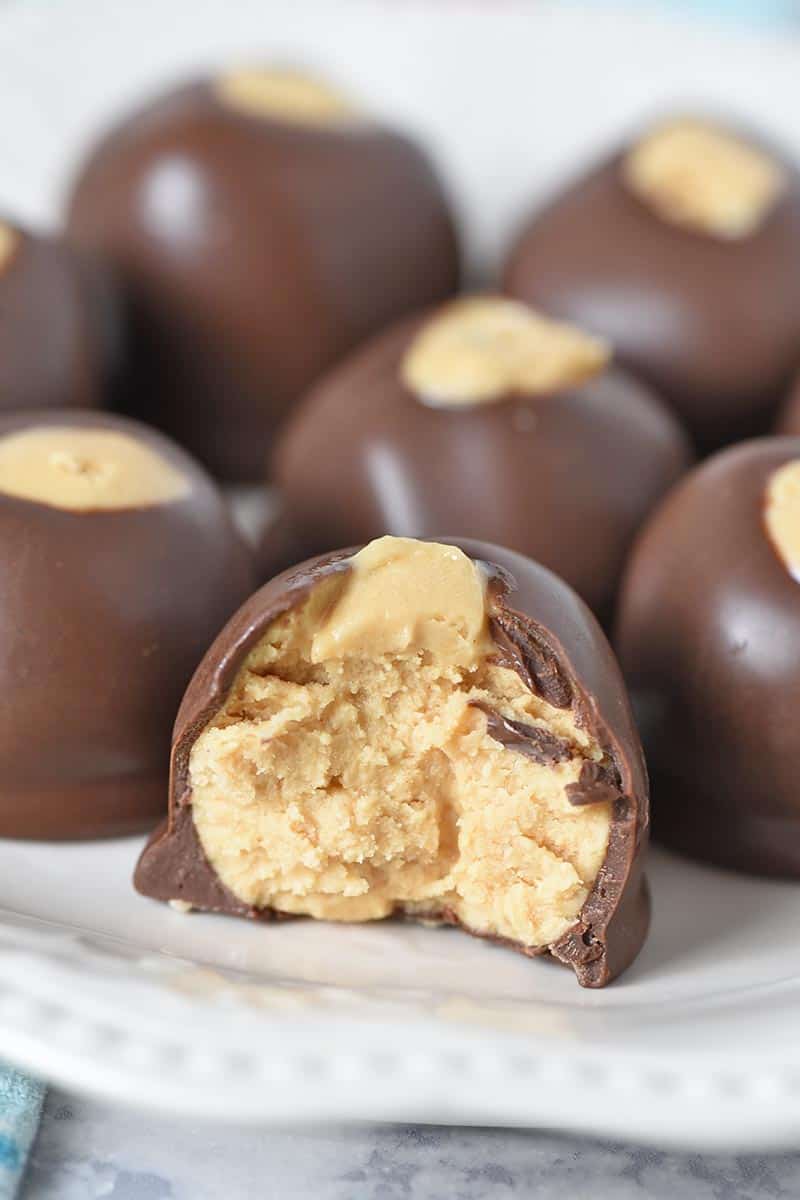
    We absolutely love making these Chocolate Peanut Butter Balls every Christmas. Another one of our absolute musts at Christmas time are these Ritz Cracker Chocolate Peanut Butter Cups.

    Mommy Hates Cooking has a scrumptious looking recipe for Peppermint Mocha No Bake Cookies. Sprinkle Some Fun has a recipe for the cutest ever Grinch Rice Krispie Treats.

    festive decorated Christmas trees made from Rice Krispies cereal

    KITCHEN TOOLS YOU MAY NEED TO MAKE CHRISTMAS TREE RICE KRISPIE TREATS

    Dutch Oven or Sauce Pot

    Heat-Resistant Spatula – This one is my go to spatula.

    9″x13″ Baking Dish or Brownie Pan

    Christmas Tree Cookie Cutter

    Decorating Bag and Small Round Tip

    CHRISTMAS TREE RICE KRISPIE TREATS RECIPE

    If you love this Rice Krispie treats recipe as much as I do, please write a 5 star review, and help me share the recipe on Facebook and Pinterest! If you make the recipe, be sure to share that you tried it on Pinterest. I love when readers share feedback!

    Christmas Tree Rice Krispie Treats Recipe

    CONNECT WITH ADVENTURES OF MEL!

    Be sure to follow me on social, so you never miss a post!

    Facebook | Pinterest | YouTube | Instagram | Twitter

    Sign up to receive my newsletter, filled with delicious recipes and outdoor travel adventures, in your inbox:

    FREE EMAIL SUBSCRIPTION

    Christmas Tree Rice Krispie Treats

    Fun and simple holiday recipe for kids! How to make Christmas tree Rice Krispie treats with a cookie cutter, gooey marshmallow treats, and candy.

    • 5 tablespoons salted butter
    • 1 teaspoon vanilla extract
    • 1/4 teaspoon salt
    • 6 cups mini marshmallows
    • 6 cups Rice Krispies cereal
    • 1 cup Marshmallow Fluff
    • 20 Sour Punch Twists (or Straws)
    • 10 ounces M&M’s Minis
    • 1 cup spice drops
    • 1 cup sprinkles
    1. Grease a 9×13 baking pan with cooking spray.

    2. In a large sauce pot or Dutch oven, melt the butter over low to medium heat on the stove.

    3. Stir the vanilla extract and salt into the butter.

    4. Add the mini marshmallows to the melted butter mixture, stirring until the marshmallows have fully melted.

    5. Remove the mixture from the heat, and quickly stir in the Rice Krispies cereal.

    6. Spread the Rice Krispies mixture in the prepared baking pan.

    7. Cut out Christmas tree shapes with a Christmas tree cookie cutter, and place the Rice Krispie trees on a wire rack to cool completely.

    8. For tinsel, pipe marshmallow cream back and forth on the trees, or pipe it onto the back of Sour Punch Twists (or Straws) to hold them on the trees.

    9. Use M&M's Minis, spice drops, and sprinkles as ornaments for the trees. Cut spice drops in half, which will give you a sticky side you can stick onto the Christmas trees; or use a little marshmallow cream to hold the candies in place.

    10. When you're all finished decorating, have fun serving and eating these festive treats!

    *You can also use decorating icing, but Marshmallow Fluff works really well. You can use a regular cake pan, or to make cutting shapes easier, you can use a more shallow brownie pan. Be careful cutting out the trees because the treats will still be quite hot, so just take your time.

    Desserts
    American
    Christmas recipes, Christmas treats, Christmas tree, marshmallow treats, no bake Christmas treats, Rice crispy treats, Rice Krispie Christmas trees, Rice Krispie squares, Rice Krispie treats, Rice Krispie treats recipe, Rice Krispies, Rice Krispies treats
    Recipe for Christmas tree Rice Krispie Treats
    easy recipe for Christmas tree Rice Krispie treats
    recipe for Christmas tree marshmallow treats
  • Leftover Ham and Stuffing Crescent Rolls

    Leftover Ham and Stuffing Crescent Rolls

    Leftover Ham Crescent Rolls – Easy appetizer recipe with leftover ham, stuffing, and crescent rolls. Simple and delicious finger foods, perfect for party snacks or lunch with the kids!

    crescent rolls with leftover ham, stuffing, and cheese baked inside, stacked on a white plate

    Sometimes I think leftovers are even better than the main dish, especially when it comes to leftover ham and crescent rolls. When you combine the two with a few tasty ingredients, you’ve definitely got the makings of a delicious snack, lunch, or appetizer.

    Not too long ago, I shared how to make the yummiest leftover turkey stuffing crescent roll appetizers. Well, now we’re going to do the same thing, only with ham.

    Because Christmas and Easter are all about ham, right? So now you’ll have a way to use up all those holiday leftovers in a really delicious way.

    stuffed crescent rolls made with leftover ham, cheese, and stuffing

    These ham and cheese crescents really are the perfect finger foods to serve as easy appetizers or even a fun lunch with your kids.

    WHERE CAN I FIND THE RECIPE FOR LEFTOVER HAM AND STUFFING CRESCENT ROLLS?

    If you’d rather skip all of my cooking tips, important cooking info for this recipe, and similar recipe ideas – and get straight to the scrumptious leftover ham and stuffing crescent rolls recipe – just scroll down to the bottom, where you’ll find a printable recipe card.

    CAN I JUST USE DELI HAM IF I DON’T HAVE LEFTOVER HAM?

    Yes, you can; in fact, that’s what I did for this recipe.

    leftover ham recipe made with crescent rolls, crescent roll appetizers stacked on a white plate and cookie sheet

    You can use any kind of ham, including a fully cooked ham, pineapple honey glazed ham, deli ham, or even chicken or roasted turkey.

    You can also use sausage and make something similar to my favorite maple sausage stuffed pastry bites, only with crescent roll dough instead of puff pastry.

    DOES IT MATTER WHICH CHEESE I USE?

    The type of cheese used is really up to the individual because cheese is such a personal choice. At least, that’s how I look at it anyway.

    I’ve been a cheese lover since I was a kid, sneaking pieces of American cheese out of the fridge when Mom wasn’t looking. In fact, I’d have much rather had a slice of cheese over a cookie any day… Unless they were chocolate chip cookies, of course.

    shredded cheddar cheese for leftover ham and stuffing crescent rolls recipe

    You can use just about any cheese you want with these. A few suggestions might be…

    • American Cheese
    • Extra Sharp Cheddar
    • Smoked Cheddar – One of my favorites.
    • Speaking of smoked, smoked Gouda would be fabulous, as would smoked Swiss or smoked Gruyére.
    • Pepper Jack

    Really, your options are limitless. Pick a cheese, any cheese, and you’ll have the most delicious crescent roll appetizers ever.

    TIPS FOR HOW TO MAKE LEFTOVER HAM AND TURKEY STUFFING CRESCENT ROLLS

    The first step for making these easy party appetizers is to gather your ingredients. You’ll need canned crescent rolls (or you can make homemade crescent dinner rolls), leftover ham, stuffing, your choice of cheese, and green onions.

    When I first made these, I used American cheese, but these days I’d rather use extra sharp cheddar or pepper jack.

    making leftover ham and cheese crescent rolls, easy party appetizers

    Take each piece of crescent roll dough, and add a quarter slice of cheese (or shredded cheese), as well as a small pile of leftover ham.

    Then add a bite of turkey stuffing (or Christmas stuffing or whatever type of stuffing you want).

    making leftover ham and stuffing crescent rolls on cookie sheet

    Another additional ingredient idea is leftover cranberry sauce. You can add just a tiny dollop of cranberry sauce on top of the ham for a li’l sweet and salty flavor.

    Finally, add a little pile of chopped green onions. Don’t leave these out because they add so much delicious flavor.

    making leftover ham and stuffing crescent rolls with cheese, ham, stuffing, and green onions

    Roll each crescent up, per the instructions on the can. They’ll probably be a bit bulky and might not be quite as pretty as they  normally would, but that’s ok; they’ll still taste amazing.

    Finally, pop them in the oven and bake as usual, per the instructions on the can.

    When you take them out of the oven, they’re best eaten while warm. Dip them in leftover ham gravy and enjoy!

    leftover ham and stuffing crescent rolls baked on a cookie sheet, ready to serve as easy appetizers

    Mmmm…. Happy Holiday Leftovers Season! You’ll find even more ideas in our big list of Christmas recipes.

    MORE LEFTOVER HAM RECIPES AND CRESCENT ROLL RECIPES YOU’LL LOVE:

    These 3 easy appetizer recipes are 3 of my favorites; the ham and dill spirals are perfect for using up leftover ham. You can also make the most delicious ham and cheese egg muffins (recipe coming soon).

    Venturing out into friend land, Mommy Hates Cooking has a Leftover Ham and Stuffing Frittata that looks out of this world amazing. And Crazy Adventures in Parenting made the most delicious looking Ham and Cheese Crescent Roll Sandwiches.

    pile of leftover ham crescent rolls on white plate with a sprinkling of green onions

    KITCHEN TOOLS YOU’LL NEED TO MAKE THESE EASY APPETIZERS

    Cookie Sheet – This is by far my favorite cookie sheet; I use it for so many things.

    Cheese Slicer

    Rustic Appetizer Server

    Holiday Dessert/Appetizer Plates

    Disposable Holiday Plates

    LEFTOVER HAM AND STUFFING CRESCENT ROLLS RECIPE

    If you love this leftover ham recipe as much as I do, please write a 5 star review, and help me share the recipe on Facebook and Pinterest!

    Leftover Ham and Stuffing Crescent Rolls Recipe

    CONNECT WITH ADVENTURES OF MEL!

    Be sure to follow me on social, so you never miss a post!

    Facebook | Pinterest | YouTube | Instagram | Twitter

    Sign up to receive my newsletter, filled with delicious recipes and outdoor travel adventures, in your inbox:

    FREE EMAIL SUBSCRIPTION

    Leftover Ham and Stuffing Crescent Rolls

    Easy appetizer recipe with leftover ham, stuffing, and crescent rolls. Simple and delicious finger foods, perfect for party snacks or lunch with the kids!

    • 2 cans crescent rolls
    • 1 1/2 cups ham (leftover and chopped or sliced)
    • 1 1/2 cups stuffing (leftover*)
    • 2 cups cheddar cheese (**shredded)
    • 1/2 cup green onions (chopped)
    1. Pre-heat your oven to 375°F.
    2. Separate each crescent roll.
    3. Add a bite of cheese, a small pile of ham, a bite of stuffing, and a sprinkling of green onions in that order.***
    4. Roll each crescent up, per the instructions on the can, and place on an un-greased cookie sheet.
    5. Bake at 375° for 11 to 13 minutes or until the crescent rolls turn a golden brown.
    6. They’re best served while warm, right out of the oven.

    *You can use leftover stuffing or even boxed stuffing for this recipe.

    **You can use any kind of cheese you want. I’ve used American, Extra Sharp Cheddar, Pepper Jack, Smoked Cheddar, etc.

    ***If you like, you can add just a tiny dollop of cranberry sauce on top of the turkey for a li’l sweet and salty flavor.

    Appetizers
    American
    Christmas appetizers, Christmas party appetizers, crescent roll appetizers, crescent roll recipes, crescent rolls, easy appetizers, easy party appetizers, ham and cheese, ham and cheese crescent rolls, leftover ham, leftover ham recipes, stuffed crescent rolls
    Leftover Ham and Cheese Crescent Rolls with Stuffing Recipe
    Leftover Ham and Stuffing Crescent Roll Appetizers Recipe
  • Mint Chocolate Crinkle Cookies

    Mint Chocolate Crinkle Cookies

    Make the best chocolate crinkle cookies ever! Made with cocoa powder, they’re a classic, family favorite Christmas cookie with a yummy chocolate mint twist.

    Every Christmas I make a few of our favorite Christmas cookies, including cutout sugar cookies, hot chocolate cookies and crinkles. This crinkles recipe has become a staple Christmas dessert, even making it into Thanksgiving festivities this year.

    stack of chocolate crinkle cookies on white countertop with plate of Christmas cookies and milk

    While I used to make chocolate crinkles with a brownie mix, I don’t anymore. In fact, I’m actually pretty proud of this recipe for perfectly gooey chocolate mint cookies.

    While the cookie dough is easy to mix up, it is a thicker, stickier dough. It’s a lot like brownie dough in that way.

    The cookies themselves are coated in powdered sugar and infused with peppermint flavor. They’re best when they’re warm and gooey from the melted chocolate chips and mint baking chips.

    chocolate crinkles piled on white plate, festive chocolate mint Christmas cookies recipe

    If you enjoy these Christmas cookies, you may also enjoy these reindeer thumbprint cookiesbutter almond snowball Christmas cookies, and chocolate lover’s Christmas light cookies.

    WHERE CAN I FIND THE RECIPE FOR CHOCOLATE CRINKLE COOKIES?

    If you’d rather skip all of my baking tips, important cooking info for this recipe, and similar recipe ideas – and get straight to the scrumptious crinkles recipe – just scroll down to the bottom, where you’ll find a printable recipe card.

    TIPS FOR HOW TO MAKE CRINKLE COOKIES

    Your first step will be to soften the butter, which you can do by either getting it out of the fridge ahead of time and letting it sit or putting it in the microwave for a few seconds.

    using KitchenAid mixer to cream butter and sugar for chocolate crinkle cookie recipe

    After creaming (or mixing) together the butter and sugar, mix in the eggs and the flavored extracts.

    sifting together dry ingredients, including cocoa powder, for chocolate crinkle cookies

    Sift the dry ingredients, and add them to the mixture.

    mixing ingredients with KitchenAid mixer for crinkles

    Then comes the best part… Fold in the chocolate chips and mint baking chips, making sure they’re mixed into the dough really well.

    You can if you want to, but you don’t have to. Here’s a tip, though.

    These cookies are best when they’re warm out of the oven. In fact, they can be a little stale after a day or two (unless you pop them in the microwave and warm them up).

    chocolate crinkles cookie dough in KitchenAid mixer bowl

    However, when you chill the dough, it helps to keep the cookies fresher for longer. I chilled my dough for about 4 hours the last time I made a batch, and the cookies were still fresh as a daisy and quite delicious 2 to 3 days later.

    So… My recommendation is to chill the cookie dough for a good 3 to 4 hours before baking.

    HOW DO I FORM THE CHOCOLATE CRINKLES FOR BAKING?

    Once you have your baking sheet out and ready to go, oven pre-heated, and cookie scoop in hand, take the following steps:

    • Scoop about a tablespoon or so of cookie dough.
    • Drop that scoop of cookie dough into a small bowl of powdered sugar and roll the dough ball around, making sure it’s good and coated.
    rolling chocolate crinkle cookies dough balls in powdered sugar for baking
    • Then just place each sugar coated dough ball on your baking sheet and you’ll bake according to the recipe instructions below.

    These really are the best Christmas cookies ever; they’re one of my favorite Christmas recipes.

    chocolate crinkle cookies baked and placed on white marble countertop

    I dare you to try and stop at just one.

    stack of chocolate mint crinkle cookies with bite taken

    CAN I FREEZE THESE COOKIES?

    You can freeze the cookies, but I’m not sure how fresh they’ll taste later on… I’d almost recommend freezing the cookie dough over the already baked cookies if possible.

    chocolate mint crinkles piled on plate with holiday kitchen towel and served with milk

    KITCHEN TOOLS YOU’LL NEED TO MAKE CHOCOLATE CRINKLES

    Stand Mixer or Hand Mixer with Mixing Bowl

    Sifter

    Cookie Scoop

    Cookie Sheet

    Wire Rack

    Christmas Cookie Jar or Festive Christmas Tin

    crinkles piled on plate with bite taken out of Christmas cookie, served with jar of milk

    Nothing says Christmas quite like a warm batch of gingerbread cookies.

    Mommy Hates Cooking has a scrumptious alternative to milk chocolate with these White Chocolate Christmas Cookies. And Around Our Family Table has a super easy recipe for Chocolate Peppermint Cookies.

    stack of chocolate crinkle cookies with bite taken out of Christmas cookie

    CHOCOLATE CRINKLE COOKIES RECIPE

    If you love this chocolate crinkle cookie recipe as much as I do, please write a 5 star review, and help me share the recipe on Facebook and Pinterest!

    Mint Chocolate Crinkle Cookies Recipe

    CONNECT WITH ADVENTURES OF MEL!

    Be sure to follow me on social, so you never miss a post!

    Facebook | Pinterest | YouTube | Instagram | Twitter

    Sign up to receive my newsletter, filled with delicious recipes and outdoor travel adventures, in your inbox:

    FREE EMAIL SUBSCRIPTION

    Mint Chocolate Crinkle Cookies

    Make the best chocolate crinkle cookies ever! Made with cocoa powder, they’re a classic, family favorite Christmas cookie with a yummy chocolate mint twist.

    • 1 cup unsalted butter (softened)
    • 1 1/2 cups cane sugar
    • 3 large eggs
    • 2 teaspoons vanilla extract
    • 1 teaspoon peppermint extract
    • 2 cups all-purpose flour
    • 3/4 cup unsweetened cocoa powder
    • 1 1/2 teaspoons baking powder
    • 1 teaspoon salt
    • 1 cup semi-sweet chocolate chips
    • 1 cup mint baking chips
    • 1 1/2 cups powdered sugar
    1. Pre-heat the oven to 350° F.

    2. In a large mixing bowl, cream or mix together the softened butter and sugar.

    3. Mix the eggs, vanilla extract, and peppermint extract into the butter mixture.

    4. In a separate large bowl, sift together the flour, cocoa, baking powder, and salt.

    5. Add the dry ingredients to the creamed mixture, mixing well.

    6. Fold the chocolate chips and mint baking chips into the mixture by hand.

    7. Using a cookie scoop, scoop about a tablespoon of cookie dough, and drop it into a small bowl of powdered sugar; roll the dough ball around, making sure it’s coated with powdered sugar.

    8. Place each sugar coated dough ball on the cookie sheet, and bake at 350° F for about 12 to 15 minutes, or until the cookies are set.

    9. Allow the cookies to rest on the cookie sheet for about 2 minutes before removing to a wire rack to cool completely.

    *I normally use an ungreased cookie sheet, but depending on the kind of baking sheet you use, you may want to spray it with a little cooking spray.

    Cookies & Bars, Desserts
    American
    best Christmas cookies, chocolate crinkle cookie recipe, chocolate crinkle cookies, chocolate crinkles, chocolate mint, chocolate mint cookies, Christmas cookie recipes, Christmas cookies, cookie recipes, crinkle cookies, crinkles, crinkles recipe
    Mint Chocolate Crinkle Cookies Christmas Recipe
    Christmas cookie recipe - Mint Chocolate Crinkle Cookies
  • Easy Orange Sherbet Punch Recipe

    Easy Orange Sherbet Punch Recipe

    Inspired by family tradition, orange sherbet punch is easy to make and the perfect recipe for Christmas, weddings, baby showers, and holiday parties.

    Soon we’ll be celebrating Christmas and ringing in the New Year, believe it or not. This orange sherbet punch is a recipe very similar to the sherbet punch my grandmother made every single Christmas without fail.

    mason jar with orange sherbet punch and red and white striped paper straw

    Orange sherbet really does make the best holiday punch. While I love the non alcoholic punch all by itself, the sherbet adds a creamy delicious froth that leaves behind an epic sherbet mustache.

    Out of all the punch recipes in the world, this one is my favorite by far. I’ve even added it to my list of favorite Christmas recipes because it truly is the best.

    If you’re looking for a Christmas punch or party punch you can throw together in just a few minutes, you’ve come to the right place.

    easy orange sherbet punch made in a large holiday punch bowl

    If you’d rather have a different flavor, you may enjoy my Polyjuice Potion recipe, aka lime sherbet punch.

    WHERE CAN I FIND THE RECIPE FOR ORANGE SHERBET PUNCH?

    If you’d rather skip all of my cooking tips, important cooking info for this recipe, and similar recipe ideas – and get straight to the sherbet punch recipe – just scroll down to the bottom, where you’ll find a printable recipe card.

    creamy orange sherbet punch in a mason jar with red and white paper straw, easy sherbet punch recipe

    A HOLIDAY PUNCH THAT BRINGS BACK SO MANY MEMORIES

    Every Christmas my grandma would set the punch bowl out on top of her big console tv. Little handled glasses hung on the sides of that punch bowl.

    Grandma, my mom, and aunts would scoop orange sherbet as fast as they could, topping that delicious party punch with every scoop.

    scooping orange sherbet while making orange sherbet punch in punch bowl

    Everyone would grab a cup, and the punch seemed to refill itself as everyone enjoyed it. Looking back, I realize now how much pride and happiness Grandma got out of having everyone in her home.

    Personally, I love a good non alcoholic drink recipe. My family doesn’t really drink, and we have a lot of kids in the family who love to enjoy a really good punch.

    orange sherbet punch from punch bowl to mason jar, perfect punch recipe for party punch, holiday punch, Christmas punch, and more

    TIPS FOR HOW TO MAKE A DELICIOUS SHERBET PUNCH

    While Grandma used 7-Up in her punch, I love to use Cranberry Sprite. Really, any lemon lime or cranberry lemon lime soda will work.

    ingredients for making orange sherbet punch recipe, including pineapple juice, cranberry apple juice, Cranberry Sprite, and orange sherbet

    I also use a little less cranberry apple juice than Grandma used. 3 cups seems to be just the right amount of juice.

    pouring juice for orange sherbet punch into large punch bowl

    Just a couple of tips…

    • Chill the juices and soda ahead of time so they’re nice and cold, and the sherbet won’t melt as fast.
    • Definitely be sure to get your sherbet out of the freezer ahead of time so it’s easier to scoop when you’re ready for it.
    scooping plenty of orange sherbet onto top of sherbet punch in punch bowl
    • 1/2 gallon of sherbet seems to do the trick, but if you want more, add a whole gallon. No one will ever complain of too much sherbet.
    serve orange sherbet punch recipe in mason jar or small party punch cups

    KITCHEN TOOLS YOU’LL NEED TO MAKE A SHERBET PUNCH RECIPE

    Punch Bowl

    Ice Cream Scoop

    Punch Cups – These Glitter Plastic Cups and Snowflake Tumblers are so pretty. But my favorite is the Moose Mug from Christmas Vacation.

    EASY ORANGE SHERBET PUNCH RECIPE

    If you love this sherbet punch recipe as much as I do, please write a 5 star review, and help me share the recipe on Facebook and Pinterest! If you make the recipe, be sure to share that you tried it on Pinterest. I love when readers share feedback!

    Inspired by family tradition, orange sherbet punch is easy to make and the perfect recipe for Christmas, weddings, baby showers, and holiday parties.

    CONNECT WITH ADVENTURES OF MEL!

    Be sure to follow me on social, so you never miss a post!

    Facebook | Pinterest | YouTube | Instagram | Twitter

    Sign up to receive my newsletter, filled with delicious recipes and outdoor travel adventures, in your inbox:

    FREE EMAIL SUBSCRIPTION

    Click on the video below to see how easy it is to make orange sherbet punch!

    Orange Sherbet Punch

    Inspired by family tradition, orange sherbet punch is easy to make and the perfect recipe for Christmas, weddings, baby showers, and holiday parties.

    • Punch Bowl
    • 46 ounces pineapple juice
    • 3 cups cranberry apple juice
    • 2 liters lemon lime soda
    • 1/2 gallon orange sherbet
    1. Combine the pineapple juice, cranberry apple juice, and lemon lime soda in a large punch bowl, stirring well.

    2. Then scoop orange sherbet on top, placing scoops all over the top of the punch.
    3. Serve immediately!

    I highly recommend chilling the juices and soda beforehand; this will help the sherbet not to melt so quickly.

    *You can use any lemon lime or cranberry lemon lime soda for this sherbet punch.

    *If you like more sherbet, feel free to add a whole gallon. 

    Beverage, Drinks
    American
    Christmas punch, easy punch recipes, non alcoholic punch, non alcoholic punch recipes, orange sherbet, orange sherbet punch, party punch, punch recipes, sherbet, sherbet punch, sherbet punch recipe
    easy orange sherbet punch recipe
    sherbet punch recipe made with orange sherbet
  • Red-Nosed Reindeer Thumbprint Cookies

    Red-Nosed Reindeer Thumbprint Cookies

    Bake a yummy batch of reindeer thumbprint cookies, decorated with pretzels and strawberry jam. Easy recipe for your Christmas party or cookie exchange!

    One of my favorite old-time Christmas specials, Rudolph the Red-Nosed Reindeer, inspired these li’l reindeer thumbprint cookies. Strawberry jam really does make the brightest red nose.

    reindeer thumbprint cookies made with mini pretzels and strawberry jam, on log platter

    Thumbprints are must have Christmas cookies. Just like our favorite cut out cookies, hot chocolate cookies and mint chocolate crinkle cookies, they’ve become tradition every year in our kitchen, and my boys look forward to the Christmas tins being filled with all our favorite holiday cookies.

    While these reindeer cookies may seem like a lot of work, they’re actually really easy. All you need is a little time, and really, baking and cookie decorating are great ways to spend quality time with your kids this holiday season.

    This festive thumbprint cookie recipe is just the thing for a holiday party or cookie exchange. They also make the best homemade gifts for your neighbors, as well as cookies for Santa.

    They’re just one of many family favorite Christmas recipes.

    reindeer thumbprint cookies on log platter with Christmas kitchen towel

    WHERE CAN I FIND THE RECIPE FOR REINDEER THUMBPRINT COOKIES?

    If you’d rather skip all of my baking tips, important cookie decorating info for this recipe, and similar recipe ideas – and get straight to the scrumptious thumbprint cookie recipe – just scroll down to the bottom, where you’ll find a printable recipe card.

    TIPS FOR HOW TO MAKE REINDEER THUMBPRINT COOKIES

    Your first step is to mix up your cookie dough.

    Start by creaming together (mixing together) the butter and sugar. Then mix the eggs, vanilla, and almond extract into the creamed mixture.

    sifting dry ingredients for reindeer thumbprint cookie recipe

    Sift together your dry ingredients, and then gradually mix them into the creamed mixture.

    mixing dry ingredients with creamed mixture, making Christmas cookies, reindeer thumbprints

    HOW TO FORM THE THUMBPRINTS

    • Using a cookie scoop, take about a tablespoon or just slightly smaller scoop of dough, and roll it into a ball.
    • Repeat the above step with the rest of the dough, placing the dough balls on an un-greased cookie sheet. Be sure to leave enough room between each cookie for your antlers. We’ll get to those in a minute.
    pressing dough into thumbprint Christmas cookies on OXO cookie sheet
    • Using a smooth bottomed glass, you’re going to press each cookie flat.
    • Then press your thumb into the center of each cookie, leaving enough room for eyes above and mouth beneath.

    Life Made Sweeter has an awesome tip in her recipe for Easy Shortbread Thumbprint Cookies… She uses a round 1/4 teaspoon to make the perfect indentation in the middle of her thumbprints. So brilliant!

    Once your thumbprint indentations are made, you’ll fill each thumbprint with a tiny spoonful or dab of strawberry jam. You can add as little or as much as you prefer, but don’t overfill because the jam may run out of the cookies as they bake.

    strawberry jam thumbprint cookies unbaked on cookie sheet

    Also, try to use a thicker jam. This will help prevent any mishaps with Rudolph’s nose during baking.

    Break mini pretzels in half, and place one on each side of your thumbprint cookies, to serve as antlers.

    using mini twist pretzels as antlers for reindeer thumbprint cookies on cookie sheet

    You’ll need to bake the cookies at this point and allow them to cool before adding tiny eyes and a mouth with black frosting or decorating gel (though I prefer frosting because it hardens). If you don’t want to use black frosting, you can use candy eyeballs instead.

    decorating reindeer thumbprint cookies with Wilton Sparkle Gel, adding eyes and mouth

    And then just give them a sprinkling of powdered sugar, using a powder shaker.

    sprinkle powdered sugar on reindeer thumbprint Christmas cookies, thumbprint cookies on log platter

    CAN I FREEZE THESE DECORATED CHRISTMAS COOKIES?

    So if you’re wanting to make these holiday cookies ahead and freeze them, I’d recommend freezing the dough… Or you can freeze the already formed reindeer thumbprints.

    reindeer holiday cookies on log platter

    I don’t know that I’d recommend freezing them decorated and all because I’m not sure how the pretzels would handle freezing and thawing.

    But you can definitely freeze the dough or unbaked cookies themselves.

    Christmas reindeer thumbprint cookies on log platter

    Chewy Gingerbread Cookies

    Chocolate Lover’s Christmas Light Cookies

    Butter Almond Snowball Christmas Cookies

    30 of the Most Scrumptious Classic Christmas Cookies Ever

    log platter full of reindeer thumbprint cookies for Christmas and the holidays

    KITCHEN TOOLS YOU’LL NEED TO MAKE JAM THUMBPRINT COOKIES

    Stand Mixer or Hand Mixer with Mixing Bowl

    Sifter

    Cookie Scoop

    Wire Rack

    Powder Shaker

    Christmas Cookie Jar or Festive Christmas Tin

    If you love this red-nosed reindeer thumbprint cookie recipe as much as I do, please write a 5 star review, and help me share the recipe on Facebook and Pinterest!

    Red-Nosed Reindeer Thumbprint Cookies Recipe

    CONNECT WITH ADVENTURES OF MEL!

    Be sure to follow me on social, so you never miss a post!

    Facebook | Pinterest | YouTube | Instagram | Twitter

    Sign up to receive my newsletter, filled with delicious recipes and outdoor travel adventures, in your inbox:

    FREE EMAIL SUBSCRIPTION

    Reindeer Thumbprint Cookies

    Bake a yummy batch of red-nosed reindeer thumbprint cookies, decorated with pretzels and strawberry jam. Easy recipe for your Christmas party or cookie exchange!

    • 1 1/4 cups unsalted butter (softened)
    • 1 cup cane sugar
    • 2 large eggs
    • 2 teaspoons vanilla extract
    • 1 teaspoon almond extract
    • 4 cups all-purpose flour
    • 1 teaspoon baking powder
    • 1 teaspoon salt
    • 1/2 cup strawberry jam
    • 2 cups mini pretzels
    • 1/4 cup black decorating icing
    • 1/3 cup powdered sugar
    1. Pre-heat the oven to 350° F.

    2. In a large mixing bowl, cream or mix together the softened butter and sugar. 

    3. Mix the eggs, vanilla extract, and almond extract into the creamed mixture.

    4. In a separate large bowl, sift together the flour, baking powder, and salt. 

    5. Gradually mix the dry ingredients into the creamed mixture, a little bit at a time.

    6. Using a cookie scoop, take about a tablespoon of dough, and roll it into a ball. Repeat with the rest of the dough, placing the dough balls on an un-greased cookie sheet. Be sure to leave enough room between each cookie for the antlers.

    7. Using a smooth bottomed glass, press each cookie flat.
    8. Press your thumb into the center of each cookie, leaving enough room for eyes above and mouth beneath.

    9. Fill each thumbprint with a tiny spoonful or dab of strawberry jam.

    10. Break mini pretzels in half, and place one on each side of each thumbprint cookie, to serve as antlers.
    11. Bake the cookies at 350° F for about 15 minutes, or 'til the cookies are set. 

    12. Remove the cookies from the oven, and place them on a wire rack to cool completely. 

    13. After the cookies have cooled, use black decorating icing to add eyes and a little smile. 

    14. Finally, using a powder shaker, sprinkle the reindeer cookies with powdered sugar.

    *You can use any flavor of red jam you prefer, including strawberry, raspberry, cherry, etc.

    *I recommend using black decorating icing, decorating gel, or candy eyeballs for the eyes. If you want homemade frosting, you can make an easy sugar cookie icing; but you won’t need very much just for eyes and smiles.

    Christmas, Desserts
    American
    Christmas cookie recipes, Christmas cookies, cookie decorating, cookie recipes, holiday cookies, jam thumbprint cookies, reindeer cookies, reindeer thumbprint cookies, thumbprint cookie recipe, thumbprint cookies, thumbprints
    red-nosed reindeer thumbprint cookie recipe for Christmas
    reindeer thumbprints Christmas cookies
  • Easy 4 Ingredient Buckeyes Peanut Butter Balls Recipe

    Easy 4 Ingredient Buckeyes Peanut Butter Balls Recipe

    How to make dreamy, creamy 4 ingredient buckeyes, peanut butter balls dipped in chocolate. Easy small batch buckeye recipe perfect for the holidays! It’s the quintessential must have Christmas candy and holiday dessert.

    Every Christmas since I was a little girl, I’ve made buckeye candy, or easy chocolate peanut butter balls with a creamy peanut butter center. If you’ve never had homemade buckeyes, they are the #1 must have Christmas candy.

    4 ingredient buckeyes peanut butter balls on ivory plate with blue Christmas kitchen towel

    When I was a kid during the holiday season, we’d store all the Christmas candy, including chocolate-dipped peanut butter balls, in the stairs that led up to my room because there was no heat or insulation. So they’d stay nice and chilled, and they were pretty easy to access on the way to my room.

    It just wouldn’t be the holidays without a small batch of buckeye balls and Ritz crackers with peanut butter. In fact, this small batch buckeyes recipe is one of our family’s favorite Christmas recipes. They’re perfect for Valentine’s Day too, especially if your significant other loves the combination of chocolate and peanut butter.

    Sometimes I like to make them crispy too. Rice Krispie peanut butter balls with Rice Krispies are just the ticket. If you want even quicker and easier (no rolling or dipping), you’ll love buckeye bars.

    Why I Love This Easy Buckeye Recipe

    • Classic peanut butter balls consist of a creamy peanut butter center inside a chocolate coating.
    • This buckeye balls recipe is super easy to make and only requires 4 ingredients.
    • Kids can get in on the fun of making them too, as it’s a very kid-friendly recipe.
    bite out of peanut butter buckeye, yummy easy buckeye recipe

    Is There a Difference Between Chocolate Covered Peanut Butter Balls and Buckeyes?

    Actually, yes, there is. And I didn’t really think it was that big of a deal until a few years ago, when a friend from Ohio (where the state tree of Ohio is the Ohio Buckeye tree) educated me otherwise.

    Chocolate covered peanut butter balls are just that… They’re completely covered in chocolate. Buckeye candy is mostly covered in chocolate but with a bit of the peanut butter uncovered, so to look like actual buckeyes.

    buckeye balls on a white plate

    Ingredients and Substitutions Notes

    You’ll need just a handful of ingredients to make this easy buckeye recipe…

    • Salted Butter – Be sure to give the butter time to soften and come to room temperature before mixing. You can also substitute plant-based or vegan butter if you need to make dairy-free buckeyes.
    • Creamy Peanut Butter – You can also sub crunchy peanut butter. I do recommend using a regular creamy peanut butter vs. a natural peanut butter, where you have to stir in the oil before using, because the chocolate will coat better with less oily peanut butter.
    • Powdered Sugar or Confectioners’ Sugar
    • Chocolate Melting Wafers – You can use any type of melting chocolate, but I do recommend using a higher quality chocolate for better flavor. I have used semi-sweet chocolate chips, but an actual melting chocolate has better flavor, in my opinion.

    How to Make 4 Ingredient Buckeyes Peanut Butter Balls

    1. Your first step will be to soften the butter and adding it to a large bowl. You can soften it by either getting it out of the fridge and letting it sit beforehand or putting it in the microwave for a few seconds.
    2. Add in the peanut butter with the butter.
    3. Finally, add in the powdered sugar.
    4. Mix everything together until it’s blended well.
    how to make buckeye balls by mixing butter, peanut butter, and powdered sugar together in green mixing bowl

    How to Shape the Peanut Butter Balls

    1. At this point, you’ll need to shape all of the dough into creamy peanut butter balls. You’ll take about a tablespoonful or small cookie scoop of the peanut butter mixture and begin to roll it between your hands. Shape it into round 1-inch balls and place each one on a baking sheet lined with wax paper or parchment paper.
    no bake peanut butter balls sitting on cookie sheet
    1. Add toothpicks (for dipping) to each ball.
    hand adding toothpicks to peanut butter balls for dipping

    Once all of the dough is rolled into balls, chill the whole sheet in the fridge or freezer for about half an hour.

    How to Melt Chocolate for Dipping

    While your peanut butter balls are chilling, it’s a good time to melt the chocolate and get it ready to go.

    Depending on the chocolate you decide to use, you can melt it a couple different ways:

    • Melt it using a double boiler on the stove – This is basically a pan inside of another pan with boiling water in the bottom pan. It allows for more even melting without burning, and it also keeps the chocolate warm for dipping.
    • Melt it in the microwave – This is usually the route I go.
    • Use a fondue pot and make it a family affair.

    Also, depending on the type of chocolate used, some people like to add vegetable shortening or paraffin wax to their chocolate as it melts. This allows for a thinner coat and stretches your chocolate a little further. If you use a good quality chocolate, you likely won’t need this step.

    I started using Ghirardelli Dark Melting Wafers a few years ago, and I love them so much better than almond bark. They’re so much easier to work with, and they have fantastic flavor.

    How to Dip the Peanut Butter Balls

    1. Dip the chilled peanut butter balls, leaving the very top part of each undipped, so to resemble an actual buckeye. We’ve used a regular table fork in the past, as well as tongs or toothpicks. You can also use a dipping fork or tool to dip your peanut butter balls into the chocolate.
    dipping peanut butter balls in chocolate in Pyrex measuring cup to make buckeye candy
    1. At this point, you’ll need to chill the buckeye peanut butter balls for about 15-20 minutes in the freezer; then remove all the toothpicks and cover up each toothpick hole with your finger (totally optional).
    fingers smoothing and covering buckeye toothpick holes after dipping in chocolate

    As you can see in most of my pictures, I didn’t really care about the holes being there… But if you do, just smooth it over.

    Expert Tips and Recipe FAQ’s

    For best results, make sure the peanut butter you’re using isn’t a super greasy peanut butter. If it’s too oily, the chocolate may not want to coat the peanut butter mixture.

    Put the melted chocolate in a deeper dish for dipping; I prefer my 2-cup Pyrex measuring cup because I can use it in the microwave, and it’s the perfect depth and breadth for dipping.

    My homemade buckeyes usually have kind of a chocolate ring around the bottom of the buckeyes. You can avoid this by letting excess chocolate drip off the buckeye after dipping; and just lightly press the bottom of the buckeye on a separate sheet of wax paper before putting it back on your cookie sheet.

    Can I use crunchy peanut butter to make buckeye candy?

    If you like to have a little crunch to your peanut butter balls, you most certainly can use crunchy peanut butter. I’ve also used honey peanut butter, which really does make delicious peanut butter balls.

    How do you keep buckeyes from sweating?

    Keep them chilled. Freezing or chilling the dough before dipping, then after dipping, will make the buckeyes sweat if removed from the fridge or freezer. So when not eating, keep them stored in the fridge.

    How should you store buckeye candies?

    As noted above, be sure to keep this candy in an airtight container, lined with wax paper, in the fridge. They can be kept out, but they won’t keep as long as they will if you keep them in the fridge.

    Can you freeze chocolate peanut butter balls?

    Yes, you can. You can freeze them before or after dipping. Just be sure to store them in an airtight, freezer-friendly container to avoid freezer burn. They should keep for up to 3 months.

    freshly dipped chocolate peanut butter balls, made with a family buckeye balls recipe, on a white ivory plate

    More Easy Candy Recipes:

    If you love this small batch buckeye recipe as much as I do, you’ll love these candies too…

    If you try this recipe, why not leave a star rating in the recipe card right below and/or a review in the comment section further down the page? I always appreciate your feedback. You can also follow me on Pinterest, Facebook, Instagram, and YouTube. And subscribe to my email list too!

    Easy 4-Ingredient Buckeyes Recipe

    How to make dreamy 4 ingredient buckeyes, peanut butter balls dipped in chocolate. Easy small batch buckeye recipe perfect for the holidays!

    • Mixing Bowls
    • Baking Sheet
    • Wax Paper
    • Double Boiler
    • Candy Dipping Tools
    • Festive Christmas Tins
    • 3 tablespoons salted butter (softened)
    • 1/2 cup creamy peanut butter*
    • 1 cup powdered sugar
    • 10 ounces dark chocolate melting wafers
    1. In a large bowl, mix up the first three ingredients, including the softened butter, creamy peanut butter, and powdered sugar.

    2. Take about a tablespoonful or small cookie scoop of the peanut butter mixture and begin to roll it between your hands. Shape it into as round of a ball as you can and place it on a baking sheet lined with wax paper or parchment paper.

    3. Continue rolling until all of your peanut butter mixture has been rolled into 1-inch balls.

    4. Add toothpicks (for dipping) to each ball.

    5. Chill the peanut butter balls in the fridge or freezer for about half an hour.
    6. Melt the chocolate according to package directions.*
    7. Once your chocolate is ready to go, you can remove the chilled peanut butter balls from the freezer, and start dipping right away.

    8. As you partially dip each buckeye into the chocolate, using a toothpick or dipping tool, place it back on the wax paper lined cookie sheet.*

    9. Chill the chocolate covered peanut butter balls in the fridge or freezer ’til set, probably about 15-20 minutes.
    10. Then remove all the toothpicks and cover up each toothpick hole with your finger (optional step).

    11. Store them in an airtight container or festive Christmas tin, lined with wax paper or parchment paper, in the fridge.*

    *For best results, make sure the peanut butter you’re using isn’t a super greasy peanut butter. If it’s too oily, the chocolate may not want to coat the peanut butter mixture. You can also use crunchy peanut butter.

    *How to Melt Chocolate for Dipping:

    • Melt it using a double boiler on the stove – This is basically a pan inside of another pan with boiling water in the bottom pan. It allows for more even melting without burning, and it also keeps the chocolate warm for dipping.
    • Melt it in the microwave – This is usually the route I go. I like to use my 2-cup Pyrex Glass Measuring Cup for dipping. Whatever you do, put the melted chocolate in a deeper dish for dipping; I prefer my Pyrex measuring cup because I can use it in the microwave, and it’s the perfect depth and breadth for dipping.
    • Use a fondue pot and make it a family affair.

    Also, depending on the type of chocolate used, some people like to add vegetable shortening or paraffin wax to their chocolate as it melts. This allows for a thinner coating and stretches your chocolate a little further.

    If you use a good quality chocolate, you likely won’t need this step. I started using Ghirardelli Dark Melting Wafers a few years ago, and I love them so much better than almond bark. They’re so much easier to work with, and they have fantastic flavor.

    *My buckeyes usually have kind of a chocolate ring around the bottom of the buckeyes. You can avoid this by letting excess chocolate drip off the buckeye after dipping; and just lightly press the bottom of the buckeye on a separate sheet of wax paper before putting it back on your cookie sheet.

    *They can be kept out, but they won’t keep as long as they will if you keep them in the fridge.

    Can Chocolate Peanut Butter Balls Be Frozen?

    Yes, they absolutely can. You can freeze them before or after dipping. Just be sure to store them in an airtight container or festive Christmas tin to avoid freezer burn.

    Candy
    American
    buckeye balls recipe, buckeye candy, buckeye peanut butter balls, buckeye recipe, buckeyes, chocolate covered peanut butter balls, chocolate peanut butter balls, easy chocolate peanut butter balls, how to make buckeye balls, how to make chocolate peanut butter balls, no bake chocolate peanut butter balls, peanut butter buckeyes recipe, small batch buckeye recipe
  • Leftover Turkey Stuffing Crescent Roll Appetizers

    Leftover Turkey Stuffing Crescent Roll Appetizers

    Leftover Turkey Crescent Rolls – Make an easy recipe for crescent roll appetizers, filled with leftover turkey, stuffing, and cheese! Simple and delicious finger foods for holiday parties!

    leftover turkey stuffing crescent rolls with green onions on a white plate, easy party appetizers

    Every Thanksgiving we buy a turkey to cook on Black Friday or over the weekend. Even though we usually enjoy dinner with family on Thanksgiving Day, we always plan to make our own too, along with turkey gravy and all the fixin’s.

    It’s sorta become a family tradition. Of course, we have a ton of leftovers afterward, so leftover turkey sandwiches on homemade dinner rolls, cheesy turkey noodle casserole,  and turkey enchilada casserole are a given for the next day or two.

    One year instead of ordinary sandwiches, we tried something new. We stuffed crescent rolls with leftover turkey, stuffing, and cheese, creating the most delicious crescent roll appetizers ever.

    leftover turkey stuffing crescent roll sliced in half with turkey, stuffing, and green onions

    Turns out, these little Thanksgiving appetizers are the perfect finger foods to serve at holiday parties or even just lunch with the kids.

    WHERE CAN I FIND THE RECIPE FOR LEFTOVER TURKEY CRESCENT ROLL APPETIZERS?

    If you’d rather skip all of my cooking tips, important cooking info for this recipe, and similar recipe ideas – and get straight to the scrumptious leftover turkey crescent rolls recipe – just scroll down to the bottom, where you’ll find a printable recipe card.

    DO I HAVE TO USE LEFTOVER TURKEY?

    Nope, the great thing about these stuffed crescent rolls is you can make them with roasted turkey, chicken, or even make leftover ham crescent rolls!

    You can also use sausage and make something similar to my favorite maple sausage stuffed pastry bites, only with crescent roll dough instead of puff pastry.

    baked leftover turkey crescent rolls with green onions on a cookie sheet

    They’re a fantastic way to use up leftover ham from Christmas and Easter.

    DOES IT MATTER WHICH CHEESE I USE?

    Ok, so cheese is really up to the individual because cheese is such a personal choice. At least, that’s how I look at it anyway.

    I’ve been a lover of cheese since I was a kid, sneaking pieces of American cheese out of the fridge when Mom wasn’t looking. In fact, I’d have much rather had a slice of cheese over a cookie any day… Unless they were chocolate chip cookies, of course.

    leftover turkey, stuffing, American cheese, and green onions being stuffed into a crescent roll for Thanksgiving appetizers

    But no, you can use just about any cheese you want with these. A few suggestions might be…

    • Good old American Cheese
    • Extra Sharp Cheddar
    • Smoked Cheddar – One of my favorites.
    • Speaking of smoked, smoked Gouda would be fabulous, as would smoked Swiss or smoked Gruyére.
    • Pepper Jack
    leftover turkey stuffing crescent roll appetizers with Pepper Jack cheese

    Really, your options are limitless. Pick a cheese, any cheese, and you’ll have the most delicious appetizers ever.

    TIPS FOR HOW TO MAKE LEFTOVER TURKEY STUFFING CRESCENT ROLL APPETIZERS

    The first step for making these easy party appetizers is to gather your ingredients. You’ll need canned crescent rolls (or you can make homemade crescent rolls), leftover turkey, stuffing, your choice of cheese, and green onions.

    easy crescent roll appetizers with leftover turkey, cheese, and turkey stuffing on white plate with green onions

    When I first made these, I used American cheese, but anymore I’d rather use cheddar or pepper jack.

    leftover turkey and stuffing with cheddar cheese on crescent roll dough

    Take each piece of crescent roll dough, and add a quarter slice of cheese, a bite of turkey stuffing, and a small pile of leftover turkey.

    leftover turkey stuffing crescent roll dough with shredded cheddar cheese

    Another additional ingredient idea is leftover cranberry sauce. You can add just a tiny dollop of cranberry sauce on top of the turkey for a li’l sweet and salty flavor.

    Roll each crescent up, per the instructions on the can. They’ll probably be a bit bulky and might not be quite as pretty as they  normally would, but that’s ok; they’ll still taste amazing.

    baked leftover turkey crescent rolls on OXO cookie sheet

    Finally, pop them in the oven and bake as usual, per the instructions on the can. When you take them out of the oven, they’re best eaten while warm.

    delicious party appetizers made with leftover turkey, stuffing, cheese, and crescent rolls, on a white plate

    Mmmm…. Happy Thanksgiving Leftovers Season!

    leftover turkey stuffing crescent roll appetizers on an ivory plate with cookie sheet behind

    MORE EASY PARTY APPETIZERS YOU’LL LOVE:

    3 Super Easy Appetizer Recipes Anyone Can Make

    Chicken Dip Pinwheels

    Snowman Pimento Cheese Ball

    sliced leftover turkey crescent rolls on white plate

    KITCHEN TOOLS YOU’LL NEED TO MAKE THIS CRESCENT ROLL RECIPE

    Cookie Sheet – This is by far my favorite cookie sheet; I use it for so many things.

    Cheese Slicer

    Rustic Appetizer Server

    Holiday Dessert/Appetizer Plates

    Disposable Holiday Plates

    LEFTOVER TURKEY STUFFING CRESCENT ROLL APPETIZERS RECIPE

    If you love this leftover turkey recipe as much as I do, please write a 5 star review, and help me share the recipe on Facebook and Pinterest!

    Leftover Turkey Stuffing Crescent Roll Appetizers Recipe

    CONNECT WITH ADVENTURES OF MEL!

    Be sure to follow me on social, so you never miss a post!

    Facebook | Pinterest | YouTube | Instagram | Twitter

    Sign up to receive my newsletter, filled with delicious recipes and outdoor travel adventures, in your inbox:

    FREE EMAIL SUBSCRIPTION

    Leftover Turkey Stuffing Crescent Roll Appetizers

    Make an easy recipe for crescent roll appetizers, filled with leftover turkey, stuffing, and cheese! Simple and delicious finger foods for holiday parties!

    • 2 cans crescent rolls
    • 1 1/2 cups turkey (leftover and shredded)
    • 1 1/2 cups stuffing (leftover*)
    • 1 1/2 cups cheddar cheese (**shredded)
    • 1/3 cup green onions (chopped)
    1. Pre-heat your oven to 375°.
    2. Separate each crescent roll.
    3. Add a bite of cheese, a bite of stuffing, a small pile of turkey, and a sprinkling of green onions in that order.***
    4. Roll each crescent up, per the instructions on the can, and place on an un-greased cookie sheet.
    5. Bake at 375° for 11 to 13 minutes or until the crescent rolls turn a golden brown.
    6. They’re best served while warm, right out of the oven. 

    *You can use leftover stuffing or even boxed stuffing for this recipe.

    **You can use any kind of cheese you want. I’ve used American, Cheddar, Pepper Jack, Smoked Cheddar, etc.

    ***If you like, you can add just a tiny dollop of cranberry sauce on top of the turkey for a li’l sweet and salty flavor.

    Appetizers
    American
    crescent roll appetizers, crescent roll recipe, crescent rolls, easy party appetizers, leftover turkey, leftover turkey recipes, stuffed crescent rolls, thanksgiving appetizers, turkey dressing, turkey stuffing
    crescent roll recipe with leftover turkey, stuffing, and cheese
    crescent rolls stuffed with leftover turkey, stuffing, cheese, and green onions
  • The Most Scrumptious Pumpkin Roll Ever

    The Most Scrumptious Pumpkin Roll Ever

    How to make the best pumpkin roll with a delicious caramel cream cheese filling. Classic Thanksgiving dessert recipe that’s sure to be a family favorite!

    Pumpkin roll is one of our family’s favorite Thanksgiving desserts. While it may seem a bit complicated and difficult, a pumpkin roll really isn’t all that difficult to make.

    scrumptious pumpkin roll with a cream cheese filling, sliced on an ivory plate

    I actually adapted this particular pumpkin roll recipe from a recipe we found a long time ago in a vintage recipe collection we used to have, called My Great Recipes. It was a collection given to us by a friend, and all the recipes were on cards in long, brown, plastic, see-through containers.

    When we did a big purge and got rid of a few things, I held on to this particular recipe card because it makes such a scrumptious pumpkin roll. Honestly, I wish I’d kept the whole kit (sigh). Live and learn, I guess.

    sliced pumpkin roll on a wooden cutting board with a holiday kitchen towel

    Anyway, instead of a regular cream cheese filling, I like to add just a hint of caramel to the filling. It gives the pumpkin roll even more of an edge, and it’s so delicious!

    WHERE CAN I FIND THE RECIPE? TAKE ME TO THE RECIPE FOR PUMPKIN ROLL!

    If you’d rather skip all of my baking tips, important mixing/baking info for this recipe, and similar recipe ideas – and get straight to the scrumptious pumpkin roll recipe – just scroll down to the bottom, where you’ll find a printable recipe card.

    DOES IT MATTER WHETHER OR NOT I USE CANNED PUMPKIN OR HOMEMADE PUMPKIN PUREE?

    Nope, they’re the same thing. You can use homemade pumpkin purée, or you can just buy canned pumpkin.

    The only difference I notice when using either/both is that homemade pumpkin purée can have a bit more water and be a little more juicy than store bought canned pumpkin.

    Homemade pumpkin purée is really easy to make, though. The recipe involves roasting the pumpkins, then just blending the pumpkin flesh into a smooth purée.

    HOW TO MAKE A PUMPKIN ROLL

    Your first step is to combine the eggs and sugar. Then add the pumpkin and lemon juice, mixing until blended.

    sifting dry ingredients for pumpkin roll recipe

    Add the flour, baking powder, baking soda, spices, and salt to a sifter; I like to sift the dry ingredients together because that’s how my mama trained me… Sift those dry ingredients!

    Once sifted, add the dry ingredients to the egg mixture, mixing well.

    Add a sheet of wax paper to a jelly roll pan (more on what this is in a minute). Then spray it down with cooking spray.

    Spread the batter onto the wax paper, spreading it out evenly and smoothly.

    Bake the pumpkin cake at 375° for about 15 minutes or until a toothpick or cake tester inserted in the center comes out clean. Remove the cake from the oven and cool for 15 minutes.

    WHAT IF I DON’T HAVE PUMPKIN PIE SPICE?

    That’s ok! What is in pumpkin pie spice is a mixture of spices, including ground cinnamon, nutmeg, and ginger; it may also include cloves and allspice.

    You can use these spices, individually, if you have them. You’ll just need to use a smaller amount of each spice you choose to use, so they can work together to create the amount of pumpkin pie seasoning you would need, in this case, a teaspoon.

    I would definitely try to use cinnamonnutmegginger, and even allspice if possible.

    WHAT IS A JELLY ROLL PAN?

    Basically, a jelly roll pan is just a cookie sheet with raised sides. It prevents the cake batter from going off the sides of your pan.

    HOW TO ACTUALLY ASSEMBLE A PUMPKIN ROLL

    You can sprinkle a little powdered sugar on a flour sack towel to give your pumpkin roll an even prettier, more festive, almost snowy look. Then place the pumpkin cake on the towel, peel off the wax paper, and let it cool for 10 minutes longer.

    place the pumpkin roll cake onto a powdered sugar flour sack towel and peel off the wax paper

    After allowing it to cool, roll the cake up in the towel, and set it aside while you mix up the cream cheese filling.

    rolling pumpkin roll cake up in flour sack towel

    Rolling up your pumpkin roll in a towel is supposed to help it not be too moist and also help it not crack. It may or may not crack while you’re doing the final rolling; just take your time and don’t rush.

    Once your filling is mixed up and creamy smooth, unroll the cake and spread the filling on the cake.

    spread cream cheese filling onto pumpkin roll cake before rolling

    Then roll the cake back up into a scrumptious pumpkin roll (minus the towel).

    pumpkin roll sprinkled with powdered sugar on a wooden cutting board

    Wrap it in plastic wrap, and let it cool in the fridge for about an hour.

    You can slice it up when you’re ready to serve it, but keep any leftovers in the fridge.

    sliced pumpkin roll on an ivory plate for Thanksgiving and Christmas

    Mmmm…. mmmm…. Such a yummy, moist, sponge-like cake roll! The caramel cream cheese filling is the BEST!

    Pumpkin roll is definitely one of my favorite Thanksgiving recipes of all time.

    bite of pumpkin roll on a fork with ivory plate

    CAN I FREEZE A PUMPKIN ROLL?

    Yes, you can. Freezing a pumpkin roll shouldn’t hurt the integrity of your roll or your filling one bit.

    Just be sure to wrap it well in both plastic wrap and freezer paper or place it in a freezer bag for freezing. That way you can hopefully prevent freezer burn.

    pumpkin roll on wooden cutting board

    IF YOU LOVE PUMPKIN ROLL, YOU MAY LOVE THESE PUMPKIN RECIPES!

    Deliciously Moist Pumpkin Bread Recipe

    Soft and Fluffy Pumpkin Muffins

    Pumpkin Gooey Butter Cake

    Creamy No Bake Pumpkin Dessert

    Instant Pot Pumpkin Spice Cheesecake

    Old-Fashioned Pumpkin Pie

    Pumpkin Sugar Cookies

    Pumpkin Pear Spice Cake

    slices of pumpkin roll on white plate

    KITCHEN TOOLS YOU’LL NEED TO MAKE A PUMPKIN ROLL:

    Stand Mixer or Hand Mixer – You can definitely mix a pumpkin roll by hand, but a mixer enables you to get a really smooth cake batter.

    Measuring Spoons and Measuring Cups

    Sifter

    Spatula

    Cake Tester or Toothpicks

    Jelly Roll Pan

    Flour Sack Towel

    PUMPKIN ROLL RECIPE

    If you love this pumpkin roll recipe as much as I do, please write a 5 star review, and help me share the recipe on Facebook and Pinterest!

    The Most Scrumptious Pumpkin Roll Recipe Ever

    CONNECT WITH ADVENTURES OF MEL!

    Be sure to follow me on social, so you never miss a post!

    Facebook | Pinterest | YouTube | Instagram | Twitter

    Sign up to receive my newsletter, filled with delicious recipes and outdoor travel adventures, in your inbox:

    FREE EMAIL SUBSCRIPTION

    Best Pumpkin Roll Ever

    How to make the best pumpkin roll with a delicious caramel cream cheese filling. Classic Thanksgiving dessert recipe that’s sure to be a family favorite!

    Cake Roll:

    • 3 large eggs
    • 3/4 cup cane sugar
    • 2/3 cup pumpkin purée
    • 1 teaspoon lemon juice
    • 3/4 cup unbleached cake flour
    • 1 teaspoon baking powder
    • 1 teaspoon baking soda
    • 1 1/2 tablespoons pumpkin pie spice
    • 1/4 teaspoon ground cloves
    • 1/2 teaspoon salt

    Cream Cheese Filling:

    • 8 ounces cream cheese (softened)
    • 4 tablespoons salted butter (softened)
    • 1 cup powdered sugar
    • 1/2 teaspoon vanilla extract
    • 1/8 teaspoon caramel extract
    1. Pre-heat the oven to 375° F.

    2. In a large mixing bowl, combine the eggs and sugar.

    3. Add the pumpkin and lemon juice to the egg mixture, mixing until blended. Set aside.
    4. In a separate bowl, whisk together the cake flour, baking powder, baking soda, spices, and salt.

    5. Add the dry ingredients to the pumpkin mixture, mixing well.
    6. Add a sheet of wax paper to a jelly roll pan. Then spray it with cooking spray.
    7. Spread the batter onto the wax paper, spreading it out evenly and smoothly.
    8. Bake at 375° F for about 15 minutes or until a toothpick or cake tester inserted in the center comes out clean. 

    9. Remove the cake from the oven and cool for 15 minutes.
    10. Turn the cake onto a clean flour sack towel sprinkled with extra powdered sugar. Cool 10 minutes longer.

    11. Carefully peel off the wax paper; then roll the cake up in the towel and set it aside while you mix up the cream cheese filling.

    12. Beat together the softened cream cheese and butter.

    13. Mix in the powdered sugar, vanilla extract, and caramel extract, mixing until smooth.

    14. Unroll the cake and evenly spread the filling over it.
    15. Remove the towel and roll the cake back up into a pumpkin roll.
    16. Wrap the cake in plastic wrap and chill for at least 1 hour.
    17. Slice before serving and enjoy! Keep leftover slices refrigerated.

    *You can use either canned pumpkin or homemade pumpkin purée. They’re the same thing, so it doesn’t matter which one you use.

    Desserts, Thanksgiving
    American
    how to make a pumpkin roll, pumpkin desserts, pumpkin puree, pumpkin recipes, pumpkin roll, pumpkin roll recipe, thanksgiving dessert recipes, thanksgiving desserts
    the most scrumptious pumpkin roll ever
    how to make the most scrumptious pumpkin roll ever
  • The Ultimate Mashed Potato Bar with the Best Toppings

    The Ultimate Mashed Potato Bar with the Best Toppings

    Feed a crowd with the ultimate mashed potato bar at your next party, wedding, or celebration. How to create a crowd pleasing buffet with ideas for all sorts of delicious mashed potato toppings. It’ll be the talk of the party!

    There are so many things you can do with a mashed potato bar; the choices for mashed potato bar toppings are endless. Pretty much anything you think up you can use.

    mashed potato bar, including mashed potato cup with bacon, cheese sauce, and chives, with spoon in ready to eat

    It’s the perfect appetizer idea, or side dish, for a wedding or party. I experienced my first mashed potato bar, or rather a mashtini bar, at a blogging conference; I’d never seen such a beautiful thing in all my life.

    It was filled with all sorts of delicious mashed potato toppings, along with all sorts of potatoes, including purple mashed potatoes! The mashed potatoes themselves were served in martini glasses, and you could go right down the buffet line, adding any mashed potatoes toppings you wanted.

    You talk about delicious and one of my favorite things ever. That was hands down the BEST food I’ve ever had at a conference. Comfort food at its best, and man, was it delicious.

    baked potato bar with baked potatoes and baked potato toppings

    Why Create a Mashed Potato Bar?

    When I created my first baked potato bar, I thought it only appropriate to also create a mashed potato bar. Because who doesn’t love a loaded down cup of hot mashed potatoes smothered in cheese and bacon?

    • A mashed potato bar wedding buffet will definitely be a great idea and a favorite with guests.
    • A mash potato bar is also perfect for that big holiday family gathering, like Thanksgiving dinner, Christmas dinner, or Easter dinner.
    • New Year’s is also a great time to put together a mashed potato martini bar. To save on cost, make a big batch of mashed potatoes, and have each guest bring their favorite toppings to add to the ones you provide. Then you get different perspectives, different ideas, and guests get to contribute their favorite topping idea to the mix.
    mashed potatoes with mashed potato bar toppings on gray countertop with white and blue kitchen towel

    How to Make Mashed Potatoes

    I’ve got you covered with this delicious and easy mashed potatoes recipe.

    Ingredient Notes:

    • Potatoes – I prefer to use yellow potatoes, but again, you can have fun with this and use all sorts of potatoes, including yellow, russet, red potatoes, even purple potatoes.
    • Salted Butter – Don’t skimp on the butter; it gives the best flavor.
    • Heavy Cream or Whole Milk – While you can use skim milk, you’ll get the best texture and flavor with whole milk or cream.
    • Sea Salt and Black Pepper – for added flavor.

    Steps for Making Stovetop Mashed Potatoes:

    1. Wash, peel, and chop the potatoes.
    2. Boil the potatoes in a large saucepan on the stove over low to medium heat, until they’re soft enough to easily jab with a fork, about 20-30 minutes.
    3. Drain the water off the boiled potatoes, and leave them in the saucepan.
    4. Add the butter and heavy whipping cream to the potatoes.
    5. Use a hand mixer to whip the potatoes, adding salt and pepper to taste. You can also use a potato masher if you don’t have a hand mixer; your potatoes may just be a little bit chunky.
    6. Once they’re whipped, they’re ready to serve.

    If you’d rather, you can make Instant Pot mashed potatoes instead.

    mash potato bar with mini trifle bowls of mashed potatoes covered in toppings like bacon, cheese sauce, chives, broccoli, sloppy joe meat, and red onion

    How to Set up or Assemble a Mashed Potato Bar

    Gather your ingredients for your potato bar… You’ll need mashed potatoes and toppings. Your main work will be cooking the potatoes and prepping any toppings for your guests to choose from.

    Whether you’re getting together with friends for game night, hosting a family dinner, or setting up a potluck, a mashed potatoes bar is the perfect way to feed and entertain your guests. And it really doesn’t take a whole lot of time and effort on your part.

    Mash Potato Bar Ideas and Expert Tips

    • If you’d rather use sweet potatoes over regular potatoes, you can make Instant Pot sweet potatoes.
    • Prep the toppings, adding each topping to a separate dish or compartment for serving. Prepping may involve cooking, re-heating, or simply chopping.
    • Set everything out buffet style, so your guests can create their very own delicious mashed potato creations.
    • If you’re hosting a smaller gathering, try using a large charcuterie board with small bowls for a variety of toppings all around a large bowl of mashed potatoes.
    • If you’re wondering how to keep the mashed potatoes warm without warmers, you can create a CrockPot mashed potato bar or Instant Pot mashed potato bar.

    The Ultimate List of Mashed Potato Bar Toppings:

    When it comes to what toppings are good on mashed potatoes, including what to put on mashed potatoes besides gravy, this list of toppings will answer that question in a most delicious way.

    broccoli and cheese sauce on mashed potato in small glass trifle dish
    sloppy joe meat and red onions on mashed potato in small glass trifle dish
    bacon and cheese topping for mashed potato bar in small glass trifle dish

    The sky’s the limit on ideas for a mashed potato buffet because there are so many toppings you can add to this list. But this is a great start.

    Recipe FAQ’s

    How much does a mashed potato bar cost?

    Really, this depends. For a small family gathering, if you make your own mashed potatoes and put together just a few simple toppings, you can get away with less than $20. If you’re creating a larger buffet for a large crowd, your cost will depend on how many ingredients and supplies are needed to feed said crowd.

    What potatoes are best for a mash potato bar?

    While I do prefer yellow potatoes or Yukon Gold potatoes, you can use any kind of potatoes you prefer, including Russet potatoes, red potatoes, even purple potatoes if you can find them. I’ve also gone so far as to search for the best mashed potatoes near me, and I found Bob Evans mashed potatoes in my grocery store. If you really don’t want to make mashed potatoes, ready made potatoes could be just the thing.

    Can you make mashed potatoes and toppings ahead of time?

    Yes, you can. You can make mashed potatoes and prep most of the toppings 1-2 days ahead of time. You’ll just need to store everything in airtight containers in the fridge.

    How can you keep the mashed potatoes warm at a party?

    You can either use a buffet server and food warmer. Or you can keep the mashed potatoes in a Crock Pot or Instant Pot on the “Keep Warm” setting.

    How should you store leftovers?

    Definitely store leftovers in airtight containers in the refrigerator.

    More Family Favorite Potato Recipes

    If you love this mashed potato bar and think it’s as much fun as I do, you’ll love these recipes too…

    mashed potato bar toppings with small glass trifle bowls of mashed potatoes

    If you try this recipe, why not leave a star rating in the recipe card right below and/or a review in the comment section further down the page? I always appreciate your feedback. You can also follow me on Pinterest, Facebook, Instagram, and YouTube. And subscribe to my email list too!

    The Ultimate Mashed Potato Bar

    Feed a crowd with a mashed potato bar at your next party, wedding, or celebration. Ideas for all sorts of delicious toppings.

    • Stockpot
    • Hand Mixer
    • Potato Masher
    • Cutting Board
    • Vegetable Cleaver
    • Buffet Server and Food Warmer
    • Serving Bowls
    • Sectioned Serving Tray
    • Mini Appetizer Cups
    • Plastic Martini Glasses

    Mashed Potatoes:

    • 16 medium potatoes
    • 12 tablespoons salted butter
    • 4 tablespoons whole milk (or heavy cream)
    • 2 teaspoons sea salt (to taste)
    • 2 teaspoons ground black pepper (to taste)

    Mashed Potato Bar Toppings:

    • 1 1/2 cups salted butter
    • 1/4 cup salt
    • 1/4 cup ground black pepper
    • 1 1/2 cups sour cream
    • 3 cups cheese sauce
    • 12 ounces extra sharp cheddar cheese (*shredded)
    • 2 cups red onion (minced)
    • 2 cups green onion (chopped)
    • 2 cups chives (chopped)
    • 6 cups broccoli (cooked)
    • 6 cups sloppy joe meat
    • 1 1/2 cups bacon (cooked and crumbled)
    • 4 1/2 cups ham (chopped)

    Mashed Potatoes:

    1. Wash, peel, and chop the potatoes.

    2. Boil the potatoes in a large saucepan on the stove, until they're soft enough to easily jab with a fork, about 20-30 minutes.

    3. Drain the water off the boiled potatoes, and leave them in the saucepan.

    4. Add the butter and heavy whipping cream to the potatoes.

    5. Use a hand mixer to whip the potatoes, adding salt and pepper to taste. You can also use a potato masher if you don't have a hand mixer; your potatoes may just be a little bit chunky.

    6. Once they're whipped, they're ready to serve. 

    Potato Bar Toppings:

    1. Choose and prep your toppings*, adding each topping to a separate dish or compartment for serving. Prepping may involve cooking, re-heating, or simply chopping.

    2. Set everything out buffet style*, so your guests can create their very own delicious baked potato creations.

    * You can use any kind of shredded cheese you prefer. I recommend Extra Sharp Cheddar, Colby Jack, Monterey Jack, Pepper Jack, Smoked Cheddar, Mozzarella, etc.

    *More mashed potato bar topping ideas include cooked cauliflower, chili, beef taco meat, taco chicken, pulled pork, sausage, ground beef, steak, bacon bits, cubed pepperoni, BBQ sauce, Ranch dressing, pizza sauce, turkey gravy, ham gravy, ham gravy with cornstarch, chicken stock gravy, tomatoes, guacamole, salsa, jalapeños, fire roasted green chiles, corn, peas, etc.

    *You may need warmers to keep the mashed potatoes warm; you can also use a slow cooker or Crock pot. Otherwise, you may use a serving platter or serving bowls for toppings.

    Side Dish
    American
    mash potato bar, mashed potato, mashed potato bar, mashed potato bar ideas, mashed potato bar toppings, mashed potato martini bar, mashed potato toppings, mashed potatoes bar, mashed potatoes recipe, mashed potatoes toppings, mashtini bar, potato recipes, toppings for mashed potatoes
    the ultimate mashed potato bar recipe and how-to
  • 50+ Mouthwatering Apple Recipes

    50+ Mouthwatering Apple Recipes

    Apple Recipes – What to do with apples! 50 of the most mouthwatering apple recipes, including desserts, Crockpot recipes, preserving and canning, and more delicious ideas!

    Mouthwatering apple recipes for what to do with apples

    We’ve spent the last couple of months making weekly trips to the orchard and making all sorts of delicious apple recipes. I’ll tell ya, I’m really going to miss the orchard when it closes for the season.

    There is nothing quite like apples fresh off the tree. And there’s nothing quite like fresh apple recipes like apple pie, applesauce, and apple butter.

    From preserving apples to baking apple desserts and even making dinner, there’s really no limit on what to do with apples. There are so many ways you can use these wonderful fruits.

    APPLES ARE GOOD FOR YOU TOO!

    Apples taste so good, it almost seems wrong that they’re so good for us.

    Did you know apples are a good source of the following…

    • Vitamin C
    • Potassium
    • Antioxidants
    • Fiber

    Not that desserts are necessarily good for us, but apples themselves and some of the things you can make with them, can pack quite the punch when it comes to nutrients our bodies need.

    Below you’ll find 50 ways to use apples, plus kitchen tools you may need when working with apples.

    mouthwatering delicious apple recipes

    KITCHEN TOOLS YOU MAY NEED FOR MAKING APPLE RECIPES

    Apple Corer/Peeler/Slicer – This actually makes the process of chopping up the apples a lot quicker.

    Paring Knife – for trimming off any bad spots or slicing the apples. My paring knife is kinda like my spatula… I can’t cook without it.

    Food Mill or Immersion Blender – You might want this if making applesauce or apple butter.

    Jars and Lids – I prefer jelly jars or pint jars. In fact, we usually try to keep our pantry stocked with jars. But don’t forget the lids and rings. They can be easy to forget, and before you know it, you have all the jars you need but no lids.

    8-Quart Instant Pot

    Slow Cooker

    Pastry Blender – I love my simple pastry blender. The mixture doesn’t get stuck in it like it does the bigger pastry blenders.

    Rolling Pin – Definitely need this if you’re making pies.

    Glass Pie Plates – This pie plate is my old faithful pie plate; I’ve had it forever, probably since we got married. Mine actually has the fluted edge sorta built in too, so you can press it in and get somewhat of a decorative edge without a lot of handiwork on your part.

    Adjustable Pie Shield – Protects your pie crust from burning.

    Muffin Tin or Bread Pan

    Baking Sheet, Baking Pan, or Bundt Pan

    50 APPLE RECIPES – WHAT TO DO WITH APPLES

    Here are a few yummy apple recipe ideas, including some really great ways to preserve apples so your family can enjoy them for weeks to come.

    You’ll find recipes for preserving apples, canning apples, dehydrating apples, apple desserts, apple muffins, apple cinnamon snacks, and even some savory apple recipes!

    Instant Pot Apple Butter – Adventures of Mel

    Instant Pot Apple Butter

    Easy CrockPot Apple Butter – Adventures of Mel

    Crock Pot apple butter in a jar with small wooden spoon

    Stovetop Traditional Apple Butter Recipe

    stovetop apple butter in jelly jar with small wooden spoon

    Gluten-Free Apple Crisp – My Gluten-Free Kitchen

    Gluten-Free Apple Crisp

    Easy Baked Apples – Create Kids Club

    Easy Baked Apples

    Caramel Apple Dump Cake

    caramel apple dump cake on white plate with fork

    Sliced Caramel Apple Pops – Busy Mommy Media

    Sliced Caramel Apple Pops

    How to Make Apple Juice without a Juicer – Adventures of Mel

    How to Make Apple Juice without an Apple Juicer

    Baked Apple Cinnamon Donuts {Gluten-Free, Dairy-Free} – Mama Knows Gluten Free

    Baked Apple Cinnamon Donuts

    Puff Pastry Apple Tart with Goat Cheese and Honey – Umami Girl

    Puff Pastry Apple Tart with Goat Cheese and Honey

    Apple Pie Turnovers – Butter Your Biscuit

    Apple Pie Turnovers

    Easy No-Peel Instant Pot Applesauce – Adventures of Mel

    Easy No-Peel Instant Pot Applesauce

    Paleo Apple Blondies with Maple Coconut Glaze – What Great Grandma Ate

    Paleo Apple Blondies with Maple Coconut Glaze

    Apple Protein Muffins – One Clever Chef

    Apple Protein Muffins

    How to Make Apple Chutney – Cadry’s Kitchen

    How to Make Apple Chutney

    No-Peel Instant Pot Cinnamon Applesauce – Adventures of Mel

    No-Peel Instant Pot Cinnamon Applesauce

    Chicken and Apple Cheddar Dumplings – Sugar Dish Me

    Chicken and Apple Cheddar Dumplings

    Salted Caramel Apple Cheesecake with Pecan Crisp Topping – The Unlikely Baker

    Salted Caramel Apple Cheesecake with Pecan Crisp Topping

    Apple Pie Filling – Beyond the Chicken Coop

    Apple Pie Filling

    Homemade Apple Jelly without Pectin – Adventures of Mel

    Homemade Apple Jelly without Pectin

    Mouthwatering Gluten Free French Apple Cake – Fearless Dining

    Mouthwatering Gluten Free French Apple Cake

    Homemade Oven Baked Apple Chips – She Loves Biscotti

    Homemade Oven Baked Apple Chips

    Dutch Apple Crumb Pie – Adventures of Mel

    slice of Dutch apple crumb pie with fork on white plate

    Bourbon Apple Pecan Bread Pudding – Soulfully Made

    Bourbon Apple Pecan Bread Pudding

    Sugar Free Apple Butter Recipe – Eating Richly

    Sugar Free Apple Butter Recipe

    Apple Walnut Bread Stuffing – Adventures of Mel

    Apple Walnut Bread Stuffing

    Sugar-Free Stuffed Baked Apples – Veganosity

    Sugar-Free Stuffed Baked Apples

    Greek Yogurt Apple-Cinnamon Bread – Kristine’s Kitchen

    Greek Yogurt Apple-Cinnamon Bread

    HALFWAY THERE…

    Easy Slow Cooker Mulled Cider – Adventures of Mel

    Easy Slow Cooker Mulled Cider

    Delicious Toffee Apples – Supergolden Bakes

    Delicious Toffee Apples

    Apple Cinnamon Overnight Oats – Natalie’s Happy Health

    Apple Cinnamon Overnight Oats

    Homemade Apple Galette – Marsha’s Baking Addiction

    Homemade Apple Galette

    Apple Bundt Cake with a Caramel Cream Cheese Glaze – Adventures of Mel

    Apple Bundt Cake with a Caramel Cream Cheese Glaze

    Caramel Apple Mini Cheesecake – Sweet Spicy Kitchen

    Caramel Apple Mini Cheesecake

    Apple Cinnamon Pumpkin Seed Trail Mix – Adventures of Mel

    Apple Cinnamon Pumpkin Seed Trail Mix

    Caramel Apple Pops – DIY Candy

    Caramel Apple Pops

    Apple Dumplings – Celebrating Sweets

    Apple Dumplings

    Apple Cinnamon Buttermilk Pancakes – Adventures of Mel

    Apple Cinnamon Buttermilk Pancakes

    Easy Blackberry & Apple Jam – Fab Food 4 All

    Easy Blackberry and Apple Jam

    Pumpkin Pie Applesauce {in the Instant Pot} – We Are Not Martha

    Pumpkin Pie Applesauce

    Classic Apple Pie Recipe – Saving Room for Dessert

    Classic Apple Pie Recipe

    Maple Pork Chops with Apples and Onions – Adventures of Mel

    Maple Pork Chops with Apples and Onions

    Easy French Apple Jam Recipe – The View from Great Island

    Easy French Apple Jam Recipe

    Pull Apart Apple Cinnamon Bread – Baking with Mom

    Pull Apart Apple Cinnamon Bread

    Make Your Own Apple Sugar – Learning and Yearning

    Make Your Own Apple Sugar

    Caramel Apple Donut Holes – Adventures of Mel

    Caramel Apple Donut Holes

    3 Minute Sugar Free Instant Pot Pear Applesauce – Recipes to Nourish

    3 Minute Sugar Free Instant Pot Pear Applesauce

    Apple Quickie Recipe – Adventures of Mel

    Apple Quickie Recipe

    One-Minute Apple Cinnamon Muffins – Mighty Mrs.

    One-Minute Apple Cinnamon Muffins

    Apple Stuffing Crusted Pork Chops – Caroline’s Cooking

    Apple Stuffing Crusted Pork Chops

    Apple Crumble without Oats – Adventures of Mel

    apple crumble without oats, with scoop of vanilla ice cream, on white plate with fork

    Spiced Pomegranate Apple Cider Mulled Wine – Good Life Eats

    Spiced Pomegranate Apple Cider Mulled Wine

    Looking for more fall favorites?

    Deliciously Moist Pumpkin Bread Recipe

    Creamy No Bake Pumpkin Dessert

    Pumpkin Sugar Cookies

    Classic Pecan Pie

    Pumpkin Spice Gooey Butter Cake

  • Easy Slow Cooker Mulled Cider

    Easy Slow Cooker Mulled Cider

    How to make mulled cider in your slow cooker. Warm apple cider filled with cinnamon, spices, and a smidge of brown sugar, perfect for the holidays!

    ‘Tis the season for warm drinks, soft blankets, good books, and apple pie spice with all of its fall spicy goodness. Even though I love summer, I love this time of year when the temperatures drop and mulled cider becomes the beverage of choice.

    easy mulled cider with cinnamon sticks, oranges, and cloves in a slow cooker

    While I’m more of a hot chocolate girl myself, I do love a warm mug of cider, especially when my house smells as good as it does after an afternoon of slow cooking a batch of spiced cider.

    This hot apple cider is so easy to make, anyone can make it. It doesn’t require a lot of ingredients or time in the kitchen.

    Are you ready for an apple cider drink that will get you in the mood for fall? This is most definitely it.

    I JUST WANT THE RECIPE! TAKE ME TO THE RECIPE FOR MULLED CIDER!

    If you’d rather skip all of my cooking tips, important cooking info for this recipe, and similar recipe ideas – and get straight to the delicious mulled cider recipe – just scroll down to the bottom, where you’ll find a printable recipe card.

    glass mug of warm mulled cider with fresh apples and cinnamon sticks

    WHAT IS APPLE CIDER? WHAT’S THE DIFFERENCE BETWEEN APPLE JUICE AND APPLE CIDER?

    You can use either apple juice or apple cider for this recipe.

    There are a few differences, though, between apple juice vs apple cider.

    Apple cider is a thicker, more opaque apple juice, and it may have pulp and chunks of apple left behind. Apple juice is a thinner, more transparent liquid without any pulp left behind.

    In terms of commercial apple cider vs apple juice, apple juice is pasteurized and has a longer shelf life than apple cider.

    If you have fresh apples and want to make the juice yourself, here is a fairly simple recipe for how to make apple juice in your Instant Pot. You can also use the same recipe to make a thicker apple cider drink.

    mug of hot cider, mulled cider recipe, with apples and cinnamon sticks

    WHERE TO BUY APPLE CIDER

    If you decide to actually go with cider and buy it instead of making it, you can usually find it at any grocery store, orchard, or maybe even a farmer’s market.

    If apple cider isn’t available where you live and you decide to buy juice instead, you could go with a thicker juice, maybe Simply Apple or something similar.

    APPLE CIDER BENEFITS

    Remember the old saying, “An apple a day keeps the doctor away?” Apples have a ton of nutritional value and are a great addition to our diet.

    mulled cider with orange slices, whole cloves, and cinnamon sticks in black slow cooker

    While you’d probably get a LOT more benefit out of the whole apple, apple juice is a good source of vitamin C and potassium. It’s also a great source of antioxidants.

    Now with the added sugar (I use 1/4 cup of brown sugar), this hot cider won’t be quite as good for you, but it is delicious, so I guess you could say that’s a benefit too.

    APPLE CIDER INGREDIENTS YOU’LL NEED:

    You’ll need a few ingredients to make this delicious mulled cider.

    ingredients for making mulled cider, including apple cider, oranges, brown sugar, cinnamon sticks, allspice, and whole cloves

    TIPS FOR HOW TO MAKE APPLE CIDER

    Making apple cider is really easy. Just a few steps and you can walk away and let your slow cooker do all the heavy lifting.

    You’re essentially going to combine all of the ingredients in your slow cooker. But the orange and cloves require a bit of attention first.

    You can wash and slice the orange, add the cloves to the orange slices, and then add the slices to the slow cooker. Or you can wash and peel the orange and stick the cloves all over in the orange, then add the orange to the slow cooker.

    slow cooker mulled cider with orange slices, whole cloves, and cinnamon sticks

    Note: You can leave the peeling on the orange, but it may add a little bitterness to your hot cider.

    Once you’ve decided what to do with the orange, just combine all the ingredients and give it a good stir. Then cook everything on low for about 4 hours.

    Homemade apple cider makes your house smell so good.

    Once it’s cooked, strain out any loose cloves, the oranges, and the cinnamon sticks. You can serve it up in your favorite mugs, and maybe add a cinnamon stick for garnish.

    hot apple cider, mulled cider, in a glass mug with apples and cinnamon sticks

    IF YOU LOVE THIS MULLED CIDER RECIPE, TRY SOME OF OUR OTHER APPLE RECIPE FAVORITES:

    Instant Pot Apple Butter

    Apple Crumb Pie

    Homemade Apple Jelly without Pectin

    Easy No-Peel Instant Pot Applesauce

    No-Peel Instant Pot Cinnamon Applesauce

    50 Mouthwatering Apple Recipes

    slow cooked mulled cider in a glass mug with apples

    KITCHEN TOOLS YOU’LL NEED TO MAKE HOT APPLE CIDER:

    Slow Cooker

    Orange Peeler

    Wooden Spoon

    Festive Mugs – I love Peanuts mugs, this Mr. Tea mug, and I also love enamel mugs. So fun! Because why shouldn’t you have something fun to drink from? Right?! Right!

    MULLED CIDER RECIPE

    If you love this mulled cider recipe as much as I do, please write a 5 star review, and help me share the recipe on Facebook and Pinterest!

    easy slow cooker mulled cider apple cider recipe

    CONNECT WITH ADVENTURES OF MEL!

    Be sure to follow me on social, so you never miss a post!

    Facebook | Pinterest | YouTube | Instagram | Twitter

    Sign up to receive my newsletter, filled with delicious recipes and outdoor travel adventures, in your inbox:

    FREE EMAIL SUBSCRIPTION

    Slow Cooker Mulled Cider

    How to make slow cooker mulled cider. Warm apple cider filled with cinnamon, spices, and a smidge of brown sugar, perfect for the holidays!

    • 2 quarts apple cider (or apple juice)
    • 1 whole orange
    • 2 teaspoons whole cloves
    • 1/4 cup light brown sugar
    • 1/2 teaspoon ground allspice
    • 3 whole cinnamon sticks
    1. Pour the apple cider or apple juice into the slow cooker.
    2. You can wash and slice the orange, add the cloves to the orange slices, and then add the slices to the slow cooker. Or you can wash and peel the orange and stick the cloves all over in the orange, then add the slices to the slow cooker.
    3. Add the brown sugar, allspice, and cinnamon sticks to the cider in the slow cooker, and give it all a good stir.
    4. Put the lid on the slow cooker, and cook everything on low for about 4 hours.
    5. Strain out the oranges, cloves, and cinnamon sticks.
    6. Serve it in your favorite mugs, and maybe add a cinnamon stick for garnish.

    *You can use apple cider or homemade apple juice for this recipe.

    *Leaving the peeling on the orange may add some bitterness to your apple cider.

    Drinks
    American
    apple cider, apple cider recipe, crockpot apple cider, hot apple cider, hot cider, how to make apple cider, mulled cider, slow cooker apple cider, slow cooker mulled cider
    Easy Slow Cooker Mulled Cider Recipe
    easy mulled cider recipe made in the slow cooker
  • 20+ Easy Halloween Movie Night Snacks Anyone Can Make

    20+ Easy Halloween Movie Night Snacks Anyone Can Make

    Your go to list of favorite Halloween movie night snacks and treats for the whole family. Easy, spooky snacks and desserts both kids and adults will love. So easy, anyone can make them!

    Halloween is right around the corner. If you’re hosting a Halloween party or movie night, you’re probably looking for the best Halloween movie night snacks you can make in a jiffy.

    Halloween movie night snacks in collage photo, including spider cookies, Frankenstein brownies, monster cookies, Corn Flake bars, and mummy brownies

    I’ve got you covered with 20+ ideas for yummy Halloween movie desserts and Halloween food snacks, some sweeter than others.

    When it comes to Halloween party food, you can jazz up just about any type of food to make it festive, and in this case a little spooky too.

    Not a Fan of Scary?

    I’m not a fan of really scary stuff either, whether it’s horror flicks and slasher films, or scary treats. I mean, the scary movies I do like are either old Alfred Hitchcock films or more thriller type movies like The Sixth Sense or A Quiet Place.

    So I tend to err on the side of somewhat spooky but also cute and fun when it comes to Halloween desserts and Halloween snacks for party events (even this cute Garfield Halloween costume I made).

    When Should You Host Your Halloween Movie Night?

    If you want to host more than just a family movie night, you’ll want to consider the perfect time of year to host.

    While Halloween night might be a little busy for most people, what with trick-or-treating and parties or events, you might think about hosting in the weeks leading up to Halloween.

    Really, anytime during Halloween season in the month of October, and probably a weekend, will be the best time that works with most people’s schedules. So pick a time, tell your friends and family, and start planning a really fun night.

    best Halloween movie night snacks, dessert, and Halloween treats, including decorated Halloween brownies

    Tips and Tricks for Easy Halloween Treats

    Here are a few tips for keeping things easy in the kitchen when you’re figuring out what to make for Halloween movie night:

    • Save time by buying pre-baked. If you need a baked treat, save time by using a mix or buying it already pre-made. While I love homemade and it’s my first choice, it’s not always feasible, especially when life gets really busy.
    • If you need icing or frosting, again, buy pre-made. No judgment here.
    • Need to pipe icing onto your Halloween treats? Use icing tubes you can get at any grocery store in the baking aisle.
    • Think of how you can use already made foods in a creative way… For example, making donuts or Oreo cookies into spiders or Twix bars into mummies (see recipes below).
    • Make no bake desserts. Because no bake is awesome.
    • Instead of cookies, make bars. Instead of cake pops, make a whole cake. Think easy.
    • Need a pie crust? Again, use a pre-made crust. Or make a shortcut no-roll pie crust.
    • Think about putting together a buffet, like maybe a caramel apples buffet with melted caramel and fun toppings.
    • Put together a charcuterie board, in this case a Halloween movie night snack board, and set it on your coffee table in the living room. Finger foods on a board make great snacks!
    • Veggie trays and salty snacks are always a great idea.

    Kitchen Tools You May Need to Make Halloween Movie Treats

    Halloween Movie Checklist

    Of course, we’d be remiss to not mention a few family favorite Halloween movies to go along with your tasty snacks… Again, I’m keeping it pretty family-friendly here, so if you want scary horror movie marathons of movies like Nightmare on Elm Street, I ain’t your girl.

    Here are just a few suggestions…

    • It’s the Great Pumpkin, Charlie Brown (because of course)
    • Beetlejuice
    • Hocus Pocus
    • Practical Magic
    • Harry Potter collection
    • Tim Burton’s The Nightmare Before Christmas
    • The Addams Family
    • The Haunted Mansion
    • Ghostbusters
    • Edward Scissorhands
    • Halloweentown
    • Coraline
    • Gremlins
    • Goosebumps
    • The Sixth Sense

    20+ Halloween Movie Night Snacks

    Here are a few yummy recipe ideas for your Halloween party food menu, including some really cute Halloween treats all your guests will love. All of these treats will have a slightly spooky feel and maybe even a cute factor going for them too.

    You’ll find easy Halloween food, sweet treats, and movie snacks like Halloween brownies, party punch, cookies, no bake desserts, treats on a stick, Halloween cupcakes, and more!

    [wprm-recipe-roundup-item id=”41000″ name=”Twix Bar Mummy Brownies” summary=”<p><a href=%22null%22></a>Twix Bar mummy brownies are quick and easy Halloween treats you can make with a box mix, fun size candy, icing, and candy eyes!</p>” button=”Get the Recipe”] [wprm-recipe-roundup-item link=”https://www.prettymyparty.com/easy-mini-chocolate-donut-spiders/” name=”Mini Chocolate Donut Spiders” summary=”<p>Make mini chocolate donut spiders with mini donuts, pretzels, candy eyeballs, and chocolate sprinkles. Spooky treats kids will love!</p>” button=”Get the Recipe” image=”36905″] [wprm-recipe-roundup-item link=”https://www.burlapandblue.com/halloween-treat-idea-easy-dipped-pretzels/” name=”Halloween Dipped Pretzels” summary=”<p>Kids can help make these super cute no bake Halloween dipped pretzels with candy melts and candy eyeballs. Such a fun activity for a party!</p>” button=”Get the Recipe” image=”36906″] [wprm-recipe-roundup-item id=”41010″ name=”Pumpkin Patch Brownies” summary=”<p>How to make quick and easy pumpkin patch Halloween brownies for kids, a fun Halloween treat recipe with candy corn pumpkins and green icing!</p>” button=”Get the Recipe”] [wprm-recipe-roundup-item link=”https://www.mommyhatescooking.com/bake-spider-pudding-pie-3″ name=”No Bake Spider Pudding Pie” summary=”<p>Make a no bake spider pudding pie with a cream cheese filling in a chocolate cookie pie shell, and topped with the cutest Oreo cookie spiders.</p>” button=”Get the Recipe” image=”36909″] [wprm-recipe-roundup-item link=”https://www.sugarandsoul.co/goosebumps-punch-recipe/” name=”Goosebumps Halloween Punch” summary=”<p>You only need 4 ingredients to make this green Goosebumps Halloween punch. It's the perfect drink for a Halloween party!</p>” button=”Get the Recipe” image=”36910″] [wprm-recipe-roundup-item id=”41016″ name=”Peanut Butter Corn Flake Bars” summary=”<p>Mix up a batch of Corn Flake bars with peanut butter, marshmallows, peanuts, and candy corn. Quick and easy treats you can make in a jiffy!</p>” button=”Get the Recipe”] [wprm-recipe-roundup-item link=”https://www.mamagourmand.com/gluten-free-halloween-spider-cookies/” name=”No Bake Spider Cookies” summary=”<p>Easy no bake spider cookies will be a hit with both kids and adults this Halloween. These gluten-free cookies combine peanut butter cups and Rice Krispies for a cute treat all can enjoy!</p>” button=”Get the Recipe” image=”36912″] [wprm-recipe-roundup-item link=”https://artscrackers.com/2014/09/22/pumpkin-patch-pudding-fall-dirt-cups/” name=”Pumpkin Patch Pudding Cups” summary=”<p>Pumpkin patch pudding dirt cups are simple, so they're the perfect fall treat to involve kids in and enjoy on a Halloween movie night.</p>” button=”Get the Recipe” image=”36913″] [wprm-recipe-roundup-item id=”41004″ name=”Frankenstein Brownies” summary=”<p>Frankenstein brownies are the cutest Halloween treats. They're quick and easy frosted Halloween snacks anyone can make, and especially fun for kids. </p>” button=”Get the Recipe”] [wprm-recipe-roundup-item link=”https://niftymom.com/2016/10/monster-treats-stick/” name=”Monster Treats on a Stick” summary=”<p>Dip Rice Krispie treats on a stick into melted purple, green, and orange candy melts. Then add candy eyes for fun monster treats on a stick!</p>” button=”Get the Recipe” image=”36915″] [wprm-recipe-roundup-item link=”https://recipesfromapantry.com/halloween-marshmallow-pops-monster/” name=”Monster Halloween Marshmallow Pops” summary=”<p>These Monster Halloween marshmallow pops are easy Halloween treats that require only 5 ingredients and come together in just a few minutes.</p>” button=”Get the Recipe” image=”36916″] [wprm-recipe-roundup-item id=”41008″ name=”Chewy Monster Cookies” summary=”<p>How to make soft and chewy monster cookies from scratch, loaded with peanut butter, oats, M&M's, and chocolate chips. But watch out, cuz they'll disappear fast!</p>” button=”Get the Recipe”] [wprm-recipe-roundup-item link=”https://crazyadventuresinparenting.com/2018/08/frankenstein-cupcakes-recipe.html” name=”Frankenstein Cupcakes Recipe” summary=”<p>If you’re in need of a non-scary Halloween recipe for a Halloween party, look no further! These Frankenstein cupcakes for Halloween are PERFECT!</p>” button=”Get the Recipe” image=”36918″] [wprm-recipe-roundup-item link=”https://www.homeandplate.com/blog/halloween-mummy-apple-crypts/” name=”Mummy Apple Crypts” summary=”<p>Turn a simple homemade apple pastry into a fun and healthy Halloween treat. Mummy apple crypts are cute yet scary and spooky.</p>” button=”Get the Recipe” image=”36919″] [wprm-recipe-roundup-item id=”41012″ name=”Whipped Cream Ghost Brownies” summary=”<p>Whipped cream ghost brownies are the easiest Halloween treats ever! Fun and spooky Halloween idea for kids, using whipped cream and candy eyeballs.</p>” button=”Get the Recipe”] [wprm-recipe-roundup-item link=”https://crayonsandcravings.com/witch-hat-cupcakes/” name=”Witch Hat Cupcakes” summary=”<p>Witch hat cupcakes are made by topping cupcakes with sugar cones and adding detail with icing. These Halloween cupcakes will be a hit at your Halloween party.</p>” button=”Get the Recipe” image=”36921″] [wprm-recipe-roundup-item link=”https://juliassimplysouthern.com/2018/08/white-chocolate-boo-nana-ghost-pops.html” name=”White Chocolate BOO-Nana Ghost Pops” summary=”<p>Make this fun and easy Halloween treat with melted white chocolate covered bananas that look like ghosts.</p>” button=”Get the Recipe” image=”36922″] [wprm-recipe-roundup-item id=”41022″ name=”Polyjuice Potion Recipe” summary=”<p>Brew a simple Polyjuice Potion recipe for a transformative experience at your Halloween or Harry Potter party. Easy, fun, non alcoholic, lime sherbet punch!</p>” button=”Get the Recipe”] [wprm-recipe-roundup-item link=”https://www.eatsamazing.co.uk/family-friendly-recipes/dessert-sweet-treat-recipes/ghostly-mini-cheesecake-bites-recipe” name=”Ghostly Mini Cheesecake Bites” summary=”<p>Ghostly mini cheesecake bites are the perfect dessert for a Halloween party. Whip up this quick & easy Halloween dessert in minutes – just 6 ingredients!</p>” button=”Get the Recipe” image=”36924″] [wprm-recipe-roundup-item link=”https://www.shelovesbiscotti.com/halloween-witch-finger-butter-cookies/” name=”Halloween Witch Finger Butter Cookies” summary=”<p>Hosting a Halloween movie night? Shape Buranelli cookies into witch finger cookies, and lay them in edible dirt. Creepy but delicious buttery witch cookies. </p>” button=”Get the Recipe” image=”36925″] [wprm-recipe-roundup-item id=”41014″ name=”Spooky Graveyard Brownies” summary=”<p>Easy graveyard brownies, perfect for your Halloween party. Use Milano cookies, Oreos, and candy pumpkins to decorate these spooky treats!</p>” button=”Get the Recipe”] [wprm-recipe-roundup-item link=”https://www.reneeskitchenadventures.com/2016/10/pumpkin-patch-cake.html” name=”Pumpkin Patch Cake” summary=”<p>Pumpkin patch cake starts with a simple made-from-scratch chocolate cake, topped with chocolate frosting and then decorated for the season with mellowcreme pumpkins. </p>” button=”Get the Recipe” image=”36928″]

    Hopefully, you’ve found plenty of Halloween inspiration for your Halloween party menu. Happy Halloween to you and yours!

    I always appreciate your feedback. Be sure to leave a comment, and follow me on Pinterest, Facebook, Instagram, and YouTube. You can subscribe to my email list too.

  • No-Peel Instant Pot Cinnamon Applesauce

    No-Peel Instant Pot Cinnamon Applesauce

    How to make easy, homemade, no-peel, Instant Pot cinnamon applesauce, a delicious recipe for canning or freezing. Make it smooth or chunky, no sugar added!

    Instant Pot cinnamon applesauce is really easy to make and made pretty much the same way as regular Instant Pot applesauce. You really just need to add cinnamon to the mixture.

    white bowl filled with homemade cinnamon applesauce with apples

    This applesauce recipe only calls for 4 ingredients, and none of them includ added sugar. If you use the right apples, which we’ll talk about below, you won’t need additional sugar because it’ll be sweet enough on its own.

    Think about it… Natural ingredients, no need to actually peel apples, all the nutritional benefits of those peelings, and it’s all made in the Instant Pot.

    The fact that it’s pressure cooked takes the work out of making applesauce because you don’t have to stand in front of a hot stove stirring the day away. Instead, just add the ingredients to your Instant Pot pressure cooker, push a couple buttons, and let it do the majority of the work for you.

    Now you can peel your apples if you want to; it’s totally up to you. If you use an immersion blender and not a regular blender, you may have some tiny pieces of peeling still left in your sauce.

    There’s really no reason, though, that you can’t fill your pantry with jars of homemade applesauce. And can I just say it tastes so much better and has a much better texture than store canned applesauce. So much better!

    Let’s get cooking, shall we?

    Looking for apple recipes? Here are 50 mouthwatering apple recipes you may enjoy!

    I JUST WANT THE RECIPE! TAKE ME TO THE RECIPE FOR CINNAMON APPLESAUCE!

    If you’d rather skip all of my cooking tips, important cooking info for this recipe, and similar recipe ideas – and get straight to the delicious recipe for cinnamon applesauce – just scroll down to the bottom, where you’ll find a printable recipe card.

    Instant Pot cinnamon applesauce in canning jar with small wooden spoon

    WHERE CAN I FIND THE BEST APPLES FOR APPLESAUCE?

    Fall is probably the best time to find the best apples for applesauce, although you can use pretty much any apples you can find, whether you’re shopping at the store, an orchard, or the farmer’s market.

    In the fall, though, I recommend buying seconds at a local orchard if you have one, and sometimes you can find them at the farmer’s market.

    Buying seconds usually ensures that you can buy a HUGE box of apples for a lot less than normal cost, which is going to save you a ton of money.

    One thing you need to know, though… It does take a LOT of apples to get a little bit of applesauce, fresh homemade apple juiceapple jelly, or apple butter. But in my opinion, that homemade flavor and texture of home canned applesauce is totally worth it.

    washing apples in sink for cinnamon applesauce recipe

    WHAT KIND OF APPLES SHOULD I USE TO MAKE APPLESAUCE?

    Some apples are sweet and some have a more tart, sour taste. Also, some apples are crisp, while others are softer.

    When making a batch of homemade applesauce, I like to use a sweeter apple that has a little bit of tartness to it.  I prefer not to add any sugar, so I want the unsweetened applesauce to taste really good all on its own.

    Most people recommend using a softer apple for applesauce; it doesn’t even matter if your apples are mushy since they’re going to be made into mush anyway.

    We’ve found that Jonagold apples make the BEST applesauce. They’re sweet with just a little bit of tartness. And they mash up really well.

    easy Instant Pot cinnamon applesauce in Ball canning jar with wooden spoon

    Other best apples for applesauce may include:

    • Jonathan
    • Braeburn
    • Honeycrisp
    • McIntosh
    • Winesap
    • Rome
    • Golden Delicious
    • Cortland
    • Fuji
    • Gala
    • Ambrosia

    You can also try mixing and matching different kinds of apples to get the flavor you want for your applesauce.

    WHY ADD LEMON JUICE TO AN APPLESAUCE RECIPE?

    You’ll find different opinions about this topic when you research, but there are two main reasons home canners give for adding lemon juice to home canned applesauce.

    1. It helps preserve or protect the color of your apples over time.
    2. It can help make the applesauce more acidic for home canning. Wind fallen apples (including seconds) can have a lower acidity and a higher mold/bacteria count than unblemished apples.

    Even though their explanation is focused more around homemade jam, The Kitchn provides a great explanation for why it’s important to add lemon juice.

    slicing apples while making cinnamon applesauce

    TIPS FOR HOW TO MAKE CINNAMON APPLESAUCE IN THE INSTANT POT

    For this Instant Pot applesauce, you’ll need about 6 pounds of apples, just a little bit of lemon juice, water, and cinnamon.

    You can make this recipe on the stovetop, or you can even make it as Crock Pot applesauce; keep in mind that cooking times will vary.

    You can also make applesauce from the leftover apple mush you have when you make apple juice.

    sliced apples for making applesauce, cinnamon applesauce recipe, in instant pot pressure cooker

    Here’s how to make a stand alone cinnamon applesauce recipe:

    • Wash, core, and slice the apples. Be sure to cut out any bad spots, as well.
    • Put the sliced apples in your Instant Pot.
    • Add the lemon juice, water, and cinnamon to the Instant Pot, as well. If you want to mix everything together, you can; but there’s really no need to until after it all cooks.
    • Put the lid in place on the Instant Pot, and press Manual or Pressure Cook for 10 minutes.
    add cinnamon to cinnamon applesauce mixture in Instant Pot
    • When it’s finished cooking, allow the pressure cooker to do a natural release.
    • Purée the mixture with an immersion blender, or mash the apples with a potato masher.

    Note: If you want to eliminate any tiny pieces of peeling in the sauce, you may want to blend with a regular blender. It’s up to you how you prefer the texture and consistency.

    immersion blender mixing cinnamon applesauce in Instant Pot

    CAN YOU FREEZE HOMEMADE APPLESAUCE?

    Yes, you can freeze applesauce. In fact, you can freeze or can applesauce, whichever you prefer.

    My mom used to freeze a LOT of the applesauce she made when we were kids growing up. She’d keep freezer safe plastic containers just for storing things like homemade applesauce.

    pouring cinnamon applesauce through funnel into canning jars

    HOW DO I CAN APPLESAUCE?

    Applesauce canning is actually pretty simple. We use a water bath canning method.

    Should you choose to can your cinnamon applesauce, Ball has wonderful Canning Guides to guide you through the process. You can also consult the Ball Blue Book Guide to Preserving.

    cinnamon applesauce water bath for canning applesauce

    This applesauce recipe for canning makes probably around 4-6 pints total. It’s so delicious served on homemade biscuits, toast, and cornbread. Yum!

    MORE APPLE RECIPES YOU MAY ENJOY:

    Learn how to use your Instant Pot with our Instant Pot Quick Start Guide, filled with practical tips, Instant Pot recipes, accessory ideas, and more!

    cinnamon applesauce in Ball canning jar with small wooden spoon and fresh apples

    KITCHEN TOOLS YOU’LL NEED TO MAKE INSTANT POT CINNAMON APPLESAUCE

    Jars and Lids – I prefer jelly jars or pint jars. In fact, we usually try to keep our pantry stocked with jars. But don’t forget the lids and rings. They can be easy to forget, and before you know it, you have all the jars you need but no lids.

    Canning Funnel – for pouring the applesauce into the jars without making a mess.

    Jar Lifter

    Apple Corer/Peeler/Slicer – I’m telling you, this tool is so worth every penny we spent at the thrift store, but I’d order one brand new too. It saves so much time.

    coring apples for cinnamon applesauce with johnny apple peeler

    Paring Knife – for trimming off any bad spots or slicing the apples.

    Immersion Blender or Potato Masher – This will allow you to get the texture or consistency that you want.

    Instant Pot – We used our 6-quart Instant Pot.

    CINNAMON APPLESAUCE RECIPE

    If you love this cinnamon applesauce recipe as much as I do, please write a 5 star review, and help me share the recipe on Facebook and Pinterest! If you make the recipe, be sure to share that you tried it on Pinterest. I love when readers share feedback!

    easy no-peel Instant Pot cinnamon applesauce recipe

    CONNECT WITH ADVENTURES OF MEL!

    Be sure to follow me on social, so you never miss a post!

    Facebook | Pinterest | YouTube | Instagram | Twitter

    Sign up to receive my newsletter, filled with delicious recipes and outdoor travel adventures, in your inbox:

    FREE EMAIL SUBSCRIPTION

    No-Peel Instant Pot Cinnamon Applesauce

    How to make easy, homemade, no-peel, Instant Pot cinnamon applesauce, a delicious recipe for canning or freezing. Make it smooth or chunky, no sugar added!

    • 6 pounds apples (unpeeled)
    • 2 teaspoons lemon juice
    • 1 cup water
    • 2 tablespoons cinnamon
    1. Wash, core, and slice the apples. Cut out any bad spots, as well.
    2. Put the sliced apples in your Instant Pot.
    3. Add the lemon juice, water, and cinnamon to the Instant Pot, as well. If you want to mix everything together, you can; but there’s no need to until after it all cooks.
    4. Put the lid in place on the Instant Pot. Press Manual or Pressure Cook for 10 minutes.
    5. When it’s finished cooking, allow the pressure cooker to do a natural release.
    6. If it seems like the applesauce will be a bit watery, drain a bit of the water before mashing the apples.*
    7. Purée the mixture with an immersion blender, or mash the apples with a potato masher.** It’s up to you how you prefer the texture or consistency.
    8. Preserve using your preferred method, whether you choose to freeze or can the applesauce.***

    *You can drink the apple juice if you choose to drain the apples before mashing.

    **If you want to eliminate any tiny pieces of peeling in the sauce, you may want to blend with a regular blender. It’s up to you how you prefer the texture and consistency.

    ***If you choose to can it, Ball has wonderful Canning Guides to guide you through the process. You can also consult the Ball Blue Book Guide to Preserving.

    Sauces & Dressings
    American
    applesauce, applesauce recipe, cinnamon applesauce, Instant Pot applesauce
    easy no-peel instant pot or pressure cooker cinnamon applesauce recipe
  • Deliciously Moist Pumpkin Bread Recipe

    Deliciously Moist Pumpkin Bread Recipe

    Bake up a taste of fall with this deliciously moist pumpkin bread recipe. Simple, easy, and quick, you can even add walnuts, pecans, or chocolate chips. Thank you to WonderMix for sponsoring this recipe!

    There’s nothing quite like a pumpkin bread recipe to bring the taste of fall right into your very own kitchen. Filled with pumpkin and the flavors of pumpkin spice, this is one quick bread I look forward to every year.

    sliced loaf of homemade pumpkin bread on a wooden cutting board with a decorative pumpkin

    Pumpkin bread is a lot like banana bread. It has many of the same ingredients; only it has pumpkin instead of banana.

    While I haven’t tried it myself, I would think that you could also make muffins with this recipe, if you don’t want to actually make a bread loaf. The muffins will be sweet, moist, and everything you love about a fall morning.

    A couple weeks ago, I shared a buttermilk cornbread recipe we’d made, using milled corn from our WonderMill grain mill.

    baked pumpkin bread loaf in bread loaf pan

    Now with the help of my WonderMix, pumpkin bread is quite easy to make. You really just have to mix a few ingredients, pour the dough into a greased loaf pan, and bake it.

    Homemade pumpkin bread is the best! It’s right up there with pumpkin spice muffins and gingerbread loaf!

    I JUST WANT THE RECIPE! TAKE ME TO THE RECIPE FOR PUMPKIN BREAD!

    If you’d rather skip all of my baking tips, important cooking info for this recipe, and similar recipe ideas – and get straight to the deliciously easy pumpkin bread recipe – just scroll down to the bottom, where you’ll find a printable recipe card.

    TELL ME MORE ABOUT WONDERMIX!

    WonderMix is “the kitchen mixer that’s built for life.” I love using my WonderMix when I’m baking.

    The WonderMix Revolution Mixer is an all-in-one kitchen mixer with optional attachments like cookie whips, a blender, and a food processor.

    WonderMix kitchen mixer with accessories, perfect for mixing up a pumpkin bread recipe

    Features of the WonderMix include the following:

    • 900-watt motor
    • Direct drive high torque transmission
    • 3 speeds and pulse function
    • Large 5.5-qt. bowl with handle that’s dishwasher safe
    • Dough hook
    • BPA free
    • Cord storage
    • and so much more… You can read more about the features on the WonderMix site.

    WHAT ATTACHMENTS CAN I GET FOR THE WONDERMIX?

    There are several attachments you can get to complement your WonderMix, including the blender, cookie whips, a slicer/shredder, meat grinder, grain flaker, and grain mill.

    HOW DOES THE WONDERMIX REALLY WORK?

    I love how easy the WonderMix is to use and how easy it is to clean up.

    The large capacity bowl is very important when mixing larger quantities of foods, and I love that it actually has a handle. I don’t have to wrestle with the bowl to remove the ingredients.

    handle on WonderMix kitchen mixer bowl with pumpkin bread recipe dough inside bowl

    I also like that the bowl is deep and ingredients don’t splatter out near as easily, if ever, while mixing. It also has a lid that prevents splatters and flour dust.

    The beaters really do mix the ingredients in the bowl; they don’t leave chunks of unmixed ingredients in the bottom. And while I do have to occasionally scrape the sides, this mixer does a really good job overall of mixing up my recipes.

    The speed did throw me for a loop at first because it doesn’t get louder the faster it goes. I wasn’t quite used to that.

    WonderMix kitchen mixer, perfect for fall pumpkin bread recipe

    It’s easy to scrape contents out of the bowl when I’m done mixing, even with the center console for the drive shaft there. And did I mention it’s easy to clean up, even after making a batch of homemade pumpkin bread?

    WHERE CAN I BUY PUMPKINS FOR PUMPKIN RECIPES?

    You can either use fresh pumpkin for this recipe or canned pumpkin.

    Fresh pumpkins are easy to find this time of year; you can buy pumpkins at any grocery store, pumpkin patch, or orchard. You can find canned pumpkin in the baking aisle of your nearest grocery store too.

    HOW DO I MAKE PUMPKIN PUREE?

    Homemade pumpkin purée is really easy to make. In fact, I have a recipe you can follow for homemade pumpkin purée.

    The recipe involves roasting the pumpkins and blending the pumpkin flesh into a smooth purée, meaning you can use the blender on your WonderMix to make the purée.

    homemade pumpkin bread recipe dough in WonderMix mixer bowl

    IS CANNED PUMPKIN THE SAME AS PUMPKIN PUREE?

    I got this question the other day from a reader… I can see how it might be a bit confusing because they can look quite different from each other.

    Canned pumpkin is, however, pumpkin purée. The only difference I see when using either/both is that homemade pumpkin purée can have a bit more water and be a little more juicy than store bought canned pumpkin.

    You can use either kind of pumpkin for this pumpkin bread recipe.

    TIPS FOR HOW TO MAKE PUMPKIN BREAD

    You’ll need a bread loaf pan to bake easy pumpkin bread. You’ll need to grease the pan well, either with cooking spray or with shortening/butter.

    mixing butter and sugar for pumpkin bread recipe in WonderMix kitchen mixer
    • Pre-heat the oven to 350°.
    • Mix together the softened butter and sugar; then mix in the eggs, vanilla extract, and pumpkin.
    mixing eggs into pumpkin bread recipe dough with WonderMix kitchen mixer
    • Sift together the dry ingredients, including the flour, salt, baking soda, baking powder, pumpkin pie spice, and ground cloves.
    • Mix the dry ingredients into the wet ingredients.
    sifting dry ingredients for pumpkin bread recipe
    • Then add the chopped walnuts and mix again.
    • You can add a cup or so of chocolate chips, as well, if you’d like to make chocolate chip pumpkin bread.
    • Pour the dough into a well greased loaf pan, and bake at 350° for about an hour, or until a toothpick (or cake tester) inserted in the center comes out clean.
    dough for pumpkin bread recipe in bread loaf pan
    • Remove your loaf of deliciously moist pumpkin bread from the oven, and let it cool in the pan for about 10 minutes.
    • Then run a butter knife around the edge of your loaf, and slip the loaf out of the pan onto a wire rack to cool.
    best pumpkin bread recipe, sliced on cutting board

    We love to slice our bread while it’s still slightly warm (but not too hot) and slather it with butter. It’s so good!

    slice of pumpkin bread with butter on white plate

    WHAT IF I DON’T HAVE PUMPKIN PIE SPICE?

    That’s ok! What is in pumpkin pie spice is a mixture of spices, including ground cinnamon, nutmeg, and ginger; it may also include cloves and allspice.

    You can use these spices, individually, if you have them. You’ll just need to use a smaller amount of each spice you choose to use, so they can work together to create the amount of pumpkin pie spice you would need, in this case, a teaspoon.

    I would definitely try to use cinnamon, nutmeg, ginger, and even allspice if possible.

    sliced pumpkin bread on cutting board with decorative pumpkin

    MORE PUMPKIN RECIPES YOU MAY ENJOY:

    slice of moist pumpkin spice bread with butter on white plate

    KITCHEN TOOLS YOU’LL NEED TO MAKE PUMPKIN BREAD:

    WonderMix Kitchen Mixer

    Spatula – for pouring the dough into the loaf pan.

    Sifter

    Loaf Pan

    Cake Tester – While you can also use a toothpick, I kinda love my li’l cake tester.

    Wire Rack

    PUMPKIN BREAD RECIPE

    If you love this pumpkin bread recipe as much as I do, please write a 5 star review, and help me share the recipe on Facebook and Pinterest!

    moist pumpkin bread recipe

    CONNECT WITH ADVENTURES OF MEL!

    Be sure to follow me on social, so you never miss a post!

    Facebook | Pinterest | YouTube | Instagram | Twitter

    Sign up to receive my newsletter, filled with delicious recipes and outdoor travel adventures, in your inbox:

    FREE EMAIL SUBSCRIPTION

    Moist Pumpkin Bread Recipe

    Bake up a taste of fall with this deliciously moist pumpkin bread recipe. Simple, easy, and quick, you can even add walnuts, pecans, or chocolate chips.

    • 1/2 cup unsalted butter
    • 1 cup cane sugar
    • 3 large eggs
    • 1 teaspoon vanilla extract
    • 1 cup pumpkin purée
    • 2 cups all-purpose flour
    • 1/2 teaspoons salt
    • 1/2 teaspoon baking soda
    • 1/4 teaspoon baking powder
    • 1/2 teaspoon pumpkin pie spice
    • 1/2 teaspoon ground cloves
    • 3/4 cup chopped walnuts
    1. Pre-heat the oven to 350°, and grease a loaf pan well.

    2. Mix together the softened butter and sugar; then mix in the eggs, vanilla extract, and pumpkin.
    3. Sift together the dry ingredients, including the flour, salt, baking soda, baking powder, pumpkin pie spice, and ground cloves.
    4. Mix the dry ingredients into the wet ingredients.
    5. Then add the chopped walnuts and mix again.

    6. Pour the dough into a well greased loaf pan, and bake at 350° for about an hour, or until a toothpick (or cake tester) inserted in the center comes out clean.
    7. Remove your loaf of deliciously moist pumpkin bread from the oven, and let it cool in the pan for about 10 minutes. 
    8. Then run a butter knife around the edge of your loaf, and slip the loaf out of the pan onto a wire rack to cool.
    9. Serve with butter, jelly, or whatever your heart desires!

    *You can make this recipe into a pumpkin bread loaf, or you can use a muffin tin and make pumpkin muffins instead. You can add a cup or so of chocolate chips, as well, if you’d like to make chocolate chip pumpkin bread.

    Breads & Muffins
    American
    moist pumpkin bread, moist pumpkin bread recipe, pumpkin bread, pumpkin bread recipe, pumpkin recipes
    pumpkin bread recipe
  • Easy Peanut Butter Corn Flake Bars

    Easy Peanut Butter Corn Flake Bars

    Mix up a batch of Corn Flake bars with peanut butter, marshmallows, peanuts, and candy corn. Quick and easy treats you can make in a jiffy; they make the best Halloween treats for kids!

    If you love candy corn and peanuts, peanut butter cereal bars are another really yummy treat with that same sweet and salty flavor. They’re also chewy, which I don’t know why, but I love chewy when it comes to sweets.

    peanut butter Corn Flake bars drizzled with white chocolate and candy corn on gray plate

    There are a few reasons why I love this recipe and why I love to make them in the fall.

    Why You’ll Love These Treats As Much As I Do

    • They’re no bake. I mean, who doesn’t love a good no bake snack, especially during one of the busiest seasons of the year?
    • Like my favorite chocolate-y granola bars, these no bake snacks are super easy to make.
    • They’ll fit the bill for both fall and Halloween festivities.
    • You can easily add a little pizzazz by drizzling a little chocolate or white chocolate on top.
    • They’re a fun snack to make with kids.
    • They make a great snack to take on outdoor adventures together, like kayaking the Jacks Fork or hiking with your family.

    Ingredient Notes

    • Corn Flakes – You can use any brand of corn flakes you prefer. You can even try making these treats with other types of cereal, like Cheerios, Rice Krispies, etc. The texture will be quite a bit different, but it’s really up to you to decide what texture you want for your cereal bars.
    • Peanuts – I’d recommend using dry roasted or cocktail peanuts for the best flavor.
    • Candy corn – If you want to make these candy corn bars at other times of the year, you might pick up a few extra bags so you have them on hand.
    • Creamy peanut butter – Yes, you can use crunchy peanut butter instead; it’ll just add a little more crunch to your treats.
    • Light corn syrup
    • White chocolate melts – You can use melts or white chocolate chips. Either one will work.

    You’ll find a complete ingredient list with measurements in the recipe card below.

    How to Make Corn Flake Bars

    There are only a few steps to making these no bake easy desserts. Before you get started, be sure to grease an 8×8 baking dish with cooking spray.

    Then mix up the treats…

    1. Start by mixing together the cereal, peanuts, and candy corn in a large mixing bowl. That way you’re ready to go after you’ve cooked your sticky syrup mixture.
    mixing together no bake peanut butter bars ingredients, including corn flake cereal, PLANTERS peanuts, and candy corn in large blue mixing bowl
    1. Melt together the peanut butter and corn syrup in a saucepan on the stove, constantly stirring to keep it from scorching on the bottom of the pan. Cook for about 5 to 10 minutes. The peanut butter and corn syrup will melt together and form more of a syrupy liquid.
    2. Remove the peanut butter mixture from the stove, give it a good stir, and pour it over the cereal mixture.
    3. Stir everything together really well, making sure all of your cereal, peanuts, and candy corn are coated with the peanut butter syrup.
    mixing together no bake peanut butter bars in large blue mixing bowl
    1. Put the mixture into the greased dish, and pat it down really well. Allow your pan of no bake snacks to cool… You can even put it in the fridge if you’d like it to cool quicker.
    peanut butter cereal bars in mint green baking dish
    1. Once the bars have cooled, go ahead and slice them into approximately 9 bars. Then drizzle with melted white chocolate, and decorate the top with candy corn!

    I actually drizzled white chocolate on our no bake cereal bars because I love how it complements the flavors of both the peanuts and the candy corn. It’s so delicious!

    no bake Corn Flake squares with white chocolate drizzled on top and candy corn

    Expert Tips and Recipe FAQ’s

    Can I make these in the microwave?

    Yes, you can melt together the peanut butter and corn syrup in a microwave-safe bowl in the microwave. Just cook the mixture on High in 15-second increments, stirring after every cooking cycle, ’til everything is melted. The peanut butter and corn syrup will eventually melt together and form a syrupy liquid.

    Why are my corn flake squares falling apart?

    They shouldn’t be falling apart, but it might be that your cereal bars weren’t pressed down into the pan as firmly as they needed to be. You want to press them firmly enough to compact the treats but not so much that it causes the treats to be completely dense. It’s kind of a balance. It’ll also help to cool the treats before you try to eat them; warm cereal bars tend to fall apart easier.

    How should I store them?

    Store them in an airtight container at room temperature. You can also freeze them if you want to make them ahead; just be sure to place them in an airtight container or bag, so they don’t get freezer burn.

    peanut butter Corn Flake bars with candy corn on gray plate

    More Quick and Easy Treat Recipes:

    More easy last minute ideas –>> 20+ Halloween movie night snacks – including Halloween brownies, party punch, cookies, no bake desserts, treats on a stick, Halloween cupcakes, and more!

    If you try this recipe, why not leave a star rating in the recipe card right below and/or a review in the comment section further down the page? I always appreciate your feedback. You can also follow me on Pinterest, Facebook, Instagram, and YouTube. And subscribe to my email list too!

    Peanut Butter Corn Flake Bars

    Mix up a batch of Corn Flake bars with peanut butter, marshmallows, peanuts, and candy corn. Quick and easy treats you can make in a jiffy!

    • Large Mixing Bowl
    • Small Saucepan
    • 8×8 Baking Pan
    • 4 cups Corn Flakes cereal
    • 1 cup peanuts
    • 1 cup candy corn
    • 1 cup creamy peanut butter
    • 1 cup light corn syrup
    • 1 cup white chocolate melts ((or white chocolate chips))
    1. Grease an 8"x8" baking pan with cooking spray.

    2. In a large mixing bowl, mix together the cereal, peanuts, and candy corn. 

    3. In a small saucepan over low to medium heat on the stovetop, melt the peanut butter and corn syrup, constantly stirring to keep it from scorching on the bottom of the pan. 

    4. Cook for about 5 to 10 minutes, constantly stirring. The peanut butter and corn syrup will melt together and form more of a syrupy liquid.

    5. Remove the peanut butter mixture from the stove, give it a good stir, and pour it over the cereal mixture.
    6. Stir everything together really well, making sure all of the cereal, peanuts, and candy corn are coated with the peanut butter syrup.

    7. Spread the mixture in the greased dish, and firmly pat it evenly into the pan.

    8. Allow the treats to cool. Then slice the bars for serving.

    9. Drizzle the top of each bar with melted white chocolate, and add a piece of candy corn for decoration.

    *You can use either white chocolate or regular/dark chocolate for a drizzle. I actually drizzled white chocolate on our no bake cereal bars because I love how it complements the flavors of both the peanuts and the candy corn. It’s so delicious!

    Can I make these in the microwave?

    Yes, you can melt together the peanut butter and corn syrup in a microwave-safe bowl in the microwave. Just cook the mixture on High in 15-second increments, stirring after every cooking cycle, ’til everything is melted. The peanut butter and corn syrup will eventually melt together and form a syrupy liquid.

    How should I store them?

    Store them in an airtight container at room temperature. You can also freeze them if you want to make them ahead; just be sure to place them in an airtight container or bag, so they don’t get freezer burn.

    Cookies & Bars, Desserts
    American
    corn flake bars, Halloween treats, no bake peanut butter bars, peanut butter cereal bars, peanut butter cereal bars recipe
  • Whipped Cream Ghost Halloween Brownies

    Whipped Cream Ghost Halloween Brownies

    Whipped cream ghost Halloween brownies are the easiest Halloween treats ever! Fun and spooky Halloween idea for kids, using whipped cream and candy eyeballs.

    If you’re looking for Halloween snacks that are both fun and spooky, but not too scary, these ghost Halloween brownies are just the thing. They’re so easy to make, it’s not even funny.

    ghost halloween brownies made with whipped cream and candy eyeballs, on a countertop with candy corn and candy corn pumpkins

    Life gets busy and before you know it, it’s time to make the Halloween treats you committed to make for the Halloween party. I know what it’s like; weeks squeeze into weeks and days become hours and before you know it, Halloween’s tomorrow!

    It’s ok because these cute little treats will take you no time at all. And they use a brownie mix, so no need to fret over trying to make them from scratch.

    Instead you can focus on having a little fun with your kids come Halloween time. Or you can just whip these up in a jiffy.

    whipped cream and candy eyeballs ghost halloween brownies on a gray plate with candy corn and mellowcreme pumpkins

    More Halloween treats you will love: Frankenstein brownies, mummy Halloween brownies, Tombstone Brownies, and Pumpkin Patch Halloween Brownies.

    WHAT KIND OF BROWNIE MIX SHOULD I USE?

    First of all, you really need a brownie that’s easy to slice and pull out of the pan, nothing too messy or gooey.

    My first batch of brownies were extremely soft and gooey; I didn’t realize they’d be so gooey. They could hardly be scraped off the bottom of the pan.

    So, I definitely recommend making cake-like or chewy brownies (preferably chewy) that won’t be so gooey and will easily pop right out of the pan.

    This brownie mix worked wonderfully well for our ghost brownies.

    brownie mix brownies in blue baking dish for ghost halloween brownies recipe

    DO I HAVE TO MAKE HOMEMADE WHIPPED CREAM?

    No, you absolutely don’t have to. You can just use store bought whipped cream, either the whipped cream in the can (negating any need of pastry bags and tips) or the kind in the tub.

    Also, you can even use icing instead of whipped cream. Make homemade sugar cookie icing or use ready made icing that comes with a convenient tip for decorating, making the process even easier.

    It’s totally up to you! However, whipped cream is so easy to make, it only takes a few minutes.

    HOW DO I MAKE HOMEMADE WHIPPED CREAM IF I WANT TO USE THAT?

    You can just follow my recipe for homemade whipped cream, where you’ll find the exact ingredients and the steps to making it yourself.

    You’ll need cream cheese (that’s softened), heavy whipping cream, vanilla extract, and powdered sugar.

    Be sure to refrigerate the whipped cream until you’re ready to serve it.

    ingredients for ghost halloween brownies, including whipped cream, brownies, and candy eyeballs

    INGREDIENTS YOU’LL NEED TO MAKE GHOST HALLOWEEN BROWNIES

    You’ll need just a few things to make ghost Halloween brownies, including the following:

    TIPS FOR HOW TO MAKE THESE SCRUMPTIOUS HALLOWEEN TREATS

    Slice your completely cooled brownies into squares or as close to square shaped brownies as you can.

    To decorate brownies with ghosts, follow these steps:

    swirling whipped cream ghosts onto ghost halloween brownies with a pastry bag and Wilton Round Tip 2A, making easy halloween treats
    • Using Wilton Round Tip 2A (or the closest off brand cake tip) and a small pastry bag, swirl a ghost on top of each brownie.
    • Add candy eyeballs for the eyes.
    adding candy eyeballs to whipped cream ghost halloween brownies for easy halloween treats

    That was easy, right?! So simple.

    This is the perfect opportunity to get your kids in the kitchen. Let them swirl a few ghosts, or have them add the candy eyeballs while you swirl the whipped cream.

    ghost halloween brownies, ready for halloween desserts

    Most importantly, just have fun with it!

    WHAT IF I DON’T HAVE CAKE TIPS AND PASTRY BAGS?

    That’s ok! You really don’t have to have the cake tip I mentioned above or the pastry bag. You can get creative with what you have.

    If you have sandwich bags, snip the corner of a sandwich bag, fill the bag with whipped cream, and swirl away. Works like a charm!

    You can also create a DIY pastry bag using parchment paper or wax paper.

    whipped cream ghost halloween brownies for easy halloween snacks

    MORE EASY HALLOWEEN TREATS AND RECIPES YOU CAN MAKE:

    More easy last minute ideas –>> 20+ Halloween treats – including Halloween brownies, party punch, cookies, no bake desserts, treats on a stick, Halloween cupcakes, and more!

    KITCHEN TOOLS YOU’LL NEED TO MAKE WHIPPED CREAM GHOST HALLOWEEN BROWNIES

    Mixer

    Brownie Pan or Cake Pan

    Pastry Bags (or Sandwich Bags)

    Wilton Tip 2A

    GHOST HALLOWEEN BROWNIES RECIPE

    If you love this ghost Halloween brownies recipe as much as I do, please write a 5 star review, and help me share the recipe on Facebook and Pinterest! If you make the recipe, be sure to share that you tried it on Pinterest. I love when readers share feedback!

    Whipped Cream Ghost Halloween Brownies Recipe

    CONNECT WITH ADVENTURES OF MEL!

    Be sure to follow me on social, so you never miss a post!

    Facebook | Pinterest | YouTube | Instagram | Twitter

    Sign up to receive my newsletter, filled with delicious recipes and outdoor travel adventures, in your inbox:

    FREE EMAIL SUBSCRIPTION

    Click on the video below to see how easy it is to make ghost brownies for Halloween!


    Whipped Cream Ghost Brownies

    Whipped cream ghost brownies are the easiest Halloween treats ever! Fun and spooky Halloween idea for kids, using whipped cream and candy eyeballs.

    • Wilton Round Tip 2A
    • Small Pastry Bag
    • 15 brownies (baked and cooled)
    • 4 cups whipped cream
    • 40 candy eyeballs
    1. Slice the brownies into squares.

    2. Using Wilton Round Tip 2A and a small pastry bag, swirl a whipped cream ghost on top of each brownie.

    3. Add candy eyeballs for the eyes.
    4. That's it! They're ready to serve.

    I recommend not swirling the ghosts until you’re ready to serve; OR refrigerate the ghost brownies until you’re ready to serve them. Otherwise, your ghosts may start to melt.

    Desserts, Halloween
    American
    brownie mix, ghost brownies, Halloween brownies, halloween desserts, Halloween snacks, Halloween treats, whipped cream ghost
    whipped cream ghost hallloween brownies recipe, easy halloween snacks
    easy whipped cream ghost halloween brownies recipe
  • Pumpkin Patch Halloween Brownies

    Pumpkin Patch Halloween Brownies

    How to make quick and easy pumpkin patch Halloween brownies for kids, a fun Halloween treat recipe with candy corn pumpkins and green icing!

    Fall is full of so many beautiful things, including that ever anticipated trip to the pumpkin patch. Why not bring a little bit of the pumpkin patch into your Halloween treats with the cutest pumpkin patch Halloween brownies ever?

    homemade pumpkin patch halloween brownies with candy corn and candy corn pumpkins

    While you will need just a little bit of green decorating icing, the only other things you’ll need for this brownie recipe are a brownie mix and candy corn pumpkins.

    My dad used to keep these cute little mellowcreme pumpkins in our farm truck, along with Tootsie Rolls. But when fall hit, he always had a bag of Brach’s candy pumpkins.

    Every time I eat them, they take me back to riding around in the farm truck with my dad, feeding the cows and working on the farm.

    pumpkin patch halloween brownies made with mellowcreme pumpkins and green icing

    Now I’m using them to make the cutest and pretty much the quickest little Halloween desserts. Place a couple of pumpkins, swag a little bit of green icing, and you’re all set, easy peasy!

    Use a brownie mix to make the brownies. And while I use a homemade sugar cookie icing, you can totally buy a tube of decorating icing already made and ready to go; just get green.

    More Halloween treats you will love: Frankenstein brownies, Ghost Halloween Brownies, Graveyard Halloween Brownies, and Mummy Halloween Brownies.

    WHAT KIND OF BROWNIE MIX SHOULD I USE?

    I really recommend using a brownie that’s going to be easy to slice and pull out of the pan, nothing too messy or gooey.

    chewy brownie mix brownies for pumpkin patch halloween brownies, brownies baked in a blue baking dish

    Our first batch of brownies gave us a really ooey gooey brownie; I didn’t realize they’d be that gooey. They could hardly be scraped off the bottom of the pan.

    Definitely go for more cake-like or chewy brownies (preferably chewy) that won’t be so gooey and will easily pop right out of the pan.

    This brownie mix worked fantastically well for our pumpkin patch brownies.

    WHAT KIND OF ICING SHOULD I USE?

    You have two options here: You can either mix up a quick batch of my favorite sugar cookie icing and then color it green.

    Or you can use pre-made icing or decorating icing that’s ready to go.

    Personally, I love the flavor of homemade frosting. It just tastes so much better! But whatever you decide to use will work just fine.

    HOW DO I COLOR THE ICING FOR MY PUMPKIN PATCH BROWNIES?

    Add food coloring to your icing, and mix it according to your specific food coloring directions. I will say that it doesn’t take a lot either.

    swirling pumpkin vines with green icing onto pumpkin patch halloween brownies halloween treats

    Rule of thumb when baking or mixing up anything, especially when adding food coloring to anything: Start with a small amount because you can always add more, but you can’t take away.

    I used Wilton Kelly Green for the vines on my pumpkin patch treats.

    INGREDIENTS YOU’LL NEED TO MAKE PUMPKIN PATCH HALLOWEEN BROWNIES

    You’ll need just a few things to make pumpkin patch Halloween brownies, including the following:

    ingredients for pumpkin patch halloween brownies, including brownies, green icing, and Brach's mellowcreme pumpkins

    TIPS FOR HOW TO MAKE THESE SCRUMPTIOUS HALLOWEEN TREATS

    Slice your brownies into squares or as close to square shaped brownies as you can.

    To decorate brownies, follow these steps:

    • Using Wilton Round Tip 5 (or the closest off brand cake tip) and a small pastry bag, add pumpkin vines (and leaves if you want) to the top of the brownie with green icing. Just do a little swag with little loops around the outside edge of the brownie; think of how long and wispy a pumpkin vine looks.
    • Add a dab of green icing to the bottom of your candy pumpkins and set in place with the vines. You can add 2 or 3 pumpkins to each brownie.
    adding green icing to mellowcreme pumpkin for pumpkin patch Halloween brownies
    • If you have time and want to, you can even add a little bit more vine coming down from the stem of the pumpkin to meet the vine on the top of the brownie. This step is totally optional, though.

    The most important thing to remember is don’t try to make them perfect. If you’ve ever grown pumpkins, you know how much of a tangled mess the vines can be.

    decorating pumpkin patch Halloween brownies with Brach's Mellowcreme Pumpkins and green icing for a quick and easy Halloween dessert

    Just have fun with it, and get your kids in the kitchen with you. They’ll have so much fun decorating these fun little Halloween brownies.

    WHAT IF I DON’T HAVE CAKE TIPS AND PASTRY BAGS?

    That’s ok! You really don’t have to have the cake tip I mentioned above or the pastry bag. You can get creative with what you have.

    Or you can just use ready made icing that comes with a convenient tip for decorating, making the process even easier.

    If you want to use homemade icing and have sandwich bags, you can snip the corner of a sandwich bag, fill the bag with icing, and swirl away. Works like a charm!

    You can also create a DIY pastry bag using parchment paper or wax paper.

    finished pumpkin patch halloween brownies with candy corn pumpkins and green icing pumpkin vines

    MORE HALLOWEEN TREATS AND RECIPES YOU CAN MAKE:

    Soft and Chewy Monster Cookies

    More easy last minute ideas –>> 20+ Halloween treats – including Halloween brownies, party punch, cookies, no bake desserts, treats on a stick, Halloween cupcakes, and more!

    KITCHEN TOOLS YOU’LL NEED TO MAKE PUMPKIN PATCH HALLOWEEN BROWNIES

    Mixer

    Brownie Pan or Cake Pan

    Pastry Bags (or Sandwich Bags)

    Wilton Tip 5

    PUMPKIN PATCH HALLOWEEN BROWNIES RECIPE

    If you love this pumpkin patch Halloween brownies recipe as much as I do, please write a 5 star review, and help me share the recipe on Facebook and Pinterest! If you make the recipe, be sure to share that you tried it on Pinterest. I love when readers share feedback!

    Pumpkin Patch Halloween Brownies recipe

    CONNECT WITH ADVENTURES OF MEL!

    Be sure to follow me on social, so you never miss a post!

    Facebook | Pinterest | YouTube | Instagram | Twitter

    Sign up to receive my newsletter, filled with delicious recipes and outdoor travel adventures, in your inbox:

    FREE EMAIL SUBSCRIPTION

    Click on the video below to see how easy it is to make pumpkin patch brownies for Halloween!

    Pumpkin Patch Brownies

    How to make quick and easy pumpkin patch Halloween brownies for kids, a fun Halloween treat recipe with candy corn pumpkins and green icing!

    • 15 brownies (baked and cooled)
    • 2 cups green decorating icing
    • 40 mellowcreme candy pumpkins
    1. Slice the brownies into squares.

    2. Using green decorating icing with a round tip, add pumpkin vines (and leaves if you want) to the top of each brownie. Just do a little swag with little loops around the outside edge of the brownie; think of how long and wispy a pumpkin vine looks.

    3. Add a dab of green icing to the bottom of your candy pumpkins and set in place with the vines. You can add 2 or 3 pumpkins to each brownie.
    4. If you have time and want to, you can even add a little bit more vine coming down from the stem of the pumpkin to meet the vine on the top of the brownie. This step is optional.

    5. And that’s it! They’re ready to serve for a fun Halloween or fall treat!

    *If you don’t want to buy icing, you can also make homemade cookie icing; then use a pastry bag and round tip to decorate. If you’re using homemade icing and you don’t have pastry bags or tips, it’s ok! You can use a sandwich bag instead. Just snip the corner of a sandwich bag, fill the bag with icing, and swirl away.

    The most important thing to remember is don’t try to make them perfect. If you’ve ever seen pumpkins on the vine, you know how much of a tangled mess the vines can be. Just have fun with it!

    Desserts, Halloween
    American
    brownie mix, Halloween brownies, halloween desserts, Halloween snacks, Halloween treats, pumpkin patch brownies
    chewy pumpkin patch halloween brownies recipe
  • Chewy Monster Cookies

    Chewy Monster Cookies

    How to make soft and chewy monster cookies from scratch, loaded with peanut butter, oats, M&M’s, and chocolate chips. Easy dessert recipe you can easily customize for Halloween and other holidays. But watch out, cuz they’ll disappear fast!

    Monster chocolate chip cookies made with loads of chocolate are one of my favorite cookies. Partly because they remind me of a childhood neighbor and partly because they’re just so soft and chewy.

    chewy monster cookies with M&M'S candies on white marble countertop

    When I was a kid, my neighbor would make the most delicious soft and chewy monster cookies filled with oatmeal, peanut butter, peanut butter chips, chocolate chips, and M&M’s. I mean, she loaded those puppies up with all kinds of sweet chocolaty goodness.

    Why You’ll Love M&M Monster Cookies

    There are a handful of reasons to love this scrumptious monster cookies recipe…

    • They are easily customizable… You can make them festive for any occasion. Halloween? Add a spooky touch with candy eyeballs. Christmas? Use Christmas M&M’s that are red and green. Easter? Use pastel colored M&M’s.
    • These cookies are especially fun to make with kids, and this is an easy recipe for that exact purpose.
    • You can add other mix-ins besides chocolate chips and M&M’s. Try Snickers bars, Reese’s Pieces, Reese’s Peanut Butter cups, Milky Way, mini marshmallows, and more!
    • They’re thick, soft, and chewy. What’s not to love about soft monster cookies that are also thick and chewy?
    • They’re very similar to another reader favorite oatmeal cookies recipe, oatmeal chocolate chip cookies.
    monster cookies recipe ingredients on white marble countertop

    You’ll need to gather a few ingredients to mix up this monster cookie dough…

    • Butter – I prefer to use unsalted butter rather than salted when baking, so I can more easily control the amount of salt that goes into the recipe. Also, be sure to soften the butter, so it will mix well.
    • Light Brown Sugar – Brown sugar is just one of the things that helps give these cookies their soft and chewy texture.
    • Peanut Butter – You can use creamy or crunchy, but I highly recommend creamy, mainly because we’re already adding other crispy ingredients that will give a lot of crunch. It is best to use a regular peanut butter that doesn’t require stirring every time you use it. I do use Skippy Natural creamy peanut butter, but it only requires stirring upon opening the jar the first time around. The problem with other natural peanut butters is that all of the oil can be too much for the dough, and your cookies may spread more while baking.
    • Egg – You’ll need a large egg.
    • Vanilla Extract
    • All-Purpose Flour – I recommend using an unbleached all-purpose flour. If you want to make these cookies gluten-free, use a good gluten-free flour that bakes well; <<– the one I link to here is my go to.
    • Baking Soda
    • Sea Salt – I recommend Redmond Sea Salt.
    • Oats – You can use quick oats or old-fashioned oats. Either kind of oatmeal will work just fine.
    • Chocolate Chips – While I prefer semi-sweet chocolate chips, feel free to use milk chocolate chips or dark chocolate chips.
    • Peanut Butter Chips
    • M&M’s – Feel free to use Reese’s Pieces instead.
    • Other Optional Candies – Crushed Mini Snickers, Reese’s Peanut Butter Cups, or other candies. And candy eyeballs, especially if you’re making these cookies for Halloween.
    stack of soft monster cookies made with M&M's and candy eyeballs

    How to Make Chewy Monster Cookies

    These cookies are really easy to make. Here’s how to mix up the dough…

    1. In a large mixing bowl, cream, or mix together, the softened butter and brown sugar.
    2. Then mix the peanut butter into the butter sugar mixture.
    3. Add the egg and vanilla extract, mixing well.
    4. In a separate bowl, whisk together the flour, baking soda, and salt.
    5. Add the dry ingredients to the wet ingredients, mixing well.
    6. Mix the oats into the cookie dough.
    7. Add the chocolate chips, peanut butter chips, M&M’s, and other candies (except candy eyeballs) into the dough, mixing everything together well.
    8. Using a cookie scoop, drop the cookies onto a cookie sheet.
    9. Bake at 375° F for about 8 to 10 minutes, or until the cookies are lightly golden and done.
    monster cookie dough in white mixer bowl
    1. If using candy eyeballs, gently press the eyeballs into the tops of the cookies while they’re hot, adding as many or as few as you want. This has a dual purpose… 1) Great for decorating Halloween cookies and 2) It allows you to gently press the cookie down into a flatter cookie while still warm.
    decorating Halloween cookies like monster cookies with candy eyeballs on a cookie sheet
    1. Remove the cookies to a wire rack to cool. Then serve with a nice mug of cold milk and enjoy!
    dunking monster chocolate chip cookies in milk in orange Fire King mug

    Expert Tips and Recipe FAQ’s

    Should I chill monster cookie dough?

    It’s really not necessary for this cookie recipe. These cookies are already pretty chewy, and I prefer to just go ahead and bake the cookies while the dough is nice and soft.

    Why do my monster cookies go flat?

    There may be a few reasons… 1) If you use natural peanut butter, the extra oil can make the cookie dough spread flat while baking. 2) If your oven is too hot, the cookies may bake flatter, due to the butter in the dough melting too quickly. 3) Did you measure out the ingredients correctly? When measuring flour, it helps to spoon the flour into measuring cups, then use a knife’s edge to scrape off extra flour.

    Can I make this recipe into monster cookie bars instead of cookies?

    Yes, you can. Spread the dough into a greased 9×13 baking dish, and bake for at least 20-25 minutes, probably longer, ’til the cookie bars are golden and a toothpick inserted in the center comes out clean.

    How should you store these cookies?

    Store then in an airtight container on the counter. They should keep for 4 to 5 days.

    Can you freeze monster cookies?

    Yes, you can make them and freeze them. Just allow enough time for the cookies to thaw before serving time. You can also freeze the cookie dough; just be sure to wrap it in plastic wrap, as well as place in an airtight container or freezer bag so it doesn’t get freezer burn. It should keep in the freezer for up to 3 months.

    stack of M&M's monster cookies with bite taken out of top cookie

    Really Yummy Mix-In Ideas for Monster Cookies

    We touched on this just a bit in the ingredients section, but this cookie dough is really versatile, and there are several mix-ins you can add to make them even more bulky, sweet, and monster-like…

    • Mini M&M’s
    • Crushed Mini Snickers
    • Reese’s Peanut Butter Cups
    • Reese’s Pieces
    • White chocolate chips
    • Butterscotch chips
    • Chopped walnuts or pecans
    • Bits of graham crackers, mini marshmallows, and chocolate chips to make s’more monster cookies

    Just use your imagination; the sky’s the limit with these cookies.

    pile of soft and chewy monster cookies on a white plate

    If you love this monster cookies recipe, you’ll love these cookie recipes too!

    More easy last minute Halloween ideas –>> 20+ Halloween treats – including Halloween brownies, party punch, cookies, no bake desserts, treats on a stick, Halloween cupcakes, and more! And if it’s a costume you need, why not make a DIY Garfield costume?

    If you try this recipe, why not leave a star rating in the recipe card right below and/or a review in the comment section further down the page? I always appreciate your feedback. You can also follow me on Pinterest, Facebook, Instagram, and YouTube. And subscribe to my email list too!

    Chewy Monster Cookies

    How to make soft and chewy monster cookies from scratch, loaded with peanut butter, oats, M&M's, and chocolate chips. Easy dessert recipe!

    • Mixer
    • Cookie Sheet
    • Cookie Scoop
    • Wire Rack
    • 1/2 cup unsalted butter (softened)
    • 1 cup light brown sugar
    • 1/2 cup creamy peanut butter
    • 1 large egg
    • 1 teaspoon vanilla extract
    • 1 1/8 cups all-purpose flour
    • 3/4 teaspoon baking soda
    • 1/2 teaspoon sea salt
    • 1/2 cup rolled oats
    • 1/4 cup semi-sweet chocolate chips
    • 1/4 cup peanut butter chips
    • 1/2 cup M&M'S
    • 1/2 cup candy eyeballs (optional)
    1. Pre-heat the oven to 375° F. 

    2. Cream, or mix together, the butter and brown sugar.
    3. Mix the peanut butter into the creamed mixture.
    4. Add the egg and vanilla extract into the creamed mixture and mix well.
    5. In a separate bowl, whisk together the flour, baking soda, and salt. 

    6. Add the dry ingredients to the wet ingredients, mixing well.

    7. Mix the oats into the cookie dough.
    8. Add the chocolate chips, peanut butter chips, M&M'S, and any other candies you want into the cookie dough, mixing everything together well.

    9. Using a cookie scoop, drop cookies onto a cookie sheet.

    10. Bake at 375° F for 8 to 10 minutes, or until the cookies are lightly golden and done.

    11. While the cookies are still on the cookie sheet, gently press the candy eyeballs into each cookie.*

    12. Remove the cookies to a wire rack to cool.

    13. Serve with a mug of ice cold milk!

    *Gently pressing the candy eyeballs into the cookies will also allow you to gently press the cookies a bit flatter while they’re still nice and warm.

    Store the cookies in an airtight container on the counter. They should keep for 4 to 5 days.

    Cookies & Bars, Desserts
    American
    halloween cookies, halloween desserts, monster cookies, monster cookies recipe
  • Creamy No Bake Pumpkin Dessert

    Creamy No Bake Pumpkin Dessert

    Deliciously creamy no bake pumpkin dessert layered with a cream cheese filling and pecan nut pie crust. Simple dessert recipe, perfect for Thanksgiving!

    Pumpkin spice is no stranger to popularity, and neither is a really good no bake dessert. Combine the two, and you’ve got a deliciously cold and creamy no bake pumpkin dessert that is, to put it simply, to die for.

    no bake pumpkin dessert with whipped cream and pecans on top in blue baking dish

    Made with a nutty pie crust, homemade pumpkin purée, and a creamy layer of cream cheese lush, it’s just as dreamy as my favorite no bake blueberry dessert.

    Like Strawberry Delight, this dessert is yet another twist on my mom’s recipe for her famous Cherry Crunch. I will definitely have to share the cherry version of this recipe someday soon.

    plate of no bake pumpkin dessert, no bake pumpkin pie with cream cheese

    While the pie crust does require bake time, the rest of this recipe is indeed no bake. And it’s actually really simple and easy to make, even though, like an icebox cake, it does require a bit of chill time before serving.

    I JUST WANT THE RECIPE! TAKE ME TO THE RECIPE FOR THIS DREAMY CREAMY NO BAKE PUMPKIN DESSERT!

    If you’d rather skip all of my cooking tips, important cooking info for this recipe, and similar recipe ideas – and get straight to this deliciously creamy no bake pumpkin dessert recipe – just scroll down to the bottom, where you’ll find a printable recipe card.

    No Bake Pumpkin Dessert layers in blue baking dish

    INGREDIENTS YOU’LL NEED FOR THIS NO BAKE PUMPKIN DESSERT

    You’ll need just a few ingredients to make this no bake pumpkin pie absolutely delicious…

    HOW TO MAKE THE 3-INGREDIENT PIE CRUST:

    Making the pie crust is so simple and easy and requires just a few minutes of bake time.

    pecan nut pie crust for no bake pumpkin dessert

    First, melt the butter; then mix it together with the flour, forming a dough. Stir in the chopped pecans.

    Press the crust into a 13″x9″ baking dish, and bake at 350° for about 20 minutes, or until the crust begins to turn a golden brown.

    It’s important to let the crust cool before adding any filling.

    layered no bake pumpkin dessert recipe in blue baking dish with chopped pecans on top

    Here is the full recipe for a pecan nut pie crust. Or if you’d rather have a crust without nuts, you might want to try this more traditional pie crust recipe or this easy no roll pie crust.

    WHY DO I NEED DREAM WHIP FOR THIS CREAM CHEESE DESSERT? WHY CAN’T I JUST USE PLAIN WHIPPED CREAM?

    I’ve tried making the cream cheese filling with homemade whipped cream; for some reason, it just doesn’t work. In fact, you’ll end up with a liquid goop that just won’t work for pie filling.

    So, I usually reserve my whipped cream for the top (or save back a little Dream Whip) and use Dream Whip for the filling, the same ingredient my mom uses in her Cherry Crunch.

    Dream Whip layer in no bake pumpkin dessert recipe

    Dream Whip creates an ultra creamy pie filling that’s silky smooth, a bit like angel fluff (hard to describe it any other way), and so creamy delicious. It’s hard to beat when it comes to making a really rich, creamy, no bake dessert.

    WHAT IS IN PUMPKIN PIE SPICE ANYWAY?

    Pumpkin pie spice is used more traditionally in classic pumpkin pie. But it’s used in a lot of other recipes, as well, including Pumpkin Roll and Pumpkin Spice Gooey Butter Cake.

    So, what is in pumpkin pie spice? It’s a blend of spices, including ground cinnamon, nutmeg, and ginger; it may also include cloves and allspice.

    pumpkin pie filling layer in no bake pumpkin dessert

    It smells and tastes so good and adds that pumpkin spice kick to your favorite fall dessert recipes.

    TIPS FOR HOW TO MAKE A CREAMY NO BAKE PUMPKIN DESSERT

    When you use Dream Whip, you’ll need to mix it up according to the package directions. You can follow how to make Dream Whip Whipped Topping Mix here, but be sure to double the ingredient amounts if you do.

    Mix together your whipped cream, powdered sugar, and softened cream cheese with a mixer.

    Spread the creamy filling on top of your cooled pie crust. At this point, you need to save back about a cup of the Dream Whip to top off your pumpkin dessert later when you’ve finished making it.

    For the pumpkin layer, mix together the pumpkin purée, vanilla pudding mixes, milk, and pumpkin pie spice, until you’ve got a creamy pumpkin pie filling. Add the pumpkin layer on top of the Dream Whip layer.

    no bake pumpkin dessert with chopped pecans on top

    Top the entire pumpkin dessert with the leftover cup of Dream Whip, and sprinkle chopped pecans on top.

    And that’s it! This recipe is so easy. If you’re not quite ready to serve it, just cover it and chill in the refrigerator; and it’ll be ready when you are.

    Personally, I think the colder it is, the better it tastes.

    slice of no bake pumpkin dessert, no bake pumpkin pie with cream cheese on white plate

    ANOTHER NO BAKE DESSERT RECIPE YOU MAY ENJOY:

    Creamy No Bake Blueberry Dessert

    MORE PUMPKIN DESSERT RECIPES YOU MAY ENJOY:

    And if you’re looking for even more holiday recipes, you’ll find a whole slew of them on my list of Best Thanksgiving Recipes for Your Holiday Menu.

    no bake pumpkin dessert layered in blue baking dish with pecans on top

    KITCHEN TOOLS YOU’LL NEED TO MAKE A PUMPKIN NO BAKE DESSERT

    13″x9″ Baking Dish – You’ll need this size baking dish for this recipe. I find myself using this size for so many recipes, not just desserts.

    Mixer – You’ll need a mixer to mix together the ingredients for the creamy filling.

    Spatula – Where would I be without my spatulas? I have a whole slew of them because we’re ALWAYS using them.

    CREAMY NO BAKE PUMPKIN DESSERT RECIPE

    If you love this creamy no bake pumpkin dessert recipe as much as I do, please write a 5 star review, and help me share the recipe on Facebook and Pinterest!

    no bake pumpkin dessert recipe

    CONNECT WITH ADVENTURES OF MEL!

    Be sure to follow me on social, so you never miss a post!

    Facebook | Pinterest | YouTube | Instagram | Twitter

    Sign up to receive my newsletter, filled with delicious recipes and outdoor travel adventures, in your inbox:

    FREE EMAIL SUBSCRIPTION

    No Bake Pumpkin Dessert

    Deliciously creamy no bake pumpkin dessert layered with a cream cheese filling and pecan nut pie crust. Simple dessert recipe, perfect for Thanksgiving!

    • 1 pecan nut pie crust

    Cream Cheese Filling:

    • 1 box Dream Whip ((2 small packets))
    • 1 cup whole milk
    • 1 teaspoon vanilla extract
    • 16 ounces cream cheese (softened)
    • 2 cups powdered sugar

    No Bake Pumpkin Filling:

    • 15 ounces pumpkin purée ((or canned pumpkin))
    • 6.8 ounces vanilla pudding mix ((2 small boxes))
    • 3/4 cup whole milk
    • 2 teaspoons pumpkin pie spice

    Topping:

    • 1 cup Dream Whip
    • 1 cup chopped pecans
    1. Prepare and bake the crust ahead of time, so it's cooled and ready to go.

    2. In a large mixing bowl, mix the Dream Whip according to package directions, whisking the 2 small packets with the whole milk and vanilla extract.

    3. In a separate bowl, beat the cream cheese well with a mixer.

    4. Add the cream cheese and powdered sugar to the Dream Whip whipped cream, whisking the mixture 'til it’s smooth and creamy.

    5. Spread about 3 cups of the creamy filling on top of the cooled crust in a 9×13 pan.

    6. For the pumpkin layer, mix together the pumpkin purée, vanilla pudding mixes, whole milk, and pumpkin pie spice, until you’ve got a creamy pumpkin pie filling.
    7. Spread the pumpkin layer on top of the Dream Whip layer.
    8. Top the entire dessert with the leftover cup of Dream Whip, and sprinkle chopped pecans on top.
    9. Cover and chill in the fridge for at least 4 hours, or overnight if possible, before serving.

    *Personally, I think the colder this no bake dessert is, the better it tastes.

    Thanksgiving
    American
    cream cheese desserts, no bake, no bake pumpkin dessert, pumpkin dessert, pumpkin recipes, pumpkin spice recipe
    creamy no bake pumpkin dessert recipe
  • Frankenstein Brownies for Halloween

    Frankenstein Brownies for Halloween

    Frankenstein brownies are the cutest Halloween treats. They’re quick and easy Halloween snacks anyone can make, and especially fun for kids. Decorate these frosted chocolate treats at your next Halloween party!

    These fun Frankenstein Halloween Brownies are my favorite out of my entire Halloween brownie series I’m sharing with you. There’s just something so cute and sweet about a silly Frankenstein face.

    Frankenstein brownies decorated with frosting and candy eyeballs on wood countertop with candy corn

    I wanted to give you several Halloween desserts you can make in just a short amount of time. More Halloween brownie recipes you’ll love include: 

    And even though they’re not brownies, I can’t forget these super cute Frankenstein Rice Krispie treats.

    Frankenstein brownie on white marble countertop with green frosting, Halloween kitchen towel, candy eyeballs, and candy corn

    Why You’ll Love These Halloween Frankenstein Brownies

    • These Frankenstein Halloween treats may look like they take a lot of time, but they really don’t. They’re super quick and easy to make; you can even use a brownie mix.
    • You can either mix up a quick batch of sugar cookie icing, or you can buy pre-made decorating icing, whatever is easiest for you.
    • This recipe makes the best activity for a Halloween party. Set up a simple brownie buffet, and let everyone decorate their own Frankenstein brownie.

    Below you’ll find a few tips so that hopefully, making these Halloween snacks can be quick, seamless, and enjoyable for you. This is an opportunity for you to grab your kids and have some Halloween fun with them in the kitchen!

    If you still need a costume, I’ve gotcha covered with the most adorable Garfield costume ever!

    Frankenstein brownie ingredients, including brownie mix brownies, green icing, black icing, and candy eyeballs

    Ingredients and Substitutions Notes

    You’ll need just a handful of things to make Frankenstein Halloween brownies, including the following:

    • Already baked and cooled brownies – You really want a brownie that’s going to be easy to slice and pull out of the pan, nothing too messy or gooey. My first batch of brownies turned out really soft and gooey; I didn’t realize they’d be that gooey. They could hardly be scraped off the bottom of the pan. I recommend using cake-like or chewy brownies (preferably chewy) that won’t be so gooey and will easily come right out of the pan. This brownie mix worked wonderfully for our Frankenstein brownies.
    • Green and black sugar cookie icing – Like I said above, you can mix up a quick batch of my favorite sugar cookie icing. You can even add peppermint extract if you want a minty flavor to your frosting. Once mixed, just separate the icing into two bowls, and mix according to your specific food coloring directions. I used Wilton Leaf Green and Black icing colors for my Frankenstein treats. Or you can use pre-made icing or decorating icing that’s ready to go. Personally, I love the flavor of homemade frosting. It just tastes so much better! But whatever you decide to use will work just fine.
    • Candy eyeballs
    Frankenstein Halloween brownies on wood countertop with candy corn

    How to Make Frankenstein Brownies

    First things first, make and prep the brownies…

    1. Mix and bake a brownie mix according to package directions.
    brownie mix brownies in blue baking dish
    1. Slice the brownies into squares, or at least, as close to square shaped brownies as you can.
    square brownie with candy eyeballs and Wilton leaf green icing on white marble countertop

    How to Decorate a Frankenstein Brownie

    1. Spread a layer of green icing on top of the brownie.
    decorating Frankenstein Halloween treats with green icing, Wilton Leaf Green food color
    1. Using Wilton Round Tip 5 (or the closest off brand cake tip) and a small pastry bag, add hair to your Frankenstein with the black icing. Just do a zig-zag along the hairline, and outline around the top of the head. Then fill in with black icing.
    adding black icing for hair to Halloween Frankenstein brownies, Wilton black food color
    1. Add candy eyeballs for his eyes.
    2. Add a small smile or mouth with the black icing.
    3. Then add a small piece of stitching to one cheek, also with black icing.
    decoraed Frankenstein brownie with candy eyeballs, black icing smile, and stitches

    Don’t worry about perfection because the more imperfect your Frankenstein looks, the more he’ll look like the monster mash-up his character was really created to be. Just have fun with it!

    Halloween Frankenstein brownies decorated for Halloween treats on wood countertop with candy corn

    Expert Tips and Recipe FAQ’s

    What if you don’t have cake tips and pastry bags?

    No worries! You really don’t have to have the cake tip I mentioned above or the pastry bag. You can get creative with what you have. If you have sandwich bags, snip the corner of a sandwich bag, fill the bag with icing, and swirl away. Works like a charm! You can also create a DIY pastry bag using parchment paper or wax paper. Or you can just use ready made icing that comes with a convenient tip for decorating, making the process even easier.

    Can I make Frankenstein brownies ahead of time?

    I’d recommend making them day of or only 1 day ahead of time. Reason being is the brownies, icing, and candy can degrade over time, and you really want these spooky Halloween brownies to look and taste their best.

    How should you store decorated Halloween brownies?

    Depending on the type of frosting you use, you should be able to store them in an airtight container on the countertop for 1-2 days; after that, they should be in the fridge for longer keep.

    close up Frankenstein Halloween brownies on wood countertop with candy corn

    More Easy and Spooky Halloween Recipes:

    If you love this freaky Frankenstein dessert, you’ll love these recipes too…

    More easy last minute ideas –>> 20+ Halloween movie desserts – including Halloween brownies, party punch, cookies, no bake desserts, treats on a stick, Halloween cupcakes, and more!

    If you try this recipe, why not leave a star rating in the recipe card right below and/or a review in the comment section further down the page? I always appreciate your feedback. You can also follow me on Pinterest, Facebook, Instagram, and YouTube. And subscribe to my email list too!

    Frankenstein Brownies

    Frankenstein brownies are the cutest Halloween treats. Quick and easy Halloween snacks anyone can make, especially fun for kids!

    • Mixer
    • Brownie Pan
    • Wilton Tip 5
    • Pastry Bags
    • 15 brownies (baked and cooled)
    • 2 cups green icing
    • 2 cups black decorating icing
    • 40 candy eyeballs
    1. Slice the brownies into squares.

    2. Spread a layer of green icing on top of each brownie.

    3. Using the black decorating icing and a round tip, add hair to your Frankenstein brownie. Just do a zig-zag along the hairline, and outline around the top of the head. Then fill in with the icing.

    4. Add candy eyeballs for his eyes.
    5. Add a small smile or mouth with the black icing.
    6. Then add a small piece of stitching to one cheek, also with the black icing.

    7. And that's it! They're ready to serve. 

    *I used Wilton Leaf Green and Black icing colors for my Frankenstein.

    *If you don’t want to buy icing, you can make homemade cookie frosting; then just separate the icing into two bowls, and mix it with black and green food coloring. Use a pastry bag and round tip to decorate. If you don’t have pastry bags or tips, you can use a sandwich bag instead. Just snip the corner of a sandwich bag, fill the bag with icing, and swirl away. You can also create a DIY pastry bag using parchment paper or wax paper.

    Depending on the type of frosting you use, you should be able to store these Halloween brownies in an airtight container on the countertop for 1-2 days; after that, they should be in the fridge for longer keep. I’d recommend making them either day of or only 1 day ahead of time. Reason being is the brownies, icing, and candy can degrade over time, and you really want these spooky Halloween brownies to look and taste their best.

    Halloween
    American
    Frankenstein brownie, Frankenstein brownies, Frankenstein dessert, Frankenstein Halloween treats, Halloween brownies, halloween desserts, Halloween Frankenstein brownies, Halloween snacks, Halloween treats