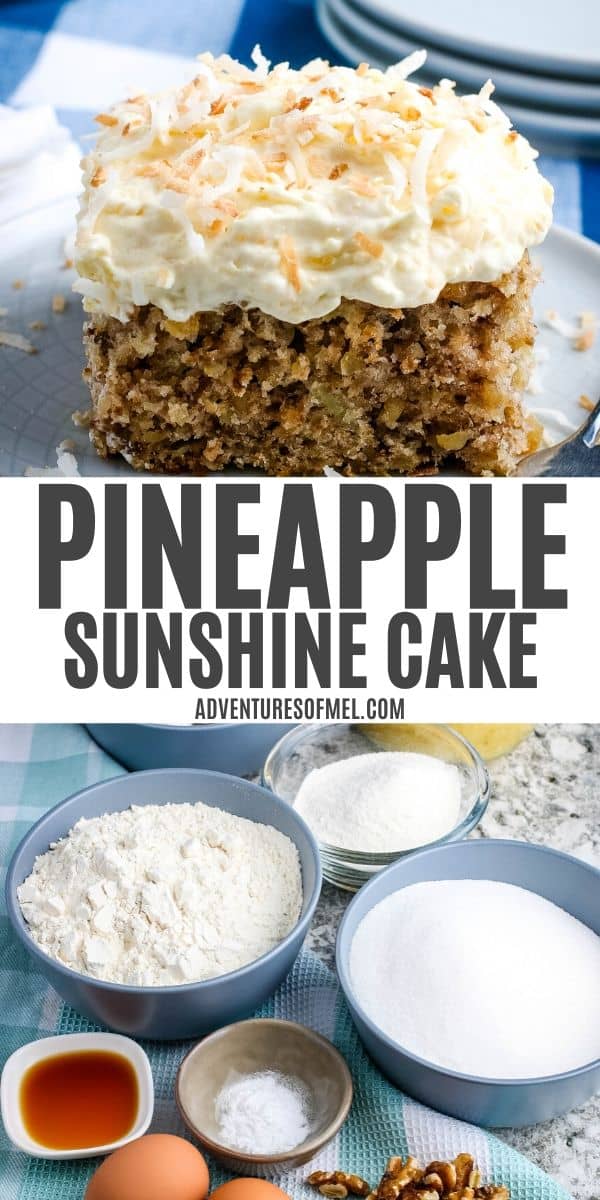
Desserts can make a person smile, and that’s why I love a good dessert. Here you’ll find loads of scrumptious dessert recipes, including cake recipes, cupcakes, cookie recipes, pies and pastries, frozen treats, and sweet snacks.
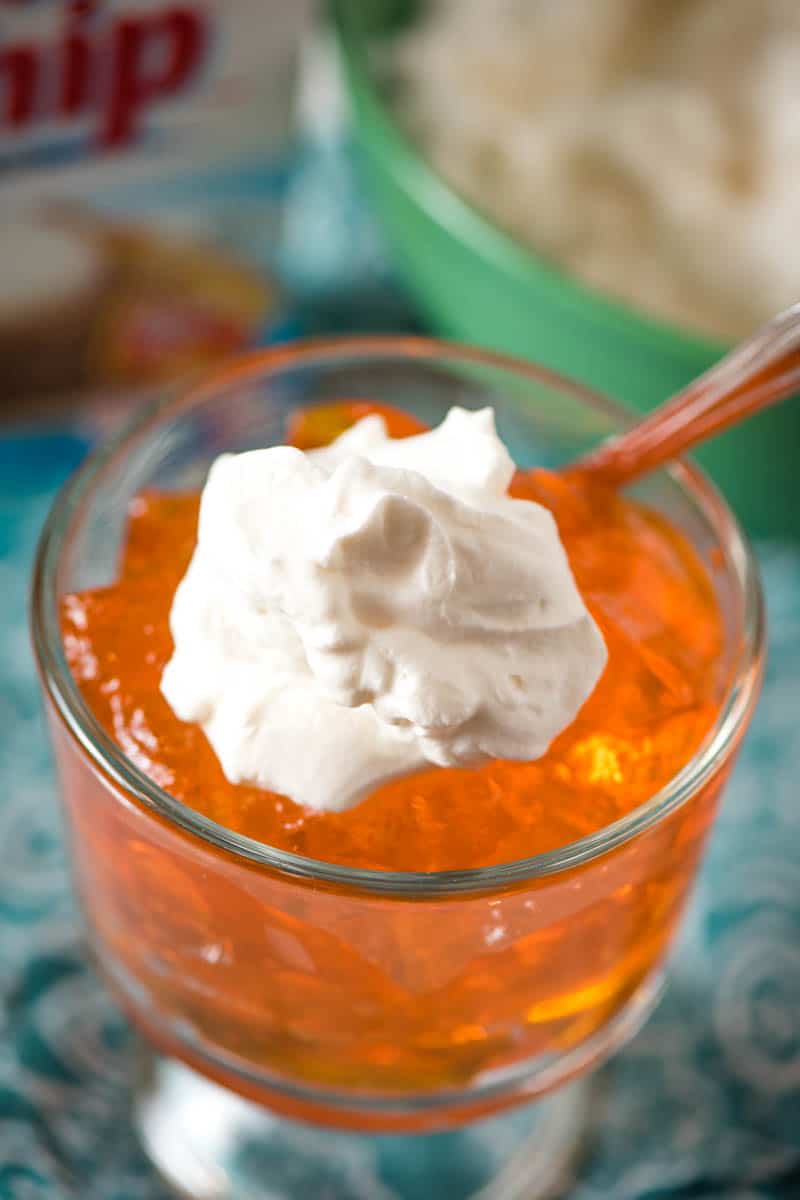
Easy recipe for homemade Jello no bake cheesecake. Creamy lemon-y dessert made with Jello mix, cream cheese, and whipped cream.
We love a good cheesecake, and lemon Jello no bake cheesecake used to be one of our favorite desserts.
So color me happy when I found a recipe card for “Strawberry Miracle Cheesecake” in my grandma’s recipe box. Only I’m not sure why it’s got strawberry in the title because it’s more of a lemon-y dessert, and you can put strawberries on top if you want.
The first time I made this recipe, I was really afraid the lemon flavor might be overpowering, but it really isn’t. The creaminess far outweighs the lemon-y flavor.
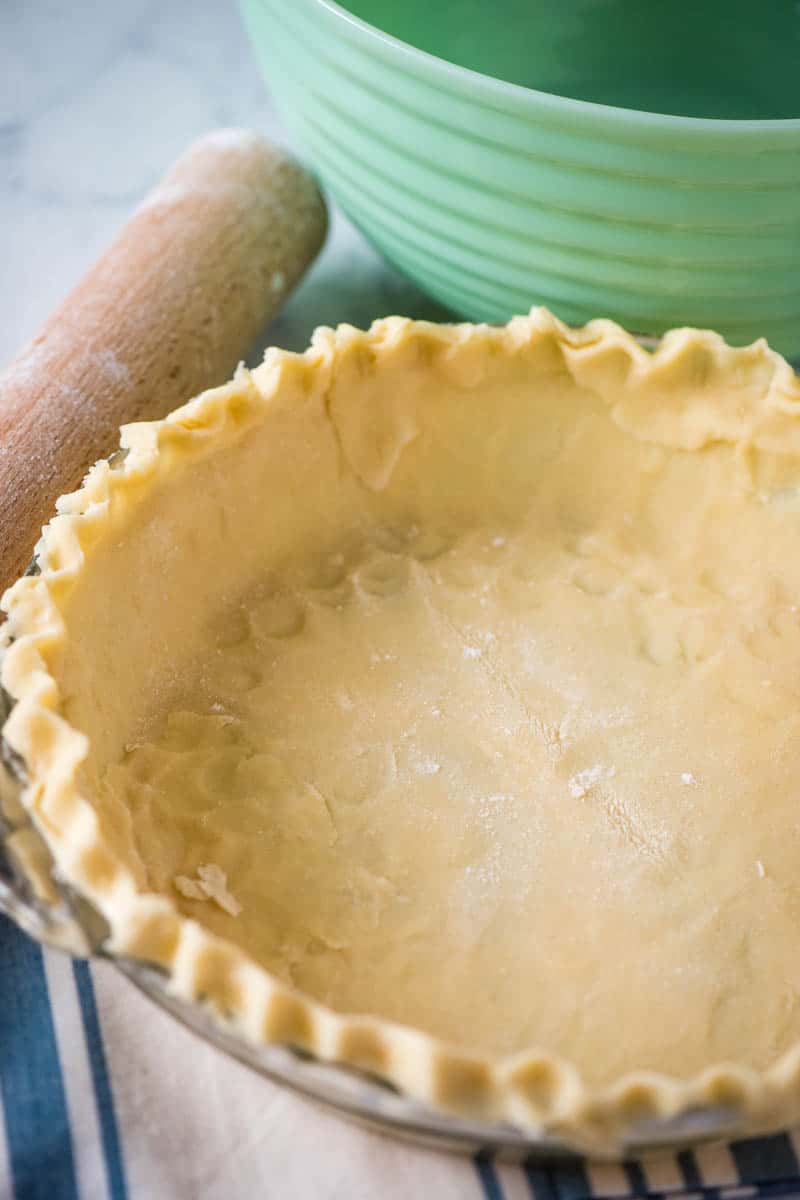
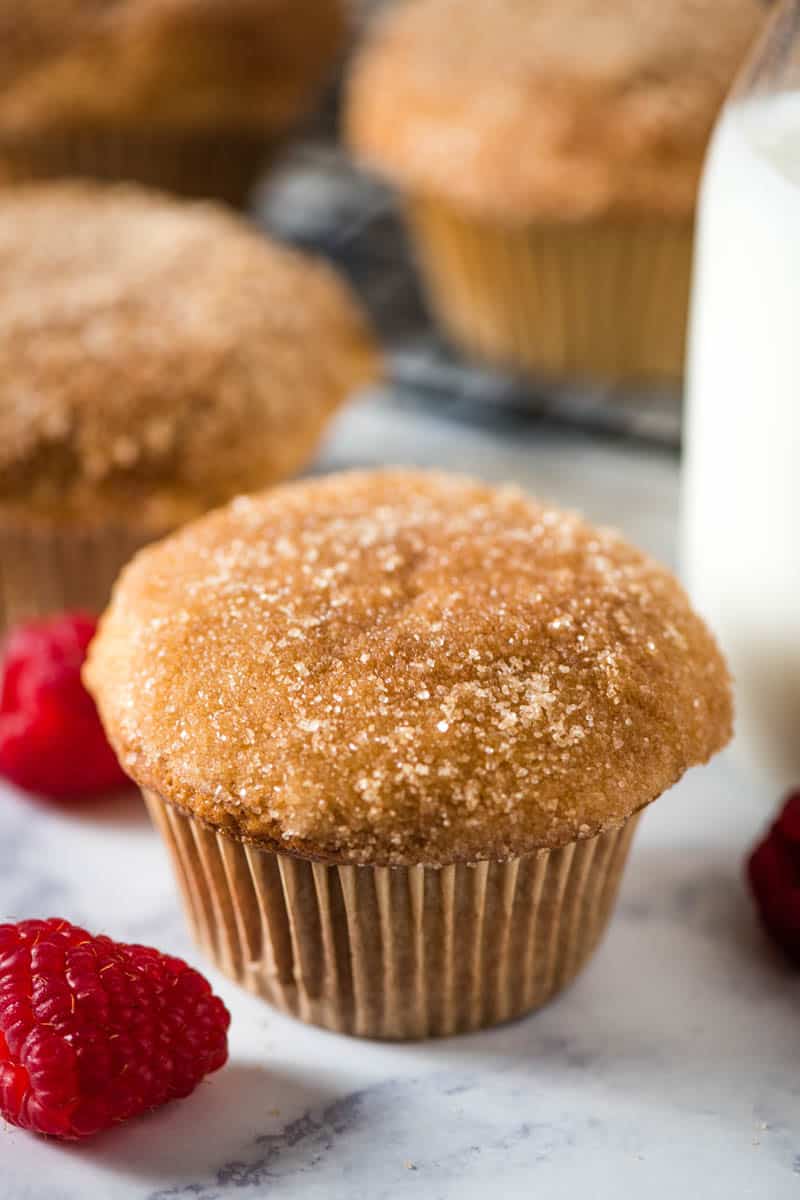
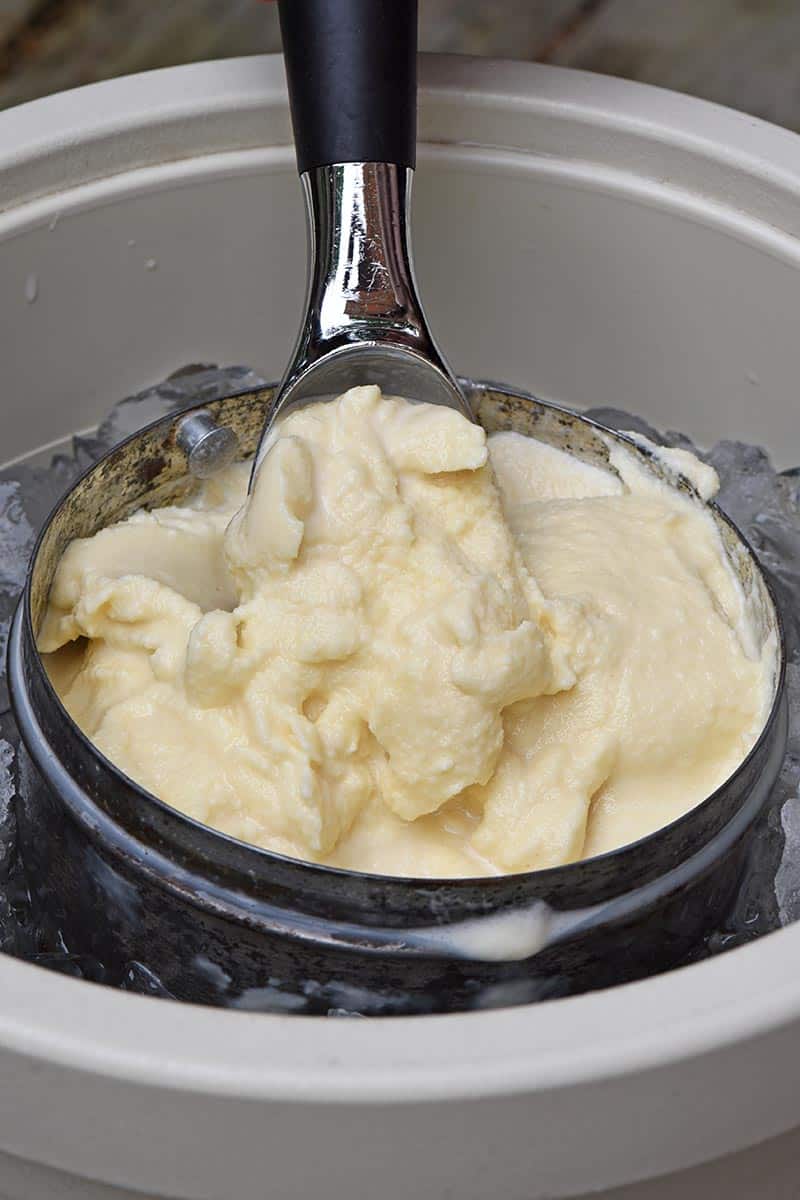
This no bake lemon cheesecake is a Jello-based recipe with a delicious graham cracker crust. While you can make the crust homemade, I just picked up a crust already made at the store.
Being that this is a no bake dessert, it’s also an eggless lemon cheesecake. So no need for eggs.
If you’d rather skip all of my cheesecake tips, important info for this recipe, and similar recipe ideas – and get straight to the Jello no bake cheesecake recipe – just scroll down to the bottom, where you’ll find a printable recipe card.
LET’S TALK ABOUT INGREDIENTS:
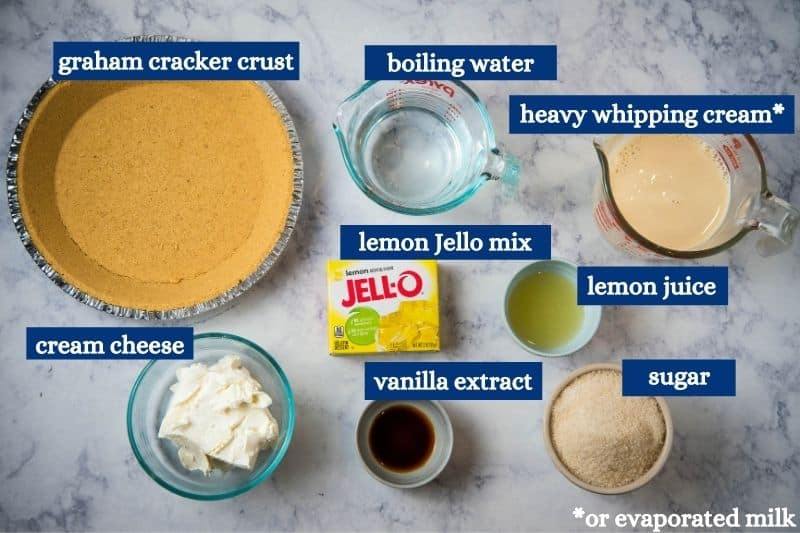
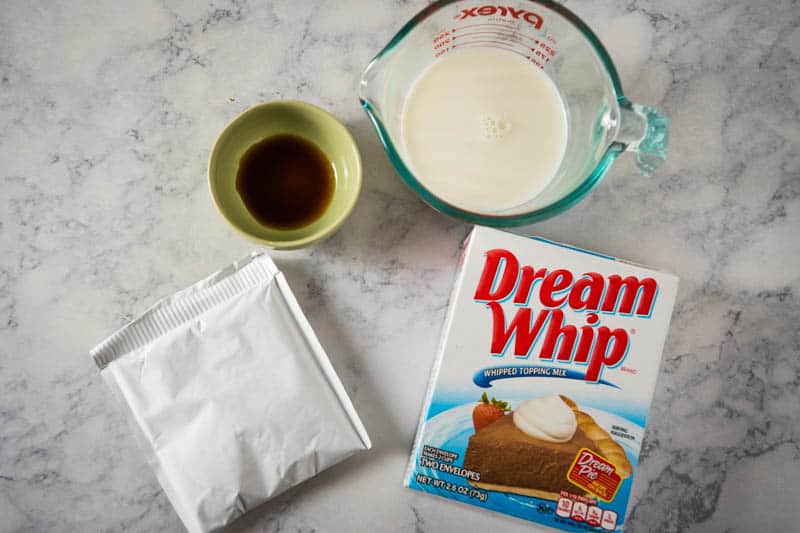
Lemon Jello Mix: You just need the smaller size Jello box, the 3 ounce box.
Cream Cheese: I recommend using full fat cream cheese, so you get all the creamy benefits of full fat.
Heavy Whipping Cream: Now the original recipe calls for Milnot, or evaporated milk. But it’s required to chill it beforehand, and I always forget. So if you’re like me and you forget, heavy whipping cream works just as well, maybe even better.
Graham Cracker Crust: Again, you can either make it homemade, or you can just pick up a crust at the store. You may have enough batter for 2 cheesecakes, depending on the size of your crust. Most of the store bought crusts are quite small.
Keep in mind, all of the ingredients and ingredient amounts you’ll need are in the printable recipe card below.
KITCHEN TOOLS AND EQUIPMENT YOU’LL NEED:
Liquid Measuring Cup: A larger liquid measuring cup makes it easy to mix up the Jello and pour it into your ingredients.
Pie Plate – If you’re making your own crust. Otherwise, just use the pie plate that comes with your store-bought crust.
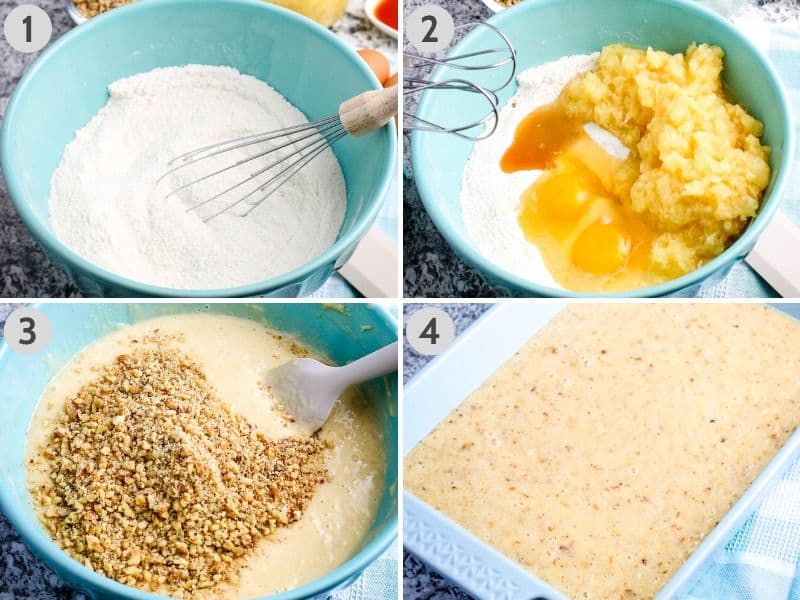
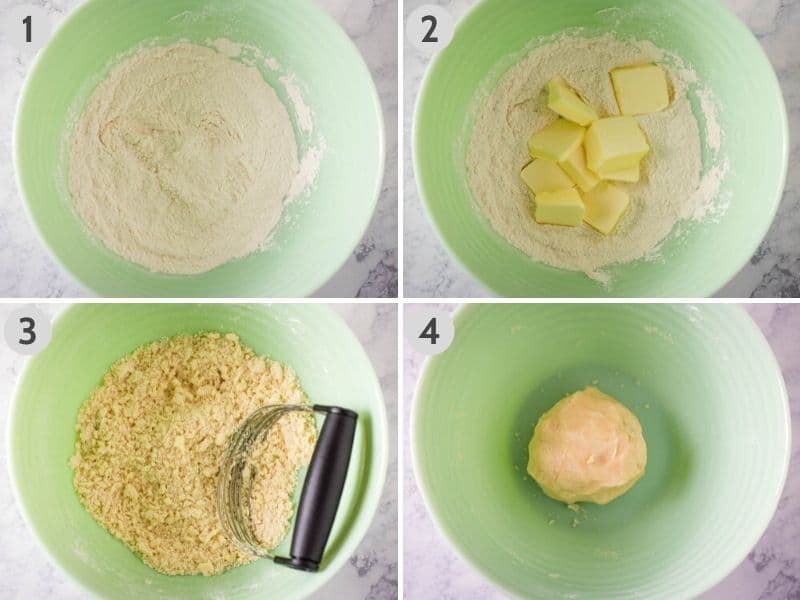
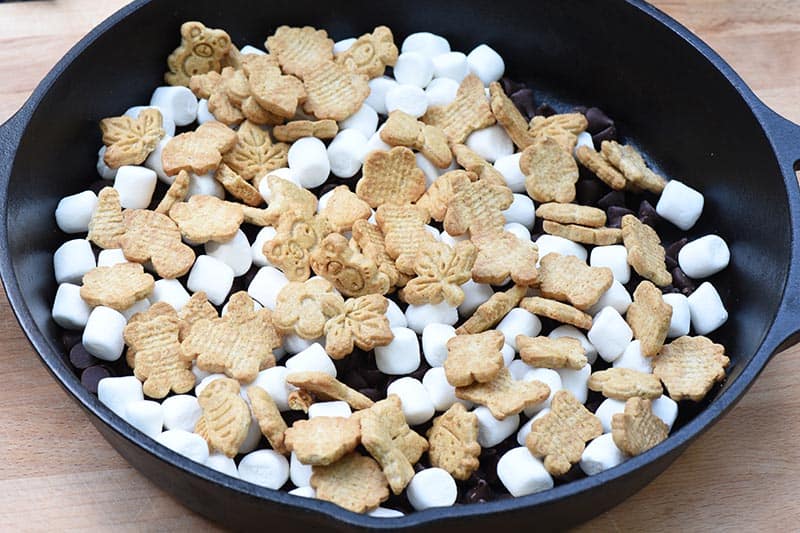
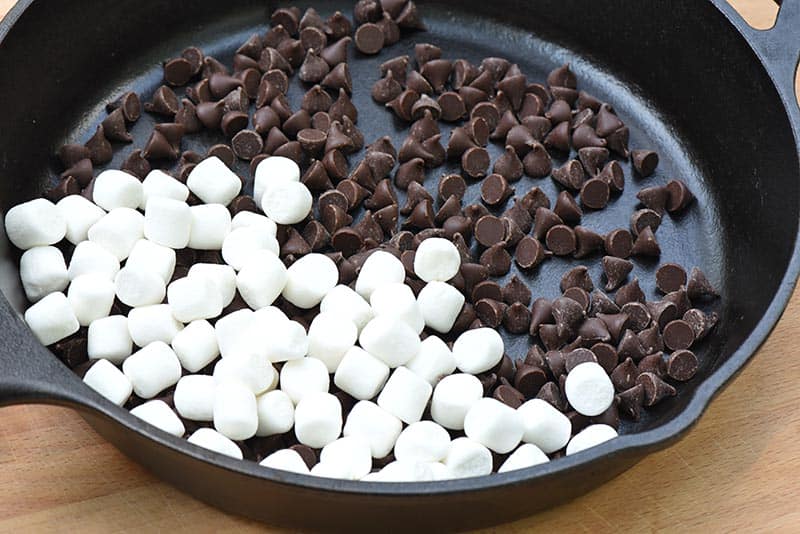
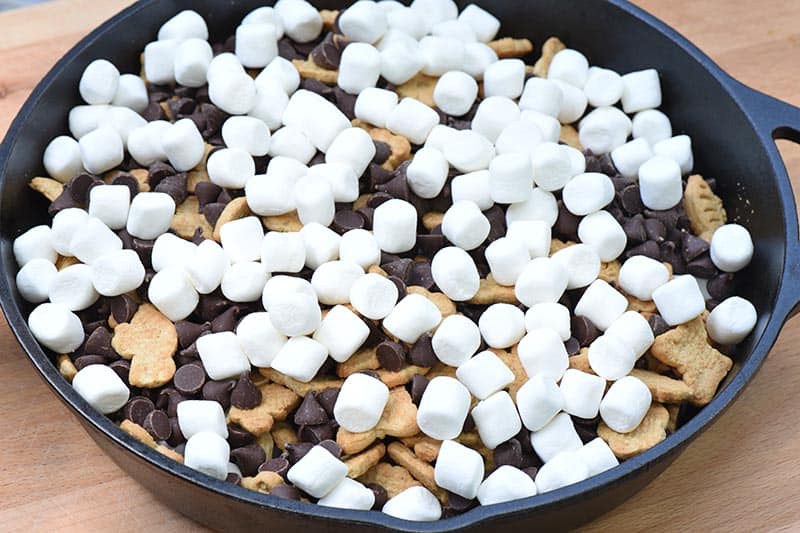
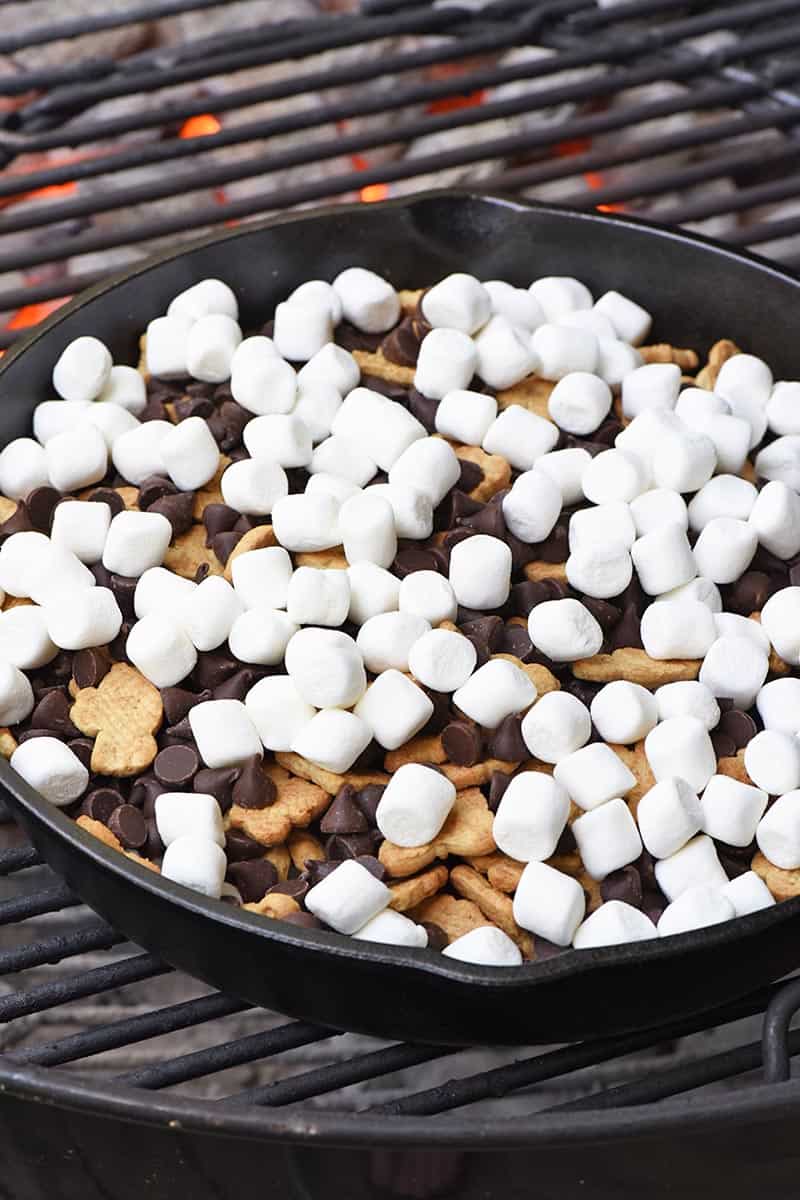
HOW TO MAKE JELLO CHEESECAKE FROM SCRATCH
This is such an easy no bake lemon cheesecake. It really only takes minutes to mix up; but it does require a little chill time.
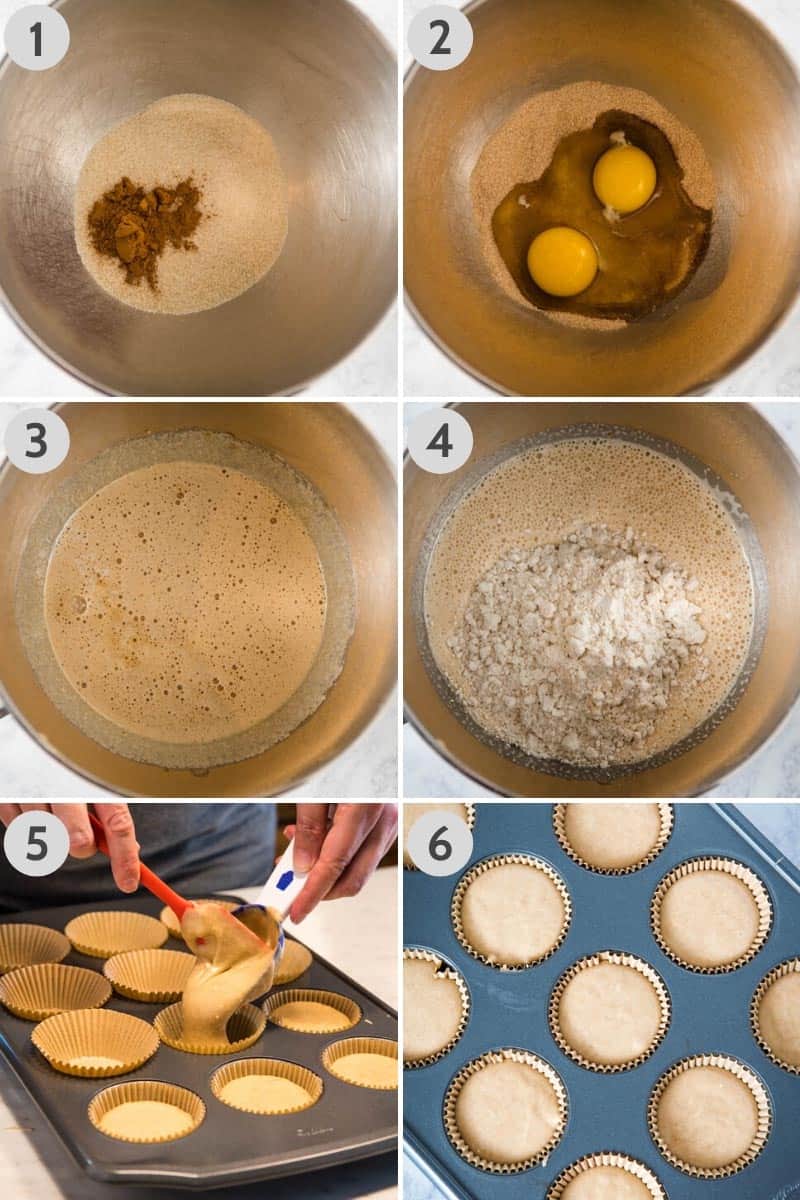
Gather your ingredients and get to mixing…
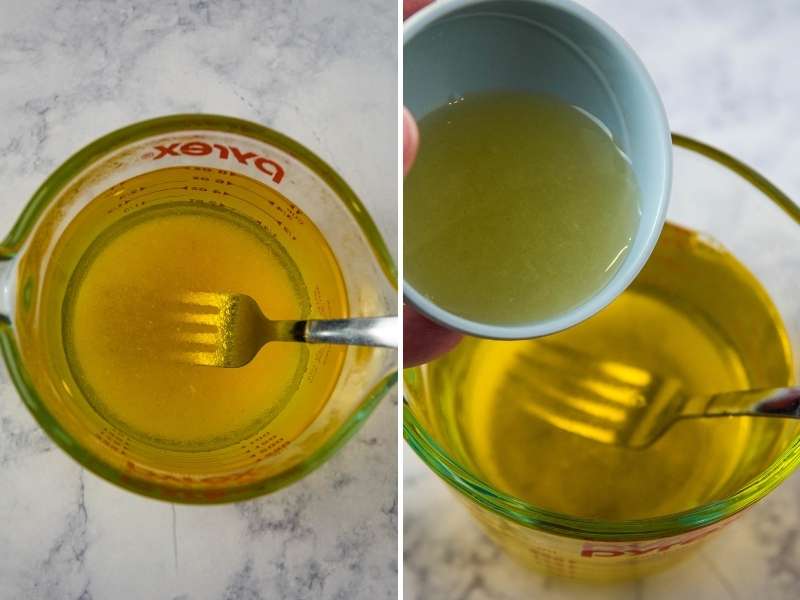
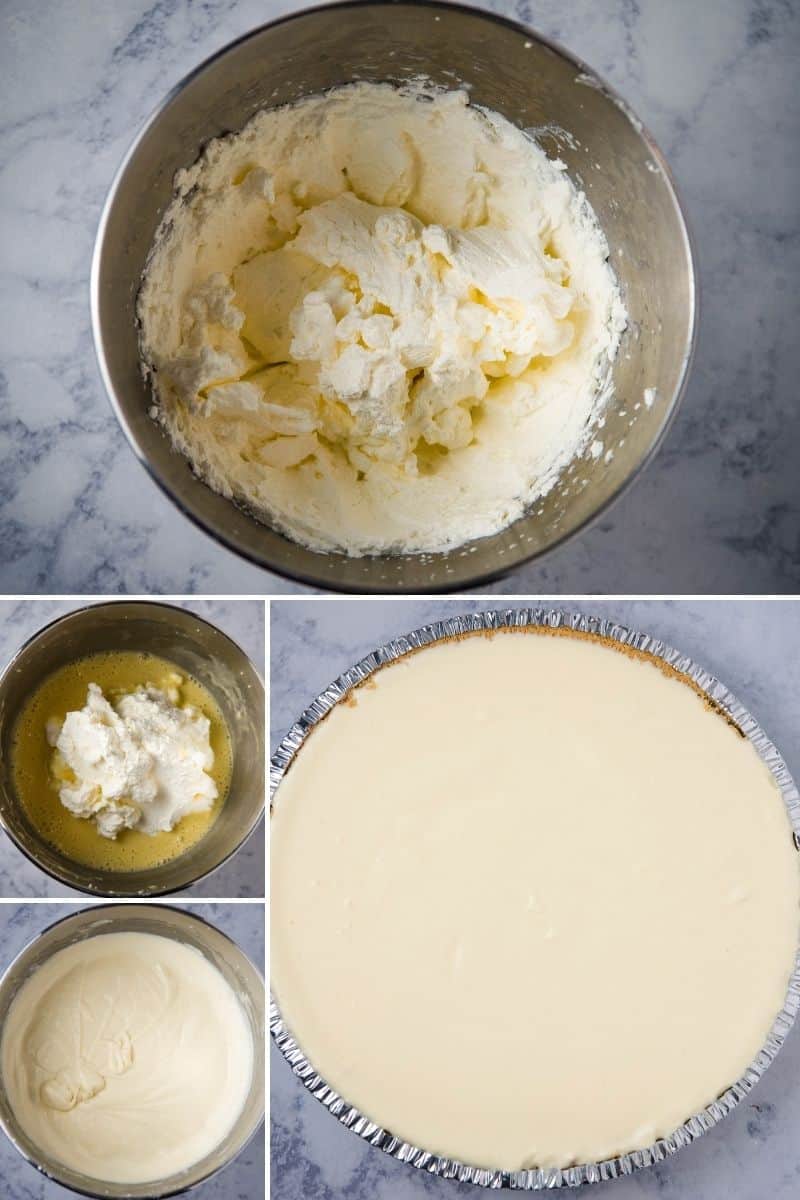
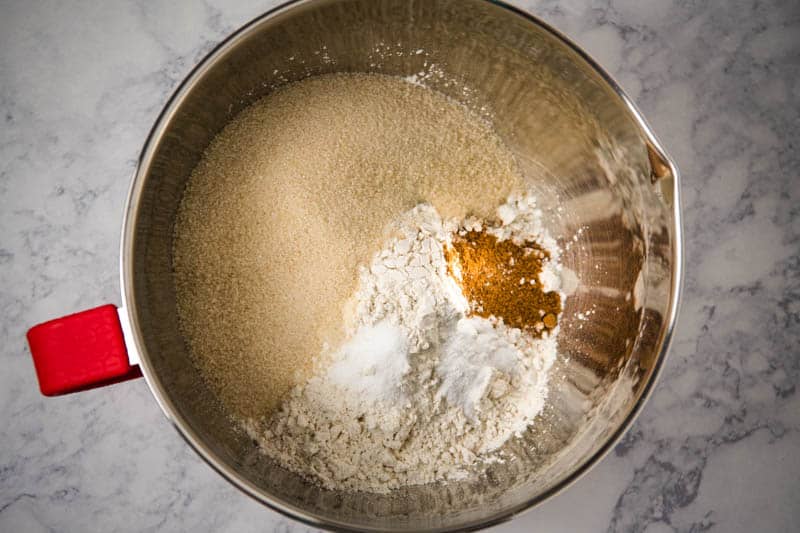
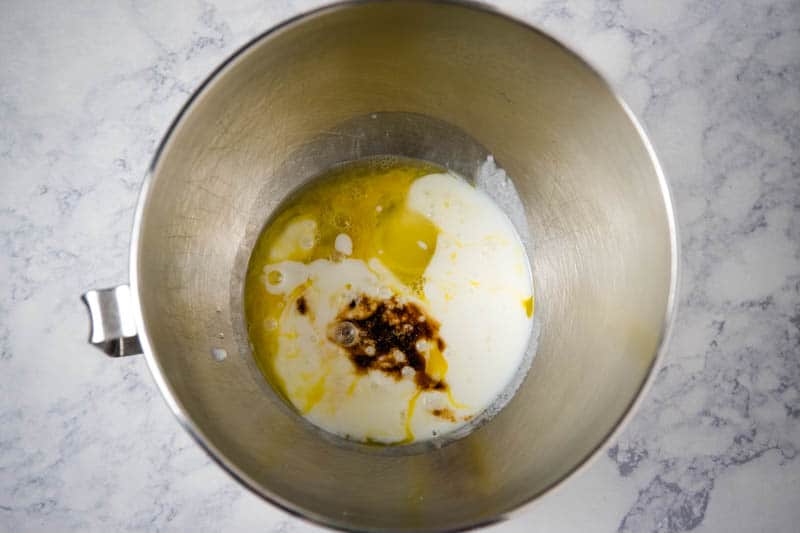
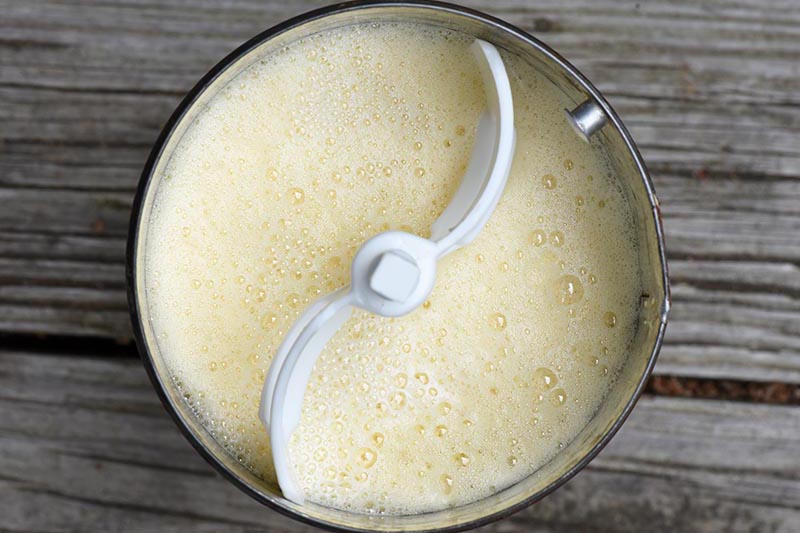
First dissolve the lemon Jello mix in boiling water.
Then add the lemon juice to the jello mixture, stir it up well, and set aside.
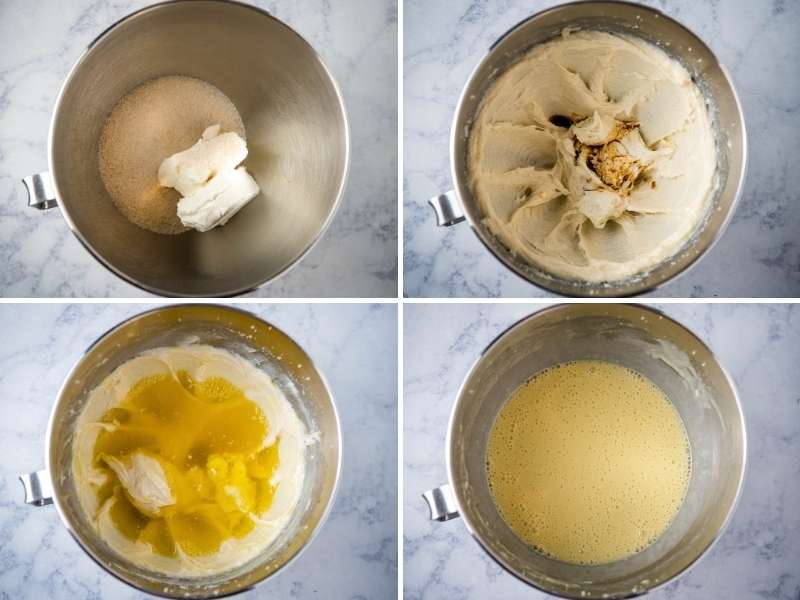
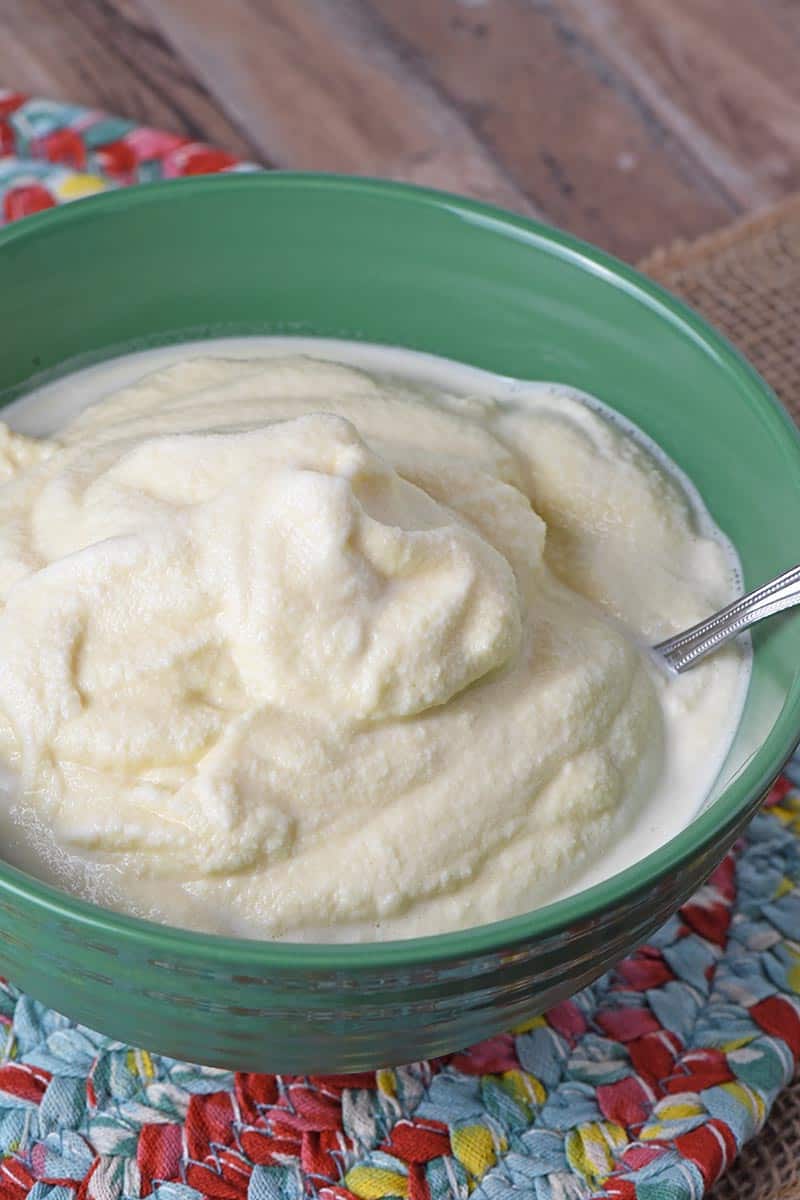
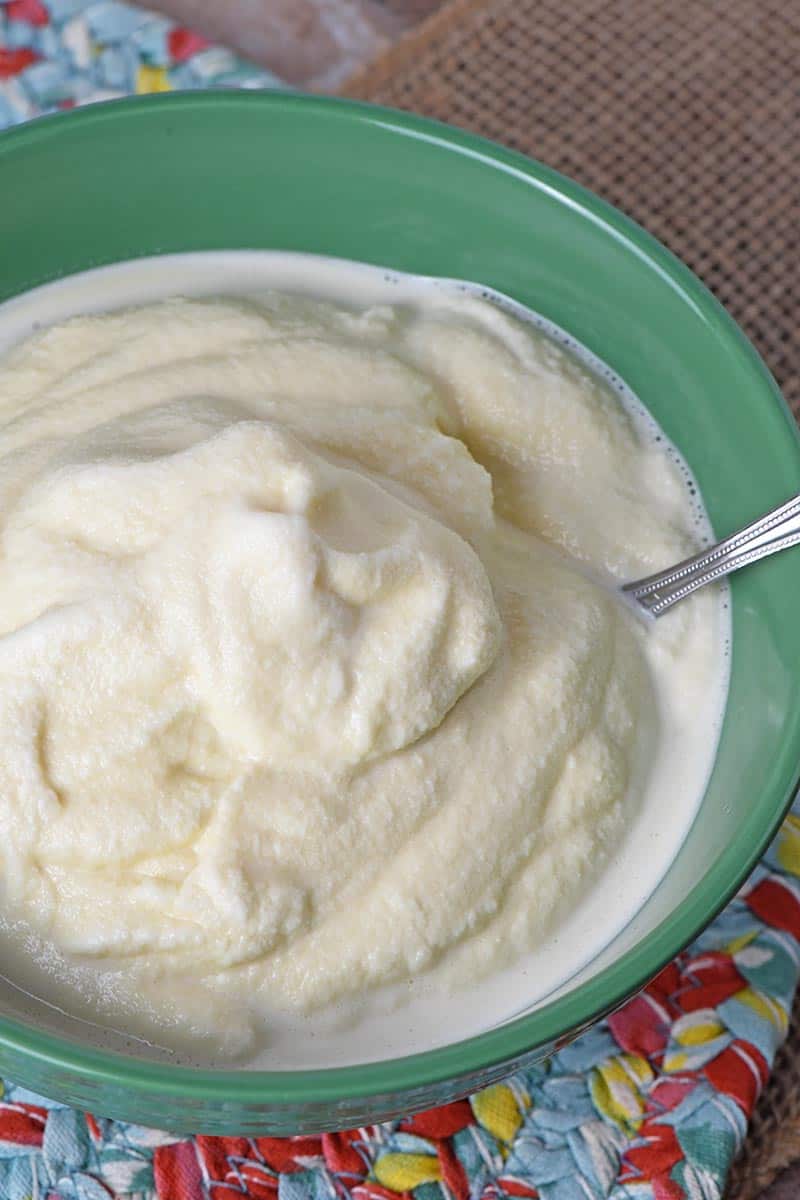
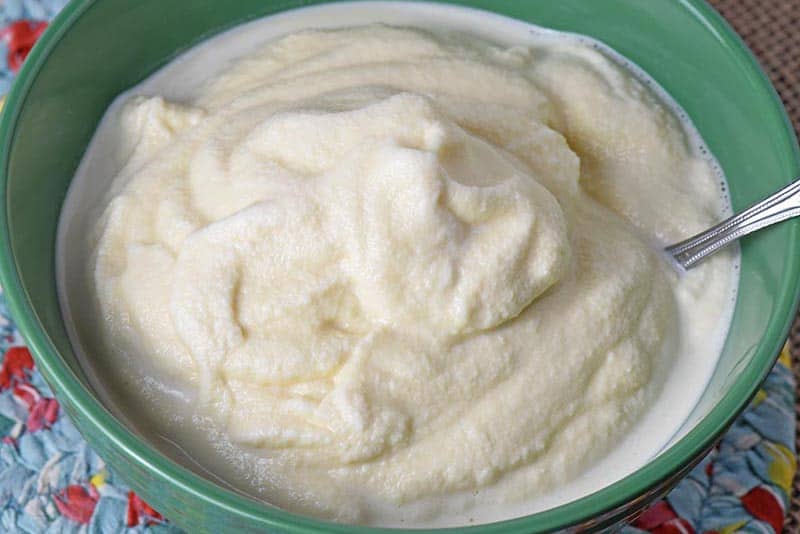
Whip the cream cheese and sugar together.
Add vanilla to the cream cheese mixture, mixing well.
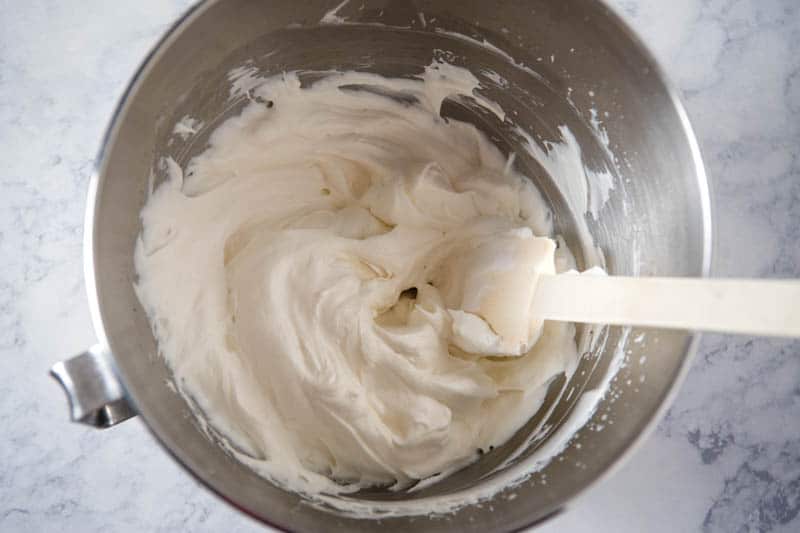
Now take the Jello mixture and mix it into the cream cheese mixture ’til smooth.
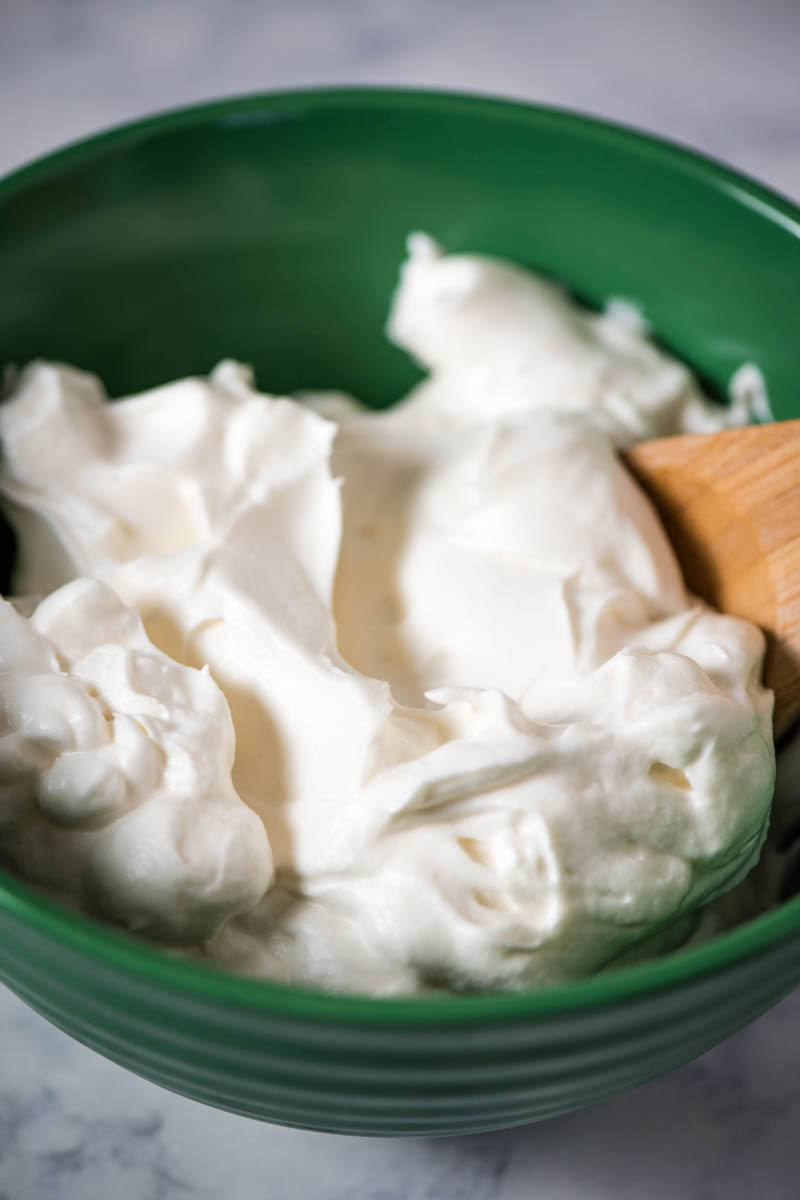
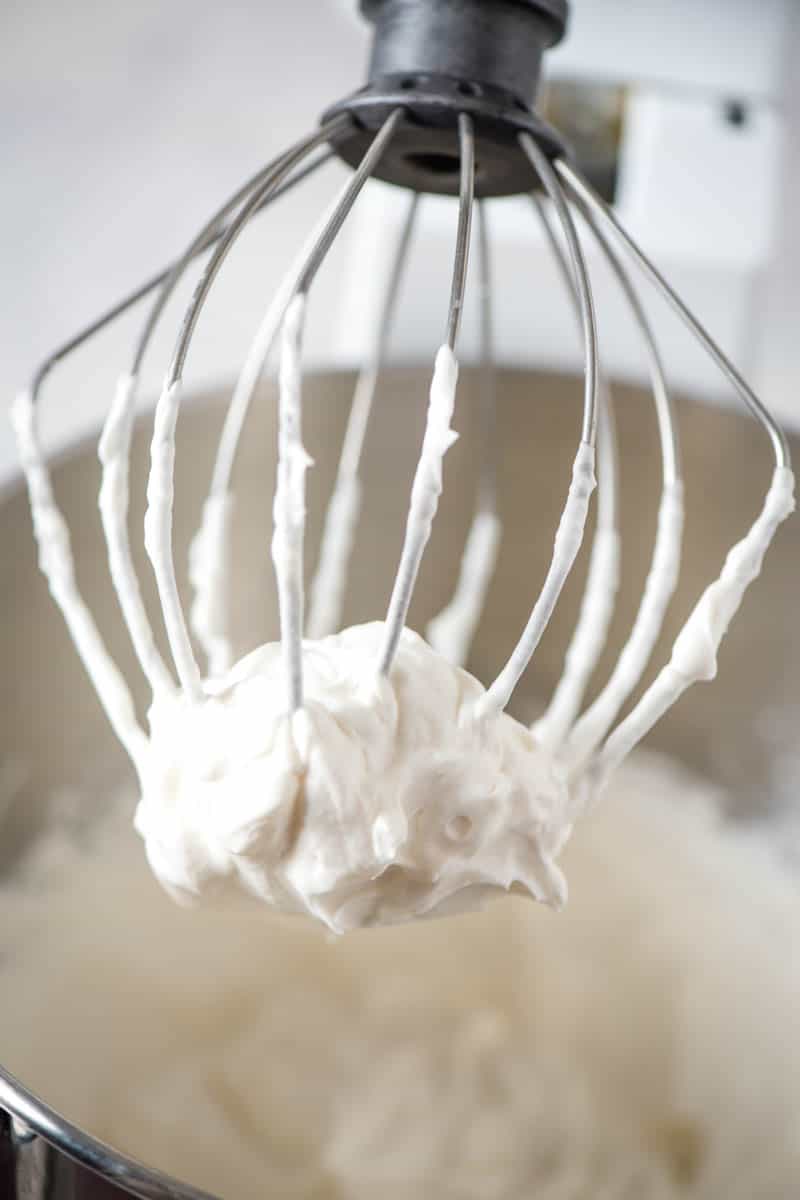
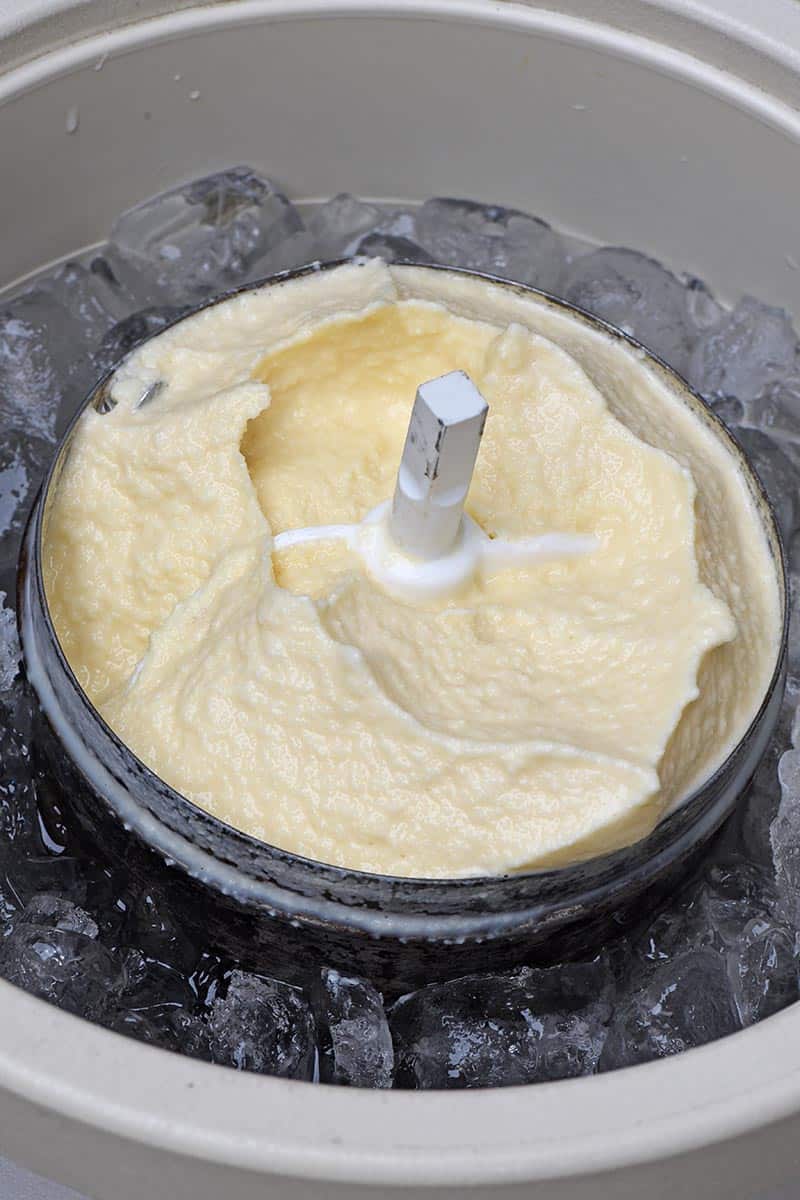
In a separate mixing bowl, whip the heavy whipping cream ’til it forms stiff peaks.
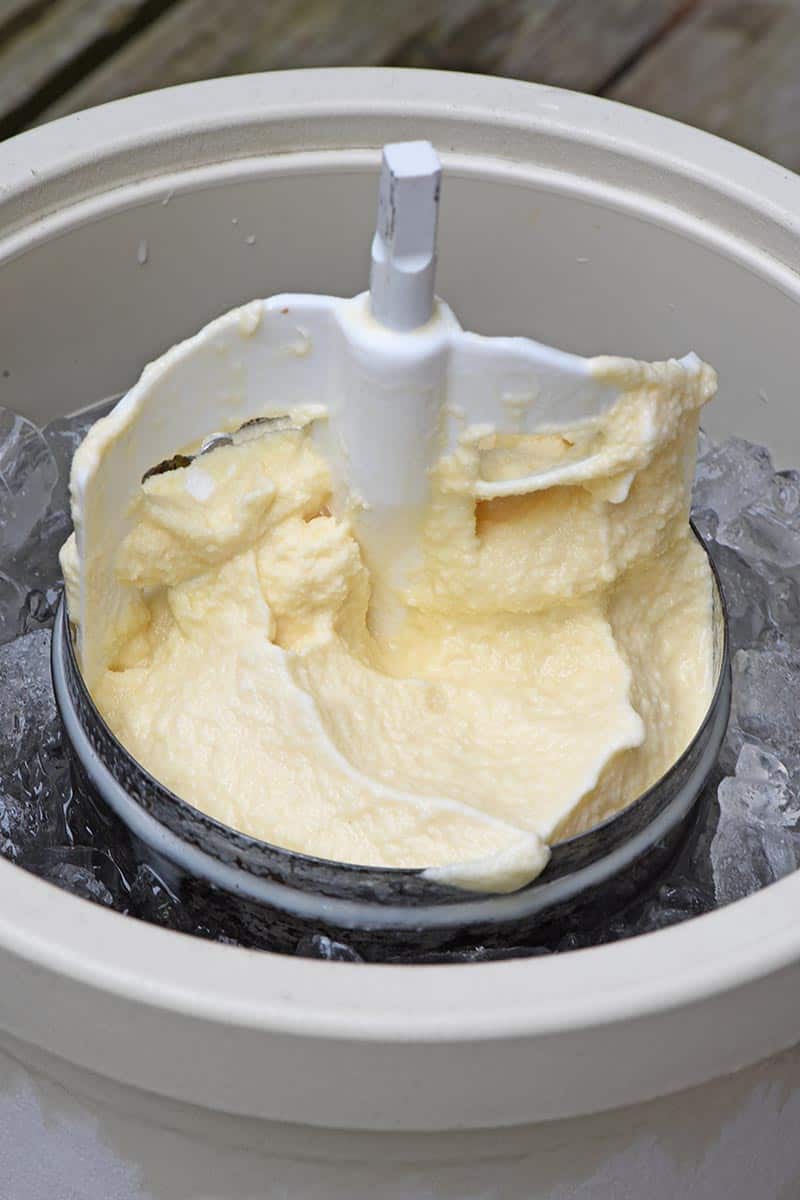
Then mix the heavy whipping cream into your cheesecake mixture, making it smooth and creamy.
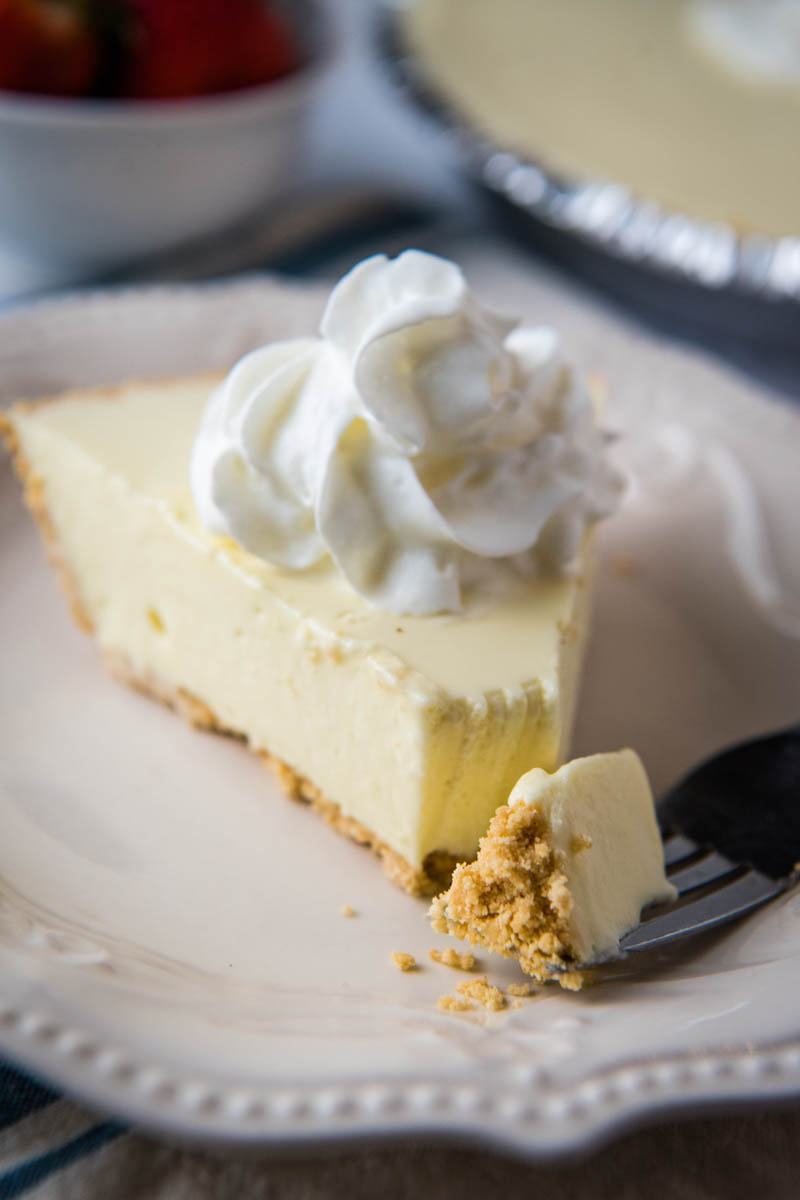
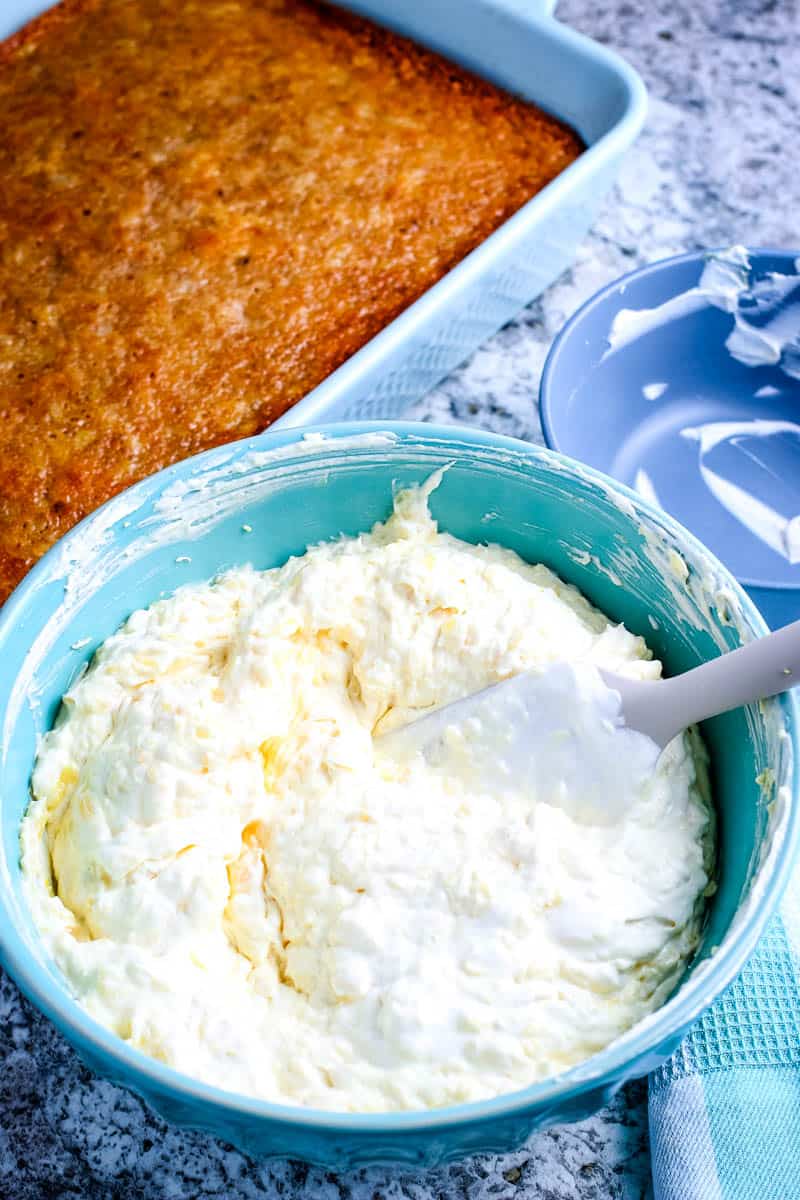
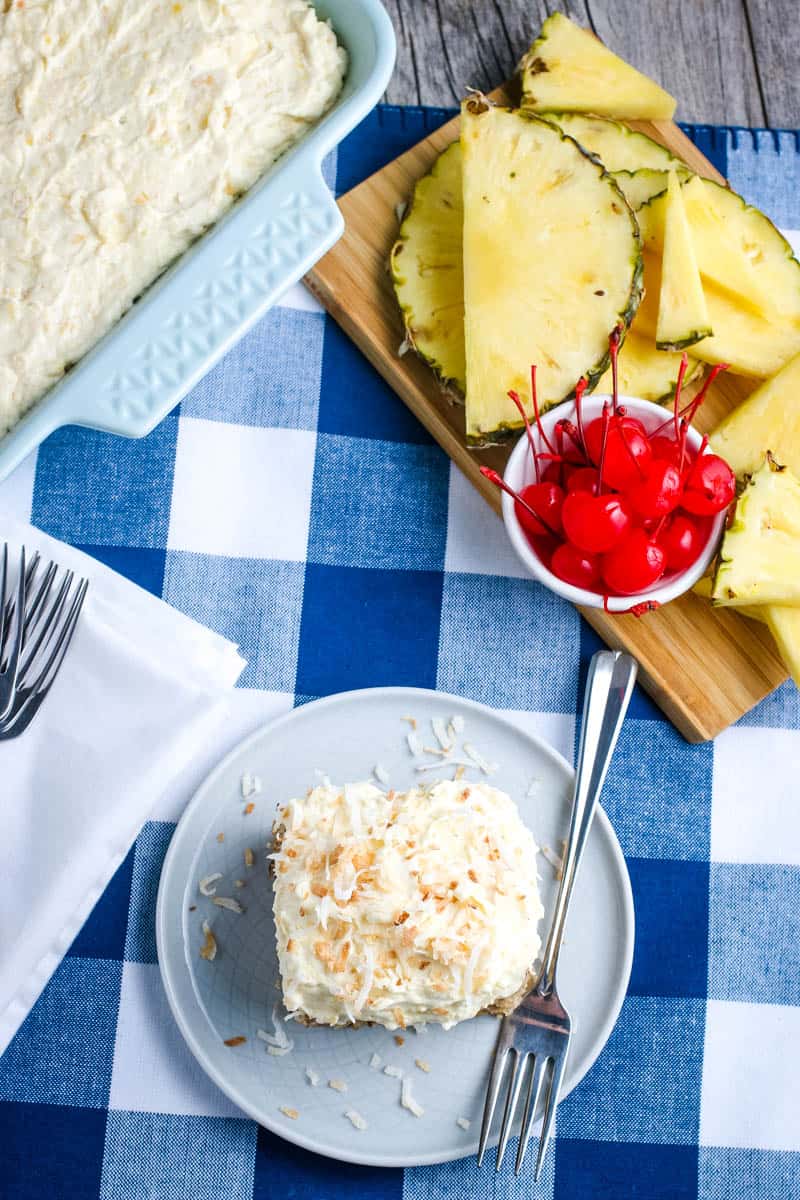
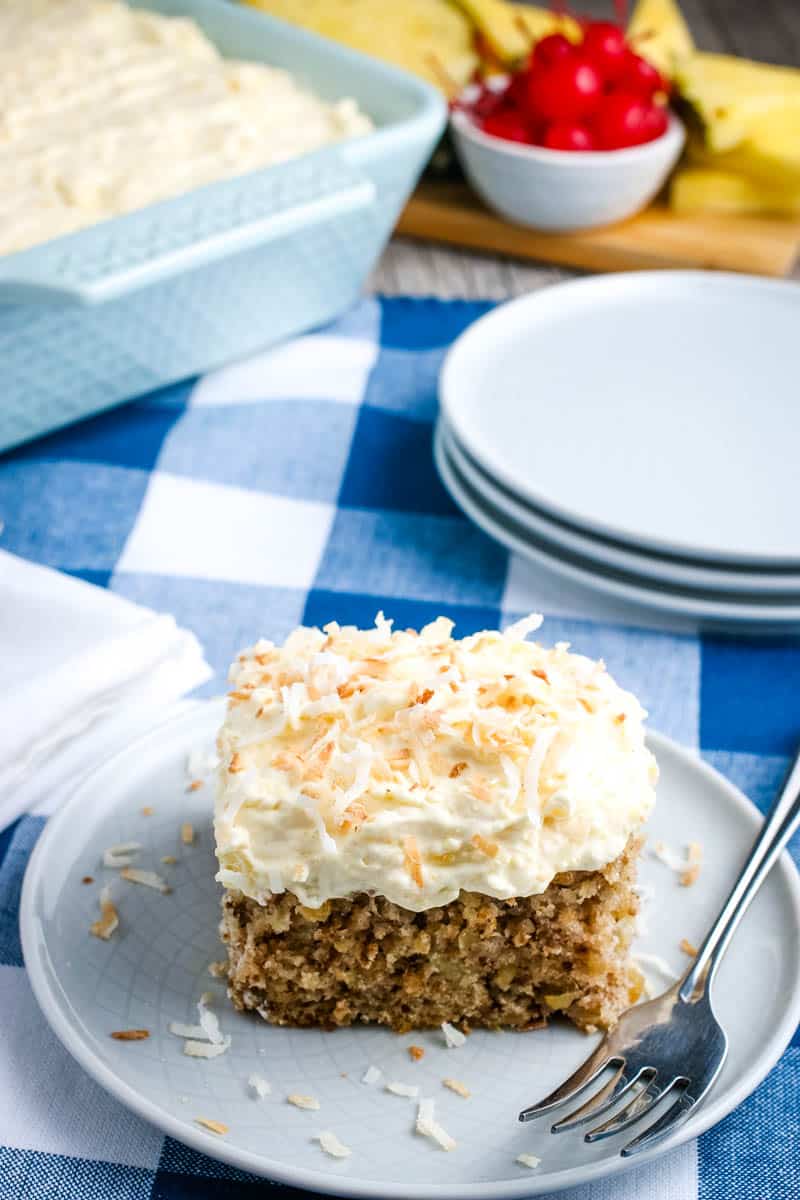
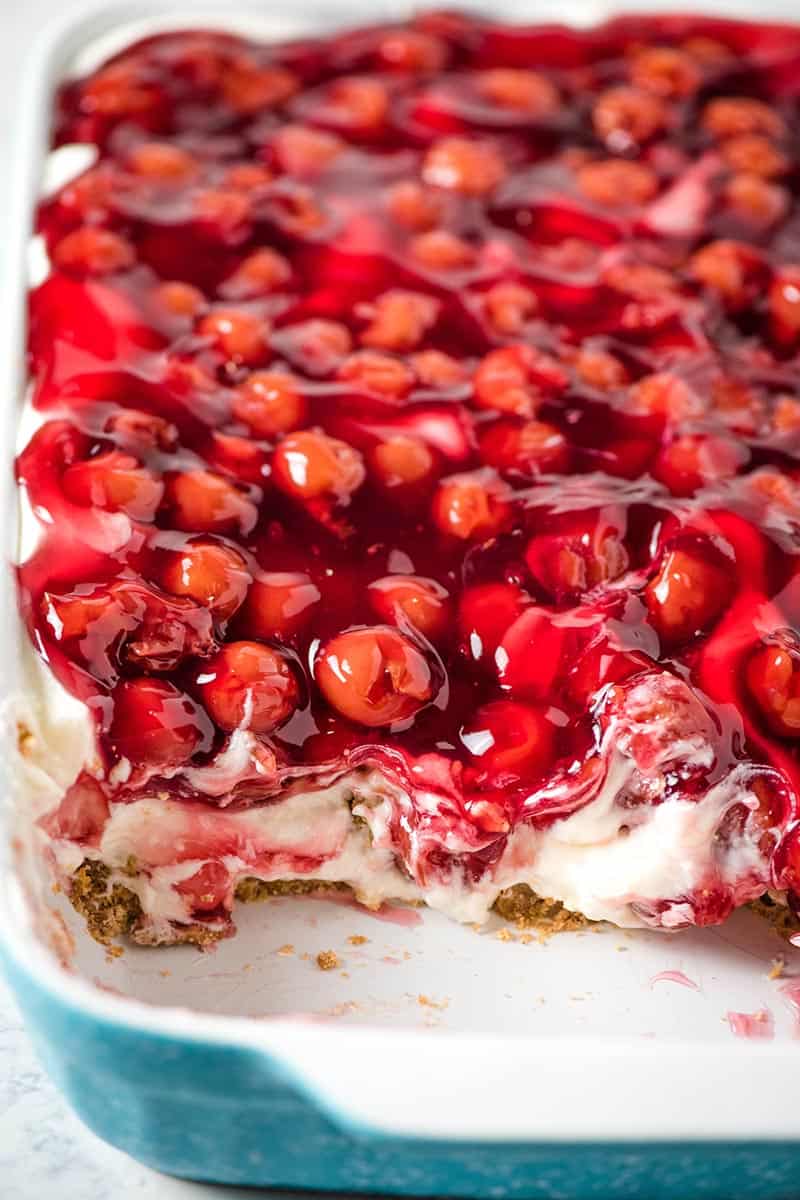
Pour the cheesecake batter into the prepared graham cracker crust, cover, and chill for at least 1 to 2 hours
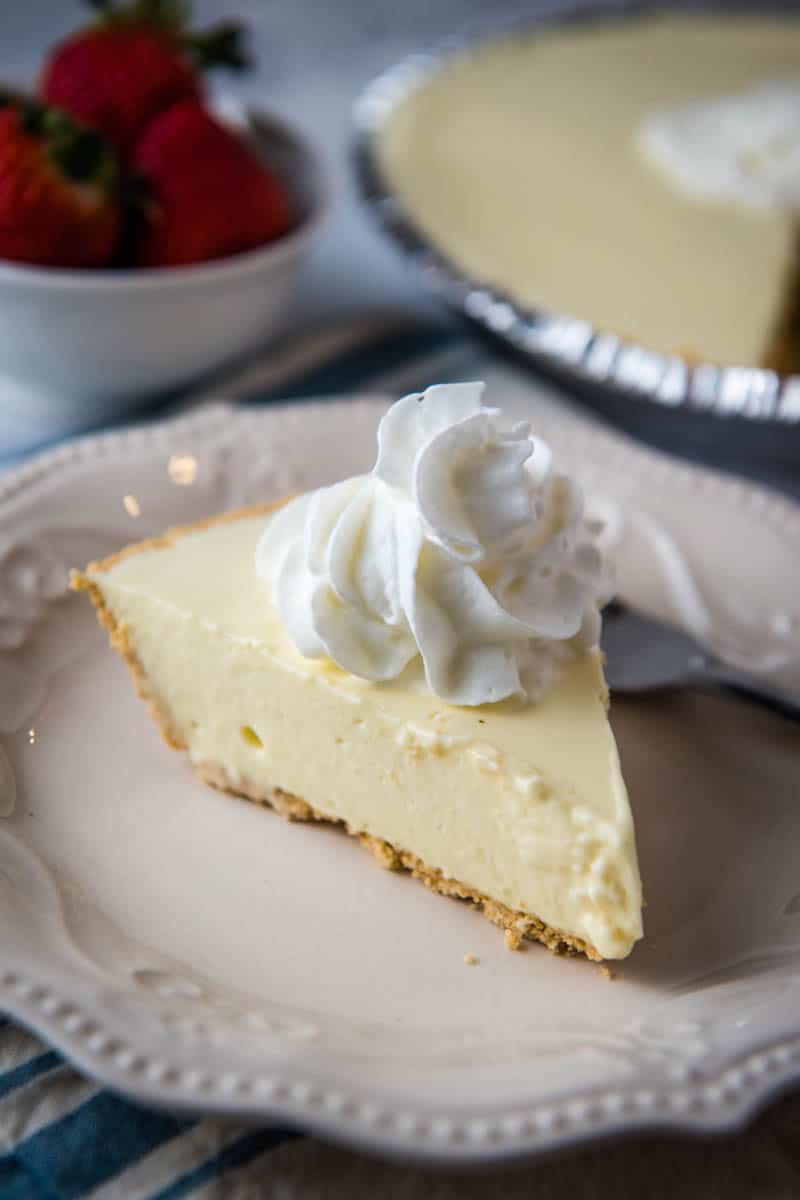
Your cheesecake should become firm enough to slice and serve with strawberries or other fruit topping, along with whipped cream.
FAQ:
Why is my no bake cheesecake not firm?
One of the most important steps in this recipe is whipping the cold (make sure it’s absolutely cold) heavy whipping cream ’til it forms stiff peaks. If those peaks aren’t stiff enough, your cheesecake may come out more runny than firm. Chill time is also important. You may need to give it more than 1-2 hours to set up properly.
How should I store lemon Jello no bake cheesecake?
Be sure to cover it and store it in the refrigerator. It should keep for 4-5 days.
Can I freeze a no bake cheesecake?
You definitely can. Just be sure to cover and wrap it well with both plastic wrap and aluminum foil to prevent freezer burn. It should keep in the freezer for 3 months.
VARIATIONS YOU CAN TRY WITH JELLO CHEESECAKE
Oh the flavors you can make with a Jello cheesecake…
Easy recipe for homemade Jello no bake cheesecake. Creamy lemon-y dessert made with Jello mix, cream cheese, and whipped cream.
3 ounce lemon Jello mix
1 cup boiling water
3 tablespoons lemon juice
8 ounces cream cheese
1 cup sugar
1 teaspoon vanilla extract
12 ounces heavy whipping cream (cold*)
1 graham cracker crust
First dissolve the lemon Jello mix in boiling water.
Then add the lemon juice to the jello mixture, stir it up well, and set aside.
Whip the cream cheese and sugar together.
Add vanilla to the cream cheese mixture, mixing well.
Now take the Jello mixture and mix it into the cream cheese mixture ’til smooth.
In a separate mixing bowl, whip the heavy whipping cream ’til it forms stiff peaks.
Then mix the heavy whipping cream into your cheesecake mixture.
Pour the cheesecake batter into the prepared graham cracker crust, cover, and chill for at least 1 to 2 hours.
Your cheesecake should become firm enough to slice and serve with strawberries or other fruit topping, along with whipped cream.
*The original recipe calls for Milnot, or evaporated milk. But it’s required to chill it beforehand, and I always forget. So if you’re like me and you forget, heavy whipping cream works just as well, maybe even better.
Why is my no bake cheesecake not firm?
One of the most important steps in this recipe is whipping the cold (make sure it’s absolutely cold) heavy whipping cream ’til it forms stiff peaks. If those peaks aren’t stiff enough, your cheesecake may come out more runny than firm. Chill time is also important. You may need to give it more than 1-2 hours to set up properly.
How should I store lemon Jello no bake cheesecake?
Be sure to cover it and store it in the refrigerator. It should keep for 4-5 days.
Can I freeze a no bake cheesecake?
You definitely can. Just be sure to cover and wrap it well with both plastic wrap and aluminum foil to prevent freezer burn. It should keep in the freezer for 3 months.
Cheesecakes
American
cheesecake, easy no bake lemon cheesecake, eggless lemon cheesecake, how to make Jello cheesecake, Jello cheesecake, Jello no bake cheesecake, Jello no bake cheesecake recipe, lemon Jello no bake cheesecake, no bake cheesecake, no bake lemon cheesecake, strawberry miracle cheesecake
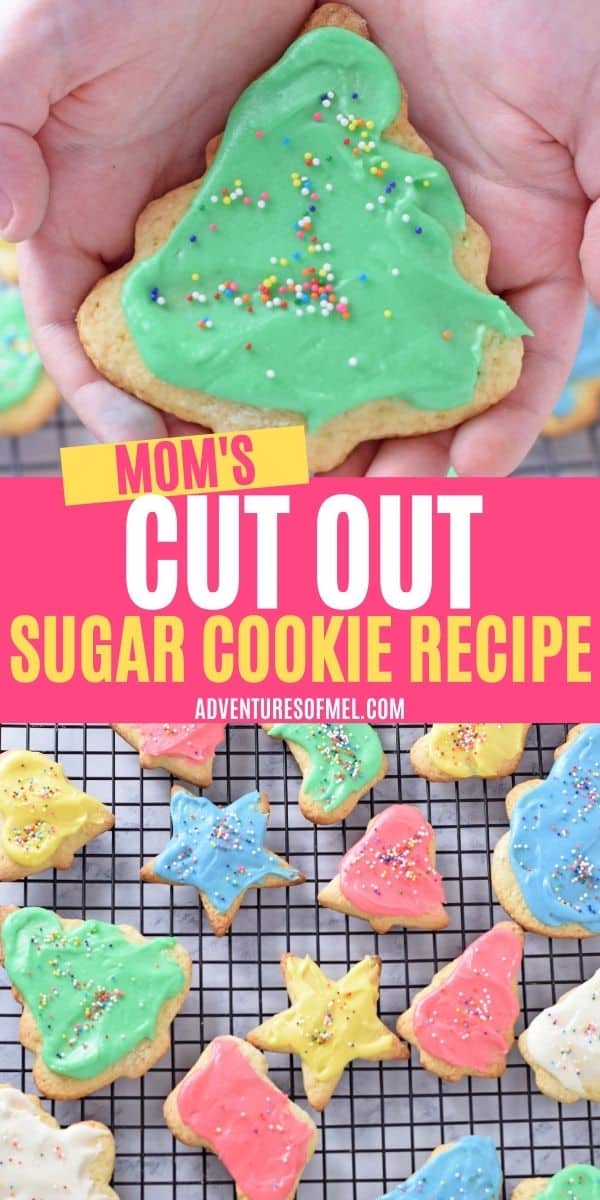
How to make the best cut out sugar cookie recipe. My mom’s recipe for crisp, soft sugar cookies you can decorate with icing and sprinkles.
Cutout sugar cookies are definitely one of my favorite Christmas treats. I’ve made these soft cut out sugar cookies every Christmas for as long as I can remember.
What makes this recipe special is that my mom taught me how to make it, just like a lot of recipes I love to make. She’s the best at making these yummy Christmas sugar cookies, and she taught me everything I know about baking them.
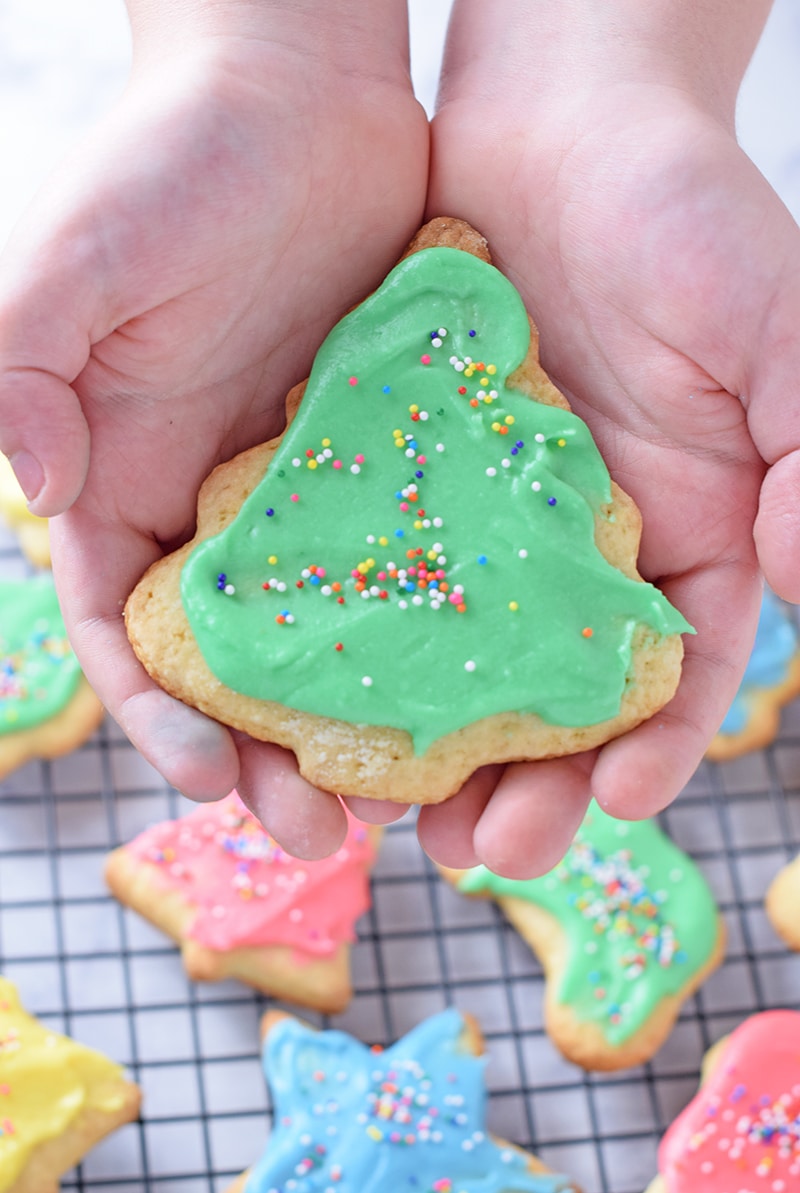
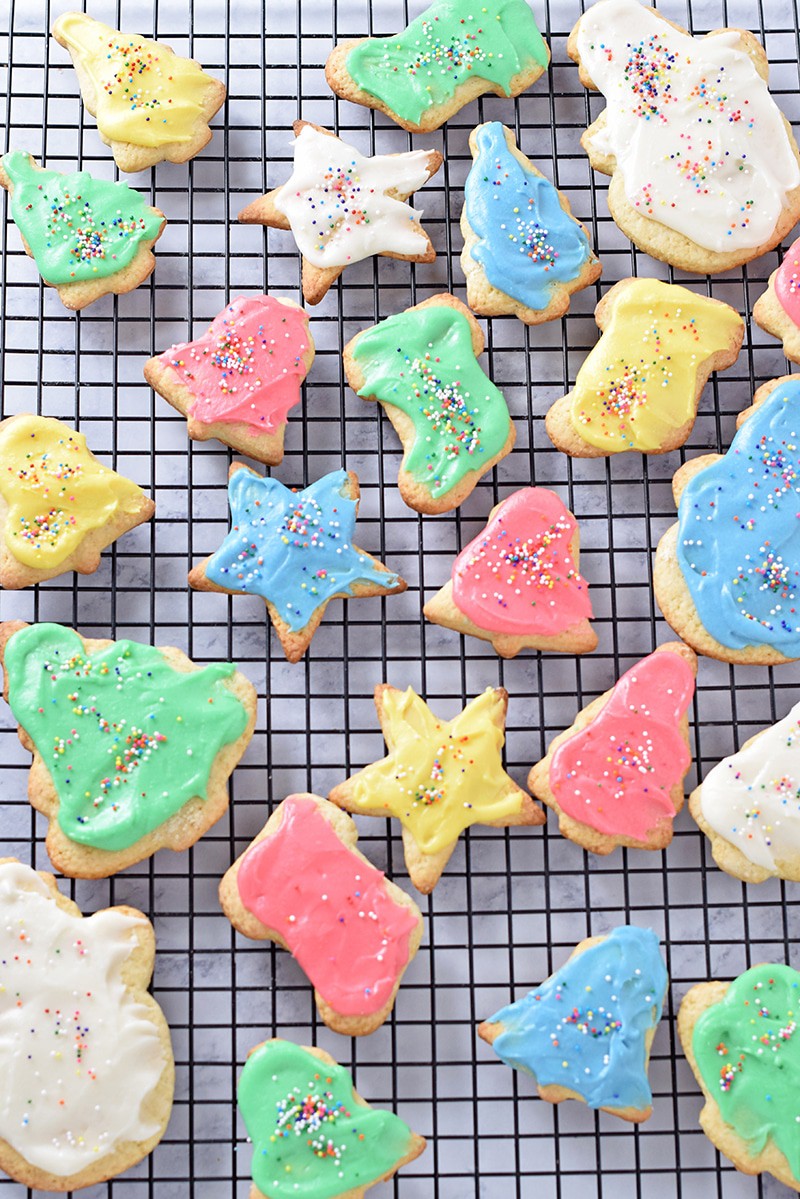
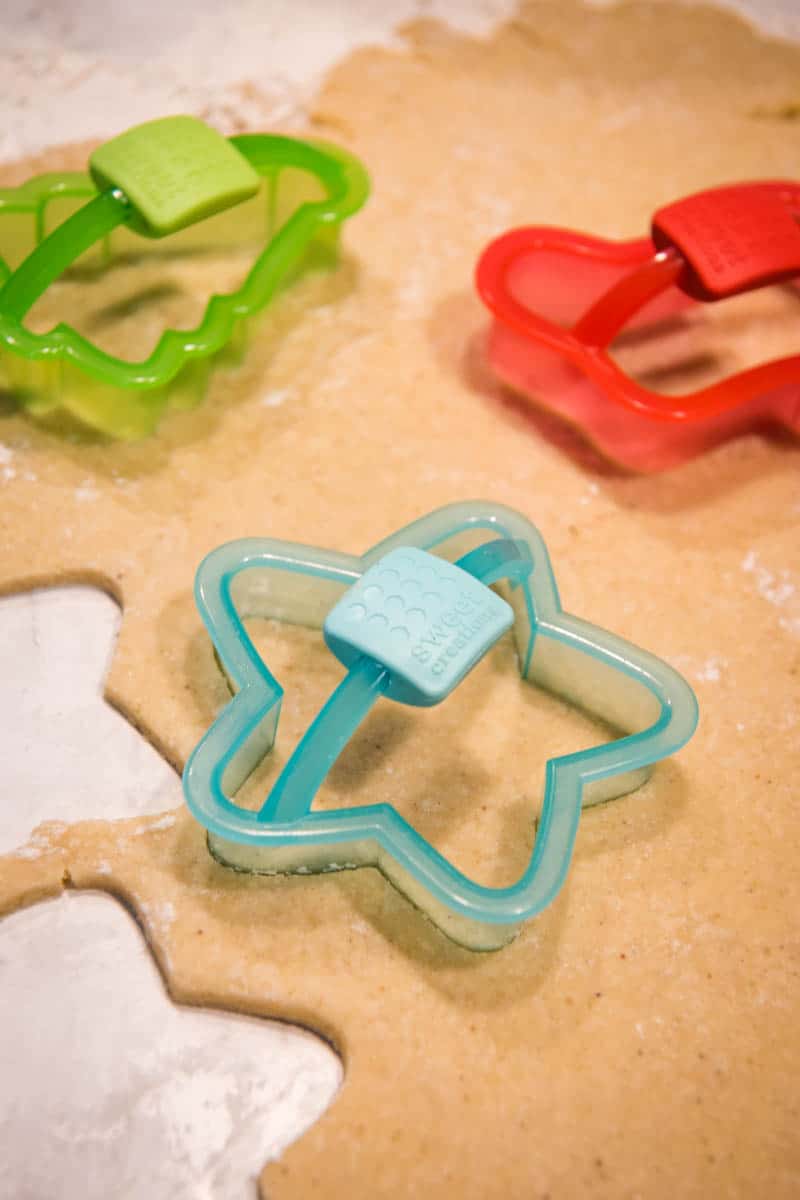
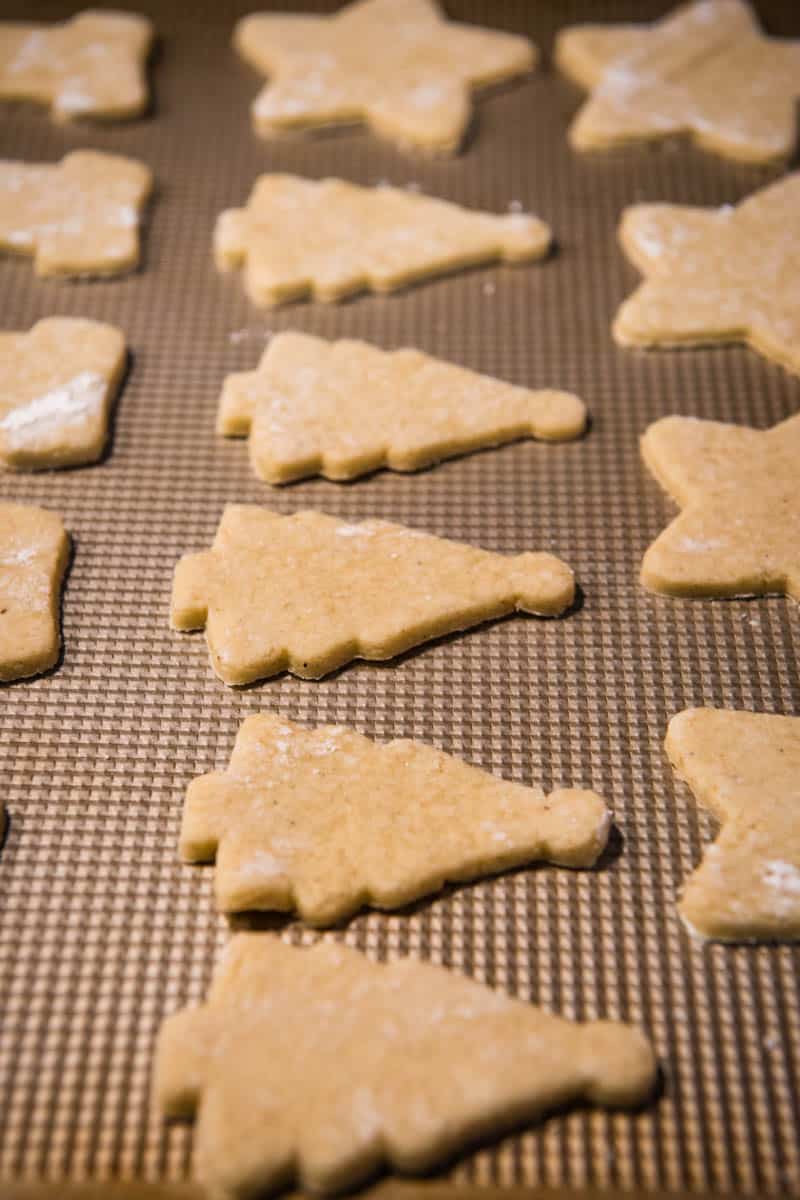
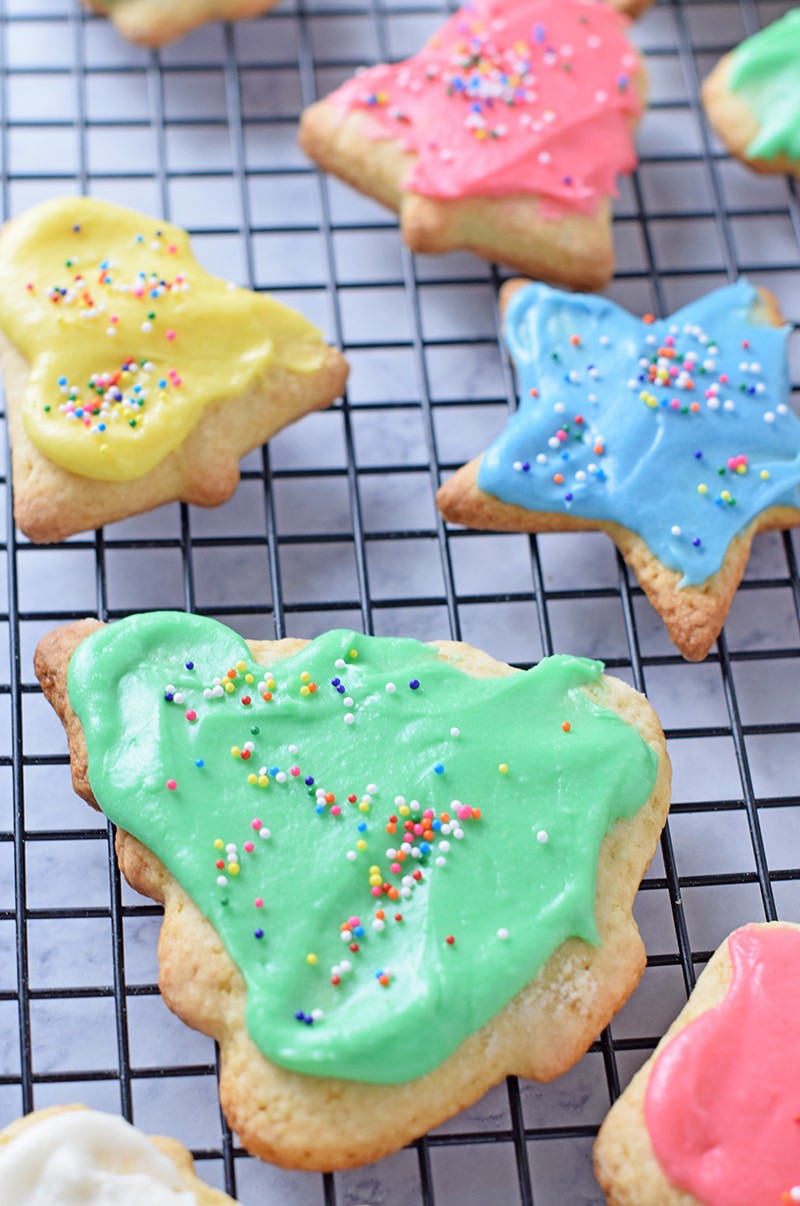
To make these cut out cookies special, all the Christmas cookie cutters come out, along with my old friend, the rolling pin. We roll and re-roll the dough, cutting out snowmen, Christmas trees, bells, and stars.
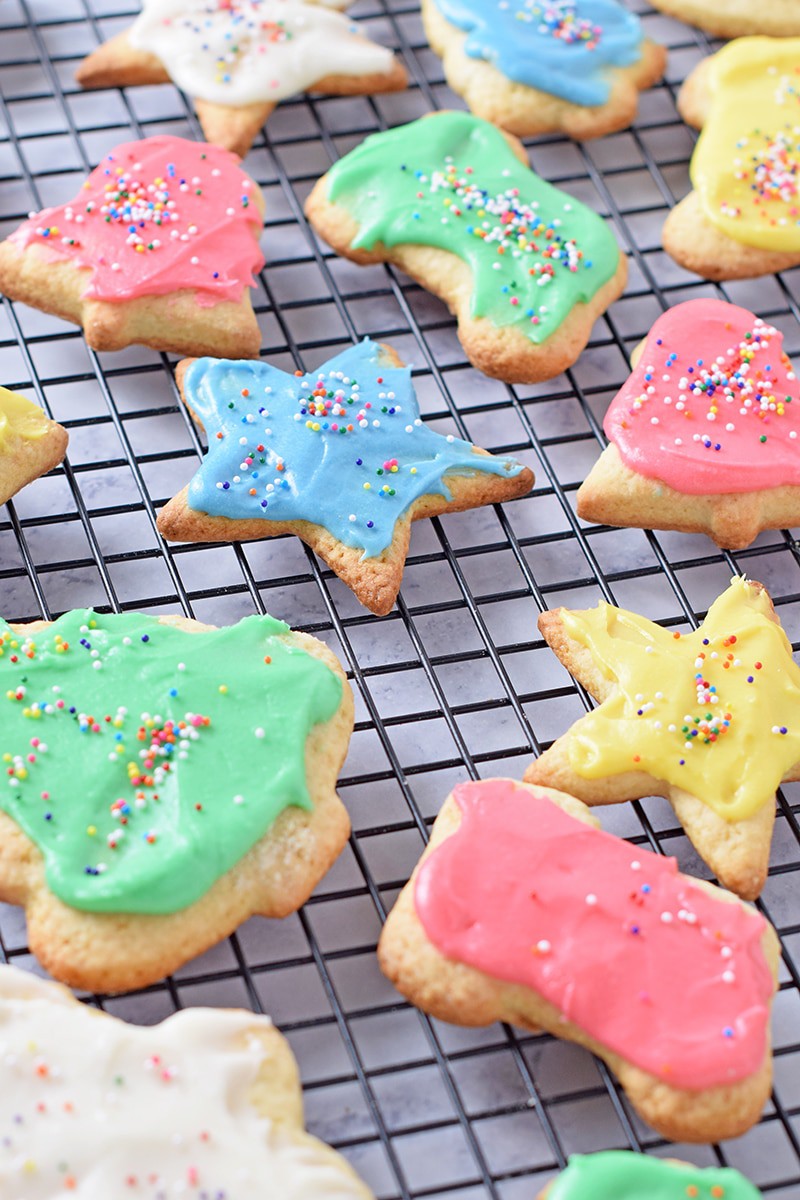
After the cookies have baked and cooled, it’s time to decorate, and the kids have so much fun with this. Jaden’s cookies are usually decorated to the hilt; they make my teeth hurt just looking at them.
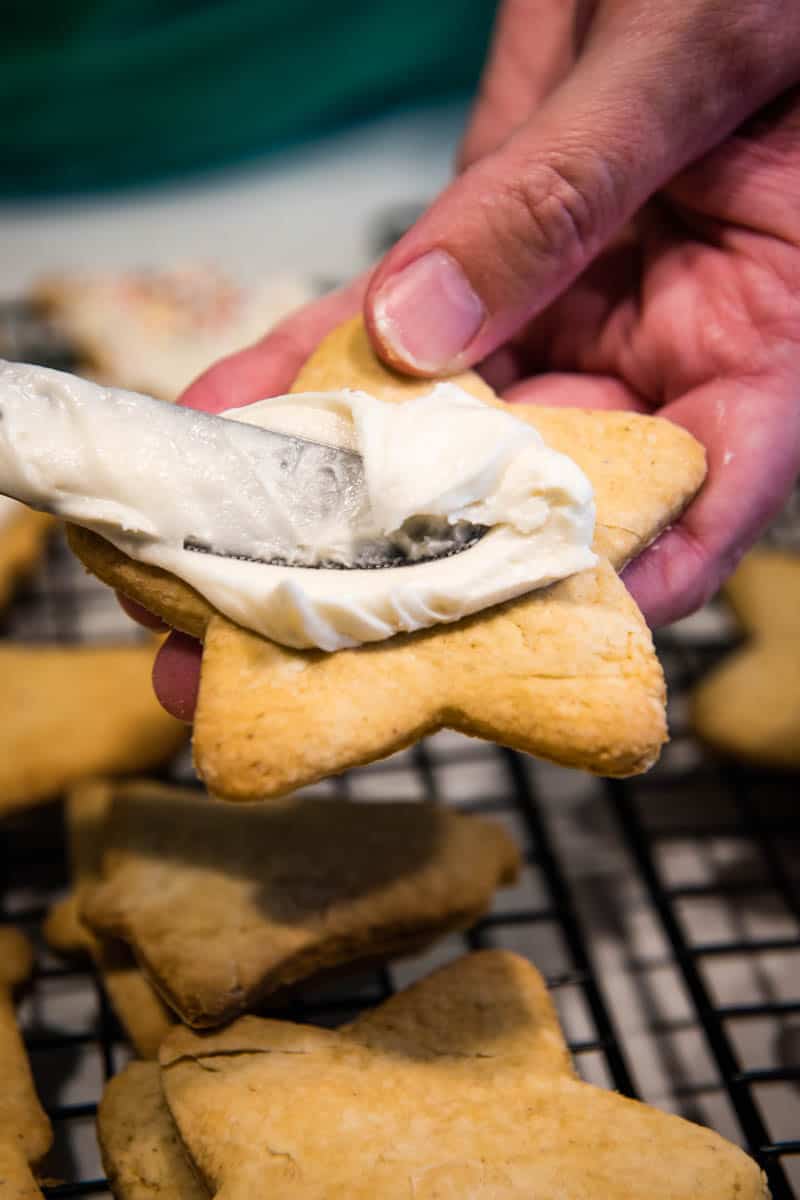
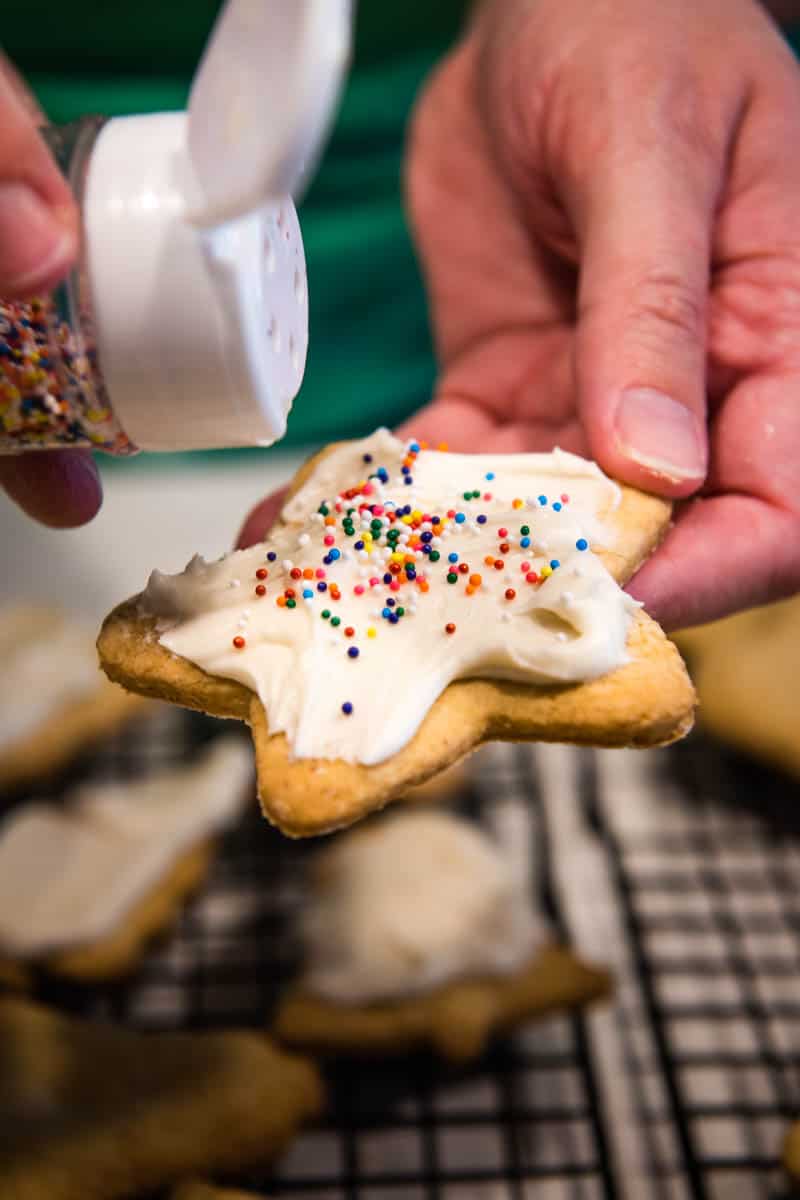
We keep the decorating simple, using butter knives to spread the icing on… Then sprinkle a few of our favorite sprinkles to add a little crunch.
Rolled sugar cookies, along with our favorite mint chocolate crinkle cookies and reindeer thumbprint cookies, usually end up on a plate with a glass of milk come Christmas Eve. And they always disappear, so apparently, Santa likes them too.
Of course, like my pumpkin sugar cookie recipe in the fall, you can also make these cookies for other holidays (like Valentine’s Day) and even in between as an everyday cookie recipe. My boys love using their race car, dinosaur, and Bigfoot cookie cutter too. And sometimes I even use this recipe to make sugar cookies for mini fruit pizzas!
WHERE CAN I FIND THE ACTUAL RECIPE CARD?
If you’d rather skip all of my cookie baking tips, important info for this recipe, and similar recipe ideas – and get straight to the soft cut out sugar cookie recipe – just scroll down to the bottom, where you’ll find a printable recipe card.
Ground nutmeg – I added this ingredient on my own because I love the flavor kick it gives to the cookies.
Unsalted butter
Buttermilk – I make my own by adding about a tablespoon of vinegar to a glass measuring cup, then adding milk to the 1/2 cup line. The vinegar sours the milk, so it becomes an excellent substitute for buttermilk.
Wire Rack – This will give your cookies a place to cool.
HOW TO MAKE THIS CUT OUT SUGAR COOKIE RECIPE
Before you get started, be sure to gather all of your ingredients. This recipe has multiple stages, from mixing up the dough to rolling it out and cutting out the cookies.
HOW TO MAKE THE SUGAR COOKIE DOUGH
Sift, then measure the flour.
Sift or mix the flour with the baking soda, salt, sugar, and nutmeg.
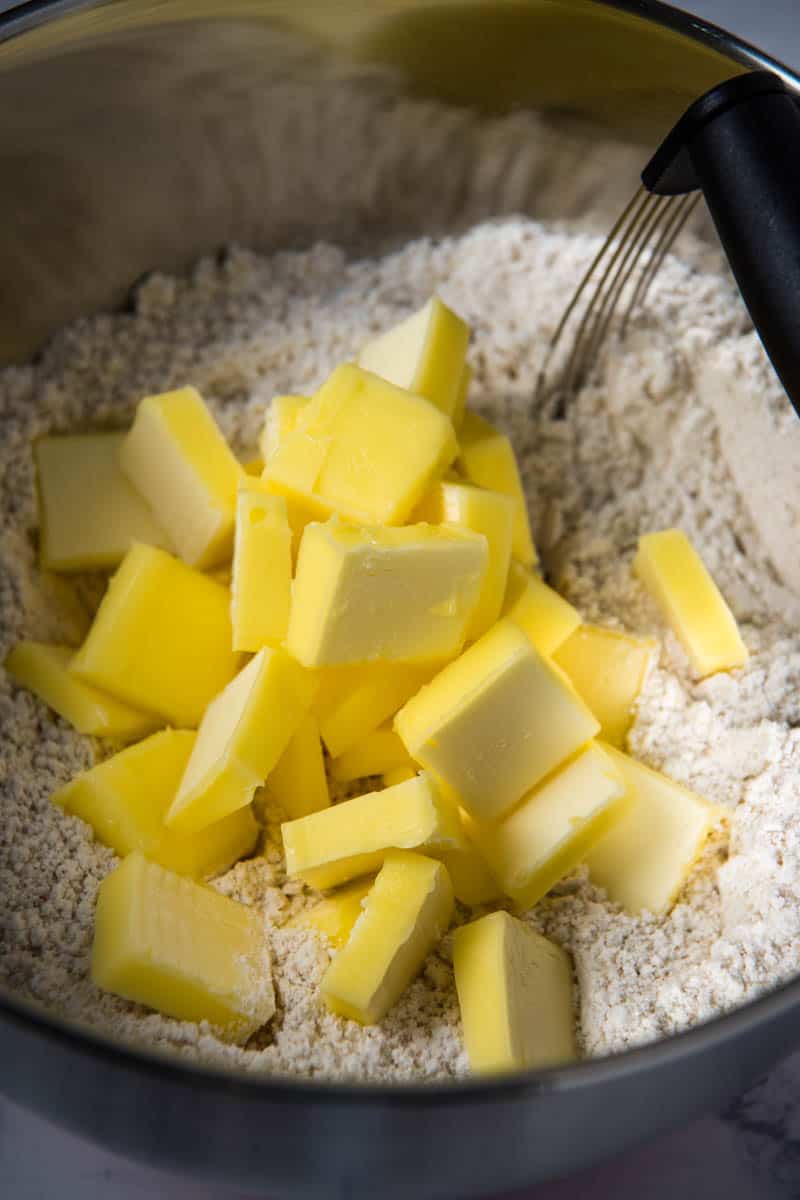
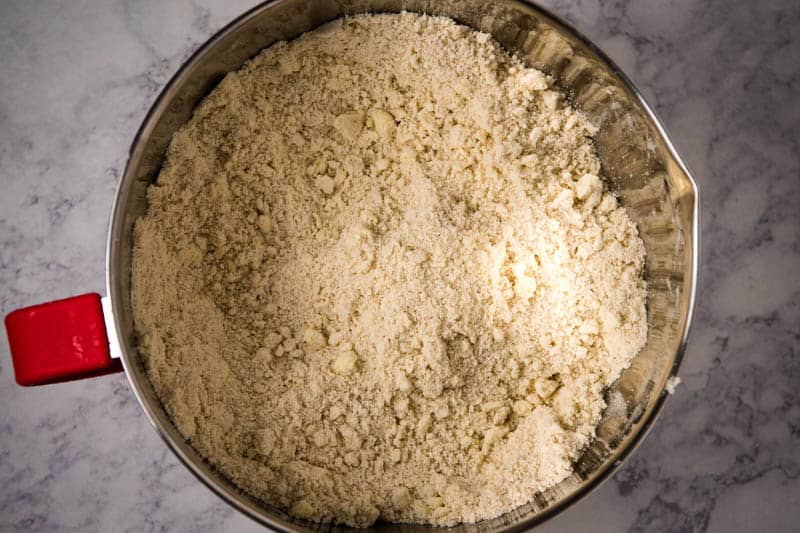
Using a pastry blender, cut the butter into the dry ingredients.
Work the butter in until the mixture is as fine as corn meal.
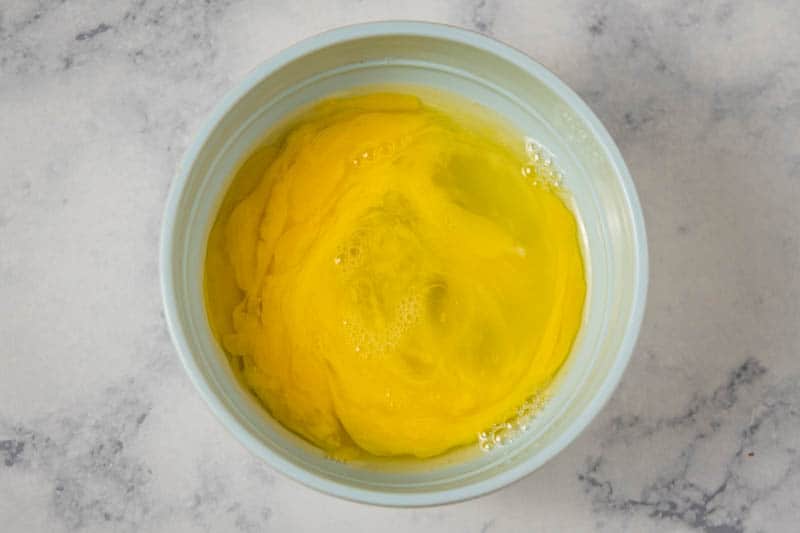
Then in a separate mixing bowl, combine the buttermilk and vanilla extract with the slightly beaten eggs.
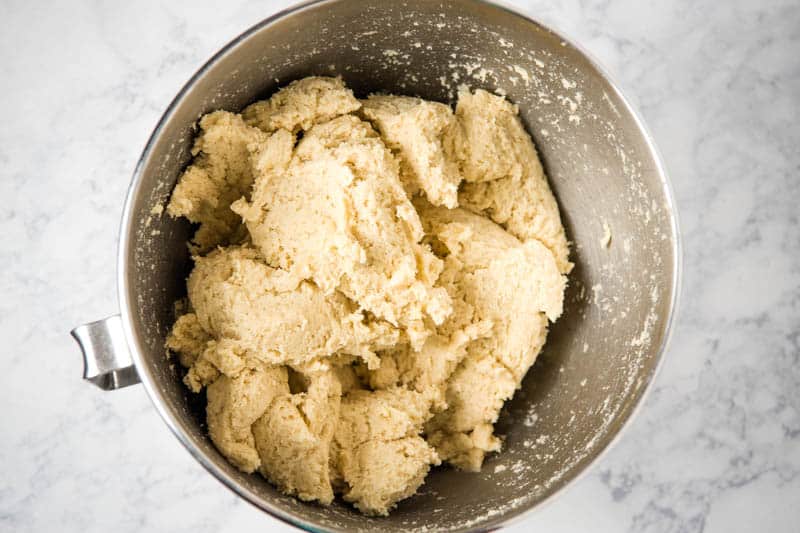
Add the dry ingredients to the liquid ingredients.
Mix ’til you have a smooth cookie dough.
HOW LONG TO CHILL THE DOUGH
At this point, you’ll need to cover the dough closely with wax paper or plastic wrap, and chill it in the refrigerator overnight or at least 3-4 hours.
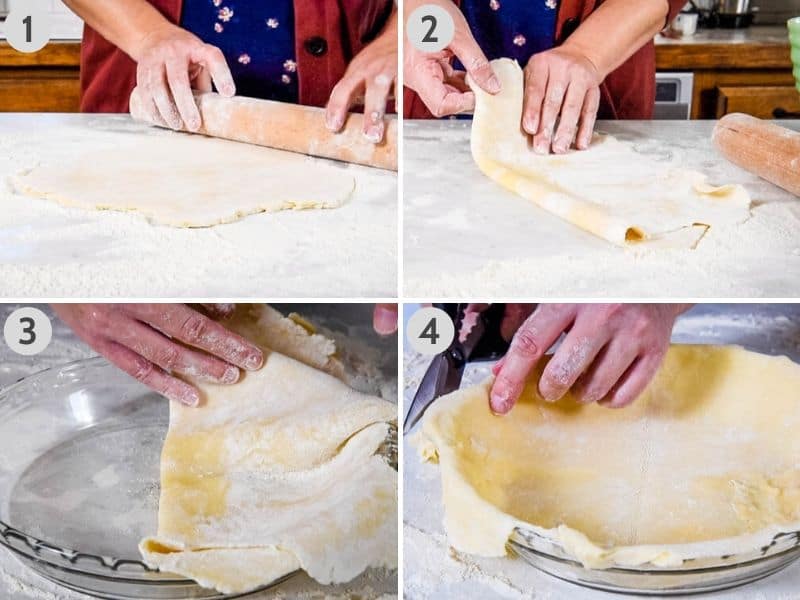
HOW TO ROLL SUGAR COOKIE DOUGH AND CUT OUT SHAPES
Be sure to pre-heat your oven to 425°F.
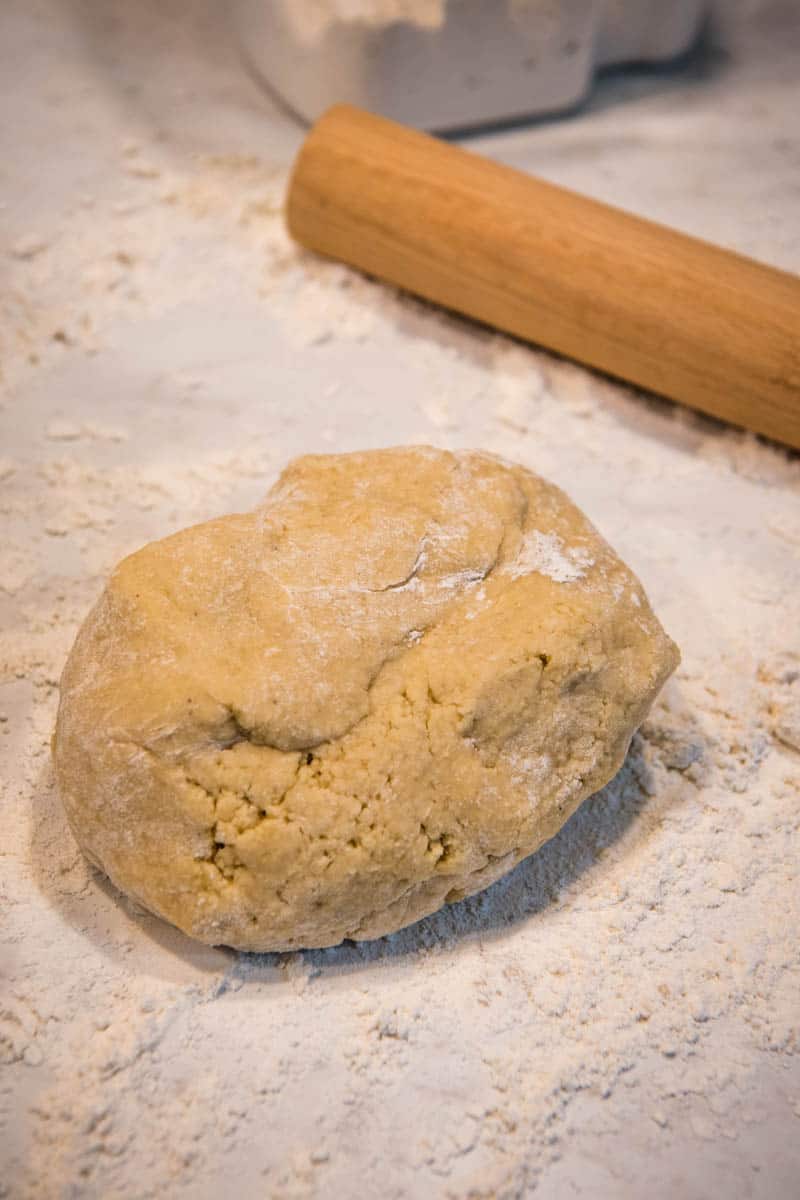
When you’re ready to roll out the dough, turn it out onto a lightly floured surface, coating the dough with flour and kneading it until it’s less sticky and more pliable.
Then roll the dough out to about a 1/4 to 1/2-inch thickness.
Place the cutout cookies on an un-greased baking sheet, and bake at 425°F for about 8-10 minutes, or until the cookies begin to turn slightly golden. Allow them to cool on a wire rack.
Icing Alternative: If you don’t want to decorate your cookies with icing, you can sprinkle each cookie shape with sugar before baking. Colored sugar is especially festive.
WAYS TO DECORATE CUTOUT SUGAR COOKIES
As I’ve said before, around here, baking cutout sugar cookies is a family tradition. Every Christmas I always looked forward to decorating these cookies with my mom, and now it’s no different with my own kids.
Decorating sugar cookies is a great way to spend some much-needed time with the family, and there is no limit to creativity with this recipe. Here are some of the ways that we like to decorate our own cookies.
Sprinkles – This is another no-brainer, and it’s easily my kids’ favorite decoration, probably due to the wide variety of different shapes and colors available in the supermarket. With kids, they also make a big mess!
Rainbow Nonpareils – This is my personal favorite way to decorate after icing the cookies. These tiny sprinkles give a little crunch to each sugar cookie.
Colored sugar – This is a great option if you’d like to keep it easy; you can even use regular sugar. Just sprinkle it on before the cookies are loaded into the oven.
HOW TO STORE DECORATED SUGAR COOKIES
Decorated sugar cookies must be stored in layers in between sheets of wax paper in an airtight container. The wax paper is essential in keeping the icing in-tact, preventing the cookies from sitting on top of each other and bleeding into each other.
Rolled sugar cookies are best enjoyed the first few days after baking.
WHY ARE MY SUGAR COOKIES HARD?
There are many possibilities as to why your cut out cookies are hard, but the most common and overlooked reason is that they’re overcooked.
Sugar cookies are fully cooked when the edges have just reached a light golden brown and the middle has begun to form miniature cracks, around 8-10 minutes at 425°F for this recipe. Any more than this will result in sugar rocks, not cookies.
It’s also possible that you’re overworking the dough; this can work the gluten in the flour to the point of elasticity, which makes for a hard, chewy cookie. When it comes to working the dough, keep it to the bare minimum!
HOW TO PREVENT CUT OUT COOKIES FROM SPREADING
Although this is a very common problem, it can be easily avoided. Here are some tips to keep your sugar cookies from spreading.
Chill the dough – Chilling the dough helps tremendously to prevent spreading. The colder the temperature, the less greasy your dough will be; this is essential.
Don’t over-mix – Over-mixing will destroy the natural structure of your cookies, and they simply won’t hold together; in fact, the excessive amount of air introduced into the dough during this process can actually cause your cookies to collapse in the oven! Don’t mix any more than you have to.
Use colder butter – Using room temperature butter is best. If the butter is too warm, it will melt into the dough and create a greasy mess with no structure whatsoever.
Work the dough properly – Don’t overwork the dough, and don’t roll it out more than you have to. As you work the dough, the heat of your hands will melt the butter, creating an excessive amount of grease that will most certainly cause your cookies to spread in the oven.
Use plenty of flour – Having enough flour is crucial in baking a spread-resistant sugar cookie. These cookies are naturally fatty, and they need just the right amount of flour to soak up any grease that forms; be precise.
CAN YOU FREEZE SUGAR COOKIE DOUGH?
Yes, there are a couple of ways to freeze raw sugar cookie dough, depending on whether you plan to freeze the entire dough ball or freeze individual cutout cookies. Raw dough will last up to 3 months in the freezer.
To freeze the dough before cutting out the cookies, simply roll it into a ball, wrap it in plastic wrap, and place it in an airtight container in the freezer.
Otherwise, you can go ahead and cut out the cookies beforehand, placing them in between alternating layers of wax paper in an airtight container.
Bake the frozen cutout cookies as normal, adding a few minutes to make up for the frozen state. On the other hand, a glob of uncooked dough will need to be thawed until you are able to cut through the dough with a sharp knife, around 30 minutes at room temperature, or several hours in the refrigerator.
CAN YOU FREEZE BAKED OR DECORATED COOKIES?
Yes, you can absolutely freeze baked and decorated sugar cookies.
Once they are decorated, place the completely cooled cookies in sealed freezer bags, ensuring that they each have plenty of space. Next, stack these freezer bags into airtight containers in the freezer.
When you pull the cookies out of the freezer, let them thaw for several hours at room temperature. Never let your decorated cookies thaw in the refrigerator, as the resulting condensation will ruin your icing.
How to make the best cut out sugar cookie recipe. My mom's recipe for crisp, soft sugar cookies you can decorate with icing and sprinkles.
Stand Mixer
Pastry Blender
Rolling Pin
Cookie Sheet
Cookie Cutters
Wire Rack
Cookie Dough:
4 cups all-purpose flour
1 teaspoon baking soda
1 teaspoon ground nutmeg
1/2 teaspoon salt
1 1/2 cups cane sugar
1 1/2 cups unsalted butter
1/2 cup buttermilk
1 teaspoon vanilla extract
2 large eggs (slightly beaten)
Cookie Icing:
4 tablespoons salted butter (softened)
1 teaspoon vanilla extract
1 teaspoon almond extract
1 cup whole milk
6 cups powdered sugar
Food coloring ((optional))
Sugar Cookies:
In a large mixing bowl, sift together the flour, baking soda, ground nutmeg, salt, and sugar.
Using a pastry blender, cut the butter into the dry ingredients until it is as fine as corn meal.
In a separate large mixing bowl, combine the buttermilk, vanilla extract, and slightly beaten eggs.
Add the dry ingredients to the liquid ingredients, mixing ’til you have a smooth cookie dough.
Cover the dough and chill in the refrigerator overnight, or at least 4 hours.
Pre-heat the oven to 425° F.
Turn the dough out onto a lightly floured surface, coating the dough with flour and kneading it until it's less sticky and more pliable.
Then roll the dough out to about a 1/4 to 1/2-inch thickness.
Cut out cookies with floured cookie cutters.
Place the cutout cookies on an un-greased cookie sheet, and bake at 425° F for about 8-10 minutes, or until the cookies begin to turn slightly golden.
Place the cookies on a wire rack to cool completely before decorating.
Cookie Icing:
In a large mixing bowl, mix together the softened butter, vanilla extract, and almond extract.
Add the milk to the mixture.
Slowly add the powdered sugar to the mixture, mixing it in as you go; the finished icing should be smooth, creamy, and spreadable.
Optional Step: At this point, you can add food coloring, if desired.
Decorate the sugar cookies with icing, sprinkles, and nonpareils.
*I make my own buttermilk or sour milk by adding about a tablespoon of vinegar to a glass measuring cup, then adding milk to the 1/2 cup line. The vinegar sours the milk, so it becomes an excellent substitute for buttermilk.
*Icing Alternative: If you don’t want to decorate your cookies with icing, you can sprinkle each cookie shape with sugar before baking. Colored sugar is especially festive.
WAYS TO DECORATE CUTOUT SUGAR COOKIES
As I’ve said before, around here, baking cutout sugar cookies is a family tradition. Every Christmas I always looked forward to decorating these cookies with my mom, and now it’s no different with my own kids.
Decorating sugar cookies is a great way to way to spend some much-needed time with the family, and there is no limit to creativity with this recipe. Here are some of the ways that we like to decorate our own cookies.
Sugar cookie icing – I make my own powdered sugar icing (linked in the ingredients list above), but you can even use a can from the store if desired. You can use cream cheese frosting, buttercream frosting, whipped cream frosting, or even a simple powdered sugar glaze.
Sprinkles – this is another no-brainer, and it’s easily my kids’ favorite decoration, probably due to the wide variety of different shapes and colors available in the supermarket. With kids, they also make a big mess!
Rainbow Nonpareils – This is my personal favorite way to decorate after icing the cookies.
Colored sugar – this is a great option if you’d like to keep it easy; you can even use regular sugar. Just sprinkle it on before the cookies are loaded into the oven.
HOW TO STORE DECORATED SUGAR COOKIES
Decorated sugar cookies must be stored in layers in between sheets of wax paper in an airtight container. The wax paper is essential in keeping the icing in-tact, preventing the cookies from sitting on top of each other and bleeding into each other.
Rolled sugar cookies are best enjoyed the first few days after baking.
HOW TO PREVENT CUT OUT COOKIES FROM SPREADING
Although this is a very common problem, it can be easily avoided. Here are some tips to keep your sugar cookies from spreading.
Chill the dough – Chilling the dough helps tremendously to prevent spreading. The colder the temperature, the less greasy your dough will be; this is essential.
Don’t over-mix – Over-mixing will destroy the natural structure of your cookies, and they simply won’t hold together; in fact, the excessive amount of air introduced into the dough during this process can actually cause your cookies to collapse in the oven! Don’t mix any more than you have to.
Use colder butter – Using room temperature butter is best. If the butter is too warm, it will melt into the dough and create a greasy mess with no structure whatsoever.
Work the dough properly – Don’t overwork the dough, and don’t roll it out more than you have to. As you work the dough, the heat of your hands will melt the butter, creating an excessive amount of grease that will most certainly cause your cookies to spread in the oven.
Use plenty of flour – Having enough flour is crucial in baking a spread-resistant sugar cookie. These cookies are naturally fatty, and they need just the right amount of flour to soak up any grease that forms; be precise.
CAN YOU FREEZE SUGAR COOKIE DOUGH?
Yes, raw dough will last up to 3 months in the freezer.
To freeze the dough before cutting out the cookies, simply roll it into a ball, wrap it in plastic wrap, and place it in an airtight container in the freezer.
Otherwise, you can go ahead and cut out the cookies beforehand, placing them in between alternating layers of wax paper in an airtight container.
Bake the frozen cutout cookies as normal, adding a few minutes to to make up for the frozen state. On the other hand, a glob of uncooked dough will need to be thawed until you are able to cut through the dough with a sharp knife, around 30 minutes at room temperature, or several hours in the refrigerator.
CAN YOU FREEZE BAKED OR DECORATED COOKIES?
Yes. Once they are decorated, place the completely cooled cookies in sealed freezer bags, ensuring that they each have plenty of space. Next, stack these freezer bags into airtight containers in the freezer.
When you pull the cookies out of the freezer, let them thaw for several hours at room temperature. Never let your decorated cookies thaw in the refrigerator, as the resulting condensation will ruin your icing.
Cookies & Bars, Desserts
American
Christmas cut out cookies, Christmas sugar cookies, classic Christmas cookies, cut out cookies, cut out sugar cookie recipe, cut out sugar cookies with sprinkles, cutout sugar cookies, gluten-free cut out cookies, how to make sugar cookie dough, how to make sugar cookies from scratch, rolled sugar cookies, soft cut out sugar cookie recipe, soft cut out sugar cookies
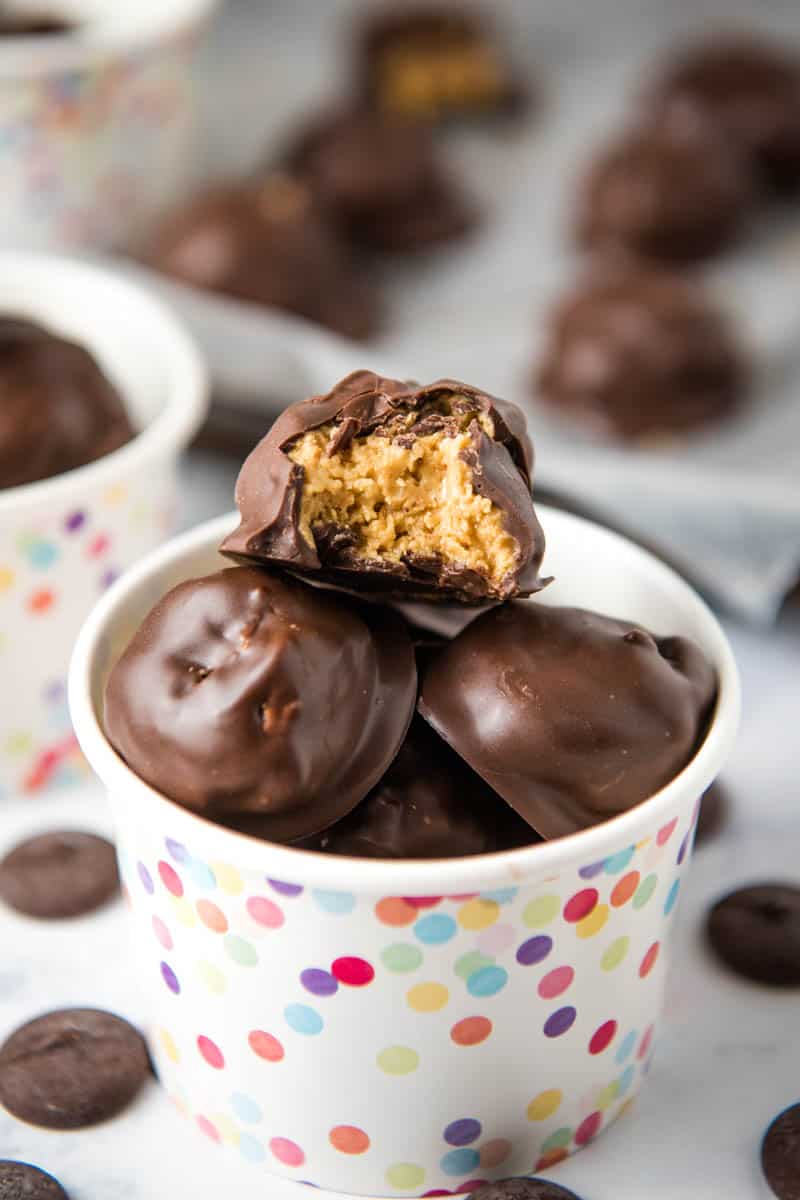
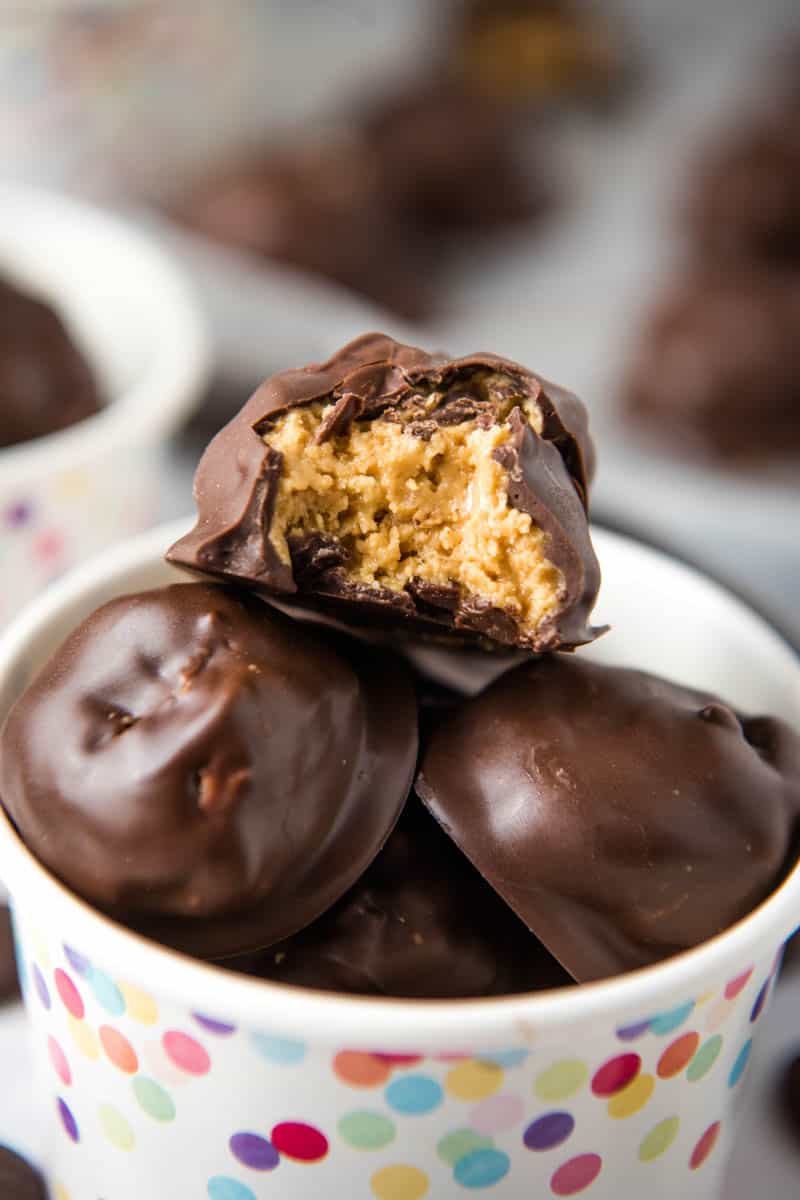
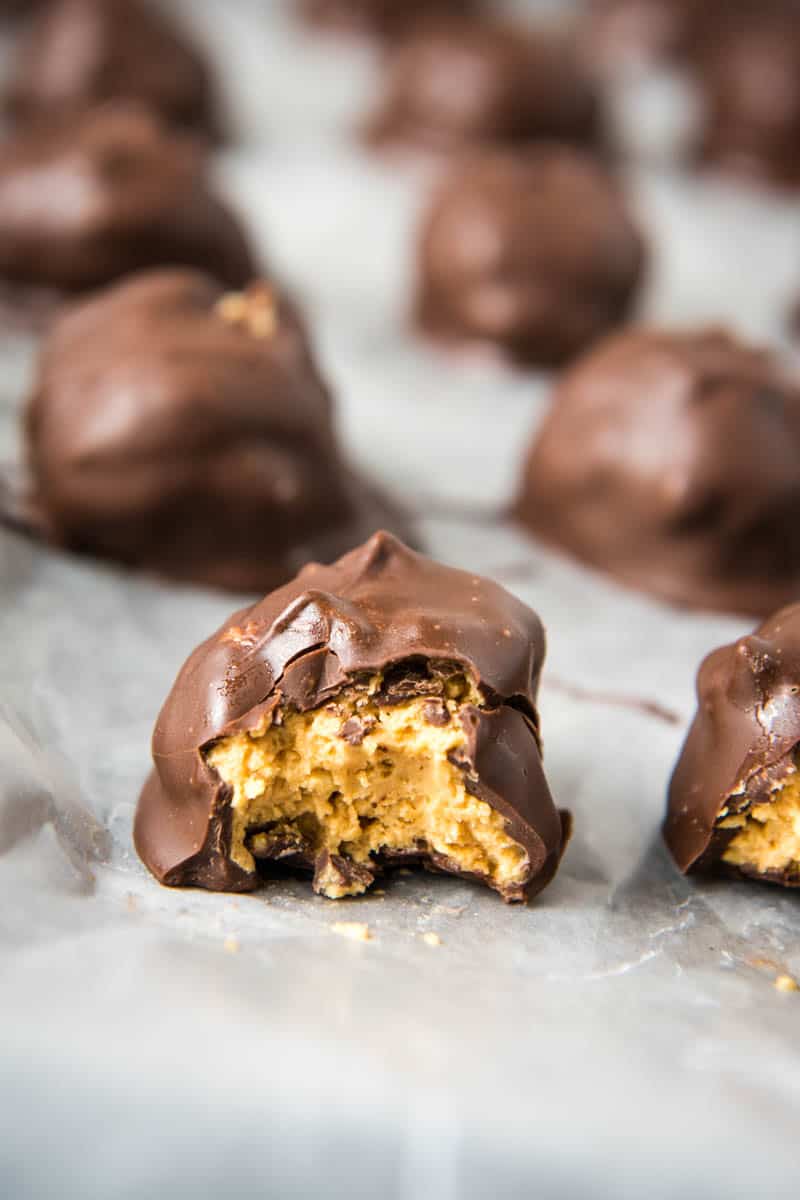
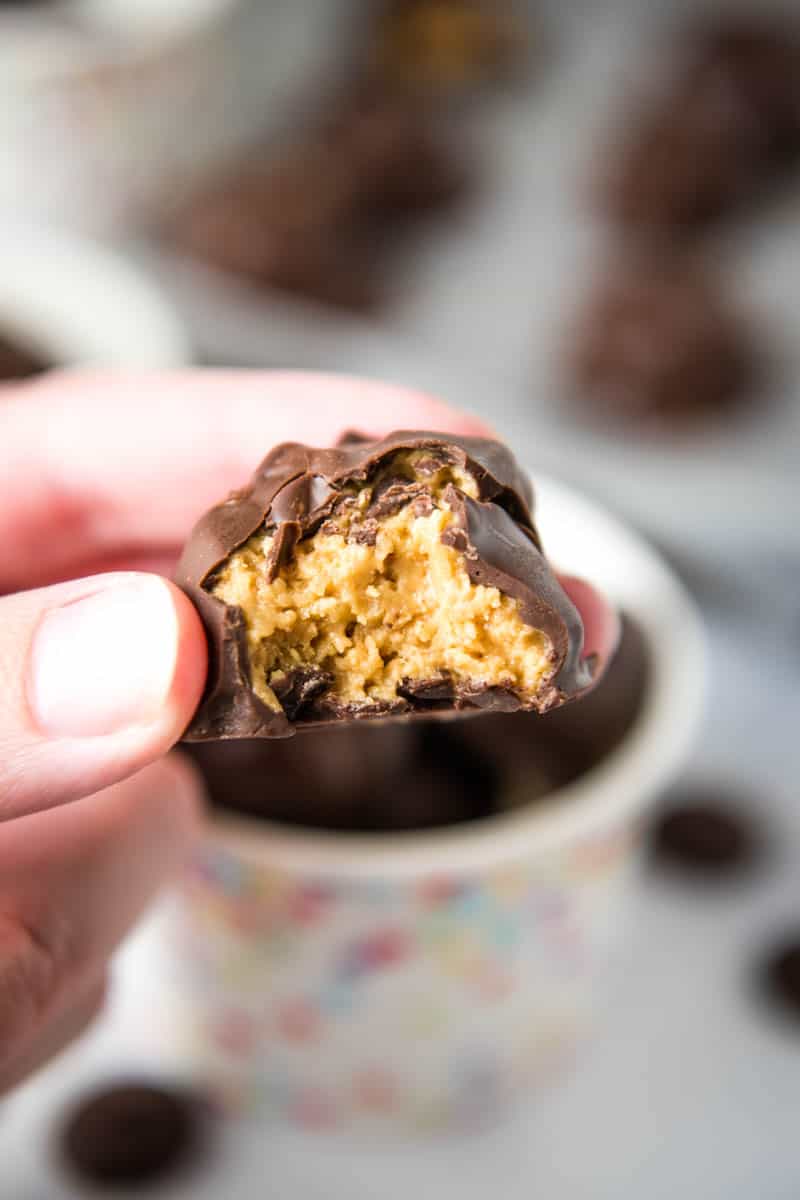
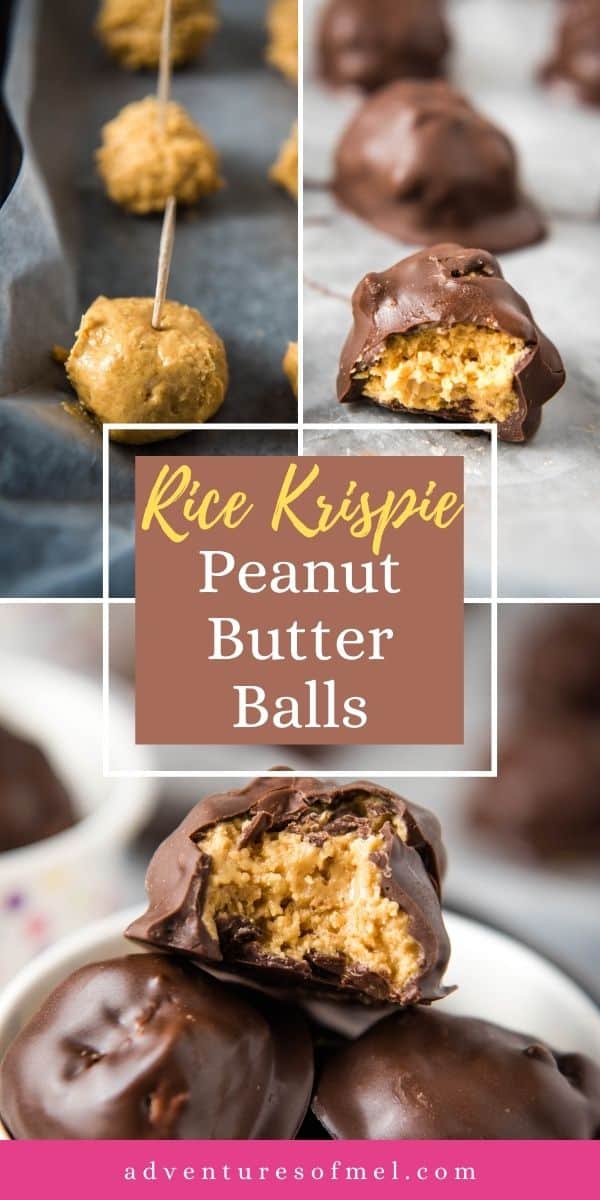
Mix up an easy 5 ingredient recipe for Rice Krispie peanut butter balls. Crispy no bake chocolate covered candy perfect for the holidays!
Nothing says Christmas quite like a batch of 4 ingredient buckeyes candy, chocolate covered Ritz crackers with peanut butter, or better yet, peanut butter balls with Rice Krispies. These chocolate covered candies take the smooth out of buckeyes and give them a crispy texture that is oh so scrumptious and curbs those cravings for something sweet and crunchy.
Not to mention that once again, we’re marrying chocolate and peanut butter together. The two together make a delicious candy that’s hard to resist.
Chocolate crispy balls are easy to make and take just a handful of ingredients. I’ll take you through the simple process, step by step, as you read further.
Kids can get in on the fun of making chocolate peanut butter balls with Rice Krispies too. I know my own kids love to help roll the balls and dip them in the melted chocolate.
While I love to make rice crispy peanut butter balls at Christmas, they make an excellent Halloween, Valentine’s Day, or Easter candy. And if you want even quicker and easier, try making this peanut butter chocolate bars recipe.
WHERE CAN I FIND THE ACTUAL RECIPE CARD?
If you’d rather skip all of my candy making tips, important info for this recipe, and similar recipe ideas – and get straight to the crispy peanut butter balls recipe – just scroll down to the bottom, where you’ll find a printable recipe card.
INGREDIENTS YOU’LL NEED:
Salted butter
Creamy peanut butter – Preferably a regular peanut butter rather than a natural peanut butter, so it’s not so greasy.
Add the powdered sugar to the peanut butter mixture, and combine.
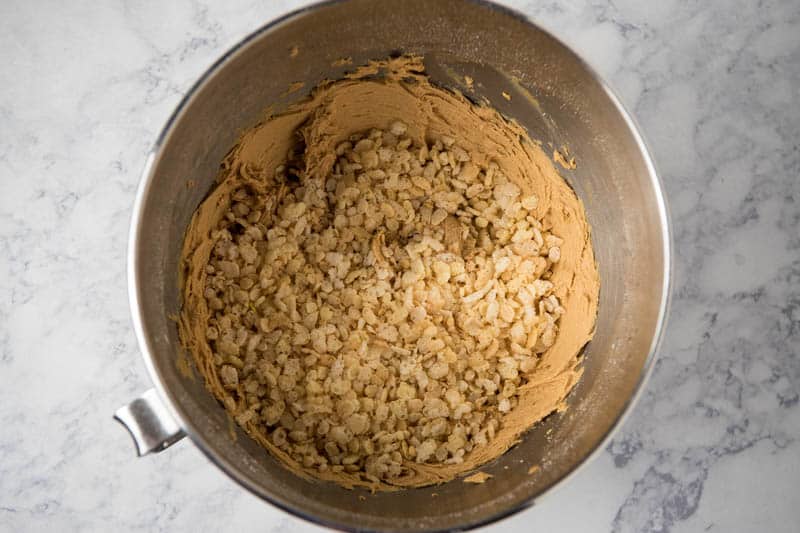
Add and mix in the crispy rice cereal.
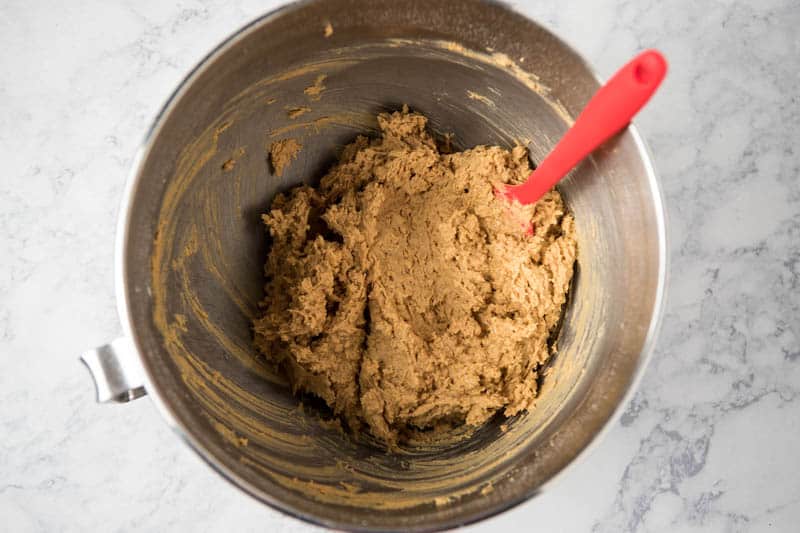
Mix everything together until it’s blended well.
HOW TO SHAPE THE PEANUT BUTTER BALLS
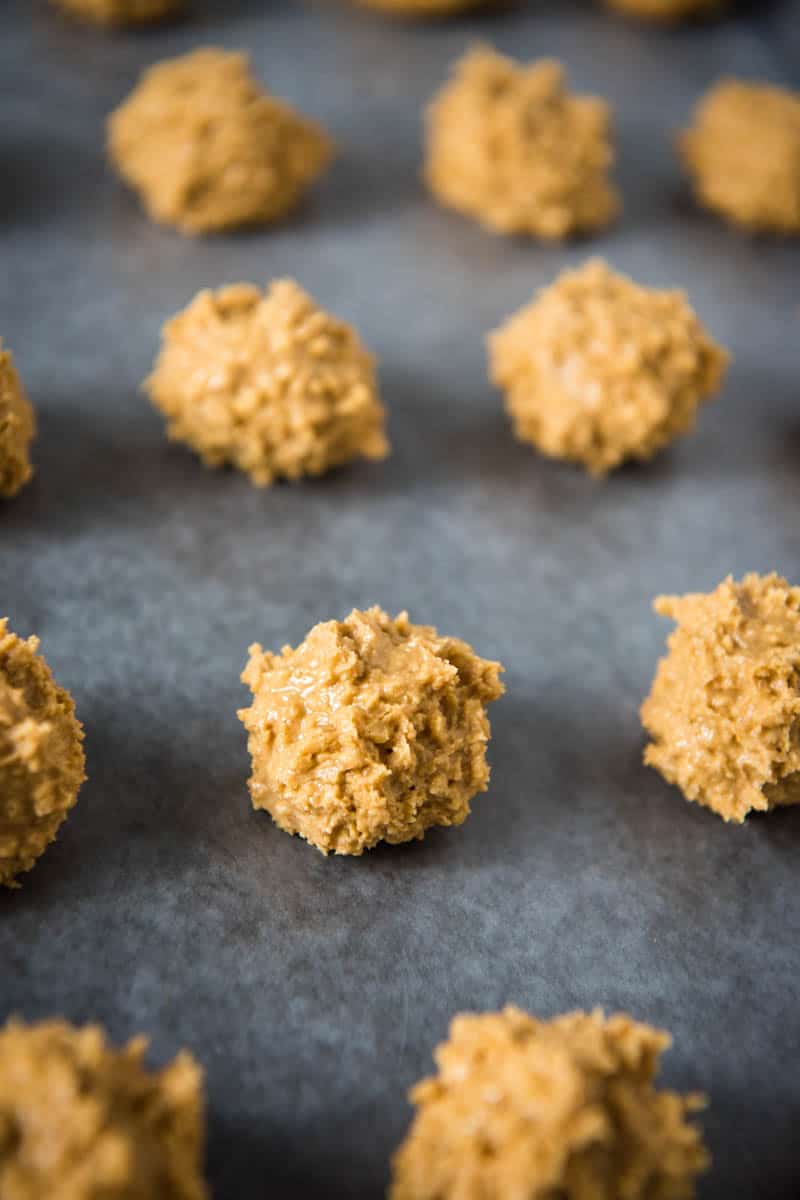
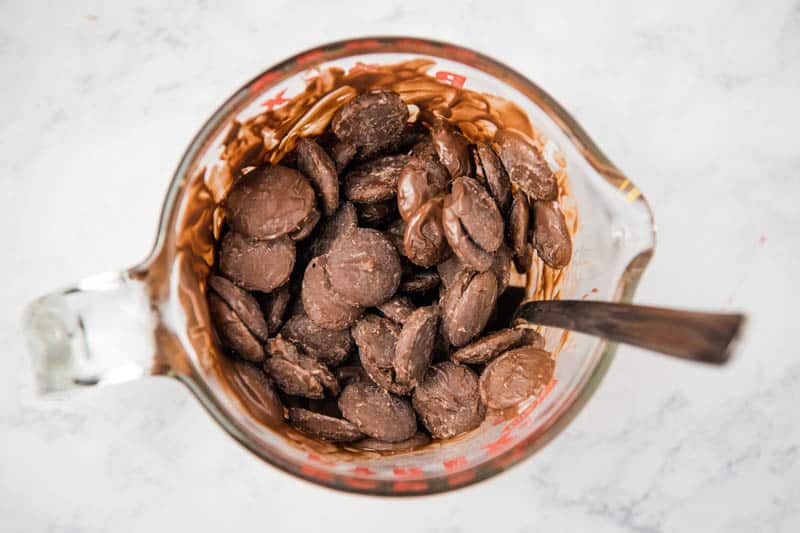
At this point, you’ll need to shape all of the crispy dough into 1-inch peanut butter balls. You’ll take about a tablespoonful of the peanut butter mixture and begin to roll it between your hands. Shape it into as round of a ball as you can and place it on a baking sheet lined with wax paper.
Continue rolling the rest of the dough into balls.
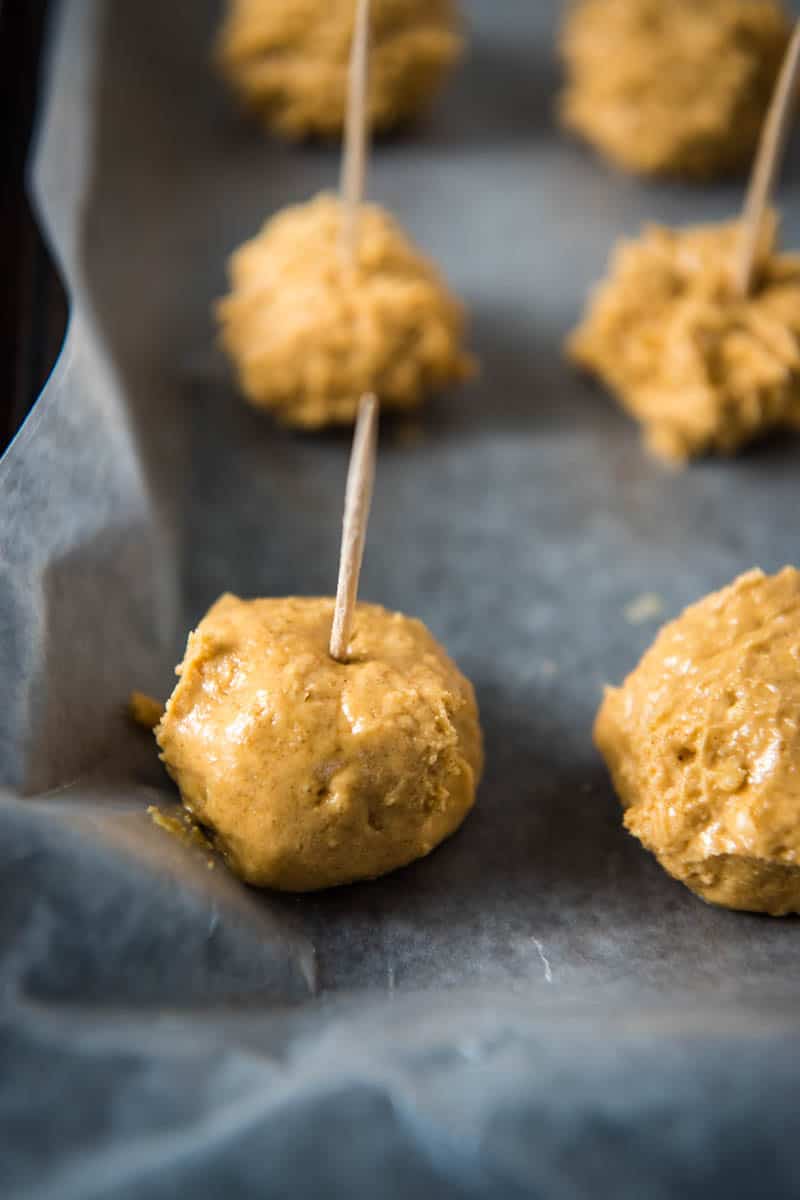
Add toothpicks for dipping to each peanut butter ball.
Once all of the dough is rolled into balls, chill the whole sheet in the fridge or freezer for about 30 minutes.
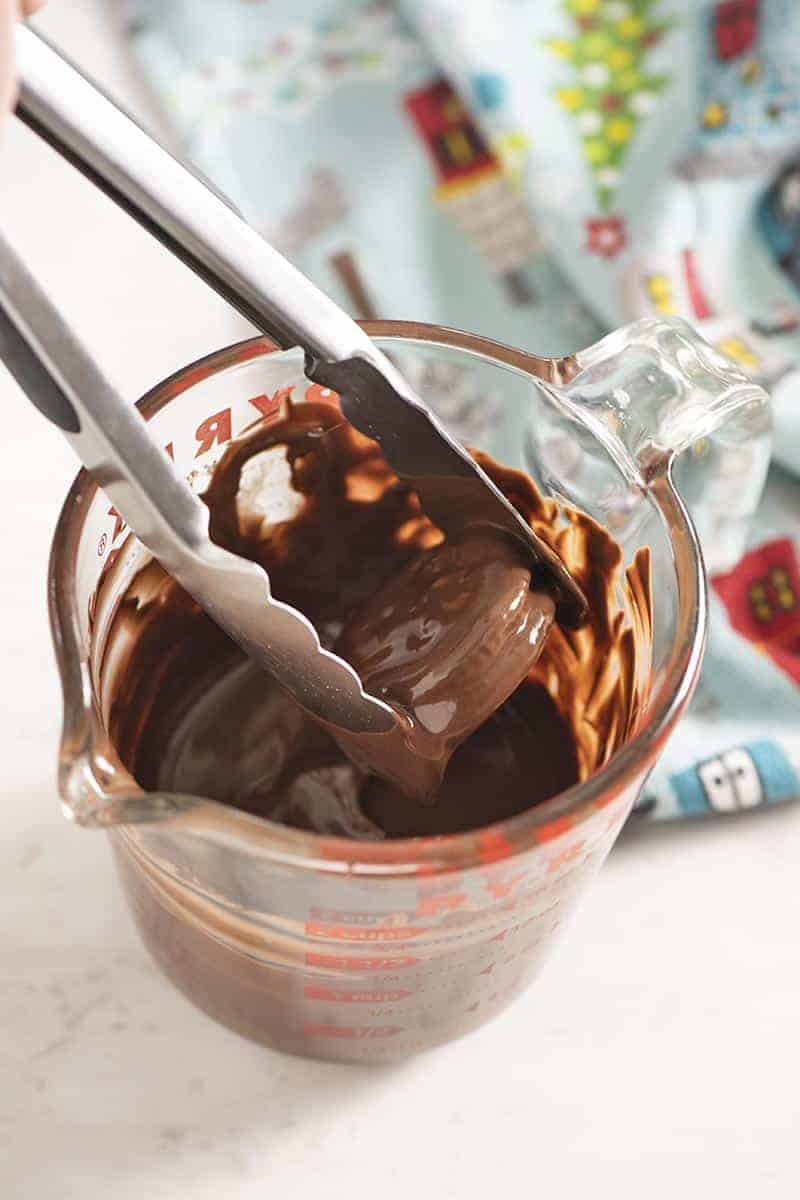
HOW TO MELT CHOCOLATE FOR PEANUT BUTTER BALLS
While your peanut butter balls are chilling, it’s a good time to melt the chocolate and get it ready to go.
Depending on the chocolate you decide to use, you can melt it a few different ways:
Melt it using a double boiler on the stove – This is basically a pan inside of another pan with boiling water in the bottom pan. It allows for more even melting without burning, and it also keeps the chocolate warm for dipping.
Melt it in the microwave – This is usually the route I go. Just follow package directions.
Also, depending on the type of chocolate used, some people like to add shortening or paraffin wax to their chocolate as it melts. This allows for a thinner coating and stretches your chocolate a little further.
If you use a good quality chocolate, you likely won’t need this step.
I started using Ghirardelli Dark Melting Wafers a few years ago, and I love them so much better than almond bark. They’re so much easier to work with, and they have fantastic flavor. They also have milk chocolate wafers now.
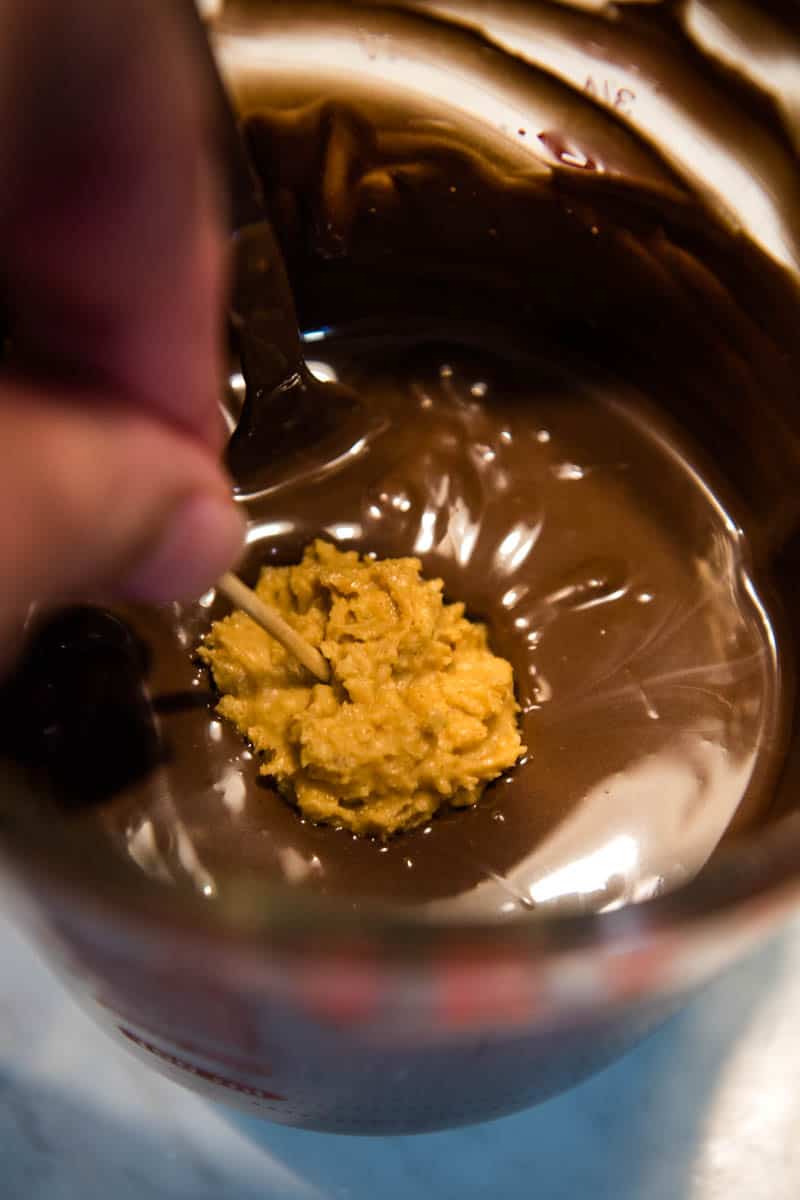
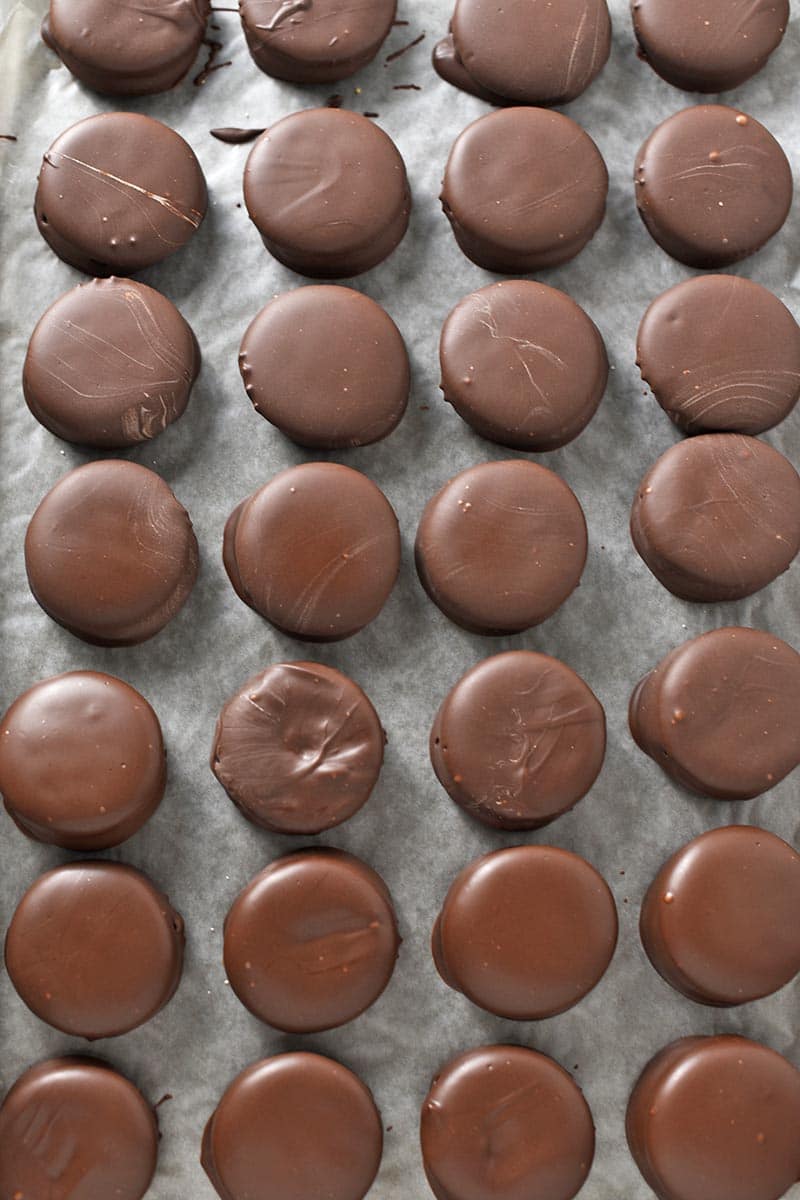
HOW TO DIP THE PEANUT BUTTER BALLS
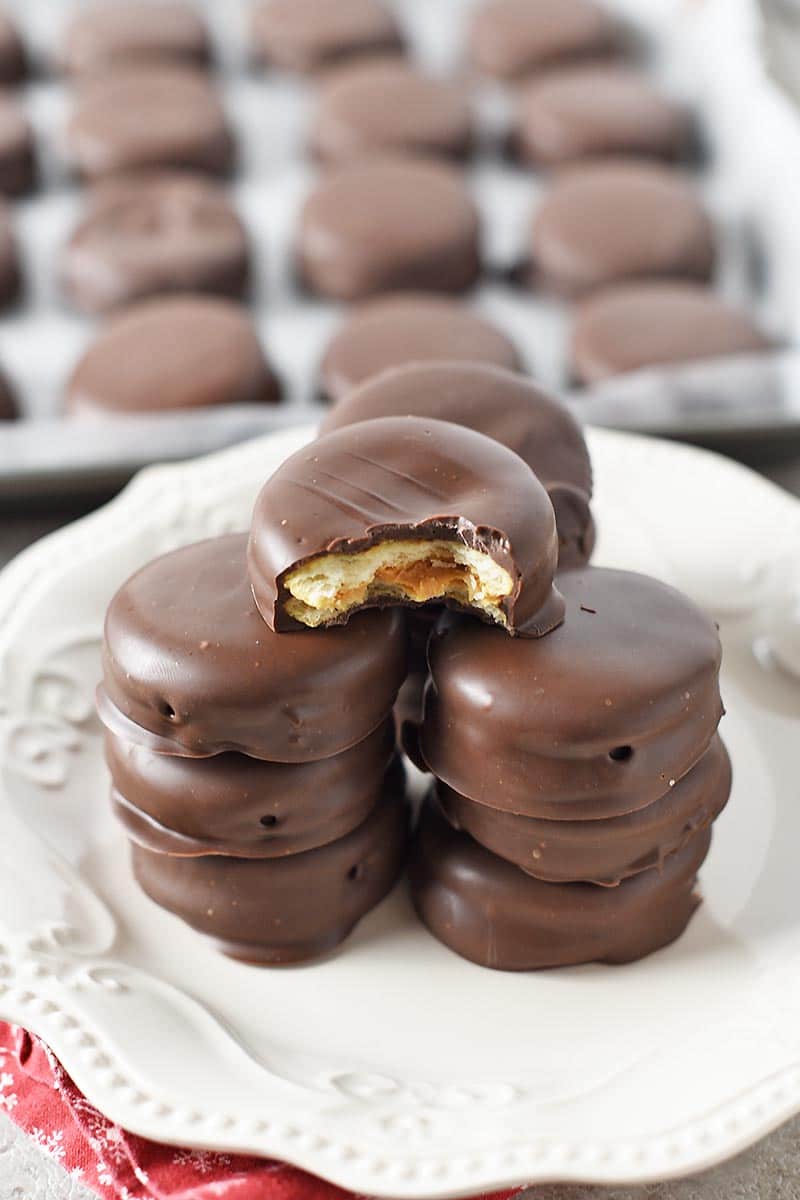
Using the inserted toothpicks, dip every single peanut butter ball, fully immersing each one into the melted chocolate.
Tip: If you don’t have toothpicks… We’ve used a regular table fork in the past, as well as tongs. You can also use a dipping fork or tool to dip your peanut butter balls into the chocolate.
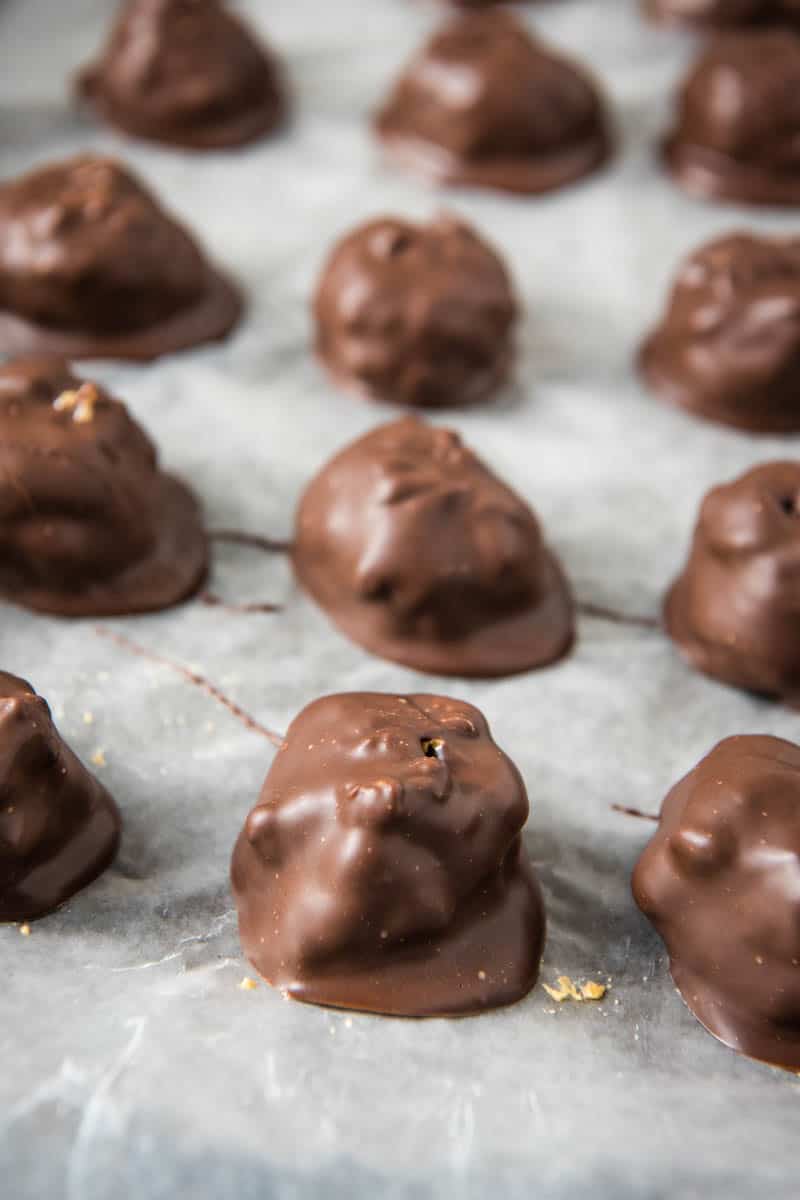
Place the dipped balls back onto the wax paper lined baking sheet (or you can place the dipped balls into a festive paper cup). Remove the toothpicks, and cover over the hole by dabbing the chocolate with the end of the toothpick.
Chill the peanut butter Rice Krispies balls ’til set, probably about 15 to 20 minutes or so.
CAN YOU USE WHITE CHOCOLATE OR DARK CHOCOLATE FOR THIS RECIPE?
Yes, you can. In fact, I prefer a rich, high quality dark chocolate because it’s easier to work with and melts far more efficiently.
Aside from the differences in flavor, milk chocolate and dark chocolate both have different melting properties, so be sure to adjust the cook time accordingly.
Don’t be afraid to get creative and experiment with different melting chocolates! You can try chocolate chips, chocolate bars, almond bark, etc., to see what you prefer.
CAN YOU FREEZE PEANUT BUTTER BALLS WITH RICE KRISPIES?
Absolutely! You can freeze them either before dipping or after dipping, and they will stay fresh for up to 3 months.
Make sure the peanut butter you’re using isn’t a super greasy peanut butter. If it’s too oily, the chocolate may have trouble coating the peanut butter mixture.
Put the melted chocolate in a deeper dish or measuring cup for dipping. I prefer my 2-cup Pyrex measuring cup because I can use it in the microwave, and it’s the perfect size for dipping.
My chocolate covered candy sometimes has kind of a chocolate ring around the bottom. You can avoid this by letting excess chocolate drip off the candy after dipping; and just lightly press the bottom of the candy on a separate sheet of wax paper before putting it back on your cookie sheet.
GET THE PRINTABLE RECIPE
If you love these peanut butter rice crispy balls as much as I do, please write a 5 star review, and help me share the recipe on Facebook and Pinterest!
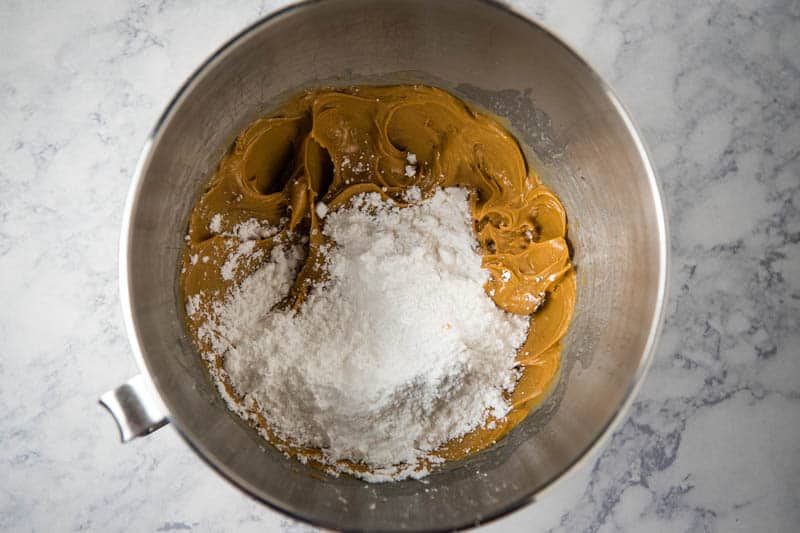
In a small mixing bowl, mix together the melted butter and peanut butter.
Add the powdered sugar to the mixture, and combine.
Stir in the crispy rice cereal, mixing everything together 'til well blended.
Shape all of the crispy dough into 1-inch peanut butter balls. Take about a tablespoonful of the peanut butter mixture and begin to roll it between your hands. Shape it into as round of a ball as you can, and place it on a baking sheet lined with wax paper. Continue rolling the rest of the dough into balls.
Add toothpicks for dipping to each peanut butter ball.
Chill the whole sheet in the fridge or freezer for about 30 minutes.
Add the chocolate to a microwave-safe measuring cup or bowl; and melt, starting at 30 seconds, then stirring every 15-20 seconds, 'til melted and smooth.
Remove the peanut butter balls from the freezer, and using the inserted toothpicks, dip every single peanut butter ball, fully immersing each one into the melted chocolate.
Place the dipped balls back onto the wax paper lined baking sheet. Remove the toothpicks, and cover over the hole by dabbing the chocolate with the end of the toothpick.
Chill the Krispie balls 'til set, probably about 15 to 20 minutes or so.
Rice Krispie peanut butter balls are best stored in between layers of wax paper, in an airtight container or festive Christmas tin, in the refrigerator for up to 2 weeks.
*Preferably a regular peanut butter rather than a natural peanut butter, so it’s not so greasy.
*If you don’t have toothpicks… We’ve used a regular table fork in the past, as well as tongs. You can also use a dipping fork or tool to dip your peanut butter balls into the chocolate.
Depending on the chocolate you decide to use, you can melt it a few different ways:
Melt it using a double boiler on the stove – This is basically a pan inside of another pan with boiling water in the bottom pan. It allows for more even melting without burning, and it also keeps the chocolate warm for dipping.
Melt it in the microwave – This is usually the route I go. Just follow package directions.
Depending on the type of chocolate used, some people like to add shortening or paraffin wax to their chocolate as it melts. This allows for a thinner coating and stretches your chocolate a little further. If you use a good quality chocolate, you likely won’t need this step.
I started using Ghirardelli Dark Melting Wafers a few years ago, and I love them so much better than almond bark. They’re so much easier to work with, and they have fantastic flavor. They also have milk chocolate wafers now.
CAN YOU FREEZE PEANUT BUTTER BALLS WITH RICE KRISPIES?
Absolutely! You can freeze them either before dipping or after dipping, and they will stay fresh for up to 3 months.
Put the melted chocolate in a deeper dish or measuring cup for dipping; I prefer my 2-cup Pyrex measuring cup because I can use it in the microwave, and it’s the perfect size for dipping.
My chocolate covered candy sometimes has kind of a chocolate ring around the bottom. You can avoid this by letting excess chocolate drip off the candy after dipping; and just lightly press the bottom of the candy on a separate sheet of wax paper before putting it back on your cookie sheet.
Candy, Desserts
American
chocolate crispy balls, chocolate peanut butter balls with Rice Krispies, crispy peanut butter balls, how to make Rice Krispie peanut butter balls, peanut butter and chocolate treats, peanut butter balls with Rice Krispies, peanut butter rice crispy balls, peanut butter Rice Krispies balls, rice crispy peanut butter balls, Rice Krispie peanut butter balls
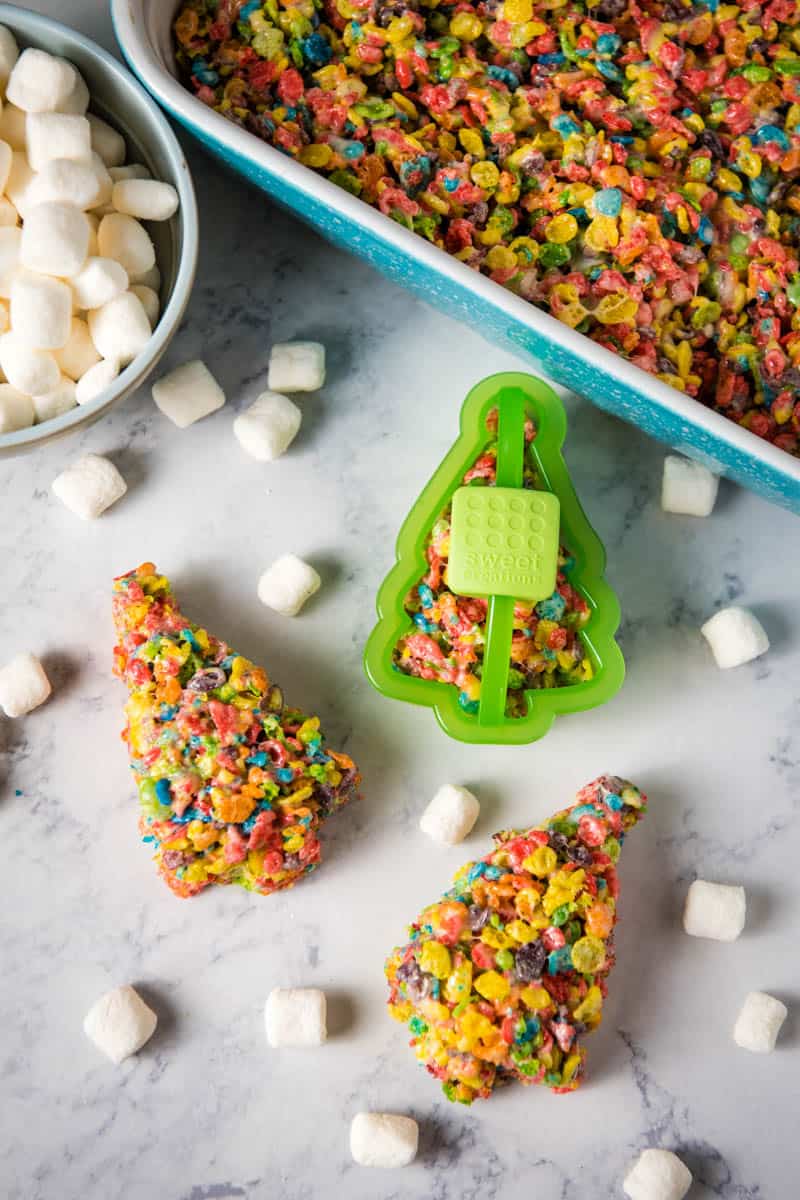
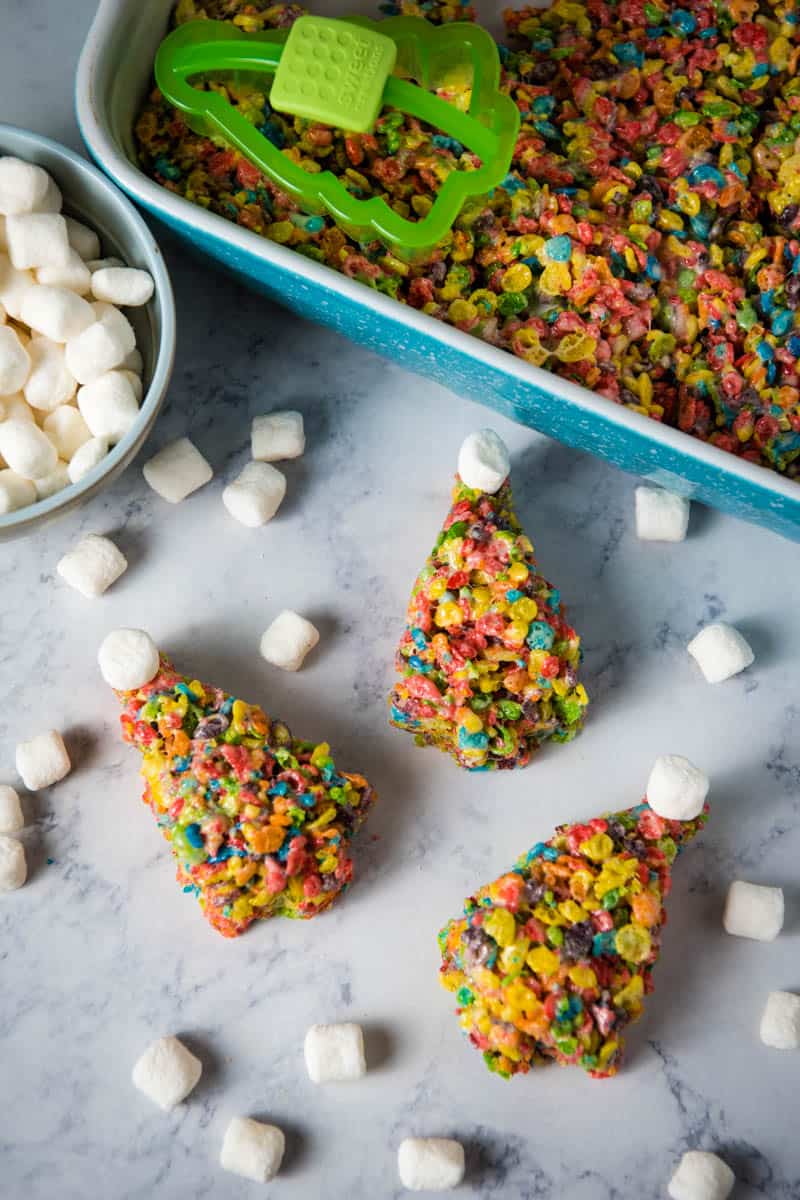
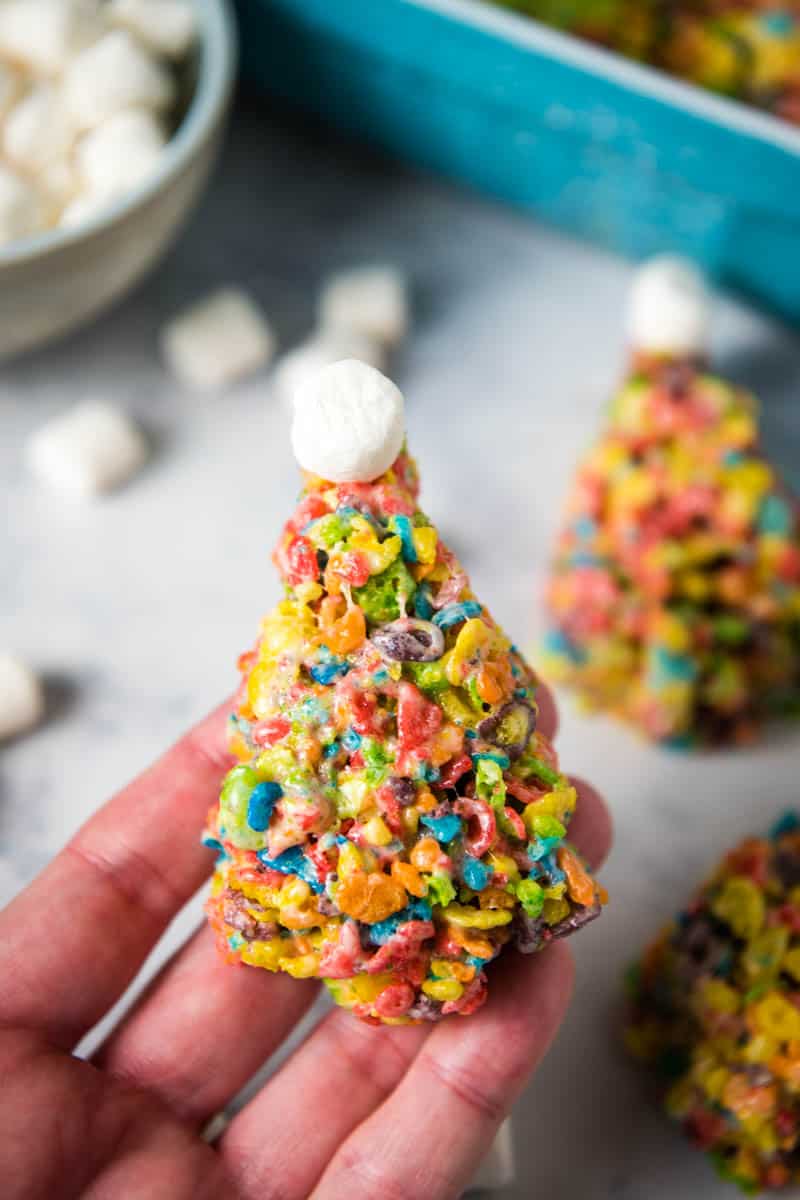
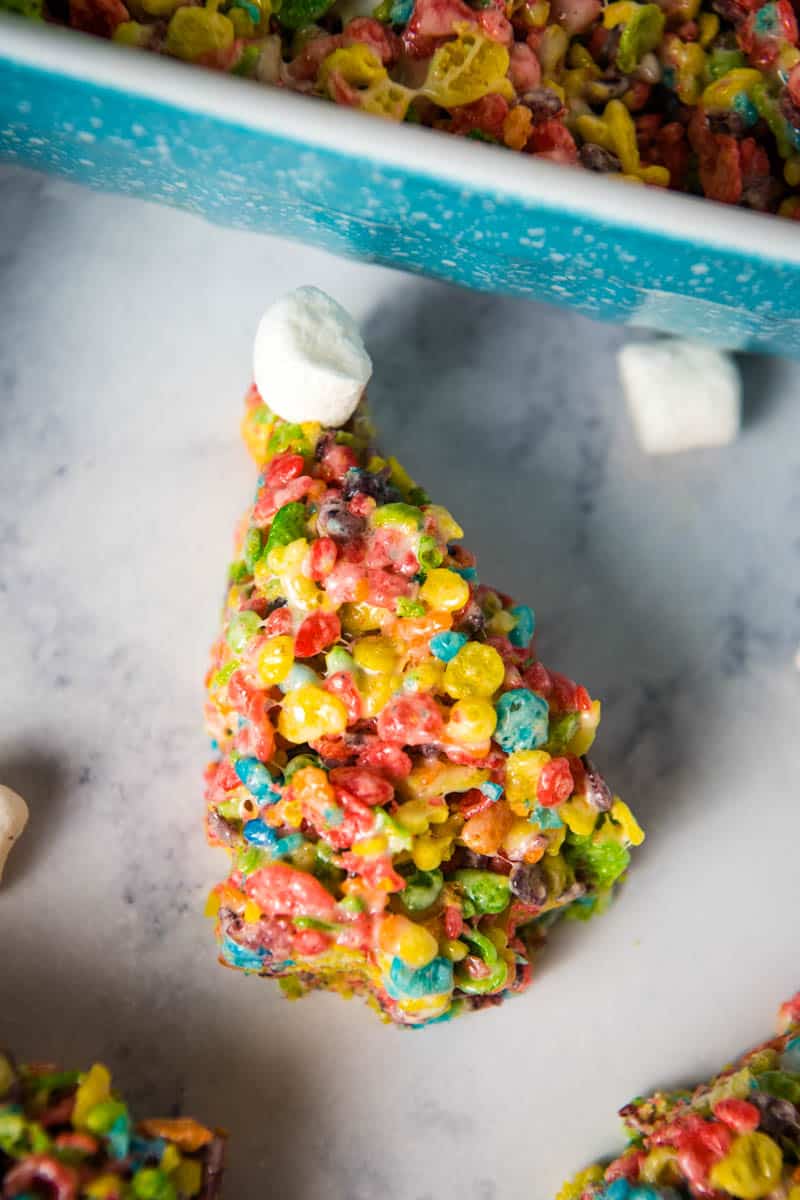
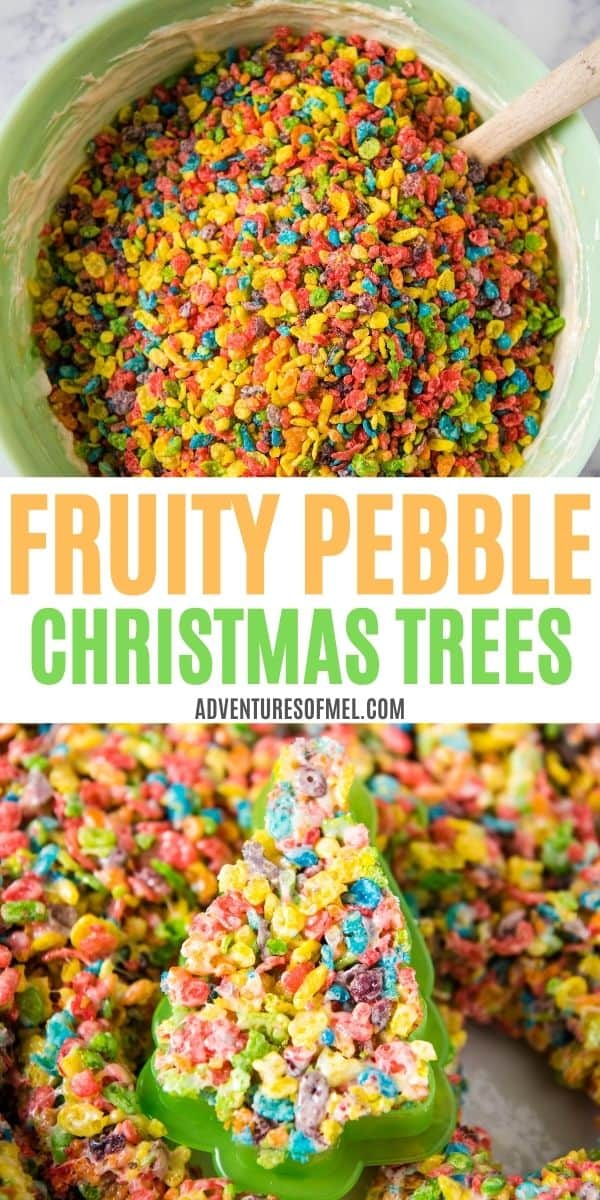
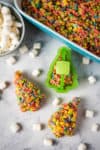
How to make festive and easy Fruity Pebble Christmas trees, a colorful holiday Krispie treat recipe for kids. Make it in 10 minutes in the microwave!
Take a dessert like easy Fruity Pebbles treats or classic Rice Krispie treats, switch out the cereal, cut them out with a Christmas tree cookie cutter, and you’ve got a colorful treat all the kids will love this holiday season.
Heck even I love these festive and colorful Fruity Pebbles Christmas trees. They’re ooey, gooey, chewy, and downright delicious.
Fruity Pebbles has always been one of my favorite cereals. It’d stand to reason that my kids love it too, which is one reason I also like to make Fruity Pebbles ice cream. Yum!
Fruity Pebble crispy treats are super easy to make and only take about 10 minutes from start to finish, using the microwave. Cutting them out may take a bit more time if you really sit down and just enjoy the process with your kids.
You mix them up; your kids do the cutting out and decorating.
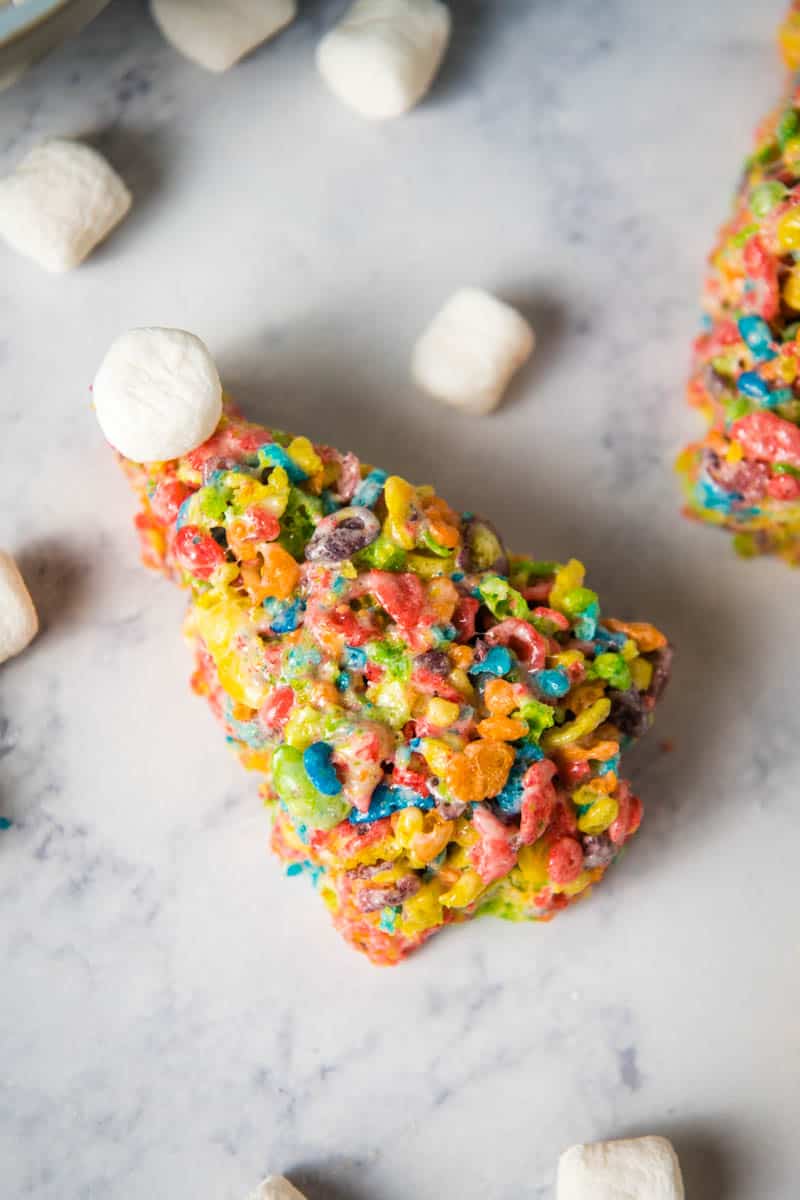
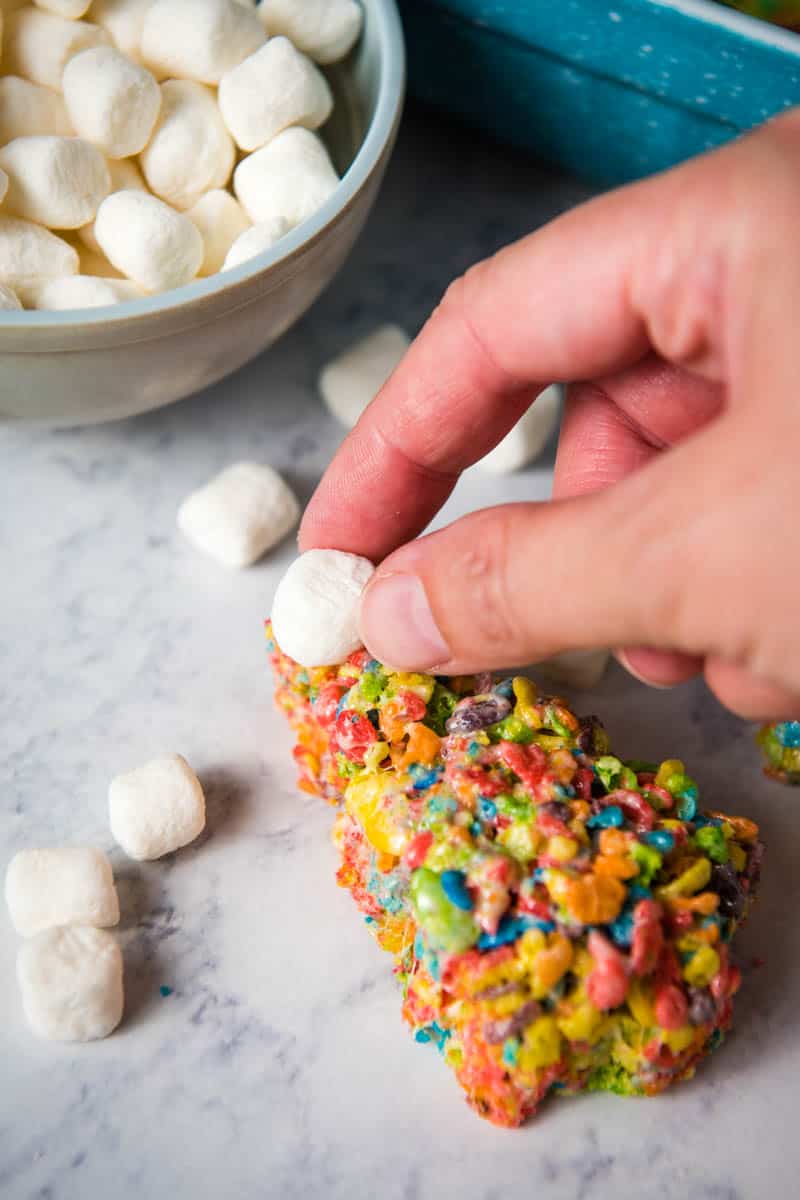
To decorate I like to just add a mini marshmallow for the star at the top of each tree, because the cereal is colorful and festive enough all by itself. Fruity Pebbles treats are just so cute!
INGREDIENTS YOU’LL NEED:
You’ll need just a few ingredients to make this Fruity Pebbles Christmas treats recipe…
This marshmallow cereal treat only requires a few steps to mix…
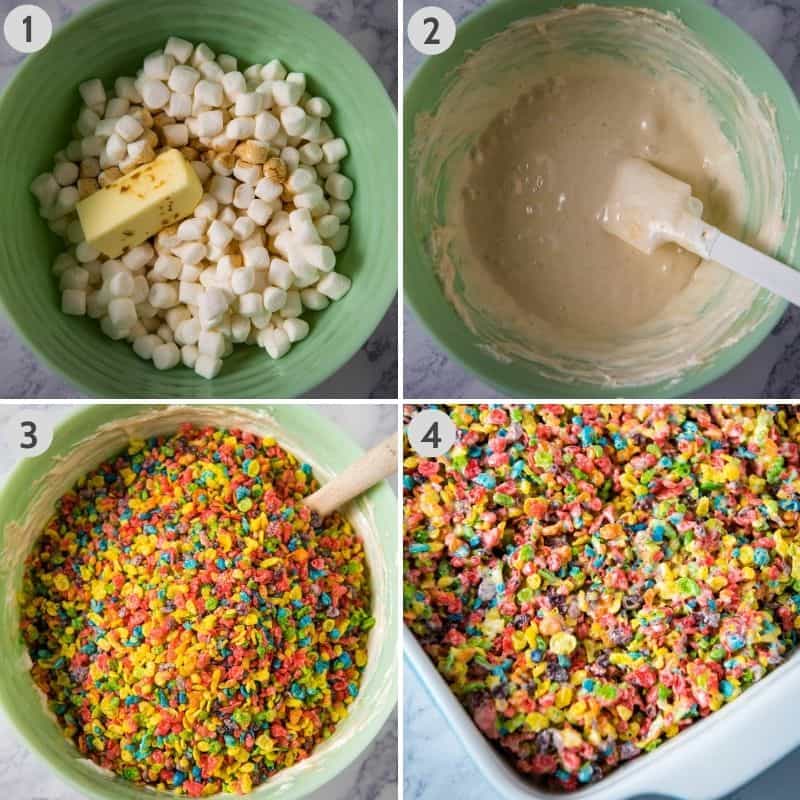
Add the mini marshmallows, salted butter, and vanilla extract to a large microwave-safe bowl, and heat on high for 2 minutes, mostly melting everything.
Remove the bowl from the microwave, and stir the mixture ’til smooth; the mixture will finish melting with stirring.
Quickly stir in the cereal.
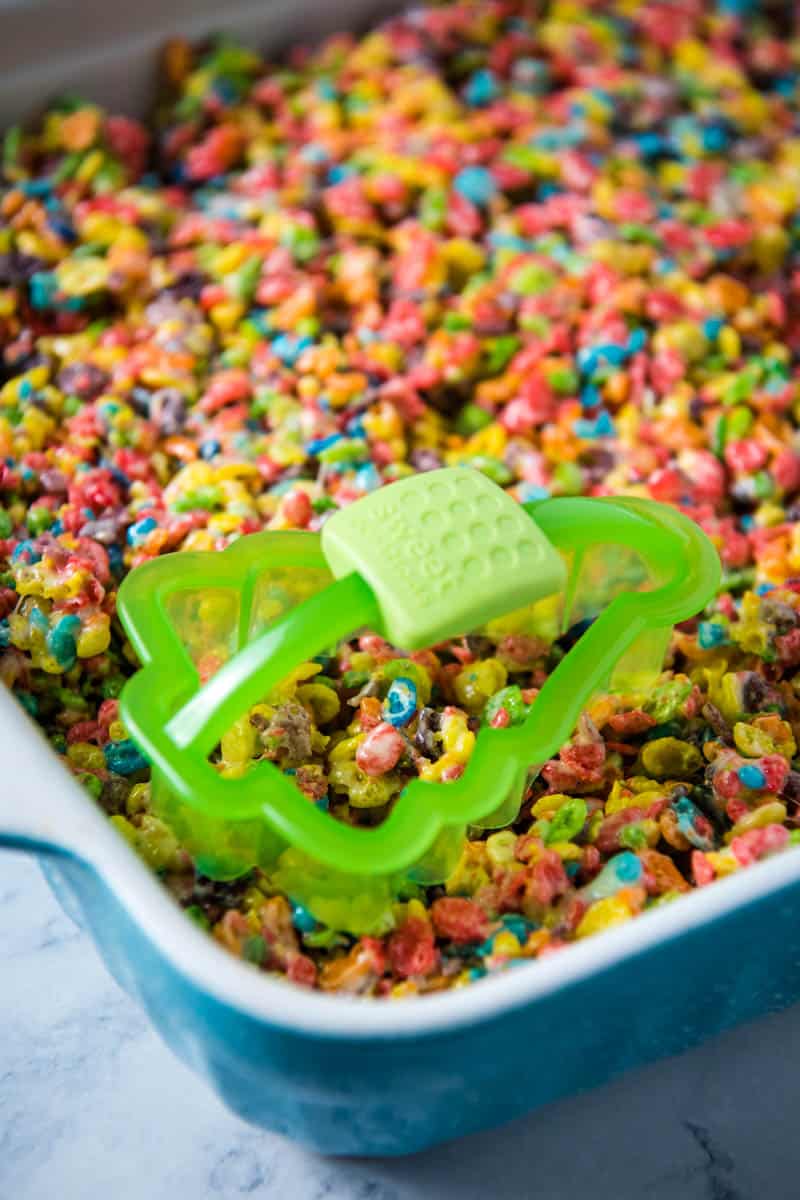
Gently spread and pat the mixture into a greased 9×13 baking dish, and allow it to cool. (Tip: To prevent your hands from sticking to the cereal mixture, dip your hands in water beforehand, and rub them together; or you can spray them with a light coating of cooking spray.)
Top each Christmas tree with a mini marshmallow star. It’ll stick to the treat with no help needed besides a gentle press of your finger.
ARE THEY GLUTEN-FREE?
Yes, they are typically gluten-free. Fruity Pebbles are gluten-free, but some marshmallow brands can contain gluten, so just ensure that your marshmallows are gluten-free.
As with any other recipe, always check your ingredients over to ensure that they are, in fact, gluten-free. It’s better to be safe than sorry!
WHAT KIND OF MARSHMALLOWS SHOULD I USE FOR FRUITY PEBBLE CRISPY TREATS?
While you can use big marshmallows, jumbo marshmallows, or mini marshmallows, it really is best to use mini marshmallows. These melt far more efficiently and quicker than larger marshmallows.
You can also use marshmallow fluff. Just use 1 jar of marshmallow cream for every 4 cups of mini marshmallows.
CAN I USE MARGARINE INSTEAD OF BUTTER?
I highly recommend that you use a good salted butter over margarine. Salted butter will give these treats a much richer flavor and texture.
WHY ARE MY TREATS HARD?
Sometimes it can be hard to tell what causes Fruity Pebble treats to be hard, but here are a few pointers to avoid that scenario.
It’s best to use fresh marshmallows. Often a pack of marshmallows will have an expiration date 4 or 5 months out from the time that it is purchased, and the closer you get to this date, the harder your marshmallows can become; once this date has passed, you may want to buy new marshmallows.
It’s easy to get impatient and melt the marshmallows at too high of a temperature, and if they cook too quickly, the resulting mixture will harden. Remember, be patient; slow and steady wins the race!
Don’t use too much cereal. You don’t want too dry of a mixture, as this will certainly become tough and chewy!
VARIATIONS ON FRUITY PEBBLE MARSHMALLOW TREATS
Here are some ideas to add a little more variety to these treats!
Add freeze-dried fruit. Strawberries come to mind!
If you need a dairy-free option, try using the same amount of coconut oil in place of the butter.
Try different marshmallow flavors. You can often buy a wide variety of different marshmallow flavors at just about any local grocery store.
Use a different cereal. I reckon that cocoa pebbles would be amazing for this recipe!
Fruity pebble treats are best freshly made, but they will store in an airtight container for a few days. Alternatively, you can store them in the freezer in an airtight container for up to 6 weeks.
If you love this marshmallow cereal treat recipe as much as I do, please write a 5 star review, and help me share the recipe on Facebook and Pinterest!
How to make festive and easy Fruity Pebble Christmas trees, a colorful holiday Krispie treat recipe for kids. Make it in 10 minutes in the microwave!
Large Microwave-Safe Bowl
Christmas Tree Cookie Cutter
9×13 Baking Pan
6 cups mini marshmallows
5 tablespoons salted butter
1 teaspoon vanilla extract
8 cups Fruity Pebbles cereal
Grease a 9×13 baking pan with cooking spray and set aside.
Add the mini marshmallows, salted butter, and vanilla extract to a large microwave-safe bowl, and heat on high for 2 minutes, mostly melting everything.
Remove the bowl from the microwave, and stir the mixture ’til smooth; the mixture will finish melting with stirring.
Quickly stir in the cereal.
Gently spread and pat the mixture into a greased 9×13 baking pan, and allow it to cool. Tip: To prevent your hands from sticking to the cereal mixture, dip your hands in water beforehand, and rub them together; or you can spray them with a light coating of cooking spray.
Use a Christmas tree cookie cutter to cut the treats into trees.
Top each Christmas tree with a mini marshmallow star. It’ll stick to the treat with no help needed besides a gentle press of your finger.
Then place the trees on a platter and serve!
WHAT KIND OF MARSHMALLOWS SHOULD I USE FOR FRUITY PEBBLE CRISPY TREATS?
While you can use big marshmallows, jumbo marshmallows, or mini marshmallows, it really is best to use mini marshmallows. These melt far more efficiently and quicker than larger marshmallows.
You can also use marshmallow fluff. Use 1 jar of marshmallow cream for every 4 cups of mini marshmallows.
CAN I USE MARGARINE INSTEAD OF BUTTER?
I highly recommend that you use a good salted butter over margarine. Salted butter will give these treats a much richer flavor and texture.
WHY ARE MY TREATS HARD?
Sometimes it can be hard to tell what causes fruity pebble treats to be hard, but here are a few pointers to avoid that scenario.
It’s best to use fresh marshmallows. Often a pack of marshmallows will have an expiration date 4 or 5 months out from the time that it is purchased, and the closer you get to this date, the harder your marshmallows will become; once this date has passed, you might as well buy new marshmallows.
It’s easy to get impatient and melt the marshmallows at too high of a temperature, and if they cook too quickly, the resulting mixture will harden. Remember, be patient; slow and steady wins the race!
Don’t use too much cereal. You don’t want too dry of a mixture, as this will certainly become tough and chewy!
HOW TO STORE FRUITY PEBBLES TREATS
Fruity pebble treats are best freshly made, but they will store in an airtight container for a few days. Alternatively, you can store them in the freezer in an airtight container for up to 6 weeks.
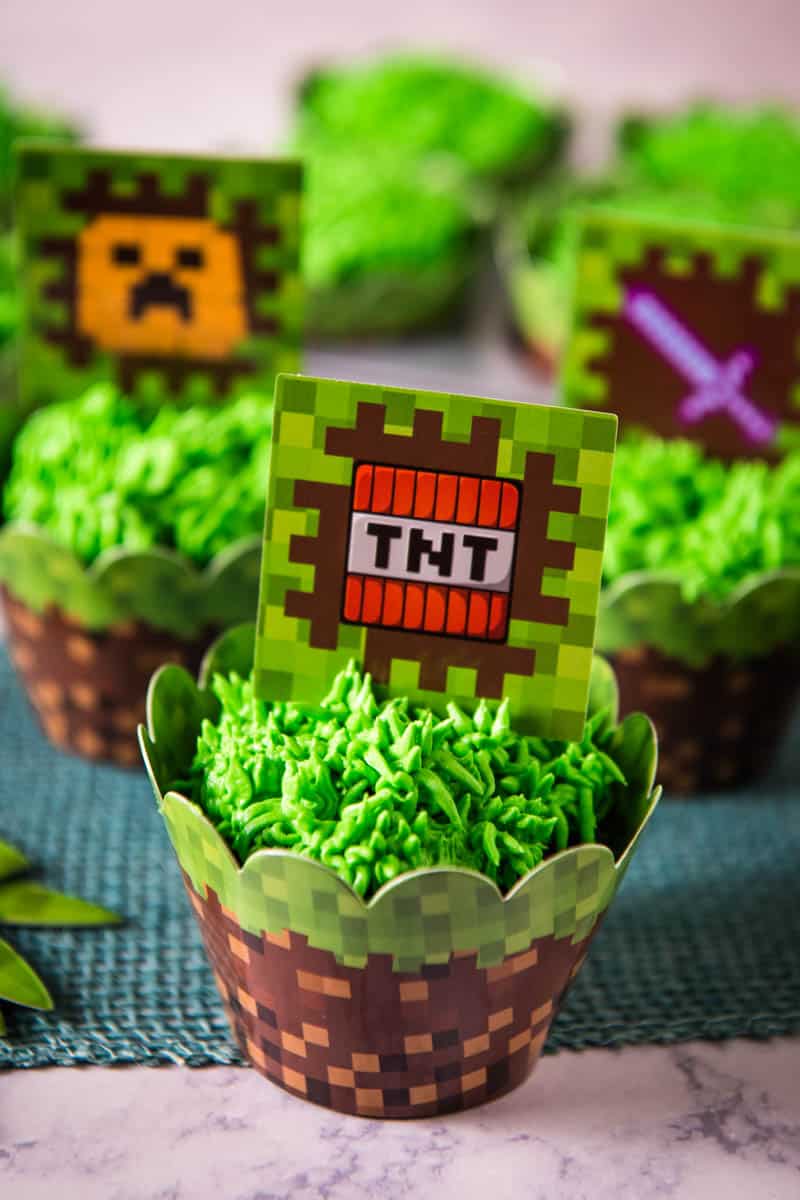
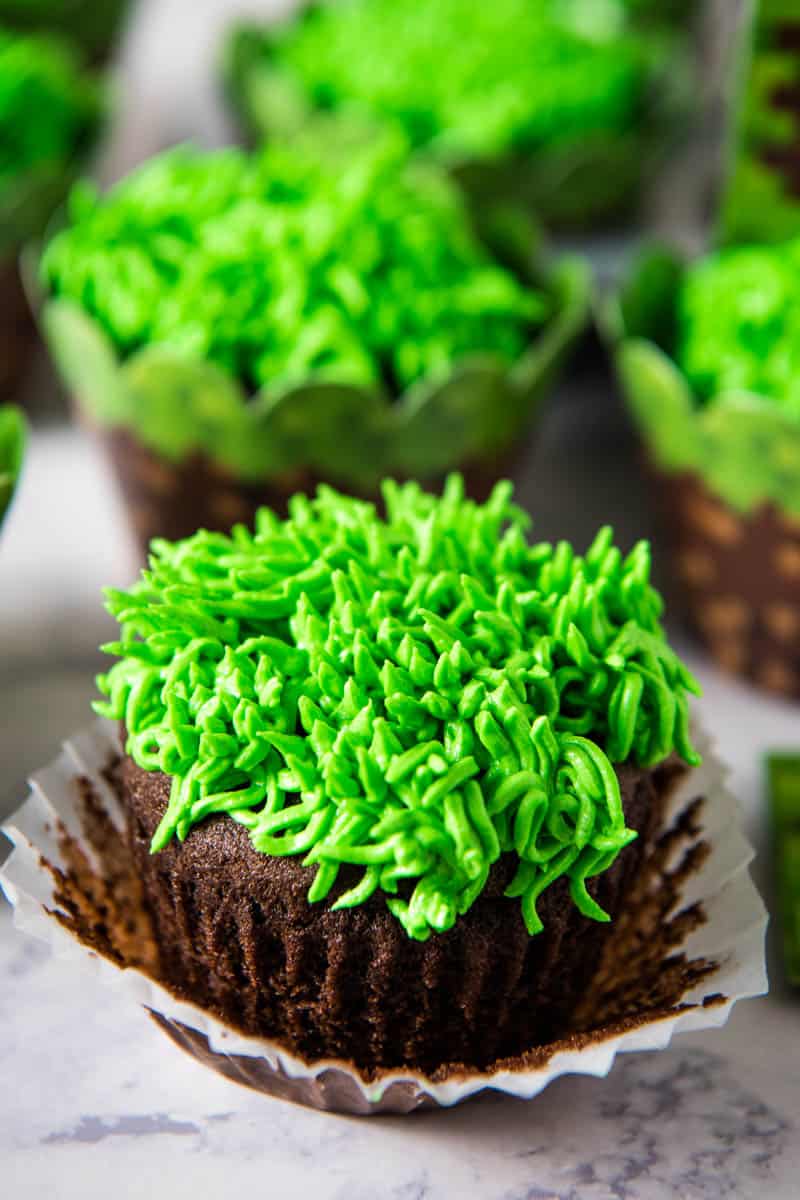
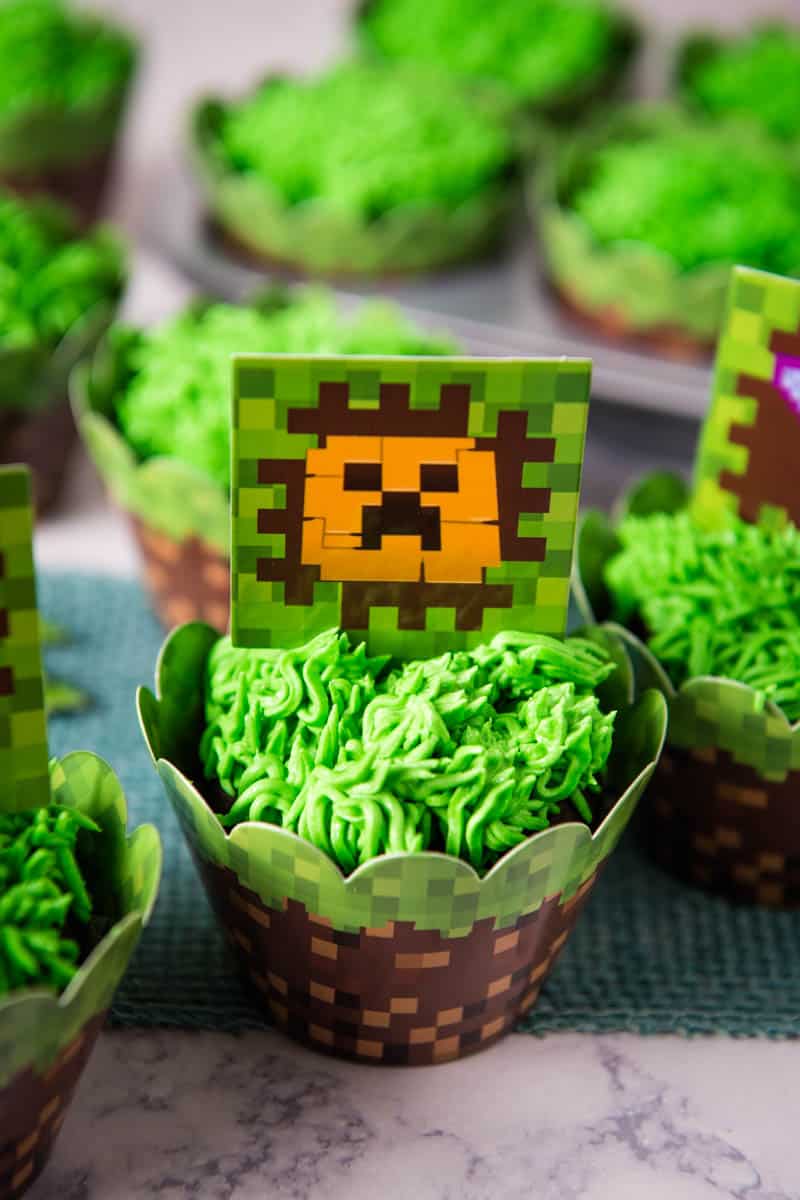
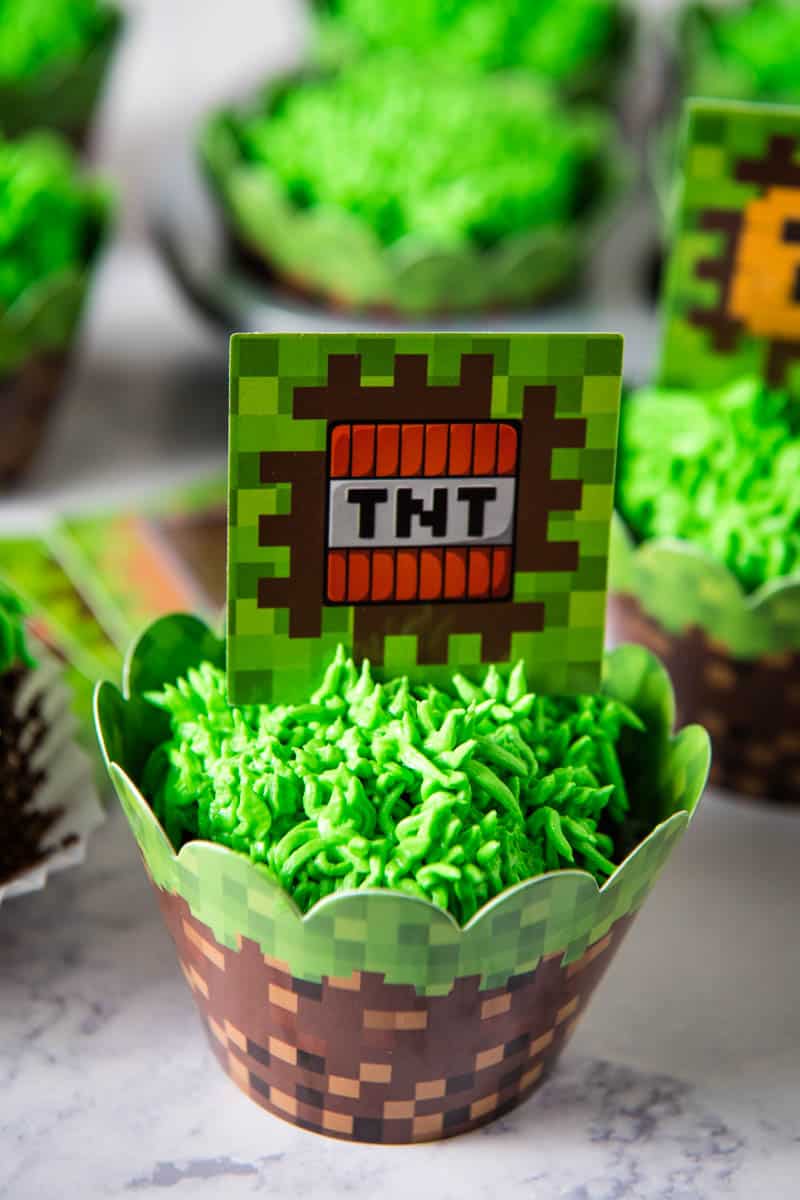
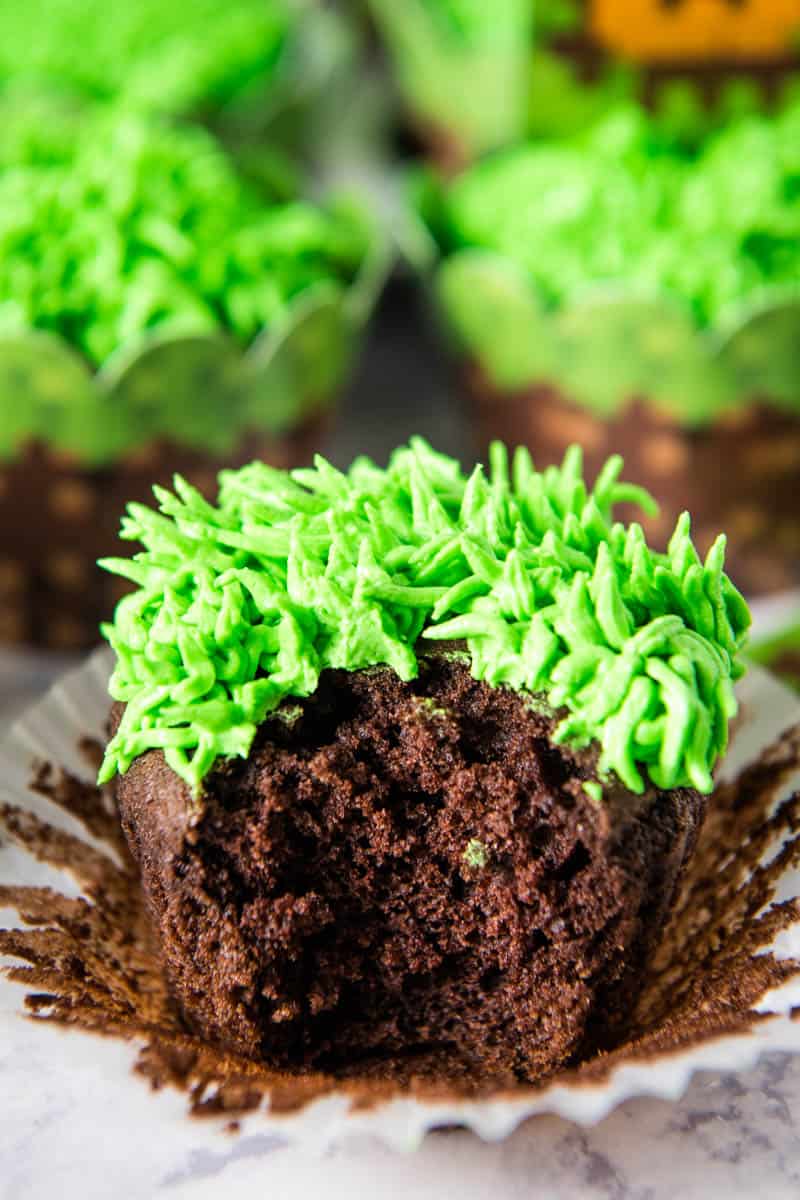
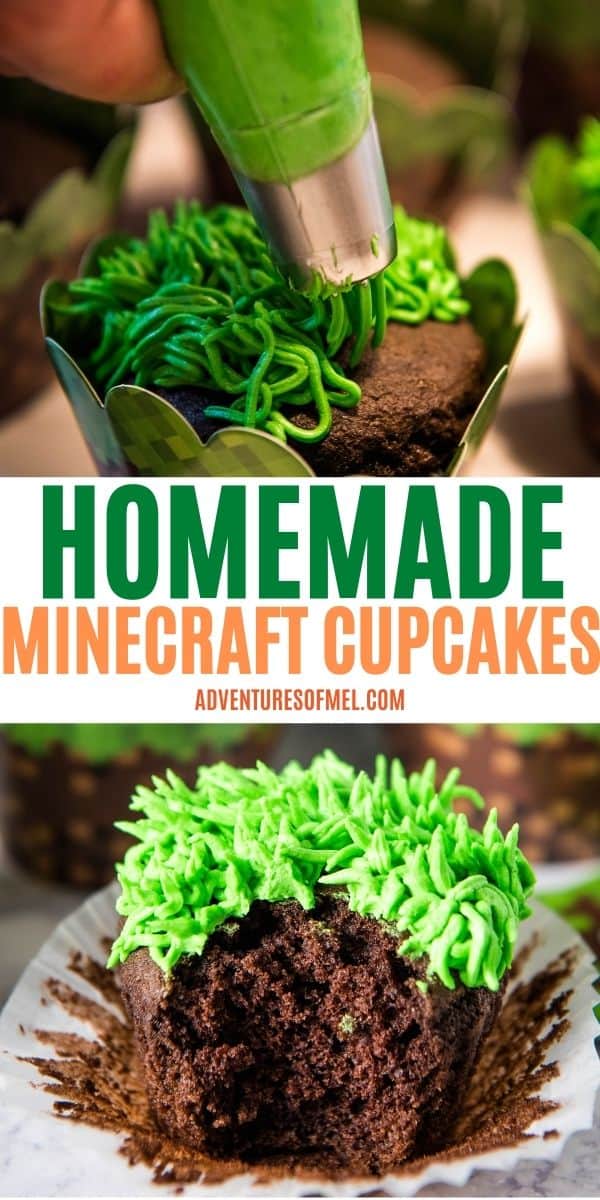
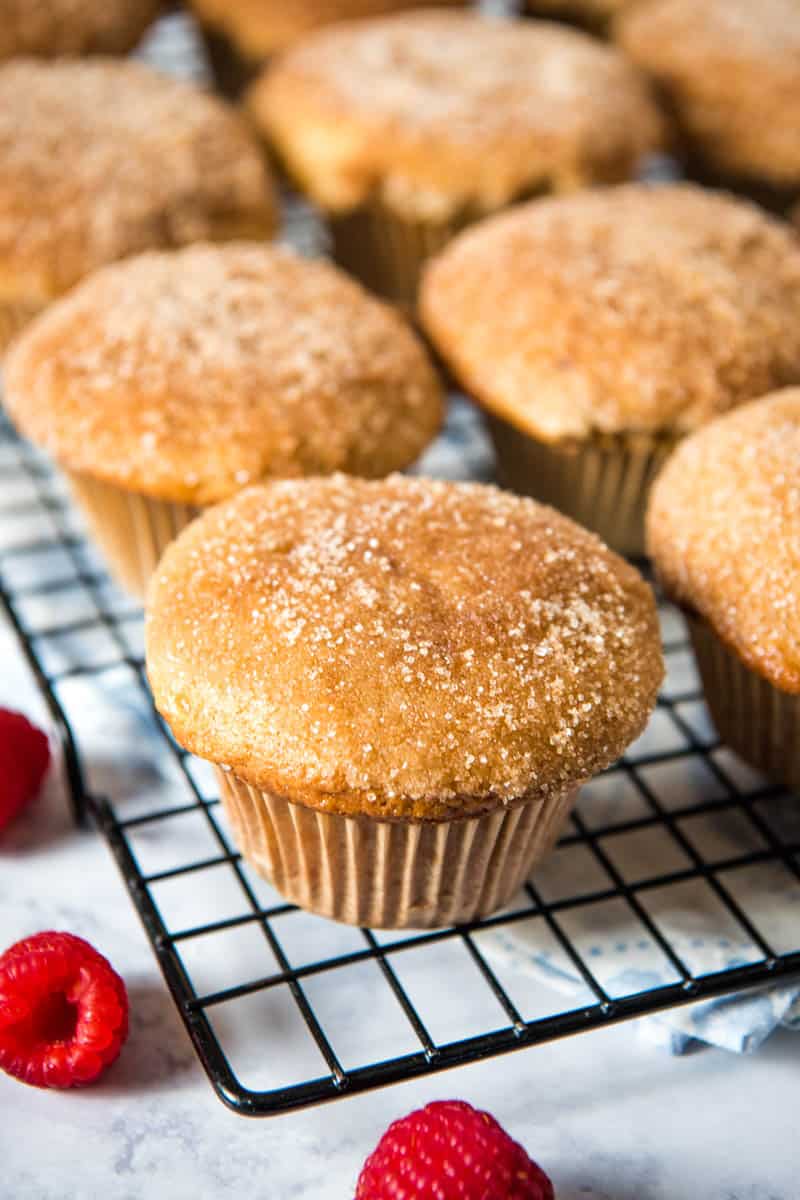
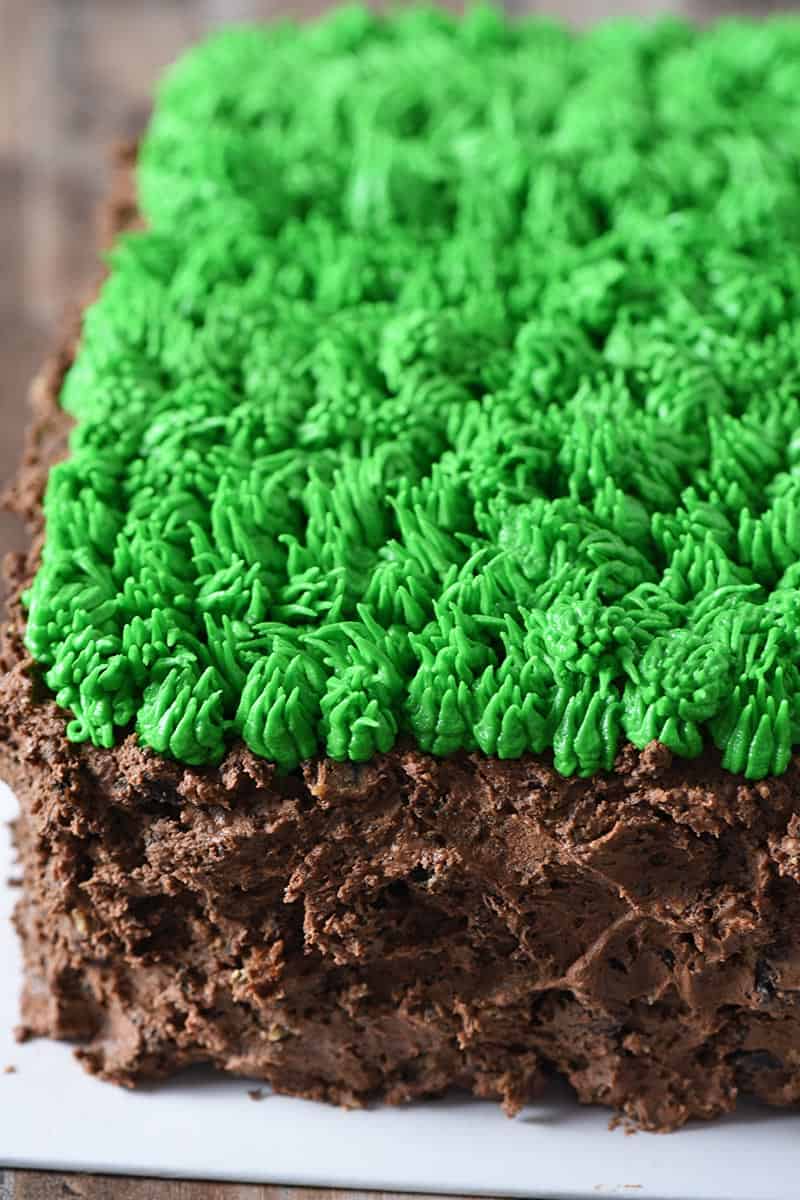
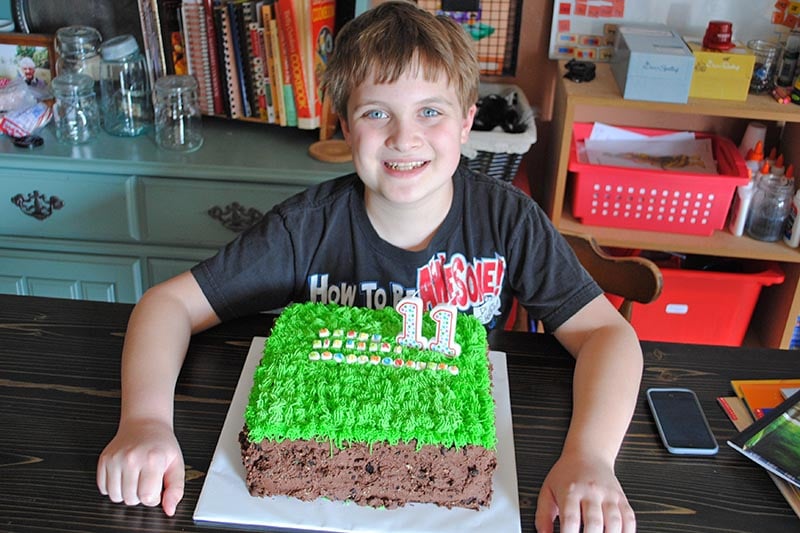
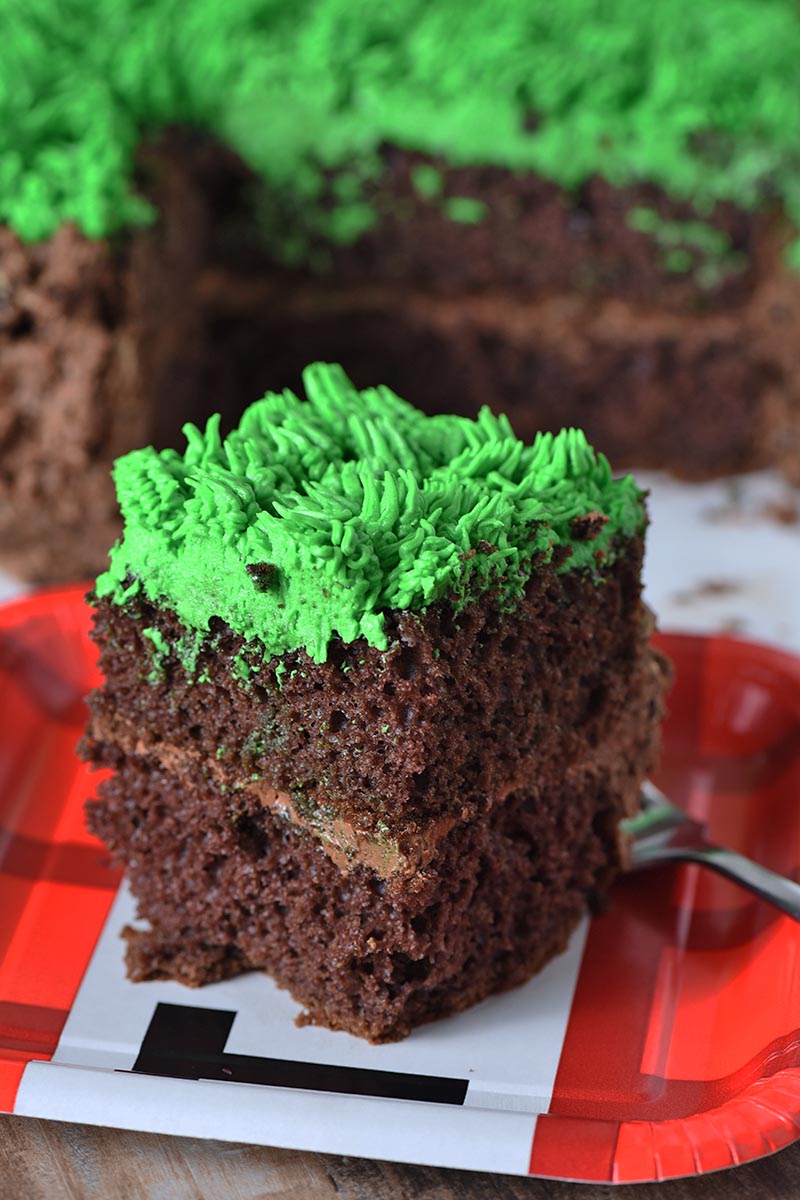
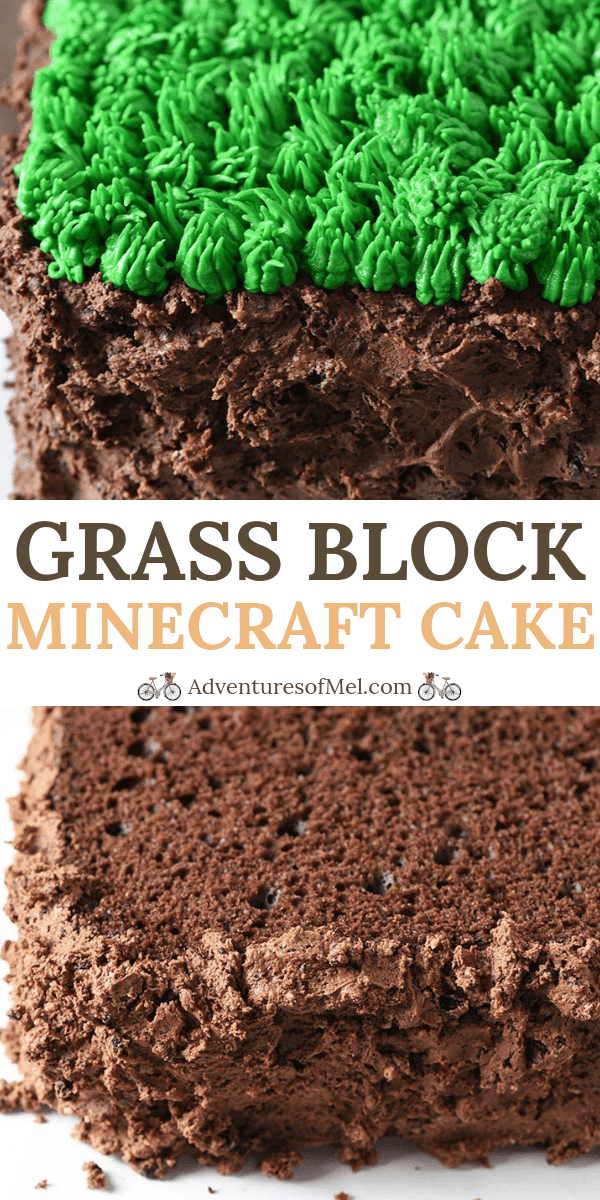
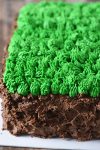
How to make fluffy chocolate Minecraft cupcakes and decorate them with an easy buttercream grass frosting. Ideas for wrappers and toppers too!
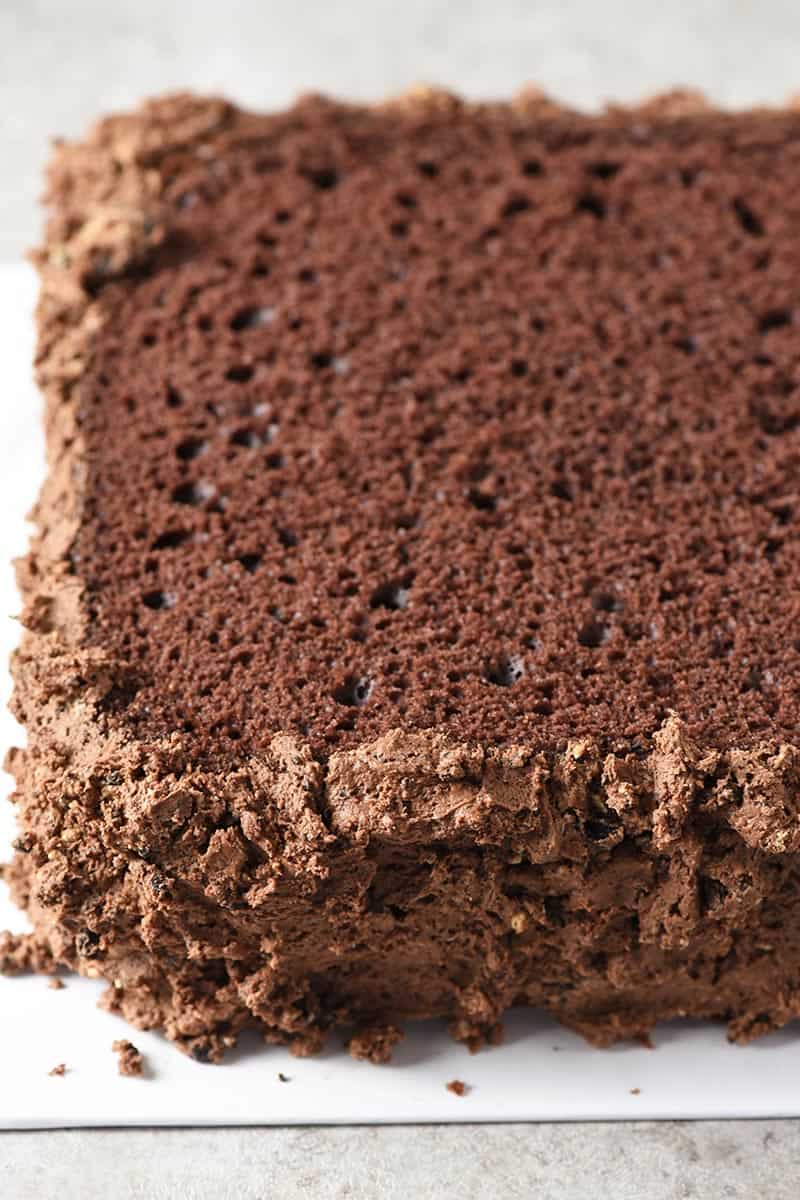
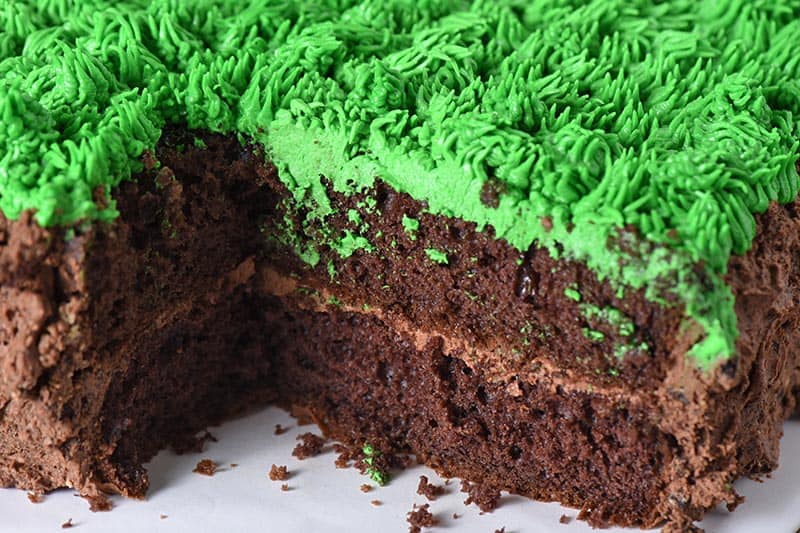
I’d be lying if I said I didn’t love these easy Minecraft cupcakes just as much as my boys. And not because of Minecraft, probably more so because they are so soft and fluffy!
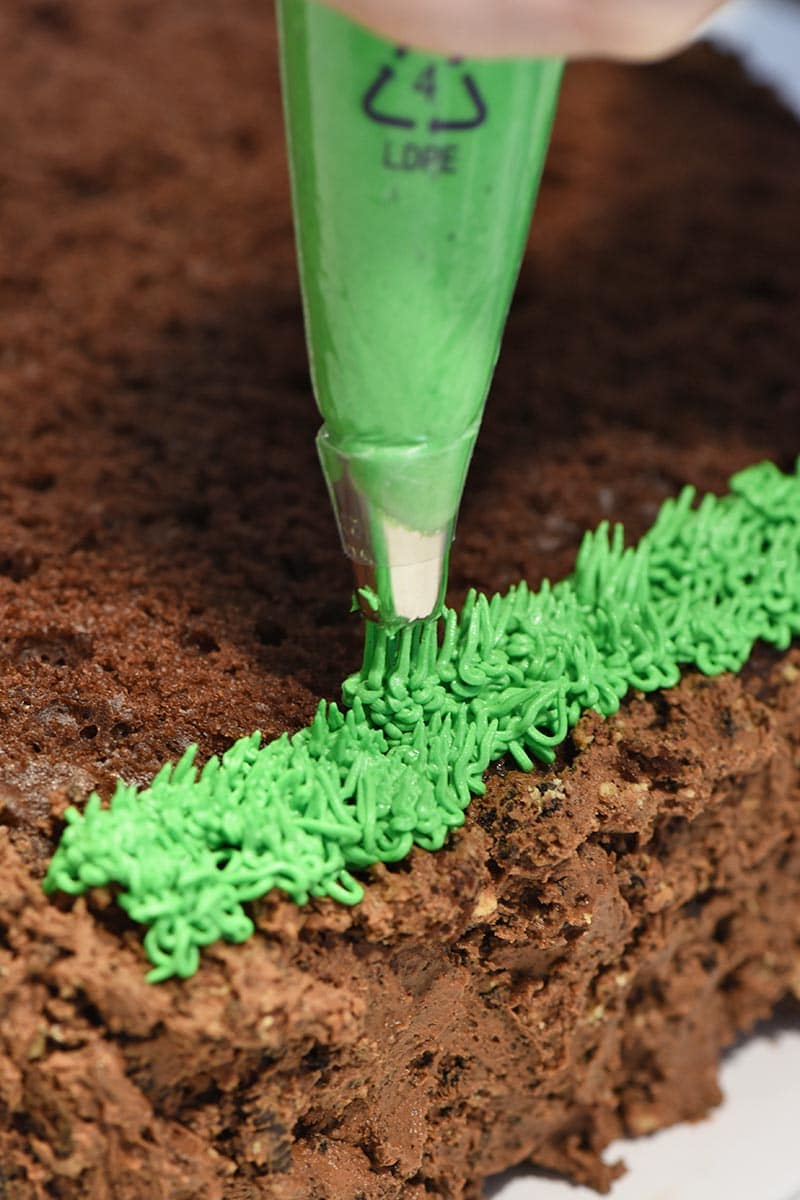
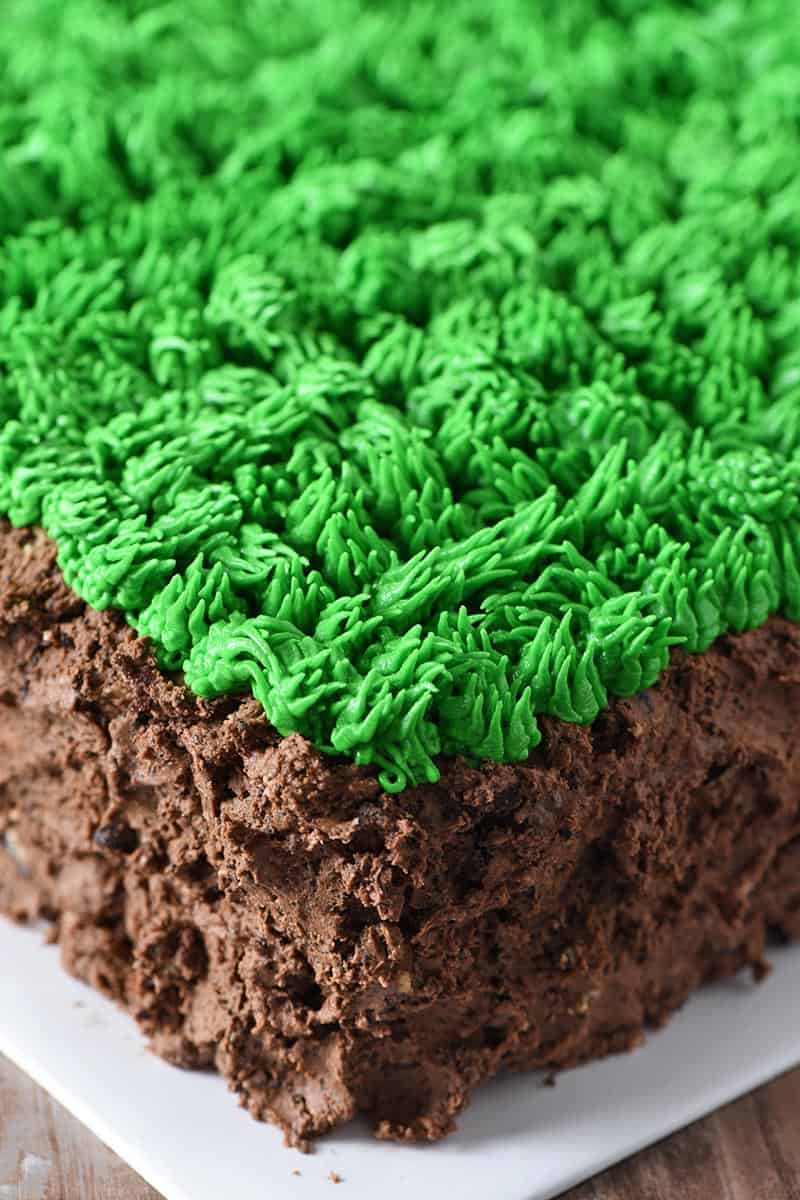
I love the green buttercream frosting too, and making grass frosting has never been easier with my handy little secret, which I’ll share with you as you read on.
This recipe makes wonderful Minecraft birthday cupcakes or cupcakes for whatever occasion you’re celebrating. You don’t even have to have an occasion to make them; you can simply make them just because.
I don’t know about you, but I’m ready to make this chocolate Minecraft cupcakes recipe. Let’s get baking!
BENEFITS OF CUPCAKES OVER CAKE
Cupcakes are just easier to make. Simply mix up the batter, pour it into cupcake cups, and bake it!
Whereas big cakes require a little more work. Everything has to be just right, including the cook time, batter consistency, frosting, etc. Cupcakes are simply more forgiving.
If diet is a concern, it is much easier to control your portion size with cupcakes. Believe me, it is easy to pig out on a big cake, eating way more than you should.
However, cupcakes are already portioned out of the oven. This eliminates the temptation to slice off a bigger piece of cake!
As I said before, making cupcakes is far more forgiving than baking a large cake. Because of this, you can often be far more creative with all of the different flavors you have to choose from and try.
Large grass tip and pastry bag – This is my handy little secret tip for piping grass frosting… I switched to a larger tip for piping grass, and it is amazing! So much more efficient, so much quicker, and so much easier! (Also, I don’t use a coupler because I just don’t see the need.)
We’ll talk specifically about cupcake wrappers and toppers as you keep reading.
HOW TO MAKE MINECRAFT CUPCAKES
Making these cupcakes is fairly simple, and decorating them is even easier. We’ll go through the entire process here.
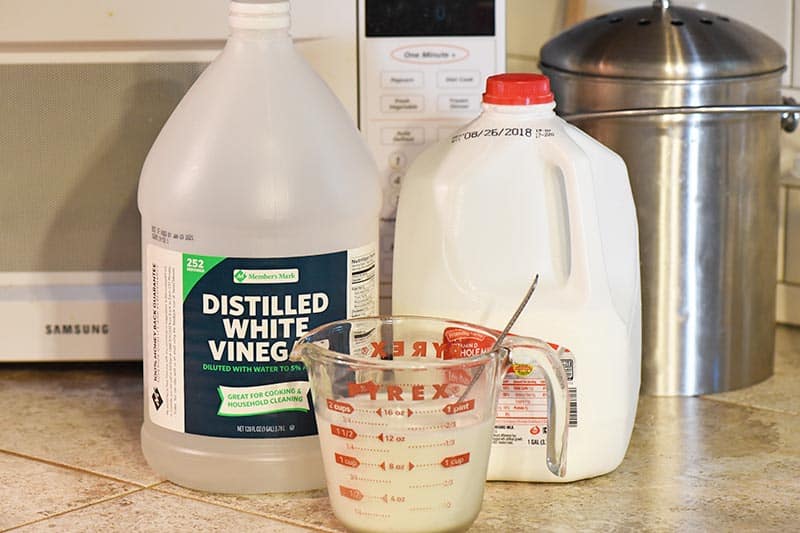
FIRST LET’S MAKE SOME BUTTERMILK
We almost never buy buttermilk. We just never use it because I know I can make my own when I’m baking.
Just add about a tablespoon of distilled white vinegar to a cup (or two) of milk; I usually use a tablespoon for every 1 to 2 cups of milk. Stir and let sit for 5 to 10 minutes.
Before you know it, you have sour milk or buttermilk. Works like a charm!
HOW TO BAKE THE PERFECT CUPCAKE
Now we need to mix up our batter, and if you follow these steps to a t, you’ll come out with the softest, fluffiest cupcakes you’ve ever had.
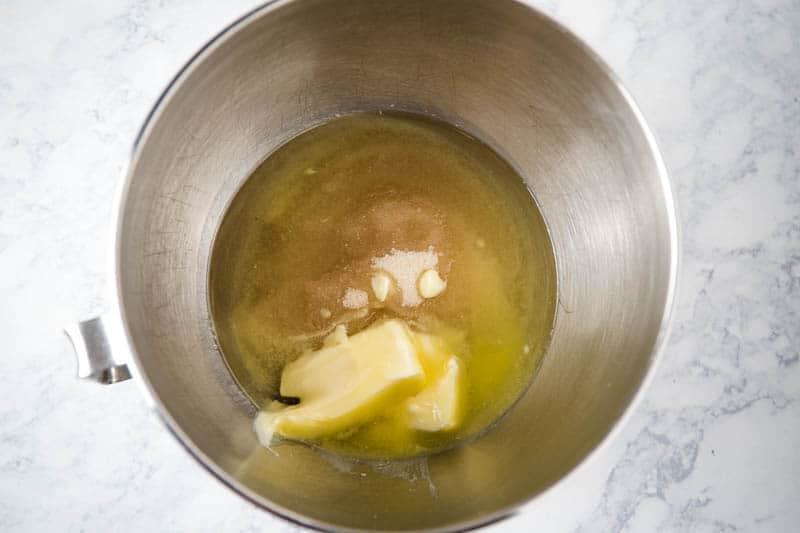
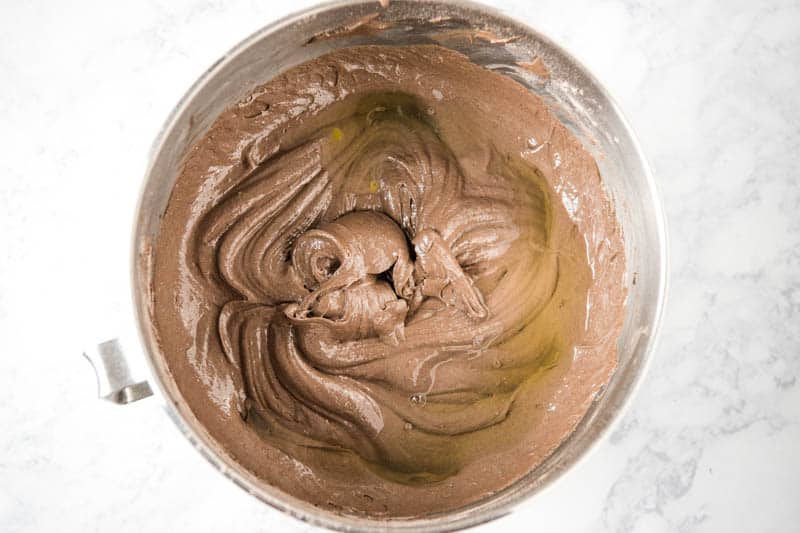
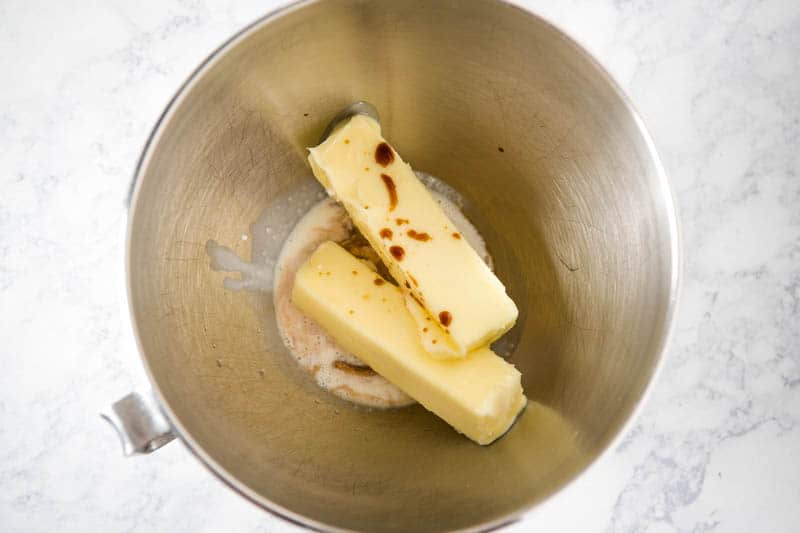
Cream (or mix) together the butter, canola oil, and sugar for a good 5 to 8 minutes.
You should have already separated your eggs at this point, so go ahead and add the egg yolks and vanilla extract in with the sugar mixture, and mix well.
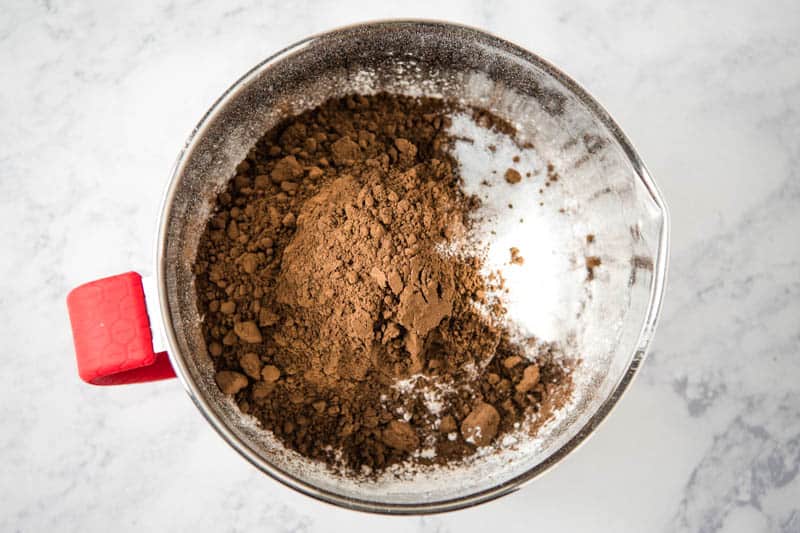
In a separate mixing bowl, mix together the dry ingredients, including the cake flour, dark cocoa powder, baking soda, and salt.
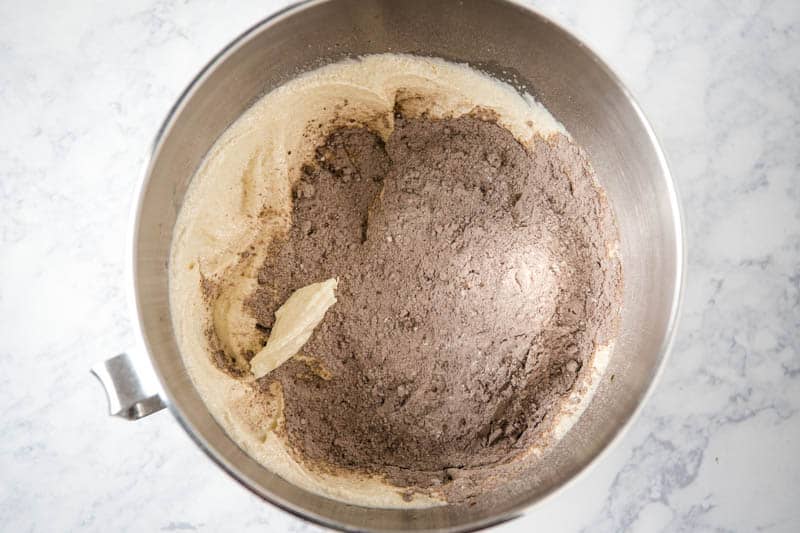
Begin by adding a small part of the dry ingredients to your creamed mixture, mixing well.
Then alternate adding buttermilk with dry ingredients, mixing after each addition, and ending with the dry ingredients.
Finally, when everything is mixed together, fold in the egg whites and mix together just until the batter is blended.
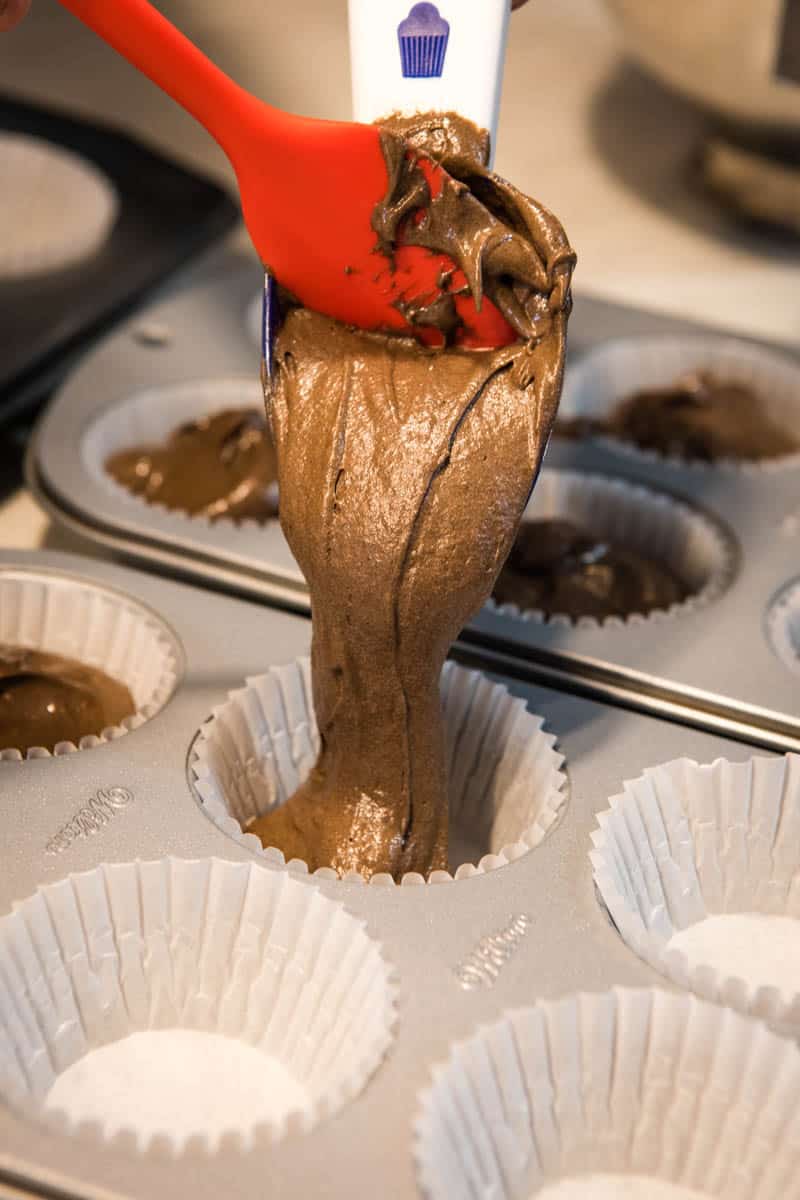
Add cupcake liners to your muffin tins (you’ll need about 24 muffin cups), and pour or dispense the batter into each liner, filling each cup 3/4 of the way full.
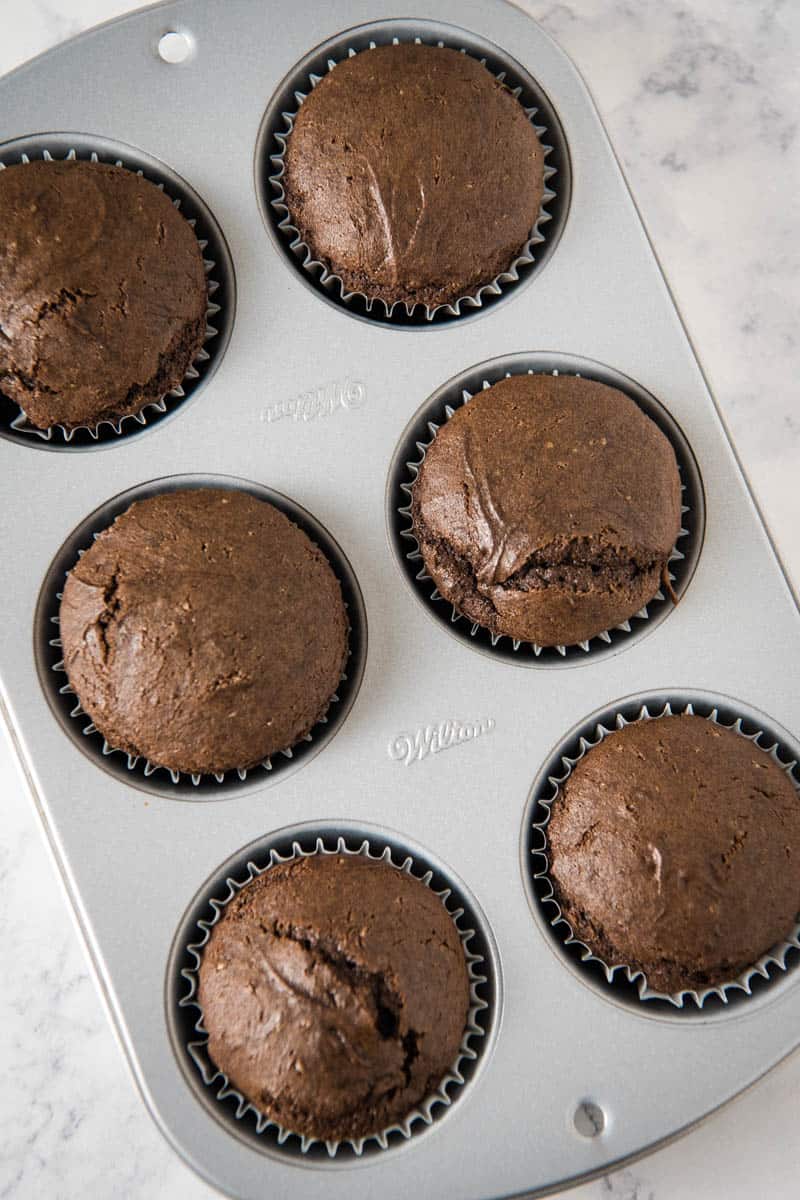
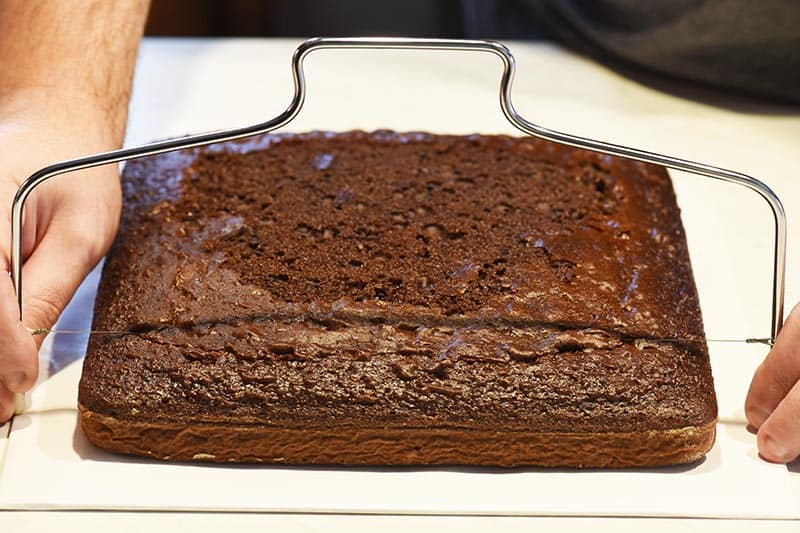
Bake at 350° F for about 20 minutes, or until a toothpick comes out clean.
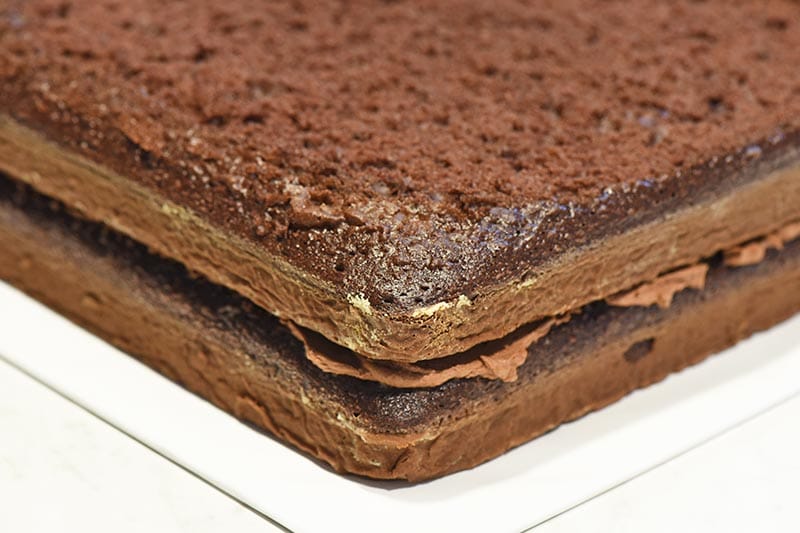
Allow the cupcakes to cool in the pan for about 10 minutes; then remove to a wire rack to finish cooling before frosting.
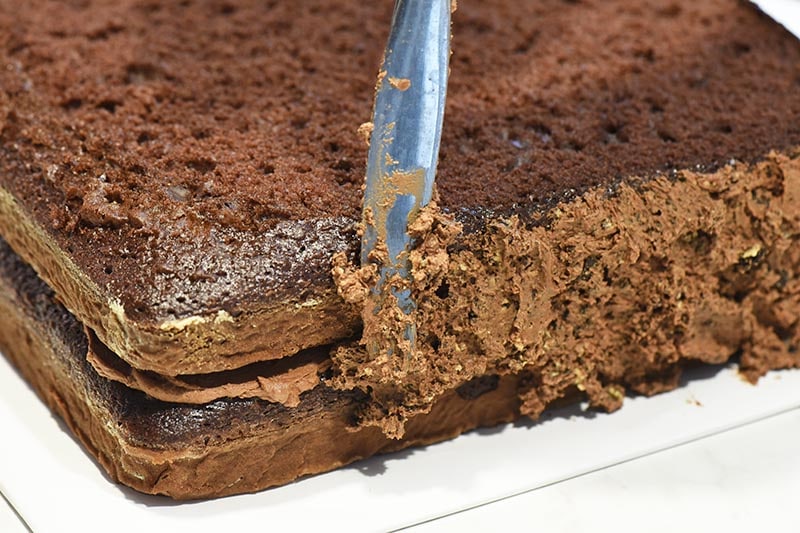
HOW TO MAKE GREEN BUTTERCREAM FROSTING
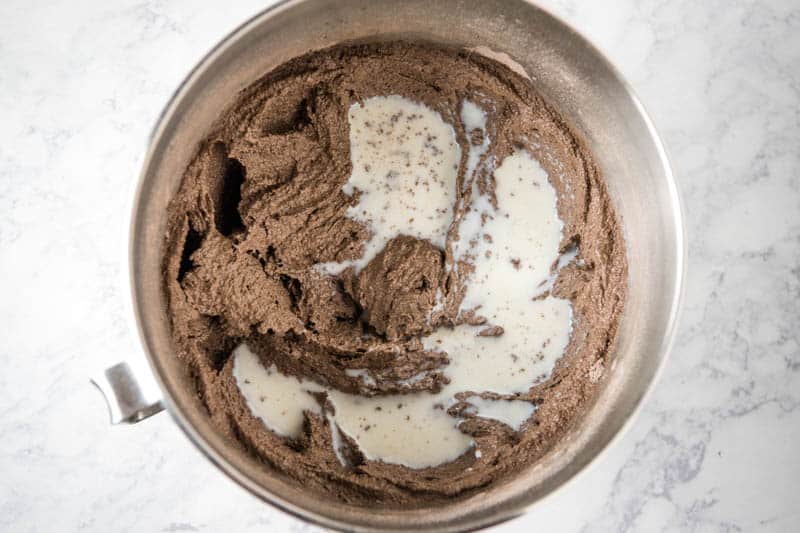
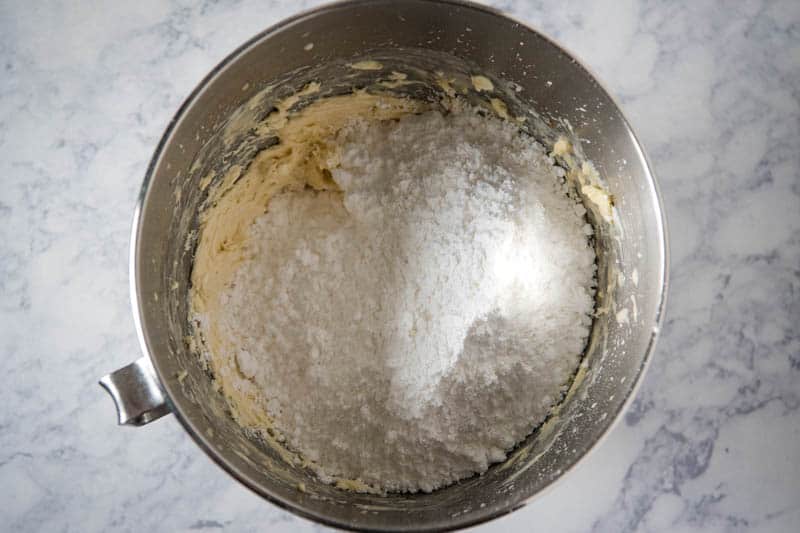
Mix together the softened butter, vanilla extract, almond extract, and heavy whipping cream.
Add in the powdered sugar, and mix everything together for 2 to 3 minutes, mixing well.
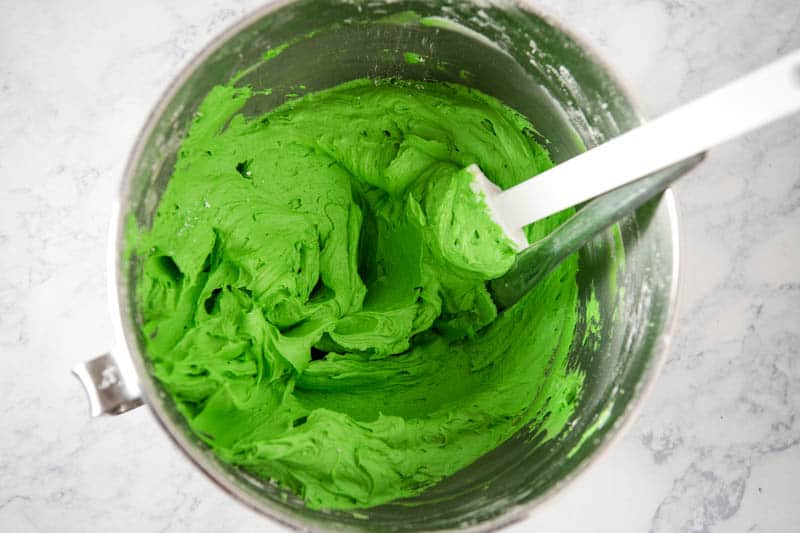
Using Wilton Leaf Green (or a similar coloring), add green coloring to your frosting, and mix until well blended. Be sure to follow instructions for your specific food coloring.
You’ll end up with a smooth, creamy, beautifully green buttercream frosting to use for decorating your cupcakes.
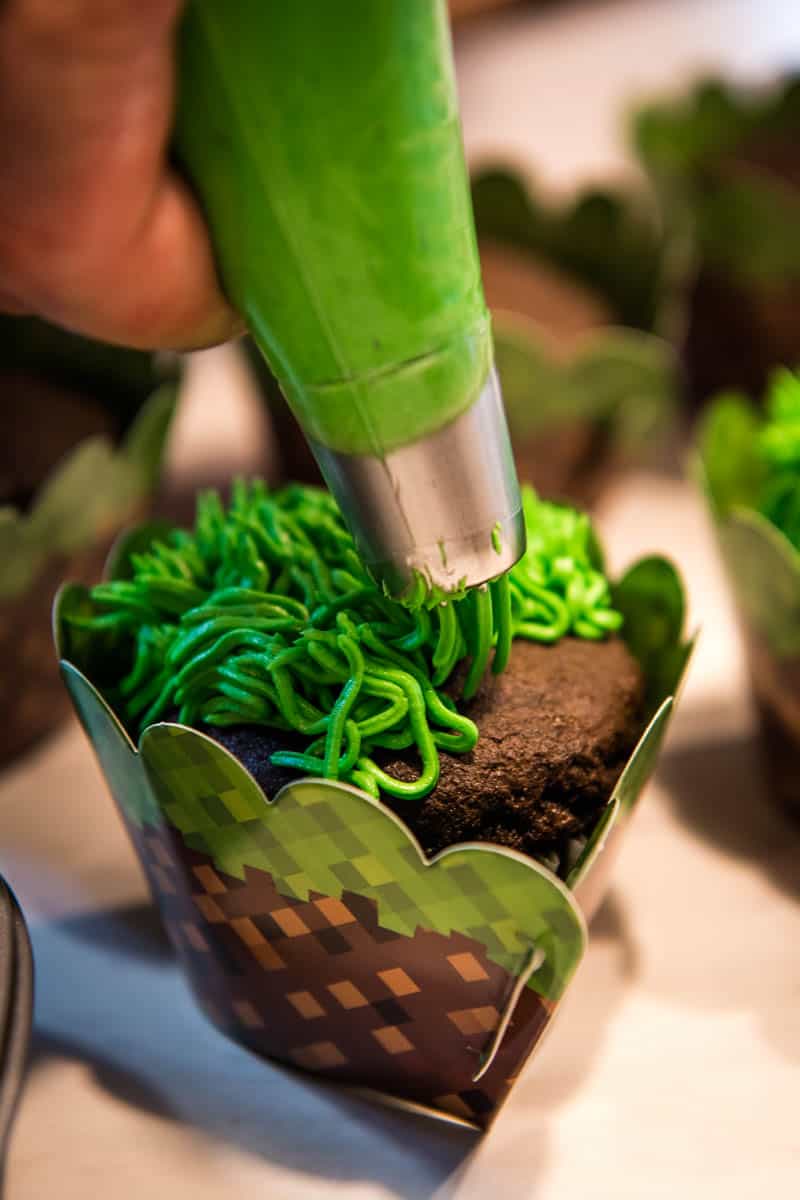
HOW TO PIPE GRASS FROSTING ONTO YOUR CUPCAKES
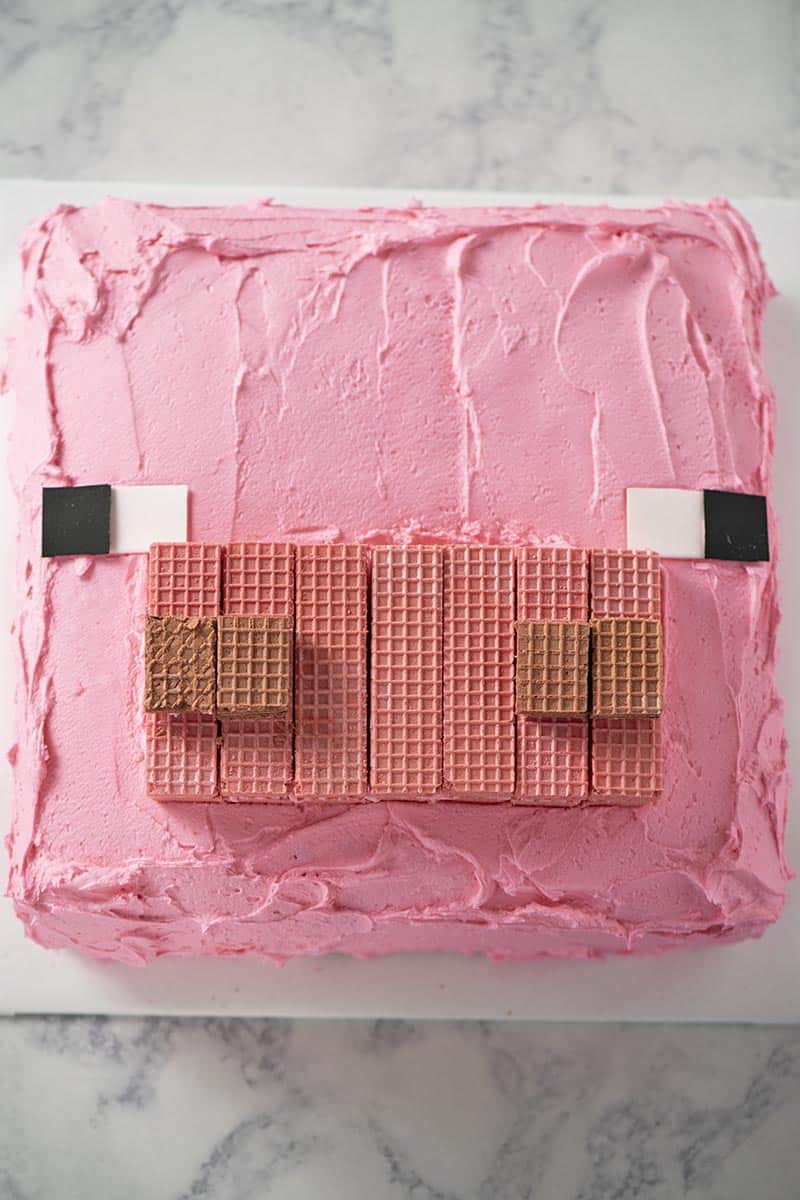
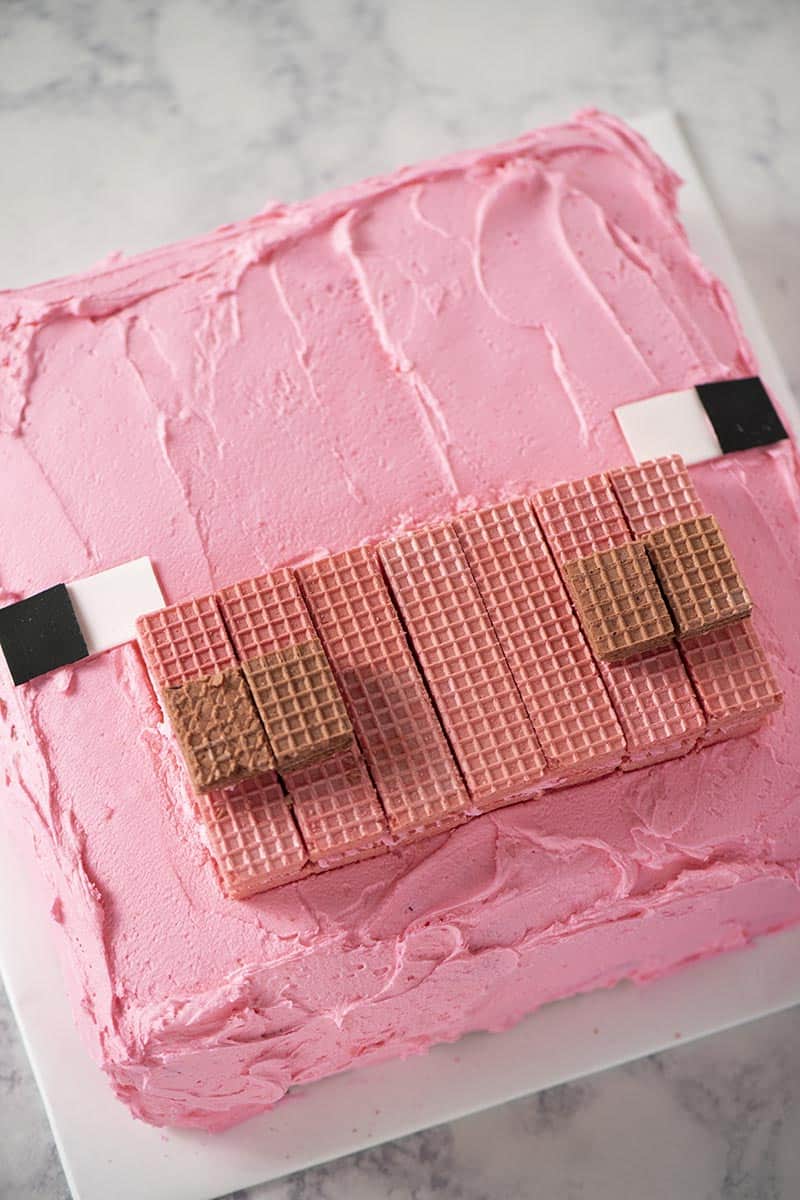
Place the cooled cupcakes in the Minecraft liners of your choosing before decorating.
Using this large grass tip (or a similar grass tip), add grass to each cupcake with your green buttercream frosting. Make sure the icing is thin enough to squeeze through the tip but not so thin it’ll just melt away. Your technique should be to squeeze thru, and pull up or away (see my technique video).
When finished, plop a cupcake topper into each cupcake if you want.
SPEAKING OF MINECRAFT CUPCAKE WRAPPERS AND TOPPERS
Plus my boys love them, so that right there is the real winner.
HOW TO STORE MINECRAFT BIRTHDAY CUPCAKES
Because of the buttercream frosting in this recipe, I recommend refrigerating these cupcakes after they have completely cooled. I think these cupcakes taste better cold anyway!
EASIEST WAY TO TRANSPORT CUPCAKES
This collapsible cupcake carrier (and cake carrier) holds 24 cupcakes, making it easy to transport your cupcakes wherever they need to go. I love that it’s collapsible, so it’s easy to store too.
WHAT CAN YOU PUT IN THE MIDDLE OF CUPCAKES?
You can try piping frosting into the center of cupcakes. Use a cupcake corer to core the cupcake and pipe frosting, berry jam, or whipped cream into the center. This can be a delicious surprise to anyone who takes a bite!
Try layering fruit in your cupcake cups before filling them with batter. For this recipe, strawberries come to mind.
Add small candies to the center, like mini M&M’s or peanut butter cups.
KitchenAid 5-Qt. Artisan Design Series with Glass Bowl – Candy Apple Red
Chocolate Cupcakes:
1/2 cup unsalted butter
1/2 cup canola oil
1 1/2 cups pure cane sugar
2 large eggs (separated)
1 teaspoon vanilla extract
1 1/2 cups buttermilk*
2 cups cake flour*
1/2 cup dark cocoa powder
1 1/2 teaspoons baking soda
1 teaspoon salt
Buttercream Frosting:
1 cup salted butter (softened)
1 teaspoon vanilla extract
1 teaspoon almond extract
3 tablespoons heavy whipping cream
4 cups powdered sugar
Wilton Leaf Green icing color
Cream (or mix) together the butter, canola oil, and sugar for a good 5 to 8 minutes.
You should have already separated your eggs at this point, so go ahead and add the egg yolks and vanilla extract in with the sugar mixture, and mix well.
In a separate mixing bowl, mix together the dry ingredients, including the cake flour, dark cocoa powder, baking soda, and salt.
Alternate adding the dry ingredients with the buttermilk to your creamed mixture, mixing after each addition.
Finally, when everything is mixed together, fold in the egg whites and mix together just until the batter is blended.
Add cupcake liners to your muffin tins (you’ll need about 24 muffin cups), and pour or dispense the batter into each liner, filling each cup 3/4 of the way full.
Bake at 350° F for about 20 minutes, or until a toothpick comes out clean.
Allow the cupcakes to cool in the pan for about 10 minutes; then remove to a wire rack to finish cooling before frosting.
To make green buttercream frosting, mix together the softened butter, vanilla extract, almond extract, and heavy whipping cream.
Add in the powdered sugar, and mix everything together for 2 to 3 minutes, mixing well.
Using Wilton Leaf Green (or a similar coloring), add green coloring to your frosting, and mix until well blended. Be sure to follow instructions for your specific food coloring.
Place the cooled cupcakes in the Minecraft liners of your choosing before decorating.
Using this large grass tip (or a similar grass tip), add grass to each cupcake with your green buttercream frosting. Make sure the icing is thin enough to squeeze through the tip but not so thin it’ll just melt away. Your technique should be to squeeze thru, and pull up or away (see video above).
When finished, plop a cupcake topper into each cupcake if you want.
*To make your own buttermilk or sour milk, just add about a tablespoon of distilled white vinegar to a cup (or two) of milk; I usually use a tablespoon for every 1 to 2 cups of milk. Stir and let sit for 5 to 10 minutes.
*You can use a good gluten-free flour, along with xanthan gum, instead. This is my go to brand of gluten-free cake flour.
HOW TO STORE MINECRAFT BIRTHDAY CUPCAKES
Because of the buttercream frosting in this recipe, I recommend refrigerating these cupcakes after they have completely cooled. I think these cupcakes taste better cold anyway!
EASIEST WAY TO TRANSPORT CUPCAKES
This collapsible cupcake carrier (and cake carrier) holds 24 cupcakes, making it easy to transport your cupcakes wherever they need to go. I love that it’s collapsible, so it’s easy to store too.
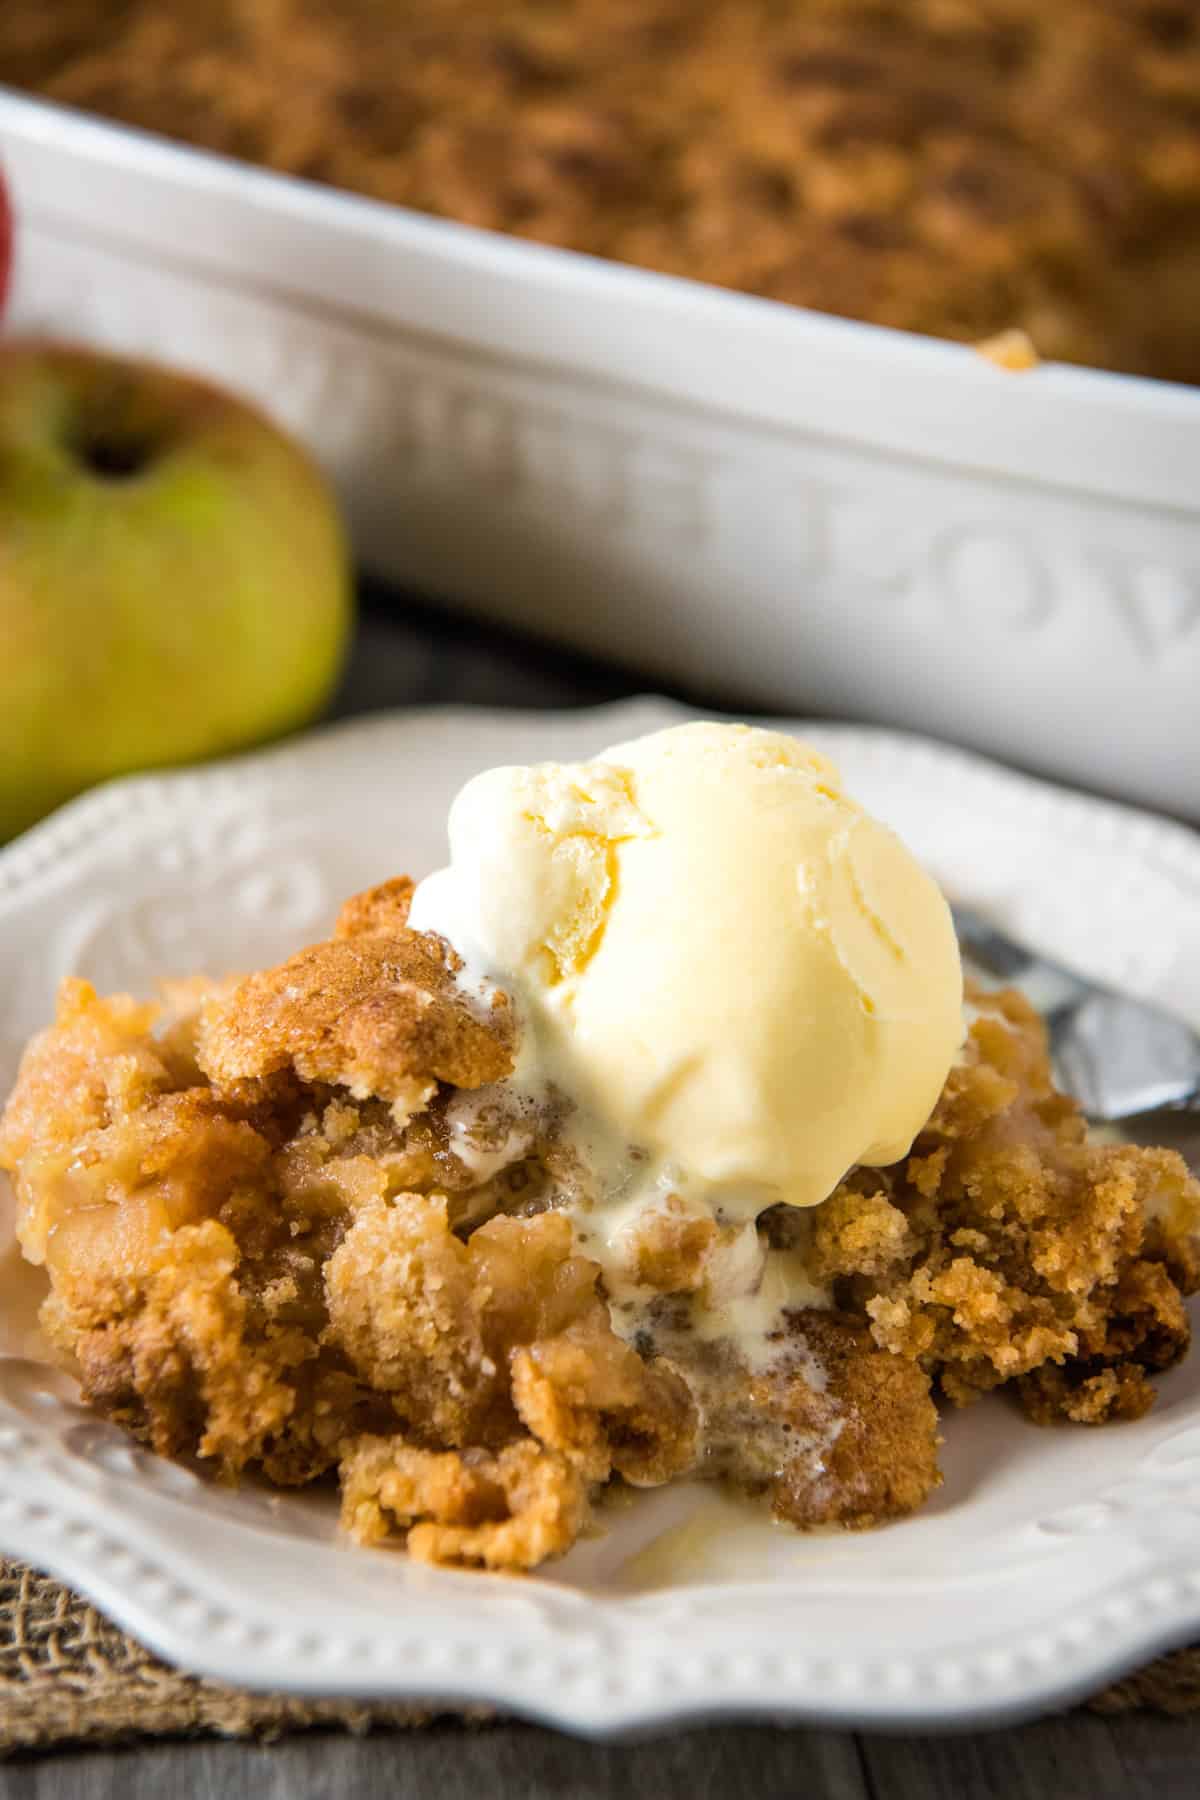
One of my favorite things to make every fall is this easy apple crumble without oats, straight from my grandma’s recipe box. It’s amazing how good sliced apples with a cinnamon brown sugar topping can taste.
It seems Grandma collected recipes everywhere she went; and this apple crisp without oats was no exception.
As with all my favorite apple recipes, I use my favorite apple peeler tool to help me make quick work of this beloved old-fashioned apple crumble. It cores, peels, and slices the apples all in one shot.
The streusel topping comes together in about 5-10 minutes. Made with flour, sugar, and cinnamon, you can crumble it right on top of the apples and then bake. It’s so easy! Sometimes I even mix in a pinch of homemade apple pie spice.
[mv_video jsonLd=”true” key=”xuvexg3ryrms3tlkfue4″ ratio=”16:9″ thumbnail=”https://mediavine-res.cloudinary.com/v1632781717/dabjdpj2wbhu7vtrk09j.jpg” title=”Easy Apple Crumble without Oats”]
You don’t even need a crust for this apple crumble recipe, because you’ll crumble the crust right on top.
Then the butter allows that crust to melt down into the apples, giving a crispy flavorful kick to every single bite of this delicious dessert.
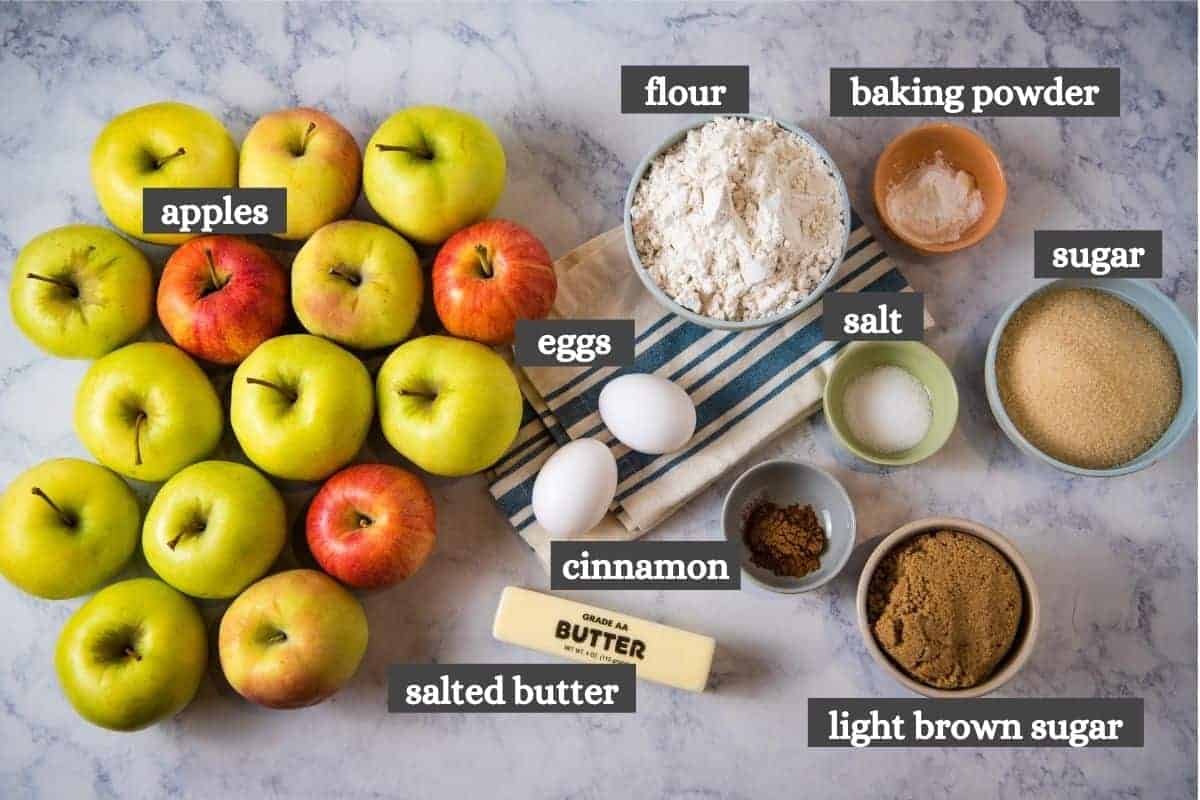
Ingredient Notes
Apples – For any kind of apple crisp, cobbler, crumble, or pie, I love using seconds; seconds are imperfect apples you can often buy cheaper and in bulk at an orchard or farmer’s market. I prefer to use Jonathan apples or Jonagold apples. Jonagolds are a cross between Jonathans and Golden Delicious, and they are so sweet, tart, and crisp. Some more of the best apples to use include Granny Smith apples, Golden Delicious, Pink Lady, Honeycrisp, Braeburn, and Northern Spy. According to Bob’s Red Mill, Northern Spy is a rare apple and hard to find; but if you love apple pie, it’s definitely one you may want to hunt down.
Light brown sugar – I prefer to use light over dark because of the texture and slight fluffiness it gives to the topping.
Salted butter – You can also use unsalted butter, if preferred; but you may want to add a bit more salt to the topping if you do.
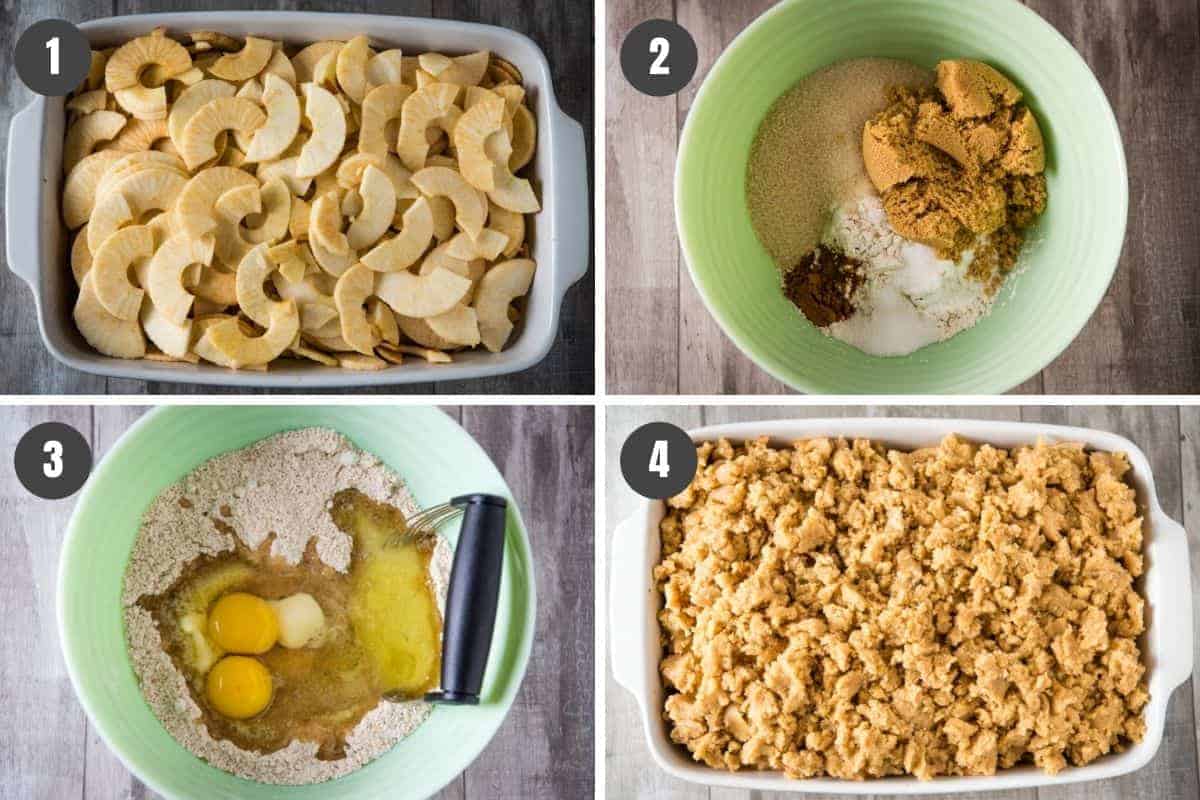
How to Make Apple Crumble without Oats
This apple crisp recipe without oats is so easy to make; it involves just a few steps…
Core, peel, and slice the washed apples, and add them to a greased 9×13 casserole dish.
In a large mixing bowl, whisk together the flour, baking powder, salt, cinnamon, sugar, and brown sugar.
Using a pastry blender, mix the dry ingredients with the unbeaten eggs and melted butter, forming a kind of crumble topping.
Crumble the topping right over the apples.
And that’s it. Just bake it uncovered for the first 20 minutes (at 425° F); it should be a nice golden brown. Then cover it with foil, and bake another 10 to 15 minutes, ’til the apples are tender.
Once you’ve removed it from the oven, allow it to cool for about 15 minutes before serving.
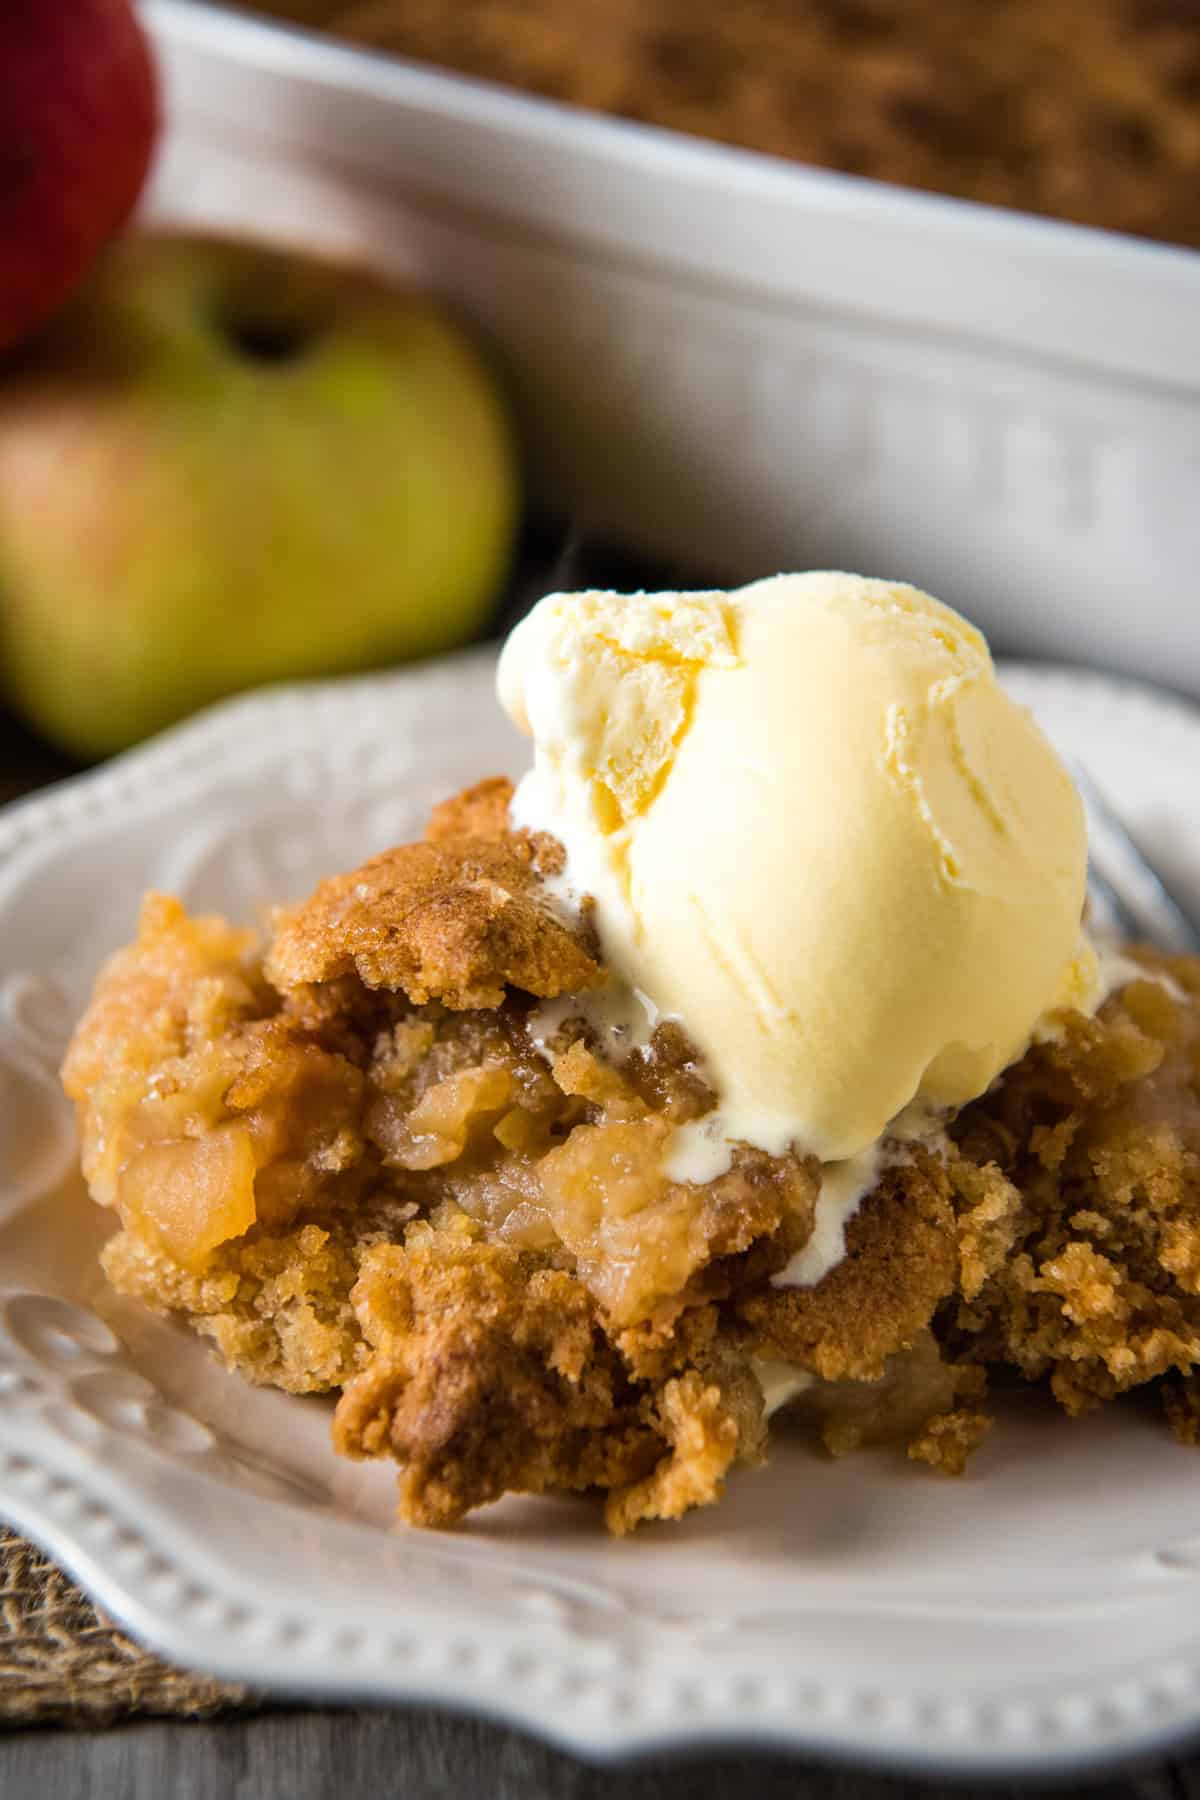
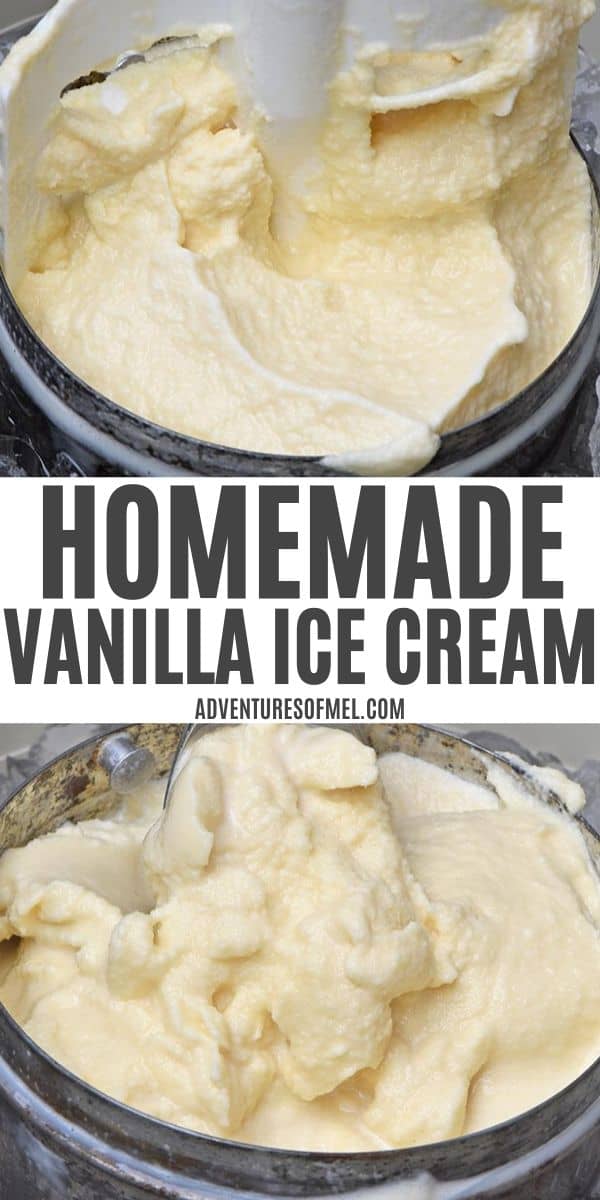
How to Serve Apple Crisp
Serving apple crumble with vanilla ice cream is the absolute best! You can serve it with whipped cream too, but personally, I go for the ice cream every time.
While it’s delicious when served warm from the oven, especially with a nice warm mug of coffee, it’s equally as delicious when it’s cold. So no worries if you’re making this dessert in advance.
Expert Tips and Recipe FAQ’s
Is there a difference between apple crisp and apple crumble?
Here in the States, the terms can be used interchangeably. However, most of the time a crisp involves oats; not always, but most of the time. Grandma called this an apple crisp. I’m mostly calling it an apple crumble because of the brown sugar cookie-like crisp topping and no oats. Crumble is what comes to my mind when I think about this dessert.
Can I make it gluten-free?
Yes, you most definitely can; in fact, I use my favorite gluten-free flour to make this recipe. Just make sure all of your other ingredients are gluten-free too.
How should I store it?
We usually let apple crumble sit out on the counter for 2-3 days just fine. Any longer, and you may want to throw it in the refrigerator. You can also freeze this dessert, baked or unbaked. Just be sure to store it in an airtight container or baking dish, so it doesn’t get freezer burn.
Why is my apple crumble dry?
This particular crumble is so moist and delicious. However, I suppose it could depend on the apples you use and the cook time. It could also depend on the amount of butter you use in the recipe. 8 tablespoons seems to be the right amount of butter to give this topping the right amount of crispness and moisture that blends right in with the apples.
Why is my crumble topping not crispy?
This has to do with ingredient quantities. You may not have just the right ratio of flour, butter, or sugar. The light brown sugar also plays a role in giving it a crunchier texture.
If you try this recipe, why not leave a star rating in the recipe card right below and/or a review in the comment section further down the page? I always appreciate your feedback. You can also follow me on Pinterest, Facebook, Instagram, and YouTube. And subscribe to my email list too!
Apple Crumble without Oats
How to make an easy homemade apple crumble without oats, from Grandma's recipe box. Sliced apples with the best cinnamon brown sugar topping.
Johnny apple peeler
9×13 Baking Dish
Mixing Bowl
Whisk
Pastry Blender
12 to 15 apples (cored, peeled, and sliced)
2 cups all-purpose flour
2 teaspoons baking powder
1 1/2 teaspoons salt
1 teaspoon ground cinnamon
1 cup cane sugar
1 cup light brown sugar
2 large eggs
8 tablespoons salted butter (melted)
Pre-heat the oven to 425° F.
Core, peel, and slice the washed apples, and add them to a greased 9×13 baking dish.
In a large mixing bowl, whisk together the flour, baking powder, salt, cinnamon, sugar, and brown sugar.
Using a pastry blender, mix the dry ingredients with the unbeaten eggs and melted butter, forming a kind of crumble topping.
Crumble the topping right over the apples.
Bake, uncovered, at 425° F for about 20 minutes; the crust should be a nice golden brown. Then cover with aluminum foil, and bake an additional 10 to 15 minutes, 'til the apples are tender.
Once you’ve removed it from the oven, allow it to cool for about 15 minutes before serving.
Serve with a scoop of vanilla ice cream or a swirl of whipped cream.
We usually let apple crumble sit out on the counter for 2-3 days just fine. Any longer, and you may want to throw it in the refrigerator. You can also freeze this dessert, baked or unbaked. Just be sure to store it in an airtight container or baking dish, so it doesn’t get freezer burn.
Desserts, Pies & Pastries
American
apple crisp, apple crisp without oats, apple crumble recipe, apple crumble without oats, easy apple crisp, easy apple crisp recipe without oats, easy apple crumble, grandma’s apple crisp recipe without oats, how to make apple crisp without oats, how to make apple crumble without oats, old-fashioned apple crisp, old-fashioned apple crumble
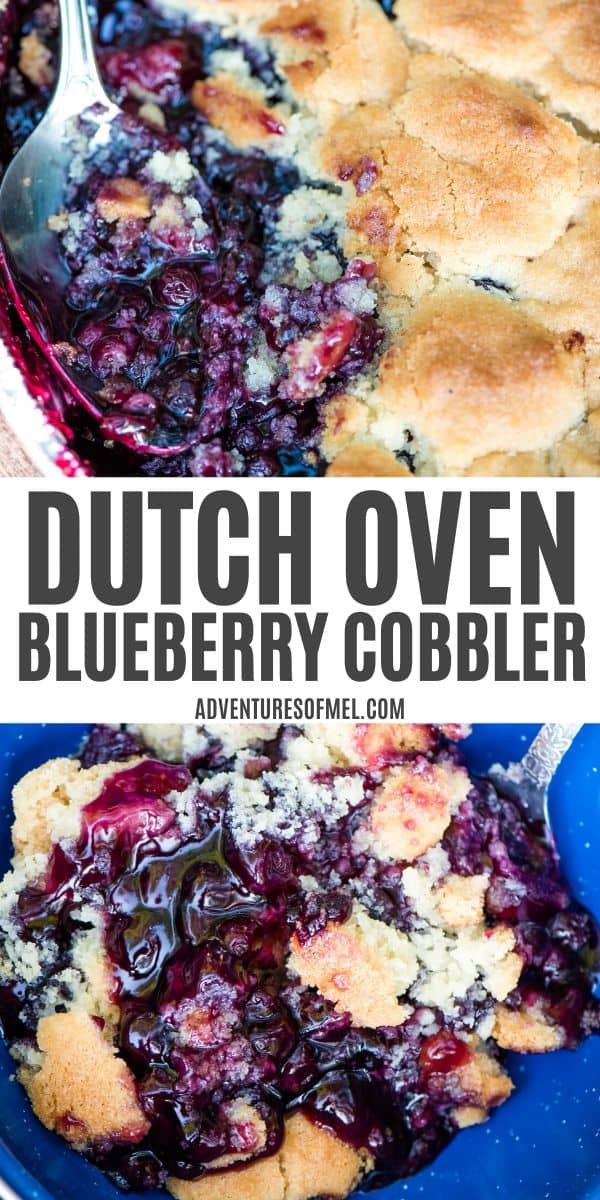
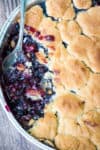
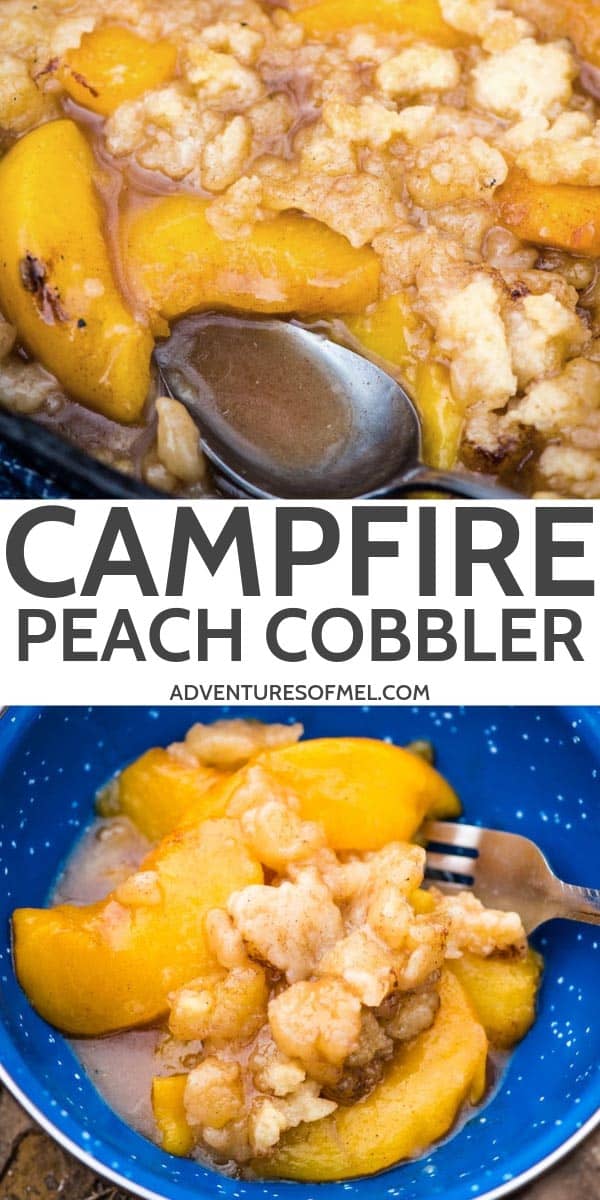
Easy Dutch oven blueberry cobbler with only 2 simple ingredients, including pie filling. Quick and easy camping recipe perfect for a campfire dessert.
When we’re camping, we eat a lot of food. I know it’s because we’re so active and outdoors most of the day, and food, including a good sugar cookie cobbler, tastes so much better when we’re ravenously hungry.
Not to mention, food tastes so much better when it’s cooked over the campfire. And there’s something especially tasty about a fruit cobbler cooked over the smoky fire.
That’s right… 2 ingredients. It’s such an easy campfire dessert, it’s not even funny. And it pairs especially well with a mug of freshly brewed campfire coffee.
Now you can cook this easy blueberry cobbler over the campfire, on the grill, or even in the oven at home. Totally up to you.
Sometimes I make a more traditional recipe for homemade blueberry cobbler, and I especially love its crumbled top crust that soaks into the blueberry filling.
WHERE CAN I FIND THE ACTUAL RECIPE CARD?
If you’d rather skip all of my campfire baking tips, important baking info for this recipe, and similar recipe ideas – and get straight to the campfire blueberry cobbler recipe – just scroll down to the bottom, where you’ll find a printable recipe card.
INGREDIENTS YOU’LL NEED:
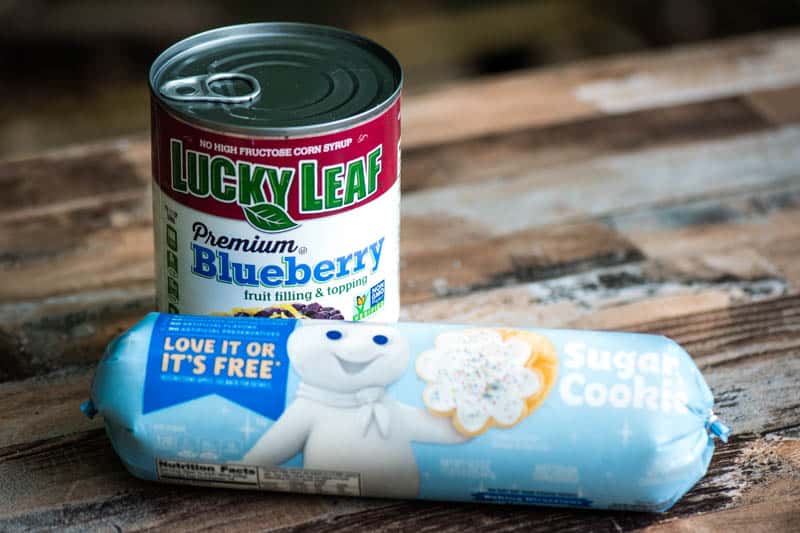
Sugar cookie dough – I just pick up a roll of cookie dough at the store, and put it in the cooler. If you’d rather have homemade, or make it gluten-free, we’ll talk about that below.
Remember, all of the ingredient amounts you’ll need are in the printable recipe card below.
KITCHEN TOOLS AND EQUIPMENT YOU’LL NEED:
9″ Foil Pan – If you don’t have a foil pan, you can fashion one from a big sheet of aluminum foil, double or triple layered and shaped into a round-ish pan for baking. Then follow the same instructions to make your cobbler.
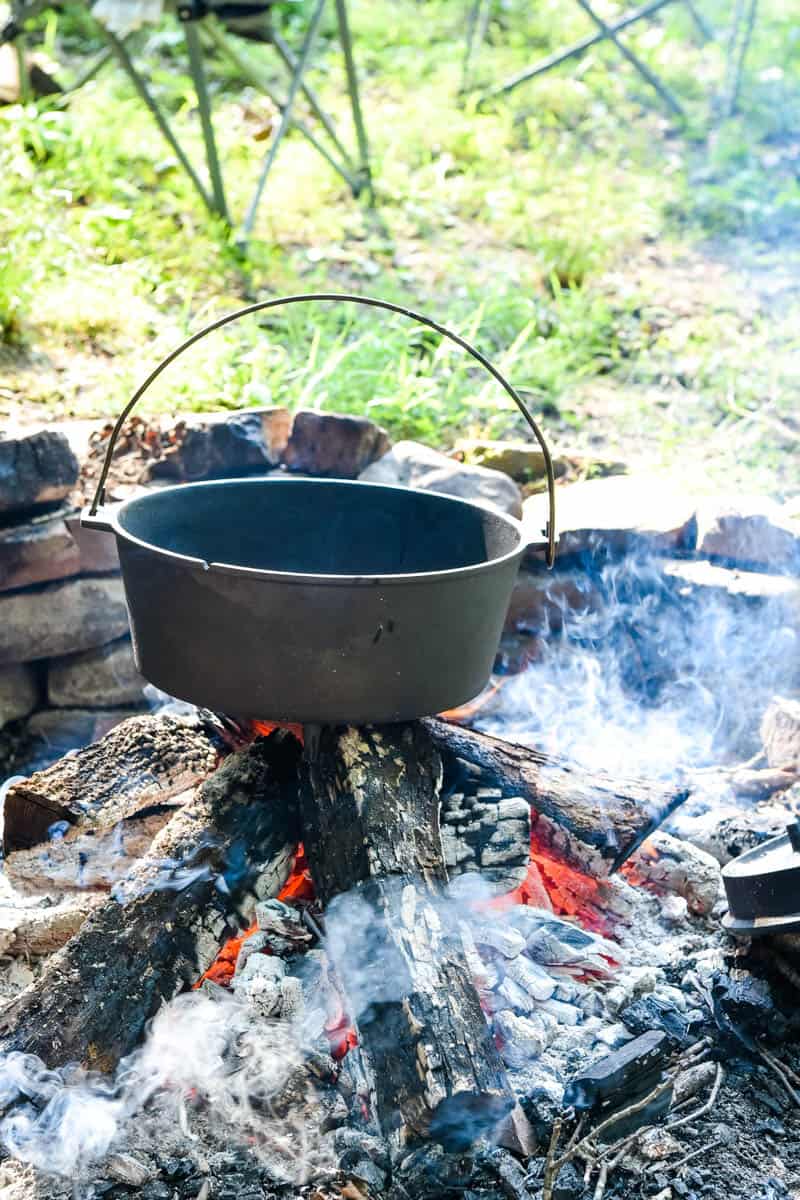
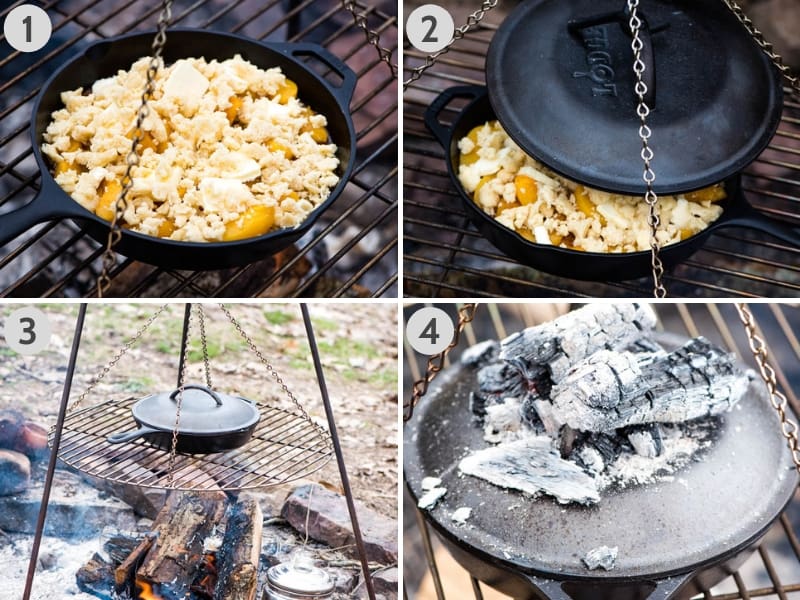
Before you get started, make sure your campfire (or grill) is ready to go. Your fire should be down to coals, with a little bit of flame here and there.
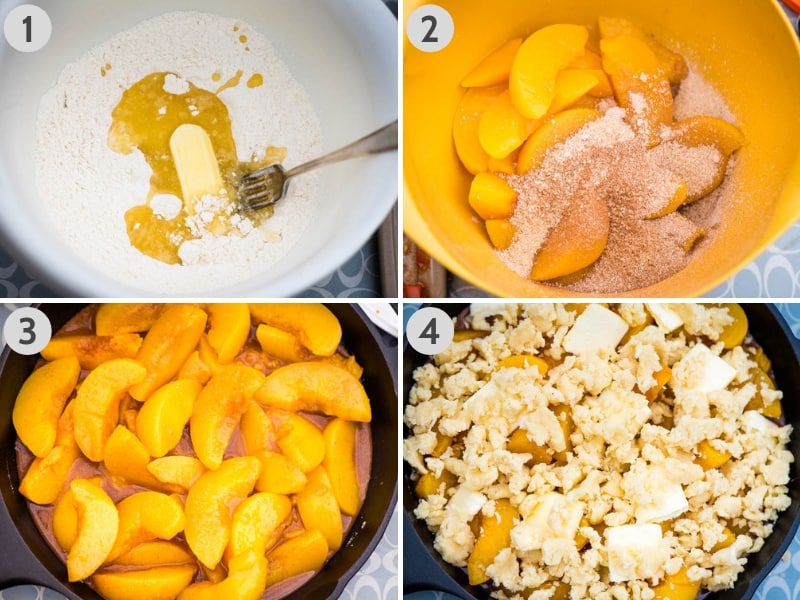
Pre-heat your Dutch oven and lid on the hot coals so it’s heated and ready to bake. Also, be sure to grease the foil pan with cooking spray.
Then just follow these steps…
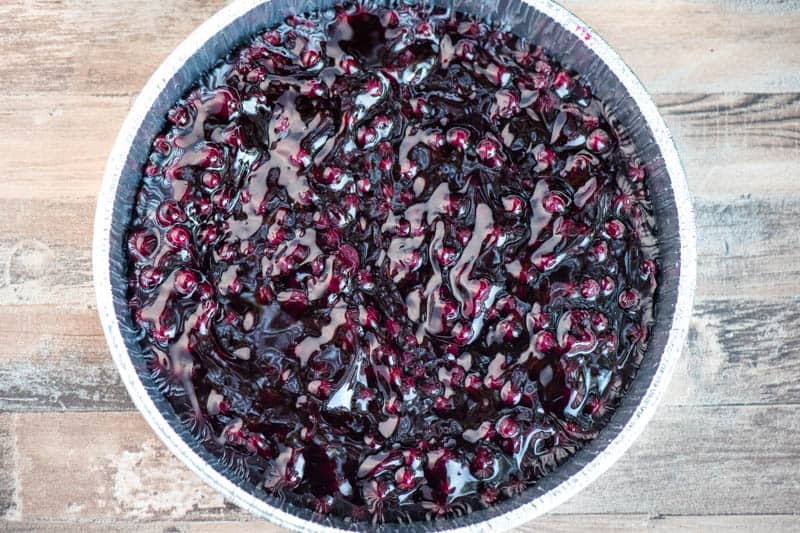
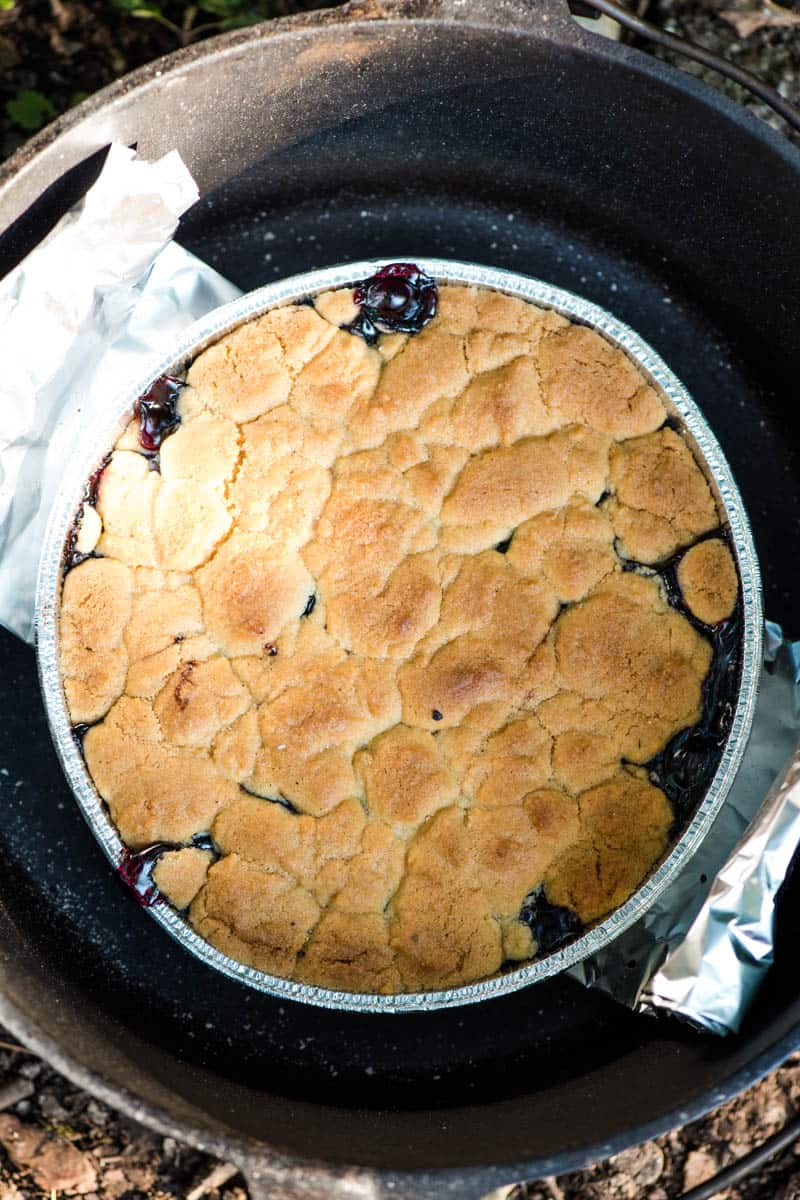
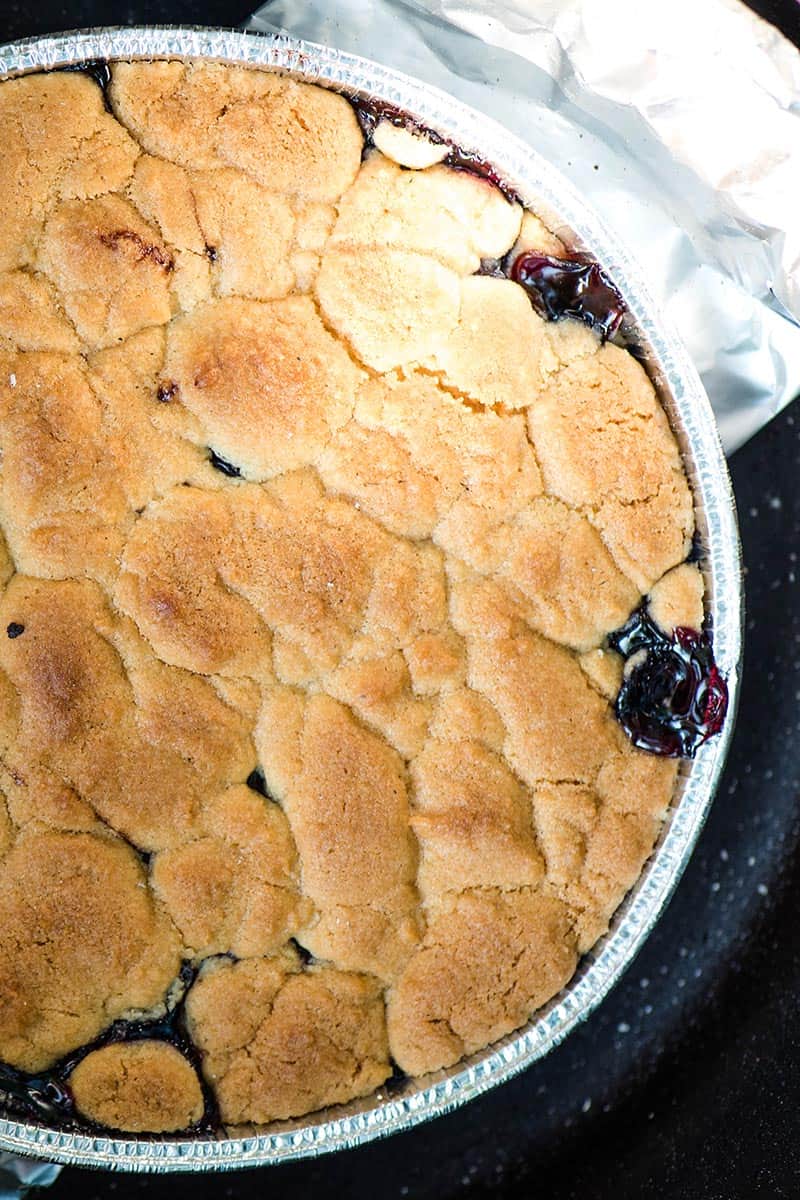
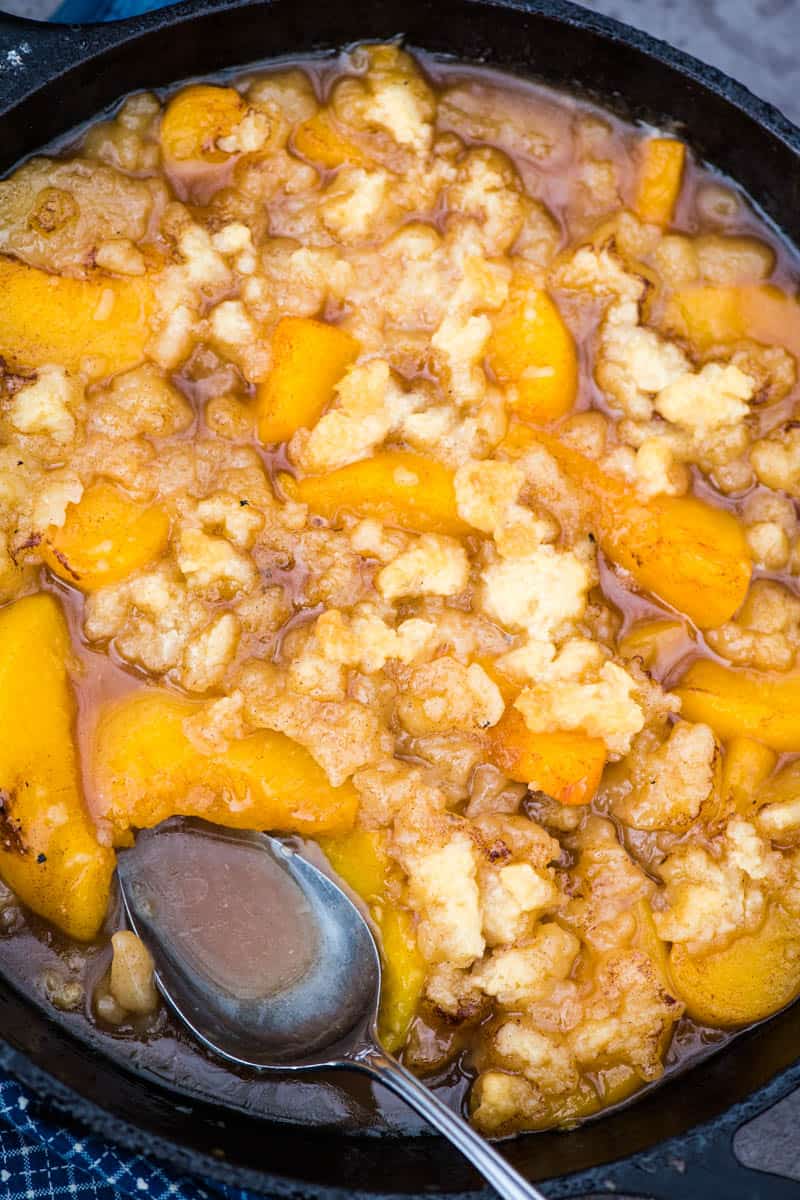
Pour the blueberry pie filling into the greased foil pan.
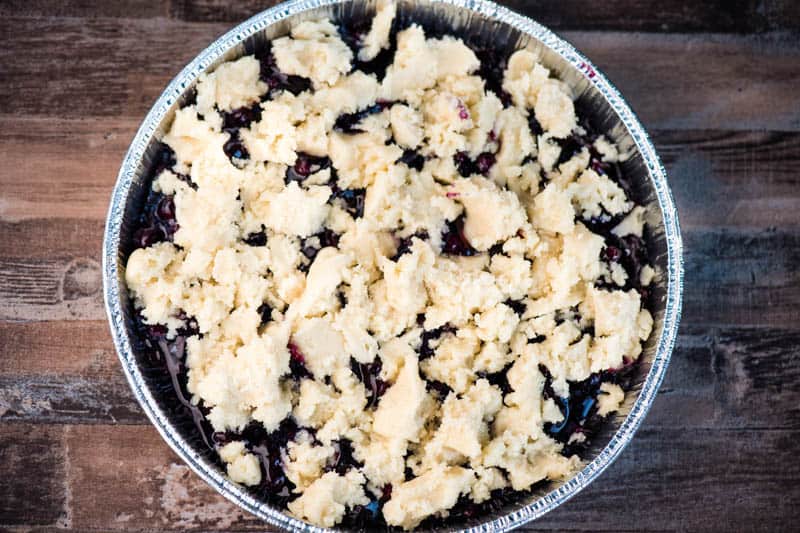
Crumble the sugar cookie dough over the top of the pie filling. Just crumble it all around on top.
Place the foil pan down inside the Dutch oven with a foil sling underneath (so you can easily take it in and out of the hot Dutch oven), put the lid on the Dutch oven, and then place the Dutch oven on the campfire. Or just place the foil pan inside the heated grill without the Dutch oven.
Allow it to cook for 20-30 minutes, checking in every so often to make sure everything is cooking well but not burning. You can place coals on top of the Dutch oven lid to help the cobbler bake through and through.
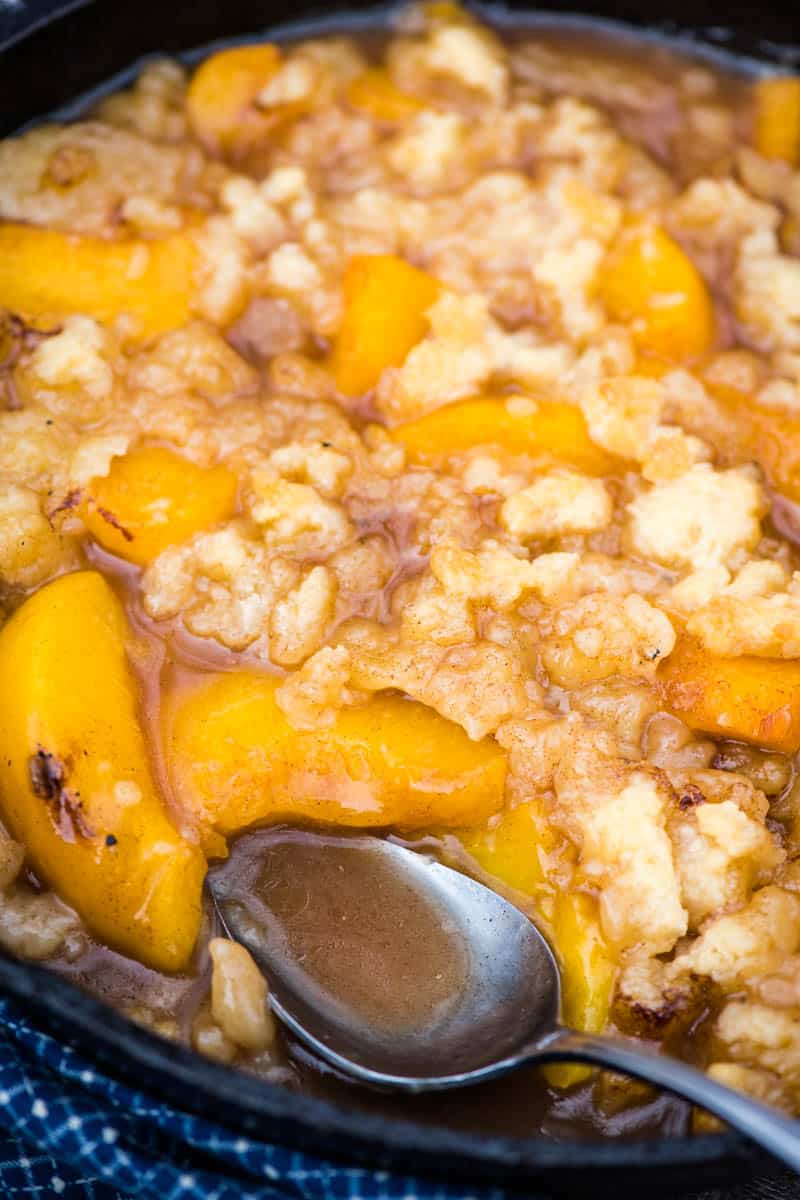
When the cobbler is done, the cookie dough will have turned a nice golden brown.
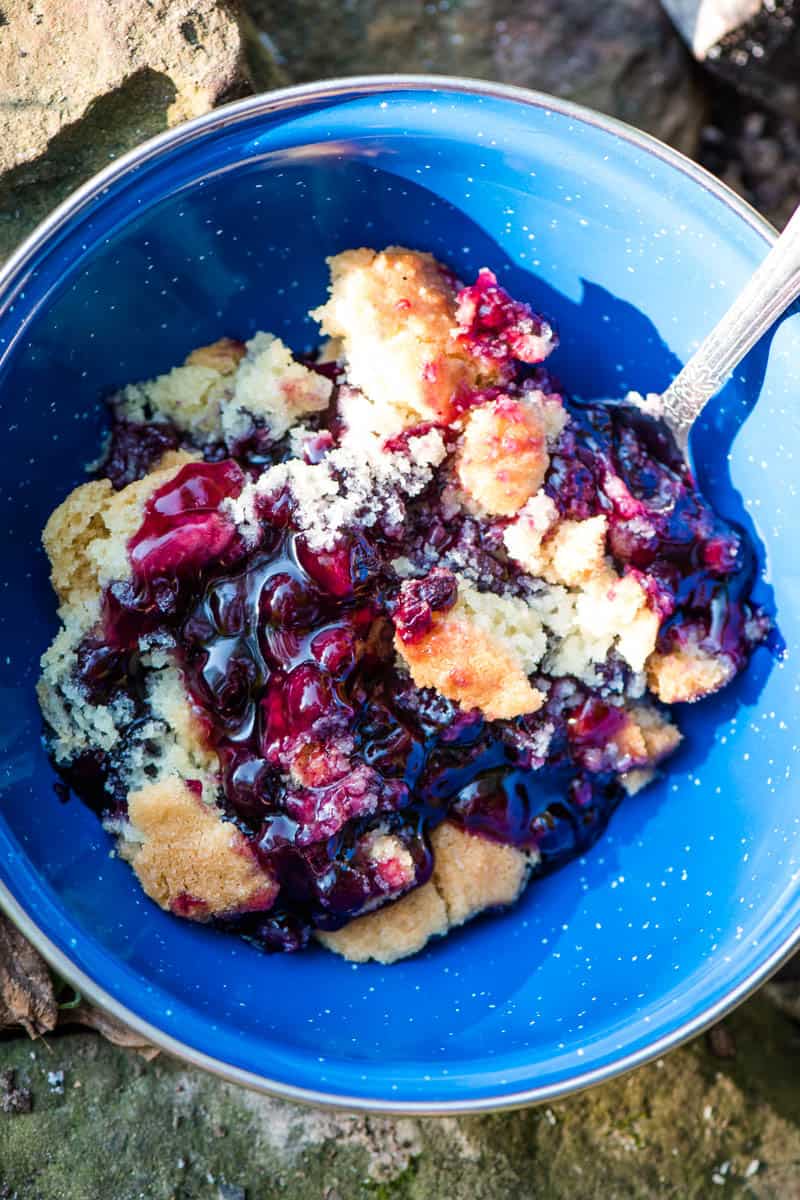
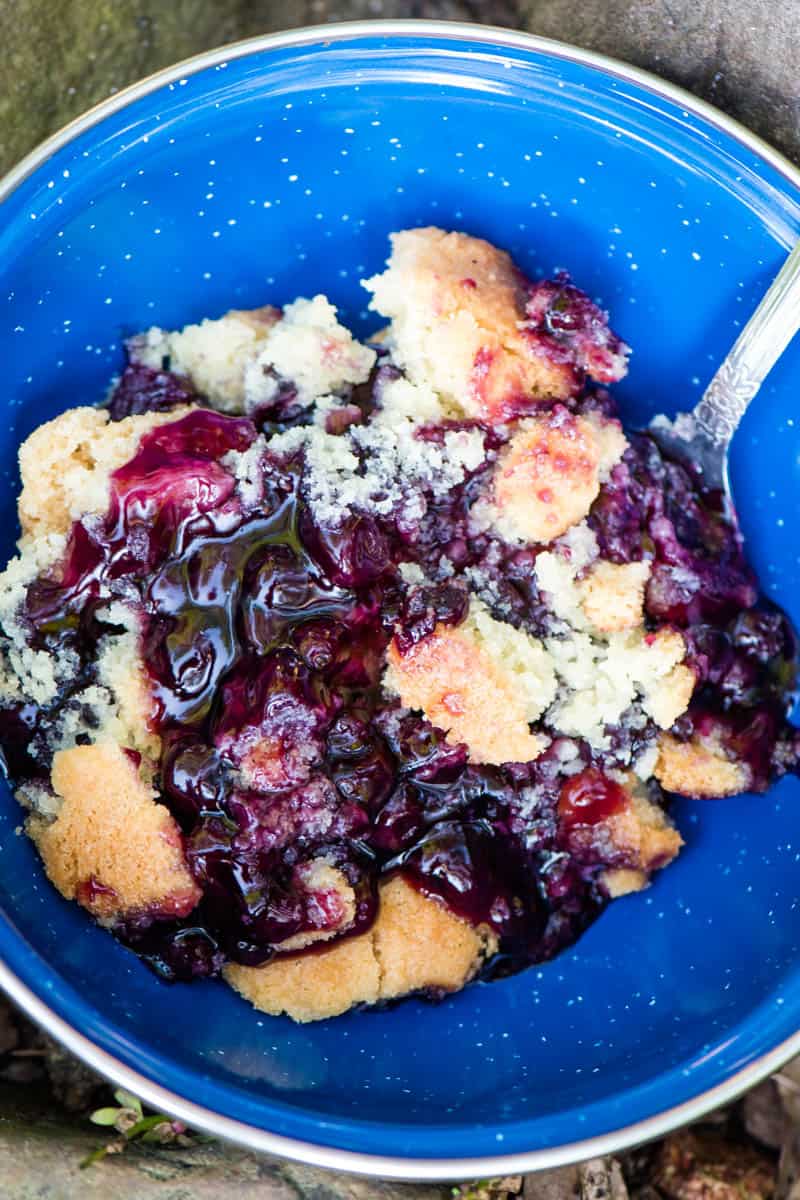
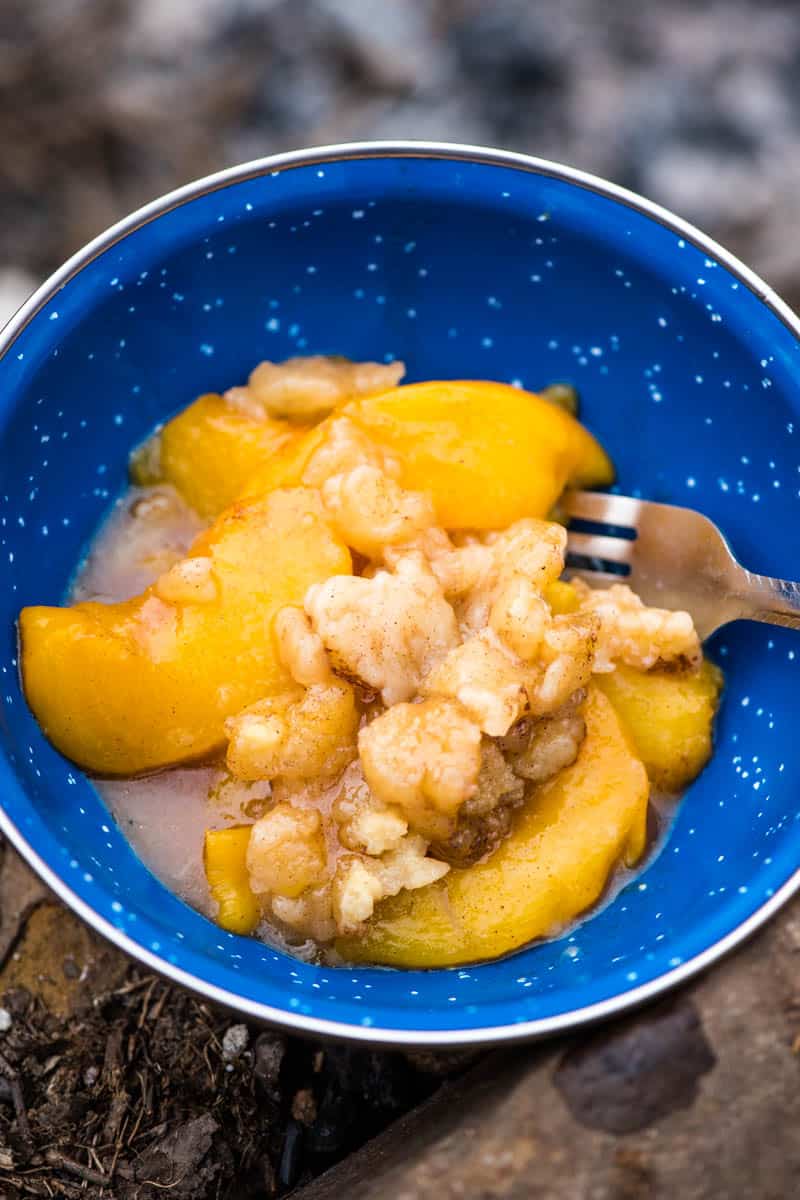
You can take it off the fire and serve while it’s warm. When we’re at home, we love eating this cobbler with vanilla ice cream.
HOW TO STORE BLUEBERRY COBBLER
Storing any leftover pie really depends on the weather conditions where you happen to be staying and also your camping digs.
If it’s super hot and all of your stuff is either outdoors or in your vehicle, you may want to keep any leftover cobbler cold by putting it in an airtight container in the cooler.
Otherwise, we usually don’t refrigerate fruit cobbler when we’re at home, so I’d likely dish it into a sealed container and that be it.
CAN BLUEBERRY COBBLER BE FROZEN?
Yes, you can freeze old-fashioned blueberry cobbler. In fact, you can make it at home in the oven; then let it cool, wrap it in plastic wrap, place it in a freezer bag, and freeze it.
Then when you’re ready to go camping, transfer it straight from the freezer to the cooler.
When you’re ready to eat it, place the unwrapped foil pan down inside your Dutch oven, and re-heat over the campfire until it’s heated thru, probably about the same cook time, depending how much it’s thawed while in the cooler.
HOW TO COOK OVEN BLUEBERRY COBBLER AT HOME
You’ll follow the same basic instructions, though there’s no need to pre-heat the Dutch oven. Instead you’ll just pre-heat the oven to 375°F.
With a foil sling, place the foil pan down in the Dutch oven, put the lid on, and place it in the oven to bake for 20-30 minutes. Oven times may vary.
Again, when the cobbler is done, the cookie dough will have changed to a deep golden brown color. Take it out of the oven, allow it to cool for a few minutes, and serve it while warm.
If you’re like me and want a gluten-free blueberry cobbler, make that cookie dough with gluten-free flour and a little bit of xanthan gum (to help with the leavening process). Be sure to use a gluten-free pie filling too.
ALTERNATIVE IDEAS FOR A CRUMBLED TOPPING
If you don’t want to use cookie dough at all, you have a few options to make a pretty tasty crumb topping.
Dutch Oven Blueberry Cobbler with Just 2 Ingredients
Easy Dutch oven blueberry cobbler with only 2 simple ingredients, including pie filling. Quick and easy camping recipe perfect for a campfire dessert.
9 Inch Round Foil Pans with Clear Plastic Lids – Pack of 10
6 Qt Seasoned Cast Iron Dutch Oven
Texsport 6″ Blue Enamel Bowl (Set of 12)
1 roll (16.5 ounces sugar cookie dough*)
1 can (21 ounces blueberry pie filling*)
Before you get started, make sure your campfire (or grill) is ready to go. Your fire should be down to coals, with a little bit of flame here and there.
Pre-heat your Dutch oven and lid on the hot coals so it’s heated and ready to bake.
Also, be sure to grease the foil pan with cooking spray.
Pour the blueberry pie filling into the greased foil pan.
Crumble the sugar cookie dough over the top of the pie filling. Just crumble it all around on top.
Place the foil pan down inside the Dutch oven with a foil sling underneath (so you can easily take it in and out of the hot Dutch oven), put the lid on the Dutch oven, and then place the Dutch oven on the campfire. Or just place the foil pan inside the heated grill without the Dutch oven.
Allow it to cook for 20-30 minutes, checking it every so often to make sure everything is cooking well but not burning. You can place coals on top of the Dutch oven lid to help the cobbler bake through and through.
When the cobbler is done, the cookie dough will have turned a nice golden brown.
You can take it off the fire and serve while it’s warm. When we’re at home, we love eating this cobbler with vanilla ice cream.
*If you’d rather not buy cookie dough, you can always use a cookie mix or make homemade sugar cookie dough. If you’re like me and want a gluten-free blueberry cobbler, make that cookie dough with gluten-free flour and a little bit of xanthan gum (to help with the leavening process). Then use a gluten-free pie filling too.
You’ll follow the same basic instructions, though there’s no need to pre-heat the Dutch oven. Instead you’ll just pre-heat the oven to 375°F. With a foil sling, place the foil pan down in the Dutch oven, put the lid on, and place it in the oven to bake for 20-30 minutes. Oven times may vary.
Again, when the cobbler is done, the cookie dough will have changed to a deep golden brown color. Take it out of the oven, allow it to cool for a few minutes, and serve it while warm.
HOW TO STORE BLUEBERRY COBBLER
Storing any leftover pie really depends on the weather conditions where you happen to be staying and also your camping digs. If it’s super hot and all of your stuff is either outdoors or in your vehicle, you may want to keep any leftover cobbler cold by putting it in an airtight container in the cooler. Otherwise, we usually don’t refrigerate fruit cobbler when we’re at home, so I’d likely dish it into a sealed container and that be it.
CAN BLUEBERRY COBBLER BE FROZEN?
Yes, you can freeze old-fashioned blueberry cobbler. In fact, you can make it at home in the oven; then let it cool, wrap it in plastic wrap, place it in a freezer bag, and freeze it.
Then when you’re ready to go camping, transfer it straight from the freezer to the cooler. When you’re ready to eat it, place the unwrapped foil pan down inside your Dutch oven, and re-heat over the campfire until it’s heated thru, probably about the same cook time, depending how much it’s thawed while in the cooler.
Pies & Pastries
American
blueberry cobbler with sugar cookie topping, blueberry recipes, campfire blueberry cobbler, campfire desserts, camping blueberry cobbler, cast iron blueberry cobbler, cobblers, Dutch oven blueberry cobbler, Dutch oven cooking, easy blueberry cobbler, fruit desserts, how to make blueberry cobbler, how to make Dutch oven blueberry cobbler, old-fashioned blueberry cobbler, sugar cookie cobbler
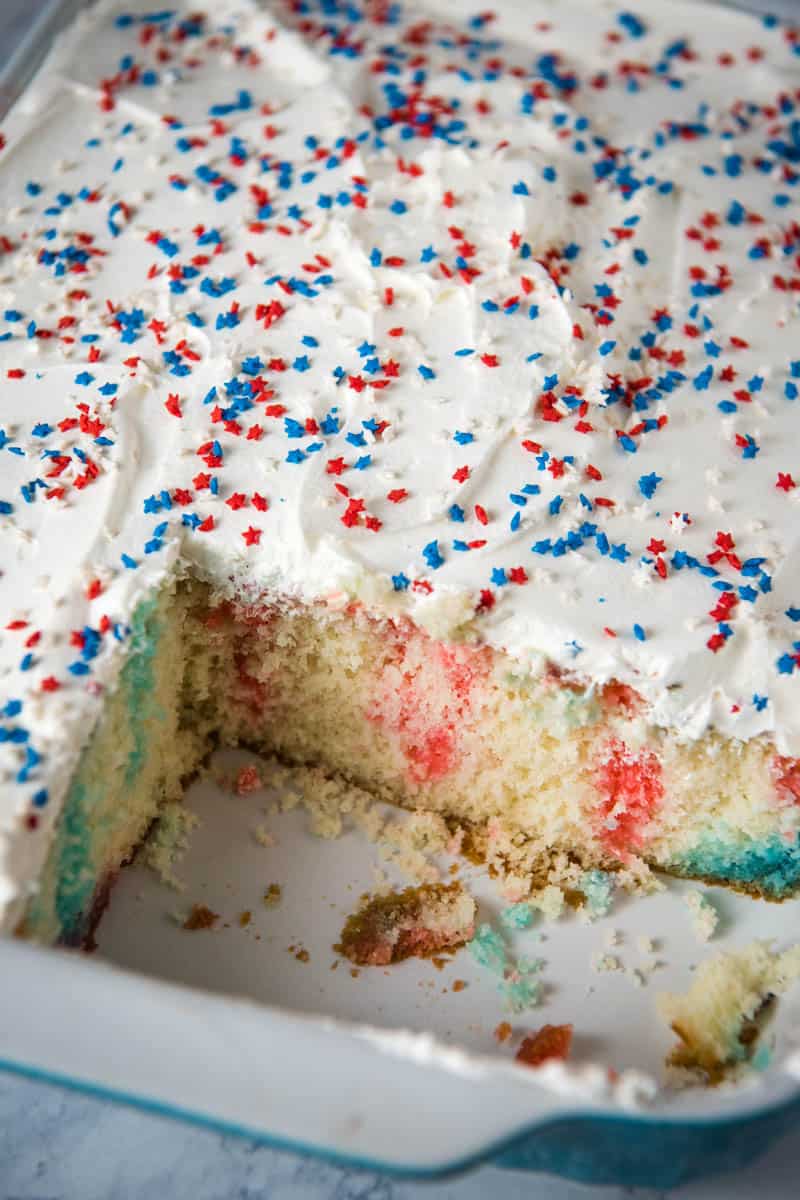
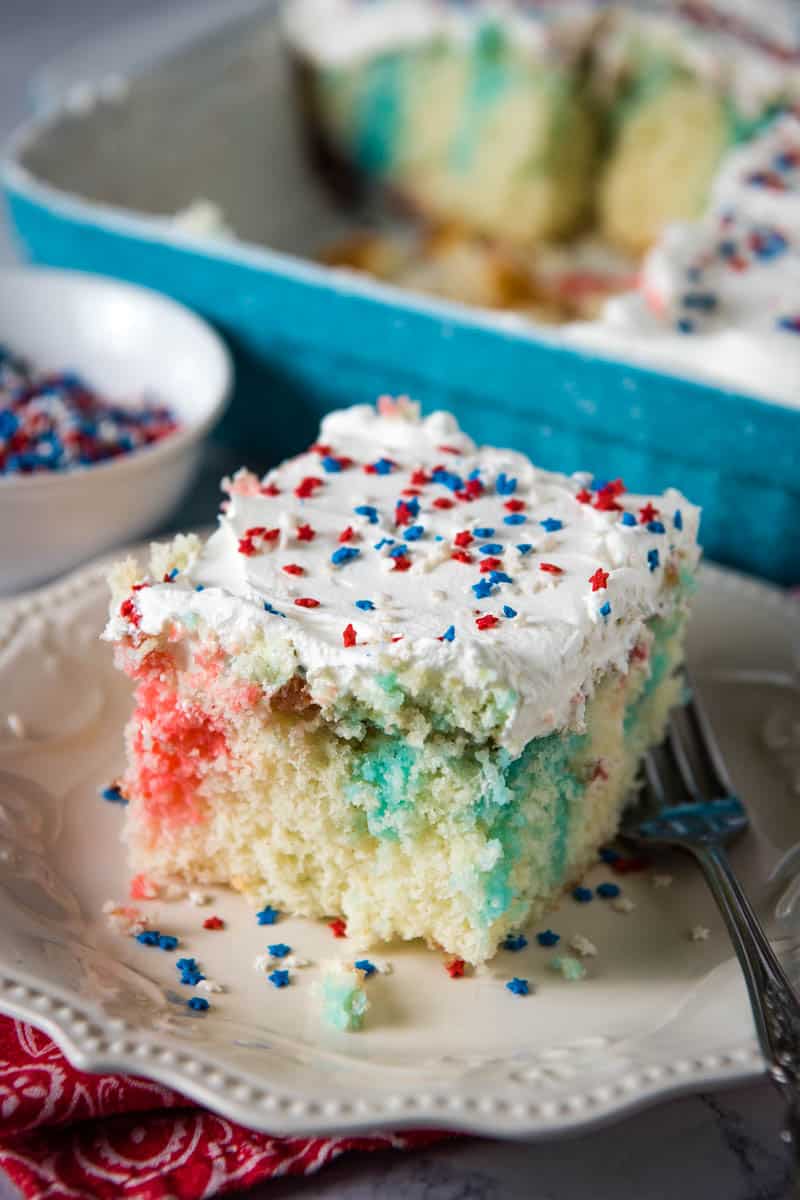
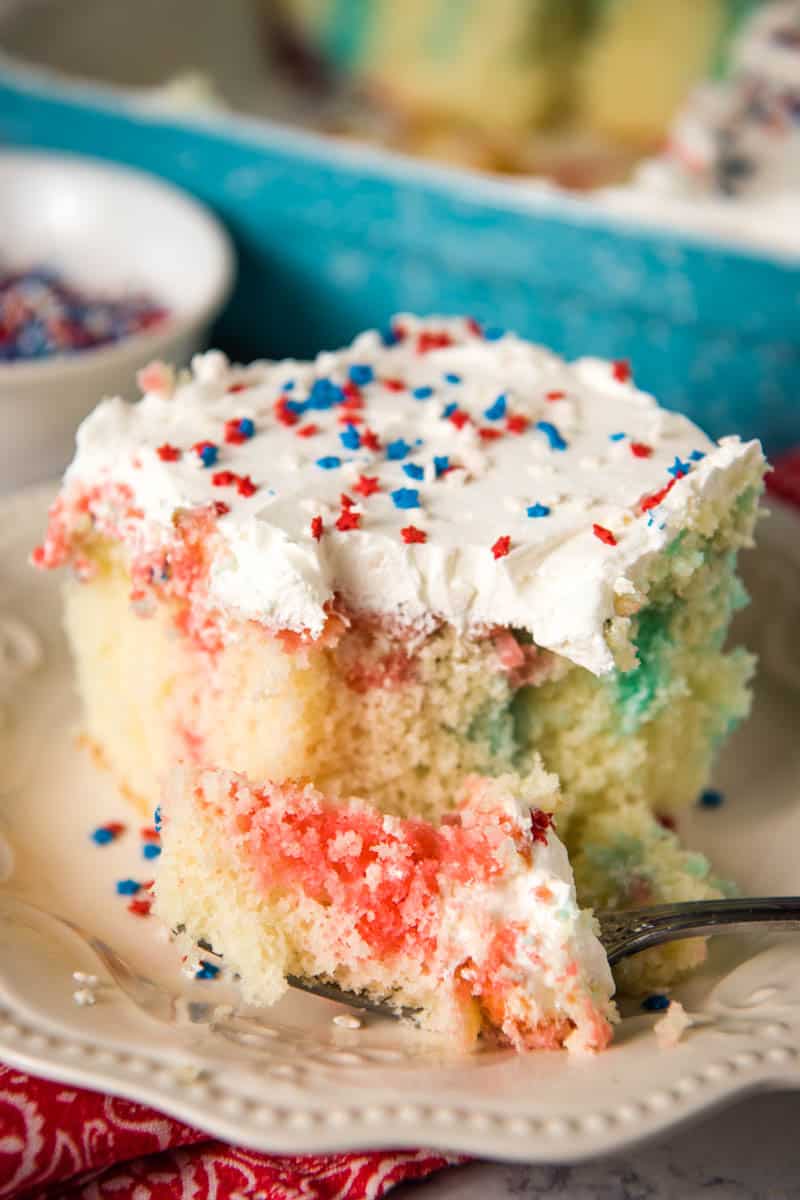
Make a red white and blue poke cake for the 4th of July and other patriotic celebrations. This is an easy 4th of July poke cake topped with whipped cream and red white and blue sprinkles.
I’ve loved Jello cake ever since I was a little girl. It was Mom’s go to dessert back in the day, and I remember the excitement I felt as I watched her cover it and place it in the fridge to chill for dessert.
Like 4th of July cupcakes, this 4th of July poke cake is made with a white cake mix. Once it’s baked, you poke a few holes and turn it into a red white and blue Jello cake by alternately pouring blue and red Jello over the tiny holes, so it soaks down into the cake.
I like to spread whipped topping all over the top of the cake and then chill it overnight so everything really melds together to create a cold, refreshing, flavorful dessert.
Then when it comes out of the fridge, sprinkle a few patriotic sprinkles on top, and you’ve got a beautiful 4th of July dessert.
Another one of my favorite red, white, and blue desserts is strawberry Jello flag cake covered in whipped cream, strawberries, and blueberries.
Why You’ll Love This Recipe
There are many reasons to love this red blue and white cake…
A patriotic poke cake is the perfect way to celebrate Independence Day with friends and family. It also works wonderfully for Memorial Day, Veterans Day, or any other type of patriotic remembrance or celebration.
Red white and blue Jello cake is such a refreshing dessert; there’s really no other way to describe it. And this 4th of July Jello cake is the perfect summer dessert.
It’s so easy to make, especially with a cake mix. Even creating the red white and blue parts of the cake is as simple as pouring liquid Jello over the cake.
Ingredient Notes:
White cake mix – I also love using a French vanilla cake mix. You can also make this gluten-free with a gluten-free cake mix. Just be sure to check all your other ingredients to make sure they’re truly gluten-free.
Oil – I just use canola oil.
Blue Jello – I use Berry Blue.
Red Jello – I use strawberry, but you can use cherry or raspberry too.
Remember, all of the ingredient amounts you’ll need are in the printable recipe card below.
How to Make Red White and Blue Poke Cake
Before you get started, go ahead and pre-heat your oven to 350° F, or whatever temperature it says on your cake mix box.
Then just follow these steps…
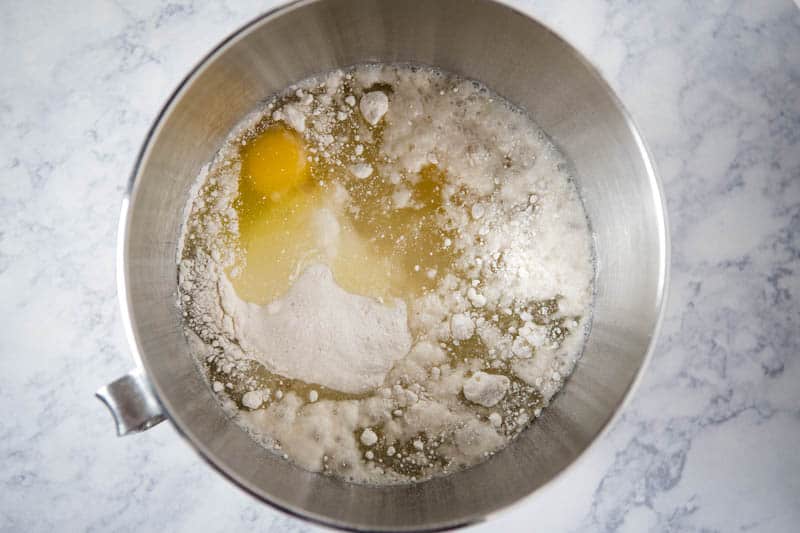
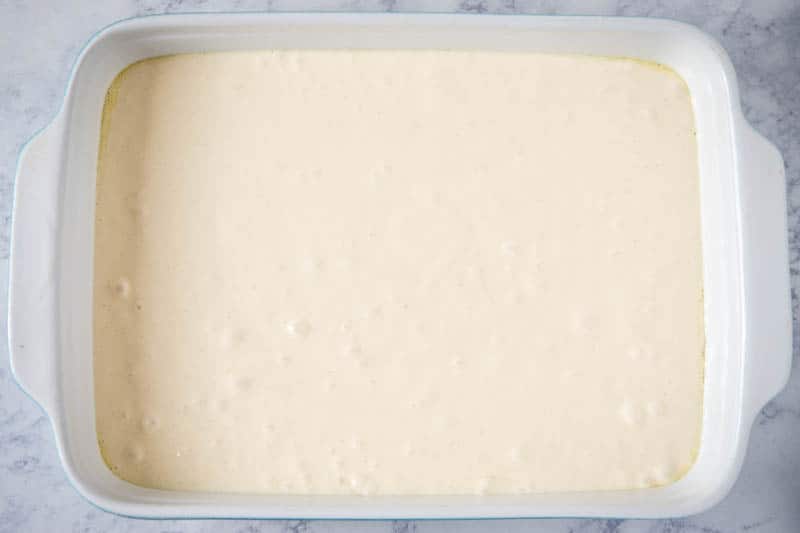
Mix together the cake mix, water, eggs, and canola oil.
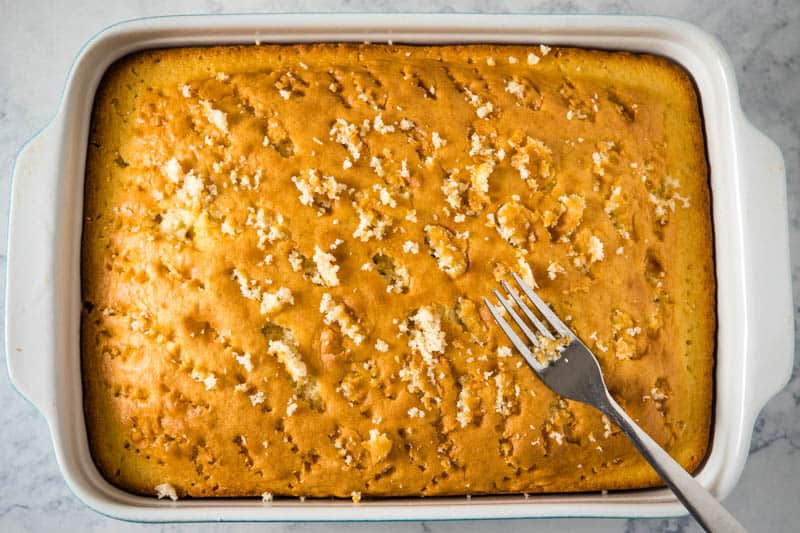
Pour the cake batter into a greased 9×13 baking dish or cake pan, and bake according to the package directions on your cake mix.
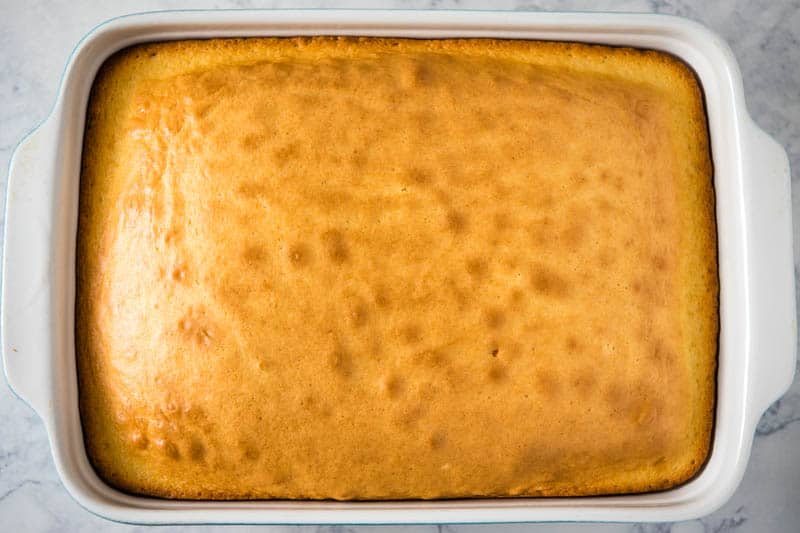
When the cake is fully baked, remove it from the oven, and allow it to cool for 15-20 minutes.
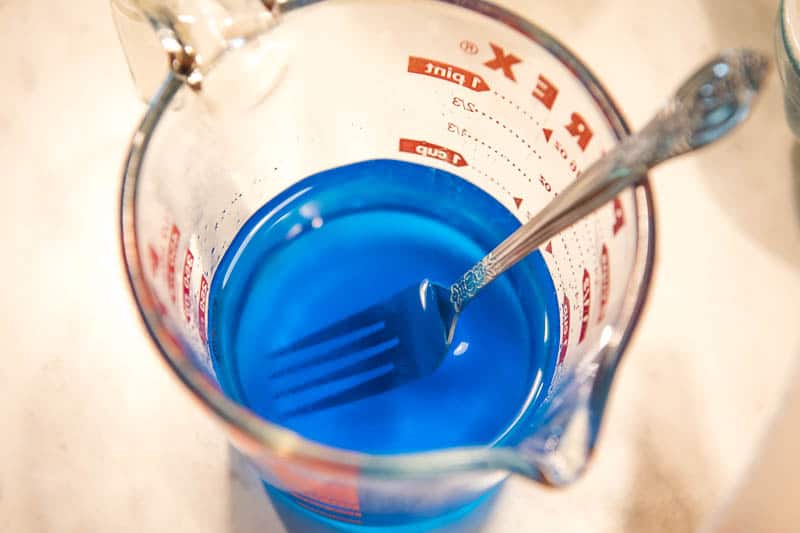
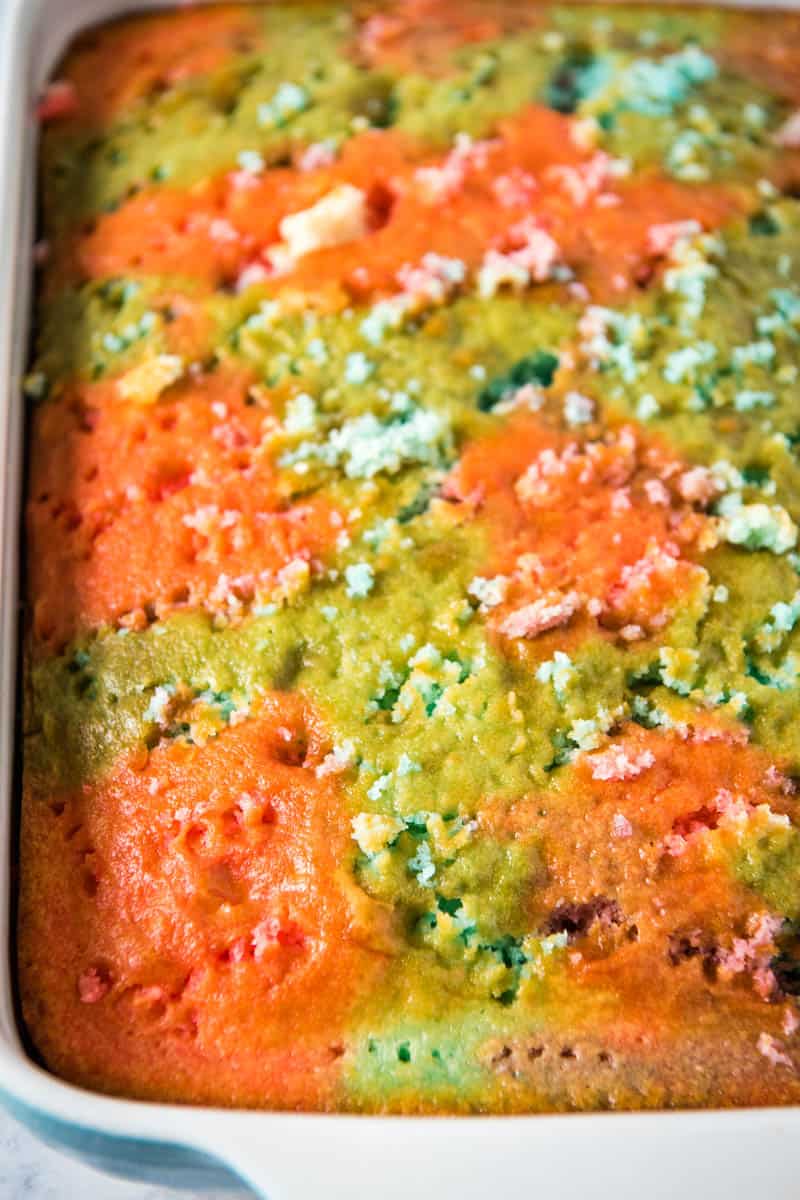
Meanwhile, mix half of the blue Jello mix (1.5 ounces) with 1/2 cup boiling water ’til the Jello mix dissolves. Then add 1/4 cup cold water, and mix well.
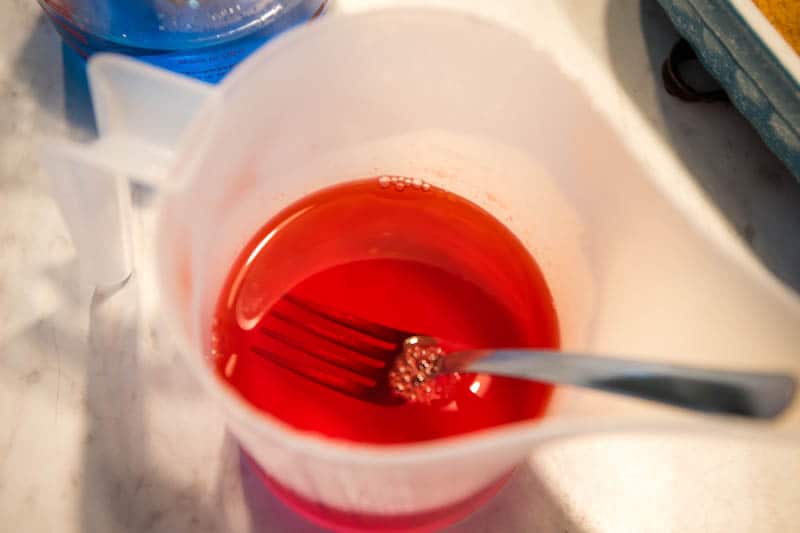
Then mix half of the red Jello mix (1.5 ounces) with 1/2 cup boiling water ’til the Jello mix dissolves. Add 1/4 cup cold water, and mix well.
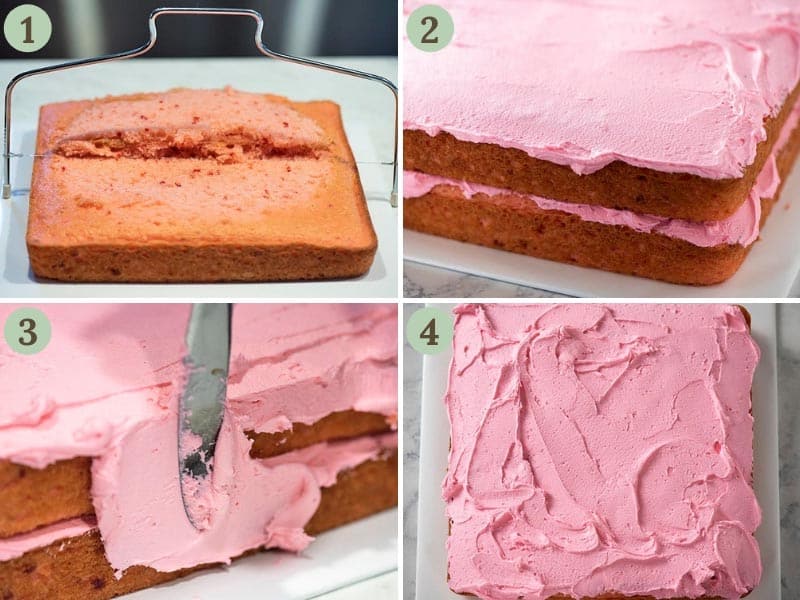
Poke holes all over the top of the slightly cooled but still warm cake with a fork. I find that a fork works really well, but you can also use the handle of a wooden spoon or a wooden skewer if you want bigger holes.
Carefully and slowly pour the blue and red Jello mixture alternately over the entire cake. To keep the colors separate, I skip around with the red Jello, and then I fill in the rest of the cake with the blue. A funnel pitcher works great for this. Because of the random poke holes, there will always be parts of the cake that are left without color, so you’ll end up with red white and blue.
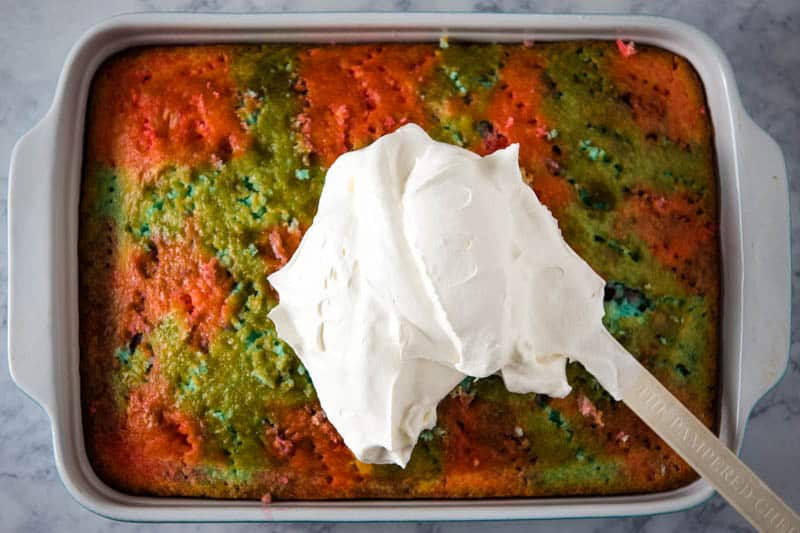
Allow the cake to cool completely.
Then spread Cool Whip or whipped topping over the top of the entire cake.
Chill the cake for at least 4 hours, or better yet overnight, before serving.
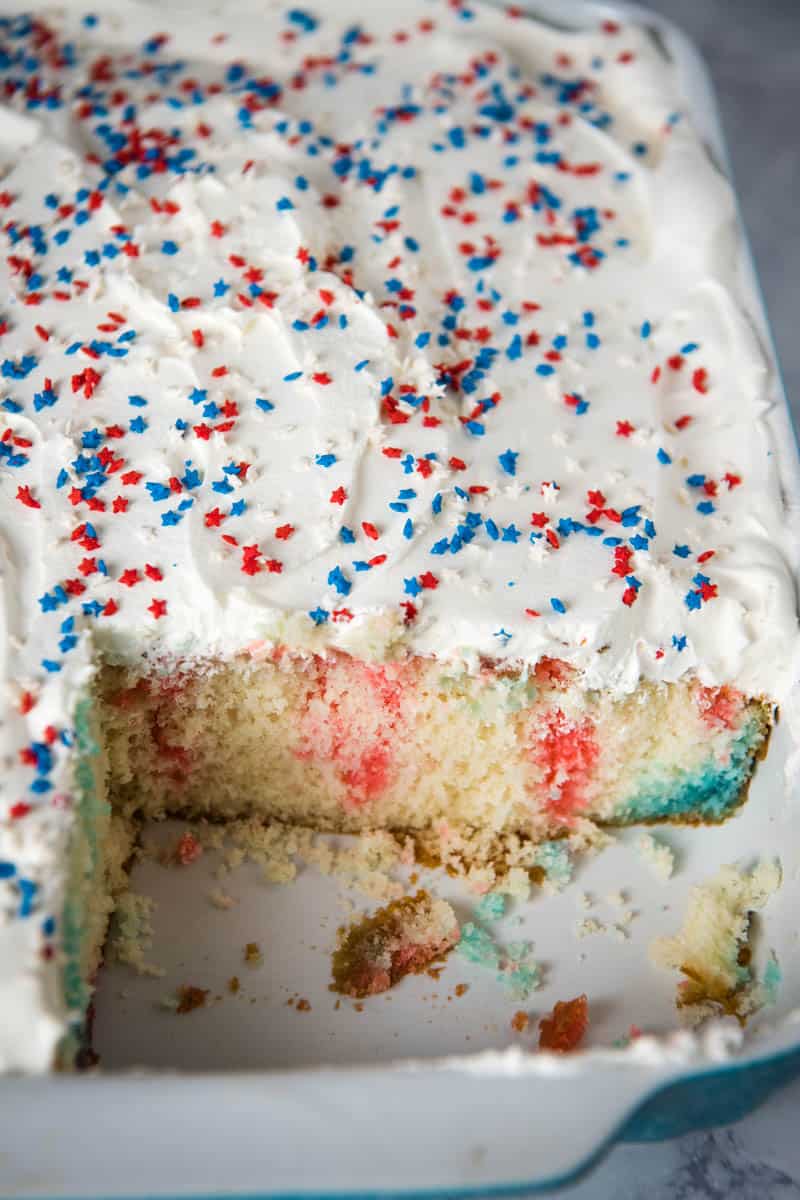
Before serving, sprinkle red white and blue sprinkles all over the top of the cake, as many or as few as you want. Then slice and serve the cake. Just a note: I like to wait until after chilling to add the sprinkles, so they don’t bleed into the whipped cream and ruin the look of the cake.
FAQ’s and Expert Tips
What do you use to poke holes in a cake?
If pouring Jello or a thinner liquid over the cake, you can just use a fork to poke holes all over the top of the cake. However, if pouring a thicker liquid like pudding over it, you might want to use something bigger, like the end of a wooden spoon handle.
You can definitely make Jello cake ahead of time, and the whipped cream, as well. Of course, be sure to store it all in the fridge ’til you’re ready to serve it. And don’t forget to add the sprinkles when it’s ready to serve.
How should you store Jello cake?
Definitely keep it in and airtight container in the fridge. This will keep the cake fresh for at least 3-4 days.
Can you freeze poke cake?
Yes, you can. However, I would freeze the cake without the topping and sprinkles, and just add those on when it’s thawed and you’re ready to serve it.
What to Do with Leftover Jello Mix
I just take my leftover Jello mixes, put them together in a bowl, and make Jello according to package directions. It makes a mixed berry Jello that almost tastes like grape, and my boys love it.
You can also use it to make a batch of Jello Jigglers, or make festive layered Jello cups.
How to Change Jello Cake to Fit Other Holidays
Poke cake opens up a whole new world of possibilities for other holidays too. It’s a way to add some festive fun to your holiday dessert table, no matter what you’re celebrating.
Here are a few ideas that will hopefully spark your imagination…
Valentine’s Day – Make it with red Jello and cover with pink whipped cream and Valentine sprinkles.
Easter – Think pastels… Lemon, Berry Blue, Strawberry, Lime, and Grape Jello, along with Easter sprinkles, will make a beautiful Easter poke cake.
Halloween – Use orange and purple Jello, or use green and purple Jello, combining forces to make it fit whatever theme you’re going for. You can add Halloween sprinkles and candy corn too, and you can even color the Cool Whip to make it purple, green, or orange.
Christmas – Go with red and green Jello, and top it off with Christmas sprinkles galore.
If you try this recipe, why not leave a star rating in the recipe card right below and/or a review in the comment section further down the page? I always appreciate your feedback. You can also follow me on Pinterest, Facebook, Instagram, and YouTube. And subscribe to my email list too!
Red White and Blue Poke Cake
How to make a red white and blue poke cake for patriotic celebrations. Easy 4th of July poke cake topped with whipped cream and sprinkles.
Mixer
9×13 Cake Pan
Pyrex Measuring Cups
Funnel pitcher
1 box white cake mix* (16.25 ounce)
1 cup water
3 large eggs
1/2 cup canola oil
1/2 box blue Jello (1.5 ounces)
1/2 box red Jello (1.5 ounces)
1 cup boiling water (divided)
1/2 cup cold water (divided)
8 ounces Cool Whip
1/3 cup red white and blue sprinkles
Pre-heat your oven to 350° F, or whatever temperature it says on your specific cake mix box.
Mix together the cake mix, water, eggs, and canola oil.
Pour the cake batter into a greased 9×13 cake pan, and bake according to the package directions on your cake mix.
When the cake is fully baked, remove it from the oven, and allow it to cool for 15-20 minutes.
Meanwhile, mix half of the blue Jello mix (1.5 ounce) with 1/2 cup boiling water ’til the Jello mix dissolves. Then add 1/4 cup cold water, and mix well.
Then mix half of the red Jello mix (1.5 ounce) with 1/2 cup boiling water ’til the Jello mix dissolves. Add 1/4 cup cold water, and mix well.
Poke holes all over the top of the slightly cooled but still warm cake with a fork. I find that a fork works really well, but you can also use the handle of a wooden spoon or a wooden skewer if you want bigger holes.
Carefully and slowly pour the blue and red Jello mixture alternately over the entire cake. I skip around with the red Jello, and then I fill in the rest of the cake with the blue. A funnel pitcher works great for this.
Allow the cake to cool completely.
Then spread Cool Whip or whipped topping over the top of the entire cake.
Chill the cake for at least 4 hours, or better yet overnight, before serving.
Before serving, sprinkle 4th of July sprinkles all over the top of the cake, as many or as few as you want.* Then slice and serve the cake.
*I also love to use French Vanilla cake mix; you can also use a gluten-free cake mix. Keep in mind, ingredient amounts may differ on the water, eggs, and canola oil, depending on the brand/type of cake mix you use. Follow package instructions for your specific cake mix.
*Just a note about the sprinkles: I like to wait until after chilling to add the sprinkles, so they don’t bleed into the whipped cream and ruin the look of the cake.
Can you make this ahead of time? You can definitely make Jello cake ahead of time, and the whipped cream, as well. Of course, be sure to store it all in the fridge ’til you’re ready to serve it. And don’t forget to add the sprinkles when it’s ready to serve.
How should you store Jello cake? Definitely keep it in and airtight container in the fridge. This will keep the cake fresh for at least 3-4 days.
Can you freeze poke cake? Yes, you can. However, I would freeze the cake without the topping and sprinkles, and just add those on when it’s thawed and you’re ready to serve it.
Cakes & Cupcakes
American
4th of July desserts, 4th of July Jello cake, 4th of July poke cake, 4th of July treats, cake recipe, how to make 4th of July cake, how to make a Jello poke cake, Jello cake, Jello recipes, patriotic poke cake, poke cake, red white and blue desserts, red white and blue Jello cake, red white and blue poke cake
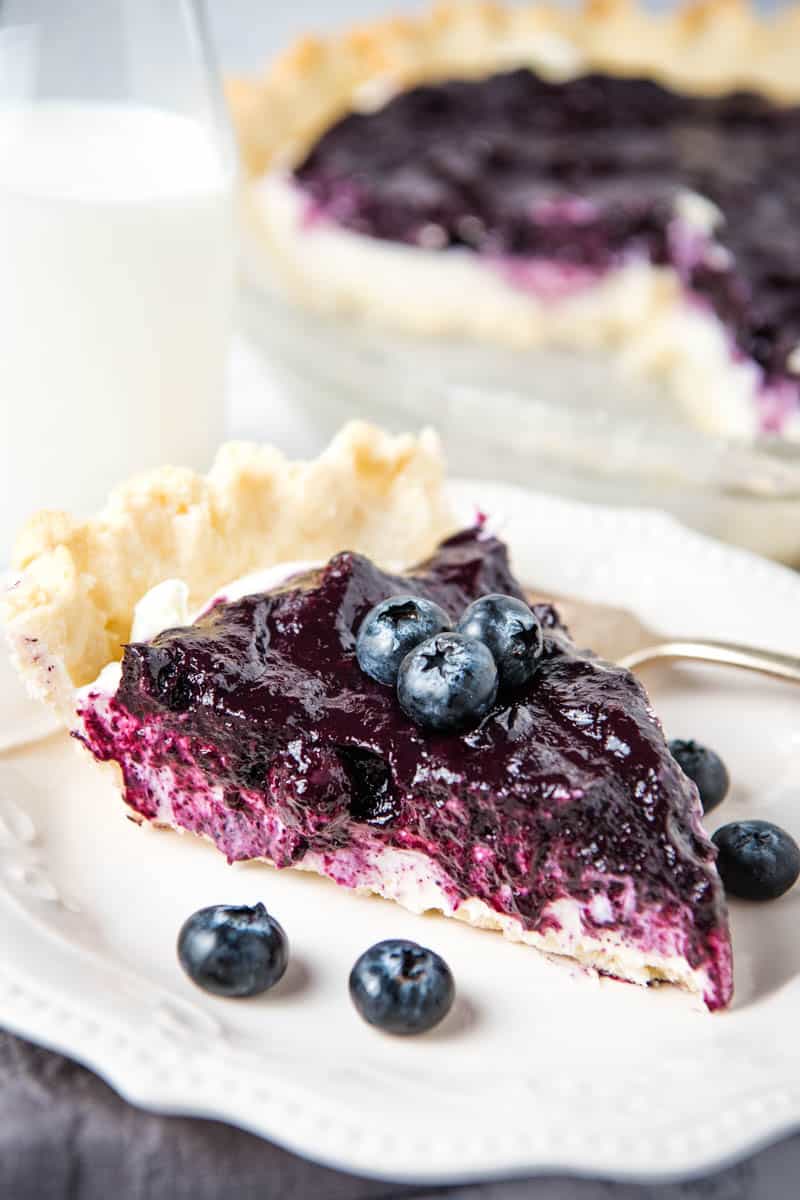
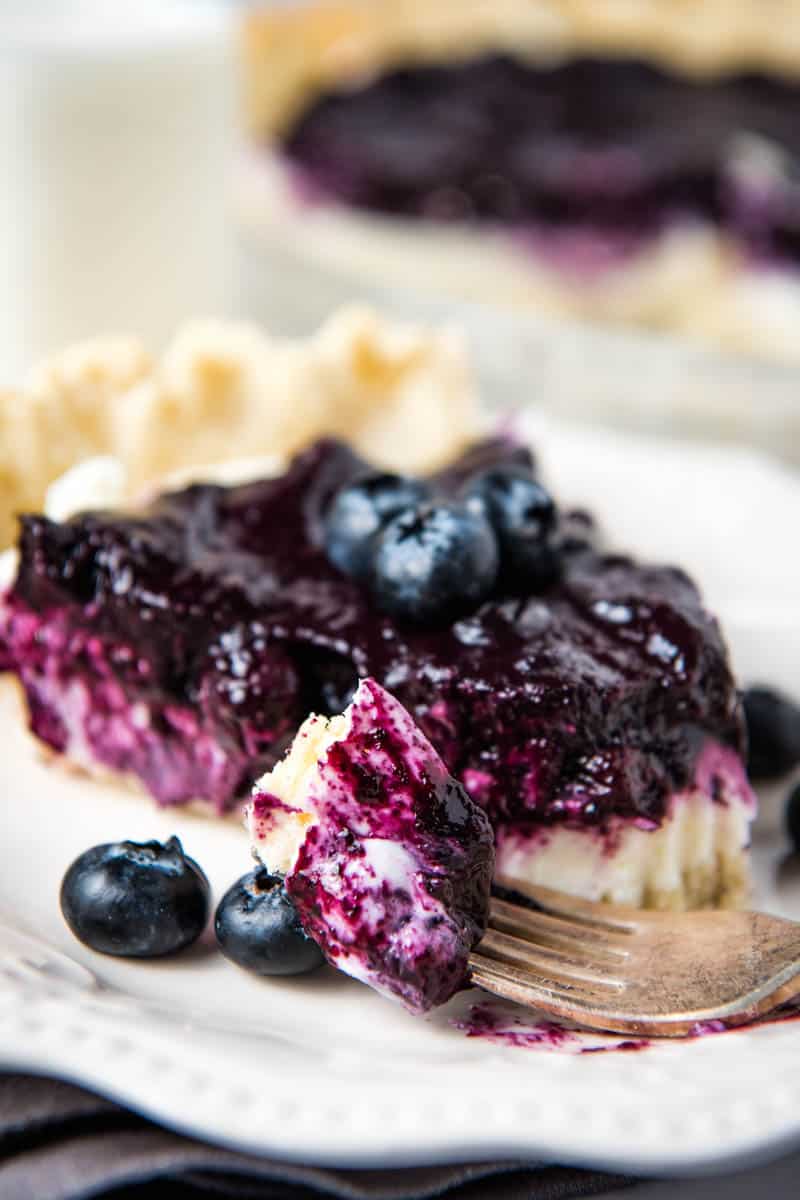
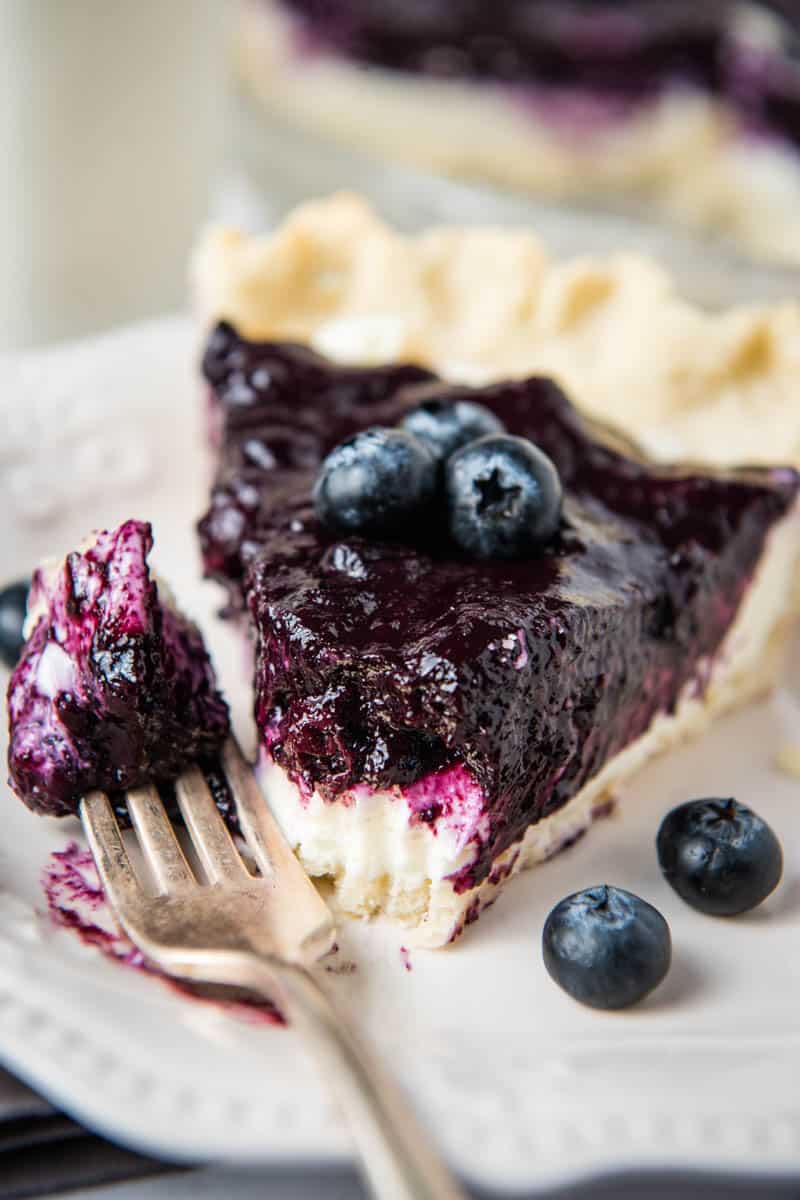
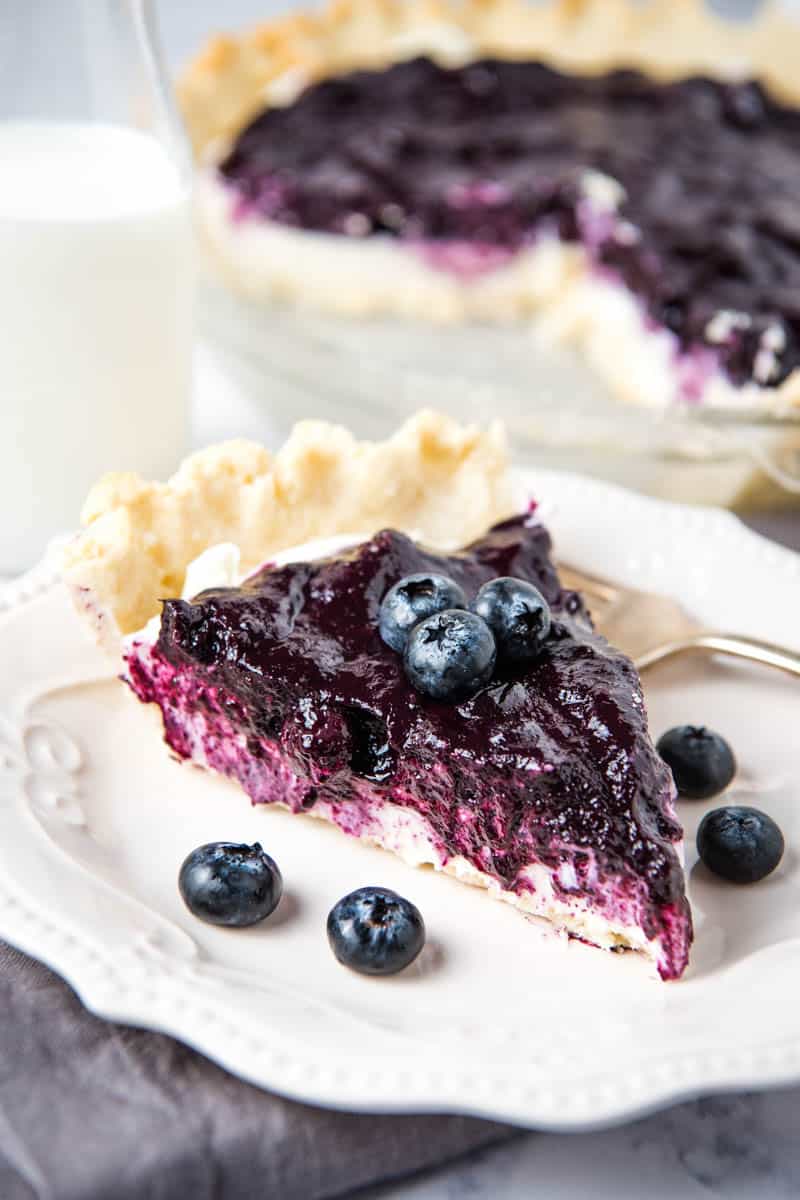
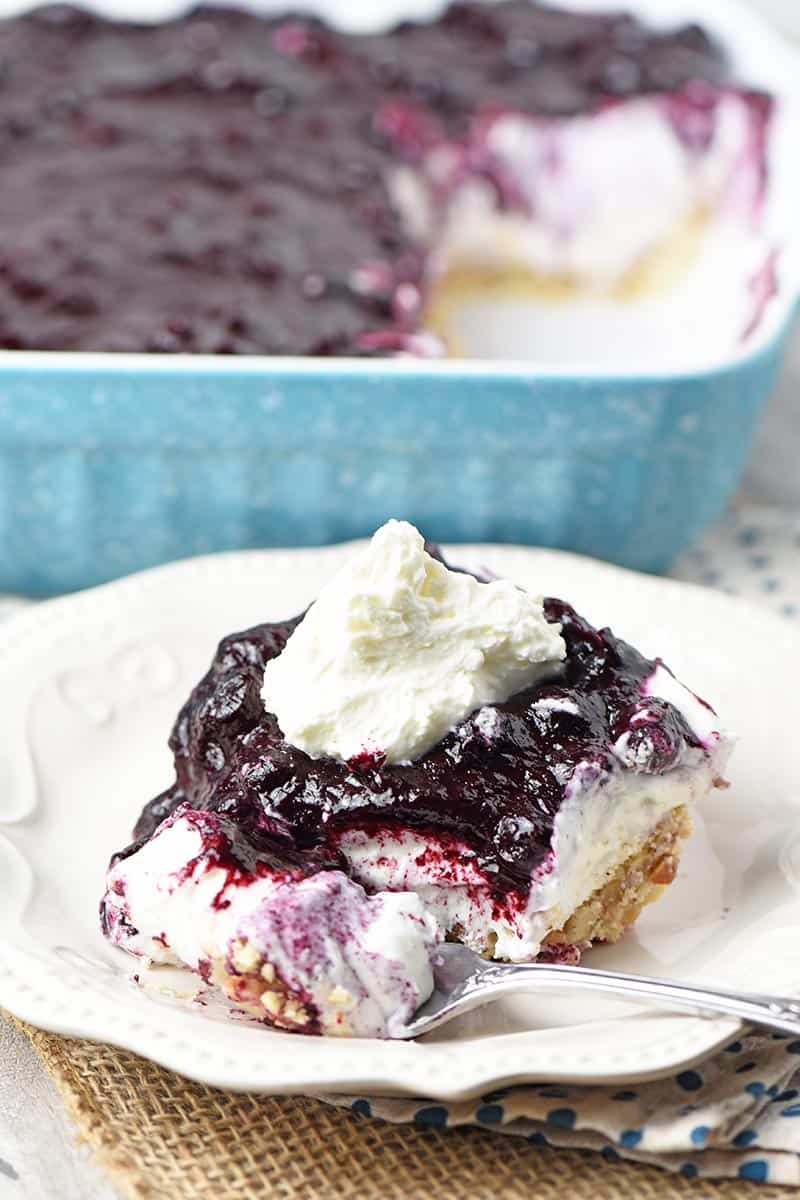
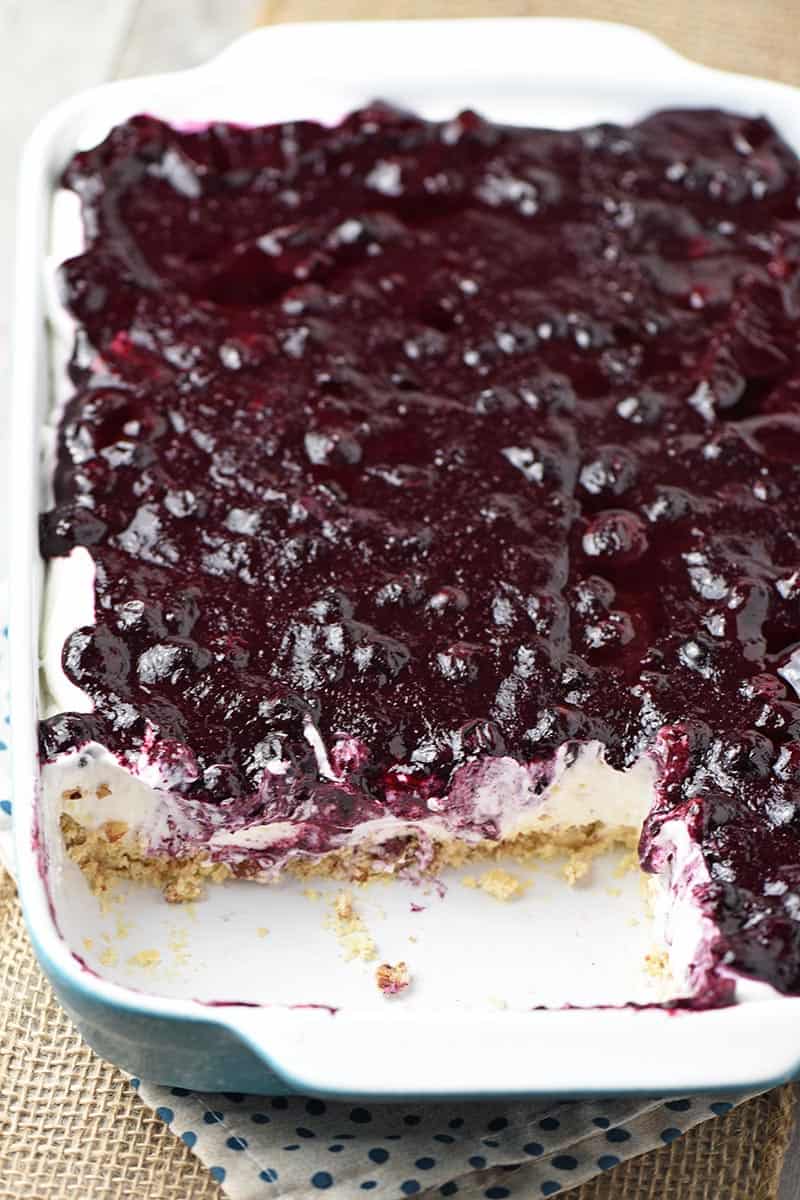
How to make the best blueberry cream cheese pie with this easy recipe using fresh or frozen blueberries. Can be no bake and gluten-free too!
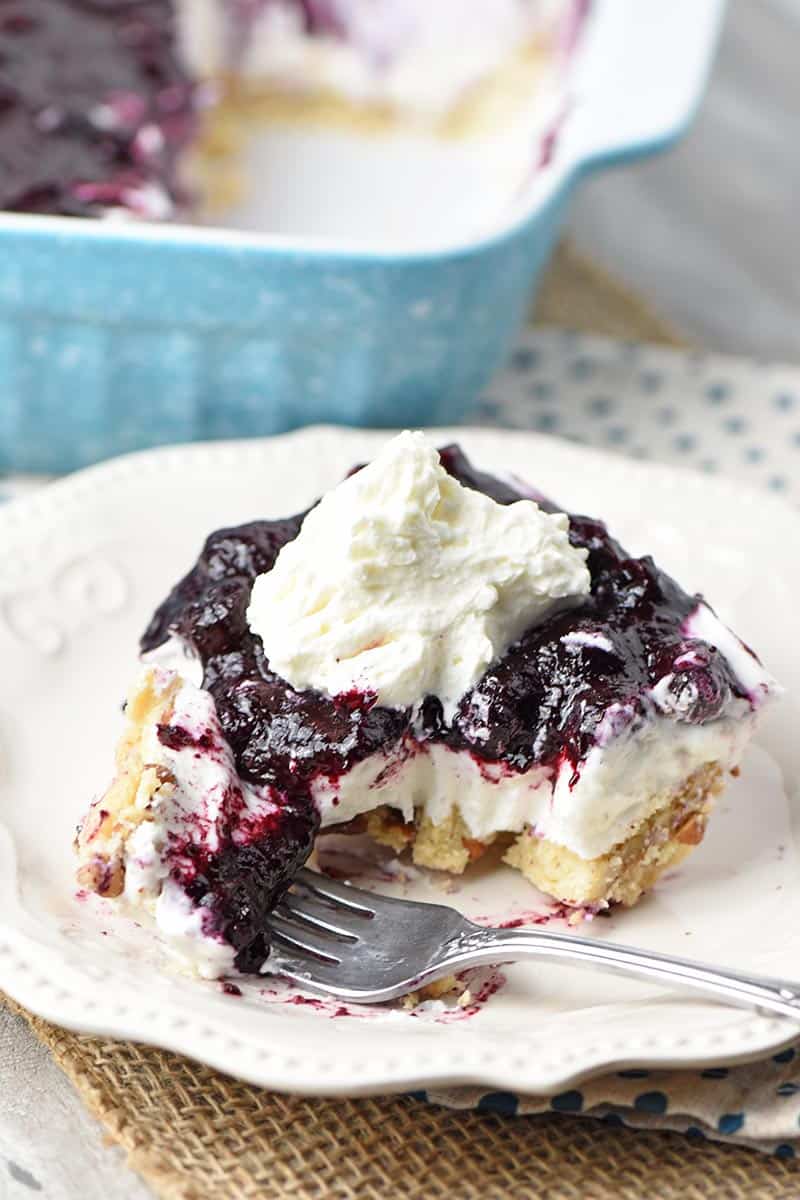
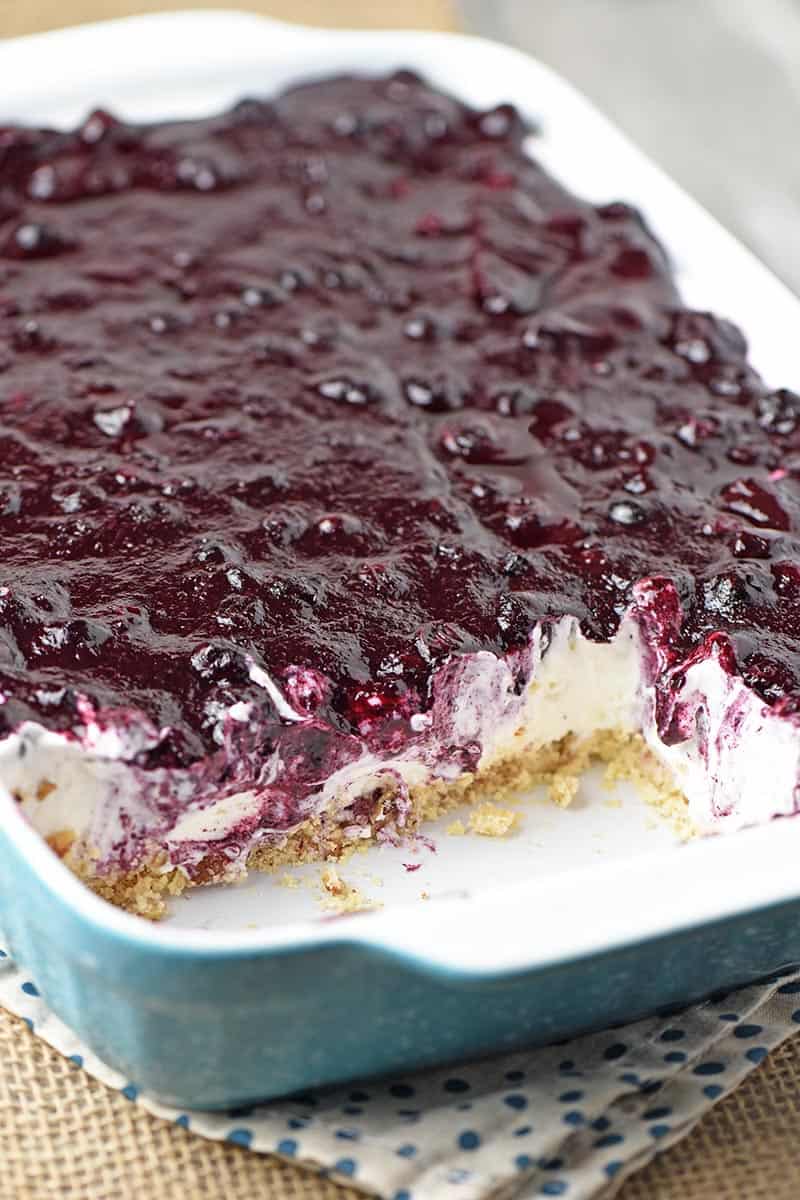
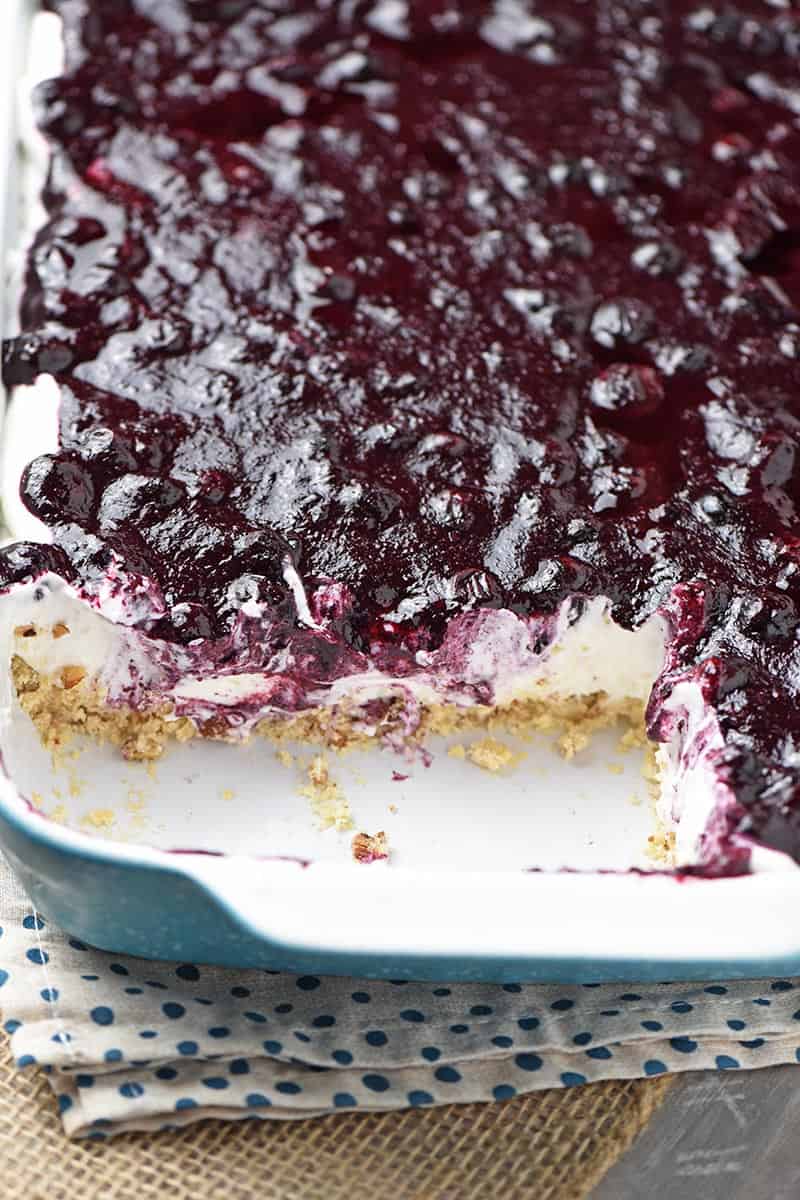
Cream cheese blueberry pie has to be one of my favorite desserts, kinda like cream cheese strawberry pie. It’s full of creamy goodness and outstanding blueberry flavor.
One of my most popular recipes is my blueberry delight, made with Dream Whip and cream cheese. This pie is similar, but without the Dream Whip, and it’s made in a regular pie plate.
Instead of using Dream Whip, I love to make a no bake, cheesecake-like, cream cheese filling with cream cheese, powdered sugar, and milk.
It’s topped with homemade blueberry pie filling you can make with fresh and/or frozen blueberries. And also note, this pie filling requires minimal stove time, making it a win win in my book, cuz y’all know I don’t like stove time.
This blueberry cream pie is perfect for a weeknight dessert, church potluck, backyard bbq, 4th of July celebration, and all manner of family and friend get togethers.
For a non-creamy blueberry pie option, blueberry cobbler is one of my favorites.
If you’d rather skip all of my pie making tips, important cooking info for this recipe, and similar recipe ideas – and get straight to the blueberry cream pie recipe – just scroll down to the bottom, where you’ll find a printable recipe card.
INGREDIENTS YOU’LL NEED:
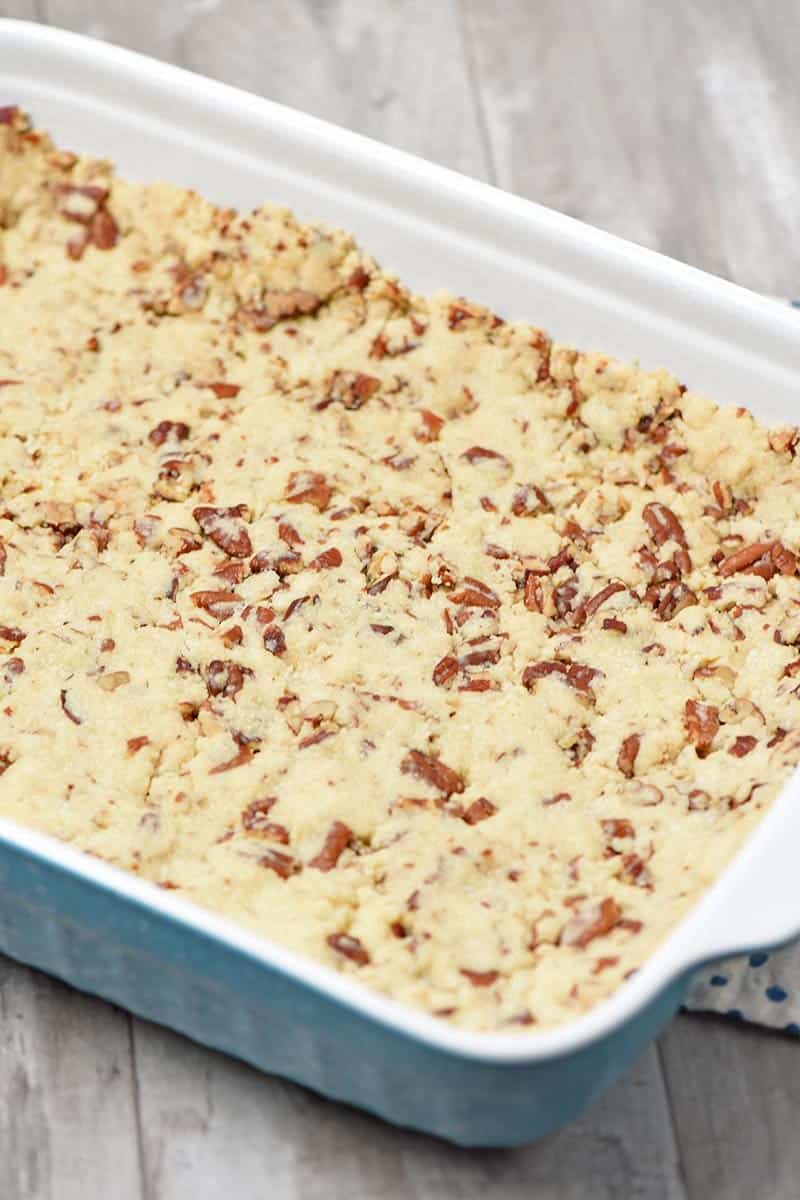
Single pie crust – You have options here, including no bake and gluten-free, and we’ll talk about them below. But be sure to make this ahead of time so it’s ready to go.
Pecan Sandies crust – Make it like you would a graham cracker crust.
Vanilla Wafer crust – like a graham cracker crust.
Golden Oreo crust – again, like a graham cracker crust.
Pecan nut crust – or buy a store bought crust and press pecans into it.
Store bought crust
Just be sure to make your crust ahead of time, so it’s all set and ready to go. From that point on, there will be no baking necessary.
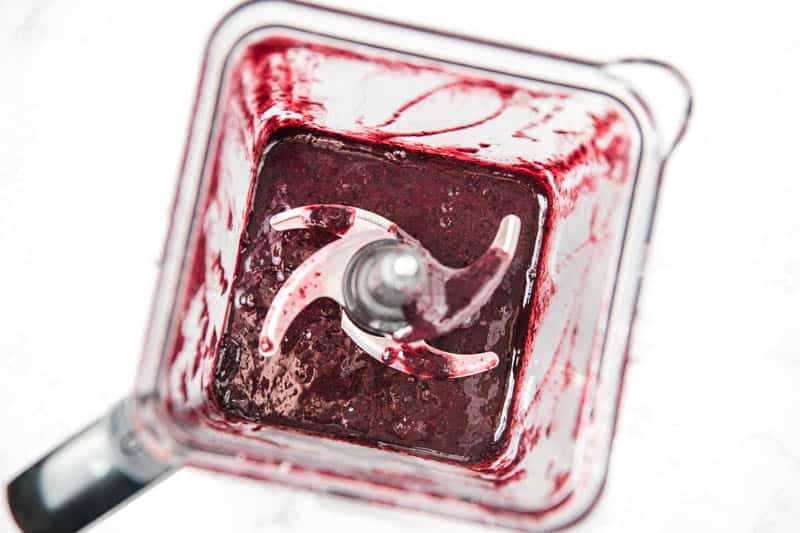
HOW TO MAKE BLUEBERRY PUREE
To make blueberry purée, you simply put blueberries in a blender, and blend them up into a purée. Your blender may even have a purée button.
It’ll likely take around 3+ cups of blueberries, fresh or frozen, to make 2 cups of purée. If you’re using frozen berries, make sure to rinse and dry them off so you don’t get ice (aka, extra liquid) mixed in with the berries, which will lessen the flavor.
HOW TO MAKE A BLUEBERRY CREAM CHEESE PIE
Ok, you’ve got your crust made and ready to go. And you’ve got your blueberry purée ready to go too.
Now it’s time to make the blueberry pie filling with said purée. Then I’ll show you how to make the cream cheese filling.
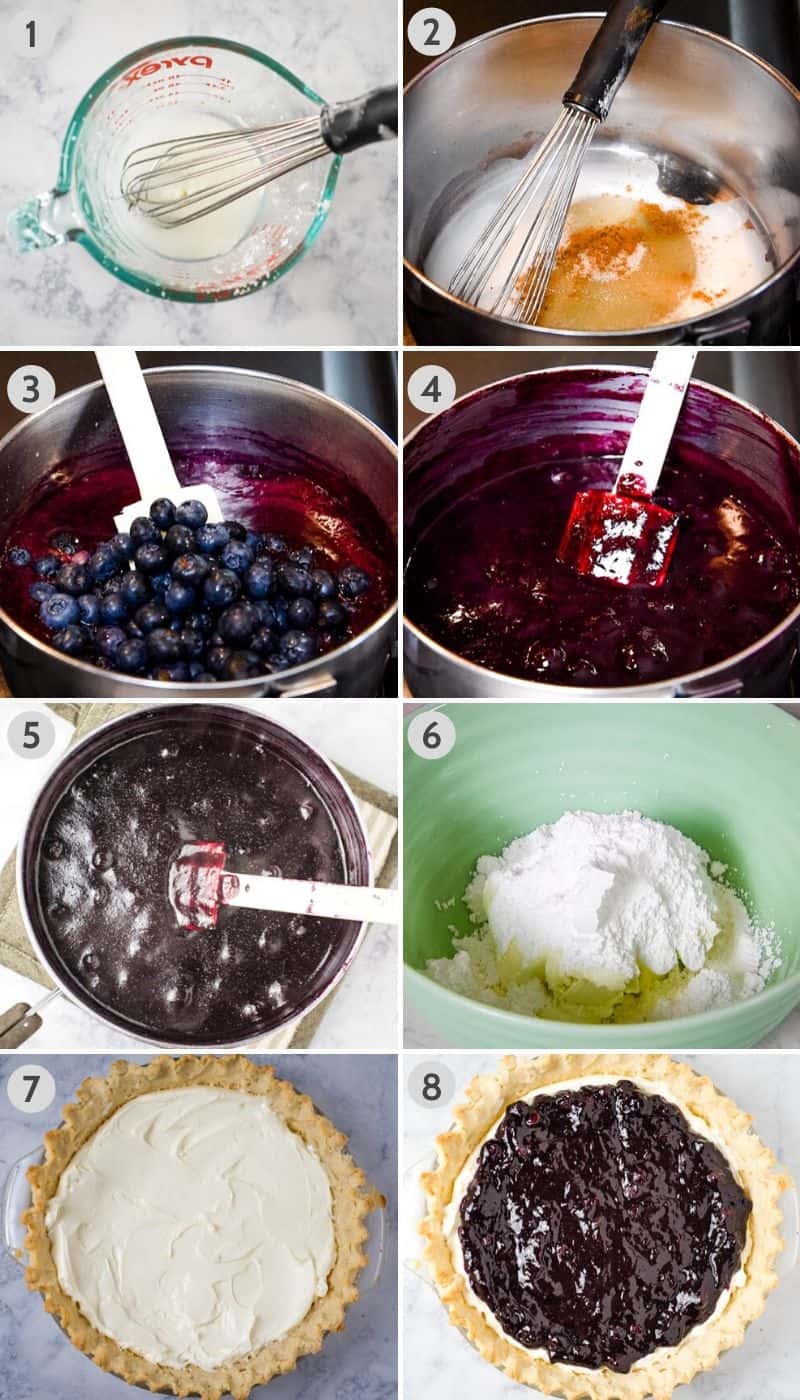
In a small measuring cup or bowl, whisk together the water and corn starch first. This will ensure no lumps in your pie filling.
In a medium saucepan on medium heat, whisk together the corn starch mixture with the lemon juice, sugar, and cinnamon.
Add the puréed blueberries and whole blueberries to the mixture. You can use fresh or frozen blueberries, but I highly recommend fresh blueberries for the whole berries.
Cook the entire mixture for about 10-15 minutes, bringing it to a slow boil, stirring constantly ’til the mixture begins to thicken.
Remove the mixture from the heat and allow it to cool completely. Sometimes I even stick it in the fridge to cool more quickly.
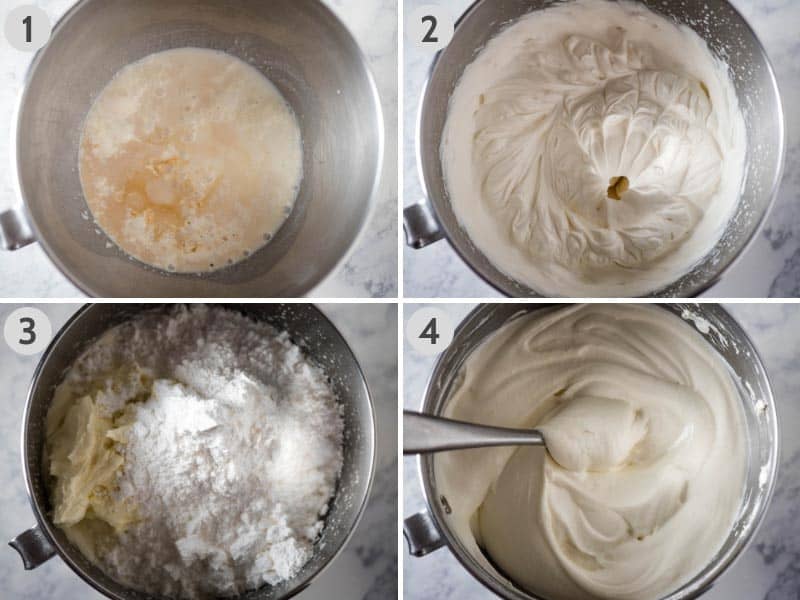
Meanwhile in a separate bowl, mix together the cream cheese, powdered sugar, and milk.
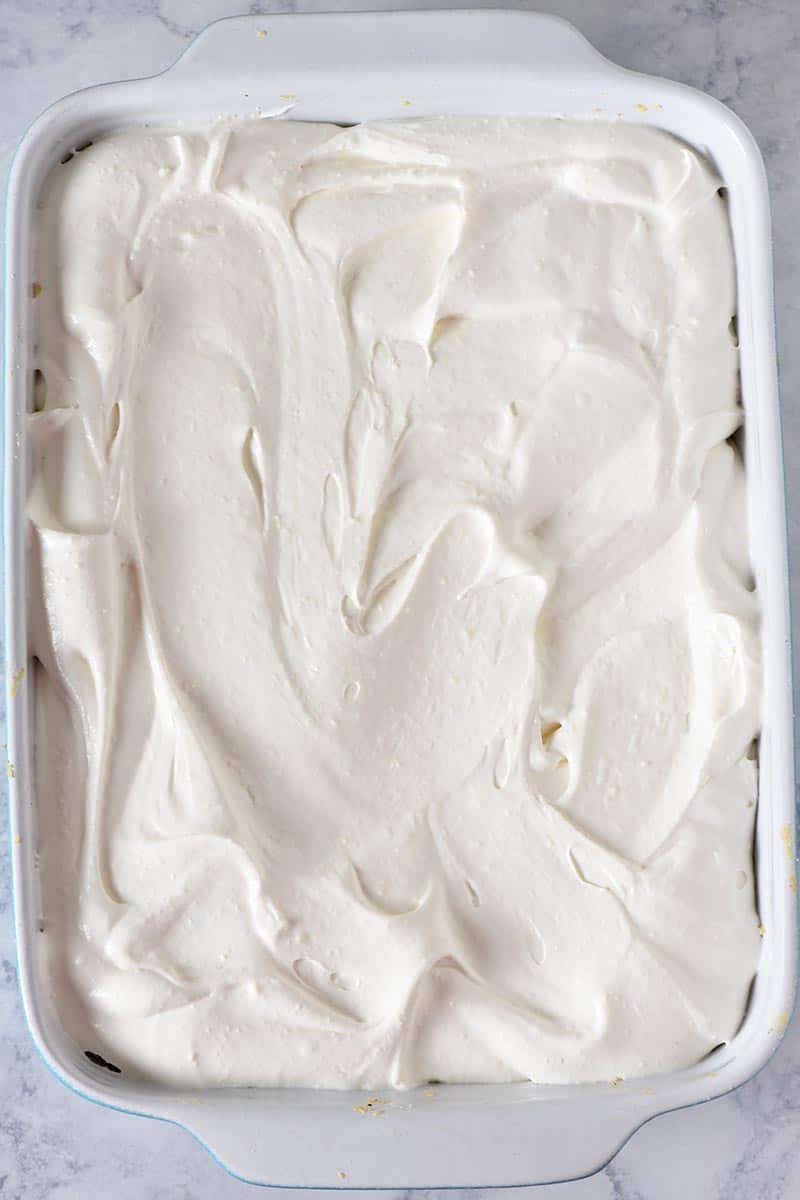
Spread the cream cheese filling in the cooled and prepared pie crust.
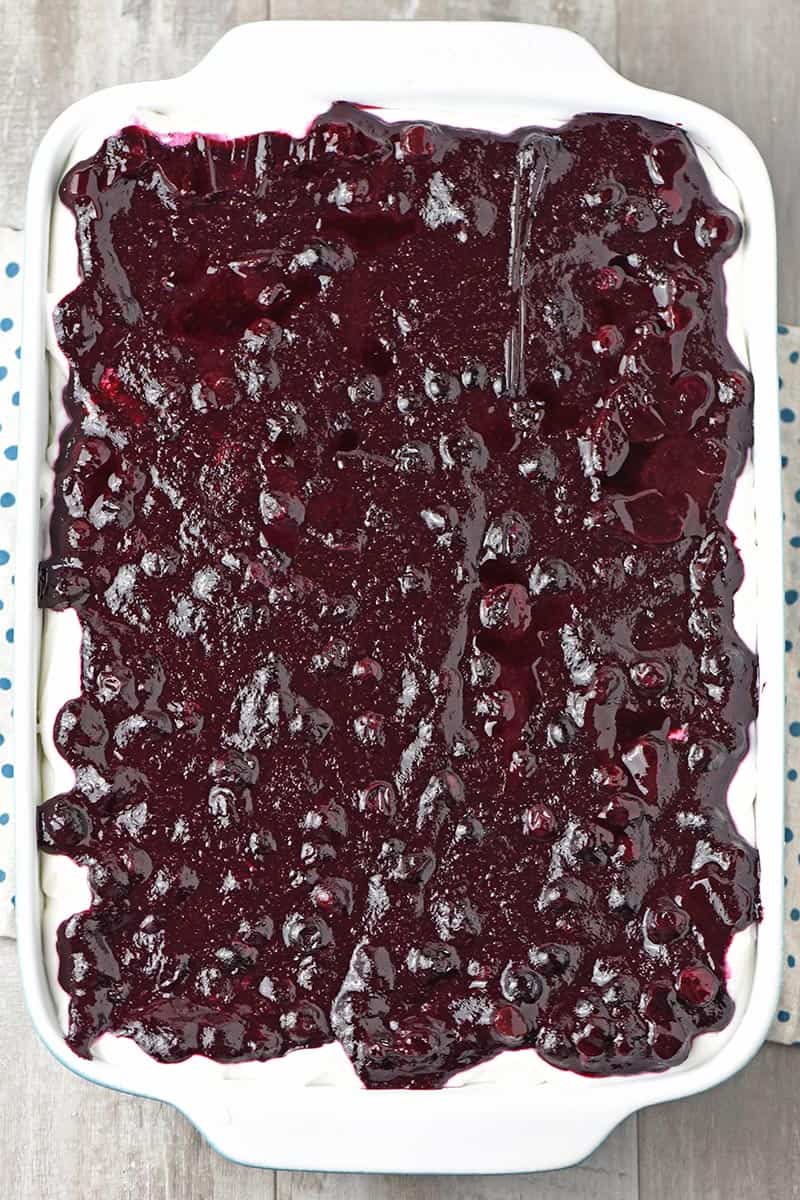
Top the cream cheese filling with the cooled blueberry pie filling.
At this point, you’ll need to chill the pie for at least 1-2 hours, or overnight.
Once it’s chilled, you can slice it up, serve it, and enjoy! You can even top it with a dollop of Cool Whip if you want.
It’s such a yummy pie!
HOW TO THICKEN PIE FILLING
If the blueberry pie filling doesn’t seem to be thickening up enough, you can add a little more corn starch, 1/2 to 1 teaspoon at a time.
Just be sure to whisk the corn starch with a little bit of water first (about 1 tablespoon of water for every teaspoon of corn starch), so you’re not just adding lumps to your filling.
HOW TO STORE BLUEBERRY CREAM PIE
Be sure to cover the pie and store it in the refrigerator if not eating right away. Any leftovers should be refrigerated due to the cream filling.
And yes, you can freeze this pie. Just be sure to cover it well and store it in an airtight pie container so it doesn’t get freezer burn. It should keep for up to 2 months in the freezer.
How to make the best blueberry cream cheese pie with this easy recipe using fresh or frozen blueberries. Can be no bake and gluten-free too!
Ninja Professional Countertop Blender with 1100-Watt Base, 72oz Total Crushing Pitcher and (2) 16oz Cups for Frozen Drinks and Smoothies, Gray
OXO Good Grips 11-Inch Better Balloon Whisk
Cuisinart MultiClad Pro Stainless Steel 2-Quart Saucepan with Cover
IMUSA USA Hand Mixer with Case 5-Speed, White
Pyrex Easy Grab Glass 9.5 Inch Pie Plate (2-Pack)
OXO SteeL Pie Server
1 single pie crust* (baked and ready)
2 tablespoons water
1 tablespoon corn starch
1/2 teaspoon lemon juice
2 tablespoons cane sugar*
1/4 teaspoon cinnamon
2 cups blueberry purée*
2 cups blueberries*
16 ounces cream cheese
1 1/2 cups powdered sugar
1 tablespoon milk
Make your pie crust ahead of time, so it’s all set and ready to go. From that point on, there will be no baking necessary.
In a small measuring cup or bowl, whisk together the water and corn starch first. This will ensure no lumps in your pie filling.
In a medium saucepan on medium heat, whisk together the corn starch mixture with the lemon juice, sugar, and cinnamon.
Add the puréed blueberries and whole blueberries to the mixture. You can use fresh or frozen blueberries, but I highly recommend fresh blueberries for the whole berries.
Cook the entire mixture for about 10-15 minutes, bringing it to a slow boil, stirring constantly ’til the mixture begins to thicken.
Remove the mixture from the heat and allow it to cool completely. Sometimes I even stick it in the fridge to cool more quickly.
Meanwhile in a separate bowl, mix together the cream cheese, powdered sugar, and milk.
Spread the cream cheese filling in the cooled and prepared pie crust.
Top the cream cheese filling with the cooled blueberry pie filling.
Cover and chill the pie for at least 1-2 hours, or overnight.
Once it’s chilled, you can slice it up, serve it, and enjoy! You can even top it with a dollop of Cool Whip if you want.
*Personally, I like to use my favorite pie crust recipe, which I usually make gluten-free with my favorite gluten-free flour.
However, you can also go with any one of a number of other options:
Pecan Sandies crust – Make it like you would a graham cracker crust.
Vanilla Wafer crust – like a graham cracker crust.
Golden Oreo crust – again, like a graham cracker crust.
Pecan nut crust – or buy a store bought crust and press pecans into it.
Store bought crust
*To make blueberry purée, you simply put blueberries in a blender, and blend them up into a purée. Your blender may even have a purée button. It’ll likely take around 3+ cups of blueberries, fresh or frozen, to make 2 cups of purée. If you’re using frozen berries, make sure to rinse and dry them off so you don’t get ice (aka, extra liquid) mixed in with the berries, which will lessen the flavor.
*I choose to use pure cane sugar, but you can also use granulated sugar.
HOW TO THICKEN PIE FILLING
If the blueberry pie filling doesn’t seem to be thickening up enough, you can add a little more corn starch, 1/2 to 1 teaspoon at a time, while it’s still on the stove. Just be sure to whisk the corn starch with a little bit of water first (about 1 tablespoon of water for every teaspoon of corn starch), so you’re not just adding lumps to your filling.
HOW TO STORE BLUEBERRY CREAM PIE
Be sure to cover the pie and store it in the refrigerator if not eating right away. Any leftovers should be refrigerated due to the cream filling.
And yes, you can freeze this pie. Just be sure to cover it well and store it in an airtight pie container so it doesn’t get freezer burn. It should keep for up to 2 months in the freezer.
Pies & Pastries
American
blueberry cream cheese pie, blueberry cream cheese pie recipe, blueberry cream pie, blueberry cream pie recipe, blueberry pie, blueberry recipes, cream cheese blueberry pie, cream cheese desserts, cream pie, how to make a blueberry cream cheese pie, pie recipe
The best pineapple sunshine cake from scratch. Topped with a dreamy crushed pineapple fluff frosting, this dessert recipe is sure to be a crowd pleaser!
Pineapple cake is one simple dessert you can make in a pinch. And what I love most about this dessert is the light, angel lush, pineapple fluff frosting on top of the cake.
That whipped pudding topping really adds a refreshment factor to this very yummy dessert. Nothing about this cake is heavy or dense, but it does have the most incredible pineapple flavor.
While you can make this pineapple sunshine cake recipe with a cake mix, I highly recommend making it from scratch with just a handful of ingredients, including crushed pineapple. Even making it homemade, it’s super easy to make.
While I do like to add nuts to my cake batter, they are totally optional. I guess you could say the same for the shredded coconut and maraschino cherries I like to sprinkle or add on top of each slice.
If you’d rather skip all of my baking tips, important info for this recipe, and similar recipe ideas – and get straight to the pineapple cake recipe – just scroll down to the bottom, where you’ll find a printable recipe card.
Before you get started mixing up your cake batter, be sure to preheat your oven to 350° F, and grease a 9″x13″ cake pan with cooking spray (or shortening/flour).
To mix up the batter…
In a large bowl, whisk together the dry ingredients, including the flour, sugar, and baking soda ’til well combined.
Add in the eggs, vanilla extract, and pineapple (do not drain the pineapple), mixing everything together well.
Fold the nuts into the cake batter (optional step).
Spread the batter evenly into the prepared baking pan, and bake at 350° F for about 30-35 minutes, or until a toothpick or cake tester inserted in the center comes out clean.
Once your crushed pineapple cake is fully baked, allow it to cool completely on a wire rack.
Now to make the whipped pineapple frosting…
Add the crushed pineapple to a large bowl. Do not drain the pineapple.
Whisk the pudding mix into the crushed pineapple ’til well combined.
Let the pudding mixture sit for about 2 minutes.
Then gently fold the whipped topping or whipped cream into the mixture ’til smooth.
Now you can frost your pineapple cake and garnish with toppings like shredded coconut, extra nuts, maraschino cherries, and/or fresh pineapple.
Be sure to refrigerate the cake topped with angel lush frosting for at least 30 minutes before serving; and be sure to store any leftover cake in the refrigerator, as well.
You can make this easy pineapple cake ahead of time, preferably no longer than the day before unless you’re freezing it.
CAN PINEAPPLE CAKE BE FROZEN?
Yes, this cake can definitely be frozen. But I’d wait to make the frosting when you’re ready to actually serve the cake.
Just be sure to store pineapple cake in an airtight cake pan or cover it with plastic wrap and foil for protection while in the freezer.
ALTERNATIVE INGREDIENT OPTIONS
If you wanna really twist things up, instead of pineapple, you can use mandarin oranges, canned peaches, etc. I’d be tempted to also try making this with crushed strawberries.
Or maybe mix it up with two different kinds of fruits. Strawberries and pineapple would be fantastic… Maybe pineapple in the cake and strawberries in the whipped pudding topping.
Just be sure whatever fruit you choose is canned in 100% fruit juice and not in a syrup. Or if using strawberries, maybe lean toward fresh so you don’t have all the added water from frozen fruit.
CAN I MAKE IT GLUTEN-FREE?
Now I’ll be honest. I have not tried making this cake gluten-free.
That being said, I’d probably trial it like I have other cake recipes, and I’d make it with a good gluten-free cake flour. I might add a little bit of xanthan gum, as well, depending on if the flour already includes it.
Of course, you also want to check other ingredients to make sure that everything is safe to consume for a gluten intolerance/allergy.
GET THE PRINTABLE RECIPE
If you love this moist pineapple cake recipe as much as I do, please write a 5 star review, and help me share the recipe on Facebook and Pinterest!
Pineapple Sunshine Cake with Pineapple Fluff Frosting
The best pineapple sunshine cake from scratch. Topped with a dreamy crushed pineapple fluff frosting, this dessert recipe is sure to be a crowd pleaser!
KitchenAid Artisan Tilt-Head Stand Mixer with Pouring Shield, 5-Quart, Empire Red
Rorence Stainless Steel Non-Slip Mixing Bowls With Pour Spout, Handle and Lid, Nesting Set of 3, Red
Dole Crushed Pineapple in Juice, 20 Ounce Cans (Pack of 12)
1 can (20 ounces crushed pineapple (do not drain))
1 cup chopped pecans*
Pineapple Fluff Frosting:
1 container (8 ounces Cool Whip*)
1 small box (3.5 ounces instant vanilla pudding)
1 can (20 ounces crushed pineapple (do not drain))
Garnish, optional
Extra pecans or walnuts
Shredded coconut
Maraschino cherries
Fresh pineapple
Before you get started mixing up your cake batter, be sure to preheat your oven to 350° F, and grease a 9″x13″ cake pan with cooking spray (or shortening/flour).
In a large bowl, whisk together the dry ingredients, including the flour, sugar, and baking soda ’til well combined.
Add in the eggs, vanilla extract, and pineapple (do not drain the pineapple), mixing everything together well.
Fold the nuts into the cake batter (optional step).
Spread the batter evenly into the prepared baking pan, and bake at 350° F for about 30-35 minutes, or until a toothpick or cake tester inserted in the center comes out clean.
Once your crushed pineapple cake is fully baked, allow it to cool completely on a wire rack.
To make the frosting, add the crushed pineapple to a large bowl. Do not drain the pineapple.
Whisk the pudding mix into the crushed pineapple ’til well combined.
Let the pudding mixture sit for about 2 minutes.
Then gently fold the whipped topping or whipped cream into the mixture ’til smooth.
Now you can frost your pineapple cake and garnish with toppings like shredded coconut, extra nuts, maraschino cherries, and/or fresh pineapple.
Be sure to refrigerate it for at least 30 minutes before serving; and be sure to store any leftover cake in the refrigerator, as well.
You can make this cake ahead of time, preferably no longer than the day before unless you’re freezing it.
CAN PINEAPPLE CAKE BE FROZEN?
Yes, the cake can definitely be frozen. But I’d wait to make the frosting when you’re ready to actually serve the cake. Just be sure to store the cake in an airtight cake pan or cover it with plastic wrap and foil for protection while in the freezer.
ALTERNATIVE INGREDIENT OPTIONS
If you wanna really twist things up, instead of pineapple, you can use mandarin oranges, canned peaches, etc. I’d be tempted to also try making this with crushed strawberries. Or maybe mix it up with two different kinds of fruits. Strawberries and pineapple would be fantastic… Maybe pineapple in the cake and strawberries in the whipped pudding topping.
Just be sure whatever fruit you choose is canned in 100% fruit juice and not in a syrup. Or if using strawberries, maybe lean toward fresh so you don’t have all the added water from frozen fruit.
CAN I MAKE IT GLUTEN-FREE?
Now I’ll be honest. I have not tried making this cake gluten-free. That being said, I’d probably trial it like I have other cake recipes, and I’d make it with a good gluten-free cake flour. I might add a little bit of xanthan gum, as well, depending if the flour already includes it.
Of course, you also want to check other ingredients to make sure that everything is safe to consume for a gluten intolerance/allergy.
Cakes & Cupcakes
American
cake, cake recipes, crushed pineapple cake, easy pineapple cake, how to make a pineapple cake from scratch, how to make pineapple sunshine cake, moist pineapple cake recipe, pineapple cake, pineapple cake recipe, pineapple fluff frosting, pineapple recipes, pineapple sunshine cake, pineapple sunshine cake recipe, southern pineapple cake, whipped pineapple frosting, whipped pudding topping
Step by step guide for a no fail pie crust with butter and 3 simple ingredients. Perfect homemade crust for both sweet and savory recipes.
Pie crust recipe cards probably make up a good portion of many a grandmother’s recipe box. While I used to wonder at the variety of pie crusts in my own grandma’s recipe box, I think I understand now why she had so many.
There are so many different ways you can make a pie crust.
You can make it with oil, shortening, lard, or butter. Make it flaky, or you can make it crumbly.
I think I understand now why Grandma had so many pie crust recipes. Maybe like me, it took her awhile to find or come up with just the right recipe. Or maybe it was the thrill of the hunt for an even more delicious recipe. Of course, it may’ve just had a little something to do with her love for trying new recipes.
For far too long, I’ve let pie crust intimidate me to the point that I hardly ever made pie. And if I did, I didn’t roll it out; instead I opted for pressing it into the pie plate.
So I want to take you along on my journey and help you, as well. Let’s kick intimidation to the curb and make a really delicious pie crust recipe with butter that you will want to use again and again for your favorite pie recipes.
Now keep in mind, my pie crust may not look perfect, but it sure is tasty; and really, that’s all that matters.
WHERE CAN I FIND THE ACTUAL RECIPE CARD?
If you’d rather skip all of my baking tips, important info for this recipe, and similar recipe ideas – and get straight to the pie crust recipe – just scroll down to the bottom, where you’ll find a printable recipe card.
Salted butter – You can use unsalted butter over salted because you’re more able to control the amount of salt that goes into your pie crust. However, we like the flavor that salted butter gives to our pie crust.
Milk
Remember, all of the ingredient amounts you’ll need are in the printable recipe card below.
KITCHEN TOOLS AND EQUIPMENT YOU’LL NEED:
Glass Pie Plates – The pie plate I’m using for this recipe is my old faithful pie plate. I’ve had it forever, probably since we got married. Mine actually has the fluted edge sorta built in too, so we can press it in and get somewhat of a decorative edge without a lot of handiwork on our part.
Making a good crust is actually a pretty simple process. While you can use shortening, or even part shortening part butter, I prefer to use butter both for the flavor and for the texture it gives the crust.
Next you need to cut the butter into the flour mixture with a pastry cutter until the mixture resembles coarse crumbs… Or you can use a food processor. I just keep things simple with a pastry blender.
Then add the milk, a tablespoon at a time, until the mixture forms together well, but isn’t so wet that it’s sticky. You don’t want a crust that’s too crumbly and hard to manage. So make sure you add enough liquid.
Once you’ve got it mixed up, wrap your pie dough in plastic wrap at this time, and place it in the fridge to chill for at least 30 minutes.
HOW TO ROLL OUT HOMEMADE PIE CRUST
Now you’re ready to get out the rolling pin, and sprinkle a clean surface with a little bit of extra flour, so the dough won’t stick to the surface.
Roll the dough out with a rolling pin, equally rolling in all directions, ’til the dough is about 2 to 3 inches bigger around than your pie plate.
If your pie plate is ready to go, fold the crust in quarters.
Carefully place the dough in the pie plate, unfolding it to cover the entire plate.
Smooth it out inside the pie plate, and then trim off any overhanging edges with kitchen shears or a knife. Be careful here: Leave enough dough (about 1/2 inch overlapping) so you can flute the edges of your crust.
HOW TO FLUTE PIE CRUST
If you want a fluted edge, use your thumb and index finger, along with the tip of your opposite index finger, to flute or pinch the edge of the dough all around the pie plate.
Alternatively, you can press the dough to the rim of the pie plate, or you can add decorative pieces of crust you’ve cut out with a cookie cutter or other tool (like a leaf cutter for fall and Thanksgiving).
WAYS TO KEEP PIE CRUST FROM SHRINKING
Pie crust can tend to shrink, but there are ways you can keep this from happening.
Using cold ingredients helps a lot, the colder the better. So your butter and your milk should both be as ice cold as possible.
Chilling the pie dough makes a difference. You can chill it before rolling it out, which will also help to give it more of a flaky texture.
I also recommend chilling the dough before baking or adding any kind of filling to bake. Chilling helps reduce and/or eliminate shrinkage.
LET’S TALK ABOUT PIE WEIGHTS
If this is a single crust and you’re blind baking it without filling, use a fork to prick holes all around the inside of the crust.
A lot of people mention using pie weights for this step, but you really don’t need them. My mom taught me this little trick with the fork to keep the crust from bubbling up during baking.
It works just as well as pie weights, and you don’t have to spend any money.
HOW TO BAKE YOUR CRUST
You’ll need to bake the crust at 400° F for about 20 to 30 minutes, or until the crust begins to turn golden. You’ll likely bake for less time if making a gluten-free crust.
If you’re baking the crust with filling, be sure to follow the exact instructions for that particular recipe.
A FEW MORE TIPS…
If you want a double crust, you’ll need to double the recipe. And you’ll flute the edges after you add the top crust over your filling. You’ll also need to vent the top crust by cutting slits in it. Then you’ll bake it according to the instructions for the specific pie recipe you’re making.
To protect your pie crust from burning while baking, you can use a pie shield to protect those raised edges of the crust that are more likely to burn before the rest of the pie is done.
You can chill your pie dough in the fridge for about 3 days before it’ll start to go bad. So yes, you can make your crust ahead of time or the day before.
To make this a dairy-free pie crust, substitute shortening for the butter, and substitute ice water for the milk.
To make it a gluten-free pie crust, substitute a good gluten-free flour for the all-purpose flour. And always check any other ingredients before adding. I recommend Authentic Foods Classical Blend for a roll-out pie crust (it’s not always available thru Amazon, so I order directly from the company). If you want a press-in pie crust, their Multi-Blend Flour or Cup4Cup work just fine, but you may not be able to roll it out; I haven’t tried making a pie crust with the multi-blend flour yet.
Step by step guide for a no fail pie crust with butter and 3 more ingredients. Perfect homemade crust for both sweet and savory recipes.
Large Mixing Bowl
Pastry Blender
Rolling Pin
Kitchen Shears
9-Inch Pie Plate
Pie Shield
1 cup all-purpose flour
3/4 teaspoon salt
8 tablespoons salted butter
4 tablespoons whole milk
Whisk together the flour and salt in a large mixing bowl.
Slice the cold butter into the flour mixture.
Using a pastry blender, cut the butter into the flour mixture until it resembles coarse crumbs.
Then add the milk, a tablespoon at a time, until the mixture forms together well, but isn't so wet that it's sticky; you don't want a crust that's too crumbly and hard to manage either, so make sure you add enough milk.
Wrap the pie dough in plastic wrap, and place it in the fridge to chill for at least 30 minutes.
Sprinkle a clean surface with a bit of flour, so the dough won't stick to the surface. Roll the dough out with a rolling pin, equally rolling in all directions, 'til the dough is about 2 to 3 inches bigger around than your pie plate.
Fold the crust in quarters; then carefully place the dough in the pie plate, unfolding it to cover the entire plate.
Smooth it out inside the pie plate, and then trim off any overhanging edges with kitchen shears or a knife; leave enough dough (about 1/2 inch overlapping) so you can flute the edges of the crust.
If this is a single crust and you're blind baking it without filling, use a fork to prick holes all around the inside of the crust.
If you want a fluted edge, use your thumb and index finger, along with the tip of your opposite index finger, to flute or pinch the edge of the dough all around the pie plate. Alternatively, you can press the dough to the rim of the pie plate with a fork; or you can add decorative pieces of crust you've cut out with a mini cookie cutter or other decorative tool.
Cover with plastic wrap, and chill for at least 30 minutes to an hour.
Pre-heat the oven to 400° F.
Remove the crust from the fridge, uncover, and bake it at 400° F for about 20 to 30 minutes, or until the crust begins to turn golden. If you're baking the crust with filling, be sure to follow the exact instructions for that particular recipe.
*To make it a gluten-free pie crust, substitute a good gluten-free flour for the all-purpose flour. And always check any other ingredients before adding. I recommend Authentic Foods Classical Blend for a roll-out pie crust (it’s not always available thru Amazon, so I order directly from the company). If you want a press-in pie crust, their Multi-Blend Flour or Cup4Cup work just fine, but you may not be able to roll it out; I haven’t tried making a pie crust with the multi-blend flour yet.
*You can use either salted or unsalted butter; we’ve used both. Using unsalted butter will give you more ability to control the amount of salt that goes into your pie crust, but we like the flavor that salted butter gives to our pie crust, so it’s usually what we use.
*To make this a dairy-free pie crust, substitute shortening for the butter. And substitute ice water for the milk.
WAYS TO KEEP PIE CRUST FROM SHRINKING
Pie crust can tend to shrink, but there are ways you can keep this from happening.
Using cold ingredients helps a lot, the colder the better. So your butter and your milk should both be as ice cold as possible.
Chilling the pie dough makes a difference. You can chill it before rolling it out, which will also help to give it more of a flaky texture. I also recommend chilling the dough before baking or adding any kind of filling to bake. Chilling helps reduce and/or eliminate shrinkage.
LET’S TALK ABOUT PIE WEIGHTS
A lot of people mention using pie weights for this step, but you really don’t need them. My mom taught me the little trick with the fork to keep the crust from bubbling up during baking.
It works just as well as pie weights, and you don’t have to spend any money.
A FEW MORE TIPS…
If you want a double crust, you’ll need to double the recipe. And you’ll flute the edges after you add the top crust over your filling. You’ll also need to vent the top crust by cutting slits in it. Then you’ll bake it according to the instructions for the specific pie recipe you’re making.
To protect your pie crust from burning while baking, you can use a pie shield to protect those raised edges of the crust that are more likely to burn before the rest of the pie is done.
You can chill your pie dough in the fridge for about 3 days before it’ll start to go bad. So yes, you can make your crust ahead of time or the day before.
Desserts, Pies & Pastries
American
butter pie crust, flaky pie crust, flute edges of pie, flute pie crust, gluten free pie crust, homemade pie crust, how to keep pie crust from shrinking, how to make a pie crust from scratch, how to roll out pie crust, no fail pie crust, perfect pie crust, pie, pie crust, pie crust recipe, pie crust recipe with butter, pie crust tutorial, pie dough, traditional pie crust
How to make Dream Whip in 2 easy steps, right from the box. Makes a delicious whipped cream you can use for pies, no bake desserts, cakes, Jello, and more!
Dream Whip whipped topping mix is an old-time favorite ingredient I love to use for quite a few of my recipes, especially no bake desserts, like my ever popular blueberry no bake dessert.
Over the last couple of years, I’ve fielded a lot of questions from readers about Dream Whip… Like where to find it, how to mix Dream Whip, can you substitute Cool Whip for Dream Whip, and more.
So this post is going to answer all of those questions and hopefully inspire you to make some delicious Dream Whip desserts of your own. I mean, yum, right?!
Believe me, when I first started to use Dream Whip, I wondered if I’d even still be able to get it. I remembered my mom using it way back when, those many years ago when I was a kid.
Sure enough, I had no problem finding it. And my store even runs out sometimes. So that tells me that Dream Whip is still living its best life.
[mv_video doNotAutoplayNorOptimizePlacement=”false” doNotOptimizePlacement=”false” jsonLd=”true” key=”ay5uatmnutwho4coj5vy” sticky=”false” thumbnail=”https://mediavine-res.cloudinary.com/v1581460461/kwc62ura65taark86gyk.jpg” title=”How to Make Dream Whip Straight from the Box” volume=”100″]
WHERE CAN I FIND THE ACTUAL RECIPE CARD?
If you’d rather skip all of my Dream Whip recipe tips, important info for this recipe, and similar recipe ideas – and get straight to the actual recipe – just scroll down to the bottom, where you’ll find a printable recipe card.
WHAT IS DREAM WHIP?
Just in case you don’t know, because you are not alone, my friend… A lot of people don’t know what Dream Whip is.
Basically, Dream Whip is a dessert topping mix you can use both in desserts and as a topping for desserts. It comes in powdered form, and you mix it together with cold milk and vanilla extract to get the final result.
I like to think of it as angel topping or cloud topping because it’s so light and fluffy. And it has a slightly sweet taste, perfect for topping a bowl of Instant Jello.
You’ll find instructions for how to mix Dream Whip on the side of the box, but I’ll show you how right here…
Empty 1 envelope of Dream Whip mix into a mixing bowl, and begin to mix milk and vanilla into that dry powdery mix, beating on low speed ’til blended.
Then beat on high speed for about 4 minutes or until the topping thickens and forms soft peaks.
WHAT ARE SOFT PEAKS?
Soft peaks form when whipped cream thickens.
So when your whipped cream thickens, you should be able to hold your mixer paddle upside down, and the whipped cream stays in place. You’ll also notice soft little ruffles, or peaks, in the topping.
STORING DREAM WHIP
You’ll definitely need to store it in the refrigerator in an airtight container until you’re ready to use it.
Personally, I would not freeze Dream Whip because I’m afraid it would change the texture. However, it’s quick and easy to mix up and use same day in any recipe.
And I have a few recipes and ideas for ways you can use Dream Whip.
MY FAVORITE DREAM WHIP RECIPES:
Like I mentioned above, I love making this blueberry delight recipe with Dream Whip and cream cheese.
Ohhhh, you can also dip strawberries in Dream Whip, add a dollop to your favorite flavor of Jello, and top pies and Jello cake with Dream Whip. Speaking of Jello cake, this whipped cream makes a great topping for a 4th of July poke cake.
So many ways you can use this yummy whipped cream.
IS DREAM WHIP GLUTEN AND DAIRY FREE?
As far as I can tell, both Dream Whip and Cool Whip are gluten-free. But they are not dairy-free.
Please double check the ingredients for yourself to determine if any of the ingredients do contain gluten or an ingredient that could imply cross-contamination.
WHERE TO BUY DREAM WHIP
In short, I buy it at Walmart. And my store has it placed in the baking aisle right above the Jello mixes and marshmallows.
ARE DREAM WHIP AND COOL WHIP THE SAME?
While they both make a good dessert topping, they are not quite the same, and I’ve had better luck making my no bake desserts with Dream Whip rather than Cool Whip.
Cool Whip is pre-whipped and ready to go.
Dream Whip, on the other hand, has to be whipped and made. One thing I like is that it’s made with sugar and not high fructose corn syrup.
Note: I have tried substituting homemade whipped cream for Dream Whip in my favorite no bake desserts, but they turn out a liquid-y, gooey mess. So, I don’t recommend it.
GET THE PRINTABLE RECIPE
If you love learning how to make Dream Whip as much as I do, please write a 5 star review, and help me share the recipe on Facebook and Pinterest!
How to make Dream Whip in 2 easy steps, right from the box. Makes a delicious whipped cream you can use for pies, no bake desserts, cakes, Jello, and more!
Dream Whip, Dessert Topping, 2.6-Ounce Box (Pack of 4)
KitchenAid Classic Series 4.5 Quart Tilt-Head Stand Mixer, White
Wooden Spoons, 6 Pieces 9 Inch Wood Soup Spoons for Eating Mixing Stirring
1 envelope Dream Whip Whipped Topping Mix
1/2 cup cold milk*
1/2 teaspoon vanilla extract
Empty 1 envelope of Dream Whip mix into a mixing bowl, and begin to mix milk and vanilla extract into that dry powdery mix, beating on low speed ’til blended.
Then beat on high speed for about 4 minutes or until the topping thickens and forms soft peaks.
*I use whole milk, but you can use 2%, skim milk, etc.
*Personally, I would not freeze Dream Whip because I’m afraid it would change the texture. However, it’s quick and easy to mix up and use same day in any recipe.
WHERE TO BUY DREAM WHIP
I buy Dream Whip at Walmart. And my store has it placed in the baking aisle right above the Jello mixes and marshmallows.
ARE DREAM WHIP AND COOL WHIP THE SAME?
While they both make a good dessert topping, they are not quite the same, and I’ve had better luck making my no bake desserts with Dream Whip rather than Cool Whip.
Cool Whip is pre-whipped and ready to go. Dream Whip, on the other hand, has to be whipped and made. One thing I like is that it’s made with sugar and not high fructose corn syrup.
Note: I have tried substituting homemade whipped cream for Dream Whip in my favorite no bake desserts, but they turn out a liquid-y, gooey mess. So, I don’t recommend it.
Mix up a quick batch of Bisquick cinnamon muffins, dipped in butter and cinnamon sugar. Simple, easy, melt-in-your-mouth, breakfast and brunch recipe perfect for a quick grab and go breakfast or a holiday brunch!
I really thought there was nothing quite as yummy as my favorite Bisquick cinnamon biscuits. But I’ll tell ya, these Bisquick cinnamon sugar muffins give my biscuits a run for their money.
Why I Love Making Bisquick Muffins and You Will Too
The batter’s made with Bisquick biscuit mix, along with 5 other ingredients. Meaning it’s super easy to mix up.
In addition to easy, this recipe makes a quick breakfast.
My original intention was to add a crumb topping to these Bisquick muffins. But I decided for this recipe, I really wanted to emphasize the cinnamon with a buttery cinnamon sugar topping. Once the muffins have baked, they’re dipped in melted butter, and then in cinnamon sugar. This gives them a slightly crispy, melt-in-your-mouth topping that is oh so scrumptious.
Even my self-professed “bread snob” of an oldest child loves these Bisquick sweet muffins. And let me tell you, that right there means something.
This is a great recipe for an everyday breakfast, a special occasion, or a holiday brunch.
Cane Sugar – You can also use granulated sugar. It might even be interesting to try a half cane sugar, half brown sugar mix for these muffins, which would ultimately lead to a slightly moister crumb.
Ground Cinnamon
Large Eggs – You could probably substitute applesauce for the eggs; it’s usually 1/4 cup per egg.
Whole Milk – You can use skim milk or low-fat milk like 2%, as well. I prefer full fat. In fact, you can use buttermilk for an even lighter, more fluffy muffin. If you need to accommodate allergies, you can also use almond milk, oat milk, etc.
Bisquick Mix – I’ve made these muffins with both original Bisquick mix and gluten-free Bisquick mix, so either/or will work just fine.
Salted Butter
How to Make Bisquick Cinnamon Muffins
Mixing up the muffin batter is really easy and requires only a few steps. Before you start, you’ll need to either spray your muffin tins with cooking spray or line them with cupcake liners. Also, pre-heat oven to 350° F.
Mix the Muffin Batter and Bake
In a large bowl, mix together the butter, sugar, and cinnamon.
Add the eggs to the cinnamon sugar mixture, and mix well.
Next add in the milk and vanilla extract, continuing to mix well.
Finally, add in the Bisquick mix, and mix everything together just until blended.
Then just fill each of the regular-size muffin cups 1/2 to 2/3 of the way full with muffin batter.
Bake at 350° F for about 25 to 30 minutes, or until the muffins are golden brown and a toothpick or cake tester inserted in the center comes out clean.
Allow the muffins to cool in the pan for about 5 minutes; then take a knife, run it around the edge of each muffin, and pop them out for dipping.
How to Dip Bisquick Muffins in Cinnamon Sugar
First of all, you’ll need to melt the butter in one bowl. And then in a separate bowl, mix the cinnamon and sugar.
Then you’re ready for dipping…
Dip the warm muffin tops in the melted butter first.
Then dip every muffin in the cinnamon sugar mixture, rolling the tops around to make sure they’re covered with the slightly crispy cinnamon sugar topping.
Then place the muffins on a wire rack or cooling rack to finish cooling. Or better yet, serve them while still warm.
Ways to Customize Your Muffins
You can add just about anything you want. But keep in mind, certain things will change the texture of your muffins.
That said, there are so many awesome add-ins for Bisquick muffins…
Cinnamon Chips – You can easily transform these muffins into a cinnamon chip muffins recipe.
Expert Tips and Recipe FAQ’s
Can you make Bisquick muffins gluten-free?
Yes, you can. In fact, Bisquick has a Gluten-Free Bisquick Mix. How awesome is that? I do suggest having a little xanthan gum available to add to your biscuit batter when mixing. I usually add about a teaspoon for every 2 cups of flour, so with this recipe, I’d likely add a somewhat heaping teaspoon.
Why do you stir the muffin batter just until the flour is blended in?
You don’t want to over-mix muffin batter, because this will remove the air from the batter and lead to a much less fluffy muffin. In fact, you may end up with dense muffins, and nobody wants dense muffins. So carefully blend just ’til the flour is blended in, and then be done. This is also why we add the dry ingredients last, so everything else is already mixed into the batter.
What’s the secret to moist muffins?
This is partially answered in the question above about not over-mixing the batter. Using buttermilk in place of regular milk will also lead to moist muffins.
Yes, you can. But be sure to allow at least an hour to thaw before serving. To re-heat the muffins, just place them in the microwave for 10-15 seconds each. Be sure when freezing them, though, that you again store them in an airtight container or freezer bag.
If you try this recipe, why not leave a star rating in the recipe card right below and/or a review in the comment section further down the page? I always appreciate your feedback. You can also follow me on Pinterest, Facebook, Instagram, and YouTube. And subscribe to my email list too!
Bisquick Cinnamon Muffins
Mix up a quick batch of Bisquick cinnamon muffins, dipped in butter and cinnamon sugar. Simple, easy, melt-in-your-mouth, breakfast and brunch recipe!
Stand Mixer
Batter Spoons
Muffin Tin
Wire Rack
3 tablespoons salted butter (softened)
1/2 cup cane sugar
2 teaspoons ground cinnamon
2 large eggs
1/2 cup whole milk
1 teaspoon vanilla extract
2 1/2 cups Bisquick Mix
Cinnamon Sugar Topping:
2/3 cup cane sugar
2 teaspoons ground cinnamon
1/4 cup salted butter (melted)
Pre-heat the oven to 350° F, and grease muffin tins or line them with cupcake liners.
In a large bowl, mix together the butter, sugar, and cinnamon.
Add the eggs to the cinnamon sugar mixture, and mix well.
Next add in the milk and vanilla extract, continuing to mix well.
Finally, add in the Bisquick mix, and mix everything together just until blended.
Fill each of the greased or lined muffin cups about 1/2 to 2/3 full with muffin batter.
Bake at 350° F for about 25 to 30 minutes, or until the muffins are golden brown and a toothpick or cake tester inserted in the center comes out clean.
Allow them to cool in the muffin tin for about 5 minutes; then take a knife, run it around the edge of each muffin, and pop them out onto a wire rack for dipping.
In a small bowl, mix the sugar and cinnamon together.
Dip the warm muffin tops in the melted butter.
Then dip every muffin in the cinnamon sugar mixture, rolling the top around to make sure it’s covered with the slightly crispy cinnamon sugar topping.
Place the muffins back on the wire rack to finish cooling, or serve them while warm.
*Bisquick has a Gluten-Free Bisquick Mix, as well. I do suggest having a little xanthan gum available to add to your biscuit batter when mixing. I usually add about a teaspoon for every 2 cups of flour, so with this recipe, I’d likely add a somewhat heaping teaspoon.
It’s important to store muffins in a muffin container, airtight container, or sealed plastic bag. And you’ll probably want to eat them within the first 2 or 3 days, so they’re still nice and soft.
To re-heat Bisquick muffins, just place them in the microwave for 10-15 seconds each.
Breads & Muffins
American
Bisquick cinnamon muffins, Bisquick cinnamon muffins recipe, Bisquick cinnamon sugar muffins, Bisquick muffins, Bisquick sweet muffins, cinnamon muffins, cinnamon muffins from Bisquick, cinnamon muffins made with Bisquick, cinnamon muffins with Bisquick, easy cinnamon muffins, muffin recipe, muffins
How to make an easy campfire peach cobbler recipe with canned peaches and homemade pie crust crumbled on top. One of our favorite cast iron skillet campfire recipes!
Making peach cobbler has never been easier than this. Don’t let the fact that it’s cooked over the campfire scare you away.
You can cook this peach crumble over a campfire or on a grill, totally up to you but probably dependent on fire bans.
We use a regular pie crust that we just crumble on top, so there’s no bottom crust to deal with. And we use canned peaches mixed with just a few ingredients for added flavor.
While this is a cast iron skillet peach cobbler, you can also use a Dutch oven. The Dutch oven would likely make it easier to put coals on top for browning that crumbled topping.
There’s nothing quite like dessert cooked over the campfire, and old fashioned peach cobbler is just about the best dessert there is, especially when you wash it down with a warm cup of camp coffee. Unless, of course, you want to switch it up and make Dutch oven blueberry cobbler or Dutch oven cherry cobbler instead.
If you’d rather skip all of my campfire cooking tips, important info for this recipe, and similar recipe ideas – and get straight to the campfire cobbler recipe – just scroll down to the bottom, where you’ll find a printable recipe card.
WHAT IS PEACH COBBLER?
It’s easy to get peach cobbler, peach crumble, and peach crisp confused. I mean, really, they’re basically the same thing.
Sometimes they’re made in different ways, though.
Cobbler can have a crumbled topping or a layer of crust on top (most of the time it’s biscuit), and it doesn’t always have a bottom crust. More traditional southern cobblers do have a bottom crust, though.
Crumbles and crisps usually have brown sugar, cinnamon, and sometimes other spices mixed into the streusel-like topping. A lot of times a crisp will have oats mixed into the topping, as well.
WHICH IS BETTER FOR CAMP COOKING? FRESH, FROZEN, OR CANNED PEACHES?
In my humble opinion, fresh is always going to be better.
But the fact of the matter is, being a seasonal item, fresh peaches aren’t always available. And it’s not always feasible to carry fresh peaches on a camping trip either, especially if it’s a long haul.
So for this recipe, I made this peach cobbler with canned peaches. I made it a point to use sliced peaches in juice (not heavy syrup).
Now I’ve made almost this exact same peach cobbler with fresh peaches, so I know it can be done, and it’s absolutely delicious. But for camping, canned peach cobbler is just so much easier.
HOW TO MAKE PEACH COBBLER WITH CANNED PEACHES
There are just a few steps to making this yummy dessert and getting it ready to cook over the fire.
First mix up the crust by combining the dry ingredients, then mixing the softened butter and milk into the dry ingredients with a fork. Set the dough aside.
In a large mixing bowl, mix together the canned peaches, sugar, salt, corn starch, and cinnamon.
Pour the peach mixture into a cast iron skillet.
Top the peaches with slices of butter and the crust crumbled over the top.
HOW TO COOK CAMPFIRE PEACH COBBLER
Once you’ve assembled your peach cobbler crumble, you’re ready to cook it.
You’ll want to make sure your campfire is ready to go and your skillet lid is placed on the hot coals so it can heat. Your fire should be down to coals, with a little bit of flame here and there.
We use a tripod grill. You’ll want to watch it closely, though, as you may need to adjust the height of the grill over the fire, so the pan doesn’t get so hot that it burns the cobbler.
Once you have your tripod or grill adjusted to the proper height, place the pan on the grill.
When the cobbler starts to bubble or sizzle, place a heated lid on top to create an oven-like atmosphere for everything to bake.
All in all, your cobbler will need to “bake” for about 45 minutes or until the crumbled topping starts to turn golden brown.
You can place coals on top of the lid to help the cobbler bake through and through.
When the cobbler is done, you can take it off the fire and serve while it’s warm. When we’re at home, we love eating this cobbler with vanilla ice cream.
HOW TO STORE PEACH COBBLER
Storing any leftover pie really depends on the weather conditions where you happen to be staying and also your camping digs.
If it’s super hot and all of your stuff is either outdoors or in your vehicle, you may want to keep any leftover cobbler cold by putting it in an airtight container in the cooler.
Otherwise, we usually don’t refrigerate peach cobbler when we’re at home, so I’d likely dish it into a sealed container and that be it.
ALTERNATIVE IDEAS FOR A CRUMB TOPPING
If you don’t want to mix up an easy pie crust, you have a few options to make a pretty tasty crumb topping.
Use cookie dough instead.
Put dollops of biscuit dough on top or put actual biscuits on top.
Place a solid layer of biscuit dough on top of the cobbler, and cook it that way.
Add more of a streusel like topping onto it, making more of a peach crisp.
Roll out a can of crescent rolls, and place the dough on top after the peaches have cooked enough to warm them through.
SHOP KITCHEN TOOLS AND CAMPING GEAR FOR THIS RECIPE:
How to make an easy peach cobbler recipe with canned peaches and homemade pie crust crumbled on top. One of our favorite cast iron skillet campfire recipes!
Crumble Topping:
1 cup unbleached all-purpose flour
2 tablespoons pure cane sugar
1/4 teaspoon salt
6 tablespoons unsalted butter
2 tablespoons whole milk
Peach Filling:
58 ounces canned peaches (*)
2/3 cup pure cane sugar
1 teaspoon salt
1/2 tablespoon corn starch
1/2 tablespoon cinnamon
1/4 cup salted butter (sliced)
Make sure your campfire is ready to go and your skillet lid is placed on the hot coals so it can heat. Your fire should be down to coals, with a little bit of flame here and there.
For the crust, combine the dry ingredients and set aside.
Combine the softened butter and milk.
Then add the milk mixture to the dry ingredients, stirring with a fork.
In a large mixing bowl, mix together the canned peaches, sugar, salt, corn starch, and cinnamon.
Pour the peach mixture into a cast iron skillet** and top with the sliced butter.
Crumble the crust topping over the entire peach mixture.
Once you have your tripod grill adjusted to the proper height, place the pan on the grill.
When the cobbler starts to bubble, place a heated skillet lid on top to create an oven-like atmosphere for everything to bake.
All in all, your cobbler will need to “bake” for about 45 minutes or until the crumbled topping starts to turn golden brown. You can place coals on top of the lid to help the cobbler bake through and through.
When the cobbler is done, take it off the fire and serve while it’s warm.
*I recommend using sliced peaches in juice (versus heavy syrup). Also, I did not drain the peaches, though you may want to if you don't want a more juicy cobbler.
Easy, no fail, Minecraft pig cake tutorial, made with buttercream, wafer cookies, and sugar paper (no fondant). Awesome birthday party idea for kids!
Out of all the Minecraft characters, I have to say the pig was the first one to come to mind when I started to think about different Minecraft cake ideas.
While I mulled this idea over and even experimented with cupcakes in the beginning, I knew I wanted this particular Minecraft cake to be as easy as possible.
And let me just say that anything with fondant just isn’t that easy (at least for me). We much prefer the taste of buttercream frosting over fondant any day.
So I came up with an idea for how to decorate this Minecraft birthday cake without any fondant and without any cake tips. It’s as simple as spreading the icing on and adding the finishing touches.
If you’d rather skip all of my cake decorating tips, important info for this recipe, and similar recipe ideas – and get straight to the easy Minecraft cake recipe – just scroll down to the bottom, where you’ll find a printable recipe card.
SHOP KITCHEN TOOLS TO MAKE A MINECRAFT PIG CAKE:
10-inch Square Cake Pan – Since you’re creating a square cake, you’ll want 2 square shaped pans.
Cake Board and Freezer Paper – You’ll place the baked cake on a cake board wrapped in freezer paper for decorating.
Icing Spatula – This comes in handy for spreading the icing between cake layers and around the sides of the cake.
Cutting Board with Knife – for cutting the wafer cookies and the sugar paper.
Candles – If you’re making a birthday cake, add candles or whatever other decorations you want.
THE TROUBLE WITH FONDANT
If you’re trying to figure out how to make a Minecraft cake without fondant, you’ve come to the right place.
There is no fondant whatsoever in this recipe. In fact, I have a love/hate relationship with fondant, and in my opinion (and my family’s opinions), it just never tastes as good as frosting.
Plus I want this recipe to be easy. Anyone can make it, regardless of creative ability or time constraints.
TIPS FOR HOW TO MAKE THIS MINECRAFT CAKE RECIPE
Before you can decorate, you need to bake and cool 2 10-inch square cakes (I just used strawberry cake mixes).
While the cakes are baking, it’s a good time to mix up the icing. I use my favorite recipe for buttercream frosting.
The regular buttercream icing needs to be pink, so add enough pink food color until you’re satisfied with the shade you have.
When the cakes have cooled, place them on a square cake board that’s been wrapped in white freezer paper.
Once you have all of that done, you’re ready to decorate…
An optional step is to slice the rounded top off of the cakes with a cake slicer/leveller. This helps the cakes to have a flatter shape and makes them easier to decorate.
Spread about 1 cup of the buttercream frosting on top of one cake.
Then sandwich the two cakes together.
Spread more icing on top of and around the sides of the cake, until your cake is completely covered in pink icing.
HOW TO DECORATE A MINECRAFT PIG BIRTHDAY CAKE
First things first, you’ll need to prep both the wafer cookies and the sugar paper. You’ll need the following:
Now you’re ready to put the decorations for your Minecraft pig face in place on top of the cake.
Find the center of your cake and place 1 layer of pink wafer cookies for the pig’s snout. You should have your center cookie and then 3 cookies on each side of the center, so 7 cookies total. As you place a second layer of 7 more wafer cookies on top of the first layer, use some of the leftover buttercream to hold those cookies in place. (see picture 1)
Using more buttercream for your “glue,” add the chocolate wafer cookies as nostrils on top of the snout. (see pictures 2, 3, and 4)
At the top corners of each side of the snout, place the 1″x2″ pieces of white sugar paper in place for the eyes. (see picture 5)
Then using buttercream as “glue,” place the smaller pieces of black sugar paper on the outside edge of the white sugar paper. (see picture 6)
And that’s pretty much it. I told you it was easy!
At this point, if it’s a Minecraft birthday cake, you can add the candles. Then slice it up and serve to your guests!
Tip: I do recommend refrigerating this cake before/after serving.
An optional step is to slice the rounded top off of the cakes with a cake slicer/leveller. This helps the cakes to have a flatter shape and makes them easier to decorate.
Spread about 1 cup of the buttercream frosting on top of one cake. Then sandwich the two cakes together.
Spread more icing on top of and around the sides of the cake, until your cake is completely covered in pink icing.
Prep the wafer cookies and sugar paper by cutting 2 chocolate wafer cookies in half; then cut 2 – 1″x2″ pieces of white sugar paper and 2 – 1″x1″ pieces of black sugar paper.
Find the center of your cake and place 1 layer of pink wafer cookies for the pig’s snout. You should have your center cookie and then 3 cookies on each side of the center, so 7 cookies total.
As you place a second layer of 7 more wafer cookies on top of the first layer, use some of the leftover buttercream to hold those cookies in place.
Using more buttercream for your “glue,” add the chocolate wafer cookies as nostrils on top of the snout (on the left and right edges).
At the top corner of each side of the snout, place the 1″x2″ pieces of white sugar paper in place for the eyes.
Then using buttercream as “glue,” place the smaller pieces of black sugar paper on the outside edge of the white sugar paper.
At this point it's ready to decorate with candles and serve.
Our old fashioned homemade vanilla ice cream recipe is a summer staple to remember. Mix the ice cream base with this family favorite recipe; then freeze it, using an old fashioned ice cream maker. Best homemade ice cream for family gatherings and summer holidays!
Along with old fashioned banana ice cream, my family’s favorite old fashioned ice cream recipe has been a part of every summer for a long time, as far back as I can remember. While it’s morphed from person to person, it’s pretty much the same homemade old fashioned ice cream recipe I remember enjoying with family on special summer occasions gone by.
When we visited Boquillas, one of the main souvenirs we came home with was a huge bottle of Mexican vanilla. So far, we’ve made a batch of chocolate chip cookies with it, and then we made a big freezer of old fashioned homemade ice cream. It has amazing flavor and makes the best old fashioned vanilla ice cream ever.
When You’ll Want to Make Old Fashioned Ice Cream
You can make a batch of homemade ice cream for an ordinary everyday treat, but there are a few special occasions when you’ll definitely want to grab the ice cream maker and get freezing.
Family Gatherings – Whether it’s a holiday or just Sunday family dinner, family gatherings are the best time to make a freezer full of this delicious ice cream.
Holidays – Make a refreshing batch of old fashion ice cream for Memorial Day, 4th of July, Labor Day… Even holidays like Easter and Thanksgiving, to go with all those delectable desserts on the dessert table.
Potlucks and Backyard BBQ’s – Church potlucks are one of the best times to serve this old fashioned ice cream maker recipe.
Ingredients and Substitutions Notes:
Gather a few simple ingredients to make this old-fashioned vanilla ice cream base…
Large Eggs – You’ll need the whole egg, yolks and all, to make this custard base. (Just a note for housekeeping purposes: If you choose to make an old fashioned homemade ice cream recipe with raw eggs, do keep in mind that consuming raw or undercooked meats, poultry, seafood, shellfish, or eggs may increase your risk of food borne illness, especially if you have certain medical conditions.) That said, we have always made homemade ice cream with eggs and have never had a problem. However, if you’re leery, some people prefer to temper and heat the eggs up to at least 160ºF in order to prevent any possible food poisoning. Here’s a great guide on how and why to temper eggs for custard-based ice creams. You can temper the eggs with the condensed milk, evaporated milk, and whole milk called for in this recipe, while following the instructions in that guide. Then just whisk everything else in as I explain in the recipe card below. If you’d rather make an egg-free version, my raw milk ice cream without eggs, using whole milk from our milk cow, is the best. Don’t worry, you can use store bought milk and cream if you don’t have access to raw milk.
Cane Sugar – You can use granulated sugar, as well.
Vanilla Extract – Use a really good dark vanilla extract, real vanilla if possible.
Sweetened Condensed Milk – My dad always loved using Eagle Brand; sometimes I use that, and sometimes I use Aldi’s brand to make this homemade ice cream with sweetened condensed milk and whole milk.
Evaporated Milk – If you prefer, you can use regular milk, but I do prefer to use evaporated milk. My mom and grandma always preferred to use Milnot evaporated milk; but I’ve always used what I can easily get, which is sometimes Milnot and sometimes generic or Aldi’s brand when making evaporated milk ice cream.
Whole Milk – Although you can use 2% milk or 1% milk in a pinch, I highly recommend that you use whole milk, because it will make your ice cream much more creamy. You can even use Half-and-Half or part heavy cream to get a creamier texture.
Ice and Rock Salt – You’ll need crushed ice and rock salt to freeze the ice cream. While you can find rock salt online and smaller bags or boxes at the grocery store, sometimes you can get a bigger and less expensive bag at a hardware store or feed store. So just keep that in mind.
Before you get started, you may want to check out our complete guide to ice cream accessories and tools for making ice cream at home. It’s the ultimate list for every ice cream lover’s kitchen and especially helpful if you’re planning an ice cream social.
Also, make sure your ice cream freezer, especially the freezer bowl or canister, is washed out good. We store ours in the garage, so we always have to wash it before we use it.
How to Make Old Fashioned Homemade Vanilla Ice Cream
Use a mixer or blender to mix up homemade vanilla ice cream with eggs; this will ensure that the ingredients are mixed really well, especially the eggs*. This recipe fills a 4-quart ice cream maker.
Start by creaming (or mixing) the eggs and the sugar together.
Then add in the vanilla extract to the egg mixture. Did you know you can even make your own vanilla?
Next, mix in the sweetened condensed milk, scraping all the ooey gooey liquid out of the can with a spatula.
Then add both cans of evaporated milk.
Add in a good-sized dash of salt, which equals out to about a teaspoon.
Mix everything together well.
Pour the mixture into the metal canister of your ice cream maker.
Finish topping off the canister with whole milk, making sure to fill it about 3/4 of the way full, leaving room for expansion as it freezes. Your metal canister should have a fill line.
How to Freeze Homemade Ice Cream with an Old Fashioned Ice Cream Maker
Freezing the mixture to make old fashioned ice cream is fairly easy, especially once you get it going. You will need to stay with it so you can monitor if it needs more ice, rock salt, or needs unplugged when done.
While I always advise you to follow manufacturer’s directions for your specific ice cream maker, here are a few tips.
Set the freezer in a sink, or somewhere where it can drain without making a mess. Then put the lid on, place the metal canister down into the bucket of your ice cream maker, set the motor in place, and plug it in to turn it on and get the motor running, which will start to turn the canister.
Crush a big bag of ice, gradually pouring ice around the canister. Tip: You can add up to a gallon of water if needed, as well. We sometimes do this because our motor will seize up. Adding a bit of water will help it keep turning.
Add 2-3 cups of rock salt as you add the ice, making sure to top it off with rock salt.
Let the electric motor run until it stops. Once the ice cream freezes, the motor on your ice cream maker will stop churning. Unplug it immediately. This should signal that the ice cream is completely frozen. Wipe any excess ice or rock salt off the lid and out from around the top of the canister. Then remove the lid to reveal the best vanilla ice cream ever.
Carefully remove the churning paddle, and let your kids battle it out over who gets it. Oh, the memories!
Serve the ice cream immediately. If you’re not ready to serve it up just yet, you can always leave the lid on, remove the motor, top the canister off with ice, and place a towel or two over it to insulate it and keep it cold for an hour or two.
I’ve shared how to make the ice cream, but here are a few tips for things to avoid when making and freezing homemade ice cream.
Avoid low-fat ingredients, for example, skim milk. You’ll get the best ice cream with a creamy texture when you use full fat ingredients, like whole milk.
If possible, try not to mix by hand. Blend the ingredients really well, using either a blender or a mixer. Either one works just fine. This will ensure you have a smooth, creamy mixture going into the ice cream maker.
Try not to overfill the ice cream canister in your ice cream maker. Overfilling will lead to one big mess if it overflows while freezing. Remember… Freezing means expansion. Always leave room for expansion, and don’t go over the fill line on your ice cream maker.
When freezing the ice cream in an ice cream maker, place the maker down in a sink, or freeze it outside on a porch. You’ll flood your countertop with a mess from all the ice, water, and rock salt if you don’t.
When the ice cream is done, don’t open the lid ’til you’ve wiped all the rock salt and ice off the top. That way you avoid getting any of the gunk in your ice cream.
As long as you follow specific old-fashioned ice cream maker instructions for your ice cream maker, you’ll be fine.
Favorite Toppings and Mix-Ins for Old-Fashioned Ice Cream
There are so many things you can mix into your ice cream to make it even more fun, especially with kids.
Chocolate Syrup, Butterscotch Topping, Caramel Sauce, etc. – With whipped cream and a cherry on top, classic.
Oreo Cookies – I especially love crushing up Oreo Minis. It’s my favorite way to add mix-ins, especially when enjoying a bowl of mint chocolate chip ice cream.
Chocolate candies – Like M&M’s, Snickers, Reese’s Peanut Butter Cups, and more treats.
Chocolate Chips and Sliced Strawberries
Brownies or Cookies
Expert Tips and Recipe FAQ’s
How should you store leftover homemade ice cream?
We always have a lot of leftover ice cream when we make it homemade, so we purchased some of these freezer containers to hold all the leftovers. Each storage container is big enough to hold 2-3+ servings of ice cream. Then we just stick each airtight container down in the freezer. If you have an upright, I’d place it on the shelves, rather than the door, so it doesn’t melt or have a higher risk of freezer burn. Homemade ice cream usually keeps for up to about a month in the freezer.
How can I get a more firm consistency to this ice cream?
If you prefer a more firm ice cream than soft-serve that you can actually scoop, just place your ice cream in ice cream containers and stick it in the freezer, ’til it reaches the preferred consistency. It’ll usually firm up enough to scoop onto an ice cream cone within 3-4 hours.
Why do you put raw eggs in homemade ice cream?
Eggs give rich flavor to homemade ice cream, and they give that characteristic yellow color, as well. They act as a stabilizer and provide a custard base that turns to smooth, creamy ice cream when finished.
More Homemade Ice Cream Recipes for Ice Cream Makers
If you love this ice cream recipe as much as we do (isn’t it a great recipe?!), you’ll love these flavors too…
If you try this recipe, why not leave a star rating in the recipe card right below and/or a review in the comment section further down the page? I always appreciate your feedback. You can also follow me on Pinterest, Facebook, Instagram, and YouTube. And subscribe to my email list too!
Old Fashioned Homemade Vanilla Ice Cream
Our homemade vanilla ice cream recipe has been a summer staple for as long as I can remember. How to make it the old fashioned way using an ice cream maker.
Mixer
Old-Fashioned Ice Cream Maker
Ice Cream Storage Containers
Ice Cream Scoop
Ice Cream:
6 large eggs
1 1/4 cups cane sugar
4 teaspoons vanilla extract
14 ounces sweetened condensed milk
24 ounces evaporated milk
1 teaspoon sea salt
6 cups whole milk
Freezing Supplies:
16 pounds ice
3 cups rock salt
Start by creaming (or mixing) the eggs and the sugar together using a mixer.
Then add in the vanilla extract.
Next, mix in the sweetened condensed milk, scraping all the ooey gooey liquid out of the can with a spatula.
Add both cans of evaporated milk.
Add in a good-sized dash of salt, which equals out to about a teaspoon, and mix everything together well.
Pour the mixture into the metal canister of your ice cream maker.
Finish topping off the canister with whole milk, making sure to fill it about 3/4 of the way full, leaving room for expansion as it freezes. Your metal canister should have a fill line.
Put the lid on, and place the metal canister down into the bucket of your ice cream maker.
Crush a big bag of ice, gradually pouring ice around the canister. Tip: You can add up to a gallon of water if needed, as well. We sometimes do this because our motor will seize up. Adding a bit of water will help it keep turning.
Add 2-3 cups of rock salt as you add the ice, making sure to top it off with rock salt.
Let the motor run until it stops. Once the ice cream is frozen, the motor on your ice cream maker will stop churning.
Unplug it immediately. This should signal that the ice cream is completely frozen.
Wipe any excess ice or rock salt off the lid and out from around the top of the canister. Then remove the lid.
Carefully remove the churning paddle.
Serve the ice cream immediately. If you’re not ready to serve it up just yet, you can always leave the lid on, remove the motor, top the canister off with ice, and place a towel or two over it to insulate it and keep it cold.
*Consuming raw or undercooked meats, poultry, seafood, shellfish, or eggs may increase your risk of food borne illness, especially if you have certain medical conditions. Some people prefer to temper and heat the eggs up to at least 160ºF in order to prevent any possible food poisoning. Here’s a great guide on how and why to temper eggs for custard-based ice creams. You can temper the eggs with the condensed milk, evaporated milk, and whole milk called for in this recipe, while following the instructions in that guide. Then just whisk everything else in as I explain in the recipe card instructions above.
*You can use Half & Half in place of the whole milk if you want an even creamier texture to your ice cream.
How to Store Leftover Vanilla Ice Cream
We always have a lot of leftover ice cream when we make it homemade, so we purchased some of these freezer containers to hold all the leftovers. They’re big enough to hold 2-3+ servings of ice cream. Then we just stick it down in the freezer. If you have an upright, I’d place it on the shelves, rather than the door, so it doesn’t melt or have a higher risk of freezer burn. Homemade ice cream usually keeps for up to about a month in the freezer.
Desserts
American
homemade vanilla ice cream, homemade vanilla ice cream recipe, how to make vanilla ice cream, ice cream maker ice cream recipes, old fashioned homemade ice cream, old fashioned homemade vanilla ice cream, old fashioned ice cream, old fashioned ice cream recipe, vanilla ice cream recipe
Make chocolate covered Ritz crackers with peanut butter in a jiffy. Quick and easy no bake recipe, only 3 ingredients, and they’re the perfect bite-sized candy for the holidays, family gatherings, parties, and celebrations!
Ritz cookies are another one of our favorite treats during the holiday season, and I’ve made them for years. My family can’t go a Christmas without making peanut butter Ritz crackers and rice crispy peanut butter balls; they make great Valentine’s Day and Easter candies too.
Every single Christmas when I was a kid, my mom would make chocolate covered Ritz crackers with peanut butter, along with this easy buckeye recipe.
I remember we’d store these crunchy little Ritz cracker peanut butter cups in the stairwell of our old farmhouse because there was no heat and they’d stay nice and chilled there. My bedroom was at the top of said stairwell, so of course, I’d help myself as I climbed past on the way to my room.
So Many Reasons to Love This Christmas Candy
Chocolate Ritz crackers are so easy to make! And they’re no bake cookies, so they’re quick too! It’s super easy to make a double batch or triple batch of these delicious goodies.
You need a grand total of 3 ingredients to make them, unless you want to get creative and add extras, like festive sprinkles or sea salt flakes. But they’re delicious just the way they are.
I mean, if you think about it, what goes together better than chocolate and peanut butter?
As a sweet and salty treat, they’re the best of both worlds. You get a sweet snack, while at the same time, a salty snack. Yum!
They’re the perfect no bake treat for celebrations, holidays, and special occasions. They make an especially festive holiday cookie tray.
Along with a cold glass of milk, they make the perfect yummy treats for Santa.
Chocolate Melting Wafers – You can also use semi-sweet chocolate chips, chocolate baking bars, or almond bark.
How to Make Chocolate Covered Ritz Crackers with Peanut Butter
First things first, you’ll need to prep by placing a sheet of wax paper or parchment paper on a cookie sheet. Then…
Use a knife to spread peanut butter between 2 Ritz Crackers, sandwiching the peanut butter crackers together.
Set each sandwich cookie on the wax paper covered baking sheet, in preparation for dipping.
How to Prep Chocolate for Dipping
You’ll need melted chocolate that’s ready to go. Depending on the chocolate you decide to use, you can melt it a few different ways:
Melt it using a double boiler on the stove – The double boiler method is basically a pan inside of another pan with boiling water in the bottom pan. It allows for more even melting without burning, and it also keeps the chocolate warm for dipping.
Melt it in the microwave using a microwave-safe bowl or Pyrex measuring cup – This is usually the route I go. I like to use my glass measuring cup for melting the chocolate wafers in the microwave, according to package directions, usually in 15 to 30 second intervals, stirring after each increment ’til the chocolate is melted. The depth of my measuring cup makes dipping a lot easier
Or enlist the help of your family, and use a fondue pot for dipping.
Also, depending on the type of chocolate used (chocolate almond bark, candy melts, or chocolate chips), some people like to use shortening or paraffin wax, adding it into their chocolate as it melts. This allows for a thinner coat and stretches the chocolate a little further. If you use a good quality chocolate, you likely won’t need that extra step.
I started using Ghirardelli Dark Melting Wafers a few years ago, and I love them so much better than almond bark. They’re so much easier to work with, and they have fantastic flavor.
How to Dip Chocolate Peanut Butter Ritz Crackers
Once the chocolate is melted, dip each cracker sandwich in the melted chocolate, using the forks or tongs.
Shake off any excess chocolate before placing the chocolate peanut butter Ritz cracker cookies back on the wax paper covered sheet pan to dry.
When all your crackers have been dipped, chill them in the freezer for about 15 to 20 minutes. Remove them from the freezer and place them in an airtight container or festive Christmas tin (lined with wax paper) in the fridge.
Expert Tips and Recipe FAQ’s
How should you store chocolate Ritz crackers with peanut butter?
Store in an airtight container in the fridge. They can be kept out at room temperature, but they won’t keep as long as they will if you keep them in the fridge or freezer. Kept chilled, they’ll last up to 2 weeks.
Can you freeze Ritz cracker cookies?
Yes, you can! Just be sure to keep them in an airtight container in between layers of wax paper, to avoid freezer burn.
Can I use a different nut butter?
Of course! You can use almond butter, cashew butter, etc.
Alternative Recipe Variations for Ritz Cookies
Use marshmallow fluff instead of peanut butter in between the crackers.
Add a layer of marshmallow fluff, along with peanut butter, for an even creamier treat.
Use crunchy peanut butter instead of creamy, especially if you like a crunchier treat. Or use a different nut butter, like almond butter, cashew butter, etc.
Double or triple the layers on your cracker sandwiches, using more crackers and more peanut butter for a triple layer treat.
Drizzle the dipped crackers with white chocolate or dark chocolate. Or double dip, dipping half of each cracker in chocolate and half in white chocolate… You get the idea.
Add sprinkles, sea salt flakes, or festive sugar on top of each of your Ritz crackers dipped in chocolate, before the chocolate hardens.
If you try this recipe, why not leave a star rating in the recipe card right below and/or a review in the comment section further down the page? I always appreciate your feedback. You can also follow me on Pinterest, Facebook, Instagram, and YouTube. And subscribe to my email list too!
Chocolate Covered Ritz Crackers with Peanut Butter
Make chocolate covered Ritz crackers with peanut butter in a jiffy. Quick and easy no bake recipe perfect for holidays and parties!
Wax Paper
Baking Sheet
Double Boiler
Pyrex Measuring Cup
Candy Dipping Tools
Festive Christmas Tins
3 sleeves Ritz Crackers
1 cup creamy peanut butter
20 ounces dark chocolate melting wafers ((or chocolate chips))
Line a baking sheet with wax paper.
Use a table knife to spread peanut butter between 2 Ritz Crackers, sandwiching the crackers together.
Set each sandwich cookie on the wax paper lined baking sheet, in preparation for dipping.
Add the chocolate to a microwave-safe measuring cup or bowl; and melt, starting at 30 seconds, then stirring every 15-20 seconds, 'til melted and smooth.
Using 2 forks or tongs, dip each cracker sandwich in the melted chocolate; shake any excess chocolate off before placing back on the wax paper to dry.
When all the crackers have been dipped, chill them in the freezer for about 15 to 20 minutes.
Remove them from the freezer, and place them in an airtight container. They're best stored in between layers of wax paper in an airtight container in the fridge for up to 2 weeks.
Depending on the type of chocolate used (chocolate almond bark, candy melts, or chocolate chips), some people like to use shortening or paraffin wax, adding it into their chocolate as it melts. This allows for a thinner coat and stretches the chocolate a little further. But if you use a good quality chocolate, you likely won’t need that extra step. I started using Ghirardelli Dark Melting Wafers a few years ago, and I love them so much better than almond bark. They’re so much easier to work with, and they have fantastic flavor.
You can also melt the chocolate using a double boiler on the stove. This is basically a pan inside of another pan with boiling water in the bottom pan. It allows for more even melting without burning, and it also keeps the chocolate warm for dipping.
Sweet Snacks
American
chocolate covered peanut butter crackers, chocolate covered Ritz crackers, chocolate Ritz crackers, how to make Ritz cracker cookies, how to make Ritz peanut butter chocolate cookies, peanut butter Ritz crackers dipped in chocolate, Ritz cookies, Ritz cracker Christmas cookies, Ritz cracker cookies, Ritz cracker cookies with peanut butter and chocolate, Ritz crackers dipped in chocolate, sweet and salty treat
How to make kid-friendly s’mores dip over a campfire, on the grill, on the stove, or in the oven at home. Easy camping dessert recipe you can enjoy anytime.
S’mores are the perfect way to end a busy week together as a family. And they’re an especially great way to enjoy time together around the campfire.
We love hanging out by a campfire, especially when we’re camping. When at home, we’ll even fill up a tray with all sorts of campfire goodies and head outside to the fire pit.
Usually, we end up with a hodge podge assortment of whatever we have available, maybe hot dogs, the makings for s’mores, and our roasting sticks.
But we’re not always able to have a campfire due to burn bans and fire restrictions. No worries, though. This is one of my favorite shortcuts for how to make s’mores without a fire.
So whether you love the great outdoors or would rather enjoy a movie night in, this is the perfect dessert to share.
WHERE CAN I FIND THE RECIPE CARD FOR THIS TOASTED S’MORES DIP?
If you’d rather skip all of my cooking tips, important cooking info for this recipe, and similar recipe ideas – and get straight to the s’mores dip recipe – just scroll down to the bottom, where you’ll find a printable recipe card.
HOW TO MAKE S’MORES DIP
Really, the only ingredients you need are graham crackers, mini marshmallows, and chocolate chips.
WHAT KIND OF GRAHAM CRACKERS SHOULD I USE?
You can use regular graham crackers and break them up, or you can use smaller graham crackers in different shapes, like Teddy Grahams or Goldfish Grahams.
If you’re wondering which crackers we used, I found these Teddy Grahams Outdoor Discoveries crackers at our grocery store, and they were perfect! They come in cute li’l outdoor shapes like butterflies, bumblebees, and leaves.
WHAT’S THE BEST CHOCOLATE FOR S’MORES?
I’ll tell ya, I love using semi sweet chocolate chips. But you can use any kind of chocolate, whether you love milk chocolate or dark chocolate.
HOW TO LAYER S’MORES IN A PAN
Layer your ingredients in a oven or campfire friendly skillet, preferably an 8-inch cast iron skillet or 10.25-inch cast iron skillet.
Start with a layer of chocolate chips and mini marshmallows.
Add another layer of chocolate chips.
Then add a layer of graham crackers.
Add another layer of chocolate chips, then a top layer of mini marshmallows.
You can add as many or as few layers as you want; I say, the more the merrier.
HOW TO COOK S’MORES DESSERT DIP
On a Campfire or on a Grill: Put your skillet s’mores over the fire or on the grill for about 3 to 5 minutes, or until things begin to show signs of melting… Not too long or your bottom layer will burn.
On the Stove: Layer ingredients and warm on low heat until everything begins to melt. If you want to toast a top layer of marshmallows, just place in the oven for a few minutes.
In the Oven: Place the skillet in the oven at about 450° for about 5 to 10 minutes, or until things begin to show signs of melting… Again, not too long or your bottom layer will burn.
Don’t worry if the chocolate doesn’t look completely melted when you take it off the fire or out of the oven. Once you remove the skillet from the fire or oven, it will continue to radiate heat and melt the rest of your chocolate.
And if your marshmallows aren’t toasted enough for your liking, you can keep your pan over the heat for just a bit longer until you have perfectly toasted marshmallows.
These are not the type of s’mores you serve by hand; these are more the type of s’mores you dig in with a fork or a graham cracker, sharing the same skillet with the entire family.
ALTERNATIVE RECIPE OPTIONS
You can use regular graham crackers, or you can use graham snacks, like I mentioned above.
How to make kid-friendly s’mores dip over a campfire, on the grill, or in the oven at home. Easy camping dessert recipe you can enjoy anytime.
3 cups semi-sweet chocolate chips
2 cups graham crackers (*)
2 cups mini marshmallows
In a cast iron skillet, start with a layer of chocolate chips and mini marshmallows.
Add another layer of chocolate chips.
Then add a layer of graham crackers.
Add another layer of chocolate chips, then a top layer of mini marshmallows.**
Cook following the desired instructions below.
Once they’re cooked through, serve with forks or more graham crackers.
Over a Campfire:
Place your skillet over the fire for about 3 to 5 minutes, or until things begin to show signs of melting… Not too long or your bottom layer will burn.***
On a Grill:
Place your skillet on the grill for about 3 to 5 minutes, or until things begin to show signs of melting… Not too long or your bottom layer will burn.***
On the Stove:
Layer ingredients and warm on low heat until everything begins to melt.
If you want to toast a top layer of marshmallows, just place in the oven for a few minutes.
In the Oven:
Place the skillet in the oven at about 450° for about 5-10 minutes, or until things begin to show signs of melting… Again, not too long or your bottom layer will burn.***
**You can add as many or as few layers as you want; I say, the more the merrier.
***Don’t worry if the chocolate doesn’t look completely melted when you take it off the fire or out of the oven. Once you remove the skillet from the fire or oven, it will continue to radiate heat and melt the rest of your chocolate. If you want the marshmallows to be more golden brown, just cook the s’mores a bit longer, being careful that they don’t burn.
Whip up a dreamy no bake blueberry dessert, aka blueberry yum yum recipe, layered with cream cheese, Dream Whip, blueberry pie filling, and a pecan crust. Easy recipe that’s perfect for potlucks and family gatherings!
If you’ve been blueberry picking and have fresh blueberries, I’ve got the perfect blueberry yum yum dessert recipe for you. Made with the best pecan crust, blueberry pie filling, and a creamy layer of cream cheese lush, it’s just as dreamy as fresh strawberry yum yum and blueberry cobbler.
Growing up, my mom always made what she called a cherry crunch; it was my dad’s favorite dessert. Well, this blueberry delight is a twist on that classic cherry yum yum dessert.
While the pie crust does require bake time, the rest of this recipe is no bake. We’ll talk about other crust options too, just in case you don’t really want to bake a crust.
Another no bake dessert and Dream Whip recipe perfect for Thanksgiving is no bake pumpkin dessert.
Ingredients and Substitutions Notes:
Crust – We’ll talk about crust options, both baked and no bake crusts, below. I’ll also show you how to make my favorite pecan crust recipe for this dessert, even though it’s baked.
Dream Whip – You can also use Cool Whip, but I really prefer the angelic fluff of Dream Whip. It’s like pudding, only lighter in texture.
Powdered sugar or Confectioners Sugar
Cream cheese – I recommend using fall fat cream cheese to make blueberry lush; however, you can use Neufchatel cheese, as well.
Blueberry pie filling – While I prefer to make this homemade with fresh or frozen (but thawed) blueberries, you can just buy cans of blueberry pie filling if you’d rather; they definitely work well and make the recipe a lot quicker in a pinch.
Homemade Whipped Cream – This really is optional; I’ve even saved back just a little bit of Dream Whip to add a dollop to the top of our dessert.
Alternative Crust Options for Blueberry Yum Yum
You can get creative with the crust, as well, especially if you’d rather have a fully no bake option. For instance…
Graham cracker crust – Crush graham crackers into graham cracker crumbs to make this crust, with or without bake time.
Pecan Sandies crust – Make it like you would a graham cracker crumbs crust.
Ok, you’ve got your crust made and ready to go. And hopefully, you’ve got your blueberry purée or pie filling ready to go, as well.
How to Make the Dream Whip Filling for No Bake Blueberry Dessert
Before you get started, be sure to soften and whip your cream cheese with a whisking paddle, and then set it aside. This will help the cream cheese to soften up more, and it will blend in better with the Dream Whip, once you’re ready for that step.
Now you can follow these steps to make blueberry delight with a Dream Whip filling…
In a separate mixer bowl with an electric mixer, whisk together the Dream Whip with the milk and vanilla, according to package directions.
Whisk the whipped cream mixture until it begins to form soft peaks, about 4 minutes. You can also follow this tutorial for how to make Dream Whip.
Mix cream cheese and powdered sugar into the Dream Whip mixture.
Whisk the cream cheese mixture for 3 to 5 minutes, or until it’s velvety smooth and creamy.
Layer Your No Bake Dessert
Spread the Dream Whip cream cheese filling onto the prepared and cooled pie crust.
Then top it all off with a layer of blueberry pie filling for a sensational blueberry topping.
Cover your no bake blueberry dessert and allow it to chill in the fridge for at least 4 hours, or overnight if possible.
And that’s it! You can save back a little bit of Dream Whip and use the remaining whipped topping for the top, maybe add a dollop on each slice you serve.
Another great tip… You can split the Dream Whip filling (and the blueberry topping) in half to make 2 smaller pies.
Expert Tips and Recipe FAQ’s
Can I use whipped cream or Cool Whip instead of Dream Whip?
I’ve tried making the cream cheese filling with homemade whipped cream; for some reason, it just hasn’t worked as well. So I usually reserve my whipped topping for the top and use Dream Whip for the filling, which is what my mom uses in her cherry crunch. Now some people do make this filling with Cool Whip, but I’ve carried on my mom’s tradition of a creamy Dream Whip filling. I like to call it angel fluff.
How should you store blueberry delight?
This recipe is so easy. If you’re not quite ready to serve it, just cover it and chill in the refrigerator; and it’ll be ready when you are. I do recommend making this no more than 1 day ahead of time. But it should keep in the fridge for 2-3 days, as long as you keep it covered.
Can you freeze this easy blueberry dessert?
You can definitely make this creamy dessert ahead of time, freeze it, and thaw it when you need it. Now one tip… I would definitely freeze it before adding the pie filling. Especially if you’re using canned pie filling, it’d be super easy to just add that later on after you’ve thawed the crust and creamy filling. Just be sure, if you do freeze this dessert, to cover it well so it doesn’t get freezer burnt.
Want More Blueberry Dessert Recipes?
If you’re a fan of blueberry desserts and sweets and you love this creamy blueberry delight recipe as much as I do, you will love these recipes…
If you try this recipe, why not leave a star rating in the recipe card right below and/or a review in the comment section further down the page? I always appreciate your feedback. You can also follow me on Pinterest, Facebook, Instagram, and YouTube. And subscribe to my email list too!
No Bake Blueberry Yum Yum Dessert Recipe
Whip up a dreamy no bake blueberry dessert, aka blueberry yum yum recipe, with cream cheese, Dream Whip, blueberry pie filling, and a pecan crust. Easy recipe!
9×13 Baking Pan
Stand Mixer
Rubber Spatula
Pecan Nut Pie Crust:*
12 tablespoons salted butter (melted)
1 1/2 cups all-purpose flour
1 cup pecans (chopped)
No Bake Filling:
16 ounces cream cheese
2 envelopes Dream Whip ((1 box))
1 cup whole milk
1 teaspoon vanilla extract
2 cups powdered sugar
42 ounces blueberry pie filling
Crust:
Mix together the melted butter and flour, forming a dough.
Stir in the chopped pecans.
Press the crust into an un-greased 9×13 baking dish.
Bake at 350° F for about 20 minutes, or until the crust begins to turn a golden brown.
Let the crust cool before adding any filling.
No Bake Filling:
Using a mixer, beat the cream cheese well.
In a separate mixer bowl, whisk together the Dream Whip with the milk and vanilla, according to package directions. Whisk it until it begins to form soft peaks, about 4 minutes.
Add the cream cheese and powdered sugar to the Dream Whip mixture, and whisk for 3 to 5 minutes, or until it’s smooth and creamy.
Spread the Dream Whip cream cheese filling onto the prepared pie crust.
Then top it all off with blueberry pie filling.
Cover your no bake blueberry dessert and allow it to chill in the fridge for at least 4 hours, or overnight if possible.
When it’s ready to serve, you can top it off with a dollop of homemade whipped cream or serve it as is. It’s so delicious!
*Pie Crust Options:
You can get creative with the crust, especially if you’d rather have a fully no bake option. For instance…
Buy a store bought crust and press pecans into it. (This would likely make a smaller pie.)
Line a graham cracker crust with sliced bananas.
You can also split the Dream Whip filling (and the blueberry topping) in half to make 2 smaller pies.
Can I Use Whipped Cream or Cool Whip Instead of Dream Whip?
I’ve tried making the cream cheese filling with homemade whipped cream; for some reason, it just hasn’t worked as well. So I usually reserve my whipped topping for the top and use Dream Whip for the filling, which is what my mom uses in her Cherry Crunch. Now some people do make this filling with Cool Whip, but I’ve carried on my mom’s tradition of a creamy Dream Whip filling. I like to call it angel fluff.
How to Store Blueberry Delight
This recipe is so easy. If you’re not quite ready to serve it, just cover it and chill in the refrigerator; and it’ll be ready when you are. I do recommend making this no more than 1 day ahead of time. But it should keep in the fridge for 2-3 days, as long as you keep it covered.
Desserts
American
blueberry delight, blueberry delight with pecan crust, blueberry dessert, blueberry no bake dessert, blueberry yum yum, blueberry yum yum recipe, blueberry yum yum recipe with pecan crust, Dream Whip recipes, easy blueberry desserts, layered blueberry dessert, no bake blueberry dessert
How to make an easy, no fail, Minecraft grass block cake. Simple recipe tutorial for a square cake with buttercream, awesome for kids and birthdays!
It makes sense that my oldest would request a Minecraft grass block cake for his 11th birthday way back when. Especially considering how much my boys AND my husband all love to play the game.
The memories this brings (he’s now a teenager)… When he requested a Minecraft birthday cake, I mulled it over for a bit and sifted through all sorts of Minecraft cake ideas, figuring out the best way to make this cake.
Since he wanted a grass block, I decided to use chocolate buttercream for the dirt part of the block. And then I used a regular buttercream icing for the grass, only I colored it green.
Creating the grass is the most time consuming part of the entire cake, but it’s so easy with one handy dandy little cake tip.
The thing about this cake that I love… You don’t even have to do anything else to it, in order for it to look good. The dirt and the grass are the decoration, so you don’t even really need a cake topper unless you just want one.
If you’d rather skip all of my cake decorating tips, important info for this recipe, and similar recipe ideas – and get straight to the Minecraft grass block cake recipe – just scroll down to the bottom, where you’ll find a printable recipe card.
Kitchen Tools You’ll Need to Make a Minecraft Grass Block Cake:
10-inch Square Cake Pan – Since you’re creating a grass block, you’ll want 2 square shaped pans.
Cake Board and Freezer Paper – You’ll place the baked cake on a cake board wrapped in freezer paper for decorating.
Icing Spatula – This comes in handy for spreading the icing between cake layers and around the sides of the cake.
Candles – If you’re making a birthday cake, add candles or whatever decorations you want.
To Use Fondant or Not to Use Fondant
If you’re trying to figure out how to make a Minecraft cake without fondant, you’ve come to the right place.
There is no fondant whatsoever in this recipe. In fact, I have a love/hate relationship with fondant, and in my opinion, it never tastes as good as frosting.
That said… Here are a few tips for how to make a most beautiful grass block cake.
Tips for How to Make This Minecraft Cake Recipe
Before you start to decorate, you need to bake the cakes and make the frosting.
Bake 2 10-inch square cakes (the grass block should be square-shaped). Jacob wanted chocolate, so I used 2 chocolate cake mixes to make the process easier.
Important: Be sure to save back about 1 cup of the chocolate buttercream to spread between the two cakes.
The regular buttercream icing needs to be green, so add enough green food color until you’re satisfied with the shade you have.
Then the secret to making the rest of the chocolate buttercream icing look even more like dirt and mud, is to crush up Peanut Butter Oreos and mix them in with the icing. Combined, this makes the perfect texture for the dirt part of the grass block.
An optional step is to slice the rounded top off of the cakes with a cake slicer/leveller. This helps the cakes to have a flatter shape and makes them easier to decorate.
Spread the saved portion of the chocolate buttercream frosting on top of one cake. Then sandwich the two cakes together.
Work your way around the sides of the cake, spreading the chocolate buttercream “dirt” icing. It’s ok if it looks a little messy; that just makes for a more authentic look to your dirt.
How to Make Grass on a Cake
Once your block has “mud” all around the sides, it’s ready for you to add the grass with the green buttercream icing.
Important Tip: Make sure your icing is thin enough to easily squeeze through the grass tip, or it will be very difficult indeed (don’t ask me how I know this).
In order to create the grass, just squeeze the pastry bag to create your grass and then pull up or away.
This cake tip works like a charm to create beautiful patches of green grass for the top of the grass block.
While this part of the process is probably what will take the longest, it’s so worth it when you’re done.
When finished, decorate with candles or whatever your heart desires. Then slice it up and serve to your guests!
Tip: I do recommend refrigerating this cake before/after serving.
How to make an easy, no fail, Minecraft grass block cake. Simple recipe tutorial for a square cake with buttercream, awesome for kids and birthdays!
2 square chocolate cakes (*)
3 cups chocolate buttercream frosting
12 Peanut Butter Oreos
3 cups buttercream frosting (colored green)
Bake 2 square cakes, using 10"x10" cake pans and following recipe/cake mix instructions.
While the cakes are baking, mix up both the regular buttercream frosting and the chocolate buttercream.
The regular buttercream icing needs to be colored green, so add enough green food color until satisfied with the shade you have.
When the cakes have cooled, place one cake on a 12-inch square cake board that’s been wrapped in white freezer paper.
Optional but very helpful step at this point: Slice the rounded top off of the cakes with a cake slicer/leveller. This helps the cakes to have a flatter shape and makes it easier to decorate them.
Spread a portion of the chocolate buttercream frosting on top of that cake.
Then sandwich the two cakes together.
Make the rest of the chocolate buttercream frosting look more like dirt and mud by crushing up the Peanut Butter Oreos and mixing them in with the frosting.**
Spread the chocolate buttercream "dirt" frosting on the sides of the cake, working your way around.
Using Wilton Tip 233, add the grass with the green buttercream frosting. Make sure the icing is thin enough to easily squeeze through the grass tip, or it will be very difficult. The Wilton website gives a great tutorial for how to create the grass, but basically, just squeeze the pastry bag to create each little patch of grass, and then pull up or away.
When finished, decorate your masterpiece with candles or whatever your heart desires.
**I recommend crushing the Oreos by placing them in a Ziploc bag and then beating them with a rolling pin. You want them to have some chunks, so to look like dirt and rocks in the frosting.
Tip: I do recommend refrigerating this cake before/after serving.