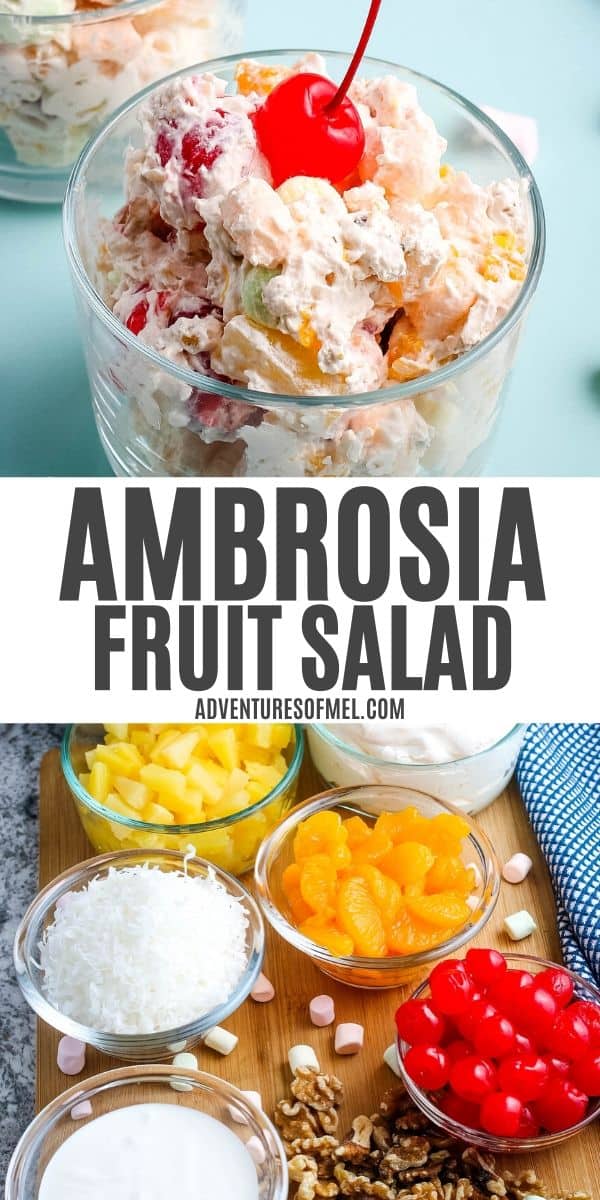
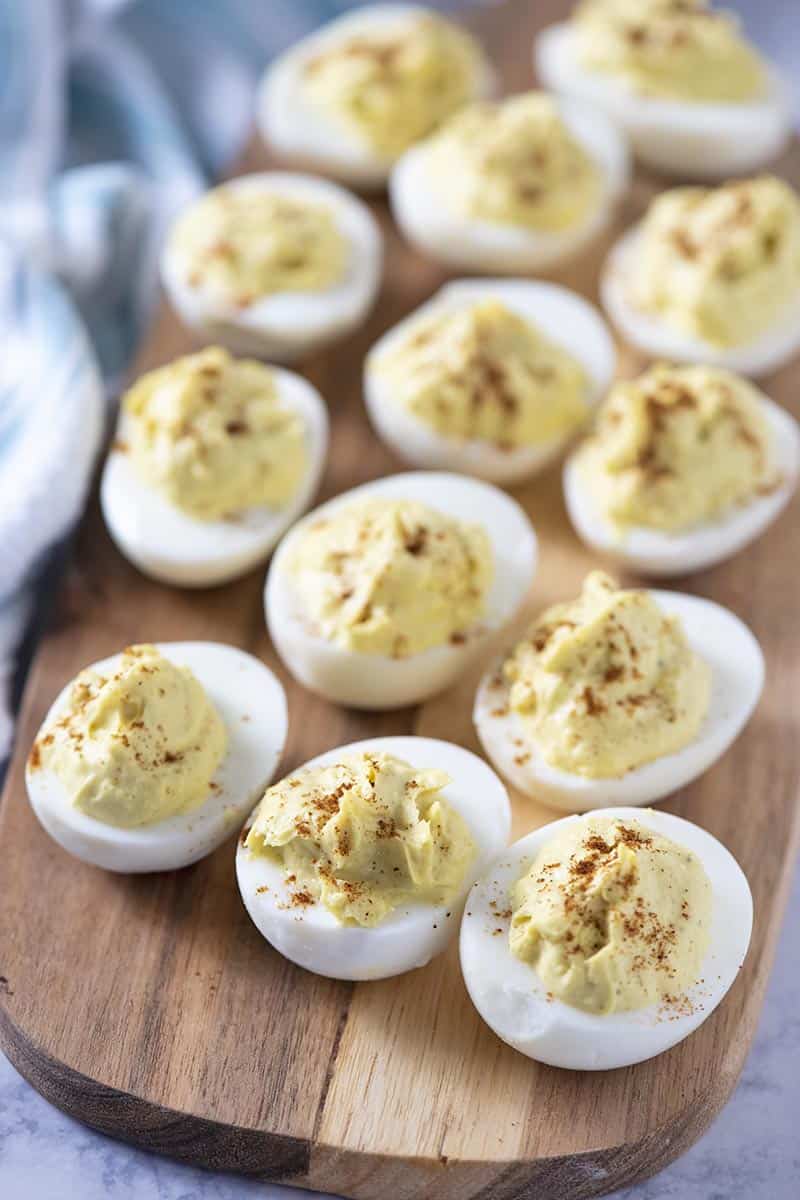
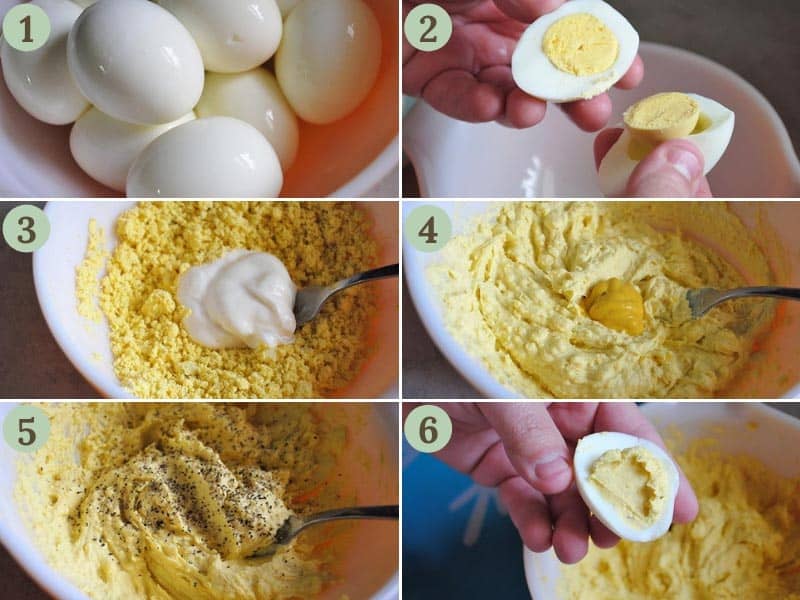
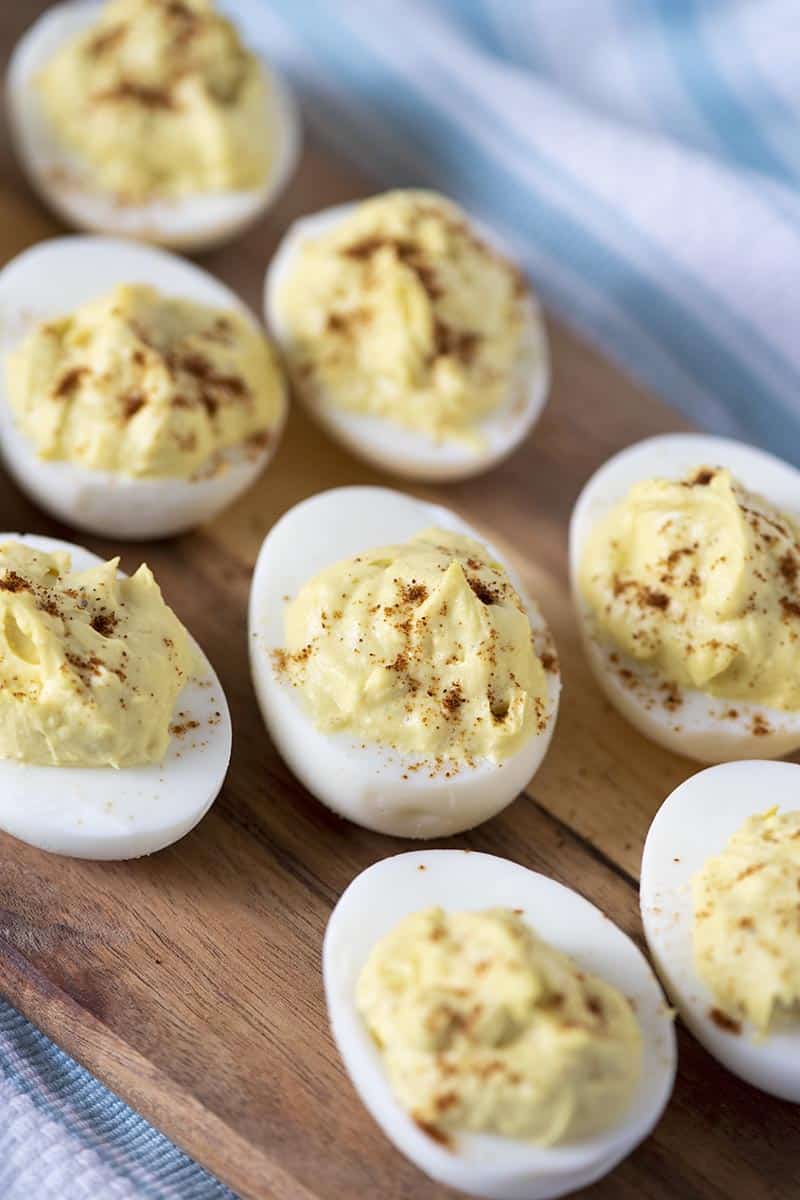
How to make the best homemade green bean casserole from scratch with canned green beans, creamy mushrooms and French fried onions. Quick and easy, classic holiday side dish recipe that can feed a crowd!
Here in the Midwest, our holiday tables tend to be full of all the different casseroles. Think corn casserole, hash brown casserole, sweet potato casserole and this classic green bean casserole! Serve it up for Thanksgiving, Christmas or Easter; it also makes an easy side dish for the next church potluck or even just an easy weeknight dinner!
Traditionally, green beans casserole uses canned cream of mushroom soup from the grocery store, but for this recipe I decided to make my own cream of mushroom soup from scratch instead. Not only is this healthier, but it also tastes a lot better. This recipe is so easy to make, and everyone will be coming back for seconds!
Ingredients & Substitutions Notes
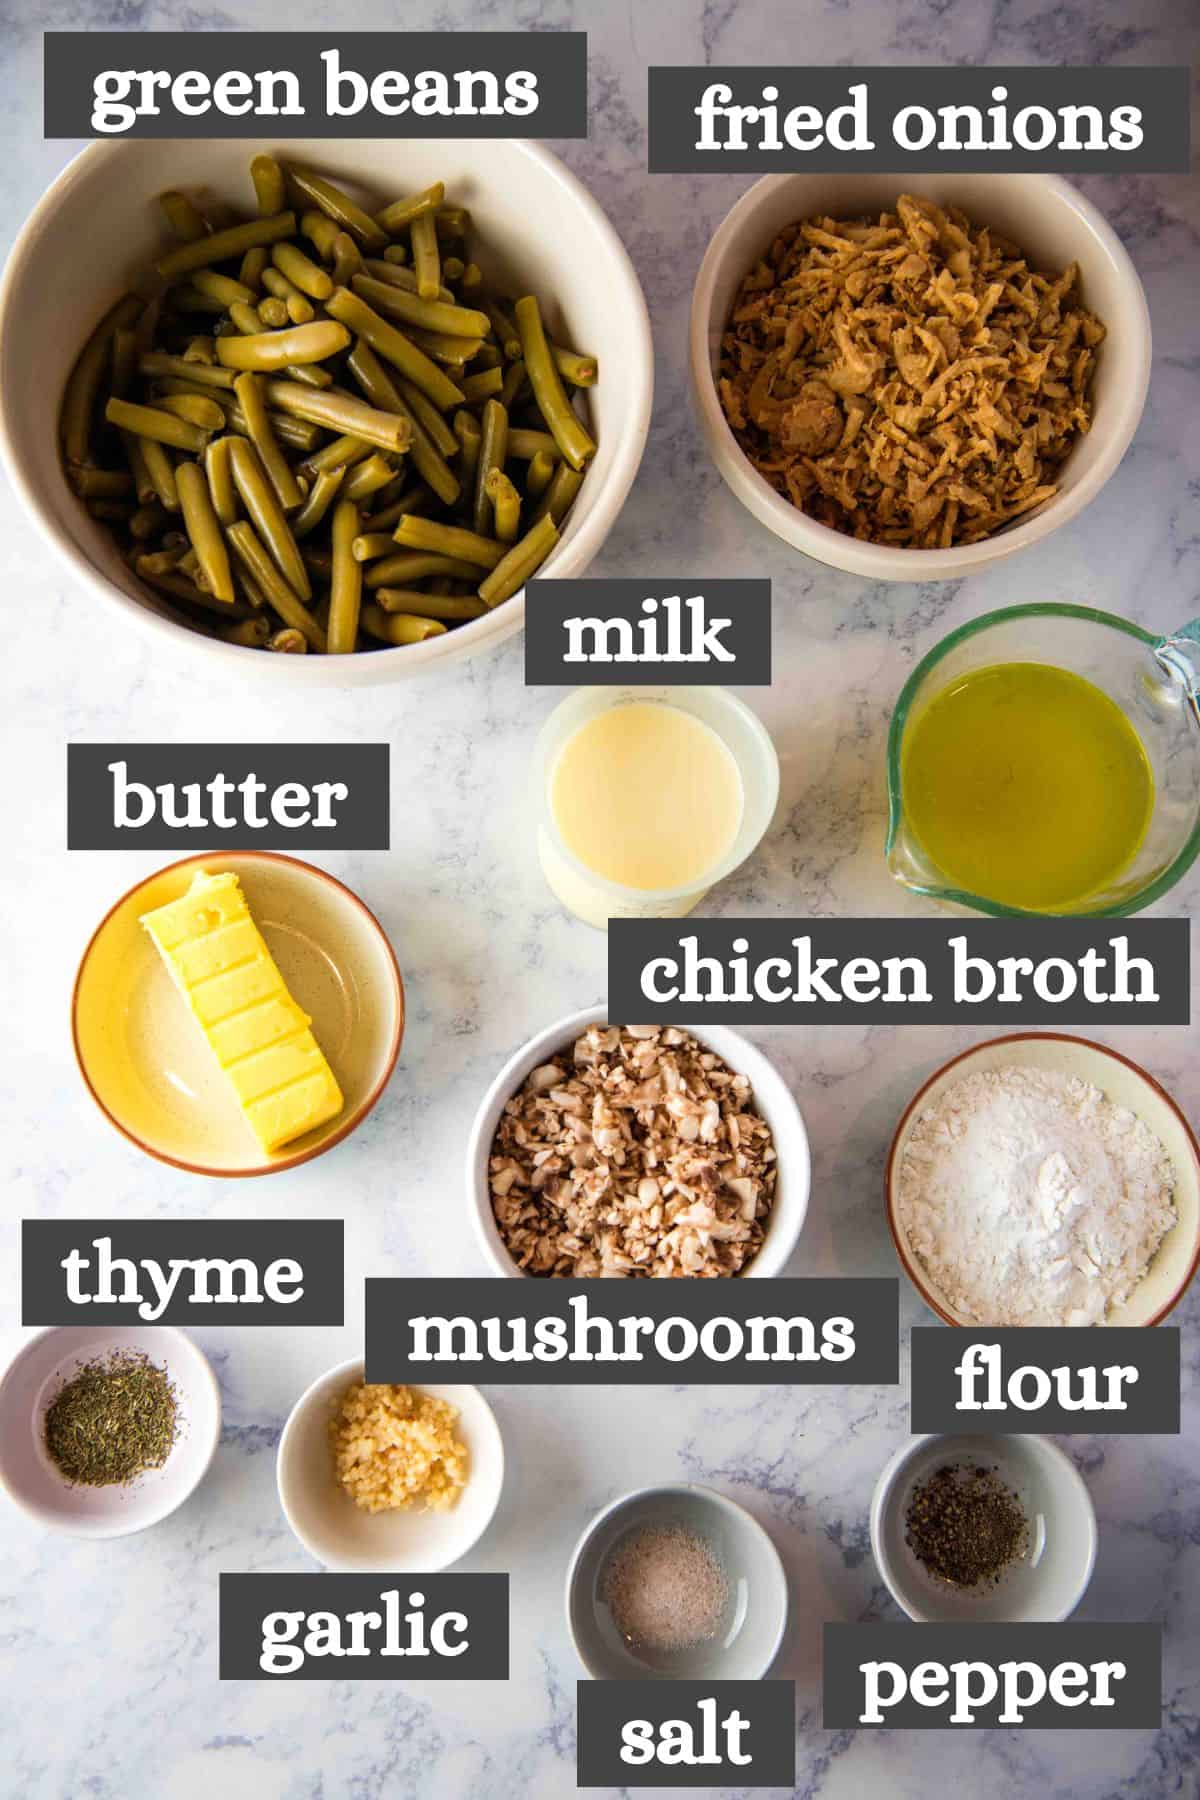
Salted Butter – I recommend using salted butter for best flavor, although you can substitute with unsalted butter in a pinch. If using unsalted butter, be sure to add about 1/8 teaspoon of extra salt to make up for the lack of salt in the butter.
Mushrooms – This recipe calls for brown mushrooms, but you can also use cremini, portobello or shiitake mushrooms depending on what’s available in your area.
All-Purpose Flour – I just use plain all-purpose flour to thicken the creamy mushroom sauce in this recipe. You can make this recipe gluten free by using sweet rice flour instead. If you go this route, be sure to use gluten free French fried onions. And as always, check all of the other ingredient labels over to ensure that they are truly gluten free.
Chicken Broth –Chicken broth is kind of the secret ingredient for making the best green bean casserole. It adds so much flavor! We often make ours from chicken bouillon…
Whole Milk – Although whole milk makes the richest mushroom sauce, you can also use 2% milk or even skim milk if that’s all you have on hand.
Canned Green Beans – For the sake of ease, we always just use canned green beans out of Jacob’s garden. You can also make your green bean casserole with either fresh green beans or frozen green beans. If using frozen green beans, just be sure to let them thaw out in the refrigerator overnight before assembling the casserole.
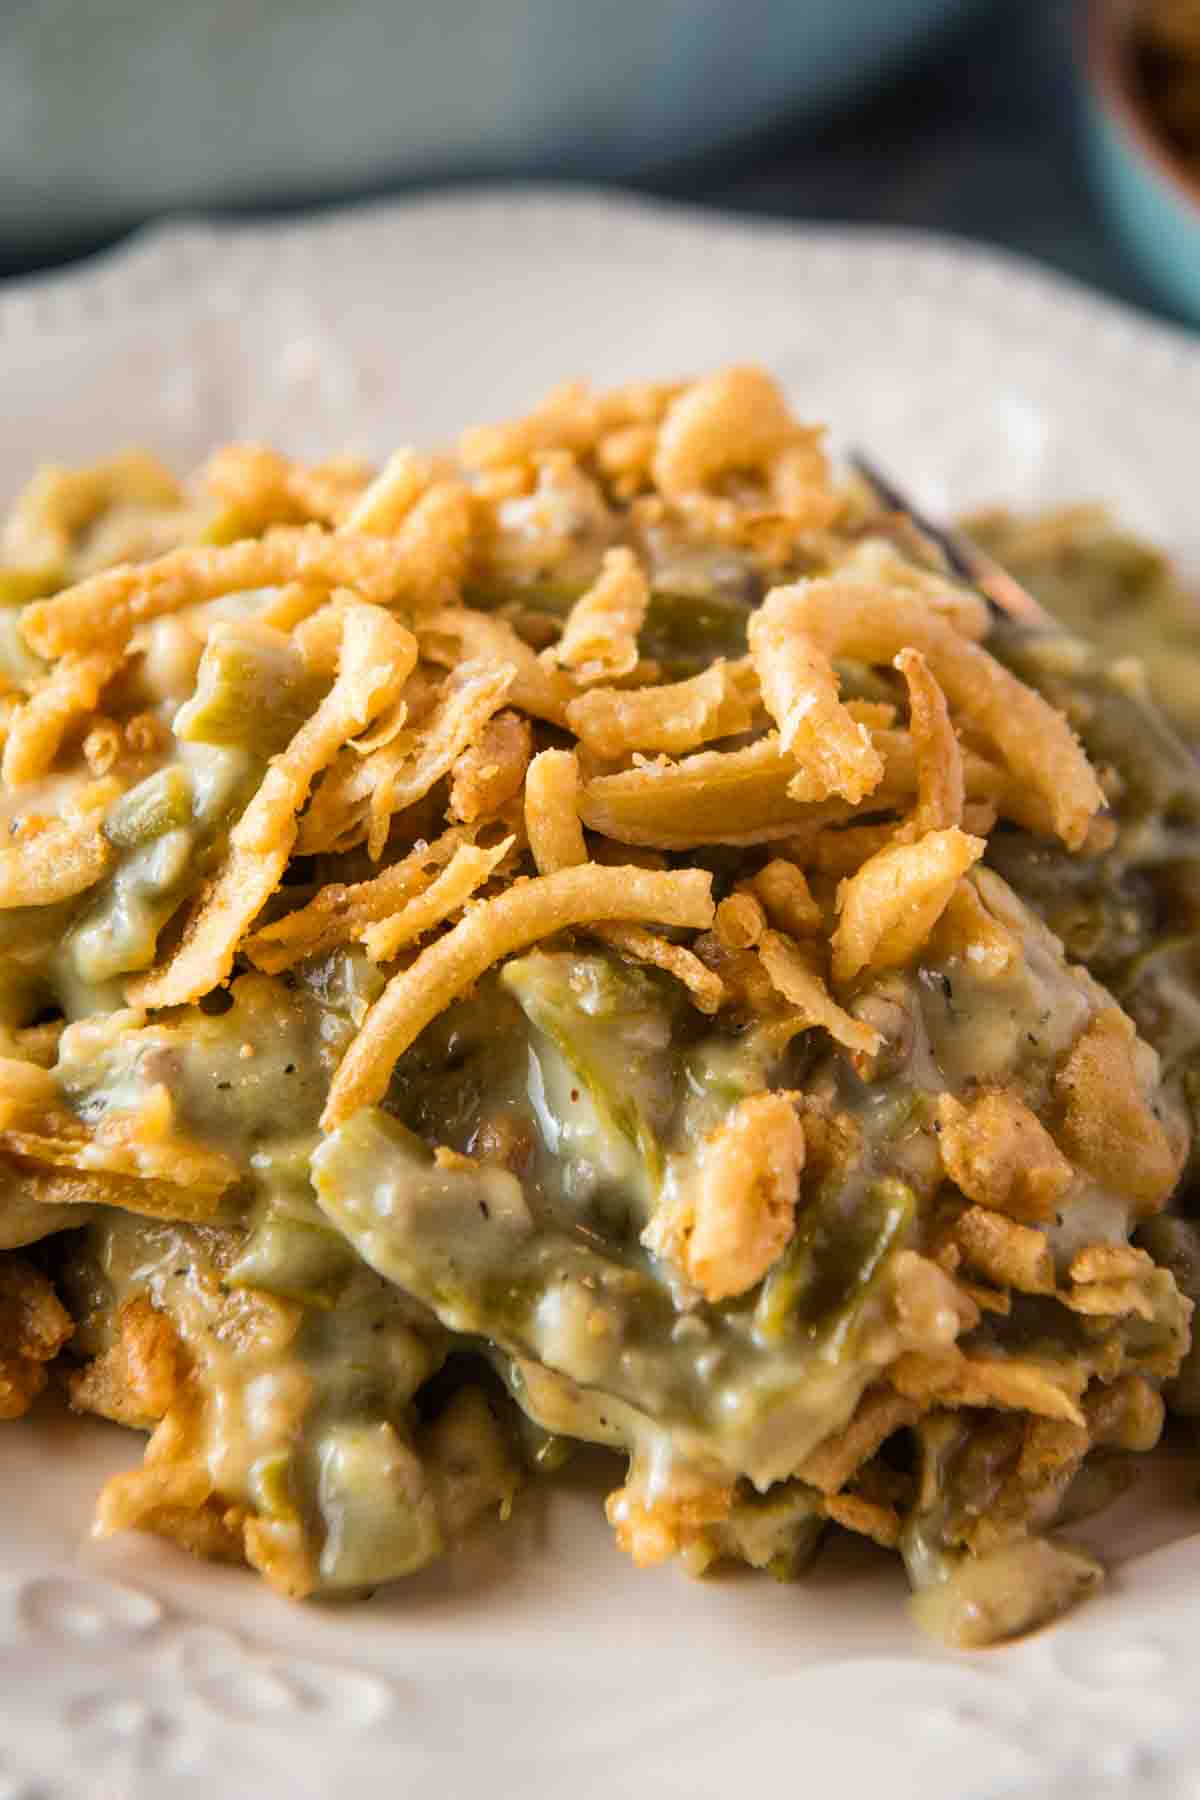
French Fried Onions – I always top my green bean casserole off with French fried onions for a perfectly crispy top. I just buy mine from the store, but you can make homemade French fried onions instead!
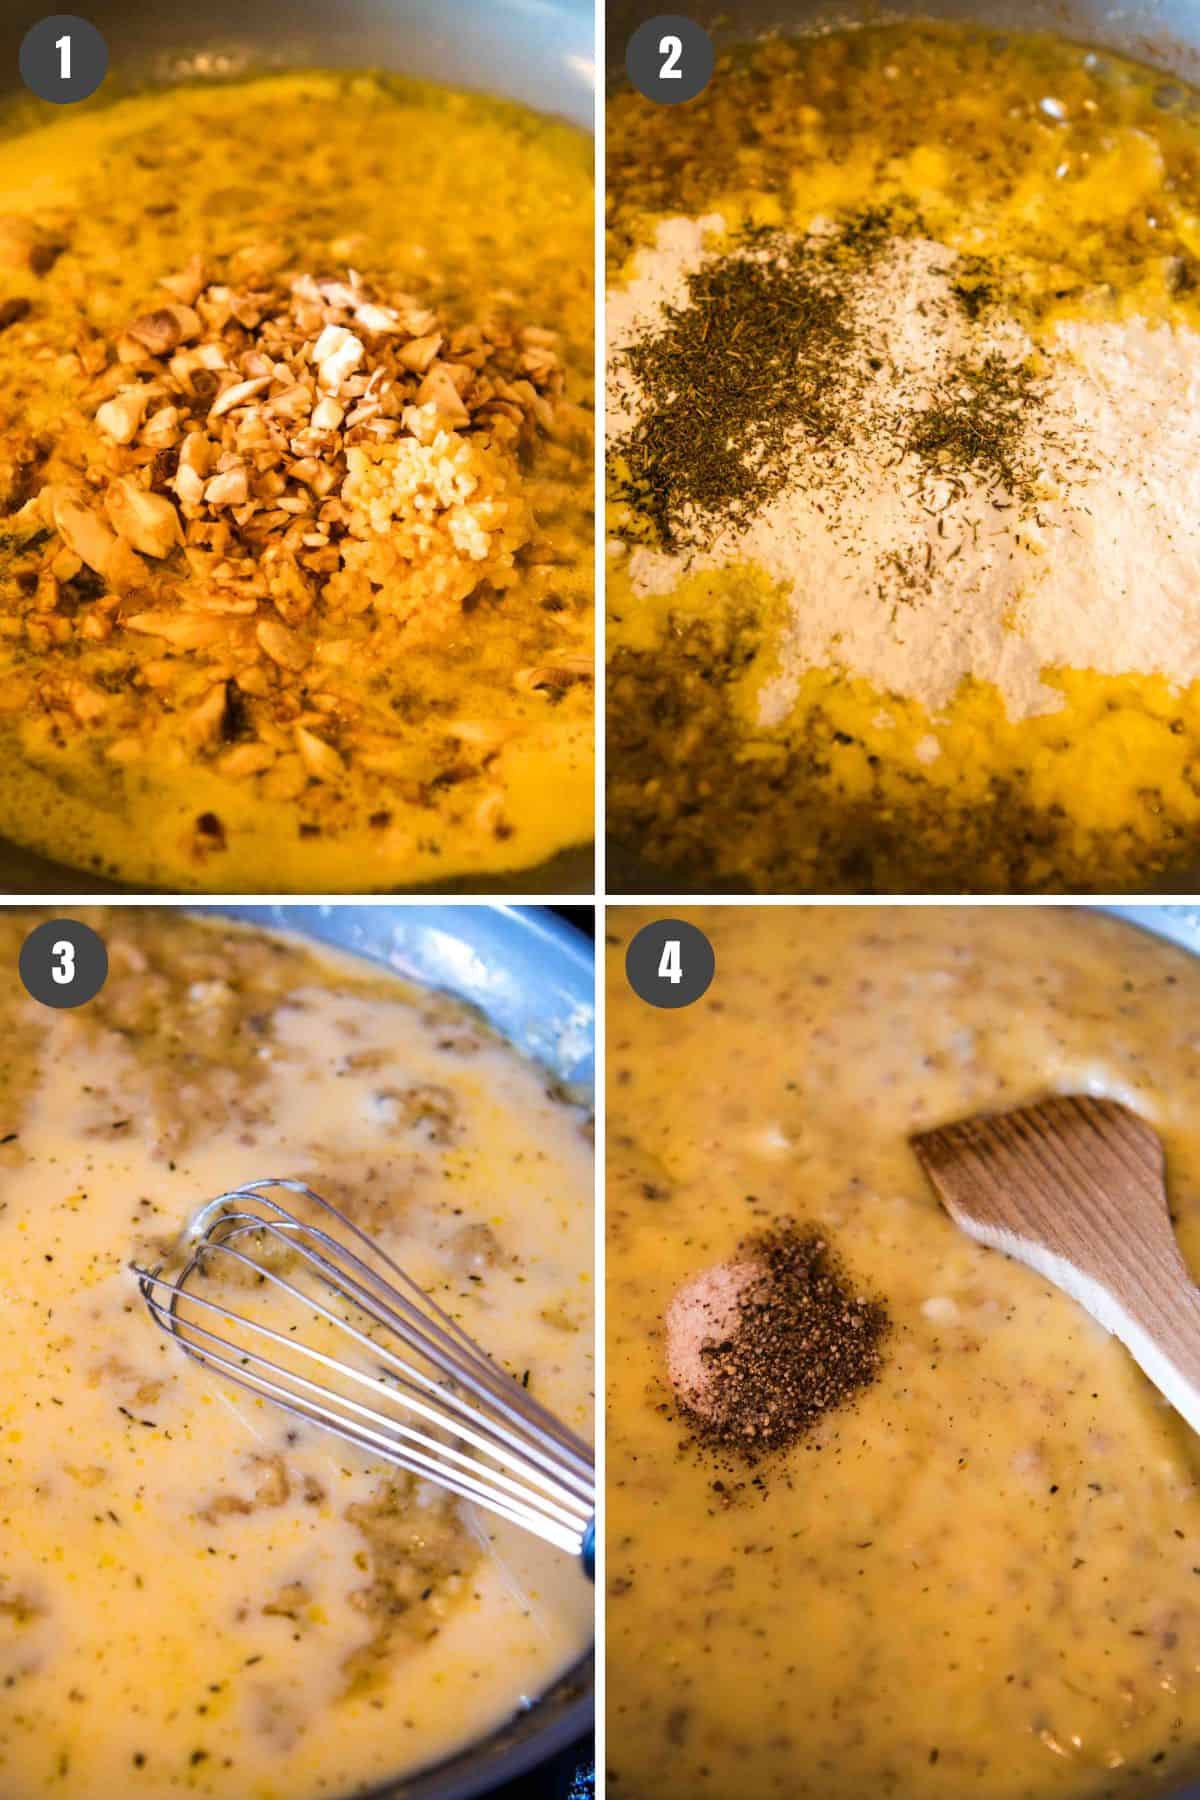
Start by sautéing the minced garlic and mushrooms in the melted butter for about 4-5 minutes, or ’til softened.
Once softened, sprinkle the flour and thyme over the mushrooms, stirring ’til well combined.
Next, add the chicken broth and milk to the mushroom mixture, whisking ’til the mushroom mixture thickens, usually 3-5 minutes.
Finally whisk in the salt and pepper. I recommend taste testing the mixture after this step so that you can add more salt if needed. That’s it!
Baking Easy Green Bean Casserole Recipe
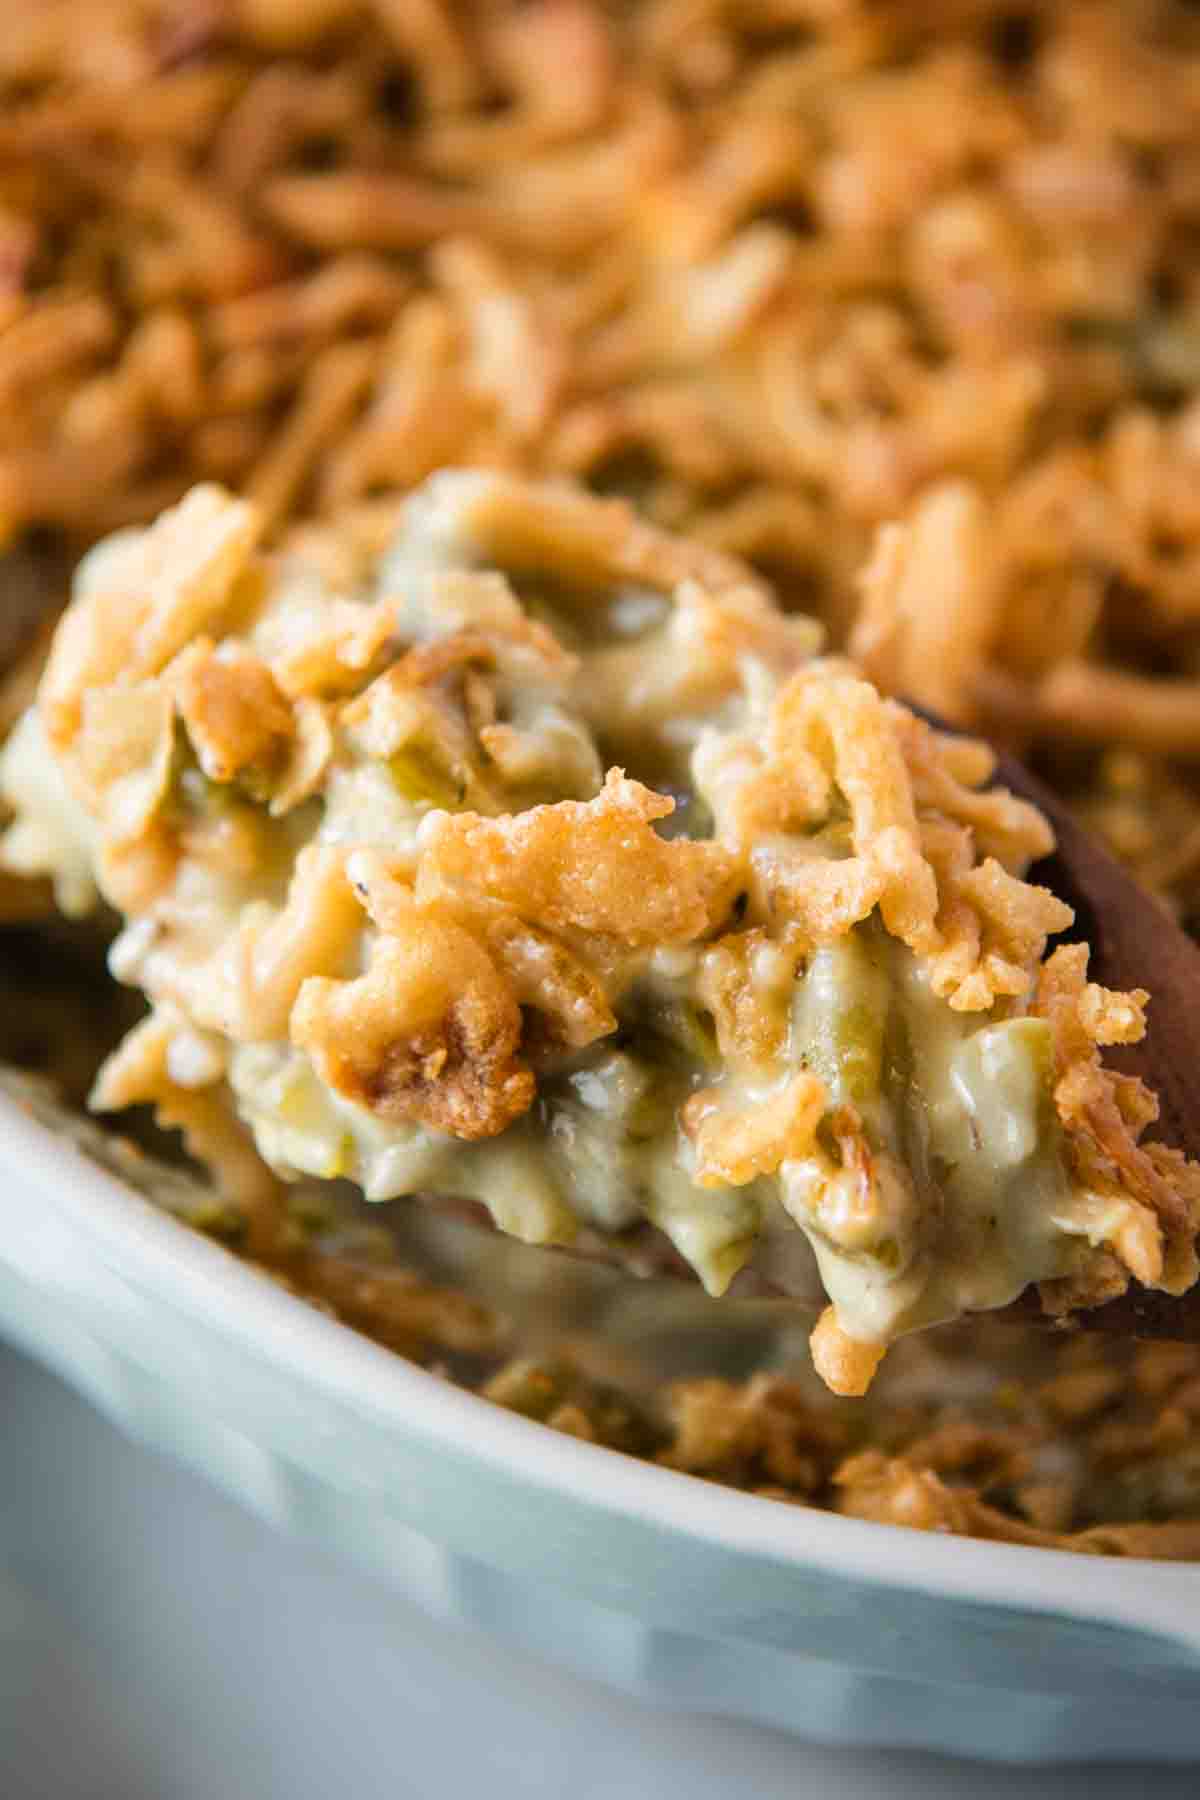
Now you can use a rubber spatula to mix the creamy mushroom sauce with all of the green beans and 1/2 of the French fried onions in a large mixing bowl.
Next, use the same spatula to spread your green bean casserole mixture into the 9×13 baking dish that you greased up in the first step.
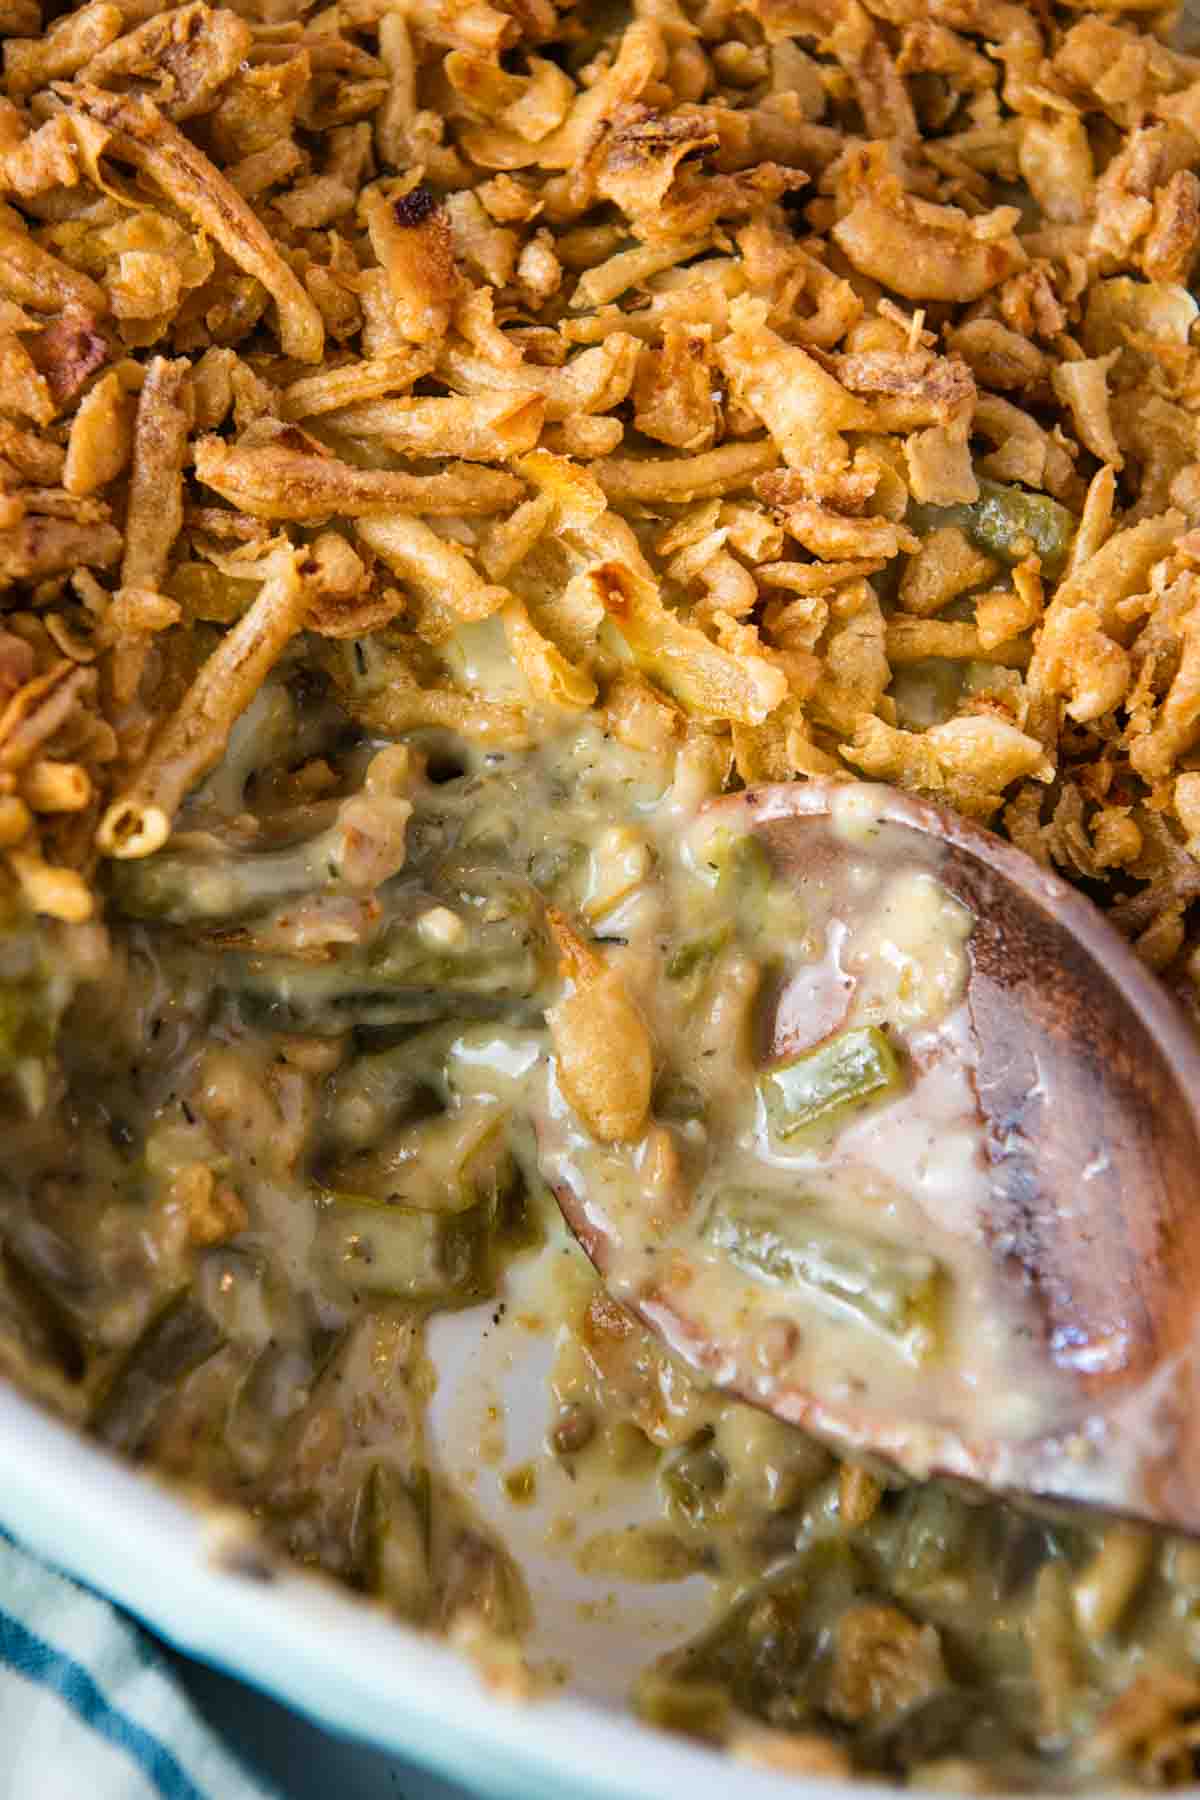
Bake your green bean casserole at 350ºF for 10-15 minutes, or ’til hot and bubbly in the center. Remove from the oven and top it off with the remaining French fried onions that you saved back earlier.
That’s it! Let it cool for a few minutes before serving.
No, but you can easily make this a gluten free green bean casserole. First, swap out the all-purpose flour with the same amount of sweet rice flour. Then you’ll need to use gluten free French fried onions. Other than that, you should be good to go. Just be sure to check over all of the other ingredients to ensure that they are truly gluten free!
Can I make this a dairy free green bean casserole?
Yes, you can make this recipe dairy free. Start by replacing the salted butter with a dairy free plant butter. Then you’ll need to swap out the whole milk for a dairy free alternative, like oat milk, almond milk, cashew milk, rice milk or even soy milk. Most of the other ingredients in this recipe are naturally dairy free, but I always recommend checking the ingredient labels over just to make sure.
Can I make green bean casserole ahead of time?
Yes, this is a great recipe to make ahead! I recommend leaving the French fried onion topping off until you’re ready to serve the casserole. Start by getting your casserole mixed up according to the instructions in the recipe card below, and spread it into your casserole dish or into an airtight container. If using the casserole dish, cover it with plastic wrap. Stored either way, it should last up to 3-4 days in the refrigerator. When you’re ready to eat, bake as normal, and then add the rest of your French fried onion topping. Serve and enjoy!
Can you freeze green bean casserole?
Of course! I recommend leaving the French fried onion topping off until you’re ready to serve the casserole. Follow the same instructions for making the green bean casserole ahead of time above, except you’ll want to transfer it to the freezer instead of the refrigerator. When you’re ready to eat, transfer the frozen green bean casserole to the refrigerator so that it has time to thaw overnight. Bake as normally directed in the recipe, and then add your French fried onion topping before serving.
Recipe Variations
Mix a little bit of shredded cheddar cheese into the casserole for a delicious cheesy flavor!
Try making your green bean casserole in the Crock Pot!
Bacon makes everything better, so why not add crumbled bacon to the top?
Add sliced potatoes to make this a green bean and potato casserole!
If you try this recipe, why not leave a star rating in the recipe card right below and/or a review in the comment section further down the page? I always appreciate your feedback. You can also follow me on Pinterest, Facebook, Instagram, and YouTube. And subscribe to my email list too!
Green Bean Casserole
How to make the best homemade green bean casserole with canned green beans. Quick and easy holiday side dish recipe that can feed a crowd!
9×13 Baking Dish
Large Skillet
Whisk
Rubber Spatula
Large Mixing Bowl
6 tablespoons Salted Butter
2 teaspoon Garlic (Minced)
1 cup Brown Mushrooms (Minced)
6 tablespoons All-Purpose Flour
1 cup Chicken Broth
1 cup Whole Milk
1 teaspoon Thyme
1 teaspoon Sea Salt
1/2 teaspoon Black Pepper
48 ounces Canned Green Beans
6 ounces French Fried Onions
Before getting started, pre-heat your oven to 350ºF, and grease a 9×13 baking dish with nonstick cooking spray.
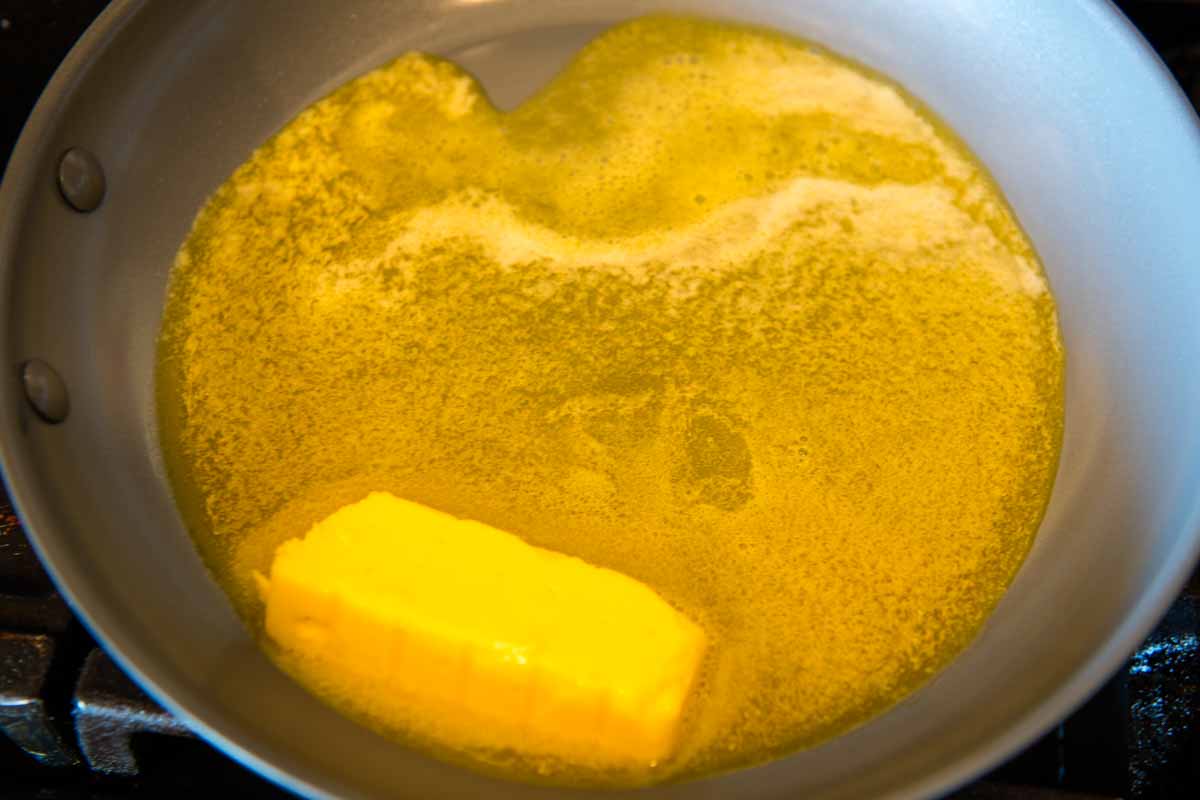
Start by melting the butter in a large skillet over low to medium heat.
Sauté the garlic and mushrooms in the melted butter for about 4-5 minutes, or 'til softened.
Once softened, sprinkle the flour and thyme over the mushrooms, stirring 'til well combined.
Next, add the chicken broth and milk to the mushroom mixture, whisking 'til the mushroom mixture thickens, usually 3-5 minutes.
Finally whisk in the salt and pepper. I recommend taste testing the mixture after this step so that you can add more salt if needed.
Now you can use a rubber spatula to mix the creamy mushroom sauce with all of the green beans and 1/2 of the fried onions in a large mixing bowl.
Next, use the same spatula to spread your green bean casserole mixture into the 9×13 baking dish that you greased up in the first step.
Bake your green bean casserole at 350ºF for 10-15 minutes, or 'til hot and bubbly in the center. Remove from the oven and top it off with the remaining French fried onions that you saved back earlier.
That's it! Let it cool for a few minutes before serving.
Can I make green bean casserole ahead of time?
I recommend leaving the French fried onion topping off until you’re ready to serve the casserole. Start by getting your casserole mixed up according to the instructions in the recipe card below, and spread it into your casserole dish or into an airtight container. If using the casserole dish, cover it with plastic wrap. Stored either way, it should last up to 3-4 days in the refrigerator. When you’re ready to eat, bake as normal, and then add the rest of your French fried onion topping. Serve and enjoy!
Casserole, Christmas, dinner, Dinner Ideas, Easter, Holiday, Main Dish – Casserole, Side Dish, Thanksgiving
American, Christmas, Dinner, Holiday, Side Dish, Thanksgiving
easy green bean casserole recipe, green bean casserole, green beans casserole, recipe for green bean casserole, recipe of green bean casserole
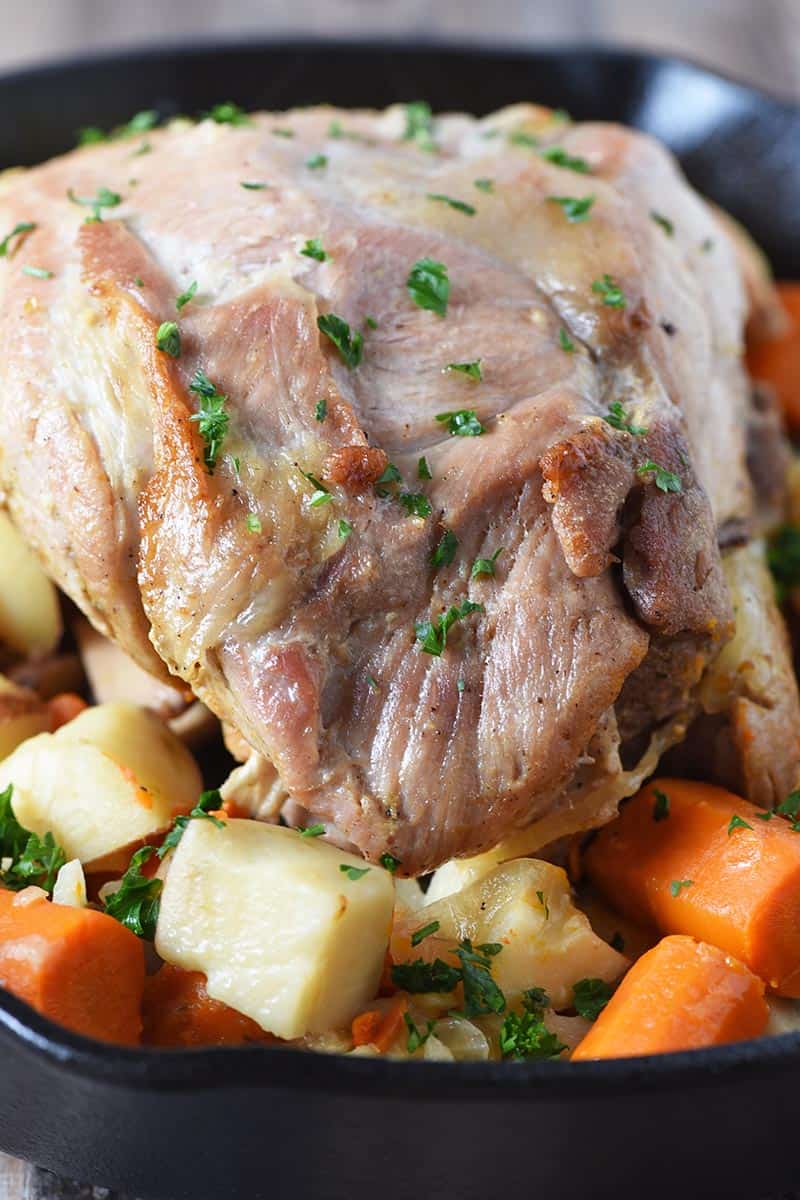
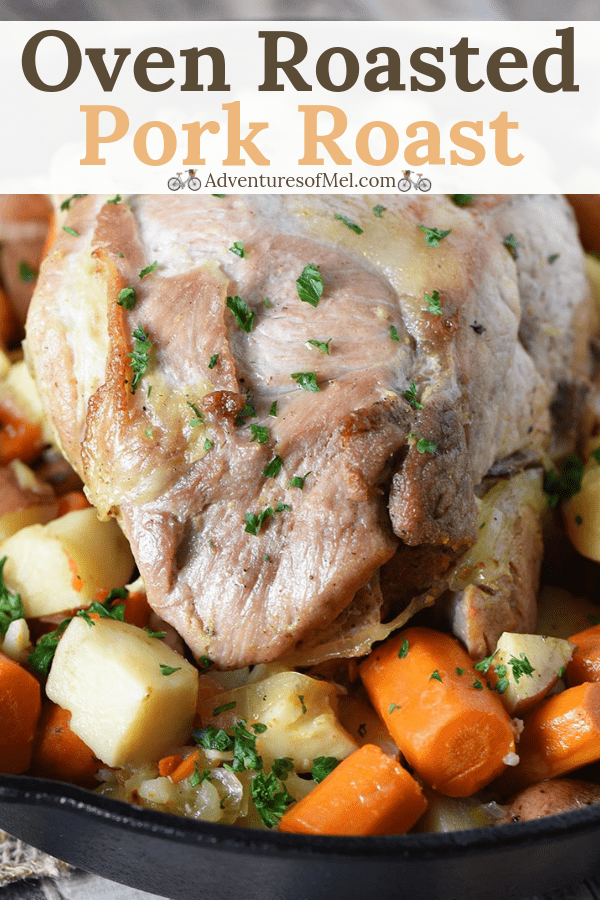
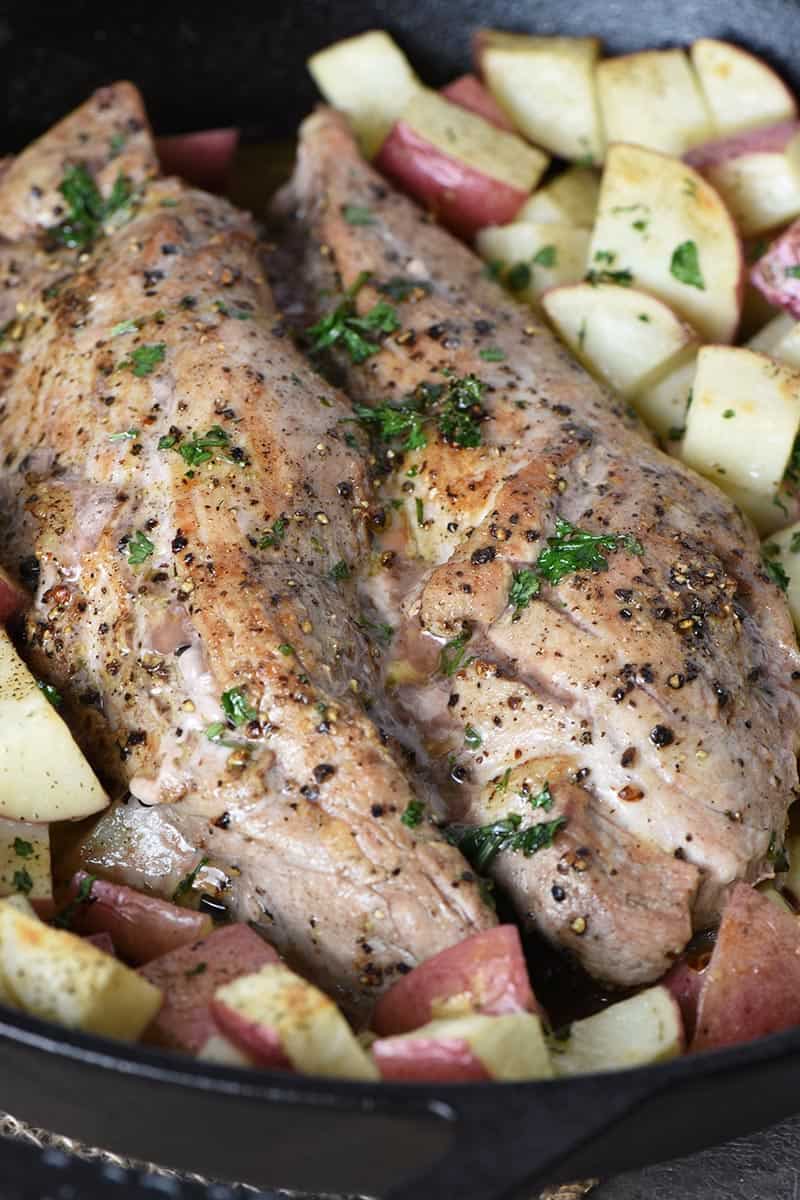
Learn step by step how to make the best ever slow cooker pork roast that’s perfectly pull apart juicy & tender. It’s the ultimate set-it-and-forget-it recipe that’s so easy to make, and it’s perfect for holiday dinners, church potlucks, or even just a healthy and nutritious weeknight meal!
My family eats a pot roast at least every week. Maybe it’s a Midwestern thing, but they’re just so easy to make. I love a good oven roasted pork roast, and it’s just hard to beat roasted pork tenderloin! And man, leftover pork roast makes the best pork sandwiches.
Roast pork is super easy to make in the slow cooker, and it uses simpleingredients. It’s the ultimate set-it-and-forget-it recipe for busy days!
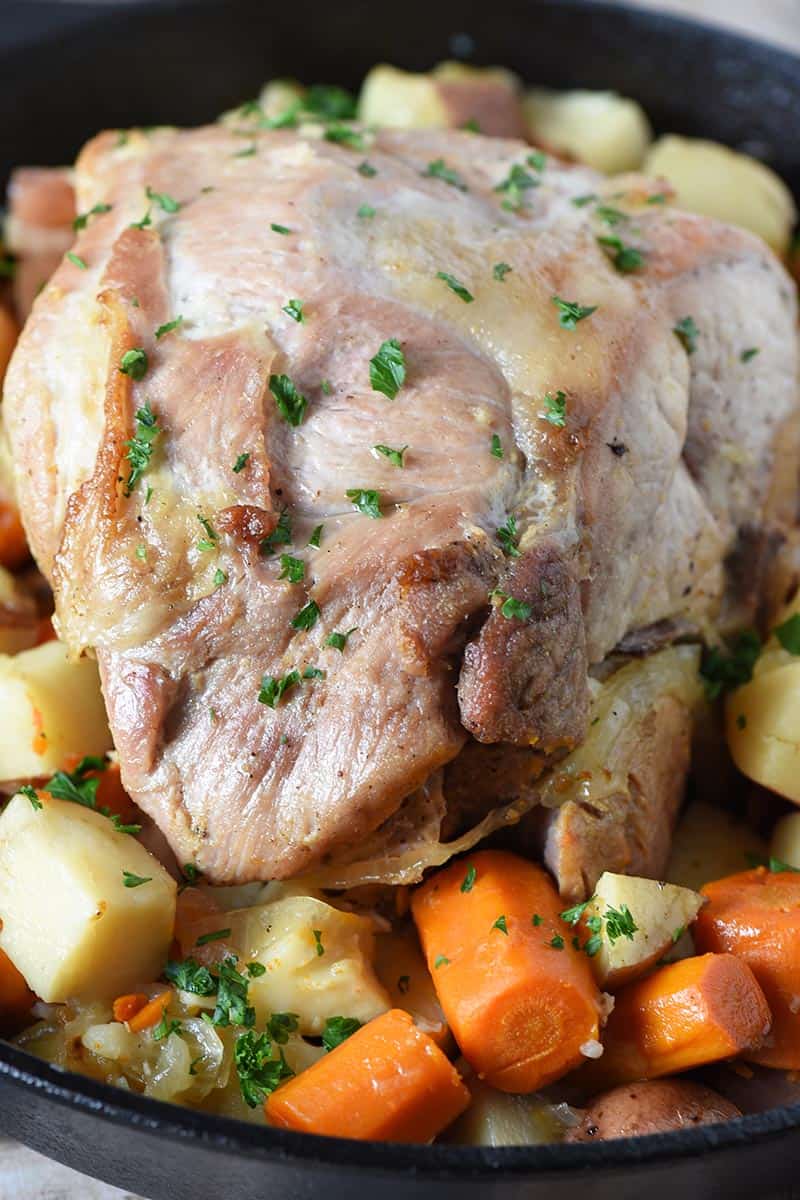
This Crock Pot recipe makes a perfectly tender and juicy pork roast. It cooks on a low heat all day long, giving even the toughest of pork cuts plenty of time to break down for that ultimate pull-apart, fork-tender texture.
Pork roast makes the best holiday dinner for Easter, Thanksgiving, Christmas or even New Year’s Eve. It also makes a complete meal for potlucks, family get-togethers and other large gatherings.
The best part is that this flavorful pork roast recipe is just so versatile. Throw in your favorite root vegetables, herbs and spices for the ultimate one-pot meal!
This old-fashioned comfort food is nutritious and healthy. Good pork contains a wide range of essential vitamins, minerals and healthy fats. Not to mention, it’s a rich source of lean protein.
Ingredients & Substitutions Notes
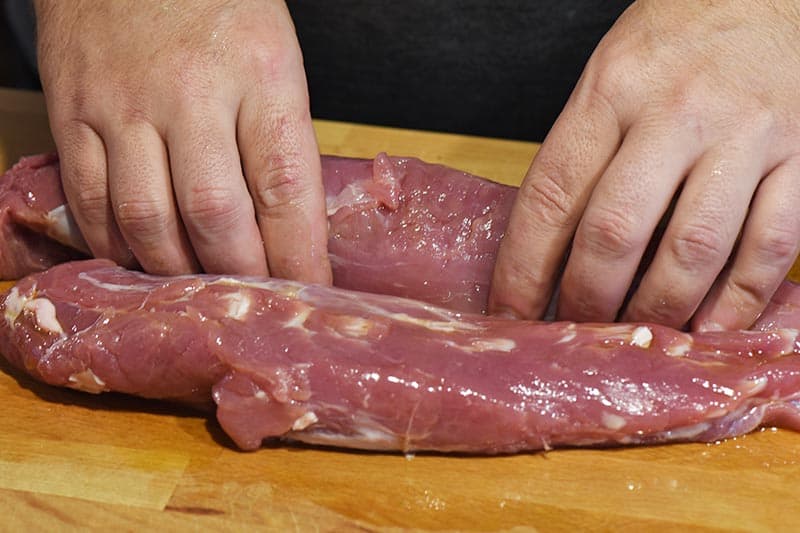
Pork Roast – I used a pork butt roast for this recipe, but you can use almost any boneless pork roast, including shoulder roast, loin roast, and even pork belly. Just remember to adjust the cooking time accordingly, based on the fat content and the size of the cut of meat that you use.
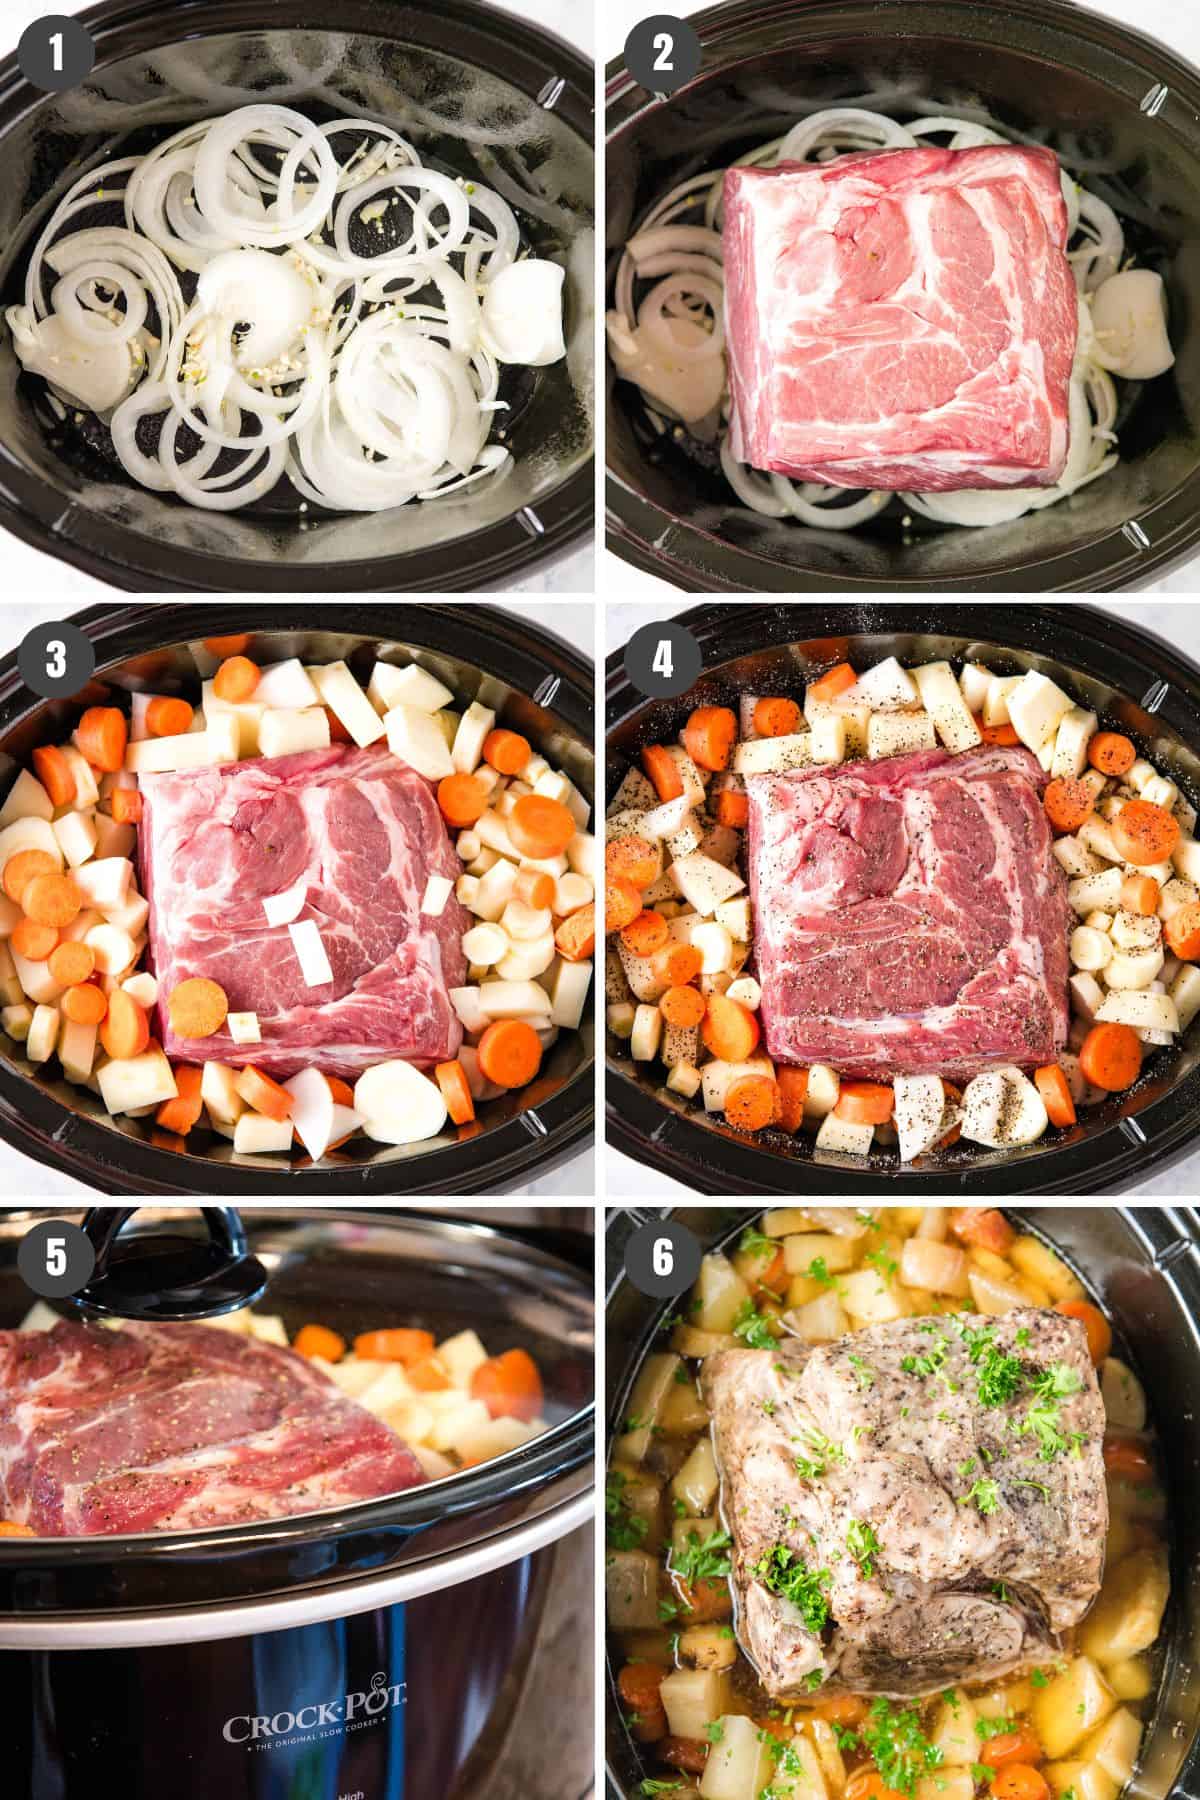
Before getting started, you’ll need to get all of your ingredients out and ready to go. Then grease up your slow cooker with nonstick cooking spray. I use a 6-quart slow cooker for a 3-4LB roast.
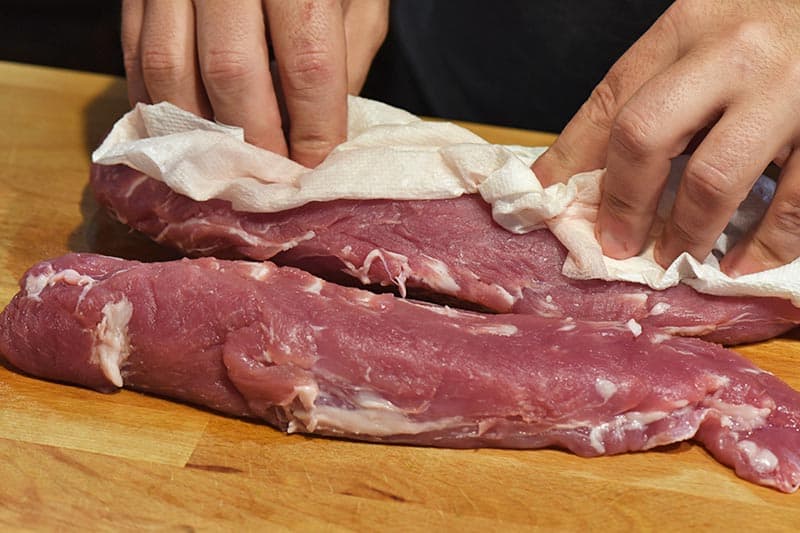
For ingredient preparation, you’ll want to mince the garlic, slice up the onion, chop up and peel any root vegetables that you use with a large knife and cutting board. If your pork roast is frozen, I recommend setting it out in the refrigerator overnight so that it has time to thaw before making this recipe. You can add it frozen in a pinch, but you may have to increase the cooking time by a couple hours.
How to Cook Pork Roast in the Crock Pot
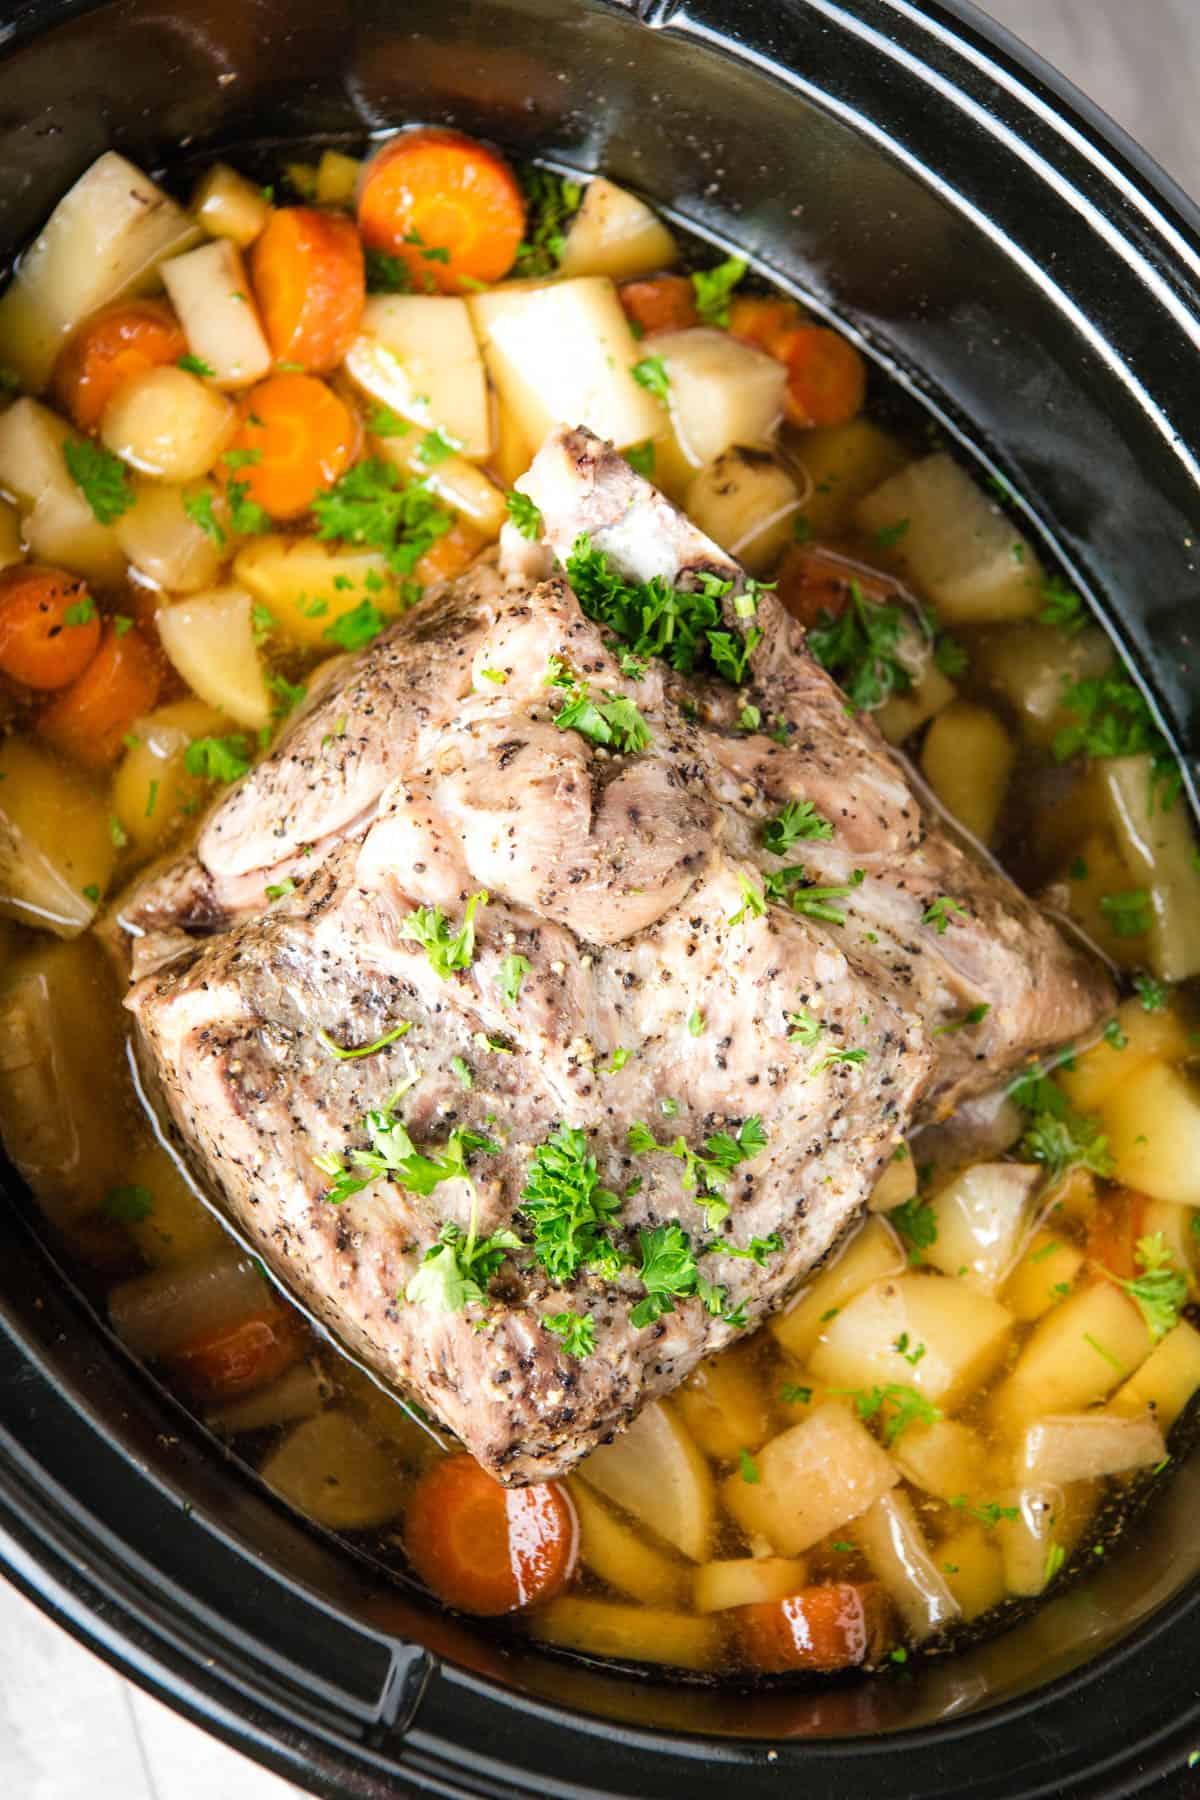
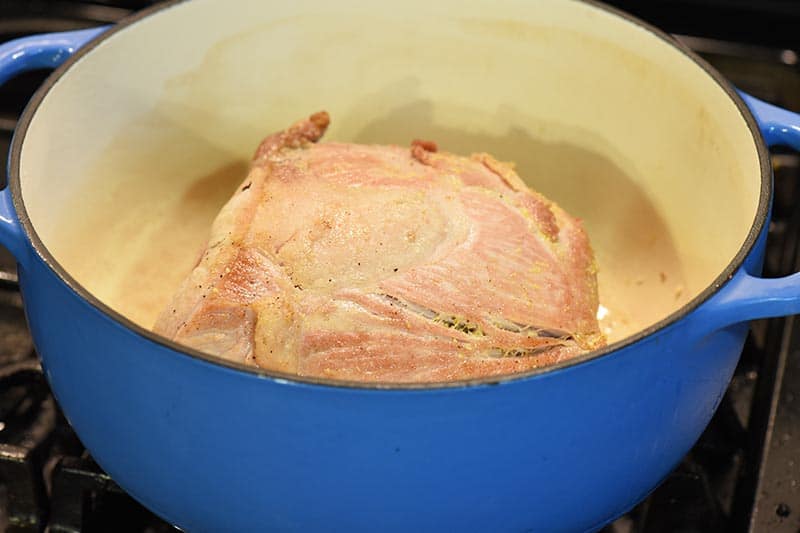
Start by adding the sliced onions and minced garlic to the bottom of the Crock Pot.
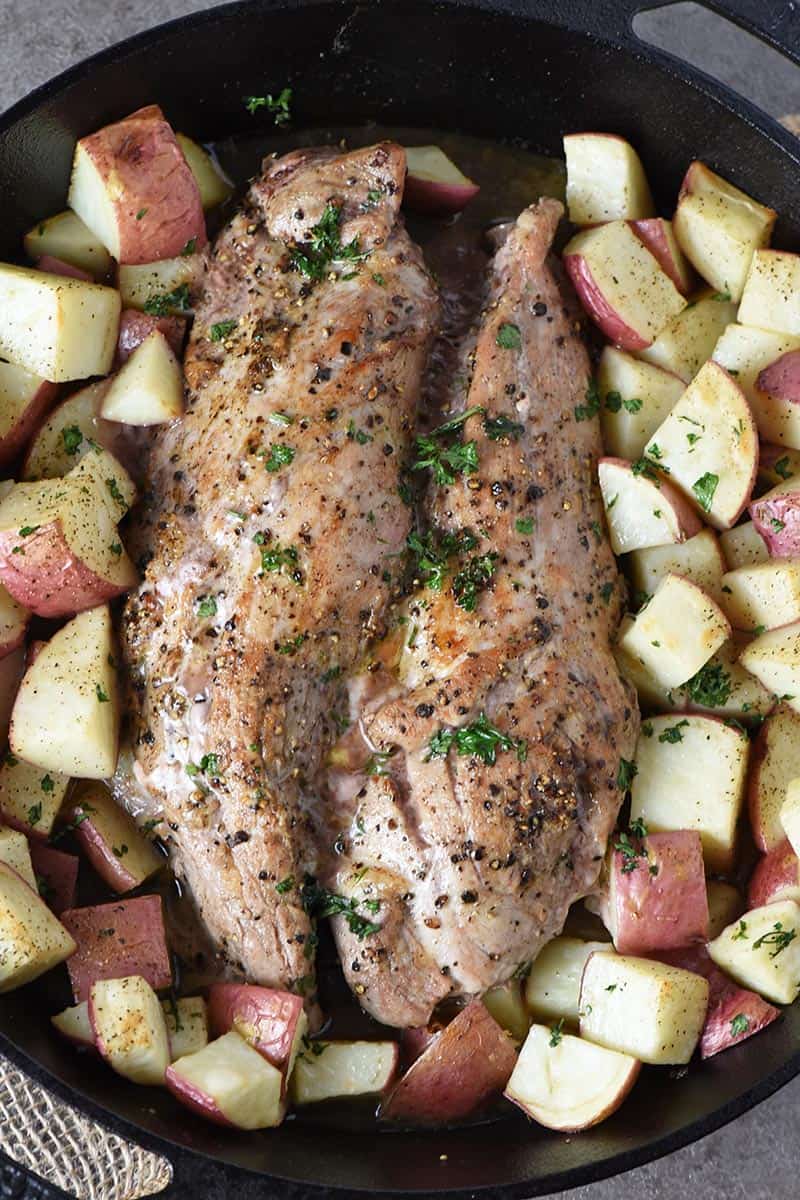
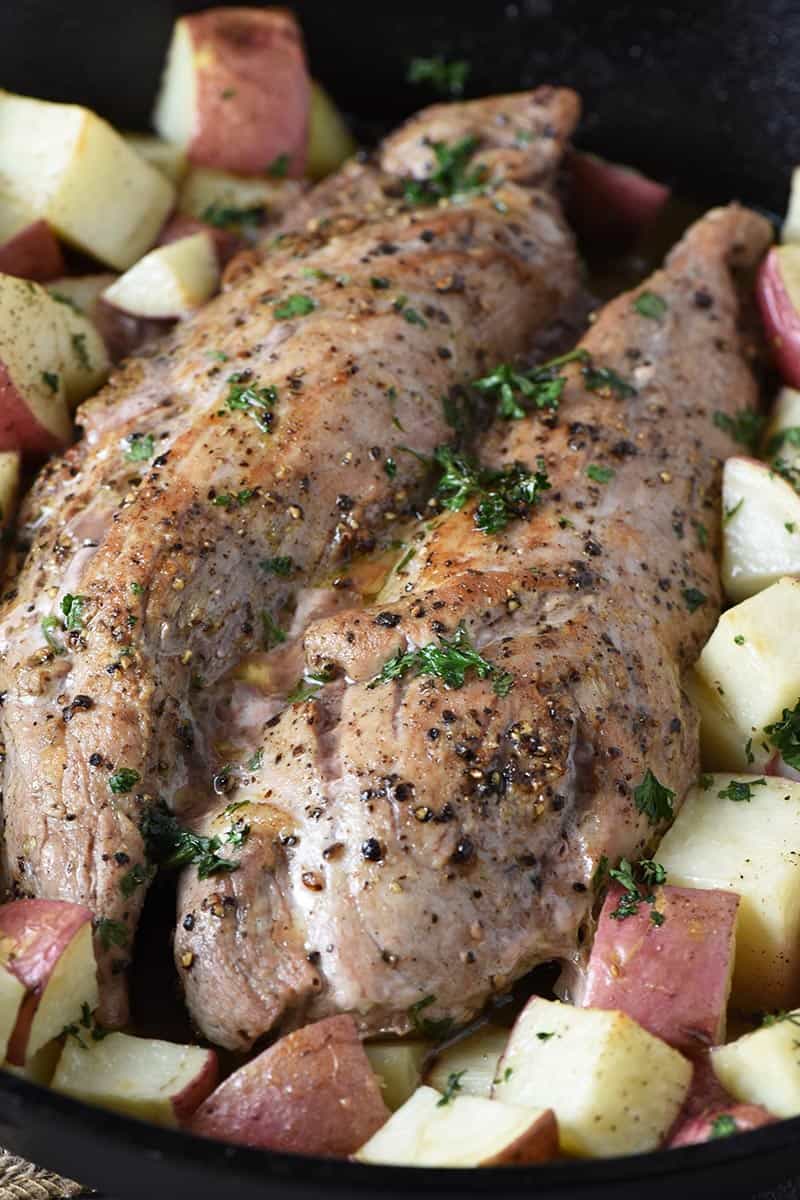
Next, center your roast on top of the bed of garlic and onions with the fat side up in the slow cooker.
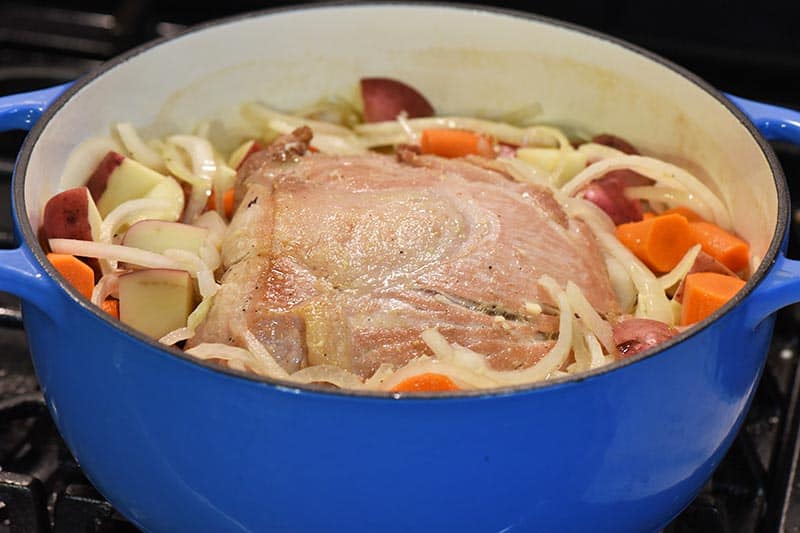
Situate the chopped up root vegetables around the roast in the slow cooker. It’s okay to really pile them in there!
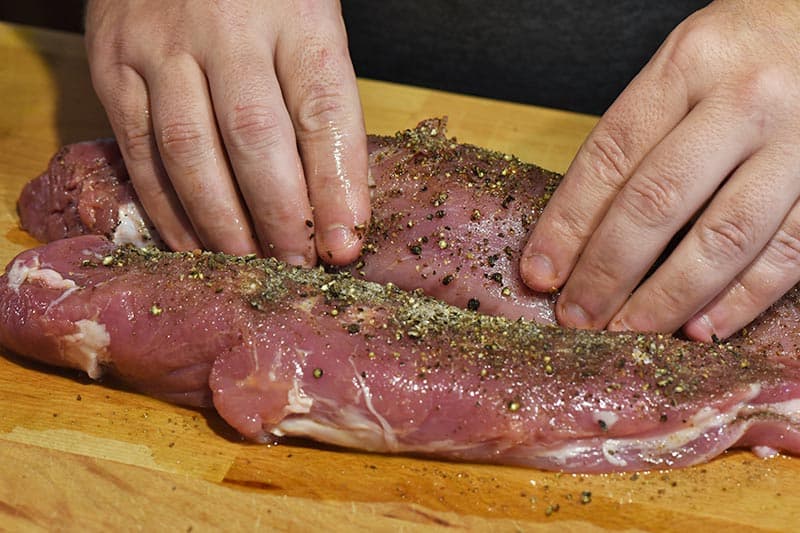
Once everything is situated, go ahead and dry rub the salt, pepper and any other herbs/spices into the pork roast.
Finally, pour chicken stock over the roast and veggies, and then place the lid on top of your Crock Pot.
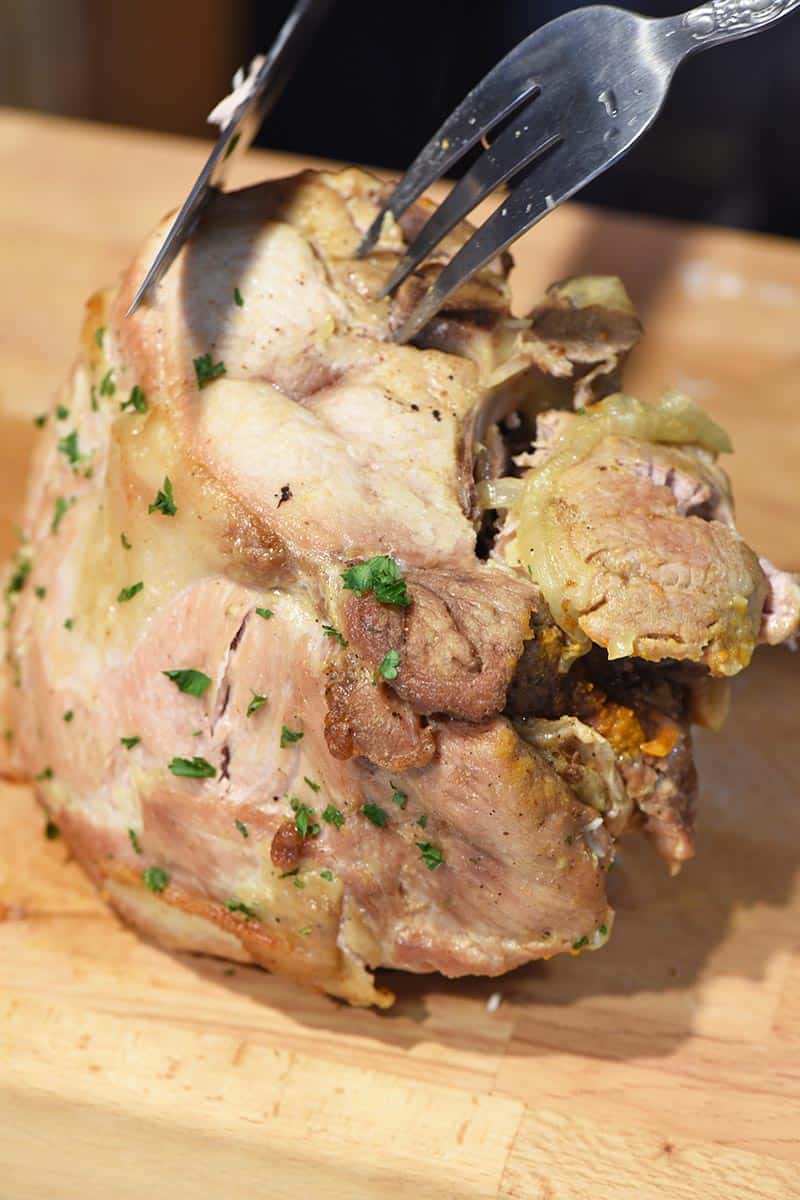
That’s it! Now you’ll want to set your Crock Pot on low and let it cook for at least 10-12 hours, or until it reaches an internal temperature of at least 200ºF with a meat thermometer, and the roast easily falls apart when prodded with a fork.
Keep in mind that the cooking time may vary depending on the size and fat content of your pork roast. The most important thing is that your roast reaches and maintains at least 200-205ºF for a good while. This is required to break down the collagen in the pork roast that can otherwise make it tough and chewy.
How to Serve Crock Pot Slow Cook Pork Roast
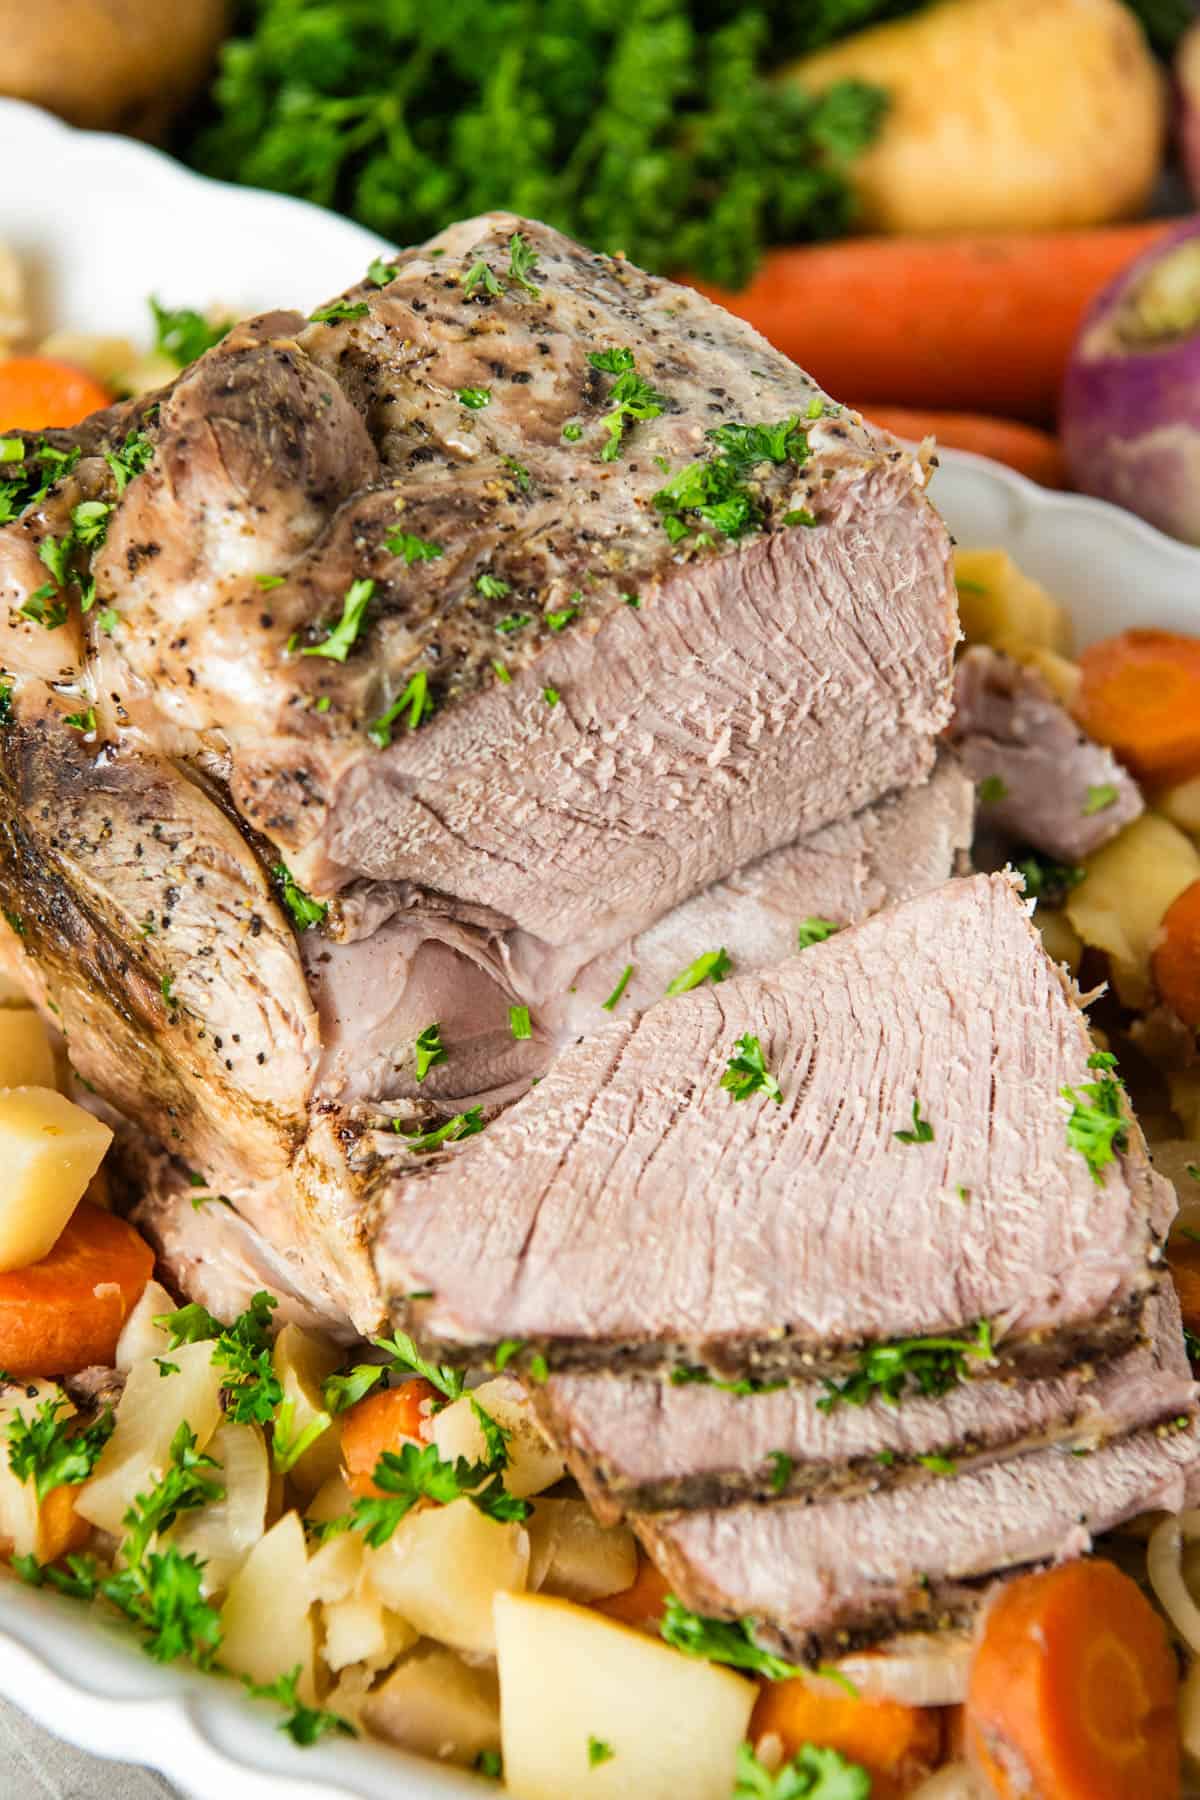
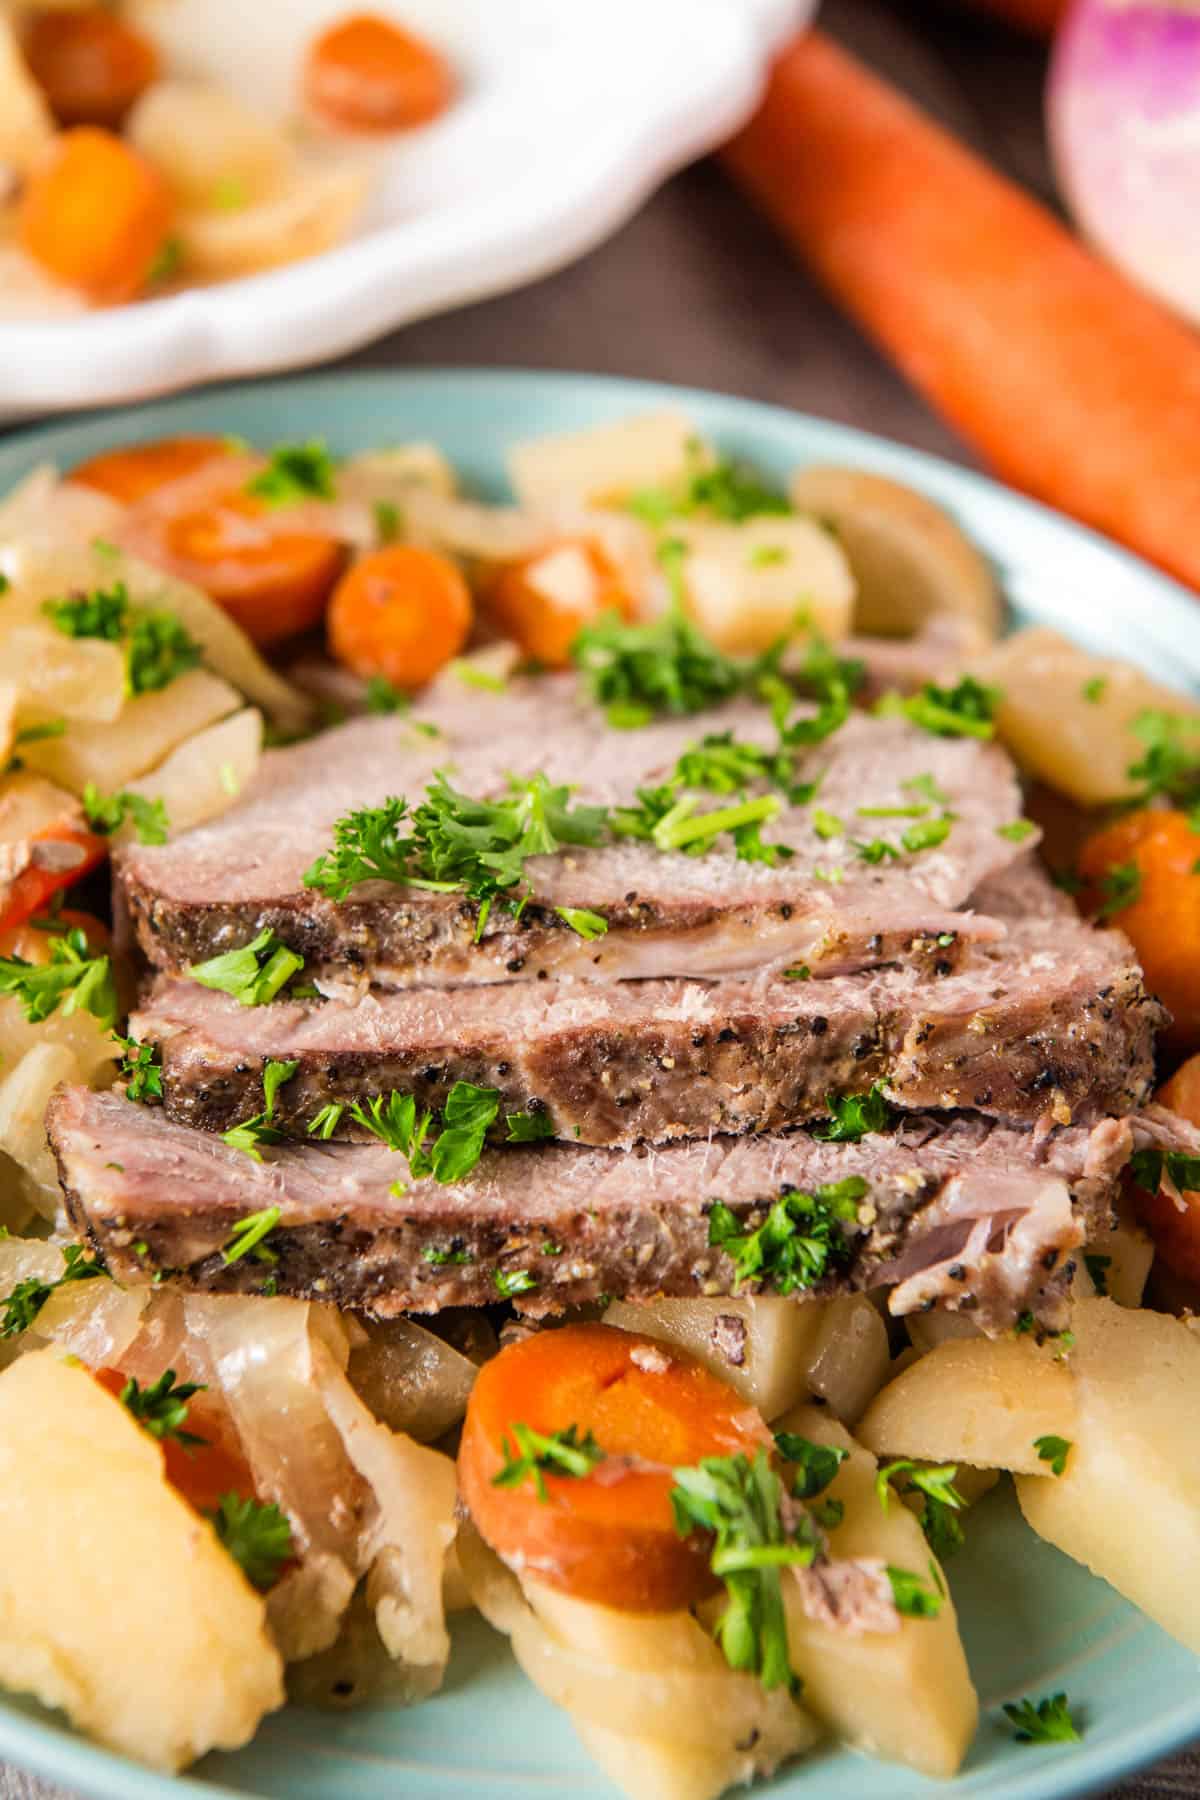
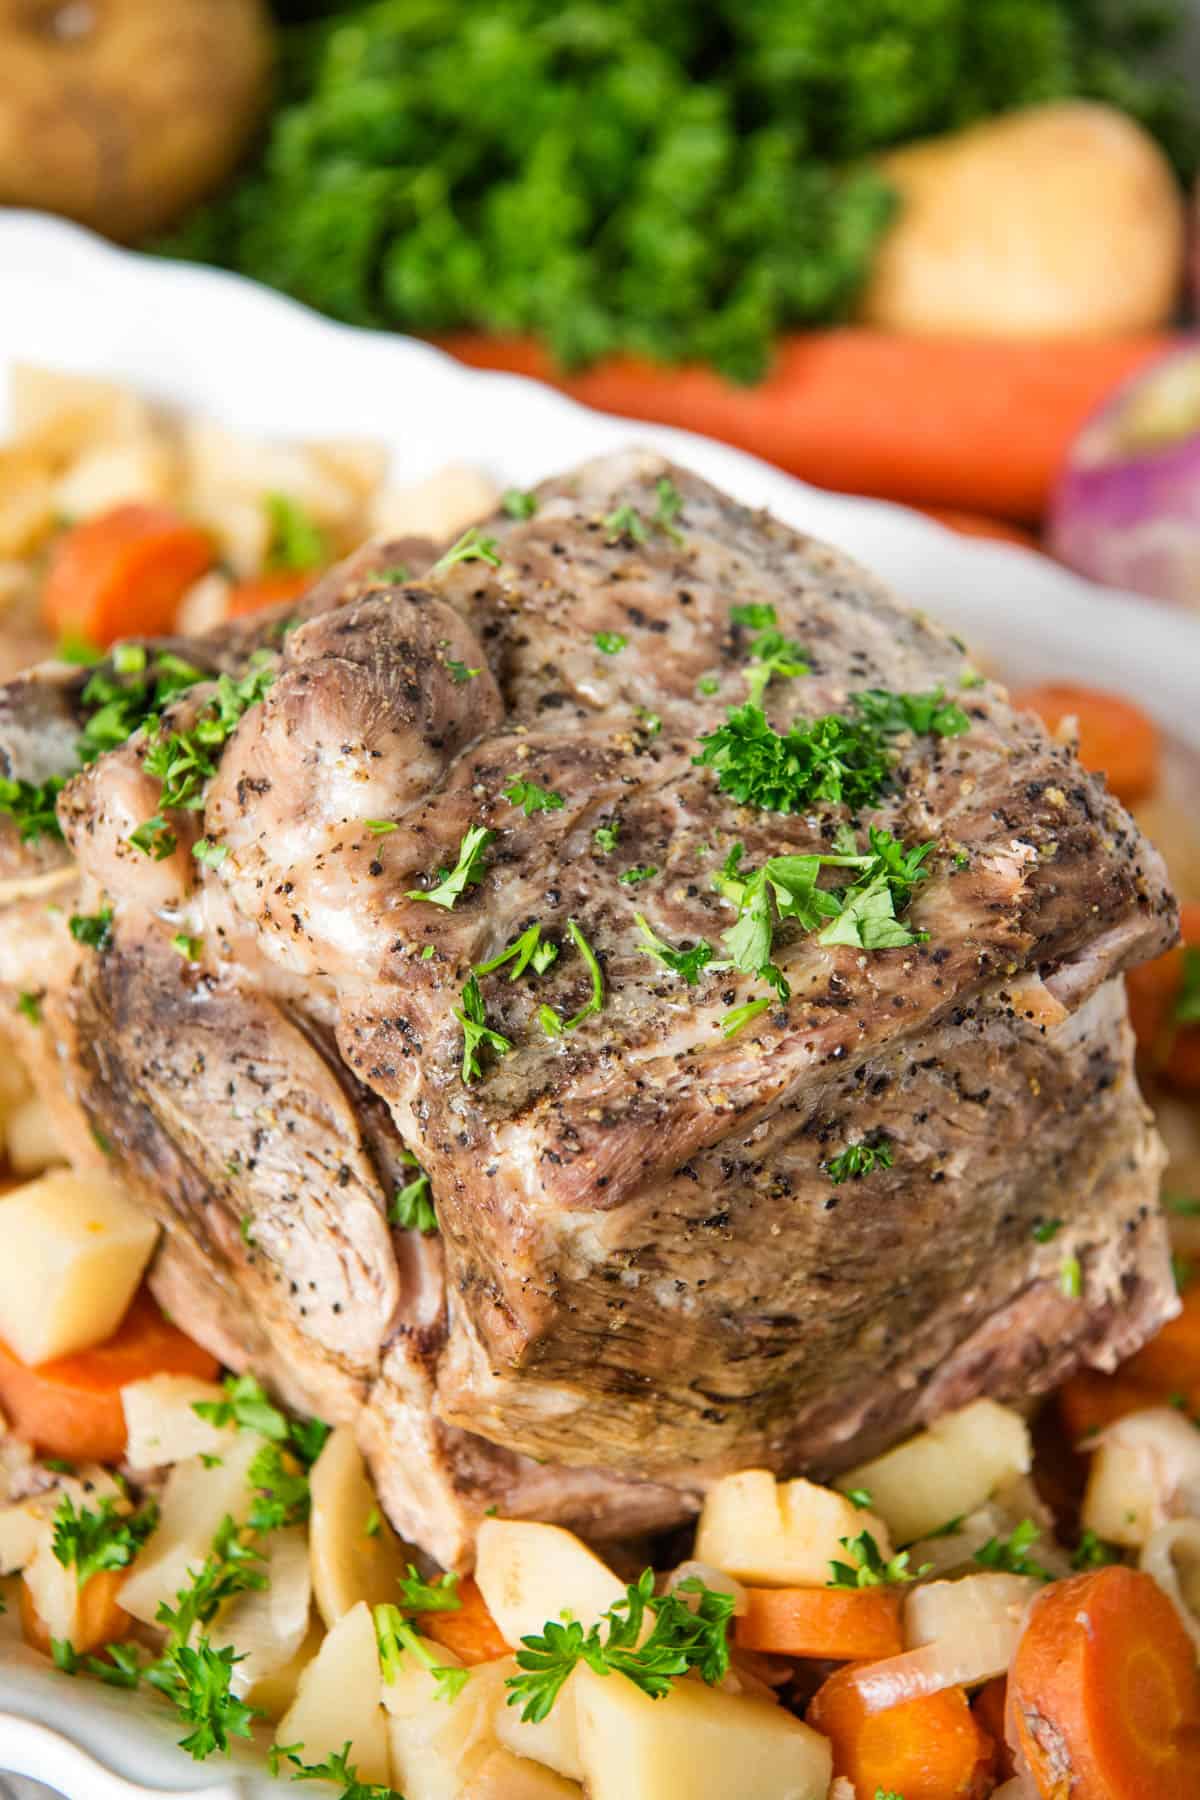
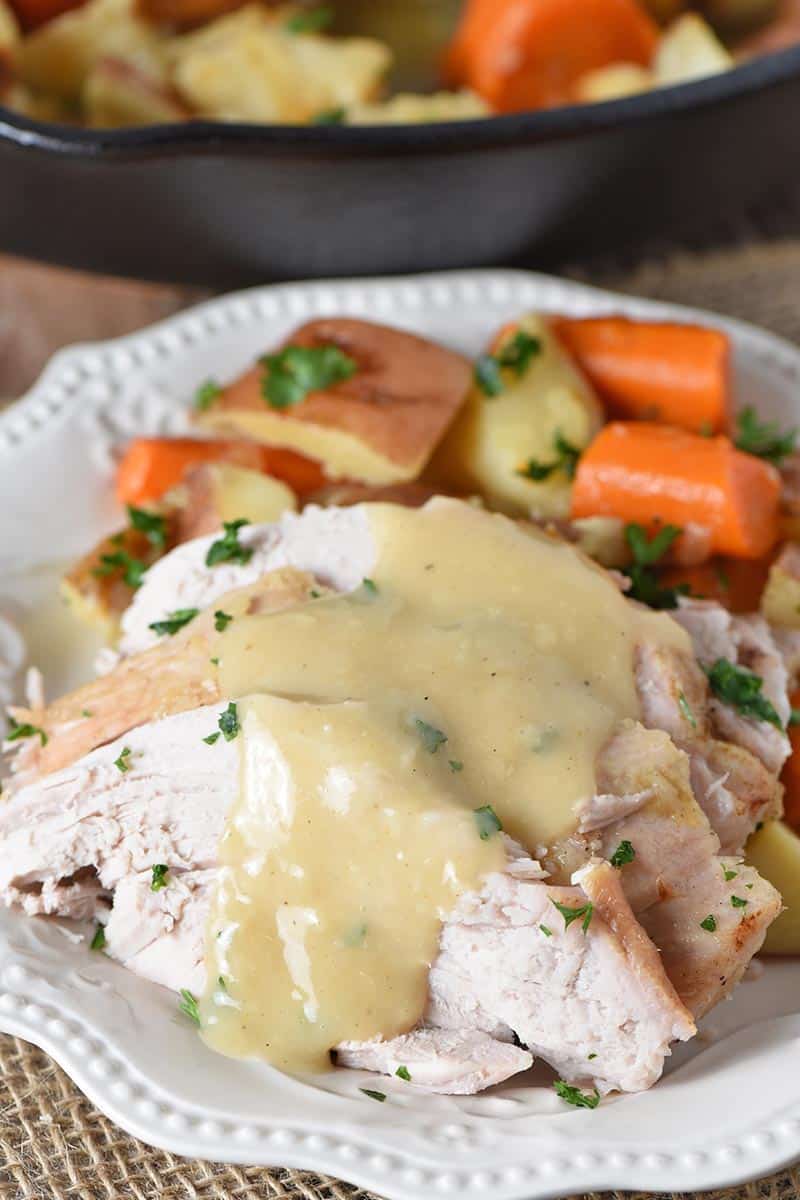
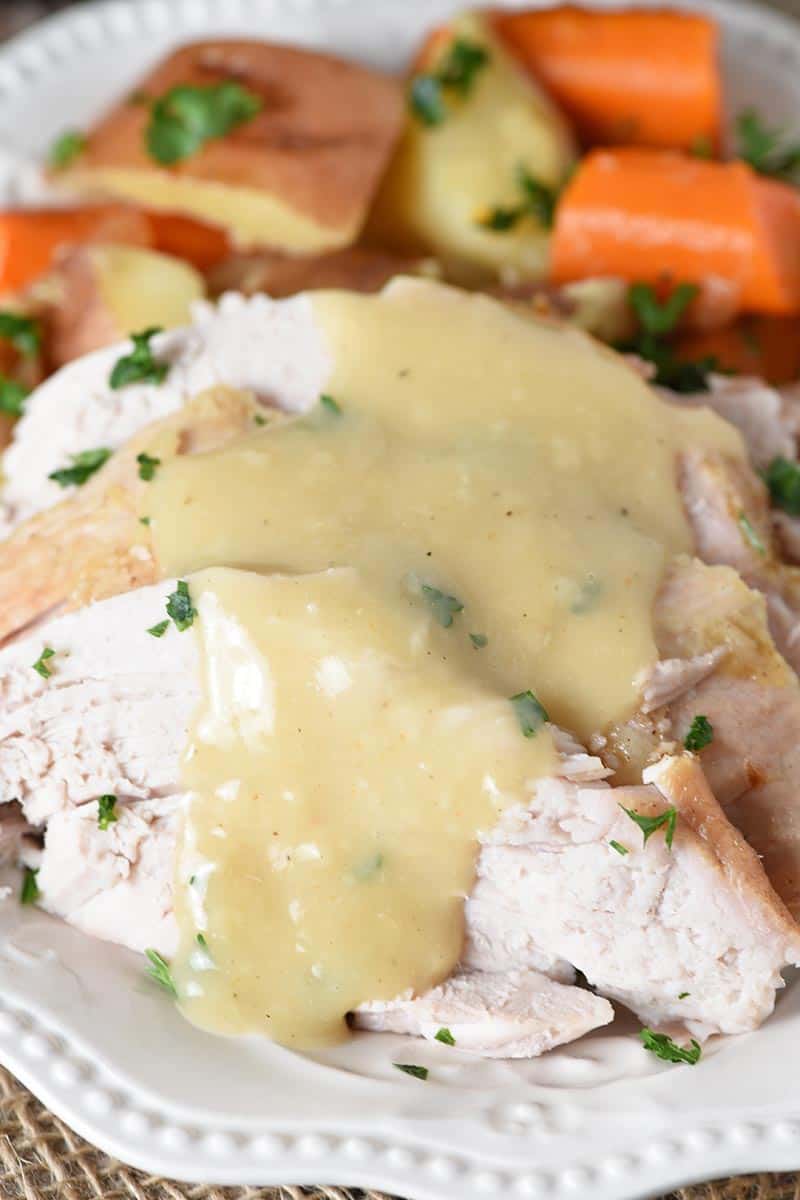
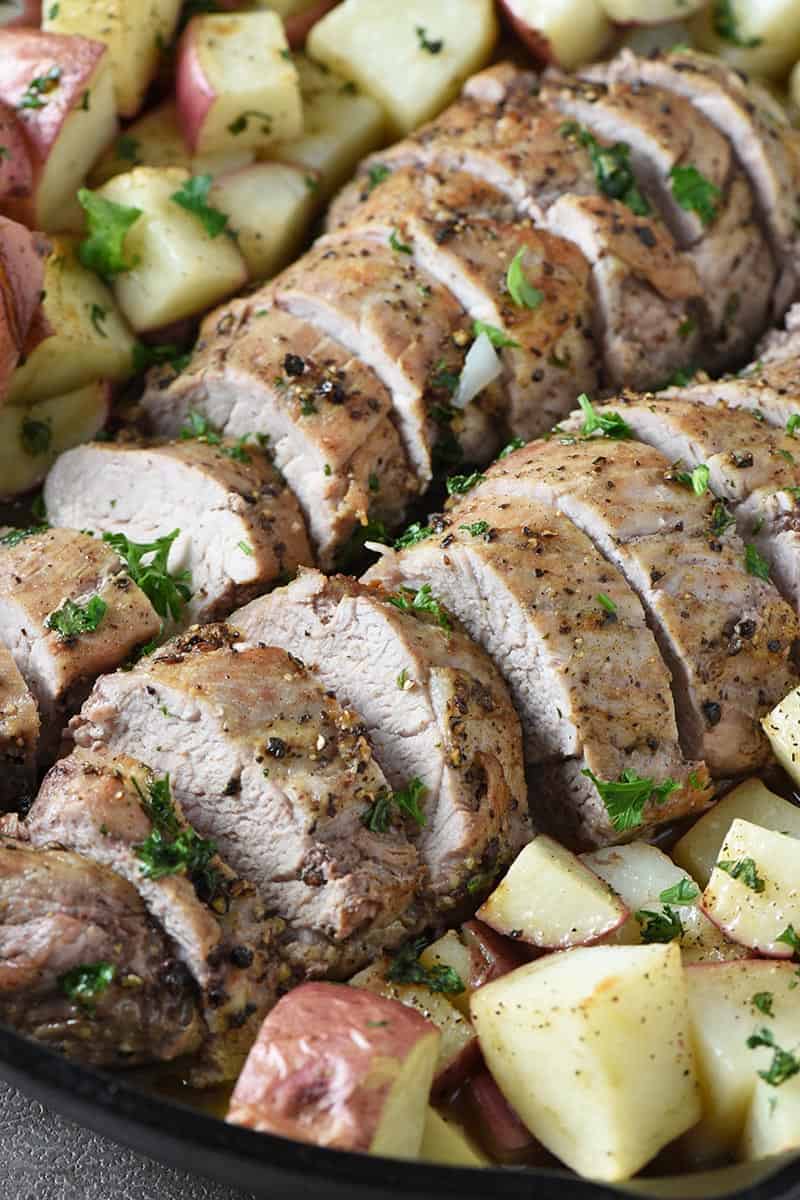
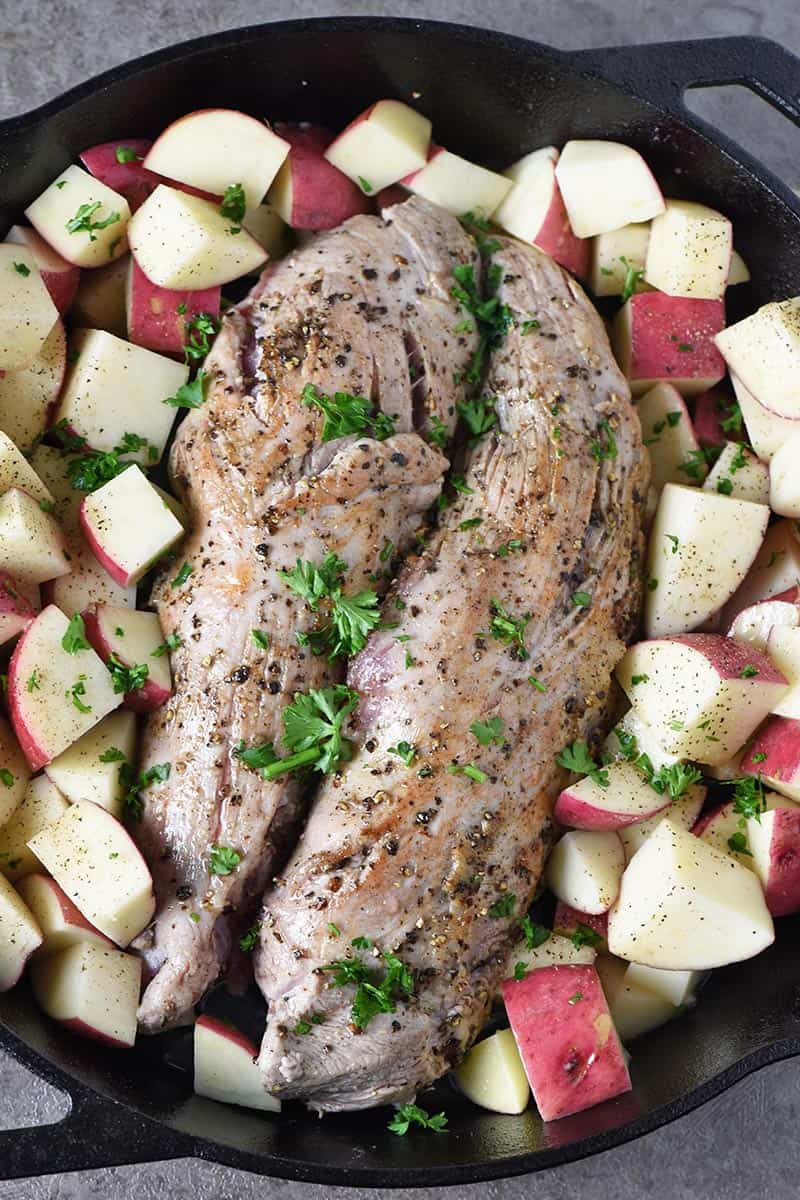
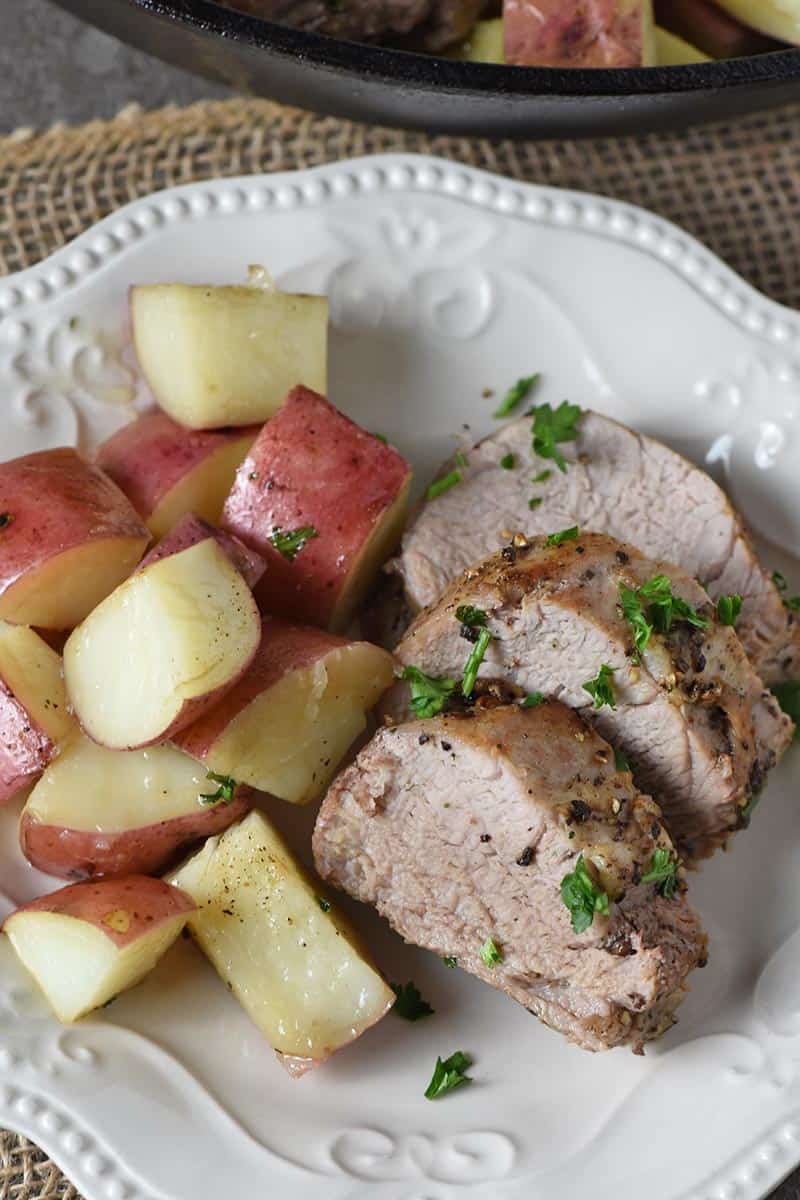
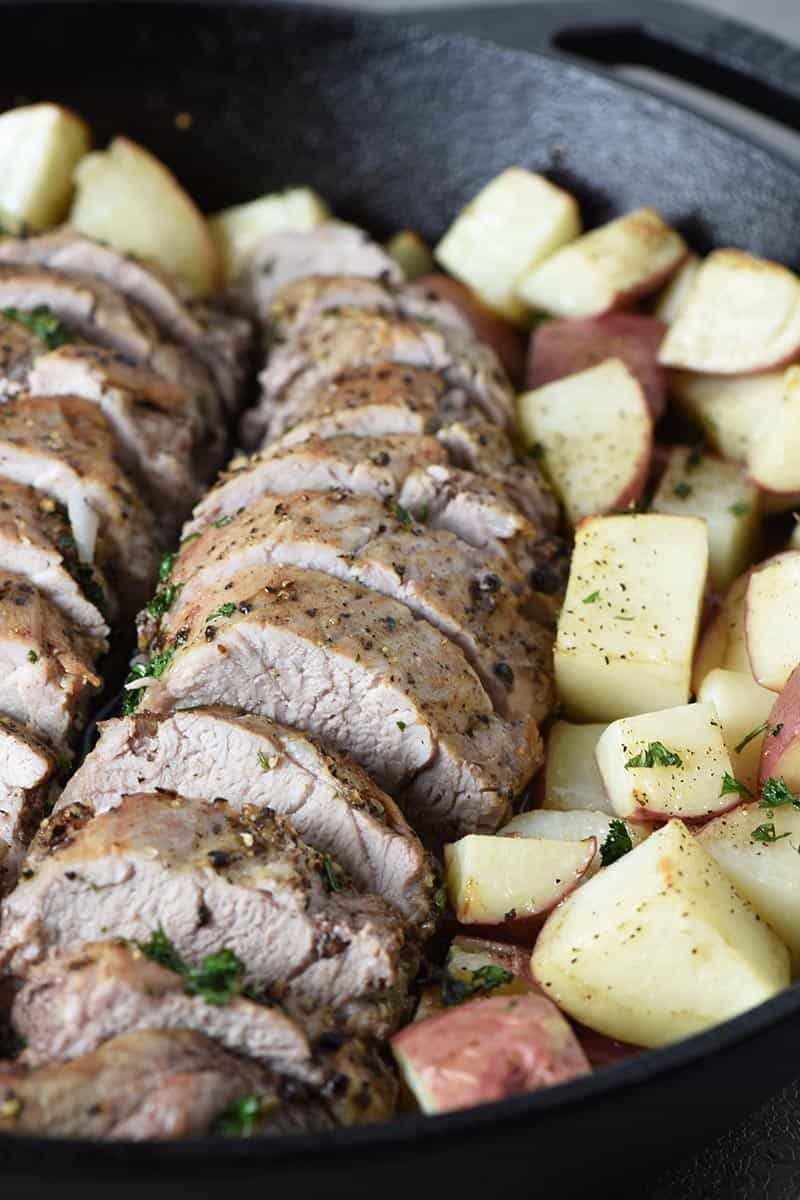
Now that your pork roast is fully cooked, it’s ready to serve. I like to slice it up with a large knife and top it off with a splash of Worcestershire sauce. Pair with all of your favorite side dishes and appetizers for an easy meal that the whole family will love!
And don’t be tempted to throw out the leftover broth in the slow cooker. You can make a flavorful gravy by whisking 1/4 cup of flour into 1 cup of the broth in a medium saucepan or cast iron skillet on the stovetop over medium-high heat. Once it starts to simmer and subsequently thicken, add salt and pepper to taste, and drizzle it all over your juicy pork roast!
What to Serve with Slow Cooker Pork Roast
Crock Pot pork roast goes well with so many different side dishes and appetizers! Here are a few ideas as to what you can serve with your pot roast…
Why is my pork roast not tender in the slow cooker?
You most likely undercooked the pork roast. For a tender pork roast, a long cooking time is required, and the roast needs to reach at least 200ºF with an instant-read thermometer, and then maintain that temperature for a good while. This is the only way to properly break down the collagen in the pork that can otherwise make it tough and chewy.
Crockpot pork roast is best stored in an airtight container in the refrigerator for up to 5 days. Reheat your pot roast in a covered baking dish in the oven at 350ºF, or you can reheat it in a microwave-safe container in the microwave until hot and ready to serve.
Can you freeze leftover pork roast?
Yes, you can freeze leftover pork roast. Place it into a freezer-safe container or freezer bag and into the freezer for up to 3 months. Be sure to let it thaw out in the refrigerator overnight before reheating in the oven or microwave.
If you try this recipe, why not leave a star rating in the recipe card right below and/or a review in the comment section further down the page? I always appreciate your feedback. You can also follow me on Pinterest, Facebook, Instagram, and YouTube. And subscribe to my email list too!
Slow Cooker Pork Roast
Easy slow cooker pork roast that's perfectly pull apart tender & juicy. It's the ultimate set-it-and-forget-it recipe that anyone can make!
6-Quart Slow Cooker
Large Knife
Cutting Board
Meat Thermometer
3-4 pounds Pork Butt Roast
1 Large Yellow Onion (peeled, sliced)
2 teaspoons Minced Garlic
2 Medium Potatoes (chopped)
3 Medium Carrots (peeled, chopped)
2 Medium Parsnips (peeled, chopped)
1 Medium Turnip (peeled, chopped)
1 teaspoon Sea Salt
1 teaspoon Black Pepper
2 cups Chicken Broth
Before getting started, go ahead and grease up your slow cooker with nonstick cooking spray and get all of your veggies prepped.
Start by adding the sliced onions and minced garlic to the bottom of the greased slow cooker.
Next, center your roast on top of the bed of garlic and onions in the slow cooker.
Situate the chopped up root vegetables around the roast in the slow cooker. It's okay to really pile them in there!
Once everything is situated, go ahead and rub the salt, pepper and any other herbs/spices into the pork roast.
Finally, pour chicken broth over the roast and veggies, and then place the lid on top of your Crock Pot.
Now you'll want to set your Crock Pot on low and let it cook for at least 10-12 hours*, or until it reaches an internal temperature of at least 200ºF with a meat thermometer, and the roast easily falls apart when prodded with a fork.
That's it! Serve and enjoy with your favorite side dishes and appetizers!
*Keep in mind that the cooking time may vary depending on the size and fat content of your pork roast.
How should I store leftover Crock Pot pork roast?
Crockpot pork roast is best stored in an airtight container in the refrigerator for up to 5 days. Reheat your pot roast in a covered baking dish in the oven at 350ºF, or you can reheat it in a microwave-safe container in the microwave until hot and ready to serve.
Christmas, dinner, Dinner Ideas, Easter, Holiday, Main, Main Course, main dish, Meat & Seafood, Pork Recipes, Slow Cooker, Thanksgiving
American, Dinner, Holiday, Main Dish, Thanksgiving
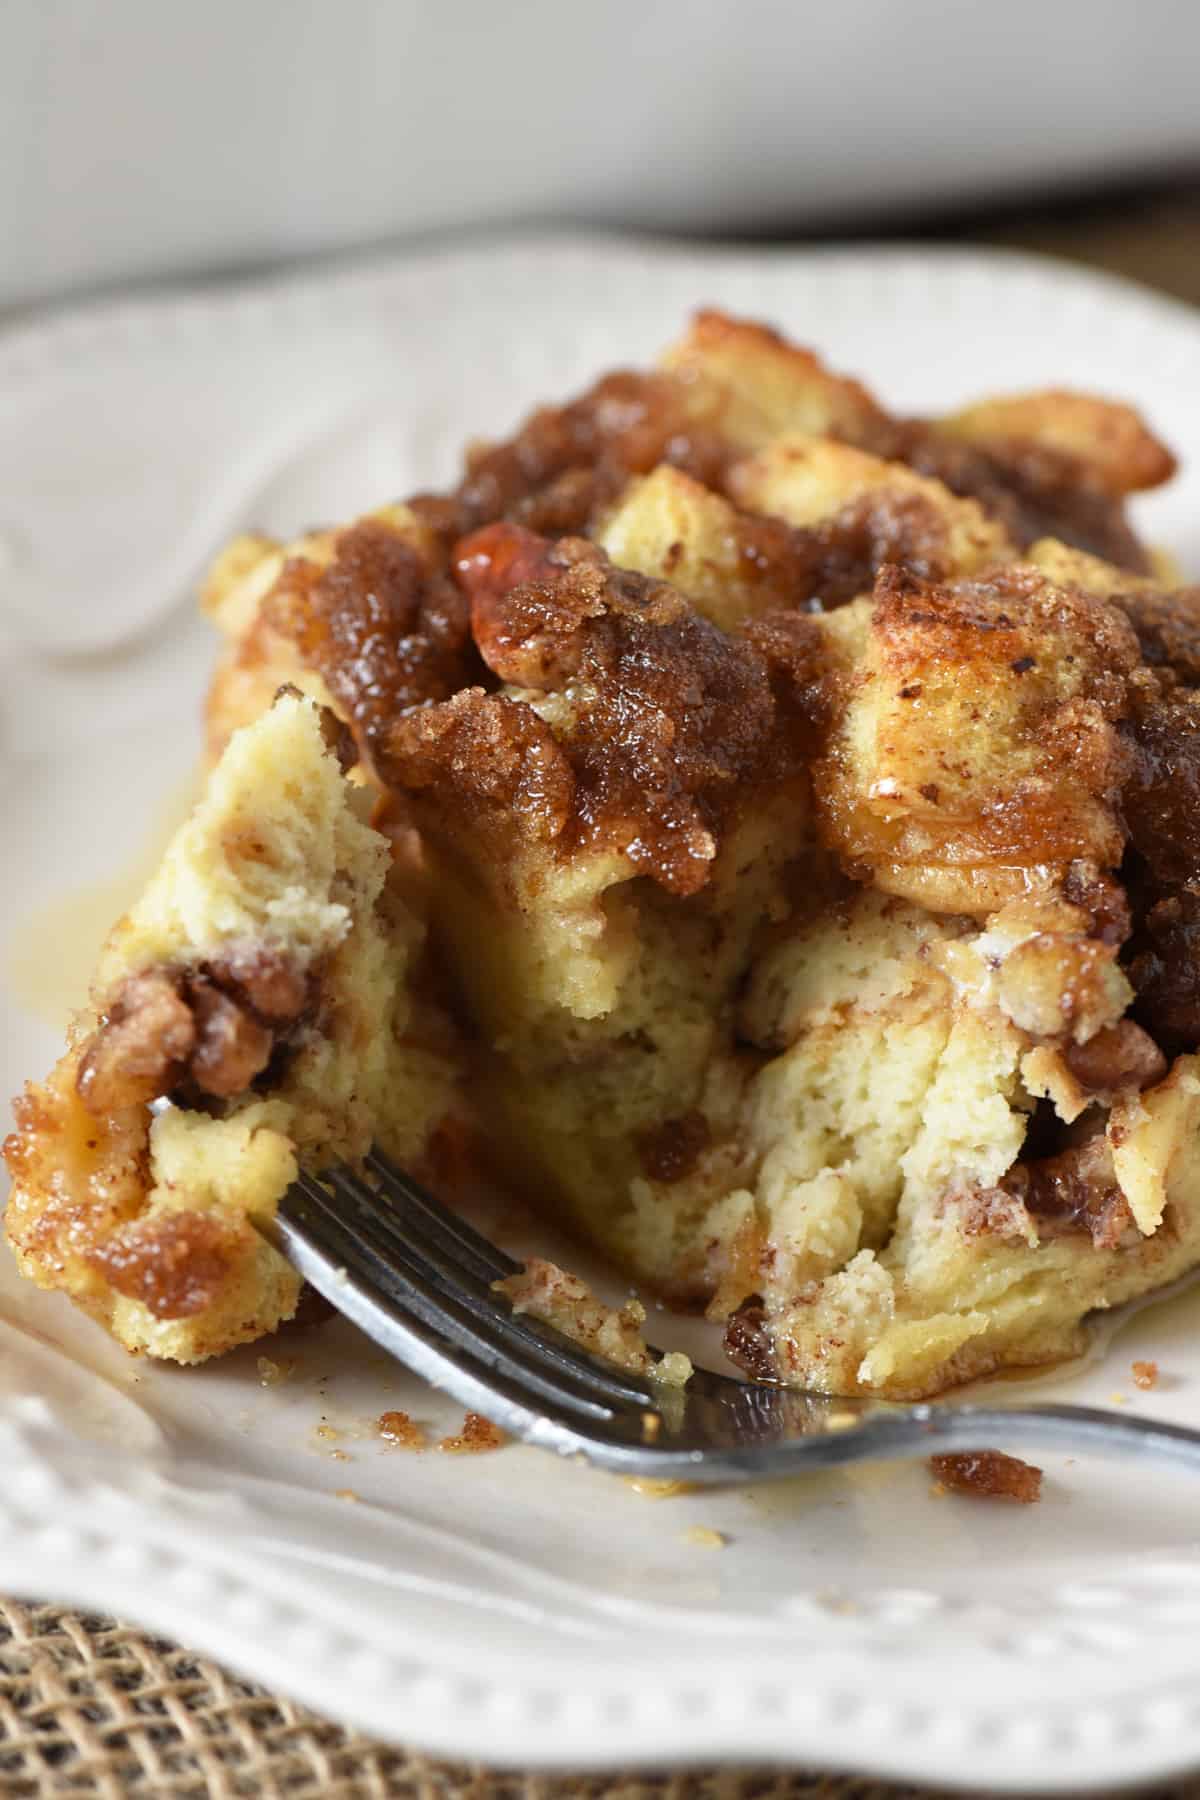
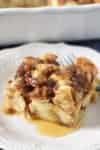
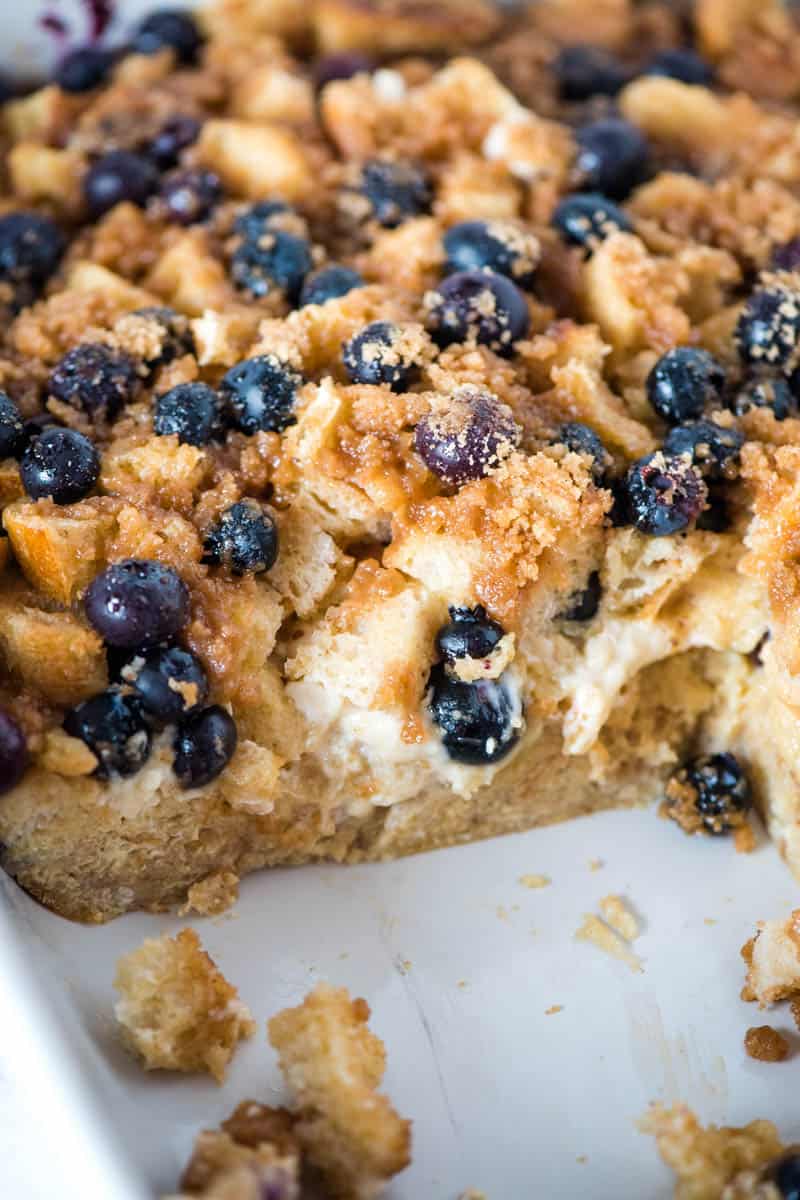
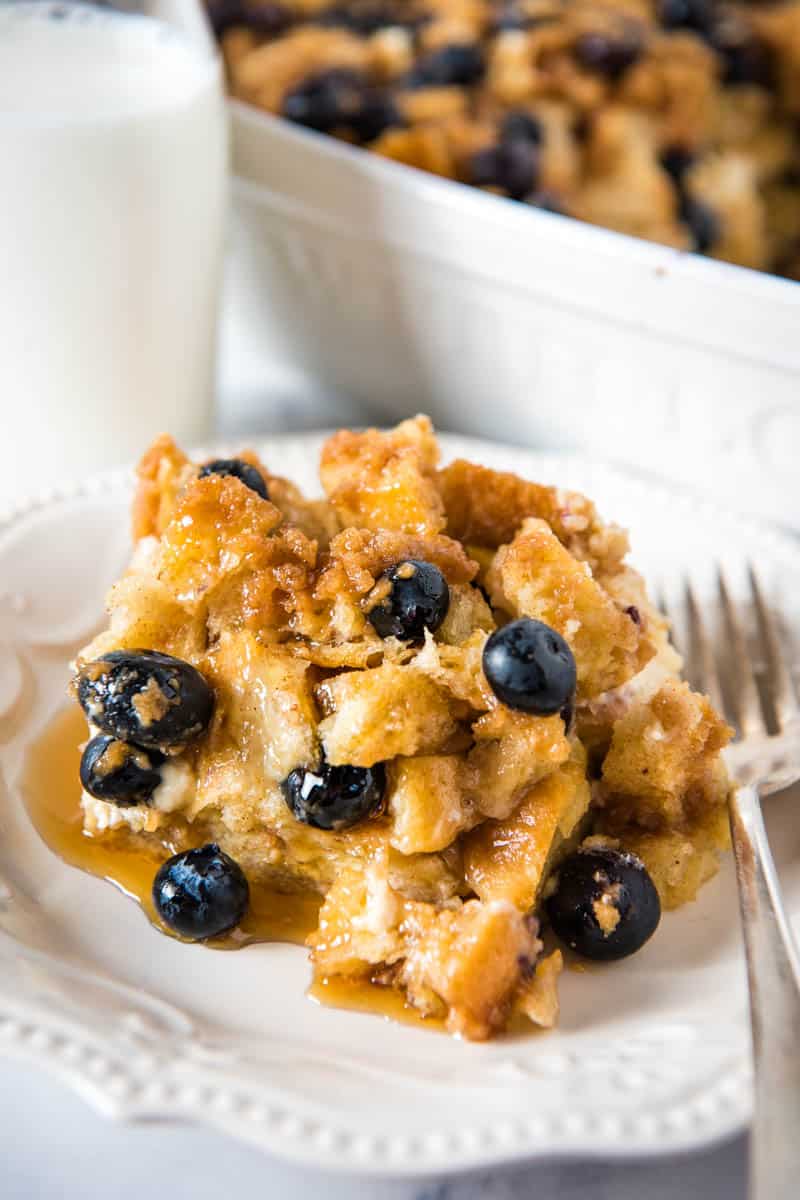
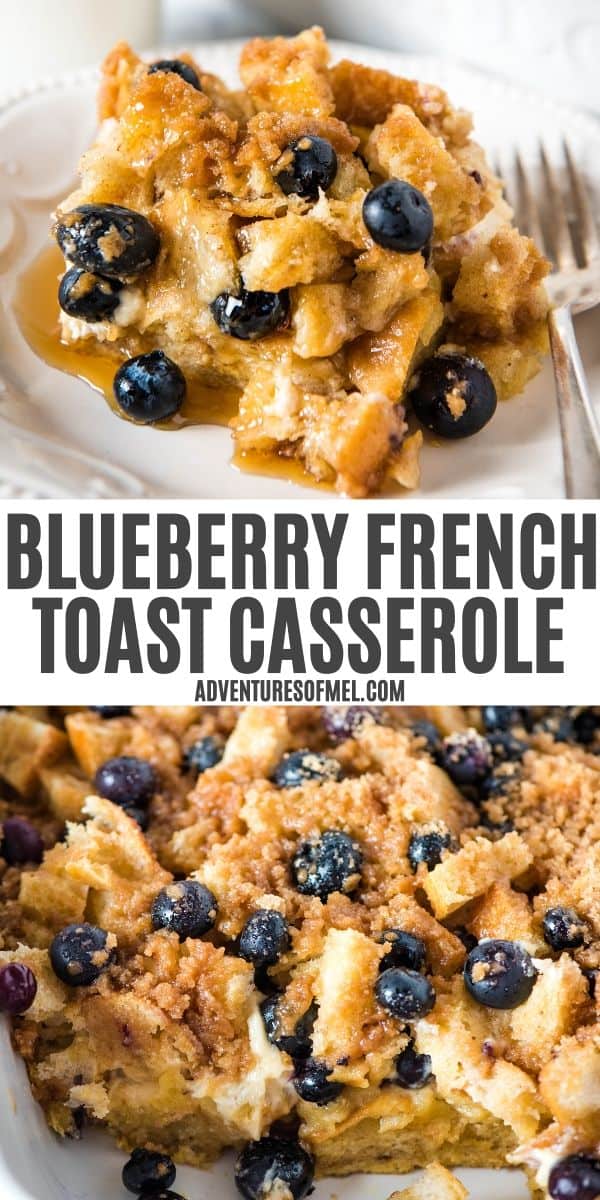
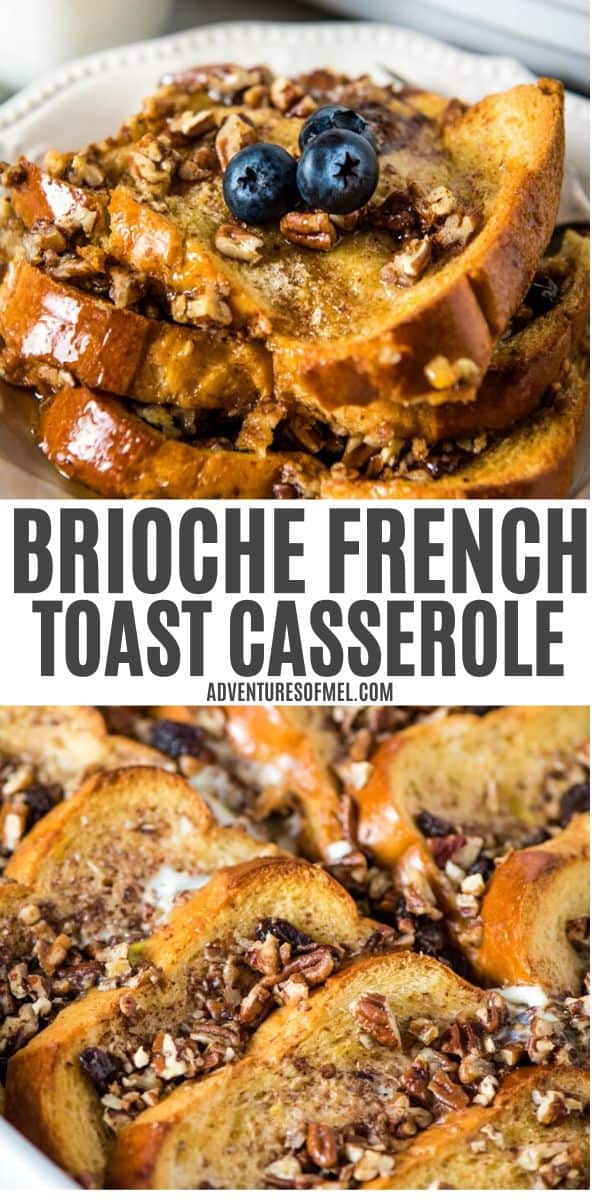
Make breakfast simple with an easy French toast casserole baked in one pan. You can make it ahead overnight or the same day. Topped with a cinnamon brown sugar topping, it’s the best recipe to make breakfast or brunch for a crowd!
Like Crock Pot French toast casserole, this easy French toast casserole recipe is a win win for those special times when we don’t necessarily feel like going to all the work of making traditional French toast. And let me tell you, one of my pet peeves is when the French toast I’ve already cooked gets cold while waiting on the rest to cook.
A good French toast bake pairs really well with eggs and bacon, or better yet, eggs and sausage. So you don’t have to have all sweet for breakfast, but it does add a little sweet treat to a delicious breakfast time.
While you can make this rich overnight French toast without the topping, it won’t be near as good. The topping is super quick to mix up, and you can just crumble it right onto the casserole before baking.
Be sure and check out the accompanying video in the post below. It’ll walk you through all the steps of how to make this delicious breakfast bake, so you don’t miss a beat.
French toast meets bread pudding. You’ll love this cinnamon French toast bake recipe because it…
Takes 30 minutes to make – While it takes longer to chill and bake, it’s super easy and quick to make. And you’re not standing in front of the stove making breakfast while everyone else is having fun or off doing their own thing. Instead you can throw it together the night before, then put it in the oven when you’re ready to eat.
Everyone can eat at the same time, and it’ll still be warm – While you can keep French toast warm in the oven, while waiting on the rest of it to cook, this is just so much easier because it’s all in one pan, all baked at the same time.
It’s perfect for Sunday morning or a special occasion, like Christmas morning. It makes a great everyday breakfast or holiday breakfast. It’s always a hit and a great option for Mother’s Day too, because it’s pretty easy for kids to make, with a little guidance from Dad or a trusted adult.
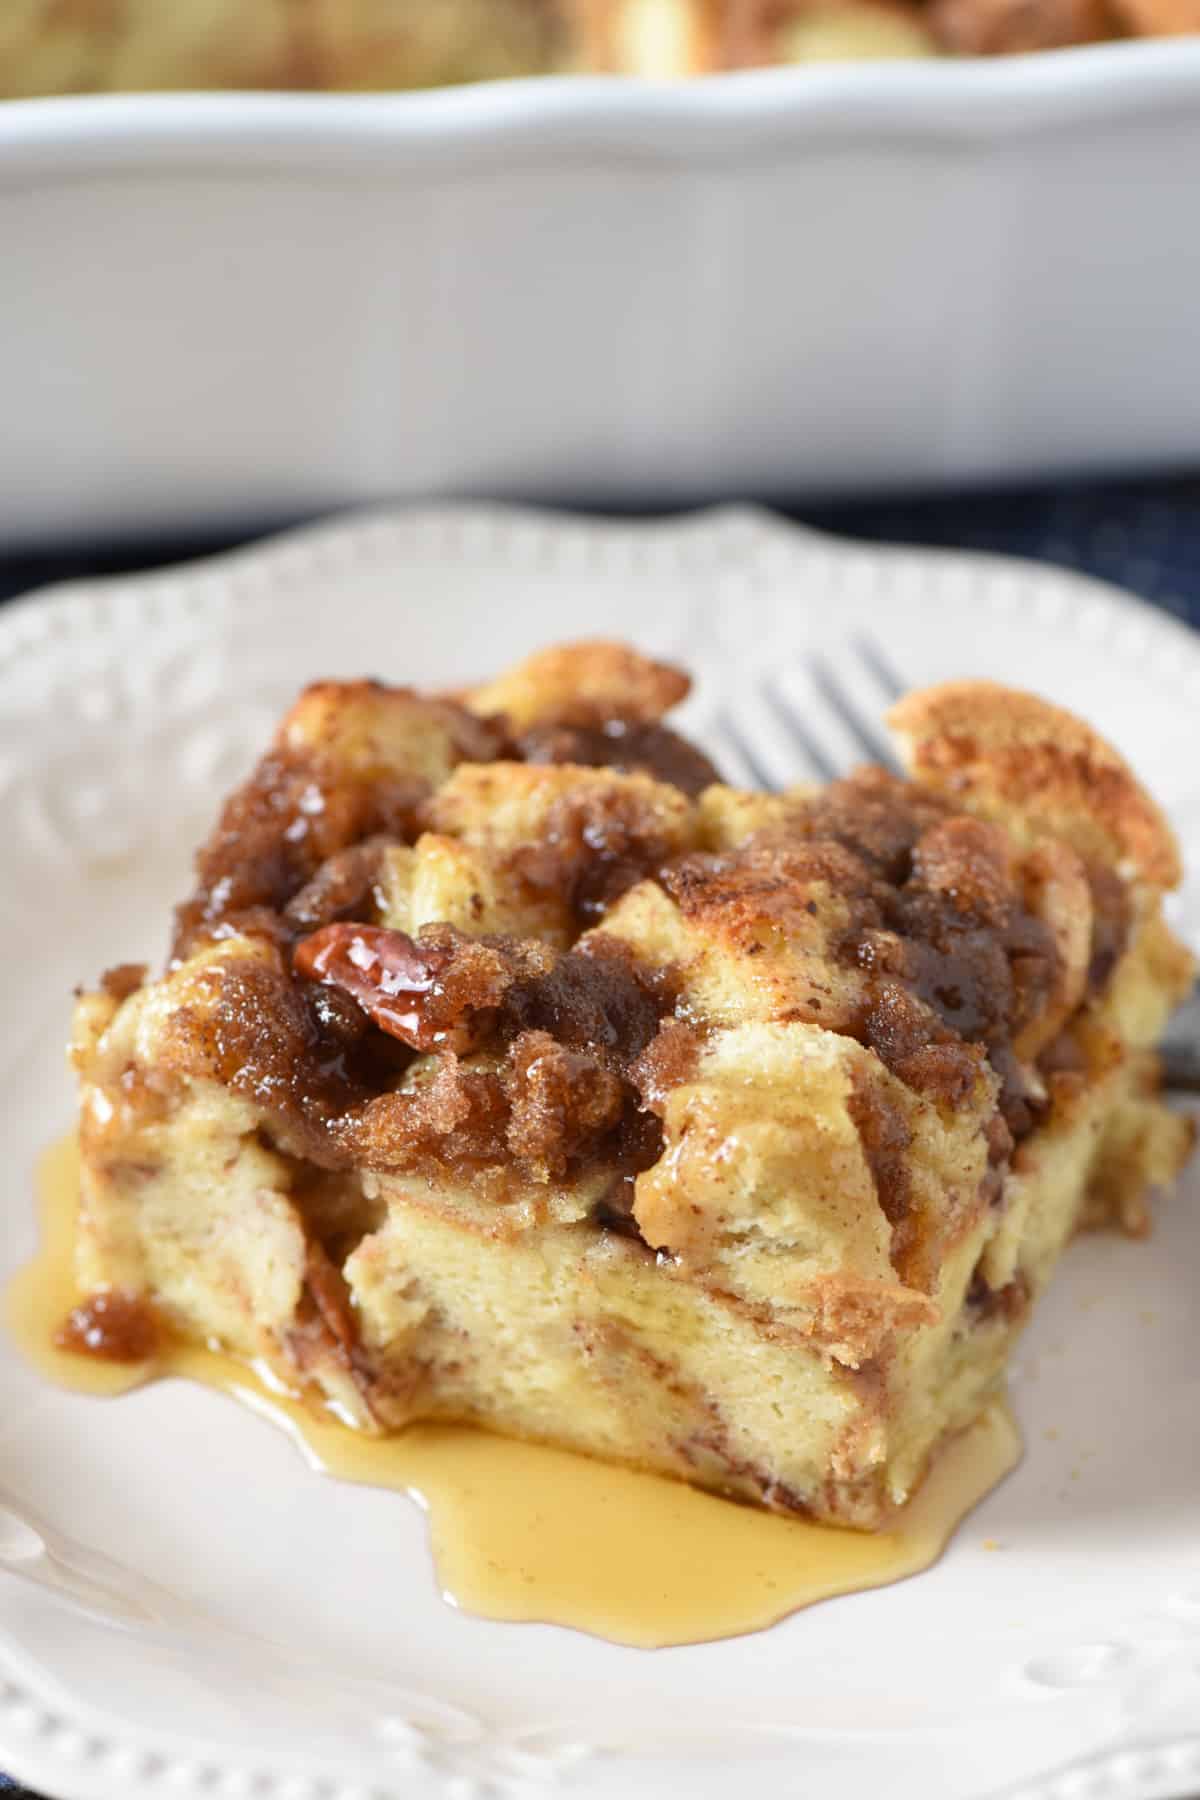
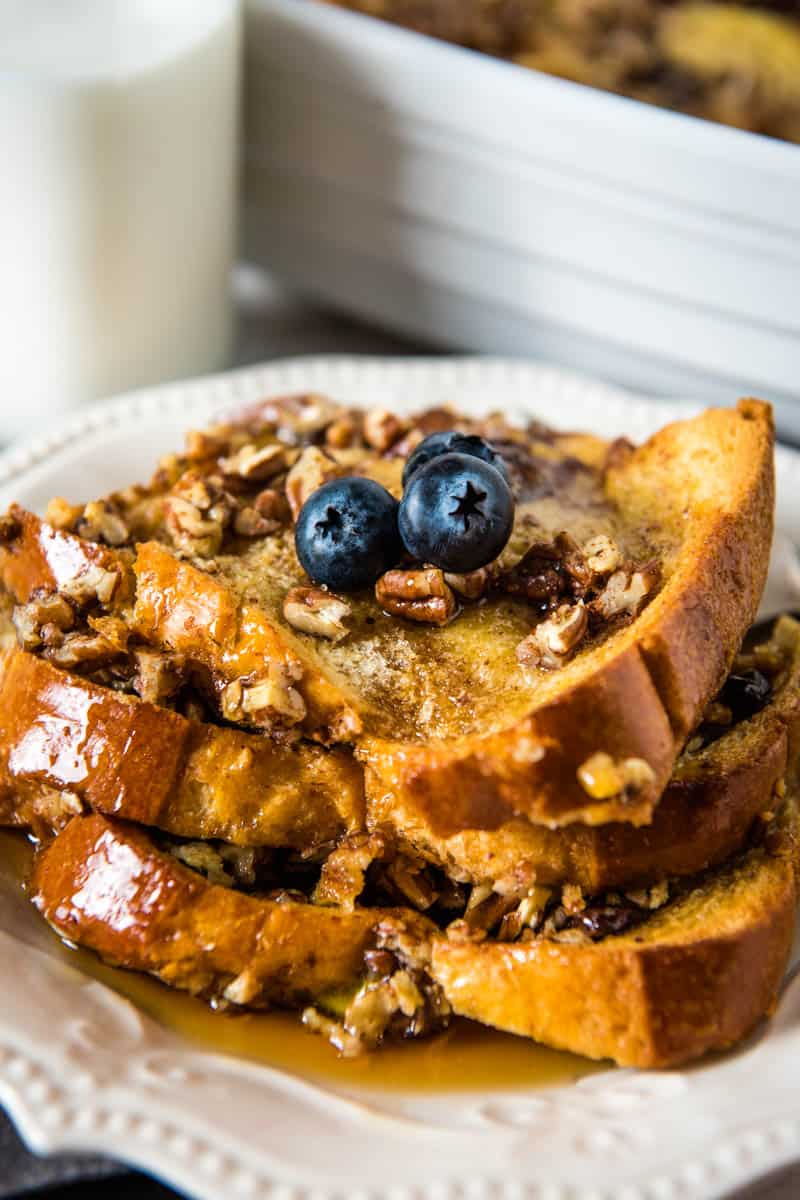
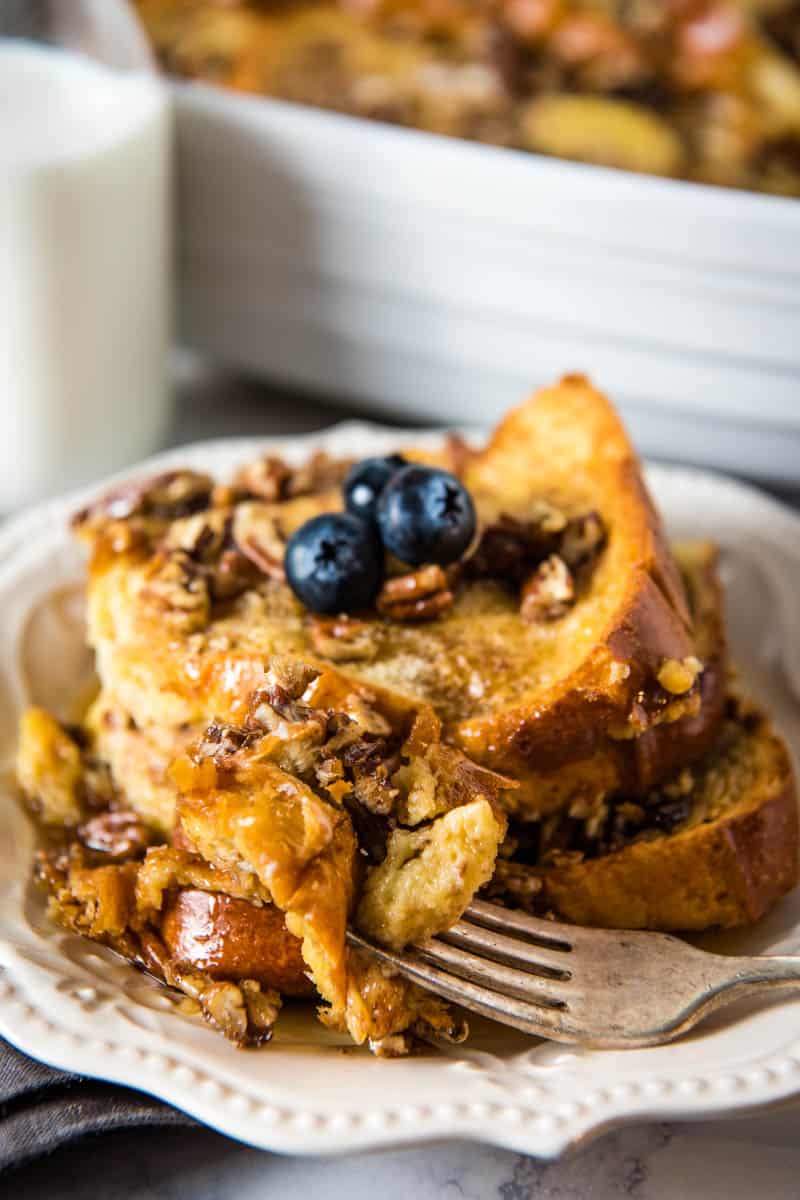
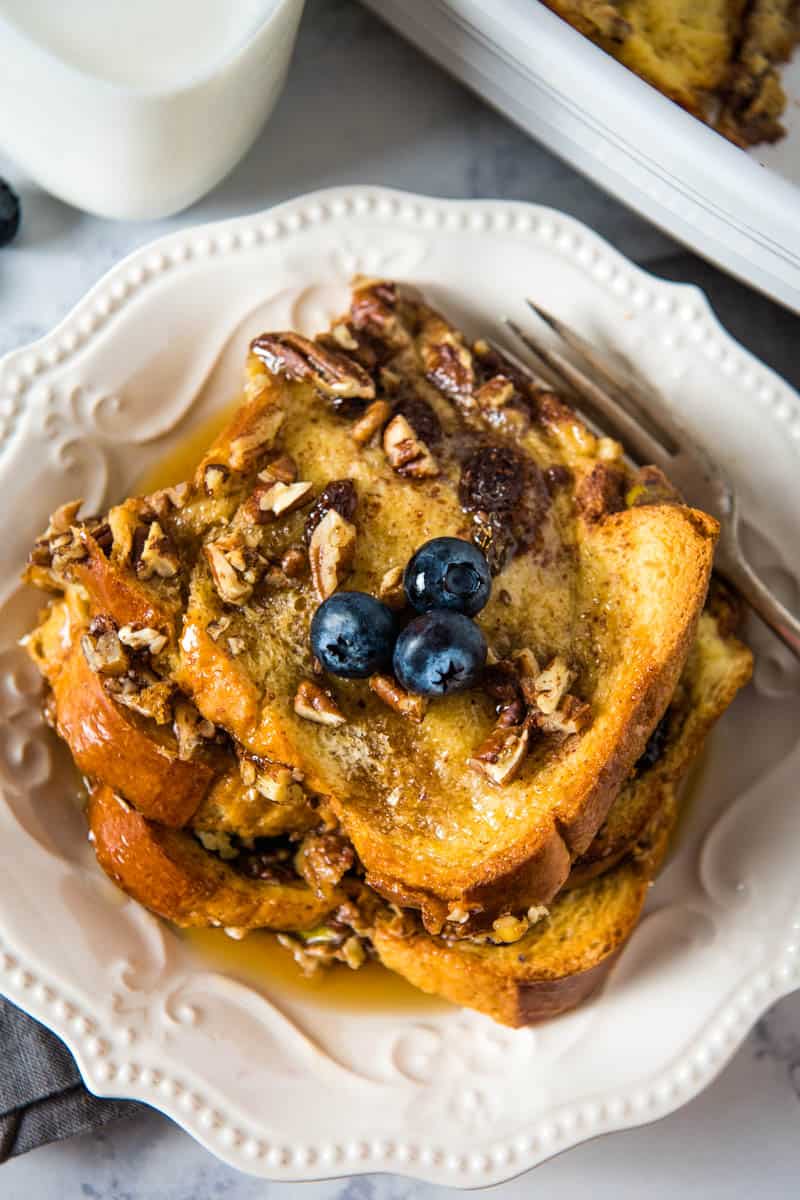
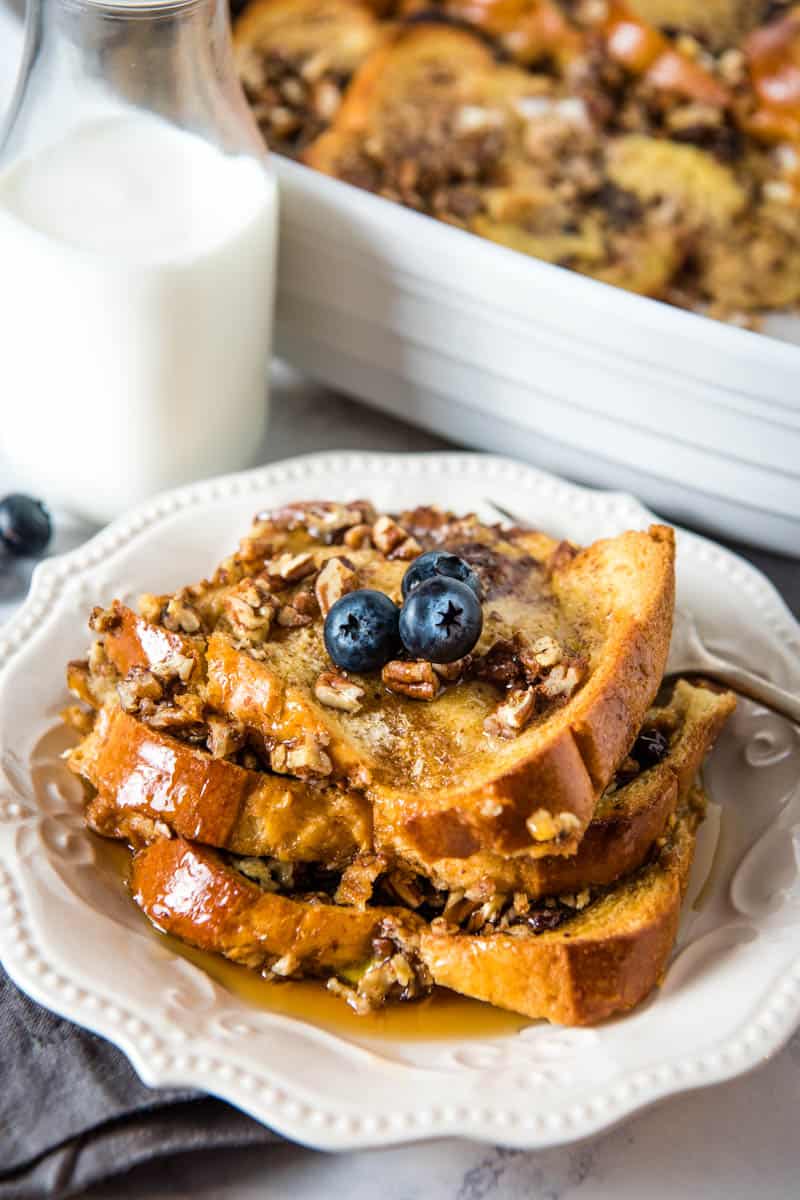
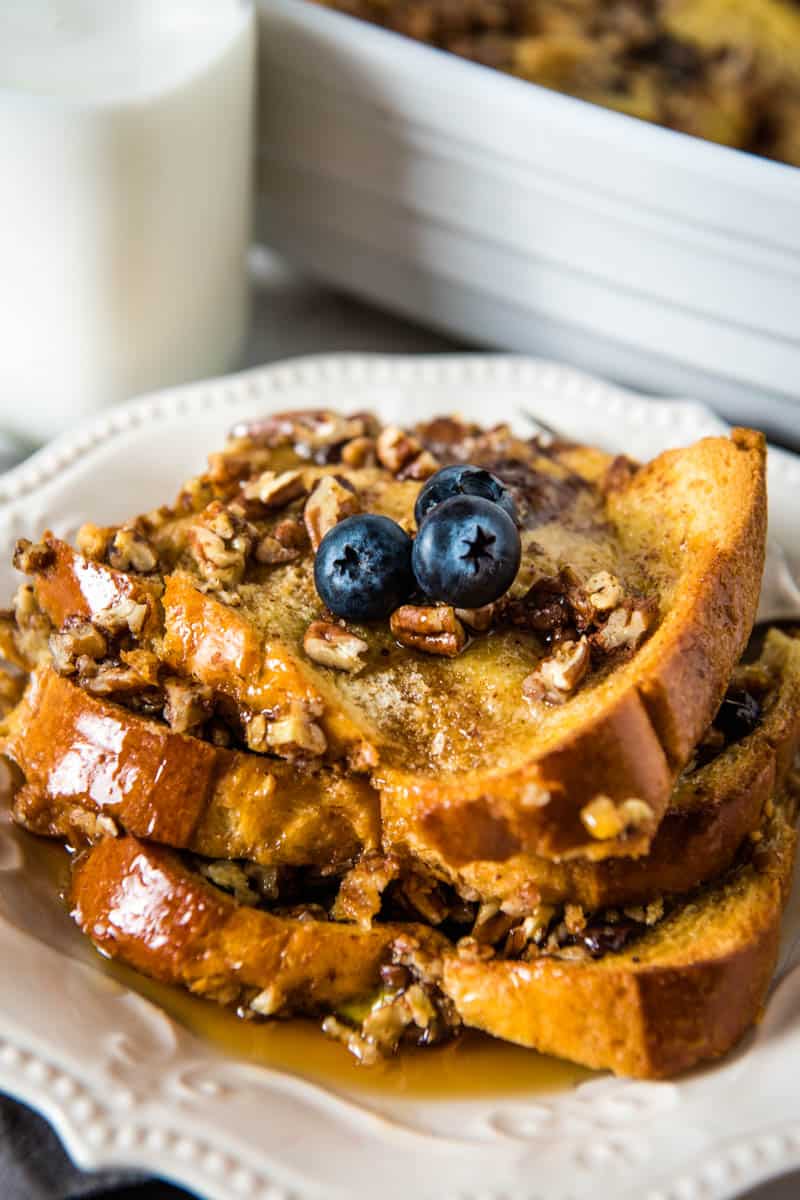
It’s delicious – I’ve been told this delicious French toast casserole is much like a bread pudding. Oh my word, the cinnamon brown sugar topping on top of the French toast casserole is my absolute favorite. With a drizzle of maple syrup, a slice of this wonderful casserole is just so mouthwateringly delicious.
It’s budget-friendly – I usually always make the best French toast casserole with white bread, just plain old sandwich bread. While it does use quite a few eggs, the rest of the ingredients you likely already have in your pantry or freezer. I’d estimate you can make baked French toast for less than $8, depending on the ingredients you already have on hand.
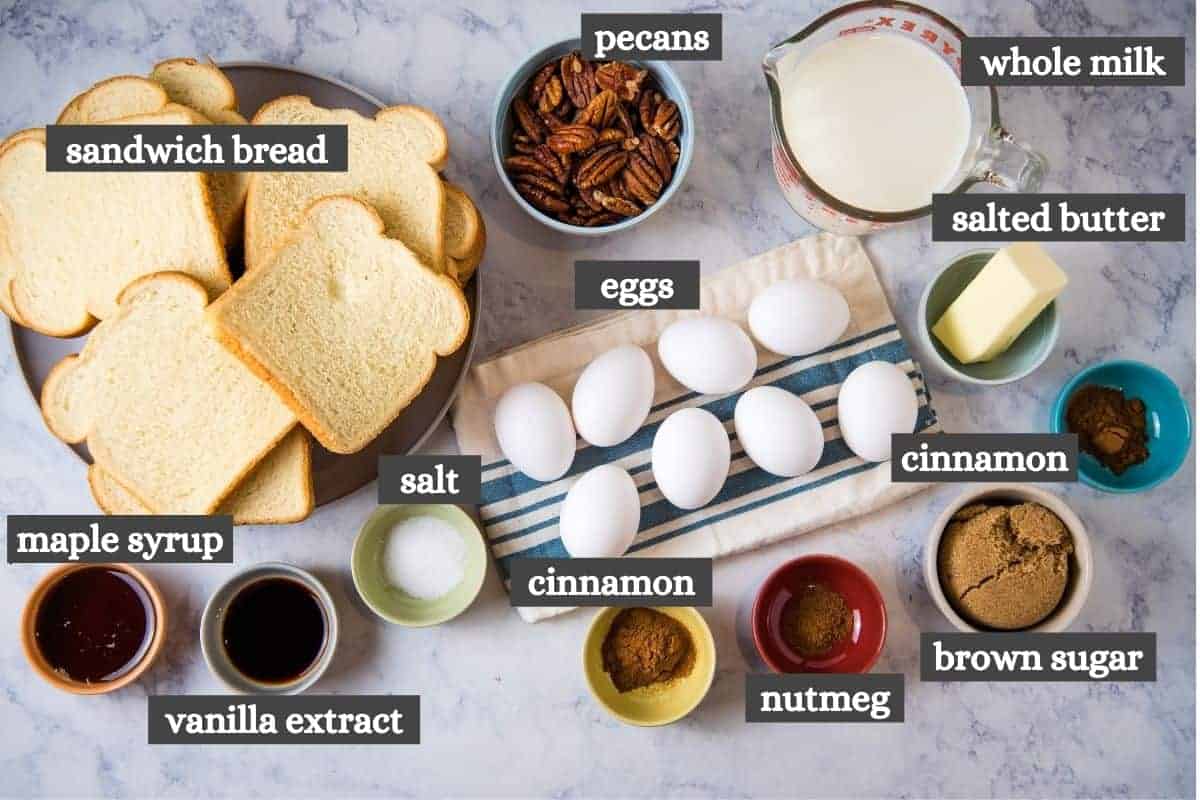
Ingredients and Substitutions Notes
Just gather up a few simple ingredients to get started making this easy French toast bake…
Sandwich bread – The main decision you have to make is which bread is the best bread for French toast casserole. And to that I’d answer the best type of bread is just a good old loaf of sandwich bread; in fact, I prefer to just use butter bread. Now you can use a loaf of whole wheat bread, sourdough bread, Texas toast, challah bread, crusty French bread, Italian bread, Kings Hawaiian Rolls, brioche bread, cinnamon swirl bread, crescent rolls, or really any other type of fresh baked bread. Any of them will be delicious. But a good French toast bake with white bread is just as good, in my opinion.
Pecans – We use chopped pecans. You can also use walnuts, black walnuts, or almonds if you want.
Whole Milk – You can use 2% milk or skim milk, but I recommend using whole milk, or a mixture of whole milk with half-and-half for an even creamier texture. If you need to make it dairy-free, substitute almond milk, coconut milk, soy milk, or oat milk instead.
Pure maple syrup – Be sure to use real maple syrup, not table syrup. There’s a distinct difference, and subbing artificial table syrup will change the texture, flavor, and especially the amount of sweetness in your casserole.
Vanilla Extract – This is going to add a cozy flavor to the baked French toast casserole.
Topping – The topping is, in my opinion, the best part about this overnight breakfast casserole, and it includes butter, brown sugar, and ground cinnamon. Again, if you need to make it dairy-free, you can substitute vegan butter.
Alternative Ingredients Ideas from Readers
Readers have given us a lot of creative ideas for ways to really switch up this recipe for French toast casserole and add your own touch to this sweet breakfast casserole.
Top with a powdered sugar glaze instead of, or in addition to, the brown sugar topping.
Add raisins or dried cranberries when you add the bread and pecans.
Add fresh strawberries, blueberries, or raspberries.
Speaking of milk, use eggnog in place of milk, especially around the holidays.
Use part heavy cream, part whole milk for an extra rich casserole.
In place of pecans, try other nuts, like chopped walnuts or almonds.
Add a handful of chocolate chips for melty chocolaty flavor.
Try adding bacon… Because everything’s better with bacon!
Try baking the casserole in a bundt pan, inverting it after baking, to make it even prettier.
How to Make Easy French Toast Casserole
This is a fairly simple French toast casserole with sliced bread. It only takes a few steps to make.
Make the Casserole…
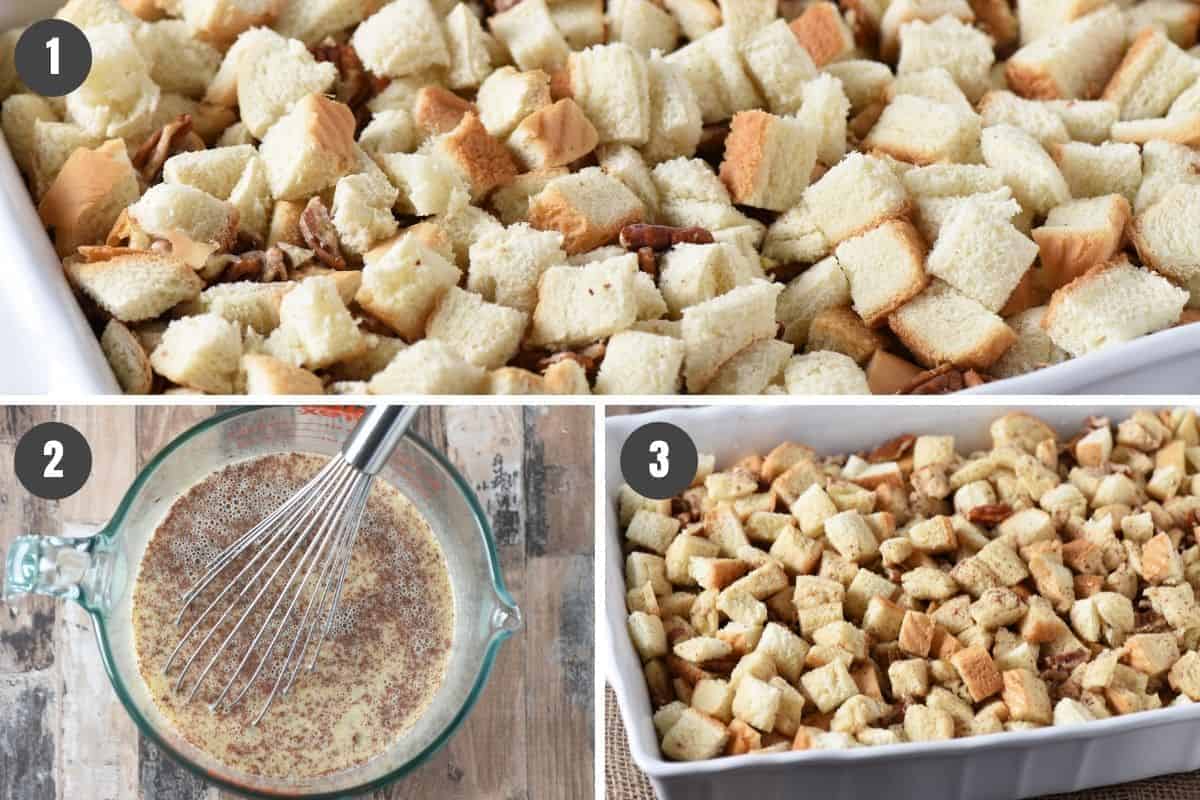
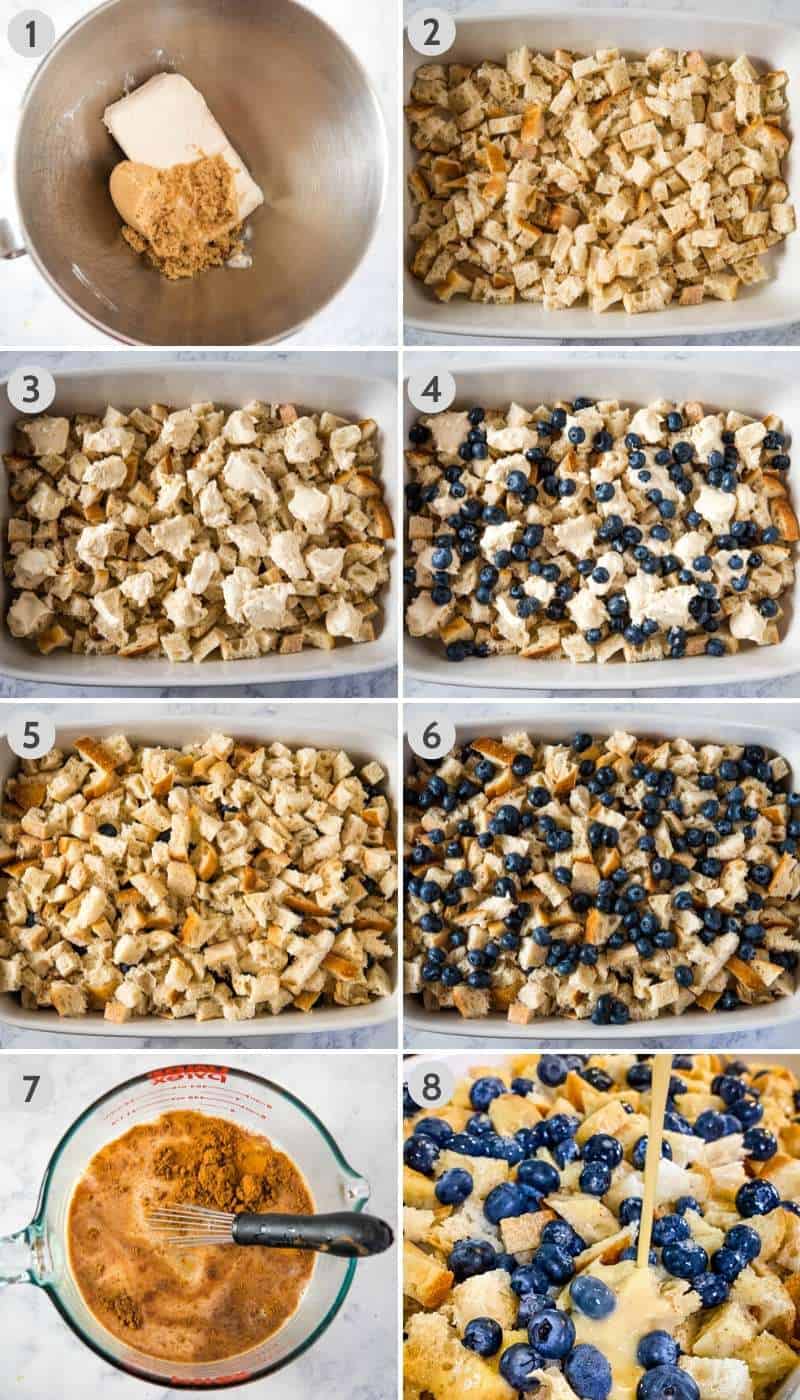
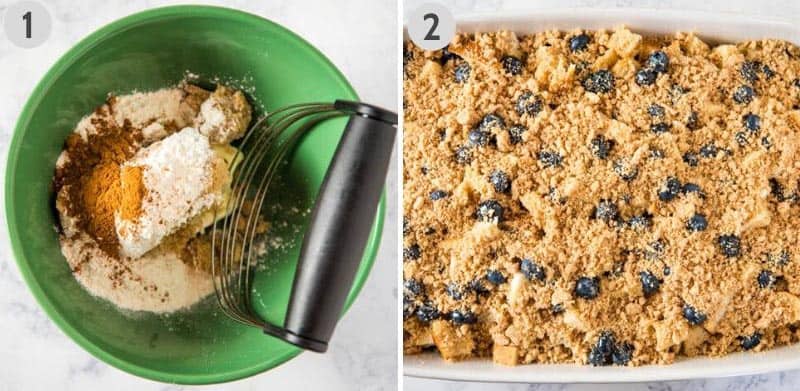
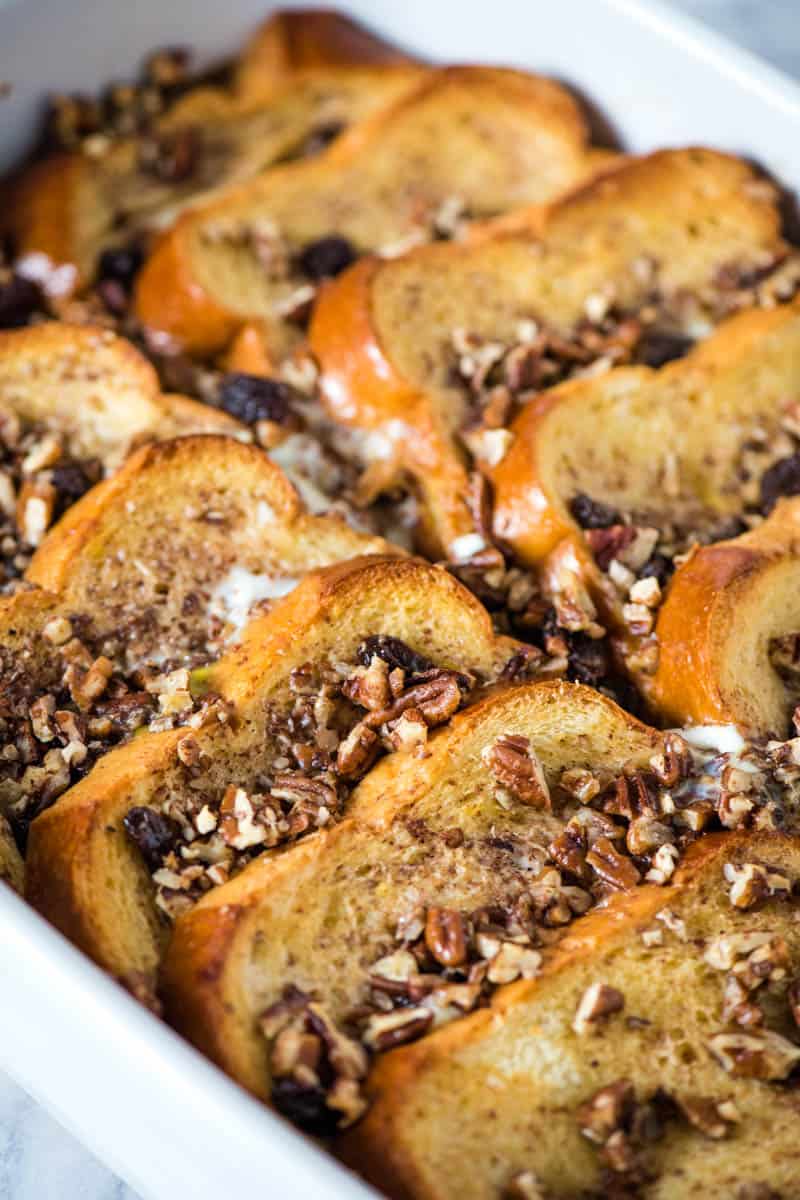
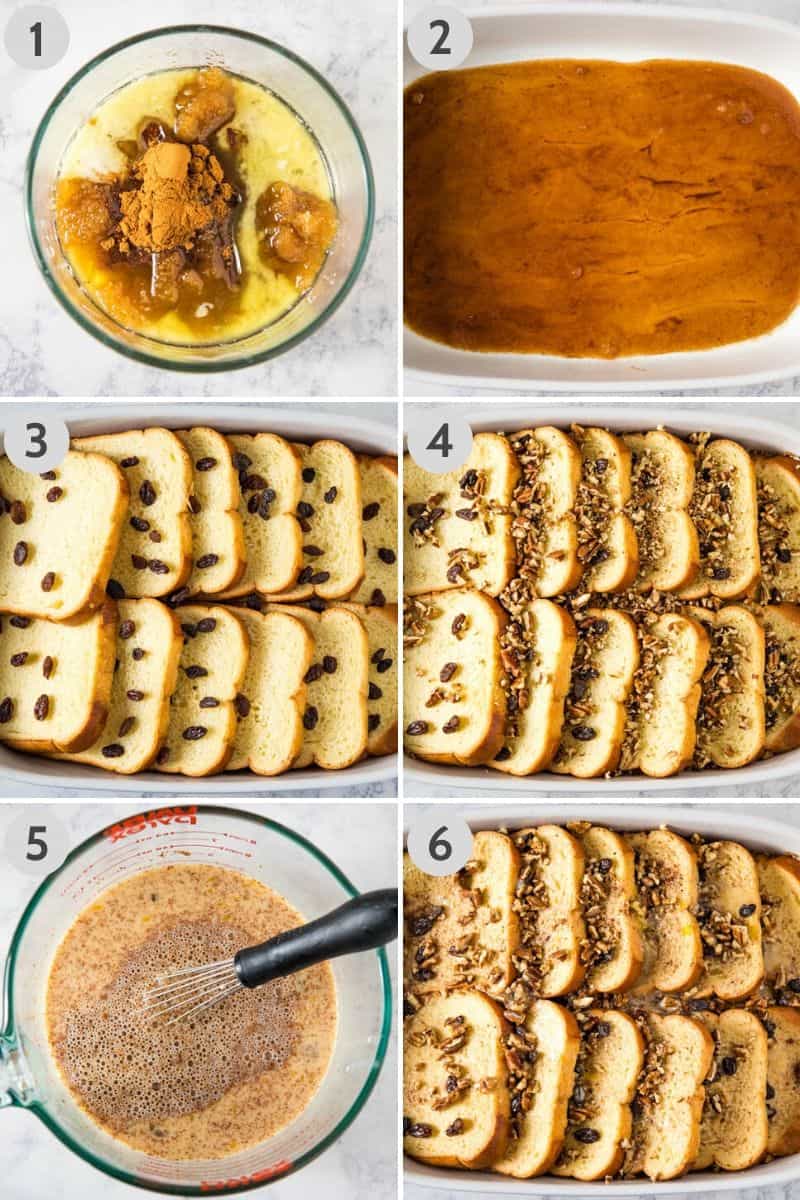
First cut the bread slices into 1-inch cubes and place it in a greased 9×13 baking dish, along with the chopped pecans. You can layer the bread cubes and pecans so everything’s blended well in the dish. Tip: You can cut the bread into cubes using a knife or a pastry cutter.
Then in a large bowl, whisk together the eggs, milk, pure maple syrup, vanilla, salt, cinnamon, and nutmeg, to make a sort of custard mixture.
Pour the egg mixture over the bread and pecans, making sure all the bread is good and soaked. Then cover the casserole dish with plastic wrap, and chill the casserole in the fridge for a good 4 to 6 hours or more, just to let that custard mixture soak into the bread really well. Overnight is best.
Make the Topping…
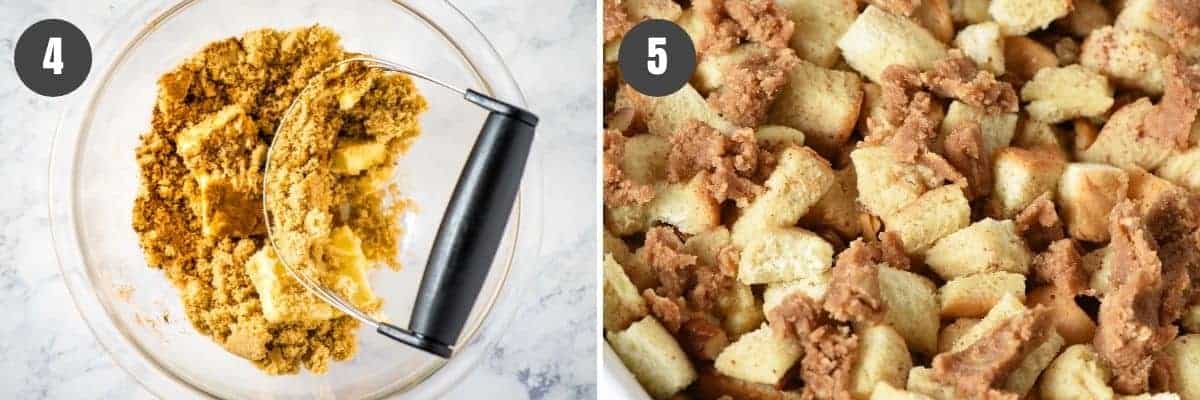
Before baking the next morning or the next day, pre-heat the oven to 350° F; then in a small bowl, mix up your topping by combining the butter, brown sugar, and cinnamon with a pastry blender.
Crumble the topping on the top of the casserole as best you can. It’s a really moist mixture, so it’s more like clumps of cinnamon brown sugar.
Bake It…
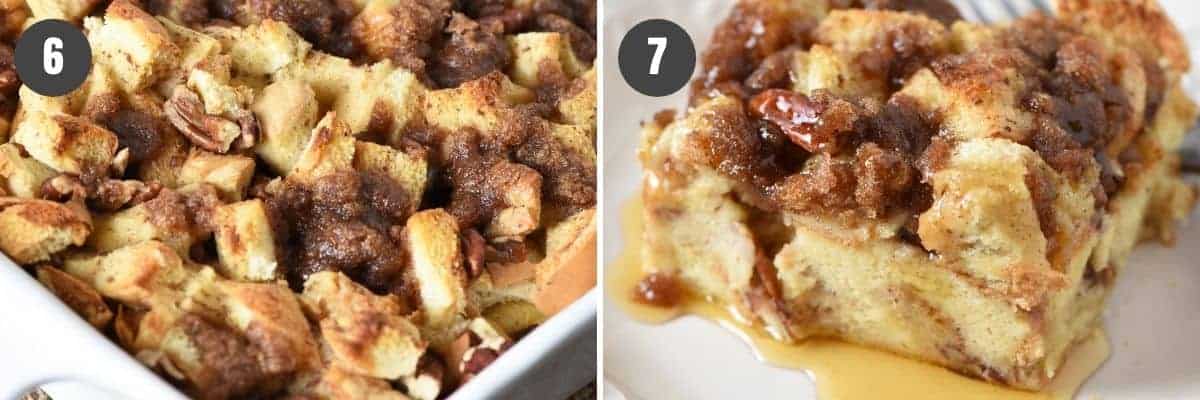
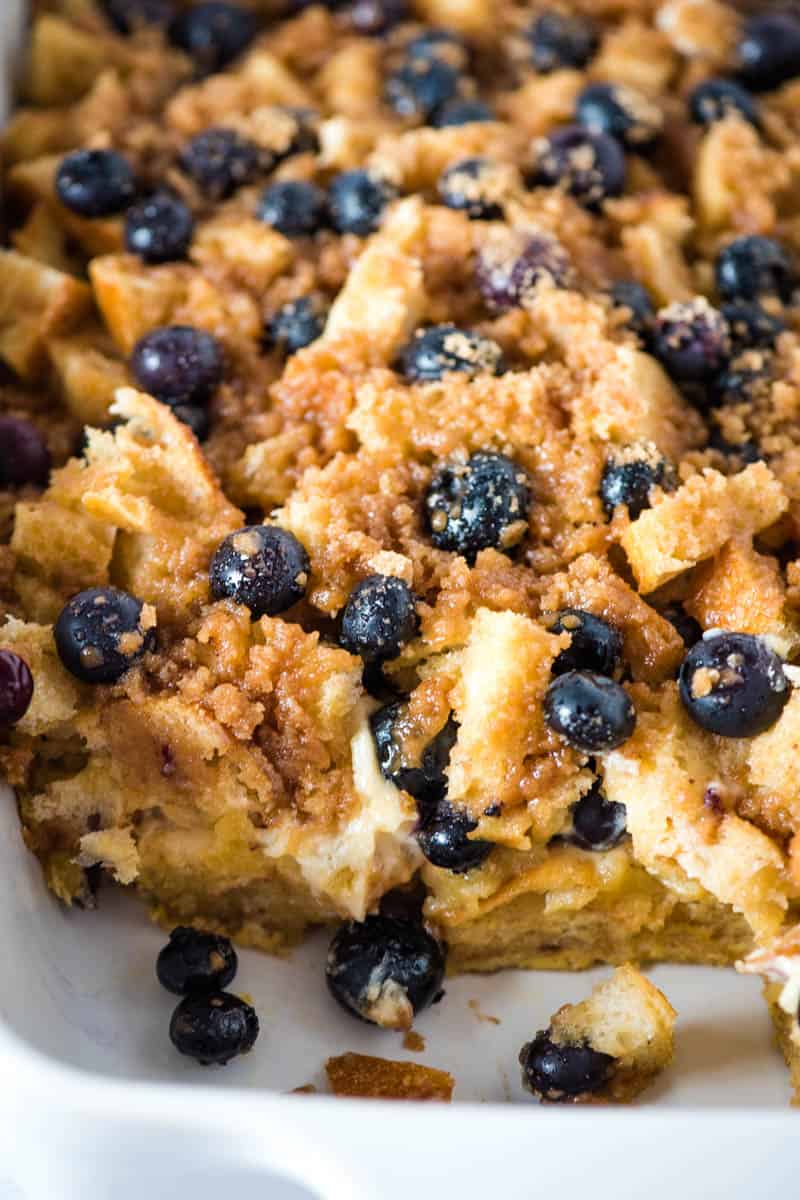
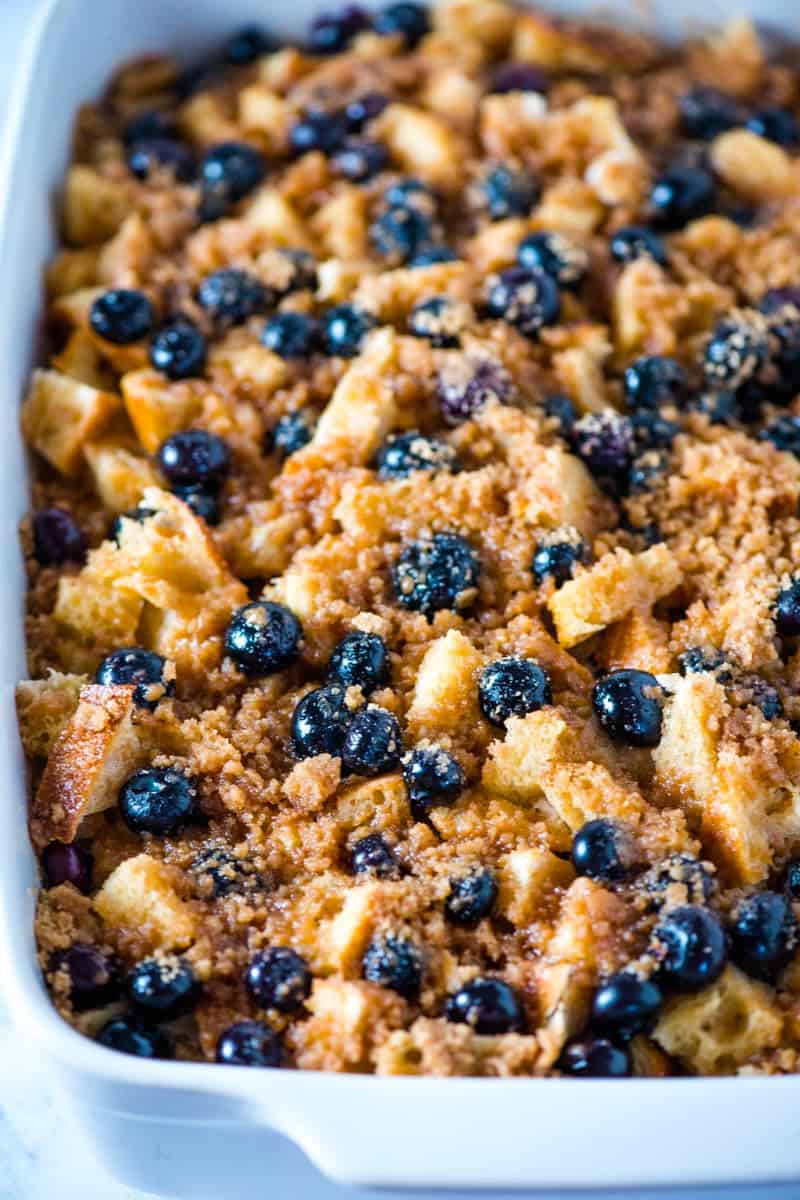
Cover the baking dish with aluminum foil, and bake at 350°F for about 25 to 30 minutes. Then uncover and bake it for an additional 15 to 20 minutes, ’til it’s golden brown.
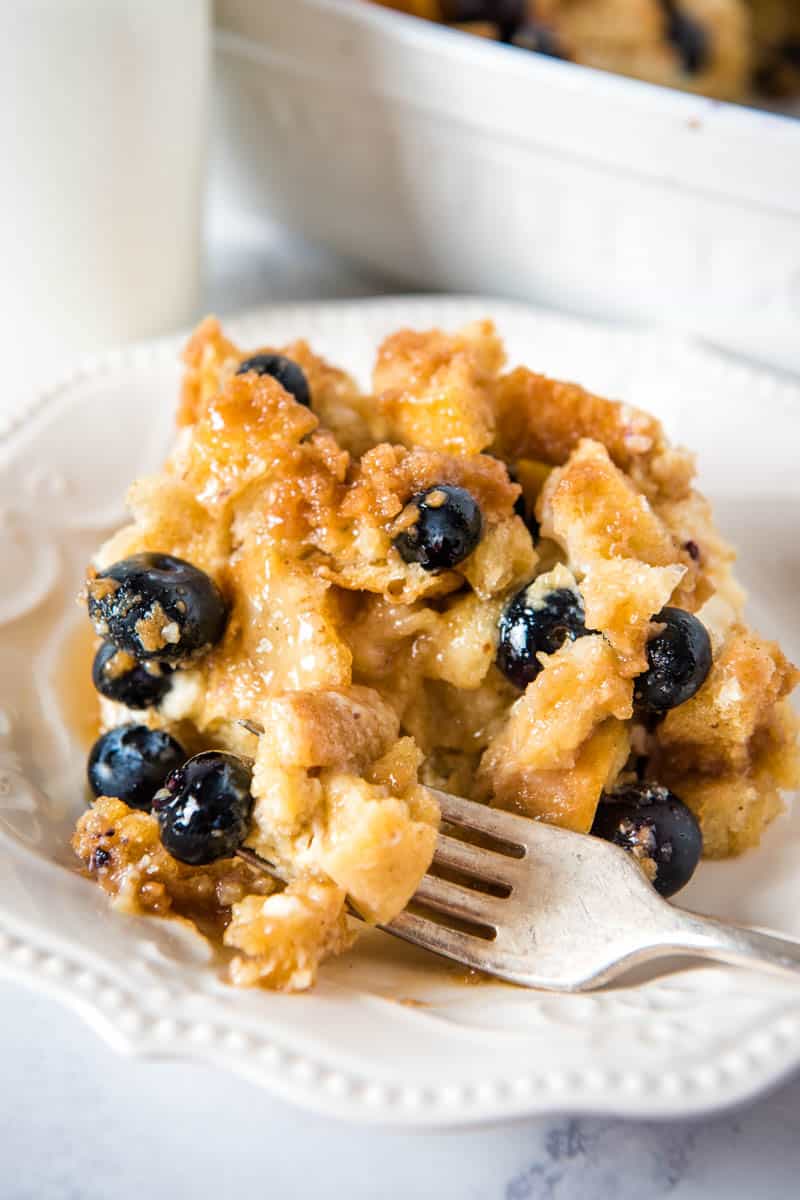
When you remove it from the oven, let it cool for just a few minutes. Then slice into individual servings, and serve with powdered sugar or maple syrup.
It also pairs well with flavored syrups like blueberry syrup, whipped cream, fresh berries, fresh fruit, sausage, or bacon and eggs. You’ll especially enjoy a slice of French toast breakfast casserole with your morning cup of coffee or hot tea.
Expert Tips and Recipe FAQ’s
Do you really have to chill the casserole overnight?
While this really is best as an easy overnight French toast casserole, you don’t have to chill it. But let me just say, the flavors and texture of the casserole will be at their best after chilling for at least a few hours. If you’re in a hurry, didn’t have time to plan ahead, and need to make it now, that’s ok. Just mix it up, make sure the bread is moistened well with the egg mixture, add the topping, and bake it. But if you do have time, just cover the casserole dish with plastic wrap or aluminum foil, and chill in the fridge overnight.
What are gluten-free and dairy-free options for this baked French toast recipe?
Just substitute your favorite gluten-free bread in place of the regular sandwich bread included in the ingredients. You can also substitute almond milk, coconut milk, soy milk, oat milk, or another non-dairy milk, instead of whole milk; and you can use a dairy-free butter substitute in the topping. Always check all of your other ingredients, as well, to make sure they’re really gluten-free and dairy-free.
Why is my French toast casserole soggy?
There can be multiple reasons for this. 1. There may be too much egg mixture to soak into the bread or it may need longer to soak into the bread, in which case you can soak the bread in a separate bowl overnight, then transfer to the baking dish (without all the extra liquid) right before baking. 2. It may not have baked long enough. 3. And if you want to prevent soggy French toast casserole altogether, I’d suggest leaving your bread open the night before, so it can dry out just a bit; stale bread, crusty bread, or day-old bread soaks up the egg mixture more easily and readily.
Can you freeze French toast casserole?
Normally, you’ll just store any leftovers in the fridge. But if you wish to freeze it, you can. While I recommend covering it well and freezing it after it’s already been baked, you can also freeze it before baking (though I’d add the topping later before actually baking it). Keep in mind it’ll keep longer in the freezer if it’s already been cooked. Just be sure you have plenty of time for it to thaw and re-heat when taking it out of the freezer. Allow time for it to thaw in the fridge before cooking or re-heating in the oven or microwave.
How should you store leftovers?
Store any leftovers in an airtight container in the fridge; they should keep for 2-3 days.
More Breakfast and Brunch Recipes for You to Enjoy
This easy baked French toast casserole is a tried and true reader favorite!
“I have made this wonderful and perfect french toast casserole TWICE!!! 💕 The first time I was sad I didn’t make more,lol. The next batch is finishing in the oven for our neighbors. Thanks Mel for posting and showing how easy it really is to make.” – Denise
“I made this today and it was delicious. I prepped it the night before and let the bread sit out to get a little dry and it worked out great. One of my granddaughters said, I can just taste the love you put in this. So thanks for sharing the recipe.” – Mandy
“Best French toast casserole we’ve ever had. This is our new go to for all special occasions. Everyone loved it! Thank you for the wonderful and delicious recipe!” – Jojo
“This French toast casserole was AMAZING! Instead of milk I used eggnog, as you suggested, and it was ooooh so good. Everyone loved it. Is my go-to crowd pleaser now!” – Valerie
If you try this recipe, why not leave a star rating in the recipe card right below and/or a review in the comment section further down the page? I always appreciate your feedback. You can also follow me on Pinterest, Facebook, Instagram, and YouTube. And subscribe to my email list too!
Easy French Toast Casserole
Make breakfast simple with easy French toast casserole baked in one pan. Make ahead overnight or same day. Best recipe for a crowd!
Whisk
Mixing Bowl
9×13 Baking Dish
Pastry Blender
Aluminum Foil
Casserole:
20 ounces sandwich bread
1 cup pecans (chopped)
8 large eggs
2 cups whole milk
1/4 cup maple syrup
1 tablespoon vanilla extract
1 teaspoon sea salt
1 1/2 teaspoons ground cinnamon
1/4 teaspoon ground nutmeg
Topping:
4 tablespoons salted butter (sliced)
1/2 cup light brown sugar
1 teaspoon ground cinnamon
Grease a 9"x13" baking dish.
Cut the bread into small 1-inch cubes, and layer with the chopped pecans in the baking dish.
In a large bowl, whisk together the eggs, milk, pure maple syrup, vanilla extract, salt, cinnamon, and nutmeg, to make a sort of custard mixture.
Pour the egg milk mixture over the bread and pecans in the baking dish.
Cover and chill for a good 4 to 6 hours or overnight.
When you're ready to bake the casserole, remove it from the fridge, and pre-heat the oven to 350° F.
Using a pastry blender, mix together the sliced butter, brown sugar, and cinnamon in a small mixing bowl.
Crumble or clump the topping on the top of the casserole.
Cover the baking dish with aluminum foil, and bake at 350° F for about 25 to 30 minutes. Then uncover and bake it for an additional 15 to 20 minutes, 'til it's golden brown.
Once it’s thoroughly cooked through, remove it from the oven and let it cool for just a few minutes.
Then slice and serve with powdered sugar and maple syrup.
*20 ounces is about 22 slices of the butter bread (or white bread) that I use. You can use a loaf of sourdough, Texas toast, challah bread, French bread, Kings Hawaiian Rolls, brioche, cinnamon swirl bread, crescent rolls, or really any other type of fresh baked bread. Any of them will be delicious.
*Be sure to use real maple syrup. Table syrup will change the texture, flavor, and especially the amount of sweetness in your casserole.
*While this really is best as an overnight French toast casserole, you don’t have to chill it. But let me just say, the flavors will be at their best after chilling for at least a few hours. If you’re in a hurry, didn’t have time to plan ahead, and need to make it now, that’s ok. Just mix it up, make sure the bread is moistened well with the egg mixture, add the topping, and bake it.
Store any leftovers in the fridge.
Breakfast & Brunch, main dish
American
baked French toast, cinnamon French toast bake, easy French toast casserole, French toast bake, French toast bake recipe, French toast bake with white bread, French toast casserole, French toast casserole recipe, French toast casserole with sliced bread, French toast casserole with white bread, overnight French toast casserole
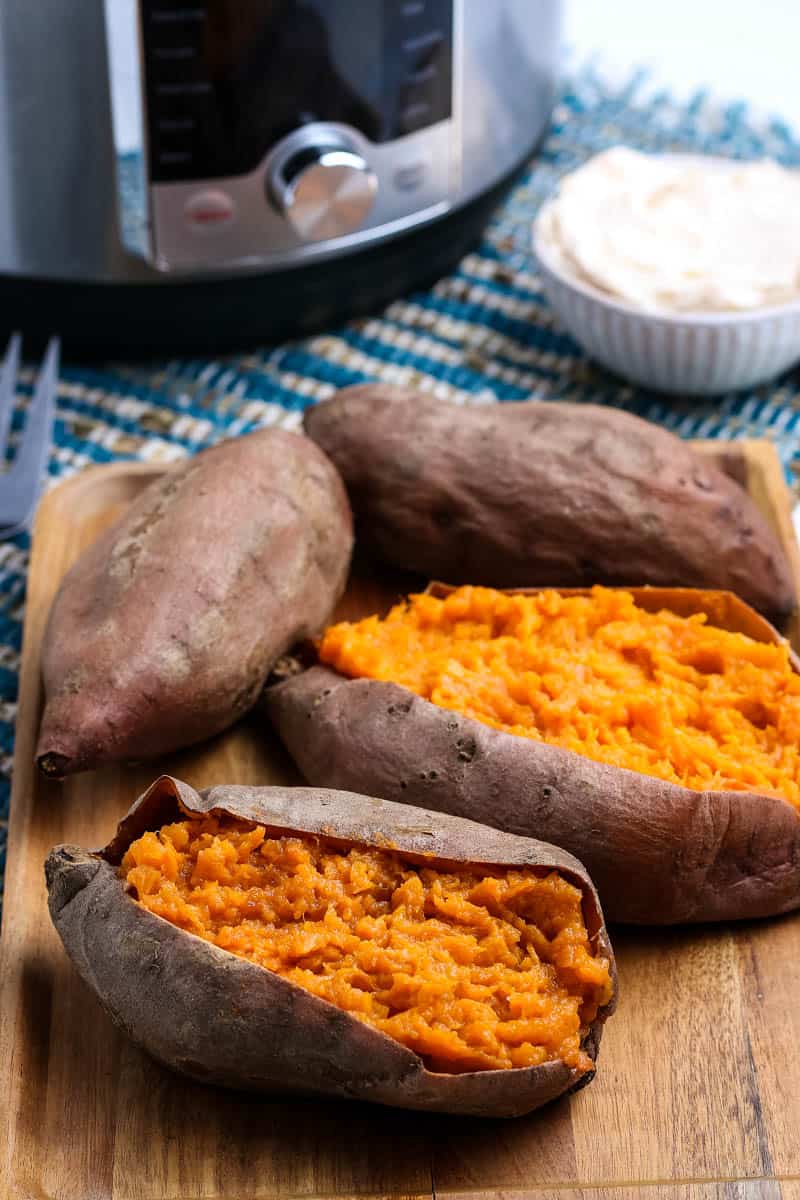
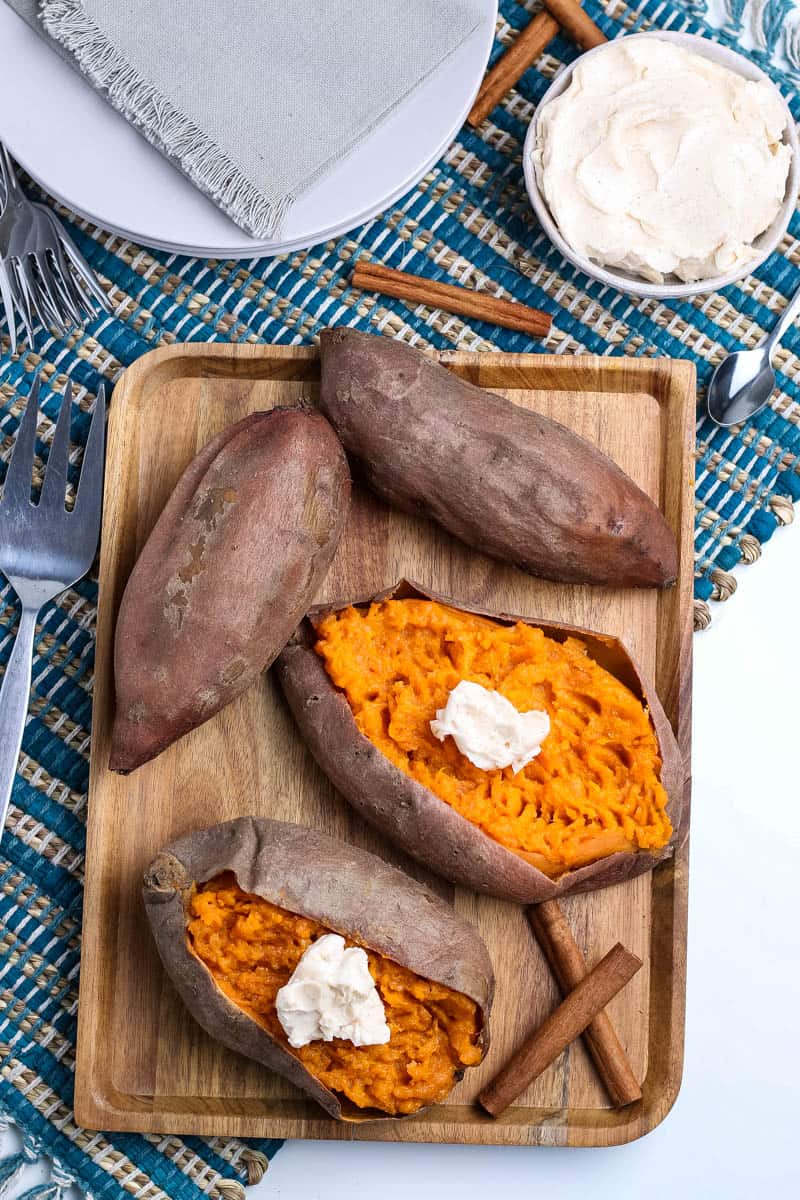
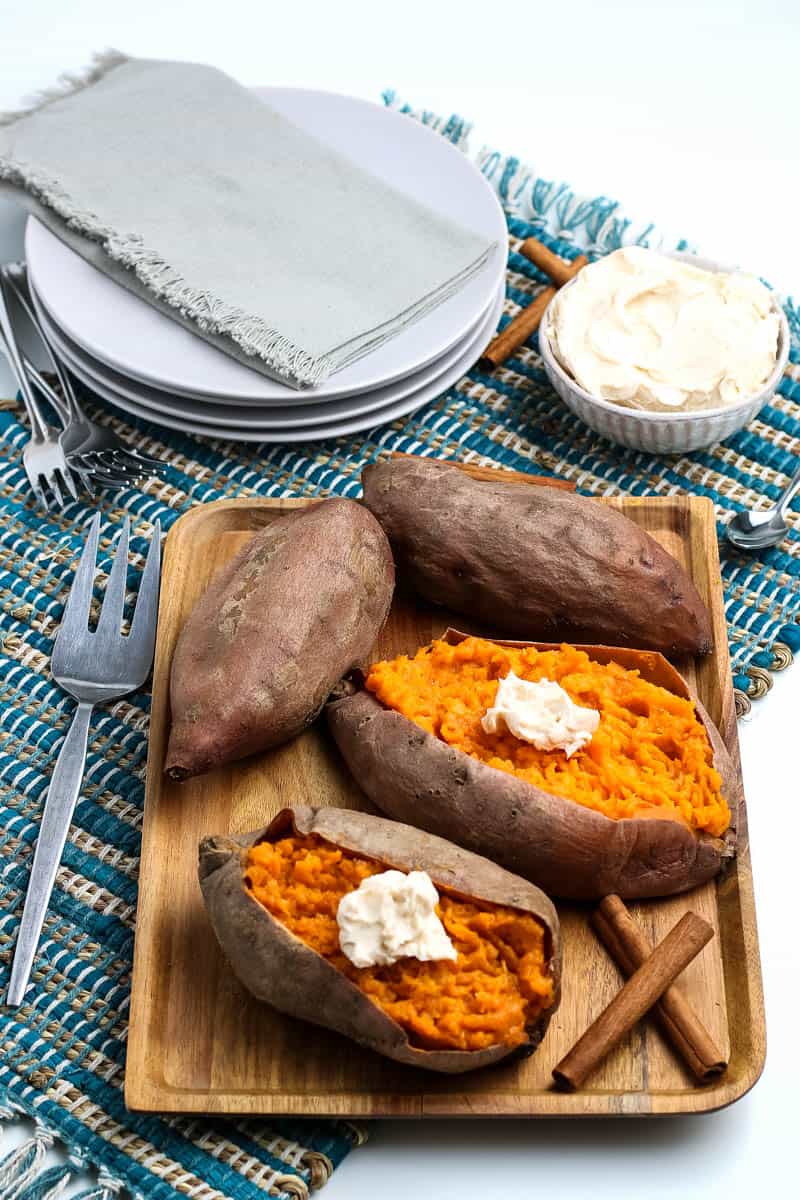
How to make easy Instant Pot sweet potatoes to eat whole, mashed, or use in your favorite recipes. Healthy side dish, perfect for casserole!
This time of year gets me thinking about one of my favorite Thanksgiving desserts, my Great Aunt Jennie’s sweet potato pie. In order to make all my family’s favorite holiday recipes, it’s a given that I’ll need to cook up a bunch of sweet potatoes.
Now I’ve found a much easier way to make all the sweet potato purée I need for sweet potato casserole, Aunt Jennie’s pie, candied sweet potatoes, and more.
Of course, we can also just make sweet potatoes in the Instant Pot for a healthy side with our meals. Baked or mashed, we can add our choice of toppings and have a hint of the holidays year round.
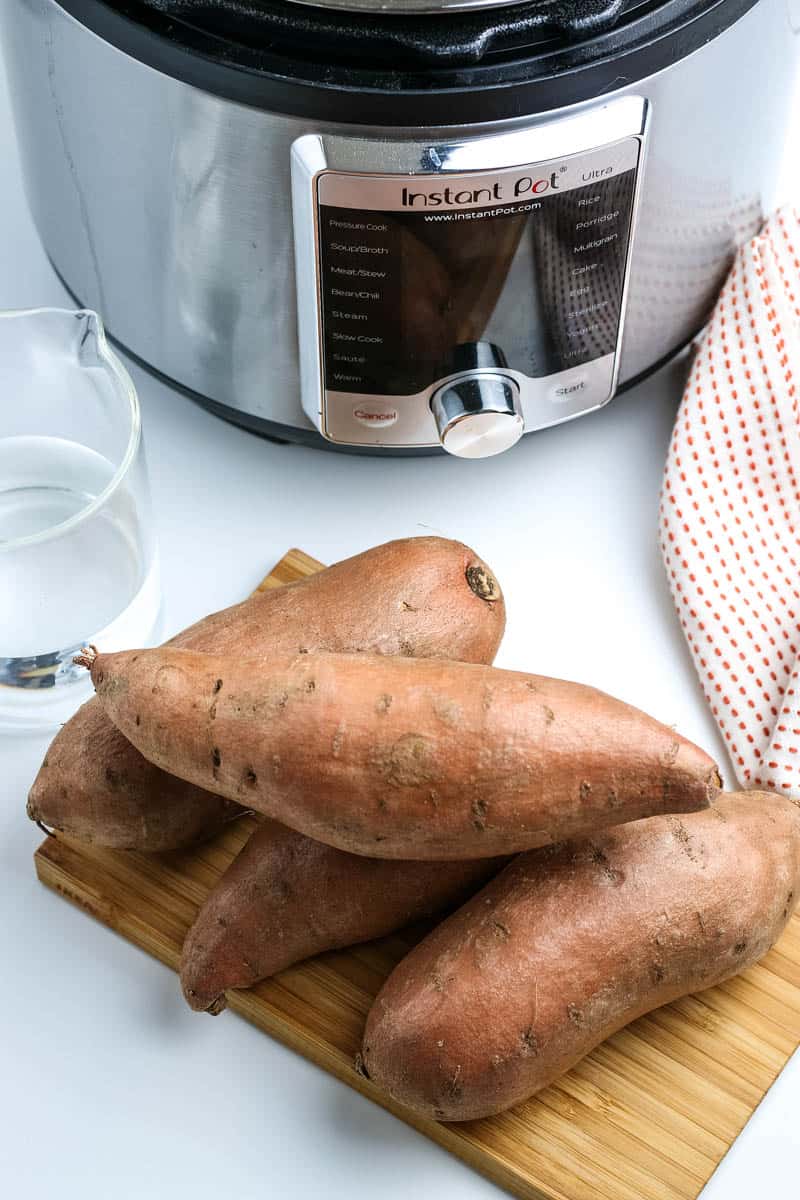
Making pressure cooker sweet potatoes only takes 2 ingredients, and it’s so, so easy to do. It’s as easy as scrubbing your potatoes, placing them in your Instant Pot with a little bit of water, and setting it to cook.
Don’t you just love an easy side dish? I know I do.
WHERE CAN I FIND THE ACTUAL RECIPE CARD?
If you’d rather skip all of my pressure cooking tips, important info for this recipe, and similar recipe ideas – and get straight to the Instant Pot sweet potato recipe – just scroll down to the bottom, where you’ll find a printable recipe card.
INGREDIENTS YOU’LL NEED:
Medium-sized sweet potatoes
Water
Keep in mind, all of the ingredient amounts you’ll need are in the printable recipe card below.
KITCHEN TOOLS AND EQUIPMENT YOU’LL NEED:
Scrub Brush – A good potato brush makes all the difference in washing potatoes.
Instant Pot – We use our 8 quart Instant Pot on most occasions.
Making sweet potatoes in the Instant Pot definitely has its advantages.
It’s faster. Baking sweet potatoes in the oven can sometimes take well over an hour, but the Instant Pot will have them ready within 30 minutes.
It’s easy and convenient. You clean your potatoes, place them in the Instant Pot, and cook; it doesn’t get any easier than that!
Pressure cooker sweet potatoes have a far better flavor. The Instant Pot creates a perfectly moist inside with a rich, creamy flavor that’s simply hard to resist.
IS IT BETTER TO BOIL OR STEAM SWEET POTATOES?
While boiling sweet potatoes may actually retain more nutrients, it’s best to cook sweet potatoes however works best and most efficiently for you.
I actually prefer to steam my sweet potatoes. Boiled sweet potatoes can typically gain a soggy texture that I just don’t care for.
Instead I prefer a rich and creamy, melt-in-your-mouth sweet potato, and steaming is the way to go for that. It’s quicker, it’s easier, and the result is far superior in both flavor and texture.
HOW TO COOK INSTANT POT SWEET POTATOES
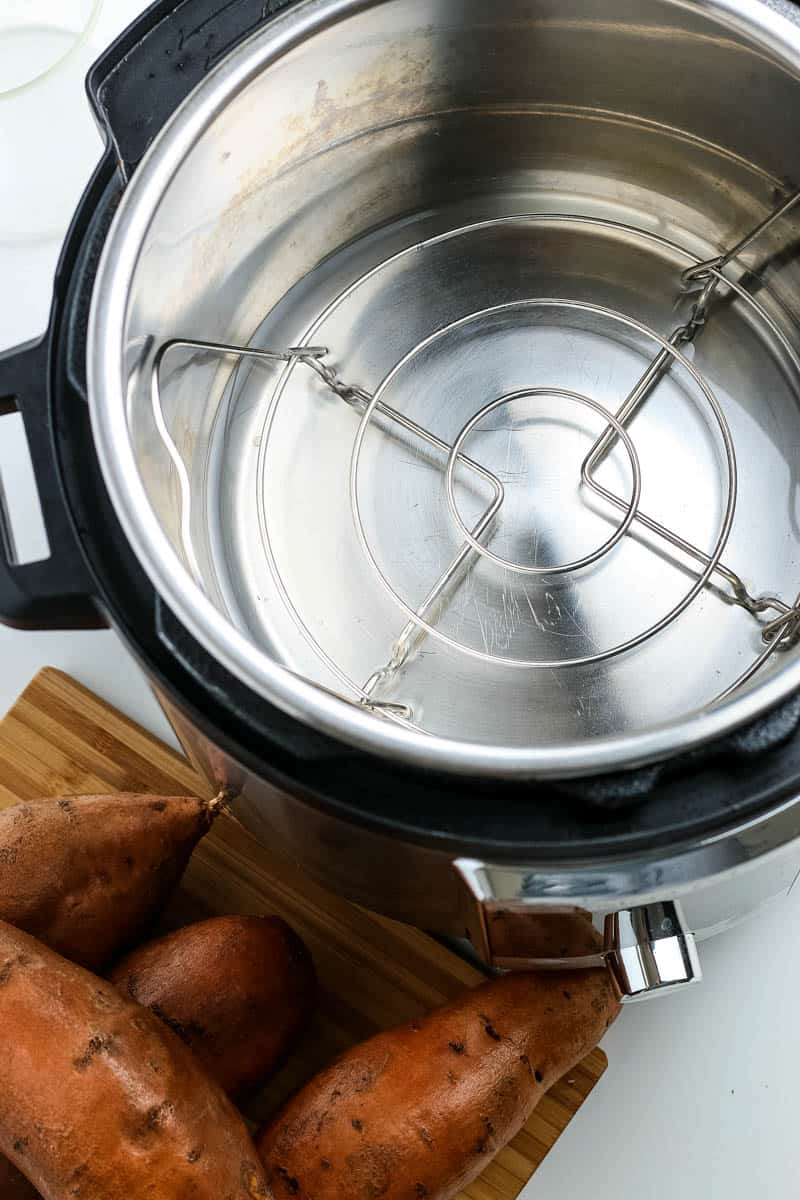
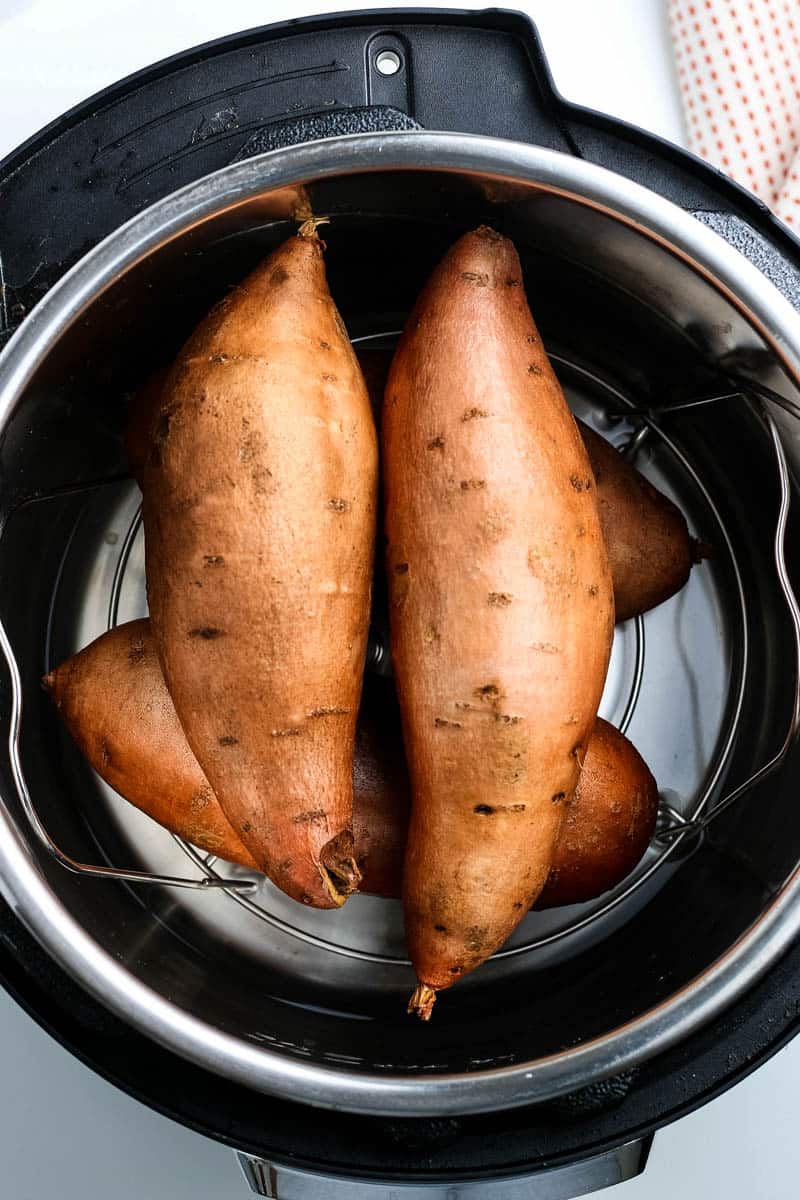
Cooking whole sweet potatoes in a pressure cooker requires very little prep time. Be sure to rinse and scrub your sweet potatoes before getting started, so they’re ready to go.
Lay the potatoes on top of the trivet. It’s ok to stack the potatoes; the steam in the Instant Pot will cook them thru and thru.
HOW LONG TO STEAM SWEET POTATOES IN THE INSTANT POT
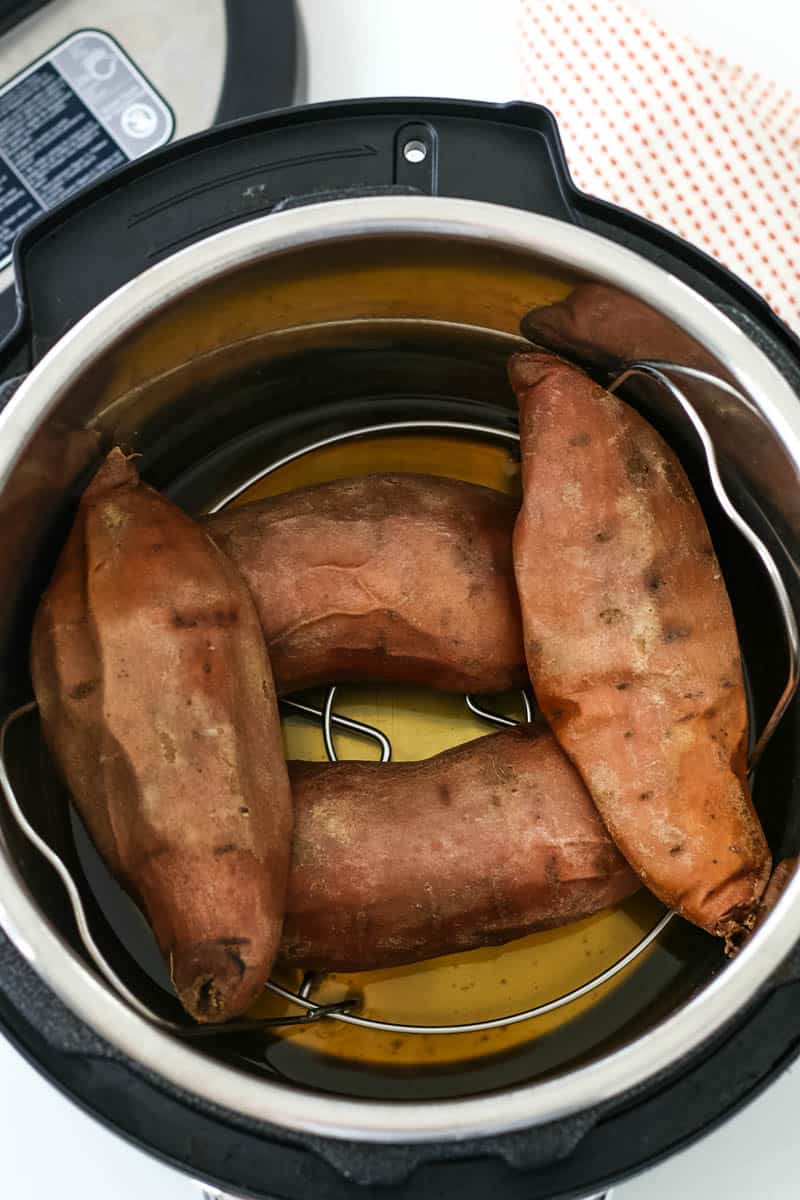
Place the lid on the Instant Pot, seal the vent, and press Manual mode, setting to high-pressure cook for about 15 minutes. If your sweet potatoes are larger, they’ll need more cooking time.
Allow the pressure cooker to naturally release pressure for 10 minutes.
Then manually release any remaining pressure. Just be careful of the steam, so it doesn’t burn your fingers.
Tip: To manually release the valve, I like to use the long handle of a wooden spoon covered in a kitchen towel, with my hand under the towel on the other end of the spoon.
Carefully remove the lid, and remove the sweet potatoes to a cutting board or plates.
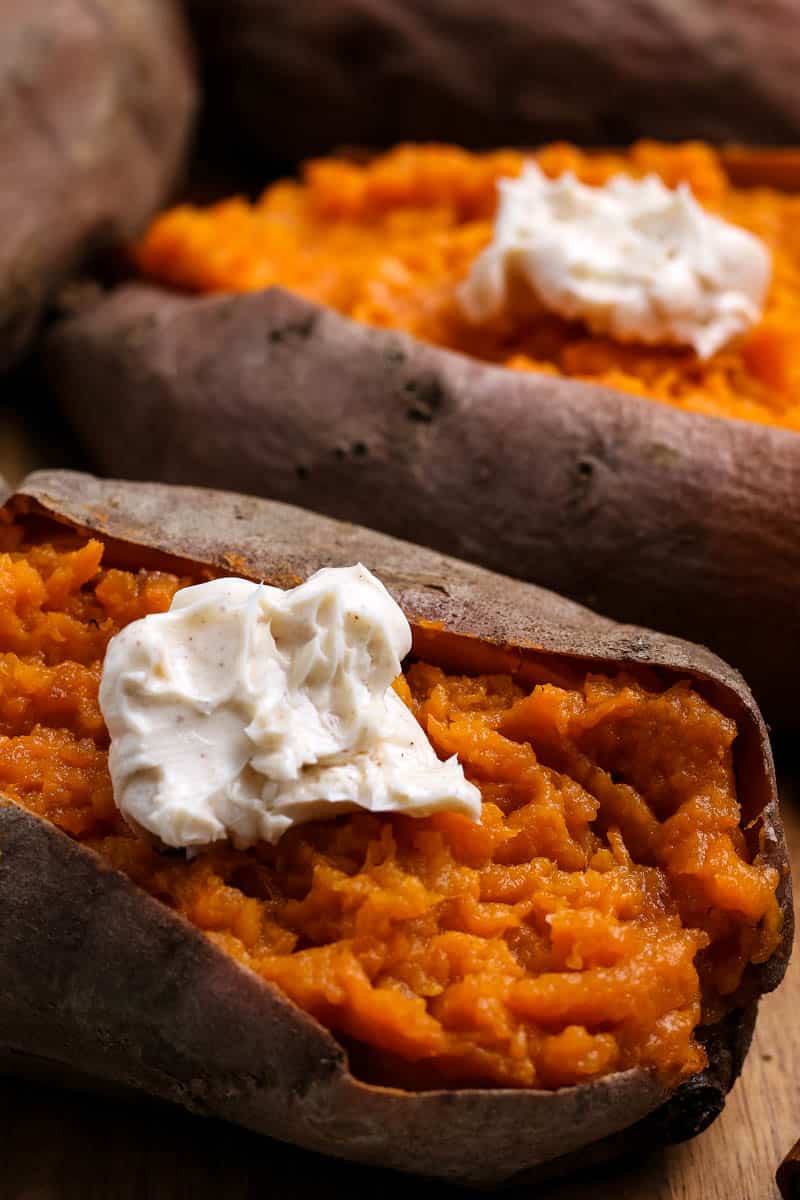
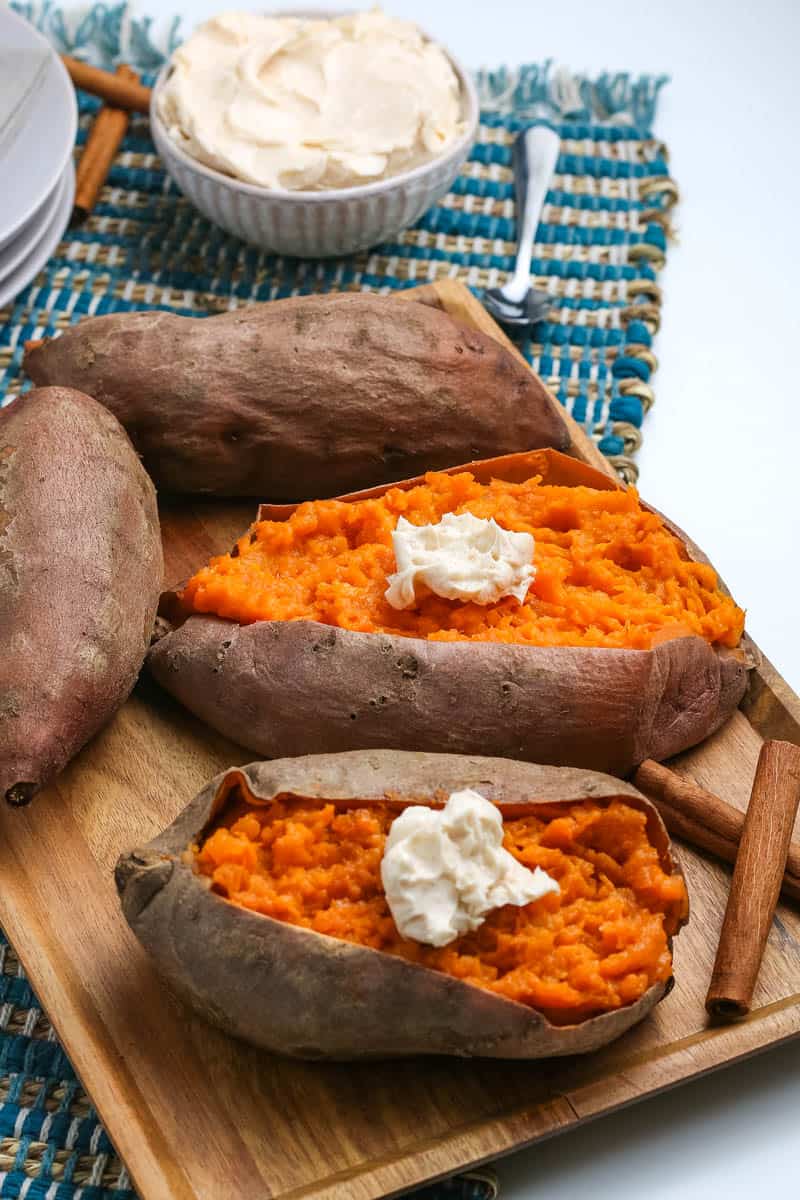
Serve with butter or other toppings of your choice.
HOW TO TELL IF YOUR SWEET POTATOES ARE DONE
It’s fairly easy to tell when sweet potatoes are fully cooked. Just poke the sweet potatoes with a fork or table knife; if your fork slides into the sweet potato easily, it’s done.
HOW TO STORE AND REHEAT STEAMED SWEET POTATOES
You can refrigerate leftover sweet potatoes in an airtight container for up to 5 days.
To reheat, just pop them into the microwave (in a microwave-safe dish) and heat on high ’til the sweet potato is heated through and through, probably about 2 minutes or so.
HOW TO SERVE BAKED SWEET POTATOES
When it comes to topping your baked sweet potatoes, the sky’s the limit. Here are some simple ideas to serve your sweet potatoes in a manner that your family will be sure to enjoy!
Spread butter, salt and pepper for a savory snack, much like a regular baked potato. You could even throw on some sour cream and chives!
Sprinkle some brown sugar and cinnamon with melted butter for an irresistible sweet treat.
Throw some marshmallows on top. This would pair wonderfully with the brown sugar and cinnamon, and you could even throw some pecans on top to imitate a traditional sweet potato casserole.
Finish them off in the oven with some melted cheese; cheddar, Monterey Jack, Colby Jack, mozzarella, Asiago, and even grated parmesan cheese would all be wonderful candidates. You could even add caramelized garlic and onions and sliced tomatoes to this mixture.
Make taco stuffed sweet potatoes! Split the potato open, add your taco meat (taco beef or taco chicken), salsa, cheese, and all of the normal taco fixings.
DO SWEET POTATOES AND REGULAR POTATOES COOK THE SAME?
Sweet potatoes cook very differently from regular baked potatoes, and I would not recommend substituting one for the other.
Sweet potatoes are more fibrous and typically contain quite a bit more moisture, which considerably lengthens their cooking time. They are much softer and far creamier with a higher sugar content than that of a regular potato.
On the other hand, regular potatoes have a much drier, starchier flesh, which is why they’re almost exclusively reserved for use in savory dishes.
CAN I USE THIS METHOD FOR MAKING SWEET POTATO PUREE FOR CASSEROLE AND OTHER SIDE DISHES?
Yes, you can use this Instant Pot sweet potato recipe to make sweet potato purée. Just follow the recipe all the way to the end, at which point you will need to peel and mash the potatoes into a smooth, creamy purée.
Making mashed sweet potatoes can easily be done in a blender or with a hand mixer.
Perhaps the most unique of all, this sweet potato crunch bread goes great with a steaming cup of coffee, perfect for that late weekend brunch.
GET THE PRINTABLE RECIPE
If you love this Instant Pot sweet potatoes recipe as much as I do, please write a 5 star review, and help me share the recipe on Facebook and Pinterest!
Lay the potatoes on top of the trivet. It’s ok to stack the potatoes; the steam in the Instant Pot will cook them thru and thru.
Place the lid on the Instant Pot, seal the vent, and press Manual mode, setting to high-pressure cook for about 15 minutes. If your sweet potatoes are larger, they’ll need more cooking time.
Allow the pressure cooker to naturally release pressure for 10 minutes.
Then manually release any remaining pressure. Just be careful of the steam, so it doesn’t burn your fingers.*
Carefully remove the lid, and remove the sweet potatoes to a cutting board or plates.
Serve with butter or other toppings of your choice.*
*Tip: To manually release the valve, I like to use the long handle of a wooden spoon covered in a kitchen towel, with my hand under the towel on the other end of the spoon.
*When it comes to topping your baked sweet potatoes, the sky’s the limit. Here are some simple ideas to serve your sweet potatoes in a manner that your family will be sure to enjoy!
Spread butter, salt and pepper for a savory snack, much like a regular baked potato. You could even throw on some sour cream and chives!
Sprinkle some brown sugar and cinnamon with melted butter for an irresistible sweet treat.
Throw some marshmallows on top. This would pair wonderfully with the brown sugar and cinnamon, and you could even throw some pecans on top to imitate a traditional sweet potato casserole.
Finish them off in the oven with some melted cheese; cheddar, Monterey Jack, Colby Jack, mozzarella, Asiago, and even grated parmesan cheese would all be wonderful candidates. You could even add caramelized garlic and onions and sliced tomatoes to this mixture.
Make taco stuffed sweet potatoes! Split the potato open, add your taco meat (taco beef or taco chicken), salsa, cheese, and all of the normal taco fixings.
HOW TO TELL IF YOUR SWEET POTATOES ARE DONE
It’s fairly easy to tell when sweet potatoes are fully cooked. Just poke the sweet potatoes with a fork or table knife; if your fork slides into the sweet potato easily, it’s done.
HOW TO STORE AND REHEAT STEAMED SWEET POTATOES
You can refrigerate leftover sweet potatoes in an airtight container for up to 5 days.
To reheat, just pop them into the microwave (in a microwave-safe dish) and heat on high ’til the sweet potato is heated through and through, probably about 2 minutes or so.
CAN I USE THIS METHOD FOR MAKING SWEET POTATO PUREE FOR CASSEROLE AND OTHER SIDE DISHES?
Yes, you can use sweet potatoes in the Instant Pot to make sweet potato purée. Follow this recipe all the way to the end, at which point you will simply peel and mash the potatoes into a smooth, creamy purée. This can also be more easily done in a blender.
Instant Pot Recipes
American
cooking whole sweet potatoes, how to cook sweet potatoes in the instant pot, how to make instant pot sweet potatoes, instant pot sweet potato recipe, instant pot sweet potatoes, instant pot sweet potatoes cut in half, instant pot sweet potatoes recipe, pressure cooker sweet potatoes, sweet potatoes in the instant pot
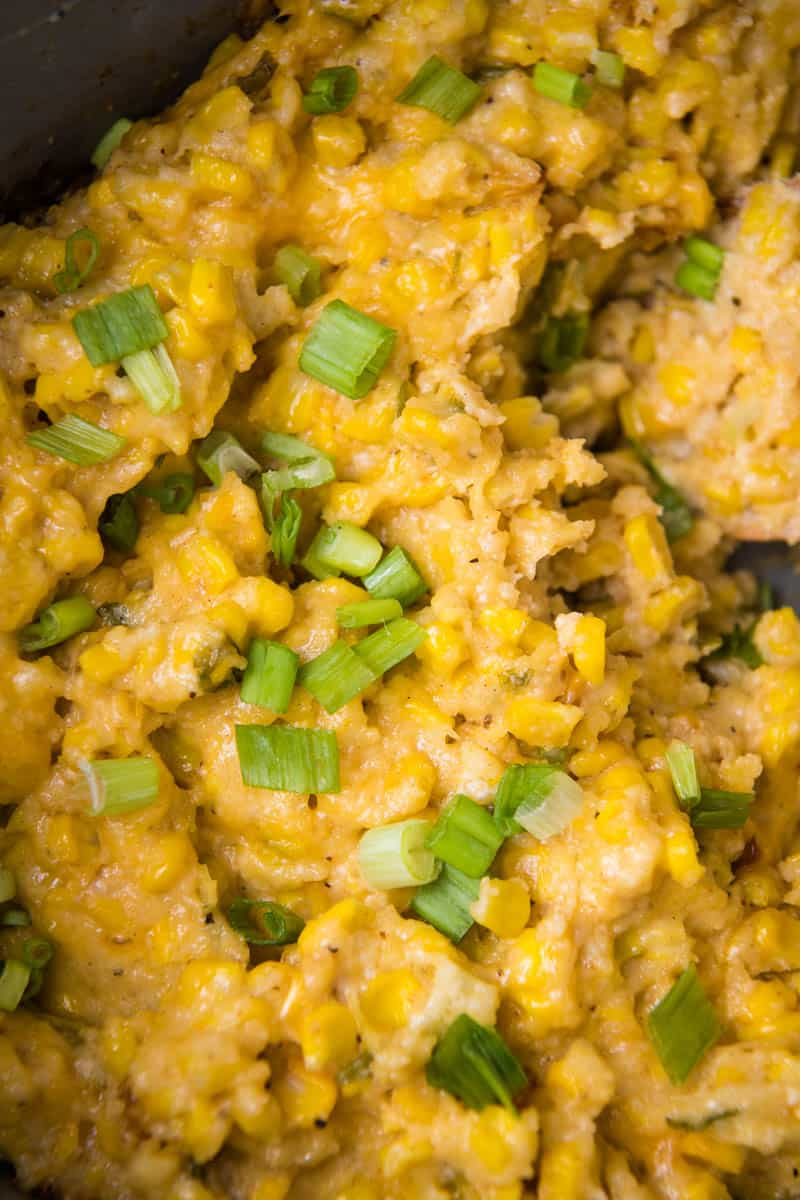
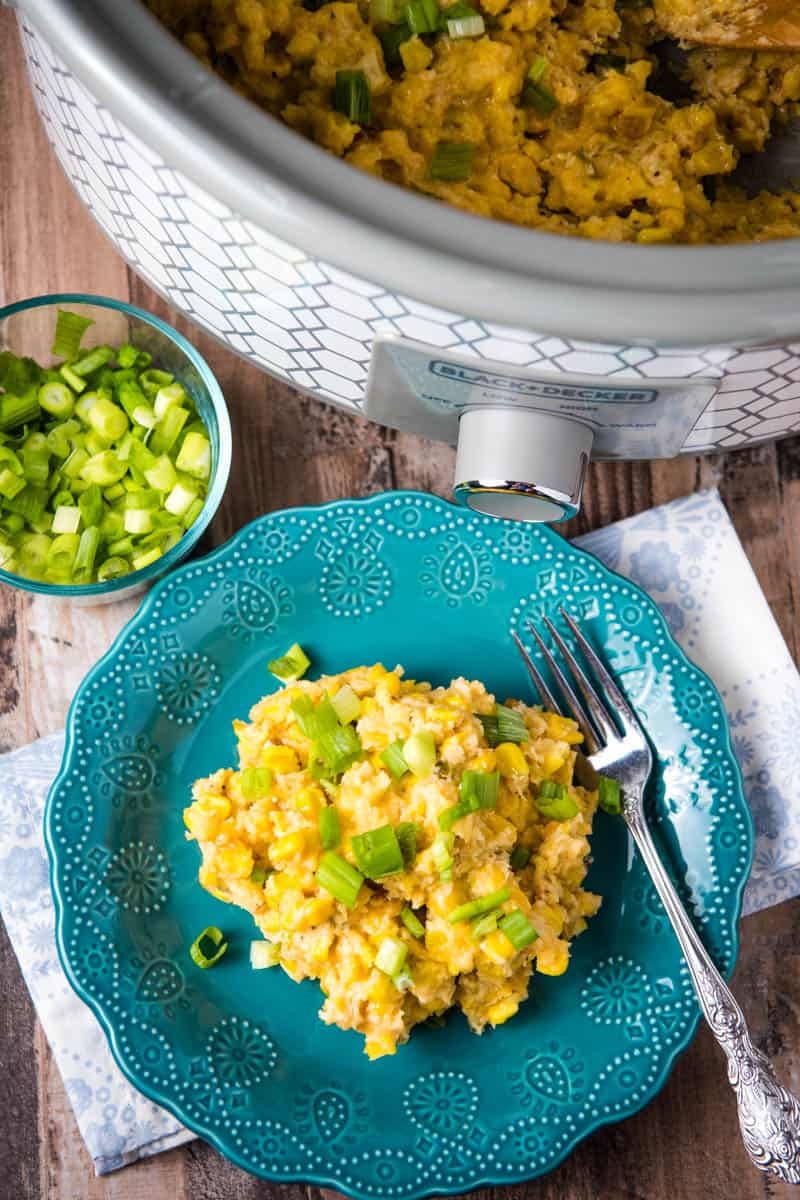
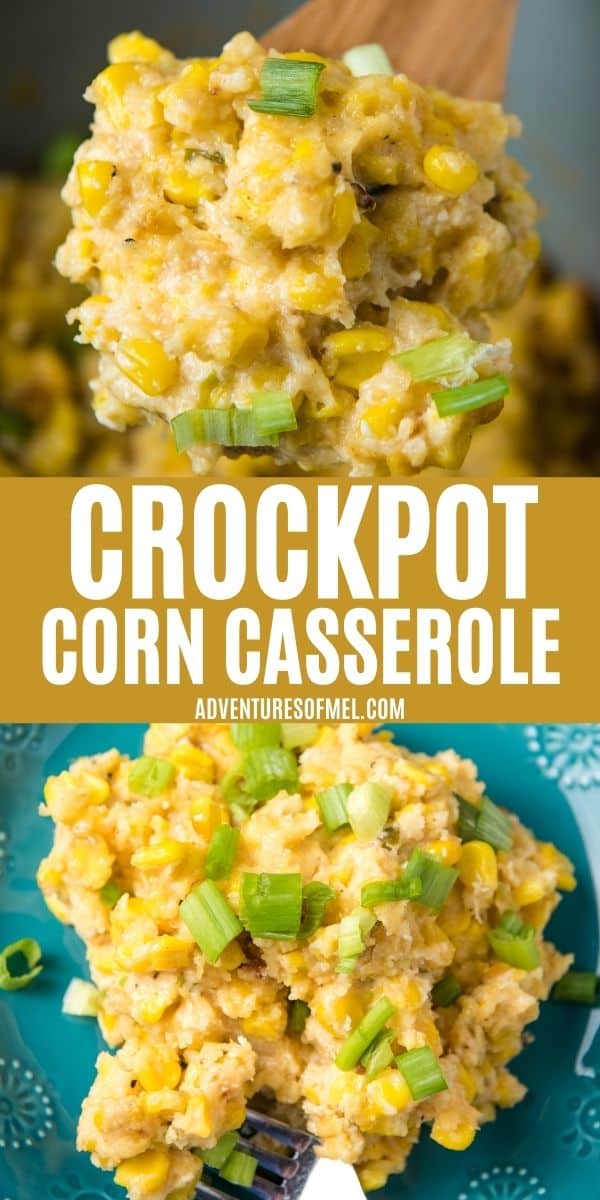
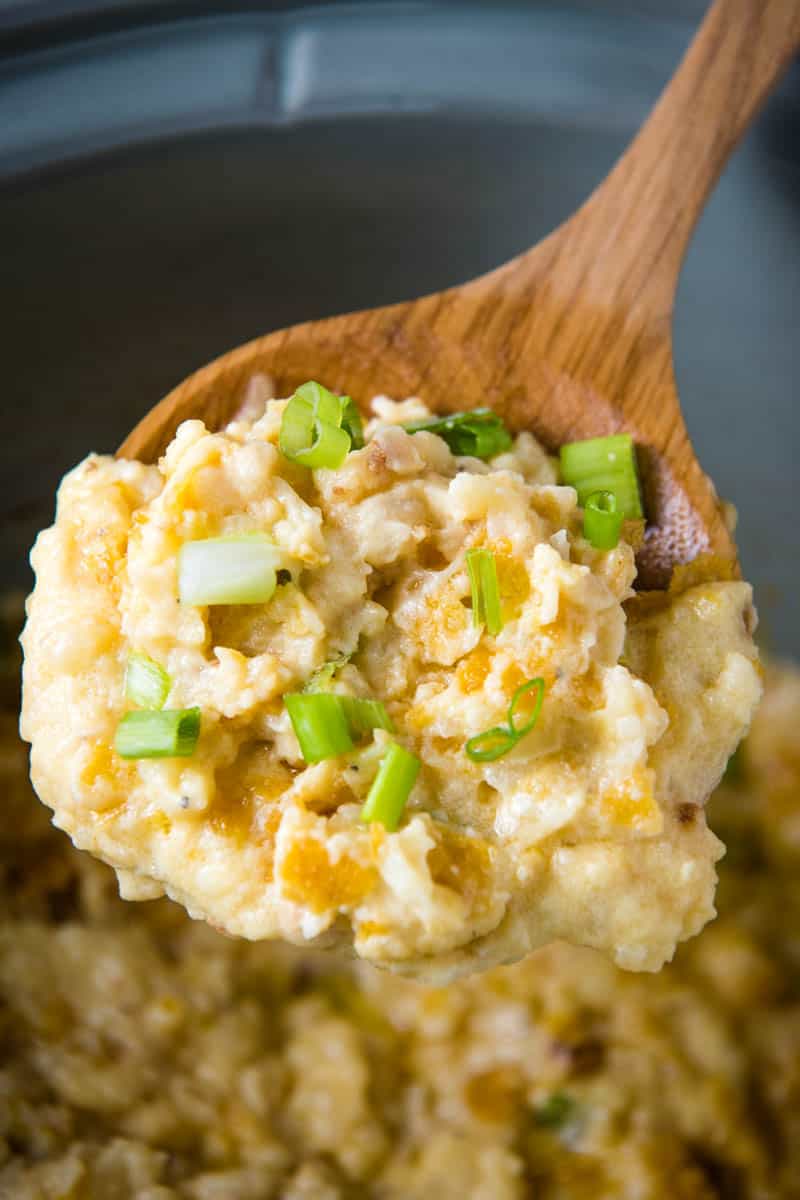
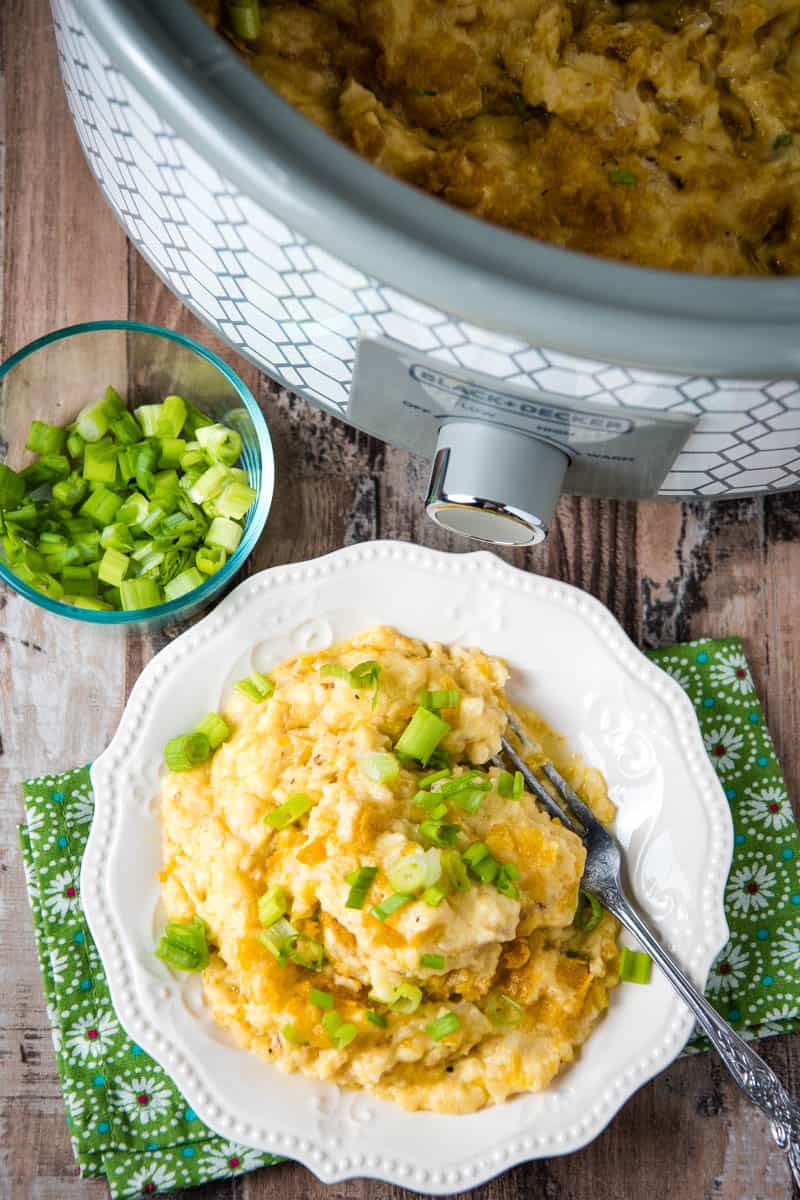
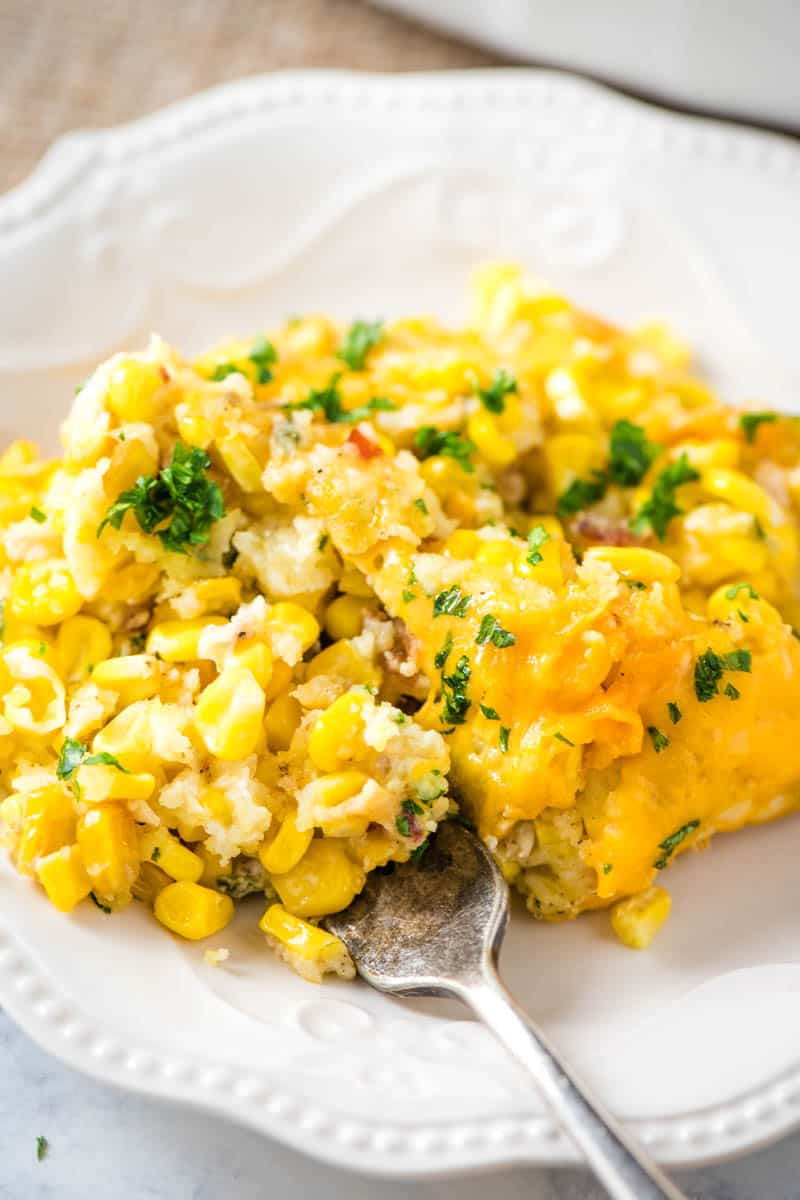
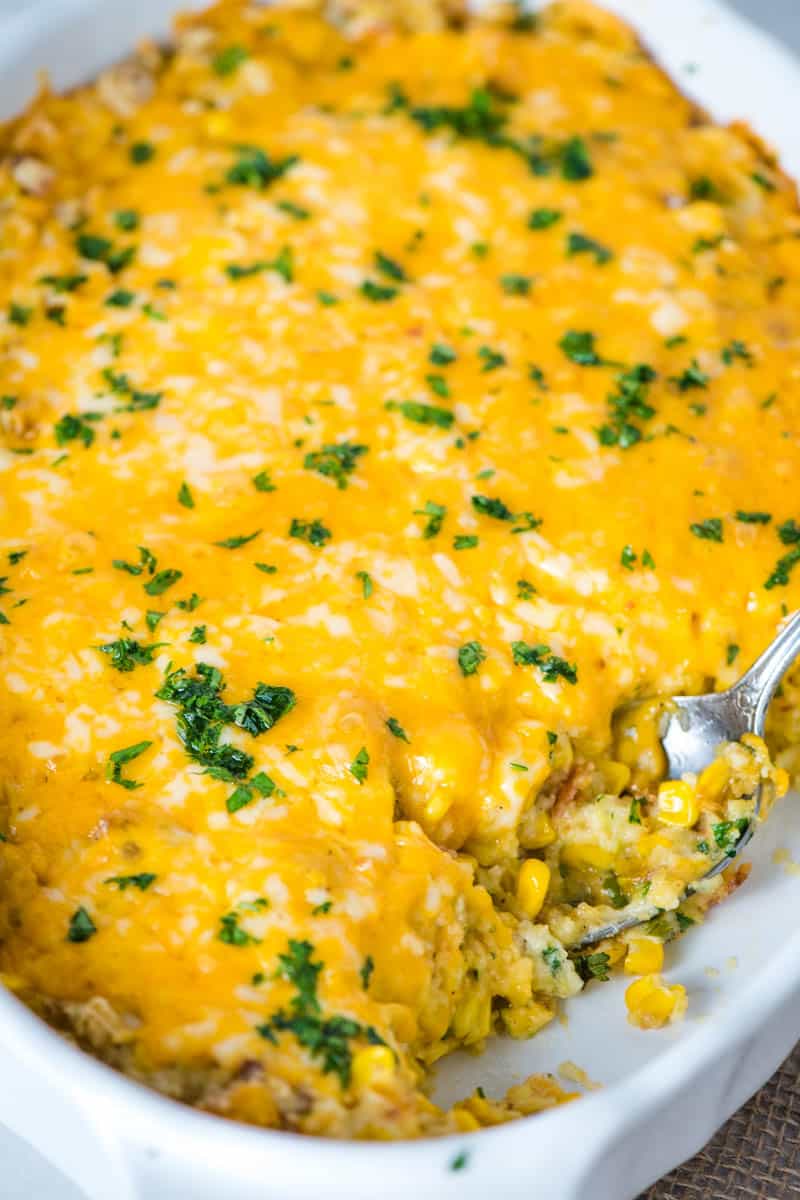
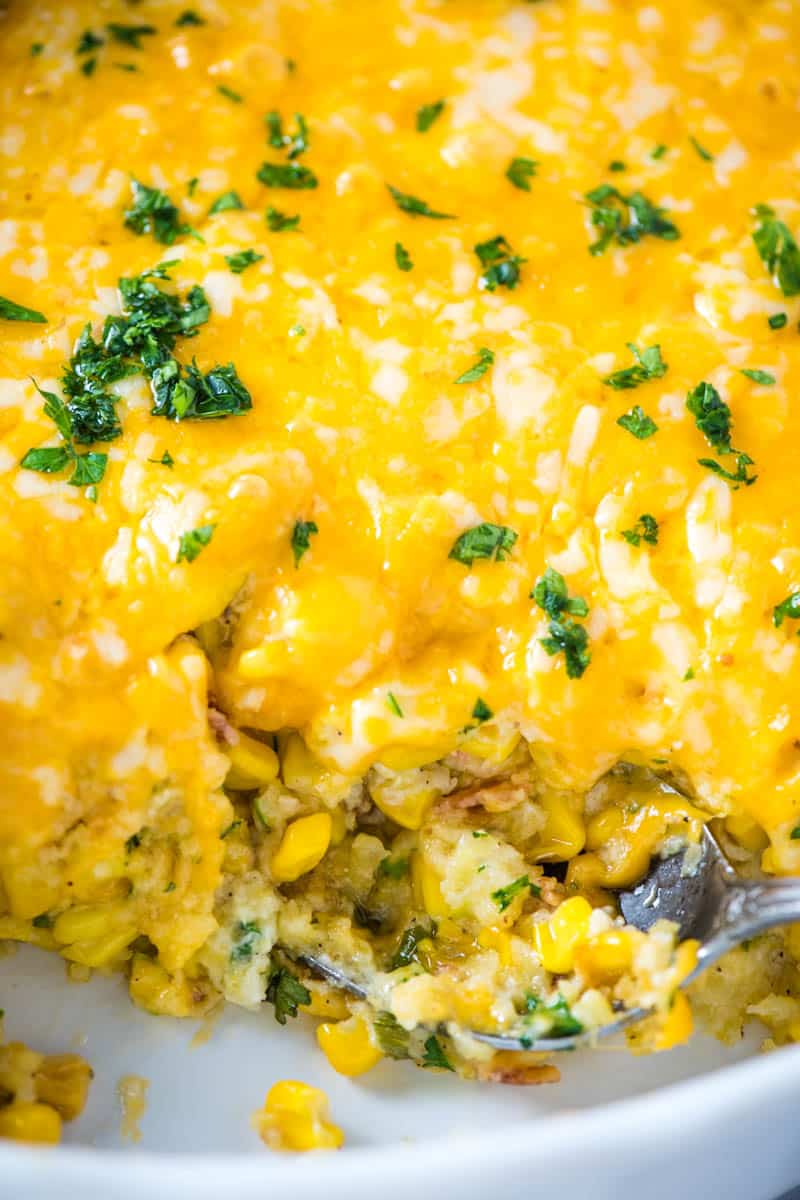
Throw together CrockPot corn casserole with cream cheese and Jiffy mix. Easy side dish recipe for a crowd. Make ahead for Thanksgiving and Easter.
Every Thanksgiving (and sometimes Easter too), I make my family’s favorite Jiffy corn casserole. It’s one of our favorite holiday side dish recipes.
Last Thanksgiving I was away from home and didn’t have an oven; however, I did have a slow cooker. So I decided to take my recipe and make it into a slow cooker corn casserole.
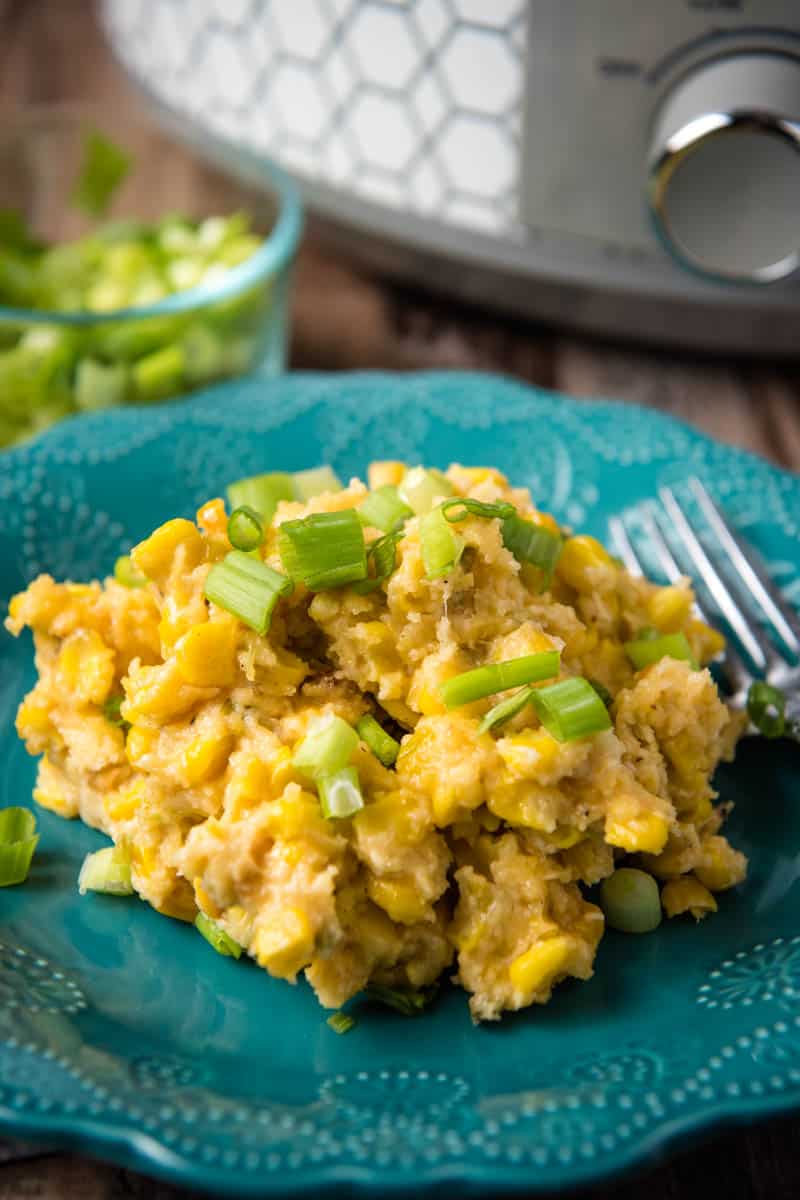
You talk about delicious. I love this CrockPot cheesy corn casserole even more than the traditional oven baked casserole, if that’s possible.
What I love even more about this slow cooker rendition is that I literally throw everything in the slow cooker, give it all a good stir, set it to cook, and walk away. It’s perfect for the morning before a big holiday dinner. It also goes great at a potluck, served up with a good CrockPot pork roast or CrockPot whole chicken and alongside my family’s favorite green bean casserole!
Plus you can keep this Jiffy CrockPot corn casserole warm while waiting for dinner to be served. It’s a win win!
Now if you’re like me and love a little Tex-Mex, you can change it up and make a Mexican corn casserole too.
WHERE CAN I FIND THE ACTUAL RECIPE CARD?
If you’d rather skip all of my slow cooking tips, important info for this recipe, and similar recipe ideas – and get straight to the CrockPot corn casserole recipe – just scroll down to the bottom, where you’ll find a printable recipe card.
IS CROCKPOT CORN CASSEROLE THE SAME AS CROCK POT CORN PUDDING?
Yes, it’s the same as Crock Pot corn pudding. Just like corn pudding, you are basically mixing a bunch of ingredients together all at once to make a creamy side dish.
On the other hand, this is far different from corn bread. Corn bread is stable, and you can eat it with your hands; creamy corn casserole is spooned onto your plate.
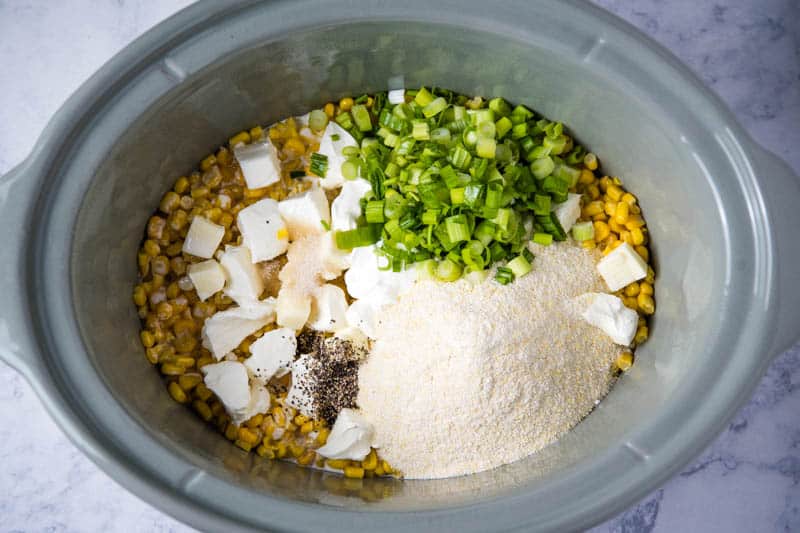
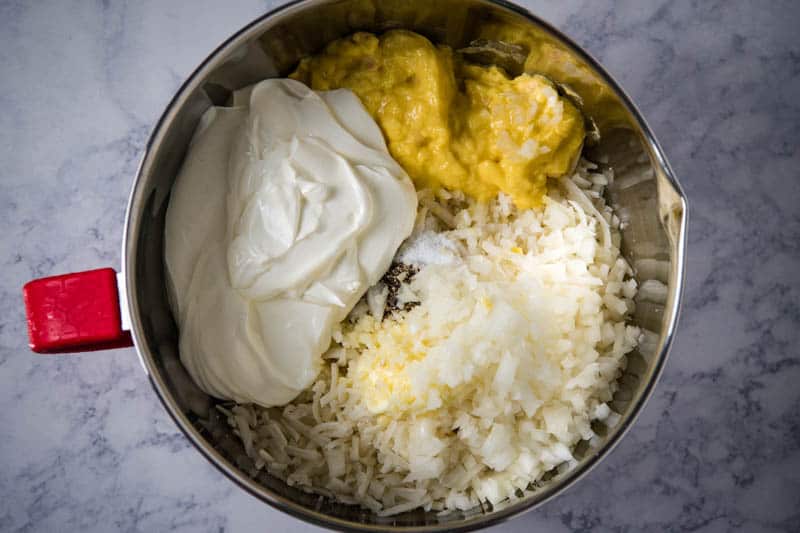
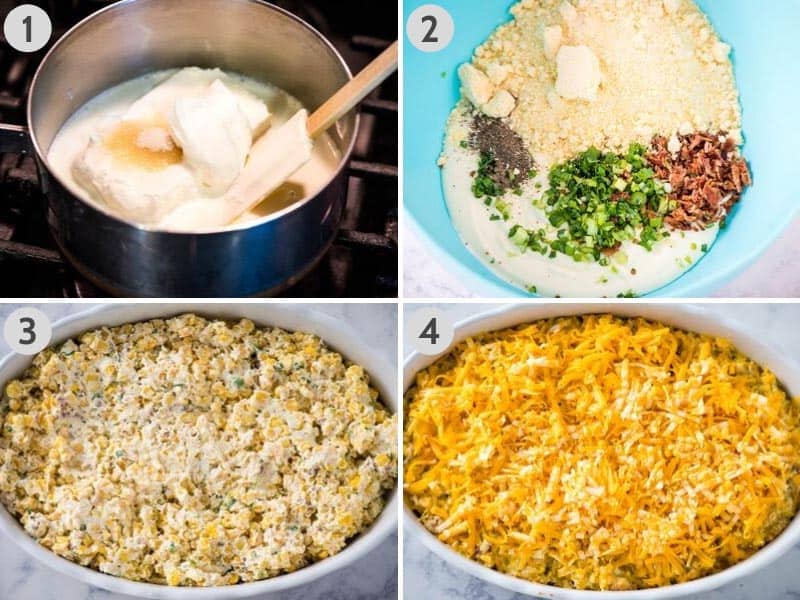
Before you get started making corn casserole in the slow cooker, be sure to chop the green onions. You’ll also need to grease the slow cooker with cooking spray to help prevent sticking and scorching.
Add the cream cheese, heavy whipping cream, salted butter, sugar, sour cream, thawed frozen corn, corn muffin mix, salt, black pepper, and green onions to the slow cooker.
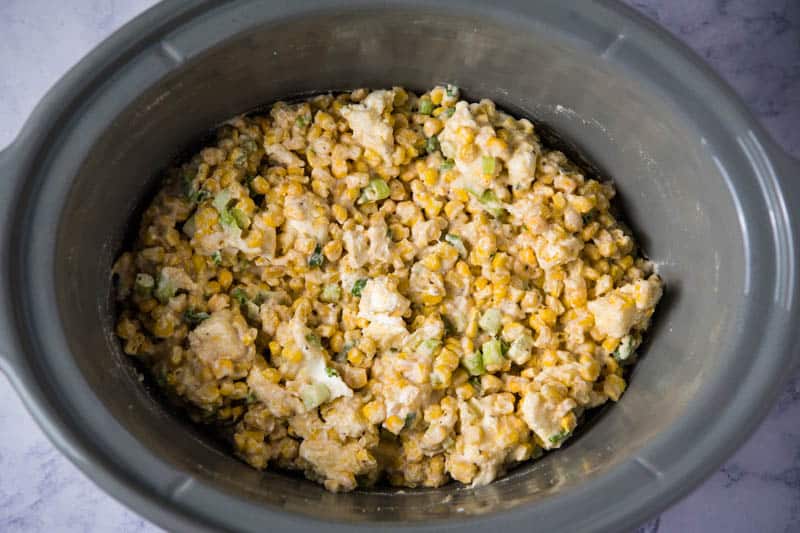
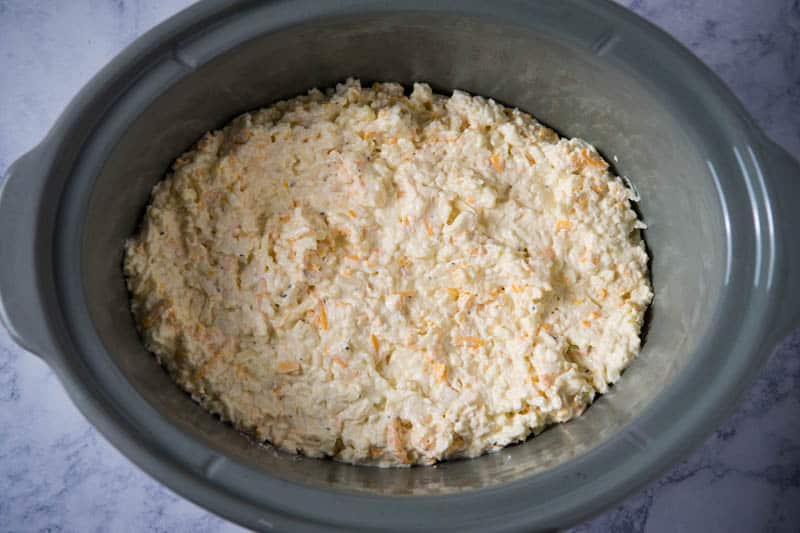
Combine everything together with a good stir.
HOW LONG TO COOK CROCKPOT CORN CASSEROLE WITH CREAM CHEESE
Cover and cook on high for 2 to 3 hours, or on low for 4 to 5 hours.
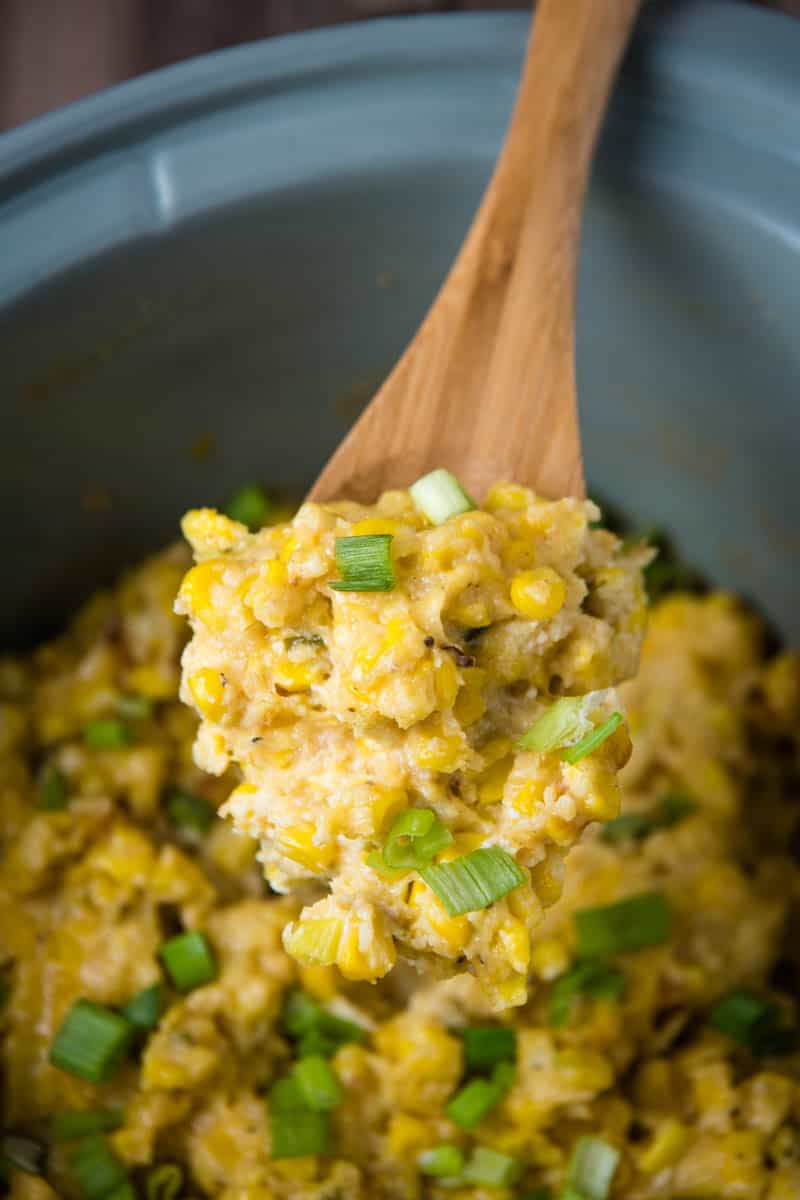
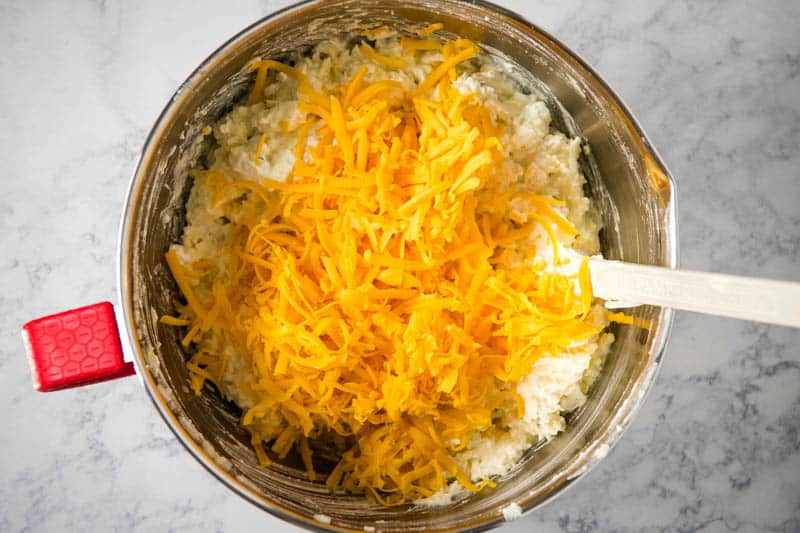
Then sprinkle the grated cheese on top of the cooked casserole, and stir into the casserole ’til it’s melted.
And that’s it. Your slow cooker corn pudding is done and ready to serve!
CAN I MAKE CORN CASSEROLE AHEAD OF TIME?
Absolutely! Jiffy CrockPot corn casserole is a great make-ahead recipe; in fact, it’s a great recipe to dump into the slow cooker later in the morning, allowing it to cook for the rest of the day until dinner.
One way to make this recipe even farther ahead of time is to mix everything together except the cheese, waiting to add the cheese until you’re ready to cook. Store the mixture in an airtight container up to 2 days in your refrigerator before cooking.
You can also mix it up and cook it all at once as the recipe states, later storing the leftovers in an airtight container in the refrigerator for up to 2-3 days. To reheat your casserole, bake it in the oven at 300°F for 10-20 minutes, or until warmed throughout.
The latter storage method will result in a slightly drier, less creamy texture. That being said, it is still delicious.
HOW TO FREEZE CORN CASSEROLE
CrockPot corn casserole with cream cheese can freeze just fine; in fact, it’ll store up to 3 months in the freezer. Just be sure to store it in an airtight container to prevent freezer burn.
Although this casserole will be delicious whether or not you freeze it, freezing it will somewhat alter the flavor and texture. After thawing, it may not be quite as rich, and it will be less creamy. This is where you’ll have to make your own judgment based on your schedule and preferences.
CORN CASSEROLE SUBSTITUTIONS YOU CAN MAKE
You can make this recipe gluten-free by using a gluten-free corn bread mix; I prefer to use Aldi’s gluten-free mix because it tastes very similar to Jiffy and makes a delicious corn casserole. You can also make your own Gluten-Free Jiffy-Style Corn Muffin Mix. Of course, if you are trying to make the casserole gluten-free, be sure to check labels on all your ingredients to ensure they’re truly gluten-free.
Sprinkle corn bread over the top for a crunchier texture.
Use creamed corn. This will add more moisture to the casserole, so be sure to cut down on the heavy whipping cream accordingly.
Adapt the liquid to your preference. Some people prefer to use whole milk instead of heavy whipping cream for an even creamier but less rich result, and some people just use half and half for the best of both worlds!
Add more cheese. Other cheeses that might pair well with this casserole include parmesan, mozzarella, asiago, Monterey jack, and even pepper Jack.
Add some jalapeños for an extra kick, or chopped bell peppers for added texture and flavor.
Diced ham and bacon pair delightfully well with this recipe.
Taste of Home Casseroles, Slow Cooker & Soups: 515 Hot & Hearty Dishes Your Family Will Love
BLACK+DECKER Slow Cooker, 7 quart, Teal Wave
Professional Box Grater, Stainless Steel with 4 Sides, XL Size, Black
Jiffy Corn Muffin Mix, 8.5 oz (Pack of 2)
Slow Cooker Travel Bag with Easy to Clean Lining, Insulated Carrier with Zippered Accessory Pocket, Carry Case Compatible with Crock Pot 6-8 Quart
8 ounces cream cheese (cubed)
1 cup heavy whipping cream
4 tablespoons salted butter (cubed)
1 teaspoon sugar
1 tablespoon sour cream
32 ounces frozen corn (thawed)
1/2 box (4.25 ounces corn muffin mix*)
1 teaspoon salt
1/2 teaspoon ground black pepper
3 green onions (chopped)
1/2 cup extra sharp cheddar cheese (grated)
1/2 cup Colby Jack cheese (grated)
Optional Ingredient: 6 slices bacon (cooked and crumbled)
Before you get started, be sure to chop the green onions. You’ll also need to grease the slow cooker with cooking spray to help prevent sticking and scorching.
Add the cream cheese, heavy whipping cream, salted butter, sugar, sour cream, thawed frozen corn, corn muffin mix, salt, black pepper, and green onions to the slow cooker. You can also add the bacon, if desired.
Combine everything together with a good stir.
Cover and cook on high for 2 to 3 hours, or on low for 4 to 5 hours.
Then sprinkle the grated cheese on top of the cooked casserole, and stir into the casserole ’til it’s melted.
And that’s it. It’s done and ready to serve!
*You can make this recipe gluten-free by using a gluten-free corn bread mix. I prefer to use Aldi’s gluten-free mix because it tastes very similar to Jiffy and makes a delicious corn casserole. Of course, if you are trying to make the casserole gluten-free, be sure to check labels on all your ingredients to ensure they’re truly gluten-free.
CAN I MAKE CROCKPOT CHEESY CORN CASSEROLE AHEAD OF TIME?
Absolutely! Jiffy CrockPot corn casserole is a great make-ahead recipe; in fact, it’s a great recipe to dump into the slow cooker later in the morning, allowing it to cook for the rest of the day until dinner.
One way to make this recipe even farther ahead of time is to mix everything together except the cheese, waiting to add the cheese until you’re ready to cook. Store the mixture in an airtight container up to 2 days in your refrigerator before cooking.
You can also mix it up and cook it all at once as the recipe states, later storing the leftovers in an airtight container in the refrigerator up to 2-3 days. To reheat your casserole, bake it in the oven at 300°F for 10-20 minutes, or until warmed throughout.
The latter storage method will result in a slightly drier, less creamy texture. That being said, it is still delicious.
HOW TO FREEZE CORN CASSEROLE
CrockPot corn casserole with cream cheese can freeze just fine; in fact, it’ll store up to 3 months in the freezer. Just be sure to store it in an airtight container to prevent freezer burn.
Although this casserole will be delicious whether or not you freeze it, freezing it will somewhat alter the flavor and texture. After thawing, it may not be quite as rich, and it will be less creamy. This is where you’ll have to make your own judgment based on your schedule and preferences.
Side Dish
American
Crock Pot corn casserole, Crock Pot corn pudding, CrockPot cheesy corn casserole, CrockPot corn casserole, CrockPot corn casserole recipe, CrockPot corn casserole with cream cheese, how to make corn casserole in a slow cooker, how to make CrockPot corn casserole, Jiffy CrockPot corn casserole, slow cooker corn casserole, slow cooker corn pudding
How to make cheesy CrockPot funeral potatoes. Easy slow cooker hashbrown casserole, a family favorite side dish, breakfast, or brunch recipe.
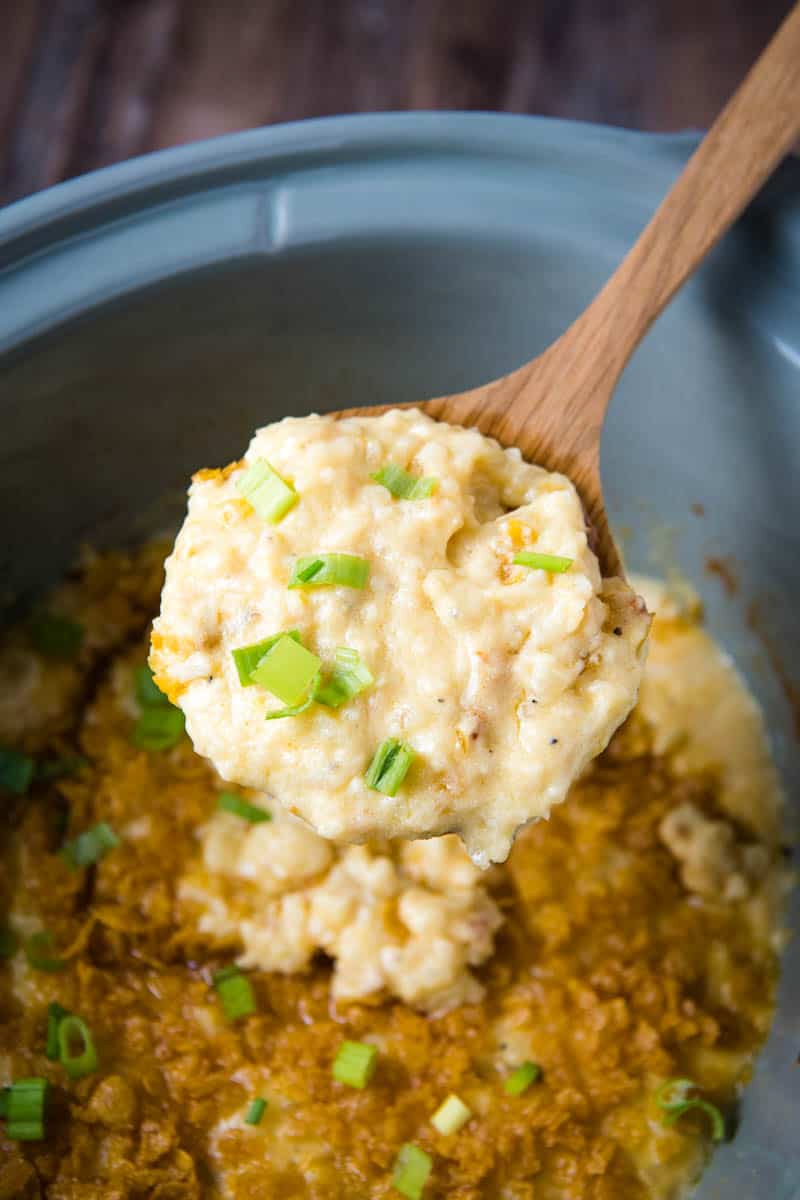
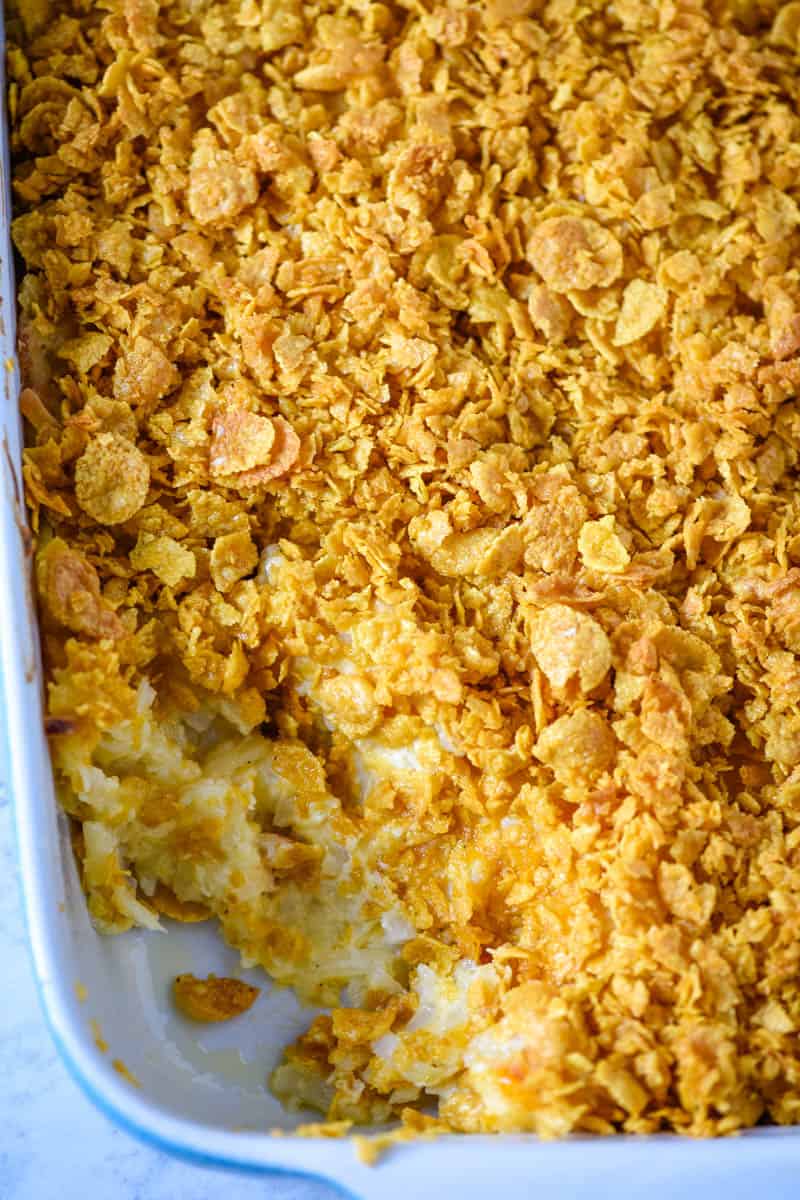
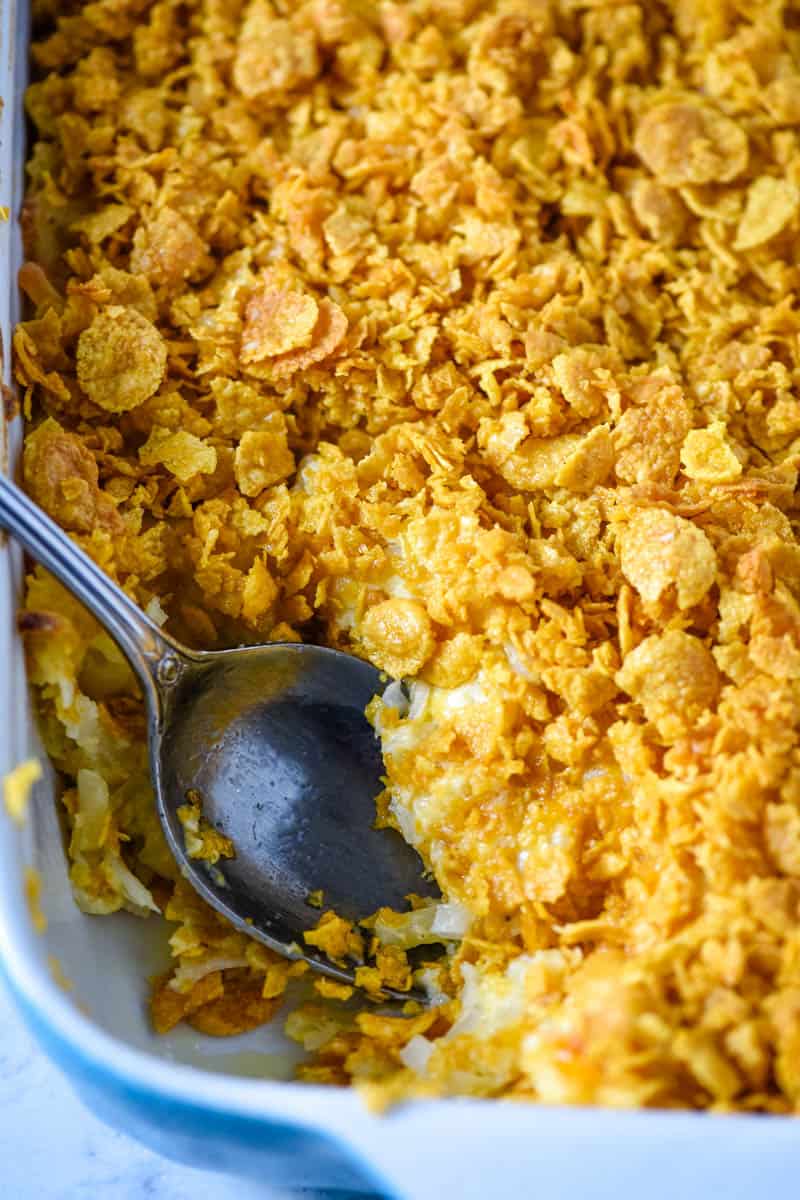
Remember that wonderful hash brown casserole with Corn Flakes we made in the oven a little while ago? It was such a big hit with y’all, that I decided to adapt it and make it into a CrockPot hash brown casserole.
Only this time, I added one secret ingredient that really gives it a kick. What a difference one powerful, little ingredient can make.
CrockPot cheesy hashbrowns are the perfect side dish for Thanksgiving, Christmas, and Easter; they also make the perfect breakfast or brunch idea, especially if you add a little bit of protein like ham, bacon, or sausage. Yum!
One of the many things I love about slow cooker hash brown casserole is that it’s very easy to mix up. It’s as easy as dumping, mixing, and spreading in your slow cooker.
If you’d rather skip all of my cooking tips, important cooking info for this recipe, and similar recipe ideas – and get straight to the casserole recipe – just scroll down to the bottom, where you’ll find a printable recipe card.
WHY ARE THEY CALLED FUNERAL POTATOES?
Well, Southern Living states that although they are consumed all across the country, funeral potatoes are really more of a southern tradition, and the reasoning is in the name. To put it simply, cheesy hash brown casserole is an easy make-ahead recipe that can feed a crowd, and that’s perfect for a funeral.
To be honest, here in the South and even living in the Midwest, I can’t remember ever attending a funeral or potluck at which funeral potatoes weren’t served!
Cook on high for 2 to 3 hours, or on low for 4 to 5 hours.
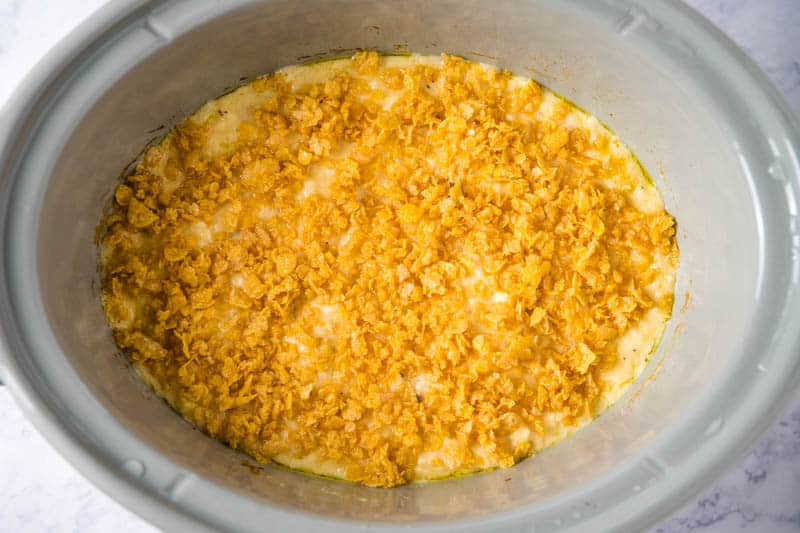
In a small bowl, mix together the slightly crushed Corn Flakes and the melted butter.
Sprinkle the Corn Flakes over the hash brown mixture in the slow cooker; then cover and cook an additional 30 minutes.
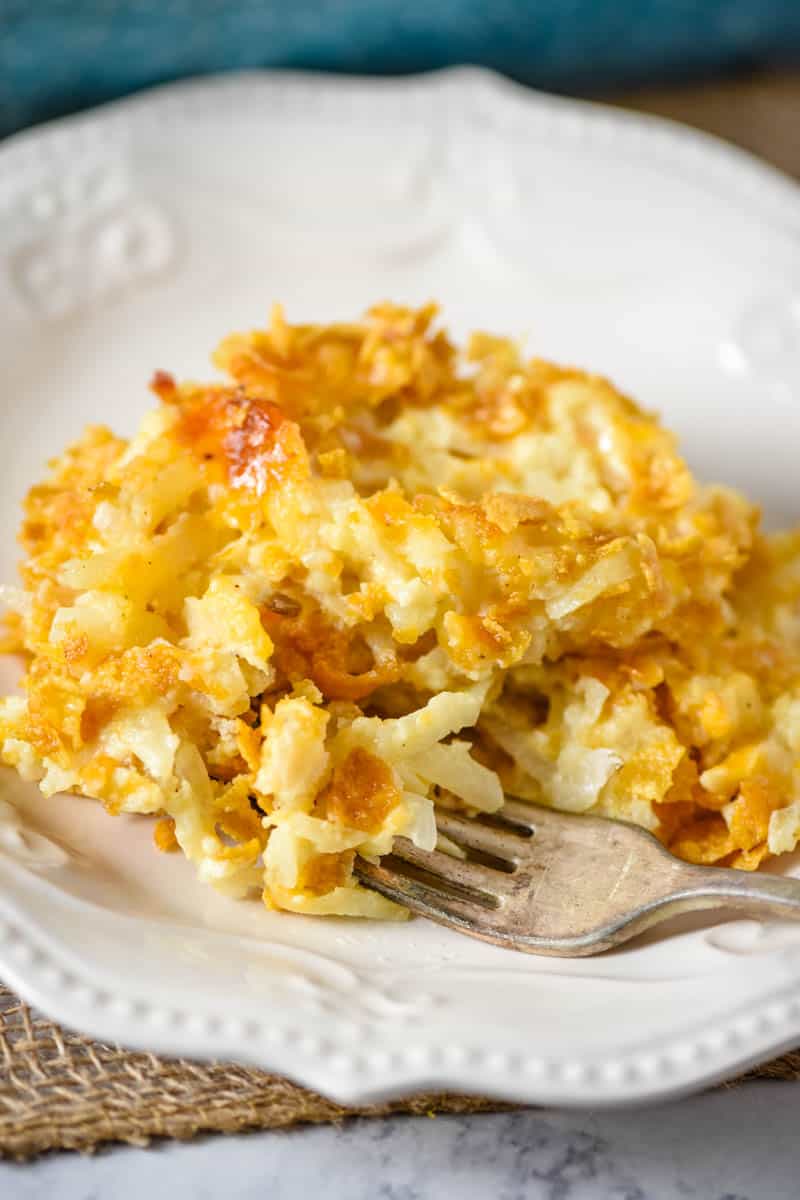
And that’s it! When it’s done, it’s ready to serve while warm. You can sprinkle it with chopped green onions, if preferred.
CAN I PUT FROZEN POTATOES IN THE SLOW COOKER, OR DO I HAVE TO COOK THEM FIRST?
Yes, the potatoes can be put straight into the slow cooker, but it’s important to ensure that they are thawed beforehand. Just follow the instructions on the package, and be sure to allow ample time for thawing.
HANDY TIP: HOW TO CRUSH CORN FLAKES
The quickest and least messy way that I have found to crush Corn Flakes is to place them in a quart sized plastic bag and seal the bag. Be sure that all of the air inside the bag escapes.
Using either your hands or a rolling pin, you can now crush the Corn Flakes. For this recipe, they only need to be slightly crushed, so don’t spend too much time on it.
WHAT CAN I SUBSTITUTE FOR SOUR CREAM?
The best 1:1 substitute for sour cream that I have found is plain Greek yogurt. For every cup of sour cream, it is also possible to substitute 1 cup of milk or cream mixed with 1 tablespoon of lemon juice.
If a vegan substitute is desired, you can simply use a vegan sour cream or Greek yogurt, both of which can be found in most grocery stores and health food stores.
That being said, I highly recommend that you keep the sour cream in these CrockPot funeral potatoes, as nothing else really comes close to the flavor and richness sour cream provides.
WHAT TO SERVE WITH CROCKPOT HASH BROWN CASSEROLE:
Crockpot hash brown casserole pairs wonderfully with the following dishes:
HOW TO STORE AND REHEAT CROCKPOT CHEESY HASHBROWNS
Thankfully, this recipe is a great make-ahead side dish. It can be made the night before, the day before, etc. This casserole will store in the fridge in an airtight container for up to 3 days.
Although it is certainly possible to cook it beforehand, for the best results I recommend mixing it up to store in the fridge, waiting to cook until you’re ready to eat.
For longer storage time, cook your funeral potatoes in the slow cooker beforehand, and place them in the freezer in an airtight container for up to 3 months. When you’re ready, simply let your potatoes thaw overnight in the refrigerator, and bake them at 350° F for 30 minutes to an hour.
IS CROCKPOT HASHBROWN CASSEROLE GLUTEN-FREE?
Unfortunately, CrockPot hashbrown casserole is not typically gluten-free, reason being that cream of chicken soup and hash browns are rarely gluten-free. Corn Flakes aren’t either.
That being said, there are options for both gluten-free cream of chicken soup and gluten-free frozen hashbrowns in most grocery stores and health food stores. I’ve found that Ore-Ida makes delicious gluten-free frozen hash browns.
As for the Corn Flakes, I haven’t found a gluten-free option yet; but you could always substitute slightly crushed potato chips or maybe a gluten-free Corn Chex cereal.
Always be sure to check all of your ingredient labels to ensure that they’re truly gluten-free.
If you love this slow cooker hash brown casserole as much as I do, please write a 5 star review, and help me share the recipe on Facebook and Pinterest!
How to make cheesy CrockPot funeral potatoes. Easy slow cooker hashbrown casserole, a family favorite side dish, breakfast, or brunch recipe.
Vegetable Chopper
Large Mixing Bowl
7-Quart Slow Cooker
30 ounces frozen hash browns (thawed)
1/2 cup salted butter (melted)
1 teaspoon salt
1/2 teaspoon ground black pepper
2 cloves garlic (minced)
1/2 cup yellow onion (minced)
10.5 ounces cream of chicken soup
16 ounces sour cream
2 cups extra sharp cheddar cheese (shredded)
Topping:
2 cups Corn Flakes (slightly crushed)
1/4 cup salted butter (melted)
4 green onions (chopped (optional))
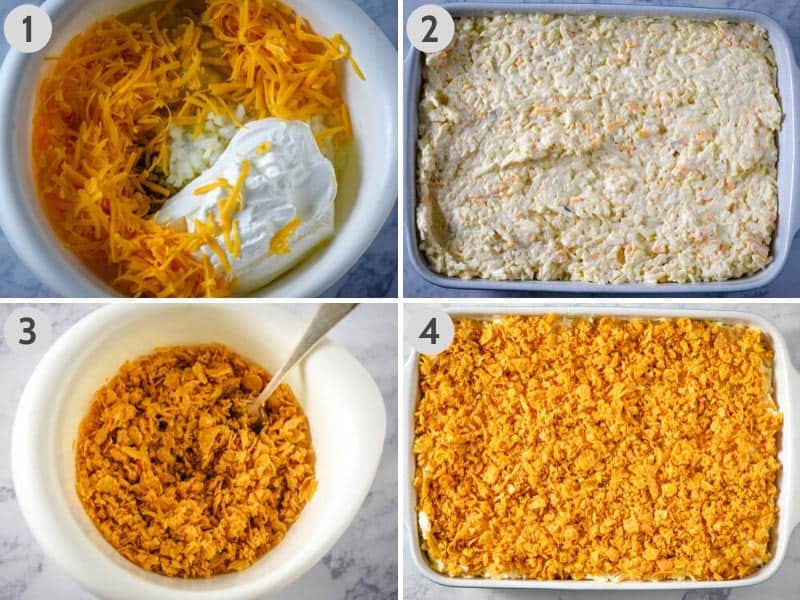
Spray the inside of the CrockPot or slow cooker with cooking spray to prevent sticking or scorching.
In a large mixing bowl, combine the hashbrowns, melted butter, salt, pepper, minced garlic, minced onion, cream of chicken soup, and sour cream.
Stir in the cheddar cheese.
Spread the mixture into the greased slow cooker.
Cook on high for 2 to 3 hours, or on low for 4 to 5 hours.
Topping:
In a small bowl, mix together the slightly crushed Corn Flakes and melted butter.
Sprinkle the Corn Flakes over the hash brown mixture in the slow cooker; then cover and cook an additional 30 minutes.
Sprinkle with chopped green onions, if desired, and serve while warm.
CAN I PUT FROZEN POTATOES IN THE SLOW COOKER, OR DO I HAVE TO COOK THEM FIRST?
Yes, the potatoes can be put straight into the slow cooker, but it’s important to ensure that they are thawed beforehand. Just follow the instructions on the package, and be sure to allow ample time for thawing.
HANDY TIP: HOW TO CRUSH CORN FLAKES
The quickest and least messy way that I have found to crush Corn Flakes is to place them in a quart sized plastic bag and seal the bag. Be sure that all of the air inside the bag escapes. Using either your hands or a rolling pin, you can now crush the Corn Flakes. For this recipe, they only need to be slightly crushed, so don’t spend too much time on it.
HOW TO STORE AND REHEAT CROCKPOT CHEESY HASHBROWNS
Thankfully, this recipe is a great make-ahead meal. It can be made the night before, the day before, etc. This casserole will store in the fridge in an airtight container for up to 3 days.
Although it is certainly possible to cook it beforehand, for the best results I recommend mixing it up to store in the fridge, waiting to cook until you’re ready to eat.
For longer storage time, cook your funeral potatoes in the slow cooker beforehand, and place them in the freezer in an airtight container for up to 3 months. When you’re ready, simply let your potatoes thaw overnight in the refrigerator, and bake them at 350° F for 30 minutes to an hour.
Side Dish
American
casserole recipe, CrockPot cheesy hashbrowns, CrockPot funeral potatoes, CrockPot hash brown casserole, CrockPot hashbrown casserole, how to make CrockPot funeral potatoes, potato casserole with Corn Flakes, potato dish, side dish, slow cooker funeral potatoes, slow cooker hash brown casserole
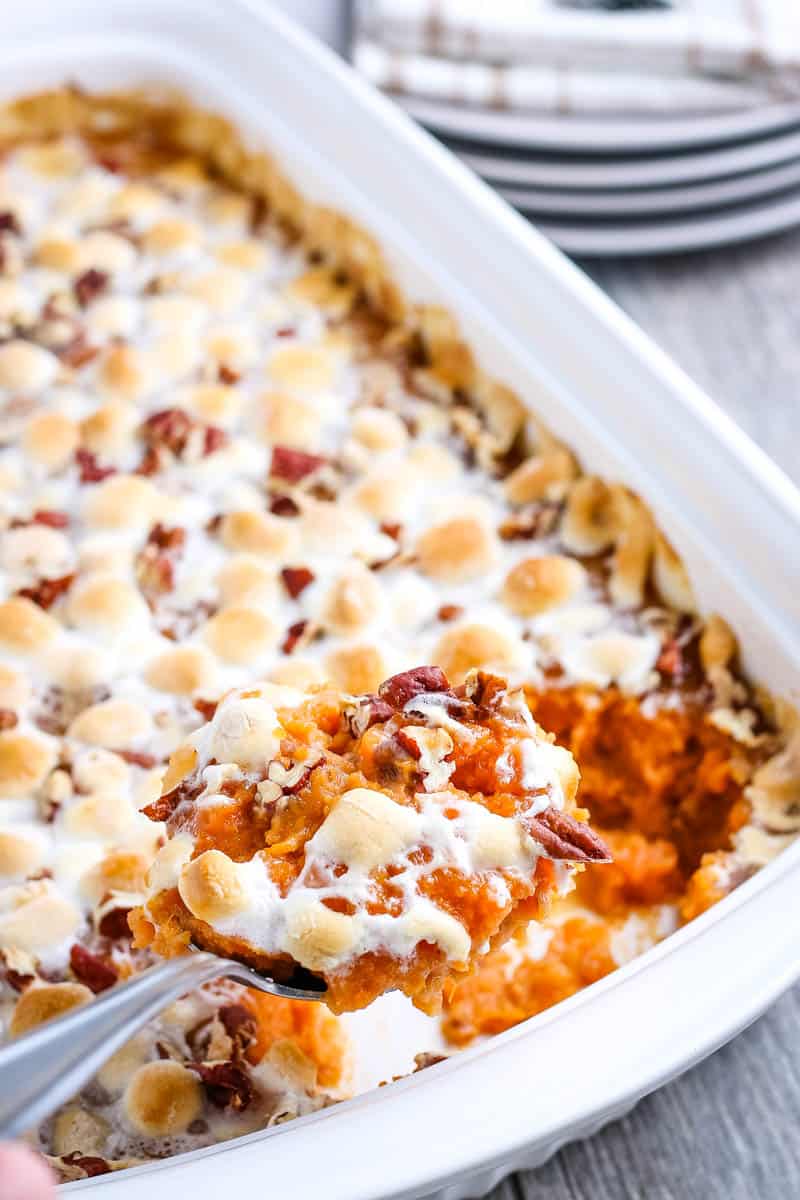
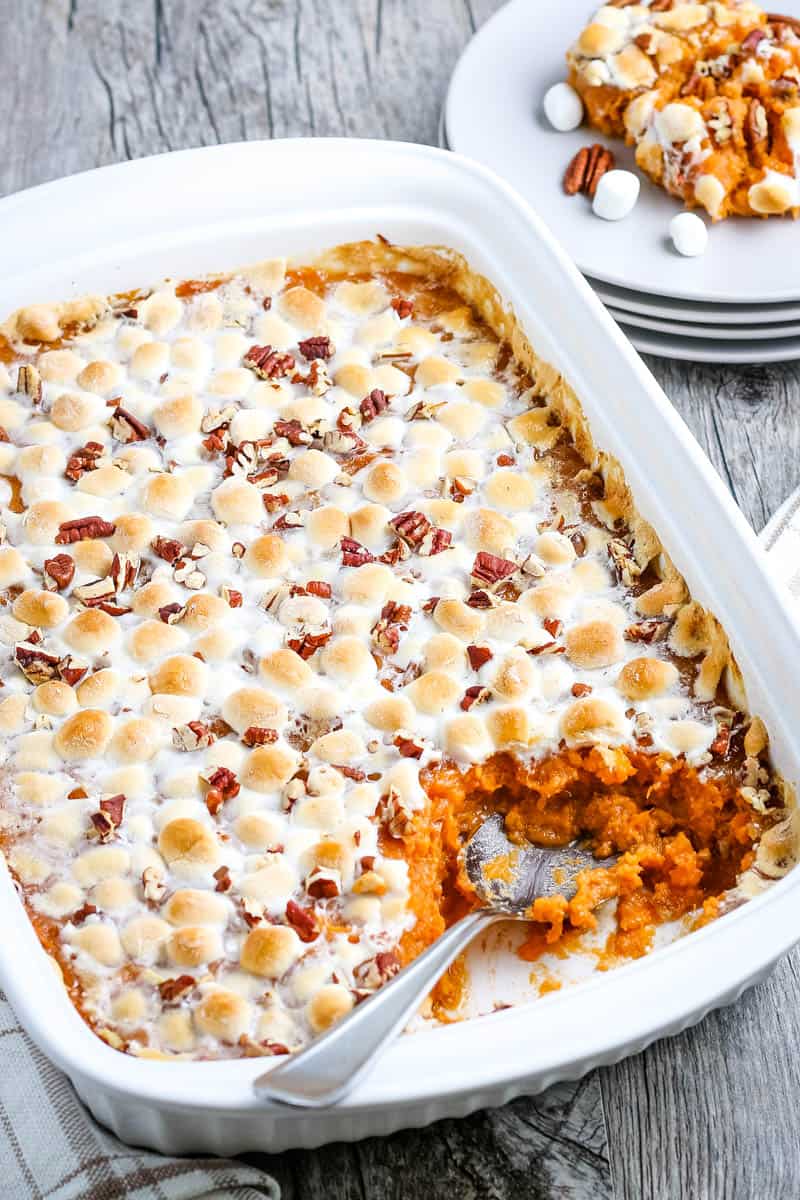
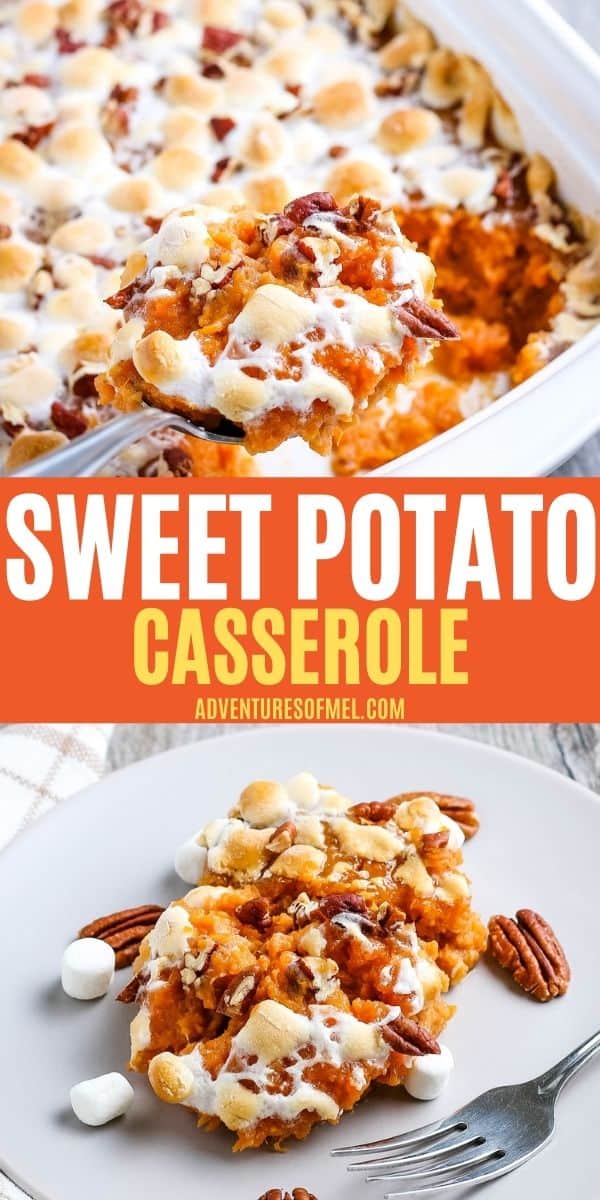
How to make the best southern sweet potato casserole with marshmallows and pecans. Classic Thanksgiving side dish you can easily make ahead.
Thanksgiving will soon be upon us, and nothing says Thanksgiving dinner quite like a delicious sweet potato casserole covered in a gooey marshmallow pecan topping.
I have never been a huge fan of sweet potatoes by themselves. But throw together a good, old-fashioned, southern sweet potato casserole, and I can eat it by the spoonful; it’s so good!
My grandma made sweet potato and marshmallow casserole every single Thanksgiving. I still remember waiting on the marshmallows to get just brown enough that dinner was finally ready to eat.
This side dish is really easy to make and doesn’t take a lot of time to bake, maybe 25 to 30 minutes in all. You can make it the day of, or you can make it ahead of time.
Whether you’re serving it as a side dish or on the dessert table, your crowd is definitely going to love this sweet potato casserole recipe. Speaking of dessert, sweet potato pie is another crowd-pleasing favorite.
HOW TO MAKE SWEET POTATO CASSEROLE WITH MARSHMALLOWS
Making sweet potato casserole with marshmallows is a two-part process, involving both prepping the sweet potatoes and then layering the casserole.
HOW TO PREPARE THE SWEET POTATOES
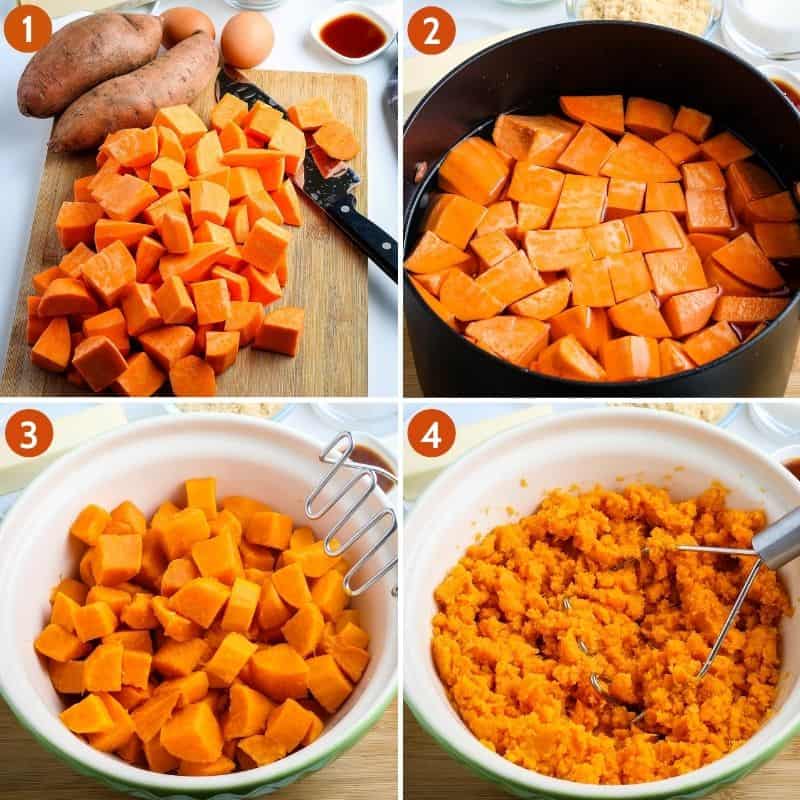
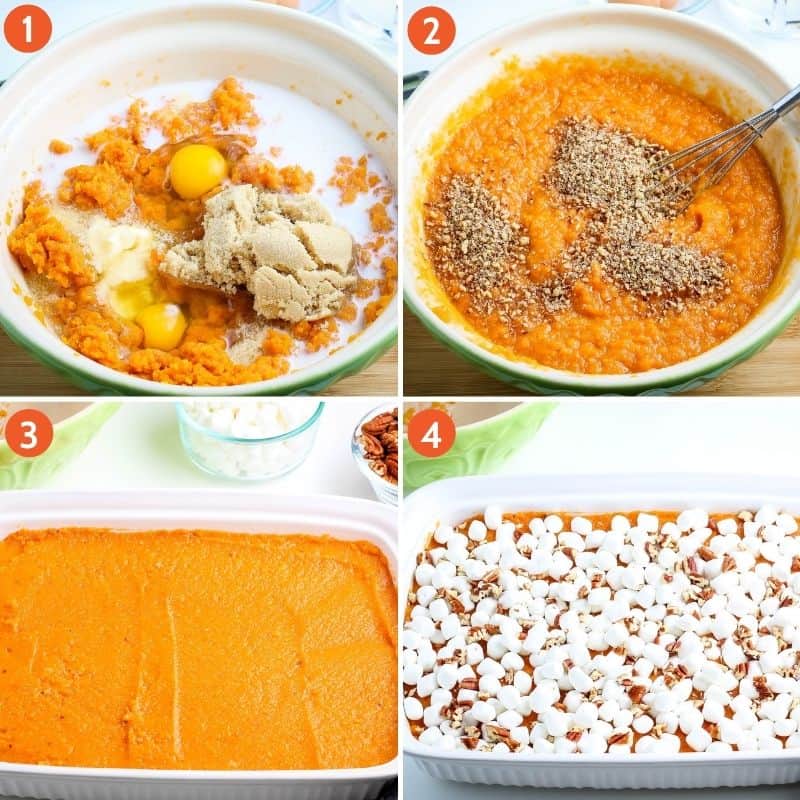
Peel and cut the washed sweet potatoes into cubes.
Add the cubed sweet potatoes to a large stock pot, and cover them with water. Bring to a boil on the stove over medium heat, and cook for 10 to 15 minutes, or until tender when poked with a fork.
When the potatoes are fully cooked, drain the water, and add the potatoes to a large mixing bowl.
Mash the sweet potatoes with a potato masher or hand mixer, so they’re ready to go into the casserole.
If you don’t want to go through the process of boiling your sweet potatoes, you can go the easier route and just make pressure cooker sweet potatoes in your Instant Pot. Then peel them and mash them right in the pot with an immersion blender or hand mixer.
HOW TO MAKE SWEET POTATO CASSEROLE FROM SCRATCH
At this point, you can pre-heat your oven to 375°F, and lightly spray the sides and bottom of a 9×13 casserole dish with cooking spray.
Add the softened butter, brown sugar, milk, eggs, vanilla extract, and salt to the sweet potatoes in the mixing bowl, and whisk until everything is well combined.
Stir the chopped pecans into the sweet potato mixture.
Evenly spread the mixture into the prepared baking dish.
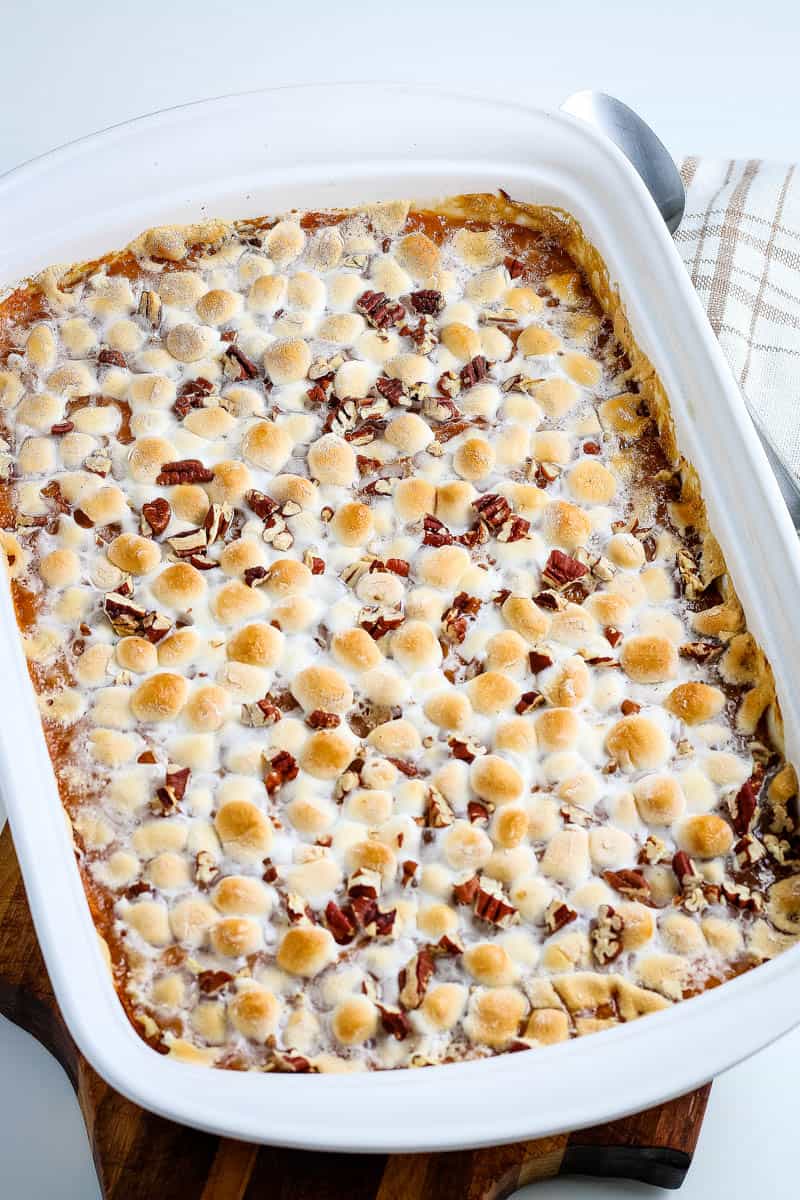
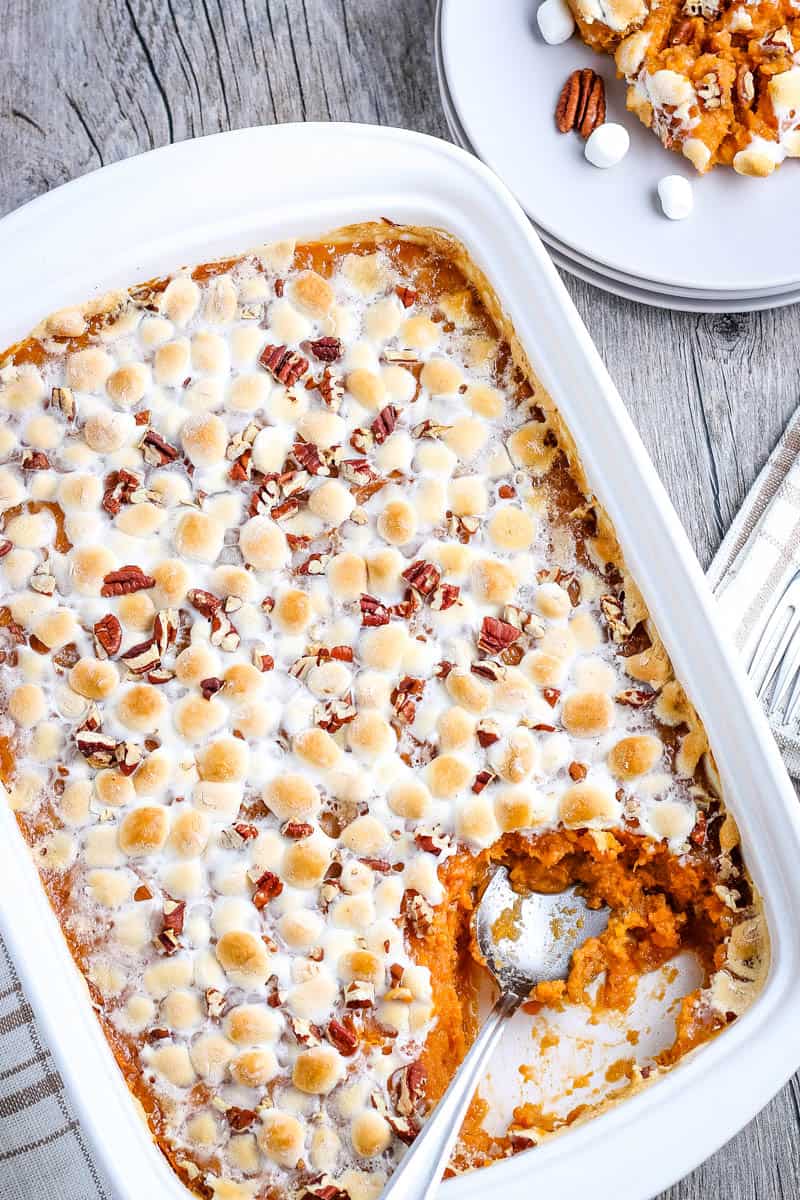
Sprinkle the top with marshmallows and the remaining pecans.
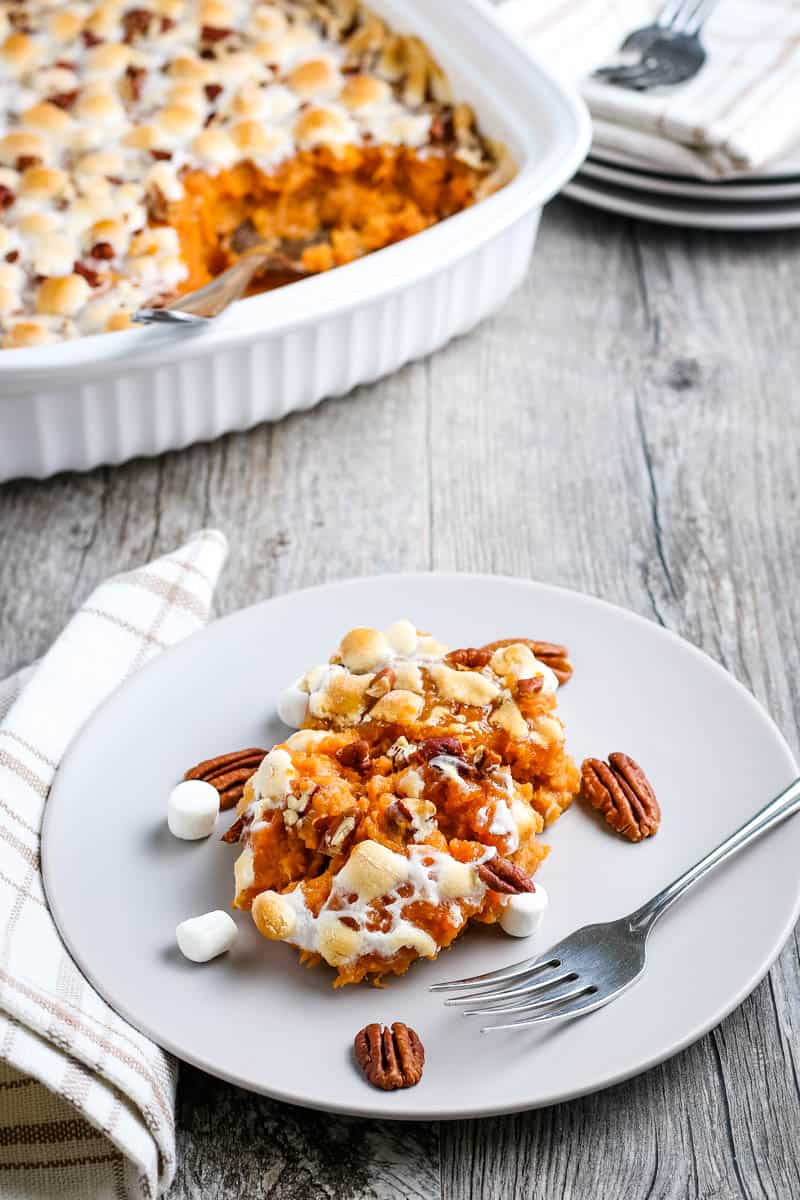
At this point, it’s ready to bake at 375°F for 25 to 30 minutes, or until the marshmallows are golden brown. Serve it immediately while warm, and store any leftovers in the fridge.
CAN I MAKE IT IN ADVANCE?
Yes, sweet potato casserole is a great make-ahead recipe.
It’s best to mix everything together, leaving the topping off until it is time to bake. You can then place the raw filling in the refrigerator in an airtight container for up to 2-3 days.
When you’re ready to bake the casserole, place the pre-made filling in your baking dish and top with mini marshmallows and pecans. Bake it as normal, at 375°F for 25-30 minutes, or until the marshmallows are golden brown.
HOW TO STORE SWEET POTATO CASSEROLE
A baked sweet potato casserole is best stored in the refrigerator. It will typically keep for up to 4-5 days.
To reheat, cover your casserole with aluminum foil, and bake at 375°F for 5-10 minutes. It is now ready to serve!
CAN I FREEZE THIS CASSEROLE?
Yes, you can freeze this casserole, although it’s best to freeze it before baking.
Simply spread both the filling and the topping in your pan, and cover it with a double layer of aluminum foil. Place it in the freezer, and it will keep for around 3 months.
You can also freeze just the filling in an airtight container, waiting until it’s time to bake to spread it in your pan with the topping.
Be sure to let it warm up at room temperature for around 30 minutes before baking. Bake as the recipe directs, or until the marshmallows are golden brown.
WHAT GOES WELL WITH SWEET POTATO CASSEROLE?
Sweet potato casserole pairs well with just about anything, but here are some of my favorite recipes.
WHAT’S THE DIFFERENCE BETWEEN A YAM AND A SWEET POTATO?
This is a good question. Bon Appétit states, “At most grocery stores, absolutely nothing.”
Most yams that you see in the grocery store are, in fact, orange-fleshed sweet potatoes. However, back in the 1930’s, Louisiana market growers decided to name their orange-fleshed sweet potatoes “yams,” and the name has stuck even to this day.
Real yams are a different root vegetable altogether, more comparable to a white russet potato than a sweet potato. Real yams are not typically easy to find in the U.S.
CAN YOU USE CANNED YAMS FOR THIS RECIPE?
Real yams will definitely not work. They are far different from a sweet potato.
That being said, most canned yams that are available in American grocery stores are really orange-fleshed sweet potatoes. Usually it will state on the can whether or not it is actually a sweet potato product.
If your canned yams are just sweet potatoes, they will make a fine 1:1 substitute for this recipe.
VARIOUS WAYS TO MAKE SOUTHERN SWEET POTATO CASSEROLE
When it comes to making sweet potato casserole, the sky is the limit. Toppings are a great place to start.
Instead of topping with marshmallows, try making a brown sugar and pecan streusel topping. This makes for a delicious casserole.
Try using a different nut. Pecans are not the only option; almonds and walnuts come to mind.
You can also change up the seasonings; sometimes a hint of pumpkin pie spice or just cinnamon goes a long way. Be creative!
HOW TO MAKE THIS CASSEROLE A LITTLE BIT HEALTHIER
Here are some ideas to make southern sweet potato casserole a little bit healthier.
If you are looking for a gluten-free casserole, this recipe pretty much fits the bill. Just be sure to check all of your ingredients to ensure that they really are gluten-free.
To make this recipe lactose-free, you can substitute just about any dairy-free milk, like almond milk or cashew milk, and you can use ghee in place of butter. These products can be found in most grocery stores and health food stores.
You can eliminate the marshmallow topping and simply use a pecan streusel topping.
How to make the best southern sweet potato casserole with marshmallows and pecans. Classic Thanksgiving side dish you can easily make ahead.
Vegetable Peeler
Large Stockpot
Large Mixing Bowl
Hand Mixer
9×13 Baking Dish
Casserole:
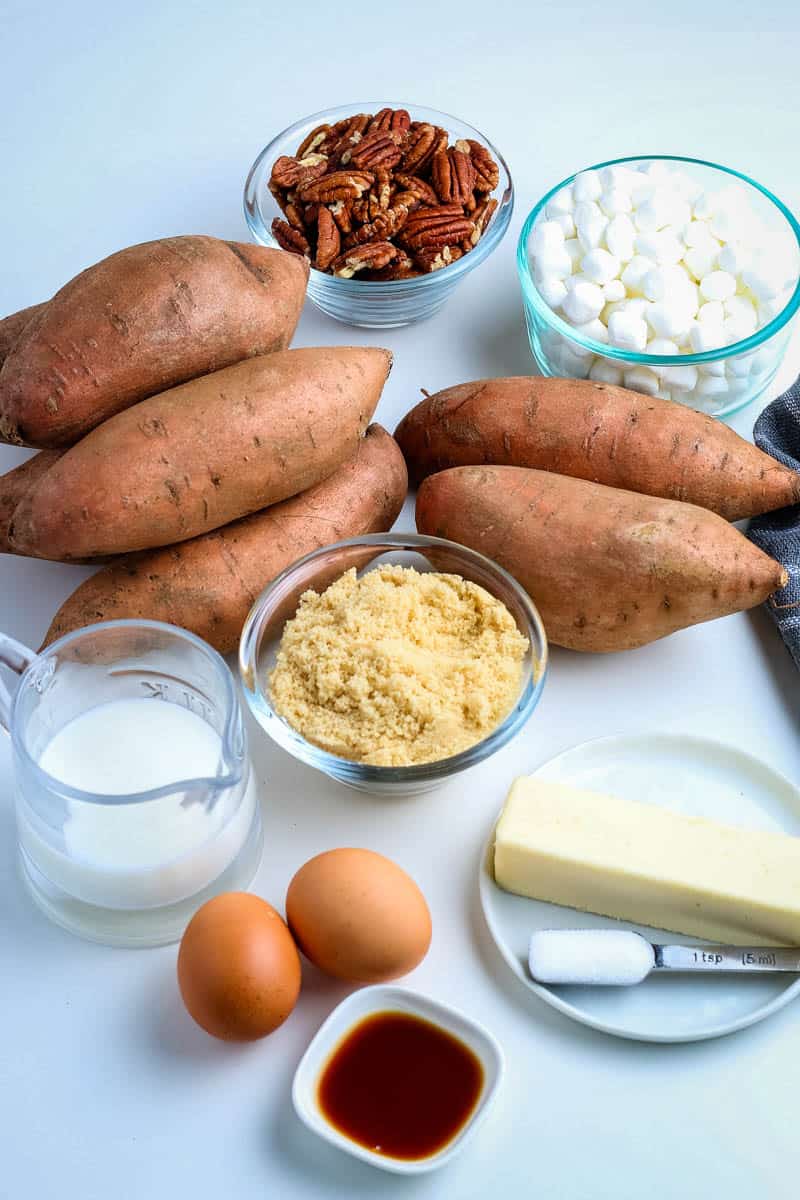
4 pounds sweet potatoes
1/2 cup unsalted butter (softened)
3/4 cup light brown sugar
1/2 cup whole milk
2 large eggs
1 teaspoon vanilla extract
1 teaspoon salt
1/4 cup chopped pecans
Topping:
2 cups mini marshmallows
1/4 cup chopped pecans
Peel and cut the washed sweet potatoes into cubes.
Add the cubed sweet potatoes to a large stockpot, and cover them with water. Bring to a boil on the stove over medium heat, and cook for 10 to 15 minutes, or until tender when poked with a fork.
When the potatoes are fully cooked, drain the water and add the potatoes to a large mixing bowl.
Mash the sweet potatoes with a potato masher or hand mixer, so they're ready to go into the casserole.
Pre-heat your oven to 375° F, and lightly spray the sides and bottom of a 9×13 casserole dish with cooking spray.
Add the softened butter, brown sugar, milk, eggs, vanilla extract, and salt to the sweet potatoes in the mixing bowl, and whisk until everything is well combined.
Stir the chopped pecans into the sweet potato mixture.
Evenly spread the mixture into the prepared baking dish.
Sprinkle the top with marshmallows and the remaining pecans.
Bake at 375° F for 25 to 30 minutes, or until the marshmallows are golden brown.
Serve it immediately while warm, and store any leftovers in the fridge.
*If you don’t want to go through the process of boiling your sweet potatoes, you can go the easier route and just make Instant Pot sweet potatoes. Then peel them and mash them right in the pot with an immersion blender or hand mixer.
CAN I MAKE IT IN ADVANCE?
Yes, sweet potato casserole is a great make-ahead recipe.
It’s best to mix everything together, leaving the topping off until it is time to bake. You can then place the raw filling in the refrigerator in an airtight container for up to 2-3 days.
When you’re ready to bake the casserole, place the pre-made filling in your baking dish and top with mini marshmallows and pecans. Bake it as normal, at 375°F for 25-30 minutes, or until the marshmallows are golden brown.
HOW TO STORE SWEET POTATO CASSEROLE
A baked sweet potato casserole is best stored in the refrigerator. It will typically keep for up to 4-5 days. You can either keep it in your baking dish, covering the top with plastic wrap or aluminum foil, or you can alternatively dish it out into an airtight container. Both ways work equally as well!
To reheat, cover your casserole with aluminum foil, and bake at 375°F for 5-10 minutes. It is now ready to serve!
CAN I FREEZE THIS CASSEROLE?
Yes, you can freeze this casserole, although it’s best to freeze it before baking. Simply spread both the filling and the topping in your pan, and cover it with a double layer of aluminum foil. Place it in the freezer, and it will keep for around 3 months.
You can also freeze just the filling in an airtight container, waiting until it’s time to bake to spread it in your pan with the topping.
Be sure to let it warm up at room temperature for around 30 minutes before baking. Bake as the recipe directs, or until the marshmallows are golden brown.
CAN YOU USE CANNED YAMS FOR THIS RECIPE?
Real yams will definitely not work. They are far different from a sweet potato.
That being said, most canned yams that are available in American grocery stores are really orange-fleshed sweet potatoes. Usually it will state on the can whether or not it is actually a sweet potato product.
If your canned yams are just sweet potatoes, they will make a fine 1:1 substitute for this recipe.
Side Dish
American
homemade sweet potato casserole, how to make sweet potato casserole from scratch, southern sweet potato casserole, sweet potato and marshmallow casserole, sweet potato casserole, sweet potato casserole recipe, sweet potato casserole with marshmallows, sweet potato casserole with marshmallows and pecans, thanksgiving sweet potato casserole
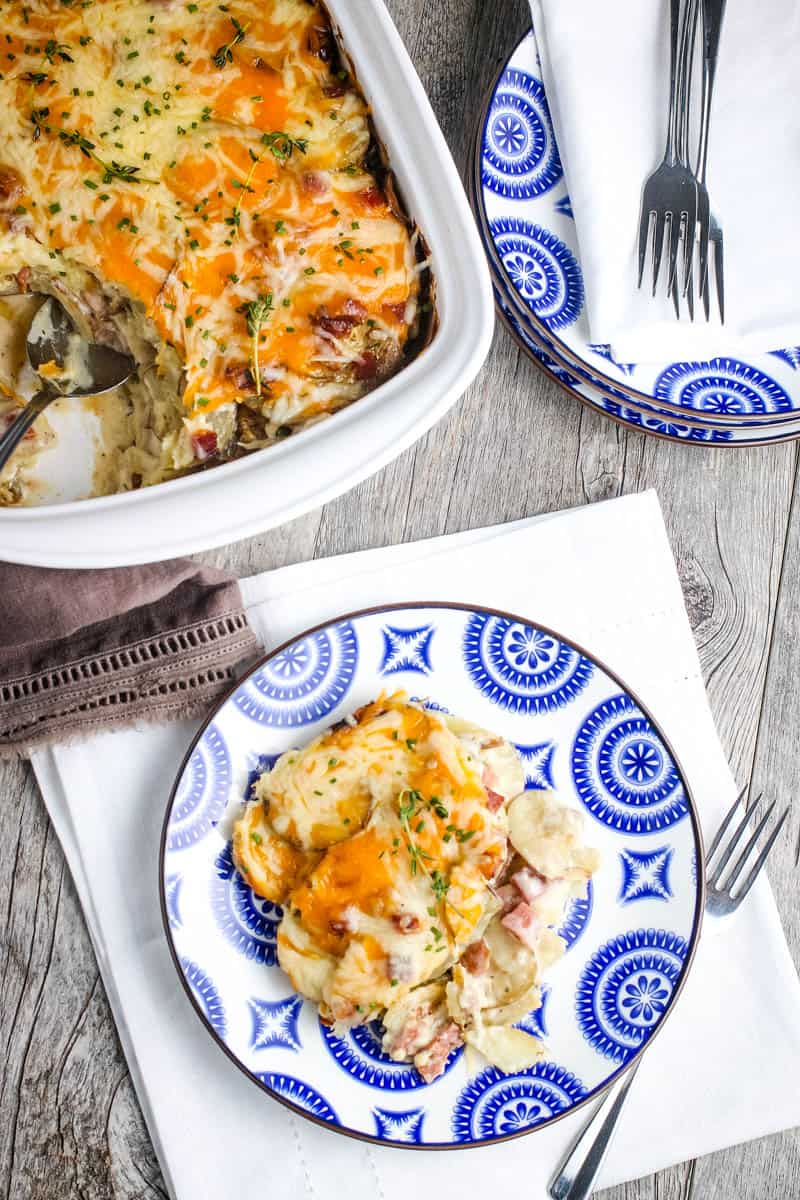
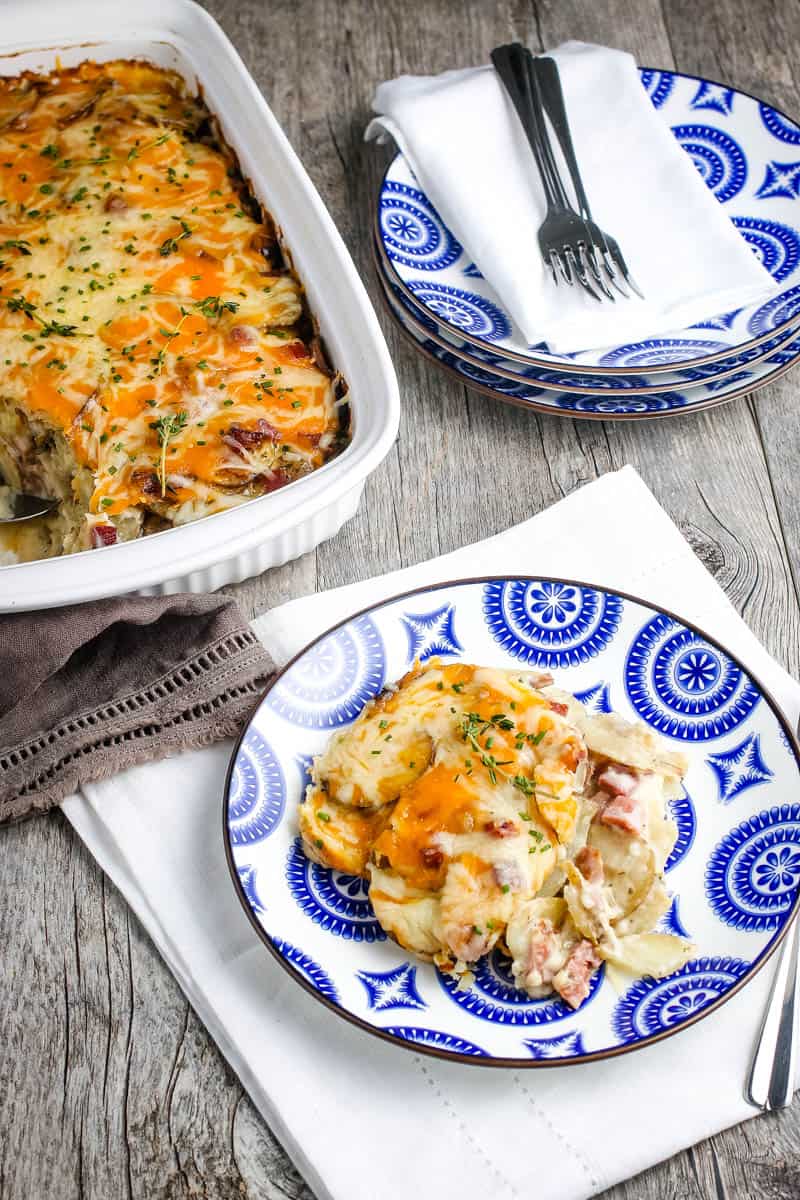
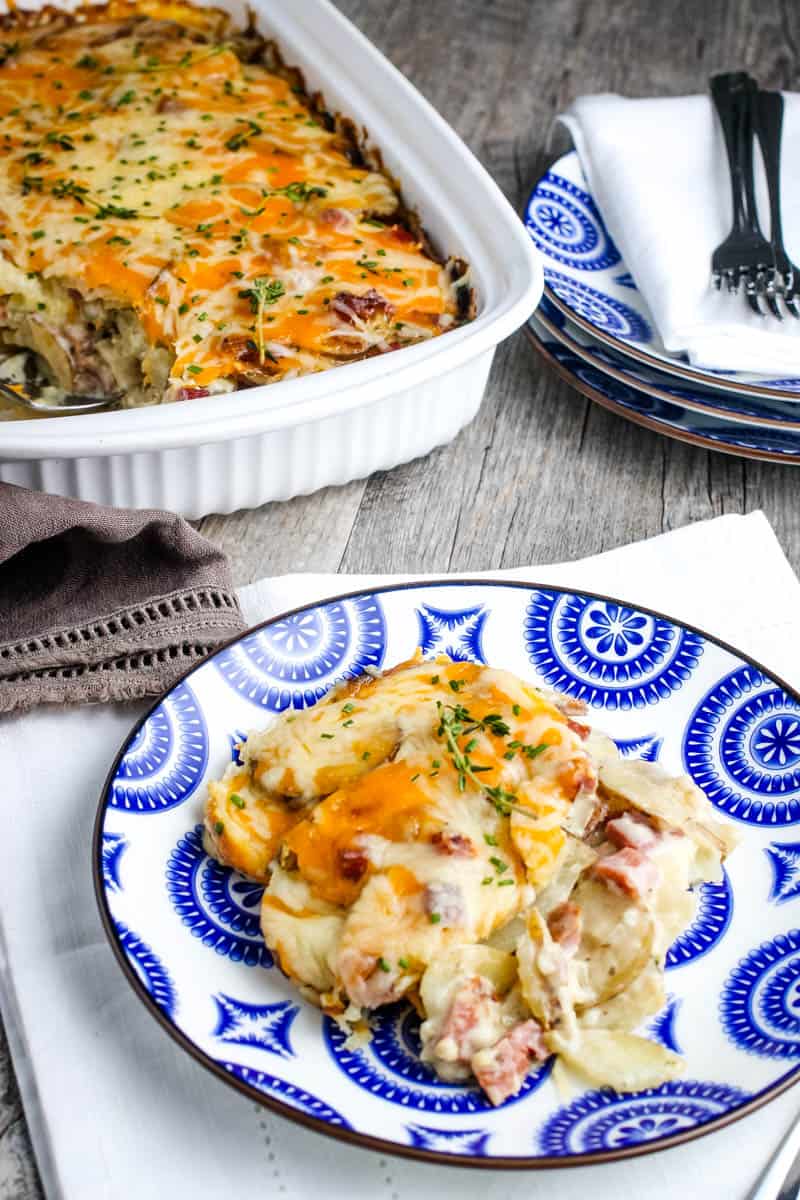
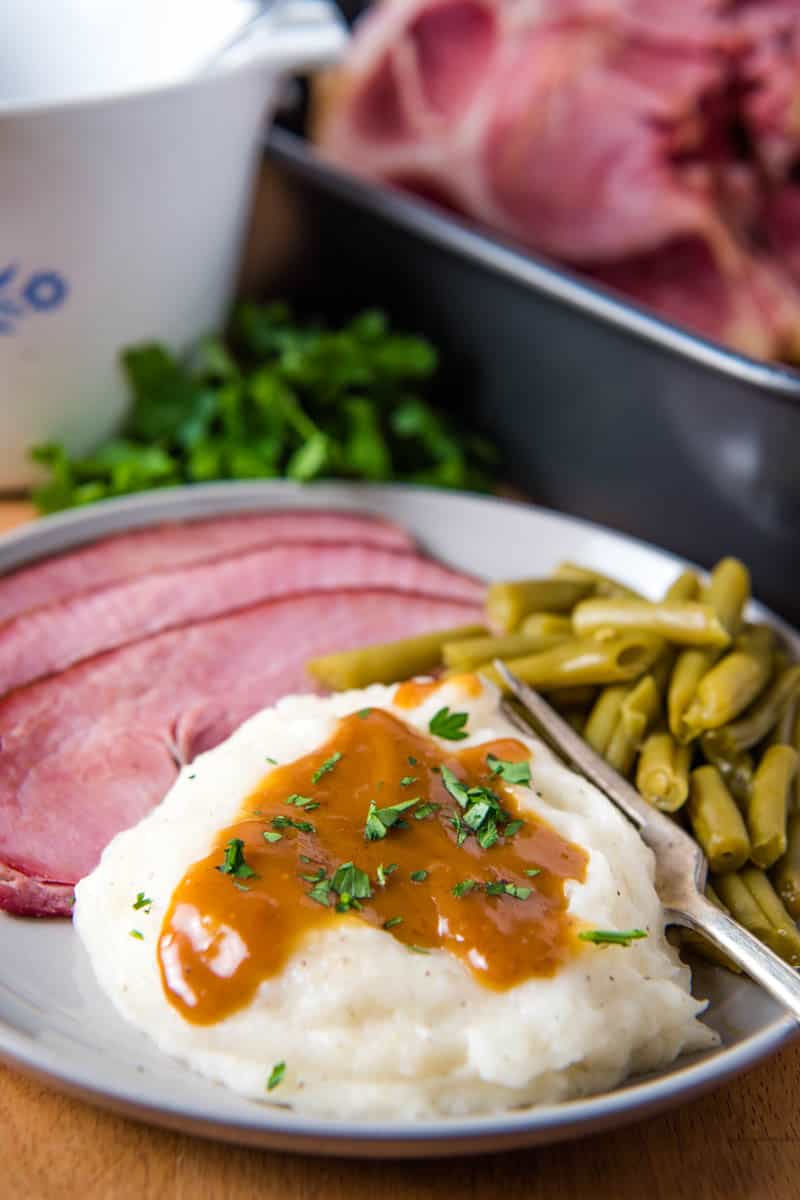
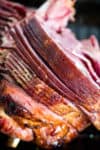
How to make scalloped potatoes and ham in a creamy sauce, baked in the oven. Easy, old-fashioned, homemade, cheesy casserole recipe perfect for a crowd!
I absolutely love a hearty comfort food dish, and that’s exactly what this cheesy scalloped potatoes and ham casserole is. It’s comfort food at its finest.
Not to mention, this recipe can be designated a main dish for dinner, or a side dish to accompany your main dish and other side dishes, like a CrockPot pork roast and green bean casserole. You can feed just your family with it, or rather feed a crowd at Easter, Thanksgiving, and Christmas.
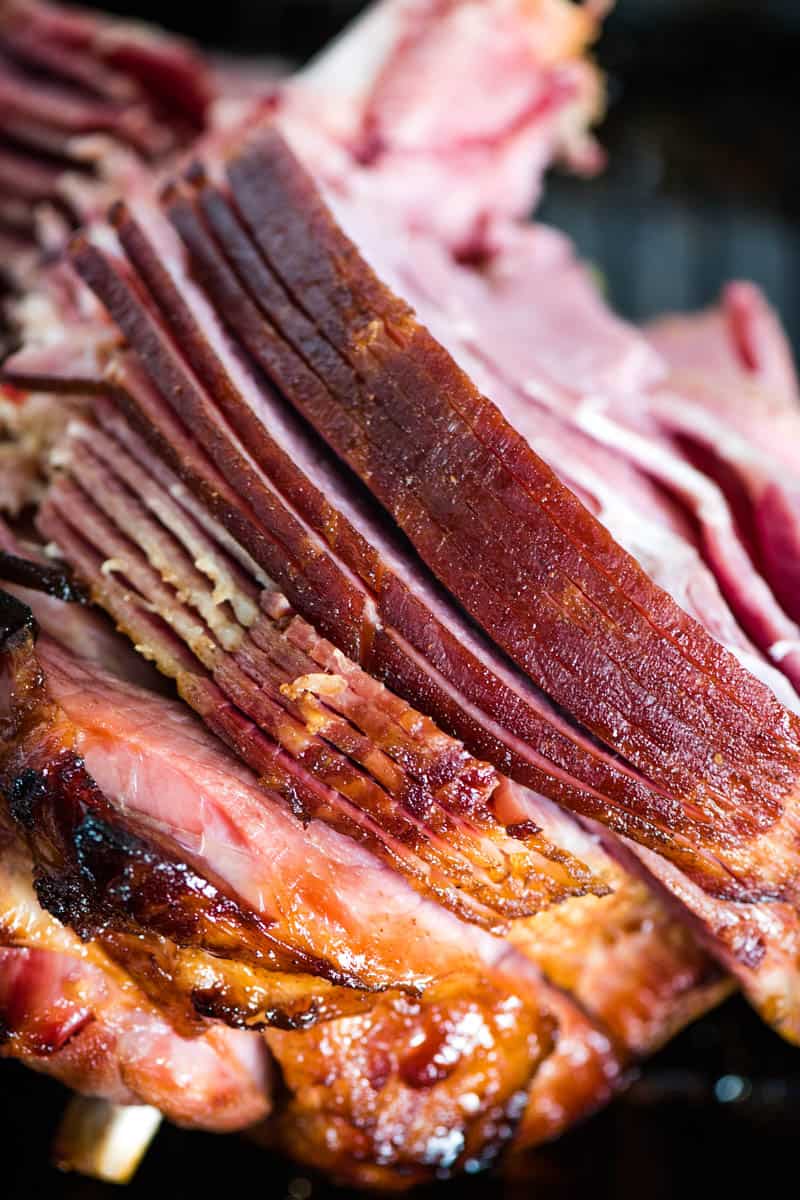
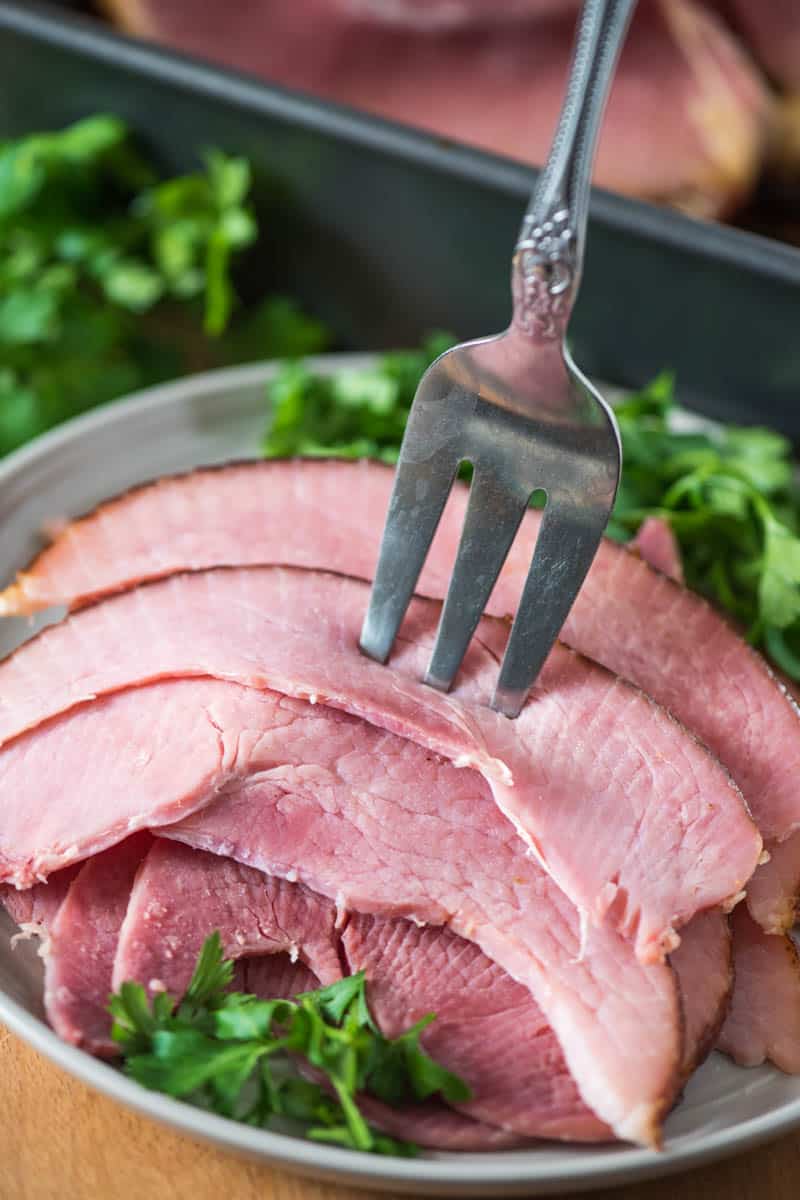
And if you have leftovers from a holiday meal, ham and scalloped potatoes is a great way to use up any leftover ham you may have. We always enjoy the leftovers when we cook a ham or roast a pineapple ham.
Now the cheese in these scalloped potatoes with cheese is optional, but I do recommend it. We’re not layering the cheese; we’re just sprinkling it on top of the meat and potatoes toward the end of baking.
The creamy sauce is full of flavor, thanks to ingredients like onion, thyme, and parsley. It provides enough coverage to the thinly sliced potatoes to really infuse a ton of flavor into each and every bite.
And you don’t even have to peel the potatoes, making this a truly easy recipe to put together.
WHERE CAN I FIND THE ACTUAL RECIPE CARD?
If you’d rather skip all of my cooking tips, important cooking info for this recipe, and similar recipe ideas – and get straight to the scalloped potatoes recipe – just scroll down to the bottom, where you’ll find a printable recipe card.
WHAT’S THE DIFFERENCE BETWEEN SCALLOPED POTATOES AND AU GRATIN?
Scalloped potatoes usually don’t have cheese, and that’s why I’m including it as an optional ingredient.
However. potatoes au gratin do have cheese. In fact, cheese is a main ingredient, sprinkled between layers. Sometimes an actual cheese sauce is used, as well.
Potatoes au gratin also sometimes have breadcrumbs sprinkled on top. Even the potatoes can be sliced a bit more thinly in au gratin potatoes.
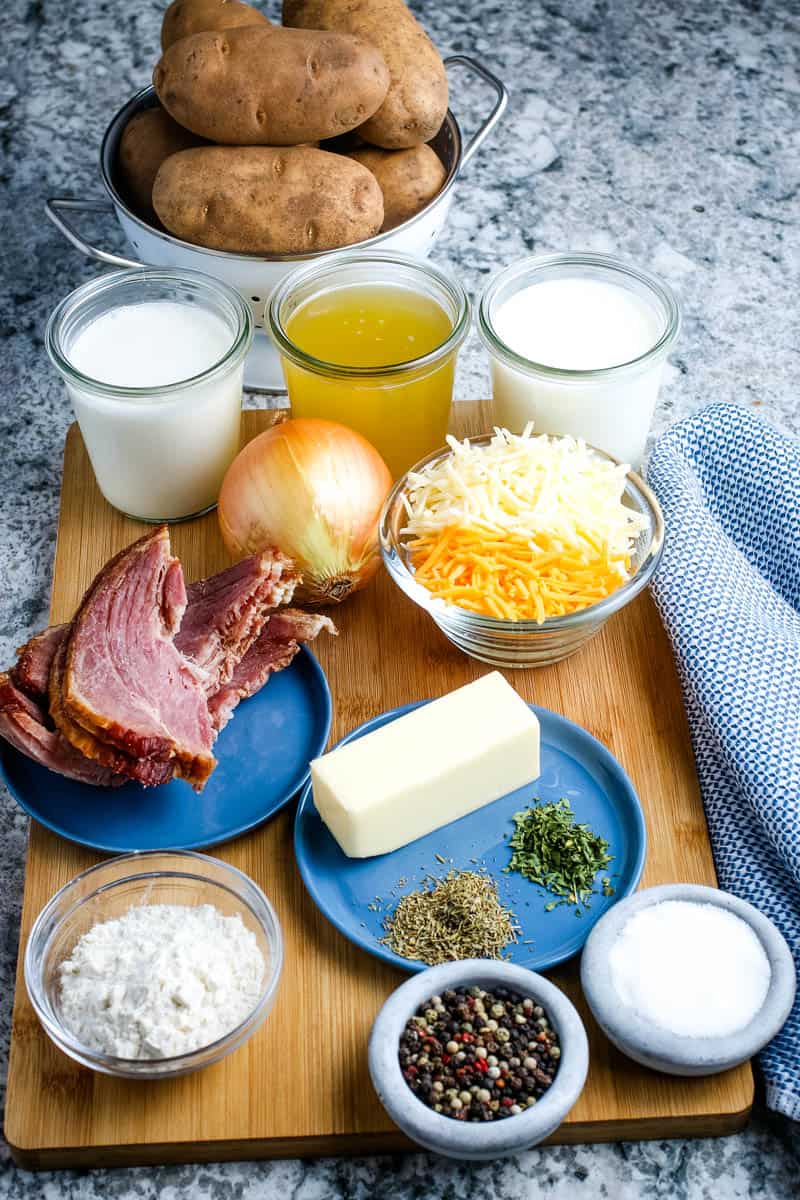
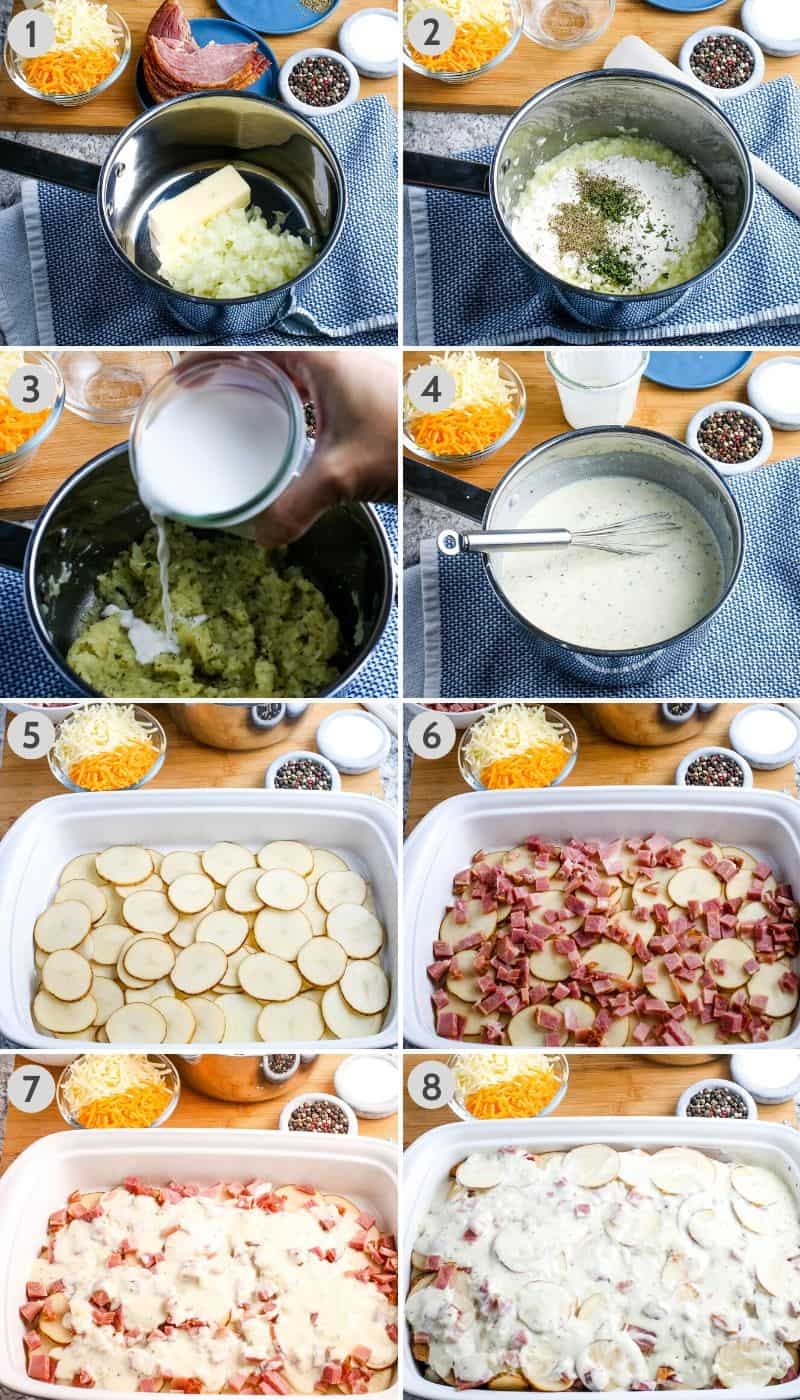
HOW TO MAKE SCALLOPED POTATOES AND HAM FROM SCRATCH
Before you get started, you’ll need to gather and prep all of your ingredients. Do things like dicing the onion and ham, as well as washing and slicing up the potatoes.
Pre-heat the oven to 350° F, and grease your casserole dish with cooking spray.
Make the roux and layer classic scalloped potatoes, in steps…
In a medium saucepan, cook the butter and onions over medium heat ’til the onions are soft and translucent.
Add in the thyme, parsley, and flour; cook for 1-2 minutes.
Then turn the heat to low, and add in the cream and milk a little at a time, whisking between each addition.
Stir in the chicken broth, and the salt and pepper (to taste), and bring to a boil, cooking for about 1 minute. Remove the white sauce from heat and set aside.
Begin by layering 1/3 of the thinly sliced potatoes on the bottom of your prepared baking dish.
Top that layer off with about 2/3 cup of the ham.
Then add about 1 cup of the cream sauce.
Repeat these same layers until the dish is full; you should have 3 layers altogether.
Cover the dish with aluminum foil and bake at 350° F for about 50 minutes. Then uncover and bake an additional 20-30 minutes, or until the potatoes are tender.
If you want to add cheese to the top, add it during the last 15 minutes of baking. Then remove the potatoes from the oven, and allow them to cool at least 20 minutes before serving.
WHAT ELSE CAN I ADD TO SCALLOPED POTATOES?
I might have a few suggestions for you…
Smoked paprika – This has quickly become one of my favorite seasonings; it’s absolutely delicious in Philly cheesesteak sliders. A good sprinkling of smoked paprika would give these potatoes a real kick. It’s so good!
Basil would add a whole other dimension of flavor.
Use bacon instead of ham.
My family loves sliced sausage links with potatoes too. Yum!
Add a layer of chopped spinach right before you add each layer of sauce.
Add your favorite cheese. Maybe smoked cheddar instead of regular. Or smoked gruyere, smoked gouda, goat cheese, etc.
Speaking of cheese, add a final layer of parmesan cheese.
CAN I MAKE THIS GLUTEN FREE?
Yes, you can. Be sure to check all ingredient labels to make sure they are definitely gluten-free.
And again, check labels. Make sure that your ham and chicken broth are gluten-free too; sometimes the glaze on certain hams contains gluten.
CAN I MAKE IT AHEAD OF TIME?
Yes, you can make cheesy scalloped potatoes and ham ahead of time.
You’ll need to go ahead and follow the steps thru the first 50 minutes of bake time.
Then remove the potatoes from the oven, still covered with foil, and allow them to cool completely.
Refrigerate them ’til serving time, no more than a day or two.
Then take them out of the fridge, pre-heat the oven, and complete the baking time. They may need to bake slightly longer than 30 minutes, but bake ’til the potatoes are tender and everything is cooked thru.
CAN I FREEZE SCALLOPED POTATOES?
Yes, you can, but you need to semi-cook them before freezing; otherwise, the potatoes will discolor.
To freeze homemade scalloped potatoes, follow the same instructions above for making ahead of time, cooking them thru the first 50 minutes of bake time, cooling, and freezing in an airtight container.
Don’t thaw before cooking, though; you’ll likely need to add at least 20-30 minutes on to the cook time, since you’ll be finishing the cooking process while everything is still frozen.
The California Wine Club has a great selection of wines you can have delivered right to your doorstep.
GET THE PRINTABLE RECIPE
If you love this scalloped potatoes and ham recipe as much as I do, please write a 5 star review, and help me share the recipe on Facebook and Pinterest!
How to make scalloped potatoes and ham in a creamy sauce, baked in the oven. Easy, old-fashioned, homemade, cheesy casserole recipe perfect for a crowd!
Mueller Austria Premium Quality V-Pro Multi Blade Adjustable Mandoline Cheese/Vegetable Slicer, Cutter, Shredder with Precise Maximum Adjustability
Baking Dishes, Krokori Rectangular Bakeware Set Ceramic Baking Pan Lasagna Pans for Cooking, Kitchen, Cake Dinner, Banquet and Daily Use, 13 x 9 Inches
6 tablespoons salted butter
1 small yellow onion (diced)
1/2 teaspoon thyme
1/2 teaspoon dried parsley
1/4 cup all-purpose flour*
1 cup heavy whipping cream
2 cups milk*
1 cup chicken broth
Salt (to taste)
Ground black pepper (to taste)
3 pounds potatoes* (washed and thinly sliced)
2 cups cooked ham (diced)
1 cup cheddar cheese (shredded, optional)
1 cup Monterey Jack cheese (shredded, optional)
Before you get started, you’ll need to gather and prep all of your ingredients. Dice the onion and ham, as well as wash and slice up the potatoes.
Pre-heat the oven to 350° F, and grease your casserole dish with cooking spray.
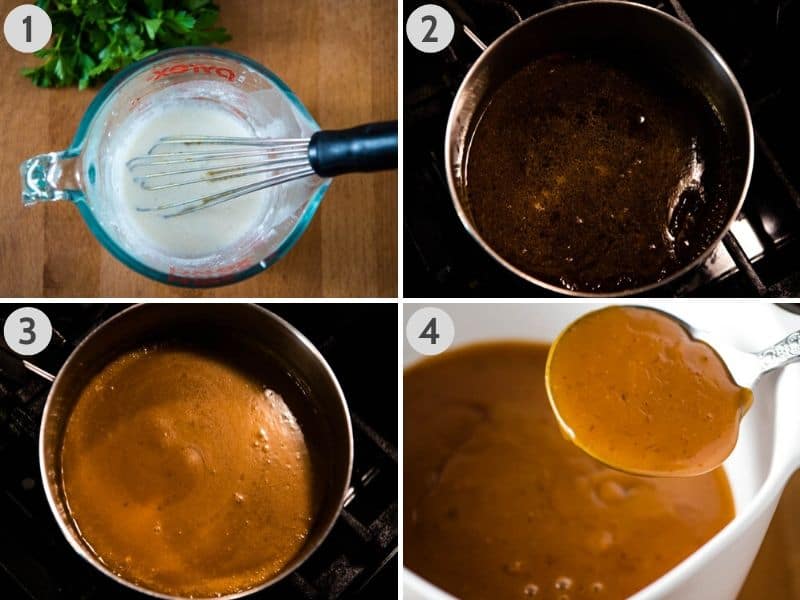
In a medium saucepan, cook the butter and onions over medium heat ’til the onions are soft and translucent.
Add in the thyme, parsley, and flour; cook for 1-2 minutes.
Then turn the heat to low, and add in the cream and milk a little at a time, whisking between each addition.
Stir in the chicken broth, and the salt and pepper (to taste), and bring to a boil, cooking for about 1 minute. Remove the white sauce from heat and set aside.
Begin by layering 1/3 of the thinly sliced potatoes on the bottom of your prepared baking dish.
Top that layer off with about 2/3 cup of the ham.
Then add about 1 cup of the cream sauce.
Repeat these same layers until the dish is full; you should have 3 layers altogether.
Cover the dish with aluminum foil and bake at 350° F for about 50 minutes. Then uncover and bake an additional 20-30 minutes, or until the potatoes are tender. If you want to add cheese to the top, add it during the last 15 minutes of baking.
Then remove the potatoes from the oven, and allow them to cool at least 20 minutes before serving.
*Milk – You can either use 2 cups milk or 1 cup half-and-half.
*Potatoes – I recommend using Russet or Yukon Gold potatoes.
WHAT ELSE CAN I ADD TO SCALLOPED POTATOES?
I might have a few suggestions for you…
Smoked paprika – This has quickly become one of my favorite seasonings; it’s absolutely delicious in Philly cheesesteak sliders. A good sprinkling of smoked paprika would give these potatoes a real kick. It’s so good!
Basil would add a whole other dimension of flavor.
Use bacon instead of ham.
My family loves sliced sausage links with potatoes too. Yum!
Add a layer of chopped spinach right before you add each layer of sauce.
Add your favorite cheese. Maybe smoked cheddar instead of regular. Or smoked gruyere, smoked gouda, goat cheese, etc.
Speaking of cheese, add a final layer of parmesan cheese.
CAN I MAKE THIS GLUTEN FREE?
Yes, you can. Be sure to check all ingredient labels to make sure they are definitely gluten-free.
As mentioned above, you can change out the all-purpose flour for a good gluten-free flour. I prefer to use Authentic Foods Classical Blend; it makes a delicious ham gravy.
And again, check labels. Make sure that your ham and chicken broth are gluten-free too; sometimes the glaze on certain hams contains gluten.
CAN I MAKE IT AHEAD OF TIME?
Yes, you can make cheesy scalloped potatoes and ham ahead of time.
You’ll need to go ahead and follow the steps thru the first 50 minutes of bake time.
Then remove the potatoes from the oven, still covered with foil, and allow them to cool completely.
Refrigerate them ’til serving time, no more than a day or two.
Then take them out of the fridge, pre-heat the oven, and complete the baking time. They may need to bake slightly longer than 30 minutes, but bake ’til the potatoes are tender and everything is cooked thru.
CAN I FREEZE SCALLOPED POTATOES?
Yes, you can, but you need to semi-cook them before freezing; otherwise, the potatoes will discolor.
To freeze homemade scalloped potatoes, follow the same instructions above for making ahead of time, cooking them thru the first 50 minutes of bake time, cooling, and freezing in an airtight container.
Don’t thaw before cooking, though; you’ll likely need to add at least 20-30 minutes on to the cook time, since you’ll be finishing the cooking process while everything is still frozen.
The California Wine Club has a great selection of wines you can have delivered right to your doorstep.
Dinner Ideas
American
cheesy scalloped potatoes and ham, cheesy scalloped potatoes and ham casserole, classic scalloped potatoes, comfort food, easy scalloped potatoes, ham and scalloped potatoes, homemade scalloped potatoes, how to make scalloped potatoes, how to make scalloped potatoes and ham, meat and potatoes, potato casserole, potato recipes, scalloped potatoes, scalloped potatoes and ham, scalloped potatoes and ham casserole, scalloped potatoes and ham recipe, scalloped potatoes recipe, scalloped potatoes with cheese, what to serve with scalloped potatoes and ham
Whip up a classic ambrosia fruit salad with Cool Whip, sour cream, fruit, and mini marshmallows. Easy southern side dish recipe perfect for every holiday dinner!
With Easter just around the corner, ambrosia salad is a quick and easy side dish you can make to go with your Easter dinner. Of course, it’s perfect for other holidays too, like Thanksgiving and Christmas.
Actually, I can see my family making this marshmallow fruit salad throughout the spring and summer too because of how refreshing it is. Made with whipped topping and a sort of fruit cocktail, it’s such a sweet, delicious treat.
While I use multi-colored mini marshmallows in my fruit salad, you can use whatever color marshmallows you can find.
I also add walnuts or pecans to our salad, and again, you’re welcome to leave those out if nuts just aren’t your thing.
Now you will need a little bit of chill time, about an hour to let your fruit salad sit and chill in the fridge. Just keep that in mind for when you plan to make it.
WHERE CAN I FIND THE ACTUAL RECIPE CARD?
If you’d rather skip all of my salad making tips, important info for this recipe, and similar recipe ideas – and get straight to the ambrosia salad recipe – just scroll down to the bottom, where you’ll find a printable recipe card.
WHY IS IT CALLED AMBROSIA SALAD?
Ambrosia is a fruit salad. Really, that’s all it is. It consists of whipped cream, sour cream, fruit, coconut, mini marshmallows, and sometimes nuts like walnuts or pecans.
It’s thought that the idea of ambrosia salad came to be in the 1800’s. The name “ambrosia” originates from the food of the Greek and Roman gods.
Before you get started mixing, be sure to drain all the liquid off each can or jar of fruit. I use my can strainer for this task.
You’ll also need to rinse, stem, and slice the cherries in half. Although be sure to save a few cherries back with stems to top off your salad when serving.
Then you’re ready to mix up your classic ambrosia salad recipe.
In a large bowl, fold together the whipped cream and sour cream until blended and smooth.
Fold in the oranges, pineapple tidbits, and cherries.
Fold in the mini marshmallows, nuts, and coconut until well blended.
Cover the bowl with plastic wrap, and refrigerate for at least 1 hour before scooping into small serving bowls. (Note: Any leftovers should be stored in the refrigerator.)
CAN I MAKE AMBROSIA A DAY AHEAD?
Yes, you can! In fact, it helps the flavors all meld together if you let it sit for at least an hour or two before serving.
Feel free to make it the day before and chill it overnight for serving the next day.
And that brings me to the next question…
HOW LONG WILL IT KEEP IN THE FRIDGE?
Ambrosia salad with Cool Whip will keep in the fridge for about 2-3 days. After that it’ll start to get a bit yucky, so you’ll want to eat it up those first couple days.
CAN I FREEZE IT?
I wouldn’t recommend it. It’s best to make this salad day of or day before and just chill it in the refrigerator.
If you freeze this fruit salad, all of your fruit will likely get very soggy and watery and just be kind of a mess.
SUGAR FREE OPTIONS FOR AMBROSIA
Seeing that this is a salad with fruit and marshmallows, it may prove difficult to make it completely sugar-free; but there are ways to cut down on the sugar…
Use sugar-free whipped cream.
With the fruit, you’ll want to be sure there’s no sugar added and that it’s canned in 100% fruit juice, not syrup.
Look for sugar-free marshmallows. If all you can find are bigger marshmallows, you can cut them into smaller pieces.
Whip up a classic ambrosia fruit salad with Cool Whip, sour cream, fruit, and mini marshmallows. Easy southern side dish recipe for every holiday dinner!
Large Mixing Bowl
8 ounces Cool Whip (thawed)
1/2 cup sour cream
10 ounces maraschino cherries (drained)
11 ounces mandarin oranges (drained)
20 ounces pineapple tidbits (drained)
2 cups mini marshmallows
1 cup chopped pecans
1 cup sweetened coconut
In a large bowl, fold together the whipped cream and sour cream until blended and smooth.
Rinse, stem, and slice the cherries in half, although be sure to save a few cherries with stems to top off your salad when serving.
Fold in the sliced cherries, along with the oranges and pineapple tidbits.
Fold in the mini marshmallows, nuts, and coconut until well blended.
Cover the bowl with plastic wrap, and refrigerate for at least 1 hour before scooping into small serving bowls.
Any leftovers should be stored in the refrigerator.
Yes, you can! In fact, it helps the flavors all meld together if you let it sit for at least an hour or two before serving. Feel free to make it the day before and chill it overnight for serving the next day.
How Long Will It Keep in the Fridge?
Ambrosia salad with Cool Whip will keep in the fridge for about 2-3 days. After that it’ll start to get a bit yucky, so you’ll want to eat it up those first couple days.
Can I Freeze It?
I wouldn’t recommend freezing ambrosia. It’s best to make this salad day of or day before and just chill it in the refrigerator. If you freeze this fruit salad, all of your fruit will likely get very soggy and watery and just be kind of a mess.
Side Dish
American
ambrosia, ambrosia fruit salad, ambrosia salad, ambrosia salad recipe, ambrosia salad with Cool Whip, classic ambrosia salad recipe, dessert salads, fruit salad, fruit salad recipe, fruit salad recipes, how to make ambrosia, marshmallow fruit salad, salad with marshmallows
Bake a blueberry French toast casserole with cream cheese and a cinnamon streusel topping. Quick and easy overnight breakfast recipe that tastes so amazing!
If you love blueberries and cream cheese, you are in for a treat with this blueberry cream cheese French toast casserole. Let me tell you, I think this is my favorite one yet.
Layered with sourdough bread, blueberries, cream cheese, an egg custard mixture, and a cinnamon streusel topping, it is the perfect sweet breakfast casserole for Christmas, Easter, Thanksgiving, or just because.
Now I know all my French toast bakes so far have had pecans in them, but this one does not. There are no nuts whatsoever in this overnight blueberry French toast.
And while I use sourdough, which I get at Aldi or make homemade, you can use other types of bread, including plain old sandwich bread, Challah bread, French bread, brioche, gluten-free bread, etc. The choice is up to you.
The egg mixture combines eggs with vanilla, maple syrup, cinnamon, and nutmeg, giving this blueberry French toast bake incredible flavor.
[mv_video doNotAutoplayNorOptimizePlacement=”false” doNotOptimizePlacement=”false” jsonLd=”true” key=”hrh84hixlyycys8g1gew” sticky=”false” thumbnail=”https://mediavine-res.cloudinary.com/v1592430119/whpgqsrq8cmb9dm5tmls.jpg” title=”Blueberry French Toast Casserole with Cream Cheese” volume=”70″]
WHERE CAN I FIND THE ACTUAL RECIPE CARD?
If you’d rather skip all of my cooking tips, important cooking info for this recipe, and similar recipe ideas – and get straight to the blueberry French toast casserole recipe – just scroll down to the bottom, where you’ll find a printable recipe card with a longer how to video.
INGREDIENTS YOU’LL NEED:
Sourdough bread – Again, you can also use sandwich bread, challah bread, French bread, brioche bread, or even gluten-free bread.
Mixing Bowl or Large Glass Measuring Cup – I love using my Pyrex measuring cups for whisking any kind of egg mixture up, because I can pour it right from that cup. Makes it so easy.
Aluminum Foil – to cover the casserole while chilling and baking.
LET’S TALK ABOUT THE BREAD…
I mentioned a couple of times the types of bread you can use in this casserole. And yes, you can make this a gluten-free blueberry French toast casserole by using gluten-free bread.
But let’s talk about the freshness of the bread.
You want the bread to be at least a day old and somewhat stale, so the bread cubes will really soak up the egg mixture. This ensures you don’t have any egg mixture just sitting off to itself making a mini quiche in the middle of your casserole.
This is one reason I love to use sourdough because it’s a coarse, usually dryer bread, and it really does well with soaking up all that liquid from the eggs and milk.
Of course, you can also dry the bread out a bit by opening up the bag the night before and letting it get air. Or spread the slices out on a baking sheet, and let sit in a low heat oven for just a bit to lose some of the moisture.
HOW TO MAKE BLUEBERRY FRENCH TOAST CASSEROLE
Before you get started layering your recipe, go ahead and grease a 9″x13″ baking dish with cooking spray. If you’re baking it now without chilling, you’ll also need to preheat your oven to 350° F.
Combine the cream cheese and brown sugar in a mixing bowl, and set aside.
Cube the bread into small 1-inch cubes, and add 1/2 of your bread cubes to the bottom of the baking dish.
Spoon small dollops of the cream cheese mixture onto the bread cubes until you’ve used it all.
Sprinkle half the blueberries over the bread and cream cheese.
Add the remaining bread cubes on top of the blueberries.
Then sprinkle on the rest of the blueberries, sprinkling them evenly all over the casserole.
In a large bowl or glass measuring cup, whisk together the eggs, milk, maple syrup, vanilla extract, salt, cinnamon, and nutmeg.
Pour the egg mixture over the bread in the baking dish, making sure to soak every single piece of bread.
At this point, you can either cover and chill the casserole for at least 4 to 6 hours or overnight. Or you can go ahead and mix up the streusel topping and bake it.
I prefer to refrigerate my overnight blueberry French toast because it lets everything sit and soak into the bread a little longer, bringing out all of the wonderful flavors later on when baking.
But sometimes I just want to bake it and be done. And that’s ok too.
HOW TO MAKE THE STREUSEL TOPPING:
Ok, I’m just going to say this. Do NOT skip the streusel topping. This topping makes this casserole. You MUST make the topping.
Don’t worry, it’s super easy to make. Before you get started, go ahead and preheat your oven to 350° F.
Crumble the topping over the entire French toast casserole.
Cover the baking dish with aluminum foil, and bake for about 50 minutes. Then uncover and bake an additional 15 to 20 minutes.
Allow it to cool for at least 10 to 15 minutes after baking. Then slice it and serve it with powdered sugar, maple syrup, blueberry sauce/syrup, and more blueberries.
ALTERNATIVE FRUIT OPTIONS
While I use blueberries in this recipe, you could switch out the blueberries for strawberries, blackberries, raspberries, or other types of fruit.
You could even combine blueberries with other berries or maybe even peaches.
As for using frozen blueberries instead of fresh, you likely would be fine to use frozen blueberries. Be aware, though, that using frozen fruit can add more moisture to whatever recipe you’re making, so your baked French toast could end up a little on the mushy side.
CAN YOU FREEZE FRENCH TOAST CASSEROLE?
Yes, you can freeze a blueberry French toast casserole before or after baking. Just be sure it’s either in an airtight container or covered with plastic wrap and aluminum foil to prevent freezer burn.
Also, be sure to allow enough time for thawing in the refrigerator before baking. Bake time will vary, depending on whether or not your casserole was already baked before freezing.
Re-heating after freezing…
Allow time for the casserole to thaw in the fridge. Then cover with aluminum foil, and re-heat in a 350° F oven for about half an hour, or until it’s warmed through.
Re-heating after refrigerating…
You can re-heat it in the oven or microwave. If you’re in a hurry, it’s easier and quicker to re-heat it in the microwave in 30-second intervals until it’s heated through.
Bake a blueberry French toast casserole with cream cheese and a cinnamon streusel topping. Quick and easy overnight breakfast recipe that tastes so amazing!
9×13 Baking Dish
Whisk
Pastry Blender
Casserole:
8 ounces cream cheese (softened)
1/4 cup light brown sugar
20 ounces sourdough bread
2 cups fresh blueberries
8 large eggs
2 cups whole milk
1/4 cup maple syrup
1 tablespoon vanilla extract
1 teaspoon salt
1 1/2 teaspoons ground cinnamon
1/4 teaspoon ground nutmeg
Streusel Topping:
4 tablespoons salted butter (sliced)
1/3 cup light brown sugar
1/3 cup all-purpose flour
1 teaspoon ground cinnamon
Grease a 9×13 baking dish.
In a small mixing bowl, combine the cream cheese and brown sugar; then set aside.
Cube the bread into small 1-inch cubes, and add 1/2 of the bread cubes to the bottom of the prepared baking dish.
Spoon small dollops of the cream cheese mixture onto the bread cubes until you’ve used it all.
Sprinkle half the blueberries over the bread and cream cheese.
Add the remaining bread cubes on top of the blueberries.
Then sprinkle on the rest of the blueberries, sprinkling them evenly all over the casserole.
In a large bowl, whisk together the eggs, milk, maple syrup, vanilla extract, salt, cinnamon, and nutmeg.
Pour the egg mixture over the bread in the baking dish, making sure to soak every single piece of bread.
At this point, you can either cover and chill the casserole for at least 4 to 6 hours or overnight; or you can go ahead and mix up the streusel topping and bake it.
When you're ready to bake the casserole, remove it from the fridge, and preheat the oven to 350° F.
Using a pastry blender, mix together the sliced butter, brown sugar, flour, and cinnamon in a small mixing bowl.
Crumble the topping over the entire French toast casserole.
Cover the baking dish with aluminum foil, and bake at 350° F for about 45-50 minutes. Then uncover and bake for an additional 15 to 20 minutes.
Allow it to cool for at least 10 to 15 minutes after baking. Then slice it and serve it with powdered sugar, maple syrup, blueberry sauce/syrup, and more blueberries.
*While I use sourdough, which I get at Aldi or make homemade, you can use other types of bread, including plain old sandwich bread, Challah bread, French bread, brioche, gluten-free bread, etc. The choice is up to you. You want the bread to be at least a day old and somewhat stale, so the bread cubes will really soak up the egg mixture. This ensures you don’t have any egg mixture just sitting off to itself making a mini quiche in your casserole. You can also dry the bread out a bit by opening up the bag the night before and letting it get air. Or spread the slices out on a baking sheet the morning of, and let sit in a low heat oven for just a bit to lose some of the moisture.
*If you’re wondering whether to use frozen blueberries over fresh, you likely would be fine to use frozen blueberries. Be aware, though, that using frozen fruit can add more moisture to whatever recipe you’re making, so your baked French toast could end up a little on the mushy side.
*Be sure to use real maple syrup, not table syrup.
*I prefer to refrigerate my overnight blueberry French toast overnight because it lets everything sit and soak into the bread a little longer, bringing out all of the wonderful flavors later on when baking. But sometimes I just want to bake it and be done. And that’s ok too.
ALTERNATIVE FRUIT OPTIONS
While I use blueberries in this recipe, you could switch out the blueberries for strawberries, blackberries, raspberries, or other types of fruit. You could even combine blueberries with other berries or maybe even peaches.
CAN YOU FREEZE FRENCH TOAST CASSEROLE?
Yes, you can freeze a blueberry French toast casserole before or after baking. Just be sure it’s either in an airtight container or covered with plastic wrap and aluminum foil to prevent freezer burn.
Also, be sure to allow enough time for thawing in the refrigerator before baking. Bake time will vary, depending on whether or not your casserole was already baked before freezing.
Re-heating after freezing…
Allow time for the casserole to thaw in the fridge. Then cover with aluminum foil, and re-heat in a 350° F oven for about half an hour, or until it’s warmed through.
Re-heating after refrigerating…
You can re-heat it in the oven or microwave. If you’re in a hurry, it’s easier and quicker to re-heat it in the microwave in 30-second intervals until it’s heated through.
Breakfast & Brunch, Main Course
American
baked French toast, blueberry cream cheese French toast casserole, blueberry French toast bake, blueberry French toast casserole, blueberry French toast casserole recipe, breakfast casserole, brunch recipes for a crowd, easy overnight blueberry French toast, French toast casserole, French toast casserole with streusel topping, French toast recipes, gluten-free blueberry French toast casserole, how to make blueberry French toast casserole, overnight blueberry French toast, sweet breakfast casserole
Make traditional Easter dinner recipes for the main course, Easter sides, breads, and more. Fill your Easter menu with family favorite foods fit for a holiday feast! You’ll also find simple and festive hosting ideas for your Easter Sunday dinner.
I really enjoyed putting together this collection of Easter dinner menu ideas for a traditional Easter dinner. If you’re not quite sure what to make for Easter dinner, I’ve got ya covered with over 50 Easter menu ideas.
What Is a Traditional Easter Dinner Menu?
I’ve always thought of honey-baked ham as being associated with the traditional Easter meal because it’s usually been our meat of choice and what we’ve always had for this special occasion, even growing up. However, traditional Easter dinner ideas include so much more.
Yes, even roast beef, pork roast, and salmon can be part of a traditional Easter feast. I guess it just depends what your family loves to eat this time of year and what traditions have been passed down through the generations.
Main things to remember when hosting a family dinner for the first time are the invitations, traditional Easter foods and drinks, the seating arrangements, and the hospitality factor. Let’s talk a little bit about each one.
“People will forget what you said, forget what you did, but people will never forget how you made them feel.”
– Maya Angelou
1. Make Sure to Invite Guests
Whether it’s a text message or an actual paper invitation, be sure to send out Easter dinner invitations. Otherwise, how will people know you’re even hosting dinner?
2. Plan to Make Traditional Easter Foods and Drinks
I think I’ve covered this enough below, but plan out a menu with all the Easter food ideas and drinks you want to make. Something to think about… If you’re hosting an Easter potluck, then make sure you’ve got enough people bringing sides, others bringing desserts, and so on.
3. Seating Arrangements
When I say seating arrangements, I don’t mean who sits next to who, like at a wedding; I just mean, making sure everyone has an actual place to sit, whether it’s at a table, or a seat in the living room.
Back in the day at Easter time, my family would sprawl all over my grandma’s house, from the living room to the kitchen to the back utility room. Small house for a big family, but we made it work.
You might need to think about borrowing a few extra tables and chairs from someone in the family. Or get up to the attic, and haul down all the folding chairs you have to make it work.
4. Make Your Guests Feel Welcome with Graceful Hospitality
My friend Linda, who blogs over at Life on Summerhill, has so many wonderful ideas for hosting the perfect Easter dinner, including how to create Easter table decor. Beautiful ideas she gives for Easter tablescapes inspire much creativity when it comes to setting a welcoming table for family and friends.
Not to mention all of her wonderful ideas for putting up Easter home decorations, as well. From the centerpiece to festive garland ideas and table settings, you’re sure to find loads of ideas for making your guests feel more welcome and at home.
Whew! I don’t know ’bout you, but I’m ready for all the Easter food!
Easter Appetizers
No get together or family gathering would be complete without an assortment of finger licking appetizers to whet the appetite.
[wprm-recipe-roundup-item id=”39896″ name=”Easy Deviled Eggs in 30 Minutes or Less” summary=”<p>Can't have Easter dinner without deviled eggs, a popular Easter dinner favorite! Mix up a batch of easy deviled eggs in 30 minutes or less with this classic deviled egg recipe.</p>” button=”Get the Recipe”]
[wprm-recipe-roundup-item id=”52445″ name=”Bacon Ranch Deviled Eggs” summary=”<p>Make an easy recipe for bacon Ranch deviled eggs… Because everything is better with bacon. Perfect appetizer for a crowd!</p>” button=”Get the Recipe”]
[wprm-recipe-roundup-item link=”https://noshingwiththenolands.com/rainbow-easter-deviled-eggs/” name=”Rainbow Easter Deviled Eggs” summary=”<p>Wonderful colorful Rainbow Easter Eggs are made with natural dyes and everyone can participate in making these. So fun for Easter to make and eat.</p>” button=”Get the Recipe” image=”42390″]
[wprm-recipe-roundup-item id=”41070″ name=”Ham and Stuffing Crescent Rolls” summary=”<p>Ham and stuffing crescent rolls are a delicious finger food even the kids will love. They're easy to make too!</p>” button=”Get the Recipe”]
[wprm-recipe-roundup-item link=”https://www.currytrail.in/baked-potato-roses/” name=”Baked Potato Roses” summary=”<p>Baked potato roses are the ultimate party starter or simply the most gorgeous potato side dish for your every-day-meal plan!</p>” button=”Get the Recipe” image=”57099″]
[wprm-recipe-roundup-item id=”40976″ name=”Delicious Salmon Patties Recipe” summary=”<p>Salmon patties, made with salmon and crackers, are the perfect Easter appetizer or finger food, especially when served with a tzatziki dipping sauce.</p>” button=”Get the Recipe”]
[wprm-recipe-roundup-item id=”40872″ name=”Maple Sausage Stuffed Pastry Bites” summary=”<p>Made with cream cheese, spinach, and puffed pastry, sausage stuffed pastry bites are the ultimate appetizer for any holiday dinner.</p>” button=”Get the Recipe”]
[wprm-recipe-roundup-item link=”https://savorthebest.com/greek-cheese-triangle-pies-tiropita/” name=”Greek Cheese Triangle Pies (Tiropita)” summary=”<p>These Greek cheese triangle pies have a savory cheese filling inside flaky, buttery phyllo pastry. These make a great appetizer or side for your Easter dinner.</p>” button=”Get the Recipe” image=”42415″]
[wprm-recipe-roundup-item link=”https://happykitchen.rocks/vegan-roasted-carrot-soup-lentils/” name=”Vegan Roasted Carrot Soup with Lentils” summary=”<p>Easy and delicious Vegan Roasted Carrot Soup with lentils and Moroccan spices. This velvety, rich and healthy carrot soup has a unique and perfectly balanced flavor!</p>” button=”Get the Recipe” image=”42429″]
Easter Main Dish Recipes
Traditional Easter dishes that make delicious main dishes, including ham, lamb, beef, and pork.
[wprm-recipe-roundup-item id=”42281″ name=”How to Cook a Ham in the Oven” summary=”<p>Everything you've ever wanted to know about how to cook a pre-cooked ham in the oven. Tips, steps, and everything you need to get your Easter ham well on its way.</p>” button=”Get the Recipe”]
[wprm-recipe-roundup-item id=”40862″ name=”Pineapple Honey Glazed Ham” summary=”<p>If you like a sweeter flavor to your ham, you'll love this pineapple honey glazed ham. How to get it perfectly cooked, moist, and delicious for your holiday dinner with family and friends.</p>” button=”Get the Recipe”]
[wprm-recipe-roundup-item link=”https://consumerqueen.com/lifestyle/sponsored-posts/crock-pot-slow-cooker-pineapple-ham-recipe” name=”Crock-Pot Slow Cooker Pineapple Ham” summary=”<p>This CrockPot slow cooker pineapple ham recipe is so yummy and plentiful that you could actually freeze left overs for later meals to save you time and money.</p>” button=”Get the Recipe” image=”57100″]
[wprm-recipe-roundup-item link=”https://www.gritsandpinecones.com/glazed-ham/” name=”Brown Sugar Bourbon Glazed Ham” summary=”<p>You and your family or guests will love this easy baked ham with pineapple and cherries, complete with traditional pineapple rings and maraschino cherries, with its yummy, sticky, sweet and savory brown sugar bourbon glaze!</p>” button=”Get the Recipe” image=”57101″]
[wprm-recipe-roundup-item link=”https://noshingwiththenolands.com/southern-pecan-glazed-ham/” name=”Southern Pecan Glazed Ham” summary=”<p>This Southern Pecan Glazed Ham was perfection for us. Not sure I have had a better ham than this one EVER. Honey, brown sugar, sweet mustard with a hint of cloves and oranges and then smothered in pecans.</p>” button=”Get the Recipe” image=”42394″]
[wprm-recipe-roundup-item link=”https://www.gritsandpinecones.com/roasted-rack-of-lamb/” name=”Roasted Rack of Lamb with Garlic and Herbs” summary=”<p>Surprisingly easy to make, Roasted Rack of Lamb with Garlic and Herbs is an impressive, crowd-pleasing main-dish full of herbaceous deliciousness. Traditionally served at Easter, this lamb recipe has the best of everything.</p>” button=”Get the Recipe” image=”57102″]
[wprm-recipe-roundup-item link=”https://www.supergoldenbakes.com/slow-cooker-lamb/” name=”Slow Cooker Leg of Lamb” summary=”<p>Incredibly tender Slow Cooker Roast Leg of Lamb that’s tender, juicy and falling apart at the touch of a fork. This is truly the easiest way to cook roast lamb – add a handful of ingredients to your slow cooker and leave it to work its magic.</p>” button=”Get the Recipe” image=”42396″]
[wprm-recipe-roundup-item link=”https://savorthebest.com/braised-herb-lamb-shanks/” name=”Braised Herb Lamb Shanks” summary=”<p>You will love this recipe for Braised Herb Lamb Shanks! The meat is fall-off-the-bone tender and full of flavor from the herb blend, wine and beef broth. This makes a great Easter dinner.</p>” button=”Get the Recipe” image=”42397″]
[wprm-recipe-roundup-item link=”https://familyspice.com/grilled-leg-lamb-rosemary-mint-garlic/” name=”Grilled Leg of Lamb with Rosemary, Mint, and Garlic” summary=”<p>Juicy, tender and ridiculously delicious, this recipe for Grilled Leg of Lamb with Rosemary, Mint and Garlic can be made with either a bone-in or boneless version and makes an impressive meal for family and friends.</p>” button=”Get the Recipe” image=”42398″]
[wprm-recipe-roundup-item link=”https://www.urbanblisslife.com/herb-crusted-rack-of-lamb/” name=”Herb Crusted Rack of Lamb” summary=”<p>This herb crusted rack of lamb is a classic Easter dinner! It's easy to prepare and so delicious.</p>” button=”Get the Recipe” image=”42428″]
[wprm-recipe-roundup-item link=”https://www.becomingness.com/slow-cooker-beef-ribs/” name=”Slow Cooker Beef Ribs” summary=”<p>Slow Cooker Beef Ribs are a great meal to serve your guests. The flavor is amazing, and they are so easy to make. Your guests will seriously be impressed!</p>” button=”Get the Recipe” image=”42400″]
[wprm-recipe-roundup-item link=”https://www.upstateramblings.com/sous-vide-beef-tenderloin/” name=”Sous Vide Beef Tenderloin” summary=”<p>This recipe for Sous Vide Beef Tenderloin gives you the perfect roast every time. And an elegant beef tenderloin is the perfect centerpiece for a special dinner like Easter that is delicious and surprisingly easy to make.</p>” button=”Get the Recipe” image=”42401″]
[wprm-recipe-roundup-item id=”62543″ name=”Best Slow Cooker Pork Roast Recipe” summary=”<p>Learn step by step how to make the best ever slow cooker pork roast that's perfectly pull apart juicy & tender. It's the ultimate set-it-and-forget-it recipe, so easy to make, and perfect for holiday dinners, church potlucks, or a weeknight meal!</p>” button=”Get the Recipe”]
[wprm-recipe-roundup-item id=”41086″ name=”Oven Roasted Pork Roast Recipe” summary=”<p>This deliciously easy pork roast recipe with vegetables and gravy is the perfect main dish for Easter dinner. Learn how to cook a pork roast with simple seasoning in the oven.</p>” button=”Get the Recipe”]
[wprm-recipe-roundup-item id=”41076″ name=”Simple and Delicious Roasted Pork Tenderloin” summary=”<p>Learn how to cook pork tenderloin, roasted to a juicy perfection in the oven. This is a very easy recipe for a delicious Easter dinner main dish, paired with simple seasonings and potatoes.</p>” button=”Get the Recipe”]
[wprm-recipe-roundup-item id=”40922″ name=”Sweet Chili Instant Pot Baby Back Ribs” summary=”<p>Sweet Chili Instant Pot Baby Back Ribs are so easy to make. Pair them with a sweet chili dry rub that gives them a wonderful flavor, throw them in your pressure cooker, and walk away. They’re fall off the bone delicious!</p>” button=”Get the Recipe”]
[wprm-recipe-roundup-item link=”https://www.therisingspoon.com/2017/03/slow-cooker-pork-shoulder.html” name=”Slow Cooker Pork Shoulder” summary=”<p>Fall-apart-tender pork shoulder cooked in the crock-pot. This super easy recipe takes less than 10 minutes to prep and can be cooked in as little as 4-5 hours on the high setting. </p>” button=”Get the Recipe” image=”57103″]
[wprm-recipe-roundup-item link=”https://www.simplystacie.net/brown-sugar-dijon-pork-tenderloin/” name=”Brown Sugar Dijon Pork Tenderloin” summary=”<p>Brown Sugar Dijon Pork Tenderloin – Just two simple ingredients to create a meal your family will rave about!</p>” button=”Get the Recipe” image=”51698″]
[wprm-recipe-roundup-item link=”https://www.mommyhatescooking.com/roasted-lemon-pepper-chicken-veggies-dutch-oven” name=”Roasted Lemon Pepper Chicken and Veggies in the Dutch Oven” summary=”<p>Make a delicious dinner with this Roasted Lemon Pepper Chicken & Veggies in the Dutch Oven.</p>” button=”Get the Recipe” image=”57104″]
Easter Side Dishes Ideas
All the Easter dinner sides you’ll ever need for a traditional Easter dinner table that will fill bellies and warm hearts.
[wprm-recipe-roundup-item id=”40864″ name=”Homemade Ham Gravy” summary=”<p>Homemade Ham Gravy, made with leftover ham drippings and cream, is a delicious side dish that pairs with ham, mashed potatoes, and all your Easter dinner fixings!</p>” button=”Get the Recipe”]
[wprm-recipe-roundup-item id=”42318″ name=”Ham Gravy with Cornstarch” summary=”<p>Homemade ham gravy with cornstarch and drippings is perfect if you've got at least one person in the crowd who's gluten-free. It's also super easy and simple to make.</p>” button=”Get the Recipe”]
[wprm-recipe-roundup-item id=”45077″ name=”Chicken Gravy from Bouillon” summary=”<p>How to make chicken gravy from bouillon, no drippings needed! Easy recipe you can make last minute to go with dinner. Simple ingredients!</p>” button=”Get the Recipe”]
[wprm-recipe-roundup-item id=”40882″ name=”Creamy Mashed Potatoes” summary=”<p>This is my family's go to recipe for creamy mashed potatoes, made with yellow potatoes, cream, and butter. They are a must have potato dish at Easter dinner.</p>” button=”Get the Recipe”]
[wprm-recipe-roundup-item id=”41040″ name=”The Ultimate Mashed Potato Bar” summary=”<p>Feed a crowd on Easter day with a festive mashed potato bar at your next party filled with all sorts of delicious, mouthwatering toppings.</p>” button=”Get the Recipe”]
[wprm-recipe-roundup-item id=”40426″ name=”Easy Cheesy Hash Brown Casserole Recipe” summary=”<p>I absolutely love a cheesy hash brown casserole recipe, filled with shredded cheesy potatoes and topped with Corn Flakes. It's a quick and easy side dish perfect for a crowd or potluck on Easter day!</p>” button=”Get the Recipe”]
[wprm-recipe-roundup-item id=”43872″ name=”Cheesy CrockPot Funeral Potatoes Recipe” summary=”<p>How to make cheesy CrockPot funeral potatoes. Easy slow cooker hashbrown casserole, a family favorite side dish, breakfast, or brunch recipe.</p>” button=”Get the Recipe”]
[wprm-recipe-roundup-item id=”42925″ name=”Scalloped Potatoes and Ham” summary=”<p>How to make scalloped potatoes and ham in a creamy sauce, baked in the oven. Easy, old-fashioned, homemade, cheesy casserole recipe perfect for a crowd!</p>” button=”Get the Recipe”]
[wprm-recipe-roundup-item link=”https://www.joyousapron.com/easy-garlic-parmesan-asparagus/” name=”Easy Garlic Parmesan Asparagus” summary=”<p>Asparagus, topped with lots of fragrant garlic and fresh shredded parmesan cheese, perfectly roasted in the oven. The perfect side dish for Easter Sunday!</p>” button=”Get the Recipe” image=”57106″]
[wprm-recipe-roundup-item id=”43911″ name=”Cheesy Slow Cooker Corn Casserole” summary=”<p>Throw together CrockPot corn casserole with cream cheese and Jiffy mix. Easy side dish recipe for a crowd. Make ahead for Thanksgiving and Easter.</p>” button=”Get the Recipe”]
[wprm-recipe-roundup-item id=”40220″ name=”Jiffy Corn Casserole with Cream Cheese and Bacon” summary=”<p>Bake up a Jiffy corn casserole with cream cheese and bacon. I love this simple, easy recipe because it's so cheesy and delicious; plus you can make it ahead of time. It's the perfect side dish for Easter dinner!</p>” button=”Get the Recipe”]
[wprm-recipe-roundup-item id=”43826″ name=”Southern Sweet Potato Casserole with Marshmallows” summary=”<p>How to make the best southern sweet potato casserole with marshmallows and pecans. Classic Easter sweet potatoes side dish you can easily make ahead.</p>” button=”Get the Recipe”]
[wprm-recipe-roundup-item id=”40838″ name=”Easy Broccoli Salad with Bacon and Cauliflower” summary=”<p>Throw together a Broccoli Salad with bacon, cauliflower, sunflower seeds, and peas. This salad is a staple side dish and salad recipe perfect for every family gathering.</p>” button=”Get the Recipe”]
[wprm-recipe-roundup-item id=”42821″ name=”Quick and Easy Ambrosia Fruit Salad” summary=”<p>Whip up a classic ambrosia fruit salad with Cool Whip, sour cream, fruit, and mini marshmallows. Easy southern side dish recipe for every holiday dinner!</p>” button=”Get the Recipe”]
[wprm-recipe-roundup-item id=”40720″ name=”Layered Salad” summary=”<p>Layered Salad is the perfect salad recipe for family gatherings. Add fresh, delicious layers like cauliflower, peas, lettuce, bacon, or whatever else your heart desires.</p>” button=”Get the Recipe”]
[wprm-recipe-roundup-item link=”https://www.glueandglitter.com/broccoli-salad-kale-macadamia/” name=”Crunchy Kale Broccoli Salad with Cranberries and Macadamia Nuts” summary=”<p>Crunchy Kale Broccoli Salad is a perfect side dish, especially when you load it up with tart cranberries and rich macadamia nuts in a sweet balsamic dressing!</p>” button=”Get the Recipe” image=”57107″]
[wprm-recipe-roundup-item link=”https://julieblanner.com/homemade-potato-salad/” name=”Homemade Potato Salad” summary=”<p>An easy, homemade potato salad with egg is the best way to use up all those extra eggs from the Easter holiday. This potato salad recipe uses a few key ingredients including gherkins and mustard, and one little secret technique!</p>” button=”Get the Recipe” image=”57108″]
[wprm-recipe-roundup-item id=”40860″ name=”Honey Glazed Carrots with Rosemary” summary=”<p>Honey Glazed Carrots, made with simple ingredients like butter, honey, and rosemary, make a delicious side dish. They're colorful and packed full of fresh flavor.</p>” button=”Get the Recipe”]
[wprm-recipe-roundup-item link=”https://theschmidtywife.com/roasted-carrots-dill/” name=”Easy Roasted Carrots with Dill” summary=”<p>This easy recipe for Roasted Carrots with Dill is a simple side dish to whip up for any occasion. With 4 simple ingredients, this recipe for baked carrots with dill is a breeze to make, perfect for a family dinner but also fancy enough for holidays like Thanksgiving and Easter!</p>” button=”Get the Recipe” image=”57109″]
[wprm-recipe-roundup-item link=”https://www.acedarspoon.com/honey-balsamic-roasted-carrots/” name=”Balsamic Roasted Carrots Recipe” summary=”<p>Balsamic Roasted Carrots offer a healthy side dish to your next holiday meal or weeknight dinner. The sweet honey mixed with the robust flavors of balsamic vinegar and extra virgin olive oil pair wonderfully to add flavor to this roasted carrots recipe.</p>” button=”Get the Recipe” image=”57110″]
[wprm-recipe-roundup-item link=”https://dancingthroughtherain.com/candied-carrots/” name=”Candied Carrots – Butter and Brown Sugar Glazed” summary=”<p>These Candied Carrots are the perfect addition to any dinner! With only three ingredients, this delicious dish will be one that people ask for again and again!</p>” button=”Get the Recipe” image=”57111″]
[wprm-recipe-roundup-item link=”https://joyfoodsunshine.com/best-mashed-potatoes/” name=”Best Mashed Potatoes Recipe” summary=”<p>These herb-infused garlic mashed potatoes are the best mashed potatoes you will ever eat. They are creamy, fluffy, buttery and so insanely delicious you will never make another mashed potatoes recipe again.</p>” button=”Get the Recipe” image=”57112″]
[wprm-recipe-roundup-item link=”https://www.simplymaderecipes.com/perfect-mashed-potatoes/” name=”Cream Cheese Mashed Potatoes” summary=”<p>Cream Cheese Mashed Potatoes are creamy potatoes made with Russet potatoes, cream cheese, sour cream, butter, salt and pepper for the must-have side dish for any holiday gathering.</p>” button=”Get the Recipe” image=”57113″]
[wprm-recipe-roundup-item id=”40850″ name=”Instant Pot Southern Green Beans” summary=”<p>If you've never had Southern Green Beans, made with bacon, onion, and ground beef, you're in for a real treat. Made in the Instant Pot, so they're super easy to make, they're a yummy side dish everyone will love and ask for at every holiday gathering.</p>” button=”Get the Recipe”]
[wprm-recipe-roundup-item link=”https://savorthebest.com/instant-pot-lebanese-braised-green-beans/” name=”Instant Pot Lebanese Braised Green Beans” summary=”<p>These Instant Pot Lebanese Braised Green Beans have all the flavor you’d get with the traditional slow braise, but without all the time. Make this Easter side dish in the IP and save room in your oven for the main course.</p>” button=”Get the Recipe” image=”57114″]
[wprm-recipe-roundup-item link=”https://www.beyondthechickencoop.com/green-bean-almondine/” name=”Green Beans Almondine” summary=”<p>Fresh green beans sauteed with butter and almonds and finished with a squeeze of fresh lemon juice makes a delicious green bean almondine!</p>” button=”Get the Recipe” image=”57115″]
[wprm-recipe-roundup-item link=”https://wholenewmom.com/roasted-brussels-sprouts-with-bacon/” name=”Roasted Brussels Sprouts with Bacon” summary=”<p>This combo of oven roasted brussels sprouts with bacon is the perfect way to convince you that yes, brussels sprouts really can be delicious! It's the perfect dish to grace your Easter table!</p>” button=”Get the Recipe” image=”57117″]
[wprm-recipe-roundup-item link=”https://www.shelovesbiscotti.com/parmesan-roasted-cauliflower/” name=”Parmesan Roasted Cauliflower” summary=”<p>Roasted Cauliflower florets sprinkled with Parmesan cheese are truly the perfect side dish for all special occasions. Includes methods for both oven-roasted and air fryer.</p>” button=”Get the Recipe” image=”57118″]
Must Have Dinner Rolls!
Bread rolls are a must have with every family member at any Easter spread. When wondering what to make for Easter lunch, definitely add dinner rolls to the menu.
[wprm-recipe-roundup-item id=”40856″ name=”Grandma’s Homemade Dinner Rolls” summary=”<p>These dinner rolls have been in our family beyond when I was even born. My grandma made them with love, and they were a staple on the table every Easter Sunday. They're fluffy, light, buttery, and oh so delicious!</p>” button=”Get the Recipe”]
[wprm-recipe-roundup-item link=”https://flouronmyfingers.com/butterhorn-rolls/” name=”Homemade Butterhorn Rolls” summary=”<p>Bake up an easy family recipe for homemade butterhorn rolls. How to make the best buttery crescent rolls, perfect for your Thanksgiving or holiday dinner.</p>” button=”Get the Recipe” image=”57122″]
[wprm-recipe-roundup-item link=”https://joyfoodsunshine.com/homemade-dinner-rolls/” name=”The Best Homemade Dinner Rolls” summary=”<p>This Best Homemade Dinner Rolls recipe turns out perfectly every time. These easy, soft & fluffy dinner rolls are, slightly sweet and salty, irresistibly buttery and made from scratch!</p>” button=”Get the Recipe” image=”57123″]
[wprm-recipe-roundup-item link=”https://flouronmyfingers.com/gluten-free-hot-cross-buns/” name=”Gluten-Free Hot Cross Buns” summary=”<p>This hot cross buns recipe makes a sweet cinnamon dough filled with currants; top each baked bun with a frosted cross to celebrate the Easter holiday.</p>” button=”Get the Recipe” image=”61938″]
Traditional Easter Desserts
Most of us live for the dessert table at family get togethers. Now you can fill Easter baskets with chocolate eggs and other goodies, something many family traditions encompass. But I think most of us agree… Easter dinner would not be complete without dessert.
[wprm-recipe-roundup-item id=”40930″ name=”Carrot Cake in a Sheet Pan” summary=”<p>Carrot sheet cake is easy to make, moist, and delicious, paired with a cream cheese frosting that's simply to die for. </p>” button=”Get the Recipe”]
[wprm-recipe-roundup-item id=”40858″ name=”Caramel Custard Pie” summary=”<p>Caramel custard pie, made with an easy shortcut pie crust and a brown sugar caramel twist with creamy egg custard.</p>” button=”Get the Recipe”]
[wprm-recipe-roundup-item id=”40792″ name=”Bunny Tail Cupcakes” summary=”<p>Make easy and adorable bunny tail cupcakes with chocolate cupcakes, frosting, and mini marshmallows. Fun Easter dessert for kids!</p>” button=”Get the Recipe”]
[wprm-recipe-roundup-item link=”https://flouronmyfingers.com/no-bake-easy-banana-pudding-recipe/” name=”No Bake Banana Pudding” summary=”<p>How to make an easy no bake banana pudding with cream cheese, Cool Whip, and Nilla Wafers. Perfect for a crowd, quick and simple recipe!</p>” button=”Get the Recipe” image=”61676″]
[wprm-recipe-roundup-item id=”40944″ name=”Strawberry Cream Cheese Pie” summary=”<p>Easy recipe for a strawberry cream cheese pie, made with fresh strawberries, a creamy no bake filling, and a simple homemade crust. </p>” button=”Get the Recipe”]
[wprm-recipe-roundup-item id=”40880″ name=”Chocolate Meringue Pie” summary=”<p>Make chocolate pie with a rich, creamy filling and fluffy homemade meringue on top. Delicious Easter dessert recipe perfect for chocolate lovers!</p>” button=”Get the Recipe”]
[wprm-recipe-roundup-item id=”40552″ name=”Cinnamon Streusel Coffee Cake with Pecans” summary=”<p>Bake up an easy to make cinnamon streusel coffee cake with pecans, perfect for Easter brunch. This praline coffee cake is moist, buttery, and topped with a crispy cinnamon sugar topping.</p>” button=”Get the Recipe”]
[wprm-recipe-roundup-item link=”https://flouronmyfingers.com/blueberry-coffee-cake-recipe/” name=”Blueberry Coffee Cake Recipe with Streusel Topping” summary=”<p>How to make the best blueberry coffee cake recipe that's moist and delicious with tons of sweet berry flavor and a simple streusel topping.</p>” button=”Get the Recipe” image=”61942″]
[wprm-recipe-roundup-item id=”41130″ name=”Blueberry Yum Yum Dessert” summary=”<p>Whip up a dreamy blueberry yum yum dessert with cream cheese, Dream Whip, blueberry pie filling, and a pecan crust. </p>” button=”Get the Recipe”]
[wprm-recipe-roundup-item id=”41110″ name=”Strawberry Yum Yum Dessert” summary=”<p>Easy strawberry yum yum dessert layered with fresh strawberries, cream cheese filling, and a pecan crust. Dreamy delight perfect for potlucks!</p>” button=”Get the Recipe”]
[wprm-recipe-roundup-item id=”40970″ name=”Lemon Poke Cake with Lemon Glaze” summary=”<p>How to make Grandma's lemon poke cake with lemon glaze, a fluffy cake recipe with a simple lemony icing drizzled on top.</p>” button=”Get the Recipe”]
[wprm-recipe-roundup-item link=”https://flouronmyfingers.com/gluten-free-texas-sheet-cake/” name=”Aunt Jennie’s Texas Sheet Cake” summary=”<p>Best ever recipe for moist chocolate Texas sheet cake, topped with rich, fudgy chocolate icing. Easy dessert anyone can make!</p>” button=”Get the Recipe” image=”61941″]
Now that you’ve filled everyone’s bellies with good food, who’s ready for a good, old-fashioned Easter egg hunt? So many wonderful Easter traditions to enjoy!
Easy brioche French toast casserole with cinnamon and pecans. Made overnight or baked the morning of, it’s the perfect recipe for breakfast, brunch, or holidays.
I’ve had a lot of readers tell me that they love to make my regular French toast casserole with brioche bread. Of course, I love when readers share these sorts of ideas because it always gets my wheels turning, thinking of new breakfast recipes.
If you’ve never had brioche, you’re in for a real treat with this recipe. This brioche French toast bake is hands down my kids’ favorite French toast casserole I’ve made to date.
You can usually find brioche bread in the bakery section of your local grocery store, and it comes already sliced. I don’t chop it up for this casserole; instead I use whole slices to make it a little bit easier.
I do like to add raisins and pecans because it’s kinda like one big sticky bun by the time this casserole bakes. But of course, these are optional, and you don’t have to add them (but I still highly recommend them; it just wouldn’t be the same without them).
The egg mixture contains vanilla, maple syrup, cinnamon, and nutmeg, giving this baked brioche French toast incredible flavor.
Top it all off with a sprinkling of powdered sugar or a drizzle of maple syrup, and oh my goodness, my mouth is watering. Who’s ready for breakfast?
Another easy casserole I love to make is Crock Pot French toast casserole. Throw everything in the slow cooker, and wait for it to cook. My kinda meal.
WHERE CAN I FIND THE ACTUAL RECIPE CARD?
If you’d rather skip all of my cooking tips, important cooking info for this recipe, and similar recipe ideas – and get straight to the brioche French toast casserole recipe – just scroll down to the bottom, where you’ll find a printable recipe card.
Mixing Bowl or Large Glass Measuring Cup – I love using my Pyrex measuring cups for whisking any kind of egg mixture up, because I can pour it right from that cup. Makes it so easy.
Aluminum Foil – to cover the casserole while baking.
WHAT IS BRIOCHE BREAD?
Brioche is a French bread that’s very similar to the kind of pastry used for danishes. You can usually find it in loaves, braids, or rolls.
It has a very high egg and butter content, making it very soft and very rich. It can sometimes have a slight sweetness to it, as well.
Sometimes it’ll even have different flavors. For instance, I’ve seen different flavors like vanilla cream and chocolate chip at Aldi.
There are so many things you can do with brioche. You can make this casserole, make a delicious grilled cheese sandwich, enjoy a burger on a brioche bun, and on and on. It really is a very versatile type of bread.
Brioche makes a very good bread for French toast because of its texture, the richness of its flavor, and the fact that it’s not overly crumbly or tough. It also doesn’t hurt that it’s a beautiful bread, making it very appetizing, as well.
HOW TO MAKE BRIOCHE FRENCH TOAST CASSEROLE
Before you get started compiling your sweet breakfast casserole, you need to grease a 9″x13″ baking dish with cooking spray. If you’re baking it now without chilling, you’ll also need to preheat your oven to 350° F.
In a small mixing bowl, mix together the melted butter, maple syrup, brown sugar, and cinnamon.
Spread this mixture on the bottom of your greased baking dish.
Place 2 rows of the brioche bread slices in the pan, sprinkling raisins and half of the pecans in between each slice.
Then sprinkle the rest of the pecans on top.
In a separate mixing bowl or measuring cup, whisk together the eggs, milk, maple syrup, vanilla extract, salt, cinnamon, and nutmeg.
Pour the egg mixture over the bread in the pan.
Now at this point you can either cover and chill the casserole overnight, or you can go ahead and bake it. It’s totally up to you.
When you’re ready to bake the casserole, you’ll need to cover the dish with foil, and bake it at 350° F for about 30 minutes. Then uncover and bake an additional 15 to 20 minutes.
BEST TOPPINGS FOR FRENCH TOAST
You may want to add certain kinds of toppings to your French toast. I like to keep it simple and just give our French toast a sprinkling of powdered sugar or a generous drizzle of real maple syrup. It’s so, so good!
Of course, you could also top it off with all sorts of other things, including…
Butter
Fresh berries and fruit – blueberries, raspberries, or strawberries
HOW TO KEEP FRENCH TOAST CASSEROLE FROM GETTING SOGGY
Once your casserole is baked, it should be soft in the middle but slightly crispy on top. It should come to an internal temperature of 160° F with a food thermometer.
There are a few things you can do to ensure that your French toast casserole is not soggy.
Instead of pouring the egg mixture right over the bread in the pan, you can soak the bread in a separate dish instead. Then carefully place each slice in the pan.
On a related note, if you are pouring the egg mixture over the bread, each piece of bread really needs to be completely soaked, so it firms up as it bakes. Try not to leave liquid just sitting in the pan; make sure it’s all soaked up.
Use a more shallow baking dish or baking pan, something like a sheet cake pan or baking sheet with sides. This helps all that liquid to spread out instead of just sitting on your bread. Of course, you may need to adjust your cooking time if changing the size of your pan.
Be sure to follow the recipe to a t. Don’t add any extra liquid or change the type of liquid used. If you do make changes, it will alter the recipe, and it could lead to soggy French toast.
CAN YOU FREEZE A FRENCH TOAST BAKE?
Yes, you can freeze French toast casserole before or after baking. Just be sure it’s either in an airtight container or covered with plastic wrap and aluminum foil to prevent freezer burn.
Also, be sure to allow enough time for thawing in the refrigerator before baking. Bake time will vary, depending on whether or not your casserole was already baked before freezing.
Re-heating after freezing…
Allow time for the casserole to thaw in the fridge. Then cover with aluminum foil, and re-heat in a 350° F oven for about half an hour, or until it’s warmed through.
Re-heating after refrigerating…
You can re-heat it in the oven or microwave. If you’re in a hurry, it’s easier and quicker to re-heat it in the microwave in 30-second intervals until it’s heated through.
Easy brioche French toast casserole with cinnamon and pecans. Baked overnight or morning of, it's the perfect recipe for breakfast, brunch, or holidays.
9×13 Baking Dish
Whisk
Large Mixing Bowl
1/4 cup salted butter (melted)
2 tablespoons maple syrup
1/3 cup light brown sugar
1 teaspoon ground cinnamon
12 slices brioche bread
1/2 cup raisins (optional)
1 cup chopped pecans (optional)
8 large eggs
2 cups whole milk
2 tablespoons maple syrup
1 tablespoon vanilla extract
1 teaspoon salt
1 1/2 teaspoons ground cinnamon
1/4 teaspoon ground nutmeg
Grease a 9×13 baking dish with cooking spray; if you're baking it now without chilling, preheat the oven to 350° F.
In a small mixing bowl, mix together the melted butter, maple syrup, brown sugar, and cinnamon.
Spread this mixture on the bottom of the greased baking dish.
Place 2 rows of brioche bread slices in the pan, sprinkling raisins and half of the pecans in between each slice.
Sprinkle the rest of the pecans on top.
In a separate mixing bowl whisk together the eggs, milk, maple syrup, vanilla extract, salt, cinnamon, and nutmeg.
Pour the egg mixture over the bread in the pan.
At this point, cover and chill the casserole overnight, or go ahead and bake it.
When you're ready to bake the casserole, cover the dish with aluminum foil, and bake it at 350° F for about 30 minutes. Then uncover and bake an additional 15 to 20 minutes.
Once the casserole is baked, it should be soft in the middle but slightly crispy on top. It should come to an internal temperature of 160° F with a meat thermometer.
Serve with a dusting of powdered sugar or a generous drizzle of real maple syrup.
*Be sure to use real maple syrup, not table syrup.
*I used 12 slices of Marketside brioche bread from Walmart. You may be able to add more or less slices, depending on the thickness of the slices in the loaf that you purchase.
HOW TO KEEP FRENCH TOAST CASSEROLE FROM GETTING SOGGY
There are a few things you can do to ensure that your French toast casserole is not soggy.
Instead of pouring the egg mixture right over the bread in the pan, you can soak the bread in a separate dish instead. Then carefully place each slice in the pan.
On a related note, if you are pouring the egg mixture over the bread, each piece of bread really needs to be completely soaked, so it firms up as it bakes. Try not to leave liquid just sitting in the pan; make sure it’s all soaked up.
Use a more shallow baking dish or baking pan, something like a sheet cake pan or baking sheet with sides. This helps all that liquid to spread out instead of just sitting on your bread. Of course, you may need to adjust your cooking time if changing the size of your pan.
Be sure to follow the recipe to a t. Don’t add any extra liquid or change the type of liquid used. If you do make changes, it will alter the recipe, and it could lead to soggy French toast.
BEST TOPPINGS FOR FRENCH TOAST
You can top it off with all sorts of things, besides powdered sugar and maple syrup, including…
Butter
Fresh berries and fruit – blueberries, raspberries, or strawberries
Yes, you can freeze French toast casserole before or after baking. Just be sure it’s either in an airtight container or covered with plastic wrap and aluminum foil to prevent freezer burn.
Also, be sure to allow enough time for thawing in the refrigerator before baking. Bake time will vary, depending on whether or not your casserole was already baked before freezing.
Re-heating after freezing…
Allow time for the casserole to thaw in the fridge. Then cover with aluminum foil, and re-heat in a 350° F oven for about half an hour, or until it’s warmed through.
Re-heating after refrigerating…
You can re-heat it in the oven or microwave. If you’re in a hurry, it’s easier and quicker to re-heat it in the microwave in 30-second intervals until it’s heated through.
Breakfast & Brunch, main dish
American
baked brioche French toast, best toppings for French toast, breakfast recipes, brioche French toast bake, brioche French toast casserole, brioche French toast casserole recipe, brunch recipes, French toast bake, French toast casserole, how to keep French toast casserole from getting soggy, how to make brioche French toast casserole, sweet breakfast casserole
Learn how to make ham gravy with cornstarch and either drippings or broth. This easy recipe will help you cook and thicken any gravy, including ham, turkey, chicken, or brown gravy. It’s especially good at Thanksgiving, Christmas, and Easter; but it’s also great for family dinner!
One of my most popular recipes, especially around Christmas and Easter, is my homemade ham gravy recipe; unlike this cornstarch gravy recipe, it’s made with flour and ham drippings.
This good gravy, on the other hand, is made with cornstarch and ham drippings. Learning how to make gravy with cornstarch is super easy to do, and it just so happens to be gluten-free ham gravy (as long as all of your ingredients contain no gluten; I always recommend you double check to be safe).
Now you do have to know how to bake a ham for this easy gravy recipe. And, in fact, you can switch out the pan drippings for any flavor broth you like to make any flavor corn starch gravy you like; so you can make brown gravy, turkey gravy, chicken gravy, vegetarian gravy, and more.
Keep in mind… The main flavoring for this flavorful gravy comes directly from the ham itself. So if you glaze your ham, like I did with my pineapple glazed ham, the flavoring from that glaze will go into your homemade gravy. Rule of thumb: If you’re using a sweet glaze, your gravy will be a little sweeter.
Why You May Want to Make Gravy with Cornstarch
If you’re like me and need to make gluten free ham gravy, then corn starch gravy is the key. Just make sure the brand of cornstarch you use is gluten-free, and make sure all your other ingredients are too.
Gravy made with cornstarch is a great condiment for Thanksgiving dinner, Christmas dinner, and Easter dinner.
Learning how to make gravy with cornstarch also makes a great addition to any ordinary family dinner, because it’s absolutely easy to make; and if you don’t have drippings, no problem. Use broth instead.
Ingredients and Substitutions Notes
Ham Drippings – You can get ham drippings when you bake any kind of ham, whether you bake a bone-in ham, spiral ham, fresh ham, etc. Of course, you can substitute broth for drippings if you’re not making a big roast; while ham broth may not have the excellent flavor real ham drippings have, it still makes a fine gravy. This goes for other types of meat, as well… You can use beef broth to make brown gravy, chicken broth for chicken gravy, vegetable stock to make vegetarian gravy, etc. You can also substitute other types of drippings, like turkey drippings to make homemade turkey gravy, pot roast drippings to make roast beef gravy, etc.
Cold Water
Heavy Whipping Cream – I use both cream and water in this recipe for ham gravy. You can replace the cream with milk, though, if preferred.
Cornstarch – It doesn’t take much cornstarch to make a good gravy, only about 3 tablespoons of cornstarch.
How to Make Ham Gravy with Cornstarch
There are different methods to making a good gravy, but this is my simple recipe…
First, whisk together the water, heavy whipping cream, and cornstarch in a liquid measuring cup and set aside.
Add the brown bits of ham drippings or pan juices from the roasting pan, to a medium saucepan, and start to cook on medium heat.
Add the cornstarch mixture, as a thickening agent, to the ham drippings in the pan, and continue whisking and stirring constantly ’til the mixture boils and the gravy begins to thicken.
Once your gravy has thickened, this hot liquid is ready to pour into a gravy crock or gravy boat for serving.
Now keep in mind, depending how salty your gravy is, you may need to add a little extra water to bring that saltiness down. If you add extra water, you’ll need to add a pinch up to a tablespoon of cornstarch (depending how much extra water you add), in order to keep a thicker consistency.
And always, always, if you’re going to add more cornstarch, whisk it together into a cornstarch slurry with liquid in a separate dish first to avoid lumps. Speaking of lumps…
How to Avoid Lumpy Gravy
Here’s the easy way and the best way to prevent lumps in your gravy…
It’s important to start by mixing together a slurry of cornstarch, water, and heavy whipping cream in a small small bowl or glass measuring cup. Whisking this together in the beginning will help prevent lumps in your gravy, as well as thicken the gravy.
Use a wire whisk to stir your gravy while it’s cooking. It’s pretty much a given that you may have a few lumps, but you can minimize them by whisking the gravy.
Also, there’s no hurry. Take your time to avoid any lumps in your delicious gravy.
Expert Tips and Recipe FAQ’s
Why is my gravy bland?
If your gravy happens to be bland upon tasting, you likely just need to add a little salt and pepper to give it added flavor.
How should you store leftover gravy?
Store it in an airtight container in the refrigerator.
Can you freeze ham gravy with cornstarch?
While you’d have no problem freezing a gravy made with water and flour, this gravy contains cream and will not freeze well. It will likely change the consistency when it thaws, so you’re better off not to freeze it.
More Recipes to Enjoy with Gravy
If you love ham gravy with cornstarch and making homemade gravy with cornstarch, you’ll love these recipes to go with your homemade gravy!
If you try this recipe, why not leave a star rating in the recipe card right below and/or a review in the comment section further down the page? I always appreciate your feedback. You can also follow me on Pinterest, Facebook, Instagram, and YouTube. And subscribe to my email list too!
How to Make Ham Gravy with Cornstarch
Learn how to make ham gravy with cornstarch and either drippings or broth. This easy recipe will help you cook and thicken any gravy, including ham, turkey, chicken, or brown gravy. It's especially good at Thanksgiving, Christmas, and Easter; but it's also great for family dinner!
Medium Saucepan
Whisk
Liquid Measuring Cup
Gravy Boat
1/4 cup water
1/4 cup heavy whipping cream
3 tablespoons cornstarch
2 cups ham drippings
First, whisk together the water, heavy whipping cream, and cornstarch in a liquid measuring up, and set aside.
Add the ham drippings* or pan juices from the roasting pan, to a medium saucepan, and start to cook on medium heat.
Add the cornstarch mixture to the ham drippings in the pan, and continue whisking and stirring constantly ’til the gravy begins to thicken.*
Once your gravy has thickened, it's ready to pour into a gravy boat for serving.
*You can substitute broth for drippings if you’re not making a big roast. You can use beef broth to make brown gravy, chicken broth for chicken gravy, etc. You can also substitute other types of drippings to make homemade turkey gravy, roast beef gravy, etc.
*Depending how salty your gravy is, you may need to add a little extra water to bring that saltiness down. If you add extra water, you’ll need to add a pinch of cornstarch, as well, in order to keep a thicker consistency. Always, always, if you’re going to add more cornstarch, whisk it together with liquid in a separate dish first to avoid lumps.
How to Avoid Lumpy Gravy
Here are a few tips to help prevent lumps in your gravy…
It’s important to start by mixing together the cornstarch, water, and heavy whipping cream in a small small bowl or glass measuring cup. Whisking this together in the beginning will help prevent lumps in your gravy.
Use a whisk to stir your gravy while it’s cooking. It’s pretty much a given that you may have a few lumps, but you can minimize them by whisking the gravy.
Also, there’s no hurry. Take your time to avoid any lumps in your gravy.
Condiments, Sauces & Dressings
American
cornstarch gravy, gluten-free ham gravy, gravy for ham, gravy recipe, ham gravy with cornstarch, how to make gravy with cornstarch, how to make ham gravy with cornstarch, how to thicken gravy with cornstarch, recipe for ham gravy
Learn everything you need to know about how to cook a ham in the oven. This baked spiral ham recipe with an easy, simple glaze is perfect for family dinners and holidays like Thanksgiving, Christmas, and Easter.
Every Christmas and Easter, since I learned how to bake a ham, it’s become our preferred main dish, or centerpiece at the dinner table. We like to have ham, whether we’re having company or not.
Even sometimes through the year, if prices at the grocery store are cheap enough, we’ll bake a whole ham and cut it up for lunch meat that week. I absolutely love a good ham, almost as much as a good Crock Pot pork roast.
While baked ham is fairly easy to make, there are lots of things to think about when you’re baking a ham in the oven. Things like how to keep it moist, how long do you cook a ham, and so on.
Hopefully, I’ll be able to answer all of your burning questions about how to cook a pre-cooked ham. But if you don’t find the answer to your questions, leave me a comment (I check them every so often), and I’ll reply back to you.
Why You’ll Love Cooking a Ham in the Oven
It makes an easy main dish for family dinner or a special occasion like Thanksgiving, Christmas dinner, or Easter dinne.
There will be leftovers, lots of leftovers! So that means lunch tomorrow, maybe even dinner, and just maybe lunch the next day too. Or breakfast, if you like ham and eggs.
Every bite is delicious, and it pairs well with so many different side dishes and vegetables.
Ingredients and Substitutions Notes:
For this oven-baked ham recipe, you’ll need just 3 ingredients…
A pre-cooked ham – My ham in this ham recipe is a 10-pound spiral cut ham. We’ll talk about selecting a ham a little further down.
Glaze packet – It usually comes with the ham, and you’ll find it in the packaging.
Water
How to Choose a Ham
Our grocery stores here make it pretty simple when it comes to selecting the right ham. They don’t offer a whole lot of choices. However, your store may offer an entire selection.
I’m going to keep it pretty simple here and talk about the basic ham types, so you can easily make a decision as to what kind of ham you’d like to serve.
Types of Ham
Bone-in ham – A bone-in ham is going to give you more flavor and texture. It’s also likely going to be sold as a half ham. It’ll still likely be a fairly large size, but you’ll only get half the ham. It will require carving.
Boneless ham – This ham is going to be more processed and have less flavor but a smoother texture. It will need sliced, but it won’t be as much work as carving around the bone.
Spiral-cut ham – A spiral-sliced ham is what I used to make this recipe. Spiral-cut hams are bone-in hams, and they sometimes have a glaze already applied. That’s something to think about if you’re wanting to make your own glaze; you’ll want to look for one that comes with a glaze packet instead, so you can opt out of the pre-made glaze.
Smoked ham – This type of ham usually has been smoked by the manufacturer.
Heritage ham or fresh ham – This type of ham usually comes from a local farmer who raises a heritage breed of pigs. You might even find fresh ham at a local butcher shop.
The size ham you need depends on how many people you’re cooking for and whether you’re serving a bone-in ham or boneless ham. Remember, the bone adds weight, that isn’t meat, to the ham.
For a bone-in ham, you’ll probably need about 3/4 to 1 pound per person; for a boneless ham, figure about 1/3 to 1/2 pound per person.
So, if you’re like me and cooking a 10-pound bone-in ham, you can probably feed 10-12 people. If it’s a 10-pound boneless ham, you can probably feed 15-20 people.
How to Cook a Ham in the Oven
Baking a fully cooked ham is a pretty straightforward, simple, and easy process. If this is your first time learning how to bake a ham, rest easy, because usually, your package will have all the instructions you need.
Before you get started, be sure to preheat the oven to 250° F.
Remove the ham from its packaging, and place it face down in the roasting pan for ham. Important Tip: If your package has any juices in it, pour them into the bottom of the pan, along with about a cup of water; this will help your ham to stay more moist.
Cover the ham tightly with foil (all of it but the bottom, so the juices can run out into the pan, and so juices can steam into the ham, keeping it more moist). Then bake the ham according to the instructions in the recipe card below (or according to your package instructions). Usually, you’ll bake it for 12 to 15 minutes per pound. So a 10-pound ham will bake for about 120+ minutes.
About 45 minutes before the end of your bake time, empty the ham glaze packet into a small saucepan, along with the water.
Bring your glaze to a boil over high heat while stirring constantly.
At this point, you’ll need to remove the glaze from the heat. And about 1/2 hour before end of cook time, remove your ham from the oven, take off the foil, and apply the glaze all over the outside of the ham with a basting brush. Then bake it, glazed and uncovered, for another 30 minutes or so.
When the ham is done, you can bring it out of the oven, let it cool just a bit, and use a sharp knife to slice it for serving.
Baked ham is the highlight of many a Sunday dinner or holiday get together, especially when it’s a juicy ham with loads of delicious flavor.
Expert Tips and Recipe FAQ’s
How long does it take to bake a ham?
Let’s talk about cooking time and internal temperature when you’re learning how to bake a ham in the oven. Always be sure to look at the packaging instructions for your specific ham, and follow what it says for cook time. This spiral ham came from Aldi, and it said 12 to 15 minutes per pound. So being a 10-pound ham, it needed to cook for about 2 hours (120 minutes) or more, but not too long or it’ll dry out. An 8-pound ham would take about 96+ minutes to bake. A 12-pound ham, 144+ minutes. And so on and so forth. It’s best to have a meat thermometer on hand. According to the USDA, spiral-cut cooked hams that were packaged in processing plants under USDA inspection must be heated to 140 °F as measured with a food thermometer (165 °F for leftover spiral-cut hams or ham that has been repackaged in any other location outside the plant). Cook-before-eating hams or fresh hams must reach 145 °F (with a 3-minute rest time) to be safely cooked before serving. Read more of their Ham and Food Safety instructions.
How do you cook a spiral ham without drying it out?
There are a few specific steps you can take to keep a fully cooked ham from drying out while it’s baking… – Like I mentioned above, save ham juices from packaging, and pour them into the bottom of the pan; this will help your ham to stay moist. – You can put a little less than a cup of water or some kind of stock/broth in the bottom of the pan before baking if you want. This will also add moisture. – Covering your ham with foil helps it to retain moisture, as well. Of course, you can also bake it in a roasting bag.
How do you store baked ham?
You need to store baked ham in an airtight container in the fridge; it should keep for 3-5 days.
Can you freeze baked ham?
Yes, you can freeze a pre-cooked or baked ham. I suggest cutting your ham up into smaller portions and freezing it in airtight containers or freezer bags with aluminum foil; that way it’s easier to get those smaller portions out and re-heat them. When it’s time to re-heat, just make sure you have plenty of time for thawing, especially if you’re thawing a big, huge ham. Keep in mind, according to the USDA, you can store a spiral-cut ham or ham leftovers in the fridge for about 3 to 5 days; and you can freeze them for about 1 to 2 months.
What to Do with a Ham Hock
Don’t just throw away that ham hock or leftover bone. Repurpose and make something delicious.
15 bean soup with ham is a great way to use a ham bone and make something comforting. My mom and grandma always used ham hock to make a big pot of pinto beans, and we’d eat it with cornbread.
What to Do with Ham Leftovers
Here are a few ideas for what to do with all that leftover ham.
If you try this recipe, why not leave a star rating in the recipe card right below and/or a review in the comment section further down the page? I always appreciate your feedback. You can also follow me on Pinterest, Facebook, Instagram, and YouTube. And subscribe to my email list too!
How to Cook a Ham in the Oven
Everything you need to know about how to cook a ham in the oven. Baked spiral ham recipe with an easy, simple glaze, perfect for holidays.
Roasting Pan
Aluminum Foil
Meat Thermometer
Small Saucepan
Basting Brush
1 spiral cut or half bone-in ham w/ ham juices (*)
1 cup water (*)
Glaze:
1 glaze packet (*)
2 tablespoons water
Preheat the oven to 250° F.
Remove the ham from its packaging, and place it face down in the roasting pan.
If your package has any juices in it, pour them into the bottom of the pan, along with about 1 cup of water; this will help your ham to stay more moist.
Cover the ham tightly with foil (all of it but the bottom, so the juices can run out into the pan).
Bake the ham according to the instructions in your packaging; usually, it will require you to bake it for 12 to 15 minutes per pound. So a 10-pound ham will bake for about 120+ minutes.
About 45 minutes before the end of your bake time, empty the ham glaze packet into a small saucepan, along with 2 tablespoons water.
Bring the glaze to a boil over high heat while stirring constantly.
Remove the glaze from the heat. About 1/2 hour before end of cook time, remove the ham from the oven, take off the foil, and apply the glaze all over the outside of the ham with a basting brush.
Finish baking the ham, glazed and uncovered, for another 30 minutes or so.
When the ham is done, you can bring it out of the oven, let it cool just a bit, and use a sharp knife to slice it for serving. Store any leftovers in an airtight container in the fridge.
*I used a 10 pound spiral cut ham for this recipe.
*I use a little less than a cup of water.
*The glaze packet usually comes with the ham, and you’ll find it in the packaging.
How Long to Cook a Ham in the Oven
Always be sure to look at the packaging instructions for your specific ham, and follow what it says for cook time. This spiral ham said 12 to 15 minutes per pound. So being a 10-pound ham, it needed to cook for about 2 hours (120 minutes) or more, but not too long or it’ll dry out. An 8-pound ham would take about 96+ minutes to bake. A 12-pound ham, 144+ minutes. And so on and so forth. It’s best to have a meat thermometer on hand.
According to the USDA, spiral-cut cooked hams that were packaged in processing plants under USDA inspection must be heated to 140 °F as measured with a food thermometer (165 °F for leftover spiral-cut hams or ham that has been repackaged in any other location outside the plant). Cook-before-eating hams or fresh hams must reach 145 °F (with a 3-minute rest time) to be safely cooked before serving. Read more of their Ham and Food Safety instructions.
Ways to Keep a Spiral Ham from Drying Out
Like I mentioned above, save the ham juices from the packaging, and pour them into the bottom of the pan; this will help your ham to stay moist.
You can put a little less than a cup of water or some kind of stock/broth in the bottom of the pan before baking if you want. This will also add moisture.
Covering your ham with foil helps it to retain moisture, as well. Of course, you can also bake it in a roasting bag.
dinner, main dish, Pork Recipes
American
baked ham, Christmas ham, Easter ham, fully cooked ham, glazed ham, ham, ham in the oven, ham recipe, how do you heat a precooked spiral ham, how do you warm up a fully cooked ham, how to bake a ham, how to cook a ham in the oven, how to cook a pre-cooked ham, Thanksgiving ham
Learn how to make hash brown casserole with Corn Flakes, filled with cheesy shredded potatoes and a crispy topping. This quick and easy side dish recipe is perfect for breakfast, family dinner, or a holiday spread. Feed a crowd and watch them go back for seconds!
Back in the day, I remember many a church potluck where someone would bring the most flavorful hash brown casserole ever. Both that potato casserole with Corn Flakes and the green bean casserole were always one of my favorite things about potlucks and special occasions!
Thumbing through my family cookbook, I realized my aunt added her family favorite recipe for cheesy hashbrown casserole. And let me tell you, this cheesy side dish brings back so many delicious memories.
Now some might call this cheesy funeral potatoes. My aunt calls it sour cream potatoes. I’m just calling it like it is… a cheesy hashbrown casserole recipe.
What You’ll Love about This Side Dish
My goodness, how cheesy delicious these cheesy potatoes are.
I love using my slow cooker to make this casserole too. CrockPot funeral potatoes are the ultimate comfort food.
It’s a great recipe for the perfect side dish. This crowd favorite cheesy potato casserole is perfect for Thanksgiving, Christmas, and that one Easter side dish everyone will love! It’s a family favorite for Sunday dinner and family gatherings served up alongside a CrockPot pork roast!
What Is Hash Brown Casserole Made Of?
Hash brown casserole is a potato dish that’s very cheesy and has delicious flavor, thanks in part to the sour cream. But it also has a mix of ingredients like soup, onion, and butter that give it tremendous flavor, as well.
It’s a comforting side dish served at church potlucks, family gatherings, holiday dinners, and after-funeral luncheons too, hence the name funeral potatoes. Cracker Barrel even serves cheesy hashbrown potatoes on their menu.
Ingredients and Substitutions Notes:
You’ll need a few simple ingredients to make this simple casserole…
Frozen Hash Browns – Be sure to thaw them beforehand; just follow the instructions on the packaging, and allow ample time for thawing. You can use shredded or cubed hash browns, but I highly recommend shredded for the texture they give the casserole.
Minced Garlic – You can either mince up garlic cloves or use already minced garlic found in most produce sections.
Cream of Chicken Soup – You can also use cream of mushroom soup if you prefer, but it will change the flavor just a bit.
Yellow Onion – While we prefer to use yellow onion for its less sweet flavor and to give a little kick to every bite, you can also use a sweet onion.
Sour Cream – I recommend whole sour cream rather than low fat. You can also substitute Greek yogurt instead.
Sharp Cheddar Cheese – I actually prefer to use extra sharp cheddar cheese for added flavor (and it’s usually what I have on hand). Lots of cheese gives lots of flavor.
Corn Flakes – You can also substitute potato chips for the Corn Flake mixture.
How to Make Hash Brown Casserole with Corn Flakes
In a large bowl, combine the hash browns, melted butter, salt, pepper, minced onion, cream of chicken soup, sour cream, and shredded cheese.
In a smaller mixing bowl, mix together the slightly crushed Corn Flakes and melted butter.
Sprinkle the buttery CornFlakes over the top of the casserole in the casserole dish.
Bake uncovered at 350° F for about 1 hour, ’til the casserole is golden brown.
And that’s it! When it’s done, this easy hash brown casserole is ready to serve while warm.
Expert Tips and Recipe FAQ’s
How do you crush Corn Flakes?
To quickly crush the Corn Flakes, just put them in a quart sized plastic bag, and seal the bag, making sure there’s no air left in it. Then just crush the cereal with your hands, or with a rolling pin. For this recipe, they just need to be slightly crushed, so no need to spend a lot of time on this.
How do you make this a gluten-free hash brown casserole?
Sadly, regular cream of chicken soup is NOT gluten-free. And you may want to watch which hash browns you use too, because some have a coating that makes them not gluten-free, as well. BUT there is hope for all of us gluten-free peeps. There are gluten-free hash browns; just read the labels on the packaging before purchasing. AND there are options for gluten-free cream of chicken soup, as well. So you can make this a gluten-free hash brown casserole if needed.
How do you store leftover casserole; and can hash brown casserole be made ahead?
Yes, you can make this casserole the night before, the day before, etc. You can even freeze hash brown casserole. Just be sure to store leftover casserole in an airtight container so it doesn’t get freezer burn.
Why is my hash brown casserole watery?
The answer is that you likely didn’t thaw the hash browns beforehand. This is why it’s so important to allow adequate time for thawing before mixing and baking.
What Goes with Corn Flake Casserole?
Potato casserole with Corn Flakes pairs well with these delicious side dish recipes:
I’ve joined up with a bunch of blogger friends for a Friendsgiving Virtual Potluck! Be sure to check out the recipes below for wonderful Friendsgiving and Thanksgiving recipe and craft ideas!
If you try this recipe, why not leave a star rating in the recipe card right below and/or a review in the comment section further down the page? I always appreciate your feedback. You can also follow me on Pinterest, Facebook, Instagram, and YouTube. And subscribe to my email list too!
Hash Brown Casserole with Corn Flakes
How to make hash brown casserole with Corn Flakes, filled with cheesy shredded potatoes and a crispy topping. Quick and easy side dish recipe.
Large Mixing Bowl
Cutting Board
Chef's Knife
9×13 Baking Dish
30 ounces frozen hash browns (thawed)
1/2 cup salted butter (melted)
1 teaspoon salt
1/2 teaspoon ground black pepper
2 cloves garlic (minced)
1/2 cup yellow onion (minced)
10.5 ounces cream of chicken soup
1 pint sour cream
2 cups sharp cheddar cheese
Corn Flake Topping:
2 cups Corn Flakes (slightly crushed)
1/4 cup salted butter (melted)
Pre-heat the oven to 350° F.
In a large bowl, combine the hash browns, melted butter, salt, pepper, minced garlic and onion, cream of chicken soup, sour cream, and shredded cheese.
Spread the potato mixture in a greased 9×13 baking dish.
In a smaller mixing bowl, mix together the slightly crushed Corn Flakes and melted butter.
Sprinkle the buttery Corn Flakes over the top of the casserole in the casserole dish.
Bake uncovered at 350° F for about 1 hour, 'til the casserole is golden brown.
Serve while warm.
*I prefer to use extra sharp cheddar for added flavor, but sharp is fine, as well.
*To quickly crush the Corn Flakes, just put them in a quart sized plastic bag, and seal the bag, making sure there’s no air left in it. Then just crush the cereal with your hands, or with a rolling pin.
You can make this a gluten-free hash brown casserole by using gluten-free hash browns (watch the packaging) and a gluten-free cream of chicken soup.
You can make ahead and freeze hash brown casserole. Just be sure to store it in an airtight container so it doesn’t get freezer burn.
Side Dish
American
cheesy hash brown casserole recipe, cheesy hashbrown casserole, cheesy potato casserole, corn flake casserole, funeral potatoes, funeral potatoes recipe, hash brown casserole, hash brown casserole with Corn Flakes, hash brown potato casserole, hashbrown casserole recipe, how to make cheesy hashbrown casserole, potato casserole with Corn Flakes
Bake up a Jiffy corn casserole with cream cheese and bacon. Simple and easy make ahead recipe that’s cheesy and delicious. Perfect side dish for a crowd!
Corn casserole with cream cheese is easily one of my family’s favorite side dish recipes during the holiday season. We usually make it every Thanksgiving, also Christmas and Easter dinner too.
It’s the perfect complement to a nice ham or turkey dinner. And just like our Mexican corn casserole, it has bacon too. Because we all know, bacon makes everything better!
We also make this corn casserole with Jiffy mix. It gives it a kind of breading but in a very moist, delicious sort of way, and it’s all mixed in with the rest of the ingredients.
What you end up with is a very creamy, flavorful, cheesy side dish you’ll likely add to your holiday menu from henceforth and forevermore.
I like to make it in my slow cooker too, making it easy to transport and keep warm. In fact, I might love CrockPot corn casserole a tad bit more, if that’s even possible.
Let’s talk about how to make this scrumptious corn casserole with bacon.
[mv_video doNotAutoplayNorOptimizePlacement=”false” jsonLd=”true” key=”fsuik4z8g6heczxsdiks” sticky=”false” thumbnail=”https://mediavine-res.cloudinary.com/v1569162674/yjcsqutxdltnzxkjmfby.jpg” title=”Jiffy Corn Casserole with Cream Cheese and Bacon” volume=”100″]
WHERE CAN I FIND THE ACTUAL RECIPE CARD?
If you’d rather skip all of my cooking tips, important cooking info for this recipe, and similar recipe ideas – and get straight to the recipe – just scroll down to the bottom, where you’ll find a printable recipe card.
IS JIFFY CORN CASSEROLE THE SAME AS JIFFY CORN PUDDING?
Yes, it’s the same as corn pudding. You’re basically mixing a bunch of ingredients together to create a creamy side dish.
The casserole isn’t fully stable either, like a slice of corn bread would be. It requires you to spoon it onto your plate, versus eating with your hands.
You can make corn casserole ahead of time and warm it up for your holiday dinner.
Before you get started mixing it up, be sure to cook the bacon and set it aside. You’ll need 5 to 6 slices, so you can even cook a little extra at breakfast and stick it in the fridge ’til you need it.
Also, you’ll need to mince the green onions and have those ready to go.
Here are the steps for making it…
In a medium saucepan, add the cream cheese, heavy whipping cream, salted butter, sugar, and sour cream. Cook the mixture on low heat until the cream cheese is fully melted. Use a heat resistant spatula to constantly stir and keep the mixture from scorching.
Pour the casserole mixture into the greased baking dish, making sure it’s evenly spread throughout the dish, and bake according to the instructions in the recipe card below.
Finally, add shredded cheese to the top of the casserole, and bake an additional 10 minutes.
Serve the deliciously cheesy corn casserole while warm and enjoy! It’s so good!
IS CORN CASSEROLE GLUTEN-FREE?
It’s not gluten-free if made with ordinary Jiffy mix. BUT… That doesn’t mean you can’t make it gluten-free.
In fact, I found a great recipe for Gluten Free Jiffy-Style Corn Muffin Mix over at Gluten Free on a Shoestring. I can’t wait to try substituting this cornbread mix for the Jiffy mix in my own casserole this Thanksgiving.
CAN YOU FREEZE CORN CASSEROLE?
Absolutely, yes, you can! The ingredients used in corn casserole are all pretty conducive to freezing.
Bake up a Jiffy corn casserole with cream cheese and bacon. Simple and easy make ahead recipe that's cheesy and delicious. Perfect side dish for a crowd!
Medium Saucepan
Heat-Resistant Spatula
Large Mixing Bowl
9×13 Baking Dish
8 ounces cream cheese
1 cup heavy whipping cream
4 tablespoons salted butter
1 teaspoon cane sugar
1 tablespoon sour cream
6 slices bacon (cooked and crumbled)
3 green onions (minced)
32 ounces frozen corn
1/2 box JIFFY Corn Muffin Mix
1 teaspoon salt
1/2 teaspoon ground black pepper
1/2 cup cheddar cheese (shredded)
1/2 cup Colby Jack cheese (shredded)
Pre-heat the oven to 325° F.
In a medium saucepan, add the cream cheese, heavy whipping cream, salted butter, sugar, and sour cream.
Cook the mixture on low heat until the cream cheese is fully melted. Constantly stir to keep the mixture from scorching.
In a large mixing bowl, mix together the cream cheese mixture, crumbled bacon, minced green onions, frozen corn, JIFFY Corn Muffin Mix (1/2 a box), salt, and pepper.
Grease a 9×13 baking dish with cooking spray.
Pour the casserole mixture into the baking dish, making sure it's evenly spread throughout the dish.
Bake at 325° F for about 55 minutes, or until the mixture is set.
Add the shredded cheese to the top of the casserole, and bake an additional 10 minutes.
Serve while warm and enjoy!
*If you’re feeding a smaller crowd, just cut the recipe ingredients in half and bake it in an 8″x8″ baking dish.
How to make easy deviled eggs in 30 minutes or less with this simple, classic recipe, the best ever for Easter, holidays, and summer get togethers!
Making deviled eggs has never been easier than this. In fact, you can probably make them almost as fast as your family will eat them.
My husband, Dan, came up with this deviled eggs recipe a few years back, so along with bacon Ranch deviled eggs, it’s one we’ve made over and over again. We like to make them for Easter and other occasions, especially summer holidays and potlucks.
While we make these deviled eggs with Miracle Whip, we do occasionally switch up the recipe, and I’ll share a few ideas for toppings and mix-ins below.
If you’d rather skip all of my tips for how to make deviled eggs, important info for this recipe, and similar recipe ideas – and get straight to the deviled eggs recipe – just scroll down to the bottom, where you’ll find a printable recipe card.
WHAT ARE DEVILED EGGS?
Deviled eggs are boiled eggs that have been peeled, cut in half, and filled with a mixture made out of the yolks.
Usually the yolks are mixed with things like mayo, Miracle Whip, mustard, paprika, and sometimes other ingredients like bacon.
They’re usually served at holiday dinners, especially on special occasions like Easter, the 4th of July, etc.
They go by other names too, like stuffed eggs, Russian eggs, dressed eggs, salad eggs, and mimosa eggs.
WHY ARE THEY CALLED DEVILED EGGS?
As I was making this recipe, my oldest son asked a really good question. Why do we call them deviled eggs?
So, of course, we had to look it up, because honestly, I wasn’t really sure myself. I thought I had an idea, though, and I was close.
In the 1800’s, the word deviled had to do with hot and spicy foods. And according to What’s Cooking America’s Culinary Dictionary, the word deviled describes food that is dark, rich, chocolate, spicily piquant, or stimulating… Means a highly seasoned, chopped, ground, or whole mixture that is served hot or cold.
History actually has a fascinating read on The Ancient History of Deviled Eggs, dating them all the way back to the days of ancient Rome.
TIPS FOR HOW TO MAKE DEVILED EGGS
First of all, you want to determine how many eggs you’ll need, based on how many people you’ll be feeding. We usually use about a dozen eggs, unless we’re making them for a big potluck, in which case we make more.
Once they’re boiled, peeled, and cooled, the process is really simple.
HOW TO BOIL EGGS FOR DEVILED EGGS
You can simply boil eggs in water on the stove for about 12 minutes or a little longer.
Or if you have an Instant Pot, you can follow this recipe for easy peel hard boiled eggs.
Once you’ve cooled and peeled the eggs, they’re ready for making deviled eggs.
HOW DO YOU MAKE DEVILED EGGS?
Now you’re ready to prep the eggs and mix up the yolk mixture.
Slice each egg in half, and remove each egg yolk, setting each egg white aside.
Mash the yolks in a mixing bowl, and combine them with Miracle Whip. You can mash them with a hand mixer or just by hand.
Mix the mustard into the yolk mixture.
Then add pepper and stir it all up again.
Spoon the creamy yolk mixture back into each halved egg white.
Optional last step: Dust each egg with a dash of paprika.
Easy deviled eggs are great for family dinners, church potlucks, holiday parties, and sometimes just a yummy snack.
DEVILED EGGS TOPPINGS AND ALTERNATIVE IDEAS
You can tweak this recipe to add a taste of this or that. Just a few ideas…
Food Network really gives the lowdown in Easter Eggs 101, and it answers this very question.
Normally, in our house, they don’t last more than a day. But 3 to 4 days max are how long I’d keep them.
CAN DEVILED EGGS BE FROZEN?
While you can freeze the egg yolks themselves or the yolk mixture, there’s no reason to do that without the egg whites. Freezing the egg whites would ruin the flavor and texture.
So, no, I don’t recommend freezing them at all.
HOW TO TRANSPORT DEVILED EGGS
When looking for ways for how to store deviled eggs and transport them (because it’s likely you’re making them for a get together), there are a few options.
Make chocolate covered Ritz crackers with peanut butter in a jiffy. Quick and easy no bake recipe, only 3 ingredients, and they’re the perfect bite-sized candy for the holidays, family gatherings, parties, and celebrations!
Ritz cookies are another one of our favorite treats during the holiday season, and I’ve made them for years. My family can’t go a Christmas without making peanut butter Ritz crackers and rice crispy peanut butter balls; they make great Valentine’s Day and Easter candies too.
Every single Christmas when I was a kid, my mom would make chocolate covered Ritz crackers with peanut butter, along with this easy buckeye recipe.
I remember we’d store these crunchy little Ritz cracker peanut butter cups in the stairwell of our old farmhouse because there was no heat and they’d stay nice and chilled there. My bedroom was at the top of said stairwell, so of course, I’d help myself as I climbed past on the way to my room.
So Many Reasons to Love This Christmas Candy
Chocolate Ritz crackers are so easy to make! And they’re no bake cookies, so they’re quick too! It’s super easy to make a double batch or triple batch of these delicious goodies.
You need a grand total of 3 ingredients to make them, unless you want to get creative and add extras, like festive sprinkles or sea salt flakes. But they’re delicious just the way they are.
I mean, if you think about it, what goes together better than chocolate and peanut butter?
As a sweet and salty treat, they’re the best of both worlds. You get a sweet snack, while at the same time, a salty snack. Yum!
They’re the perfect no bake treat for celebrations, holidays, and special occasions. They make an especially festive holiday cookie tray.
Along with a cold glass of milk, they make the perfect yummy treats for Santa.
Chocolate Melting Wafers – You can also use semi-sweet chocolate chips, chocolate baking bars, or almond bark.
How to Make Chocolate Covered Ritz Crackers with Peanut Butter
First things first, you’ll need to prep by placing a sheet of wax paper or parchment paper on a cookie sheet. Then…
Use a knife to spread peanut butter between 2 Ritz Crackers, sandwiching the peanut butter crackers together.
Set each sandwich cookie on the wax paper covered baking sheet, in preparation for dipping.
How to Prep Chocolate for Dipping
You’ll need melted chocolate that’s ready to go. Depending on the chocolate you decide to use, you can melt it a few different ways:
Melt it using a double boiler on the stove – The double boiler method is basically a pan inside of another pan with boiling water in the bottom pan. It allows for more even melting without burning, and it also keeps the chocolate warm for dipping.
Melt it in the microwave using a microwave-safe bowl or Pyrex measuring cup – This is usually the route I go. I like to use my glass measuring cup for melting the chocolate wafers in the microwave, according to package directions, usually in 15 to 30 second intervals, stirring after each increment ’til the chocolate is melted. The depth of my measuring cup makes dipping a lot easier
Or enlist the help of your family, and use a fondue pot for dipping.
Also, depending on the type of chocolate used (chocolate almond bark, candy melts, or chocolate chips), some people like to use shortening or paraffin wax, adding it into their chocolate as it melts. This allows for a thinner coat and stretches the chocolate a little further. If you use a good quality chocolate, you likely won’t need that extra step.
I started using Ghirardelli Dark Melting Wafers a few years ago, and I love them so much better than almond bark. They’re so much easier to work with, and they have fantastic flavor.
How to Dip Chocolate Peanut Butter Ritz Crackers
Once the chocolate is melted, dip each cracker sandwich in the melted chocolate, using the forks or tongs.
Shake off any excess chocolate before placing the chocolate peanut butter Ritz cracker cookies back on the wax paper covered sheet pan to dry.
When all your crackers have been dipped, chill them in the freezer for about 15 to 20 minutes. Remove them from the freezer and place them in an airtight container or festive Christmas tin (lined with wax paper) in the fridge.
Expert Tips and Recipe FAQ’s
How should you store chocolate Ritz crackers with peanut butter?
Store in an airtight container in the fridge. They can be kept out at room temperature, but they won’t keep as long as they will if you keep them in the fridge or freezer. Kept chilled, they’ll last up to 2 weeks.
Can you freeze Ritz cracker cookies?
Yes, you can! Just be sure to keep them in an airtight container in between layers of wax paper, to avoid freezer burn.
Can I use a different nut butter?
Of course! You can use almond butter, cashew butter, etc.
Alternative Recipe Variations for Ritz Cookies
Use marshmallow fluff instead of peanut butter in between the crackers.
Add a layer of marshmallow fluff, along with peanut butter, for an even creamier treat.
Use crunchy peanut butter instead of creamy, especially if you like a crunchier treat. Or use a different nut butter, like almond butter, cashew butter, etc.
Double or triple the layers on your cracker sandwiches, using more crackers and more peanut butter for a triple layer treat.
Drizzle the dipped crackers with white chocolate or dark chocolate. Or double dip, dipping half of each cracker in chocolate and half in white chocolate… You get the idea.
Add sprinkles, sea salt flakes, or festive sugar on top of each of your Ritz crackers dipped in chocolate, before the chocolate hardens.
If you try this recipe, why not leave a star rating in the recipe card right below and/or a review in the comment section further down the page? I always appreciate your feedback. You can also follow me on Pinterest, Facebook, Instagram, and YouTube. And subscribe to my email list too!
Chocolate Covered Ritz Crackers with Peanut Butter
Make chocolate covered Ritz crackers with peanut butter in a jiffy. Quick and easy no bake recipe perfect for holidays and parties!
Wax Paper
Baking Sheet
Double Boiler
Pyrex Measuring Cup
Candy Dipping Tools
Festive Christmas Tins
3 sleeves Ritz Crackers
1 cup creamy peanut butter
20 ounces dark chocolate melting wafers ((or chocolate chips))
Line a baking sheet with wax paper.
Use a table knife to spread peanut butter between 2 Ritz Crackers, sandwiching the crackers together.
Set each sandwich cookie on the wax paper lined baking sheet, in preparation for dipping.
Add the chocolate to a microwave-safe measuring cup or bowl; and melt, starting at 30 seconds, then stirring every 15-20 seconds, 'til melted and smooth.
Using 2 forks or tongs, dip each cracker sandwich in the melted chocolate; shake any excess chocolate off before placing back on the wax paper to dry.
When all the crackers have been dipped, chill them in the freezer for about 15 to 20 minutes.
Remove them from the freezer, and place them in an airtight container. They're best stored in between layers of wax paper in an airtight container in the fridge for up to 2 weeks.
Depending on the type of chocolate used (chocolate almond bark, candy melts, or chocolate chips), some people like to use shortening or paraffin wax, adding it into their chocolate as it melts. This allows for a thinner coat and stretches the chocolate a little further. But if you use a good quality chocolate, you likely won’t need that extra step. I started using Ghirardelli Dark Melting Wafers a few years ago, and I love them so much better than almond bark. They’re so much easier to work with, and they have fantastic flavor.
You can also melt the chocolate using a double boiler on the stove. This is basically a pan inside of another pan with boiling water in the bottom pan. It allows for more even melting without burning, and it also keeps the chocolate warm for dipping.
Sweet Snacks
American
chocolate covered peanut butter crackers, chocolate covered Ritz crackers, chocolate Ritz crackers, how to make Ritz cracker cookies, how to make Ritz peanut butter chocolate cookies, peanut butter Ritz crackers dipped in chocolate, Ritz cookies, Ritz cracker Christmas cookies, Ritz cracker cookies, Ritz cracker cookies with peanut butter and chocolate, Ritz crackers dipped in chocolate, sweet and salty treat
Pork Roast Recipe – Deliciously easy pork roast recipe with vegetables and gravy, perfect for dinner tonight. How to cook a pork roast with simple seasoning in the oven.
My house is full of meat eaters. They love their meat, so I try to occasionally add a roast to our weekly menu, or baked chicken drumsticks.
A good pork roast recipe can stretch to more than just one meal, especially if you’re careful about portion sizes. That means leftover pork for the win when it comes to more dinnertime meals (or leftovers for lunch).
Not only that, but a pork roast with vegetables can mean a one pot meal. I love cooking pork roast in the Crock Pot because it’s an easy meal I can set and forget.
It’s also delicious with a good side of mashed potatoes or green beans or even a colorful salad. I’ll also share with you how to make a simple gravy to go with your roast.
If you’d rather skip all of my cooking tips, important cooking info for this recipe, and similar recipe ideas – and get straight to the pork roast recipe – just scroll down to the bottom, where you’ll find a printable recipe card.
TIPS FOR HOW TO COOK A PORK ROAST
This recipe is pretty simple. I use chicken broth, a yellow onion, and garlic for simple seasoning and flavoring.
Your first step is to sear the roast in a Dutch oven. You want to brown all sides of your roast, and this usually takes about 10 minutes or so to do.
Once it’s seared, you can add all of the prepared vegetables into the pan all around the meat. We like to add potatoes, carrots, onion, and garlic.
Then just bake the roast until it’s fully cooked.
I didn’t find it necessary with this roast because we cover it while cooking so it steams. But, depending on the size of your roast, you may want to parboil potatoes and veggies just a bit, so they get completely cooked in the amount of time they’ll cook with the meat.
You can also make a simple pork gravy with some of the leftover pork broth (instructions included in the recipe below).
PORK ROAST COOKING TIME
How long to cook pork roast really depends on a number of factors, including both your oven and the size of your roast.
We cooked ours for close to an hour or more, or until it came to temp.
SPEAKING OF PORK TEMPERATURE…
You want to make sure that it reaches the recommended internal temperature for pork, which is 145 to 160°F. We prefer not to mess around with pork and always let it come to temp before eating.
Use a meat thermometer to check the temperature of your roast before removing it from the oven.
If you love this pork roast as much as I do, please write a 5 star review, and help me share the recipe on Facebook and Pinterest! If you make the recipe, be sure to share that you tried it on Pinterest. I love when readers share feedback!
CONNECT WITH ADVENTURES OF MEL!
Be sure to follow me on social, so you never miss a post!
Deliciously easy pork roast recipe with vegetables and gravy, perfect for dinner tonight. How to cook a pork roast with simple seasoning in the oven.
Pork Roast:
1 tablespoon bacon grease
4 1/12 pounds pork roast (*)
2 cups chicken broth
1 medium yellow onion (sliced)
4 cloves garlic (minced)
5 medium potatoes (chopped or chunked)
5 medium carrots (peeled and chopped)
Pork Gravy:
1 cup pork broth
1/2 cup unbleached all-purpose flour
1 1/2 cups water
1 tablespoon salt
1 teaspoon ground black pepper
Pre-heat the oven to 350°F.
Add bacon grease to the heated Dutch oven.
Sear the roast in the Dutch oven, being sure to brown all sides. This may take about 10 minutes or so.
Pour the chicken broth over the roast.
Add the sliced onion, minced garlic, potatoes, and carrots all around the roast.
Cover and bake at 350°F for about an hour, or until it reaches an internal temperature between 145° to 160°F.
Once your roast and vegetables are fully cooked, you can make a simple gravy. You can make it right in the same pan after removing the contents, or in a different skillet.
Whisk together the pork broth and flour over low to medium heat.
Then add water, salt, and pepper to the broth mixture, and constantly stir until the gravy starts to thicken.
Once the gravy has thickened enough to form a gravy, it’s ready to eat.
Pair the gravy with the pork roast and vegetables.
*This roast was a bone in pork roast.
Pork Recipes
American
cooking pork roast, how to cook a pork roast, pork recipes, pork roast, pork roast in oven, pork roast recipe, pork roast with vegetables
Pork Tenderloin – How to cook pork tenderloin, roasted to a juicy perfection in the oven. Easy recipe for a delicious dinner with simple seasonings and potatoes.
Growing up in a meat and potatoes household, I have a love relationship with meat and potatoes, even though we don’t always eat the second part of that equation. My guys love meat too, so we occasionally gravitate toward pork for dinner.
If you’d rather skip all of my cooking tips, important cooking info for this recipe, and similar recipe ideas – and get straight to the pork tenderloin recipe – just scroll down to the bottom, where you’ll find a printable recipe card.
FIRST, LET’S TALK ABOUT THE DIFFERENCE BETWEEN PORK LOIN AND PORK TENDERLOIN
Because yep, there is a difference. Don’t feel bad if you didn’t know, because I didn’t realize it either; I thought they were one and the same.
I share this with you because I want to make sure you get the right cut of meat for this recipe.
As it happens, pork loin is speaking about more of a pork roast, while pork tenderloin is more of a boneless filet. Pork tenderloin is that longer, thinner piece of pork that almost looks like a long roll.
This pork tenderloin recipe is really simple, and we actually only use a couple of seasonings that you likely already have in your kitchen.
Your first step is to dry the pork tenderloin with a paper towel. It’ll likely have a little bit of water in the package with it, so just pat it dry.
Then rub it down with the olive oil.
Sprinkle the salt and pepper over the entire pork tenderloin, and rub it in well.
Sear the meat in a large skillet (preferably a skillet you can also bake it in), being sure to turn it so that both sides slightly brown.
And now you’re ready to roast it.
Note: You’ll want to parboil potatoes and veggies just a bit, so they get completely cooked in the short amount of time they’ll cook with the meat.
PORK TENDERLOIN COOKING TIME
How long to cook pork tenderloin really depends on a number of factors, including both your oven and the size of your tenderloin.
We cooked ours for about 25 to 30 minutes.
You want to make sure that it reaches the recommended internal temperature for pork, which is 145 to 160°F. We prefer not to mess around with pork and always let it come to temp before eating.
Cute Pot Holders – Ok, so they don’t have to be cute, but it certainly doesn’t hurt anything.
PORK TENDERLOIN RECIPE
If you love this baked pork tenderloin as much as I do, please write a 5 star review, and help me share the recipe on Facebook and Pinterest! If you make the recipe, be sure to share that you tried it on Pinterest. I love when readers share feedback!
CONNECT WITH ADVENTURES OF MEL!
Be sure to follow me on social, so you never miss a post!
How to cook pork tenderloin, roasted to a juicy perfection in the oven. Easy recipe for a delicious dinner with simple seasonings and potatoes.
Pork Tenderloin:
2 pounds pork tenderloin (*)
4 tablespoons olive oil
2 teaspoons smoked sea salt
2 teaspoons ground black pepper
Potatoes (Optional):
5 whole potatoes (chopped)
2 tablespoons olive oil
1 teaspoon salt
1/2 teaspoon ground black pepper
2 tablespoons fresh parsley (chopped or minced)
Pre-heat the oven to 400°F.
If you want to roast potatoes or veggies with your pork tenderloin, now is the time to prep them and get them ready.**
Pat the pork tenderloin dry with a paper towel.
Rub it down with olive oil.
Sprinkle the smoked sea salt and black pepper over the tenderloin, rubbing the seasonings in.
Sear the meat in a large skillet (preferably a skillet you can also bake it in), being sure to turn the tenderloin halfway thru searing, so that both sides slightly brown.
Place the parboiled potatoes and veggies in the skillet with the tenderloin, sprinkling olive oil, salt, and black pepper over the veggies.
Bake everything at 400°F for about 25 to 30 minutes, or until it reaches the recommended internal temperature of 145 to 160°F with a meat thermometer.***
Optional step: In the last 5 to 10 minutes of baking, sprinkle parsley over the entire skillet.
Once the pork tenderloin is fully cooked, remove it from the oven.
Slice the tenderloin and serve with the potatoes and veggies.
*This recipe is based on the size of about a 2 pound pork tenderloin.
**Wash, chop, and parboil potatoes and veggies, so they’re ready to go.
***How long to cook pork tenderloin really depends on a number of factors, including both your oven and the size of your tenderloin.
Pork Recipes
American
baked pork tenderloin, how long to cook pork tenderloin, how to cook pork tenderloin, oven roasted pork tenderloin, pork recipes, pork tenderloin, pork tenderloin cooking time, pork tenderloin recipe, roasted pork tenderloin