Category: Recipes

  • Heart Shaped Valentine Rice Krispie Treats with M&M’s

    Heart Shaped Valentine Rice Krispie Treats with M&M’s

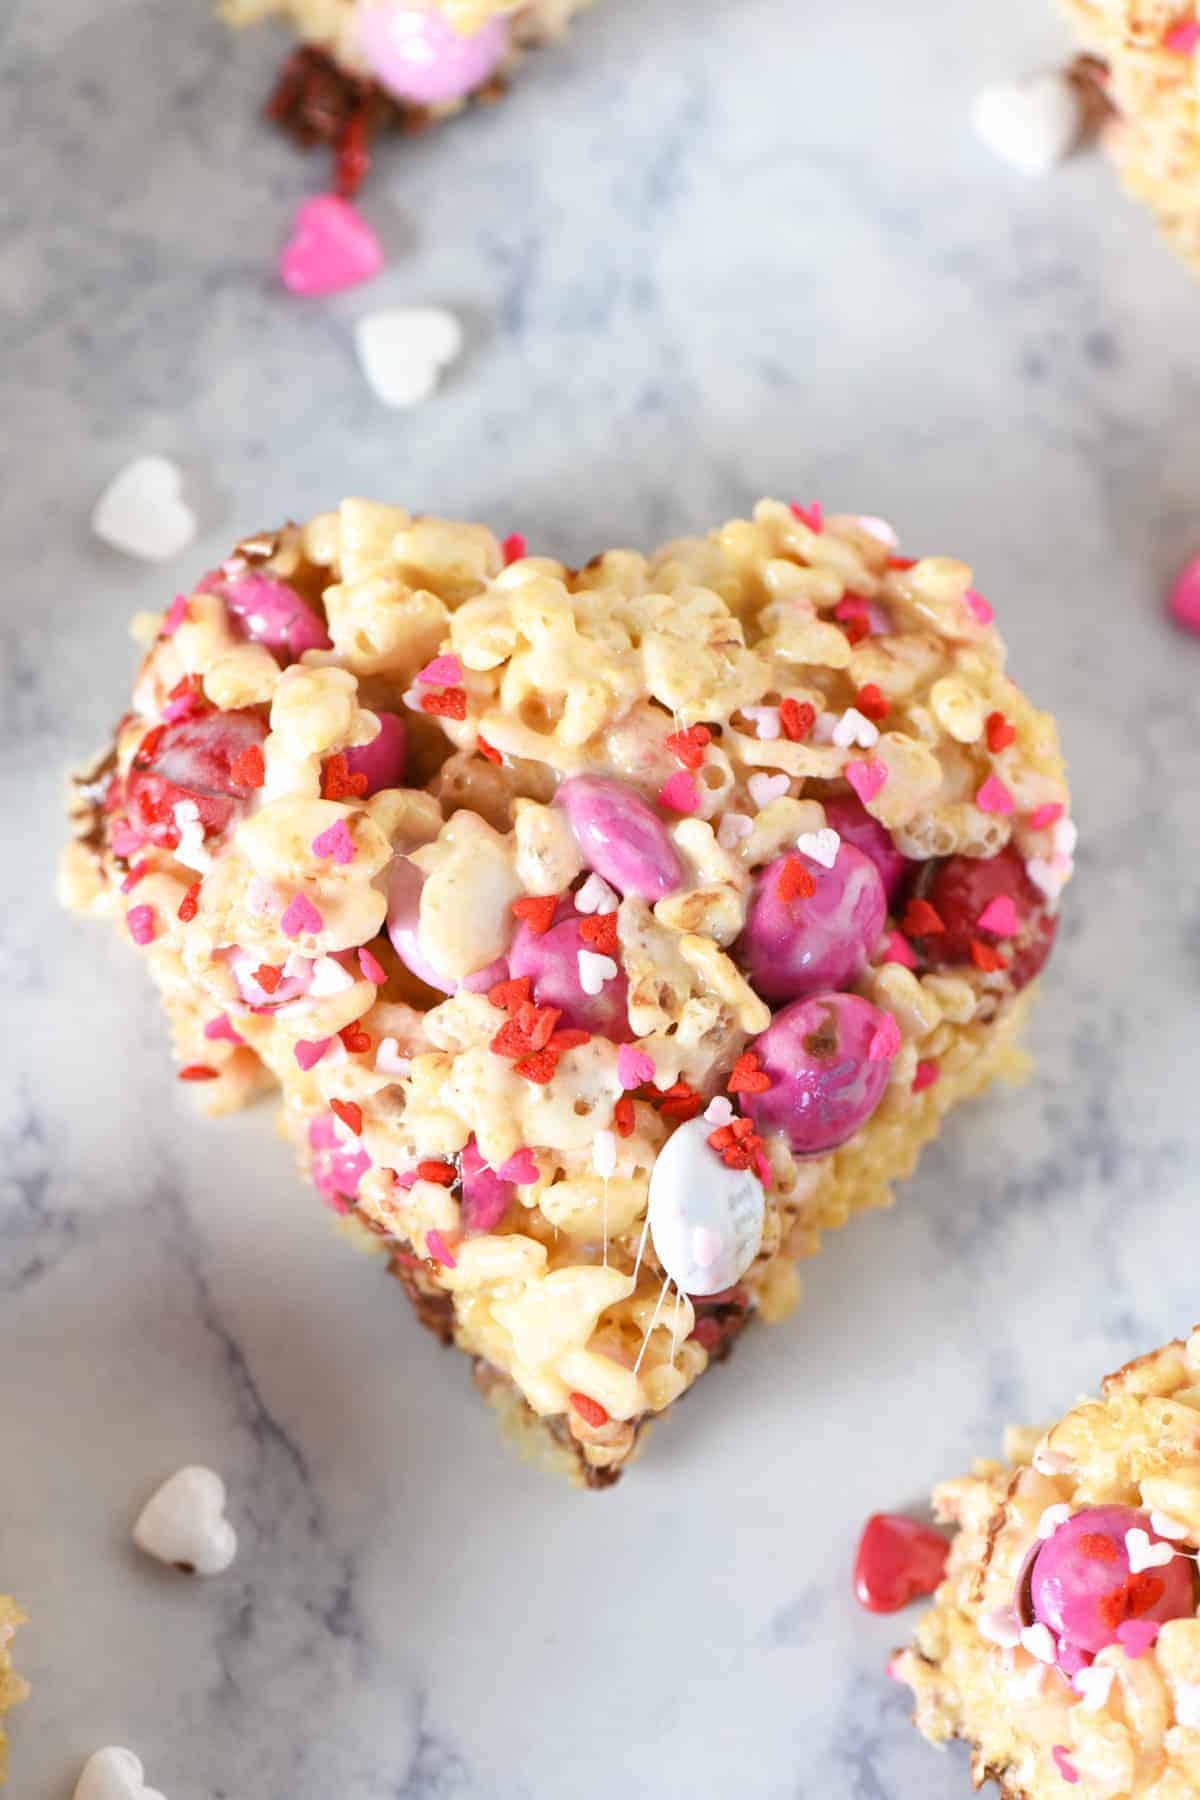
    Make easy heart shaped Valentine Rice Krispie treats with M&M’s and sprinkles. Cute Valentine’s Day snack that’s perfect for kids, classroom, and a Valentine’s Day party! Or make just because for a sweet heart shaped dessert filled with crispy chocolaty bites.

    Classic Rice Krispie treats are an all time favorite dessert, loved by many, and they’re so easy to reinvent for all your favorite holidays. I mean, how cute are heart shaped Rice Krispie treats, Christmas tree Rice Krispie treats, and snowman Rice Krispie treats?

    heart shaped Valentine Rice Krispie treats on white marble countertop with heart sprinkles

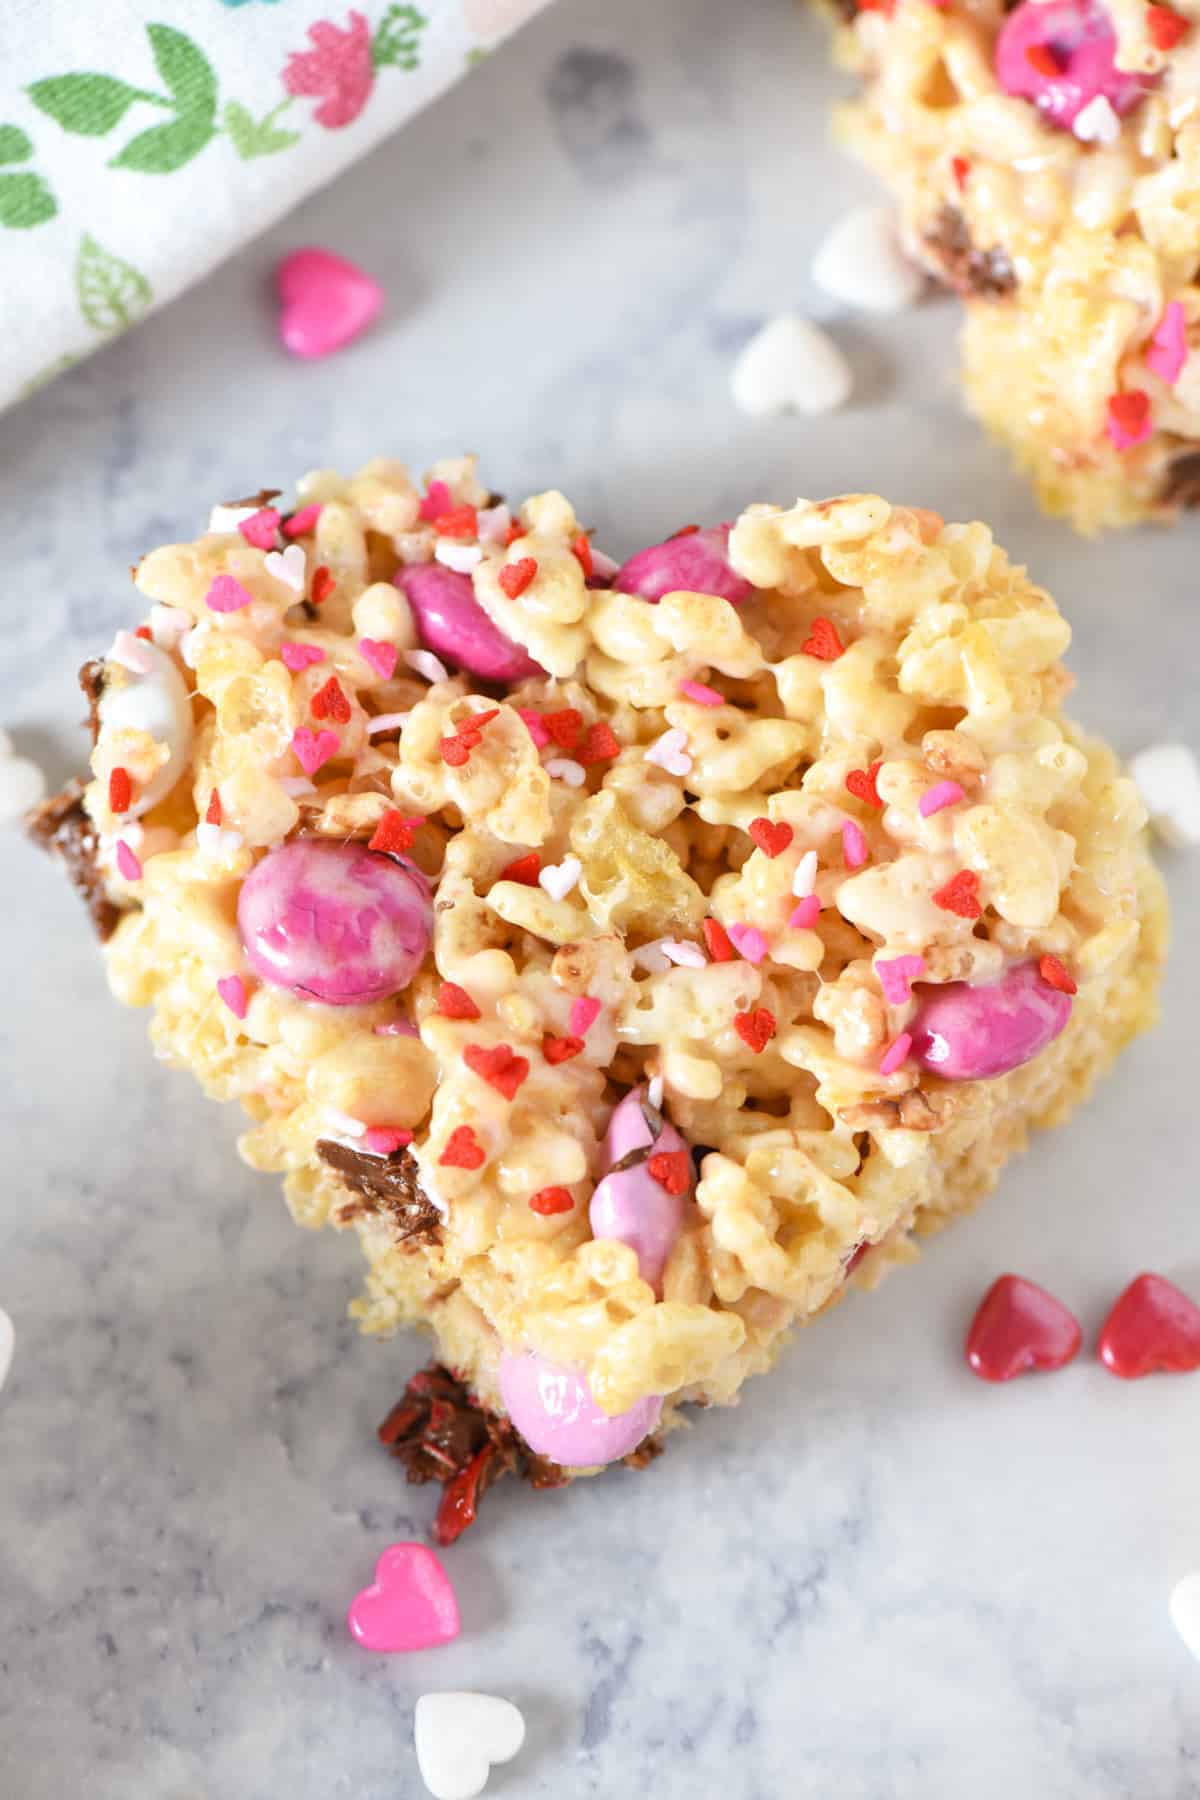
    Heart shaped Valentine’s Rice Krispie treats are super easy to make, and just as cute too. Only they’re perfect for Cupid’s special holiday.

    Why You’re Going to Love This Recipe

    • Valentine’s Day Rice Krispie treats don’t use a lot of ingredients. This easy recipe is very simple to make.
    • Even though these delicious treats are very festive, you can decorate them with minimal effort. Mix in a bag of Valentine M&M’s, sprinkle on a handful of heart shaped sprinkles, and you’re pretty much set.
    • Rice Krispie Valentine treats make the perfect treat for a classroom party, as well as a special after school snack or fun dessert for your sweethearts on Valentine’s Day. They’re the perfect way to say I love you.
    ingredients for Rice Krispie Valentine treats on white marble countertop

    Ingredients and Substitutions Notes

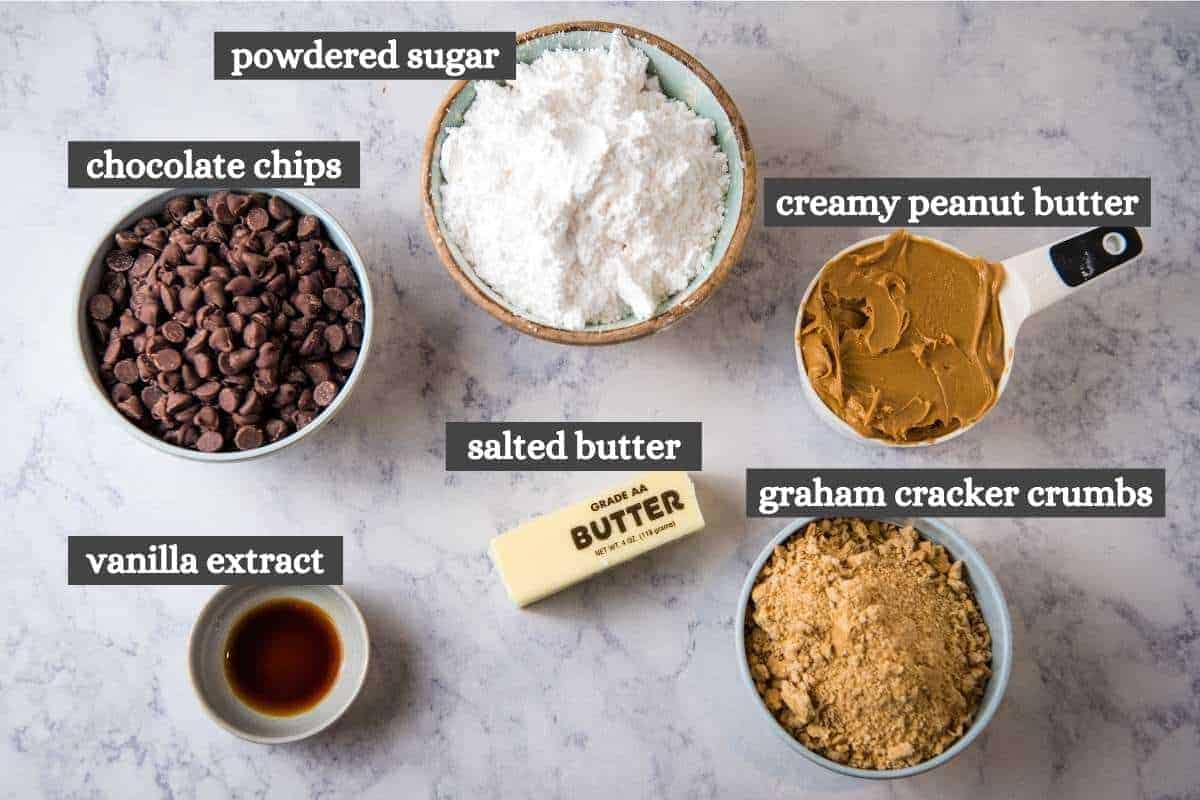
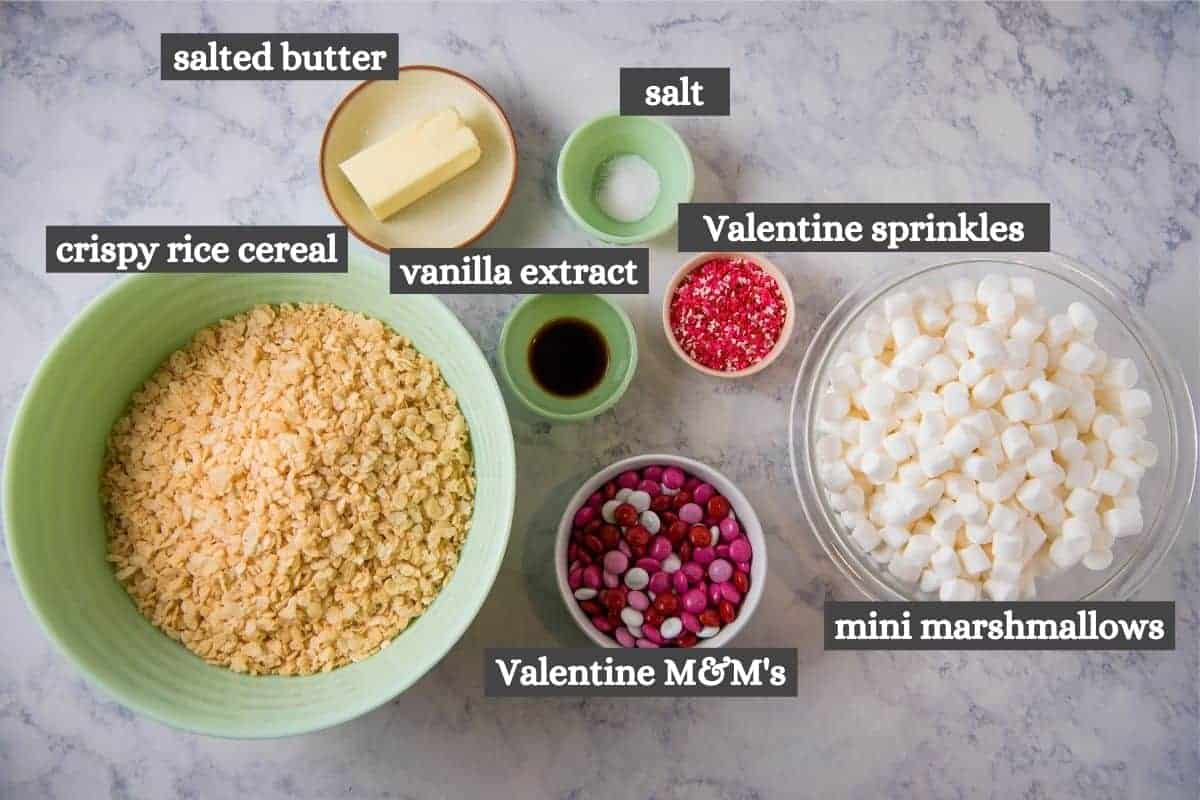
    You’ll need to gather just a few simple ingredients to make heart Rice Krispie treats…

    • Salted Butter Use real butter, not margarine. And use salted butter so you get that extra boost of flavor from the salt.
    • Vanilla Extract Most Rice Krispie treat recipes don’t call for vanilla, but I really love the flavor it gives to these wonderfully chewy treats.
    • Sea Salt Don’t leave this out; it really helps give a boost of flavor to these heart shaped Rice Krispie treats.
    • Mini Marshmallows You can use big marshmallows or marshmallow cream (though ingredient amounts differ), but mini marshmallows melt more quickly and efficiently.
    • Rice Krispies cereal – You can use any brand of crisp rice cereal or Rice Krispie cereal you want; I prefer to use either Malt-O-Meal Crispy Rice or Millville (from Aldi) because they’re gluten-free.
    • Valentine M&M’s These colorful M&M’s give an extra festive touch to your Valentine treats.
    • Valentine Sprinkles Feel free to use whatever sprinkles you can find, the tinier the better, because you don’t want to take away from the flavor of your treats.

    How to Make Valentine Rice Krispie Treats

    First things first, you’ll need to make the treats.

    How to Make Rice Crispy Treats

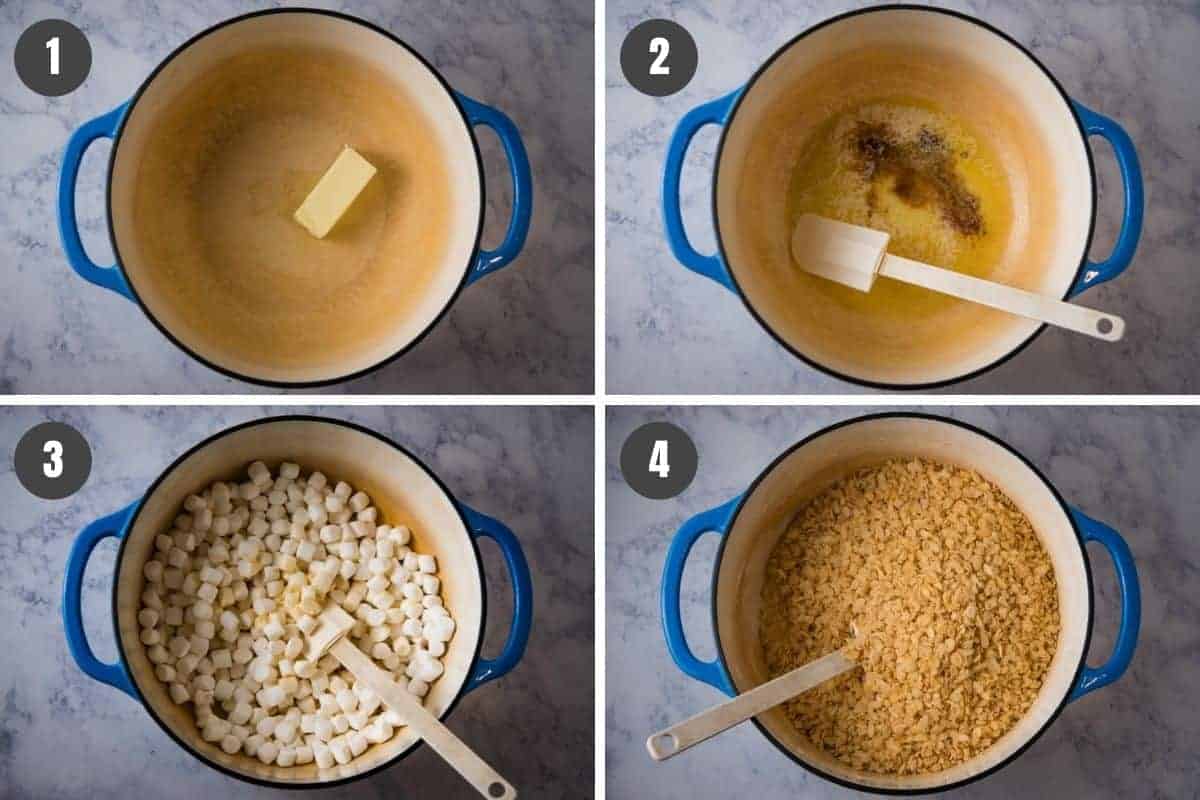
    1. Melt butter in a large saucepan or Dutch oven over medium-low heat.
    2. Then stir in the vanilla extract and salt.
    3. Add the mini marshmallows, and stir ’til they melt into a smooth, creamy mixture.
    4. Next begin to stir in the Rice Krispies cereal, partially stirring them in to your marshmallows.
    steps for how to make Valentine Rice Krispie treats in blue Dutch oven
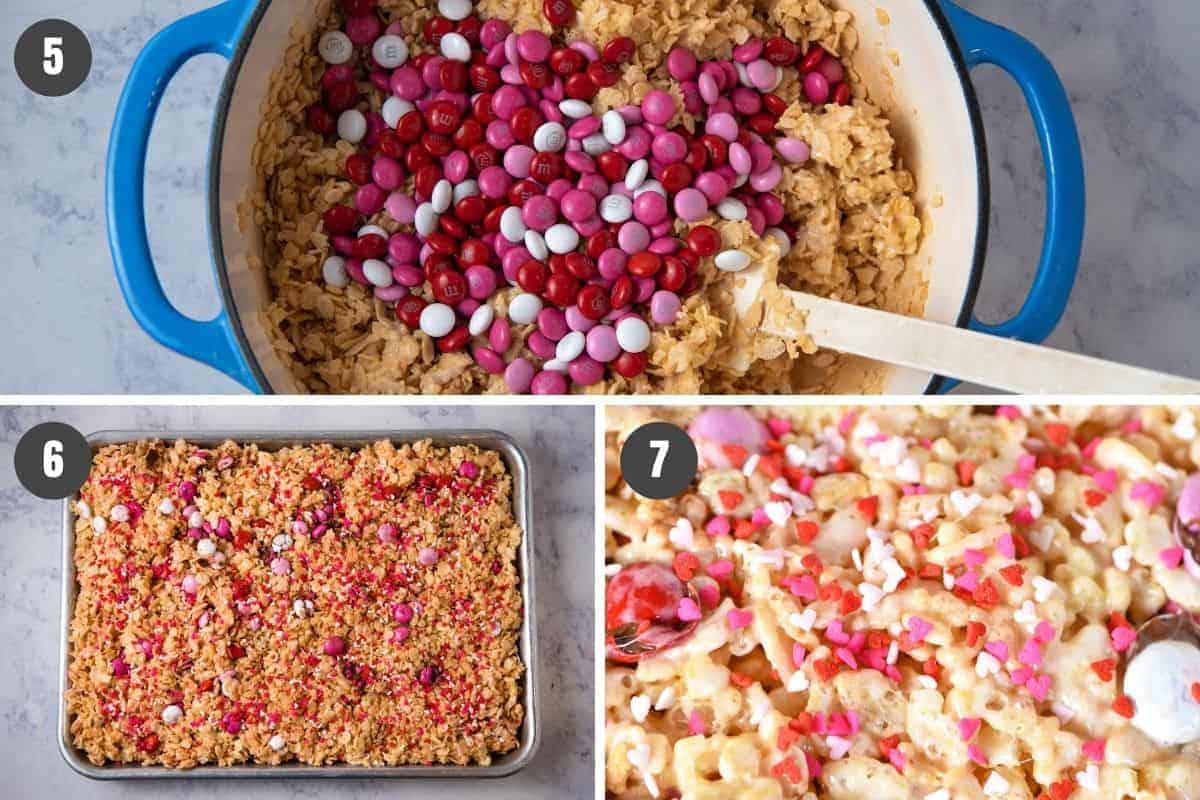
    1. Now for the best part… Stir in the M&M’s candies, and finish mixing everything together.
    2. Wet your hands with water; then spread the Rice Krispies cereal mixture into a greased 9×13 baking pan. (Note: Sometimes I’ll use a regular cake pan, but if I know I’m cutting out shapes, I’ll use my more shallow brownie pan. The brownie pan really allows me to get in with the cookie cutter and not have to fight with the sides of the pan. OR you can also go the route of sticking parchment paper or wax paper in your pan, grease it with non-stick cooking spray, and spread the mixture on top of the paper. That way when it comes time to cut out the heart shaped treats, you can just pull the whole thing, by the paper, out of the pan, then cut.)
    3. Be sure to add the sprinkles right away, so they’ll stick to the warm marshmallow treats. If you wait too long, the sprinkles will just fall right off.
    mixing M&M's into Rice Krispie treat mixture, pressing into pan, and adding Valentine sprinkles on top

    How to Shape Valentines Rice Krispie Treats

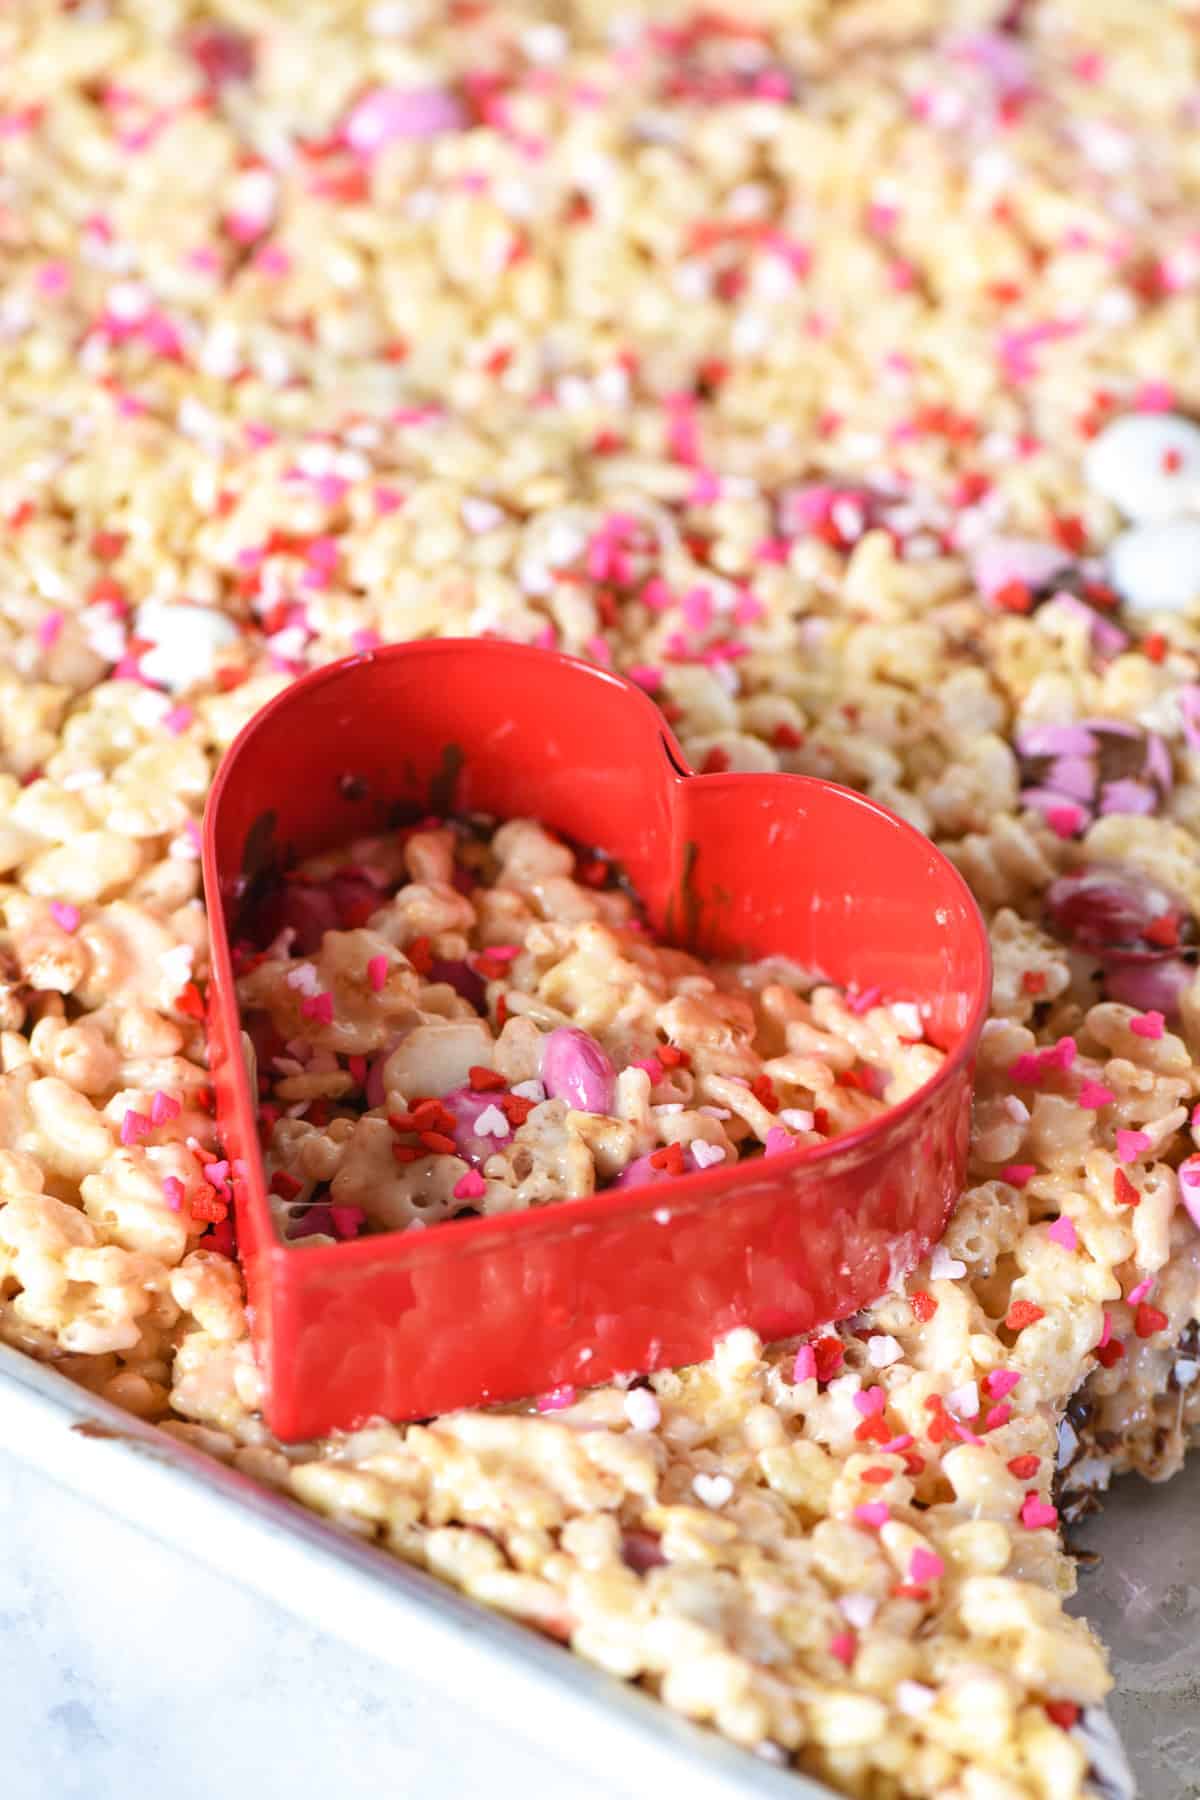
    You can use cookie cutters to make any kind of shapes you want.

    Once you’ve spread your Rice Krispies treats mixture in your pan or baking sheet, you can go ahead and start cutting out heart shapes with a heart-shaped cookie cutter. I recommend dipping it in water before cutting, so the treats will fall right off the cutter.

    Be careful because the treats will still be quite hot, so just take your time.

    cutting heart shaped Rice Krispie treats with red heart cookie cutter

    Decorating and Flavor Alternatives for These Treats

    There are many things you can do to decorate Rice Krispie hearts for Valentine’s Day. First let’s talk about decorating.

    How to Decorate Rice Krispie Treats

    • Skip adding M&M’s to the mixture, and add M&M’s Minis on top instead. You’d probably need to pipe on a little marshmallow fluff or melted candy melts and then sprinkle them on.
    • Use a piping bag to pipe a thin zig zag of melted red, white, or pink candy melts or melted chocolate all over the top of your Rice Krispie treats, and add Valentine sprinkles.
    • Instead of Valentine sprinkles, use pink Nerds. Kids LOVE Nerds.
    • Add festive sprinkles right into the Rice Krispie squares recipe instead of sprinkling them on top.
    • Make pops out of your Rice crispy treats by adding a lollipop stick into each of the treats.
    • Dip a portion of or the whole treat into melted candy melts or melted chocolate, and sprinkle with sprinkles.
    • Try different Valentine shape cookie cutters! Maybe X’s and O’s for hugs and kisses.
    • Decorate your heart-shaped Rice Krispie treats with adorable little Cupid’s arrows made out of toothpicks and gummy hearts.

    Alternative Flavor and Color Options

    As you can see, the options are endless with this sweet treat.

    heart shaped Valentine's Day Rice Krispie treats on white marble countertop

    Expert Tips and Recipe FAQ’s

    Can I make Valentine’s Day Rice Krispies treats in advance?

    Yes, you can totally make these ahead of time. Make them the day before, and you’re all set for the party the next day. I wouldn’t make them more than 1-2 days in advance, though, as they can grow stale over a couple of days.

    Why are my treats not chewy?

    There may be a couple of reasons your treats aren’t chewy. First, your marshmallows and cereal may not have been fresh; be sure to use fresh marshmallows and non-stale cereal. It’s also important to cook the marshmallow mixuture on low to medium heat, so the marshmallows slowly and evenly melt. Also, did you press hard when you pressed the finished mixture into the pan? It’s important to lightly press them into the pan and don’t overly compress them down. Lightly pressing them will help with keeping the treats soft and chewy, rather than hard and tough as nails.

    Why are my Rice Krispie treats not crispy?

    You shouldn’t have this problem if you follow this recipe to a t. But it could be that the recipe calls for too much butter. Too much butter will give an overly soft treat that doesn’t compact together into a nice, uniform, crispy treat.

    How should I store Rice Krispie treats with M&M’s?

    It’s important to store your treats in an airtight container or sealed plastic bag. You’ll probably want to eat them within the first 2 or 3 days.

    Creative Valentine Gifting Ideas

    If you want to use this recipe to make treats for a Valentine’s Day party and you’re gifting the treats to classmates or friends, here are just a few easy ideas for creative packaging and gifting.

    Valentine's Day heart shaped Rice Krispies treat with M&M's on white marble countertop

    More Valentine’s Day Treats You’ll Love:

    If you want more Valentine treats, you’ll love these heart shaped chocolate whoopie pies and Valentine snack cakes.

    While these Ritz Cracker chocolate peanut butter cups are one of our favorite Christmas treats, they make an excellent Valentine’s Day dessert too. Valentine marshmallow pops are another easy treat you can make in a jiffy.

    Crazy Adventures in Parenting has a recipe for the cutest li’l Minions Valentine’s Rice Krispies treats. Mom on Timeout shares how to make the cutest easy Valentine’s Day patties.

    If you try this recipe, why not leave a star rating in the recipe card right below and/or a review in the comment section further down the page? I always appreciate your feedback. You can also follow me on Pinterest, Facebook, Instagram, and YouTube. And subscribe to my email list too!

    Heart Shaped Valentine Rice Krispie Treats

    Make easy heart shaped Valentine Rice Krispie treats with M&M's and sprinkles. Cute Valentine's Day snack for kids, classroom, and party!

    • Large Sauce Pan
    • Dutch oven
    • Heat-Resistant Spatula
    • 9×13 Brownie Pan
    • Heart Shaped Cookie Cutter
    • 5 tablespoons salted butter
    • 1 teaspoon vanilla extract
    • 1/4 teaspoon sea salt
    • 6 cups mini marshmallows
    • 6 cups Rice Krispies cereal (*)
    • 10 ounces Valentine M&M's
    • 1/4 cup Valentine sprinkles
    1. Grease a 9×13 baking pan with cooking spray.

    2. Melt the butter in a large sauce pan or Dutch oven over low to medium heat.

    3. Stir the vanilla extract and salt into the butter.

    4. Add the mini marshmallows to the melted butter mixture, stirring until the marshmallows have fully melted.

    5. Remove the mixture from the heat, and partially stir into the Rice Krispies cereal.

    6. Once you’ve partially mixed together the melted marshmallows with the Rice Krispies cereal, stir in the Valentine's M&M’s candies and finish mixing everything together.

    7. Spread the Rice Krispies treats mixture into a pan.

    8. Immediately sprinkle on Valentine sprinkles, so they'll stick to the warm marshmallow treats.

    9. Cut heart shaped Rice Krispie treats with a regular or mini size heart shaped cookie cutter. Work your way around the edge, then in toward the middle.

    10. And that's it. Your chocolate filled Valentines treats are ready to serve and enjoy!

    *You can use any brand of crisp rice cereal you want, including Kellogg’s; I prefer to use either Malt-O-Meal Crispy Rice or Millville (from Aldi) because they’re gluten-free.

    Can I make Valentine’s Day Rice Krispies treats in advance?

    Yes, you can totally make these ahead of time. Make them the day before, and you’re all set for the party the next day. I wouldn’t make them more than 1-2 days in advance, though, as they can grow stale over a couple of days.

    How should I store Rice Krispie treats with M&M’s?

    It’s important to store your treats in an airtight container or sealed plastic bag. You’ll probably want to eat them within the first 2 or 3 days.

    Desserts, Valentine’s Day
    American
    heart shaped Rice Krispie treats, how to make Valentine Rice Krispie treats, Rice Krispie treats with M&M’s, Rice Krispie Valentine treats, Valentine Rice Krispie treats, Valentine’s Day Rice Krispie treats, Valentine’s Day Rice Krispies treats, Valentines rice crispy treats, Valentines Rice Krispie treats
  • Quick and Easy Buckeye Bars

    Quick and Easy Buckeye Bars

    Whip up a batch of buckeye bars in minutes. This quick and easy, no bake, chocolate peanut butter dessert is perfect for the holidays.

    My family has enjoyed making buckeye peanut butter balls every Christmas for as long as I can remember. This year I decided to make easy buckeye bars instead.

    buckeye bars on white plate

    And that’s exactly what these chocolate peanut butter bars are all about… They’re so easy to make. And dare I say they’re just as good? Yeah, they definitely are.

    Why You’re Going to Love This Recipe

    • They’re quicker and easier because there’s no rolling of balls or dipping in chocolate involved. Just layer the peanut butter mixture, then cover with melted chocolate and let set.
    • It takes a minimal amount of ingredients to make them, 6 actually.
    • You can make them gluten-free if you want, by using gluten-free graham crackers (and checking your other ingredient labels to make sure they’re truly gluten-free).
    • They’re budget-friendly. It should cost less than $10 to make these amazing treats.
    buckeye bars ingredients on white marble countertop

    Ingredient Notes

    • Salted Butter Use real butter, not margarine. And use salted butter so you get that extra boost of flavor from the salt.
    • Creamy Peanut Butter You can use crunchy peanut butter, but try to avoid all natural peanut butters. All natural peanut butter is more oily, and it will mess up the set and the texture of your finished bars.
    • Graham Cracker Crumbs – Just crush graham crackers in a blender or Ziploc bag (use a rolling pin).
    • Semi-Sweet Chocolate Chips I prefer the flavor of semi-sweet chocolate, but you are more than welcome to use milk chocolate, white chocolate, etc. I do recommend using a good quality chocolate chip, like Nestle Toll House or Ghirardelli.

    Optional Variations You May Want to Try

    How to Make Buckeye Bars

    Before you get started making this peanut butter chocolate bars recipe, go ahead and line an 8×8 or 9×9 baking dish with parchment paper, overlapping the sides of the pan. Then set it aside ’til you’re ready for it; that way it’s ready to go.

    1. In a large mixing bowl or using a mixer, mix together the butter, vanilla extract, peanut butter, and powdered sugar.
    2. Add in the graham cracker crumbs, and mix well.
    3. Spread the peanut butter mixture into the paper lined baking dish, and press it into a fairly smooth and even layer.
    4. Add the chocolate chips to a microwave-safe measuring cup or bowl and melt, starting at 30 seconds, then stirring every 15-20 seconds, ’til melted and smooth. Spread the melted chocolate mixture over the peanut butter layer.
    steps for how to make buckeye bars, mixing ingredients in mixing bowl and layering peanut butter mixture then melted chocolate

    At this point, you can immediately chill in the fridge for at least 2 hours or until the bars are firm; or you can wait until the chocolate has just about set at room temperature, and cut into bars before chilling.

    When you are ready to serve your no bake chocolate peanut butter bars, just lift them out of the pan by the paper, peel it back, slice the bars, and serve.

    no bake chocolate peanut butter bars on parchment paper

    Expert Tips and Recipe FAQ’s

    What can I use instead of graham crackers?

    You can use Rice Krispies. Or you can leave out the graham crackers altogether, and cut the butter down by at least half.

    How do I keep the chocolate from cracking?

    I mentioned this above, but in order to keep it from chipping off or cracking, don’t chill the bars until you’ve sliced them. You’ll want to wait until the chocolate has just about set; then cut into bars.

    How should I store them?

    I definitely recommend keeping them in a cold place, like the fridge or an un-heated room. When I was growing up, we kept our Christmas candy in the stairwell leading up to my room because it wasn’t insulated or heated. They should last for 1-2 weeks.

    Can I freeze no bake chocolate peanut butter candy?

    Yes, you can. Just be sure to store it in an airtight container so it doesn’t get freezer burn. It should keep for at least 2-3 months.

    stack of peanut butter chocolate bars on white marble countertop

    More Peanut Butter Recipes

    If you love chocolate peanut butter bars, you’ll love these chocolate peanut butter treats too…

    If you try this recipe, why not leave a star rating in the recipe card right below and/or a review in the comment section further down the page? I always appreciate your feedback. You can also follow me on Pinterest, Facebook, Instagram, and YouTube. And subscribe to my email list too!

    Buckeye Bars

    Whip up a batch of buckeye bars in minutes. Quick and easy no bake chocolate peanut butter dessert recipe, perfect for the holidays.

    • Mixer
    • Parchment Paper
    • 9×9-Inch Baking Dish
    • Glass Measuring Cup
    • 6 tablespoons salted butter (melted)
    • 1/2 teaspoon vanilla extract
    • 1 cup creamy peanut butter
    • 2 cups powdered sugar
    • 1 1/4 cups graham cracker crumbs
    • 12 ounces semi-sweet chocolate chips
    1. Line an 8×8 or 9×9-inch baking dish with parchment paper, overlapping the sides of the pan. Then set aside.

    2. In a large mixing bowl, mix together the butter, vanilla extract, peanut butter, and powdered sugar.

    3. Add in the graham cracker crumbs, and mix well.

    4. Spread the peanut butter mixture into the paper lined baking dish, and press it into a fairly smooth and even layer.

    5. Add the chocolate chips to a microwave-safe measuring cup or bowl and melt, starting at 30 seconds, then stirring every 15-20 seconds, 'til melted and smooth.

    6. Spread the melted chocolate over the peanut butter layer.

    7. At this point, you can immediately chill in the fridge for at least 2 hours or until the bars are firm; or you can wait until the chocolate has just about set at room temperature, and cut into bars before chilling. When you're ready to serve them, just lift them out of the pan by the paper, peel it back, slice the bars (if you didn't already slice them), and serve.

    *You can make the bars gluten-free if you want, by using gluten-free graham crackers (and checking your other ingredient labels to make sure they’re truly gluten-free).

    How do I keep the chocolate from cracking?

    I mentioned this above, but in order to keep it from chipping off or cracking, don’t chill the bars until you’ve sliced them. You’ll want to wait until the chocolate has just about set; then cut into bars.

    How should I store them?

    I definitely recommend keeping them in a cold place, like the fridge or an un-heated room. They should last for 1-2 weeks.

    Desserts
    American
    buckeye bars, buckeye bars recipe, chocolate peanut butter bars, easy buckeye bars, no bake chocolate peanut butter bars, peanut butter chocolate bars recipe
  • Grandma’s Old-Fashioned Pumpkin Pie Recipe

    Grandma’s Old-Fashioned Pumpkin Pie Recipe

    Learn how to make old-fashioned pumpkin pie from my Grandma’s recipe box. You can make it with canned or fresh pumpkin. It’s a classic, family favorite Thanksgiving dessert!

    Grandma’s pumpkin pie is one of the more popular desserts, besides pumpkin roll, on my family’s Thanksgiving dessert table. My grandma made pumpkin pie every Thanksgiving, and it’s just always been a staple ingredient for our holiday celebrations.

    slice of Grandma's old-fashioned pumpkin pie topped with whipped cream on white plate

    Of course, we also enjoy apple crumb pie, along with sweet potato pie (my personal favorite), and pecan pie too… But pumpkin pie is always the must have dessert.

    Grandma’s recipe card is really worn and tattered, with lots of smudges and fingerprints. That’s how you know a recipe has been well used. It also bears the name of a close family friend, so Grandma actually took time to copy this recipe down after she’d likely eaten the pie; she wanted that recipe.

    Grandma's pumpkin pie recipe card with slice of pie in background

    Why You’ll Love this Recipe…

    • This pumpkin pie Grandma made is creamy, thick, and delicious with loads of pumpkin flavor.
    • It’s easy to make from scratch, as simple as mixing up the pie filling and pouring it into the pie crust to bake.
    • You can use canned pumpkin or fresh pumpkin for this American pumpkin pie recipe… We’ll talk about more options below.
    ingredients for pumpkin pie Grandma made on white marble countertop

    Ingredients and Substitutions Notes

    • Pie Crust – You can make a homemade single-layer pie crust, or you can just buy a pre-made pie crust.
    • All-Purpose Flour – You can use regular all-purpose flour, or if you’re like me and gluten-free, you can use a good cup-for-cup gluten-free flour.
    • Spices – This recipe calls for ground cinnamon, ginger, cloves, and nutmeg. You can also simplify and just use pumpkin pie spice if preferred; just keep in mind pumpkin pie spice also includes allspice.
    • Pumpkin – Like I mentioned above, you can use canned pumpkin or fresh pumpkin. You can also use winter squash (or butternut squash); it makes an absolutely delicious pumpkin pie, and it’s a great way to use that over abundant supply of squash sitting in your root cellar. One more note about the pumpkin… When I say pumpkin purée, it means either canned pumpkin or fresh pumpkin that has been roasted, peeled, and mashed up in a blender… Here’s a step-by-step recipe for how to make pumpkin purée.
    • Milk – I prefer to use whole milk, and the recipe also calls for evaporated milk. The evaporated milk gives the pie a richness, and it also gives it a subtle caramelized flavor. If you don’t want to use evaporated milk, easy substitutes include cream or half-and-half. Food Network has a great guide to the best evaporated milk substitutes with instructions and measurements.

    How to Make Grandma’s Old-Fashioned Pumpkin Pie from Scratch

    First things first, make a single pie crust and have it ready to go. Note: If you want, you can reserve a small portion of the crust to create decorative pieces for the top of your finished pie, for instance, leaf or acorn shapes. You’ll want to bake these separately and add them to the finished pie before serving.

    1. In a large bowl, mix together the brown sugar, salt, flour, and spices.
    2. Slightly beat the eggs with a whisk, and add them to the mixture.
    3. Add the pumpkin purée, milk, and evaporated milk, and mix everything together well.
    4. Pour the pie filling into your pie shell.
    steps for how to make old-fashioned pumpkin pie recipe by mixing in mint green bowl and pouring pie filling into pie shell
    1. Bake at 425° for about 15 minutes; then reduce the temp to 350° and bake for about 40 minutes. You can use a pie shield to keep the crust from burning.
    whole American pumpkin pie in pie plate

    Then just allow the pie time to cool completely. You can serve it with whipped cream, or chill in the refrigerator until you’re ready to serve it.

    Expert Tips and Recipe FAQ’s

    How do you make pumpkin pie not soggy on the bottom?

    There are several ways to avoid soggy pie crust, including blind baking, brushing the crust with egg before baking, or putting your pie plate directly on a hot baking sheet already in the oven while baking.

    How do you tell when pumpkin pie is done?

    Pumpkin pie is done when a knife or toothpick inserted in the pie comes out clean. If you gently shake it, the pie will be just a little jiggly in the middle. At this point, you want to pull it out of the oven, or you risk it splitting in the middle. I’ll also say this… While overcooking your pie can lead to splitting, when in doubt, bake it some more.

    How should you store pumpkin pie?

    Cover the pie, and place it in the refrigerator. It should keep for at least 3 to 4 days.

    Can you freeze it?

    Yes, you can. In fact, it’s a great pie to make ahead, especially if you’re using a foil pie plate. Just be sure you allow it time enough to cool completely before you cover it tightly with plastic wrap and aluminum foil, and place it in the freezer.

    slice of old-fashioned pumpkin pie from scratch, topped with whipped cream, on white plate

    More Great Pumpkin Desserts

    If you’re looking for more holiday recipes like pumpkin pie, you’ll find a whole slew of them on my list of Best Thanksgiving Recipes.

    Watch the video below, where I’ll walk you through every step of this recipe. I get it; sometimes it helps to actually see the recipe in action. You can also find my recipes on YouTube, Pinterest, Facebook, and right here on the website.

    [adthrive-in-post-video-player video-id=”VZEpev1h” upload-date=”2021-11-19T00:00:00+00:00″ name=”Grandma’s Old-Fashioned Pumpkin Pie from Scratch” description=”How to make old-fashioned pumpkin pie from Grandma’s recipe box. Make it with canned or fresh pumpkin. Family favorite Thanksgiving dessert!” player-type=”default” override-embed=”default”]

    Grandma’s Old-Fashioned Pumpkin Pie Recipe

    How to make old-fashioned pumpkin pie from Grandma's recipe box. Make it with canned or fresh pumpkin. Family favorite Thanksgiving dessert!

    • Mixer
    • Whisk
    • Pie Plate
    • Pie Shield
    • 1 1/4 cups light brown sugar
    • 3/4 teaspoon salt
    • 1 1/2 tablespoon all-purpose flour
    • 3/4 teaspoon ground cinnamon
    • 1/4 teaspoon ground ginger
    • 1/4 teaspoon ground cloves
    • 1/2 teaspoon ground nutmeg
    • 3 large eggs (slightly beaten)
    • 2 2/3 cups pumpkin
    • 1 1/2 teaspoons whole milk
    • 1/2 cup evaporated milk
    • 1 single pie crust (unbaked)
    1. Pre-heat the oven to 425° F.

    2. In a large bowl, whisk together the brown sugar, salt, flour, and spices.

    3. Slightly beat the eggs with a whisk, and add them to the mixture.

    4. Add the pumpkin purée, milk, and evaporated milk, and mix everything together well.

    5. Pour the pie filling into your prepared and unbaked pie shell.

    6. Bake at 425° F for about 15 minutes; then reduce the temp to 350° F and bake for about 40 minutes, or until a knife inserted near the center comes out clean. You can use a pie shield to keep the crust from burning.

    7. Then just allow the pie time to cool completely before serving. You can serve it with whipped cream or ice cream.

    *You can use canned pumpkin or fresh pumpkin. You can also use winter squash (or butternut squash); it makes an absolutely delicious pumpkin pie. If using fresh pumpkin, you’ll need to cook, peel, and mash the pumpkin into a purée.

    How do I tell when pumpkin pie is done?

    It’s done when a knife or toothpick inserted in the pie comes out clean. If you gently shake it, the pie will be just a little jiggly in the middle. At this point, you want to pull it out of the oven, or you risk it splitting in the middle. I’ll also say this… While overcooking your pie can lead to splitting, when in doubt, bake it some more.

    How should I store pumpkin pie?

    Cover the pie, and place it in the refrigerator. It should keep for at least 3 to 4 days.

    Desserts, Pies & Pastries, Thanksgiving
    American
    American pumpkin pie recipe, classic pumpkin pie, Grandma’s pumpkin pie, how to make pumpkin pie, old fashioned pumpkin pie recipe, old-fashioned pumpkin pie, pumpkin pie from scratch, pumpkin pie grandma
  • Easy Pumpkin Gooey Butter Cake

    Easy Pumpkin Gooey Butter Cake

    Whip up a delicious pumpkin gooey butter cake with just a handful of ingredients, including a cake mix and cream cheese. It has all the ooey goodness of butter cake, but with pumpkin spice!

    I spent my younger years in St. Louis, Missouri, and if you’ve ever been to St. Louis, you know that this ooey gooey butter cake recipe is a St. Louis icon, staple, whatever you want to call it. Let’s just say it was one of my favorite desserts from an early age.

    slice of pumpkin gooey butter cake topped with whipped cream on white plate with fork

    There are a lot of St. Louis foods I love; in fact, you can find the best St. Louis gooey butter cake at Soulard Market.

    However, my ooey gooey pumpkin cake is a fall/Thanksgiving twist to that favorite, iconic dessert. And man, is it ever delicious. You’re going to love it!

    Why This Recipe Works

    • There’s just something really yummy about cream cheese mixed together with butter and powdered sugar.
    • And then, of course, there’s the chewy crust and crackle-y top, probably my favorite things about gooey butter pumpkin cake.
    • It only takes a few ingredients to make this dessert.
    • And it can be made in a jiffy. Pumpkin butter cake takes less than 20 minutes mix time from start to bake time.
    pumpkin spice gooey butter cake ingredients on white marble countertop

    Ingredient Notes

    • Yellow Cake Mix – You can use just a regular yellow cake mix or a gluten-free yellow cake mix. I like to make my pumpkin spice gooey butter cake gluten-free.
    • Pumpkin Pie Spice Store bought works, but you can also make your own pumpkin pie spice; it’s super easy to do.
    • Salted Butter – Be sure to use salted butter, so you’re not missing out on flavor.
    • Cream Cheese – I prefer to use full fat cream cheese for pumpkin ooey gooey cake, but you can substitute reduced fat or Neufchatel cream cheese, and your finished cake will still be really good.
    • Pumpkin Purée – I get a lot of questions about where to find pumpkin purée, and I’m gonna let you in on a little secret… It’s just canned or mashed up pumpkin. You can use canned pumpkin straight from the can, or you can make homemade pumpkin purée, using a fresh pie pumpkin and your blender.

    How to Make Pumpkin Gooey Butter Cake

    First Make the Crust…

    1. Mix together the cake mix and pumpkin pie spice.
    2. Add the softened butter and 2 eggs, mixing everything together really well. It’ll form a stiff, somewhat crumbly batter.
    3. Spread or pat the mixture into an un-greased 9×13 baking pan.
    steps for how to make pumpkin gooey butter cake crust in stainless mixing bowl and spread in white baking dish

    Then Make the Filling…

    1. In a separate mixing bowl, mix together the egg, softened cream cheese and butter, and pumpkin purée.
    2. Slowly and gradually add the powdered sugar to the mixture, mixing well between each addition.
    3. Spread the filling onto the crust as a second layer.
    steps for how to make pumpkin gooey butter cake, with mixing ingredients in stainless mixing bowl and spreading batter in white baking dish
    1. Bake at 350° for about an hour, or until a toothpick comes out barely gooey. Once you remove it from the oven, allow it to cool for about 15 to 20 minutes; then sprinkle powdered sugar over the top.
    sliced ooey gooey pumpkin cake, topped with powdered sugar, in blue and white baking dish

    Expert Tips and Recipe FAQ’s

    Can you use winter squash instead of pumpkin?

    Yes, you absolutely can; in fact, winter squash makes a fabulous pumpkin pie. You’d just need to roast the squash and purée enough of it (in a blender) to make this pumpkin gooey butter cake recipe.

    Does it need to be refrigerated?

    Because of the cream cheese in the ooey gooey pumpkin cake, it does need to be covered and stored in the fridge. It should last at least 3 to 5 days (although probably not, if your house is like mine and filled with hungry, growing boys).

    fork with bite and slice of gooey butter pumpkin cake topped with whipped cream on white plate

    Watch the video below, where I’ll walk you through every step of this recipe. I get it; sometimes it helps to actually see the recipe in action. You can also find my recipes on YouTubePinterestFacebook, and right here on the website.

    [adthrive-in-post-video-player video-id=”c4RSfoFm” upload-date=”2021-11-03T00:00:00+00:00″ name=”Easy Pumpkin Gooey Butter Cake” description=”Whip up a delicious pumpkin gooey butter cake with a cake mix and cream cheese. All the ooey goodness of butter cake, but with pumpkin spice!” player-type=”default” override-embed=”default”]

    Pumpkin Gooey Butter Cake

    Whip up a delicious pumpkin gooey butter cake with a cake mix and cream cheese. All the ooey goodness of butter cake, but with pumpkin spice!

    • Hand Mixer
    • Mixing Bowl
    • 9×13 Baking Dish
    • Powdered Sugar Shaker

    Crust:

    • 1 yellow cake mix
    • 1 teaspoon pumpkin pie spice
    • 8 tablespoons salted butter (softened)
    • 2 large eggs

    Filling:

    • 1 large egg
    • 8 ounces cream cheese (softened)
    • 4 tablespoons salted butter (softened)
    • 1/2 cup pumpkin
    • 4 1/3 cups powdered sugar

    Crust:

    1. Mix together the cake mix and pumpkin pie spice.

    2. Add the softened butter and eggs, mixing everything together really well. It'll form a stiff, somewhat crumbly batter.

    3. Spread or pat the mixture into an un-greased 9" x 13" baking pan.

    Filling:

    1. In a separate mixing bowl, mix together the egg, softened cream cheese and butter, and pumpkin purée.

    2. Slowly and gradually add the powdered sugar to the mixture, mixing well between each addition.

    3. Spread the filling onto the crust as a second layer.
    4. Bake at 350° for about an hour, or until a toothpick comes out barely gooey. Once you remove it from the oven, allow it to cool for about 15 to 20 minutes.

    5. Then sprinkle powdered sugar over the top and serve.

    *I get a lot of questions about where to find pumpkin purée, and I’m gonna let you in on a little secret… It’s just canned or mashed up pumpkin. You can use canned pumpkin straight from the can, or you can make homemade pumpkin purée, using a fresh pie pumpkin and your blender. You can also use winter squash instead of pumpkin. You just need to roast the squash and purée enough of it (in a blender) for the recipe.

    Can I make this gluten-free?

    Yes, you can. You can use a gluten-free yellow cake mix; and just be sure to check your other ingredient labels to make sure they’re all gluten-free.

    Does it need to be refrigerated?

    Because of the cream cheese in the cake, it does need to be covered and stored in the fridge. It should last at least 3 to 5 days.

    cakes, Desserts
    American
    gooey butter pumpkin cake, how to make pumpkin gooey butter cake, ooey gooey pumpkin cake, pumpkin gooey butter cake, pumpkin gooey butter cake recipe, pumpkin spice gooey butter cake
  • Easy CrockPot V8 Vegetable Soup Made with Juice

    Easy CrockPot V8 Vegetable Soup Made with Juice

    Make a quick and easy recipe for a delicious, hearty CrockPot V8 vegetable soup. Chunky soup you can throw together and serve for dinner. The whole family will want seconds!

    My dad always made the best homemade vegetable soup with V8 juice and whatever he could find in the fridge, including leftover veggies and meat; I sometimes joke that he threw everything in but the kitchen sink. Needless to say, this V8 soup has always been one of our favorite soups to make.

    white bowl of CrockPot V8 vegetable soup with spoon on blue and white checked linen

    In honor of my dad, I decided to re-work his soup into a delicious CrockPot vegetable soup. Perfect for those chillier months of the year, this soup can simmer in the slow cooker all afternoon.

    Why You’ll Love This Soup Recipe

    • When it comes to comfort food, this slow cooker vegetable soup is definitely at the top of the list. It’s chock full of flavor and a very hearty vegetable soup, while warm and soothing all at the same time.
    • As you know, I love recipes I can throw together on a busy weeknight, and like my favorite Instant Pot vegetable soup, this veggie soup is one of those dump and go recipes. Throw in a few fresh veggies, some frozen veggies, and a few of your favorite seasonings, and you’re good to go.
    • Soup makes a delicious dinner, especially on a cold winter night, and you’ll likely have enough left over for lunch the next day. It’s a win win for sure!
    easy V8 vegetable soup recipe ingredients on white marble countertop

    Ingredients and Substitutions Notes:

    To make vegetable soup with V8 and frozen vegetables, you’ll need a few simple ingredients, including a variety of veggies…

    • Potatoes, Celery, Carrots, and Yellow Onion These are the fresh vegetables you’ll need, and they’ll need to be chopped, diced, or minced. You’ll need a medium onion. While I usually prefer to use yellow potatoes, you can also use Russet potatoes or red potatoes. You can substitute white turnips for the potatoes, as well.
    • Peas, Corn, Green Beans, and Okra These are all the frozen vegetables you’ll need to thaw before cooking. You can use canned vegetables; I just like the flavors that fresh and frozen vegetables give to the soup.
    • Original V8 Juice You can use V8 juice or any brand vegetable juice you can find at the store. Tomato juice with all the added veggies makes an excellent base for the soup and gives it great flavor.
    • Herbs and Spices – Add sea salt and black pepper to this soup, and you may need to add more, to taste.

    Variations You May Enjoy

    Here are a few ingredient variations you may want to try…

    • Additional vegetables that might pair well with this soup are garlic, kale, spinach, sweet potatoes, butternut squash, cherry tomatoes, chickpeas, lima beans, lentil beans, black-eyed peas, etc.
    • Protein – Sometimes I’ll add ground beef or hamburger meat to make a hamburger vegetable soup, beef stew meat, or leftover chuck roast for even more protein and flavor. In fact, my dad always added whatever leftover meat he had on hand, and it ended up like a vegetable beef stew. Just keep in mind you’ll need to brown the meat in a skillet, then drain it, before adding it to the CrockPot.
    • Herbs and Spices – When adding seasonings, always start small and add, to taste. You can add things like Bay leaves, Parsley, Marjoram, Rosemary, Thyme, Basil, Italian seasoning, Oregano, and Chili powder.
    • Other Flavors – I think a hint of Worcestershire sauce or even a flavorful broth like a good bone broth, beef broth, or vegetable broth might pair wonderfully with this recipe too. Minced fresh garlic will also add a lot of flavor by leaps and bounds.

    How to Make CrockPot V8 Vegetable Soup

    Before you get started making this easy V8 vegetable soup recipe, be sure to wash, peel, and chop the fresh vegetables you’ll be using… Potatoes, celery, carrots, and onion.

    chopped fresh celery, carrots, and potatoes for hearty CrockPot vegetable soup on wooden cutting board

    Then just follow these steps to make this Crock Pot vegetable soup…

    1. Add the chopped fresh vegetables, including the peeled potatoes, celery, carrots, and onion, to the slow cooker.
    2. Then add in all the frozen vegetables, including the peas, corn, green beans, and okra.
    3. Pour in the bottle of V8 Juice, and give everything a good stir with a wooden spoon.
    4. Cover and cook on high for about 1 hour; then simmer on low for 4-6 hours.
    steps for how to make CrockPot vegetable soup with V8 juice

    Serve with your favorite crusty bread or crackers and cheese.

    ladle full of CrockPot V8 soup over black slow cooker full of soup

    Expert Tips and Recipe FAQ’s

    How should I store and re-heat leftover vegetable soup?

    Vegetable soup is really the best make-ahead recipe; you can make it at the beginning of the week, and then simply warm it up for lunch or dinner throughout the week, whenever you choose. For short-term storage, always store your soup in an airtight container in the refrigerator. If stored properly, vegetable soup can last up to 4-5 days. You can re-heat refrigerated soup on the stovetop or in the microwave. In the microwave, just re-heat it at 30 second intervals, running it for 30 seconds, stirring, 30 seconds more, etc., until it reaches approximately 165°F; on the stovetop, simply heat it on medium-high until it comes to a boil.

    Can I freeze it?

    To freeze the cooled soup, place it in an airtight container, or as we sometimes prefer, in a sealed freezer bag, for up to 3 months. If your soup is stored in a freezer bag, it’ll need to be thawed before re-heating. To make life easier, it can be helpful to divide your soup into portions using smaller freezer-safe bowls. This makes it much easier for your family to pull out individual portions as they please, curbing the need to thaw out all of the stored soup, only to take their own small portion out of it.

    Can I use canned vegetables to make V8 vegetable soup?

    Yes, you can totally use canned vegetables. Like I said, Dad used whatever he had on hand. I just like the flavors that fresh and frozen vegetables give to the soup.

    Can you put frozen vegetables in the CrockPot?

    Yes, you can. However, if not thawed, the veggies will likely add more liquid to the soup mixture. So you may want to consider adding a bit more seasoning, to taste.

    What to Serve with This Chunky Soup

    Some of my favorite foods to serve with slow cooker vegetable soup include…

    Focus on foods that will soak up or complement the soup, one reason bread is such a great choice!

    easy V8 vegetable soup in white soup bowl with spoon

    More Hearty Soup Recipes:

    If you try this recipe, why not leave a star rating in the recipe card right below and/or a review in the comment section further down the page? I always appreciate your feedback. You can also follow me on Pinterest, Facebook, Instagram, and YouTube. And subscribe to my email list too!

    CrockPot V8 Vegetable Soup

    Make a quick and easy recipe for a delicious, hearty CrockPot V8 vegetable soup. Chunky soup you can throw together and serve for dinner.

    • Slow Cooker
    • Cutting Board
    • Chopping Knife
    • Ladle
    • Soup Bowls
    • Soup Cozy
    • 5 medium potatoes (washed, peeled, and chopped)
    • 2 stalks celery (chopped)
    • 4 carrots (chopped)
    • 1/2 large yellow onion (chopped)
    • 12 ounces frozen peas (thawed)
    • 12 ounces frozen corn (thawed)
    • 12 ounces frozen green beans (thawed)
    • 12 ounces frozen okra (thawed)
    • 2 teaspoons sea salt
    • 1 teaspoon ground black pepper
    • 64 ounces vegetable juice
    1. Add the chopped fresh vegetables, including the potatoes, celery, carrots, and onion, to the slow cooker.

    2. Then add in all the frozen vegetables, including the peas, corn, green beans, and okra.
    3. Pour in the V8 Juice, and give everything a good stir.
    4. Cover and cook on high for about 1 hour; then simmer on low for 4-6 hours.
    5. Serve the soup while hot with your favorite soup sides, like crackers, cheddar cheese, toasted sourdough, cornbread, etc.

    How should I store and re-heat vegetable soup?

    For short-term storage, always store your soup in an airtight container in the refrigerator. If stored properly, vegetable soup can last up to 4-5 days. You can re-heat refrigerated soup on the stovetop or in the microwave. In the microwave, just re-heat it at 30 second intervals, running it for 30 seconds, stirring, 30 seconds more, etc., until it reaches approximately 165°F; on the stovetop, simply heat it on medium-high until it comes to a boil.

    Can I use canned vegetables?

    Yes, you can totally use canned vegetables. I just like the flavors that fresh and frozen vegetables give to the soup.

    Soups & Stews
    American
    Crock Pot vegetable soup, CrockPot vegetable soup, easy V8 vegetable soup recipe, hearty vegetable soup, homemade vegetable soup, how to make V8 vegetable soup, slow cooker vegetable soup, V8 soup recipe, V8 vegetable soup, vegetable soup made with V8, vegetable soup recipe, vegetable soup with V8, vegetable soup with V8 and frozen vegetables, vegetable soup with V8 juice
  • Spooky Graveyard Brownies for Halloween

    Spooky Graveyard Brownies for Halloween

    Make an easy batch of graveyard brownies, perfect for your Halloween party. Use Milano cookies, Oreos, and candy pumpkins to decorate these spooky treats!

    You can make the cutest little tombstone brownies with just a little bit of time and a handful of ingredients. They’re so cute and fun to eat too, especially for kids.

    spooky graveyard brownies with Milano Cookies as gravestones, Oreos as dirt, green icing, and candy pumpkins

    The secret to making these brownies quick? Use a brownie mix.

    Why This Recipe Works

    • They’re so quick and easy to make.
    • Brownie mix brownies taste just as good as homemade, especially when they’re chewy.
    • You can just use pre-made decorating icing; or make homemade icing, whatever’s easiest for you.
    • This is a great opportunity to get your kids in the kitchen and let them help decorate too.
    Graveyard brownies ingredients on wooden countertop, including brownie mix brownies, Milano cookies, green and black icing, Oreo Cookies, and candy pumpkins

    Ingredient Notes

    You’ll need just a few things to make Halloween graveyard brownies…

    • Brownies – Make sure you pick out a brownie mix that’ll make brownies that are easy to slice and pull out of the pan, nothing too messy or gooey. I recommend using cake-like or chewy brownies (preferably chewy) that won’t be so gooey and will easily pop right out of the pan.
    • Decorating Icing – You’ll need black and green. You can usually find it in the baking aisle or the cake decorating aisle at the grocery store. If you choose to go with pre-made, just make sure it has a fine enough tip, or you can attach a tip, to write letters on your “gravestone.” If you don’t want to buy icing, you can make homemade cookie frosting; then just separate the icing into two bowls, and mix it with black and green food coloring. I used Wilton Kelly Green and Black icing colors.
    • Oreo CookiesThese will need to be crushed.
    • Milano Cookies They’ll need to be cut or broken in half to make the cookie graves. I like the curvature of Milano Cookies, but you can use other cookies like Oreo cookies, graham crackers, chocolate covered grahams, vanilla wafers, or shortbread cookies.
    • Candy pumpkins – Brach’s Mellowcreme Pumpkins are my favorite.
    [mv_video jsonLd=”true” key=”a5gm9cupp9e0dtyfheww” ratio=”16:9″ thumbnail=”https://mediavine-res.cloudinary.com/v1634158313/dcscjpfaa1cbv3rgaqot.jpg” title=”Spooky Graveyard Brownies for Halloween”]

    How to Make Graveyard Brownies

    First you’ll need to mix up the brownie mix according to package directions, bake the brownies, and allow them to cool completely. Then slice the brownies into squares or as close to square shaped brownies as you can.

    brownie mix brownies in blue baking dish

    Then to decorate each brownie graveyard, follow these steps:

    1. Using either pre-made icing or homemade icing with Wilton Round Tip 5 (or the closest off brand cake tip) and a small pastry bag, add pumpkin vines (or squiggles) to the top of the brownie with green icing.
    2. Crumble crushed Oreos on top of the green icing.
    3. Break or cut a Milano Cookie in half. Using either pre-made icing or homemade icing with Wilton Round Tip 5 (or the closest off brand cake tip) and a small pastry bag, pipe the letters R.I.P. with black icing.
    4. Pipe black icing onto the cut end of the Milano Cookie.
    steps for how to make graveyard brownies, including adding icing, crushed Oreos, and RIP Milano cookie graves
    1. Press the “gravestone” into the corner of the brownie; and add a dab of green icing to the bottom of a candy pumpkin, and set it in place on the “grave.”
    hand holding finished Halloween graveyard brownie with candy pumpkin on top

    Just remember that perfection is overrated and have fun with this! While there are a few more steps to this brownie, it’s still really easy to make and a really fun way to spend some quality time with your kids in the kitchen.

    Expert Tips and Recipe FAQ’s

    What if I don’t have cake tips and pastry bags?

    Don’t sweat it! If you want to use homemade icing, you can snip the corner of a sandwich bag, fill the bag with icing, and swirl away. Works like a charm! You can also create a DIY pastry bag using parchment paper or wax paper.

    Can I make these ahead of time?

    You can definitely make the brownies ahead of time. But I’d wait to decorate them ’til right before your party or event. That way everything looks fresh and crisp. Because of the ingredients used and the way they’re decorated, they can be more difficult to properly store.

    tombstone brownies with candy corn on wood countertop

    More Halloween Desserts:

    More easy last minute ideas –>> 20+ Halloween snacks for party – including Halloween brownies, party punch, cookies, no bake desserts, treats on a stick, Halloween cupcakes, and more!

    If you try this recipe, why not leave a star rating in the recipe card right below and/or a review in the comment section further down the page? I always appreciate your feedback. You can also follow me on Pinterest, Facebook, Instagram, and YouTube. And subscribe to my email list too!

    Spooky Graveyard Brownies

    Easy graveyard brownies, perfect for your Halloween party. Use Milano cookies, Oreos, and candy pumpkins to decorate these spooky treats!

    • 15 brownies (baked and cooled)
    • 1 1/2 cups green decorating icing
    • 2 cups Oreo cookies (crushed)
    • 6 Milano Cookies
    • 1 1/2 cups black decorating icing
    • 12 mellowcreme candy pumpkins
    1. Slice the brownies into squares.

    2. Using green decorating icing with a round tip, add pumpkin vines (or squiggles) with green icing to the top of each brownie.

    3. Crumble crushed Oreos on top of the green icing.
    4. Break or cut a Milano Cookie in half.
    5. Using black decorating icing with a round tip, pipe the letters R.I.P. with black icing onto the front of the cookie.

    6. Pipe black icing onto the cut end of the Milano Cookie.
    7. Press the "gravestone" into the corner of the brownie.
    8. Add a dab of green icing to the bottom of a candy pumpkin and set it in place on the grave.

    9. And that’s it! They’re ready to serve for a fun Halloween treat!

    *I recommend using cake-like or chewy brownies (preferably chewy) that won’t be so gooey and will easily pop right out of the pan.

    *If you don’t want to buy icing, you can make homemade cookie frosting; then just separate the icing into two bowls, and mix it with black and green food coloring. Use a pastry bag and round tip to decorate. If you don’t have pastry bags or tips, you can use a sandwich bag instead. Just snip the corner of a sandwich bag, fill the bag with icing, and swirl away. You can also create a DIY pastry bag using parchment paper or wax paper.

    Desserts, Halloween
    American
    brownie graveyard, graveyard brownies, Halloween brownies, Halloween graveyard brownies, how to make graveyard brownies, spooky brownies, tombstone brownies
  • Polyjuice Potion Recipe (Non Alcoholic with 4 Ingredients)

    Polyjuice Potion Recipe (Non Alcoholic with 4 Ingredients)

    Brew a simple Polyjuice Potion recipe for a transformative experience at your Halloween or Harry Potter party. It’s an easy, fun, non alcoholic, lime sherbet punch your guests will love!

    I love orange sherbet punch at Christmas time, but this spooky green sherbet punch is perfect for Halloween festivities.

    mason jar of Polyjuice Potion recipe with lime sherbet punch with candy eyeball and brown paper straw

    What Is Polyjuice Potion?

    Polyjuice Potion is a drink from the Harry Potter books by J.K. Rowling; it allows the one who drinks it to temporarily take on the likeness of another person of their choosing.

    In the books, Polyjuice Potion ingredients include fluxweed, knotgrass, leeches, lacewing flies, boomslang skin, and bicorn horn. The catch is they also need something from the person’s body they wish to become, in order to mix into the brewing of said potion; so something like a hair, nail clippings, or even dandruff.

    Harry and his friends used Polyjuice Potion quite a few times in the books (and movies). Two particular instances stick out in my memory…

    • In Harry Potter and the Goblet of Fire, Barty Crouch, Jr. uses the potion to turn himself into Mad Eye Moody and thus get close to Harry, with the goal to eventually help bring Voldemort back to power and give Harry up to the Dark Lord.
    • In Harry Potter and the Deathly Hallows in one of my favorite instances because it’s somewhat hilarious at first, the Order of the Phoenix uses it to safely move Harry.
    • Also in Harry Potter and the Deathly Hallows, Harry, Ron, and Hermione need to sneak into the Ministry of Magic but can’t risk being seen and captured. Polyjuice Potion does the trick.

    Fandom has a great wiki all about how Harry and his friends use Polyjuice Potion throughout the series; they even include a detailed list of the ingredients and steps necessary to make the real thing.

    Why You’ll Love This Punch

    Reasons to love this Polyjuice Potion recipe non alcoholic version include:

    • This Harry Potter punch has just 4 basic ingredients, so you can whip it up in no time at all.
    • You can dress it up with whatever you like, including spiders, eyeballs, or other creepy crawly creatures.
    • I love the frothy effect sherbet gives to a Halloween punch. It really does resemble a witch’s brew, or what I’d imagine a witch’s brew looks like anyway.
    • Kids and adults both love it.
    Polyjuice Potion ingredients, including pineapple juice, cranberry apple juice, lemon lime soda, lime sherbet, and candy eyeballs

    Ingredients and Substitutions Notes

    Polyjuice Potion ingredients for the non book version are simple…

    • Pineapple juice I just get a 46-ounce can of pineapple juice at the grocery store.
    • Cranberry apple juice I usually just go with generic.
    • Lemon-lime soda – I prefer to use Sierra Mist or 7UP. My grandma always used 7UP for her sherbet punch. You can also use ginger ale if you prefer.
    • Lime sherbet – This can sometimes be harder to find, though most grocery stores should carry it. A couple tips, especially if you live in an area with Braum’s… Their Fresh Market carries all flavors of sherbet. If you don’t have a Braum’s, I have the best luck finding it at non big box grocery stores. You can also use rainbow sherbet if you can’t find lime sherbet.
    • Gummy eyeballs, spiders (non-edible), or any other kind of creepy crawlies – for decoration.

    How to Make Polyjuice Potion

    If you’re making this punch for a party and want it to be cold, I would chill the juices and the soda beforehand. While the sherbet will help to chill it, chilling the juices beforehand will also help the sherbet not to melt quite so fast.

    Before you start to make your punch, be sure to soften the sherbet just a little bit, so it’s not too difficult to scoop.

    To make this magical green punch, you’ll need to follow these steps…

    1. Add the pineapple juice to a large punch bowl.
    2. Stir in the cranberry apple juice.
    3. Mix in the lemon lime soda.
    4. Then just scoop lime sherbet on top, and serve it immediately.
    how to make Polyjuice potion in large punch bowl

    Your final sherbet punch will have a greenish brownish appearance. It makes the perfect green drinks for kids.

    large punch bowl filled with green lime sherbet punch

    If You Want, You Can Dress It Up

    I like to dress up our Polyjuice Potion drink with candy eyeballs.

    Some people choose to add green food coloring to their potion; personally, I just don’t want to pump my kids full of food coloring, so I choose not to do that. But make it however you want.

    You can add spiders, eyeballs, and any other creepy crawlies you can think of to your cups of Polyjuice Potion. If they are plastic, be sure to wash them; and use caution when serving with small children.

    Note: Keep in mind that gummy candies don’t float very well, or at least, the eyeballs don’t. So I just add the candy eyeball on top of a scoop of sherbet. Also, note that small candies can pose a choking hazard, so use caution when serving with small children.

    Expert Tips and FAQ’s

    Can I make Polyjuice Potion punch ahead of time?

    I don’t recommend making sherbet punch ahead of time, mainly because of the sherbet, but also because of the carbonated soda. It’ll lose its fizz, and it just won’t taste as good. Not to mention, the sherbet will melt and just make a green gloppy mess. It would be impossible to store it for any length of time.

    How do you store green sherbet punch?

    Honestly, you can store the punch part, but not the sherbet in the punch. You’d have to store them separately. However, the punch will lose its fizz, or carbonation, and it won’t be as good. So I don’t recommend storing it; I recommend making it last minute same day and serving right away.

    Can I add alcohol to it?

    Go for it! If you’re having a party for adult friends and/or family, you can definitely spike the punch. My recommendation would probably be vodka, but it’s totally up to you!

    mason jar of Harry Potter Polyjuice Potion punch recipe (nonalcoholic) with gummy eyeball on top

    More Harry Potter Recipes for the Perfect Harry Potter Party

    If you try this recipe, why not leave a star rating in the recipe card right below and/or a review in the comment section further down the page? I always appreciate your feedback. You can also follow me on Pinterest, Facebook, Instagram, and YouTube. And subscribe to my email list too!

    Polyjuice Potion Recipe

    Brew a fun Polyjuice Potion recipe for your Halloween or Harry Potter party. Easy, non alcoholic, lime sherbet punch your guests will love!

    • Large Punch Bowl
    • Ice Cream Scoop
    • 46 ounces pineapple juice
    • 3 cups cranberry apple juice
    • 2 liters lemon lime soda
    • 1/2 gallon lime sherbet
    1. Add the pineapple juice to a large punch bowl.

    2. Stir in the cranberry apple juice.

    3. Mix in the lemon lime soda.

    4. Then just scoop lime sherbet on top, placing scoops of sherbet all over the top of the punch.

    5. Serve immediately. Your Polyjuice Potion will have a greenish brownish appearance, the perfect color for this fun festive drink.
    6. You can decorate it with gummy eyeballs, spiders, or any kind of creepy crawly creatures you wish! Or just serve it up plain and simple.

    *I prefer to use 7UP, Sierra Mist, or Sprite.

    Before you make the punch…

    If you’re making this punch for a party and want it to be cold, go ahead and chill the juices and the soda beforehand. While the sherbet will help to chill it, chilling the liquids beforehand will also help the sherbet not to melt quite so fast and will ensure that your punch is nice and cold. Before you start to make your party punch, be sure to soften the sherbet just a little bit, so it’s not too difficult to scoop.

    Can I make it ahead of time?

    I don’t recommend making sherbet punch ahead of time, mainly because of the sherbet, but also because of the carbonated soda. It’ll lose its fizz, and it just won’t taste as good. Not to mention, the sherbet will melt and just make a green gloppy mess. It would be impossible to store it for any length of time.

    Drinks
    American
    green sherbet punch, Halloween punch, Harry Potter punch, how to make Polyjuice Potion, lime sherbet punch, Polyjuice Potion, Polyjuice Potion mocktail, polyjuice potion punch, polyjuice potion recipe, sherbet punch
  • Dutch Apple Crumb Pie

    Dutch Apple Crumb Pie

    Learn how to make an easy Dutch apple crumb pie from scratch. Make it homemade with crumb-topped cinnamon spiced apples, baked in the best pie crust ever!

    Apple crumb pie is one dessert I make every fall and Thanksgiving, and I love to enjoy it with a scoop of vanilla ice cream (or cinnamon ice cream).

    slice of Dutch apple crumb pie with scoop of vanilla ice cream on top, on white plate with fork

    While apple pie and apple crisp without oats taste good any time of year, there’s something about going to the orchard when the air is just getting crisp outside, picking up a bushel of apples, and making all the apple recipes, including this apple pie with crumb topping.

    When it comes to apple pie, I love using the freshest apple I can possibly find. It adds so much more flavor into the pie than the average store-bought apple. Sometimes I also add a pinch of homemade apple pie spice for extra flavor.

    One of my favorite things about making apple crumble pie is the fact that you don’t have to add a top crust. While a top crust isn’t necessarily hard, Dutch apple pie topping is easier and quicker.

    This pie actually inspired one of my favorite personal-sized desserts with a crumb topping, stuffed pears.

    [mv_video jsonLd=”true” key=”mpz23bu2xndldymjij76″ ratio=”16:9″ thumbnail=”https://mediavine-res.cloudinary.com/v1633635033/rw31vugfpmxry0tjzyag.jpg” title=”Dutch Apple Crumb Pie”]

    What is Dutch Apple Pie?

    Dutch apple pie is easier than a traditional apple pie because it only involves a single pie crust. Instead of the second crust, the delicious apple pie filling is covered with a streusel topping that crumbles right over the apples.

    That streusel topping is made with butter, flour, and sugar.

    sliced apple crumb pie in glass Pyrex pie plate

    Why This Recipe Works

    • This is definitely my favorite apple pie recipe, not only because it’s easy to make, but also because it’s so delicious. If you’re a beginner pie baker, apple pie with streusel topping is definitely the best apple pie recipe to start with on your pie making journey. You can even make delicious baked cinnamon apples without the crust.
    • The combination of the cinnamon apple pie filling with the buttery streusel topping makes a pie that everyone will love.
    • The butter, combined with the sugar and brown sugar, give the topping a slightly crispy texture with every single bite.
    apple crumb pie ingredients on white marble countertop

    Ingredient Notes

    • Pie Crust – This is the perfect pie crust and my favorite crust to use. I usually make it gluten-free, but you can make it with regular all-purpose flour, as well. It’s a buttery crust that adds loads of flavor to your pie.
    • Apples – For any kind of apple crisp, cobbler, crumble, or pie, I love using seconds; seconds are imperfect apples you can often buy cheaper and in bulk at an orchard or farmer’s market. I prefer to use Jonathan apples or Jonagold apples. Jonagolds are a cross between Jonathans and Golden Delicious, and they are so sweet, tart, and crisp. Some more of the best apples to use for pie include Granny Smith apples, Golden Delicious, Pink Lady, Honeycrisp, Braeburn, Cortland, and Northern Spy. According to Bob’s Red Mill, Northern Spy is a rare apple and hard to find; but if you love apple pie, it’s definitely one you may want to hunt down.
    • All-Purpose Flour – While I use a gluten-free flour, you can also use a regular all-purpose flour.
    • Lemon Juice – I prefer to use my favorite Minute Maid lemon juice, which you can find in the freezer juice section of the grocery store.

    How to Make Apple Crumb Pie

    There are 3 parts to this wonderful autumn dessert, including the crust, the apple pie filling, and the crumble topping. Let’s start with the crust.

    Make the Pie Crust…

    If you prefer a traditional roll-out crust, this pie crust is the way to go. If you want to keep it easy, try  making this no-roll pie crust or use a store bought pie crust.

    Make the Apple Pie Filling…

    1. Wash, core, peel, and thinly slice the apples, adding them to a large bowl. An apple peeler makes this process so much easier and quicker too.
    2. Melt the butter, and mix it into the prepared apples. Then add the sour cream, sugar, brown sugar, flour, cinnamon, nutmeg, and lemon juice. Mix together well.
    3. Take your pie crust out of the fridge, and pour the apple mixture into the pie shell.
    steps for how to make apple crumb pie, including mixing sliced apples with sugar, spices, and sour cream in mint green mixing bowl, then pouring apple pie filling into pie crust

    Make the Dutch Apple Pie Topping…

    1. Add flour, brown sugar, and sugar to a small mixing bowl, and mix together well.
    2. Slice cold butter into the dry ingredients.
    3. Then mix together with a pastry blender. It will form into a nice crumbly mixture.
    4. Top off your pie with the crumble topping, making sure you crumble it all up around the edge, as well.
    how to make Dutch apple pie topping, including mixing sugar and flour with cold butter, then crumbling over apple pie

    How to Bake Apple Pie…

    Place your pie plate on a baking sheet (a cookie sheet works just fine), and bake at 375° F for about an hour. And as I’ve recommended before, you can use a pie shield to keep your crust from getting too brown around the edges.

    Once your Dutch apple crumb pie is done, take it out of the oven, and allow it to cool on a wire rack. Serve it with a scoop of vanilla ice cream or a dollop of homemade whipped cream.

    half eaten slice of apple pie with crumb topping, with scoop of vanilla ice cream on top, on white plate

    Expert Tips and Recipe FAQ’s

    How do you know when a Dutch apple pie is done?

    The crust and crumb topping will turn a nice golden brown. The apple pie filling will also be very bubbly, and the apples will soften; you can test them with a fork.

    How do I store it?

    You can make this pie in advance, but I wouldn’t recommend more than a day ahead of time, unless you’re going to freeze the pie. To store the pie, I recommend covering it well and placing it in the refrigerator. You can warm it up the next day at a low temperature in the oven, or in the microwave.

    Can you freeze apple pie?

    Yes, you can freeze this deep dish apple crumb pie. Just make sure it’s covered well so it doesn’t get freezer burn. You may also want to make it in a pie dish you don’t plan to use again before you take the pie out of the freezer; or use a disposable aluminum pie plate. When you’re ready to eat it, be sure to allow plenty of time to thaw before serving.

    Can I make this pie gluten-free?

    You can absolutely make it gluten-free by substituting a good gluten-free flour (<— this one’s my favorite) for the all-purpose flour. And then also make the pie crust with gluten-free flour. Also, be sure to check labels on all of the ingredients, just to be safe, especially the spices you use, because they can be a risk for cross-contamination.

    slice of apple pie with streusel topping on white plate with fork

    MORE FAMILY FAVORITE PIE RECIPES:

    Find more holiday dessert recipes on my list of Favorite Thanksgiving Recipes.

    If you try this recipe, why not leave a star rating in the recipe card right below and/or a review in the comment section further down the page? I always appreciate your feedback. You can also follow me on Pinterest, Facebook, Instagram, and YouTube. And subscribe to my email list too!

    Dutch Apple Crumb Pie

    How to make an easy Dutch apple crumb pie from scratch. Homemade with crumb-topped cinnamon spiced apples, baked in the best pie crust ever!

    • Johnny apple peeler
    • Nested Mixing Bowls
    • Pastry Blender
    • Glass Pie Plate
    • Baking Sheet
    • Pie Shield
    • Pie Server
    • 1 single pie crust

    Apple Pie Filling:

    • 6 cups apples (sliced)
    • 2 tablespoons salted butter
    • 2 tablespoons sour cream
    • 1/4 cup cane sugar
    • 1/4 cup light brown sugar
    • 1 tablespoon all-purpose flour
    • 1 teaspoon ground cinnamon
    • 1/2 teaspoon ground nutmeg
    • 3 teaspoons lemon juice

    Crumb Topping:

    • 1/2 cup all-purpose flour
    • 1/4 cup light brown sugar
    • 1/4 cup cane sugar
    • 1/4 cup salted butter (sliced cold)
    1. Make a single pie crust and have it ready to go beforehand.
    2. Pre-heat your oven to 375° F.

    Apple Pie Filling:

    1. Wash, core, peel, and thinly slice the apples, adding them to a large bowl.

    2. Melt the butter, and mix it into the prepared apples.
    3. Then add the sour cream, sugar, brown sugar, flour, cinnamon, nutmeg, and lemon juice. Mix together well.

    4. Pour the apple pie filling into the pie shell.

    Crumb Topping:

    1. Mix together the flour, brown sugar, and sugar.

    2. Then slice cold butter into the dry ingredients, and mix together with a pastry blender. It will form into a nice crumbly mixture.

    3. Top off your pie with the crumble topping, making sure you crumble it all up around the edge, as well.
    4. Place your pie plate on a baking sheet, and bake at 375° F for about 1 hour, possibly a little longer depending on whether or not your crust is done.

    5. Once the pie is done, take it out of the oven, and allow it to cool on a wire rack, 'til you're ready to slice it up and serve it.

    *You can make this pie gluten-free by substituting a good gluten-free flour (<— this one’s my favorite) for the all-purpose flour. And then also make the pie crust with gluten-free flour. Also, be sure to check labels on any of the above ingredients, just to be safe, especially the spices you use.

    *An easy way to prep the apples is to use an apple peeler. It just makes the process so much quicker and easier.

    How do you know when a Dutch apple pie is done?

    The crust and crumb topping will turn a nice golden brown. The apple pie filling will also be very bubbly, and the apples will soften; you can test them with a fork.

    How do I store apple crumb pie?

    You can make this pie in advance, but I wouldn’t recommend more than a day ahead of time, unless you’re going to freeze the pie. To store the pie, I recommend covering it well and placing it in the refrigerator. You can warm it up the next day at a low temperature in the oven, or in the microwave.

    Desserts, Pies & Pastries
    American
    apple crumb pie, apple crumble pie, apple crumble pie filling, apple pie with crumb topping, apple pie with streusel topping, deep dish apple crumb pie, Dutch apple crumb pie, Dutch apple pie recipe, Dutch apple pie topping, how to make apple crumb pie, how to make Dutch apple pie from scratch
  • Easy French Toast Casserole Recipe {with Video}

    Easy French Toast Casserole Recipe {with Video}

    Make breakfast simple with an easy French toast casserole baked in one pan. You can make it ahead overnight or the same day. Topped with a cinnamon brown sugar topping, it’s the best recipe to make breakfast or brunch for a crowd!

    Like Crock Pot French toast casserole, this easy French toast casserole recipe is a win win for those special times when we don’t necessarily feel like going to all the work of making traditional French toast. And let me tell you, one of my pet peeves is when the French toast I’ve already cooked gets cold while waiting on the rest to cook.

    slice of easy French toast casserole on white plate with maple syrup and fork

    A good French toast bake pairs really well with eggs and bacon, or better yet, eggs and sausage. So you don’t have to have all sweet for breakfast, but it does add a little sweet treat to a delicious breakfast time.

    While you can make this rich overnight French toast without the topping, it won’t be near as good. The topping is super quick to mix up, and you can just crumble it right onto the casserole before baking.

    Be sure and check out the accompanying video in the post below. It’ll walk you through all the steps of how to make this delicious breakfast bake, so you don’t miss a beat.

    Want more breakfast favorites? My kids’ absolute favorites are brioche French toast casserole and blueberry French toast casserole.

    Why Make This Recipe for Breakfast?

    French toast meets bread pudding. You’ll love this cinnamon French toast bake recipe because it…

    • Takes 30 minutes to make – While it takes longer to chill and bake, it’s super easy and quick to make. And you’re not standing in front of the stove making breakfast while everyone else is having fun or off doing their own thing. Instead you can throw it together the night before, then put it in the oven when you’re ready to eat.
    • Everyone can eat at the same time, and it’ll still be warm – While you can keep French toast warm in the oven, while waiting on the rest of it to cook, this is just so much easier because it’s all in one pan, all baked at the same time.
    • It’s perfect for Sunday morning or a special occasion, like Christmas morning. It makes a great everyday breakfast or holiday breakfast. It’s always a hit and a great option for Mother’s Day too, because it’s pretty easy for kids to make, with a little guidance from Dad or a trusted adult.
    • It’s delicious – I’ve been told this delicious French toast casserole is much like a bread pudding. Oh my word, the cinnamon brown sugar topping on top of the French toast casserole is my absolute favorite. With a drizzle of maple syrup, a slice of this wonderful casserole is just so mouthwateringly delicious.
    • It’s budget-friendly – I usually always make the best French toast casserole with white bread, just plain old sandwich bread. While it does use quite a few eggs, the rest of the ingredients you likely already have in your pantry or freezer. I’d estimate you can make baked French toast for less than $8, depending on the ingredients you already have on hand.
    easy French toast casserole ingredients on white marble countertop

    Ingredients and Substitutions Notes

    Just gather up a few simple ingredients to get started making this easy French toast bake…

    • Sandwich bread – The main decision you have to make is which bread is the best bread for French toast casserole. And to that I’d answer the best type of bread is just a good old loaf of sandwich bread; in fact, I prefer to just use butter bread. Now you can use a loaf of whole wheat bread, sourdough bread, Texas toast, challah bread, crusty French bread, Italian bread, Kings Hawaiian Rolls, brioche bread, cinnamon swirl bread, crescent rolls, or really any other type of fresh baked bread. Any of them will be delicious. But a good French toast bake with white bread is just as good, in my opinion.
    • Pecans – We use chopped pecans. You can also use walnuts, black walnuts, or almonds if you want.
    • Large Eggs
    • Whole Milk You can use 2% milk or skim milk, but I recommend using whole milk, or a mixture of whole milk with half-and-half for an even creamier texture. If you need to make it dairy-free, substitute almond milk, coconut milk, soy milk, or oat milk instead.
    • Pure maple syrup – Be sure to use real maple syrup, not table syrup. There’s a distinct difference, and subbing artificial table syrup will change the texture, flavor, and especially the amount of sweetness in your casserole.
    • Vanilla Extract This is going to add a cozy flavor to the baked French toast casserole.
    • Sea Salt – I prefer to use Redmond Fine Sea Salt.
    • Spices – You’ll need ground cinnamon and ground nutmeg. Of course, if you want a bit more fall flavor to your casserole, you can also substitute pumpkin pie spice.
    • Topping – The topping is, in my opinion, the best part about this overnight breakfast casserole, and it includes butter, brown sugar, and ground cinnamon. Again, if you need to make it dairy-free, you can substitute vegan butter.

    Alternative Ingredients Ideas from Readers

    Readers have given us a lot of creative ideas for ways to really switch up this recipe for French toast casserole and add your own touch to this sweet breakfast casserole.

    • Top with a powdered sugar glaze instead of, or in addition to, the brown sugar topping.
    • Mix some of this apple pie spice recipe into the cinnamon streusel topping!
    • Add raisins or dried cranberries when you add the bread and pecans.
    • Add fresh strawberries, blueberries, or raspberries.
    • Speaking of milk, use eggnog in place of milk, especially around the holidays.
    • Use part heavy cream, part whole milk for an extra rich casserole.
    • In place of pecans, try other nuts, like chopped walnuts or almonds.
    • Add a handful of chocolate chips for melty chocolaty flavor.
    • Try adding bacon… Because everything’s better with bacon!
    • Try baking the casserole in a bundt pan, inverting it after baking, to make it even prettier.

    How to Make Easy French Toast Casserole

    This is a fairly simple French toast casserole with sliced bread. It only takes a few steps to make.

    Make the Casserole…

    1. First cut the bread slices into 1-inch cubes and place it in a greased 9×13 baking dish, along with the chopped pecans. You can layer the bread cubes and pecans so everything’s blended well in the dish. Tip: You can cut the bread into cubes using a knife or a pastry cutter.
    2. Then in a large bowl, whisk together the eggs, milk, pure maple syrup, vanilla, salt, cinnamon, and nutmeg, to make a sort of custard mixture.
    3. Pour the egg mixture over the bread and pecans, making sure all the bread is good and soaked. Then cover the casserole dish with plastic wrap, and chill the casserole in the fridge for a good 4 to 6 hours or more, just to let that custard mixture soak into the bread really well. Overnight is best.
    how to make French toast casserole with white bread in 3 steps, including cubed bread and pecans in baking dish, beating eggs with milk and spices, and pouring egg mixture over bread cubes

    Make the Topping…

    1. Before baking the next morning or the next day, pre-heat the oven to 350° F; then in a small bowl, mix up your topping by combining the butter, brown sugar, and cinnamon with a pastry blender.
    2. Crumble the topping on the top of the casserole as best you can. It’s a really moist mixture, so it’s more like clumps of cinnamon brown sugar.
    mixing French toast bake topping with pastry blender in glass Pyrex bowl and crumbling topping over top of casserole

    Bake It…

    1. Cover the baking dish with aluminum foil, and bake at 350°F for about 25 to 30 minutes. Then uncover and bake it for an additional 15 to 20 minutes, ’til it’s golden brown.
    2. When you remove it from the oven, let it cool for just a few minutes. Then slice into individual servings, and serve with powdered sugar or maple syrup.
    baked French toast casserole with sliced bread in white baking dish, with slice served on white plate with maple syrup

    It also pairs well with flavored syrups like blueberry syrup, whipped cream, fresh berries, fresh fruit, sausage, or bacon and eggs. You’ll especially enjoy a slice of French toast breakfast casserole with your morning cup of coffee or hot tea.

    Expert Tips and Recipe FAQ’s

    Do you really have to chill the casserole overnight?

    While this really is best as an easy overnight French toast casserole, you don’t have to chill it. But let me just say, the flavors and texture of the casserole will be at their best after chilling for at least a few hours. If you’re in a hurry, didn’t have time to plan ahead, and need to make it now, that’s ok. Just mix it up, make sure the bread is moistened well with the egg mixture, add the topping, and bake it. But if you do have time, just cover the casserole dish with plastic wrap or aluminum foil, and chill in the fridge overnight.

    What are gluten-free and dairy-free options for this baked French toast recipe?

    Just substitute your favorite gluten-free bread in place of the regular sandwich bread included in the ingredients. You can also substitute almond milk, coconut milk, soy milk, oat milk, or another non-dairy milk, instead of whole milk; and you can use a dairy-free butter substitute in the topping. Always check all of your other ingredients, as well, to make sure they’re really gluten-free and dairy-free.

    Why is my French toast casserole soggy?

    There can be multiple reasons for this. 1. There may be too much egg mixture to soak into the bread or it may need longer to soak into the bread, in which case you can soak the bread in a separate bowl overnight, then transfer to the baking dish (without all the extra liquid) right before baking. 2. It may not have baked long enough. 3. And if you want to prevent soggy French toast casserole altogether, I’d suggest leaving your bread open the night before, so it can dry out just a bit; stale bread, crusty bread, or day-old bread soaks up the egg mixture more easily and readily.

    Can you freeze French toast casserole?

    Normally, you’ll just store any leftovers in the fridge. But if you wish to freeze it, you can. While I recommend covering it well and freezing it after it’s already been baked, you can also freeze it before baking (though I’d add the topping later before actually baking it). Keep in mind it’ll keep longer in the freezer if it’s already been cooked. Just be sure you have plenty of time for it to thaw and re-heat when taking it out of the freezer. Allow time for it to thaw in the fridge before cooking or re-heating in the oven or microwave.

    How should you store leftovers?

    Store any leftovers in an airtight container in the fridge; they should keep for 2-3 days.

    slice and bite of cinnamon French toast bake with fork on white plate

    More Breakfast and Brunch Recipes for You to Enjoy

    Sometimes on weekends, and especially on holidays and birthdays, we’ll make blueberry buttermilk pancakes or our favorite recipe for cinnamon French toast.

    April J. Harris has a delicious recipe for blueberry bread and butter pudding. And cook up a batch of make ahead stuffed French toast with Mommy Hates Cooking.

    Check out all our breakfast recipes for more easy breakfast ideas, like my grandma’s cinnamon streusel coffee cake.

    Reader Comments and Praise for This Recipe

    This easy baked French toast casserole is a tried and true reader favorite!

    I have made this wonderful and perfect french toast casserole TWICE!!! 💕 The first time I was sad I didn’t make more,lol. The next batch is finishing in the oven for our neighbors. Thanks Mel for posting and showing how easy it really is to make.” – Denise

    I made this today and it was delicious. I prepped it the night before and let the bread sit out to get a little dry and it worked out great. One of my granddaughters said, I can just taste the love you put in this. So thanks for sharing the recipe.” – Mandy

    Best French toast casserole we’ve ever had. This is our new go to for all special occasions. Everyone loved it! Thank you for the wonderful and delicious recipe!” – Jojo

    This French toast casserole was AMAZING! Instead of milk I used eggnog, as you suggested, and it was ooooh so good. Everyone loved it. Is my go-to crowd pleaser now!” – Valerie

    If you try this recipe, why not leave a star rating in the recipe card right below and/or a review in the comment section further down the page? I always appreciate your feedback. You can also follow me on Pinterest, Facebook, Instagram, and YouTube. And subscribe to my email list too!

    Easy French Toast Casserole

    Make breakfast simple with easy French toast casserole baked in one pan. Make ahead overnight or same day. Best recipe for a crowd!

    • Whisk
    • Mixing Bowl
    • 9×13 Baking Dish
    • Pastry Blender
    • Aluminum Foil

    Casserole:

    • 20 ounces sandwich bread
    • 1 cup pecans (chopped)
    • 8 large eggs
    • 2 cups whole milk
    • 1/4 cup maple syrup
    • 1 tablespoon vanilla extract
    • 1 teaspoon sea salt
    • 1 1/2 teaspoons ground cinnamon
    • 1/4 teaspoon ground nutmeg

    Topping:

    • 4 tablespoons salted butter (sliced)
    • 1/2 cup light brown sugar
    • 1 teaspoon ground cinnamon
    1. Grease a 9"x13" baking dish.
    2. Cut the bread into small 1-inch cubes, and layer with the chopped pecans in the baking dish.

    3. In a large bowl, whisk together the eggs, milk, pure maple syrup, vanilla extract, salt, cinnamon, and nutmeg, to make a sort of custard mixture.

    4. Pour the egg milk mixture over the bread and pecans in the baking dish.

    5. Cover and chill for a good 4 to 6 hours or overnight.

    6. When you're ready to bake the casserole, remove it from the fridge, and pre-heat the oven to 350° F.

    7. Using a pastry blender, mix together the sliced butter, brown sugar, and cinnamon in a small mixing bowl.

    8. Crumble or clump the topping on the top of the casserole.

    9. Cover the baking dish with aluminum foil, and bake at 350° F for about 25 to 30 minutes. Then uncover and bake it for an additional 15 to 20 minutes, 'til it's golden brown.

    10. Once it’s thoroughly cooked through, remove it from the oven and let it cool for just a few minutes.
    11. Then slice and serve with powdered sugar and maple syrup.

    *20 ounces is about 22 slices of the butter bread (or white bread) that I use. You can use a loaf of sourdough, Texas toast, challah bread, French bread, Kings Hawaiian Rolls, brioche, cinnamon swirl bread, crescent rolls, or really any other type of fresh baked bread. Any of them will be delicious.

    *Be sure to use real maple syrup. Table syrup will change the texture, flavor, and especially the amount of sweetness in your casserole.

    *While this really is best as an overnight French toast casserole, you don’t have to chill it. But let me just say, the flavors will be at their best after chilling for at least a few hours. If you’re in a hurry, didn’t have time to plan ahead, and need to make it now, that’s ok. Just mix it up, make sure the bread is moistened well with the egg mixture, add the topping, and bake it.

    Store any leftovers in the fridge.

    Breakfast & Brunch, main dish
    American
    baked French toast, cinnamon French toast bake, easy French toast casserole, French toast bake, French toast bake recipe, French toast bake with white bread, French toast casserole, French toast casserole recipe, French toast casserole with sliced bread, French toast casserole with white bread, overnight French toast casserole
  • Easy Instant Pot Applesauce in 30 Minutes or Less

    Easy Instant Pot Applesauce in 30 Minutes or Less

    Now it’s easier than ever to make homemade applesauce with an electric pressure cooker. This Instant Pot applesauce (with skins) has no added sugar, and it’s ready to eat in 15 minutes.

    The fact that it’s pressure cooked takes the work out of making applesauce because you don’t have to stand in front of a hot stove. Instead, just load everything up in the Instant Pot, push a couple buttons, and let it do the work for you.

    homemade Instant Pot applesauce in a Ball canning jar

    My boys love both applesauce and Instapot apple butter, and we eat quite a bit of it throughout the year. I especially like to keep it on hand for times when we’re sick; in a way, it’s a sort of comfort food too.

    It’s quite fulfilling to fill your pantry up with homemade canned foods that your family will actually eat. And when it’s easy to do, it’s a win win.

    [mv_video doNotAutoplayNorOptimizePlacement=”false” doNotOptimizePlacement=”false” jsonLd=”true” key=”feqiv3m4fb2wykmfijd8″ ratio=”16:9″ thumbnail=”https://mediavine-res.cloudinary.com/v1630362383/wfrf9ob81l8m4loh8gmj.jpg” title=”Easy Instant Pot Applesauce in 30 Minutes or Less” volume=”70″]

    Why Make This Recipe?

    I think you’ll love this no-peel applesauce because it’s…

    • Easy to make – Pressure cooker applesauce is made with 3 ingredients, and you just put everything in the Instant Pot and let it cook. That means no need to stand in front of the stove and stir; you can walk away and let the pressure cooker do the work.
    • No peeling required – While you do need to core and slice the apples up, there’s no need to peel off the skins, unless you just want to.
    • Budget-friendly – Let’s face it, good applesauce can be more expensive at the store. And it just doesn’t taste as good as homemade. You can make 5 to 6 pints of applesauce for less than $10, depending on the cost of your apples.
    ingredients for pressure cooker applesauce, including apples, lemon juice, and water

    Ingredient Notes

    The ingredients you need are simple, and you may already have them on hand.

    A bit of advice… I’m very partial to canning applesauce in the fall because it’s usually pretty easy to find seconds at a local orchard or farmer’s market. Buying seconds means you can buy a HUGE box of less-than-perfect apples for a lot less than normal cost, which is going to save you a ton of money.

    • Apples – When it comes to picking the type of apples you should use, I recommend apples that are both sweet and tart; I don’t add any sugar, so I want the unsweetened applesauce to taste really good. Some of the best apples for making applesauce include Jonathan, Jonagold, Braeburn, McIntosh, Winesap, Rome, Golden Delicious, Cortland, Fuji, Gala, and Ambrosia.
    • Lemon juice – I like to use a fresh lemon juice, either straight from a lemon or my favorite shortcut, Minute Maid lemon juice you can find in the freezer section of some grocery stores; I’ve been able to find it at my local Walmart. There are multiple reasons for adding lemon juice to applesauce, but it’s usually to help preserve or protect the color of your apples over time (making your applesauce stay pretty), and/or to make the applesauce more acidic for home canning. Wind fallen apples (including seconds) can have a lower acidity and a higher mold/bacteria count than umblemished apples.

    If you are one who loves to add the flavor of cinnamon to your sauce, you may also love my recipe for cinnamon applesauce.

    How to Make Instant Pot Applesauce

    You can make applesauce from the leftover apple mush you have left behind when you make fresh apple juice. But if you’re not making apple juice, here’s how to make a fresh batch of sauce in your pressure cooker.

    Keep in mind, you can make this recipe in any brand of electric pressure cooker you have, including the Instant Pot, Ninja Foodi, or Power Pressure Cooker XL.

    1. Wash, core, and slice the apples; I use my Johnny apple peeler to core and slice all at once. Cut out any bad spots, as well.
    2. Put the sliced apples in your Instant Pot.
    3. Sprinkle lemon juice over the apples.
    4. Then add water to the apples, as well. If you want to mix everything together, you can; but there’s no need to until after it all cooks.
    how to make applesauce in the Instant Pot, including slicing apples with Johnny apple peeler, putting apples in Instant Pot, then adding lemon juice and water
    1. Put the lid in place on the Instant Pot. Press Manual or Pressure Cook for 10 minutes. When it’s finished cooking, allow the pressure cooker to do a natural release.
    1. Purée the mixture with an immersion blender, standing blender, or food mill; or if you want a chunky applesauce, you can mash the apples with a potato masher. It’s up to you how you prefer the texture and consistency.
    how to make pressure cooker applesauce in Ninja Foodi, then mashing cooked apples with immersion blender

    Freezing Instructions:

    My mom used to freeze a LOT of the applesauce she made when we were kids growing up. She’d keep freezer safe plastic containers just for storing things like her homemade applesauce.

    1. When your applesauce has cooked, allow it to cool to room temperature.
    2. Then just ladle or pour it into freezer safe containers that seal; leave 1/2 inch headroom at the top, to allow for expansion as it freezes.
    3. Label the containers, and place them in the freezer.

    Frozen applesauce should keep for about a year.

    Canning Instructions:

    I prefer water bath canning applesauce.

    1. While your applesauce is cooking, wash pint jars in hot soapy water, rinse, and keep warm. We like to place ours on a baking sheet in a lower temp oven to stay hot.
    2. Once you’ve mashed up your sauce, promptly ladle or pour it into the hot jars you prepared ahead of time. Be sure to leave about a 1/2-inch gap at the top of each jar.
    pouring homemade applesauce into canning jars with yellow canning funnel
    1. Wipe the rim of each jar with a wet towel or rag, place the lid on, and tighten the band.
    2. Then place the hot jars down in a boiling hot water bath canner with 1-2 inches of water over the jars, and process those jars in the hot water bath for about 20 minutes.
    canning applesauce in water bath canner

    Home canned applesauce should last at least 1 year. If you choose to can applesauce, Ball has wonderful Canning Guides to guide you through the process. You can also consult the Ball Blue Book Guide to Preserving.

    Expert Tips and Recipe FAQ’s

    Can you overcook applesauce?

    Yes, actually, you can; and overcooking it will lose a lot of the flavor. That’s why making it in the Instant Pot is better because it cooks for a set amount of time with no guesswork, and pressure cooking is a wonderful way to preserve the flavors of whatever food you’re cooking.

    How should I store it?

    If you’re not freezing or canning your applesauce, it should be kept in the refrigerator. It’ll keep in the fridge for about 5 to 7 days.

    What are some ways I can use applesauce?

    We love to eat applesauce on buttered toast. It’s also delicious on pancakes, especially apple cinnamon pancakes. You can enjoy it with oatmeal, cottage cheese, and pork chops. And you can use it when you’re baking… For example, you can use it to make apple bundt cake; or you can sometimes use it as a substitute for egg, butter, oil, or sugar, depending on the recipe. Momables shares an ingredient substitution list for baking that explains how to sub applesauce in; and Craftsy has a really good explanation, as well, as to how and when to substitute applesauce for certain ingredients when you’re baking.

    white bowl of pressure cooker applesauce

    More Recipes for Fresh Apples:

    You can also learn how to use your Instant Pot with our Instant Pot Quick Start Guide, filled with practical tips, Instant Pot recipes, accessory ideas, and more!

    You’ll find a longer recipe tutorial in the Instant Pot applesauce recipe card below.

    If you try this recipe, why not leave a star rating in the recipe card right below and/or a review in the comment section further down the page? I always appreciate your feedback. You can also follow me on Pinterest, Facebook, Instagram, and YouTube. And subscribe to my email list too!

    Instant Pot Applesauce

    How to make the best homemade Instant Pot applesauce with skins and no added sugar. Easy pressure cooker recipe, ready to eat in 30 minutes or less.

    • Instant Pot
    • Ninja Foodi
    • Johnny apple peeler
    • Immersion blender
    • Pint jars
    • Hot Water Bath Canner
    • Canning Funnel
    • Jar Lifter
    • 6 pounds apples (unpeeled)
    • 2 teaspoons lemon juice
    • 1 cup water
    1. Wash, core, and slice the apples; I use my Johnny apple peeler to core and slice all at once. Cut out any bad spots, as well.

    2. Put the sliced apples in your Instant Pot.
    3. Sprinkle lemon juice over the apples.

    4. Then add water to the apples, as well. If you want to mix everything together, you can; but there’s no need to until after it all cooks.

    5. Put the lid in place on the Instant Pot. Press Manual or Pressure Cook for 10 minutes. When it’s finished cooking, allow the pressure cooker to do a natural release.

    6. Purée the mixture with an immersion blender, standing blender, or food mill; or if you want a chunky applesauce, you can mash the apples with a potato masher. It’s up to you how you prefer the texture and consistency.

    7. If you're not freezing or canning your applesauce, it should be kept in the refrigerator. It'll keep in the fridge for about 5 to 7 days.

    Freezing Instructions:

    1. When your applesauce has cooked, allow it to cool to room temperature.

    2. Then just ladle or pour it into freezer safe containers that seal; leave 1/2 inch headroom at the top, to allow for expansion as it freezes.

    3. Label the containers, and place them in the freezer.

    Canning Instructions:

    1. While your applesauce is cooking, wash pint jars in hot soapy water, rinse, and keep warm. We like to place ours on a baking sheet in a lower temp oven to stay hot.

    2. Once you've mashed up your sauce, promptly ladle or pour it into the hot jars. Be sure to leave about a 1/2-inch gap at the top of each jar.

    3. Wipe the rim of each jar with a wet towel or rag, place the lid on, and tighten the band.

    4. Then place the hot jars in a boiling hot water bath canner with 1-2 inches of water over the jars, and process those jars in the hot water bath for about 20 minutes.

    5. Allow your jars to rest for at least 24 hours, but be sure to check every lid to make sure it's sealed shortly after canning.

    6. Before moving to the pantry, write what it is and the year on the lid, so you know when you made it.

    *When it comes to picking the type of apples you should use, I recommend apples that are both sweet and tart; I don’t add any sugar, so I want the unsweetened applesauce to taste really good. Some of the best apples for making applesauce include Jonathan, Jonagold, Braeburn, McIntosh, Winesap, Rome, Golden Delicious, Cortland, Fuji, Gala, and Ambrosia.

    Canning & Freezing, Sauces & Dressings
    American
    applesauce in the instant pot, canning applesauce, how to make applesauce, Instant Pot applesauce, instant pot applesauce no sugar, instant pot applesauce with skins, no peel applesauce, pressure cooker applesauce
  • Homemade Apple Jelly Recipe without Pectin

    Homemade Apple Jelly Recipe without Pectin

    It’s really easy to make a delicious apple jelly recipe everyone will love with just 3 simple ingredients. I especially love that this easy home canning recipe needs no added pectin!

    My boys love a good fruit spread in the mornings with breakfast, whether we’re eating toast or biscuits. We’ve made pressure cooker apple butter for a long time now, and this apple jelly recipe without pectin has become another family-favorite breakfast addition.

    small wooden spoon in half pint jar of apple jelly recipe with Gala apples

    This recipe for apple jelly reminds me of my sister, because her version was the first I’d ever tasted in my then young life. I’m pretty sure she made her apple jelly from juice too; I just remember it tasting so delicious.

    Why You’ll Love Making This Apple Jelly Recipe without Pectin

    I think you’ll love this homemade apple jelly because it’s…

    • Easy to make – With only 3 ingredients, it only requires a little bit of cook time. It’s just a matter of mixing and stirring while it heats.
    • No need to peel or core any apples – Instead of apples, you use apple juice for this recipe. You can either make homemade apple juice; or you can use store-bought juice, though you may need to add a little bit of pectin to store-bought juice.
    • Budget-friendly – Let’s face it, good jelly is expensive at the store. You can make 4 to 6 jelly jars (or half-pints) of this homemade jelly for less than $10.

    What’s the Difference Between Apple Butter and Apple Jelly?

    Basically, jelly is clear and made from juice.

    Apple butter is more like jam and made with actual apples vs. juice. It’s not clear and also has various spices like cloves and nutmeg for added flavors.

    Ingredients and Substitutions Notes

    3 ingredients for apple jelly recipe without pectin, including apple juice, lemon juice, and sugar on white marble countertop

    The ingredients you need are simple, and you may already have them in your pantry. If you choose to juice your own apples, that may require a quick trip to the orchard or farmer’s market.

    • Apple juice Again, you can make this homemade with fresh apples, or you can use store bought juice. If making apple juice, I recommend a sweeter apple like Gala, Honeycrisp, Fuji, Yellow Delicious, Rome, Jonagold, or Pink Lady. You’ll need about 5 pounds of apples to get enough juice to make jelly.
    • Lemon juice – I like to use a fresh lemon juice, either straight from a lemon or my favorite shortcut… Minute Maid lemon juice you can find in the freezer section of some grocery stores; I’ve been able to find it at my local Walmart.

    How to Make Apple Jelly

    The process of making apple jelly is actually really easy, especially if your juice is already made and ready to go.

    1. Mix together the apple juice, lemon juice, and sugar in a stock pot. Then bring the mixture to a boil, constantly stirring. Continue to cook the mixture, constantly stirring, until the mixture reaches a temperature of 220° with a candy thermometer.
    cooking apple jelly in a stock pot with a whisk
    1. Remove from the heat, and promptly ladle or pour into clean and sanitized/sterilized jelly jars for canning or freezing. Be sure to leave about a 1/2-inch gap at the top of each jar.
    pouring cooked apple jelly from juice into half pint jelly jars for canning, using yellow canning funnel
    1. Wipe the rim of each jar with a wet towel or rag, place the lid on, and tighten the band. At this point, you can either can the apple jelly or freeze it. I prefer water bath canning apple jelly, where I place the hot jars down in a boiling hot water bath canner with 1-2 inches of water over the jars. Then we process those jars in the hot water bath for about 10 to 15 minutes.
    water bath canning apple jelly in black water bath canner

    If you choose to can it, Ball has wonderful Canning Guides to guide you through the process. You can also consult the Ball Blue Book Guide to Preserving.

    Expert Tips and Recipe FAQ’s

    Careful… If the jelly hasn’t begun to set or thicken once it’s reached 220° F, you may need to cook it just a little bit longer. Whatever you do, do not cook it too long, or it will end up like our first batch… A sticky, gooey apple taffy mess that eventually turns into a slab of apple rock. Believe me, you don’t want that.

    How long does apple jelly take to set?

    Time to set up really depends on a number of factors, including the type of stove you’re using to cook the jelly. It will likely take a good 30 to 45 minutes, maybe longer for your jelly to set. And even as you remove it from the stove, it won’t be completely set; in fact, it will be more like liquid. As it sits in the jars and begins to cool, the jelly will firm up and set even more. That’s why it’s important to put it in jars right away.

    How long will jelly keep in the pantry?

    Most sources say that pantry stored (and canned) jam and jelly can last 1 to 2 years. Freezer jam is a bit less with a freezer life of about 6 months. Shelf Life Advice has a helpful chart with the life span of a jar of jelly.

    Why may store-bought juice need added pectin?

    Pectin occurs naturally in fruits like berries and apples. When that pectin is cooked with sugar, it can thicken, forming the gel that makes jam and jelly. Apples have a very good amount of natural pectin, especially when you cook the peelings, cores, and all to make your juice. Store bought juice may not have all the natural pectin you’ll get from a good homemade apple juice made by cooking the whole apple.

    What to Eat with Apple Jelly

    Apple jelly is so delicious served on homemade biscuits and crescent dinner rolls and toast with butter. It’s also a welcome addition to a slice of buttermilk cornbread.

    homemade apple jelly on toast on white flowered plate

    More Homemade Jams and Jellies and Sauces You’ll Love:

    If you try this recipe, why not leave a star rating in the recipe card right below and/or a review in the comment section further down the page? I always appreciate your feedback. You can also follow me on Pinterest, Facebook, Instagram, and YouTube. And subscribe to my email list too!

    Homemade Apple Jelly Recipe without Pectin

    How to make an apple jelly recipe everyone will love with 3 simple ingredients. Easy home canning recipe with no added pectin!

    • Stock Pot
    • Candy Thermometer
    • Canning Funnel
    • Half-Pint Jelly Jars
    • Hot Water Bath Canner
    • Jar Lifter
    • Dissolvable Canning Jar Labels
    • 4 cups apple juice*
    • 2 tablespoons lemon juice
    • 3 cups sugar
    1. Mix together the apple juice, lemon juice, and sugar in a stock pot.
    2. Bring the mixture to a boil, constantly stirring.
    3. Continue to cook the mixture, constantly stirring, until the mixture reaches a temperature of 220° with a candy thermometer. If the jelly hasn't begun to gel once it's reached 220°, you may need to cook it just a little bit longer.*

    4. Remove the jelly from the heat, and promptly ladle or pour into clean and sanitized/sterilized jars for canning or freezing. Be sure to leave about a 1/2-inch gap at the top of each jar.

    5. Wipe the rim of each jar with a wet towel or rag, place the lid on, and tighten the band.
    6. At this point, you can either can the apple jelly or freeze it. I prefer water bath canning apple jelly, where I place the hot jars down in a boiling hot water bath canner with 1-2 inches of water over the jars. Then we process those jars in the hot water bath for about 10 to 15 minutes.

    7. Once canned, allow your jelly to sit undisturbed for 24 hours before labeling and storing in your pantry.

    *You can buy store bought juice to make apple jelly, but you may need to add a little pectin to it if it’s not a good quality juice. Some store bought juice may not have all the natural apple pectin you’ll get from a good homemade apple juice made by cooking the whole apple.

    *It will likely take a good 30 to 45 minutes, maybe longer for your jelly to thicken or set. And even as you remove it from the stove, it won’t be completely set. Whatever you do, do not cook it too long, or it will end up like our first batch… A sticky, gooey apple taffy mess that eventually turns into a slab of apple rock.

    How long will jelly keep in the pantry?

    Most sources say that pantry stored (and canned) jam and jelly can last 1 to 2 years. Freezer jam is a bit less with a freezer life of about 6 months.

    Canning & Freezing, jams and jellies
    American
    apple jelly, apple jelly from juice, apple jelly no pectin, apple jelly recipe, apple jelly recipe without pectin, apple jelly without pectin, canning apple jelly, homemade apple jelly, how to make apple jelly, recipe for apple jelly
  • Bisquick Cinnamon Scones with Crisp Sugar Topping

    Bisquick Cinnamon Scones with Crisp Sugar Topping

    How to make wonderful Bisquick cinnamon scones, brushed with buttermilk and sprinkled with sweet cinnamon sugar. Easy breakfast recipe!

    My Bisquick cinnamon biscuits recipe is a much-loved recipe, and I love making them. So much so, I thought it’d be fun to make Bisquick drop scones and add them to my Bisquick recipe files.

    Instead of just biscuit mix and water, I make these similar to my Irish soda scones. Ingredients like butter, egg, vanilla extract, and buttermilk give a flavor and texture that’s hard to beat.

    Bisquick cinnamon scones sprinkled with cinnamon sugar topping on parchment covered baking sheet

    Oh and the crispy cinnamon sugar topping… Brush these babies with a little dab of buttermilk, sprinkle a little cinnamon sugar, and you’ve got a soft biscuit with a sweet, crispy top. Soooo good!!!

    Now let’s say you’re just not that into Bisquick. That’s ok, because my friend Kelly over at The Scone Blog (it’s all scones!) makes a delicious cinnamon scones recipe without biscuit mix.

    If, however, you are into Bisquick as much as I am, read on, my friend. Let’s make some sweet breakfast treats, shall we?

    WHERE CAN I FIND THE ACTUAL RECIPE CARD?

    If you’d rather skip all of my scone baking tips, important info for this recipe, and similar recipe ideas – and get straight to the cinnamon Bisquick scone recipe – just scroll down to the bottom, where you’ll find a printable recipe card.

    LET’S TALK ABOUT THE INGREDIENTS:

    The right ingredients are the secret to making good Bisquick scones.

    ingredients for Bisquick cinnamon scones on white marble countertop

    Bisquick Baking Mix: While I prefer to use Bisquick, you can use any baking mix you prefer; just keep in mind, I can’t guarantee how other mixes may change the texture, fluffiness, etc.

    Unsalted Butter: I use unsalted butter because I want a little more control over how salty my scones are.

    Egg: The egg helps to bind the ingredients together. It helps make scones more fluffy and gives a richer flavor to them too.

    Buttermilk: I use this buttermilk mix to make buttermilk. But if you don’t have either buttermilk or a mix, you can make your own with about 1 tablespoon of vinegar for every cup of milk you use. Just let the mixture sit for a few minutes before adding to your scone mixture.

    Cinnamon Chips: While I don’t use cinnamon chips, they are an optional add-in for even more cinnamon flavor.

    Keep in mind, all of the ingredients and ingredient amounts you’ll need are in the printable recipe card below.

    KITCHEN TOOLS AND EQUIPMENT YOU’LL NEED:

    Large Mixing Bowl – I love my handled mixing bowls; the handle makes them easy to use.

    Whisk

    Pastry Blender – This enables you to cut the cold butter into the dry ingredients. Although I’ve watched my grandma use a table knife in the past to do the same thing.

    Baking Sheet with Parchment Paper

    Pastry Brush – for brushing buttermilk on top of your scones.

    HOW TO MAKE BISQUICK CINNAMON SCONES

    Before you get started mixing up your scone batter, be sure to pre-heat your oven to 400° F, and either grease a baking sheet, or add parchment paper to it. I prefer to use parchment paper because the scones just slide right off of it after baking.

    MIX UP YOUR BATTER…

    1. Whisk Bisquick baking mix, sugar, and cinnamon together in a large mixing bowl.
    2. Using a pastry blender (or table knife), cut the cold, sliced butter into the dry ingredients until the mixture consists of fine crumbles.
    3. In a separate measuring cup or bowl, beat the egg, vanilla extract, and buttermilk together; and add to the dry ingredients.
    steps for mixing Bisquick scones in mint green bowl, including whisking dry ingredients together, cutting butter into mixture, mixing together liquid ingredients, and adding liquid to dry ingredients
    1. Mix the egg mixture into the dry ingredients, just ’til blended. Be careful not to overmix.
    Bisquick scones dough in mint green bowl with large spoon on white marble countertop

    An optional step here would be to fold the cinnamon chips into the dough if you want. By fold, I mean to gently stir them into the dough.

    1. Drop the dough, by spoonfuls, onto your parchment paper covered baking sheet.
    Bisquick drop scones ready to bake on parchment paper covered baking sheet
    1. Brush the top of each scone with buttermilk.
    Bisquick scones with buttermilk brushed on top on parchment paper lined baking sheet
    1. Then sprinkle a little cinnamon sugar on top of each scone.
    Bisquick drop scones sprinkled with cinnamon sugar on parchment paper lined baking sheet

    Then you’ll just bake your scones at 400° F for 12 to 15 minutes, or ’til they turn a nice golden brown. They’re best served while warm with butter, apple butter, etc.

    Bisquick drop scone sprinkled with cinnamon sugar and sliced in half on gray plate with other scones

    FAQ:

    Why put milk or cream in scones? Can I make them dairy-free?

    Buttermilk gives scones a lighter, fluffier texture. While I have not attempted to make these dairy-free, you could try making them with almond milk, rice milk, or coconut milk. You can also substitute a non-dairy butter, though keep in mind this will likely change the texture and density of the finished scone.

    Can I make these using gluten-free Bisquick?

    Yes, you can. I actually make these with gluten-free Bisquick, and they turn out great. Just know that gluten-free ingredients have a tendency to change the texture in baked goods, though these scones turn out very moist and fluffy. One last note… Be sure to check all ingredient labels to make sure everything you’re using is truly gluten-free.

    How do I get my scones to rise and be fluffy?

    Ingredients play a huge role in rise. The egg and buttermilk, as well as ingredients in the biscuit mix, all work together to give these scones both a rise and a fluffiness. I’ve also read that placing them so they’re slightly touching on the baking sheet can help with lift while baking; while I don’t do this, it is worth a try.

    How can I make scones less crumbly?

    Not adding enough buttermilk and over mixing can cause scones to be harder and more crumbly. Be sure to follow the recipe to a t.

    How should Bisquick drop scones be stored?

    Make sure they’ve cooled completely; then store them in a covered airtight container.

    Can I freeze Bisquick scones?

    You can freeze scones for up to 3 months. While you can freeze them unbaked or baked, it’s better to freeze them unbaked. To do so, place all your scones on a parchment paper covered baking sheet; place the baking sheet in the freezer ’til the scones are good and frozen. Then remove them from the freezer, place the unbaked scones in an airtight container or freezer bag, and put them back in the freezer ’til you’re ready to bake them.

    HOW TO SERVE BISQUICK SCONES

    I prefer to enjoy mine with a little pat of butter. I also sometimes like to sprinkle a little cinnamon sugar on the melted butter, or add a dollop of homemade apple butter.

    MORE BISQUICK RECIPES:

    GET THE PRINTABLE RECIPE

    If you love these Bisquick cinnamon scones as much as I do, please write a 5 star review, and help me share the recipe on Facebook and Pinterest!

    CRAVING MORE DELICIOUS RECIPES? Subscribe to my newsletter, and follow along on PinterestFacebookYouTube, and Instagram for all the latest updates!

    Bisquick Cinnamon Scones with Crisp Sugar Topping

    How to make wonderful Bisquick cinnamon scones, brushed with buttermilk and sprinkled with sweet cinnamon sugar. Easy breakfast recipe!

    • Baking Sheet
    • 2 cups Bisquick baking mix
    • 1 1/2 tablespoons sugar
    • 1/2 tablespoon cinnamon
    • 6 tablespoons unsalted butter (cold)
    • 1 large egg
    • 1 tsp vanilla extract
    • 1 cup buttermilk*

    Topping:

    • 1 tablespoon buttermilk
    • 1-2 tablespoons cinnamon sugar
    1. Pre-heat your oven to 400° F, and either grease a baking sheet, or add parchment paper to it. I prefer to use parchment paper because the scones just slide right off of it after baking.

    2. Whisk Bisquick baking mix, sugar, and cinnamon together in a large mixing bowl.

    3. Using a pastry blender (or table knife), cut the cold, sliced butter into the dry ingredients until the mixture consists of fine crumbles.

    4. In a separate measuring cup or bowl, beat the egg, vanilla extract, and buttermilk together.
    5. Mix the egg mixture into the dry ingredients, just ’til blended. Be careful not to overmix.
    6. Drop the dough, by spoonfuls, onto your parchment paper covered baking sheet.
    7. Brush the top of each scone with buttermilk.
    8. Then sprinkle a little cinnamon sugar on top of each scone.
    9. Bake your scones at 400° F for 12 to 15 minutes, or 'til they turn a nice golden brown. They're best served while warm with butter, apple butter, etc.

    *I use this buttermilk mix to make buttermilk. But if you don’t have either buttermilk or a mix, you can make your own with about 1 tablespoon of vinegar for every cup of milk you use. Just let the mixture sit for a few minutes before adding to your scone mixture.

    Can I make these using gluten-free Bisquick?

    Yes, you can. I actually make these with gluten-free Bisquick, and they turn out great. Just know that gluten-free ingredients have a tendency to change the texture in baked goods, though these scones turn out very moist and fluffy. One last note… Be sure to check all ingredient labels to make sure everything you’re using is truly gluten-free.

    Breads & Muffins
    American
    Bisquick cinnamon scones, Bisquick drop scones, Bisquick scones, how to make Bisquick cinnamon scones
  • Grasshopper Sundae Easy Last Minute Dessert

    Grasshopper Sundae Easy Last Minute Dessert

    Make a decadent grasshopper sundae with mint chocolate chip ice cream and Oreo cookies in minutes. Delicious last minute dessert recipe!

    This mint chocolate chip sundae is just in time for St. Patrick’s Day, and it’s such an easy dessert to make. It makes the perfect last minute dessert; in fact, it’ll seem like you’ve gone all out, when really, it only takes a few minutes to make this yummy frozen dessert.

    grasshopper sundae with mint chocolate chip ice cream, crushed Oreos, shaved chocolate, whipped cream, chocolate syrup, and maraschino cherry in sundae bowl with spoon

    Mint chocolate chip ice cream has been a favorite of mine since I was a little girl. While I have my favorite brand, and I’ll talk about that a little bit on down below, any brand will do, as long as it’s minty and full of chocolate chips.

    Now normally, grasshopper flavored ice cream is full of both chocolate and brownies. Instead of brownies, though, I love the crunchiness of crushed or chunked up Oreo cookies.

    Put your mint chocolate chip ice cream sundae together with shaved chocolate and whipped cream (or peppermint whipped cream), and you’ve got a family favorite dessert.

    WHERE CAN I FIND THE ACTUAL RECIPE CARD?

    If you’d rather skip all of my sundae making tips, important info for this recipe, and similar recipe ideas – and get straight to the mint chocolate sundae recipe – just scroll down to the bottom, where you’ll find a printable recipe card.

    LET’S TALK INGREDIENTS

    ingredients for grasshopper sundae, including shaved chocolate, mint chocolate chip ice cream, whipped cream, crushed Oreos, and chocolate syrup, on white marble countertop

    Oreo Cookies: You can use any brand chocolate sandwich cookies, but Oreo cookies are the best. I especially love gluten-free Oreos (Great Value has a great gluten-free version of Oreos too).

    Mint Chocolate Chip Ice Cream: I said I’d tell you my favorite brand, and that is Turkey Hill’s Choco Mint Chip. Blue Ribbon is another tasty brand, but I really love Turkey Hill’s version of mint chip, because it’s a beautiful old-fashioned minty green, has amazing mint flavor, and is chock full of slivered up chocolate chips. It’s so delicious. Oh and it’s gluten-free and also free of any high-fructose corn syrup. If you’d rather make homemade and love mint cookie ice cream, I love my Oreo mint ice cream recipe; it’s so, so good! Now that my sales pitch is over (but really, it’s my boys’ favorite too), let’s talk about some of the other ingredients.

    Chocolate Syrup or Sauce: You can use a chocolate syrup or hot fudge sauce. I prefer to just drizzle on a little bit of Hershey’s Syrup. No warming necessary, and it’s super easy.

    Whipped Cream: You can make homemade whipped cream, or you can use Reddi-Whip. But take my advice if using Reddi-Whip, and get the real stuff; this is one example when generic is not always better, because it will melt very quickly.

    Shaved Dark Chocolate: I used just a little chunk of Baker’s Semi-Sweet Chocolate. You can use just a regular candy bar if you want. I prefer to use dark chocolate over milk chocolate, though, for a richer, more decadent flavor.

    Keep in mind, all of the ingredients and ingredient amounts you’ll need are in the printable recipe card below.

    KITCHEN TOOLS AND EQUIPMENT YOU’LL NEED:

    Before you get started making your sundae, you may want to check out our complete guide to ice cream tools and equipment. It’s the ultimate supply list for every ice cream lover’s kitchen.

    Plastic Baggie and Rolling Pin – for crushing up the Oreos.

    Vegetable Peeler – for shaving the chocolate.

    Sundae Bowls or Sundae Cups

    Ice Cream Scoop

    HOW TO MAKE A GRASSHOPPER SUNDAE

    Before you get started, be sure to gather all of your ingredients together, and get them prepped.

    Prep Your Ingredients First…

    The only prep needed for this sundae is to crush up the Oreos and shave the chocolate.

    To crush the Oreo cookies, put all your Oreos in a plastic baggie, and seal it well without any air left in the bag. Then take a rolling pin and roll over the cookies, or beat the cookies with the rolling pin, ’til they’re the consistency that you want.

    To shave the chocolate, take a vegetable peeler and peel the chocolate bar, just like you would a carrot or a potato. You should get beautiful fine shavings or curls of chocolate, perfect for topping off and decorating your sundae.

    Then Make the Sundaes…

    1. Place 1/2 to 3/4 of the crushed Oreo cookies in the bottom of your sundae bowls. Set the rest of the crumbles aside.
    2. Add 2 to 3 scoops of mint chocolate chip ice cream to each sundae bowl.
    3. Add a drizzle of chocolate syrup to every sundae.
    4. Crumble on the rest of the crushed Oreos.
    5. Add a swirl of whipped cream on top.
    6. Then sprinkle on the shaved chocolate.
    steps for how to make a mint chocolate chip sundae in glass sundae bowl, including adding crushed Oreo cookies to bottom of dish, then mint chocolate chip ice cream, chocolate syrup, more crushed Oreos, whipped cream, and shaved chocolate on top

    Now if you want, you can add a cherry on top. Maraschino cherries straight from the jar work just fine.

    FAQ:

    Can I make this sundae dairy-free?

    To make it dairy-free, you’d need to use a dairy-free mint chocolate chip ice cream or gelato. It’s pretty easy to find dairy-free ice cream in the freezer section; but it may prove more difficult to find the rest of the ingredients dairy-free, though they may be easier to find at a health food store.

    Can I make it gluten-free?

    Yes, you can; I make this gluten-free. Get a good gluten-free ice cream (like Turkey Hill’s Choco Mint Chip), gluten-free Oreos, etc. Just check ingredient labels to make sure everything is truly gluten-free.

    How can I make sundaes ahead of time so they’re ready to go?

    If making these sundaes a day or two ahead of time, I’d recommend adding only the Oreos, ice cream, and chocolate syrup to your sundae bowls. Then cover each one well with plastic wrap and aluminum foil, and place them in the freezer. When you’re ready to serve, you can add the whipped cream and shaved chocolate.

    spoon digging into mint chocolate chip ice cream sundae with whipped cream and cherry on top, in clear glass sundae bowl

    WHAT GOES WELL WITH MINT CHOCOLATE CHIP ICE CREAM?

    Well, we’ve already established that Oreo cookies are my favorite addition. But there are other things you can add, as well, including the following:

    What would you add to mint chocolate chip ice cream?

    MORE ST. PATRICK’S DESSERT IDEAS:

    GET THE PRINTABLE RECIPE

    If you love this grasshopper sundae as much as I do, please write a 5 star review, and help me share the recipe on Facebook and Pinterest!

    CRAVING MORE DELICIOUS RECIPES? Subscribe to my newsletter, and follow along on PinterestFacebookYouTube, and Instagram for all the latest updates!

    Grasshopper Sundae Easy Last Minute Dessert

    Make a decadent grasshopper sundae with mint chocolate chip ice cream and Oreo cookies in minutes. Delicious last minute dessert recipe!

    • 12 Oreo Cookies (crushed*)
    • 2 quarts mint chocolate chip ice cream
    • 1/2 cup chocolate syrup
    • 1 cup whipped cream
    • 2 tablespoons semi-sweet chocolate (shaved*)
    • 4 Maraschino cherries (optional)
    1. Place 1/2 to 3/4 of the crushed Oreo cookies in the bottom of your sundae bowls. Set the rest of the crumbles aside.
    2. Add 2 to 3 scoops of mint chocolate chip ice cream to each sundae bowl.
    3. Add a drizzle of chocolate syrup to every sundae.
    4. Crumble on the rest of the crushed Oreos.
    5. Add a swirl of whipped cream on top.
    6. Then sprinkle on the shaved chocolate.
    7. If you want, you can add a cherry on top. Maraschino cherries straight from the jar work just fine.

    *To crush the Oreo cookies, put all your Oreos in a plastic baggie, and seal it well without any air left in the bag. Then take a rolling pin and roll over the cookies, or beat the cookies with the rolling pin, ’til they’re the consistency that you want.

    *To shave the chocolate, take a vegetable peeler and peel the chocolate bar, just like you would a carrot or a potato. You should get beautiful fine shavings or curls of chocolate, perfect for topping off and decorating your sundae.

    How can I make sundaes ahead of time so they’re ready to go?

    If making these sundaes a day or two ahead of time, I’d recommend adding only the Oreos, ice cream, and chocolate syrup to your sundae bowls. Then cover each one well with plastic wrap and aluminum foil, and place them in the freezer. When you’re ready to serve, you can add the whipped cream and shaved chocolate.

    Frozen Treats
    American
    grasshopper sundae, how to make a grasshopper sundae, mint chocolate chip ice cream, mint chocolate chip ice cream sundae, mint chocolate chip sundae, mint Oreo ice cream, mint Oreo sundae, st. patrick’s dessert ideas
  • Easy Chicken Gravy from Bouillon

    Easy Chicken Gravy from Bouillon

    How to make delicious chicken gravy from bouillon, no drippings needed! You can make this easy gravy recipe last minute to go with dinner, and it only takes 6 simple ingredients you probably already have in your pantry!

    My husband introduced me to the world of gravy when we got married. I grew up eating biscuits and gravy; but other special gravies like brown gravy, chicken stock gravy, ham gravy, and turkey gravy were reserved for holidays like Thanksgiving, Christmas, and Easter dinner.

    spoonful of easy chicken gravy from bouillon over white bowl full of gravy

    Chicken gravy without drippings is especially easy to make, so it makes the perfect addition to an Instant Pot whole chicken. You can also pair it with baked chicken drumsticks or whole chicken in the CrockPot. It’s also a fantastic addition to a mashtini bar or baked potato bar if you happen to be entertaining guests or hosting a dinner party.

    Why You’ll Love Making Gravy with Chicken Broth

    • All you need to make chicken gravy from broth are 6 simple ingredients you likely already have in your pantry. 3 of those ingredients are seasonings, just onion powder, salt, and pepper.
    • As I mentioned above, it’s really easy to make and only takes a few minutes.
    • You can make this chicken gravy with bouillon or from broth. Only difference is you’ll need to mix the bouillon into broth before you begin cooking.
    chicken gravy ingredients, including chicken broth from bouillon, black pepper, salt, water, onion powder, and all-purpose flour on white marble countertop with black whisk

    Ingredients and Substitutions Notes:

    To make this chicken gravy recipe, you’ll need 6 simple ingredients. Gather your ingredients and let’s make some delicious gravy.

    • Chicken Broth: Like I mentioned above, you can use straight up chicken broth, including bone broth. Or since bouillon is basically dehydrated broth, you can just mix bouillon into broth and make your gravy with that bouillon broth. You can also use homemade chicken stock to make this gravy.
    • Onion Powder: Here’s a little tip. I haven’t been able to find a gluten-free onion powder in store. You’d think all seasonings are gluten-free, but they are not. So I took a little bit of dried minced onion we had on hand and crushed it into onion powder.
    • Water
    • All-Purpose Flour: I tried making this with corn starch; it did not go well. So my advice is to stick with flour. Flour makes a silky, smooth gravy. And yes, you can use a good gluten-free flour instead.
    • Salt and Pepper: These are really only added to taste. I’ve found it needs quite a bit of salt, but I only add a dash of black pepper.

    How to Make Chicken Gravy from Bouillon

    For this gravy, I prefer to make a slurry over a roux. It’s part of prepping and gathering my ingredients together so I’m ready for each step along the way.

    If I were making a roux, I would melt butter in my pan and then whisk flour into the butter, cooking the mixture. Instead I prefer to just mix my thickening agent, in this case flour, with water before starting the process of cooking the gravy… It works for me, and I know it’ll work well for you too.

    How to Make the Slurry

    To make the slurry, whisk together the water and flour, making sure there are no lumps and no flour sticking to the bottom of your bowl or measuring cup. Then just set your slurry aside ’til you need it.

    chicken gravy slurry in Pyrex glass measuring cup with black whisk

    Making a slurry allows us to add flour to our gravy without adding any lumps, ensuring a lump-free gravy.

    Then Make the Gravy

    1. Add chicken broth to a medium sauce pan, and bring to a boil over medium heat.
    2. Whisk in the onion powder, cooking another 1 to 2 minutes.
    3. Now whisk your slurry mixture into the boiling broth, stirring constantly ’til the gravy thickens; it will start to thicken right away. If, for some reason, your gravy is too thin and not thickening up enough, you can whisk another tablespoon of flour into just a little bit of water (making another slurry), and add that to your gravy to help it thicken up more.
    4. Add salt and pepper, to taste.
    steps for how to make chicken gravy from broth in sauce pan, including boiling broth, adding onion powder, stirring in slurry, and whisking 'til thickens

    Then serve the gravy while warm with your dinner. It’s a good idea to make gravy just before you’re ready to eat.

    Expert Tips and Recipe FAQs:

    How should you store chicken gravy?

    Store in the fridge in an airtight container. Chicken gravy will keep in the fridge for 2-3 days.

    Can you freeze leftover gravy?

    Yes, you can store a flour-based chicken gravy in the freezer for up to 4 months.
    Store in an airtight container or freezer bag. Just be sure to allow enough time to thaw in the fridge before serving.

    How do you re-heat gravy?

    You can re-heat gravy on the stovetop in a sauce pan, stirring frequently until hot. Or you can re-heat in a microwave at 30 second intervals, stirring in between ’til heated. If the gravy is really thick after cooling, you may need to add just a little bit of water to thin it out a bit.

    Can you make gluten-free gravy?

    Yes. Gluten-free flour works like a charm with this gravy. Just make sure to check all your other ingredient labels to make sure they are truly gluten-free, as well, especially seasonings.

    What should you do if the gravy is too thick?

    Add chicken broth or water 1/2 cup at a time until your gravy is the desired consistency. Keep in mind, adding liquid may necessitate adding a bit more seasoning, as well, especially salt and pepper.

    chicken gravy with bouillon poured over mashed potatoes on gray plate with shredded chicken and green peas

    Good Recipes to Make with Chicken Gravy:

    If you love this easy chicken gravy recipe as much as I do, you’ll love pairing it with these dishes…

    If you try this recipe, why not leave a star rating in the recipe card right below and/or a review in the comment section further down the page? I always appreciate your feedback. You can also follow me on Pinterest, Facebook, Instagram, and YouTube. And subscribe to my email list too!

    Chicken Gravy from Bouillon

    How to make chicken gravy from bouillon, no drippings needed! Easy recipe you can make last minute to go with dinner. Simple ingredients!

    • Medium Sauce Pan
    • Whisk
    • Heat-Resistant Spatula
    • Liquid Measuring Cup
    • Gravy Boat
    • 1/4 cup water
    • 3 tablespoons all-purpose flour*
    • 2 cups chicken broth
    • 1 teaspoon onion powder
    • Salt (to taste)
    • 1/8 teaspoon ground black pepper
    1. To make the slurry, whisk together the water and flour, making sure there are no lumps and no flour sticking to the bottom of your bowl or measuring cup. Then just set your slurry aside 'til you need it.

    2. Add chicken broth to a medium sauce pan, and bring to a boil over medium heat.

    3. Whisk in the onion powder, cooking another 1 to 2 minutes.
    4. Now whisk your slurry mixture into the boiling broth, stirring constantly ’til the gravy thickens; it will start to thicken right away. If, for some reason, your gravy is too thin and not thickening up enough, you can whisk another tablespoon of flour into just a little bit of water (making another slurry), and add that to your gravy to help it thicken up more.
    5. Add salt and pepper, to taste.
    6. Then serve the gravy while warm with your dinner. It’s a good idea to make gravy just before you’re ready to eat.

    *You can use a good gluten-free flour instead.

    Store leftover chicken gravy in the fridge in an airtight container. It will keep in the fridge for 2-3 days. 

    You can re-heat gravy on the stovetop in a sauce pan, stirring frequently until hot. Or you can re-heat in a microwave at 30 second intervals, stirring in between ’til heated. If the gravy is really thick after cooling, you may need to add just a little bit of water to thin it out a bit.

    What should you do if the gravy is too thick?

    Add chicken broth or water 1/2 cup at a time until your gravy is the desired consistency. Keep in mind, adding more liquid may necessitate adding a bit more seasoning, as well, especially salt and pepper.

    Condiments, Sauces & Dressings
    American
    chicken broth gravy, chicken gravy from bouillon, chicken gravy from broth, chicken gravy with bouillon, chicken gravy without drippings, chicken stock gravy, easy chicken gravy, gravy with chicken broth, how to make chicken gravy without drippings
  • Easy Homemade Jello No Bake Cheesecake

    Easy Homemade Jello No Bake Cheesecake

    Easy recipe for homemade Jello no bake cheesecake. Creamy lemon-y dessert made with Jello mix, cream cheese, and whipped cream.

    We love a good cheesecake, and lemon Jello no bake cheesecake used to be one of our favorite desserts.

    So color me happy when I found a recipe card for “Strawberry Miracle Cheesecake” in my grandma’s recipe box. Only I’m not sure why it’s got strawberry in the title because it’s more of a lemon-y dessert, and you can put strawberries on top if you want.

    slice of Jello no bake cheesecake topped with whipped cream on ivory plate with fork

    The first time I made this recipe, I was really afraid the lemon flavor might be overpowering, but it really isn’t. The creaminess far outweighs the lemon-y flavor.

    This no bake lemon cheesecake is a Jello-based recipe with a delicious graham cracker crust. While you can make the crust homemade, I just picked up a crust already made at the store.

    Being that this is a no bake dessert, it’s also an eggless lemon cheesecake. So no need for eggs.

    If you love cheesecake as much as we do, you’ll love my favorite white chocolate raspberry cheesecake; or switch berries and make a delicious strawberry swirl cheesecake. Either way you can’t go wrong.

    WHERE CAN I FIND THE ACTUAL RECIPE CARD?

    If you’d rather skip all of my cheesecake tips, important info for this recipe, and similar recipe ideas – and get straight to the Jello no bake cheesecake recipe – just scroll down to the bottom, where you’ll find a printable recipe card.

    LET’S TALK ABOUT INGREDIENTS:

    lemon Jello no bake cheesecake ingredients on white marble countertop

    Lemon Jello Mix: You just need the smaller size Jello box, the 3 ounce box.

    Cream Cheese: I recommend using full fat cream cheese, so you get all the creamy benefits of full fat.

    Heavy Whipping Cream: Now the original recipe calls for Milnot, or evaporated milk. But it’s required to chill it beforehand, and I always forget. So if you’re like me and you forget, heavy whipping cream works just as well, maybe even better.

    Graham Cracker Crust: Again, you can either make it homemade, or you can just pick up a crust at the store. You may have enough batter for 2 cheesecakes, depending on the size of your crust. Most of the store bought crusts are quite small.

    Keep in mind, all of the ingredients and ingredient amounts you’ll need are in the printable recipe card below.

    KITCHEN TOOLS AND EQUIPMENT YOU’LL NEED:

    Liquid Measuring Cup: A larger liquid measuring cup makes it easy to mix up the Jello and pour it into your ingredients.

    Stand Mixer or Hand Mixer with Extra Mixing Bowl

    Pie Plate – If you’re making your own crust. Otherwise, just use the pie plate that comes with your store-bought crust.

    HOW TO MAKE JELLO CHEESECAKE FROM SCRATCH

    This is such an easy no bake lemon cheesecake. It really only takes minutes to mix up; but it does require a little chill time.

    Gather your ingredients and get to mixing…

    1. First dissolve the lemon Jello mix in boiling water.
    2. Then add the lemon juice to the jello mixture, stir it up well, and set aside.
    making lemon jello and adding lemon juice to it in Pyrex measuring cup
    1. Whip the cream cheese and sugar together.
    2. Add vanilla to the cream cheese mixture, mixing well.
    3. Now take the Jello mixture and mix it into the cream cheese mixture ’til smooth.
    steps for making easy no bake lemon cheesecake, including mixing cream cheese and sugar, adding vanilla extract, and mixing lemon Jello mixture into cream cheese mixture
    1. In a separate mixing bowl, whip the heavy whipping cream ’til it forms stiff peaks.
    2. Then mix the heavy whipping cream into your cheesecake mixture, making it smooth and creamy.
    3. Pour the cheesecake batter into the prepared graham cracker crust, cover, and chill for at least 1 to 2 hours
    steps for making a no bake lemon cheesecake, including whipping heavy whipping cream in metal bowl 'til it has stiff peaks, mixing whipped cream into Jello cheesecake mixture 'til smooth and creamy, and pouring cheese cake batter into graham cracker crust in foil pie plate

    Your cheesecake should become firm enough to slice and serve with strawberries or other fruit topping, along with whipped cream.

    FAQ:

    Why is my no bake cheesecake not firm?

    One of the most important steps in this recipe is whipping the cold (make sure it’s absolutely cold) heavy whipping cream ’til it forms stiff peaks. If those peaks aren’t stiff enough, your cheesecake may come out more runny than firm. Chill time is also important. You may need to give it more than 1-2 hours to set up properly.

    How should I store lemon Jello no bake cheesecake?

    Be sure to cover it and store it in the refrigerator. It should keep for 4-5 days.

    Can I freeze a no bake cheesecake?

    You definitely can. Just be sure to cover and wrap it well with both plastic wrap and aluminum foil to prevent freezer burn. It should keep in the freezer for 3 months.

    slice of Jello cheesecake topped with whipped cream on ivory plate with forked bite

    VARIATIONS YOU CAN TRY WITH JELLO CHEESECAKE

    Oh the flavors you can make with a Jello cheesecake…

    I’m telling you, the possibilities are endless.

    MORE VERY YUMMY LEMON DESSERTS:

    GET THE PRINTABLE RECIPE

    If you love this Jello no bake cheesecake as much as I do, please write a 5 star review, and help me share the recipe on Facebook and Pinterest!

    CRAVING MORE DELICIOUS RECIPES? Subscribe to my newsletter, and follow along on PinterestFacebookYouTube, and Instagram for all the latest updates!

    Easy Homemade Jello No Bake Cheesecake

    Easy recipe for homemade Jello no bake cheesecake. Creamy lemon-y dessert made with Jello mix, cream cheese, and whipped cream.

    • 3 ounce lemon Jello mix
    • 1 cup boiling water
    • 3 tablespoons lemon juice
    • 8 ounces cream cheese
    • 1 cup sugar
    • 1 teaspoon vanilla extract
    • 12 ounces heavy whipping cream (cold*)
    • 1 graham cracker crust
    1. First dissolve the lemon Jello mix in boiling water.
    2. Then add the lemon juice to the jello mixture, stir it up well, and set aside.
    3. Whip the cream cheese and sugar together.
    4. Add vanilla to the cream cheese mixture, mixing well.
    5. Now take the Jello mixture and mix it into the cream cheese mixture ’til smooth.
    6. In a separate mixing bowl, whip the heavy whipping cream ’til it forms stiff peaks.
    7. Then mix the heavy whipping cream into your cheesecake mixture.
    8. Pour the cheesecake batter into the prepared graham cracker crust, cover, and chill for at least 1 to 2 hours.
    9. Your cheesecake should become firm enough to slice and serve with strawberries or other fruit topping, along with whipped cream.

    *The original recipe calls for Milnot, or evaporated milk. But it’s required to chill it beforehand, and I always forget. So if you’re like me and you forget, heavy whipping cream works just as well, maybe even better.

    Why is my no bake cheesecake not firm?

    One of the most important steps in this recipe is whipping the cold (make sure it’s absolutely cold) heavy whipping cream ’til it forms stiff peaks. If those peaks aren’t stiff enough, your cheesecake may come out more runny than firm. Chill time is also important. You may need to give it more than 1-2 hours to set up properly.

    How should I store lemon Jello no bake cheesecake?

    Be sure to cover it and store it in the refrigerator. It should keep for 4-5 days.

    Can I freeze a no bake cheesecake?

    You definitely can. Just be sure to cover and wrap it well with both plastic wrap and aluminum foil to prevent freezer burn. It should keep in the freezer for 3 months.

    Cheesecakes
    American
    cheesecake, easy no bake lemon cheesecake, eggless lemon cheesecake, how to make Jello cheesecake, Jello cheesecake, Jello no bake cheesecake, Jello no bake cheesecake recipe, lemon Jello no bake cheesecake, no bake cheesecake, no bake lemon cheesecake, strawberry miracle cheesecake
  • Irish Soda Bread Scones with Cinnamon

    Irish Soda Bread Scones with Cinnamon

    Bake up a batch of sweet and buttery Irish soda bread scones, filled with cinnamon and raisins. This easy to make recipe uses simple ingredients. It’s perfect for breakfast or brunch.

    I love a good cinnamon biscuit recipe, so when I decided to take Irish soda bread and morph it into soda bread scones, I knew they would be delicious.

    bitten Irish soda bread scones on gray plate with crumbs and raisins

    And they are. While I do add a few more ingredients beyond the traditional, the ingredients are what give these Irish soda scones a rise, a lift, a fluffiness, and a softness that can’t be beat.

    What’s the Difference Between Scones and Irish Soda Bread?

    The main difference is the shape of each…

    Scones are round like biscuits, or wedges; soda bread, on the other hand, is loaf shaped and baked in a loaf pan.

    Why I Love This Recipe (And You Will Too)

    • This soda scone recipe is chock full of cinnamon flavor (and raisins). While the raisins *could* be optional, I wouldn’t want to make this soda scones recipe without them because they add so much more flavor and a hint of sweetness.
    • Give yourself about 20 minutes to mix these up, pop them in the oven, and you’ve got a quick breakfast scone the whole family will love.
    • They’re soft, tender, and fluffy, not to mention buttery with just a hint of sweetness.
    • They’re perfect for breakfast and brunch, on St. Patrick’s Day (think St. Patrick’s Day scones), or any day of the year.

    Ingredients and Substitution Notes:

    The right ingredients are the secret to making a good Irish soda bread scones recipe.

    • Baking Powder and Baking Soda: Why use both? Because I want just the right amount of lift (and fluffiness) in my scones. Baking soda neutralizes the acid, and baking powder steps in to give the extra rise these scones need. The Kitchn has a wonderful explanation for why use baking soda and baking powder.
    • Unsalted Butter: I use unsalted butter because I want a little more control over how salty my scones are.
    • Egg: The egg helps to bind the ingredients together. It helps make them more fluffy and gives a richer flavor to the scones.
    • Buttermilk: I use this buttermilk mix to make buttermilk. But if you don’t have either buttermilk or a mix, you can make your own with about 1 tablespoon of vinegar for every cup of milk you use. Just let the mixture sit for a few minutes before adding to your scone mixture.
    • Raisins: While raisins are totally optional, I highly recommend them. They give a flavor and a hint of sweetness that can’t be beat.

    Keep in mind, all of the ingredients and ingredient amounts you’ll need are in the printable recipe card below.

    soda bread scones on gray plate with jadeite butter dish and butter knife, and baking sheet full of scones, on white marble countertop with blue and white striped kitchen towel

    How to Make Irish Soda Bread Scones

    Before you get started mixing up your batter, be sure to pre-heat your oven to 400° F, and either grease a baking sheet, or add parchment paper to it. I prefer to use parchment paper because the scones just slide right off of it after baking.

    Mix up the Scone Dough…

    1. In a large mixing bowl, whisk together the dry ingredients, including the flour, sugar, cinnamon, baking powder, baking soda, and salt.
    2. Using a pastry blender (or table knife), cut the cold, sliced butter into the dry ingredients until the mixture has fine crumbles.
    3. In a separate measuring cup or bowl, beat the egg and buttermilk together.
    4. Mix the egg mixture into the dry ingredients.
    5. Then fold the raisins into your batter.
    6. Drop the dough, by the spoonful, onto your parchment paper covered baking sheet, and bake.
    steps for how to make Irish soda scones, including whisking dry ingredients together in mint green mixing bowl, cutting cold sliced butter into dry ingredients with pastry blender, whisking egg and buttermilk together, mixing buttermilk into dry ingredients, adding raisins to scone batter, and dropping batter by spoonfuls onto baking sheet covered with parchment paper
    1. Bake your scones at 400° F for about 30-40 minutes, or ’til your scones turn a nice golden brown.

    Serve the scones warm with butter, apple butter, etc.

    FAQ:

    Why put milk in scones? Can I make them dairy-free?

    Buttermilk gives scones a lighter, fluffier texture. While I have not attempted to make these dairy-free, you could try making them with almond milk, rice milk, or coconut milk. You can also substitute a non-dairy butter, though keep in mind this will likely change the texture and density of the finished scone.

    Can I make them gluten-free?

    Yes, you can; and I have made them gluten-free using a good gluten-free all-purpose flour (my favorite is Authentic Foods Classical Blend). You may need to add a little xanthan gum (per the package), as well, for extra leavening. Of course, be sure to check all ingredient labels to make sure everything is truly gluten-free.

    How do I get my scones to rise and be fluffy?

    Ingredients play a huge role in rise, as we read above. Baking powder, baking soda, egg, and even the buttermilk all work together to give scones both a rise and a fluffiness. Keep in mind that not adding enough buttermilk and over mixing can cause scones to be harder. Also, placing them so they’re slightly touching on the baking sheet can help with lift while baking; while I don’t do this, it is worth a try.

    How should scones be stored?

    Make sure they’ve cooled completely; then store them in a covered airtight container.

    Can I freeze scones?

    You can freeze scones for up to 3 months. While you can freeze them unbaked or baked, it’s better to freeze them unbaked. To do so, place all your scones on a parchment paper covered baking sheet; place the baking sheet in the freezer ’til the scones are good and frozen. Then remove them from the freezer, place the unbaked scones in an airtight container or freezer bag, and put them back in the freezer ’til you’re ready to bake them.

    How to Serve Soda Bread Scones

    I prefer mine with a little pat of butter. I also sometimes like to sprinkle a little cinnamon sugar on the melted butter, or add a dollop of homemade apple butter.

    Either way, they are so delicious!

    golden baked Irish soda bread scones on parchment covered baking sheet

    More Quick Bread Recipes

    If you love this soda scones recipe as much as I do, you’ll love these recipes too…

    • If you do still want that taste of cinnamon without the raisins, you may enjoy these Bisquick scones with cinnamon in the dough and a crisp cinnamon sugar topping.
    • Biscuit cinnamon rolls are my favorite thing to make when I’m craving cinnamon rolls but don’t want to go to all the work and waiting.
    • Bisquick cinnamon muffins are quick, easy, and simple to make. Think soft, tender muffins dipped in a cinnamon sugar topping.

    If you try this recipe, why not leave a star rating in the recipe card right below and/or a review in the comment section further down the page? I always appreciate your feedback. You can also follow me on Pinterest, Facebook, Instagram, and YouTube. And subscribe to my email list too!

    Irish Soda Bread Scones

    Bake up a batch of sweet and buttery Irish soda bread scones. Easy to make recipe, simple ingredients, perfect for breakfast or brunch.

    • Handled Mixing Bowls
    • Whisk
    • Pastry Blender
    • Baking Sheet
    • Parchment Paper
    • 4 cups unbleached all-purpose flour
    • 3 tablespoons sugar
    • 1 tablespoon ground cinnamon
    • 1 tablespoon baking powder
    • 3/4 teaspoon baking soda
    • 1 teaspoon salt
    • 1 cup unsalted butter (cold)
    • 1 large egg
    • 2 cups buttermilk*
    • 1 cup raisins
    1. Pre-heat your oven to 400° F, and either grease a baking sheet or add parchment paper to it.

    2. In a large mixing bowl, whisk together the dry ingredients, including the flour, sugar, cinnamon, baking powder, baking soda, and salt.

    3. Using a pastry blender (or table knife), cut the cold, sliced butter into the dry ingredients until the mixture has fine crumbles.

    4. In a separate measuring cup or bowl, beat the egg and buttermilk together..

    5. Mix the egg mixture into the dry ingredients.
    6. Then fold the raisins into your batter.
    7. Drop the dough, by the spoonful, onto your parchment paper covered baking sheet, and bake at 400° F for about 30-40 minutes, or 'til your scones turn a nice golden brown.

    8. Serve the scones warm with butter, apple butter, etc.

    *I use this buttermilk mix to make buttermilk. But if you don’t have either buttermilk or a mix, you can make your own with about 1 tablespoon of vinegar for every cup of milk you use. Just let the mixture sit for a few minutes before adding to your scone mixture.

    Can I make them gluten-free?

    Yes, you can; and I have made them gluten-free using a good gluten-free all-purpose flour (my favorite is Authentic Foods Classical Blend). You may need to add a little xanthan gum (per the package), as well, for extra leavening. Of course, be sure to check all ingredient labels to make sure everything is truly gluten-free.

    How should Irish soda bread scones be stored?

    Make sure they’ve cooled completely; then store them in a covered airtight container.

    Can I freeze these scones?

    You can freeze scones for up to 3 months. While you can freeze them unbaked or baked, it’s better to freeze them unbaked. To do so, place all your scones on a parchment paper covered baking sheet; place the baking sheet in the freezer ’til the scones are good and frozen. Then remove them from the freezer, place the unbaked scones in an airtight container or freezer bag, and put them back in the freezer ’til you’re ready to bake them.

    Breads & Muffins
    Irish
    how to make Irish soda scones, Irish soda bread cinnamon scones, Irish soda bread scones, Irish soda scones, soda bread scones, soda scones recipe, St. Patrick’s Day recipes
  • KFC Famous Bowl Copycat

    KFC Famous Bowl Copycat

    How to make a homemade KFC Famous Bowl, with homestyle mashed potatoes, crispy chicken, corn, gravy, and cheese. Easy copycat dinner recipe!

    If you’re in need of a quick and easy dinner without a ride thru the fast food lane, I’ve got just the recipe for you. The KFC chicken bowl has everything you need for a one dish meal.

    KFC Famous bowl, including mashed potatoes, corn, crispy chicken nuggets, brown gravy, and shredded cheese in white bowl

    Filled with creamy mashed potatoes, corn, and crispy chicken nuggets, it’s a definite winner with my kids. For me, it’s the brown gravy and slightly melted cheese that make this KFC bowl complete.

    What I love about this mashed potato bowl is… It’s quick and easy to make because of the ingredients I use. Not to mention, my kids can get involved and layer their own bowls.

    We also love the occasional mashed potato bar (and baked potato bar) around here, so dinners like this are nothing new to this family.

    Ingredients and Substitutions Notes:

    • Mashed Potatoes – I prefer to buy ready made mashed potatoes; my grocery store carries Bob Evans mashed potatoes in a package, and they’re delicious and easy to pop into the microwave for just a few minutes. You can also use instant mashed potatoes or homemade mashed potatoes.
    • Corn – While I prefer the ease of steamable frozen corn I can just pop in the microwave, you can also use canned corn or fresh corn.
    • Chicken Nuggets – I use gluten-free chicken nuggets, but you can also use popcorn chicken or chicken strips. If you do use nuggets or strips, you’ll need to cut them into bite-size pieces.
    • Brown Gravy – While I prefer to use a gluten-free brown gravy mix, you can use any kind of gravy you want, including homestyle gravy, ham gravy, turkey gravy, chicken gravy, etc. I even had the thought that a chicken dipping sauce or honey mustard would be good in place of gravy.
    • Cheese – We use extra sharp cheddar and Colby Jack cheese. However, consider the flavors you want because the options are endless… Think smoked cheddar or smoked gouda, Monterey Jack, an Italian cheese blend, parmesan cheese, etc.

    How to Make a KFC Famous Bowl

    Before you can layer your KFC mashed potato bowls, you need to prep a few ingredients.

    How to Prep Ingredients:

    1. Mix up and cook the gravy according to package directions.
    2. Cook the chicken nuggets according to package directions, and cut them into bite-size pieces.
    3. Steam cook frozen corn in the microwave, according to package directions.
    4. Cook or heat up the mashed potatoes, again according to package directions (unless making homemade).
    KFC potato bowl ingredients, including brown gravy, crispy chicken nuggets, corn, and mashed potatoes

    How to Layer the Bowls:

    1. First add a pile of mashed potatoes into your serving bowl.
    mashed potatoes for KFC chicken bowl in white serving bowl
    1. Sprinkle the mashed potatoes with corn.
    corn sprinkled on top of mashed potatoes in white serving bowl
    1. Sprinkle bite-size crispy chicken nuggets on top of the potatoes and corn.
    crispy bite-size chicken nuggets sprinkled on top of corn and mashed potatoes in white cereal bowl
    1. Spoon small spoonfuls of gravy onto chicken and mashed potatoes.
    brown gravy spooned on top of KFC mashed potato bowl in white serving bowl
    1. Finally, sprinkle a mixture of cheese on top of each bowl.
    shredded cheese on top of homemade KFC bowl in white serving bowl

    And that’s it. Serve the bowls while warm and enjoy!

    Expert Tips and Recipe FAQ’s:

    How should I store chicken bowls?

    Store in the refrigerator in an airtight container. They should keep for 3-5 days.

    How do I reheat them?

    The best way to reheat your mashed potato bowls is in the oven at 350° F. This method will help to keep your chicken crispy. If in a hurry, reheat in the microwave for 3-5 minutes, checking every minute to stir or see if it’s hot; with the microwave, chicken will be less crispy.

    Can I make ahead and freeze KFC Bowls for quick meals?

    Yes, you can. Just be sure to store your ingredients in an airtight container to prevent freezer burn. They should keep for 3-5 months.

    Extra Topping Ideas for This Recipe:

    There are a plethora of toppings you can add to your bowl in addition to the ingredients we’ve already discussed.

    Delicious toppings like…

    • Crushed bacon or bacon bits
    • Chopped tomatoes
    • Green onions
    • Red onions
    • Fresh chives
    • Fresh herbs – thyme, parsley or rosemary
    • Sautéed mushrooms

    More Favorite Copycat Recipes:

    spoonful bite of chicken, mashed potatoes, corn, gravy, and cheese over KFC potato bowl in white serving bowl

    If you try this recipe, why not leave a star rating in the recipe card right below and/or a review in the comment section further down the page? I always appreciate your feedback. You can also follow me on Pinterest, Facebook, Instagram, and YouTube. And subscribe to my email list too!

    KFC Famous Bowl

    How to make a homemade KFC Famous Bowl, with homestyle mashed potatoes, crispy chicken, corn, gravy, and cheese. Easy copycat dinner recipe!

    • Serving Bowls
    • Saucepan
    • Sheet Pan
    • 1 ounce brown gravy mix
    • 20 ounces chicken nuggets
    • 2 cups steam-able frozen corn
    • 24 ounces mashed potatoes
    • 1/2 cup sharp cheddar cheese (shredded)
    • 1/2 cup Colby Jack cheese (shredded)
    1. Mix up and cook the gravy according to package directions.
    2. Cook the chicken nuggets according to package directions, and cut them into bite-size pieces.
    3. Steam cook frozen corn in the microwave, according to package directions.
    4. Cook or heat up the mashed potatoes, again according to package directions (unless making homemade).
    5. First add a pile of mashed potatoes into each serving bowl.

    6. Sprinkle the mashed potatoes with corn.
    7. Sprinkle bite-size crispy chicken nuggets on top of the potatoes and corn.

    8. Spoon small spoonfuls of gravy onto the chicken and mashed potatoes.

    9. Finally, sprinkle a mixture of cheese on top of each bowl.
    10. Serve the bowls while warm!

    *Or you can use popcorn chicken or chicken strips.

    *I prefer to buy ready made mashed potatoes for this recipe; you can also use instant mashed potatoes or homemade mashed potatoes.

    How should I store mashed potato bowls?

    Store in the refrigerator in an airtight container. They should keep for 3-5 days.

    How do I reheat them?

    The best way to reheat your mashed potato bowls is in the oven at 350° F. This method will help to keep your chicken crispy. If in a hurry, reheat in the microwave for 3-5 minutes, checking every minute to stir or see if it’s hot; with the microwave, chicken will be less crispy.

    Can I make ahead and freeze KFC Bowls for quick meals?

    Yes, you can. Just be sure to store your ingredients in an airtight container to prevent freezer burn. They should keep for 3-5 months.

    Dinner Ideas, Main Course
    American
    kentucky fried chicken’s famous bowls, kfc bowl recipe, kfc bowls, KFC chicken bowl, kfc famous bowl, kfc mashed potato bowl, kfc potato bowl, mashed potato bowl, mashed potato bowl recipe
  • Homemade Sausage and Egg McMuffin with Cheese

    Homemade Sausage and Egg McMuffin with Cheese

    How to make a delicious homemade version of McDonald’s sausage and egg McMuffin. Easy recipe for a grab-and-go breakfast sandwich!

    I love a good breakfast sandwich, and McDonald’s Sausage Egg McMuffin has long been a favorite of mine, both with and without the muffin.

    It only makes sense that I’d recreate the sausage egg and cheese McMuffin at home, especially since my boys love it just as much as I do.

    sausage and egg McMuffin sandwich on baking sheet with more breakfast sandwiches

    Besides a little oil or bacon grease, you only need 5 ingredients for this recipe. And once you have the eggs and sausage cooked, it’s just a matter of layering up your sandwich.

    Serve it with a cold glass of orange juice and a little fruit on the side, and you’ve got the makings of a delicious breakfast. Or if you’re in a rush, wrap it up and take it on the go.

    Sometimes I prefer ham in the mornings, so McDonald’s Egg McMuffin (with Canadian bacon) is another family favorite I love to make.

    WHERE CAN I FIND THE ACTUAL RECIPE CARD?

    If you’d rather skip all of my sandwich making tips, important info for this recipe, and similar recipe ideas – and get straight to the sausage McMuffin recipe – just scroll down to the bottom, where you’ll find a printable recipe card.

    sausage McMuffin ingredients, including English muffins, sausage patties, and eggs on blue plate with paper towel

    INGREDIENT NOTES:

    The Bread: McDonald’s sausage McMuffin is made with an English muffin, and it’s what I prefer. However, you can change things up and make it with a bagel, a croissant, Texas toast, a big biscuit, etc.

    Eggs: While I prefer to fry a rounded egg, you can use a poached egg or scramble the eggs and pour them into an egg ring (see below for more options if you don’t have egg rings.) You might even make a rounded omelet with peppers and onions in your scrambled egg/s if you like.

    Cheese: For this recipe, I use American cheese, but I’m tempted to try my favorite super sharp cheddar sometime in the near future. A good smoked gouda or smoked cheddar would be good too.

    Meat: To get a similar taste to McDonald’s sausage without any extra ingredients, I prefer to use Jimmy Dean breakfast sausage. If you want to make it a totally different kind of McMuffin, try making it with Canadian bacon, regular bacon, maple sausage, vegetarian meat, etc.

    Other Options: If you really want to give it more oomph, you can add tomato slices, sliced onion, etc.

    Keep in mind, all of the ingredients and ingredient amounts you’ll need are in the printable recipe card below.

    KITCHEN TOOLS AND EQUIPMENT YOU’LL NEED:

    Large Skillet – I use our 10.25 inch cast iron skillet.

    Baking Sheet

    Egg Rings

    HOW TO MAKE A SAUSAGE AND EGG MCMUFFIN

    Before you get started cooking and assembling your sausage McMuffins, you’ll need to pre-heat the oil in the skillet over low to medium heat. While I prefer to use bacon grease, you can also use butter or canola oil/vegetable oil.

    Also, pre-heat your oven to 350° F.

    LET’S PREP OUR INGREDIENTS FIRST:

    1. Shape the sausage into patties that are large enough to fit on the English muffins, so slightly larger than the muffins because the sausage patties will shrink while cooking. I like to make mine about 1/4 inch thick.
    sausage patties shaped and rounded, ready for cooking, on blue cutting board
    1. Fry the sausage patties ’til they’re cooked thru and browned.
    frying sausage patties in cast iron skillet
    1. Once the sausage is removed from the skillet, fry the eggs ’til well done, using rounded egg rings.
    frying eggs in rounded egg rings in cast iron skillet
    1. Slice the English muffins in half, toast them in a toaster, and spread a thin layer of butter on each toasted muffin half.
    spreading butter on toasted English muffins with table knife
    1. Add a slice of American cheese to the bottom half of each muffin. Place the English muffins on a baking sheet in your pre-heated oven, and allow the cheese to just slightly melt; it should only take about 1-2 minutes.
    melted slice of American cheese on English muffin bottom, on gray plate

    ASSEMBLE YOUR BREAKFAST SANDWICHES:

    1. Start with a sausage patty on top of the cheese.
    sausage patty on top of melted American cheese on English muffin, on gray plate
    1. Next add the fried egg.
    assembling sausage egg McMuffin on gray plate
    1. Complete your sandwich with the muffin top, and serve it up while warm.
    copycat version of McDonald's Sausage McMuffin in hand

    FAQ:

    What can I use if I don’t have egg rings?

    Some things you can use in place of egg rings are metal canning jar rings, a round metal cookie cutter, or a tuna can with no top or bottom.

    Can I freeze this breakfast sandwich?

    Yes. Double wrap the sandwich in plastic wrap, then place in a freezer bag.
    It should keep up to 2 months in the freezer.

    How do I reheat a sausage McMuffin?

    Reheat in the microwave for 40 seconds. For a crispier McMuffin, reheat in the oven at 350° F for about 10-15 minutes.

    MORE EGGS FOR BREAKFAST:

    bite out of sausage egg and cheese McMuffin on gray plate

    GET THE PRINTABLE RECIPE

    If you love this sausage and egg McMuffin recipe as much as I do, please write a 5 star review, and help me share the recipe on Facebook and Pinterest!

    CRAVING MORE DELICIOUS RECIPES? Subscribe to my newsletter, and follow along on PinterestFacebookYouTube, and Instagram for all the latest updates!

    Homemade Sausage and Egg McMuffin with Cheese

    How to make a delicious homemade version of McDonald's sausage and egg McMuffin. Easy recipe for a grab-and-go breakfast sandwich!

    • 1 tablespoon bacon grease*
    • 1 pound ground breakfast sausage
    • 4 large eggs
    • 4 English muffins
    • 4 tablespoons salted butter
    • 4 slices American cheese
    1. Pre-heat bacon grease in the skillet over low to medium heat. Also, pre-heat your oven to 350° F.
    2. Shape the sausage into patties that are large enough to fit on the English muffins, so slightly larger than the muffins because the sausage patties will shrink while cooking. I like to make mine about 1/4 inch thick.
    3. Fry the sausage patties ’til they’re cooked thru and browned.
    4. Once the sausage is removed from the skillet, fry the eggs ’til well done, using rounded egg rings.
    5. Slice the English muffins in half, toast them in a toaster, and spread a thin layer of butter on each toasted muffin half.
    6. Add a slice of American cheese to the bottom half of each muffin.
    7. Place the English muffins on a baking sheet in your pre-heated oven, and allow the cheese to just slightly melt; it should only take about 1-2 minutes. Then remove them from the oven.
    8. Assemble your breakfast sandwiches by starting with a sausage patty on top of the cheese.
    9. Next add the fried egg.
    10. Complete your sandwich with the muffin top, and serve it up while warm.

    *If you don’t have bacon grease, you can use butter, canola oil, or vegetable oil.

    What can I use if I don’t have egg rings?

    Some things you can use in place of egg rings are metal canning jar rings, a round metal cookie cutter, or a tuna can with no top or bottom.

    Can I freeze this breakfast sandwich?

    Yes. Double wrap the sandwich in plastic wrap, then place in a freezer bag.It should keep up to 2 months in the freezer.

    How do I reheat a sausage McMuffin?

    Reheat in the microwave for 40 seconds. For a crispier McMuffin, reheat in the oven at 350° F for about 10-15 minutes.

    Breakfast & Brunch
    American
    how to make a sausage and egg McMuffin, McDonald’s sausage McMuffin, sausage and egg McMuffin, sausage and egg McMuffin recipe, sausage egg and cheese McMuffin, sausage egg McMuffin, sausage egg McMuffin sandwich, sausage McMuffin, sausage McMuffin recipe
  • How to Make Eggs in a Nest with Cheese

    How to Make Eggs in a Nest with Cheese

    If you have bread, eggs, and cheese, you can easily make eggs in a nest, or eggs in a basket. Quick recipe, perfect for breakfast or brunch!

    This recipe comes with fond memories from when I was a little girl, when my mom made a special breakfast every once in awhile….It was my favorite breakfast. She called it egg bread, better known as eggs in a nest, eggs in a basket, toad in a hole, egg in a hole, etc.

    eggs in a nest with cheese, with bite taken out, on white plate with strawberries

    Now having 3 boys of my own, I make egg in a nest every so often for them, and they love it just as much as I still do. I’m not sure if it’s the egg cooked into the toast or if it’s the melted cheese on top that gets us every time.

    It’s a quick and easy recipe you can cook up in minutes, especially if you have a griddle and can cook everyone’s at once. Kids can get in on the cooking fun too.

    Sometimes I can’t get enough of eggs and cheese; a good homemade breakfast sandwich like McDonald’s Egg McMuffin is another family favorite.

    WHERE CAN I FIND THE ACTUAL RECIPE CARD?

    If you’d rather skip all of my breakfast making tips, important info for this recipe, and similar recipe ideas – and get straight to the eggs in a basket recipe – just scroll down to the bottom, where you’ll find a printable recipe card.

    LET’S TALK INGREDIENTS:

    Bread: While I use a typical sandwich bread (gluten-free bread for mine), you can use other types of bread too. My kids love sourdough, and brioche bread would make delicious egg in a hole with cheese. Other ideas might include bagels, puff pastry, avocados, or hash browns.

    Cheese: We use American cheese because it gives so much flavor and melts right into the bread; but the options are limitless here. I have a favorite super sharp cheddar cheese that would be delicious; other ideas might include smoked cheddar, smoked gouda, parmesan, etc.

    Keep in mind, all of the ingredients and ingredient amounts you’ll need are in the printable recipe card below.

    KITCHEN TOOLS AND EQUIPMENT YOU’LL NEED:

    Small Biscuit Cutter (or Sharp Knife) – I have what used to be an old apple juice can that I use as a small biscuit cutter.

    Griddle or Large Skillet – I prefer to use the griddle on our stove because I can cook everyone’s breakfast at once. Makes for a quick and easy job.

    Flipper Spatula

    HOW TO MAKE EGGS IN A NEST

    Gather your ingredients and follow these steps…

    1. Butter both sides of the bread.
    buttered slide of bread on wooden cutting board
    1. Cut a hole in the center of the bread with a small biscuit cutter or knife. Set the cut circle aside; we’ll fry it up with the main slice.
    cutting a hole in center of buttered bread with small biscuit cutter (old apple juice can)
    1. Melt 1/2 tablespoon butter on the griddle (or in a large skillet), over low to medium heat. Add the bread to the griddle.
    frying buttered bread with hole on griddle
    1. Crack the egg into the hole.
    cracked egg in a hole frying on griddle
    1. Cook ’til the egg slightly sets on the bottom, and sprinkle with salt and pepper.
    salt and pepper added to egg in a nest
    1. Flip and cook the other side of the egg and bread, ’til the egg is cooked, the yolk is soft, and the bread is golden brown.
    frying eggs in a basket, or eggs on toast, on griddle
    1. If desired, flip again and melt the slice of cheese on top. You can make this without cheese, but trust me when I say, cheese makes everything better.
    frying eggs in a basket with cheese, along with cut out bread circles, on griddle

    Note: Also, fry the bread circle you cut out earlier. This is the best part; crispy, crunchy goodness. We all try to sneak them while the bread is cooking. Yum!

    FAQ:

    How should I store it?

    To be honest, I’ve never had to store any leftovers because we make just enough for us to eat at breakfast. However, if you do have leftovers, just store them in an airtight container in the fridge. Leftovers should keep for 1-2 days.

    Can I make this recipe ahead and freeze it?

    Yes, you actually can. It would probably be better to make the recipe all the way through, without the cheese. Then allow your eggy toast to cool well, wrap it in plastic wrap, and store it in an airtight container or freezer bag in the freezer. When you’re ready to get it out and cook it, then you can add the cheese.

    How do I reheat it?

    While you can use the microwave, I wouldn’t because it will likely make it soggy. Simply get it out of the freezer, let it thaw for 15-20 minutes, and place back on the griddle, or in the oven at 350°F for 20 minutes or ’til heated thru. Add the cheese after the bread and egg are warmed through, and allow it to melt.

    FUN IDEA FOR HOLIDAYS AND SPECIAL OCCASIONS

    While I use a biscuit cutter, that’s not to say you can’t make eggs in a basket with cheese a little more special on holidays.

    Try using small cookie cutters to cut the hole in the center of the bread. Maybe a small Christmas tree or star, or even a heart for Valentine’s Day.

    HOW TO SERVE EGGS IN A BASKET

    While it’s delicious all by itself, you can also serve it alongside fresh fruit, ambrosia fruit salad, bacon, sausage, and more.

    MORE YUMMY BREAKFAST IDEAS WITH EGGS:

    half eaten egg in a hole with cheese on white plate with fork and strawberries

    GET THE PRINTABLE RECIPE

    If you love this breakfast recipe as much as I do, please write a 5 star review, and help me share the recipe on Facebook and Pinterest!

    CRAVING MORE DELICIOUS RECIPES? Subscribe to my newsletter, and follow along on PinterestFacebookYouTube, and Instagram for all the latest updates!

    Eggs in a Nest with Cheese

    If you have bread, eggs, and cheese, you can easily make eggs in a nest, or eggs in a basket. Quick recipe, perfect for breakfast or brunch!

    • 1 tablespoon salted butter (softened)
    • 1 slice bread
    • 1 large egg
    • 1 pinch salt
    • 1 pinch ground black pepper
    • 1 slice American cheese (optional)
    1. Melt 1/2 tablespoon butter on a griddle or in a large skillet, over low to medium heat.

    2. Butter both sides of the bread with the remaining butter.

    3. Cut a hole in the center of the bread with a small biscuit cutter or knife. Set the cut circle aside; you'll fry it up with the main slice.

    4. Add the bread to the hot griddle.

    5. Crack the egg into the hole.
    6. Cook ’til the egg slightly sets on the bottom, and sprinkle with salt and pepper.
    7. Flip and cook the other side of the egg and bread, ’til the egg is cooked, the yolk is soft, and the bread is golden brown.
    8. If desired, flip again and melt the slice of cheese on top. You can make this without cheese, but trust me when I say, cheese makes everything better.
    9. Serve while warm.

    Note: Also, fry the bread circle you cut out earlier. This is the best part; crispy, crunchy goodness. We all try to sneak them while the bread is cooking. Yum!

    How should I store it?

    To be honest, I’ve never had to store any leftovers because we make just enough for us to eat at breakfast. However, if you do have leftovers, just store them in an airtight container in the fridge. Leftovers should keep for 1-2 days.

    Can I make this recipe ahead and freeze it?

    Yes, you actually can. It would probably be better to make the recipe all the way through, without the cheese. Then allow your eggy toast to cool well, wrap it in plastic wrap, and store it in an airtight container or freezer bag in the freezer. When you’re ready to get it out and cook it, then you can add the cheese.

    How do I reheat it?

    While you can use the microwave, I wouldn’t because it will likely make it soggy. Simply get it out of the freezer, let it thaw for 15-20 minutes, and place back on the griddle, or in the oven at 350°F for 20 minutes or ’til heated thru. Add the cheese after the bread and egg are warmed through, and allow it to melt.

    Breakfast & Brunch, Main Course
    American
    egg in a hole with cheese, egg in a nest, eggs in a basket, eggs in a basket recipe, eggs in a basket with cheese, eggs in a nest, how to make eggs in a basket, how to make eggs in a nest, toad in the hole
  • Easy Chili Cheese Dip {Microwave, Oven, or CrockPot}

    Easy Chili Cheese Dip {Microwave, Oven, or CrockPot}

    How to make amazing chili cheese dip with cream cheese in the microwave, oven, or CrockPot. Easy, homemade, crowd favorite appetizer recipe!

    A good dip recipe makes the perfect appetizer for all kinds of occasions. Whether you’re hosting a tailgating party or a baby shower, this chili cream cheese dip definitely fits the bill for any and all occasions. It would make the perfect appetizer to serve alongside slow cooker hot dogs!

    chili cheese dip, topped with avocado, cilantro, and fresh diced tomatoes, in cast iron skillet on wooden cutting board with corn chips

    Now, you can make this a Hormel chili cheese dip with Hormel chili; or you can make homemade chili. We’ll talk about the type of chili you want to use below, whether you want beans or no beans and why or why not.

    What I love about this chili dip is we can make it in about 5 minutes using the microwave; or we can take a little longer and use the oven or slow cooker. It’s so easy to just throw all the ingredients together and cook it.

    All you need are 5 ingredients, and then a few toppings to make it even more delicious. Tortilla chips, crackers, or raw vegetables on the side, and you’ve got the makings of a crowd-favorite game day appetizer that’s right up there with my favorite chili cheese fries!

    WHERE CAN I FIND THE ACTUAL RECIPE CARD?

    If you’d rather skip all of my dip making tips, important info for this recipe, and similar recipe ideas – and get straight to the chili cheese dip recipe – just scroll down to the bottom, where you’ll find a printable recipe card.

    LET’S TALK INGREDIENTS

    Cream Cheese: While I prefer to use a full-fat cream cheese, you can use the low-fat kind, or Neufchatel cheese. It won’t change too much about the dip besides making it slightly less creamy.

    Chili without Beans: Choosing the right chili is all about what you like. You can use any canned chili or homemade chili with or without beans. Hormel chili is one of the most popular chilis to use, and it comes with or without beans. While beans are high in protein and fiber, they will add a chunky texture to your dip. So keep that in mind when choosing whether to go with beans or not.

    Taco Seasoning: Badia Taco Seasoning is my favorite; it’s delicious and gluten-free. I keep a big container of it because we use it a lot, in tacos, chicken fajitas, quesadillas, etc.

    ingredients for chili dip in glass bowls, including chili without beans, shredded cheese, cream cheese, garlic, and taco seasoning

    Garlic Clove: You can chop up a fresh garlic clove, or even just use garlic powder. Sometimes I like to cheat and use already minced garlic. Hint: While you can certainly order it on Amazon, you can usually get a jar of minced garlic for less than $3 at the grocery store.

    Cheese: Our recipe calls for a shredded Mexican cheese blend, or shredded fiesta cheese; this is a blend of Monterey Jack, mild cheddar, Asadero, and queso quesadilla cheeses. Another favorite choice you might think about using is shredded triple cheddar cheese, a mixture of Vermont cheddar, sharp cheddar, and mild cheddar.

    Keep in mind, all of the ingredients and ingredient amounts you’ll need are in the printable recipe card below.

    KITCHEN TOOLS AND EQUIPMENT YOU’LL NEED:

    Mixing Bowl and Spatula

    Microwave-Safe Bowl or Baking Dish or Slow Cooker – I like to use my cast iron skillet if I’m baking it.

    Cheese Grater

    Cutting Board and Chef’s Knife – If you want to add toppings like cilantro or fresh tomatoes.

    HOW TO MAKE CHILI CHEESE DIP

    Making this easy chili dip is as simple as mixing ingredients in a bowl and cooking that mixture ’til it’s hot and bubbly.

    Just follow these steps…

    1. Whisk the cream cheese in a medium mixing bowl ’til smooth and creamy.
    2. Add in the chili, taco seasoning, garlic, and cheese.
    3. Stir everything together ’til it’s well combined.
    4. Transfer the mixture to a microwave-safe bowl, baking dish, cast iron skillet, or CrockPot.
    steps for how to make chili cheese dip in green mixing bowl, including 1: whisking cream cheese, 2: adding chili, taco seasoning, garlic, and cheese, 3: stirring everything together, and 4: transferring mixture to microwave-safe bowl.

    Now it’s ready to cook.

    COOK IT IN THE MICROWAVE:

    To make chili cheese dip with cream cheese in the microwave, cook it on high for 5 minutes, or until hot and bubbling. Then stir before serving.

    BAKE IT IN THE OVEN:

    In a 350°F pre-heated oven, bake it for 20-25 minutes, or until it’s bubbling. Stir it up well before you serve it.

    MAKE IT IN THE CROCKPOT:

    To make slow cooker chili cheese dip, mix all your ingredients together and spread the cream cheese mixture into a greased slow cooker. Cook on high for about 2 hours, or low for about 3-4 hours.

    FAQ:

    How can I make my chili cream cheese dip more spicy?

    You have a lot of options to make chili cheese dip spicy. Cayenne pepper, red pepper flakes, and smoked paprika come to mind. You can also use chili powder, a mixture of red chili peppers, cumin, onion, and garlic powder. Other ideas are hot sauce or diced green chilies, which come in “mild” or “hot”.

    How should I store chili cheese dip with cream cheese?

    Store chili dip in an airtight container in the refrigerator up to 3 days.

    How do I reheat chili dip?

    To reheat the dip, you can place it in the microwave for a few minutes, stirring occasionally to prevent scorching; or you can reheat it in the oven at 350° F ’til hot.

    Can I freeze chili dip?

    Yes, you can freeze chili and cream cheese dip. Use an airtight container or a freezer bag to prevent freezer burn. Stored properly, this dish will keep up to 3 months in the freezer.

    close up of chili dip, topped with sliced avocado, cilantro, and fresh diced tomatoes, in cast iron skillet

    WHAT TO SERVE WITH CHILI CHEESE DIP

    There are all sorts of toppings that hit this dip out of the park. Things like…

    Of course, you’ll also need whatever crunchy foods you’re serving with the dip, whether you choose tortilla chips, crackers, or fresh raw veggies. Fritos Scoops are another snack that pair really well with chili and cream cheese dip.

    MORE CREAM CHEESE DIP RECIPES:

    GET THE PRINTABLE RECIPE

    If you love hot chili cheese dip as much as I do, please write a 5 star review, and help me share the recipe on Facebook and Pinterest!

    CRAVING MORE DELICIOUS RECIPES? Subscribe to my newsletter, and follow along on PinterestFacebookYouTube, and Instagram for all the latest updates!

    Easy Chili Cheese Dip {Microwave, Oven, or CrockPot}

    How to make amazing chili cheese dip with cream cheese in the microwave, oven, or CrockPot. Easy, homemade, crowd favorite appetizer recipe!

    • 8 ounces cream cheese (softened)
    • 30 ounces chili without beans*
    • 2 teaspoons taco seasoning
    • 1 garlic clove (minced)
    • 8 ounces Mexican blend shredded cheese
    1. Whisk the cream cheese in a medium mixing bowl ’til smooth and creamy.
    2. Add in the chili, taco seasoning, garlic, and cheese.
    3. Stir everything together ’til it’s well combined.
    4. Transfer the mixture to a microwave-safe bowlbaking dishcast iron skillet, or CrockPot.
    5. Microwave Instructions: To make chili cheese dip with cream cheese in the microwave, cook it on high for 5 minutes, or until hot and bubbling. Then stir before serving.
      Oven Instructions: In a 350°F pre-heated oven, bake it for 20-25 minutes, or until it’s bubbling. Stir it up well before you serve it.
      CrockPot Instructions: To make slow cooker chili cheese dip, mix all your ingredients together and spread the cream cheese mixture into a greased slow cooker. Cook on high for about 2 hours, or low for about 3-4 hours.
    6. Serve with your favorite toppings, tortilla chips, crackers, or fresh vegetables. Ideas for toppings include sour cream, fresh diced tomatoes, sliced avocados, jalapeños, cilantro, and green onions.

    How can I make my chili cream cheese dip more spicy?

    You have a lot of options to make chili cheese dip spicy. Cayenne pepperred pepper flakes, and smoked paprika come to mind. You can also add a little chili powder, a mixture of red chili peppers, cumin, onion, and garlic powder. Other ideas are hot sauce or diced green chilies, which come in “mild” or “hot”.

    How should I store chili cheese dip with cream cheese?

    Store chili dip in an airtight container in the refrigerator up to 3 days.

    How do I reheat chili dip?

    To reheat the dip, you can place it in the microwave for a few minutes, stirring occasionally to prevent scorching; or you can reheat it in the oven at 350° F ’til hot.

    Can I freeze chili dip?

    Yes, you can freeze chili and cream cheese dip. Use an airtight container or a freezer bag to prevent freezer burn. Stored properly, this dish will keep up to 3 months in the freezer.

    Appetizers
    Tex-Mex
    chili and cream cheese dip, chili cheese dip, chili cheese dip with cream cheese, chili cheese dip without velveeta, chili cream cheese dip, chili dip, chli cheese dip with no velveeta, easy chili dip, Hormel chili cheese dip, hot chili cheese dip, how to make chili cheese dip