My kids love pancakes and French toast, though we don’t really have them often for breakfast. Once in awhile, though, usually on a weekend, we’ll have a special breakfast treat.
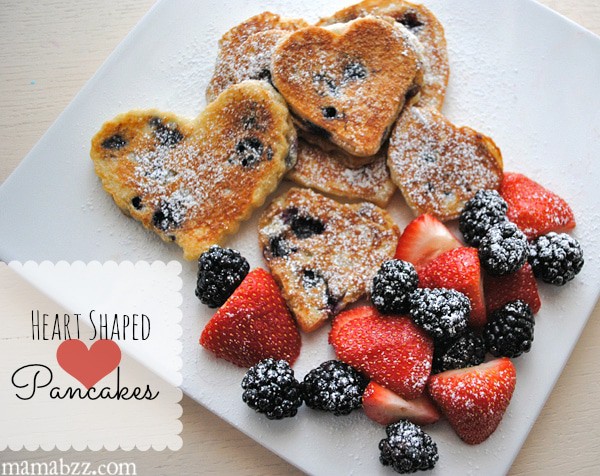
Valentine’s Day definitely calls for special heart shaped pancakes, along with lots of fresh fruit on the side. Heart shaped chocolate chip pancakes are another great option for your Valentine.
Below is a printable recipe, without photos, for your convenience.
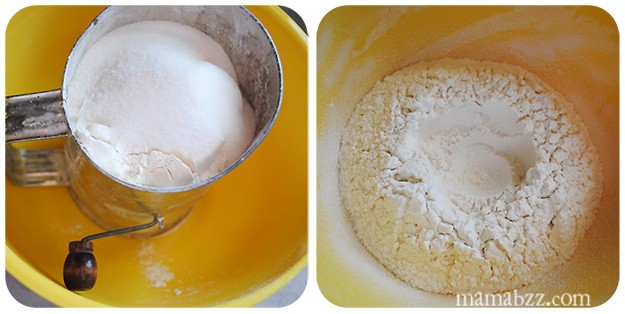
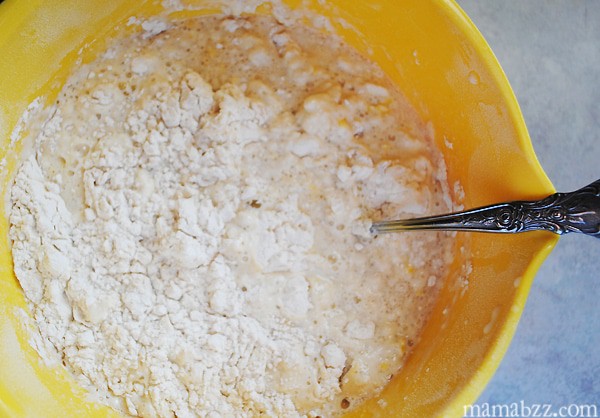
This recipe is out of our family cookbook, given to us as a wedding gift. Sift and stir together dry ingredients in bowl; then make a well in the center of the mixture. Stir together egg, buttermilk, and oil; add to dry ingredients, stirring just until moistened.
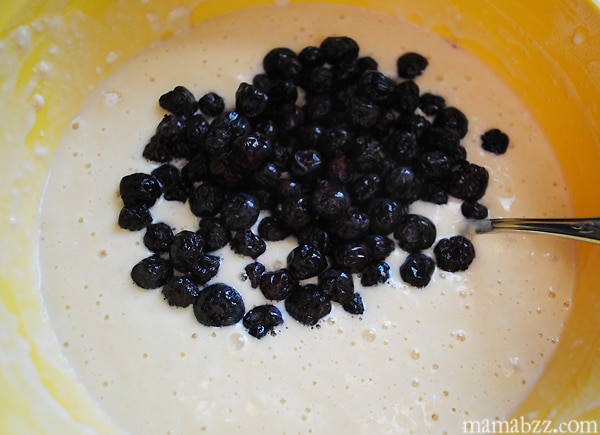
Add blueberries or other type of fruit to batter.
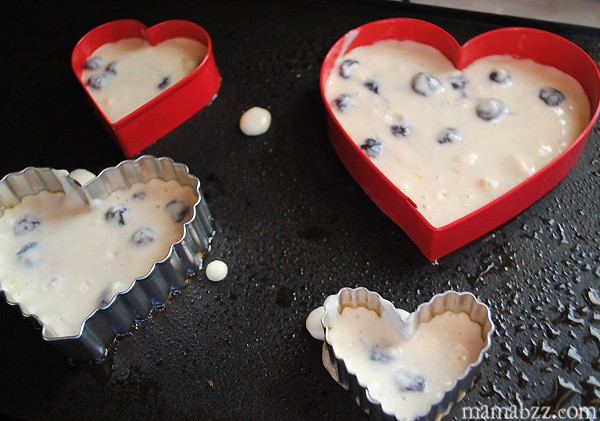
Lightly spray griddle with cooking spray, and heat to a moderate temperature; lightly spray heart shaped cookie cutters on inside rim, as well.
Place cookie cutters onto griddle, and pour batter into cookie cutters for each pancake.
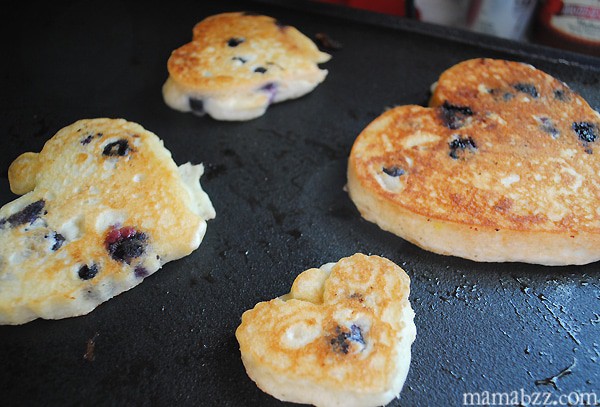
Cook pancakes until tops are covered with bubbles and edges look cooked. Remove cookie cutters, turn pancakes, and cook on other side.
Cook well, until pancakes are browned and cooked through. Tip: You may want to double the recipe and add a few pancakes to the freezer for quick use on weekday mornings.
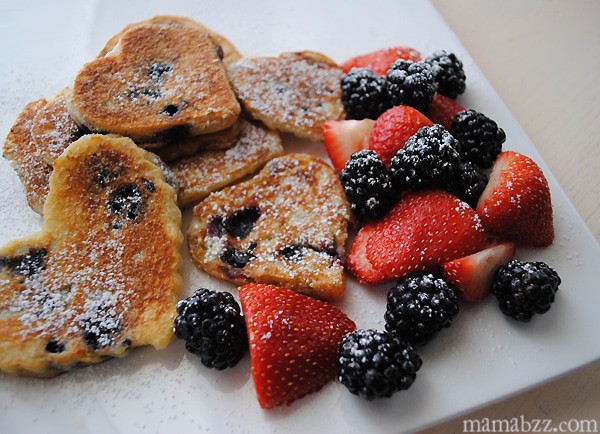
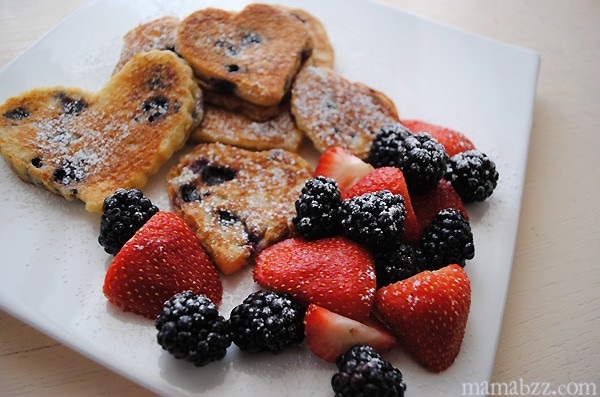
Serve with butter, warm syrup, a dusting of powdered sugar, and fresh fruit on the side. Enjoy!
Valentine's Day definitely calls for special heart shaped buttermilk pancakes, along with lots of fresh fruit on the side.
1 1/4 cups all-purpose flour
1/2 tsp baking soda
2 tsp baking powder
3/4 tsp salt
2 tbsp sugar
1 large egg
1 1/4 cups buttermilk
3 tbsp vegetable oil
Sift and stir together dry ingredients in bowl. Then make a well in center of the mixture.
Stir together egg, buttermilk, and oil; add to dry ingredients, stirring just until moistened.
Add blueberries or other type of fruit to batter, if desired.
Lightly spray griddle with cooking spray, and heat to a moderate temperature; lightly spray heart shaped cookie cutters on inside rim, as well.
Place cookie cutters onto griddle, and pour batter into cookie cutters for each pancake; I filled cookie cutters about a third to halfway, depending on the size of each cookie cutter.
Cook pancakes until tops are covered with bubbles and edges look cooked.
Remove cookie cutters, turn pancakes, and cook on other side. Cook well, until pancakes are browned and cooked through.
Serve with butter, warm syrup, a dusting of powdered sugar, and fresh fruit on the side. Enjoy!
Tip: You may want to double the recipe and add a few pancakes to the freezer for quick use on weekday mornings.
Bake heart shaped sugar cookies on a stick to make Valentine cookie pops. This is the perfect recipe to make and decorate with kids on Valentine’s Day! It’s fun and easy too!
With February just around the corner, I’ve been seeing Valentine treats galore on Pinterest. These Valentines cookie pops were more of an experiment for me, but I was determined to make them.
The end result with these sugar cookie pops was most definitely worth it. It was a lot of fun decorating them too. Who knew a cookie on a stick could be so much fun?
How to Make Valentine Cookie Pops
For these frosted sugar cookie pops, I made my mom’s cutout sugar cookie recipe; I’ve been making this recipe for as long as I can remember.
Make the Dough
First mix up the dough following these steps…
Sift or whisk together the flour with the baking soda, salt, and sugar.
Using a pastry blender, cut the butter into the dry ingredients.
Work the butter in until the mixture is as fine as corn meal.
Then in a separate mixing bowl, combine the buttermilk and vanilla extract with the slightly beaten eggs.
Add the dry ingredients to the liquid ingredients.
Mix ’til you have a smooth cookie dough.
Chill the Dough
At this point, you’ll need to cover the dough closely with wax paper or plastic wrap, and chill it in the refrigerator overnight or at least 3-4 hours.
Cut out Heart Shapes and More
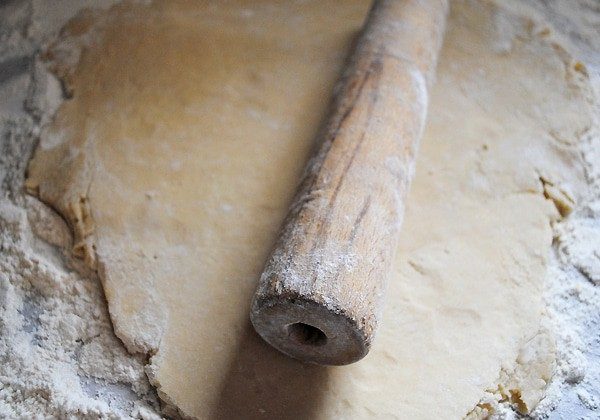
Now it’s time to roll out the dough.
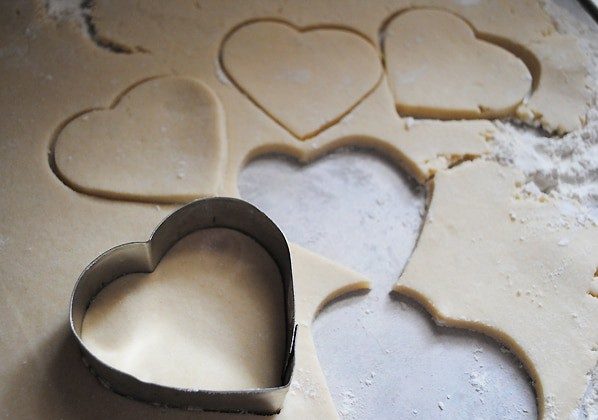
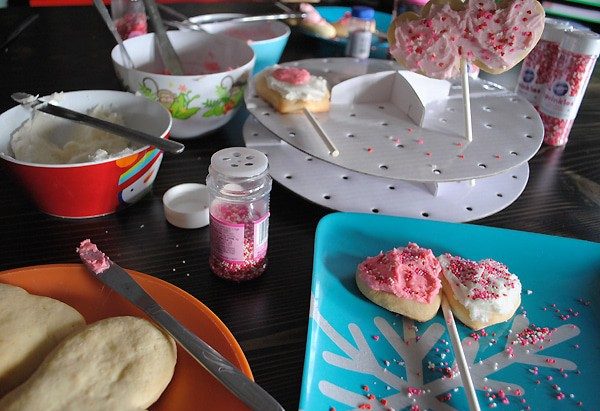
Then cut out the heart shaped cookies. I have a simple heart cookie cutter that I used, along with a mitten and a double heart cookie cutter.
How to Put Cookies on a Stick
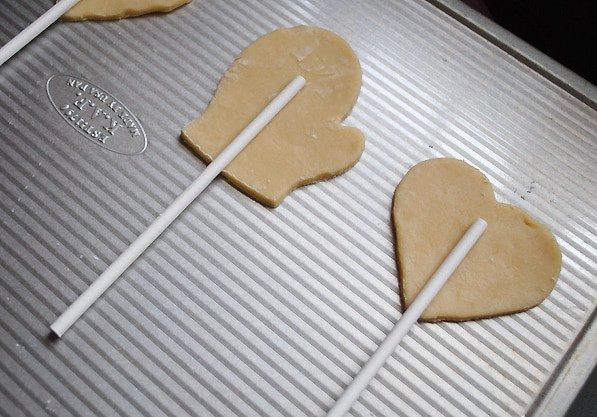
After cutting out the cookies, place them, one at a time, onto an un-greased baking sheet. Then place the cookie pop sticks on each cookie, gently pressing down into the dough just a bit.
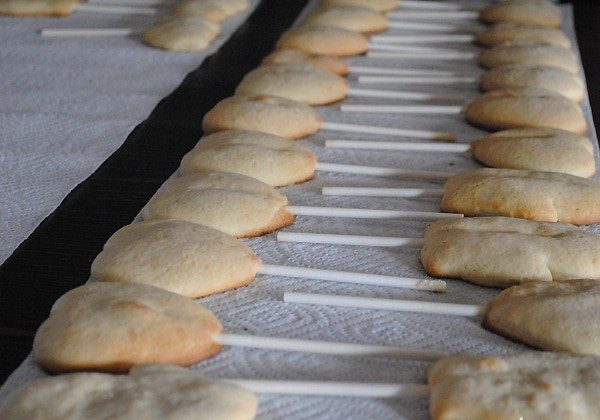
Bake the heart cookie pops at 425° for about 8-10 minutes. They’ll puff up somewhat. Lay cookies out on a paper towel, and let cool.
Frost and Decorate Heart Shaped Cookie Pops
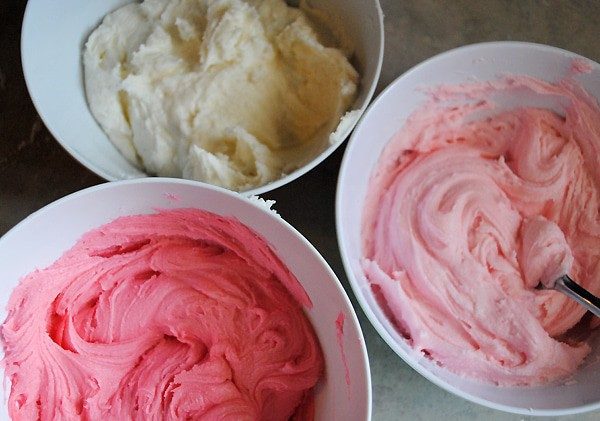
When the cookies have cooled well, the fun begins. You can make a simple sugar cookie icing out of powdered sugar, butter, cream, vanilla, and almond extract.
We like to use different colors. I normally shy away from coloring as much as possible, because I don’t like to feed it to my kids; but it’s an occasional special treat.
You can use whatever your heart desires to decorate, things like sprinkles, colored sugar, candy hearts, etc. Once you’ve decorated your cookies to the hilt, they’re ready to eat or gift.
Though my mitten and heart cookie pops are definitely far from perfect, they’re really fun to make, especially once I halfway figured out what I was doing. They’re definitely a fun project to work on with kids (especially the decorating part). Enjoy!
If you try this recipe, why not leave a star rating in the recipe card right below and/or a review in the comment section further down the page? I always appreciate your feedback. You can also follow me on Pinterest, Facebook, Instagram, and YouTube. And subscribe to my email list too!
Valentine Cookie Pops
Bake heart shaped sugar cookies on a stick to make Valentine cookie pops. Perfect recipe to make and decorate with kids on Valentine's Day!
Cookie Dough:
4 cups all-purpose flour
1 teaspoon baking soda
1/2 teaspoon salt
1 1/2 cups sugar
1 1/2 cups unsalted butter
1/2 cup buttermilk (or sour milk)
2 large eggs
1 teaspoon vanilla extract
Frosting:
4 tablespoons salted butter (softened)
1 teaspoon vanilla extract
1 teaspoon almond extract
1 cup heavy whipping cream
6 cups powdered sugar
Cookie Decorating:
1/2 cup sprinkles (optional)
5 drops food coloring (optional)
Cookies:
Sift or whisk together the flour with the baking soda, salt, and sugar.
Using a pastry blender, cut the butter into the dry ingredients.
Work the butter in until the mixture is as fine as corn meal.
Give the eggs a slight beating with a whisk.
Then in a separate mixing bowl, combine the buttermilk and vanilla extract with the slightly beaten eggs.
Add the dry ingredients to the liquid ingredients.
Mix 'til you have a smooth cookie dough.
At this point, you'll need to cover the dough closely with wax paper or plastic wrap, and chill it in the refrigerator overnight or at least 3-4 hours.
Roll out the dough on a floured surface.
Then cut out the heart shaped cookies. I have a simple heart cookie cutter that I used, along with a mitten and a double heart cookie cutter.
After cutting out the cookies, place them, one at a time, onto an un-greased baking sheet. Then place the cookie pop sticks on each cookie, gently pressing down into the dough just a bit.
Bake the heart cookie pops at 425° for about 8-10 minutes. They'll puff up somewhat. Lay the cookies out on a paper towel, and let cool.
Frosting and Decorating:
Mix together the softened butter, vanilla extract, almond extract, whipping cream, and powdered sugar, 'til you have a smooth frosting that's spreadable.
Decorate each Valentines cookie pop with frosting and sprinkles, as desired. Enjoy!
This recipe comes from my grandma’s recipe box; we’ve made it a couple times now. It’s a chewy sweet treat that only requires a small piece, very rich, so one pan will go a long way.
Below you’ll find a printable recipe, without photos, for your convenience.
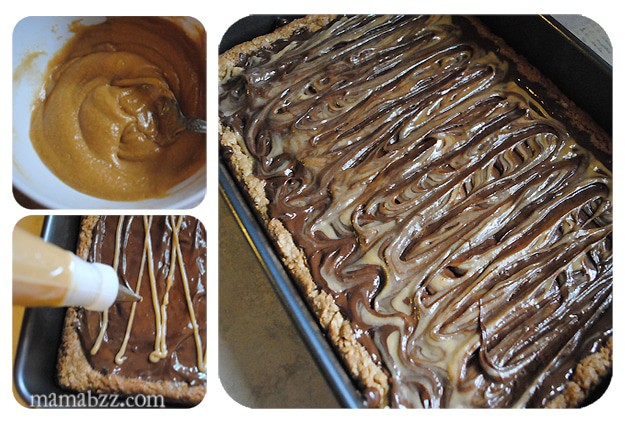
First, cream together the butter and sugars until light and fluffy.
Add in the egg, and beat well. Add in peanut butter and vanilla, mixing well.
Sift together flour, baking soda, and salt. Stir dry ingredients and oats gradually into creamed mixture (or dump everything in like I did and mix).
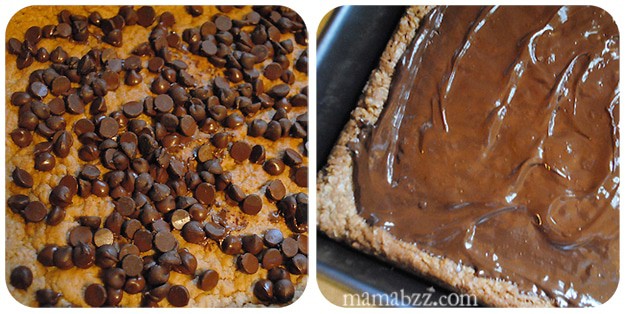
Spread mixture into a greased 13x9x2 pan.
Bake in moderate oven (about 350 degrees) for 20-25 minutes. Sprinkle top with chocolate chips, and let stand for about 5 minutes. Spread melted chocolate over the top.
For the topping, combine powdered sugar, peanut butter, and enough milk to make a thin icing. Drizzle over melted chocolate in pan.
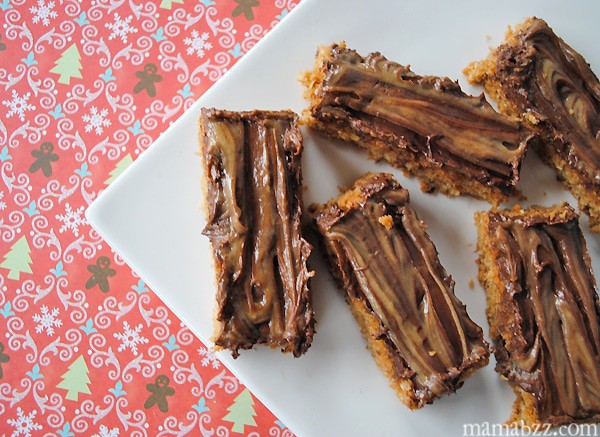
Cut chocolate peanut butter bars into squares or “fingers.” Serve and enjoy!
Chocolate peanut butter fingers bring my two favorite ingredients together in one chewy treat.
Bars:
1/2 cup salted butter
1/2 cup sugar
1/2 cup brown sugar (firmly packed)
1 large egg
1/3 cup creamy peanut butter
1/2 teaspoon vanilla extract
1 cup all-purpose flour (sifted)
1/2 teaspoon baking soda
1/4 teaspoon salt
1 cup quick cook oats
6 ounces semi-sweet chocolate chips
Icing:
1/2 cup powdered sugar
1/4 cup peanut butter
4 tablespoons milk
Cream together butter and sugars until light and fluffy. Add egg, and beat well. Add in peanut butter and vanilla, mixing well.
Sift together flour, baking soda, and salt. Stir dry ingredients and oats gradually into creamed mixture. Spread mixture into a greased 13x9x2 pan. Bake in moderate oven (about 350 degrees) for 20-25 minutes.
Upon removal from oven, sprinkle top with chocolate chips, and let stand for about 5 minutes. Spread melted chocolate over top.
For topping, combine powdered sugar, peanut butter, and enough milk to make a thin icing. Drizzle over melted chocolate in pan. Cut chocolate peanut butter bars into squares or “fingers.” Serve and enjoy!
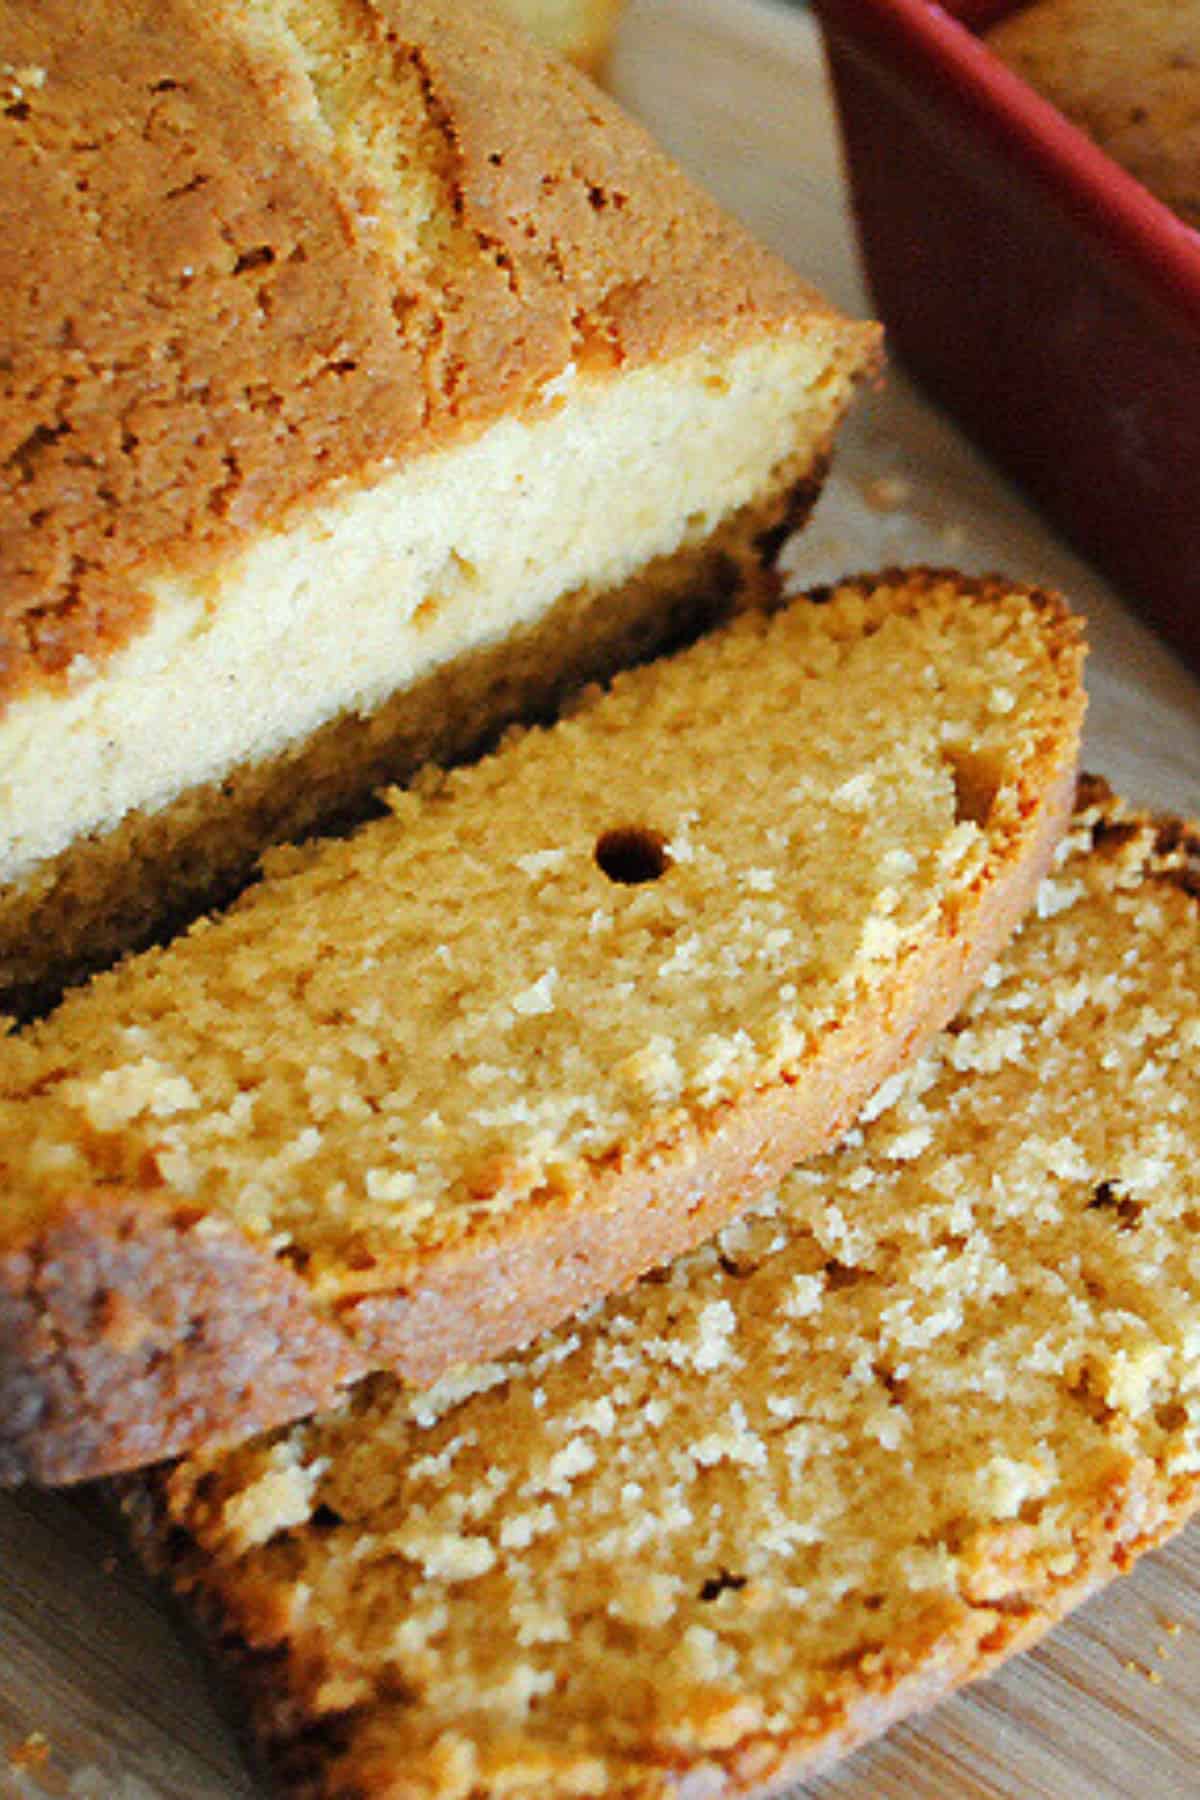
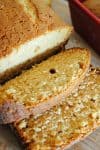
Grandma’s homemade gingerbread loaf recipe without molasses makes moist, soft cake full of the best spiced flavor. This classic quick bread is baked perfect for a holiday dessert!
When I was a little girl, my mom would make gingerbread loaf, pull it out of the warm oven, and slather it with butter. I barely remember it, but I do remember it being really special, a homemade gingerbread treat.
One weekend I searched through my grandma’s recipe box, looking for gingerbread loaf cake, and I found just the recipe… A bit tattered, but definitely still readable and so very special because it looks like it’s been used quite a lot.
What Is Gingerbread Loaf?
When you think of gingerbread, you probably automatically think gingerbread cookies. This gingerbread loaf is essentially a gingerbread cake recipe without molasses, but in loaf form. Mom used to make it in a 9×13 cake pan too, so it can be either/or.
Did you know it’s thought that gingerbread actually originated in Greece? There’s also history of it in China and then in Europe… But it was first made in Greece.
And just for kicks and giggles, gingerbread houses first came along in Germany in the 16th century. Sometimes I find little historical facts like this fascinating.
Why You’ll Love This Recipe
There are definitely a few reasons to love this gingerbread loaf recipe without molasses…
You can serve it for breakfast or dessert. It’s great for both!
It’s delicious sliced with a simple dollop of butter spread into each slice.
It’s quick and easy to make, especially perfect for last minute.
This recipe makes 2 loaves, so you can eat one and gift the other.
When baked, it’s not too sweet, not too strong…. it makes a really delicious breakfast treat or snack.
Ingredients and Substitutions Notes:
You’ll need a handful of ingredients, most of which you probably already have in your pantry.
Butter – While I prefer to use unsalted butter when baking, you can also use salted. Just know that unsalted allows you to more easily control the amount of salt in the recipe.
Cane Sugar – You can also use granulated sugar.
Large Eggs – These are better used at room temperature.
Light Corn Syrup – While this is a gingerbread loaf recipe without molasses, I do use light corn syrup, which adds to the sweetness and gives a moister texture to the loaf cake. My grandma’s recipe calls for Ribbon Cane Syrup, and it seems to be a darker syrup but not quite as dark as molasses. However if you can’t find any, a good substitute is actually molasses or light corn syrup.
Buttermilk – I love using buttermilk for its leavening effect, especially when I’m making a recipe gluten-free. It really helps with rise, no matter what you’re baking. Now… If you don’t have buttermilk, you can easily make a substitute out of milk and vinegar. Just add a tablespoon of vinegar to a glass measuring cup; then fill up to the 1 cup line with milk. Give it a little stir, and allow it to sit for just a few minutes. This makes an excellent substitute for buttermilk.
All-Purpose Flour – I prefer to use an unbleached all-purpose flour, like King Arthur. If you’re making gluten-free gingerbread, I recommend using a quality gluten-free flour like my favorite, and add maybe 1/4 teaspoon of xanthan gum, as well.
Baking Soda and Salt – I recommend using a good sea salt, like Redmond.
Ground Spices – You’ll need ground ginger and ground allspice.
How to Make This Gingerbread Loaf Recipe without Molasses
Before you get started mixing up the batter, be sure to pre-heat the oven to 350° F and grease 2 loaf pans.
First cream (which means mix) the softened butter and sugar together in a large bowl.
Then beat in the eggs.
Next add the corn syrup and the buttermilk, mixing everything together well.
In a separate large bowl, sift or whisk together the dry ingredients, including the flour, baking soda, salt, ground ginger, and ground allspice.
Add the dry ingredients to the creamed mixture, and mix well.
Divide and spread the batter in the prepared loaf pans.
Bake at 350° F for about 45 minutes, or ’til a toothpick inserted in the center of each loaf comes out clean.
Serve gingerbread loaf with butter; it’s definitely best while warm.
We really enjoy this gingerbread loaf recipe. It’s not too sweet, not too strong; it makes a really delicious breakfast treat or snack.
Expert Tips and Recipe FAQ’s
How can you prevent dry bread or cake?
This is the main reason this recipe calls for light corn syrup. It gives it more of a moist texture, rather than a dry, mealy crumb. Also, watch your bake time. Ovens can vary, so your ginger loaf cake may bake faster; it may not take 45 minutes. If over baked, it can turn out dry and crumbly.
How do you store gingerbread loaf?
Gingerbread loaf cake can sit out on the counter; there’s no need to refrigerate it. It should keep well for 2-3 days. But good luck keeping it that long, because in my house, it’s usually gone within a day. Gobbled up!
Can you freeze ginger loaf?
Yes, you totally can. You can make this ahead of time and freeze it. Just allow it to cool before wrapping in plastic wrap and aluminum foil, and place it in an airtight, freezer-friendly container or freezer bag. Then freeze. It should keep for up to 3 months in the freezer.
Recipe Variations
There are a few ways you can tweak this recipe to add more oomph, flavor, different textures, etc. Here are a few of those ways…
Put an icing or glaze on top. You can always drizzle a simple powdered sugar icing on top; maybe even add a little citrus flavor to the drizzle by squeezing in a bit of lemon juice or orange juice to the icing. Of course, you can also make a thinner form of cream cheese frosting to drizzle on top, as well. Yum!
Add walnuts or pecans to the batter; then sprinkle a few chopped nuts on top before baking.
Add chocolate chips to the batter before baking.
Mix raisins or dried cranberries into the batter before baking.
Add 1/2 teaspoon ground cinnamon to the dry ingredients when mixing.
Add a teaspoon or so of vanilla extract to the batter for more flavor.
If you try this recipe, why not leave a star rating in the recipe card right below and/or a review in the comment section further down the page? I always appreciate your feedback. You can also follow me on Pinterest, Facebook, Instagram, and YouTube. And subscribe to my email list too!
Gingerbread Loaf Recipe without Molasses
Grandma's homemade gingerbread loaf recipe without molasses makes moist, soft cake full of the best spiced flavor. Classic quick bread!
Mixer
Loaf Pans
1 cup unsalted butter (softened)
1 cup cane sugar
3 large eggs
1 cup light corn syrup
1 cup buttermilk
3 cups all-purpose flour
1 teaspoon baking soda
1/4 teaspoon salt
1 teaspoon ground ginger
1/2 teaspoon ground allspice
Pre-heat the oven to 350° F, and grease and flour 2 loaf pans.
In a large mixing bowl, cream or mix together the softened butter and sugar.
Beat in the eggs.
Then add the corn syrup and buttermilk, mixing well.
In a separate large bowl, whisk together the flour, baking soda, salt, ginger, and allspice.
Add the dry ingredients to the creamed mixture, and mix well.
Divide and spread the batter in the prepared loaf pans.
Bake at 350° F for about 45 minutes, or 'til a toothpick inserted in the center of each loaf comes out clean.
Serve while warm with a generous slather of butter.
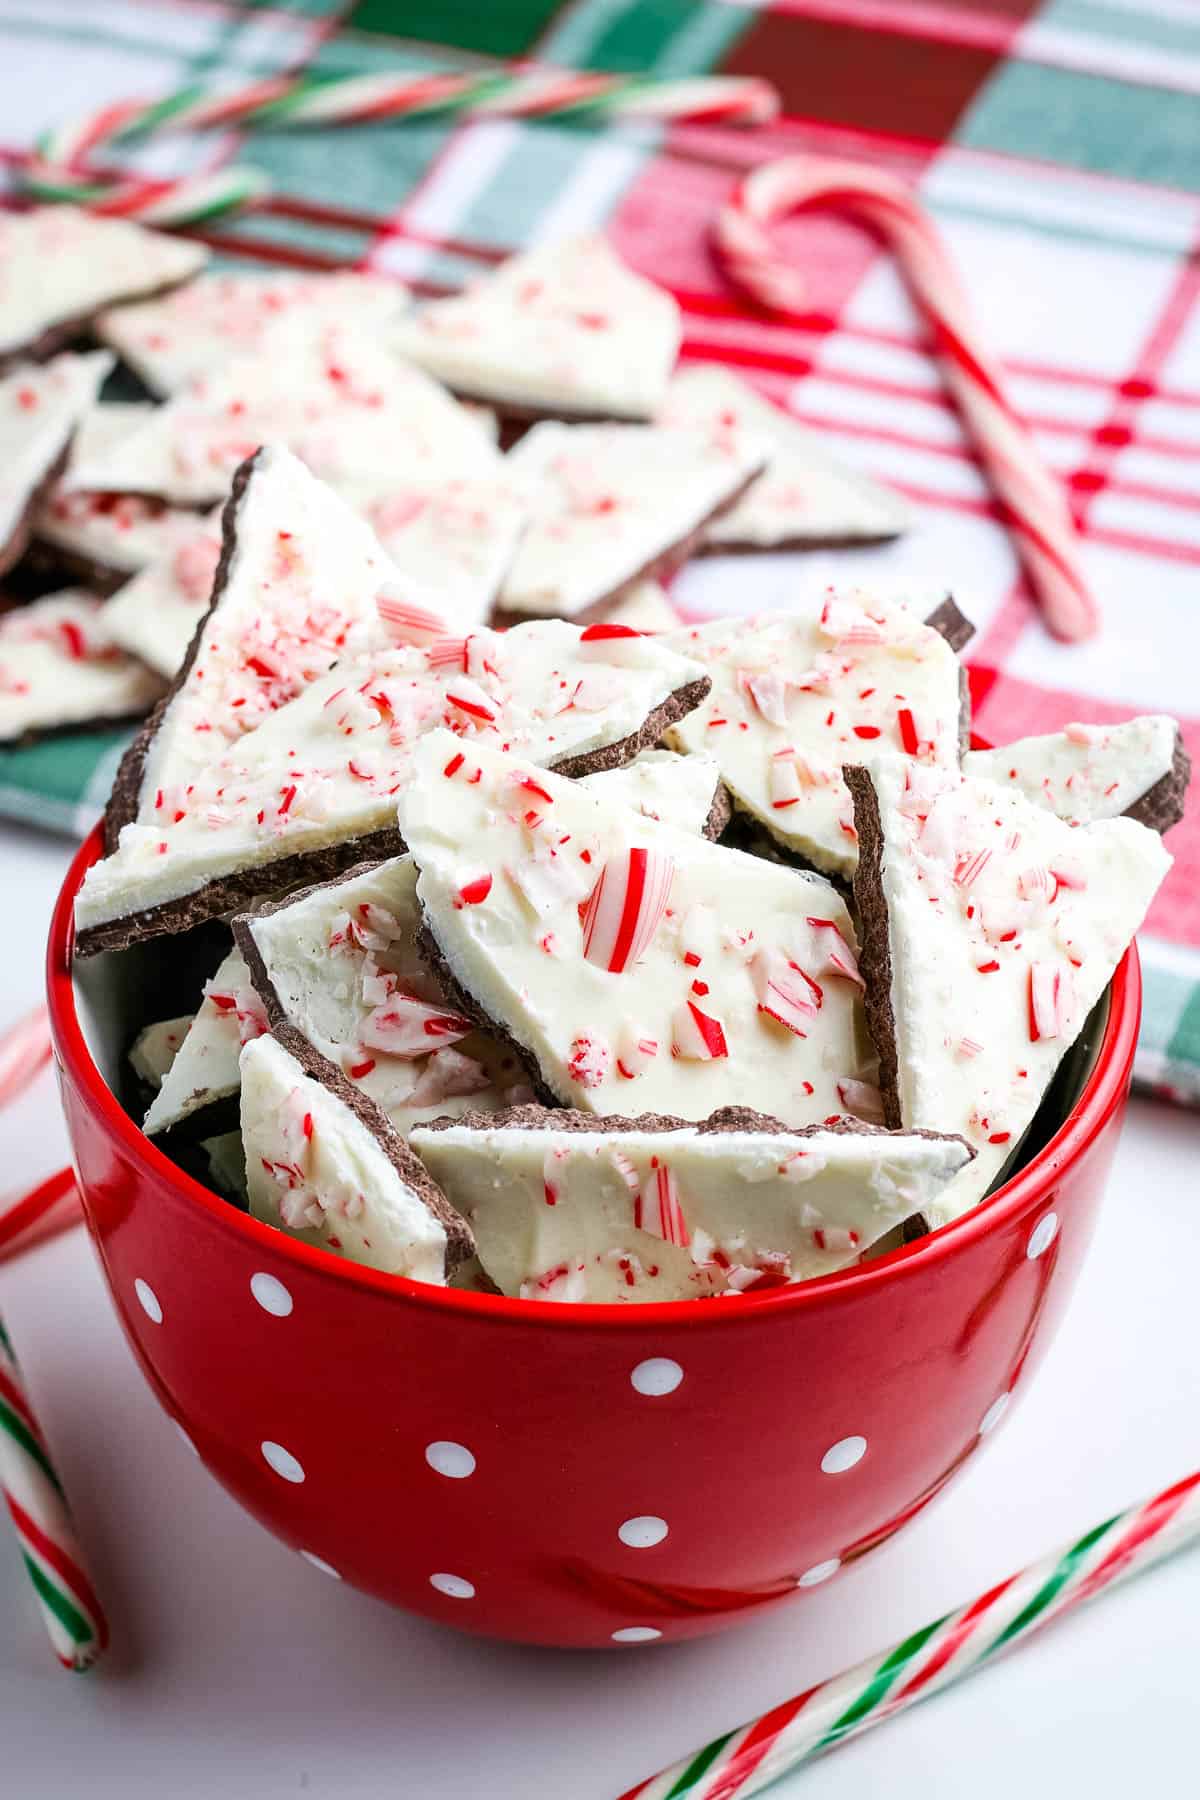
How to make the best holiday chocolate peppermint bark with just 4 ingredients, including crushed candy canes! This festive Christmas candy is a quick and easy, family favorite, Christmas dessert your family and friends will love!
The Christmas season is definitely my favorite time of year. It’s the perfect time for Christmas recipe making, holiday baking, making holiday treats like candy cane bark, and more.
Christmas bark candy is simple, quick, and easy to make and only involves a few steps.
It’s also very versatile because there are so many ways you can make it. You can make dark chocolate peppermint bark, white chocolate peppermint bark, milk chocolate peppermint bark, and more.
It’s also versatile for the fact you can add different toppings. Doesn’t have to be crushed candy canes… In fact, I’ve added diced up Hershey Mint Kisses, crushed Heath Bars, etc. We’ll talk a little bit more about variations below.
Just a few ingredients will make a whole pan of Christmas candy.
You can even make it more festive by using decorative molds with Christmas imprints. I sometimes use a non-stick silicone chocolate bark molds that have raised words that actually mold themselves into the chocolate candy, so the finished dessert says things like Merry Christmas, Season’s Greetings, etc. It really does make for a beautiful gift idea.
Speaking of gift ideas… Holiday chocolate bark makes a fantastic gift idea! And you can package it up in a festive little box or treat bag.
What Is Peppermint Bark?
Peppermint bark is a layered Christmas candy, usually layered with milk or dark chocolate, then white chocolate, and topped with crushed candy canes or peppermint candies. It’s easy to break apart and makes a sweet holiday snack that’s actually kinda addictive.
Ingredients and Substitutions Notes:
You’ll need 4 ingredients to make this layered or swirled peppermint bark.
Dark, Semi-Sweet, or Milk Chocolate Chips – I recommend using a quality chocolate chip, like Ghirardelli or Nestle. I actually use Nestle’s dairy-free chocolate chips, and they work just fine for candy. You can also use the actual candy making chocolate bars that are usually available in the baking aisle at the grocery store, things like Baker’s Chocolate; I think Ghirardelli has a line of these too. You can use almond bark if preferred. But I’ve found that chocolate chips are just as easy, and they taste good too.
Peppermint Extract – This is going to give a li’l extra peppermint flavor to your candy bark.
White Chocolate Chips – A layer of this is almost like a festive layer of snow on top of your candy.
Candy Canes – Or you can use peppermint candies.
How to Make Chocolate Peppermint Bark
There are just a few steps you need to take to make this wonderful candy cane bark. But first let’s talk about the chocolate.
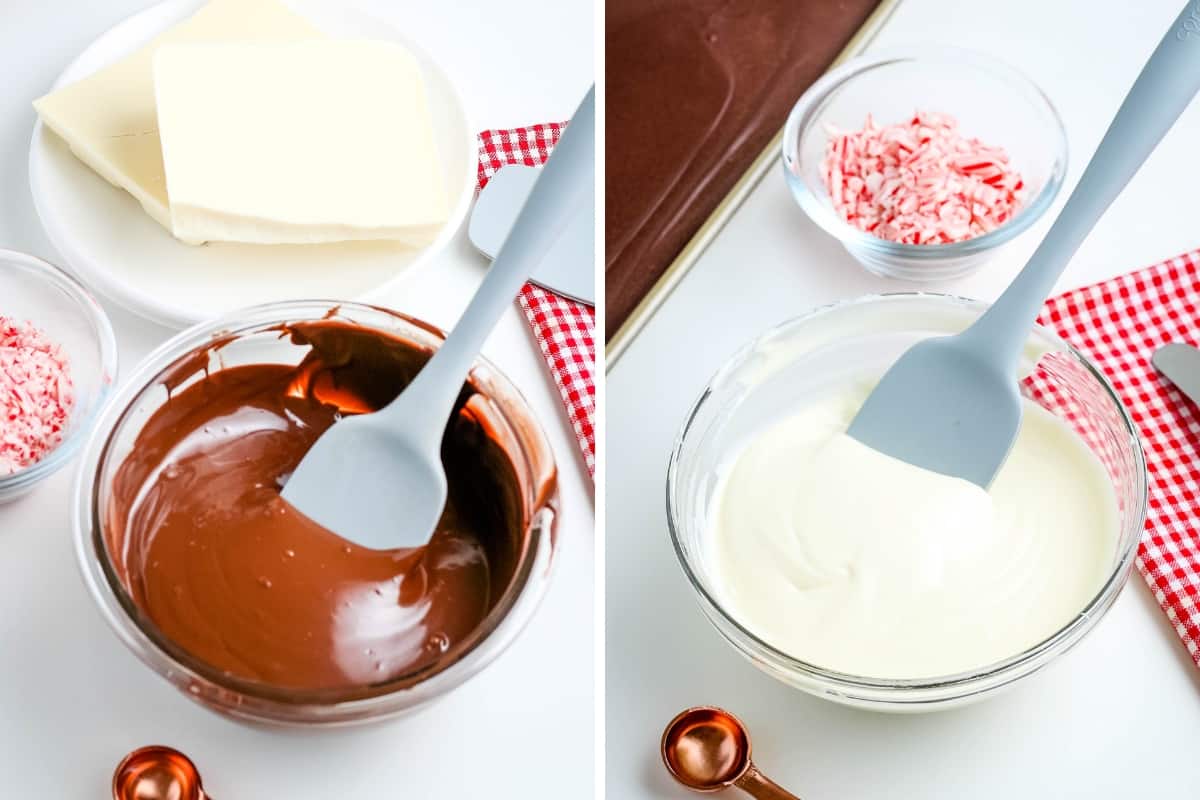
How to Melt Chocolate for Candy Bark
Depending on the chocolate you decide to use, you can melt it a couple different ways:
Melt it using a double boiler on the stove – This is basically a pan inside of another pan with boiling water in the bottom pan. It allows for more even melting without burning, and it also keeps the chocolate warm for layering.
Melt it in the microwave – This is usually the route I go. I usually melt it in a medium sized glass bowl or glass measuring cup. Heat for 1 minute and stir; then continue heating for 15 seconds at a time, stirring after each heating. Stop heating just before all the chocolate is melted; stir it until it’s completely melted.
How to Crush the Candy Canes
I usually use the smaller candy canes, as they’re easier to crush into smaller pieces. That or you can use peppermint candies.
It’s easiest to place the candy canes in a Ziploc bag, and seal it without air.
Then crush the candy canes using a rolling pin. Just roll over the canes, or slap the candy canes with the rolling pin like you would a gavel on a desktop.
How to Make Candy Cane Bark
Now that your ingredients are prepped, you’re ready to layer and make the candy bark. If not using a candy mold, be sure to line a cookie sheet with parchment paper (that overlaps the cookie sheet by a couple inches) before getting started.
Mix the melted dark or milk chocolate with 1/2 teaspoon of the peppermint extract. Then spread the peppermint chocolate layer into the parchment paper lined cookie sheet. Allow this chocolate layer to set for 10-15 minutes in the fridge or freezer.
Mix 1/2 teaspoon peppermint extract into the melted white chocolate. Then spread the white chocolate onto the set chocolate layer. Immediately sprinkle the crushed candy canes all over the top of the white chocolate.
Then allow the bark to set in the fridge or freezer for another 15-20 minutes before breaking it apart to serve.
How to Break Candy Bark Up
If you’re using a parchment paper lined cookie sheet…
Allow the candy to come back to room temperature.
Then lift the parchment paper out of the pan, and loosen it from the candy. It should peel right off.
Then just break the bark off by hand, or you can cut it with a knife. It’ll be all different shapes and sizes, so no need to worry if corners break off or what have you. Just have fun with it and enjoy this delectable Christmas candy together.
If you’re using a candy mold, the mold pretty much peels right off the bark, and then you can use a knife to break the chocolate. With this step, you want to be careful because the corners are easy to break.
Expert Tips and Recipe FAQ’s
How should you store chocolate peppermint bark?
While it can sit out at room temp, it won’t last as long. I recommend storing it in an airtight container or Christmas tin in the fridge. It should keep for a good 2 weeks or more. When I was a kid, the stairwell to my room (and my room) had no heat or insulation, so we stored all our Christmas goodies like this in that cold stairwell… As a kid, that was the best place ever.
Can you freeze Christmas bark candy?
Yes, you can. Just be sure to store it in an airtight container so it doesn’t get freezer burn. It should keep for 6 months or more.
Let’s Talk Recipe Variations
This is the fun part… The good stuff… I love how versatile this recipe can be!
Instead of crushed candy canes, use chopped or crushed Hershey Mint Kisses, Butterfinger candies, Heath Bar candies, peanut butter cups, etc.
Instead of adding peppermint extract, think caramel extract for a dark salted caramel bark.
Make it all dark chocolate peppermint bark, or all milk chocolate peppermint bark. Or make it all white chocolate peppermint bark. Both layers the same chocolate.
Really, the options are endless with this.
More Favorite Holiday Recipes
If you want more Christmas candy recipes and other holiday treats, you’ll enjoy these for sure…
If you try this recipe, why not leave a star rating in the recipe card right below and/or a review in the comment section further down the page? I always appreciate your feedback. You can also follow me on Pinterest, Facebook, Instagram, and YouTube. And subscribe to my email list too!
Chocolate Peppermint Bark
How to make holiday chocolate peppermint bark with 4 ingredients, including candy canes! Quick and easy, family favorite, Christmas dessert!
Glass Bowls
Rubber Spatula
Parchment Paper
Cookie Sheet
12 ounces milk chocolate chips
1 teaspoon peppermint extract (divided)
12 ounces white chocolate chips
1/3 cup crushed candy canes ((about 6-8 small candy canes))
How to Melt the Chocolate:
in separate medium sized glass bowls or glass measuring cups, heat the chocolate chips for 1 minute and stir.
Continue heating for 15 seconds at a time, stirring after each heating.
Stop heating just before all the chocolate is melted, and stir it until it's completely melted.
How to Crush the Candy Canes:
I usually use the smaller candy canes, as they're easier to crush into smaller pieces. It's easiest to place the candy canes in a Ziploc bag, and seal it without air.
Then crush the candy canes using a rolling pin. Just roll over the canes, or slap the candy canes with the rolling pin like you would a gavel on a desktop.
How to Layer Candy Cane Bark:
Line a cookie sheet with parchment paper (that overlaps the cookie sheet by a couple inches) before getting started.
Mix the melted milk chocolate with 1/2 teaspoon of the peppermint extract.
Then spread the peppermint chocolate layer into the parchment paper lined cookie sheet. Allow this chocolate layer to set for 10-15 minutes in the fridge or freezer.
Mix 1/2 teaspoon peppermint extract into the melted white chocolate.
Then spread the white chocolate onto the set chocolate layer.
Immediately sprinkle the crushed candy canes all over the top of the white chocolate.
Then allow the bark to set in the fridge or freezer for another 15-20 minutes.
How to Break Candy Bark Up:
Allow the candy to come back to room temperature.
Lift the parchment paper out of the pan, and loosen it from the candy. It should peel right off.
Then just break the bark off by hand, or you can cut it with a knife. It'll be all different shapes and sizes, so no need to worry if corners break off or what have you. Just have fun with it and enjoy this delectable Christmas candy together.
While candy bark can sit out at room temp, it won’t last as long. I recommend storing it in an airtight container or Christmas tin in the fridge. It should keep for a good 2 weeks or more.
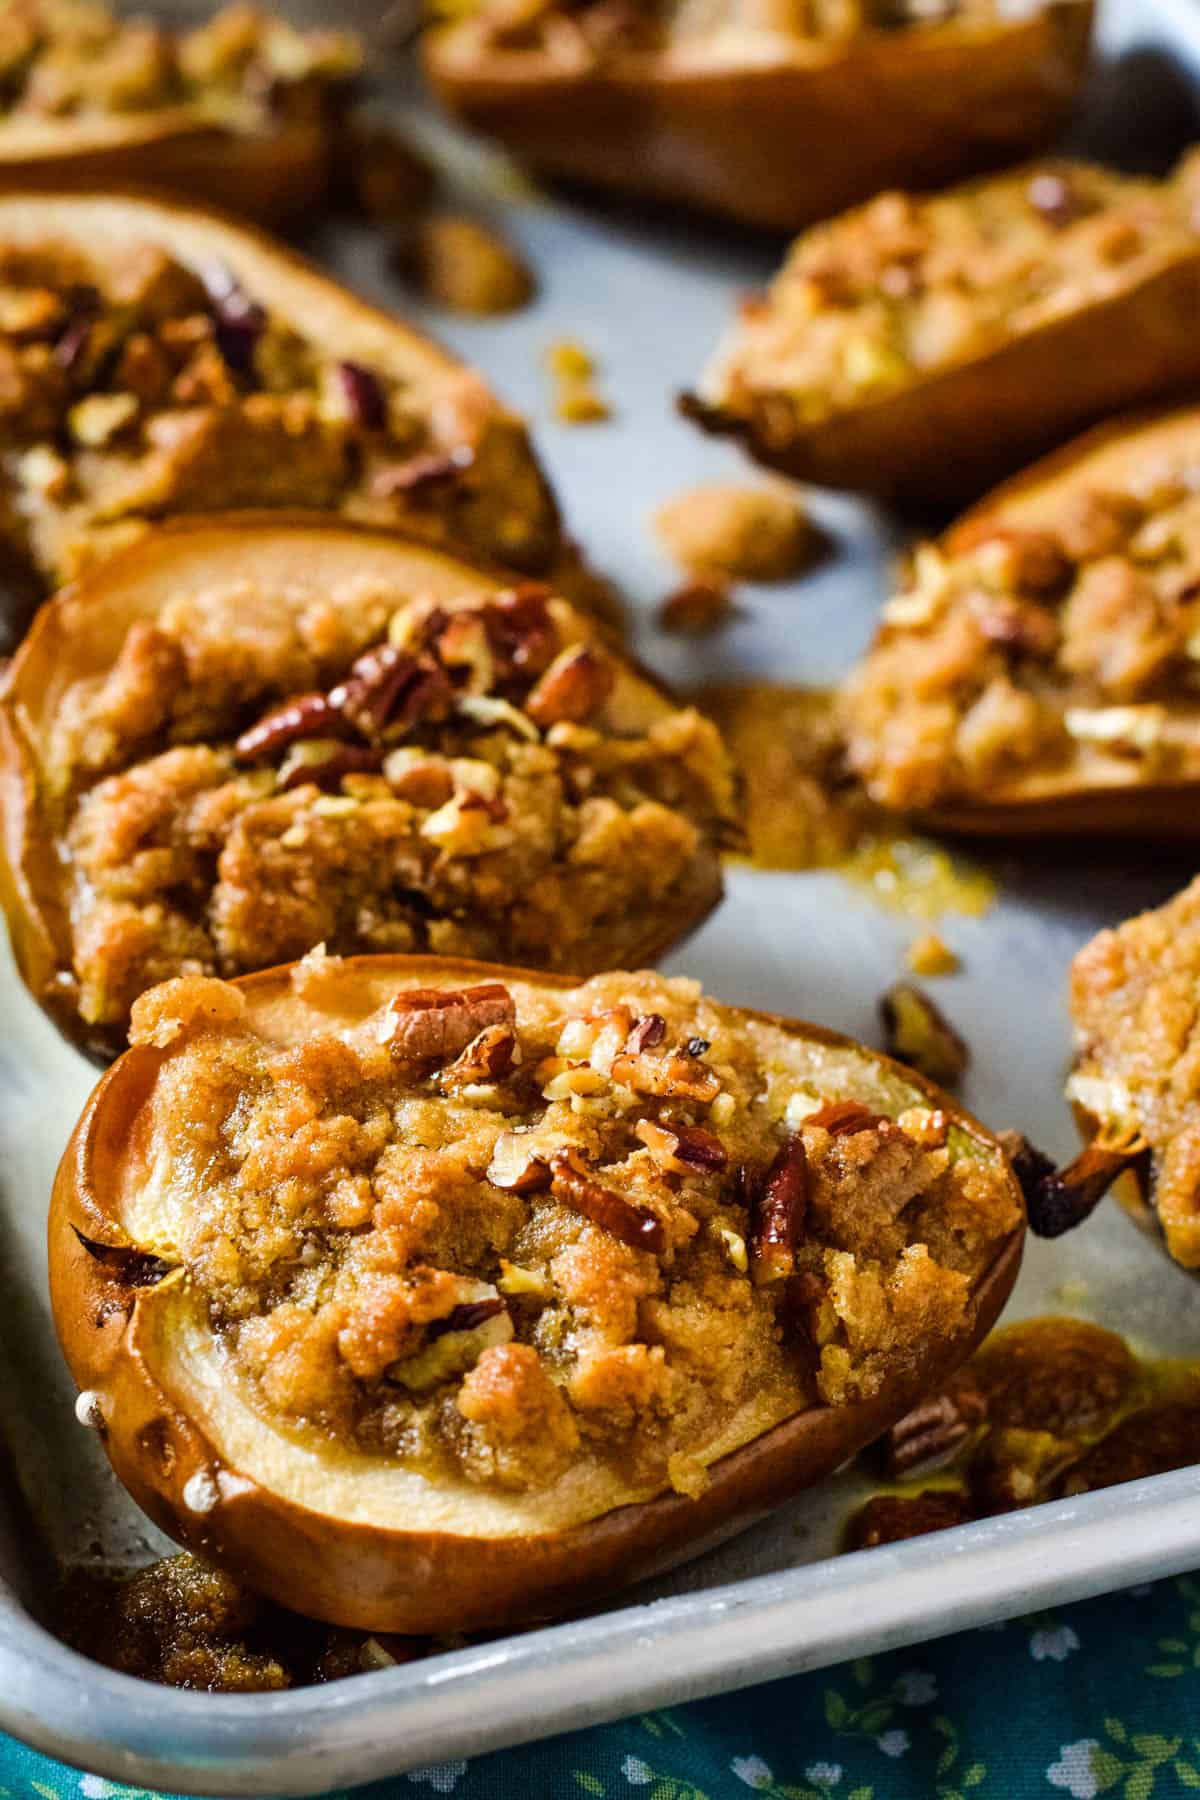
Learn how to turn fresh pear halves into baked stuffed pears, filled with butter, brown sugar, cinnamon, and pecans. This is an easy dessert recipe anyone can make and oh so delicious!
My mom has a pear tree in her front yard, and every year she shares those pears with all the kids. One season I came up with this delicious buttery recipe for cinnamon baked pears, and I’ve made them ever since.
I love the buttery crispy topping on each individual pear half. It’s like a mini, personal-sized pear crisp with every bite.
Why You’ll Love This Recipe Too
One of my favorite things about this dessert is you can change ingredients to fit any dietary need. For example, I’m gluten-free, so I sub gluten-free flour for the all-purpose flour. You can also sub dairy-free butter for the butter in the recipe.
Speaking of ingredients, there are only 6 ingredients, most of which you probably already have in your pantry.
This makes 12 personal-sized desserts with just 6 pears. That makes it a really easy and simple dessert you can make for a dinner party or get together.
Again, that buttery crispy topping; when you dig into the pear with your fork, the pear is all tender ooey gooey with that wonderful sweet topping… It’s so delicious!
Ingredients and Substitutions Notes
Salted Butter – Real butter is best, but if you need dairy-free, you can sub a dairy-free butter instead. I also recommend salted butter for the flavor it gives to each stuffed pear. Just be sure to soften it ahead of time.
All-Purpose Flour – If you’re like me and need to make this gluten-free, just sub a good gluten-free flour. I also recommend unbleached flour.
Cane Sugar – You can also use granulated sugar.
Light Brown Sugar
Ground Cinnamon – I love the flavor cinnamon adds to the topping mixture; you can also add nutmeg if you want.
Pears – Let’s talk about the best pears for baking below. I highly recommend Bartlett, as they’re usually easily available.
Pecans – These are optional, and you can sub walnuts if preferred.
What Kind of Pears Are Best for Baking?
I’m pretty sure my mom’s pear tree is a Bartlett pear tree, and Bartletts bake quite nicely. If they’re a little underripe, no worries… You just may need to bake them a tad bit longer than riper pears.
Bartletts have a sweet flavor and soft, juicy texture when baked. In fact, the topping can make the top of the pear quite ooey gooey, but when you dig in with a fork, you’ll find a soft yet firm texture below, making it the perfect combination. These pears make the best oven roasted pears, in my opinion.
Other good choices for baking might include…
Anjou
Bosc
How Ripe Do Pears Need to Be for Baking?
You want pears to be ripe but not overripe; when they start to change color and show bruising, they’re probably starting to get a bit overripe. While I’ve baked them in this condition (quite a bit, actually), keep in mind they won’t be quite as pretty, and they could fall apart.
Instead I recommend waiting ’til the pears are almost perfectly ripe, meaning they’re slightly soft to the touch but still a bit firm. They will also have a pleasant fruity smell when they’re just about right for baking.
Pears ripen on the inside first, so when they just start to soften, they’re likely ready to use. When you bake the pears, they’ll acquire that soft, juicy texture you want baked pears to have.
How to Make Stuffed Pears
The first step is to mix up the crumb topping. The topping I use is inspired by my Dutch apple crumb pie recipe.
In a large mixing bowl, combine the softened butter, flour, sugar, brown sugar, and cinnamon together with a pastry blender.
How to Assemble and Bake the Pears…
Cut the pears in half, and scoop the center of each pear out with a melon baller, making sure to scoop out all the seeds. Place all the halves on a baking sheet.
Fill in each center with the crumb topping. Then sprinkle more on top, covering each pear with the topping.
Sprinkle with chopped pecans, if desired.
Bake at 375° F for about 45 minutes, or until the crumbled topping is golden and the pear is tender when poked with a fork.
To serve, top with whipped topping or vanilla ice cream, if desired, and serve while warm.
More Topping Ideas for Cinnamon Baked Pears
I talk about oats a bit in the FAQ’s below, but you can also add other toppings, including…
Yes, you can, so you’ll want to keep an eye on them and follow instructions for baking in the recipe card. Otherwise, your pears could turn out to be quite mushy and more gooey than intended. I usually do a fork test when testing whether they’re done in the oven… Stick a fork in the pear; if it’s tender and easy to poke with a fork, it’s likely done.
Can I use oats, including instant oats?
Yes, you can; I just prefer to make stuffed pears without oats. But yes, you can add oats; in fact, if you want to add oats, you might cut the flour in half, then sub in 1/2 cup oats. Instant oats will bake faster, but they’ll work just as well as regular rolled oats.
How should you store stuffed pears?
Place the cinnamon baked pears in an airtight container and keep them in the fridge. They should keep for 3 to 5 days.
If you try this recipe, why not leave a star rating in the recipe card right below and/or a review in the comment section further down the page? I always appreciate your feedback. You can also follow me on Pinterest, Facebook, Instagram, and YouTube. And subscribe to my email list too!
Cinnamon Stuffed Pears
How to turn fresh pear halves into baked stuffed pears, filled with brown sugar, cinnamon, and pecans. Easy dessert recipe anyone can make!
Mixing Bowl
Melon Baller
Baking Sheet
16 tablespoons salted butter (softened)
1 cup all-purpose flour
1 cup cane sugar
3/4 cup light brown sugar
1 teaspoon ground cinnamon
6 whole pears
1 cup chopped pecans (optional)
In a large mixing bowl, combine the softened butter, flour, sugar, brown sugar, and cinnamon together with a pastry blender.
Cut the pears in half, and scoop the center of each pear out with a melon baller, being sure to scoop out all the seeds. Place all the halves on a baking sheet.
Fill in each center with the crumb topping. Then sprinkle more on top, covering each pear with the topping.
Sprinkle with chopped pecans, if desired.
Bake at 375° F for about 45 minutes, or until the crumbled topping is golden and the pear is tender when poked with a fork.
To serve, top with whipped topping or vanilla ice cream, if desired, and serve while warm.
Be sure not to overcook the pears. Otherwise, your pears could turn out to be quite mushy and more gooey than intended. I usually do a fork test when testing whether they’re done in the oven… Stick a fork in the pear; if it’s tender and easy to poke with a fork, it’s likely done.
How should you store stuffed pears? Place the cinnamon baked pears in an airtight container and keep them in the fridge. They should keep for 3 to 5 days.
Learn how to make easy muffin tin chicken pot pie with Grands biscuits and a creamy chicken and vegetable filling that’s oh so delicious. Makes the perfect appetizer or a fun way to serve up a personal sized dinner with your family!
I was inspired to make this recipe by another recipe we’d made from Pillsbury, Easy Taco Melts. Instead of filling biscuits with taco filling, however, we decided to make them into mini muffin tin pot pies.
You’ll need just a handful of ingredients to make these yummy mini chicken pot pies.
Boneless Skinless Chicken Thighs – You can also use chicken breasts. Just be sure to cook these beforehand and shred, so they’re ready to go. I like to use my Instant Pot to cook the chicken, then just shred it up while it’s hot.
Cream of Chicken Soup – If you want to make these gluten-free, you can also use a gluten-free cream of chicken soup.
Frozen Vegetables – I like to use a mixture of peas and carrots with corn. However, if you’d like to add green beans or any other veggies, this recipe is easy to accommodate.
Salt and Pepper
Grands Biscuits – If you’d like to make these gluten-free, you can mix up gluten-free biscuits and sub the dough for Grands Biscuits.
How to Make Muffin Tin Chicken Pot Pies
Before getting started, be sure to prep by pre-heating your oven to 375° F; then grease a muffin tin with cooking spray and set aside ’til needed.
Then Assemble your Mini Pot Pies…
In a large mixing bowl, mix together the shredded chicken, cream of chicken soup, vegetables, salt, and pepper.
Press each biscuit into a separate muffin cup, pressing the biscuits up the sides to the top of each cup.
Add about 2 spoonfuls of the chicken mixture to each biscuit, and level it.
Bake at 375° F for about 20-25 minutes, or ’til golden brown. Then cool on a wire rack for about 5 minutes before serving.
These are a really cozy meal or appetizer, perfect for a fun night with your family.
If you try this recipe, why not leave a star rating in the recipe card right below and/or a review in the comment section further down the page? I always appreciate your feedback. You can also follow me on Pinterest, Facebook, Instagram, and YouTube. And subscribe to my email list too!
Muffin Tin Chicken Pot Pie
How to make easy muffin tin chicken pot pie with Grands biscuits and a creamy chicken and vegetable filling that's oh so delicious!
Large Mixing Bowl
Muffin Tin
1 pound boneless skinless chicken thighs (cooked and shredded)
10.5 ounces cream of chicken soup
3/4 cup frozen peas and carrots (thawed)
1/4 cup frozen corn (thawed)
1/2 teaspoon salt (to taste)
1/4 teaspoon ground black pepper (to taste)
16.3 ounces Grands Biscuits
Pre-heat the oven to 375° F, and grease a muffin tin with cooking spray.
In a large mixing bowl, mix together the shredded chicken, cream of chicken soup, vegetables, salt, and pepper.
Press each biscuit into a separate muffin cup, pressing the biscuits up the sides to the top of each cup.
Add about 2 spoonfuls of the chicken mixture to each biscuit, and level it.
Bake at 375° F for about 20-25 minutes, or 'til golden brown.
Cool on a wire rack for about 5 minutes before serving.
Appetizer, dinner, main dish
American
mini pot pies, muffin tin chicken pot pie, muffin tin pot pies
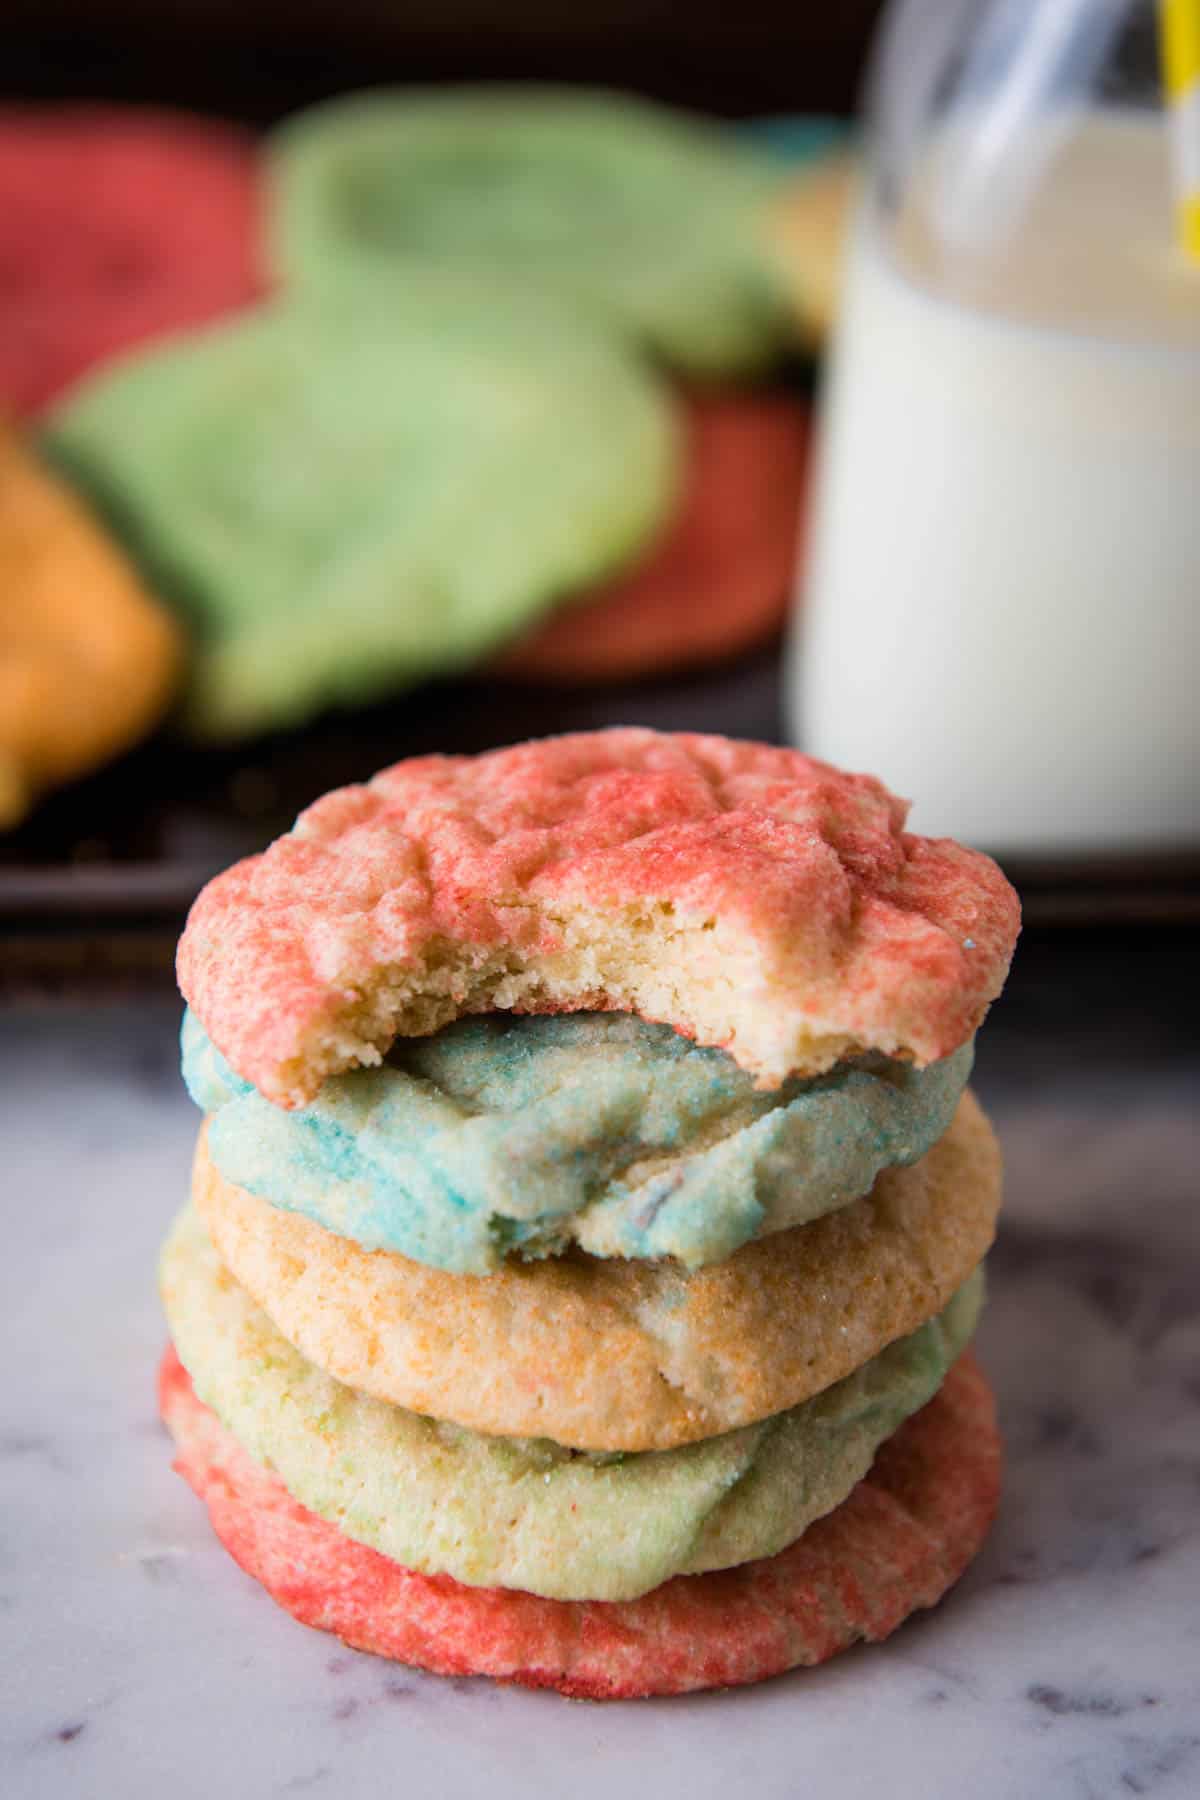
How to make quick and easy Jello sugar cookies with your favorite Jello flavors. Soft and chewy, these cookies are so colorful and perfect for holidays and celebrations, like baby showers and parties.
Growing up I baked a lot with my grandma. One of her favorite desserts to make was easy Jello cookies, essentially sugar cookies rolled in Jello powder before baking.
These cookies made with Jello always had the crispy, chewy texture of a sugar cookie yet a slightly fruity taste, as well. As a kid, I absolutely loved that tangy flavor.
Why I Think You’ll Like This Recipe Too
They’re super easy to make.
You only need a few simple ingredients to make them.
They’re such a colorful and versatile food for any type of party or celebration with the people in your life, like friends, family, and co-workers. Think red and green for Christmas, blue for a boy baby shower, pink for a girl baby shower, green for St. Patrick’s Day, pink or red for Valentine’s Day… You get the picture.
You can use whatever flavor Jello powder you like. So, you can make strawberry Jello cookies or raspberry Jello cookies, even lime Jello cookies.
There’s no need for frosting on these cookies because the Jello powder adds enough of a festive touch as is.
Kids love to help make this Jello sugar cookie recipe because of how fun it is.
Ingredients and Substitutions Notes:
You’ll need a few simple ingredients to make this Jello cookie recipe…
Unsalted Butter – You can use salted butter if that’s all you have; you may just want to decrease the amount of salt you use by maybe 1/2 teaspoon.
Cane Sugar – You can also use granulated sugar.
Large Eggs
Vanilla Extract – I love using pure Mexican vanilla I get from Leos Imports. It makes such delicious desserts.
Whole Milk – You can also use 2% or skim milk, but keep in mind, this lower fat milk may change the texture of the cookie.
Sea Salt – Or just table salt. I prefer to use Redmond Sea Salt.
Jello Mix – You can use whatever flavors Jello you like. I picked up a box of Raspberry Jello and Berry Blue Jello for this batch. Just be sure to keep it in powder form, no need to actually make Jello with it.
How to Make Jello Sugar Cookies
Here’s a basic rundown, step-by-step, of how to make Jello cookies for your own family.
First Mix the Cookie Dough…
In a large mixing bowl, cream or mix together the softened butter and sugar.
Then mix in the eggs, vanilla extract, and milk.
In a separate bowl, whisk together the flour, baking powder, and salt.
Then add the dry ingredients to the wet ingredients, mixing everything together ’til it forms a soft dough.
Form and Roll the Cookies…
Take spoonfuls of dough and roll into 1-inch dough balls. Pour a little bit of the Jello powder at a time, straight out of the box into small bowls, and roll the dough balls in the Jello powder. Again, you can use raspberry, strawberry Jello, or whatever flavor you like.
Place the Jello coated dough balls on an un-greased cookie sheet.
Using the bottom of a glass or cup, flatten the dough balls to about 1/2-inch thickness; this allows the cookies to bake evenly.
Bake at 350° F for about 8-10 minutes. When the cookies are done, remove from the cookie sheet and place on a cooling rack.
Once they’ve cooled, you can serve them and enjoy with a glass of cold milk.
Expert Tips and Recipe FAQ’s
Why aren’t my sugar cookies chewy?
Several factors play a role in whether or not your cookies turn out chewy, probably most of all, the ingredients that you use. As long as you follow this recipe to a t and use the proper ingredients, you should have chewy sugar cookies. If you use margarine instead of butter, or melted butter instead of softened butter, that will greatly affect that chewy texture. If you don’t use large eggs, that can change the texture. Not using whole milk can also change the texture of your cookies. Changing the ratio of ingredients can also affect the end results.
Why aren’t my sugar cookies fluffy?
Again, ingredients. Make sure you follow the recipe to a t, including using the proper amount of dry ingredients, like flour and baking powder. But also, oven temperature can really affect how cookies bake. It’s a given that oven temperatures will vary from household to household. So, if you notice your sugar cookies are coming out flat and not baking into a soft, chewy cookie, think about decreasing the temperature of your oven before baking.
How do I store Jello cookies?
Once they’ve cooled completely, you can store them in an airtight container on the counter.
Can I freeze these cookies?
Yes, you totally can. Just place completely cooled cookies in an airtight container or freezer bag, and put them in the freezer for up to 3 months.
If you try this recipe, why not leave a star rating in the recipe card right below and/or a review in the comment section further down the page? I always appreciate your feedback. You can also follow me on Pinterest, Facebook, Instagram, and YouTube. And subscribe to my email list too!
Jello Sugar Cookies
Easy to make Jello sugar cookies made with your favorite flavor Jello. Soft and chewy, colorful, and versatile for holidays and celebrations.
Large Mixing Bowl
Whisk
Cookie Sheet
Wire Rack
1 cup unsalted butter
2 cups cane sugar
2 large eggs
1 1/2 teaspoons vanilla extract
2 tablespoons whole milk
3 1/4 cups all-purpose flour
1 teaspoon baking powder
2 teaspoons sea salt
3 ounces Jello mix (whichever flavor/s you prefer)
Pre-heat the oven to 350° F.
In a large mixing bowl, cream or mix together the softened butter and sugar.
Then mix in the eggs, vanilla extract, and milk.
In a separate bowl, whisk together the flour, baking powder, and salt.
Then add the dry ingredients to the wet ingredients, mixing everything together 'til it forms a soft dough.
Take spoonfuls of the dough and roll into 1-inch dough balls. Pour a little bit of the Jello powder at a time, straight out of the box into small bowls, and roll the dough balls in the Jello powder. Again, you can use raspberry, strawberry Jello, or whatever flavor you like.
Place the Jello coated dough balls on an un-greased cookie sheet.
Using the bottom of a glass or cup, flatten the dough balls to about 1/2-inch thickness; this allows the cookies to bake evenly.
Bake at 350° F for about 8-10 minutes. When the cookies are done, remove them from the cookie sheet and place on a cooling rack.
Once they've cooled, you can serve them and enjoy with a glass of cold milk.
Once they’ve cooled completely, you can store the cookies in an airtight container on the counter.
Cookies & Bars, Desserts
American
cookies made with Jello, Jello cookie recipe, Jello cookies, Jello sugar cookie recipe, Jello sugar cookies
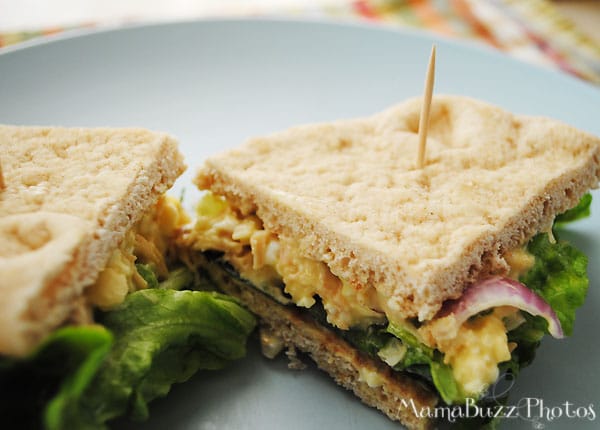
Sometimes the hot summer weather calls for an easy recipe that’s lighter on the tummy yet delicious at the same time. We enjoy our favorite open-faced chicken salad sandwich or tuna salad, but it’d been awhile since we’d made chicken salad.
My grandmother, my dad, and my mom used to make tuna/chicken salad with all kinds of good ingredients like apples, nuts, and more. We decided to get a little funky with it and add some crunch to the salad.
Below is a printable recipe without photos, for your convenience.
The first step was to boil our eggs and get our crunchy ingredients chopped up. We chopped up green onions, purple onion, and an apple.
Then we opened our chicken and drained it; we used Applewood Smoke Chunk Chicken.
When the eggs were done, it was time to smash them up really well.
Finally, we mixed all the ingredients together in a bowl.
Then we added Miracle Whip to give the salad a creamy, tangy texture/flavor.
Finally, we applied the mixture to pita slices with lettuce. Dan also added mustard to his pita sandwiches.
Next time we might even add chopped up pecans…. but for now, this was light and de-lish! Perfect for a summer meal or even an end of the summer party. Enjoy!
Crunchy Chicken Salad Pitas
Mix up a light, delicious dinner, filling pita pockets with a crunchy and flavorful chicken salad filled with apples and nuts.
12.5 ounces chicken (shredded)
4 large eggs (boiled, peeled, and smashed)
1/4 cup green onions (chopped)
1/4 cup purple onion (minced)
1 apple (cored and chopped)
1/2 cup Miracle Whip
1/2 cup pecans (optional)
Chop green onions, purple onion, and an apple. Open chicken and drain it.
Mix all ingredients together in a bowl, including nuts if you choose. Add Miracle Whip to give the salad a creamy, tangy texture/flavor. Finally, layer on pita slices with lettuce. You can add mustard for extra flavor, if desired.
Dinner Ideas, lunch, sandwiches
American
chicken salad pitas
(Disclosure: I was not compensated for this post in any way. This recipe and all views/opinions remain honestly and solely my own.)
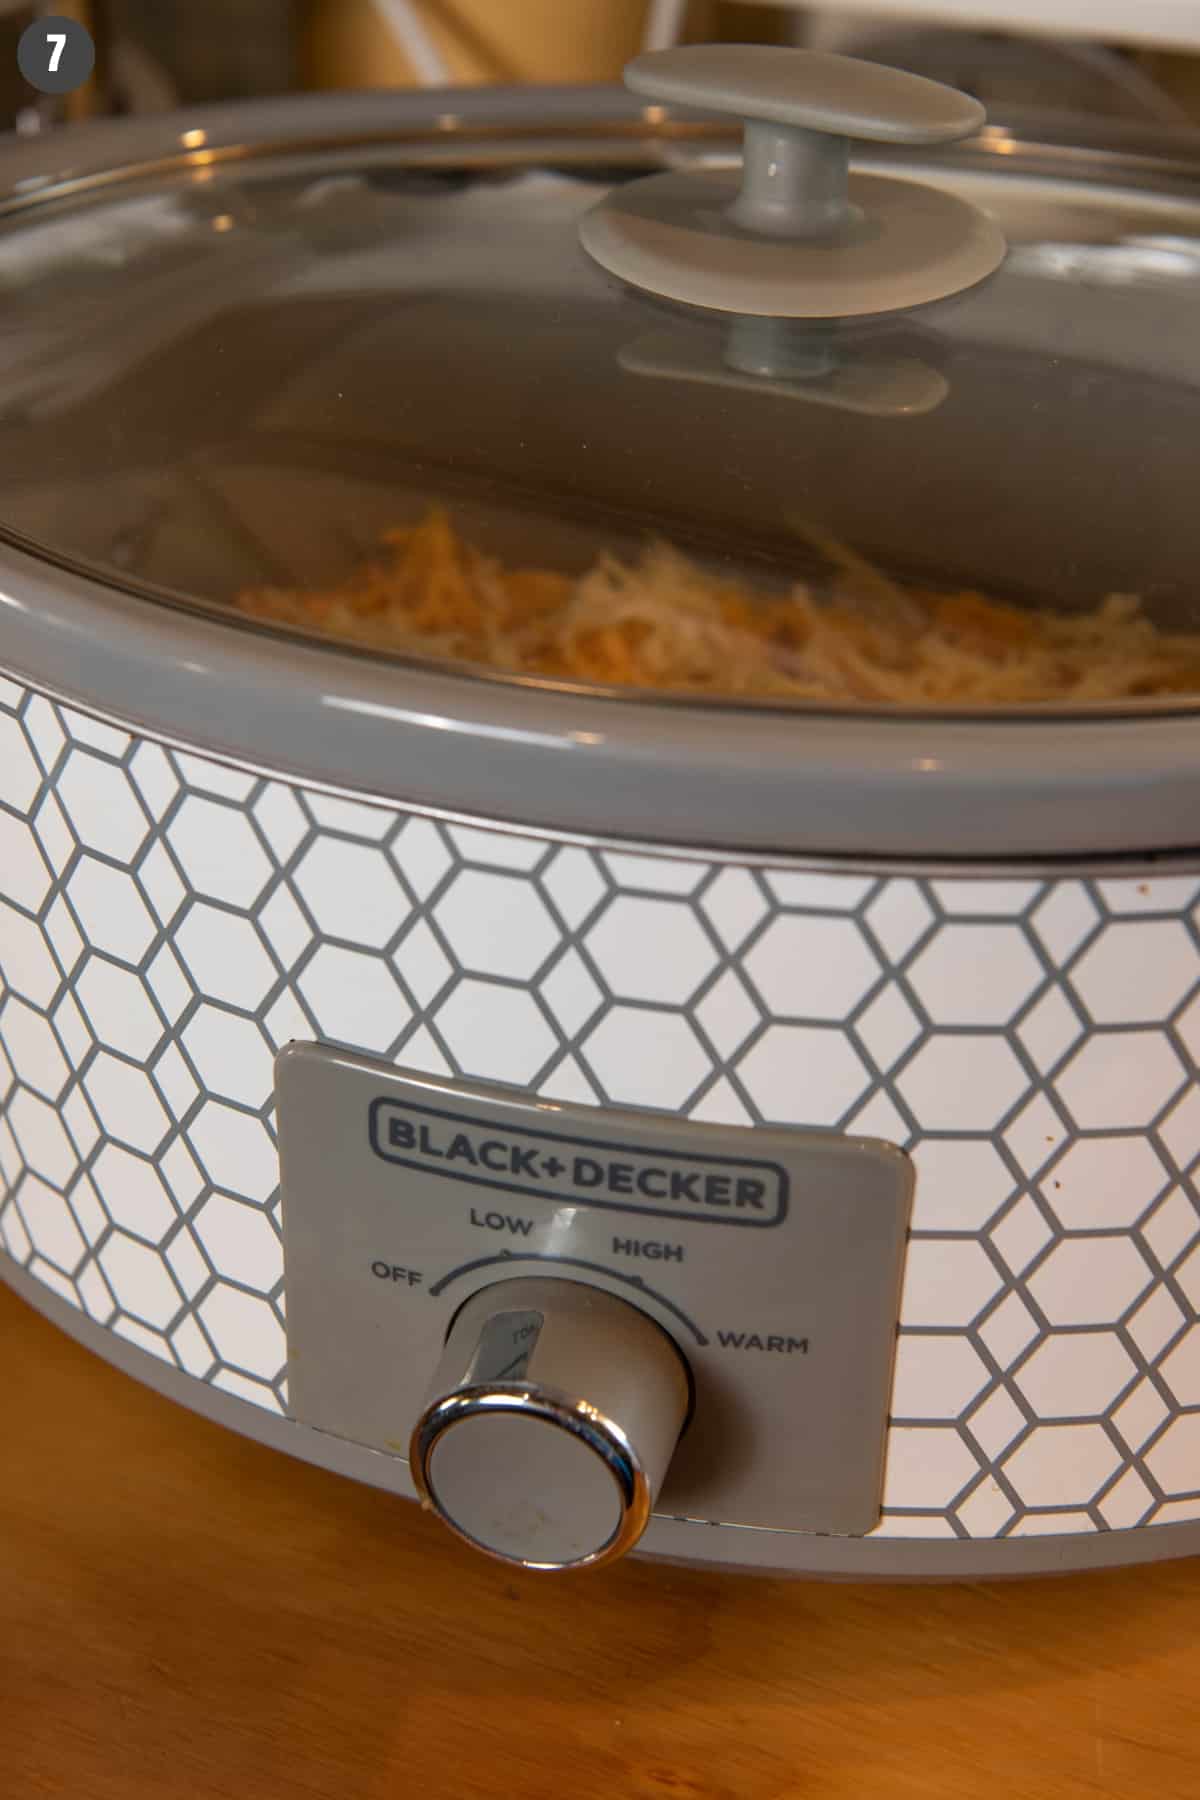
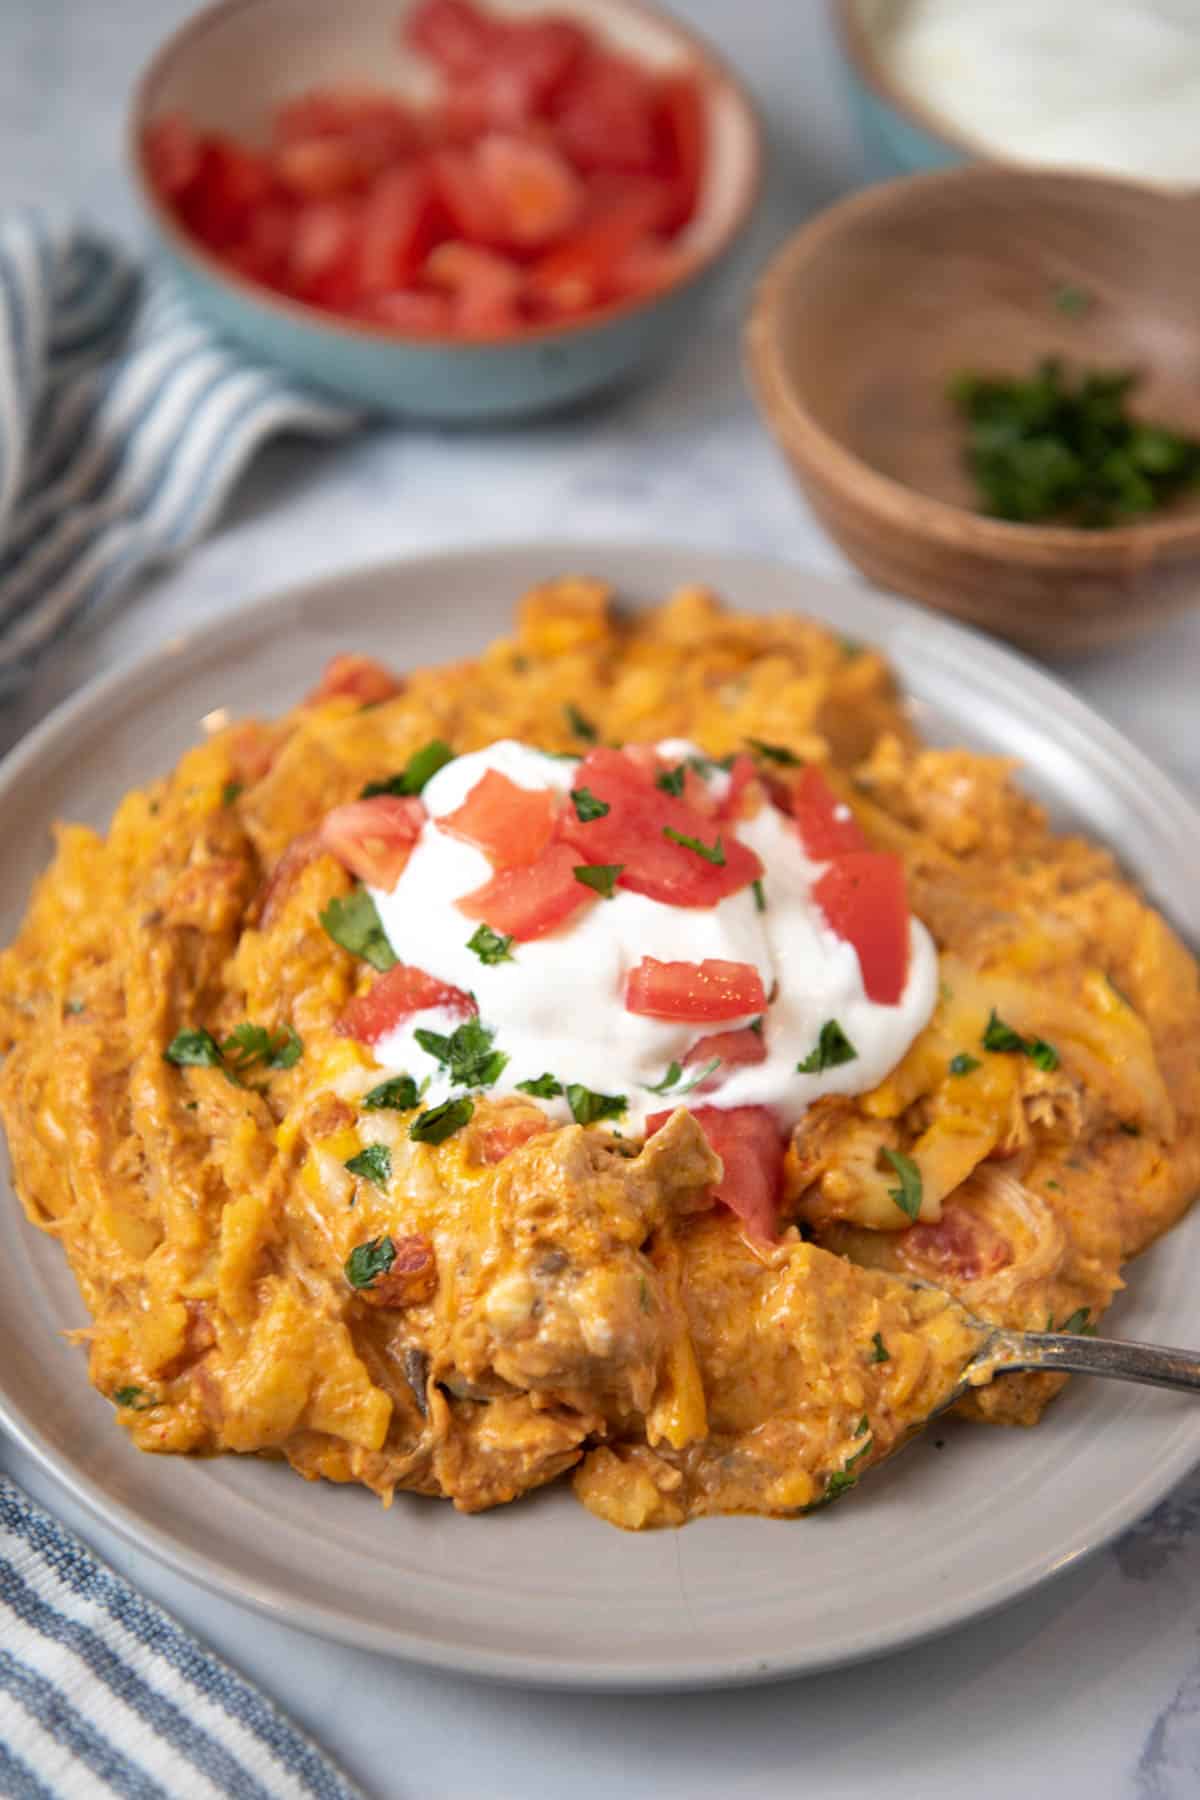
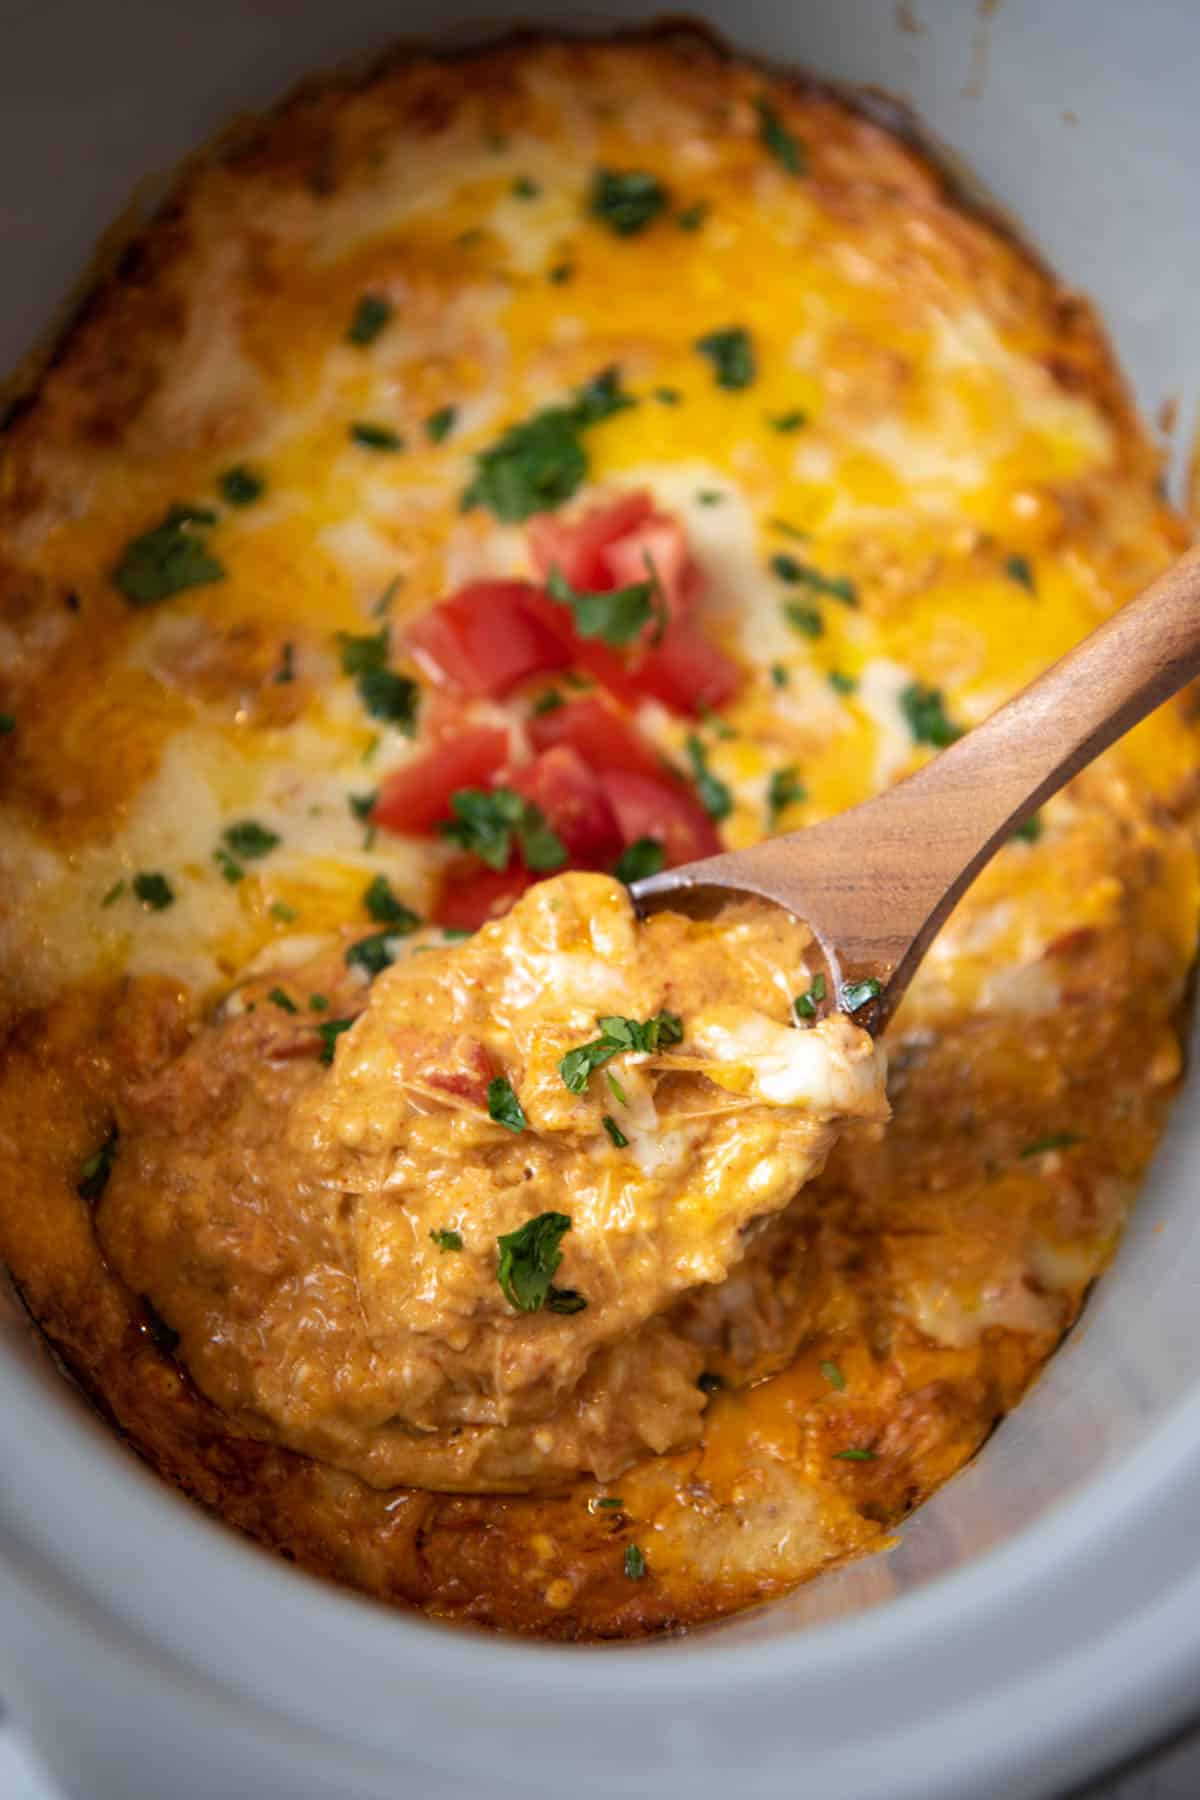
Throw together a quick and easy CrockPot chicken enchilada casserole, so your slow cooker can make dinner for you. Delicious Tex-Mex family meal with creamy enchiladas in casserole form!
Inspiration for this Crock Pot chicken enchilada casserole comes from our family cookbook and from my favorite recipe for chicken enchiladas. We’ve made this meal since our oldest was a toddler. It’s always been a favorite, and the best part is…. It’s easy peasy.
All the ingredients melt together and make a delicious slow cooker enchilada casserole. In fact, if you think this recipe is delicious, you’ll love turkey enchilada casserole, as well.
Why You’ll Love This Casserole Recipe
It’s a slow cooker enchilada casserole. So your CrockPot will do all the hard work for you.
In other words, it’s easy to make. You can throw everything in the CrockPot and let it cook while you work on other things or just enjoy life while dinner cooks for you.
It’s deliciously creamy. With both cream cheese and cream of chicken soup, this casserole is a creamy enchilada casserole.
This recipe makes enough to have leftovers. I love leftovers after enchilada night!
It’s easy to change it up… For instance, you can make chicken enchilada casserole or beef enchilada casserole. You can swap out corn tortillas for flour, especially if you’re gluten-free.
It’s a budget-friendly dinner recipe with not a ton of prep work. Most ingredients don’t require prep.
Cleanup’s a breeze, especially if you insert a slow cooker liner in your CrockPot.
Speaking of ingredients…
Ingredients and Substitutions Notes
Here are just a few notes on the ingredients you’ll need to make this CrockPot enchilada casserole…
Cream Cheese – You can use a lower fat cream cheese, like Neufchatel cheese, but I much prefer whole fat.
Cream of Chicken Soup – You can use regular or gluten-free cream of chicken. If you don’t want to use soup, you can substitute sour cream instead.
Red Enchilada Sauce – You can use store bought sauce for the convenience of it, or you can make homemade enchilada sauce.
Rotel – I use a can of diced tomatoes with green chilies.
Boneless Skinless Chicken Thighs – You can also use chicken breasts, but I love using chicken thighs for casseroles because they add more juice and flavor.
Corn Tortillas – I regularly make and prefer enchiladas made with corn tortillas, especially since I’m gluten-free. I feel the corn tortillas don’t get as soggy as flour tortillas, and they have much more authentic flavor. Not that this casserole is authentic; it’s not. But I do prefer the taste of corn tortillas.
Shredded Cheese – You’ll need cheddar cheese and Monterey Jack, though I’ve been known to substitute Manchego cheese, or sheep cheese, (which I find at Costco) at times.
How to Make CrockPot Chicken Enchilada Casserole
The first thing to do when making this casserole is to cook the chicken; you can use boneless skinless chicken breasts or thighs, though I do prefer thighs because they have so much more flavor and juiciness. We make a batch of Instant Pot taco chicken with ours.
Prep the Ingredients:
In a large mixing bowl, mix the cream cheese, soup, enchilada sauce, and Rotel.
Add the shredded chicken to the sauce mixture and mix together well.
Cut the tortillas into triangles or strips, perfect for layering in the slow cooker.
Assemble the Casserole:
Now it’s time to make the layers. First spray your slow cooker with cooking spray (this eliminates a hard, crusty ring around the side of the slow cooker when cleanup comes).
Start with a thin layer of the sauce mixture in the bottom of the slow cooker.
Then add a layer of tortilla triangles (or strips).
Add another layer of the sauce mixture.
Then top it off with a mixture of the shredded cheeses.
Continue with a second round of layers, starting with tortilla triangles, then a layer of sauce.
Top off the sauce layer with the rest of the shredded cheese mixture.
Cook on low heat for 2-3 hours or high heat for 1-2 hours, making sure the cheese doesn’t brown.
While you can fry your tortillas in a little bit of oil before putting into the casserole, this may be more work than you’d bargained for. This is why I like to use corn tortillas, which are less likely to get soggy than flour tortillas. Personally, I feel they taste better too, and they’re usually gluten-free, so it’s a win-win.
Can I use green sauce?
Yes, you can. Just know it’ll change the flavor and possibly even the texture of your finished casserole.
Can I make CrockPot enchilada casserole ahead of time?
You can make it ahead of time. In fact, you can layer it all together and put it in the fridge for a day or two. However, I recommend no longer than that uncooked.
Does chicken enchilada casserole freeze well?
Yes, you can freeze the cooked casserole for up to 3 months. Just make sure it cools before covering with a layer of plastic wrap and aluminum foil; then place it in the freezer.
How do I store leftovers?
Just put them in an airtight container and refrigerate for 3-4 days.
If you try this recipe, why not leave a star rating in the recipe card right below and/or a review in the comment section further down the page? I always appreciate your feedback. You can also follow me on Pinterest, Facebook, Instagram, and YouTube. And subscribe to my email list too!
CrockPot Chicken Enchilada Casserole
Throw together a quick and easy CrockPot chicken enchilada casserole, so your slow cooker can make dinner for you. Delicious family meal!
Slow Cooker
Slow Cooker Liner
8 ounces cream cheese (softened)
10.5 ounces cream of chicken soup
10 ounces red enchilada sauce
10 ounces Rotel
1 1/2 pounds boneless skinless chicken thighs (cooked and shredded)
6 whole corn tortillas
1 cup cheddar cheese (shredded)
1 cup Monterey Jack cheese (shredded)
In a large mixing bowl, mix the cream cheese, soup, enchilada sauce, and Rotel.
Add the shredded chicken to the sauce mixture and mix together well.
Cut the tortillas into triangles or strips, perfect for layering in the slow cooker.
Spray the inside of your slow cooker with cooking spray to eliminate sticking.
Start with a thin layer of the sauce mixture in the bottom of the slow cooker.
Then add a layer of tortilla triangles (or strips).
Add another layer of the sauce mixture.
Then top it off with a mixture of the shredded cheeses.
Continue with a second round of layers, starting with tortilla triangles, then a layer of sauce.
Top off the sauce layer with the rest of the shredded cheese mixture.
Cook on low heat for 2-3 hours or high heat for 1-2 hours, making sure the cheese doesn't brown.
Serve with your favorite toppings and enjoy!
Store leftovers in an airtight container and refrigerate for 3-4 days.
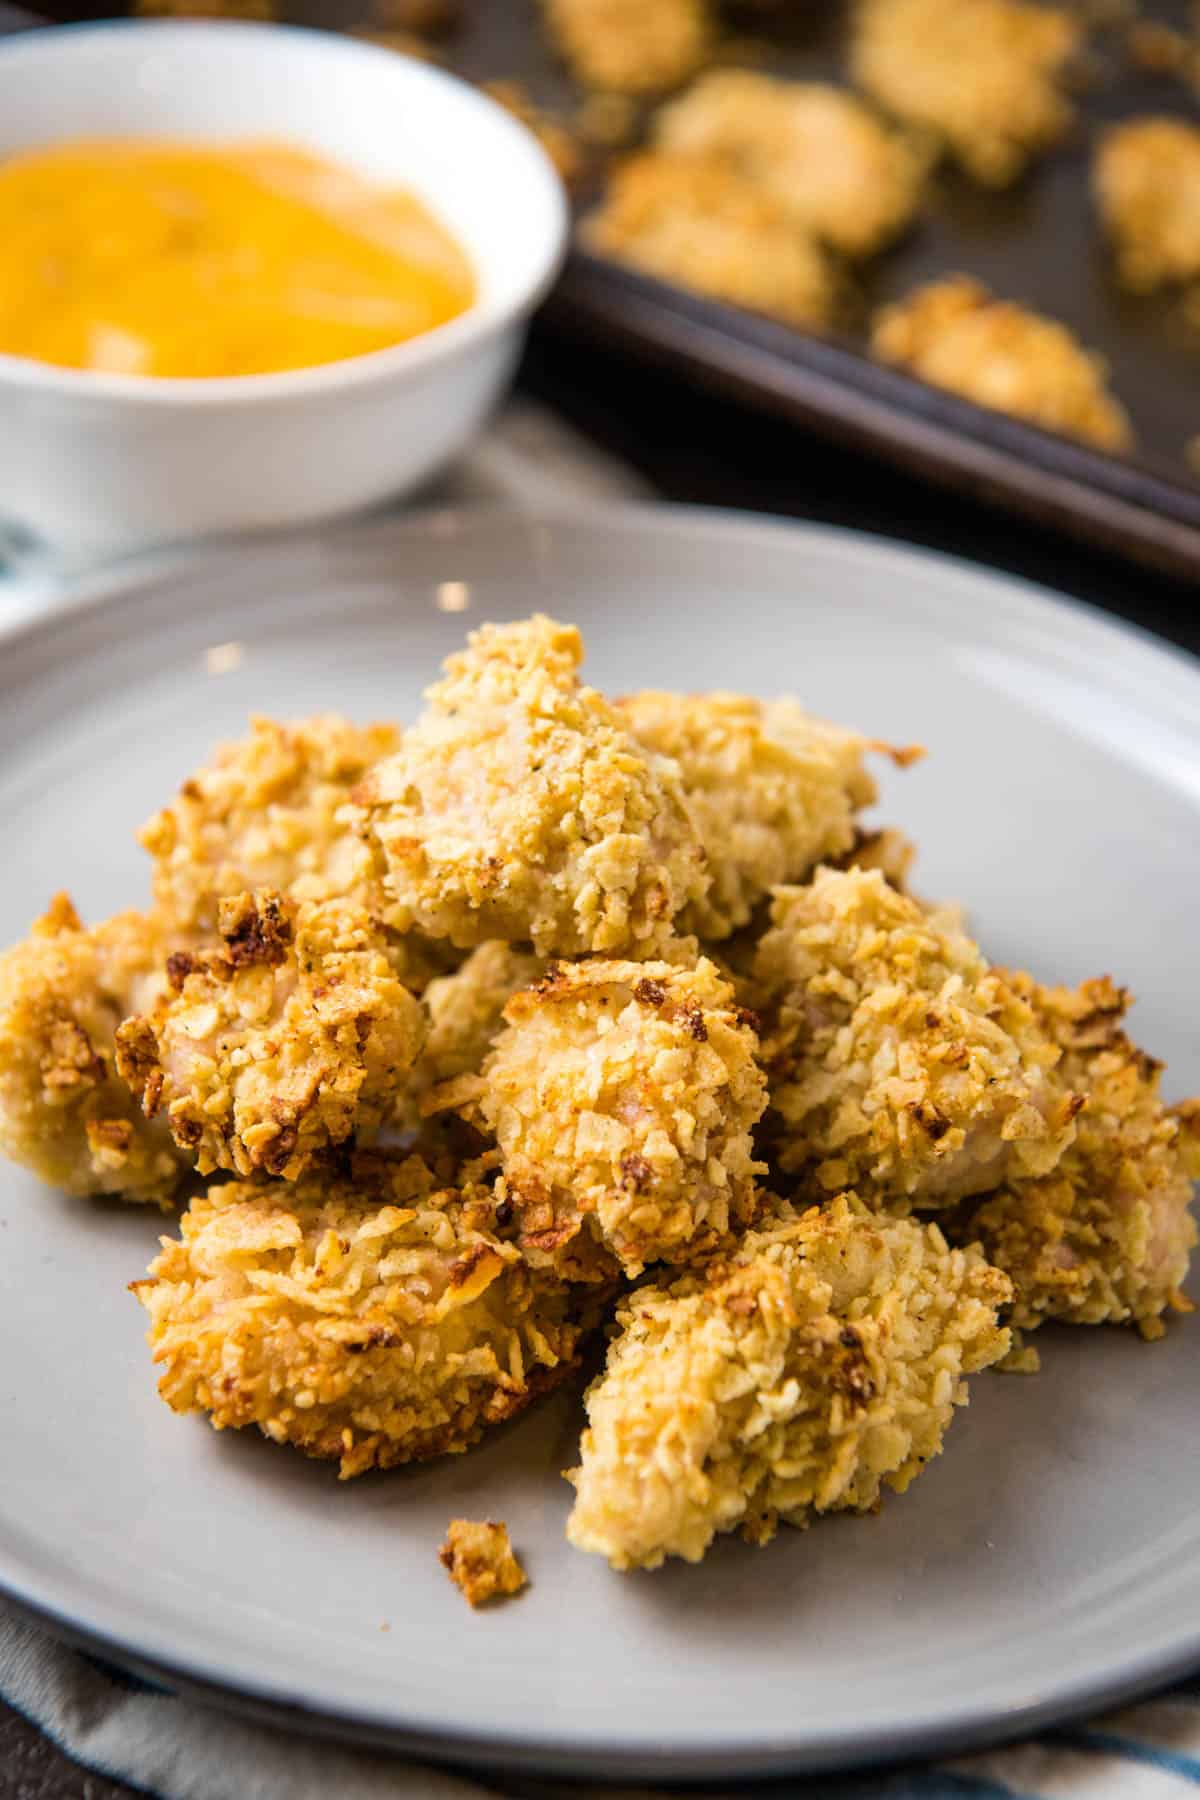
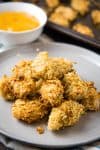
How to make easy Pringles chicken, breaded with your favorite flavor Pringles chips. It’s tender yet crispy, delicious, and easy to make, perfect for lunch, dinner, snack, or appetizer!
This crunchy, delicious, yummy treat is a family favorite, especially when paired with chicken dipping sauce. Think Pringles chicken nuggets, but I also like to call them Chicken Pringlers.
Dinner with Pringle chicken is always a huge hit, and I love that you can make it with different flavors.
Ingredient and Substitution Notes:
You really only need 4 ingredients to make Pringles coated chicken…
Pringles – You can use whatever flavor you want. We’ve used regular and cheese. We’ve even used gluten-free versions of these tasty chips.
Seasoned Salt – This just gives extra flavor to the chicken and the crispy coating.
Boneless Skinless Chicken Breasts – You can also use thigh meat, which gives a juicier, sometimes more tender, chicken nugget. Many prefer to use wings, as well.
Buttermilk – You can use regular buttermilk, you can mix up buttermilk powder into liquid, or you can make your own buttermilk with the same measure of milk but add a tablespoon of vinegar.
How to Make Pringles Chicken
A big plus is that this Pringles chicken recipe is so easy to make. Before getting started, be sure to pre-heat the oven to 400°F and grease a 16×20 baking sheet, so everything’s ready to go.
Here’s how to bread the chicken and bake it…
First crush the Pringles, using a gallon bag and rolling pin or a food processor. Then add the crushed chips or potato crisps to a gallon bag with the seasoned salt, seal the bag, and shake it around to mix.
Cut the chicken breast into small 1-2 inch nuggets.
Dip the nuggets in the buttermilk.
Then place the nuggets, 2-3 at a time, into the gallon bag, and shake them around to coat them with the Pringles chip breading.
Place the nuggets in a single layer on a baking sheet.
Then bake the Pringles crusted chicken at 400°F for about 20 minutes, or ’til they’re cooked thru. At this point, you can remove them from the oven and let stand, uncovered, about 5-10 minutes to crisp up even more.
Serve it with your favorite chicken dipping sauce, with fries or salad on the side.
Pringles breaded chicken is really good and has such a delicious flavor. I can’t wait to try making it again with more flavors like Barbecue or Dill Pickle.
Expert Tips and Recipe FAQ’s
Can I cook chicken nuggets in the air fryer?
While I prefer to make this oven baked chicken, you can also use an air fryer to make Pringles fried chicken. Just pop it in the air fryer for the appropriate amount of time for fried chicken to cook internally and crisp up.
Can I make Pringles chicken tenders instead of nuggets?
Sure! Yes, you totally can make this into tenders; just cut the chicken into longer strips rather than nuggets.
I love when chicken salad sandwiches are on the menu because they’re easy to make and usually hit the spot.
If you try this recipe, why not leave a star rating in the recipe card right below and/or a review in the comment section further down the page? I always appreciate your feedback. You can also follow me on Pinterest, Facebook, Instagram, and YouTube. And subscribe to my email list too!
Crispy Pringles Chicken
How to make easy Pringles chicken, breaded with your favorite flavor Pringles chips. So crispy, delicious, and easy to make!
5.2 ounces Pringles chips
1 tablespoon seasoned salt
2 pounds boneless skinless chicken breasts
1 cup buttermilk
Pre-heat the oven to 400°F and grease a 16×20 baking sheet.
Crush the Pringles, using a gallon bag and rolling pin or a food processor.
Then add the crushed chips or potato crisps to a gallon bag with the seasoned salt, seal the bag, and shake it around to mix.
Cut the chicken breast into small 1-2 inch nuggets.
Dip the nuggets in the buttermilk.
Then place the nuggets, 2-3 at a time, into the gallon bag, and shake them around to coat them with the Pringles chip breading.
Place the nuggets in a single layer on a baking sheet.
Then bake the Pringles crusted chicken at 400°F for about 20 minutes, or 'til they're cooked thru. At this point, you can remove them from the oven and let stand, uncovered, about 5-10 minutes to crisp up even more.
Serve with your favorite chicken dipping sauce, with fries, or salad on the side.
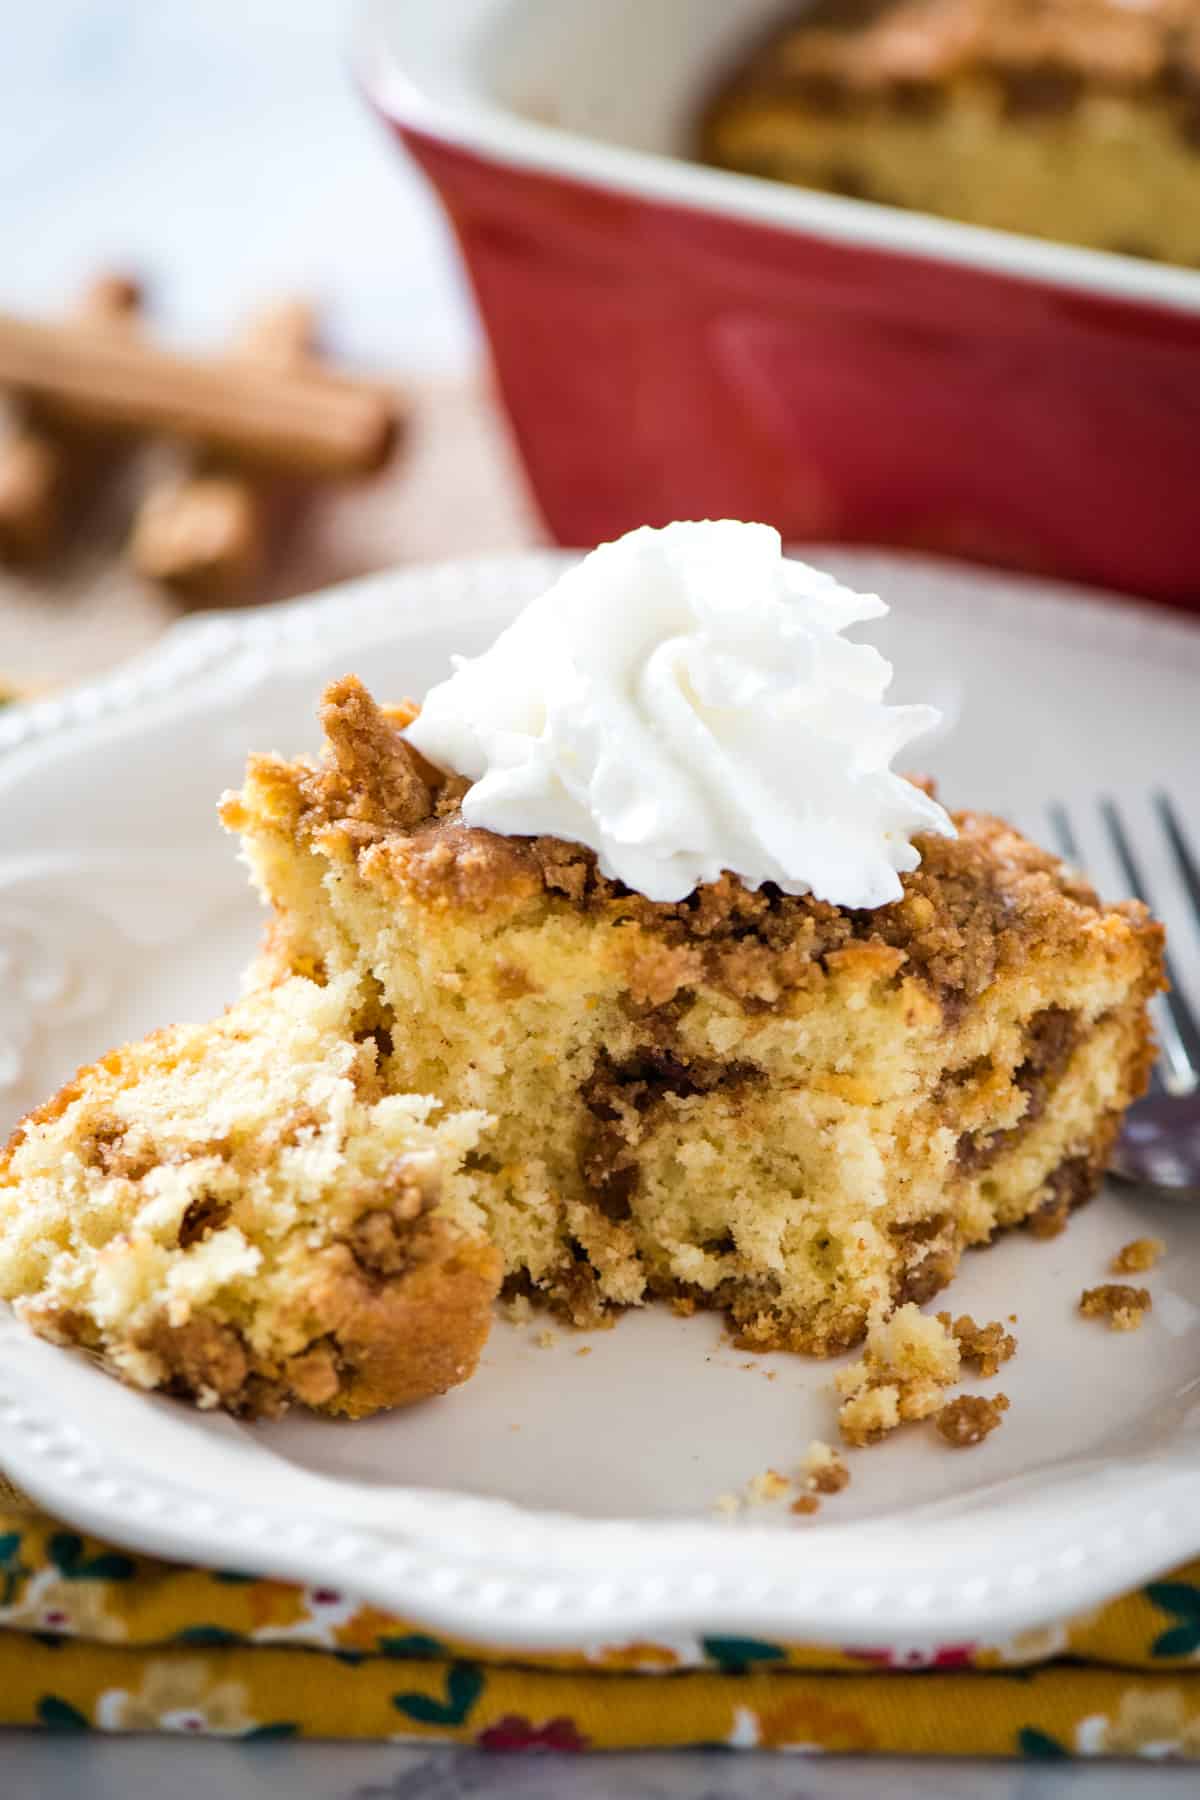
Bake up an easy to make cinnamon streusel coffee cake with pecans for breakfast or brunch. This praline coffee cake is moist, buttery, and topped with a crispy cinnamon sugar topping that can’t be beat.
With holidays throughout the year, coffee streusel cake seems just the right recipe to make. This particular coffee cake recipe is from my grandma’s recipe box.
This brown sugar coffee cake is so delicious, and the batter is a thick, deliciously rich batter. It’s a delight for the senses as it bakes with its sweet, cinnamon smell wafting through the house, and a taste of heaven when it’s done.
Why You’ll Love This Recipe
It’s super easy to make, and it bakes in about an hour.
The cake is buttery and moist, while the cinnamon sugar topping gives a crispy texture to the top of the cake. The cake pairs so well with that delightfully crispy topping.
You can eat it for dessert, or make it for breakfast or brunch. It’s perfect for both.
It’s an old-fashioned cinnamon coffee cake that’s especially perfect for Easter, Thanksgiving, and Christmas.
You can take it to a family get together or a church potluck.
Why Is It Called Coffee Cake?
Since the time that coffee was introduced to Europe in the 1600’s, Scandinavians liked to pair their coffee with things like sweet breads and cakes. However, the name ‘coffee cake’ really wasn’t commonly used until the late 1800’s.
As Dutch and German immigrants came to the United States, bringing their cherished family recipes with them, coffee cake began to be very popular, especially on the East Coast.
O&H Danish Bakery wrote a very fascinating and interesting history of coffee cake, where you can read more about this sweet breakfast treat and how it came to be.
Ingredient Notes
Most of the ingredients you probably already have on hand. Here are a few with notes…
Butter – I like to use unsalted butter for the cake and salted butter for the topping. Whatever you do, be sure to use real butter; don’t use margarine, as that will completely change the texture and flavor of your finished cake.
All-Purpose Flour – You can make this with regular all-purpose flour or a good gluten-free all-purpose flour. Just be sure if you do make it gluten-free that you also add a little xanthan gum, as well as check all of your other ingredients to make sure they’re truly gluten-free.
Evaporated Milk – You can use any brand of evaporated milk you happen to have.
Brown Sugar, Cinnamon, and Chopped Pecans – These 3 ingredients, along with the flour and butter, really give the topping the best flavor. In my opinion, they really make the recipe. While I love pecans in this coffee cake, if nuts aren’t your thing, that’s ok; go ahead and leave them out.
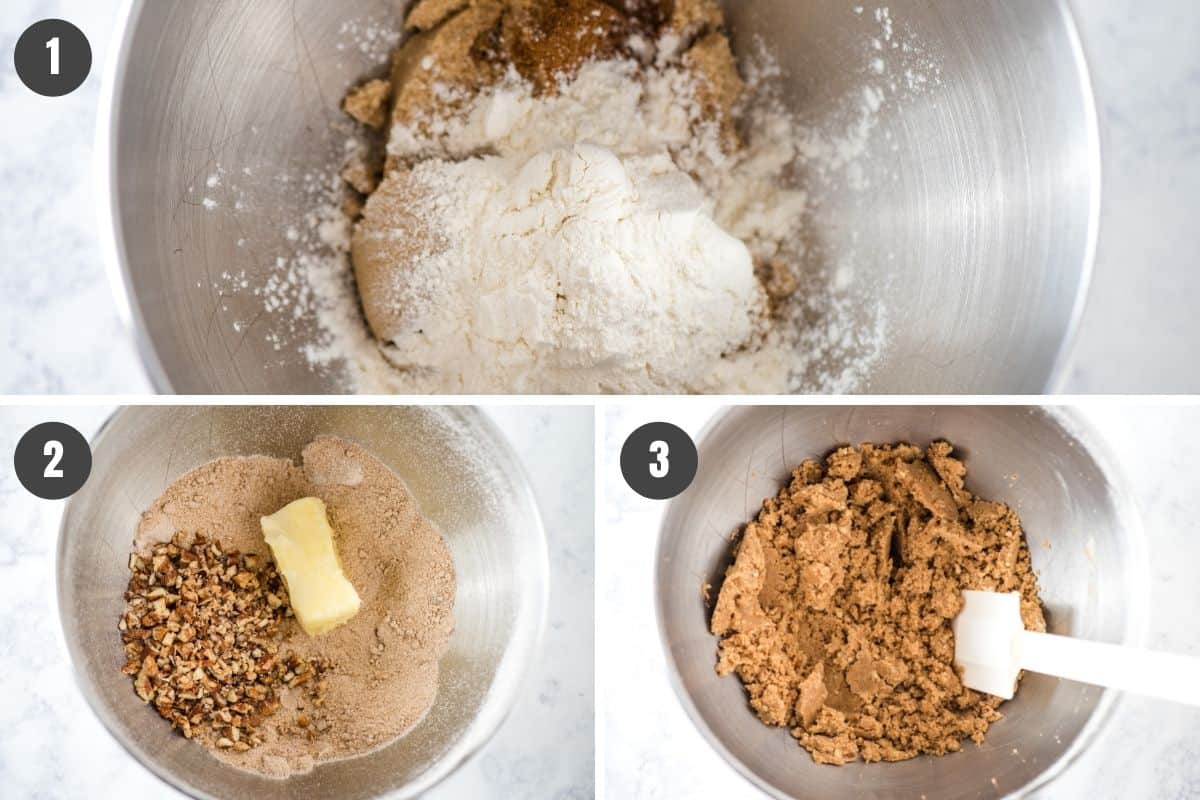
How to Make Cinnamon Streusel Coffee Cake
Before you get started, be sure to gather your ingredients. Then grease an 8×8 baking dish, and pre-heat the oven to 350° F.
Also, keep in mind that you can double this recipe and make it in a 9×13 baking dish or a bundt pan, if you’re needing to feed a bigger crowd.
Let’s Start with the Batter…
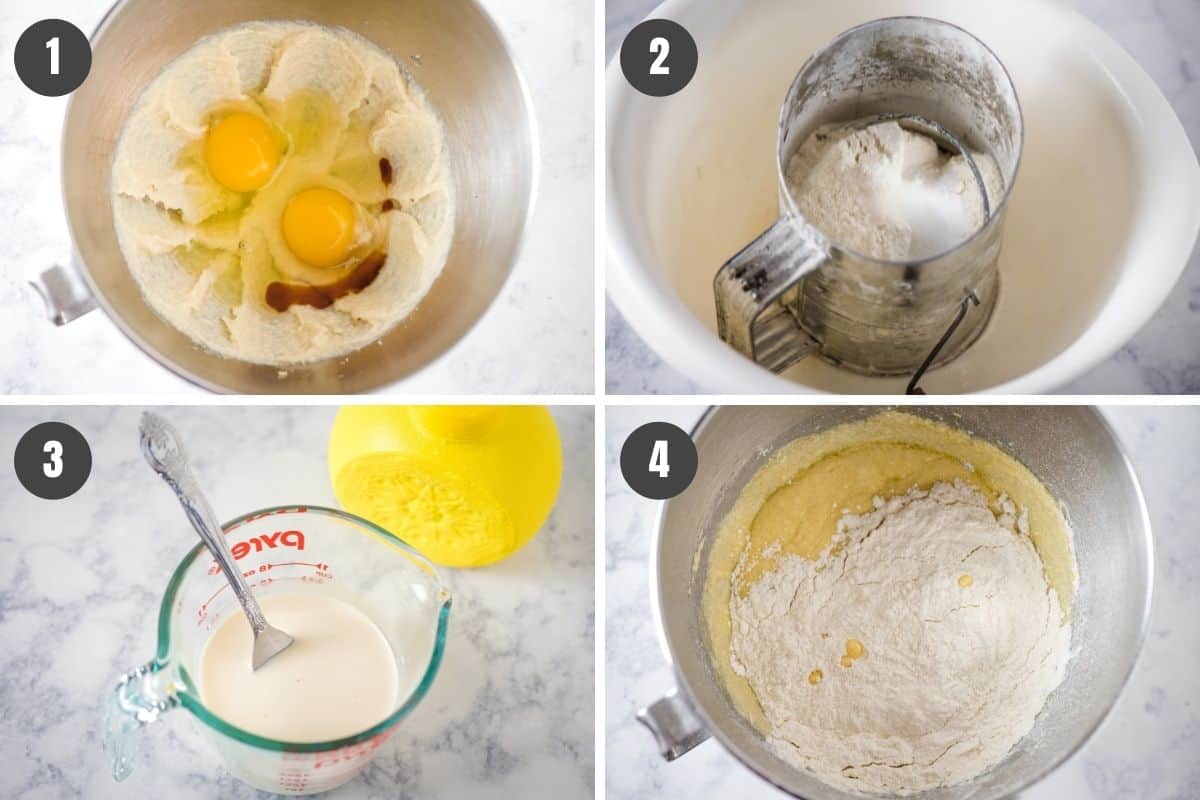
Cream or mix together the unsalted butter and sugar in a large mixing bowl. Then add in the eggs and vanilla, mixing well ’til combined.
Sift or whisk together the dry ingredients, including the flour, baking powder, baking soda, and salt.
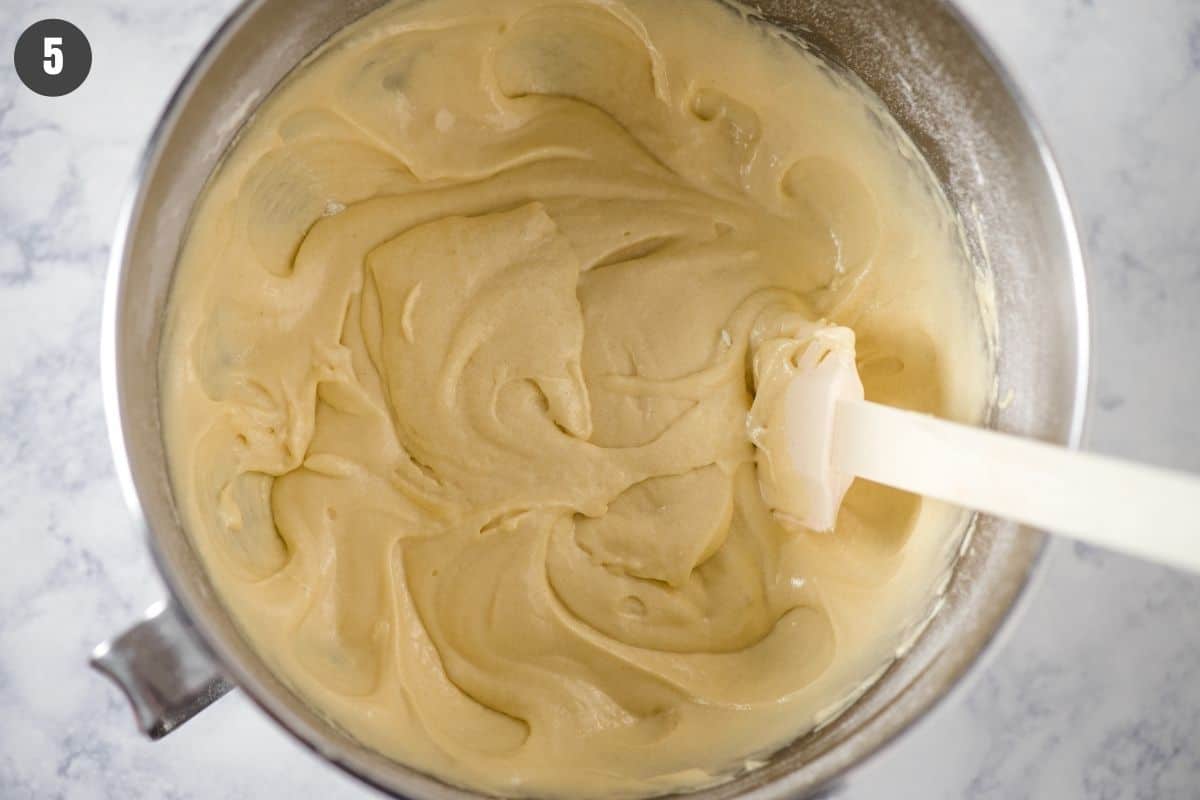
Add the dry ingredients to the butter/sugar/egg mixture, alternating with the milk mixture, beginning and ending with the dry ingredients.
At this point, you’ll have a creamy, somewhat stiff, cake batter. Go ahead and set it aside for just a few minutes.
Now for the Topping…
Whisk together the brown sugar, cinnamon, and flour in a large mixing bowl.
Add the chopped pecans and softened salted butter to the mixture, mixing ’til combined.
Your mixture will be a crumbly mixture, perfect for crumbling onto the cake.
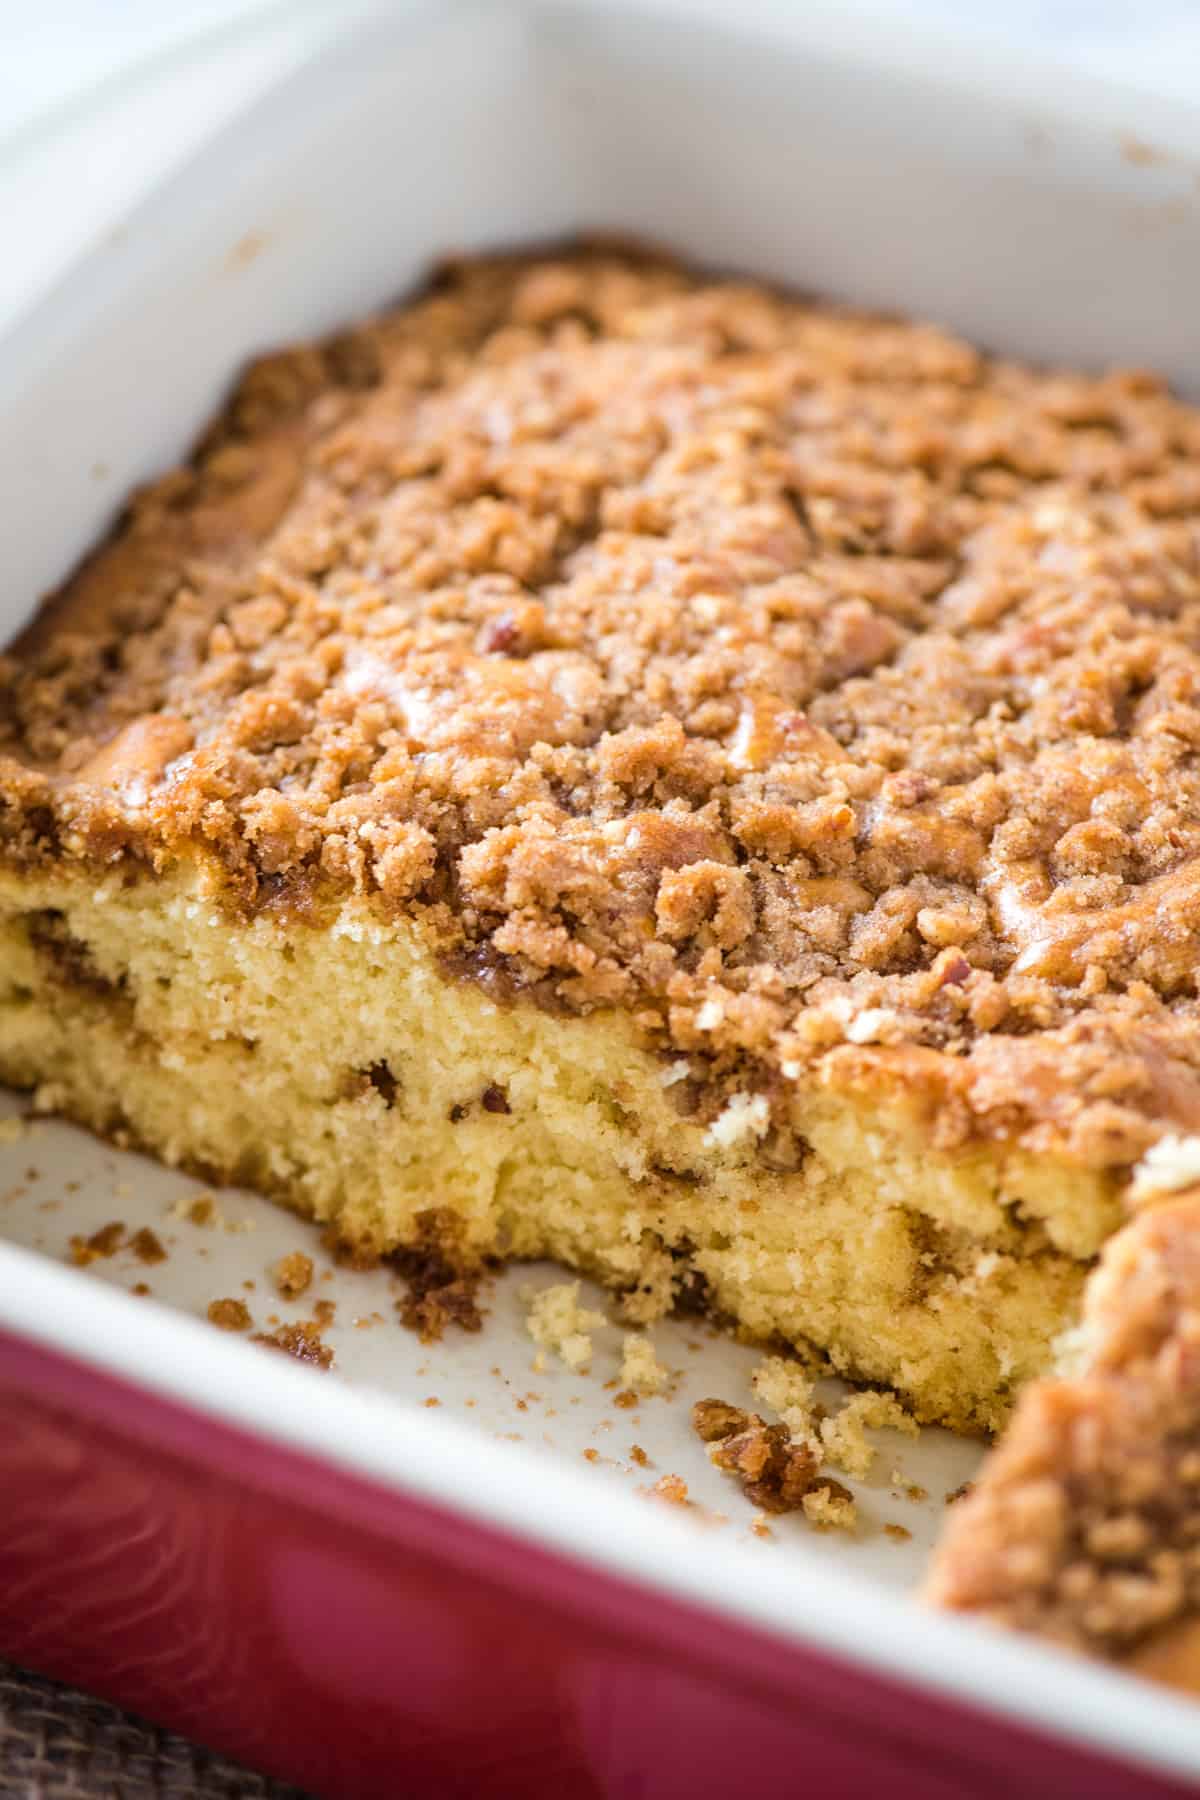
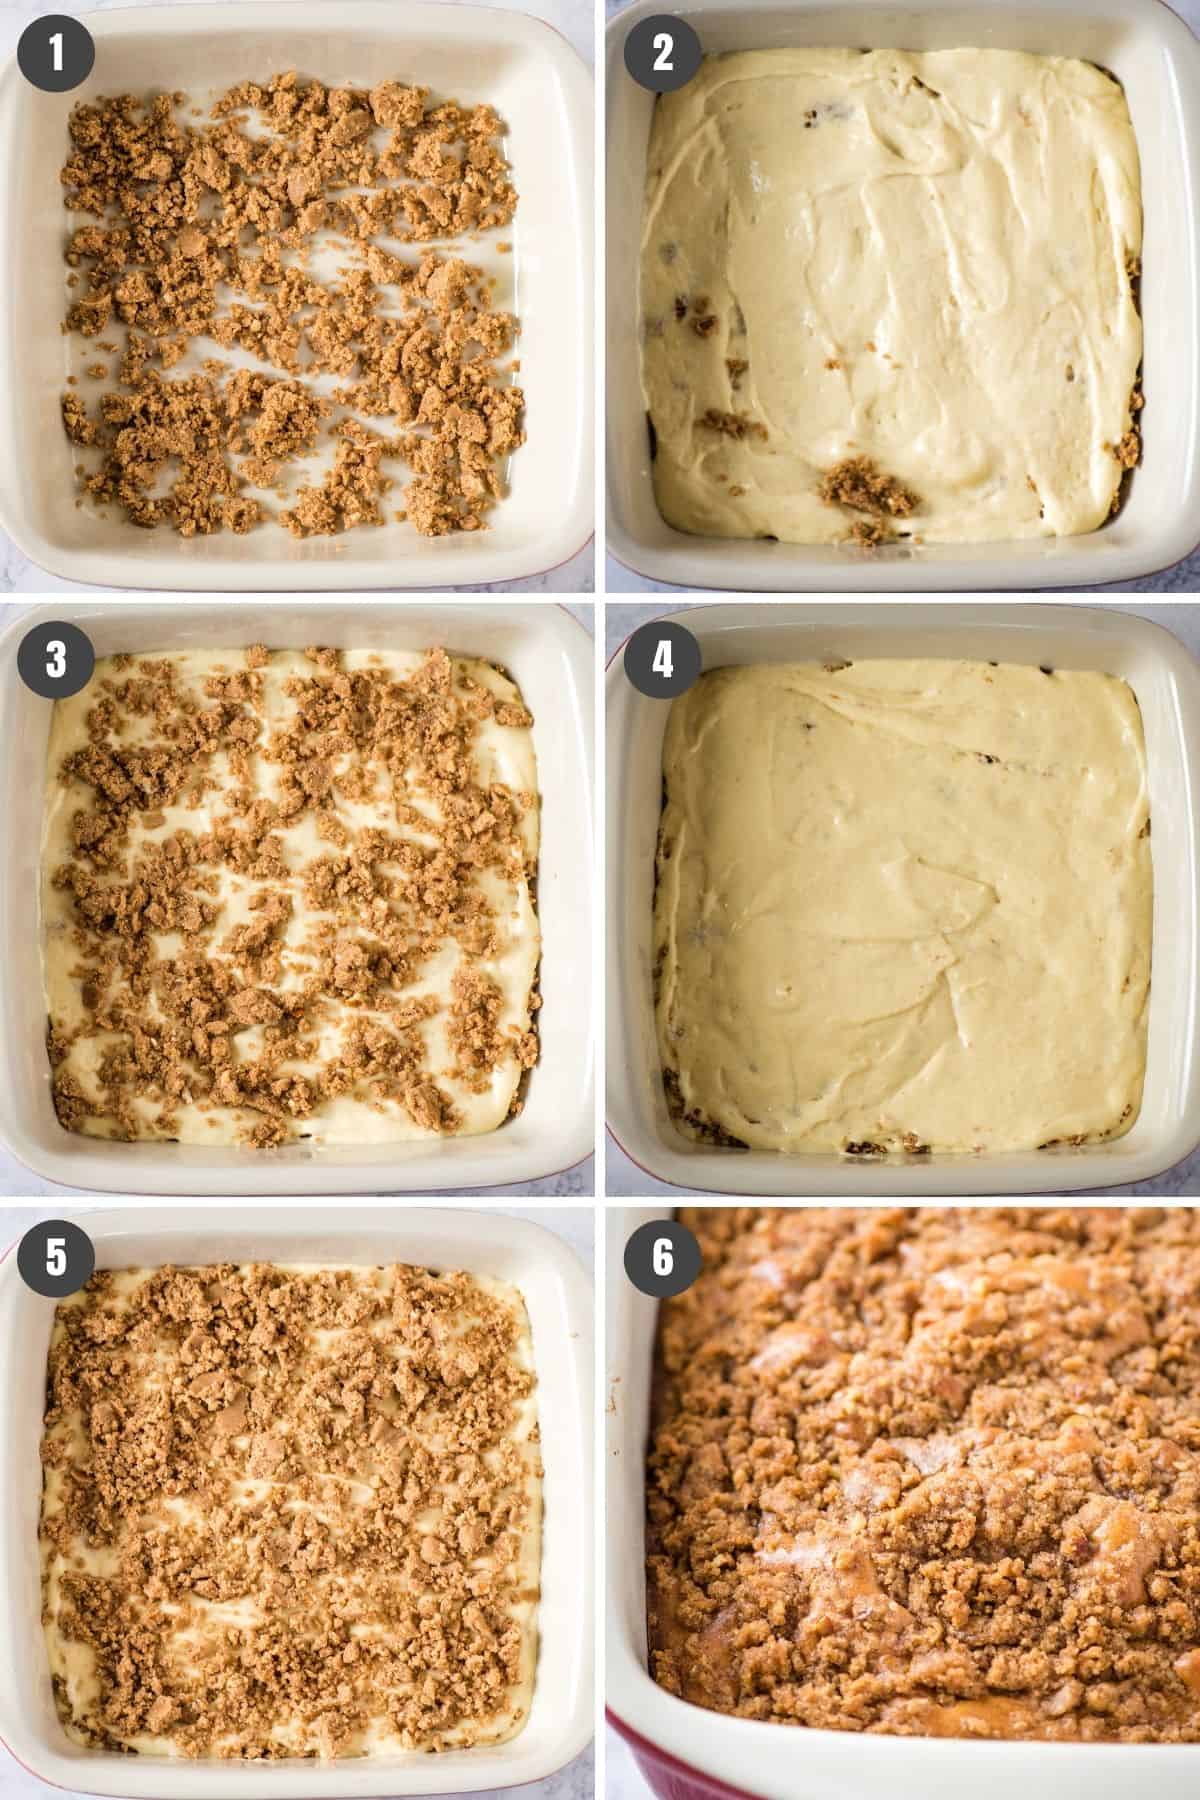
How to Layer a Praline Coffee Cake
Sprinkle 1/3 of the topping mixture in the bottom of the greased baking dish.
Cover with half the batter.
Then crumble 1/3 more of the praline topping mixture.
Scoop and spread the remaining batter on top of that.
Finally, sprinkle on the remaining cinnamon sugar topping, and gently press it into the batter with your fingers.
Bake the cake at 350° F for about 1 hour, or ’til a toothpick inserted in the center comes out clean. Let the cake stand and cool for about 10 minutes before serving.
Expert Tips and Recipe FAQ’s
What’s the difference between coffee cake and crumb cake?
Coffee cake is more cake, less topping; crumb cake is more topping, less cake. Crumb cake has a much thicker topping on it.
How can I keep streusel topping crunchy?
This particular recipe has a crispy streusel topping. However, if warmed in the microwave, it could grow a bit soggy. I’d recommend re-heating it, covered in foil in the oven for a few minutes, before serving, if you want to serve it warm.
Why does the streusel sink?
As your coffee cake bakes, the streusel will sort of meld into the cake… Meaning some of it will actually melt and combine with the top of the cake. It’s made of things that melt together, including the butter, cinnamon, and sugar; and that’s ok. However, the flour is there to keep the whole thing from just melting down into the cake entirely, and that melding together, in my opinion, is what makes this cake taste even better.
Can I make this cinnamon streusel cake ahead of time?
Yes, in fact, you can mix up the batter and the topping, throw it all together according to the recipe; then cover your baking dish and place it in the fridge ’til you’re ready to bake it the next morning. If you’re actually baking it ahead of time, I would recommend baking it no more than 1 day in advance. Then just cover it and store it on the counter ’til you’re ready to serve it.
Can I freeze coffee cake with pecans?
Yes, you can. Just be sure to store it in an airtight container so it doesn’t get freezer burn.
If you try this recipe, why not leave a star rating in the recipe card right below and/or a review in the comment section further down the page? I always appreciate your feedback. You can also follow me on Pinterest, Facebook, Instagram, and YouTube. And subscribe to my email list too!
Cinnamon Streusel Coffee Cake with Pecans
Easy to make cinnamon streusel coffee cake with pecans. Moist, buttery, and topped with a crispy cinnamon sugar topping.
8×8 Baking Dish
Mixer
Liquid Measuring Cup
Coffee Cake Batter:
1/4 cup unsalted butter (softened)
6 tablespoons cane sugar
2 large eggs
1/2 teaspoon vanilla extract
1 1/2 cups all-purpose flour
1 teaspoon baking powder
1/4 teaspoon baking soda
1/2 teaspoon salt
1/2 cup evaporated milk
1/2 tablespoon lemon juice
Streusel Topping:
3/4 cup light brown sugar
1 1/2 teaspoons ground cinnamon
6 tablespoons all-purpose flour
1/4 cup chopped pecans
1/4 cup salted butter (softened)
Grease an 8×8 baking dish, and pre-heat the oven to 350° F.
Coffee Cake Batter:
Cream or mix together the unsalted butter and sugar in a large mixing bowl. Then add in the eggs and vanilla, mixing well 'til combined.
In a separate bowl, sift or whisk together the dry ingredients, including the flour, baking powder, baking soda, and salt.
Mix together the evaporated milk and lemon juice in a liquid measuring cup.
Add the dry ingredients to the butter/sugar/egg mixture, alternating with the milk mixture, beginning and ending with the dry ingredients.
At this point, you'll have a creamy, somewhat stiff, cake batter. Go ahead and set it aside for just a few minutes.
Streusel Topping:
Whisk together the brown sugar, cinnamon, and flour in a large mixing bowl.
Add the chopped pecans and softened butter to the mixture, mixing 'til combined. The mixture will be a crumbly mixture, perfect for crumbling onto the cake.
Layer the Cake:
Sprinkle 1/3 of the topping mixture in the bottom of the greased baking dish.
Cover with half the batter.
Then crumble 1/3 more of the praline topping mixture.
Scoop and spread the remaining batter on top of that.
Finally, sprinkle on the remaining cinnamon sugar topping, and gently press it into the batter with your fingers.
Bake the cake at 350° F for about 1 hour, or 'til a toothpick inserted in the center comes out clean. Let the cake stand and cool for about 10 minutes before serving.
How can I keep streusel topping crunchy? This particular recipe has a crispy streusel topping. However, if warmed in the microwave, it could grow a bit soggy. I’d recommend re-heating it, covered in foil in the oven for a few minutes, before serving, if you want to serve it warm.
Can I make this cinnamon streusel cake ahead of time? Yes, in fact, you can mix up the batter and the topping, throw it all together according to the recipe; then cover your baking dish and place it in the fridge ’til you’re ready to bake it the next morning. If you’re actually baking it ahead of time, I would recommend baking it no more than 1 day in advance. Then just cover it and store it on the counter ’til you’re ready to serve it.
Can I freeze coffee cake with pecans? Yes, you can. Just be sure to store it in an airtight container so it doesn’t get freezer burn.