Category: Main Dishes

  • Tex-Mex Omelette Recipe

    Tex-Mex Omelette Recipe

    An omelette breakfast is a family favorite. How to make Tex-Mex omelettes using tenderloin tips, vegetables, and cheeses. Breakfast just got tastier than ever.

    Breakfast is one of my favorite meals of the day, especially on a holiday or a weekend when we might be a little more free to do as we wish. I love a good omelette, and Dan makes the absolute best omelettes in the world. When you combine Tex-Mex and the ever delicious omelette… well, you’ve got a winning omelette recipe and a yummy breakfast idea.

    An omelette breakfast is a family favorite. How to make Tex-Mex omelettes using tenderloin tips, vegetables, and cheeses. Breakfast just got tastier than ever.

    Usually we just add a few veggies and a little cheese to our omelettes. Sometimes we’ll add a little ham or bacon. This time, however, we used tenderloin tips we picked up at our local meat shop. The tenderloin adds flavor like no other, especially when combined with different cheeses and vegetables.

    An omelette breakfast is a family favorite. How to make Tex-Mex omelettes using tenderloin tips, vegetables, and cheeses. Breakfast just got tastier than ever.

    Below you’ll find the printable recipe. Memorial Day is coming up. What better way to celebrate than with an omelette to start your day?!

    IF YOU LOVE THIS TEX-MEX OMELETTE RECIPE, TRY SOME OF OUR OTHER BREAKFAST FAVORITES:

    Bacon, Egg, and Cheese Breakfast Muffin Cups

    McDonald’s Egg McMuffin (Copycat Recipe)

    Low Carb Sausage Egg Muffins

    Easy Omelet Breakfast Muffin

    Tex-Mex Omelette

    An omelette breakfast is a family favorite. How to make Tex-Mex omelettes using tenderloin tips, vegetables, and cheese. Breakfast just got tastier than ever.

    • 2 eggs/omelette
    • 1 lb. tenderloin tips
    • 5-6 small peppers
    • 5-7 green onions
    • 2-3 to matoes
    • 10 oz. Queso Fresco
    • 2-4 oz. shredded Cheddar cheese
    • 2-4 oz. shredded Monterey Jack cheese
    • Cilantro
    • Avocado
    • Sour cream and salsa
    1. Wash and chop peppers, green onions, and tomatoes.
    2. Sauté peppers and green onions for 3-5 minutes, or until tender; remove and set aside.
    3. Cook tenderloin tips in skillet until done to preference.
    4. Combine peppers and green onions with meat; remove and set aside.
    5. Beat 2 eggs/omelette.
    6. Pour enough egg for 1 omelette into small skillet; sprinkle with Queso Fresco, and cook for 2-3 minutes or until done on one side.
    7. Flip omelette over and cook other side for 2-3 minutes or until nearly done on that side.
    8. Add small amount of filling, including tenderloin tips, peppers, green onions, tomatoes, Cheddar, and Monterey Jack, to half of one side of the omelette.
    9. Close omelette by folding over. Cook for 1-2 minutes more or until cheeses begin to melt and inside of omelette is hot.
    10. Serve immediately with cilantro, avocado, sour cream, and salsa. Enjoy!
    Breakfast & Brunch
    Tex-Mex
    omelet recipe, steak omelet, Tex-Mex omelet, Tex-Mex omelette
  • Family Dinner: Creamy Tortellini Alfredo

    Family Dinner: Creamy Tortellini Alfredo

    Need a dinner idea that’ll get your whole family around the table tonight? I partnered with Bertolli® to share a delicious recipe for Creamy Tortellini Alfredo.

    Bring your family back to the dinner table with a spring inspired, Tuscany inspired recipe for Creamy Tortellini Alfredo, a simple family dinner recipe that takes very little time to make, giving you more time with the ones you love. And don’t forget to add a few special touches to the table; after all, it’s the little things in life that are worth celebrating.

    When it comes to dinnertime, I’m just going to be honest. We don’t always sit down at the table together. Some nights we sit on the couch. It’s true. A recent conversation with other moms in our homeschool group gave me food for thought, no pun intended. That conversation, coupled with the opportunity to create a Tuscan-inspired, spring-inspired Alfredo dish, really motivated me to clear the table of all the school books, all the pencils and markers, and all the tests and papers. In the end, this Creamy Tortellini Alfredo was the clincher in bringing us back to the family table.

    The mission: “Bring Tuscany to your Table”… It has been a lifelong dream of mine to some day visit Tuscany. I’ve only ever seen photos of this beautiful place; in fact, the calendar above my desk is filled with beautiful photos of Tuscany. I can imagine that it must be a very peaceful part of Italy with rolling hills and luscious, beautiful colors… warm and inviting. I can only imagine what the food must be like; I’m certain if I ever visited Tuscany, I’d probably never want to leave.

    It’s that same peaceful feeling that I wanted to bring to our family meals (you know, the one when you stare into the photo on your calendar and imagine you’re there breathing in the scents, warm sun shining down, a slight breeze wisping hair about your face). The dinner table should be something to look forward to, a place to catch up, a place to be at home.

    Bring your family back to the dinner table with a spring inspired, Tuscany inspired recipe for Creamy Tortellini Alfredo, a simple family dinner recipe that takes very little time to make, giving you more time with the ones you love. And don’t forget to add a few special touches to the table; after all, it’s the little things in life that are worth celebrating.
    Bring your family back to the dinner table with a spring inspired, Tuscany inspired recipe for Creamy Tortellini Alfredo, a simple family dinner recipe that takes very little time to make, giving you more time with the ones you love. And don’t forget to add a few special touches to the table; after all, it’s the little things in life that are worth celebrating.
    Bring your family back to the dinner table with a spring inspired, Tuscany inspired recipe for Creamy Tortellini Alfredo, a simple family dinner recipe that takes very little time to make, giving you more time with the ones you love. And don’t forget to add a few special touches to the table; after all, it’s the little things in life that are worth celebrating.

    Creating a simple yet warm, inviting table scape was my first priority. And you know, for a table to be inviting, it doesn’t have to be fancy. I’m quite certain I only own 1 complete set of place mats. So, I chose to go the eclectic route, mixing and matching. Adding a plate, silverware, and glasses for each person came next. Of course, what table would be complete without a beautiful centerpiece? For this simple centerpiece, I grabbed my pruning shears and went out to the back yard to cut a few flowers. We have a bush that’s filled with beautiful pink blooms right now, and a mason jar makes the perfect vase for fresh cut flowers.

    After clearing the table and setting it up for the meal, it’s time to make dinner. Again, dinner doesn’t have to be complicated. In fact, this dinner was so simple, easy to make, and delicious, we all agreed it’s going to become a regular meal.

    Bring your family back to the dinner table with a spring inspired, Tuscany inspired recipe for Creamy Tortellini Alfredo, a simple family dinner recipe that takes very little time to make, giving you more time with the ones you love. And don’t forget to add a few special touches to the table; after all, it’s the little things in life that are worth celebrating.
    Bring your family back to the dinner table with a spring inspired, Tuscany inspired recipe for Creamy Tortellini Alfredo, a simple family dinner recipe that takes very little time to make, giving you more time with the ones you love. And don’t forget to add a few special touches to the table; after all, it’s the little things in life that are worth celebrating.
    Bring your family back to the dinner table with a spring inspired, Tuscany inspired recipe for Creamy Tortellini Alfredo, a simple family dinner recipe that takes very little time to make, giving you more time with the ones you love. And don’t forget to add a few special touches to the table; after all, it’s the little things in life that are worth celebrating.

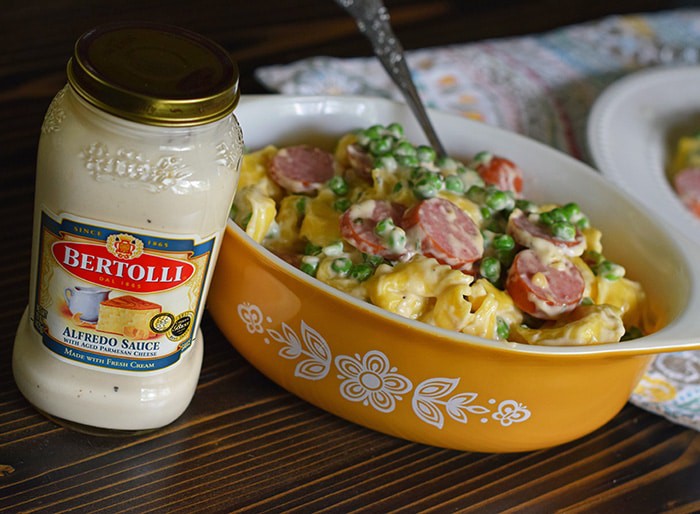
    Creamy Tortellini Alfredo is a rather quick meal. Creating a simpler meal just means you have more time together as a family. To make this dish, cook the tortellini according to package directions. Slice the sausage links and add to a skillet, along with the peas. Once the tortellini has been cooked and drained, add it in with the peas and sausage. Add a jar of Bertolli® Creamy Alfredo Sauce, along with basil; mix together well. Cook for 15-20 minutes, or until the ingredients are well heated.

    Bring your family back to the dinner table with a spring inspired, Tuscany inspired recipe for Creamy Tortellini Alfredo, a simple family dinner recipe that takes very little time to make, giving you more time with the ones you love. And don’t forget to add a few special touches to the table; after all, it’s the little things in life that are worth celebrating.
    Bring your family back to the dinner table with a spring inspired, Tuscany inspired recipe for Creamy Tortellini Alfredo, a simple family dinner recipe that takes very little time to make, giving you more time with the ones you love. And don’t forget to add a few special touches to the table; after all, it’s the little things in life that are worth celebrating.

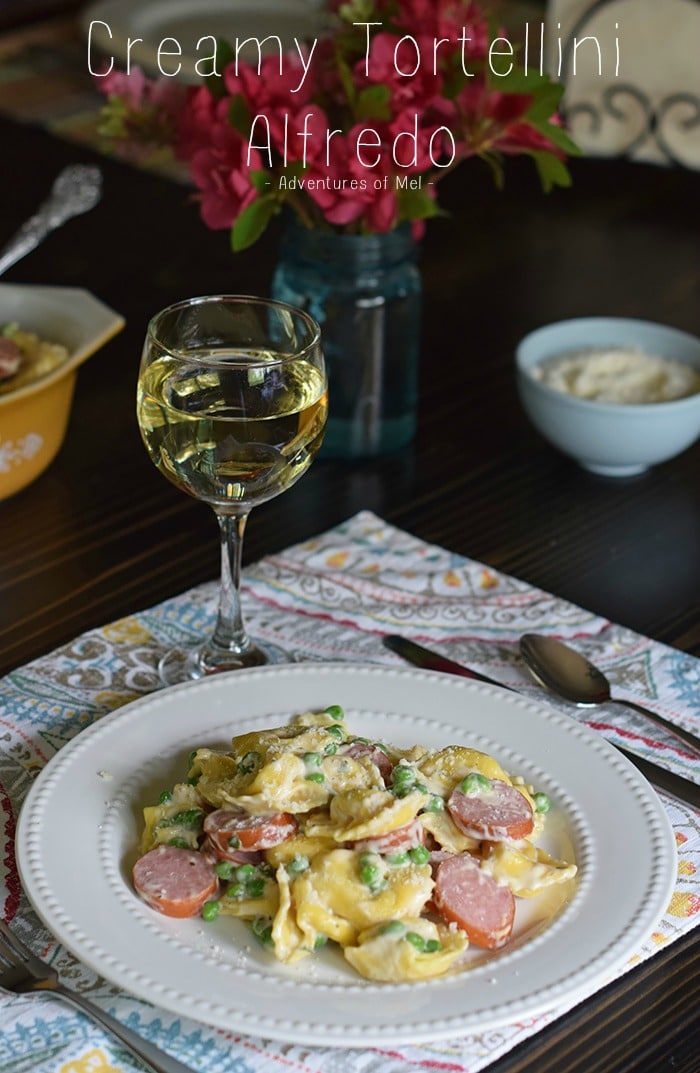
    This pasta is so delicious with a little Parmesan sprinkled on top. Since we don’t like wine, we paired our pasta with a little bit of sparkling grape juice… It was delicious! It was one meal that even our picky 7 year old loved; he actually asked for seconds and not dessert. How often does that happen?!

    More Pasta Dishes You May Enjoy:

    Grab the printable recipe below!

    Creamy Tortellini Alfredo

    Bring your family back to the dinner table with a spring inspired, Tuscany inspired recipe for Creamy Tortellini Alfredo, a simple family dinner recipe that takes very little time to make, giving you more time with the ones you love.

    • 1 pkg. frozen cheese tortellini
    • 8-10 oz. fresh or frozen peas
    • 1 pkg. smoked sausage link
    • 1 jar Bertolli Creamy Alfredo Sauce
    • 1 tsp. basil
    • Parmesan cheese
    1. Cook tortellini, according to package directions.
    2. Slice smoked sausage link/s.
    3. Add peas and sausage links to large skillet.
    4. Drain tortellini and add to skillet, along with Bertolli Creamy Alfredo Sauce.
    5. Add basil and mix ingredients together in skillet.
    6. Cook on low to medium heat for 15-20 minutes, or until heated through.
    7. Serve with Parmesan cheese sprinkled on top. Enjoy!
    Pasta
    Italian
    creamy tortellini alfredo, sausage tortellini alfredo, tortellini alfredo

    Can’t Make it Just Yet? Pin It for Later!

    Bring your family back to the dinner table with a spring inspired, Tuscany inspired recipe for Creamy Tortellini Alfredo, a simple family dinner recipe that takes very little time to make, giving you more time with the ones you love. And don’t forget to add a few special touches to the table; after all, it’s the little things in life that are worth celebrating.

    Visit Bertolli for More Dinner Time Inspiration!

    Bertolli

    Viva Bertolli® and join me in celebrating delicious Italian food, friends and family. Felice Anniversario and Buono Appetito! Visit Bertolli on Facebook, Pinterest and Twitter for more inspirations and ideas to bring Tuscany to your table.

    Bring your family back to the dinner table with a spring inspired, Tuscany inspired recipe for Creamy Tortellini Alfredo, a simple family dinner recipe that takes very little time to make, giving you more time with the ones you love. And don’t forget to add a few special touches to the table; after all, it’s the little things in life that are worth celebrating.

    How will you “Bring Tuscany to your Table”? Do you have a special moment to commemorate?

  • Loaded Egg Salad Pitas

    Loaded Egg Salad Pitas

    Ready for a spring picnic but not sure what to pack in your picnic basket? Loaded Egg Salad Pitas make a delicious lunch or picnic, and they’re a great way to use up leftover hard boiled eggs.

    In addition to hard boiled eggs, I added a few extra ingredients. My grandma used to make tuna salad and chicken egg salad with a host of fresh ingredients, from apples to pickles and pecans.

    Got leftovers? Maybe you have a few leftover hard boiled eggs sitting in your fridge. Use them to make Loaded Egg Salad Pitas, a delicious picnic food and pure perfection in your lunch box. Grab the recipe for Loaded Egg Salad Pitas!

    She had 2 long rows of pecan trees in her front yard, so she always had pecans sitting around in a pan waiting to be cracked or bags full of pecans already stored away in the freezer. I miss those pecan trees.

    Got leftovers? Maybe you have a few leftover hard boiled eggs from Easter sitting in your fridge. Use them to make Loaded Egg Salad Pitas, a delicious picnic food… pure perfection in the lunch box. Grab the recipe for Loaded Egg Salad!

    That’s kinda where my cravings led me with this egg salad, back to the good ole days.

    Below you’ll find a printable recipe. Serve this egg salad up with a flat bread or sandwiched in a pita, and you’re all set. I’m getting hungry just thinking about it. I hope you enjoy!

    Loaded Egg Salad Pitas

    Got leftovers? Maybe you have a few leftover hard boiled eggs sitting in your fridge. Use them to make Loaded Egg Salad Pitas, a delicious picnic food and pure perfection in your lunch box.

    • 6 hard boiled eggs
    • 1 apple
    • 1 avocado
    • ½ small red onion
    • ½ cup pecans
    • 4-5 bread & butter pickles
    • 1/2 cup shredded Cheddar
    • ¼ cup pickle juice
    • ¼ cup mayo
    • Pita bread
    • Lettuce leaves
    1. Boil eggs and peel; crumble.
    2. Wash, peel, and chop apple.
    3. Wash, peel, and slice avocado
    4. Mince onion.
    5. Chop pecans and pickles.
    6. Shred Cheddar cheese.
    7. Mix together eggs, apple, avocado, red onion, pecans, pickles, Cheddar, pickle juice, and mayo in a medium-sized bowl.
    8. Serve in pita bread pockets with lettuce. Enjoy!
    Burgers & Sandwiches
    American
    egg salad, egg salad pitas, loaded egg salad, pita bread
  • Easy Chicken Fajitas Recipe

    Easy Chicken Fajitas Recipe

    Simple and easy are the way to go when it comes to dinner on busy week nights. Healthy is also an important factor to add into the equation.

    When it comes to my go-to, favorite kind of food… It’d hands down be Tex-Mex. Chicken enchiladas, chicken tacos, ground beef tacos, fajitas… I love it all!

    When it comes to week night dinner recipes, we love and need an easy dinner. Easy chicken recipes for the win! Cook a whole chicken in the slow cooker over the weekend; then make that chicken stretch. Chicken fajitas are one of our go-to meals; in fact, I could totally eat Tex-Mex all the time. Grab the recipe for deliciously Easy Chicken Fajitas!

    Chicken Fajitas are a simple, easy-to-fix meal that can also be quite healthy, depending on the ingredients you choose to add. Hint: Fruit Salsa is the best!!

    When it comes to making meals with chicken, I really like to buy a whole chicken and then stretch it as far as I can for other meals. Sometimes I’ll even buy a whole chicken, cook it, and keep on hand a few days for sandwiches (so much better and healthier than lunch meat), chicken salad, and more.

    Easy chicken recipes are the way to go.

    Fajitas are one of those secondary meals we make after cooking an Instant Pot whole chicken. (We also love to make a big batch of Instant Pot Taco Chicken, perfect for fajitas.)

    When it comes to week night dinner recipes, we love and need an easy dinner. Easy chicken recipes for the win! Cook a whole chicken in the slow cooker over the weekend; then make that chicken stretch. Chicken fajitas are one of our go-to meals; in fact, I could totally eat Tex-Mex all the time. Grab the recipe for deliciously Easy Chicken Fajitas!

    Our favorite way to cook a whole chicken is by using the slow cooker. Plop that chicken in, add a few seasonings of choice, add some chicken broth, and you’ve got a tasty dinner.

    To make fajitas, all you need are a few ingredients besides the chicken.

    When it comes to week night dinner recipes, we love and need an easy dinner. Easy chicken recipes for the win! Cook a whole chicken in the slow cooker over the weekend; then make that chicken stretch. Chicken fajitas are one of our go-to meals; in fact, I could totally eat Tex-Mex all the time. Grab the recipe for deliciously Easy Chicken Fajitas!

    You’ll need peppers and onions, avocados, cilantro, tomatoes, tortillas, and if you want… sour cream, salsa with basil, mango peach salsa or yogurt.

    When it comes to week night dinner recipes, we love and need an easy dinner. Easy chicken recipes for the win! Cook a whole chicken in the slow cooker over the weekend; then make that chicken stretch. Chicken fajitas are one of our go-to meals; in fact, I could totally eat Tex-Mex all the time. Grab the recipe for deliciously Easy Chicken Fajitas!

    Below you’ll find the printable recipe. Enjoy!

    When it comes to week night dinner recipes, we love and need an easy dinner. Easy chicken recipes for the win! Cook a whole chicken in the slow cooker over the weekend; then make that chicken stretch. Chicken fajitas are one of our go-to meals; in fact, I could totally eat Tex-Mex all the time. Grab the recipe for deliciously Easy Chicken Fajitas!

    More Tex Mex recipes you may enjoy:

    Easy Chicken Fajitas

    Chicken fajitas are one of our go-to meals; in fact, I could totally eat Tex-Mex all the time. Grab the recipe for deliciously Easy Chicken Fajitas!

    • 1/2 of a whole chicken (cooked)
    • 2 tbsp. butter
    • 10-12 small peppers
    • 1/2 large onion
    • 2-3 avocados
    • Cilantro
    • Sour cream
    • Tomatoes
    • Tortillas
    1. Dice onion and julienne peppers.
    2. Sauté onion in butter for 2-4 minutes, or until tender.
    3. Add peppers and sauté for another 5-10 minutes, or until tender but still very colorful.
    4. Shred chicken and mix with pepper/onion mixture if desired, keeping warm on low heat.
    5. Warm tortillas and layer ingredients. Add sour cream or yogurt, cilantro, avocado slices, and freshly diced tomatoes for extra flavor and garnish.
    6. Serve and enjoy!
    Dinner Ideas
    Tex-Mex
    chicken fajita recipe, chicken fajitas, easy chicken fajitas
  • Kid Recipes: Pizza Pot Pie

    Kid Recipes: Pizza Pot Pie

    Cooking with kids, coupled with yummy recipes for kids, equals quality time AND a yum-licious meal like Pizza Pot Pie. Let a kid loose in the kitchen, and there’s no telling what delicious concoction he’ll come up with. Kid friendly recipes, like this pizza casserole, make the best family meals.

    I’m so excited to start a new adventure here on this li’l blog of mine. The older Jacob gets (Jaden too), the more I realize how much we still have to teach him.

    Cooking is one of those skills he really enjoys and also one skill I’d love for him to have when he eventually leaves the nest and begins his own life adventures. He chose to take a cooking class at homeschool group, and he absolutely loves it. He’s been brimming with ideas.

    For now, you may see a few older recipes we’ve enjoyed in the past; but every so often, we’ll share a new kid-friendly recipe.

    It’ll be Jacob’s creation, along with a bit of my guidance, but mostly his own; sometimes Jaden might jump in too. He’ll come up with what we’re making, and we’ll share it here.

    Cooking with kids, coupled with yummy recipes for kids, equals quality time AND a yum-licious meal like Pizza Pot Pie. Let a kid loose in the kitchen, and there’s no telling what delicious concoction he’ll come up with. Kid friendly recipes, like this pizza casserole, make the best family meals.

    Mmmm, this is such a yummy dinner, and the kids love it. Jacob actually made this for us a couple of months ago.

    It was so delicious we decided to make it again, but with just a few tweaks. This time he wanted to add sausage, zucchini, and peppers.

    This definitely gave him the opportunity to practice his chopping skills. We made individual pot pies in little ramekin dishes, but you could even make this in one big casserole dish.

    Cooking with kids, coupled with yummy recipes for kids, equals quality time AND a yum-licious meal like Pizza Pot Pie. Let a kid loose in the kitchen, and there’s no telling what delicious concoction he’ll come up with. Kid friendly recipes, like this pizza casserole, make the best family meals.

    Once our sauce was finished, we layered cheese and sauce in the half-cooked biscuit crust. Then we baked each pizza pot pie according to the instructions below.

    Cooking with kids, coupled with yummy recipes for kids, equals quality time AND a yum-licious meal like Pizza Pot Pie. Let a kid loose in the kitchen, and there’s no telling what delicious concoction he’ll come up with. Kid friendly recipes, like this pizza casserole, make the best family meals.
    Cooking with kids, coupled with yummy recipes for kids, equals quality time AND a yum-licious meal like Pizza Pot Pie. Let a kid loose in the kitchen, and there’s no telling what delicious concoction he’ll come up with. Kid friendly recipes, like this pizza casserole, make the best family meals.

    Our new adventure will feature recipes that, hopefully, your kids will enjoy making too. It’s a little inspiration when meals get boring and you need a little help livening things up. Kids always help liven things up, right?

    Cooking with kids, coupled with yummy recipes for kids, equals quality time AND a yum-licious meal like Pizza Pot Pie. Let a kid loose in the kitchen, and there’s no telling what delicious concoction he’ll come up with. Kid friendly recipes, like this pizza casserole, make the best family meals.
    Cooking with kids, coupled with yummy recipes for kids, equals quality time AND a yum-licious meal like Pizza Pot Pie. Let a kid loose in the kitchen, and there’s no telling what delicious concoction he’ll come up with. Kid friendly recipes, like this pizza casserole, make the best family meals.

    Below you’ll find a printable recipe. Grab the kids, gather all your ingredients, and get cookin’! Enjoy!

    Cooking with kids, coupled with yummy recipes for kids, equals quality time AND a yum-licious meal like Pizza Pot Pie. Let a kid loose in the kitchen, and there’s no telling what delicious concoction he’ll come up with. Kid friendly recipes, like this pizza casserole, make the best family meals.

    Kid Recipes: Pizza Pot Pie

    Cooking with kids, coupled with yummy recipes for kids, equals quality time AND a yum-licious meal like Pizza Pot Pie. Let a kid loose in the kitchen, and there’s no telling what delicious concoction he’ll come up with. Kid friendly recipes, like this pizza casserole, make the best family meals.

    Crust:

    • 2 1/4 cups biscuit mix
    • 2/3 cup skim milk

    Sauce:

    • 1 tbsp. butter
    • 1/2 small onion (minced)
    • 1/4 large red pepper (minced)
    • 1/4 large yellow pepper (minced)
    • 1/4 large orange pepper (minced)
    • 1 lb. Italian sausage (cooked & crumbled)
    • 3 oz. pepperoni (chopped)
    • 1 zucchini
    • 2 to matoes
    • 1 small can tomato sauce
    • 1 tsp. basil
    • 1/2 tsp. garlic powder
    • 1/2 tsp. Italian seasoning
    • 1 tbsp. brown sugar
    • 1 tsp. salt
    • 1/2 tsp. black pepper

    Topping:

    • 1/2 cup mozzarella
    • 1/2 cup Colby Jack
    1. Pre-heat oven to 400°. Grease 4-5 ramekins.
    2. Mix crust ingredients together well. Press into greased ramekins, pressing into bottom and up sides of each dish.
    3. Bake at 400° for about 5-10 minutes.
    4. Meanwhile, cook Italian sausage, crumbling as it browns. When fully cooked, remove from skillet and set aside.
    5. Sauté onion and peppers in melted butter for 1-2 minutes, or until tender.
    6. Add sausage to peppers and onion mixture in skillet; turn heat to low.
    7. Purée zucchini (peeled) and tomatoes in small food processor.
    8. Mix puréed mixture with tomato sauce, seasonings, brown sugar, salt, and black pepper.
    9. Add pepperoni and 1 1/2 cups sausage/pepper/onion mixture to sauce.
    10. Add sauce and shredded cheese to biscuit crusted ramekins. Layer cheese, adding to bottom of dish and top.
    11. Bake at 400° for about 20 minutes.
    12. Serve and enjoy!
    Dinner Ideas
    American
    dinner ideas, pizza casserole, pizza pot pie
    Cooking with kids, coupled with yummy recipes for kids, equals quality time AND a yum-licious meal like Pizza Pot Pie. Let a kid loose in the kitchen, and there’s no telling what delicious concoction he’ll come up with. Kid friendly recipes, like this pizza casserole, make the best family meals.

    Can’t make it just yet? Pin it for later!

  • Turkey Enchilada Skillet Casserole Recipe

    Turkey Enchilada Skillet Casserole Recipe

    When it comes to Mexican food, I could probably eat my weight in it, I’m not even kidding. My guys get tired of asking me where I want to go out to eat, if and when we do go out…my choice is always Mexican.

    That’s pretty much the reason why anytime I make a whole chicken (or, in this case, a turkey), chicken enchiladas are a must with the leftovers.

    My family loves a good casserole, and this is one casserole recipe to add to the list of recipes to try. Whether you love chicken recipes, enchiladas, or any type of Mexican food, this turkey enchilada casserole is a delicious skillet casserole that can be made with either turkey or chicken. Add it to the list of simple and easy dinner recipes.

    With leftover turkey, my boys’ favorite turkey stuffing crescent roll appetizers are another must, perfect for lunch; and of course, I can’t help but make my favorite leftover turkey casserole.

    I’ve shared a slow cooker chicken enchilada casserole recipe in the past, but this recipe is quite a bit different with fresher, slightly healthier ingredients. This skillet casserole is super easy to make; you basically layer all the ingredients together in an iron skillet and bake.

    Don’t you just love cooking in an iron skillet? I didn’t realize how much I love it until more recently.

    Love a good casserole? You may also enjoy this classic tater tot casserole recipe and tater tot taco bake.

    TIPS FOR HOW TO MAKE ENCHILADA CASSEROLE

    An iron skillet is so versatile, not to mention photogenic. I almost feel like I’m going back to my days on the farm when I bring out the iron skillet.

    My family loves a good casserole, and this is one casserole recipe to add to the list of recipes to try. Whether you love chicken recipes, enchiladas, or any type of Mexican food, this turkey enchilada casserole is a delicious skillet casserole that can be made with either turkey or chicken. Add it to the list of simple and easy dinner recipes.

    The one thing I wanted to eliminate from this casserole was cream soup.

    There are some ingredients that are easier to eliminate than others, but I found success by substituting sour cream. It was a tip I picked up via Heavenly Homemakers; they have an entire list of substitutions you can make for cream soups.

    I think this casserole was even better with the sour cream than with the cream of chicken soup I usually use. If you want low-fat, you could even go that route with the sour cream. If you like creamy enchiladas, you’re sure to love this recipe.

    My family loves a good casserole, and this is one casserole recipe to add to the list of recipes to try. Whether you love chicken recipes, enchiladas, or any type of Mexican food, this turkey enchilada casserole is a delicious skillet casserole that can be made with either turkey or chicken. Add it to the list of simple and easy dinner recipes.

    The recipe is fairly simple to make.

    • Sauté the onion and green chilies.
    • Add in the cream cheese, sour cream, and salsa.
    • Add shredded turkey. Mix together well.
    • Then layer everything in the skillet.
    My family loves a good casserole, and this is one casserole recipe to add to the list of recipes to try. Whether you love chicken recipes, enchiladas, or any type of Mexican food, this turkey enchilada casserole is a delicious skillet casserole that can be made with either turkey or chicken. Add it to the list of simple and easy dinner recipes.

    Serve with sour cream, green onions, tomatoes, and anything else you prefer.

    My family loves a good casserole, and this is one casserole recipe to add to the list of recipes to try. Whether you love chicken recipes, enchiladas, or any type of Mexican food, this turkey enchilada casserole is a delicious skillet casserole that can be made with either turkey or chicken. Add it to the list of simple and easy dinner recipes.

    A printable recipe, including full instructions, is available below. Use up those leftovers in a very enjoyable way!

    My family loves a good casserole, and this is one casserole recipe to add to the list of recipes to try. Whether you love chicken recipes, enchiladas, or any type of Mexican food, this turkey enchilada casserole is a delicious skillet casserole that can be made with either turkey or chicken. Add it to the list of simple and easy dinner recipes.

    Turkey Enchilada Skillet Casserole

    Turkey enchilada skillet casserole is super easy to make; just layer all the ingredients together in a cast iron skillet and bake.

    • 1 tbsp. salted butter
    • 1/2 large onion (finely chopped)
    • 1 – 4 oz. can chopped green chilies (drained)
    • 1 – 8 oz. pkg. cream cheese
    • 1 cup sour cream
    • 3/4 cup chunky salsa
    • 3 cups shredded turkey (or chicken)
    • 2 cups Extra Sharp Cheddar cheese (shredded)
    • 1 1/2 cups Colby Jack cheese (shredded)
    • 10 small corn tortillas (sliced into strips)
    1. Pre-heat oven to 350°.
    2. Melt butter in skillet. Sauté onion for 5 minutes.
    3. Add green chilies and sauté for 1 minute.
    4. Add cream cheese and let melt. Add sour cream and salsa, stirring to combine.
    5. Add shredded turkey, mixing well with other ingredients. Keep warm.
    6. Shred cheese and set aside.
    7. Stack corn tortillas and slice in half. Then cut into 1-inch strips.
    8. Begin layering ingredients in iron skillet. Begin with thin layer of creamy turkey mixture. Add layer of tortilla strips, then a thicker layer of creamy turkey mixture, then cheese. Repeat layers, starting with tortilla strips and ending with cheese.
    9. Bake at 350° for 30-45 minutes, or until cooked thru and cheese is melted.
    10. Serve with sour cream, green onions, tomatoes, and whatever else you enjoy with enchiladas. Enjoy!
    Dinner Ideas
    American
    casserole recipes, casseroles, enchilada casserole, skillet casserole, turkey enchilada casserole, turkey enchiladas
  • Slow Cooker Shepherd’s Pie Stew Recipe

    Slow Cooker Shepherd’s Pie Stew Recipe

    Sigh, my slow cooker…it’s my best friend when the weather starts to get a little chilly and days start to get insanely busy due to the holidays, school stuff, appointments, work meetings, or whatever else happens during the course of a week.

    I’ll freely admit it…My name is Mel and I love my slow cooker.

    Slow Cooker Recipe Shepherd's Pie Stew {MamaBuzz - mamabzz.com}

    I don’t know if I could live without my slow cooker. It makes such delicious things and only requires a minimal amount of work from me to do so.

    It’s better than a Rosie (am I dating myself here? Jetsons?). It’s better than chocolate (wait, maybe not). It’s definitely better than slaving over a hot stove after a loooooonnnnngggg day, can I get an amen?

    Slow Cooker Shepherd's Pie Stew {MamaBuzz - mamabzz.com}

    Yeah, I may be a little obsessed with my slow cooker, but it does make delicious things like this Shepherd’s Pie Stew.

    Hearty Slow Cooker Recipe for Shepherd's Pie Stew {MamaBuzz - mamabzz.com}

    This recipe kinda happened by accident, but now that I think about it, some of the best things happen by accident. I wanted to make Shepherd’s Pie in the slow cooker, but instead it turned into a sort of hearty stew that won our hearts.

    Chock full of veggies, like my favorite vegetable soup with V8, and meaty deliciousness… This stew is a must try. 

    Shepherd's Pie Stew {MamaBuzz - mamabzz.com}

    Below you’ll find the printable recipe. Enjoy!

    Slow Cooker Shepherd’s Pie Stew

    How to make a delicious slow cooker recipe for Shepherd's Pie Stew. Sometimes an accident turns into something delicious.

    • 4-5 large potatoes (washed, peeled, & chunked)
    • 1-16 oz. soup mix frozen veggies (basically, a mixed veggie good for soup)
    • 1 can creamed corn
    • 1 lb. ground beef (cooked & drained)
    • 1-24 oz. jar spaghetti sauce
    • Salt & pepper
    • 1 cup shredded Colby Jack (shredded)
    • 1/2 to 1 cup Cheddar (shredded)
    1. Prepare potatoes and add to slow cooker.
    2. Cook ground beef in skillet. Cook well and drain. Add to slow cooker.
    3. Add rest of ingredients to slow cooker, minus the cheese. Mix together well.
    4. Cook on low for 4-6 hours. 20-30 minutes before serving, add shredded cheese. Replace lid and finish cooking.
    5. Once cheese is melted, serve and enjoy!
    Soups & Stews
    American
    shepherd’s pie soup, shepherd’s pie stew, slow cooker recipes, slow cooker shepherd’s pie stew, slow cooker stew

    Looking for more slow cooker recipes? Follow me on Pinterest!

    Follow MamaBuzz – Mel Lockcuff’s board Slow Cooker Recipes on Pinterest.

  • Slow Cooker Recipe – Green Beans, Potatoes, and Sausages

    Slow Cooker Recipe – Green Beans, Potatoes, and Sausages

    Last week I headed to the local farmer’s market to find some fresh eats. Our garden is just starting to produce, so I love visiting the market and getting a few things I can’t quite get out of my garden yet.

    I have a couple of favorite vendors I love to buy from, one being an older gentleman who always has the best potatoes, green beans, tomatoes, and more. He’s always been the sweetest guy, and I just love buying from him.

    Slow Cooker Green Beans, Potatoes, and Sausages - MamaBuzz {mamabzz.com}

    This time he had mounds of fresh green beans. I got a big bag of beans, and he asked me what I was going to do with them, whether I was canning them or freezing them. I mentioned making a big pot of green beans, potatoes, and sausages.

    He then proceeded to invite himself over, asking me when they would be done. I cracked up laughing.

    He’s definitely my favorite farmer, ’cause he kinda reminds me of my own dad and grandpa.

    After digging a few potatoes from our own patch in the back yard, I set to work.

    Snapping the beans is probably one of my favorite parts, it’s just so relaxing. Of course, my helper supervised as I snapped, and the boys had to come out and snap a few.

    Snapping Green Beans with My Helper

    This is something my mom always made when I was growing up, especially during the summer gardening season. I’ve kinda carried the tradition over to my own family.

    Every summer when beans come on and potatoes are ready to dig, I make a big, huge pot of beans.

    Green Beans, Sausages, and Potatoes in the Slow Cooker

    It’s a fantastic meal, healthy and delicious. The sausages add flavor to the beans and potatoes, almost to the point that you hardly need any salt.

    It’s filling and the best part is, my kids love it.

    Fresh Green Beans, Potatoes, and Sausages

    Below you’ll find a printable recipe. I hope you enjoy!

    Garden fresh green beans and potatoes with sausages - recipe from MamaBuzz

    Looking for more potato recipes?

    Instant Pot Baked Potatoes

    Creamy Mashed Potatoes

    The Ultimate Baked Potato Bar

    The Ultimate Mashed Potato Bar

    Slow Cooker Recipe – Green Beans, Potatoes, and Sausages

    Garden fresh green beans and potatoes with sausages in the slow cooker.

    • 3 + quarts of green beans
    • 6-8 potatoes
    • 2 packs Lit’l Smokies
    • 8 + cups of water
    • Salt & Pepper (to taste)
    1. Wash and snap green beans. Wash and chop potatoes. Add green beans, potatoes, Lit’l Smokies, and water to slow cooker.
    2. Cook on high for about 4 hours or until beans and potatoes are tender and everything is cooked through. Add salt and pepper, to taste.
    3. Serve and enjoy!
    Slow Cooker
    American
    green beans potatoes and sauasages, slow cooker green beans, slow cooker green beans and potatoes, slow cooker recipes
  • Cheesy Chicken Quesadilla Recipe

    Cheesy Chicken Quesadilla Recipe

    With the Winter Olympics coming up later this week, an appetizer recipe seemed just the thing, especially in light of Olympics watch parties that may be taking place. This particular recipe could work as either an appetizer or lunch.

    We like to have quesadillas for lunch sometimes, along with fresh fruit; the kids love when we have them. They’re super easy to make, and they’re pretty healthy, depending on your ingredients.

    Cheesy Chicken Quesadillas Recipe from MamaBuzz

    Below you’ll find a printable recipe. Serve with a side of salsa, sour cream, and avocado. Enjoy!

    Recipe for Cheesy Chicken Quesadillas

    More Tex Mex recipes you may enjoy:

    Cheesy Chicken Quesadillas

    Make cheesy chicken quesadillas with fajita chicken, and serve with a side of salsa, sour cream, and avocado.

    • 1 can fat-free refried beans
    • 1/2 pkg. (11 oz. chicken breast strips, cooked)
    • 1-2 to matoes (chopped)
    • 3-4 small peppers (chopped)
    • 3-4 green onions (chopped)
    • 1 cup shredded Cheddar
    • Salsa (sour cream, and avocado)
    1. with this recipe, you can make about 2 quesadillas, possibly more depending on how high you pile the ingredients inside the quesadillas.
    2. First spread about 1/3 cup fat-free refried beans on two tortillas. Sprinkle chicken breast strips around each tortilla. Add tomatoes, peppers, green onions, and Cheddar. Top with a tortilla.
    3. Bake at 350° for about 15-20 minutes, or until edges start to crisp.
    4. Slice and serve with a side of salsa, sour cream, and avocado. Enjoy!
    Appetizers
    Tex-Mex
    chicken quesadillas, quesadillas, Tex-Mex recipes
  • 15 Bean Soup with Ham

    15 Bean Soup with Ham

    Learn how to make homemade 15 bean soup with ham with this easy stovetop dinner recipe, perfect for leftover ham. There’s so much flavor in this hearty, meaty, filling soup! Fill your bowl with the ultimate comfort food soup.

    Cooler months of the year are when I just want to break out all the soup recipes… There’s just something cozy about a warm, steaming bowl of ham and 15 bean soup.

    blue Dutch oven full of 15 bean soup with ham

    15 bean soup is perfect for chilly fall days, rainy days, or days where you just need a bit of down home comfort. And it pairs deliciously with a skillet of buttermilk cornbread.

    Why You’ll Love This Soup

    • It’s the perfect way to use up leftover ham in a most delicious way. We usually use a ham hock from a glazed pre-cooked ham we’ve baked.
    • Like I mentioned above, 15 bean and ham soup really is the ultimate comfort food. It’s warm and cozy.
    • It’s also hearty and filling.
    • 15 bean soup with rice is a healthy one pot dinner. You’ve got protein, fiber, fat, and carbs in one big pot of soup.
    • It’s chock full of delicious flavor, from the beans to the meat to the veggies and seasonings used.
    15 bean soup mix in metal colander

    Ingredients and Substitutions Notes:

    Speaking of seasonings, let’s talk ingredients…

    • Garlic and Yellow Onion – You can use fresh cloves of garlic or already minced garlic you can get at the grocery store, usually in the produce section. Yellow onion also gives a nice kick to the flavor.
    • Red and Green Bell Peppers – I love the color this gives to the soup, not to mention the flavor. If you need help learning how to dice the peppers, here’s how to cut a pepper, including how to dice.
    • Ham Bone or Ham Hocks – If you don’t have a leftover ham bone, you can always just buy one at a local butcher shop. Or instead you can substitute something like smoked sausage.
    • 15 Bean Soup Mix – While you can just use navy beans or cannellini beans, I love a bag of 15 bean soup mix. You get a variety of beans in Hurst’s HamBeens, including northern, pinto, large lima, yelloweye, garbanzo, baby lima, green split, kidney, cranberry, small white, pink, small red, yellow split, lentil, navy, white kidney, and/or black bean. You will need to soak the beans overnight in water, but you won’t need the seasoning packet.
    • Long-Grain Rice – I prefer long-grain rice because it’s usually not as sticky, and it falls apart in the soup. Of course, you can always leave out the rice if you don’t want to add it to the soup; but I will say the rice really adds to the heartiness of this wonderful bean and rice soup.
    • Seasonings – It’s pretty simple. You’ll just need salt, pepper, and smoked paprika for a good flavor kick.

    How to Make 15 Bean Soup with Ham

    As I mentioned in the ingredient notes above, be sure to soak the beans overnight, so they’re ready to go the next day. Also, be sure to thaw the ham hocks ahead of time.

    Then just follow these steps…

    1. Heat the olive oil in a Dutch oven pan over medium heat, and sauté the onion, garlic, and bell peppers for 5-10 minutes, or ’til softened.
    2. Add the ham bone or hocks and 15 bean soup mix to the onion mixture in the Dutch oven.
    3. Cover the ham bone with the water. Cover and bring to a boil; then reduce the heat to low-medium, and simmer for about 1 1/2 hours.
    4. Remove the hocks from the water; then pull the meat from the bone and chop.
    5. Add the chopped meat back into the water, along with the rice, salt, pepper, and smoked paprika.
    6. Cook for another 15-20 minutes, or ’til the rice is thoroughly cooked.
    steps for how to make 15 bean soup with ham in blue Dutch oven on stovetop

    Then serve the soup with cornbread or crackers.

    ham and 15 bean soup in brown soup bowl on red and white striped kitchen towel

    Expert Tips and Recipe FAQ’s

    Can you freeze 15 bean soup with ham?

    Yes, you can. Just be sure to store it in an airtight container, so it doesn’t get freezer burn. It should freeze well for about 3 months.

    How should you store this soup?

    Store it in an airtight container in the fridge; it should keep for 3-5 days.

    Can you make this soup in the slow cooker?

    Yes, you absolutely can slow cook it. You may need to remove the ham from the bone half way through cook time, which will likely be 4-5 hours on low heat.

    Why do you need to soak 15 bean soup mix?

    There are a few reasons for soaking a package of 15 soup beans… One is to make them more tender and not have to cook quite as long. Another reason is because it helps to make them easier to digest and not cause quite as much gas.

    Is there a way to thicken the soup?

    While I feel this soup is already pretty thick, you can use a potato masher to mash some of the beans, and that’ll lead to a somewhat thicker consistency.

    Variations and Ways to Change It Up

    There are a few ingredients you can swap and things you can do to change this bean and ham soup up just a bit…

    • Use chopped smoked sausage, Italian sausage, or breakfast sausage in place of ham.
    • Add crushed tomatoes, or better yet, diced tomatoes with green chilies for a Tex-Mex flair.
    • Add more veggies, like chopped Swiss chard, parsnips, or spinach leaves. You can even add in some shredded carrots for a little more color, flavor, texture, and nutrients.
    • Get creative with seasonings… Make it Cajun or Tex-Mex by swapping out seasonings.
    • Sub in chicken broth for part of the water to give even more flavor.
    ladle full of 15 bean and ham soup over Dutch oven

    More Delicious Soup Recipes

    If you love this 15 bean soup recipe, you’ll love these soups too…

    If you try this recipe, why not leave a star rating in the recipe card right below and/or a review in the comment section further down the page? I always appreciate your feedback. You can also follow me on Pinterest, Facebook, Instagram, and YouTube. And subscribe to my email list too!

    15 Bean Soup with Ham

    How to make homemade 15 bean soup with ham. Easy stovetop dinner recipe, perfect for leftover ham. So much flavor in this hearty soup!

    • Cutting Board
    • Chef's Knife
    • Dutch oven
    • 1 tablespoon olive oil
    • 1 cup yellow onion (minced)
    • 3 cloves garlic (minced)
    • 1 large red bell pepper (minced)
    • 1 large green bell pepper (minced)
    • 2 pounds ham bone (or ham hocks)
    • 20 ounces 15 bean soup mix* (without seasoning packet)
    • 6 cups water (see instructions below)
    • 1/2 cup long-grain rice
    • 2 teaspoons sea salt (to taste)
    • 1/2 teaspoon ground black pepper (to taste)
    • 1/4 teaspoon smoked paprika
    1. Heat the olive oil in a Dutch oven pan over medium heat.

    2. Sauté the onion, garlic, and bell peppers in the olive oil for 5-10 minutes, or 'til softened.

    3. Add the ham bone or hocks and 15 bean soup mix to the onion mixture in the Dutch oven.

    4. Cover the ham bone with the water.

    5. Cover and bring to a boil; then reduce the heat to low-medium, and simmer for about 1 1/2 hours.

    6. Remove the hocks from the water; then pull the meat from the bone and chop.

    7. Add the chopped meat back into the water, along with the rice, salt, pepper, and smoked paprika.

    8. Cook for another 15-20 minutes, or 'til the rice is thoroughly cooked.

    9. Serve ham and 15 bean soup with cornbread or crackers.

    *You will need to soak the beans overnight in water, but you won’t need the seasoning packet.

    Store any leftover soup in an airtight container in the fridge; it should keep for 3-5 days.

    dinner, Soup
    American
    15 bean and ham soup, 15 bean soup, 15 bean soup recipe, 15 bean soup with ham, 15 bean soup with rice, ham and 15 bean soup, homemade 15 bean soup
  • Chicken and Rice Stuffed Peppers Recipe

    Chicken and Rice Stuffed Peppers Recipe

    This summer I’ve been making it a point to go to the Farmer’s Market and buy our produce, fresh and locally grown.

    I usually always come home with fresh peppers because, frankly, peppers are so versatile. You can do any number of things with a pepper, and it adds so much flavor.

    Chicken and Rice Stuffed Peppers

    We love making stuffed peppers, but this recipe is just a bit different. Instead of using ground beef, I used chicken and rice. You could even switch things up and use pork fried rice for better flavor! Below, you’ll find a printable recipe. Enjoy!

    More stuffed pepper recipes you may enjoy: chicken stuffed peppers and beef taco stuffed peppers.

    The first step is to cook your rice and peas, using chicken bullion for extra flavor. We put ours in the rice cooker. Then cook your chicken. We used boneless, skinless breasts and cooked them in a skillet. You can also use leftover Instant Pot whole chicken. Then shred the chicken.

    Shred chicken

    Chop or finely mince an onion, as well.

    Chop and mince onion

    When rice is cooked, mix together with chicken and onion.

    Some people prefer to boil their peppers before stuffing, but I prefer to just cut the core out and stuff with the rice and chicken mixture. Learn how to cut a bell pepper.

    Once finished with this process, place extra rice mixture around the peppers, and it’s time to bake.

    Stuff peppers with chicken and rice

    Bake at 350° for about 30 minutes or until heated through. Remove from oven and serve.

    Peppers stuffed with chicken and rice

    The nice thing about this dish is that you have your entire meal all in one, vegetable and all.

    Chicken and Rice stuffed into peppers

    Chicken and Rice Stuffed Peppers

    How to make a one dish meal the whole family will love, rice and chicken stuffed peppers. Full of delicious flavor, it'll be a weeknight hit!

    • 4 large bell peppers
    • 2 pounds chicken breasts (cooked and shredded)
    • 1 large yellow onion (minced)
    • 3 cups long-grain white rice (cooked)
    • 3 cups chicken broth
    • 2 cups peas
    1. Cook rice and peas, using chicken broth for extra flavor. We put ours in a rice cooker. Cook chicken, and shred. Chop or finely mince an onion.

    2. When rice is cooked, mix together with chicken and onion. Some people prefer to boil their peppers before stuffing, but I prefer to just cut the core out and stuff with the rice and chicken mixture. Once finished with this process, place extra rice mixture around peppers. Bake at 350° for about 30 minutes or until heated through.
    3. Remove from oven and serve.
    Dinner Ideas
    American
    chicken stuffed peppers
  • Gourmet Grilled Cheese with Bacon, Tomato, and Avocado

    Gourmet Grilled Cheese with Bacon, Tomato, and Avocado

    Good Cook ProFreshionals DisclosureThere is no other comfort food quite like a really good grilled cheese, and this grilled cheese is no exception with its tantalizing tastes of melted Cheddar, American, bacon, freshly sliced tomato, and avocado. Gourmet grilled cheese with bacon tomato and avocadoThis sandwich probably beats all the grilled cheese I’ve ever made. It’s kinda funny because a year ago, I didn’t really like avocado; it just wasn’t one of my favorite foods at all. This summer it’s like my tastes have reawakened, and I can’t get enough of it.

    Of course, I couldn’t have made this grilled cheese without my handy Avocado Slicer from Good Cook. Good Cook Avocado Slicer
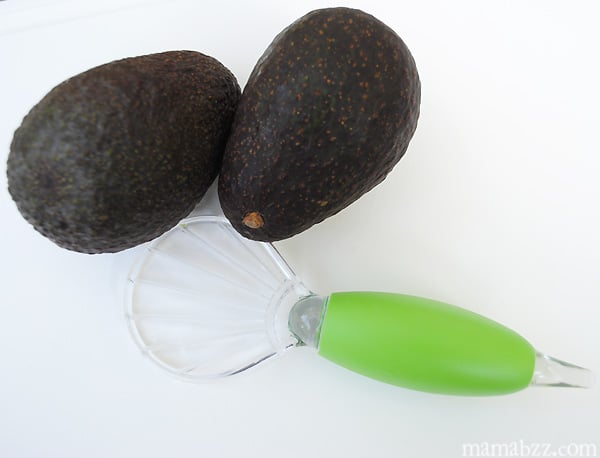
This slicer made pitting and slicing the avocados an easy peasy process. The hook on the end of the handle helps you to remove the avocado pit. Removing the pit from the avocadoThen you just run the slicer down the skin of the avocado through the meat of the fruit, and you have a sliced avocado. Slicing up the avocado with the Good Cook Avocado Slicer
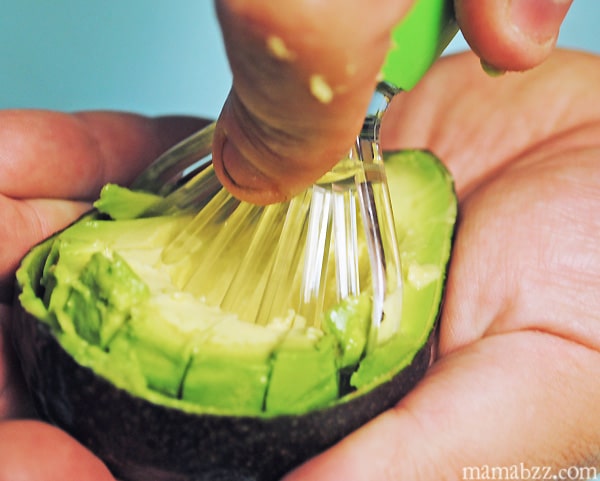
The tool is quite sturdy and something we’ll probably be using quite a bit in our kitchen, as we’re always eating avocado on our sandwiches or making guacamole.

    So, how do you make this delicious grilled cheese? See below for a printable recipe. You’ll want to cook the bacon beforehand; we like to bake ours. Then, of course, get your tomatoes and avocados ready to go. Good Cook Avocado Slicer with Tomatoes and Avocado
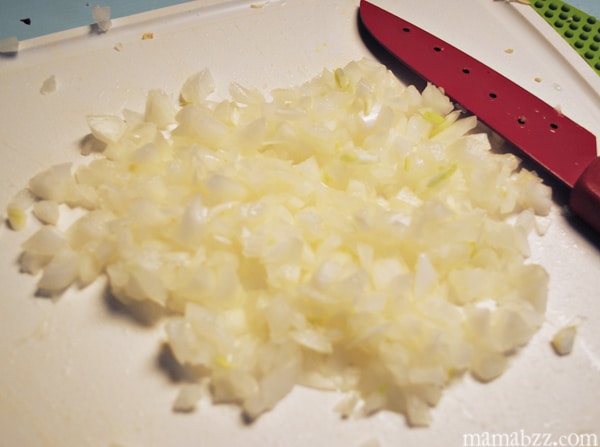
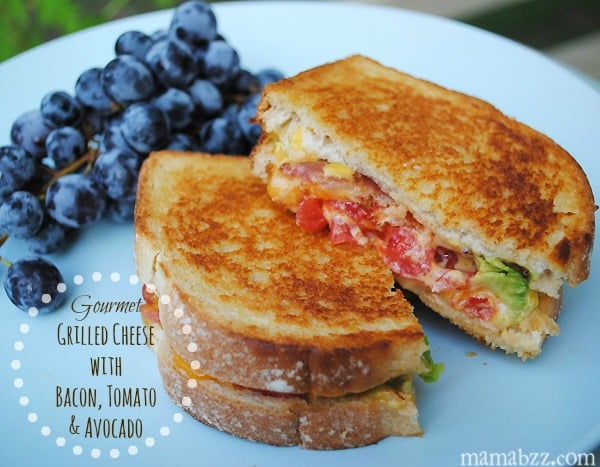
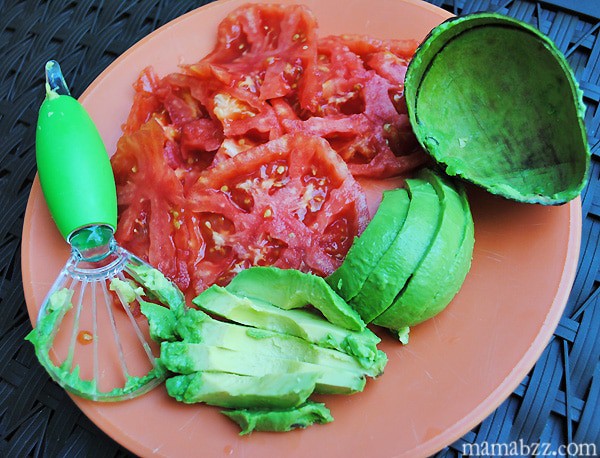
Putting this sandwich together is super easy, and you start with two slices of sourdough bread. Butter the outsides; I used to butter the insides too on all my grilled cheese, but I don’t do that anymore…. trying to be a bit more health-conscious. Fire up the griddle, and place one slice of bread on the griddle. Add a few slices of Cheddar Cheese, then tomato, avocado, and a slice of American Cheese. Sandwiching the tomato and avocado between the two cheeses ensures that everything will be wrapped together in ooey, gooey goodness. Finally, add a few slices of bacon, already cooked. How to make a gourmet grilled cheese sandwich with avocado
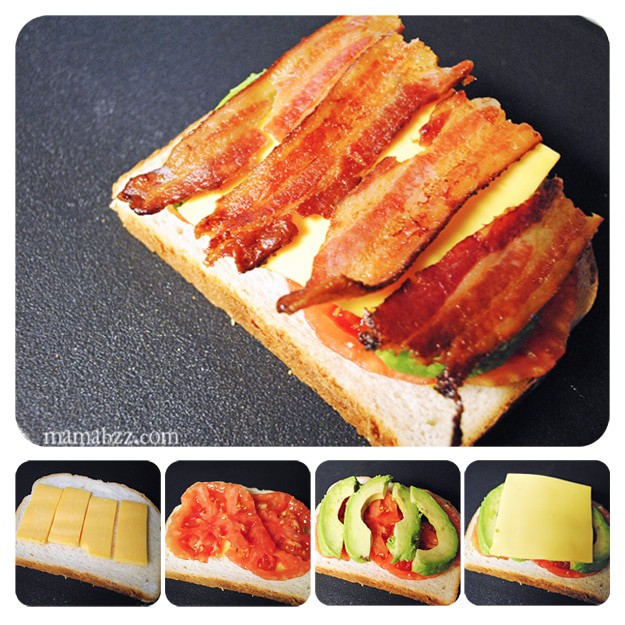
Top it off with your other slice of buttered sourdough, and cook until golden brown and cheeses are melted and gooey.Grilled cheese with avocado, tomato, and bacon

    This sandwich is delicious and best served with your favorite fruit on the side and maybe a handful of chips. Enjoy!Grilled bacon cheese tomato and avocado sandwich

    Gourmet Grilled Cheese with Bacon, Tomato, and Avocado

    How to make grilled cheese with tantalizing flavors of melted cheddar, American, bacon, freshly sliced tomato, and avocado.

    • 2 slices sourdough bread
    • 1 tablespoon salted butter
    • 1 slice cheddar cheese
    • 1 slice American cheese
    • 2 tomato slices
    • 1/2 large avocado (sliced)
    • 2 slices bacon (cooked)
    1. Cook bacon beforehand; we like to bake ours. Prepare tomatoes and avocados by peeling and slicing tomatoes, then pitting and slicing avocados.
    2. Start with two slices of sourdough bread. Butter the outsides. Heat griddle, and place one slice of bread on griddle. Add a few slices of Cheddar Cheese, then tomato, avocado, and American Cheese. Finally, add a few slices of bacon, already cooked. Top sandwich off with second slice of buttered sourdough. Cook until golden brown and cheeses are melted and gooey.
    3. Serve with side of favorite fruit and maybe a handful of chips.
    Dinner Ideas
    American
    grilled cheese with bacon and tomato

  • Muffin Tin Chicken Pot Pie

    Muffin Tin Chicken Pot Pie

    Learn how to make easy muffin tin chicken pot pie with Grands biscuits and a creamy chicken and vegetable filling that’s oh so delicious. Makes the perfect appetizer or a fun way to serve up a personal sized dinner with your family!

    I was inspired to make this recipe by another recipe we’d made from Pillsbury, Easy Taco Melts. Instead of filling biscuits with taco filling, however, we decided to make them into mini muffin tin pot pies.

    muffin tin chicken pot pie on wood cutting board with fork

    They turned out pretty yummy and just as much of a hit as my favorite chicken pot pie with biscuits.

    Ingredients and Substitutions Notes:

    You’ll need just a handful of ingredients to make these yummy mini chicken pot pies.

    • Boneless Skinless Chicken Thighs – You can also use chicken breasts. Just be sure to cook these beforehand and shred, so they’re ready to go. I like to use my Instant Pot to cook the chicken, then just shred it up while it’s hot.
    • Cream of Chicken Soup – If you want to make these gluten-free, you can also use a gluten-free cream of chicken soup.
    • Frozen Vegetables – I like to use a mixture of peas and carrots with corn. However, if you’d like to add green beans or any other veggies, this recipe is easy to accommodate.
    • Salt and Pepper
    • Grands Biscuits – If you’d like to make these gluten-free, you can mix up gluten-free biscuits and sub the dough for Grands Biscuits.

    How to Make Muffin Tin Chicken Pot Pies

    Before getting started, be sure to prep by pre-heating your oven to 375° F; then grease a muffin tin with cooking spray and set aside ’til needed.

    Then Assemble your Mini Pot Pies…

    1. In a large mixing bowl, mix together the shredded chicken, cream of chicken soup, vegetables, salt, and pepper.
    2. Press each biscuit into a separate muffin cup, pressing the biscuits up the sides to the top of each cup.
    3. Add about 2 spoonfuls of the chicken mixture to each biscuit, and level it.
    4. Bake at 375° F for about 20-25 minutes, or ’til golden brown. Then cool on a wire rack for about 5 minutes before serving.

    These are a really cozy meal or appetizer, perfect for a fun night with your family.

    If you try this recipe, why not leave a star rating in the recipe card right below and/or a review in the comment section further down the page? I always appreciate your feedback. You can also follow me on Pinterest, Facebook, Instagram, and YouTube. And subscribe to my email list too!

    Muffin Tin Chicken Pot Pie

    How to make easy muffin tin chicken pot pie with Grands biscuits and a creamy chicken and vegetable filling that's oh so delicious!

    • Large Mixing Bowl
    • Muffin Tin
    • 1 pound boneless skinless chicken thighs (cooked and shredded)
    • 10.5 ounces cream of chicken soup
    • 3/4 cup frozen peas and carrots (thawed)
    • 1/4 cup frozen corn (thawed)
    • 1/2 teaspoon salt (to taste)
    • 1/4 teaspoon ground black pepper (to taste)
    • 16.3 ounces Grands Biscuits
    1. Pre-heat the oven to 375° F, and grease a muffin tin with cooking spray.

    2. In a large mixing bowl, mix together the shredded chicken, cream of chicken soup, vegetables, salt, and pepper.

    3. Press each biscuit into a separate muffin cup, pressing the biscuits up the sides to the top of each cup.

    4. Add about 2 spoonfuls of the chicken mixture to each biscuit, and level it.

    5. Bake at 375° F for about 20-25 minutes, or 'til golden brown.

    6. Cool on a wire rack for about 5 minutes before serving.

    Appetizer, dinner, main dish
    American
    mini pot pies, muffin tin chicken pot pie, muffin tin pot pies
  • Crunchy Chicken Salad Pitas {Recipe Box}

    Crunchy Chicken Salad Pitas {Recipe Box}

    Sometimes the hot summer weather calls for an easy recipe that’s lighter on the tummy yet delicious at the same time. We enjoy our favorite open-faced chicken salad sandwich or tuna salad, but it’d been awhile since we’d made chicken salad.

    My grandmother, my dad, and my mom used to make tuna/chicken salad with all kinds of good ingredients like apples, nuts, and more. We decided to get a little funky with it and add some crunch to the salad.

    Below is a printable recipe without photos, for your convenience.

    The first step was to boil our eggs and get our crunchy ingredients chopped up. We chopped up green onions, purple onion, and an apple.

    Then we opened our chicken and drained it; we used Applewood Smoke Chunk Chicken.

    When the eggs were done, it was time to smash them up really well.

    Finally, we mixed all the ingredients together in a bowl.

    Then we added Miracle Whip to give the salad a creamy, tangy texture/flavor.

    Finally, we applied the mixture to pita slices with lettuce. Dan also added mustard to his pita sandwiches.

    Next time we might even add chopped up pecans…. but for now, this was light and de-lish! Perfect for a summer meal or even an end of the summer party. Enjoy!

    Crunchy Chicken Salad Pitas

    Mix up a light, delicious dinner, filling pita pockets with a crunchy and flavorful chicken salad filled with apples and nuts.

    • 12.5 ounces chicken (shredded)
    • 4 large eggs (boiled, peeled, and smashed)
    • 1/4 cup green onions (chopped)
    • 1/4 cup purple onion (minced)
    • 1 apple (cored and chopped)
    • 1/2 cup Miracle Whip
    • 1/2 cup pecans (optional)
    1. Chop green onions, purple onion, and an apple. Open chicken and drain it.

    2. Mix all ingredients together in a bowl, including nuts if you choose. Add Miracle Whip to give the salad a creamy, tangy texture/flavor. Finally, layer on pita slices with lettuce. You can add mustard for extra flavor, if desired.
    Dinner Ideas, lunch, sandwiches
    American
    chicken salad pitas

    (Disclosure: I was not compensated for this post in any way. This recipe and all views/opinions remain honestly and solely my own.)

  • CrockPot Chicken Enchilada Casserole

    CrockPot Chicken Enchilada Casserole

    Throw together a quick and easy CrockPot chicken enchilada casserole, so your slow cooker can make dinner for you. Delicious Tex-Mex family meal with creamy enchiladas in casserole form!

    Inspiration for this Crock Pot chicken enchilada casserole comes from our family cookbook and from my favorite recipe for chicken enchiladas. We’ve made this meal since our oldest was a toddler. It’s always been a favorite, and the best part is…. It’s easy peasy.

    CrockPot chicken enchilada casserole with fresh tomatoes and cilantro in gray slow cooker with wooden spoon

    All the ingredients melt together and make a delicious slow cooker enchilada casserole. In fact, if you think this recipe is delicious, you’ll love turkey enchilada casserole, as well.

    Why You’ll Love This Casserole Recipe

    • It’s a slow cooker enchilada casserole. So your CrockPot will do all the hard work for you.
    • In other words, it’s easy to make. You can throw everything in the CrockPot and let it cook while you work on other things or just enjoy life while dinner cooks for you.
    • It’s deliciously creamy. With both cream cheese and cream of chicken soup, this casserole is a creamy enchilada casserole.
    • This recipe makes enough to have leftovers. I love leftovers after enchilada night!
    • It’s easy to change it up… For instance, you can make chicken enchilada casserole or beef enchilada casserole. You can swap out corn tortillas for flour, especially if you’re gluten-free.
    • It’s a budget-friendly dinner recipe with not a ton of prep work. Most ingredients don’t require prep.
    • Cleanup’s a breeze, especially if you insert a slow cooker liner in your CrockPot.

    Speaking of ingredients…

    crock pot chicken enchilada casserole ingredients on white marble countertop

    Ingredients and Substitutions Notes

    Here are just a few notes on the ingredients you’ll need to make this CrockPot enchilada casserole…

    • Cream Cheese – You can use a lower fat cream cheese, like Neufchatel cheese, but I much prefer whole fat.
    • Cream of Chicken Soup – You can use regular or gluten-free cream of chicken. If you don’t want to use soup, you can substitute sour cream instead.
    • Red Enchilada Sauce – You can use store bought sauce for the convenience of it, or you can make homemade enchilada sauce.
    • Rotel – I use a can of diced tomatoes with green chilies.
    • Boneless Skinless Chicken Thighs – You can also use chicken breasts, but I love using chicken thighs for casseroles because they add more juice and flavor.
    • Corn Tortillas – I regularly make and prefer enchiladas made with corn tortillas, especially since I’m gluten-free. I feel the corn tortillas don’t get as soggy as flour tortillas, and they have much more authentic flavor. Not that this casserole is authentic; it’s not. But I do prefer the taste of corn tortillas.
    • Shredded Cheese – You’ll need cheddar cheese and Monterey Jack, though I’ve been known to substitute Manchego cheese, or sheep cheese, (which I find at Costco) at times.

    How to Make CrockPot Chicken Enchilada Casserole

    The first thing to do when making this casserole is to cook the chicken; you can use boneless skinless chicken breasts or thighs, though I do prefer thighs because they have so much more flavor and juiciness. We make a batch of Instant Pot taco chicken with ours.

    Prep the Ingredients:

    1. In a large mixing bowl, mix the cream cheese, soup, enchilada sauce, and Rotel.
    2. Add the shredded chicken to the sauce mixture and mix together well.
    3. Cut the tortillas into triangles or strips, perfect for layering in the slow cooker.
    steps for how to prep ingredients for CrockPot chicken enchiladas, mixing ingredients in white mixing bowl, and cutting corn tortillas into triangles on wood cutting board

    Assemble the Casserole:

    Now it’s time to make the layers. First spray your slow cooker with cooking spray (this eliminates a hard, crusty ring around the side of the slow cooker when cleanup comes).

    1. Start with a thin layer of the sauce mixture in the bottom of the slow cooker.
    2. Then add a layer of tortilla triangles (or strips).
    3. Add another layer of the sauce mixture.
    4. Then top it off with a mixture of the shredded cheeses.
    5. Continue with a second round of layers, starting with tortilla triangles, then a layer of sauce.
    6. Top off the sauce layer with the rest of the shredded cheese mixture.
    steps for how to make CrockPot chicken enchilada casserole by layering ingredients in gray slow cooker
    1. Cook on low heat for 2-3 hours or high heat for 1-2 hours, making sure the cheese doesn’t brown.
    cooking slow cooker chicken enchilada casserole in Black + Decker slow cooker on low on wood countertop

    Serve with your favorite toppings, like fresh tomato salsa with basil, guacamole, and sour cream!

    serving of Crock Pot chicken enchilada casserole topped with sour cream and tomatoes on gray plate, with forked bite

    Expert Tips and Recipe FAQ’s

    How do you make enchilada casserole not soggy?

    While you can fry your tortillas in a little bit of oil before putting into the casserole, this may be more work than you’d bargained for. This is why I like to use corn tortillas, which are less likely to get soggy than flour tortillas. Personally, I feel they taste better too, and they’re usually gluten-free, so it’s a win-win.

    Can I use green sauce?

    Yes, you can. Just know it’ll change the flavor and possibly even the texture of your finished casserole.

    Can I make CrockPot enchilada casserole ahead of time?

    You can make it ahead of time. In fact, you can layer it all together and put it in the fridge for a day or two. However, I recommend no longer than that uncooked.

    Does chicken enchilada casserole freeze well?

    Yes, you can freeze the cooked casserole for up to 3 months. Just make sure it cools before covering with a layer of plastic wrap and aluminum foil; then place it in the freezer.

    How do I store leftovers?

    Just put them in an airtight container and refrigerate for 3-4 days.

    wooden spoonful of CrockPot chicken enchilada casserole over gray slow cooker full of cheesy casserole

    More Top Slow Cooker Chicken Recipes

    You may also enjoy Instant Pot chicken tacos for dinner.

    If you try this recipe, why not leave a star rating in the recipe card right below and/or a review in the comment section further down the page? I always appreciate your feedback. You can also follow me on Pinterest, Facebook, Instagram, and YouTube. And subscribe to my email list too!

    CrockPot Chicken Enchilada Casserole

    Throw together a quick and easy CrockPot chicken enchilada casserole, so your slow cooker can make dinner for you. Delicious family meal!

    • Slow Cooker
    • Slow Cooker Liner
    • 8 ounces cream cheese (softened)
    • 10.5 ounces cream of chicken soup
    • 10 ounces red enchilada sauce
    • 10 ounces Rotel
    • 1 1/2 pounds boneless skinless chicken thighs (cooked and shredded)
    • 6 whole corn tortillas
    • 1 cup cheddar cheese (shredded)
    • 1 cup Monterey Jack cheese (shredded)
    1. In a large mixing bowl, mix the cream cheese, soup, enchilada sauce, and Rotel.

    2. Add the shredded chicken to the sauce mixture and mix together well.

    3. Cut the tortillas into triangles or strips, perfect for layering in the slow cooker.

    4. Spray the inside of your slow cooker with cooking spray to eliminate sticking.

    5. Start with a thin layer of the sauce mixture in the bottom of the slow cooker.

    6. Then add a layer of tortilla triangles (or strips).

    7. Add another layer of the sauce mixture.

    8. Then top it off with a mixture of the shredded cheeses.

    9. Continue with a second round of layers, starting with tortilla triangles, then a layer of sauce.

    10. Top off the sauce layer with the rest of the shredded cheese mixture.

    11. Cook on low heat for 2-3 hours or high heat for 1-2 hours, making sure the cheese doesn't brown.

    12. Serve with your favorite toppings and enjoy!

    Store leftovers in an airtight container and refrigerate for 3-4 days.

    dinner, Main Course, Main Dish – Casserole
    Tex-Mex
    chicken enchilada casserole, Crock Pot chicken enchilada casserole, CrockPot chicken enchilada casserole, slow cooker chicken enchilada casserole
  • Crispy Pringles Chicken

    Crispy Pringles Chicken

    How to make easy Pringles chicken, breaded with your favorite flavor Pringles chips. It’s tender yet crispy, delicious, and easy to make, perfect for lunch, dinner, snack, or appetizer!

    This crunchy, delicious, yummy treat is a family favorite, especially when paired with chicken dipping sauce. Think Pringles chicken nuggets, but I also like to call them Chicken Pringlers.

    baked Pringles chicken piled on gray plate

    Dinner with Pringle chicken is always a huge hit, and I love that you can make it with different flavors.

    Pringles chicken ingredients on white marble countertop

    Ingredient and Substitution Notes:

    You really only need 4 ingredients to make Pringles coated chicken…

    • Pringles – You can use whatever flavor you want. We’ve used regular and cheese. We’ve even used gluten-free versions of these tasty chips.
    • Seasoned Salt – This just gives extra flavor to the chicken and the crispy coating.
    • Boneless Skinless Chicken Breasts – You can also use thigh meat, which gives a juicier, sometimes more tender, chicken nugget. Many prefer to use wings, as well.
    • Buttermilk – You can use regular buttermilk, you can mix up buttermilk powder into liquid, or you can make your own buttermilk with the same measure of milk but add a tablespoon of vinegar.

    How to Make Pringles Chicken

    A big plus is that this Pringles chicken recipe is so easy to make. Before getting started, be sure to pre-heat the oven to 400°F and grease a 16×20 baking sheet, so everything’s ready to go.

    Here’s how to bread the chicken and bake it…

    1. First crush the Pringles, using a gallon bag and rolling pin or a food processor. Then add the crushed chips or potato crisps to a gallon bag with the seasoned salt, seal the bag, and shake it around to mix.
    2. Cut the chicken breast into small 1-2 inch nuggets.
    3. Dip the nuggets in the buttermilk.
    4. Then place the nuggets, 2-3 at a time, into the gallon bag, and shake them around to coat them with the Pringles chip breading.
    5. Place the nuggets in a single layer on a baking sheet.
    6. Then bake the Pringles crusted chicken at 400°F for about 20 minutes, or ’til they’re cooked thru. At this point, you can remove them from the oven and let stand, uncovered, about 5-10 minutes to crisp up even more.
    steps for how to make Pringles chicken recipe, including crushing Pringles chips, cutting up chicken, coating and breading chicken, and baking

    Serve it with your favorite chicken dipping sauce, with fries or salad on the side.

    Pringles breaded chicken is really good and has such a delicious flavor. I can’t wait to try making it again with more flavors like Barbecue or Dill Pickle.

    fingers holding chicken Pringler with bite taken out over white bowl with chicken dipping sauce

    Expert Tips and Recipe FAQ’s

    Can I cook chicken nuggets in the air fryer?

    While I prefer to make this oven baked chicken, you can also use an air fryer to make Pringles fried chicken. Just pop it in the air fryer for the appropriate amount of time for fried chicken to cook internally and crisp up.

    Can I make Pringles chicken tenders instead of nuggets?

    Sure! Yes, you totally can make this into tenders; just cut the chicken into longer strips rather than nuggets.

    fingers dipping Pringles coated chicken nugget in chicken dipping sauce in white bowl

    More Great Chicken Recipes

    If you try this recipe, why not leave a star rating in the recipe card right below and/or a review in the comment section further down the page? I always appreciate your feedback. You can also follow me on Pinterest, Facebook, Instagram, and YouTube. And subscribe to my email list too!

    Crispy Pringles Chicken

    How to make easy Pringles chicken, breaded with your favorite flavor Pringles chips. So crispy, delicious, and easy to make!

    • 5.2 ounces Pringles chips
    • 1 tablespoon seasoned salt
    • 2 pounds boneless skinless chicken breasts
    • 1 cup buttermilk
    1. Pre-heat the oven to 400°F and grease a 16×20 baking sheet.

    2. Crush the Pringles, using a gallon bag and rolling pin or a food processor.

    3. Then add the crushed chips or potato crisps to a gallon bag with the seasoned salt, seal the bag, and shake it around to mix.

    4. Cut the chicken breast into small 1-2 inch nuggets.

    5. Dip the nuggets in the buttermilk.

    6. Then place the nuggets, 2-3 at a time, into the gallon bag, and shake them around to coat them with the Pringles chip breading.

    7. Place the nuggets in a single layer on a baking sheet.

    8. Then bake the Pringles crusted chicken at 400°F for about 20 minutes, or 'til they're cooked thru. At this point, you can remove them from the oven and let stand, uncovered, about 5-10 minutes to crisp up even more.

    9. Serve with your favorite chicken dipping sauce, with fries, or salad on the side.

    Appetizers, dinner, lunch
    American
    chicken pringlers, Pringles breaded chicken, Pringles chicken, pringles chicken nuggets, Pringles chicken recipe, Pringles coated chicken, Pringles crusted chicken