Leftover Ham Crescent Rolls – Easy appetizer recipe with leftover ham, stuffing, and crescent rolls. Simple and delicious finger foods, perfect for party snacks or lunch with the kids!
Sometimes I think leftovers are even better than the main dish, especially when it comes to leftover ham and crescent rolls. When you combine the two with a few tasty ingredients, you’ve definitely got the makings of a delicious snack, lunch, or appetizer.
Because Christmas and Easter are all about ham, right? So now you’ll have a way to use up all those holiday leftovers in a really delicious way.
These ham and cheese crescents really are the perfect finger foods to serve as easy appetizers or even a fun lunch with your kids.
WHERE CAN I FIND THE RECIPE FOR LEFTOVER HAM AND STUFFING CRESCENT ROLLS?
If you’d rather skip all of my cooking tips, important cooking info for this recipe, and similar recipe ideas – and get straight to the scrumptious leftover ham and stuffing crescent rolls recipe – just scroll down to the bottom, where you’ll find a printable recipe card.
CAN I JUST USE DELI HAM IF I DON’T HAVE LEFTOVER HAM?
Yes, you can; in fact, that’s what I did for this recipe.
You can also use sausage and make something similar to my favorite maple sausage stuffed pastry bites, only with crescent roll dough instead of puff pastry.
DOES IT MATTER WHICH CHEESE I USE?
The type of cheese used is really up to the individual because cheese is such a personal choice. At least, that’s how I look at it anyway.
I’ve been a cheese lover since I was a kid, sneaking pieces of American cheese out of the fridge when Mom wasn’t looking. In fact, I’d have much rather had a slice of cheese over a cookie any day… Unless they were chocolate chip cookies, of course.
You can use just about any cheese you want with these. A few suggestions might be…
American Cheese
Extra Sharp Cheddar
Smoked Cheddar – One of my favorites.
Speaking of smoked, smoked Gouda would be fabulous, as would smoked Swiss or smoked Gruyére.
Pepper Jack
Really, your options are limitless. Pick a cheese, any cheese, and you’ll have the most delicious crescent roll appetizers ever.
TIPS FOR HOW TO MAKE LEFTOVER HAM AND TURKEY STUFFING CRESCENT ROLLS
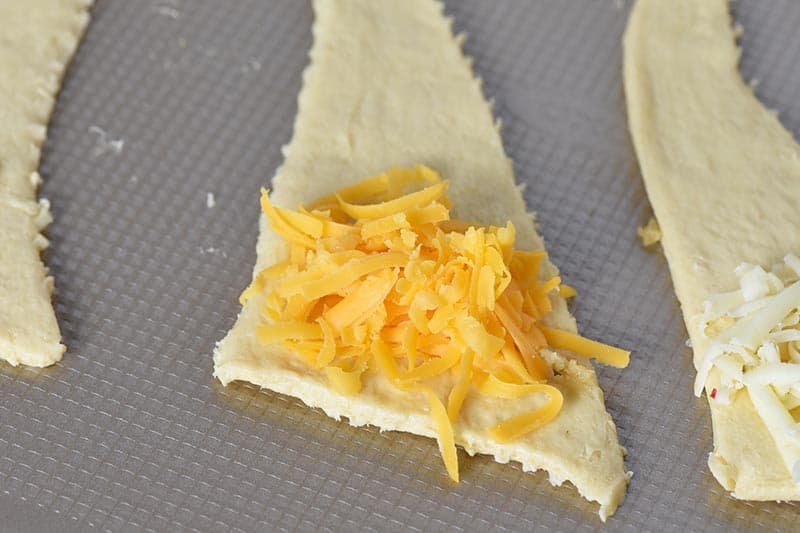
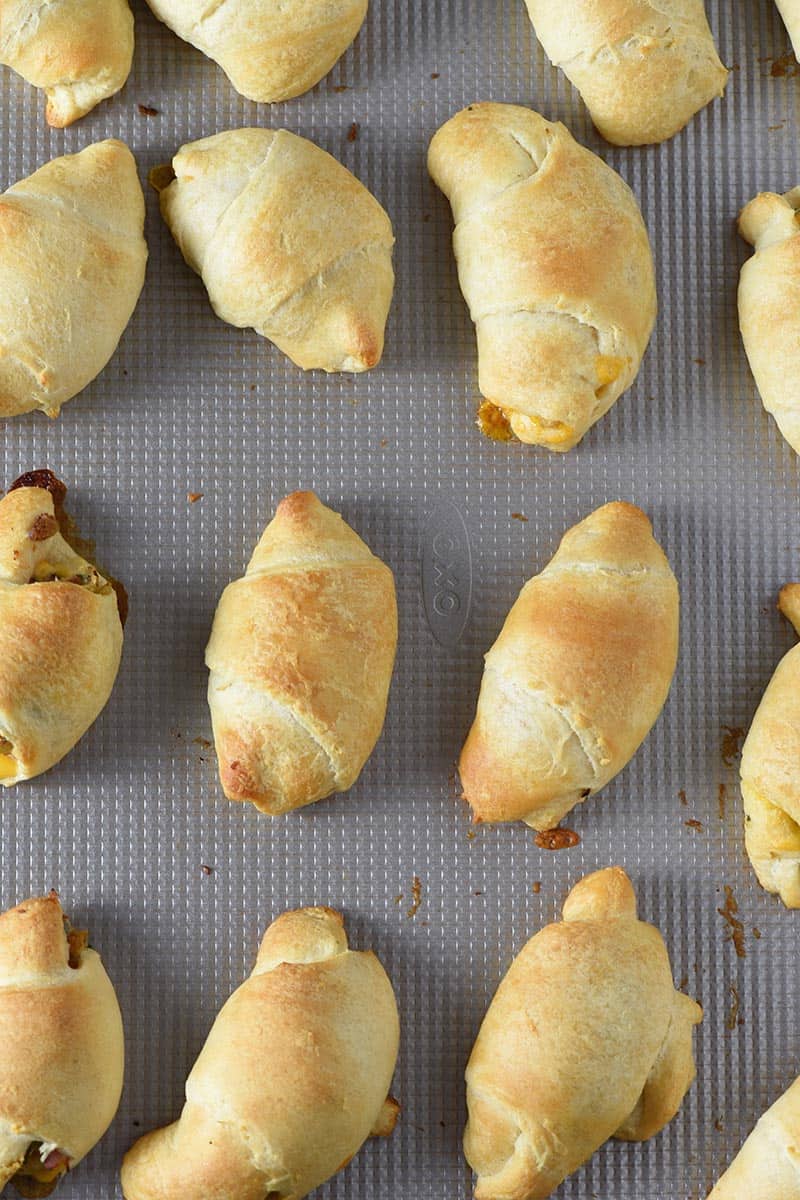
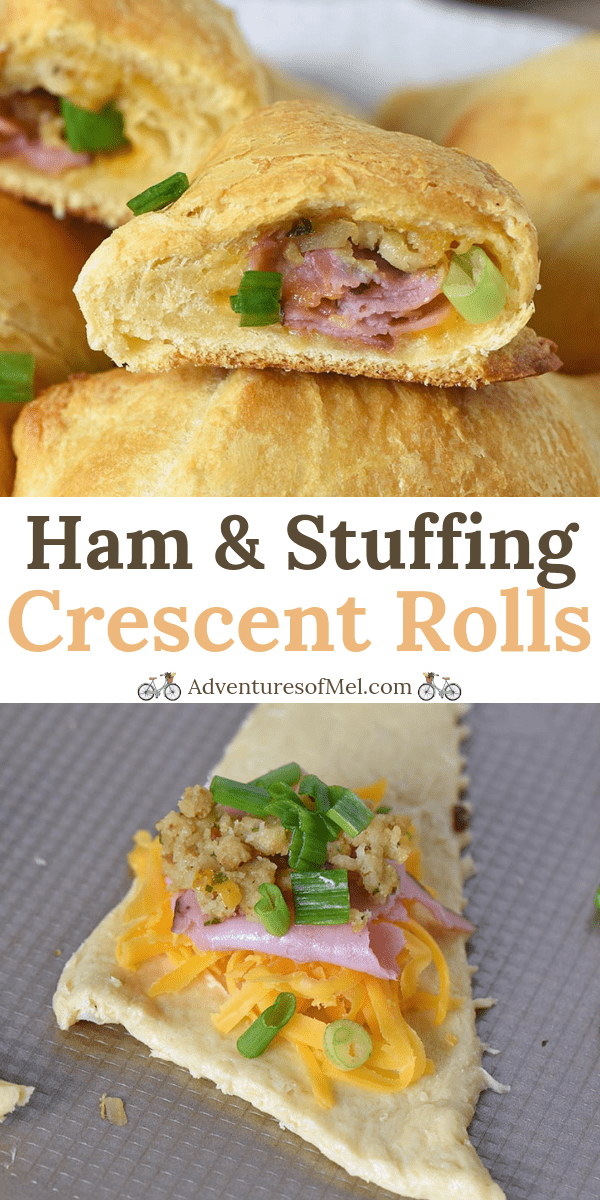
The first step for making these easy party appetizers is to gather your ingredients. You’ll need canned crescent rolls (or you can make homemade crescent dinner rolls), leftover ham, stuffing, your choice of cheese, and green onions.
When I first made these, I used American cheese, but these days I’d rather use extra sharp cheddar or pepper jack.
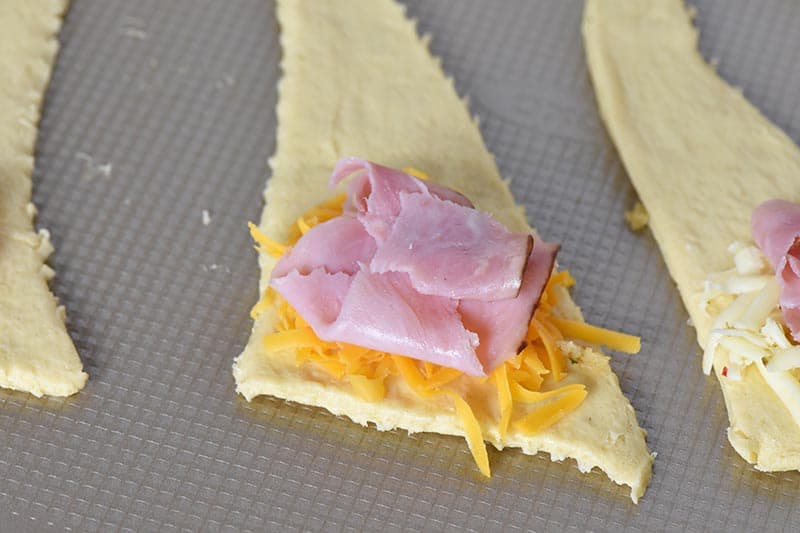
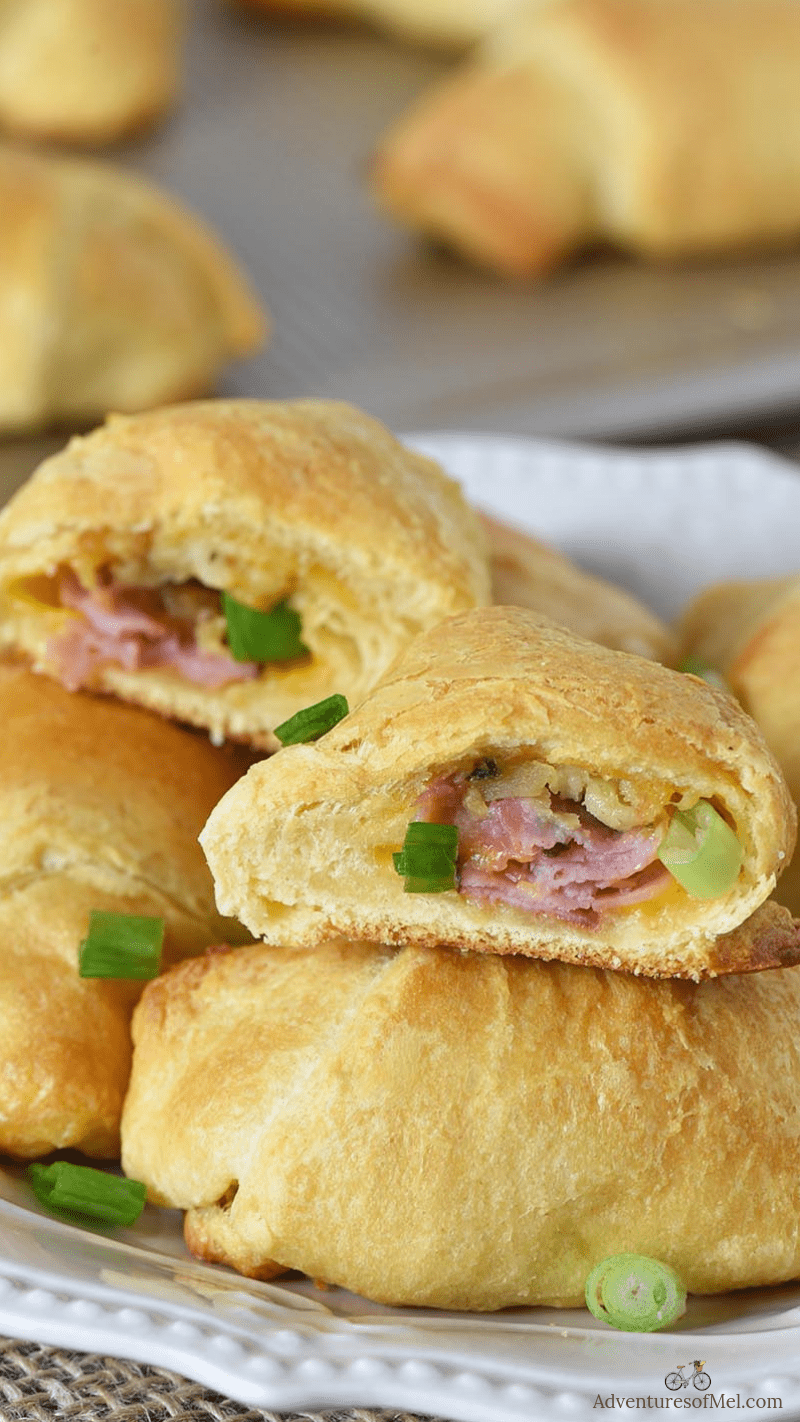
Take each piece of crescent roll dough, and add a quarter slice of cheese (or shredded cheese), as well as a small pile of leftover ham.
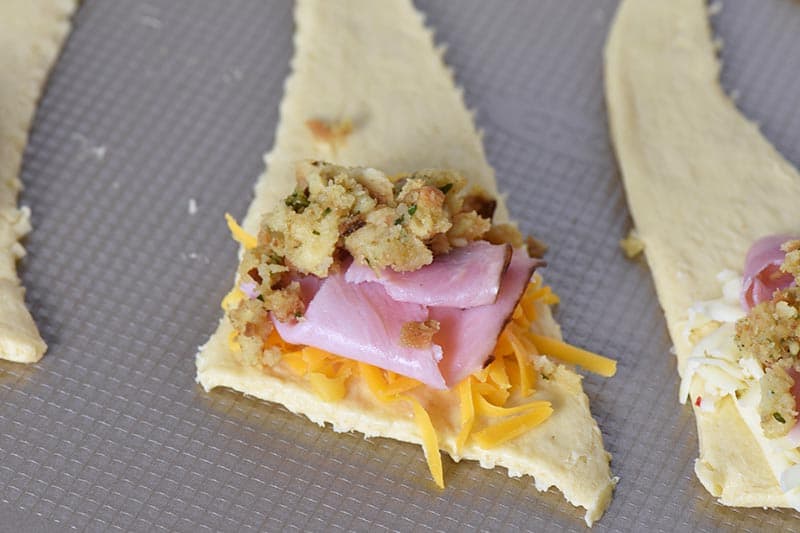
Then add a bite of turkey stuffing (or Christmas stuffing or whatever type of stuffing you want).
Another additional ingredient idea is leftover cranberry sauce. You can add just a tiny dollop of cranberry sauce on top of the ham for a li’l sweet and salty flavor.
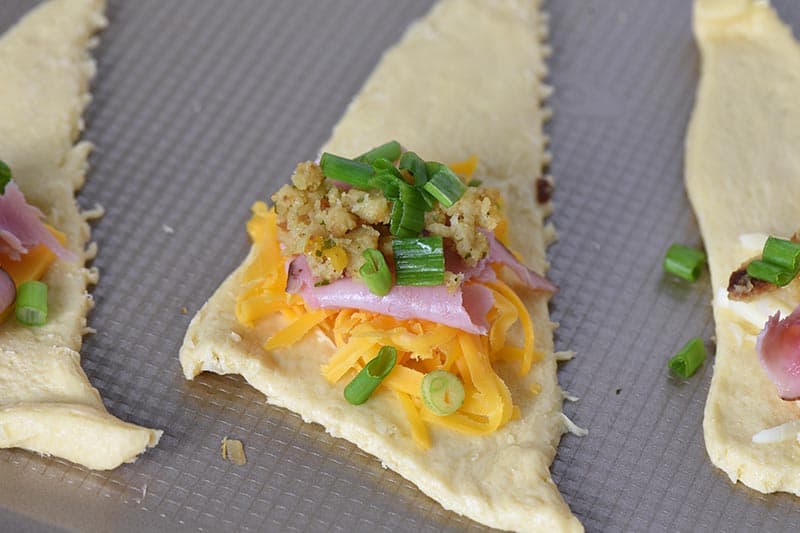
Finally, add a little pile of chopped green onions. Don’t leave these out because they add so much delicious flavor.
Roll each crescent up, per the instructions on the can. They’ll probably be a bit bulky and might not be quite as pretty as they normally would, but that’s ok; they’ll still taste amazing.
Finally, pop them in the oven and bake as usual, per the instructions on the can.
When you take them out of the oven, they’re best eaten while warm. Dip them in leftover ham gravy and enjoy!
Mmmm…. Happy Holiday Leftovers Season! You’ll find even more ideas in our big list of Christmas recipes.
MORE LEFTOVER HAM RECIPES AND CRESCENT ROLL RECIPES YOU’LL LOVE:
These 3 easy appetizer recipes are 3 of my favorites; the ham and dill spirals are perfect for using up leftover ham. You can also make the most delicious ham and cheese egg muffins (recipe coming soon).
Venturing out into friend land, Mommy Hates Cooking has a Leftover Ham and Stuffing Frittata that looks out of this world amazing. And Crazy Adventures in Parenting made the most delicious looking Ham and Cheese Crescent Roll Sandwiches.
KITCHEN TOOLS YOU’LL NEED TO MAKE THESE EASY APPETIZERS
Cookie Sheet – This is by far my favorite cookie sheet; I use it for so many things.
Easy appetizer recipe with leftover ham, stuffing, and crescent rolls. Simple and delicious finger foods, perfect for party snacks or lunch with the kids!
2 cans crescent rolls
1 1/2 cups ham (leftover and chopped or sliced)
1 1/2 cups stuffing (leftover*)
2 cups cheddar cheese (**shredded)
1/2 cup green onions (chopped)
Pre-heat your oven to 375°F.
Separate each crescent roll.
Add a bite of cheese, a small pile of ham, a bite of stuffing, and a sprinkling of green onions in that order.***
Roll each crescent up, per the instructions on the can, and place on an un-greased cookie sheet.
Bake at 375° for 11 to 13 minutes or until the crescent rolls turn a golden brown.
They’re best served while warm, right out of the oven.
*You can use leftover stuffing or even boxed stuffing for this recipe.
**You can use any kind of cheese you want. I’ve used American, Extra Sharp Cheddar, Pepper Jack, Smoked Cheddar, etc.
***If you like, you can add just a tiny dollop of cranberry sauce on top of the turkey for a li’l sweet and salty flavor.
Appetizers
American
Christmas appetizers, Christmas party appetizers, crescent roll appetizers, crescent roll recipes, crescent rolls, easy appetizers, easy party appetizers, ham and cheese, ham and cheese crescent rolls, leftover ham, leftover ham recipes, stuffed crescent rolls
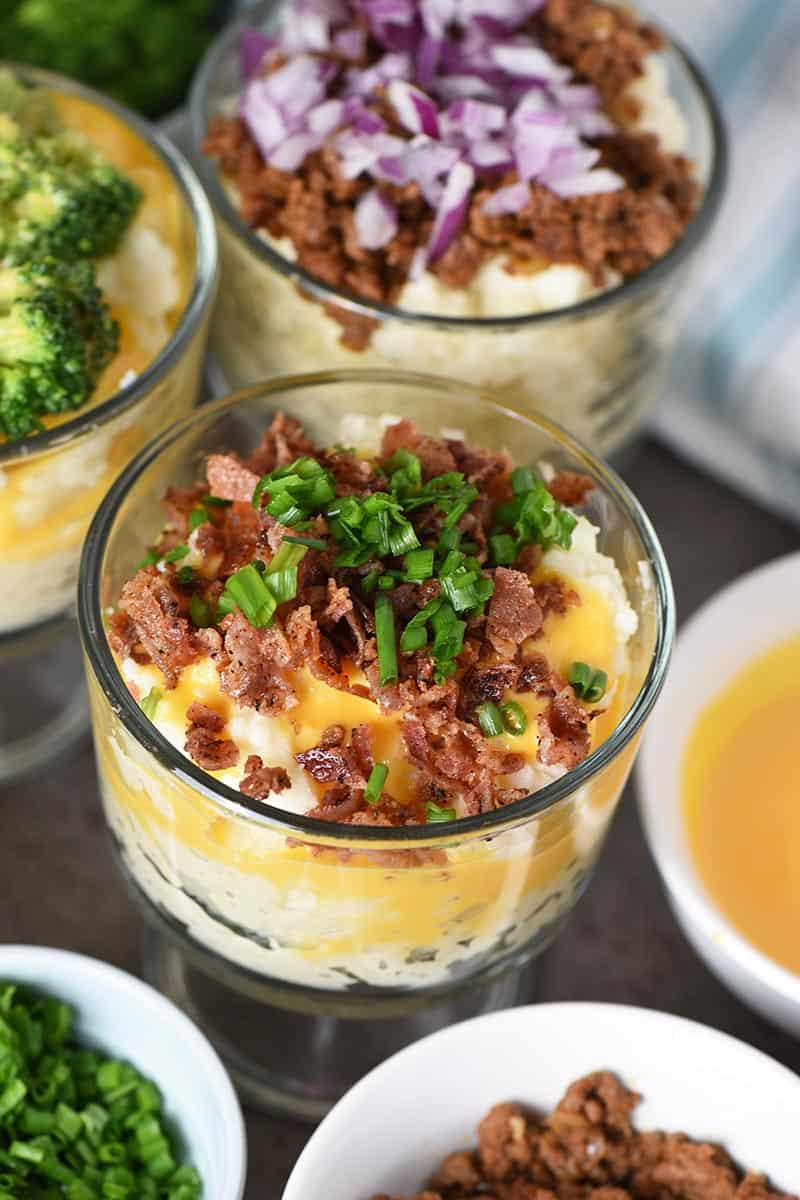
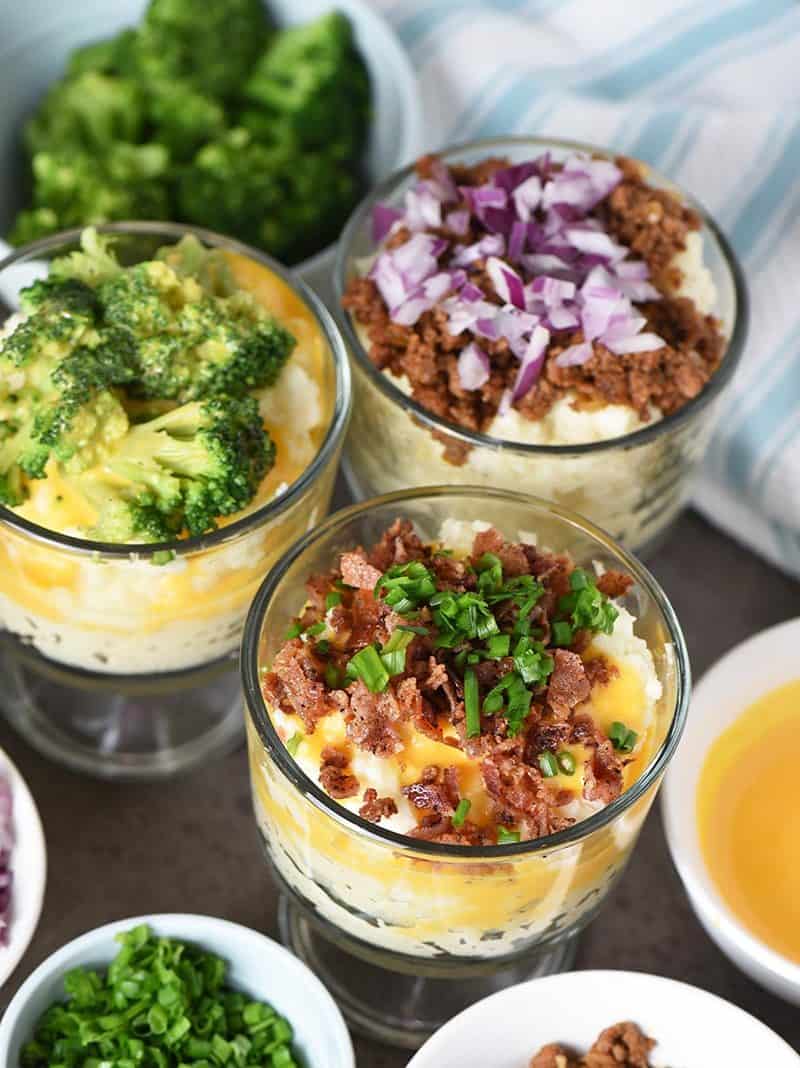
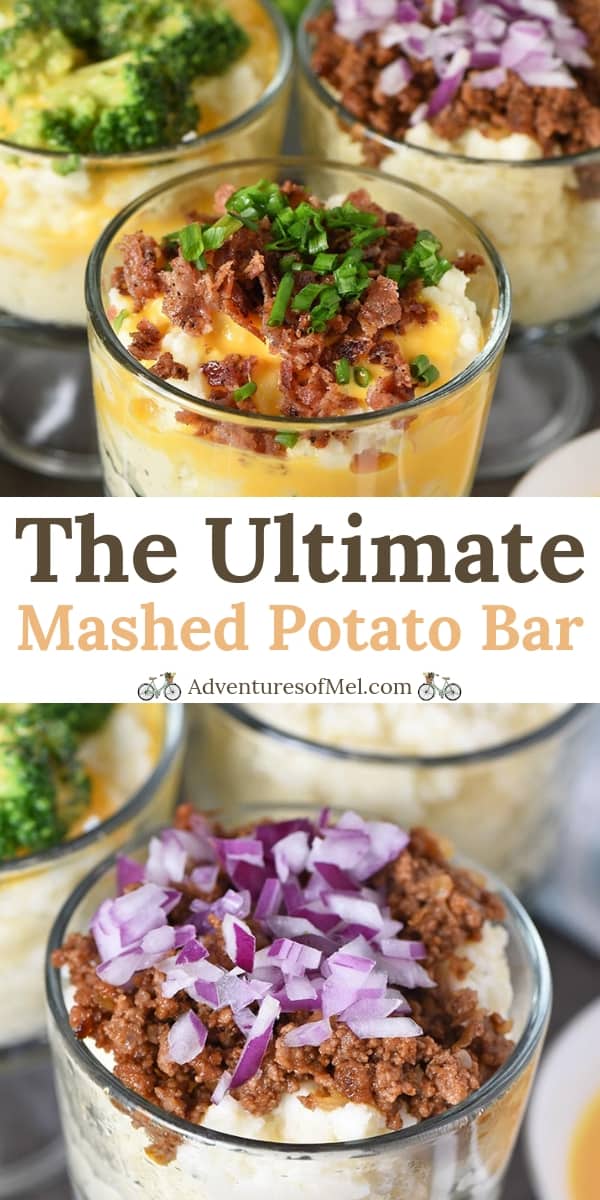
Feed a crowd with the ultimate mashed potato bar at your next party, wedding, or celebration. How to create a crowd pleasing buffet with ideas for all sorts of delicious mashed potato toppings. It’ll be the talk of the party!
There are so many things you can do with a mashed potato bar; the choices for mashed potato bar toppings are endless. Pretty much anything you think up you can use.
It’s the perfect appetizer idea, or side dish, for a wedding or party. I experienced my first mashed potato bar, or rather a mashtini bar, at a blogging conference; I’d never seen such a beautiful thing in all my life.
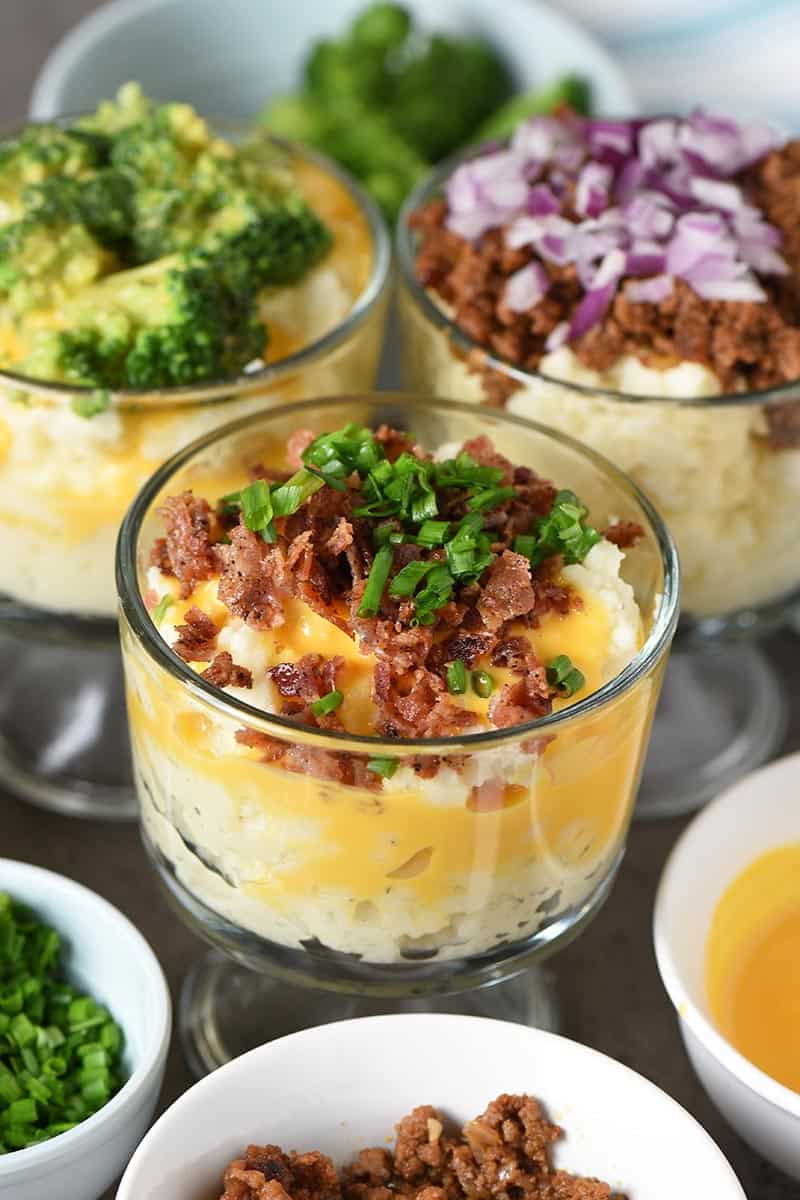
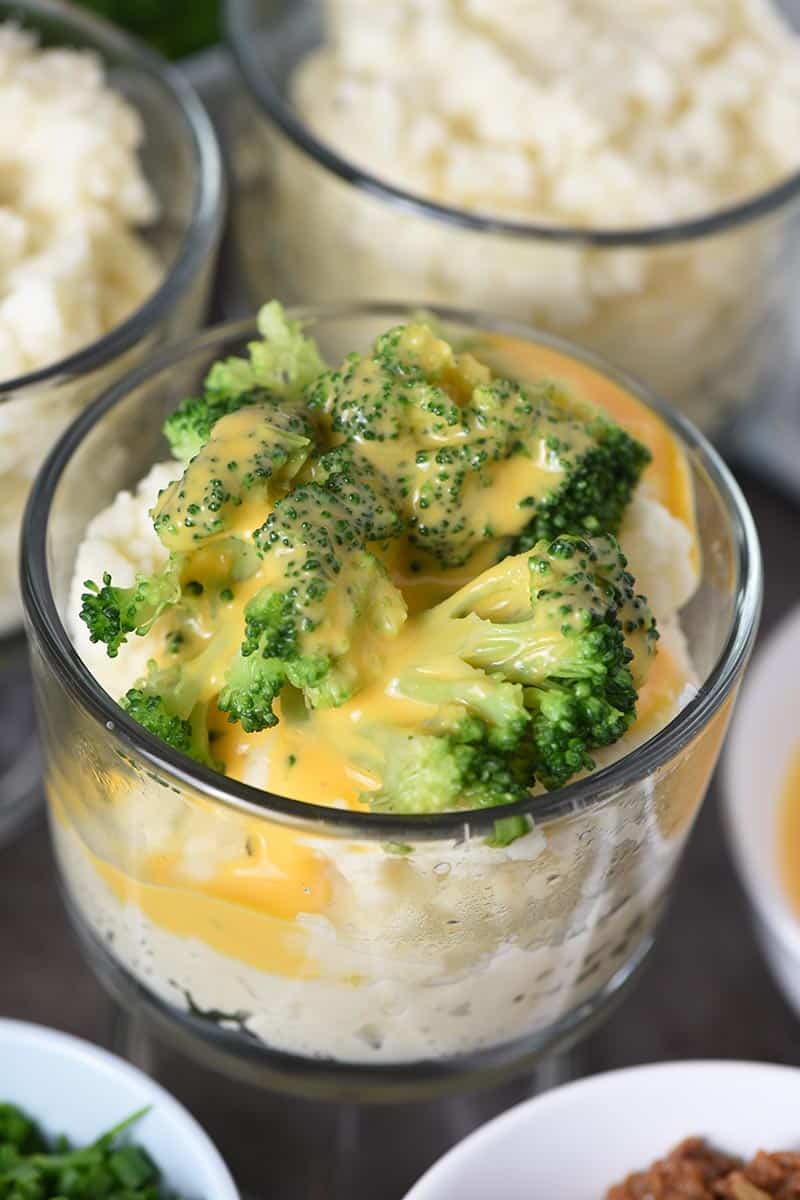
It was filled with all sorts of delicious mashed potato toppings, along with all sorts of potatoes, including purple mashed potatoes! The mashed potatoes themselves were served in martini glasses, and you could go right down the buffet line, adding any mashed potatoes toppings you wanted.
You talk about delicious and one of my favorite things ever. That was hands down the BEST food I’ve ever had at a conference. Comfort food at its best, and man, was it delicious.
Why Create a Mashed Potato Bar?
When I created my first baked potato bar, I thought it only appropriate to also create a mashed potato bar. Because who doesn’t love a loaded down cup of hot mashed potatoes smothered in cheese and bacon?
A mashed potato bar wedding buffet will definitely be a great idea and a favorite with guests.
New Year’s is also a great time to put together a mashed potato martini bar. To save on cost, make a big batch of mashed potatoes, and have each guest bring their favorite toppings to add to the ones you provide. Then you get different perspectives, different ideas, and guests get to contribute their favorite topping idea to the mix.
Potatoes – I prefer to use yellow potatoes, but again, you can have fun with this and use all sorts of potatoes, including yellow, russet, red potatoes, even purple potatoes.
Salted Butter – Don’t skimp on the butter; it gives the best flavor.
Heavy Cream or Whole Milk – While you can use skim milk, you’ll get the best texture and flavor with whole milk or cream.
Sea Salt and Black Pepper – for added flavor.
Steps for Making Stovetop Mashed Potatoes:
Wash, peel, and chop the potatoes.
Boil the potatoes in a large saucepan on the stove over low to medium heat, until they’re soft enough to easily jab with a fork, about 20-30 minutes.
Drain the water off the boiled potatoes, and leave them in the saucepan.
Add the butter and heavy whipping cream to the potatoes.
Use a hand mixer to whip the potatoes, adding salt and pepper to taste. You can also use a potato masher if you don’t have a hand mixer; your potatoes may just be a little bit chunky.
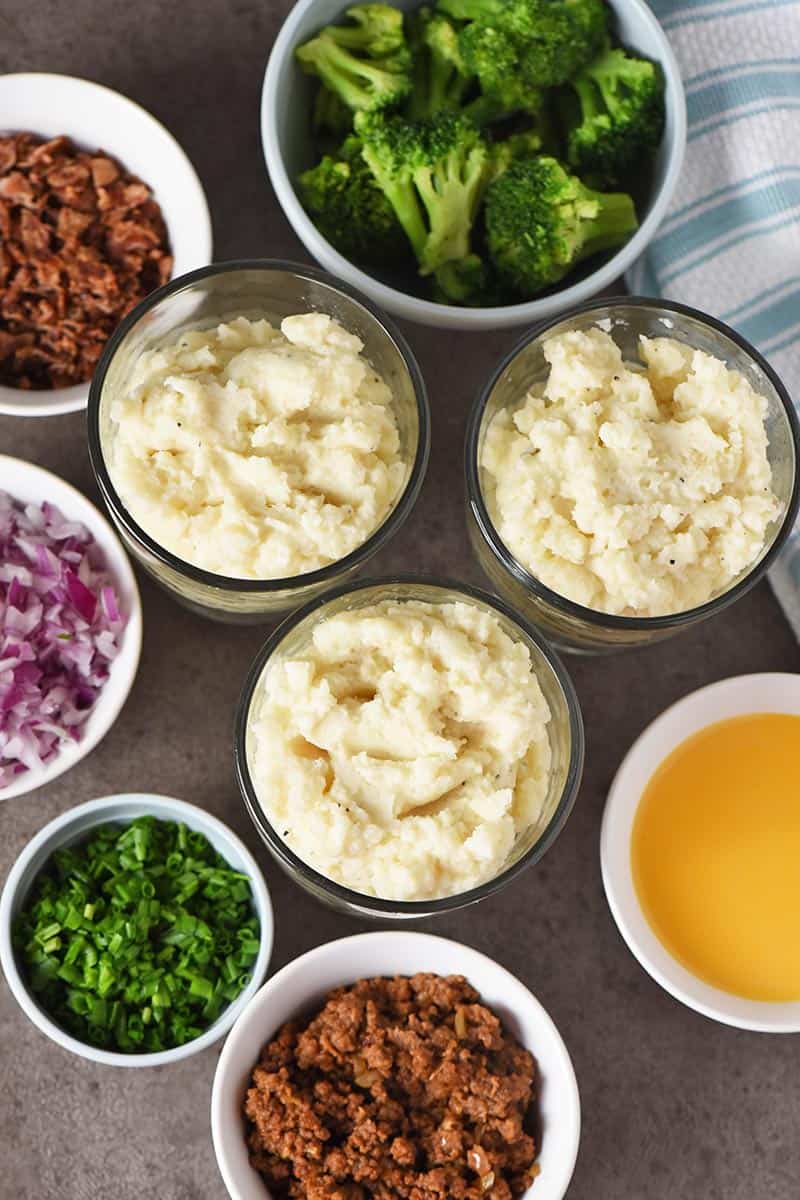
Gather your ingredients for your potato bar… You’ll need mashed potatoes and toppings. Your main work will be cooking the potatoes and prepping any toppings for your guests to choose from.
Whether you’re getting together with friends for game night, hosting a family dinner, or setting up a potluck, a mashed potatoes bar is the perfect way to feed and entertain your guests. And it really doesn’t take a whole lot of time and effort on your part.
Prep the toppings, adding each topping to a separate dish or compartment for serving. Prepping may involve cooking, re-heating, or simply chopping.
Set everything out buffet style, so your guests can create their very own delicious mashed potato creations.
If you’re hosting a smaller gathering, try using a large charcuterie board with small bowls for a variety of toppings all around a large bowl of mashed potatoes.
If you’re wondering how to keep the mashed potatoes warm without warmers, you can create a CrockPot mashed potato bar or Instant Pot mashed potato bar.
The Ultimate List of Mashed Potato Bar Toppings:
When it comes to what toppings are good on mashed potatoes, including what to put on mashed potatoes besides gravy, this list of toppings will answer that question in a most delicious way.
The sky’s the limit on ideas for a mashed potato buffet because there are so many toppings you can add to this list. But this is a great start.
Recipe FAQ’s
How much does a mashed potato bar cost?
Really, this depends. For a small family gathering, if you make your own mashed potatoes and put together just a few simple toppings, you can get away with less than $20. If you’re creating a larger buffet for a large crowd, your cost will depend on how many ingredients and supplies are needed to feed said crowd.
What potatoes are best for a mash potato bar?
While I do prefer yellow potatoes or Yukon Gold potatoes, you can use any kind of potatoes you prefer, including Russet potatoes, red potatoes, even purple potatoes if you can find them. I’ve also gone so far as to search for the best mashed potatoes near me, and I found Bob Evans mashed potatoes in my grocery store. If you really don’t want to make mashed potatoes, ready made potatoes could be just the thing.
Can you make mashed potatoes and toppings ahead of time?
Yes, you can. You can make mashed potatoes and prep most of the toppings 1-2 days ahead of time. You’ll just need to store everything in airtight containers in the fridge.
How can you keep the mashed potatoes warm at a party?
You can either use a buffet server and food warmer. Or you can keep the mashed potatoes in a Crock Pot or Instant Pot on the “Keep Warm” setting.
How should you store leftovers?
Definitely store leftovers in airtight containers in the refrigerator.
More Family Favorite Potato Recipes
If you love this mashed potato bar and think it’s as much fun as I do, you’ll love these recipes too…
If you try this recipe, why not leave a star rating in the recipe card right below and/or a review in the comment section further down the page? I always appreciate your feedback. You can also follow me on Pinterest, Facebook, Instagram, and YouTube. And subscribe to my email list too!
The Ultimate Mashed Potato Bar
Feed a crowd with a mashed potato bar at your next party, wedding, or celebration. Ideas for all sorts of delicious toppings.
Stockpot
Hand Mixer
Potato Masher
Cutting Board
Vegetable Cleaver
Buffet Server and Food Warmer
Serving Bowls
Sectioned Serving Tray
Mini Appetizer Cups
Plastic Martini Glasses
Mashed Potatoes:
16 medium potatoes
12 tablespoons salted butter
4 tablespoons whole milk (or heavy cream)
2 teaspoons sea salt (to taste)
2 teaspoons ground black pepper (to taste)
Mashed Potato Bar Toppings:
1 1/2 cups salted butter
1/4 cup salt
1/4 cup ground black pepper
1 1/2 cups sour cream
3 cups cheese sauce
12 ounces extra sharp cheddar cheese (*shredded)
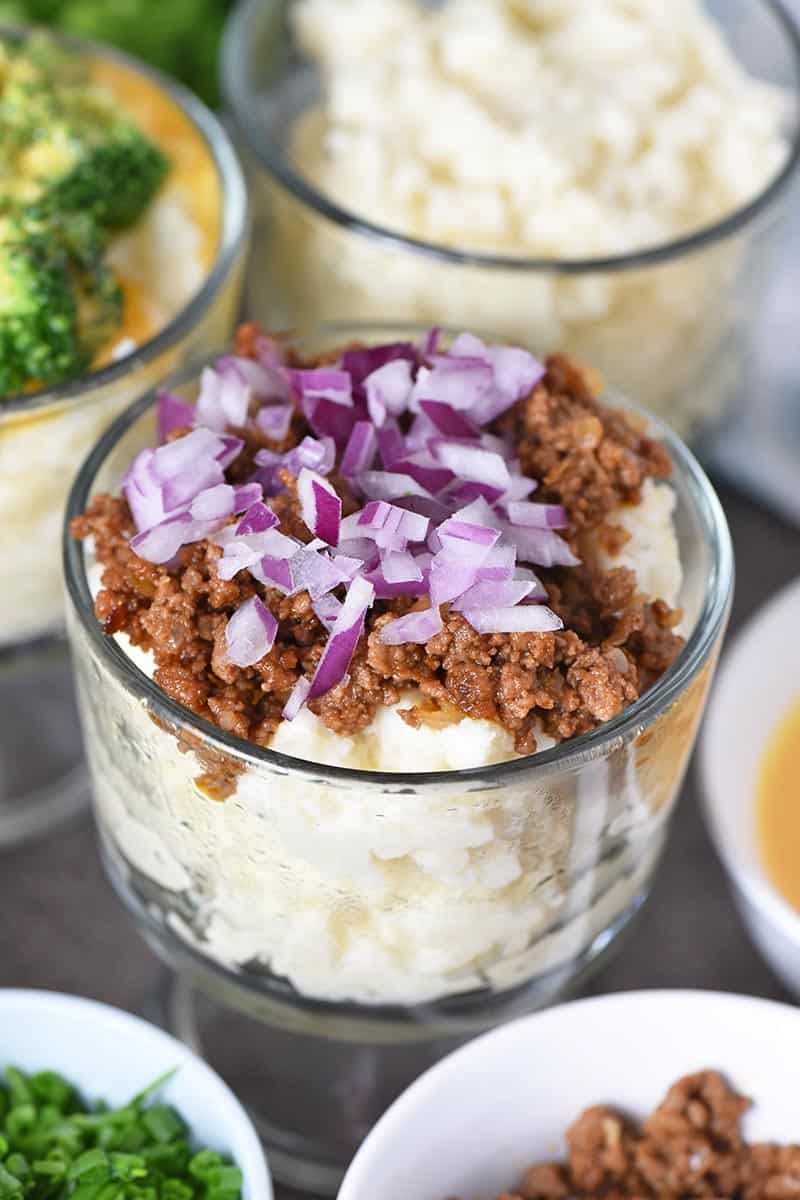
2 cups red onion (minced)
2 cups green onion (chopped)
2 cups chives (chopped)
6 cups broccoli (cooked)
6 cups sloppy joe meat
1 1/2 cups bacon (cooked and crumbled)
4 1/2 cups ham (chopped)
Mashed Potatoes:
Wash, peel, and chop the potatoes.
Boil the potatoes in a large saucepan on the stove, until they're soft enough to easily jab with a fork, about 20-30 minutes.
Drain the water off the boiled potatoes, and leave them in the saucepan.
Add the butter and heavy whipping cream to the potatoes.
Use a hand mixer to whip the potatoes, adding salt and pepper to taste. You can also use a potato masher if you don't have a hand mixer; your potatoes may just be a little bit chunky.
Once they're whipped, they're ready to serve.
Potato Bar Toppings:
Choose and prep your toppings*, adding each topping to a separate dish or compartment for serving. Prepping may involve cooking, re-heating, or simply chopping.
Set everything out buffet style*, so your guests can create their very own delicious baked potato creations.
* You can use any kind of shredded cheese you prefer. I recommend Extra Sharp Cheddar, Colby Jack, Monterey Jack, Pepper Jack, Smoked Cheddar, Mozzarella, etc.
*More mashed potato bar topping ideas include cooked cauliflower, chili, beef taco meat, taco chicken, pulled pork, sausage, ground beef, steak, bacon bits, cubed pepperoni, BBQ sauce, Ranch dressing, pizza sauce, turkey gravy, ham gravy, ham gravy with cornstarch, chicken stock gravy, tomatoes, guacamole, salsa, jalapeños, fire roasted green chiles, corn, peas, etc.
*You may need warmers to keep the mashed potatoes warm; you can also use a slow cooker or Crock pot. Otherwise, you may use a serving platter or serving bowls for toppings.
Side Dish
American
mash potato bar, mashed potato, mashed potato bar, mashed potato bar ideas, mashed potato bar toppings, mashed potato martini bar, mashed potato toppings, mashed potatoes bar, mashed potatoes recipe, mashed potatoes toppings, mashtini bar, potato recipes, toppings for mashed potatoes
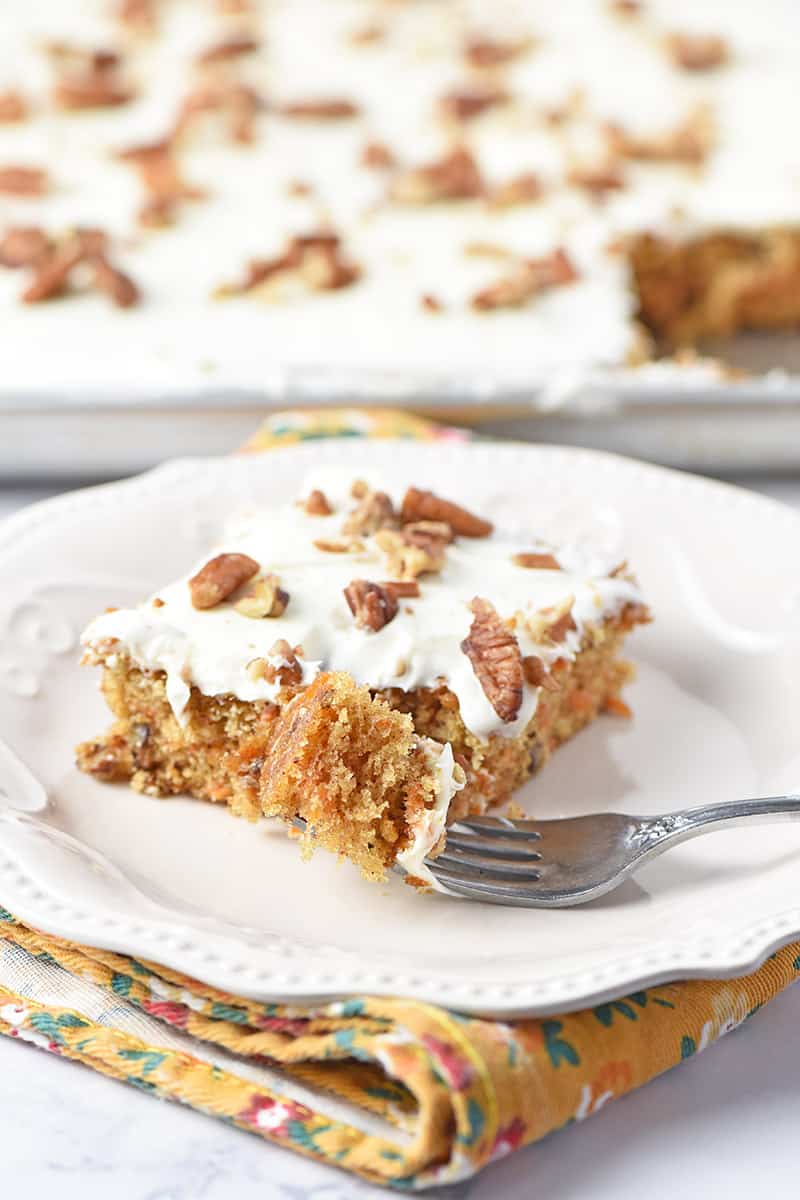
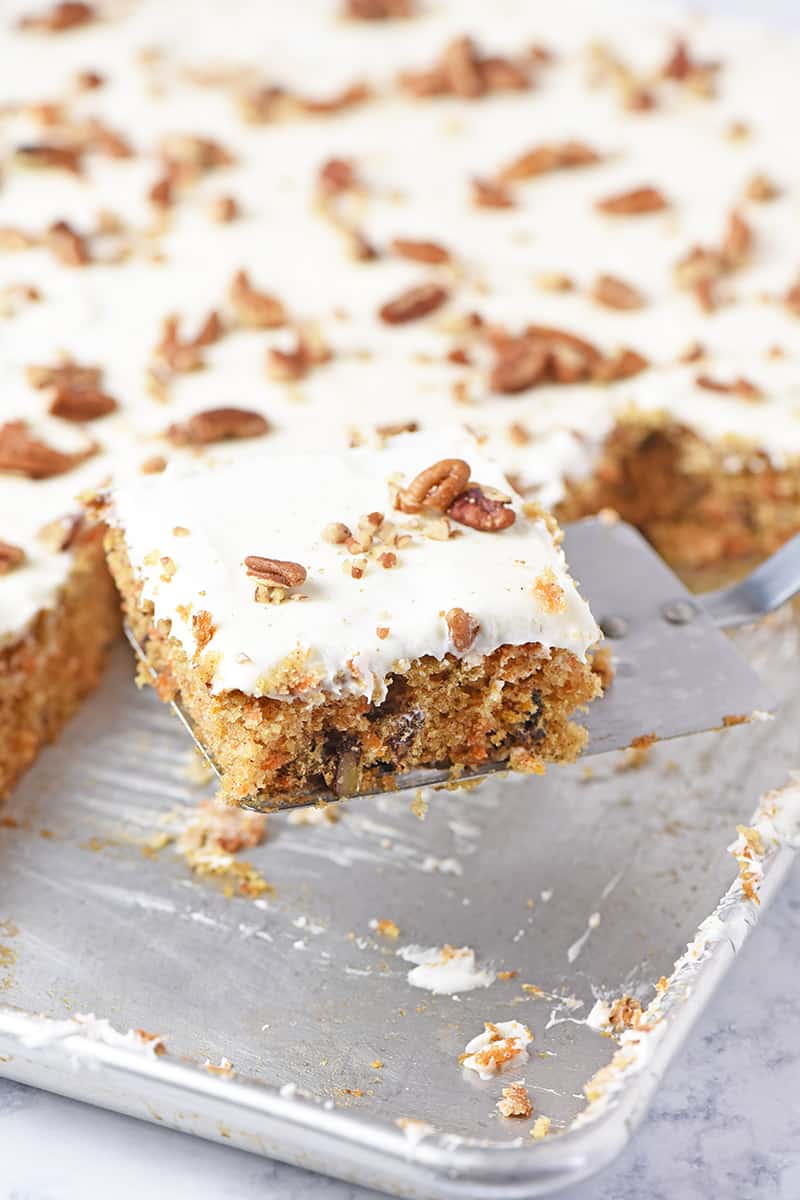
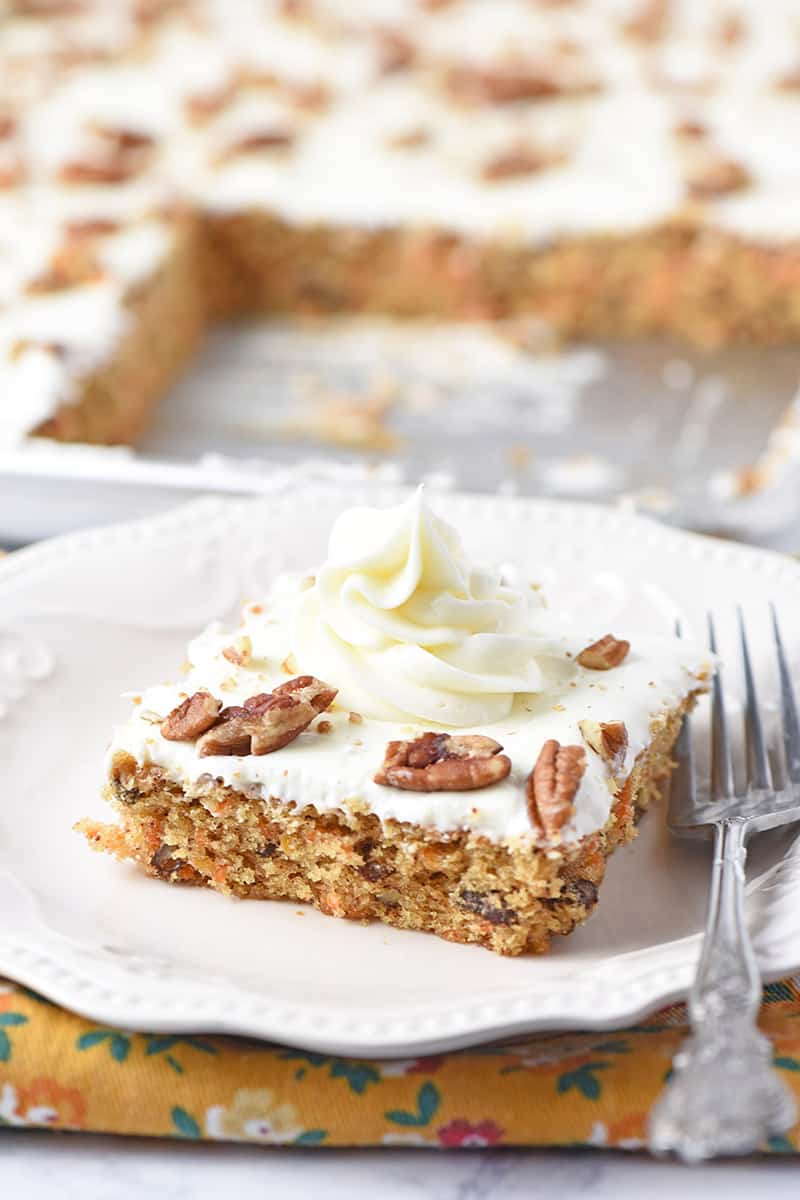
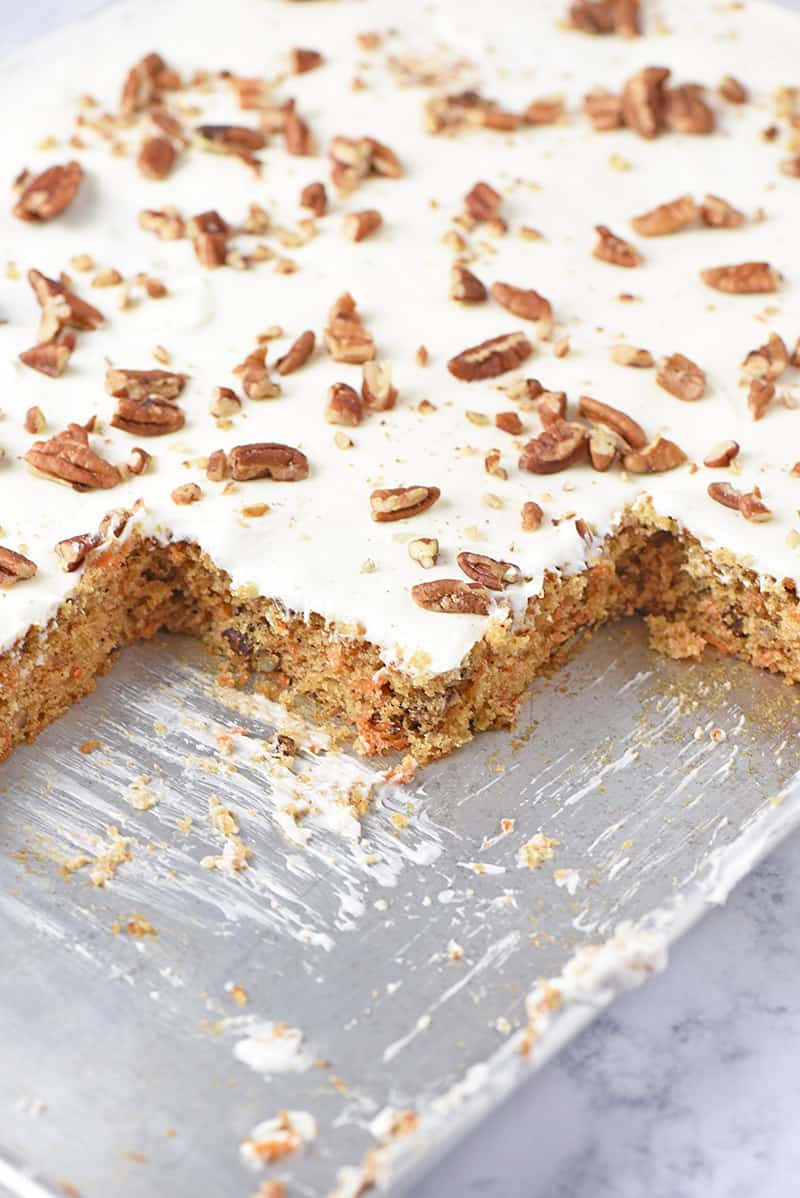
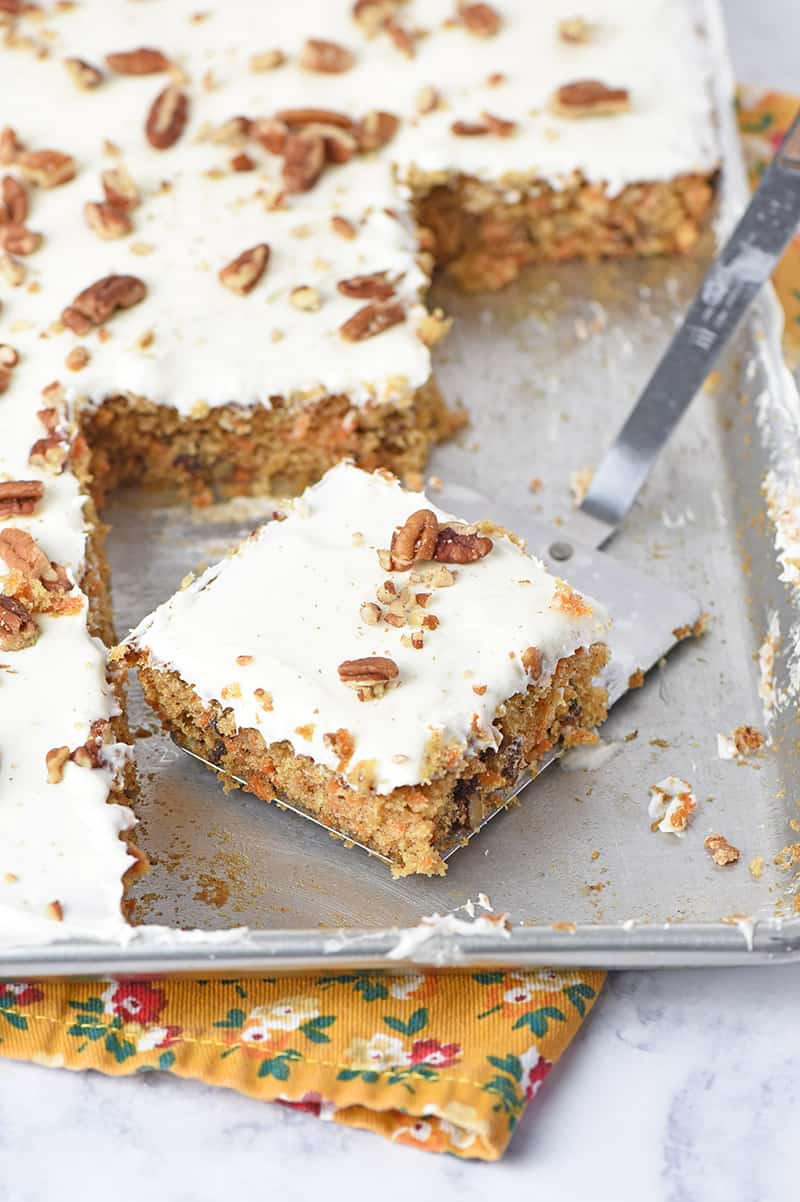
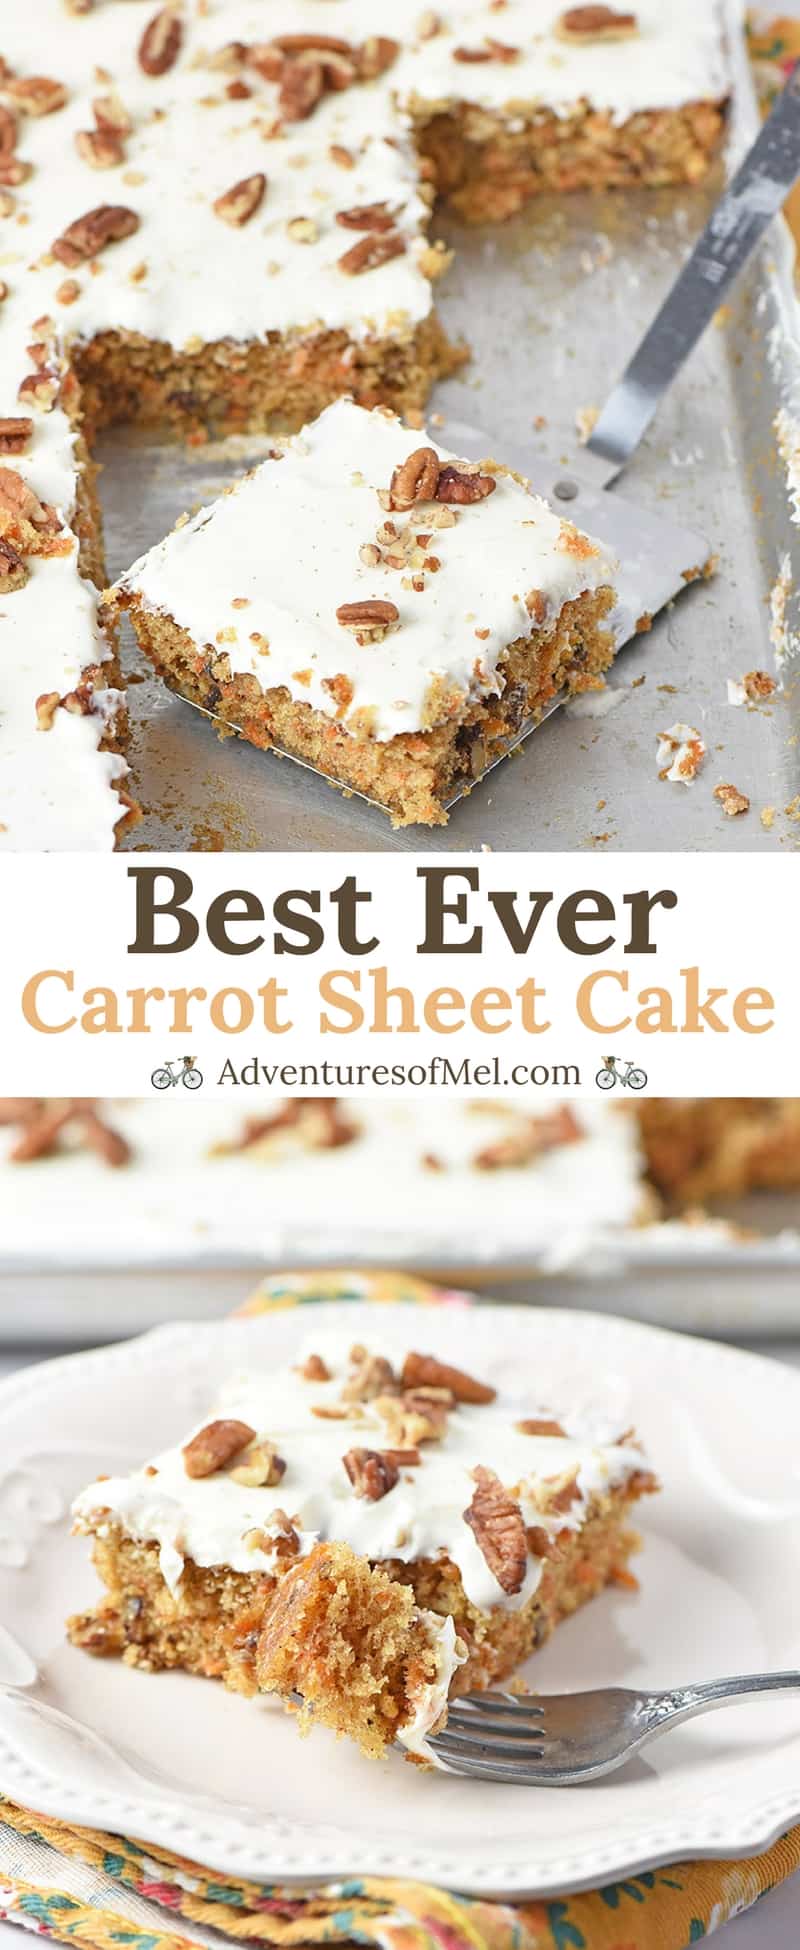
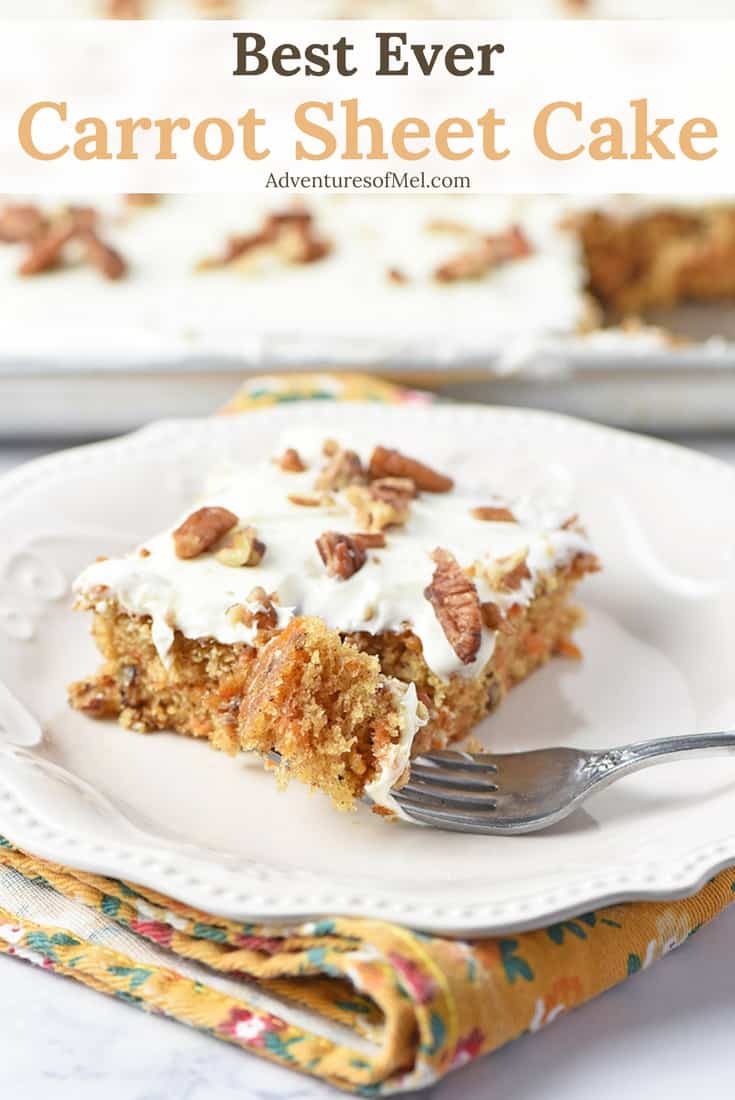
Best Ever Carrot Cake Sheet Cake is easy to make, moist, and delicious. It’s one of my favorite desserts, especially paired with a cream cheese frosting that’s simply to die for. Homemade carrot sheet cake recipe you can feed a crowd.
Is there anything better than a carrot sheet cake lathered with a sweet and tangy cream cheese frosting? Nope. There’s nothing better than my best ever carrot cake sheet cake. Mmmm, it really is that good.
My original thought was to make this recipe into a traditional layer cake because it’s carrot cake, right? But when I got to thinking about it, I decided I wanted to give you a truly easy carrot cake recipe that’s super simple to make.
Plus a sheet cake feeds a crowd. It’s something you can cut into squares and feed a large group of people, perfect for Easter and summer get togethers.
And don’t be intimidated by the thought of making carrot cake from scratch. It’s not difficult at all, especially if you have a salad shooter for shredding up your carrots.
While I decided to put pecans in our carrot cake, you can totally decide whether or not you want them in yours. I know a lot of people don’t like nuts, and that’s ok. With or without, it’ll still be delicious either way you go.
Kitchen tools you may need to make carrot cake from scratch:
Mixer – I love using my Bosch mixer for mixing up cake batter.
Sifter – I never make a cake without sifting, the result of training by my mom and grandmas.
Salad Shooter – This kitchen tool makes it so much easier to shred the carrots.
Sheet Cake Pan – You’ll need a large pan that makes a thinner cake.
Cake Tester – This will help you see if your cake is done after baking.
Spatula/Server – Slice and serve your cake with a square spatula.
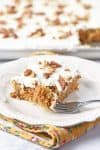
Best Ever Carrot Cake Sheet Cake
Best Ever Carrot Cake Sheet Cake is easy to make, moist, and delicious. It’s one of my favorite desserts, especially paired with a cream cheese frosting that’s simply to die for. Homemade carrot sheet cake recipe you can feed a crowd.
1 cup unsalted butter
2 cups pure cane sugar
4 eggs
2 teaspoons vanilla extract
1/2 teaspoon caramel extract
2 cups unbleached all-purpose flour
2 teaspoons baking soda
1 teaspoon baking powder
1 teaspoon salt
2 teaspoons cinnamon
2 1/2 cups shredded carrots
1 1/2 cups chopped pecans
2 cups cream cheese frosting
Pre-heat your oven to 375°.
Melt the butter, and cream (mix) together with the sugar.
Add the eggs, vanilla extract, and caramel extract into your butter mixture, and mix well.
Sift together your dry ingredients, including the flour, baking soda, baking powder, salt, and cinnamon.
Add the dry ingredients to the wet ingredients, and mix well for 2 to 3 minutes.
Add the shredded carrots and pecans (nuts are optional) to your mixture, and continue to mix well until everything is blended together.
Pour and spread the cake batter into a large sheet cake pan.
Bake at 375° for 25 to 30 minutes, or until a toothpick/cake tester comes out clean.
Remove the cake from the oven, and allow it to cool right in the pan.
Meanwhile, mix up your frosting. I highly recommend using a cream cheese frosting.
Once the cake has cooled, spread the frosting all over the top of the cake.
Optional step: Sprinkle chopped pecans all over the top of the frosting.
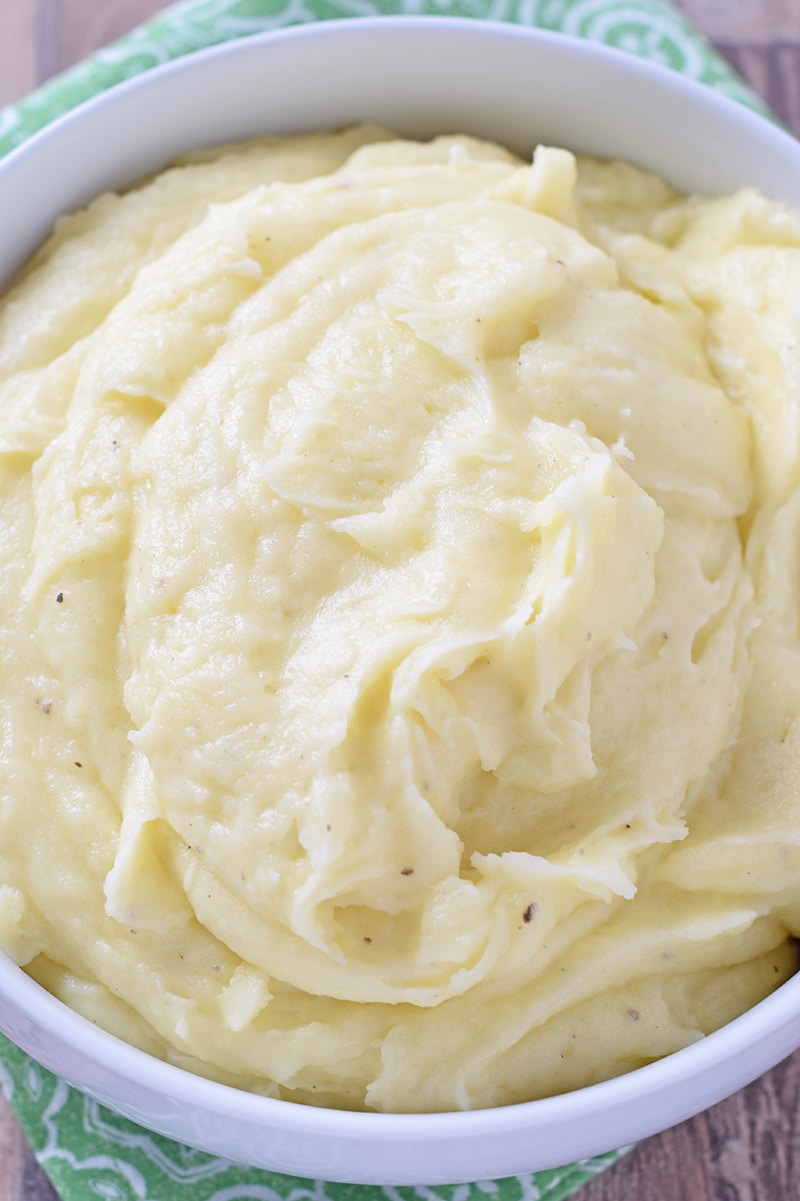
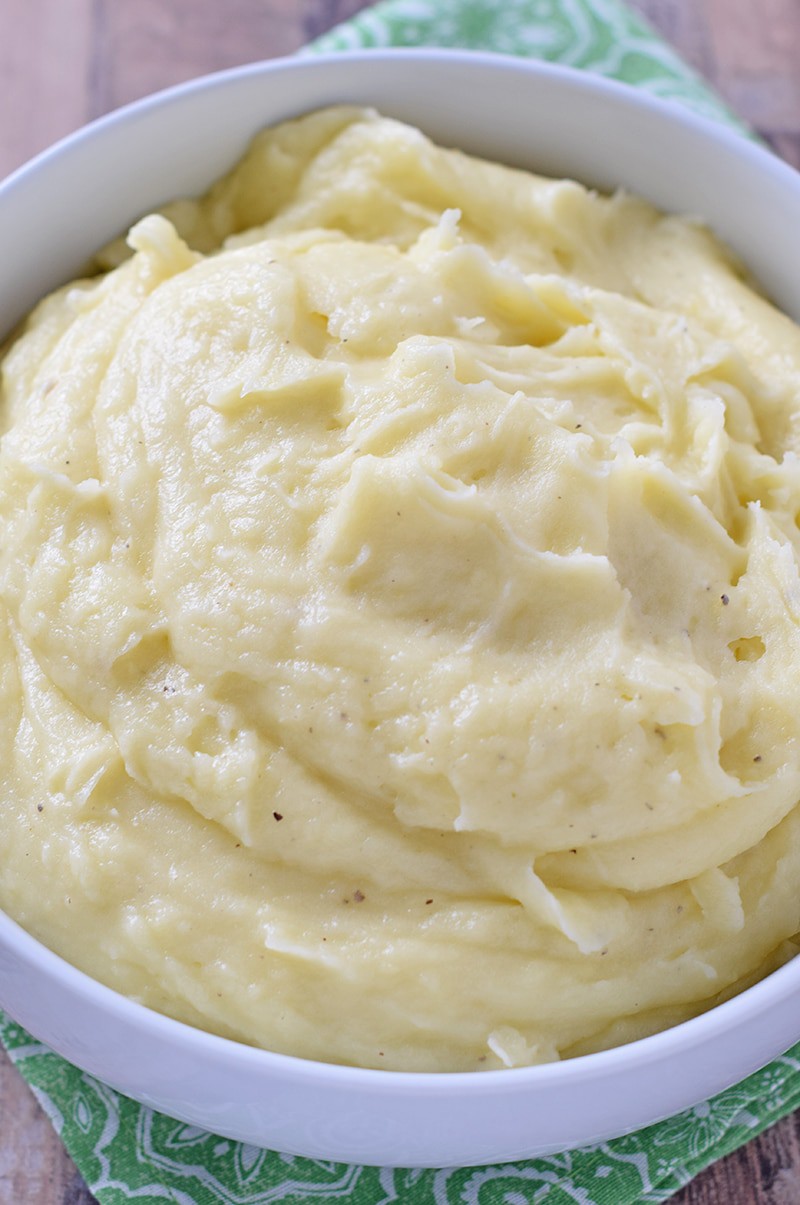
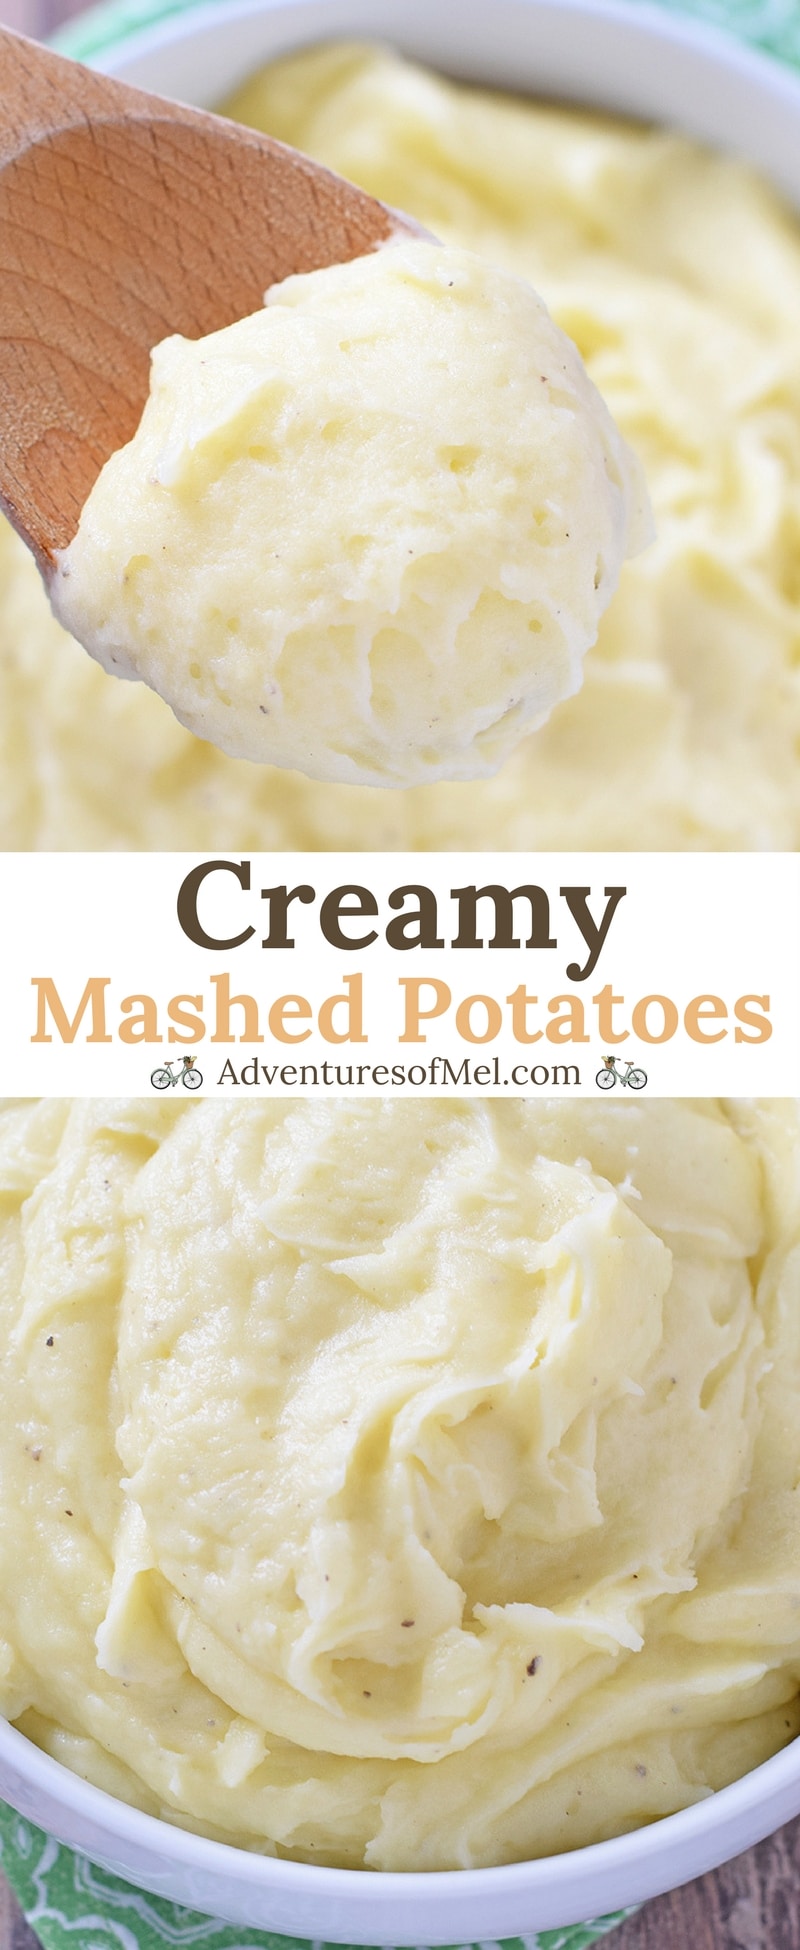
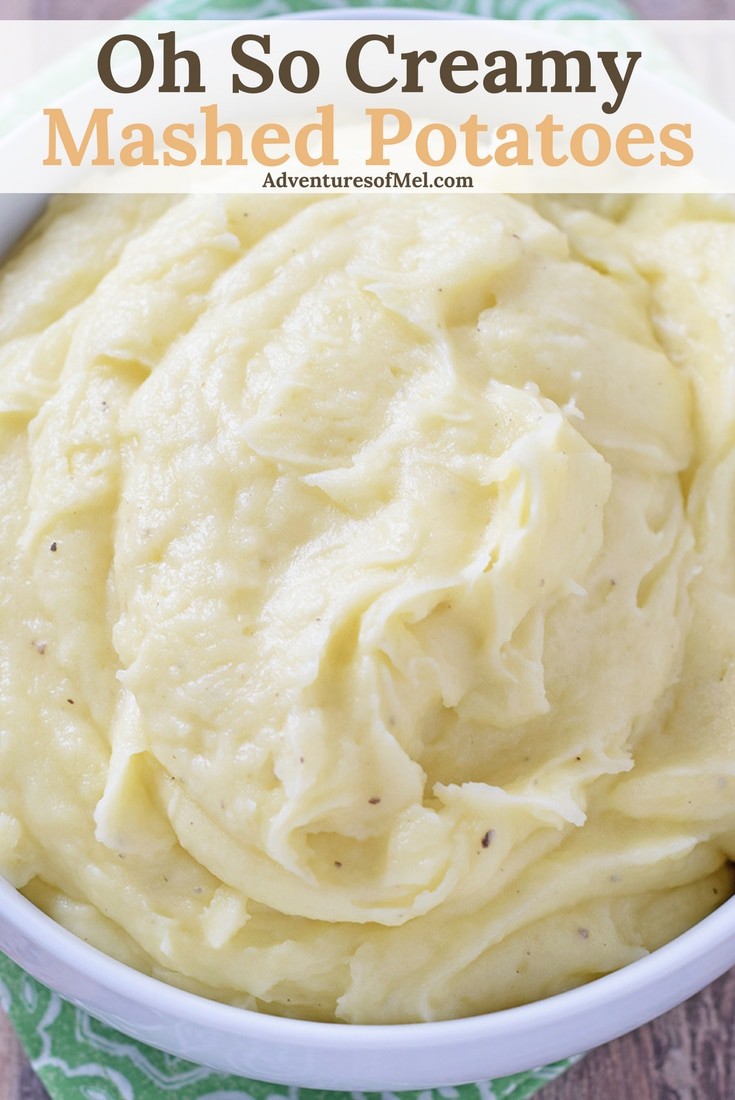
Make creamy mashed potatoes with yellow potatoes, cream, and butter. Delicious side dish recipe perfect for weeknight meals and holiday dinners.
Creamy Mashed Potatoes with gravy is the quintessential side for every holiday dinner and even some weeknight meals, like my family favorite easy meatloaf recipe with oats, slow cooker whole chicken and Crock Pot pork roast. We used to eat potatoes a lot more than we do now; but we still have our favorite mashed potatoes recipe that’s pretty basic but oh so creamy delicious.
Only 5 ingredients… That’s all it takes to make these simple potatoes. You know how we like to keep it simple. And if you know how to make gravy with cornstarch, you can have any flavor gravy you want!
Now I do suggest being picky about which potatoes you use. And maybe this topic is for another post at another time.
But our favorite type of potato for the most flavorful mashed potatoes is the yellow potato or Yukon Gold. We like red potatoes too, but I find myself going for the gold whenever we buy potatoes.
Gather your ingredients… You’ll need yellow potatoes, salted butter, heavy whipping cream, salt, and pepper.
Wash, peel, and chop the potatoes.
Cook the potatoes until they’re soft enough to easily jab with a fork. We usually cook ours by boiling them on the stove in a medium to large saucepan for about 30 minutes, but sometimes we use our Instant Pot.
Drain the water off your boiled potatoes, leaving your potatoes in the saucepan.
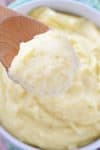
Add the butter and heavy whipping cream to the potatoes.
Use a hand mixer to whip the potatoes, adding salt and pepper to taste. You can also use a potato masher if you don’t have a hand mixer; your potatoes may just be a little bit chunky.
Strainer – You’ll need this to drain the potatoes.
Hand Mixer or Potato Masher – A hand mixer will enable you to get smooth, creamy mashed potatoes; a potato masher will allow you to mash the potatoes, but they’ll have a chunkier texture.
Print the recipe for Creamy Mashed Potatoes
Creamy Mashed Potatoes
Creamy Mashed Potatoes made with yellow potatoes, cream, and butter. Delicious side dish recipe perfect for weeknight meals and holiday dinners.
8 potatoes (medium size)
6 tablespoons salted butter
2 tablespoons heavy whipping cream
1 teaspoon salt (to taste)
1 teaspoon ground black pepper (to taste)
Wash, peel, and chop the potatoes.
Boil the potatoes in a large saucepan on the stove, until they're soft enough to easily jab with a fork, about 20-30 minutes.
Drain the water off the boiled potatoes, and leave them in the saucepan.
Add the butter and heavy whipping cream to the potatoes.
Use a hand mixer to whip the potatoes, adding salt and pepper to taste. You can also use a potato masher if you don’t have a hand mixer; your potatoes may just be a little bit chunky.
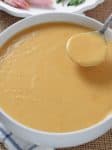
How to make an easy homemade ham gravy recipe, made last minute with leftover ham drippings. This gravy makes a delicious side dish with ham, mashed potatoes, and all the fixings at your holiday or family dinner!
Homemade ham gravy (like its counterpart turkey gravy) is a staple side dish whenever we cook a ham in the oven, which is mostly on holidays like Thanksgiving, Christmas, or Easter. Family dinner and holiday dinners just wouldn’t be the same without gravy to smother over our sliced ham and mashed potatoes.
Now it’s important to remember… The main flavoring for ham gravy comes directly from the ham itself. So if you glaze your ham, like with a brown sugar glaze or something like this sweet pineapple honey baked ham, the sweet flavoring from the glazed ham will go into your gravy for ham, and the end result will be a sweet gravy.
It’s so easy to make homemade gravy, and it’s super quick too. It’s delicious and definitely worth the minimal effort.
Why You’ll Love Knowing How to Make Ham Gravy
There are a lot of reasons to love this delicious gravy recipe…
It’s an easy condiment to make, takes less than 30 minutes to make, and it’s something you can make last minute just before serving the main meal.
It takes a very minimal amount of ingredients to make gammon gravy. In fact, they’re all pretty simple, and you likely already have them on hand.
It’s a fantastic addition to your holiday dinner spread. I’ve added this ham gravy recipe with drippings to my collections of favorite Thanksgiving recipes, Christmas recipes, and Easter dinner recipes, where you’ll find all the holiday inspiration you need in one place.
Ingredients and Substitutions Notes
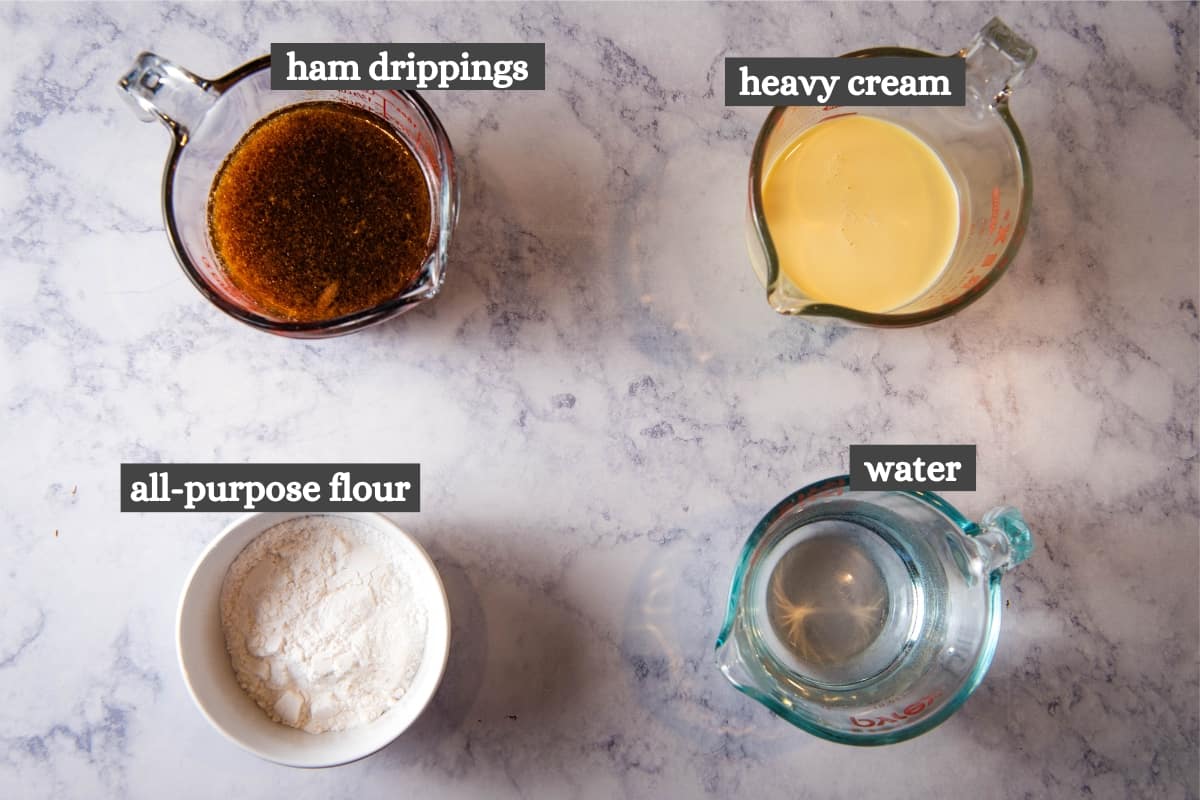
You’ll need just a handful of ingredients to make gravy for gammon (or ham). While you should have most of the ingredients on hand, you’ll likely need to purchase a ham at the grocery store, in order to have leftover ham drippings.
All-Purpose Flour – I prefer to use an unbleached all-purpose flour; you can also use a good gluten-free flour, although it’s important to note that gravy made with gluten-free flour doesn’t stay thick as long as with regular flour… In other words, it won’t store well. If you need a good gluten-free ham gravy alternative, ham gravy with cornstarch is just the thing.
Heavy Cream – You can skim heavy cream off of raw milk, or you can use store bought heavy whipping cream.
Ham Drippings – You can scoop the ham juices and pan drippings from the roasting pan after baking a spiral ham, bone-in whole ham, or boneless ham. You should have enough drippings to at least make a small batch of homemade gravy. These leftover ham drippings will likely give you all the delicious flavor you need without any extra seasoning, salt, or black pepper. If you don’t have any ham drippings, you can always use ham broth made from bouillon to make ham gravy.
Water
How to Make This Old-Fashioned Ham Gravy Recipe
Making this easy gravy for ham is actually really simple, but there are a few tips and tricks that will ensure you make a really good gravy from ham drippings.
How to Avoid Lumpy Gravy
Before we get started, here are 3 tips for preventing lumpy gravy…
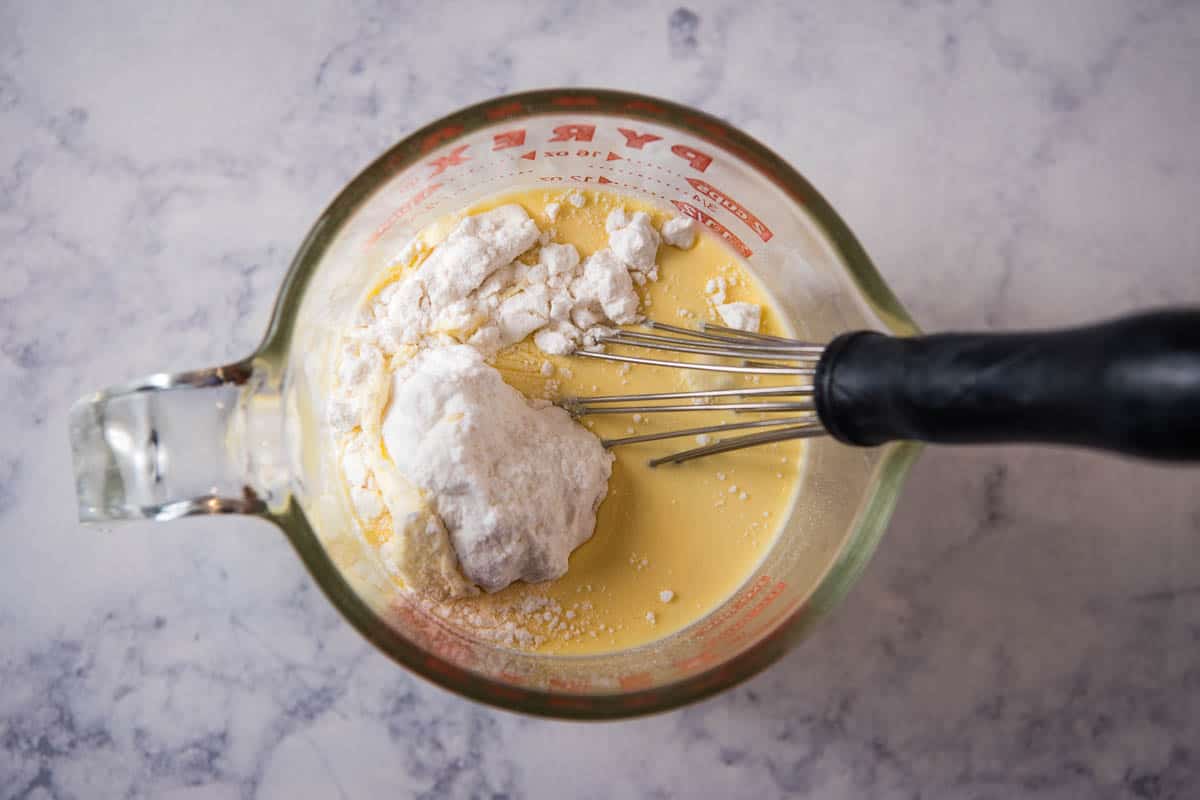
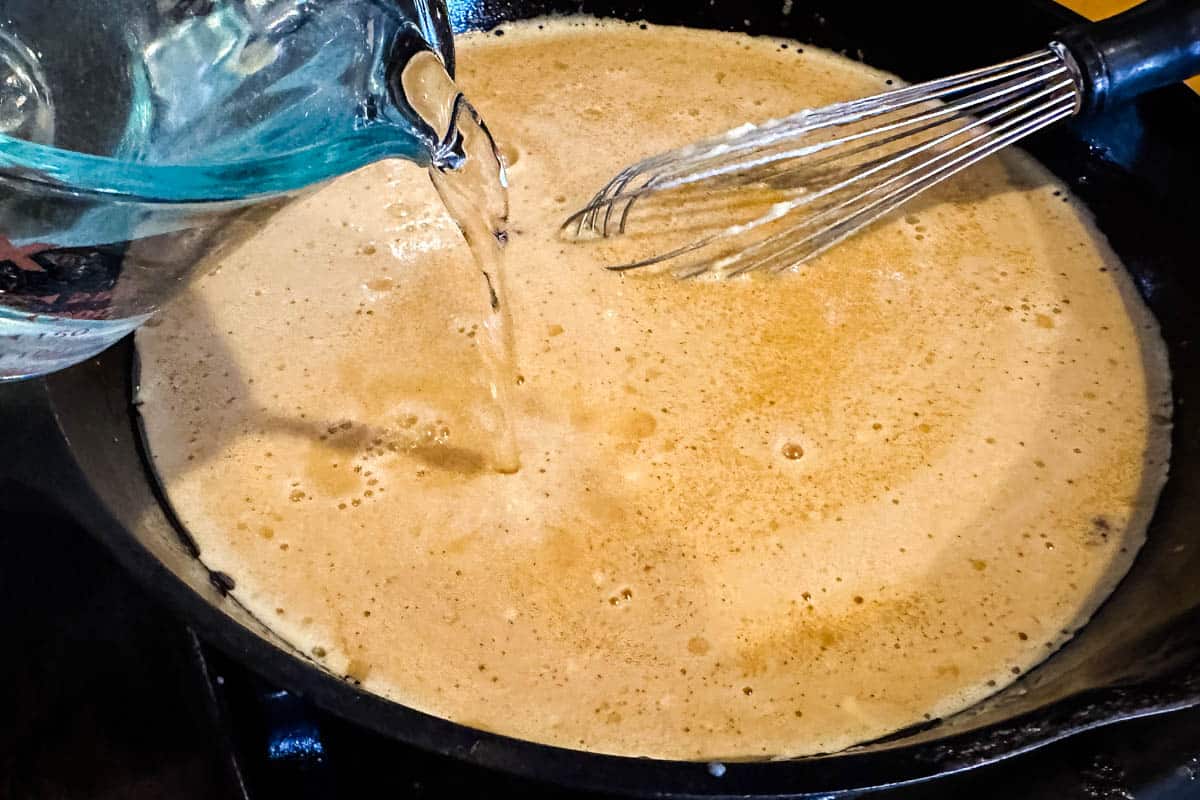
It’s important to start with a roux, and you do this by mixing together the flour and heavy whipping cream in a small mixing bowl or glass measuring cup. Whisking this together in the beginning will help prevent lumps in your gravy.
Use a whisk to stir your gravy while it’s cooking. It’s pretty much a given that you may have a few lumps, but you can minimize them by whisking the gravy.
Take your time to avoid any lumps in your gravy. To me, this right here is the secret to good gravy… Patience and being willing to take your time. Work on medium-low heat, and don’t get in a hurry, and you’ll make a good gravy.
Now Let’s Make Ham Gravy
Mix together the flour and heavy whipping cream in a small mixing bowl or glass measuring cup.
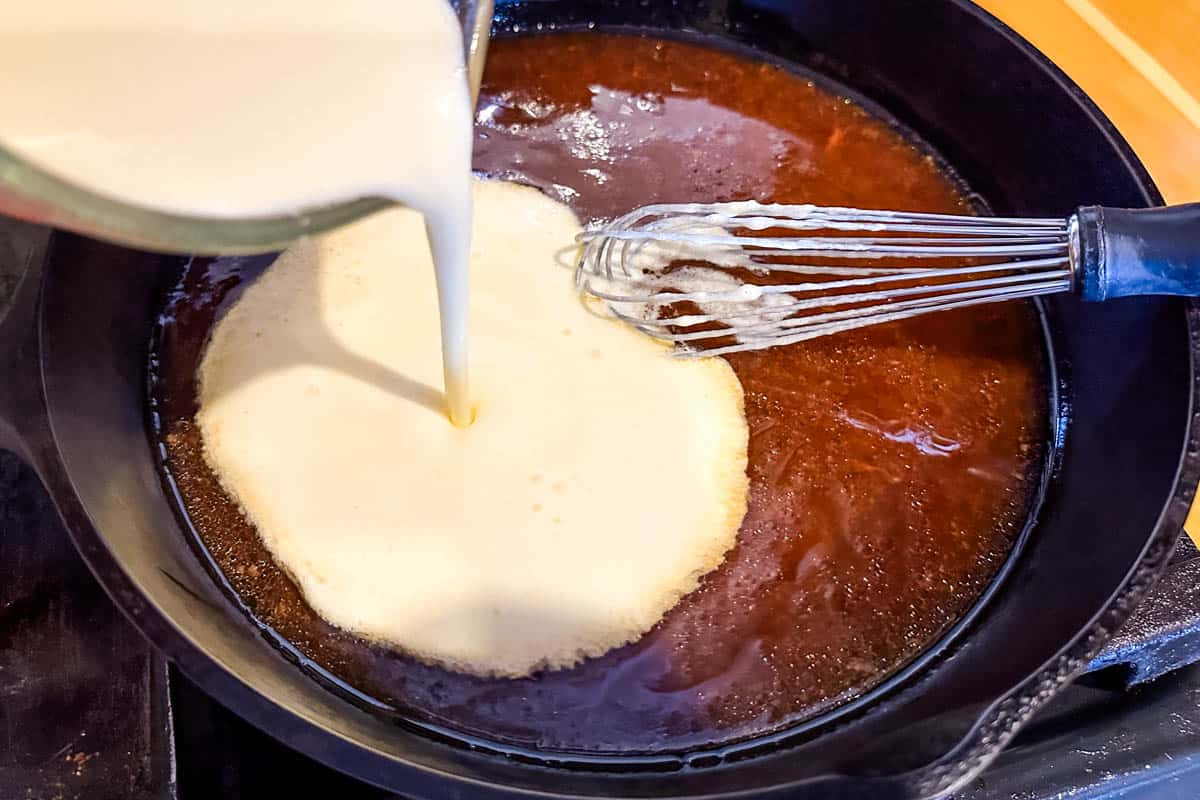
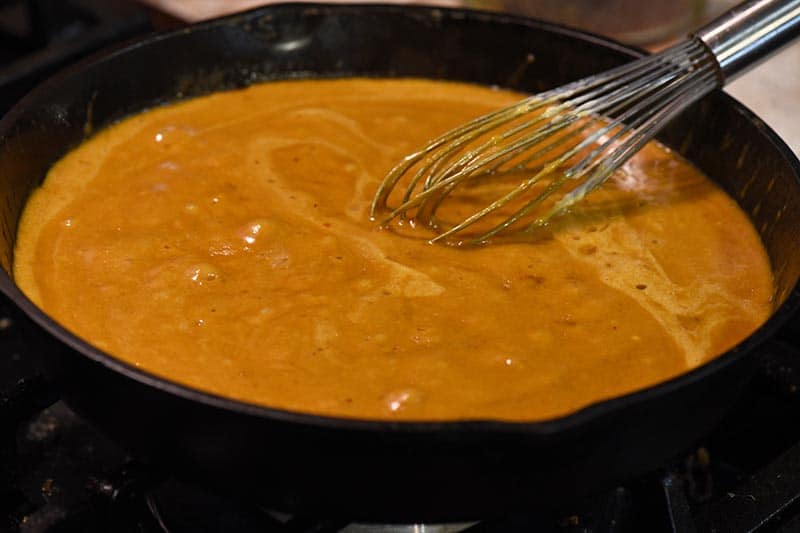
Gradually whisk together the flour/cream mixture with the pan drippings in a large saucepan or skillet on medium heat.
Add in the water.
Continue whisking and stirring the gravy until it begins to thicken and is ready to serve.
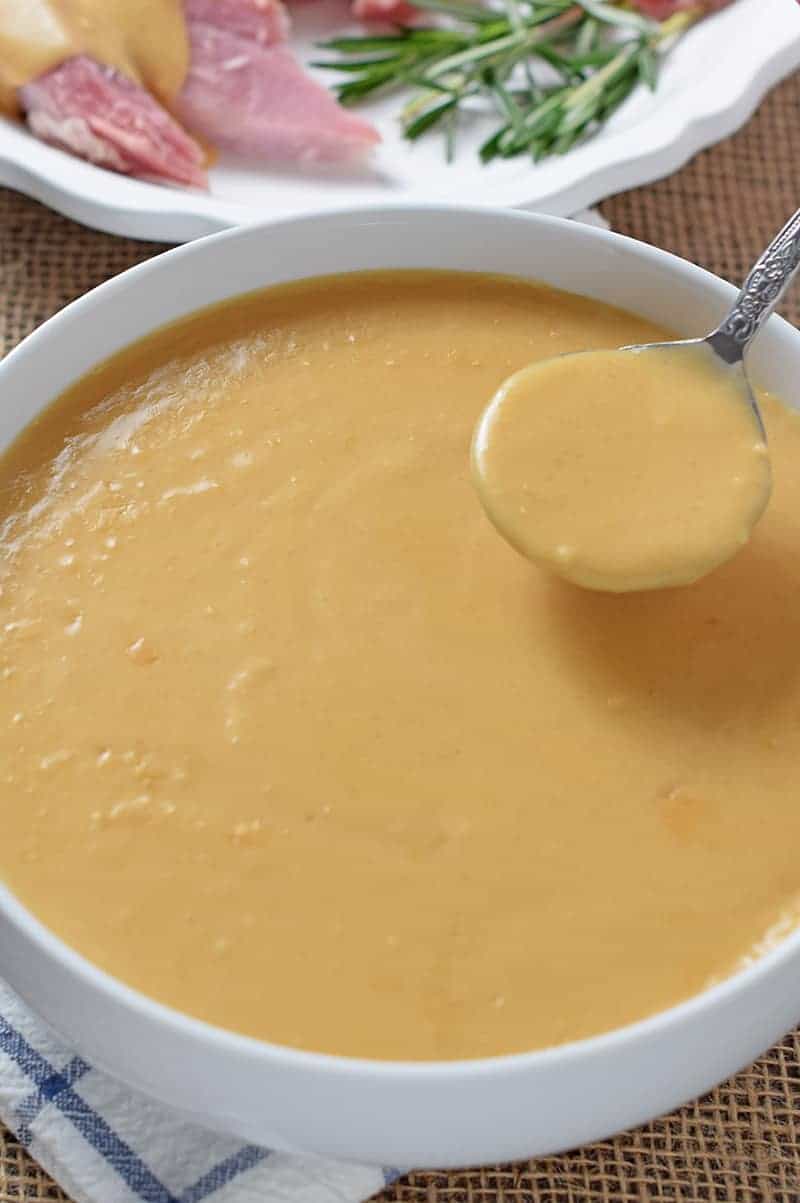
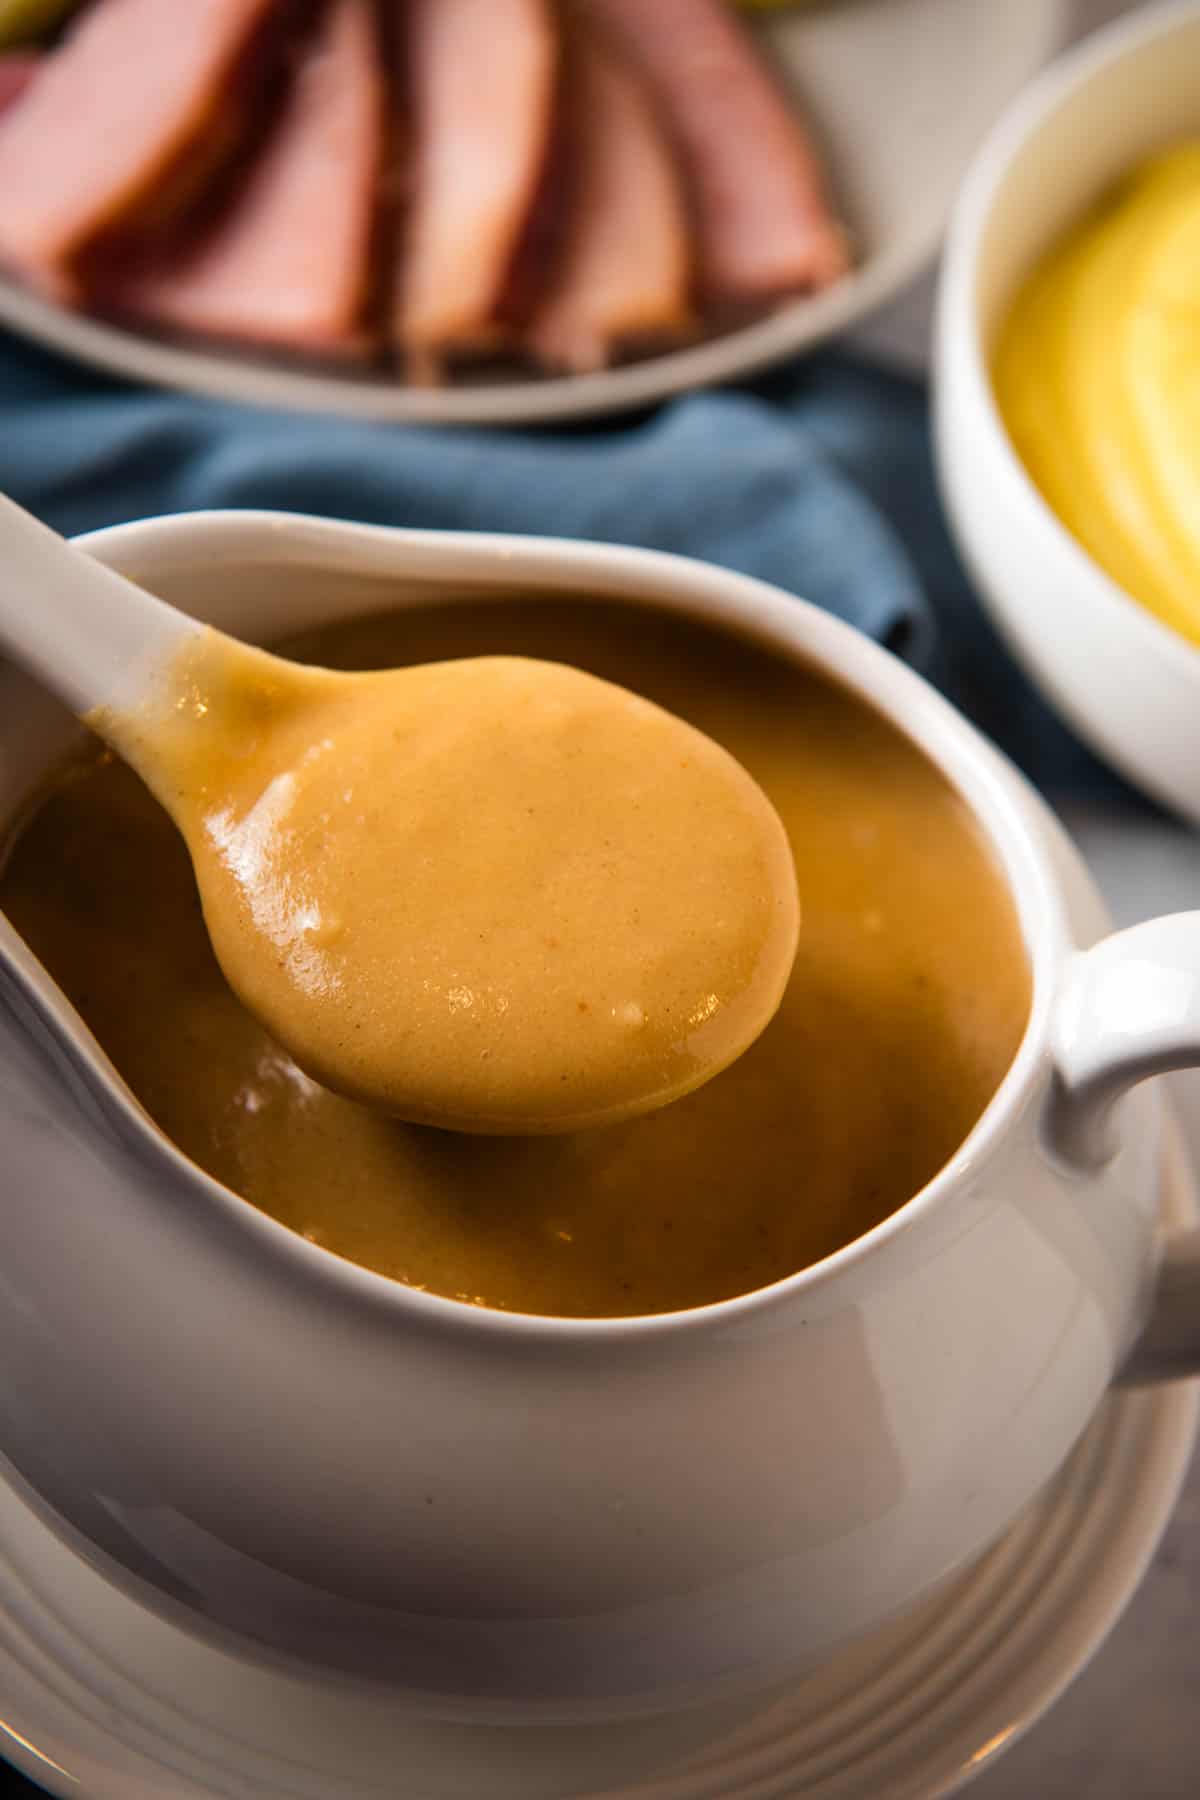
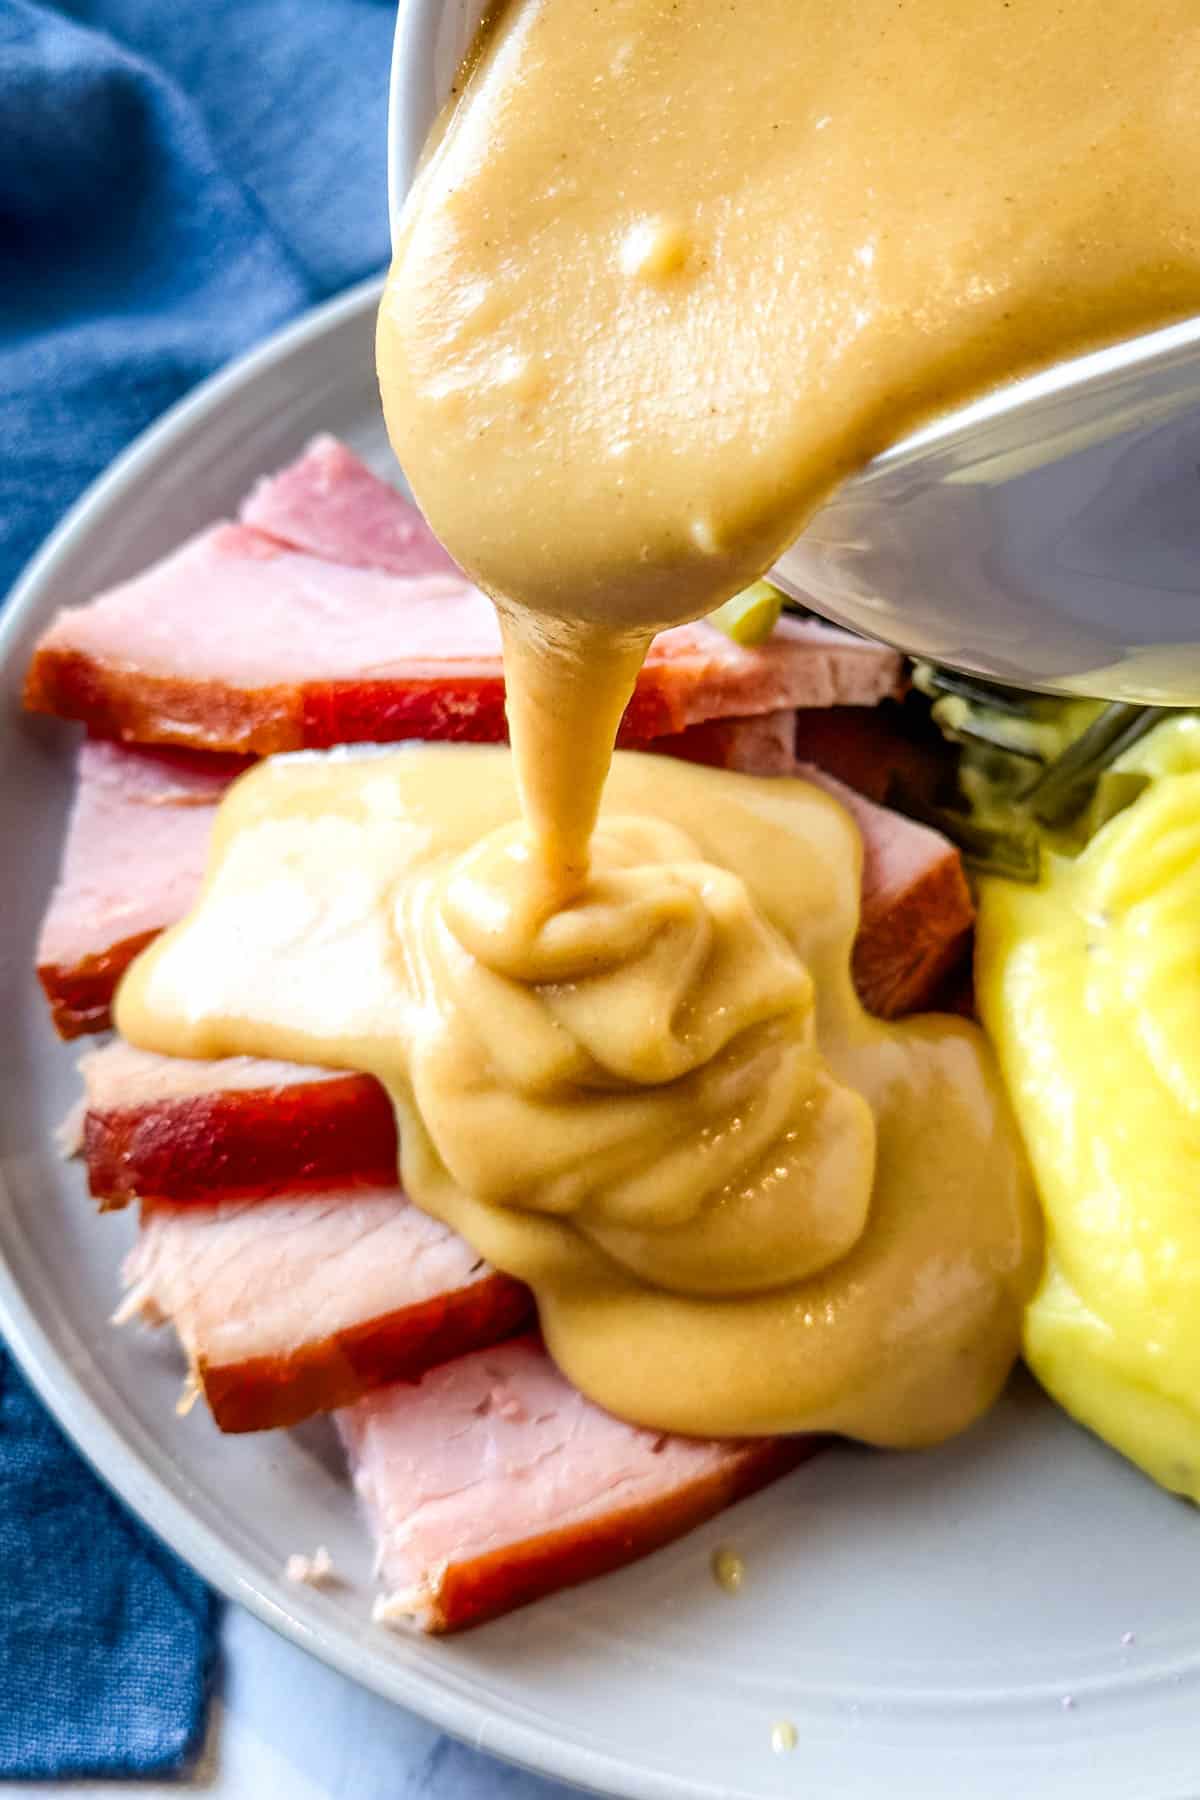
Then just pour the gravy into a gravy boat, and serve it with ham, mashed potatoes, and all the fixin’s! It will add such a rich flavor to your mashed potatoes, you’ll wish you had that ham flavor the next time you eat potatoes.
Expert Tips and Recipe FAQ’s
How much gravy should you make per person?
The answer to this will really depend on the consistency of your gravy. When we make this recipe, we usually have a lot of leftover gravy. You want to plan on about 1/3 to 1/2 cup per person, again depending on how thick your gravy is.
How do you store and reheat ham gravy?
Store leftover gravy in an airtight container in the fridge; it should keep for about 3-4 days. You can re-heat gravy by placing it in the microwave in a microwave-safe dish for a few minutes, stirring between every 30-second increments of time, ’til heated through; or put the gravy in a saucepan, and heat it up over low to medium heat on the stove, constantly stirring so it doesn’t scorch.
Can you freeze gravy?
Yes, you can. Just be sure to put it in an airtight freezer-friendly container, so it doesn’t get freezer burn. It should keep for about 4 to 6 months.
If you try this recipe, why not leave a star rating in the recipe card right below and/or a review in the comment section further down the page? I always appreciate your feedback. You can also follow me on Pinterest, Facebook, Instagram, and YouTube. And subscribe to my email list too!
Ham Gravy Recipe
How to make an easy homemade ham gravy recipe with leftover ham drippings. Delicious side dish with ham, mashed potatoes, and all the fixings!
Mixing Bowl
Large Skillet
Whisk
Wooden Spoon
Heat-Resistant Spatula
Gravy Boat
1/2 cup unbleached all-purpose flour
1 cup heavy whipping cream
2 cups ham drippings
1 cup water
Mix together the flour and heavy cream in a small mixing bowl or glass measuring cup.
Gradually whisk together the flour/cream mixture with the pan drippings in a large saucepan or skillet on medium heat.
Add in the water.
Continue whisking and stirring the gravy until it begins to thicken and is ready to serve.
Serve with ham, mashed potatoes, and all the fixin's!
*Take your time whisking in the flour mixture to avoid any lumps in your gravy. It’s pretty much a given that you may have a few lumps, but you can minimize them by starting with the roux and taking your time, whisking the gravy.
Store leftover gravy in an airtight container in the fridge; it should keep for about 3-4 days. You can re-heat gravy by placing it in the microwave in a microwave-safe dish for a few minutes, stirring between every 30-second increments of time, ’til heated through; or put the gravy in a saucepan, and heat it up over low to medium heat on the stove, constantly stirring so it doesn’t scorch.
Condiments, Sauces & Dressings, Side Dish
American
gammon gravy, gravy for gammon, gravy for ham, gravy from ham drippings, gravy recipes, ham gravy, ham gravy recipe, ham gravy recipe with drippings, homemade ham gravy, how to avoid lumpy gravy, how to make gravy, how to make ham gravy, making ham gravy
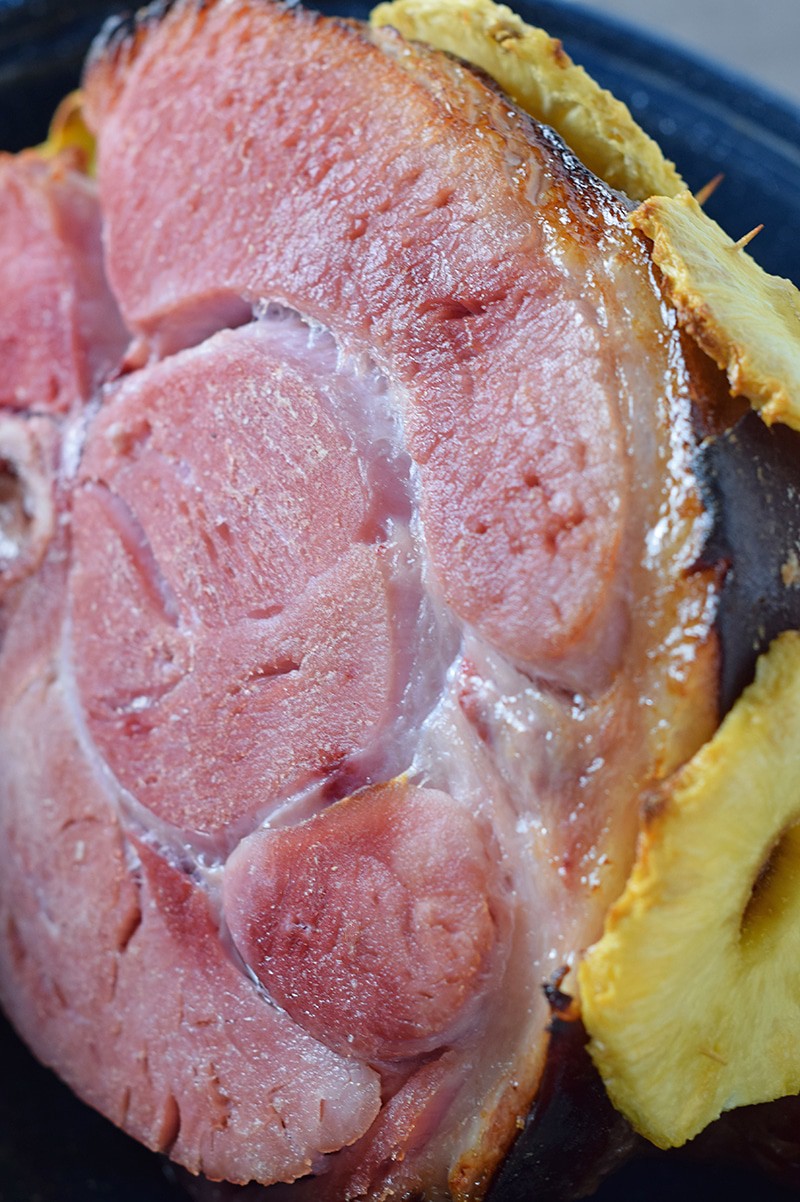
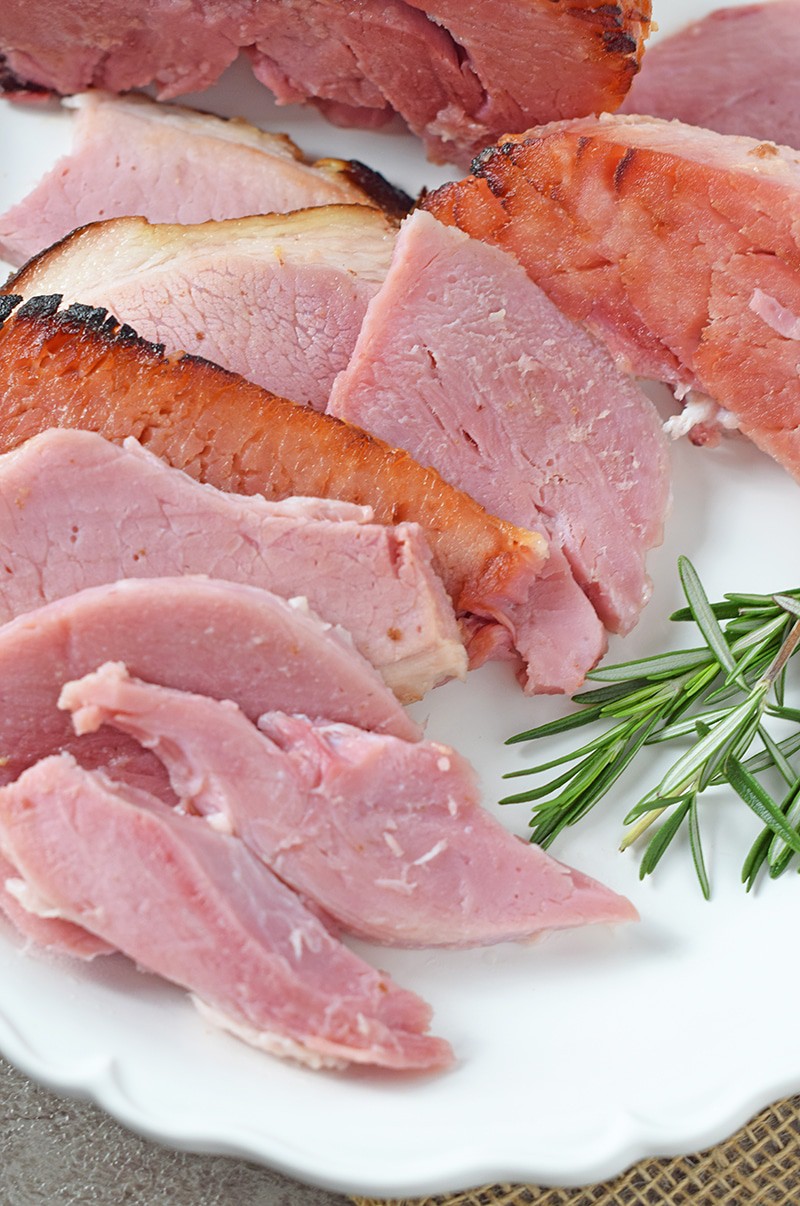
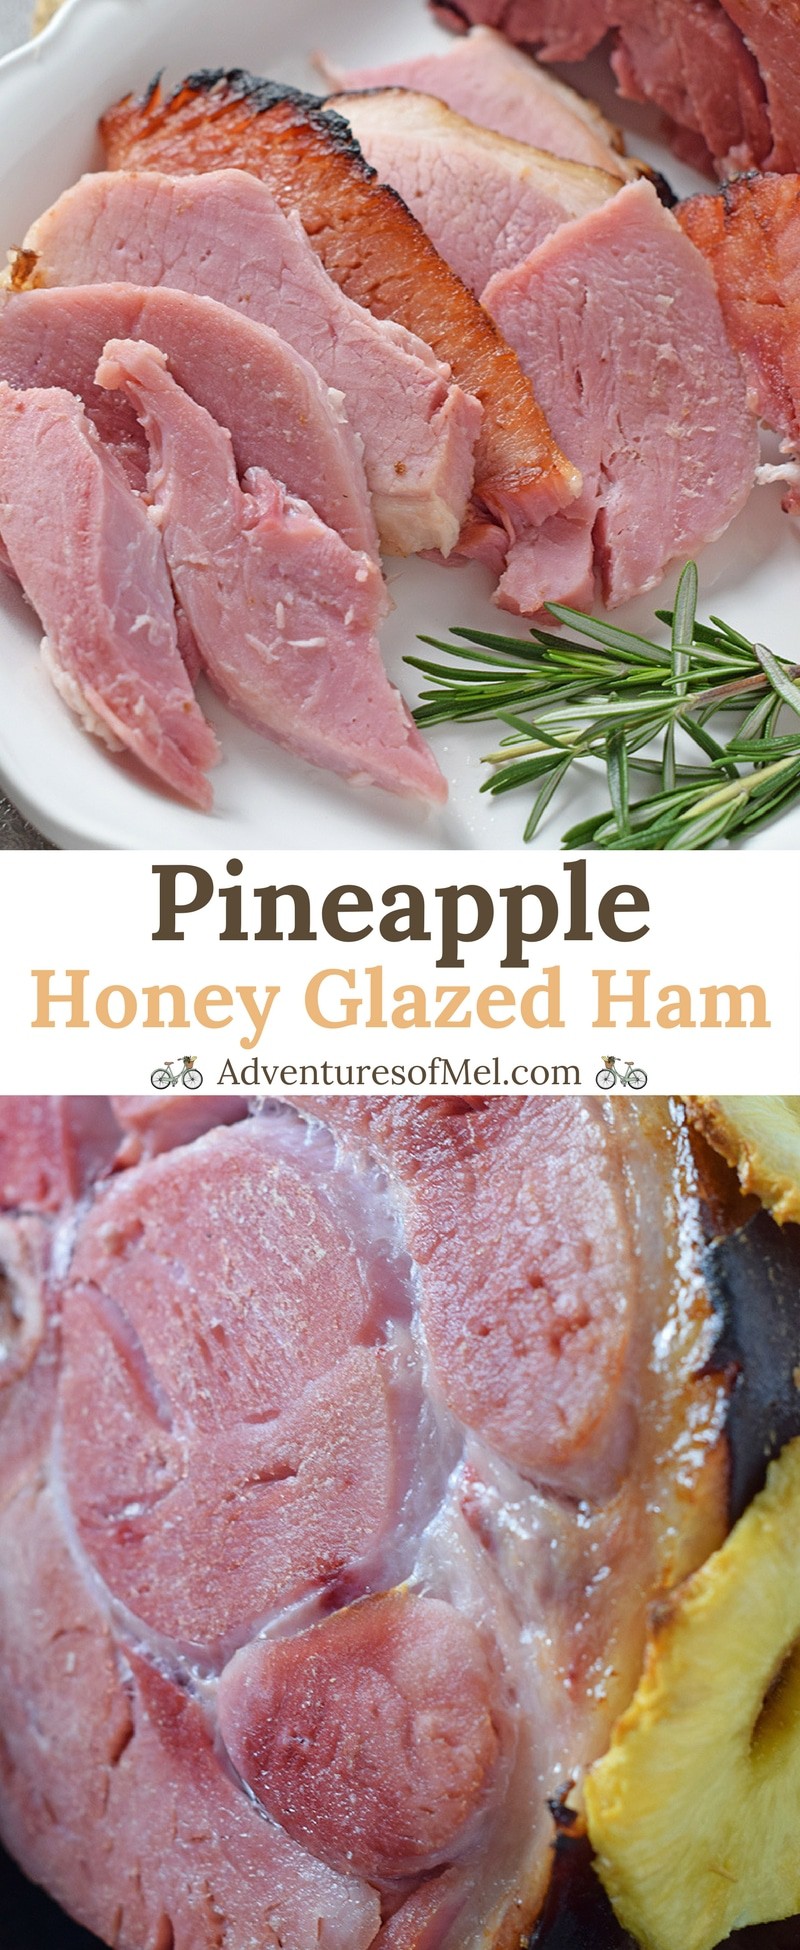
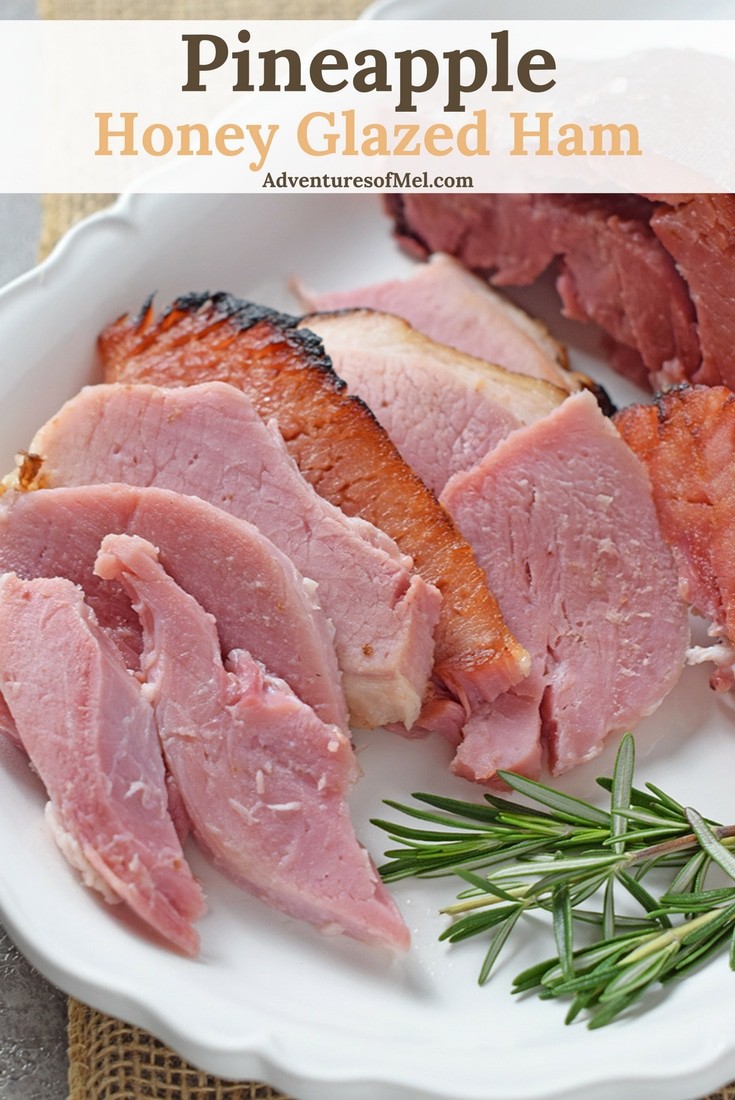
How to make a perfectly cooked, moist, delicious pineapple honey glazed ham for dinner and holiday celebrations.
Pineapple Honey Glazed Ham is a blend of sweet and salty deliciousness. Whether you’re looking for a family dinner idea or rather a main dish to add to your holiday menu, this ham is the perfect addition.
Years ago in a past life, we had a grocery store where we loved to occasionally shop. One of the treats we enjoyed from that store was shaved pineapple ham fresh from the deli.
That’s what this recipe reminds me of. The fresh pineapple purée and sliced pineapple, along with honey, give the roasted ham a slightly sweet flavor, but not too sweet.
Purée a slice or two of pineapple in a blender, just enough to make 2 tablespoons of purée.
Mix the pineapple purée with the honey, and brush it all over the ham, letting the excess glaze run off the ham and into the bottom of the roasting pan.
Using toothpicks, attach pineapple slices to the outside of the ham, at least 6 to 8 slices.
Bake the ham at 325°. Bake time will be per the weight of your ham and will differ per ham.
Once the ham has cooked through and is ready, you’ll need to slice it up before serving.
Looking for delicious side dish recipes to go with your ham?
Pineapple Honey Glazed Ham recipe. How to make a perfectly cooked, moist, delicious ham for dinner and holiday celebrations.
1 large ham
1 cup water
2 tablespoons pineapple purée
1/2 cup honey
6 to 8 pineapple slices
12 to 18 to othpicks
Pre-heat the oven to 325°.
Place a large ham in a roasting pan.
Add water to the roasting pan.
Purée a slice or two of pineapple in a blender, just enough to make 2 tablespoons of purée.
Mix the pineapple purée with the honey, and brush it all over the ham, letting the excess glaze run off the ham and into the bottom of the roasting pan.
Using toothpicks, attach pineapple slices to the outside of the ham, at least 6 to 8 slices.
Bake the ham at 325°. Bake time will be per the weight of your ham and will differ per ham.
Once the ham has cooked through and is ready, you’ll need to slice it up before serving.
Pork Recipes
American
honey glazed ham, pineapple ham, pineapple honey glazed ham
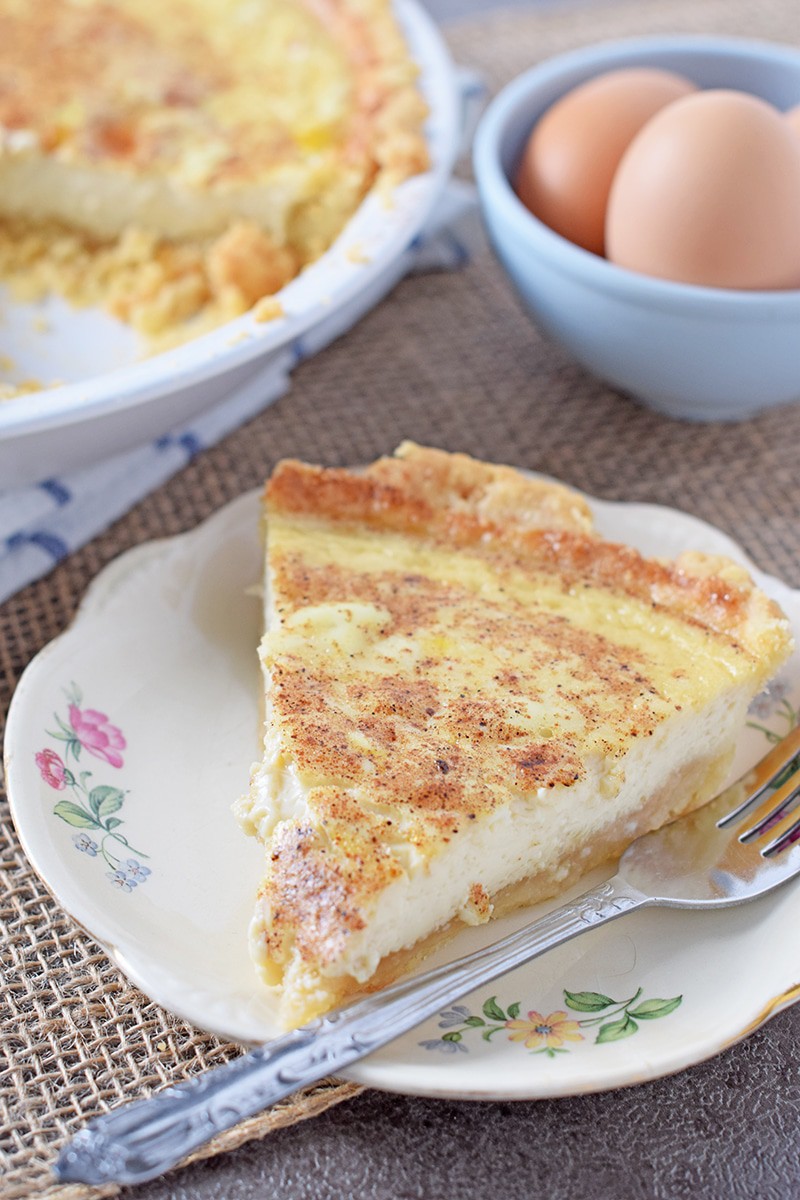
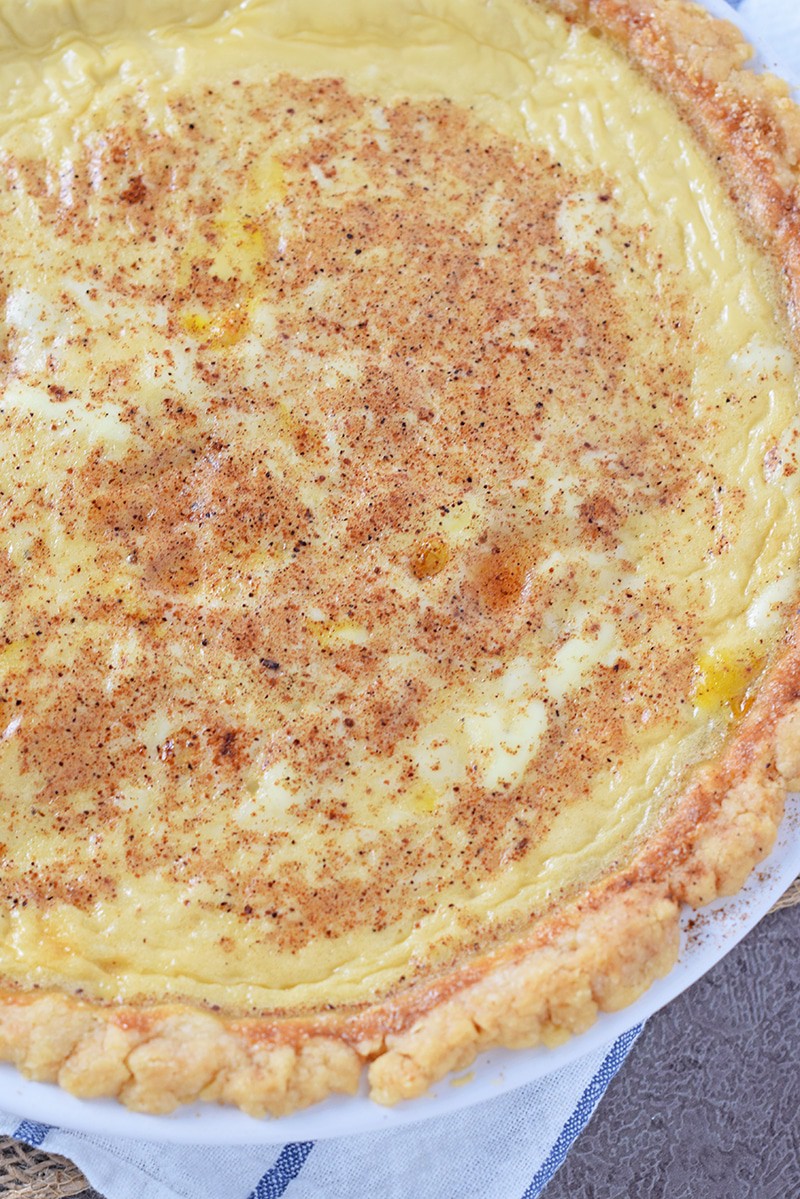
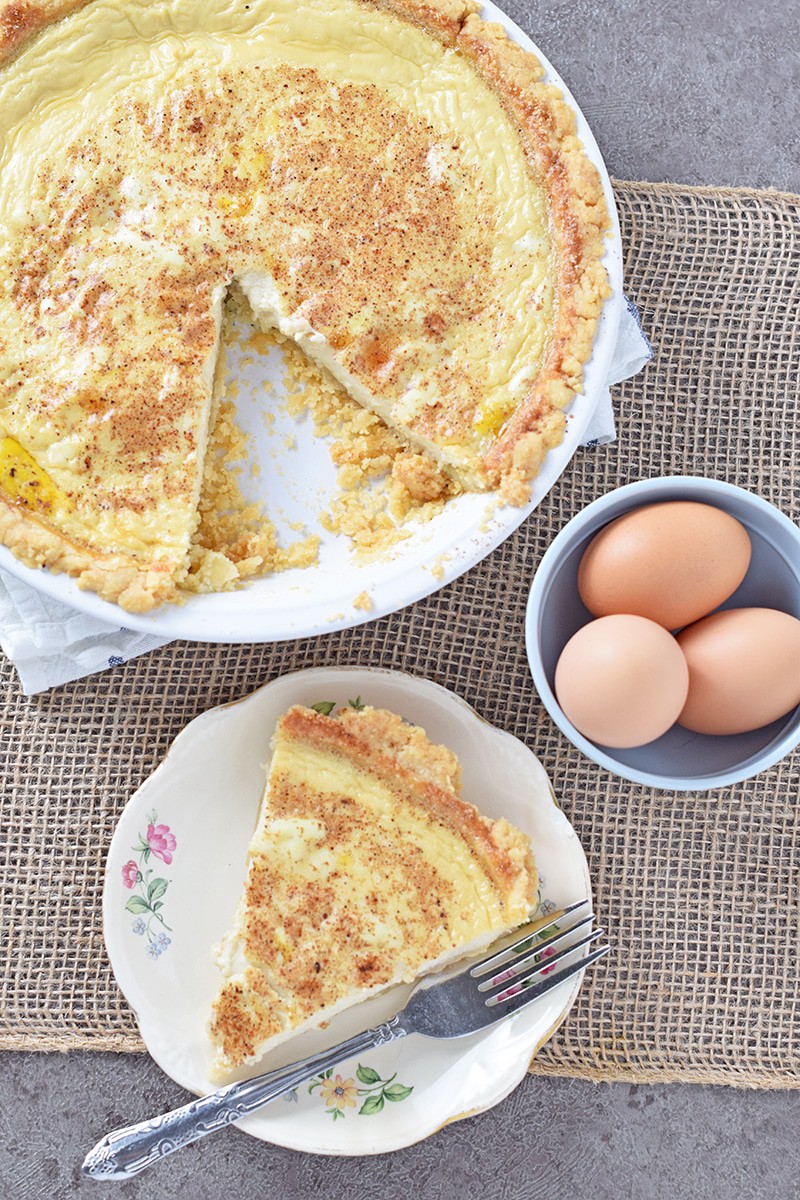
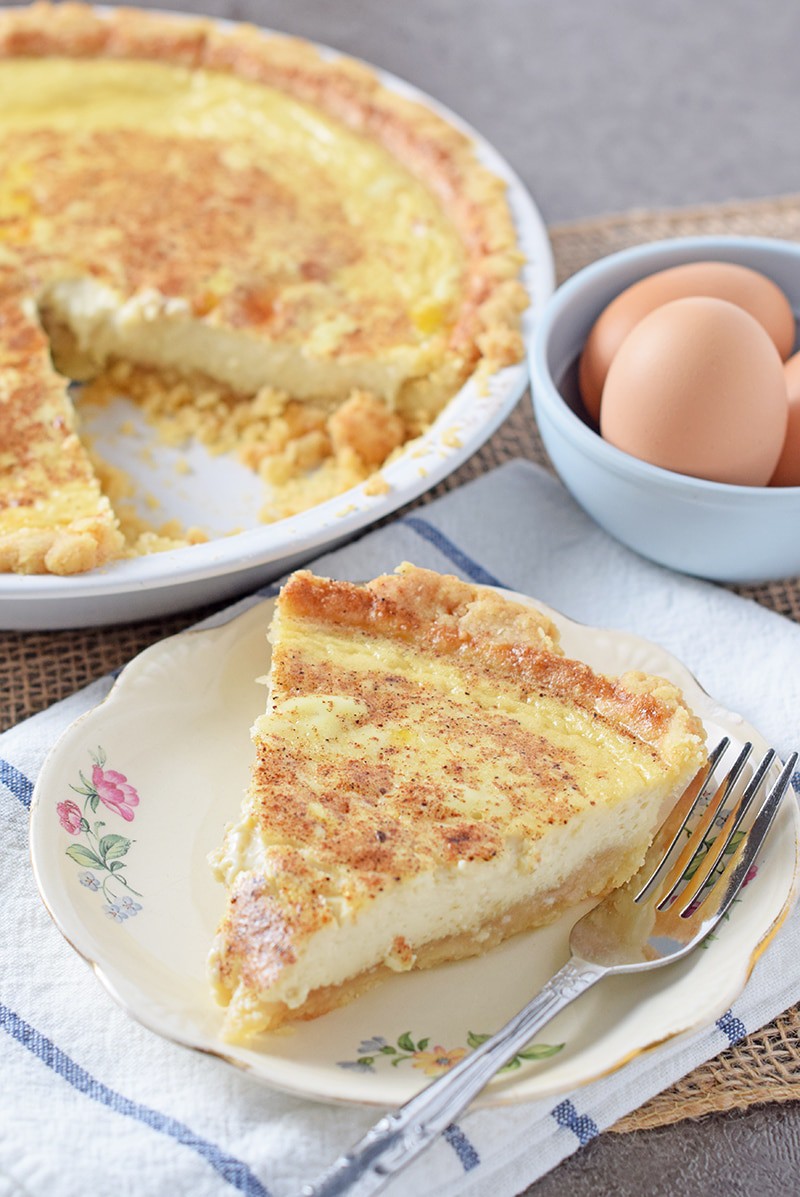
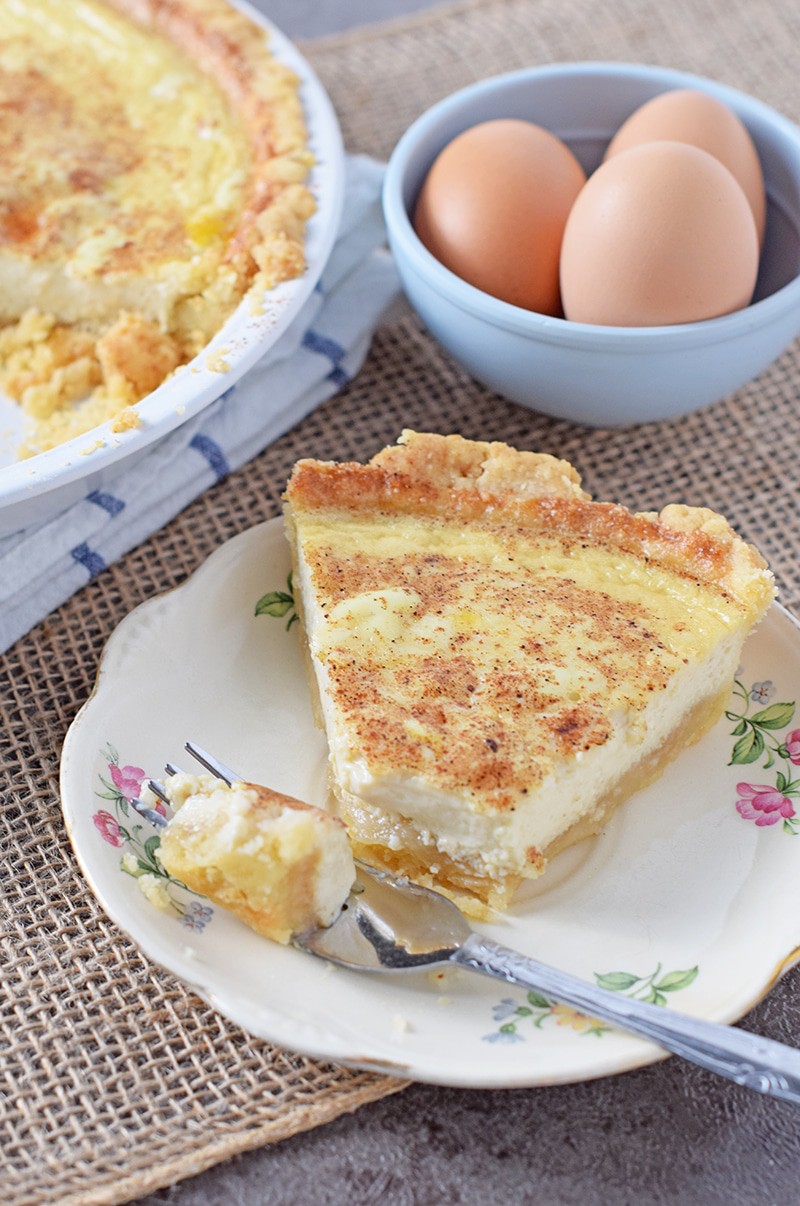
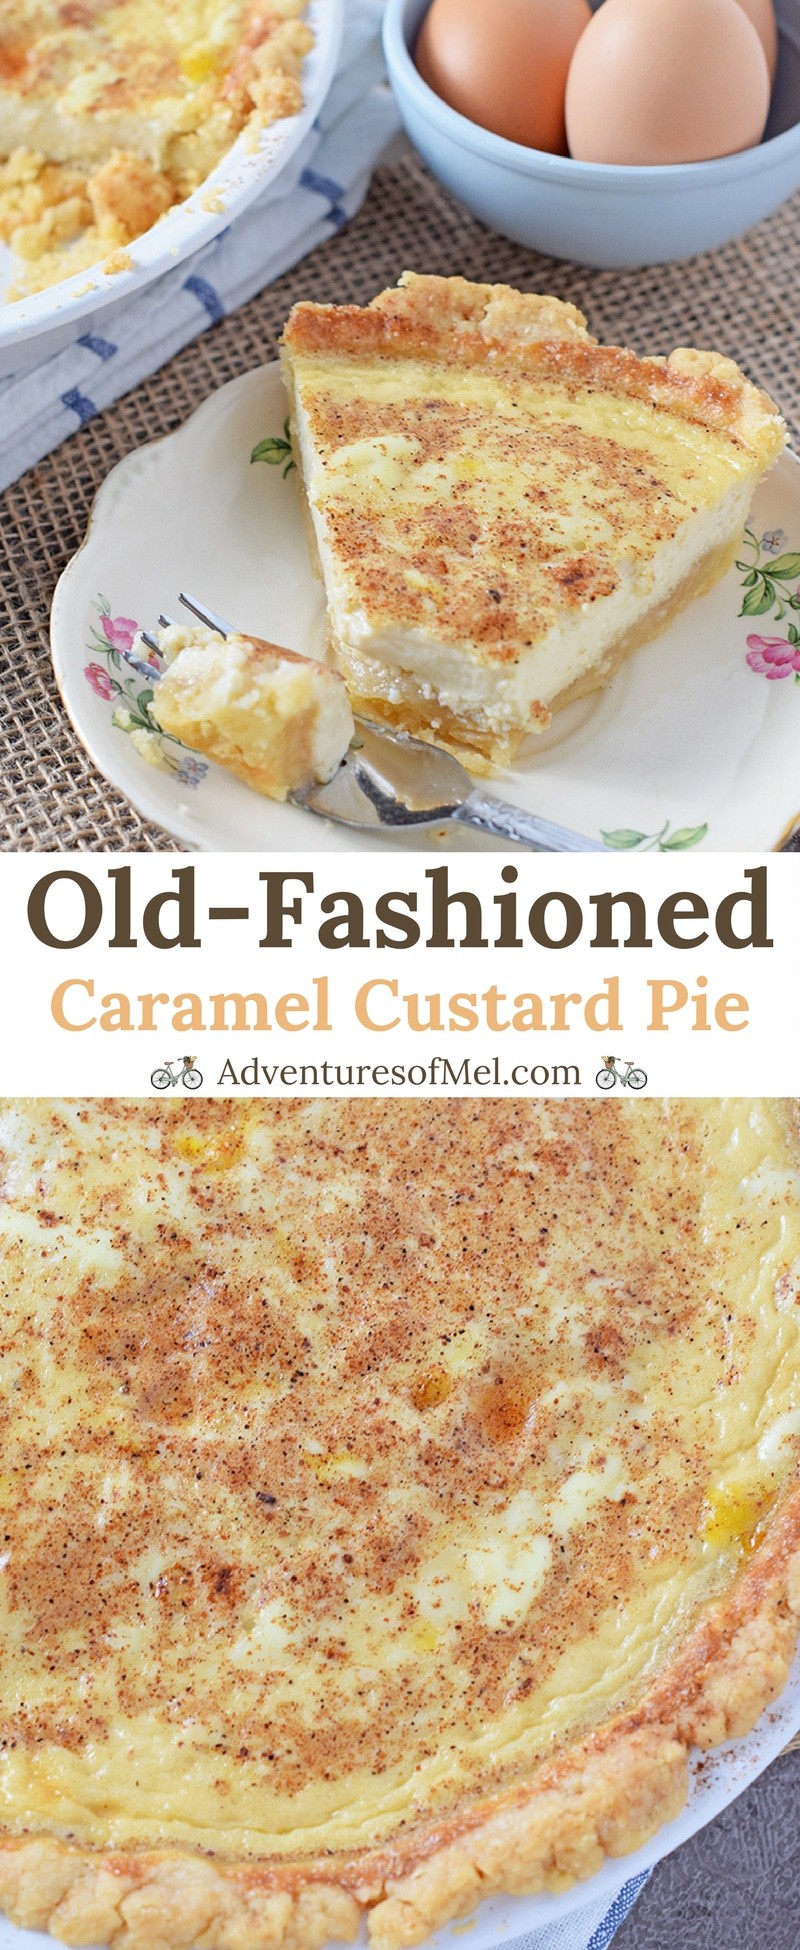
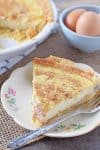
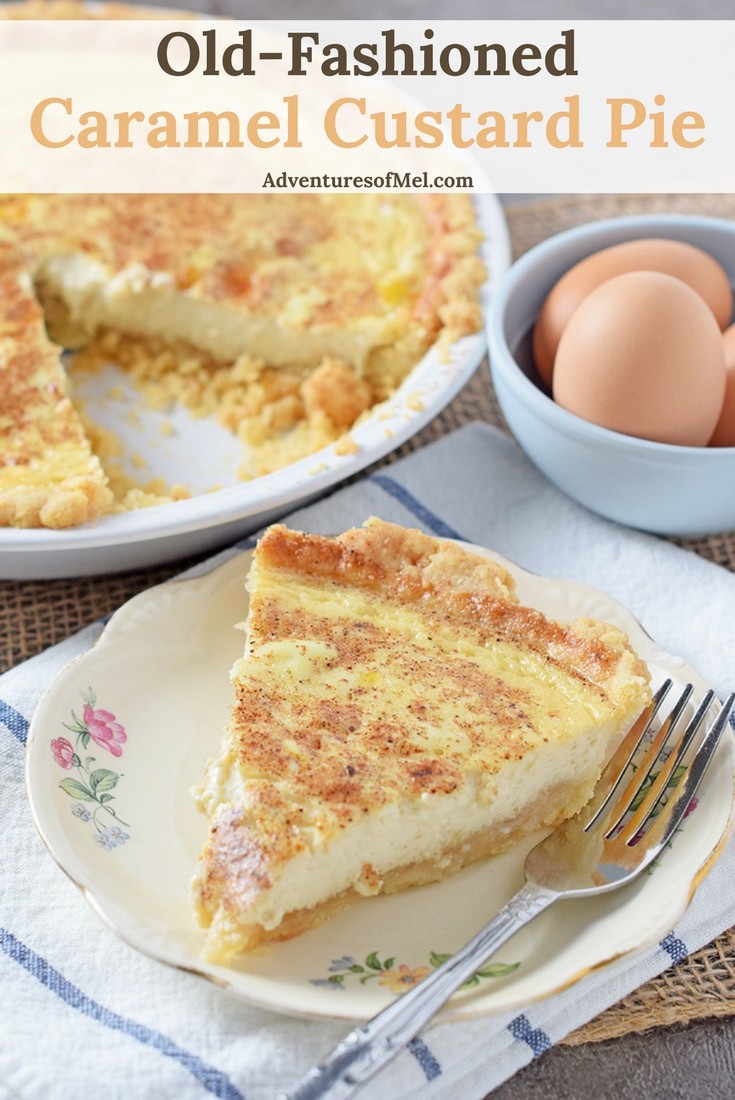
Made with an easy shortcut pie crust and a brown sugar caramel twist, this caramel custard pie is a delicious dessert and a family favorite recipe!
Caramel Custard Pie is not your ordinary custard pie. It has a caramel twist that adds an oomph to traditional custard pie, and it’s easily become another one of my family’s favorite pie recipes.
I remember my mom making custard and putting it in the oven to cook; much like pecan pie, it seemed to be one of her favorite desserts to make. Making this pie always brings back those memories of Mom in her kitchen cooking up a scrumptious dessert.
The brown sugar mixture I press into my crust gives this pie a great flavor, almost like a graham cracker crust but a different texture altogether.
While most custard pie recipes say to chill for an hour or two (and this one is delicious when it’s been chilled overnight), I enjoy this pie just as much when it’s warm from the oven. Mmmm, mmmm good.
WHERE CAN I FIND THE RECIPE FOR CARAMEL CUSTARD PIE?
If you’d rather skip all of my baking tips, important baking info for this recipe, and similar recipe ideas – and get straight to the scrumptious caramel custard pie recipe – just scroll down to the bottom, where you’ll find a printable recipe card.
Mix the brown sugar, granulated sugar, and flour together.
Then lightly press the brown sugar mixture into your crust, pressing into the bottom and sides. You may have a little bit left over.
For the filling, mix together the eggs, vanilla, caramel extract, milk, sugar, and salt. Don’t let the mixture become too frothy; just make sure it’s blended well.
Pour the egg mixture into your pie crust.
Sprinkle the top of the pie with a pinch of nutmeg.
Bake at 350° for about 45 minutes to an hour. You may want to use a pie shield to keep the edges of your pie from burning.
Insert a knife or baking tester in the center; if it comes out clean, the pie should be done.
Let the pie cool; it may sink just a bit.
Store in the refrigerator, and you may even want to chill overnight before serving. Serve alone or with whipped cream and fresh fruit. Enjoy!
Caramel Custard Pie, made with an easy shortcut pie crust and a brown sugar caramel twist. Delicious dessert and a family favorite recipe!
Crust:
2 cups all-purpose flour
2 teaspoons cane sugar
1 1/4 teaspoons salt
2/3 cup canola oil
3 tablespoons whole milk ( )
1/4 cup light brown sugar
1/4 cup cane sugar
2 teaspoons all-purpose flour
Custard Pie Filling:
3 large eggs
1 teaspoon vanilla extract
1 teaspoon caramel extract
1 3/4 cups whole milk
3 tablespoons cane sugar
1 teaspoon salt
1/2 teaspoon ground nutmeg
Pre-heat the oven to 350° F.
Crust:
Mix together 2 cups flour, 2 teaspoons cane sugar, and salt.
In a separate bowl (or glass measuring cup), whisk together the oil and milk.
Add the oil mixture to the dry ingredients, and stir together with a fork until the flour is all moistened.
Press the dough evenly into an un-greased 9-inch pie plate, covering the bottom and the sides. If you want to crimp the edges, go right ahead.
In a small mixing bowl, mix the brown sugar, 1/4 cup cane sugar, and 2 teaspoons flour together.
Then lightly press the brown sugar mixture into the crust, pressing into the bottom and sides. You may have a little bit left over.
Custard Pie Filling:
In a large mixing bowl, mix together the eggs, vanilla, caramel extract, milk, sugar, and salt. Don't let the mixture become too frothy; just make sure it's blended well.
Pour the egg mixture into your pie crust.
Sprinkle the top of the pie with the ground nutmeg.
Bake at 350° F for about 45 minutes to 1 hour. You may want to use a pie shield to keep the edges of your pie from burning. When a knife inserted in the center comes out clean, the pie should be done.
Remove the pie from the oven, and let it cool on a wire rack; it may sink just a bit.
Store the pie in the refrigerator, and you may even want to chill overnight before serving. Serve alone or with whipped cream and fresh fruit.
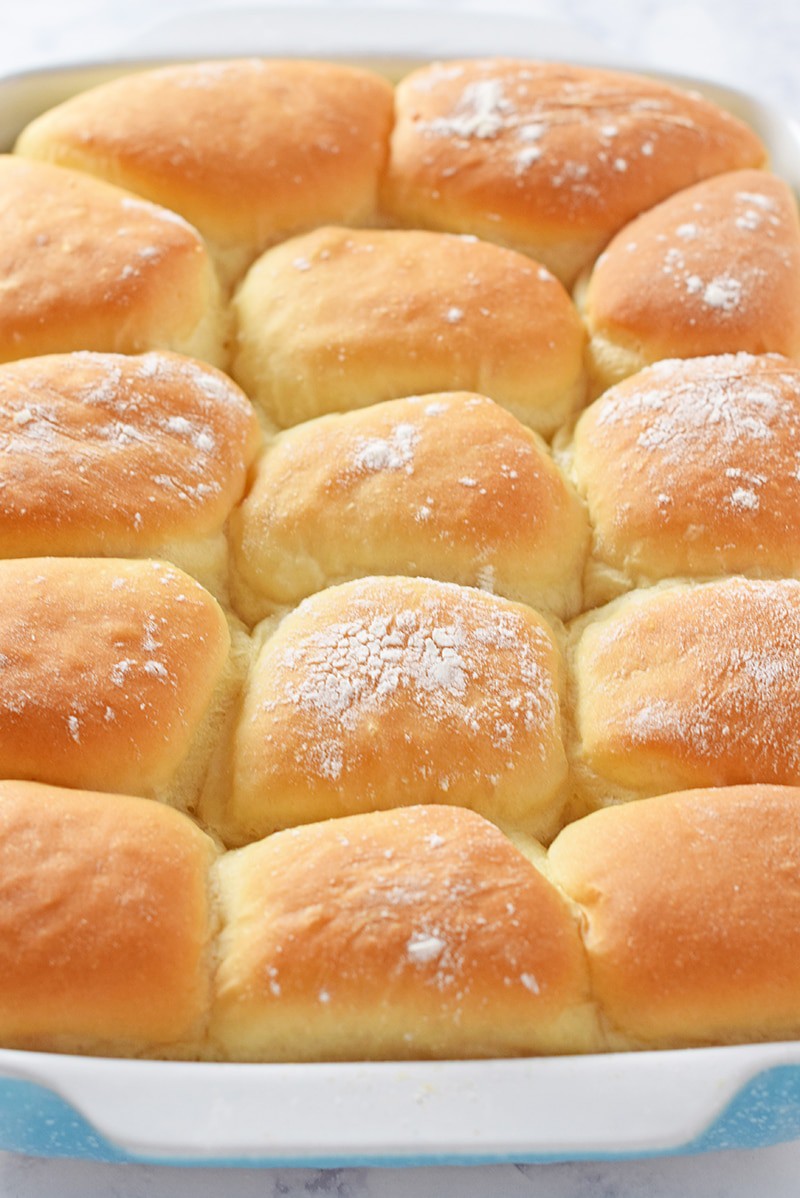
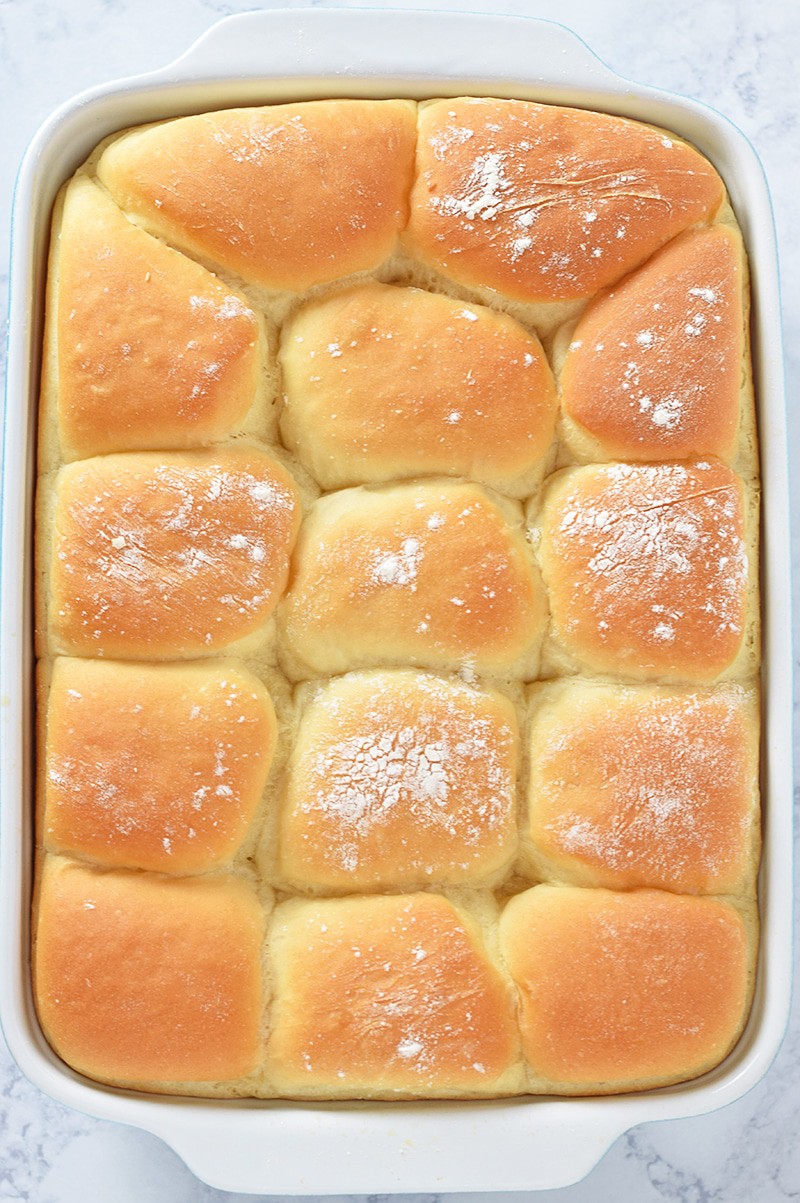
How to make Grandma’s homemade yeast rolls. Soft and buttery, these are easy yeast rolls for beginners, and a family favorite holiday dinner recipe. Enjoy fluffy dinner rolls at Thanksgiving, Christmas, and Easter!
Homemade dinner rolls are a staple for special occasions and holiday dinners in my family. My grandma made these old fashioned yeast rolls every Thanksgiving, Christmas, and Easter. Sometimes we just make them for our weekly slow cooker pork roast!
Just baking up a batch of these golden beauties brings back so many memories. I learned to make this dinner rolls recipe from my mom, just like she learned from her mom.
Why I Love Making My Grandma’s Yeast Rolls
There are loads of reasons to love Grandma’s yeast rolls…
I’m not going to say this is a quick recipe because it’s definitely not, but I will say it’s easy. While the recipe is a bit time-consuming, and you do have the added time of waiting for the dough to rise, these are easy yeast rolls for beginners to make and a great recipe to use for learning purposes.
It’s definitely a recipe I cherish and one I’m passing down to my own boys, so that Grandma’s legacy lives on. My oldest makes these rolls even better than I do; when he bakes them, they always turn out so light and fluffy.
We make this recipe for dinner rolls with all our favorite Easter recipes, Thanksgiving recipes, and Christmas recipes, and sometimes in between. We have to pace ourselves, because some of us will eat rolls with every meal when we have them around.
Ingredients and Substitutions Notes
Gather your ingredients before you get started.
Active Dry Yeast – While you can use instant yeast, I recommend using active dry yeast, which will ensure a longer rise time, and in turn, a batch of very soft, pillowy rolls. Whether you buy jars or packets of yeast, just know that 1 packet of yeast equals about 1 tablespoon.
Cane Sugar – You can also use granulated sugar
Warm Water – Not too hot, because you don’t want to kill the yeast. You want it slightly warm, so almost lukewarm.
Unsalted Butter – You can also sub shortening if you don’t have unsalted butter. My grandma actually used shortening; in fact, sometimes we would use regular shortening, and sometimes butter shortening (example: butter Crisco).
Large Eggs
All-Purpose Flour – I recommend using a really good unbleached all-purpose flour to make these rolls. You can also use a good bread flour. We’ll talk more about the differences below.
Sea Salt – I prefer using Redmond Fine Sea Salt.
How to Make Grandma’s Homemade Yeast Rolls
While there are a few steps to making dinner rolls from scratch, you’ll find the process is really pretty easy.
Activate the Yeast
Stir the yeast, sugar, and warm water in a glass measuring cup or small bowl.
Set aside in a warm place to rise. It will bubble and rise up.
Mix the Dough
While waiting for the yeast mixture to rise, cream (or mix together) the sugar and unsalted butter in a large mixing bowl.
Beat in the eggs, one at a time.
Add the bubbly yeast mixture to the butter mixture, along with an additional 1 1/2 cups warm water.
In a separate bowl, sift together the flour and salt.
Gradually add the flour in, and mix well. For this step, I like to use the dough hook on my stand mixer.
Turn the dough into a large greased bowl or stockpot, and let it rise to the top or almost to the top (it can take 2 to 3 hours to double in size). Keep the bowl or pan covered with a lightweight kitchen towel.
How to Shape the Dinner Rolls
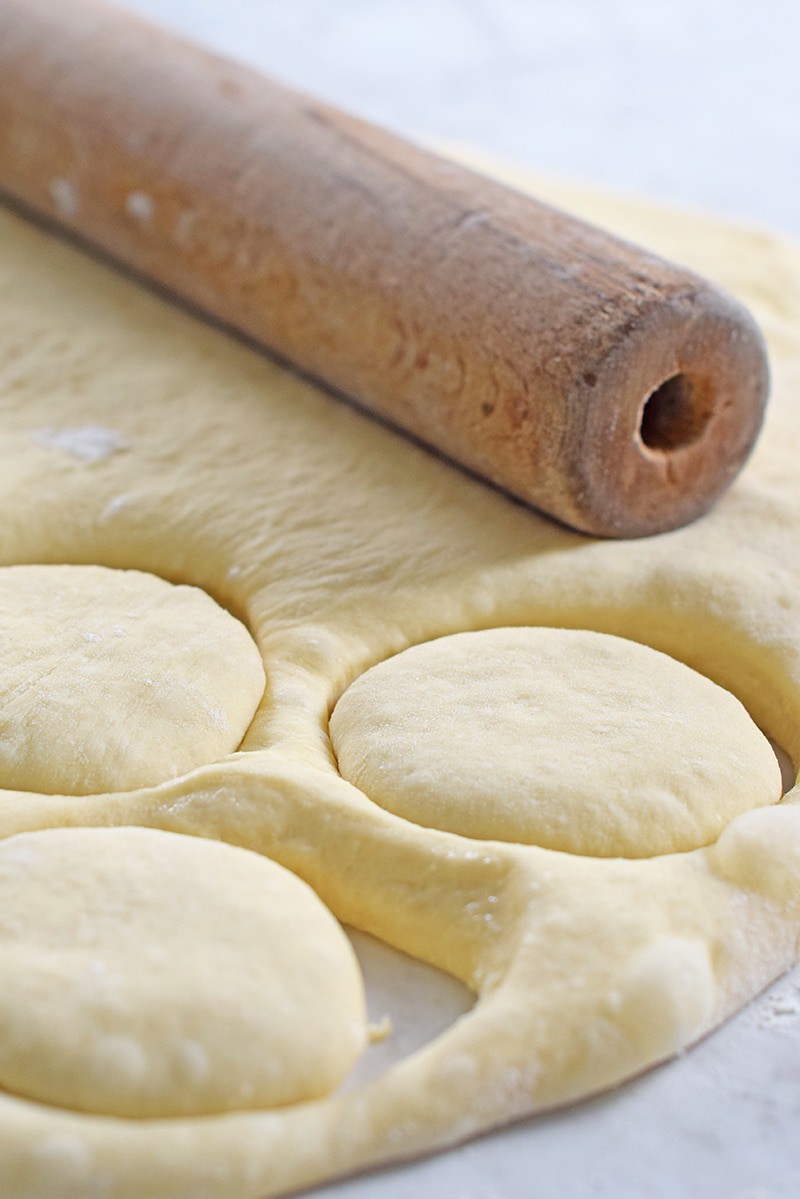
Once the dough has risen, turn it out onto a floured surface. Coat generously with flour by turning and shaping. No kneading is necessary, though I still like to knead it a bit just for fun.
Roll out the dough to about a 1 to 2 inch thickness.
Then cut round rolls with a cup, glass, or biscuit cutter.
Bake the Rolls
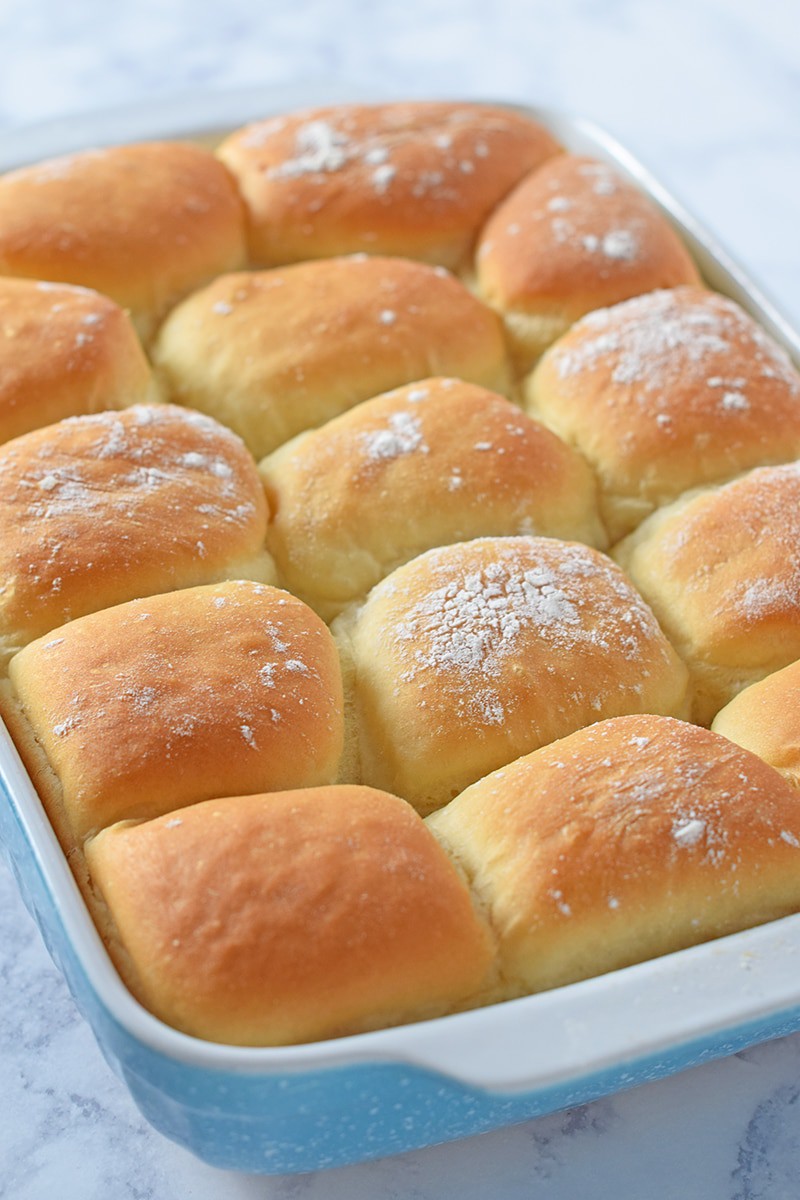
Place the rolls, side by side against each other, in greased baking pans, and let them rise (this will probably take another 1 to 2 hours).
Bake the rolls for about 20 minutes (maybe a little longer) at 350°F. Halfway through baking, you may need to cover the rolls with foil, so they don’t brown too much before they bake through.
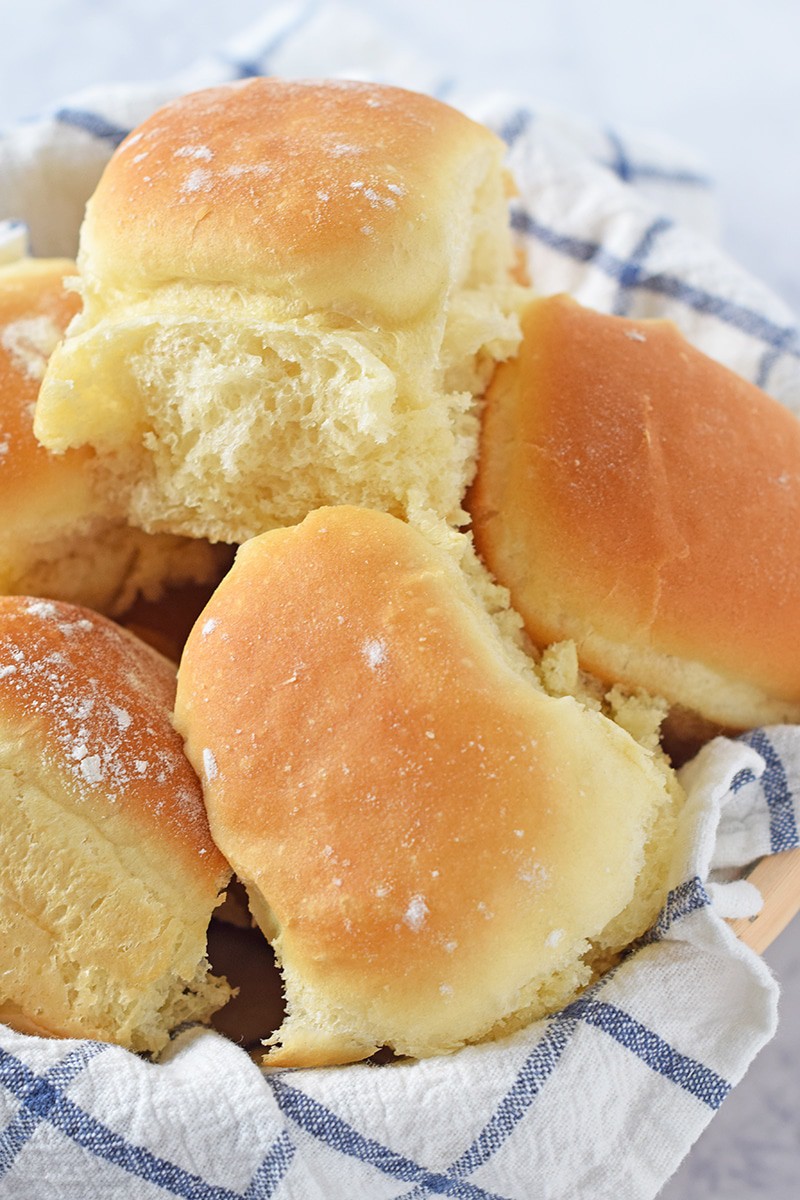
When they’re done baking, remove the rolls from the oven and allow them to cool.
What to Serve with Yeast Rolls
Of course, I usually can’t resist enjoying a hot roll with warm melty butter. They’re so delicious, especially since I learned how to make salted butter; homemade butter is the best!
Which is better for dinner rolls, all-purpose flour or bread flour?
We’ve used both kinds of flour, and while I’ve always used all-purpose flour, my son always uses bread flour. It’s a personal preference we both have. However, here’s the truth, so you can decide which is best for you. Bread flour contains more protein, which equals more gluten, which equals more elasticity and stretchability. It’s especially good for making actual loaves of bread, baguettes, etc. All-purpose flour will create a tighter crumb; it’s also a great choice in roll recipes that require more butter and sugar, which both make a difference in the final texture of the bread when baked. King Arthur actually has a really great article about whether bread flour really does make a difference when baking bread. I encourage you to read it if you’d like to learn more.
Why aren’t my yeast rolls light and fluffy?
Dry, dense rolls can happen when we 1) add too much flour; or 2) don’t allow enough rise time. My grandma always wanted us to sift the flour at least 7 times while baking cakes and bread. While I’ve never done that, sifting does make a difference. And allowing that rise time so your rolls get big and puffy and pillowy soft makes a huge difference in the final baked bread roll.
Why did my homemade rolls get hard?
Probably over kneading. This recipe doesn’t require any kneading at all, so there’s no need to even worry about this.
Should you brush yeast rolls before baking?
Totally up to you, but I never have with this recipe. My oldest does. He likes a shiny golden top to his bread rolls. An egg yolk will help the rolls to brown, but you really don’t need any help with these rolls browning, as the oven temp will do just fine on its own; in fact, you may have to cover with foil to avoid too much browning. Egg white will give the shine. You can even brush with melted butter after baking for added flavor and a bit of shine.
Can you freeze homemade rolls?
Yes, you can. You can either freeze the shaped unbaked rolls, covered in an airtight baking pan; then thaw before baking as usual. Or you can freeze the baked rolls in an airtight container; then thaw and warm before serving.
If you try this recipe, why not leave a star rating in the recipe card right below and/or a review in the comment section further down the page? I always appreciate your feedback. You can also follow me on Pinterest, Facebook, Instagram, and YouTube. And subscribe to my email list too!
Grandma’s Homemade Yeast Rolls
How to make Grandma's homemade yeast rolls. Soft and buttery, easy yeast rolls for beginners, a family favorite holiday dinner recipe.
Glass Measuring Cup
Mixer
Large Mixing Bowl
Sifter
Rolling Pin
Stockpot
Biscuit Cutter
Baking Pans
1 tablespoon active dry yeast
1 teaspoon cane sugar
1/2 cup warm water
2/3 cup cane sugar
3 tablespoons unsalted butter (softened)
3 large eggs
1 1/2 cups warm water
6 cups all-purpose flour
3 teaspoons sea salt
Whisk together the yeast, sugar, and warm water in a glass measuring cup or small bowl. Set aside in a warm place to rise. It will bubble and rise up.
While waiting for the yeast mixture to rise, cream (or mix together) the sugar and unsalted butter in a large mixing bowl.
Beat in the eggs, one at a time.
Add the bubbly yeast mixture to the butter mixture, along with an additional 1 1/2 cups warm water.
In a separate bowl, sift the flour and salt together.
Gradually add the flour mixture into the wet ingredients, and mix well. For this step, I like to use the dough hook on my stand mixer.
Turn the dough into a large greased bowl or stockpot, and let it rise to the top or almost to the top (it can take 2 to 3 hours to double in size). Keep the bowl or pan covered with a lightweight kitchen towel.
Once the dough has risen, turn it out onto a floured surface. Coat generously with flour by turning and shaping. No kneading is necessary, though I still like to knead it a bit just for fun.
Roll out the dough to about a 1 to 2 inch thickness.
Then cut round rolls with a cup, glass, or biscuit cutter.
Place the rolls, side by side against each other, in greased baking pans, and let them rise (this will probably take another 1 to 2 hours).
Pre-heat the oven to 350° F.
Bake the rolls for about 20 minutes (maybe a little longer) at 350°F. Halfway through baking, you may need to cover the rolls with foil, so they don't brown too much before they bake through.
When they're done baking, remove the rolls from the oven and allow them to cool. Of course, I usually can't resist enjoying a hot roll with warm melty butter. They're so delicious!
*Grandma used shortening in her rolls; I prefer to use butter instead.
Breads & Muffins
American
bread roll recipe, bread rolls, dinner roll recipe, dinner rolls, dinner rolls from scratch, dinner rolls recipe, easy yeast rolls for beginners, grandma’s homemade yeast rolls, grandma’s yeast rolls, homemade rolls, old fashioned yeast rolls, recipe for dinner rolls, yeast roll recipe, yeast rolls
Learn how to make easy and adorable bunny tail cupcakes with chocolate cupcakes, frosting, and mini marshmallows. This is a fun Easter dessert kids will love to help make!
Easter will soon be here, and these little bunny cupcakes are so easy and fun, you’ll want to add them to your traditional Easter dinner menu.
Why You’ll Love This Easter Dessert
This is a fun dessert for kids and young at heart.
Perfect recipe for toddlers and working on fine motor skills… Placing the marshmallows on the cupcakes will keep them entertained and busy for at least a little bit.
You can make regular sized cupcakes or mini cupcakes. Mini bunny tail cupcake bites are the perfect size dessert if you’re trying to watch what you eat but still want a bit of a sweet treat.
They involve chocolate, so that’s a win win dessert right there. Of course, you can make the cupcakes any flavor you like.
Ingredients and Substitutions Notes:
You’ll need a few ingredients to make this recipe…
Butter and Oil – I like to use salted butter and canola oil for this recipe.
Unsweetened Cocoa Powder – I prefer Hershey’s Cocoa Powder, but you can use any brand you like.
Large Eggs
Baking Soda
Buttermilk – You can use a buttermilk mix, straight buttermilk from the store, or just sour regular milk by adding a tablespoon of vinegar to the measuring cup, then measure out the milk to the line for the amount you need.
Another option is to use a cake mix. I’m all for easy, so I totally get it, plus you can make any flavor you want.
If you decide to make mini cupcakes, you’ll definitely need a mini muffin pan.
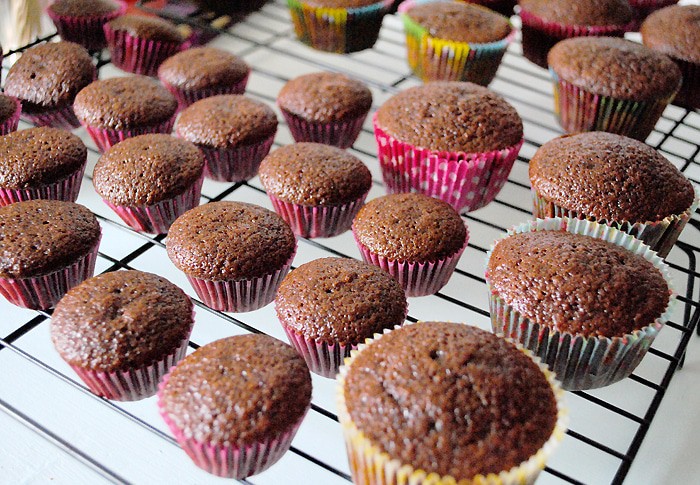
Before you get starting mixing up the cupcake batter, pre-heat the oven to 350° F, and line your muffin pan/s with cupcake liners.
Mix and Bake the Cupcakes
In a large mixing bowl, whisk together the sugar, flour, and cocoa powder.
In a medium saucepan, bring the butter, oil, and water to a boil.
Then remove the mixture from the heat, and mix together with the flour mixture.
In a separate bowl, dissolve the baking soda in the buttermilk by whisking together for a minute or so.
Then beat the eggs in with that buttermilk mixture.
Add the egg mixture and vanilla extract to the flour mixture in the mixing bowl, and mix well.
Pour the cupcake batter into the prepared muffin pan/s, and bake at 350° for about 15-20 minutes, or until a toothpick inserted in the center of a cupcake comes out clean.
Let the cupcakes cool in the pan for about 10 minutes before removing to a wire rack to cool completely.
Make the Frosting
While your cupcakes are baking, mix up the frosting.
In a medium mixing bowl, whisk together the powdered sugar and cocoa powder. Set aside.
In a medium saucepan, melt the butter into the buttermilk, but do not boil. Remove from the heat when all the butter has melted.
Then beat in the powdered sugar mixture ’til you have a spreadable consistency for frosting.
Whisk in the vanilla extract, and it’s ready to go.
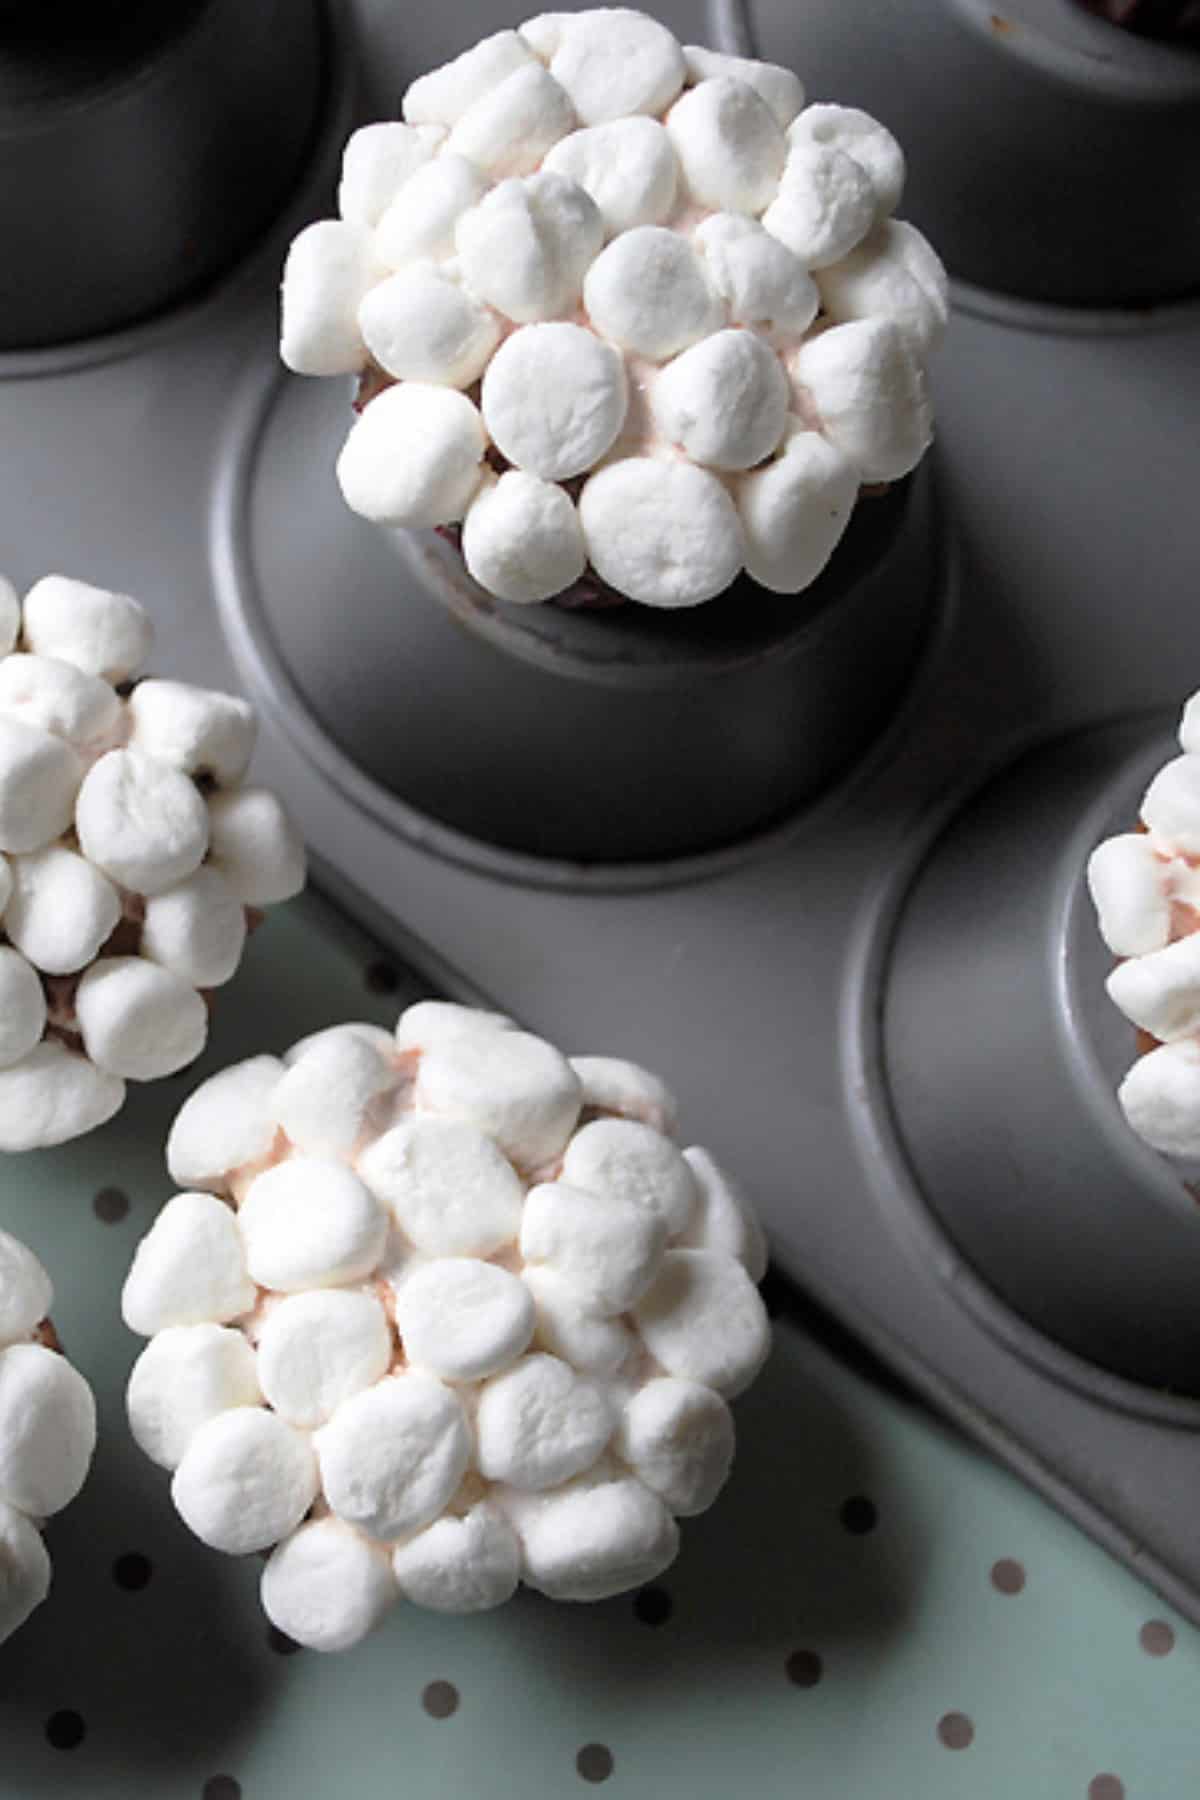
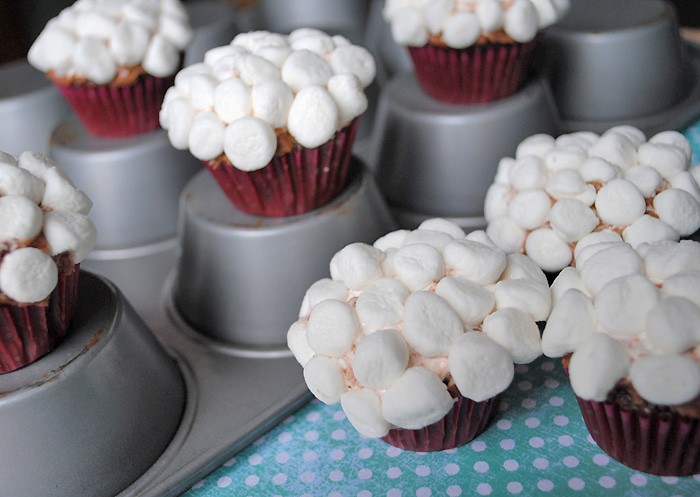
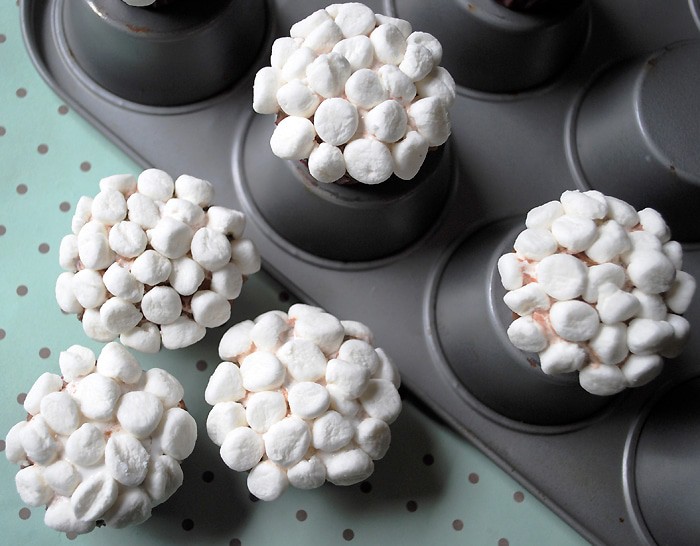
How to Decorate Bunny Tail Cupcakes
Once your cupcakes have baked and cooled, frost to whatever thickness you prefer.
Then apply a thin layer of marshmallow cream; it’s ok if the marshmallow cream mixes just a bit with the chocolate frosting. This mixture will allow the mini marshmallows to really adhere to the top of the cupcake without sliding off.
Slice or tear each mini marshmallow in half.
Place the marshmallows all over the top of each frosted cupcake, adding more marshmallow halves ’til the top of each cupcake is covered, resembling a fluffy bunny tail.
And that’s it. They are so cute and perfect for the Easter holiday with family and friends.
Expert Tips and Recipe FAQ’s
How should I store bunny tail cupcakes?
If you have leftovers, store them in an airtight container in the fridge. They’ll keep better in the fridge, though they’ll likely only last about 3-4 days before going stale.
Do I have to frost the cupcakes?
No, you don’t. You can just use marshmallow cream if you want. However, you do need marshmallow cream, no matter what, to help the marshmallows stick to the cupcake tops; I’ve found it works the best to keep them from sliding off.
If you try this recipe, why not leave a star rating in the recipe card right below and/or a review in the comment section further down the page? I always appreciate your feedback. You can also follow me on Pinterest, Facebook, Instagram, and YouTube. And subscribe to my email list too!
Bunny Tail Cupcakes
How to make easy, adorable bunny tail cupcakes with chocolate cupcakes, frosting, and mini marshmallows. Fun Easter dessert kids will love!
Muffin Tins
Cupcake Liners
Cupcakes:
2 cups cane sugar
2 cups all-purpose flour
1/4 cup unsweetened cocoa powder
1/2 cup salted butter
1/2 cup canola oil
1 cup water
1 1/2 teaspoons baking soda
1/2 cup buttermilk
2 large eggs
1 teaspoon vanilla extract
Frosting:
5 1/2 to 6 cups powdered sugar
1/4 cup unsweetened cocoa powder
8 tablespoons salted butter (softened)
1/2 cup buttermilk
1 teaspoon vanilla extract
1 cup marshmallow cream
4 cups mini marshmallows
Mix and Bake the Cupcakes:
Pre-heat the oven to 350° F, and line muffin tin/s with cupcake liners.
In a large mixing bowl, whisk together the sugar, flour, and cocoa powder.
In a medium saucepan, bring the butter, oil, and water to a boil.
Then remove the mixture from the heat, and mix together with the flour mixture.
In a separate bowl, dissolve the baking soda in the buttermilk by whisking together for a minute or so.
Then beat the eggs in with that buttermilk mixture.
Add the egg mixture and vanilla extract to the flour mixture in the mixing bowl, and mix well.
Pour the cupcake batter into the prepared muffin pan/s, and bake at 350° for about 15-20 minutes, or until a toothpick inserted in the center of a cupcake comes out clean.
Let the cupcakes cool in the pan for about 10 minutes before removing to a wire rack to cool completely.
Make the Frosting:
In a medium mixing bowl, whisk together the powdered sugar and cocoa powder. Set aside.
In a medium saucepan, melt the butter into the buttermilk, but do not boil. Remove from the heat when all the butter has melted.
Then beat in the powdered sugar mixture 'til you have a spreadable consistency for frosting.
Whisk in the vanilla extract, and it's ready to go.
How to Decorate Bunny Tail Cupcakes:
Once your cupcakes have baked and cooled, frost to whatever thickness you prefer.
Then apply a thin layer of marshmallow cream; it's ok if the marshmallow cream mixes just a bit with the chocolate frosting. This mixture will allow the mini marshmallows to really adhere to the top of the cupcake without sliding off.
Slice or tear each mini marshmallow in half.
Place the marshmallows all over the top of each frosted cupcake, adding more marshmallow halves 'til the top of each cupcake is covered, resembling a fluffy bunny tail.
*You can also make mini cupcakes by using a mini muffin pan.
If you have leftovers, store them in an airtight container in the fridge. They’ll keep better in the fridge, though they’ll likely only last about 3-4 days before going stale.
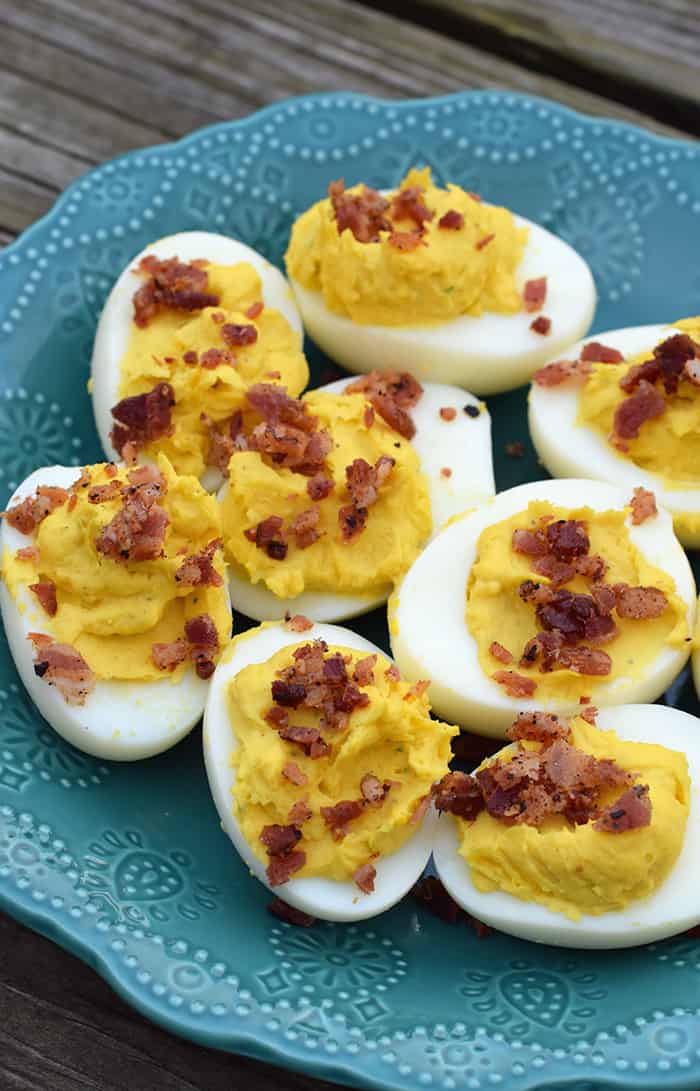
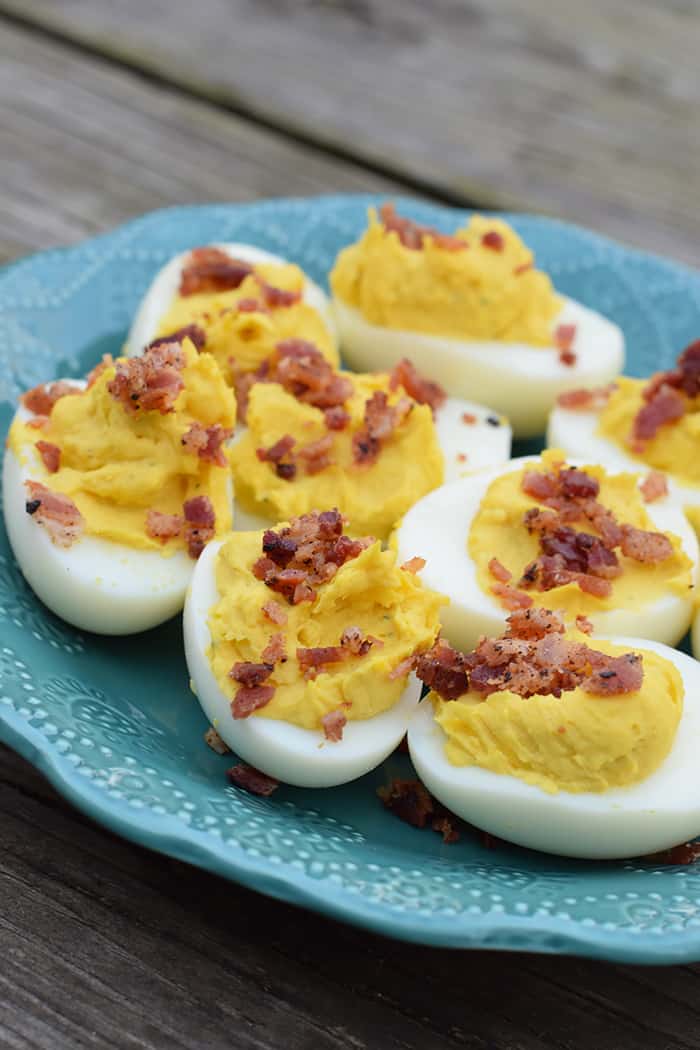
Learn how to make bacon Ranch deviled eggs with a handful of simple ingredients. These yummy finger foods are perfect for an Easter or holiday appetizer. This recipe is easy to make, and it makes enough to feed a crowd.
Eggs, eggs, and more eggs… Thanks to our chickens, we have plenty of eggs right now, something I’m over the moon about because that’s one thing I don’t have to buy at the grocery store.
Easter Sunday is right around the corner, so what better way to use them than by making a big batch of delicious Ranch deviled eggs with bacon to go with your traditional Easter dinner? Yum!
Random Fun Fact: Did you know some people call deviled eggs angel eggs? Essentially the same thing, but I just thought that was interesting.
Why You’ll Love This Recipe
They’re quick and easy to make, perfect for a last minute appetizer.
You can make Ranch deviled eggs with bacon or without bacon… Of course, I’m of the mind that bacon makes everything better.
This recipe makes enough to feed a group of people, so it’s perfect for family dinner, holiday parties, etc.
Simple ingredients… This means everything, especially with the costs of groceries these days.
Even if you don’t necessarily have a get together to make them for, they make great snacks.
Ingredients and Substitutions Notes
You only need a handful of ingredients to make Ranch bacon deviled eggs…
Hardboiled Eggs – You can boil these ahead of time, so they’re ready.
Buttermilk Ranch Mix – I prefer to use Hidden Valley Buttermilk Ranch mix to make Hidden Valley Ranch deviled eggs. It’s easy and convenient.
Condiments – You’ll need both mayonnaise and mustard. While mayo makes a lower carb version of these eggs, I’ve also used a dressing like Miracle Whip; but keep in mind, you may not need as much salt if doing so.
Dill Pickles – Just mince them up.
Bacon – I prefer to cook our bacon with breakfast and save it back in the fridge for use later; but you can also use precooked bacon and just pop it in the microwave when ready. Regardless which bacon you choose, it will need to be cooked and crumbled.
How to Make Bacon Ranch Deviled Eggs
Prep work mainly involves boiling the eggs ahead of time and allowing them to cool. You can also cook the bacon and crumble it.
How to Make and Fill Deviled Eggs
Peel and slice each hardboiled egg in half, removing the yolks and placing them in a large mixing bowl. Set the whites aside on a platter.
Add the Ranch mix, mayonnaise, mustard, and minced Dill pickles to the egg yolks, and mix together well.
Fill each egg white half with a spoonful of the yolk mixture.*
Cover and refrigerate the eggs for 1-2 hours.
When ready to serve, crumble the bacon on top of each deviled egg.
And that’s it! They’re ready to serve.
Expert Tips and Recipe FAQ’s
When is the best time to make bacon Ranch deviled eggs, the day before or the day of?
Personally, I’d rather eat deviled eggs the day of, but with maybe 2-3 hours to chill in the fridge. However, you can make them the day before, and they’ll be just fine. Now, if you are making them the day before, I do recommend crumbling freshly cooked bacon on the day of; if you add bacon the day before, it can get kinda chewy and tough from sitting in the fridge.
How should you store deviled eggs?
Definitely store them in an airtight deviled egg container with a lid, and in the refrigerator. You can also put them on a platter and cover it tightly with plastic wrap.
Can you freeze deviled eggs?
While you can freeze the yolk mixture, it’s best to not freeze the egg whites because they’ll become quite rubbery in texture.
If you try this recipe, why not leave a star rating in the recipe card right below and/or a review in the comment section further down the page? I always appreciate your feedback. You can also follow me on Pinterest, Facebook, Instagram, and YouTube. And subscribe to my email list too!
Bacon Ranch Deviled Eggs
How to make bacon Ranch deviled eggs, perfect for an Easter or holiday appetizer. Easy to make, this recipe makes enough to feed a crowd.
Deviled Egg Container with Lid
24 large hardboiled eggs
2 teaspoons buttermilk Ranch mix
1 cup mayonnaise
1 teaspoon mustard
1/4 cup Dill pickles (minced)
4 slices bacon (cooked and crumbled)
Peel and slice each hardboiled egg in half, removing the yolks and placing them in a large mixing bowl. Set the whites aside on a platter.
Add the Ranch mix, mayonnaise, mustard, and minced Dill pickles to the egg yolks, and mix together well.
Fill each egg white half with a spoonful of the yolk mixture.*
Cover and refrigerate the eggs for 1-2 hours.
When ready to serve, crumble the bacon on top of each deviled egg. Then serve.
*You can fill the eggs 3 ways…
Use a spoon to add the yolk mixture to the whites.
Snip the corner of a Ziploc bag with scissors, fill the bag with yolk mixture, and pipe the filling into the whites.
Or you can use a cake tip and pastry bag filled with the yolk mixture to pipe the yolk mixture into the whites.
When is the best time to make bacon Ranch deviled eggs, the day before or the day of? Personally, I’d rather eat deviled eggs the day of, but with maybe 2-3 hours to chill in the fridge. However, you can make them the day before, and they’ll be just fine. Now, if you are making them the day before, I do recommend crumbling freshly cooked bacon on the day of; if you add bacon the day before, it can get kinda chewy and tough from sitting in the fridge.
How should you store deviled eggs? Definitely store them in an airtight container with a lid, and in the refrigerator. You can also put them on a platter and cover it tightly with plastic wrap.
Super easy appetizers anyone can make, perfect for your holiday party. This list of 30+ recipes includes finger food appetizers, quick and easy dips, and more. Who doesn’t love the bite-sized deliciousness of a simple appetizer?
The holidays mean loads of holiday parties and events with loads of finger foods. It’s a great time to have an arsenal of easy appetizer recipes, like leftover ham and stuffing crescent rolls, you can turn to when you need something quick and easy.
This list of simple appetizers is a list of recipes that aren’t just easy; they’re really delicious too.
In fact, sometimes we make finger foods and appetizers just because we want to, no party plans in sight. Did I mention they’re great for game day too?
When it comes to easy party foods and finger foods, you want to keep it as simple as possible but still make sure it tastes good. Keep it simple with as few ingredients as possible, and hopefully ingredients you already have on hand.
Great options for simple appetizers and good finger foods include…
When planning easy apps for a crowd, there are 4 things you need to think about.
1. Timing
What appetizers can sit out, which ones can you make ahead, can you freeze any ahead of time, and are there appetizers that need to be made last minute right before the party or event? Figuring out the timing of making all the appetizers will help you plan an appetizer menu that works for you, not against you. It’ll also help you know how to give people tasks when they ask how they can help.
2. Serving
How much of each appetizer do you need to make? How many people will be in attendance, and how much will you need per person? Think serving sizes; also think about making extra on the most popular appetizers people love the most.
Once you figure out how many and how much, you’ll need to think about serving dishes, platters, bowls, and such. Also plates, napkins, and utensils needed.
3. Dietary Restrictions
Yeah, dietary restrictions can be a major bummer, but think about your guests who are living with those food restrictions… Even more of a bummer for them if there’s nothing they can eat. Ask your guests if they have any restrictions, and try to plan a few appetizers or snacks they can enjoy, as well. Think about vegetarian, vegan, gluten-free, dairy-free, etc.
4. Can You Turn the Party into an Appetizer Potluck?
Instead of doing all the work yourself, ask everyone to bring their favorite snacks, dips, and finger foods. Talk about cheap easy appetizers… Less work for you and everyone involved, and everyone gets to graze on their favorites. It’s a win-win!
Finger Food Appetizers
Super simple bites and foods you can eat with your fingers… Sometimes I’d rather have the appetizers over the main meal. Your guests will feel the same with this delicious array.
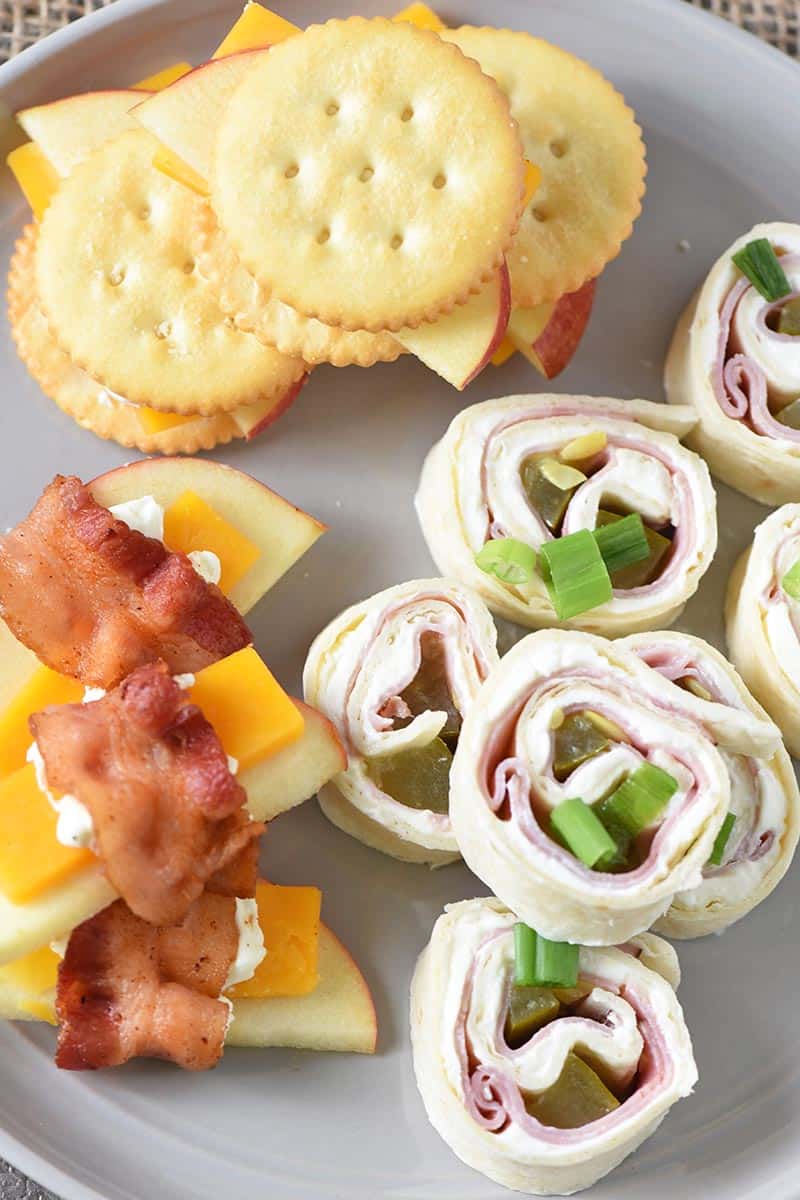
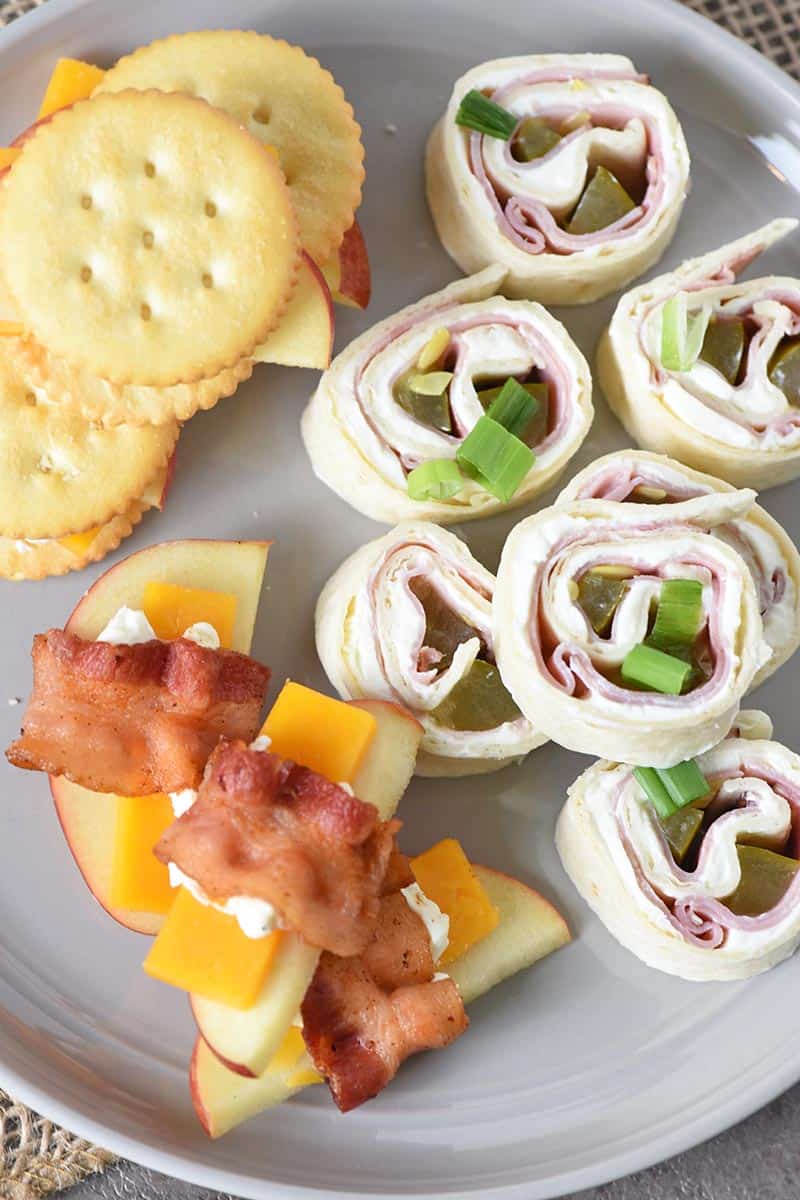
[wprm-recipe-roundup-item link=”https://staging.adventuresofmel.com/dill-pickle-ham-roll-ups/” newtab=”0″ name=”1. Dill Pickle Ham Roll Ups” summary=”<p>Whip up a batch of dill pickle ham roll ups in 10 minutes or less. These easy to make pinwheels make perfect snacks and party appetizers.</p>” image=”56265″]
[wprm-recipe-roundup-item link=”https://staging.adventuresofmel.com/apple-cheese-and-crackers/” newtab=”0″ name=”2. Apple Cheese and Crackers” summary=”<p>Top crackers with apple slices and cheddar to make apple cheese and crackers, an easy snack and basic appetizer idea grown-ups and kids will love!</p>” button=”Get the Recipe” image=”56342″]
[wprm-recipe-roundup-item link=”https://staging.adventuresofmel.com/bacon-wrapped-apples-with-cheese/” newtab=”0″ name=”3. Bacon Wrapped Apples with Cheese” summary=”<p>All you need are 4 ingredients to make bacon wrapped apples with cheese. Insanely delicious, easy appetizer recipe, perfect for a party.</p>” button=”Get the Recipe” image=”56195″]
[wprm-recipe-roundup-item link=”https://theforkedspoon.com/bacon-wrapped-shrimp/” name=”4. Bacon Wrapped Shrimp” summary=”<p>Delicious bite-sized bacon wrapped shrimp are the best quick and easy appetizer, perfect for game day, holidays, and special occasions. Made with juicy shrimp wrapped in crispy bacon, then brushed with a sweet and spicy honey Cajun glaze.</p>” button=”Get the Recipe” image=”56435″]
[wprm-recipe-roundup-item link=”https://nibbleanddine.com/smoked-salmon-canapes/” name=”5. Smoked Salmon Canapés” summary=”<p>Smoked salmon canapés are a quick, easy, and elegant appetizer with only 8 ingredients; and you can make them in about 15 minutes! </p>” button=”Get the Recipe” image=”56436″]
[wprm-recipe-roundup-item link=”https://staging.adventuresofmel.com/maple-bourbon-grilled-shrimp-kabobs/” newtab=”0″ name=”6. Maple Bourbon Shrimp Skewers” summary=”<p>Easy recipe for grilled shrimp kabobs marinated with the most delicious, two ingredient, maple bourbon grilled shrimp marinade, then skewered with pineapple chunks and thrown on the grill.</p>” button=”Get the Recipe” image=”34952″]
[wprm-recipe-roundup-item link=”https://staging.adventuresofmel.com/maple-sausage-stuffed-pastry-bites/” newtab=”0″ name=”7. Maple Sausage Stuffed Pastry Bites” summary=”<p>Maple sausage stuffed pastry bites, made with cream cheese and spinach, are the ultimate appetizer and finger food idea for your holiday party.</p>” button=”Get the Recipe” image=”32369″]
[wprm-recipe-roundup-item link=”https://staging.adventuresofmel.com/appetizer-recipe-taco-bites/” newtab=”0″ name=”8. Taco Bites” summary=”<p>Little taco bites snacks are super easy to make, and they contain fresh ingredients, like tomatoes, lettuce, and shredded cheese.</p>” button=”Get the Recipe” image=”21975″]
[wprm-recipe-roundup-item link=”https://staging.adventuresofmel.com/chicken-dip-pinwheels-appetizer/” newtab=”0″ name=”9. Chicken Dip Pinwheels” summary=”<p>Chicken dip pinwheels may be bite-sized, but they pack a delicious, flavor-filled punch. Add a little lettuce for a bit of green, and you've got an appetizer your guests will love.</p>” button=”Get the Recipe” image=”24801″]
[wprm-recipe-roundup-item link=”https://confessionsofparenting.com/cranberry-brie-bites/” name=”10. 15 Minute Cranberry Brie Bites” summary=”<p>Cranberry brie bites are the perfect addition to your next holiday party! With a beautiful cranberry sauce over melted brie in Filo shells, these simple cranberry appetizers are so easy to prep, but look like you slaved all day in the kitchen!</p>” button=”Get the Recipe” image=”56422″]
[wprm-recipe-roundup-item link=”https://budgetdelicious.com/buffalo-chicken-meatballs/” name=”11. Buffalo Chicken Meatballs” summary=”<p>Enjoy the great taste of Buffalo wings in convenient meatball form!</p>” button=”Get the Recipe” image=”56423″]
[wprm-recipe-roundup-item link=”https://xoxobella.com/homemade-mini-pizza-bagel-bites/” name=”12. Homemade Mini Pizza Bagel Bites” summary=”<p>Once you know how to make bagel bites, you'll want to rustle up this bite size pizza snack all the time. Homemade mini pizza bagel bites are a great lunch, snack or appetizer. Give these easy DIY pizza bagels a try!</p>” button=”Get the Recipe” image=”56424″]
[wprm-recipe-roundup-item link=”https://www.wholesomeyum.com/recipes/crispy-bacon-wrapped-asparagus/” name=”13. Bacon Wrapped Asparagus” summary=”<p>This oven baked bacon wrapped asparagus recipe includes tips to make it extra crispy, and it takes less than 30 minutes to make!</p>” button=”Get the Recipe” image=”56425″]
[wprm-recipe-roundup-item link=”https://staging.adventuresofmel.com/leftover-ham-and-stuffing-crescent-rolls/” newtab=”0″ name=”14. Leftover Ham and Stuffing Crescent Rolls” summary=”<p>Easy appetizer recipe with leftover ham, stuffing, and crescent rolls. Simple and delicious finger foods, perfect for party snacks or lunch with the kids!</p>” button=”Get the Recipe” image=”38063″]
[wprm-recipe-roundup-item link=”https://crazyadventuresinparenting.com/2015/10/spinach-balls-great-for-football-entertaining.html” name=”15. Easy Spinach Balls” summary=”<p>Get ready for this delectable spinach balls recipe which can be made gluten-free or no-carb, easy peasy.</p>” button=”Get the Recipe” image=”56427″]
[wprm-recipe-roundup-item link=”https://blackberrybabe.com/2021/06/16/puff-pastry-wrapped-asparagus/” name=”16. Cheesy Puff Pastry Wrapped Asparagus” summary=”<p>Cheesy puff pastry wrapped asparagus is a wonderful side dish or great appetizer! This tasty recipe uses just 6 ingredients, including fresh asparagus.</p>” button=”Get the Recipe” image=”56428″]
[wprm-recipe-roundup-item link=”https://eatpicks.com/ham-roll-ups/” name=”17. Easy Ham Roll Ups” summary=”<p>This easy ham roll ups recipe is perfect for your next appetizer or snack set up. With only 3 ingredients of sliced ham, cream cheese, and green onion, you can serve retro ham pinwheels for any party or holiday table!</p>” button=”Get the Recipe” image=”56429″]
[wprm-recipe-roundup-item link=”https://inspiredbycharm.com/brie-fig-and-prosciutto-crostini/” name=”18. Brie, Fig, and Prosciutto Crostini” summary=”<p>Inspired by a charcuterie, the wonderful flavors of this brie, fig, and prosciutto crostini will delight you and your guests, whether you’re hosting a large gathering or an intimate dinner.</p>” button=”Get the Recipe” image=”56430″]
[wprm-recipe-roundup-item link=”https://www.simplystacie.net/air-fryer-crab-rangoon/” name=”19. Air Fryer Crab Rangoon” summary=”<p>Air fryer crab rangoon is a quick and easy appetizer that's ready to eat in less than 20 minutes. The wonton is crispy on the outside with creamy crab filling on the inside. Perfect for parties or game day gatherings.</p>” button=”Get the Recipe” image=”56432″]
[wprm-recipe-roundup-item link=”https://www.wholesomeyum.com/bacon-wrapped-dates/” name=”20. Bacon Wrapped Dates with Goat Cheese” summary=”<p>Bacon wrapped dates with goat cheese make a classic appetizer! Just 4 Ingredients to make this EASY bacon wrapped stuffed dates recipe.</p>” button=”Get the Recipe” image=”56433″]
[wprm-recipe-roundup-item link=”https://recipesfromapantry.com/corn-ribs-air-fryer/” name=”21. Corn Ribs Air Fryer Style” summary=”<p>Making corn ribs air fryer style is a fun twist on traditional corn on the cob. This infamous recipe really is the perfect appetizer, party food, snack, or side dish.</p>” button=”Get the Recipe” image=”56434″]
[wprm-recipe-roundup-item link=”https://thegirlinspired.com/charcuterie-cups/” name=”22. Charcuterie Cups” summary=”<p>Charcuterie cups provide a creative twist to the everyday charcuterie board! Load clear plastic cups with assorted snacks of choice for a decorative and fun hand-held party appetizer.</p>” button=”Get the Recipe” image=”56482″]
Easy Party Dips
Don’t you just love a good dip? Family and friends will love these hot and cold dips that pair so well with tortilla chips, crackers, potato chips, fresh raw veggies, and more.
[wprm-recipe-roundup-item link=”https://staging.adventuresofmel.com/easy-chili-cheese-dip/” newtab=”0″ name=”23. Easy Chili Cheese Dip” summary=”<p>How to make amazing chili cheese dip with cream cheese in the microwave, oven, or CrockPot. Easy, homemade, crowd favorite appetizer recipe!</p>” button=”Get the Recipe” image=”44118″]
[wprm-recipe-roundup-item link=”https://staging.adventuresofmel.com/bbq-chicken-dip/” newtab=”0″ name=”24. Creamy BBQ Chicken Dip” summary=”<p>BBQ Chicken Dip, made with cream cheese, is an easy appetizer recipe. Pair it with tortilla chips for a delicious snack your friends and family will love!</p>” button=”Get the Recipe” image=”33009″]
[wprm-recipe-roundup-item link=”https://staging.adventuresofmel.com/game-day-recipe-bacon-cheddar-bbq-ranch-dip/” newtab=”0″ name=”25. Bacon Cheddar BBQ Ranch Dip” summary=”<p>Bacon cheddar bbq ranch dip is a tasty appetizer your guests will love. Pair with your favorite snacks, like chips, crackers, and raw vegetables!</p>” button=”Get the Recipe” image=”51736″]
[wprm-recipe-roundup-item link=”https://staging.adventuresofmel.com/snowman-pimento-cheese-ball-recipe/” newtab=”0″ name=”26. Snowman Pimento Cheese Ball” summary=”<p>Festive snowman pimento cheese ball you can serve with crackers, pretzels, or a fresh veggie tray. Perfect for a Christmas party!</p>” button=”Get the Recipe” image=”21525″]
[wprm-recipe-roundup-item link=”https://www.saltysidedish.com/fiesta-corn-dip-with-rotel/” name=”27. Fiesta Corn Dip with Rotel” summary=”<p>Fiesta corn dip recipe with whole kernels of corn, green onions, and loads of cheddar cheese makes the perfect easy and cold large party dip. It's a no fail Mexican party dip that every one is sure to love!</p>” button=”Get the Recipe” image=”56483″]
[wprm-recipe-roundup-item link=”https://julieblanner.com/creamy-spinach-dip-recipe/” name=”28. Spinach Dip with Cream Cheese” summary=”<p>Creamy spinach dip with cream cheese is quick and easy to prepare, making it a great last minute appetizer that feels anything but last minute.</p>” button=”Get the Recipe” image=”56484″]
[wprm-recipe-roundup-item link=”https://unsophisticook.com/chips-and-dip/” name=”29. Copycat Lawson’s Potato Chip Dip” summary=”<p>If you're a chips and dip junkie, you're going to love this out-of-this-world easy chip dip… AND it doubles as a delicious veggie dip!</p>” button=”Get the Recipe” image=”56485″]
[wprm-recipe-roundup-item link=”https://www.westviamidwest.com/5-minute-crack-dip/” name=”30. 5 Minute Crack Dip” summary=”<p>This 5 minute crack dip comes together in 5 minutes and is perfect for serving with crackers. Ideal for holiday party appetizers, game day snacking, or just to serve with cocktails!</p>” button=”Get the Recipe” image=”56486″]
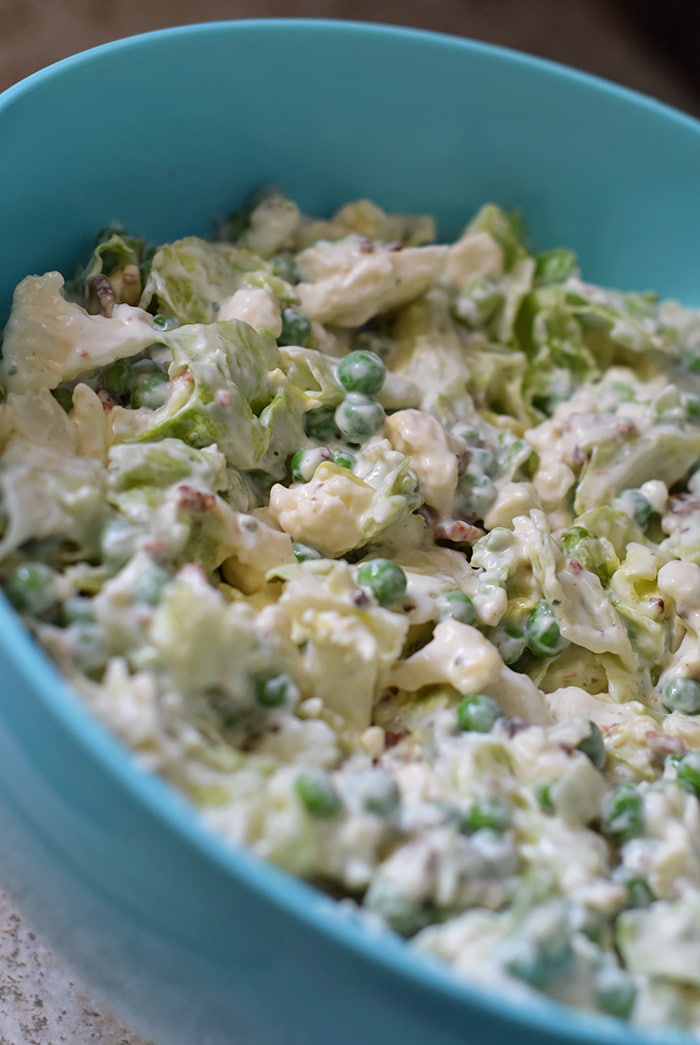
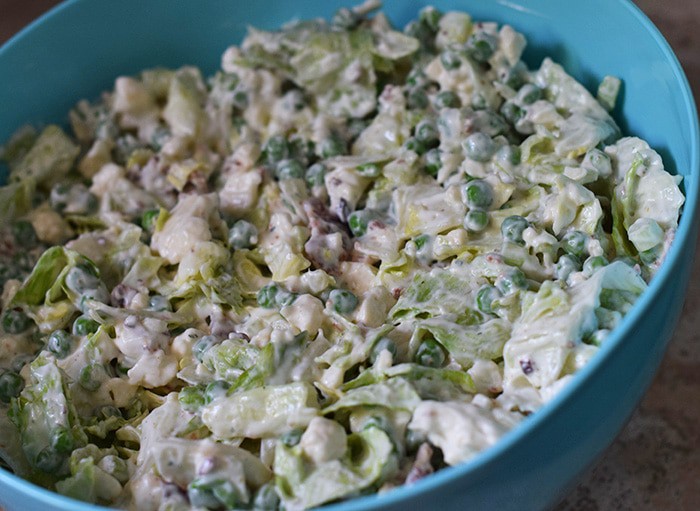
Layered salad… Every family get-together, my aunt would make a 7 layer salad that was so delicious. Everyone looked forward to it, as we’d heap spoonfuls of the creamy deliciousness onto our plates.
This layered salad recipe, that I’m about to share with you, is one way I’ve found to get my youngest to eat his veggies. He can’t get enough of this salad.
While this recipe comes from a family cookbook made for us as a wedding gift, I’m not sure it’s the same recipe my aunt made. It seems a little different but still similar in some ways.
The best thing about this layered salad is that you can add however many types of ingredients you want. You could add boiled eggs, broccoli, peppers, tomatoes, cheese, cucumbers… There’s no end to the amount and types of layers you could add.
Looking for more salad recipes? Here are a few you may enjoy.
Grab the printable recipe below, get creating with your layers, and enjoy!
Layered Salad Recipe
Layered Salad is the perfect salad recipe for family get-togethers, parties, or your next BBQ. Add whatever types of layers you want, including cauliflower, peas, lettuce, bacon, or whatever else your heart desires.
Salad:
1 head iceberg lettuce (chopped)
12 ounces frozen peas (thawed)
1 head cauliflower (chopped)
6 green onions (chopped)
1 pound bacon (cooked, crumbled, and cooled)
Dressing:
1 cup sour cream
1 cup Miracle Whip ((or salad dressing))
1 ounce Hidden Valley Ranch Dressing Mix
1/2 cup whole milk
Wash and prep the ingredients.
In a large bowl, layer the vegetables and bacon, making sure all the veggies are dry when you add them.
In a separate mixing bowl or large measuring cup, mix the dressing ingredients, including the sour cream, Miracle Whip, dressing mix, and milk.
Spread the dressing on top of the salad, putting small tablespoons randomly around on top of the salad; then spread out with a spoon or spatula.
Cover with plastic wrap, and chill overnight or all day.
When ready to serve, stir the dressing into the salad, blending well with all the ingredients.
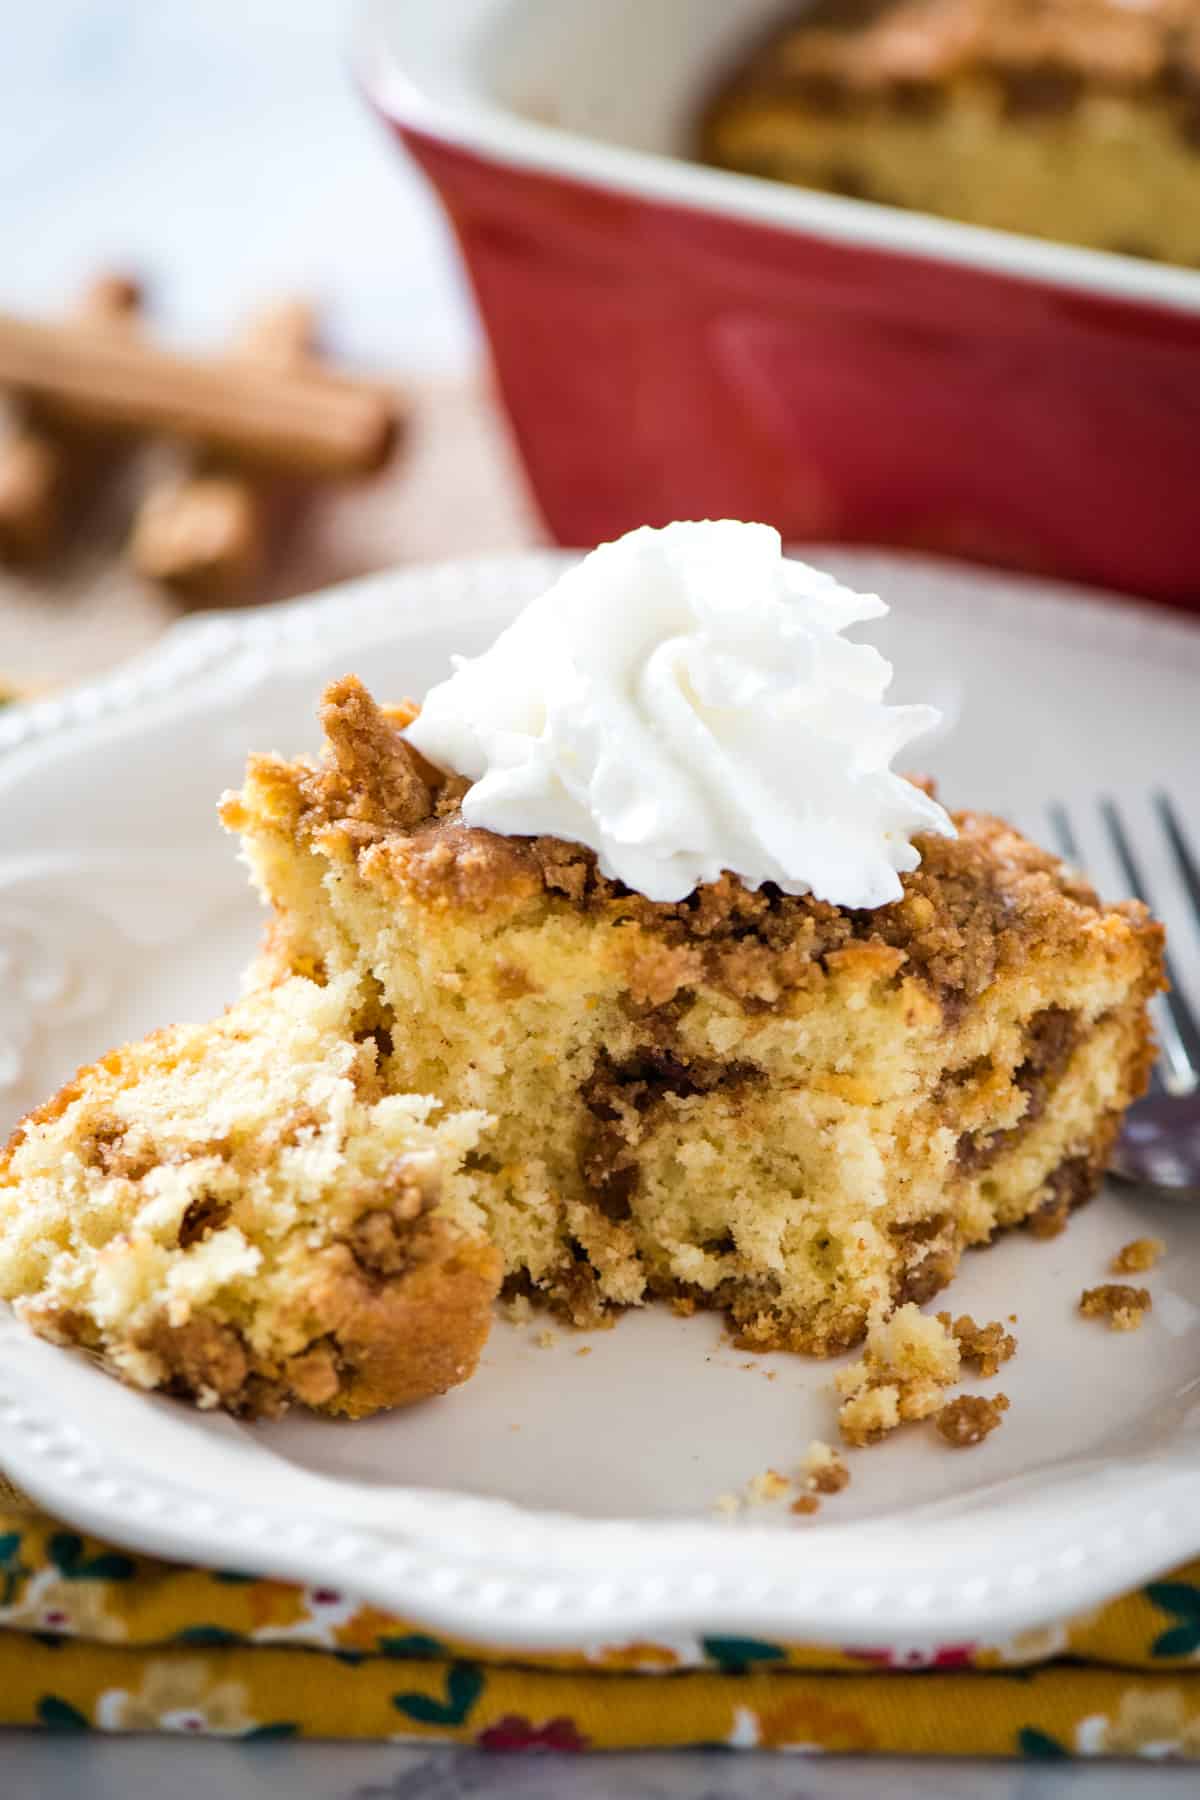
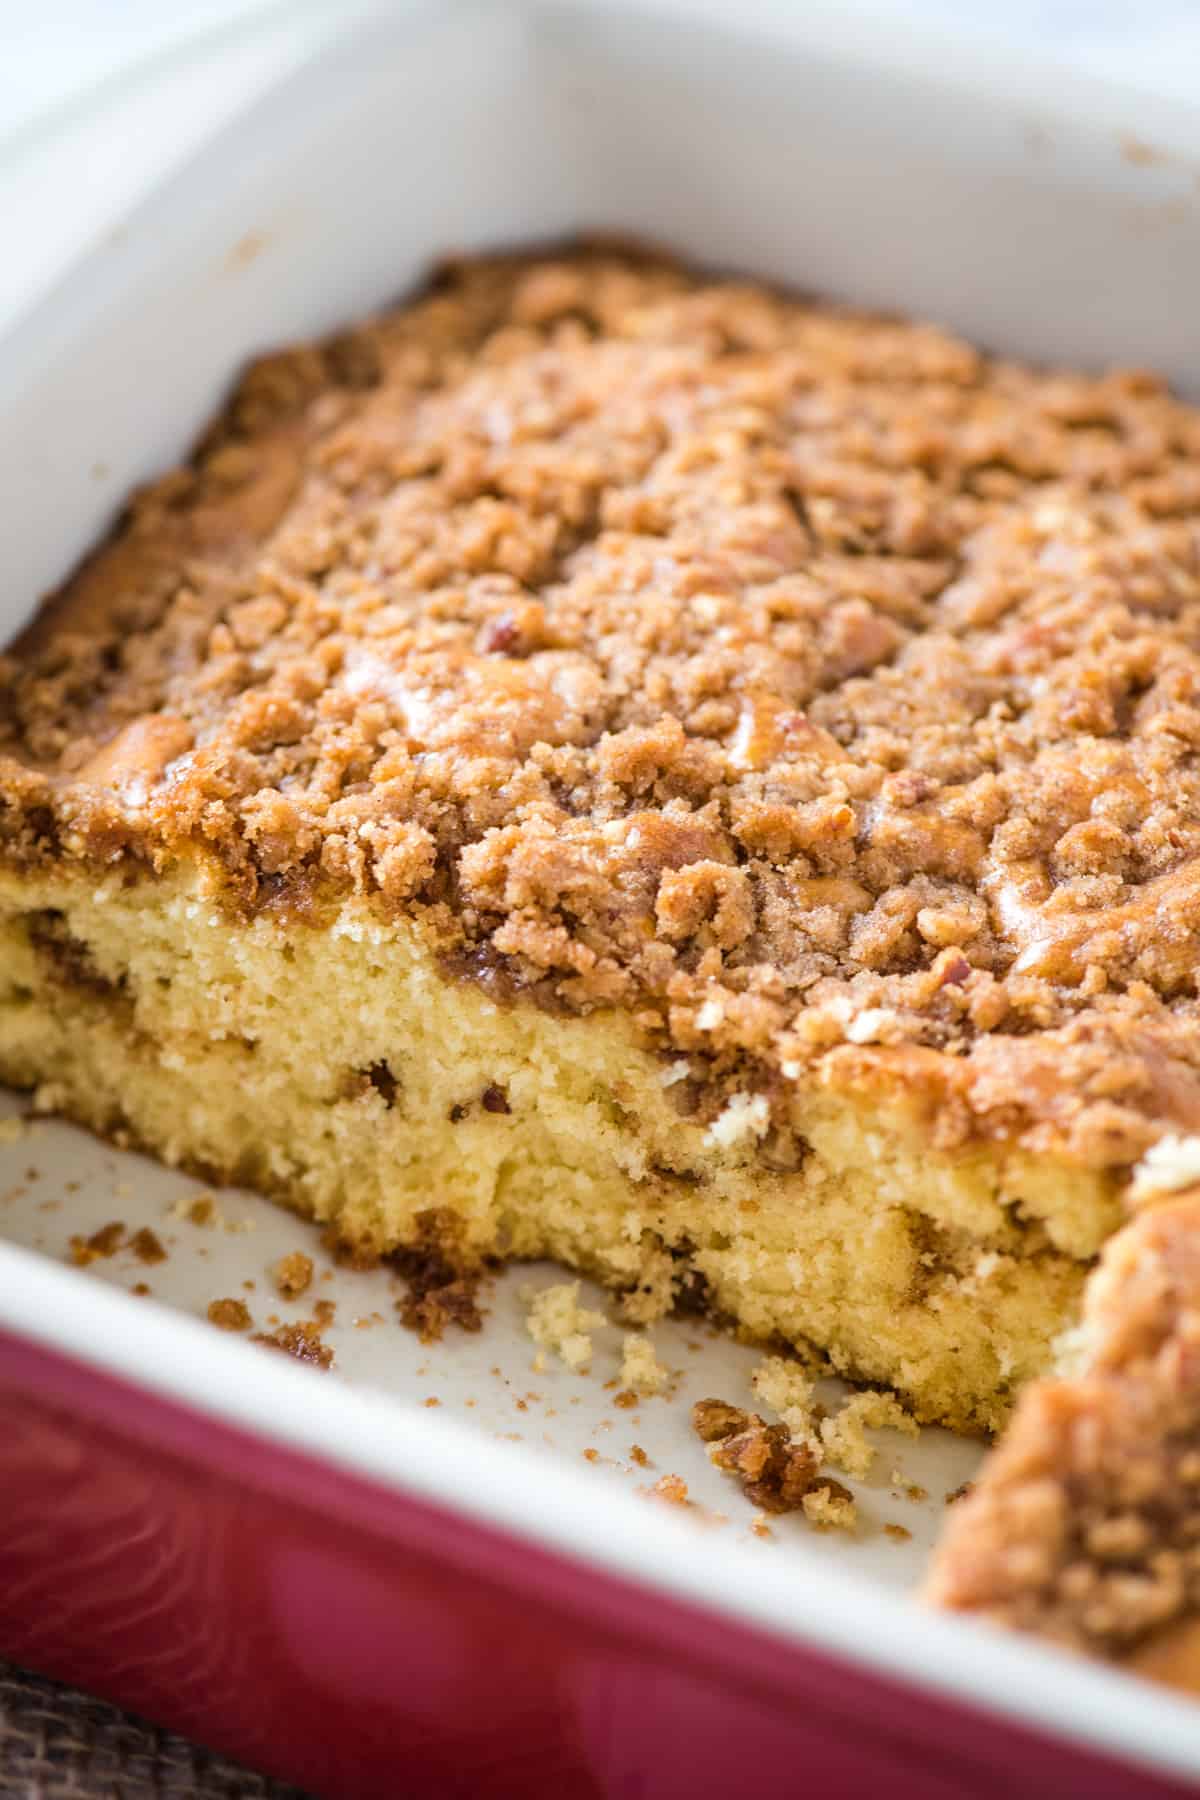
Bake up an easy to make cinnamon streusel coffee cake with pecans for breakfast or brunch. This praline coffee cake is moist, buttery, and topped with a crispy cinnamon sugar topping that can’t be beat.
With holidays throughout the year, coffee streusel cake seems just the right recipe to make. This particular coffee cake recipe is from my grandma’s recipe box.
This brown sugar coffee cake is so delicious, and the batter is a thick, deliciously rich batter. It’s a delight for the senses as it bakes with its sweet, cinnamon smell wafting through the house, and a taste of heaven when it’s done.
Why You’ll Love This Recipe
It’s super easy to make, and it bakes in about an hour.
The cake is buttery and moist, while the cinnamon sugar topping gives a crispy texture to the top of the cake. The cake pairs so well with that delightfully crispy topping.
You can eat it for dessert, or make it for breakfast or brunch. It’s perfect for both.
It’s an old-fashioned cinnamon coffee cake that’s especially perfect for Easter, Thanksgiving, and Christmas.
You can take it to a family get together or a church potluck.
Why Is It Called Coffee Cake?
Since the time that coffee was introduced to Europe in the 1600’s, Scandinavians liked to pair their coffee with things like sweet breads and cakes. However, the name ‘coffee cake’ really wasn’t commonly used until the late 1800’s.
As Dutch and German immigrants came to the United States, bringing their cherished family recipes with them, coffee cake began to be very popular, especially on the East Coast.
O&H Danish Bakery wrote a very fascinating and interesting history of coffee cake, where you can read more about this sweet breakfast treat and how it came to be.
Ingredient Notes
Most of the ingredients you probably already have on hand. Here are a few with notes…
Butter – I like to use unsalted butter for the cake and salted butter for the topping. Whatever you do, be sure to use real butter; don’t use margarine, as that will completely change the texture and flavor of your finished cake.
All-Purpose Flour – You can make this with regular all-purpose flour or a good gluten-free all-purpose flour. Just be sure if you do make it gluten-free that you also add a little xanthan gum, as well as check all of your other ingredients to make sure they’re truly gluten-free.
Evaporated Milk – You can use any brand of evaporated milk you happen to have.
Brown Sugar, Cinnamon, and Chopped Pecans – These 3 ingredients, along with the flour and butter, really give the topping the best flavor. In my opinion, they really make the recipe. While I love pecans in this coffee cake, if nuts aren’t your thing, that’s ok; go ahead and leave them out.
How to Make Cinnamon Streusel Coffee Cake
Before you get started, be sure to gather your ingredients. Then grease an 8×8 baking dish, and pre-heat the oven to 350° F.
Also, keep in mind that you can double this recipe and make it in a 9×13 baking dish or a bundt pan, if you’re needing to feed a bigger crowd.
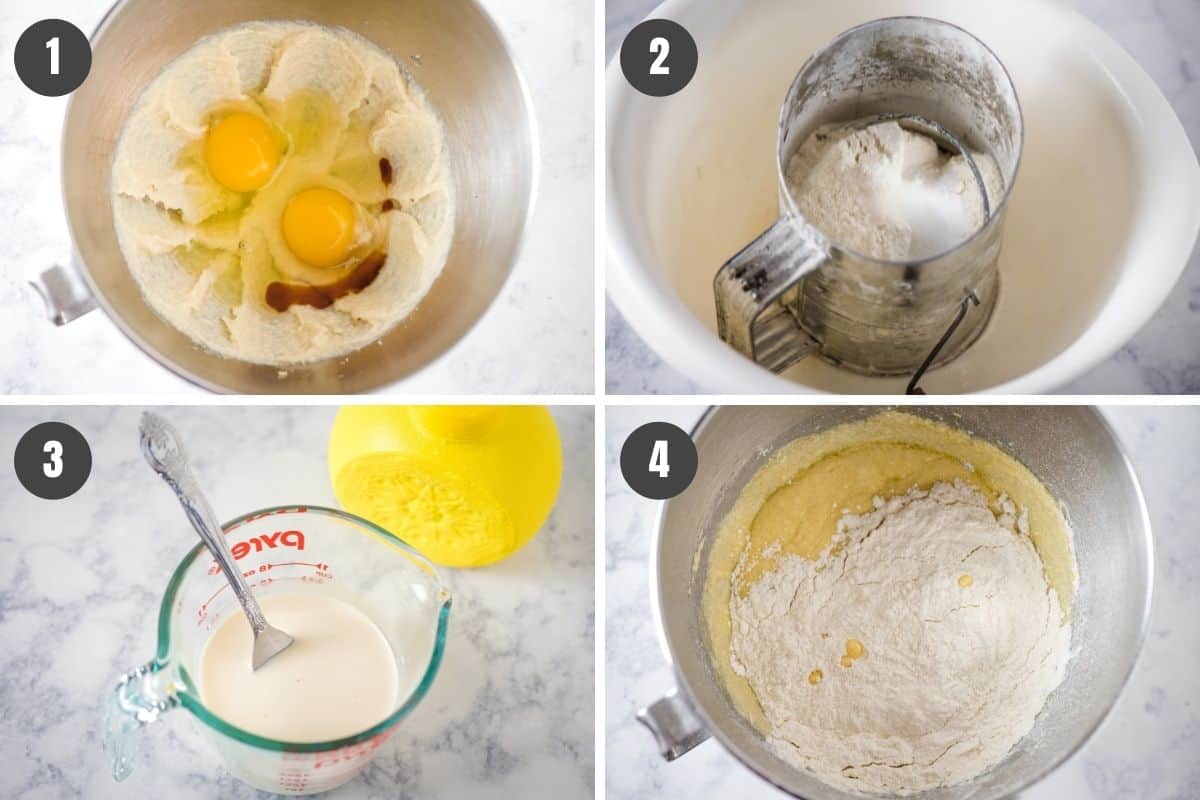
Let’s Start with the Batter…
Cream or mix together the unsalted butter and sugar in a large mixing bowl. Then add in the eggs and vanilla, mixing well ’til combined.
Sift or whisk together the dry ingredients, including the flour, baking powder, baking soda, and salt.
Add the dry ingredients to the butter/sugar/egg mixture, alternating with the milk mixture, beginning and ending with the dry ingredients.
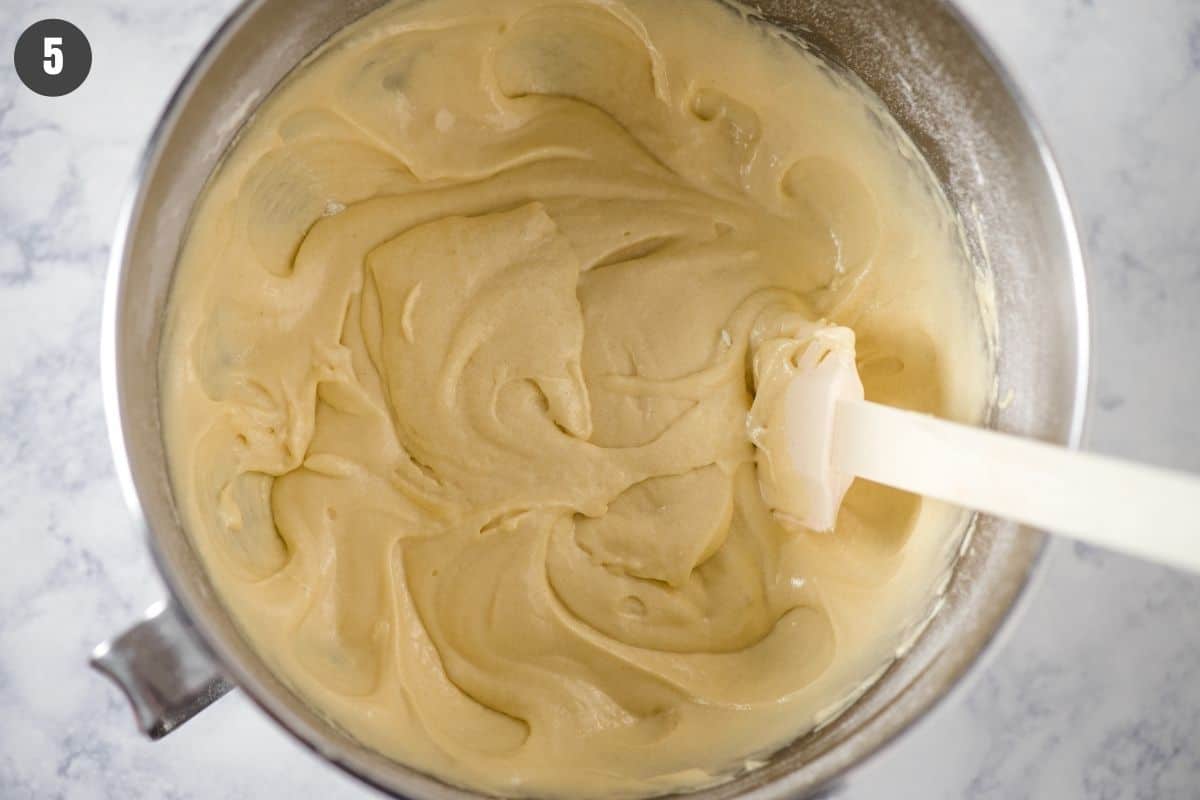
At this point, you’ll have a creamy, somewhat stiff, cake batter. Go ahead and set it aside for just a few minutes.
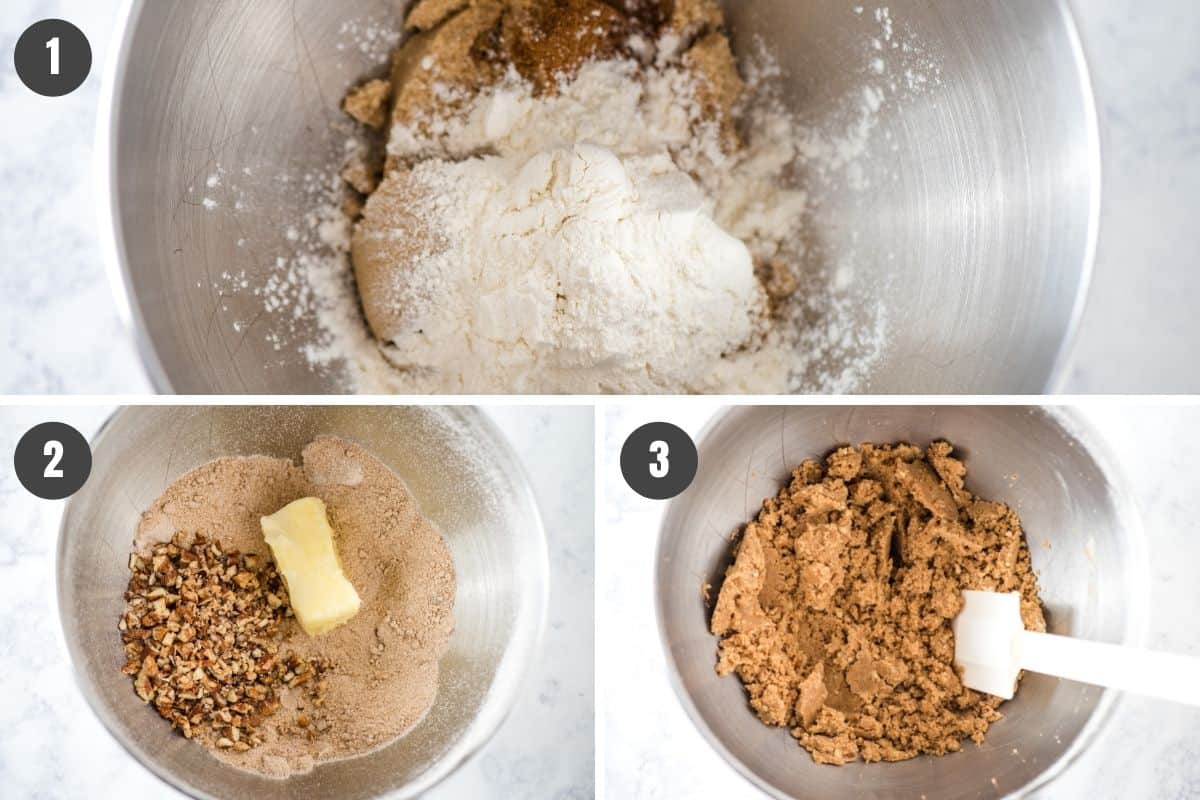
Now for the Topping…
Whisk together the brown sugar, cinnamon, and flour in a large mixing bowl.
Add the chopped pecans and softened salted butter to the mixture, mixing ’til combined.
Your mixture will be a crumbly mixture, perfect for crumbling onto the cake.
How to Layer a Praline Coffee Cake
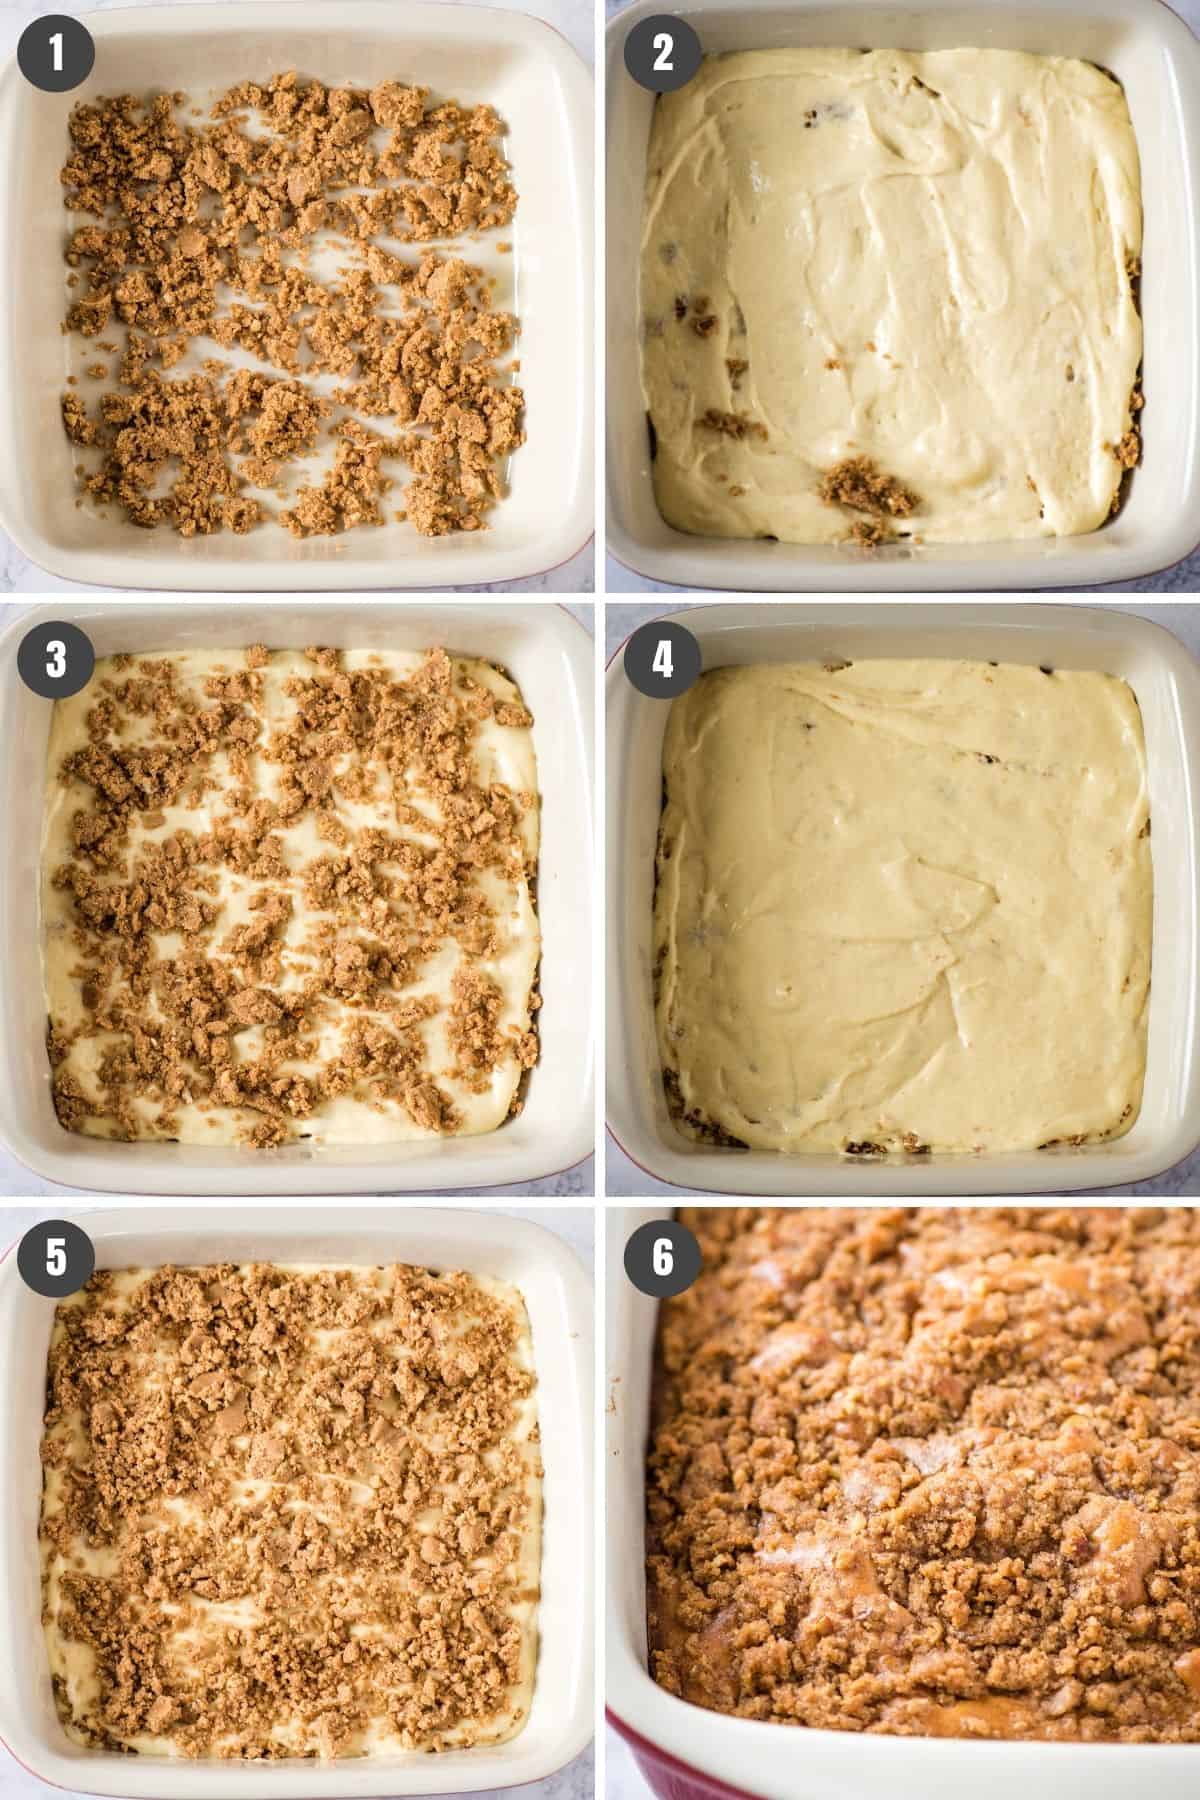
Sprinkle 1/3 of the topping mixture in the bottom of the greased baking dish.
Cover with half the batter.
Then crumble 1/3 more of the praline topping mixture.
Scoop and spread the remaining batter on top of that.
Finally, sprinkle on the remaining cinnamon sugar topping, and gently press it into the batter with your fingers.
Bake the cake at 350° F for about 1 hour, or ’til a toothpick inserted in the center comes out clean. Let the cake stand and cool for about 10 minutes before serving.
Expert Tips and Recipe FAQ’s
What’s the difference between coffee cake and crumb cake?
Coffee cake is more cake, less topping; crumb cake is more topping, less cake. Crumb cake has a much thicker topping on it.
How can I keep streusel topping crunchy?
This particular recipe has a crispy streusel topping. However, if warmed in the microwave, it could grow a bit soggy. I’d recommend re-heating it, covered in foil in the oven for a few minutes, before serving, if you want to serve it warm.
Why does the streusel sink?
As your coffee cake bakes, the streusel will sort of meld into the cake… Meaning some of it will actually melt and combine with the top of the cake. It’s made of things that melt together, including the butter, cinnamon, and sugar; and that’s ok. However, the flour is there to keep the whole thing from just melting down into the cake entirely, and that melding together, in my opinion, is what makes this cake taste even better.
Can I make this cinnamon streusel cake ahead of time?
Yes, in fact, you can mix up the batter and the topping, throw it all together according to the recipe; then cover your baking dish and place it in the fridge ’til you’re ready to bake it the next morning. If you’re actually baking it ahead of time, I would recommend baking it no more than 1 day in advance. Then just cover it and store it on the counter ’til you’re ready to serve it.
Can I freeze coffee cake with pecans?
Yes, you can. Just be sure to store it in an airtight container so it doesn’t get freezer burn.
If you try this recipe, why not leave a star rating in the recipe card right below and/or a review in the comment section further down the page? I always appreciate your feedback. You can also follow me on Pinterest, Facebook, Instagram, and YouTube. And subscribe to my email list too!
Cinnamon Streusel Coffee Cake with Pecans
Easy to make cinnamon streusel coffee cake with pecans. Moist, buttery, and topped with a crispy cinnamon sugar topping.
8×8 Baking Dish
Mixer
Liquid Measuring Cup
Coffee Cake Batter:
1/4 cup unsalted butter (softened)
6 tablespoons cane sugar
2 large eggs
1/2 teaspoon vanilla extract
1 1/2 cups all-purpose flour
1 teaspoon baking powder
1/4 teaspoon baking soda
1/2 teaspoon salt
1/2 cup evaporated milk
1/2 tablespoon lemon juice
Streusel Topping:
3/4 cup light brown sugar
1 1/2 teaspoons ground cinnamon
6 tablespoons all-purpose flour
1/4 cup chopped pecans
1/4 cup salted butter (softened)
Grease an 8×8 baking dish, and pre-heat the oven to 350° F.
Coffee Cake Batter:
Cream or mix together the unsalted butter and sugar in a large mixing bowl. Then add in the eggs and vanilla, mixing well 'til combined.
In a separate bowl, sift or whisk together the dry ingredients, including the flour, baking powder, baking soda, and salt.
Mix together the evaporated milk and lemon juice in a liquid measuring cup.
Add the dry ingredients to the butter/sugar/egg mixture, alternating with the milk mixture, beginning and ending with the dry ingredients.
At this point, you'll have a creamy, somewhat stiff, cake batter. Go ahead and set it aside for just a few minutes.
Streusel Topping:
Whisk together the brown sugar, cinnamon, and flour in a large mixing bowl.
Add the chopped pecans and softened butter to the mixture, mixing 'til combined. The mixture will be a crumbly mixture, perfect for crumbling onto the cake.
Layer the Cake:
Sprinkle 1/3 of the topping mixture in the bottom of the greased baking dish.
Cover with half the batter.
Then crumble 1/3 more of the praline topping mixture.
Scoop and spread the remaining batter on top of that.
Finally, sprinkle on the remaining cinnamon sugar topping, and gently press it into the batter with your fingers.
Bake the cake at 350° F for about 1 hour, or 'til a toothpick inserted in the center comes out clean. Let the cake stand and cool for about 10 minutes before serving.
How can I keep streusel topping crunchy? This particular recipe has a crispy streusel topping. However, if warmed in the microwave, it could grow a bit soggy. I’d recommend re-heating it, covered in foil in the oven for a few minutes, before serving, if you want to serve it warm.
Can I make this cinnamon streusel cake ahead of time? Yes, in fact, you can mix up the batter and the topping, throw it all together according to the recipe; then cover your baking dish and place it in the fridge ’til you’re ready to bake it the next morning. If you’re actually baking it ahead of time, I would recommend baking it no more than 1 day in advance. Then just cover it and store it on the counter ’til you’re ready to serve it.
Can I freeze coffee cake with pecans? Yes, you can. Just be sure to store it in an airtight container so it doesn’t get freezer burn.