Sometimes you just need a refreshing smoothie or a comforting bowl of ice cream. We’ve got you covered with loads of very yummy ice cream recipes, smoothie recipes, and freezer pops.
In addition, this helpful ice cream accessories guide includes tools, equipment, and recipes for making ice cream at home. It’s the perfect list for every ice cream lover’s kitchen.
Learn how to make homemade Fruity Pebbles ice cream, infused with a rainbow of flavors. Easy cereal milk ice cream recipe you can make to eat in 30 minutes. It’s colorful, creamy, and oh so delicious!
Fruity Pebbles has long been one of my favorite cereals, ever since I was a kid. It was a rare treat, so that made it that much more special when we actually had a box in the cabinet.
I love the crunchy, fruity flavor of this cereal; and I do have to say, it makes some rather delicious cereal milk at the end of a bowl too.
There are a few reasons to love this Fruity Pebbles ice cream recipe…
It’s super easy to make and takes less than 30 minutes ’til you can actually eat the ice cream soft serve.
Color! This ice cream is so colorful; in fact, it’s a rainbow of colors!
You’ll use simple ingredients, so there’s no sweetened condensed milk and no eggs. Just milk, sugar, cream, and a few more ingredients to really infuse all the flavors.
You can eat it in a bowl or eat it on a cone.
This cereal milk ice cream tastes exactly like the yummy sweet cereal milk you’re left with at the end of a bowl of Fruity Pebbles.
There will be leftovers. Unless you’re feeding a crowd, you’ll have plenty left over. I have a family of 5, and I actually make one batch of this to last a few days. Sometimes during the hotter months it goes a lot quicker; but we always have leftovers to store in the freezer and enjoy through the week.
Ingredients and Substitutions Notes
Gather the handful of ingredients it takes to make this ice cream…
Whole Milk – While you can use 2% or skim milk, your ice cream won’t be quite as creamy as if you use whole milk.
Cane Sugar – While I prefer to use organic cane sugar, you can also use granulated sugar.
Sea Salt – This right here is an ingredient you definitely want to include; don’t leave it out. Without the salt, you won’t get near as good a flavor.
Fruity Pebbles Cereal – You’ll need almost 2 cups of this wonderfully crunchy cereal. We’ll talk about more cereal alternatives further below.
Orange Zest – I prefer to use orange zest because it gives a stronger orange flavor than juice, and it pairs really well with the fruity flavors in the cereal. You can also add lemon zest if desired.
Vanilla Extract – Again, this just helps give that flavor a kick.
How to Make Fruity Pebbles Ice Cream
Before you start to mix this up, be sure you’ve pre-frozen the ice cream canister that goes with your ice cream maker; if you don’t, your ice cream won’t freeze.
I usually just wash mine after using, then store it, covered with wrap, in the freezer. That way it’s always frozen and ready to go. (Oh, how I wish Cuisinart would make a lid for our ice cream canisters, don’t you? It’s my one wish for this ice cream maker.)
How to Mix It and Freeze It
In a large mixing bowl, combine the whole milk, sugar, and salt ’til the sugar and salt dissolve, about 1-2 minutes.
Add the Fruity Pebbles to the mixture, and blend ’til combined.
Whisk in the heavy cream, orange zest, and vanilla extract, mixing well.
Turn on the ice cream freezer, and pour the mixture into the freezer bowl with the churn paddle in place.
Then place the cover on top, and let it mix ’til it thickens, about 20-25 minutes.
When the ice cream has a soft, creamy texture, turn off the machine, and scoop the soft-serve ice cream into bowls for serving; or if desired, scoop it into an airtight container, and place it in the freezer for 2-3 hours to firm up more. Then serve when ready.
Expert Tips and Recipe FAQ’s
Do you have to leave whole cereal pieces in the mixture?
No, you don’t. If you don’t like the soggy cereal texture, you can either let the cereal infuse into the milk for at least an hour before mixing up the ice cream, then strain it out; or you can crush the cereal into smaller bits and mix that into the ice cream. If it were me, I’d crush the cereal and still let it infuse into the ice cream as it mixes.
Can you use another cereal besides Fruity Pebbles?
Of course! You can make Cocoa Pebbles ice cream. You could also use another other cereal you like, for example, Fruit Loops, Crunch Berries, Cinnamon Toast Crunch, and more. The sky’s the limit!
How do you store cereal milk ice cream?
Store it in an airtight container in the freezer; it needs to be airtight so it doesn’t get freezer burn. It should last up to 2 weeks. I use these super cool ice cream containers, and I have 2 of them, so I can always have 1-2 containers of ice cream in the freezer for the kids. They work great, and they’re easy to wash too. You can find more options in my guide filled with ice cream accessories and tools.
Recipe Variations
Gosh, there are so many things you can add or change about this recipe to switch it up…
Swap out cereals, like we talked about above in the FAQ’s. You can use Fruit Loops, Crunch Berries, Cinnamon Toast Crunch, and more. The sky’s the limit!
Add mini marshmallows toward the end of the churning/freezing process, or add marshmallow fluff into the mixture to give it even more flavor, sweetness, and texture.
Add in chunked or chopped fruit, like strawberries, cherries, or blueberries toward the end of the churn process, probably the last 5 minutes.
Make a sundae with syrup and sprinkles (or more cereal sprinkled) on top. Better yet, sandwich this ice cream between sugar cookies or brownies and enjoy a refreshing ice cream sandwich.
More Ice Cream Recipes
If you love this recipe, you’re going to love these flavors too…
If you try this recipe, why not leave a star rating in the recipe card right below and/or a review in the comment section further down the page? I always appreciate your feedback. You can also follow me on Pinterest, Facebook, Instagram, and YouTube. And subscribe to my email list too!
Fruity Pebbles Ice Cream
How to make homemade Fruity Pebbles ice cream with a rainbow of flavors. Easy cereal milk ice cream recipe you can make to eat in 30 minutes.
Large Mixing Bowl
Ice Cream Maker
Ice Cream Container with Lid
Ice Cream Scoop
1 1/4 cups whole milk
1 1/8 cups cane sugar
1 teaspoon sea salt
1 3/4 cups Fruity Pebbles cereal
3 cups heavy cream
2 teaspoons orange zest
1 1/2 tablespoon vanilla extract
Before you start to mix this up, be sure you've pre-frozen the ice cream canister that goes with your ice cream maker; if you don't, your ice cream won't freeze.
In a large mixing bowl, combine the whole milk, sugar, and salt 'til the sugar and salt dissolve, about 1-2 minutes.
Add the Fruity Pebbles to the mixture, and blend 'til combined.
Whisk in the heavy cream, orange zest, and vanilla extract, mixing well.
Turn on the ice cream freezer, and pour the mixture into the freezer bowl with the churn paddle in place.
Then place the cover on top, and let it mix 'til it thickens, about 20-25 minutes.
When your Fruity Pebble ice cream has a soft, creamy texture, turn off the machine, and scoop the soft-serve ice cream into bowls for serving; or if desired, scoop it into an airtight container, and place it in the freezer for 2-3 hours to firm up more. Then serve when ready.
*If you don’t like the soggy cereal texture, you can either let the cereal infuse into the milk for at least an hour before mixing up the ice cream, then strain it out; or you can crush the cereal into smaller bits and mix that into the ice cream. If it were me, I’d crush the cereal and still let it infuse into the ice cream as it mixes.
Store this ice cream in an airtight container in the freezer; it needs to be airtight so it doesn’t get freezer burn. It should last up to 2 weeks.
Learn how to make the best old-fashioned homemade chocolate ice cream (no eggs) recipe. This is an easy, machine churned recipe filled with delicious chocolaty flavor, just like the chocolate ice cream you remember as a kid, only better.
Chocolate ice cream no eggs is easy to make, and it takes me back to that good, old-fashioned chocolate flavor chocolate ice cream used to have. It’s so, so good!
Why You’re Going to Love It Too
Like I said, it’s really easy to make with only 7 ingredients needed, most of which you likely have in your pantry.
You can eat it soft serve or firm enough to put in a cone.
It’s got that good, old-fashioned chocolate flavor, thanks to good cocoa powder.
It’s a quick dessert recipe you can make in 30 minutes or less.
There will be leftovers. Unless you’re feeding a crowd, you’ll have plenty left over. I have a family of 5, and I actually make one batch of this to last a few days. Sometimes during the hotter months it goes a lot quicker; but we always have leftovers to store in the freezer and enjoy through the week.
You don’t just have to make it into ice cream. If you have a popsicle mold, you can pour the churned, soft serve ice cream into that mold and make homemade fudge bars.
Ingredients and Substitutions Notes:
What’s in this homemade chocolate ice cream no eggs version? Actually, the ingredients are really quite simple…
Unsweetened Cocoa Powder – I like to use Hershey’s cocoa powder, mainly because I like the flavor and because it’s labeled gluten-free. You can also use a Dutch process cocoa powder, or even dark cocoa powder to make dark chocolate ice cream.
Light Brown Sugar – This just adds to that good, old-fashioned chocolate flavor.
Whole Milk – While I like to use raw milk, you can use store bought milk too. You can use whole milk, 2% milk, or 1% milk. I do, however, recommend sticking with whole milk, because it will make your ice cream more creamy.
Heavy Cream – Again, while I use cream I skim off our milk, you can buy heavy whipping cream at the store and substitute that if needed. You could probably also use half-and-half, but just keep in mind, your ice cream won’t be as creamy as it will with heavy cream.
Vanilla Extract – My favorite vanilla is this Mexican vanilla. It has superior flavor and makes everything I use it in absolutely delicious.
Sea Salt – While you can use regular table salt, I love the flavor and the “real” of Redmond Sea Salt.
How to Make Old-Fashioned Homemade Chocolate Ice Cream
Before you start to mix this up, be sure to pre-freeze the ice cream canister that goes with your ice cream maker; if you don’t, your ice cream won’t freeze.
I usually just wash mine after using, then store it, covered with wrap, in the freezer. That way it’s always frozen and ready to go. (Oh, how I wish Cuisinart would make a lid for our ice cream canisters, don’t you? It’s my one wish for this ice cream maker.)
How to Mix It and Freeze It
In a large mixing bowl, whisk together the cocoa powder, sugar, brown sugar, and salt.
Whisk in the whole milk, mixing ’til the sugars and cocoa powder dissolve, about 1-2 minutes. (This step is important; I usually recommend extra whisking, just to make sure your ice cream isn’t grainy. You want all of the sugars and cocoa powder to dissolve in the milk.)
Whisk in the cream and vanilla extract.
Turn on the ice cream freezer, and pour the mixture into the freezer bowl with the churn paddle in place.
Then place the cover on top, and let it mix ’til it thickens, about 20-25 minutes.
When the ice cream has a soft, creamy texture, it’s ready. Turn off the machine, and scoop the soft-serve chocolate ice cream into bowls for serving; or if desired, scoop it into an airtight container, and place it in the freezer for 2-3 hours to firm up more. Then serve when ready.
How to Serve Chocolate Ice Cream
You can serve eggless chocolate ice cream in a bowl or on a cone. If serving on a cone, I definitely recommend putting it in the freezer to firm up more, so then you can get actual scoops to put on the ice cream cone.
Here are a few more ideas…
Serve it with toppings, like butterscotch syrup, caramel syrup, strawberry syrup, etc.
Top scoops of ice cream with whipped cream and sprinkles, or marshmallow fluff and sprinkles.
Expert Tips and Recipe FAQ’s
My expert tips would be to, again, make sure you freeze the ice cream canister beforehand.
Why is my homemade chocolate ice cream grainy?
This is where whisking those ingredients together comes in and why it’s so important. When you’re mixing up the ice cream, I recommend extra whisking, just to make sure all the cocoa powder and sugars dissolve in the milk. If not dissolved, this will make your ice cream grainy.
Should homemade ice cream be so soft?
When it first comes out of the churn, yes, it will be soft. However, if you put it in the freezer, it will firm up, so much so, you’ll be able to scoop the ice cream into a bowl or cone.
How should I store leftover ice cream?
Of course, you’ll need to store it in the freezer. But as far as containers, I found these super cool ice cream containers online, and I have 2 of them, so I can always have 1-2 containers of ice cream in the freezer for the kids. They work great, and they’re easy to wash too. You can find more options in my guide filled with ice cream accessories and tools.
How long will homemade ice cream last in the freezer?
I’ve found that it’ll generally last about 3-4 weeks, as long as it’s stored in an airtight container where it won’t get freezer burn.
Do I need an ice cream maker to make this recipe?
Yes, you really do. I recommend the one I have, which is this ice cream maker. It’s easy to use, and it makes 2 quarts (1/2 gallon) of ice cream at a time.
Variations and Mix-Ins to Try with This Recipe
With this chocolate ice cream recipe with no eggs base, you can do a number of different things to change it up…
Add a little coffee kick with a teaspoon or so of espresso powder. My sister ran out of cocoa powder and added a bit of this to hers, and she said you couldn’t even tell it had coffee in it.
Add a teaspoon of peppermint extract to make mint chocolate ice cream. You could even chop up some leftover chocolate mint candies to add to the mixture in the last 5 minutes of churning.
Make it Rocky Road instead of chocolate. In the last 5 minutes of churning, just add a handful of mini marshmallows and nuts and let it all mix together.
Swirl marshmallow cream into the mixture at the last minute to make chocolate marshmallow swirl ice cream.
If you try this recipe, why not leave a star rating in the recipe card right below and/or a review in the comment section further down the page? I always appreciate your feedback. You can also follow me on Pinterest, Facebook, Instagram, and YouTube. And subscribe to my email list too!
Old-Fashioned Homemade Chocolate Ice Cream
How to make the best old-fashioned homemade chocolate ice cream (no eggs) recipe. Easy, machine churned, delicious chocolaty flavor.
Ice Cream Maker
Ice Cream Container with Lid
Ice Cream Scoop
1 cup unsweetened cocoa powder
2/3 cup cane sugar
1/2 cup light brown sugar
1 teaspoon sea salt
1 1/2 cups whole milk
3 1/4 cups heavy cream
1 tablespoon vanilla extract
Before you start to mix this up, be sure you pre-freeze the ice cream canister that goes with your ice cream maker; if you don't, your ice cream won't freeze.
In a large mixing bowl, whisk together the cocoa powder, sugar, brown sugar, and salt.
Whisk in the whole milk, mixing 'til the sugars and cocoa powder dissolve, about 1-2 minutes.*
Whisk in the cream and vanilla extract.
Turn on the ice cream freezer, and pour the mixture into the freezer bowl with the churn paddle in place.
Then place the cover on top, and let it mix 'til it thickens, about 20-25 minutes.
When the ice cream has a soft, creamy texture, it's ready. Turn off the machine, and scoop the soft-serve chocolate ice cream into bowls for serving; or if desired, scoop it into an airtight container, and place it in the freezer for 2-3 hours to firm up more. Then serve when ready.
*This step is important; I usually recommend extra whisking, just to make sure your ice cream isn’t grainy. You want all of the sugars and cocoa powder to dissolve in the milk.
Desserts
American
chocolate ice cream, chocolate ice cream no eggs, chocolate ice cream recipe with no eggs, eggless chocolate ice cream, homemade chocolate ice cream, homemade chocolate ice cream no eggs, old-fashioned homemade chocolate ice cream, raw milk chocolate ice cream
Make mint Oreo ice cream in 30 minutes or less. This nostalgic recipe is filled with peppermint flavor and crushed Oreo cookies in a creamy ice cream base. It’s quick, easy, and eggless too!
As a girl, I fell in love with mint chocolate chip ice cream the first time I had it in a restaurant in Glacier National Park with my dad and mom. That creamy, minty, green ice cream had my heart right then and there.
Since getting our milk cows, I’ve come up with all sorts of flavors, one of my favorites being Butterfinger ice cream. I have to say, though, that I think mint cookies and cream ice cream has to be one of my personal absolute favorites.
I think it’s a nostalgia thing for me.
Why I Think You’ll Love This Ice Cream Too
Let me count the ways…
It’s so easy to make, it’s not even funny.
8 simple ingredients. That’s it. 2 of those ingredients are milk and cream.
It’s affordable. Cartons of ice cream have gone down in size and up in price. And let’s face it, homemade is better than store bought anyway. Most of the ingredients you probably already have on hand.
It’s a quick recipe you can make in 30 minutes or less.
There will be leftovers. Unless you’re feeding a crowd, you’ll have plenty left over. I have a family of 5, and I actually make one batch of this to last a few days. Sometimes during the hotter months it goes a lot quicker; but we always have leftovers to store in the freezer and enjoy through the week.
Ingredients and Substitutions Notes:
What’s in this Oreo mint ice cream recipe? Actually, the ingredients are really quite simple…
Whole Milk – While I like to use raw milk, you can use store bought milk too. I do, however, recommend sticking with whole milk to make your ice cream more creamy.
Sea Salt – While you can use regular table salt, I love the flavor and the “real” of Redmond Sea Salt.
Heavy Cream – Again, while I use cream I skim off our milk, you can buy heavy whipping cream at the store and substitute that if needed.
Vanilla Extract – My favorite vanilla is this Mexican vanilla. It has superior flavor and makes everything I use it in absolutely delicious.
Peppermint Extract – I prefer Watkins peppermint extract. While you can make the flavor spearmint, most mint ice creams are flavored with peppermint, whether you use fresh mint or an extract.
Green Food Coloring – This is totally optional, but I like to differentiate between regular cookies and cream ice cream and mint by adding a little bit of green to the mix. You can always use a natural food coloring like Watkins. But food coloring is generally how to make mint ice cream green.
Oreo Cookies – You only need about 8 cookies, so the rest of the pack is all yours. Crush them up and you’re set to go. You can also use gluten-free Oreos.
How to Make Mint Oreo Ice Cream
Before you start to mix this up, be sure you’ve pre-frozen the ice cream canister that goes with your ice cream maker; if you don’t, your ice cream won’t freeze.
I usually just wash mine after using, then store it, covered with wrap, in the freezer. That way it’s always frozen and ready to go. (Oh, how I wish Cuisinart would make a lid for our ice cream canisters, don’t you? It’s my one wish for this ice cream maker.)
I also recommend freezing the crushed Oreo cookies ahead of time, so they don’t warm the ice cream when you add them.
How to Mix It and Freeze It
In a large mixing bowl, combine the whole milk, sugar, and salt ’til the sugar dissolves, about 1-2 minutes.
Whisk in the heavy cream, vanilla extract, peppermint extract, and green food coloring, if desired.
Turn on the ice cream freezer, and pour the mixture into the freezer bowl with the churn paddle in place.
Then place the cover on top, and let it mix ’til it thickens, about 20-25 minutes.
About 5 minutes before the freezing is completed (the ice cream should have a soft, creamy texture at this point), add the crushed Oreo cookies through the top of the ice cream maker, and let the cookie crumbles mix in completely.
Once the cookies are all mixed in, turn off the machine, and scoop the soft-serve ice cream into bowls for serving; or if desired, scoop it into an airtight container, and place it in the freezer for 2-3 hours to firm up more. Then serve when ready.
I’m really thinking mint Oreo would make a great flavor for my gluten-free ice cream sandwiches, the next time I make them. Can you imagine how yummy that will be?!
How to Serve It
Oh boy, this is the fun part. You can serve mint cookie ice cream in a bowl or on a cone. If serving on a cone, I definitely recommend putting it in the freezer to firm up more, so then you can get actual scoops to put on the ice cream cone.
Here are a few more ideas…
Serve it with toppings, like chocolate syrup, butterscotch syrup, caramel syrup, hot fudge, etc. Make a grasshopper sundae with a cherry on top!
Crumble more crushed cookies on top.
Put a scoop of mint Oreo ice cream on a warm brownie.
Expert Tips and Recipe FAQ’s
My expert tips would be to, again, make sure you freeze the ice cream canister beforehand; and also freeze the crushed Oreo cookies so the cookie crumbles don’t melt the ice cream as they’re added.
How should I store leftover ice cream?
Of course, you’ll need to store it in the freezer. But as far as containers, I found these super cool ice cream containers online, and I have 2 of them, so I can always have 1-2 containers of ice cream in the freezer for the kids. They work great, and they’re easy to wash too. You can find more options in my guide filled with ice cream accessories and tools.
How long will homemade ice cream last in the freezer?
I’ve found that it’ll generally last about 3-4 weeks, as long as it’s stored in an airtight container where it won’t get freezer burn.
Do I need an ice cream maker to make this recipe?
Yes, you really do. I recommend the one I have, which is this ice cream maker. It’s easy to use, and it makes 2 quarts (1/2 gallon) of ice cream at a time.
If you try this recipe, why not leave a star rating in the recipe card right below and/or a review in the comment section further down the page? I always appreciate your feedback. You can also follow me on Pinterest, Facebook, Instagram, and YouTube. And subscribe to my email list too!
Mint Oreo Ice Cream
Make mint Oreo ice cream in 30 minutes. Nostalgic recipe filled with peppermint flavor and crushed Oreo cookies. Quick, easy, and eggless!
Ice Cream Maker
Ice Cream Container with Lid
Ice Cream Scoop
1 1/2 cups whole milk
1 1/8 cups cane sugar
1 teaspoon sea salt
3 cups heavy cream
1 tablespoon vanilla extract
1 teaspoon peppermint extract
5 drops green food coloring (optional)
8 whole Oreo cookies (crushed*)
Before you start to mix this up, be sure you pre-freeze the ice cream canister that goes with your ice cream maker; if you don't, your ice cream won't freeze.
In a large mixing bowl, combine the whole milk, sugar, and salt 'til the sugar dissolves, about 1-2 minutes.
Whisk in the heavy cream, vanilla extract, peppermint extract, and green food coloring, if desired.
Turn on the ice cream freezer, and pour the mixture into the freezer bowl with the churn paddle in place.
Then place the cover on top, and let it mix 'til it thickens, about 20-25 minutes.
About 5 minutes before the freezing is completed (the ice cream should have a soft, creamy texture at this point), add the crushed Oreo cookies through the top of the ice cream maker, and let the cookie crumbles mix in completely.
Once the cookies are all mixed in, turn off the machine, and scoop the soft-serve ice cream into bowls for serving; or if desired, scoop it into an airtight container, and place it in the freezer for 2-3 hours to firm up more. Then serve when ready.
*I recommend freezing the crushed Oreo cookies ahead of time, so they don’t warm and melt the ice cream when you add them. You can also use gluten-free Oreo cookies.
Desserts
American
mint cookies and cream ice cream, mint Oreo ice cream, Oreo mint ice cream recipe
Mix and freeze an easy recipe for homemade Butterfinger ice cream that’s oh so creamy and rich, full of buttery vanilla flavor, and filled to the gills with crushed chocolate Butterfinger candies. It’s a family favorite homemade ice cream recipe.
One of my favorite ice cream flavors used to be Edy’s Butterfinger. Since we’ve switched to mostly A2 dairy, I’ve started making our ice cream, including homemade Butterfinger just like Edy’s, only better.
This one, however, is my family’s favorite. It’s my favorite too.
Just a note: When I say I use raw fresh milk, that doesn’t mean it’s the only kind of milk you can use. If you don’t have access to fresh milk, you can use store bought milk and cream just fine for this recipe.
Why I Know You’re Going to Love This Recipe
First of all, the ice cream itself has such a silky, creamy texture. So smooth and delicious.
Secondly, it’s rich with a buttery vanilla flavor. I think the combination of vanilla and butterfinger candy bars is magical.
There are only 6 ingredients to this butterfinger ice cream recipe. That’s it! That’s all you need, and you probably have most of them on hand.
It’s so easy to make. It takes me maybe 5 minutes to mix up the base, then 20-25 minutes to freeze.
There will be leftovers. Unless you’re feeding a crowd, you’ll have plenty left over. I have a family of 5, and I actually make one batch of this to last a few days. Sometimes during the hotter months it goes a lot quicker; but we always have leftovers to store in the freezer and enjoy through the week.
Ingredients and Substitutions Notes:
What’s in Butterfinger ice cream? Actually, Butterfinger ice cream ingredients are really quite simple…
Whole Milk – While I like to use raw milk, you can use store bought milk too. I do, however, recommend sticking with whole milk to make your ice cream more creamy.
Heavy Cream – Again, while I use cream I skim off our milk, you can buy heavy whipping cream at the store and substitute that if needed.
Vanilla Extract – My favorite vanilla is this Mexican vanilla. It has superior flavor and makes everything I use it in absolutely delicious.
Sea Salt – While you can use regular table salt, I love the flavor and the “real” of Redmond Sea Salt.
Fun Size Butterfinger Bars – Crush them up and you’re set to go. While I use the smaller snack size, you can use a couple of big bars instead.
How to Make Homemade Butterfinger Ice Cream
Before you start to mix this up, be sure you’ve pre-frozen the ice cream canister that goes with your ice cream maker; if you don’t, your ice cream won’t freeze.
I usually just wash mine after using, then store it, covered with wrap, in the freezer. That way it’s always frozen and ready to go. (Oh, how I wish Cuisinart would make a lid for our ice cream canisters, don’t you? It’s my one wish for this ice cream maker.)
I also recommend freezing the crushed Butterfinger Bars ahead of time, so they don’t warm the ice cream when you add them.
How to Mix It and Freeze It
In a large mixing bowl, combine the whole milk and sugar ’til the sugar dissolves, about 1-2 minutes.
Whisk in the heavy cream, vanilla extract, and sea salt.
Turn on the ice cream freezer, and pour the mixture into the freezer bowl with the churn paddle in place.
Then place the cover on top, and let it mix ’til it thickens, about 20-25 minutes.
About 5 minutes before the mixing is completed, add the crushed Butterfinger bars through the top of the ice cream maker, and let the candy mix in completely.
Once the candy is all mixed in, turn off the machine, and scoop the soft-serve ice cream into bowls for serving; or if desired, scoop it into an airtight container, and place it in the freezer for 2-3 hours to firm up more. Then serve when ready.
I’m just going to say that next time I make gluten-free ice cream sandwiches, I may use butterfinger ice cream as the filling. Can you imagine how delicious that will be?! Yum!
How to Serve It
Oh boy, this is the fun part. You can serve Butterfinger ice cream in a bowl or on a cone. If serving on a cone, I definitely recommend putting it in the freezer to firm up more, so then you can get actual scoops to put on the ice cream cone.
Here are a few more ideas…
Serve it with toppings, like chocolate syrup, butterscotch syrup, caramel syrup, hot fudge, etc.
Crumble crushed candies on top.
Put a scoop of Butterfinger ice cream on a warm brownie.
My expert tips would be to, again, make sure you freeze the ice cream canister beforehand; and also freeze the crushed Butterfinger bars so the candy doesn’t melt the ice cream as it’s added.
What is Butterfinger filling made of? Does it have peanut butter?
Butterfinger has a crispy, crunchy, buttery filling that’s actually made from peanuts, then covered with melted chocolate. So yes, it does contain peanuts.
How should I store leftover ice cream?
Oh boy, this is my favorite part. Of course, you’ll need to store it in the freezer. But as far as containers, I found these super cool ice cream containers online, and I have 2 of them, so I can always have 1-2 containers of ice cream in the freezer for the kids. They work great, and they’re easy to wash too. You can find more options in my guide filled with ice cream accessories and tools.
More Homemade Ice Cream Recipes
What can I say? My readers love ice cream, so I just keep on keeping on when it comes to making this delicious frozen dessert.
If you try this recipe, why not leave a star rating in the recipe card right below and/or a review in the comment section further down the page? I always appreciate your feedback. You can also follow me on Pinterest, Facebook, Instagram, and YouTube. And subscribe to my email list too!
Homemade Butterfinger Ice Cream
Easy recipe for homemade butterfinger ice cream, so creamy and rich, full of buttery vanilla flavor and chocolate Butterfinger candies.
Ice Cream Maker
Ice Cream Container with Lid
Ice Cream Scoop
1 1/2 cups whole milk
1 1/8 cups cane sugar
3 cups heavy cream
1 1/2 tablespoons vanilla extract
1 teaspoon sea salt
8-10 Fun Size Butterfinger Bars (crushed*)
Before you start to mix this up, be sure you've pre-frozen the ice cream canister that goes with your ice cream maker; if you don't, your ice cream won't freeze.
In a large mixing bowl, combine the whole milk and sugar 'til the sugar dissolves, about 1-2 minutes.
Whisk in the heavy cream, vanilla extract, and sea salt.
Turn on the ice cream freezer, and pour the mixture into the freezer bowl with the churn paddle in place.
Then place the cover on top, and let it mix 'til it thickens, about 20-25 minutes.
About 5 minutes before the mixing is completed, add the crushed Butterfinger bars through the top of the ice cream maker, and let the candy mix in completely.
Once the candy is all mixed in, turn off the machine, and scoop the soft-serve ice cream into bowls for serving; or if desired, scoop it into an airtight container, and place it in the freezer for 2-3 hours to firm up more. Then serve when ready.
*I recommend freezing the crushed Butterfinger Bars ahead of time, so they don’t warm and melt the ice cream when you add them.
This recipe makes the best raw milk ice cream with just 5 simple ingredients, including raw fresh milk but no eggs. It’s the easiest recipe you’ll ever make, chock full of rich vanilla flavor in every bite.
When we started milking, I knew I was going to need to use up all the gallons of milk we get every day. We make loads of homemade butter, along with pudding, ice cream, and more.
Raw milk ice cream is ice cream made with raw fresh milk from dairy cows. We have A2 Jersey cows, and we use milk and cream from them to make this ice cream.
Why You’ll Love This Recipe
If you’re like me, you’ll love not having to buy ice cream anymore.
You can easily make this recipe in less than 30 minutes, depending how fast you can mix it up. The machine does most of the work for you.
It only uses 5 ingredients, and none of those ingredients are eggs. This is ice cream without eggs at its finest.
My Jersey milk ice cream is oh so creamy and so infused with rich vanilla flavor; it really is so good.
Unlike my old-fashioned ice cream recipes, my raw milk ice cream recipe doesn’t need any ice or rock salt to freeze it. You just need a simple ice cream maker like the one I use.
Ingredient and Substitution Notes
You’ll need a handful of ingredients to make this recipe…
Raw Milk – We use fresh milk from our Jersey mamas. If you don’t have access to raw milk, you can substitute whole milk.
Raw Heavy Cream – Again, if you don’t have access to raw cream, you can substitute heavy whipping cream from the store. If you do have access to raw milk, you’ll need to skim the cream off the top of the milk; I like to do this by using a small gravy ladle.
Sea Salt – You can use regular salt, as well, but I prefer to use Redmond Sea Salt.
How to Make Raw Milk Ice Cream
Before you start to mix this up, be sure you’ve pre-frozen the ice cream canister that goes with your ice cream maker; if you don’t, your ice cream won’t freeze. Don’t ask me how I know, I just do.
I usually just wash mine after using, then store it, covered with wrap, in the freezer. That way it’s always frozen and ready to go. (Oh, how I wish Cuisinart would make a lid for our ice cream canisters, don’t you? It’s my one wish for this ice cream maker.)
How to Mix and Freeze Vanilla Ice Cream without Eggs
In a large mixing bowl, combine the raw whole milk and sugar ’til the sugar dissolves, about 1-2 minutes.
Whisk in the heavy cream, vanilla extract, and sea salt.
Turn on the ice cream freezer, and pour the mixture into the freezer bowl with the church paddle in place.
Then place the cover on top, and let it mix ’til it thickens, about 20-25 minutes.
When the ice cream has a soft, creamy texture, it’s ready, and you can turn off the machine.
Scoop into bowls for serving (it’ll be soft-serve); or if desired, scoop it into an airtight container, and place it in the freezer for about 2-3 hours, which will allow it to firm up.
I really recommend an ice cream maker to help churn the ice cream. However, you could do the freeze/stir method, where you mix everything up, put it in a large enough container to allow you to stir without a mess, then freeze and stir in intervals, ’til the ice cream is thick enough to your satisfaction. If it were me, I’d use a hand mixer on low speed to stir every time, just to mimic the effects of a churn.
What makes ice cream creamy?
Well, some people say the eggs make it so… But every time I make this recipe, it’s oh so creamy. I think it really ultimately depends on your milk to cream ratio when mixing the ingredients. Raw whole milk is very creamy anyway, but you add 3 cups of cream to the mix, and you’re going to have a very creamy texture when all is said and frozen.
How should I store the ice cream?
Oh boy, this is my favorite part. Of course, you’ll need to store it in the freezer. But as far as containers, I found these super cool ice cream containers online, and I have 2 of them, so I can always have 1-2 containers of ice cream in the freezer for the kids. They work great, and they’re easy to wash too. You can find more options in my guide filled with ice cream accessories and tools.
If you try this recipe, why not leave a star rating in the recipe card right below and/or a review in the comment section further down the page? I always appreciate your feedback. You can also follow me on Pinterest, Facebook, Instagram, and YouTube. And subscribe to my email list too!
Raw Milk Ice Cream
How to make the best raw milk ice cream with just 5 simple ingredients, including raw milk but no eggs. Easy recipe with rich vanilla flavor.
Ice Cream Maker
Ice Cream Container with Lid
1 1/2 cups raw whole milk
1 1/8 cups cane sugar
3 cups raw heavy cream
1 1/2 tablespoons vanilla extract
1 teaspoon sea salt
Before you start to mix this up, be sure you've pre-frozen the ice cream canister that goes with your ice cream maker; if you don't, your ice cream won't freeze.
In a large mixing bowl, combine the raw whole milk and sugar 'til the sugar dissolves, about 1-2 minutes.
Whisk in the heavy cream, vanilla extract, and sea salt.
Turn on the ice cream freezer, and pour the mixture into the freezer bowl with the church paddle in place.
Then place the cover on top, and let it mix 'til it thickens, about 20-25 minutes.
When the ice cream has a soft, creamy texture, it's ready, and you can turn off the machine.
Scoop into bowls for serving (it'll be soft-serve); or if desired, scoop it into an airtight container, and place it in the freezer for about 2-3 hours, which will allow it to firm up. Then serve when ready.
*Note about pre-freezing the ice cream canister: I usually just wash mine after using, then store it, covered with wrap, in the freezer. That way it’s always frozen and ready to go.
If you do not have raw milk, you can use store bought whole milk and heavy whipping cream.
Desserts
American
ice cream without eggs, Jersey milk ice cream, raw milk ice cream, raw milk ice cream recipe, vanilla ice cream no eggs, vanilla ice cream without eggs
Missing your favorite ice cream treats? Learn how to make delicious homemade gluten-free ice cream sandwiches. Who needs store bought when you can easily take vanilla ice cream and sandwich it between two chocolate cookie wafers? They’re the best!
These ice cream sandwiches are made up of two soft but sturdy chocolate wafer cookies that sandwich a layer of vanilla ice cream in between.
My oldest, like me, always thought the cookie was the best part of an ice cream sandwich. In fact, when he was little, he’d pick off and eat every last bit of that precious cookie before consuming the ice cream!
I used to love picking up a box of ice cream sandwiches when I’d go to the grocery store, but since I’ve gone gluten-free, they’ve been a big no-no. I still occasionally get them for my boys, but man it’s a bummer not to be able to eat them.
Enter this recipe. The great thing is, you can even make these goodies into gluten-free dairy-free ice cream sandwiches by subbing a good dairy-free ice cream.
Also, I may be getting ahead of myself here, but here’s a handy tip: It’s possible to cut your ice cream sandwiches with a knife, but I highly recommend buying an ice cream mold/cutter. I’ve listed several affordable options over on my Top 10 Ice Cream Accessories and Tools post. Scroll down to #6!
Why You’ll Love This Recipe
Although this recipe can be fairly time-consuming to make, it’s easy enough that anybody can make it.
Gf ice cream sandwiches feature deliciously soft gluten-free chocolate wafer cookies with a layer of vanilla ice cream (or any flavor) sandwiched in between.
Did I mention that this recipe is gluten-free? You won’t find these in the freezer aisle.
Ingredient Notes
Vanilla Extract – I always avoid imitation vanilla, instead opting for 100% real vanilla extract. In my opinion, real vanilla is far superior in flavor.
Gluten-Free All-Purpose Flour – I almost always use Authentic Foods Classical Blend gluten-free flour. Time and time again, this flour blend has given me the best results and gluten-free baked goods that taste no different than the original.
Gluten-FreeUnsweetened Cocoa Powder – I prefer to use Hershey’s cocoa powder. I appreciate the balanced sweetness it provides compared to a darker cocoa.
Raw Milk – Although it is possible to make this recipe with regular old whole milk, I prefer to use the raw milk we get from a local dairy. You can also sub almond milk for whole milk; I actually love the way almond milk bakes.
Add the egg and vanilla to the butter mixture, mixing well.
In a separate bowl, whisk together the dry ingredients, including the flour, baking powder, cocoa powder, and salt.
Alternate adding the dry ingredients and the milk into the butter mixture, beginning and ending with the dry ingredients.
Divide the cookie dough in half and spread each half into the paper covered jelly roll pans. The dough will be thin but should cover the bottom of each pan completely.
Bake the cookie dough at 350º F for about 10-12 minutes, switching racks halfway through. Then allow the sheets to cool for about 20 minutes.
Chill the Cookies While You Soften the Ice Cream
Place the baking sheets in the freezer for about 20 minutes.
Now, rock hard, 100% frozen ice cream is next to impossible to spread without tearing the cookie into pieces. That’s why I recommend beating the ice cream with a mixer on low speed for a few minutes. This will quickly soften the ice cream to a spreadable form without melting it, provided you’re working with cold ingredients.
Assemble the Ice Cream Sandwiches
Remove your cookies from the freezer, and spread the ice cream over one cookie wafer sheet.
Top with the remaining cookie wafer sheet. Then remove the parchment paper from the top layer.
Cover the entire cookie sheet with plastic wrap or foil and freeze for at least 2-3 hours.
How to Cut Homemade Ice Cream Sandwiches
Cut the ice cream sandwiches into rectangles, using a knife or an ice cream sandwich mold/cutter. You can also use an imprint plate, if you’d like the look of tiny holes like a store bought ice cream sandwich.
They’re ready to serve, or you can store them, individually wrapped with plastic, in the freezer.
Can I Make This Recipe Dairy-Free?
It’s challenging, but it can be done. I’ve never made this recipe dairy-free, but here are a few ideas as to how you can make dairy-free ice cream sandwiches.
You’ll simply need to replace any dairy ingredient in this recipe with a non-dairy substitute.
You’ll also need to use a dairy-free ice cream. If you can’t find dairy-free at your grocery store, you might check out this dairy-free vanilla ice cream recipe from Joy Food Sunshine. Homemade always tastes better anyways!
Just like that, you’ve (hopefully) just made a delicious batch of gluten free dairy free ice cream sandwiches! Let me know how it turned out in the comments below.
Expert Tips and Recipe FAQ’s
Can I use any flavor ice cream?
You can use whatever flavor you’d like. I might recommend trying salted caramel ice cream, peanut butter ice cream, or strawberry ice cream. Heck, you could even use Neapolitan ice cream! The sky’s the limit.
How do you keep the ice cream from melting while making this recipe?
The best way to keep your ice cream from melting while making this recipe is to work with cold ingredients. This is why I recommend placing your cookie wafer in the freezer for 20 minutes before spreading the ice cream. Just try to be quick, and get your ice cream sandwiches in the freezer as quickly as possible.
How do you store homemade ice cream sandwiches?
The only way to store them is by freezing them. Wrapped tightly with a layer of plastic wrap and then a second layer of aluminum foil, they will keep up to 3 months in the deep freeze.
If you try this recipe, why not leave a star rating in the recipe card right below and/or a review in the comment section further down the page? I always appreciate your feedback. You can also follow me on Pinterest, Facebook, Instagram, and YouTube. And subscribe to my email list too!
Gluten-Free Ice Cream Sandwiches
How to make delicious homemade gluten-free ice cream sandwiches. Vanilla ice cream sandwiched between chocolate cookie wafers. Easy recipe!
Mixer
Mixing Bowl
Whisk
16x10x1 Jelly Roll Pans
Ice Cream Sandwich Mold/Cutter
1/2 cup unsalted butter (softened)
1 cup cane sugar
1 large egg
1/2 teaspoon vanilla extract
1 3/4 cups gluten-free all-purpose flour
1 teaspoon baking powder
4 tablespoons unsweetened cocoa powder
1/2 teaspoon salt
1/2 cup whole milk
1/2 gallon vanilla ice cream
Make the Chocolate Cookie Wafers:
Pre-heat the oven to 350º F, and line two jelly roll pans (16x10x1) with parchment paper.
In a large bowl, mix together the butter and sugar.
Add the egg and vanilla to the butter mixture, mixing well.
In a separate bowl, whisk together the flour, baking powder, cocoa powder, and salt.
Alternate adding the dry ingredients and the milk into the butter mixture, beginning and ending with the dry ingredients.
Divide the cookie dough in half and spread each half into the prepared jelly roll pans. The dough will be thin but should cover the bottom of each pan completely.
Bake the cookie dough at 350º F for about 10-12 minutes, switching racks halfway through. Then allow the sheets to cool for about 20 minutes.
Chill the Cookies While You Soften the Ice Cream:
Place the baking sheets in the freezer for about 20 minutes.
Now, rock hard, 100% frozen ice cream is next to impossible to spread without tearing the cookie into pieces. That's why I recommend beating the ice cream with a mixer on low speed for a few minutes. This will quickly soften the ice cream to a spreadable form without melting it, provided you're working with cold ingredients.
Assemble the Ice Cream Sandwiches:
Remove your cookies from the freezer, and spread the ice cream over one cookie wafer sheet.
Top with the remaining cookie wafer sheet. Then remove the parchment paper from the top layer.
Cover the entire cookie sheet with plastic wrap or foil and freeze for at least 2-3 hours.
How to Cut Homemade Ice Cream Sandwiches:
Cut the ice cream sandwiches into rectangles, using a knife or an ice cream sandwich mold/cutter. You can also use an imprint plate, if you'd like the look of tiny holes like a store bought ice cream sandwich.
They're ready to serve, or you can store them, individually wrapped with plastic, in the freezer.
*I almost always use Authentic Foods Classical Blend gluten-free flour. Time and time again, this flour blend has given me the best results and gluten-free baked goods that taste no different than the original. Do keep in mind that different gluten-free flours can give different results.
*You can use whatever flavor ice cream you’d like.
How do you store homemade ice cream sandwiches?
The only way to store them is by freezing them. Wrapped tightly with a layer of plastic wrap and then a second layer of aluminum foil, they will keep up to 3 months in the deep freeze.
This helpful guide includes ice cream accessories, tools, equipment, and recipes for making ice cream at home. It’s the perfect list for every ice cream lover’s kitchen.
Summer is coming, and with summer inevitably comes ice cream! Around here, we get pretty serious about our ice cream.
Not only is it a family tradition that goes way back, but there is no better way to provide the cold, refreshing treat that we so crave during the stifling dog days of summer than by making old-fashioned homemade ice cream.
This is a great way to get the kids into the kitchen; homemade ice cream can make memories that they will remember their entire lives… Speaking from experience. Who knew that making ice cream could be so much fun?
So here you go. This is my extensive guide that covers my top 10 essential ice cream tools and equipment. Whether you’re looking to improve your own experience, or you’re making a large batch for a church potluck or ice cream social, I hope you can put this guide to good use.
So what are the best tools for making ice cream at home? Do you need a special machine to make ice cream? Keep reading to find out!
1. Ice Cream Maker
Although you can mix up your ice cream with just a large mixing bowl and whisk, you will need some sort of machine to churn it. Here are a few options…
Automatic Compressor Ice Cream Maker
If you want a dump-and-go, high-quality experience, then this ice cream maker is for you. This compressor ice cream maker is prized for its ease of use and silky smooth ice cream; it’s about as automatic as it gets.
Not only does this machine feature 12 consistency settings, but it’s also possible to make sorbet, frozen yogurt, and gelato in addition to ice cream.
It has a pre-chill function.
It can cool your ice cream for up to 3 hours.
That said, there’s still a catch. This machine is not at all budget-friendly, and it’s fairly small at a 1.1 quarts capacity; however, many die-hard fans would argue that it is well worth its weight in just the savings in time alone. It’s fully automatic, no hassle involved.
Freezer Bowl Ice Cream Maker
If you’re looking for an easy going ice cream maker that doesn’t cost an arm and a leg, you may just consider buying this Cuisinart Cool Creations ice cream maker. It’s mostly automatic, and all it requires is a working freezer!
Making ice cream with a freezer bowl ice cream maker is super easy. Simply pre-chill the double-walled freezer bowl in the deep freeze for at least 6 hours; then pour your ice cream mixture into the bowl, churning it with a paddle until the desired consistency is reached.
KitchenAid Ice Cream Maker Attachment
The KitchenAid ice cream maker attachment for the stand mixer uses a 2 quart freezer bowl that works in much the same manner as the freezer bowl ice cream maker mentioned above.
It’s recommended that you place the bowl in the deepest, coldest part of your deep freeze for at least 15 hours. After this, simply fill the frozen bowl with your ice cream mixture and let it churn on the stand mixer until a desired consistency is reached.
The advantage to this method is that, provided you already own a KitchenAid stand mixer, a stand-alone ice cream maker isn’t needed. So, this attachment exhibits a much smaller footprint as compared to any other ice cream maker on the list.
However, one disadvantage is that it won’t keep the ice cream cold, so it’s important to get your finished ice cream into the freezer as soon as possible in order to prevent melting.
Chef’n Sweet Spot Ice Cream Maker
The Chef’n Sweet Spot ice cream maker is, by far, the best ice cream maker for kids. It’s SO easy, and it takes practically no time at all!
Again, this product features a small freezer bowl that is stored in the deep freeze for roughly 24 hours, and it’s designed to make roughly 1-2 servings for the average consumer. Once the bowl is frozen, pour your chilled ice cream mixture into the bowl, scooping and turning the mixture on the fast-freezing pan surface until a desired consistency is reached.
With this ice cream maker, it’s also possible to make rolled ice cream. Simply use a soft scraper to roll the ice cream into your desired shapes. It’s a fun, unique method of making ice cream that your guests will love!
Old-Fashioned Hand-Crank Ice Cream Maker
Who needs a gym when you can buy this blast from the past? Make your ice cream like Grandpa made it– with lots of elbow grease and dedication. For me, it’s really nostalgic.
I’ve always thought it would be fun to find an antique hand-crank ice cream maker, but you may check out this Immergood stainless steel ice cream maker with triple layer, leak-free construction. No, it’s not cheap provided its fairly limited capabilities, but if well-cared for, it will very likely outlast you and everyone you know!
I can see a hand-crank ice cream maker as really standing out in a party setting. What if everybody at the event took turns cranking the ice cream churner? Yeah? No? It could definitely be a fun, memory-making experience for all involved.
Old-Fashioned Electric Ice Cream Maker
This old-fashioned Nostalgia electric bucket ice cream maker is actually quite similar to our own machine! It features an easy-to-carry handle for fast transport, and it can make up to 4 quarts of ice cream in one batch. That’s plenty for the average family.
I may be set in my ways, but this is, by far, my preferred ice cream maker; I’ve actually written quite extensively on old-fashioned ice cream makers. If this at all interests you, check out my Old-Fashioned Ice Cream Maker Guide.
While it’s not the most sophisticated and maybe not the easiest ice cream maker to use, I prefer and embrace the dependable simplicity of this design.
2. Ice Cream Scoop
There are so many ice cream scoops on the market that sometimes it can be hard to choose. Most people have no knowledge of the different types and styles of scoops, all of which serve a unique purpose.
For example, If ice cream has at all melted, it can form a very hard, icy crust on the surface when refrozen. It’s in this situation that I prefer this OXO Good Grips ice cream spade, which, as the name implies, can effectively dig right through that crusty surface.
Better yet, if you really want to get fancy, check out this cool ice cream shovel and spade kit. These tools feature unique wooden handles for added comfort and aesthetic.
Once you break through that crust and gain access to the softer ice cream below, you can use something like this heavy duty heavy duty ice cream scoop to form those perfectly rounded scoops that most people desire.
Similar to the heavy duty ice cream scoop listed above, you might also like this Spring Chef ice cream scoop due to its more comfortable rubber handle for better grip and performance.
Last but not least, I really love this Oneida stainless steel ice cream scoop for its speedy, trigger-release design. This sort of ice cream scoop may not be quite as durable as some of its above-mentioned counterparts, but with proper care it can really speed things up. In fact, this scoop really stands out at an ice cream social, allowing its user to work much faster and far more efficiently.
3. Dessert Bowls and Spoons
Ice cream can be served in any bowl, and any old spoon will work. I really like these long-handled dessert spoons. For formal occasions, you might look at something like these Turkish ice cream spades– so neat!
Again, it’s entirely up to you and/or the party theme. That said, for special occasions, you may desire something a bit more decorative…
I really love this insulated ice cream bowl. This nifty bowl is double-walled with an insulated, freezable gel in between; once frozen, it’s crazy effective at preventing the dreaded ice cream melt! It allows you to take your time eating – there’s no need to rush!
Porcelain ice cream bowls, as found in this colorful decorative porcelain bowl set, are refined and hardened at very high temperatures, resulting in a very strong serving dish that doesn’t absorb odors.
Then there’s ceramic bowls, like this cheerful tulip-shaped ceramic bowl set. Although ceramic bowls are not as durable as porcelain, they are much stronger than glass, and they often cost less.
Of course, all bowls are breakable when kids are present. In this situation, it’s hard to beat this set of ice cream cone bowls with spoons. I know my Zeke would love these!
Many people prefer a custard cup for their ice cream. I think these ramekin custard cups would work very well in a party setting!
Last but not least, I LOVE these cool ice cream cone cups. Wouldn’t they just be perfect for an ice cream social or get-together?
4. Storage Containers and Tubs
The most important rule in preserving ice cream is that you should never let it melt. Pull it out for only as long as it takes to scoop out your serving, and quickly place it back into the deep freeze.
Freshly-churned ice cream should be placed in the freezer as soon as possible; it will melt with any sudden increase in temperature.
It’s also essential that you store it in an airtight container. Plastic is preferable, as it freezes faster than any other material.
I’m a big fan of these small, rectangular ice cream storage tubs. Their size and shape can easily fit into most freezer spaces. I also like these little personal-sized mini ice cream storage tubs for smaller batches.
These airtight, 1-gallon storage tubs work great for larger batches of ice cream. They also happen to have plastic handles for easy transfer!
All that said, you can use any airtight food storage container, glass or plastic. Don’t think you have to go out and buy something special if you already have a food-grade container on hand. In fact, we like to wash and reuse old tubs that we save back from the occasional splurge on store-bought ice cream!
5. Waffle Cone Maker
Homemade waffle cones are a must-have when making ice cream at home. In fact, I know some people that won’t eat ice cream without one!
Unfortunately, it’s not possible to use a regular waffle maker to make ice cream cones. The grid-pattern holes are simply too deep, and it would be next to impossible to roll up the cones as is necessary.
With the right machine, they’re easy to make, and they don’t take long at all. This is a great, fun way to get the kids into the kitchen, with supervision of course. Those waffle makers get hot!
For a budget-friendly option, check out this MasterChef ice cream cone maker. It comes with both a cone and bowl shaper, and it features 100% nonstick heating plates for easy cleanup. This ice cream cone maker would make great summer entertainment, parties, and even gift giving!
Then there’s the CucinaPro ice cream cone maker. Like the MasterChef, this one comes with both a cone and a bowl shaper. It can cook an ice cream cone in under 2 minutes, and, like the MasterChef, it features nonstick heating plates. Did I mention that it’s cheap?
The VEVOR ice cream cone maker is a real step-up from either aforementioned models. This restaurant model is constructed of durable stainless steel, and it has adjustable time and temperature control. Again, it features nonstick heating plates for easy cleanup. This one would be perfect for an ice cream social or party!
This simple ice cream sandwich cutter allows you to cut out your cookies with ease. You can even press a desired design into the cookie as you cut!
With this Chef’n mini ice cream sandwich maker, you can bake the cookies inside of a provided silicone mold. Then, fill it with ice cream and freeze; it’s that easy! It makes 10 miniature round ice cream sandwiches.
If you want regular size, the Chef’n ice cream sandwich maker allows you to bake the cookies right in the silicone mold, then fill with ice cream and freeze. It makes 4 regular-sized ice cream sandwiches.
If you really want to get fancy, check out this electric ice cream sandwich maker. You can bake your pre-shaped cookies in a matter of seconds!
7. Ice Cream Toppings and Sprinkles
Whether you’re just making a personal-sized batch of ice cream, or you’re hosting an ice cream social or even making it for a church potluck, you’ll want toppings. Here are some ideas as to what you can put on ice cream to switch things up when making it at home. These optional add-ins can really make a difference!
Sliced strawberries, or really any fresh fruit, tossed with a hint of sugar to get the juice running
Another option that’s worthy of consideration is this Stonewall Kitchen 4 Piece Dessert Topping Collection. You’ll receive a generous supply of Bittersweet Chocolate Sauce, Chocolate Peanut Butter Sauce, Dark Chocolate Sea Salt Caramel Sauce, and Sea Salt Caramel Sauce.
Most importantly, be creative! When it comes to ice cream, the sky’s the limit.
8. Milkshake Mixer
Of all the different ways to serve ice cream, I think it’s hard to beat a good homemade vanilla milkshake. It’s just so easy to make!
You can definitely make some of the best milkshakes with just a blender, but many people prefer to buy a milkshake mixer simply for the savings in time. The same people will often argue that a good milkshake maker can produce a much higher quality, more consistent and more flavorful dessert!
I’m loving this Hamilton Beach DrinkMaster milkshake mixer. Complete with a roomy 28oz. mixing cup for plenty of ice cream, this milkshake mixer features 2 speeds, allowing you to blend and mix by preference, in order to obtain the perfect texture. It’s easy-to-clean, and the detachable spindle is even dishwasher-safe!
Another great milkshake mixer is this Brentwood classic milkshake maker. Although it’s a bit of a step down with its mere 15oz. mixing cup, it does have a high and low speed; it only requires 2 minutes to make a milkshake, on average! Plus, look at the price. This is a fantastic option for those that don’t have a lot of money to spend.
Then there’s the VEVOR milkshake maker kit. It’s a bit more expensive, but it may well be worth the extra cash. This milkshake mixer features an 800ml cup, a durable stainless steel design, and an adjustable 2 speed, 180-watt full copper motor. It even features a lotus leaf corrugated mixing head for 360º rotation, which makes for a more consistent, better tasting milkshake.
9. Ice Cream Social Supplies
I have a feeling that most people reading this post are likely preparing for an ice cream social or ice cream party, or maybe you’re just looking to make enough ice cream for a large gathering! Either way, this section is for you.
Regardless of what flavors you decide to serve, you’ll want to give people a choice of toppings. Going off of my list of toppings above, try making an all-you-can-eat toppings buffet with this ice cooled condiment caddy!
Many people pre-scoop the ice cream into individual dishes that are bedded down in a shallow, ice-filled bucket for a chilling display.
You can add a decorative touch to the sundae bar by displaying this chalkboard menu with all of the available ice cream flavors and toppings listed.
For decorative style, I recommend sticking to pastel colors and gold accents. Why not simplify the whole process with this ice cream party decorations kit?
You may opt for using easy-clean dishes. When it comes to an ice cream social, clean-up will probably be the worst part. There is no shame in using disposable bowls and spoons!
Play fun party games!
To add on to the all-you-can-eat buffet mentioned above, try making an ice cream toppings bar scavenger hunt! You can hide all of the ingredients around the party space, except the ice cream of course, as it needs to stay frozen.
Perform a blind ice cream taste test. Whoever guesses correctly the most amount of times is declared the winner!
Hold an ice cream eating contest! Set the players down at the table, blindfolded and/or with their hands behind their back. Who can eat the most?
Host a contest for who can make the best ice cream (or sundae). Have judges and everything, just like at the county fair.
Have an ice cream sundae relay game! The goal is for each team to gather the necessary ingredients and build a sundae in as short amount of time as possible.
10. Ice Cream Cookbooks
If you’re really serious about getting good at making ice cream, you’ll inevitably want to find some cookbooks. So, here you go.
Listed below are some of my favorite ice cream cookbooks, some of which even have recipes for extras like cones, toppings, and sauces
[wprm-recipe-roundup-item id=”39912″ name=”Old Fashioned Homemade Vanilla Ice Cream Recipe” summary=”<p>Our homemade vanilla ice cream recipe has been a summer staple for as long as I can remember. How to make it the old fashioned way using an ice cream maker.</p>”]
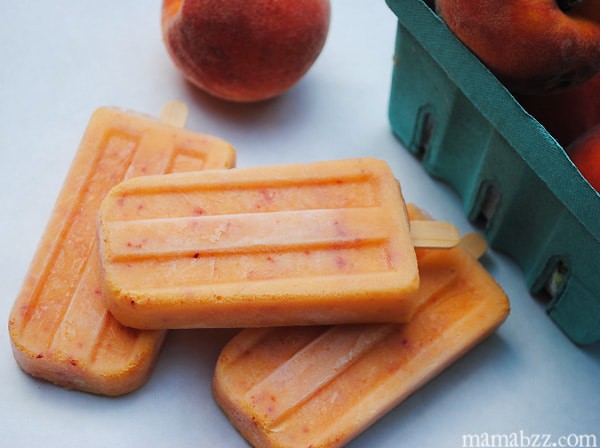
[wprm-recipe-roundup-item link=”https://flouronmyfingers.com/old-fashioned-homemade-peach-ice-cream/” name=”Homemade Peach Ice Cream” summary=”<p>Whip up the best homemade peach ice cream in an ice cream maker. No cook, it's an easy dessert you can make with fresh or frozen fruit.</p>” image=”53037″]
[wprm-recipe-roundup-item id=”40654″ name=”Grasshopper Sundae” summary=”<p>Make a decadent grasshopper sundae with mint chocolate chip ice cream and Oreo cookies in minutes. Delicious last minute dessert recipe!</p>”]
[wprm-recipe-roundup-item id=”40934″ name=”Old-Fashioned Homemade Strawberry Ice Cream” summary=”<p>Strawberry ice cream was always a special treat growing up in my family. We made our favorite frozen dessert for summertime get togethers and church ice cream socials. How to make old-fashioned homemade strawberry ice cream using an ice cream maker.</p>”]
[wprm-recipe-roundup-item id=”40804″ name=”Old-Fashioned Homemade Banana Ice Cream” summary=”<p>How to make homemade banana ice cream, my favorite frozen dessert recipe ever. Easy to make, it's chock full of creamy fresh banana flavor!</p>”]
[wprm-recipe-roundup-item id=”57051″ name=”Raw Milk Ice Cream” summary=”<p>How to make the best raw milk ice cream with just 5 simple ingredients, including raw milk but no eggs. Easy recipe with rich vanilla flavor.</p>” button=”Get the Recipe”]
[wprm-recipe-roundup-item id=”57292″ name=”Old-Fashioned Homemade Chocolate Ice Cream” summary=”<p>How to make the best old-fashioned homemade chocolate ice cream (no eggs) recipe. Easy, machine churned, delicious chocolaty flavor.</p>” button=”Get the Recipe”]
[wprm-recipe-roundup-item id=”57143″ name=”Homemade Butterfinger Ice Cream” summary=”<p>Mix and freeze an easy recipe for homemade butterfinger ice cream that's oh so creamy and rich, full of buttery vanilla flavor, and filled to the gills with crushed chocolate Butterfinger candies. It's a family favorite homemade ice cream recipe.</p>” button=”Get the Recipe”]
[wprm-recipe-roundup-item id=”57205″ name=”Easy Mint Oreo Ice Cream” summary=”<p>Make mint Oreo ice cream in 30 minutes. Nostalgic recipe filled with peppermint flavor and crushed Oreo cookies. Quick, easy, and eggless!</p>” button=”Get the Recipe”]
[wprm-recipe-roundup-item id=”59984″ name=”Fruity Pebbles Ice Cream” summary=”<p>How to make homemade Fruity Pebbles ice cream with a rainbow of flavors. Easy cereal milk ice cream recipe you can make to eat in 30 minutes.</p>” button=”Get the Recipe”]
Make a decadent grasshopper sundae with mint chocolate chip ice cream and Oreo cookies in minutes. Delicious last minute dessert recipe!
This mint chocolate chip sundae is just in time for St. Patrick’s Day, and it’s such an easy dessert to make. It makes the perfect last minute dessert; in fact, it’ll seem like you’ve gone all out, when really, it only takes a few minutes to make this yummy frozen dessert.
Mint chocolate chip ice cream has been a favorite of mine since I was a little girl. While I have my favorite brand, and I’ll talk about that a little bit on down below, any brand will do, as long as it’s minty and full of chocolate chips.
Now normally, grasshopper flavored ice cream is full of both chocolate and brownies. Instead of brownies, though, I love the crunchiness of crushed or chunked up Oreo cookies.
Put your mint chocolate chip ice cream sundae together with shaved chocolate and whipped cream (or peppermint whipped cream), and you’ve got a family favorite dessert.
WHERE CAN I FIND THE ACTUAL RECIPE CARD?
If you’d rather skip all of my sundae making tips, important info for this recipe, and similar recipe ideas – and get straight to the mint chocolate sundae recipe – just scroll down to the bottom, where you’ll find a printable recipe card.
LET’S TALK INGREDIENTS
Oreo Cookies: You can use any brand chocolate sandwich cookies, but Oreo cookies are the best. I especially love gluten-free Oreos (Great Value has a great gluten-free version of Oreos too).
Mint Chocolate Chip Ice Cream: I said I’d tell you my favorite brand, and that is Turkey Hill’s Choco Mint Chip. Blue Ribbon is another tasty brand, but I really love Turkey Hill’s version of mint chip, because it’s a beautiful old-fashioned minty green, has amazing mint flavor, and is chock full of slivered up chocolate chips. It’s so delicious. Oh and it’s gluten-free and also free of any high-fructose corn syrup. If you’d rather make homemade and love mint cookie ice cream, I love my Oreo mint ice cream recipe; it’s so, so good! Now that my sales pitch is over (but really, it’s my boys’ favorite too), let’s talk about some of the other ingredients.
Chocolate Syrup or Sauce: You can use a chocolate syrup or hot fudge sauce. I prefer to just drizzle on a little bit of Hershey’s Syrup. No warming necessary, and it’s super easy.
Whipped Cream: You can make homemade whipped cream, or you can use Reddi-Whip. But take my advice if using Reddi-Whip, and get the real stuff; this is one example when generic is not always better, because it will melt very quickly.
Shaved Dark Chocolate: I used just a little chunk of Baker’s Semi-Sweet Chocolate. You can use just a regular candy bar if you want. I prefer to use dark chocolate over milk chocolate, though, for a richer, more decadent flavor.
Keep in mind, all of the ingredients and ingredient amounts you’ll need are in the printable recipe card below.
KITCHEN TOOLS AND EQUIPMENT YOU’LL NEED:
Before you get started making your sundae, you may want to check out our complete guide to ice cream tools and equipment. It’s the ultimate supply list for every ice cream lover’s kitchen.
Before you get started, be sure to gather all of your ingredients together, and get them prepped.
Prep Your Ingredients First…
The only prep needed for this sundae is to crush up the Oreos and shave the chocolate.
To crush the Oreo cookies, put all your Oreos in a plastic baggie, and seal it well without any air left in the bag. Then take a rolling pin and roll over the cookies, or beat the cookies with the rolling pin, ’til they’re the consistency that you want.
To shave the chocolate, take a vegetable peeler and peel the chocolate bar, just like you would a carrot or a potato. You should get beautiful fine shavings or curls of chocolate, perfect for topping off and decorating your sundae.
Then Make the Sundaes…
Place 1/2 to 3/4 of the crushed Oreo cookies in the bottom of your sundae bowls. Set the rest of the crumbles aside.
Add 2 to 3 scoops of mint chocolate chip ice cream to each sundae bowl.
Add a drizzle of chocolate syrup to every sundae.
Crumble on the rest of the crushed Oreos.
Add a swirl of whipped cream on top.
Then sprinkle on the shaved chocolate.
Now if you want, you can add a cherry on top. Maraschino cherries straight from the jar work just fine.
FAQ:
Can I make this sundae dairy-free?
To make it dairy-free, you’d need to use a dairy-free mint chocolate chip ice cream or gelato. It’s pretty easy to find dairy-free ice cream in the freezer section; but it may prove more difficult to find the rest of the ingredients dairy-free, though they may be easier to find at a health food store.
Can I make it gluten-free?
Yes, you can; I make this gluten-free. Get a good gluten-free ice cream (like Turkey Hill’s Choco Mint Chip), gluten-free Oreos, etc. Just check ingredient labels to make sure everything is truly gluten-free.
How can I make sundaes ahead of time so they’re ready to go?
If making these sundaes a day or two ahead of time, I’d recommend adding only the Oreos, ice cream, and chocolate syrup to your sundae bowls. Then cover each one well with plastic wrap and aluminum foil, and place them in the freezer. When you’re ready to serve, you can add the whipped cream and shaved chocolate.
WHAT GOES WELL WITH MINT CHOCOLATE CHIP ICE CREAM?
Well, we’ve already established that Oreo cookies are my favorite addition. But there are other things you can add, as well, including the following:
Brownies – Chunk up brownies to mix with your mint chocolate ice cream.
Walnuts or pecans – You can sprinkle chopped walnuts or pecans onto your sundaes.
Make a decadent grasshopper sundae with mint chocolate chip ice cream and Oreo cookies in minutes. Delicious last minute dessert recipe!
12 Oreo Cookies (crushed*)
2 quarts mint chocolate chip ice cream
1/2 cup chocolate syrup
1 cup whipped cream
2 tablespoons semi-sweet chocolate (shaved*)
4 Maraschino cherries (optional)
Place 1/2 to 3/4 of the crushed Oreo cookies in the bottom of your sundae bowls. Set the rest of the crumbles aside.
Add 2 to 3 scoops of mint chocolate chip ice cream to each sundae bowl.
Add a drizzle of chocolate syrup to every sundae.
Crumble on the rest of the crushed Oreos.
Add a swirl of whipped cream on top.
Then sprinkle on the shaved chocolate.
If you want, you can add a cherry on top. Maraschino cherries straight from the jar work just fine.
*To crush the Oreo cookies, put all your Oreos in a plastic baggie, and seal it well without any air left in the bag. Then take a rolling pin and roll over the cookies, or beat the cookies with the rolling pin, ’til they’re the consistency that you want.
*To shave the chocolate, take a vegetable peeler and peel the chocolate bar, just like you would a carrot or a potato. You should get beautiful fine shavings or curls of chocolate, perfect for topping off and decorating your sundae.
How can I make sundaes ahead of time so they’re ready to go?
If making these sundaes a day or two ahead of time, I’d recommend adding only the Oreos, ice cream, and chocolate syrup to your sundae bowls. Then cover each one well with plastic wrap and aluminum foil, and place them in the freezer. When you’re ready to serve, you can add the whipped cream and shaved chocolate.
Frozen Treats
American
grasshopper sundae, how to make a grasshopper sundae, mint chocolate chip ice cream, mint chocolate chip ice cream sundae, mint chocolate chip sundae, mint Oreo ice cream, mint Oreo sundae, st. patrick’s dessert ideas
Our old fashioned homemade vanilla ice cream recipe is a summer staple to remember. Mix the ice cream base with this family favorite recipe; then freeze it, using an old fashioned ice cream maker. Best homemade ice cream for family gatherings and summer holidays!
Along with old fashioned banana ice cream, my family’s favorite old fashioned ice cream recipe has been a part of every summer for a long time, as far back as I can remember. While it’s morphed from person to person, it’s pretty much the same homemade old fashioned ice cream recipe I remember enjoying with family on special summer occasions gone by.
When we visited Boquillas, one of the main souvenirs we came home with was a huge bottle of Mexican vanilla. So far, we’ve made a batch of chocolate chip cookies with it, and then we made a big freezer of old fashioned homemade ice cream. It has amazing flavor and makes the best old fashioned vanilla ice cream ever.
When You’ll Want to Make Old Fashioned Ice Cream
You can make a batch of homemade ice cream for an ordinary everyday treat, but there are a few special occasions when you’ll definitely want to grab the ice cream maker and get freezing.
Family Gatherings – Whether it’s a holiday or just Sunday family dinner, family gatherings are the best time to make a freezer full of this delicious ice cream.
Holidays – Make a refreshing batch of old fashion ice cream for Memorial Day, 4th of July, Labor Day… Even holidays like Easter and Thanksgiving, to go with all those delectable desserts on the dessert table.
Potlucks and Backyard BBQ’s – Church potlucks are one of the best times to serve this old fashioned ice cream maker recipe.
Ingredients and Substitutions Notes:
Gather a few simple ingredients to make this old-fashioned vanilla ice cream base…
Large Eggs – You’ll need the whole egg, yolks and all, to make this custard base. (Just a note for housekeeping purposes: If you choose to make an old fashioned homemade ice cream recipe with raw eggs, do keep in mind that consuming raw or undercooked meats, poultry, seafood, shellfish, or eggs may increase your risk of food borne illness, especially if you have certain medical conditions.) That said, we have always made homemade ice cream with eggs and have never had a problem. However, if you’re leery, some people prefer to temper and heat the eggs up to at least 160ºF in order to prevent any possible food poisoning. Here’s a great guide on how and why to temper eggs for custard-based ice creams. You can temper the eggs with the condensed milk, evaporated milk, and whole milk called for in this recipe, while following the instructions in that guide. Then just whisk everything else in as I explain in the recipe card below. If you’d rather make an egg-free version, my raw milk ice cream without eggs, using whole milk from our milk cow, is the best. Don’t worry, you can use store bought milk and cream if you don’t have access to raw milk.
Cane Sugar – You can use granulated sugar, as well.
Vanilla Extract – Use a really good dark vanilla extract, real vanilla if possible.
Sweetened Condensed Milk – My dad always loved using Eagle Brand; sometimes I use that, and sometimes I use Aldi’s brand to make this homemade ice cream with sweetened condensed milk and whole milk.
Evaporated Milk – If you prefer, you can use regular milk, but I do prefer to use evaporated milk. My mom and grandma always preferred to use Milnot evaporated milk; but I’ve always used what I can easily get, which is sometimes Milnot and sometimes generic or Aldi’s brand when making evaporated milk ice cream.
Whole Milk – Although you can use 2% milk or 1% milk in a pinch, I highly recommend that you use whole milk, because it will make your ice cream much more creamy. You can even use Half-and-Half or part heavy cream to get a creamier texture.
Ice and Rock Salt – You’ll need crushed ice and rock salt to freeze the ice cream. While you can find rock salt online and smaller bags or boxes at the grocery store, sometimes you can get a bigger and less expensive bag at a hardware store or feed store. So just keep that in mind.
Before you get started, you may want to check out our complete guide to ice cream accessories and tools for making ice cream at home. It’s the ultimate list for every ice cream lover’s kitchen and especially helpful if you’re planning an ice cream social.
Also, make sure your ice cream freezer, especially the freezer bowl or canister, is washed out good. We store ours in the garage, so we always have to wash it before we use it.
How to Make Old Fashioned Homemade Vanilla Ice Cream
Use a mixer or blender to mix up homemade vanilla ice cream with eggs; this will ensure that the ingredients are mixed really well, especially the eggs*. This recipe fills a 4-quart ice cream maker.
Start by creaming (or mixing) the eggs and the sugar together.
Then add in the vanilla extract to the egg mixture. Did you know you can even make your own vanilla?
Next, mix in the sweetened condensed milk, scraping all the ooey gooey liquid out of the can with a spatula.
Then add both cans of evaporated milk.
Add in a good-sized dash of salt, which equals out to about a teaspoon.
Mix everything together well.
Pour the mixture into the metal canister of your ice cream maker.
Finish topping off the canister with whole milk, making sure to fill it about 3/4 of the way full, leaving room for expansion as it freezes. Your metal canister should have a fill line.
How to Freeze Homemade Ice Cream with an Old Fashioned Ice Cream Maker
Freezing the mixture to make old fashioned ice cream is fairly easy, especially once you get it going. You will need to stay with it so you can monitor if it needs more ice, rock salt, or needs unplugged when done.
While I always advise you to follow manufacturer’s directions for your specific ice cream maker, here are a few tips.
Set the freezer in a sink, or somewhere where it can drain without making a mess. Then put the lid on, place the metal canister down into the bucket of your ice cream maker, set the motor in place, and plug it in to turn it on and get the motor running, which will start to turn the canister.
Crush a big bag of ice, gradually pouring ice around the canister. Tip: You can add up to a gallon of water if needed, as well. We sometimes do this because our motor will seize up. Adding a bit of water will help it keep turning.
Add 2-3 cups of rock salt as you add the ice, making sure to top it off with rock salt.
Let the electric motor run until it stops. Once the ice cream freezes, the motor on your ice cream maker will stop churning. Unplug it immediately. This should signal that the ice cream is completely frozen. Wipe any excess ice or rock salt off the lid and out from around the top of the canister. Then remove the lid to reveal the best vanilla ice cream ever.
Carefully remove the churning paddle, and let your kids battle it out over who gets it. Oh, the memories!
Serve the ice cream immediately. If you’re not ready to serve it up just yet, you can always leave the lid on, remove the motor, top the canister off with ice, and place a towel or two over it to insulate it and keep it cold for an hour or two.
I’ve shared how to make the ice cream, but here are a few tips for things to avoid when making and freezing homemade ice cream.
Avoid low-fat ingredients, for example, skim milk. You’ll get the best ice cream with a creamy texture when you use full fat ingredients, like whole milk.
If possible, try not to mix by hand. Blend the ingredients really well, using either a blender or a mixer. Either one works just fine. This will ensure you have a smooth, creamy mixture going into the ice cream maker.
Try not to overfill the ice cream canister in your ice cream maker. Overfilling will lead to one big mess if it overflows while freezing. Remember… Freezing means expansion. Always leave room for expansion, and don’t go over the fill line on your ice cream maker.
When freezing the ice cream in an ice cream maker, place the maker down in a sink, or freeze it outside on a porch. You’ll flood your countertop with a mess from all the ice, water, and rock salt if you don’t.
When the ice cream is done, don’t open the lid ’til you’ve wiped all the rock salt and ice off the top. That way you avoid getting any of the gunk in your ice cream.
As long as you follow specific old-fashioned ice cream maker instructions for your ice cream maker, you’ll be fine.
Favorite Toppings and Mix-Ins for Old-Fashioned Ice Cream
There are so many things you can mix into your ice cream to make it even more fun, especially with kids.
Chocolate Syrup, Butterscotch Topping, Caramel Sauce, etc. – With whipped cream and a cherry on top, classic.
Oreo Cookies – I especially love crushing up Oreo Minis. It’s my favorite way to add mix-ins, especially when enjoying a bowl of mint chocolate chip ice cream.
Chocolate candies – Like M&M’s, Snickers, Reese’s Peanut Butter Cups, and more treats.
Chocolate Chips and Sliced Strawberries
Brownies or Cookies
Expert Tips and Recipe FAQ’s
How should you store leftover homemade ice cream?
We always have a lot of leftover ice cream when we make it homemade, so we purchased some of these freezer containers to hold all the leftovers. Each storage container is big enough to hold 2-3+ servings of ice cream. Then we just stick each airtight container down in the freezer. If you have an upright, I’d place it on the shelves, rather than the door, so it doesn’t melt or have a higher risk of freezer burn. Homemade ice cream usually keeps for up to about a month in the freezer.
How can I get a more firm consistency to this ice cream?
If you prefer a more firm ice cream than soft-serve that you can actually scoop, just place your ice cream in ice cream containers and stick it in the freezer, ’til it reaches the preferred consistency. It’ll usually firm up enough to scoop onto an ice cream cone within 3-4 hours.
Why do you put raw eggs in homemade ice cream?
Eggs give rich flavor to homemade ice cream, and they give that characteristic yellow color, as well. They act as a stabilizer and provide a custard base that turns to smooth, creamy ice cream when finished.
More Homemade Ice Cream Recipes for Ice Cream Makers
If you love this ice cream recipe as much as we do (isn’t it a great recipe?!), you’ll love these flavors too…
If you try this recipe, why not leave a star rating in the recipe card right below and/or a review in the comment section further down the page? I always appreciate your feedback. You can also follow me on Pinterest, Facebook, Instagram, and YouTube. And subscribe to my email list too!
Old Fashioned Homemade Vanilla Ice Cream
Our homemade vanilla ice cream recipe has been a summer staple for as long as I can remember. How to make it the old fashioned way using an ice cream maker.
Mixer
Old-Fashioned Ice Cream Maker
Ice Cream Storage Containers
Ice Cream Scoop
Ice Cream:
6 large eggs
1 1/4 cups cane sugar
4 teaspoons vanilla extract
14 ounces sweetened condensed milk
24 ounces evaporated milk
1 teaspoon sea salt
6 cups whole milk
Freezing Supplies:
16 pounds ice
3 cups rock salt
Start by creaming (or mixing) the eggs and the sugar together using a mixer.
Then add in the vanilla extract.
Next, mix in the sweetened condensed milk, scraping all the ooey gooey liquid out of the can with a spatula.
Add both cans of evaporated milk.
Add in a good-sized dash of salt, which equals out to about a teaspoon, and mix everything together well.
Pour the mixture into the metal canister of your ice cream maker.
Finish topping off the canister with whole milk, making sure to fill it about 3/4 of the way full, leaving room for expansion as it freezes. Your metal canister should have a fill line.
Put the lid on, and place the metal canister down into the bucket of your ice cream maker.
Crush a big bag of ice, gradually pouring ice around the canister. Tip: You can add up to a gallon of water if needed, as well. We sometimes do this because our motor will seize up. Adding a bit of water will help it keep turning.
Add 2-3 cups of rock salt as you add the ice, making sure to top it off with rock salt.
Let the motor run until it stops. Once the ice cream is frozen, the motor on your ice cream maker will stop churning.
Unplug it immediately. This should signal that the ice cream is completely frozen.
Wipe any excess ice or rock salt off the lid and out from around the top of the canister. Then remove the lid.
Carefully remove the churning paddle.
Serve the ice cream immediately. If you’re not ready to serve it up just yet, you can always leave the lid on, remove the motor, top the canister off with ice, and place a towel or two over it to insulate it and keep it cold.
*Consuming raw or undercooked meats, poultry, seafood, shellfish, or eggs may increase your risk of food borne illness, especially if you have certain medical conditions. Some people prefer to temper and heat the eggs up to at least 160ºF in order to prevent any possible food poisoning. Here’s a great guide on how and why to temper eggs for custard-based ice creams. You can temper the eggs with the condensed milk, evaporated milk, and whole milk called for in this recipe, while following the instructions in that guide. Then just whisk everything else in as I explain in the recipe card instructions above.
*You can use Half & Half in place of the whole milk if you want an even creamier texture to your ice cream.
How to Store Leftover Vanilla Ice Cream
We always have a lot of leftover ice cream when we make it homemade, so we purchased some of these freezer containers to hold all the leftovers. They’re big enough to hold 2-3+ servings of ice cream. Then we just stick it down in the freezer. If you have an upright, I’d place it on the shelves, rather than the door, so it doesn’t melt or have a higher risk of freezer burn. Homemade ice cream usually keeps for up to about a month in the freezer.
Desserts
American
homemade vanilla ice cream, homemade vanilla ice cream recipe, how to make vanilla ice cream, ice cream maker ice cream recipes, old fashioned homemade ice cream, old fashioned homemade vanilla ice cream, old fashioned ice cream, old fashioned ice cream recipe, vanilla ice cream recipe
Strawberry ice cream was always a special treat growing up in my family. We made our favorite frozen dessert for summertime get togethers and church ice cream socials. How to make old-fashioned homemade strawberry ice cream using an ice cream maker.
There’s nothing quite like a bowl of my dad’s homemade banana ice cream… Besides maybe his homemade strawberry ice cream. Oh my goodness, I love summer because it means delectable bowls of creamy frozen deliciousness.
This strawberry ice cream recipe is made using an old-fashioned ice cream maker, not the crank kind, but the motor kind (you’re welcome). You can use an old crank handled maker if you want, but I prefer motor.
You can also use fresh or frozen berries. For some reason, when we went to make this ice cream, the stores were completely out of strawberries, everywhere we looked. Hence, no strawberries in the photos.
Not sure if there’s a shortage or what, but we decided to use frozen, and it turned out beautifully. You will want to crush or purée the berries ahead of time.
Tips for how to make strawberry ice cream:
I recommend using a mixer to mix up your ice cream. This will ensure that the ingredients are mixed really well.
Start by creaming (or mixing) the eggs* and the sugar together. Then you’ll add in the vanilla extract.
Next you’ll mix in the sweetened condensed milk, scraping all the ooey gooey liquid out of the can.
Then add all 3 cans of evaporated milk. Now my mom and dad use nothing but Milnot, and when they use Milnot, they only use 2 cans. For any other brand, they say to use 3 cans. So we went with 3 cans.
Add in a good-sized dash of salt, which equals out to about a teaspoon.
If your strawberries are crushed and ready to go, you can pour them into the mixer. Mix everything together well, and watch your mixture turn a nice pink color.
Make sure your ice cream freezer, especially the canister, is washed out good. We store ours in the garage, so we always have to wash it before we use it.
Pour the mixture into the metal canister of your ice cream maker.
Finish topping it off with whole milk, making sure to fill it about 3/4 of the way full, leaving room for expansion as it freezes. Your metal canister should have a fill line.
Tips for how to freeze homemade strawberry ice cream:
Put the lid on, and place the canister down into the bucket of your ice cream maker. Crush a big bag of ice, gradually pouring ice around the canister.
Tip: You can add up to a gallon of water if needed, as well. We sometimes do this because our motor will seize up. Adding a bit of water will help it keep turning.
Add 2-3 cups of rock salt as you add the ice, making sure to top it off with rock salt.
Let the motor run until it stops. Once the ice cream is frozen, the motor on your ice cream maker will stop churning. Unplug it immediately. This should signal that the ice cream is completely frozen.
Wipe any excess ice or rock salt off the lid and out from around the top of the canister. Then remove the lid.
Mmmm, I love this recipe. Homemade ice cream is so good!
Carefully remove the churning paddle, and serve the paddle to the winning kid (may the best boy or girl win).
Serve up the ice cream immediately.
If you’re not ready to serve it up just yet, you can always leave the lid on, remove the motor, top the canister off with ice, and place a towel or two over it to insulate it and keep it cold.
Alternative options for your homemade ice cream recipe:
Hand crush the strawberries so you’ll have bigger chunks of berries in your ice cream.
Instead of just straight strawberry, why not make it strawberry banana? Add a couple bananas in with the strawberries for added fruity flavor.
You could make this a berry ice cream by adding all sorts of berries, including strawberries, blueberries, raspberries, and blackberries.
Add both crushed frozen peaches and strawberries to your ice cream mixture.
Kitchen tools you may need to make homemade strawberry ice cream:
Mixer – A mixer will ensure you mix everything together really well. Ice Cream Freezer – This is an ice cream maker recipe, so you’ll need a maker. Food Storage Containers – We use dishes similar to these to store our ice cream in the freezer, especially when we have a big batch. Ice Cream Scoop – Can’t have ice cream without a scooper.
Be sure to check out our complete guide to ice cream accessories and tools for making homemade ice cream. It’s the ultimate list for every ice cream lover’s kitchen.
Want to see how to make this strawberry ice cream recipe? Watch our video!
Old-Fashioned Homemade Strawberry Ice Cream
Strawberry ice cream was always a special treat growing up in my family. We made our favorite frozen dessert for summertime get togethers and church ice cream socials. How to make old-fashioned homemade strawberry ice cream using an ice cream maker.
6 eggs*
3/4 cup pure cane sugar
4 teaspoons vanilla extract
14 ounces sweetened condensed milk
36 ounces evaporated milk
1 teaspoon salt
2 cups crushed strawberries
6 cups whole milk
16 pounds ice
3 cups rock salt
Cream (or mix) together the eggs and the sugar.
Add in the vanilla extract.
Mix in the sweetened condensed milk, scraping all the gooey liquid out of the can.
Then add all of the evaporated milk.
Next add in a good-sized dash of salt, which equals out to about a teaspoon.
If your strawberries are crushed and ready to go, you can pour them into the mixer.
Mix everything together well, and watch your mixture turn a nice pink color.
Pour the mixture into the metal canister of your ice cream freezer.
Finish topping it off with whole milk, making sure to fill it about 3/4 of the way full, leaving room for expansion as it freezes. Your metal canister should have a fill line.
Put the lid on, and place the canister down into the bucket of your ice cream maker.
Crush a big bag of ice, gradually pouring ice around the canister.
Add 2-3 cups of rock salt as you add the ice, making sure to top it off with rock salt.
Let the motor run until it stops. Once the ice cream is frozen, the motor on your ice cream maker will stop churning. Unplug it immediately. This should signal that the ice cream is completely frozen.
Wipe any excess ice or rock salt off the lid and out from around the top of the canister; then remove the lid and the churning paddle, and serve immediately.
If you’re not ready to serve it up just yet, you can always leave the lid on, remove the motor, top the canister off with ice, and place a towel or two over it to insulate it and keep it cold.
*Consuming raw or undercooked meats, poultry, seafood, shellfish, or eggs may increase your risk of food borne illness, especially if you have certain medical conditions.
How to make homemade banana ice cream, my favorite frozen dessert recipe ever. Easy to make, it’s chock full of creamy fresh banana flavor!
Homemade banana ice cream was always a special treat growing up in my family. We made ice cream for any type of get together in the summertime, and church ice cream socials in our little country church were a big event back then.
I remember my dad and my grandpa making ice cream at the same time, competing to see whose ice cream was better. Grandpa had the old hand crank ice cream maker, and somehow I always got stuck turning that crank. “Goofball, get to work!” Grandpa would say.
While my recipe may differ just a bit from Dad’s, it’s pretty similar if not the same. I’d written this recipe down after talking with my mom, and it tastes just like Dad’s old fashioned banana ice cream. My boys give it a thumbs up too; that’s when I really know it’s good.
Ingredients You’ll Need:
To make this banana ice cream recipe, you’ll need a few ingredients on hand…
Large Eggs – You’ll need the whole egg, yolks and all. If you choose to use raw eggs to make old fashioned banana ice cream, do keep in mind that consuming raw or undercooked meats, poultry, seafood, shellfish, or eggs may increase your risk of food borne illness, especially if you have certain medical conditions. But we have personally always used raw eggs and have never had any problem. That said, some people prefer to temper and heat the eggs up to at least 160ºF in order to prevent any possible food poisoning. This is a great guide on how and why to temper eggs for custard-based ice creams. You can temper the eggs with the condensed milk, evaporated milk, and whole milk in this recipe, following the instructions in the post that I linked to above. Then just whisk everything else in as I explain in the recipe card below. If you’d rather make an egg-free version, my vanilla ice cream no eggs can easily be converted to banana ice cream.
Cane Sugar – You can also use granulated sugar.
Vanilla Extract – Use a really good dark vanilla extract, real vanilla if possible.
Sweetened Condensed Milk and Evaporated Milk – Now here’s one instance when my mom and dad have always used a brand name product, or they used to anyway. Mom (and Grandma) always insisted on Eagle Brand and Milnot. In fact, when I wrote this recipe down, I was told that if you’re using Milnot evaporated milk, only use 2 cans; if you’re using a generic brand, use 3 cans. Dan and I always just use 2 cans of whatever type of sweetened condensed milk and evaporated milk we have on hand, usually Aldi’s brand. And it works just fine. So I recommend just using 2 cans of whatever brand you have on hand, unless you want to try Mom and Grandma’s tried and true method with Eagle Brand and Milnot.
Whole Milk – Although you can use 2% milk or 1% milk in a pinch, I highly recommend that you use whole milk, because it will make your ice cream much more creamy. You can even use Half-and-Half to get a creamier texture.
Crushed Ice and Rock Salt – You can find rock salt at the grocery store and online. But I recommend looking for the bigger bulk bag at your local hardware store or feed store, because it will be much more affordable.
Kitchen Tools and Equipment You’ll Need:
Mixer or Blender – A mixer or blender will ensure you mix everything together really well. A blender is less messy and possibly quicker.
Be sure to check out our complete guide to ice cream accessories and tools for making the best homemade ice cream and/or hosting your own ice cream social. It’s the ultimate list for every ice cream lover’s kitchen. My friend Linda also has a beautiful post dedicated to ice cream social ideas.
How to Make Homemade Banana Ice Cream
Homemade banana ice cream with milk is a pretty simple mixture. Most of the ingredients you probably already have on hand.
How to Mix up Old-Fashioned Banana Ice Cream
The first step is to cream the eggs and the sugar together.
Next add in the vanilla extract.
Then mix in your sweetened condensed milk.
Then mix in the evaporated milk.
Next you’ll add in a good-sized dash of sea salt.
Lastly, peel and mash the bananas; then mix them into the liquid ice cream mixture.
Then finish topping it off with whole milk, making sure to fill it about 3/4 of the way full, leaving room for expansion as it freezes.
How to Freeze Ice Cream in an Ice Cream Maker
Now that your ice cream maker’s canister is full of liquid ice cream mixture, you’re ready to start the freezing process.
Put the lid on, and place the canister down into the bucket of your ice cream maker. Then attach the motor, clamp it on, and plug the ice cream maker in to get the motor running.
Gradually pour crushed ice around the canister. Tip: You can add up to a gallon of water if needed, as well. We sometimes do this because our motor will seize up. Adding a bit of water will help it keep turning.
Alternately with the ice, add 2-3 cups of rock salt, making sure to top it off with rock salt.
Let the motor run until it stops, which signals that the ice cream is completely frozen. Once the ice cream is frozen, the motor on your ice cream maker will stop churning; and you need to unplug it immediately.
Wipe any excess ice or rock salt off the lid and out from around the top of the canister. Then remove the lid and the churning paddle, and serve immediately.
If you’re not ready to serve it just yet, you can always leave the lid on (removing the motor), top it off with ice, and place a towel or two over it to kind of insulate it and keep it cold.
Expert Tips and FAQ’s
Do you have to freeze bananas for ice cream?
No, in fact, I never do. I just mash up room temperature bananas and add them to the mixture. All the freezing will be done using the ice cream maker.
How should you store leftover banana ice cream?
We always have a lot of leftover ice cream when we make it homemade, so we purchased some of these freezer containers to hold all the leftovers. They’re big enough to hold 2-3+ servings of ice cream. Then we just stick them down in the freezer. If you have an upright, I’d place the containers on the shelves, rather than in the door, so the ice cream doesn’t melt or have a higher risk of freezer burn. I also really like this larger ice cream container if I don’t care about freezing it in smaller batches. Homemade ice cream usually keeps for up to about 1 month in the freezer.
Favorite Mix-Ins for Banana Ice Cream
There are so many things you can mix into your ice cream to make it even more fun, especially with kids.
If you try this recipe, why not leave a star rating in the recipe card right below and/or a review in the comment section further down the page? I always appreciate your feedback. You can also follow me on Pinterest, Facebook, Instagram, and YouTube. And subscribe to my email list too!
Homemade Banana Ice Cream
How to make homemade banana ice cream, my favorite frozen dessert recipe ever. Easy to make, it's chock full of creamy fresh banana flavor!
Stand Mixer
4-Quart Electric Ice Cream Maker
Ice Cream Scoop
Ice Cream Container with Lid
Ice Cream:
6 large eggs
3/4 cup cane sugar
4 teaspoons vanilla extract
14 ounces sweetened condensed milk
24 ounces evaporated milk
1 teaspoon sea salt
4 bananas
6 cups whole milk*
Freezing Supplies:
16 cups ice (crushed)
3 cups rock salt*
Cream (or mix) the eggs and the sugar together.
Add in the vanilla extract.
Mix in the sweetened condensed milk and evaporated milk.
Then add in a good-sized dash, or teaspoon, of salt.
Peel and mash the bananas; then mix them into the liquid ice cream mixture.
Pour the mixture into the metal canister of the ice cream maker.
Then finish topping off the canister with whole milk, making sure to fill it about 3/4 of the way full, leaving room for expansion as it freezes.
Put the lid on, and place the canister down into the bucket of your ice cream maker. Then attach the motor, clamp it on, and plug the ice cream maker in to get the motor running.
Gradually, pour crushed ice around the canister. Tip: You can add up to a gallon of water if needed, as well. We sometimes do this because our motor will seize up. Adding a bit of water will help it keep turning.
Alternately with the ice, add 2-3 cups of rock salt, making sure to top it off with rock salt.
Let the motor run until it stops, which signals that the ice cream is completely frozen. Once the ice cream is frozen, the motor on your ice cream maker will stop churning; and you need to unplug it immediately.
Wipe any excess ice or rock salt off the lid and out from around the top of the canister; then remove the lid and the churning paddle, and serve immediately. If you're not ready to serve it just yet, you can always leave the lid on (removing the motor), top it off with ice, and place a towel or two over it to help insulate it and keep it cold.
*Consuming raw or undercooked meats, poultry, seafood, shellfish, or eggs may increase your risk of food borne illness, especially if you have certain medical conditions.
*You can use Half & Half in place of the whole milk if you want an even creamier texture to your ice cream.
*You can find rock salt at the grocery store and online. But I recommend looking for the bigger bulk bag at your local hardware or feed store, because it will be much more affordable.
Does It Matter Which Canned Milk I Use?
Mom and Grandma always insisted on Eagle Brand and Milnot. In fact, when I wrote this recipe down, I was told that if you’re using Milnot evaporated milk, only use 2 cans; if you’re using a generic brand, use 3 cans.
Dan and I always just use 2 cans of whatever type of sweetened condensed milk and evaporated milk we have on hand, usually Aldi’s brand. And it works just fine. So I recommend just using 2 cans of whatever brand you have on hand, unless you want to try Mom and Grandma’s tried and true method with Eagle Brand and Milnot.
How to Store Leftover Banana Ice Cream
We always have a lot of leftover ice cream when we make it homemade, so we purchased some of these freezer containers to hold all the leftovers. They’re big enough to hold 2-3+ servings of ice cream. Then we just stick it down in the freezer. If you have an upright, I’d place it on the shelves, rather than the door, so it doesn’t melt or have a higher risk of freezer burn. Homemade ice cream usually keeps for up to about a month in the freezer.
Make the yummiest red white and blue popsicles with real food ingredients. No artificial colors, no added sugar, and they’re perfect for the 4th of July!
Summer weather is here to stay, meaning my boys are making frequent trips to the freezer to look for homemade ice cream and freezer pops.
Zeke could practically live on popsicles in the summer, and sometimes we have a hard time limiting him to just one or two, especially on hot, humid, sticky days like we’ve had here lately.
Since the 4th of July is just around the corner, I thought it might be fun to make naturally colored red white blue freeze pops, festive for this patriotic occasion!
Why You’ll Love This Recipe
It’s so easy to make; your kids can even help you.
Red white and blue pops only have 3 ingredients!
All the ingredients are real food… No artificial colors, no added sugar… Like with my mandarin peach fruit pops, you can feel good about letting your kids eat these natural freezer pops.
Ingredient Notes
Fresh Berries – We use fresh strawberries and blueberries to make red white and blue ice pops.
Greek Yogurt – While we prefer to use a honey strawberry flavor, you can use any flavor you want.
How to Make Red White and Blue Popsicles
Before you get started, be sure to wash all your berries and pat them dry with a clean kitchen towel.
Then you can mix and make by following these steps…
Slice or chop the strawberries and crush with a potato masher.
Mix the strawberries with 1/4 cup Greek yogurt and set aside.
Crush the blueberries in a separate bowl.
Mix the blueberries with 1/4 cup Greek yogurt and set aside.
For the first (RED) layer, place 1-2 spoonfuls strawberry/yogurt mixture in each freezer pop mold. How many spoonfuls you add to each layer will depend on the size of your freezer pop mold.
For the second (WHITE) layer, add 1-2 spoonfuls of Greek yogurt (no berries) next.
For the third and final (BLUE) layer, add 1-2 spoonfuls blueberry/yogurt mixture.
Add the popsicle sticks and freeze overnight or until frozen through. Then serve and enjoy!
If you try this recipe, why not leave a star rating in the recipe card right below and/or a review in the comment section further down the page? I always appreciate your feedback. You can also follow me on Pinterest, Facebook, Instagram, and YouTube. And subscribe to my email list too!
Red White and Blue Popsicles
How to make the yummiest red white and blue popsicles with real food ingredients. No colors, no added sugar, and perfect for the 4th of July!
Popsicle Molds
Potato Masher
Mixing Bowl
10 large strawberries
1 cup blueberries
1 cup Greek yogurt (your favorite flavor)
Wash all the berries and pat dry.
Slice or chop the strawberries and crush with a potato masher.
Mix the strawberries with 1/4 cup Greek yogurt and set aside.
Crush the blueberries in a separate bowl.
Mix the blueberries with 1/4 cup Greek yogurt and set aside.
For the first (RED) layer, place 1-2 spoonfuls strawberry/yogurt mixture in each freezer pop mold. How many spoonfuls you add to each layer will depend on the size of your freezer pop mold.
For the second (WHITE) layer, add 1-2 spoonfuls of Greek yogurt (no berries) next.
For the third and final (BLUE) layer, add 1-2 spoonfuls blueberry/yogurt mixture.
Add the popsicle sticks and freeze overnight or until frozen through. Then serve and enjoy!
Desserts, Frozen Treats
American
4th of July freezer pops, red white and blue freezer pops, red white and blue frozen yogurt pops, red white and blue ice pops, red white and blue pops, red white and blue popsicles
What do you do when you can no longer find great popsicles, that your kids just absolutely love, with no artificial colors or high fructose corn syrup? You make them yourself. Yep, we’re really trying to steer clear of those nasty colors, not always, but more so with foods and snacks our kids eat all the time, like popsicles. Here is a recipe that involves real fruit, Greek Yogurt, and just a wee bit of sugar. You’ll find a printable recipe below. Enjoy!
The first step is to add all of your ingredients to a blender; in this case, I used our Ninja. I added a banana, peaches, a fruit cup of mandarin oranges, about 1/2 cup of Greek Yogurt, and 1-2 tsp of sugar. I kept the peeling on the peaches, so we locked all those awesome nutrients into these ice pops. Blend everything together, making it into a nice liquidy mixture. Then pour into popsicle molds. I highly recommend this popsicle mold, sold on Amazon; I just recently bought this myself and love it because I can make 10 pops at a time. Set your popsicles in the freezer, and leave for however long they need, usually a few hours. Then remove pops from the freezer, and enjoy. These have been delicious, and my kids are still enjoying them. More recipes and experiments with homemade popsicles to come!
More homemade ice cream recipes and frozen treats you may enjoy:
How to make freezer pops with fresh peaches and Greek yogurt. Refreshing summer treats your kids will love!
8 peaches (pitted)
1 banana (peeled)
8.25 ounces mandarin oranges (drained)
1/2 cup Greek yogurt
2 teaspoons sugar
Add all ingredients to blender; in this case, I used our Ninja. Keep peeling on peaches, but cut in half and remove the pit, or seed. Blend everything together, making it into a nice liquidy mixture. Pour into popsicle molds.
Set popsicles in freezer, and leave for however long they need, usually a few hours. Then remove pops from freezer, and enjoy!

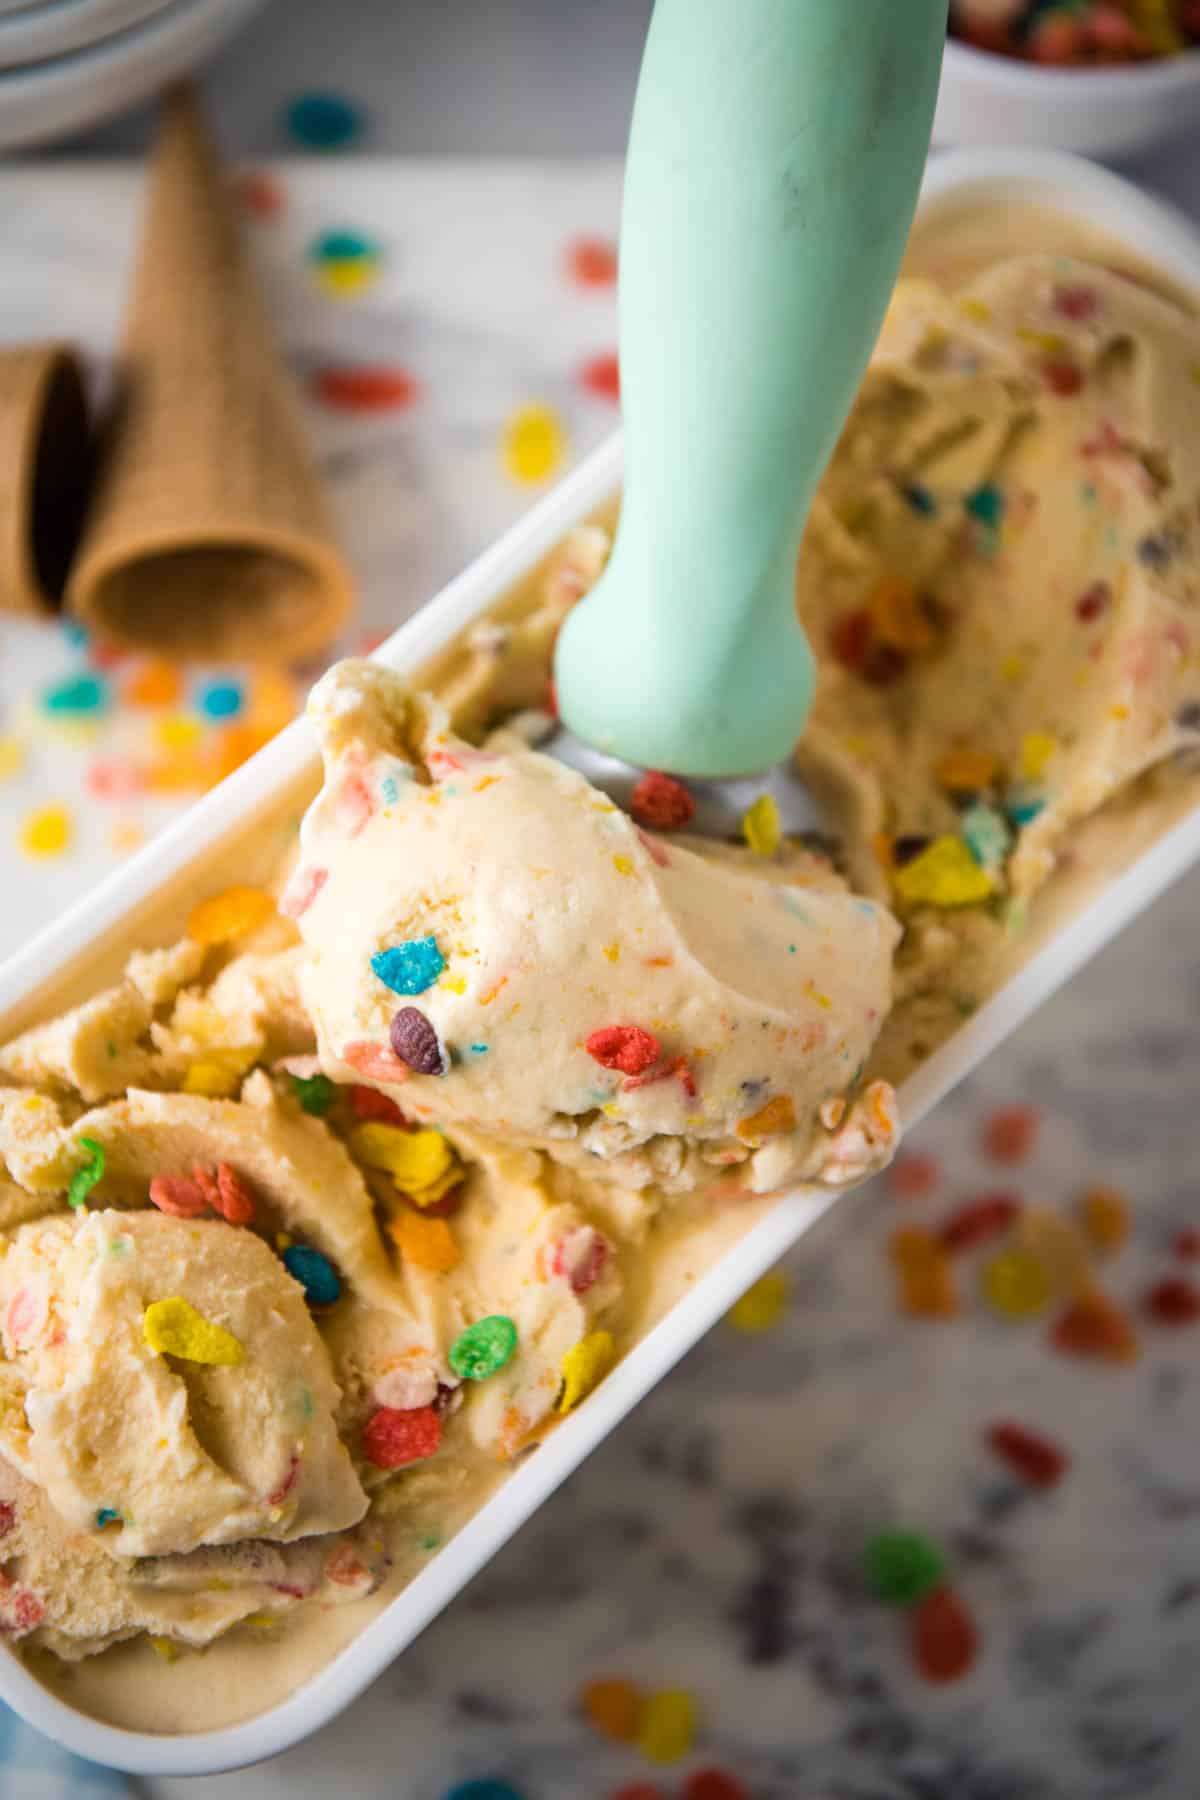
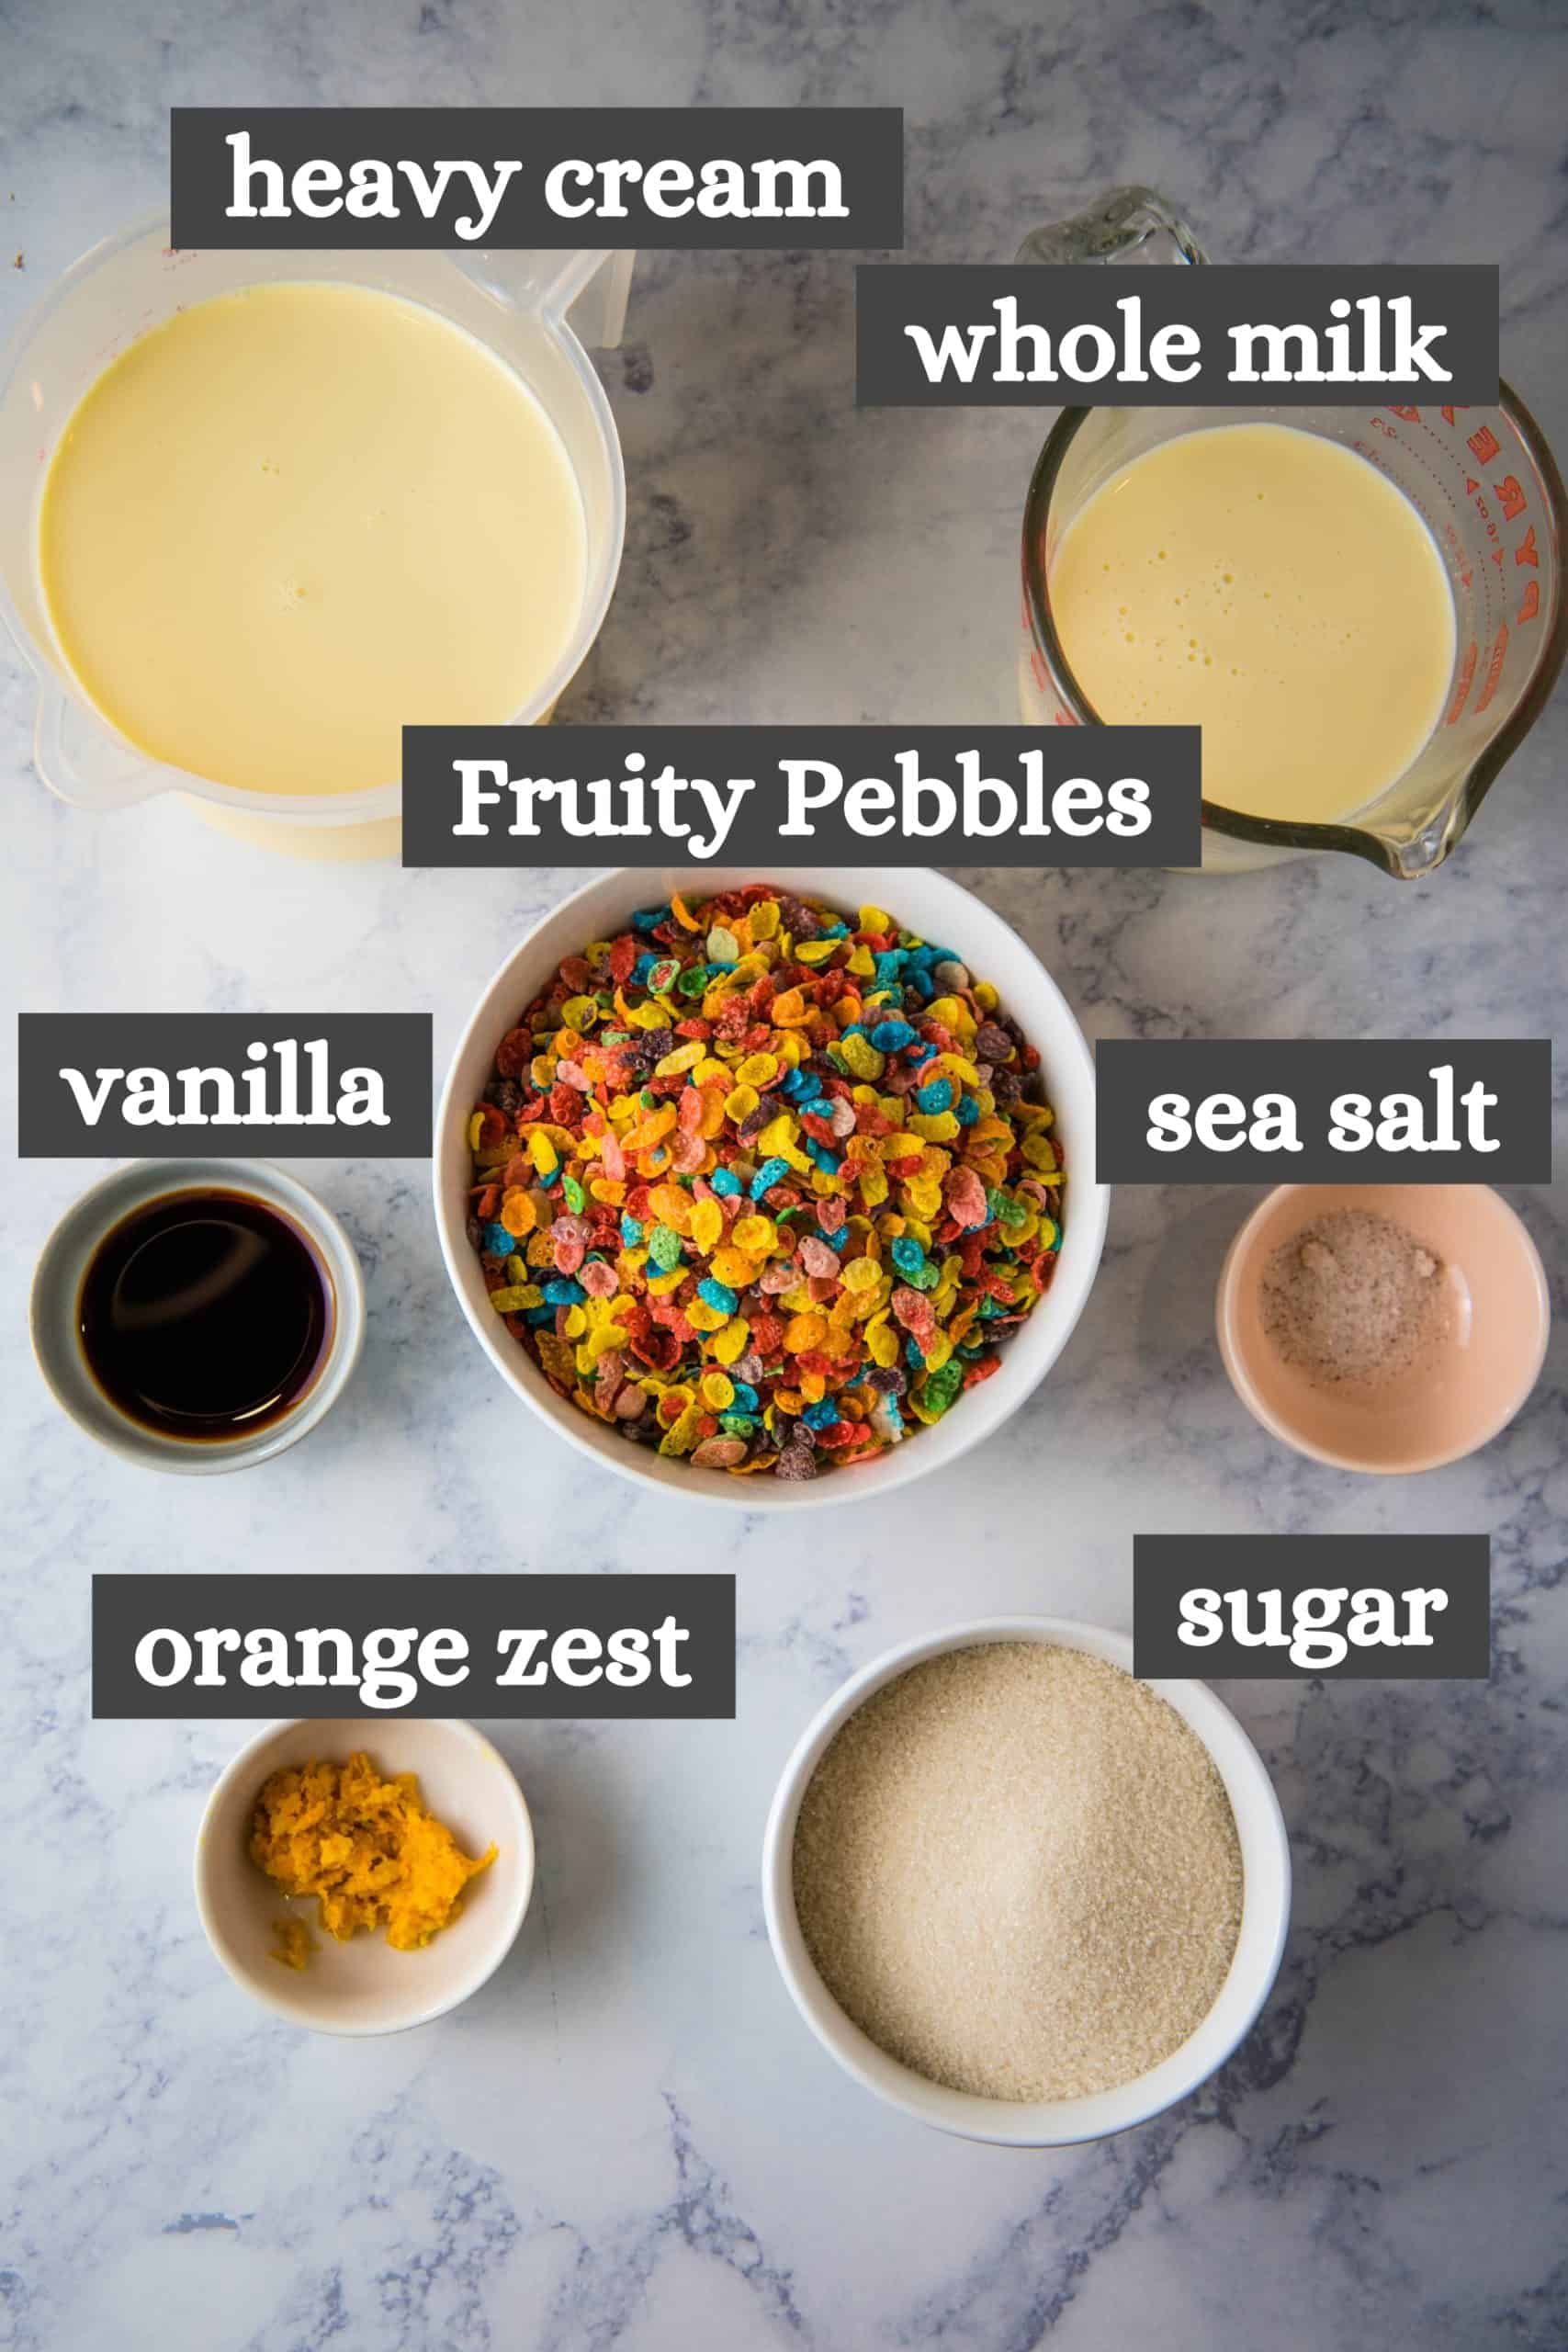
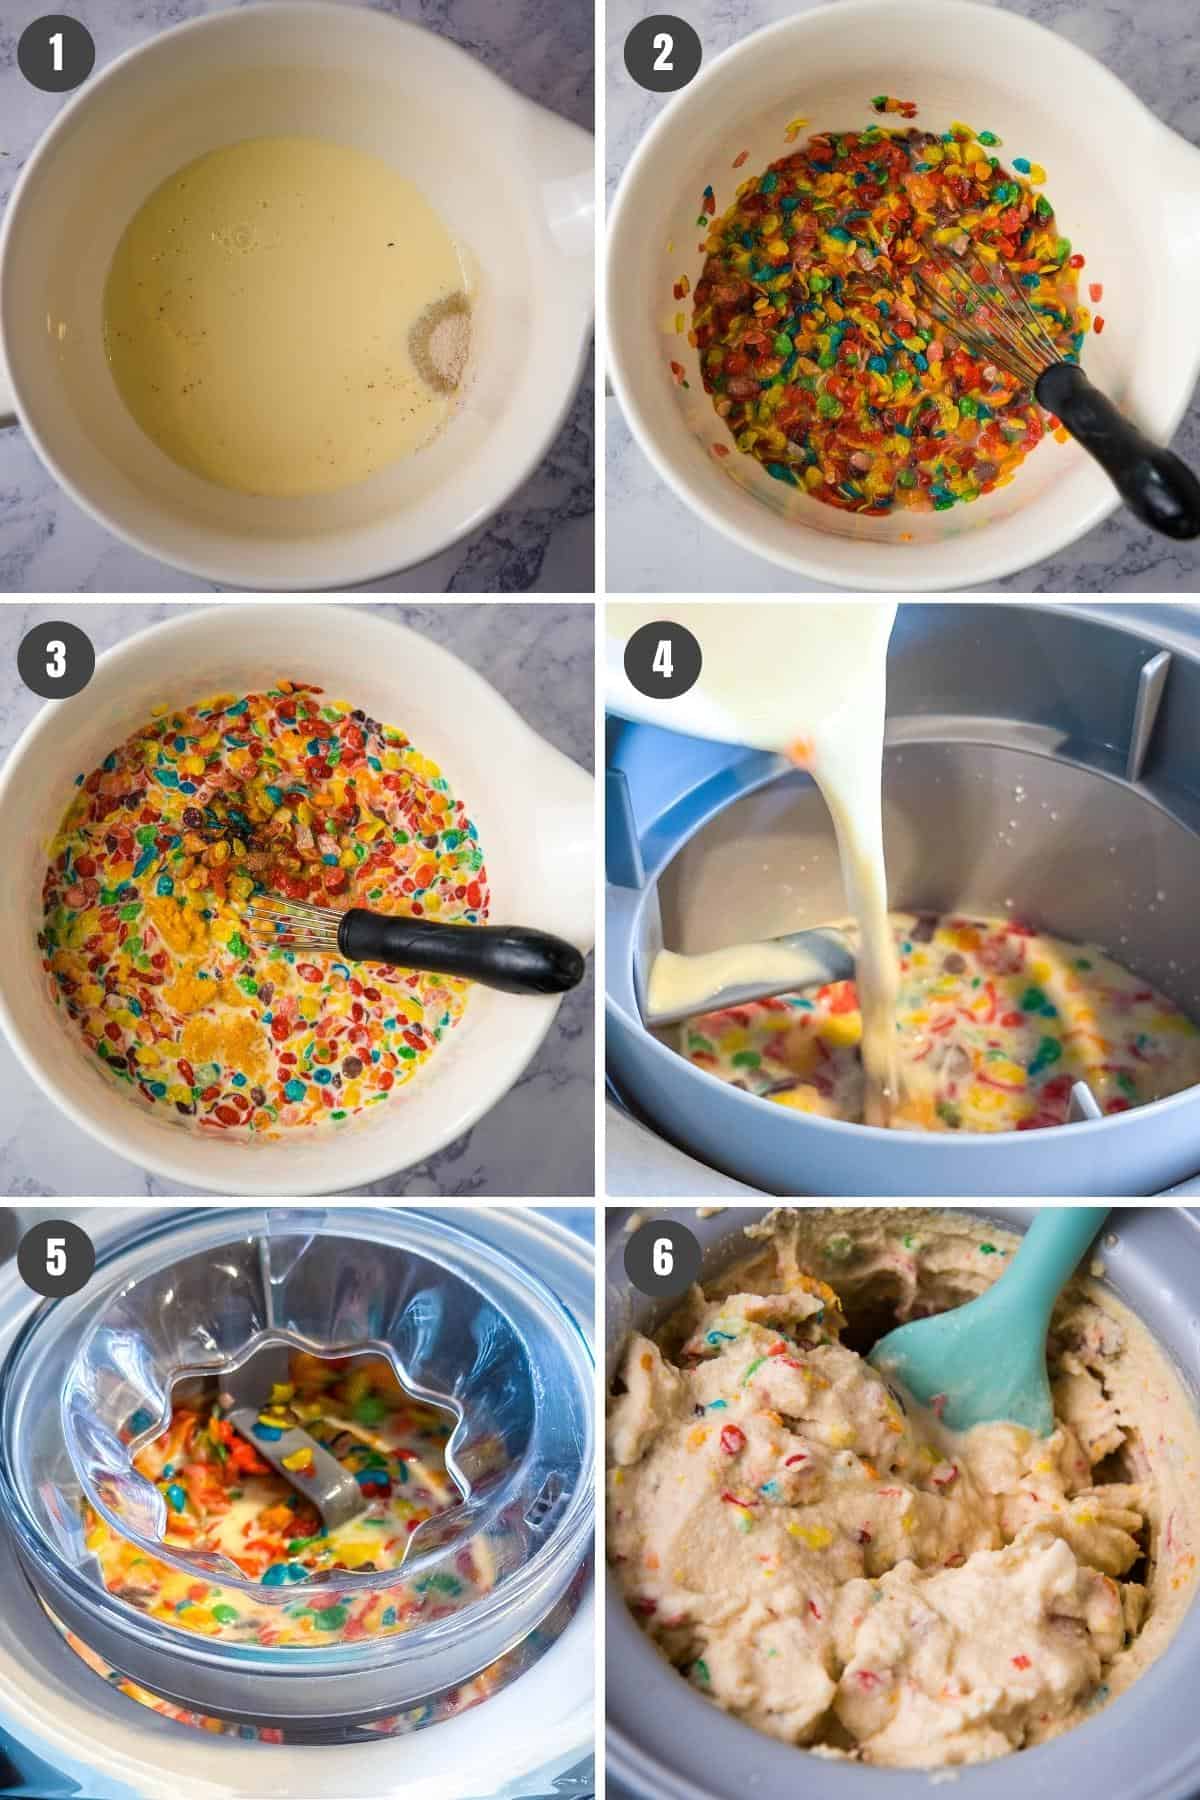
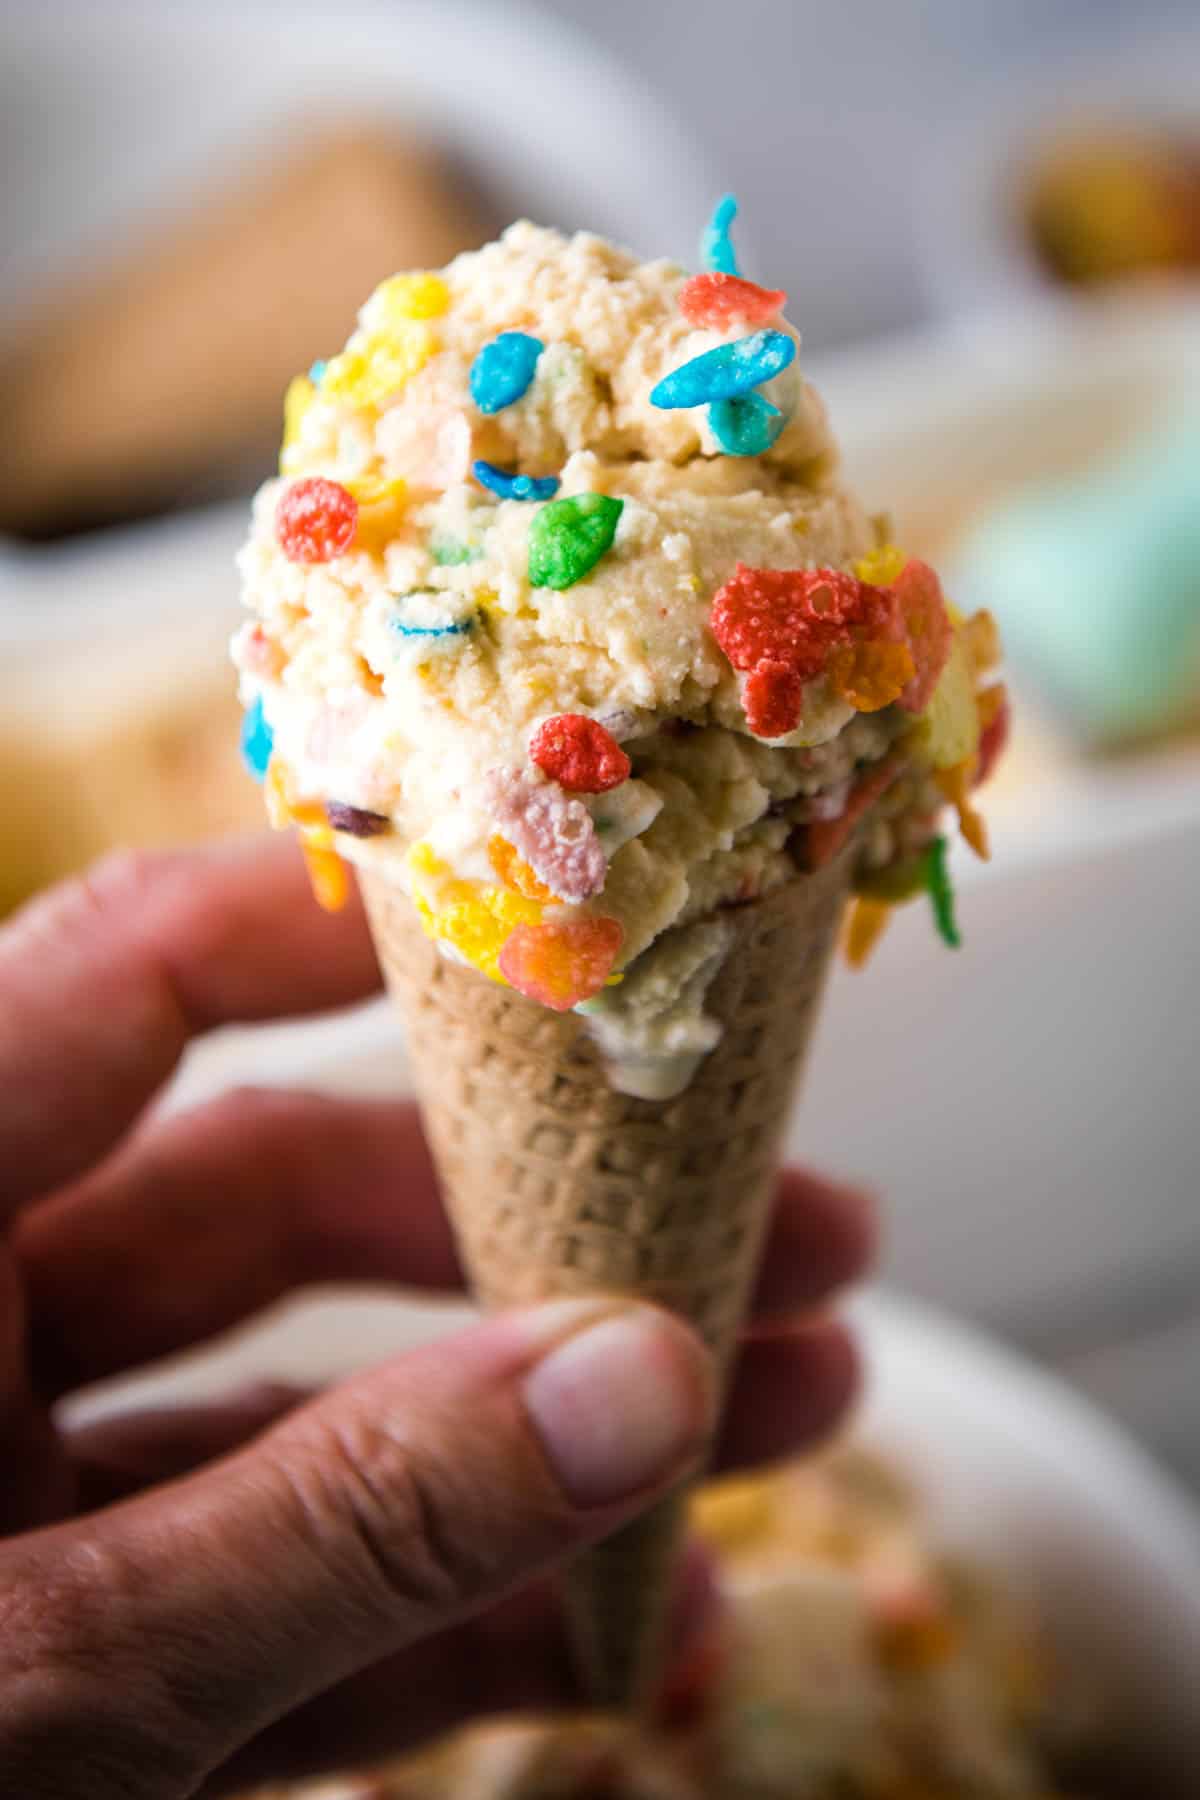
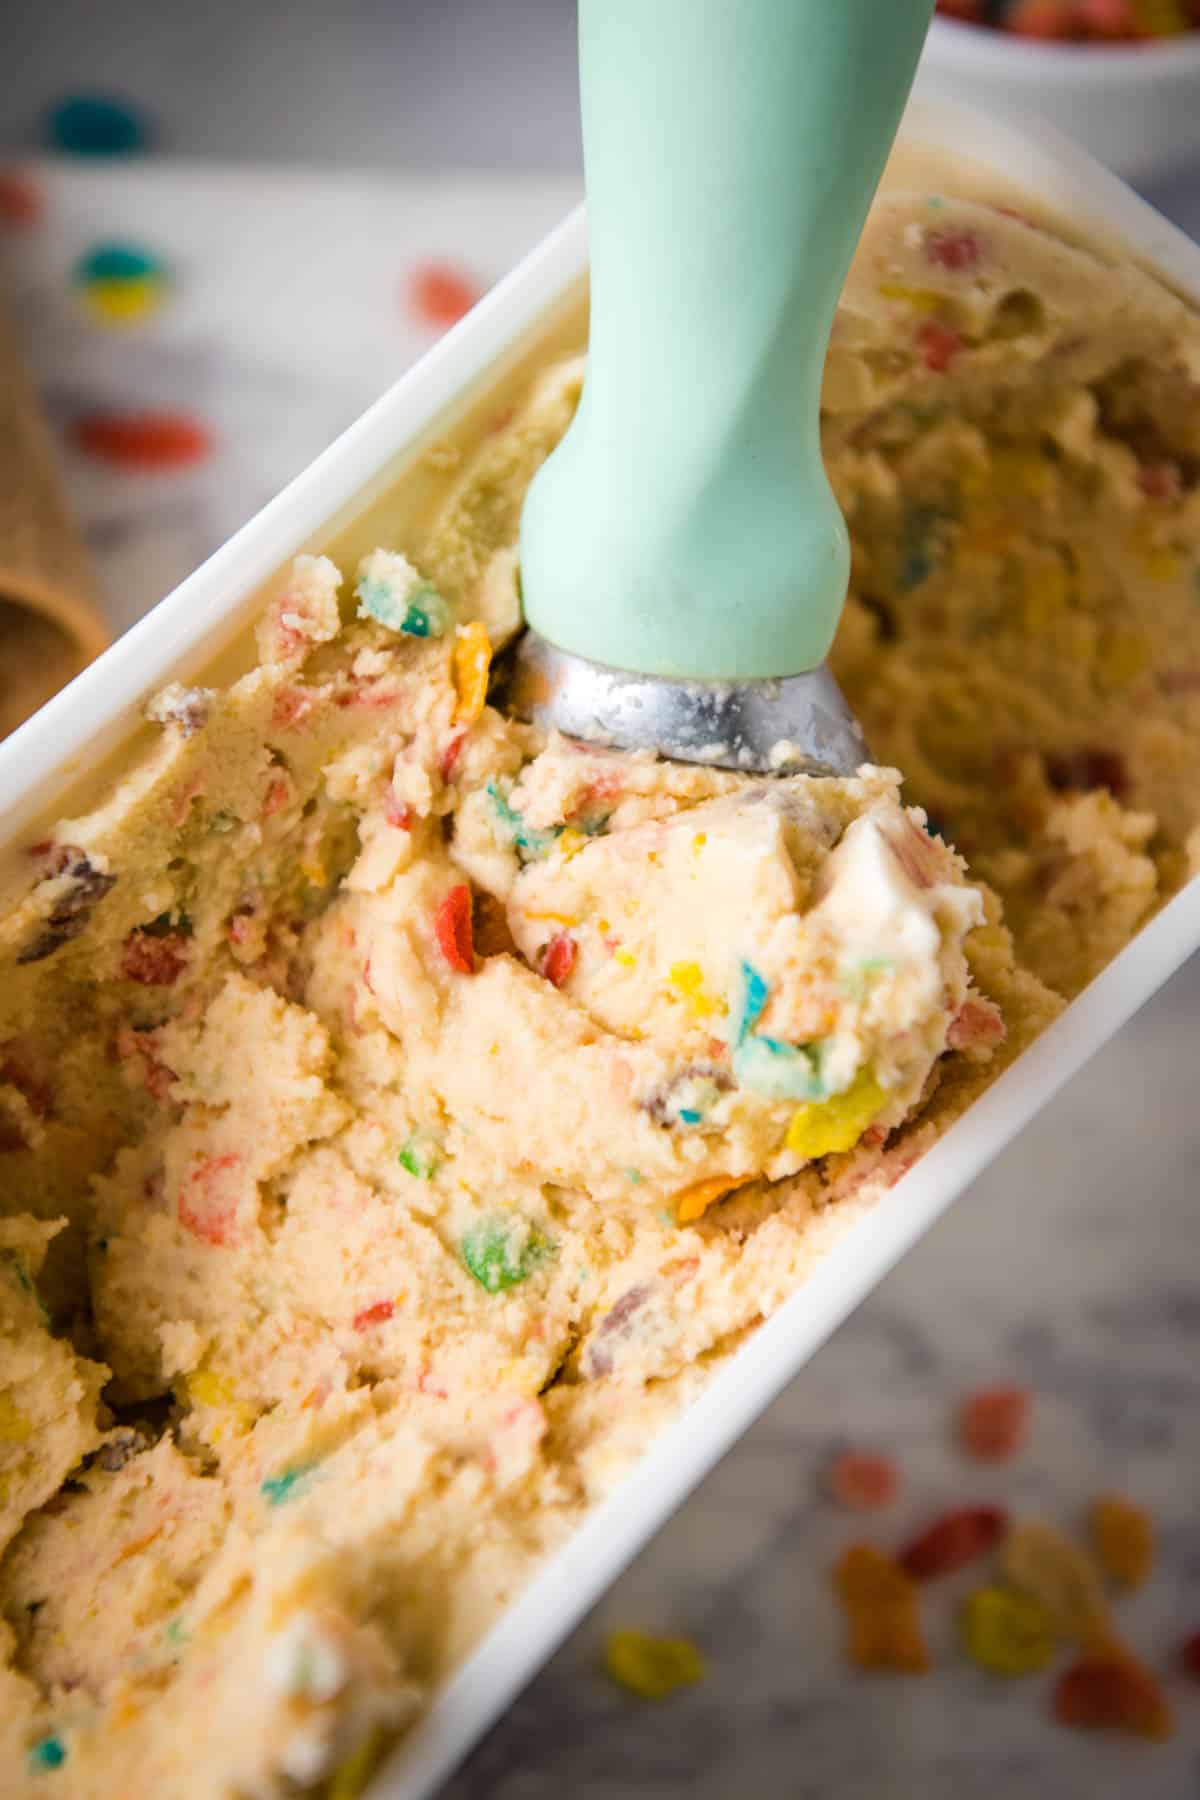


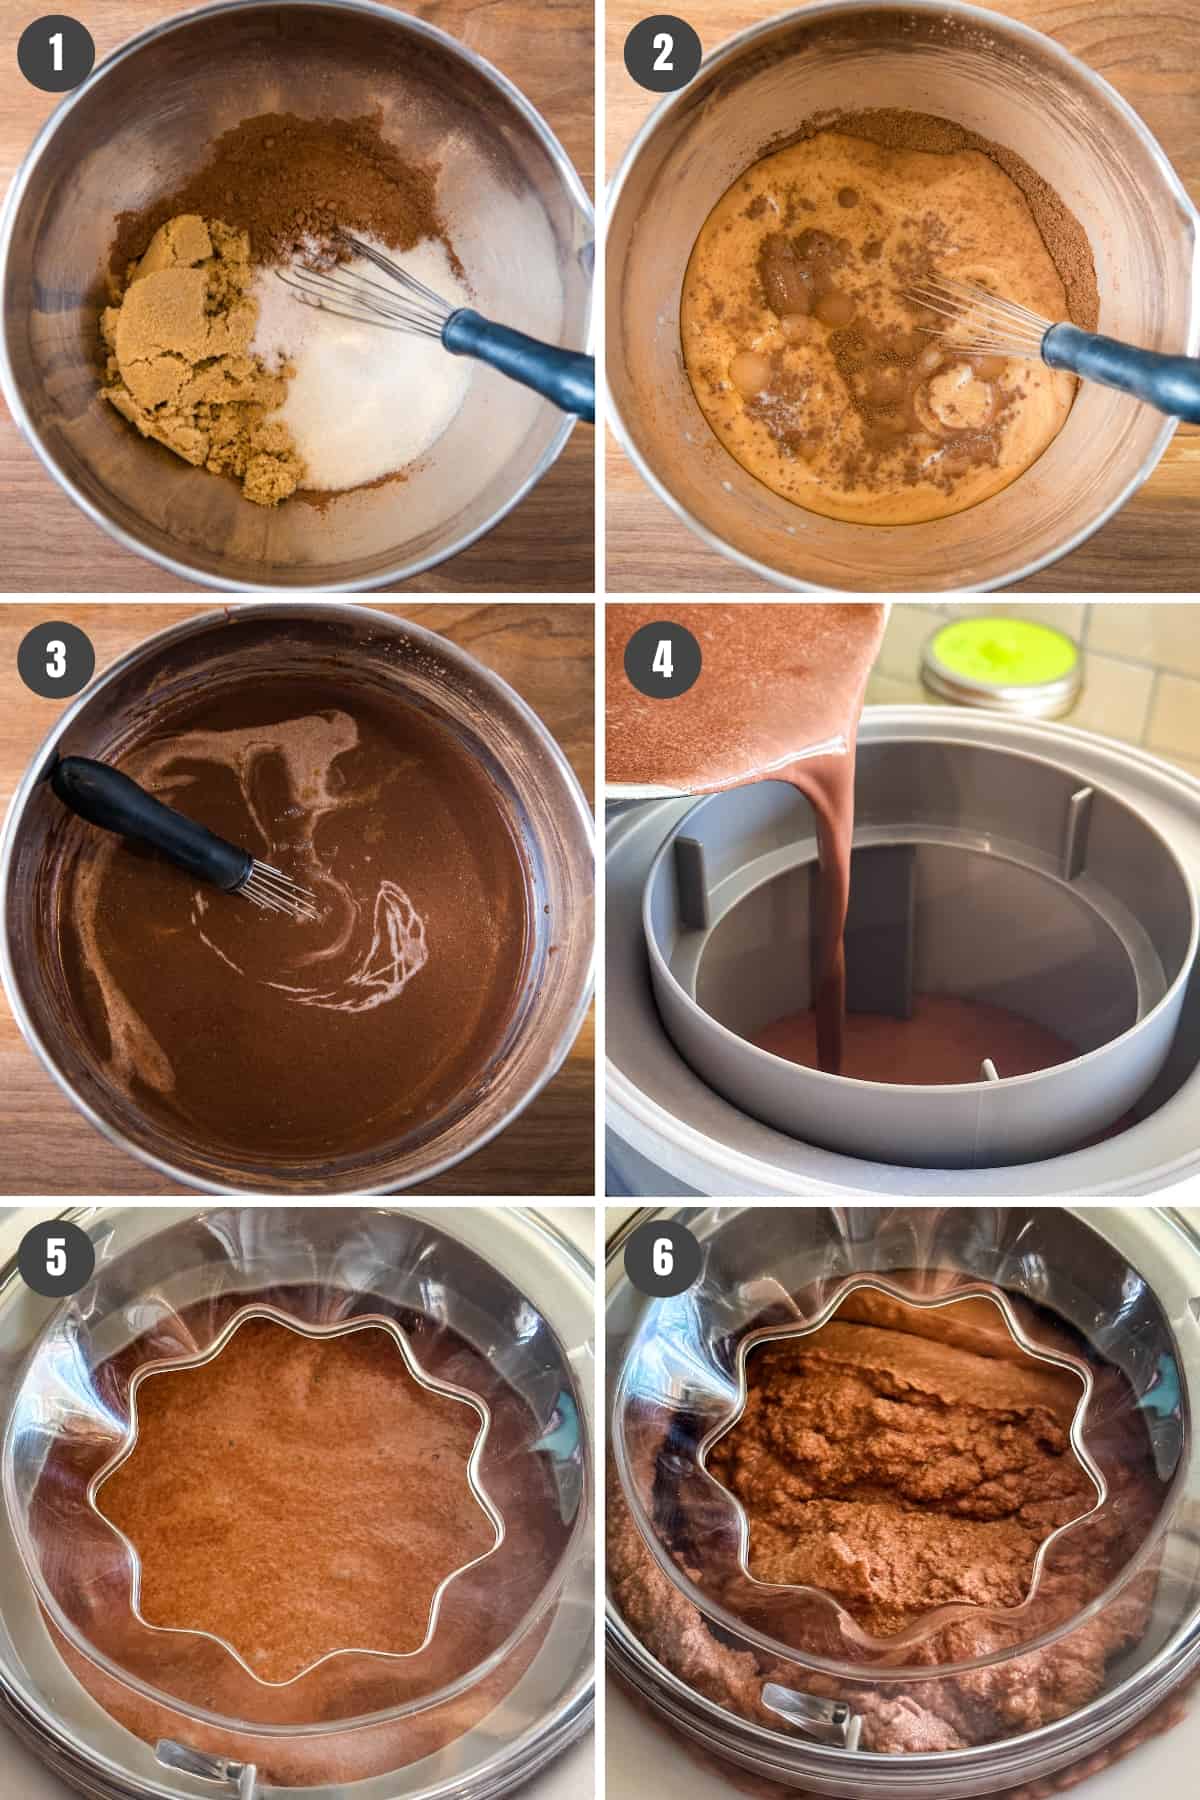
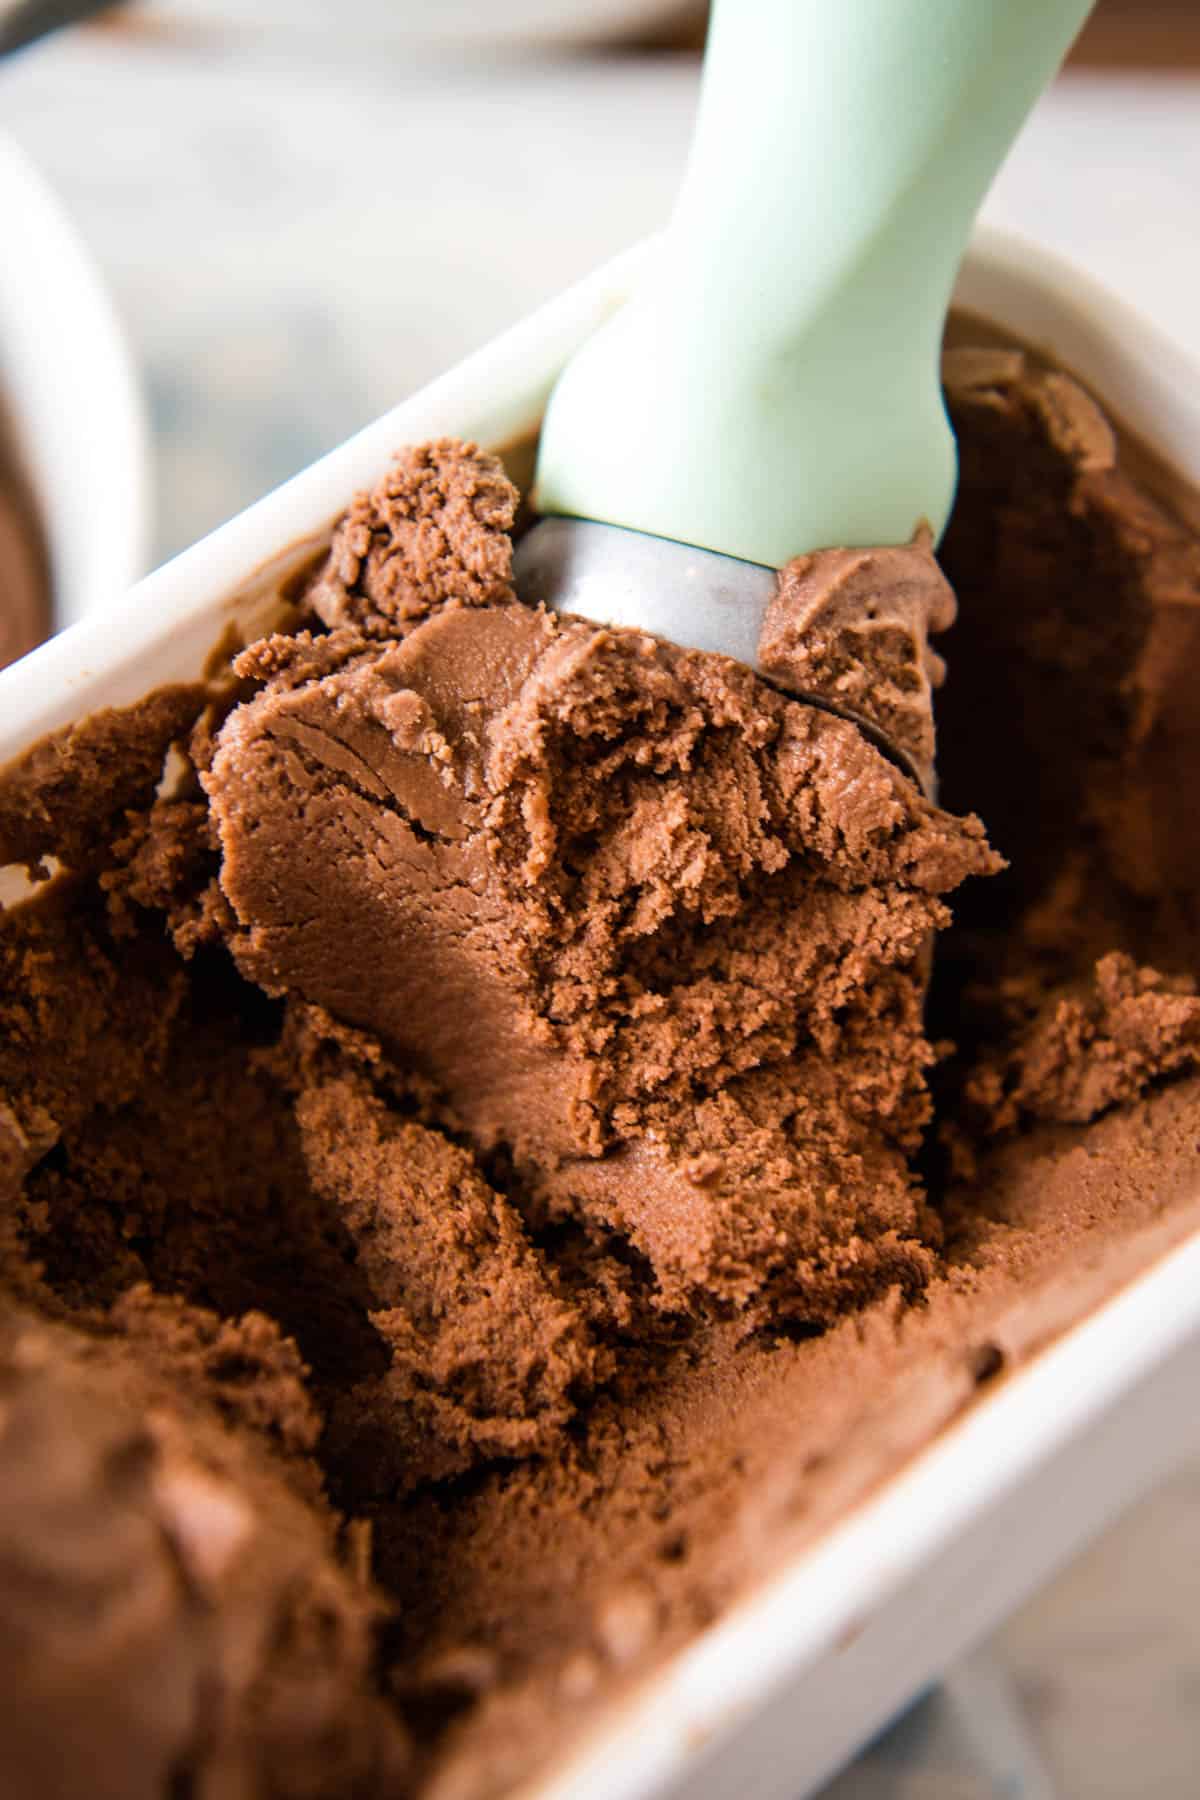
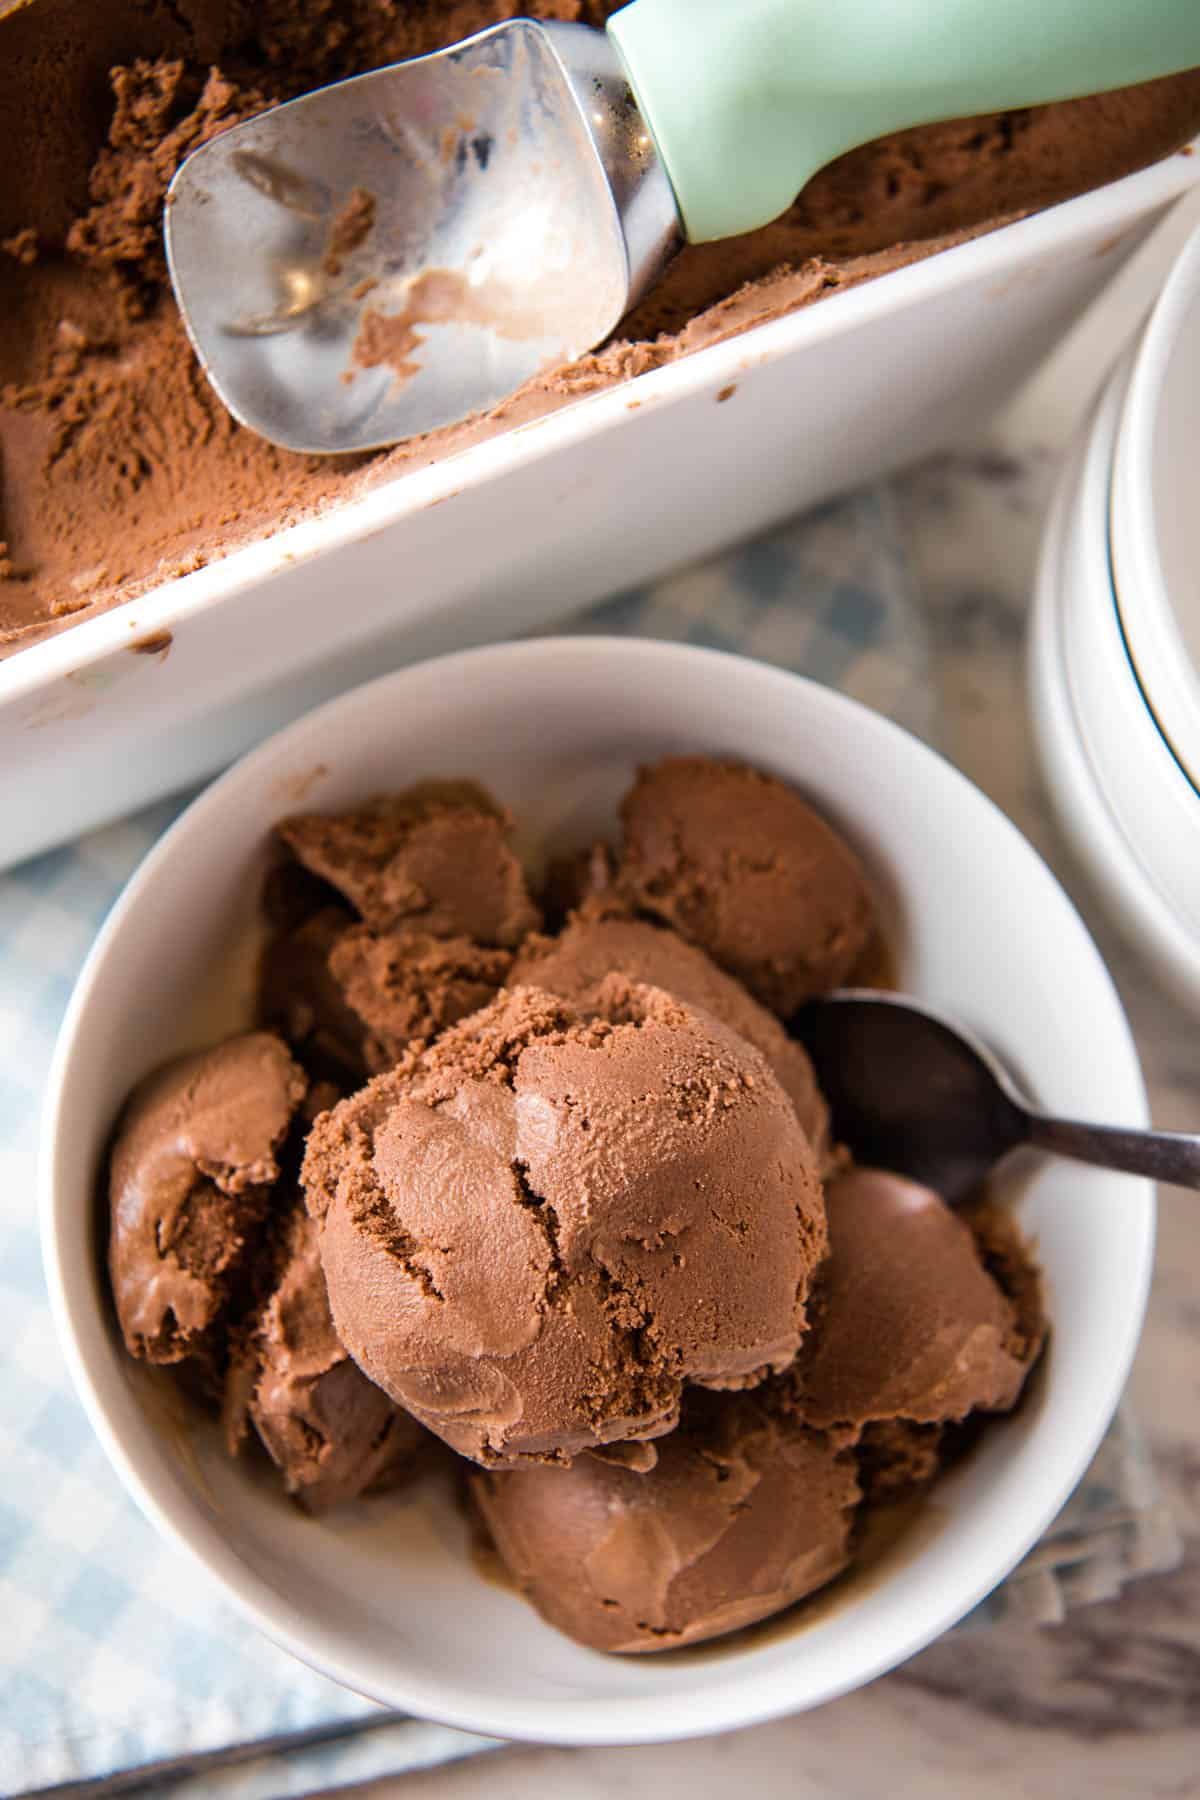


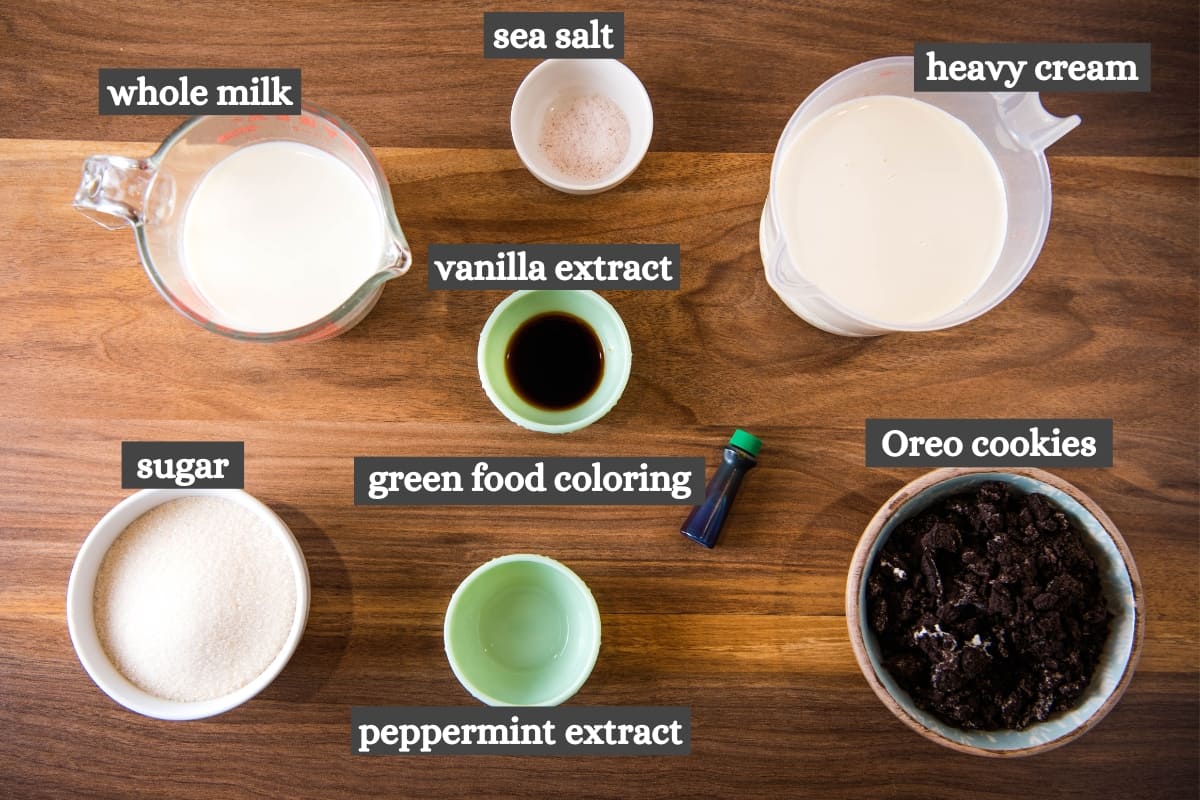
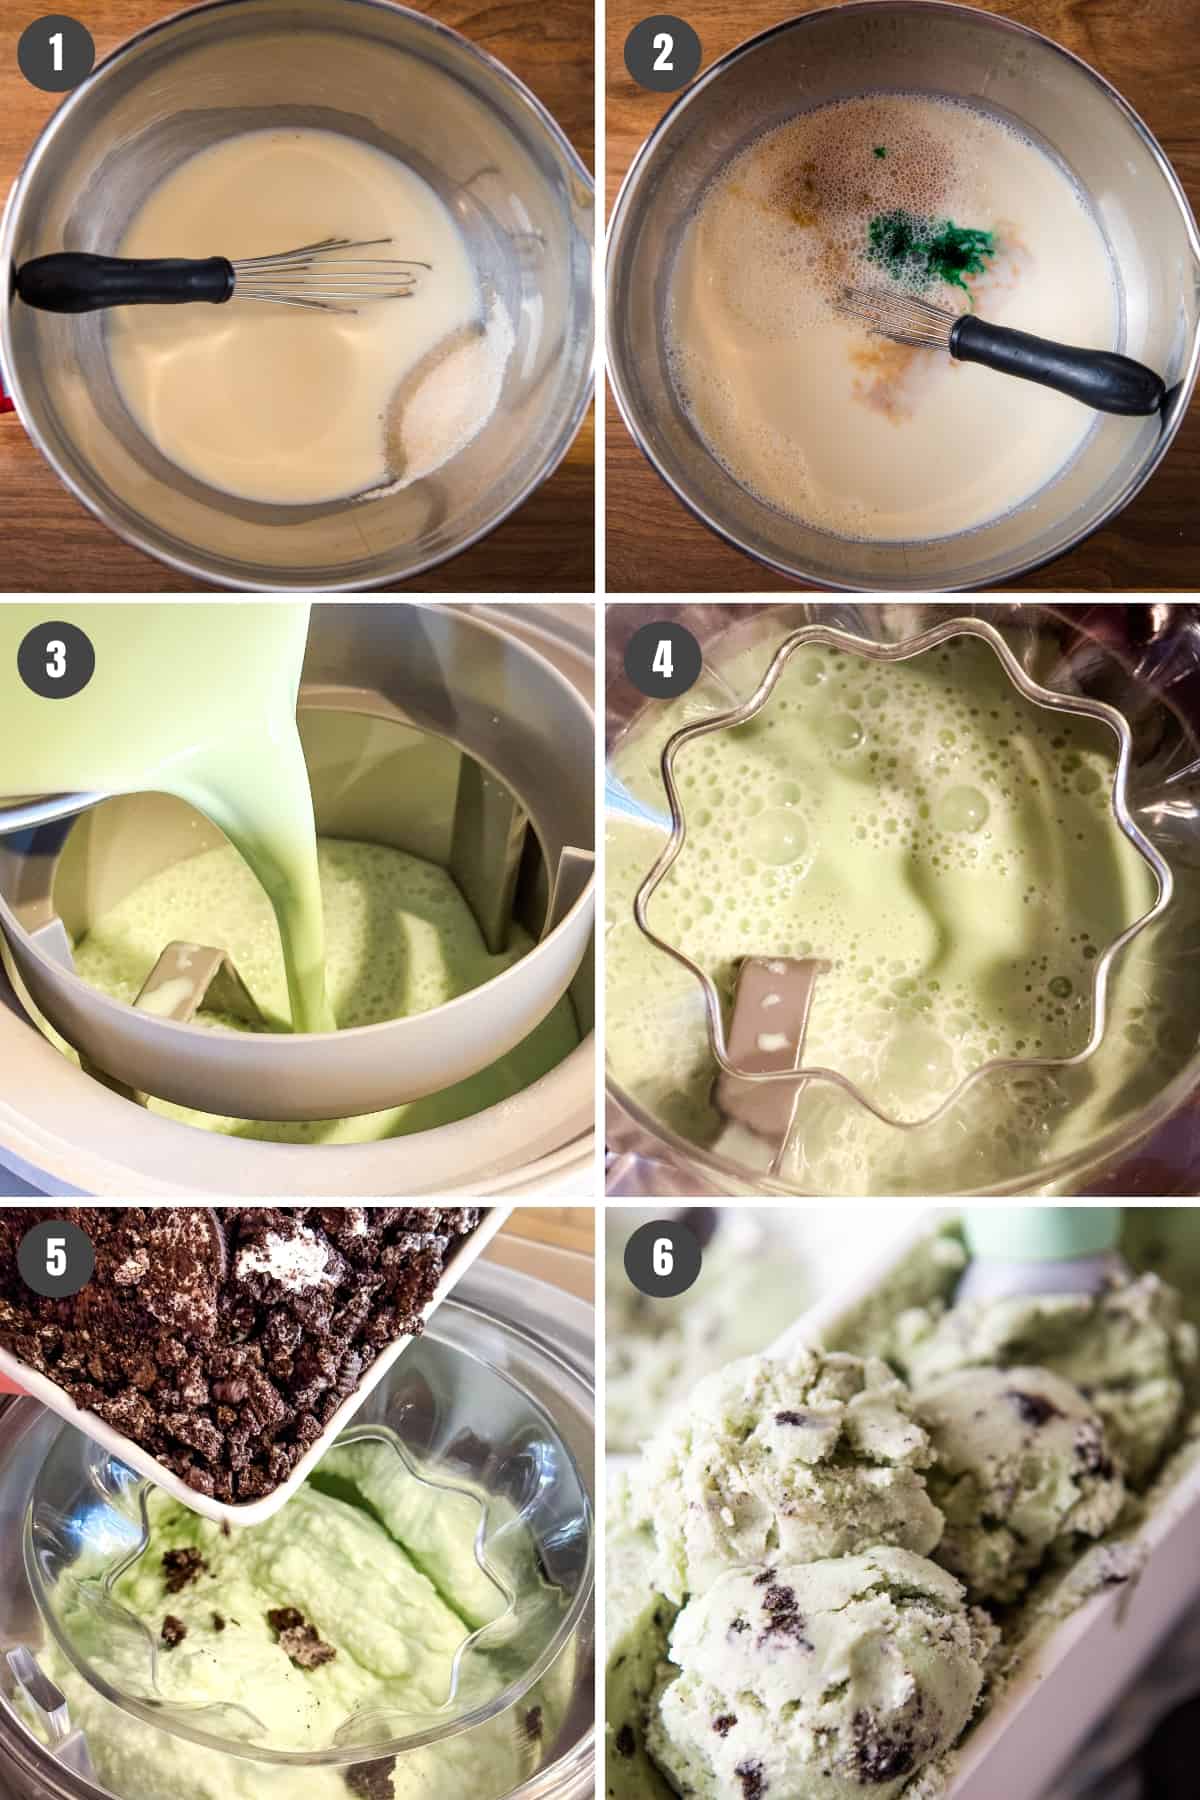
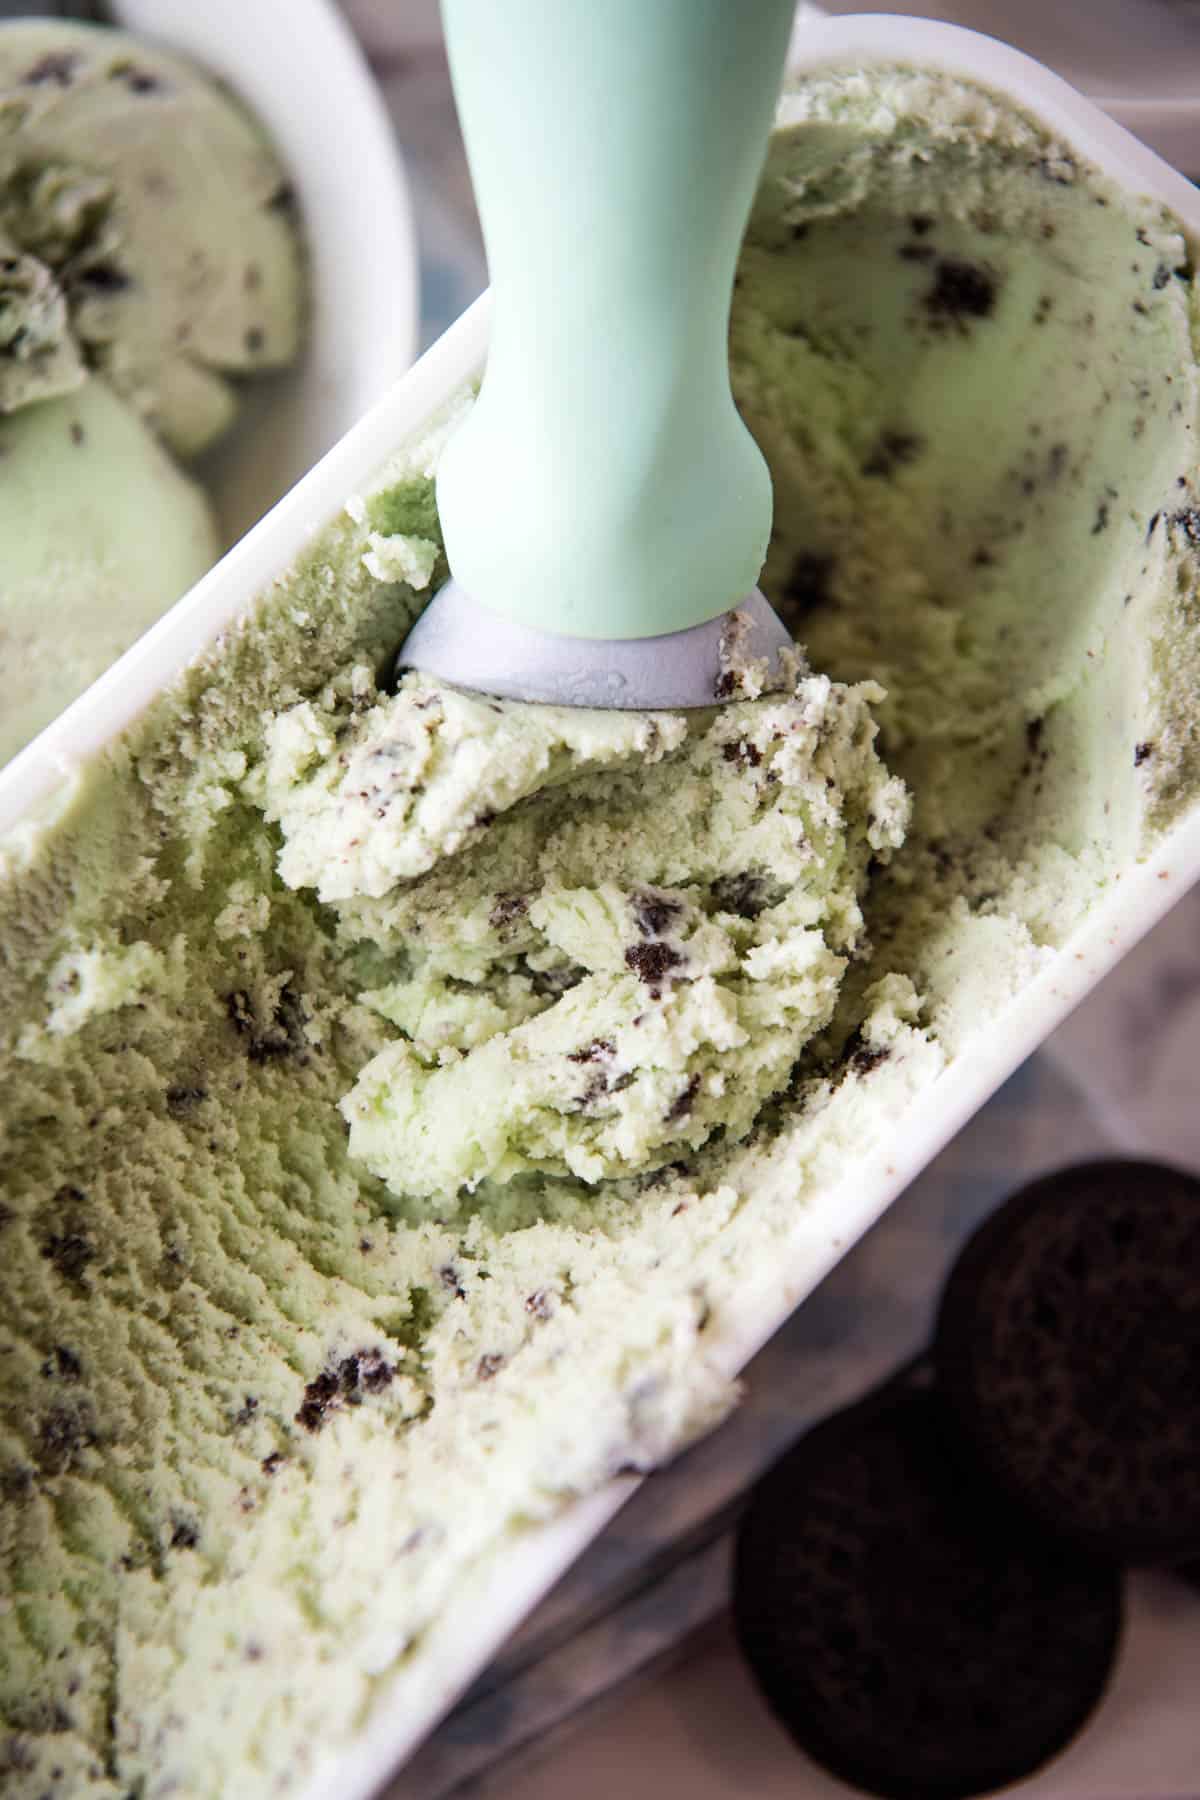
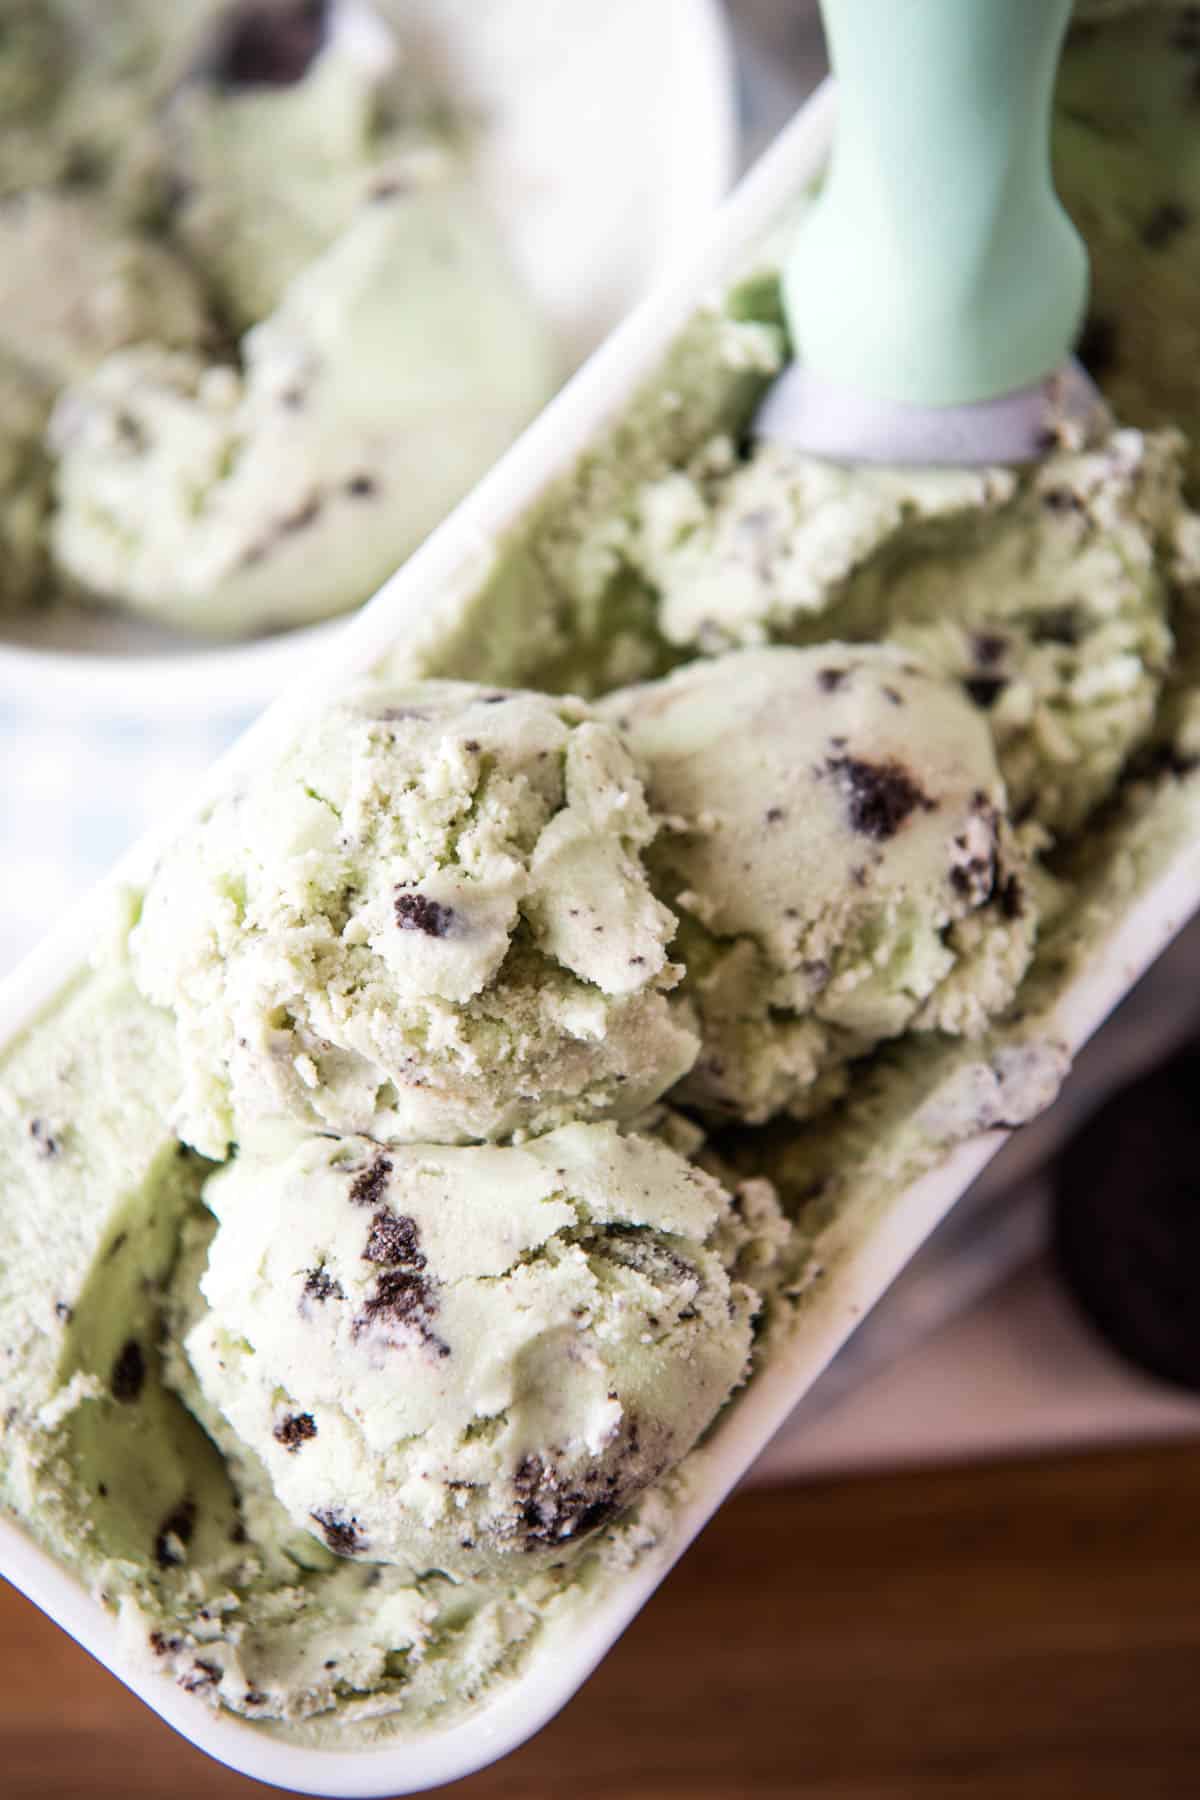
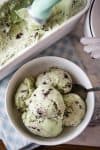

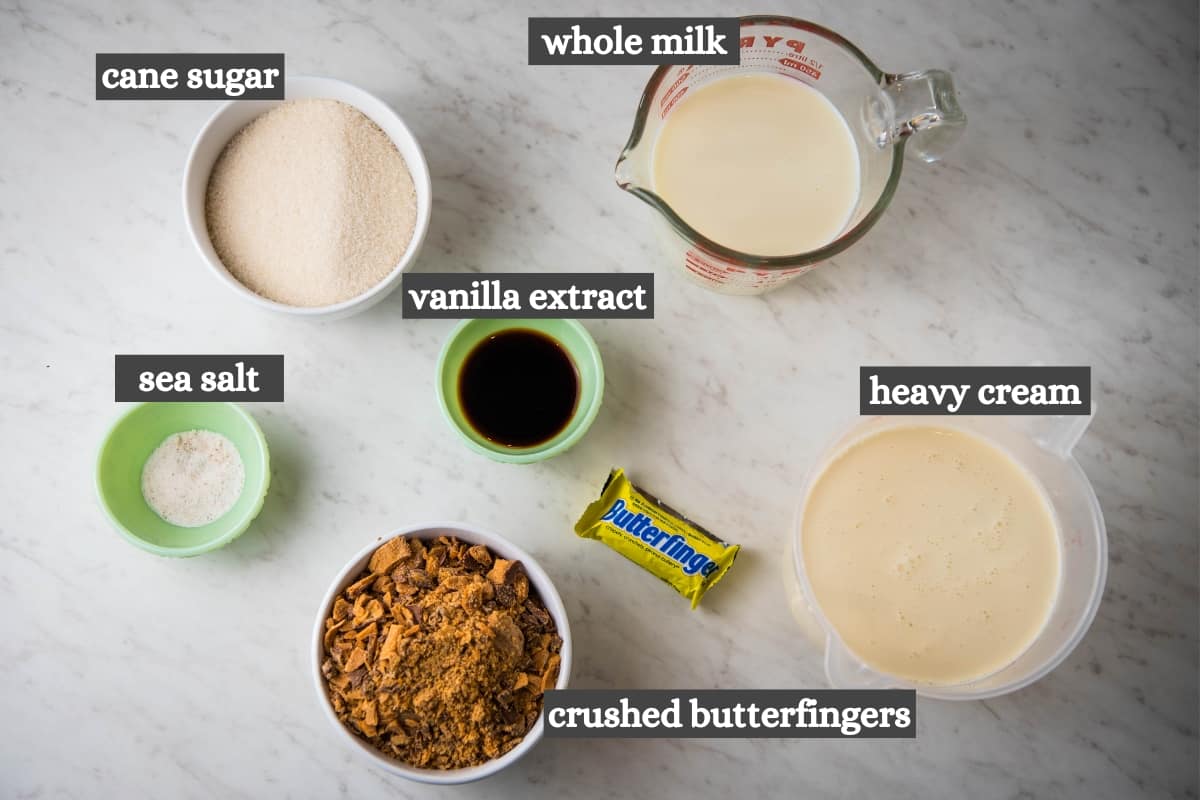
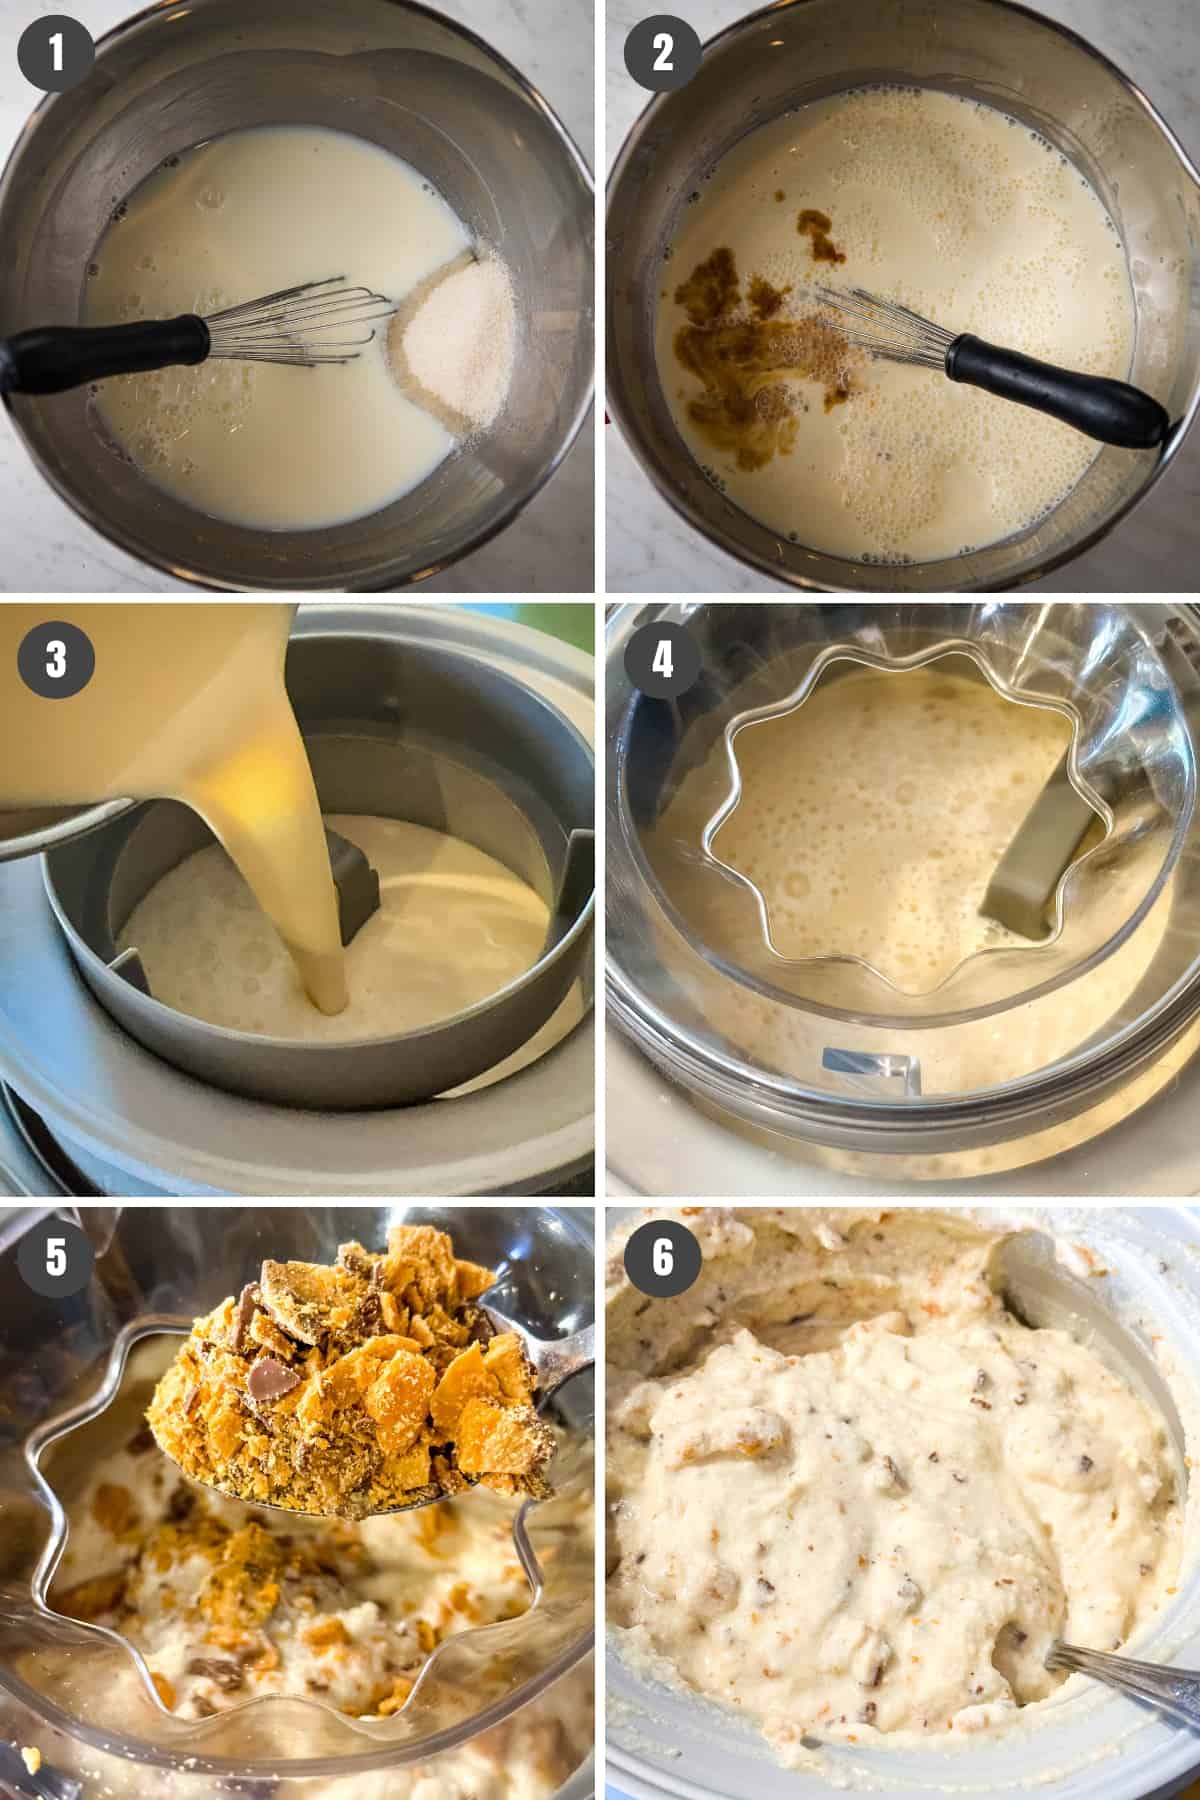
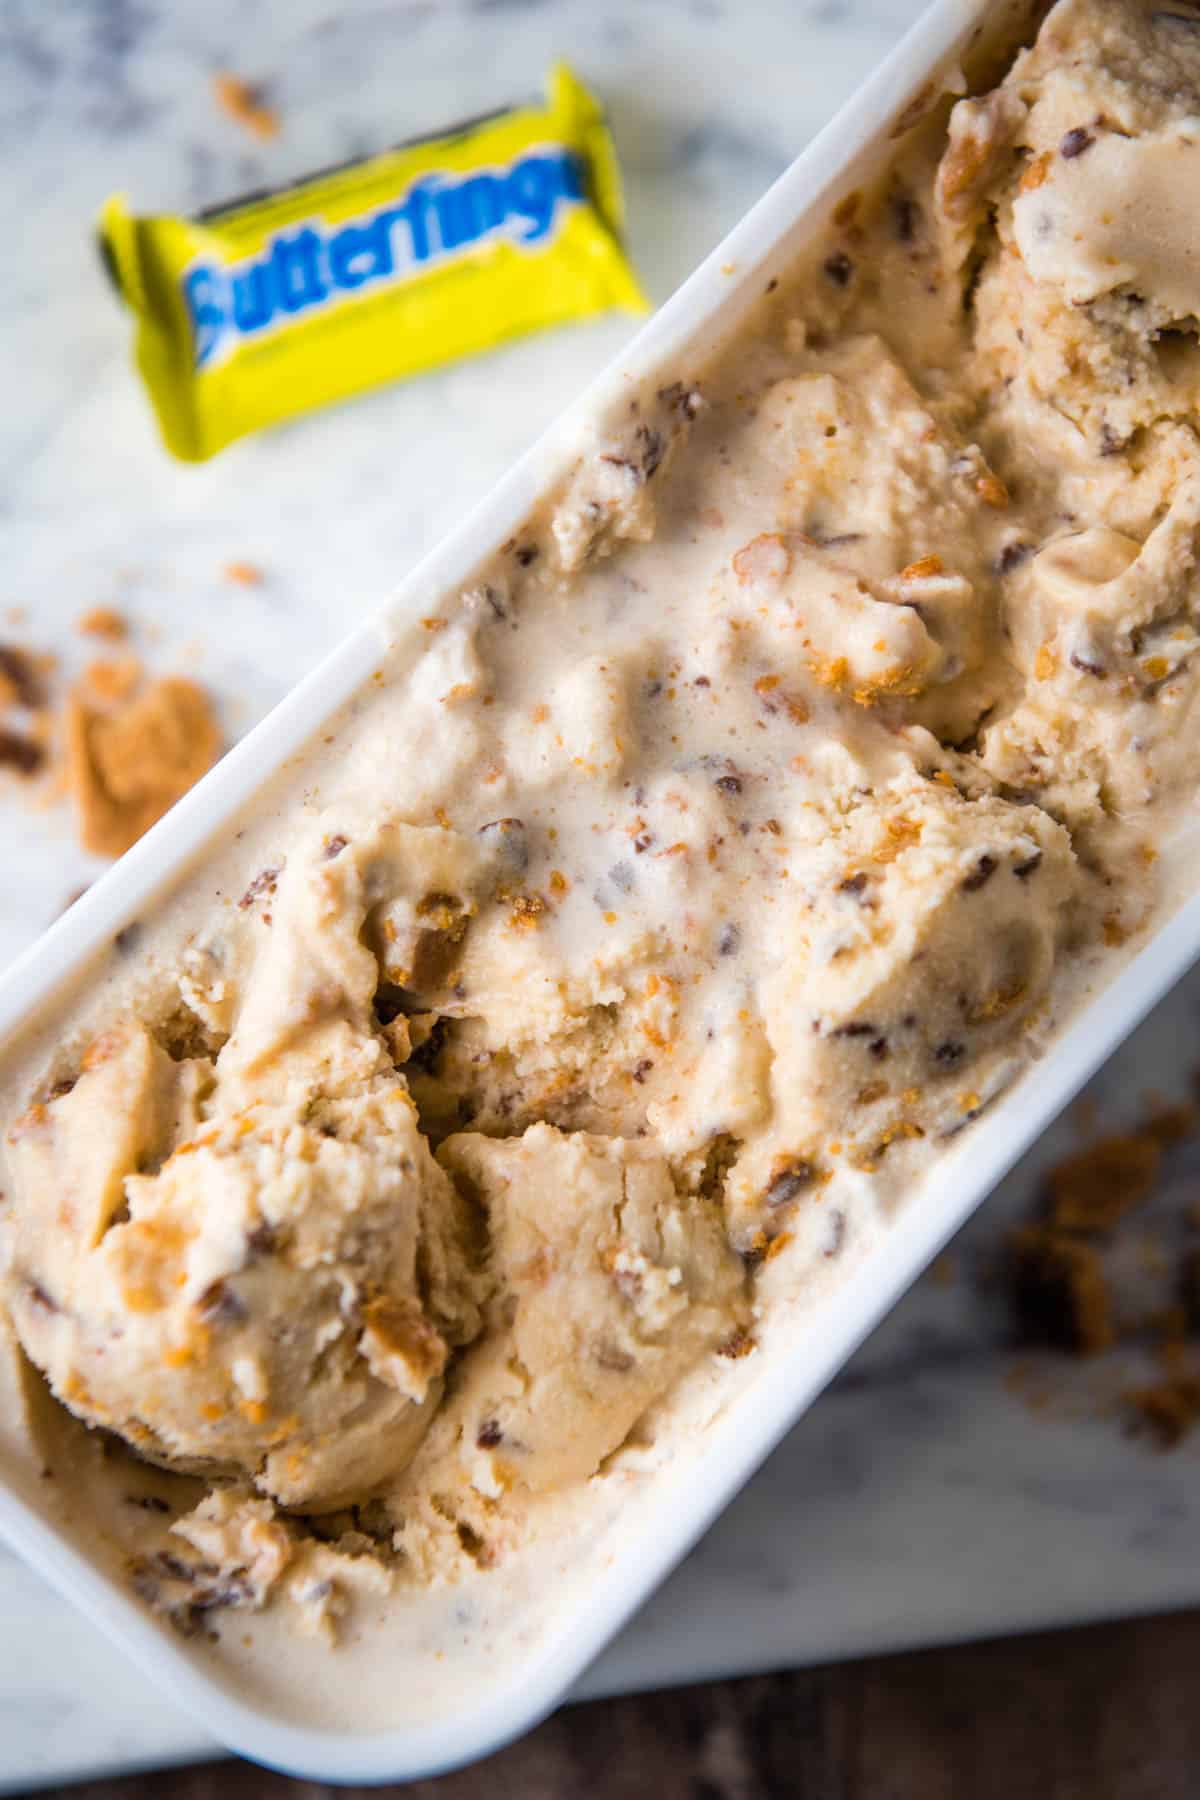
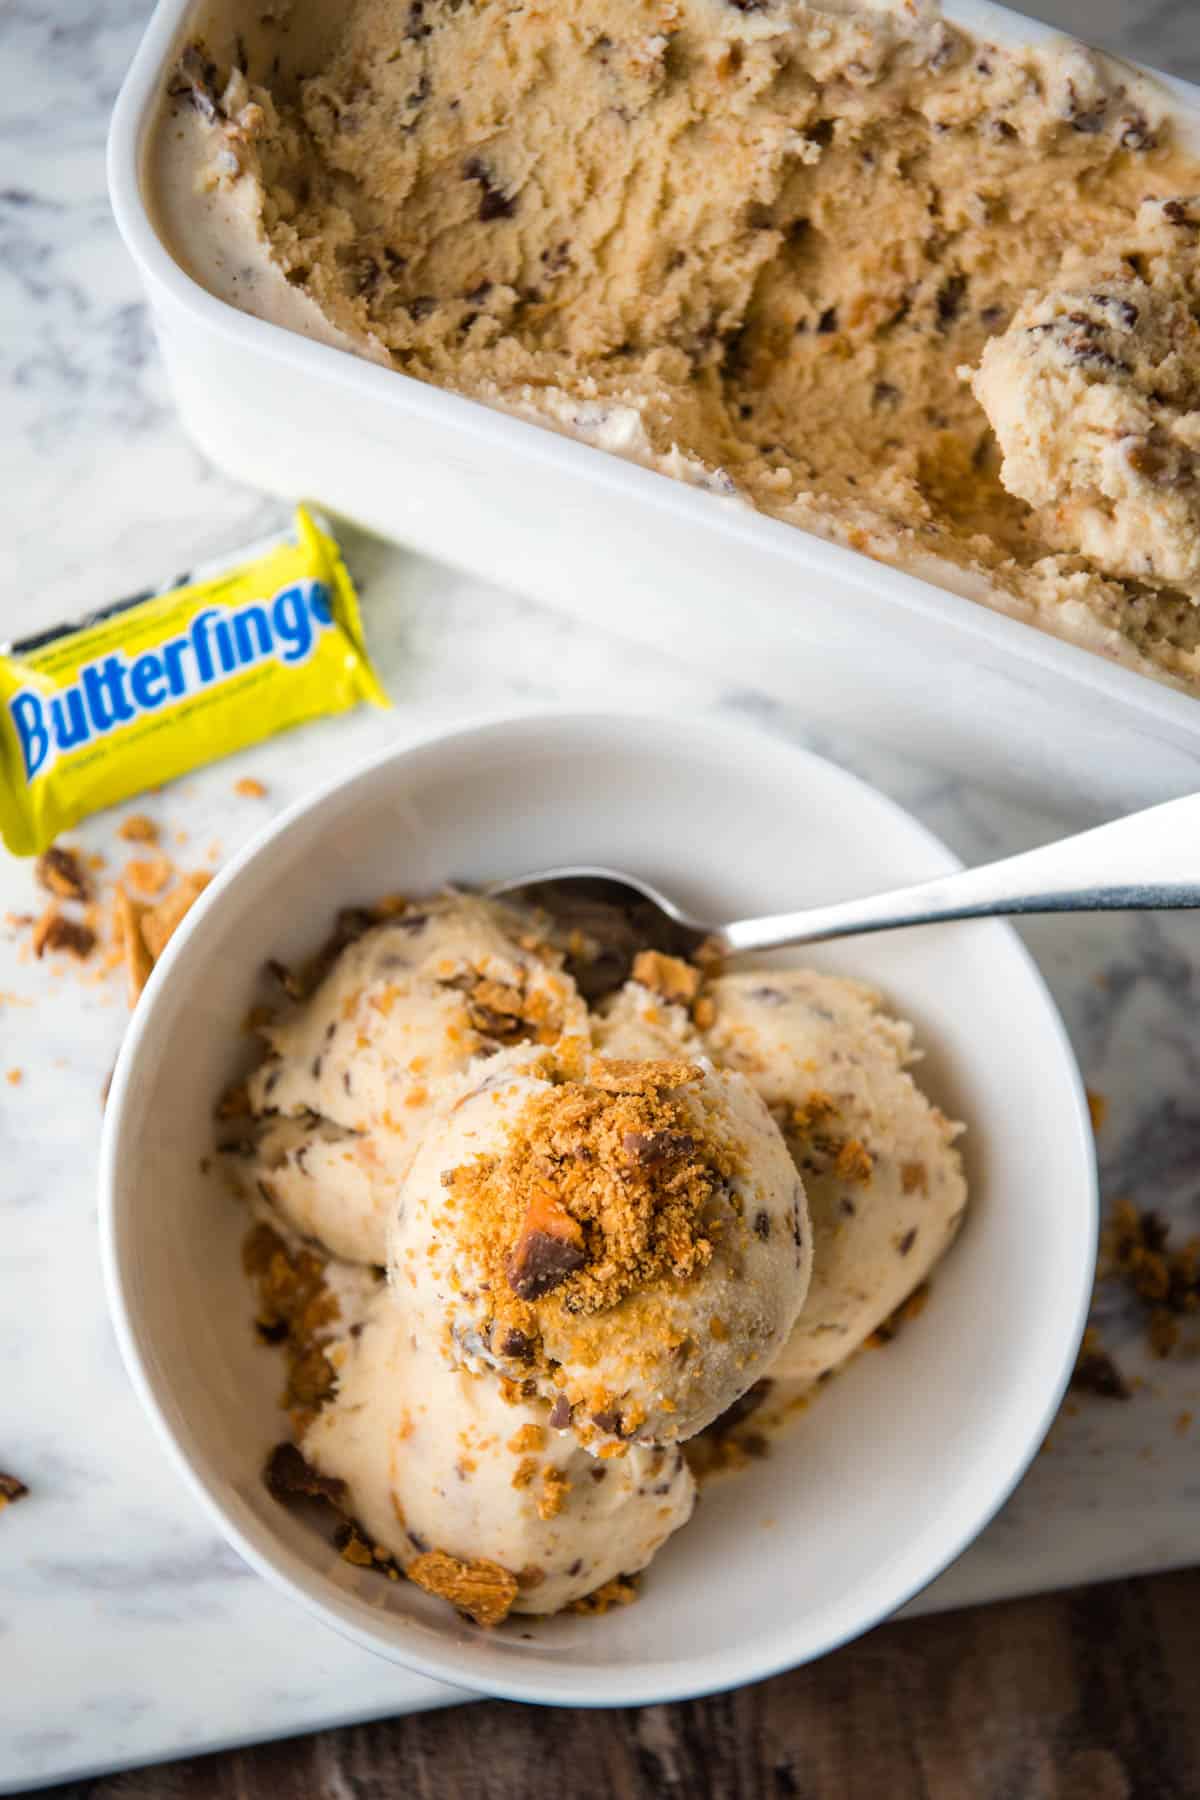
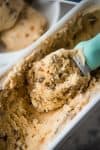


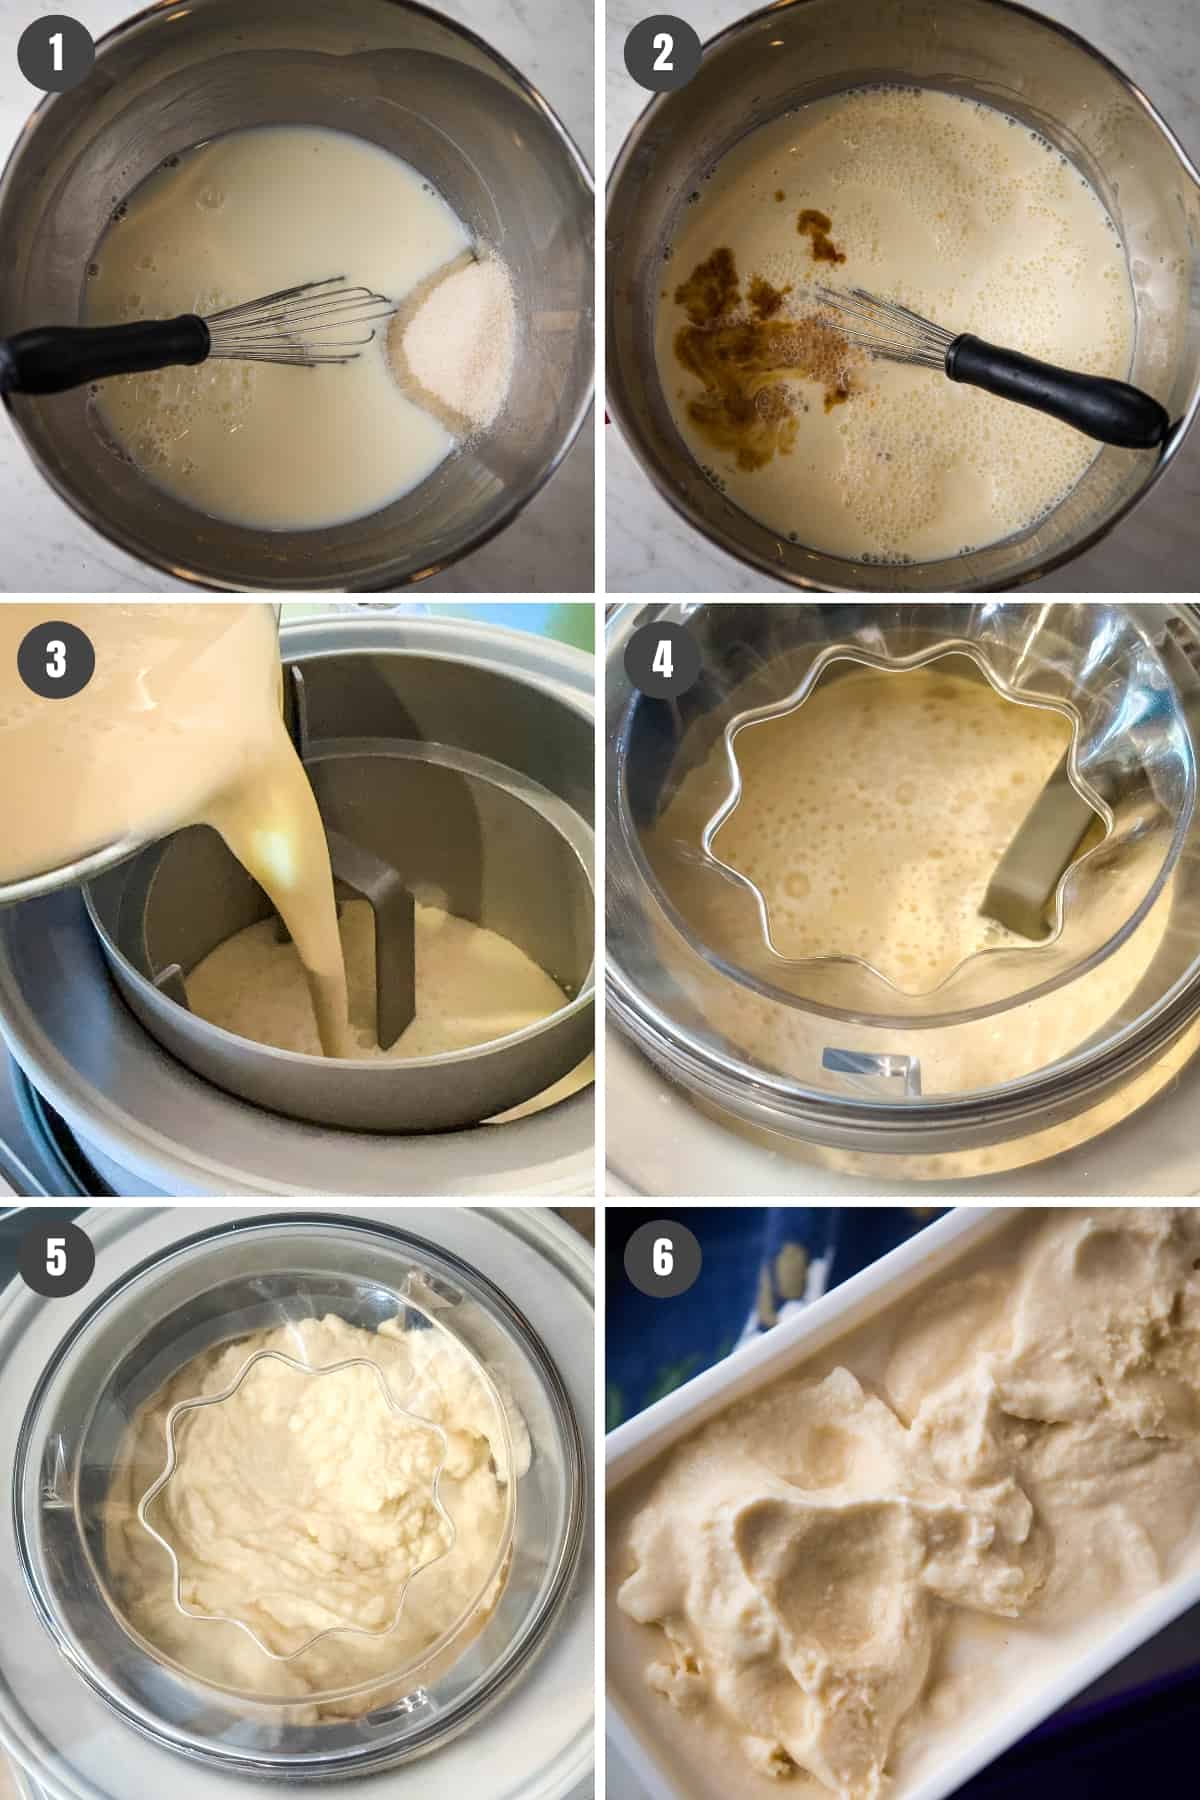
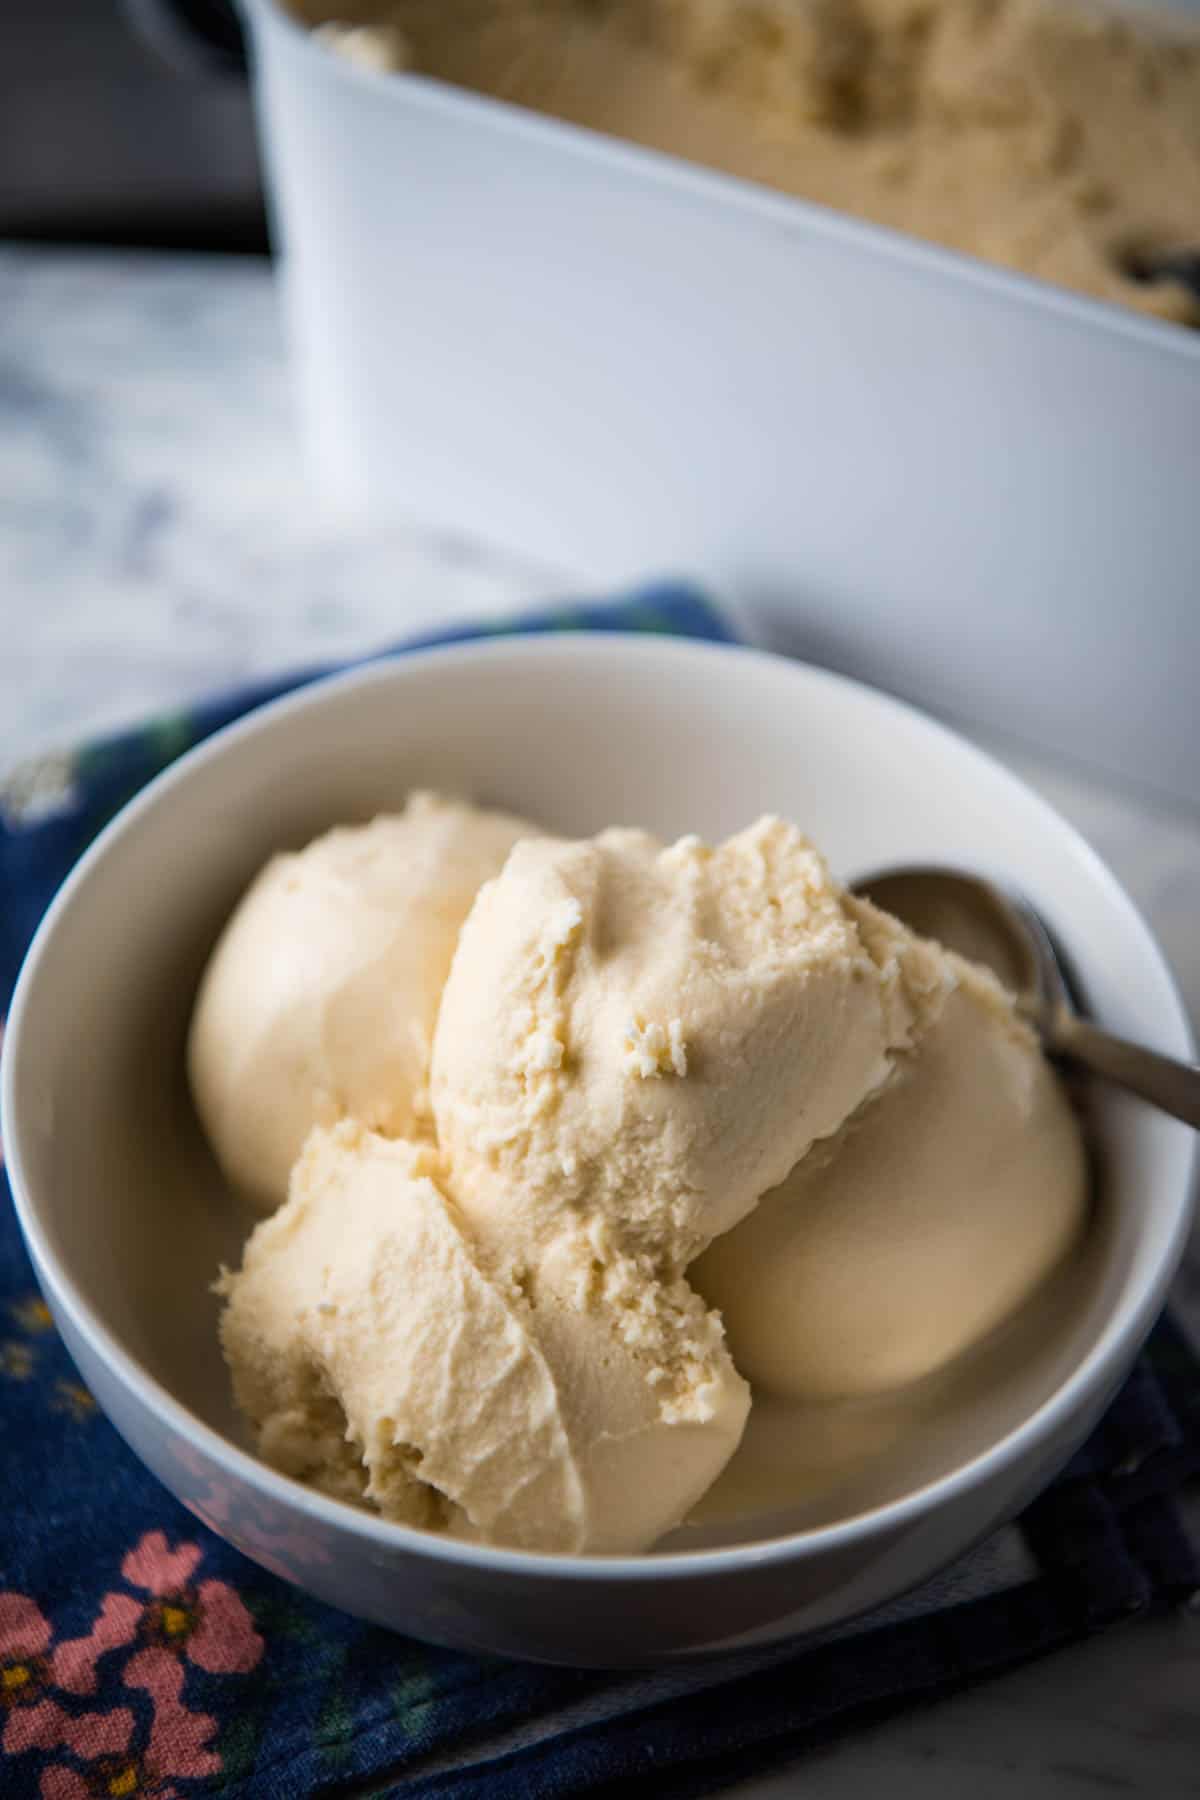
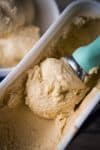

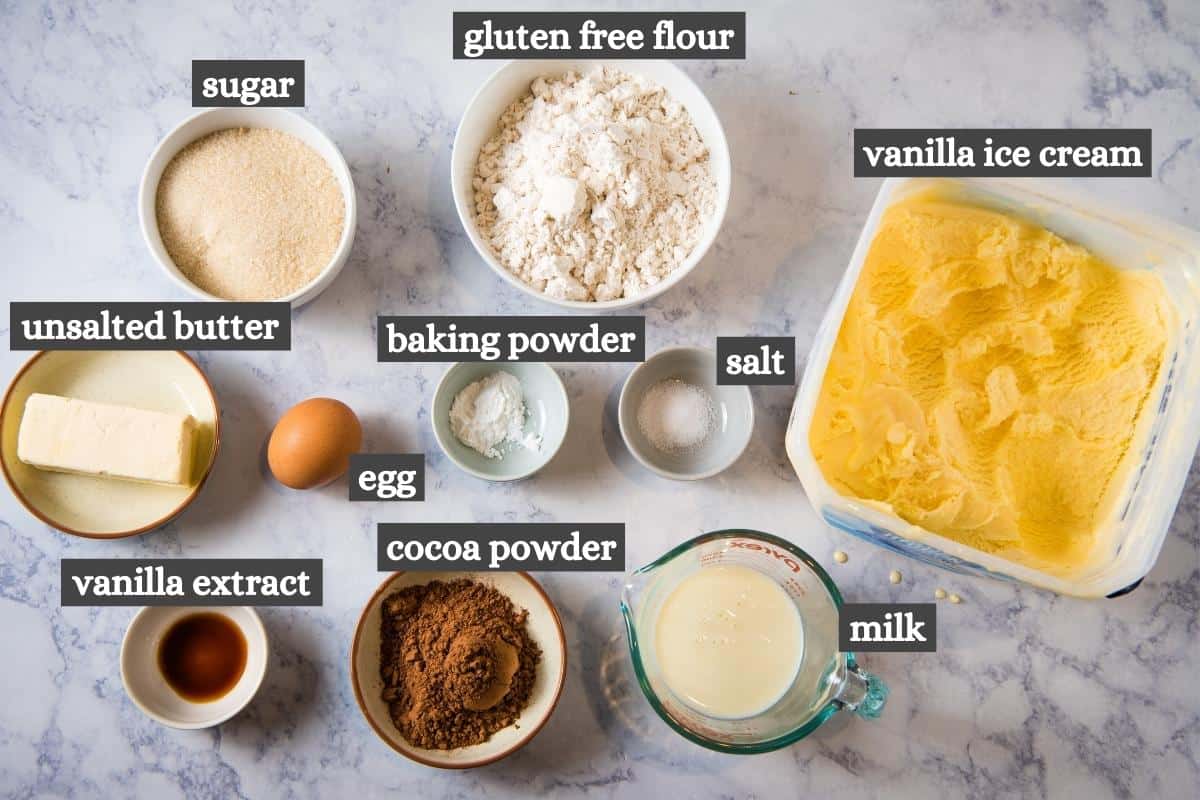
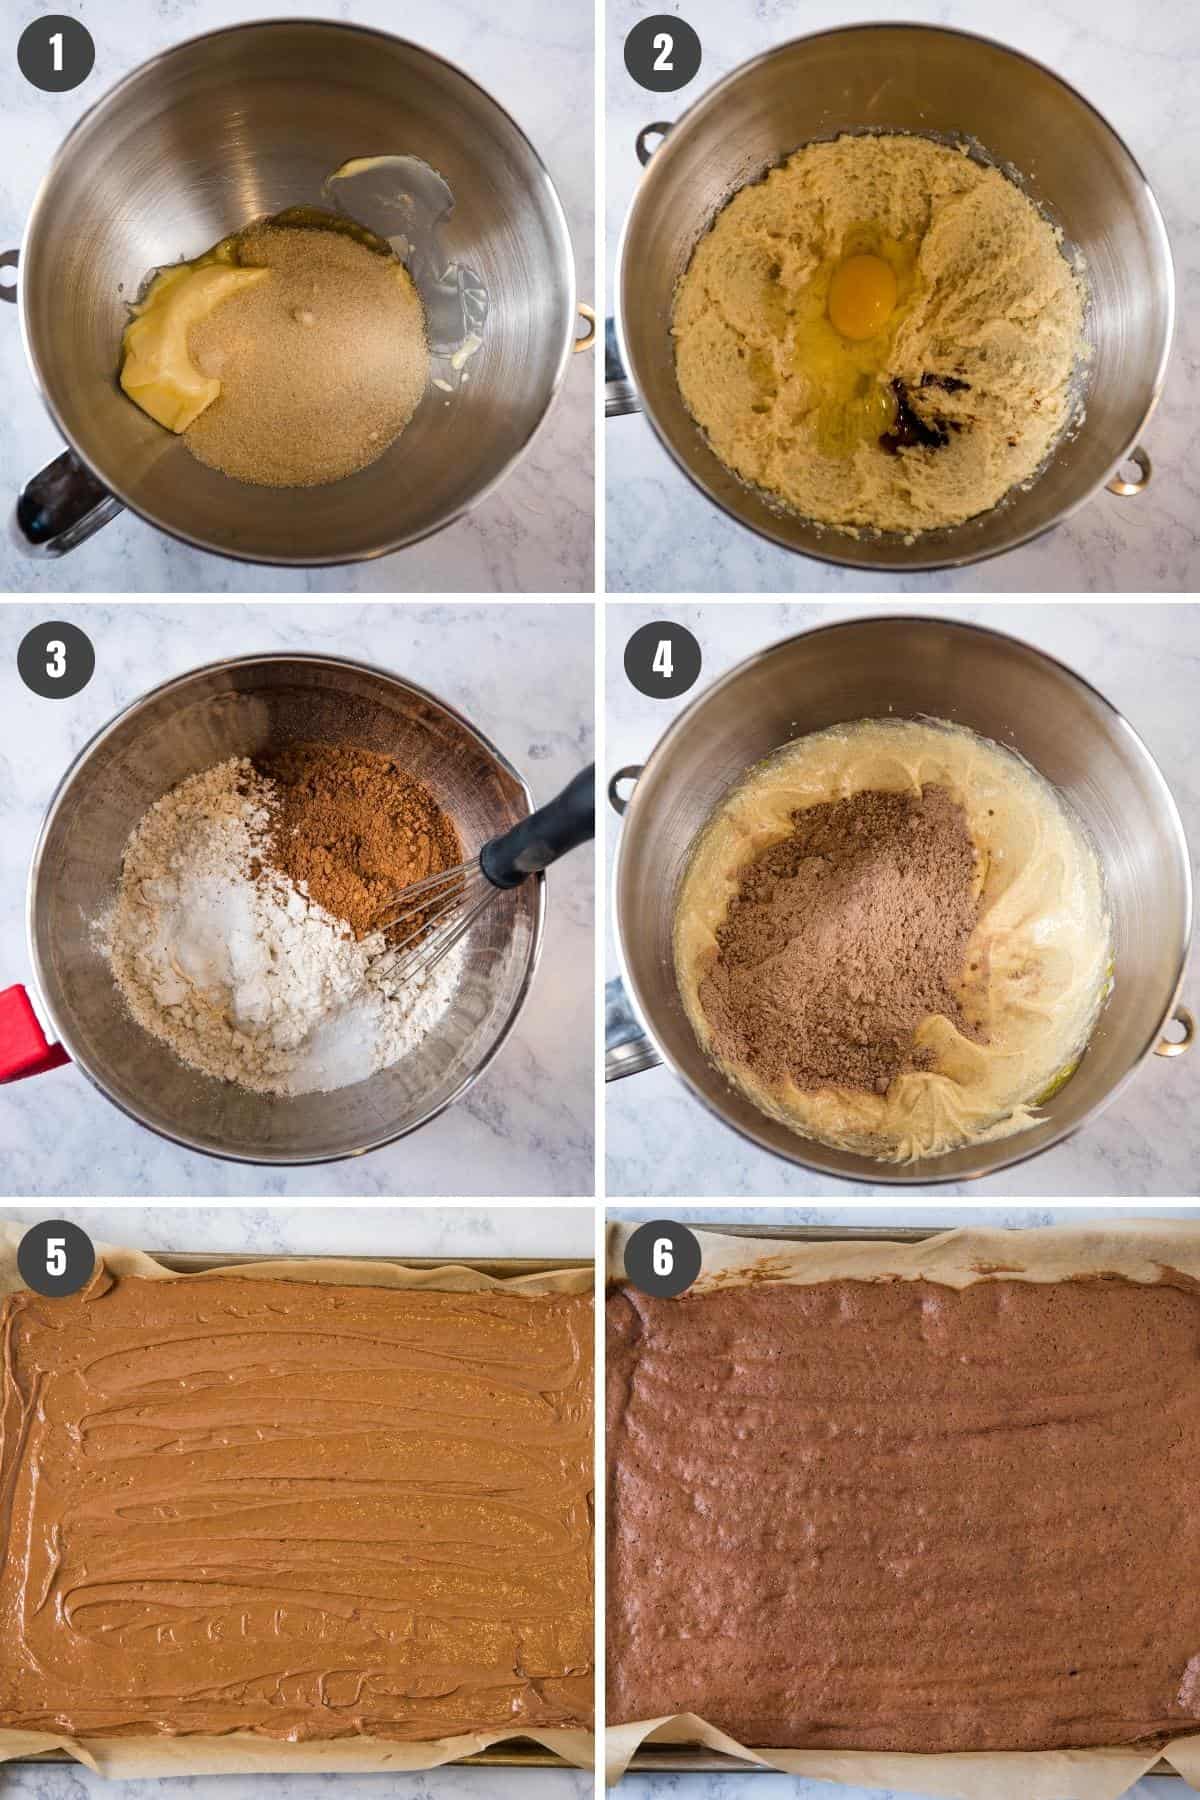
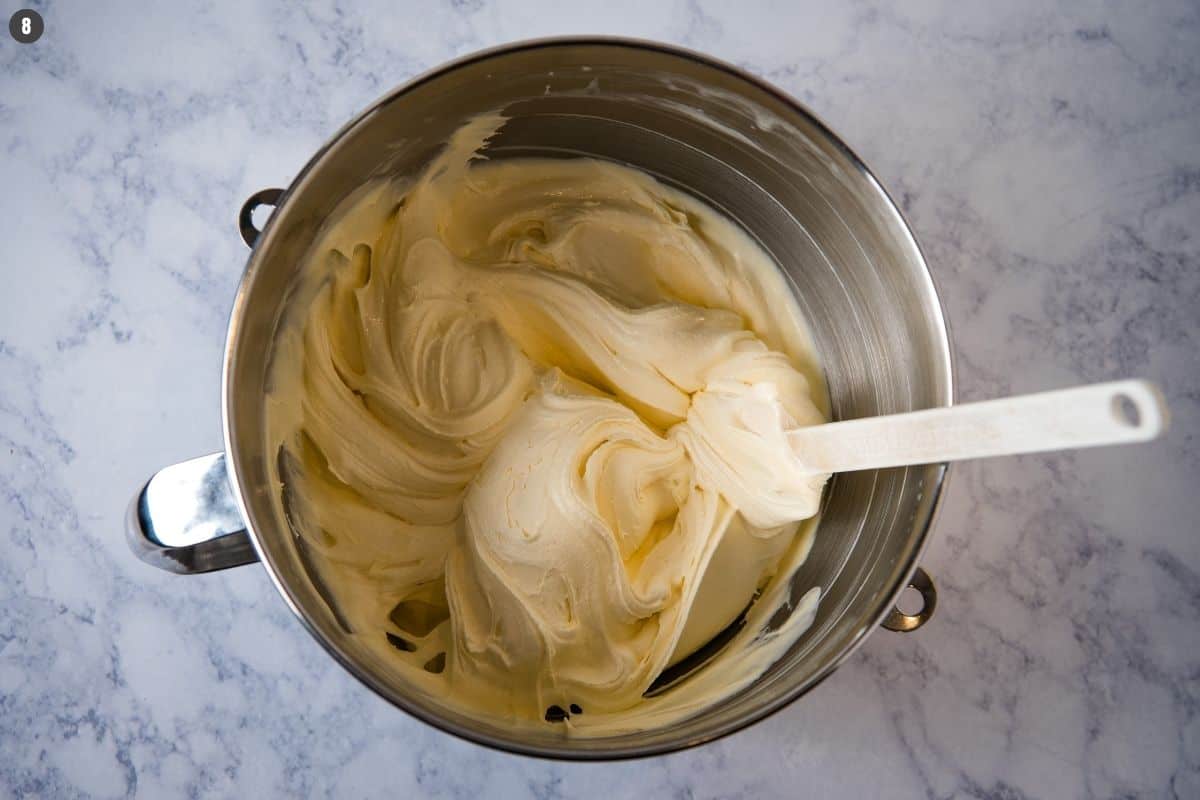
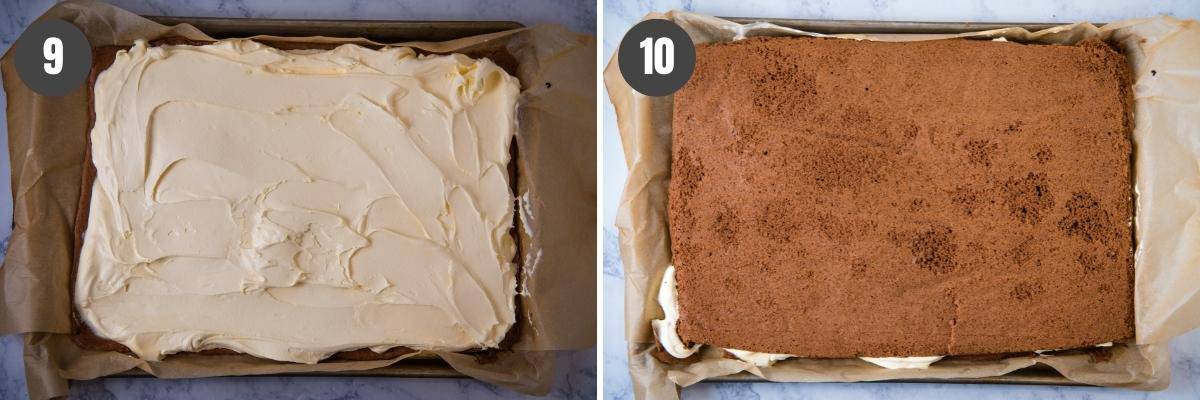
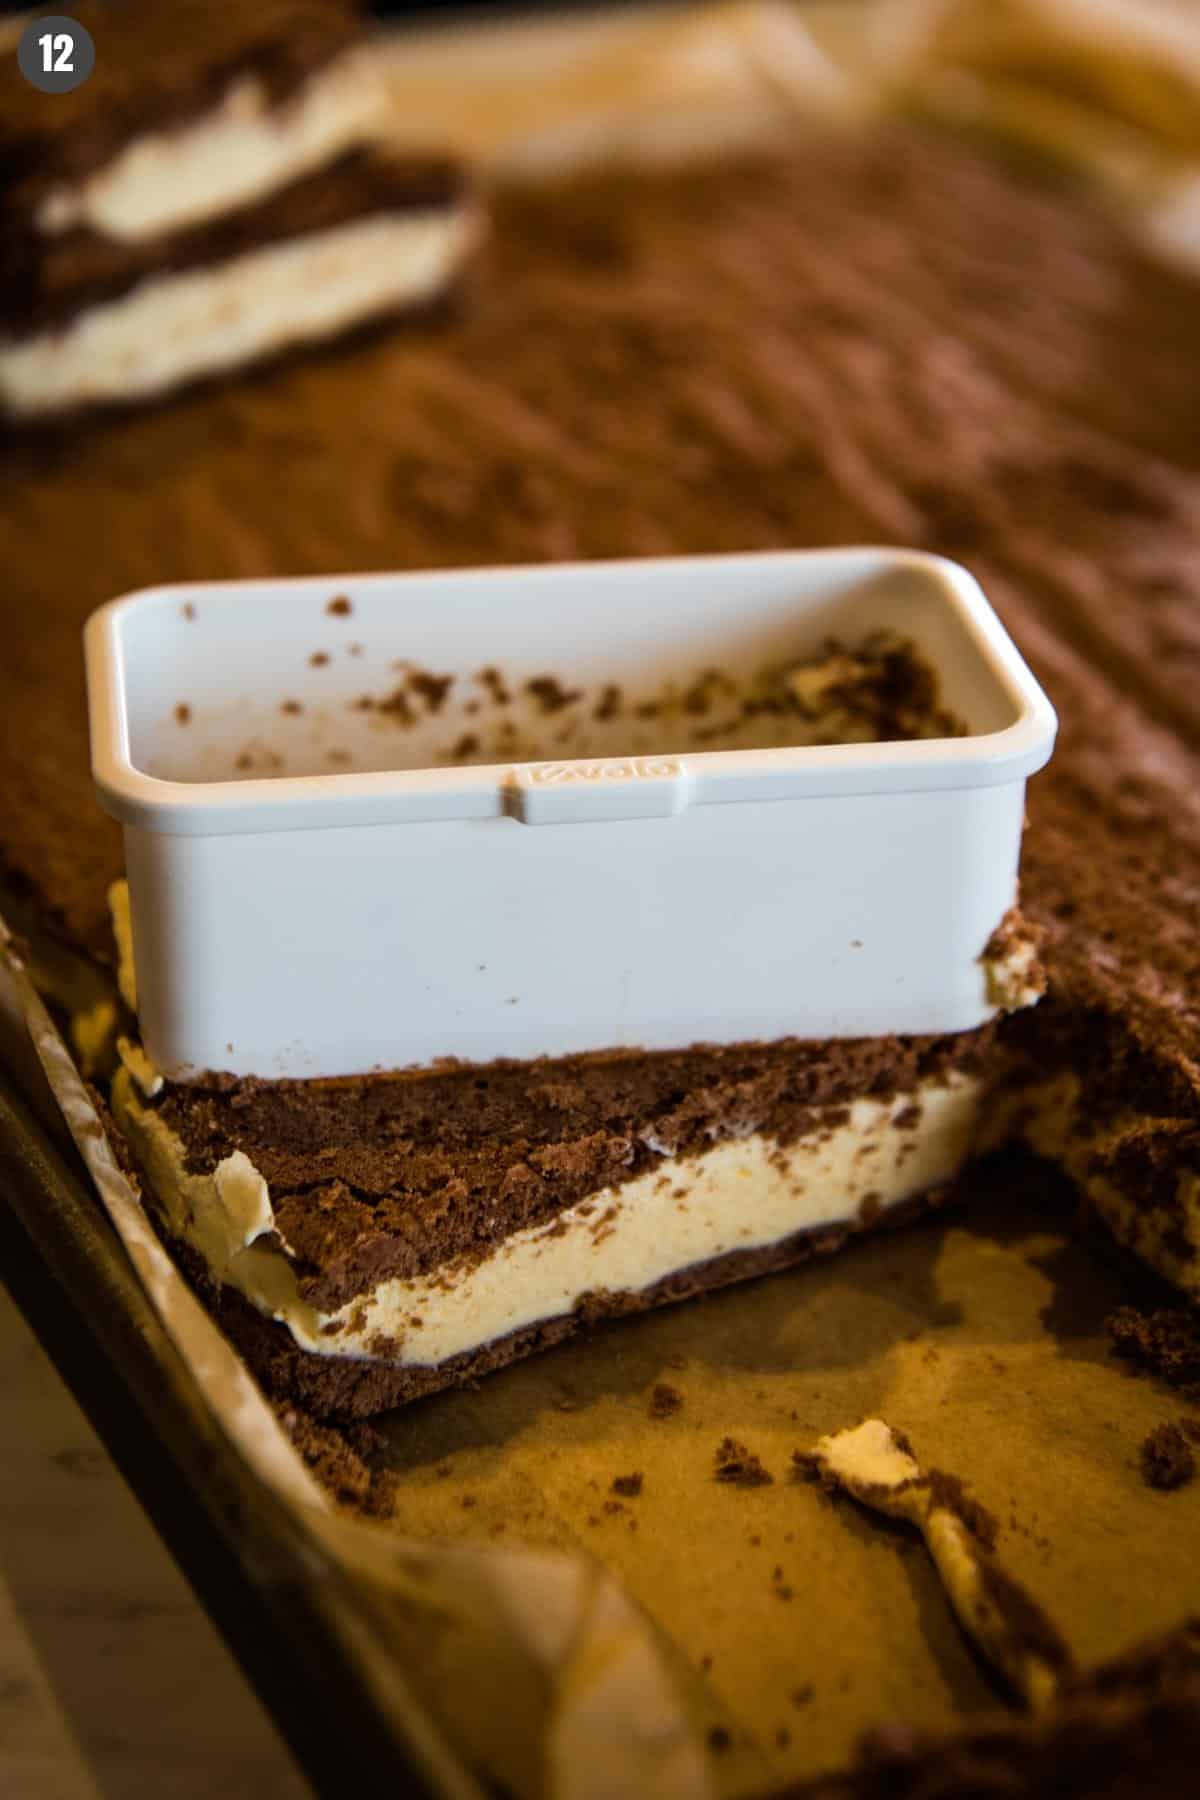
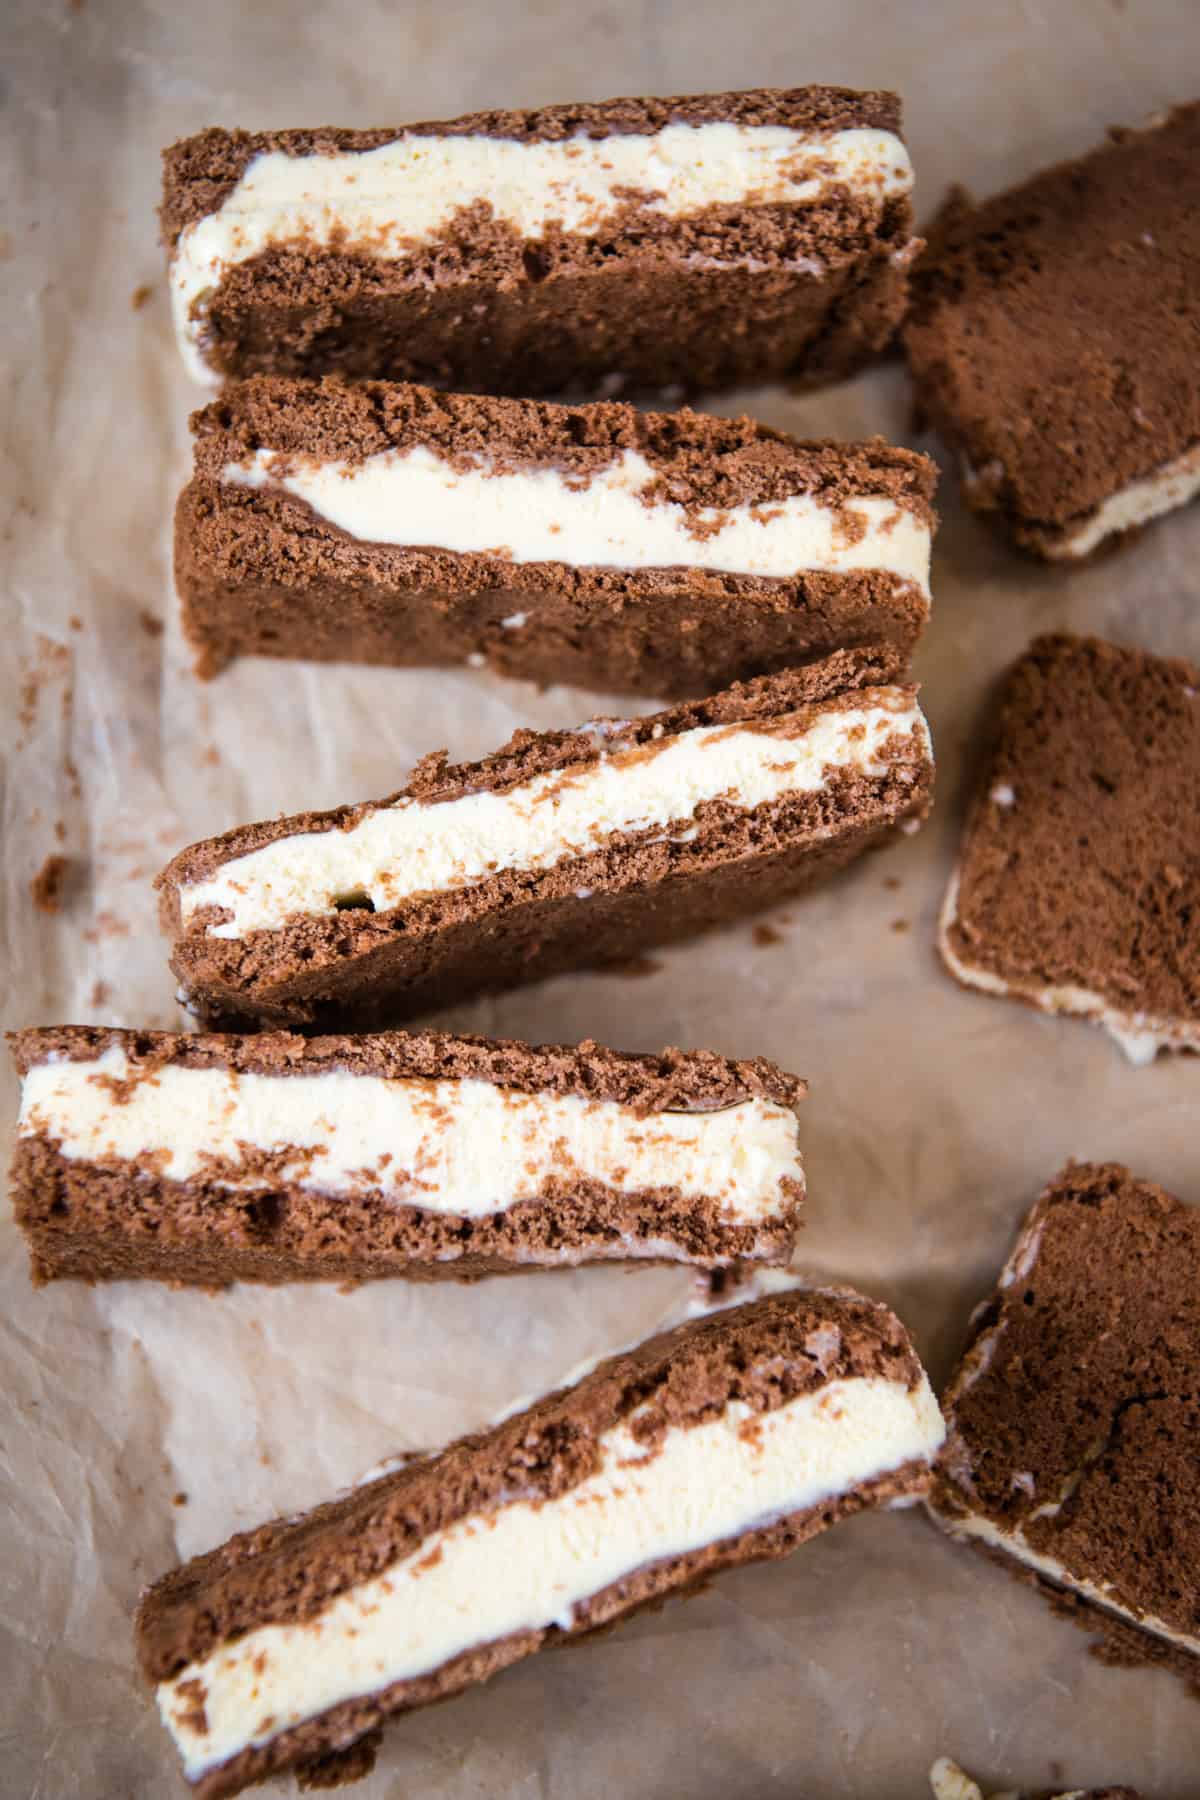
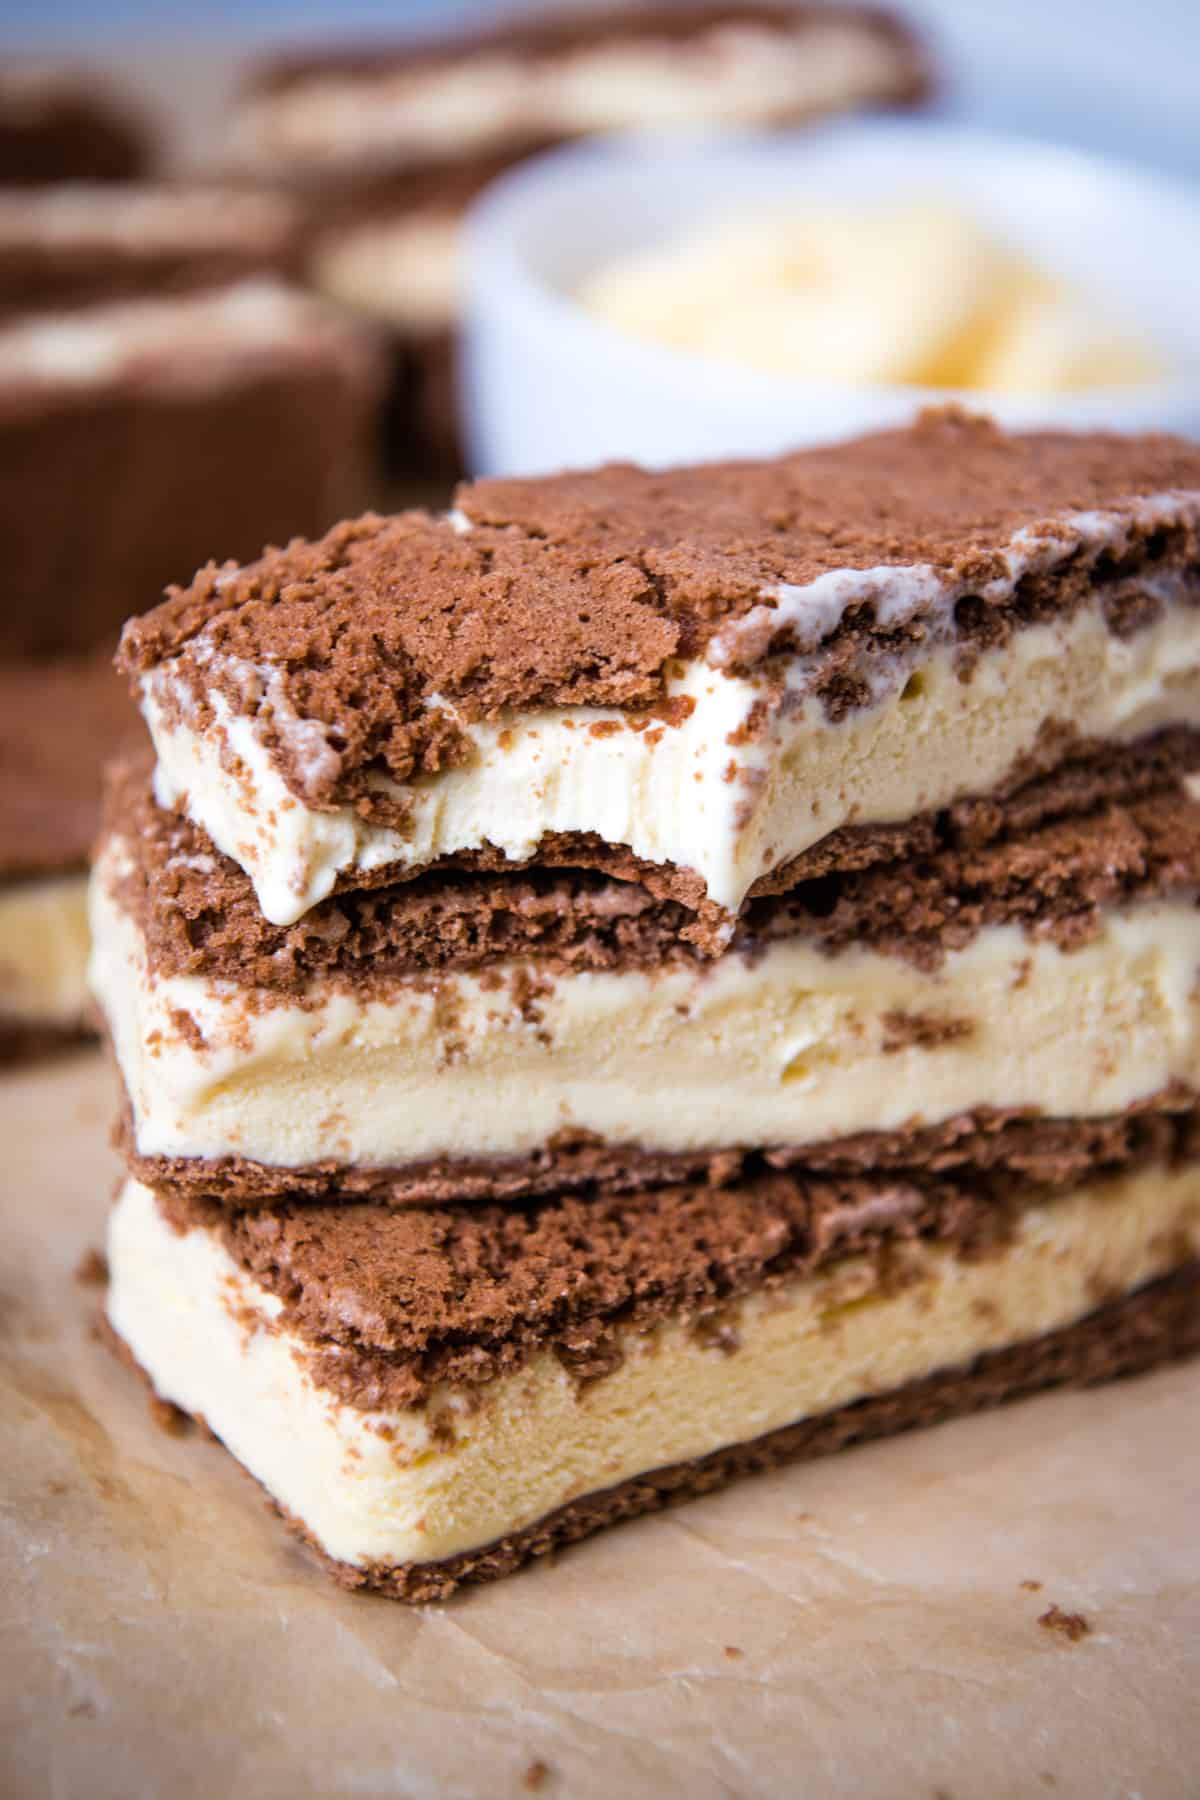

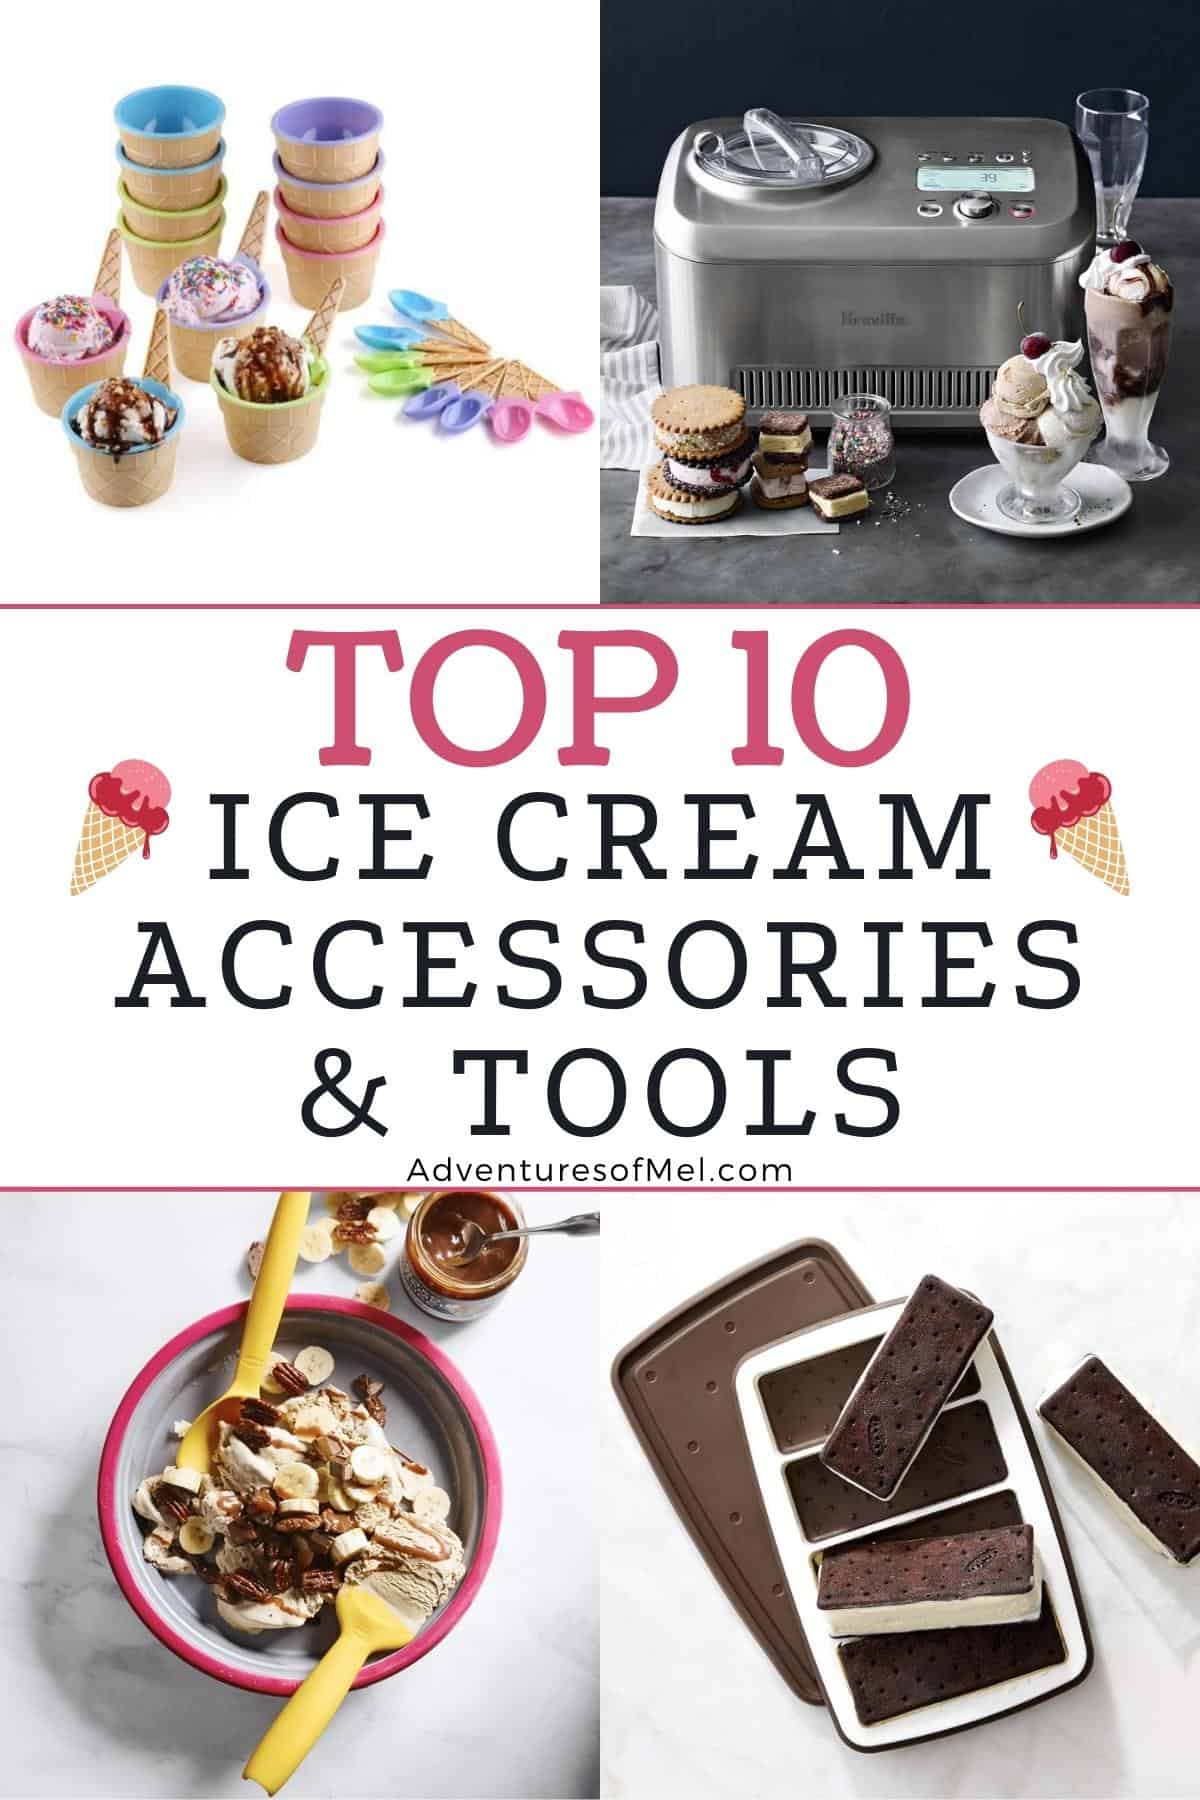
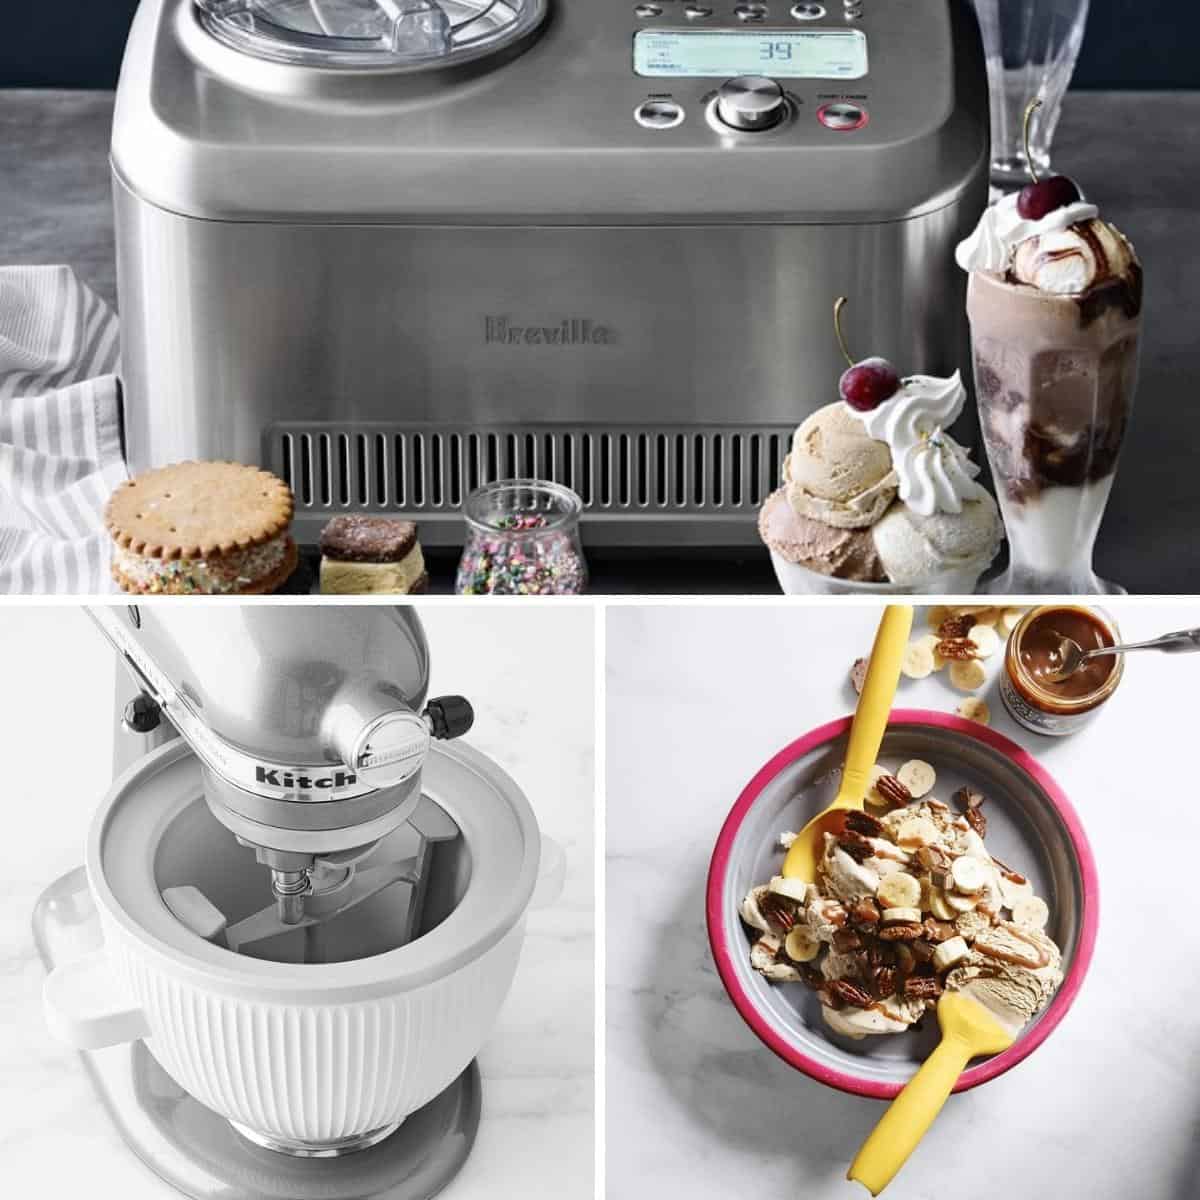
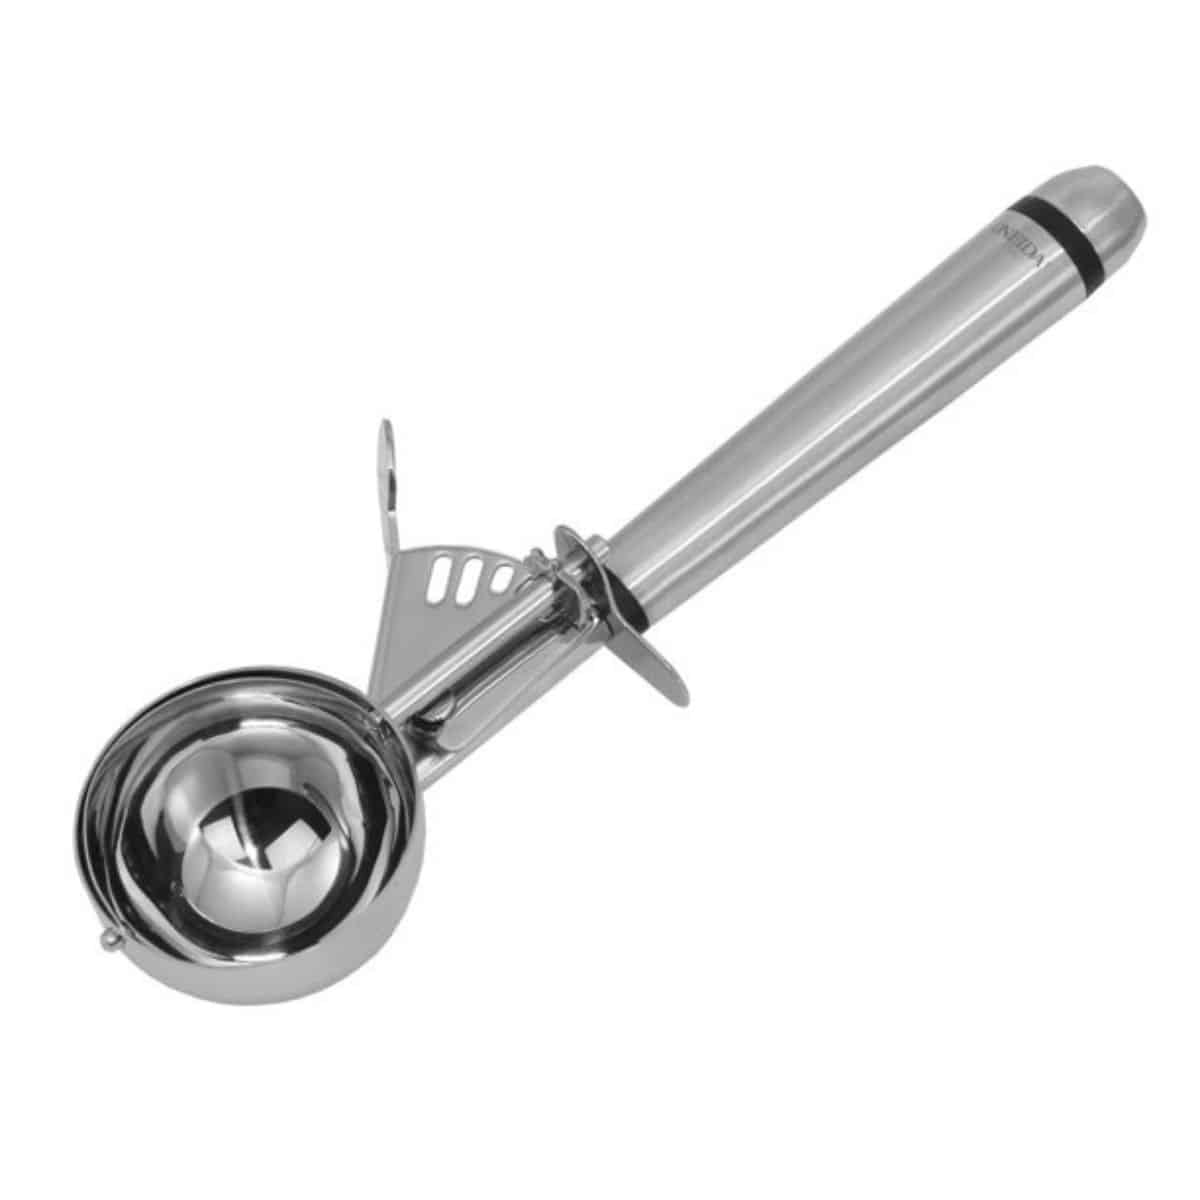
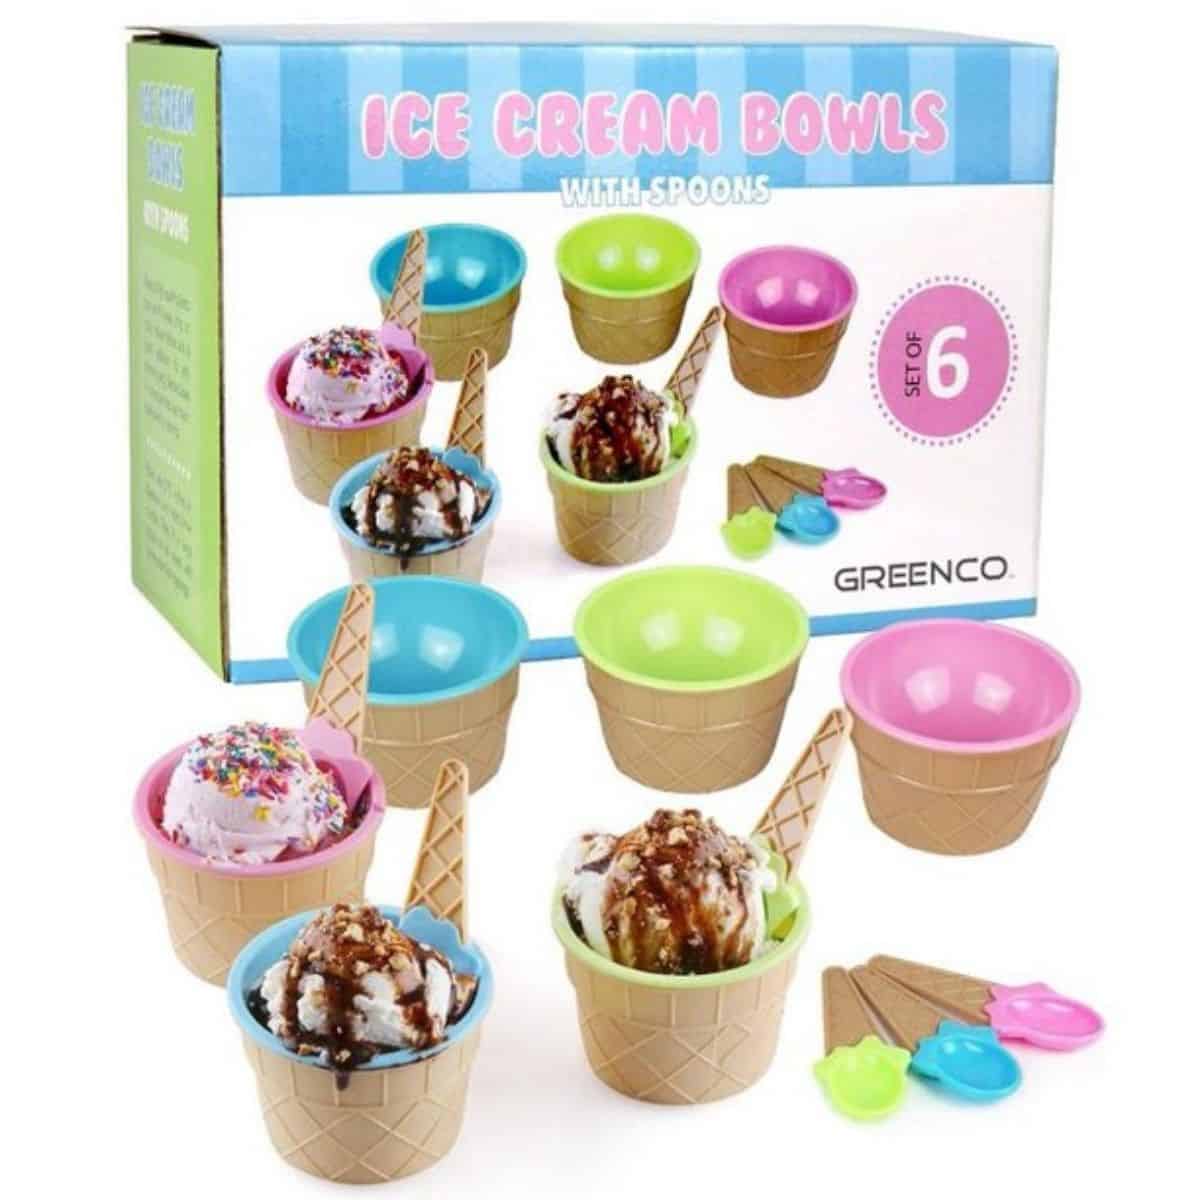
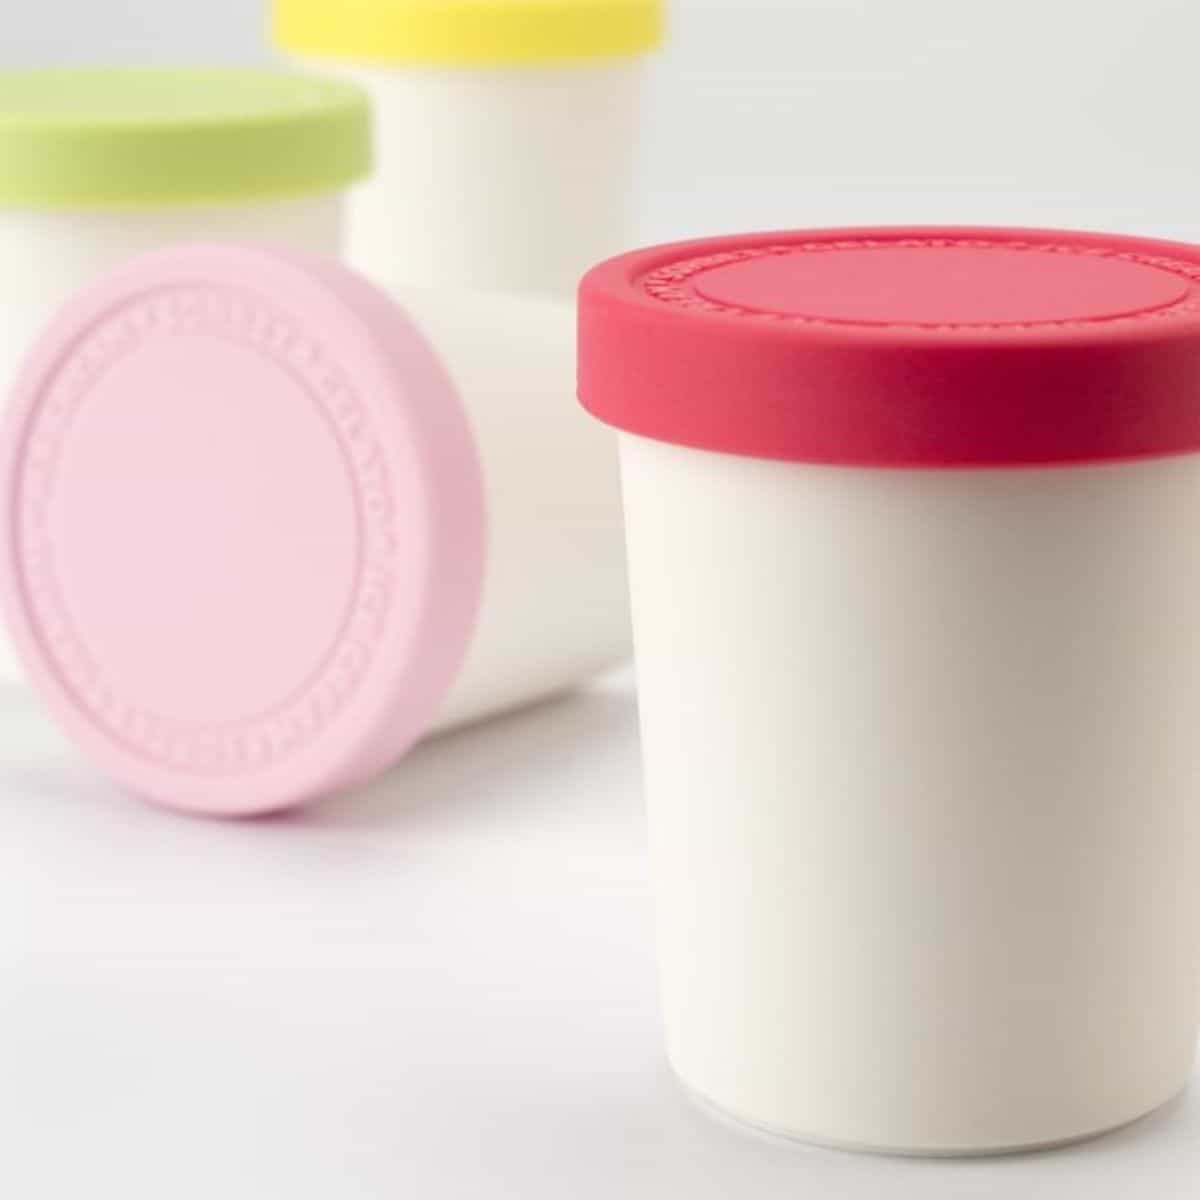
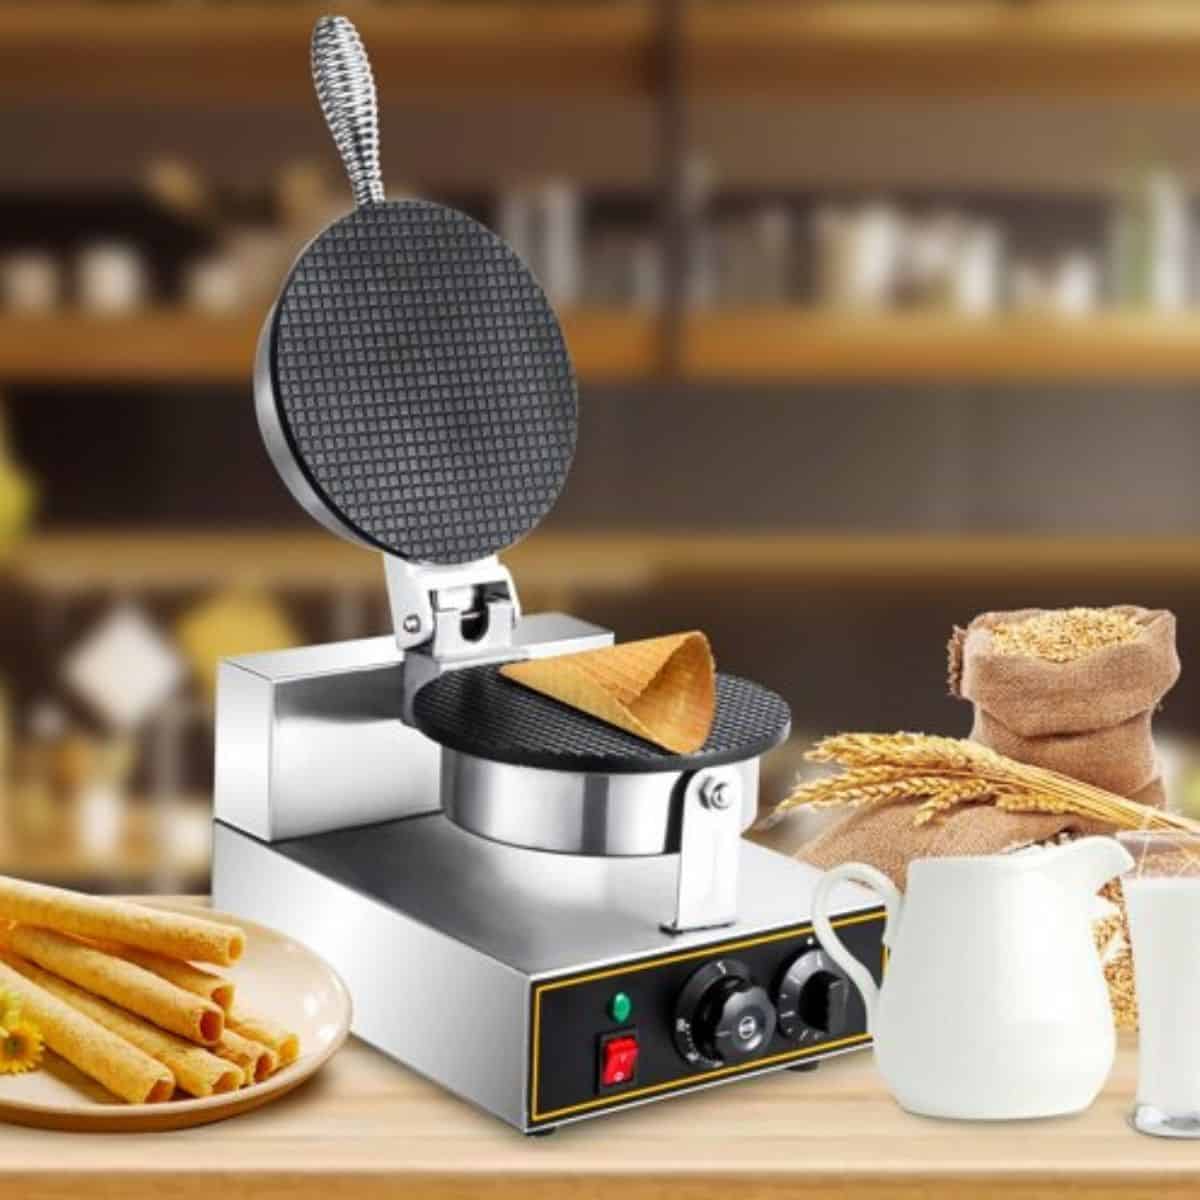
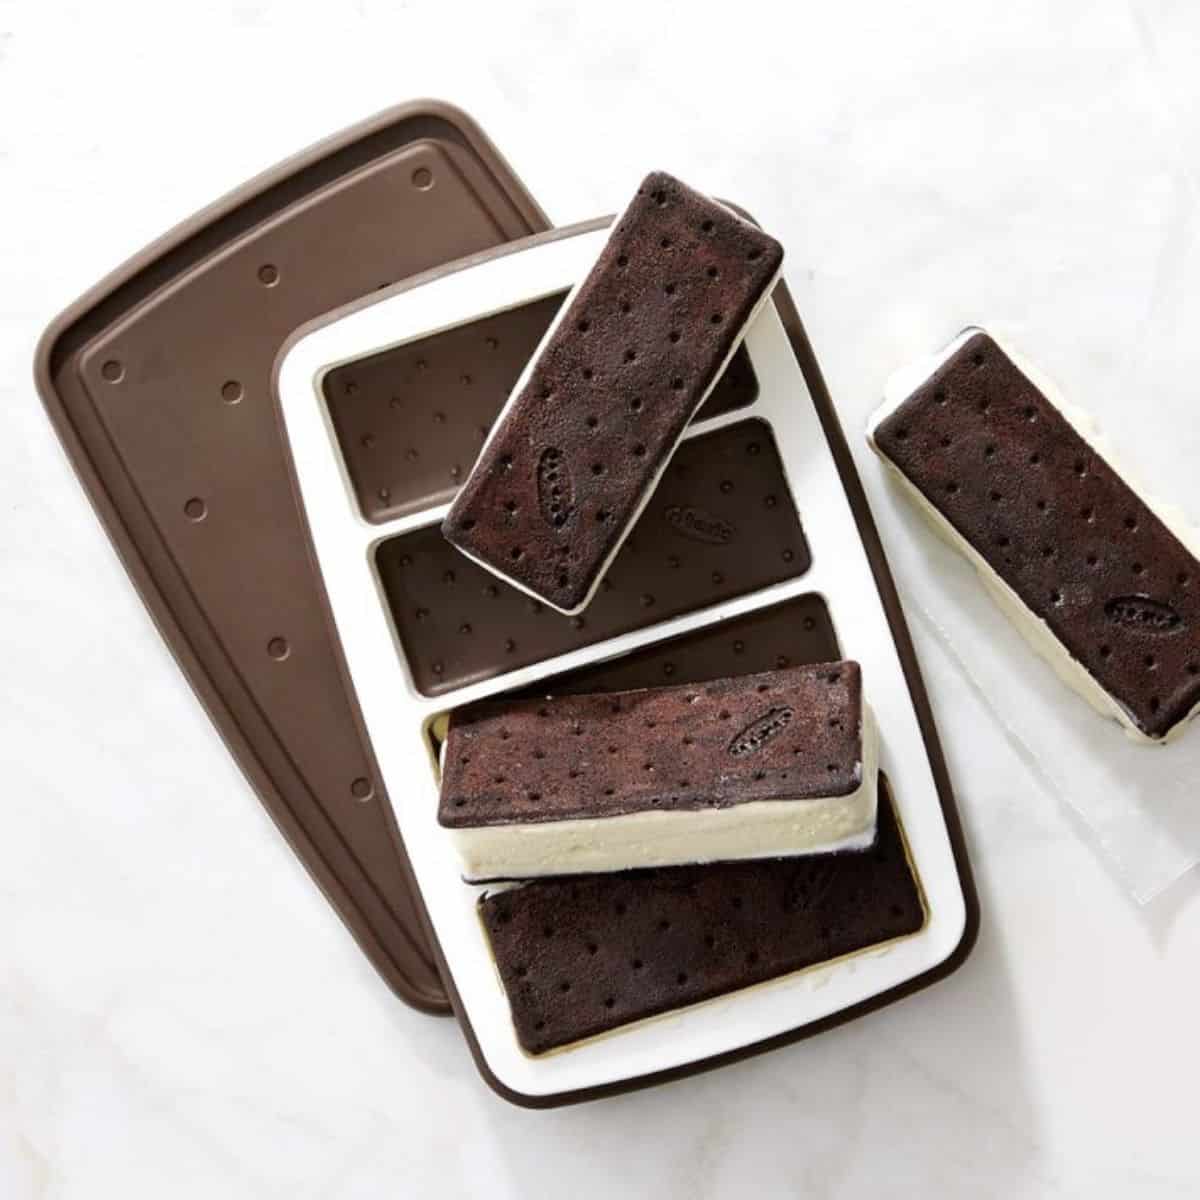
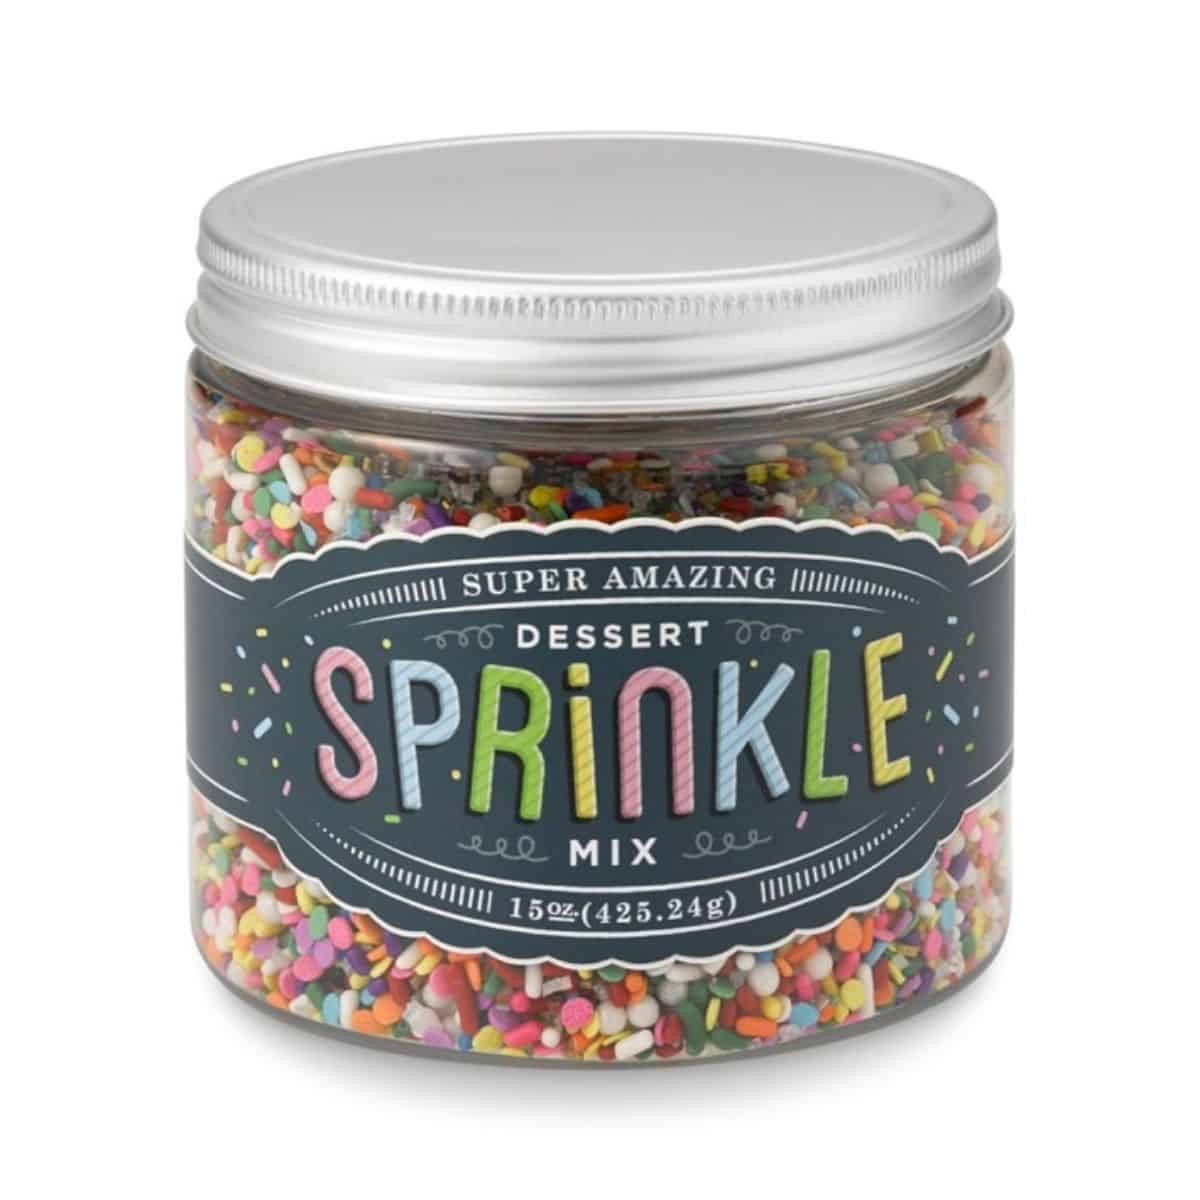
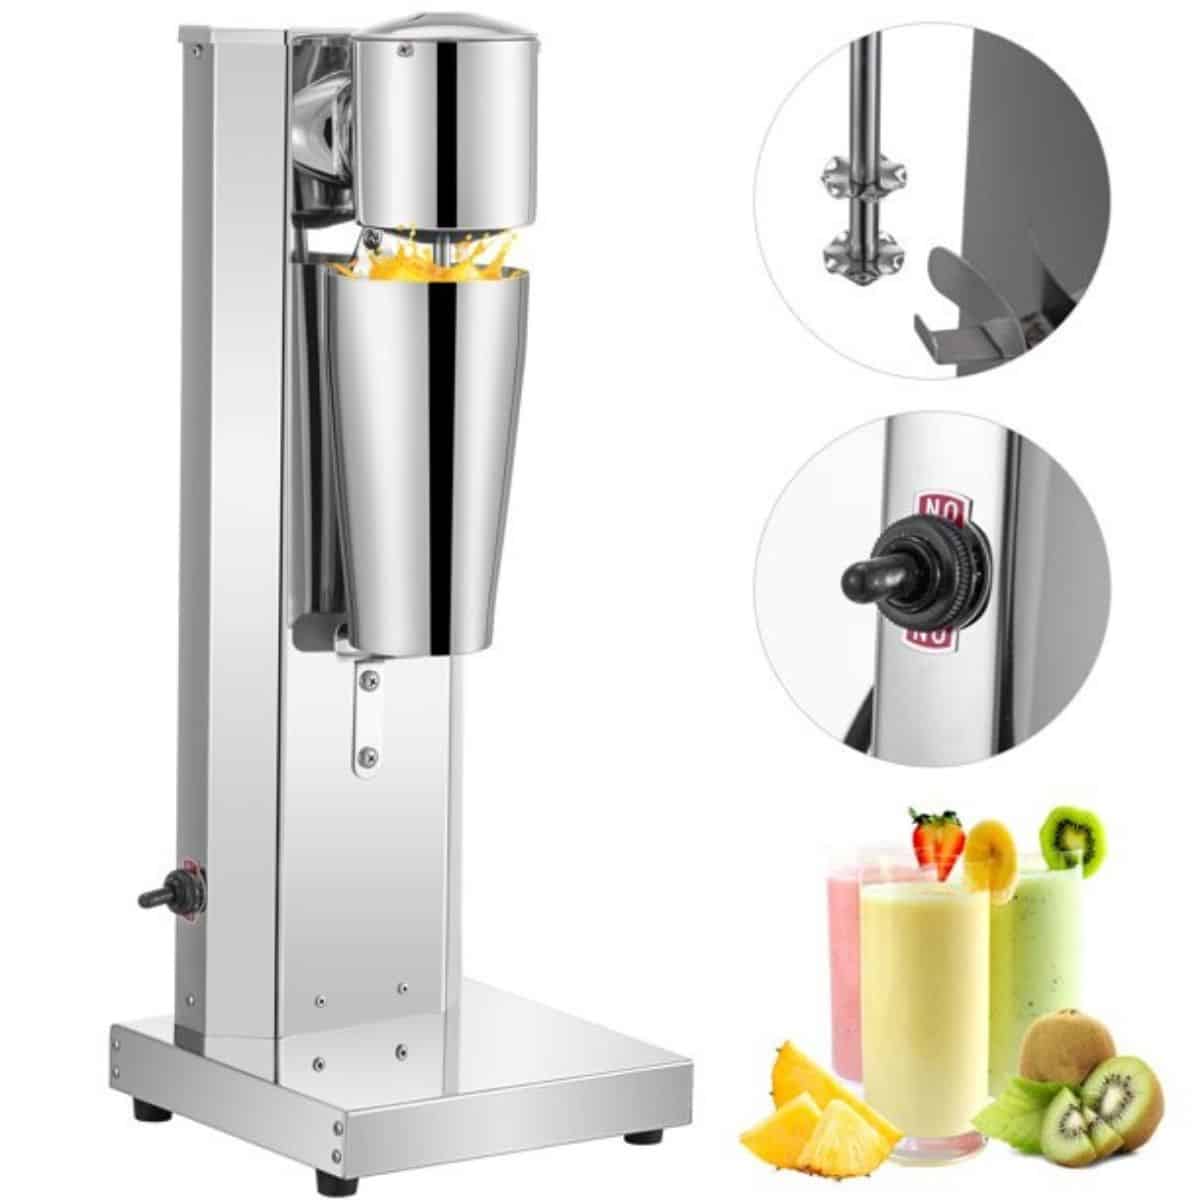
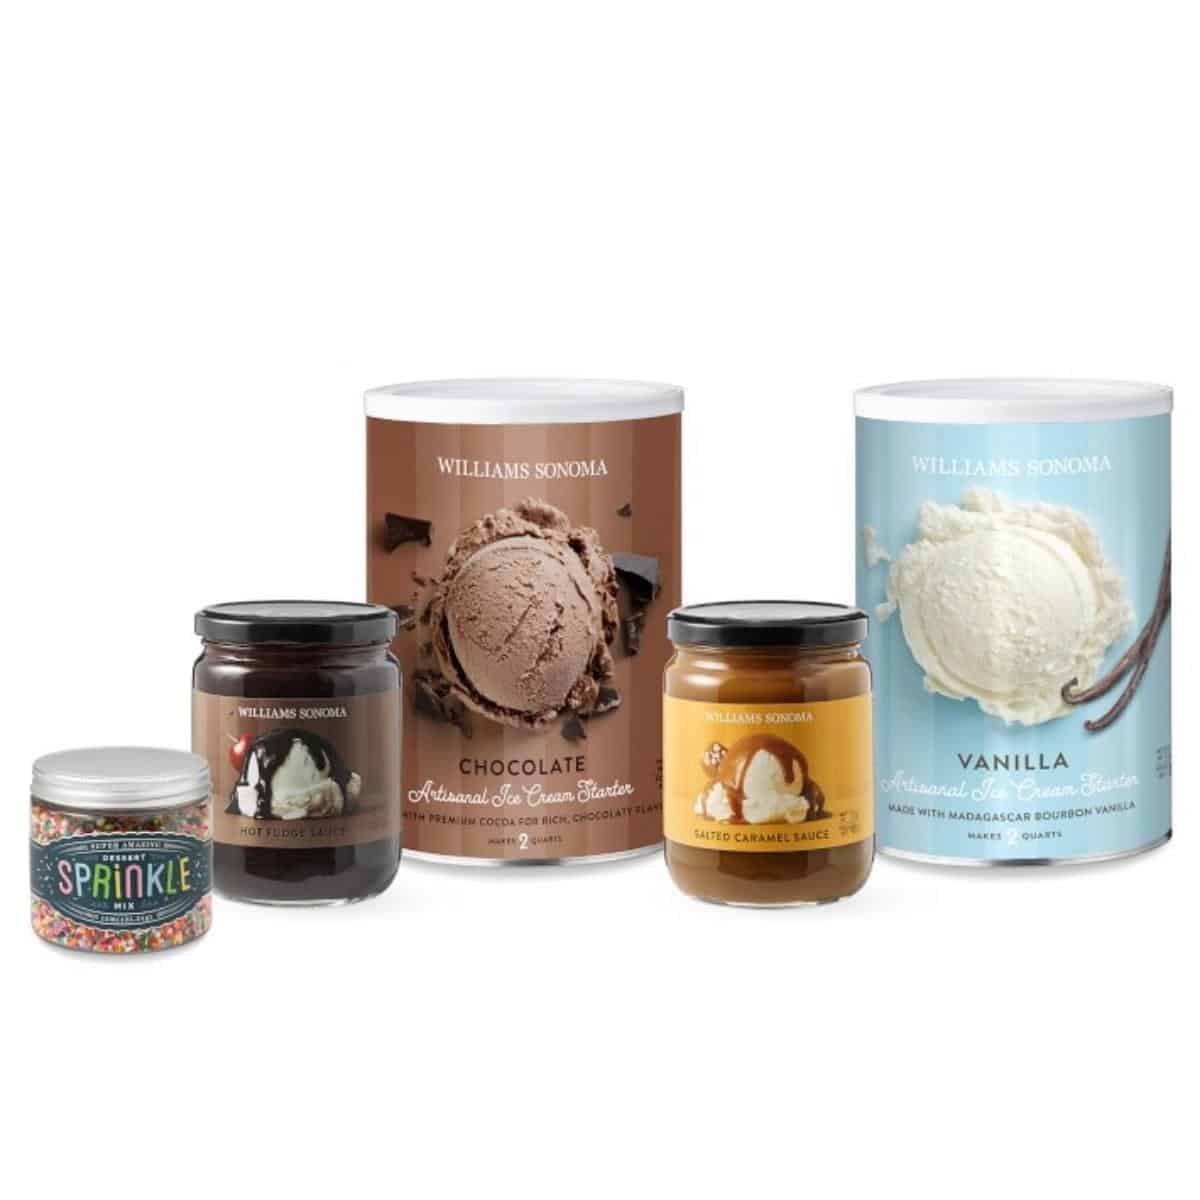
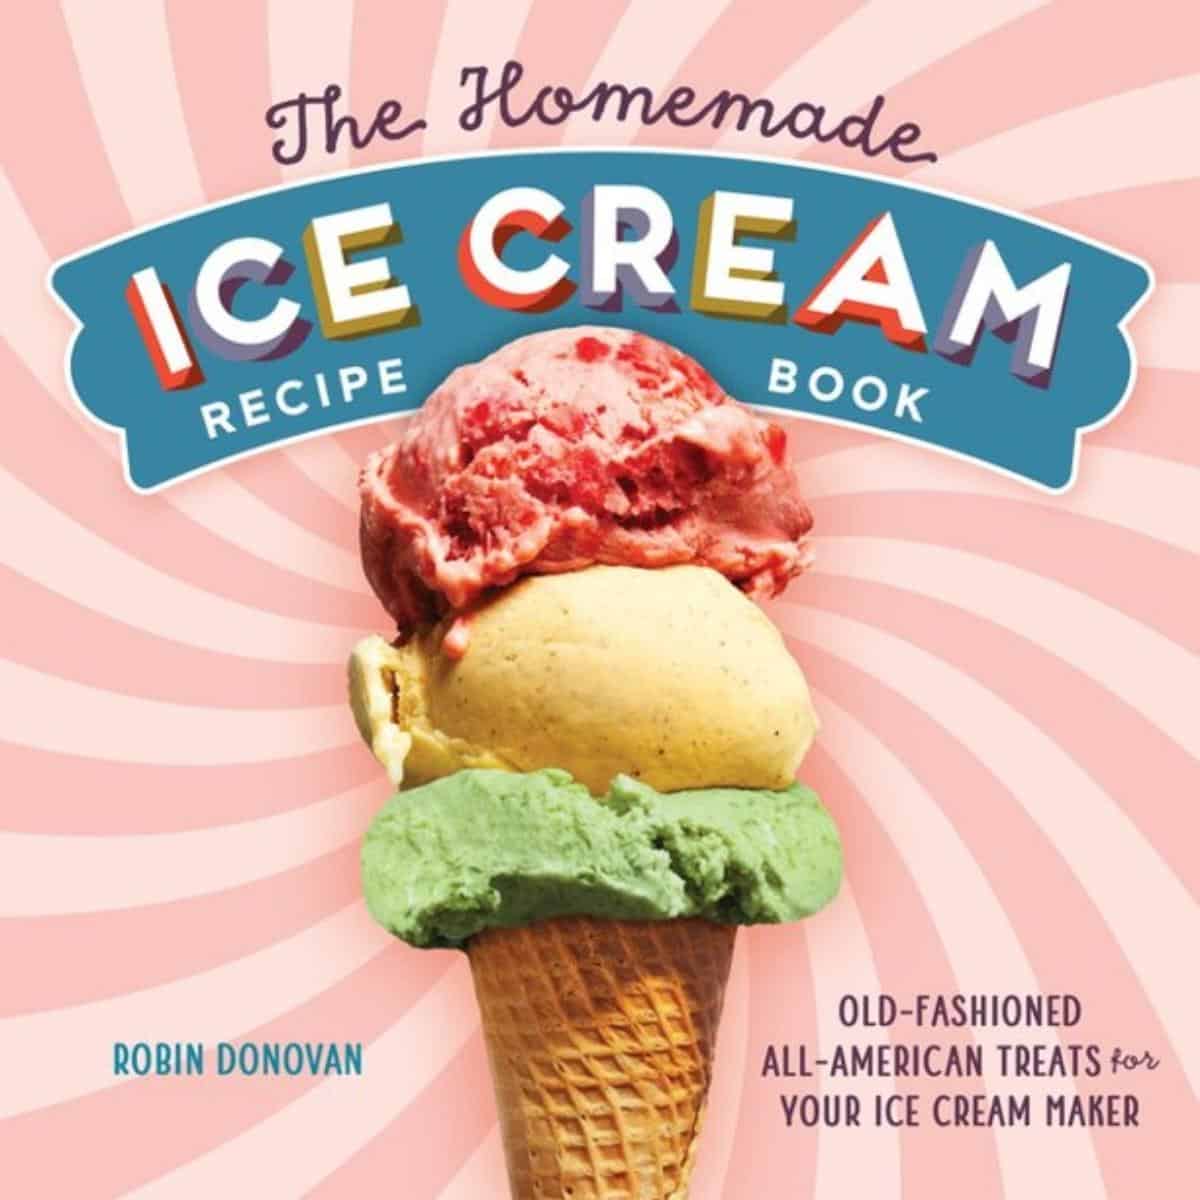
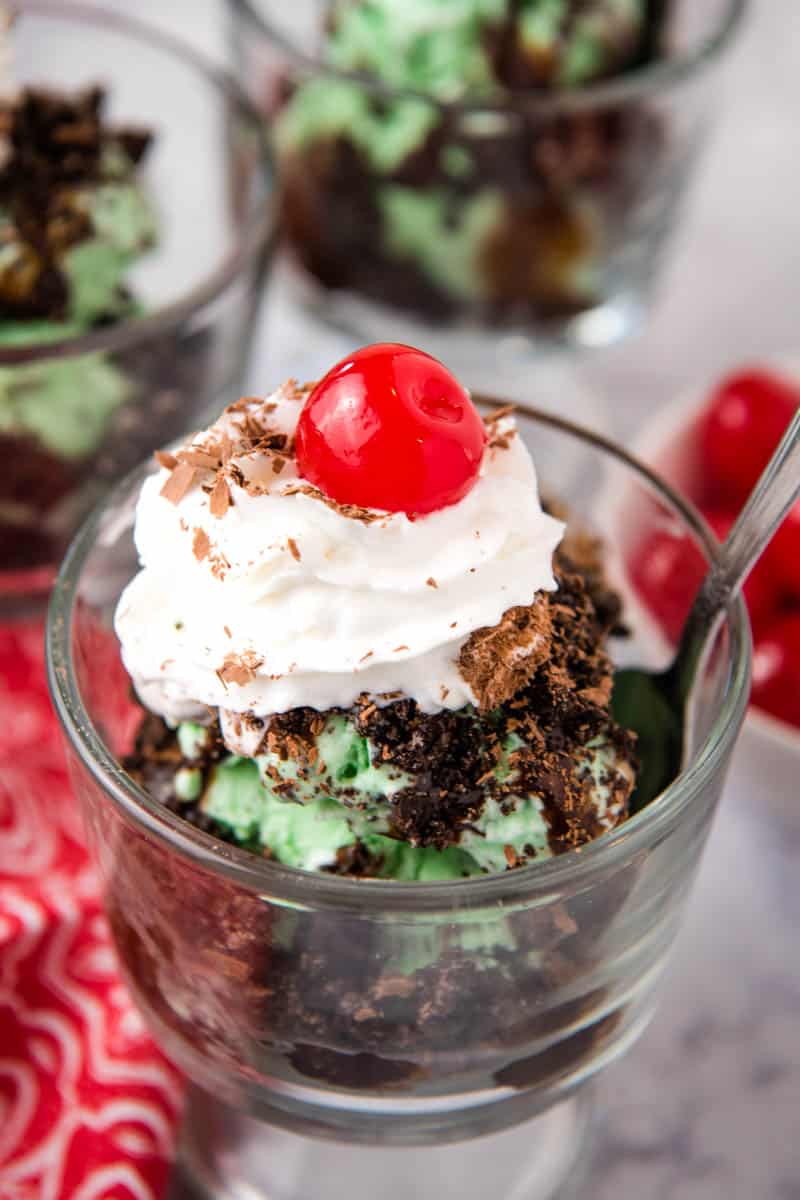
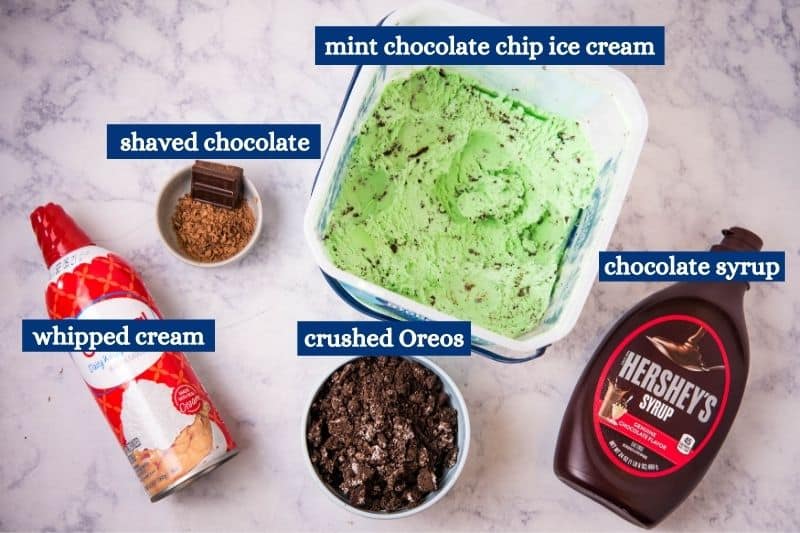

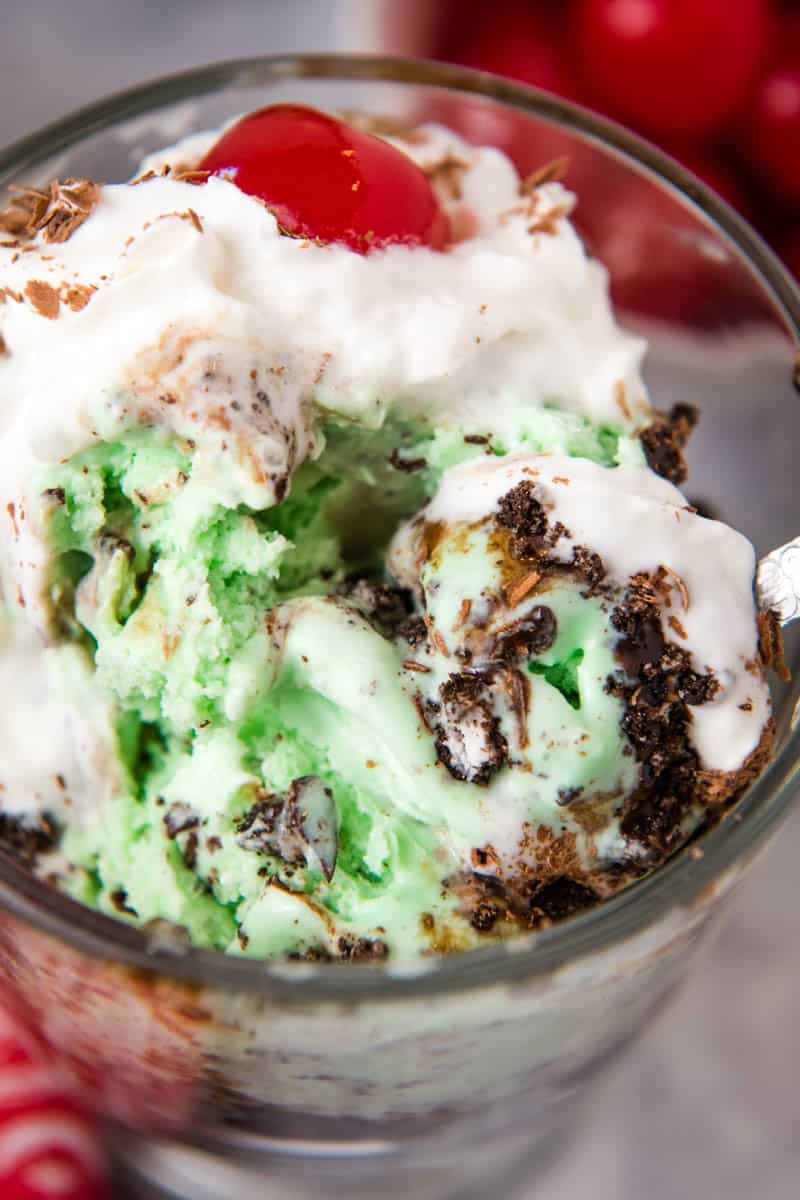


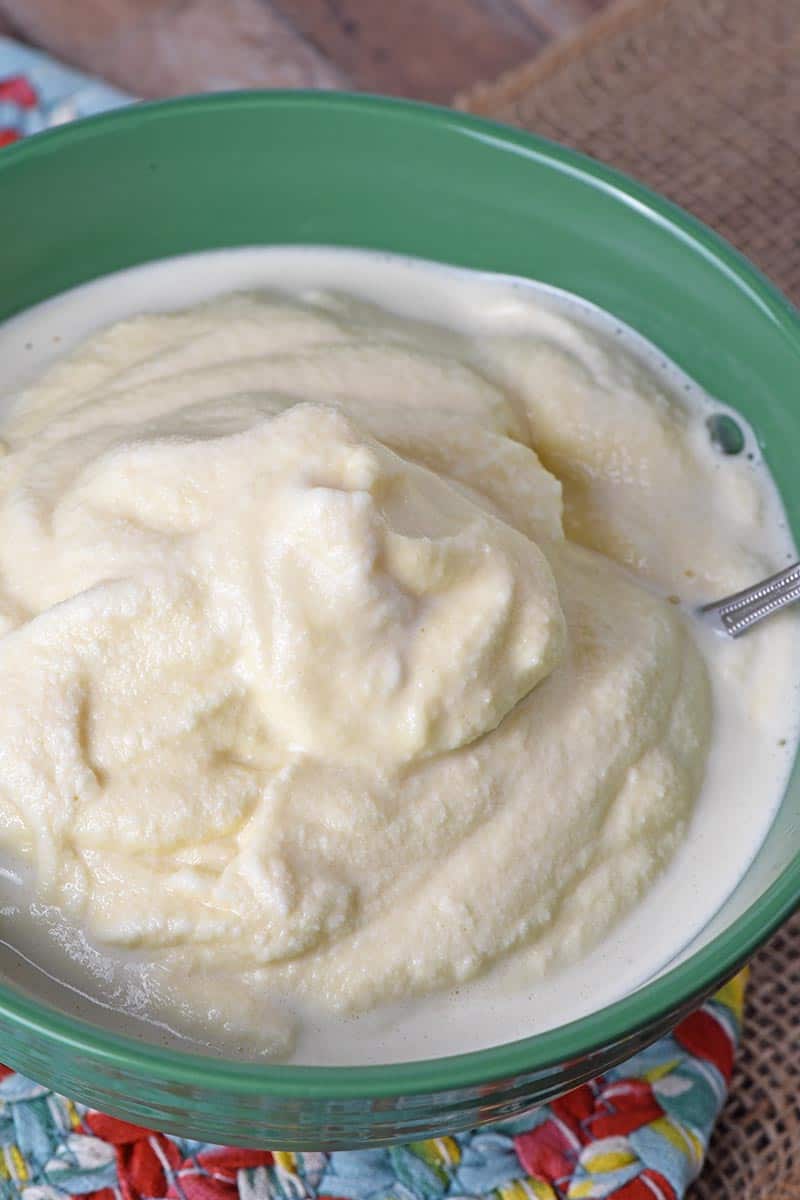
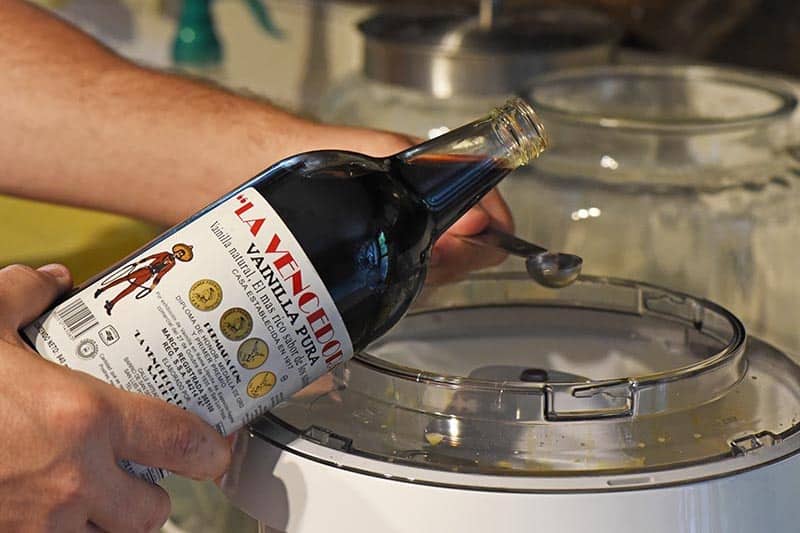

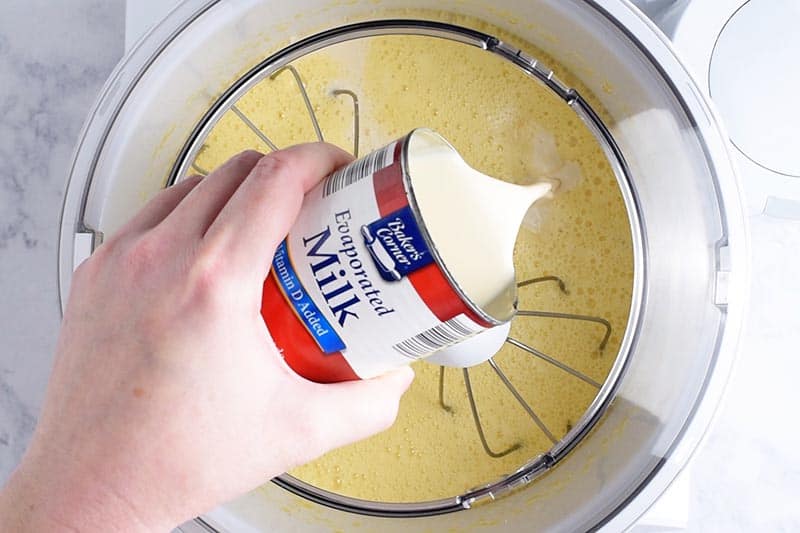
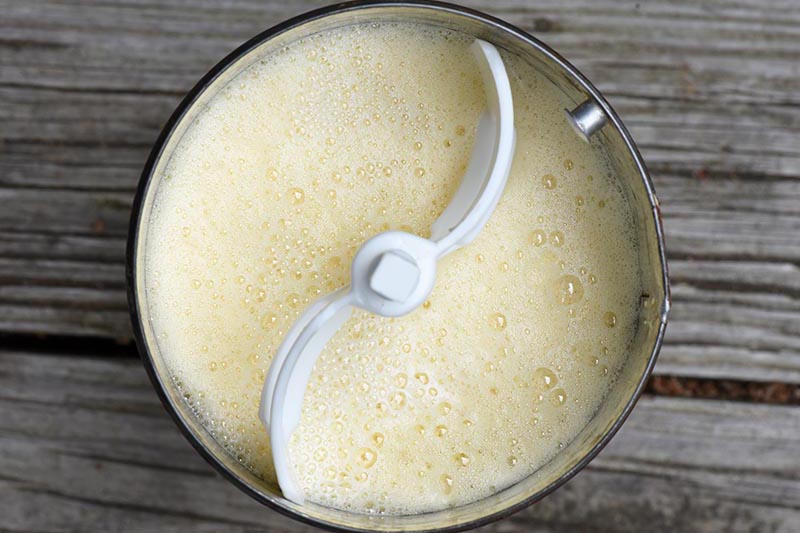
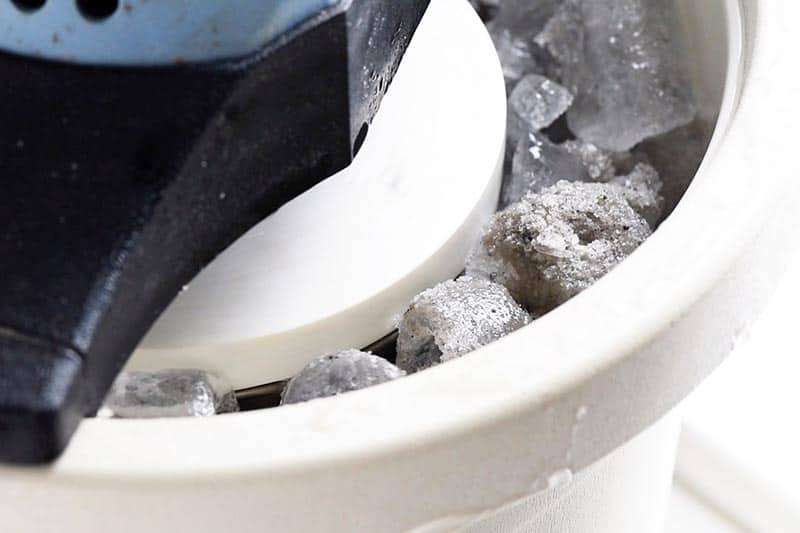
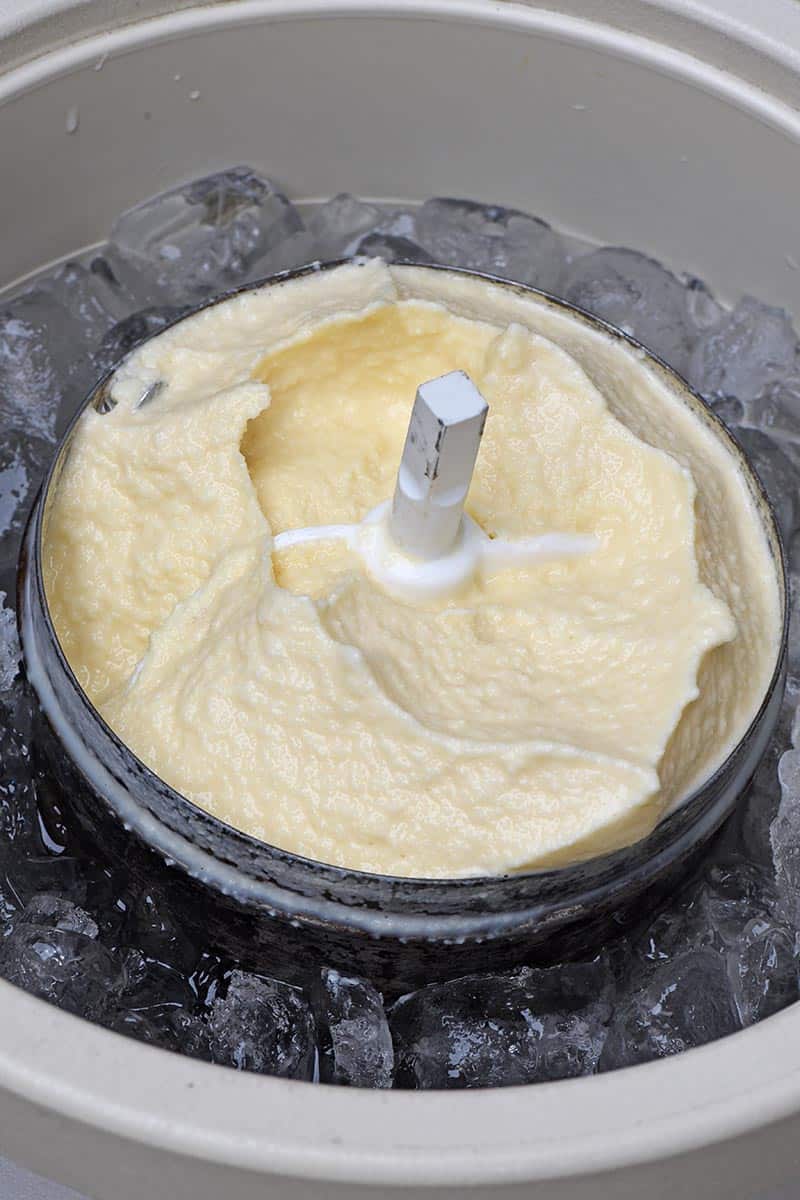
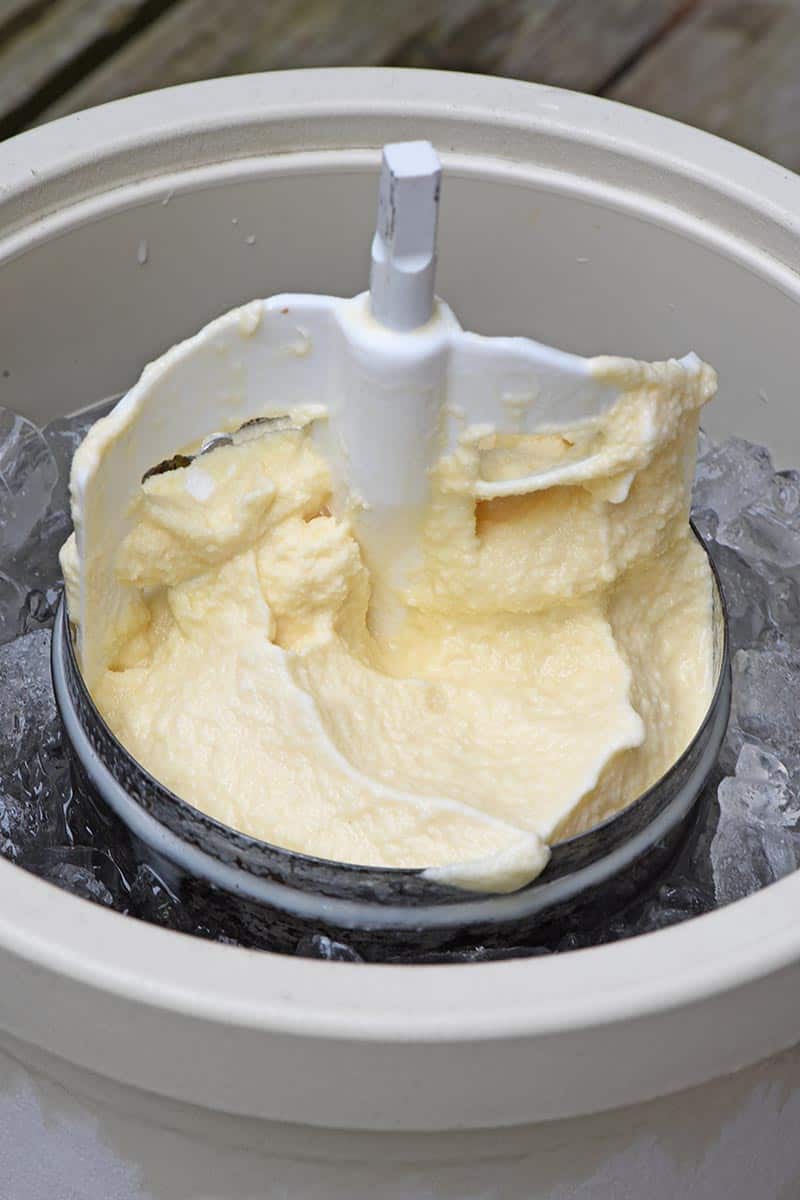
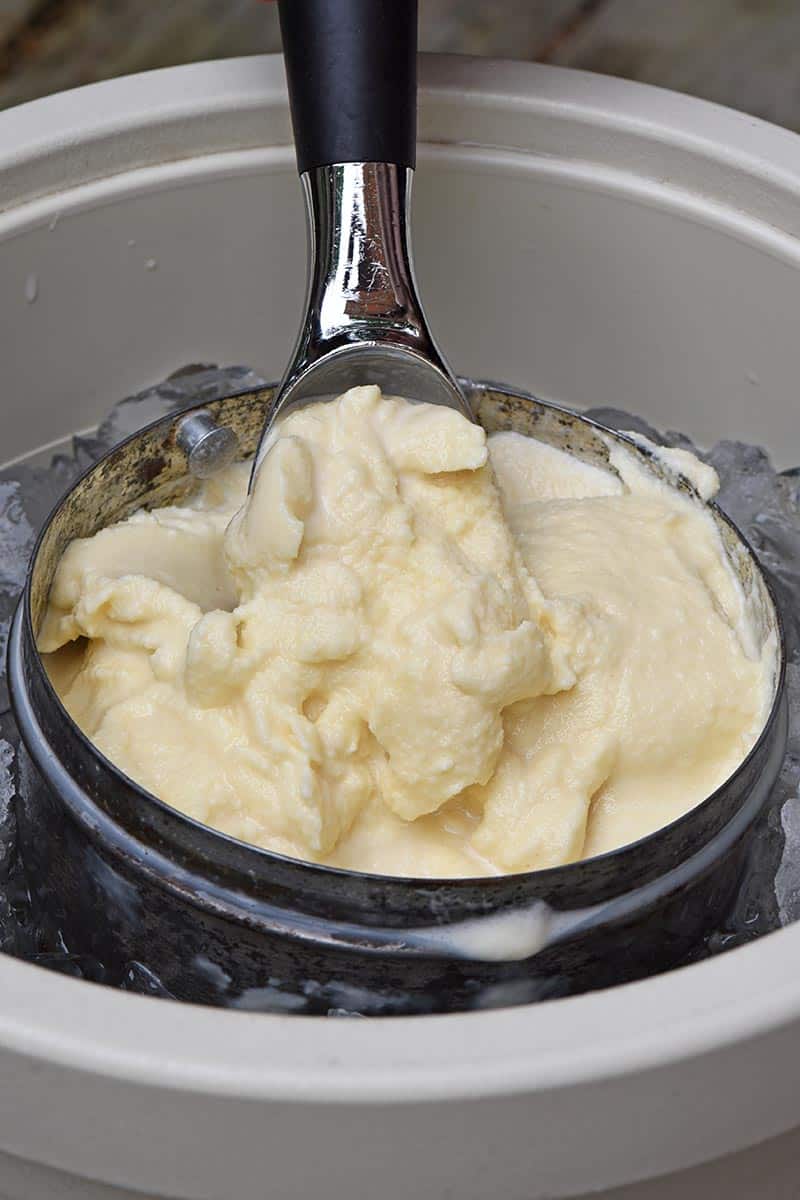
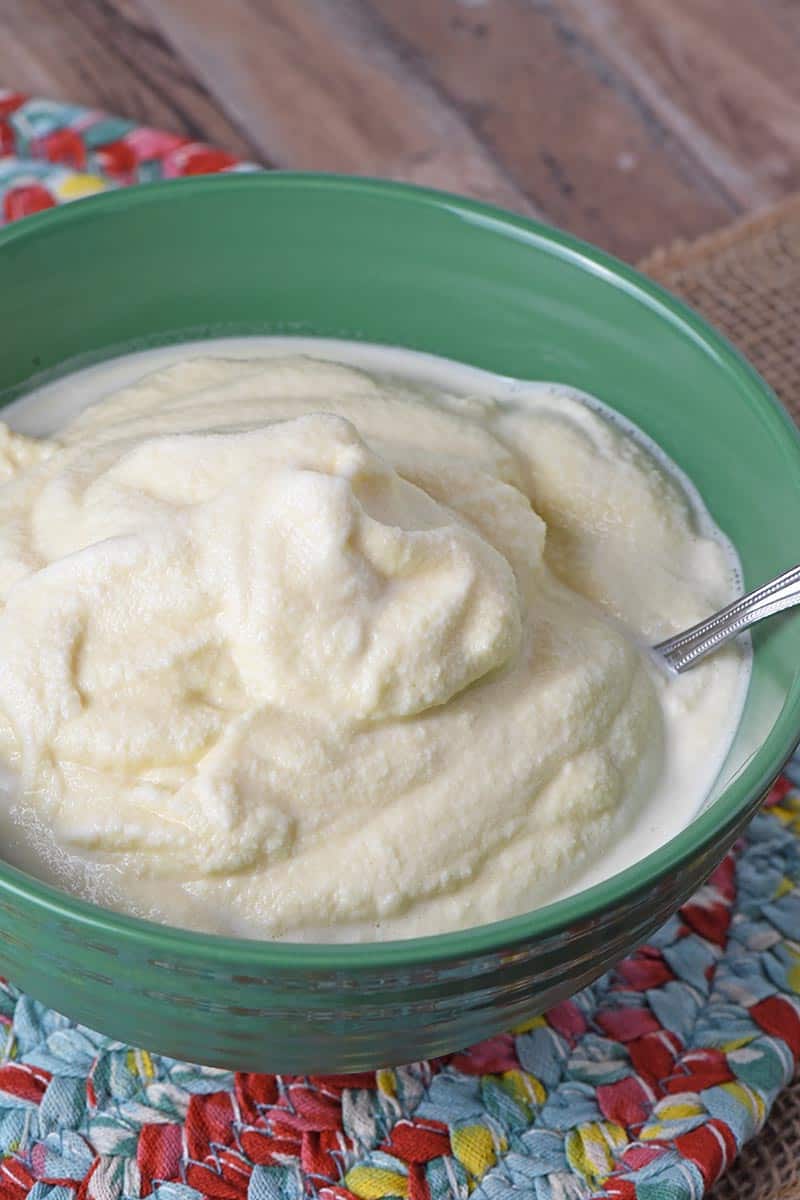
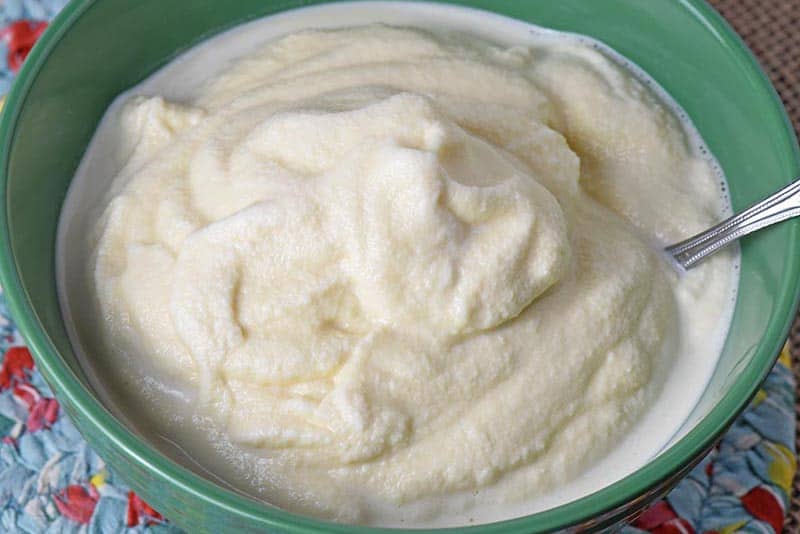
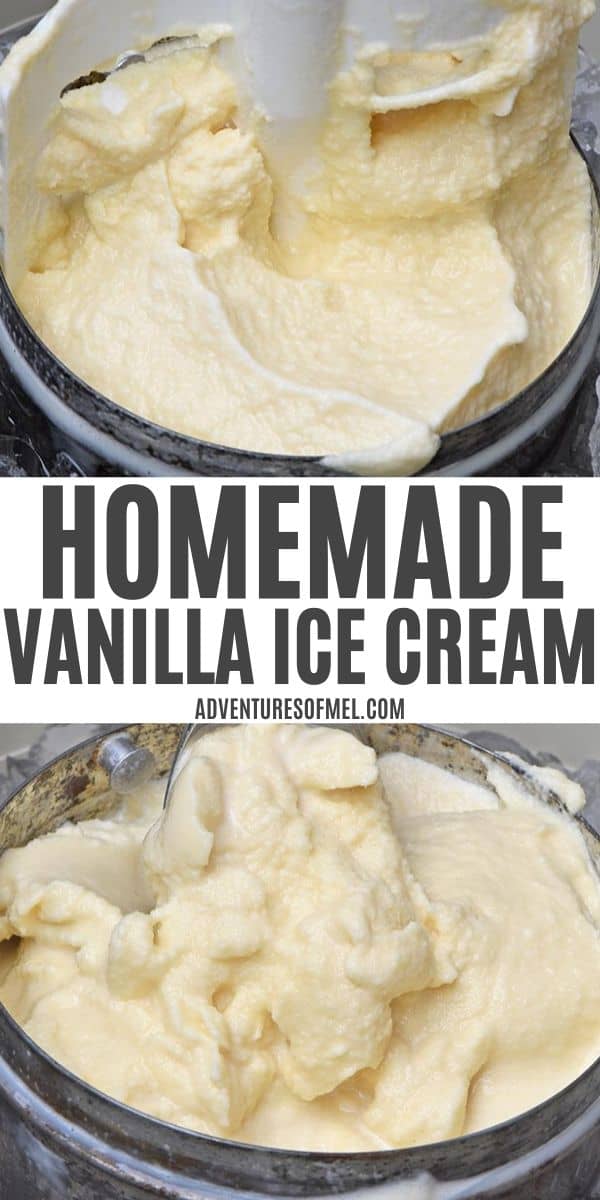

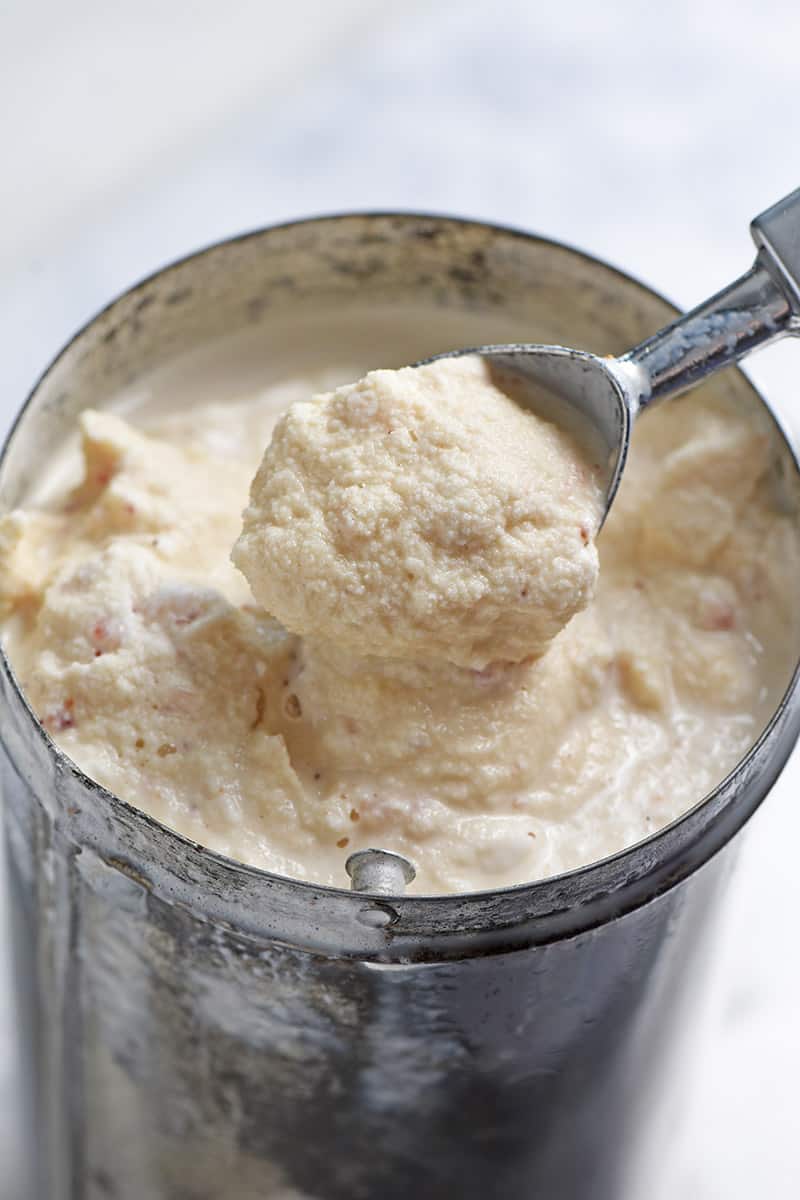
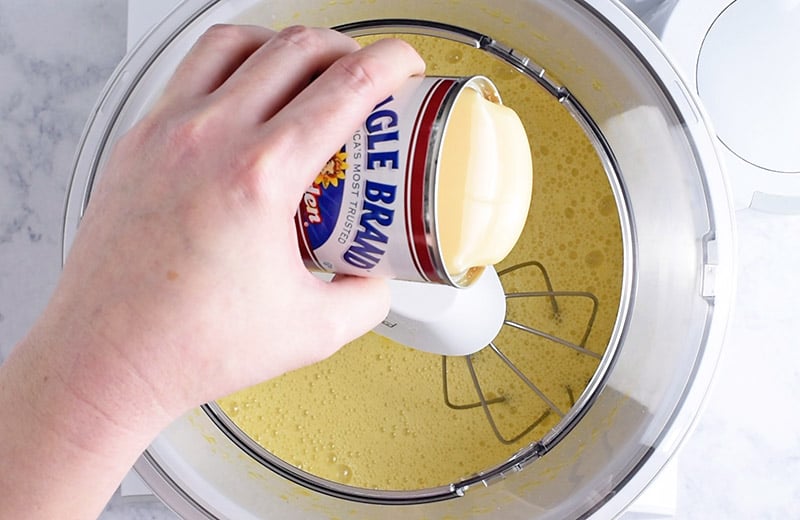
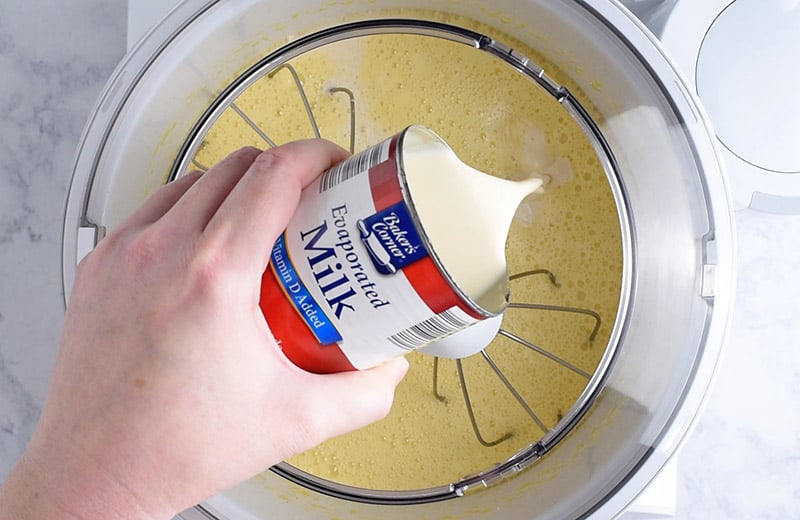
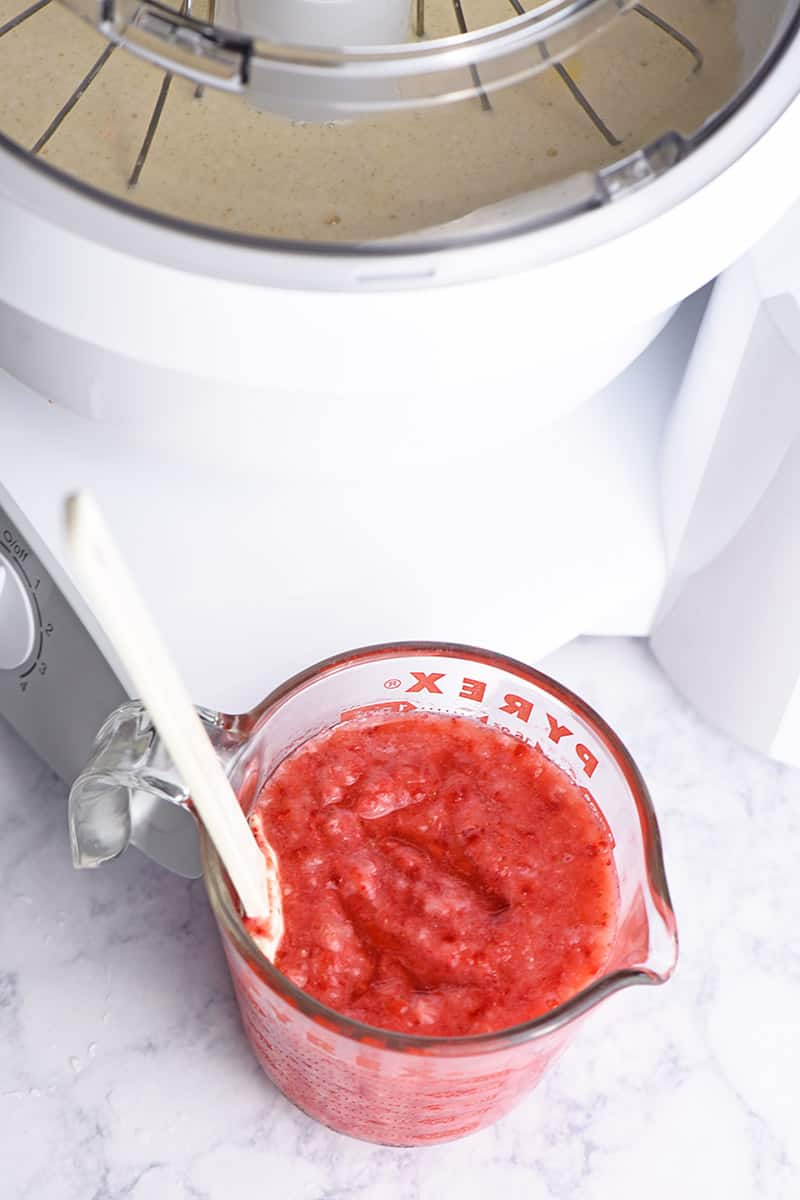
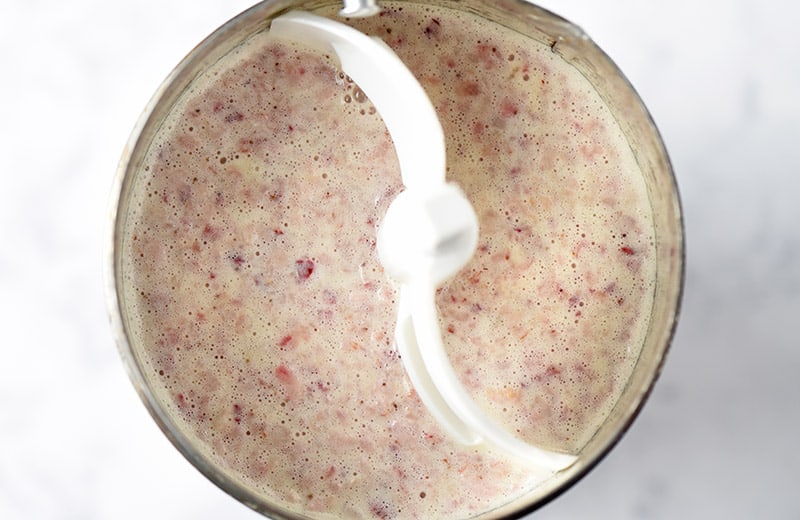
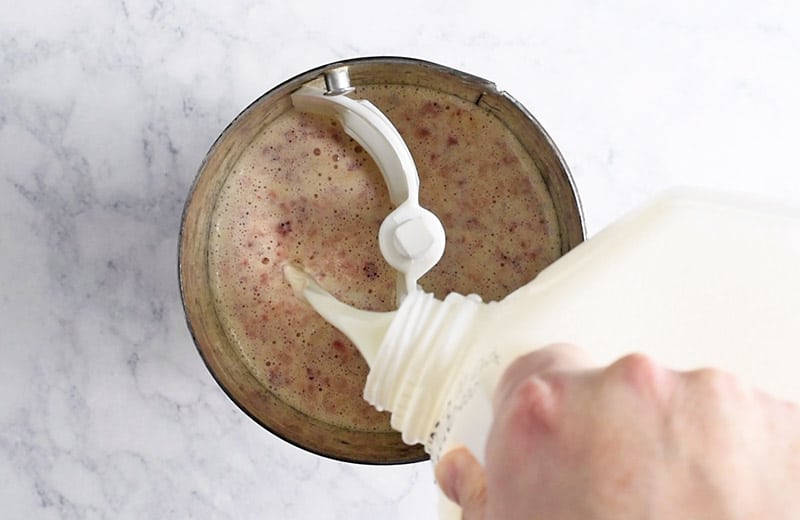
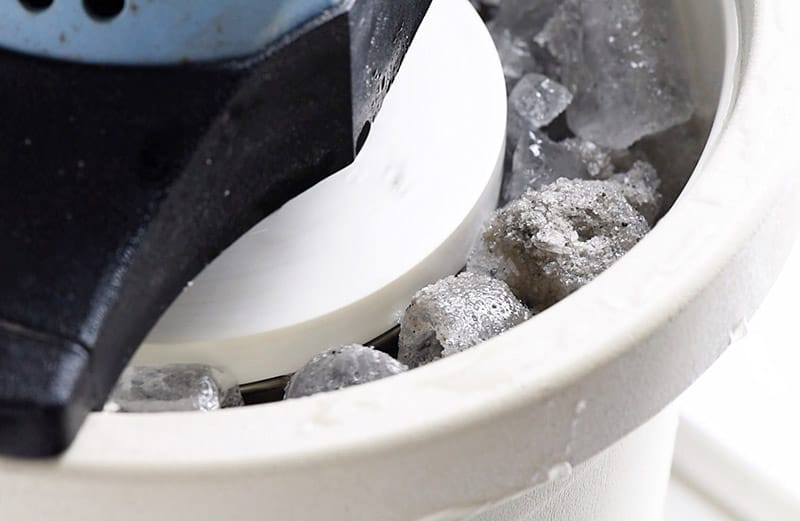
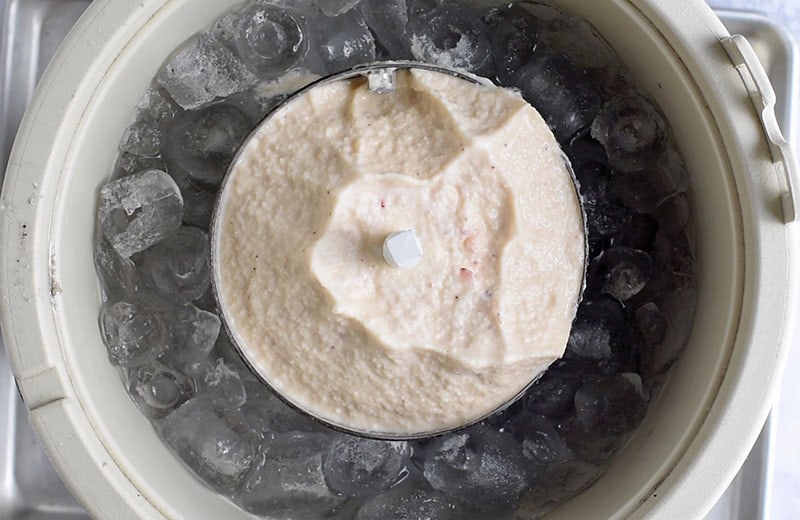

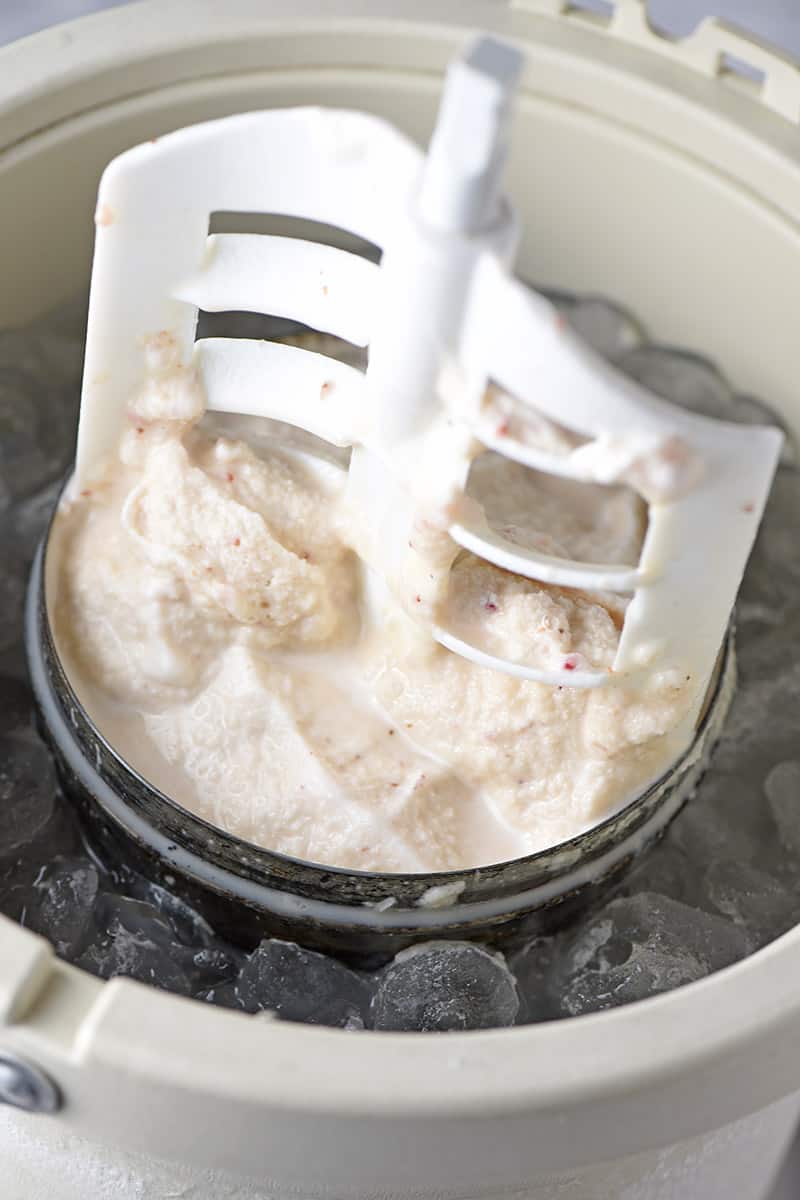
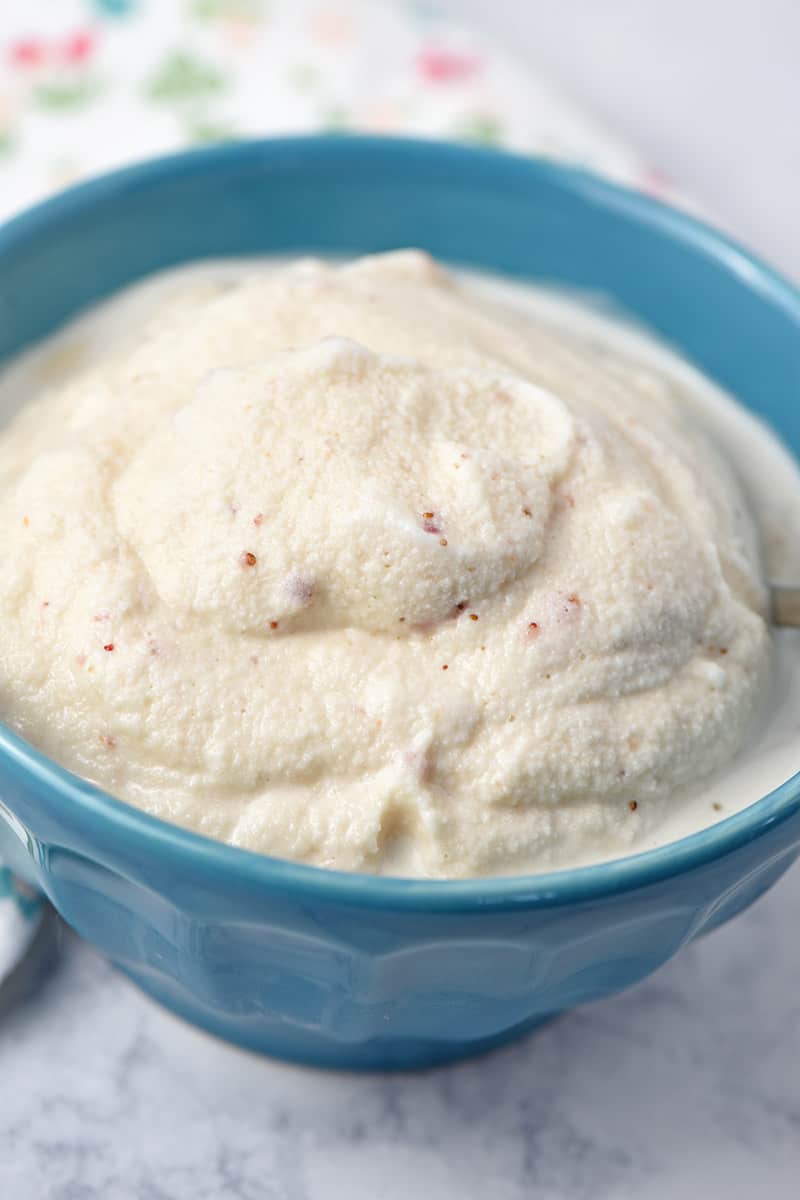

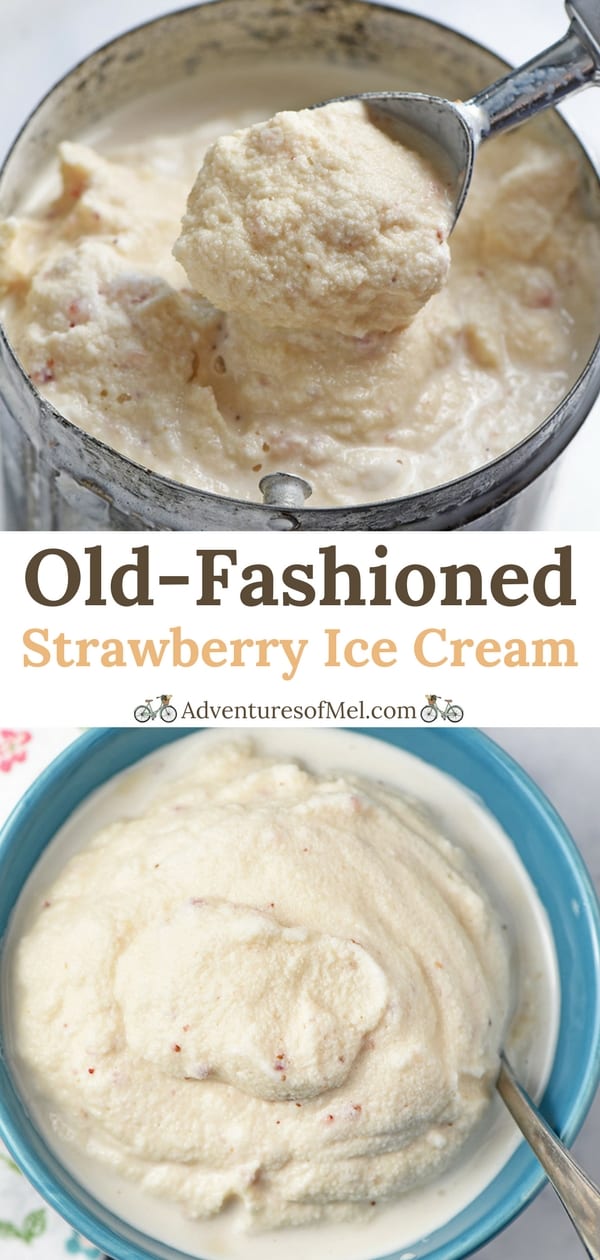
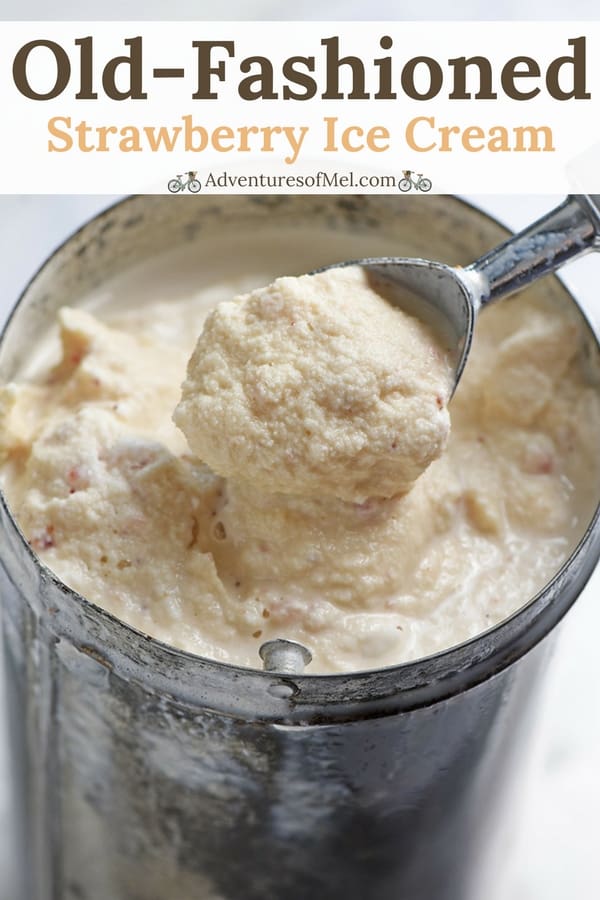
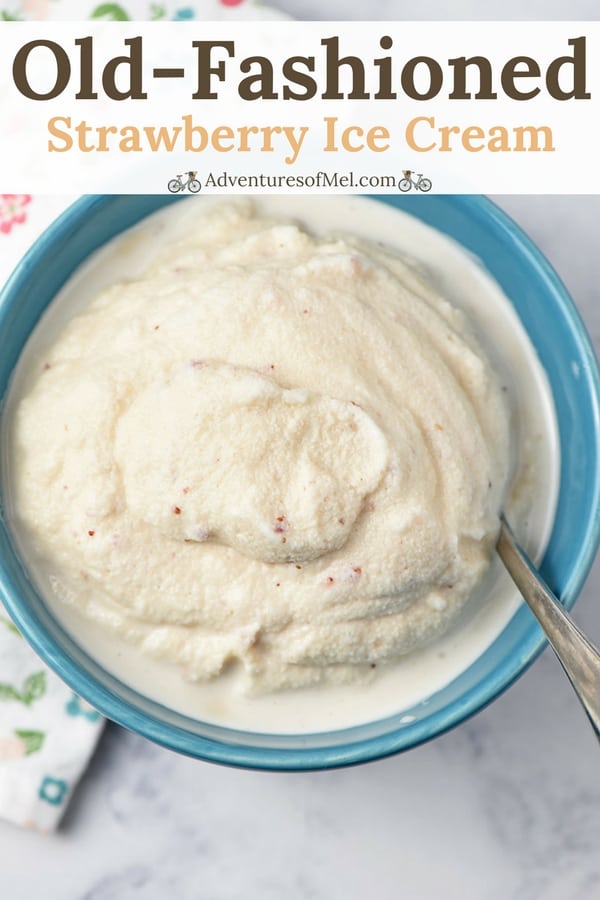
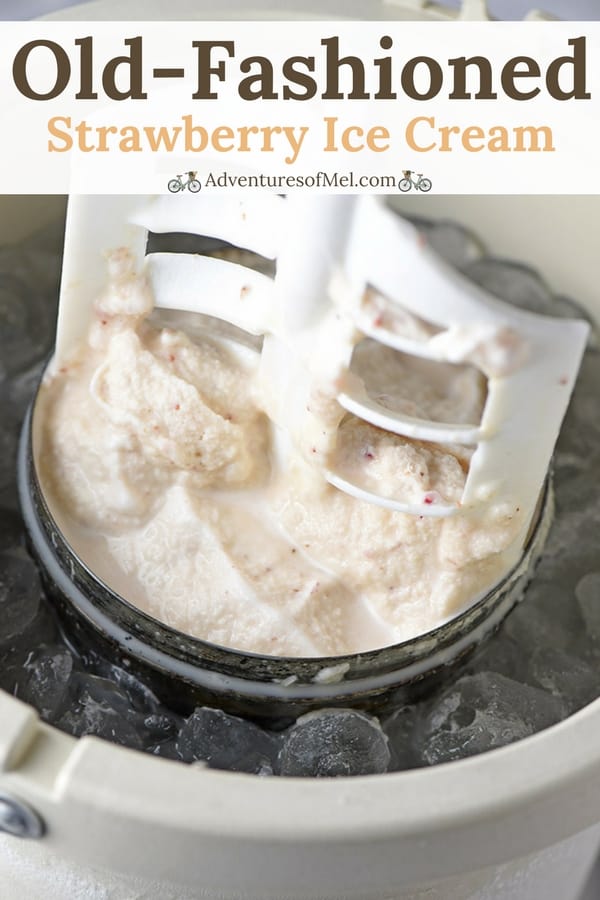

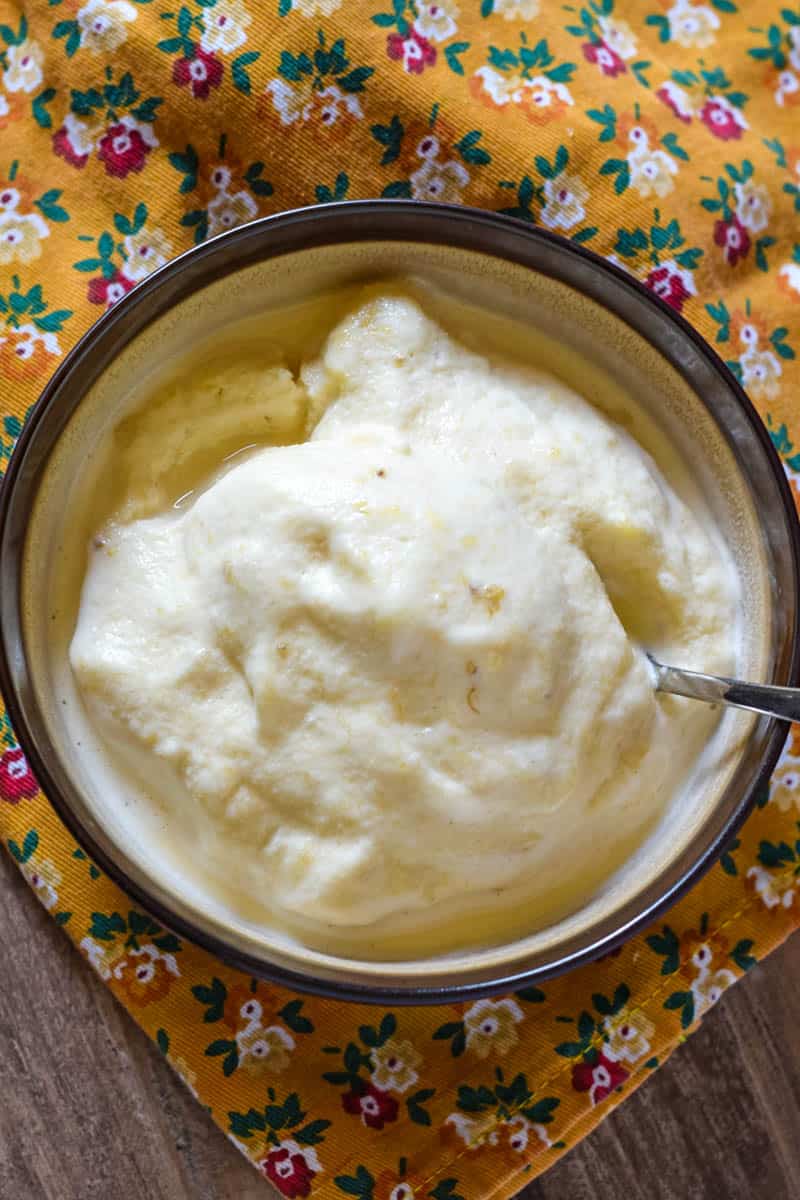
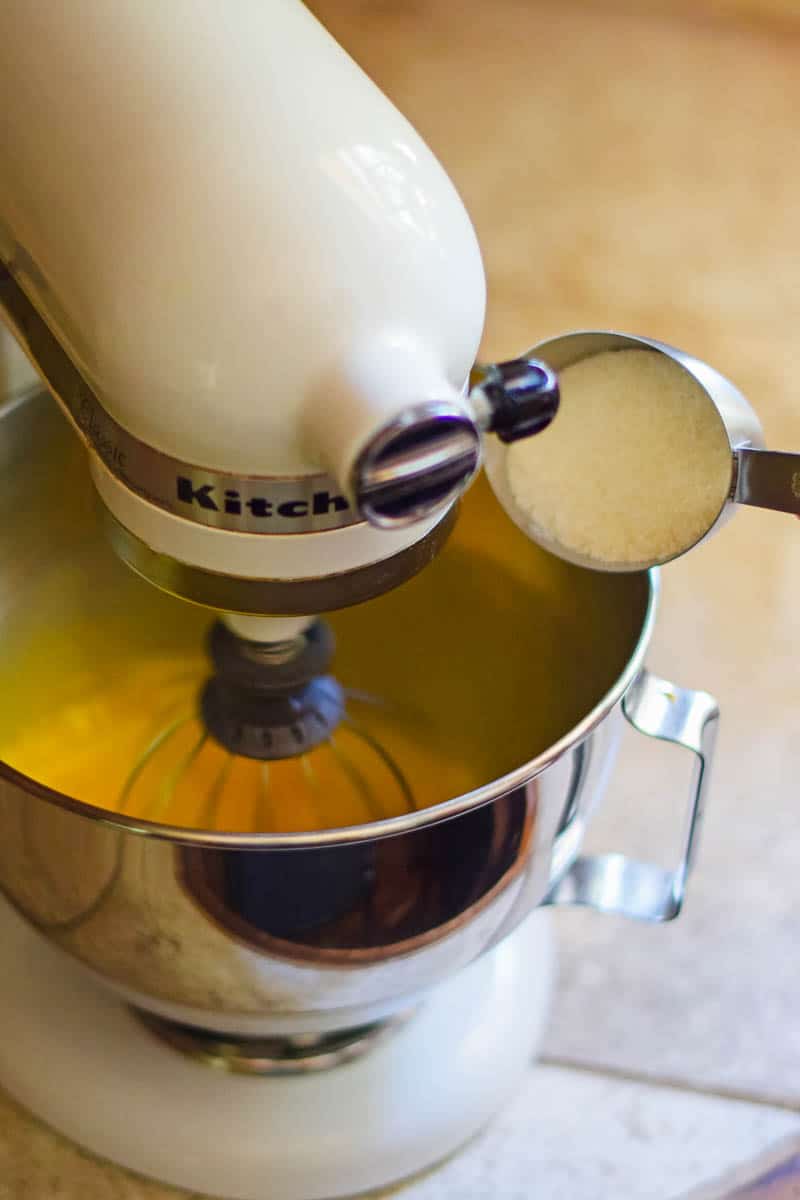
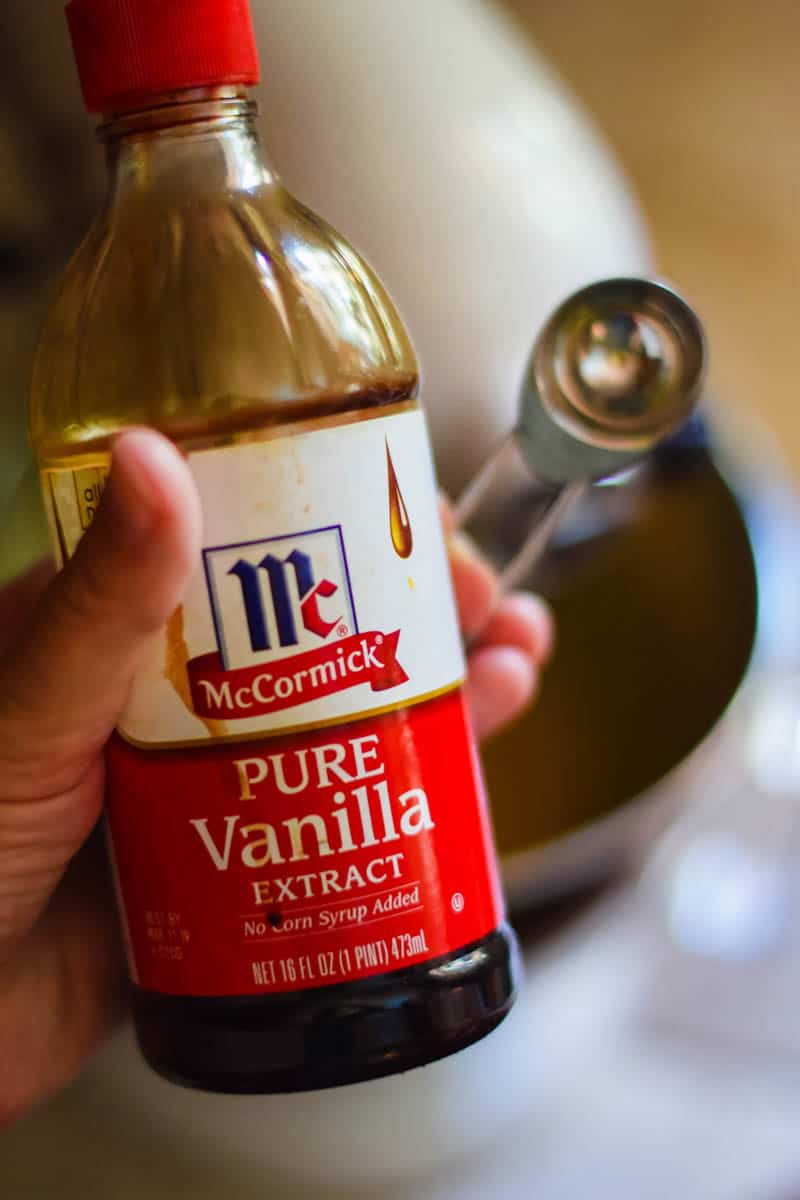
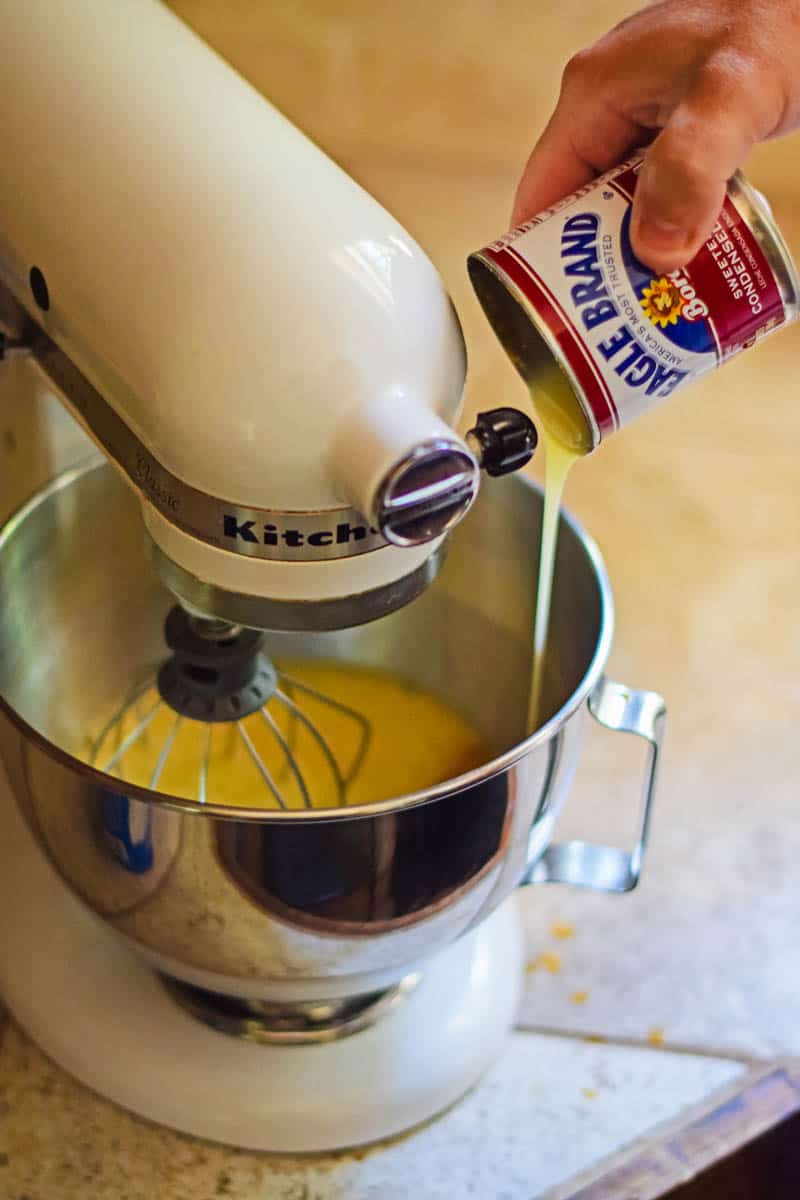
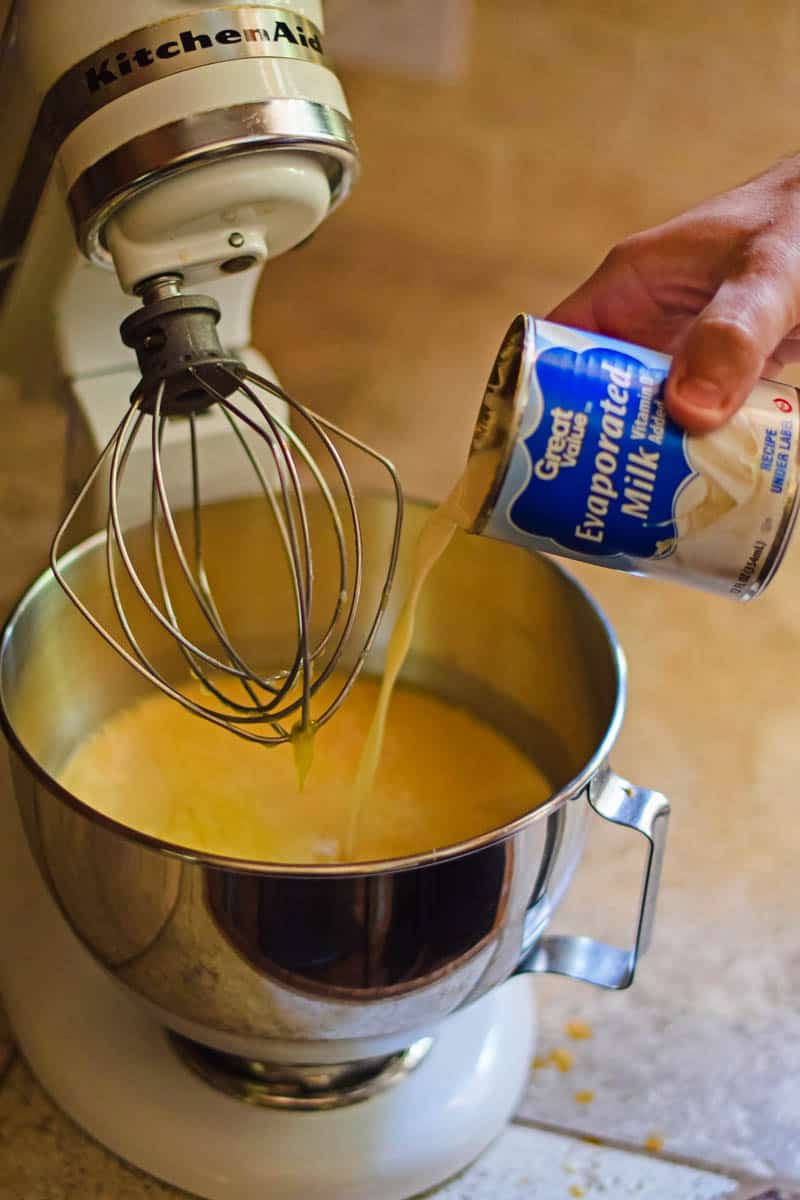
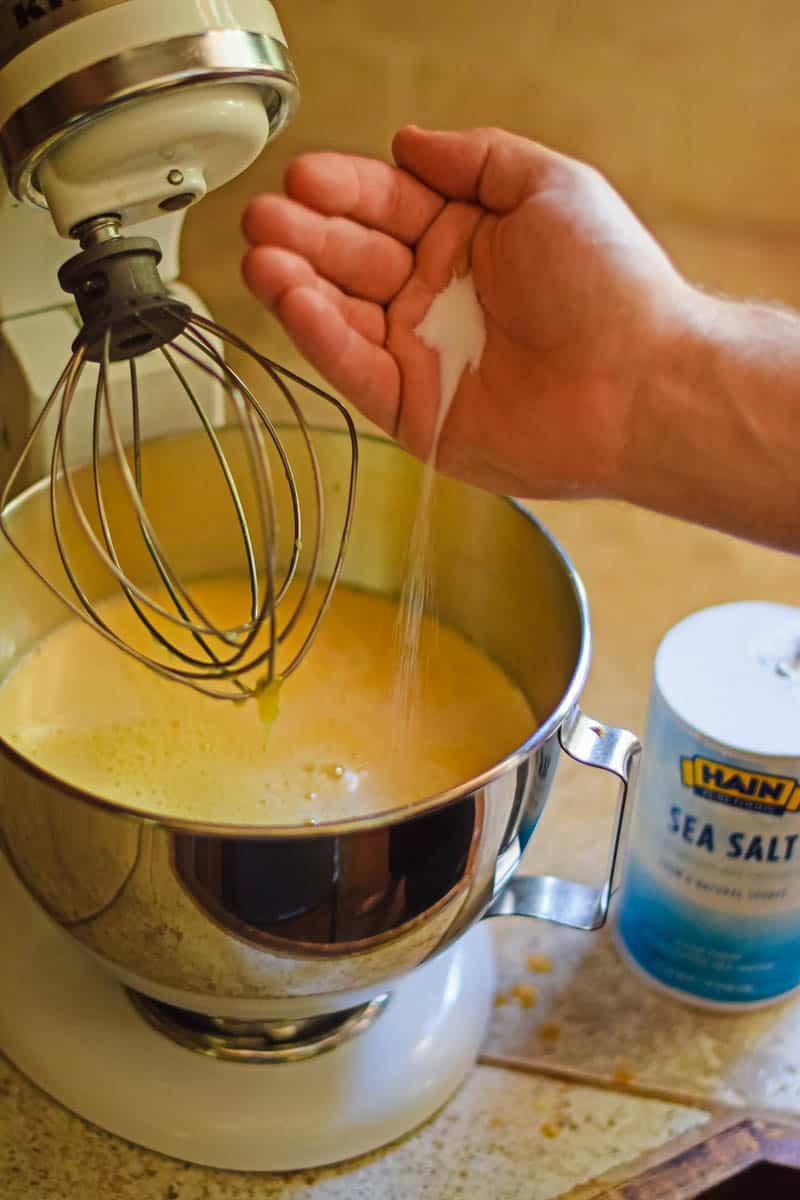
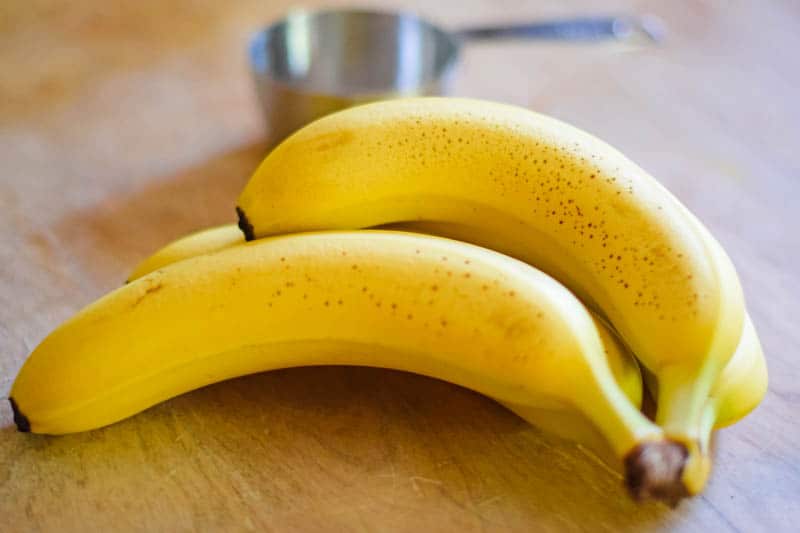
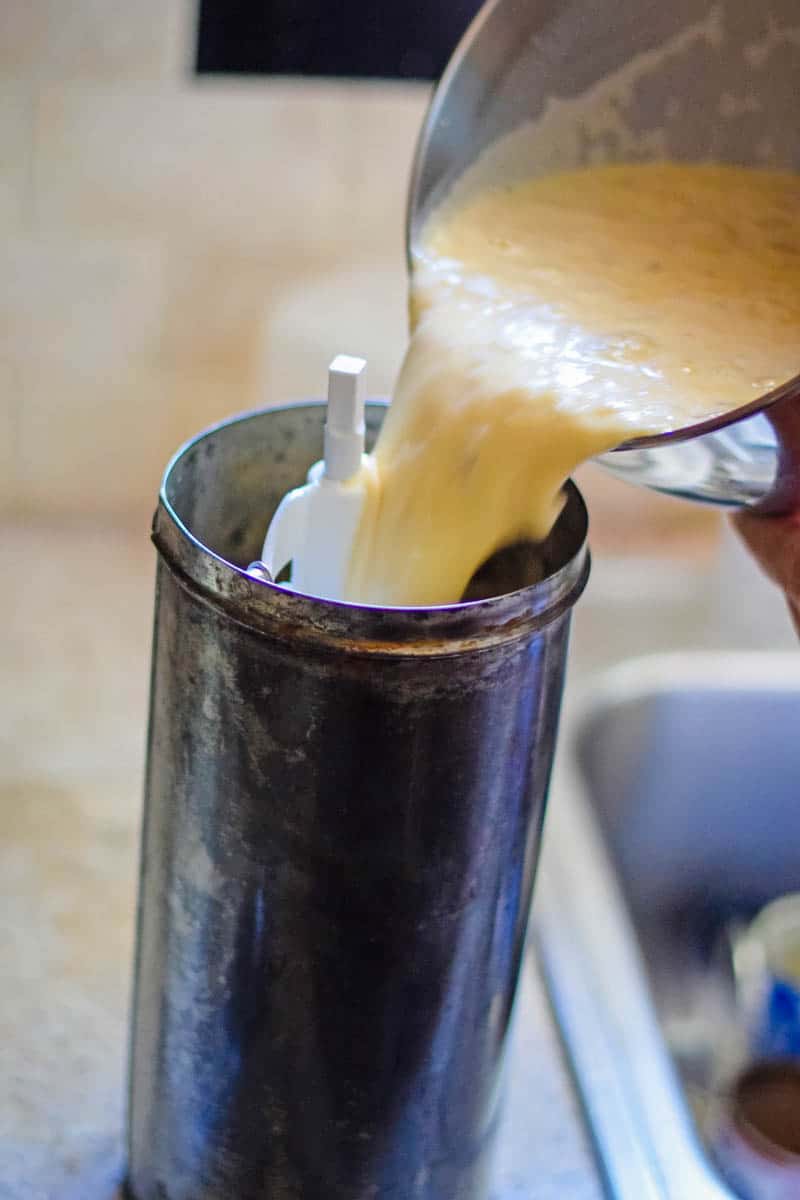
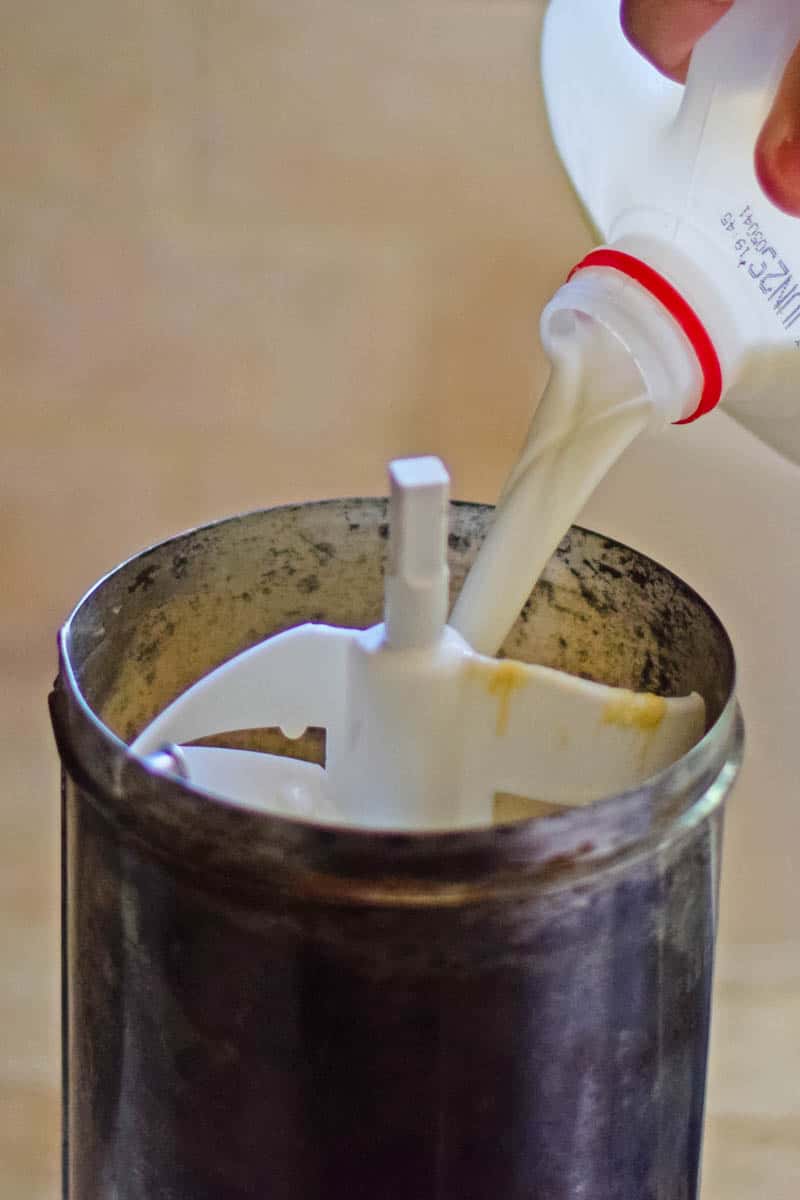
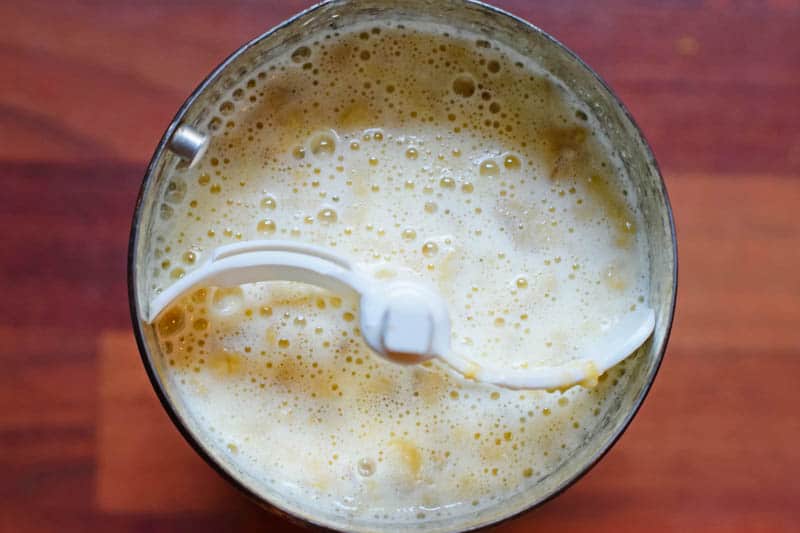
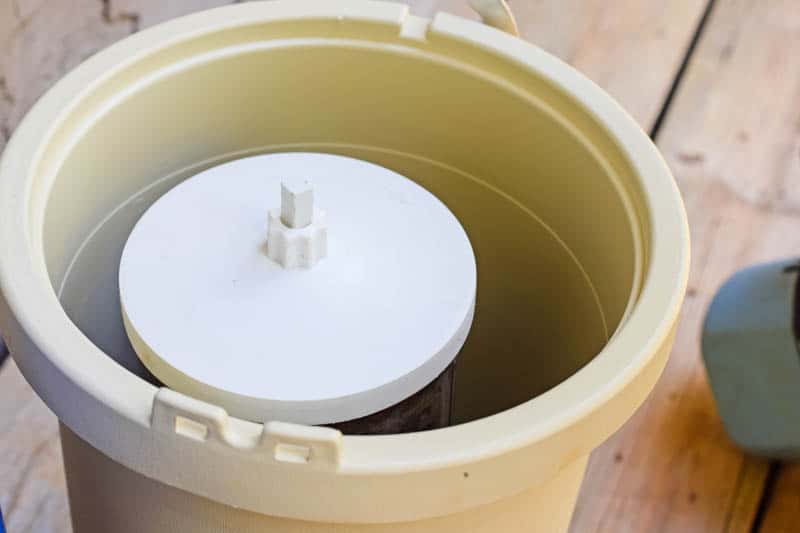
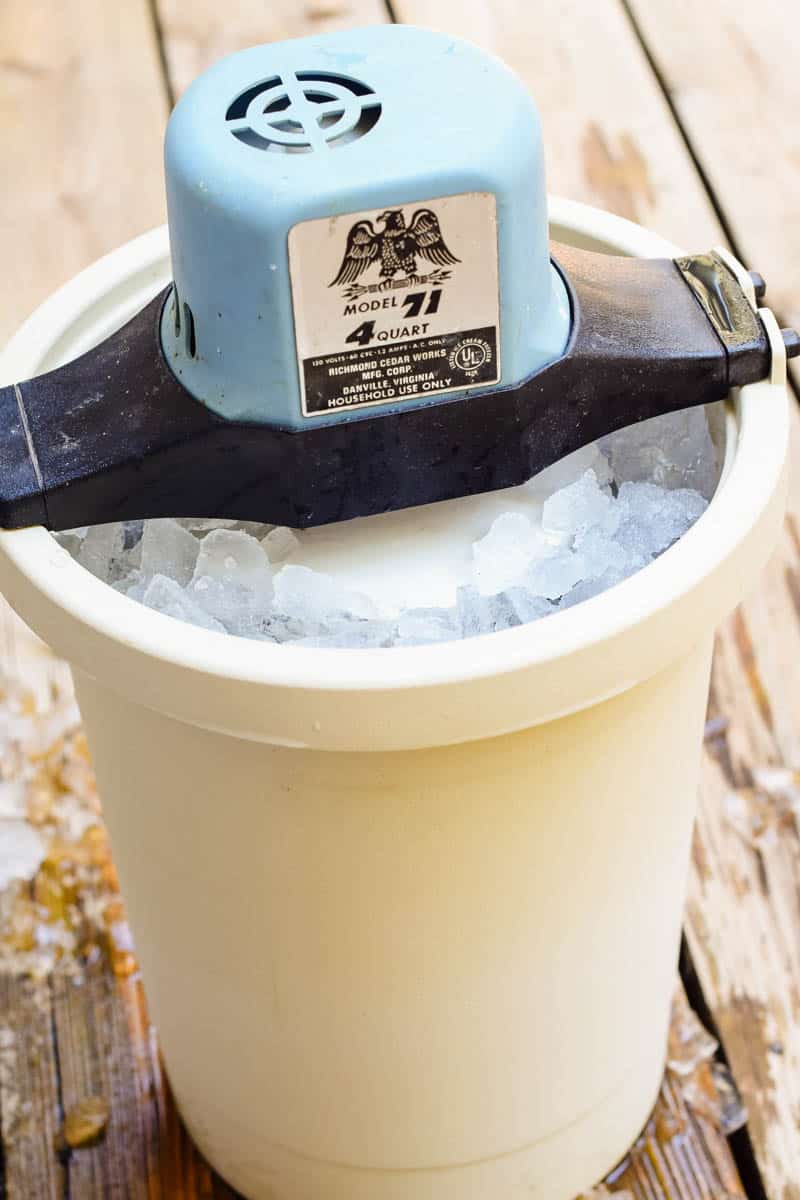
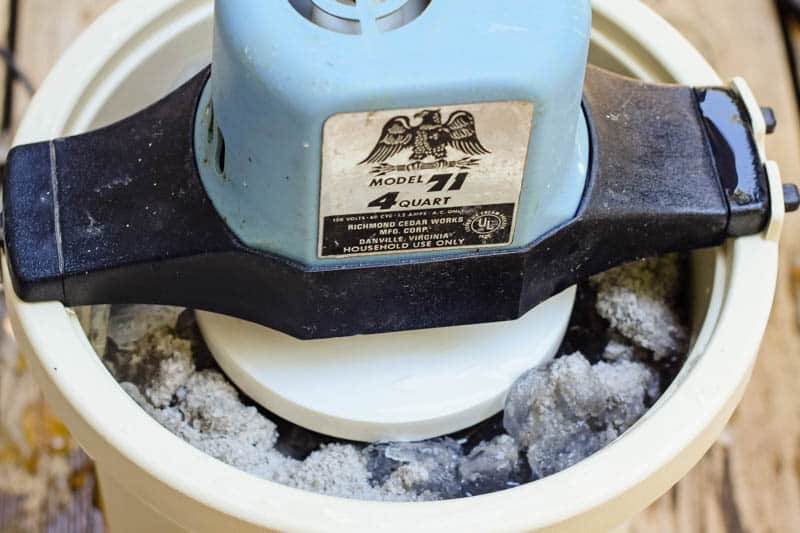
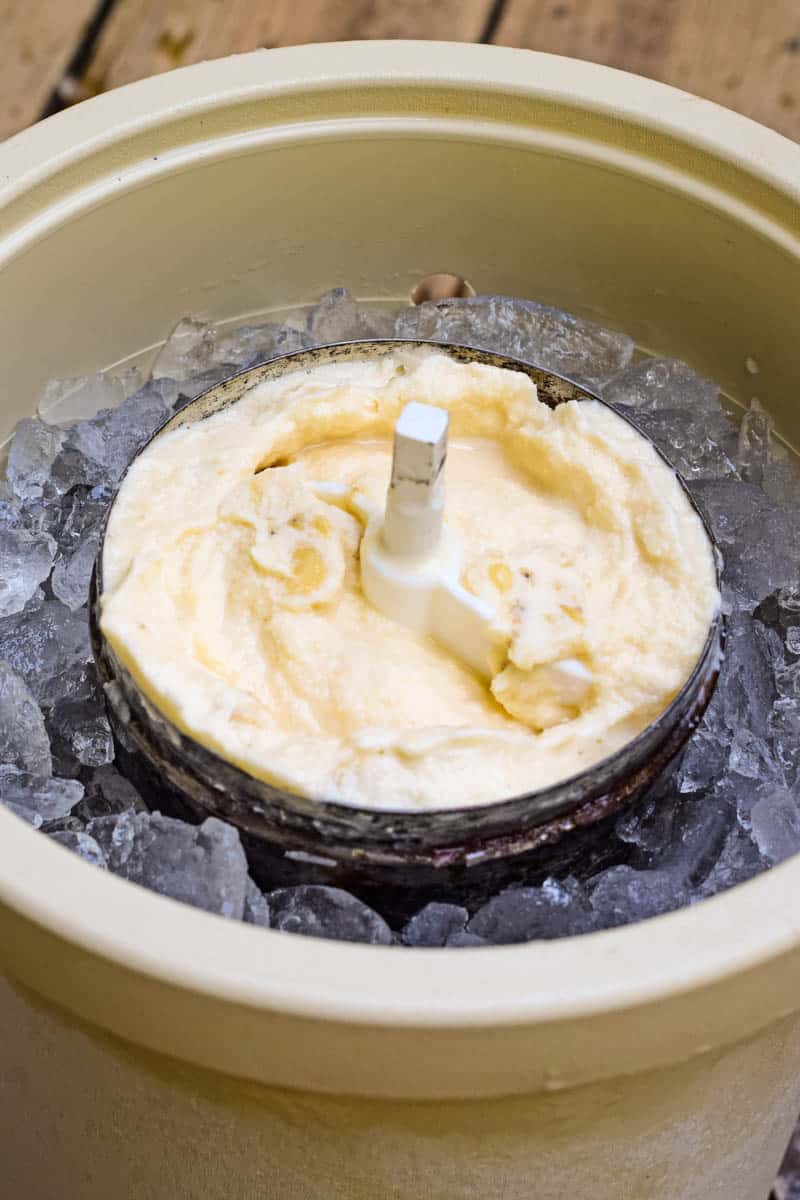
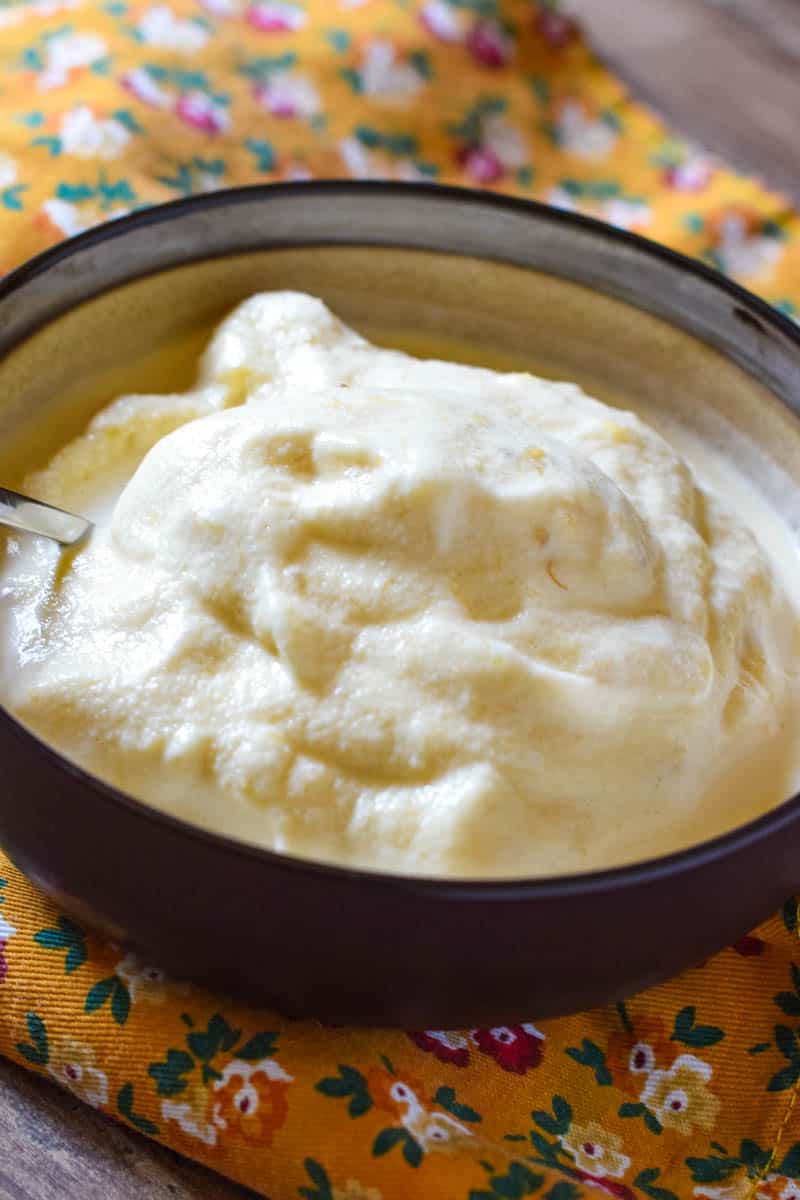
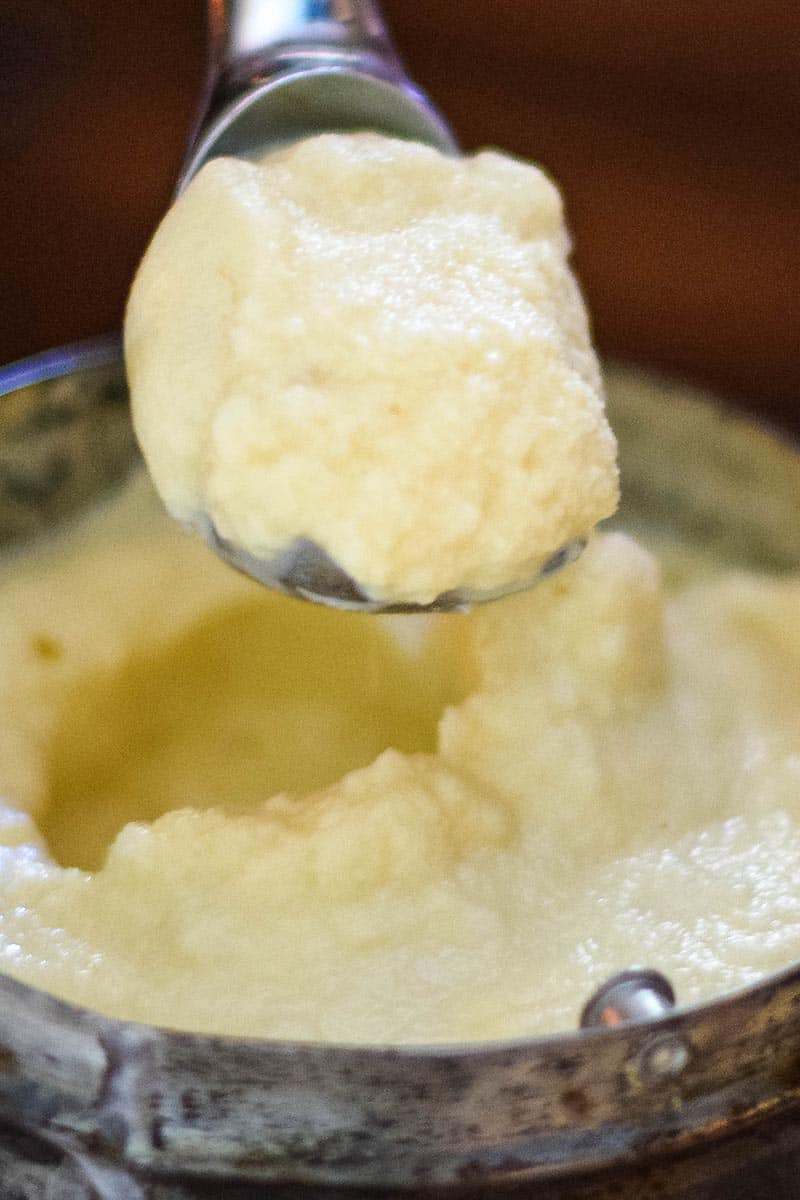
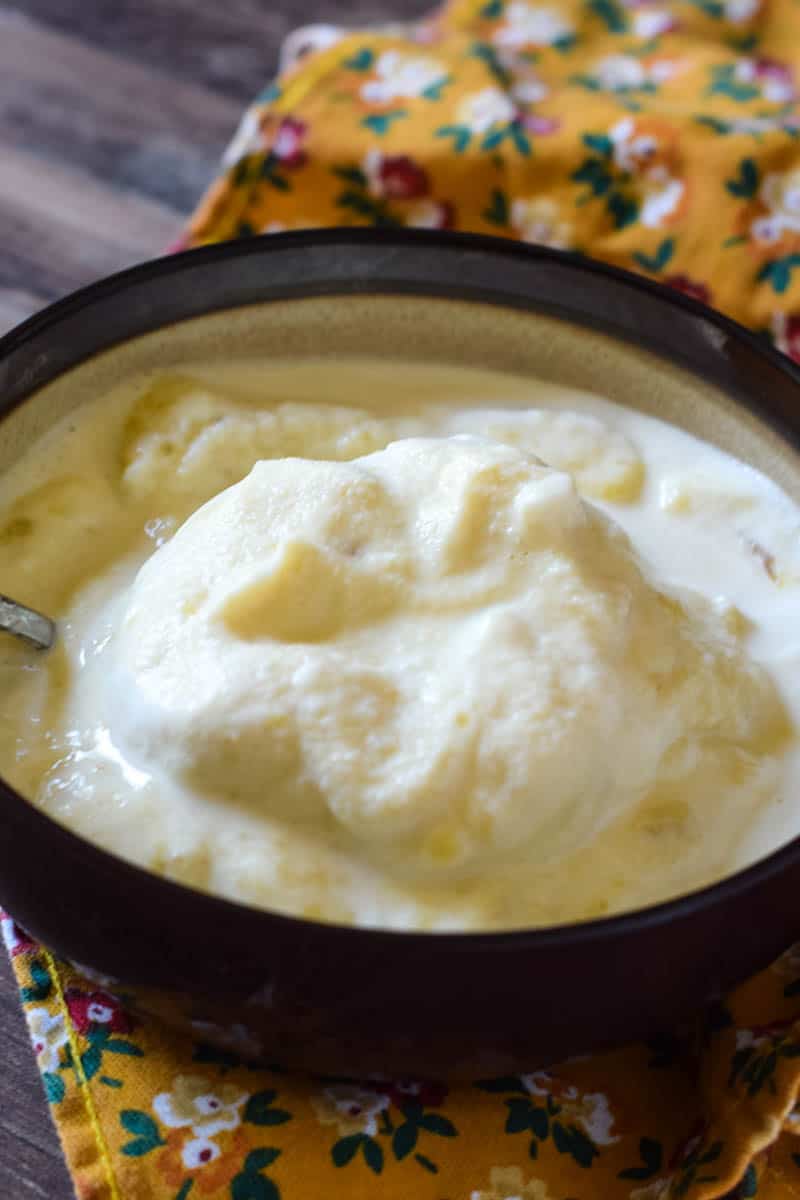
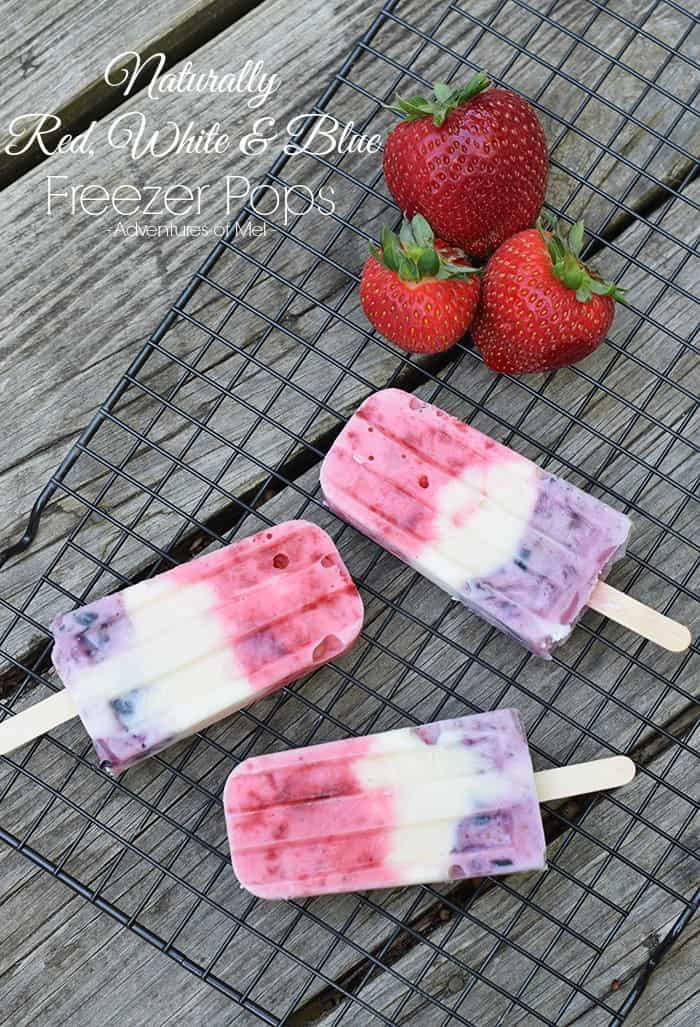
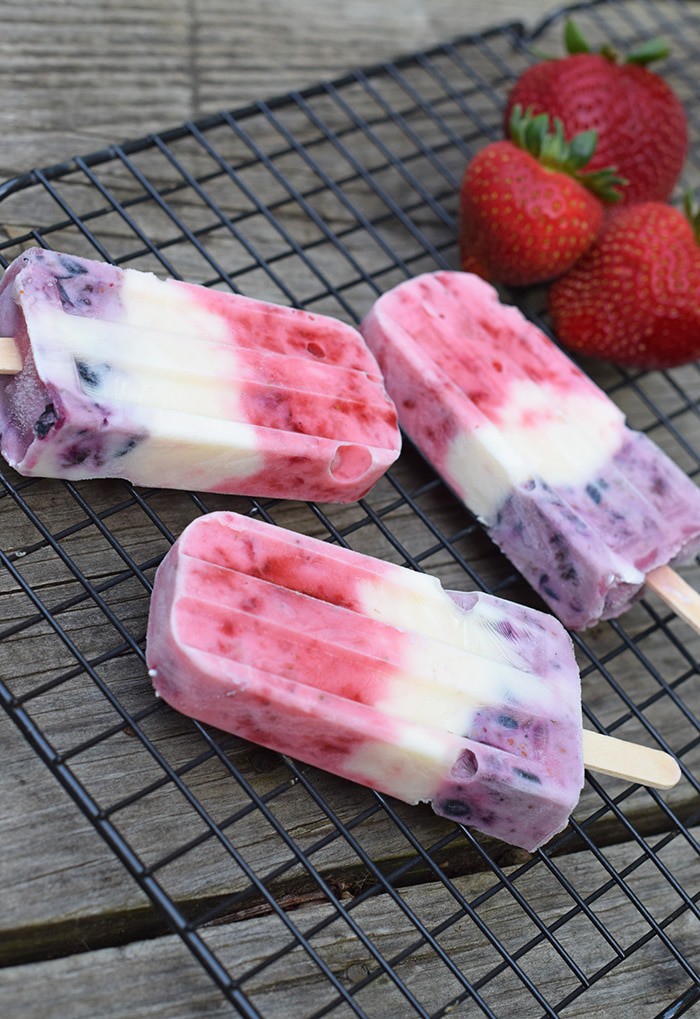
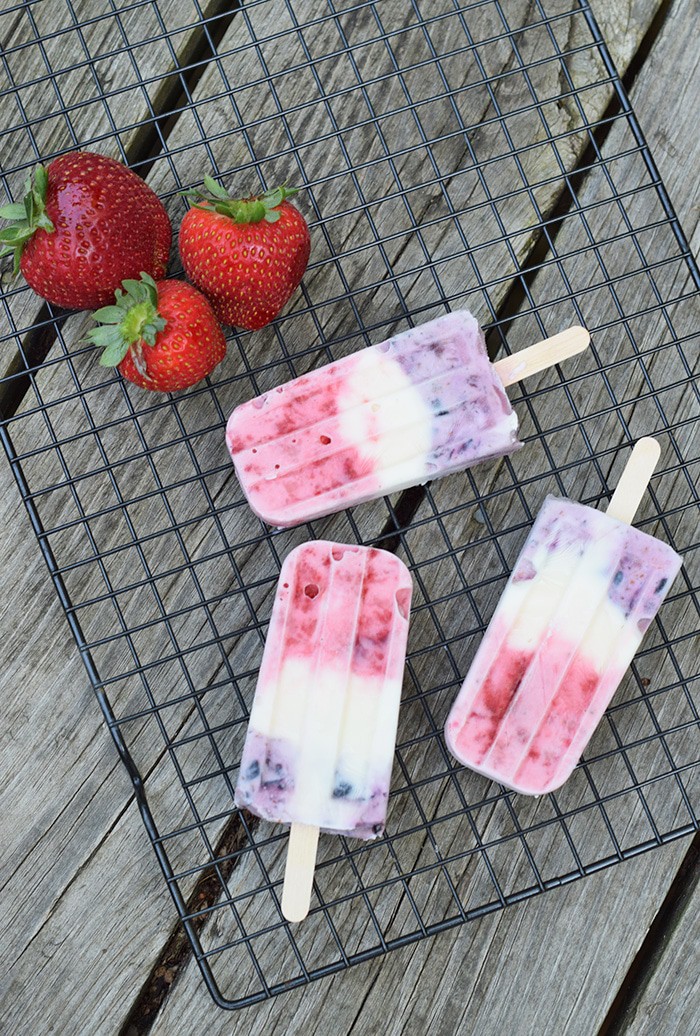
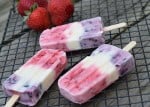
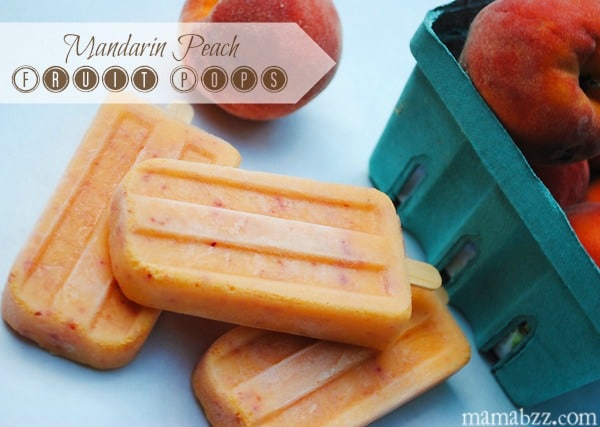
 I added a banana, peaches, a fruit cup of mandarin oranges, about 1/2 cup of Greek Yogurt, and 1-2 tsp of sugar. I kept the peeling on the peaches, so we locked all those awesome nutrients into these ice pops. Blend everything together, making it into a nice liquidy mixture. Then pour into popsicle molds. I highly recommend
  Set your popsicles in the freezer, and leave for however long they need, usually a few hours. Then remove pops from the freezer, and enjoy.
 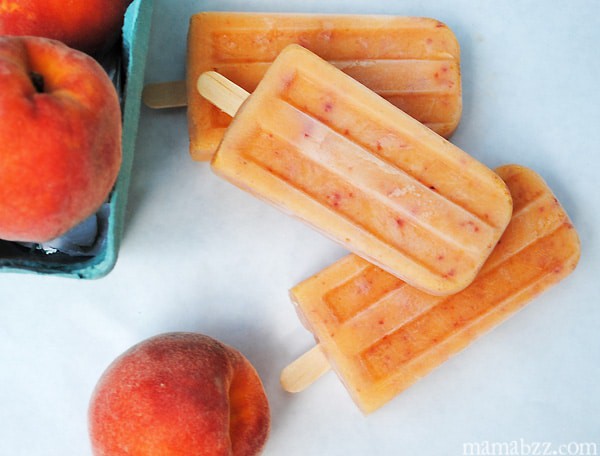 These have been delicious, and my kids are still enjoying them.
 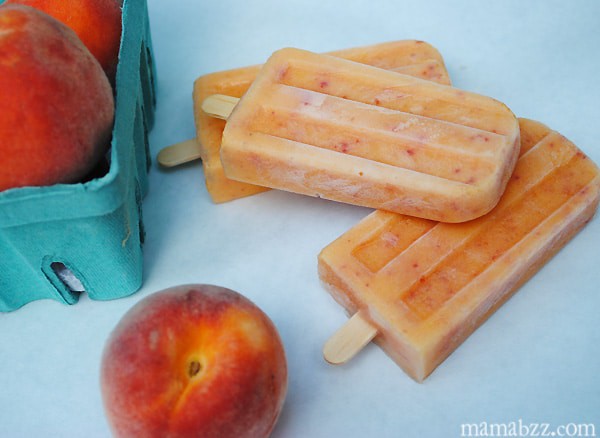 More recipes and experiments with homemade popsicles to come!