Category: Uncategorized

  • Easy Homemade Fire Starters That Work like a Charm

    Easy Homemade Fire Starters That Work like a Charm

    How to make awesome homemade fire starters for your campfire with an egg carton, paper, and wax. Super easy DIY with tips for starting a fire.

    It’s not every time we head out that we get to enjoy a campfire while we’re camping. But there are occasions where we do, and this egg carton fire starter helps us get it going quickly and efficiently.

    DIY fire starter, made from an egg carton, paper shreds, and wax, sitting on campfire logs or wood

    My boys have enjoyed learning how to make campfire coffee, and we love to cook breakfast over the fire.

    A DIY fire starter isn’t hard or time consuming to make. In fact, you can make however many you need the night before your camping trip.

    All you need are a few supplies and a stove to melt the wax. We actually made ours outside using our camp stove, so technically, you can even make these while you’re camping.

    I like that we can make them on the go because I’m not always that great at prepping everything beforehand, although I do always make sure we have a batch of our favorite body wipes made up ahead for every trip.

    This is a really handy tutorial for all my fellow outdoor adventurers, though. Because at the end of the day, what do we enjoy more than a warm campfire with a side of rest?

    campfire built with homemade fire starters

    IS THERE AN ACTUAL PRINTABLE INSTRUCTION CARD?

    If you’d rather skip all of my tips for making fire starters, important info for this project, and similar camping hacks – and get straight to the instructions – just scroll down to the bottom, where you’ll find a printable “how to” card and video.

    [mv_video doNotAutoplayNorOptimizePlacement=”false” doNotOptimizePlacement=”false” jsonLd=”true” key=”vx2hhvbablhuazfzcz3c” thumbnail=”https://mediavine-res.cloudinary.com/video/upload/vx2hhvbablhuazfzcz3c.jpg” title=”Easy Homemade Fire Starters That Work like a Charm” volume=”100″]

    SUPPLIES TO MAKE YOUR OWN FIRE STARTERS

    You only need 3 things to make these…

    You’ll also need some sort of stove and skillet, preferably a cast iron skillet. You can make these in your kitchen or on the camp stove while you’re camping.

    HOW TO MAKE FIRE STARTERS

    Making fire starters is a great way to both recycle and repurpose all those paper shreds from your home office, as well as any leftover cardboard egg cartons.

    Important Tip: Be sure none of your paper shreds include any type of plastic, such as the plastic you find in envelope windows. Also watch out for any non-paper mailing inserts or even credit cards. Only use paper.

    1. First, fill the egg cups in each egg carton with shreds of paper.
    2. Then melt the wax over a low to medium heat.
    3. Once the wax is melted, pour the wax over the paper shreds in the egg carton and let it sit until it hardens.
    4. Using a box cutter or large pocket knife, cut the egg carton into three sections for use in starting a fire.
    steps for making fire starters using an egg carton, paper shreds, and melted paraffin wax, also cutting the egg carton apart with knife

    And that’s it. Your easy fire starter is ready to start a fire!

    ALTERNATIVE HOMEMADE FIRE STARTER IDEAS

    If you don’t have paper shreds, no worries. You may have some other things that will work just as well, laying around the house.

    HOW TO USE YOUR DIY FIRE STARTER

    Once it’s ready to use, you can place the fire starter on the ground in the middle of your fire pit or fire ring. You should only need one section of your egg carton, leaving you with extras for another campfire at a later time.

    egg carton fire starter in fire pit

    Use a lighter or matches for lighting a fire, adding small pieces of kindling to help fuel the fire and get it going.

    man starting a fire with a homemade fire starter in fire pit

    Eventually, you’ll add larger pieces of kindling and small logs to keep your campfire going.

    man adding kindling to easy fire starter in campfire pit

    We usually build a small teepee with our firewood once we have a small fire going.

    If you’re new to making a campfire… We’ll be showing you exactly how to start a fire, as well as how to put a fire out, in the very near future. So, stay tuned.

    teepee fire in camp fire pit, built with homemade fire starters

    FIRE STARTING GEAR YOU MAY NEED TO MAKE A CAMPFIRE:

    DIY Fire Starter (of course)

    Mag Striker

    Zippo Windproof Lighter or this Flex Neck Utility Lighter

    Matches

    We’ve put together a camping checklist with all the gear you’ll need for your next adventure. Be sure to check it out for all the essentials!

    GET THE PRINTABLE INSTRUCTION CARD

    If you love these homemade fire starters as much as we do, please write a 5 star review, and help me share the “how to” on Facebook and Pinterest!

    how to make easy homemade fire starters that work like a charm

    CONNECT WITH ADVENTURES OF MEL!

    Be sure to follow me on social, so you never miss a post!

    Facebook | Pinterest | YouTube | Instagram | Twitter

    Sign up to receive my newsletter, filled with delicious recipes and outdoor travel adventures, in your inbox:

    FREE EMAIL SUBSCRIPTION

    Easy Homemade Fire Starters That Work like a Charm

    How to make awesome homemade fire starters for your campfire with an egg carton, paper, and wax. Super easy DIY with tips for starting a fire.

    • 1 cast iron skillet
    • Large pocket knife
    • Pot holder or welding gloves
    • 2 cardboard egg cartons
    • 4-8 cups paper shreds
    • 8 ounces paraffin wax
    1. First, fill the egg cups in each egg carton with shreds of paper.*
    2. Then melt the wax in a cast iron skillet over low to medium heat.
    3. Once the wax is melted, pour the wax over the paper shreds in the egg cartons, and let everything sit until it hardens.
    4. Using a box cutter or large pocket knife, cut each egg carton into three sections for use in starting a fire.
    5. And that’s it. Your easy fire starter is ready to start a fire!

    *You can also use dryer lint or any one of the suggestions I offered above in the post.

    Camping
    diy fire starter, easy fire starter, egg carton fire starter, homemade fire starter, homemade fire starters, homemade fire starters for camping, how to make fire starters, how to make homemade fire starters, make your own fire starters, making fire starters, making fire starters from shredded paper
  • Wash up with a Solar Outdoor Shower for Camping

    Wash up with a Solar Outdoor Shower for Camping

    Grab a hot shower with a solar shower for camping that holds 5 gallons of water and warms up with a little help from the sun.

    One thing I hear most often from people who don’t necessarily like dispersed camping, is that they’d miss their hot showers. We usually do a lot of free National Forest camping and backcountry camping, so a hot shower just isn’t always available.

    I’d be lying if I said I didn’t miss them too, but we’re living in a time where a hot shower for camping really does exist.

    Advanced Elements Summer Shower or solar outdoor shower for camping

    All you need is a little help from the sun and the Advanced Elements 5 Gallon Shower. You can even pair it up with a quick pop up camping shower tent for privacy.

    While we use our homemade body wipes for camping on every trip, it’s still nice to take a hot shower, especially when it’s hot. 5 gallons may not seem like a lot, but it actually goes a long way in showering our family of 5, especially if we conserve.

    man washing hair with solar camping shower, perfect for backcountry camping and dispersed camping

    On a recent trip backcountry camping in Big Bend National Park, it came in quite handy, especially after days spent in 100°+ heat. And let me tell you, desert heat will warm this shower up quick.

    Features of the Advanced Elements Solar Shower

    The Advanced Elements camping shower has a lot of great features, including the following:

    • Holds 5 gallons
    • 4-ply construction
    • Warms up quickly with direct heat from the sun
    • Easy to use on/off shower head
    • Extra large screw cap filling valve
    • Pocket for soap and shampoo
    • Velcro straps that hold other items, like washcloths
    • Mirror (perfect for shaving)
    • Water temperature gauge
    • Easy and durable carry handle
    • Compact storage

    What it’s like to use this camp shower

    5 gallons definitely goes a long way, especially when you conserve water. For example, I tend to use dry shampoo when we’re camping, just so I don’t have to use a ton of water for my shower.

    portable shower for camping, hanging on a camp trailer, in the backcountry of Big Bend National Park

    The 4-ply construction on this outdoor shower for camping includes a reflector panel, insulator panel, solar panel, and the water reservoir. This makes quick work of heating it up.

    Camping Hack: While you may not want to wait around for the portable shower to warm up in the mornings, you can literally fill it up with the handy filling valve, strap it to the top of your vehicle or leave it in the sun with your tent and other gear, and away you go to explore all day. Come back in the evening, and you’ll have a hot shower waiting for you.

    handy filling valve on solar shower for camping

    You can even check the temperature of your water with the temperature gauge on the back of the bag.

    temperature gauge on Advanced Elements camp shower

    The shower head itself is super easy to turn off and on, so you can easily conserve more water for the next person.

    turn the shower head off on the Advanced Elements Solar Shower

    You can either hang the shower head up, or you can hold it in your hands, which makes it a LOT easier to shower a toddler.

    turn the shower head on the Advanced Elements Summer Shower on

    I like to have all my stuff with me no matter what I’m doing, so the fact that I can store my soap and shampoo in the handy holding pocket while showering outdoors gets a thumbs up from me.

    soap holder pocket on outdoor shower for camping

    There’s also a mirror, perfect for washing your face or shaving.

    And, of course, it’s important that it stores well, especially in a confined space like a camping trailer. It has a convenient and durable carry handle and rolls up into a smaller pack so you can easily store it while on the go.

    carry handle on outdoor camp shower

    Where to hang your outdoor camping shower

    Usually, where we’re camping, there are plenty of places to hang our portable shower for camping. Then other times, we have nothing but a cactus, and well, that just won’t work.

    Important Note: It’s important that when hanging your shower pack, you not harm any vegetation in the area. Find a place to hang your shower that’s safe and that will ultimately leave no trace. 

    You can hang your camping shower in a tree; we’ve even hung ours on the side of our camp trailer. They do make special privacy tents, aka shower tents, that will hold an outdoor camp shower, as well.

    hang outdoor camp shower bag on tree, somewhere where you won't hurt any vegetation, where you'll ultimately leave no trace

    Find a place that’s safe to hang your shower, but think about the ease of use when doing so, as well.

    Where to buy an affordable shower for camping:

    You can purchase the Advanced Elements Solar Shower through both US Outdoor Store and Amazon. You’ll also find more affordable options for camping showers and shower tents through US Outdoor Store, MoosejawREI, and Amazon.

    You may also want to invest in a quick dry towel so you’re not toting around wet towels on your camping trip. Campsuds is a biodegradable soap you can use not just for dishes, but for hair and body, as well.

    hold the shower head in your hands or hang it up on the Advanced Elements Solar Shower

    Have you made a hot shower your excuse for not camping? You can easily enjoy an outdoor shower while camping with this affordable option for a camping shower. It’s time to let go and get out there!

    More outdoor gear and camping gear suggestions for you:

    Roof Top Tent vs. Ground Tent: The Inside Scoop

    The Ultimate Camping Checklist for Packing

    Homemade No Rinse Body Wipes for Camping

    Best Baby Carrier Backpack for Hiking and Outdoors

    Camping Cooking Gear and Outdoor Cooking Tips

    wash up with a solar outdoor shower for camping
    solar shower with removable shower head for easy showering outdoors
    solar shower for camping and outdoors
    camp shower perfect for backcountry camping and dispersed camping
    portable shower for camping
  • How to Make a Beautiful DIY Photography Background on the Cheap

    How to Make a Beautiful DIY Photography Background on the Cheap

    This year has brought a need to simplify certain ways I have of doing things, certain everyday responsibilities. I’m realizing that it’s ok to change things up and do things differently. And you know the funny thing? It’s making my life easier, including photography with something as simple as a DIY photography background.Use Contact Paper and Adhesive Vinyl to make your own photography background boards. How to make a beautiful DIY photography background on the cheap!

    I’ve shared loads of recipes, along with home projects. And I’m not gonna lie… The photography part of each project hasn’t always been a piece of cake. A friend recently shared her process for taking photos, and it really motivated me to learn more and get my butt in gear on making this part of my life easier.

    So for the sake of simplifying, I’ve purchased a couple of things, but I’ve also made these amazing photography backgrounds on the cheap. They have completely changed my photo taking life. I’m not even kidding. No more clearing surfaces to take photos. With a house full of boys, you know how epic this is for me.

    I have a couple more tongue and groove boards to make, but for now I want to share how to make your own beautiful DIY photography backgrounds on the cheap, using Contact Paper or self-adhesive vinyl.Use Contact Paper and Adhesive Vinyl to make your own photography background boards. How to make a beautiful DIY photography background on the cheap!

    Supplies You Need to Make a Simple DIY Photography Background

    You’ll need just a few supplies for this, and I’ve listed them below…

    • MDF board – I purchased a large sheet of this at Lowe’s and had them cut it into several 20″ x 34″ boards. It was so much more affordable than purchasing already cut boards right off the shelf, plus I got several boards out of the deal.
    • Dust cloth
    • Contact Paper, Self-Adhesive Vinyl, or Self-Adhesive Wallpaper – Wood Panel, Stone Pattern, and Marble Granite are a few designs I prefer because of their sturdiness and the fact they are either water proof or water resistant. (Make sure your roll is 20″ or more so you won’t have a seam.)
    • Scissors
    • Craft Knife


    Instructions for How to Make a DIY Photography Background

    This is such a simple project and so much more affordable than purchasing already made boards. I made my boards double-sided, so I could make the best use of each board and have several different backgrounds to choose from. Here’s how to do it.

    Once your boards are cut, wipe them with a dry cloth that will remove all dust. You’re prepping it to apply the Contact Paper or vinyl. I used several different kinds of Contact paper, self-adhesive vinyl, and self-adhesive wallpaper. And let me just say again, the vinyl and wallpaper are my preferred choices because they are so sturdy; they’re also water proof or water resistant, depending on what you get. It really looks very professional when all is said and done.

    Cut your Contact Paper or adhesive vinyl to the length you need for your board, leaving a little extra room.Use Contact Paper and Adhesive Vinyl to make your own photography background boards. How to make a beautiful DIY photography background on the cheap! 
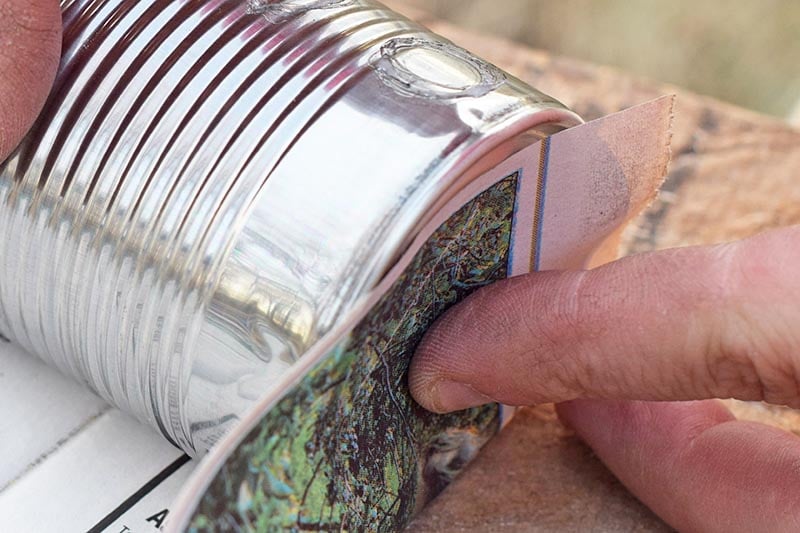
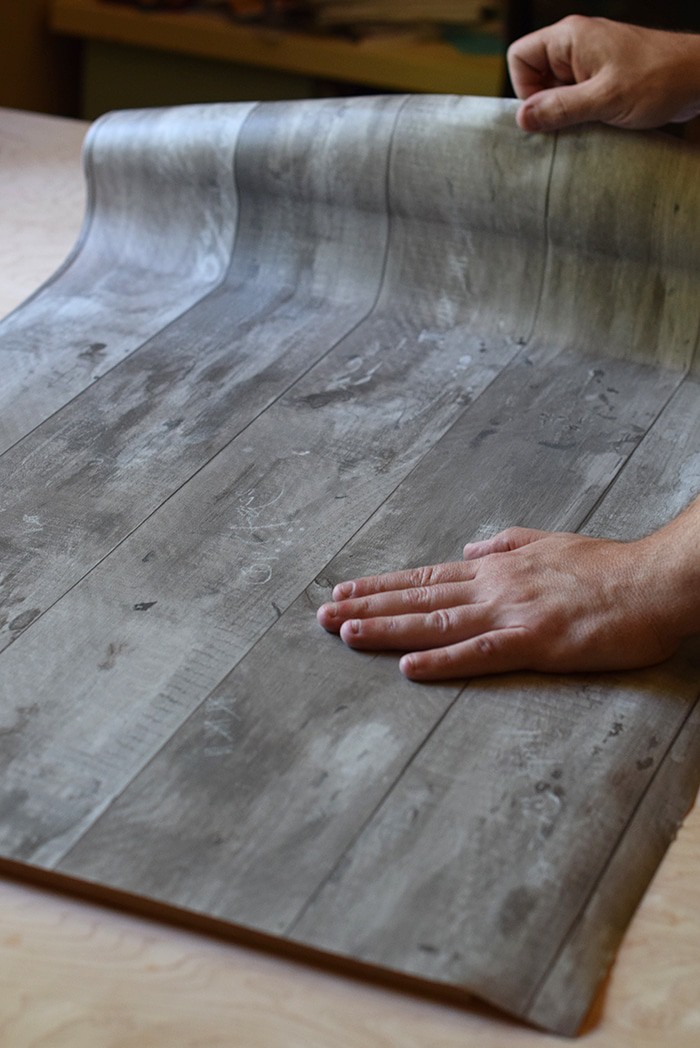
When you’re ready to apply, slowly peel back the paper from the adhesive and apply it to your board, making sure to smooth out any bubbles that may form. Keep smoothing as you go, peeling the backing until your adhesive is fully applied to your board. It may help to have two people working together.

    Use Contact Paper and Adhesive Vinyl to make your own photography background boards. How to make a beautiful DIY photography background on the cheap! 
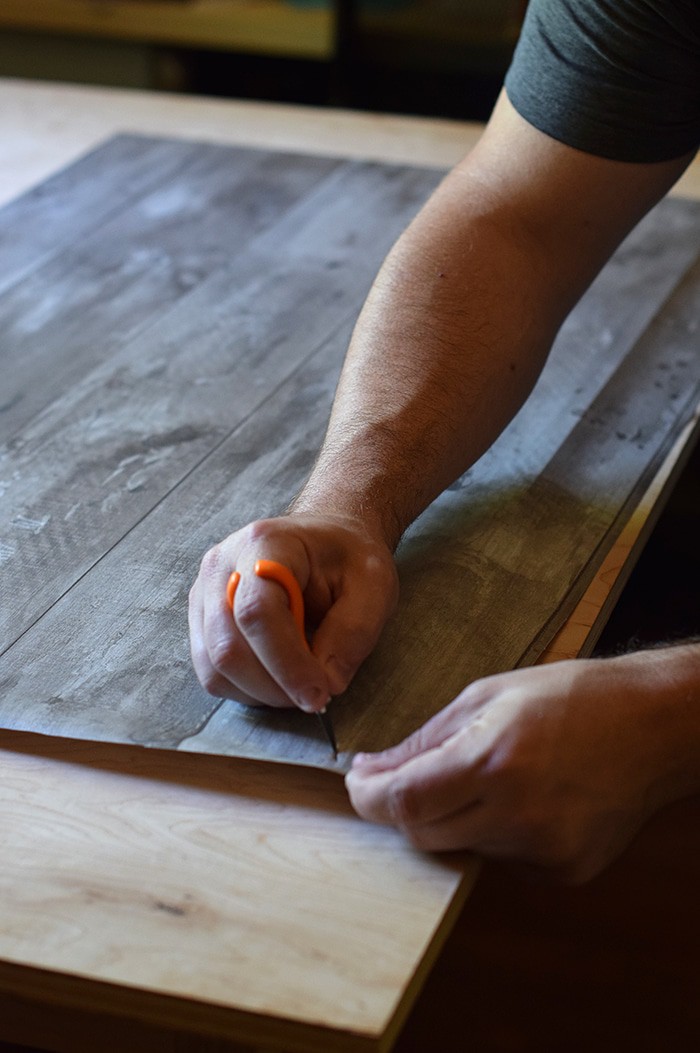
The last step is to cut off any excess edges with the craft knife. And that’s it!Use Contact Paper and Adhesive Vinyl to make your own photography background boards. How to make a beautiful DIY photography background on the cheap!

    You can apply another design to the other side of your board if you wish. Then you’ve got 2 boards in 1!Use Contact Paper and Adhesive Vinyl to make your own photography background boards. How to make a beautiful DIY photography background on the cheap! 
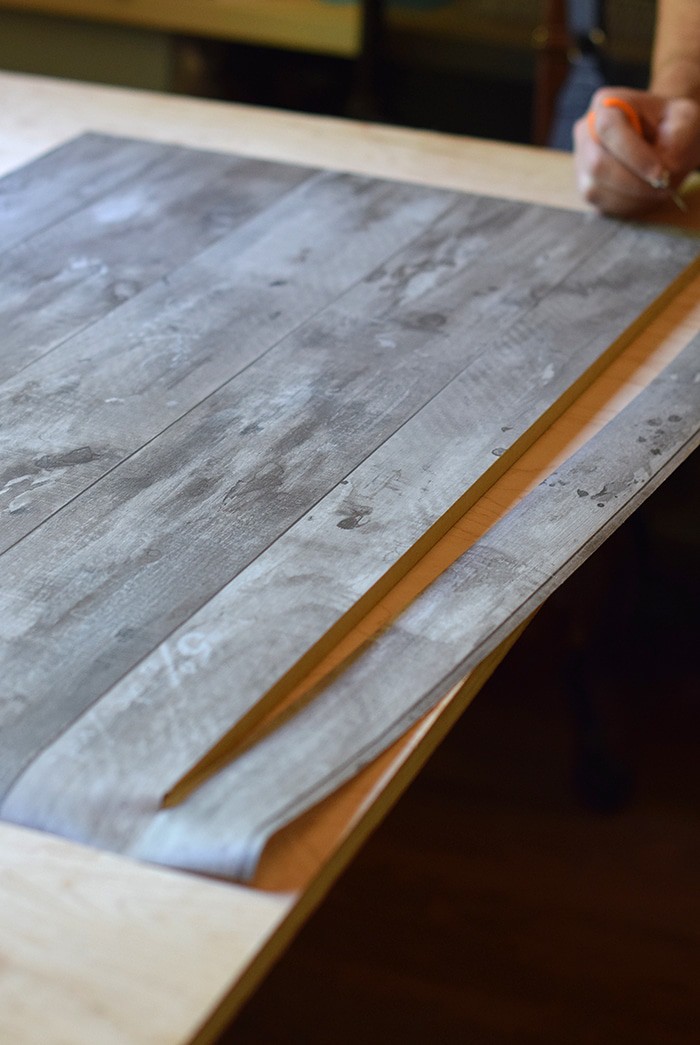
I chose to do this so I’d get more bang for my buck.Use Contact Paper and Adhesive Vinyl to make your own photography background boards. How to make a beautiful DIY photography background on the cheap!

    Now you’ve got a beautiful DIY photo background you can use for food photography, still life photos, crafts, and more.Use Contact Paper and Adhesive Vinyl to make your own photography background boards. How to make a beautiful DIY photography background on the cheap!

    Here’s an example of a food photo I’ve taken with one of my new boards! (FYI, click here to get my Strawberry Shortcake recipe.)Strawberry Shortcake made with a cream cheese whipped cream, Grandma's biscuits, and juicy red strawberries! Print the recipe for Old-Fashioned Strawberry Shortcake with Grandma's Biscuits.

    I’m off to create a few more boards! Happy DIY’ing!

    Looking for more thrifty DIY project inspiration?

    Can’t make it just yet? Pin it for later!

    Use Contact Paper and Adhesive Vinyl to make your own photography background boards. How to make a beautiful DIY photography background on the cheap!

  • How to Build Suitcase Shelves, Easy Step by Step

    How to Build Suitcase Shelves, Easy Step by Step

    Last Christmas Dan and the boys got me a gift certificate to one of my favorite antique stores. I pretty much knew right away what I wanted to get with it. I’d been wanting to build suitcase shelves for quite awhile, so it only made sense to use part of it for an old suitcase. We already had the suitcase cabinet, and we had the suitcase table. We definitely needed shelves. Off on the hunt I went.Got an old suitcase just waiting to be used for something special? How to build suitcase shelves, step by step, and hang them up for a vintage decorative look in your home's living space. Vintage home decor DIY project!

    It was in the very back of the antique store that I found a booth filled to the gills with vintage suitcases. There were several on a table, underneath the table, under a bird cage, stacked on top of one another, everywhere. I dug and dug until I found what felt like just the right fit for my project. The entire suitcase had a certain charm to it, from the clasps on the front to the hinges on the back.Got an old suitcase just waiting to be used for something special? How to build suitcase shelves, step by step, and hang them up for a vintage decorative look in your home's living space. Vintage home decor DIY project! 
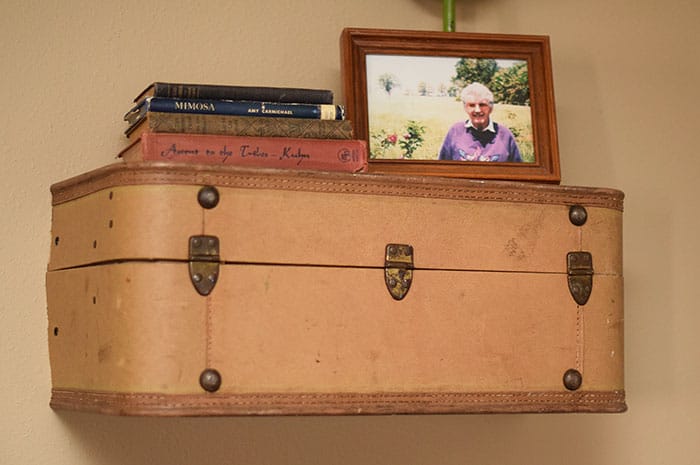
And the color was neutral but absolutely beautiful. It was a bit roughed up, a part of its character that only adds more charm, in my opinion.

    I brought it home, and we got to work, ready to build suitcase shelves that would add even more character and charm to our living area.

    Supplies You’ll Need to Build Suitcase Shelves

    You’ll need a few supplies for this DIY project, including the following:

    • 1 old suitcase, preferably a level design
    • Wood
    • Tape measure
    • Sharpie or carpenter’s pencil
    • Saw (Sawzall, table saw, hand saw, miter saw)
    • Cutoff tool or grinder
    • Vacuum cleaner
    • Screw gun (or screwdriver) and screws

    How to Build Suitcase Shelves

    First you’ll want to clean out your suitcase, removing any unnecessary fabric or metal pieces/framework.Got an old suitcase just waiting to be used for something special? How to build suitcase shelves, step by step, and hang them up for a vintage decorative look in your home's living space. Vintage home decor DIY project!

    Measure and cut your suitcase in half in the direction you desire.Got an old suitcase just waiting to be used for something special? How to build suitcase shelves, step by step, and hang them up for a vintage decorative look in your home's living space. Vintage home decor DIY project! We intended to use both the top half and the bottom half of the suitcase as shelves. So, we cut right down the middle using a Sawzall.

    Measurements of the wood you plan to use are case by case, since suitcases vary in size, and it will depend what size your suitcase is. Cut pieces of wood, using a table saw or hand saw, to screw to the inside of the suitcase to hold the suitcase halves together. Otherwise, each part will want to flop open.

    Build your shelf framework.Got an old suitcase just waiting to be used for something special? How to build suitcase shelves, step by step, and hang them up for a vintage decorative look in your home's living space. Vintage home decor DIY project! This is the piece of wood you’ll place on the wall with 3 perpendicular pieces of wood jutting into the suitcase.

    To place your suitcase shelves on the wall, attach the framework to the wall. Slide your suitcase half on, and screw the suitcase to the framework from the top down.Got an old suitcase just waiting to be used for something special? How to build suitcase shelves, step by step, and hang them up for a vintage decorative look in your home's living space. Vintage home decor DIY project!

    You can watch this video to see the entire process, from start to finish.

    Finally, you’re ready to decorate your vintage shelves however your heart desires.Got an old suitcase just waiting to be used for something special? How to build suitcase shelves, step by step, and hang them up for a vintage decorative look in your home's living space. Vintage home decor DIY project! It’s such an easy DIY project, and they add so much vintage flair to a living area.Got an old suitcase just waiting to be used for something special? How to build suitcase shelves, step by step, and hang them up for a vintage decorative look in your home's living space. Vintage home decor DIY project!

    Looking for more thrifty DIY project inspiration?

    Can’t build them just yet? Pin it for later!

    Got an old suitcase just waiting to be used for something special? How to build suitcase shelves, step by step, and hang them up for a vintage decorative look in your home's living space. Vintage home decor DIY project!

  • How to Make a Beautiful DIY Photo Canvas on the Cheap

    How to Make a Beautiful DIY Photo Canvas on the Cheap

    How to transfer family pictures and travel photographs to a DIY photo canvas, using Mod Podge and acrylic paint. Cheap, simple, and creative!

    gallery wall decor with DIY photo canvas prints

    A few months after Zeke was born, we had family photos taken. Shortly after, I decided I wanted to learn how to make a DIY photo canvas and create a gallery wall in our living room.

    I started to price canvas prints, and wowsers, the price for even a small print was shocking.

    So I thought to myself, “How can I make my own photo transfer to canvas?” And I started looking for DIY canvas print tutorials.

    That’s when I found the Youtube video below. Y’all, I would totally have made a video for this (because I’m loving video production), but why re-invent the wheel when this perfectly beautiful tutorial is already out there?

    I’m just gonna share the steps for how to make your own canvas, and then embed the video below for all my visual readers and to give credit where credit is due.

    family pictures gallery wall with DIY canvas print

    Love using Mod Podge? Learn how to make a Mod Podge photo plaque and a beautiful pair of DIY earrings with Mod Podge.

    Supplies You’ll Need for a DIY Photo Canvas

    supplies for a photo transfer to canvas, including Mod Podge, acrylic paint, foam brushes, and family photos

    You’ll need the following craft supplies:

    • Photo Prints – in whatever sizes you want to use on your wall… I ordered photo prints through Snapfish. They have photo printing services for small, medium, and large photo sizes.
    • Canvases to fit those prints – I picked mine up at Hobby Lobby while they were 50% off and bought a few of the cheaper multi-packs, as well.

    How to Do a Photo Transfer to Canvas

    Now it’s time to have some fun. This is truly such an easy project, I don’t know why I haven’t done this before now.

    Mod Podge really works great for so many different projects, especially DIY canvas prints.

    I decided to create a few different photo canvases, some with family photos and some with travel photos and family adventures.

    Prep Your Canvas

    The first step, since it’s a step that requires time to dry, is to paint the edges of your canvas.

    With a foam brush, paint the edge of the canvas, overlapping all around the top, as well as the sides, the bottom, and just over the front and back. It’ll take about 2 to 3 coats of paint to get a good amount of coverage.

    painting the edges of a canvas for a DIY canvas print

    Time Saver Tip: Set out 2 to 4 canvases, paint them, and then start the process all over again even if the paint is still a little damp (because I’m impatient like that).

    Allow your paint to get good and dry before attempting to apply your photos.

    Prep Your Photo Prints

    While you’re waiting, trim any white edges off of your photo prints. You may even need to size them up to the canvas and make sure you don’t need to do any extra trimming.

    preparing to make a photo canvas by trimming the white edges off photos with a craft knife on a craft board

    What Kind of Paper Should I Use to Print My Photos?

    If you’re printing the photos yourself, you may be wondering what kind of paper to use. I’ve actually gotten this question from readers.

    Should you decide not to have them printed, but you want to print them at home, use a matte photo paper.

    Photo paper will be strong enough to withstand all of the Mod Podge you’re going to brush onto the photo. Regular paper may snag or tear and just isn’t strong enough for this kind of project.

    How to Mod Podge Photo to Canvas

    The process of actually Mod Podging photo canvases takes a few steps…

    • After your paint is dry, apply a good layer of Mod Podge to the front of your canvas. Make sure you’re using Matte Finish Mod Podge.
    add a layer of Mod Podge to the front of the canvas before applying the photo
    • Then place the photo on the canvas, maneuvering it into place, making sure the edge of the photo lines up with the edge of the canvas.
    • Once the photo is placed correctly, flip the canvas over and rub your hands all along the back side of the canvas inside the frame. This will work out any bubbles and ensure that the photo adheres well to the canvas.
    applying a photo transfer to canvas with Matte Finish Mod Podge
    • Finally, flip your canvas back over and apply another good layer of Mod Podge to the photo and the sides of the canvas. This will not only seal the photo and protect it, but it will also provide a really nice matte texture to your photo canvas.
    • Allow your Mod Podge to dry completely before touching the canvas; otherwise you’ll end up with smudges or fingerprints on your otherwise beautiful photos.

    Mod Podge Tip: While I used up and down strokes, you can go any direction with your brush. The Mod Podge will dry clear.

    Mod Podge photo to canvas with foam brush

    Watch How to Make a DIY Canvas Print

    Here is the video I mentioned above… Watch and behold the magic of Mod Podge on a DIY photo canvas!

    Time to Decorate!

    And that’s it… Wasn’t that so simple and easy? That’s really all there is to it!

    DIY canvas prints with family photos on gallery wall with metal arrows

    Now you’re ready to decorate with your own beautiful photo canvases. They add a really beautiful touch to any room and make a wonderful gallery wall.

    gallery wall with DIY photo canvas prints, printables, and other home decor

    More Thrifty DIY Project Inspiration

  • 9 Free or Super Cheap DIY Planner Supplies and Printables

    9 Free or Super Cheap DIY Planner Supplies and Printables

    Planner Supplies and Printables – Creative supplies, including accessories like to do lists, paper clips, dividers, planner stickers, weekly planners, and more! I love my Happy Planner; my semi-obsession led me to compile a list with all sorts of cheap, pretty planner ideas!

    Planner supplies and printables are so much fun to look for on the internet. I’ve found that Pinterest and Instagram are both a planner lover’s paradise when it comes to ideas and accessories.

    free or super cheap planner supplies, printables, and accessories

    Where would I be without my planner organizer? I’ve always used a paper planner, but I’ve had a hard time finding one that truly fits my life.

    I think I’ve finally found a great fit and a planner design I love with the Happy Planner from Me & My Big Ideas. I absolutely love it.

    My love and semi-obsession with it got me looking for free or DIY planner supplies and printables. Who doesn’t love a good printable, especially when it provides a nice addition to your planner notebook?

    WHAT I LOVE ABOUT MY HAPPY PLANNER

    What I love about the Happy Planner is that I can take pages out and add pages in if I want. It’s also a planner full of positivity, which is something I desperately need in my life.

    Truth be told, I tend to be a glass half empty person, and I’m working on changing that. So the visual reminders each and every day really brighten up my day, my thinking, and my outlook on life in general.

    I also love that I can pick up my Happy Planner at Hobby Lobby with a 40% off coupon. And while I love Happy Planner accessories, I also love when I can find free stuff for my planner.

    I EVEN CREATED A VIDEO SHOWING HOW I USE MY PLANNER NOTEBOOK

    You can click below to watch the video, where I share how I use my planner to my full advantage when planning out my days and weeks.


    While I also use online programs like Airtable, Google Docs, Google Calendar, and Trello, I’m constantly referring to my traditional paper planner. It just works for me!

    9 FREE OR SUPER CHEAP DIY PLANNER SUPPLIES AND PRINTABLES

    I searched around and came up with quite a few handy dandy supplies for your planner, my planner, ALL the planners. Ready to have a li’l fun?

    Where would I be without my planner? I love my Happy Planner, and my semi-obsession led me to compile a list of free or super cheap DIY planner supplies and printables. Get all sorts of planner ideas to feed your own obsession!

    1. DIY Erin Condren Snap-In Meal Planner/To Do List and Free Printable – Where the Smiles Have Been

    Where would I be without my planner? I love my Happy Planner, and my semi-obsession led me to compile a list of free or super cheap DIY planner supplies and printables. Get all sorts of planner ideas to feed your own obsession!

    2. DIY Planner Paper Clips & Pretty Planner IdeasEverything Etsy

    Where would I be without my planner? I love my Happy Planner, and my semi-obsession led me to compile a list of free or super cheap DIY planner supplies and printables. Get all sorts of planner ideas to feed your own obsession!

    3. Free Printable Planner StickersThe Pinning Mama

    Where would I be without my planner? I love my Happy Planner, and my semi-obsession led me to compile a list of free or super cheap DIY planner supplies and printables. Get all sorts of planner ideas to feed your own obsession!

    4. Free Printable Weekly PlannerArtsy-Fartsy Mama

    Where would I be without my planner? I love my Happy Planner, and my semi-obsession led me to compile a list of free or super cheap DIY planner supplies and printables. Get all sorts of planner ideas to feed your own obsession!

    5. How to Make DIY Planner Folder Pockets (Perfect for the Happy Planner) – Hello Creative Family

    Where would I be without my planner? I love my Happy Planner, and my semi-obsession led me to compile a list of free or super cheap DIY planner supplies and printables. Get all sorts of planner ideas to feed your own obsession!

    6. Printable Special Dates Planner PagesThe Country Chic Cottage

    Where would I be without my planner? I love my Happy Planner, and my semi-obsession led me to compile a list of free or super cheap DIY planner supplies and printables. Get all sorts of planner ideas to feed your own obsession!

    7. Totally Free Blog PlannerTried & True

    Where would I be without my planner? I love my Happy Planner, and my semi-obsession led me to compile a list of free or super cheap DIY planner supplies and printables. Get all sorts of planner ideas to feed your own obsession!

    8. DIY Planner Stickers Free PrintableMom Endeavors

    Where would I be without my planner? I love my Happy Planner, and my semi-obsession led me to compile a list of free or super cheap DIY planner supplies and printables. Get all sorts of planner ideas to feed your own obsession!

    9. How to Create Planner Stickers with Your CricutLaura’s Crafty Life

    OF COURSE, I LOVE SHOPPING FOR PLANNER ACCESSORIES TOO!

    [amazon_link asins=’B01BVJ5EAY,B01FS9LVIW,B01MY4RJ2M,B07791PH5Z,B06WWG2W8Y,B01L9NU2Q8,B06XDP1GZ7,B000WWGANC,B00XHBT6X6′ template=’ProductCarousel’ store=’adventure097c-20′ marketplace=’US’ link_id=’3d387144-f884-11e7-89d2-45396d1ddb6a’]

    CONNECT WITH ADVENTURES OF MEL!

    Be sure to follow me on social, so you never miss a post!

    Facebook | Pinterest | YouTube | Instagram | Twitter

    Sign up to receive my newsletter, filled with delicious recipes and outdoor travel adventures, in your inbox:

    FREE EMAIL SUBSCRIPTION

    MORE THRIFTY DIY PROJECTS AND ORGANIZING HACKS YOU MAY LOVE:

    Meal Planning and Grocery List Hack

    How to Organize and Remember Family Birthdays

    How to Make a Beautiful DIY Photo Canvas on the Cheap

    DIY Photography Background on the Cheap

  • When It’s Time to Grow Out the Gray

    When It’s Time to Grow Out the Gray

    Last year about this time when I found out I was pregnant with Zeke, I knew that I may potentially be done with ever dyeing my hair again. I considered dyeing it with an ammonia-free dye after my first trimester when they say it’s safe to do so, but I just couldn’t bring myself to do it. I think I was tired… tired of dyeing it, tired of the fumes, tired of it fading within such a short time. To put it simply, I was over it. I started to question then whether or not I should grow out the gray.

    A little back story on the gray…

    My first gray hair showed up when I was 16. It held back, for the most part, until I reached my early 30’s when I started dyeing. The dye would last only a few weeks; then the gray was back with a vengeance. For awhile, I had this skunk stripe goin’ on; I’d sometimes try to cover it up with my eyeliner pencil (works like a charm, by the way), and every so often, I’d dye it again. At one point, I had a hairstylist tell me that if I continued dyeing it at home, my hair would eventually be the texture of a horse’s mane. Call me vain, but I didn’t care at the time… All I knew was that I didn’t want a head full of gray.

    Eventually while expecting Zeke, the gray grew out long enough that it was no longer just a few roots showing. It was literally taking over my world. Encouragement for anyone who might be considering or going thru the same "grow out the gray" process… My experience, my struggles, and why I chose to let the gray do its thing. Silver hair, here I come!

    I felt like the gray made me look tired and old. Ironically, that’s when the compliments started to come. A friend told me the silvery color was beautiful, which was when I realized that it was quite silvery vs. a duller gray. Then my dad (who normally teased me about my gray hair) came along and shared my grandma’s story with me and how she had a head full of white hair at my age (38). It’s a true family trait, written in my DNA. And then there was Dan, who encouraged me time and again to keep the gray, telling me over and over how much he loved my silvery hair.

    The wheels in my silver streaked head began to turn, and I began to think that maybe I was looking at this all wrong.

    I still hadn’t made a decision when I decided that I’d just find a good hairstylist and have her help me. And by help, I meant HELP! What do I do with this mess? I hadn’t had a haircut in over a year, bless her heart. The day before my appointment, I was really trying to make up my mind… Do I dye it? Do I grow out the gray? Should I cut it short? What should I do? Laugh if you will, but it was a really serious thing for me to grow out the gray at this “young” an age.

    It’s a beautiful sisterhood thing, this whole grow out the gray process…

    And that’s when I found a whole sisterhood of silver sisters. One of the first sites I came upon was How Bourgeois. First of all, I was drawn in by her photo (she had a full head of gorgeous platinum hair); but then I began to read her posts about her own experience growing out the gray. As I Googled some more and read some more, I became more and more encouraged. Silver hair really is a beautiful thing, especially when it involves a person learning to accept and embrace themselves the way they are and the way God’s made them, even if that plan involves the gift of getting your first gray hair at the ripe old age of 16.

    I knew it was time to let my gray do its thing. It was time to embrace who I am, gray hair and all. It was more a heart thing than anything, this decision of mine.

    The next day as I went to my salon appointment, I had to stop in and ask directions. The receptionist there, out of nowhere, just went on and on about how beautiful my silver streaks were. I hadn’t even had it cut yet. And when I finally reached the salon and told my stylist that I wasn’t going to be dyeing, she completely agreed with me, telling me that my gray was a silvery color that looked good with my face and complexion. I ’bout fell out of my chair when she said that. I’d NEVER had a stylist tell me to keep the gray; they’d ALWAYS tried to get me to dye it. She cut my hair in a style that works for me for awhile (just while I let the gray grow out) and encouraged me to keep going, that it’d only be a couple more cuts and we’d have it all grown out.Encouragement for anyone who might be considering or going thru the same "grow out the gray" process… My experience, my struggles, and why I chose to let the gray do its thing. Silver hair, here I come!

    I’ve always believed that God cares about even the tiniest of things in our lives, but that day I went to the salon, it was almost as if He were speaking directly to me through those women and confirming that I’d made the right choice, that He cared about this tiny decision of mine.

    A little encouragement for anyone else who might be considering or going thru the same “grow out the gray” process… 

    I’ve had a few friends reach out with their own stories of dyeing for years and their fears of going gray. When it’s time to let go, you’ll know. Don’t let fear stop you from being who you are, both inside and out. You’re NOT ugly, old, and tired just because of a few gray hairs. If anything, you’re on trend (did you know gray hair was trendy?). You’ve earned every single one of those gray hairs. I like to think with gray hair comes wisdom. If it’s a family trait, embrace and carry that trait with pride.

    When it’s time, you’ll have a peace about it, you’ll accept it, and you won’t look back.

    Encouragement for anyone who might be considering or going thru the same "grow out the gray" process… My experience, my struggles, and why I chose to let the gray do its thing. Silver hair, here I come!

    And a HUGE plus? You’ll never have to dye again, meaning you’ll likely save a ton of money.

    My mission now: To tame these wiry grays and make them softer than ever. Stay tuned for more grow out the gray adventures!

    If you’ve been thinking about jumping ship on dyeing, you’ve got this! Email me or leave me a comment. I’d love to encourage you on your journey to growing out your gray.

  • How to Make an Easy Mosquito and Tick Repellent

    How to Make an Easy Mosquito and Tick Repellent

    Do you have a mosquito problem where you live? We have a ton of mosquitoes.

    Between the woods and the creek in the woods, along with various things sitting outside that collect water, we tend to have a lot of mosquitoes. It’s almost impossible to sit outside on a warm summer evening without getting eaten alive.

    We have so many mosquitoes the minute we step into our backyard. I’m so excited to finally have a homemade DIY mosquito and tick repellent spray that actually works, and it smells great too!

    And this year, we’ve had a few ticks. For the most part, our chickens really help to keep the tick population to a minimum, but we still have a few.

    A mosquito and tick repellent is a must if we’re headed outside, especially in the evenings.

    Last summer I came up with a homemade mosquito repellent. When we used it, we still noticed mosquitoes landing on our arms and legs, though they wouldn’t bite; they’d just land, then fly away. 

    While that spray worked ok, we noticed that we had to keep spraying it on for it to work; I’ve since researched and found that adding in a bit of vegetable glycerin would probably help the spray to last longer, but I’m not trying that just yet.

    We have so many mosquitoes the minute we step into our backyard. I’m so excited to finally have a homemade DIY mosquito and tick repellent spray that actually works, and it smells great too!

    This year, I think I’ve perfected my recipe, though I may still add in that vegetable glycerin… We’ll see.

    I’ve added a few other things, and when I tested it by going outside to stand by our fire pit (which can be a dangerous thing to do on a summer evening, especially right around dusk), I didn’t have one single mosquito land on me.

    I went even further and went out to sit on our porch swing… Not one mosquito made its presence known on my skin. Woohoo! I think we have a winner.

    I’ll keep testing and update here if needed, but I’m really excited to have a bug repellent that I don’t have to worry about putting on our skin. It smells great too because of the essential oils I added.

    We have so many mosquitoes the minute we step into our backyard. I’m so excited to finally have a homemade DIY mosquito and tick repellent spray that actually works, and it smells great too!

    Below you’ll find the printable recipe.

    Per FDA regulations, I will say that the use of essential oils is entire optional, but I love the oils I chose to use and wouldn’t want to make my spray without them.

    So, here you go! Let me know what you think if you make it and try it. I’d love to get your feedback on how the spray worked for you.

    Easy Mosquito and Tick Repellent

    We have so many mosquitoes the minute we step into our backyard. I’m so excited to finally have a homemade DIY mosquito and tick repellent spray that actually works, and it smells great too!

    • 8 ounce spray bottle
    • 4 ounces distilled water
    • 3 ounces Witch Hazel
    • 5 drops Purification essential oil
    • 5 drops Lavender essential oil
    • 5 drops Geranium essential oil
    • 3 drops Peppermint essential oil
    • 3 drops Lemon essential oil
    • 1 drop Thyme essential oil
    1. Mix all ingredients in an 8 oz. spray bottle.
    2. Spray on exposed skin when headed outdoors!

    Disclaimer: Everything I share about essential oils on Adventures of Mel is based on personal experience and has not been approved by the FDA. Please do your own research, and never use essential oils in a way that would make you uncomfortable. Also, take special caution for those pregnant or nursing, as well as children. Read the full disclaimer.

    Adventure Gear
    homemade bug repellent, mosquito and tick repellent, mosquito repellent, tick repellent

    What do you use for bug repellent? What’s your favorite way to keep those pesky mosquitoes at bay?

    Disclaimer: Everything I share about essential oils on Adventures of Mel is based on personal experience and has not been approved by the FDA. Please do your own research, and never use essential oils in a way that would make you uncomfortable. Also, take special caution for those pregnant or nursing, as well as children. Read the full disclaimer.

  • How to Make Beautiful DIY Earrings with Mod Podge

    How to Make Beautiful DIY Earrings with Mod Podge

    Love Mod Podge crafts? Me too! Mod Podge is one of my favorite crafting mediums because there are so many things you can do with it; for instance, you can create things like handmade jewelry, photo gifts, special keepsakes, furniture makeovers… The possibilities are endless. If you love jewelry but haven’t tried making your own yet, I have an easy tutorial that will have you making all sorts of beautiful earrings. It really is that easy. Love finding Mod Podge ideas? Me too! Here’s an easy tutorial for making your own DIY earrings with Mod Podge Dimensional Magic and scrapbook paper. Homemade jewelry with your own special touch!

    These little earrings only require a few supplies. They’re actually really affordable to make, and you could make several pair, depending on how many designs you want.Love finding Mod Podge ideas? Me too! Here’s an easy tutorial for making your own DIY earrings with Mod Podge Dimensional Magic and scrapbook paper. Homemade jewelry with your own special touch!

    Supplies Needed for DIY Mod Podge Earrings
    • Scrapbook paper
    • Craft knife
    • Cutting mat
    • Mod Podge Dimensional Magic
    • 2 Earring pendants
    • 2 flat fishhook earwires
    • 2 round jump rings (optional)
    • Round-nose pliers

    Love finding Mod Podge ideas? Me too! Here’s an easy tutorial for making your own DIY earrings with Mod Podge Dimensional Magic and scrapbook paper. Homemade jewelry with your own special touch!

    Instructions for Making Earrings

    The first step is to pick out the scrapbook paper design you want. I stuck with a smaller, colorful, floral pattern for this particular pair, allowing for more design flair in the earrings.

    Cut paper to pendant shape with a craft knife. This is the most tedious step because it may require more trimming and shaping to fit the paper inside the pendant.

    Fit paper inside each pendant.

    Love finding Mod Podge ideas? Me too! Here’s an easy tutorial for making your own DIY earrings with Mod Podge Dimensional Magic and scrapbook paper. Homemade jewelry with your own special touch!

    Dimensional Magic allows you to finish the earrings with a clear raised finish. Fill in the surface of each earring pendant with Mod Podge Dimensional Magic, making sure it goes to the edges of your earrings, also removing bubbles with a toothpick. It’s important to remove any bubbles you may have; otherwise, they’ll show up even after the Mod Podge has dried. You’ll want to allow about 3 hours for this to dry. When first applied, it will look milky, but it’ll clear as it dries.Love finding Mod Podge ideas? Me too! Here’s an easy tutorial for making your own DIY earrings with Mod Podge Dimensional Magic and scrapbook paper. Homemade jewelry with your own special touch!

    After your jewelry has dried well, then you can add the necessary hardware, using the round-nose pliers. Hardware includes jump rings (if you prefer them) and flat fishhook earwires. Love finding Mod Podge ideas? Me too! Here’s an easy tutorial for making your own DIY earrings with Mod Podge Dimensional Magic and scrapbook paper. Homemade jewelry with your own special touch!
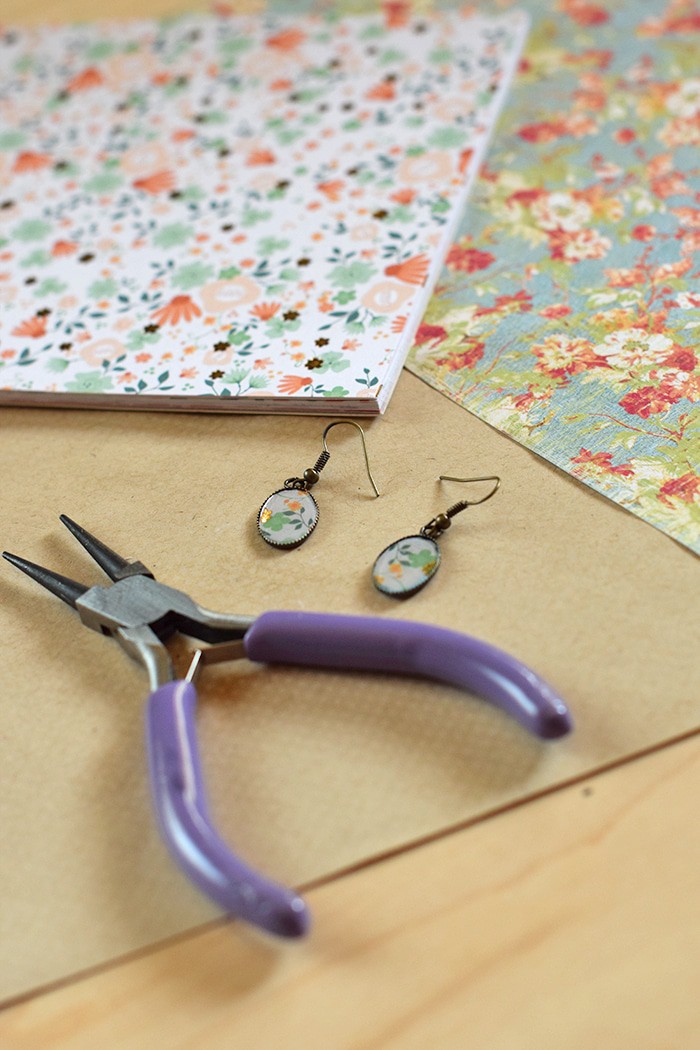
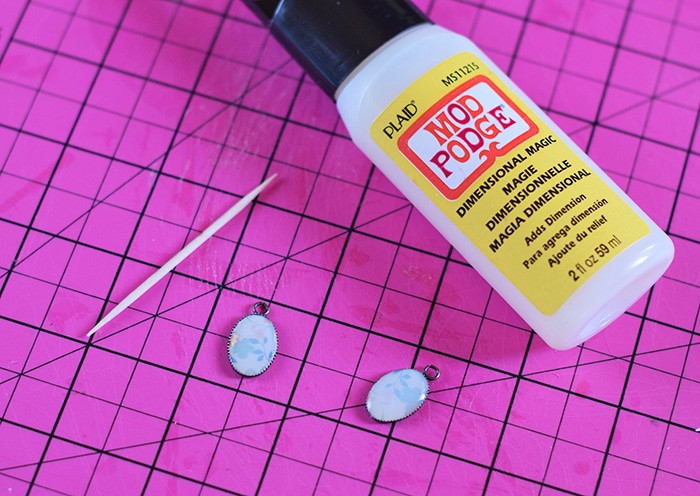
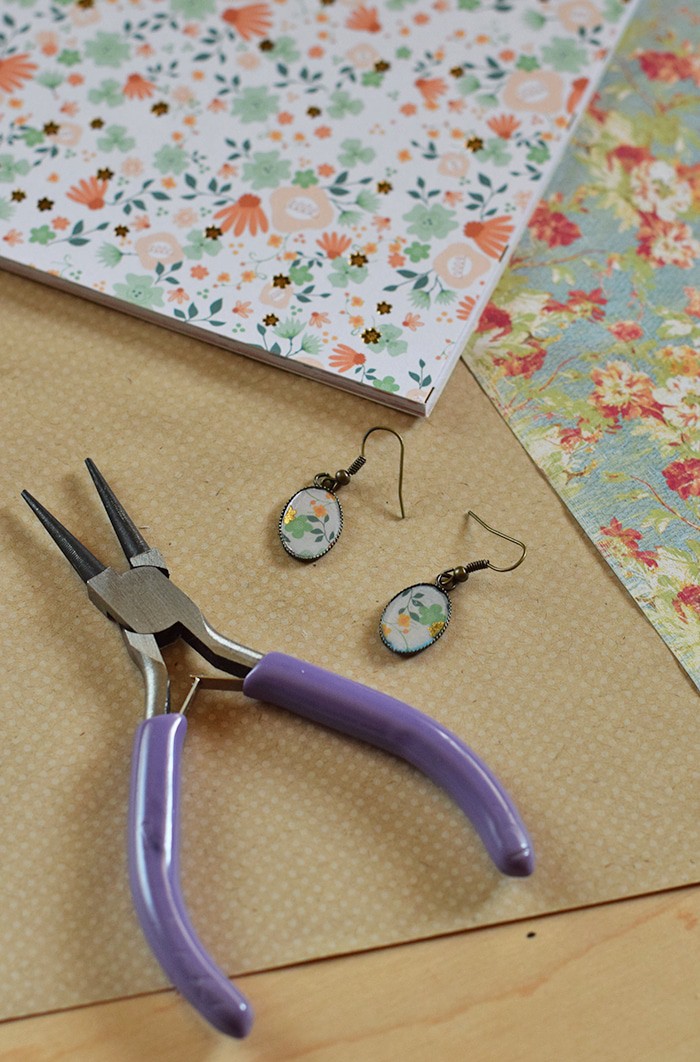
I didn’t add jump rings to this pair because I didn’t feel they needed them, but it’s totally up to you.Love finding Mod Podge ideas? Me too! Here’s an easy tutorial for making your own DIY earrings with Mod Podge Dimensional Magic and scrapbook paper. Homemade jewelry with your own special touch!

    Love finding Mod Podge ideas? Me too! Here’s an easy tutorial for making your own DIY earrings with Mod Podge Dimensional Magic and scrapbook paper. Homemade jewelry with your own special touch!

    And that’s it! Making your own earrings is super duper easy and quite addictive.Love finding Mod Podge ideas? Me too! Here’s an easy tutorial for making your own DIY earrings with Mod Podge Dimensional Magic and scrapbook paper. Homemade jewelry with your own special touch! They make great gifts too; I’m sure we all know a birthday girl, a graduate, a friend, sister, mom, teacher who would love a gift like this. Happy crafting!Love finding Mod Podge ideas? Me too! Here’s an easy tutorial for making your own DIY earrings with Mod Podge Dimensional Magic and scrapbook paper. Homemade jewelry with your own special touch!

    Looking for more thrifty DIY project inspiration?

    Not quite ready to make them but want to save for a later crafty date? Pin them so you’ll never lose them!Love finding Mod Podge ideas? Me too! Here’s an easy tutorial for making your own DIY earrings with Mod Podge Dimensional Magic and scrapbook paper. Homemade jewelry with your own special touch!

  • How to Keep Squirrels Out of Deck Rail Planters

    How to Keep Squirrels Out of Deck Rail Planters

    Squirrels eating your tomatoes, strawberries, and just making a mess out of your garden? A simple solution to keep squirrels out of deck rail planters.

    Squirrels… They have officially become my nemesis over the last year and a half.

    When we first moved here, we were fairly lucky in that pests hadn’t discovered our garden. Last year, however, was a different story.

    We would find a squirrel sitting contentedly and almost mockingly on the corner of our deck railing, munching happily on an almost ripened tomato he’d just plucked from our plants. That or they’d leave traces of half eaten tomatoes and berries along their trail of destruction.

    This year before we ever even started our garden, in fact while we were still starting seeds indoors before the growing season, we came up with a plan to put a stop to it.

    Ornery little buggers! Squirrels are no longer cute in my eyes. And our cat, well… he’s just pure laziness these days and couldn’t give a hoot. Good thing he’s cute!

    Squirrels eating your tomatoes, strawberries, and just making a mess out of your garden? A simple solution to keep squirrels out of deck rail planters.

    Anyway, we had to come up with a solution to keep squirrels out of our deck rail planters where we are planting lettuce, spinach, and have a few strawberry plants. We’ve already found where they dug up our spinach seeds before we could get the squirrel-proofing done. I kinda feel like I’m in an old 80’s hit comedy with these critters!

    Squirrels eating your tomatoes, strawberries, and just making a mess out of your garden? A simple solution to keep squirrels out of deck rail planters.

    We’ve read all sorts of solutions, including using wolf (or other predator) pee, which we may be desperate enough to try around our front garden beds and pots. But for deck rail planters, chicken wire makes a great cage of sorts to keep squirrels out. I swear, as we built these, we could hear them angrily chattering from their perch in the trees overhead. I won’t share how Dan answered them back…

    Supplies You Need
    • Chicken wire
    • Wire cutters
    • Staple gun
    • Staples
    • Pliers
    • Hooks
    Instructions for Keeping Squirrels Out of Deck Rail Planters
    Squirrels eating your tomatoes, strawberries, and just making a mess out of your garden? A simple solution to keep squirrels out of deck rail planters.
    Squirrels eating your tomatoes, strawberries, and just making a mess out of your garden? A simple solution to keep squirrels out of deck rail planters.

    Roll out the chicken wire and cut to the length needed for your planter. Form it into a tunnel, and staple it to the outside edge of your deck rail planter. 

    Squirrels eating your tomatoes, strawberries, and just making a mess out of your garden? A simple solution to keep squirrels out of deck rail planters.

    Cut another piece of fencing to match the shape of the tunnel end, and wire to the end, snipping extra wire off when done. 

    Squirrels eating your tomatoes, strawberries, and just making a mess out of your garden? A simple solution to keep squirrels out of deck rail planters.
    Squirrels eating your tomatoes, strawberries, and just making a mess out of your garden? A simple solution to keep squirrels out of deck rail planters.
    Squirrels eating your tomatoes, strawberries, and just making a mess out of your garden? A simple solution to keep squirrels out of deck rail planters.

    Place hooks in deck rail to fasten squirrel guard/tunnel down to railing. This way you can open it up when you need to work with your plants or harvest. 

    Squirrels eating your tomatoes, strawberries, and just making a mess out of your garden? A simple solution to keep squirrels out of deck rail planters.

    And that’s pretty much it! You now have a way to keep those pesky critters out of your deck planters. It’s so simple, it’s not even funny. So simple, the squirrels in your neck of the woods will probably be telling you off as you make it.

    Happy squirrel-free gardening!

    More Gardening Tips and Outdoor Living

  • Nest Your Way to a DIY Changing Table and Homemade Baby Wipes

    Nest Your Way to a DIY Changing Table and Homemade Baby Wipes

    Kimberly-Clark Post Disclosure
    How to create a DIY changing table from a dresser and make your own homemade baby wipes, along with a few tips for adding joy to spring cleaning and organizing your home, whether in the baby’s room or elsewhere.

    Ah, spring cleaning… I can’t even tell you how good it feels to purge the clutter and clean out even just one room.

    Though lately, I’ve gotten three whole rooms cleaned up, including three closets. One of those rooms I’ve been working on for about 3 weeks, amidst hobbling along in my 7th month of pregnancy, has been our guest room/playroom.

    It was more play/storage/complete cluttered chaos than anything. But today, I’m going to show you how I tamed the clutter and started the transition to a baby’s room by creating a DIY changing table area.

    Oh, and you will definitely want to grab my recipe for homemade baby wipes below.

    Want more homemade wipes recipes? Try these!

    Love organizing and prepping? Learn how to stock your pantry for the first time too!

    5 Tips for Adding Joy to Spring Cleaning and Organizing 

    First of all, I feel the need to share a few tips for making that overwhelming, cluttered up room, together with “dangerous” closet area, more fun to clean because I know how you’re feeling about your own room of doom. I get it, I really do. When you finally start to clean, here are 5 tips for making the process more FUN and JOYFUL!

    • Before I ever start cleaning a room, I like to go in, clear a place to sit, and envision what I want that room to be, how I want it to look, how I want that room to really function. And functional is so important when cleaning out and organizing; it’s important to think about how you can make your life or the room occupant’s life easier and better, along with making the room much more functional.
    • Put on your favorite music. Myself, I have my favorite online radio stations, something that will really get me out of the over-cluttered mental zone and into the spring cleaning/nesting zone where I really start to move (and sometimes sing along to my favorite tunes).
    • Keep 2 bags/boxes on hand… one for trash and one for donations. Nothing brings more joy than making the decision to get rid of something that’s no longer used or needed.
    • Start with just one surface. I promise, as soon as you’ve cleared that surface, you’ll get your groove on, and it may even become addictive, leading you to clean more and more surfaces ’til the room is a whole different space.
    • Incorporate little things to help add pops of color and personality to the room. I’m not talking expensive items… I’m talking things like wire or wicker baskets for decorative storage, your kids’ artwork on the wall, colorful containers, maybe a couple plants, or whatever your heart desires.
    How to create a DIY changing table from a dresser and make your own homemade baby wipes, along with a few tips for adding joy to spring cleaning and organizing your home, whether in the baby’s room or elsewhere.

    Here are a few more handy spring cleaning tips… 

    Creating a DIY Changing Table

    Creating a DIY changing table involves only a minimal number of supplies. You’ll need the following:

    • A dresser
    • 1 changing pad (cover optional)
    • Basket
    • Diapers
    • Homemade Baby Wipes (recipe below)
    • Baby Lotion
    • Hamper
    • Whatever else your heart desires
    How to create a DIY changing table from a dresser and make your own homemade baby wipes, along with a few tips for adding joy to spring cleaning and organizing your home, whether in the baby’s room or elsewhere.

    We’ve had an old wooden dresser through both of our boys, so it made sense to transition it over to our new baby boy. Of course, it was quite dusty and needed a good cleanup, as did our crib. That’s where Viva® Towels come to save the day, along with your favorite wood cleaner or polish. I originally wanted to paint the old dresser, but all my guys kinda pitched a fit over that… apparently, they have memories with every little scratch and dent. So, we’re keeping the vintage wood look, for now.

    How to create a DIY changing table from a dresser and make your own homemade baby wipes, along with a few tips for adding joy to spring cleaning and organizing your home, whether in the baby’s room or elsewhere.

    Transforming the dresser top into a changing table is so easy, it’s not even funny. Once the surface has been thoroughly cleaned, add a changing pad, which you should be able to attach to the top of the dresser (follow the instructions for your particular changing pad). Then on the other end of the dresser, add a basket filled with all the diaper changing necessities you’ll need like diapers, wipes, lotion, butt paste, etc. Of course, don’t forget the diaper pail.

    Having a changing spot on the top of a dresser is so convenient because the baby’s clothes are right there in the drawers if and when you need them. Handy dandy.

    Homemade Baby Wipes Recipe
    How to create a DIY changing table from a dresser and make your own homemade baby wipes, along with a few tips for adding joy to spring cleaning and organizing your home, whether in the baby’s room or elsewhere.

    We’ve made our own baby wipes since our oldest (13 years) was born. They’ve definitely served us well. And I do not mince words when I highly recommend Viva® Towels for said baby wipes. The reason I prefer Viva® Towels is because they’re very soft and smooth, but at the same time, they’re very strong and durable (like cloth) for using as wipes. I even make my own household cleaning wipes with them.

    How to create a DIY changing table from a dresser and make your own homemade baby wipes, along with a few tips for adding joy to spring cleaning and organizing your home, whether in the baby’s room or elsewhere.

    To make the wipes, you cut a roll of towels in half. Then fill a sealable container with the ingredients listed, and add the roll of paper towels, cut side down, to the container. Place the lid on top and turn upside down so all of the liquid can soak into the roll.

    How to create a DIY changing table from a dresser and make your own homemade baby wipes, along with a few tips for adding joy to spring cleaning and organizing your home, whether in the baby’s room or elsewhere.

    Below is the printable recipe.

    Homemade Baby Wipes

    Homemade baby wipes are so easy to make. Just a few ingredients, paper towels, and a container to hold your wipes is all you need for this super easy DIY.

    • 1 knife
    • 1 container with lid
    • 1 3/4 cups water
    • 1 tablespoon baby wash
    • 3 drops Tea Tree essential oil
    1. Cut a roll of Viva® Towels in half.
    2. Add all ingredients to sealable container, mixing well.
    3. Add roll of paper towels, cut side down, to liquid in container.
    4. Secure lid in place, and turn container upside down, allowing all liquid to soak into towels.
    5. When towel roll is fully soaked, remove cardboard tube and use towels as baby wipes.
    Homestead
    homemade baby wipes
    Nesting, Spring Cleaning, and Stocking Up
    How to create a DIY changing table from a dresser and make your own homemade baby wipes, along with a few tips for adding joy to spring cleaning and organizing your home, whether in the baby’s room or elsewhere.
    How to create a DIY changing table from a dresser and make your own homemade baby wipes, along with a few tips for adding joy to spring cleaning and organizing your home, whether in the baby’s room or elsewhere.

    Of course, it’s not only baby I need to prepare for. I’m working at giving the whole house a good cleaning, as well as stocking both our bathroom and the boys’ bathroom with a good supply of the basic necessities, one of those necessities being toilet paper. I’ve stocked our bathroom with Cottonelle®, which has that CleanRipple texture for getting a good, clean bum. My boys prefer Scott® 1000, which I have to say lasts them a REALLY long time.

    And for cleaning… Viva® Vantage paper towels have more of a scrubby texture, making them great for cleaning household appliances and outdoor items… Viva® Towels have a softer texture, which makes them great for cleaning up furniture and baseboards, or even making baby wipes.

    All the above products, including Viva® Towels, Cottonelle®, and Scott® 1000 can be found at Walmart.

    And now I’m off to clean and nest a bit more… I think the kitchen could use a little cleaning. Look out, here I come!

    Looking for more thrifty DIY project inspiration?

    Tell me, what are you spring cleaning right now? What is your room of doom in your home?
    How to create a DIY changing table from a dresser and make your own homemade baby wipes, along with a few tips for adding joy to spring cleaning and organizing your home, whether in the baby’s room or elsewhere.
  • So This Is Hyperemesis Gravidarum | My Story

    So This Is Hyperemesis Gravidarum | My Story

    For 2-3 months now, I have tried to put this post into words; it’s been a difficult one to share. My husband’s encouraged me numerous times to write our story, but I’ve had to really mull it over and think about whether I wanted to share something so personal. He’s also pointed out that I tend to downplay things that I’ve gone through, mainly because I don’t want to appear as though I’m being over-dramatic or feel vulnerable; I have to agree. In all honesty, it’s just not something I really like to talk about but know it needs to be talked about, especially the more and more I read the stories of other women who have gone through far worse than what I’ve had to go through. Hyperemesis Gravidarum is something I never want to re-live, hoped I’d never have to re-live, even in subsequent pregnancies. But I did. And this is my (or really our) story.What Hyperemesis Gravidarum is, my HG story, the effects of HG, and encouragement for those experiencing HG, including information about the HER Foundation.

    What Is Hyperemesis Gravidarum?

    According to the HER Foundation (the world’s largest grassroots network of hyperemesis gravidarum survivors and leading site for HG information on the Internet), Hyperemesis Gravidarum, otherwise known as HG, is a severe form of nausea and vomiting in pregnancy. It is generally described as unrelenting, excessive pregnancy-related nausea and/or vomiting that prevents adequate intake of food and fluids. If severe and/or inadequately treated, it is typically associated with: loss of greater than 5% of pre-pregnancy body weight (usually over 10%), dehydration and production of ketones, nutritional deficiencies, metabolic imbalances, and difficulty with daily activities.

    First and foremost, let’s get something straight. HG is not your typical morning sickness. It’s not the same thing, nor can the two even be compared. It’s much more severe than your run-of-the-mill pregnancy sickness. I’ve seen shows on television try to depict HG in a seemingly lesser light than what it is; they always portray it as your typical, everyday morning sickness. It’s described as severe morning sickness, when in fact, it’s a different beast all its own. HG has been in the headlines with Kate Middleton, and even Kelly Clarkson (who also portrayed it as severe morning sickness, much to the dismay of many an HG survivor). However, as evidenced by real life stories from everyday women, it’s a proven fact that many doctors out there simply don’t know enough about it to adequately treat it. Consequently, many women are sent home to suffer alone, untreated and left to try to deal.

    As my husband has described our experience with HG, “It was a hellacious time.”

    My HG Story

    I was once one of those women sent home, left to try to deal. During my first pregnancy, there was no Facebook, there were no online friendships that I knew about (besides email), no support groups. This was when I first learned what HG really is. It affected me physically, emotionally, and mentally, both during my pregnancy and, to a degree, postpartum.

    I remember being so excited that we were going to have a baby, our first, our sweet Jacob! I’d read all about morning sickness, but neither of us had any idea the ride we were in for. I just remember being in that honeymoon phase, expecting pregnancy to be this beautiful, wonderful event in our lives. That picture changed drastically over the coming days and weeks.

    I remember waking up extremely ill, early one morning. Nothing would stay down… I could hardly eat or drink a thing. Food was revolting, just the mere mention, thought, or smell of it. I became so dehydrated that we made our first ER visit, and I just remember the doctor looking at me and saying that this would all be over at 12 weeks, that it was “just morning sickness” and blah blah blah. I thought to myself, “How can I even endure that many more weeks of this?!” Nothing was done, and I was sent home, unable to really function at all. I tried every natural remedy I could possibly find to try that was safe for me and baby; none of them helped, even a little. And don’t even dare to say the word ginger to me… Nope.

    I became sicker and sicker, my husband having to try to force me to eat dry toast, buttered toast, mustard and cheese (one of the only things I could get down), also forcing me to drink anything he could get down my throat or even forcing ice chips. I’d eat or drink something, and back up it would come. He describes me at that time as having simply given up, feeling like I was going to die; I can honestly agree. My body wasn’t getting adequate nutrition or fluids to support both myself and my baby. Many more ER visits were to come because my body was simply so dehydrated, and I was losing so much weight. By the time we’d leave the emergency room and get back out to our car in the parking garage, I was already puking again, even though I had nothing left to come up, a bucket or bin my constant companion. It was horrible. Medicines were prescribed, none of which worked very well to help alleviate my symptoms. I took them ’round the clock, subsisting on cheese and mustard sandwiches to get the meds down, because it was all I could stand to eat most of the time.

    And then during one particular ER visit, doctors began to realize this was no ordinary morning sickness. I was placed in a side room of an already overcrowded hospital and fully hydrated. I remember being sent to see a woman doctor, who honestly became my champion… I don’t remember her name, nor do I remember a lot (Dan and I both agree that we’ve both blocked out a lot of this time), but I do remember her being outraged that nothing had been done. She was very concerned about my weight (I believe I had lost 20-24 pounds, more than 15% of my body weight at that time), and I remember her concern over deficiencies and imbalances that were beginning to rear their ugly heads. Electrolyte imbalance, including potassium, was wreaking havoc. My champion doctor began to talk of sending me home with a permanent IV line, if things did not begin to clear up, with a home health nurse visiting on a regular basis. They’d begun to teach Dan what he would need to do to change out my IV bags and keep fluids going into my sick and wasting away body. 12 weeks had come and gone, all my hope gone with them. We both remember feeling, though, that finally, FINALLY, someone was taking us seriously. I was diagnosed with Hyperemesis Gravidarum, the first I’d ever heard of this ugly illness. I was prescribed Phenergan suppositories (so much fun), which is when my turnaround began. Instead of constantly throwing up, I was finally resting; I still wasn’t eating or drinking a lot, but the Phenergan made me sleep. Thankfully, a permanent IV at home was not needed. Somewhere around 15-20 weeks, my time with HG began to abate somewhat, though I still fought nausea on a daily basis for some time afterward. Nausea, as uncomfortable as it may be, I could handle… Constant dehydration, loss of weight, and complete inability to function were something else altogether.

    Not only did HG affect me physically, but it affected our entire lives, leading to a huge life change and cross-country move. My husband had lost his job because of that last visit to the ER; his boss was not happy that he chose to take me to the emergency room, even though that visit could very well be the one that saved my life. So, financial implications began to hit us head on. We were in a rut that would take us some time to dig our way out of.

    Thankfully, we gave birth to a beautiful, healthy baby boy.

    6 years later (because it took us that long to work up the courage to get pregnant again), my second pregnancy had some nausea but nowhere near what I endured the first time around. I was even able to work the first few months, a blessing in and of itself. I will say that I stayed away from pre-natal vitamins altogether, a fact which probably led me to being dangerously anemic when our sweet Jaden was born.

    And then there’s my third pregnancy, which I am currently in. Hyperemesis returned at 5 1/2 weeks with a vengeance, and let me tell you, the flashbacks of that first time ’round were not fun for either myself or my amazing husband. We both began to panic, remembering what it was like and knowing how many more weeks it would take to get through. This time, though, was different because we knew what to expect, and we’d already informed my doctor at the time (now we’re seeing a midwife who is also very understanding). We immediately called and having already shared my history, we were straight away given a prescription for the highest dose/frequency of a new medication called Diclegis, a time-released medication. Did I want to take medication? No. No, I didn’t. But desperate times… In less than a week’s time, I’d already lost 8-9 pounds. Again, I’d tried all the natural remedies and knew that I was going to need a little help to get through this.

    I won’t say that the medication took away all of the sickness. It didn’t. But at least, after starting on the medication, I was miraculously able to keep food and fluids down and avoid the hospital altogether, a HUGE blessing. I was still in bed most of the time for a good 8 weeks, God bless my guys for helping me hold down the fort. I still had to force myself to eat and drink much of the time. We would work on school from my bed, ’cause when you homeschool, the show must go on and you’re still the teacher. My bedside table became command central for anything that just couldn’t wait. Every movement, every noise, all these little things that ordinarily don’t bother you, instantly become triggers. A noise, for me, could trigger a trip to the porcelain god, or in my case, a bucket. All I wanted was a quiet room, no movement of any kind, no flashing. Even to look at my phone would cause the nausea to bubble up inside; but I’ll tell you, that was the difference for me this time ’round, because this time I had support in the way of other friends who were going through the same thing and an HG support group I’d found on Facebook, through the HER Foundation. The thing that really got me through was prayer. Several nights, I would lay in bed, praying not just for myself, but for others I knew who were going through the same thing, calling them out by name in my prayers. I would also think about the end reward… this precious little baby that’s growing inside of me.

    Around 12-14 weeks, the severe nausea began to somewhat subside during the day, enough that I could function again. I still deal with nausea off and on, but as I said before, I can handle a little bit of nausea, compared to everything we went through before.

    All of that said, I count myself as one of the lucky ones, because many women with HG don’t experience relief until baby’s born.

    The Effects of HG

    Many women who endure HG end up having to get a PICC line placed for nutritional needs. They endure complications like encephalopathy, nutritional deficiencies, metabolic imbalances, and so much more. It can affect a mother’s ability to breastfeed after baby is born. In some cases, sickness can become so severe that loss of baby’s life, miscarriage, occurs.

    The implications of HG aren’t just physical, though. As I’d previously mentioned, it can involve loss of job and loss of financial security, the last thing a pregnant woman needs to worry about. But it also has psychological repercussions. Pregnancy became much feared by both myself and Dan for a very long time; it was something we had to work through together.

    There are other implications, as well. As much as I hate even the thought of abortion, there are countless stories where it has come to this for those who are severely and intensely sick for such a long period of time. It’s not something to be judged, but something that should raise anyone’s level of compassion for the toll that HG takes on a woman, enough of a toll that she would take such a desperate measure. When I learned this fact, my heart just broke, one of the many reasons I’m finally sharing my story and hoping to raise at least some awareness around HG.

    Doctors and midwives need to be aware. More research and study need to be done, in order to facilitate a positive change. Family and friends need to know what their pregnant wife, mom, daughter, daughter-in-law, or friend are going through so they can reach out. Just one person reaching out with an offer of help, prayer, or compassion makes all the difference in the world. Bosses need to know the hell their employee is going through. It affects all immediate family members too. Though it’s a shorter-lived illness than something like cancer, for instance, it doesn’t make it any less of an illness. Believe me when I tell you that this time of coping with HG is one of the loneliest experiences a woman can ever go through. It’s such a bittersweet time… In one sense, you feel elated to be having a baby; but in another sense, you feel utterly unable to deal and completely miserable, which then leads to a feeling of guilt because you want to feel happy and blessed, but instead you feel like you could die.

    Now I’ve shared my story… but it’s not just my story. It’s also the story of thousands of other women who have gone through this very same thing and worse. This is for all of us who are HG survivors. This is for all the babies who were lost, due to Hyperemesis Gravidarum. THIS IS FOR A POSITIVE CHANGE.

    Have you or someone you loved experienced the effects of HG? Share your story in the comments. Above all, please know that you are not alone; you can find help and support through the HER Foundation.

  • So This is the Dreaded Mirena Crash (and Burn)

    So This is the Dreaded Mirena Crash (and Burn)

    Experiencing and coping with the Mirena crash, following removal of the Mirena IUD. Symptoms, feelings, and helpful tips for getting through it.

    IUD or intrauterine device

    The Mirena IUD… All I can say is never again. Ever.

    I used Mirena for a very long time. And yes, I’m experiencing the Mirena crash at this very moment and have been for the last week and a half, though I really didn’t know exactly what I was experiencing until I started to do a little more research and reading. 

    I can say that I wish I’d researched the IUD more before deciding to go down that path. I wish I’d been more concerned about my health when I was younger, more concerned with living a more natural lifestyle.

    Now that we do care more, we’re also getting a little older; I’m no spring chicken. And though my family may be shocked to read this (if they read this), we’re also planning to try for another baby (more on this in a near future post, I promise).

    We weren’t going to tell anyone and just keep our secret all to ourselves, but Dan and I both decided maybe I should write about this and share my story.

    Mirena removal side effects seem to be something that many women experience, but if they’re like me, they may not fully be prepared for them or even know they’re coming.

    What Causes the Mirena Crash?

    In short, the Mirena Crash is due to hormone imbalance following Mirena removal.

    Now that I’m experiencing the crash, I’m seriously wondering if some of the problems I’ve experienced while having Mirena as a form of birth control have been due to that little foreign contraption hangin’ out in my uterus. So many things make a lot of sense when I think about it.

    For the longest time, I’ve woke up with night sweats, had severe abdominal pain and issues with what I thought was my colon (nothing found on colonoscopy and other tests), mood swings, hair loss (you wouldn’t believe the amount of hair I’ve cleaned out of my brush time and again), weight gain that just seems stuck no matter how much exercise or eating right I do, etc., etc.

    Mirena Crash Symptoms

    Symptoms of Mirena crash can include the following:

    • Headaches
    • Fatigue
    • Mood swings
    • Anxiety
    • General malaise and feeling of just not feeling good

    Since having the Mirena IUD removed about a week and a half ago, I’ve crashed (and sorta burned). Well, not literally, but I’ve honestly felt like it.

    Headaches

    Oh my word, the headaches. I can honestly say the only headache I’ve had that’s been worse than these headaches was due to altitude sickness because they’re killer.

    No amount of ibuprofen or essential oils help. Nothing. It’s like I’ve gone cold turkey, and I just have to wait for the pain to subside, and it eventually does, but it can last all day.

    The pain is all over my head, even in my neck. I’ve even had pain shoot up from my shoulder/neck area to my head. Awful.

    woman experiencing a headache, one of the Mirena crash symptoms

    Fatigue

    I’m sooooo tired! I could sleep 12-14 hours straight.

    Well, I can’t, but if I could… So tired.

    Mood Swings

    One minute I’m fine, the next I feel like I’m raging inside. Well, raging is what my boys call it when you get angry, so I’m going with that.

    I’m irritable and grumpy.

    Anxiety

    I think this has been the worst of it all. I wake up at night, can’t go back to sleep, and feel this elephant of anxiety in my chest, mind, and spirit.

    I can’t put my finger on exactly why I’m feeling that way. There’s no reason to feel anxious.

    I mean, I have the normal deadlines for work, the normal family stuff going on, the normal chores and stuff that need done, but nothing out of the ordinary. I can’t put my finger on why I’m so pent up and worked up!

    It’s like doom, gloom, and anxiety all rolled up into one tightly wound little package. It’s got me feeling like I’m going C-R-A-Z-Y!

    And until I learned about the Mirena Crash, I thought I was going crazy.

    General Malaise and Feeling of Just Not Feeling Good

    I’ve almost felt like I’m coming down with something.

    It’s just a general feeling of not feeling good. It’s yuck.

    So, What Am I Doing about It? Mirena Crash Detox

    (Disclaimer: If you’re experiencing Mirena crash symptoms, please do your own research, and talk to your health care provider. This is simply my own experience.)

    Citrus fruits on a cutting board with a knife

    Honestly, I’m just waiting it out and taking a few steps to help myself go through a bit of a Mirena detox.

    • I’m using my essential oils for emotional and general well-being, and I’m so glad I have them.
    • Drinking a lot of water. My water bottle helps me stay well hydrated.
    • Eating more citrus and berries and trying to eat things that will hopefully help me detox just a bit and get through this. My favorite blueberry spinach smoothie and tropical fruit smoothie are just what I’m craving.
    • I’m on a food-based prenatal vitamin.
    • Also, I’m exercising every day, sweating it out; and let me tell you, exercise does wonders for the emotions and for building up a feeling of strength.
    • I’m using my calming bedtime foot rub to both help with feeling anxious, and it helps my restless legs and arms.

    From what I’ve read, I think my body is just freaking out a bit, trying to get back on track, and figure out what is going on and what it needs to do.

    Hopefully, this won’t last much longer; most people say it lasts for a short period of time, about a week or two… A select few have gone longer or more long term.

    I’ve also read that it gets better with menstruation. Can’t say I’ve ever looked forward to that ’til now. Oh but I do.

    I honestly feel like I’m on the tail end of the crash. Yesterday was better, today is ok, tomorrow can only go up from here.

    Why Share All of This?

    I can’t tell you what to do in your personal life, nor do I want to; but I do want you to be aware.

    Do your own research, study up on things before you say yes, know what you’re putting into your body.

    Get to know your own body. Don’t ignore problems.

    Ask your health care provider, and don’t be afraid to go to your visit armed with a whole list of questions.

    Your health really is in your hands.
    Grab on to that responsibility for dear life, and don’t let go.

    Of course, I also write this to share my story and relate to others who’ve experienced it, as well.

    With that said…

    Have you experienced the dreaded Mirena Crash? What has been your experience?

    IUD - Mirena Crash and Burn - Symptoms and Mirena Detox
  • How to Upcycle Vintage Cake Tins to DIY Light Fixtures

    How to Upcycle Vintage Cake Tins to DIY Light Fixtures

    Green Works DIY DisclosureEarth Day gives me reason to share yet another project, aka a Green Work of Art we’ve been working on, only this time with a vintage flare. I can’t even tell you how much I’m loving my vintage cake tins upcycled to DIY light fixtures. They are the first step to a farmhouse kitchen transformation I’m working on. A little paint goes a long way, as do little touches like new to me light fixtures. Keep reading to learn how to make your own charming, upcycled, kitchen lighting.Create a farmhouse kitchen look with DIY light fixtures upcycled from vintage cake tins. How to create a charming look with affordable and simple kitchen lighting.

    For awhile now, we’ve had this large, rectangular, gaudy, fluorescent tube light in the ceiling of our kitchen. It honestly made me want to crawl in a shell and hide every time we turned it on because it reminded me of a hospital. It was huge and when you turned it on, it was almost as if an alien spacecraft was beaming through the kitchen ceiling. Ok, maybe I exaggerate, but that’s how it felt.

    Anyway, when opportunity arose, I knew it was time for the gaudy fluorescent tube light to go and something old yet quite charming to take its place. While Pinterest lent to a bit of inspiration for this project, so did my grandma’s old cake tin which sits proudly in my kitchen. When I was a little girl, Grandma had this beautiful blue cake tin; I’m so fortunate to have it and still use it to this day. Due to my complete and utter love for vintage kitchen ware, the lids to three similar vintage cake tins have now become light fixtures over the old postal table (another story for another day) that serves as an island in our kitchen.Create a farmhouse kitchen look with DIY light fixtures upcycled from vintage cake tins. How to create a charming look with affordable and simple kitchen lighting.

    Turning the cake tins into light fixtures could not have been simpler; it’s honestly a fairly easy project.

    What You’ll Need

    • Vintage cake tin/s
    • Green Works All-Purpose Cleaner
    • Rags or paper towels
    • Keyless light socket/s – 1 for each light fixture and pre-wired by electrician
    • Electrical cord – enough to reach the electrical box
    • Chain
    • 2 hooks per light fixture
    • Hose clamp/s
    • 1 wooden fence panel, old or new
    • Stain or paint for fence panel
    • Drill
    • Screws
    • Light bulb/s

    Instructions for DIY Light Fixtures

    The first step to creating light fixtures out of old cake tins is to actually clean them up. Mine were pretty filthy, so I used Green Works All-Purpose Cleaner.

    Create a farmhouse kitchen look with DIY light fixtures upcycled from vintage cake tins. How to create a charming look with affordable and simple kitchen lighting. 
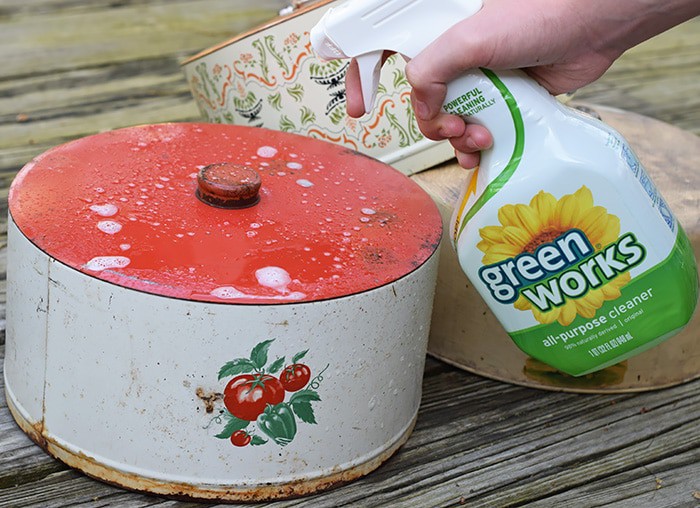
Being 98% naturally derived, this cleaner has a very pleasant smell, not overpowering in any sense of the word. But the fact of the matter is it’s a very powerful cleaner that really shined up my dirty old cake tins, minus a few dents from lots of use and a little rust (although rust adds a little character, don’t you think?). The donkey tin was the worst of the three; the top of it was a grayish-black.Create a farmhouse kitchen look with DIY light fixtures upcycled from vintage cake tins. How to create a charming look with affordable and simple kitchen lighting. 
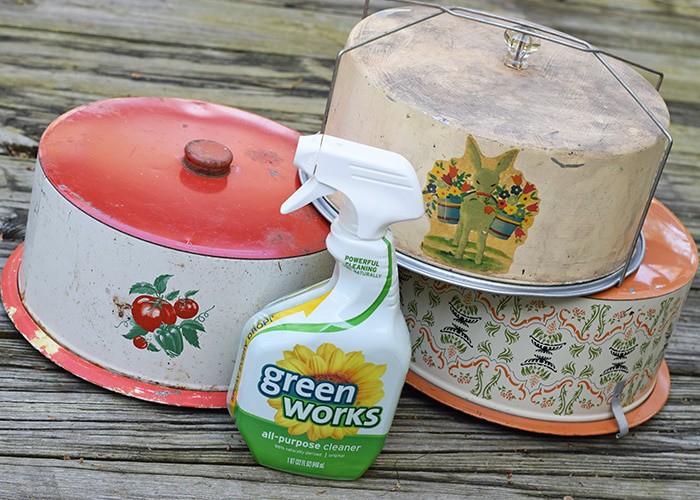
With Green Works and a little elbow grease, the dirt and grime disappeared.Create a farmhouse kitchen look with DIY light fixtures upcycled from vintage cake tins. How to create a charming look with affordable and simple kitchen lighting.

    After cleaning up your cake tin, it’s time to assemble the pre-cut length of chain to the light socket and route the wire through the chain.Create a farmhouse kitchen look with DIY light fixtures upcycled from vintage cake tins. How to create a charming look with affordable and simple kitchen lighting. 
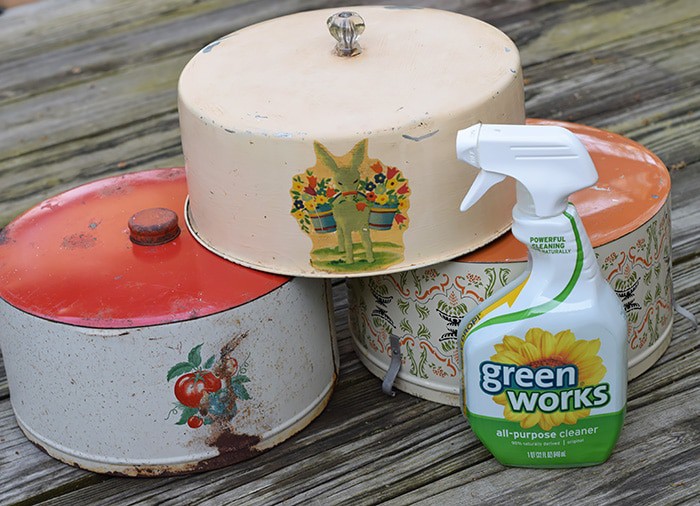
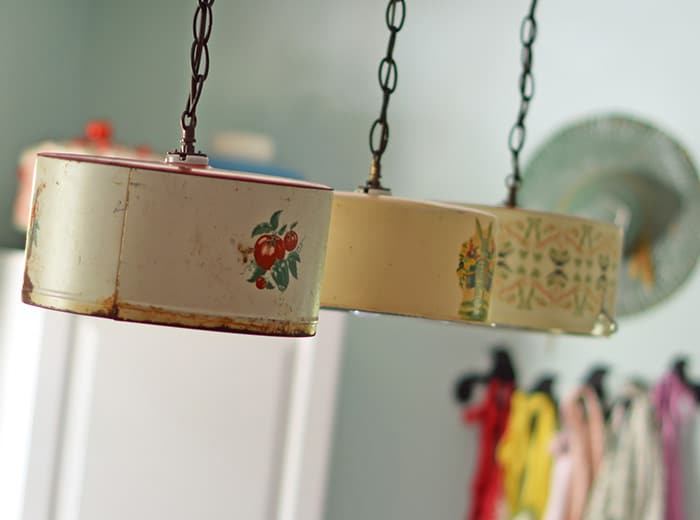
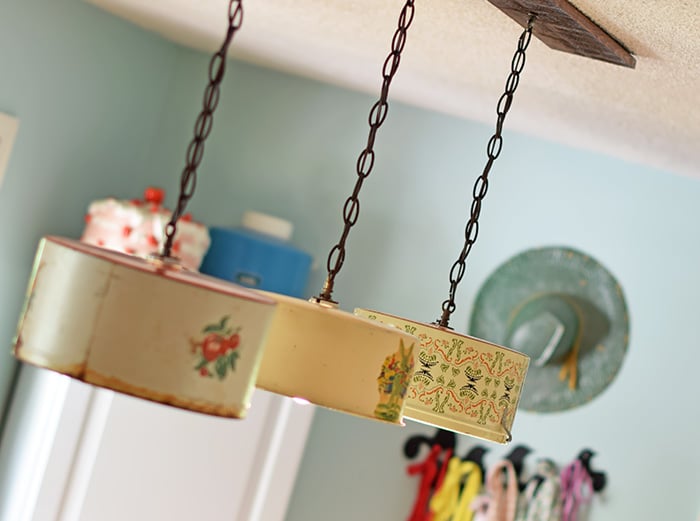
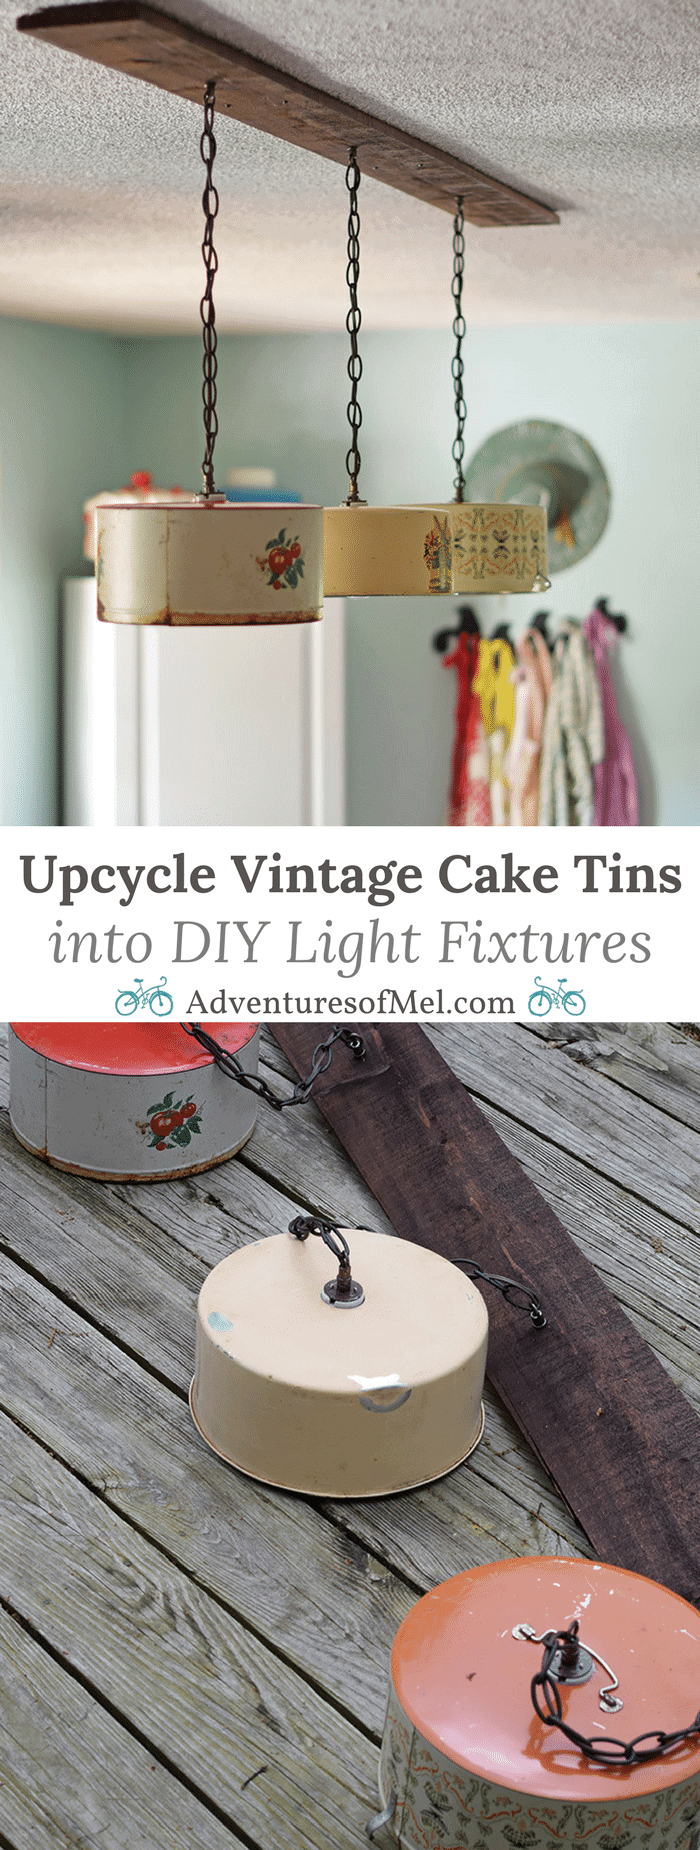
How long your chain is depends on how low you want your light to hang from the ceiling. We chose to go about 24 inches.Create a farmhouse kitchen look with DIY light fixtures upcycled from vintage cake tins. How to create a charming look with affordable and simple kitchen lighting.

    Attach the opposite end of the chain to your hook or other hanging device.Create a farmhouse kitchen look with DIY light fixtures upcycled from vintage cake tins. How to create a charming look with affordable and simple kitchen lighting.

    Now for the fun! Drill a hole, matching the circumference of your light socket, through the center of your cake pan lid. Create a farmhouse kitchen look with DIY light fixtures upcycled from vintage cake tins. How to create a charming look with affordable and simple kitchen lighting.
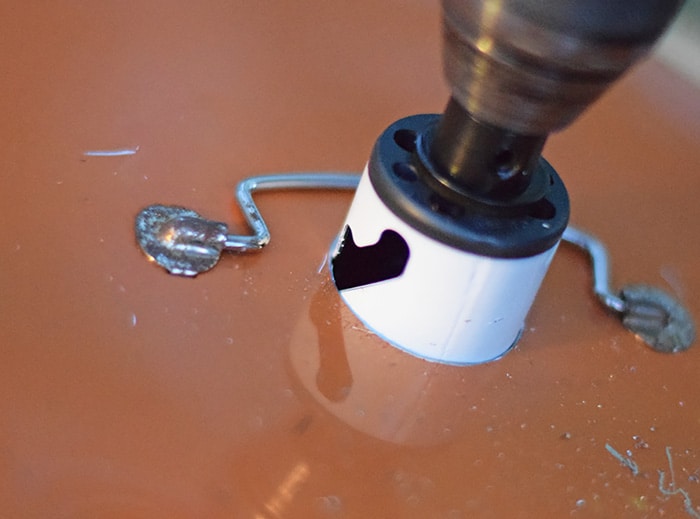
Stick the lamp socket through the hole in your lid.Create a farmhouse kitchen look with DIY light fixtures upcycled from vintage cake tins. How to create a charming look with affordable and simple kitchen lighting. 
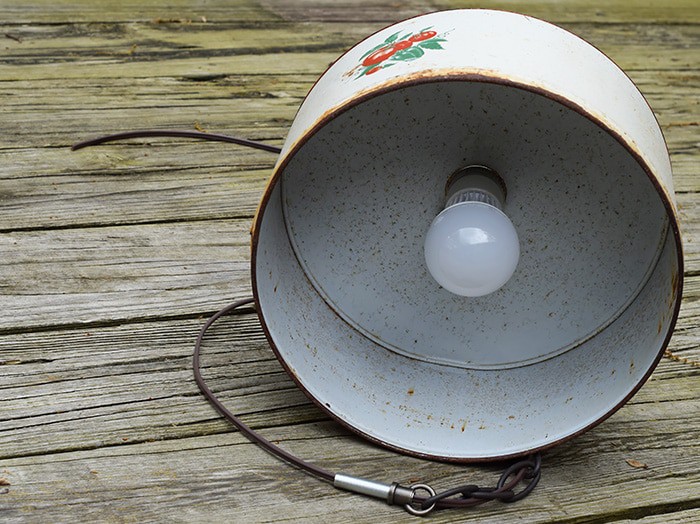
Attach a hose clamp to the desired position on your light socket, and allow the cake pan to rest on the clamp. This will set the height of your lamp socket.Create a farmhouse kitchen look with DIY light fixtures upcycled from vintage cake tins. How to create a charming look with affordable and simple kitchen lighting.

    Create a farmhouse kitchen look with DIY light fixtures upcycled from vintage cake tins. How to create a charming look with affordable and simple kitchen lighting.

    You can either hang your light from the ceiling or hang from another decorative object. We chose to stain a piece of fence panel and mount our lights on that.Create a farmhouse kitchen look with DIY light fixtures upcycled from vintage cake tins. How to create a charming look with affordable and simple kitchen lighting. 
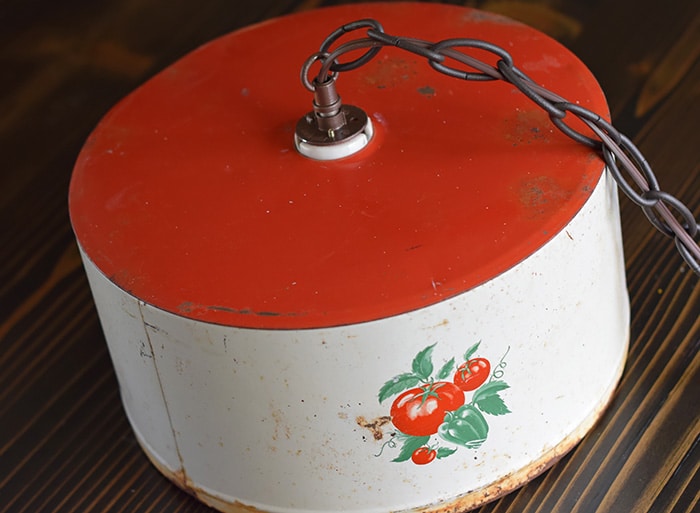
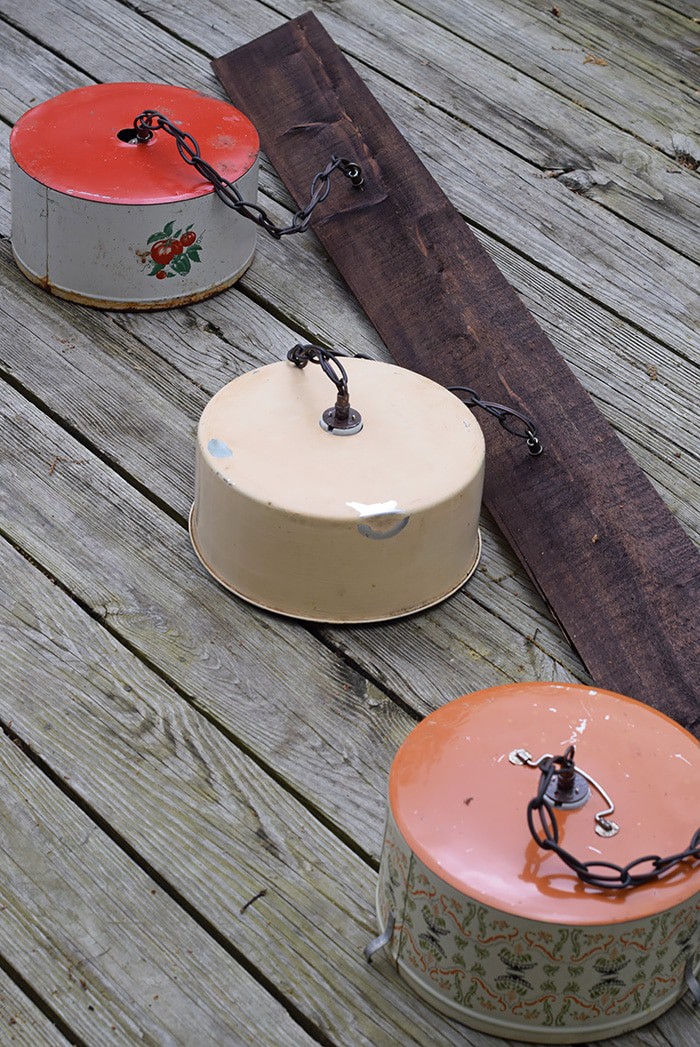
Now here is where I’ll leave the wiring to be done by an experienced electrician; in our case, my husband is an electrician and did our wiring. (If doing your own wiring, do so at your own risk. I can’t be held liable for any accidents or mistakes that may occur.)

    Once your light/s have been correctly and fully wired, add light bulbs, flip the switch, and you’ve got a beautiful set of kitchen light fixtures that will definitely serve as a great conversation piece when company arrives.Create a farmhouse kitchen look with DIY light fixtures upcycled from vintage cake tins. How to create a charming look with affordable and simple kitchen lighting.

    Create a farmhouse kitchen look with DIY light fixtures upcycled from vintage cake tins. How to create a charming look with affordable and simple kitchen lighting.

    I’m loving our new to us light fixtures. The kitchen just feels so much bigger now, even though it isn’t; and the lights really give the illusion of a higher ceiling.Create a farmhouse kitchen look with DIY light fixtures upcycled from vintage cake tins. How to create a charming look with affordable and simple kitchen lighting.

    Create a farmhouse kitchen look with DIY light fixtures upcycled from vintage cake tins. How to create a charming look with affordable and simple kitchen lighting. 
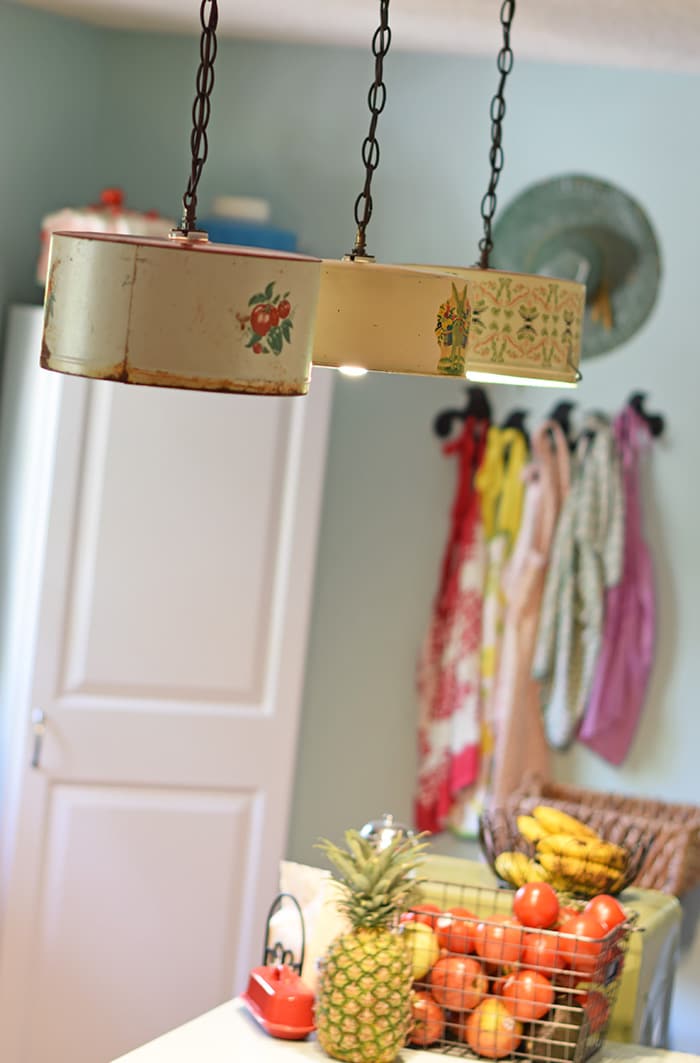
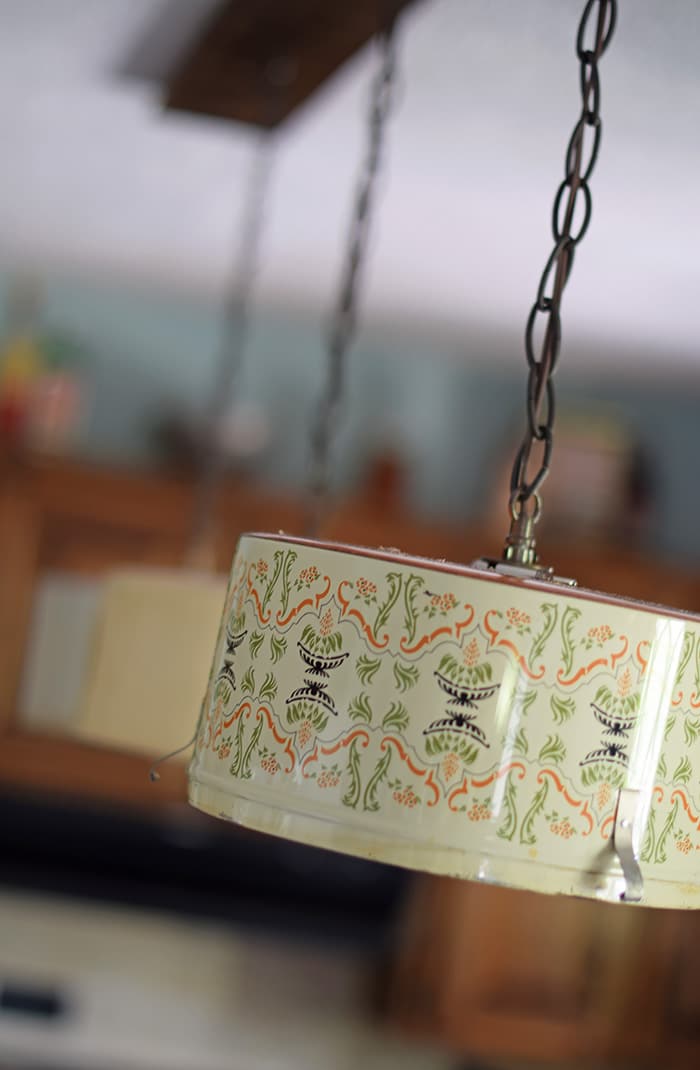
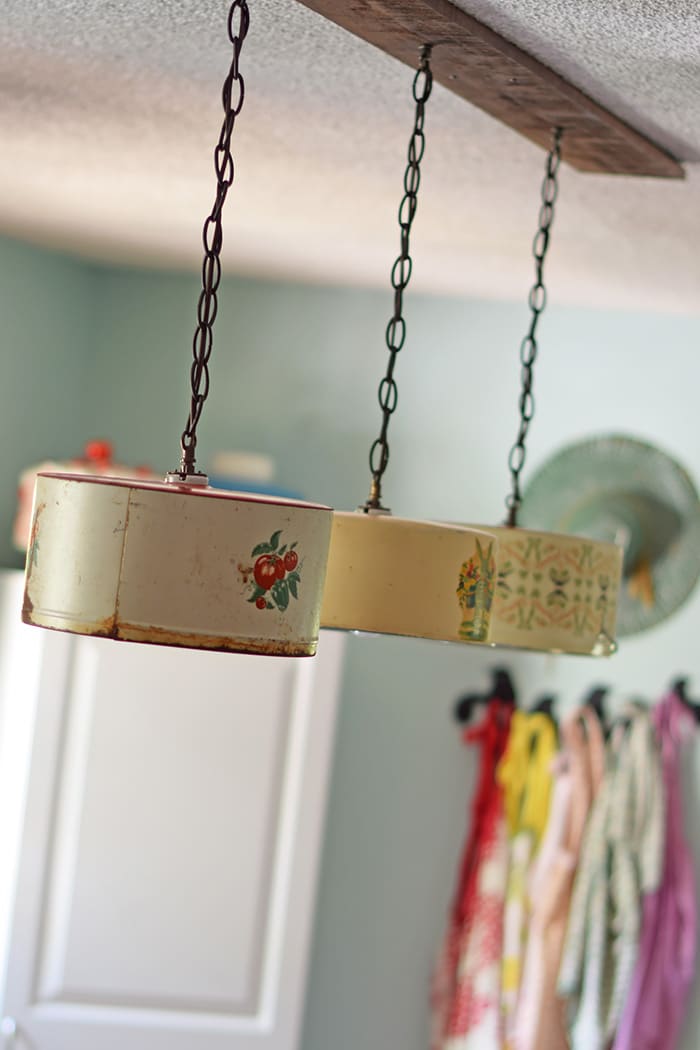
The lights have truly changed the feeling of the most important room in our home.Create a farmhouse kitchen look with DIY light fixtures upcycled from vintage cake tins. How to create a charming look with affordable and simple kitchen lighting.

    They’ve also really inspired me to continue on with my vision of a farmhouse kitchen. Stay tuned for more projects in the near future!

    Upcycling Inspiration with Green Works

    Green Works is celebrating the power in nature this Earth Day and has enlisted the help of acclaimed metal artist, Rebecca Anders, on another upcycling adventure. In fact, the Oakland based artist is taking the dirtiest, greasiest kitchen materials found in the Bay area and turning them into a sculpture of a daisy. Scrap to sculpture, trash to treasure… the ultimate upcycled work of art. Check it out and share!

    Green Works knows that a balanced, natural lifestyle begins with a clean home. I have to agree. Honestly, an upcycled project always begins by cleaning up the object being re-purposed, but that doesn’t mean you have to compromise your green lifestyle to get that object clean. Green Works makes it easy to take that next project, or even your spring cleaning, to the next level; the All-Purpose Cleaner was definitely a great kickstart to my upcycled kitchen light fixtures. I enjoyed seeing the effects of the cleaner and how it made my cake tins shine… I also enjoyed the light, natural scent. Of course, being thrifty, I also appreciate that it’s affordable. You can purchase the largest selection of Green Works products in the natural cleaning aisle at Target.

    Now stay tuned because I’ll be sharing a very special Green Works giveaway with you tomorrow! You won’t want to miss it! Meanwhile, be sure to join the conversation and get to know Green Works a little bit more. You can use the hashtags #EarthDay and #GreenDIY on social; you can also find Green Works on Twitter @GreenWorks; Instagram @GreenWorksClean; Facebook at Green Works; and Pinterest at GreenWorksClean. Happy upcycling!

    Do you have an upcycled project, or Green Work of Art, to share? I’d love to see what you’re working on! Tell me about it by leaving a comment.

    Looking for more thrifty DIY project inspiration?

    Can’t make it just yet? Pin it for later!

    Create a farmhouse kitchen look with DIY light fixtures upcycled from vintage cake tins. How to create a charming look with affordable and simple kitchen lighting.

  • Calming Bedtime Foot Rub

    Calming Bedtime Foot Rub

    Bedtime is that magical time of the day when the kids have finally quieted down, the house is quiet, and maybe you have a few minutes to actually pamper yourself. Pamper yourself in seconds with a homemade, calming foot rub made from natural ingredients, including Peace and Calming and Lavender essential oils.

    Bedtime… that magical time of night when the kids are finally quieted down for the night, and the house is quiet with hardly a sound save the snoring of the dog and the click click click of the cat’s claws on the hardwood floor. It’s usually the time of night where I finally have a few moments to take care of myself. Life is busy! Introducing essential oils into my family’s life has led me to make a calming bedtime foot rub made with both Peace & Calming and Lavender oils. And let me tell you, I L-O-V-E it!

    I’m sharing the printable recipe with you down below… This is a super simple rub to make, and it involves coconut oil. The moisturizing properties of the coconut oil make it a great solution for rough, calloused feet. But then you mix it with a little Peace & Calming and Lavender, and you’ve got a lovely foot rub that’s perfect for bedtime.

    Bedtime is that magical time of the day when the kids have finally quieted down, the house is quiet, and maybe you have a few minutes to actually pamper yourself. Pamper yourself in seconds with a homemade, calming foot rub made from natural ingredients, including Peace and Calming and Lavender essential oils.

    Natural ingredients and knowing exactly what’s in my foot rub make it a winner. Not only do I use it for myself, but I love rubbing Jaden’s feet with it before bed; it gives us time to talk, and he loves having his feet rubbed.

    Bedtime is that magical time of the day when the kids have finally quieted down, the house is quiet, and maybe you have a few minutes to actually pamper yourself. Pamper yourself in seconds with a homemade, calming foot rub made from natural ingredients, including Peace and Calming and Lavender essential oils.

    Grab the recipe below, so you can make your own. 

    Calming Bedtime Foot Rub

    Mix coconut oil with a little Peace & Calming and Lavender, and you’ve got a calming bedtime foot rub that’s perfect for calloused, restless feet.

    • 6 to 8 ounce jar with lid
    • Mixing bowl
    • Measuring cup
    • 3/4 cup coconut oil
    • 10 + drops Peace and Calming essential oil
    • 5 + drops Lavender essential oil
    1. Add coconut oil to dish.
    2. Add at least 10 drops of Peace & Calming. I tend to be pretty thrifty with my oils, but you can definitely add more if desired.
    3. Add at least 5 drops of Lavender oil. Again, you can add more if desired.
    4. Mix well. The rub stores well in a jam or jelly jar.
    5. Rub on your feet and legs before bedtime.

    (Disclaimer: Everything I share about essential oils on Adventures of Mel is based on personal experience and has not been approved by the FDA. Please do your own research, and never use essential oils in a way that would make you uncomfortable. Also, take special caution for those pregnant or nursing, as well as children. Read the full disclaimer…)

    Homestead
    bedtime foot rub, calming bedtime foot rub, calming foot rub, homemade foot rub

    (Disclaimer: Everything I share about essential oils on Adventures of Mel is based on personal experience and has not been approved by the FDA. Please do your own research, and never use essential oils in a way that would make you uncomfortable. Also, take special caution for those pregnant or nursing, as well as children. Read the full disclaimer…)

  • Starting Seeds Indoors with Newspaper Seedling Pots

    Starting Seeds Indoors with Newspaper Seedling Pots

    How to make your own newspaper seedling pots for starting seeds indoors, along with tips and ideas for soil, supplies, and growing plants from seed.

    newspaper seedling pots filled with potting mix in a black seed starter tray for starting seeds indoors

    We’ve already begun starting seeds indoors for the coming growing season. Seed starting is a process that requires planning, good timing, and a li’l tender loving care.

    We’d learned some time ago, in one of our gardening groups, that newspaper makes great little seedling pots… Not only that, but it’s a great way to re-purpose newspaper.

    I’m a huge fan of re-purposing. In fact, I even re-purposed this vintage tractor seat to make a tractor seat bucket that’s perfect for weeding and working with plants in the garden.

    While we don’t actually pay for a newspaper anymore, we still have newspaper laying around, not to mention newspapers are only 50 cents apiece at our local convenience store.

    So if you’re trying to save money with your garden, newspaper can be much cheaper than seed starter pots.

    It also makes compostable or biodegradable pots. So it’s good all the way around.

    By the time we’re done, our dining room will probably be filled to the gills with trays of seedlings waiting to be planted.

    heirloom seed packets from Baker Creek Heirloom Seeds

    Tips for How to Start Seeds Indoors

    When it comes to starting seeds, a lot depends on the types of plants you’re wanting to grow. Here are a few general tips for starting seeds.

    • Start seedlings in a quality potting mix or potting soil.
    • Make sure the seed starting containers they grow in give them plenty of space, and pot up if needed.
    • Don’t overwater your seedlings, which can lead to fungi, like damp-off, which thrives in a too-wet environment.
    • Ensure that your seedlings are fed well, whether the fertilizer is in the potting mix or you feed with an all-purpose fertilizer.
    • Make sure the seedlings have plenty of light. You may even consider using grow lights.
    • Kinda along the same lines as light, give your seedlings plenty of warmth (80-90 degrees) when they need to sprout, but don’t keep it too warm after they have sprouted (70-80 degrees).
    • When your seedlings are growing, brush your hand against them to strengthen and exercise them, preparing them for the real world.
    • And you may think I’m a li’l cuckoo, but… Talk to your seedlings. Play music for them. They like company, and they will thrive even more with a little tender loving care and attention.

    Seed Starting Supplies for Starting Seeds Indoors

    You really don’t need that many seed starting supplies, especially if you’re using newspaper; in fact, it’s more affordable than people think.

    With a little creativity and re-purposing, you can save a LOT of money.

    • Seeds – We prefer heirloom seeds because then we can harvest our seeds and re-plant the next year.
    • Newspapers – How many depends on how many seedlings you plan to grow.
    • Seed starting trays, with or without lids

    How to Make Newspaper Seedling Pots

    Making newspaper seed pots is so simple. If there are a few of you working together, you can start an assembly line and help each other, making the process go by even more quickly.

    To make a paper pot planter…

    • Take a regular-sized tin can and use that to measure and roll the newspaper into a sort of pot.
    measuring newspaper with a tin can for newspaper seedling pots
    • Fold your bottom end up, closing it in. Then fold your top down over the top, creating a crease so it’s easier to fold down once you remove the can.
    folding newspaper end over tin can for seed starter pot
    • Unfold that top fold and remove the can from your seedling pot.
    pulling newspaper pot off of tin can, making paper pot planter
    • Following that crease, fold the top back down. Fill each newspaper seed starter pot with dirt.
    filling newspaper seedling pot with potting mix
    • Then place the seedling pot in a seed starting tray. You should be able to fit at least 20 pots in one seed starter tray; you definitely want the tray, so when you water the seeds, it can hold the excess water.
    newspaper seedling pots with potting mix in seed starting tray

    Things to Keep in Mind When Planting Seeds

    Once you have your pots made and filled with potting mix or seed starting mix, it’s time to plant your seeds. This is where our boys got a little more involved.

    family starting seeds in newspaper seedling pots

    You’ll want to make sure to follow the instructions on the back of each individual seed packet when growing plants from seed. Reasons I mention this…

    • Different seeds have different planting depths.
    • Some seeds may do better if started outdoors rather than indoors.
    • Growing times and when to start seeds may differ. You’ll need to factor in frost date, best times to grow each type of plant, the rate seedlings grow, germination time, the time it will take for the plants to mature, etc.

    So, be sure to read the seed packets before you ever start planting.

    seeds in hand above seedling pots

    Once your seeds are planted, be sure to water the seedlings, and place them in a sunny spot indoors. This will keep them safe and happy.

    boy child starting seeds in newspaper seedling pots

    More Gardening Tips and Outdoor Living

    Save and Pin It for Later!

    If you find this seed starting tutorial helpful, please share it with your friends on Facebook and Pinterest! If you make the newspaper seedling pots, be sure to share that you tried it on Pinterest. I love when readers share feedback!

    Starting seeds indoors with newspaper seedling pots
  • Mod Podge Your Memories Photo Plaque Craft

    Mod Podge Your Memories Photo Plaque Craft

    Photos and Mod Podge make the ultimate team when it comes to crafting. This is a project I’ve kinda been sitting on for quite awhile. I’d made a similar photo craft for a wedding gift (of course, with a different photo) a couple of months ago. When I found this picture in our Colorado photos, I knew it was the perfect one to either put onto a canvas or create a photo on wood Mod Podge craft. After pricing photo canvases, I opted for the latter. With a fairly cheap wooden plaque, a self-printed photo, a bit of Mod Podge, and a scrap of burlap, I now have a memory to hang on the wall.I love me some Mod Podge. Photos are the perfect way to add a meaningful touch to your home decor. Mod Podge pictures on wood to preserve your favorite memories or to create amazing DIY gifts.

    I love mine so much; of course, I have to share how to make it. Below are the supplies you’ll need and instructions for creating your own.I love me some Mod Podge. Photos are the perfect way to add a meaningful touch to your home decor. Mod Podge pictures on wood to preserve your favorite memories or to create amazing DIY gifts.

    Supplies Needed

    • Wood plaque in desired size
    • Photo
    • Antique Matte Mod Podge
    • Sponge brush
    • Burlap ties
    • Staple gun

    Instructions

    The project is actually really simple. Once you have your plaque and your photo, place photo in desired position, and apply Mod Podge according to instructions on bottle.I love me some Mod Podge. Photos are the perfect way to add a meaningful touch to your home decor. Mod Podge pictures on wood to preserve your favorite memories or to create amazing DIY gifts. 
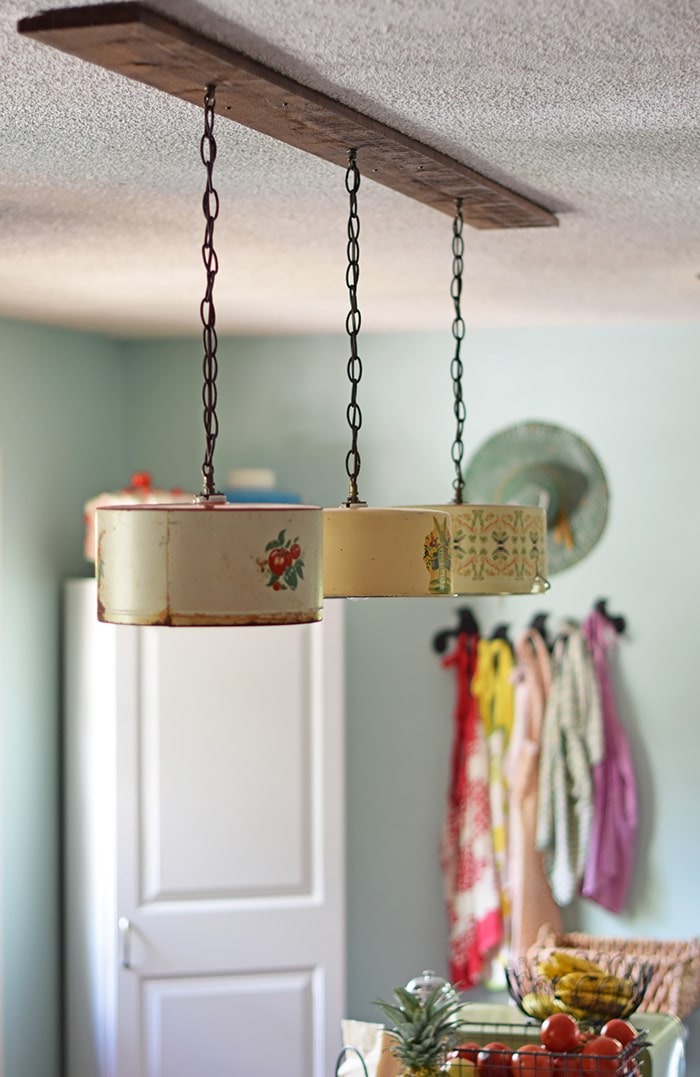
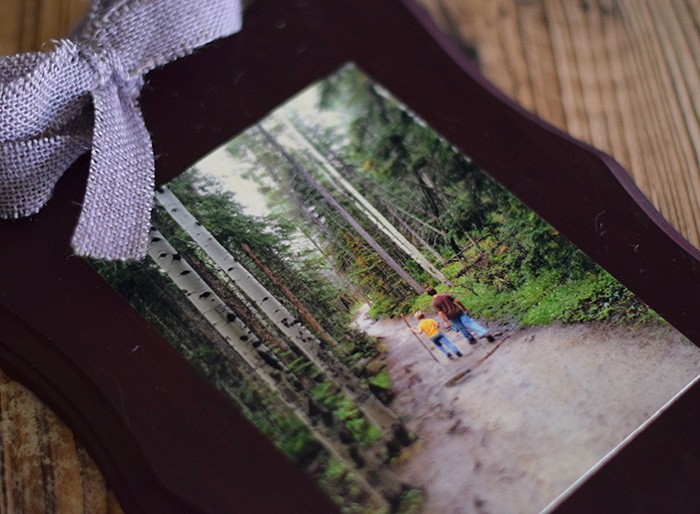
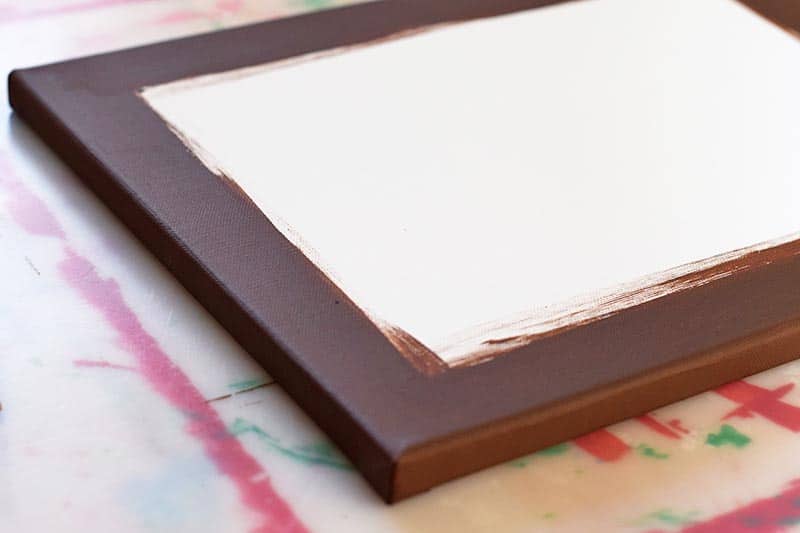
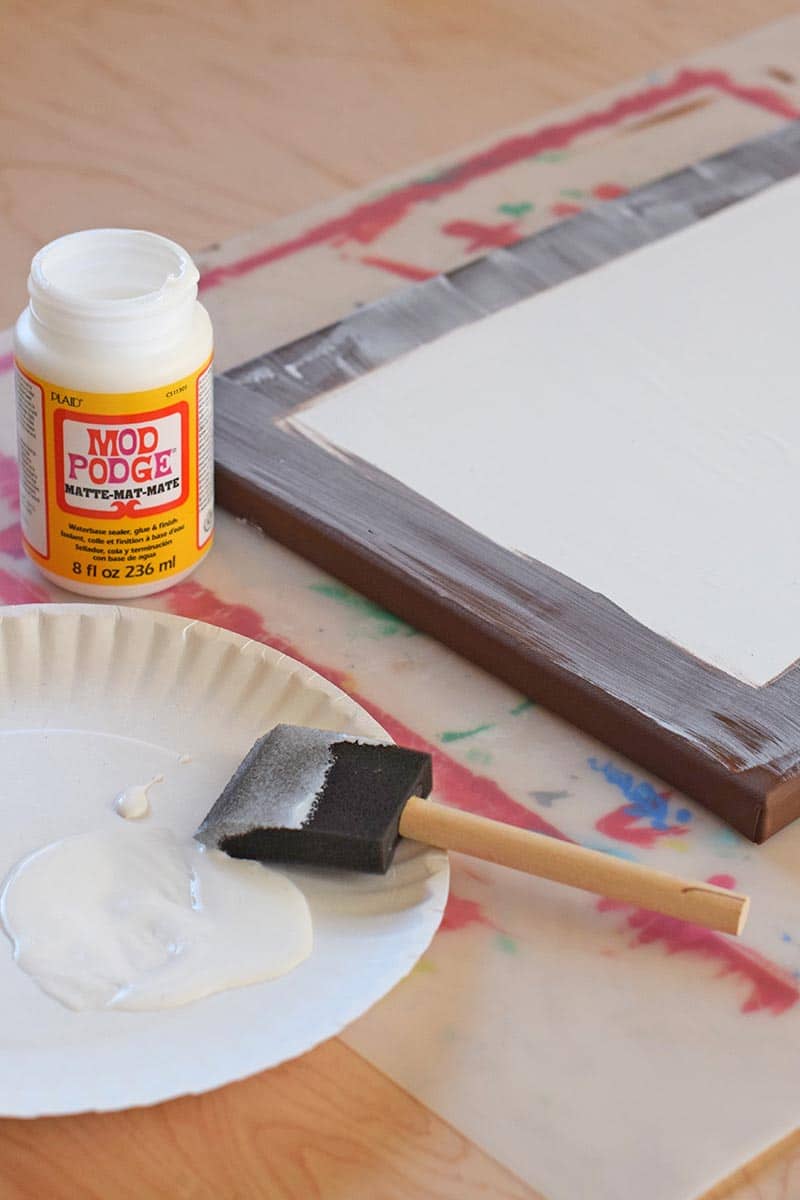
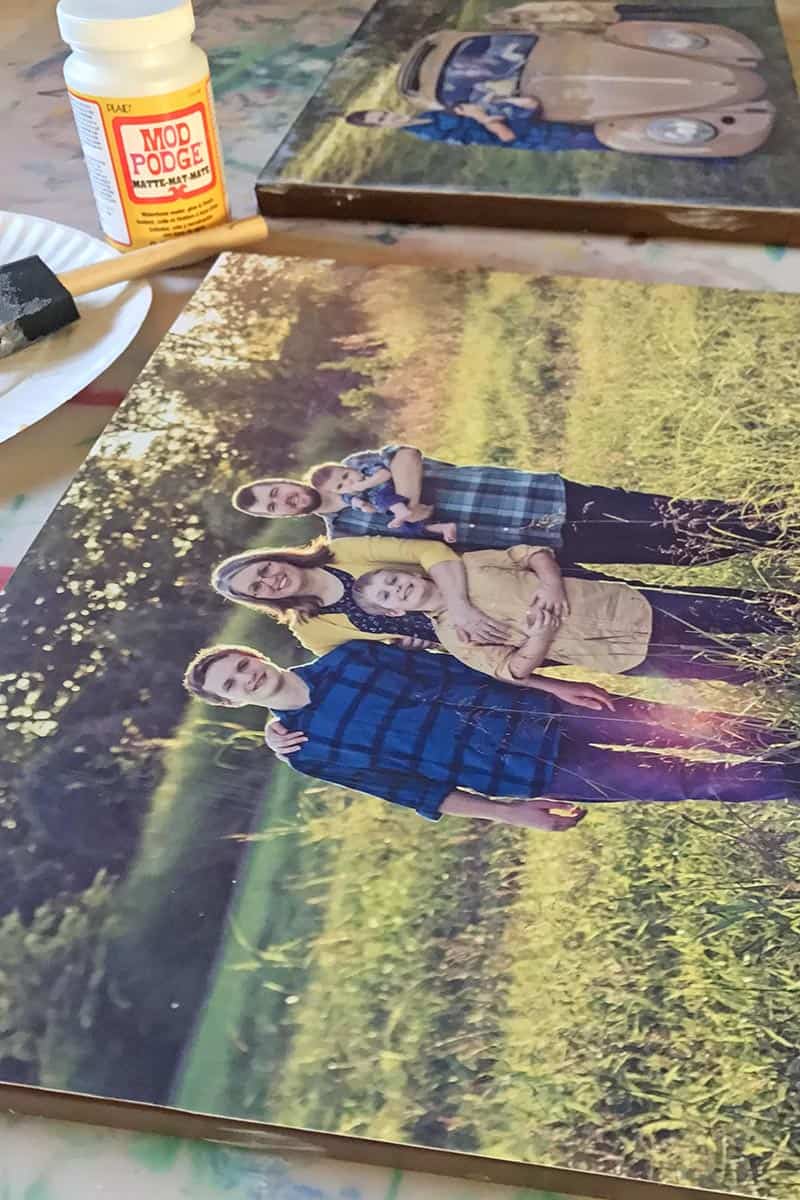
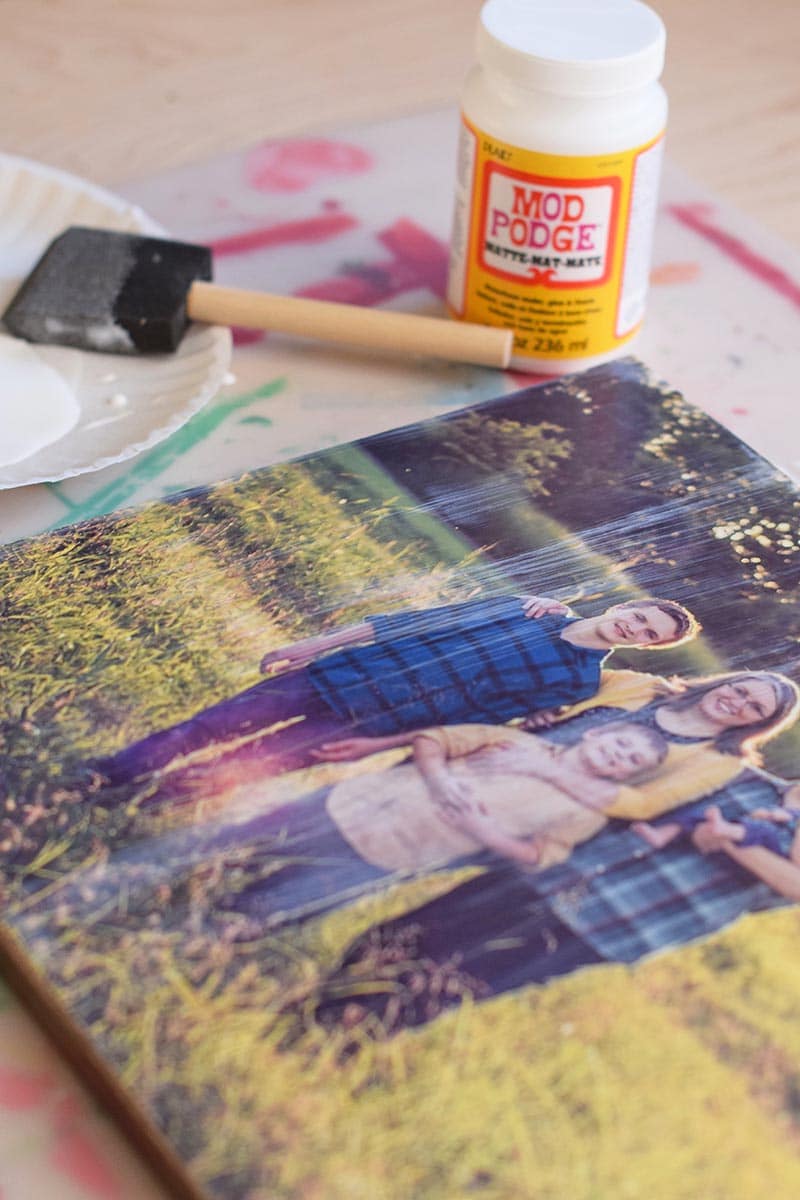
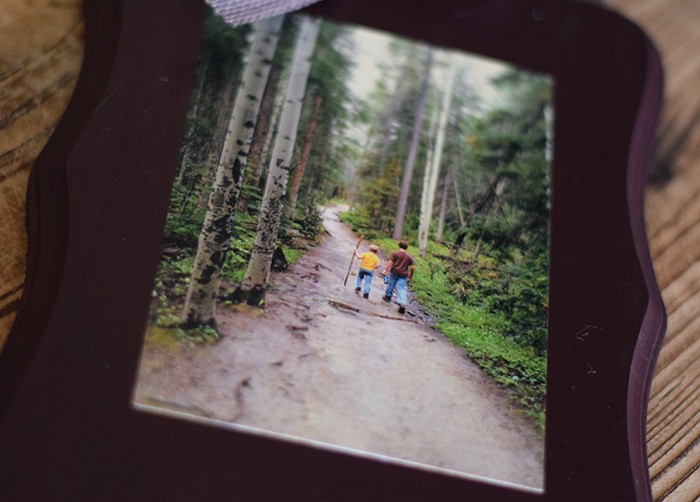
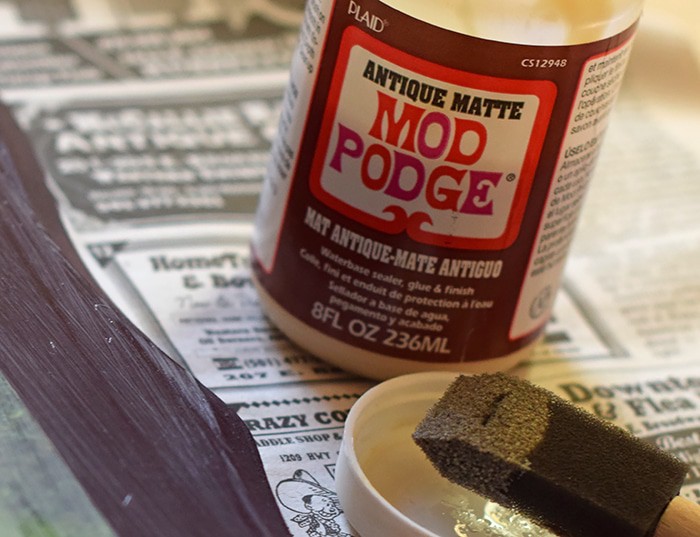
Apply to back of photo, set in place, and then apply to front of photo and plaque. I applied 2 coats of Mod Podge, at least 20 minutes apart, making sure to let the first coat dry well before applying more. A sponge brush works really well. I love me some Mod Podge. Photos are the perfect way to add a meaningful touch to your home decor. Mod Podge pictures on wood to preserve your favorite memories or to create amazing DIY gifts.Once you’ve finished applying all coats of Mod Podge, let dry for 24 hours.

    Create burlap ties about 1-2 feet in length, depending on how long you want the ties to be when hanging the plaque on the wall. I love me some Mod Podge. Photos are the perfect way to add a meaningful touch to your home decor. Mod Podge pictures on wood to preserve your favorite memories or to create amazing DIY gifts.
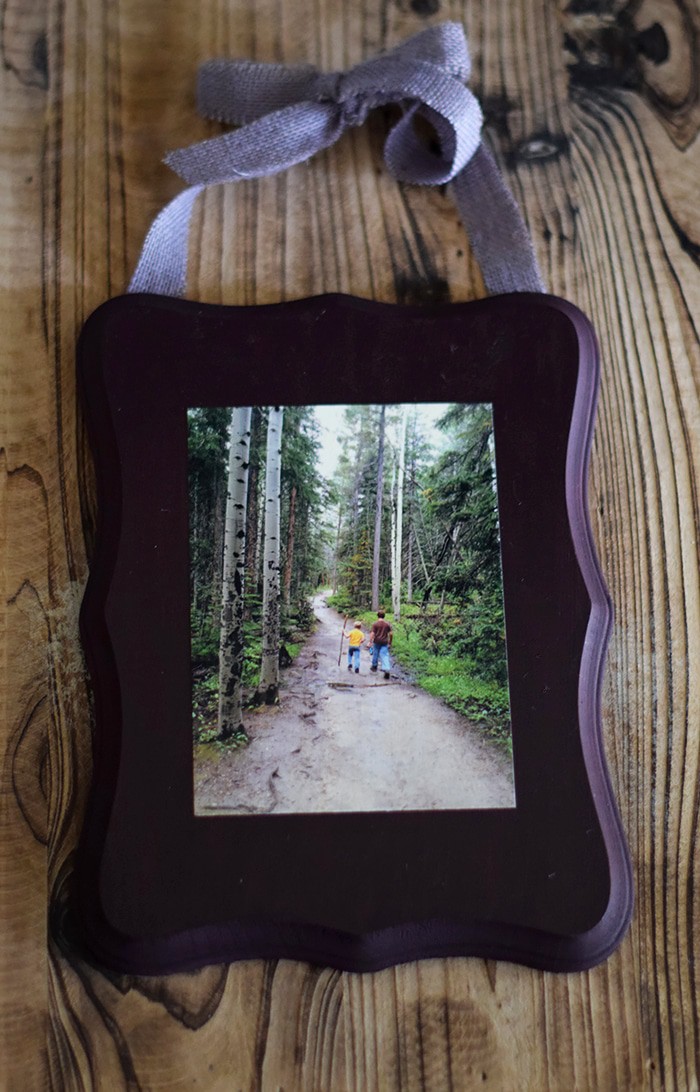
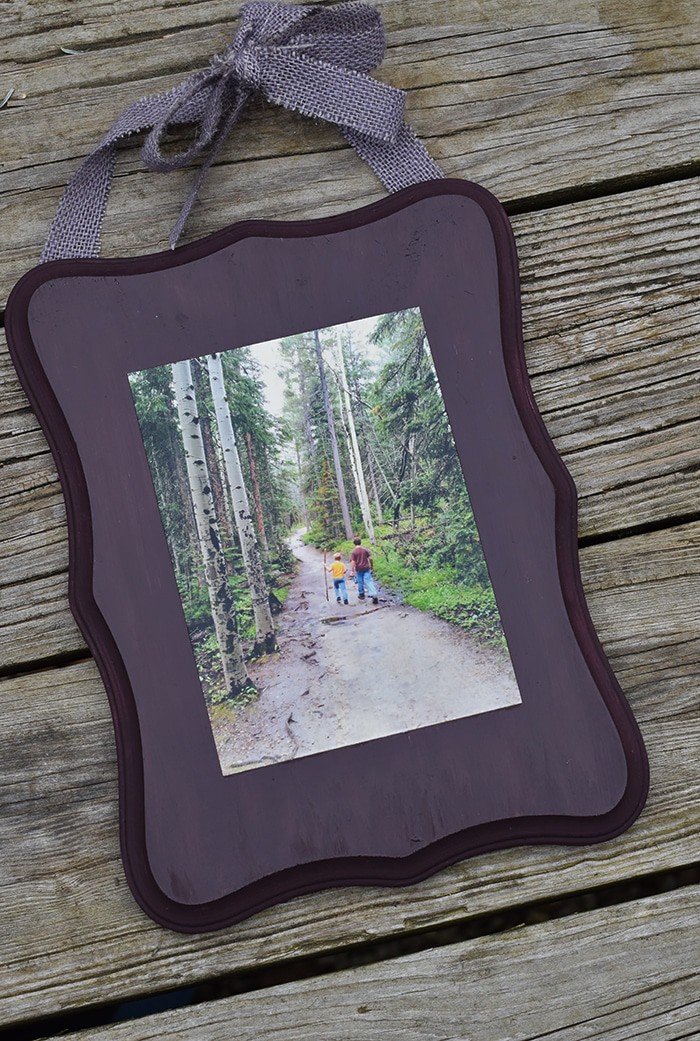
Staple each tie to back of frame, one on the left hand side and one on the right hand side.I love me some Mod Podge. Photos are the perfect way to add a meaningful touch to your home decor. Mod Podge pictures on wood to preserve your favorite memories or to create amazing DIY gifts. Bring ties together and tie in a bow. This will be the hanger for your photo plaque.I love me some Mod Podge. Photos are the perfect way to add a meaningful touch to your home decor. Mod Podge pictures on wood to preserve your favorite memories or to create amazing DIY gifts.

    I love me some Mod Podge. Photos are the perfect way to add a meaningful touch to your home decor. Mod Podge pictures on wood to preserve your favorite memories or to create amazing DIY gifts.

    And that’s it! Easy peasy. I really love decorating with photos, especially photos from trips we’ve taken together.

    photo on wood

    Old family photos also add a touch of “home” to your home being surrounded by all the memories and people you love.

    Want more ideas for Mod Podge crafts? I heart Mod Podge! Be sure to follow me on Pinterest!


  • 65 Movies from the 90’s for a Family Movie Night

    65 Movies from the 90’s for a Family Movie Night

    A while ago, I came up with a list of 55 Movies from the 80’s. That was so much fun that I decided to do another, focusing on different movie eras, genres, and type of movie night (whether family, date night, chick flick, whatever). This time I’m focusing on movies from the 90’s that’ll work for your family movie night.65 Movies from the 90's for a Family Movie Night If you want more info, you can find all of these movies on IMDb.

    It kills me to think that the 90’s are that long ago now…. geez, time flies! There were some pretty awesome movies made in the 90’s. Use this list, arranged in alphabetical order by title, to create amazing family movie nights with your own family. Most of all, enjoy! (And stay tuned, as I’ll have another movies from the 90’s list coming soon, geared more toward date night.)

    Family Movies from the 90’s

    1. A Walton Easter, TV Movie, 1997
    2. A Walton Thanksgiving Reunion, TV Movie, 1993
    3. A Walton Wedding, TV Movie, 1995
    4. Alaska, rated PG, 1996
    5. Angels in the Outfield, rated PG, 1994
    6. Beauty and the Beast, rated G, 1991
    7. Beethoven, rated PG, 1992
    8. Camp Nowhere, rated PG, 1994
    9. Casper, rated PG, 1995
    10. Christy, TV Movie (also a series), 1994
    11. Cool Runnings, rated PG, 1993
    12. Cop and a Half, rated PG, 1993
    13. Curly Sue, rated PG, 1991
    14. Dr. Dolittle, rated PG-13, 1998
    15. Ever After: A Cinderella Story, rated PG-13, 1998
    16. Father of the Bride, rated PG, 1991
    17. Father of the Bride Part II, rated PG, 1995
    18. Fly Away Home, rated PG, 1996
    19. Ghost Dad, rated PG, 1990
    20. Happy Christmas, Miss King, rated PG, 1998
    21. Home Alone, rated PG, 1990
    22. Home Alone 2: Lost in New York, rated PG, 1992
    23. Homeward Bound: The Incredible Journey, rated G, 1993
    24. Hook, rated PG, 1991
    25. Iron Will, rated PG, 1994
    26. It Takes Two, rated PG, 1995
    27. Jack, rated PG-13, 1996
    28. Jetsons: The Movie, rated G, 1990
    29. Jumanji, rated PG, 1995
    30. Jungle 2 Jungle, rated PG, 1997
    31. Jurassic Park, rated PG-13, 1993
    32. Kindergarten Cop, rated PG-13, 1990
    33. Little Giants, rated PG, 1994
    34. Look Who’s Talking Too, rated PG-13, 1990
    35. Major Payne, rated PG-13, 1995
    36. Mighty Joe Young, rated PG, 1998
    37. Mrs. Doubtfire, rated PG-13, 1993
    38. Mulan, rated G, 1998
    39. Muppet Treasure Island, rated G, 1996
    40. Muppets from Space, rated G, 1999
    41. My Girl, rated PG-13, 1991
    42. My Girl 2, rated PG, 1994
    43. October Sky, rated PG, 1999
    44. Operation Dumbo Drop, rated PG, 1995
    45. Rigoletto, unsure of rating, 1993
    46. Star Wars Episode I: The Phantom Menace, rated PG, 1999
    47. Swing Kids, rated PG-13, 1993
    48. That Darn Cat, rated PG, 1997
    49. The Air Up There, rated PG, 1994
    50. The Indian in the Cupboard, rated PG, 1995
    51. The Little Rascals, rated PG, 1994
    52. The Mighty Ducks, rated PG, 1992
    53. The Muppet Christmas Carol, rated G, 1992
    54. The Rocketeer, rated PG, 1991
    55. The Rugrats Movie, rated G, 1998
    56. The Sandlot, rated PG, 1993
    57. The Santa Clause, rated PG, 1994 (can you believe it’s been 20 years?!)
    58. The Secret Garden, rated G, 1993
    59. The Three Musketeers, rated PG, 1993
    60. Toy Story, rated G, 1995
    61. Toy Story 2, rated G, 1999
    62. What About Bob?, rated PG, 1991
    63. White Fang, rated PG, 1991
    64. Wild America, rated PG, 1997
    65. Wild Hearts Can’t Be Broken, rated G, 1991

    Did I miss one of your favorites? What was your favorite family-friendly movie from the 90’s?